

Page 1
Compaq Armada E500, Armada E500S, and Armada V300 Series of Personal Computers
Maintenance and Service Guide
Page 2

Notice
2000 Compaq Computer Corporation.
OMPAQ
C
U. S. Patent and Trademark Office
Microsoft, Windows, and Windows NT are trademarks of Microsoft Corporation.
Intel, Pentium, and Celeron are registered trademarks of Intel Corporation.
All other product names mentioned herein may be trademarks or registered
trademarks of their respective companies.
Compaq shall not be liable for technical or editorial errors or omissions contained
herein. The information in this document is subject to change without notice.
The information in this publication is provided “as is” without warranty of any
kind. The entire risk arising out of the use of this information remains with the
recipient. In no event shall Compaq be liable for any direct, consequential,
incidental, special, punitive or other damages whatsoever (including without
limitation, damages for loss of business profits, business interruption or loss of
business information), even if Compaq has been advised of the possibility of such
damages and whether in an action or contract or tort, including negligence.
The limited warranties for Compaq products are exclusively set forth in the
documentation accompanying such products. Nothing herein should be construed
as constituting a further or additional warranty.
M
, the Compaq logo, A
AINTENANCE AND SERVICE GUIDE
RMADA
, and Compaq Insight Manager Registered in
Compaq Armada E500, E500S, and Armada V300 Series of
Personal Computers
Sixth Edition (October 2000)
First Edition (November 1999)
Published in the U.S.A., U.K., Singapore, and Taiwan.
Documentation Part Number 128679-006
Spare Part Number 162812-001
Page 3

ONTENTS
C
preface
SING THIS GUIDE
U
Symbols........................................................................................ix
Technician Notes...........................................................................x
Serial Number................................................................................ x
Locating Additional Information...................................................x
chapter1
RODUCT DESCRIPTION
P
1.1 Models and Features............................................................1-1
1.2 Intelligent Manageability ..................................................1-15
1.3 Computer External Components .......................................1-19
1.4 Design Overview...............................................................1-30
chapter2
ROUBLESHOOTING
T
2.1 Preliminary Steps.................................................................2-2
2.2 Clearing Passwords .............................................................2-3
2.3 Power-On Self-Test (POST)................................................2-4
2.4 POST Error Messages .........................................................2-4
2.5 Compaq Utilities..................................................................2-9
2.6 Troubleshooting Without Diagnostics...............................2-17
chapter3
LLUSTRATED PARTS CATALOG
I
3.1 Serial Number Location ......................................................3-1
3.2 Computer System Major Components ................................3-2
3.3 Miscellaneous Plastics Kit Components ...........................3-12
3.4 Mass Storage Devices........................................................3-13
3.5 Miscellaneous....................................................................3-14
Contents v
Page 4

chapter4
EMOVAL AND REPLACEMENT PRELIMINARIES
R
4.1 Tools Required.................................................................... 4-1
4.2 Service Considerations........................................................ 4-1
4.3 Preventing Damage to Removable Drives.......................... 4-2
4.4 Preventing Electrostatic Damage........................................ 4-3
4.5 Packaging and Transporting Precautions............................ 4-4
4.6 Workstation Precautions..................................................... 4-4
4.7 Grounding Equipment and Methods................................... 4-5
chapter5
EMOVAL AND REPLACEMENT PROCEDURES
R
5.1 Serial Number..................................................................... 5-1
5.2 Disassembly Reference Chart.............................................5-2
5.3 Preparing the Computer for Disassembly........................... 5-2
5.4 Computer Feet..................................................................... 5-3
5.5 Mini PCI Slot...................................................................... 5-4
5.6 Touch Button....................................................................... 5-6
5.7 Keyboard............................................................................. 5-8
5.8 Memory............................................................................. 5-12
5.9 Display Assembly............................................................. 5-15
5.10 Real Time Clock (RTC) Battery..................................... 5-21
5.11 LED Board...................................................................... 5-22
5.12 Top Cover........................................................................ 5-23
5.13 Front Shield..................................................................... 5-27
5.14 Diskette Drive (Armada V300 only)............................... 5-29
5.15 System Board.................................................................. 5-30
5.16 Voltage Converter Board................................................ 5-34
5.17 Fan................................................................................... 5-36
chapter 6
PECIFICATIONS
S
vi Contents
...................................................................................... 6-1
Page 5

appendix A
ONNECTOR PIN ASSIGNMENTS
C
................................................................A-1
appendix B
OWER CORD SET REQUIREMENTS
P
3-Conductor Power Cord Set..................................................... B-1
Country-Specific Requirements ................................................ B-2
Index.................................................................................................... I-1
Contents vii
Page 6

preface
U
SING THIS GUIDE
This Maintenance and Service Guide is a troubleshooting reference that
can be used when servicing the Compaq Armada E500 and ArmadaV300
Series of Personal Computers.
Compaq Computer Corporation reserves the right to make changes to the
Compaq Armada E500 and Armada V300 Series of Personal Computers
without notice.
Symbols
The following words and symbols mark special messages throughout
this guide:
WARNING:
!
directions in the warning could result in bodily harm or loss of life.
CAUTION: Text set off in this manner indicates that failure to follow
directions in the caution could result in damage to equipment or loss
of information.
IMPORTANT: Text set off in this manner presents clarifying information
or specific instructions.
NOTE: Text set off in this manner presents commentary, sidelights, or
interesting points of information.
Text set off in this manner indicates that failure to follow
Using This Guide ix
Page 7

Technician Notes
WARNING:
!
repair this equipment. All troubleshooting and repair procedures are
detailed to allow only subassembly/module level repair. Because of
the complexity of the individual boards and subassemblies, no one
should attempt to make repairs at the component level or to make
modifications to any printed wiring board. Improper repairs can
create a safety hazard. Any indication of component replacement or
printed wiring board modifications may void any warranty or
exchange allowances.
WARNING:
!
ensure proper operation, plug the AC power cord into a properly
grounded electrical outlet only.
CAUTION:
least 3 inches (7.62 cm) of clearance on the left and right sides of
the computer.
Only authorized technicians trained by Compaq should
The computer is designed to be electrically grounded. To
To properly ventilate the system, you must provide at
Serial Number
When requesting information or ordering spare parts, provide the
computer serial number. The serial number is located on the bottom of
the computer.
Locating Additional Information
The following documentation provides information for the computer:
■ Compaq Armada E500 and
Computers documentation set
■ Compaq Armada E500 and
Computers Technical Reference Guide
■ Microsoft Operating System Manual
■ Compaq Service Training Guides
■ Compaq Service Advisories and Bulletins
■ Compaq QuickFind
■ Compaq Service Quick Reference Guide
■ Compaq Website at:
http://www.compaq.com
x Using This Guide
Armada
Armada
V300 Series of Personal
V300 Series of Personal
Page 8
chapter
1
P
RODUCT DESCRIPTION
1.1 Models and Features
The Compaq Armada E500, E500S, and Armada V300 Series of
Personal Computers offer advanced modularity, Intel Pentium II, III, and
Intel Celeron processors with 64-bit architecture, industry-leading
Accelerated Graphics Port (AGP) implementation, and extensive
multimedia support. The computers provide desktop functionality and
connectivity through the optional expansion base, convenience base, or
port replicator.
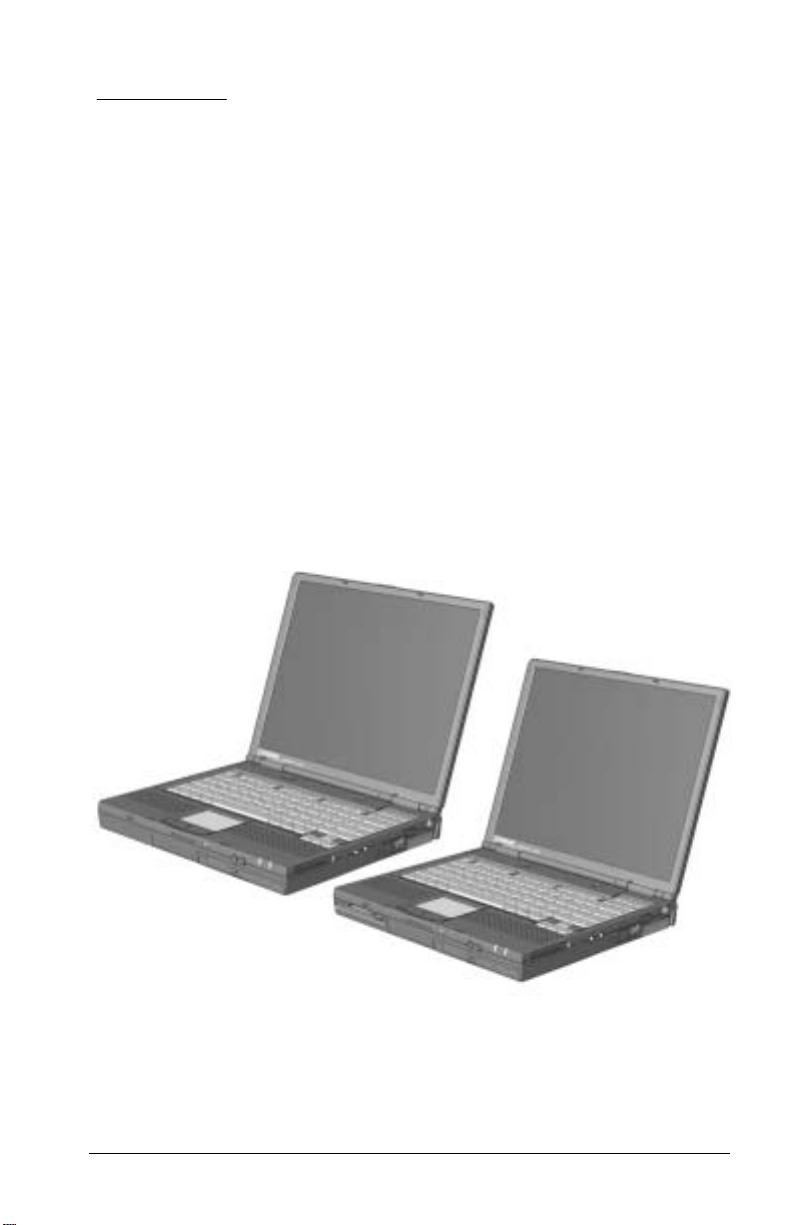
Figure 1-1. Compaq Armada E500, E500S, and Armada V300
Personal Computers
Product Description 1-1
Page 9

Models
The Armada E500 and E500S model naming conventions are shown in
Table 1-1. The computer model designation is composed of a group of
characters that defines each model’s features.
Table 1-1
Compaq Armada E500 and E500S
Model Naming Convention
Key
A E 5 P3 850 T5P 20 V M 64 58 N S F
1 2 3 4 5-6 7-9 10-12 13-14 15 16 17-19 20-21 22 23 24
Key Description Options
1 Brand designator A = Armada
2 Segment designator E = Expansion
3 Series 5 = 500
4 Blank
5-6 Processor type P3 = Intel
7-9 Processor speed 850 = 850 MHz
10 Panel type T = TFT
11 Panel size 5 = 15.x”
12 Panel resolution P = SXGA+ X = XGA S = SVGA
13-14Hard drive size
17-19RAM (in MB,
20-21Operating system 98 = Windows 98
*
(in GB, 1-2 digits)
15 Optical drive D = 24X Max CD-ROM
16 Integrated
communication
2-3 digits)
22 NAFTA N = NAFTA
23 Pointing device S = Pointing stick P = TouchPad
24 Security
End user must make a selection between the two operating systems. If end user
Pentium III
800 = 800 MHz
700 = 700 MHz
650 = 650 MHz
4 = 14.x”
20 = 20.0 GB
18 = 18.0 GB
12 = 12.0 GB
drive
M = Mini PCI
V.90 modem
64 = 64 MB
58 = Windows 95/98
dual install*
desires rejected product after selection is made, end user must acquire and pay for
rejected product separately.
P2 = Intel
Pentium II
600 = 600 MHz
550 = 550 MHz
500 = 500 MHz
3 = 13.x”
2 = 12.x”
10 = 10.0 GB
6 = 6.0 GB
4 = 4.3 GB
V = DVD-ROM drive
C = NIC/modem
combo
N4 = Windows NT 4.0
N2 = Windows NT 4.0/
C1 = Intel
Celeron 1
450 = 450 MHz
400 = 400 MHz
366 = 366 MHz
0 = none
Windows 2000
dual install*
1-2 Product Description
Page 10

Table 1-2
Compaq Armada E500
Computer Models
1 2 3 4 5-6 7-9 10 11 12 13-14 15 16 17-19 20-21 22 23 24 SKU# Config.
A E 5 P3850 T 5 P 20 V30 128 98 179856-XX11JFC1
A E 5 P3850 T 5 P 20 V30 128 N2 179856-XX81JFC2
A E 5 P3850 T 5 P 20 V3C 128 98 179858-XX11JFC3
A E 5 P3850 T 5 P 20 V3C 128 98 179858-XX31JFC5
A E 5 P3850 T 5 P 20 V3C 128 N2 179858-XX81JFC4
A E 5 P3850 T 5 P 20 V3C 128 N2 179858-XX91JFC6
A E 5 P3800 T 4 X 10 D 0 64 98 179854-XX11JFB1
A E 5 P3800 T 4 X 10 D 0 64 N2 179854-XX81JFB2
A E 5 P3800 T 4 X 10 D C 64 98 179855-XX11JFB3
A E 5 P3800 T 4 X 10 D C 64 98 179855-XX31JFB5
A E 5 P3800 T 4 X 10 D C 64 N2 179855-XX81JFB4
A E 5 P3800 T 4 X 10 D C 64 N2 179855-XX91JFB6
A E 5 P3700 T 5 X 18 V3M 128 58 174518-XX11DX44
A E 5 P3700 T 5 X 18 V3M 128 58 N 174518-XX31DX45
A E 5 P3700 T 5 X 18 V3M 128 N4 174518-XX61DX46
A E 5 P3700 T 5 X 18 V3M 128 N4 N 174518-XX71DX47
A E 5 P3700 T 5 X 18 V3M 128 N2 174518-XX81FFH2
A E 5 P3700 T 5 X 18 V3M 128 N2 174518-XX91FFH3
A E 5 P3700 T 5 X 18 V30 128 58 174517-XX11DX41
A E 5 P3700 T 5 X 18 V30 128 N4 174517-XX61DX43
A E 5 P3700 T 5 X 18 V30 128 N2 174517-XX81FFH1
A E 5 P3700 T 5 X 18 V3C 128 58 174519-XX11DX48
A E 5 P3700 T 5 X 18 V3C 128 N4 174519-XX61DX49
A E 5 P3700 T 5 X 18 V3C 128 N2 174519-XX81FFH4
A E 5 P3700 T 4 X 12 D 0 64 58 179847-XX11FMX1
A E 5 P3700 T 4 X 12 D 0 64 N2 179847-XX81FMX3
A E 5 P3700 T 4 X 12 D M 64 58 179848-XX11FMX4
A E 5 P3700 T 4 X 12 D M 64 58 179848-XX31FMX5
A E 5 P3700 T 4 X 12 D M 64 N2 179848-XX81FMX8
A E 5 P3700 T 4 X 12 D M 64 N2 179848-XX91FMX9
A E 5 P3700 T 4 X 12 D C 64 58 179849-XX11FMZ1
A E 5 P3700 T 4 X 12 D C 64 N2 179849-XX31FWZ1
A E 5 P3700 T 4 X 12 D C 64 N2 179849-XX81FMZ3
A E 5 P3700 T 4 X 12 D C 64 N2 179849-XX91FWZ2
1
9-cell Lithium Ion main battery pack
2
6-cell Lithium ion main battery pack
3
8X DVD-ROM drive
4
4X DVD-ROM drive
Code
Continued
Product Description 1-3
Page 11

Table 1-2
continued
1 2 3 4 5-6 7-9 10 11 12 13-14 15 16 17-19 20-21 22 23 24 SKU# Config.
Code
A E 5 P3700 T 3 X 5 D M 64 98 212281-XX11JFF3
A E 5 P3700 T 3 X 5 D M 64 98 212281-XX31JFF5
A E 5 P3700 T 3 X 5 D M 64 N2 212281-XX81JFF4
A E 5 P3700 T 3 X 5 D M 64 N2 212281-XX91JFF6
A E 5 P3700 T 3 X 5 D C 64 98 212282-XX11JFF7
A E 5 P3700 T 3 X 5 D C 64 98 212282-XX31JFF9
A E 5 P3700 T 3 X 5 D C 64 N2 212282-XX81JFF8
A E 5 P3700 T 3 X 5 D C 64 N2 212282-XX91JFFA
A E 5 P3700 T 3 X 5 D 0 64 98 212327-XX11JFF1
A E 5 P3700 T 3 X 5 D 0 64 N2 212327-XX81JFF2
A E 5 P3650 T 4 X 12 V40 64 58 161608-XX11DPB1
A E 5 P3650 T 4 X 12 V40 64 N4 161608-XX61DPB3
A E 5 P3650 T 4 X 12 V40 64 N2 161608-XX81FFD5
A E 5 P3650 T 4 X 12 V4M 64 58 161609-XX11DPB4
A E 5 P3650 T 4 X 12 V4M 64 58 N 161609-XX31DPB5
A E 5 P3650 T 4 X 12 V4M 64 N4 161609-XX61DPB6
A E 5 P3650 T 4 X 12 V4M 64 N4 N 161609-XX71DPB7
A E 5 P3650 T 4 X 12 V4M 64 N2 161609-XX81FFD6
A E 5 P3650 T 4 X 12 V4M 64 N2 N 161609-XX91FFD7
A E 5 P3650 T 4 X 12 V4C 64 58 164764-XX11DPB8
A E 5 P3650 T 4 X 12 V4C 64 N4 164764-XX61DPB9
A E 5 P3650 T 4 X 12 V4C 64 N2 164764-XX81FFD8
A E 5 P3600 T 4 X 12 D 0 64 58 161606-XX11DN91
A E 5 P3600 T 4 X 12 D 0 64 N4 161606-XX61DN93
A E 5 P3600 T 4 X 12 D 0 64 N2 161606-XX81FFD1
A E 5 P3600 T 4 X 12 D M 64 58 161607-XX11DN94
A E 5 P3600 T 4 X 12 D M 64 58 N 161607-XX31DN95
A E 5 P3600 T 4 X 12 D M 64 N4 161607-XX61DN96
A E 5 P3600 T 4 X 12 D M 64 58 N 161607-XX71DN97
A E 5 P3600 T 4 X 12 D M 64 N2 161607-XX81FFD2
A E 5 P3600 T 4 X 12 D M 64 N2 N 161607-XX91FFD3
A E 5 P3600 T 4 X 12 D C 64 58 164763-XX11DN98
A E 5 P3600 T 4 X 12 D C 64 N4 164763-XX61DN99
A E 5 P3600 T 4 X 12 D C 64 N2 164763-XX81FFD4
1
9-cell Lithium Ion main battery pack
2
6-cell Lithium ion main battery pack
3
8X DVD-ROM drive
4
4X DVD-ROM drive
Continued
1-4 Product Description
Page 12

Table 1-2
continued
1 2 3 4 5-6 7-9 10 11 12 13-14 15 16 17-19 20-21 22 23 24 SKU# Config.
Code
A E 5 P3600 T 3 X 6 D 0 64 58 179844-XX11FL51
A E 5 P3600 T 3 X 6 D 0 64 N2 179844-XX81FL53
A E 5 P3600 T 3 X 6 D M 64 58 179845-XX11FL54
A E 5 P3600 T 3 X 6 D M 64 N2 179845-XX31FL55
A E 5 P3600 T 3 X 6 D M 64 58 179845-XX81FL58
A E 5 P3600 T 3 X 6 D M 64 N2 179845-XX91FL59
A E 5 P3600 T 3 X 6 D C 64 58 179846-XX11FL61
A E 5 P3600 T 3 X 6 D C 64 N2 179846-XX81FL63
A E 5 P3600 T 2 S 5 D M 64 58 207063-XX11FVY1
A E 5 P3600 T 2 S 5 D M 64 58 207063-XX31FVY4
A E 5 P3600 T 2 S 5 D M 64 N2 207063-XX81FVY2
A E 5 P3600 T 2 S 5 D M 64 N2 207063-XX91FVY3
A E 5 P3500 T 4 X 12 D 0 64 58 187427-XX11FLC1
A E 5 P3500 T 4 X 12 D 0 64 N4 187427-XX61FLC2
A E 5 P3500 T 4 X 12 D 0 64 N2 187427-XX81FLC3
A E 5 P3500 T 4 X 12 D M 64 58 187428-XX11FLC4
A E 5 P3500 T 4 X 12 D M 64 N4 187428-XX61FLC5
A E 5 P3500 T 4 X 12 D M 64 N2 187428-XX81FLC6
A E 5 P3500 T 4 X 12 D C 64 58 187429-XX11FLC7
A E 5 P3500 T 4 X 12 D C 64 N4 187429-XX61FLC8
A E 5 P3500 T 4 X 12 D C 64 N2 187429-XX81FLC9
A E 5 P3500 T 3 X 6 D O 64 58 161604-XX11DNN1
A E 5 P3500 T 3 X 6 D O 64 98 161604-XX41DNN2
A E 5 P3500 T 3 X 6 D O 64 N4 161604-XX61DNN3
A E 5 P3500 T 3 X 6 D M 64 58 161605-XX11DNN4
A E 5 P3500 T 3 X 6 D M 64 58 N 161605-XX31DNN5
A E 5 P3500 T 3 X 6 D M 64 N4 161605-XX61DNN6
A E 5 P3500 T 3 X 6 D M 64 N4 N 161605-XX71DNN7
A E 5 P3500 T 3 X 6 D C 64 58 164749-XX11DNN8
A E 5 P3500 T 3 X 6 D C 64 N4 164749-XX61DN83
1
9-cell Lithium Ion main battery pack
2
6-cell Lithium ion main battery pack
Continued
Product Description 1-5
Page 13

Table 1-2
continued
1 2 3 4 5-6 7-9 10 11 12 13-14 15 16 17-19 20-21 22 23 24 SKU# Config.
Code
A E 5 P3500 T 2 S 6 D 0 64 58 161602-XX11DNM1
A E 5 P3500 T 2 S 6 D 0 64 98 161602-XX41DNM2
A E 5 P3500 T 2 S 6 D 0 64 N4 161602-XX61DNM3
A E 5 P3500 T 2 S 6 D M 64 58 161603-XX11DNM4
A E 5 P3500 T 2 S 6 D M 64 58 N 161603-XX31DNM5
A E 5 P3500 T 2 S 6 D M 64 N4 161603-XX61DNM6
A E 5 P3500 T 2 S 6 D M 64 N4 N 161603-XX71DNM7
A E 5 P3500 T 2 S 6 D C 64 58 166761-XX11DVM1
A E 5 P3500 T 2 S 6 D C 64 N4 166761-XX61DVM2
A E 5 P3450 T 4 X 12 D 0 64 58 127669-XX11CZQ1
A E 5 P3450 T 4 X 12 D 0 64 98 127669-XX41CZQ2
A E 5 P3450 T 4 X 12 D 0 64 N4 127669-XX61CZQ3
A E 5 P3450 T 4 X 12 D M 64 58 127670-XX11CZQ4
A E 5 P3450 T 4 X 12 D M 64 58 N 127670-XX31CZQ5
A E 5 P3450 T 4 X 12 D M 64 N4 127670-XX61CZQ6
A E 5 P3450 T 4 X 12 D M 64 N4 N 127670-XX71CZQ7
A E 5 P3450 T 4 X 12 D C 64 58 164751-XX11DN84
A E 5 P3450 T 4 X 12 D C 64 N4 164751-XX61DN85
A E 5 P2400 T 4 X 6 D 0 64 58 152675-XX11DC41
A E 5 P2400 T 4 X 6 D 0 64 98 152675-XX41DC42
A E 5 P2400 T 4 X 6 D 0 64 N4 152675-XX61DC43
A E 5 P2400 T 4 X 6 D M 64 58 152676-XX11DC44
A E 5 P2400 T 4 X 6 D M 64 58 N 152676-XX31DC45
A E 5 P2400 T 4 X 6 D M 64 N4 152676-XX61DC46
A E 5 P2400 T 4 X 6 D M 64 N4 N 152676-XX71DC47
A E 5 P2400 T 4 X 6 D C 64 58 164748-XX11DN81
A E 5 P2400 T 4 X 6 D C 64 N4 164748-XX61DN82
1
9-cell Lithium Ion main battery pack
2
6-cell Lithium ion main battery pack
Continued
1-6 Product Description
Page 14

Table 1-2
continued
1 2 3 4 5-6 7-9 10 11 12 13-14 15 16 17-19 20-21 22 23 24 SKU# Config.
Code
A E 5 P2366 T 2 S 4 D 0 64 58 155058-XX11DJC1
A E 5 P2366 T 2 S 4 D 0 64 98 155058-XX41DJC2
A E 5 P2366 T 2 S 4 D 0 64 N4 155058-XX61DJC3
A E 5 P2366 T 2 S 4 D M 64 58 155059-XX11DJC4
A E 5 P2366 T 2 S 4 D M 64 58 N 155059-XX31DJC5
A E 5 P2366 T 2 S 4 D M 64 N4 155059-XX61DJC6
A E 5 P2366 T 2 S 4 D M 64 N4 N 155059-XX71DJC7
A E 5 C1600 T 4 X 5 D C 64 98 202805-XX11JFD7
A E 5 C1600 T 4 X 5 D C 64 98 202805-XX31JFD9
A E 5 C1600 T 4 X 5 D C 64 N2 202805-XX81JFD8
A E 5 C1600 T 4 X 5 D C 64 N2 202805-XX91JFDA
A E 5 C1600 T 4 X 5 D 0 64 98 202850-XX11JFD1
A E 5 C1600 T 4 X 5 D 0 64 N2 202850-XX81JFD2
A E 5 C1600 T 4 X 5 D M 64 98 202852-XX11JFD3
A E 5 C1600 T 4 X 5 D M 64 98 202852-XX31JFD5
A E 5 C1600 T 4 X 5 D M 64 N2 202852-XX81JFD4
A E 5 C1600 T 4 X 5 D M 64 N2 202852-XX91JFD6
A E 5 C1600 T 3 X 5 D M 64 98 202802-XX12JFH3
A E 5 C1600 T 3 X 5 D M 64 98 202802-XX32JFH5
A E 5 C1600 T 3 X 5 D M 64 N2 202802-XX82JFH4
A E 5 C1600 T 3 X 5 D M 64 N2 202802-XX92JFH6
A E 5 C1600 T 3 X 5 D 0 64 98 202803-XX12JFH1
A E 5 C1600 T 3 X 5 D 0 64 N2 202803-XX82JFH2
A E 5 C1600 T 3 X 5 D C 64 98 202804-XX12JFH7
A E 5 C1600 T 3 X 5 D C 64 98 202804-XX32JFH9
A E 5 C1600 T 3 X 5 D C 64 N2 202804-XX82JFH8
A E 5 C1600 T 3 X 5 D C 64 N2 202804-XX92JFHA
1
9-cell Lithium Ion main battery pack
2
6-cell Lithium ion main battery pack
Continued
Product Description 1-7
Page 15

Table 1-2
continued
1 2 3 4 5-6 7-9 10 11 12 13-14 15 16 17-19 20-21 22 23 24 SKU# Config.
Code
A E 5 C1550 T 4 X 6 D C 64 58 207057-XX12FVX1
A E 5 C1550 T 4 X 6 D C 64 N2 207057-XX82FVX2
A E 5 C1550 T 3 X 5 D 0 64 58 196659-XX12FWB1
A E 5 C1550 T 3 X 5 D 0 64 N2 196659-XX82FWB2
A E 5 C1550 T 3 X 5 D M 64 58 196665-XX12FWB3
A E 5 C1550 T 3 X 5 D M 64 58 196665-XX32FWB5
A E 5 C1550 T 3 X 5 D M 64 N2 196665-XX82FWB4
A E 5 C1550 T 3 X 5 D M 64 N2 196665-XX92FWB6
A E 5 C1550 T 3 X 5 D C 64 58 196661-XX12FWB7
A E 5 C1550 T 3 X 5 D C 64 N2 196661-XX82FWB8
A E 5 C1550 T 2 S 5 D 0 64 58 196657-XX12FVZ1
A E 5 C1550 T 2 S 5 D 0 64 N2 196657-XX82FVZ2
A E 5 C1550 T 2 S 5 D M 64 58 196664-XX12FVZ3
A E 5 C1550 T 2 S 5 D M 64 58 196664-XX32FVZ5
A E 5 C1550 T 2 S 5 D M 64 N2 196664-XX82FVZ4
A E 5 C1550 T 2 S 5 D M 64 N2 196664-XX92FVZ6
A E 5 C1550 T 2 S 5 D C 64 58 196658-XX12FVZ7
A E 5 C1550 T 2 S 5 D C 64 N2 196658-XX82FVZ8
1
9-cell Lithium Ion main battery pack
2
6-cell Lithium ion main battery pack
1-8 Product Description
Page 16

The Armada V300 model naming conventions are shown in Table 1-3.
The computer model designation is composed of a group of characters
that define each model’s features.
Table 1-3
Compaq Armada V300
Model Naming Convention
Key
A V 3 C1 500 T4X 6 D M 64 58 N S F
1 2 3 4 5-6 7-9 10-12 13-14 15 16 17-19 20-21 22 23 24
Key Description Options
1 Brand designator A = Armada
2 Segment designator V = Versatility
3 Series 3 = 300
4 Blank
5-6 Processor type C1 = Intel Celeron 1
7-9 Processor speed 500 = 500 MHz 466 = 466 MHz 400 = 400 MHz
10 Panel type T = TFT H=HPA
11 Panel size 4 = 14.x” 3 = 13.x” 2 = 12.x”
12 Panel resolution X = XGA S= SVGA
13-14Hard drive size
17-19RAM (in MB,
20-21Operating system 98 = Windows 98
*
(in GB, 1-2 digits)
15 Optical drive D = 24X Max CD-ROM drive
16 Integrated
communication
2-3 digits)
22 NAFTA N = NAFTA
23 Pointing device P = TouchPad
24 Security
End user must make a one-time selection between Windows 95 and Windows 98. If
end user desires rejected product(s) after selection is made, end user must acquire
and pay for rejected product(s) separately.
6 = 6.0 GB 4 = 4.3 GB
M = Mini PCI
V.90 modem
64 = 64 MB 32 = 32 MB
58 = Windows 95/98 dual
install*
C = NIC/modem
combo
N4 = Windows NT 4.0
N2 = Windows NT
0 = none
4.0/2000 dual install
Product Description 1-9
Page 17

Table 1-4
Compaq Armada V300
Computer Models
1 2 3 4 5-6 7-9 10 11 12 13-14 15 16 17-19 20-21 22 23 24 SKU# Config.
A V 3 C1500 T 4 X 6 D 0 58 64 P
A V 3 C1500 T 4 X 6 D 0 N4 64 P
A V 3 C1500 T 4 X 6 D M 58 64 P
A V 3 C1500 T 4 X 6 D M 58 64 N P
A V 3 C1500 T 4 X 6 D M N4 64 P
A V 3 C1500 T 4 X 6 D M N4 64 N P
A V 3 C1500 T 4 X 6 D C 58 64 P
A V 3 C1500 T 4 X 6 D C N4 64 P
163308-XX2
163308-XX6
163309-XX2
163309-XX3
163309-XX6
163309-XX7
163310-XX2
163310-XX6
A V 3 C1466 T 4 X 4 D C 58 64 P 158984-XX21DJD3
A V 3 C1466 T 4 X 4 D C N4 64 P 158984-XX61DJD4
A V 3 C1466 T 4 X 4 D 0 58 64 P 117734-XX21CXX1
A V 3 C1466 T 4 X 4 D 0 98 64 P 117734-XX41CXX2
A V 3 C1466 T 4 X 4 D 0 N4 64 P 117734-XX61CXX3
A V 3 C1466 T 4 X 4 D M 58 64 P 117735-XX21CXX4
A V 3 C1466 T 4 X 4 D M 58 64 N P 117735-XX31CXX5
A V 3 C1466 T 4 X 4 D M N4 64 P 117735-XX61CXX8
A V 3 C1466 T 4 X 4 D M N4 64 N P 117735-XX71CXX9
A V 3 C1466 H 3 S 6 D 0 58 32 P
A V 3 C1466 H 3 S 6 D 0 N4 32 P
A V 3 C1466 H 3 S 6 D M 58 32 P
A V 3 C1466 H 3 S 6 D M 58 32 N P
A V 3 C1466 H 3 S 6 D M N4 32 P
A V 3 C1466 H 3 S 6 D M N4 32 N P
A V 3 C1466 H 3 S 6 D C 58 32 P
A V 3 C1466 H 3 S 6 D C N4 32 P
1
9-cell Lithium Ion main battery pack
2
6-cell Lithium ion main battery pack
163199-XX2
163199-XX6
163229-XX2
163229-XX3
163229-XX6
163229-XX7
163304-XX2
163304-XX6
Code
1
DVR1
1
DVR3
1
DVR4
1
DVR5
1
DVR6
1
DVR7
1
DVR8
1
DVR9
2
DVP1
2
DVP3
2
DVP4
2
DVP5
2
DVP6
2
DVP7
2
DVP8
2
DVP9
Continued
1-10 Product Description
Page 18

Table 1-4
continued
1 2 3 4 5-6 7-9 10 11 12 13-14 15 16 17-19 20-21 22 23 24 SKU# Config.
Code
A V 3 C1466 T 2 S 6 D 0 58 64 P
A V 3 C1466 T 2 S 6 D 0 N4 64 P
A V 3 C1466 T 2 S 6 D M 58 64 P
A V 3 C1466 T 2 S 6 D M 58 64 N P
A V 3 C1466 T 2 S 6 D M N4 64 P
A V 3 C1466 T 2 S 6 D M N4 64 N P
A V 3 C1466 T 2 S 6 D C 58 64 P
A V 3 C1466 T 2 S 6 D C N4 64 P
A V 3 C1400 T 2 S 4 D C 58 64 P
A V 3 C1400 T 2 S 4 D C N4 64 P
A V 3 C1400 T 2 S 4 D 0 58 64 P
A V 3 C1400 T 2 S 4 D 0 98 64 P
A V 3 C1400 T 2 S 4 D 0 N4 64 P
A V 3 C1400 T 2 S 4 D M 58 64 P
A V 3 C1400 T 2 S 4 D M 58 64 N P
A V 3 C1400 T 2 S 4 D M N4 64 P
A V 3 C1400 T 2 S 4 D M N4 64 N P
A V 3 C1400 H 2 S 4 D 0 58 32 P
A V 3 C1400 H 2 S 4 D 0 98 32 P
A V 3 C1400 H 2 S 4 D 0 N4 32 P
A V 3 C1400 H 2 S 4 D M 58 32 P
A V 3 C1400 H 2 S 4 D M 58 32 N P
A V 3 C1400 H 2 S 4 D M N4 32 P
A V 3 C1400 H 2 S 4 D M N4 32 N P
1
9-cell Lithium Ion main battery pack
2
6-cell Lithium ion main battery pack
163305-XX2
163305-XX6
163306-XX2
163306-XX3
163306-XX6
163306-XX7
163307-XX2
163307-XX6
158983-XX2
158983-XX6
117732-XX2
117732-XX4
117732-XX6
117733-XX2
117733-XX3
117733-XX6
117733-XX7
117730-XX2
117730-XX4
117730-XX6
117731-XX2
117731-XX3
117731-XX6
117731-XX7
2
DVQ1
2
DVQ3
2
DVQ4
2
DVQ5
2
DVQ6
2
DVQ7
2
DVQ8
2
DVQ9
2
DJD3
2
DJD4
2
CXW1
2
CXW2
2
CXW3
2
CXW4
2
CXW5
2
CXW8
2
CXW9
2
CXV1
2
CXV2
2
CXV3
2
CXV4
2
CXV5
2
CXV8
2
CXV9
Product Description 1-11
Page 19

Features
The computer has the following features:
The Armada E500 and E500S feature the following processors,
■
varying by computer model:
Intel Pentium III 850-, 800-, 700-, 650-, 600-, 500- or 450-MHz
■
processor, with 256-KB integrated cache
Intel Pentium II 400- or 366-MHz, with 256-KB integrated
■
cache
Intel Celeron 550-MHz, with 128-KB integrated cache
■
The Armada V300 features an Intel Celeron 500-, 466- or 400-MHz
■
processor, with 128-KB integrated L2 cache, varying by computer
model.
ATI RAGE LT Pro, 4-MB SGRAM (synchronous graphics)
■
The following standard memory is available, varying by computer
■
model:
The Armada E500 and E500S are equipped with 64-MB high-
■
performance Synchronous DRAM (SDRAM), expandable to
512 MB.
The Armada V300 is equipped with 64- or 32-MB
■
high-performance SDRAM, expandable to 512 MB.
Microsoft Windows 95, Windows 98, Windows NT
■
Workstation 4.0, or Windows 2000 preinstalled
The following displays are available, varying by computer model:
■
The Armada E500 and E500S feature a 15.0-inch, SXGA, TFT
■
(1400 × 1050), 15.0- or 14.1-inch, XGA, TFT (1024 × 768),
13.3-inch, XGA, TFT (1024 × 768) or 12.1-inch, SVGA, TFT
(800 × 600) display, all with over 16.8 million colors.
The Armada V300 features a 14.1- inch XGA TFT (1024 × 768),
■
13.3-inch SVGA HPA (800 × 600), 12.1-inch SVGA TFT
(800 × 600), or 12.1-inch SVGA STN (800 × 600) display, all
with over 16.8 million colors.
The following keyboards are available, varying by computer model:
■
The Armada E500 and E500S support a TouchPad or pointing
■
stick keyboard.
The Armada V300 is equipped with a TouchPad keyboard.
■
Mini PCI 56K V.90 modem, or optional Mini PCI V.90 modem plus
■
10/100 NIC combination card
1-12 Product Description
Page 20

The following PC Card features are available, varying by computer
■
model:
The Armada E500 and E500S feature two Type II PC Card slots
■
with support for both 32-bit CardBus and 16-bit PC Cards;
Zoomed video is supported in the bottom slot.
The Armada V300 features one Type II PC Card slot with
■
support for both 32-bit CardBus and 16-bit PC Cards.
External AC adapter with power cord
■
The following battery packs are available, varying by computer
■
model:
The Armada E500 and E500S support a 9- or 6-cell Lithium ion
■
(Li ion) primary battery pack in the battery bay or DualBay, and
a 6-cell Li ion MultiBay battery pack in the MultiBay; it supports
up to three battery packs in the computer at one time.
The Armada V300 supports a 9- or 6-cell Li ion primary battery
■
pack in the battery bay and a 6-cell Li ion MultiBay battery pack
in the MultiBay.
The following hard drives are available, varying by computer
■
model:
The Armada E500 and E500S support 18.0-, 12.0-, 6.0-, or 4.3-
■
GB high-capacity SMART hard drives with DriveLock security
and Prefailure Warranty.
The Armada V300 supports a 6.0- or 4.3-GB high-capacity
■
SMART hard drive with DriveLock security and Prefailure
Warranty.
Flexible MultiBay that accommodates a 24X MAX CD-ROM drive,
■
4X MAX CD-RW drive, DVD-ROM drive, SuperDisk LS-120
drive, 6-cell Li ion MultiBay battery pack, or secondary hard drive
(when used with a Hard Drive MultiBay Adapter)
Connectors for parallel, serial, audio in/out, external monitor,
■
universal serial bus, external keyboard, and AC power
Stereo speakers providing Compaq PremierSound 16-bit stereo
■
sound
Product Description 1-13
Page 21

1.2 Intelligent Manageability
Intelligent Manageability consists of preinstalled software tools for the
computer and Compaq servers that assist in tracking, troubleshooting,
protecting, and maintaining the computer. Intelligent Manageability
provides the following functions:
■
Asset Management
diagnostic information.
■
Fault Management
hardware problems.
■
Security Management
components.
■
Configuration Management
providing the latest drivers, utilities, and software, which are
available on CD-ROM and the Compaq Web site at:
www.compaq.com/support/portables
For further help with Intelligent Manageability, select Start !
NOTE:
Compaq Information Center ! Intelligent Manageability.
—provides detailed configuration and
—prevents, predicts, and alerts of impending
—prevents unauthorized access to data and
—optimizes the computer by
Accessing the Web Agent
The computer may have a preinstalled Web Agent that allows you to
view computer configuration information using Web technology. To
access this feature, select Start ! Compaq Information Center ! Insight
Web Management.
If the computer does not have a preinstalled Web Agent, it can be
downloaded from the Compaq Web site at:
www.compaq.com
Asset Management
Asset Management enables component information to be retrieved when
you are on the road or connected to the network.
Asset Management also enables the network administrator to remotely
retrieve information from any Compaq computer connected to the
network. The information can be used to assist in tracking and
maintaining the computer and its components. Asset Management
provides the following information:
1-14 Product Description
Page 22

Inventory information—The network administrator can retrieve
■
information about the computer over the network by using Compaq
Insight Manager
TM
or any PC management tool provided by Compaq
Solution Partners. Asset control information retrieved from the
computer includes:
Manufacturer, model, and serial number of Compaq
■
computers, monitors, hard drives, battery packs, memory
boards, processor speeds, and operating systems
System board and ROM revision levels
■
BIOS settings
■
Diagnostic information—Diagnostics for Windows includes
■
information on hard drives, ports, video, sound, and other
components. This application also allows multi-threaded tests to be
run on hardware components. If problems are found,
recommendations are provided.
All of the above information can be viewed, printed, or saved.
Fault Management
Fault Management features minimize downtime and data loss by
monitoring system performance and generating the following alerts:
■
Hard drive alert
—provides 72-hour advance warning of impending
hard drive problems and can automatically start optional backup
software.
■
System temperature alert
—reports overheating. As the system
temperature rises, this feature first adjusts fan speed and other
cooling components, then displays an alert, then shuts down the
system.
■
Battery pack alert
—reports charging problems and battery pack
failure.
■
Monitor alert
—diagnoses and displays external monitor
operational problems.
■
Memory alert
—reports memory board configuration changes when
a memory board is removed, added, or reconfigured. It also provides
the previous and current configurations for comparison.
The alerts work with or without network connection. However, if the
computer is not connected to the network, the network administrator
cannot receive alerts from the computer.
Product Description 1-15
Page 23

Fault Management Alerts
Alerts can be enabled, disabled, and tested, and software can be set to
back up information whenever a hard drive alert occurs.
While the computer is connected to a network, alerts pop up on the
■
computer display and are simultaneously reported to the network
console.
A system temperature alert reports overheating. As the system
■
temperature rises, this feature first adjusts fan speed and other
cooling components, then displays an alert, then shuts down the
system.
NOTE:
A battery charging problem alert is reported only on the
computer display.
When the computer is not connected to a network, the user receives
■
a local alert.
To set alerts, select the Intelligent Manageability icon in the system
■
tray.
Security Management
Security Management features customize system security.
■
Power-On and Setup Passwords
information and computer configuration.
■
DriveLock
■
Device disabling
—prevents unauthorized access to hard drives.
—prevents unauthorized data transfer through
modems, serial ports, parallel ports, and infrared ports on the
computer and provides an optional docking station.
■
QuickLock/QuickBlank
■
Ownership Tag
—displays ownership information during system
—locks the keyboard and clears the screen.
restart.
—prevent unauthorized access to
1-16 Product Description
Page 24

Configuration Management
Configuration Management optimizes software upgrade and customer.
This support software is accessible through a monthly CD-ROM
subscription. Support software can also be downloaded from the
Compaq Web site at:
www.compaq.com/support/portables
Managing Power
The computer comes with a collection of power management features
that allow battery operating time to be extended and power to be
conserved. Use power management to monitor most computer
components such as the hard drive, processor, and display.
Accessing Power Management
In Windows 95, select Start ! Settings ! Control Panel ! Power
■
to view or adjust settings in Power Properties.
In Windows NT 4.0, select Compaq Power instead of Power
■
In Windows 98, select Power Management instead of Power.
■
Power Management Levels
To extend the life of batteries, use the Battery Conservation tab in Power
Properties.
In Windows 95, select Start ! Settings ! Control Panel ! Power
■
to access Power Properties.
In Windows NT 4.0, select Compaq Power instead of Power.
■
In Windows 98, select Power Management instead of Power.
■
You can customize the level of battery conservation or the selection of
preset power management levels.
Product Description 1-17
Page 25
1.3 Computer External Components
The external components on the display and left side of the computer are
shown in Figure 1-2 and described in Table 1-5.
Figure 1-2. Display and Left Side Components
1-18 Product Description
Page 26

Table 1-5
Display and Left Side Components
Item Component Function
1 Tilt feet (2) Tilt the computer for ease of use.
2 Battery bay Accepts a 9- or 6-cell Lithium ion (Li ion)
3 Armada E500 & E500S:
DualBay
Armada V300:
Fixed diskette drive
4 Display release latch Opens the computer.
5 Audio bass port Enhances stereo sound.
6 MultiBay Accepts the following MultiBay devices:
7 Volume buttons Adjust the volume of the stereo speakers.
8 Power/suspend light
(green)
9 Battery light (green) On—a battery pack is charging.
*In Windows 98 the term Standby replaces the term Suspend.
primary battery pack.
Accepts a removable diskette drive or 9- or
6-cell Li ion primary battery pack.
Accepts diskettes.
CD-ROM drive, CD-RW drive, DVD-ROM
drive, hard drive (in Hard Drive MultiBay
Adapter), SuperDisk LS-120 Drive, 6-cell
Li ion MultiBay battery pack.
On—power is turned on.
Off—power is turned off.
Blinking—computer is in Suspend.*
NOTE: The power/suspend light also blinks if
a battery pack that is the only source of
power available to the computer reaches a
critical low-battery condition while
Hibernation is disabled.
Off—no battery packs are changing.
Blinking—a battery pack that is the only
available power source has reached a
low-battery condition.
Product Description 1-19
Page 27
The external components on the right side of the computer are shown in
Figure 1-3 and are described in Table 1-6.
Figure 1-3. Right Side Components
1-20 Product Description
Page 28

Table 1-6
Right Side Components
Item Component Function
1 PC Card slots* Supports 32-bit (CardBus) and 16-bit
2 Stereo speaker/
headphone jack
3 Mono microphone jack Connects a mono microphone, disabling the
4 Security cable slot Accepts an optional security cable to secure
5 RJ-11 jack (internal
modem models only)
6 RJ-45 jack (internal
network interface card
models only)
7 Infrared port Provides wireless communication between
8 Air vent Provides airflow to cool internal
9 Composite TV
connector
* The Armada E500 and E500S have two PC Card slots; the Armada V300 has only one PC
Card slot.
PC Cards.
Connects stereo speakers, headphones, or
headset.
This jack is driven by an amplifier and has
volume control. The internal computer
speakers are turned off when external
speakers or headphones are plugged into
this jack.
built-in microphone.
the computer to a fixed object to prevent
theft.
Connects the modem cable to an internal
modem.
NOTE: A modem cable is included with
internal modem models.
Connects the network cable.
the computer and another infrared-equipped
device using an infrared beam.
components.
Connects a television, VCR, camcorder, or
overhead projector.
Product Description 1-21
Page 29
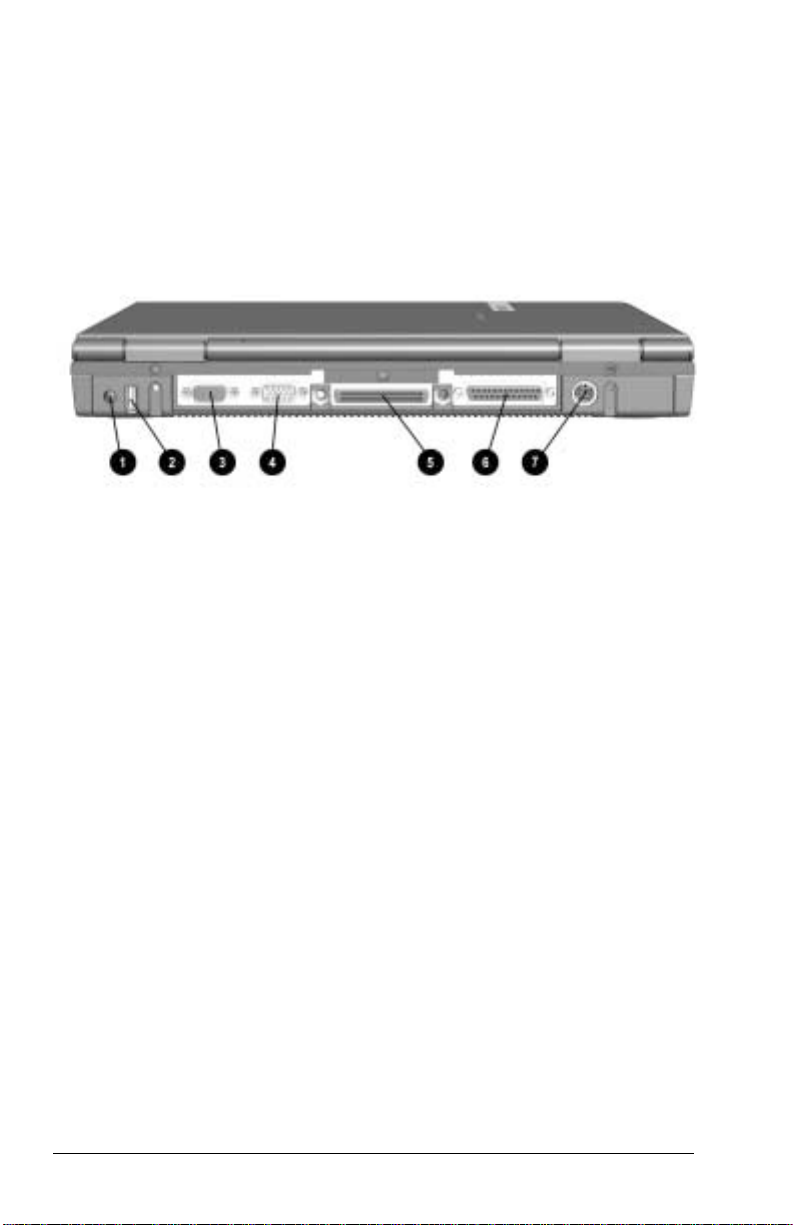
The external components on the rear of the computer are shown in
Figure 1-4 and described in Table 1-7.
Figure 1-4. Rear Components
1-22 Product Description
Page 30

Table 1-7
Rear Components
Item Component Function
1 AC Adapter connector Connects the AC power adapter.
2 Universal Serial Bus
(USB) connector
3 External monitor
connector
4 Serial connector Connects optional serial devices, such as a
5 Docking connector Connects the computer to the expansion
6 Parallel connector Connects an optional parallel device, such
7 Keyboard/mouse
connector
Connects USB devices, such as cameras
for video conferencing, or hubs which
connect multiple USB devices.
The USB connector is a powered hub.
When running Windows 95 or higher or
Windows NT, any combination of up to five
powered or unpowered hubs can be
connected in any sequence, as long as two
unpowered hubs are not connected next to
each other.
When running a lower version of Windows
or Windows NT, or if using a different
operating system, up to two hubs can be
connected.
Connects an optional external monitor,
overhead projector, or TV adapter.
mouse.
base, convenience base, or port replicator.
as a printer.
Connects an optional full-sized keyboard or
a mouse.
Both external mouse and computer pointing
device are active. An optional
splitter/adapter allows both an external
keyboard and mouse to be used at the
same time.
Product Description 1-23
Page 31

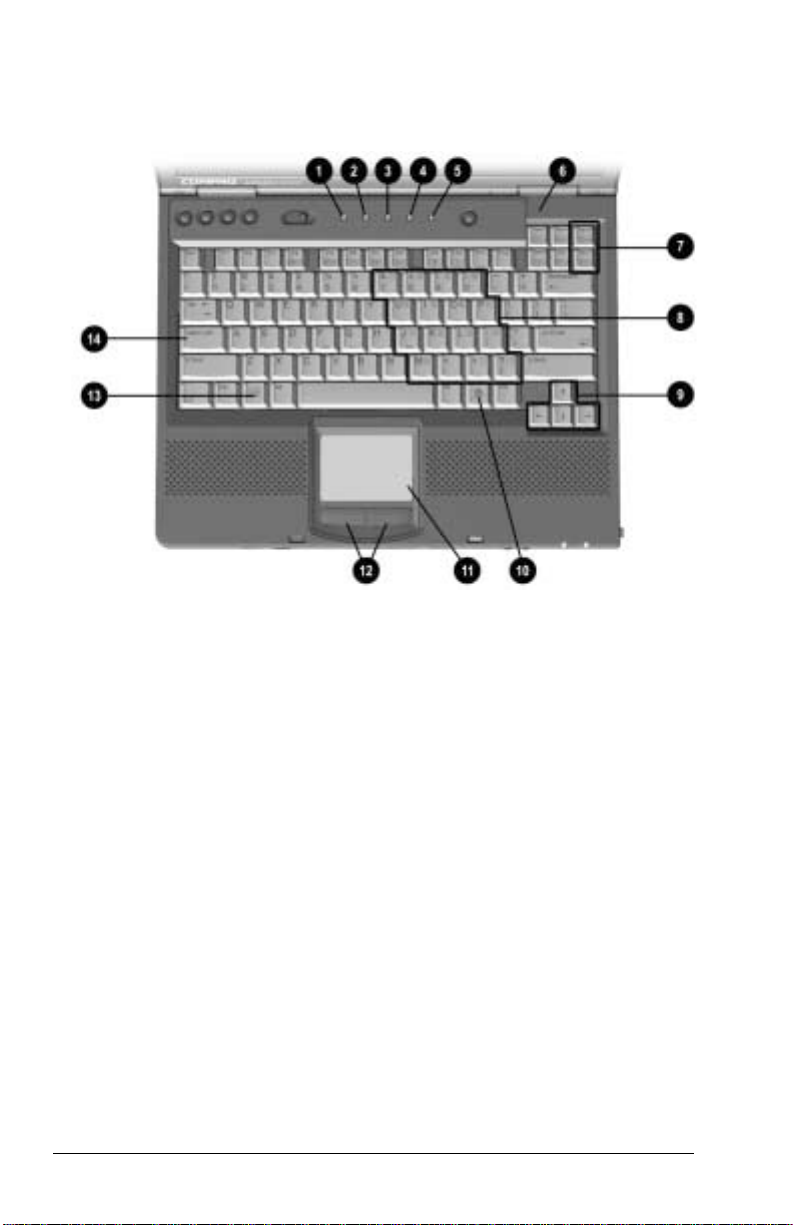
Computer keyboard components are shown in Figure 1-5 and described
in Table 1-8.
Figure 1-5. Keyboard Components
1-24 Product Description
Page 32
Table 1-8
Keyboard Components
Item Component Function
1
2
3
4
5 Power switch Turns the computer on or off or exits
6 Suspend button Initiates or exits Suspend1. When pressed
7 Scroll lock key Turns on the scroll function.
8 Num lock key Turns on the numeric lock function.
9 Pointing stick Moves the mouse cursor.
10 Stereo speakers Produce stereo sound.
11 Left and right mouse
buttons
12 Fn key Used with hotkeys to perform preset hotkey
12 F1 through F12
function keys
Information—links directly to Compaq
Armada user information for quick answers
to your computer questions. This key is
present only on computer models with
config. codes beginning with “FL5,” “FL6,”
“FM,” “FV,” and “FW.”
Home—provides an Internet starting point,
connecting to a personalized Web page
filled with local weather, news, sports, and
financial information. This key is present
only on computer models with config. codes
beginning with “FL5,” “FL6,” “FM,” “FV,” and
“FW.”
Search—opens the AltaVista search engine
Web site, which helps you locate
information on the Internet. This key is
present only on computer models with
config. codes beginning with “FL5,” “FL6,”
“FM,” “FV,” and “FW.”
Email—accesses your default email
application. This key is present only on
computer models with config. codes
beginning with “FL5,” “FL6,” “FM,” “FV,” and
“FW.”
1
Suspend
.
with the Fn key, initiates Hibernate.
Function like left and right mouse buttons
on an external mouse.
functions.
Perform preset functions.
Product Description 1-25
Page 33
Additional computer keyboard components are shown in Figure 1-6 and
described in Table 1-9.
Figure 1-6. Keyboard Components (continued)
1-26 Product Description
Page 34

Table 1-9
Keyboard Components (continued)
Item Component Function
1 Hard drive light (green) Turns on when the hard drive is being
2 MultiBay light (green) Turns on when a MultiBay device is being
3 Num lock light Turns on when the numeric lock function is
4 Caps lock light Turns on when the caps lock function is on.
5 Scroll lock light Turns on when the scroll function is on.
6 Display switch Turns off the display if it is closed while the
7 Page up and page
down keys
8 Embedded numeric
keypad
9 Cursor-control keys Move the cursor around the screen.
10 Windows application
key
11 TouchPad (TouchPad
models only)
12 Left and right
TouchPad buttons
(TouchPad models
only)
13 Microsoft logo key Displays the Windows Start menu.
14 Caps lock key Turns on the caps lock function.
accessed.
accessed or a battery pack in the MultiBay
is charging or waiting to be charged.
on.
computer is turned on.
Move to the previous or next screen.
Converts keys to numeric keypad.
Displays shortcut menu for item beneath
mouse cursor.
Moves the mouse cursor, selects, and
activates.
Function like the left and right mouse
buttons on an external mouse.
Product Description 1-27
Page 35
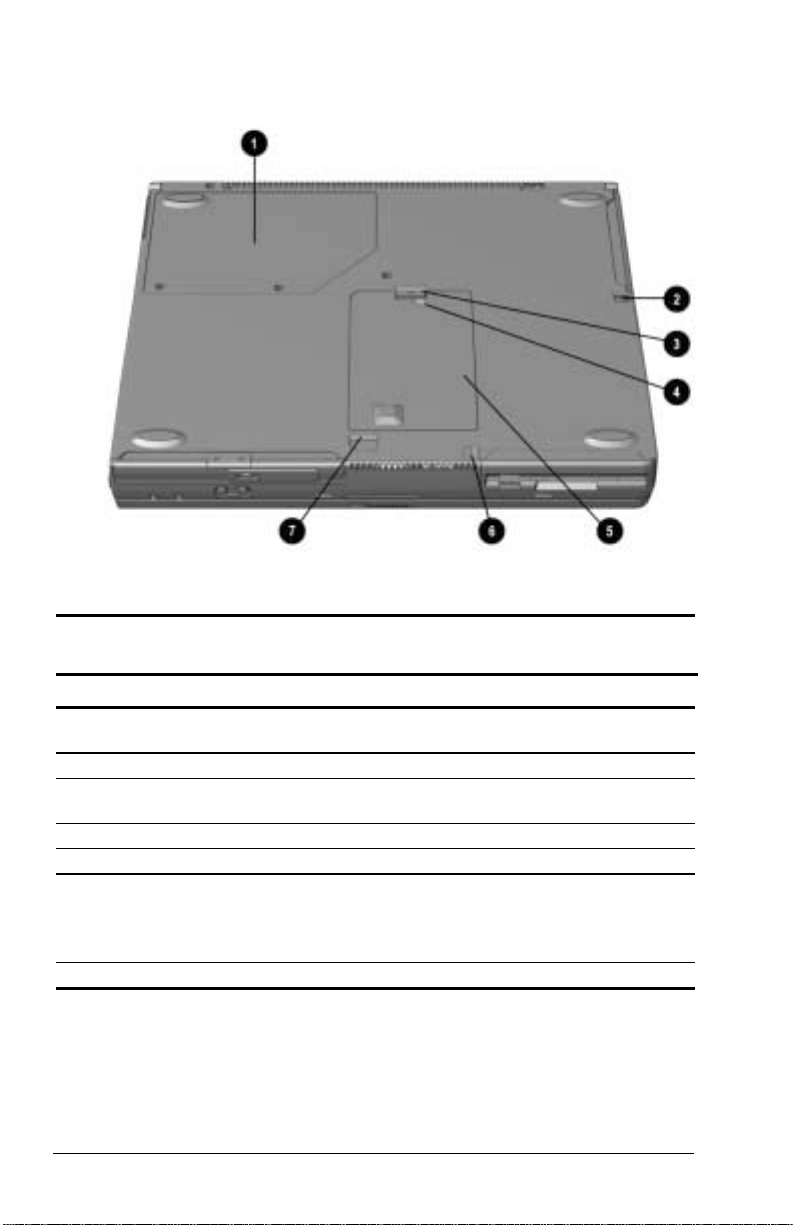
The external components on the bottom of the computer are shown in
Figure 1-7 and are described in Table 1-10.
Figure 1-7. Bottom Components
Table 1-10
Bottom Components
Item Component Function
1 Mini PCI slot cover Contains the mini PCI modem or network
2 Battery release latch Releases the battery from the battery bay.
3 Hard drive cover
release latch
4 Hard drive cover screw Secures the hard drive cover.
5 Hard drive cover Covers the hard drive bay.
6 Diskette drive release
latch
7 MultiBay release latch Releases the MultiBay device.
interface card.
Releases the hard drive cover.
Releases the device from the DualBay on
the Armada E500.
Releases the diskette drive bezel from the
Armada V300.
1-28 Product Description
Page 36

1.4 Design Overview
This section presents a design overview of key parts and features of the
computer. Refer to Chapter 3 for the illustrated parts catalog and
Chapter 5 for removal and replacement procedures.
The system board provides the following device connections:
Memory expansion board
■
Hard drive
■
Display
■
Keyboard/TouchPad or pointing stick
■
Audio
■
Intel Pentium III, II, or Celeron processors
■
Fan
■
PC Cards
■
Modem or modem/NIC
■
The Armada E500, E500S, and Armada V300 computers use an
electrical fan for ventilation. The fan is controlled by a temperature
sensor and is designed to turn on automatically when high temperature
conditions exist. These conditions are affected by high external
temperatures, system power consumption, power management/battery
conservation configurations, battery fast charging, and software
applications. Exhaust air is displaced through the ventilation grill located
on the right side of the computer.
CAUTION: To properly ventilate the computer, allow at least a
3-inch (7.6 cm) clearance on the left and right sides of the computer.
Product Description 1-29
Page 37

chapter
2
ROUBLESHOOTING
T
Follow these basic steps when beginning the troubleshooting process:
1. Complete the preliminary steps listed in Section 2.1.
2. Run the Power-On Self-Test (POST) as described in Section 2.3.
3. Run Computer Setup as described in Section 2.5.
4. If you are unable to run POST or if the problem persists after
running POST, perform the recommended actions described in the
diagnostic tables in Section 2.5.
Follow these guidelines when troubleshooting:
Complete the recommended actions in the order in which they are
■
given.
Repeat POST after each recommended action until the problem is
■
resolved and the error message does not return.
When the problem is resolved, stop performing the troubleshooting
■
steps and do not complete the remaining recommended actions.
Refer to Chapter 5 for recommended removal and replacement
■
procedures.
If the problem is intermittent, check the computer several times to
■
verify that the problem is solved.
Troubleshooting 2-1
Page 38

The following table describes the troubleshooting actions:
If You Want To: Then Run:
Check for POST error
messages
Perform any of the following:
Check the system
■
configuration
Set the system power
■
management parameters
Return the system to its
■
original configuration
Check system configuration
■
of installed devices
POST
Computer Setup
2.1 Preliminary Steps
IMPORTANT:
Use AC power when running POST or Computer
Setup. A low battery condition could initiate Hibernation and
interrupt the test.
Before running POST, complete the following steps:
1. Obtain established passwords. If you must clear the passwords, go to
Section 2.2.
2. Ensure that the battery pack is installed in the computer and the
power cord is connected to the computer and plugged into an AC
power source.
3. Turn on the computer.
4. If a power-on password has been established, type the password and
press Enter.
5. Run Computer Setup (Section 2.5). If a Setup password has been
established, type the password and press Enter.
6. Turn off the computer and all external devices.
7. Disconnect external devices that you do not want to test. If you want
to use the printer to log error messages, leave it connected to the
computer.
2-2 Troubleshooting
Page 39

NOTE: If a problem only occurs when an external device is
connected to the computer, the problem could be with the external
device or its cable. Isolate the problem by running POST with and
without the external device connected.
8. Use Compaq Utilities and loopback plugs in the serial and parallel
connectors if you plan to test these ports.
Follow these steps to run Compaq Utilities:
a. If you are running Compaq Utilities from the hard drive, turn on
or restart the computer. Press F10 when the cursor appears in the
upper-right corner of the screen. If you do not press F10 in time,
restart the computer and try again.
If you are running Compaq Utilities from a diskette, insert the
Compaq Utilities diskette in drive A. Turn on or restart the
computer.
b. Press Enter to accept OK.
c. Select Prompted Diagnostics.
d. After “Identifying System Hardware” completes, select
Interactive Testing and follow the instructions on the screen.
2.2 Clearing Passwords
1. Turn off the computer.
2. Disconnect the AC Adapter.
3. Remove all battery packs.
4. Remove the switch cover (refer to Chapter 5, Section 5.8).
5. Disconnect the Real Time Clock (RTC) battery (Section 5.9).
6. Wait five minutes.
7. Reconnect the RTC battery.
8. Replace the switch cover.
9. Reconnect the AC Adapter. Do not reinstall any battery packs yet.
10. Turn on the computer.
NOTE: Remember to set the date and time the next time the computer is
turned on.
Troubleshooting 2-3
Page 40

2.3 Power-On Self-Test (POST)
The Power-On Self-Test (POST) is a series of tests that run every time
the computer is turned on. POST verifies that the system is configured
and functioning properly.
To run POST, complete the following steps:
1. Complete the preliminary steps (Section 2.1).
2. Turn on the computer.
If POST does not detect any errors, the computer beeps once or twice to
indicate that POST has run successfully. The computer boots from the
hard drive or from a bootable diskette if one is installed in the diskette
drive.
2.4 POST Error Messages
If the system is not functioning well enough to run POST, or if the
display is not functioning well enough to show POST error messages,
refer to the Troubleshooting tables in Section 2.6.
If POST detects an error, one of the following events occurs:
A message with the prefix "WARNING" appears, informing you
■
where the error occurred. The system pauses until you press F1 to
continue.
produce WARNING messages.
A message with the prefix "FATAL" appears, informing you
■
where the error occurred. After the message, the system emits a
series of beeps, then stops.
You should be able to correct problems that
2-4 Troubleshooting
Page 41

If you receive one of the error messages listed below, follow the
recommended action.
Table 2-1
Warning Messages
Message Description Recommended Action
CMOS checksum
invalid, run SCU
CMOS failure, run
SCU
Diskette controller
error
Diskette track 0 failed The diskette
Hard disk controller
error
Keyboard controller
failure
CMOS RAM
information has
been corrupted.
CMOS RAM has
lost power.
The diskette
drive controller
failed to respond
to the recalibrate
command.
drive cannot
read track 0 of
the diskette in
the drive.
The hard drive
controller failed
to respond to the
reset command.
The keyboard
failed the selftest command.
Run Computer Setup
(Section 2.5) to reinitialize
CMOS-RAM.
Run Computer Setup
(Section 2.5) to reinitialize
CMOS-RAM.
If there is no diskette drive
in the system, run Computer
Setup (Section 2.5) to
properly configure the
CMOS-RAM to show no
diskette drive present. If the
problem persists, or if a
diskette drive is present,
complete these steps until
the problems are solved:
1. Check diskette drive
connections.
2. Replace diskette drive.
3. Replace system board.
Try another diskette. If the
problem persists, you may
need to replace the diskette
drive.
Check the drive parameters.
Turn off the system and
check all related
connections.
Replace the system board.
Continued
Troubleshooting 2-5
Page 42

Table 2-1
continued
Message Description Recommended Action
Keyboard failure The keyboard
failed to respond
to the RESET ID
command.
No interrupts from
Timer 0
ROM at xxxx
(LENGTH yyyy) with
nonzero checksum
(zz)
Time/Date corrupt run SCU
Hard disk xx failure (or
error)
The periodic
timer interrupt is
not occurring.
An illegal adapter
ROM was
located at the
specified
address.
The time and
date stored in the
real time clock
(RTC) have been
corrupted,
possibly by a
power loss.
A failure or an
error occurred
when trying to
access the
hard drive.
Replace the keyboard. If the
problem persists, replace
the system board.
Replace the system board.
Check the external adapter
(such as a video card) to
determine if it is causing the
conflict.
1. Run Computer Setup
(Section 2.5).
2. If problem persists,
replace RTC battery.
3. If problems persists,
replace system board.
1. Run ScanDisk.
2. Check disk in DOS and
Windows 95.
2-6 Troubleshooting
Page 43

Fatal errors emit a beep and may display a FATAL message. Fatal errors
indicate severe problems, such as a hardware failure. Fatal errors do not
allow the system to resume. Some of the Fatal error beep codes are listed
at the end of this section.
Table 2-2
Fatal Error Messages
Message Description Beep code
CMOS RAM test failed A walking bit test of
CMOS RAM location 0E
(Hex) - 3F (Hex) failed.
DMA controller faulty A sequential read/write
of the transfer count and
transfer address
registers within the
primary and secondary
DMA controllers failed.
Faulty DMA page
registers
Faulty refresh circuits A continuous read/write
Interrupt controller failed A sequential read/write
ROM checksum
incorrect
RAM error at location
xxxx
*Beep codes are defined in Table 2-3.
A walking bit read/write
of the 16 DMA controller
page registers starting at
location 80 Hex failed.
test of port 61h found
that bit 4 (Refresh
Detect) failed to toggle
within an allotted amount
of time.
of various Interrupt
Controller registers
failed.
A checksum of the ROM
BIOS does not match
the byte value at
F000:FFFF.
RAM error occurred
during memory test.
3
4
0
1
5
2
None
Troubleshooting 2-7
Page 44

Table 2-3
Fatal Error Beep Codes
Beep Code Beep Sequence Description Recommended
Action
0 S-S-S-P-S-S-L-P The DMA page
registers are
faulty.
1 S-S-S-P-S-L-S-P The refresh
circuitry is faulty.
2 S-S-S-P-S-L-L-P The ROM
checksum is
incorrect.
3 S-S-S-P-L-S-S-P The CMOS RAM
test failed.
4 S-S-S-P-L-S-L-P The DMA
controller is faulty.
5 S-S-S-P-L-L-S-P The interrupt
controller failed.
6 S-S-S-P-L-L-L-P The keyboard
controller failed.
7 S-S-L-P-S-S-S-P Graphics adapter
is faulty.
8 S-S-L-P-S-S-L-P Internal RAM is
faulty.
Replace system
board.
Replace memory
board or system
board if memory
on system board
is faulty.
S = Short, L = Long, P = Pause
NOTE:
2-8 Troubleshooting
Page 45

2.5 Compaq Utilities
Compaq Utilities contain several functions that:
Determine if various computer devices are recognized by the
■
system and are operating properly
Provide information about the system once it is configured.
■
Compaq Utilities include the following programs:
Computer Setup
■
Compaq Diagnostics
■
To access Compaq Utilities:
1. Turn on or restart the computer by clicking Start!Shut
Down!Restart the computer.
2. Press F10 when the blinking cursor appears in the upper-right
corner of the display.
3. Select a menu option.
Selecting Computer Setup or Compaq Diagnostics
for Windows
The computer features two system management utilities:
Computer Setup is a system information and configuration utility
■
that can be used even when your operating system is not working
or will not load. It includes custom settings that are not available in
Windows.
To configure a device in Windows NT 4.0, you must use Computer
Setup.
Compaq Diagnostics for Windows is a system information and
■
diagnostic utility that is used within the Windows operating
system. Use Compaq Diagnostics for Windows to test system
components and to display system information whenever possible.
To configure a device in Windows 95 or 98, use the operating system
itself. Windows 95 and 98 can be used to add and remove programs, and
provide Wizards to ensure proper device drivers are installed. Compaq
Diagnostics for Windows is NOT a configuration tool and might only
test devices that are properly configured by the operating system.
NOTE: It is not necessary to configure a device connected to a USB
connector on the computer or to an optional docking base.
Troubleshooting 2-9
Page 46

Using Computer Setup
All information and settings in Computer Setup are accessed from the
File, Security, or Advanced menus.
NOTE: Your settings in Computer Setup are not affected by updating the
system ROM.
To view information or change a setting in Computer Setup:
1. Turn on or restart the computer. When the blinking cursor appears in
the upper-right corner of the screen, press F10.
To change the language, press F2.
■
To view navigation information, press F1.
■
To return to the Computer Setup menu from anywhere in
■
Computer Setup, press Esc.
2. Select the File, Security, or Advanced menu.
3. To close Computer Setup and restart the computer:
Select File!Ignore Changes and Exit, then press Enter.
■
or
Select File!Save Changes and Exit, then press Enter.
■
4. To confirm your choice, press F10.
2-10 Troubleshooting
Page 47

The following sections provide detailed instructions on using the File,
Security, and Advanced menus.
File Menu
Begin here To do this
System information
Save to floppy Save system configuration to a
Restore from floppy Restore system configuration from a
Restore defaults Replace configuration settings in
Ignore changes and exit Cancel changes entered during the
Save changes and exit Save changes, then exit and restart
View identification information
■
about the computer, docking
base, and battery packs
View specification information
■
about the processor, memory and
cache size, and ROM date and
family
diskette
diskette. (The diskette contains your
personal configuration, so you should
restore from the diskette before using
the Quick Restore CD-ROM.)
Computer Setup with factory default
settings. (Identification information is
retained.)
current Computer Setup session, then
exit and restart the computer
the computer
Troubleshooting 2-11
Page 48

Security Menu
Begin here To do this
Setup password Enter, change, or delete a setup
password
Power-on password Enter, change, or delete a power-on
password
Password options Enable/disable:
QuickLock/QuickBlank
■
Lock keyboard and pointing stick
■
or touchpad at startup
(These features can be enabled only
when a power-on password is set.)
DriveLock passwords Enter, change, or delete a DriveLock
password
Device security Enable/disable:
Ports or diskette drives
■
Diskette write
■
CD-ROM or diskette startup
■
(Settings for a DVD-ROM can be
entered in the CD-ROM field.)
System IDs Enter identification numbers for the
computer, a docking base, and
battery packs
2-12 Troubleshooting
Page 49

Advanced Menu
Begin here To do this
Language (or press F2)
Boot Options Enable/disable:
Device Options
Change the Computer Setup
language
QuickBoot, which starts the
■
computer more quickly by
eliminating some startup tests
(If you suspect a memory failure
and want to test memory
automatically during startup, you
may want to disable QuickBoot.)
MultiBoot, which enables you to
■
set a startup sequence that can
include any drives in the system
Enable/disable the embedded
■
numeric keypad at startup
Enable/disable multiple standard
■
pointing devices at startup
When this feature is disabled,
only one pointing device is
activated at startup.
Enable/disable USB legacy
■
support for one USB mouse and
one USB keyboard
(When USB legacy support is
enabled, the keyboard and
mouse work without a loaded
USB driver.)
Set as the primary device an
■
optional external monitor or
overhead projector connected to
a video card in a docking base.
(When the computer display is set
as secondary, the computer must
be shut down before undocking.)
Set video-out mode to NTSC
■
(default), NTSC-J, PAL, or PAL-M
Change the parallel port mode to
■
or from EPP, standard, bidirectional, or ECP
Troubleshooting 2-13
Page 50

Using Compaq Diagnostics for Windows
1. Access Compaq Diagnostics for Windows by selecting
Start!Settings!Control Panel!Compaq Diagnostics.
2. To select a category, choose one of two methods:
Select the Categories menu, then select a category from the
■
drop-down list.
Select a category icon on the toolbar.
■
3. To run diagnostic tests:
a) Select the Test tab.
b) In the scroll box, select the category or device you want to test.
c) Select the Quick, Complete, or Custom test type.
d) Select the Interactive or Unattended test mode.
e) Select the Begin Testing button.
f) View test information by selecting a report from the Status,
Log, or Error tab.
4. To print the information or save it to a drive, select the File menu,
then select Print or Save As.
5. To exit, select File menu!Exit.
2-14 Troubleshooting
Page 51

Factory Default Settings
Table 2-4
Initialization
Enable POST Memory Test Checked (enabled)
Keyboard Num Lock Unchecked (off)
Hard drive boot sequence
1 Hard drive in the computer
MultiBay
2 Hard drive in the computer hard
drive bay
Boot display Auto
Language Language of country
Table 2-5
Ports
Serial port 3F8, IRQ4
Infrared port 2F8, IRQ9
Parallel port 378, IRQ7
Ethernet port 300, IRQ11
Troubleshooting 2-15
Page 52

Table 2-6
Power
Low Battery Warning Beep Checked (enabled)
External Energy Saving
Monitor Connected
Power Management
Enabled While operating on battery power
Conservation Level High
Level Definition
High Suspend Time: 3 minutes
Medium Suspend Time: 5 minutes
Custom
Unchecked (not connected)
Hibernation Timeout: Immediate
Drive Timeout: 1 minute
Screen Timeout: 1 minute
Hibernation Timeout: 1 hour
Drive Timeout: 2 minutes
Screen Timeout: 3 minutes
Allows the desired times to be
customized. Default settings are:
Suspend Time: disabled
Hibernation Timeout: low battery
Drive Timeout: always on
Screen Timeout: always on
Table 2-7
Security
Enable
QuickLock/QuickBlank
Enable Power-on Password Unchecked (disabled)
Disable Serial/Infrared Ports Unchecked (enabled)
Disable Parallel Port Unchecked (enabled)
Disable PC Card Slots Unchecked (enabled)
Setup Password Password blank
Power-on Password Password blank
Diskette Drives
Disable Diskette Drives Unchecked (enabled)
Disable Diskette Boot Unchecked (enabled)
2-16 Troubleshooting
Unchecked (disabled)
Page 53

2.6 Troubleshooting Without Diagnostics
This section provides information about how to identify and correct
some common hardware, memory, and software problems. It also
explains several types of messages that are displayed on the screen.
Since symptoms can appear to be similar, carefully match the symptoms
of the computer malfunction against the problem description in the
Troubleshooting tables to avoid a misdiagnosis.
Before Replacing Parts
When troubleshooting a problem, check the following items for possible
solutions before replacing parts:
Verify that cables are connected properly to the suspected
■
defective parts.
Verify that all required device drivers are installed.
■
Verify that all printer drivers have been installed for each
■
application.
Obtaining Update Information with Info Messenger
Compaq Info Messenger allows you to set a customized search of the
Compaq Web site. By registering for this utility, you can stay up-to-date
with software and hardware information specific to your system.
Verify that cables are connected properly to the suspected
■
defective parts.
Select the Categories menu, then select a category from the
■
drop-down list.
To register, follow the instructions on the Info Messenger page.
■
When your registration is complete, you can:
Implement your customized search from the Info Messenger
■
page whenever you prefer.
Set Info Messenger to send you the information by email as it
■
becomes available.
Info Messenger will also inform you if there are updates available to the
system ROM for your computer.
Troubleshooting 2-17
Page 54

Table 2-8
Solving Audio Problems
Problem Possible Cause Solution
Computer does not
beep after the PowerOn Self-Test (POST).
Internal speaker does
not produce sound
when an external
audio source is
connected to the
stereo line-in jack.
External microphone
does not work.
System beeps have
been turned down.
Volume may be
turned off or set too
low.
Line input may not
be connected
properly.
Headphones or
speakers are
connected to the
stereo speaker/
headphone jack,
which disables the
internal speakers.
Volume may be
muted/
You are using the
wrong type of
microphone or
microphone plug for
the computer.
The microphone may
not be connected
properly.
Use the Fn+F5 hotkeys to
turn up the system
volume.
Adjust the overall
■
volume by pressing
the Fn+F5 hotkeys.
Adjust the sliding
■
mixer controls by
double-clicking the
Speaker icon on the
Windows taskbar.
Check the line input
connection.
Disconnect the
headphones or speakers
to enable the internal
speakers.
Uncheck the mute box in
volume properties.
Check to see if you are
using a monophonic
electret condenser
microphone with a
3.5-mm plug.
Ensure that the
microphone plug is
properly connected to the
mono microphone jack.
Continued
2-18 Troubleshooting
Page 55

Table 2-8
continued
Problem Possible Cause Solution
External microphone
does not work
(continued).
There is no sound
from headphones
Sound source is not
The headphones are
Volume is too low or
too loud.
Sound source is not
selected.
Audio settings are
not set correctly.
Volume control on
the computer is
turned down.
Volume or mixing
controls are set
incorrectly.
selected.
connected to the
wrong jack.
Volume or mixing
controls are set
incorrectly.
Ensure that microphone
is selected as the
recording source in
Control Panel
Multimedia and that the
recording level is
adjusted.
Check the game
program's audio settings.
Adjust the computer
volume with the Fn+F5
hotkeys.
Adjust the overall
■
volume with the
Fn+F5 hotkeys.
Use the mixing
■
features available by
double-clicking the
Speaker icon on the
Windows taskbar.
Verify that the sound
source is selected in
Control Panel
Multimedia.
!
Check the connection.
Adjust the overall
■
volume with the
Fn+F5 hotkeys.
Check the mixing
■
features available by
double-clicking the
Speaker icon on the
Windows taskbar.
!
Troubleshooting 2-19
Page 56

Table 2-9
Solving Battery/Battery Gauge Problems
Problem Possible Cause Solution
Computer is beeping
and battery power
light is blinking.
Computer battery
charge light blinks to
indicate low battery
condition, but
computer does not
beep.
Battery pack will not
charge.
Computer shut down
and memory was lost
when replacing the
battery pack.
Battery charge does
not last very long.
Battery pack charge
is low.
Volume is turned
down too low.
Battery pack was
exposed to
temperature
extremes.
Battery pack is
already charged.
Battery pack has
exceeded its useful
life cycle.
Hibernation was not
initiated before
removing the battery
pack.
Battery was exposed
to high
temperatures.
Charge the battery
■
pack by connecting it
to an external power
source.
Replace the battery
■
pack with another
fully charged battery.
Initiate Hibernation or
■
turn the computer off
until AC power or a
fully charged battery
is available.
Turn up the volume using
the Fn+F5 hotkeys.
Allow time for the battery
pack to return to room
temperature.
No action is required.
Use a different battery
pack.
Work is lost.
Move the computer to a
cooler place and recharge
the battery pack.
Continued
2-20 Troubleshooting
Page 57

Table 2-9
continued
Problem Possible Cause Solution
Battery charge does
not last very long
(continued).
Date and time must
be set every time
computer is turned
on.
Battery gauge seems
inaccurate.
Battery pack is warm
after charging.
Battery was exposed
to extremely cold
temperatures.
Battery conservation
is disabled or set to
drain.
An external device is
draining the battery.
Battery gauge is
inaccurate and
requires
recalibration.
The real time clock
(RTC) battery has
reached the end of
its useful life.
The battery pack
needs calibration.
The battery pack has
reached the end of
its useful life.
Warming occurs
during charging.
Move the computer to a
warmer place and
recharge the battery
pack.
NOTE: The recommended
operating temperature
range for the battery is
from 10°C to 40°C (50°F
to 104°F). The
recommended storage
temperature range for the
battery is from 0°C to
30°C (32°F to 86°F).
Reset the battery
conservation level.
Turn off or remove any
external device or PC
Cards when not in use.
Recalibrate the gauge.
Replace the RTC battery
(refer to Section 5.10).
Recalibrate the battery.
Replace the battery pack.
No action is required.
Troubleshooting 2-21
Page 58

Table 2-10
Solving Compact Disc and DVD-ROM Problems
Problem Possible Cause Solution
Drive cannot read a
disc
CD-ROM drive or
DVD-ROM drive is
not detected by the
computer.
Disc is not properly
seated in the drive.
Disc is loaded in the
loading tray upside
down.
Disc has a scratch
on its surface.
Drive is not
connected properly.
Open the loading tray,
insert the disc, then close
the tray.
Open the loading tray,
turn over the disc (label
facing up), then close the
tray.
Insert a different disc.
If you are running a
version of Windows that
was preinstalled by
Compaq, remove the
drive from the MultiBay
and reinsert it.
If you are running a
version of Windows that
was not preinstalled by
Compaq, turn off the
computer. Then remove
the drive from the
MultiBay and reinsert it.
2-22 Troubleshooting
Page 59

Table 2-11
Solving Diskette Drive/SuperDisk LS-120 Drive Problems
Problem Possible Cause Solution
Drive cannot write to
a diskette.
System cannot start
up from diskette or
SuperDisk LS-120
drive.
Diskette is not
formatted.
Diskette is
write-protected.
Writing to the wrong
drive
Not enough space is
left on the diskette.
Drive is disabled. Enable the proper drive
Disable diskette
write ability is turned
on.
A bootable diskette is
not in the drive.
Diskette bootability is
disabled in Computer
Setup.
Format the diskette.
Use another diskette that
is not write-protected or
disable the write-protect
feature.
Check the drive letter in
your path statement.
Save the information to
another diskette.
through Device Manager.
Run Computer Setup
(Section 2.5). Select the
Storage icon. Make sure
Disable diskette write
ability is not checked.
Verify that a diskette with
the necessary system
files is in the drive.
Enable diskette
bootability in Computer
Setup!Security menu.
Troubleshooting 2-23
Page 60

Table 2-12
Solving Hard Drive Problems
Problem Possible Cause Solution
Accessing
information on the
hard drive is much
slower than usual.
Hard drive does not
work.
Errors occur after
starting from an
additional hard drive.
System does not
recognize a hard
drive.
DriveLock settings
cannot be accessed
in Computer Setup.
Hard drive entered
low power state due
to timeout and is
now exiting from it.
Hard drive is
fragmented/not
optimized or has
errors.
Hard drive is not
seated properly.
Additional hard drive
has not been
prepared with
necessary software.
The drive is not
seated properly.
The drive is
damaged.
The drive was
inserted while
system was on or in
Suspend or
Hibernation.
The DriveLock
settings are
accessible only
when you enter
Computer Setup by
turning on (not
restarting) the
computer.
Wait for the system to
restore the previously
saved data prior to
initiating a low power
state.
Run ScanDisk and Disk
Defragmenter.
Turn off and unplug the
computer, remove and
reinsert the hard drive.
Boot from the original
hard drive or a prepared
hard drive.
Turn off and unplug the
computer, then remove
and reinsert the drive.
Try using the hard drive in
another bay to verify that
the problem is with the
drive. Run ScanDisk on
the drive.
Shut down the computer
before inserting or
removing a hard drive.
Completely turn off the
computer. Turn the
computer back on, then
run Computer Setup
(Section 2.5) by pressing
F10 when the blinking
cursor light appears in the
upper-right corner of the
screen.
2-24 Troubleshooting
Page 61

Table 2-13
Solving Infrared Problems
Problem Possible Cause Solution
Cannot communicate
with another
computer
The appropriate
software is not
running on both
computers.
The other computer
does not have an
IrDA-compliant
infrared port. Your
Compaq computer
uses the IrDA
communications
protocol.
The pathway
between the infrared
ports is obstructed,
one port is more than
30 degrees (plus or
minus 15 degrees off
the center line) from
the other, or the
ports are more than
one meter apart.
There is an interrupt
request (IRQ)
conflict.
There is a baud rate
conflict.
There is a conflict
with the # bits.
There is a stop byte
conflict.
There is a parity
conflict.
Install the appropriate
software on the second
device, start the second
device, and start the
program on both
computers.
Communication between
infrared devices must use
the same communications
protocol. Check the
manufacturer’s
instructions for
connecting with infrared
devices or try connecting
with a device you know to
be IrDA-compliant.
Remove the obstruction,
align the infrared ports to
within 30 degrees, and
position computers within
1.5 feet (about 0.5 meter)
of each other.
Check for IRQ conflicts in
the Device Manager. If
two devices have the
same IRQ address,
reassign one of the
devices.
Select the same baud
rate for both computers.
Select the same # bits
setting for both
computers.
Select the same stop byte
for both computers.
Select the same parity
setting for both
computers.
Continued
Troubleshooting 2-25
Page 62

Table 2-13
continued
Problem Possible Cause Solution
Cannot transmit data Direct sunlight,
Infrared port doesn’t
work.
fluorescent light, or
flashing
incandescent light is
close to the infrared
connections.
There is interference
from other wireless
devices.
There is a physical
obstruction in the
way.
One of the units was
moved during data
transmission.
The orientation of
the units is wrong.
The distance
between the units is
too great.
Direct sunlight,
fluorescent light, or
flashing
incandescent light is
close to the infrared
connections.
There is interference
from other wireless
devices.
IR has been
disabled.
Remove any interfering
light sources.
Keep remote control units
such as wireless
headphones and other
audio devices away from
the infrared connections.
Do not place objects that
will interfere with a line-ofsight data transmission
between the two units.
Do not move either unit
during data transmission.
Adjust the devices so that
they point directly at each
other.
Verify that devices are not
more than 1.5 feet (0.5
meter) apart.
Remove any interfering
light sources.
Keep remote control units
such as wireless
headphones and other
audio devices away from
the infrared connections.
Run the IR configuration
utility in Control Panel.
2-26 Troubleshooting
Page 63

Table 2-14
Solving Keyboard Problems
Problem Possible Cause Solution
Screen is blank
and keyboard is
working.
Embedded
numeric keypad on
computer keyboard
is disabled.
A screen timeout has
been initiated.
QuickLock/QuickBlank
has been initiated.
LCD has been
disabled.
Num Lock function is
not turned on.
Press any key to refresh
the screen.
To enable the keyboard
and return your
information to the screen,
enter your power-on
password.
Press Fn+F4 to cycle
from external monitor to
internal LCD.
Press Fn+Num Lk to
enable the Num Lock
function and the
embedded numeric
keypad.
Troubleshooting 2-27
Page 64

Table 2-15
Solving Modem Problems
Problem Possible Cause Solution
Modem loses
connection.
Modem is not
responding.
The cable
connection from the
phone line to the
modem is loose.
Call Waiting has not
been disabled.
There is noise or
excessive traffic on
the phone line.
Modem is not set up
correctly in system
BIOS.
Ensure that the telephone
cable is properly
connected.
Disable Call Waiting:
Select Start ! Setting !
Control Panel
Modems.
From the General tab of
the Modems Properties
page, select Dialing
Properties.
From the My Locations
tab of the Dialing
Properties page, check
the box labeled This
location has call waiting.
Select *70, 70#, or 1170
from the drop-down list to
disable call waiting.
Try connecting at a later
time.
Check the computer
BIOS setup. If it requires
specific settings for
modems, be sure that
they have been enabled.
!
Continued
2-28 Troubleshooting
Page 65

Table 2-15
continued
Problem Possible Cause Solution
Modem does not dial
correctly.
Characters are
garbled/transfer rates
are slow.
Telephone number is
not entered correctly
in the modem’s
dialing software.
There is noise in the
telephone line.
Make sure the
■
telephone number you
dialed is correct if you
are using the dialing
directory or the
terminal mode.
Dial 1 if using dialing
■
long distance.
The other line could
■
be busy or not
answering. Try again
later.
Make sure call waiting
■
is disabled.
The modem may not
■
recognize an
international dial tone.
Try the ATX3DT
command and the
telephone number.
Check your telephone
■
and modem cable
connections. If they
are a little loose, they
can cause noise on
the line.
Check with your local
■
telephone company
for a phone line filter.
Continued
Troubleshooting 2-29
Page 66

Table 2-15
continued
Problem Possible Cause Solution
Phone line noise is
causing a
disconnection.
No dial tone Phone service is not
Hang-up Delay S
Register (S10) is set
too low.
connected to the
telephone wall jack.
Change S10 default to
150.
To set S10=150:
1. Select Start !
Programs !
Accessories !
HyperTerminal, then
go to Command
Mode.
2. Type ATS10=150 and
press Enter.
This command causes
the modem to take longer
to disconnect even if
there is noise on the line.
Verify that service from
the local phone company
exists by following these
steps:
1. Unplug the telephone
cable from the
telephone wall jack.
2. Connect a telephone
to the jack, pick up
the handset, and
listen for a dial tone. If
there is a dial tone,
reconnect the modem
to the telephone wall
jack with the
telephone cable and
make sure all
connections are
secure.
3. If there is still no dial
tone, contact your
local phone company
or building manager.
Continued
2-30 Troubleshooting
Page 67

Table 2-15
continued
Problem Possible Cause Solution
No dial tone
(continued)
Modem does
not connect at
highest speed.
The modem is not
responding to
commands from the
computer keyboard.
Line conditions in
your area or in the
area you are calling
may not support
the highest
connect speeds.
Another device on
your telephone line
may be causing
interference.
Verify the modem and
computer are connected:
1. Select Start !
Programs !
Accessories !
HyperTerminal, then
go to Terminal Mode.
2. Type AT and press
the Enter key. If the
modem displays OK,
the modem and
computer are working
together. If the
modem displays
ERROR, or does not
respond, restart the
computer and repeat
step 1.
3. Type ATDT and listen
for dial tone.
4. Type ATH0 to hang
up.
Have your telephone line
checked by your local
telephone service
provider.
Try dialing an alternate
telephone number for the
service you are using.
Hang up an extension
telephone and disconnect
any other devices that
may be using the same
telephone line, then
redial.
Continued
Troubleshooting 2-31
Page 68

Table 2-15
continued
Problem Possible Cause Solution
Modem does not
connect at highest
speed (continued).
The service or site
called does not
support 56K or
supports an
incompatible 56K
implementation.
An internal modem
supports K56flex.
To find an Internet service
provider (ISP) that
supports K56flex, go to
the Compaq Web site at:
www.compaq.com
There is noise on the
telephone line.
The telephone line
does not support
56K implementation.
The 56K protocol of an
internal modem will fall
back to lower speeds if
the telephone line is too
noisy for a high-speed
connection.
Try using another
telephone line.
Change the Hang-up
Delay S Register:
1. Select Start!
Programs
!Accessories!
HyperTerminal.
2. Go to Command
Mode, type
ATS10=150, then
press Enter.
NOTE: This command
causes the modem to
take longer to disconnect
even if there is no noise
on the line.
The 56K protocol requires
that the telephone line
contain no more than one
analog-to-digital
conversion.
Try connecting from an
alternate site.
2-32 Troubleshooting
Page 69

Table 2-16
Solving PC Card Problems
Problem Possible Cause Solution
Computer does not
beep when a PC
Card is inserted.
Computer beeps only
once when a PC
Card is inserted.
Network PC Card
does not work.
PC Card is not
inserted properly.
Speakers are turned
off or volume is
turned down.
PC Card or card
driver is not PCMCIA
compliant.
The computer beeps
once to indicate that
a PC Card is
recognized but not
properly configured.
Necessary drivers
are not installed
(turned on).
PC Card is not fully
inserted or is upside
down.
Try reinserting the card.
Ensure that the PC Card
is inserted in the correct
orientation. Insert the
card gently to prevent
damage to the pins.
Adjust the volume control
on the computer.
Check the list of PC
Cards tested successfully
in Compaq PC Card
platforms.
Before a new PC Card
can be used, it may be
necessary to perform an
initial setup procedure.
Follow the PC Card
manufacturer's
instructions for formatting
a hard drive card or
installing
PC Card-specific drivers
for a network card.
Refer to the instructions
that came with the PC
Card or contact the
vendor for information on
installing the correct
drivers.
Ensure the PC Card is
inserted correctly.
Continued
Troubleshooting 2-33
Page 70

Table 2-16
continued
Problem Possible Cause Solution
Network PC Card
does not work
(continued).
Storage PC Card
does not work.
Network PC Card or
driver is not PCMCIA
compliant.
SRAM and flash
memory PC Cards
require the memory
card driver to be
loaded.
You are trying to
access the storage
PC Card using the
wrong drive letter.
The PC Card is not
formatted.
The card is not
supported.
Storage cards, such
as SRAM, do not
work in the
expansion base.
Check the list of PC
Cards tested successfully
in Compaq PC Card
platforms.
Memory cards can only
be accessed using DOS
real mode drivers. Ensure
that the correct drivers
are loaded.
If you are running
Windows 95, change the
drive letter assignment in
Device Manager
If you are running
Windows NT 4.0, change
the drive letter
assignment through the
Control Panel.
For memory cards, run
MCFORMAT in MS-DOS
Mode to format the PC
Card. For ATA cards, run
ATAINIT, then run
MCFORMAT in MS-DOS
Mode to format the PC
Card.
Check the list of PC
Cards tested successfully
in Compaq PC Card
platforms.
Use the storage card in
the computer.
2-34 Troubleshooting
Page 71

Table 2-17
Solving Power Problems
Problem Possible Cause Solution
Computer will not
turn on.
Computer turned off
while it was left
unattended.
Battery is
discharged and
computer is not
connected to a
power source.
Battery is
discharged and
cables to the
external power
source are
unplugged.
Computer initiated
power-down
because of a critical
low battery
condition.
The computer
initiated Hibernation
after a user-defined
timeout expired.
Charge the battery pack.
■
Replace the battery
■
pack.
Connect the computer to
■
an external power
source.
Ensure that cables
connecting the computer and
the external power source
are plugged in properly.
Charge the battery pack.
■
Replace the battery
■
pack.
Connect the computer to
■
an external power
source.
Turn on the computer.
Troubleshooting 2-35
Page 72

Table 2-18
Solving Display Problems
Problem Possible Cause Solution
Characters on
computer display are
dim.
You may have a
Screen timeout was
System initiated
Computer initiated a
Computer is in direct
light.
The brightness
control is not set
properly.
screen saver or
screen blanking
utility installed.
initiated.
Suspend after a
user-defined timeout
expired.
low battery Suspend
or Hibernation.
Move the computer or
adjust the screen.
Adjust the brightness
control by pressing the
Fn+F10 hotkeys.
Press any key to refresh
the screen.
Press any key to light the
screen.
Press the suspend button
to exit Suspend.
Replace the battery
■
pack and exit
Suspend or
Hibernation.
Connect the computer
■
to an external power
source and exit
Suspend or
Hibernation.
Continued
2-36 Troubleshooting
Page 73

Table 2-18
continued
Problem Possible Cause Solution
Characters on
computer display are
dim (continued).
Computer screen is
blank and external
monitor displays
information.
Fn+F4 hotkey
combination does not
switch between
internal and external
displays.
Power Management,
which controls
Suspend and
Hibernation, is
disabled and the
battery pack has
discharged.
Display was
switched to the
external monitor.
Display switch is
stuck.
CRT or other display
device is not
connected properly.
Replace the battery
■
pack and turn on the
computer.
Connect the
■
computer to an
external power
source and turn on
the computer.
Press Fn+F4 to display
information on the
computer screen; press
Fn+F4 again to display
information
simultaneously on both
screens.
Tap the switch.
Check your connections
to ensure that an external
device is connected
properly.
Troubleshooting 2-37
Page 74

Table 2-19
Solving USB Problems
Problem Possible Cause Solution
External device
connected to a USB
connector does not
work.
External device
connected to USB
connector does not
work during startup
(before Windows 95
loads).
External devices in
lower tiers do not
work.
The operating
system limits
external devices
connected by USB
to two tiers that can
include no more
than two hubs on
the first tier and no
more than one
keyboard and one
pointing device on
the first or second
tier.
During startup, only
two tiers are
supported by the
USB port. These
tiers can include no
more than two hubs
on the first tier and
no more than one
keyboard and one
pointing device on
the first or second
tier.
An unpowered hub
is connected to
another unpowered
hub.
Reduce the number of
connected external USB
devices to no more than
two hubs on the first tier,
and no more than one
keyboard and one
pointing device on the
first or second tier.
Use the external device
only after Windows 95 or
Windows 98 has loaded.
Reduce the number of
connected external USB
devices to no more than
two hubs on the first tier,
and no more than one
keyboard and one
pointing device on the
first or second tier.
Use only powered hubs.
Make sure that all
unpowered hubs are
immediately preceded by
powered hubs in the USB
chain.
2-38 Troubleshooting
Page 75

chapter
3
I
LLUSTRATED PARTS CATALOG
This chapter provides an illustrated parts breakdown and a reference
for spare part numbers and option part numbers for the Compaq
Armada E500, E500S, and Armada V300 Series of Personal Computers.
3.1 Serial Number Location
When ordering parts or requesting information, provide the computer
serial number and model number located on the bottom of the computer
(Figure 3-1).
Figure 3-1. Serial Number Location
Illustrated Parts Catalog 3-1
Page 76

3.2 Computer System Major Components
Figure 3-2. Computer System Major Components
3-2 Illustrated Parts Catalog
Page 77

Table 3-1
Spare Parts: Computer System Major Components
Item Description Spare Part Number
1 Display assembly
15.0-inch, TFT, SXGA (Armada E500 and
E500S only); used only with config. codes
beginning with JFC.
15.0-inch, TFT, XGA (Armada E500 and
E500S only); used only with config. codes
beginning with DX and FFH.
14.1-inch, TFT, XGA; used only with config.
codes beginning with:
CXX
CZQ
DC
DJD3
13.3-inch, TFT, XGA (Armada E500 and
E500S only); used only with config. codes
beginning with:
DN83
DNN
13.3-inch, HPA, SVGA, (Armada V300 only);
used only with config. codes beginning
with DVP.
12.1-inch, TFT, SVGA; used only with config.
codes beginning with:
CXW
DJC
12.1-inch, HPA, SVGA, (Armada V300 only);
used only with config. codes beginning
with CXV.
Miscellaneous Plastics Kit, includes: 159536-001
2a
2b
2c
2d
2e
2f
2g
2h
Switch cover (2)
Hinge cover
Real time clock (RTC) battery
Touch button cable
Front shield
Diskette drive bezel
Hard drive cover
Mini PCI slot cover
DJD4
DN81
DN82
DN84
FL5
FL6
DJD1
DJD2
DN85
DN9
DPB
DVR
FWB JFF JFH
DNM
DVM1
FFD
FLC
FMX
FMZ
DVM2
DVQ
FWX
FVX
JFB
JFD
FVY
FVZ
not illustrated:
RJ-11 modem cover
RJ-45 LAN cover
Computer feet
Display screw covers
TV out connector cover
PC Card space saver
Diskette drive space saver
CD-ROM drive space saver
Infrared lens
201059-001
190806-001
159532-001
167133-001
177749-001
159531-001
160536-001
Continued
Illustrated Parts Catalog 3-3
Page 78

Computer System Major Components (continued)
3-4 Illustrated Parts Catalog
Page 79

Table 3-1
continued
Item Description Spare Part Number
3 LED board
4 Keyboard with pointing stick
5a
5b
6 Top cover without TouchPad 159533-001
used with all config. codes except those
beginning with FL5, FL6, FM, FV, FW,
and JF.
used with all config. codes beginning with
FL5, FL6, FM, FV, FW, and JF.
(Armada E500 and E500S only)
Belgian
Brazilian
Danish
French
French Canadian
German
International
Italian
Japanese
Korean
Keyboard without pointing stick 154877-XXX
Arabic
Belgian
Brazilian
Danish
French
French Canadian
German
International
Italian
Japanese
Korean
Touch button with TouchPad
Touch button 3 with TouchPad
Touch button without TouchPad
(Armada E500 and E500S only)
-181
-201
-081
-051
-121
-041
-002
-061
-291
-AD1
-171
-181
-201
-081
-051
-121
-041
-002
-061
-291
-AD1
Latin American
Spanish
Norwegian
Portuguese
Spanish
Swedish
Swiss
Taiwanese
U.K. English
U.S. English
Latin American
Spanish
Norwegian
Portuguese
Spanish
Swedish
Swiss
Taiwanese
Turkish
U.K. English
U.S. English
159539-001
201058-001
154876-XXX
-161
-091
-131
-071
-101
-111
-AB1
-031
-001
-161
-091
-131
-071
-101
-111
-AB1
-141
-031
-001
135227-001
188645-001
159530-001
Continued
Illustrated Parts Catalog 3-5
Page 80
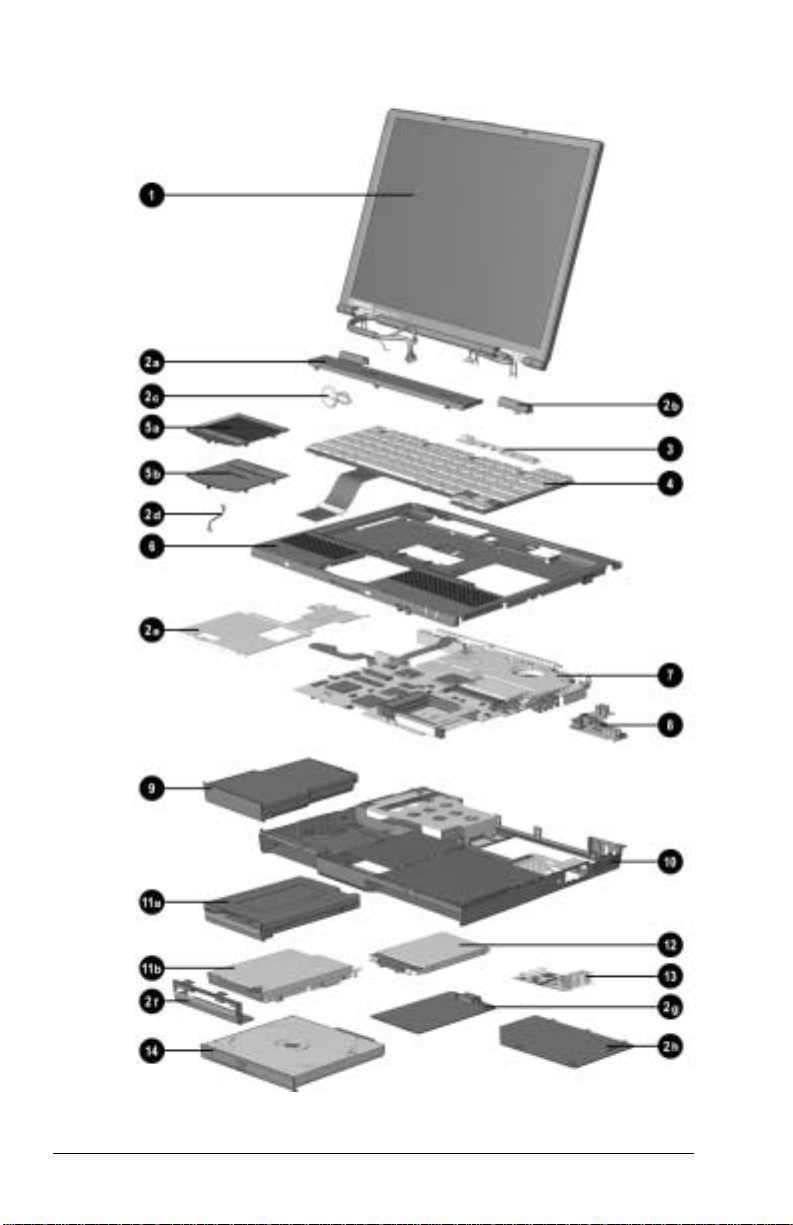
Computer System Major Components (continued)
3-6 Illustrated Parts Catalog
Page 81

Table 3-1
continued
Item Description Spare Part Number
7 System board
Armada E500 and E500S only (all with 64 MB
SDRAM)
Intel Pentium III 850-MHz processor; used
only with config. codes beginning with JFC.
Intel Pentium III 800-MHz processor; used
only with config. codes beginning with JFB.
Intel Pentium III 700-MHz processor; used
only with config. codes beginning with:
DX
FFH
Intel Pentium III 650-MHz processor; used
only with config. codes beginning with:
DPB FFD5 FFD6 FFD7 FFD8
Intel Pentium III 600-MHz processor; used
only with config. codes beginning with:
DN9
FFD1
FFD2
FFD3
FFD4
Intel Pentium III 500-MHz processor; used
only with config. codes beginning with:
DN83 DNM DNN DVM FLC
Intel Pentium III 450-MHz processor; used
only with config. codes beginning with:
CZQ DN84 DN85
Intel Pentium II 400-MHz processor; used
only with config. codes beginning with:
DC DN81 DN82
Intel Pentium II 366-MHz processor; used
only with config. codes beginning with DJC.
Intel Celeron 600-MHz processor; used only
with config. codes beginning with JFD
and JFH.
Intel Celeron 550-MHz processor; used only
with config. codes beginning with:
FVX FVZ FWB
FMX FMZ FWZ JFF
FL51
FL52
FL53
FL54
FL55
FL56
FL57
FL58
FL59
FL60
FL61
FL62
FL63
FVY1
FVY2
FVY3
FVY4
217374-001
217373-001
190804-001
177751-001
177750-001
165102-001
165101-001
159528-001
159527-001
200398-001
200397-001
Continued
Illustrated Parts Catalog 3-7
Page 82

Computer System Major Components (continued)
3-8 Illustrated Parts Catalog
Page 83

Table 3-1
continued
Item Description Spare Part Number
7 System board (continued)
Armada V300 only
Intel Celeron 500-MHz processor with 64 MB
SDRAM; used only with config. codes
beginning with DVR.
Intel Celeron 466-MHz processor with 64 MB
SDRAM; used only with config. codes
beginning with DVP.
Intel Celeron 466-MHz processor with 64 MB
SDRAM; used only with config. codes
beginning with:
CXX DJD3 DJD4 DVQ
Intel Celeron 400-MHz processor with 64 MB
SDRAM; used only with config codes
beginning with:
CXW DJD1 DJD2
Intel Celeron 400-MHz processor with 32 MB
SDRAM; used only with config. codes
beginning with CXV.
Fan (not illustrated; spared with system board
or separately)
8 Voltage converter board 152928-001
177748-001
177747-001
160535-001
160534-001
159540-001
159535-001
Continued
Illustrated Parts Catalog 3-9
Page 84

Computer System Major Components (continued)
3-10 Illustrated Parts Catalog
Page 85

Table 3-1
continued
Item Description Spare Part Number
9 Li ion battery pack, 9 cell (also available as an
10 CPU base enclosure 159534-001
11a
11b
12 Removable hard drive
13 Modem or combination modem/network
14 MultiBay device (availability varies by computer
option)
Li ion battery pack, 6 cell (also available as an
option)
Removable diskette drive (Armada E500 and
E500S only)
Fixed diskette drive (Armada V300 only)
20.0 GB (Armada E500 and E500S only)
18.0 GB (Armada E500 and E500S only;
available only as an option)
12.0 GB (Armada E500 and E500S only)
10.0 GB (Armada E500 and E500S only)
6.0 GB
5.0 GB
4.3 GB
10.0 GB (available only as an option)
interface (NIC) card
Type-II V.90 modem card
Type-II combination modem/NIC card
model)
24X CD-ROM drive
8X DVD-ROM drive
4X DVD-ROM drive
The following are available only as options:
4X CD-RW drive
Li ion MultiBay battery pack, 6 cell
LS-120 SuperDisk drive
Hard Drive MultiBay Adapter
159524-001
159529-001
159538-001
160537-001
218371-001
167528-001
167527-001
218370-001
159526-001
200396-001
159525-001
155351-001
121895-001
153207-001
315082-002
173949-001
102266-001
153992-001
100680-001
327456-003
153100-001
Illustrated Parts Catalog 3-11
Page 86

3.3 Miscellaneous Plastics Kit Components
Figure 3-3. Miscellaneous Plastics Kit Components
Table 3-2
Miscellaneous Plastics Kit Components
Spare Part Number 159536-001
Item Description
1a does not include Easy Access buttons; used with config. codes not
1b includes Easy Access buttons; used with config. codes beginning
2 Hinge cover
3 Real time clock (RTC) battery
4 Front shield
5 Diskette drive bezel
6 Diskette drive space saver
7 Hard drive cover
8 Mini PCI slot cover
9 CD-ROM drive space saver
10 Computer feet (4)
11 Display screw covers (4)
12 PC Card space saver (2)
13 RJ-11 modem cover & RJ-45 LAN cover (2)
14 Touch button cable
15 TV out connector cover
16 Infrared lens
Switch cover
beginning with FL5, FL6, FM, FV, and FW.
with FL5, FL6, FM, FV, FW, and JF.
3-12 Illustrated Parts Catalog
Page 87

3.4 Mass Storage Devices
Figure 3-4. Mass Storage Devices
Table 3-3
Spare Parts: Mass Storage Devices
Item Description Spare Part Number
1 Hard drive
20.0 GB (Armada E500 and E500S only)
18.0 GB (Armada E500 and E500S only;
available only as an option)
12.0 GB (Armada E500 and E500S only)
10.0 GB (Armada E500 and E500S only)
6.0 GB (Armada E500 and E500S only)
5.0 GB
4.3 GB
10.0 GB (available only as an option)
2 24X CD-ROM drive
4X CD-RW drive
3 8X DVD-ROM drive
4X DVD-ROM drive
4 Removable diskette drive, 1.44-megabyte,
3.5-inch (standard on Armada E500 and
E500S only)
5 LS-120 SuperDisk drive
(available only as an option)
6 Fixed diskette drive (Armada V300 only) 160537-001
218371-001
167528-001
167527-001
218370-001
159526-001
200396-001
159525-001
155351-001
315082-002
153992-001
173949-001
102266-001
159538-001
327456-003
Illustrated Parts Catalog 3-13
Page 88

3.5 Miscellaneous
Table 3-4
Spare Parts: Miscellaneous (not illustrated)
Description Spare Part Number
AC Adapter, 50 W
* When ordering an AC Adapter, use the spare part
number on the part number label of the adapter
being replaced.
Armada E500, E500S, and Armada V300 Maintenance
& Service Guide
Battery charger 153991-001
Hard drive adapter 155352-001
Memory expansion board
256 MB
128 MB
64 MB
32 MB
Miscellaneous Screw Kit 159537-001
Return Kit 159541-001
Power cord, black, 6 feet 246959-XXX
Australian
Danish
International
Italian
Japanese
RJ11 modem cable
RJ45 modem cable
-011
-081
-021
-061
-291
Korean
Swiss
U.K. English
U.S. English
163444-001 or
101898-001*
162812-001
167136-001
135244-001
135243-001
135242-001
-AD1
-AG1
-031
-001
165224-001
191230-001
3-14 Illustrated Parts Catalog
Page 89

chapter
4
EMOVAL AND REPLACEMENT
R
RELIMINARIES
P
This chapter provides essential information for proper and safe removal
and replacement service.
4.1 Tools Required
You will need the following tools to complete the removal and
replacement procedures:
Magnetic screwdriver
■
Torx T-8 screwdriver
■
Phillips screwdriver (for screw securing diskette drive bezel to base
■
assembly on Armada V300 only)
7-mm hex socket (for bushing guides)
■
Tool kit (includes connector removal tool, loopback plugs, and case
■
utility tool)
4.2 Service Considerations
Listed below are some of the considerations that you should keep in
mind during disassembly and assembly procedures.
IMPORTANT: As you remove each subassembly from the computer,
place it (and all accompanying screws) away from the work area to
prevent damage.
Removal and Replacement Preliminaries 4-1
Page 90

Plastic Parts
Using excessive force during disassembly and reassembly can damage
plastic parts. Use care when handling the plastic parts. Apply pressure
only at the points designated in the maintenance instructions.
Cables and Connectors
Cables must be handled with extreme care to avoid damage. Apply only
the tension required to unseat or seat the cables during removal and
insertion. Handle cables by the connector whenever possible. In all
cases, avoid bending, twisting, or tearing cables. Ensure that cables are
routed in such a way that they cannot be caught or snagged by parts
being removed or replaced. Handle flex cables with extreme care; they
tear easily.
CAUTION:
placed in their proper location during the reassembly process.
When servicing the computer, ensure that cables are
Improper cable placement can damage the computer.
4.3 Preventing Damage to Removable Drives
Removable drives are fragile components that must be handled with
care. To prevent damage to the computer, damage to a removable drive,
or loss of information, observe these precautions:
Before removing or inserting a hard drive, shut down the computer.
■
If you are unsure whether the computer is off or in Hibernation, turn
the computer on, then shut it down.
Before removing a diskette drive or CD-ROM drive, ensure that a
■
diskette or disc is not in the drive. Ensure that the CD-ROM tray is
closed.
Before handling a drive, ensure that you are discharged of static
■
electricity. While handling a drive, avoid touching the connector.
Handle drives on surfaces that have at least one inch of shock-proof
■
foam.
Avoid dropping drives from any height onto any surface.
■
4-2 Removal and Replacement Preliminaries
Page 91

After removing a hard drive, CD-ROM drive, or a diskette drive,
■
place it into a static-proof bag.
Do not use excessive force when inserting a drive into a drive bay.
■
After inserting a hard drive into the hard drive bay, always reinsert
■
either the original hard drive security plate or the tamper-resistant
security plate to prevent the hard drive from accidentally
disconnecting.
Avoid exposing a hard drive to products that have magnetic fields
■
such as monitors or speakers.
Avoid exposing a drive to temperature extremes or to liquids.
■
If a drive must be mailed, do the following: place the drive into a
■
bubble pack mailer or other suitable form of protective packaging;
label the package “Fragile: Handle With Care.”
4.4 Preventing Electrostatic Damage
Many electronic components are sensitive to electrostatic discharge
(ESD). Circuitry design and structure determine the degree of sensitivity.
Networks built into many integrated circuits provide some protection,
but in many cases the discharge contains enough power to alter device
parameters or melt silicon junctions.
A sudden discharge of static electricity from a finger or other conductor
can destroy static-sensitive devices or microcircuitry. Often the spark is
neither felt nor heard, but damage occurs. An electronic device exposed
to electrostatic discharge may not be affected at all and can work
perfectly throughout a normal cycle. It may function normally for a
while, then degrade in the internal layers, reducing its life expectancy.
Removal and Replacement Preliminaries 4-3
Page 92

4.5 Packaging and Transporting Precautions
Use the following grounding precautions when packaging and
transporting equipment:
To avoid hand contact, transport products in static-safe containers
■
such as tubes, bags, or boxes.
Protect all electrostatic-sensitive parts and assemblies with
■
conductive or approved containers or packaging.
Keep electrostatic-sensitive parts in their containers until they arrive
■
at static-free workstations.
Place items on a grounded surface before removing them from their
■
container.
Always be properly grounded when touching a sensitive component
■
or assembly.
Place reusable electrostatic-sensitive parts from assemblies in
■
protective packaging or non-conductive foam.
Use transporters and conveyers made of antistatic belts and roller
■
bushings. Ensure that mechanized equipment used for moving
materials is wired to ground, and that proper materials were selected
to avoid static charging. When grounding is not possible, use an
ionizer to dissipate electric charges.
4.6 Workstation Precautions
Use the following grounding precautions at workstations:
Cover the workstation with approved static-dissipative material
■
(refer to Table 4-2).
Use a wrist strap connected to a properly grounded work surface and
■
use properly grounded tools and equipment.
Use conductive field service tools, such as cutters, screwdrivers, and
■
vacuums.
When using fixtures that must directly contact dissipative surfaces,
■
use fixtures made of static-safe materials only.
Keep the work area free of nonconductive materials such as ordinary
■
plastic assembly aids and Styrofoam.
Handle electrostatic-sensitive components, parts, and assemblies by
■
the case or PCM laminate. Handle them only at static-free
workstations.
4-4 Removal and Replacement Preliminaries
Page 93

Avoid contact with pins, leads, or circuitry.
■
Turn off power and input signals before inserting or removing
■
connectors or test equipment.
4.7 Grounding Equipment and Methods
Grounding equipment must include either a wrist strap or a foot strap at
a grounded workstation.
When seated, wear a wrist strap connected to a grounded system.
■
Wrist straps are flexible straps with a minimum of one megaohm
±10% resistance in the ground cords. To provide proper ground,
wear a strap snug against the skin at all times. On grounded mats
with banana-plug connectors, connect a wrist strap with alligator
clips.
When standing, use foot straps and a grounded floor mat. Foot
■
straps (heel, toe, or boot straps) can be used at standing workstations
and are compatible with most types of shoes or boots. On
conductive floors or dissipative floor mats, use them on both feet
with a minimum of one-megohm resistance between the operator
and ground. To be effective, the conductive strips must be worn in
contact with the skin.
Other grounding equipment recommended for use in preventing
■
electrostatic damage includes:
Antistatic tape
■
Antistatic smocks, aprons, or sleeve protectors
■
Conductive bins and other assembly or soldering aids
■
Non-conductive foam
■
Conductive tabletop workstations with ground cord of one-megohm
■
resistance
Static-dissipative table or floor mats with hard tie to ground
■
Field service kits
■
Static awareness labels
■
Material-handling packages
■
Non-conductive plastic bags, tubes, or boxes
■
Metal tote boxes
■
Electrostatic voltage levels and protective materials
■
Removal and Replacement Preliminaries 4-5
Page 94

Table 4-1 shows how humidity affects the electrostatic voltage levels
generated by different activities.
Table 4-1
Typical Electrostatic Voltage Levels
Relative Humidity
Event 10% 40% 55%
Walking across carpet 35,000 V 15,000 V 7,500 V
Walking across vinyl floor 12,000 V 5,000 V 3,000 V
Motions of bench worker 6,000 V 800 V 400 V
Removing DIPS from plastic
tube
Removing DIPS from vinyl tray 11,500 V 4,000 V 2,000 V
Removing DIPS from Styrofoam 14,500 V 5,000 V 3,500 V
Removing bubble pack from
PCB
Packing PCBs in foam-lined
box
NOTE: A product can be degraded by as little as 700 volts.
2,000 V 700 V 400 V
26,500 V 20,000 V 7,000 V
21,000 V 11,000 V 5,000 V
Table 4-2 lists the shielding protection provided by antistatic bags and
floor mats.
Table 4-2
Static-Shielding Materials
Material Use Voltage Protection Level
Antistatic plastic Bags 1,500 V
Carbon-loaded plastic Floor mats 7,500 V
Metallized laminate Floor mats 15,000 V
4-6 Removal and Replacement Preliminaries
Page 95

chapter
5
R
EMOVAL AND REPLACEMENT PROCEDURES
This chapter provides removal and replacement procedures for the
Compaq Armada E500, E500S, and Armada V300 Series of Personal
Computers.
5.1 Serial Number
Report the computer serial number to Compaq when requesting
information or ordering spare parts. The serial number is located on the
bottom of the computer (Figure 5-1).
Figure 5-1. Serial Number Location
Removal and Replacement Procedures 5-1
Page 96

5.2 Disassembly Reference Chart
Use the chart below to determine the section number to be referenced
when removing components from the computer.
Disassembly Sequence Chart
5.3 Preparing the Computer for Disassembly
5.4 Computer Feet
5.5 Mini PCI Slot
Removing the Mini PCI Slot Cover
Installing a Modem or Modem/Network Interface Card
5.6 Touch Button
5.7 Keyboard
5.8 Memory
Removing a Memory Expansion Board
Installing a Memory Expansion Board
5.9 Display Assembly
5.10 Real Time Clock (RTC) Battery
5.11 LED Board
5.12 Top Cover
5.13 Front Shield
5.14 Diskette Drive (Armada V300 only)
5.15 System Board
5.16 Voltage Converter Board
5.17 Fan
5.3 Preparing the Computer for Disassembly
Perform the following steps before disassembling the computer. Consult
the computer reference guide, available as an electronic book on the
QuickRestore CD-ROM, for instructions on the steps below.
1. Undock the computer from the docking base.
2. Disconnect the AC Adapter and external devices.
3. Remove any battery packs inserted into the battery bay, DualBay
(Armada E500 only), or MultiBay.
5-2 Removal and Replacement Procedures
Page 97

4. If installed, remove the diskette drive from the DualBay
(Armada E500 only).
5. Remove the hard drive from the hard drive bay.
6. Remove any devices installed in the MultiBay.
5.4 Computer Feet
The base feet are oblong, adhesive-backed rubber pads. The base feet are
included in the Miscellaneous Plastics Kit.
Computer Feet
Spare Part Number Information
Miscellaneous Plastics Kit, includes: 159536-001
Switch cover (2)
Hinge cover
Real time clock (RTC) battery
Touch button cable
Front shield
Diskette drive bezel
Hard drive cover
Mini PCI slot cover
RJ-11 modem cover
RJ-45 LAN cover
Computer feet
Display screw covers
TV out connector cover
PC Card space saver
Diskette drive space saver
CD-ROM drive space saver
Infrared lens
Figure 5-2. Installing the Computer Feet
Removal and Replacement Procedures 5-3
Page 98

5.5 Mini PCI Slot
Modem and Modem/Network Interface Card
Spare Part Number Information
Mini PCI V. 90 modem card 121895-001
Mini PCI V. 90 modem/Network Interface Card 153207-001
Removing the Mini PCI Slot Cover
1. Prepare the computer for disassembly (Section 5.3).
2. Turn the computer bottom side up with the front facing forward.
3. Remove the two screws
the base enclosure (Figure 5-3).
4. Lift up the front edge of the mini PCI slot cover and swing the
cover back
Figure 5-3. Removing the Mini PCI Slot Cover
2
.
that secure the mini PCI slot cover to
1
5. Remove the mini PCI slot cover.
Reverse the removal procedure described above to replace the mini PCI
slot cover.
5-4 Removal and Replacement Procedures
Page 99

Installing a Modem or Modem/Network Interface Card
1. Remove the mini PCI slot cover.
2. Remove the two screws
to the system board (Figure 5-4).
3. Make sure the appropriate RJ11/RJ45 covers are removed from the
base enclosure.
4. Install the card into the mini PCI slot, making sure to seat the card
connector on the system board
that secure the modem or modem/NIC
1
.
2
Figure 5-4. Installing a Modem or Modem/Network Interface Card
Reverse the installation procedure described above to remove a modem
or modem/Network Interface Card.
Removal and Replacement Procedures 5-5
Page 100

5.6 Touch Button
Touch Button
Spare Part Number Information
Touch Button without TouchPad
(Armada E500 only)
Touch Button 3 with TouchPad 188645-001
Touch Button with TouchPad 135227-001
159530-001
Removing the Touch Button
1. Prepare the computer for disassembly (Section 5.3).
Position the computer with the front facing forward.
2.
3. Open the computer.
4. Use a flat blade screwdriver to pry the upper right corner of the
touch button away from the top cover
(Figure 5-5).
1
5. Lift the right side of the touch button away from the top cover
and swing the touch button up and to the left 3.
6. Disconnect the touch button cable from the system board
7. Remove the touch button.
Figure 5-5. Removing the Touch Button
4
.
2
5-6 Removal and Replacement Procedures
 Loading...