

Page 1
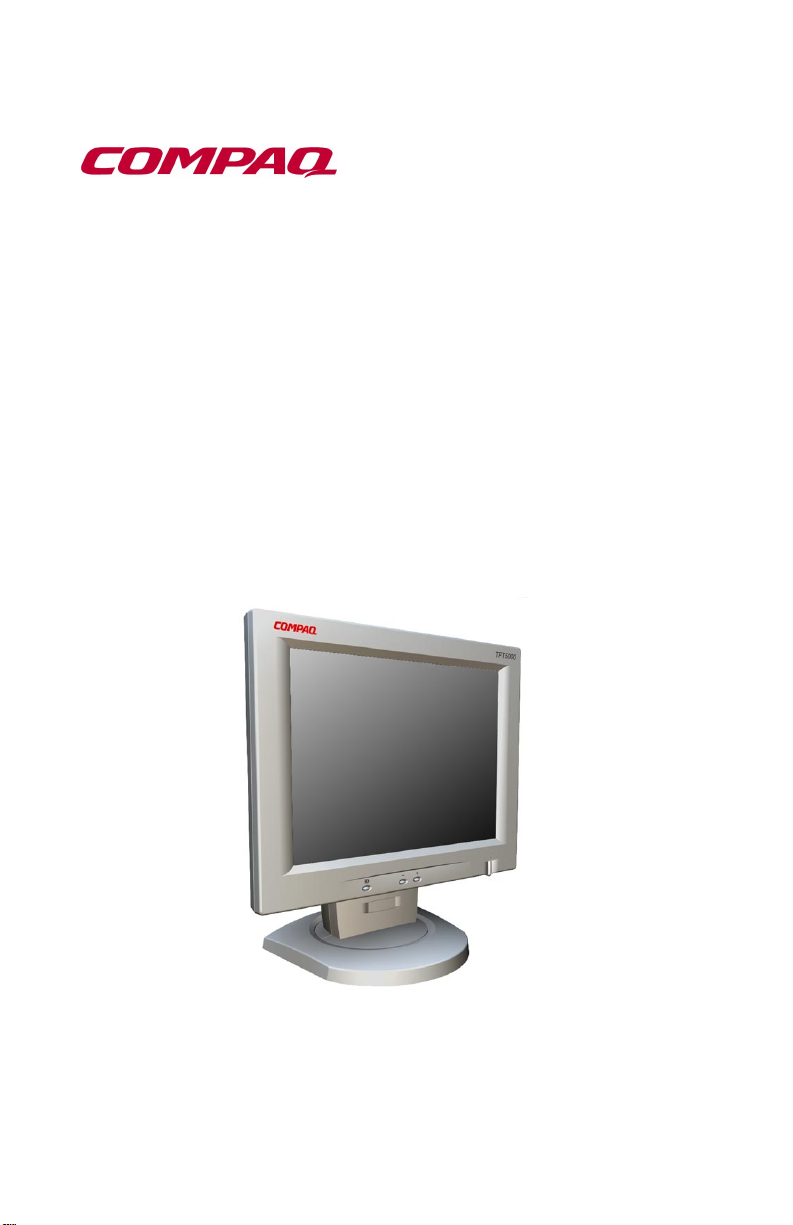
U
SER’S GUIDE
OMPAQ
C
TFT5000 F
LAT PANEL MONITOR
Page 2

Notice
The information in this guide is subject to change without notice.
COMPAQ COMPUTER CORPORATION SHALL NOT BE
LIABLE FOR TECHNICAL OR EDITORIAL ERRORS OR
OMISSIONS CONTAINED HEREIN; NOR FOR INCIDENTAL
OR CONSEQUENTIAL DAMAGES RESULTING FROM THE
FURNISHING, PERFORMANCE, OR USE OF THIS MATERIAL.
This guide contains information protected by copyright. No part of
this guide may be photocopied or reproduced in any form without
prior written consent from Compaq Computer Corporation.
1999 Compaq Computer Corporation.
All rights reserved. Printed in Taiwan.
Compaq and Deskpro are registered in the U. S. Patent and
Trademark Office.
Microsoft, MS-DOS, Windows, Windows NT, and other names of
Microsoft products referenced herein are trademarks or registered
trademarks of Microsoft Corporation.
NERGY STAR
E
Product names mentioned herein such as Pivot Software may be
trademarks and/or registered trademarks of their respective
companies.
The software described in this guide is furnished under a license
agreement or nondisclosure agreement. The software may be used or
copied only in accordance with the terms of the agreement.
is a U.S. registered mark.
User’s Guide
Compaq TFT5000 Flat Panel Monitor
Third Edition (March 1999)
Compaq Computer Corporation
Page 3

English
Product Features
The Compaq TFT5000 Flat Panel Monitor has an active matrix, thinfilm transistor (TFT), liquid crystal display (LCD). The monitor
features include:
15-inch (38.1-cm) viewable area display
1024 × 768 resolution, plus full-screen support for lower
resolutions
Wide viewing angle to allow viewing from a sitting or standing
position, or when moving side-to-side
Tilt, swivel, and height adjustment capabilities
Monitor panel rotates 90 degrees to display portrait mode
Pivot 90-degree rotation software included on CD-ROM
Removable base for flexible mounting solutions
Plugs into a standard VGA connector; does not require a special
graphics adapter card
Plug and Play capability if supported by your system
On-Screen Display (OSD) adjustments in six different
languages: English, Dutch, French, German, Italian, and Spanish
for ease of set-up and screen optimization
Programmable Sleep Timer
CD-ROM includes an information file (INF), Image Color
Matching file (ICM), the Compaq LCD Display Assistant setup
and configuration utility, the Compaq Display LiteSaver utility,
Pivot software, and product documentation
Model with additional protective panel available
Security lock slot
AssetControl
Energy Saver feature for Energy Star compliance
English 1-1
Page 4

Compliance with the following regulated specifications:
Swedish MPR II 1990
EPA E
European Union CE Directives
Swedish TCO 1995
NERGY STAR
Universal Driver Manager
This monitor may require a graphics driver (and/or .INF file) that is
compatible with your computer’s graphics adapter. The CD-ROM
included with this monitor contains an .INF file (see the section on
Information Files). Compaq has also created a Universal Driver
Manager (UDM) release that supports all graphics adapters found on
Compaq Deskpro and Compaq Workstation products. The UDM eases
graphics driver deployment across Compaq platforms ensuring crosscompatibility and backward-compatibility. The resulting solution
enables customers to manage and control ongoing software
maintenance costs. The UDM is available on the
Software CD
for Compaq Desktop, Portable, and Workstation
Compaq Support
Products and the Compaq World Wide Web site (www.compaq.com).
Information Files
This monitor includes a CD-ROM with two information files that
should be installed onto your computer—an .INF file and an .ICM file.
The .INF file defines monitor resources and provides specifications
used by Microsoft Windows 95 and Windows 98 to install support
software for certain hardware devices. The .INF file ensures monitor
compatibility and optimization with your computer’s graphics adapter.
The .ICM file provides color matching consistency from monitor
screen to printer and is activated from within the graphics programs
that have this feature. To install these files on your computer, follow
the instructions on the “Configuring Your Compaq LCD Monitor”
card located in the Program License Agreement packet along with the
CD-ROM. INF file updates are downloadable by clicking on:
www.compaq.com/products/monitors/index.html
1-2 English
Page 5
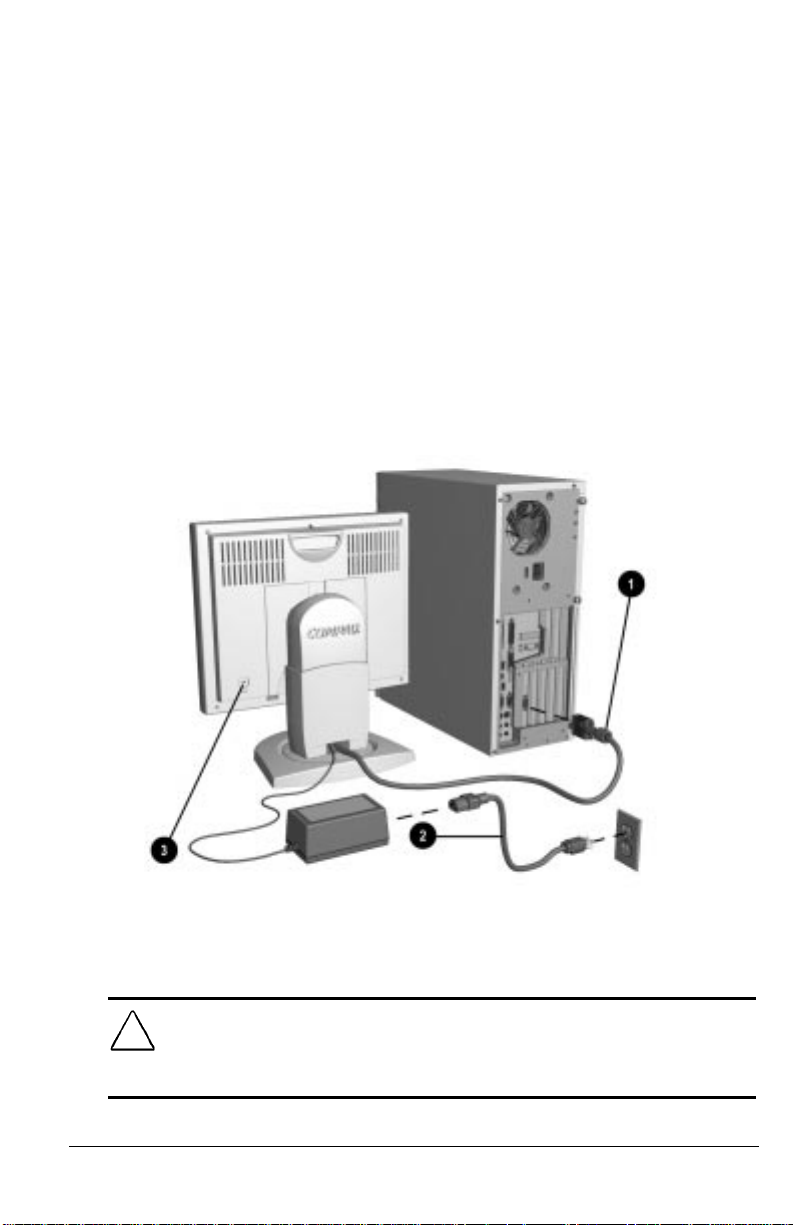
Setting Up the Monitor
To set up the monitor, ensure that the power is turned off to the
monitor, computer system, and other attached devices, then follow
these steps:
1. Place the monitor in a convenient, well-ventilated location near
your computer.
2. Connect the monitor signal cable 1 on the rear panel of the
monitor to the 15-pin connector on the rear panel of the
computer and tighten the screws.
Be sure the signal cable aligns with the 15-pin connector.
Do not force the cable onto the connector or you may
damage the signal cable.
3. Connect one end of the AC power cord 2 to the AC adapter and
the other end to an electrical outlet that is easily accessible and
close to the monitor.
CAUTION:
AC adapter supplied with the monitor. Failure to use this
AC adapter may result in damage to the monitor.
When connecting the monitor, be sure to use the
English 1-3
Page 6

To reduce the risk of electric shock or damage
WARNING:
!
to your equipment:
For security purposes, this monitor has been fitted with a
slot 3 for use with a security cable lock that can be
purchased separately at most computer stores.
After you turn on the monitor, install the Compaq LCD
Display Assistant utility included on the CD-ROM. Use
the on-screen instructions to adjust the picture quality of
your monitor. To install this utility onto your computer,
follow the instructions on the “Configuring Your Compaq
LCD Monitor” card located in the Program License
Agreement packet.
Do not disable the power cord grounding plug. The
grounding plug is an important safety feature.
Plug the power cord into a grounded (earthed)
electrical outlet that is easily accessible at all times.
Disconnect power from the monitor by unplugging
the power cord from the electrical outlet.
IMPORTANT:
mable sleep timer, the Compaq Display LiteSaver utility, or turn off
the monitor when it is not in use for a prolonged period of time. All
LCD monitors that display the same static image on the screen for a
prolonged period of time may exhibit screen image retention. Please
note that image retention is not a permanent condition and will fade
over a period of time. Image retention is a condition that may occur on
all LCD screens.
1-4 English
Always activate a screen saver program, the program-
Page 7

Adjusting the Monitor Height
To raise the monitor to the desired height:
Place one hand on the side of the monitor panel, press the
adjustment button located on the neck, and lift the monitor panel
to the correct height.
To lower the monitor to the desired height:
Position your hand to support the bottom of the monitor panel,
press the adjustment button located on the neck, and lower the
monitor panel.
CAUTION:
ALWAYS support the bottom of the monitor
panel with one hand when lowering the monitor panel.
English 1-5
Page 8
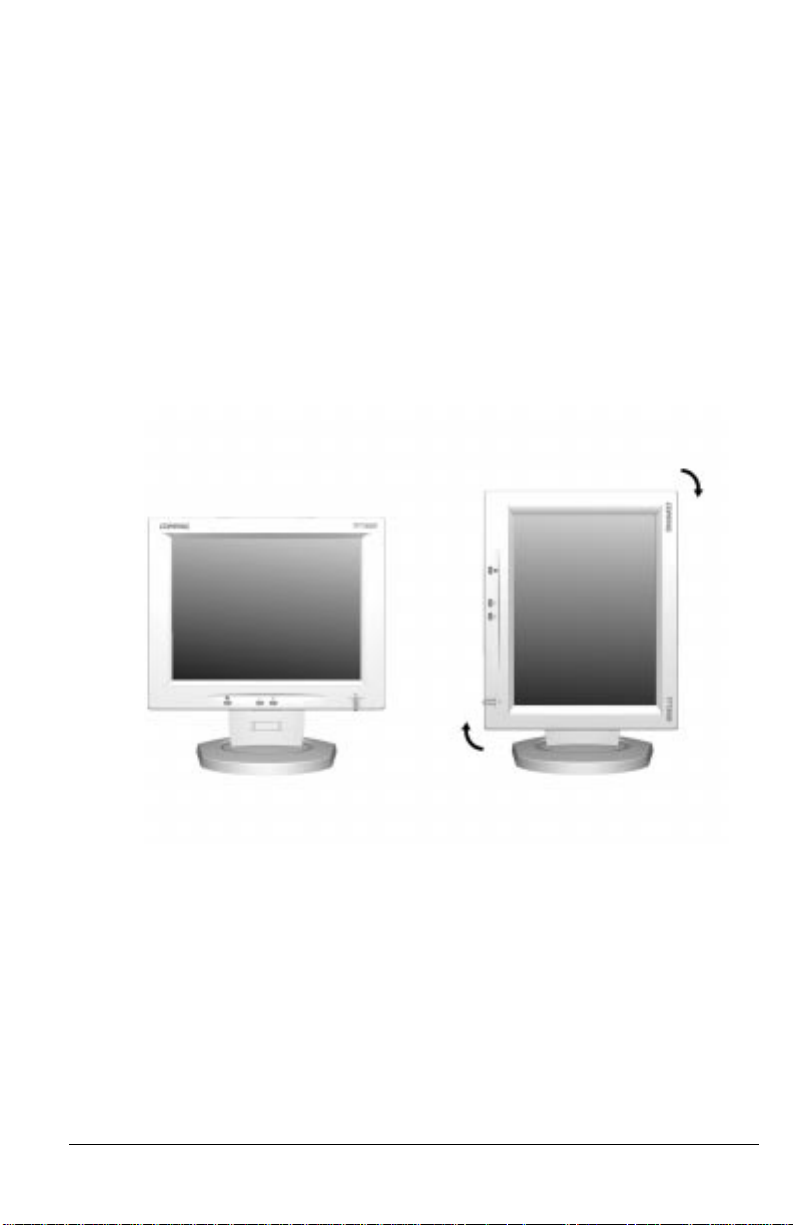
Rotating the Monitor Panel
The monitor panel can be rotated 90 degrees as shown below. This is
an added feature for use with software that displays portrait
dimensions on-screen instead of landscape dimensions. The Pivot
software package included on the Compaq CD-ROM should be
installed on the computer to accommodate matching screen rotation.
To rotate the monitor panel to portrait mode:
1. Raise the monitor panel to its highest height to avoid bumping the
panel on the desk.
2. Place your hand on the side of the monitor panel and turn the panel
clockwise.
To rotate the monitor panel back to landscape mode, rotate the monitor
panel counter-clockwise.
Installing the Pivot Software
To install the Pivot rotation software:
1. Insert the Compaq CD-ROM into the CD drive on your computer.
2. Using Microsoft Windows as your operating system, go to
and type x
StartRun
:\Pivot\Setup.exe
designating the CD-ROM drive) in the Open box and click
1-6 English
(where x is the letter
OK.
Page 9

After installing the Pivot rotation software on your computer, a
monitor icon will appear on the right side of the Microsoft Windows
Taskbar at the bottom of your screen.
To rotate the screen contents:
1. Click on the monitor icon appearing in the Windows Taskbar.
Click on
2.
To return the screen to its original dimensions, repeat this procedure.
The monitor icon also activates the monitor Display
Properties dialog box.
Rotate.
English 1-7
Page 10
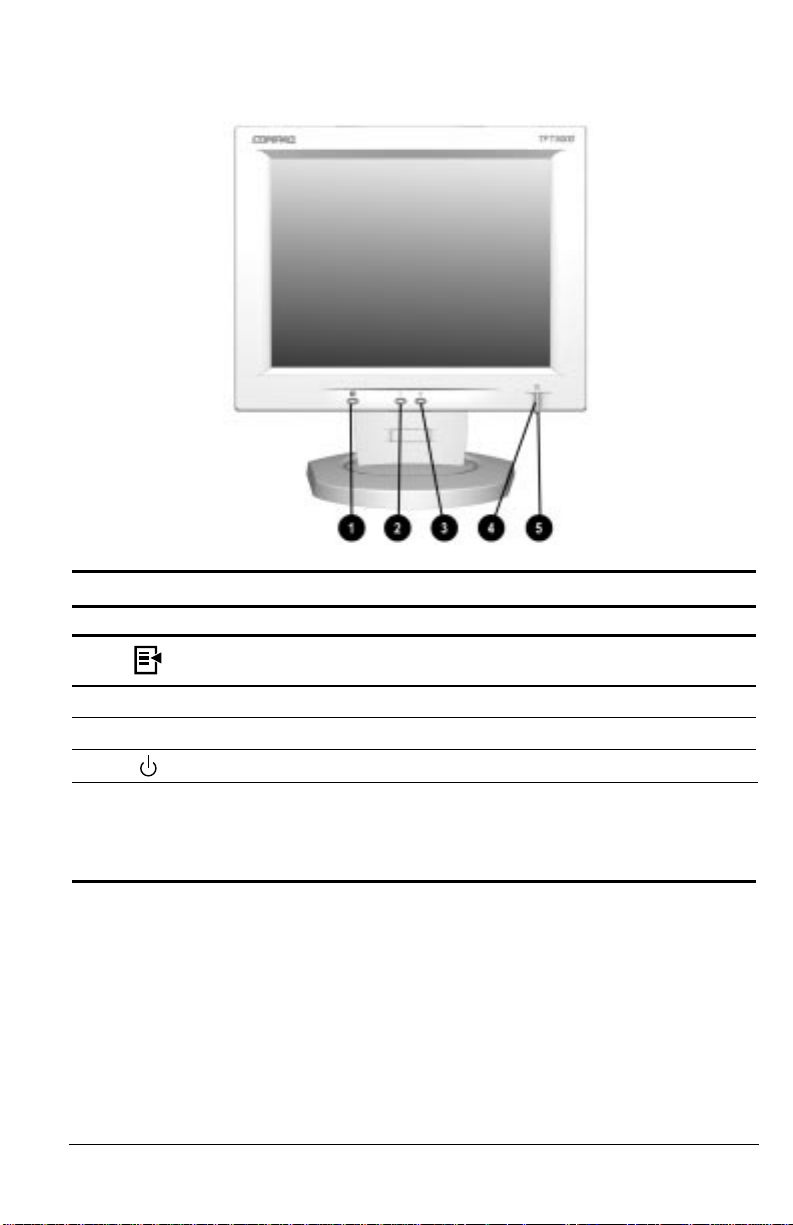
Operating the Monitor
Front Panel Controls
No./Icon Control Function
1
2
3
4
5
Menu button
Minus button Selects and adjusts the functions.
Plus button Selects and adjusts the functions.
Power switch Turns the monitor on and off.
Power LED 1. Green indicates monitor is turned on.
1. Launches first and second-level on-screen menus.
2. Exits menus and on-screen display.
2. Yellow indicates Suspend mode.
3. Amber indicates Sleep mode.
4. Blinking Amber indicates Sleep Timer*.
*Sleep Timer enables you to set a time for the monitor to
power on and power off at the same time every day. It
eliminates the need to turn off the monitor at the end of the
day and conserves energy. To set this mode, refer to the
Sleep Timer in the on-screen display.
1-8 English
Page 11

On-Screen Display Settings
The adjustments for screen settings are located in the on-screen
display (OSD) and can be viewed in one of six available languages.
The following menus show the functions at each level:
Main Menu
Menu Level 1 Menu Level 2 Menu Level 3
Brightness Adjustment scale
Contrast Adjustment scale
Auto Adjustment
Advanced Menu
Exit
Advanced Menu
Brightness Adjustment scale
Contrast Adjustment scale
Auto Adjustment
Position Horizontal Position
Vertical Position
Cancel
Save and Return
Digital Conversion Clock
Clock Phase
Clock Phase Fine
Cancel
Save and Return
Color 9300 K
6500 K
Custom Color
Cancel
Save and Return
Language Deutsch
English
Espanol
Francais
Italiano
Nederlands
Cancel
Save and Return
Adjustment scale
Adjustment scale
Adjustment scale
Adjustment scale
Adjustment scale
Adjustment scale
Adjustment scale
Color adjustment scale
English 1-9
Page 12

Advanced Menu (Continued)
Management Full Screen
Power Saver
Mode Display
Serial No.
Sleep Timer
Basic Menu
Cancel
Save and Return
Factory Reset Cancel Reset
Exit
How to Adjust Settings
Yes No
Yes No
Yes No
Displays Serial No.
Set Time and On/Off Times
To launch the on-screen display Main Menu:
1. Press the Menu button 1 on the monitor front panel. The Main
Menu will display on the monitor screen.
2. To select an item from the Main Menu, scroll down by pressing
the Minus (-) button 2 located on the monitor front panel. To
reverse or back up, press the Plus (+) button 3.
3. Highlight your choice and press the Menu button 1 again.
Monitor with On-Screen Display
1-10 English
Page 13

4. Adjust the second-level menu displays using the same
procedures as the first level.
5. To save the adjustments and exit from the second-level menu,
select
To launch the Advanced Main Menu:
1. Select the Advanced Main Menu from the Main Menu or press
the Menu button twice and repeat procedures 2 and 3 for the
previous paragraphs.
For example, to select the Position menu, press the Minus
button 2 until Position is highlighted, then press the Menu
button 1 to display the submenu for Position.
Selecting the Advanced Menu from the Basic Menu
resets the on-screen display to default to the Advanced
Menu each time the monitor is powered on. The
Advanced Menu will remain the default menu until the
Basic Menu option is selected from the Advanced Menu
or Factory Reset is enabled.
2. A second-level menu displays with expanded menu items.
Again, to make a selection, press the Minus () button 2 to
scroll down or press the Plus () button 3 to reverse or back up.
Save and Return
, then select
Exit.
3. Highlight your choice, then select
changes made, select
The second-level menu for Brightness and Contrast
displays an adjustment screen. Use the Minus button to
decrease and the Plus button to increase the screen
brightness and contrast.
4. Access the third level menu by selecting a function and pressing
the Menu button. Adjust the third level menu displays using the
same procedures as the second level.
5. To exit from the on-screen menu, select
Menu. If the display is a second or third-level menu, select
and Return
Menu.
The on-screen display is easy to use, just follow the instructions on the
screen.
or
Cancel,
Cancel
then select
Save and Return.
instead of
from the Advanced
Exit
Save and Return.
from the Advanced
Exit
To void any
Save
English 1-11
Page 14

Special OSD Messages
Special OSD messages will appear on the monitor screen when
identifying the following monitor conditions:
Input Signal Out of Range
—Indicates the monitor is unable to
access the appropriate input signal.
Going to Sleep
—Indicates the screen display is entering a sleep
mode.
Check Video Cable
—Indicates the video cable may not be
plugged into the computer or the computer may not be turned on.
Sleep Timer Mode
The Sleep Timer mode is an energy-saving feature that enables you to
set a time for the monitor to power on and off at the same time every
day. This also extends the life of the backlight bulbs in the monitor.
The Sleep Timer has five settings:
Set Current Time
Set Sleep Time
Set On Time
Timer: On/Off
Sleep Now
To set the timer:
1. Press the Menu button on the monitor front panel to display the
Advanced Menu.
2. Scroll down and highlight
Management.
3. Press the Menu button to select
4. Scroll down and highlight and select
.
Time
You must set the current local time before you reset the
time for
1-12 English
Sleep Time
or
On Time.
Management.
Sleep Timer Set Current
Page 15

5. Press the Menu button once to enter the adjustment mode for
hours.
6. Press the Minus or Plus buttons to adjust the hour.
7. Press the Menu button again to enter the time for minutes.
8. Press the Minus or Plus buttons to adjust the minutes.
9. Press the Menu button to lock in the time chosen.
10. After setting the current time, the highlight automatically skips
to
Set Sleep Time
“hours.” Repeat steps 6 through 9 to set
Sleep
Time.
If you do not want to set
twice, then select
Save and Return
Sleep Time,
press the Menu button
to exit the menu.
11. After setting Sleep Time, the highlight automatically skips to
Set On Time
“hours.” Repeat steps 6 through 9 to set
On Time
12. Set the Timer mode to On to activate the Sleep Timer settings.
13. When you are finished, select
The fifth selection
Sleep Now
turns the monitor backlights off
Save and Return
immediately and stays in sleep mode until the next
to exit the menu.
On Time
activates
or a monitor button is pressed.
.
English 1-13
Page 16

Adjusting Screen Quality
Allow the monitor to warm up for 20 minutes before performing the
following procedures.
The Auto Adjustment feature in the OSD automatically fine-tunes the
image quality each time a new video mode is utilized. If additional
improvement is desired, select "Auto Adjust" in the Main Menu.
For more precise adjustments, use the Compaq LCD Display Assistant
utility included on the CD-ROM. This utility graphically illustrates
how to adjust the Clock, Clock Phase, and Clock Phase Fine controls
explained in the
The Compaq LCD Display Assistant utility is used to adjust the
screen quality of your monitor. This utility provides on-screen
instructions. To install this utility onto your computer, follow the
instructions on the “Configuring Your Compaq LCD Monitor”
card located in the Program License Agreement packet.
Optimizing Digital Conversion
This monitor contains advanced circuitry that allows the flat panel
screen to function like a standard monitor. Three controls in the onscreen display can be adjusted to improve image performance: Clock,
Clock Phase, and Clock Phase Fine.
Optimizing Digital Conversion
section below.
IMPORTANT:
Phase settings are dependent on the main Clock setting.
Clock—Increase/decrease the value to minimize any vertical
bars or stripes visible on the screen background.
Clock Phase—Increase/decrease the value to minimize video
distortion or video jitter.
Clock Phase Fine—Increase/decrease the value to fine-tune or
focus the display.
The Clock must first be set correctly since the Clock
When adjusting the Clock and Clock Phase values, if the
monitor images become distorted, continue adjusting the
values until the distortion disappears. To restore the factory
settings, select
screen display.
Reset
from the
Factory Reset
menu in the on-
1-14 English
Page 17

Display Resolutions
The display resolutions listed below are the most commonly used
modes and are set as factory defaults. This monitor automatically
recognizes these preset modes and they will appear properly sized and
centered on the screen.
Display Resolutions
Preset Modes
1. Industry Standard 640 × 350 at 31.5 kHz/70 Hz
2. Industry Standard 640 × 480 at 31.5 kHz/60 Hz
3. VESA 640 × 480 at 37.5 kHz/75 Hz
4. VESA 640 × 480 at 43.3 kHz/85 Hz
5. Industry Standard 720 × 400 at 31.5 kHz/70 Hz
6. VESA 800 × 600 at 37.9 kHz/60 Hz
7. VESA 800 × 600 at 46.9 kHz/75 Hz
8. VESA 800 × 600 at 53.7 kHz/85 Hz
9. Macintosh-compatible 832 × 624 at 49.7 kHz/75 Hz
10. VESA 1024 × 768 at 48.4 kHz/60 Hz
11. VESA 1024 × 768 at 56.5 kHz/70 Hz
12. VESA 1024 × 768 at 60 kHz/75 Hz
Resolutions
User Modes
The video controller signal may occasionally call for a mode that is
not preset if:
You are not using a Compaq standard graphics adapter.
You are not using a preset mode.
If this occurs, you may need to readjust the parameters of the monitor
screen by using the on-screen display. User changes can be made to
any or all of these modes and saved in memory. The monitor
automatically stores the new setting, then recognizes the new mode
just as it does a preset mode. In addition to the 12 factory preset
modes, there are four user modes that can be entered and stored.
English 1-15
Page 18

Energy Saver Feature
The energy saver feature has four different modes of operation:
Full power
Suspend
Sleep
Programmable Sleep
By selecting settings in the computer's Energy Saver utility, you are
able to determine the length of the inactivity period before the monitor
goes into sleep or programmable sleep mode.
The following table describes the monitor energy saver levels
available during the different modes of operation.
Energy Saver Levels
Mode Power Usage Description
Full Power Less than
45 watts
Suspend Less than
8 watts
Sleep Less than
8 watts
Programmable
Sleep
Less than
8 watts
ON = Normal operation
Power LED is green.
Monitor screen is blanked. Backlights are
turned off. Power LED turns yellow. There
is a brief warm-up period before returning
to full power mode.
Monitor screen is blanked. Backlights are
turned off. Power LED turns amber. There
is a brief warm-up period before returning
to full power mode.
Monitor screen is blanked. Backlights are
turned off. Power LED blinks amber. There
is a brief warm-up period before returning
to full power mode.
Refer to your computer manual for instructions on setting energy saver
features (sometimes referred to as power management features).
The energy saver features for monitors only work when
connected to computers that have energy saver features.
1-16 English
Page 19

Care and Maintenance
This section explains how to care for and maintain your Compaq
monitor during normal everyday use.
Protecting the Monitor
To protect your monitor from overheating and other types of damage,
follow these suggestions:
Use only a power source and connection appropriate for this
monitor, as indicated on the marking label/back plate.
If an extension cord or power strip is used, make sure that the
cord or strip is rated for the product and that the total ampere
ratings of all products plugged into the extension cord or power
strip do not exceed 80% of the extension cord or strip ampere
ratings limit.
Do not overload an electrical outlet, power strip, or convenience
receptacle. The overall system load must not exceed 80% of the
branch circuit rating. If power strips are used, the load should not
exceed 80% of the power strip input rating.
Install the monitor near an outlet that you can easily reach.
Disconnect the product by grasping the plug firmly and pulling it
from the outlet. Never disconnect it by pulling the cord.
Unplug the monitor from the wall outlet before cleaning. Do not
use liquid cleaners or aerosol cleaners.
Slots and openings in the cabinet are provided for ventilation.
These openings must not be blocked or covered. Never push
objects of any kind into cabinet slots or other openings.
Do not place plants on top of the monitor. Water or dirt from the
plant may fall into the vents.
Do not drop the monitor or place it on an unstable surface.
Do not allow anything to rest on the power cord. Do not walk on
the cord.
English 1-17
Page 20

Keep the monitor in a well-ventilated area, away from excessive
light, heat, and moisture.
Do not open the monitor cabinet or attempt to service this
product yourself. Adjust only those controls that are covered by
the operating instructions. If the monitor is not operating
properly or has been dropped or damaged, contact your Compaq
authorized dealer, reseller, or service provider.
Cleaning the Monitor
To clean the monitor, follow these steps:
1. Turn off the monitor and the computer.
2. Dust the monitor by wiping the screen and the cabinet with
a soft, clean cloth.
If the screen requires additional cleaning, use any antistatic CRT
screen cleaner.
CAUTION:
Do not use benzene, thinner, ammonia, or any
volatile substance to clean the monitor screen or cabinet.
These chemicals may damage the monitor. Never use water
to clean an LCD screen.
Shipping the Monitor
Keep the original packing box in a storage area. You may need it later
if you move or ship your monitor.
1-18 English
Page 21

appendix
Agency Regulatory Notices
Federal Communications Commission Notice
This equipment has been tested and found to comply with the
limits for a Class B digital device, pursuant to Part 15 of the FCC
Rules. These limits are designed to provide reasonable protection
against harmful interference in a residential installation. This
equipment generates, uses, and can radiate radio frequency energy
and, if not installed and used in accordance with the instructions,
may cause harmful interference to radio communications.
However, there is no guarantee that interference will not occur in a
particular installation. If this equipment does cause harmful
interference to radio or television reception, which can be
determined by turning the equipment off and on, the user is
encouraged to try to correct the interference by one or more of the
following measures:
Reorient or relocate the receiving antenna.
Increase the separation between the equipment and the
receiver.
Connect the equipment into an outlet on a circuit different
from the circuit that the receiver is connected.
Consult the dealer or an experienced radio or television
technician for help.
Modifications
The FCC requires the user to be notified that if any changes or
modifications are made to this device, not expressly approved by
Compaq Computer Corporation, this may void the user's authority
to operate the equipment.
Cables
Connections to this device must be made with shielded cables with
metallic RFI/EMI connector hoods to maintain compliance with
FCC Rules and Regulations.
Specifications 1-19
Page 22

Declaration of Conformity for products marked
with the FCC logo - United States only
This device complies with Part 15 of the FCC Rules. Operation is
subject to the following two conditions: (1) this device may not
cause harmful interference, and (2) this device must accept any
interference received, including interference that may cause
undesired operation.
For questions regarding your product, contact:
Compaq Computer Corporation
P.O. Box 692000, Mail Stop 530113
Houston, Texas 77269-2000
Or, call 1-800-652-6672 (1-800-OK COMPAQ)
For questions regarding this FCC declaration, contact:
Compaq Computer Corporation
P.O. Box 692000, Mail Stop 510101
Houston, Texas 77269-2000
Or, call (281) 514-3333
To identify this product, refer to the Part, Series, or Model number
found on the product.
Canadian Notice
This Class B digital apparatus meets all requirements of the
Canadian Interference-Causing Equipment Regulations.
Avis Canadien
Cet appareil numérique de la classe B respecte toutes les exigences
du Règlement sur le matériel brouilleur du Canada.
German Ergonomics Notice
Compaq Computers, when tested with the Compaq PE1200 Series
monitors, were evaluated and found compliant to the requirements
of ZH 1/618 (German Safety Regulations for Display Work Places
in the Office Sector).
1-20 Specifications
Page 23

NERGY STAR
EPA E
Monitors that are marked with the E
Compliance
NERGY STAR Logo meet the
requirements of the EPA ENERGY STAR program. As an ENERGY
STAR Partner, Compaq Computer Corporation has determined that
this product meets the ENERGY STAR guidelines for energy
efficiency. Specific details on using the Energy Saving features
can be found in the energy saver or power management section of
the computer manual.
European Notice
Products with the CE Marking comply with both the EMC
Directive (89/336/EEC) and the Low Voltage Directive
(73/23/EEC) issued by the Commission of the European
Community.
Compliance with these directives implies conformity to the
following European norms:
EN55022 (CISPR 22) - Radio Frequency Interference
EN50082-1 (IEC801-2, IEC801-3, IEC801-4) -
Electromagnetic Immunity
EN60950 (IEC950) - Product Safety
Japanese Notice
Specifications 1-21
Page 24

Specifications
Compaq TFT5000 Flat Panel Monitor
Display 15-in 38.1 cm
Type Flat panel, Active matrix-TFT LCD
Viewable Image Size 15-in diagonal 38.1 cm
Face Treatment 3H hardness coating with antiglare treatment
Maximum Weight
(Unpacked) 20 lb 9.06 kg
Maximum Dimensions (Landscape Mode)
Height 17.7 in 45.0 cm
Depth 9.4 in 23.8 cm
Width 15.4 in 39.1 cm
Maximum Graphics
Resolution 1024 × 768 at 75 Hz Refresh Rate
Text Mode 720 × 400
Pixel Pitch 0.28 mm
Horizontal Frequency 32 to 60 kHz
Vertical Frequency 57 to 85 Hz
Environmental Requirements
Temperature (Independent of Altitude)
Operating Temperature
Storage Temperature
Humidity
(Noncondensing)
Operating
Nonoperating
Power Source 90 - 132/195 - 264 VAC, 50-60 Hz
Power Consumption < 45 watts
Input Terminal 15-pin D-type connectors with cable included
50 to 104F
-22 to 140F
20 to 80%
5 to 95%
10 to 40C
-30 to 60C
Color Display Values
CIE* Chromaticity Coordinates
x (+/- 0.030) y (+/- 0.030)
Red
Green
Blue
White Point
Gamma: 2.1
*Commission International d’Eclairage, 1931 Standard.
1-22 Specifications
0.61 0.34
0.29 0.62
0.14 0.13
0.31 0.34
Page 25

Power Cord Set Requirements
The monitor power supply is provided with Automatic Line
Switching (ALS). This feature allows the monitor to operate on
input voltages between 90-130V or 195-265V.
The power cord set (flexible cord or wall plug) received with the
monitor meets the requirements for use in the country where you
purchased the equipment.
Power cord sets must meet the requirements of the country where
you use the monitor. For more information on power cord set
requirements, contact your Compaq authorized dealer, reseller or
service provider.
General Requirements
The requirements listed below are applicable to all countries:
1. The length of the power cord set must be at least 5.00 feet
(1.5 m) and a maximum of 9.75 feet (3.0 m).
2. All power cord sets must be approved by an acceptable
accredited agency responsible for evaluation in the country
where the power cord set will be used.
3. The power cord set must have a minimum current capacity
of 10A and a nominal voltage rating of 125 VAC or 5 Amps
at 250 volts AC, as required by each country’s power
system.
4. The appliance coupler must meet the mechanical
configuration of an EN 60 320/IEC 320 Standard Sheet C13
connector, for mating with appliance inlet on the rear of the
unit.
Specifications 1-23
Page 26

Country-Specific Requirements
Power Cord Set Requirements: By Country
Country Accredited Agency
Australia
Austria OVE 1
Belgium CEBC 1
Canada CSA 2
China CCEE 1
Denmark DEMKO 1
Finland FIMKO 1
France UTE 1
Germany VDE 1
Italy IMQ 1
Japan MITI 3
The Netherlands KEMA 1
Norway NEMKO 1
Singapore PSB or PUB 1
Sweden SEMKO 1
Switzerland SEV 1
United Kingdom BSI 1
United States UL 2
EANSW 1
Applicable Note
Numbers
Notes:
1. The flexible cord must be <HAR> Type HO5VV-F, 3conductor, 1.0 mm2 conductor size. Power cord set fittings
(appliance coupler and wall plug) must bear the certification
mark of the agency responsible for evaluation in the country
where it will be used.
2. The flexible cord must be Type SJT or equivalent, No. 18
AWG, 3-conductor. The wall plug must be a two-pole
grounding type with a NEMA 5-15P (15A, 125V) or NEMA
6-15P (15A 250V) configuration.
3. The appliance coupler, flexible cord, and wall plug must bear
a "T" mark and registration number in accordance with the
Japanese Dentori Law. The flexible cord must be Type VCT
2
or VCTF, 3-conductor, 0.75mm
conductor size. The wall
plug must be a two-pole grounding type with a Japanese
Industrial Standard C8303 (15A, 125V) configuration.
1-24 Specifications
 Loading...