

Page 1

CE net.book Page i Tuesday, August 20, 2002 3:51 PM
b
Quick Reference and
Administrator’s Guide
For Microsoft Windows CE.NET-based
Thin Clients
Document Part Number: 303534-001
August 2002
This guide explains how to use and administer Microsoft Windows
CE.NET-based thin clients. This document covers both user- and
administrator-related functions.
Page 2

CE net.book Page ii Tuesday, August 20, 2002 3:51 PM
© 2002 Compaq Information Technologies Group, L.P.
Compaq, the Compaq logo, and Evo are trademarks of Compaq Information
Technologies Group, L.P. in the U.S. and/or other countries.
Microsoft, MS-DOS, Windows, and Windows CE.NET are trademarks of
Microsoft Corporation in the U.S. and/or other countries.
All other product names mentioned herein may be trademarks of their respective
companies.
Compaq shall not be liable for technical or editorial errors or omissions
contained herein. The information is provided “as is” without warranty of any
kind and is subject to change without notice. The warranties for Compaq
products are set forth in the express limited warranty statements accompanying
such products. Nothing herein should be construed as constituting an additional
warranty.
WARNING: Text set off in this manner indicates that failure to follow
Å
directions could result in bodily harm or loss of life.
Ä
CAUTION: Text set off in this manner indicates that failure to follow
directions could result in damage to equipment or loss of information.
Quick Reference and Administrator’s Guide
First Edition (July 2002)
Document Part Number: 303534-001
Page 3

CE net.book Page iii Tuesday, August 20, 2002 3:51 PM
1 Introduction
2 User’s Instructions
General Terminal Information. . . . . . . . . . . . . . . . . . . . . . . . . . . . . . . . . . . . . . . . . . . . 2–1
Terminal Login . . . . . . . . . . . . . . . . . . . . . . . . . . . . . . . . . . . . . . . . . . . . . . . . . . . . 2–2
Terminal Logout and Shutdown . . . . . . . . . . . . . . . . . . . . . . . . . . . . . . . . . . . . . . . 2–3
Connection Manager Window. . . . . . . . . . . . . . . . . . . . . . . . . . . . . . . . . . . . . . . . . . . . 2–4
Field Definitions . . . . . . . . . . . . . . . . . . . . . . . . . . . . . . . . . . . . . . . . . . . . . . . . . . . 2–5
Connections List Box . . . . . . . . . . . . . . . . . . . . . . . . . . . . . . . . . . . . . . . . . . . . 2–5
Icon. . . . . . . . . . . . . . . . . . . . . . . . . . . . . . . . . . . . . . . . . . . . . . . . . . . . . . . . . . 2–5
Name . . . . . . . . . . . . . . . . . . . . . . . . . . . . . . . . . . . . . . . . . . . . . . . . . . . . . . . . 2–5
Type . . . . . . . . . . . . . . . . . . . . . . . . . . . . . . . . . . . . . . . . . . . . . . . . . . . . . . . . . 2–5
Status . . . . . . . . . . . . . . . . . . . . . . . . . . . . . . . . . . . . . . . . . . . . . . . . . . . . . . . . 2–5
Startup . . . . . . . . . . . . . . . . . . . . . . . . . . . . . . . . . . . . . . . . . . . . . . . . . . . . . . . 2–6
Connection Button . . . . . . . . . . . . . . . . . . . . . . . . . . . . . . . . . . . . . . . . . . . . . . 2–6
End Button . . . . . . . . . . . . . . . . . . . . . . . . . . . . . . . . . . . . . . . . . . . . . . . . . . . . 2–6
Add, Edit, Delete, and Startup . . . . . . . . . . . . . . . . . . . . . . . . . . . . . . . . . . . . . 2–6
Control Panel Button . . . . . . . . . . . . . . . . . . . . . . . . . . . . . . . . . . . . . . . . . . . . 2–6
Shut Down Button . . . . . . . . . . . . . . . . . . . . . . . . . . . . . . . . . . . . . . . . . . . . . . 2–7
Control Panel Window . . . . . . . . . . . . . . . . . . . . . . . . . . . . . . . . . . . . . . . . . . . . . . . . . 2–8
Contents
3 Administrator’s Instructions
Server Environment. . . . . . . . . . . . . . . . . . . . . . . . . . . . . . . . . . . . . . . . . . . . . . . . . . . . 3–1
Enterprise Intranet Access . . . . . . . . . . . . . . . . . . . . . . . . . . . . . . . . . . . . . . . . . . . 3–1
Ethernet Direct Access . . . . . . . . . . . . . . . . . . . . . . . . . . . . . . . . . . . . . . . . . . . 3–1
Dial-up Access . . . . . . . . . . . . . . . . . . . . . . . . . . . . . . . . . . . . . . . . . . . . . . . . . 3–2
PPTP VPN Access . . . . . . . . . . . . . . . . . . . . . . . . . . . . . . . . . . . . . . . . . . . . . . 3–2
Quick Reference and Adminstrator’s Guide iii
Page 4

CE net.book Page iv Tuesday, August 20, 2002 3:51 PM
Contents
Network Services . . . . . . . . . . . . . . . . . . . . . . . . . . . . . . . . . . . . . . . . . . . . . . . . . . 3–3
DHCP . . . . . . . . . . . . . . . . . . . . . . . . . . . . . . . . . . . . . . . . . . . . . . . . . . . . . . . . 3–3
FTP . . . . . . . . . . . . . . . . . . . . . . . . . . . . . . . . . . . . . . . . . . . . . . . . . . . . . . . . . . 3–3
DNS . . . . . . . . . . . . . . . . . . . . . . . . . . . . . . . . . . . . . . . . . . . . . . . . . . . . . . . . . 3–4
Line Printer Daemon (LPD) Setup. . . . . . . . . . . . . . . . . . . . . . . . . . . . . . . . . . 3–4
Session Services . . . . . . . . . . . . . . . . . . . . . . . . . . . . . . . . . . . . . . . . . . . . . . . . . . . 3–4
Independent Computing Architecture (ICA) Session Services . . . . . . . . . . . . 3–4
Remote Desktop Protocol (RDP) Session Services . . . . . . . . . . . . . . . . . . . . . 3–6
Initial Terminal Setup . . . . . . . . . . . . . . . . . . . . . . . . . . . . . . . . . . . . . . . . . . . . . . . . . . 3–8
Terminal Reset and Setup Wizard . . . . . . . . . . . . . . . . . . . . . . . . . . . . . . . . . . . . . 3–8
Local Setup . . . . . . . . . . . . . . . . . . . . . . . . . . . . . . . . . . . . . . . . . . . . . . . . . . . . . . . 3–8
Remote Administration and Software Upgrades . . . . . . . . . . . . . . . . . . . . . . . . . . 3–9
Control Panel Window . . . . . . . . . . . . . . . . . . . . . . . . . . . . . . . . . . . . . . . . . . . . . . . . 3–10
Add-on . . . . . . . . . . . . . . . . . . . . . . . . . . . . . . . . . . . . . . . . . . . . . . . . . . . . . . . . . 3–11
Add/Remove Tab . . . . . . . . . . . . . . . . . . . . . . . . . . . . . . . . . . . . . . . . . . . . . . 3–12
Flash Memory Tab . . . . . . . . . . . . . . . . . . . . . . . . . . . . . . . . . . . . . . . . . . . . . 3–12
Date/Time . . . . . . . . . . . . . . . . . . . . . . . . . . . . . . . . . . . . . . . . . . . . . . . . . . . . . . . 3–13
DHCP Options . . . . . . . . . . . . . . . . . . . . . . . . . . . . . . . . . . . . . . . . . . . . . . . . . . . 3–14
Display Properties. . . . . . . . . . . . . . . . . . . . . . . . . . . . . . . . . . . . . . . . . . . . . . . . . 3–15
Desktop Area and Refresh Frequency . . . . . . . . . . . . . . . . . . . . . . . . . . . . . . 3–16
Enable Energy Savers. . . . . . . . . . . . . . . . . . . . . . . . . . . . . . . . . . . . . . . . . . . 3–17
ELO Touch . . . . . . . . . . . . . . . . . . . . . . . . . . . . . . . . . . . . . . . . . . . . . . . . . . . . . . 3–18
ICA . . . . . . . . . . . . . . . . . . . . . . . . . . . . . . . . . . . . . . . . . . . . . . . . . . . . . . . . . . . . 3–18
Hotkeys Tab . . . . . . . . . . . . . . . . . . . . . . . . . . . . . . . . . . . . . . . . . . . . . . . . . . 3–19
Preferences Tab . . . . . . . . . . . . . . . . . . . . . . . . . . . . . . . . . . . . . . . . . . . . . . . 3–20
Server Location Tab . . . . . . . . . . . . . . . . . . . . . . . . . . . . . . . . . . . . . . . . . . . . 3–22
Firewall Settings Tab . . . . . . . . . . . . . . . . . . . . . . . . . . . . . . . . . . . . . . . . . . . 3–24
PNLite Tab . . . . . . . . . . . . . . . . . . . . . . . . . . . . . . . . . . . . . . . . . . . . . . . . . . . 3–25
Jetcet Print Pro . . . . . . . . . . . . . . . . . . . . . . . . . . . . . . . . . . . . . . . . . . . . . . . . . . . 3–26
Field Definitions. . . . . . . . . . . . . . . . . . . . . . . . . . . . . . . . . . . . . . . . . . . . . . . 3–26
Keyboard. . . . . . . . . . . . . . . . . . . . . . . . . . . . . . . . . . . . . . . . . . . . . . . . . . . . . . . . 3–28
Field Definitions. . . . . . . . . . . . . . . . . . . . . . . . . . . . . . . . . . . . . . . . . . . . . . . 3–28
LPD. . . . . . . . . . . . . . . . . . . . . . . . . . . . . . . . . . . . . . . . . . . . . . . . . . . . . . . . . . . . 3–29
How to Set Up the Terminal to Provide LPD Print Services . . . . . . . . . . . . . 3–29
How to Set Up the Application Server for Terminal LPD Printing . . . . . . . . 3–30
Modems . . . . . . . . . . . . . . . . . . . . . . . . . . . . . . . . . . . . . . . . . . . . . . . . . . . . . . . . 3–32
ISDN Settings. . . . . . . . . . . . . . . . . . . . . . . . . . . . . . . . . . . . . . . . . . . . . . . . . 3–33
iv Quick Reference and Adminstrator’s Guide
Page 5

CE net.book Page v Tuesday, August 20, 2002 3:51 PM
Mouse . . . . . . . . . . . . . . . . . . . . . . . . . . . . . . . . . . . . . . . . . . . . . . . . . . . . . . . . . . 3–34
Field Definitions. . . . . . . . . . . . . . . . . . . . . . . . . . . . . . . . . . . . . . . . . . . . . . . 3–34
Network . . . . . . . . . . . . . . . . . . . . . . . . . . . . . . . . . . . . . . . . . . . . . . . . . . . . . . . . 3–36
Changing Adapter Configurations . . . . . . . . . . . . . . . . . . . . . . . . . . . . . . . . . 3–37
Port Lock. . . . . . . . . . . . . . . . . . . . . . . . . . . . . . . . . . . . . . . . . . . . . . . . . . . . . . . . 3–38
RDP Printers . . . . . . . . . . . . . . . . . . . . . . . . . . . . . . . . . . . . . . . . . . . . . . . . . . . . . 3–39
Adding a Printer . . . . . . . . . . . . . . . . . . . . . . . . . . . . . . . . . . . . . . . . . . . . . . . 3–39
Editing the Configuration of an Existing Printer . . . . . . . . . . . . . . . . . . . . . . 3–46
Security . . . . . . . . . . . . . . . . . . . . . . . . . . . . . . . . . . . . . . . . . . . . . . . . . . . . . . . . . 3–47
Field Definitions. . . . . . . . . . . . . . . . . . . . . . . . . . . . . . . . . . . . . . . . . . . . . . . 3–47
Adding a User Account . . . . . . . . . . . . . . . . . . . . . . . . . . . . . . . . . . . . . . . . . 3–51
SNMP . . . . . . . . . . . . . . . . . . . . . . . . . . . . . . . . . . . . . . . . . . . . . . . . . . . . . . . . . . 3–54
Agent Dialog Tab . . . . . . . . . . . . . . . . . . . . . . . . . . . . . . . . . . . . . . . . . . . . . . 3–54
Security Dialog Tab . . . . . . . . . . . . . . . . . . . . . . . . . . . . . . . . . . . . . . . . . . . . 3–56
SNTP Client . . . . . . . . . . . . . . . . . . . . . . . . . . . . . . . . . . . . . . . . . . . . . . . . . . . . . 3–58
System. . . . . . . . . . . . . . . . . . . . . . . . . . . . . . . . . . . . . . . . . . . . . . . . . . . . . . . . . . 3–59
General Tab . . . . . . . . . . . . . . . . . . . . . . . . . . . . . . . . . . . . . . . . . . . . . . . . . . 3–59
Systems Info Tab . . . . . . . . . . . . . . . . . . . . . . . . . . . . . . . . . . . . . . . . . . . . . . 3–60
Touchscreen . . . . . . . . . . . . . . . . . . . . . . . . . . . . . . . . . . . . . . . . . . . . . . . . . . . . . 3–61
Calibrate Tab . . . . . . . . . . . . . . . . . . . . . . . . . . . . . . . . . . . . . . . . . . . . . . . . . 3–61
Touch Settings Tab. . . . . . . . . . . . . . . . . . . . . . . . . . . . . . . . . . . . . . . . . . . . . 3–62
Cursor Tab . . . . . . . . . . . . . . . . . . . . . . . . . . . . . . . . . . . . . . . . . . . . . . . . . . . 3–62
Hardware Tab. . . . . . . . . . . . . . . . . . . . . . . . . . . . . . . . . . . . . . . . . . . . . . . . . 3–63
Upgrade. . . . . . . . . . . . . . . . . . . . . . . . . . . . . . . . . . . . . . . . . . . . . . . . . . . . . . . . . 3–64
Volume . . . . . . . . . . . . . . . . . . . . . . . . . . . . . . . . . . . . . . . . . . . . . . . . . . . . . . . . . 3–65
Connection Manager Window. . . . . . . . . . . . . . . . . . . . . . . . . . . . . . . . . . . . . . . . . . . 3–66
Field Definitions . . . . . . . . . . . . . . . . . . . . . . . . . . . . . . . . . . . . . . . . . . . . . . . . . . 3–66
Connections List Box . . . . . . . . . . . . . . . . . . . . . . . . . . . . . . . . . . . . . . . . . . . 3–66
Icon. . . . . . . . . . . . . . . . . . . . . . . . . . . . . . . . . . . . . . . . . . . . . . . . . . . . . . . . . 3–67
Name . . . . . . . . . . . . . . . . . . . . . . . . . . . . . . . . . . . . . . . . . . . . . . . . . . . . . . . 3–67
Type . . . . . . . . . . . . . . . . . . . . . . . . . . . . . . . . . . . . . . . . . . . . . . . . . . . . . . . . 3–67
Status . . . . . . . . . . . . . . . . . . . . . . . . . . . . . . . . . . . . . . . . . . . . . . . . . . . . . . . 3–67
Startup . . . . . . . . . . . . . . . . . . . . . . . . . . . . . . . . . . . . . . . . . . . . . . . . . . . . . . 3–67
Connection Button . . . . . . . . . . . . . . . . . . . . . . . . . . . . . . . . . . . . . . . . . . . . . 3–67
End Button . . . . . . . . . . . . . . . . . . . . . . . . . . . . . . . . . . . . . . . . . . . . . . . . . . . 3–68
Add Button . . . . . . . . . . . . . . . . . . . . . . . . . . . . . . . . . . . . . . . . . . . . . . . . . . . 3–68
Edit Button . . . . . . . . . . . . . . . . . . . . . . . . . . . . . . . . . . . . . . . . . . . . . . . . . . . 3–68
Delete Button . . . . . . . . . . . . . . . . . . . . . . . . . . . . . . . . . . . . . . . . . . . . . . . . . 3–68
Contents
Quick Reference and Adminstrator’s Guide v
Page 6

CE net.book Page vi Tuesday, August 20, 2002 3:51 PM
Contents
Startup Button . . . . . . . . . . . . . . . . . . . . . . . . . . . . . . . . . . . . . . . . . . . . . . . . 3–69
Control Panel Button . . . . . . . . . . . . . . . . . . . . . . . . . . . . . . . . . . . . . . . . . . . 3–69
Shut Down Button . . . . . . . . . . . . . . . . . . . . . . . . . . . . . . . . . . . . . . . . . . . . . 3–69
Connection Types . . . . . . . . . . . . . . . . . . . . . . . . . . . . . . . . . . . . . . . . . . . . . . . . . 3–70
RDP . . . . . . . . . . . . . . . . . . . . . . . . . . . . . . . . . . . . . . . . . . . . . . . . . . . . . . . . 3–70
ICA . . . . . . . . . . . . . . . . . . . . . . . . . . . . . . . . . . . . . . . . . . . . . . . . . . . . . . . . . 3–70
Internet . . . . . . . . . . . . . . . . . . . . . . . . . . . . . . . . . . . . . . . . . . . . . . . . . . . . . . 3–71
Dial-Up. . . . . . . . . . . . . . . . . . . . . . . . . . . . . . . . . . . . . . . . . . . . . . . . . . . . . . 3–71
TEC . . . . . . . . . . . . . . . . . . . . . . . . . . . . . . . . . . . . . . . . . . . . . . . . . . . . . . . . 3–71
VPN . . . . . . . . . . . . . . . . . . . . . . . . . . . . . . . . . . . . . . . . . . . . . . . . . . . . . . . . 3–71
Creating New Connections . . . . . . . . . . . . . . . . . . . . . . . . . . . . . . . . . . . . . . . . . . 3–72
Citrix ICA Client . . . . . . . . . . . . . . . . . . . . . . . . . . . . . . . . . . . . . . . . . . . . . . 3–72
Dial-Up. . . . . . . . . . . . . . . . . . . . . . . . . . . . . . . . . . . . . . . . . . . . . . . . . . . . . . 3–80
Internet Explorer . . . . . . . . . . . . . . . . . . . . . . . . . . . . . . . . . . . . . . . . . . . . . . 3–88
Microsoft Remote Desktop Client . . . . . . . . . . . . . . . . . . . . . . . . . . . . . . . . . 3–89
Terminal Emulation . . . . . . . . . . . . . . . . . . . . . . . . . . . . . . . . . . . . . . . . . . . 3–102
VPN (PPTP) Client . . . . . . . . . . . . . . . . . . . . . . . . . . . . . . . . . . . . . . . . . . . 3–115
Remote Administration and Software Upgrades. . . . . . . . . . . . . . . . . . . . . . . . . . . . 3–120
Administration and Upgrades Using Rapport. . . . . . . . . . . . . . . . . . . . . . . . . . . 3–120
Other Upgrade Methods . . . . . . . . . . . . . . . . . . . . . . . . . . . . . . . . . . . . . . . . . . . 3–120
DHCP Firmware Upgrades . . . . . . . . . . . . . . . . . . . . . . . . . . . . . . . . . . . . . 3–121
FTP Pull Firmware Upgrades. . . . . . . . . . . . . . . . . . . . . . . . . . . . . . . . . . . . 3–124
vi Quick Reference and Adminstrator’s Guide
Page 7

CE net.book Page 1 Tuesday, August 20, 2002 3:51 PM
This CE.NET-based terminal is a thin-client device. It displays the
graphical user interfaces (GUIs) of applications that run on remote
enterprise ICA and RDP protocol servers (session services). A
terminal emulation software suite is also installed locally for
accessing legacy computers.
1
Introduction
Session and network services available on enterprise networks may be
accessed through a direct intranet connection, a dial-up server, or an
ISP which provides access to the Internet and thus permits the
terminal to connect to an enterprise VPN (virtual private network)
server.
The CE.NET-based terminals operate in an enterprise server
environment that provides the network and session services necessary
for the unit to function. The server environment is maintained by the
network administrator.
There are three levels of terminal operator privilege:
(1) Administrator, (2) User, and (3) Guest. A terminal account is a set
of application connection definitions and terminal configuration
settings grouped under one of the privilege levels and assigned to an
operator logon name and password (if required).
Terminal accounts can include specific connections, privileges,
password protection, Autologon and/or Autostart and Single Button
Connect functions. If security is not enabled the terminal defaults to
autologon as Administrator.
This document will discuss User, Guest, and Administrator functions
and features available with this CE.NET-based thin client.
Quick Reference and Administrator’s Guide 1–1
Page 8

CE net.book Page 1 Tuesday, August 20, 2002 3:51 PM
This chapter covers the functions and features available to the
operator with User- and Guest-level access.
General Terminal Information
2
User’s Instructions
The requirement to use a log-in name and password is available to
prevent unauthorized access to the terminal. The Administrator must
enable security for the log on requirement to be active; otherwise, the
terminal automatically logs on as Administrator with no password
required.
Note the following:
The settings for a new terminal or a terminal that has been reset to
■
factory defaults must be configured before it is made available to
an operator. Terminal configuration is a complex subject and is
best performed by an administrator either locally or through
remote administration tools.
If the Setup Wizard initially displays, or if the terminal
■
automatically logs in and displays the administrator-level
Connection Manager (in which the Add, Edit, Delete, and Startup
buttons are enabled), refer to the Administrator Instructions later
in this guide.
Quick Reference and Administrator’s Guide 2–1
Page 9

CE net.book Page 2 Tuesday, August 20, 2002 3:51 PM
User’s Instructions
Terminal Login
Typically the terminal will be configured so that the following
Terminal Login dialog box initially is presented when the terminal is
turned on or restarted, or when an operator logs out. At log in, the
Connection Manager dialog box is presented, or possibly an
application connection may be launched automatically.
Terminal Login
The terminal may be configured to log on automatically without the
requirement to enter a logon name and password. In this case, display
of the Terminal Logon dialog box will be bypassed.
At log in, the User, Guest, or Administrator Connection Manager
window normally is displayed. However, one or more
connections/applications may be configured to open automatically
upon login.
If the administrator has enabled access to the Connection Manager,
the window may be accessed by typing Ctrl+Alt+End.
If the terminal is configured to obtain an IP address from a DHCP
server (this is the default for a new or reset terminal), a message is
displayed indicating that the terminal is Waiting for Network
Services. If DHCP is unable to obtain an IP address, after a short
period, a message is displayed suggesting that because DHCP was
unable to obtain an IP address, an IP address should be statically
assigned. This task may be performed by an administrator through the
Network selection in the Administrator's Control Panel.
2–2 Quick Reference and Administrator’s Guide
Page 10

CE net.book Page 3 Tuesday, August 20, 2002 3:51 PM
Terminal Logout and Shutdown
You may log out, shut down, or shutdown and restart the terminal by
using the Shutdown Window dialog box. This dialog box may be
accessed by clicking on the Shut Down button on the Connection
Manager window. Logging out is available to all account types
(Guest, User, and Administrator) if security is enabled.
If automatic login is enabled, whenever you log out or restart, the
terminal will automatically return to the logged-in state. You may
break out of automatic login by pressing Alt+F4 during the login
countdown process.
User’s Instructions
Quick Reference and Administrator’s Guide 2–3
Page 11

CE net.book Page 4 Tuesday, August 20, 2002 3:51 PM
User’s Instructions
Connection Manager Window
The following figure shows the Connection Manager window for an
operator with User-level logon privileges. This window allows the
User to make connections to application servers and to open a dialog
box for logging out, shutting down, or restarting the terminal. It also
provides access to a Control Panel that allows setting of operator
preferences best selected by the individual User-level operator (The
control panel is by default not available to a guest operator, but the
administrator may enable a Guest-level Control Panel with limited
functionality). Connection definitions are pre-configured at the
Administrative level; the User-level operator may only open and close
connections.
User-level Connection Manager
2–4 Quick Reference and Administrator’s Guide
Page 12

CE net.book Page 5 Tuesday, August 20, 2002 3:51 PM
Field Definitions
This section highlights the available fields and options in the
user-level Connection Manager window.
Connections List Box
This is a list of connections that you can use. Click on a list entry to
select and highlight it, then click on the Connect button to open the
connection, or click on the End button to terminate the connection.
You may also double-click on the selection to open it.
Icon
The icon preceding the listed name indicates the type of connection.
A computer terminal icon represents a standard thin client, terminal
emulation, or VPN connection. A telephone icon represents a dial-up
connection. A composite icon consisting of a computer terminal and a
telephone indicates that the standard connection will access the
network through a dial-up server (“tagged” in administrator's Dial-up
connection wizard).
User’s Instructions
Name
Type
Status
✎
If a standard connection is configured to access an application server
through dial-up (using the connection type’s connection wizard), the
icon is not tagged.
Name given to the connection by the administrator when the
connection definition parameters are entered (administrator Add or
Edit button).
Type of connection, selected by the administrator through the Add or
Edit buttons. There are five connection types: RDP, ICA, Dialup,
TEC, and VPN. Refer to the sections later in this chapter for more
information about each one.
If a connection is alive, the status listed for that connection is Active.
If a connection is not alive, the entry is blank.
Quick Reference and Administrator’s Guide 2–5
Page 13

CE net.book Page 6 Tuesday, August 20, 2002 3:51 PM
User’s Instructions
Startup
Autostart is displayed if the connection is set to start at terminal
startup; otherwise the entry is blank.
Connection Button
Click on a connection in the Connections list box to highlight it. Click
on the Connect command button to make the highlighted connection.
You can also double-click on a selection to make a connection.
End Button
Click on the End command button to end the connection process.
When you press the End button and the connection is active, the
active session is disconnected. The End command button is enabled
when one or more sessions become active.
Add, Edit, Delete, and Startup
The Add, Edit, Delete, and Startup buttons are disabled for user-level
operators and are available to administrator-level operators only. They
are described in Chapter 3 under the administrator Connection
Manager Window section. In addition, the Control Panel button is by
default is available to both user- and administrator-level operators but
is not available (disabled) to guest-level operators unless the
administrator enables the control panel for limited functionality. The
user-level control panel by default provides limited functionality,
which can be modified by the administrator.
Control Panel Button
Control Panel opens the user Control Panel window. See the user
Control Panel Window section later in this guide for information
about this window and its selections.
✎
By default, this button is disabled (not available) to an operator with
guest-level logon privileges. However, the administrator may make
selected Control Panel privileges available to a guest-level operator or
modify the user-level operator privileges.
2–6 Quick Reference and Administrator’s Guide
Page 14
CE net.book Page 7 Tuesday, August 20, 2002 3:51 PM
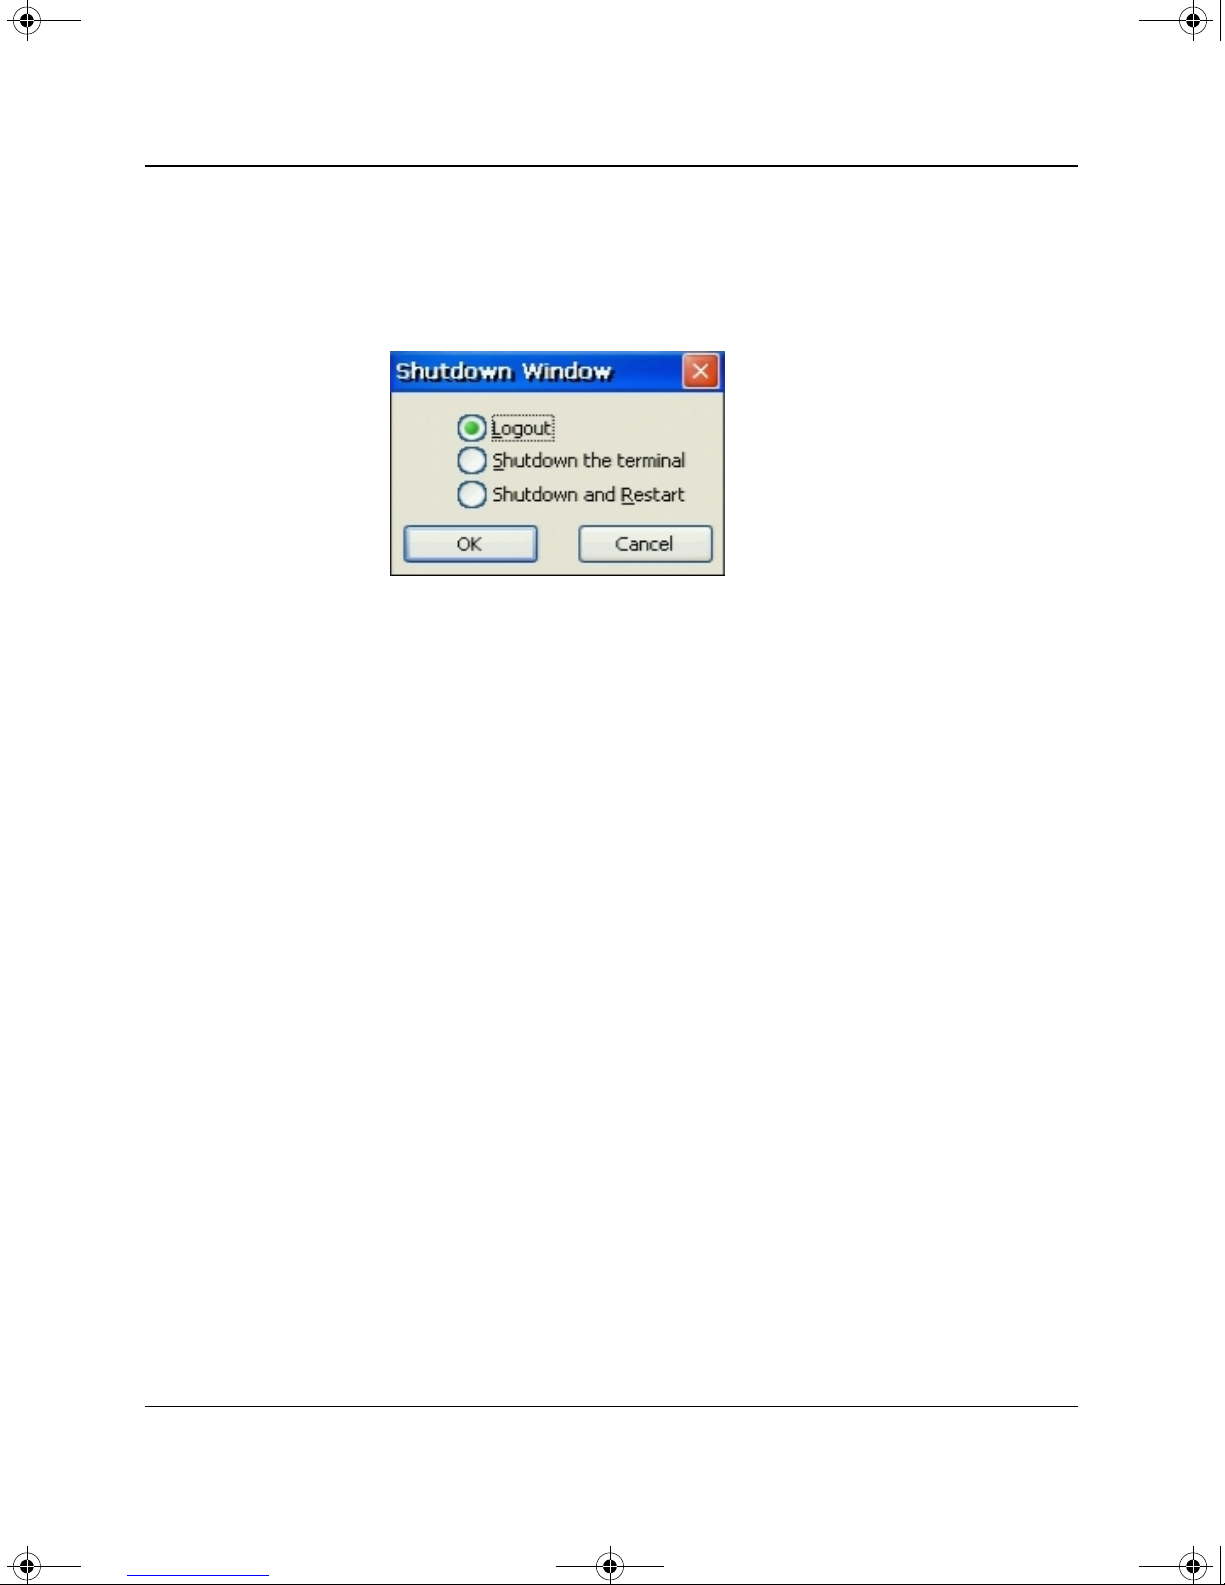
Shut Down Button
Shut Down opens the Shutdown Window dialog box, which allows
you to log out, shut down, or shut down and restart the terminal. The
following figure shows the selections.
Shutdown dialog box
User’s Instructions
Make your selection and click on OK, or click Cancel to cancel the
action and close the dialog box. The following section describes each
of the Shutdown options available.
Logout
By default this radio button is disabled. The terminal's security
function must be enabled to activate this radio button.
Shutdown the Terminal
Click on this radio button to shut down the terminal without restarting
it. A prompt will be displayed asking if you want to continue.
Shutdown and Restart
Click on this radio button to shut down then restart the terminal. A
prompt will be displayed asking if you want to continue.
Quick Reference and Administrator’s Guide 2–7
Page 15

CE net.book Page 8 Tuesday, August 20, 2002 3:51 PM
User’s Instructions
Control Panel Window
The following figure shows the Control Panel window for an operator
with user-level privileges. It displays icons that open applications for
making preference settings best left to the individual User-level
operator. The default settings are those set by the administrator, but
the user-level operator may set preferences that take precedence over
the default settings. The preference settings are unique to each
individual user and are saved for recall when the User logs on.
User-level Control Panel
✎
✎
2–8 Quick Reference and Administrator’s Guide
The icons in the User-level Control Panel also display in the
Administrator-level Control Panel window. See the administrator’s
Control Panel Window section in Chapter 3 for a description of each
of the icons.
Instructions for add-ons (represented by icons), that are not part of the
standard factory-installed set, accompany the individual add-on
upgrade packages.
Page 16

CE net.book Page 9 Tuesday, August 20, 2002 3:51 PM
A Control Panel window, by default, is not available to Guest-level
operators. However, an Administrator may activate a Control Panel
with selected functionality for individual Guest-level operator.
User’s Instructions
Quick Reference and Administrator’s Guide 2–9
Page 17

CE net.book Page 1 Tuesday, August 20, 2002 3:51 PM
This chapter covers the functions and features available to the
operator with Administrator-level access.
Server Environment
3
Administrator’s Instructions
The server environment provides both network services and session
services. To use these services, the terminal must gain access to the
enterprise server environment.
Enterprise Intranet Access
Enterprise Intranet Access is composed of Ethernet Direct Access,
Dial-up Access, and PPTP VPN Access. These methods allow the
thin client to gain access to the enterprise server environment.
Ethernet Direct Access
This is a connection from the thin clients Ethernet port directly to the
enterprise intranet. No additional hardware is required.
In this configuration all network services may be used, including the
enterprise DHCP server. A DHCP server on the network may provide
not only the terminal's IP address, but also the location of the file
server containing the software updates.
Quick Reference and Administrator’s Guide 3–1
Page 18

CE net.book Page 2 Tuesday, August 20, 2002 3:51 PM
Administrator’s Instructions
Dial-up Access
A USB dial-up modem can be used with the thin client to access a
dial-up server. With this method there are two ways to access the
enterprise intranet:
■
■
An enterprise dial-up server will connect directly to the enterprise
intranet.
An Internet Service Provider (ISP) dial-up server provides access
to the Internet, from which the thin client must access an
enterprise Point-to-Point Tunneling Protocol (PPTP) Virtual
Private Network (VPN) server that connects to the enterprise
intranet.
✎
PPTP VPN Access
The dial-up server must be a Microsoft Remote Access Server or
another server that supports industry-standard protocols.
PPTP is a network protocol that enables the secure transfer of data
between a remote client (in this case the thin client) and an enterprise
server environment by creating a VPN across TCP/IP-based data
networks such as the Internet. It provides a password-protected path
through the enterprise firewall to the enterprise server environment in
which the network and session services required by Thin Appliances
reside.
An ISP must be available to provide access to the Internet. Any of the
standard means of connecting to the ISP may be used, such as a
dial-up modem, cable modem, and DSL modem.
The connection to the ISP must be established first, before contacting
the enterprise PPTP VPN server. This includes dial-up access as well
as direct access through the cable modem and DSL modem paths.
3–2 Quick Reference and Administrator’s Guide
Page 19

CE net.book Page 3 Tuesday, August 20, 2002 3:51 PM
Network Services
Network services reside on the enterprise intranet. Network services
used by the CE.NET thin clients are Dynamic Host Configuration
Protocol (DHCP) and File Transfer Protocol (FTP), and in some cases
Domain Name System (DNS).
DHCP
A DHCP server performs two main functions:
■
■
Administrator’s Instructions
It provides the thin client with an IP address.
It provides (in DHCP Option IDs) the IP address or DNS name of
the FTP server and the FTP root-path location of the upgrade
images for access through the DHSP Upgrade process.
FTP
✎
Upgrade images used by the DHCP and FTP Pull upgrade processes
are stored on the FTP server in a directory in the FTP root path.
This server name and root-path directory must be made available to
the terminal.
If DHCP upgrade is used, these items must be entered in the
■
server DHCP options identified in the terminal DHCP Option IDs
dialog box (defaults are “161” and “162”, respectively). The FTP
server must provide anonymous logon capability.
If FTP Pull upgrade is used, these items must be entered in the
■
Upgrade dialog box on the terminal, and the login name and
password must be entered in the Upgrade dialog box (the default
name and password are both “anonymous”).
Params . i ni must be installed on the FTP server to upgrade the thin
client.
Quick Reference and Administrator’s Guide 3–3
Page 20

CE net.book Page 4 Tuesday, August 20, 2002 3:51 PM
Administrator’s Instructions
DNS
DNS may be used if desired. However, DNS requires that a fixed IP
address be assigned to the thin client. For this reason, DNS is
typically used when the terminal is used as an RDP print server.
Line Printer Daemon (LPD) Setup
A terminal with a locally connected printer can be configured to
provide LPD services, making the terminal a printer server on the
network.
Session Services
Session services are made available by the server-installed
components of the Citrix ICA and Microsoft RDP thin client
products.
Independent Computing Architecture (ICA) Session Services
ICA is a three-tier, server-based computing technology that separates
an application's logic from its user interface. The ICA client software
installed on the Thin Appliance allows the user to interact with the
application's GUI interface, while all of the application's processes
are executed on the server.
With ICA, applications consume as little as one-tenth of their normal
network bandwidth, and on average this is about 24 Kb. The ICA
protocol sends only keystrokes, mouse clicks and screen updates.
Combined with Metaframe, ICA also allows audio across the
network.
This efficiency enables the latest, most powerful 32-bit applications
to be accessed with exceptional performance, even over telephone
lines with 28k modems.
✎
ICA Server must be licensed from Citrix Systems, Inc. The ICA
Client software is already installed on the CE.NET thin clients.
3–4 Quick Reference and Administrator’s Guide
Page 21

CE net.book Page 5 Tuesday, August 20, 2002 3:51 PM
PNLite is an ICA connection mode that enables the Thin Appliance to
connect to applications available (“published”) on an ICA server
without having to configure connections for individual published
applications. PNLite is part of the Citrix XML publishing service,
which is selected for installation during the MetaFrame server
update/installation.
Configuring ICA Session Services
ICA session services can be made available on the network using
either of the following services:
■
Administrator’s Instructions
Windows 2000 Server with Terminal Services and one of the
following installed:
Citrix MetaFrame 1.8
❏
✎
Citrix MetaFrame XP
❏
Citrix Devices Service (CDS)
❏
Windows NT 4.0 Terminal Server Edition with one of the
■
following installed:
Citrix MetaFrame 1.8
❏
Citrix MetaFrame 1.0
❏
Citrix Device Services
❏
Use the instructions accompanying these products to install them and
make sessions and applications available to the Thin Appliances
sharing the server environment. If PNLite-published application
services are to be made available to the Thin Appliance clients, refer
to the following PNLite Installation Guidelines when installing the
MetaFrame 1.8 and MetaFrame XP products.
If a Windows 2000 server is used, a Terminal Services Client Access
License (TSCAL) server must also reside somewhere on the network.
The server will grant temporary (90-day) licenses on an individual
device basis. Beyond that, you must purchase TSCALs and install
them on the TSCAL server (you will not be able to make a connection
without a temporary or permanent license).
Quick Reference and Administrator’s Guide 3–5
Page 22

CE net.book Page 6 Tuesday, August 20, 2002 3:51 PM
Administrator’s Instructions
✎
Applications accessed through a dial-up connection or over a WAN
generally should have Enable optimization for low speed link selected
in the user profile or the Connection Settings (ICA or RDP) dialog
box.
PNLite Installation Guidelines
PNLite is a component of the Citrix XML publishing service. Note
the following:
MetaFrame 1.8—XML publishing service support is introduced
■
with Service Pack 2. During SP2 installation, the installer is
prompted with the choice to install the XML publishing service.
When the reply is “yes” the installer is presented with a choice to
change the default port (80) used by the service.
MetFrame XP—Supports XML publishing services and during
■
installation presents a series of prompts similar to those for
MetaFrame 1.8 SP2.
The port to be used for XML publishing services must be known for
making the PNLite server location entries in DHCP Option IDs dialog
box. The terminal uses port 80 as the default, but if a port other than
80 is used the port number must be specified explicitly with the
PNLite server location in the form IP:port or name:port.
Remote Desktop Protocol (RDP) Session Services
RDP, like ICA, is a network protocol that allows a thin client (the
CE.NET terminal) to communicate with the Terminal Server or
Windows 2000 Server with Terminal Services over the network. This
protocol is based on the T.120 protocol, an international, standard
multichannel conferencing protocol currently used in Microsoft
NetMeeting. The Thin Appliance supports both RDP version 4 and
version 5. Version 5 supports more features than ICA, although the
bandwidth required is greater.
✎
3–6 Quick Reference and Administrator’s Guide
The RDP version 5 client software is already installed on the
CE.NET-based thin clients.
Page 23

CE net.book Page 7 Tuesday, August 20, 2002 3:51 PM
Use the instructions accompanying these products to install them and
make sessions and applications available to the Thin Appliances
sharing the server environment. If PNLite-published application
services are to be made available to the Thin Appliance clients, refer
to the PNLite Installation Guidelines mentioned previously when
installing the MetaFrame 1.8 and MetaFrame XP products.
Administrator’s Instructions
✎
✎
If a Windows 2000 server is used, a Terminal Services Client Access
License (TSCAL) server must also reside somewhere on the network.
The server will grant temporary (90-day) licenses on an individual
device basis. Beyond that, you must purchase TSCALs and install
them on the TSCAL server (you will not be able to make a connection
without a temporary or permanent license).
Applications accessed through a dial-up connection or over a WAN
generally should have Enable optimization for low speed link selected
in the user profile or the Connection Settings (ICA or RDP) dialog
box.
Configuring RDP Session Services
RDP session services can be made available on the network using any
of the following services:
Windows 2000 Server with Terminal Services installed
■
Windows NT 4.0 Terminal Services (WTS) edition
■
Windows XP
■
Use the instructions accompanying these products to install them and
make sessions and applications available to the Thin Appliances
sharing the server environment.
✎
Quick Reference and Administrator’s Guide 3–7
If a Windows 2000 server is used, a Terminal Services Client Access
License (TSCAL) server must also reside somewhere on the network.
The server will grant temporary (90-day) licenses on an individual
device basis. Beyond that, you must purchase TSCALs and install
them on the TSCAL server (you will not be able to make a connection
without a temporary or permanent license).
Page 24

CE net.book Page 8 Tuesday, August 20, 2002 3:51 PM
Administrator’s Instructions
✎
Applications accessed through a dial-up connection or over a WAN
generally should have Enable optimization for low speed link selected
in the user profile or the Connection Settings (ICA or RDP) dialog
box.
Initial Terminal Setup
A new terminal or a terminal reset to factory defaults initially will log
on automatically as administrator with no password required.
Terminal settings may be initialized for subsequent operation by
either of the following methods:
Locally by an administrative operator. There are many selections
■
and configuration entries to be made and generally it is too
labor-intensive to perform manual local setup for each individual
terminal on a network.
Remotely using the Rapport Remote Administration Software
■
suite or through SNMP tools. This is the most convenient method,
but at least one terminal should be set up manually for use as a
template for the other terminals on the network.
Terminal Reset and Setup Wizard
You may reset the terminal by selecting Control Panel > System >
General > Reset the terminal to factory-default property settings
check box. The Setup Wizard, which prompts for entry of basic
settings necessary for basic operation and access to network resources
needed for remote administration, starts when this selection is made.
Local Setup
Local setup is performed by an administrator through the Control
Panel and the Connection Manager. Individual local setup of more
than just a few terminals on a network would be impractical; however,
one terminal may be set up locally for use as a template for the others
through remote administration tools.
3–8 Quick Reference and Administrator’s Guide
Page 25

CE net.book Page 9 Tuesday, August 20, 2002 3:51 PM
Remote Administration and Software Upgrades
The terminals may be administered remotely, both for initial setup of
many terminals at a time and individual maintenance. Typically, a
single terminal would be configured manually, and then a software
tool would be used to extract the settings into a database for broadcast
as an upgrade to other terminals on the network. See the Remote
Administration and Software Upgrades chapter later is this guide for
more details.
Administrator’s Instructions
✎
A new or reset terminal will initializes with DHCP enabled. The
DHCP server (if set up properly - see the Server Environment section
earlier in this chapter) provides the location of the upgrade server.
However, if DHCP is not available on the network, the location of the
upgrade server may be entered locally at the terminal through the
Control Panel > Upgrade selection.
Quick Reference and Administrator’s Guide 3–9
Page 26

CE net.book Page 10 Tuesday, August 20, 2002 3:51 PM
Administrator’s Instructions
Control Panel Window
The following figure shows the Control Panel window for an operator
with administrator privileges. The icons provide access a complete set
terminal configuration utilities. These utilities generally will be used
for local modification of configuration settings and user preferences
resulting from terminal defaults or remote administration.
Administrator’s Control Panel
An operator with user privileges has access to a limited Control Panel
which is used for making operator preference settings (a control panel
is not by default available to guest-level operators, but the
administrator may enable a guest control panel with limited
functionality). Preference settings appearing in the administrator's
Control Panel (either entered locally or through remote
administration) serve as defaults for user- and guest-level operators. A
new terminal or newly reset terminal will open a Setup Wizard that is
used for selecting initial user preferences and for ensuring access to
software upgrades and remote administration tools on the network
(see the Initial Terminal Setup section earlier in this chapter).
The following sections describe each option.
3–10 Quick Reference and Administrator’s Guide
Page 27

CE net.book Page 11 Tuesday, August 20, 2002 3:51 PM
Add-on
The terminal comes from the factory with a number of applications
(“add-ons”) already installed. Add-on applications may be installed
(added) and removed as needed, and are available from the
manufacturer for free or for a modest licensing fee.
The Add-on dialog box (see below) is opened from the administrator's
Control Panel window. It contains two tab dialogs that allow an
administrator to add or remove add-ons and to determine if there is
sufficient flash memory to install add-ons. Instructions for installing
add-ons accompany the individual add-on applications received from
the manufacturer.
Administrator’s Instructions
Add-on dialog box
Quick Reference and Administrator’s Guide 3–11
Page 28

CE net.book Page 12 Tuesday, August 20, 2002 3:51 PM
Administrator’s Instructions
Add/Remove Tab
The Add/Remove tab dialog lists the currently installed add-ons. To
remove an add-on, follow the instructions on the dialog. A message is
displayed (see figure below) asking you to confirm add-on removal.
To install an add-on, click on the Add button and follow the
instructions for using the Upgrade dialog box later is this chapter.
✎
Flash Memory Tab
Add-on remove confirmation
The thin client must be shut down and restarted for the changes to
take effect.
The Flash Memory tab dialog displays information about available
flash memory and has no user controls. This information is needed
when installing an add-on to determine if sufficient flash memory is
available.
Flash memory tab
3–12 Quick Reference and Administrator’s Guide
Page 29

CE net.book Page 13 Tuesday, August 20, 2002 3:51 PM
Date/Time
The Date/Time Properties dialog box is opened from the user or
administrator Control Panel window. This option is used to set/update
the date and time on the thin client.
Administrator’s Instructions
Date/Time properties
To set the date:
1. Select the month by clicking on the forward and back buttons on
the calendar.
2. Select the day of the month by clicking the day on the calendar.
3. Click the Apply button.
To set the time:
1. In the Current Time field, enter a time that is slightly ahead of the
actual time.
2. From the Time Zone field pull down menu, select the appropriate
time zone.
3. As the actual time approaches the time entered in the Current
Time field, click the Apply button.
If a time server is available, the terminal may be set to automatically
synchronize to the time provided by the server (the administrator may
select the SNTP Client icon on the administrator Control Panel
window, and select the Synchronize button and/or select the
Synchronize Time on Boot check box - this function is not available
to user- or guest-level operators).
Quick Reference and Administrator’s Guide 3–13
Page 30

CE net.book Page 14 Tuesday, August 20, 2002 3:51 PM
Administrator’s Instructions
DHCP Options
The DHCP Options dialog box opens by clicking on DHCP Options
in the Control Panel window.
DHCP Options dialog box
This dialog box sets the terminal access to DHCP server option ID
tags that contain locations of items listed on the dialog box. To
change an option ID, type over the current number in the ID field
(range 0 - 255). Specific numbers must match those set on the DHCP
server.
The main components of the DHCP Options dialog box are:
Common Option IDs—is used to set the DHCP tags of common
■
DHCP variables. Option 158 is not currently supported; it is
reserved for future use.
The RDP Option ID—is used to set DHCP tags that identify the
■
RDP Startup Application.
FTP Option IDs—is used to set the DHCP tags that identify the
■
FTP location of the firmware upgrade image. See the DHCP
Firmware Upgrades sections later in this guide for more
information.
3–14 Quick Reference and Administrator’s Guide
Page 31

CE net.book Page 15 Tuesday, August 20, 2002 3:51 PM
■
■
■
Display Properties
The Display Properties dialog box, opened by clicking on Display in
the user or administrator Control Panel window, allows you to select
the monitor screen resolution and energy saver mode.
Administrator’s Instructions
SNMP Option IDs—is used to set the DHCP tags that identify
SNMP options.
Terminal Emulation Option IDs—is used to set DHCP tags that
identify terminal emulation options.
Reset to Defaults—is used to reset all option IDs to the default
values (the values shown in the screen shot are the terminal
default values).
Display Properties dialog box
Quick Reference and Administrator’s Guide 3–15
Page 32

CE net.book Page 16 Tuesday, August 20, 2002 3:51 PM
Administrator’s Instructions
Desktop Area and Refresh Frequency
Use the upper drop-down list box to select a screen resolution and
refresh rate.
Resolution options
Use the lower drop-down list box to select the desired color palette.
Color palette options
Click on the Test button to test the resolution and palette selections.
You will get the following window.
Testing Mode dialog box
3–16 Quick Reference and Administrator’s Guide
Page 33

CE net.book Page 17 Tuesday, August 20, 2002 3:51 PM
Clicking OK initiates the test. After the test is complete you are
prompted:
Test confirmation
If you click No, you will return to the Display Properties dialog box.
If you click Ye s, you will be prompted to restart the terminal for the
new settings to take effect.
Administrator’s Instructions
Enable Energy Savers
Select the Enable Energy Savers check box to activate the energy
saver functions.
■
■
Select the radio button corresponding to the desired energy saver
actions (Screen Saver or Turn Off Monitor) when the wait time
expires.
Select or type the desired Wait time (in minutes) for the energy
saver function to become active.
Quick Reference and Administrator’s Guide 3–17
Page 34

CE net.book Page 18 Tuesday, August 20, 2002 3:51 PM
Administrator’s Instructions
ELO Touch
Double-clicking on Elo Touch on the administrator's Control Panel
opens the ELO Touch Screen dialog box.
ICA
ELO Touch Screen dialog box
The drop-down list box allows the selection of a serial port that the
touch screen is connected to (required on some models).
Serial port drop-down menu
To calibrate the touch screen, click the Calibrate button and follow
the prompts.
ICA client settings are made using the Global ICA Client Settings
tabbed properties dialog. This tabbed dialog contains the 5 tabs
shown in the following figure (the Hotkeys tab initially is on top as
the default).
ICA Client Settings tabs
The following sections describe each of these tabs.
3–18 Quick Reference and Administrator’s Guide
Page 35

CE net.book Page 19 Tuesday, August 20, 2002 3:51 PM
Hotkeys Tab
Hotkeys can be used during ICA sessions to invoke various functions.
Some hotkeys control the behavior of ICA windows, and others
emulate standard Windows hotkeys. The following figure shows the
default hotkey settings. Use the pull-down list boxes to select other
key combinations for the described functions.
Administrator’s Instructions
✎
Hotkeys tab
An ICA session must be active for these hotkeys t function.
The Hotkeys tab fields are described in following sections.
Status Dialog
The hotkey in the Status Dialog field displays an ICA connection
status message.
Close Session
The hotkey in the Close Session field disconnects an ICA client from
a server and closes the client window on the local desktop. When you
use this hotkey, the open session continues to run on the server. If you
do not want to leave the session running in a disconnected state, log
off.
ESC
The hotkey in the ESC field functions as the Esc (escape) key.
Quick Reference and Administrator’s Guide 3–19
Page 36

CE net.book Page 20 Tuesday, August 20, 2002 3:51 PM
Administrator’s Instructions
CTRL-ALT-DEL
The hotkey in the CTRL-ALT-DEL field opens the terminal Security
dialog box.
CTRL-ESC
The hotkey in the CRTL-ESC field on WinFrame servers, displays the
Remote Task list. On MetaFrame servers, pressing this key sequence
displays the Windows NT Start menu.
ALT-ESC
The hotkey in the ALT-ESC field cycles the focus through the
minimized icons.
Preferences Tab
ALT-TAB
The hotkey in the ALT-TAB field cycles sequentially through
applications that are open. A window appears to display the
applications as you cycle through them.
ALT-BACKTAB
The hotkey in the ALT-BACKTAB field cycles sequentially through
applications that are open in a session, but in the opposite direction.
This tab is used to specify certain ICA settings.
ICA Preferences tab
3–20 Quick Reference and Administrator’s Guide
Page 37

CE net.book Page 21 Tuesday, August 20, 2002 3:51 PM
Administrator’s Instructions
✎
There is no Citrix ICA Auto Update feature; ICA client on the
terminals is updated through terminal administrative upgrades.
The Preferences tab fields are described in the following sections.
Serial Number
This field displays the serial number of your ICA Client software.
This field is only necessary when you are using the ICA Windows CE
Client with a product such as WinFrame Host/Terminal, which
requires each client to have a Citrix PC Client Pack serial number in
order to connect to the server. If a serial number is required, you must
enter it exactly as it appears on the serial number card. The Serial
Number field is not used by MetaFrame servers.
Default Window Colors
Two or three radio buttons are displayed in this group box. If the
terminal Color Palette (Display dialog box opened from the Control
Panel) is 256 colors, radio buttons for 16 or 256 colors are displayed.
If 65536 is selected in the Color Palette, after restarting the terminal
an additional radio button, Thousands, is displayed.
The ICA server must be capable of supporting 16-bit color for the
Thousands selection to work. If not, the terminal will display only
256 (8-bit) colors when Thousands is selected.
When using a PPP connection, 16 color mode may provide faster
performance. If the window options specified exceed the capabilities
of the client hardware, the maximum size and color depth supported
by the CE operating system are used.
Client Name
This text box allows you to change the client name of your client
device. The Citrix server uses the client name to uniquely identify
resources (such as mapped printers) associated with a given client
device. The client name should be unique for each computer running
a copy of a Citrix ICA Client. If you do not use unique client names,
device mapping and application publishing may not operate correctly.
The default is WBT<mac address>. The maximum length of the
client name is 15 characters.
Quick Reference and Administrator’s Guide 3–21
Page 38

CE net.book Page 22 Tuesday, August 20, 2002 3:51 PM
Administrator’s Instructions
Server Location Tab
Server location (also called server browsing) provides a method for a
user to view a list of all Citrix servers on the network that have ICA
connections configured, and a list of all published applications. The
way in which server location works depends on which network
protocol has been configured.
Server Location tab
The following sections highlight the components of this dialog box.
Add
This command button opens the Add Server Address dialog box. The
server is added to the selected server group. If you checked use HTTP
server location, you must enter the server address and port to use.
Delete
This command button delete the name or IP address of a server from
the selected group.
3–22 Quick Reference and Administrator’s Guide
Page 39

CE net.book Page 23 Tuesday, August 20, 2002 3:51 PM
Drop Down Window
Select the network protocol to be used:
■
■
Address List
Administrator’s Instructions
TCP browser selection- The default setting for server location is
auto-locate. The ICA client attempts to contact any of the servers
on the network by broadcasting on the UDP protocol.
Alternatively, you can set specific addresses for Citrix servers.
TCP+HTTP browser and SSL+HTTPS browser selections - The
default server address is ica. You must set sp[ecific server
addresses for Citrix servers. The ICA client uses the HTTP or
HTTPS protocol, respectively, to contact the servers.
List of server locations entered through Add button or a recalled list.
The default server address is auto-locate or ica, depending on the
selection in the drop-down list box.
Default List
Use this button to recall the previous server list.
Server Group
Select whether the servers entered in the Address List field belong to
your Primary, first backup (Backup 1), or second backup (Backup 2)
group.
Rename Group
Opens the Rename Server Location Group dialog box.
Quick Reference and Administrator’s Guide 3–23
Page 40

CE net.book Page 24 Tuesday, August 20, 2002 3:51 PM
Administrator’s Instructions
Firewall Settings Tab
Use the Firewall Settings properties tab dialog to set up a SOCKS
(Socket Secure) firewall. SOCKS is a protocol that sets up a proxy
server between a client and a server. This proxy server then acts as a
channel for communication between the client and server.
Firewall Settings tab
The following sections describe the components of the Firewall
Settings tab.
Connect Via SOCKS Proxy
Select this box to enable connection via SOCKS proxy (default is not
selected).
Use Alternate Address Through Firewalls
Check this box to enable the use of an alternate IP address returned
from an ICA master browser to get through firewalls.
Address of SOCKS Proxy to Use/Port
Enter in these boxes the address and port of the SOCKS proxy server,
if used.
Address of SSL Relay to Use/Port
Enter in these boxes the address and port of the secure sockets layer
(SSL) relay, if used.
3–24 Quick Reference and Administrator’s Guide
Page 41

CE net.book Page 25 Tuesday, August 20, 2002 3:51 PM
PNLite Tab
PNLite is an ICA connection mode that enables the terminal to
connect to applications available on a Citrix server without having to
configure connections for each published application.
Refer to Server Environment > NFuse Server Configuration
Requirements for an explanation of the differences between the
methods of accessing published applications via the NFuse server and
limitations on the NFuse server application setup for use with CE.net
terminals.
PNLite connections are not supported by failover.
Administrator’s Instructions
PNLite Tab
The following sections highlight some of the fields in the PNLite tab.
Enable PNLite
Select this box to enable the PNLite application.
Server
Enter the address and port number of the NFuse server in the Address
and port of NFuse server text boxes.
Select the SSL check box if secure sockets layer services is to be used
for added security. The address of the SSL relay is entered in the
Firewall Settings tab dialog.
Quick Reference and Administrator’s Guide 3–25
Page 42

CE net.book Page 26 Tuesday, August 20, 2002 3:51 PM
Administrator’s Instructions
User Credentials
Enter the requested information in the User Name, Password, and
Domain text boxes. Select the Save password box if you want the
password retained on the terminal.
Jetcet Print Pro
JETCET PRINT Professional is a utility that supports local printing
from your CE.NET-based terminal.
JETCET PRINT Professional dialog box
✎
JETCET only supports IE 4.0, ICA, RDP, or terminal emulations that
do not use the JETCET printer driver.
Field Definitions
The following sections highlight the fields in this dialog box.
Default Printer
Displays a list of supported printers for selection as default.
Manufacturer Model
Drop-down list box displays a list of manufacturers of the currently
selected default printer.
3–26 Quick Reference and Administrator’s Guide
Page 43

CE net.book Page 27 Tuesday, August 20, 2002 3:51 PM
Serial Handshaking
This drop-down menu allows selection of software or hardware
handshaking between the terminal and the printer. The default
selection is software.
Spooler
Controls in this area are used to select print spooler options. Selecting
Use Spooler (default is checked) enables the Hold Jobs check box and
the spooler memory selection radio buttons. Currently only main
memory is available (Main Memory radio button is permanently
active). If you select Hold Jobs, the print jobs will be held in main
memory until the box is unchecked.
Administrator’s Instructions
Properties
The Properties command button opens the Printer Properties tab
dialog. This tab dialog has four tab sections: Coloring, Dithering,
Toner Saver, and Layout. Each tab contains controls for setting the
levels of each print property.
Display This Dialog While Printing
Select this check box if you want this dialog box to automatically
open when printing.
Quick Reference and Administrator’s Guide 3–27
Page 44

CE net.book Page 28 Tuesday, August 20, 2002 3:51 PM
Administrator’s Instructions
Keyboard
The Keyboard Properties dialog box, opened by clicking on Keyboard
in the user or administrator Control Panel window, allows you to
select the keyboard language, Num Lock key state, and the character
repeat parameters. The defaults are shown on the following figure.
Keyboard Properties
Field Definitions
The following sections describe the fields in the Keyboard Properties
dialog box.
Type
From this drop-down list, select the appropriate keyboard.
Keyboard drop-down list
3–28 Quick Reference and Administrator’s Guide
Page 45

CE net.book Page 29 Tuesday, August 20, 2002 3:51 PM
Locale
From this drop-down list, select the appropriate language.
NumLock on Boot
Select this option if you want the numeric keyboard to be active when
the terminal boots.
Administrator’s Instructions
LPD
✎
An IEPC keyboard is required for any language other than English
(US). The keyboard layouts are different for each of the languages in
the drop-down list.
Repeat Delay
This slider control adjusts the repeat delay of keyboard characters.
Repeat delay determines how quickly the same character displays on
screen when typed more than once.
Repeat Rate
This slider control adjusts the repeat rate of a keyboard character.
Repeat rate determines how quickly the same character displays on
screen when the associated key is held down.
A terminal with a locally-connected printer can be configured to
provide LPD (Line Printer Daemon) services, making the terminal a
printer server on the network. This section provides instructions for
setting up the terminal and the application server for LPD printing.
✎
LPD can only be used with a printer connected to the parallel port of a
terminal.
How to Set Up the Terminal to Provide LPD Print Services
To set up the thin client:
1. Open the Network dialog box by clicking on Network in the
Quick Reference and Administrator’s Guide 3–29
Terminal Properties window, and enter a static IP address for your
terminal (ask your network administrator for an IP address).
Page 46

CE net.book Page 30 Tuesday, August 20, 2002 3:51 PM
Administrator’s Instructions
2. Open the LPD Config dialog box (see the following figure) by
clicking on LPD in the Terminal Properties window.
LPD Config dialog box
3. Select the Enable Printer check box. This enables LPD printing to
a printer connected to your terminal.
4. Name the printer in the Printer Name text box. The default for
this field is Noname.
5. Type the virtual port number in the Port text box. Virtual port is a
logical device assigned when you set up LPD services on your
server. The default for this field is 515.
6. Select the Send Form Feed check box if form feeds are needed for
this print service.
How to Set Up the Application Server for Terminal LPD Printing
Refer to the following instructions that are applicable to your server
operating system.
Windows NT4 Server
To set up a Windows NT4 server:
1. Select Control Panel > Network > Services and verify the
2. Add the [Terminal Name] as the LPD printer.
3–30 Quick Reference and Administrator’s Guide
Microsoft TCP/IP Printing service is installed.
Page 47

CE net.book Page 31 Tuesday, August 20, 2002 3:51 PM
3. Navigate to Control Panel > Printers > Add Printers > My
Administrator’s Instructions
Computer > Add Port. Double-click on LPR Port.
✎
✎
If you do not see the LPR Port, you must install the Microsoft TCP/IP
Printing service.
4. Type the terminal's IP address or DNS name in the Name or
Address of Host Providing LPD text box.
5. Type the printer name (assigned earlier) in the Name of Printer on
That Machine text box.
6. Select OK and Next.
Windows 2000 Server
To set up a Windows 2000 server:
1. Select Control Panel > Administrative Tools > Services and
verify the Microsoft TCP/IP Printing services is installed.
2. Add the [Terminal Name] as the LPD printer.
3. Navigate to Control Panel > Printers > Add Printers > Local
Printer > Create a new port. Select LPR PORT.
If you do not see the LPR Port, you must install the Microsoft TCP/IP
Printing service.
4. Type the terminal's IP address or DNS name in the Name or
5. Type the printer name (assigned earlier) in the Name of Printer on
6. Select OK and Next.
✎
Quick Reference and Administrator’s Guide 3–31
At this time you can perform your normal printer setup. For example,
select the printer type and printer name of the printer manufacturer.
Address of Host Providing LPD text box.
That Machine text box.
Page 48

CE net.book Page 32 Tuesday, August 20, 2002 3:51 PM
Administrator’s Instructions
Modems
This dialog box allows entry or modification of control commands
required to operate the modem.
✎
✎
Modem Settings dialog box
Refer to the modem device instructions for listings of modem AT
commands available for the modem.
If Integrated Services Digital Network (ISDN) is used, click on the
ISDN Settings command button to open a dialog box for entering
ISDN parameters.
3–32 Quick Reference and Administrator’s Guide
Page 49

CE net.book Page 33 Tuesday, August 20, 2002 3:51 PM
ISDN Settings
The ISDN Settings dialog box allows entry of parameters and
protocol information for the ISDN modem.
Administrator’s Instructions
ISDN Settings dialog box
✎
These settings are specific to EiCon-Tech modems only. Defaults are
shown on this figure.
The following sections describe the fields located in the ISDN
Settings dialog box.
Modem Name
This is a read-only display of the manufacturer and model of the
modem selected in the Modem Settings dialog box.
Switch Type
This list box allows you to select the primary switch type from the
drop-down list.
Quick Reference and Administrator’s Guide 3–33
Page 50

CE net.book Page 34 Tuesday, August 20, 2002 3:51 PM
Administrator’s Instructions
Service Profile ID 1 and 2
In these text boxes enter the SPID numbers provided by your
telephone company.
Protocol
Select the ISDN protocol required by the telephone company.
ISDN protocol drop-down list
Mouse
Use the Mouse Properties dialog box, opened by clicking on Mouse
in the user or administrator Control Panel window, to select your
mouse properties.
Mouse Properties dialog box
Field Definitions
The sections that follow highlight the fields located in the Mouse
Properties dialog box.
3–34 Quick Reference and Administrator’s Guide
Page 51

CE net.book Page 35 Tuesday, August 20, 2002 3:51 PM
Button Configuration
Choose which button configuration you will use on your mouse. The
default is Right-handed.
Pointer Acceleration
This setting controls how long it takes for the pointer to get up to its
top speed when the mouse is moved. When it is set to None, it takes
the pointer a long time to get up to top speed. This setting does not
affect the functioning of the pointer when the mouse is being used.
Pointer Speed
This setting controls how fast the pointer moves on the screen. Slow
corresponds to slow pointer motion, and Fast corresponds to fast
pointer motion. This setting does not affect the functioning of the
pointer when the mouse is being used.
Administrator’s Instructions
Quick Reference and Administrator’s Guide 3–35
Page 52

CE net.book Page 36 Tuesday, August 20, 2002 3:51 PM
Administrator’s Instructions
Network
The Network Adapters Configuration dialog box opens when you
click on the Network icon in the administrator's Control Panel. It lists
the adapters installed on your terminal.
Network Adapters Configuration dialog box
3–36 Quick Reference and Administrator’s Guide
Page 53

CE net.book Page 37 Tuesday, August 20, 2002 3:51 PM
Changing Adapter Configurations
To change the configuration settings of an adapter, select it and click
on the Properties button in the Network Adapters Configuration
dialog box. This displays the Settings dialog box for that particular
adapter. This dialog box contains two tabbed dialogs, IP Address and
Name Servers (see the following figures). To modify the default
settings, follow the instructions in the dialogs boxes.
Administrator’s Instructions
IP Address tab
Name Servers tab
Quick Reference and Administrator’s Guide 3–37
Page 54

CE net.book Page 38 Tuesday, August 20, 2002 3:51 PM
Administrator’s Instructions
Port Lock
Click on the Port Lock icon in the administrator's control panel to
open the Port Lock dialog box. The check boxes allow you to select
which ports you want to lock (enable). The default is all boxes
checked.
Port Lock default settings
3–38 Quick Reference and Administrator’s Guide
Page 55

CE net.book Page 39 Tuesday, August 20, 2002 3:51 PM
RDP Printers
Your CE.NET terminal supports printing from an RDP server to a
local printer. Local printers may be configured and modified through
the RDP Printers utility, opened by double-clicking on the RDP
Printers icon on the administrator's Control Panel.
The following figure shows the Printers window. It contains and Add
Printer icon which selects the wizard for configuring a new printer,
and an icon for each (if any) configured printer.
Administrator’s Instructions
Printers dialog box
Adding a Printer
To add a printer configuration, select (highlight) the Add Printer icon
from the Printers dialog box and either click on the Open button or
double-click on the icon. This opens the WBT Printer Wizard.
✎
Quick Reference and Administrator’s Guide 3–39
After a printer has been added an icon displays representing the
configured printer. Selecting an icon of a configured printer changes
the name of the Open command button to “Properties”.
Page 56

CE net.book Page 40 Tuesday, August 20, 2002 3:51 PM
Administrator’s Instructions
Selecting the Printer Port
This is the first panel of the wizard. Refer to the instructions on the
panel to select the port. Then click on Next to continue to the next
panel.
Printer port selection screen
3–40 Quick Reference and Administrator’s Guide
Page 57

CE net.book Page 41 Tuesday, August 20, 2002 3:51 PM
Selecting the Printer Model
Refer to the instructions in this panel to select the model. If the User
Defined check box is selected, the next panel will prompt for the
model and manufacturer.
Administrator’s Instructions
Printer model selection screen
If your printer is not listed, check the User Defined option. After
completing the selections/entries, click on Next to continue to the
next panel.
Quick Reference and Administrator’s Guide 3–41
Page 58

CE net.book Page 42 Tuesday, August 20, 2002 3:51 PM
Administrator’s Instructions
If you selected the User Defined option, the following panel displays:
User Defined dialog box
Once the printer information is entered, click Next.
3–42 Quick Reference and Administrator’s Guide
Page 59

CE net.book Page 43 Tuesday, August 20, 2002 3:51 PM
Naming Your Printer
Follow the instructions in this panel to provide a name for the chosen
printer. Then click on Next to continue to the next panel.
Administrator’s Instructions
✎
Naming your printer screen
The Printer Name text box initially contains the manufacturer’s name
for the printer. Type over this with the name you will call this printer.
Quick Reference and Administrator’s Guide 3–43
Page 60

CE net.book Page 44 Tuesday, August 20, 2002 3:51 PM
Administrator’s Instructions
Setting the Printer as the Default
Make the appropriate selection from this screen if this will be the
default printer for Windows-based programs, then click Next.
Setting the default printer panel
Configuring Another Printer
Use this panel if you want to configure another printer. Make your
selection and click Next to continue.
Configuring another printer panel
3–44 Quick Reference and Administrator’s Guide
Page 61

CE net.book Page 45 Tuesday, August 20, 2002 3:51 PM
Completing the Printer Setup
Once you made all your selections, the following panel displays:
Administrator’s Instructions
Printer setup completion panel
Click Finish to complete the printer setup process.
Quick Reference and Administrator’s Guide 3–45
Page 62

CE net.book Page 46 Tuesday, August 20, 2002 3:51 PM
Administrator’s Instructions
Editing the Configuration of an Existing Printer
To edit the configuration of an existing printer, click on the RDP
Printers icon from the administrator’s Control Panel window. From
the Printers dialog box, highlight the printer to be edited and click on
Properties.
Printer Properties dialog box
Make any necessary updates, then click OK to lock in the changes.
3–46 Quick Reference and Administrator’s Guide
Page 63

CE net.book Page 47 Tuesday, August 20, 2002 3:51 PM
Security
The Security dialog box (see the following figure) allows
administrative control of various terminal functions related to security
and the ability to create terminal operator accounts. The dialog box is
opened by double-clicking on the Security icon on the administrator's
Control Panel.
Administrator’s Instructions
Security dialog box
Field Definitions
The following sections highlight the fields located in the Security
dialog box.
Security Enable
Select this option to enable terminal security and deactivate the Hide
Configure Buttons in Connection Manager check box. It forces a user
to log in if automatic login is not enabled. By default this check box is
not selected, but the selection is automatically made if the AutoLogin
Enable check box is selected.
Quick Reference and Administrator’s Guide 3–47
Page 64

CE net.book Page 48 Tuesday, August 20, 2002 3:51 PM
Administrator’s Instructions
Hide Configure Buttons in Connection Manager
Select this check box to disable the connection configuration buttons
(Add, Edit, Delete, and Startup) in the Connection Manager. By
default this check box is not selected.
Failover Enable Check Box
Select this option to enable the failover function. Failover allows the
unit to try the next connection in a list if a current connection attempt
(ping) is unsuccessful. Enabling this function activates Multiple
Connect and Verbose check boxes. By default this function is
disabled.
Multiple Connect Check Box
Failover must be enabled before you can access this function. The
unit will attempt a connection to all servers listed in the Connection
Manager starting from where the first connection is launched.
Ping Before Connect Check Box
When selected, the server is “pinged” before a connection is
attempted to avoid losing time waiting for failure responses.
Verbose Check Box
When selected, a Failover Log Window is displayed reporting details
about the connection process.
AutoLogin Enable Check Box
Select to enable the function. AutoLogin is enabled only for the user
name currently selected in the User Name list box. Enabling the
autologin function activates the Single Button Connect check box. By
default the AutoLogin function is disabled.
User Name Drop-down List Box
Contains a listing of user names derived from the User Accounts list
box. When AutoLogin Enable is selected, the terminal automatically
logs-in to the selected user account.
3–48 Quick Reference and Administrator’s Guide
Page 65

CE net.book Page 49 Tuesday, August 20, 2002 3:51 PM
Single Button Connect Check Box
Select to enable the single-button connect function. By default the
function is not selected.
DHCP Connection Enable Check Box
Select to enable automatic DHCP connection. Selecting this check
box enables the Connection Name and Type list box. This function is
enabled by default if DHCP is enabled (Control Panel > Network
dialog box).
Connection Name and Type Drop-down List Box
Displays all application connections available to your terminal. You
must select the connection that will use information supplied by
DHCP. By default this function is Default ICA Connection {ICA}.
Administrator’s Instructions
Auto Fail Recovery
Select this check box to enable the auto fail recovery function. Auto
fail recovery checks the validity of a disconnection, and closes down a
connection if the disconnection is valid. By default the function is not
selected. The terminal reconnects to a session when you log off or end
an ICA or RDP session. If the DHCP Connection Enable check box is
selected (for ICA or RDP), you must have a server that can respond to
ping commands set in the DHCP Server Options or reconnection will
not be performed (per RDP- or ICA-assigned options).
Reset HotKey Enable
Select this box to allow the terminal to be reset using a hot key. The
hot key reset function must be performed as directed by the system
administrator.
User Accounts List Box
This lists all the operator accounts. Each listing includes the name,
security privilege level, and whether auto start and auto login are
enabled.
Quick Reference and Administrator’s Guide 3–49
Page 66

CE net.book Page 50 Tuesday, August 20, 2002 3:51 PM
Administrator’s Instructions
Add User and Modify User Command Buttons
Opens a User Account dialog box for adding or modifying a user
account. See the Adding a User Account section that follows for more
information.
Permissions Command Button
Opens the following dialog box for configuring the Control Panel for
user- and guest-level operators. The defaults are shown in the
following figure.
Permissions settings
3–50 Quick Reference and Administrator’s Guide
Page 67

CE net.book Page 51 Tuesday, August 20, 2002 3:51 PM
Adding a User Account
From the Security dialog box, clicking on the Add User command
button opens the Add User Account dialog box, and selecting a user
in the list box and clicking on the Modify User command button
opens the Modify User Account dialog box for the selected user.
These two dialog boxes are identical except that the first is blank and
the second contains the current information for the selected user.
Administrator’s Instructions
Adding a user account dialog box
The following sections describe the fields located in the Add User
Account dialog box.
Enable Password Change
This check box allows the operator to change the password by
selecting this option at logon.
✎
Quick Reference and Administrator’s Guide 3–51
After the first administrative assignment of a password, the
administrator can not change it. The password may be changed only
by the operator at logon. The logon account will be disabled if the
administrator attempts to change the password using this dialog box.
Page 68

CE net.book Page 52 Tuesday, August 20, 2002 3:51 PM
Administrator’s Instructions
User Name, Password, and Confirm Password
Enter the requested information in these text boxes.
Account Privilege
From the Administrator, User, and Guest radio buttons, select the
privilege level of the operator user account.
A terminal account is a group of connection and configuration
parameters organized into an account and assigned to a terminal user.
Terminal accounts can include specific connections, privileges,
password protection, Autologin and/or Autostart and Single Button
Connect functions. The three types of accounts are Administrator,
User, and Guest.
Administrator
The Administrator account has the greatest amount of privileges.
With this account you can:
Use Enable Password Change (to permit users to change the
■
passwords to their accounts).
Add, modify, and delete accounts, and configure or reconfigure
■
the connections for any account.
Use all the other functions of the terminal.
■
User
With a User account, you will not be able to configure the connection
for the account unless enabled by the administrator. You will be able
to access the password function to change your password (if this
privilege is granted). You can also access the following Terminal
Properties sheets: General, Input, Display, Network, Printers, Apps,
Devices, and SysInfo.
Guest
The Guest account has the fewest privileges. With this account you
can not configure a connection unless enabled by the administrator.
You also can not gain access to the password function or effect any
changes to security.
3–52 Quick Reference and Administrator’s Guide
Page 69

CE net.book Page 53 Tuesday, August 20, 2002 3:51 PM
With this account type you can access the following Terminal
Properties sheets: General, Input, Display, and SysInfo.
Administrator’s Instructions
✎
The administrator may modify the default User and Guest
configuration privileges through the administrator Control Panel >
Security dialog box.
Allow Access to Connection Manager
If connections are set to automatically start when the operator
manually or automatically logs on, the operator will not be able to
access the Connection Manager unless this box is selected. The check
box is disabled for an administrator log-on account.
Connections Group
This group includes two list boxes and five associated command
buttons:
All available connections, which are created by the administrator
■
and appear in the administrator's Connection Manager window,
appear in the left list by name and connection type. Use the
Assign button to copy selected connections from the left list to
the right list. These connections then appear in the Connection
Manager when the operator logs on. Use the Unassign button to
remove connections from the right list.
The Up and Down buttons can be used to arrange the order of the
■
list. Ordering may be required if failover is operational and an
attempted connection fails.
The Toggle Autostart button may be used to enable/disable the
■
connection for automatic startup when the operator logs on.
Quick Reference and Administrator’s Guide 3–53
Page 70

CE net.book Page 54 Tuesday, August 20, 2002 3:51 PM
Administrator’s Instructions
SNMP
The terminal may be managed through standard third-party simple
network management protocol (SNMP) tools. Parameters required for
SNMP management may be entered in the SNMP Network
Administration dialog box, opened by double-clicking on the SNMP
icon in the administrator's Control Panel window. This dialog box
contains two tab dialogs, Agent, and Security. The following figures
show and describe each dialog.
✎
Agent Dialog Tab
Refer to the manufacturer’s MIB for requirements to perform a
software upgrade using SNMP.
SNMP agents run in network elements and respond to Network
Management Station (NMS) queries (GETs).
Agent dialog tab
The following sections describe the fields located in the SNMP
Network Administration Agent tab.
3–54 Quick Reference and Administrator’s Guide
Page 71

CE net.book Page 55 Tuesday, August 20, 2002 3:51 PM
Top Area Fields
The top group of controls contains a check box for enabling firmware
update through SNMP, and text boxes for entry of the physical
Location of the terminal and the name of the Contact person
responsible for the terminal. Custom fields text boxes are also
provided for supplying supplemental information (if any) required by
the SNMP manager.
Community Name
An SNMP community is a logical relationship between an SNMP
agent and one or more SNMP managers. The community has a name,
and all members of a community have the same access privileges.
Administrator’s Instructions
Select the Community Name that the terminal will participate in for
SNMP management. The default is public. Other community names
may be added to the list by clicking on the Add Community button,
which opens the following dialog box.
Community Configuration dialog box
Quick Reference and Administrator’s Guide 3–55
Page 72

CE net.book Page 56 Tuesday, August 20, 2002 3:51 PM
Administrator’s Instructions
Trap Destinations
Agents send unsolicited reports (called traps) back to the NMS when
certain network activity occurs. These traps can spawn various types
of events.
Click on the Add button to open the following dialog box, which may
be used to add NMS trap servers to the list.
Security Dialog Tab
SNMP Configuration dialog box
This tab allows you to add/change the SNMP security settings.
Security Dialog Tab
3–56 Quick Reference and Administrator’s Guide
Page 73

CE net.book Page 57 Tuesday, August 20, 2002 3:51 PM
The following sections describe the fields in the Security Dialog tab.
Top Area Fields
The top area allows the authentication failure trap to be enabled, and
assignment of rights to community names. The Add and Edit buttons
open the following dialog box which allows entry/editing of
community names and assignment of rights.
Administrator’s Instructions
Community Configuration dialog box
Bottom Area Fields
The bottom area allows selection of hosts from which SNMP packets
may be accepted. Instead of globally authorizing all hosts, specified
hosts appearing in the list box may be authorized. The list may be
edited by using the buttons on the right. The Add and Edit buttons
open the following dialog box.
SNMP Configuration dialog box
Quick Reference and Administrator’s Guide 3–57
Page 74

CE net.book Page 58 Tuesday, August 20, 2002 3:51 PM
Administrator’s Instructions
SNTP Client
The terminal is capable of synchronizing its clock to time provided by
a SNTP (Simple Network Time Protocol) server. The SNTP Client
dialog box opens by double-clicking on the SNTP Client icon on the
administrator's Control Panel.
✎
SNTP Client dialog box
SNTP client is available only when Internet Explorer is installed.
The SNTP Server box lists servers that will be contacted to provide
the time synchronization signal. The server list can be modified using
the Add and Edit buttons (see the following figures), or list items may
be deleted using the Remove button.
The synchronization can be set to occur upon boot (using the
Synchronize Time on Boot check box), or can be initiated
immediately by clicking on the Synchronize button. A message
appears if synchronization fails. This local synchronization feature
can be used to test availability of listed SNTP servers.
Add SNTP Server dialog box
3–58 Quick Reference and Administrator’s Guide
Page 75

CE net.book Page 59 Tuesday, August 20, 2002 3:51 PM
Edit SNTP Server dialog box
System
The System Info dialog box opens by clicking on the System icon in
the user or administrator Control Panel window. The two dialog tabs
are described in the following sections.
Administrator’s Instructions
General Tab
The General tab dialog displays manufacturer's name, product
information, installed memory, operating system version, and
copyright information. It also contains a check box that allows the
administrator to reset the terminal to factory defaults (the check box is
disabled for User and Guest operators).
General tab dialog box
Quick Reference and Administrator’s Guide 3–59
Page 76

CE net.book Page 60 Tuesday, August 20, 2002 3:51 PM
Administrator’s Instructions
The following message displays upon administrator selection of the
Reset the Terminal to Factory-default Property Settings check box.
Follow the instructions to reset the terminal.
Systems Settings change caution dialog box
Ä
Systems Info Tab
CAUTION: All prior changes to the factory default settings will be lost.
Be prepared to restore settings either manually or through remote
administration.
The System Info tab dialog displays the Network Settings, Hardware
Number, and Flash Memory information as shown in the following
figure.
System Info tab
3–60 Quick Reference and Administrator’s Guide
Page 77

CE net.book Page 61 Tuesday, August 20, 2002 3:51 PM
Touchscreen
The MicroTouch Touchscreen Properties tabbed dialog box opens by
clicking on the Touchscreen icon on the Control Panel. The following
sections discuss each of the tabs located in this properties dialog box.
Touchscreen properties
Calibrate Tab
The Calibrate button is enabled if the touch screen is installed. Click
on the button and follow the prompts.
Administrator’s Instructions
Touchscreen Calibrate tab
Quick Reference and Administrator’s Guide 3–61
Page 78

CE net.book Page 62 Tuesday, August 20, 2002 3:51 PM
Administrator’s Instructions
Touch Settings Tab
From this tab you can select which mode you want to use.
Touchscreen Touch Settings tab
Cursor Tab
This dialog tab includes Cursor Offset and Stabilize Cursor areas.
Follow the prompts and click on the Set and Stabilize buttons as
instructed.
Touchscreen Cursor tab
3–62 Quick Reference and Administrator’s Guide
Page 79

CE net.book Page 63 Tuesday, August 20, 2002 3:51 PM
Hardware Tab
This dialog tab contains Information and Connection areas. The
Information area displays information about the touch screen
controller. The Connection area allows selection of the port to which
the touch screen is connected. The Find Touchscreen button allows
the touchscreen to be detected automatically.
Administrator’s Instructions
Touchscreen Hardware tab
Quick Reference and Administrator’s Guide 3–63
Page 80

CE net.book Page 64 Tuesday, August 20, 2002 3:51 PM
Administrator’s Instructions
Upgrade
This dialog box opens by double-clicking on the Upgrade icon in the
administrator Control Panel. It is used enter information required for
Automatic DHCP and FTP Pull Upgrade methods. It allows the
choice of having the DHCP server provide the location of the file
server on which the upgrade image files are located or local entry of
this location. The check box allows selection of having the upgrade to
be performed automatically each time the terminal is restarted. The
Upgrade command button initiates an immediate upgrade.
Upgrade dialog box
Refer to the Remote Administration and Software Upgrades chapter
later in this guide for more information on performing upgrades.
3–64 Quick Reference and Administrator’s Guide
Page 81

CE net.book Page 65 Tuesday, August 20, 2002 3:51 PM
Vol ume
The Volume Properties dialog box opens by clicking on the Volume
icon in the Control Panel. It contains a slider for setting the volume
and four check boxes for enabling sounds for various events and
conditions. Follow the prompts on the dialog for making the volume
setting and check box selections.
Administrator’s Instructions
Volume dialog box
Quick Reference and Administrator’s Guide 3–65
Page 82

CE net.book Page 66 Tuesday, August 20, 2002 3:51 PM
Administrator’s Instructions
Connection Manager Window
The following figure shows the Connection Manager window for an
operator with administrator-level log-on privileges. This window
provides the operator with additional privileges not available to
user-or guest-level operators.
Administrator’s Connection Manager window
Field Definitions
This section describes the fields and options located in the
Connection Manager window.
Connections List Box
This is a list of connections that you can use. Click on a list entry to
select and highlight it, then click on the Connect button to open the
connection, or click on the End button to terminate the connection.
You may also double-click on the selection to open it.
3–66 Quick Reference and Administrator’s Guide
Page 83

CE net.book Page 67 Tuesday, August 20, 2002 3:51 PM
Icon
The icon preceding the listed name indicates the type of connection.
A computer terminal icon represents a standard thin client, terminal
emulation, or VPN connection. A telephone icon represents a dial-up
connection. A composite icon consisting of a computer terminal and a
telephone indicates that the standard connection will access the
network through a dial-up server (“tagged” in administrator's Dial-up
connection wizard).
Administrator’s Instructions
Name
Type
Status
✎
If a standard connection is configured to access an application server
through dial-up (using the connection type’s connection wizard), the
icon is not tagged.
Name given to the connection by the administrator when the
connection definition parameters are entered (administrator Add or
Edit button).
Type of connection, selected by the administrator through the Add or
Edit buttons. There are five connection types: RDP, ICA, Dialup,
TEC, and VPN. Refer to the sections later in this chapter for more
information about each one.
If a connection is alive, the status listed for that connection is Active.
If a connection is not alive, the entry is blank.
Startup
Autostart is displayed if the connection is set to start at terminal
startup; otherwise the entry is blank.
Connection Button
Click on a connection in the Connections list box to highlight it. Click
on the Connect command button to make the highlighted connection.
You can also double-click on a selection to make a connection.
Quick Reference and Administrator’s Guide 3–67
Page 84

CE net.book Page 68 Tuesday, August 20, 2002 3:51 PM
Administrator’s Instructions
End Button
Click on the End command button to end the connection process.
When you press the End button and the connection is active, the
active session is disconnected. The End command button is enabled
when one or more sessions become active.
Add Button
Add opens the New Connection dialog box shown in the following
figure. The drop-down list box displays the available connection
types. Select a connection type in the list and click on OK to initiate a
setup wizard for the connection.
Edit Button
Delete Button
New Connection dialog box
This function allows the editing of connection parameters for the
currently selected connection. It reopens the connection wizard or
dialog boxes that allow modifications to the parameters entered when
the connection definitions were created.
When the Delete button is used, it causes the currently selected
connection to be deleted.
3–68 Quick Reference and Administrator’s Guide
Page 85

CE net.book Page 69 Tuesday, August 20, 2002 3:51 PM
Startup Button
This selection opens the Startup Options dialog box, that allows the
currently selected connection to automatically open on terminal start
up.
Startup Options dialog box
Administrator’s Instructions
Control Panel Button
Control Panel opens an extended Control Panel window, which
provides access to administrative-level terminal settings. See the
Control Panel Window section of this chapter for information about
the administrator control panel.
Shut Down Button
Shut Down opens the Shutdown Window dialog box, which allows
you to log out, shut down, or shut down and restart the terminal. The
following figure shows the selections.
Shutdown dialog box
Make your selection and click on OK, or click Cancel to cancel the
action and close the dialog box. The following section describes each
of the Shutdown options available.
Quick Reference and Administrator’s Guide 3–69
Page 86

CE net.book Page 70 Tuesday, August 20, 2002 3:51 PM
Administrator’s Instructions
Logout
By default this radio button is disabled. The terminal's security
function must be enabled to activate this radio button.
Shutdown the Terminal
Click on this radio button to shut down the terminal without restarting
it. A prompt will be displayed asking if you want to continue.
Shutdown and Restart
Click on this radio button to shut down then restart the terminal. A
prompt will be displayed asking if you want to continue.
Connection Types
This section describes the five connection types available.
RDP
RDP (Remote Desktop Protocol), like ICA, is a network protocol that
allows thin clients (the CE.NET terminals) to communicate with the
terminal server or Windows 2000 Server with Terminal Services over
the network. This protocol is based on the T.120 protocol, an
international, standard multichannel conferencing protocol currently
used in Microsoft NetMeeting. The CE.NET terminal supports RDP
version 5.1. Version 5.1 supports more features than ICA, but the
bandwidth required is greater.
ICA
ICA (Independent Computing Architecture) is a three-tier,
server-based computing technology that separates an application’s
logic from its user interface. A CE.NET terminal serves as an ICA
thin client that allows the user to interact with the application's GUI
interface, while all of the application's processes are executed on the
server. With ICA, applications consume as little as one-tenth of their
normal network bandwidth. The ICA protocol transfers only
keystrokes, mouse clicks and screen updates. Combined with
Metaframe, ICA also allows audio across the network.
3–70 Quick Reference and Administrator’s Guide
Page 87

CE net.book Page 71 Tuesday, August 20, 2002 3:51 PM
This efficiency enables the latest, most powerful 32-bit applications
to be accessed with exceptional performance, even over telephone
lines with 28k modems.
PNLite is an ICA connection mode that enables the CE.NET terminal
to connect to applications available (“published”) on an ICA server
without having to configure connections for individual published
applications.
Internet
Dial-Up
Session servers may be contacted through dial-up. A connection or
connections listed in the Connection Manager may be tagged for
launching when the dial-up connection is established. The
administrator may configure dial-up connections through a dial-up
wizard. A small graphic telephone is appended to Connection
Manager icons tagged for dial-up.
Administrator’s Instructions
TEC
VPN
A terminal emulation application is built-in to the CE.NET terminal.
It is used for running legacy character-based applications on remote
computers. The administrator may set up a wide variety of
connections that an operator may open through the Connection
Manager window. The host computers are accessed through TCP/IP
network, dial-up modem, or serial port.
Virtual Private Network (VPN) uses the PPTP (Point-to-Point
Tunneling Protocol) network protocol that enables the secure transfer
of data between a remote client (in this case a CE.NET terminal) and
an enterprise server environment by creating a VPN across
TCP/IP-based data networks such as the Internet. It provides a
password-protected path through the enterprise firewall to the
enterprise server environment in which the network and session
services required by CE.NET terminals reside.
Quick Reference and Administrator’s Guide 3–71
Page 88

CE net.book Page 72 Tuesday, August 20, 2002 3:51 PM
Administrator’s Instructions
Creating New Connections
This section discusses adding different types of new connections to
your terminal. You create new connections by clicking the Add button
in the Connection Manager window. This action initiates the New
Connection dialog box (see the following figure).
Citrix ICA Client
✎
New Connection dialog box
From the pull down menu, select the type of connection you want to
create. You will have several choices to select from.
Available connection types
See the following sections for instructions on creating the different
types of connections.
This section describes how an administrator can create a new ICA
client connection definition.
Internet Explorer requires a minimum of 16 MB of flash memory and
32 MB of RAM installed on the terminal. The application may not be
factory-installed on some models because of competition for available
memory by other installed applications. Contact the manufacturer for
availability of Internet Explorer as an add-on.
The ICA connection wizard opens upon selecting the Citrix ICA
Client connection type in the administrator's Connection Manager
New Connection dialog box.
3–72 Quick Reference and Administrator’s Guide
Page 89

CE net.book Page 73 Tuesday, August 20, 2002 3:51 PM
Administrator’s Instructions
✎
For all panels of the ICA connection wizard, use the Cancel, Next,
Back, and Finish buttons as appropriate when navigating through the
wizard; the following guided tour assumes that the reader understands
these basic operations.
Specify Connection Type Panel
The first panel of the wizard allows you to select the connection type.
This selection must be made based on how the terminal accesses the
ICA application server (see Server Environment). If Dial-In
Connection is selected, the wizard will present the Dial-In Devices
panel, before continuing with panels common to both connection
types (including the Network Connection selection).
Selecting the connection type
Make the appropriate selection and click Next to continue.
At this point, use the following instructions that apply to the
connection type you selected.
Quick Reference and Administrator’s Guide 3–73
Page 90

CE net.book Page 74 Tuesday, August 20, 2002 3:51 PM
Administrator’s Instructions
Dial-In Connection
✎
This is a dial-in to the application server; it is distinguished from the
dial-in connection available from the Connection Manager window
which dials a server that provides access to a network hosting
application servers.
The following Dial-In Devices panel allows you to select the dial-in
device, either a direct serial connection or a modem. Contact the
manufacturer for available modems.
Dial-In Device dialog box
From the drop down Dial-In Device menu, select the appropriate
modem, then click Configure. This action opens up the Device
Properties dialog box with the Port Settings tab active.
Port Settings tab
3–74 Quick Reference and Administrator’s Guide
Page 91

CE net.book Page 75 Tuesday, August 20, 2002 3:51 PM
Call Options tab
Administrator’s Instructions
Select the appropriate entries for the Port Settings and Call Options
tabs and then click OK to retain the settings and exit Device
Properties.
From the Dial-In Devices dialog box, click Finish to accept the
settings and close the wizard, or click Next to continue with the
following steps of the wizard.
Quick Reference and Administrator’s Guide 3–75
Page 92

CE net.book Page 76 Tuesday, August 20, 2002 3:51 PM
Administrator’s Instructions
Network Connection
After you have completed setting up the Dial-In Connection
procedures or if you selected Network Connection from the Specify
Connection Type, you should following the following screens and
instructions.
Select a Citrix Server or Published Application
The first panel of this series prompts you to select a Citrix server from
a list or to enter a server name. The server name entry can be an IP
address or a valid DNS name. The list entries are created from
browsing for servers on the network when the dialog panel opens; it
may be updated by clicking on the Refresh command button.
Selecting a Citrix Server or Published Application dialog box
Click on Server Location to open a dialog that allows you to select a
server or a published application.
Server Location dialog box
3–76 Quick Reference and Administrator’s Guide
Page 93

CE net.book Page 77 Tuesday, August 20, 2002 3:51 PM
After making your selections, click OK to return back to the Select a
Citrix Server or Published Application dialog box. From this dialog
box click Next to continue.
Select a Title for the ICA Connection
In this panel, enter the title that is to appear in the Connection
Manager list.
Administrator’s Instructions
Selecting a title
Click Next to continue.
Specify an Application
Make entries in the Command Line and Working Directory text boxes
required to launch an application when the server connection is made.
Leave the fields blank if you just want to see a server desktop.
Specifying an application
Click Next to continue.
Quick Reference and Administrator’s Guide 3–77
Page 94

CE net.book Page 78 Tuesday, August 20, 2002 3:51 PM
Administrator’s Instructions
Specify Logon Information
The information asked for in this dialog panel may be required by the
server before access is granted.
Entering logon information
Click Next to continue.
Select Windows Options Panel
A smaller color depth will result in faster network speed at the
expense of display quality.
Selecting the Windows options
Click Next to continue.
3–78 Quick Reference and Administrator’s Guide
Page 95

CE net.book Page 79 Tuesday, August 20, 2002 3:51 PM
Compression, Encryption, and Sound Panel
This dialog panel is used for making various option selections.
Administrator’s Instructions
Compression, Encryption, and Sound options
Click Next to continue.
Firewall Settings Panel
You may need to enter information in this dialog panel to get through
an enterprise firewall or other security barrier.
Firewall settings
Click on Finish to save the wizard entries and return the display to the
Connection Manager window. The new connection appears in the list.
Quick Reference and Administrator’s Guide 3–79
Page 96

CE net.book Page 80 Tuesday, August 20, 2002 3:51 PM
Administrator’s Instructions
Dial-Up
A new dial-up connection may be defined by selecting the Dial-Up
Client connection type in the administrator's Connection Manager >
New Connection dialog box. This launches the following Dial-Up
Configuration Wizard. An existing dial-up connection profile may be
modified by selecting it in the Connection Manager window and
clicking the Edit command button. This launches the Dial-Up
Configuration Wizard with the previously defined parameters and
entries appearing in the wizard panels and available for modification.
✎
For all panels of the Dial-Up Configuration Wizard, use the Cancel,
Next, Back, and Finish buttons as appropriate when navigating
through the wizard.
Name Panel
The following figure shows the first panel in the wizard. Enter the
name that is to appear in the Connection Manager list.
Naming the connection
An error dialog box is displayed if Next is clicked with an empty text
box or invalid characters. Click Next to continue to the next wizard
panel.
3–80 Quick Reference and Administrator’s Guide
Page 97

CE net.book Page 81 Tuesday, August 20, 2002 3:51 PM
Properties Panel
Use this panel to enter dial-up properties. Command buttons on this
panel open dialog boxes for entering properties.
Administrator’s Instructions
Entering properties panel
The following sections describe the fields and command buttons
located in this panel. After making your entries click Next to continue
to the next wizard panel.
Serial Port
Use this drop-down list to select the access path to the dial-up server.
Country Code, Area Code, Telephone Number
Enter the telephone number and supporting information for dialing.
Quick Reference and Administrator’s Guide 3–81
Page 98

CE net.book Page 82 Tuesday, August 20, 2002 3:51 PM
Administrator’s Instructions
Dialing Properties
Click on the Dialing Properties command button to open the
following dialog box. Make the selections and entries indicated in the
dialog. Refer to the modem instruction manual for information about
Dialing Patterns.
Dialing Properties dialog box
Configure
Click on the Configure command button to open the following tabbed
dialog. When you are finished with your selections and entries in both
tabbed dialogs, click OK to exit the Device Properties dialog box.
3–82 Quick Reference and Administrator’s Guide
Page 99

CE net.book Page 83 Tuesday, August 20, 2002 3:51 PM
In the Port Settings tab, make the appropriate entries for the port
configuration.
Administrator’s Instructions
Port Settings tab
In the Call Options tab, make the necessary entries and then click OK
to exit.
Call Options tab
Quick Reference and Administrator’s Guide 3–83
Page 100

CE net.book Page 84 Tuesday, August 20, 2002 3:51 PM
Administrator’s Instructions
TCP/IP Settings
Click on the TCP/IP Settings command button to open the following
dialog box. Make the indicated entries, and then click OK close the
dialog box and return to the wizard.
TCP/IP Settings dialog box
Security
Click on the Security command button to open the following dialog
box. Select the desired Authentication and Encryption Policy, and if
desired, click on Unsave Password to delete a password for this
connection from memory. When you are finished making your
selections, click OK to close the dialog box.
Security Settings
3–84 Quick Reference and Administrator’s Guide
 Loading...