

Page 1
HP Photosmart D7500 series
Basics Guide
Grundlagenhandbuch
Guide d’utilisation
Guida di base
Page 2

Hewlett-Packard Company notices
The information contained in this document is subject to change without notice.
All rights reserved. Reproduction, adaptation, or translation of this material is prohibited without prior written permission of Hewlett-Packard, except
as allowed under copyright laws. The only warranties for HP products and services are set forth in the express warranty statements accompanying
such products and services. Nothing herein should be construed as constituting an additional warranty. HP shall not be liable for technical or editorial
errors or omissions contained herein.
© 2007 Hewlett-Packard Development Company, L.P.
Windows, Windows 2000, and Windows XP are U.S. registered trademarks of Microsoft Corporation.
Windows Vista is either a registered trademark or trademark of Microsoft Corporation in the United States and/or other countries.
Intel and Pentium are trademarks or registered trademarks of Intel Corporation or its subsidiaries in the United States and other countries.
Hewlett-Packard Company weist auf Folgendes hin:
Die Informationen in diesem Dokument können jederzeit ohne vorherige Ankündigung geändert werden.
Alle Rechte vorbehalten. Die Verfielfältigung, Adaptation oder Übersetzung dieses Materials ist ohne vorherige schriftliche Genehmigung von
Hewlett-Packard verboten, mit Ausnahme des Umfangs, den die Urheberrechtsgesetze zulassen. Die einzigen Gewährleistungen für HP-Produkte und
Dienste werden in den Gewährleistungserklärungen beschrieben, die im Lieferumfang unserer Produkte und Dienste enthalten sind. Keine in diesem
Dokument beschriebene Bedingung stellt eine zusätzliche Gewährleistung dar. HP ist nicht haftbar für technische oder redaktionelle Fehler sowie
Auslassungen.
© 2007 Hewlett-Packard Development Company, L.P.
Windows, Windows 2000 und Windows XP sind in den USA eingetragene Marken der Microsoft Corporation.
Windows Vista ist eine eingetragene Marke oder Marke der Microsoft Corporation in den USA und/oder in anderen Ländern.
Intel und Pentium sind Marken oder eingetragene Marken der Intel Corporation oder seiner Tochterunternehmen in den USA und in anderen
Ländern.
Avis publiés par la société Hewlett-Packard
Les informations contenues dans ce document peuvent faire l'objet de modifications sans préavis.
Tous droits réservés. La reproduction, l'adaptation ou la traduction de ce matériel est interdite sans l'accord écrit préalable de Hewlett-Packard, sauf
dans les cas permis par la législation relative aux droits d'auteur. Les seules garanties relatives aux produits et services HP sont décrites dans les
déclarations de garantie expresse accompagnant lesdits produits et services. Aucun élément de ce document ne constitue une garantie
supplémentaire. Hewlett-Packard ne saurait être tenu pour responsable des erreurs ou omissions techniques ou rédactionnelles de ce document.
© 2007 Hewlett-Packard Development Company, L.P.
Windows, Windows 2000 et Windows XP sont des marques déposées de Microsoft Corporation aux Etats-Unis.
Windows Vista est une marque déposée ou une marque de Microsoft Corporation aux Etats-Unis et/ou dans d'autres pays.
Intel et Pentium sont des marques ou des marques déposées d'Intel Corporation ou de ses filiales aux Etats-Unis et dans d'autres pays.
Avvisi della Hewlett-Packard Company
Le informazioni contenute in questo documento sono soggette a modifica senza preavviso.
Tutti i diritti riservati. Sono proibiti la riproduzione, l'adattamento o la traduzione di questo materiale senza previa autorizzazione scritta della
Hewlett-Packard, salvo per quanto consentito dalle leggi sui diritti d'autore. Le uniche garanzie per i prodotti e i servizi HP sono definite nelle
dichiarazioni di garanzia esplicita che accompagnano tali prodotti e servizi. Nulla di quanto dichiarato nel presente documento costituisce una
garanzia aggiuntiva. HP non sarà ritenuta responsabile di eventuali omissioni o errori tecnici o editoriali qui contenuti.
© 2007 Hewlett-Packard Development Company, L.P.
Windows, Windows 2000 e Windows XP sono marchi registrati di Microsoft Corporation negli Stati Uniti.
Windows Vista è un marchio o un marchio registrato di Microsoft Corporation negli Stati Uniti e in altri Paesi.
Intel e Pentium sono marchi o marchi registrati di Intel Corporation o di società controllate da Intel negli Stati Uniti e in altri Paesi.
Page 3

HP Photosmart D7500 series
Basics Guide
English
Page 4

English
Page 5

Contents
1 HP Photosmart overview
The HP Photosmart at a glance.................................................................................................2
Control panel features................................................................................................................3
Find more information.................................................................................................................4
Load paper.................................................................................................................................4
Print directly onto a CD/DVD......................................................................................................7
Avoid paper jams........................................................................................................................9
Print a photo on photo paper....................................................................................................10
Replace the ink cartridges........................................................................................................11
2 Troubleshooting and support
Uninstall and reinstall the software...........................................................................................14
Setup troubleshooting...............................................................................................................15
Clear paper jams......................................................................................................................17
CD/DVD print troubleshooting..................................................................................................17
Information on ink cartridges and the printhead.......................................................................21
Support process.......................................................................................................................21
3 Technical information
System requirements................................................................................................................22
Product specifications...............................................................................................................22
Regulatory notices....................................................................................................................22
Warranty...................................................................................................................................23
English
1
Page 6

1 HP Photosmart overview
Use the HP Photosmart to print photos from a memory card or print directly on the surface
of specially coated CDs and DVDs. You can access many HP Photosmart functions
directly from the control panel, without turning on your computer.
NOTE: This guide introduces basic operations and troubleshooting, as well as
English
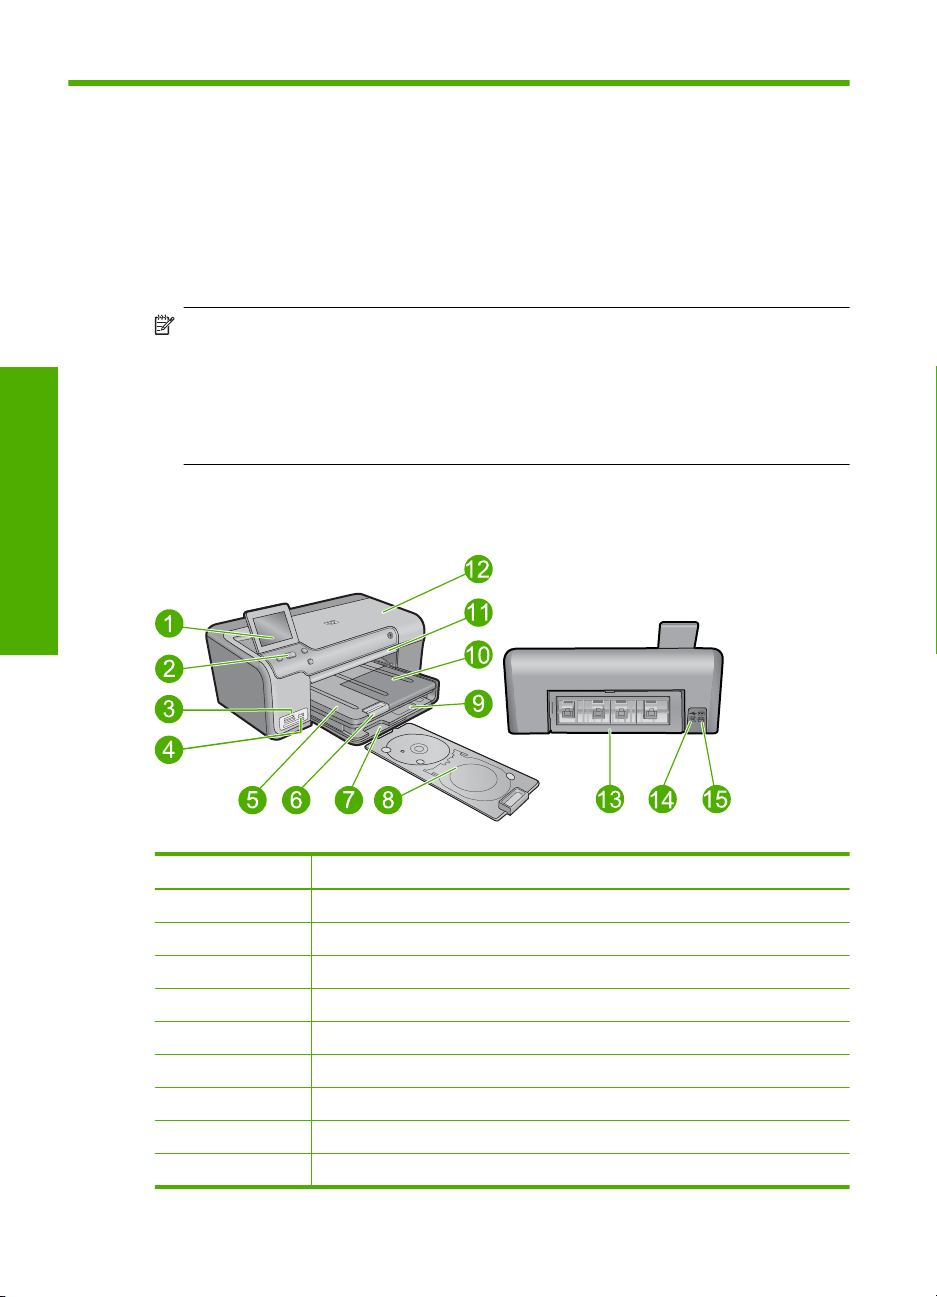
The HP Photosmart at a glance
provides information for contacting HP support and ordering supplies.
The onscreen Help details the full range of features and functions, including use of
the HP Photosmart Software that came with the HP Photosmart.
Label Description
1 Color graphics display (also referred to as the display)
2 Control panel
3 Memory card slots and Photo light
4 Front USB port
5 Output tray
6 Paper tray extender (also referred to as the tray extender)
7 CD/DVD holder storage area
8 CD/DVD holder
9 Main input tray (also referred to as the input tray)
10 Photo tray
11 CD/DVD tray
12 Ink cartridge door
2 HP Photosmart D7500 series
Page 7
(continued)
Label Description
13 Rear door
14 Rear USB port
15 Power connection*
* Use only with the power adapter supplied by HP.
Control panel features
The following diagram and related table provide a quick reference to the HP Photosmart
control panel features.
Label Icon Name and Description
1 Display: The touch screen display shows menus, photos, and messages. The display
can be pulled up and angled for better viewing.
2 Attention light: Indicates a problem occurred. See the display for more information.
3 Home: Returns to the Home screen (the default screen when you turn on the
product).
4 Print Photos: Prints the photos selected on your memory card. If no photos are
currently selected, the product prints the photo currently showing on the display.
5 Cancel: Stops the current operation and returns to the main screen.
English
6 Red-Eye Removal: Turns the Red-Eye Removal feature on or off. This feature turns
7 On: Turns the product on or off. When the product is off, a minimal amount of power
on when a memory card is inserted. The product automatically corrects red-eye
coloring in the photo currently shown on the display.
is still used. To completely remove power, turn off the product, and then unplug the
power cord.
Control panel features 3
Page 8

Chapter 1
Find more information
A variety of resources, both printed and onscreen, provide information about setting up
and using the HP Photosmart.
Start Here guide
The Start Here guide provides instructions for setting up your HP Photosmart and
English
Onscreen Help
installing software. Make sure you follow the steps in the Start Here guide in order.
If you have problems during setup, see Troubleshooting in the last section of the Start
Here guide, or see “
The onscreen Help provides detailed instructions on features of your HP Photosmart that
are not described in this guide, including features that are only available using the
software you installed with your HP Photosmart. The onscreen Help also provides
regulatory and environmental information.
To access the onscreen Help
• Windows: Click Start > All Programs > HP > Photosmart D7500 series > Help.
• Macintosh: Open the HP Device Manager and click the ? icon. Next, click the main
menu and select Photosmart D7500 series.
Troubleshooting and support” on page 14 in this guide.
HP Web site
If you have Internet access, you can get help and support from the HP Web site at
www.hp.com/support. This Web site offers technical support, drivers, supplies, and
ordering information.
Load paper
You can load different types and sizes of paper in the HP Photosmart, including letter or
A4 paper, photo paper, transparencies, and envelopes. For more information, see the
onscreen Help.
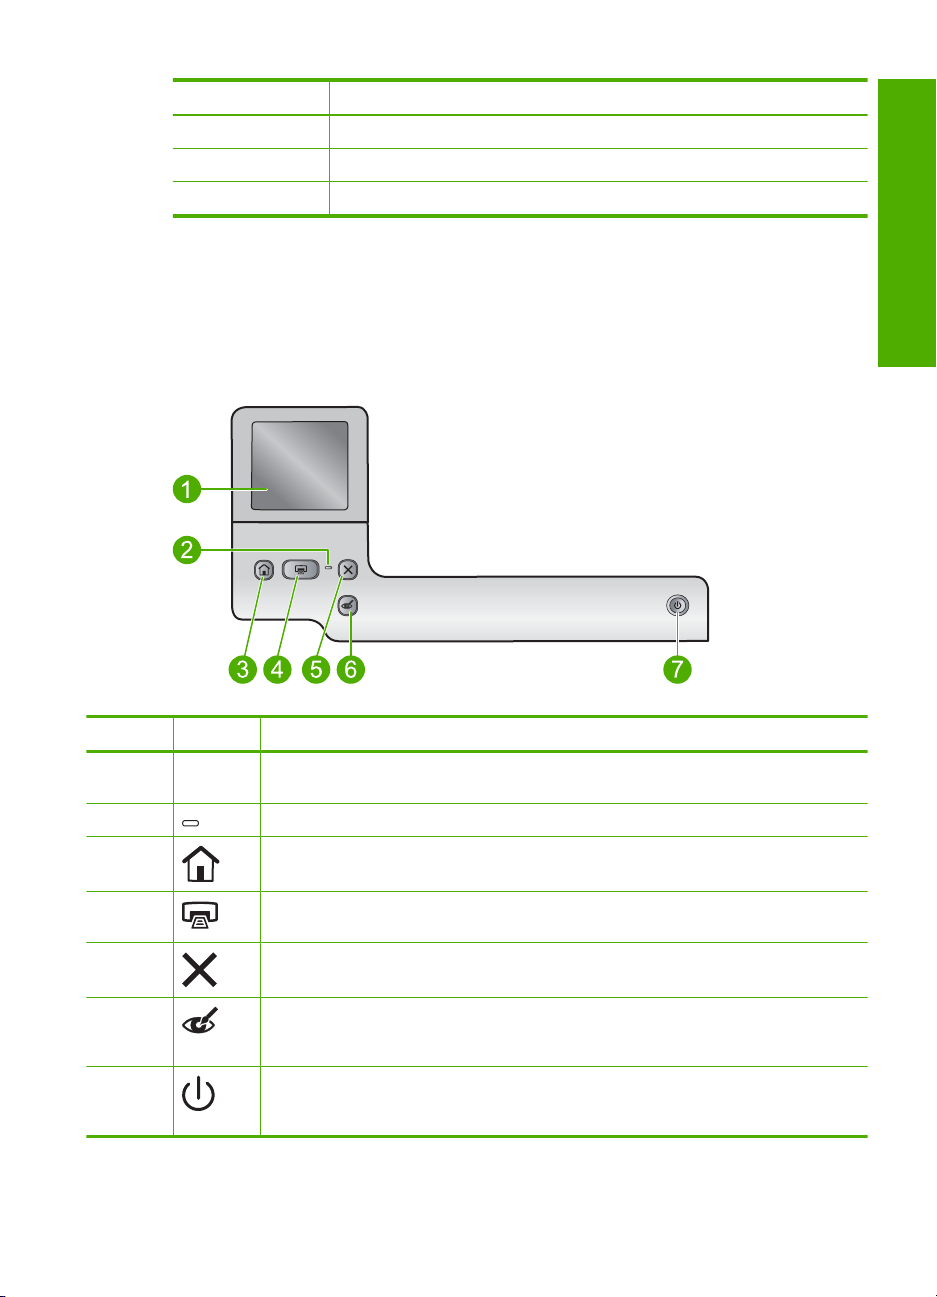
To load full-size paper
1. Raise the output tray.
4 HP Photosmart D7500 series
Page 9

TIP: Tap a stack of paper on a flat surface to align the edges. Make sure all the
paper in the stack is the same size and type and free of rips, dust, wrinkles, and
curled or bent edges.
2. Slide the paper-width guide to its outermost position.
3. Insert the stack of paper into the main input tray with the short edge forward and the
print side down. Slide the stack of paper forward until it stops.
English
CAUTION: Make sure that the product is idle and silent when you load paper
into the main input tray. If the product is servicing the ink cartridges or otherwise
engaged in a task, the paper stop inside the product might not be in place. You
could push the paper too far forward, causing the product to eject blank pages.
TIP: If you are using letterhead, insert the top of the page first with the print side
down.
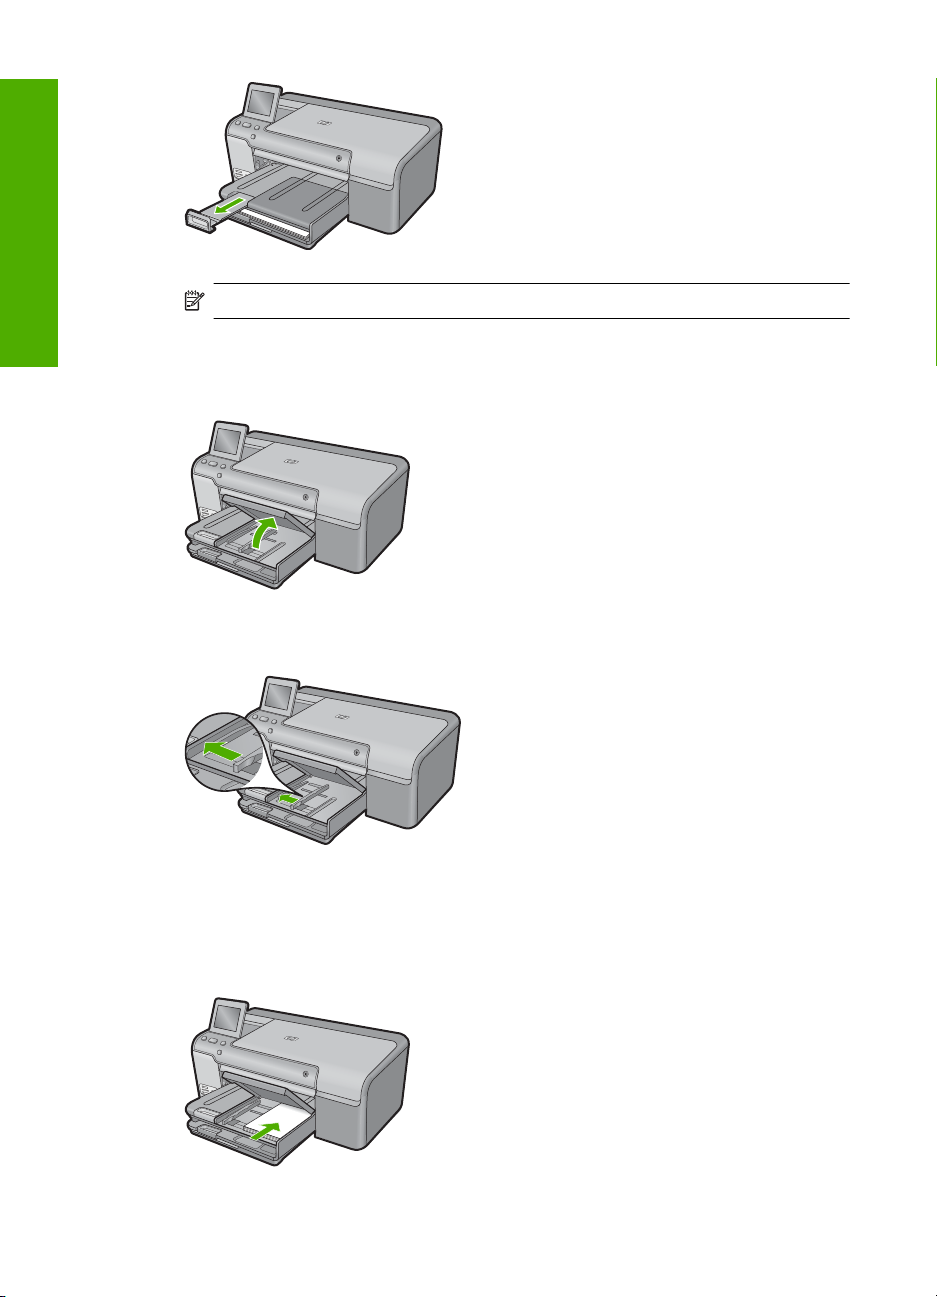
4. Slide the paper-width guide inward until it stops at the edge of the paper.
Do not overload the main input tray; make sure the stack of paper fits within the main
input tray and is no higher than the top of the paper-width guide.
5. Lower the output tray. Pull the tray extender towards you, as far as it will go. Flip the
paper catch at the end of the tray extender to open the extender the rest of the way.
Load paper 5
Page 10
Chapter 1
English
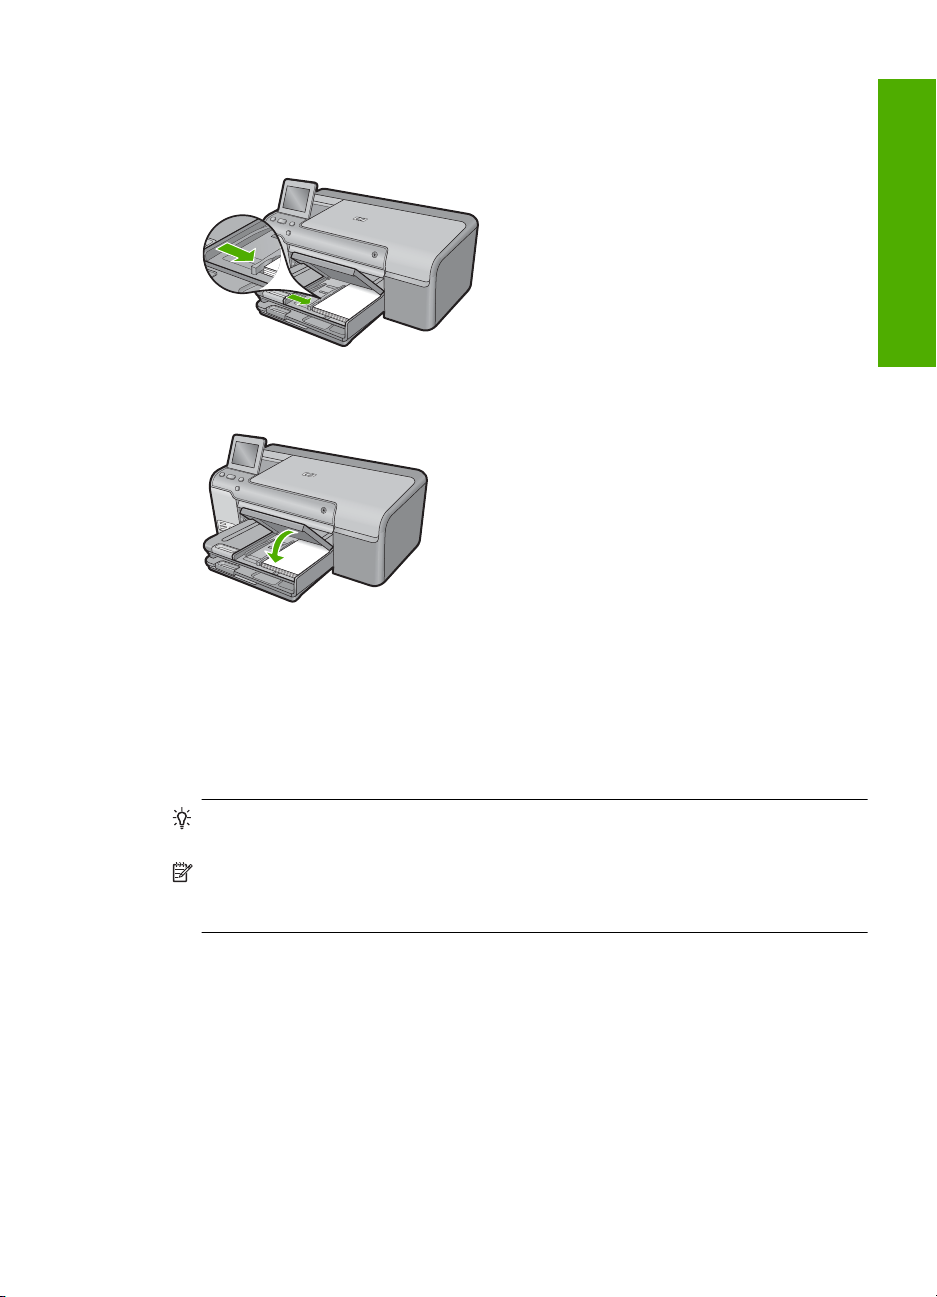
NOTE: When you use legal-size paper, leave the tray extender closed.
To load up to 13 x 18 cm (5 x 7 inch) photo paper in the photo tray
1. Raise the photo tray lid.
2. Slide the paper-width guide to its outermost position.
3. Insert the stack of photo paper into the photo tray with the short edge forward and the
print side down. Slide the stack of photo paper forward until it stops.
If the photo paper you are using has perforated tabs, load the photo paper so that the
tabs are closest to you.
6 HP Photosmart D7500 series
Page 11
4. Slide the paper-width guide inward until it stops at the edge of the paper.
Do not overload the photo tray; make sure the stack of photo paper fits within the
photo tray and is no higher than the top of the paper-width guide.
5. Lower the photo tray lid.
Print directly onto a CD/DVD
English
In addition to printing on paper, the HP Photosmart enables you to print directly on the
surface of specially coated CDs and DVDs for print jobs started from a connected
computer. You can design and create a custom label for your CD or DVD using the
software that came with the HP Photosmart. You can then print the label on your printable
CD or DVD media.
TIP: It is recommended that you write your data to the CD or DVD before printing
the label on it.
NOTE: The HP Photosmart does not support a CD/DVD print job started from the
control panel. You must use the software that came with the HP Photosmart to print
on a CD/DVD. For more information, see the software help.
To print directly onto a CD/DVD
1. Use the software that came with the product to create and print a CD/DVD label.
2. If the product is placed close to a wall, move it at least 7.5 cm (3 inches) away from
the wall.
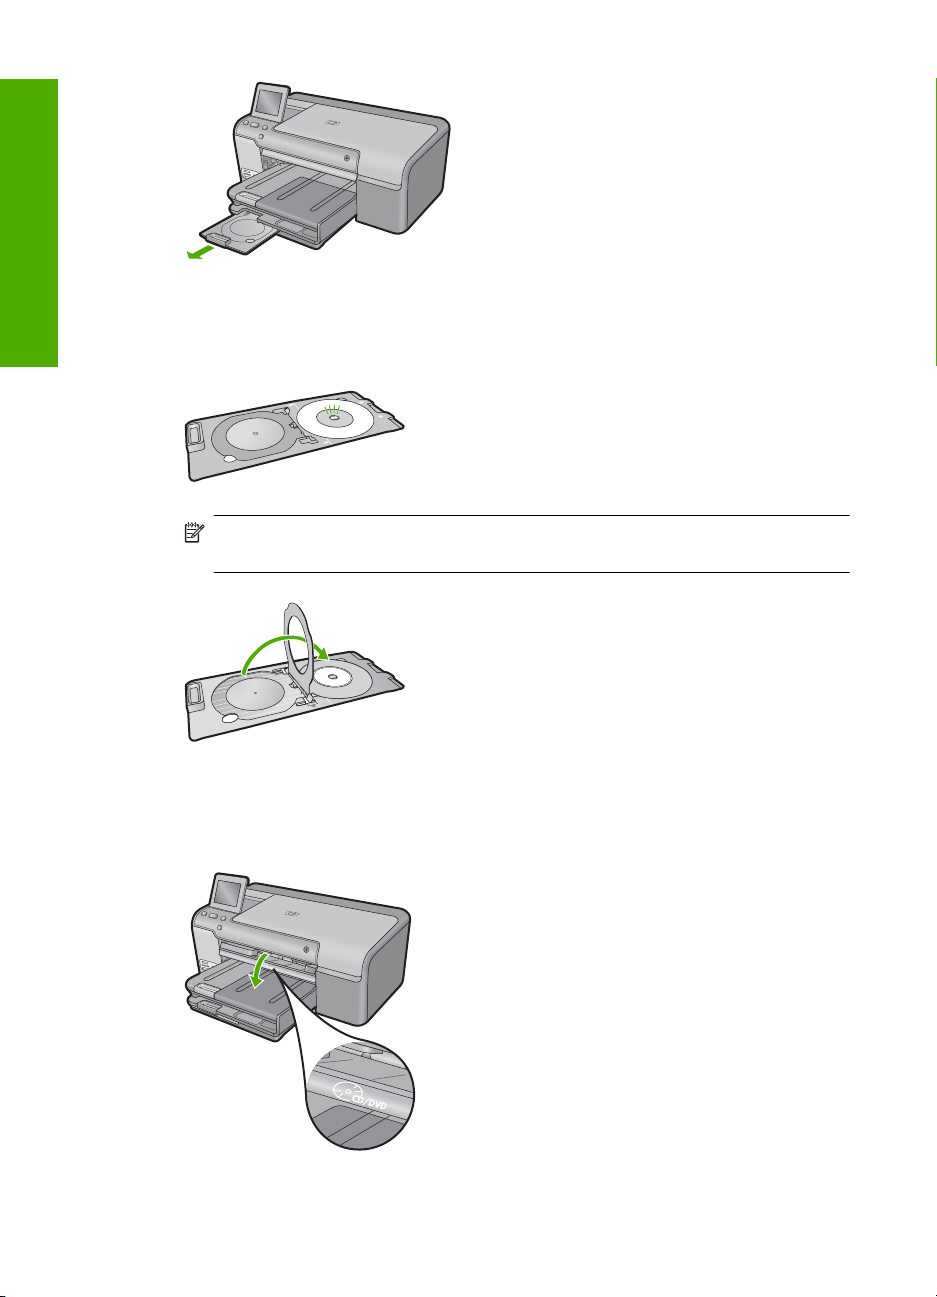
3. Carefully remove the CD/DVD holder from the storage area below the main input tray.
Print directly onto a CD/DVD 7
Page 12
Chapter 1
English
4. Securely snap the inkjet printable media onto the CD/DVD holder with the printable
side up. The CD/DVD should be placed on the ring at the end of the holder with the
arrows.
NOTE: If you are using a smaller-sized media, only then should you flip the CD/
DVD holder ring over the CD/DVD.
5. Lower the CD/DVD tray.
The CD/DVD tray is located just below the control panel. When in its lowered position,
the CD/DVD tray sits on top of the output tray.
8 HP Photosmart D7500 series
Page 13
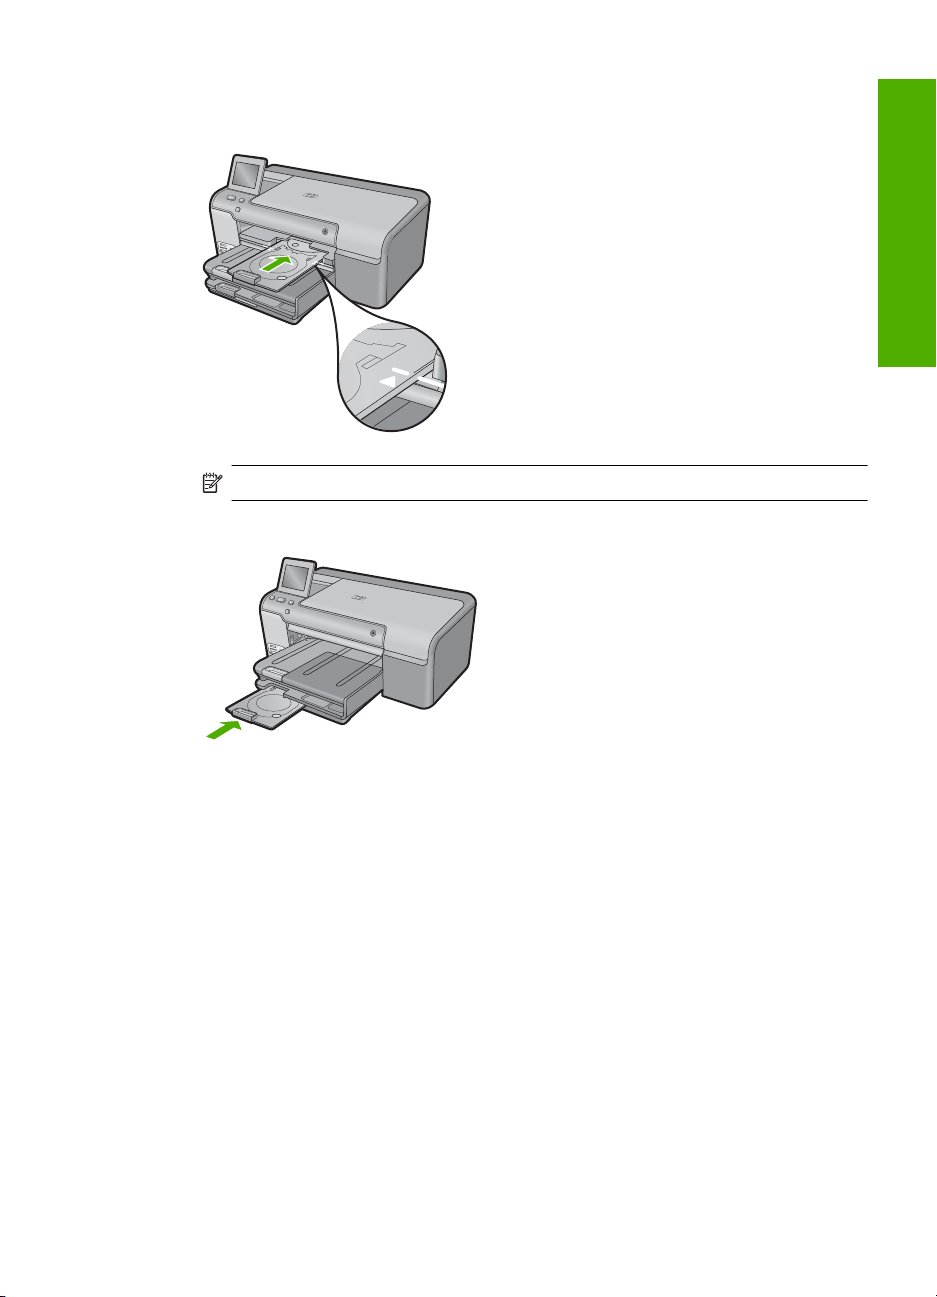
6. Push the CD/DVD holder into the product until the white lines on the CD/DVD holder
line up with the white lines on the CD/DVD tray, and then touch OK.
NOTE: The product pulls the CD/DVD holder while printing on the media.
7. After printing, make sure you insert the CD/DVD holder back into the storage area.
English
Avoid paper jams
To help avoid paper jams, follow these guidelines.
• Remove printed papers from the output tray frequently.
• Prevent curled or wrinkled photo paper by storing all unused photo paper flat in a
resealable bag.
• Ensure that paper loaded in the input tray lays flat and the edges are not bent or torn.
• If you are printing labels, ensure that the label sheets are no more than two years old.
Labels on older sheets might peel off when the paper is pulled through the product,
and cause paper jams.
• Do not combine different paper types and paper sizes in the input tray; the entire stack
of paper in the input tray must be the same size and type.
• Adjust the paper-width guide in the input tray to fit snugly against all paper. Make sure
the paper-width guide does not bend the paper in the input tray.
• Do not force paper too far forward in the input tray.
• Use paper types that are recommended for the product.
Avoid paper jams 9
Page 14

Chapter 1
Print a photo on photo paper
To achieve the best print quality, HP recommends using HP papers that are specifically
designed for the type of project you are printing along with genuine HP ink. HP papers
and HP ink are specifically designed to work well together to provide high-quality output.
English
1 Memory Stick, Memory Stick Pro, Memory Stick Select, Memory Stick Magic Gate, Memory
Stick Duo or Duo Pro (adapter optional), or Memory Stick Micro (adapter required)
2 MultiMedia Card (MMC), MMC Plus, Secure MultiMedia Card, MMC Mobile (RS-MMC; adapter
required), Secure Digital (SD), Secure Digital Mini, Secure Digital High Capacity (SDHC),
TransFlash MicroSD Card (adapter required), or xD-Picture card
3 CompactFlash (CF) types I and II
4 Front USB port (for storage devices and PictBridge cameras)
To print photos
1. Load photo paper in the appropriate input tray.
2. Insert a memory card into the appropriate slot on the product or connect a storage
device to the front USB port.
3. Touch View & Print.
4. Touch the left or right arrow to scroll through the thumbnails of your photos.
5. Touch the photos you want to print.
6. Touch Done and then touch the up arrow to increase the number of copies. You must
specify at least one copy or the photo will not print.
TIP: If you want to crop, rotate, or make any other changes to the photo before
printing, touch Edit.
7. (Optional) Continue left-right scrolling to add more photos to the print queue.
8. Touch Done to preview the print job.
10 HP Photosmart D7500 series
Page 15
9. (Optional) Touch Settings to change the print settings.
10. Touch Print or press Print Photos.
TIP: During printing, you can touch Add more photos to add more photos to
the print queue.
Replace the ink cartridges
Follow these instructions when you need to replace ink cartridges.
NOTE: If you are setting up the product for the first time, make sure you follow the
instructions in the Start Here guide for installing the printhead and the ink cartridges.
If you do not already have replacement ink cartridges for the HP Photosmart, to order
cartridges, go to
follow the prompts to select your product, and then click one of the shopping links on the
page.
CAUTION: Wait until you have a new ink cartridge available before removing the
old ink cartridge. Do not leave the ink cartridge outside of the product for an extended
period of time. This can result in damage to both the product and the ink cartridge.
To replace the ink cartridges
1. Make sure the product is turned on.
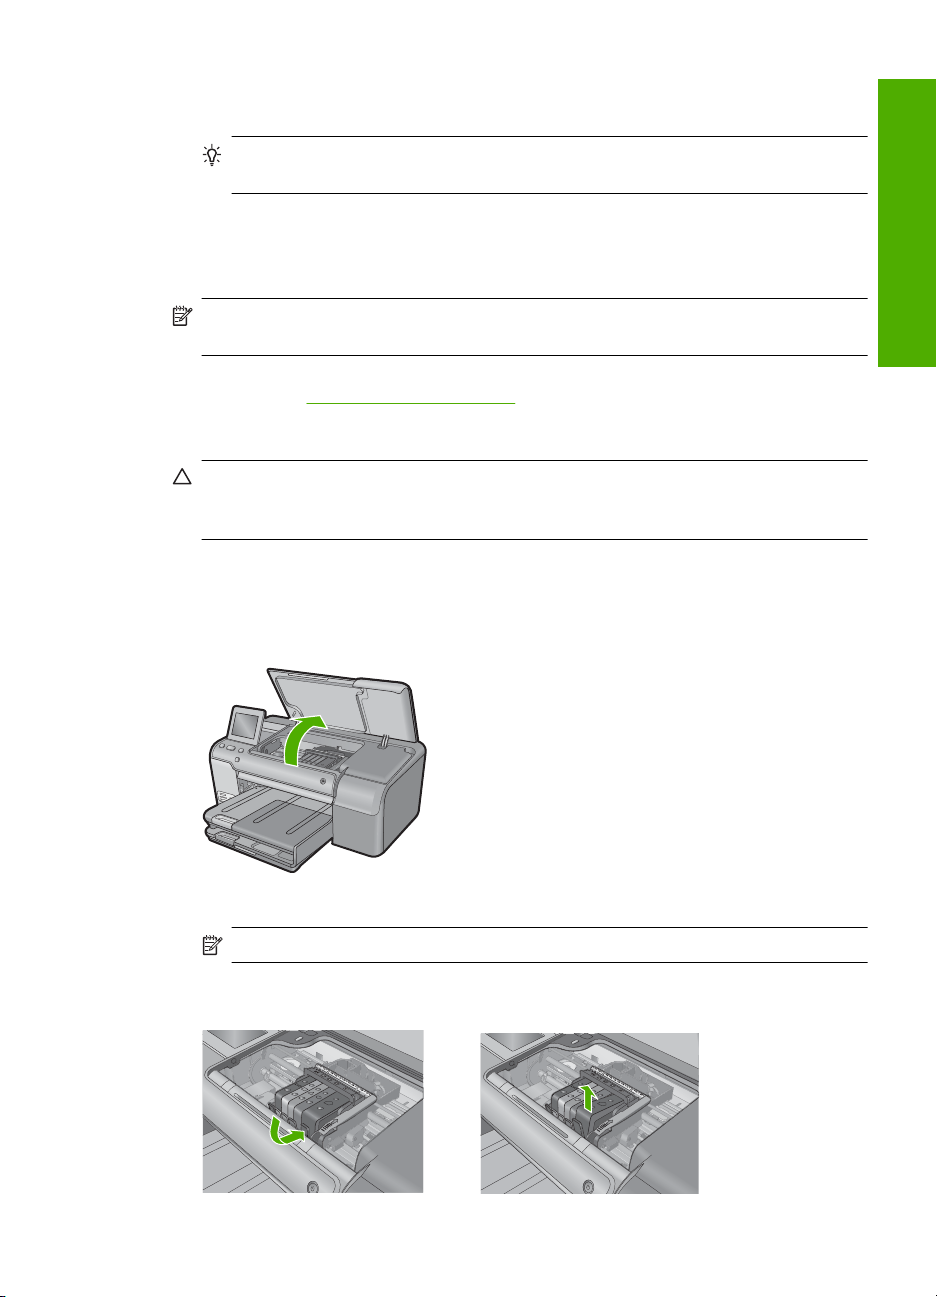
2. Open the ink cartridge door by lifting from the front right of the product, until the door
locks into place.
www.hp.com/buy/supplies. If prompted, choose your country/region,
English
The print carriage moves to the center of the product.
NOTE: Wait until the print carriage stops moving before proceeding.
3. Press the tab on the front of the ink cartridge to release it, and then remove it from
the slot.
Replace the ink cartridges 11
Page 16

English
Chapter 1
CAUTION: Do not lift the latch handle on the print carriage to remove the ink
cartridges.
4. Remove the new ink cartridge from its packaging by pulling the orange pull-tab
straight back to remove the plastic wrap from the ink cartridge.
NOTE: Make sure you remove the plastic wrap from the ink cartridge before
installing it in the product, or printing will fail.
5. Twist the orange cap to snap it off.
6. Using the colored shaped icons for help, slide the ink cartridge into the empty slot
until it clicks into place and is seated firmly in the slot.
CAUTION: Do not lift the latch handle on the print carriage to install the ink
cartridges. Doing so can result in incorrectly seated ink cartridges and printing
problems. The latch must remain down in order to correctly install the ink
cartridges.
Make sure that you insert the ink cartridge into the slot that has the same shaped icon
and color as the one you are installing.
12 HP Photosmart D7500 series
Page 17
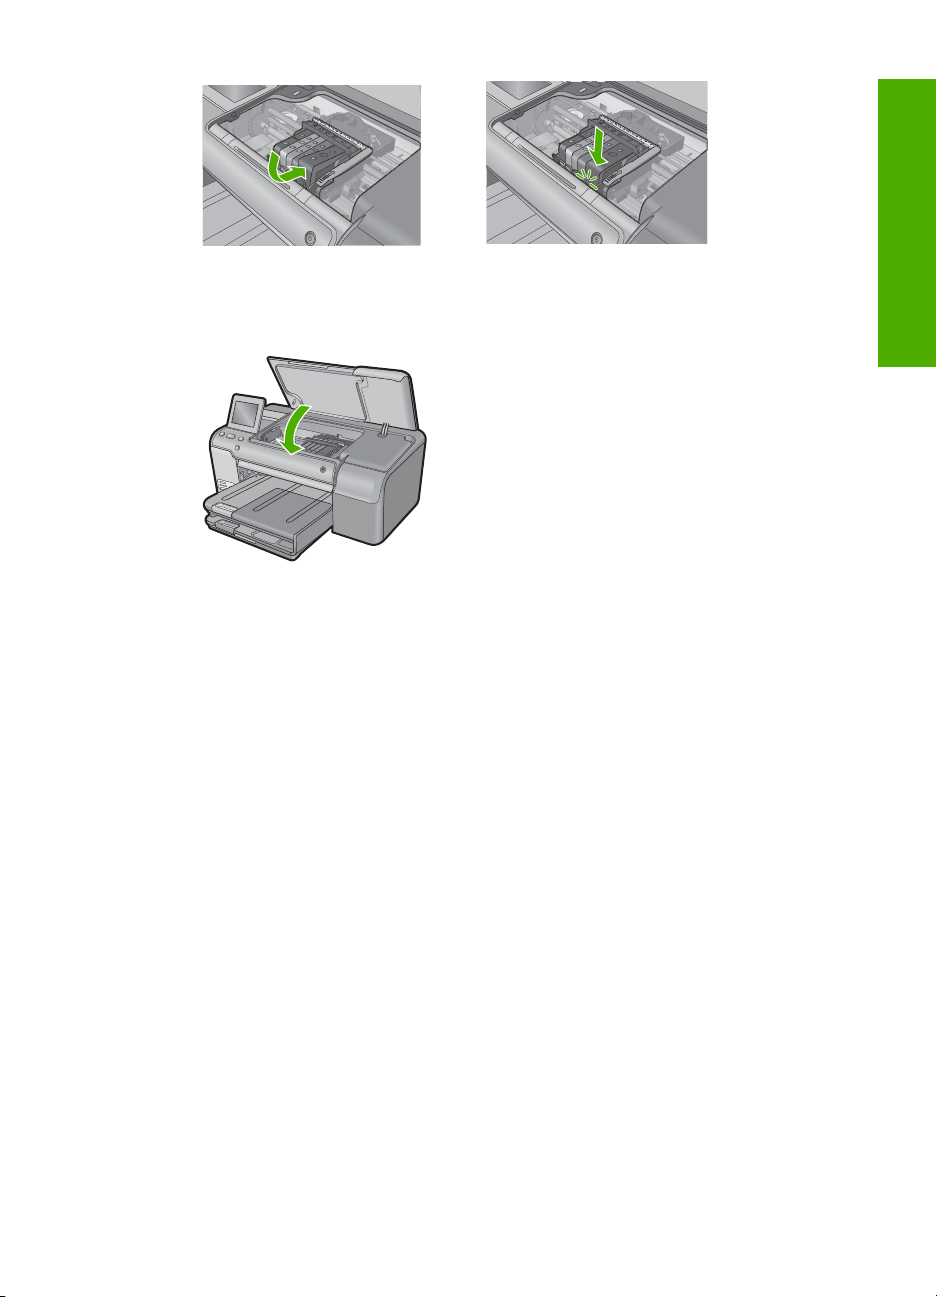
7. Repeat steps 3 through 6 for each ink cartridge you are replacing.
8. Close the ink cartridge door.
English
Replace the ink cartridges 13
Page 18

2 Troubleshooting and support
This chapter contains troubleshooting information for the HP Photosmart. Specific information is
provided for installation and configuration issues, and some operational topics. For more
troubleshooting information, see the onscreen Help that came with your software.
Many issues are caused when the HP Photosmart is connected to the computer using a USB cable
before the HP Photosmart software is installed on the computer. If you connected the HP Photosmart
English
Uninstall and reinstall the software
to your computer before the software installation screen prompts you to do so, you must follow these
steps:
Troubleshooting common setup issues
1. Disconnect the USB cable from the computer.
2. Uninstall the software (if you have already installed it).
3. Restart your computer.
4. Turn off the product, wait one minute, then restart it.
5. Reinstall the product software.
CAUTION: Do not connect the USB cable to the computer until prompted by the software
installation screen.
For support contact information, see the inside back cover of this guide.
If your installation is incomplete, or if you connected the USB cable to the computer before prompted
by the software installation screen, you might need to uninstall and then reinstall the software. Do
not simply delete the HP Photosmart application files from your computer. Make sure to remove
them properly using the uninstall utility provided when you installed the software that came with the
HP Photosmart.
To uninstall and reinstall the software
1. On the Windows taskbar, click Start, Settings, Control Panel (or just Control Panel).
2. Double-click Add/Remove Programs (or click Uninstall a program).
3. Select HP Photosmart All-in-One Driver Software, and then click Change/Remove.
Follow the onscreen instructions.
4. Disconnect the product from your computer.
5. Restart your computer.
NOTE: It is important that you disconnect the product before restarting your computer. Do
not connect the product to your computer until after you have reinstalled the software.
6. Insert the product CD-ROM into your computer’s CD-ROM drive and then start the Setup
program.
NOTE: If the Setup program does not appear, locate the setup.exe file on the CD-ROM
drive and double-click it.
NOTE: If you no longer have the installation CD, you can download the software from
www.hp.com/support.
7. Follow the onscreen instructions and the instructions provided in the Start Here guide that came
with the product.
When the software installation is complete, the HP Digital Imaging Monitor icon appears in the
Windows system tray.
14 HP Photosmart D7500 series
Page 19

Setup troubleshooting
Use this section to solve any problems you might encounter while setting up the HP Photosmart
hardware.
The product will not turn on
Try the following solutions if there are no light indications, no noise, and no movement from the
product when you turn it on.
Solution 1: Make sure you use the power cord that came with the product
Solution
• Make sure the power cord is firmly connected to both the product and the power adapter.
Plug the power cord into a power outlet, surge protector, or power strip.
• If you are using a power strip, make sure the power strip is turned on. Or, try plugging the
product directly into a power outlet.
• Test the power outlet to make sure it is working. Plug in an appliance that you know works,
and see if the appliance has power. If not, then there might be a problem with the power
outlet.
• If you plugged the product into a switched outlet, make sure the outlet is switched on. If it
is switched to on but still does not work, then there might be a problem with the power outlet.
Cause: The product was not being used with the power cord provided.
If this did not solve the issue, try the next solution.
Solution 2: Reset the product
Solution: Turn off the product, and then unplug the power cord. Plug the power cord back in,
and then press the On button to turn on the product.
Cause: The product experienced an error.
If this did not solve the issue, try the next solution.
English
Solution 3: Press the On button more slowly
Solution: The product might not respond if you press the On button too quickly. Press the On
button once. It might take a few minutes for the product to turn on. If you press the On button
again during this time, you might turn the product off.
Cause: You pressed the On button too quickly.
If this did not solve the issue, try the next solution.
Solution 4: Contact HP to replace the power supply
Solution: Contact HP support to request a power supply for the product.
Go to: www.hp.com/support.
If prompted, choose your country/region, and then click Contact HP for information on calling
for technical support.
Cause: The power supply was not intended for use with this product or it had a mechanical
failure.
If this did not solve the issue, try the next solution.
Solution 5: Contact HP support for service
Solution: If you have completed all of the steps provided in the previous solutions and are still
having a problem, contact HP support for service.
www.hp.com/support.
Go to:
If prompted, choose your country/region, and then click Contact HP for technical support.
Setup troubleshooting 15
Page 20

English
Chapter 2
Cause: You might need assistance to enable the product or software to function properly.
I connected the USB cable, but I am having problems using the product with my
computer
Solution: You must first install the software that came with the product before connecting the
USB cable. During installation, do not plug in the USB cable until prompted by the onscreen
instructions.
Once you have installed the software, plug one end of the USB cable into the back of your
computer and the other into the back of the product. You can connect to any USB port on the
back of your computer.
For more information on installing the software and connecting the USB cable, see the Start
Here guide that came with the product.
Cause: The USB cable was connected before the software was installed. Connecting the USB
cable before you are prompted can cause errors.
After setting up the product, it does not print
Try the following solutions to resolve the issue. Solutions are listed in order, with the most likely
solution first. If the first solution does not solve the problem, continue trying the remaining solutions
until the issue is resolved.
Solution 1: Press the On button to turn on the product
Solution: Look at the display on the product. If the display is blank and the On button is not
lit, the product is turned off. Make sure the power cord is firmly connected to the product and
plugged into a power outlet. Press the On button to turn on the product.
Cause: The product might not have been turned on.
If this did not solve the issue, try the next solution.
Solution 2: Set your product as the default printer
Solution: Use the system tools on your computer to change your product to be the default
printer.
Cause: You sent the print job to the default printer, but this product was not the default printer.
If this did not solve the issue, try the next solution.
Solution 3: Check the connection between the product and computer
Solution: Check the connection between the product and computer.
Cause: The product and computer were not communicating with each other.
If this did not solve the issue, try the next solution.
Solution 4: Check that the ink cartridges are installed properly and have ink
Solution: Check that the ink cartridges are installed properly and have ink.
Cause: There might have been a problem with one or more of the ink cartridges.
If this did not solve the issue, try the next solution.
Solution 5: Load paper in the input tray
Solution: Load paper in the input tray.
Cause: The product might have been out of paper.
16 HP Photosmart D7500 series
Page 21
Clear paper jams
In case of a paper jam, check the rear door. You might need to clear the paper jam from the rear
door.
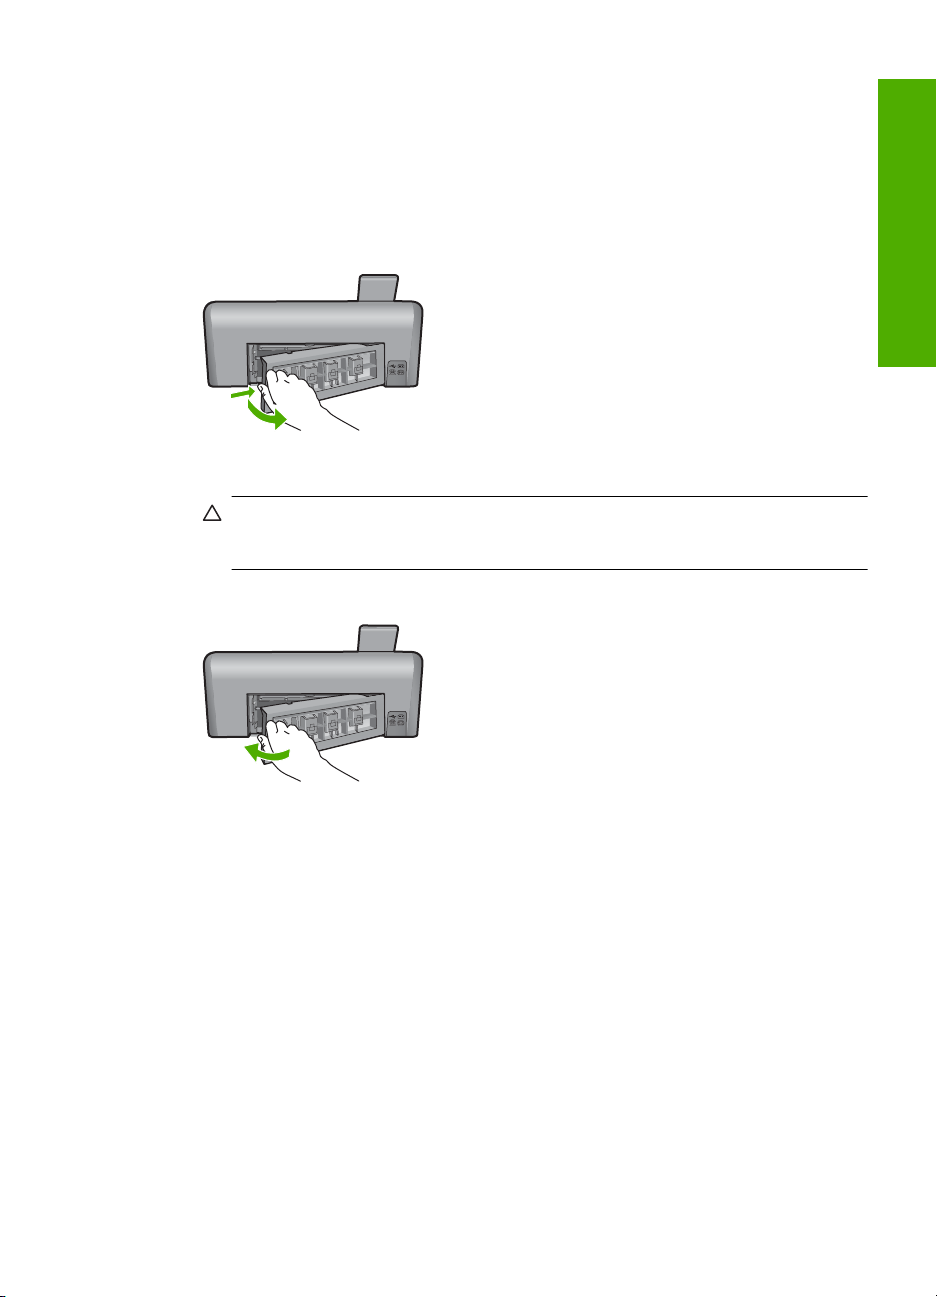
To clear a paper jam from the rear door
1. Press in the tab on the left side of the rear door to release the door. Remove the door by pulling
it away from the product.
2. Gently pull the paper out of the rollers.
CAUTION: If the paper tears when you are removing it from the rollers, check the rollers
and wheels for torn pieces of paper that might be remaining inside the product. If you do not
remove all the pieces of paper from the product, more paper jams are likely to occur.
3. Replace the rear door. Gently push the door forward until it snaps into place.
English
4. Touch OK to continue the current job.
CD/DVD print troubleshooting
Use this section to solve any problems you might encounter while printing on CD/DVD surfaces with
the HP Photosmart.
The product does not detect the CD/DVD holder
Try the following solutions to resolve the issue. Solutions are listed in order, with the most likely
solution first. If the first solution does not solve the problem, continue trying the remaining solutions
until the issue is resolved.
Solution 1: Push the CD/DVD holder into the CD/DVD tray
Solution: Push the CD/DVD holder forward into the CD/DVD tray until the lines on the holder
line up to the white lines on the tray. The end of the holder marked with arrows goes into the
CD/DVD tray first.
CD/DVD print troubleshooting 17
Page 22

English
Chapter 2
Cause: You did not push the CD/DVD holder far enough into the CD/DVD tray.
If this did not solve the issue, try the next solution.
Solution 2: Remove the CD/DVD holder from the storage area
Solution: Remove the CD/DVD holder from the storage area below the main input tray. Lower
the CD/DVD tray (located below the control panel).
Make sure you loaded a printable disc onto the CD/DVD holder with the printable side up. Push
the CD/DVD holder forward into the CD/DVD tray until the lines on the holder line up to the white
lines on the tray. The end of the holder marked with arrows goes into the CD/DVD tray first.
Cause: You inserted the CD/DVD holder back into the storage area.
If this did not solve the issue, try the next solution.
Solution 3: Place the CD/DVD on the CD/DVD holder
Solution: Remove the CD/DVD holder from the storage area below the main input tray.
Remove the printable disc from the CD/DVD tray and load it onto the CD/DVD holder with the
printable side up. Push the holder forward into the CD/DVD tray until the lines on the holder line
up to the white lines on the tray. The end of the holder marked with arrows goes into the CD/
DVD tray first.
Cause: You inserted the disc directly into the CD/DVD tray without placing it on the CD/DVD
holder.
If this did not solve the issue, try the next solution.
18 HP Photosmart D7500 series
Page 23

Solution 4: Load the next disc on the CD/DVD holder
Solution: Remove the CD/DVD holder from the CD/DVD tray. Remove the printed CD/DVD
from the holder. Load the next disc onto the CD/DVD holder with the printable side up and
reinsert the holder into the CD/DVD tray until the lines on the holder line up to the white lines
on the tray. When the product detects the holder, the prompt disappears.
Cause: The product prompted you to insert the next disc when printing multiple CD/DVDs in
a print job.
The product does not detect a CD/DVD on the holder
Solution: Remove the CD/DVD holder from the CD/DVD tray. Load a printable disc onto the
CD/DVD holder with the printable side up and reinsert the holder into the CD/DVD tray until the
lines on the holder line up to the white lines on the tray.
Cause: You inserted the CD/DVD holder into the CD/DVD tray without loading a CD/DVD onto
the holder.
The product stalled while printing a CD/DVD
Solution: Ensure that there is at least 7.5 cm (3 inches) of space behind the product. Also,
make sure that the slot on the back of the product is not blocked.
Cause: The product pulled the CD/DVD holder while printing on the CD/DVD. The holder can
protrude about 7.5 cm (3 inches) from the back of the product. If there is not sufficient space
behind the product, the holder stops and printing stalls.
The image on my printed disc is cropped and there is ink on the CD/DVD holder
Solution: If you are loading a regular-size (120 mm) CD/DVD onto the CD/DVD holder to be
printed, do not flip the blue ring over the disc. The blue ring should only be used if you are
printing on a small-size (80 mm) CD/DVD.
Before trying again, clean the CD/DVD holder to remove ink from the holder. This avoids ink
contamination within the product, as well as protects your discs, hands, and clothing from stains
later.
After the CD/DVD holder is clean and dry, load a new printable disc onto the holder with the
printable side up. Leave the blue ring in its original location on the opposite side of the holder
from your disc, as shown below. Reinsert the holder into the CD/DVD tray until the lines on the
holder line up to the white lines on the tray and try your print again.
English
Cause: You loaded the CD/DVD onto the CD/DVD holder incorrectly.
The product is printing on a non-printable area of my disc
Try the following solutions to resolve the issue. Solutions are listed in order, with the most likely
solution first. If the first solution does not solve the problem, continue trying the remaining solutions
until the issue is resolved.
Solution 1: Change the software settings
Solution: Make sure the design you are printing is appropriate for the size of the media loaded
in the CD/DVD holder, including the diameter of the inner and outer rings. Change the software
settings accordingly to center and size your design for the disc you are using. Refer to the
documentation or the online help of the software you are using for additional information.
Cause: Your design was not the correct size for the CD/DVD you loaded.
CD/DVD print troubleshooting 19
Page 24

Chapter 2
If this did not solve the issue, try the next solution.
Solution 2: Load a new CD/DVD with the printable side up
Solution: If you have already burned your content onto the CD/DVD, you might need to burn
your contents again onto a new disc. Load the new disc onto the CD/DVD holder with the
printable side up. Reinsert the holder into the CD/DVD tray until the lines on the holder line up
to the white lines on the tray and try your print again.
Cause: You loaded the CD/DVD upside down on the holder.
English
The design is not centered on my disc
Solution: Change the software settings to center and size your design for the disc you are
using. Refer to the documentation or the online help of the software you are using for additional
information.
Cause: Your design settings were not correct.
The ink on the CD/DVD is not drying
Try the following solutions to resolve the issue. Solutions are listed in order, with the most likely
solution first. If the first solution does not solve the problem, continue trying the remaining solutions
until the issue is resolved.
Solution 1: Use inkjet printable discs
Solution: Make sure that the CD/DVD you use is compatible for inkjet printing. Inkjet printable
discs normally have a white printing surface. (Some discs also have a silver printing surface.)
Cause: The surface of the disc was not compatible for printing.
If this did not solve the issue, try the next solution.
Solution 2: Load a new CD/DVD with the printable side up
Solution: If you have already burned your content onto the CD/DVD, you might need to burn
your contents again onto a new disc. Load the new disc onto the CD/DVD holder with the
printable side up. Reinsert the holder into the CD/DVD tray until the lines on the holder line up
to the white lines on the tray and try your print again.
Cause: You loaded the CD/DVD upside down on the holder.
The product reports a CD/DVD size mismatch error
Solution: Cancel the print job and replace the CD/DVD currently loaded on the CD/DVD
holder with a CD/DVD that is the same size as specified in the print job, or change the print
settings in the software.
Cause: The size of the CD/DVD currently loaded on the CD/DVD holder did not match the
size you specified when you started the print job from the computer.
The CD/DVD holder is stuck in the storage area
Solution: Pull the CD/DVD holder out as far as possible, until you feel resistance. Then, insert
a flat blunt object (such as a butter knife or screwdriver) into the left corner of the storage slot
and push down on the blue ring. With the blue ring pressed down, you should be able to pull the
CD/DVD holder out of the storage slot.
Cause: You inserted the CD/DVD holder back into the storage area with a CD/DVD loaded
and the blue ring flipped over the disc.
20 HP Photosmart D7500 series
Page 25

Information on ink cartridges and the printhead
The following tips help maintain HP ink cartridges and ensure consistent print quality.
• Keep all ink cartridges in the original sealed packages until they are needed.
• Turn off the product by pressing the On button. Do not turn off the product by turning off a power
strip or unplugging the power cord. If you improperly turn off the product, the printhead assembly
might not return to the correct position.
• Store ink cartridges at room temperature (15.6°-26.6° C or 60°-78° F).
• HP recommends that you do not remove the ink cartridges from the product until you have
replacement cartridges available to install.
• If you are transporting the product make sure you turn it off by pressing the On button to power
it down properly. Also, make sure you leave the ink cartridges installed. Doing these actions will
prevent ink leaking from the printhead assembly.
• Clean the printhead when you notice a significant decrease in print quality.
• Do not clean the printhead unnecessarily. This wastes ink and shortens the life of the cartridges.
• Handle ink cartridges carefully. Dropping, jarring, or rough handling during installation can cause
temporary printing problems.
Support process
If you have a problem, follow these steps:
1. Check the documentation that came with the product.
2. Visit the HP online support Web site at
all HP customers. It is the fastest source for up-to-date product information and expert
assistance and includes the following features:
• Fast access to qualified online support specialists
• Software and driver updates for the product
• Valuable product and troubleshooting information for common problems
• Proactive product updates, support alerts, and HP newsgrams that are available when you
register the product
3. Call HP support. Support options and availability vary by product, country/region, and language.
For support contact information, see the inside back cover of this guide.
www.hp.com/support. HP online support is available to
English
Support process 21
Page 26

3 Technical information
The technical specifications and international regulatory information for the HP Photosmart are
provided in this section. For additional regulatory and environmental information, including the
Declaration of Conformity statement, see the onscreen Help.
System requirements
English
Product specifications
Software system requirements are located in the Readme file.
For product specifications, go to the HP Web site at www.hp.com/support.
Paper specifications
• Main input tray capacity: Plain paper sheets: Up to 125 (60 to 90 gsm. (20 lb) paper)
• Output tray capacity: Plain paper sheets: Up to 50 (60 to 90 gsm. (20 lb) paper)
• Photo tray capacity: Photo paper sheets: Up to 20
NOTE: For a complete list of supported media sizes, see the printer software.
Physical specifications
• Height: 18.32 cm (7.21 inches)
• Width: 45.79 cm (18.027 inches)
• Depth: 38.31 cm (15.181 inches)
• Weight: 5.56 kg (12.25 lbs)
Power specifications
• Power consumption: 42 watts maximum (average printing)
• Power adapter input rating: AC 100 to 240 V ~ 1300 mA 50–60 Hz
• Printer DC rating: DC 32 V===1300 mA
NOTE: Use only with the power adapter supplied by HP.
Environmental specifications
• Recommended operating temperature range: 15 ºC to 32 ºC (59 ºF to 90 ºF)
• Allowable operating temperature range: 5 ºC to 35 ºC (41 ºF to 95 ºF)
• Humidity: 15% to 80% RH non-condensing
• Non-operating (Storage) temperature range: –20 ºC to 50 ºC (–4 ºF to 122 ºF)
• In the presence of high electromagnetic fields, it is possible the output from the HP Photosmart
may be slightly distorted
• HP recommends using a USB cable less than or equal to 3 metres (10 feet) in length to minimize
injected noise due to potential high electromagnetic fields
Regulatory notices
The HP Photosmart meets product requirements from regulatory agencies in your country/region.
For a complete listing of regulatory notices, see the onscreen Help.
Regulatory model identification number
For regulatory identification purposes, your product is assigned a Regulatory Model Number. The
Regulatory Model Number for your product is SDGOB-0822. This regulatory number should not be
confused with the marketing name (HP Photosmart D7500 series, etc.) or product numbers
(Q8440A, etc.).
22 HP Photosmart D7500 series
Page 27
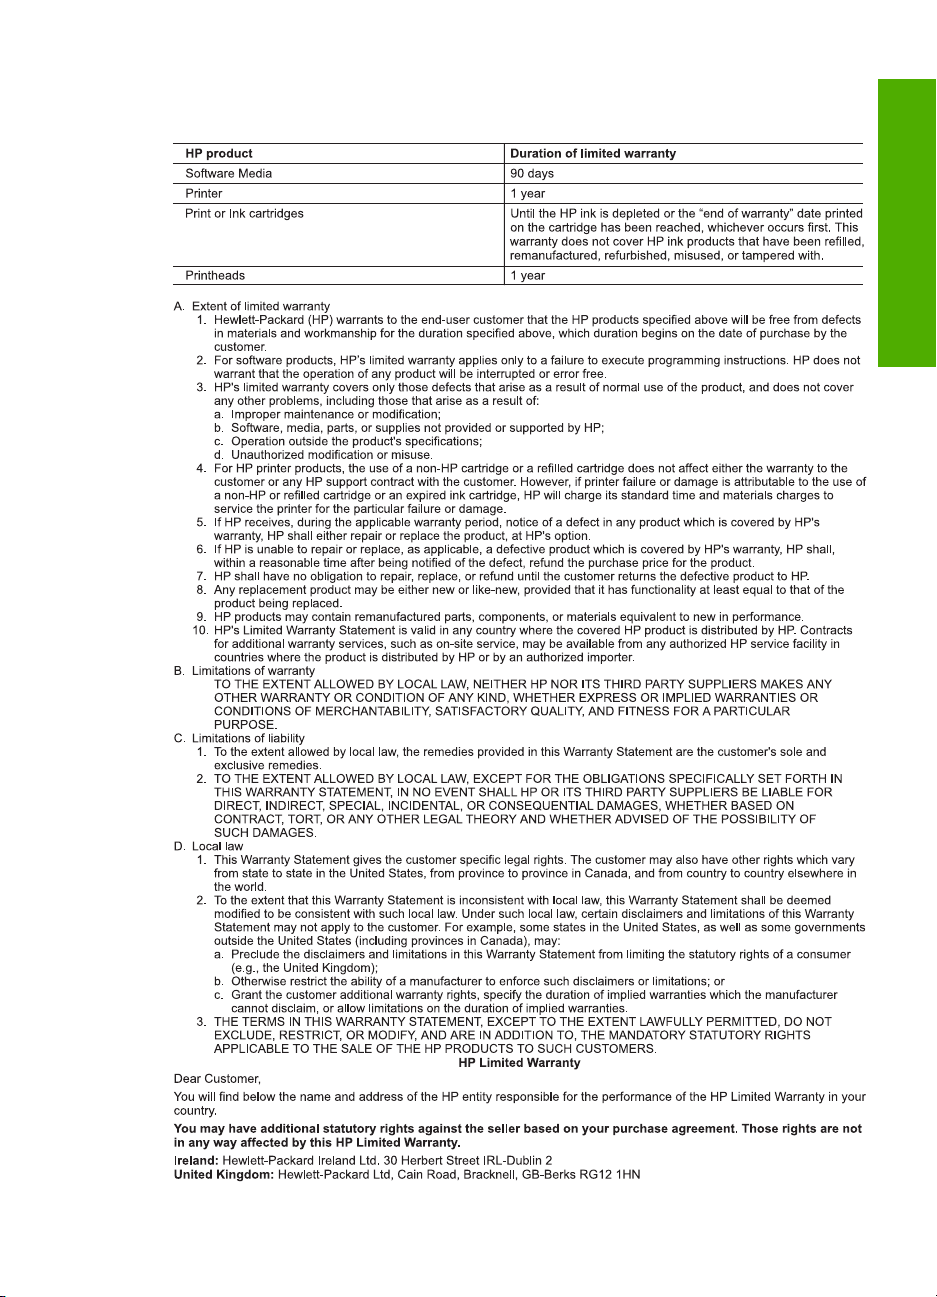
Warranty
English
Warranty 23
Page 28

HP Photosmart D7500 Series
Grundlagenhandbuch
Deutsch
Page 29

Inhalt
1 Übersicht über den HP Photosmart
Der HP Photosmart auf einen Blick..........................................................................................26
Elemente des Bedienfelds........................................................................................................27
Weitere Informationen..............................................................................................................28
Einlegen von Papier.................................................................................................................28
Bedrucken einer CD oder DVD................................................................................................32
Vermeiden von Papierstaus.....................................................................................................34
Drucken eines Fotos auf Fotopapier........................................................................................34
Auswechseln von Tintenpatronen............................................................................................36
2 Fehlerbehebung und Support
Deinstallieren und Neuinstallieren der Software.......................................................................39
Fehlerbehebung bei der Einrichtung........................................................................................40
Beheben von Papierstaus........................................................................................................42
CDs/DVDs bedrucken – Fehlerbehebung................................................................................42
Informationen zu Tintenpatronen und zum Druckkopf..............................................................46
Ablauf beim Support.................................................................................................................47
3 Technische Daten
Systemanforderungen..............................................................................................................48
Produktspezifikationen.............................................................................................................48
Zulassungsinformationen.........................................................................................................48
Gewährleistung.........................................................................................................................49
Deutsch
25
Page 30
1 Übersicht über den
HP Photosmart
Mithilfe des HP Photosmart können Sie Fotos von einer Speicherkarte aus oder direkt
auf die Oberfläche von CDs oder DVDs mit Spezialbeschichtung drucken. Auf viele
Funktionen des HP Photosmart können Sie direkt über das Bedienfeld zugreifen, ohne
den Computer einzuschalten.
Hinweis Diese Dokumentation enthält Beschreibungen zu Basisoperationen und
zur Fehlerbehebung. Außerdem bietet sie Informationen zur Kontaktaufnahme mit
dem HP Support und zum Bestellen von Verbrauchsmaterial.
Vollständige Informationen zu allen Merkmalen und Funktionen, einschließlich der
mit dem HP Photosmart gelieferten HP Photosmart-Software, sind in der Online-Hilfe
zu finden.
Der HP Photosmart auf einen Blick
Deutsch
Nummer Beschreibung
1 Farbdisplay (auch als Anzeige oder Display bezeichnet)
2 Bedienfeld
3 Speicherkartensteckplätze und Foto-LED
4 Vorderer USB-Anschluss
5 Ausgabefach
6 Verlängerung des Papierfachs (auch als Fachverlängerung bezeichnet)
7 Aufbewahrungsfach für den CD/DVD-Halter
8 CD/DVD-Halter
9 Hauptzufuhrfach (auch als Zufuhrfach bezeichnet)
26 HP Photosmart D7500 Series
Page 31

(Fortsetzung)
Nummer Beschreibung
10 Fotofach
11 CD/DVD-Fach
12 Tintenpatronenklappe
13 Hintere Zugangsklappe
14 Hinterer USB-Anschluss
15 Netzanschluss*
* Verwenden Sie das Produkt nur mit dem von HP mitgelieferten Netzteil.
Elemente des Bedienfelds
Die folgende Abbildung und die dazugehörige Tabelle bieten eine Übersicht über das
Bedienfeld des HP Photosmart.
Deutsch
Nummer Symbol Name und Beschreibung
1 Anzeige: Auf dem Touchscreen-Display werden Menüs, Fotos und Meldungen
2 Achtung-LED: Weist auf ein aufgetretenes Problem hin. Weitere Informationen
3 Home: Ermöglicht die Rückkehr zur Startseite, die beim Einschalten des Produkts
4 Fotos drucken: Druckt die ausgewählten Fotos von einer Speicherkarte. Sind zurzeit
5 Abbrechen: Dient zum Stoppen der aktuellen Operation und Zurückkehren zur
angezeigt. Um das Display besser lesen zu können, können Sie dieses anheben und
in eine schräge Position bringen.
sehen Sie auf dem Display.
angezeigt wird.
keine Fotos ausgewählt, druckt das Produkt automatisch das zurzeit auf dem Display
angezeigte Foto.
Hauptanzeige.
Elemente des Bedienfelds 27
Page 32

Kapitel 1
(Fortsetzung)
Nummer Symbol Name und Beschreibung
6 Rote Augen entfernen: Hiermit schalten Sie die Funktion Rote Augen entfernen
7 Ein: Hiermit schalten Sie das Produkt ein oder aus. Auch wenn das Produkt
ein oder aus. Diese Funktion wird eingeschaltet, wenn eine Speicherkarte eingesetzt
wird. Vom Produkt werden rote Augen, die im zurzeit angezeigten Foto erscheinen,
automatisch entfernt.
ausgeschaltet ist, verbraucht es noch geringfügig Strom. Damit die Stromzufuhr zum
Produkt vollständig unterbrochen wird, schalten Sie es aus, und ziehen Sie das
Netzkabel ab.
Weitere Informationen
Zur Einrichtung und Verwendung des HP Photosmart stehen verschiedene
Informationsquellen (gedruckt und online) zur Verfügung.
Kurzanleitung
In der Kurzanleitung finden Sie Anweisungen zum Einrichten des HP Photosmart und
zum Installieren der Software. Führen Sie die Schritte in der Kurzanleitung in der
angegebenen Reihenfolge aus.
Deutsch
Online-Hilfe
Falls während der Einrichtung Probleme auftreten, lesen Sie die Informationen zur
Fehlerbehebung im letzten Kapitel der Kurzanleitung oder das Kapitel „
und Support“ auf Seite 39 in diesem Handbuch.
Die Online-Hilfe enthält detaillierte Anweisungen zu den Funktionen des HP Photosmart,
die in diesem Handbuch nicht beschrieben sind, einschließlich der Funktionen, die nur
in der installierten Software für den HP Photosmart verfügbar sind. Außerdem enthält die
Online-Hilfe rechtliche Hinweise und Informationen zu den Umgebungsbedingungen.
Fehlerbehebung
So rufen Sie die Online-Hilfe auf:
• Windows: Klicken Sie auf Start > Alle Programme > HP > Photosmart
D7500 Series > Hilfe.
• Macintosh: Öffnen Sie den HP Gerätemanager, und klicken Sie auf das
Fragezeichen (?). Klicken Sie danach im Hauptmenü auf Photosmart
D7500 Series.
HP Website
Wenn Sie Zugriff auf das Internet haben, können Sie Hilfe und Support von der HP
Website unter
Unterstützung, Treiber sowie Informationen zur Bestellung von Zubehör und
Verbrauchsmaterialien.
www.hp.com/support abrufen. Auf der Website finden Sie technische
Einlegen von Papier
Sie können verschiedene Papiertypen und Papierformate in den HP Photosmart
einlegen, einschließlich Papier im Format Letter oder A4, Fotopapier, Transparentfolien
und Umschläge. Weitere Informationen finden Sie in der Online-Hilfe.
28 HP Photosmart D7500 Series
Page 33

So legen Sie großformatiges Papier ein:
1. Klappen Sie das Ausgabefach nach oben.
Tipp Stoßen Sie die Seiten des Papierstapels auf einer glatten Oberfläche auf,
um sie bündig auszurichten. Vergewissern Sie sich, dass alle Seiten im Stapel
dasselbe Format und denselben Typ aufweisen und frei von Rissen, Staub, Falten
und aufgewellten oder gebogenen Kanten sind.
2. Schieben Sie die Papierquerführung ganz nach außen.
Deutsch
3. Legen Sie den Papierstapel mit der schmalen Kante nach vorne und der zu
bedruckenden Seite nach unten in das Hauptzufuhrfach ein. Schieben Sie den
Papierstapel bis zum Anschlag nach vorne.
Vorsicht Stellen Sie sicher, dass das Produkt keine andere Aufgabe ausführt,
wenn Sie Papier in das Hauptzufuhrfach einlegen. Wenn das Produkt die
Druckpatronen wartet oder eine andere Aufgabe ausführt, befindet sich die
Papierbegrenzung innerhalb des Produkts möglicherweise nicht an ihrem Platz.
Hierdurch kann das Papier zu weit hineingeschoben werden, sodass das Produkt
leere Seiten auswirft.
Einlegen von Papier 29
Page 34

Deutsch
Kapitel 1
Tipp Wenn Sie Papier mit einem Briefkopf verwenden, legen Sie es mit der
Oberkante voran und der bedruckten Seite nach unten ein.
4. Schieben Sie die Papierquerführung nach innen bis an die Papierkanten heran.
Legen Sie nicht zu viel Papier in das Hauptzufuhrfach ein. Vergewissern Sie sich,
dass der Stapel in das Hauptzufuhrfach passt und nicht höher als die obere Kante
der Papierquerführung ist.
5. Klappen Sie das Ausgabefach nach unten. Ziehen Sie die Verlängerung des Fachs
ganz heraus. Legen Sie den Anschlag am Ende der Papierfachverlängerung um, um
diese vollständig zu öffnen.
Hinweis Wenn Sie das Papierformat Legal verwenden, lassen Sie die
Fachverlängerung geschlossen.
So legen Sie Fotopapier im Format 13 x 18 cm (5 x 7 Zoll) in das Fotofach ein:
1. Klappen Sie die Abdeckung des Fotofachs nach oben.
2. Schieben Sie die Papierquerführung ganz nach außen.
30 HP Photosmart D7500 Series
Page 35

3. Legen Sie den Fotopapierstapel mit der schmalen Kante nach vorne und der zu
bedruckenden Seite nach unten in das Fotofach ein. Schieben Sie den
Fotopapierstapel bis zum Anschlag nach vorne.
Wenn das verwendete Fotopapier Abreißstreifen aufweist, legen Sie es so in das
Fach ein, dass die Abreißstreifen zu Ihnen weisen.
4. Schieben Sie die Papierquerführung nach innen bis an die Papierkanten heran.
Legen Sie nicht zu viel Papier in das Fotofach ein. Vergewissern Sie sich, dass der
Stapel in das Fotofach passt und nicht höher als die obere Kante der
Papierquerführung ist.
5. Klappen Sie die Abdeckung des Fotofachs nach unten.
Deutsch
31
Page 36

Kapitel 1
Bedrucken einer CD oder DVD
Neben dem Bedrucken von Papier können Sie mit dem HP Photosmart auch direkt auf
die Oberfläche speziell beschichteter CDs und DVDs drucken, wenn diese Druckaufträge
von einem angeschlossenen Computer gestartet werden. Entwerfen und erstellen Sie
zunächst das Etikett für Ihre CD oder DVD mit der Anwendung, die mit dem
HP Photosmart geliefert wurde. Drucken Sie anschließend dieses Etikett direkt auf eine
bedruckbare CD oder DVD.
Tipp Es empfiehlt sich, die Daten auf die CD oder DVD zu brennen, bevor Sie die
CD oder DVD bedrucken.
Hinweis Vom HP Photosmart werden keine CD/DVD-Druckaufträge unterstützt, die
vom Bedienfeld aus gestartet werden. Sie müssen die mit dem HP Photosmart
gelieferte Software verwenden, um eine CD/DVD zu bedrucken. Weitere
Informationen finden Sie in der Hilfe zur Software.
So drucken Sie direkt auf eine CD/DVD:
1. Verwenden Sie die Software, die mit dem Produkt geliefert wurde, um ein CD/DVD-
Etikett zu erstellen und zu drucken.
2. Wenn das Produkt zu nahe an einer Wand aufgestellt ist, müssen Sie es um
Deutsch
mindestens 7,5 cm (3 Zoll) von der Wand wegziehen.
3. Nehmen Sie den CD/DVD-Halter vorsichtig aus dem Aufbewahrungsbereich
unterhalb des Hauptzufuhrfachs heraus.
4. Lassen Sie das bedruckbare Medium sicher auf dem CD/DVD-Halter einrasten. Die
bedruckbare Seite muss dabei nach oben zeigen. Die CD/DVD muss auf den Ring
auf der mit den Pfeilen markierten Seite des Halters gelegt werden.
Hinweis Wenn Sie Medien mit kleinerem Format verwenden, klappen Sie den
CD/DVD-Halterring über die CD/DVD.
32 HP Photosmart D7500 Series
Page 37

5. Klappen Sie das CD/DVD-Fach nach unten.
Das CD/DVD-Fach befindet sich direkt unter dem Bedienfeld. In der
heruntergeklappten Position befindet sich das CD/DVD-Fach auf dem Ausgabefach.
6. Schieben Sie den CD/DVD-Halter in das Produkt, bis die Linien auf dem CD/DVD-
Halter an den weißen Linien am CD/DVD-Fach ausgerichtet sind, und tippen Sie dann
auf OK.
Deutsch
Hinweis Das Produkt zieht den CD/DVD-Halter beim Bedrucken des
Datenträgers ein.
7. Stecken Sie den CD/DVD-Halter nach dem Drucken wieder in den
Aufbewahrungsbereich.
Bedrucken einer CD oder DVD 33
Page 38

Kapitel 1
Vermeiden von Papierstaus
Um Papierstaus zu vermeiden, beachten Sie Folgendes:
• Nehmen Sie das Papier im Ausgabefach in regelmäßigen Abständen heraus.
• Vermeiden Sie die Bildung von Wellen und Knicken im Fotopapier, indem Sie es flach
in einem wiederverschließbaren Beutel lagern.
• Vergewissern Sie sich, dass das im Zufuhrfach eingelegte Papier flach aufliegt und
die Kanten nicht geknickt oder eingerissen sind.
• Wenn Sie Etiketten drucken, vergewissern Sie sich, dass das Etikettenpapier nicht
mehr als zwei Jahre alt ist. Ältere Etiketten können sich lösen, wenn das Papier durch
das Produkt geführt wird, und somit Papierstaus verursachen.
Deutsch
• Legen Sie ausschließlich Stapel in das Zufuhrfach ein, die aus einem einheitlichen
Papiertyp in einheitlichem Format bestehen.
• Stellen Sie die Papierquerführung im Zufuhrfach so ein, dass sie eng am Papier
anliegt. Vergewissern Sie sich, dass die Papierquerführung das Papier im Zufuhrfach
nicht zusammendrückt.
• Schieben Sie das Papier nicht zu weit in das Zufuhrfach hinein.
• Verwenden Sie die für das Produkt empfohlenen Papiertypen.
Drucken eines Fotos auf Fotopapier
HP empfiehlt, HP Papier zu verwenden, das speziell für den Typ des zu druckenden
Projekts entwickelt wurde, sowie HP Originaltinte, um eine optimale Druckqualität zu
erzielen. HP Papier und HP Tinte wurden eigens aufeinander abgestimmt, um
hochwertige Druckausgaben sicherzustellen.
34 HP Photosmart D7500 Series
Page 39

1 Memory Stick, Memory Stick Pro, Memory Stick Select, Memory Stick Magic Gate, Memory
Stick Duo oder Duo Pro (Adapter optional) oder Memory Stick Micro (Adapter erforderlich)
2 MultiMedia Card (MMC), MMC Plus, Secure MultiMedia Card, MMC Mobile (RS-MMC,
Adapter erforderlich), Secure Digital (SD), Secure Digital Mini, Secure Digital High Capacity
(SDHC), TransFlash MicroSD Card (Adapter erforderlich) oder xD-Picture Card
3 CompactFlash (CF) Typ I und II
4 Vorderer USB-Anschluss (für Speichergeräte und PictBridge-Kameras)
So drucken Sie Fotos:
1. Legen Sie Fotopapier in das entsprechende Zufuhrfach ein.
2. Setzen Sie eine Speicherkarte in den entsprechenden Steckplatz am Produkt ein,
oder schließen Sie ein Speichergerät am vorderen USB-Anschluss an.
3. Tippen Sie auf Anzeigen und drucken.
4. Tippen Sie auf den Pfeil nach links oder rechts, um durch die Miniaturansichten der
Fotos zu blättern.
5. Tippen Sie auf die Fotos, die gedruckt werden sollen.
6. Tippen Sie auf Fertig, und tippen Sie dann auf den Pfeil nach oben, um die Anzahl
der zu druckenden Kopien zu erhöhen. Sie müssen mindestens eine Kopie angeben,
damit das Foto gedruckt wird.
Tipp Wenn Sie das Foto vor dem Drucken zuschneiden oder drehen oder
andere Änderungen vornehmen möchten, tippen Sie auf Bearbeiten.
7. (Optional) Blättern Sie weiter nach links oder rechts, um weitere Fotos zur
Druckwarteschlange hinzuzufügen.
8. Tippen Sie auf Fertig, um eine Vorschau des Druckauftrags anzuzeigen.
9. (Optional) Tippen Sie auf Einstell., um die Druckeinstellungen zu ändern.
10. Tippen Sie auf Drucken, oder drücken Sie Fotos drucken.
Deutsch
Tipp Während des Druckvorgangs können Sie auf Weitere Fotos hinzufügen
tippen, um der Druckerwarteschlange weitere Fotos hinzuzufügen.
Drucken eines Fotos auf Fotopapier 35
Page 40

Kapitel 1
Auswechseln von Tintenpatronen
Beachten Sie die folgenden Anweisungen, wenn Sie Tintenpatronen ersetzen müssen.
Hinweis Wenn Sie das Gerät zum ersten Mal einrichten, müssen Sie unbedingt die
Anweisungen in der Kurzanleitung zum Einsetzen des Druckkopfs und der
Tintenpatronen befolgen.
Wenn Sie noch keine Ersatztintenpatronen für den HP Photosmart besitzen, können Sie
diese unter
Aufforderung Ihr Land/Ihre Region aus, befolgen Sie die Schritte zum Auswählen des
gewünschten Produkts, und klicken Sie dann auf einen der Links zum Kaufen.
Vorsicht Nehmen Sie die alte Tintenpatrone erst heraus, wenn eine neue
Tintenpatrone verfügbar ist. Lassen Sie die Tintenpatrone nicht über längere Zeit
außerhalb des Produkts liegen. Dies kann zu Schäden am Produkt und an der
Tintenpatrone führen.
So tauschen Sie die Tintenpatronen aus:
1. Vergewissern Sie sich, dass das Produkt eingeschaltet ist.
2. Öffnen Sie die Tintenpatronenklappe, indem Sie diese vorne am Gerät in der Mitte
Deutsch
anheben, bis sie einrastet.
www.hp.com/buy/supplies bestellen. Wählen Sie bei entsprechender
Der Patronenwagen fährt in die Mitte des Produkts.
Hinweis Warten Sie, bis der Patronenwagen sich nicht mehr bewegt, bevor Sie
fortfahren.
3. Drücken Sie auf die Arretierung an der Vorderseite der Tintenpatrone, um sie
freizugeben, und nehmen Sie diese anschließend aus der Halterung.
36 HP Photosmart D7500 Series
Page 41

Vorsicht Heben Sie den Griff der Verriegelung am Patronenwagen nicht an, um
die Tintenpatronen herauszunehmen.
4. Nehmen Sie die neue Tintenpatrone aus der Verpackung, indem Sie den
orangefarbenen Streifen nach hinten ziehen, um die Kunststoffverpackung von der
Tintenpatrone zu entfernen.
Hinweis Entfernen Sie den Kunststoffschutzstreifen von der Tintenpatrone,
bevor Sie diese in das Produkt einsetzen. Ansonsten schlägt der Druck fehl.
5. Drehen Sie die orangefarbene Kappe, um diese zu entfernen.
Deutsch
6. Schieben Sie die Tintenpatrone unter Beachtung der Farbsymbole in die jeweilige
leere Halterung, bis die Tintenpatrone einrastet und fest in der Halterung sitzt.
Vorsicht Heben Sie den Griff der Verriegelung am Patronenwagen nicht an, um
die Tintenpatronen einzusetzen. Dies kann dazu führen, dass die Tintenpatronen
nicht korrekt sitzen, und Druckprobleme verursachen. Die Verriegelung muss in
der unteren Position verbleiben, damit die Tintenpatronen korrekt eingesetzt
werden.
Auswechseln von Tintenpatronen 37
Page 42

Deutsch
Kapitel 1
Stellen Sie sicher, dass Sie die Tintenpatrone in den Steckplatz einsetzen, der über
ein Symbol mit derselben Form und derselben Farbe wie die einzusetzende
Tintenpatrone verfügt.
7. Wiederholen Sie die Schritte 3 bis 6 für alle auszuwechselnden Tintenpatronen.
8. Schließen Sie die Tintenpatronenklappe.
38 HP Photosmart D7500 Series
Page 43

2 Fehlerbehebung und Support
Dieses Kapitel enthält Informationen zum Beheben von Problemen mit dem HP Photosmart.
Außerdem finden Sie hier spezifische Informationen zur Installation und Konfiguration sowie einige
Hinweise zum Betrieb des Geräts. Weitere Informationen zur Fehlerbehebung finden Sie in der
Online-Hilfe der Software.
Viele Probleme entstehen dadurch, dass der HP Photosmart über ein USB-Kabel mit dem Computer
verbunden wird, bevor die HP Photosmart-Software auf dem Computer installiert wird. Wenn der
HP Photosmart an den Computer angeschlossen wurde, bevor Sie vom Installationsprogramm für
die Software dazu aufgefordert wurden, gehen Sie wie folgt vor:
Beheben häufig bei der Einrichtung auftretender Probleme
1. Ziehen Sie das USB-Kabel vom Computer ab.
2. Deinstallieren Sie die Software (falls Sie diese bereits installiert haben).
3. Starten Sie den Computer neu.
4. Schalten Sie das Gerät aus, warten Sie eine Minute, und schalten Sie es wieder ein.
5. Installieren Sie die Produktsoftware neu.
Vorsicht Schließen Sie das USB-Kabel erst an den Computer an, wenn Sie während der
Installation dazu aufgefordert werden.
Informationen zur Kontaktaufnahme mit dem Support finden Sie auf dem Rückumschlag dieses
Handbuchs.
Deinstallieren und Neuinstallieren der Software
Wenn die Installation unvollständig ist oder Sie das USB-Kabel an den Computer angeschlossen
haben, bevor Sie während der Installation dazu aufgefordert wurden, müssen Sie die Software
deinstallieren und dann erneut installieren. Löschen Sie aber nicht einfach die Programmdateien
der Software für den HP Photosmart vom Computer. Verwenden Sie unbedingt das
Deinstallationsprogramm der Software des HP Photosmart.
So deinstallieren Sie die Software und installieren sie erneut:
1. Klicken Sie in der Windows-Taskleiste auf Start, Einstellungen, Systemsteuerung (oder nur
Systemsteuerung).
2. Doppelklicken Sie auf Software (oder klicken Sie auf Programm deinstallieren).
3. Wählen Sie HP Photosmart All-in-One Treibersoftware aus, und klicken Sie danach auf
Hinzufügen/Entfernen.
Befolgen Sie die Anweisungen auf dem Bildschirm.
4. Trennen Sie die Verbindung zwischen Produkt und Computer.
5. Starten Sie den Computer neu.
Deutsch
Hinweis Es ist wichtig, dass Sie die Verbindung zum Gerät trennen, bevor Sie den
Computer neu starten. Verbinden Sie das Gerät erst mit Ihrem Computer, wenn Sie die
Software erneut installiert haben.
6. Legen Sie die Produkt-CD-ROM in das CD-ROM-Laufwerk ein, und starten Sie das Setup-
Programm.
Hinweis Wenn das Setup-Programm nicht gestartet wird, suchen Sie auf der CD-ROM
nach der Datei setup.exe, und doppelklicken Sie auf diese.
Hinweis Wenn Ihnen die Installations-CD nicht mehr zur Verfügung steht, können Sie die
Software unter folgender Adresse herunterladen:
7. Befolgen Sie die Anweisungen auf dem Bildschirm und in der Kurzanleitung für das Produkt.
www.hp.com/support
Fehlerbehebung und Support 39
Page 44

Kapitel 2
Nach Abschluss der Softwareinstallation wird das Symbol für HP Digital Imaging Monitor in der
Windows-Taskleiste angezeigt.
Fehlerbehebung bei der Einrichtung
Dieser Abschnitt enthält Informationen zu Problemen, die bei der Einrichtung der HP PhotosmartHardware auftreten können.
Das Gerät lässt sich nicht einschalten
Probieren Sie die folgenden Lösungswege aus, wenn beim Einschalten des Produkts keine LEDs
leuchten, keine Geräusche zu hören sind und sich keine Komponenten im Produkt bewegen.
Lösung 1: Sicherstellen, dass das mit dem Produkt gelieferte Netzkabel verwendet
wird
Lösung
• Stellen Sie sicher, dass das Netzkabel fest mit dem Produkt und dem Netzteil verbunden
ist. Verbinden Sie das Netzkabel mit einer Steckdose, einem Überspannungsschutz oder
einer Steckerleiste.
• Wenn Sie eine Steckerleiste verwenden, schalten Sie diese ein. Sie können das Produkt
auch direkt an die Netzsteckdose anschließen.
• Prüfen Sie die Steckdose auf Funktionstüchtigkeit. Schließen Sie ein anderes
funktionierendes Gerät an, um zu überprüfen, ob die Stromversorgung gewährleistet ist. Ist
dies nicht der Fall, könnte die Steckdose die Ursache für das Problem sein.
• Wenn das Produkt an eine Steckerleiste angeschlossen ist, stellen Sie sicher, dass diese
Deutsch
eingeschaltet ist. Wenn die Leiste eingeschaltet ist, aber das Produkt dennoch nicht mit
Strom versorgt wird, liegt ein Problem mit der Steckdose vor.
Mögliche Ursache: Das Produkt wurde nicht mit dem mitgelieferten Netzkabel verwendet.
Wenn das Problem weiterhin besteht, probieren Sie den nächsten Lösungsweg aus.
Lösung 2: Produkt zurücksetzen
Lösung: Schalten Sie das Produkt aus, und ziehen Sie das Netzkabel ab. Schließen Sie das
Netzkabel wieder an, und drücken Sie anschließend die Taste Ein, um das Produkt
einzuschalten.
Mögliche Ursache: Am Produkt trat ein Fehler auf.
Wenn das Problem weiterhin besteht, probieren Sie den nächsten Lösungsweg aus.
Lösung 3: Taste Ein langsamer drücken
Lösung: Das Produkt reagiert unter Umständen nicht, wenn Sie die Taste Ein zu schnell
drücken. Drücken Sie die Taste Ein einmal. Es kann ein paar Minuten dauern, bis das Produkt
eingeschaltet wird. Wenn Sie während dieser Zeit erneut die Taste Ein drücken, wird das
Produkt wieder ausgeschaltet.
Mögliche Ursache: Sie haben die Taste Ein zu kurz gedrückt.
Wenn das Problem weiterhin besteht, probieren Sie den nächsten Lösungsweg aus.
Lösung 4: Kontakt mit HP aufnehmen, um das Netzteil zu ersetzen
Lösung: Fordern Sie beim HP Support ein Netzteil für das Produkt an.
Rufen Sie die folgende Webseite auf:
Wählen Sie bei entsprechender Aufforderung Ihr Land/Ihre Region aus, und klicken Sie auf
Kontakt zu HP, um Kontaktinformationen für den technischen Support zu erhalten.
Mögliche Ursache: Das Netzteil war nicht für dieses Produkt vorgesehen, oder es wies einen
mechanischen Defekt auf.
Wenn das Problem weiterhin besteht, probieren Sie den nächsten Lösungsweg aus.
40 HP Photosmart D7500 Series
www.hp.com/support.
Page 45

Lösung 5: Kontaktaufnahme mit dem HP Support
Lösung: Wenn Sie alle Arbeitsschritte in den vorherigen Lösungswegen ausgeführt haben
und das Problem weiterhin besteht, bitten Sie den HP Support um Unterstützung.
Rufen Sie die folgende Webseite auf:
Wählen Sie bei entsprechender Aufforderung Ihr Land/Ihre Region aus, und klicken Sie auf
Kontakt zu HP, um Kontaktinformationen für den technischen Support zu erhalten.
Mögliche Ursache: Sie benötigen Hilfe, damit das Produkt oder die Software
ordnungsgemäß funktioniert.
www.hp.com/support.
Das USB-Kabel ist angeschlossen, es treten jedoch Probleme bei der Verwendung
des Produkts mit dem Computer auf
Lösung: Sie müssen vor dem Anschließen des USB-Kabels die im Lieferumfang des Produkts
enthaltene Software installieren. Schließen Sie das USB-Kabel während der Installation erst
dann an, wenn Sie dazu aufgefordert werden.
Sobald die Software installiert wurde, schließen Sie ein Ende des USB-Kabels an der Rückseite
des Computers und das andere Ende an der Rückseite des Produkts an. Sie können das USBKabel mit jedem USB-Anschluss des Computers verbinden.
Weitere Informationen zum Installieren der Software und zum Anschließen des USB-Kabels
finden Sie in der Kurzanleitung, die mit dem Produkt geliefert wurde.
Mögliche Ursache: Das USB-Kabel wurde angeschlossen, bevor die Software installiert
wurde. Wenn das USB-Kabel vor der entsprechenden Anforderung angeschlossen wird, können
Fehler auftreten.
Nach der Einrichtung druckt das Gerät nicht
Probieren Sie die folgenden Lösungswege aus, um dieses Problem zu beheben. Die Lösungswege
sind so sortiert, dass die wahrscheinlichste Lösung am Anfang steht. Wenn sich das Problem mit
dem ersten Lösungsweg nicht lösen lässt, probieren Sie die weiteren Lösungswege aus, bis das
Problem behoben ist.
Lösung 1: Die Taste Ein drücken, um das Produkt einzuschalten
Lösung: Überprüfen Sie das Display des Produkts. Wenn auf dem Display nichts zu sehen
ist und die Taste Ein nicht leuchtet, ist das Produkt ausgeschaltet. Stellen Sie sicher, dass das
Netzkabel mit dem Produkt verbunden und an die Stromversorgung angeschlossen ist. Drücken
Sie die Taste Ein, um das Produkt einzuschalten
Mögliche Ursache: Das Produkt war nicht eingeschaltet.
Wenn das Problem weiterhin besteht, probieren Sie den nächsten Lösungsweg aus.
Deutsch
Lösung 2: Produkt als Standarddrucker einrichten
Lösung: Verwenden Sie die Systemprogramme auf dem Computer, um Ihr Produkt als
Standarddrucker festzulegen.
Mögliche Ursache: Der Druckauftrag wurde an den Standarddrucker gesendet, aber das
Produkt war nicht der Standarddrucker.
Wenn das Problem weiterhin besteht, probieren Sie den nächsten Lösungsweg aus.
Lösung 3: Anschlussverbindung zwischen dem Produkt und dem Computer
überprüfen
Lösung: Überprüfen Sie die Anschlussverbindung zwischen dem Produkt und dem
Computer.
Mögliche Ursache: Das Produkt und der Computer kommunizierten nicht miteinander.
Wenn das Problem weiterhin besteht, probieren Sie den nächsten Lösungsweg aus.
Fehlerbehebung bei der Einrichtung 41
Page 46

Kapitel 2
Lösung 4: Sicherstellen, dass die Tintenpatronen korrekt eingesetzt sind und Tinte
enthalten
Lösung: Stellen Sie sicher, dass die Tintenpatronen korrekt eingesetzt sind und Tinte
enthalten.
Mögliche Ursache: Es lag ein Problem mit mindestens einer Tintenpatrone vor.
Wenn das Problem weiterhin besteht, probieren Sie den nächsten Lösungsweg aus.
Lösung 5: Papier in das Zufuhrfach einlegen
Lösung: Legen Sie Papier in das Zufuhrfach ein.
Mögliche Ursache: Im Produkt befand sich kein Papier.
Beheben von Papierstaus
Überprüfen Sie bei einem Papierstau zunächst den Bereich hinter der hinteren Zugangsklappe. Ggf.
müssen Sie den Papierstau von der hinteren Zugangsklappe aus beseitigen.
So beseitigen Sie Papierstaus durch die hintere Klappe:
1. Drücken Sie auf die Arretierung auf der linken Seite der hinteren Klappe, um diese freizugeben.
Entfernen Sie die Klappe, indem Sie diese vom Produkt wegziehen.
Deutsch
2. Ziehen Sie das Papier vorsichtig aus den Walzen heraus.
Vorsicht Wenn das Papier reißt, während Sie versuchen, es zwischen den Walzen
hervorzuziehen, untersuchen Sie Walzen und Rädchen gründlich auf Papierreste. Diese
dürfen nicht im Produkt verbleiben. Wenn Sie nicht alle Papierstückchen aus dem Produkt
entfernen, kommt es mit großer Wahrscheinlichkeit zu weiteren Papierstaus.
3. Bringen Sie die hintere Zugangsklappe wieder an. Drücken Sie die Klappe vorsichtig hinein, bis
sie einrastet.
4. Tippen Sie auf OK, um den aktuellen Auftrag fortzusetzen.
CDs/DVDs bedrucken – Fehlerbehebung
In diesem Abschnitt finden Sie Hinweise zur Behebung von Problemen, die beim Bedrucken von
CDs/DVDs mit dem HP Photosmart auftreten können.
42 HP Photosmart D7500 Series
Page 47

Das Produkt erkennt den CD/DVD-Halter nicht
Probieren Sie die folgenden Lösungswege aus, um dieses Problem zu beheben. Die Lösungswege
sind so sortiert, dass die wahrscheinlichste Lösung am Anfang steht. Wenn sich das Problem mit
dem ersten Lösungsweg nicht lösen lässt, probieren Sie die weiteren Lösungswege aus, bis das
Problem behoben ist.
Lösung 1: CD/DVD-Halter in das CD/DVD-Fach einschieben
Lösung: Schieben Sie den CD/DVD-Halter weiter in das CD/DVD-Fach hinein, bis die Linien
auf dem CD/DVD-Halter an den weißen Linien des CD/DVD-Fachs ausgerichtet sind. Das Ende
des Halters, das mit Pfeilen markiert ist, wird in das CD/DVD-Fach eingesetzt.
Mögliche Ursache: Der CD/DVD-Halter wurde nicht weit genug in das CD/DVD-Fach
geschoben.
Wenn das Problem weiterhin besteht, probieren Sie den nächsten Lösungsweg aus.
Lösung 2: CD/DVD-Halter aus dem Aufbewahrungsbereich herausziehen
Lösung: Entfernen Sie den CD/DVD-Halter aus dem Aufbewahrungsbereich unterhalb des
Hauptzufuhrfachs. Klappen Sie das CD/DVD-Fach nach unten. (Es befindet sich direkt unter
dem Bedienfeld.)
Stellen Sie sicher, dass Sie ein bedruckbares Medium mit der bedruckbaren Seite nach oben
auf den CD/DVD-Halter legen. Schieben Sie den CD/DVD-Halter weiter in das CD/DVD-Fach
hinein, bis die Linien auf dem CD/DVD-Halter an den weißen Linien des CD/DVD-Fachs
Deutsch
CDs/DVDs bedrucken – Fehlerbehebung 43
Page 48

Deutsch
Kapitel 2
ausgerichtet sind. Das Ende des Halters, das mit Pfeilen markiert ist, wird in das CD/DVD-Fach
eingesetzt.
Mögliche Ursache: Der CD/DVD-Halter wurde von Ihnen wieder in den
Aufbewahrungsbereich gesteckt.
Wenn das Problem weiterhin besteht, probieren Sie den nächsten Lösungsweg aus.
Lösung 3: CD/DVD auf den CD/DVD-Halter legen
Lösung: Nehmen Sie den CD/DVD-Halter aus dem Aufbewahrungsbereich unterhalb des
Hauptzufuhrfachs heraus. Entfernen Sie die bedruckbare CD/DVD aus dem CD/DVD-Fach, und
legen Sie diese mit der bedruckbaren Seite nach oben auf den CD/DVD-Halter. Schieben Sie
den Halter in das CD/DVD-Fach hinein, bis die Linien auf dem Halter an den weißen Linien des
CD/DVD-Fachs ausgerichtet sind. Das Ende des Halters, das mit Pfeilen markiert ist, wird in
das CD/DVD-Fach eingesetzt.
Mögliche Ursache: Die CD/DVD wurde ohne CD/DVD-Halter direkt in das CD/DVD-Fach
eingelegt.
Wenn das Problem weiterhin besteht, probieren Sie den nächsten Lösungsweg aus.
Lösung 4: Nächste CD/DVD auf den CD/DVD-Halter legen
Lösung: Nehmen Sie den CD/DVD-Halter aus dem CD/DVD-Fach heraus. Nehmen Sie die
bedruckte CD/DVD aus dem Halter. Legen Sie die nächste CD/DVD mit der bedruckbaren Seite
nach oben auf den CD/DVD-Halter, und setzen Sie den Halter wieder in das CD/DVD-Fach ein,
bis die Linien auf dem Halter an den weißen Linien des CD/DVD-Fachs ausgerichtet sind.
Sobald das Produkt den Halter erkennt, wird die Anweisung ausgeblendet.
Mögliche Ursache: Das Produkt forderte Sie auf, die nächste CD/DVD einzulegen, wenn
mehrere CDs/DVDs in einem Druckauftrag bedruckt wurden.
Das Produkt erkennt keine CD/DVD auf dem Halter.
Lösung: Nehmen Sie den CD/DVD-Halter aus dem CD/DVD-Fach heraus. Legen Sie eine
bedruckbare CD/DVD mit der bedruckbaren Seite nach oben auf den CD/DVD-Halter, und
setzen Sie den Halter wieder in das CD/DVD-Fach ein, bis die Linien auf dem Halter an den
weißen Linien des CD/DVD-Fachs ausgerichtet sind.
Mögliche Ursache: Sie haben den CD/DVD-Halter in das CD/DVD-Fach eingesetzt, ohne
eine CD/DVD auf den Halter zu legen.
Das Produkt blockierte beim Bedrucken einer CD/DVD.
Lösung: Vergewissern Sie sich, dass sich hinter dem Produkt in einem Abstand von
mindestens 7,5 cm keine anderen Gegenstände befinden. Stellen Sie außerdem sicher, dass
die Öffnung auf der Rückseite des Produkts nicht blockiert ist.
Mögliche Ursache: Das Produkt zog den CD/DVD-Halter beim Bedrucken der CD/DVD ein.
Der Halter kann hinten am Produkt um etwa 7,5 cm herausragen. Wenn der Platz hinter dem
Produkt nicht ausreicht, wird der Halter gestoppt und der Druckvorgang angehalten.
Das Bild auf der bedruckten CD/DVD ist abgeschnitten, und auf dem CD/DVD-Halter
befindet sich Tinte.
Lösung: Wenn Sie eine zu bedruckende CD/DVD mit Standardgröße (120 mm) auf den CD/
DVD-Halter legen, klappen Sie den blauen Ring nicht über die CD/DVD. Der blaue Ring darf
nur verwendet werden, wenn Sie eine kleinformatige CD/DVD (80 mm) bedrucken.
Bevor Sie den Druckvorgang erneut ausführen, entfernen Sie die Tinte vom CD/DVD-Halter.
Dadurch wird vermieden, dass das Innere des Produkts mit Tinte verunreinigt wird. Außerdem
vermeiden Sie dadurch Flecken auf Ihren CDs/DVDs, Ihren Händen und Ihrer Kleidung.
44 HP Photosmart D7500 Series
Page 49

Nachdem Sie den CD/DVD-Halter gereinigt und getrocknet haben, legen Sie eine neue
bedruckbare CD/DVD mit der bedruckbaren Seite nach oben auf den Halter. Lassen Sie den
blauen Ring in der ursprünglichen Position auf der gegenüberliegenden Seite des Halters der
CD/DVD, wie unten dargestellt. Schieben Sie den Halter wieder in das CD/DVD-Fach hinein,
bis die Linien auf dem Halter an den weißen Linien des CD/DVD-Fachs ausgerichtet sind, und
führen Sie den Druckvorgang erneut aus.
Mögliche Ursache: Die CD/DVD wurde falsch auf den CD/DVD-Halter gelegt.
Das Produkt druckt auf einen nicht bedruckbaren Bereich der CD/DVD
Probieren Sie die folgenden Lösungswege aus, um dieses Problem zu beheben. Die Lösungswege
sind so sortiert, dass die wahrscheinlichste Lösung am Anfang steht. Wenn sich das Problem mit
dem ersten Lösungsweg nicht lösen lässt, probieren Sie die weiteren Lösungswege aus, bis das
Problem behoben ist.
Lösung 1: Software-Einstellungen ändern
Lösung: Stellen Sie sicher, dass der Entwurf, den Sie drucken möchten, für die auf den CD/
DVD-Halter gelegte CD/DVD das korrekte Format aufweist, einschließlich der Durchmesser des
inneren und äußeren Rings. Ändern Sie die Softwareeinstellungen für die verwendete CD/DVD
entsprechend dem Mittelpunkt und der Größe Ihres Entwurfs. Weitere Informationen können
Sie der Dokumentation oder Online-Hilfe der von Ihnen verwendeten Software entnehmen.
Mögliche Ursache: Ihr Design entsprach nicht der Größe der eingelegten CD/DVD.
Wenn das Problem weiterhin besteht, probieren Sie den nächsten Lösungsweg aus.
Deutsch
Lösung 2: Neue CD/DVD mit der bedruckbaren Seite nach oben auflegen
Lösung: Wenn Sie den Inhalt bereits auf die CD/DVD gebrannt haben, müssen Sie den Inhalt
noch einmal auf eine neue CD brennen. Legen Sie die neue CD/DVD mit der bedruckbaren
Seite nach oben auf den CD/DVD-Halter. Schieben Sie den Halter wieder in das CD/DVD-Fach
hinein, bis die Linien auf dem Halter an den weißen Linien des CD/DVD-Fachs ausgerichtet
sind, und führen Sie den Druckvorgang erneut aus.
Mögliche Ursache: Die CD/DVD wurde verkehrt auf den Halter gelegt.
Der Entwurf ist auf der CD/DVD nicht zentriert.
Lösung: Ändern Sie die Softwareeinstellungen für die verwendete CD/DVD entsprechend
dem Mittelpunkt und der Größe Ihres Entwurfs. Weitere Informationen können Sie der
Dokumentation oder Online-Hilfe der von Ihnen verwendeten Software entnehmen.
Mögliche Ursache: Die Einstellungen für das Design waren nicht korrekt.
Die Tinte auf der CD/DVD trocknet nicht.
Probieren Sie die folgenden Lösungswege aus, um dieses Problem zu beheben. Die Lösungswege
sind so sortiert, dass die wahrscheinlichste Lösung am Anfang steht. Wenn sich das Problem mit
dem ersten Lösungsweg nicht lösen lässt, probieren Sie die weiteren Lösungswege aus, bis das
Problem behoben ist.
Lösung 1: Mit Tintenstrahldruckern bedruckbare CDs/DVDs verwenden
Lösung: Stellen Sie sicher, dass die von Ihnen verwendete CD/DVD zum Bedrucken mit
Tintenstrahldruckern geeignet ist. Mit Tintenstrahldruckern bedruckbare CDs/DVDs weisen
CDs/DVDs bedrucken – Fehlerbehebung 45
Page 50

Deutsch
Kapitel 2
normalerweise eine weiße Oberfläche auf. (Einige CDs/DVDs haben auch eine silberne
Oberfläche.)
Mögliche Ursache: Die Oberfläche der CD/DVD eignete sich nicht zum Bedrucken.
Wenn das Problem weiterhin besteht, probieren Sie den nächsten Lösungsweg aus.
Lösung 2: Neue CD/DVD mit der bedruckbaren Seite nach oben auflegen
Lösung: Wenn Sie den Inhalt bereits auf die CD/DVD gebrannt haben, müssen Sie den Inhalt
noch einmal auf eine neue CD brennen. Legen Sie die neue CD/DVD mit der bedruckbaren
Seite nach oben auf den CD/DVD-Halter. Schieben Sie den Halter wieder in das CD/DVD-Fach
hinein, bis die Linien auf dem Halter an den weißen Linien des CD/DVD-Fachs ausgerichtet
sind, und führen Sie den Druckvorgang erneut aus.
Mögliche Ursache: Die CD/DVD wurde verkehrt auf den Halter gelegt.
Vom Produkt wird ein CD/DVD-Größenfehler berichtet.
Lösung: Brechen Sie den Druckauftrag ab, und tauschen Sie die CD/DVD, die derzeit in den
CD/DVD-Halter eingelegt ist, gegen eine CD/DVD aus, die der für den Druckauftrag
angegebenen Größe entspricht, oder ändern Sie die Druckeinstellungen in der Software.
Mögliche Ursache: Die Größe der zurzeit auf dem CD/DVD-Halter eingelegten CD/DVD
entsprach nicht der Größe, die beim Starten des Druckauftrags vom Computer aus angegeben
wurde.
Der CD/DVD-Halter klemmt im Aufbewahrungsbereich.
Lösung: Ziehen Sie den CD/DVD-Halter soweit wie möglich heraus, bis Sie einen Widerstand
spüren. Führen Sie anschließend einen flachen Gegenstand (wie ein Messer oder einen
Schraubendreher) links in den Schlitz ein, und drücken Sie den blauen Ring nach unten. Wenn
der blaue Ring nach unten gedrückt wird, sollte sich der CD/DVD-Halter aus dem Schlitz
herausziehen lassen.
Mögliche Ursache: Der CD/DVD-Halter wurde in den Aufbewahrungsbereich eingesetzt,
obwohl noch eine CD/DVD eingelegt und der blaue Ring über die CD/DVD geklappt war.
Informationen zu Tintenpatronen und zum Druckkopf
Die folgenden Tipps tragen dazu bei, Ihre HP Tintenpatronen zu schonen und eine konsistente
Druckqualität zu erhalten.
• Bewahren Sie alle Tintenpatronen bis zur Verwendung in der versiegelten Originalverpackung
auf.
• Schalten Sie das Produkt durch Drücken der Taste Ein aus. Schalten Sie das Gerät nicht über
die Steckerleiste oder durch Abziehen des Netzkabels vom Produkt aus. Wenn Sie das Produkt
nicht ordnungsgemäß ausschalten, kann die Druckkopfeinheit nicht in die korrekte Position
zurückkehren.
• Bewahren Sie die Patronen bei Raumtemperatur auf (15,6 bis 26,6 °C, oder 60 bis 78 °F).
• HP empfiehlt, die Tintenpatronen erst dann aus dem Produkt zu nehmen, wenn Sie
Ersatzdruckpatronen zur Hand haben.
• Wenn Sie das Produkt transportieren müssen, schalten Sie es vorher durch Drücken der Taste
Ein vollständig aus. Lassen Sie die Tintenpatronen eingesetzt. Durch diese Vorgehensweise
wird verhindert, dass Tinte aus der Druckkopfeinheit austritt.
• Reinigen Sie den Druckkopf, wenn die Druckqualität deutlich nachlässt.
• Reinigen Sie den Druckkopf nur, wenn es nötig ist. Andernfalls verschwenden Sie Tinte und
verkürzen die Lebensdauer der Patronen.
• Gehen Sie sorgsam mit den Tintenpatronen um. Wenn Sie die Tintenpatronen fallen lassen
oder nicht vorsichtig handhaben, können vorübergehend Druckprobleme entstehen.
46 HP Photosmart D7500 Series
Page 51

Ablauf beim Support
Führen Sie bei einem Problem die folgenden Schritte aus:
1. Lesen Sie die im Lieferumfang des Produkts enthaltene Dokumentation.
2. Besuchen Sie die HP Support-Website unter
steht allen Kunden von HP zur Verfügung. Unsere Kunden erhalten hier immer die neuesten
Produktinformationen und Hilfestellung von unseren erfahrenen Experten:
• Schneller Kontakt mit qualifizierten Supportmitarbeitern
• Aktualisierungen der Software und Druckertreiber für das Produkt
• Wichtige Produktinformationen und Fehlerbehebungsinformationen zu häufig auftretenden
Problemen
• Proaktive Produkt-Updates, Support-Hinweise und HP Neuigkeiten, die verfügbar sind,
wenn das Produkt registriert ist
3. Rufen Sie beim HP Support an. Die Supportoptionen sind je nach Produkt, Land/Region und
Sprache verschieden.
Informationen zur Kontaktaufnahme mit dem Support finden Sie auf dem Rückumschlag dieses
Handbuchs.
www.hp.com/support. Der HP Online-Support
Deutsch
Ablauf beim Support 47
Page 52

3 Technische Daten
Dieser Abschnitt enthält die technischen Daten und internationalen Zulassungsinformationen für den
HP Photosmart. Weitere rechtliche Hinweise und Informationen zu den Umgebungsbedingungen
finden Sie in der Konformitätserklärung in der Online-Hilfe.
Systemanforderungen
Informationen zu den Systemvoraussetzungen für die Software finden Sie in der Readme-Datei.
Produktspezifikationen
Produktspezifikationen finden Sie auf der folgenden HP Website: www.hp.com/support
Papierspezifikationen
• Kapazität des Hauptzufuhrfachs: Normalpapier: Bis zu 125 Blatt (60 bis 90 g/m²)
• Ausgabefachkapazität: Normalpapier: Bis zu 50 Blatt (60 bis 90 g/m²)
• Kapazität des Fotofachs: Fotopapier: Bis zu 20
Hinweis Eine vollständige Liste der unterstützten Druckmedienformate finden Sie in der
Druckersoftware.
Abmessungen und Gewicht
Deutsch
• Höhe: 18,32 cm
• Breite: 45,79 cm
• Tiefe: 38,31 cm
• Gewicht: 5,56 kg
Stromversorgung
• Leistungsaufnahme: Max. 42 Watt (mittlere Druckkapazität)
• Nenneingangsspannung am Netzteil: 100 bis 240 V AC ~ 1300 mA, 50 – 60 Hz
• DC-Nennspannung am Drucker: 32 V DC (1300 mA)
Hinweis Verwenden Sie das Gerät nur mit dem mitgelieferten HP Netzteil.
Umgebungsbedingungen
• Empfohlener Betriebstemperaturbereich: 15 bis 32 ºC
• Max. Betriebstemperatur: 5 bis 35 ºC
• Luftfeuchtigkeit: 15 bis 80 %, nicht kondensierend
• Lagerungstemperatur: -20 bis 50 ºC
• Wenn starke elektromagnetische Felder vorhanden sind, kann die Ausgabe des HP Photosmart
leicht verzerrt sein.
• HP empfiehlt die Verwendung eines höchstens 3 m langen USB-Kabels, um Störungen aufgrund
von potenziell starken elektromagnetischen Feldern zu reduzieren
Zulassungsinformationen
Der HP Photosmart erfüllt die Produktanforderungen der Kontrollbehörden in Ihrem Land/Ihrer
Region. Die vollständigen Zulassungsinformationen finden Sie in der Online-Hilfe.
Zulassungsmodellnummer
Dem Gerät wurde zu Identifizierungszwecken eine modellspezifische Zulassungsnummer
zugewiesen. Die Zulassungsmodellnummer Ihres Produkts lautet SDGOB-0822. Diese
Modellidentifikationsnummer darf nicht mit dem Produktnamen (z. B. HP Photosmart D7500 Series)
oder der Modellnummer (z. B. Q8440A) verwechselt werden.
48 HP Photosmart D7500 Series
Page 53

Gewährleistung
HP Produkt Dauer der beschränkten Gewährleistung
Softwaremedien 90 Tage
Drucker 1 Jahr
Druckpatronen Bis die HP Tinte verbraucht oder das auf der Druckpatrone
Druckköpfe 1 Jahr
A. Umfang der beschränkten Gewährleistung
1. Hewlett-Packard (HP) gewährleistet dem Endkunden, dass die oben genannten HP Produkte während des oben genannten
Gewährleistungszeitraums frei von Material- und Verarbeitungsfehlern sind. Der Gewährleistungszeitraum beginnt mit dem
Kaufdatum.
2. Bei Softwareprodukten gilt die eingeschränkte Garantie von HP nur für die Nichtausführung von Programmieranweisungen.
HP übernimmt keine Garantie dafür, dass die Verwendung jeglicher Produkte unterbrechungsfrei bzw. ohne Fehler verläuft.
3. Die beschränkte Gewährleistung von HP gilt nur für Mängel, die sich bei normaler Benutzung des Produkts ergeben, und
erstreckt sich nicht auf Fehler, die durch Folgendes verursacht wurden:
a. Unsachgemäße Wartung oder Abänderung des Produkts;
b. Software, Druckmedien, Ersatzteile oder Verbrauchsmaterial, die nicht von HP geliefert oder unterstützt werden;
c. Betrieb des Produkts, der nicht den technischen Daten entspricht;
d. Unberechtigte Abänderung oder falsche Verwendung.
4. Bei HP-Druckerprodukten wirkt sich die Verwendung einer nicht von HP hergestellten bzw. einer aufgefüllten Patrone nicht
auf die Garantie für den Kunden bzw. auf jegliche Unterstützungsverträge mit dem Kunden aus. Wenn der Ausfall bzw. die
Beschädigung des Druckers jedoch auf die Verwendung einer nicht von HP hergestellten bzw. einer aufgefüllten Patrone
oder einer abgelaufenen Tintenpatrone zurückzuführen ist, stellt HP für die Wartung des Druckers bei diesem Ausfall bzw.
dieser Beschädigung die standardmäßigen Arbeits- und Materialkosten in Rechnung.
5. Wenn HP während des jeweils zutreffenden Gewährleistungszeitraums von einem Schaden an einem unter die
Gewährleistung von HP fallenden Produkt in Kenntnis gesetzt wird, wird das betreffende Produkt nach Wahl von HP
entweder repariert oder ersetzt.
6. Sollte HP nicht in der Lage sein, ein fehlerhaftes, unter die Gewährleistung fallendes Produkt zu reparieren oder zu ersetzen,
erstattet HP innerhalb eines angemessenen Zeitraums nach Benachrichtigung über den Schaden den vom Endkunden
bezahlten Kaufpreis für das Produkt zurück.
7. HP ist erst dann verpflichtet, das mangelhafte Produkt zu reparieren, zu ersetzen oder den Kaufpreis zurückzuerstatten,
wenn der Endkunde dieses an HP zurückgesandt hat.
8. Ersatzprodukte können entweder neu oder neuwertig sein, solange sie über mindestens denselben Funktionsumfang
verfügen wie das zu ersetzende Produkt.
9. HP Produkte können aufgearbeitete Teile, Komponenten oder Materialien enthalten, die in der Leistung neuen Teilen
entsprechen.
10. Die Erklärung zur beschränkten Gewährleistung von HP gilt in jedem Land, in dem die aufgeführten Produkte von HP
vertrieben werden. Weitergehende auf der Gewährleistung beruhende Dienstleistungen (z.B. Vor-Ort-Service) können mit
jeder autorisierten HP Serviceeinrichtung in den Ländern vereinbart werden, in denen das Produkt durch HP oder einen
autorisierten Importeur vertrieben wird.
B. Einschränkungen der Gewährleistung
WEDER HP NOCH DESSEN ZULIEFERER ÜBERNEHMEN ÜBER DAS NACH GELTENDEM RECHT ZULÄSSIGE
AUSMASS HINAUS ANDERE AUSDRÜCKLICHE ODER STILLSCHWEIGENDE GEWÄHRLEISTUNGEN ODER
ZUSICHE-RUNGEN HINSICHTLICH DER MARKTGÄNGIGKEIT, ZUFRIEDEN STELLENDEN QUALITÄT UND EIGNUNG
FÜR EINEN BESTIMMTEN ZWECK.
C. Haftungsbeschränkung
1. Sofern durch die geltende Gesetzgebung keine anderen Bestimmungen festgelegt sind, stehen dem Endkunden über die in
dieser Gewährleistungsvereinbarung genannten Leistungen hinaus keine weiteren Ansprüche zu.
2. IN DEM NACH GELTENDEM RECHT ZULÄSSIGEN MASS UND MIT AUSNAHME DER IN DIESER
GEWÄHRLEISTUNGSVEREINBARUNG AUSDRÜCKLICH ANGEGEBENEN VERPFLICHTUNGEN SIND WEDER HP
NOCH DESSEN ZULIEFERER ERSATZPFLICHTIG FÜR DIREKTE, INDIREKTE, BESONDERE, ZUFÄLLIGE ODER
FOLGESCHÄDEN, UNABHÄNGIG DAVON, OB DIESE AUF DER GRUNDLAGE VON VERTRÄGEN, UNERLAUBTEN
HANDLUNGEN ODER ANDEREN RECHTSTHEORIEN GELTEND GEMACHT WERDEN UND OB HP ODER DESSEN
ZULIEFERER VON DER MÖGLICHKEIT EINES SOLCHEN SCHADENS UNTERRICHTET WORDEN SIND.
D. Geltendes Recht
1. Diese Gewährleistungsvereinbarung stattet den Endkunden mit bestimmten Rechten aus. Der Endkunde hat unter
Umständen noch weitere Rechte, die in den Vereinigten Staaten von Bundesstaat zu Bundesstaat, in Kanada von Provinz zu
Provinz, und allgemein von Land zu Land verschieden sein können.
2. Soweit diese Gewährleistungsvereinbarung nicht dem geltenden Recht entspricht, soll sie als dahingehend abgeändert
gelten, dass die hierin enthaltenen Bestimmungen dem geltenden Recht entsprechen. Unter dem geltenden Recht treffen
bestimmte Erklärungen und Einschränkungen dieser Gewährleistungsvereinbarung möglicherweise nicht auf den Endkunden
zu. In einigen US-Bundesstaaten und in einigen anderen Ländern (sowie in einigen kanadischen Provinzen):
a. werden die Rechte des Verbrauchers nicht durch die Erklärungen und Einschränkungen dieser
Gewährleistungsvereinbarung beschränkt (z.B. in Großbritannien);
b. ist ein Hersteller nicht berechtigt, solche Erklärungen und Einschränkungen durchzusetzen;
c. verfügt ein Endkunde über weitere Gewährleistungsansprüche; insbesondere kann die Dauer stillschweigender
Gewährleistungen durch das geltende Recht geregelt sein und darf vom Hersteller nicht eingeschränkt werden, oder eine
zeitliche Einschränkung der stillschweigenden Gewährleistung ist zulässig.
3. DURCH DIESE GEWÄHRLEISTUNGSVEREINBARUNG WERDEN DIE ANSPRÜCHE DES ENDKUNDEN, DIE DURCH
DAS IN DIESEN LÄNDERN GELTENDE RECHT IM ZUSAMMENHANG MIT DEM KAUF VON HP PRODUKTEN GEWÄHRT
WERDEN, NUR IM GESETZLICH ZULÄSSIGEN RAHMEN AUSGESCHLOSSEN, EINGESCHRÄNKT ODER GEÄNDERT.
DIE BEDINGUNGEN DIESER GEWÄHRLEISTUNGSVEREINBARUNG GELTEN ZUSÄTZLICH ZU DEN GESETZLICHEN
ENDKUNDENRECHTEN.
Sehr geehrter Kunde,
Als Anlage finden Sie die Namen und Adressen der jeweiligen HP Gesellschaft, die in Ihrem Land die HP Herstellergarantie
gewähren.
Über die Herstellergarantie hinaus haben Sie gegebenenfalls Mängelansprüche gegenüber Ihrem Verkäufer aus dem
Kaufvertrag, die durch diese Garantie nicht eingeschränkt werden.
Deutschland: Hewlett-Packard GmbH, Herrenberger Straße 140, D-71034 Böblingen
Luxemburg: Hewlett-Packard Luxembourg SCA, 7a, rue Robert Stümper, L-2557 Luxembourg-Gasperich
Österreich: Hewlett-Packard Ges.m.b.H., Wienerbergstrasse 41 A-1120 Wien
angegebene Enddatum für die Garantie erreicht ist, je nachdem,
welcher Fall zuerst eintritt. Diese Garantie gilt nicht für nachgefüllte,
nachgearbeitete, recycelte, zweckentfremdete oder in anderer
Weise manipulierte HP Tintenprodukte.
HP Herstellergarantie
Deutsch
Gewährleistung 49
Page 54

HP Photosmart série D7500
Guide d'utilisation
Français
Page 55

Sommaire
1 Présentation de l'appareil HP Photosmart
L'appareil HP Photosmart en un coup d'œil.............................................................................52
Fonctions du panneau de commande......................................................................................53
Recherche d'informations supplémentaires..............................................................................54
Chargement du papier..............................................................................................................54
Impression directe sur un CD/DVD..........................................................................................58
Prévention des bourrages papier.............................................................................................60
Impression d'une photo sur du papier photo............................................................................60
Remplacement des cartouches d'encre...................................................................................62
2 Dépannage et assistance
Désinstallation et réinstallation du logiciel................................................................................65
Dépannage concernant l'installation.........................................................................................66
Élimination de bourrages papier...............................................................................................68
Dépannage de l'impression sur CD/DVD.................................................................................69
Informations sur les cartouches d'encre et la tête d'impression...............................................72
Procédure d’assistance............................................................................................................73
3 Renseignements techniques
Configurations système minimales...........................................................................................74
Spécifications du produit..........................................................................................................74
Déclarations de conformité.......................................................................................................74
Garantie....................................................................................................................................76
51
Français
Page 56

1 Présentation de
l'appareil HP Photosmart
L'appareil HP Photosmart vous permet d'imprimer des photos à partir d'une carte
mémoire, ou d'imprimer directement à la surface de CD et de DVD munis d'un revêtement
spécial. Vous pouvez accéder directement à de nombreuses fonctions de
l'appareil HP Photosmart à partir du panneau de commande, sans allumer votre
ordinateur.
Remarque Le présent guide décrit le fonctionnement et les opérations de résolution
des incidents de base, et contient des informations pour entrer en contact avec le
service d'assistance HP et commander des consommables.
L'aide visible à l'écran détaille la totalité des fonctionnalités, y compris l'utilisation du
logiciel HP Photosmart fourni avec l'appareil HP Photosmart.
L'appareil HP Photosmart en un coup d'œil
Français
52 HP Photosmart série D7500
Etiquette Désignation
1 Ecran graphique couleur (aussi appelé écran)
2 Panneau de configuration
3 Logements pour carte mémoire et voyant Photo
4 Port USB avant
5 Bac de sortie
6 Rallonge du bac d'alimentation (également appelée rallonge du bac)
7 Zone de stockage du support de CD/DVD
8 Support de CD/DVD
9 Bac d'alimentation principal (également appelé bac d'entrée)
Page 57

(suite)
Etiquette Désignation
10 Bac photo
11 Tiroir de CD/DVD
12 Porte d'accès aux cartouches d'encre
13 Porte arrière
14 Port USB arrière
15 Raccordement électrique*
* Utilisez uniquement l'adaptateur secteur fourni par HP.
Fonctions du panneau de commande
Le schéma et le tableau associé suivants décrivent brièvement les caractéristiques du
panneau de commandes de l'appareil HP Photosmart.
Libellé Icône Nom et description
1 Écran : l'écran tactile affiche les menus, les photos et les messages. Vous pouvez
réhausser l'écran et l'orienter pour optimiser l'affichage.
2 Voyant d'avertissement : indique qu'un problème est survenu. Pour plus
d'informations, reportez-vous à l'écran.
3 Démarrage: permet de revenir à l'écran d'accueil (écran par défaut lorsque vous
activez le produit).
4 Imprimer photos : imprime les photos de votre carte mémoire que vous avez
sélectionnées. Si aucune photo n'est sélectionnée, le produit imprime la photo
affichée à l'écran.
5 Effacer : interrompt l'opération en cours et revient à l'écran principal.
6 Suppression yeux rouges : active ou désactive la fonction Suppression yeux
rouges. Cette fonction s'active lorsqu'une carte mémoire est insérée. Le produit
Fonctions du panneau de commande 53
Français
Page 58

Chapitre 1
(suite)
Libellé Icône Nom et description
corrige automatiquement les yeux rouges présents sur la photo actuellement affichée
à l'écran.
7 Allumé : permet de mettre le produit sous tension ou hors tension. Lorsque le produit
est hors tension, il continue à recevoir une quantité minimale de courant. Pour
supprimer toute alimentation, mettez le produit hors tension, puis débranchez le
cordon d'alimentation.
Recherche d'informations supplémentaires
Diverses ressources, imprimées et en ligne, fournissent des informations sur la
configuration et l'utilisation de votre appareil HP Photosmart.
Guide de démarrage
Le Guide de démarrage fournit des instructions sur la configuration du produit et
l'installation du logiciel. Assurez-vous de suivre les instructions du Guide de démarrage
dans l'ordre indiqué.
Si vous rencontrez des problèmes lors de la configuration, consultez les conseils de
dépannage dans la dernière section du Guide de démarrage ou reportez-vous au chapitre
«
Dépannage et assistance, » page 65 du présent guide.
Aide en ligne
L'aide affichée à l'écran fournit des instructions détaillées relatives aux fonctionnalités de
votre produit HP Photosmart qui ne sont pas décrites dans ce guide, notamment les
fonctionnalités uniquement disponibles via le logiciel que vous avez installé avec le
produit HP Photosmart. L'aide affichée à l'écran contient également des informations
réglementaires et environnementales.
Pour accéder à l'aide affichée à l'écran
• Windows : Cliquez sur Démarrer > Tous les programmes > HP > Photosmart
série D7500 > Aide.
Français
• Macintosh : Ouvrez le Gestionnaire de périphériques HP et cliquez sur l'icône ? .
Ensuite, cliquez sur le menu principal et sélectionnez Photosmart série D7500.
Site Web HP
Si vous disposez d'un accès à Internet, vous pouvez obtenir de l'aide sur le site Web HP
à l'adresse
pilotes, des fournitures et des informations pour passer des commandes.
www.hp.com/support. Vous y trouverez une assistance technique, des
Chargement du papier
Vous pouvez charger différents types et formats de papiers dans le produit
HP Photosmart, y compris du papier au format A4 ou Lettre, du papier photo, des
transparents et des enveloppes. Pour plus d'informations, reportez-vous à l'aide en ligne.
54 HP Photosmart série D7500
Page 59

Pour charger du papier au format standard
1. Soulevez le bac de sortie.
Conseil Taquez une pile de papier sur une surface plane pour en aligner les
bords. Assurez-vous que le papier contenu dans la pile est de format et de type
identiques et est exempt de déchirures, poussière, plis et bords racornis ou
recourbés.
2. Faites glisser le guide de réglage de largeur du papier jusqu'à sa position extrême.
3. Insérez la pile de papier dans le bac d'alimentation principal, dans le sens de la
longueur et face à imprimer vers le bas. Faites-la glisser en avant jusqu'à ce qu'elle
soit calée.
Attention Assurez-vous que le produit est inactif et silencieux quand vous
chargez du papier dans le bac d'alimentation principal. Si le produit est en cours
d'entretien des cartouches d'encre ou s'il effectue une autre tâche, le dispositif
d'arrêt de papier à l'intérieur du produit risque de ne pas être en place. Vous
risqueriez d'enfoncer le papier trop profondément et le produit éjecterait des
pages vierges.
Chargement du papier 55
Français
Page 60

Chapitre 1
Conseil Si vous utilisez du papier à en-tête, insérez le haut de la page en
premier, face à imprimer vers le bas.
4. Faites glisser le guide de largeur de façon à ce qu'il touche le bord du papier.
Ne remplissez pas trop le bac d’alimentation principal ; assurez-vous que la pile de
papier tient dans le bac d'alimentation principal et ne dépasse pas le haut du guide
de largeur.
5. Abaissez le bac de sortie. Tirez l'allonge du bac vers vous, aussi loin que possible.
Retournez le dispositif de verrouillage du papier à l'extrémité de la rallonge du bac
afin de déployer le reste de la rallonge.
Remarque Si vous utilisez du papier au format Légal, laissez l'extension du bac
fermée.
Français
Pour charger du papier photo jusqu'au format 13 x 18 cm (5 x 7 pouces) dans le
bac d'alimentation photo
1. Soulevez le couvercle du bac photo.
2. Faites glisser le guide de réglage de largeur du papier jusqu'à sa position extrême.
56 HP Photosmart série D7500
Page 61

3. Insérez la pile de papier photo dans le bac d'alimentation photo dans le sens de la
longueur et face à imprimer vers le bas. Faites-la glisser jusqu'à ce qu'elle soit calée.
Si le papier photo utilisé est perforé, chargez-le de manière à ce que les perforations
soient le plus près de vous.
4. Faites glisser le guide de largeur vers l'intérieur, de façon à ce qu'il soit calé contre
le bord du papier.
Ne surchargez pas le bac photo. Assurez-vous que la pile de papier tient dans le bac
photo et ne dépasse pas le haut du guide de largeur.
5. Abaissez le couvercle du bac photo.
Français
57
Page 62

Chapitre 1
Impression directe sur un CD/DVD
Outre l'impression sur du papier, l'appareil HP Photosmart vous permet d'imprimer
directement à la surface de CD et DVD à revêtement spécial en exécutant des travaux
d'impression à partir d'un ordinateur connecté. Vous pouvez, à l'aide du logiciel
HP Photosmart, concevoir et créer des étiquettes personnalisées pour votre CD ou DVD,
que vous pourrez ensuite imprimer sur vos supports CD/DVD imprimables.
Conseil Nous vous recommandons d'écrire vos données sur le CD ou sur le DVD
avant d'imprimer l'étiquette.
Remarque L'appareil HP Photosmart ne prend pas en charge les travaux
d'impression de CD/DVD à partir du panneau de commande. Pour effectuer
l'impression sur un CD ou un DVD, vous devez utiliser le logiciel fourni avec l'appareil
HP Photosmart. Pour plus d'informations, reportez-vous à l'aide sur le logiciel.
Pour imprimer directement sur un CD/DVD
1. Utilisez le logiciel fourni avec le produit pour créer et imprimer une étiquette de CD/
DVD.
2. Si le produit est placé près d'un mur, laissez un interstice d'au moins 7,5 cm
(3 pouces).
3. Retirez avec précaution le support de CD/DVD de la zone de stockage située sous
le bac d'alimentation principal.
Français
58 HP Photosmart série D7500
4. Insérez et fixez le support d'impression jet d'encre dans le support de CD/DVD, face
à imprimer orientée vers le haut. Le CD/DVD doit être placé sur l'anneau situé à
l'extrémité du support comportant des flèches.
Remarque Si vous utilisez un support de plus petite taille, retournez l'anneau
du support de CD/DVD et positionnez-le sur le dessus.
Page 63

5. Abaissez le tiroir de CD/DVD.
Le tiroir de CD/DVD est situé juste en dessous du panneau de commande. Lorsque
le tiroir de CD/DVD est en position basse, il surplombe le bac de sortie.
6. Poussez le support de CD/DVD dans le produit jusqu'à ce que ses lignes soient
alignées sur celles du plateau de CD/DVD, puis touchez OK.
Remarque Le produit tire le support de CD/DVD lors de l'impression sur le
médium.
7. Une fois l'impression terminée, assurez-vous que le support de CD/DVD a été
réinséré dans la zone de stockage.
Impression directe sur un CD/DVD 59
Français
Page 64

Chapitre 1
Prévention des bourrages papier
Pour éviter les bourrages papier, respectez les principes suivants :
• Retirez fréquemment le papier imprimé du bac de sortie.
• Évitez que le papier photo ne se froisse ou n'ondule en le stockant à plat dans un
sachet étanche.
• Assurez-vous que le papier chargé dans le bac d'alimentation repose à plat et que
les bords ne sont pas cornés ou déchirés.
• Si vous imprimez des étiquettes, assurez-vous que les planches ne datent pas de
plus de deux ans. Les étiquettes contenues sur des planches plus anciennes risquent
de se détacher lorsque le papier est entraîné dans le produit, ce qui peut créer des
bourrages papier.
• Ne mélangez pas des papiers de types et de formats différents dans le bac
d'alimentation ; chargez un seul type et un seul format de papier à la fois.
• Ajustez le guide de largeur du bac d'alimentation pour qu'il se cale contre le papier
chargé. Assurez-vous que le guide de largeur ne courbe pas le papier chargé dans
le bac d'alimentation.
• Ne poussez pas le papier trop loin dans le bac d'alimentation.
• Utilisez les types de papier recommandés pour le produit.
Impression d'une photo sur du papier photo
Pour obtenir une qualité d'impression optimale, il est recommandé d'utiliser des
papiers HP conçus spécialement pour le type de projet que vous imprimez, ainsi que des
Français
60 HP Photosmart série D7500
encres HP authentiques. Les papiers et encres HP sont spécialement conçus pour être
utilisés ensemble et produire des impressions de grande qualité.
Page 65

1 Memory Stick, Memory Stick Pro, Memory Stick Select, Memory Stick Magic Gate, Memory
Stick Duo ou Duo Pro (adaptateur facultatif) ou Memory Stick Micro (adaptateur requis)
2 MultiMediaCard (MMC), MMC Plus, Secure MultiMedia Card, MMC Mobile (RS-MMC;
adaptateur requis), Secure Digital (SD), Secure Digital Mini, Secure Digital High Capacity
(SDHC), TransFlash MicroSD Card (adapter required) ou xD-Picture
3 CompactFlash (CF) types I et II
4 Port USB avant (pour les périphériques de stockage et les appareils photo PictBridge)
Pour imprimer des photos
1. Chargez du papier photo dans le bac d'alimentation approprié.
2. Insérez une carte mémoire dans l'emplacement approprié du produit ou connectez
une unité de stockage au port USB frontal.
3. Touchez Aff. et impr.
4. Touchez la flèche gauche ou droite pour faire défiler les miniatures de vos photos.
5. Touchez les photos à imprimer.
6. Touchez Terminé puis la flèche vers le haut afin d'augmenter le nombre de copies.
Vous devez spécifier au moins une copie. Dans le cas contraire, aucune impression
de la photo n'aura lieu.
Conseil Si vous souhaitez recadrer, faire pivoter ou apporter d'autres
modifications à la photo avant de l'imprimer, touchez Édition.
7. (Facultatif) Continuez à faire défiler les photos vers la gauche ou vers la droite pour
ajouter d'autres photos à la file d'attente d'impression.
8. Touchez l'icône Terminé pour prévisualiser le travail d'impression.
9. (Facultatif) Touchez l'icône Paramètres pour modifier les paramètres d'impression.
10. Touchez l'icône Imprimer ou appuyez sur Imprimer photos.
Français
Conseil Au cours de l'impression, vous pouvez sélectionner Ajouter des
photos pour ajouter des photos à la file d'attente d'impression.
Impression d'une photo sur du papier photo 61
Page 66

Chapitre 1
Remplacement des cartouches d'encre
Suivez ces instructions lorsque vous devez remplacer des cartouches d'encre.
Remarque Si vous configurez le produit pour la première fois, assurez-vous de
suivre les instructions mentionnées dans le Guide de démarrage lors de l'installation
de la tête d'impression et des cartouches d'encre.
Si vous ne disposez pas de cartouches d'encre de rechange HP Photosmart, vous
pouvez en commander sur le site Web
invite, sélectionnez votre pays/région, suivez les instructions des invites pour
sélectionner votre produit, puis cliquez sur l'un des liens d'achat figurant sur la page.
Attention Attendez d'avoir une cartouche d'encre neuve à portée de main avant de
procéder au retrait de la cartouche périmée. Ne laissez pas la cartouche d'encre à
l'extérieur du produit pendant une période prolongée. Il pourrait en résulter un
endommagement à la fois du produit et de la cartouche d'encre.
Pour remplacer les cartouches d'encre
1. Assurez-vous que le produit est sous tension.
2. Ouvrez la trappe d'accès aux cartouches d'encre en la soulevant par la partie centrale
du produit jusqu'à ce que la porte s'enclenche.
www.hp.com/buy/supplies. Si le système vous y
Français
62 HP Photosmart série D7500
Le chariot d’impression se déplace vers le centre de l’appareil.
Remarque Avant de poursuivre, attendez que le chariot d'impression se soit
immobilisé.
3. Exercez une pression sur le loquet situé à l'avant de la cartouche d'impression pour
libérer celle-ci, puis ôtez-la de son emplacement.
Page 67

Attention Ne soulevez pas le loquet du chariot d'impression lors du retrait des
cartouches d'encre.
4. Retirez la cartouche neuve de son emballage en tirant la languette de couleur orange,
afin d'ôter l'emballage plastique entourant la cartouche d'encre.
Remarque Assurez-vous d'avoir ôté l'emballage en plastique entourant la
cartouche d'encre avant d'installer celle-ci dans le produit. Dans le cas contraire,
aucune impression n'aura lieu.
5. Tournez le bouchon de couleur orange afin de l'enlever.
6. En vous aidant des icônes colorées, insérez la cartouche d'encre dans l'emplacement
vide jusqu'à ce qu'elle émette un cliquetis indiquant qu'elle est correctement introduite
dans l'emplacement.
Attention Ne soulevez pas le loquet du chariot d'impression lors de l'installation
des cartouches d'encre. Si vous procédiez de la sorte, les cartouches d'encre
risqueraient de ne pas être correctement positionnées, d'où des problèmes
d'impression. Pour que l'installation des cartouches d'encre soit correcte, le loquet
doit demeurer en position abaissée.
Remplacement des cartouches d'encre 63
Français
Page 68

Chapitre 1
Assurez-vous que vous insérez la cartouche d'encre dans le logement présentant
une icône de même forme et de même couleur que celle de la cartouche que vous
utilisez.
7. Répétez les étapes 3 à 6 pour chaque cartouche d'encre que vous remplacez.
8. Fermez la trappe d'accès aux cartouches d'encre.
Français
64 HP Photosmart série D7500
Page 69

2 Dépannage et assistance
Ce chapitre contient des informations de dépannage relatives au produit HP Photosmart. Il fournit
notamment des renseignements sur les problèmes liés à l'installation, à la configuration et à certains
aspects de l'utilisation. Pour plus d'informations sur le dépannage, consultez l'aide en ligne fournie
avec votre logiciel.
Plusieurs problèmes peuvent se produire si le produit HP Photosmart est connecté à l'ordinateur via
un câble USB avant l'installation du logiciel HP Photosmart sur l'ordinateur. Si vous avez connecté
le produit HP Photosmart à votre ordinateur avant que le programme d'installation du logiciel ne
vous y ait invité, procédez comme suit :
Dépannage des problèmes courant rencontrés pendant l'installation
1. Débranchez le câble USB de l'ordinateur.
2. Désinstallez le logiciel (si vous l'avez déjà installé).
3. Redémarrez l'ordinateur.
4. Mettez le produit hors tension, attendez une minute, puis redémarrez-le.
5. Réinstallez le logiciel fourni avec l'appareil.
Attention Ne branchez pas le câble USB avant d'y avoir été invité par le biais de l'écran
d'installation du logiciel.
Pour plus d'informations pour contacter le support, reportez-vous à la troisième de couverture de ce
guide.
Désinstallation et réinstallation du logiciel
Si l'installation est incomplète ou que vous avez connecté le câble USB à l'ordinateur avant d'y être
invité par l'écran d'installation du logiciel, il peut être nécessaire de désinstaller, puis de réinstaller
le logiciel. Ne supprimez pas simplement les fichiers de l'application de l'appareil HP Photosmart de
votre ordinateur. Assurez-vous de les désinstaller à l'aide de l'utilitaire prévu à cet effet, lequel est
fourni lors de l'installation du logiciel associé à l'appareil HP Photosmart.
Pour désinstaller, puis réinstaller le logiciel
1. Dans la barre des tâches de Windows, cliquez sur Démarrer, Paramètres, Panneau de
configuration (ou simplement Panneau de configuration).
2. Double-cliquez sur Ajout/suppression de programmes (ou cliquez sur Désinstaller un
programme).
3. Sélectionnez l'entrée Logiciel de pilote HP Photosmart tout-en-un (HP Photosmart All-in-One
Driver Software) et cliquez sur Modifier/Supprimer.
Suivez les instructions qui s'affichent à l'écran.
4. Déconnectez le produit de l'ordinateur.
5. Redémarrez l'ordinateur.
Français
Remarque Il est important de déconnecter l'appareil avant de redémarrer l'ordinateur. Ne
connectez pas l'appareil à l'ordinateur avant d'avoir réinstallé le logiciel.
Dépannage et assistance 65
Page 70

Chapitre 2
6. Insérez le CD-ROM du produit dans le lecteur de CD-ROM de votre ordinateur, puis lancez le
programme d'installation.
Remarque Si le programme d'installation ne s'affiche pas, recherchez le fichier setup.exe
sur le lecteur de CD-ROM, puis double-cliquez dessus.
Remarque Si vous n'êtes plus en possession du CD-ROM d'installation, vous pouvez
télécharger le logiciel sur le site
7. Suivez les instructions à l'écran et celles fournies dans le Guide de démarrage qui accompagne
le produit.
Une fois l'installation du logiciel terminée, l'icône HP Digital Imaging Monitor apparaît dans la barre
d'état système de Windows.
Dépannage concernant l'installation
Reportez-vous à cette section pour résoudre les problèmes rencontrés lors de la configuration de
l'appareil HP Photosmart.
L'appareil ne s'allume pas.
Essayez les solutions suivantes si aucune indication n'est émise par un voyant, qu'aucun bruit n'est
émis ou qu'aucun mouvement n'a lieu dans le produit lorsque vous mettez celui-ci sous tension.
Solution 1 : Assurez-vous que vous utilisez le cordon d'alimentation fourni avec le
produit.
Solution
• Assurez-vous que le cordon d'alimentation est correctement branché au produit et à
l'adaptateur secteur. Branchez le cordon d'alimentation à une prise de courant, à un
parasurtenseur ou à une prise multiple.
• Si vous utilisez une prise multiple, assurez-vous que l'interrupteur dont elle est équipée est
en position de marche. Vous pouvez aussi brancher directement le produit à une prise
secteur.
• Testez la prise d'alimentation pour vérifier qu'elle est en bon état. Branchez un appareil dont
vous être sûr du bon fonctionnement et vérifiez s'il est alimenté. Si ce n'est pas le cas, la
prise d'alimentation est très certainement défectueuse.
• Si vous avez branché le produit sur une prise à interrupteur, assurez-vous que ce dernier
est en position de marche. S'il est sous tension mais ne fonctionne toujours pas, il se peut
que la prise de courant ait un problème.
Cause: Le produit n'était pas utilisé avec le cordon d'alimentation fourni.
Français
Si le problème persiste, passez à la solution suivante.
www.hp.com/support.
Solution 2 : Réinitialisez le produit
Solution: Mettez le produit hors tension, puis débranchez le cordon d'alimentation.
Rebranchez le cordon d'alimentation, puis appuyez sur le bouton Allumé pour mettre le produit
sous tension.
Cause: Le produit a généré une erreur.
Si le problème persiste, passez à la solution suivante.
Solution 3 : Appuyez sur le bouton Allumé plus lentement.
Solution: Il se peut que le produit ne réponde pas si vous appuyez trop rapidement sur le
bouton Allumé. Appuyez une fois sur le bouton Allumé. Il faut parfois quelques minutes pour
mettre le produit sous tension. Si vous appuyez à nouveau sur le bouton Allumé pendant cette
période, vous risquez de mettre le produit hors tension.
Cause: Vous avez appuyé sur le bouton Allumé trop vite.
66 HP Photosmart série D7500
Page 71

Si le problème persiste, passez à la solution suivante.
Solution 4 : Contactez HP pour obtenir le remplacement du bloc d'alimentation
Solution: Contactez l’Assistance HP afin de commander un bloc d'alimentation électrique
pour le produit.
Rendez-vous sur le site :
Si vous y êtes invité, sélectionnez votre pays/région, puis cliquez sur Contacter HP pour savoir
comment contacter l'assistance technique.
Cause: Le bloc d'alimentation n'était pas destiné à être utilisé avec ce produit ou a subi une
défaillance mécanique.
Si le problème persiste, passez à la solution suivante.
www.hp.com/support.
Solution 5 : Contactez l'assistance HP pour la maintenance.
Solution: Si vous avez procédé à toutes les étapes mentionnées dans les solutions
précédentes et que le problème n'est toujours pas résolu, contactez le support HP pour obtenir
une assistance.
Consultez le site :
Si vous y êtes invité, sélectionnez votre pays/région, puis cliquez sur Contacter HP pour
contacter l'assistance technique.
Cause: Une assistance est peut-être nécessaire pour permettre le bon fonctionnement du
produit ou du logiciel.
www.hp.com/support.
J'ai branché le câble USB mais je rencontre des problèmes d'utilisation du produit
avec mon ordinateur
Solution: Vous devez installer le logiciel fourni avec le produit avant de brancher le câble USB.
Durant l'installation, ne branchez pas le câble USB avant d'y être invité par les instructions
affichées à l'écran.
Une fois le logiciel installé, branchez une extrémité du câble USB à l'arrière de votre ordinateur
et l'autre extrémité à l'arrière du produit. Vous pouvez effectuer la connexion sur n'importe quel
port USB à l'arrière de votre ordinateur.
Pour plus d'informations sur l'installation du logiciel et la connexion du câble USB, reportez-vous
au Guide de démarrage fourni avec le produit.
Cause: Le câble USB a été connecté avant l'installation du logiciel. La connexion du câble
USB avant l'invitation peut engendrer des erreurs.
L'appareil est configuré mais n'imprime pas
Pour résoudre ce problème, essayez de suivre les solutions ci-après. Les solutions sont indiquées
dans l'ordre, la solution la plus probable étant indiquée en premier. Si la première solution n'a pas
permis de résoudre le problème, essayez les solutions suivantes jusqu'à ce que vous soyez parvenu
à solutionner l'incident.
Solution 1 : appuyez sur le bouton Allumé pour mettre le produit sous tension.
Solution: Regardez l'écran du produit. S'il n'affiche rien et que le bouton Allumé n'est pas
allumé, le produit est hors tension. Assurez-vous que le cordon d'alimentation est correctement
connecté au produit et branché sur une prise de courant. Appuyez sur le bouton Allumé pour
mettre le produit sous tension.
Cause: Le produit n'avait peut-être pas été mis sous tension.
Si le problème persiste, passez à la solution suivante.
Dépannage concernant l'installation 67
Français
Page 72

Chapitre 2
Solution 2 : définissez le produit en tant qu'imprimante par défaut
Solution: Utilisez les outils système disponibles sur votre ordinateur pour définir votre produit
en tant qu'imprimante par défaut.
Cause: Vous avez envoyé le travail d'impression vers l'imprimante par défaut, mais celle-ci
ne correspondait pas au produit.
Si le problème persiste, passez à la solution suivante.
Solution 3 : vérifiez la connexion entre le produit et l'ordinateur
Solution: Vérifiez la connexion entre le produit et l'ordinateur.
Cause: Le produit et l'ordinateur ne communiquaient pas.
Si le problème persiste, passez à la solution suivante.
Solution 4 : vérifiez que les cartouches d'encre sont installées correctement et
contiennent de l'encre
Solution: Vérifiez que les cartouches sont installées correctement et contiennent de l'encre.
Cause: Un incident s'est produit au niveau d'une ou plusieurs cartouches d'encre.
Si le problème persiste, passez à la solution suivante.
Solution 5 : chargez du papier dans le bac d'alimentation
Solution: Chargez du papier dans le bac d'alimentation.
Cause: Le produit était peut-être à court de papier.
Élimination de bourrages papier
Si un bourrage papier est survenu, vérifiez d'abord la porte d'accès arrière. Il peut être nécessaire
d'éliminer un bourrage papier par la porte d'accès arrière.
Pour éliminer un bourrage papier à partir de la porte arrière
1. Appuyez sur le loquet situé à gauche de la trappe d'accès arrière afin de la libérer. Retirez la
porte en l'extrayant du produit.
Français
2. Tirez avec précaution sur le papier pour le dégager des rouleaux.
Attention Si le papier se déchire lorsque vous l'enlevez des rouleaux, assurez-vous
ensuite qu'il ne reste pas de morceaux de papier dans les rouleaux et les roues du produit.
Si vous ne retirez pas tous les morceaux de papier du produit, d'autres bourrages papier
risquent de se produire.
3. Replacez la porte arrière. Poussez-la doucement vers l'avant jusqu'à ce qu'elle s'enclenche.
68 HP Photosmart série D7500
Page 73

4. Touchez OK pour continuer le travail en cours.
Dépannage de l'impression sur CD/DVD
Cette section contient des instructions permettant de résoudre les problèmes rencontrés lors de
l'impression à la surface de CD/DVD à l'aide de l'appareil HP Photosmart.
Le produit ne détecte pas le support de CD/DVD
Pour résoudre ce problème, essayez de suivre les solutions ci-après. Les solutions sont indiquées
dans l'ordre, la solution la plus probable étant indiquée en premier. Si la première solution n'a pas
permis de résoudre le problème, essayez les solutions suivantes jusqu'à ce que vous soyez parvenu
à solutionner l'incident.
Solution 1 : poussez le support de CD/DVD dans le tiroir.
Solution: Poussez le support de CD/DVD dans le tiroir jusqu'à ce que les repères linéaires
figurant sur le support soient alignés sur les lignes blanches du tiroir. Le côté du support
comportant les flèches est celui qui doit être inséré en premier dans le tiroir de CD/DVD.
Cause: Le support de CD/DVD n'était pas inséré à fond dans le tiroir.
Si le problème persiste, passez à la solution suivante.
Solution 2 : retirez le support de CD/DVD de la zone de stockage
Solution: Retirez le support de CD/DVD de la zone de stockage située sous le bac
d'alimentation principal. Abaissez le tiroir de CD/DVD (situé sous le panneau de commande).
Dépannage de l'impression sur CD/DVD 69
Français
Page 74

Chapitre 2
Assurez-vous d'avoir chargé un disque imprimable dans le support de CD/DVD, face à imprimer
orientée vers le haut. Poussez le support de CD/DVD dans le tiroir jusqu'à ce que les repères
linéaires figurant sur le support soient alignés sur les lignes blanches du tiroir. Le côté du support
comportant les flèches est celui qui doit être inséré en premier dans le tiroir de CD/DVD.
Cause: Le support de CD/DVD a été réinséré dans la zone de stockage.
Si le problème persiste, passez à la solution suivante.
Solution 3 : insérez le CD/DVD dans le support approprié
Solution: Retirez le support de CD/DVD de la zone de stockage située sous le bac
d'alimentation principal. Retirez le disque imprimable du tiroir de CD/DVD et chargez-le sur le
support de CD/DVD, face à imprimer orientée vers le haut. Poussez le support de CD/DVD dans
le tiroir jusqu'à ce que les repères linéaires figurant sur le support soient alignés sur les lignes
blanches du tiroir. Le côté du support comportant les flèches est celui qui doit être inséré en
premier dans le tiroir de CD/DVD.
Cause: Vous avez inséré le disque directement dans le tiroir de CD/DVD sans l'avoir placé
sur le support de CD/DVD.
Si le problème persiste, passez à la solution suivante.
Solution 4 : chargez le disque suivant dans le support CD/DVD
Solution: Retirez le support de CD/DVD du tiroir de CD/DVD. Retirez le CD/DVD imprimé de
son support. Chargez le disque suivant sur le support de CD/DVD, face à imprimer orientée vers
Français
le haut, et réinsérez le support de CD/DVD jusqu'à ce que les repères linéaires figurant sur le
support soient alignés sur les lignes blanches du tiroir. Lorsque le produit détecte le support,
l'affichage de l'invite cesse.
Cause: Le produit vous a invité à insérer le disque suivant, lors de l'impression de plusieurs
CD/DVD.
Le produit ne détecte aucun CD/DVD sur le support
Solution: Retirez le support de CD/DVD du tiroir de CD/DVD. Chargez un disque imprimable
sur le support de CD/DVD, face à imprimer orientée vers le haut, jusqu'à ce que les repères
linéaires figurant sur le support soient alignés sur les lignes blanches du tiroir.
Cause: Vous avez inséré le support de CD/DVD dans le tiroir sans charger de CD/DVD sur
le support.
Un blocage s'est produit dans le produit durant l'impression d'un CD/DVD
Solution: Veillez à ménager un espace d'au moins 7,5 cm à l'arrière du produit. Assurez-vous
également que l'interstice situé à l'arrière du produit n'est pas obstrué.
70 HP Photosmart série D7500
Page 75

Cause: Le produit a tiré le support de CD/DVD lors de l'impression sur le CD/DVD. Le support
peut dépasser d'environ 7,5 cm à l'arrière du périphérique. Si l'espace à l'arrière du produit est
insuffisant, le support s'arrête et l'impression est bloquée.
L'image est tronquée sur le disque imprimé et de l'encre s'est écoulée sur le
support de CD/DVD
Solution: Si vous chargez un CD/DVD de taille normale (120 mm) sur le support de CD/DVD
à imprimer, ne retournez pas l'anneau bleu sur le disque. L'utilisation de l'anneau bleu est
nécessaire uniquement lors de l'impression sur un CD/DVD de petite taille (80 mm).
Avant d'effectuer une nouvelle tentative, nettoyez l'encre qui s'est écoulée sur le support de CD/
DVD. Ceci permet d'éviter une contamination par l'encre à l'intérieur du produit et protège à la
fois vos disques, vos mains et vos vêtements des salissures.
Une fois que le support de CD/DVD est propre est sec, chargez un disque imprimable sur le
support, face à imprimer orientée vers le haut. Laissez l'anneau bleu à son emplacement
d'origine, sur le côté du support opposé au disque, comme indiqué ci-dessous. Réinsérez le
support de CD/DVD dans le tiroir jusqu'à ce que les repères linéaires figurant sur le support
soient alignés sur les lignes blanches du tiroir.
Cause: Le CD/DVD n'a pas été correctement inséré sur son support.
Le produit imprime sur une portion non imprimable de mon disque
Pour résoudre ce problème, essayez de suivre les solutions ci-après. Les solutions sont indiquées
dans l'ordre, la solution la plus probable étant indiquée en premier. Si la première solution n'a pas
permis de résoudre le problème, essayez les solutions suivantes jusqu'à ce que vous soyez parvenu
à solutionner l'incident.
Solution 1 : modifiez les paramètres du logiciel
Solution: Assurez-vous que le motif que vous imprimez est d'une taille appropriée pour le CD/
DVD chargé sur le support, notamment au niveau du diamètre et des anneaux interne et externe.
Modifiez les paramètres du logiciel de manière à centrer et redimensionner le motif en fonction
du disque utilisé. Pour plus d'informations, reportez-vous à la documentation ou à l'aide en ligne
du logiciel utilisé.
Cause: Le motif de conception sélectionné n'était pas d'un format adapté au CD/DVD chargé.
Si le problème persiste, passez à la solution suivante.
Français
Solution 2 : chargez un nouveau CD/DVD en orientant le côté imprimable vers le
haut
Solution: Si vous avez déjà gravé le contenu du CD/DVD, il vous faut probablement
renouveler la gravure sur un autre disque. Chargez ensuite le nouveau disque sur le support
de CD/DVD, face à imprimer orientée vers le haut. Réinsérez le support de CD/DVD dans le
tiroir jusqu'à ce que les repères linéaires figurant sur le support soient alignés sur les lignes
blanches du tiroir.
Cause: Le CD/DVD a été chargé à l'envers sur le support.
Dépannage de l'impression sur CD/DVD 71
Page 76

Chapitre 2
Le motif n'est pas centré sur mon disque
Solution: Modifiez les paramètres du logiciel de manière à centrer et redimensionner le motif
en fonction du disque utilisé. Pour plus d'informations, reportez-vous à la documentation ou à
l'aide en ligne du logiciel utilisé.
Cause: Les paramètres du motif utilisé étaient incorrects.
L'encre imprimée sur le CD/DVD ne sèche pas
Pour résoudre ce problème, essayez de suivre les solutions ci-après. Les solutions sont indiquées
dans l'ordre, la solution la plus probable étant indiquée en premier. Si la première solution n'a pas
permis de résoudre le problème, essayez les solutions suivantes jusqu'à ce que vous soyez parvenu
à solutionner l'incident.
Solution 1 : utilisez des disques imprimables par jet d'encre
Solution: Assurez-vous que le CD/DVD que vous utilisez est compatible avec l'impression jet
d'encre. Les disques imprimables par technique jet d'encre ont généralement une surface de
couleur blanche. Dans certains cas, la surface d'impression est de couleur argentée.
Cause: La surface du disque n'était pas compatible avec l'impression.
Si le problème persiste, passez à la solution suivante.
Solution 2 : chargez un nouveau CD/DVD en orientant le côté imprimable vers le
haut
Solution: Si vous avez déjà gravé le contenu du CD/DVD, il vous faut probablement
renouveler la gravure sur un autre disque. Chargez ensuite le nouveau disque sur le support
de CD/DVD, face à imprimer orientée vers le haut. Réinsérez le support de CD/DVD dans le
tiroir jusqu'à ce que les repères linéaires figurant sur le support soient alignés sur les lignes
blanches du tiroir.
Cause: Le CD/DVD a été chargé à l'envers sur le support.
Le produit signale une erreur liée à une non-correspondance de la taille de CD/DVD
Solution: Annulez le travail d'impression et remplacez le CD/DVD actuellement chargé dans
le support de CD/DVD par un disque compatible avec la taille spécifiée pour ce travail, ou bien
modifiez les paramètres d'impression dans le logiciel.
Cause: La taille du CD/DVD actuellement chargé dans le support de CD/DVD ne
correspondait pas à celle spécifiée au démarrage de la tâche d'impression à partir de
l'ordinateur.
Français
Le support de CD/DVD est bloqué dans la zone de stockage
Solution: Tirez le support de CD/DVD au maximum jusqu'à ce que vous sentiez une
résistance. Insérez ensuite un objet plat et pointu (tel qu'une pointe de couteau plat ou un
tournevis) dans le coin gauche de l'emplacement de stockage, et extrayez l'anneau bleu en le
poussant vers le bas. Une fois que l'anneau bleu a été extrait, vous devez normalement pouvoir
tirer le support de CD/DVD hors de l'emplacement de stockage.
Cause: Le support de CD/DVD a été réinséré dans la zone de stockage alors qu'un CD/DVD
était chargé et que l'anneau bleu était retourné sur le disque.
Informations sur les cartouches d'encre et la tête d'impression
Pour conserver les cartouches d'encre HP et vous assurer d'une qualité d'impression régulière,
suivez les conseils ci-dessous.
72 HP Photosmart série D7500
Page 77

• Conservez toutes les cartouches d'encre dans leur emballage d'origine jusqu'à utilisation.
• Mettez le produit hors tension à l'aide du bouton Allumé. Ne mettez pas le produit hors tension
à partir d'une prise multiple ou en débranchant son cordon d'alimentation. Si vous ne mettez
pas correctement le produit hors tension, l'ensemble tête d'impression risque de ne pas revenir
dans la bonne position.
• Les cartouches d'encre doivent être stockées à température ambiante (entre 15,6 et 26,6 °C ou
60 et 78 °F).
• HP recommande de ne pas retirer les cartouches d'encre du produit tant que les cartouches de
rechange ne sont pas prêtes à être installées.
• Lorsque vous transportez le produit, assurez-vous que celui-ci est hors tension en appuyant sur
le bouton Allumé, afin de le mettre hors tension de façon appropriée. Assurez-vous également
que les cartouches d'encre sont installées. Ces actions préventives empêchent l'encre de
s'écouler hors de la tête d'impression.
• Nettoyez la tête d'impression lorsque vous observez une diminution significative de la qualité
d'impression.
• Ne nettoyez pas la tête d'impression inutilement. Une telle intervention est un gaspillage d'encre
et réduit la durée de vie des cartouches.
• Manipulez les cartouches d'encre avec précaution. Une manipulation trop brutale (chute,
secousses, etc.) peut provoquer des problèmes d'impression temporaires.
Procédure d’assistance
Si vous rencontrez un problème, procédez comme suit :
1. Consultez la documentation fournie avec le produit.
2. Accédez au site Web de l'assistance en ligne HP à l'adresse
en ligne HP est disponible pour tous les clients HP. Constituant le moyen le plus rapide d’obtenir
des informations à jour sur les produits et l’assistance de spécialistes, le service d’assistance
de HP propose par ailleurs les avantages suivants :
• Un accès rapide à des spécialistes de l’assistance en ligne compétents
• Des mises à jour de logiciels et de pilotes pour le produit
• Des informations pertinentes sur les produits et le dépannage pour les problèmes les plus
courants
• Des mises à jour de produits proactives, des alertes d'assistance et des communiqués HP
disponibles lors de l'enregistrement du produit
3. Appelez l'assistance HP. Les options d'assistance et leur disponibilité varient selon le produit,
le pays/la région et la langue.
Pour plus d'informations pour contacter le support, reportez-vous à la troisième de couverture
de ce guide.
www.hp.com/support. L'assistance
Procédure d’assistance 73
Français
Page 78

3 Renseignements techniques
Cette section contient les spécifications techniques et les informations légales internationales
relatives au produit HP Photosmart. Pour plus d'informations d'ordre réglementaire ou
environnemental, y compris la déclaration de conformité, reportez-vous à l'aide en ligne.
Configurations système minimales
La configuration requise concernant le logiciel est incluse dans le fichier Readme.
Spécifications du produit
Pour obtenir les spécifications du produit, visitez le site Web HP à l'adresse www.hp.com/support.
Spécifications relatives au papier
• Capacité du bac d'entrée principal : Feuilles de papier ordinaire : Jusqu'à 125 (papier de 60 à
90 g/m²)
• Capacité du bac de sortie : Feuilles de papier ordinaire : Jusqu'à 50 (papier de 60 à 90 g/m²)
• Capacité du bac photo : Feuilles de papier photo : jusqu'à 20
Remarque Pour obtenir la liste complète des formats de support pris en charge, reportez-vous
au logiciel d'impression.
Spécifications physiques
• Hauteur : 18,32 cm
• Largeur : 45,79 cm
• Profondeur : 38,31 cm
• Poids : 5.56 kg
Spécifications électriques
• Consommation électrique : 42 watts maximum (impression moyenne)
• Tension d'entrée sur l'adaptateur secteur : 100 à 240 V CA ~ 1300 mA, 50 à 60 Hz
• Tension CC de l'imprimante : 32 V CC===1300 mA
Remarque Utilisez uniquement l'adaptateur secteur fourni par HP.
Conditions d'exploitation
Français
• Plage de température de fonctionnement recommandée : 15 à 32 ºC
• Plage de température de fonctionnement acceptable : 5 à 35 ºC
• Humidité : de 15 à 80 % d'humidité relative sans condensation
• Plage de températures hors fonctionnement (stockage) : -20 à 50 ºC
• En présence de champs électromagnétiques, la sortie de l'appareil HP Photosmart peut être
légèrement déformée.
• HP recommande d'utiliser un câble USB de 3 mètres au maximum afin de réduire les
interférences provoquées par les champs électromagnétiques élevés qui peuvent se produire
Déclarations de conformité
L'appareil HP Photosmart respecte les exigences définies par les organismes de réglementation de
votre pays/région. Pour une liste complète des déclarations de conformité aux réglementations,
reportez-vous à l'aide en ligne.
Numéro d'identification réglementaire de modèle
Un numéro de modèle réglementaire a été attribué à votre produit dans un souci d'identification et
de respect de la réglementation. Le numéro de modèle réglementaire de votre produit est le
74 HP Photosmart série D7500
Page 79

SDGOB-0822. Vous ne devez pas confondre ce numéro réglementaire avec le nom commercial du
produit (HP Photosmart série D7500, etc.) ou le numéro du produit (Q8440A, etc.).
Déclarations de conformité 75
Français
Page 80

Chapitre 3
Garantie
Produit HP Durée de la garantie limitée
Supports logiciels 90 jours
Imprimante 1 an
Cartouches d'encre Jusqu'à épuisement de l'encre HP ou jusqu'à expiration de la
Têtes d'impression 1 an
A. Extension de garantie limitée
1. Hewlett-Packard (HP) garantit au client utilisateur final que les produhits HP décrits précédemment sont exempts de défauts de matériaux
et malfaçons pendant la durée indiquée ci-dessus, à compter de la date d'achat par le client.
2. Pour les logiciels, la garantie limitée HP est valable uniquement en cas d'impossibilité d'exécuter les instructions de programmation. HP ne
garantit pas que le fonctionnement du logiciel ne connaîtra pas d'interruptions ni d'erreurs.
3. La garantie limitée HP ne couvre que les défauts qui apparaissent dans le cadre de l'utilisation normale du produit et ne couvre aucun
autre problème, y compris ceux qui surviennent du fait :
a. d'une mauvaise maintenance ou d'une modification ;
b. de logiciels, de supports, de pièces ou de consommables non fournis ou non pris en charge par HP ;
c. du fonctionnement du produit hors de ses caractéristiques ; ou
d. d'une modification non autorisée ou d'une mauvaise utilisation.
4. Pour les imprimantes HP, l'utilisation d'une cartouche d'un autre fournisseur ou d'une cartouche rechargée n'entraîne pas la résiliation de la
garantie ni d'un contrat de support HP. Toutefois, si la panne ou les dégâts peuvent être attribués à l'utilisation d'une cartouche d'un autre
fournisseur, d'une cartouche rechargée ou d'une cartouche périmée, HP facturera les montants correspondant au temps et au matériel
nécessaires à la réparation de l'imprimante.
5. Si, pendant la période de garantie applicable, HP est informé d'une défaillance concernant un produit couvert par la garantie HP, HP
choisira de réparer ou de remplacer le produit défectueux.
6. Si HP est dans l'incapacité de réparer ou de remplacer, selon le cas, un produit défectueux couvert par la garantie HP, HP devra, dans un
délai raisonnable après avoir été informé du défaut, rembourser le prix d'achat du produit.
7. HP ne sera tenu à aucune obligation de réparation, de remplacement ou de remboursement tant que le client n'aura pas retourné le
produit défectueux à HP.
8. Tout produit de remplacement peut être neuf ou comme neuf, pourvu que ses fonctionnalités soient au moins équivalentes à celles du
produit remplacé.
9. Les produits HP peuvent contenir des pièces, des composants ou des matériels reconditionnés équivalents à des neufs en termes de
performances.
10. La garantie limitée HP est valable dans tout pays dans lequel le produit HP couvert est distribué par HP. Des contrats apportant des
services de garantie supplémentaires, tels que la réparation sur site, sont disponibles auprès des services de maintenance agréés par HP
dans les pays dans lequel le produit est distribué par HP ou par un importateur agréé.
B. Restrictions de garantie
DANS LA MESURE OÙ LES LOIS LOCALES L'AUTORISENT, HP OU SES FOURNISSEURS TIERS NE FONT AUCUNE AUTRE
GARANTIE OU CONDITION, EXPRESSE OU IMPLICITE, EN CE QUI CONCERNE LES PRODUITS HP ET NIENT TOUTE GARANTIE
IMPLICITE DE COMMERCIALISATION, DE QUALITÉ SATISFAISANTE OU D'ADAPTATION À UN BUT PARTICULIER.
C. Restrictions de responsabilité
1. Dans la mesure où les lois locales l'autorisent, les recours énoncés dans cette déclaration de garantie constituent les recours exclusifs du
client.
2. DANS LA MESURE OÙ LES LOIS LOCALES L'AUTORISENT, EXCEPTION FAITE DES OBLIGATIONS SPÉCIFIQUEMENT ÉNONCÉES
DANS LA PRÉSENTE DÉCLARATION DE GARANTIE, HP OU SES FOURNISSEURS TIERS NE POURRONT ÊTRE TENUS POUR
RESPONSABLES DE DOMMAGES DIRECTS, INDIRECTS, SPÉCIAUX OU ACCIDENTELS, QU'ILS SOIENT BASÉS SUR UN
CONTRAT, UN PRÉJUDICE OU TOUTE AUTRE THÉORIE LÉGALE, QUE CES DOMMAGES SOIENT RÉPUTÉS POSSIBLES OU NON.
D. Lois locales
1. Cette déclaration de garantie donne au client des droits juridiques spécifiques. Le client peut également posséder d'autres droits selon les
états des Etats-Unis, les provinces du Canada, et les autres pays ou régions du monde.
2. Si cette déclaration de garantie est incompatible avec les lois locales, elle sera considérée comme étant modifiée pour être conforme à la
loi locale. Selon ces lois locales, certaines renonciations et limitations de cette déclaration de garantie peuvent ne pas s'appliquer au client.
Par exemple, certains états des Etats-Unis, ainsi que certains gouvernements hors des Etats-Unis (y compris certaines provinces du
Canada), peuvent :
a. exclure les renonciations et limitations de cette déclaration de garantie des droits statutaires d'un client
Français
76 HP Photosmart série D7500
b. restreindre d'une autre manière la possibilité pour un fabricant d'imposer ces renonciations et limitations ; ou
c. accorder au client des droits de garantie supplémentaires, spécifier la durée des garanties implicites que le fabricant ne peut nier, ou
3. EXCEPTÉ DANS LA MESURE AUTORISÉE PAR LA LÉGISLATION, LES TERMES DE LA PRÉSENTE DÉCLARATION DE GARANTIE
N'EXCLUENT, NE LIMITENT NI NE MODIFIENT LES DROITS STATUTAIRES OBLIGATOIRES APPLICABLES À LA VENTE DES
PRODUITS HP AUXDITS CLIENTS, MAIS VIENNENT S'Y AJOUTER.
Cher client,
Vous trouverez, ci-après, les coordonnées de l’entité HP responsable de l'exécution de la garantie fabricant relative à votre matériel HP dans votre pays.
En vertu de votre contrat d’achat, il se peut que vous disposiez de droits légaux supplémentaires à l’encontre de votre vendeur. Ceux-ci ne sont aucunement affectés par la présente
garantie du
fabricant HP.
En particulier, si vous êtes un consommateur domicilié en France (départements et territoires d’outre-mer (DOM-TOM) inclus dans la limite des textes qui leur sont applicables), le
vendeur reste tenu à votre égard des défauts de conformité du bien au contrat et des vices rédhibitoires hhdans les conditions prévues aux articles 1641 à 1649 du Code civil.
Code de la consommation :
"Art. L. 211-4. - Le vendeur est tenu de livrer un bien conforme au contrat et répond des défauts de conformité existant lors de la délivrance.
Il répond également des défauts de conformité résultant de l'emballage, des instructions de montage ou de l'installation lorsque celle-ci a été mise à sa charge par le contrat ou a été réalisée
sous sa responsabilité."
"Art. L. 211-5. - Pour être conforme au contrat, le bien doit :
1° Etre propre à l'usage habituellement attendu d'un bien semblable et, le cas échéant correspondre à la description donnée par le vendeur et posséder les qualités que celui-ci a présentées
à l'acheteur sous forme d'échantillon ou de modèle ;
- présenter les qualités qu'un acheteur peut légitimement attendre eu égard aux déclarations publiques fa ites par le vendeur, par le producteur ou par son représentant, notamment dans
la publicité ou l'étiquetage ;
2° Ou présenter les caractéristiques définies d'un commun accord par les parties ou être propre à tout usage spécial recherché par l'acheteur, porté à la connaissance du vendeur et que
ce dernier a accepté."
"Art. L.211-12. – L’action résultant du défaut de conformité se prescrit par deux ans à compter de la délivrance du bien. "
Code civil :
"Code civil Article 1641 : Le vendeur est tenu de la garantie à raison des défauts cachés de la chose vendue qui la rendent impropre à l’usage auquel on la destine, ou qui diminuent
tellement cet usage, que l’acheteur ne l’aurait pas acquise, ou n’en aurait donné qu’un moindre prix, s’il les avait connus.
"Code civil Article 1648 : L’action résultant des vices rédhibitoires doit être intentée par l’acquéreur dans un délai de deux ans à compter de la découverte du vice."
France : Hewlett-Packard France, SAS, 80, rue Camille Desmoulins, 92788 Issy les Moulineaux Cedex 9
Belgique : Hewlett-Packard Belgium BVBA/SPRL, 1, rue de l'Aéronef, B-1140 Brussels
Luxembourg : Hewlett-Packard Luxembourg SCA, 7a, rue Robert Stümper, L-2557 Luxembourg-Gasperich
date de garantie imprimée sur la cartouche (selon le cas qui se
produira en premier). Cette garantie ne couvre pas les produits
utilisant de l'encre HP qui ont été reconditionnés, mal utilisés ou
altérés.
(par exemple au Royaume-Uni);
ne pas autoriser les limitations portant sur la durée des garanties implicites.
Garantie du fabricant HP
Page 81

HP Photosmart D7500 series
Guida alle operazioni di base
Italiano
Page 82

Sommario
1 Descrizione dell'unità HP Photosmart
Panoramica dell'unità HP Photosmart......................................................................................79
Funzioni del pannello di controllo.............................................................................................80
Ulteriori informazioni.................................................................................................................81
Caricamento della carta............................................................................................................81
Stampa diretta su CD/DVD.......................................................................................................85
Prevenzione degli inceppamenti della carta.............................................................................87
Stampa di una foto su carta fotografica....................................................................................87
Sostituzione delle cartucce.......................................................................................................89
2 Risoluzione dei problemi e assistenza
Disinstallazione e reinstallazione del software.........................................................................92
Risoluzione di problemi relativi alla configurazione..................................................................93
Eliminazione degli inceppamenti della carta.............................................................................95
Risoluzione dei problemi per la stampa su CD/DVD................................................................95
Informazioni sulle cartucce d'inchiostro e sulla testina di stampa............................................99
Procedura di assistenza...........................................................................................................99
3 Informazioni tecniche
Requisiti di sistema.................................................................................................................101
Caratteristiche tecniche del prodotto......................................................................................101
Informazioni sulle normative di conformità.............................................................................101
Garanzia.................................................................................................................................103
Italiano
78 HP Photosmart D7500 series
Page 83

1 Descrizione dell'unità
HP Photosmart
Utilizzare HP Photosmart per stampare le foto da una scheda di memoria oppure
stamparle direttamente sulla superficie di CD e DVD appositamente rivestiti. È possibile
accedere a numerose funzioni dell'unità HP Photosmart direttamente dal pannello di
controllo, senza accendere il computer.
Nota Questa guida illustra le operazioni di base e le procedure di risoluzione dei
problemi e fornisce informazioni su come contattare il supporto HP e ordinare i
materiali di consumo.
La Guida in linea illustra nel dettaglio tutte le caratteristiche e le funzioni e spiega
come utilizzare il software HP Photosmart fornito insieme all'unità HP Photosmart.
Panoramica dell'unità HP Photosmart
Numero Descrizione
1 Display grafico a colori (indicato anche come 'display')
2 Pannello di controllo
3 Alloggiamenti per schede di memoria e spia Foto
4 Porta USB anteriore
5 Vassoio di uscita
6 Estensione del vassoio della carta (indicato anche come 'estensione del
vassoio')
7 Area di conservazione del supporto CD/DVD
8 Supporto CD/DVD
Descrizione dell'unità HP Photosmart 79
Italiano
Page 84

Capitolo 1
(continuazione)
Numero Descrizione
9 Vassoio di alimentazione principale (indicato anche come 'vassoio di
10 Vassoio per foto
11 Vassoio CD/DVD
12 Sportello per la cartuccia dell'inchiostro
13 Sportello posteriore
14 Porta USB posteriore
15 Connessione di alimentazione*
alimentazione')
* Da utilizzare solo con l'adattatore fornito da HP.
Funzioni del pannello di controllo
La figura riportata di seguito e la relativa tabella forniscono un riferimento rapido alle
funzioni del pannello di controllo dell'unità HP Photosmart.
Numero Icona Nome e descrizione
1 Display: il display a sfioramento mostra menu, foto e messaggi. Il display può essere
2 Spia Attenzione: indica che si è verificato un problema. Per ulteriori informazioni,
3 Pagina iniziale: Torna alla schermata iniziale (la schermata predefinita quando si
4 Stampa foto: consente di stampare le foto selezionate sulla scheda di memoria. Se
5 Annulla: Interrompe l'operazione corrente e ritorna allo schermo principale.
Italiano
80 HP Photosmart D7500 series
sollevato e inclinato per migliorare la visualizzazione.
vedere il display.
accende l'unità).
non ci sono foto selezionate, il prodotto stampa la foto attualmente visualizzata sul
display.
Page 85

(continuazione)
Numero Icona Nome e descrizione
6 Eliminazione occhi rossi: consente di attivare o disattivare la funzione
7 Accesa: consente di accendere o spegnere l'unità. Quando l'unità è spenta,
Eliminazione occhi rossi. Questa funzione viene abilitata quando viene inserita una
scheda di memoria. Il prodotto corregge automaticamente l'effetto occhi rossi nella
foto visualizzata correntemente sul display.
l'alimentazione continua comunque a essere usata dalla periferica in quantità minima.
Per staccare completamente l'alimentazione dall'unità, spegnerla e scollegare il cavo
di alimentazione.
Ulteriori informazioni
Sono disponibili numerose risorse, su carta e in linea, che forniscono informazioni sulla
configurazione e l'utilizzo dell'unità HP Photosmart.
Guida Start Here
La Guida Start Here fornisce istruzioni per la configurazione dell'unità HP Photosmart e
l'installazione del software. Seguire la procedura nella Guida Start Here secondo l'ordine
indicato.
Se si verificano problemi durante l'installazione, consultare la sezione relativa alla
risoluzione dei problemi in fondo alla Guida Start Here oppure vedere "
problemi e assistenza" a pagina 92 in questa guida.
Guida in linea
La Guida in linea fornisce istruzioni dettagliate sulle funzioni dell'unità HP Photosmart
non descritte in questa Guida, incluse le funzioni disponibili solo tramite l'utilizzo del
software installato con HP Photosmart. Nella Guida in linea sono disponibili anche
informazioni normative e ambientali.
Risoluzione dei
Per accedere alla schermata della Guida in linea
• In Windows: Fare clic su Start > Tutti i programmi > HP > Photosmart
D7500 series > Guida.
• In Macintosh: Aprire HP Device Manager e fare clic sull'icona ? . Quindi, fare clic
sul menu principale e selezionare Photosmart D7500 series.
Sito Web HP
Se si dispone dell'accesso a Internet, è possibile ottenere assistenza visitando il sito Web
HP all'indirizzo
sui driver, sui prodotti e sulle modalità di ordinazione.
www.hp.com/support. Il sito Web offre assistenza tecnica e informazioni
Caricamento della carta
Nell'unità HP Photosmart è possibile caricare molti tipi e formati di carta diversi, tra cui
Lettera o A4, carta fotografica, lucidi e buste. Per maggiori informazioni, consultare la
Guida in linea.
Italiano
Caricamento della carta 81
Page 86

Capitolo 1
Per caricare carta di formato standard
1. Sollevare il vassoio di uscita.
Suggerimento Allineare le estremità dei fogli nella risma appoggiando
leggermente quest'ultima contro una superficie piana. Accertarsi che i fogli nella
risma siano dello stesso tipo e formato e che non siano strappati, impolverati,
piegati o stropicciati.
2. Far scorrere la guida della larghezza della carta.
3. Inserire la risma di carta nel vassoio di alimentazione principale con il lato corto del
foglio rivolto in avanti e il lato di stampa rivolto verso il basso. Far scorrere la risma
di carta finché non si arresta.
Avvertimento Accertarsi che il prodotto non sia in funzione quando si carica la
carta nel vassoio di alimentazione principale. Se il prodotto utilizza le cartucce di
inchiostro o è in corso un'altra operazione, il fermo della carta interno al prodotto
potrebbe non essere in posizione. La carta potrebbe non venire caricata
correttamente e il prodotto potrebbe espellere pagine vuote.
Italiano
82 HP Photosmart D7500 series
Page 87

Suggerimento Se si utilizza carta intestata, inserire prima l'estremità superiore
della pagina con il lato di stampa rivolto verso il basso.
4. Far scorrere la guida di larghezza della carta verso l'interno fino a toccare il bordo
della carta.
Non caricare eccessivamente il vassoio di alimentazione principale; verificare che la
risma di carta sia sistemata comodamente nel vassoio e che non superi in altezza il
bordo superiore della guida della larghezza della carta.
5. Abbassare il vassoio di uscita. Estrarre completamente l'estensione del vassoio
tirandola verso di sé. Capovolgere il fermo della carta nella parte terminale
dell'estensione del vassoio per estrarre completamente l'estensione.
Nota Quando si utilizza carta di formato Legal, non aprire l'estensione del
vassoio carta.
Per caricare carta fotografica da 13 x 18 cm (5 x 7 pollici) nel vassoio per foto
1. Sollevare il coperchio del vassoio per foto.
2. Far scorrere al massimo la guida di larghezza della carta.
Caricamento della carta 83
Italiano
Page 88

Capitolo 1
3. Caricare la risma di carta fotografica nel vassoio per foto dal lato corto del foglio e
con il lato di stampa rivolto verso il basso. Far scorrere la risma di carta fotografica
finché non si arresta.
Se la carta fotografica utilizzata ha linguette perforate, caricarla in modo che il lato
perforato sia rivolto verso l'operatore.
Italiano
4. Far scorrere la guida di larghezza della carta verso l'interno fino a toccare il bordo
della carta.
Non caricare eccessivamente il vassoio per foto; verificare che la risma di carta
fotografica sia sistemata comodamente nel vassoio e che non superi in altezza il
bordo superiore della guida della larghezza della carta.
5. Abbassare il coperchio del vassoio per foto.
84 HP Photosmart D7500 series
Page 89

Stampa diretta su CD/DVD
Oltre a stampare sulla carta, l'unità HP Photosmart consente di stampare direttamente
sulla superficie di CD e DVD con apposito rivestimento per realizzare lavori di stampa
avviati da un computer collegato. È possibile creare un'etichetta personalizzata per CD
o DVD utilizzando il software fornito con l'unitàHP Photosmart e poi stamparla su un
supporto CD o DVD stampabile.
Suggerimento Si consiglia di scrivere i dati sul CD o DVD prima di stamparvi sopra
l'etichetta.
Nota L'unità HP Photosmart non supporta i lavori di stampa su CD/DVD avviati dal
pannello di controllo. È necessario utilizzare il software fornito con l'unità
HP Photosmart per eseguire una stampa su un CD/DVD. Per ulteriori informazioni,
vedere la Guida del software.
Per stampare direttamente su un CD/DVD
1. Usare il software fornito con il prodotto per creare e stampare un'etichetta per CD/
DVD.
2. Se l'unità si trova vicino ad una parete, spostarla in avanti di almeno 7,5 cm (3 pollici).
3. Rimuovere con attenzione il supporto CD/DVD dal comparto in cui viene custodito
sotto il vassoio di alimentazione principale.
4. Inserire il CD/DVD nel relativo supporto con il lato stampabile rivolto verso l'alto. Il
CD/DVD deve essere posizionato sull'anello sul lato del supporto contrassegnato le
frecce.
Nota Se si utilizza un CD/DVD di formato ridotto, ripiegare l'anello del supporto
sul CD/DVD.
Stampa diretta su CD/DVD 85
Italiano
Page 90

Capitolo 1
5. Abbassare il vassoio CD/DVD.
Il vassoio CD/DVD si trova appena sotto il pannello di controllo. Quando è abbassato,
il vassoio CD/DVD è sopra il vassoio di uscita.
6. Spingere il supporto CD/DVD nell'unità finché le linee bianche sul supporto CD/DVD
non si sovrappongono alle linee bianche sul vassoio CD/DVD, quindi toccare OK.
Nota Il supporto CD/DVD viene alimentato nell'unità durante la stampa.
7. Dopo la stampa, verificare che il supporto CD/DVD sia stato reinserito nell'area di
memorizzazione.
Italiano
86 HP Photosmart D7500 series
Page 91

Prevenzione degli inceppamenti della carta
Per evitare inceppamenti della carta, attenersi alle indicazioni riportate di seguito.
• Rimuovere spesso il materiale stampato dal vassoio di uscita.
• Evitare che la carta fotografica si pieghi o si arricci conservando tutta la carta
fotografica inutilizzata in un sacchetto a chiusura ermetica riutilizzabile.
• Verificare che la carta caricata sia adagiata correttamente nel vassoio di
alimentazione e che i margini non siano spiegazzati o strappati.
• Quando si stampano le etichette, accertarsi che i fogli per le etichette non abbiano
più di due anni. Se si utilizzano etichette vecchie, queste potrebbero staccarsi quando
i fogli passano all'interno del prodotto, provocando inceppamenti della carta.
• Non abbinare diversi tipi e formati di carta nel vassoio di alimentazione; l'intera risma
di carta nel vassoio di alimentazione deve essere dello stesso tipo e dello stesso
formato.
• Regolare la guida di larghezza della carta nel vassoio di alimentazione in modo che
aderisca al supporto. Accertarsi che la guida di larghezza della carta non pieghi il
supporto nel vassoio di alimentazione.
• Non forzare troppo la carta nel vassoio di alimentazione.
• Utilizzare i tipi di carta consigliati per il prodotto.
Stampa di una foto su carta fotografica
Per ottenere stampe di qualità ottimale, si consigliano i tipi di carta HP specifici per il tipo
di progetto da stampare e l'inchiostro originale HP. La carta e l'inchiostro HP sono
progettati appositamente per un uso contestuale per fornire un output di alta qualità.
Stampa di una foto su carta fotografica 87
Italiano
Page 92

Capitolo 1
1 Memory Stick, Memory Stick Pro, Memory Stick Select, Memory Stick Magic Gate, Memory
Stick Duo o Duo Pro (l'adattatore è opzionale) o Memory Stick Micro (è necessario l'adattatore)
2 MultiMedia Card (MMC), MMC Plus, Secure MultiMedia Card, MMC Mobile (RS-MMC; è
necessario l'adattatore), Secure Digital (SD), Secure Digital Mini, Secure Digital High Capacity
(SDHC), TransFlash MicroSD Card (è necessario l'adattatore) o xD-Picture Card
3 CompactFlash (CF) tipi I e II
4 Porta USB anteriore (per i dispositivi di memorizzazione e fotocamere PictBridge)
Operazioni da eseguire per la stampa di fotografie
1. Caricare la carta fotografica nel vassoio di alimentazione appropriato.
2. Inserire una scheda di memoria nell'apposito alloggiamento dell'unità o collegare una
periferica di memorizzazione alla porta USB frontale.
3. Toccare Visualizza e stampa:.
4. Toccare i pulsanti freccia sinistra o freccia destra per scorrere le miniature delle foto.
5. Toccare le foto da stampare.
6. Toccare Eseguito, quindi il pulsante freccia su sul display per aumentare il numero
di copie. È necessario specificare almeno una copia. In caso contrario, la foto non
verrà stampata.
Suggerimento Per ritagliare, ruotare o apportare altre modifiche alla foto prima
della stampa, toccare Modifica.
7. (Opzionale) Continuare a scorrere verso sinistra o verso destra per aggiungere altre
foto alla coda di stampa.
8. Toccare Eseguito per visualizzare in anteprima il lavoro di stampa.
9. (Opzionale) Toccare Impostazioni per modificare le impostazioni di stampa.
10. Toccare Stampante o premere Stampa foto.
Suggerimento Durante la stampa, è possibile toccare Aggiungi altre foto per
Italiano
88 HP Photosmart D7500 series
aggiungere altre foto alla coda di stampa.
Page 93

Sostituzione delle cartucce
Seguire queste istruzioni per sostituire le cartucce d'inchiostro.
Nota Quando si configura il prodotto per la prima volta, seguire le istruzioni nella
guida Start Here per l'installazione della testina di stampa e delle cartucce di
inchiostro.
Se non si hanno già le cartucce d'inchiostro di ricambio per l'unità HP Photosmart e
occorre ordinarle, andare a
regione, attenersi alle istruzioni per selezionare il prodotto, quindi fare clic su uno dei
collegamenti per effettuare gli acquisti.
Avvertimento Prima di rimuovere la vecchia cartuccia di inchiostro, attendere che
ve ne sia una nuova disponibile. Non lasciare la cartuccia di inchiostro fuori dal
prodotto per un periodo di tempo prolungato. Ciò potrebbe danneggiare il prodotto e
la cartuccia di inchiostro.
Per sostituire le cartucce d'inchiostro
1. Verificare che il prodotto sia acceso.
2. Aprire lo sportello per la cartuccia dell'inchiostro sollevandolo dalla parte destra
anteriore dell'unità, finché lo sportello non si blocca in posizione.
www.hp.com/buy/supplies. Se richiesto, selezionare il paese/
Il carrello di stampa si sposta al centro dell'unità.
Nota Attendere che la cartuccia di stampa si fermi prima di continuare.
3. Premere la linguetta sulla parte anteriore della cartuccia d'inchiostro per rilasciarla,
quindi estrarla dall'alloggiamento.
Sostituzione delle cartucce 89
Italiano
Page 94

Capitolo 1
Avvertimento Non alzare la maniglia del fermo del carrello di stampa per
rimuovere le cartucce di inchiostro.
4. Rimuovere la cartuccia nuova dalla confezione tirando la linguetta arancione per
rimuovere la pellicola di plastica dalla cartuccia.
Nota Accertarsi di aver rimosso la plastica dalla cartuccia di inchiostro prima di
installarla nel prodotto, altrimenti non sarà possibile eseguire la stampa.
5. Girare il cappuccio arancione per rimuoverlo.
6. Aiutandosi con le icone colorate, far scorrere la cartuccia di inchiostro
nell'alloggiamento vuoto fino al completo inserimento.
Avvertimento Non alzare la maniglia del fermo del carrello di stampa per
installare le cartucce di inchiostro. In caso contrario, le cartucce di inchiostro
potrebbero non essere installate correttamente e potrebbero verificarsi problemi
di stampa. Il fermo deve restare giù per installare correttamente le cartucce di
stampa.
Italiano
90 HP Photosmart D7500 series
Accertarsi di inserire la cartuccia nell'alloggiamento con la stessa icona e lo stesso
colore della cartuccia che si sta installando.
Page 95

7. Ripetere i passi da 3 a 6 per ciascuna cartuccia che si desidera sostituire.
8. Chiudere lo sportello per la cartuccia dell'inchiostro.
Sostituzione delle cartucce 91
Italiano
Page 96

2 Risoluzione dei problemi e
assistenza
In questo capitolo vengono fornite informazioni sulla risoluzione dei problemi relativi all'unità
HP Photosmart. Vengono fornite informazioni specifiche per i problemi relativi all'installazione, alla
configurazione nonché istruzioni pratiche. Per maggiori informazioni sulla risoluzione dei problemi,
consultare la Guida in linea fornita con il software.
Se l'unità HP Photosmart viene collegata al computer mediante un cavo USB prima dell'installazione
del software HP Photosmart sul computer, è possibile che si verifichino alcuni problemi. Se l'unità
HP Photosmart è stata collegata al computer prima che venisse richiesto dalla schermata di
installazione del software, è necessario attenersi alla procedura riportata di seguito:
Risoluzione dei problemi più comuni di impostazione
1. Scollegare il cavo USB dal computer.
2. Disinstallare il software (se è già stato installato).
3. Riavviare il computer.
4. Spegnere il prodotto, attendere un minuto e riavviarlo.
5. Reinstallare il software del prodotto.
Avvertimento Non collegare il cavo USB al computer finché non viene richiesto dalla
schermata di installazione del software.
Per informazioni su come contattare l'assistenza, consultare il retro di copertina di questa guida.
Disinstallazione e reinstallazione del software
Se l'installazione risulta incompleta o il cavo USB è stato collegato al computer prima che venisse
richiesto nella schermata di installazione, potrebbe essere necessario disinstallare e reinstallare il
software. Non effettuare la semplice eliminazione dei file dell'applicazione HP Photosmart dal
computer. Accertarsi di rimuoverli correttamente utilizzando il programma di installazione fornito con
l'unità HP Photosmart.
Per disinstallare e reinstallare il software
1. Sulla barra delle applicazioni di Windows, fare clic su Start, Impostazioni, Pannello di
controllo (o solo su Pannello di controllo).
2. Fare doppio clic su Installazione applicazioni (o fare clic su Cambia/Rimuovi programmi).
3. Selezionare il software del driver HP Photosmart All-in-One e quindi fare clic su Modifica/
Rimuovi.
Attenersi alle istruzioni visualizzate sullo schermo.
4. Scollegare l'unità dal computer.
5. Riavviare il computer.
Nota Prima di riavviare il computer, è importante scollegare il prodotto. Non collegare il
prodotto al computer finché non è stato reinstallato il software.
Italiano
92 HP Photosmart D7500 series
Page 97

6. Inserire il CD-ROM dell'unità nella relativa unità del computer, quindi avviare il programma di
installazione.
Nota Se il programma di installazione non viene visualizzato, cercare il file setup.exe sul
CD-ROM e fare doppio clic sul suo nome.
Nota Se non si dispone più del CD di installazione, è possibile scaricare il software da
www.hp.com/support.
7. Seguire le istruzioni visualizzate e quelle riportate nella Guida Start Here fornita con l'unità.
Al termine dell'installazione del software, viene visualizzata l'icona Monitor di imaging digitale
HP nella barra di sistema di Windows.
Risoluzione di problemi relativi alla configurazione
Questa sezione consente di risolvere i problemi che possono verificarsi durante la configurazione
dell'hardware dell'unità HP Photosmart.
Il prodotto non si accende
Se al momento dell'accensione non si accendono le spie luminose, non viene prodotto alcun rumore
e non si muove nulla, tentare le seguenti soluzioni.
Soluzione 1: Utilizzare il cavo di alimentazione fornito con l'unità.
Soluzione
• Accertarsi che il cavo di alimentazione sia saldamente collegato all'unità e all'alimentatore.
Inserire il cavo in una presa di corrente, un dispositivo di protezione da sovratensioni o una
presa multipla.
• Se viene utilizzata una presa multipla, accertarsi che sia accesa. È possibile anche
collegare l'unità direttamente a una presa muro.
• Verificare il funzionamento della presa elettrica. Collegare un apparecchio funzionante e
controllare che riceva alimentazione. In caso contrario, potrebbe essersi verificato un
problema con la presa elettrica.
• Se l'unità è collegata a una presa con interruttore, assicurarsi che questa sia accesa. Se è
acceso ma non funziona, il problema potrebbe derivare dalla presa elettrica.
Causa: Con l'unità non viene utilizzato il cavo di alimentazione fornito.
Se ciò non risolve il problema, provare la soluzione seguente.
Soluzione 2: Ripristinare l'unità
Soluzione: Spegnere l'unità, quindi scollegare il cavo di alimentazione. Inserire di nuovo il
cavo di alimentazione, quindi premere il pulsante Accesa per accendere l'unità.
Causa: Si è verificato un errore sull'unità.
Se ciò non risolve il problema, provare la soluzione seguente.
Soluzione 3: Premere il pulsante Accesa più lentamente
Soluzione: Se il pulsante Accesa viene premuto troppo rapidamente, l'unità potrebbe non
rispondere. Premere il pulsante Accesa una sola volta. L'accensione dell'unità potrebbe
richiedere alcuni minuti. Se si preme nuovamente il pulsante Accesa in questa fase, è possibile
che l'unità venga disattivata.
Causa: È stato premuto troppo rapidamente il pulsante Accesa.
Se ciò non risolve il problema, provare la soluzione seguente.
Soluzione 4: Contattare HP per sostituire l'alimentatore
Soluzione: Contattare l'assistenza HP per richiedere l'alimentatore del prodotto.
Andare a:
www.hp.com/support.
Risoluzione di problemi relativi alla configurazione 93
Italiano
Page 98

Capitolo 2
Se richiesto, selezionare il paese/regione e fare clic su Contatta HP per informazioni su come
richiedere assistenza tecnica.
Causa: L'alimentatore non è indicato per l'utilizzo con l'unità oppure presenta un guasto
meccanico.
Se ciò non risolve il problema, provare la soluzione seguente.
Soluzione 5: Contattare HP per assistenza
Soluzione: Se, una volta completate tutte le operazioni illustrate nelle soluzioni precedenti, il
problema persiste, contattare HP per assistenza.
Andare a:
Se viene richiesto, selezionare il paese o la regione di appartenenza, quindi fare clic su Contatta
HP per l'assistenza tecnica.
Causa: Potrebbe essere necessario ricevere assistenza per consentire il corretto
funzionamento dell'unità o del software.
www.hp.com/support.
Il cavo USB è collegato ma si riscontrano problemi nell'uso del prodotto con il
computer
Soluzione: Prima di collegare il cavo USB, è necessario installare innanzitutto il software
fornito con l'unità. Durante l'installazione, non collegare il cavo USB fino a che non viene
richiesto dalle istruzioni visualizzate sullo schermo.
Una volta installato il software, collegare un'estremità del cavo USB al retro del computer e l'altra
al retro dell'unità. È possibile collegarsi a qualsiasi porta USB sul retro del computer.
Per ulteriori informazioni sull'installazione del software e sul collegamento del cavo USB,
consultare la Guida Start Here fornita con l'unità.
Causa: Il cavo USB è stato collegato prima di installare il software. Se si collega il cavo USB
prima di quando richiesto, potrebbero verificarsi degli errori.
Una volta installato, il prodotto non stampa
Per risolvere il problema, provare le seguenti soluzioni. L'elenco delle soluzioni è ordinato e riporta
prima quelle che hanno maggiore probabilità di risolvere il problema. Se la prima soluzione non
risolve il problema, continuare a provare con le successive.
Soluzione 1: Premere il pulsante Accesa per accendere l'unità
Soluzione: Osservare il display del prodotto. Se il display è vuoto e il pulsante Accesa non è
acceso, il prodotto è spento. Verificare che il cavo di alimentazione sia collegato correttamente
al prodotto e alla presa di alimentazione. Premere il pulsante Accesa per accendere il prodotto.
Causa: L'unità potrebbe essere ancora spenta.
Se ciò non risolve il problema, provare la soluzione seguente.
Soluzione 2: Impostare l'unità come stampante predefinita
Soluzione: Utilizzare gli strumenti di sistema sul computer per modificare l'impostazione
dell'unità come stampante predefinita.
Causa: Il lavoro di stampa è stato inviato alla stampante predefinita, ma questa unità ancora
non era stata selezionata come stampante predefinita.
Se ciò non risolve il problema, provare la soluzione seguente.
Soluzione 3: Verificare il collegamento tra l'unità ed il computer
Soluzione: Verificare il collegamento tra l'unità ed il computer.
Causa: L'unità ed il computer non comunicano tra di loro.
Italiano
94 HP Photosmart D7500 series
Se ciò non risolve il problema, provare la soluzione seguente.
Page 99

Soluzione 4: Verificare che le cartucce d'inchiostro siano installate correttamente
e abbiano inchiostro sufficiente
Soluzione: Verificare che le cartucce d'inchiostro siano installate correttamente e abbiano
inchiostro sufficiente.
Causa: Potrebbe essersi verificato un problema con una o più cartucce d'inchiostro.
Se ciò non risolve il problema, provare la soluzione seguente.
Soluzione 5: Caricare la carta nel vassoio di alimentazione
Soluzione: Caricare la carta nel vassoio di alimentazione.
Causa: La carta nell'unità potrebbe essere esaurita.
Eliminazione degli inceppamenti della carta
Se nell'unità si verifica un inceppamento della carta, controllare innanzitutto lo sportello posteriore.
Potrebbe essere necessario eliminare l'inceppamento della carta dallo sportello posteriore.
Per eliminare un inceppamento della carta dallo sportello posteriore
1. Sganciare lo sportello posteriore premendo la linguetta sul lato sinistro. Rimuovere lo sportello
estraendolo dal prodotto.
2. Estrarre delicatamente la carta dai rulli.
Avvertimento Se la carta si strappa durante la rimozione dai rulli, verificare la presenza
di frammenti di carta all'interno del prodotto. Se non si rimuovono tutti i frammenti di carta
dall'unità, è possibile che si verifichino altri inceppamenti.
3. Riposizionare lo sportello posteriore. Spingere delicatamente lo sportello in avanti finché non
scatta in posizione.
4. Toccare OK per riprendere la stampa.
Risoluzione dei problemi per la stampa su CD/DVD
Consultare questa sezione per risolvere qualsiasi problema che si potrebbe verificare durante la
stampa sulle superfici di CD/DVD con l'unità HP Photosmart.
Risoluzione dei problemi per la stampa su CD/DVD 95
Italiano
Page 100

Capitolo 2
L'unità non rileva il supporto CD/DVD
Per risolvere il problema, provare le seguenti soluzioni. L'elenco delle soluzioni è ordinato e riporta
prima quelle che hanno maggiore probabilità di risolvere il problema. Se la prima soluzione non
risolve il problema, continuare a provare con le successive.
Soluzione 1: Spingere il supporto CD/DVD nel vassoio CD/DVD
Soluzione: Spingere il supporto CD/DVD nel vassoio CD/DVD fino ad allineare le linee sul
supporto alle linee bianche sul vassoio. Il lato contrassegnato dalle frecce deve essere inserito
per primo nel vassoio CD/DVD.
Causa: È probabile che il supporto CD/DVD non sia stato inserito fino in fondo nel vassoio
CD/DVD.
Se ciò non risolve il problema, provare la soluzione seguente.
Soluzione 2: Rimuovere il supporto CD/DVD dall'area di conservazione
Soluzione: Rimuovere il supporto CD/DVD dal comparto in cui viene custodito sotto il vassoio
di alimentazione principale. Abbassare il vassoio CD/DVD (che si trova sotto il pannello di
controllo).
Accertarsi di aver inserito un CD/DVD nel relativo supporto con il lato stampabile rivolto verso
l'alto. Spingere il supporto CD/DVD nel vassoio CD/DVD fino ad allineare le linee sul supporto
Italiano
96 HP Photosmart D7500 series
alle linee bianche sul vassoio. Il lato contrassegnato dalle frecce deve essere inserito per primo
nel vassoio CD/DVD.
Causa: Il supporto CD/DVD è stato inserito nell'area di conservazione.
 Loading...