

Page 1

Chapter 4 -Viewing Photos
Overview
After you have taken some photos with your HP PhotoSmart C500 Digital Camera, you can view them on the
camera’s color LCD or on a television screen. Depending on the camera mode you use (Review or Play), you can:
view thumbnails of your photos
•
view one photo at a time using the entire screen
•
play back Burst, Timelapse, and grouped photo sequences
•
create a slideshow
•
HP PhotoSmart C500 Digital Camera User’s Guide 67
Page 2

See the table below for the features available in each mode.
Mode What you can do
Overview
Review
Play
Tip:
View thumbnails of your photos
•
View Burst, Timelapse, and grouped photos
•
Mark photos for further action
•
Delete selected or marked photos
•
Protect photos from being deleted
•
Categorize photos for easy searching and finding
•
Group photos for sorting and printing
•
Search for a particular photo
•
View one photo at a time, using the entire screen
•
Play back Burst, Timelapse, and grouped photo sequences
•
Zoom in on photos to see details in close-up
•
Delete single or grouped Still, Burst and Timelapse photos
•
Create a slideshow on the color LCD or on a television
•
To conserve battery life, use an AC power adapter while viewing photos on the color LCD. See “Using an AC
Power Adapter (recommended)” on page29 for details.
HP PhotoSmart C500 Digital Camera User’s Guide 68
Page 3
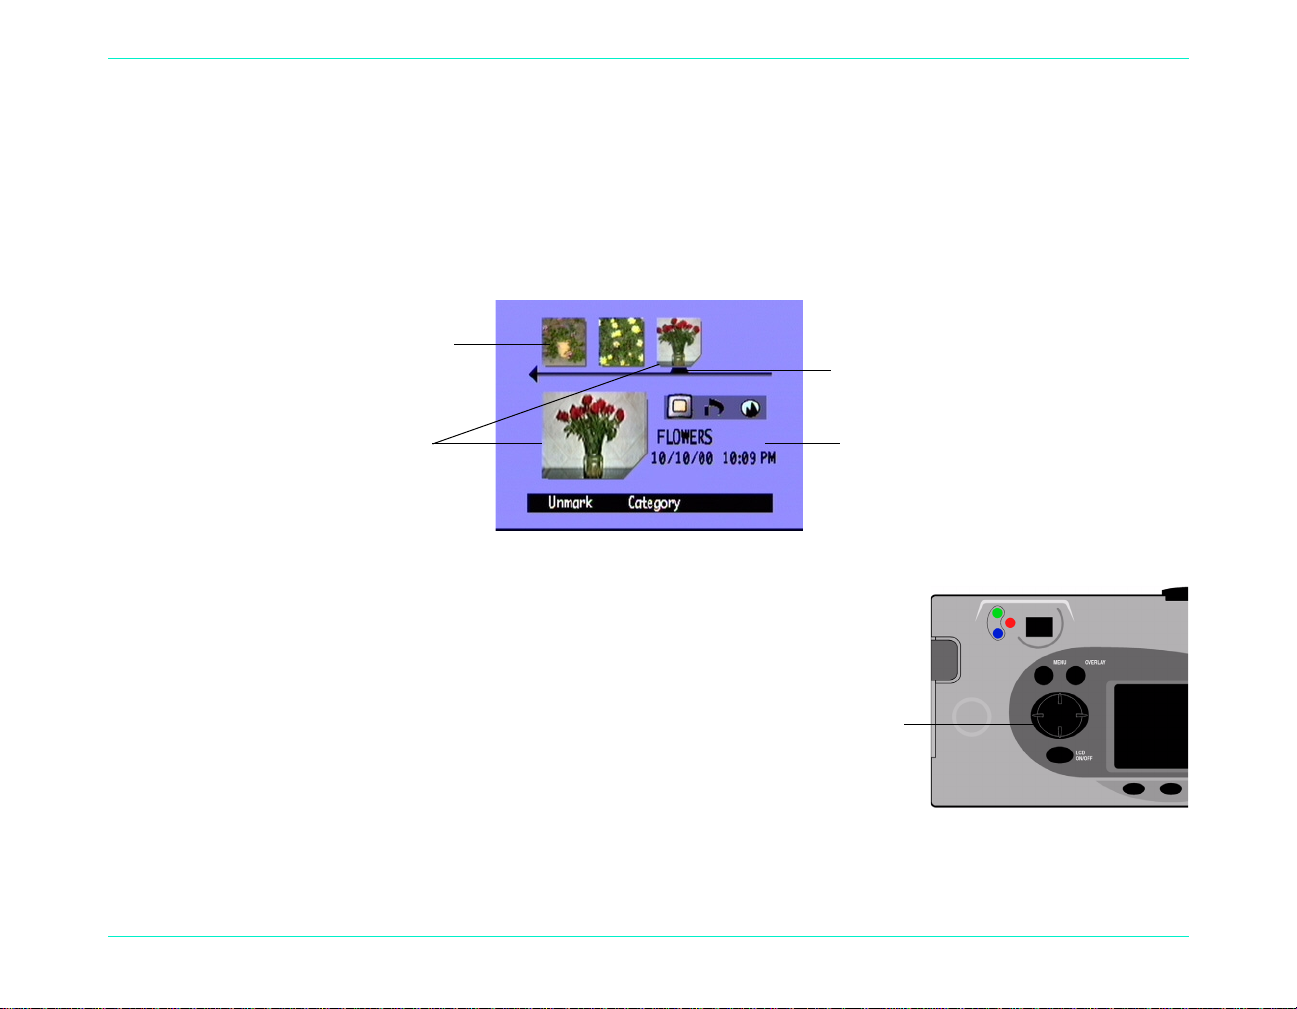
Using Review Mode
4-way arrow button
When you use Review mode, the color LCD automatically displays the photos saved on the memory card. Your
photos appear as small thumbnail images across the top of the display. A larger thumbnail of the selected photo
appears below the small thumbnails; t h e photo information (the image number, t h e image date and time, and the
group or camera name) appears on the lower right of the display.
Using Review Mode
Selecting Photos
Thumbnails
Selected
photo
To select photos:
1. Turn the camera on and turn the camera mode dial to Rev.
2. Use the 4-way arrow button to scroll through the
thumbnails until the selection marker points to the photo
you want. Press and hold the button to scroll through your
photos rapidly.
Selection
marker
Photo
information
HP PhotoSmart C500 Digital Camera User’s Guide 69
Page 4

Marking Photos
A notch indicates
a marked photo
You can “mark” several photos so that when you select an action, the action applies to all marked photos. For
example, you can mark several photos and delete them all at once, rather than deleting one photo at a time. If you
mark any photo that repre sent s a clo sed grou p, al l th e photos in the group are marked.
To mark photos:
1. Turn the camera on and turn the camera mode dial to
Rev.
2. Use the 4-way arrow button to scroll to the photo you
want to mark.
3. Press the Mark button (left soft key).
A notch appears on the lower right corner of the
selected photo and its matching thumbnail.
4. Repeat Steps 2 and 3 to mark additional photos.
Using Review Mode
OR
To mark all photos, press and hold down the Mark button (left soft key) until Mark All appears on the lower
overlay bar.
Note:
HP PhotoSmart C500 Digital Camera User’s Guide 70
Photos remain marked until you perform an action on them, or until you unmark them.
Page 5

To unmark marked photos:
1. Turn the camera on and turn the camera mode dial to Rev.
2. Use the 4-way arrow button to scroll to the photo you want to unmark.
3. Press the Unmark button (left soft key).
The notch disappears from the lower right corner of the selected photo and its matching thumbnail.
You can un m ar k a l l the photos on t he m em or y c ar d by pressing and holding down th e Unmark button (left soft
key) until Unmark All appears on the lower overlay bar.
Deleting Photos
You can delete a sin gle phot o or all marked photos in Revi ew mode. You can also delete sin gle phot os in Pl ay mode
(see “Deleting Photos” on page89).
Using Review Mode
Note:
To delete photos:
1. Turn the camera on and turn the camera mode dial to Rev.
2. Select a photo or m ark the photos you w ant to del ete. If you wa nt to del ete all the p hotos, yo u can cho ose “Mar k
HP PhotoSmart C500 Digital Camera User’s Guide 71
Protected photos will not be deleted. See “Protecting Photos” on page72 for more information.
All.” See “Marking Photos” on page70 for more information.
If you want to delete all of the photos in a group, or a Timelapse or Burst series, you can close or collapse the
photos, until just the one photo that represents the group or series is showing. You can then select the photo as
you would a single Still photo, for deleting.
Page 6

3. Press the Menu button.
4. Press the Delete button (center soft key).
The color LCD displays a message asking you to confirm that you want to delete the photos.
5. Press the Delete button (left soft key) to delete the photos.
Protecting Photos
Protecting photo s preven ts them fr om being deleted fr om the m emory card. You also cannot change the catego ry of
protected photos.
To protect photos:
1. Turn the camera on and turn the camera mode dial to Rev.
2. Select a photo or mark the photos you want to protect. See “Marking Photos” on page70 for more information.
Using Review Mode
Note:
3. Press the Menu button.
4. Use the 4-way arrow button to scroll to Protect.
5. Press the Protect button (center soft key).
The Protected icon appe ars in the photo information to indicate that the photo is protected.
HP PhotoSmart C500 Digital Camera User’s Guide 72
Protect acts on ma rked photos if there are any, or on th e c urrent photo if there a re n o m ar ked photos. If
you want to protect just the current photo, first unmark all the photos on the memory card.
Protected icon
Page 7

Using Review Mode
To remove protection from photos:
1. Turn the camera on and turn the camera mode dial to Rev.
2. Select a photo or mark the photos you want to unprotect. See “Marking Photos” on page70 for more
information.
3. Press the Menu button.
4. Use the 4-way arrow button to scroll to Protect.
5. Press the Unprotect button (left soft key).
Note:
You must unprotect your protected photos before you can delete them.
Categorizing Photos
You can assign a category to your photos, making them easier to find. You can categorize one photo at a time, or
mark photos and apply one category to all of the marked photos. Categories are also useful when you are creating
a slideshow. For example, you could create a slideshow to share your vacation photos with friends and family.
Note:
To categorize photos:
1. Turn the camera on and turn the camera mode dial to Rev.
2. Select a photo or mark the photos you want to categorize. See “Marking Photos” on page70 for more
3. Press the Category button (center soft key).
HP PhotoSmart C500 Digital Camera User’s Guide 73
You cannot assign or change categories for protected photos.
information.
Page 8
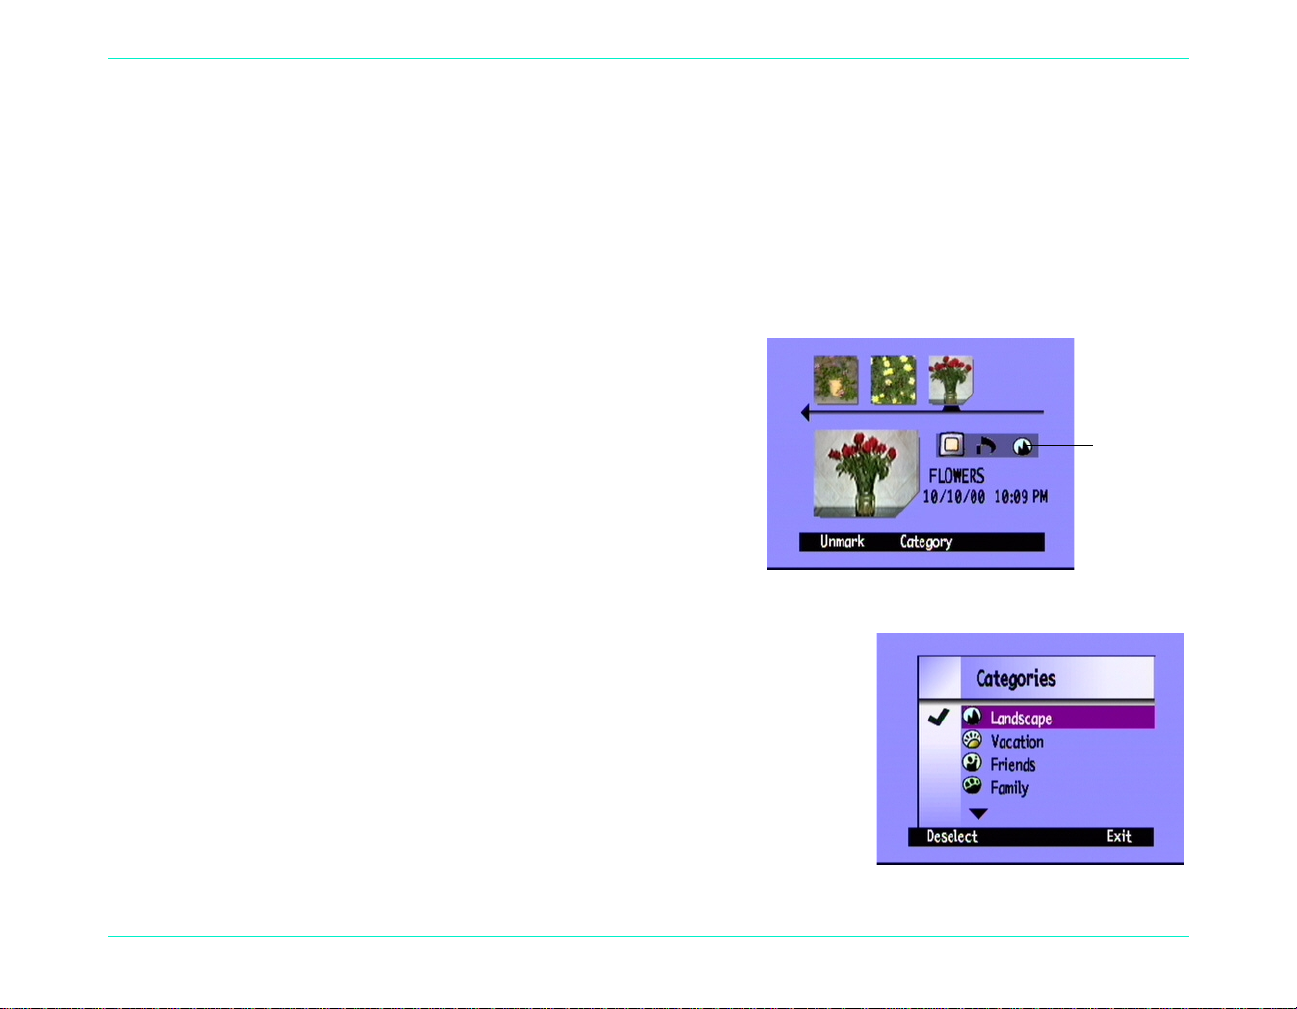
4. Use the 4-way arrow button to scroll to the category you want to use.
Category
icon
You can choose from the following categories:
Using Review Mode
Landscape
•
Vacation
•
Friends
•
Family
•
Pets
•
Work
•
Triangle
•
Square
•
Circle
•
5. Press the Select button (left soft key).
A check mark appears next to the category, and the camera
automatically exit the menus. The icon for the category you
selected app ears in the photo information.
To deselect a category:
1. Turn the camera on and turn the camera mode dial to Rev.
2. Select the photo whose category you want to deselect.
3. Press the Category button (center soft key).
4. Use the 4-way arrow button to scroll to the category you want to
deselect.
5. Press the Deselect button (left soft key).
The camera automatically exits the menus . The category icon disappear s
from the photo information.
HP PhotoSmart C500 Digital Camera User’s Guide 74
Page 9

To change a category:
1. Turn the camera on and turn the camera mode dial to Rev.
2. Select the photo whose category you want to change.
3. Press the Category button (center soft key).
4. Use the 4-way arrow button to scroll to the new category you want to select.
5. Press the Select button (left soft key) to deselect the old category and select the new category.
The camera automatically exits the menus. The new category icon appears in the photo information.
Grouping Photos
Grouping photos is similar to categorizing them. An important difference is that grouping also affects the
organization of photos on the memory card. When you create a group, you are creating a folder on the memory
card, like you would create a folder on the hard drive of your computer. As you add photos to the group, they are
organized in the group’s folder.
Using Review Mode
You can combine gr oups and categories. Individual photos within a group can each belong to a different category,
or you can put all of the photos in a group into one category.
Note:
HP PhotoSmart C500 Digital Camera User’s Guide 75
If a group is closed, marking the photo that represents the group, marks all the photos in the group.
Page 10

Using Review Mode
Creating and Removing Groups
To create a new group:
1. Turn the camera on and turn the camera mode dial to Rev.
2. Select a photo or mark the photos you want to group together. See “Marking Photos” on page70 for more
information.
3. Press the Menu button.
4. Use the 4-way arrow button to scroll to Group.
5. Press the Create button (left soft key).
Note:
6. Name the new group. Group names must be eight characters or less and cannot contain spaces.
•
•
•
Note:
HP PhotoSmart C500 Digital Camera User’s Guide 76
The Create button is available only when there are no existing
groups. If there are existing groups, press the Add button (left
soft key), then press Create New (center soft key).
Use the up and down sides of the 4-way arrow button to scroll to the letter you want to use.
Use the right side of the 4-way arrow button to add a letter to the name.
Use the left side of the 4-way arrow button to delete a letter from the name.
The camera does not accept group names that begin with BR or TL because these letters are reserved,
regardless of language, for identifying Burst and Timelapse photos on the memory card.
Page 11

7. Press the Exit button (right soft key) twice to save the settings and exit the menus.
The name of the gr oup appears in the photo information for all photos in the group. The
Grouped Images icon ap pears in the pho to i nformat ion for any p hoto t hat re presen ts a clo sed
group.
To dissolve a group:
Using Review Mode
Grouped
Images icon
Note:
Dissolving a group removes all the photos from the group and deletes the group name. It does not delete
the photos from the memory card. You cannot dissolve protected grouped photos.
1. Turn the camera on and turn the camera mode dial to Rev.
2. Use the 4-way arrow button to scroll to any photo included in the group you want to remove.
3. Press the Menu button.
4. Use the 4-way arrow button to scroll to Group.
5. Press the Dissolve button (center soft key).
6. Press the Exit button (right soft key).
To delete a group of photos:
Note:
Deleting grouped photo s delete s all the photo s in the group fr om the memo ry card, but do es not dele te the
group name. Once the photos are deleted, you cannot recover them.
1. Turn the camera on and turn the camera mode dial to Rev.
2. Use the 4-way arrow button to scroll to any photo included in the group you want to delete.
HP PhotoSmart C500 Digital Camera User’s Guide 77
Page 12

Using Review Mode
3. If the group is open, showing links between the photos, close the group by pressing the Close button (right soft
key).
4. Select the photo that represents the group of photos.
5. Press the Menu button.
The Edit menu displays with Delete highlighted.
6. Press the Delete button (center soft key).
7. Press the Delete button (left soft key) to delete all of the photos in the group. Remember that once photos are
deleted, you cannot recover them.
Adding Photos to a Group
To add a photo to a group:
1. Turn the camera on and turn the camera mode dial to Rev.
2. Select a photo or mark the photos you want to add to the group. See “Marking Photos” on page70 for more
information.
3. Press the Menu button.
4. Use the 4-way arrow button to scroll to Group.
5. Press the Add button (left soft key).
Note:
HP PhotoSmart C500 Digital Camera User’s Guide 78
The Add button is available only when there are existing groups. See “Creating and Removing Groups”
on page76 for details.
Page 13

Using Review Mode
Group name
Grouped
Images icon
Links
6. Use the 4-way arrow button to scroll to the group you want to select.
7. Press the Select button (left soft key).
8. Press the Exit button.
The name of the group appears i n the photo in formation for
all photos in the group. The Grouped Images icon appears
in the photo information for any photo that represents a
closed group.
Opening and Closing Groups
Once you have grouped some photos you can close the group
and view just the one photo that represents the group or you can open the group and view all the photos in the
group.
To open grouped photos:
1. Turn the camera on and turn the camera mode dial to Rev.
2. Use the 4-way arrow button to scroll to the photo that represents the
group you want to open.
Tip:
The photo representing the group displays the Grouped Images
icon in its photo information.
3. Press the Open button (right soft key).
Thumbnails of all of the photos in the group are displayed with links
between them.
HP PhotoSmart C500 Digital Camera User’s Guide 79
Page 14

To close grouped photos:
1. Turn the camera on and turn the camera mode dial to Rev.
2. Use the 4-way arrow button to scroll to any photo in the group you want to close.
3. Press the Close button (right soft key).
Expanding Burst and Timelapse Photos
When you take Burst or Timelapse photos, the camera takes a series of photos and uses the first photo to represent
the series. You can expand the series to display all the photos on the color LCD, or you can play the series. See
“Viewing Burst, Timelapse, and Grouped Photos” on page86 for information about playing a series of photos.
To expand Burst or Timelapse photos:
1. Turn the camera on and turn the camera mode dial to Rev.
2. Use the 4-way arro w butt on to scrol l to the pho to that re presen ts th e Burs t or T imela pse series
you want to expand.
Using Review Mode
Burst icon
Tip:
The photo representing the series displays the Burst or Timelapse icon in its photo
information.
3. Press the Expand button (right soft key).
Thumbnails of all of the photos in the series are displayed with links between them.
Timelapse
icon
HP PhotoSmart C500 Digital Camera User’s Guide 80
Page 15

To collapse Burst or Timelapse photos:
1. Turn the camera on and turn the camera mode dial to Rev.
2. Use the 4-way arrow button to scroll to any photo in the Burst or Timelapse series you want to collapse.
3. Press the Collapse button (right soft key).
Searching for Photos
Yo u can use the Find menu to search for photos by date or by category.
To search for photos by date:
1. Turn the camera on and turn the camera mode dial to Rev.
2. Press the Menu button.
3. Use the 4-way arrow button to scroll to the Find menu.
4. Press the Edit button (left soft key).
Using Review Mode
5. Enter the range of dates you want the camera to use to search for
photos:
Use the right and left sides of the 4-way arrow button to move to
•
the month, day, and year fields.
Use the up and down sides of the 4-way ar row but ton to ch ange the
•
month, day, and year.
HP PhotoSmart C500 Digital Camera User’s Guide 81
Page 16

Using Review Mode
Note:
The From date must be prior or equal to the To date.
6. Press the Find button (left soft key).
7. The results of your search appear on the color LCD. The Find icon appears in the lower right
corner to remind you that you are looking at the results of your search.
8. Use the 4-way arrow button to scroll through the photos. When you have finished, press the Show
All button (center soft key) to resume viewing all photos stored on the memory card.
Note:
If there are no photos within the range of dates you have select ed, the color LCD displays the message No
images matched search criteria. You ca n:
Press the Show All button (left soft key) to resume viewing all photos stored on the memory card.
•
OR
Press the Find button (right soft key) to select a new range of dates.
•
To search for photos by category:
Note:
For more information on categories, see “Categorizing Photos” on page 73.
1. Turn the camera on and turn the camera mode dial to Rev.
Find icon
2. Press the Menu button.
HP PhotoSmart C500 Digital Camera User’s Guide 82
Page 17

3. Use the 4-way arrow button to scroll to the Find menu, then scr oll down
to By Category.
4. Press the Edit button (left soft key).
5. Use the 4-way arrow button to scroll to the category you want to view.
6. Press the Select button (left soft key).
The results of your search appear on the color LCD. The Find icon
appears in the lower right corner to remind you that you are looking at the results
of your search.
Using Review Mode
7. Use the 4-way arrow button to scroll through the photos. When you have finished,
Find icon
press the Show All button (center soft key) to resume viewing all photos stored on
the memory card.
Note:
If there are no photos within the category you have selected, the color LCD displays the message No
images matched search criteria. You ca n:
Press the Show All button (left soft key) to resume viewing all photos stored on the memory card.
•
OR
Press the Find button (right soft key) to select a new category.
•
HP PhotoSmart C500 Digital Camera User’s Guide 83
Page 18

Using Play Mode
Overlay bar
When you use Play mod e, t he co lor LCD automatically displays you r phot os us ing th e enti re scre en. Pho tos init iall y
appear at a low resolution, and then the color LCD refreshes, from the top, to give you a clear, sharp view of your
photo. You can view information about photos on the overlay bars if you turn them on. See “Overlay Bars” on
page21 for more information.
Viewing Single Photos
To view a single photo:
1. Turn the camera on and turn the camera mode dial to
Play.
2. Use the 4-way arrow button to scroll through your
photos.
Using Play Mode
Tip:
HP PhotoSmart C500 Digital Camera User’s Guide 84
You can press the Overlay button to turn off the overlay bar and see the entire screen, or press it twice
to turn on both overlay bars.
Page 19

Using Play Mode
Zooming In on Your Photos
If you want to see a portion of your photo in more detail, use the Zoom button (center soft key). When you are
zoomed in, you can use the 4-way arrow button to see different parts of the photo. You must exit Zoom before
moving to a different photo.
To zoom in and out:
1. Turn the camera on and turn the camera mode dial to Play.
2. If the overlay bars are off, press the Overlay button to turn them on.
3. Use the right and left sides of the 4-way arrow button to select the photo you want to view.
4. Zoom in and out:
Press the Zoom button (center soft key) to zoom in. You can zoom in three times.
•
Press the Zoom Out button (left soft key) to zoom out. You can zoom out four times.
•
Use the 4-way arrow button to see different parts of the photo.
•
Each time you zoom in or out, the color LCD refreshes, from the top, to give you a clear, sharp view of your
photo.
5. Press the Exit button (right soft key) to finish zooming and return the display to the original photo size.
HP PhotoSmart C500 Digital Camera User’s Guide 85
Page 20

Viewing Burst, Timelapse, and Grouped Photos
You can play back sequences of Burst, Timelapse, and grouped photos at a pre-defined rate, much like a slideshow.
You can view the photos on the ca m era ’s co lor LCD, or on the televi si on sc reen (see “Viewing Photos on a Television”
on page92).
To play back photos:
1. Turn the camera on and turn the camera mode dial to Play.
2. If the overlay bars are off, press the Overlay button to turn them on so th a t yo u ca n s ee the names of the a cti v e
soft keys.
3. Use the 4-way arrow button to scroll to the Burst, Timelapse, or grouped photos you want to play back.
4. Press the Play button (left soft key).
5. Press the Stop Slideshow button (left soft key) to stop playing back your photos.
To change the playback rate:
Using Play Mode
1. Turn the camera on and turn the camera mode dial to Play.
2. Press the Menu button.
3. Use the 4-way arrow button to scroll to Playback Rate.
HP PhotoSmart C500 Digital Camera User’s Guide 86
Page 21

4. Press the Edit button (left soft key).
5. Scroll to Timelapse, Burst, or Group.
6. Use the 4-way arrow button to decrease or increase the Playback Rate.
You can choose a rate of 30, 45, or 60 secon ds. The de f ault i s 30 secon ds.
7. Press the Exit button (right soft key) tw ice to save the s etting s and exi t the
menus.
Creating a Slideshow
You can create a slideshow to display your photos on the color LCD or on a television screen. Your slideshow can
include all of the photos on the memory card, or you can choose a single category of photos to use. See
“Categorizing Photos” on page73 for more information on categories.
To create and play a slideshow:
1. Turn the camera on and turn the camera mode dial to Play.
Using Play Mode
Tip:
2. Press the Menu button.
The Play Settings menu displays with Slideshow highlighted.
3. Press the Edit button (left soft key).
HP PhotoSmart C500 Digital Camera User’s Guide 87
Press the Overlay button to turn the overlay bars off so that you can see the entire screen.
Page 22

4. Use the 4-way arrow button to scroll to the Slideshow option you want to change:
Option Description Default
Using Play Mode
Content The content of the slideshow can include all of the photos on the
memory card or a single category of photos.
Duration This is the amount of tim e ea ch p h oto is disp l aye d. Sel ec t fro m 30,
45, or 60 seconds.
Loop This determines whether the sl idesho w will begi n aga in (lo op) when
it reaches the last photo.
5. Use the 4-way arrow button to select the desired setting.
6. Press the Start button (left soft key) to begin the slide show.
7. You can stop the sl id eshow at a ny time by press ing t he Stop Slideshow button (left so ft key). If the overlay bars
are turned off, the Stop Slideshow label is not visible, but the soft key is still available.
8. Afte r you ha ve stop ped th e slide show, pr ess the Exit but ton (right soft key) twice to save the settings a nd exit the
menus.
All
30 seconds
On
HP PhotoSmart C500 Digital Camera User’s Guide 88
Page 23

Deleting Photos
You can delete a single photo or all of the photos in a group, Burst, or Timelapse sequence in Play mode. You can
also delete photos in Review mode (see “Deleting Photos” on page71).
Using Play Mode
Note:
To delete photos:
1. Turn the camera on and turn the camera mode dial to Play.
2. Use the 4-way arrow button to scroll to the photo you want to delete.
3. Press the Delete button (right soft key).
4. Press the Delete button (left soft key) to delete the photo.
Protected photos will not be deleted. See “Protecting Photos” on page72 for more information.
The color LCD displays a message asking you to confirm that you want to delete the photo.
HP PhotoSmart C500 Digital Camera User’s Guide 89
Page 24

Using Your Television
When the HP Phot oSmart C500 Digital Ca mera is c onnect ed to a te levi sion, the tel evisi on sc reen fu nction s the sam e
as the camera’s col or L CD. You can even use your tel evision to v iew a slide s how, ma king it easy t o share your ph otos
with family and friends.
Selecting the Video Output Format
Before you connect the camera to the television you need to select the video output format. The format that you
choose (NTSC or PAL), depends on your television’s video format.
Using Your Television
Note:
To select the video output format:
1. Turn the camera on and turn the camera mode dial to Play.
2. Press the Menu button
3. Use the 4-way arrow button to scroll to Video.
4. Press the Edit button (left soft key).
5. Press the left and r ight si des of the 4-w ay arr ow bu tton to sele ct NTSC
or PAL.
6. Press the Exit button (right soft key) twice to save the settings and exit
the menus.
HP PhotoSmart C500 Digital Camera User’s Guide 90
Refer to your television owner’s manual for more information about the video format.
Page 25

Connecting the Camera to a Television
Video Out
To connect the camera to a television:
1. Connect the video cable:
If you are using an NTS C con necti on, pl ug th e in put (yellow) e nd of the vide o cabl e into you r tel evis ion s et’s
•
video input connector (on most televisions, this is also yellow).
If you are using a PAL connection, plug the input (yellow) end of the video cable into the television’s video
•
input connector. On olde r sets pl ug th e vide o cable i nto a S CA RT ada pter ( purch ased se para tely), then p lug
the adapter into your television set’s video input connector.
Using Your Television
Note:
2. Plug the other end of the video cable into the camera.
3. On your television, set the video input to be the video input connector
where you connected the camera. See your television owner’s manual
for instructions on how to set the video input.
Tip:
HP PhotoSmart C500 Digital Camera User’s Guide 91
See your television owner’s manual for specific instructions on
how to locate the video input connector.
To conserve battery life, use an AC power adapter while your camera is connected to the television. See
“Using an AC Power Adapter (recommended)” on page29.
Page 26

Viewing Photos on a Television
When the HP PhotoSmart C500 Digital Camera is connected to a television, you can play or review your photos on
the television screen just as you would on the camera’s color LCD. You can also mark, protect, categorize, group or
delete photos, or create a slideshow.
To view your photos on a television:
1. Connect the camera to your television. See “Connecting the Camera to a Television” on page91 for details.
2. Tur n on your te levision, and selec t the video i nput. Se e your televi sion owner ’s manua l for inst ructions o n how to
set the video input.
3. Turn the camera on and turn the camera mode dial to Rev or Play.
4. V iew yo ur ph otos o n the televis ion s creen as you would on th e ca mera’s colo r LCD. See “Using Review Mode” on
page69 and “Using Play Mode” on page84 for details.
You can use the 4-way arrow button on the camera to scroll through your photos, or press the Menu button to
use the camera menus.
Using Your Television
Note:
HP PhotoSmart C500 Digital Camera User’s Guide 92
You can also take photos while the camera is connected to the television (with the camera in Rec mode)
and use the television screen to preview photos as you would on the camera’s color LCD.
 Loading...