

Page 1

Compaq MP1600
Microportable Projector
User's Guide
Page 2

Notice
The information in this guide is subject to change without notice.
COMPAQ COMPUTER CORPORATION SHALL NOT BE
LIABLE FOR TECHNICAL OR EDITORIAL ERRORS OR
OMISSIONS CONTAINED HEREIN; NOR FOR INCIDENTAL
OR CONSEQUENTIAL DAMAGES RESULTING FROM THE
FURNISHING, PERFORMANCE, OR USE OF THIS MATERIAL.
This guide contains information protected by copyright. No part of
this guide may be photocopied or reproduced in any form without
prior written consent from Compaq Computer Corporation.
1999 Compaq Computer Corporation.
All rights reserved. Printed in Taiwan.
Compaq and Deskpro are registered in the U. S. Patent and
Trademark Office.
Microsoft, MS-DOS, Windows, Windows NT, and other names of
Microsoft products referenced herein are trademarks or registered
trademarks of Microsoft Corporation.
Product names mentioned herein may be trademarks and/or
registered trademarks of their respective companies.
The software described in this guide is furnished under a license
agreement or nondisclosure agreement. The software may be used
or copied only in accordance with the terms of the agreement.
User’s Guide
Compaq MP1600 Microportable Projector
First Edition (May 1999)
Part Number 383706-001
Compaq Computer Corporation
Page 3

ONTENTS
C
preface
SING THIS GUIDE
U
Symbols and Conventions..................................................................v
Warning Messages ............................................................................vi
book 1
NGLISH
E
Product Features..............................................................................1-1
Introduction.....................................................................................1-2
Setting Up the Projector..................................................................1-3
Connecting the Projector to a Portable Computer......................1-4
Connecting the Projector to a Desktop Computer......................1-5
Connecting the Projector to a Compaq PC Companion .............1-6
Connecting the Projector to Other Video Sources......................1-7
Attaching the Compaq Video Adapter to
the MP1600 Microportable Projector ....................................1-7
Connecting the Compaq Video Adapter to
a Camcorder or VCR..............................................................1-8
Powering On the Projector..........................................................1-9
Adjusting the Projected Image..................................................1-10
Adjusting the Projector Height ..............................................1-10
Adjusting the Projector Focus................................................1-12
Image Size Adjustment.............................................................1-13
Using the Compaq Software Utility..........................................1-14
Powering Off the Projector.......................................................1-15
Operating the Projector .................................................................1-16
Control Buttons.........................................................................1-16
On-Screen Menu Adjustments..................................................1-17
Adjusting the On-Screen Menu..............................................1-18
Explaining Functions in the On-Screen Menu.......................1-19
Special On-Screen Messages....................................................1-21
Care and Maintenance...................................................................1-22
Protecting the Projector ............................................................1-22
Cleaning the Lens .....................................................................1-23
Replacing the Projector Lamp Module.....................................1-24
Contents iii
Page 4

appendix A
ROUBLESHOOTING
T
appendix B
GENCY REGULATORY NOTICES
A
Federal Communications Commission Notice.............................. B-1
Modifications............................................................................. B-1
Cables ........................................................................................ B-1
Declaration of Conformity for Products Marked
with the FCC Logo - United States Only.............................. B-2
Canadian Notice...................................................................... B-2
Avis Canadien......................................................................... B-2
European Notice ..................................................................... B-3
Japanese Notice ...................................................................... B-3
PECIFICATIONS
S
Specifications................................................................................. B-4
Preset Display Resolutions Table.............................................. B-5
Color Display Values.............................................................. B-6
Power Cord Set Requirements................................................... B-6
General Requirements ............................................................ B-6
Country-Specific Requirements ............................................. B-7
appendix C
SING THE COMPAQ VIDEO ADAPTER
U
Identifying the Buttons and Connectors........................................ C-1
Attaching the Video Adapter to the
MP1600 Microportable Projector................................................ C-2
Connecting a Video Player............................................................ C-3
iv Contents
Page 5
preface
Using This Guide
The User's Guide includes general information about your
projector, troubleshooting and diagnostics, and technical
specifications.
Symbols and Conventions
The following words and symbols mark special messages
throughout this guide:
WARNING:
!
to follow directions could result in bodily harm or loss of
life.
CAUTION:
to follow directions could result in damage to equipment or
loss of information.
Text set off in this manner presents clarifying information, specific
instructions, commentary, sidelights, or interesting points of view.
✎
Text set off in this manner indicates that failure
Text set off in this manner indicates that failure
Preface v
Page 6

Warning Messages
Before operating the projector, please read the following messages.
!
WARNING:
To reduce the risk of harm to your eyes, do not look
„#
directly into the bright light of the projection lens.
To reduce the risk of fire or electric shock, do not
„#
expose this product to rain or moisture.
To reduce the risk of electric shock, do not disassemble
„#
the projector other than to replace the lamp module.
To reduce the risk of personal injury, allow the unit to
„#
cool down before changing the lamp, and always unplug
the power cord first.
vi Preface
Page 7

book 1
English
Product Features
The Compaq MP1600 Microportable Projector generates crisp,
clear images onto a projection screen by using Digital Light
Processing (DLP) Technology. The features include the
following:
120-watt UHP high-efficiency, long-life lamp
■
1024 × 768 native XGA resolution
■
1280 × 1024 SXGA resolution
■
Zooms to 32x
■
Weighs less than 4.5 pounds
■
Standard VGA analog connection
■
All digital DFP connection
■
Convenient auto-image adjustment
■
16.7 million displayable colors
■
Multilingual on-screen adjustment menu
■
Plug and Play capability
■
Compaq utility program for ease of use in setting up the
■
projector with portable computers
Carrying case, projector carrying handle, and lens cleaning
■
cloth kit included
Security lock slot
■
User replaceable lamp module
■
Optional video adapter
■
English 1-1
Page 8

Introduction
The Compaq MP1600 Microportable Projector comes with the
following items:
Projector and lens cap
■
Power cable
■
Two signal cables:
■
one VGA signal cable for use with computers, portables,
❏
and some handheld products
one digital DFP (digital flat panel) signal cable for use with
❏
compatible digital sources
Carrying case and separate projector carrying handle
■
Lens cleaning cloth kit
■
Philip's screwdriver
■
Quick Setup card and this
■
CD-ROM containing Compaq utility program
■
User's Guide
If your shipping box does not contain all of the items listed above,
please contact your Compaq authorized dealer, reseller, or service
provider.
1-2 English
Page 9

Setting Up the Projector
Instructions below and on the following pages explain how to set
up the projector. Separate setup instructions are described for the
following products:
portable and desktop computer
■
handheld computers with VGA capability
■
VCR or camcorder (requires optional video adapter)
■
The projector is hot pluggable and can be connected, while
✎
powered on, to these products while they are powered on.
IMPORTANT:
Place the projector on a stable desk or table at a
distance not less than 3.3 feet and not greater than 35 feet from
the projection screen.
WARNING:
!
to your equipment:
Do not disable the power cord grounding plug. The
•
To reduce the risk of electric shock or damage
grounding plug is an important safety feature.
Plug the power cord into a grounded (earthed) electrical
•
outlet that is easily accessible at all times.
Disconnect power from the projector by unplugging the
•
power cord from the electrical outlet.
Do not place anything on power cords or cables.
•
Arrange them so that no one may accidentally step on or
trip over them. Do not pull on a cord or cable. When
unplugging from the electrical outlet, grasp the cord by
the plug.
English 1-3
Page 10
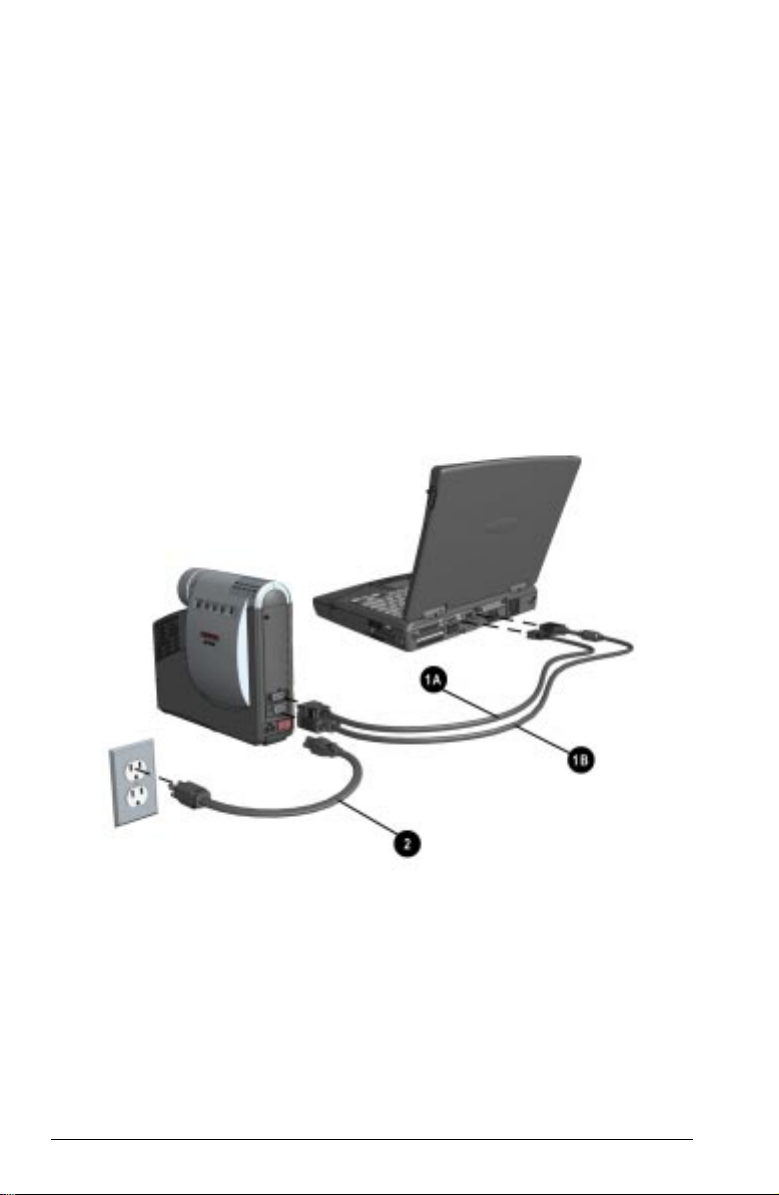
Connecting the Projector to a
Portable Computer
1. Connect one end of the projector signal cable to the projector
and the other end to the VGA connector
connector
VGA cable OR the DFP cable; do not connect both cables.
Be sure the signal cable aligns with the connector. Do not
✎
force the cable onto the connector or you may damage the
signal cable or the projector.
2. Connect one end of the power cord 2 into the back of the
projector, and the other end to an electrical outlet that is easily
accessible and close to the projector.
on the portable and tighten the screws. Use the
1
A
or the DFP
1
B
1-4 English
Page 11
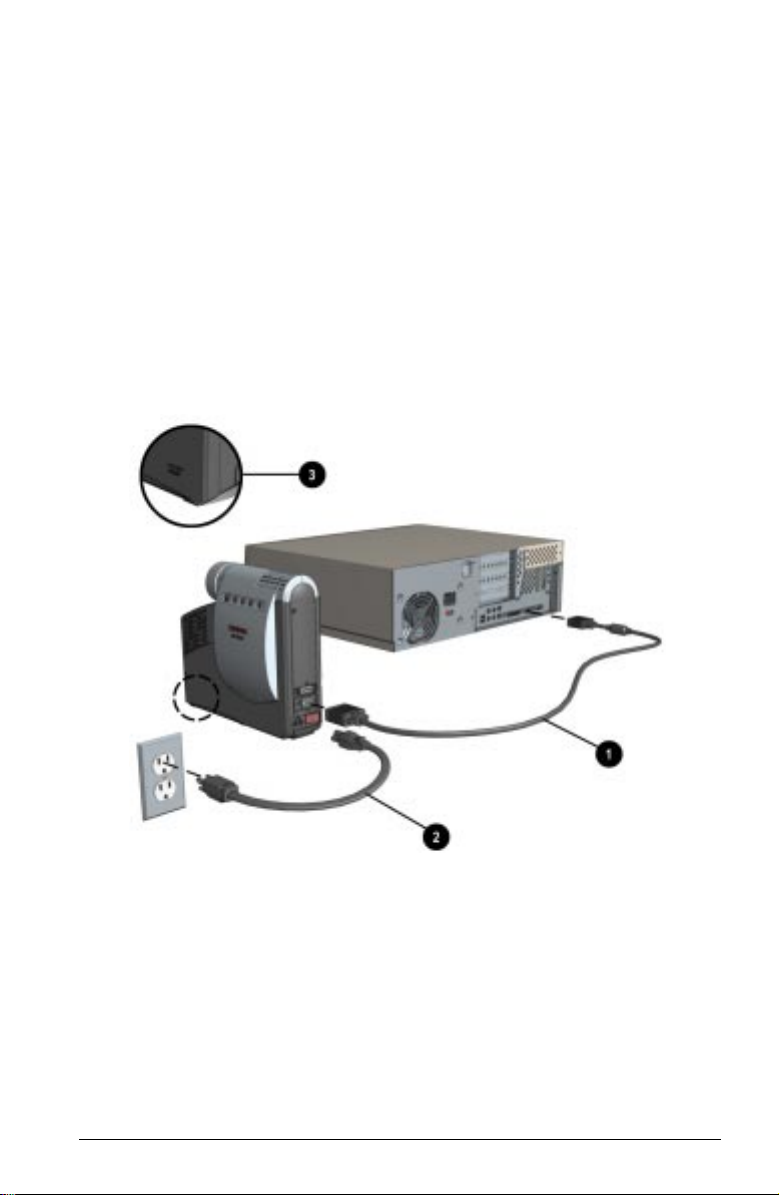
Connecting the Projector to a
Desktop Computer
1. Connect one end of the projector signal cable 1 to the
projector and the other end to the VGA connector on the
desktop computer and tighten the screws.
Be sure the signal cable aligns with the connector. Do not force
✎
the cable onto the connector or you may damage the signal
cable or the projector.
2. Connect one end of the power cord 2 into the back of the
projector, and the other end to an electrical outlet that is easily
accessible and close to the projector.
For security purposes, this projector has been fitted with a slot
✎
for use with a security cable lock that can be purchased
separately at most computer stores.
English 1-5
3
Page 12

Connecting the Projector to a
Compaq PC Companion
To connect the projector to a Compaq PC companion, the PC
companion must have a male connector adapter and a VGA-out
PC Card with a 15-pin connector.
The VGA-out PC Card with the 15-pin connector is not
✎
included with the Compaq PC companion. It is sold separately.
For information on purchasing this card, call your Compaq
authorized dealer, seller, or reseller. To locate a reseller near
you, call Compaq at 1-800-AT-COMPAQ or visit the Compaq
web site at http://www.compaq.com.
1. Connect one end of the signal cable 1 to the projector and
connect the other end to the VGA-out PC Card. The VGA-out
PC Card may be inserted into the PC slot on the Compaq PC
companion before or after connecting the signal cable.
2. Connect one end of the power cord 2 into the back of the
projector, and the other end to an electrical outlet that is easily
accessible and close to the projector.
To connect a Compaq Aero device, follow the instructions for
✎
connecting the projector to a portable computer.
1-6 English
Page 13
Connecting the Projector to Other Video Sources
To connect the projector to a camcorder or VCR, the Compaq
Video Adapter must be connected to the projector. The Compaq
Video Adapter has been specifically designed to fit the Compaq
MP1600 Microportable Projector. This adapter converts the
signals from the camcorder for compatibility with the projector.
The Compaq Video Adapter is not included with the Compaq
✎
MP1600 Microportable Projector. It is sold separately. For
information on purchasing this video adapter, call your Compaq
authorized dealer, seller, or reseller. To locate a reseller near
you, call 1-800-AT-COMPAQ or visit the Compaq web site at
http://www.compaq.com.
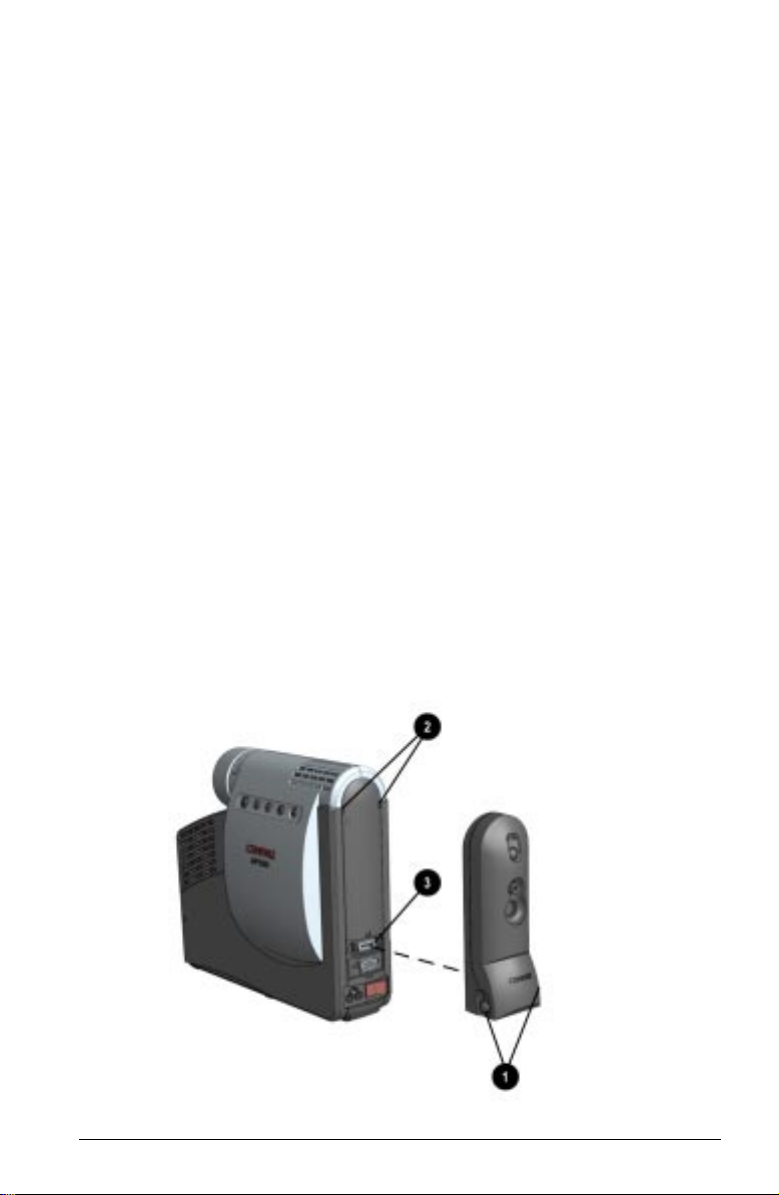
Attaching the Compaq Video Adapter to the
MP1600 Microportable Projector
1. Push in the two buttons 1 on the bottom sides of the video
adapter.
2. Insert the hooks on top of the video adapter into the upper
slots 2 on the projector and, at the same time, insert the
adapter plug into the digital connector 3 on the back of the
projector.
3. Release the buttons on the sides of the video adapter to
complete the connection.
English 1-7
Page 14

Connecting the Compaq Video Adapter
to a Camcorder or VCR
1. Use an RCA cable to connect a VCR to the video connector
on the video adapter. Use an S-video cable to connect a
camcorder to the S-video connector 2 on the video adapter.
2. Connect one end of the power cord 3 into the back of the
projector and the other end to an electrical outlet that is easily
accessible and close to the projector.
1
The Compaq Video Adapter can remain attached to the projector,
or it can be removed and stored in the carrying case. For more
information on using the video adapter, see Appendix C, "Using
the Compaq Video Adapter."
1-8 English
Page 15

Powering On the Projector
Follow these instructions to power on the projector:
1. Ensure that the power cord and signal cable are securely
connected.
Make sure the projector is perpendicular to the screen.
✎
2. Remove the lens cap 1 by pulling it straight out.
3. Turn on the Main power switch 2 on the back of the projector
and allow the projector to warm up for 1-2 minutes.
When the projector has warmed up, the Compaq startup screen
✎
will display for 30 seconds and the LED on the Standby button
will turn green. When the startup screen disappears, the video
3
from the attached computer will display. If there is no
incoming video, the "Check Video Cable" message will display
on the projection screen.
4. Power on your source (computer, PC Companion, or VCR,
etc.) and launch the software application being used to display
images on the projection screen.
English 1-9
Page 16

If there is a long delay between the time the startup screen
✎
displays and the time the presentation software is launched, the
lamp may shut off and the projector will automatically go into
standby mode. If this happens, press the Standby button 3 to
power on the lamp.
The Compaq startup screen display time is adjustable in the
✎
Standby Lamp Delay feature in the Management function of
the on-screen menu.
Adjusting the Projected Image
There are two ways to adjust the projected image:
Adjusting the projector height
■
Adjusting the projector focus
■
Adjusting the Projector Height
This projector has a built-in elevator foot that can raise the
projector approximately one inch. To adjust the height:
1. Turn the foot sideways to balance the projector.
1-10 English
Page 17

2. Raise the projector to the desired display angle, then press the
elevator button 1 on the front of the projector to release the
foot 2.
3. To lower the display angle, press the button on the front of the
projector again and press down on the projector to lower it.
WARNING:
!
overturning, always turn the elevator foot 90° from its
original position before pressing the elevator button.
To reduce the risk of the projector tipping or
English 1-11
Page 18

Adjusting the Projector Focus
To focus the projected image, rotate the focus ring 1 until the
image is clear. The projector will focus at distances from 3.3 feet
to 35.64 feet (1 meter to 10.8 meters).
If vertical bars appear on the display after adjusting the focus,
press the Resync button 2 to automatically synchronize and track
the display. If the button does not correct the display, use the
Digital Conversion feature in the on-screen menu to manually
adjust the synchronization and tracking (refer to the "On-Screen
Menu Adjustments" section).
1-12 English
Page 19

Image Size Adjustment
Screen
Diagonal
Screen
Width
Screen
Height
Projection
Distance
✎
42.2" 56.2" 84.3" 112.5" 140.6" 168.7" 196.9" 225" 253.1" 281.2"
33.8" 45" 67.4" 90" 112.4" 135" 157.5" 180" 202.4" 225"
25.3" 33.7" 50.6" 67.5" 84.4" 101.2" 118.1" 135" 151.9" 168.7"
4.9' 6.6' 9.8' 13.1' 16.4' 19.7' 23.0' 26.2' 29.5' 32.8'
If the projector is used at the maximum distance in this chart, the
display may appear to be dimmer than usual.
English 1-13
Page 20

Using the Compaq Software Utility
The Compaq software utility included on the CD-ROM is for use
with Compaq portable computers with Compaq BIOS only. The
purpose of the software utility is to disable power management
features of the portable computer while the Compaq MP1600
Microportable Projector is connected to it. The utility also
disables the computer's screen savers and auto suspend feature.
The software utility does NOT support Compaq portable computers
✎
with non-Compaq BIOS, nor does it support Compaq desktop
computers or non-Compaq computers.
A graphical user interface (GUI) is required to control the
MP1600 Projector's resolution settings and enabled/disabled
status. The Compaq software utility supports the following GUI
operating systems: Microsoft Windows 95, 98, and NT 4.0.
To install the software utility onto a Compaq portable computer:
1. Insert the CD-ROM into the computer's CD drive.
2. From Microsoft Windows 95, 98, or NT 4.0 desktop, click
STARTÆRUN and type D:\SETUP.EXE in the dialog box.
3. Select OK in the dialog box to install the program. The
software utility installs on the hard drive and places a program
icon in the Windows system tray.
4. Double-click the program icon to launch the Presentation
Properties dialog box.
5. Set the Presentation Mode Duration time in the dialog box.
The dialog box has default settings enabled to turn off the
computer's power management features and for the video
resolution.
6. Select OK or APPLY from the dialog box to execute the
default settings. The software dialog box closes and the
computer is ready to continue with the presentation.
This software utility is provided on the CD-ROM in the following
languages: English, Dutch, French, German, Italian, and Spanish.
Once Setup is executed, the appropriate language is installed on
the computer based on the computer's operating system language.
1-14 English
Page 21

Powering Off the Projector
1. Press the Standby button to turn off the projector lamp.
The Compaq startup screen displays and the LED on the
Standby button turns amber. Allow the projector to cool down
for about 5 to 10 minutes before turning it off.
The Compaq startup screen display time is adjustable in the
✎
Standby Lamp Delay feature in the Management function of
the on-screen menu.
2. Turn off the Main power switch on the back of the projector.
3. Disconnect the power cord from the electrical outlet and the
projector.
CAUTION:
amber, this indicates that the lamp has overheated and the
projector will automatically shut down. Remove any
obstruction that may prevent proper ventilation to the
projector, and wait 5 to 10 minutes to allow the projector to
cool down before powering it on again.
If the LED on the Standby button rapidly flashes
English 1-15
Page 22

Operating the Projector
Control Buttons
Symbol Control Function
1
Standby button
and LED
Powers the projector lamp on and off.
The Standby LED changes colors to indicate the
following operating modes:
1. Green glow indicates power is on.
2. Amber glow indicates warm-up, suspend, or
standby mode.
3. Amber flashing rapidly indicates projector is
overheating and will automatically shut down.
2
3
4
5
1-16 English
−
+
R
Select button 1. Launches first, second, and third-level on-
screen menus.
2. Exits the on-screen menus.
Minus button Selects and adjusts the on-screen menu functions.
Plus button Selects and adjusts the on-screen menu functions.
Resync button Automatically synchronizes the projector to track
the input source.
Page 23

On-Screen Menu Adjustments
The adjustments for screen settings are located in the on-screen
menu and can be viewed in one of six available languages. The
following menu shows the functions at each level:
Main Menu Menu Level 2 Menu Level 3
Brightness Adjustment scale
Contrast Adjustment scale
Position Horizontal Position
Zoom Adjustment scale
Keystone Adjustment scale
Picture Dark - Light
Color 7100 K
Digital
Conversion
Language Deutsche
Menu Location Up-Down
Management Power Saver
Factory Reset Confirm Reset
Exit
Vertical Position
Save and Return
Cancel
Custom Color
Saturation
Save and Return
Cancel
Clock
Clock Phase
Save and Return
Cancel
English
Espanol
Francais
Italiano
Nederlands
Save and Return
Left-Right
Save and Return
Cancel
Lamp Hours
Reset Lamp Hours
Standby Lamp Delay
Serial Number
Master Reset
Save and Return
Cancel
Adjustment scale
Adjustment scale
Adjustment scale
Adjustment scale
Adjustment scale
Adjustment scale
Adjustment scale
On-Off
Display hours - 5 digits
Confirmation
Delay adjustment
Display Serial Number
Confirmation
English 1-17
Page 24

Adjusting the On-Screen Menu
To launch and make adjustments to the on-screen menu:
1. Press the Select button 1 located on the projector panel. The
Main menu will display on the projection screen.
2. To select a function, press the Minus (-) button 2 to scroll
down the Display menu. To reverse the scroll direction, press
the Plus (+) 3 button.
3. Highlight the function to be adjusted and press the Select
button 1 again.
The bar on the bottom of the on-screen menu shows the current
✎
operating resolution and identifies it as either a factory preset mode
(Preset) or a user-adjusted mode (User Mode).
For example, to select the
button 2 until
button 1 to display the level 2 menu for
menu displays expanded menu items.
4. To make a selection from the level 2 menu, press the Minus
(-) button to scroll down the level 2 menu, or press the Plus
(+) button to reverse the scroll direction.
1-18 English
Position
Position
is highlighted, then press the Select
function, press the Minus
Position.
The level 2
Page 25

5. Highlight the selection and press the Select button to confirm
the selection. The level 3 menu displays.
6. Level 3 for Position functions display the adjustment scales.
Use the Minus button to decrease and the Plus button to
increase the screen Horizontal and Vertical positions.
Some menu functions display adjustment scales in the level 2
✎
menu, while others display adjustment scales in the level 3
menu.
7. After making the adjustment, select
any changes made, select
Cancel
instead of
Save and Return.
Save and Return.
To void
8. To exit from the on-screen menu, select Exit from the Main
menu. If the display is a second, or third-level menu, select
Save and Return
or
Cancel,
then select
from the Main
Exit
menu.
The on-screen menu is easy to use; just follow the instructions on
the screen.
Explaining Functions in the On-Screen Menu
Brightness and Contrast—Adjusts the displayed image
■
brightness and contrast ranges from 0 to 100.
Position—Fine-tunes the horizontal and vertical positions of
■
the display.
Zoom—Magnifies an image up to a factor of 32 on the
■
projection screen.
Keystone—Adjusts image distortion caused by tilting the
■
projector. The only adjustment direction allowed is to narrow
the top width of the image.
Picture—Adjusts the gamma value or degree of contrast of
■
darkness or light for the projected image.
Color—Adjusts color balance to compensate for ambient
■
conditions using three submenus:
7100°K—The factory default.
❏
Custom Color—Modify the color temperature balance.
❏
Saturation—Magnify the color intensity.
❏
English 1-19
Page 26

Digital Conversion—Improves picture stability of user modes
■
by adjusting:
Clock—Increase/decrease the value to stretch or shrink the
†#
image on the screen.
Clock Phase—Increase/decrease the value to minimize
†#
video distortion or video jitter.
If the projector image becomes distorted when adjusting the
✎
Clock and Clock Phase values, continue adjusting the values
until the distortion disappears. To restore the factory settings,
select Factory Reset in the on-screen menu.
Language—Select display from six languages in their native
■
spelling. The current language is highlighted. Select another
language to display all menu functions in that language.
Menu Location—Positions the on-screen menu at a
■
convenient location on the projector screen; moves up and
down, left and right.
Management—Allows the user to control power saver
■
characteristics of the display, or to view the cumulative lamp
hours, reset the lamp hour timer, view the unit's serial
number, or perform a Master Reset.
Factory Reset—Resets the current operating option to its
■
original factory setting.
1-20 English
Page 27

Special On-Screen Messages
Special on-screen messages will appear on the projection display
to identify the following conditions:
Check Video Cable:
■
Indicates the video cable may not be
plugged into the projector or the selected video input is not
accurate.
Input Signal Out of Range:
■
Indicates the projector is unable
to access the appropriate input signal.
2 Inputs Active - Remove One:
■
The projector has two data
inputs: one is an analog D-Sub input and the other is a digital
DFP input. This message indicates that both inputs are active
simultaneously and the user should detach one of them.
Going to Standby:
■
Indicates the projector is entering a sleep
mode or powering off the lamp.
Lamp May Fail Soon, Replacement Suggested:
■
Indicates
the lamp is approaching failure. The message will remain on
the screen for five seconds or until the on-screen menu Select
button is pressed.
English 1-21
Page 28

Care and Maintenance
This section explains how to care for and maintain your Compaq
projector during normal everyday use.
Protecting the Projector
To protect your projector from overheating and other types of
damage, follow these suggestions:
Use only a power source and connection appropriate for this
■
projector as indicated on the marking label.
Do not overload an electrical outlet, power strip, or
■
convenience receptacle. The overall system load must not
exceed 80 percent of the branch circuit rating. If an extension
cord or power strip is used, make sure that the cord or strip is
rated for the product and that the total ampere ratings of all
products plugged into the extension cord or power strip do not
exceed 80 percent of the extension cord or strip ampere
ratings limit.
Install the projector near an outlet that you can easily reach.
■
Disconnect the product by grasping the plug firmly and
pulling it from the outlet. Never disconnect it by pulling the
cord.
Unplug the projector from the wall outlet before cleaning. Do
■
not use liquid cleaners or aerosol cleaners.
Slots and openings in the cabinet are provided for ventilation.
■
These openings must not be blocked or covered. Never push
objects of any kind into cabinet slots or other openings.
Do not drop the projector or place it on an unstable surface.
■
Do not expose this product to rain or moisture.
■
Do not allow anything to rest on the power cord. Do not walk
■
on the cord.
Do not open the projector or attempt to service this product
■
for any other reason than to replace the lamp module. Adjust
only those controls that are covered by the operating
instructions. If the projector is not operating properly or has
been dropped or damaged, contact your Compaq authorized
dealer, reseller, or service provider.
1-22 English
Page 29

Cleaning the Lens
To minimize the risk of damaging the coating or scratching the
lens surface, this cleaning procedure has been developed. The
first recommendation is to remove any dust particles from the
lens by blowing it off with clean, dry, deionized air. However,
this may not be a convenient method and an alternate method is
described below using the cloth included with the projector.
To clean the lens, use only the
the projector and follow these steps:
CAUTION:
directly on the lens surface. Do not use liquid cleaners on
the cloth as this may contaminate the cloth.
1. Wipe the lens in a single direction with the
Do not wipe back and forth across the lens surface.
2. If the cloth is dirty or smears the lens, wash the cloth. If the
cloth is still dirty after washing it or the fabric is damaged,
replace it.
Do not
✎
sheets when drying the cloth.
use fabric softener when washing the cloth or softener
CAUTION:
for a long time as doing so may contaminate the lens with
dye from the cloth. Keep the cloth in its case when it is not
being used. The cloth can be contaminated if left in the
open air or in a lab coat pocket.
Do not spray any type of fluid or cleaner
Do not store the cloth in contact with the lens
cloth that was included with
clean
clean, dry
cloth.
English 1-23
Page 30

Replacing the Projector Lamp Module
When the projector lamp reaches its end of life, it may make a
slight sound when it burns out. The lamp will need to be replaced
before the projector can be used again.
The projector will alert you when the lamp approaches its failure
mode or end of life. When the message "Lamp May Fail Soon Replacement Suggested" displays on the projection screen, you
should change the lamp as soon as possible. Contact your local
Compaq authorized dealer, seller, or reseller to purchase a spare
lamp or have the lamp changed.
To replace the projector lamp module, follow these steps:
1. Turn off the power to the projector by pressing the Standby
button 1.
2. Allow the projector to cool down for at least 30 minutes.
WARNING:
!
temperature. To reduce the risk of personal injury, allow the
projector to cool down for at least 30 minutes before opening
the lamp cover. Never open the lamp cover while the projector
is operating or when the lamp is hot.
3. Turn off the main power switch 2.
4. Disconnect the power cord 3.
The lamp assembly operates at a very high
1-24 English
Page 31

5. Use the provided Philips screwdriver to remove the screw
from the lamp cover.
6. Remove the cover 5.
7. On the left side of the lamp module, push the electrical
connector 6 up to disengage it from the projector base.
8. Remove the three screws 7 from the lamp module.
9. Pull out the lamp module 8.
4
WARNING:
!
drop the lamp module or touch the glass bulb. The glass may
shatter and cause an injury if it is dropped.
To replace the lamp module, reverse the previous steps.
After replacing the lamp module, remember to reset the lamp
✎
hours in the on-screen menu.
IMPORTANT:
weight. If the projection lamp breaks, the mercury may be
released into the atmosphere. Please follow applicable federal,
state, and local regulations for disposal and/or recycling.
To reduce the risk of personal injury, do not
This lamp contains < 0.125 percent mercury by
English 1-25
Page 32

appendix A
Troubleshooting
Image does not appear on
the projection screen
Scrolling, cut-off, or
incorrect image displayed
1. Make sure the projector is powered on.
2. Ensure the lens cap has been removed.
3. Press the Standby button again.
4. Ensure that the power cable is securely
connected.
5. Ensure the pins on the connectors are
not crooked or broken.
6. Turn off or disable the portable or
desktop computer screen saver function.
7. Ensure the projection lamp has been
securely installed.
8. Ensure your portable computer's external
video port is turned on. Toggle the
function keys.
F4
1. Press the Resync button.
2. Turn everything off; then power on the
projector first and power on the portable
or desktop computer second.
3. If the above steps do not correct the
display image, adjust the resolution of
the portable or desktop computer to
1024 × 768.
Fn +
Continued
Troubleshooting A-1
Page 33

Continued
Portable computer or PC
Companion screen is not
displaying the presentation
Portable computer:
Mac PowerBooks:
Portable computers have a monitor loopthrough or simultaneous viewing function.
Press the Fn and the F4 function keys on the
portable computer to switch the image from
the portable screen to the projection screen
or to toggle through the following three
options:
1. LCD: Output displays only on the
portable screen.
2. CRT: Output displays only on the
projection screen.
3. CRT/LCD: Output displays on the portable
screen and the projection screen.
Activate CRT/LCD "ON" at the same time. To
identify any alternate function keys to be
used, refer to your portable computer's user
manual.
1. To control video mirroring, click Control
Panel Æ Display, then set Video
Mirroring to ON for both internal and
external viewing.
2. Set Video Mirroring OFF for image on
external monitor only or internal only,
depending on monitor selection in
Monitors.
Image is flickering or
unstable
A-2 Troubleshooting
Press the Resync button on the projector
panel to adjust the tracking. If that doesn't
stop the flickering, adjust the Clock Phase
function in the on-screen menu.
Continued
Page 34

Continued
Image is out of focus
1. Adjust the Focus Ring on the projection
lens.
2. Make sure the projection screen is
between the required distance (3.3 - 35
feet) from the projector.
3. Check the projection lens to see if it
needs cleaning. Follow the "Cleaning the
Lens" procedures on page 1-23 to clean
the lens.
Projected colors do not
match computer or
camcorder color
Only the Compaq startup
screen displays
1. Adjust the Brightness, Contrast, or Color
functions in the on-screen menu.
2. Make sure the pins on the cable
connectors are not bent or broken.
1. Check that the cables are connected
securely.
2. Verify that the proper input source is
connected.
3. Make sure your portable computer's
external video port is activated.
Continued
Troubleshooting A-3
Page 35

Continued
Lamp shuts off
1. If the LED on the Standby button flashes
amber, the projector has overheated and
will automatically shut down. Wait 5 to
10 minutes until the Standby button
stops flashing and turns amber before
restarting the projector again.
2. A minor power surge may cause the
lamp to shut off. Wait a few minutes,
then turn it back on.
Lamp burns out
When the lamp reaches its end of life, it will
burn out and may make a slight sound.
Contact your local Compaq authorized
dealer, seller, or reseller to purchase a
replacement lamp module. To replace the
lamp, follow the procedures in the
"Replacing the Projector Lamp Module"
section.
A-4 Troubleshooting
Page 36

appendix B
Agency Regulatory Notices
Federal Communications Commission Notice
This equipment has been tested and found to comply with the
limits for a Class B digital device, pursuant to Part 15 of the FCC
Rules. These limits are designed to provide reasonable protection
against harmful interference in a residential installation. This
equipment generates, uses, and can radiate radio frequency
energy and, if not installed and used in accordance with the
instructions, may cause harmful interference to radio communications. However, there is no guarantee that interference will not
occur in a particular installation. If this equipment does cause
harmful interference to radio or television reception, which can be
determined by turning the equipment off and on, the user is
encouraged to try to correct the interference by one or more of the
following measures:
Reorient or relocate the receiving antenna.
■
Increase the separation between the equipment and the
■
receiver.
Connect the equipment into an outlet on a circuit different
■
from the circuit that the receiver is connected.
Consult the dealer or an experienced radio or television
■
technician for help.
Modifications
The FCC requires the user to be notified that if any changes or
modifications are made to this device, not expressly approved by
Compaq Computer Corporation, this may void the user's authority
to operate the equipment.
Cables
Connections to this device must be made with shielded cables
with metallic RFI/EMI connector hoods to maintain compliance
with FCC Rules and Regulations.
Agency Regulatory Notices B-1
Page 37

Declaration of Conformity for Products Marked
with the FCC Logo - United States Only
This device complies with Part 15 of the FCC Rules. Operation is
subject to the following two conditions: (1) this device may not
cause harmful interference, and (2) this device must accept any
interference received, including interference that may cause
undesired operation.
For questions regarding your product, contact:
Compaq Computer Corporation
P.O. Box 692000, Mail Stop 530113
Houston, Texas 77269-2000
Or, call 1-800-652-6672 (1-800-OK COMPAQ)
For questions regarding this FCC declaration, contact:
Compaq Computer Corporation
P.O. Box 692000, Mail Stop 510101
Houston, Texas 77269-2000
Or, call (281) 514-3333
To identify this product, refer to the Part, Series, or Model
number found on the product.
Canadian Notice
This Class B digital apparatus meets all requirements of the
Canadian Interference-Causing Equipment Regulations.
Avis Canadien
Cet appareil numérique de la classe B respecte toutes les
exigences du Règlement sur le matériel brouilleur du Canada.
B-2 Agency Regulatory Notices
Page 38

European Notice
Products with the CE Marking comply with both the EMC
Directive (89/336/EEC) and the Low Voltage Directive
(73/23/EEC) issued by the Commission of the European
Community.
Compliance with these directives implies conformity to the
following European norms:
EN55022 (CISPR 22) - Radio Frequency Interference
■
EN50082-1 (IEC801-2, IEC801-3, IEC801-4) -
■
Electromagnetic Immunity
EN60950 (IEC950) - Product Safety
■
Japanese Notice
Agency Regulatory Notices B-3
Page 39

Specifications
Compaq MP1600 Microportable Projector
Projection Panel
Lamp Type
Image Size
Avg. Lamp Life in Hours
Noise Level
Projection Distance
Maximum Weight
(Unpacked)
n
W × H × D 3 in × 8 in × 9 3/8 in
Maximum Graphics
Resolution
Displayable Colors
Horizontal Frequencies
Analog signals
Digital signals
Vertical Frequencies
Analog signals
Digital signals
Required Environmental Temperatures for
the Following Altitudes:
Sea Level
Operating Temperature
Storage Temperature
2,500 - 5,000 Feet
Operating Temperature
Storage Temperature
5,000 - 10,000 Feet
Operating Temperature
Storage Temperature
Humidity (Non-Condensing)
Operating
Non-Operating
Power Source
Power Consumption
Input Terminal
n
DMD XGA 1024 × 768 × 1
120 watt UHP
See the Image Size Adjustment table.
1,500 hours
Less than 43dBA
3.3 feet - 35.64 feet 1 meter - 10.8 meters
4.2 lbs (without cables) 1.9 kg
1280 × 1024
16.7 million colors
15 - 69 kHz
15 - 60 kHz
48 - 85 Hz
48 - 75 Hz
50 to 104°F
-22 to 149°F
50 to 95°F
-22 to 149°F
50 to 82°F
-22 to 149°F
20 to 80%
5 to 95%
90 - 265 VAC, 50-60 Hz
< 185 watts
One 15-pin D-type connector with one cable included
One Digital FP connector with one cable included
10 to 40°C
-40 to 65°C
10 to 35°C
-40 to 65°C
10 to 28°C
-40 to 65°C
B-4 Agency Regulatory Notices
Page 40

Preset Display Resolutions Table
This projector automatically recognizes the preset display
resolutions listed in the following table.
Display Resolutions
Preset Modes Resolutions
1. Industry Standard 640 × 350 at 31.5 kHz/70 Hz
2. VESA Standard 640 × 350 at 37.8 kHz/85 Hz
3. Industry Standard 640 × 480 at 37.8 kHz/72 Hz
4. VESA Standard 640 × 480 at 37.5 kHz/75 Hz
5. VESA Standard 640 × 480 at 43.3 kHz/85 Hz
6. Industry Standard 720 × 400 at 31.5 kHz/70 Hz
7. VESA Standard 720 × 400 at 37.9 kHz/85 Hz
8. VESA Standard 800 × 600 at 35.1 kHz/56 Hz
9. VESA Standard 800 × 600 at 37.8 kHz/60 Hz
10. VESA Standard 800 × 600 at 48 kHz/72 Hz
11. VESA Standard 800 × 600 at 46.9 kHz/75 Hz
12. VESA Standard 800 × 600 at 53.7 kHz/85 Hz
13. Macintosh-compatible 832 × 624 at 49.7 kHz/75 Hz
14. VESA Standard 1024 × 768 at 35.5 kHz/43.4 Hz
15. VESA Standard 1024 × 768 at 48.4 kHz/60 Hz
16. VESA Standard 1024 × 768 at 56.4 kHz/70 Hz
17. VESA Standard 1024 × 768 at 60 kHz/75 Hz
18. VESA Standard 1024 × 768 at 68.7 kHz/85 Hz
19. VESA Standard 1280 × 1024 at 63.9 kHz/60 Hz
Agency Regulatory Notices B-5
Page 41

Color Display Values
CIE* Chromaticity Coordinates
x (+/- 0.030) y (+/- 0.030)
Red
Green
Blue
White Point (7100 K)
Gamma: 2.2
*Commission International d’Eclairage, 1931 Standard.
0.62 0.362
0.32 0.574
0.149 0.08
0.301 0.354
Power Cord Set Requirements
The projector power supply is provided with Automatic Line
Switching (ALS). This feature allows the monitor to operate on
input voltages between 90-130V or 195-265V.
The power cord set (flexible cord or wall plug) received with the
projector meets the requirements for use in the country where you
purchased the equipment.
Power cord sets must meet the requirements of the country where
you use the projector. For more information on power cord set
requirements, contact your Compaq authorized dealer, reseller or
service provider.
General Requirements
The requirements listed below are applicable to all countries:
1. The length of the power cord set must be at least 5.00 feet
(1.5 m) and a maximum of 10 feet (3.0 m).
2. All power cord sets must be approved by an acceptable
accredited agency responsible for evaluation in the country
where the power cord set will be used.
3. The power cord set must have a minimum current capacity of
10A and a nominal voltage rating of 125 VAC or 5 Amps at
250 volts AC, as required by each country’s power system.
B-6 Agency Regulatory Notices
Page 42

4. The appliance coupler must meet the mechanical
configuration of an EN 60 320/IEC 320 Standard Sheet C13
connector, for mating with appliance inlet on the rear of the
unit.
Country-Specific Requirements
Power Cord Set Requirements: By Country
Country Accredited Agency Applicable Note
Numbers
Australia
Austria OVE 1
Belgium CEBC 1
Canada CSA 2
China CCEE 1
Denmark DEMKO 1
Finland FIMKO 1
France UTE 1
Germany VDE 1
Italy IMQ 1
Japan MITI 3
The Netherlands KEMA 1
Norway NEMKO 1
Singapore PSB or PUB 1
Sweden SEMKO 1
Switzerland SEV 1
United Kingdom BSI 1
United States UL 2
EANSW 1
Notes:
1. The flexible cord must be <HAR> Type HO5VV-F, 3conductor, 1.0 mm
2
conductor size. Power cord set fittings
(appliance coupler and wall plug) must bear the certification
mark of the agency responsible for evaluation in the country
where it will be used.
2. The flexible cord must be Type SJT or equivalent, No. 18
AWG, 3-conductor. The wall plug must be a two-pole
grounding type with a NEMA 5-15P (15A, 125V) or NEMA
6-15P (15A 250V) configuration.
Agency Regulatory Notices B-7
Page 43

3. The appliance coupler, flexible cord, and wall plug must bear
a "T" mark and registration number in accordance with the
Japanese Dentori Law. The flexible cord must be Type VCT
2
or VCTF, 3-conductor, 0.75mm
conductor size. The wall
plug must be a two-pole grounding type with a Japanese
Industrial Standard C8303 (15A, 125V) configuration.
B-8 Agency Regulatory Notices
Page 44

appendix C
Using the Compaq Video Adapter
Identifying the Buttons and Connectors
The Compaq Video Adapter converts video signals for
compatibility with the Compaq MP1600 Microportable Projector.
The Compaq Video Adapter is not included with the
✎
Compaq MP1600 Microportable Projector. It is sold separately.
For information on purchasing this video adapter, call your
Compaq authorized dealer, seller, or reseller. To locate a
reseller, call Compaq at 1-800-AT-COMPAQ or visit the
Compaq web site at http://www.compaq.com.
Video Adapter LEDs, Buttons, and Ports
1 Video LED 4 Video/RCA port
2 Data LED 5 S-Video port
3 Source button to switch
between data and video signals
6 Install buttons to connect
to projector
Using the Compaq Video Adapter C-1
Page 45

Attaching the Video Adapter to the
MP1600 Microportable Projector
To attach the Compaq Video Adapter to the projector:
1. Push in the two buttons 1 on the bottom sides of the video
adapter.
2. Insert the hooks on top of the video adapter into the upper
slots 2 on the projector and, at the same time, insert the
adapter plug into the digital connector 3 on the back of the
projector.
3. Release the buttons on the sides of the video adapter to
complete the connection.
C-2 Using the Compaq Video Adapter
Page 46

Connecting a Video Player
If your video player uses a round, one-prong composite video
✎
connector, use the RCA video cable. If your video player uses
a round, four-prong S-video connector, use the S-video cable.
Both cables are included with the Compaq Video Adapter.
1. Plug the RCA video cable into the "video out" port on the
video player and the video port on the video adapter. If you
are using the S-video cable, connect it to the "s-video out"
connector on the video player and the s-video port on the
video adapter.
2. Turn on the projector first, then the video player.
3. Push the Source button on the back of the video adapter to
switch the projector signal from data (computer icon) to video
(TV icon). The data mode receives computer inputs and the
video mode receives video input such as a TV tuner, VCR,
video, and camera.
With the Compaq Video Adapter attached, the projector is
compatible with major video standards such as NTSC, PAL and
SECAM. Use the on-screen menu to adjust the video performance
manually or press the Resync button to optimize it automatically.
Using the Compaq Video Adapter C-3
 Loading...