

Page 1

Quick Setup & Users Guide
Compaq iPAQ Desktop Personal Computer
Page 2

NOTICE
© 2001 Compaq Computer Corporation. Except for use in connection with the
accompanying Compaq product, no part of this guide may be photocopied or reproduced
in any form without prior written consent from Compaq Computer Corporation.
COMPAQ, the Compaq logo, and Armada Registered in U.S. Patent and Trademark
Office. iPAQ is a trademark of Compaq Information Technologies Group, L.P.
Microsoft, Windows, Windows NT, Windows 2000 Professional, Windows Millennium,
and other names of Microsoft products referenced herein are trademarks or registered
trademarks of Microsoft Corporation.
Intel and Pentium are registered trademarks of Intel Corporation. Celeron and MMX are
trademarks of Intel Corporation.
All other product names mentioned herein may be trademarks or registered trademarks of
their respective companies.
Compaq shall not be liable for technical or editorial errors or omissions contained herein.
The information in this document is subject to change without notice.
THE INFORMATION IN THIS PUBLICATION IS PROVIDED “AS IS” WITHOUT
WARRANTY OF ANY KIND. THE ENTIRE RISK ARISING OUT OF THE USE OF
THIS INFORMATION REMAINS WITH RECIPIENT. IN NO EVENT SHALL
COMPAQ BE LIABLE FOR ANY DIRECT, CONSEQUENTIAL, INCIDENTAL,
SPECIAL, PUNITIVE OR OTHER DAMAGES WHATSOEVER (INCLUDING
WITHOUT LIMITATION, DAMAGES FOR LOSS OF BUSINESS PROFITS,
BUSINESS INTERRUPTION OR LOSS OF BUSINESS INFORMATION), EVEN IF
COMPAQ HAS BEEN ADVISED OF THE POSSIBILITY OF SUCH DAMAGES AND
WHETHER IN AN ACTION OF CONTRACT OR TORT, INCLUDING NEGLIGENCE.
The limited warranties for Compaq products are exclusively set forth in the documentation
accompanying such products. Nothing herein should be construed as constituting a further
or additional warranty.
Å
Ä
The following words and symbols mark special messages throughout this guide:
The following words and symbols mark special messages throughout this guide:
WARNING: Text set off in this manner indicates that failure to follow directions could result in
bodily harm or loss of life.
CAUTION: Text set off in this manner indicates that failure to follow directions could result in
damage to equipment or loss of information.
Quick Setup & User’s Guide
Compaq iPAQ Desktop Personal Computers
Second Edition (May 2001)
First Edition (December 2000)
Part Number 221340-002
Compaq Computer Corporation
Page 3

Quick Setup & User’s Guide
Page 4

Contents
Quick Setup
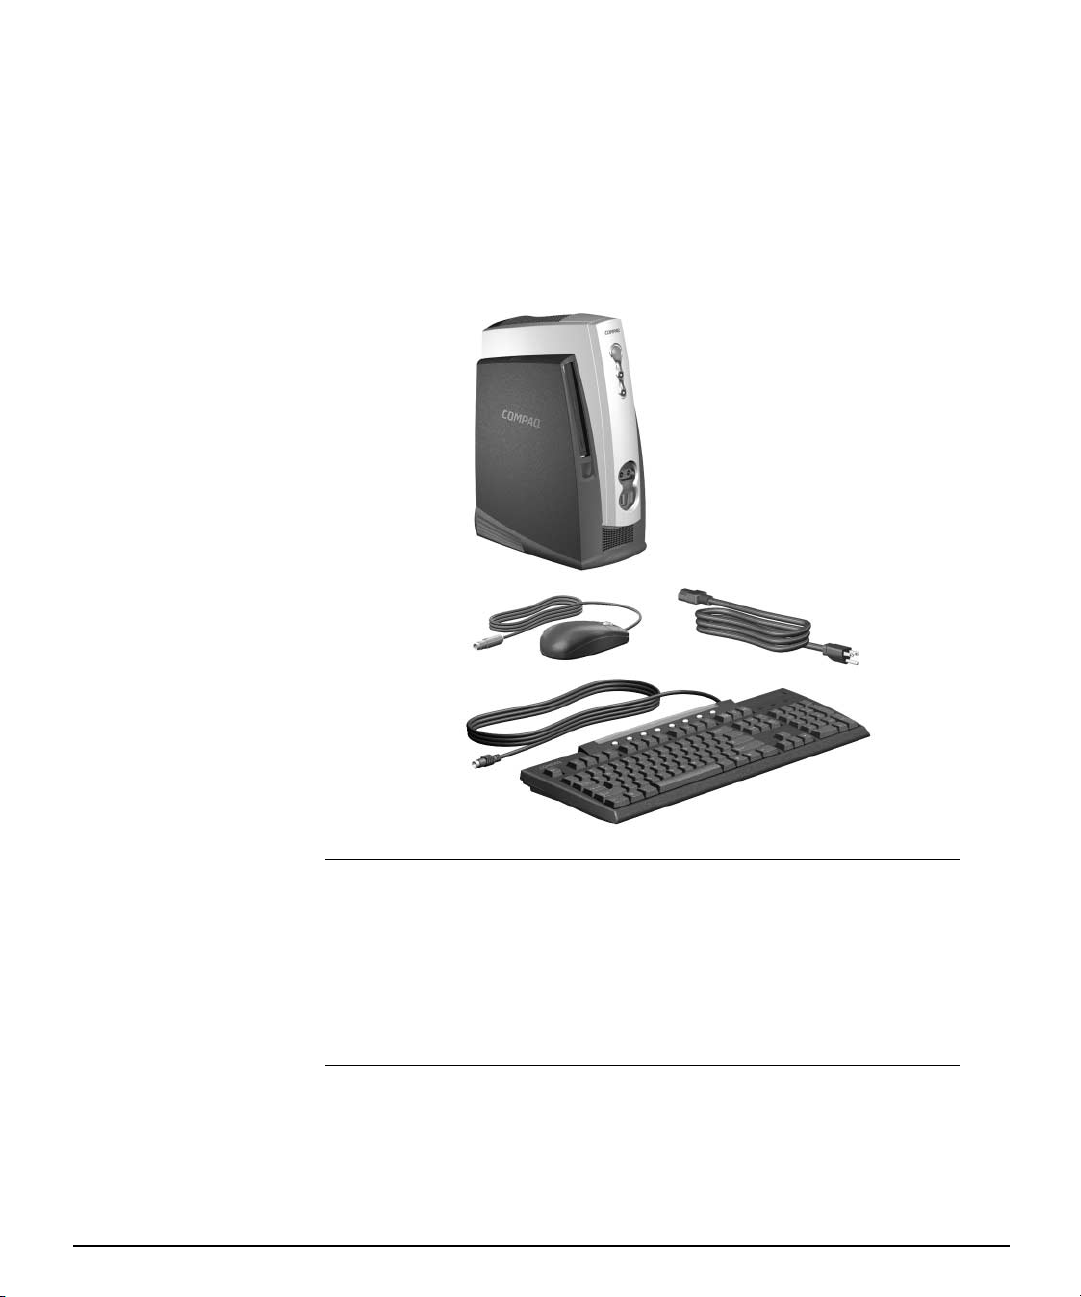
Step 1: Unpack the Compaq iPAQ Desktop Personal Computer. . . . . . . . . . . . . .1
Step 2: Identify Rear Panel Components and Confirm Voltage Setting. . . . . . . . .2
USB Connectors. . . . . . . . . . . . . . . . . . . . . . . . . . . . . . . . . . . . . . . . . . . . . . .3
Legacy Module . . . . . . . . . . . . . . . . . . . . . . . . . . . . . . . . . . . . . . . . . . . . . . .3
Step 3: Connect External Devices . . . . . . . . . . . . . . . . . . . . . . . . . . . . . . . . . . . .4
Step 4: Connect the Power Cords . . . . . . . . . . . . . . . . . . . . . . . . . . . . . . . . . . . .5
Step 5: Identify the Front Panel Components . . . . . . . . . . . . . . . . . . . . . . . . . . .6
Step 6: Turn On the Personal Computer and Install the Operating System. . . . . .7
Customizing the Monitor Display . . . . . . . . . . . . . . . . . . . . . . . . . . . . . . . . . . . .7
Protecting Your Software . . . . . . . . . . . . . . . . . . . . . . . . . . . . . . . . . . . . . . . . . .7
Compaq Restore CD . . . . . . . . . . . . . . . . . . . . . . . . . . . . . . . . . . . . . . . . . . . . . .7
Registration . . . . . . . . . . . . . . . . . . . . . . . . . . . . . . . . . . . . . . . . . . . . . . . . . . . .8
Turning Off the Personal Computer. . . . . . . . . . . . . . . . . . . . . . . . . . . . . . . . . . .8
Chapter 1
Working with the Compaq Easy Access Keyboard
Programming the Easy Access Buttons. . . . . . . . . . . . . . . . . . . . . . . . . . . . . . 1-1
Chapter 2
Working with the MultiBay
“Hot-Plugging” or “Hot-Swapping” MultiBay Drives . . . . . . . . . . . . . . . . . . . .2-2
Partitioning and Formatting a MultiBay Hard Drive . . . . . . . . . . . . . . . . . . . . . 2-3
Windows 98 and Windows Millennium (FDISK). . . . . . . . . . . . . . . . . . . . . . 2-3
Windows 2000 and Windows NT 4.0 (Disk Administrator) . . . . . . . . . . . . . 2-4
Inserting a Drive into the MultiBay . . . . . . . . . . . . . . . . . . . . . . . . . . . . . . . . . 2-4
Removing a Drive from the MultiBay. . . . . . . . . . . . . . . . . . . . . . . . . . . . . . . . 2-5
Chapter 3
Adding System Memory and Upgrading the Internal Hard Drive
General Precautions . . . . . . . . . . . . . . . . . . . . . . . . . . . . . . . . . . . . . . . . . . . . 3-1
Quick Setup & User’s Guide Contents
Page 5

Contents
Uninstalling the iPAQ Desktop Security Bar. . . . . . . . . . . . . . . . . . . . . . . . . . . 3-1
Removing and Replacing the Side Access Panels . . . . . . . . . . . . . . . . . . . . . .3-2
Adding System Memory . . . . . . . . . . . . . . . . . . . . . . . . . . . . . . . . . . . . . . . . .3-4
Adding or Removing a Memory Module . . . . . . . . . . . . . . . . . . . . . . . . . . . 3-4
Upgrading the Primary Hard Drive . . . . . . . . . . . . . . . . . . . . . . . . . . . . . . . . .3-8
Chapter 4
Accessing the Internet & Using Network Communications
Accessing the Internet . . . . . . . . . . . . . . . . . . . . . . . . . . . . . . . . . . . . . . . . . . 4-1
Using the Optional USB Modem . . . . . . . . . . . . . . . . . . . . . . . . . . . . . . . . . 4-1
Choosing an Internet Service Provider . . . . . . . . . . . . . . . . . . . . . . . . . . . . 4-1
Using Network Communications. . . . . . . . . . . . . . . . . . . . . . . . . . . . . . . . . . . 4-2
NIC-Based Alerts . . . . . . . . . . . . . . . . . . . . . . . . . . . . . . . . . . . . . . . . . . . . 4-2
Remote Wakeup Support . . . . . . . . . . . . . . . . . . . . . . . . . . . . . . . . . . . . . . 4-2
Interpreting the Network Status Lights. . . . . . . . . . . . . . . . . . . . . . . . . . . . 4-2
Disabling the Autosensing Capabilities. . . . . . . . . . . . . . . . . . . . . . . . . . . . 4-3
Installing Network Drivers . . . . . . . . . . . . . . . . . . . . . . . . . . . . . . . . . . . . . 4-3
Chapter 5
Using the Legacy Module
Chapter 6
Desktop Management
Initial Configuration and Deployment . . . . . . . . . . . . . . . . . . . . . . . . . . . . . . . 6-2
Remote System Installation . . . . . . . . . . . . . . . . . . . . . . . . . . . . . . . . . . . . 6-2
Altiris eXpress . . . . . . . . . . . . . . . . . . . . . . . . . . . . . . . . . . . . . . . . . . . . . . 6-3
PC Transplant. . . . . . . . . . . . . . . . . . . . . . . . . . . . . . . . . . . . . . . . . . . . . . . . . . . 6-3
Asset Tracking and Security . . . . . . . . . . . . . . . . . . . . . . . . . . . . . . . . . . . . . . 6-4
Password Security . . . . . . . . . . . . . . . . . . . . . . . . . . . . . . . . . . . . . . . . . . . . . 6-6
Establishing a Setup Password Using Computer Setup. . . . . . . . . . . . . . . . 6-7
Establishing a Power-On Password Using Computer Setup . . . . . . . . . . . .6-7
Entering a Power-On Password . . . . . . . . . . . . . . . . . . . . . . . . . . . . . . . . . 6-8
Entering a Setup Password . . . . . . . . . . . . . . . . . . . . . . . . . . . . . . . . . . . . 6-8
Changing a Power-On or Setup Password . . . . . . . . . . . . . . . . . . . . . . . . . 6-9
Deleting a Power-On or Setup Password . . . . . . . . . . . . . . . . . . . . . . . . . . 6-9
Enabling or Disabling DriveLock on a MultiBay Hard Drive . . . . . . . . . . . . 6-10
Contents Quick Setup & User’s Guide
Page 6

Entering a DriveLock Password on a MultiBay Hard Drive . . . . . . . . . . . . 6-11
Changing a DriveLock Password on a MultiBay Hard Drive. . . . . . . . . . . . 6-11
National Keyboard Delimiter Characters. . . . . . . . . . . . . . . . . . . . . . . . . . 6-12
Clearing Passwords . . . . . . . . . . . . . . . . . . . . . . . . . . . . . . . . . . . . . . . . . 6-12
Installing the iPAQ Desktop Security Bar . . . . . . . . . . . . . . . . . . . . . . . . . 6-12
Securing the iPAQ to a Fixed Work Surface . . . . . . . . . . . . . . . . . . . . . . . 6-13
Installing a Compaq Security Lock . . . . . . . . . . . . . . . . . . . . . . . . . . . . . .6-14
Fingerprint Identification Technology . . . . . . . . . . . . . . . . . . . . . . . . . . . . 6-15
Fault Notification and Recovery . . . . . . . . . . . . . . . . . . . . . . . . . . . . . . . . . .6-16
Celeron and Pentium III Fault Prediction and Prefailure Warranty . . . . . . . 6-16
SMART Hard Drive Fault Prediction . . . . . . . . . . . . . . . . . . . . . . . . . . . . . 6-16
Introducing the Drive Protection System . . . . . . . . . . . . . . . . . . . . . . . . . 6-17
Ultra ATA Integrity Monitoring . . . . . . . . . . . . . . . . . . . . . . . . . . . . . . . . .6-17
Surge-Tolerant Power Supply . . . . . . . . . . . . . . . . . . . . . . . . . . . . . . . . .6-17
Software Updating and Management . . . . . . . . . . . . . . . . . . . . . . . . . . . . . . 6-18
Remote ROM Flash . . . . . . . . . . . . . . . . . . . . . . . . . . . . . . . . . . . . . . . . . 6-19
Using Remote ROM Flash . . . . . . . . . . . . . . . . . . . . . . . . . . . . . . . . . . . . . . . . . 6-19
Remote Security Management. . . . . . . . . . . . . . . . . . . . . . . . . . . . . . . . . 6-20
Remote Wakeup and Remote Shutdown . . . . . . . . . . . . . . . . . . . . . . . . .6-20
NIC-Based Alerts . . . . . . . . . . . . . . . . . . . . . . . . . . . . . . . . . . . . . . . . . . . 6-21
Replicating Your Setup. . . . . . . . . . . . . . . . . . . . . . . . . . . . . . . . . . . . . . . 6-21
Dual-State Power Button . . . . . . . . . . . . . . . . . . . . . . . . . . . . . . . . . . . . . 6-22
Power Management. . . . . . . . . . . . . . . . . . . . . . . . . . . . . . . . . . . . . . . . . 6-23
World Wide Web Site . . . . . . . . . . . . . . . . . . . . . . . . . . . . . . . . . . . . . . . .6-23
Contents
Building Blocks and Partners . . . . . . . . . . . . . . . . . . . . . . . . . . . . . . . . . . . . 6-24
Desktop Management Interface (DMI) . . . . . . . . . . . . . . . . . . . . . . . . . . . 6-24
Wired for Management . . . . . . . . . . . . . . . . . . . . . . . . . . . . . . . . . . . . . . 6-24
Compaq Management Solutions Partners Program . . . . . . . . . . . . . . . . . 6-25
Chapter 7
For More Information
Using the Compaq iPAQ Reference Library CD . . . . . . . . . . . . . . . . . . . . . . . . 7-1
Appendix A
Specifications
Quick Setup & User’s Guide Contents
Page 7
Quick Setup
Step 1: Unpack the Compaq iPAQ Desktop Personal Computer
WARNING: Misuse of your Personal Computer or failure to establish a safe and comfortable
Å
Quick Setup & User’s Guide 1
workstation may result in discomfort or serious injury. Refer to your Safety & Comfort Guide for
more information on choosing a workspace and creating a safe and comfortable work
environment.
This equipment has been tested and found to comply with the limits for a Class B digital device,
pursuant to part 15 of the FCC Rules. For more information, refer to the Compaq iPAQ Reference
Library CD. To reduce the risk of electrical shock, connect your Personal Computer only to a
grounded (earthed) electrical outlet that is easily accessible at all times.
Page 8
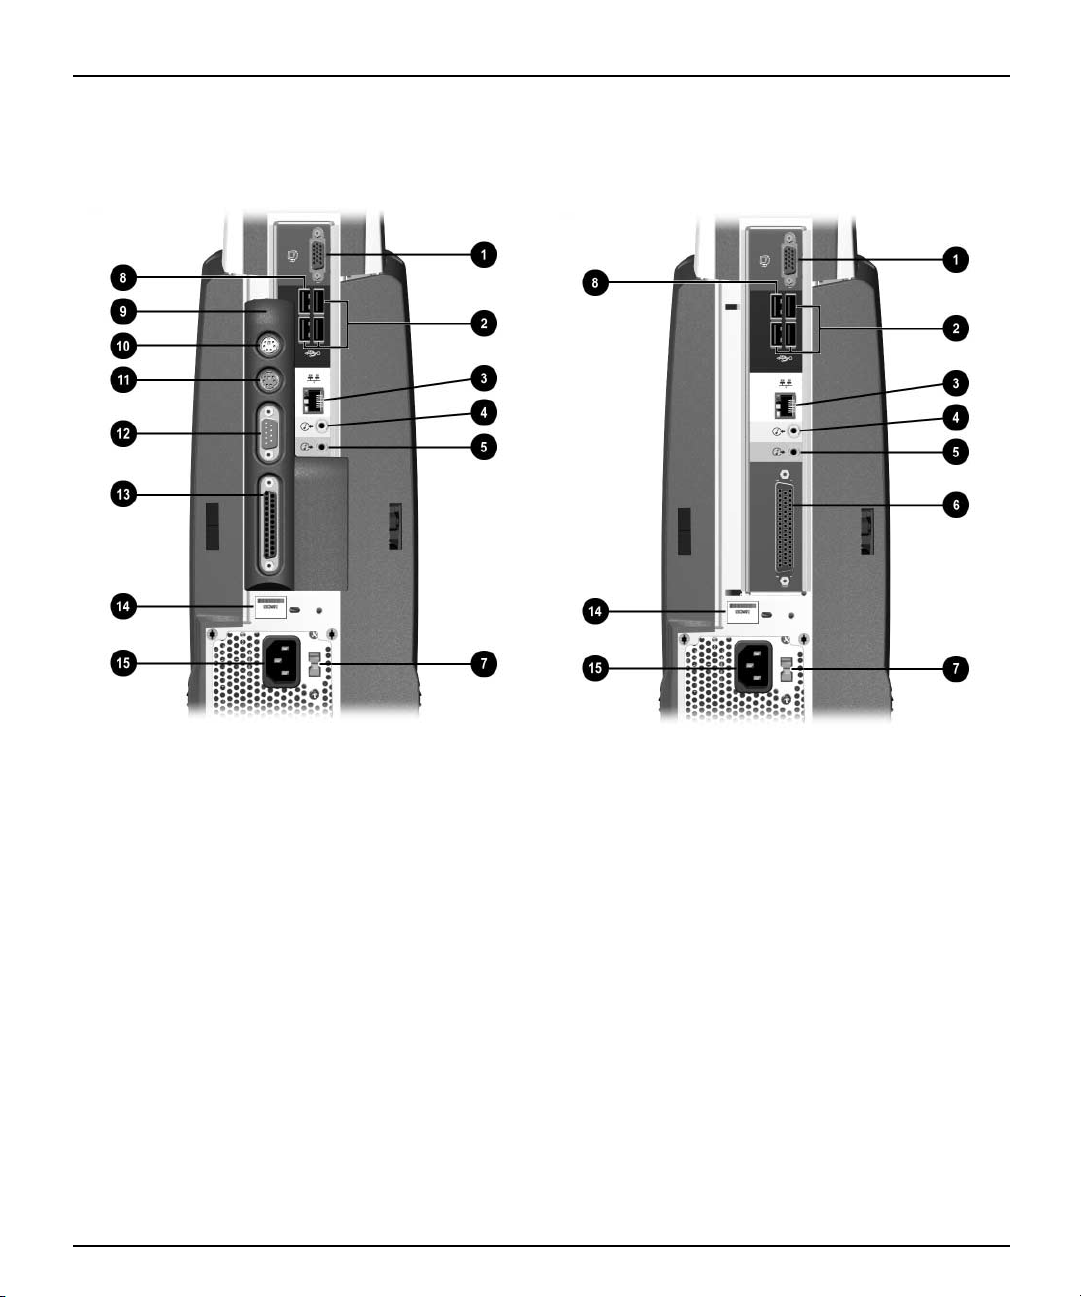
Step 2: Identify Rear Panel Components and Confirm Voltage Setting
Quick Setup
iPAQ Desktop Personal Computer with Legacy Module Installed iPAQ Legacy-Free Desktop Personal Computer
1 Monitor Connector 8 Dedicated, Full-Speed USB Connector
2 Universal Serial Bus (USB) Connectors 9 Legacy Module
3 Ethernet RJ-45 Connector - PS/2 Mouse Connector
4 Line-Out Audio Connector q PS/2 Keyboard Connector
5 Line-In Audio Connector w Serial Connector
6 Legacy Module Connector e Parallel Port Connector
7 Voltage Select Switch r Serial Number
Set the voltage select switch to match the voltage of the
power outlet to which the computer will be connected (115
VAC or 230 VAC).
t Power Cord Connector
Quick Setup & User’s Guide 2
Page 9

Quick Setup
USB Connectors
Legacy Module
✎
The iPAQ Desktop Personal Computer features two internal USB controllers,
each providing data transfer rates up to 12 megabits per second (Mbps). One
of these controllers is dedicated exclusively to a new, full-speed Universal
Serial Bus (USB) connector (shown on the previous page). The other five
USB connectors share the second controller.
Any USB device (including keyboard and mouse) can be connected to any
USB connector. However, Compaq recommends the use of the full-speed
USB connector, with its dedicated 12Mbps controller, for devices such as
scanners, digital cameras, external I/O devices, and printers that can utilize
the additional speed for maximum performance.
Microsoft Windows 98 and Windows NT 4.0 will not run properly if the Legacy Module is not
installed or has been removed from the iPAQ Desktop Personal Computer. The Legacy Module is
optional on systems running Microsoft Windows 2000 Professional or Microsoft Windows
Millennium.
The Legacy Module (standard on select models) provides serial, parallel, PS/2
mouse, and PS/2 keyboard connectors. For more information, refer to
chapter 5, “Using the Legacy Module.”
3 Quick Setup & User’s Guide
Page 10

Step 3: Connect External Devices
Connect the monitor, mouse, and keyboard cables. If you use a network,
connect the network cable to the Ethernet RJ-45 Connector. For easy setup,
Compaq has color-coded the cables and rear panel connectors.
Quick Setup
Å
Ä
WARNING: To reduce the risk of electrical shock, fire, or damage to the equipment, do not plug
telecommunications/telephone connections into the network interface controller (NIC)
connectors.
PS/2 mouse and keyboard connectors are available only on iPAQ Desktop
Personal Computers equipped with the Legacy Module. A USB mouse or
keyboard may be connected to any of the available USB connectors; however,
you may want to reserve the dedicated, full-speed USB connector for USB
devices, such as digital cameras, scanners, or networking devices that demand
the extra speed for enhanced performance.
CAUTION: Do not add additional, optional hardware devices to your Personal Computer until the
operating system is successfully installed. Doing so may cause errors and may prevent the
operating system from installing properly.
Quick Setup & User’s Guide 4
Page 11
Quick Setup
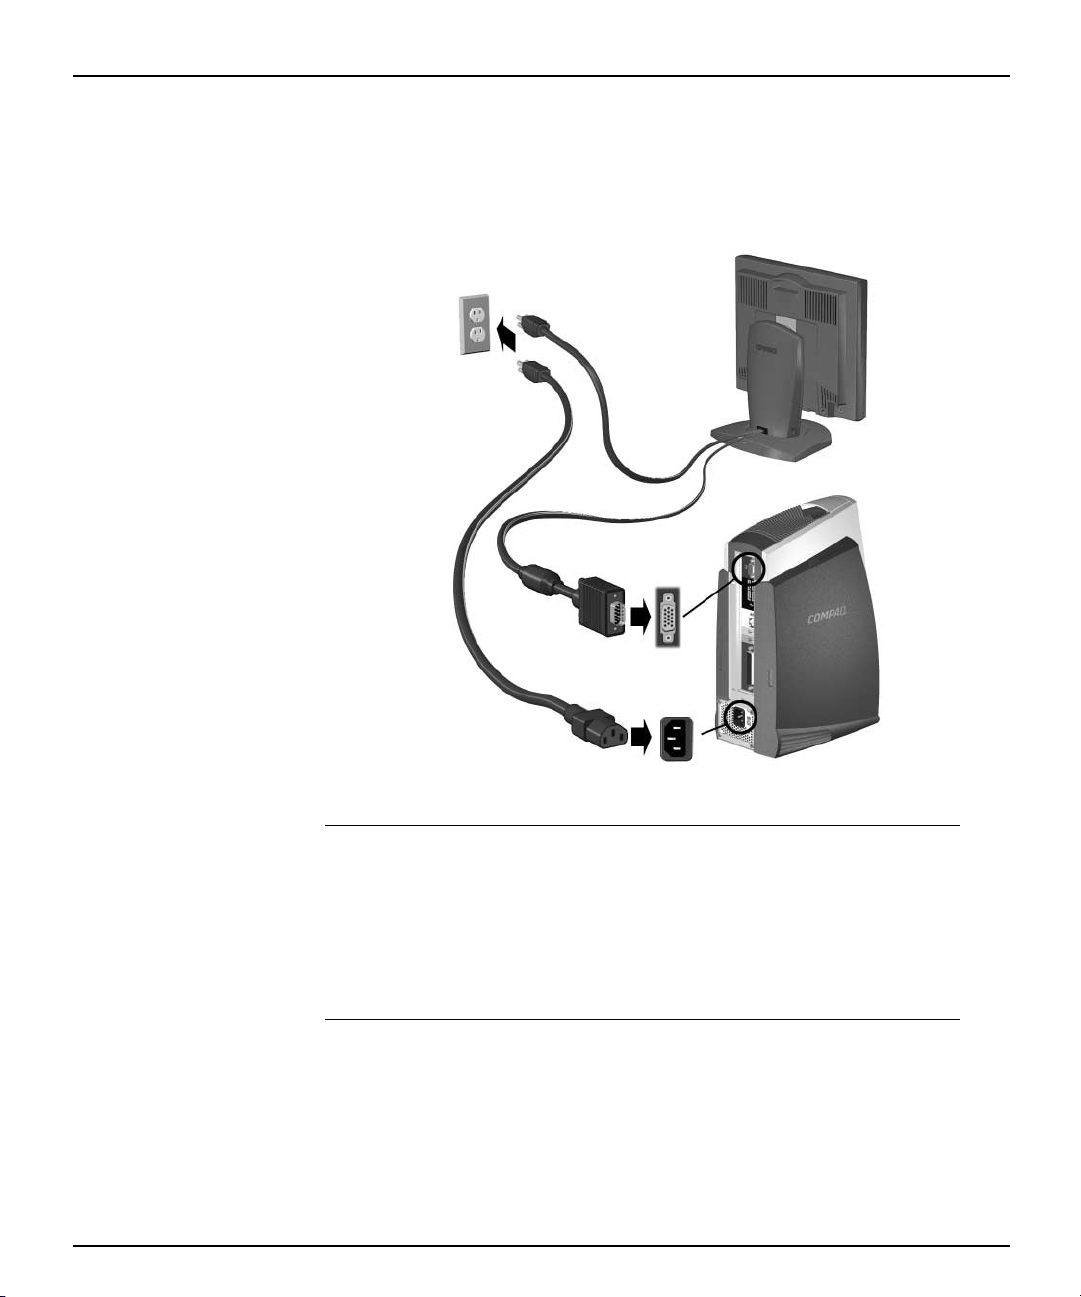
Step 4: Connect the Power Cords
Connect the power cords as shown below.
Å
5 Quick Setup & User’s Guide
WARNING: To reduce the risk of electric shock or damage to the equipment:
■ Do not disable the power cord grounding plug. The grounding plug is an important safety
feature.
■ Plug the power cord into a grounded (earthed) electrical outlet that is easily accessible at all
times.
■ Disconnect power from the Personal Computer by unplugging the power cord from either the
electrical outlet or the Personal Computer.
Page 12
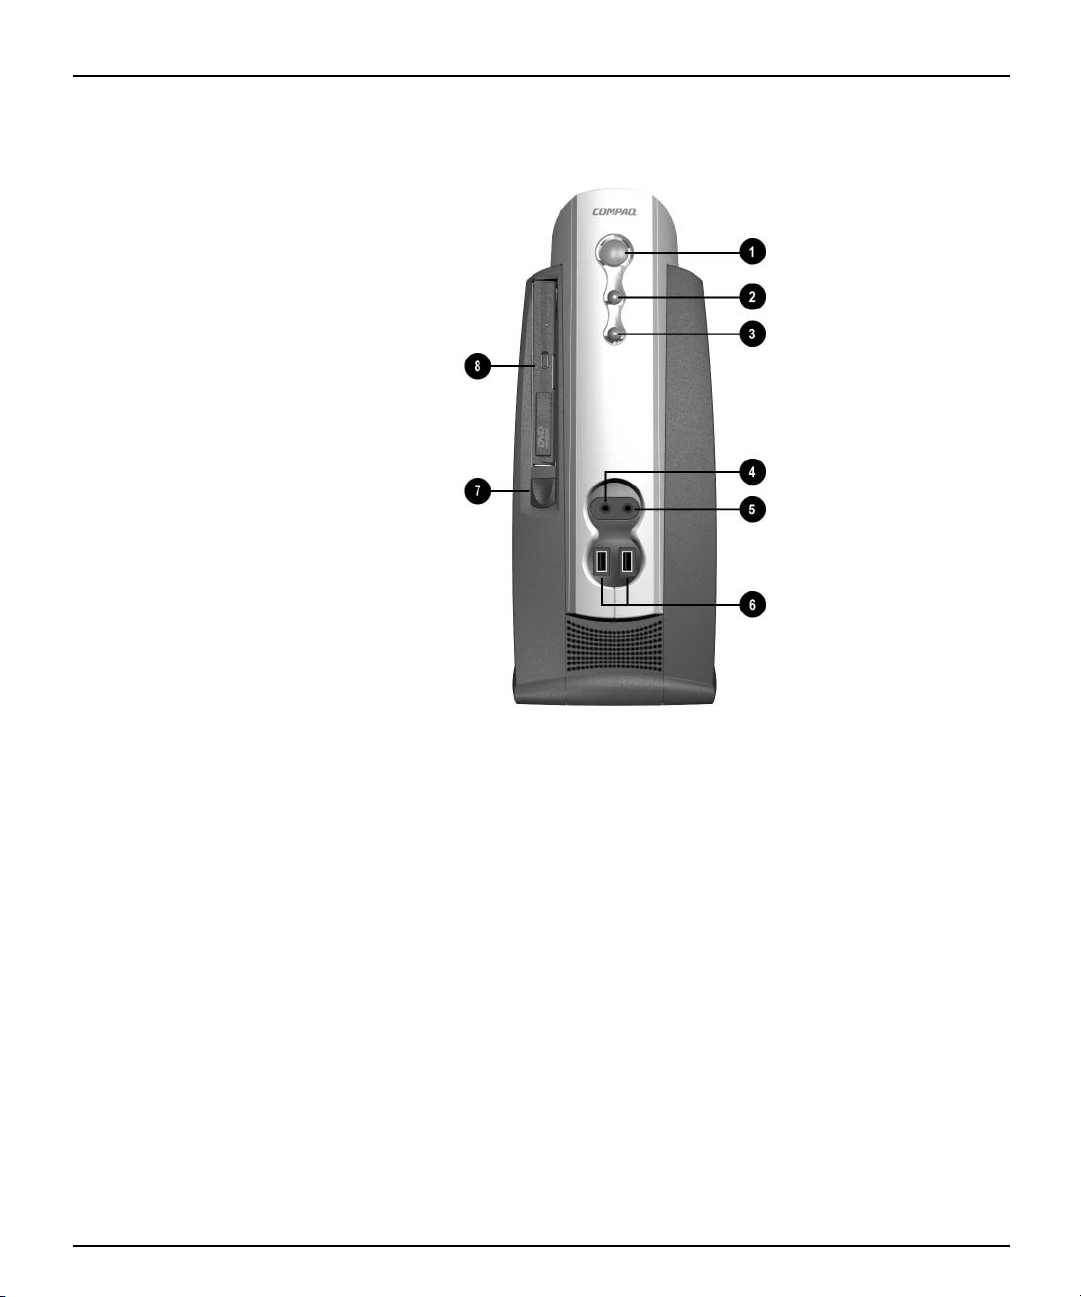
Step 5: Identify the Front Panel Components
Quick Setup
1 Dual-State Power Button
2 Power-On Light
3 System Activity Light
4 Microphone Connector
5 Headphone Connector
6 Universal Serial Bus (USB) Connectors
7 MultiBay Eject Button
8 MultiBay
Quick Setup & User’s Guide 6
Page 13

Quick Setup
Step 6: Turn On the Personal Computer and Install the Operating System
Press the power button to turn on the personal computer. Refer to “Step 2:
Identify Rear Panel Components and Confirm Voltage Setting” on page 2 for
the location of the power button.
The first time you turn on the Personal Computer, the operating system is
installed automatically. This process takes about 10 minutes, depending on
which operating system is being installed. Carefully read and follow the
instructions that appear on the screen to complete the installation.
Ä
CAUTION: Once the automatic installation has begun, DO NOT TURN OFF THE COMPUTER UNTIL
THE PROCESS IS COMPLETE. Turning off the Personal Computer during the installation process
might damage the software that runs the Personal Computer.
When the Welcome to Windows screen is displayed, the Windows installation
process is complete.
Customizing the Monitor Display
You can manually select or change the monitor brand, model, refresh rates,
color, resolution, and power management settings. Select the Display icon in
the Windows Control Panel to change display settings, or refer to the online
documentation provided with the graphics controller utility.
Protecting Your Software
To protect your software from loss or damage, you should keep a backup copy
of all system software, applications, and related files stored on your hard
drive. Refer to your operating system or backup utility documentation for
instructions on making backup copies of your data files.
Compaq Restore CD
Along with the operating system CD, the Compaq Restore CD enables you to
recover the original operating system, Internet browser, and NIC or modem
drivers. This can be extremely helpful in the event of hard drive failure or
corruption. Additional support software for specific models may be
downloaded from www.compaq.com/support. To use the Compaq Restore
CD, insert the CD into the CD-ROM drive and restart the computer. Carefully
read and follow all instructions that appear on the screen.
7 Quick Setup & User’s Guide
Page 14

Quick Setup
Ä
✎
CAUTION: To prevent loss of data, before using the Compaq Restore CD, be sure to back up any
data files and software application files created or installed after unbundling the factory-installed
software. The Restore CD will erase all files from the hard drive before restoring the original
operating system, Internet browser, and NIC or modem drivers.
You may need to use the keyboard to make selections during the system restore process. USB
mouse support is not available until USB mouse drivers have been restored.
For questions about or problems with this CD, please contact Compaq
customer service.
Registration
Be sure to register your new personal computer with Compaq. Registration
establishes a record of ownership and gives you an opportunity to receive
product announcements, updates, and other communications periodically, if
you choose to do so. Registration is easy—just visit the Compaq Web site at
www.compaq.com/register and follow the instructions that appear on the
screen.
Turning Off the Personal Computer
To properly turn off the personal computer, first shut down the operating
system software. In Microsoft Windows operating systems, click Start > Shut
Down.
In Windows NT Workstation 4.0, the power button always functions as a
power switch. However, in the default configuration of Windows 98,
Windows 2000 Professional, or Windows Millenium, pressing the power
button does not turn off the power, but causes the Personal Computer to enter
a low-power state. This allows you to conserve energy without closing
software applications; later, you can start using the computer immediately,
without having to restart the operating system and without any data loss.
If the power button is pressed and held in for four seconds, power to the Personal Computer will
✎
Quick Setup & User’s Guide 8
turn off completely. To reconfigure the power button to work in On/Off mode, run Computer
Setup. Refer to the “Computer Setup Utilities (F10 Setup)” section of the Troubleshooting Guide
for more information on using Computer Setup.
Page 15

Quick Setup
9 Quick Setup & User’s Guide
Page 16

chapter 1
Working with the Compaq Easy Access Keyboard
In addition to the standard keyboard keys, the Compaq Easy Access Keyboard
offers eight Easy Access Buttons that make accessing your favorite Web sites,
services, and applications easier and faster.
Easy Access Keyboard
Programming the Easy Access Buttons
All Easy Access Buttons can be reprogrammed to open any software
application or data file on your hard drive, or any Internet address.
An Internet address, also referred to as a Uniform Resource Locator (URL), is
simply a pointer to a Web page, file, image, newsgroup, or other resource
available on the Internet. It is very similar to the path and file name used to
point to a file on the Personal Computer’s hard drive. For example, the URL
that points to the Compaq Web site is http://www.compaq.com.
Quick Setup & User’s Guide 1-1
Page 17

Working with the Compaq Easy Access Keyboard
To reprogram your Easy Access Buttons, complete the following steps:
1. Click the Easy Access Button icon located in the status area (lower right
corner) of the Windows taskbar.
The Easy Access Button dialog is displayed.
2. On the dialog, click the icon representing the Easy Access Button you
want to program.
3. Type the new command or URL you want to assign to the button, or drag
an Internet link or software application shortcut onto the button icon.
4. Click OK when you are finished.
You can customize the Easy Access Button labels on the keyboard, using the
paper insert template document. The document is installed, by default, under
C:\Program files\Compaq\Easy Access Keyboard\.
1-2 Quick Setup & User’s Guide
Page 18

chapter 2
Working with the MultiBay
The MultiBay is located on the left side of the iPAQ Desktop Personal
Computer. It is a special drive bay that supports a variety of optional 12.7-mm
removable drives, including:
■ MultiBay 24X Max CD-ROM Drive
■ MultiBay 8X DVD-ROM Drive with Software MPEG-2
■ MultiBay SuperDisk LS-120 Drive
■ MultiBay Zip 250 Drive
■ MultiBay CD-RW Drive
■ MultiBay SMART Hard Drive
These drives may also be used with the MultiBay on Compaq Armada
Notebook PCs.
Ä
Quick Setup & User’s Guide 2-1
CAUTION: To prevent loss of work and damage to the Personal Computer or a drive:
■ If you are inserting or removing a hard drive, exit all software applications, shut down the
operating system software, and turn off the Personal Computer. Do not remove a hard drive
while the Personal Computer is on or in standby mode.
■ Before handling a drive, ensure that you are discharged of static electricity. While handling a
drive, avoid touching the connector. For more information about preventing electrostatic
damage, see the Troubleshooting Guide.
■ Before traveling with, shipping, storing, or removing a drive other than a hard drive, make
sure that no media, such as a diskette, CD-ROM, or DVD-ROM, is in the drive and that the
media tray is closed.
■ Handle a drive carefully; do not drop it.
■ Do not use excessive force when inserting a drive.
■ Avoid exposing a hard drive to liquids, temperature extremes, or products that have magnetic
fields such as monitors or speakers.
■ If a drive must be mailed, place the drive in a bubble-pack mailer or other suitable protective
packaging and label the package “Fragile: Handle with Care.”
Page 19

Working with the MultiBay
“Hot-Plugging” or “Hot-Swapping” MultiBay
Drives
Ä
✎
CAUTION: To prevent damage to the Personal Computer, the drive, and any data stored on the
drive:
■ If you are inserting or removing a hard drive, shut down the Personal Computer. Never remove a
hard drive while the Personal Computer is on or in Standby. To ensure that the Personal
Computer is not in Standby, turn the Personal Computer on, then shut it down.
■ If the Personal Computer is running a retail version of Windows 98 or Windows NT 4.0 without
software enhancements from Compaq, shut down the Internet Device before inserting or
removing any drive.
If the Personal Computer is running a preinstalled operating system supplied
by Compaq, you can insert or remove any drive except a hard drive while the
Personal Computer is on, off, or in Standby.
If the Personal Computer is running a retail version of Windows 98 or
Windows NT 4.0, you can obtain software enhancements from Compaq that
will enable you to insert or remove any drive except a hard drive without first
shutting down the Personal Computer.
The retail version of Windows 2000 supports this feature without additional software
enhancements.
To obtain these enhancements, go to the Compaq Internet site at
www.compaq.com.
2-2 Quick Setup & User’s Guide
Page 20

Partitioning and Formatting a MultiBay Hard Drive
1. Exit all software applications, shut down the operating system software,
and turn off the Personal Computer.
2. Insert the hard drive into the MultiBay as shown in the following section.
3. Turn on the Personal Computer. Follow directions for your operating
system, below:
Windows 98 and Windows Millennium (FDISK)
1. From MS-DOS command prompt, type FDISK and press the Enter key.
2. Select Y to enable large drive support (FAT32).
3. Select option 5, then select drive 2.
4. Select 1-Create DOS Partition.
Working with the MultiBay
5. Select 1-Create Primary DOS Partition.
6. Select Y for maximum size, then restart the Personal Computer.
7. From Windows, double-click the My computer icon, then right click on
the drive letter designating the Multibay drive.
8. Select format and perform a full format.
Quick Setup & User’s Guide 2-3
Page 21

Working with the MultiBay
Windows 2000 and Windows NT 4.0 (Disk Administrator)
Inserting a Drive into the MultiBay
✎
1. Run Disk Administrator.
❏ Under Windows 2000, right-click the My Computer icon, then click
Manage > Disk Management.
❏ Under Windows NT, click Start > Programs > Administrative Tools >
Disk Administrator.
2. Select the MultiBay hard drive.
3. On the Partition menu, click Create. Carefully read and respond to any
prompts that appear on the screen.
Refer to the Disk Administrator online Help for additional information.
If the Personal Computer did not ship with a MultiBay drive, there will be a drive blank in the
MultiBay. Refer to “Removing a Drive from the MultiBay” on page 5 for instructions on removing
the drive blank.
1. Exit all software applications, shut down the operating system software,
and turn off the Personal Computer if
❏ You are inserting or removing a hard drive.
❏ The Personal Computer is running a retail version of Windows 98 or
Windows NT 4.0 without software enhancements from Compaq.
2. Remove any removable media, such as a compact disc, from the drive.
2-4 Quick Setup & User’s Guide
Page 22
Working with the MultiBay
3. With the top of the drive facing left and the drive connector facing the
Personal Computer, slide the drive into the MultiBay and push firmly to
ensure that the electrical connector is properly seated.
Inserting a Drive into the MultiBay
If the device does not start, ensure that the necessary device drivers are
installed on the system. If they are not available, they may be downloaded, at
no cost, from the Compaq Web site at www.compaq.com.
Removing a Drive from the MultiBay
1. Exit all software applications, shut down the operating system software,
and turn off the Personal Computer if
❏ You are inserting or removing a hard drive.
❏ The Personal Computer is running a retail version of Windows 98 or
Windows NT 4.0 without software enhancements from Compaq.
2. Remove the iPAQ Desktop Security Bar, if it has been installed so as to
disable the MultiBay eject button 1.Referto“Uninstalling the iPAQ
Desktop Security Bar” on page 3-1.
Quick Setup & User’s Guide 2-5
Page 23

Working with the MultiBay
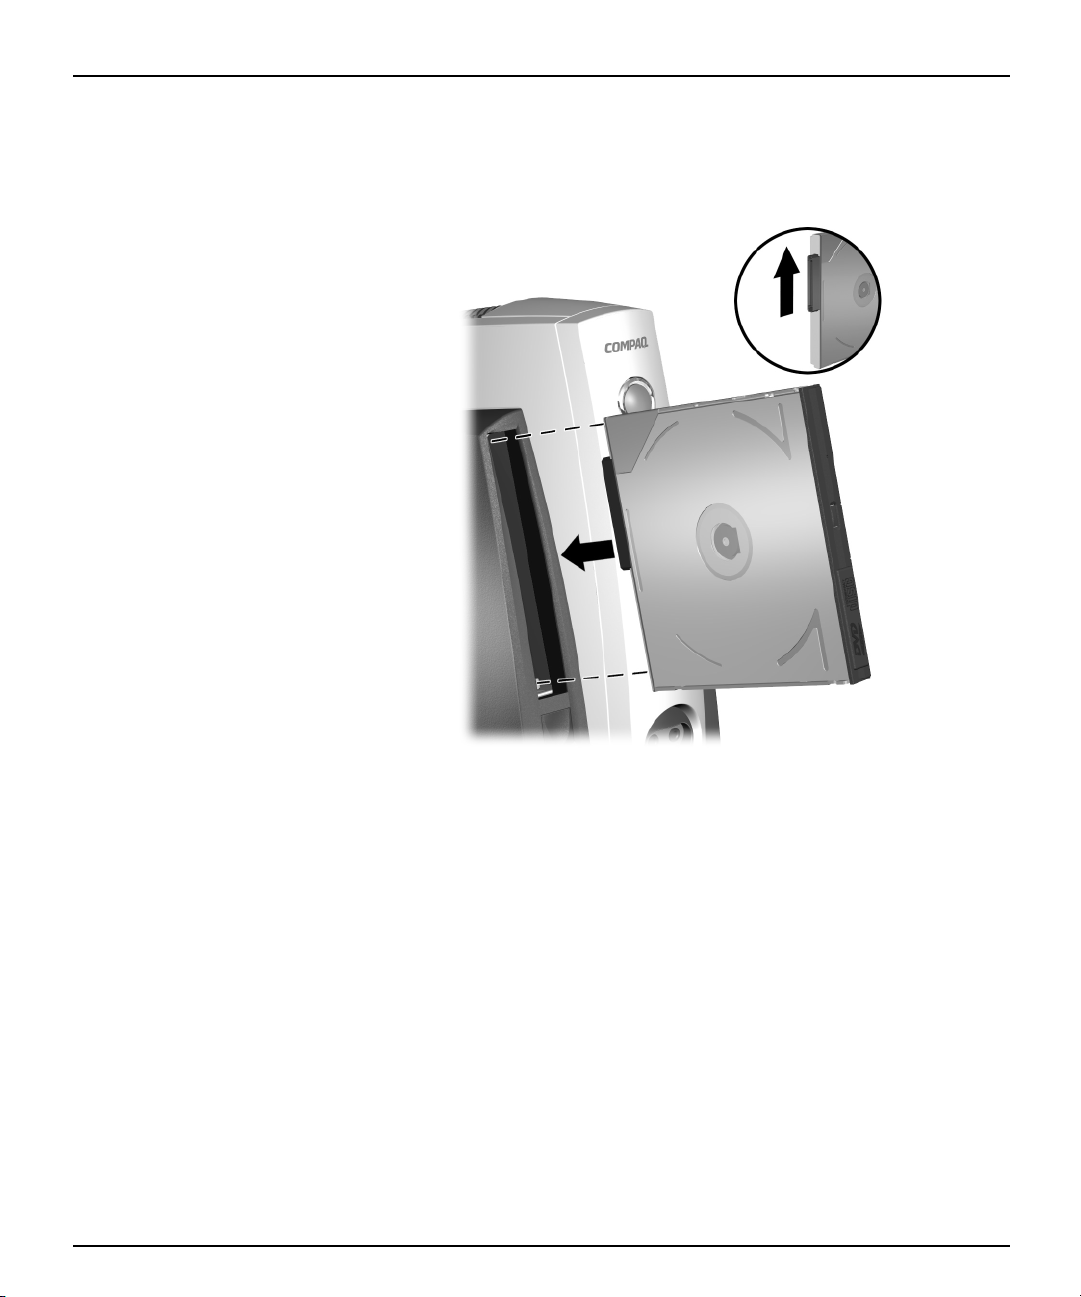
3. Firmly press and hold the eject button 1 to eject the drive from the
MultiBay.
Removing a Drive from the MultiBay
If the Personal Computer did not ship with a drive in the MultiBay, there will be a drive blank in
✎
2-6 Quick Setup & User’s Guide
the MultiBay. Follow the above procedure to remove it before inserting a MultiBay drive.
Page 24

chapter 3
Adding System Memory and Upgrading the Internal Hard Drive
General Precautions
Before adding system memory or upgrading the hard drive be sure to
carefully read all of the applicable instructions, cautions, and warnings in this
guide.
Å
Ä
WARNING: To reduce the risk of personal injury from electrical shock and/or hot surfaces, be
sure to disconnect the power cord from the wall outlet, and allow the internal system
components to cool before touching.
CAUTION: Static electricity can damage the electronic components of the Personal Computer or
optional equipment. Before beginning these procedures, ensure that you are discharged of static
electricity by briefly touching a grounded metal object. Refer to “Electrostatic Discharge” in the
Troubleshooting Guide for more information.
Uninstalling the iPAQ Desktop Security Bar
When installed, the iPAQ Desktop Security Bar protects the memory modules
and internal hard drive by preventing removal of the side covers. It also
secures the Legacy Module (if installed). Depending upon how it is installed,
the Security Bar can also disable the MultiBay eject button, so that a drive
installed in the MultiBay cannot be removed. Refer to “Installing the iPAQ
Desktop Security Bar” on page 6-12.
To remove the side panels or Legacy Module, you must first remove the
security bar, if installed.
Quick Setup & User’s Guide 3-1
Page 25

Adding System Memory and Upgrading the Internal Hard Drive
Using the Torx screwdriver 4 (provided), remove the tamper-proof Torx
screw 3 and pull the security bar 1 away from the personal computer.
Uninstalling the iPAQ Desktop Security Bar
Removing and Replacing the Side Access Panels
To access system memory or the internal hard drive, you must remove the side
access panel as shown below:
1. Exit all software applications, shut down the operating system software,
turn off the Personal Computer and any external devices, then disconnect
the power cord from the power outlet.
2. Uninstall the iPAQ Desktop Security Bar, if installed. Refer to
“Uninstalling the iPAQ Desktop Security Bar” on page 3-1.
3-2 Quick Setup & User’s Guide
Page 26

Adding System Memory and Upgrading the Internal Hard Drive
3. Press down on the ribbed middle section at the top of the access panel 1,
then pivot and lift the access panel from the Personal Computer.
4. To replace the access panel, ensure that it is aligned on the two tabs on the
base of the Compaq iPAQ 2, then pivot it up and toward the Personal
Computer until it locks into place.
Removing the Right Side Access Panel
Quick Setup & User’s Guide 3-3
Page 27

Adding System Memory and Upgrading the Internal Hard Drive
Adding System Memory
The memory sockets on the personal computer can be populated with
industry-standard DIMMs. These memory module slots are populated with at
least one preinstalled memory module. To achieve the maximum memory
support, you may be required to replace the preinstalled DIMM with a higher
capacity DIMM.
For proper system operation, the DIMMs must be industry-standard 168-pin,
100 MHz, unbuffered, PC100-compliant SDRAM DIMMs, or 133 MHz,
unbuffered, PC133-compliant SDRAM DIMMs. If two DIMMs are installed,
they must be the same speed. This computer comes equipped with 133 MHz
DIMMs.
The SDRAM DIMMs must support CAS Latency 2 or 3 (CL = 2 or CL = 3).
They must also contain the mandatory Joint Electronic Device Engineering
Council (JEDEC) Serial Presence Detect (SPD) information. DIMMs
constructed with x4 SDRAM are not supported; the system will not start when
equipped with unsupported DIMMs.
Adding or Removing a Memory Module
Ä
Ä
Ä
CAUTION: Your memory module sockets have gold-plated metal contacts. When upgrading your
memory, it is important to use memory modules with gold-plated metal contacts to prevent
corrosion and/or oxidation resulting from having incompatible metals in contact with each other.
CAUTION: Static electricity can damage the electronic components of the Personal Computer.
Before beginning these procedures, ensure that you are discharged of static electricity by briefly
touching a grounded metal object. Refer to “Electrostatic Discharge” in the Troubleshooting
Guide for more information.
CAUTION: When handling a memory module, be careful not to touch any of the contacts. Doing
so may damage the module.
1. Exit all software applications, shut down the operating system software,
turn off the Personal Computer and any external devices, then disconnect
the power cord from the power outlet.
2. Remove the right access panel. Refer to “Removing and Replacing the
Side Access Panels” on page 3-2.
3-4 Quick Setup & User’s Guide
Page 28

Adding System Memory and Upgrading the Internal Hard Drive
Å
Accessing the DIMM Slots
WARNING: To reduce the risk of personal injury from hot surfaces, allow the internal system
components to cool before touching.
3. To remove a module, press out on both latches of the DIMM socket at the
same time. This releases the module and partially pushes it out of the
socket.
4. Lift the module from the socket.
Quick Setup & User’s Guide 3-5
Page 29

Adding System Memory and Upgrading the Internal Hard Drive
Adding or Removing Memory Modules
5. To install a memory module, press out on both latches of the DIMM
socket at the same time 1. Match the notch on the module with the tab on
the memory socket 2. Firmly push the module straight into the socket,
ensuring that the module is fully inserted and properly seated 3.The
latches will close automatically when the module is seated correctly,
securing the module in the slot.
3-6 Quick Setup & User’s Guide
Page 30

✎
✎
Adding System Memory and Upgrading the Internal Hard Drive
If only one memory module is used in the system, it must be installed in the same socket that
held the preinstalled memory module.
6. Replace the right access panel.
When the Personal Computer starts up, it will recognize the system memory upgrade and
automatically reconfigure the system.
Quick Setup & User’s Guide 3-7
Page 31

Adding System Memory and Upgrading the Internal Hard Drive
Upgrading the Primary Hard Drive
The primary hard drive is a 3.5-inch hard drive located on the left side of the
Personal Computer, under the MultiBay.
1. Exit all software applications, shut down the operating system software,
turn off the Personal Computer and any external devices, then disconnect
the power cord from the power outlet.
2. Remove the left access panel. Refer to “Removing and Replacing the Side
Access Panels” on page 3-2.
Removing the Internal Hard Drive
3. Pull the release lever 1 toward the front of the personal computer.
4. Slide the drive 2 forward and away from the personal computer.
5. Disconnect the flat ribbon data cable 3 from the hard drive by pulling up
on the green tab on the cable end.
3-8 Quick Setup & User’s Guide
Page 32

✎
Adding System Memory and Upgrading the Internal Hard Drive
6. Disconnect the power cable 4 from the hard drive by pulling up on the
connector.
When removing the signal cable, pull on the tab instead of the cable itself. This will help prevent
cable damage.
Quick Setup & User’s Guide 3-9
Page 33

Adding System Memory and Upgrading the Internal Hard Drive
3-10 Quick Setup & User’s Guide
Page 34

chapter 4
Accessing the Internet & Using Network Communications
Accessing the Internet
Using the Optional USB Modem
If you do not have a network connection to the Internet, you will need an
Internet service provider and an external USB modem, available from
Compaq. Refer to the documentation included with the modem for
instructions on installing, configuring, and using the modem.
Choosing an Internet Service Provider
An Internet service provider (ISP) gives you the dial-up (telephone
networking) access and software you need to connect to the Internet. Most
ISPs also offer E-mail, access to newsgroups, space to create Web pages, and
technical support. Some ISPs offer commercial services, such as domain
hosting, to companies and individuals wanting to do business on the Internet.
You can choose from local and national ISPs.
An online service provider, such as The Microsoft Network (MSN) or
America Online (AOL), offers special features, content, and technical support
in addition to providing access to the Internet. An online service provider may
provide a categorized or customizable home page that makes it easy for you to
find some of the most popular and useful sites on the Internet.
To find the provider that’s right for you:
■ Look in the Yellow Pages
■ Ask a friend or colleague for recommendations
■ If you have access to the Internet already, you can use a search engine,
such as AltaVista, to help you locate an ISP or online service provider.
ISPs typically offer a variety of service plans for different customers’ needs.
Be sure to review and compare plans, services offered, and price to find the
provider that is right for you and your needs.
Quick Setup & User’s Guide 4-1
Page 35

Accessing the Internet & Using Network Communications
Using Network Communications
The personal computer comes with an integrated network interface controller
(NIC) and network device drivers.
NIC-Based Alerts
NIC-based alert support allows a system administrator to remotely monitor
personal computers and Personal Computers over the network. The Personal
Computer can send hardware and operating system failure alerts over the
network before the operating system is loaded or when the Personal Computer
is powered off. Alerts may include:
■ system BIOS hang
■ operating system hang
■ processor missing
■ operating temperature exceeded
Remote Wakeup Support
Remote Wakeup support allows the system administrator to turn on power to a
client computer or Personal Computer from a remote location, through the use
of supported PC LAN management tools.
Remote Wakeup support is available only when using an RJ-45 network connection.
✎
Refer to “Remote Wakeup and Remote Shutdown” on page 20, or to the online Remote
Management Administrators Guide. The Remote Management Administrators Guide is included
with the Remote Management Setup Utilities, and is available on the Support Software CD for
Compaq Desktop, Portable, and Workstation Products or at the Compaq Web Site a
www.compaq.com.
Interpreting the Network Status Lights
The integrated NIC includes network status lights:
■ The link/activity light illuminates when the system is physically connected
to an active network light and blinks when the Personal Computer detects
network activity. When the system is connected to a highly used network,
the activity light will remain on almost constantly.
■ The 100TX light illuminates during 100-Mbps operation.
4-2 Quick Setup & User’s Guide
Page 36

If Remote Wakeup is enabled, the link/activity light will remain functional
even when power to the Personal Computer is turned off.
Disabling the Autosensing Capabilities
Autosensing NICs automatically determine the maximum network operating
speed of the attached network and configure themselves accordingly. The
Personal Computer begins autosensing whenever it loses a valid network link,
for example, if the cable is disconnected.
In addition to determining the network operating speed, the Personal
Computer determines if full-duplex is supported. Full-duplex systems can
transmit and receive information on the network simultaneously. Half-duplex
systems cannot transmit and receive simultaneously.
If necessary, you can disable the autosensing capabilities and force the system
to operate in one mode only.
1. Select the Network icon, located in the Control Panel.
2. Select the appropriate NIC in the list box and click Properties.
Accessing the Internet & Using Network Communications
3. Change the Speed and Duplex values from Automatic/Auto Duplex to the
appropriate values, depending on the capabilities of your network.
4. Exit the Network control application. You will be prompted to restart
Personal Computer in order for the changes to take effect.
100Base-TX operation requires the use of Category 5 UTP cable with an RJ-45 network
✎
connection.
Installing Network Drivers
The device drivers in the network software enable the Personal Computer to
communicate with the network.
Device drivers are supplied for the Microsoft Windows NT version 4.0 and Windows 95, Windows
✎
98, or Windows 2000 operating systems, depending on which system was preinstalled on the
Personal Computer. If you are using another operating system, device drivers may be installed
from diskettes included with the network operating system or are available from Compaq. If
reinstallation of the operating system ever becomes necessary, use the Compaq Restore CD.
Quick Setup & User’s Guide 4-3
Page 37

Accessing the Internet & Using Network Communications
4-4 Quick Setup & User’s Guide
Page 38

chapter 5
Using the Legacy Module
The optional Legacy Module (standard on select models) provides connectors
for serial and parallel devices, PS/2 mouse, and PS/2 keyboard.
✎
Microsoft Windows 98 and Windows NT 4.0 will not run properly if the Legacy Module is not
installed or has been removed from the iPAQ Desktop Personal Computer. The Legacy Module is
optional on systems running Microsoft Windows 2000 Professional or Microsoft Windows
Millenium.
Connect the Legacy Module to the Legacy Module connector on the rear
panel, as shown.
If the iPAQ Desktop Security Bar is installed, you must uninstall it prior to
removing the Legacy Module. Refer to “Uninstalling the iPAQ Desktop
Security Bar” on page 3-1.
Quick Setup & User’s Guide 5-1
Page 39

Using the Legacy Module
5-2 Quick Setup & User’s Guide
Page 40

chapter 6
Desktop Management
COMPAQ pioneered desktop manageability in 1995 with the introduction of
the industry's first fully manageable desktop personal computers. Since then,
Compaq has led an industry-wide effort to develop the standards and
infrastructure required to effectively deploy, configure, and manage desktop
PCs. Compaq Intelligent Manageability provides standards-based solutions
for managing and controlling desktops in a networked environment. Compaq
works closely with leading management software solution providers in the
industry to ensure compatibility between Intelligent Manageability and these
products. Intelligent Manageability is an important aspect of our broad
commitment to providing you with PC Lifecycle Solutions that assist you
during the four phases of the desktop PC lifecycle-planning, deployment,
management, and transitions.
This guide summarizes the capabilities and features of the four key
components of desktop management:
■ Initial Configuration and Deployment
■ Asset tracking and security
■ Fault notification and recovery
■ Software updating and management
The guide also contains an overview of the tools, utilities, and information
Compaq provides to help you successfully deploy manageable desktop PCs.
Support for specific features described in this guide may vary by model or software version.
✎
Quick Setup & User’s Guide 6-1
Page 41

Desktop Management
Initial Configuration and Deployment
Remote System Installation
Compaq personal computers come with a preinstalled system software image.
After a very brief software “unbundling” process, the personal computer is
ready to be used.
■ Installing additional software applications after unbundling the
preinstalled software image
■ Using software deployment tools, such as Microsoft MS Batch or NT
Distribution Share (NTDS), or Altiris eXpress to replace the preinstalled
software with a customized software image
■ Using a disk cloning process to copy the contents from one hard drive to
another
The best deployment method depends on your information technology
environment and processes. The PC Deployment section of the Solutions and
Services Web site (www.compaq.com/im/change) provides information to
help you select the best deployment method. You'll also find guides and
utilities to integrate with Microsoft or PXE-based deployment tools.
Remote System Installation allows you to start and set up your system using
the software and configuration information located on a network server. The
Remote System Installation feature is usually used as a system setup and
configuration tool, and can be used for the following tasks:
■ Deploying a software image on one or more new PCs.
■ Formatting a hard drive.
■ Installing application software or drivers.
■ Updating the operating system, application software, or drivers.
To initiate Remote System Installation, press F12 when the F12=Network
Service Boot message appears in the lower-right corner of the Compaq logo
screen. Follow the instructions on the screen to continue the process.
Compaq and Altiris, Inc. have partnered to provide tools designed to make the
task of corporate PC deployment and management easier and less
time-consuming, ultimately lowering the total cost of ownership and making
Compaq PCs the most manageable client PCs in the enterprise environment.
6-2 Quick Setup & User’s Guide
Page 42

Altiris eXpress
PC Transplant
Desktop Management
Altiris eXpress allows the system administrator to create and quickly deploy a
customized, corporate-standard software image across one or more networked
client PCs with an interface as simple to use as Windows Explorer. Altiris
eXpress supports Intel's Wired for Management and Preboot Execution
Environment (PXE). Using Altiris eXpress and the Remote System
Installation features of the personal computer, there is no need for the system
administrator to visit each new PC individually to deploy the software image.
For more information, refer to the Compaq Web site at www.compaq.com.
PC Transplant, designed to assist you in personalizing the new PC, can be
downloaded free from the Compaq Web site. It lets you preserve the
“personality”-the customized settings such as Start menu entries, drive and
printer mappings, software application options, and so on-of an existing PC,
then transfer those unique settings to the new Compaq PC so that you don't
have to invest valuable time manually recreating them.
For more information, refer to the Compaq Web site at www.compaq.com.
Quick Setup & User’s Guide 6-3
Page 43

Desktop Management
Asset Tracking and Security
Compaq AssetControl features incorporated into the Personal Computer
provide key asset tracking data that can be managed using Compaq Insight
Manager products and Management Solutions Partners products. Seamless,
automatic integration between AssetControl features and these products
enables you to choose the management tool that is best suited to your
environment and to leverage your investment in existing tools.
Compaq Personal Computers are manufactured with the hardware and
firmware required to fully support the DMI 2.0 standard.
Compaq also offers several solutions for controlling access to valuable
Personal Computer components and information. Security features such as the
Memory Change alert, power-on password, and setup password help to
prevent unauthorized access to the internal components of the Personal
Computer. By disabling parallel, serial, or USB ports, or by disabling
removable media boot capability, you can protect valuable data assets.
Memory Change alerts can be automatically forwarded to Compaq Insight
Manager products to deliver proactive notification of tampering with the
internal components of the Personal Computer.
There are three ways to manage security settings on your Compaq Personal
Computers:
■ Locally, using the Compaq Computer Setup Utilities. See the “Computer
Setup Utilities (F10 Setup)” section of the Troubleshooting Guide for more
information and instructions.
■ Remotely, using the Compaq Remote Security Management software. This
software enables the secure, consistent deployment and control of security
settings from a central point on the network using a third-party PC LAN
management application such as Microsoft SMS.
■ Remotely, using Compaq Insight Manager LC, a tool for managing PC
workgroups.
The following table and sections refer to managing security features of your
Computer locally through the Compaq Computer Setup Utilities. Refer to the
Remote Management Setup Utilities for more information on using the
Remote Security Management software. These utilities are available on the
Compaq Web site at www.compaq.com/support/files/index.html. For more
information on Insight Manager LC, refer to www.compaq.com/im/lc.
6-4 Quick Setup & User’s Guide
Page 44

Security Features Overview
Feature Purpose How It Is Established
Removable Media Boot
Control
Serial, Parallel, or USB
Interface Control
Power-On Password Prevents use of the
Setup Password Prevents reconfiguration of
DriveLock Security Allows a MultiBay hard
Memory Change Alerts Detects when memory
Prevents booting from the
removable media drives.
Prevents transfer of data
through the integrated
serial, parallel, or USB
(universal serial bus)
interface.
Personal Computer until
the password is entered.
This can apply to both
initial system startup and
restarts.
the Personal Computer
(use of the Computer Setup
Utilities) until the password
is entered.
drive to be locked,
preventing unauthorized
access to data stored on
the drive.
modules have been added,
moved, or removed;
notifies end-user and
system administrator.
Desktop Management
From the Compaq Computer Setup
Utilities menu. For more information
about Computer Setup, see the
Troubleshooting Guide.
From the Compaq Computer Setup
Utilities menu. For more information
about Computer Setup, see the
Troubleshooting Guide.
From the Compaq Computer Setup
Utilities menu. For more information
about Computer Setup, see the
Troubleshooting Guide.
From the Compaq Computer Setup
Utilities menu.For more information
about Computer Setup, see the
Troubleshooting Guide.
From the Compaq Computer Setup
Utilities menu. For more information
about Computer Setup, see the
Troubleshooting Guide.
CAUTION: A MultiBay hard drive can
be rendered permanently unusable if
the DriveLock security feature is
enabled and the password is
forgotten. Refer to “Enabling or
Disabling DriveLock on a MultiBay
Hard Drive” on page 10 prior to using
the DriveLock security feature.
For information on enabling Memory
Change Alerts, refer to the online
Intelligent Manageability Guide.
Quick Setup & User’s Guide 6-5
Page 45

Desktop Management
Security Features Overview (Continued)
Feature Purpose How It Is Established
Ownership Tag Displays ownership
information, as defined by
the system administrator,
during system startup
(protected by setup
password).
iPAQ Desktop Security Bar Prevents removal of the
side panels to protect the
internal hard drive and
memory modules. Also
secures the Legacy
Module, if installed.
Depending upon how it is
installed, disables the
MultiBay eject button to
prevent removal of a
MultiBay drive.
Cable Lock Provision Used in conjunction with
an optional cable lock to
secure the Personal
Computer to a fixed object
to prevent theft.
Mounting Holes Holes in the base of the
chassis allow the personal
computer to be bolted to a
fixed surface.
From the Compaq Computer Setup
Utilities menu.
Refer to “Installing the iPAQ Desktop
Security Bar” on page 12 for detailed
information.
Refer to “Installing a Compaq
Security Lock” on page 14 for
detailed information.
Refer to “Securing the iPAQ to a Fixed
Work Surface” on page 13 for
detailed information.
Password Security
This Personal Computer supports several password security features-a setup
password, a power-on password, and a password to lock a MultiBay hard
drive. The power-on password prevents unauthorized use of the Personal
Computer by requiring entry of a password to access applications or data each
time the Personal Computer is turned on or restarted. The setup password
specifically prevents unauthorized access to Computer Setup, and can also be
used as an override to the power-on password. That is, when prompted for the
power-on password, entering the setup password instead will allow access to
the Personal Computer.
6-6 Quick Setup & User’s Guide
Page 46

A network-wide setup password can be established to enable the system
administrator to log in to all network systems to perform maintenance without
having to know the power-on password, even if one has been established.
The DriveLock feature prevents unauthorized access to data stored on
MultiBay hard drives.
Establishing a Setup Password Using Computer Setup
Establishing a setup password through Computer Setup prevents
reconfiguration of the Personal Computer (use of the Computer Setup utility)
until the password is entered.
1. Turn on or restart the Personal Computer. If you are in Windows, click
Start > Shut Down > Restart the Computer.
2. When the F10 Setup message appears in the lower-right corner of the
screen, press the F10 key. Press Enter to bypass the title screen, if
necessary.
If you do not press the F10 key while the message is displayed, you must
restart the Personal Computer again to access the utility.
Desktop Management
3. Select Security, then select Setup Password and follow the instructions on
the screen.
4. Before exiting, click File > Save Changes and Exit.
Establishing a Power-On Password Using Computer Setup
Establishing a power-on password through Computer Setup prevents access
to the Personal Computer when power is turned on, unless the password is
entered. The password must be entered each time the Personal Computer is
turned on, when the key icon appears on the monitor.
1. Turn on or restart the Personal Computer. If you are in Windows, click
Start > Shut Down > Restart the Computer.
2. When the F10 Setup message appears in the lower-right corner of the
screen, press the F10 key. Press Enter to bypass the title screen, if
necessary.
If you do not press the F10 key while the message is displayed, you must
restart the Personal Computer again to access the utility.
Quick Setup & User’s Guide 6-7
Page 47

Desktop Management
Entering a Power-On Password
3. Select Security, then Power-On Password and follow the instructions on
the screen.
4. Before exiting, click File > Save Changes and Exit.
To enter a power-on password, complete the following steps:
1. Turn on or restart the Personal Computer. If you are in Windows, click
Start > Shut Down > Restart the Computer.
2. When the key icon appears on the monitor, type your current password,
then press the Enter key.
Type carefully; for security reasons, the characters you type do not appear
on the screen.
If you enter the password incorrectly, a broken key icon appears. Try again.
After three unsuccessful tries, you must turn off the Personal Computer, then
turn it on again before you can continue.
Entering a Setup Password
If a setup password has been established on the Personal Computer, you will
be prompted to enter it each time you run Computer Setup.
1. Turn on or restart the Personal Computer. If you are in Windows, click
Start > Shut Down > Restart the Computer.
2. When the F10=Setup message appears in the lower-right corner of the
screen, press the F10 key.
If you do not press the F10 key while the message is displayed, you must
restart the Personal Computer again to access the utility.
3. When the key icon appears on the monitor, type the setup password, then
press the Enter key.
Type carefully; for security reasons, the characters you type do not appear
on the screen.
6-8 Quick Setup & User’s Guide
Page 48

If you enter the password incorrectly, a broken key icon appears. Try again.
After two unsuccessful tries, the system will restart, but you will be unable to
access the Computer Setup utilities.
Changing a Power-On or Setup Password
1. Turn on or restart the Personal Computer. If you are in Windows, click
Start > Shut Down > Restart the Computer. To change the setup password,
run Computer Setup.
2. When the key icon appears, type your current password, a slash (/) or
alternate delimiter character, your new password, another slash (/) or
alternate delimiter character, and your new password again as shown:
current password/new password/new password
Type carefully; for security reasons, the characters you type do not appear
on the screen.
3. Press the Enter key.
Desktop Management
The new password takes effect the next time you turn on the Personal
Computer.
Refer to “National Keyboard Delimiter Characters” on page 12 for information about the alternate
✎
delimiter characters.
The power-on password and setup password may also be changed using the Security options in
Computer Setup.
Deleting a Power-On or Setup Password
1. Turn on or restart the Personal Computer. If you are in Windows, click
Start > Shut Down > Restart the Computer. To delete the setup password,
run Computer Setup.
2. When the key icon appears, type your current password followed by a
slash (/) or alternate delimiter character as shown:
current password/
3. Press the Enter key.
Quick Setup & User’s Guide 6-9
Page 49

Desktop Management
✎
Refer to “National Keyboard Delimiter Characters” on page 12 for information about the alternate
delimiter characters.
The power-on password and setup password may also be changed using the Security options in
Computer Setup.
Enabling or Disabling DriveLock on a MultiBay Hard Drive
Ä
CAUTION: A MultiBay hard drive can be rendered permanently unusable if the DriveLock security
feature is enabled and the password is forgotten.
If the drive is shared with others or regularly used in multiple Personal
Computers or locations, the Master password should be set and used by the
owner of the drive or by the System Administrator to avoid rendering the
drive unusable if the User password is forgotten. The risk of rendering a drive
permanently inaccessible is reduced when the Master password and the User
password are set and maintained separately.
To prevent unauthorized access to Computer Setup, establish a Setup
password.
1. With the MultiBay hard drive installed, turn on or restart the Personal
Computer. If you are in Windows, click Start > Shut Down > Restart the
Computer.
2. When the F10=Setup message appears in the lower-right corner of the
screen, press the F10 key. Press Enter to bypass the title screen, if
necessary.
If you do not press the F10 key while the message is displayed, you must
restart the Personal Computer again to access the utility.
3. Select Security, then select DriveLock Security. You will be prompted to
select a drive from a list of drives in the system that suppport the
DriveLock security feature.
❏ To allow another user to enable DriveLock, yet ensure that you can
always unlock the drive, set the Master password.
❏ To enable DriveLock, click Enable DriveLock and enter a User
password when prompted to do so.
❏ To disable DriveLock, click Disable DriveLock. The user password
is cleared and must be reset next time DriveLock is enabled.
4. Before exiting, click File > Save Changes and Exit.
6-10 Quick Setup & User’s Guide
Page 50

Entering a DriveLock Password on a MultiBay Hard Drive
When DriveLock is enabled, the DriveLock User or Master password must be
entered to unlock the drive. To enter a DriveLock password, complete the
following steps:
1. Turn on or restart the Personal Computer. If you are in Windows, click
Start > Shut Down > Restart the Computer.
2. When the DiveLock key icon appears on the monitor, type your Master or
User password, then press the Enter key.
Type carefully; for security reasons, the characters you type do not appear
on the screen. If you enter the password incorrectly, a broken key icon
appears. Try again. After two unsuccessful tries, POST will continue
without unlocking the drive. You will have to restart the Personal
Computer and correctly enter the password before you can access the
drive.
Changing a DriveLock Password on a MultiBay Hard Drive
Desktop Management
1. Turn on or restart the Personal Computer. If you are in Windows, click
Start > Shut Down > Restart the Computer.
2. When the key icon appears, type your current password, a slash (/) or
alternate delimiter character, your new password, another slash (/) or
alternate delimiter character, and your new password again as shown:
current password/new password/new password
Type carefully; for security reasons, the characters you type do not appear
on the screen.
3. Press the Enter key.
The new password takes effect the next time you turn on the Personal
Computer.
Quick Setup & User’s Guide 6-11
Page 51

Desktop Management
National Keyboard Delimiter Characters
✎
Refer to “National Keyboard Delimiter Characters” on page 12 for information about the alternate
delimiter characters.
The power-on password and setup password may also be changed using the Security options in
Computer Setup. The Master password can only be changed in Setup if it was used to unlock the
device during POST.
Each keyboard is designed to meet country-specific requirements. The syntax
and keys that you use for changing or deleting your password depend on the
keyboard that came with your Personal Computer.
National Keyboard Delimiter Characters
Arabic / Greek - Russian /
Belgian = Hebrew . Slovakian -
BHCSY* - Hungarian - Spanish -
Brazilian / Italian - Swedish/Finnish /
Chinese / Japanese / Swiss -
Czech - Korean / Taiwanese /
Danish - Latin American - Thai /
French ! Norwegian - Turkish .
French Canadian é Polish - U.K. English /
German - Portuguese - U.S. English /
* For Bosnia-Herzegovina, Croatia, Slovenia, and Yugoslavia
Clearing Passwords
If you forget your password, you cannot access the Personal Computer. Refer
to the Troubleshooting Guide for instructions on clearing passwords.
Installing the iPAQ Desktop Security Bar
When installed, the iPAQ Desktop Security Bar protects the memory modules
and internal hard drive by preventing removal of the side covers Personal
Computer. It also secures the Legacy Module (if installed). Depending upon
how it is installed, the Security Bar can also disable the MultiBay eject button,
so that a drive installed in the MultiBay cannot be removed. The Security Bar
is affixed to the personal computer with either a tamper-proof Torx screw or
with the optional Compaq Security Lock.
6-12 Quick Setup & User’s Guide
Page 52

Desktop Management
1. Insert the posts 1 on the Security Bar into the openings 2 on the rear of
the side panels.
Installing the iPAQ Desktop Security Bar
If the metal extension (provided with the Security Bar) is inserted into the post that goes into the
✎
right rear hole on the personal computer, the MultiBay eject button will be disabled. A drive
installed in the MultiBay cannot be removed until the Security Bar is removed.
The Security Bar may vary slightly from the one shown in the illustration above.
2. Install the tamper-proof Torx screw 3 with the small screwdriver 4 to
lock the Security Bar onto the Personal Computer. The Security Bar
features a cable lock provision 5 for an optional cable lock. For more
information, refer to “Installing a Compaq Security Lock” on page 14.
Securing the iPAQ to a Fixed Work Surface
Holes in the base of the personal computer allow you to bolt it to a desk or
other fixed surface.
Quick Setup & User’s Guide 6-13
Page 53

Desktop Management
Installing a Compaq Security Lock
The rear panel of the personal computer features a cable lock provision that
accommodates the optional Compaq Security Lock, so that the Personal
Computer can be physically secured to a work area. If the Security Bar is
installed, the Compaq Security Lock can be used to secure it to the Personal
Computer, as well.
1. Loop the cable around a heavy, fixed object to which you want to secure
the computer.
2. Insert the locking end of the cable through the loop end of the cable.
6-14 Quick Setup & User’s Guide
Page 54

Desktop Management
3. Insert the lock into the cable lock provision on the rear of the computer
and lock it with the key.
Installing a Cable Lock
Fingerprint Identification Technology
Eliminating the need to enter end-user passwords, Compaq Fingerprint
Identification Technology tightens network security, simplifies the login
process, and reduces the costs associated with managing corporate networks.
Affordably priced and supported by the Compaq iPAQ Desktop Personal
Computer, it isn't just for high-tech, high-security organizations anymore.
Fingerprint Identification Technology is currently supported only on Compaq iPAQ PCs with the
✎
Quick Setup & User’s Guide 6-15
Legacy Module installed, not on iPAQ legacy free models.
See www.compaq.com/im/fit/index.html for more information.
Page 55

Desktop Management
Fault Notification and Recovery
Celeron and Pentium III Fault Prediction and Prefailure Warranty
Fault Notification and Recovery features combine innovative hardware and
software technology to prevent the loss of critical data and minimize
unplanned downtime.
When a fault occurs, the Personal Computer displays a Local Alert message
containing a description of the fault and any recommended actions. You can
then view current system health by using the Compaq Management Agent. If
the Personal Computer is connected to a network managed by Compaq
Insight Manager LC, Compaq Insight Manager or other management products
from Compaq Management Solutions Partners, the Personal Computer also
sends a fault notice to the network management application.
When the processor encounters an excessive number of error checking and
correcting (ECC) cache memory errors, the Personal Computer displays a
Local Alert message. This message contains detailed information about the
faulty processor, allowing you to take action before you experience
non-correctable cache memory errors. The Prefailure Warranty allows you to
replace these processors, free of charge, before they actually fail.
SMART Hard Drive Fault Prediction
SMART hard drive fault prediction and Prefailure Warranty apply only to internal hard drives, not
✎
6-16 Quick Setup & User’s Guide
to MultiBay drives.
The SMART hard drive monitors hard drive activity to predict failures and, in
some cases, fix faults before failures occur. Fault prediction and failure
indication parameters, such as abnormal variations in spinup and seek times,
or non-correctable read and write errors, are tracked to determine the hard
drive condition. Should these errors become significant, the Personal
Computer displays a warning message. The warning gives you time to back
up the hard drive and replace it prior to experiencing downtime or loss of data.
The Prefailure Warranty for SMART hard drives allows you to replace these
drives, free of charge, before the drives fail.
SMART hard drives are compliant with the Small Form Factor Committee
Specification for Self-Monitoring, Analysis, and Reporting Technology
(SMART). SMART is the industry standard technology, pioneered by
Compaq and originally called IntelliSafe, that allows you to prevent data loss
and minimize downtime, in concert with Compaq Management Agents.
Page 56

Introducing the Drive Protection System
The Compaq Drive Protection System (DPS) is a diagnostic tool built into the
internal hard drive. DPS is designed to help diagnose problems that might
result in unwarranted hard drive replacement.
When Compaq personal computers are built, each installed hard drive is
tested using DPS and a permanent record of key information is written onto
the drive. Each time DPS is run, test results are written to the hard drive. Your
service provider can use this information to help diagnose conditions that
caused you to run the DPS software. Refer to the Troubleshooting Guide for
instructions on using DPS.
Ultra ATA Integrity Monitoring
Ultra ATA Integrity Monitoring monitors the integrity of data as it is
transferred between an Ultra ATA hard drive and the system's core logic. If
the Personal Computer detects an abnormal number of transmission errors,
the Personal Computer displays a Local Alert message with recommended
actions. An alert is also sent over the network to the system administrator.
Desktop Management
Surge-Tolerant Power Supply
An integrated surge-tolerant power supply provides greater reliability when
the Personal Computer is hit with an unpredictable power surge. This power
supply is rated to withstand a power surge of up to 2000 volts without
incurring any system downtime or data loss.
Quick Setup & User’s Guide 6-17
Page 57

Desktop Management
Software Updating and Management
Compaq provides several tools for managing and updating software on
Compaq Personal Computers-Altiris eXpress, Insight Manager LC, System
Software Manager, and Remote Management Setup Utilities.
Using Insight Manager LC, you can also monitor a workgroup of PCs from a
central console and remotely update the system software, including flash
ROM or hardware device drivers, for each of the managed PCs individually.
System Software Manager (SSM) is a utility that lets you update system-level
software on multiple systems simultaneously. When executed on a PC client
system, SSM detects both hardware and software versions, then updates the
appropriate software from a file store. Support software that works with SSM
is flagged with the PC Lifecycle Management icon on the Compaq Web site.
To download the utility or to obtain more information on SSM, visit the
Compaq Web site at www.compaq.com/im.
In addition to its PC configuration capabilities mentioned in a previous
section, Altiris eXpress also includes easy to use software distribution
capabilities. You can use Altiris eXpress to update operating systems and
application software from a central console. When used in conjunction with
SSM, Altiris eXpress can also update ROM BIOS and device driver software.
Finally, the Compaq Remote Management Setup Utilities, when integrated
with Management Solutions Partners products, deliver an on-going
management solution. These utilities supplement the capabilities of Solutions
Partners products for distributing new applications, device drivers, and other
system software. The Compaq Web site include updated ROM images and
device drivers which can be distributed to client PCs using these software
tools.
For more information, refer to the online Remote Management Administrators
Guide.TheRemote Management Administrators Guide is included with the
Remote Management Setup Utilities, which are available on the Compaq Web
site at www.compaq.com/support/files/index.html. The following sections
provide information on using these utilities to accomplish various remote
management functions including ROM flash, changing security settings, and
wakeup/shutdown.
6-18 Quick Setup & User’s Guide
Page 58

Remote ROM Flash
Desktop Management
Your Personal Computer comes with reprogrammable flash ROM (read only
memory). By establishing a setup password in Security Management, you can
protect the ROM from being unintentionally updated or overwritten. This is
important to ensure the operating integrity of the Personal Computer. Should
you need or want to upgrade your ROM, you may:
■ Order an upgraded ROMPaq diskette from Compaq.
■ Download the latest ROMPaq images from the Compaq World Wide Web
site (www.compaq.com).
Ä
Using Remote ROM Flash
✎
CAUTION: For maximum ROM protection, be sure to establish a setup password. The setup
password prevents unauthorized ROM upgrades. Compaq Insight Manager LC allows the system
administrator to set the setup password on one or more PCs simultaneously. For more
information, visit the Compaq Web site at www.compaq.com.
Remote ROM Flash allows the system administrator to safely upgrade the
ROM on remote Compaq personal computers, directly from the centralized
network management console. Enabling the system administrator to perform
this task remotely, on multiple computers and Personal Computers, results in
a consistent deployment of and greater control over Compaq iPAQ ROM
images over the network. It also results in greater productivity and lower total
cost of ownership.
All Compaq iPAQ ROMPaq ROM images from Compaq are digitally signed
to ensure authenticity and minimize potential corruption.
The Personal Computer must be powered on, or turned on through Remote Wakeup, to take
advantage of Remote ROM Flash. Use of Remote ROM Flash also requires an established setup
password.
For more information on enabling Remote ROM Flash, refer to the online
Remote Management Administrators Guide.TheRemote Management
Administrators Guide is included with the Remote Management Setup
Utilities, and is available on the Compaq Web site at www.compaq.com.
Quick Setup & User’s Guide 6-19
Page 59

Desktop Management
Remote Security Management
Remote Security Management allows the system administrator to safely set or
modify security features on remote Compaq personal computers, directly
from the centralized network management console. Enabling the system
administrator to perform these tasks remotely, on multiple computers, results
in consistent deployment of and greater control over PC security parameters
over the network. It also results in greater productivity and lower total cost of
ownership.
✎
The Personal Computer must be powered on, or turned on through Remote Wakeup, to take
advantage of Remote Security Management. Use of Remote Security Management also requires
an established setup password.
For more information about the Remote Management Setup software and
enabling Remote Security Management, refer to the online Remote
Management Administrators Guide.TheRemote Management Administrators
Guide is included with the Remote Management Setup Utilities, and is
available on the Compaq Web site at www.compaq.com.
Remote Wakeup and Remote Shutdown
The personal computer features an integrated network interface card that
supports the Compaq Remote Wakeup and Remote Shutdown functions.
These functions allow a system administrator to power on and power off the
PC from a remote location, supported by PC LAN management tools.
Third-party software tools are required to remotely distribute software.
✎
Remote Wakeup allows the network interface controller to continue
functioning, even when power to the personal computer has been turned off.
The Personal Computer continues to consume a small amount of electricity even after you turn it
✎
off. Only when you disconnect the power cord from the electrical outlet does the Personal
Computer stop consuming electricity.
To enable Remote Wakeup and Remote Shutdown, complete the following
steps:
1. Double-click the Network Icon, located in the Control Panel.
2. Double-click the appropriate network controller.
3. Click the Advanced Properties tab.
6-20 Quick Setup & User’s Guide
Page 60

NIC-Based Alerts
Desktop Management
4. Select Remote Wakeup.
5. Change the value to ON.
6. Click OK to save and apply changes, then click OK to exit the Network
dialog.
For more information on using Remote Wakeup and Remote Shutdown, refer
to the online Remote Management Administrators Guide.TheRemote
Management Administrators Guide is included with the Remote Management
Setup Utilities, and is available on the Compaq Web site at
www.compaq.com.
NIC-based alert support allows a system administrator to remotely monitor
personal computers and Personal Computers over the network. The Personal
Computer can send hardware and operating system failure alerts over the
network before the operating system is loaded or when the Personal Computer
is powered off. Alerts may include:
■ system BIOS hang
■ operating system hang
■ processor missing
■ operating temperature exceeded
Replicating Your Setup
This procedure gives an administrator the ability to easily copy one setup
configuration to other Personal Computers of the same model. This allows for
faster, more consistent configuration of multiple Personal Computers. To
replicate your setup:
1. Access the Computer Setup Utilities menu.
2. Click File > Save to Diskette. Follow the instructions on the screen.
This requires a MultiBay LS-120 drive or a portable, external diskette drive.
✎
3. To replicate the configuration, click File > Restore from Diskette, and
follow the instructions on the screen.
Quick Setup & User’s Guide 6-21
Page 61

Desktop Management
Dual-State Power Button
Altiris eXpress and PC Transplant make it easy to replicate the configuration
and custom settings of one PC and copy it to one or more PCs. For more
information, visit the Compaq Web site at www.compaq.com.
With Advanced Power Management (APM) enabled in Windows 98 or
Advanced Configuration and Power Interface (ACPI) enabled for Windows
98 and Windows 2000, the power button can function either as an on/off
switch or as a suspend button. The suspend feature does not turn off power
altogether, but instead causes the Personal Computer to enter a low-power
standby. This allows you to quickly power down without closing applications
and to quickly return to the same operational state without any data loss.
To change the power button's configuration, complete the following steps:
1. Access the Computer Setup menu.
2. Select Power > Energy Saver. Select Minimal or Advanced to turn on the
Energy Saver Options menu.
3. Select Power > Energy Saver Options. Set the power button configuration
to either On/Off or Suspend/Wakeup, as desired.
Refer to the Troubleshooting Guide for more detailed information about
the features of Computer Setup.
4. Select File > Save Changes and Exit.
After configuring the power button to function as a suspend button, press the
power button to put the system in a very low power state (suspend). Press the
button again to quickly bring the system out of suspend to full power status.
To completely turn off all power to the system, press and hold the power
button for four seconds.
If you have selected the "Blink LED during Energy Save" option in Computer Setup, the power-on
✎
6-22 Quick Setup & User’s Guide
light will blink green once every two seconds while the Personal Computer is in suspend. Refer to
the Troubleshooting Guide for more information on using Computer Setup.
Page 62

Power Management
Power Management is a feature that saves energy by shutting down certain
components of the Personal Computer when they are not in use, saving energy
without having to shut down the Personal Computer. Timeouts (the period of
inactivity allowed before shutting down these components) can be enabled,
customized, or disabled using Computer Setup.
1. Access the Computer Setup menu.
2. Select Power > Energy Saver. Select Advanced to turn on the Timeouts
3. Select Power > Timeouts. Enable, customize, or disable timeouts.
4. Select File > Save Changes and Exit.
To avoid potential conflicts, never enable monitor timeouts in Windows 95 or Windows 98 while
✎
system timeouts are enabled in Computer Setup.
Desktop Management
menu.
Refer to the Troubleshooting Guide for more detailed information about
the features of Computer Setup.
Use Display Properties to establish, modify, or disable Power Management
settings for the monitor. To access Display Properties, right-click on the
Windows Desktop, then choose Properties.
World Wide Web Site
Compaq engineers rigorously test and debug software developed by Compaq
and third-party suppliers, and develop operating-system specific support
software, to ensure the highest level of performance, compatibility, and
reliability for Compaq Personal Computers.
When making the transition to new or revised operating systems, it is
important to implement the support software designed for that operating
system. If you plan to run a version of Microsoft Windows or Microsoft
Windows NT Workstation that is different from the version included with
your Personal Computer, you must install corresponding Compaq device
drivers and utilities to ensure all features are supported and functioning
properly.
Quick Setup & User’s Guide 6-23
Page 63

Desktop Management
Building Blocks and Partners
✎
Compaq has made the task of locating, accessing, evaluating, and installing
the latest support software easier. You can download the software from the
Compaq World Wide Web site at www.compaq.com.
The Web site contains the latest device drivers, utilities, and flashable ROM
images needed to run Windows 98, Windows Millenium, Windows 2000, and
Windows NT Workstation on your Compaq commercial desktop product.
If you call Compaq to place an order, be sure to have the serial number of your Personal
Computer available. For the location of the serial number, refer to Quick Setup, “Step 2: Identify
Rear Panel Components and Confirm Voltage Setting.” This number is necessary for all
purchases.
Compaq management solutions are based on industry standards, including
DMI 2.0, Web-Based Enterprise Management, Intel's "Wired for
Management," SNMP, and Net PC technologies. Microsoft, Intel,
Hewlett-Packard, Novell, Seagate, and other industry leaders work closely
with Compaq to integrate their management solutions with Compaq products
and initiatives, giving you, the Compaq customer, extraordinary flexibility
and functionality in client management and PC ownership cost reduction.
Desktop Management Interface (DMI)
The Desktop Management Task Force (DMTF) is an industry body created in
1992 with the goal of standardizing systems manageability. DMTF
established the Desktop Management Interface (DMI) framework to
standardize access to PC configuration data. Compaq, as a Steering
Committee and Technical Committee member of the DMTF, delivers
hardware and software instrumentation that supports the DMI standard.
For more information on configuring the DMI software, refer to the online
Intelligent Manageability Guide.
Wired for Management
Intel's Wired for Management initiative is focused on reducing the support
and administration cost of Intel architecture-based systems without
compromising their flexibility and performance. The Wired for Management
guidelines provide a baseline set of building blocks that Compaq utilizes in
Intelligent Manageability to provide standardized management of desktop
inventories, remote system configuration, off-hours maintenance, and next
6-24 Quick Setup & User’s Guide
Page 64

generation power management. But Compaq doesn't stop with these baseline
features. Additional capabilities have been incorporated into Intelligent
Manageability to provide an extensive solution for managing networked
computing environments.
Wired for Management technologies include:
■ Desktop Management Interface (DMI) 2.0
■ Remote System Installation
■ Remote Wakeup and Remote Shutdown
■ ACPI-Ready Hardware
Compaq Management Solutions Partners Program
Compaq delivers desktop management solutions through the Compaq
Management Solutions Partners Program. This Compaq initiative ensures
compatibility and integration of AssetControl features with leading PC LAN
and enterprise management products. These products provide remote access
to the AssetControl features so that LAN and PC administrators can manage
the Compaq Family of Personal Computers information from a central
location. The partnership ensures that the benefits of Intelligent
Manageability are accessible through a broad range of vendors. This allows
customers to use their tools of choice to remotely manage their Compaq
computers and Personal Computers more confidently and cost effectively. For
more information and a list of Compaq Management Solutions Partners and
their products, visit www.compaq.com/im/partners/index.html on the Compaq
Web site.
Desktop Management
Quick Setup & User’s Guide 6-25
Page 65

Desktop Management
6-26 Quick Setup & User’s Guide
Page 66

chapter 7
For More Information
Using the Compaq iPAQ Reference Library CD
Refer to the Compaq iPAQ Reference Library CD for additional product
documentation. Books on the CD include:
■ Quick Setup & User’s Guide (this book, in PDF Format)
■ Safety & Regulatory Information (PDF Format)
■ Troubleshooting (PDF Format)
■ Safety & Comfort Guide (Windows Help format)
If you do not have a CD-ROM drive, you may download the product documentation from the
✎
Quick Setup & User’s Guide 7-1
Compaq Web site at www.compaq.com/support.
Page 67

For More Information
✎
Insert the compact disc into the CD-ROM drive. There may be a slight delay
while the software checks the Windows Regional Settings. A menu of the
books available on the compact disc is automatically displayed.
Click the title of the book you want to read. The first time you click a link to a
book provided on CD in Adobe PDF format, you may be prompted to install
the Adobe Acrobat Reader software, which is also provided for you on the
CD. Read and follow the prompts to install Acrobat Reader.
The menu and books are displayed in the language chosen during initial system setup or
specified later in your Windows Regional Settings. If the Regional Settings do not match one of
the languages supported on the CD, the menu and books are displayed in English.
If there is no CD-ROM drive activity for two minutes or more, it may be
because Autorun is not enabled on the system. To run the Compaq iPAQ
Reference Library CD if it does not run automatically:
1. Click Start>Run.
2. Type
X:\CompaqiPAQ.exe
(where X is the drive letter designator for the CD-ROM drive)
3. Click OK.
7-2 Quick Setup & User’s Guide
Page 68

appendix A
Specifications
Compaq iPAQ Desktop Personal Computer
Desktop Dimensions
Height 11.8 in 30.0 cm
Width 5.7 in 14.4 cm
Depth 9.4 in 24.0 cm
Approximate Weight 10.7 lb 4.8 kg
Temperature Range (values subject to change with increasing altitude)
Operating 50* to 95*F 10* to 35*C
Nonoperating -22* to 140*F -30* to 60*C
Relative Humidity
(noncondensing)
Operating
(28*C max wet bulb)
Nonoperating
(38.7*C max wet bulb)
Mechanical Shock (11ms 1/2 sine shock pulse)
Operating 5 G’s 5 G’s
Nonoperating 20 G’s 20 G’s
Vibration (random, G’s nominal)
Operating (10 to 300 hz) .25 .25
Nonoperating (10 to 500 hz) .50 .50
Maximum Altitude
(unpressurized)
Operating 10,000 ft. 3048 m
Nonoperating 30,000 ft. 9144 m
Power Supply
Operating Voltage Range 90-132 VAC 180-264 VAC
Rated Voltage Range 100-127 VAC 200-240 VAC
Rated Line Frequency 50-60 Hz 50-60 Hz
Power Output 90 W 90 W
10-90% 8-90%
5-95% 5-95%
Quick Setup & User’s Guide A-1
Page 69

Specifications
Compaq iPAQ Desktop Personal Computer (Continued)
Rated Input Current
(maximum)
Power Dissipation
Maximum 400 BTU/hr. 117 watts
Typical 70 BTU/hr. 50 watts
2.5 A 1.25 A
A-2 Quick Setup & User’s Guide
Page 70

Index
A
access panels. See side access panels
Altiris eXpress
Altiris, Inc.
Armada Notebook PC
asset tracking and security
AssetControl
audio connectors
autosensing capabilities 4-3
6-3
6-2
2-1
6-4–6-17
6-4
2
B
backing up data files 7
building blocks and partners 6-24–6-25
C
cable lock provision 6-6, 6-14
cables, color-coded
caring for MultiBay drives 2-1
cautions
DriveLock security feature
memory contacts
operating system installation
prevention of data loss 8, 2-1, 2-2
ROM protection
7
setup
static electricity 3-1, 3-4
CD-ROM drive
CD-RW drive
color coding of cables
Compaq Insight Manager LC 6-4
Compaq iPAQ Reference Library CD
Safety & Comfort Guide
Safety & Regulatory Information
Troubleshooting
Compaq Restore CD
Compaq Security Lock, optional 6-14
components
front panel
rear panel 2, 5-1
configuration and deployment
connector
4
6-5, 6-10
3-4
4
6-19
2-1
2-1
4
7-1
7-1
7-1
7
6
6-2–6-3
controlling data transfer through serial, parallel,
or USB interface
Ethernet RJ-45
headphone 6
Legacy Module 2
line-in audio 2
line-out audio 2
microphone 6
monitor 2
mouse 4
parallel (Legacy Module) 2, 5-1
power cord
PS/2 keyboard (Legacy Module) 2, 5-1
PS/2 mouse (Legacy Module)
serial (Legacy Module)
2, 6
USB
connector locations 2
2
2, 5
6-5
2, 5-1
2, 5-1
D
delimiter characters, keyboard 6-12
desktop management
disabling DriveLock
display settings
documentation, additional product 7-1
DriveLock password
changing
entering
DriveLock security
DriveLock, enabling or disabling
drivers, installing network
dual-state power button
DVD-ROM drive 2-1
6-11
6-11
6-1–6-25
6-10
7
6-5
6-10
4-3
6, 8
E
Easy Access Buttons 1-1
Easy Access Keyboard
easy-carry handle
enabling DriveLock 6-10
Ethernet RJ-45 connector
external devices, connecting 4
1-1
2
2
Quick Setup & User’s Guide Index-i
Page 71

Index
F
Fingerprint Identification Technology 6-15
formatting a MultiBay hard drive
front panel components
6
2-3
H
handle 2
hard drive 3-1
MultiBay
partitioning and formatting
hard drive, removing and replacing internal
headphone connector
2-1, 2-3
2-3
6
I
installing the operating system 7
internal hard drive 3-1
Internet
accessing 4-1
choosing a service provider
iPAQ Desktop Security Bar
4-1
3-1, 6-6, 6-12
K
keyboard connection 3, 4
keyboard delimiter characters 6-12
keyboard programming
1-1
L
Legacy Module 2, 4, 5-1
light
power-on
system activity 6
line-in or line-out audio connector 2
6
M
memory 3-1
adding or removing modules
specifications
microphone connector
monitor connection 4
mounting holes 6-6, 6-13
3-4
6
3-4–3-7
3-8
mouse connection
MultiBay
DriveLock security
hot-plugging or hot-swapping drives
inserting drives
partitioning and formatting a hard drive
removable drives
removing drives
security
MultiBay eject button
3, 4
6-5, 6-10
2-2
2-4
2-1
2-5
6-5
6
N
national keyboard delimiter characters 6-12
network communications
autosensing capabilities
installing network drivers
network status lights
NIC-based alerts
remote wakeup support
network interface controller (NIC) connection
network service boot 6-2
network status lights, interpreting
NIC-based alerts
notes
Blink LED during Energy Save
calling Compaq
drive blank
Fingerprint Identification Technology
keyboard delimiters
language chosen during Setup
Legacy Module
memory module installation
monitor timeouts
network cables
network drivers
power button shutoff
power disconnection 6-20
power-on or setup password
Prefailure Warranty
product documentation
reconfiguring power button
Remote ROM Flash 6-19
Remote Security Management
remote software distribution
Remote Wakeup
4-2
6-24
2-4, 2-5
5-1
4-2
4-2
4-3
4-3
4-2
4-2
4-2
4-2
6-22
6-15
6-9, 6-12
7-2
3-7
6-23
8
6-9, 6-12, 6-13
6-16
7-1
8
6-20
6-20
4-2, 6-20
2-3
4
Index-ii Quick Setup & User’s Guide
Page 72

Index
Security Bar
Setup replication
signal cable removal
SMART hard drives
software support
USB keyboard use during setup
3-1, 6-12
6-21
3-9
6-16
6-1
O
operating system 7
ownership tag 6-6
P
parallel interface control 6-5
partitioning a MultiBay hard drive
password
clearing
DriveLock
forgotten
national keyboard delimiter characters
overview
power-on
security
setup
PC Transplant
2
ports
power button 6, 8
power cord connector 2, 5
power supply 6-17
power-on light
power-on password
changing
deleting
entering
establishing
6-12
changing
entering
6-11
6-11
6-12
6-5
changing
deleting
entering
establishing
6-9
6-9
6-8
6-6
changing
deleting
entering
establishing
6-9
6-9
6-8
6-3
6
6-9
6-9
6-8
6-7
6-7
6-7
8
2-3
6-12
product registration
programming, keyboard 1-1
PS/2 connectors
8
3, 4
R
rear panel components 2, 5-1
Reference Library CD
registration
Remote System Installation 6-2
remote wakeup support
removable drives, optional
removable media boot control
8
7-1
4-2
2-1
6-5
S
security
cable lock provision
Fingerprint Identification Technology
iPAQ Desktop Security Bar
mounting holes
password
security bar
serial connector (Legacy Module)
serial interface control 6-5
serial number
setup password
changing
deleting
entering
establishing
side access panels
removing and replacing
SMART hard drive
software updating and management
specifications
SuperDisk LS-120 drive
SuperDisk LS-260 drive
surge-tolerant power supply
system activity light
6-6
6-6
2
6-9
6-9
6-8
6-7
A-1
6-14
3-1, 6-12
6-13
3-1
2-1
2-1
2-1
6-17
6
T
turning off the personal computer 8
6-15
2, 4
6-18–6-24
Quick Setup & User’s Guide Index-iii
Page 73

Index
U
Universal Serial Bus (USB) 3
upgrading the personal computer 3-1
USB interface control
USB. See Universal Serial Bus (USB)
6-5
V
voltage select switch 2
voltage setting 2
W
warnings
electrical shock
hot surfaces
misuse of computer
network interface controller 4
4, 5, 3-1
3-5
1
Index-iv Quick Setup & User’s Guide
 Loading...