

Page 1

b
Quick User’s Guide
Compaq Evo D510 e-pc
Document Part Number: 303399-001
5970-5295-EN
August 2002
This book will help you with the initial hardware and software setup
for the Compaq Evo D510 e-pc.
Page 2

© 2002 Compaq Information Technologies, L.P.
Compaq, the Compaq logo, and Evo are trademarks of Compaq Information
Technologies Group, L.P. in the U.S. and other countries.
Microsoft and Windows are trademarks of Microsoft Corporation in the U.S.
and other countries.
All other product names mentioned herein may be trademarks of their respective
companies.
Compaq Computer Corporation shall not be liable for technical or editorial
errors or omissions contained herein or for incidental or consequential damages
in connection with the furnishing, performance, or use of this material. The
information in this document is provided “as is” without warranty of any kind,
including, but not limited to, the implied warranties of merchantability and
fitness for a particular purpose, and is subject to change without notice. The
warranties for Compaq products are set forth in the express limited warranty
statements accompanying such products. Nothing herein should be construed as
constituting an additional warranty.
This document contains proprietary information that is protected by copyright.
No part of this document may be photocopied, reproduced, or translated to
another language without the prior written consent of Compaq Computer
Corporation.
WARNING: Text set off in this manner indicates that failure to follow
Å
directions could result in bodily harm or loss of life.
CAUTION: Text set off in this manner indicates that failure to follow
Ä
directions could result in damage to equipment or loss of information.
Quick User’s Guide
Compaq Evo D510 e-pc
First Edition (August 2002)
Document Part Number: 303399-001
5970-5295-EN
Page 3

Contents
1Quick Setup
Connecting Devices. . . . . . . . . . . . . . . . . . . . . . . . . . . . . . . . . . . . . . . . . . . . . . . . . . . . 1–2
Connecting the Power Cords. . . . . . . . . . . . . . . . . . . . . . . . . . . . . . . . . . . . . . . . . . . . . 1–3
Using Your PC . . . . . . . . . . . . . . . . . . . . . . . . . . . . . . . . . . . . . . . . . . . . . . . . . . . . . . . 1–3
Starting Your PC for the First Time . . . . . . . . . . . . . . . . . . . . . . . . . . . . . . . . . . . . 1–3
Customizing the Monitor Display . . . . . . . . . . . . . . . . . . . . . . . . . . . . . . . . . . . . . . . . . 1–4
Protecting Your Software . . . . . . . . . . . . . . . . . . . . . . . . . . . . . . . . . . . . . . . . . . . . . . . 1–4
Compaq Restore Solution . . . . . . . . . . . . . . . . . . . . . . . . . . . . . . . . . . . . . . . . . . . . 1–4
Registration . . . . . . . . . . . . . . . . . . . . . . . . . . . . . . . . . . . . . . . . . . . . . . . . . . . . . . . . . . 1–4
Turning Off the PC . . . . . . . . . . . . . . . . . . . . . . . . . . . . . . . . . . . . . . . . . . . . . . . . . . . . 1–5
Accessibility . . . . . . . . . . . . . . . . . . . . . . . . . . . . . . . . . . . . . . . . . . . . . . . . . . . . . . . . . 1–5
For More Information . . . . . . . . . . . . . . . . . . . . . . . . . . . . . . . . . . . . . . . . . . . . . . . . . . 1–5
2Troubleshooting
Basic Troubleshooting. . . . . . . . . . . . . . . . . . . . . . . . . . . . . . . . . . . . . . . . . . . . . . . . . . 2–1
Overview. . . . . . . . . . . . . . . . . . . . . . . . . . . . . . . . . . . . . . . . . . . . . . . . . . . . . . . . . 2–1
Helpful Hints. . . . . . . . . . . . . . . . . . . . . . . . . . . . . . . . . . . . . . . . . . . . . . . . . . . . . . 2–1
Solving Minor Problems. . . . . . . . . . . . . . . . . . . . . . . . . . . . . . . . . . . . . . . . . . . . . 2–2
Solving Hardware Installation Problems. . . . . . . . . . . . . . . . . . . . . . . . . . . . . . . . . . . . 2–7
A Replacing the Battery
B Specifications
C Safety & Regulatory Notices
Regulatory Compliance Identification Numbers. . . . . . . . . . . . . . . . . . . . . . . . . . . . . . C–1
Federal Communications Commission Notice . . . . . . . . . . . . . . . . . . . . . . . . . . . . . . . C–1
Modifications . . . . . . . . . . . . . . . . . . . . . . . . . . . . . . . . . . . . . . . . . . . . . . . . . . . . . C–2
Quick User’s Guide iii
Page 4

Contents
Mouse Compliance Statement . . . . . . . . . . . . . . . . . . . . . . . . . . . . . . . . . . . . . . . . C–2
Cables . . . . . . . . . . . . . . . . . . . . . . . . . . . . . . . . . . . . . . . . . . . . . . . . . . . . . . . . . . . C–2
Declaration of Conformity for Products
Marked with the FCC Logo (United States only). . . . . . . . . . . . . . . . . . . . . . . . . . C–2
Canadian Notice . . . . . . . . . . . . . . . . . . . . . . . . . . . . . . . . . . . . . . . . . . . . . . . . . . . C–3
Avis Canadien. . . . . . . . . . . . . . . . . . . . . . . . . . . . . . . . . . . . . . . . . . . . . . . . . . . . . C–3
European Union Notice . . . . . . . . . . . . . . . . . . . . . . . . . . . . . . . . . . . . . . . . . . . . . . . . . C–4
Japanese Notice . . . . . . . . . . . . . . . . . . . . . . . . . . . . . . . . . . . . . . . . . . . . . . . . . . . . . . . C–4
Energy Star Compliance . . . . . . . . . . . . . . . . . . . . . . . . . . . . . . . . . . . . . . . . . . . . . . . . C–5
German Ergonomics Notice . . . . . . . . . . . . . . . . . . . . . . . . . . . . . . . . . . . . . . . . . . . . . C–6
Laser Safety. . . . . . . . . . . . . . . . . . . . . . . . . . . . . . . . . . . . . . . . . . . . . . . . . . . . . . . . . . C–6
CDRH Regulations . . . . . . . . . . . . . . . . . . . . . . . . . . . . . . . . . . . . . . . . . . . . . . . . . C–6
Compliance with International Regulations . . . . . . . . . . . . . . . . . . . . . . . . . . . . . . C–6
Laser Product Label . . . . . . . . . . . . . . . . . . . . . . . . . . . . . . . . . . . . . . . . . . . . . . . . C–7
Laser Information . . . . . . . . . . . . . . . . . . . . . . . . . . . . . . . . . . . . . . . . . . . . . . . . . . C–7
Battery Replacement Notice . . . . . . . . . . . . . . . . . . . . . . . . . . . . . . . . . . . . . . . . . . C–8
Power Cord Set Requirements . . . . . . . . . . . . . . . . . . . . . . . . . . . . . . . . . . . . . . . . . . . C–9
iv Quick User’s Guide
Page 5

Quick Setup
WARNING: Misuse of your personal computer or failure to establish a
Å
safe and comfortable workstation may result in discomfort or serious
injury. Refer to your Safety & Comfort Guide for more information on
choosing a workspace and creating a safe and comfortable work
environment.
This equipment has been tested and found to comply with the limits for a
Class B digital device, pursuant to part 15 of the FCC Rules. For more
information, refer to Appendix C, “Safety & Regulatory Notices.” To
reduce the risk of electrical shock, connect your personal computer only to
a grounded (earthed) electrical outlet that is easily accessible at all times.
1
Quick User’s Guide 1–1
Page 6
Quick Setup
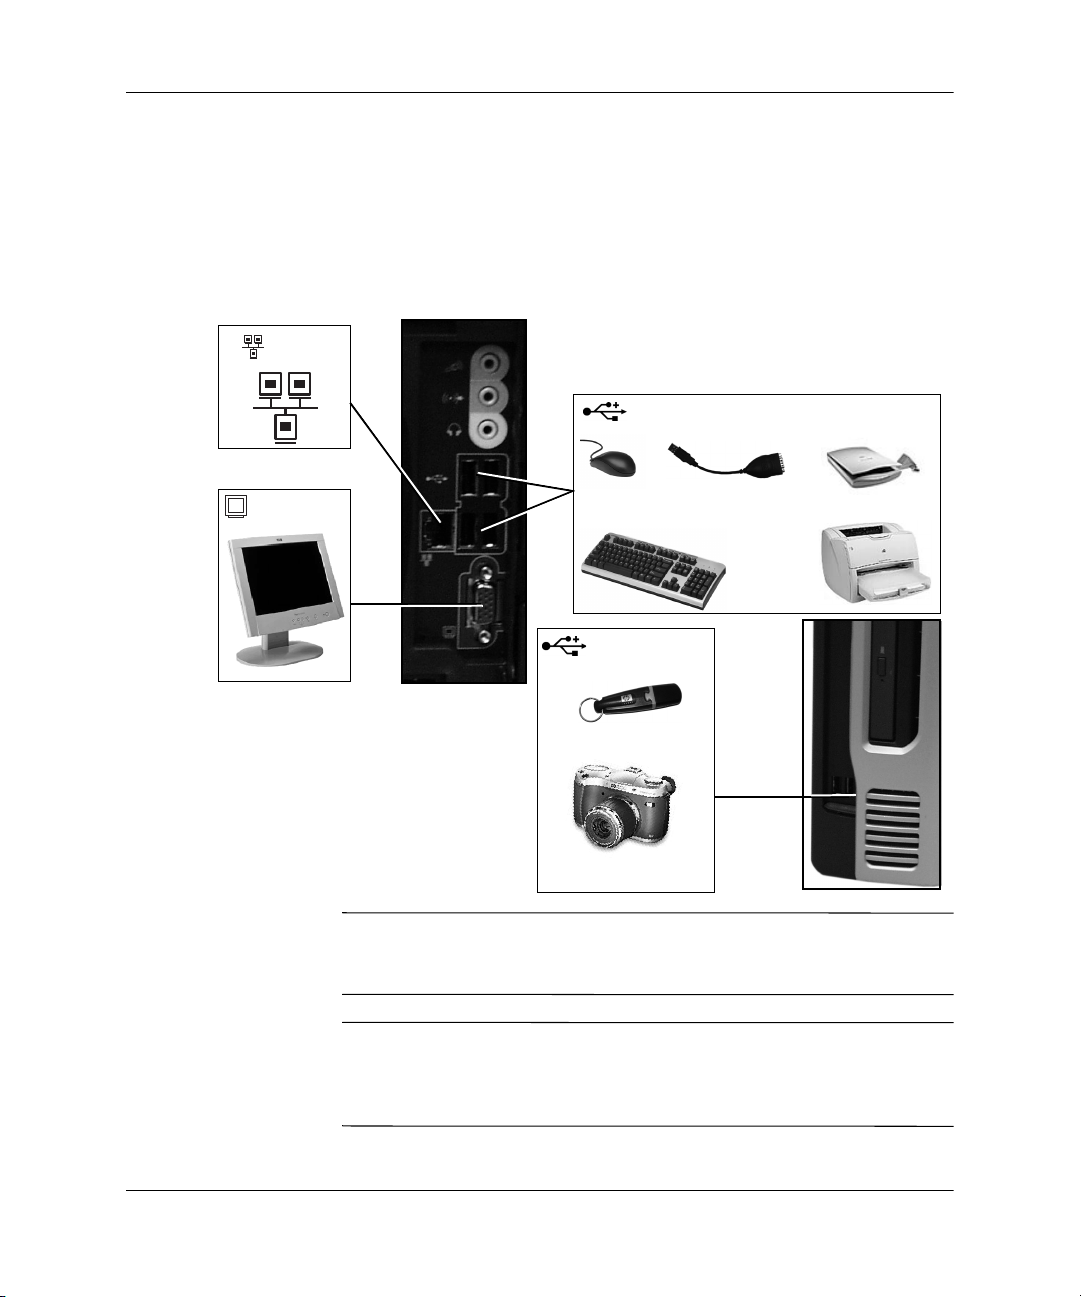
Connecting Devices
Connect the monitor, mouse, and keyboard cables to the personal
computer. If you use a network, connect the network cable to the
Ethernet RJ-45 Connector. Connectors are color-coded for easy setup.
The connectors are shaped to go in one way only. Typical connectors
are shown below:
LAN
4 x USB 2.0
monitor
Å
Ä
USB ↔ serial
USB ↔ printer
2 x USB 2.0
WARNING: To reduce the risk of electrical shock, fire, or damage to
the equipment, do not plug telecommunications/telephone connections
into the network interface controller (NIC) connectors.
CAUTION: Do not add additional, optional hardware devices to your
personal computer until the operating system is successfully installed.
Doing so may cause errors and may prevent the operating system from
installing properly.
1–2 Quick User’s Guide
Page 7
Connecting the Power Cords
WARNING: To reduce the risk of electric shock or damage to the equipment:
Å
■ Do not disable the power cord grounding plug. The grounding plug is
an important safety feature.
■ Plug the power cord into a grounded (earthed) electrical outlet that is
easily accessible at all times.
■ Disconnect power from the personal computer by unplugging the
power cord from either the electrical outlet or the personal computer.
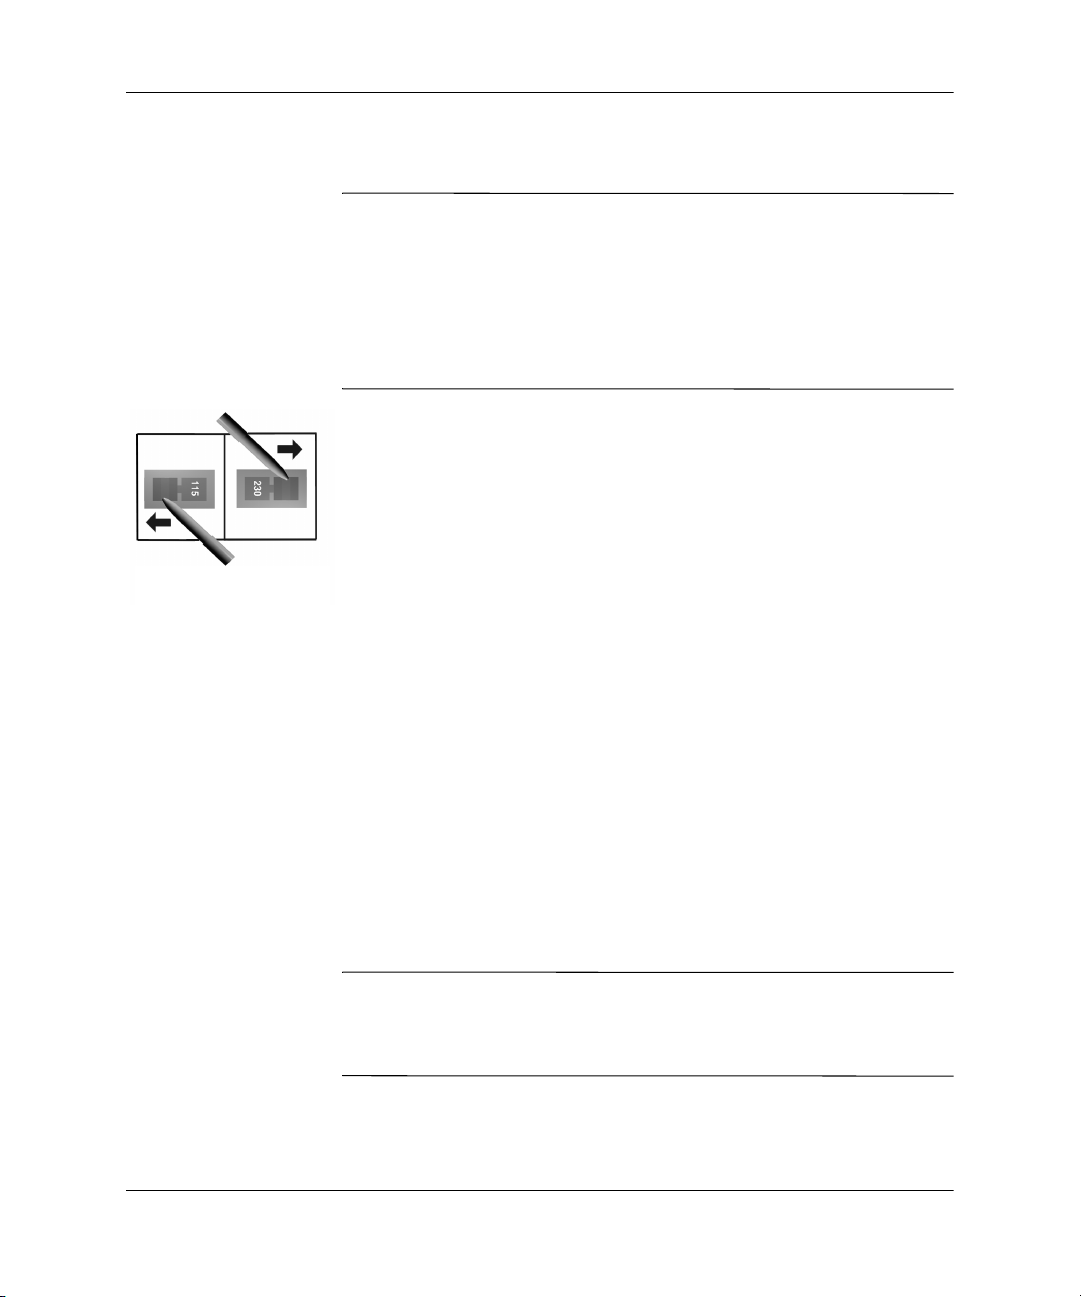
1. Remove the warning label covering the PC’s power connector,
and ensure that the voltage setting is correct for your country.
(Refer to Appendix C, in section “Power Cord Set
Requirements.” The voltage is set during manufacture and should
already be correct.)
2. Connect the power cords to the rear of the monitor and the
Voltage Selection
Switch
computer. (The connectors are shaped to go in one way only).
3. Connect the monitor’s power cord and the computer’s power cord
to a grounded outlet.
Quick Setup
Using Your PC
Starting Your PC for the First Time
Turn on the monitor, then press the power button (located on the front
panel) to turn on the PC. The first time you turn on the personal
computer, the operating system is installed automatically. This
process takes about 5 to 10 minutes, depending on which operating
system is being installed. Carefully read and follow the instructions
that appear on the screen to complete the installation. If required, the
product ID number is printed on a label affixed to the PC.
CAUTION: Once the automatic installation has begun, DO NOT TURN
Ä
OFF THE COMPUTER UNTIL THE PROCESS IS COMPLETE. Turning off the
personal computer during the installation process might damage the
software that runs the personal computer.
When the Welcome to Windows screen is displayed, the Windows
installation process is complete.
Quick User’s Guide 1–3
Page 8

Quick Setup
Customizing the Monitor Display
You can manually select or change the monitor brand, model, refresh
rates, color, resolution, and power management settings. Right-click
on the Windows Desktop, then click Properties to change display
settings, or refer to the online documentation provided with the
graphics controller utility.
Protecting Your Software
To protect your software from loss or damage, you should keep a
backup copy of all system software, applications, and related files
stored on your hard drive. Refer to your operating system or backup
utility documentation for instructions on making backup copies of
your data files.
Compaq Restore Solution
Restore the original operating system and factory-installed software
by using the Compaq Restore Plus! CD and any other CDs that came
with the computer. Carefully read and follow the instructions for the
restore solution that came with the computer the computer.
For questions about or problems with this CD, please contact Compaq
Customer Support.
Registration
Be sure to register your new personal computer with Compaq.
Registration establishes a record of ownership and gives you an
opportunity to receive product announcements, updates, and other
communications periodically, if you choose to do so. Registration is
easy—just visit the Compaq Web site at www.compaq.com/register
and follow the instructions that appear on the screen.
1–4 Quick User’s Guide
Page 9

Turning Off the PC
To properly turn off the personal computer, first shut down the
operating system software. In Microsoft Windows operating systems,
click Start > Shut Down.
To turn off power to the computer in the event that the operating
system does not respond to the Shut Down command, press and hold
the power button for five seconds.
Accessibility
Compaq is committed to designing products, services, and programs
with improved usability and accessibility for all customers. Compaq
products with Microsoft Windows XP preinstalled, or that are XP
Ready, are designed for accessibility. These products are tested with
industry-leading Assistive Technology products to ensure equal
access—anytime, anywhere...to anyone.
For More Information
Quick Setup
Additional information, software, and driver updates are available on
the Compaq Web site at: www.compaq.com/support (search for Evo
D510 e-pc).
Quick User’s Guide 1–5
Page 10

Page 11

Basic Troubleshooting
Overview
This chapter is intended for basic troubleshooting only. A
comprehensive Troubleshooting Guide is available on the Web at
http://www.compaq.com/support.
If you choose to use an operating system different than what was
shipped with your PC, refer to the following support Web site at
http://www.compaq.com/support for additional support that may be
available.
Helpful Hints
If you encounter some minor problem with your computer, monitor,
or software, refer to the following list of general suggestions before
taking further action:
2
Troubleshooting
■ Check that the computer and monitor are plugged into a working
electrical outlet.
■ Check to see that the computer is turned on and the green power
light is on.
■ Check to see that the monitor is turned on and the green monitor
light is on.
■ Turn up the brightness and contrast controls of the monitor if the
monitor is dim.
■ Press and hold any key. If the system beeps, then your keyboard is
operating correctly.
■ Check all cable connections for loose connections or incorrect
connections.
Quick User’s Guide 2–1
Page 12

Troubleshooting
■ Reconfigure your computer after installing a non–plug and play
option. Refer to “Solving Hardware Installation Problems” on
page 2-7 for instructions.
■ Be sure that all the needed device drivers have been installed. For
example, if you have connected a printer, you need to install a
printer driver.
■ Take out all removable media from the removable media drives
when you turn on your system.
CAUTION: When the computer is plugged into an AC power source,
Ä
there is always power applied to the system board. You must disconnect
the power cord from the power source before opening the computer to
prevent system board or component damage.
Solving Minor Problems
You may be able to easily resolve the minor problems described in
this section. If a problem persists and you are unable to resolve it
yourself or if you feel uncomfortable about performing the operation,
contact your Compaq authorized dealer or reseller.
Solving Minor Problems
Problem Cause Solution
Computer will not
turn on.
2–2 Quick User’s Guide
Computer is not
connected to an external
power source.
Cables to the external
power source are
unplugged.
Drive power, data, or
power supply cables may
not be properly
connected.
Connect to an external power source.
Ensure that cables connecting the
computer to the external power
source are plugged in properly and
the wall outlet is active.
Reseat drive power, data, and power
supply cables.
Page 13

Solving Minor Problems (Continued)
Problem Cause Solution
Power-On Self Test
(POST) displays an
error.
You hear a buzzing
noise.
Computer appears
locked up and will not
turn off when the power
button is pressed.
Computer date and
time display is
incorrect.
Computer powered off
automatically.
The unit temperature was
exceeded. The fan may
be blocked.
This is the pre-boot
diagnostics capability
feature. It detects
problems with your PC.
Software control of the
power switch is not
functional.
RTC (real-time clock)
battery may need to be
replaced. Battery life is
approximately 3–5 years.
The unit temperature may
have been exceeded. The
fan may be blocked.
1. Unit is in an exceedingly hot
environment. Let it cool down.
2. Ensure that computer air vents
are not blocked and internal fan
is running.
Contact Compaq authorized reseller
or service provider.
For more detailed help refer to the
troubleshooting information which is
available on the Compaq Web site
www.compaq.com/support (search
for Evo D510 e-pc).
1. Count the number of beeps after
the buzzer.
2. Contact Customer Support.
Press and hold the power button for
at least 5 seconds until the computer
turns off.
First, reset the date and time under
Control Panel. If the problem persists,
replace the RTC battery. Refer to
Appendix A, “Replacing the Battery”
for instructions on installing a new
battery, or contact your Compaq
authorized dealer or reseller for RTC
battery replacement.
1. Unit is in an exceedingly hot
environment. Let it cool down.
2. Ensure that computer air vents
are not blocked and internal fan
is running.
Contact Compaq authorized reseller
or service provider.
Troubleshooting
Quick User’s Guide 2–3
Page 14

Troubleshooting
Solving Minor Problems (Continued)
Problem Cause Solution
The unit temperature was
exceeded because the
computer was functioning
with the cover.
Computer appears to
pause periodically.
Network driver is loaded
and no network
connection is established.
Cannot remove
computer cover.
Port Control System is
installed and locked in
place, or cable lock is
used and must be
removed.
Cursor will not move
using the arrow keys on
The Num Lock key may
be on.
the keypad.
Blank monitor screen. Monitor is not turned on
and the monitor light is
not on.
The cable connections are
not correct.
The energy saver feature
has been enabled.
You a re us ing a
fixed-sync monitor and it
will not sync at the
resolution chosen.
The keyboard is not
working.
The keyboard cable is not
correctly connected.
The keyboard is dirty. Check all keys are at the same
Replace cover and let the computer
cool down before attempting to turn
on power to the computer.
Establish a network connection, or
use Computer Setup or Windows
Device Manager to disable the
network controller.
Remove Port Control System or cable
lock.
Press the Num Lock key. The Num
Lock light should not be on if you
want to use the arrow keys.
Turn on the monitor and check that
the monitor light is on.
Check the cable connection from the
monitor to the computer and to the
electrical outlet.
Press any key or click the mouse
button and, if set, type your
password.
Be sure that the monitor can accept
the refresh rate and resolution chosen.
Plug the cable into the correct
connector on the back of the PC.
Color coding is used for easy
matching.
height, and none are stuck.
2–4 Quick User’s Guide
Page 15

Solving Minor Problems (Continued)
Problem Cause Solution
The mouse is not
working.
The keyboard itself is
defective.
You are not using the
correct driver, or you
need to update the driver.
The keyboard driver is
provided with all
Windows 2000 and
Windows XP preloaded
systems. For other
operating systems, refer
to your operating system’s
documentation.
You are not using the
latest BIOS.
Your keyboard uses
batteries, and the
batteries need to be
replaced.
The mouse cable is not
correctly connected.
You are not using the
latest BIOS.
Either replace the keyboard by a
known working unit or try the
keyboard with another PC.
Download the latest driver from the
Compaq Web site
www.compaq.com/support (search
for Evo D510 e-pc).
Download the latest BIOS from the
Compaq Web site
www.compaq.com/support (search
for Evo D510 e-pc).
Replace the batteries.
1. Switch off the PC (not necessary
with a USB mouse).
2. Plug the cable into the correct
connector on the back of the PC
(color coding is used for easy
matching).
3. Switch on the PC.
Download the latest BIOS from the
Compaq Web site
www.compaq.com/support (search
for Evo D510 e-pc).
Troubleshooting
Quick User’s Guide 2–5
Page 16

Troubleshooting
Solving Minor Problems (Continued)
Problem Cause Solution
The mouse is dirty (does
not apply to optical
mouse).
Clean the mouse ball as shown
below.
The mouse itself is
defective.
Your mouse uses
batteries, and the
batteries need to be
replaced.
Replace the mouse by a known
working unit or try the mouse with
another PC.
Replace the batteries.
2–6 Quick User’s Guide
Page 17

Solving Hardware Installation Problems
You may need to reconfigure the computer when you add or remove
hardware, such as an additional diskette drive. If you install a plug
and play device, Windows 2000 and Windows XP automatically
recognize the device and configure the computer. If you install a
non–plug and play device, you must reconfigure the computer after
completing installation of the new hardware. In Windows 2000 and
Windows XP, select the Add New Hardware icon in the Control Panel
and follow the instructions that appear on the screen.
Solving Hardware Installation Problems
Problem Cause Solution
A new device is not
recognized as part of the
system.
Cable(s) of new
external device are
loose or power cables
are unplugged.
Power switch of new
external device is not
turned on.
When the system
advised you of changes
to the configuration,
you did not accept
them.
Ensure that all cables are properly
and securely connected and that
pins in the cable or connector are
not bent down.
Turn off the computer, turn on the
external device, then turn on the
computer to integrate the device
with the computer system.
Reboot the computer and follow the
instructions for accepting the
changes.
Troubleshooting
Quick User’s Guide 2–7
Page 18

Page 19

Replacing the Battery
The battery that comes with your computer provides power to the
real-time clock and has a minimum lifetime of about three years.
When replacing the battery, use a battery equivalent to the battery
originally installed on your computer. Your computer comes with a
3-volt lithium coin cell battery.
The lifetime of the lithium battery can be extended by plugging the
✎
computer into a live AC wall socket. The lithium battery is only used
when the computer is NOT connected to AC power.
WARNING: Your computer contains an internal lithium manganese dioxide
Å
battery. There is a risk of fire and burns if the battery is not handled properly. To
reduce the risk of personal injury:
■ Do not attempt to recharge the battery.
■ Do not expose to temperatures higher than 60°C (140ºF).
■ Do not disassemble, crush, puncture, short external contacts, or
dispose of in fire or water.
■ Replace the battery only with the Compaq spare designated for this
product.
A
CAUTION: Before replacing the battery, it is important to back up the
Ä
computer CMOS settings. When the battery is removed or replaced, the
CMOS settings will be cleared. Refer to the Computer Setup Guide for
information on backing up the CMOS settings.
Quick User’s Guide A–1
Page 20

Replacing the Battery
Batteries, battery packs, and accumulators should not be disposed of
N
together with the general household waste. In order to forward them to
recycling or proper disposal, please use the public collection system or
return them to Compaq, their authorized partners, or their agents.
CAUTION: Static electricity can damage the electronic components of
Ä
the computer or optional equipment. Before beginning these procedures,
ensure that you are discharged of static electricity by briefly touching a
grounded metal object.
1. Exit all software applications, shut down the operating system
software, turn off the personal computer and any external devices,
then disconnect the power cord from the power outlet.
2. Open the chassis, then remove the hard drive and CD-ROM drive.
3. Locate the battery and battery holder on the system board.
4. To release the battery from its holder, squeeze the metal clamp
that extends above one edge of the battery.
5. When the battery pops up, lift it out.
Removing a Coin Cell Battery
A–2 Quick User’s Guide
Page 21

Replacing the Battery
6. To insert the new battery, slide one edge of the replacement
battery under the holder’s lip with the positive side up. Push the
other edge down until the clamp snaps over the other edge of the
battery.
Replacing a Coin Cell Battery
7. Replace the CD-ROM drive and the hard drive, and then close the
cover.
8. Plug in the computer and turn on power to the computer.
Reset the date and time, your passwords, and any special system
setups, using Computer Setup. To access Computer Setup, restart the
computer. When the Compaq logo is displayed, press F8.
Quick User’s Guide A–3
Page 22

Page 23

Specifications
Operating temperature and humidity ranges may vary depending on
✎
the mass storage devices installed. High humidity levels can cause
improper operation of disk drives. Low humidity ranges can
aggravate static electricity problems and cause excessive wear of the
disk surface.
The power consumption and acoustics figures given in the tables
below are valid for the standard configuration as shipped. These
figures will vary if some components are changed or added to in the
initial configuration.
When the computer is turned off with the power button on the front
panel, the power consumption falls below 5W, but it is not zero. The
special on/off method used by these computers considerably extends
the lifetime of the power supply. To reach zero power consumption in
“off” mode, either unplug the power outlet or use a power block with
a switch.
B
Quick User’s Guide B–1
Page 24

Specifications
Specifications for the Compaq Evo D510 e-pc
Characteristics Compaq Evo D510 e-pc
Weight (configuration with 1 CD-ROM
drive, excluding keyboard and display)
Dimensions
Width:
Height:
Depth:
Acoustic noise emission (ISO 7779)
Idle (typical)
Operating with hard disk access
4.5kg (9.92 pounds)
250mm (9.8in.)
97mm (3.82in.)
310mm (12.2in.)
Sound power level
LwA ≤ 3.3B(A)
1
Sound pressure level at
operator position
LpA ≤ 24dB(A)
LwA ≤ 3.8B(A)
Power Supply
Input voltage (voltage selection switch)
Input frequency:
Power consumption - Windows 2000
Max. operating
Idle (typical)
Sleep (suspend)
Off
Storage Humidity 8% to 85% (relative)
2
100-127V~ 6A max,
200-240V~ 4A max
50Hz/60Hz
115V / 60Hz and 230V / 50Hz
70W
50W
< 2.5W
< 2.5W
(1) Declared values LwAd = LwA + 0.3B(A).
✎
(2) As an ENERGY STAR partner, Compaq has determined that this
product meets the ENERGY STAR guidelines for energy efficiency.
This value is only achieved when “Suspend to RAM” (S3 mode) is
enabled.
LpA ≤ 27dB(A)
B–2 Quick User’s Guide
Page 25

Safety & Regulatory Notices
Regulatory Compliance Identification Numbers
For the purpose of regulatory compliance certifications and
identification, your product has been assigned a unique Compaq
series number. The series number can be found on the product
nameplate label, along with all required approval markings and
information. When requesting compliance information for this
product, always refer to this series number. The series number should
not be confused with the marketing name or model number of the
product.
Federal Communications Commission Notice
This equipment has been tested and found to comply with the limits
for a Class B digital device, pursuant to Part 15 of the FCC Rules.
These limits are designed to provide reasonable protection against
harmful interference in a residential installation. This equipment
generates, uses, and can radiate radio frequency energy and, if not
installed and used in accordance with the instructions, may cause
harmful interference to radio communications. However, there is no
guarantee that interference will not occur in a particular installation.
If this equipment does cause harmful interference to radio or
television reception, which can be determined by turning the
equipment off and on, the user is encouraged to try to correct the
interference by one or more of the following measures:
C
■ Reorient or relocate the receiving antenna.
■ Increase the separation between the equipment and receiver.
■ Connect the equipment into an outlet on a circuit different from
that to which the receiver is connected.
Quick User’s Guide C–1
Page 26

Safety & Regulatory Notices
■ Consult the dealer or an experienced radio or television
technician for help.
Modifications
The FCC requires the user to be notified that any changes or
modifications made to this device that are not expressly approved by
Compaq Computer Corporation may void the user's authority to
operate the equipment.
Mouse Compliance Statement
This device complies with Part 15 of the FCC Rules. Operation is
subject to the following two conditions:
1. This device may not cause harmful interference, and
2. This device must accept any interference received, including
interference that may cause undesired operation.
Cables
Connections to this device must be made with shielded cables with
metallic RFI/EMI connector hoods in order to maintain compliance
with FCC Rules and Regulations.
Declaration of Conformity for Products
Marked with the FCC Logo (United States only)
This device complies with Part 15 of the FCC Rules. Operation is
subject to the following two conditions:
1. This device may not cause harmful interference, and
2. This device must accept any interference received, including
interference that may cause undesired operation.
For questions regarding your product, contact:
Compaq Computer Corporation
P. O. Box 692000, Mail Stop 530113
Houston, Texas 77269-2000
Or, call 1-800-652-6672 (1-800-OK COMPAQ).
C–2 Quick User’s Guide
Page 27

For questions regarding this FCC declaration, contact:
Or, call (281) 514-3333.
To identify this product, refer to the part, series, or model number
found on the product.
Canadian Notice
This Class B digital apparatus meets all requirements of the Canadian
Interference-Causing Equipment Regulations.
Avis Canadien
Cet appareil numérique de la classe B respecte toutes les exigences du
Règlement sur le matériel brouilleur du Canada.
Safety & Regulatory Notices
Compaq Computer Corporation
P. O. Box 692000, Mail Stop 510101
Houston, Texas 77269-2000
Quick User’s Guide C–3
Page 28

Safety & Regulatory Notices
European Union Notice
Products bearing the CE marking comply with the EMC Directive
(89/336/EEC) and the Low Voltage Directive (73/23/EEC) issued by
the Commission of the European Community and if this product has
telecommunication functionality, the R&TTE Directive (1999/5/EC).
Compliance with these directives implies conformity to the following
European Norms (in parentheses are the equivalent international
standards and regulations):
■ EN 55022 (CISPR 22) - Electromagnetic Interference
■ EN55024 (IEC61000-4-2, 3, 4, 5, 6, 8, 11) - Electromagnetic
Immunity
■ EN61000-3-2 (IEC61000-3-2) - Power Line Harmonics
■ EN61000-3-3 (IEC61000-3-3) - Power Line Flicker
■ EN 60950 (IEC 60950) - Product Safety
Japanese Notice
C–4 Quick User’s Guide
Page 29

Energy Star Compliance
Compaq Deskpro Workstations, Compaq Evo™ Desktops, and
Compaq Evo Workstations marked with the Energy Star Logo are
compliant with the U.S. Environmental Protection Agency (EPA)
Energy Star Computers Program. The EPA Energy Star Logo does
not imply endorsement by the EPA. As an Energy Star Partner,
Compaq Computer Corporation has determined the products marked
with the Energy Star Logo meet the Energy Star guidelines for energy
efficiency.
The Energy Star Computers Program was created by the EPA to
promote energy efficiency and reduce air pollution through more
energy-efficient equipment in homes, offices, and factories. Compaq
products achieve this by reducing the power consumption when not
being used. Instructions for using the energy saving features of your
computer are located in the “Power Management” section of the
Desktop Management Guide.
The power management feature of your computer is compatible with
any network operating system or environment that supports APM1.2.
This means the users in those environments will not be disconnected
from the network during the low-power operating state.
Safety & Regulatory Notices
The Power Management feature, when used in conjunction with an
external Energy Star compliant monitor, will support the power-down
features of the monitor. The Power Management feature allows an
external monitor to go into low-power mode when the energy save
timeout occurs. To take advantage of this energy savings, the monitor
Power Management feature has been preset to power down the
monitor after 15 minutes of system inactivity. Refer to the “Power
Management” section of the Desktop Management Guide for
instructions on modifying or disabling this feature.
CAUTION: Using the Energy Save Monitor feature with non–Energy Star
Ä
compliant monitors may cause video distortion when the Energy Save
timeout occurs.
Quick User’s Guide C–5
Page 30

Safety & Regulatory Notices
German Ergonomics Notice
Compaq Deskpro Workstations, Compaq Evo Desktops, and Compaq
Evo Workstations, when combined with Compaq Brand keyboards
and monitors that bear the “GS” approval mark, meet the
requirements of ZH 1/618 (German Safety Regulations for Display
Work Places in the Office Sector). The installation guides included
with the monitor provide configuration information.
Laser Safety
All Compaq systems equipped with a laser device comply with safety
standards, including International Electrotechnical Commission
(IEC) 825. With specific regard to the laser, the equipment complies
with laser product performance standards set by government agencies
as a Class 1 laser product. The product does not emit hazardous light;
the beam is totally enclosed during all modes of customer operation
and maintenance.
WARNING: To reduce the risk of exposure to hazardous radiation:
Å
■ Do not try to open the laser device enclosure. There are no
user-serviceable components inside.
■ Do not operate controls, make adjustments, or perform procedures to
the laser device other than those specified herein.
■ Allow only authorized Compaq service providers to repair the laser
device.
CDRH Regulations
The Center for Devices and Radiological Health (CDRH) of the U.S.
Food and Drug Administration implemented regulations for laser
products on August 2, 1976. These regulations apply to laser products
manufactured from August 1, 1976. Compliance is mandatory for
products marketed in the United States.
Compliance with International Regulations
All Compaq systems equipped with CD-ROM drives comply with
appropriate safety standards including IEC 825.
C–6 Quick User’s Guide
Page 31

Laser Product Label
The following label or equivalent is located on the surface of Compaq
laser products:
Safety & Regulatory Notices
This label indicates that the
product is classified as a CLASS
1 LASER PRODUCT. This label
appears on a laser device
installed in your product.
If you have an LS-120 drive or
an LS-260 drive, this label is
located next to the Class 1 Laser
Product label on your system.
Laser Information
■ Laser Type: Semiconductor GaAIAs
■ Wave Length: 780 +/- 35 nm
■ Divergence Angle: 53.5 Degrees +/- 0.5 degrees
■ Output Power: Less than 0.2 mW or 10,869 W·m-2 sr-1
■ Polarization: Circular 0.25
■ Numerical Aperture: 0.45 inches +/- 0.04 inches
Quick User’s Guide C–7
Page 32

Safety & Regulatory Notices
Battery Replacement Notice
WARNING: Your computer contains an internal lithium manganese dioxide,
Å
vanadium pentoxide, or alkaline battery or battery pack. There is risk of fire
and burns if the battery pack is not handled properly. To reduce the risk of
personal injury:
■ Do not attempt to recharge the battery.
■ Do not expose to temperatures higher than 60°C (140°F).
■ Do not disassemble, crush, puncture, short external contacts, or
dispose of in fire or water.
■ Replace only with the Compaq spare designated for this product.
Batteries, battery packs, and accumulators should not be disposed of
N
together with the general household waste. In order to forward them to
recycling or proper disposal, please use the public collection system or
return them to Compaq, your authorized Compaq partners, or their
agents.
C–8 Quick User’s Guide
Page 33

Power Cord Set Requirements
The computer is equipped with a manual voltage select switch
marked 115/230 and is designed to operate on input voltages between
100-127V on the 115V setting or 200-240V on the 230V setting.
The power cord set (flexible cord or wall plug) received with this
product meets the requirements for use in the country where you
purchased the equipment.
If you need to obtain a power cord for a different country, you should
purchase a power cord that is approved for use in that country.
The power cord must be rated for the product and for the voltage and
current marked on the product’s electrical ratings label. The voltage
and current rating of the cord should be greater than the voltage and
current rating marked on the product. In addition, the diameter of the
wire must be a minimum of 0.75 mm
the cord must be between 6 feet (1.8 m) and 12 feet (3.6 m). If you
have questions about the type of power cord to use, contact your
Compaq authorized service provider.
A power cord should be routed so that it is not likely to be walked on
or pinched by items placed upon it or against it. Particular attention
should be paid to the plug, electrical outlet, and the point where the
cord exits from the product.
Safety & Regulatory Notices
2
or 18AWG, and the length of
Quick User’s Guide C–9
Page 34

Page 35

 Loading...