

Page 1

C-S
R
ERIES
EFERENCE GUIDE
Page 2

Notice
The information in this guide is subject to change without notice.
COMPAQ COMPUTER CORPORATION SHALL NOT BE LIABLE FOR
TECHNICAL OR EDITORIAL ERRORS OR OMISSIONS CONTAINED
HEREIN; NOR FOR INCIDENTAL OR CONSEQUENTIAL DAMAGES
RESULTING FROM THE FURNISHING, PERFORMANCE, OR USE OF
THIS MATERIAL.
This guide contains information protected by copyright. No part of this
guide may be photocopied or reproduced in any form without prior
written consent from Compaq Computer Corporation.
© 1998 Compaq Computer Corporation.
All rights reserved. Printed in Singapore.
Compaq is registered in the U.S. Patent and Trademark Office.
Microsoft and Windows are registered trademarks of Microsoft
Corporation.
The software described in this guide is furnished under a license
agreement or nondisclosure agreement. The software may be used or
copied only in accordance with the terms of the agreement.
Product names mentioned herein may be trademarks and/or registered
trademarks of their respective companies.
R
EFERENCEGUIDE
C-Series Handheld PC
First Edition January 1998
Part Number 266667-001
Compaq Computer Corporation
Page 3

ONTENTS
C
preface
B
EFOREYOUBEGIN
For More Information........................................................................xi
For Updated Information..................................................................xii
Locating Information Quickly..........................................................xii
Ordering Software on Diskette........................................................xiii
Customer Registration.....................................................................xiii
In North America........................................................................xiii
Outside of North America...........................................................xiii
Symbols and Conventions...............................................................xiv
chapter 1
G
ETTINGSTARTED
Unpacking the Box..........................................................................1-2
Setting Up for the First Time ..........................................................1-3
C-Series at a Glance........................................................................1-8
Screen and Left Side Components..............................................1-8
Front and Right Side Components..............................................1-9
Top and Rear Panel Components..............................................1-10
Bottom Panel Components .......................................................1-11
chapter 2
F
ORMING APARTNERSHIP
Step 1: Determine Computer Requirements ...................................2-2
Step 2: Install Windows CE Services..............................................2-3
Step 3: Configure the Communications Port ..................................2-3
Using Windows NT Workstation................................................2-3
Using Windows 95......................................................................2-3
Step 4: Connect the Handheld PC to the Computer........................2-4
Step 5: Install the Compaq C-Series Software................................2-5
Contents
v
Page 4

chapter 3
U
SING THEKEYBOARD ANDSTYLUS
Special Keyboard Features .............................................................3-2
Using the Application Launch Keys...........................................3-4
Using the Dual Brightness Backlight Button.............................3-5
Using the Stylus..............................................................................3-6
chapter 4
U
SINGPOWER
Using Battery Power.......................................................................4-2
Checking Battery Power Levels.................................................4-2
Recognizing Low Battery Indicators..........................................4-2
Conserving Battery Power..........................................................4-4
Replacing Batteries.........................................................................4-5
Replacing the Main Batteries.....................................................4-6
Replacing the Backup Battery....................................................4-9
Disposal and Recycling of Used Batteries....................................4-11
Using AC Power...........................................................................4-11
Connecting to AC Power..........................................................4-12
Resetting Your C-Series Handheld PC.........................................4-13
Performing a Normal Reset......................................................4-13
Performing a Full Reset............................................................4-14
chapter 5
U
SING THEMODEM
Safety Precautions for Modems......................................................5-2
Connecting the Modem...................................................................5-3
Using an External Modem..............................................................5-4
Connecting an External Modem.................................................5-4
Configuring and Using the External Modem.............................5-4
Using the Modem to Access the Internet........................................5-5
Browsing the Internet.................................................................5-5
chapter 6
U
SING
PC C
ARDS
Supported PC Cards........................................................................6-1
PC Card Software ...........................................................................6-2
Operating Guidelines......................................................................6-2
Inserting a PC Card.........................................................................6-3
Removing a PC Card ......................................................................6-4
vi
Contents
Page 5

chapter 7
U
SING THEINFRAREDFEATURE
Establishing an Infrared Connection...............................................7-2
Step 1: Configure the Software...................................................7-2
Step 2: Set Up the Infrared Devices............................................7-2
Step 3: Transfer Information.......................................................7-3
Printing with the IR Port .................................................................7-4
chapter 8
U
SINGCOMPAQSOFTWARE
Using Voice Memo .........................................................................8-2
Recording A Message.................................................................8-3
Playing a Message.......................................................................8-3
Managing Messages....................................................................8-4
Adjusting Audio Levels..............................................................8-4
Using Internet Setup Utility ............................................................8-5
Setting Up a Profile.....................................................................8-5
Getting On the Internet ...............................................................8-6
Using Internet Favorites Synchronizer............................................8-7
Synchronizing Bookmarks..........................................................8-7
Copying Bookmarks ...................................................................8-8
Using Dictionary Synchronizer.......................................................8-9
Using the Backup and Restore Utilities ........................................8-10
Using Compaq Backup and Restore .........................................8-12
Using Compaq Flash Memory Manager...................................8-14
Using Compaq Enhanced Security................................................8-16
Understanding the Password Levels.........................................8-16
Setting Passwords .....................................................................8-18
Using the Owner Control Panel Application.................................8-21
Controlling Volume.......................................................................8-21
Printing..........................................................................................8-22
Supported File Types................................................................8-22
Printing Guidelines ...................................................................8-22
Printing from the Handheld PC.................................................8-23
Setting the Alarm ..........................................................................8-23
Contents
vii
Page 6
chapter 9
C
ARING FORYOURCOMPAQ
C-S
ERIES
Routine Care ...................................................................................9-2
Travel Guidelines............................................................................9-3
International Travel ........................................................................9-3
Shipping Guidelines........................................................................9-4
chapter 10
T
IPS ANDTROUBLESHOOTING
Tips for Maximizing Performance................................................10-1
Adjusting Memory....................................................................10-1
Increasing the Data Transfer Speed..........................................10-2
Troubleshooting............................................................................10-3
Solving Battery and Power Problems.......................................10-4
Solving Keyboard and Stylus Problems...................................10-5
Solving Audio Problems...........................................................10-5
Solving Memory Problems.......................................................10-6
Solving PC Card Problems.......................................................10-8
Solving Screen Problems..........................................................10-9
Solving Communication Problems.........................................10-10
Solving Security Problems.....................................................10-13
Servicing the C-Series ................................................................10-14
Preparing for a Technical Support Call..................................10-14
appendix A
W
ORLDWIDETELEPHONENUMBERS
appendix B
H
ARDWARESPECIFICATIONS
................................................................. B-1
appendix C
A
GENCYREGULATORYNOTICES
NDEX
I
................................................................................................. I-1
....................................................... A-1
............................................................. C-1
viii
Contents
Page 7

preface
EFORE YOU BEGIN
B
Congratulations on your selection of the Compaq C-Series, the
first professional handheld PC. Before using your C-Series, be
sure to read this chapter for information about:
documentation and online help
■
customer registration
■
symbols and conventions used in this guide
■
For More Information
References are provided as printed materials and as online
information that is accessible from your handheld PC. In addition
to this reference guide, the following printed references come
with your handheld PC:
Quick Setup card
■
Accessories Flier
■
Microsoft The Handheld PC Companion
■
Important Safety Information
■
Register Now card (North America only)
■
Warranty and service information
■
Before You Begin
xi
Page 8
The following online and electronic references are also available.
Name: Location:
Microsoft
Microsoft
Help
Microsoft Handheld PC Home
Page
C-Series Home Page www.compaq.com/products/
H/PC Help
Windows CE Services
For Updated Information
To learn about updates that may have occurred to your C-Series
device after this document was printed, tap the Start menu on
your handheld device, then tap My Documents and select
Compaq Updates.
NOTE:
will not appear on the screen.
If no updated information is available, Compaq Updates
Handheld PC
Microsoft
Windows CE
on your computer)
www.microsoft.com/windowsce/
hpc
handhelds
Desktop Software for
CD (to be installed
Locating Information Quickly
To quickly find the information you’re looking for, use this table
as a starting point.
To Find Information About: Look Here:
Using your C-Series
Using the Compaq software on
your C-Series
Using the Windows CE operating
system and software on your
C-Series
Using Windows CE Services on
your computer
The latest information and offers
for your C-Series device and
accessories
C-Series Reference Guide
C-Series Reference Guide
Microsoft
Companion
Microsoft
Microsoft
Help
C-Series Home Page
(www.compaq.com/products/
handhelds)
The Handheld PC
H/PC Help
Windows CE Services
xii
Before You Begin
Page 9

Ordering Software on Diskette
If the computer on which you are installing Microsoft Windows
CE 2.0 does not have a CD-ROM drive, you can purchase
diskettes containing the Windows CE software necessary for
operating your handheld PC.
To order Windows CE software diskettes, contact Compaq at
1-800-841-2761 (U.S. only) or fax a request to 510-327-4070.
NOTE:
Tour and Exchange Update) are not available on diskette. To
obtain these applications, visit the Microsoft web site at
www.microsoft.com.
Compaq C-Series software is available only on CD-ROM.
Some Windows CE applications (such as the Guided
Customer Registration
In North America
To receive the latest information on your C-Series handheld PC,
as well as receive special offers on C-Series accessories and
software, be sure to register with Compaq by completing and
mailing the Register Now card included with your handheld PC.
Outside of North America
Outside of North America, use the Compaq Info Messenger
service to obtain Internet and e-mail access to the latest software
updates and service documentation for your C-Series.
Once you register with this free service at www.compaq.com/
infomessenger and build your profile(s), Info Messenger searches
the Compaq web site and collects information specific to your
handheld PC environment. Info Messenger then sends an e-mail
alerting you when new and/or updated information is available on
a Compaq customized web page.
Before You Begin
xiii
Page 10
Symbols and Conventions
Some or all of the following format conventions may be used in
this guide to distinguish elements of text:
Names of keys are shown in bold type as they appear on the
■
keyboard, for example,
Keys that you should press at the same time are represented
■
by the key names and the plus (+) symbol, for example,
Ctrl+Alt+Delete.
Commands are presented in lowercase, bold type as shown
■
here:
An arrow is used to separate icons or menu options that you
■ ■
install
or
a:\install.
should select in succession; for example, tap
Start→Settings→Control Panel.
When you need to type information without pressing the
■
key, you are directed to “type” the information.
Ctrl, Backspace, Tab.
Enter
When you need to type information and press the
■
you are directed to “enter” the information.
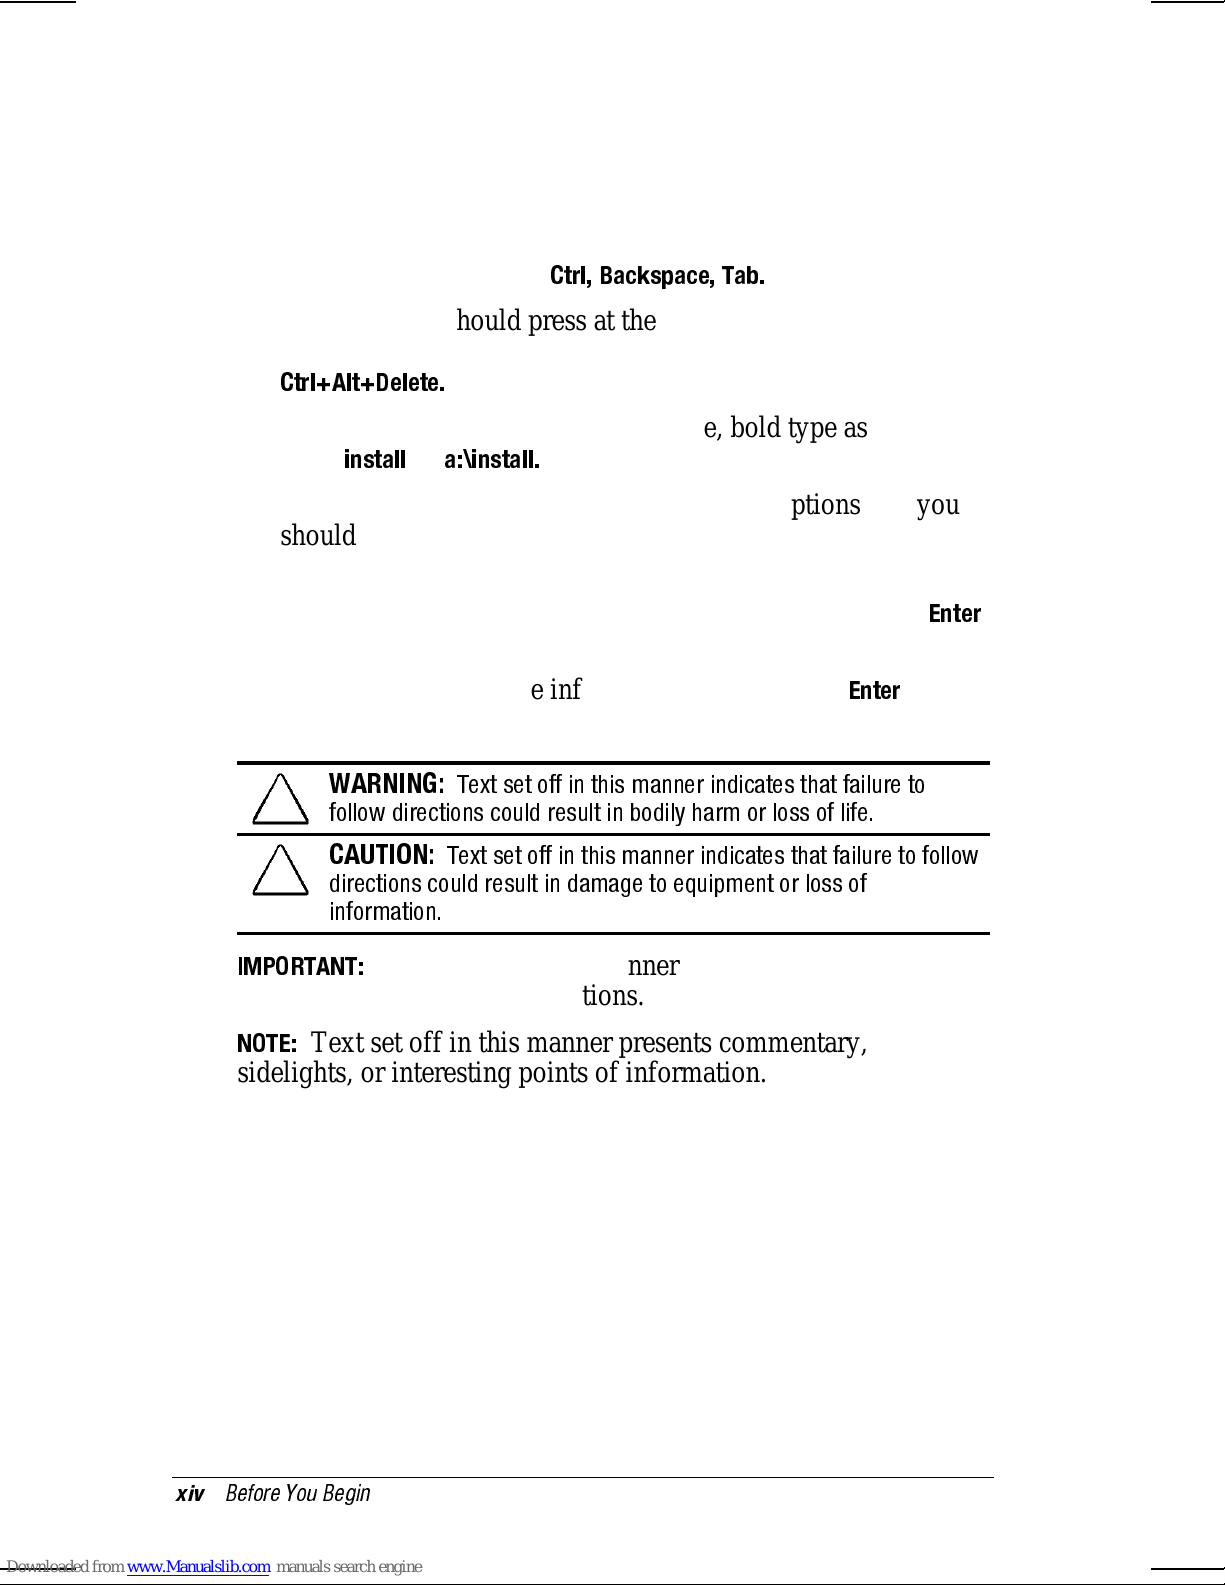
WARNING:
!
follow directions could result in bodily harm or loss of life.
CAUTION:
directions could result in damage to equipment or loss of
information.
IMPORTANT:
Text set off in this manner presents clarifying
Text set off in this manner indicates that failure to
Text set off in this manner indicates that failure to follow
information or specific instructions.
NOTE:
Text set off in this manner presents commentary,
sidelights, or interesting points of information.
Enter
key,
xiv
Before You Begin
Page 11

chapter
1
ETTING STARTED
G
This chapter provides information about getting started with your
C-Series handheld PC, such as:
unpacking the box
■
setting up for the first time
■
learning about the handheld PC features
■
Getting Started
1-1
Page 12

Unpacking the Box
Contents of the Box
Before setting up your handheld PC, be sure your shipping box
includes the following items:
1
handheld PC
2
AC Adapter
3
stylus (housed in the handheld PC)
4
auto-sync cable
5
batteries (two AA alkaline or one rechargeable NiMH,
depending on your C-Series model)
Not pictured:
modem cable (available with some models)
■
CD-ROM discs (2)
■
documentation
■
NOTE:
To order accessories that did not come with your C-Series
model, refer to the Accessories Flier included in the shipping box.
1-2
Getting Started
Page 13
Setting Up for the First Time
To set up your handheld PC for the first time, follow the
instructions below. When it is ready to use, read “C-Series at a
Glance” later in this chapter to learn more about the special
features of your device.
1. Turn over the handheld PC.
2. Do one of the following:
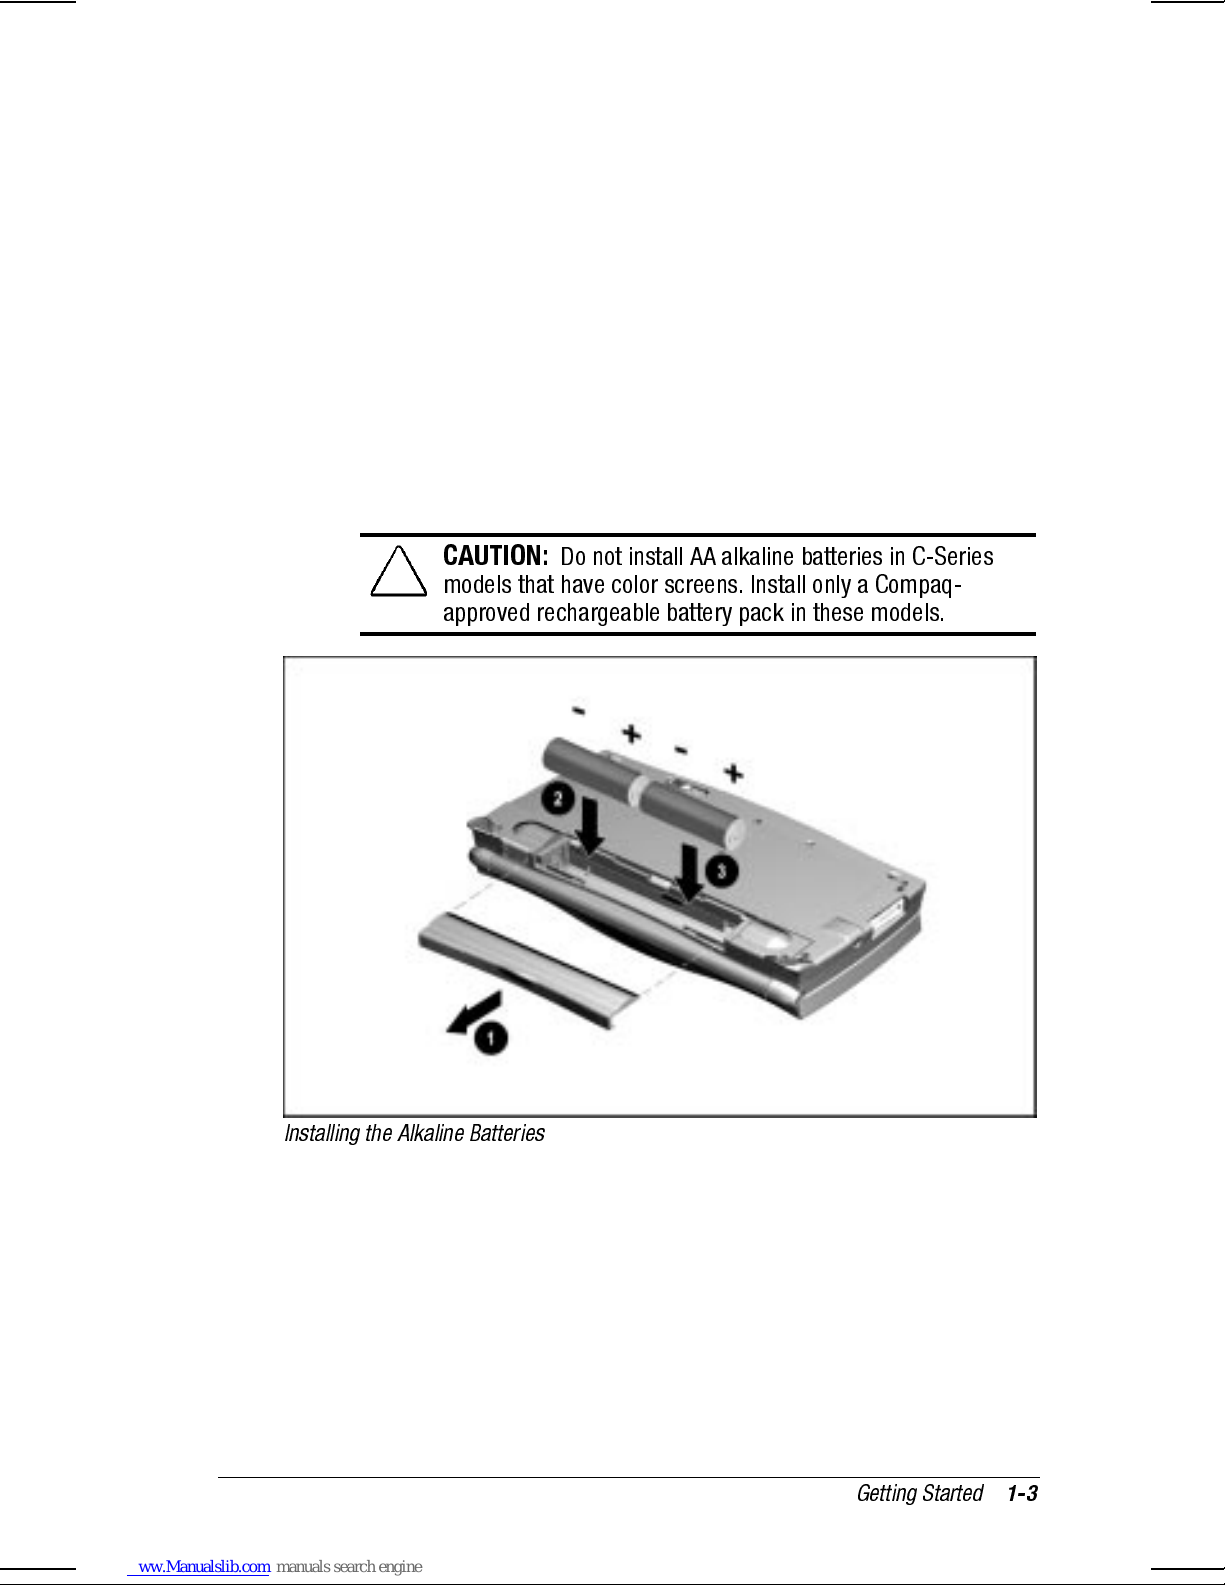
If your C-Series comes with AA alkaline batteries, follow
■
the steps in the illustration below. Remove the main battery
cover and install the batteries as illustrated below. Be sure
the positive and negative end of each battery is correctly
oriented.
CAUTION:
models that have color screens. Install only a Compaq-
approved rechargeable battery pack in these models.
Installing the Alkaline Batteries
Do not install AA alkaline batteries in C-Series
Getting Started
1-3
Page 14
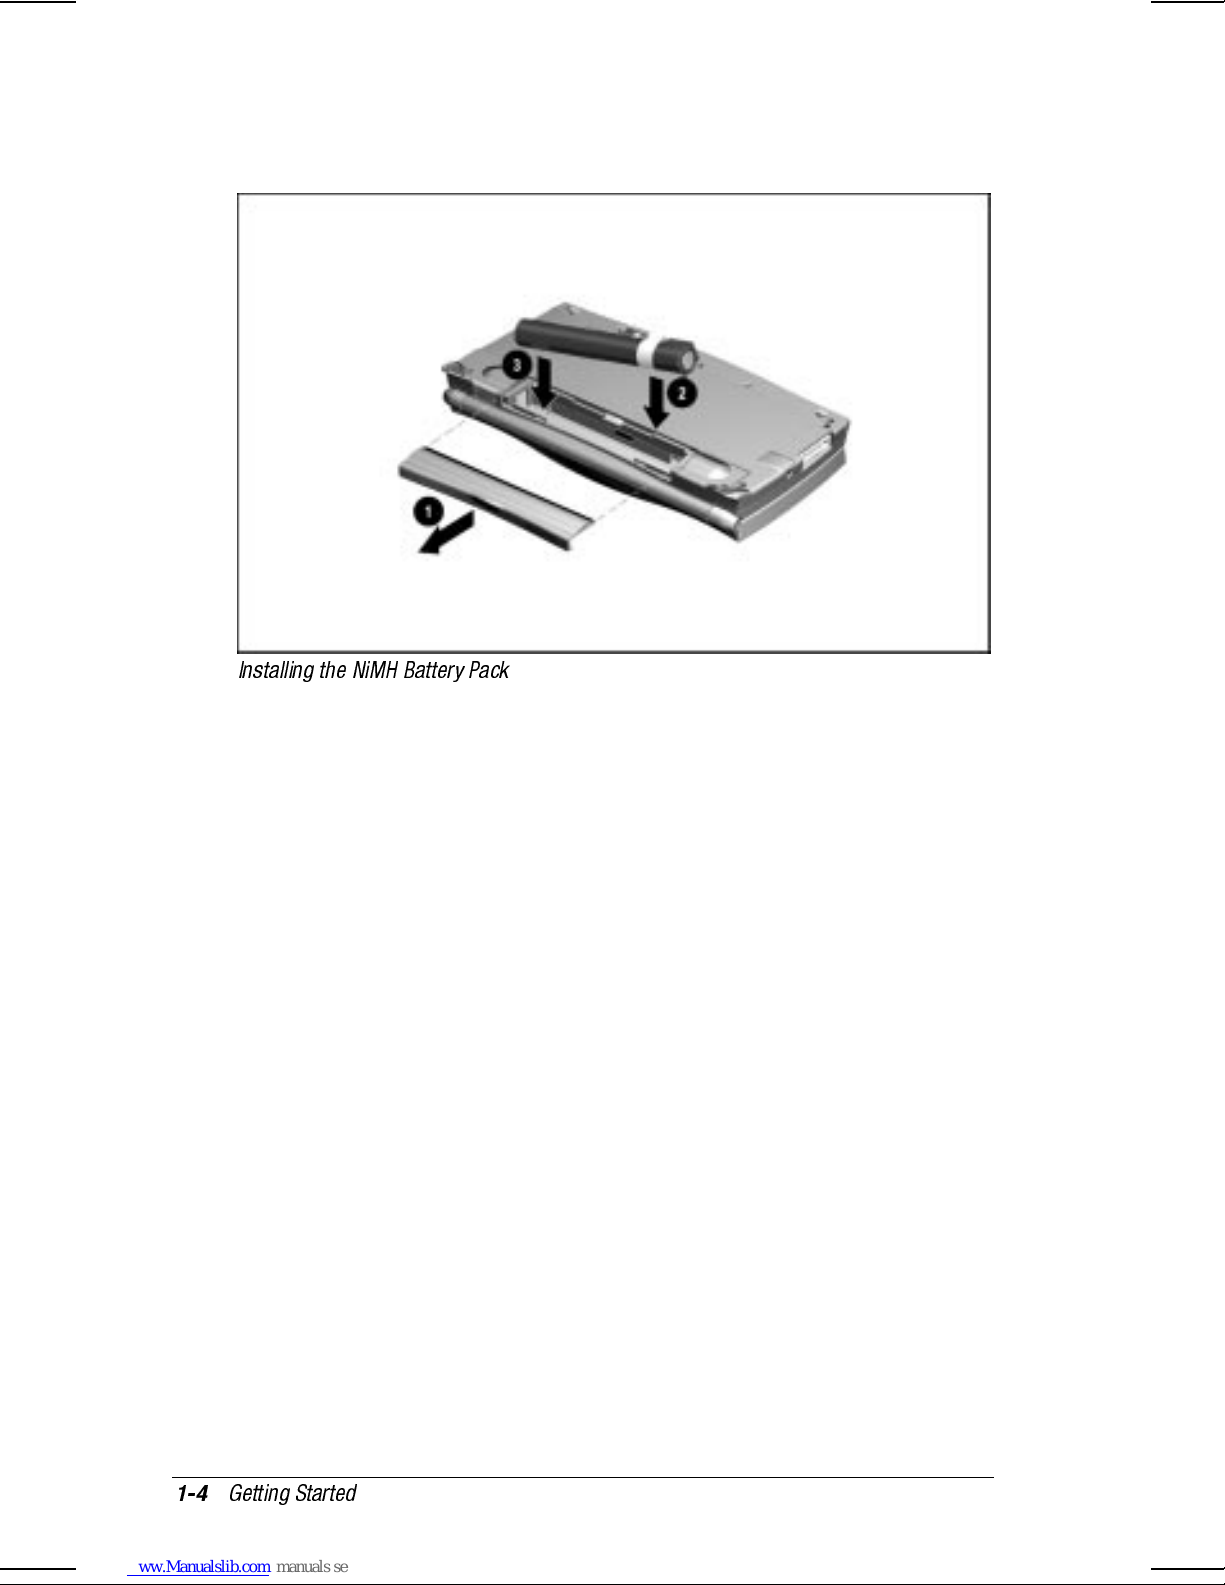
If your C-Series comes with a rechargeable NiMH battery
■
pack, follow the steps in the illustration below. Be sure the
flat side of the battery is facing in toward the battery
compartment as indicated.
Installing the NiMH Battery Pack
1-4
Getting Started
Page 15
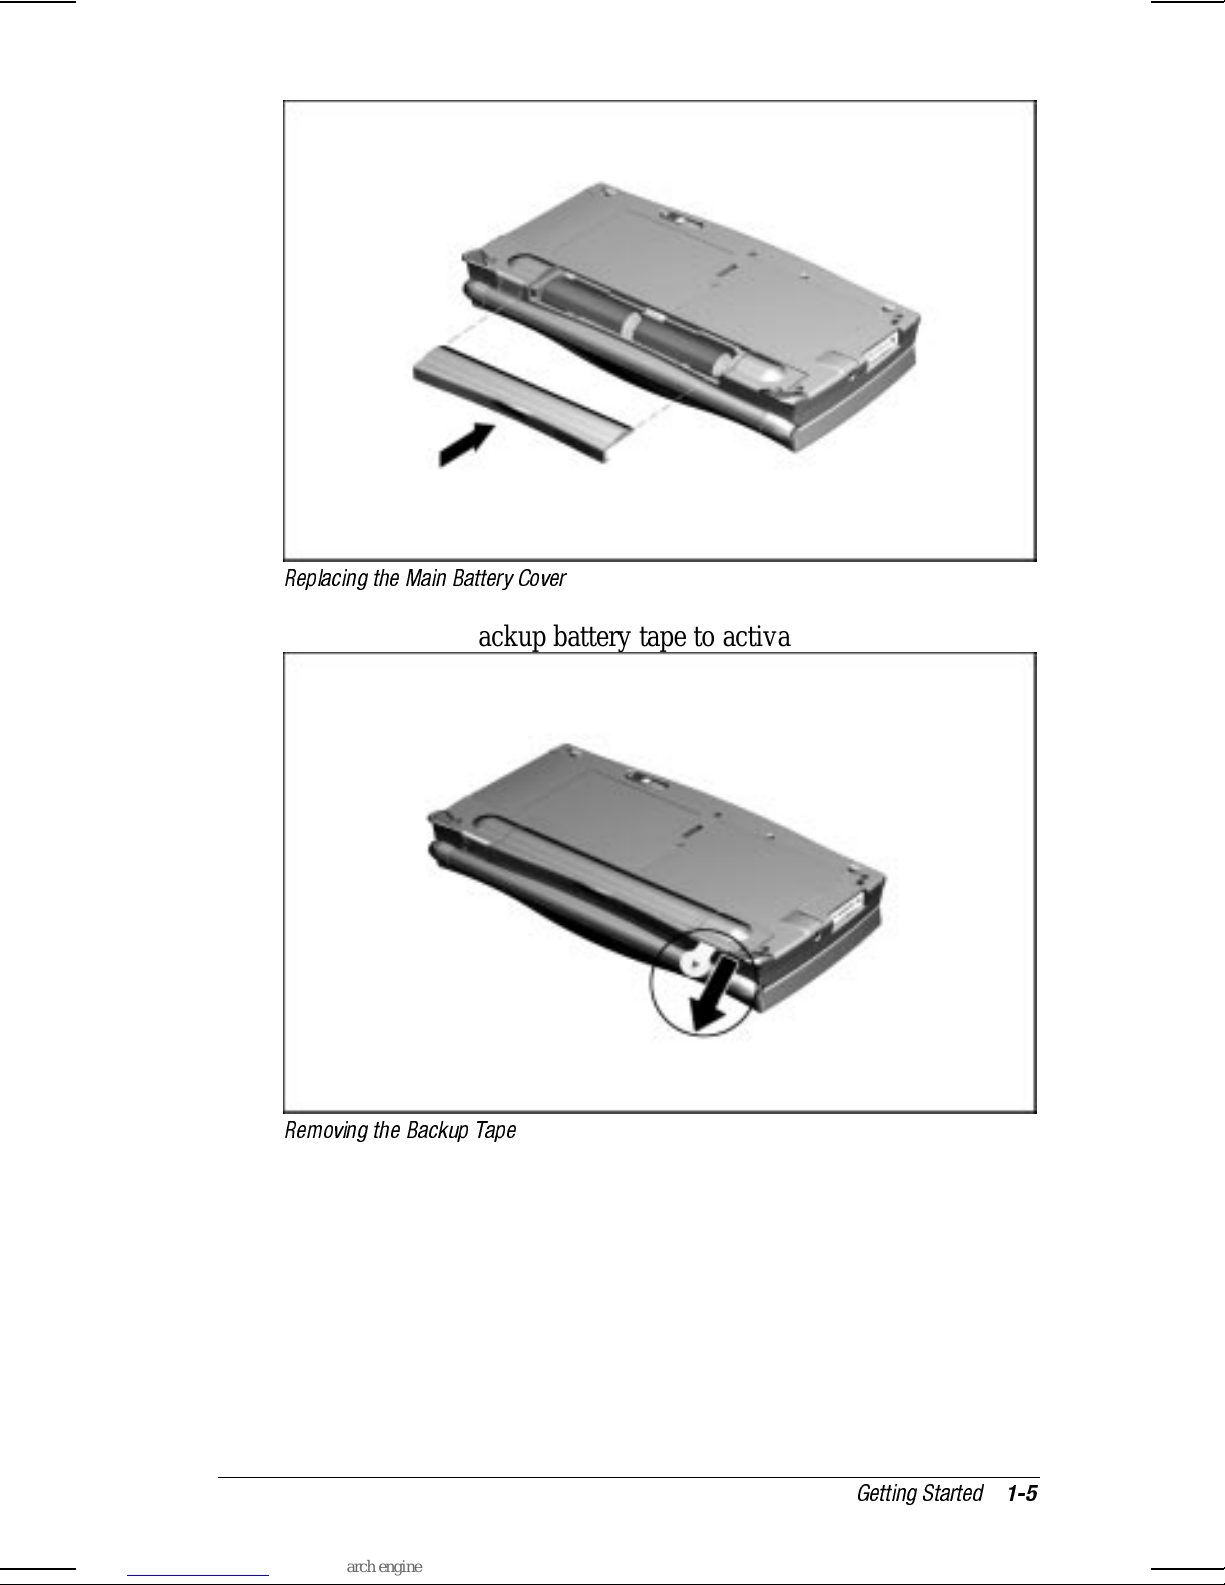
3.
Replace the main battery cover.
Replacing the Main Battery Cover
4.
Pull out the backup battery tape to activate the backup battery.
Removing the Backup Tape
Getting Started
1-5
Page 16
5.
If using a rechargeable NiMH battery pack, connect the unit
to AC power and allow the battery pack to charge for three
hours. If using AA alkaline batteries, proceed to step 6.
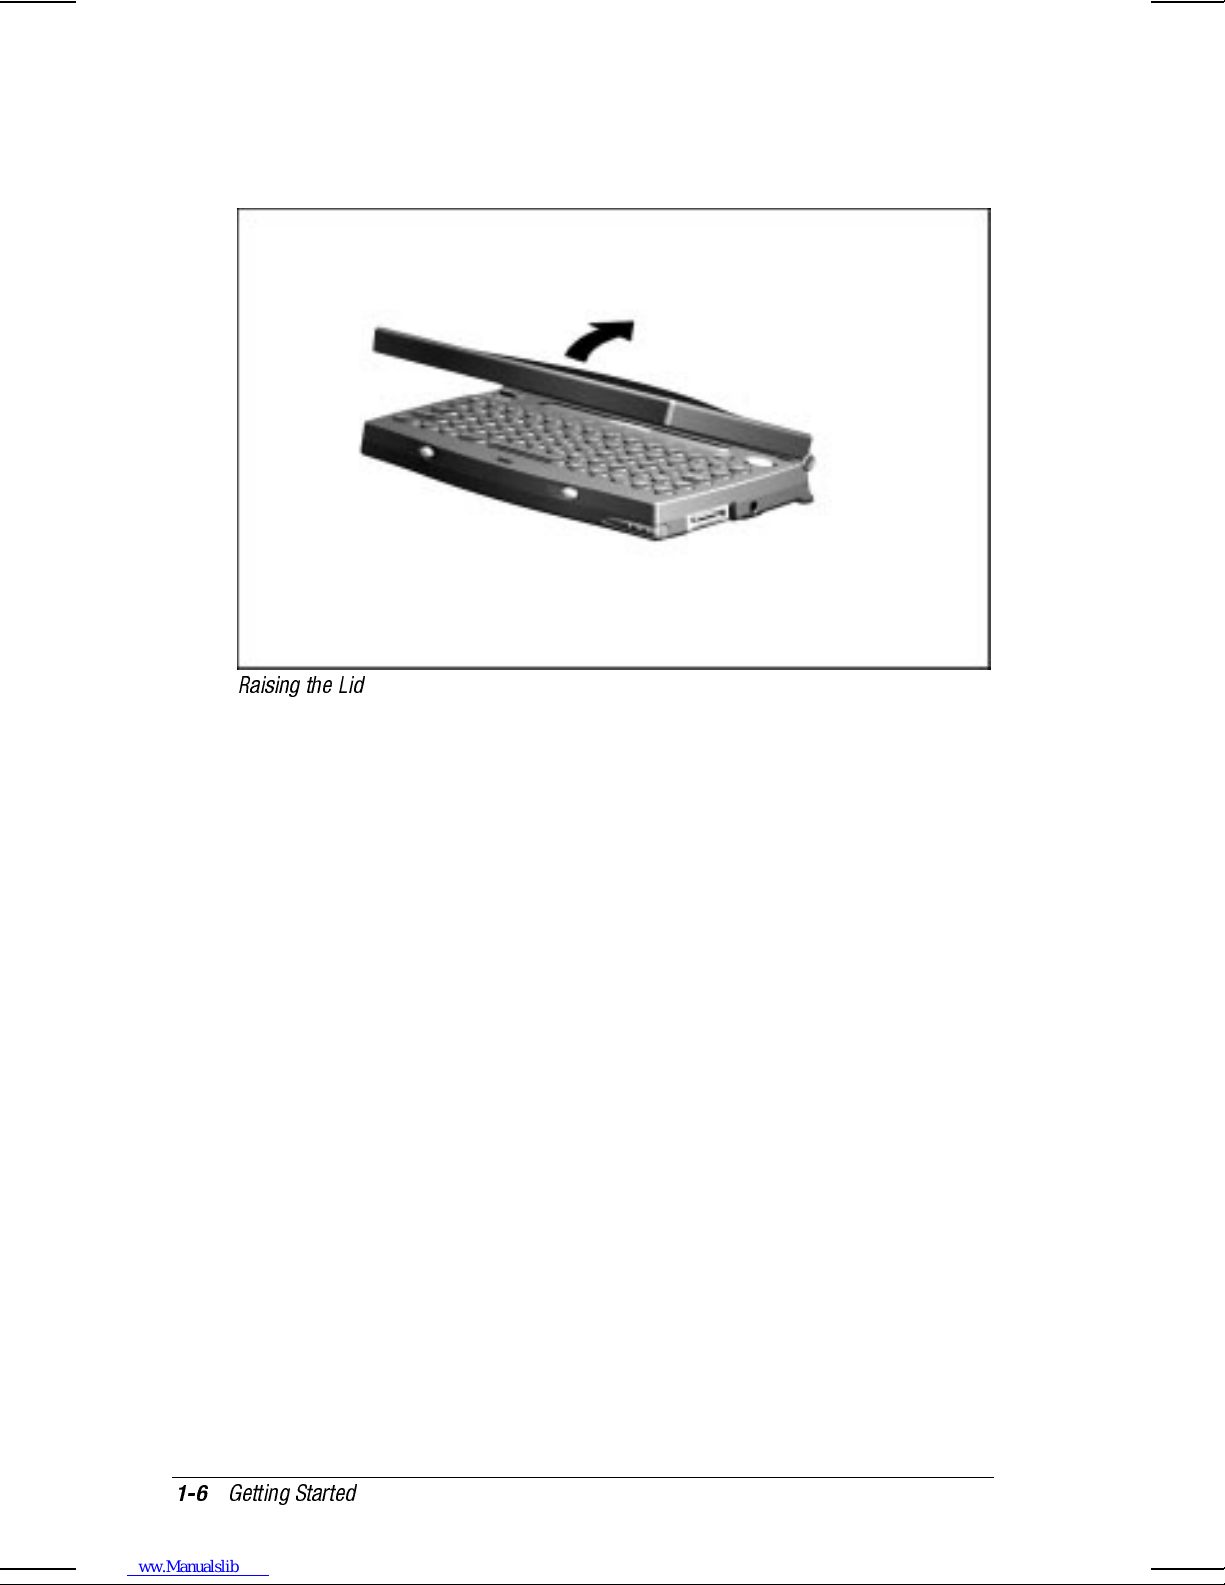
6.
Turn over the handheld PC and raise the lid.
Raising the Lid
1-6
Getting Started
Page 17
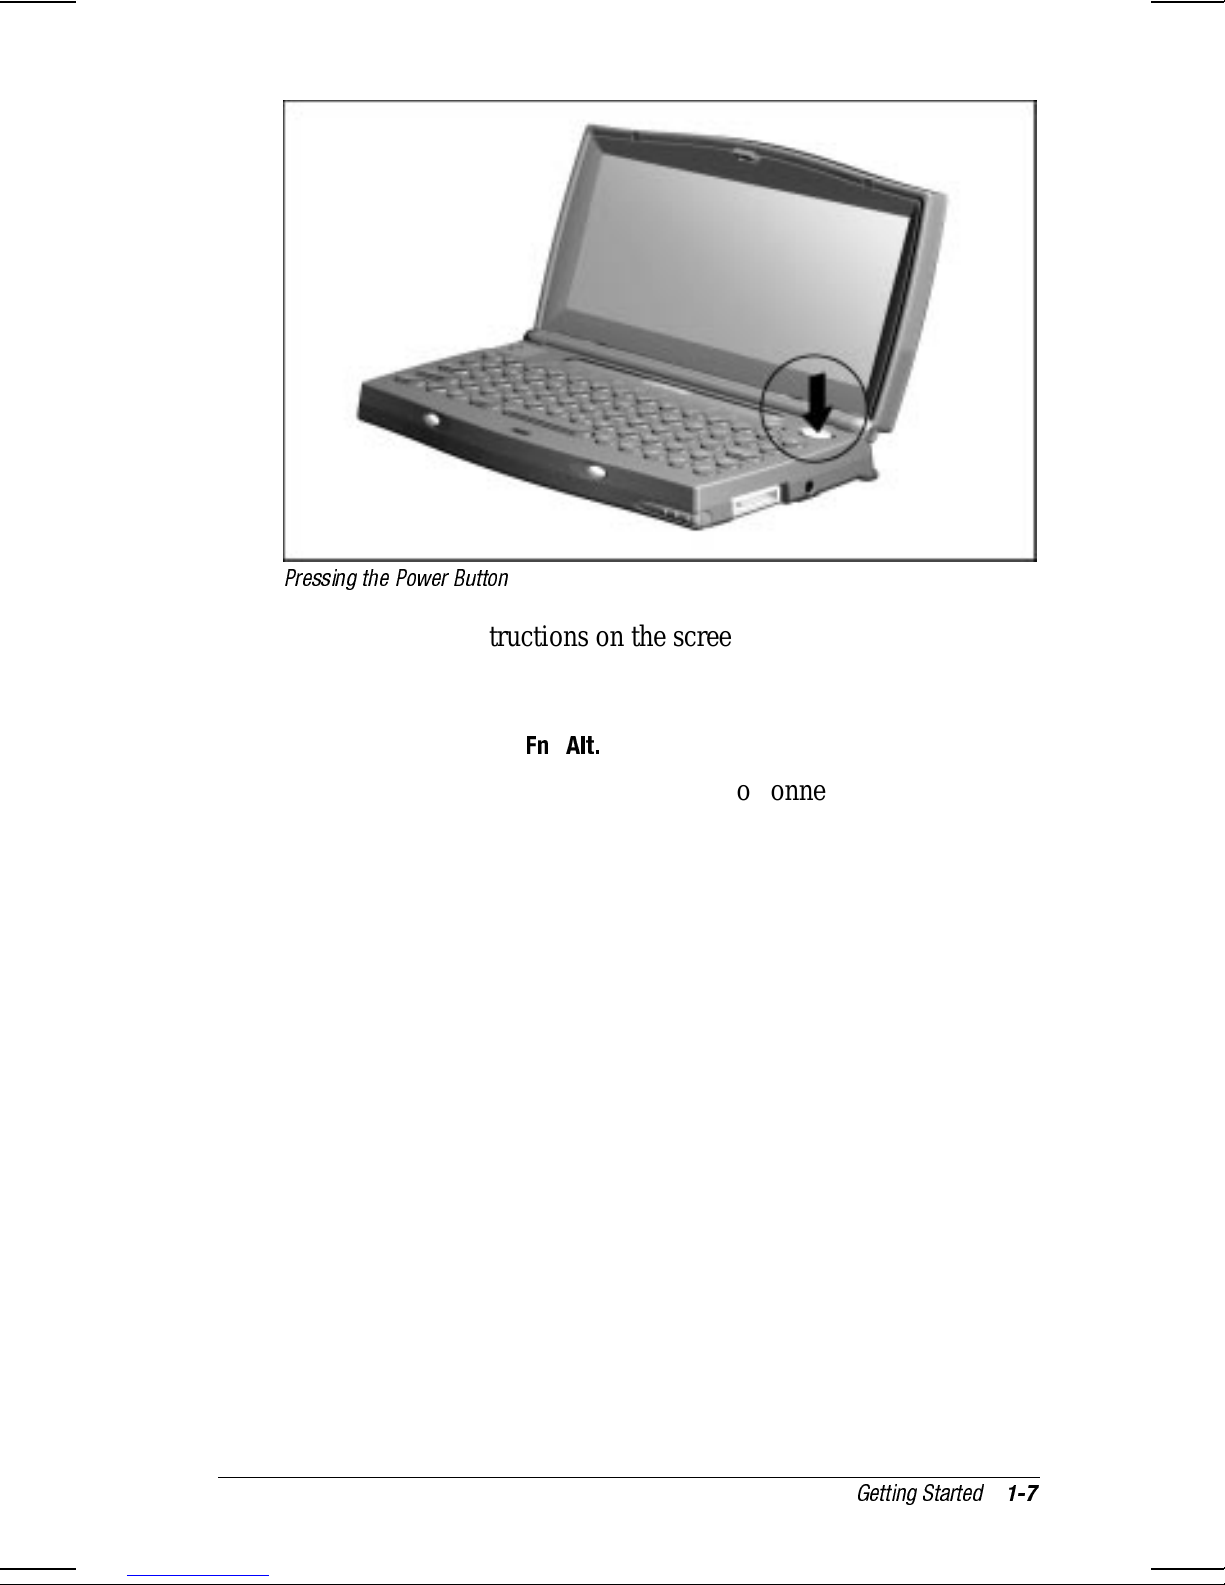
7.
Press the power button to turn on power.
Pressing the Power Button
8.
Follow the instructions on the screen to complete the setup
process.
9.
To learn more about your handheld PC, take the Welcome
Tour by pressing
Fn+Alt
.
Once setup is complete, you may want to connect your handheld
PC to a computer and load valuable Compaq software. To do so,
follow the instructions provided in Chapter 2, “Forming a
Partnership.”
Getting Started
1-7
Page 18
C-Series at a Glance
Your handheld PC is equipped with many convenient features
that make using it quick and easy. This section familiarizes you
with the location and function of these features.
Screen and Left Side Components
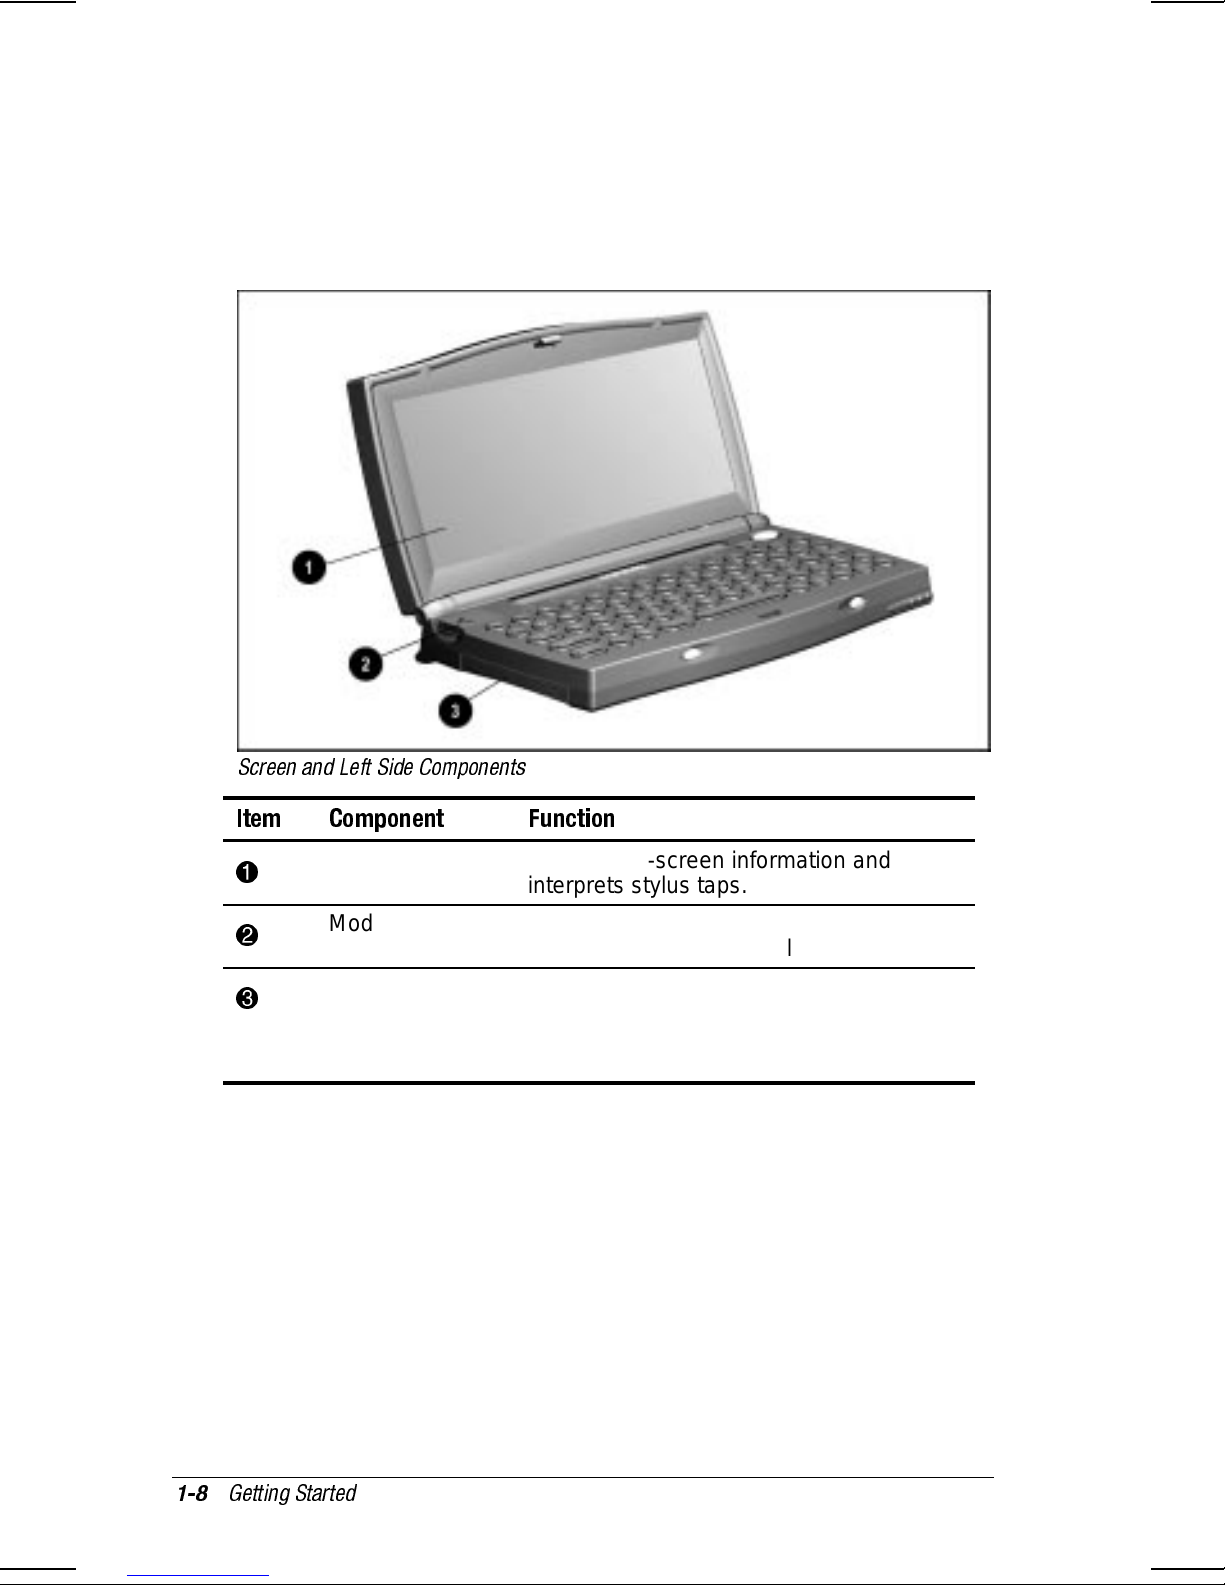
Screen and Left Side Components
Item Component Function
1
2
3
Screen Displays on-screen information and
interprets stylus taps.
Modem
connector
PC Card slot Accepts a 16-bit Type I or Type II PC
Connects an RJ-11 modem cable
(available on some models only).
(PCMCIA) Card. For more on this
feature, see Chapter 6, “Using PC
Cards.”
1-8
Getting Started
Page 19

Front and Right Side Components
Front and Right Side Components
Item Component Function
1
2
3
4
5
6
7
Dual brightness
backlight button
Power button Press once to turn on the device. Press
AC power
connector
Serial connector Connects serial devices such as the auto-
Stylus slot Holds and protects the stylus when stylus
Alarm button Press once to stop the alarm when it goes
Record button Press and hold this button while speaking
Provides increased lighting for better
viewing of the screen. For more
information, see “Using the Dual
Brightness Backlight Button” in Chapter 3.
again to turn off.
Connects to external (AC) power via the
AC Adapter.
sync cable or a printer cable.
is not in use.
off. For instructions on using the alarm,
see “Setting the Alarm” in Chapter 8.
into the microphone to record a voice
memo.
Getting Started
1-9
Page 20
Top and Rear Panel Components
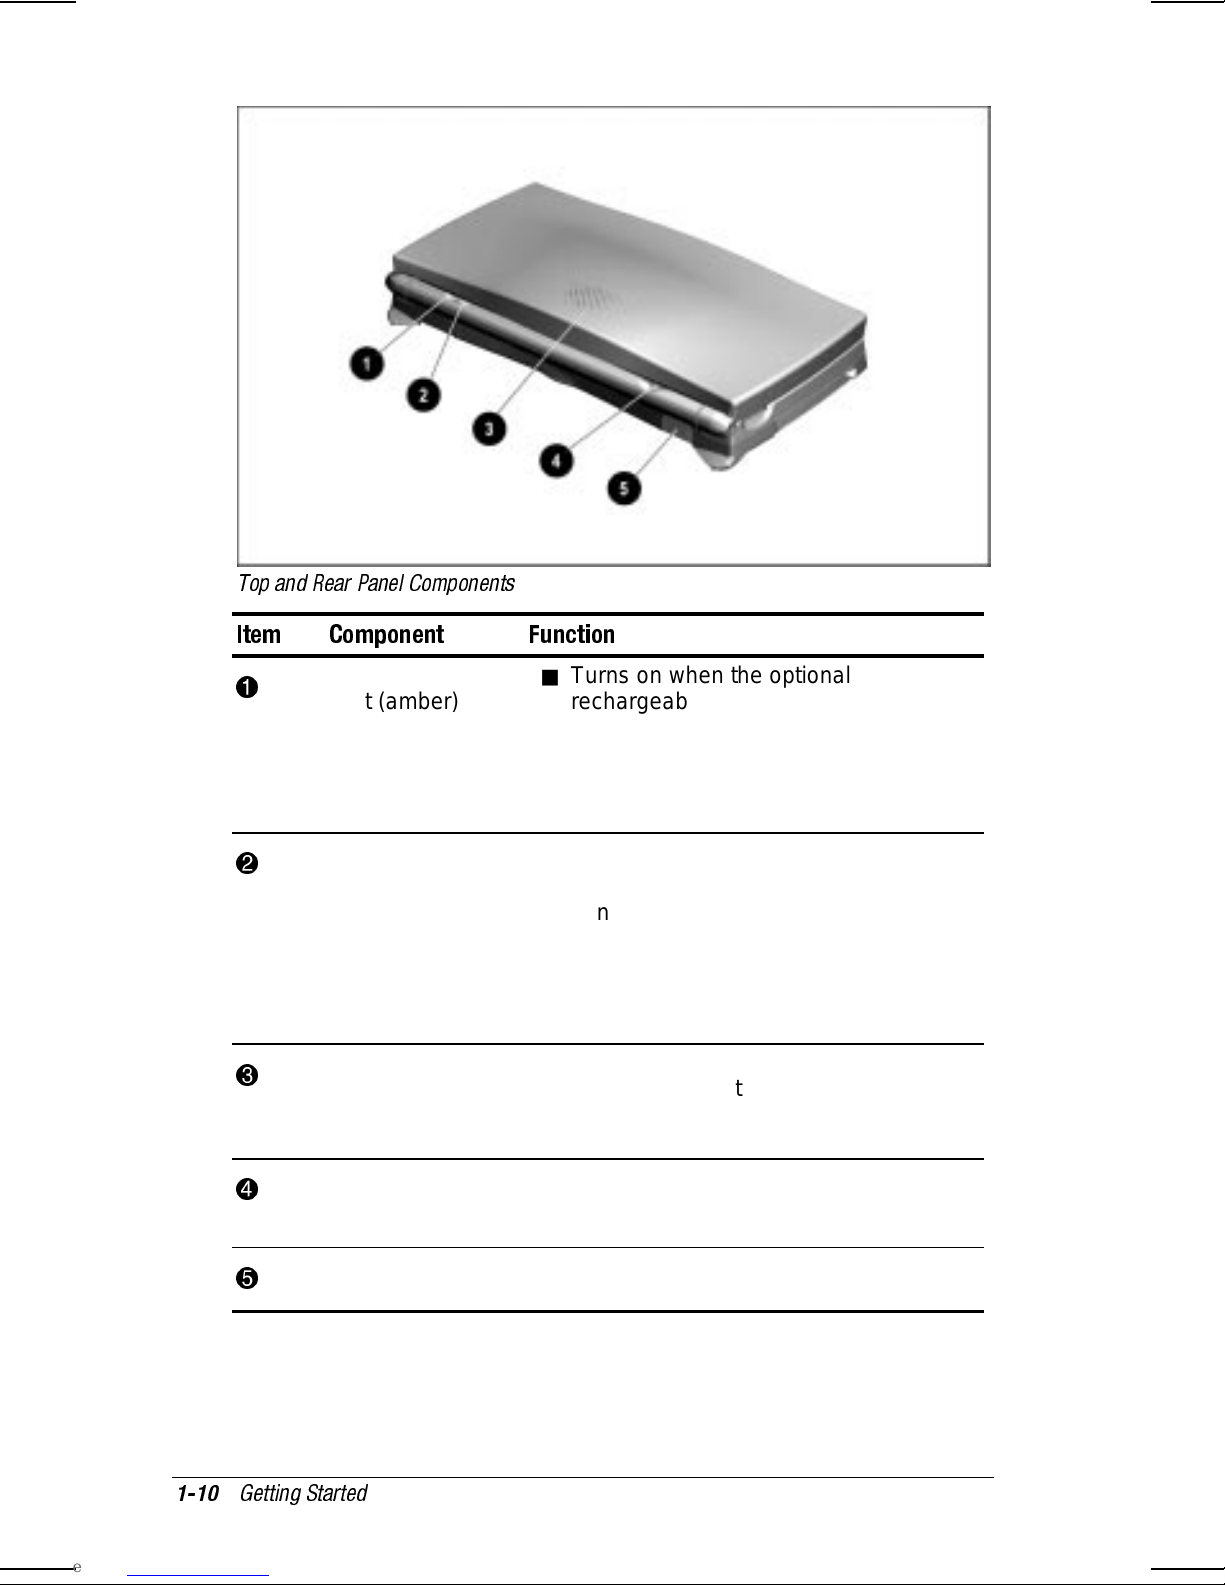
Top and Rear Panel Components
Item Component Function
1
2
3
4
Battery charge
light (amber)
Alarm light
(green)
Speaker Produces sound for the alarm, playback of
Microphone Speak into the microphone while pressing
Turns on when the optional
■
rechargeable NiMH battery pack is
being recharged; also turns on when
the device is connected to external
power
Turns off when charging is complete.
■
Blinks once when the device is turned
■
on.
Blinks continuously when an alarm
■
you have set goes off.
Turns off when you press the alarm
■
button or stop the alarm through the
software.
voice memos, and other audio effects. For
information on setting the speaker level,
see “Controlling Volume” in Chapter 8.
the record button to record a voice memo.
Works whether device is open or closed.
5
1-10
Getting Started
Infrared (IR) port Allows for wireless infrared
communication.
Page 21
Bottom Panel Components
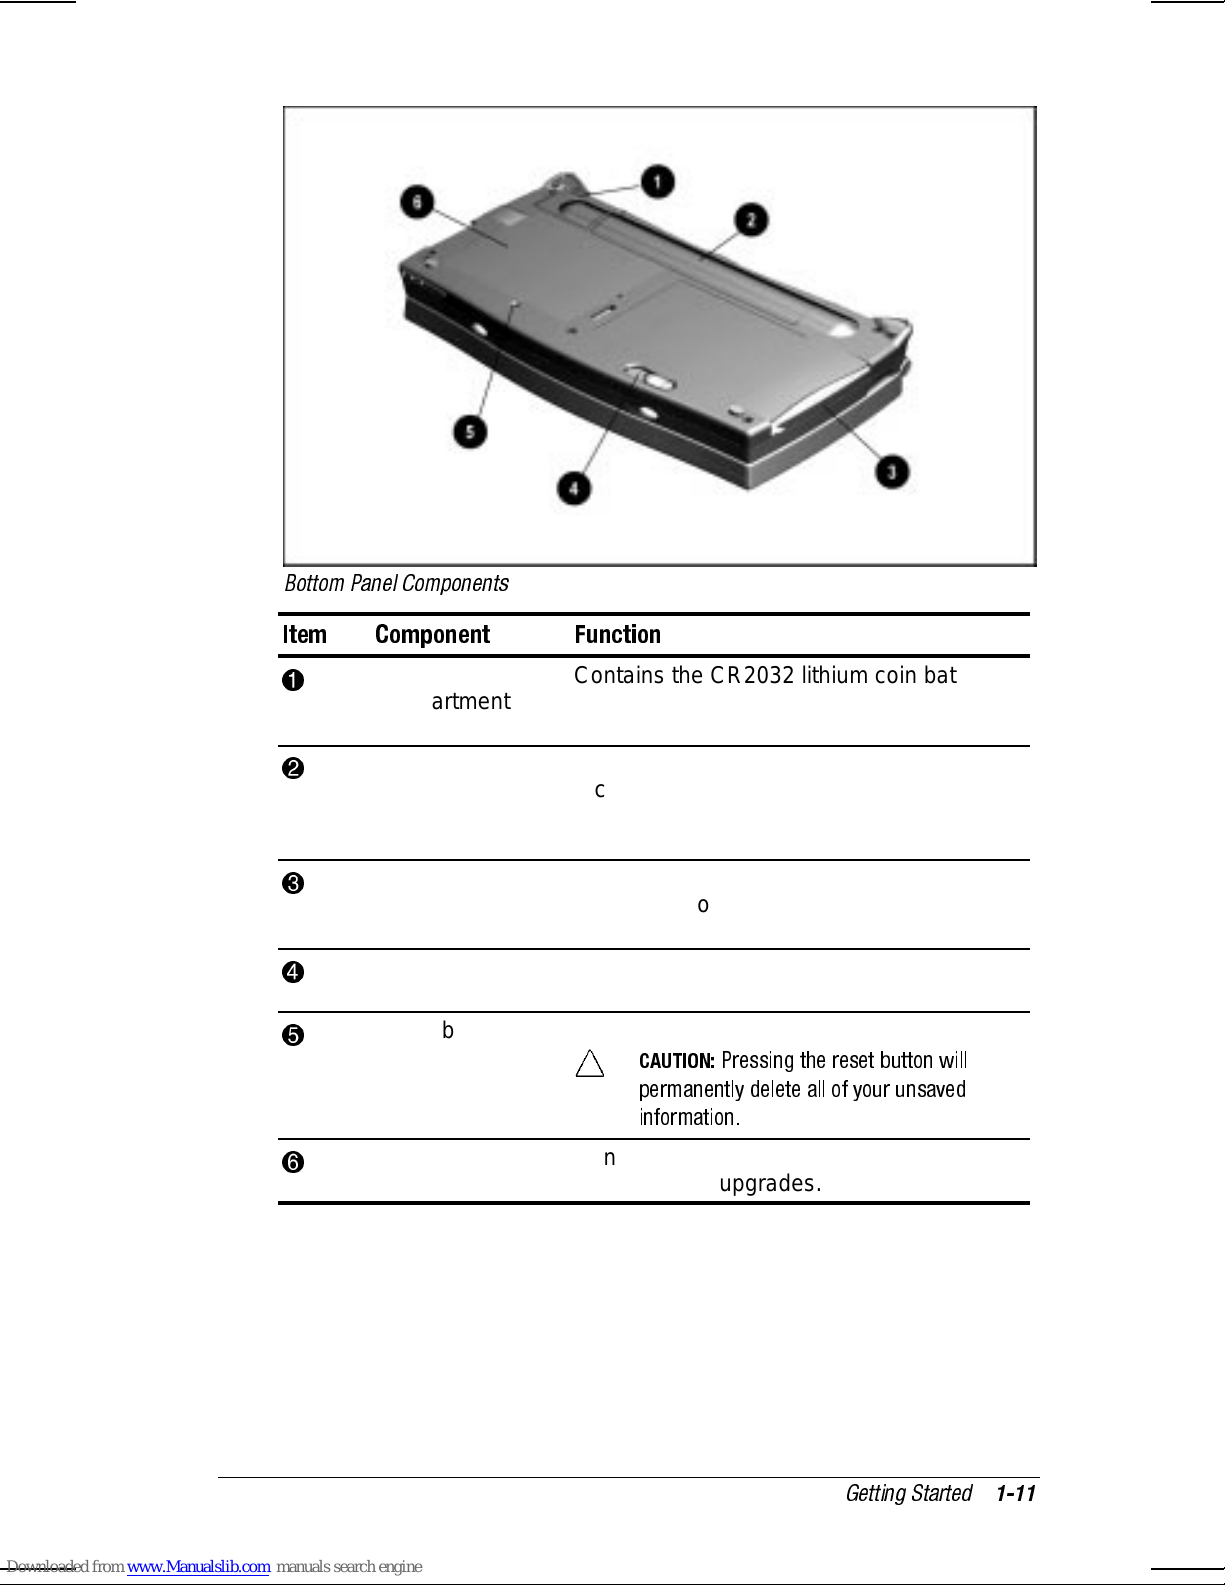
Bottom Panel Components
Item Component Function
1
2
3
4
5
6
Backup battery
compartment
Main battery
compartment
PC Card slot Accepts a Type I or Type II PC (PCMCIA)
PC Card eject
lever
Reset button Restarts the operating system.
Expansion
compartment
Contains the CR2032 lithium coin battery
which acts as a backup battery when the
main batteries are drained or removed.
Holds two AA alkaline batteries or a
rechargeable NiMH battery pack for
supplying primary battery power to the
device.
Card. For more on this feature, see
Chapter 6, “Using PC Cards.”
Ejects a PC Card from the PC Card slot.
CAUTION:
permanently delete all of your unsaved
information.
Contains the RAM module. Accepts
optional RAM upgrades.
Pressing the reset button will
Getting Started
1-11
Page 22

chapter
2
ORMING A PARTNERSHIP
F
Your C-Series handheld PC acts much like a “computer
assistant”—it supplements the capabilities of your regularly used
computer when you cannot be at your desk. The handheld PC
does this through “partnering” with your regular computer. A
partnership is the process of establishing a connection with your
regularly used computer for the purpose of synchronizing and
transferring data between the computer and the handheld PC.
Forming a partnership involves five steps, each of which is
discussed in this chapter:
Step 1: Determine computer requirements
Step 2: Install Windows CE Services on the computer
Step 3: Configure the computer’s communications port
Step 4: Connect the handheld PC to the computer
Step 5: Install the Compaq C-Series software
Additional information on forming a partnership can be found in
Microsoft’s Handheld PC Companion and in the Windows CE
Services Help that you installed on your computer.
Forming a Partnership
2-1
Page 23

Step 1: Determine Computer Requirements
Before establishing a partnership, be sure your computer meets
the minimum configuration requirements listed below:
486/33DX or higher processor
■
Microsoft Windows 95 (or later)
■
or
Windows NT Workstation 4.0 (or later)
8 MB of memory (Windows 95)
■
12 MB of memory (Windows NT Workstation 4.0)
10 MB of available hard disk space
■
Available 9- or 25-pin serial port (adapter required for 25-pin
■
serial port)
CD-ROM drive
■
VGA or higher resolution graphics card
■
Microsoft Mouse or compatible pointing device
■
NOTE:
Some third-party applications may have additional
configuration requirements. Refer to the documentation included
with these applications for more information.
2-2
Forming a Partnership
Page 24

Step 2: Install Windows CE Services
Windows CE Services is the software that allows you to
synchronize data between your handheld PC and your computer.
Follow the steps below to install Windows CE Services on your
computer.
IMPORTANT:
meets the minimum configuration requirements listed earlier in
this chapter.
1. Insert the Microsoft CD into the computer’s CD-ROM drive.
(If your computer does not have a CD-ROM drive, see
“Ordering Software on Diskette” for information on obtaining
Windows CE diskettes.)
2. Follow the instructions included with the CD and on the
computer screen to install Windows CE Services and other
software.
Before installing this software, be sure your computer
Step 3: Configure the Communications Port
Before connecting, you must configure your computer’s COM
port so that it can communicate with your handheld PC.
NOTE:
sync cable (serial cable) connection. For information on
connecting with an infrared port, RAS, or network, refer to
Chapter 7, “Using the Infrared Feature,” or see “Get Connected”
in the Windows CE Services Help that you installed on your
computer.
This procedure covers only the configuration for an auto-
Using Windows NT Workstation
Select Start→Settings→Control Panel. Choose the Ports icon.
Configure a COM port for your handheld PC with the following
settings: 19200 baud, 8 data bits, 1 stop bit, no parity.
Using Windows 95
Select Start→Settings→Control Panel. Choose the System
icon, then select the Device Manager tab. Configure a COM port
for your handheld PC with the following settings: 19200 baud,
8 data bits, 1 stop bit, no parity.
Forming a Partnership
2-3
Page 25
Step 4: Connect the Handheld PC
to the Computer
Once Windows CE Services is installed on your computer and the
communications port is configured, you are ready to connect your
handheld PC to the computer. To do so, follow the steps below.
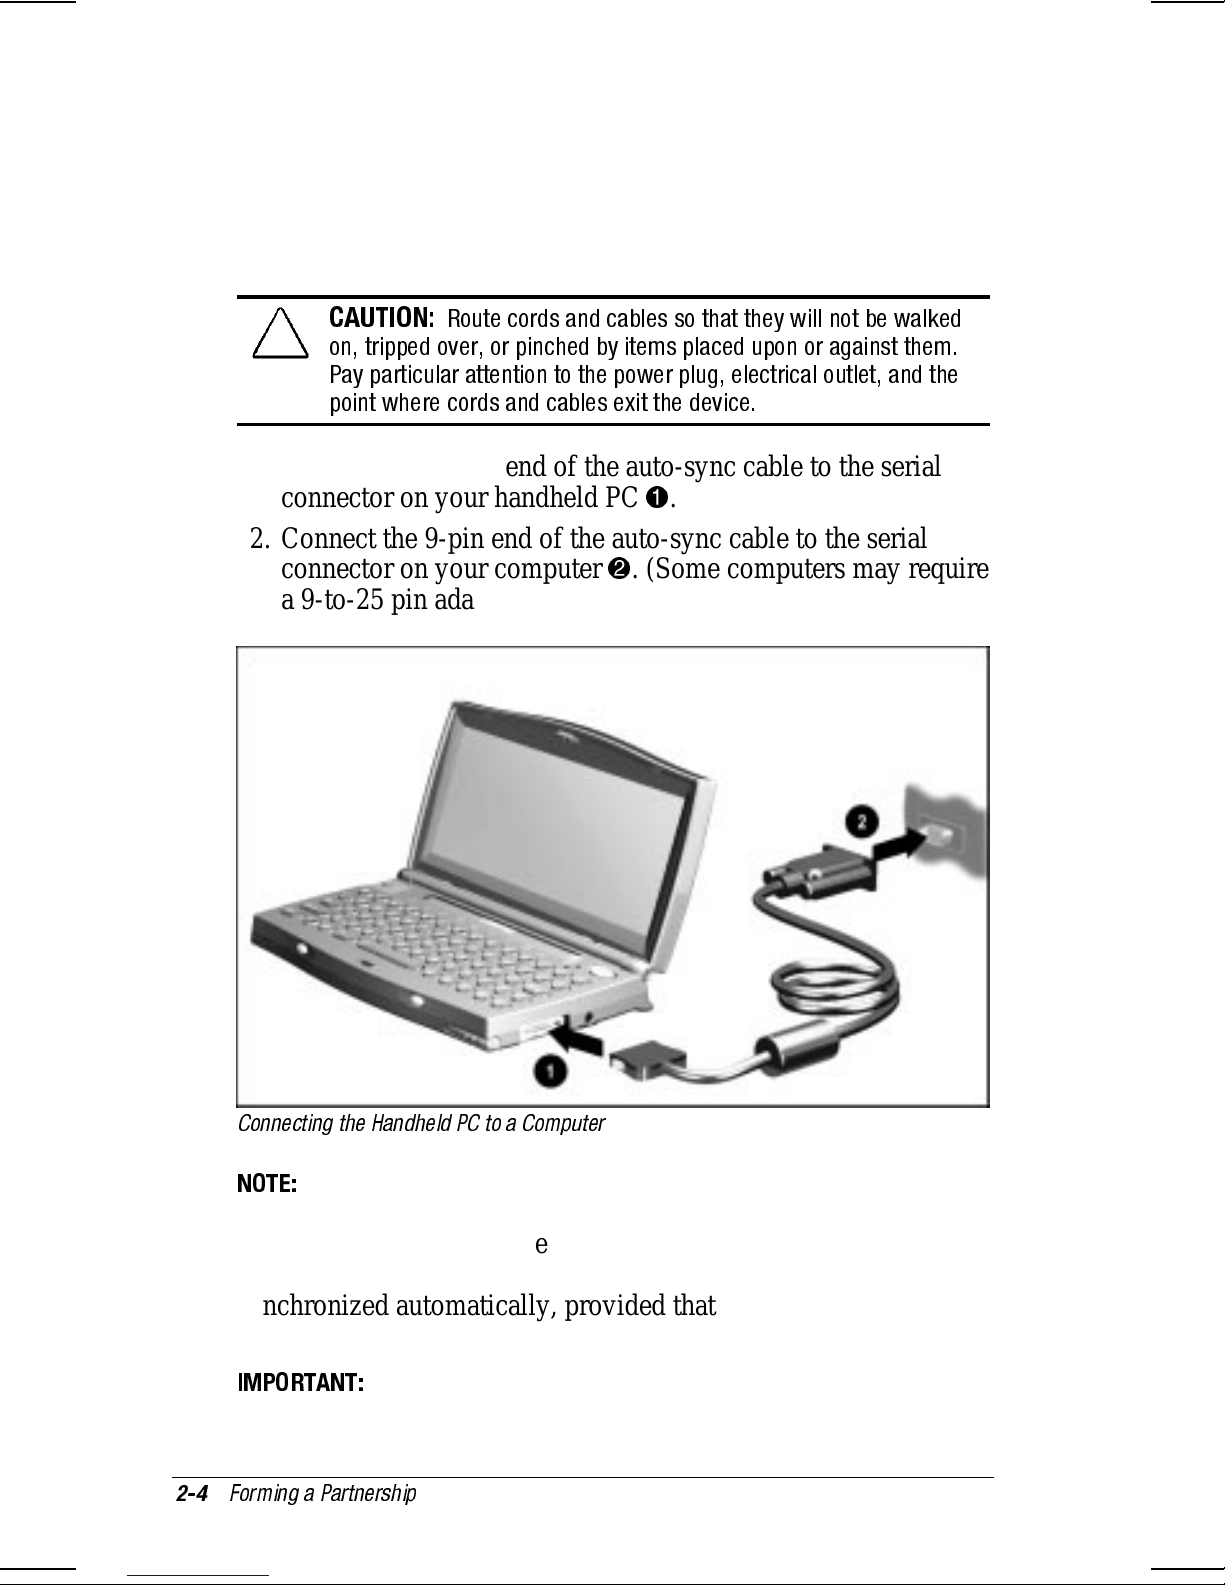
CAUTION:
on, tripped over, or pinched by items placed upon or against them.
Pay particular attention to the power plug, electrical outlet, and the
point where cords and cables exit the device.
Route cords and cables so that they will not be walked
1. Connect the 16-pin end of the auto-sync cable to the serial
connector on your handheld PC 1.
2. Connect the 9-pin end of the auto-sync cable to the serial
connector on your computer 2. (Some computers may require
a 9-to-25 pin adapter in order to connect the auto-sync cable).
Connecting the Handheld PC to a Computer
NOTE:
The first time you connect your handheld PC to the
computer, the New Partnership Wizard appears on the screen.
Follow the instructions to establish a connection between the two
devices. The next time you connect, your data will be
synchronized automatically, provided that you accept the default
settings.
IMPORTANT:
Refer to The Handheld PC Companion for more
information on establishing a connection and synchronizing data.
2-4
Forming a Partnership
Page 26

Step 5: Install the Compaq C-Series Software
After connecting to the computer, follow the steps below to install
the Compaq software. Some software will be installed on your
computer and some on your handheld PC.
1. Insert the Compaq CD into the computer’s CD-ROM drive.
2. Follow the instructions included with the CD and on the
computer screen to install the Compaq software.
IMPORTANT:
To avoid draining the batteries, use external power
whenever your handheld PC is connected to the computer.
Forming a Partnership
2-5
Page 27

chapter
3
SING THE KEYBOARD
U
AND
Your C-Series handheld PC contains several keys and buttons that
perform special functions. This chapter describes the following
features:
■
■
TYLUS
S
special keyboard keys and buttons
stylus functions
Using the Keyboard and Stylus
3-1
Page 28

Special Keyboard Features
Special Keyboard Features
NOTE:
Location and legends of keys vary by geographic region.
Item Component Function
1
2
3
4
5
Power button Press once to turn on the device. Press
again to turn off.
Dual
brightness
backlight
button
Caps
key
Shift
Contrast keys
(<) (>)
Alt
key
Provides increased lighting for better
viewing of the screen. For more
information, see “Using the Dual
Brightness Backlight Button” later in this
chapter.
When pressed with the
like a
letters or characters indicated on the
upper section of the keys).
NOTE:
area of the taskbar when this function is
on.
Press
Press
Press
simultaneously to recenter contrast.
Press in conjunction with the contrast
keys to adjust screen contrast.
Press in conjunction with the Fn key to
start the Welcome Tour.
May perform application-specific
functions.
Caps Lock
An icon appears in the status
Alt
Alt
Alt
key, works
Shift
key (produces capital
+ (<) to decrease contrast.
+ (>) to increase contrast.
+ both contrast keys
Continued
3-2
Using the Keyboard and Stylus
Page 29

Continued
Item Component Function
6
7
8
Windows key Press once to bring up the Start menu.
Press in conjunction with the
Fn
key
Application
launch keys
■
number keys (2–9 and 0) to open
applications quickly.
Press in conjunction with the
■
backlight button to toggle to a
different backlight level
(monochrome models only).
Press in conjunction with the
■
to start the Welcome Tour.
Press in conjunction with the Fn key to
open applications quickly. For more on
this, see “Using the Application Launch
Keys” in the following section.
Alt
key
Using the Keyboard and Stylus
3-3
Page 30

Using the Application Launch Keys
The application launch keys provide a fast and convenient way to
get to many of your favorite programs. To start a program, hold
down the
program you want to start. (For example, press
Pocket Word.) For instructions on using a program once it’s
started, see The Handheld PC Companion or the online Help
included with the program.
The following table lists the application launch keys and their
corresponding icons and programs.
key and press the number key below the icon for the
Fn
to start
Fn+2
Fn + Key
2
3
4
5
6
7
8
9
Icon
Program Launched
Pocket Word
Pocket Excel
Pocket PowerPoint
Calendar
Contacts
Tasks
Inbox
World Wide Web (www)
0
NOTE:
Once a program is open, pressing Fn + the application’s
launch key will quickly switch you to that application.
3-4
Using the Keyboard and Stylus
Voice Memo
Page 31

Using the Dual Brightness Backlight Button
The dual brightness backlight button provides you with two levels
of backlighting (the light that illuminates the screen). The
following table describes how to use the backlight button
according to the handheld PC model you have.
Function Monochrome screen
Color screen model
model
Press
backlight button
Press Fn +
backlight button
Toggles backlight
on
and off.
Toggles between
normal and high
backlight and sets
the selected level
as the default.
Toggles between
normal and high
backlight.
Backlight Tips
Using the backlight drains battery power. To conserve battery
■
power, use the backlight on the lowest setting that is
comfortable for you, and use it only when necessary.
To save battery life, you can set the device to automatically
■
turn off backlighting when using battery or external power.
Tap Start→Settings→Control Panel→double-tap Display
Properties. Select the Backlight tab and choose the settings
you want.
To automatically turn on the backlight whenever a key is
■
pressed or the screen is touched, select Advanced from the
Backlight tab and choose the settings you want. (Applies to
monochrome models only.)
Using the Keyboard and Stylus
3-5
Page 32

Using the Stylus
Compaq recommends using the stylus to touch the screen and
when pressing the reset button. There's no harm in using your
fingertip, but many features require the stylus for finer pointing.
Below are some tips for using the stylus:
Make sure the screen is calibrated so that the device interprets the
stylus taps correctly. If you need to recalibrate after the initial
setup calibration, select
Panel→Stylus
To quickly open the Stylus calibration page, press the
TIP:
Windows key
To remove the stylus from the stylus slot, slide the stylus to
■
the right.
To replace the stylus, slide the stylus into the slot, point first
■
and ridges facing out, until it is all the way in.
When instructed to tap the screen, use a quick, light touch.
■
Leaving the stylus on the screen, skidding it across the screen,
or tapping too hard can cause the device to misinterpret the
taps.
and follow the instructions on the screen.
+
Start→Settings→Control
.
i
When instructed to double-tap, use two quick, light taps in
■
succession.
For applications that require a right click, press the
■
Alt
while tapping with the stylus.
To adjust tap speed and sensitivity, select
■
Control Panel→Stylus→Double-Tap
Start→Settings→
and follow the
instructions on the screen.
CAUTION:
instruments such as keys or ballpoint pens to touch the screen.
To avoid damaging the screen, do not use sharp
key
3-6
Using the Keyboard and Stylus
Page 33

chapter
4
SING POWER
U
This chapter discusses the following topics:
using battery power
■
replacing batteries
■
disposal and recycling of used batteries
■
using AC power
■
resetting the C-Series handheld PC
■
Using Power
4-1
Page 34

Using Battery Power
Your C-Series has a dual power supply that consists of:
main batteries (two AA alkaline batteries or a rechargeable
■
NiMH battery pack)
backup battery (CR2032 lithium cell battery).
■
The main batteries power the handheld PC when it is not
connected to an external power source. The backup battery, which
comes preinstalled in the handheld PC, protects your saved data
when the main batteries are drained or have been temporarily
removed (for example, when you are replacing the main
batteries).
IMPORTANT:
Be sure to install the main batteries before using the
handheld PC.
Checking Battery Power Levels
To see the estimated amount of remaining battery power for both
the main and backup batteries, tap Start→Settings→Control
Panel. Double-tap the Power icon, then tap the Battery tab.
NOTE:
The amount of remaining battery power is an estimate; the
actual amount of remaining power can vary, depending on your
C-Series usage and operating conditions.
For factors that affect battery life, see “Conserving Battery
Power” later in this chapter.
Recognizing Low Battery Indicators
To protect against data loss, the following set of precautionary
measures is built into your handheld PC:
Low battery icons notify you when the condition of any
■
battery drops below Good.
A warning message appears on screen when any battery
■
reaches a critical low level.
A final warning message and a low battery shutdown (which
■
saves all data in memory) occur when the batteries are too
low to run the device.
4-2
Using Power
Page 35

Low Battery Icons
The C-Series displays various battery icons in the status area of
the taskbar when batteries are low. When you see a low or very
low battery icon, save your work, turn off the device, and replace
the old batteries with fresh ones as soon as possible.
Critical Low Battery Warning
If no action is taken to resolve the low battery condition described
above, a critical low battery warning will appear on the screen
when the batteries enter a very low state. When you see this
warning, take immediate action by saving your data, then do one
of the following:
Turn off your handheld PC and replace the batteries.
■
Connect the AC Adapter to your handheld PC until new
■
batteries are available.
CAUTION:
backup battery to run down. Replace the backup battery as soon as
you are notified that backup battery power is low.
Do not remove both the main and backup batteries at the same time.
Doing so will cause data, configuration settings, and user-installed
programs to be lost.
To avoid losing data stored in memory, do not allow the
Low Battery Shutdown
When the main batteries are too low to run the device, a final
warning message appears notifying you that your handheld PC
can no longer run and will be shut off. This is followed by an
automatic shutdown which saves all data and suspends operation
until new batteries are installed or until the device is connected to
external power.
Using Power
4-3
Page 36

Conserving Battery Power
To get the longest life from your batteries, follow these guidelines
when using your C-Series:
■
Use external power for PC Card operations
PC Card modems and other PC Cards use large amounts of
power to operate and can quickly drain the batteries in your
device. Use AC power or automobile power for PC Card
operations whenever possible.
■
Limit PC Card use when you must use battery power
When using battery power, limit the amount of time that you
use the PC Card, and remove it from the PC Card slot when it
is not in use.
■
Use external power for communications connections
Extended connections (communicating via the modem, serial
port, or IR port) can quickly drain batteries. Use the AC
Adapter to connect to an external power source when your
handheld PC is communicating through one of these channels.
■
Limit the use of backlight
Minimize backlight use when you are operating on battery
❏
power.
When using the backlight and battery power, use the lowest
❏
level of backlight needed to see the screen.
❏
Use
Display Properties
in the Control Panel to turn off the
backlight automatically when running on battery power.
■
Shorten auto-suspend time
Your handheld PC automatically suspends operation to
conserve battery power if you have not used the keyboard or
the stylus after three minutes. To shorten auto-suspend time,
follow these steps:
1.
Tap
Power
2.
Tap the
Start→Settings→Control Panel
icon.
Power Off
tab, then select another auto-suspend
, then double-tap the
setting.
NOTE:
Your handheld PC will not auto-suspend while it is
communicating through the modem, serial port, or IR port.
4-4
Using Power
Page 37

■
Enable suspend while on external power
To auto-suspend the device while it is connected to AC power
or automobile power, follow these steps:
1.
Tap
Start→Settings→Control Panel
Power
2.
Tap the
icon.
Power Off
appropriate checkbox.
■
Turn off sounds
Tap
Start→Settings→Control Panel→Sounds
sound events that you do not need.
Replacing Batteries
Improper handling of batteries can cause fire, personal injury, or
damage to the C-Series. Observe the following precautions when
replacing batteries:
Be sure the polarity (+ and - ends) of each battery is correct
■
when you install it in the handheld PC.
, then double-tap the
tab, then place a check in the
and turn off
Do not mix old batteries with new ones.
■
Use only the types of batteries specified in this chapter.
■
Keep track of the main and backup battery life by frequently
■
checking battery status via the Power Properties box in the
Control Panel. If the batteries used for both power supplies
are low at the same time, data stored in memory can be
corrupted or lost.
IMPORTANT:
Before replacing any batteries, Compaq recommends
performing a data backup. For complete instructions on this, see
“Using the Backup and Restore Utilities” in Chapter 8, “Using
Compaq Software.”
Using Power
4-5
Page 38

Replacing the Main Batteries
When replacing the main batteries, use two AA alkaline batteries
or a rechargeable NiMH battery pack.
WARNING:
!
pack. There is a risk of fire and chemical burn if the battery pack is
handled improperly. Do not disassemble, crush, puncture, short
external contacts, dispose in water or fire, or expose to temperatures
higher than 140ºF (60ºC). Do not attempt to open or service the
battery pack.
CAUTION:
the same time. Doing so will cause data, configuration settings, and
user-installed programs to be lost.
To protect against data loss, be sure you have fresh batteries
TIP:
This device may contain a nickel metal hydride battery
Do not remove both the main and backup batteries at
on hand before removing the old ones. Also connect the device to
external power before removing the batteries.
To replace the main batteries, follow these steps:
1. Save your work.
2. Turn off the handheld PC by pressing the power button.
3. Close the handheld PC and turn it over.
4. Slide the main battery cover off the battery compartment 1,
then remove the old batteries from the battery holder 2.
Removing the Old Main Batteries
4-6
Using Power
Page 39

5. Do one of the following:
If replacing with AA alkaline batteries, follow the steps in
■
the illustration below. Be sure the positive and negative
ends of the batteries are oriented correctly.
CAUTION:
models that have color screens. Install only a Compaq-
approved rechargeable battery pack in these models.
Installing New Alkaline Batteries
Do not install AA alkaline batteries in C-Series
Using Power
4-7
Page 40

If replacing with a rechargeable NiMH battery pack, follow
■
the steps in the illustration below. Be sure the flat side of
the battery is facing in toward the battery compartment as
indicated.
Installing the NiMH Battery Pack
6.
If using a rechargeable NiMH battery pack, connect the
device to AC power and allow the battery pack to charge for
three hours. If using AA alkaline batteries, proceed to Step 7.
7.
Turn over the handheld PC, raise the lid, and press the power
button to resume operation.
4-8
Using Power
Page 41

Replacing the Backup Battery
A CR2032 lithium coin backup battery (available through your
local reseller) comes preinstalled in the handheld PC. Be sure to
replace the backup battery as soon as possible when it shows
signs of low power (such as when the low battery icon appears in
the status area of the taskbar).
WARNING:
!
powered real-time clock circuit. There is a risk of explosion and
injury if the battery is incorrectly replaced or improperly handled. Do
not attempt to recharge, disassemble, immerse in water, dispose of
in fire, or expose to temperatures higher than 140ºF (60ºC). Do not
attempt to open or service the battery. Replace the battery only with
a battery designated for this product and approved by Compaq.
CAUTION:
the same time. Doing so will cause data, configuration settings, and
user-installed programs to be lost.
This device contains an internal lithium battery-
Do not remove both the main and backup batteries at
To replace the backup battery, follow these steps:
1. Save your work.
2. Turn off the handheld PC by pressing the power button.
3. Close the handheld PC and turn it over.
4. Loosen the screw on the backup battery compartment cover
using a small Phillips head screwdriver.
Using Power
4-9
Page 42

5. Remove the compartment cover and old battery.
Removing the Old Backup Battery
6.
Wipe the surface of the new backup battery with a soft cloth,
then place it in the backup battery compartment with the
positive (+) side facing up.
7.
Replace the compartment cover and tighten the screw.
Installing the New Backup Battery
8.
Turn over the handheld PC, open it, and press the power
button to resume operation.
4-10
Using Power
Page 43

Disposal and Recycling of Used Batteries
Disposal of batteries should comply with country, state, province,
and local regulations.
For information about disposal and recycling requirements, see
Appendix C, “Agency Regulatory Notices.”
Using AC Power
The AC Adapter included with your handheld PC allows you to
connect to AC power via an electrical outlet. When connected to
AC or other external power (such as automobile power), the
device functions normally, except that battery power is not used.
A plug icon appears in the status area of the taskbar to indicate
that the device is connected to external power.
WARNING:
!
to the device, do not use converter kits sold for appliances to power
the device.
NOTE:
automatically recharge while the device is connected to external
power. The amber indicator light turns on and the battery
charging icon appears in the taskbar while the battery pack
charges.
If you are using a rechargeable NiMH battery pack, it will
To reduce the risk of electrical shock, fire, or damage
Using Power
4-11
Page 44

Connecting to AC Power
It is not necessary to turn off your handheld PC before connecting
to AC power. To connect to AC power, follow the steps below.
CAUTION:
into is easily accessible at all times. To disconnect power from the
device, unplug the AC Adapter from the electrical outlet.
Ensure that the electrical outlet you plug the AC Adapter
1. Connect one end of the AC Adapter cable to the AC
connector on your handheld PC 1.
2. Plug the other end of the cable into an electrical outlet 2.
4-12
Connecting to AC Power
The device automatically switches to AC power without
interrupting operation.
Using Power
Page 45

Resetting Your C-Series Handheld PC
During a severe system lockup or when a malfunction cannot be
corrected any other way, you may need to completely reset and
restart your handheld PC. Your C-Series can be reset two
different ways, depending upon your situation and the action that
is called for: normal reset, which does not affect data that has
been saved in memory, and full reset, which erases memory
contents and settings.
Performing a Normal Reset
A normal reset restarts your handheld PC much like pressing
Ctrl+Alt+Del
these steps:
1. Save all work (if possible).
restarts a computer. To perform a normal reset, follow
IMPORTANT:
Do not press the power button to turn off the
device; the device must remain on in order to reset.
2. Close the lid and turn over the device.
Pressing the Reset Button
3. Using the stylus tip, press the reset button.
4. The device will automatically restart.
Using Power
4-13
Page 46

Performing a Full Reset
A full reset restarts your device and removes all information that
was stored in memory, such as your data files and your system
settings.
NOTE:
If you saved your data using one of the backup and restore
utilities provided with your C-Series, it is possible to restore your
saved data after performing a full reset. For more on using the
backup and restore utilities, see Chapter 8, “Using Compaq
Software.”
To perform a full reset, follow these steps:
1. If using external power, disconnect the device from the AC
Adapter.
2. Close the lid and turn over the device.
3. Remove both the main and backup batteries.
4. Wait at least 5 minutes, then replace the batteries.
5. Turn over the device, open it, and press the power button to
restart the handheld PC.
6. Run through the Setup Wizard again to reestablish your
system and calibration settings.
NOTE:
If you previously saved data using the Compaq Flash
Memory Manager backup utility, you will be prompted to restore
your saved data. Select ‘Yes’ if you wish to do so.
4-14
Using Power
Page 47

chapter
5
SING THE
U
Depending on your model and geographic region, your C-Series
handheld PC may include a built-in modem for making dial-up
connections over an analog telephone line (the kind used in most
homes and offices). You can use the modem to send and receive
e-mail, explore the Internet, send faxes, and connect to other
services. Additional software and services may be required in
order to perform some tasks.
See Appendix C, “Agency Regulatory Notices,” for information
on the Compaq Series number for your handheld PC.
NOTE:
use a PC Card modem or an external modem to perform modem
tasks. For information on using a PC Card with your handheld
PC, see Chapter 6, “Using PC Cards.”
If your model does not have an internal modem, you can
ODEM
M
Using the Modem
5-1
Page 48

Safety Precautions for Modems
Always follow these basic safety precautions when using a
modem or telephone that is not cordless.
!
WARNING:
or fire:
■
Never connect or use a modem or telephone during a lightning
storm. There may be a remote risk of electric shock from
lightning.
■
Never connect or use a modem or telephone in a wet location.
■
Never use a modem or telephone to report a gas leak in the
vicinity of the leak.
■
Always disconnect the modem cable before opening the
equipment enclosure or touching an uninsulated modem cable,
jack, or internal components.
To reduce the risk of personal injury, electric shock,
5-2
Using the Modem
Page 49

Connecting the Modem
To connect the built-in modem, follow these steps:
1. Lift up the modem jack cover (indicated by a telephone
icon) 1.
2. Plug one end of the modem cable that came with your
handheld PC into the modem jack 2.
3. Plug the other end of the modem cable into the analog
telephone jack 3.
Connecting the Modem
4.
Establish a dial-up connection through the Remote
Networking application. (Select
Start→Programs→
Communications→Remote Networking.)
NOTE:
For information on the software and COM port settings
needed to create a dial-up connection, refer to the Windows CE
Services Help that you installed on your computer.
For problems making a dial-up connection, see “Modem
Problems” in Chapter 10, or see the troubleshooting section of
The Handheld PC Companion.
Using the Modem
5-3
Page 50

Using an External Modem
An external modem can be used when you do not have a built-in
modem in your handheld PC or when you do not have a PC Card
modem. An external modem can also be used when you want to
consume less battery power than using other modem alternatives.
Connecting an External Modem
To use an external modem, you must provide a null-modem cable
and a 9-pin to 25-pin adapter. Follow these steps to connect the
external modem to the handheld PC:
1. Connect your C-Series to external power, then connect the
auto-sync cable to your handheld PC, leaving the 9-pin end
(the end that usually connects to your computer) open.
2. Connect the 9-pin end of the null-modem cable to the open
end of the auto-sync cable.
IMPORTANT:
Use only a null-modem cable for this connection.
3. Connect the other end of the null modem cable to the 9-pin to
25-pin adapter. Then connect the adapter to your modem.
4. Connect the modem cable to external power.
Configuring and Using the External Modem
When using an external modem with your device, be sure the
modem is turned on before configuring a dial-up connection.
Unlike some PC Card modems, your handheld PC does not
recognize specific types of external modems. Your device
recognizes the external modem only as a generic modem on
COM1.
5-4
Using the Modem
Page 51

Using the Modem to Access the Internet
To use the Internet with your handheld PC, you will need to do
the following:
1. Connect and configure your modem.
2. Establish an Internet Service Provider (ISP) profile using the
Internet Setup Utility. (See Chapter 8, “Using Compaq
Software,” for more on this.)
3. Make a dial-up connection by tapping Start→Programs→
Communication→Remote Networking.
Browsing the Internet
Browsing the Internet on a handheld PC can be different from
browsing it on a computer. Below are some tips for using the
Internet more efficiently with your C-Series.
To see an entire web page on the screen, tap the vertical and
■
horizontal scroll bars that appear on screen.
The C-Series does not support large amounts of graphics. To
■
avoid problems while browsing, disable the Show Picture
option in Pocket Internet Explorer. This allows you to open
web pages that contain graphics without the graphics being
displayed.
Performance with (and support for) Windows CE varies
■
among Internet service providers. If you experience difficulty
accessing the Internet, call your service provider to determine
if they support the Windows CE 2.0 operating system.
For more information on accessing the Internet, see the Windows
CE Services Help that you installed on your computer.
Using the Modem
5-5
Page 52

chapter
6
SING
U
Your C-Series handheld PC comes equipped with a versatile
feature that allows you to connect credit-card sized options called
PC Cards (PCMCIA Cards). PC Cards expand the capability of
your handheld PC by providing modem, network, ATA flash
storage, VGA, and other capabilities. And because they are small
and light-weight, PC Cards are mobile.
PC C
ARDS
Supported PC Cards
There are three types of PC Cards, each of which vary in
thickness (Type I, Type II, and Type III). The PC Card slot in
your device accommodates a Type I or Type II PC Card. In
addition, the handheld PC supports 16-bit PC Cards.
Some PC Cards consume large amounts of power. When a PC
Card drains too much power from the batteries, the C-Series
automatically shuts down to protect against data loss.
To avoid draining the batteries when using a PC Card with your
C-Series, do the following:
Connect the handheld PC to external power.
■
Use lower-voltage PC Cards, which consume less power.
■
For a list of PC Cards that have been tested and approved for use
with the C-Series, visit the C-Series web site at
www.compaq.com/products/handhelds.
Using PC Cards
6-1
Page 53

PC Card Software
Your handheld PC automatically recognizes a wide range of PC
Cards approved for use with Windows CE. If you are instructed to
install card-specific device drivers provided by a PC Card
manufacturer, be sure to install only device drivers specifically
designed for Windows CE. Do not install card and socket service
enablers. If you are unclear about installation instructions, call
your PC Card manufacturer for more information.
Operating Guidelines
Do not save data to a PC Card when the batteries on your
■
handheld PC are low, as this can result in loss of data. Be sure
the batteries are in good condition or connect to external
power before attempting to save your data.
Do not turn off your handheld PC while the PC Card is
■
performing an operation (such as saving data), as this can
result in data loss.
Do not eject a PC Card while it is performing an operation, as
■
this can result in data loss.
Do not expose the PC Card to dirt, moisture, or liquids.
■
Always carry PC Cards in protective cases or sleeves when
■
they are not being used.
6-2
Using PC Cards
Page 54

Inserting a PC Card
To insert a PC Card, follow these steps:
1. With the 68-pin connector facing in and the label containing
the arrow facing up, insert the card into the PC Card slot.
2. Gently push the card into the slot until it is seated. If inserted
correctly, the card is ready to use right away.
CAUTION:
slot.
Inserting a PC Card
Forcing a PC Card into the PC Card slot can damage the
Using PC Cards
6-3
Page 55

Removing a PC Card
You do not have to stop a PC Card from running before removing
it from the card slot. However, you should wait until a PC Card
operation is complete before attempting to remove the PC Card.
To remove a PC Card, follow these steps:
1. Slide the eject lever 1 on the bottom of the device away from
the PC Card slot until the PC Card ejects.
2. Remove the PC Card from the card slot 2.
Removing a PC Card
6-4
Using PC Cards
Page 56

chapter
7
SING THE INFRARED FEATURE
U
The built-in infrared (IR) port on your C-Series handheld PC
provides a convenient, “wireless” way to send and receive data.
Through the lens on the back of the device, an invisible beam of
IR light creates a point-to-point link with other infrared-equipped
devices such as computers, printers, and other handheld PCs.
Using the Infrared Feature
Using the Infrared Feature
7-1
Page 57

Establishing an Infrared Connection
Establishing an infrared connection involves three steps:
Step 1: Configure the software
Step 2: Set up the infrared devices
Step 3: Transfer information
Step 1: Configure the Software
To set up the IR communications ports on the sending and
receiving devices, refer to “Connecting with an Infrared Port” in
the Windows CE Services Help that you installed on your
computer.
Step 2: Set Up the Infrared Devices
To prepare for IR communication between your handheld PC and
another IrDA-compliant device, follow these guidelines:
Be sure the IR ports on both devices are turned on and facing
■
each other at a distance no greater than one meter (3.28 feet)
and no less than 5 centimeters (2 inches) apart.
Aim the ports directly at each other. (The maximum capture
■
angle is 30 degrees. Do not point one port more than 15
degrees away from the center line of the other port.)
Remove all obstacles between the IR ports.
■
Do not swing the device lid completely open, as this may
■
block the IR port.
Certain types of fluorescent lamps can interfere with IR
■
communication. If this happens, turn off the lights or move to
another location with different lighting.
When transmitting to another handheld device, tap Receive on
■
the Windows CE Explorer File menu of the receiving device
before sending.
When transmitting to a computer or another handheld PC,
■
ensure that each device has a unique computer (machine)
name. See the online Help for the operating system you are
using for instructions on assigning a computer name.
Do not transfer more than one file (or 25 Contact cards) at a
■
time.
7-2
Using the Infrared Feature
Page 58

Step 3: Transfer Information
Your handheld PC is designed to transfer information to other
computers and handheld devices that have Windows CE installed.
To transfer files from your C-Series once the devices have been
properly set up, follow these steps:
1. On the device sending the file, go to Windows CE Explorer
and select the file you want to transfer.
2. On the File menu, tap Send To, then tap Infrared Recipient
to begin the transfer process. A dialog box appears on screen
displaying the status of the file as it is sent.
3. On the device receiving the file, go to Windows CE Explorer
and tap Receive on the File menu. A dialog box appears on
screen while the data is transferred.
The transferred file will be stored in the root folder of the
Windows CE Explorer.
NOTE:
It may take several attempts before the devices establish an
IR connection and begin transferring information.
Using the Infrared Feature
7-3
Page 59

Printing with the IR Port
Your C-Series handheld PC can print directly to a printer
equipped with an IR port. You can print the following kinds of
information from your handheld PC:
Pocket Word and Pocket Excel files
■
Contacts and Tasks lists
■
A view of your schedule or agenda in Calendar
■
Inbox messages
■
For more information about printing, see “Printing” in Chapter 8,
as well as the Windows CE Services Help that you installed on
your computer.
7-4
Using the Infrared Feature
Page 60

chapter
8
SING COMPAQ SOFTWARE
U
This chapter provides information on using the Compaq
applications included with your C-Series handheld PC. Some
Compaq applications are preinstalled on your C-Series, and some
are installed from the Compaq CD. For instructions on installing
applications, refer to “Step 5: Install the Compaq C-Series
Software” in Chapter 2. For help using the applications, read this
chapter or refer to the online Help supplied with the applications.
To learn about updates that may have occurred to your C-Series
device after this document was printed, tap the Start menu on
your handheld device, then tap My Documents and select
Compaq Updates.
NOTE:
will not appear on the screen.
If updated information is not available, Compaq Updates
Using Compaq Software
8-1
Page 61

Using Voice Memo
The Voice Memo application allows you to record, play, and
manage voice messages much like you would manage data files
in Windows CE Explorer.
When a voice message is recorded, your handheld PC
automatically saves it in .WAV format. However, you can choose
to save your messages in other formats as well. The following
table provides a brief description of the voice memo file formats
and features.
Format Playback Quality File Size
.VSELP Lower Smaller
.GSM Medium Medium
.WAV Higher Larger
To select a format before recording, tap Tools from the Voice
Memo toolbar, then select Wav, Vselp, or Gsm.
To convert a previously recorded memo to another format, select
Tools→Convert. Then select Wav, Vselp, or Gsm.
NOTE:
Conversions that are not available for the selected memo
are grayed out.
8-2
Using Compaq Software
Page 62

Recording A Message
To record a voice message, follow these steps:
1. Press and hold the record button (located on the left front
panel of the device).
2. After you hear the beep, speak into the microphone to record
your message.
3. When finished recording, release the record button.
You can also record a message by launching Voice Memo via the
application launch keys (
tap the Record button at the top of the screen to start recording.
Tap Stop Recording when you’re done.
). Once the Voice Memo is open,
Fn+0
NOTE:
You can record a message while the lid is open or closed.
When the lid is open, you will see a message on the screen
showing the duration, size, and available space for the recording.
Use this information to allow yourself enough space to make a
complete recording. If your handheld PC runs out of space, it will
stop recording and display an error message.
IMPORTANT:
Each message can be up to 10 minutes in duration.
The total amount of time available for recordings depends on the
amount of available space remaining in memory.
Playing a Message
To listen to a message once it’s been recorded, follow these steps:
1. Open the Voice Memo application.
2. In the left pane of the Voice Memo window, open the folder
containing the file you want to play, then select the file.
NOTE:
Memos folder by default.
All newly recorded messages are stored in the New
3.
To play the message, tap the Play button on the toolbar or
double-tap the file name.
Using Compaq Software
8-3
Page 63

Managing Messages
You can manage voice messages much like you manage files in
Windows CE Explorer—you can view, rename, delete, copy, and
organize messages by dragging and dropping them into folders
that you create. This flexibility provides a quick and easy way to
keep track of your messages.
Adjusting Audio Levels
To adjust audio levels before and after you record, open the Voice
Memo application and tap Control, then tap Volume. Move the
sliders to adjust the input (recording) level and speaker volume.
8-4
Using Compaq Software
Page 64

Using Internet Setup Utility
Configuring a device for Internet access can be a complicated,
time-consuming process. The Internet Setup Utility simplifies this
process by automating the way you set up profiles to use when
accessing the Internet on your handheld PC.
The Internet Setup Utility allows you to transfer your existing
Internet service provider (ISP) profile information from your
computer to your handheld PC, select profiles from a list of
pre-defined ISPs, or create new, custom profiles for use on your
handheld PC.
The Internet Setup Utility consists of two major components: the
Internet Setup Utility client and the Internet Setup Utility server.
The client (which must be installed on your computer from the
Compaq CD) collects ISP information and provides you with an
easy-to-understand user interface. The server (which is
preinstalled on your C-Series) runs on the handheld PC and
transfers ISP information to and from the handheld PC.
Setting Up a Profile
To set up a profile, follow these steps:
1. Be sure the Internet Setup Utility is installed on your
computer. For more on this, see “Step 5: Install the Compaq
C-Series Software” in Chapter 2.
2. Connect the handheld PC to your computer via the auto-sync
cable or an infrared link.
3. On the computer, open Internet Setup Utility by selecting
Start→Programs →Compaq C-Series→Internet Setup
Utility. A welcome screen appears.
4. Follow the instructions on the screen to begin the setup
process.
Using Compaq Software
8-5
Page 65

5. When the profiling options screen appears, select the type of
profiling you want:
■
Express—
Select this to automatically transfer your
computer ISP profile to the handheld PC with very little
involvement from you.
■
Pre-Defined—
Select this when you don’t have any ISP
information on your computer or when you want a different
ISP configuration for your handheld device. With this
option, Internet Setup Utility gives you a pre-defined list of
ISPs to select from.
NOTE:
You may need to obtain the following information
from your provider: ISP name, dial-up number (country
code +area code + number), server (TCP/IP) settings,
authentication data, Internet mail settings, proxy server
settings for Web browser, and DNS (domain name server).
You may also need to provide a diskette of the latest script
files for your ISP if prompted by the program.
IMPORTANT:
Because Internet service providers often
change their settings, the pre-defined ISP profile you want
may not be valid. If your provider has recently changed
settings, use the Custom ISP option to set up the profile.
Contact your provider for assistance in setting this up.
■
Custom—Select this to modify or create your own ISP
profile. Internet Setup Utility guides you through the
process, providing recommended configuration settings but
letting you modify them as needed. Be sure you have the
following information from your Internet service provider:
ISP name, dial-up number (country code + area code +
number), server (TCP/IP) settings, authentication data,
Internet mail settings, proxy server settings for Web
browser, and DNS (domain name server).
6.
Once the necessary information is supplied, Internet Setup
Utility begins the profiling process. A progress bar appears on
screen indicating that the profile data is being compiled and
transferred to your handheld device.
Getting On the Internet
Once the new profile is copied to your handheld PC, make a dialup connection by tapping Start→Programs→Communication
→Remote Networking. For more information on accessing the
Internet, see Chapter 5, “Using the Modem,” and see the Window
CE Services Help that you installed on your computer.
8-6
Using Compaq Software
Page 66

Using Internet Favorites Synchronizer
The Internet Favorites Synchronizer lets you share favorite
Internet addresses (bookmarks) between the browser on your
computer and the browser on your handheld PC. Using this
program, you can:
synchronize bookmarks (put the same list of bookmarks and
■
folders on the computer and handheld PC)
copy selected bookmarks and folders by dragging and
■
dropping them between the two devices.
NOTE:
The Internet Favorites Synchronizer only works with
Microsoft Internet Explorer and Netscape Navigator.
Synchronizing Bookmarks
To synchronize the bookmarks and folders on both devices,
follow these steps:
1. Be sure the Internet Favorites Synchronizer is installed on
your computer. For more on this, see “Step 5: Install the
Compaq C-Series Software” in Chapter 2.
2. Connect the auto-sync cable or establish an infrared link
between the computer and your handheld device.
3. On the computer, open the application by selecting Start
→Programs→Compaq C-Series→Internet Favorites
Synchronizer.
4. From the Bookmark menu, place a check mark next to the
Internet browser (Explorer or Netscape) installed on your
computer.
5. Select Synchronize to begin the synchronization process.
A status indicator appears on the computer screen to track
progress.
NOTE:
To determine the currently selected communications
port and the connection status, select Communications from
the Bookmark menu.
Using Compaq Software
8-7
Page 67

Copying Bookmarks
To copy selected bookmarks or folders from one device to
another, follow these steps:
1. Be sure the Internet Favorites Synchronizer is installed on
your computer. For more on this, see “Step 5: Install the
Compaq C-Series Software” in Chapter 2.
2. Connect the auto-sync cable or establish an infrared link
between the computer and your handheld device.
3. On the computer, open the application by selecting
Start →Programs→Compaq C-Series→Internet Favorites
Synchronizer.
4. From the Bookmark menu, place a check mark next to the
Internet browser (Explorer or Netscape) installed on your
computer.
5. Using the mouse or pointing device, drag and drop the item(s)
you want to copy from one pane to another. (The left pane
represents the Pocket Internet Explorer, the right pane
represents your computer Internet browser).
6. An indicator appears on the computer screen as the files are
copied from one device to another.
8-8
Using Compaq Software
Page 68

Using Dictionary Synchronizer
The Dictionary Synchronizer lets you synchronize the custom
dictionary used in Microsoft Word with the custom dictionary
used in Pocket Word on the handheld PC. Sharing a custom
dictionary is useful when performing spell checking in either
application.
To synchronize dictionary terms, follow these steps:
1. Be sure the Dictionary Synchronizer is installed on your
computer. For more on this, see “Step 5: Installing the
Compaq C-Series Software” in Chapter 2.
2. Connect the auto-sync cable or establish an IR link between
the computer and handheld PC.
3. On the computer, select Start→Programs→Compaq
C-Series→Dictionary Synchronizer.
4. In the screen that appears, tap Synchronize.
5. A status indicator appears while the synchronization occurs.
6. When synchronization is complete, select the OK button to
close the application.
Your custom dictionaries are now synchronized. You can update
the dictionaries at any time by repeating this process.
Using Compaq Software
8-9
Page 69

Using the Backup and Restore Utilities
The handheld PC stores your personal information (data you have
entered and third-party applications you have installed) in the
device’s RAM (random access memory). However, a power loss
or other disruption of power can cause your data to be deleted
from the handheld PC.
Your C-Series provides you with several ways to protect against
this kind of data loss. You can:
back up data to the computer
■
back up data to an ATA Flash RAM PC Card
■
back up data to flash memory located in your C-Series. (Flash
■
memory is an area in your device that securely stores saved
information even if there is a power loss.)
8-10
Using Compaq Software
Page 70

You can back up and restore your C-Series data using the
following utilities:
■
Microsoft Backup/Restore.
For comprehensive and secured
backup protection, use this Windows CE Services utility to
periodically back up your handheld PC data onto your
computer’s hard drive. You can manually back up data or set
this utility to back up automatically each time you connect to
your handheld PC. For detailed instructions, see “Backup and
Restore” in the
Windows CE Services Help
that you installed
on your computer.
■
Compaq Backup and Restore.
For comprehensive and
convenient backup protection, these utilities (preinstalled on
your C-Series) let you back up and restore your entire
handheld PC memory contents to an ATA Flash RAM PC
Card (purchased separately). You can then carry a PC Card–
based copy of your data with you at all times for quick
retrieval. For more on this, see the next section, “Using
Compaq Backup and Restore.”
■
Compaq Flash Memory Manager.
When you do not have
access to your computer or a PC Card, use the Flash Memory
Manager utility (preinstalled on your C-Series) to back up as
much data as possible onto your handheld PC. Use this utility
for emergency backups when both the main and backup
batteries are almost depleted. Depending on the amount of
space available in memory, your Contacts, Tasks, Calendar,
and other application and system data can be backed up. For
more on this, see “Using Compaq Flash Memory Manager”
later in this chapter.
NOTE:
To avoid losing your data in the event that your C-Series is
lost, stolen, or becomes defective, Compaq recommends periodic
backups to the computer or ATA Flash RAM PC Card.
Depending on your handheld PC usage, you may want to perform
a backup as often as once a day.
Using Compaq Software
8-11
Page 71

Using Compaq Backup and Restore
Use the Compaq Backup and Restore utilities to save the entire
contents of your handheld PC memory to a PC Card (purchased
separately), which can be carried everywhere your handheld PC
goes for easy retrieval while on the road.
NOTE:
These utilities are designed for use with ATA Flash RAM
PC Cards which are approved by Microsoft as Windows CE 2.0
compatible. A minimum card size of 10 MB is recommended. For
information on ordering the Compaq ATA Flash RAM PC Card,
see the Accessories Flier included in the shipping box. For a list
of other Compaq-tested PC Cards, visit the C-Series home page at
www.compaq.com/products/handhelds.
Backing Up Data
Each time you use the Compaq Backup utility, your data files,
databases, preferences, Windows CE system data, and
applications are copied to the ATA Flash RAM PC Card. The
subdirectories on your handheld PC are also duplicated on the PC
Card.
To perform a backup, follow these steps:
1. Connect to external power or ensure that you have good
batteries in your handheld PC.
2. Insert the ATA Flash RAM PC Card into the PC Card slot on
your handheld PC.
3. Tap Start→Programs→Compaq Applications→Backup.
4. At the prompt, close all active programs before proceeding.
5. In the dialog box that appears, Check Dual Backup if you
want to operate in dual backup mode. (Dual backup creates
two top-level folders on the PC Card: \BackupA and
\BackupB. It toggles between these folders each time it copies
data, thus retaining copies of the last two backups that you
have made. Single backup copies only to \BackupA and
always overwrites the last backup.)
6. Tap the Backup button to begin the backup process.
7. When backup is complete, remove the PC Card and keep it
close by for easy retrieval.
8-12
Using Compaq Software
Page 72

Backup Tips
Use dual backup mode if you have sufficient space on your
■
PC Card.
If you run out of space on your PC Card when using dual
■
backup mode, delete the \BackupB folder on the PC Card and
use single backup mode.
Restoring Data
To restore a backup onto your C-Series, follow these steps:
1. Reset your handheld PC to its original factory settings by
following the procedure in “Performing a Full Reset” in
Chapter 4, “Using Power.”
2. Turn on the handheld PC and insert the ATA Flash RAM PC
Card into the PC Card slot.
3. Run the Restore utility by tapping
Start→Programs→
Compaq Applications→Restore.
4. Follow the instructions that appear on the screen.
5. When the restore process is complete, press the reset button to
restart your handheld device.
6. Set the correct time and date using the World Clock applet in
the Control Panel.
If Errors Occur
If Restore detects that you don't have a good backup file from
which to perform the restore, you can still perform a manual
restore by copying selected files and folders from your PC Card
to your handheld PC.
For more information on this and other errors, visit the Compaq
web site at www.compaq.com/products/handhelds.
Using Compaq Software
8-13
Page 73

Using Compaq Flash Memory Manager
Compaq Flash Memory Manager is a collection of programs that
allows you to track and manage the information unique to your
handheld PC. The Flash Memory Manager consists of:
Database Backup/Restore utility
■
Flash Memory Manager Control Panel application.
■
Database Backup/Restore Utility
The Database Backup/Restore utility icon always resides in the
system tray of the handheld PC. This utility lets you manually
back up the data stored in your Contacts, Tasks, Calendar, and
Appointment databases, as well as e-mail and selected system
information.
To use the Backup/Restore utility, follow these steps:
1. Double-tap the icon in the system tray to open the utility.
2. A popup box appears with three choices: “Backup Now,”
“Restore Now,” and “Delete Backup.” Select an option to
manually perform any of these database operations.
8-14
Using Compaq Software
Page 74

Flash Memory Manager Control Panel Application
Use the Flash Memory Manager Control Panel application to
track and manage information unique to your handheld PC, as
well as to specify periodic backups of data.
To use Flash Memory Manager, follow these steps:
1. Tap
Start→Settings→Control Panel
Memory Manager.
The Flash Memory Manager Properties
and double-tap
dialog box appears.
2. Select one of the following tabs:
■
Database Backup
—Backs up the Contacts, Tasks, Calendar,
Appointments, and selected system data directly to your CSeries so that this information can be easily retrieved in case
of a power failure or other disturbance to the system. Using
Database Backup, you can also:
Specify the number of days between backups. (The default
❏
value is 7 days.)
Enable or disable the Auto Backup feature. Auto Backup
❏
tells the system to perform a database backup each time it
transitions from battery power to AC power, provided that
at least 12 hours have elapsed since the last backup was
done. Using Auto Backup decreases the number of periodic
backups that must be performed while using battery power.
Flash
View the date and time of the last backup, as well as the
❏
amount of space occupied by the current backup.
■
Pocket Asset Management
—Provides information specific
to your handheld PC, such as model number, serial number,
and memory size. This information is useful when making a
technical support phone call and to give system administrators
the data needed to understand their inventory.
■
Administration
—Allows an administrator to control the
administration password and asset tag number so that
corporations can track the device as a capital asset.
NOTE:
When the administrator password is enabled, it can be
used to access the C-Series at any level of password security
except Administrator Lockout mode. For more on this, see the
next section, “Using Compaq Enhanced Security.”
Using Compaq Software
8-15
Page 75

Using Compaq Enhanced Security
To help protect against unauthorized use of your handheld PC,
four levels of password security are provided.
IMPORTANT:
For immediate protection, Compaq recommends
setting up the first two levels of security (login password and
password reminder) through the Password utility in the Control
Panel of your handheld PC.
For a detailed explanation of the four levels of Compaq security,
read the following topics in this section.
Understanding the Password Levels
■
Login Password—The most basic level of protection. If set,
your login password or the administrator password must be
entered to access Windows CE. This occurs each time you
turn on your device (provided you have not set the password
delay feature). You are allowed five attempts to enter this
password. If the correct password is not entered on the fifth
attempt, one of two things happens:
❏
If you set a password reminder, the Compaq Password
Reminder screen appears. See “Password Reminder” for
more on this.
❏
If you did not set a password reminder, the device prompts
you to erase your passwords and all of your data, or to
enter one of two lockout modes (Lockout or Administrator
Lockout). See the following sections for more on this.
■
Password Reminder—If set, this screen appears after you
have made five unsuccessful attempts in a row to enter the
login password. It displays a question that you have created,
to which your response phrase or the administrator password
must be entered.
You have five attempts to enter the correct response. If the
correct response is not entered on the fifth attempt, the device
prompts you to erase your passwords and all of your data, or
to enter one of two lockout modes (Lockout or Administrator
Lockout). See the following section for more on this.
8-16
Using Compaq Software
Page 76

■
Lockout—
If an administrator password has been enabled, the
device enters Lockout mode. To gain access to the device
again, the administrator password or the unlock key (a
character combination) must be entered. After ten
unsuccessful entries in succession, the device transitions to
Administrator Lockout mode.
NOTE:
Refer to the Compaq CD for information on obtaining
the unlock key for a nominal fee.
■
Administrator Lockout—
This mode occurs when all
password attempts have been unsuccessful. You will not be
able to access your handheld PC until the unlock key is
entered.
IMPORTANT:
When the unlock key is used to gain access to
your handheld PC, your login password and the administrator
password are removed. To reestablish security, you will need
to reset these passwords.
For information on setting the various passwords, see the next
section, “Setting Passwords.”
Using Compaq Software
8-17
Page 77

Setting Passwords
For maximum security, you can set three different kinds of
passwords on your C-Series. All passwords are set through the
Control Panel. The login password and password reminder are set
in the Passwords application. The administrator password is set in
the Flash Memory Manager application.
NOTE:
The passwords are not case-sensitive; however, any
punctuation used when setting the passwords must also be used
when subsequently entering the passwords in order for the
passwords to be recognized.
Setting the Login Password
To set your login password, follow these steps:
1. On your handheld device, tap
Panel
2. In the
. Double-tap the
Password
box, type your login password (up to forty
Password
characters). Asterisks will appear as you type.
3. Tap the
Check Password
access to the other password fields.
4. Enable the login password by checking the
Security
box. This causes a password prompt to appear each
time you turn on the device.
Start→Settings→Control
icon.
box to verify the password and gain
Enable Power On
5. Save your new settings by tapping
OK.
Your login password is now set. The login password screen will
appear each time your turn on your device, provided you have not
enabled the password delay feature. For more on this, see “Setting
the Password Delay Feature” at the end of this section.
8-18
Using Compaq Software
Page 78

Setting the Password Reminder
To set the password reminder, follow these steps:
1. Tap
Start→Settings→Control Panel
Passwords
2. In the
icon.
Password
box, type the login password you previously
. Double-tap the
set. Asterisks will appear as you type.
3. Tap the
Check Password
box to verify the password and gain
access to the other password fields.
4. In the box that appears in the lower-left corner of the screen,
type a question to which only you know the answer. The
question may be up to 80 characters long, and should be
something to which the answer can be easily recalled.
5. Type the answer in the
New Response
box. The answer may
be up to 40 characters long. Asterisks will appear as you type.
6. Retype the answer in the
Confirm Response
7. Save your settings by tapping
OK
.
box.
Your password reminder is now set. Remember, the password
reminder screen appears only after five incorrect login passwords
are entered in a row.
Using Compaq Software
8-19
Page 79

Setting the Administrator Password
To set the administrator password, follow these steps:
1. Tap
Start→Settings→Control Panel
Memory Manage
r icon, then select the
. Double-tap the
Administration
Flash
tab.
2. Type the password in the appropriate box.
3. Tap the
: If you are updating your administrator password, you
NOTE
Check Password
button verify the password.
will be prompted to enter your original administrator
password before being allowed to create a new one.
4. Save your settings by tapping
OK
.
The administrator password is now set.
IMPORTANT:
When the login password is enabled in conjunction
with this password, the administrator password can be used to
access the C-Series at any level of password security except
Administrator Lockout mode.
Setting the Password Delay Feature
The password delay feature allows you to temporarily disable the login
password screen that appears each time you turn on your handheld
device. This gives you immediate access to Windows CE when you turn
on the device. The login password screen can be disabled up to four
hours from the last time the login password was entered. To set the
password delay feature, follow these steps:
8-20
1. Tap
Start→Settings→Control Panel
Password
2. In the
icon.
Password
box, enter the login password you previously
. Double-tap the
set. Asterisks will appear as you type.
3. Tap the
Check Password
box to verify the password and gain
access to the other password fields.
4. Use the drop-down list box to select the amount of time you
wish to temporarily disable the login screen: 15 minutes, 30
minutes, 1 hour, 2 hours, 3 hours, or 4 hours.
When the time has expired, the login screen will appear the next time
your turn on your handheld device and you will be prompted to enter the
login password.
Using Compaq Software
Page 80

Using the Owner Control Panel Application
The Owner Control Panel Application allows you to display
personal identification information in the login screen of your
handheld PC. To enter your information in the Owner Control
Panel Application, follow these steps:
1. Tap
Start→Settings→Control Panel
Owner
icon.
2. Type the requested information in each box.
3. To see this information displayed, restart your handheld PC
by pressing the power button. (Be sure that your login
password is
disabled
enabled
.)
Controlling Volume
Using the internal audio features on the handheld PC, you can
record and play back sounds in digital audio files.
To control the recording level, use the slider in the Voice
■
Memo application. For more on this, see “Voice Memo”
earlier in this chapter.
To adjust the playback level and speaker volume, do one of
■
the following:
. Double-tap the
and the password delay feature is
❏
❏
NOTE:
Adjust the volume through Volume & Sounds Properties in
the Control Panel.
Adjust the volume through the Voice Memo application.
When the volume is muted, system beeps are still audible.
Using Compaq Software
8-21
Page 81

Printing
You can print files that reside on your handheld PC by:
connecting to a printer equipped with a serial port using the
■
auto-sync cable.
sending files through the IR port to an IR-equipped printer.
■
transferring files to a Windows CE–equipped computer and
■
printing from the computer.
NOTE:
When printing from the computer, Microsoft
application files are printed using the print defaults
established in the computer version of the application.
Supported File Types
Your handheld device can print the following kinds of
information:
Pocket Word and Pocket Excel files
■
Contacts and Tasks lists
■
A view of your schedule or agenda in Calendar
■
Inbox messages
■
Printing Guidelines
Before printing, follow these guidelines:
Connect the printer to the handheld PC via a serial connector
■
only. Do not connect to a printer parallel port.
Use a 9-to-25 pin adapter, if required by the printer’s serial
■
port.
Do not connect to the printer using a null modem cable.
■
Ensure that the printer’s configuration parameters (speed, data
■
bits, stop bits, and parity) match those set in your handheld
device.
8-22
Using Compaq Software
Page 82

Printing from the Handheld PC
To print a file directly from your handheld PC, follow these steps:
1. Turn on the printer and establish a connection using either an
IR link or the auto-sync cable.
2. On the handheld PC, open Windows CE Explorer and select
the file you want to print.
3. From the File menu, select Print.
For more information about printing, see the Windows CE
Services Help that you installed on your computer.
Setting the Alarm
To remind yourself of important events, you can set the alarm on
your handheld PC two different ways:
■
Outlook Calendar—To set an alarm for an event in your
Calendar, add the calendar entry you want to be reminded of,
then set the alarm using the Reminder box on the right side of
the screen. For more information on setting an alarm through
the Calendar, see the H/PC Help on your handheld PC.
■ ■
World Clock—To set a general alarm, open the World Clock
application from the Control Panel, then select the Alarm tab.
To turn off an alarm once it sounds, press the alarm button on the
front panel of your handheld PC.
Using Compaq Software
8-23
Page 83

chapter
9
ARING FOR YOUR
C
OMPAQ
C
This chapter provides recommended guidelines for taking care of
your C-Series handheld PC. Following these guidelines will help
ensure the longevity of your device and reduce the risk of
damage. They include:
routine care
■
travel guidelines
■
shipping guidelines
■
C-S
ERIES
Caring for Your Compaq C-Series
9-1
Page 84

Routine Care
To keep your handheld PC in good condition and working
properly, follow these guidelines:
Operate the device with the main and backup batteries
■
installed, even when using external power. This ensures that it
will have the necessary power to operate when disconnected
from external power.
Keep the device away from excessive moisture and
■
temperature extremes. Do not expose the device to liquids or
precipitation.
To prevent damage to the screen, do not place anything on top
■
of the device when it is closed.
Store the device in a protective case when not in use.
■
CAUTION:
only. The cases do not protect the device against damage caused by
excessive shock and vibration.
To clean the device, wipe the screen and the exterior with a
■
Compaq cases are designed for carrying convenience
soft, damp cloth moistened only with water.
CAUTION:
internal components, do not spray liquid directly on the screen or
allow excess liquid to drip down inside the device. Using soap or
other cleaning products on the screen may discolor the finish and
damage the screen.
Avoid exposing the device to direct sunlight or strong
■
To reduce the risk of electrical shock or damage to the
ultraviolet light for extended periods of time. Also avoid
scratching the surface of the screen and banging it against
hard objects.
9-2
Caring for Your Compaq C-Series
Page 85

Travel Guidelines
For safety and convenience when traveling with your handheld
PC, follow these guidelines:
Back up your data before you leave. (For more about using
■
the Backup and Restore utilities, see Chapter 8, “Using
Compaq Software.”)
Take a backup copy of your data with you. (For more about
■
backing up data onto an optional ATA Flash RAM PC Card,
see Chapter 8, “Using Compaq Software.”)
Disconnect all external equipment from the device.
■
Take the AC Adapter and new batteries with you.
■
Hand-carry your device in a protective case. Do not check it
■
with your luggage.
Do not close objects between the keyboard and screen.
■
Be aware of potential effects of airport security devices on
■
your handheld PC.
IMPORTANT:
There are three types of airport security devices:
X-ray machines, magnetic detectors (the device you walk
through), and security magnetic wands. You can send your
device through airport X-ray machines. However, Compaq
recommends that you do not send the device through
magnetic detectors or expose it to security magnetic wands.
Check with the airline if you plan to use the device on the
■
plane. In-flight use of electronic devices is at the discretion of
the airline.
International Travel
Before traveling internationally with the handheld PC, be sure to:
Check local customs regulations.
■
If using an external modem or PC Card modem, be sure you
■
have the correct modem and cable for the country you are
visiting. Telephone lines differ from country to country.
Caring for Your Compaq C-Series
9-3
Page 86

Shipping Guidelines
When shipping the handheld PC, follow these guidelines:
Safeguard your data by making a backup copy.
■
If shipping the backup copy, be sure that the medium
■
(diskette, tape, or PC Card) is not exposed to electrical or
magnetic impulses while stored or in transit.
Be sure the PC Card slot is empty.
■
Turn off the device and disconnect all external devices.
■
Close the device.
■
Pack the device and all external devices (such as cords and
■
cables) in their original packing boxes or in similar packaging
with sufficient packing material to protect them.
9-4
Caring for Your Compaq C-Series
Page 87

chapter
10
IPS AND TROUBLESHOOTING
T
This chapter provides tips on getting the best performance from your
C-Series handheld PC, as well as information on identifying and
solving typical problems that may occur while using your handheld PC.
Tips for Maximizing Performance
Adjusting Memory
Memory allocation in the handheld PC is comprised of storage memory
and program memory. You may want to increase the amount of storage
memory if you do not have enough space for files. You may want to
increase the amount of program memory if your handheld PC is
running too slow.
Increasing Storage Memory
To increase the amount of available storage memory, follow these
steps.
NOTE:
program memory.
Increasing storage memory will decrease the amount of available
1. Delete any unnecessary files.
2. Close any applications that are open.
3. Tap Start→Settings→Control Panel, then double-tap the System
icon.
4. Tap the Memory tab and adjust the memory slider to increase the
amount of storage memory.
Tips and Troubleshooting
10-1
Page 88

Increasing Program Memory
To increase the amount of available program memory, follow these
steps.
NOTE:
Increasing program memory will decrease the amount of
available storage memory.
1. Delete any unnecessary files.
2. Close any applications that are open.
3. Tap
Start→Settings → Control Panel,
then double-tap the
System
icon.
4. Tap the
Memory
tab and adjust the memory slider to increase the
amount of program memory.
Increasing the Data Transfer Speed
To increase the speed of data transfer between your handheld PC and
your computer, follow the procedure outlined in “Changing the speed
of data transfer” in the Windows CE Services Help that you installed on
your computer.
10-2
Tips and Troubleshooting
Page 89

Troubleshooting
While your handheld PC is configured just for you, problems you
encounter while working may not be unique. Eliminating the typical
problems described in this section can save you time and money.
See the categories on the following pages to find the possible solution
to your problem. If you cannot resolve the problem, contact your
Compaq authorized service provider or call Compaq Customer Support
for help. (See Appendix A, “Worldwide Telephone Numbers,” for a
complete list of customer support numbers to call.)
Tips and Troubleshooting
10-3
Page 90

Solving Battery and Power Problems
Battery and Power Problems
Problem Possible Cause Solution
The handheld PC goes
into auto-suspend after
a short period of
inactivity.
Device won’t turn on
when not connected to
AC power.
The handheld PC does
not auto-suspend
when connected to a
computer or using the
modem.
The device turned off
while left unattended.
When operating on
battery power, the
handheld PC suspends
operation after three
minutes of idle time (the
default setting).
Batteries are too low to
run device.
The handheld PC is
designed to stay on
while connected to a
computer.
Device initiated a safety
shutdown due to a
critical low battery
condition.
Press the power button
to resume operation,
then increase the
amount of idle time
through the Power icon
on the Control Panel.
NOTE:
Increasing the
idle time drains the
batteries more quickly.
1. Replace the
batteries or
connect the device
to external power.
2. Turn on the
device.
No action required.
1. Replace the
batteries or
connect the device
to external power.
10-4
I hear a humming
sound when I turn on
the device or use it to
record a memo.
Device shuts down
while the PC Card is in
use.
Battery life is very
short.
Tips and Troubleshooting
The main batteries are
low.
The PC Card drains too
much power from the
device batteries.
You are using the
device in ways that
2. Turn on the
device.
Replace the main
batteries.
1. Remove the PC
Card.
2. Connect the
device to external
power and reinsert
the PC Card.
For more information,
see Chapter 6, “Using
PC Cards.”
See Chapter 4, “Using
Power,” for tips on
Page 91

drain the batteries
quickly.
conserving battery
power.
Tips and Troubleshooting
10-5
Page 92

Solving Keyboard and Stylus Problems
Keyboard and Stylus Problems
Problem Possible Cause Solution
The stylus is not
working properly.
The device does not
respond to taps or
keystrokes.
The screen is not
calibrated correctly to
interpret the screen
taps.
Device is locked up. Press the reset button
Solving Audio Problems
Audio Problems
Problem Possible Cause Solution
Cannot get sound from
device.
Volume is muted or
too low.
Adjust volume through
Volume & Sounds
Properties in the
Control Panel or
through the Voice
Memo application.
Press the Windows
key + i to open the
stylus calibration page,
then recalibrate the
stylus.
with the stylus.
NOTE:
Pressing the
reset button will delete
unsaved data.
10-6
Tips and Troubleshooting
Page 93

Solving Memory Problems
Memory Problems
Problem Possible Cause Solution
Device will not turn on
or the device does not
recognize the
memory.
Memory expansion
module is installed
Reinstall the memory
expansion module.
incorrectly or not
seated properly.
There is an unstable
connection between
the memory expansion
module and the device.
Remove the memory
expansion module,
clean the edge
connector with a soft,
dry cloth, and reinstall
the module.
Memory has failed. 1. Remove the
memory expansion
module and turn on
the device.
If the same error
■
occurs, contact
Customer Support.
If the same error
■
does not occur,
clean the module
contacts, reinstall
the module, and
turn on the device.
Insufficient memory
error occurs during an
operation.
Device ran out of
program memory for
the application.
2. If the error returns,
remove the module
and operate with
less memory until
the module is
replaced.
Close all open
■
applications and
delete files that are
not being used.
Adjust the amount
■
of available
program memory
(see “Adjusting
Memory” earlier in
this chapter).
Upgrade memory if
■
needed.
Continued
Tips and Troubleshooting
10-7
Page 94

Memory Problems
Continued
Problem Possible Cause Solution
The device gets
slower each time
I use it.
Not enough space to
save my work.
Too many document
shortcuts are taking up
memory.
Memory needs to be
refreshed.
Device ran out of
storage memory.
1. See how many
recently used
document shortcuts
exist by pressing
the Windows key,
then select
Documents
.
2. Remove seldom
used document
shortcuts by
deleting them from
the Windows/
Recent folder.
Save your data, then
perform a full reset.
(See Chapter 4, “Using
Power,” for more on
this.)
Close all open
■
applications and
delete files that are
not being used.
Adjust the amount
■
of available storage
memory (see
“Adjusting Memory”
earlier in this
chapter).
Upgrade memory if
■
needed.
Use an ATA Flash
■
RAM PC Card for
additional storage.
10-8
Tips and Troubleshooting
Page 95

Solving PC Card Problems
PC Card Problems
Problem Possible Cause Solution
PC Card is not
recognized as part of
the system.
Device shuts down
while the PC Card is in
use.
Drivers must be
installed.
Cables or power cords
attaching the PC Card
are loose or
unplugged.
PC Card is not seated
properly.
The PC Card drains
too much power from
the device batteries.
Check the
documentation
included with the PC
Card for information on
installing drivers on the
handheld PC.
Ensure that cables are
properly and securely
connected.
Remove and reinsert
the card correctly.
1. Remove the PC
Card.
2. Connect the
device to external
power and reinsert
the PC Card.
For more information,
see Chapter 6, “Using
PC Cards.”
PC Card does not
work properly.
. PC Card is not seated
Card or card driver is
not compatible with the
handheld PC.
properly.
If using a PC Card
modem, the modem
cable is not plugged in
all the way.
Refer to the
■
documentation
that came with
your PC Card.
Visit the C-Series
■
home page on the
Internet for a list of
PC Cards
supported by
Compaq.
Remove and reinsert
the card correctly.
Secure the modem
cable connection.
Tips and Troubleshooting
10-9
Page 96

Solving Screen Problems
Screen Problems
Problem Possible Cause Solution
Screen appears to be
off, even though power
is on.
Items on the screen do
not display clearly.
Characters are dim. Screen is too light or too
Screen gets lighter or
darker.
The screen contrast is
extremely light.
Angle of screen needs
to be adjusted.
dark. Contrast and/or
brightness need to be
adjusted.
Screen has overheated. Move device away from
Increase contrast using
the
Alt
+ > keys.
Adjust the angle of the
screen until you can see
the items on the screen
as clearly as possible.
Adjust contrast
■
using the
Alt
+ < or > keys.
Adjust brightness
■
using the backlight
button. (See
“Using the
Backlight” in
Chapter 3 for more
information.)
the heat source (such
as direct sunlight) and
allow it to cool.
Nothing happens when
the screen is tapped.
Screen is not calibrated
correctly.
Press the Windows key
+ i to open the stylus
calibration page, then
recalibrate the stylus.
10-10
Tips and Troubleshooting
Page 97

Solving Communication Problems
Infrared Problems
Problem Possible Cause Solution
Can’t transfer files
using the IR port.
Can’t transfer more
than one file at a time
using the IR port.
The IR devices are not
set up properly.
The sending or receiving
device is not configured
properly for IR.
The receiving device is
not compatible with the
sending device.
The handheld PC is
designed to transfer one
file (or 25 Contact cards)
at a time when sending
data to another device.
Set up the devices
properly. See Chapter 7,
“Using the Infrared
Feature,” for setup
guidelines.
Configure each device
for IR according to the
manufacturer’s
instructions. For
additional information,
see “Connecting With
an Infrared Port” in the
Windows CE Services
that you installed
Help
on your computer.
Transfer files another
way (such as through the
auto-sync cable or via a
PC Card).
Transfer only the
recommended number of
files at one time.
Tips and Troubleshooting
10-11
Page 98

Partnership (Serial Communication) Problems
Problem Possible Cause Solution
Can’t establish a
connection between
the handheld PC and
the computer.
Can’t synchronize data
when connected to the
computer.
The auto-sync cable
may be loose or
defective.
There are problems
with the serial
communications
configuration.
There are problems
with the serial
communications
configuration.
There is a compatibility
problem with Microsoft
Outlook on the
computer.
Reconnect the auto-
■
sync cable
Replace the
■
defective cable with
a new one.
See “Communications
Problems” in the
Windows CE Services
that you installed
Help
on your computer.
See “Communications
Problems” or
“Synchronization
Problems” in the
Windows CE Services
that you installed
Help
on your computer.
See the online Help
included with Microsoft
Outlook for information
on synchronizing mail.
10-12
Tips and Troubleshooting
Page 99

Modem Problems
Problem Possible Cause Solution
Can’t connect my
modem at the specified
baud rate.
Dial-up connection is
unreliable.
Can’t use the handheld
PC modem when
connected to the
computer.
Can’t access the
Internet like I used to.
Modem is too loud or
too soft when dialing.
There may be static or
other forms of
interference on the
telephone line.
The bandwidth of the
Internet service provider
(ISP) is limited.
The modem cable is not
connected properly.
Call waiting is
interrupting the
connection.
The computer or
handheld PC may not be
properly set up for
modem communication.
Your Internet service
provider has changed
settings.
Volume needs to be
adjusted.
Disconnect (hang up)
and try to connect
again.
You can connect only at
the maximum baud rate
supported by the ISP.
Secure the modem cable
connection.
Disable call waiting. Tap
Start→Settings→
Control Panel, then
select Communications
Properties. On the
Dialing tab, select
Disable call waiting by
dialing. Then enter the
disable code specified by
your local telephone
company.
Make sure you have
■
enabled device
connections on the
Communications
tab of the Mobile
Devices folder on
your computer.
Make sure a
■
partnership is
established with
your computer.
See the
■
troubleshooting
section in the
Windows CE
Services Help
that
you installed on
your computer.
Contact your ISP and set
up a profile using the
new settings.
Adjust volume through
Volume & Sounds
Properties in the Control
Panel or through the
Voice Memo application.
Tips and Troubleshooting
10-13
Page 100

Solving Security Problems
Security Problems
Problem Possible Cause Solution
Cannot access the
system using my login
password.
Cannot access the
system using my
response phrase.
You are using the
wrong login
password.
You are entering the
wrong response
phrase.
You are not entering
the correct
punctuation.
Enter the correct
password or move to
the next stage in the
password process by
entering the wrong
password fives times in
a row. (See “Compaq
Enhanced Security” in
Chapter 8 for more on
the password process.)
Enter the correct
response phrase or
move to the next stage
in the password
process by entering the
wrong response five
times in a row. (See
“Compaq Enhanced
Security” in Chapter 8
for more on the
password process.)
Compaq security
passwords are
punctuation-sensitive;
type the punctuation
exactly as it was typed
when you established
the password.
10-14
Tips and Troubleshooting
 Loading...