


Notice
The information in this guide is subject to change without notice.
COMPAQ COMPUTER CORPORATION SHALL NOT BE LIABLE FOR
TECHNICAL OR EDITORIAL ERRORS OR OMISSIONS CONTAINED
HEREIN; NOR FOR INCIDENTAL OR CONSEQUENTIAL DAMAGES
RESULTING FROM THE FURNISHING, PERFORMANCE, OR USE OF
THIS MATERIAL.
This guide contains information protected by copyright. No part of this
guide may be photocopied or reproduced in any form without prior
written consent from Compaq Computer Corporation.
© 1997 Compaq Computer Corporation.
All rights reserved. Printed in U.S.A.
Compaq, SpeedPaq, and LTE are registered in the U.S. Patent and
Trademark Office. Armada is a trademark of Compaq Computer
Corporation.
Microsoft, MS-DOS, and Windows are registered trademarks of
Microsoft Corporation.
The software described in this guide is furnished under a license
agreement or nondisclosure agreement. The software may be used or
copied only in accordance with the terms of the agreement.
Product names mentioned herein may be trademarks and/or registered
trademarks of their respective companies.
R
EFERENCE GUIDE
Armada 7700 Family of Personal Computers
Third Edition November 1997
First Edition April 1997
Part Number 220709-003
Compaq Computer Corporation

C
ONTENTS
preface
U
SING THIS GUIDE
chapter 1
G
ETTING STARTED
Unpacking the Computer.................................................................1-1
Taking the Battery Pack Out of Ship Mode ....................................1-3
Setting Up the Computer .................................................................1-5
Protecting a New Battery Pack....................................................1-5
Connecting the Power Cord ........................................................1-6
Opening the Computer ................................................................1-7
Adjusting the Keyboard...............................................................1-7
Turning On the Computer ........................................................... 1-8
Setting Up the Software...................................................................1-8
Operating the Computer During Setup ....................................... 1-9
Choosing a Language..................................................................1-9
Choosing an Operating System...................................................1-9
Where to Go from Here ................................................................. 1-10
......................................................................................
XI
Registering the Computer..........................................................1-10
Backing Up the System.............................................................1-10
Obtaining a Backup of the Compaq Value-Add Software........1-10
Finding Information ..................................................................1-11
Customizing Computer Settings................................................1-11
Finding Optional Equipment.....................................................1-11
chapter 2
T
AKING A LOOK AT THE COMPUTER
Top Components.............................................................................. 2-2
Display and Left Side Components................................................. 2-4
Right Side Components...................................................................2-6
Rear Panel Components................................................................... 2-7
Bottom Components ........................................................................2-9
Regional Differences .....................................................................2-10
Contents v

chapter 3
U
SING THE KEYBOARD
Identifying Shortcut Keys ................................................................3-1
Performing Mouse Functions...........................................................3-2
Using the Pointing Device and Mouse Buttons...........................3-2
Changing Mouse Function Settings.............................................3-2
Calculating on the Keyboard............................................................3-3
Skipping Menus with Hotkeys.........................................................3-4
Automating Your Work with Programmable Keys .........................3-6
Setting Programmable Key Assignments....................................3-7
Viewing Programmable Key Assignments..................................3-8
Setting a Scheme ..............................................................................3-9
Adding a Scheme .........................................................................3-9
Removing a Scheme...................................................................3-10
chapter 4
M
ANAGING POWER
Choosing a Power Source.................................................................4-1
Identifying Power Controls and Indicators......................................4-2
Initiating Power Conditions .............................................................4-3
Turning the Computer On and Off ..............................................4-5
Initiating Suspend ........................................................................4-5
Initiating Hibernation...................................................................4-7
Customizing Power Settings ............................................................4-8
Using Power Properties................................................................4-9
Using Computer Setup...............................................................4-16
chapter 5
U
SING BATTERY PACKS
Managing Battery Pack Power.........................................................5-1
Monitoring Battery Pack Activity................................................5-1
Controlling Battery Discharge.....................................................5-7
Charging a Battery Pack...................................................................5-9
Replacing a Discharged Battery Pack............................................5-10
Removing a Battery Pack from the Battery Bay........................5-10
Inserting a Battery Pack in the Battery Bay...............................5-12
Inserting a Battery Pack in the MultiBay...................................5-13
Removing a Battery Pack from the MultiBay ...........................5-14
Identifying and Resolving a Low-Battery Condition.....................5-16
vi Contents

chapter 6
W
ORKING WITH REMOVABLE DRIVES
Caring for Removable Drives..........................................................6-3
Removing and Inserting Drives.......................................................6-4
Removing a Hard Drive from the Hard Drive Bay.....................6-4
Inserting a Hard Drive into the Hard Drive Bay.........................6-6
Inserting a Hard Drive into the MultiBay ...................................6-7
Removing a Hard Drive from the MultiBay ...............................6-9
Removing a Diskette Drive or CD-ROM Drive
from the MultiBay..................................................................... 6-10
Inserting a Diskette Drive or CD-ROM Drive
into the MultiBay....................................................................... 6-12
Using the Weight Saver................................................................. 6-13
Using Boot Management...............................................................6-14
Changing the Boot Sequence ....................................................6-14
Using a Partitioned Hard Drive.................................................6-15
chapter 7
C
ONNECTING EXTERNAL DESKTOP EQUIPMENT
Identifying External Connectors......................................................7-2
Connecting an External Device .......................................................7-3
Installing Parallel and Serial Device Drivers .................................. 7-3
Setting Up an External Monitor or Overhead Projector..................7-4
Choosing Display Settings .......................................................... 7-4
Enabling Energy-Saving Features............................................... 7-5
Using the Infrared Port .................................................................... 7-6
Establishing an Infrared Link......................................................7-7
Accessing Infrared Software ....................................................... 7-9
chapter 8
U
SING A MODEM
Connecting a Modem....................................................................... 8-1
Identifying Modem Connectors ..................................................8-1
Connecting a Modem in North America, Latin America,
Japan, or Hong Kong................................................................... 8-3
Connecting a Modem in Europe or Asia Pacific
(except Japan and Hong Kong)................................................... 8-5
Finding Online Modem Instructions................................................8-7
Contents vii

Selecting Modem Software ..............................................................8-8
Preinstalled Software for Windows 95........................................8-8
Preinstalled Software for Windows NT.......................................8-8
Optional Modem Software...........................................................8-8
Traveling Internationally..................................................................8-9
Traveling from Europe or Asia Pacific........................................8-9
Traveling from North America, Latin America,
Japan, or Hong Kong .................................................................8-10
Using a Country-Specific Modem Cable.......................................8-12
Adding an Optional PC Card Modem............................................8-13
Obtaining and Installing a Modem PC Card..............................8-13
Selecting Modem Software........................................................8-13
Connecting the Modem to a Cellular Phone (North America)......8-14
Connection Requirements..........................................................8-14
Connecting the Cellular Phone ..................................................8-16
Finding Online Cellular Phone Instructions..............................8-17
chapter 9
U
SING
PC C
ARDS
Selecting PC Card Slots....................................................................9-1
Using the Compaq PC Card Solutions List......................................9-2
Configuring a PC Card.....................................................................9-2
Inserting a PC Card ..........................................................................9-3
Removing a PC Card........................................................................9-5
When the Computer is Off...........................................................9-6
When the Computer is On............................................................9-6
chapter 10
U
SING AUDIO COMPONENTS
Identifying Audio Components...................................................... 10-2
Using Audio Features.....................................................................10-3
Microphone................................................................................10-3
Stereo Speakers..........................................................................10-3
Volume Control..........................................................................10-4
Connecting External Audio Devices..............................................10-5
Microphone Jack........................................................................10-5
Stereo Speaker/Headphone Jack................................................10-5
Stereo Line-In Jack ....................................................................10-6
viii Contents

chapter 11
I
NCREASING
RAM
Obtaining an Optional Memory Expansion Board........................11-2
Installing an Optional Memory Expansion Board.........................11-2
Removing a Memory Expansion Slot Cover ............................11-3
Removing a Memory Expansion Board....................................11-4
Inserting a Memory Expansion Board ......................................11-5
Replacing the Memory Expansion Slot Cover..........................11-6
chapter 12
M
AINTENANCE
, S
HIPPING, AND TRAVEL
Caring for the Computer................................................................12-1
Replacing the Pointing Device Cap............................................... 12-3
Preparing the Computer for Shipping or Travel............................12-4
Preparing for Air Travel............................................................12-5
Preparing for International Travel.............................................12-5
chapter 13
S
ECURING THE COMPUTER
Using Security Software................................................................ 13-2
Using a Power-On Password.....................................................13-2
Using Quick Controls................................................................13-4
Using a Setup Password ............................................................13-5
Changing or Deleting a Power-On or Setup Password.............13-7
Disabling Devices......................................................................13-8
Using Security Hardware............................................................... 13-9
Securing Devices in the Hard Drive Bay and MultiBay.........13-10
Securing a Memory Expansion Board ....................................13-11
Using an Optional Cable Lock................................................13-13
chapter 14
C
OMPUTER SETUP AND DIAGNOSTICS
Using Computer Setup...................................................................14-2
Viewing Menus..........................................................................14-2
Getting Help ..............................................................................14-3
Using Computer Checkup (TEST) ................................................14-3
Using View System Information (INSPECT)...............................14-5
Using Other Features ..................................................................... 14-6
Manage Diagnostics Partition ...................................................14-6
Create Diagnostics Diskette ......................................................14-6
Contents ix

chapter 15
I
NTELLIGENT MANAGEABILITY
Fault Management..........................................................................15-1
Asset Management .........................................................................15-2
Security Management.....................................................................15-2
chapter 16
T
ROUBLESHOOTING
Minor Problems Checklist..............................................................16-2
Solving Audio Problems ................................................................16-3
Solving Battery Problems...............................................................16-4
Solving Diskette and Diskette Drive Problems..............................16-7
Solving Display Problems..............................................................16-9
Solving Hard Drive Problems ......................................................16-12
Solving Hardware Problems.........................................................16-13
Solving Infrared Problems............................................................16-15
Solving Keyboard and Numeric Keypad Problems.....................16-17
Solving Memory Problems...........................................................16-18
Solving Modem Problems............................................................16-18
Solving PC Card Problems...........................................................16-20
Solving External Pointing Device Problems................................16-22
Solving Power Problems..............................................................16-22
Solving Printer Problems..............................................................16-25
appendix A
C
OMPAQ CUSTOMER SUPPORT
..................................................................A-1
appendix B
R
EGULATORY NOTICES
..............................................................................B-1
appendix C
E
LECTROSTATIC DISCHARGE
......................................................................C-1
appendix D
S
PECIFICATIONS
I
x Contents
...................................................................................................... I-1
NDEX
.......................................................................................D-1

preface
U
SING THIS GUIDE
Some or all of the following format conventions are used in this
guide to distinguish elements of text:
Names of keys are shown in bold type as they appear on the
■
keyboard, for example,
Keys that you should press at the same time are represented by
■
the key names and the plus (+) symbol, for example,
Ctrl+Alt+Delete.
Ctrl, Backspace, Tab.
Commands are presented in lowercase, bold type as shown
■
here:
An arrow symbol is used to separate icons or menu options
■
that you should select in succession, for example, click the
Start buttonÆSettingsÆControl Panel.
When you need to type information without pressing the
■
key, you are directed to “type” the information.
When you need to type information and press the
■
you are directed to “enter” the information.
NOTE:
or interesting points of information.
IMPORTANT:
information or specific instructions.
!
install
Text set off in this manner presents commentary, sidelights,
WARNING:
follow directions could result in bodily harm or loss of life.
or
a:\install.
Text set off in this manner presents clarifying
Text set off in this manner indicates that failure to
Enter
Enter
key,
CAUTION:
directions could result in damage to equipment or loss of
information.
Text set off in this manner indicates that failure to follow
Using This Guide xi

Chapter
1
G
ETTING STARTED
This chapter tells how to set up the computer for the first time.
It describes the steps shown on the graphical poster and tells how
to install the software that comes with the computer.
Unpacking the Computer
Before you begin, make sure you have removed everything from
the box:
Computer with the following removable devices:
■
Diskette drive
❏
Hard drive
❏
Lithium ion battery pack
❏
Weight saver
❏
CD-ROM drive (included with some models)
❏
Power cord
■
Hard drive carrying case
■
MultiBay device carrying case
■
Slipcase
■
Getting Started 1-1

Bag containing two spare pointing device caps
■
Bag containing seven items:
■
Two dual-bay security screws (double tab)
❏
Two single-bay security screws (single tab)
❏
Two memory expansion slot cover security screws (no tab)
❏
One Torx T-10 screwdriver for use with included security
❏
screws
Warranty and service information
■
Documentation about the computer
■
The following country-specific devices are included with some
computer models:
3-to-2-prong plug adapter (Japan models only)
■
Modem cable (models with integrated modem)
■
1-2 Getting Started

Taking the Battery Pack Out of Ship Mode
Before you set up the computer, you must take the battery pack
out of ship mode.
You must take the battery pack out of ship mode before you
■
can charge and use the battery pack.
You do not need ship mode when you travel with or ship the
■
computer.
You can take the battery pack out of ship mode by removing and
reinserting the battery pack:
1. Tilt the computer
1 to access the battery release features.
2. Slide the battery release latch 2 right while pulling on the
battery pack from the recess 3 beneath the battery bay. This
releases the battery pack from the battery bay.
Releasing the Battery Pack from the Battery Bay
Getting Started 1-3
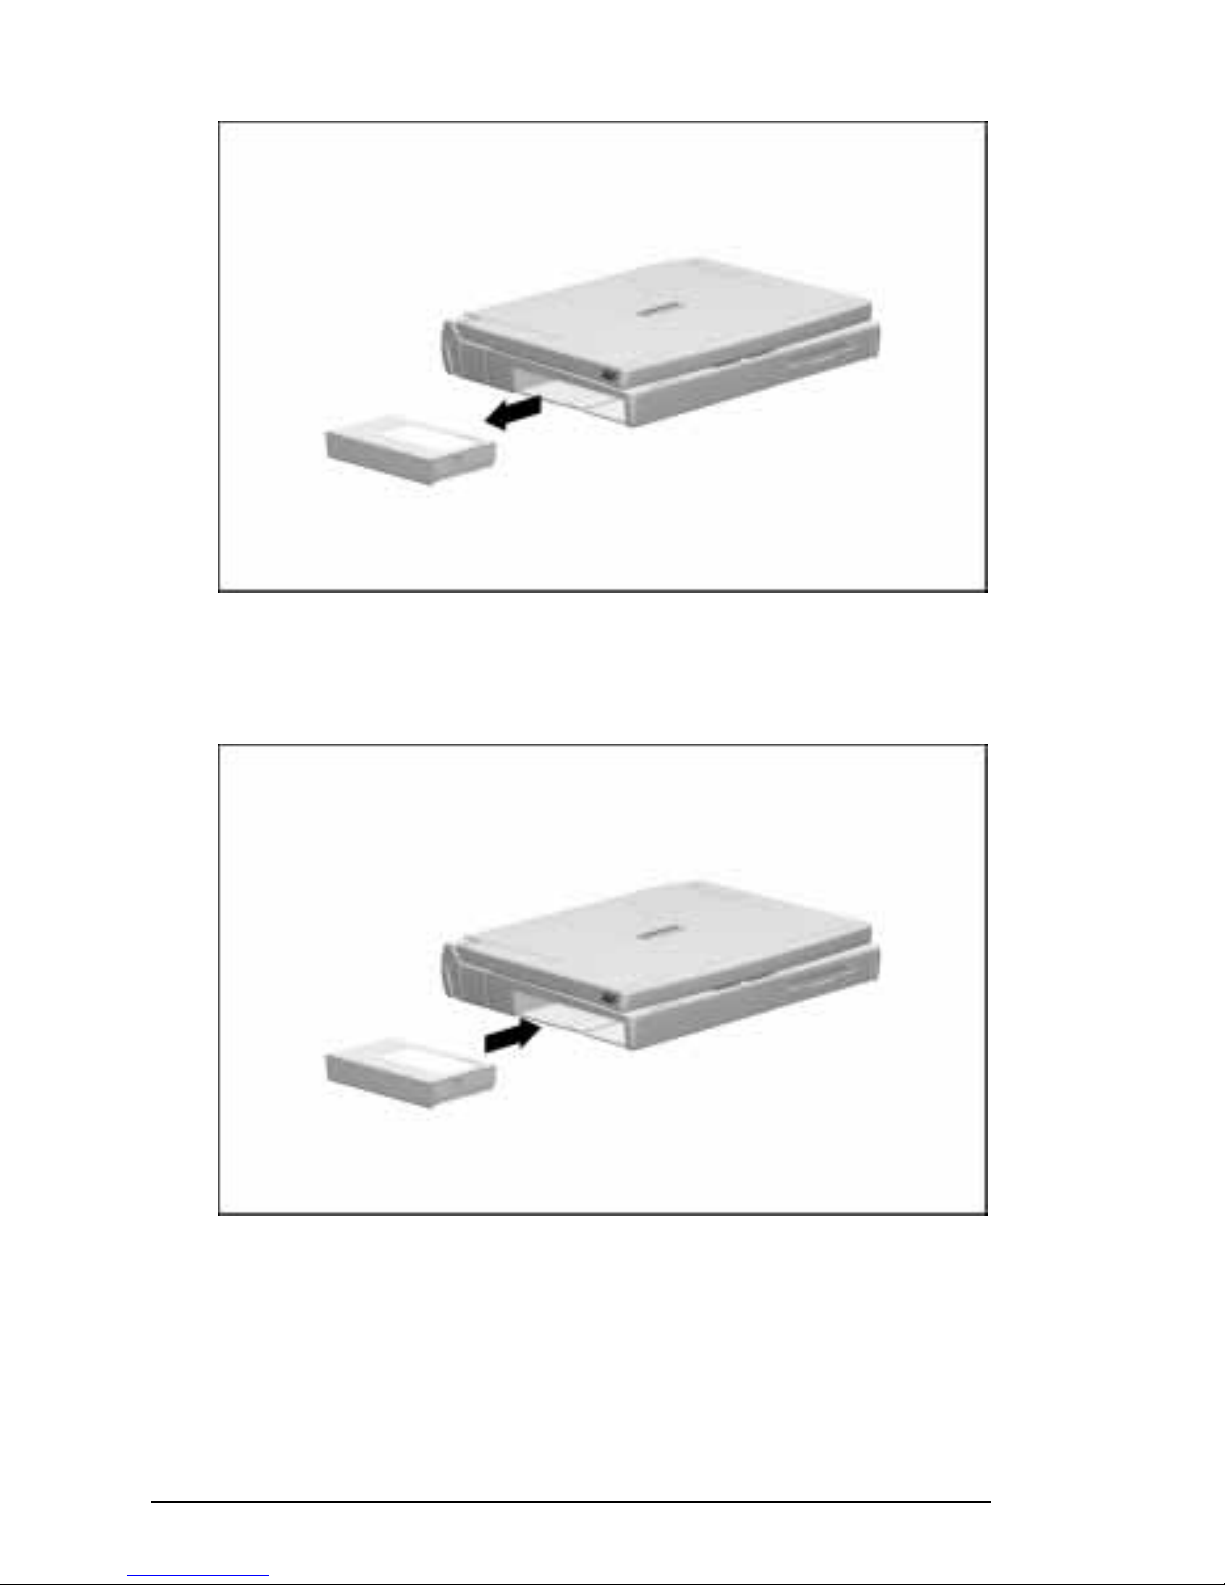
3. Slide the battery pack out of the battery bay.
Removing the Battery Pack from the Battery Bay
4. Reinsert the battery pack into the battery bay until it clicks
into place.
Reinserting the Battery Pack into the Battery Bay
1-4 Getting Started

Setting Up the Computer
Before you set up the computer for the first time, ensure that
The diskette drive is in the MultiBay.
■
The computer is not docked in a docking station.
■
Protecting a New Battery Pack
After it has been taken out of ship mode, the battery pack in the
computer begins to charge when the computer is connected to
external power.
IMPORTANT:
A new battery pack should be allowed to fully charge
before the computer is disconnected from external power or before
the battery pack is removed from the computer.
A new battery pack in a computer connected to external power
fully charges in approximately
3 hours when the computer is turned on and being used.
■
1.5 hours when the computer is plugged in and turned off.
■
For more information on the battery pack, refer to Chapter 5,
“Using Battery Packs.”
Getting Started 1-5

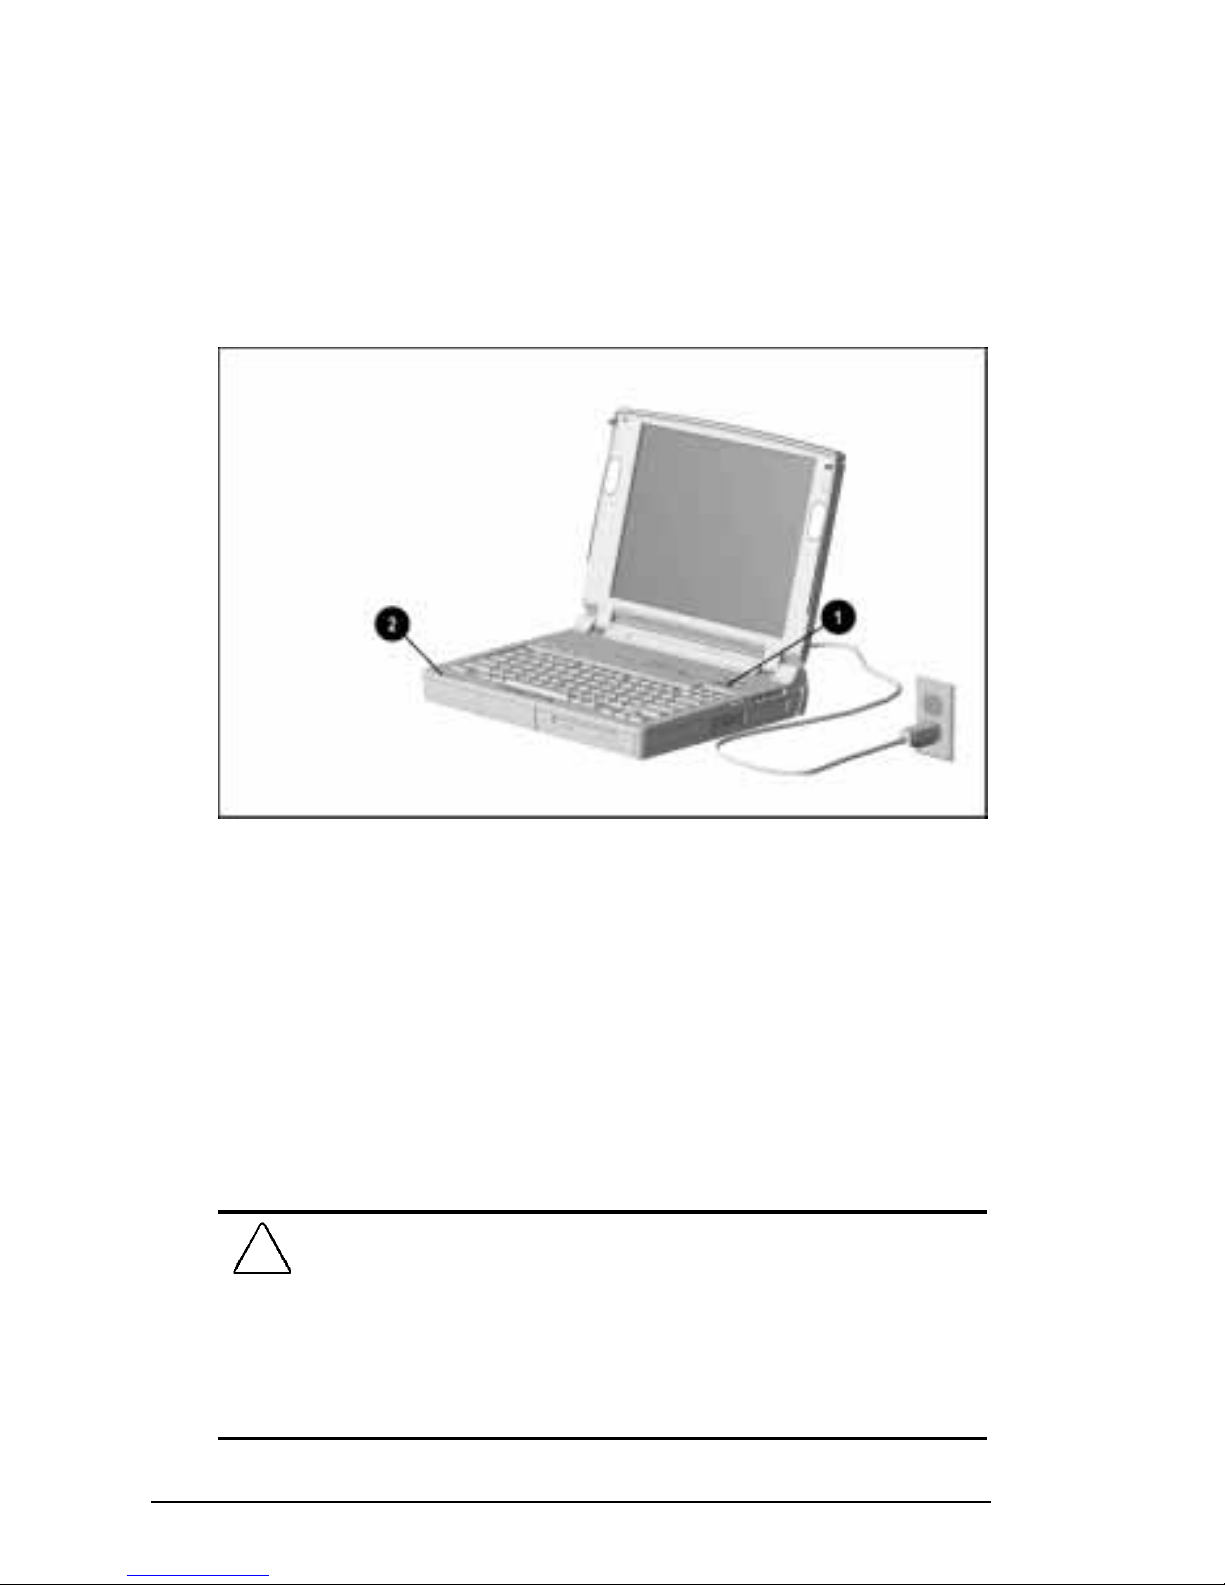
Connecting the Power Cord
To connect the computer to electrical power:
1. Place the computer on a flat surface near an electrical outlet.
2. Plug the power cord into the power connector on the rear
panel of the computer 1, then into the electrical outlet 2.
NOTE:
If you are plugging in the computer in Japan, you must first
plug the power cord into the 3-to-2-prong plug adapter included
with the computer. Ensure that the ground wire is connected to a
safe earth ground, then plug the 3-to-2-prong plug adapter into the
electrical outlet.
Plugging In the Computer
WARNING:
!
fire, or damage to the equipment:
■
■
■
■
1-6 Getting Started
To reduce the risk of personal injury, electric shock,
Do not disable the power cord grounding plug. The grounding
plug is an important safety feature.
Plug the equipment into a grounded (earthed) electrical outlet
that is easily accessible at all times.
Disconnect power from the equipment by unplugging the power
cord from the electrical outlet.
Do not place anything on power cords or cables. Arrange them so
that no one may accidentally step on or trip over them. Do not
pull on a cord or cable. When unplugging from the electrical
outlet, grasp the cord by the plug.
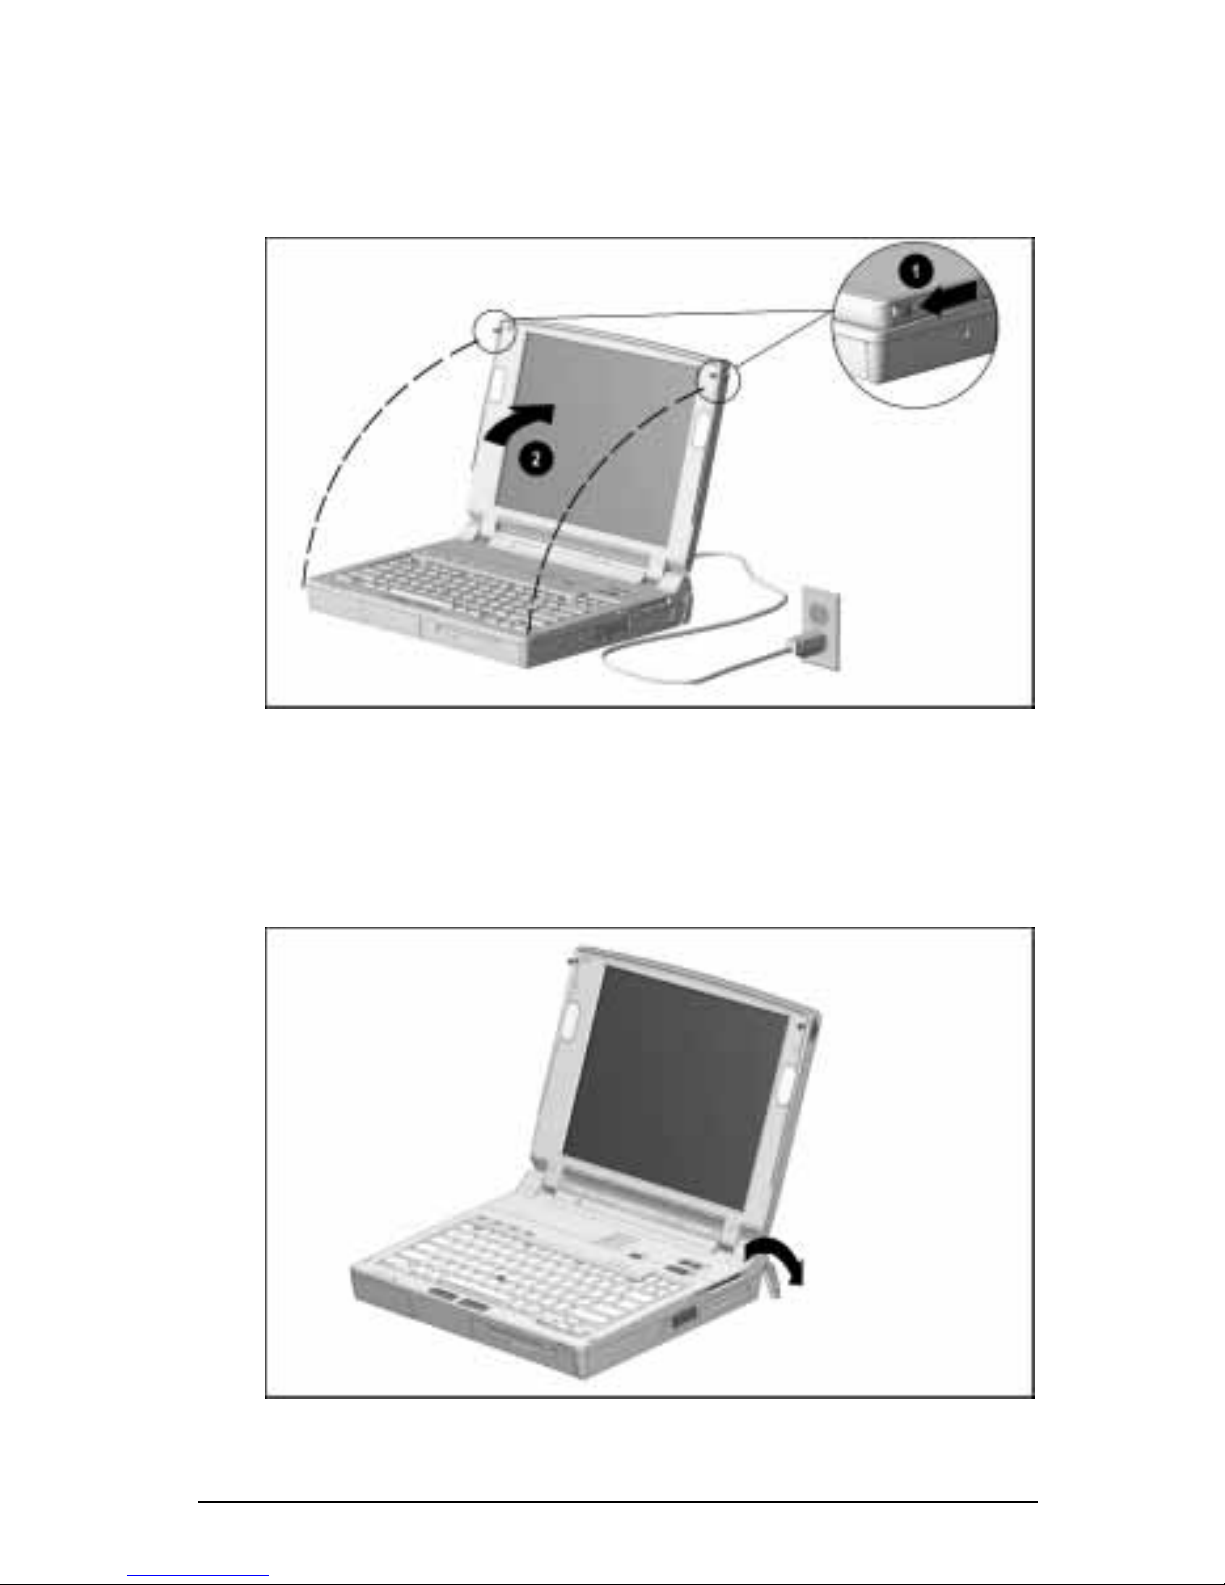
Opening the Computer
Open the computer by sliding forward the display release latch
on each side of the display, then raising the display to a
comfortable viewing angle 2.
1
Opening the Computer
Adjusting the Keyboard
To elevate the back of the keyboard, swivel the tilt feet back and
down.
Tilting the Keyboard
Getting Started 1-7
Turning On the Computer
To turn on the computer, slide the power switch 1 and release it.
Whenever the computer is turned on, the power/suspend light
turns on to indicate that power is turned on.
2
NOTE:
To restore the screen if it is blanked by the screen saver
during a period of keyboard and mouse inactivity, press the
key.
Shift
Turning On the Computer
Setting Up the Software
When you turn on the computer the first time, the Compaq setup
screen appears.
When you select to begin software setup, online instructions guide
you through the setup process.
IMPORTANT:
complete the entire process, which may require up to 20 minutes.
After you select to begin software setup, you must
CAUTION:
software drivers are installed:
Before you begin software setup, be sure the diskette drive is in
■
the computer and that the computer is
station.
During software setup, do not turn off or unplug the computer or
■
remove a drive.
To prevent file corruption and ensure the correct
docked in a docking
not
1-8 Getting Started

Operating the Computer During Setup
To move around the screen while making selections and
■
entering information: press the
(arrow) keys, or use the pointing device built into the
computer keyboard.
Tab
key, press the cursor
To record your selections, press the
■
key or press one of
Enter
the mouse buttons on the computer keyboard.
For more information about using the built-in pointing device and
mouse buttons, refer to “Performing Mouse Functions” in
Chapter 3.
Choosing a Language
When you are prompted to select your language, choose carefully.
IMPORTANT:
The languages that you do
choose will be deleted
not
from the computer and cannot be recovered.
Choosing an Operating System
On some models, a single operating system, either windows 95 or
Windows NT, is preinstalled.
On other models, both Windows 95 and Windows NT are
preinstalled, and you are asked to choose between them. If you are
asked to select an operating system, choose carefully.
IMPORTANT:
The operating system that you do
choose will be
not
deleted from the computer and cannot be recovered.
Most preinstalled online reference files, such as Help files, are
available only through the Microsoft Windows 95 or Microsoft
Windows NT Workstation interface. To use these online reference
files, either Windows 95 or windows NT must remain installed on
the computer.
CAUTION:
with a retail version will result in the loss of the Compaq value-add
software and certain hardware functionality, such as PC Card
support and enhanced power management. Installing the retail
version of Windows NT may result in system lockups and loss of
unsaved information.
Replacing the preinstalled Windows operating system
Getting Started 1-9

Where to Go from Here
Before beginning your work, consider the following resources for
Protecting your work
■
Learning to operate the computer
■
Adapting the computer to your needs
■
Registering the Computer
Registration procedures vary by region. Be sure to register
according to the online or printed instructions included with your
computer.
Backing Up the System
The hard drive preinstalled in your computer is partitioned into
two or more logical drives, depending on the size of the hard
drive. All the preinstalled software is in the primary partition,
drive C. Compaq recommends that you use a backup program to
create a backup of drive C.
Obtaining a Backup of the Compaq Value-Add Software
Device drivers and utilities for Armada computers are available on
the Compaq Internet site at http://www.compaq.com. Double-click
Technical Help & Services
For a small cost, you can order all the Armada 7700 value-add
software on a CD-ROM, or order components of the value-add
software on diskette(s). To order the CD-ROM or diskette(s):
If an order form was included with the computer, complete the
■
form and return it, or call one of the numbers listed on the
order form.
If an order form was not included with the computer, refer to
■
the Compaq “Worldwide Telephone Numbers” in
Appendix A.
NOTE:
Have the computer serial number available when you call
Compaq. The serial number is on the bottom of the computer.
ÆDownloadablesÆPortables.
1-10 Getting Started

Finding Information
Compaq online Help is combined with Windows Help. To access
online
Help:
Click StartÆCompaq Information Center
■
ÆReference Guide,
or
Click StartÆHelp.
■
To access help for a Windows application, open the application,
then click the Help menu within the application.
Customizing Computer Settings
You can use Control Panel to view and change most factorydefault settings.
To open Control Panel, click StartÆSettingsÆControl Panel.
■
To access settings from Control Panel, double-click an icon,
■
then click the tabs on top of the dialog box that appears.
You can also use Computer Setup to view and change
configurations. For information on using Computer Setup, refer to
Chapter 14, “Computer Setup and Diagnostics.”
Finding Optional Equipment
Compaq options designed for use with your computer are
described in the printed
Options
computer.
To view these options online, click StartÆCompaq Information
Center
ÆOptions Catalog
.
To purchase an option from a Compaq authorized dealer, reseller
or service provider, refer to “Worldwide Telephone Numbers” in
Appendix A. Include the part number provided in the
flyer or
Options Catalog
when you order.
flyer that came with the
Options
Getting Started 1-11


chapter
2
T
AKING A LOOK AT
C
THE
This chapter identifies the external features of the computer and
summarizes the regional differences in these features.
For more keyboard information, refer to Chapter 3, “Using the
Keyboard.”
OMPUTER
Taking a Look at the Computer 2-1
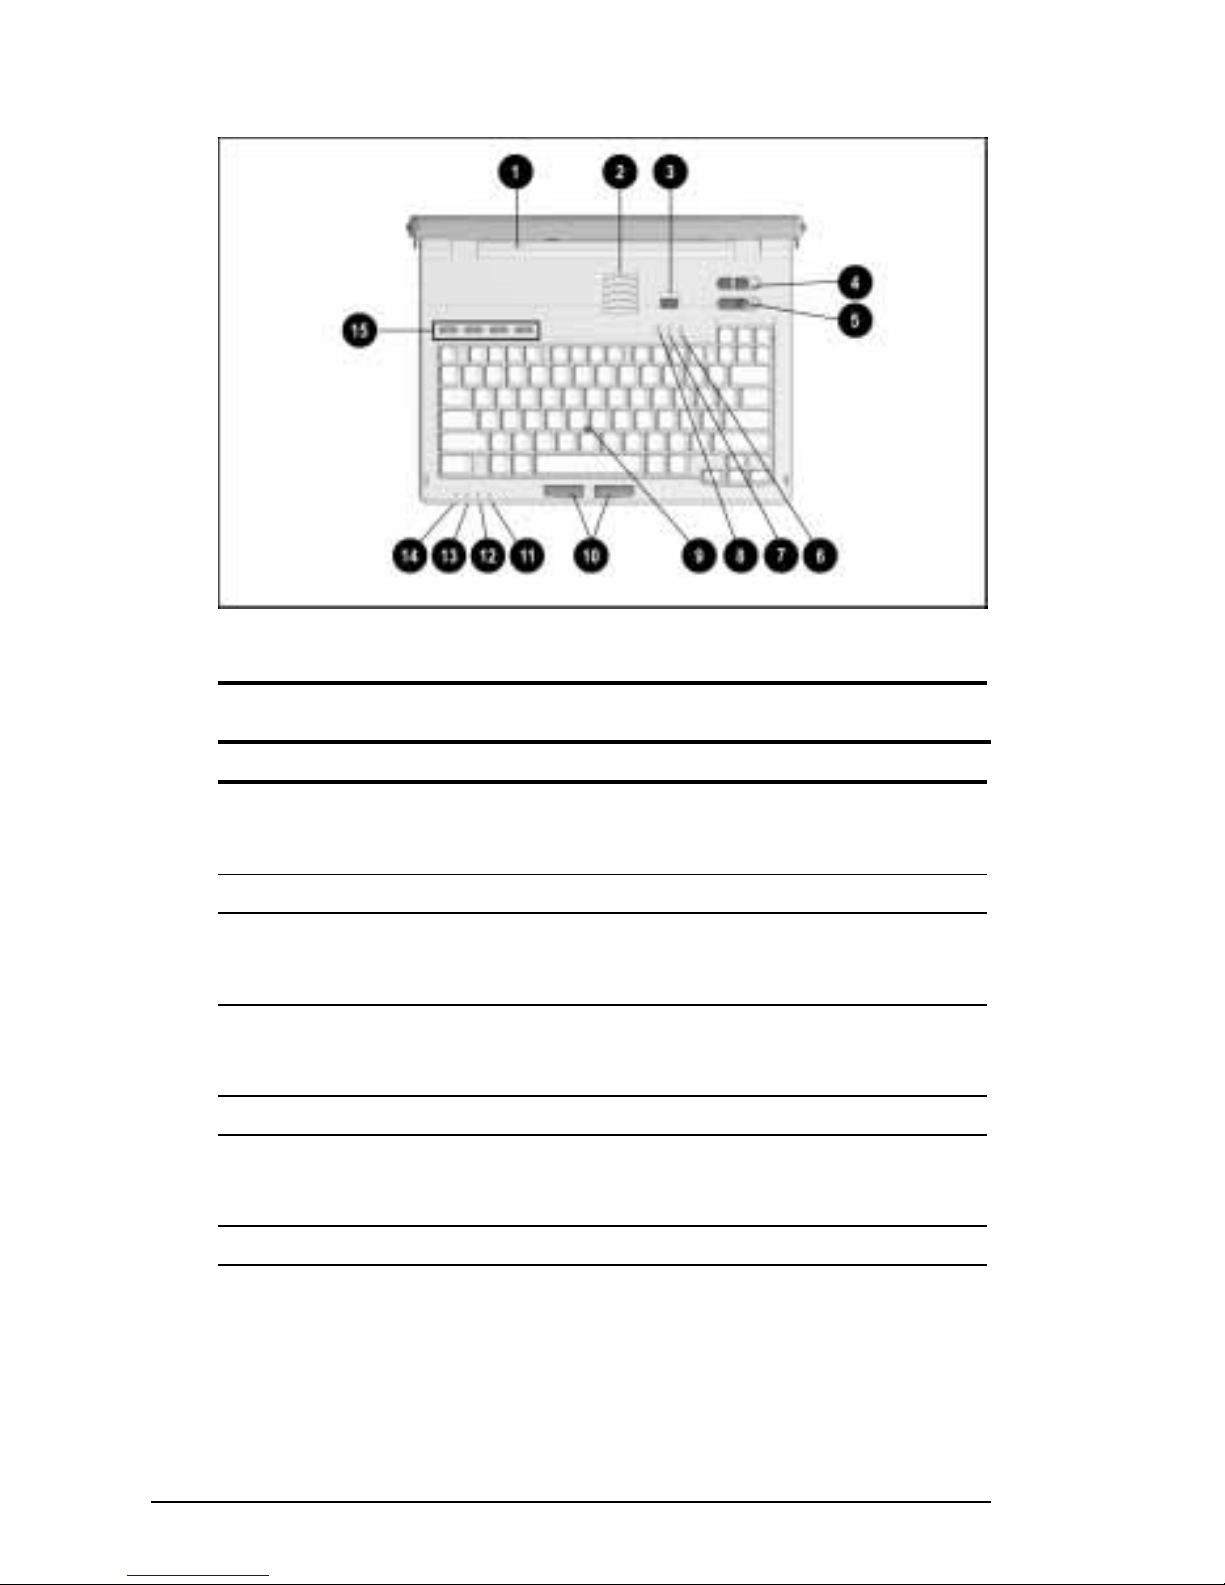
Top Components
Top Components
Top Components
Component Function
Display switch Turns the computer display off if the
1
display is closed while the computer
is on.
Vents Cool internal components.
2
Suspend button Initiates and exits Suspend. When
3
pressed with the Fn key, initiates
Hibernation.
Volume control Adjusts or mutes volume of stereo
4
speakers or of connected external
speakers, headphones, or headset.
Power switch Turns the computer on or off.
5
Num Lk light Turns on when num lock is on and
6
the embedded numeric keypad is
enabled.
Scroll Lock light Turns on when scroll lock is on.
7
Continued
2-2 Taking a Look at the Computer

Top Components
Continued
Component Function
Caps Lock light Turns on when caps lock is on.
8
EasyPoint III pointing device Moves the onscreen pointer.
9
Left and right mouse buttons Function like left and right buttons on
:
an external mouse.
MultiBay drive light Turns on when a MultiBay device is
;
being accessed or when a battery
pack in the MultiBay is charging or
waiting to be charged. Blinks when a
low-battery condition is reached while
a battery pack is in the MultiBay.
Hard drive light Turns on when a hard drive in the
<
hard drive bay is being accessed.
Battery power light Turns on when a battery pack in the
=
computer is charging; turns off when
all battery packs in the computer are
fully charged; blinks to indicate a lowbattery condition.
Power/suspend light Turns on when power to the
>
computer is turned on; turns off when
the computer is off or in Hibernation;
blinks when the computer is in
Suspend.
Programmable keys Open assigned files or applications or
?
emulate Windows or other application
logo keys.
NOTE: Shortcut keys used for special functions are identified in
Chapter 3, “Using the Keyboard.”
Taking a Look at the Computer 2-3
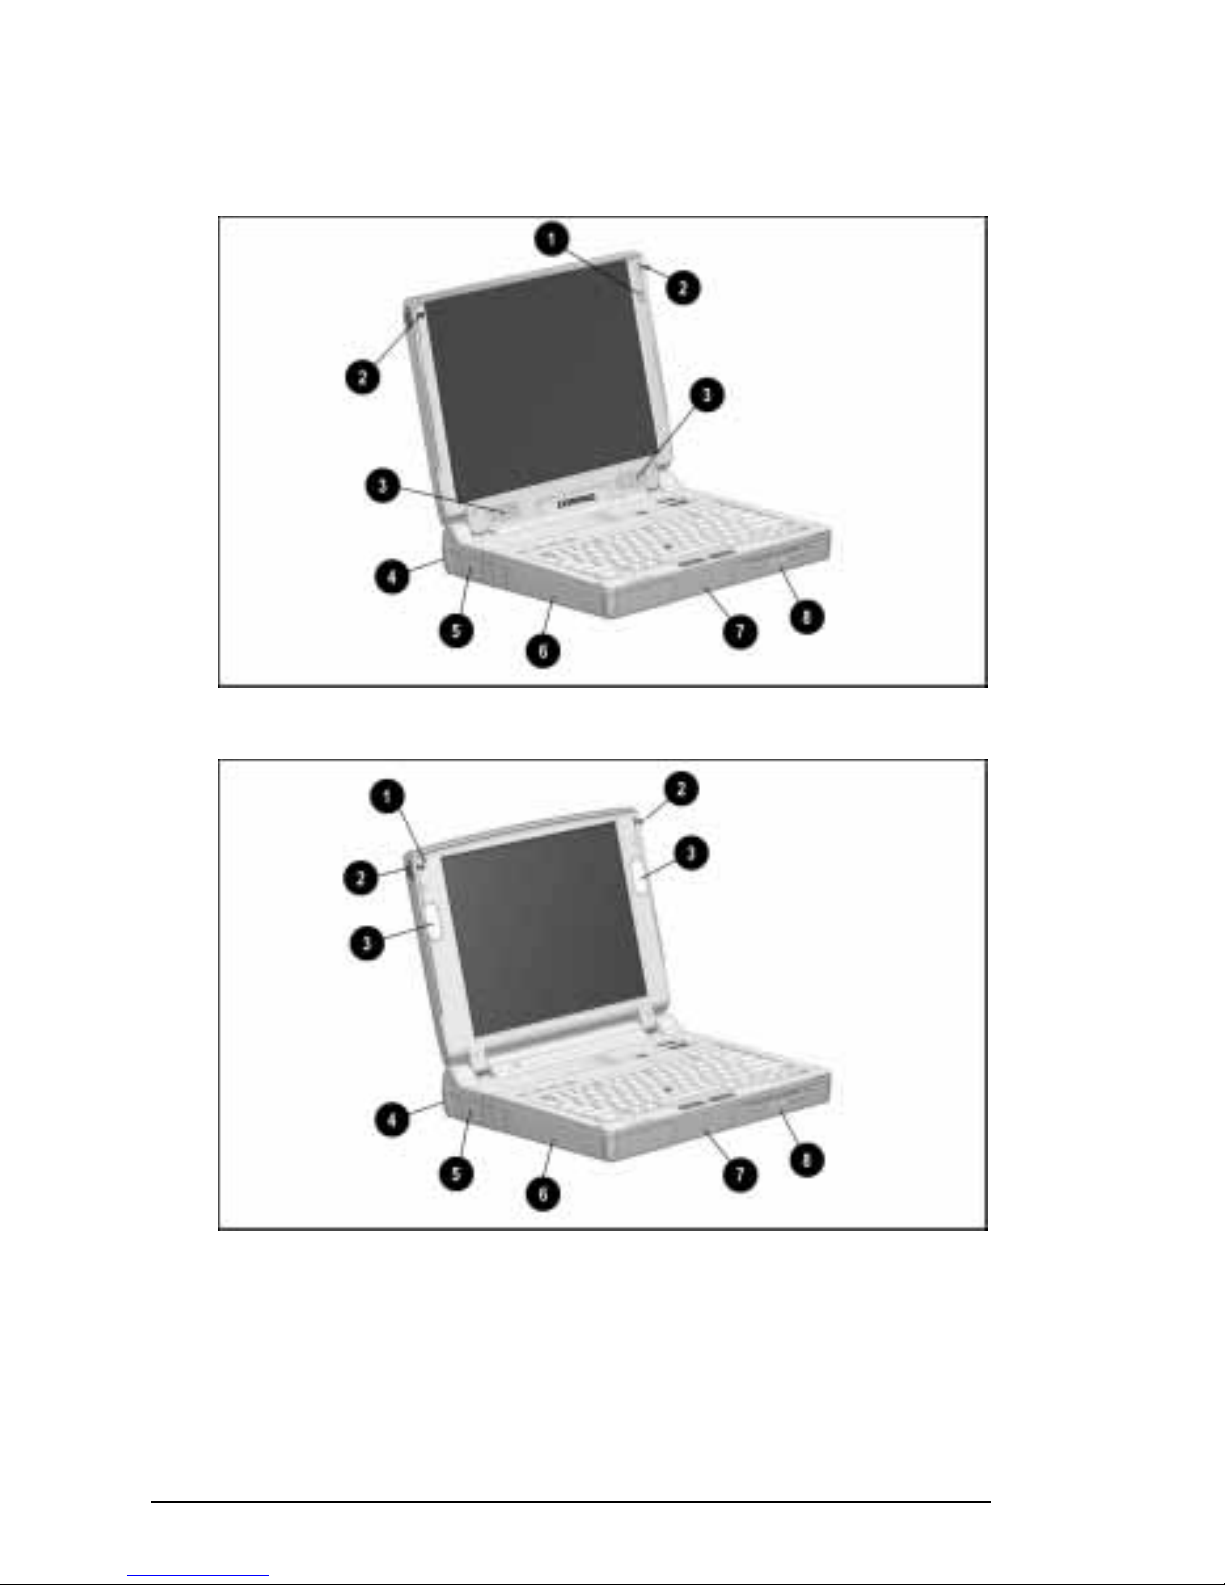
Display and Left Side Components
The size of the display and the position of the microphone and
speakers vary by model.
Display and Left Side Components on Some Models
Display and Left Side Components on Other Models
2-4 Taking a Look at the Computer

Display and Left Side Components
Component Function
Microphone Inputs sound to the computer from the
1
inside or outside of the display; can be
used whether the computer is open or
closed.
Display release latches (2) Open the computer.
2
Stereo speakers (2) Produce high-quality stereo sound.
3
Tilt feet (2) Tilt the computer for comfortable use.
4
Fan Circulates air through the computer to
5
cool internal components.
Battery bay Supports a lithium-ion battery pack
6
that is running the computer; also
charges a battery pack when the
computer is connected to an external
power source.
Hard drive bay Supports a removable hard drive.
7
MultiBay Supports a removable diskette drive,
8
CD-ROM drive, or hard drive; also
supports a battery pack that is running
the computer or charges a battery
pack when the computer is connected
to an external power source.
Taking a Look at the Computer 2-5
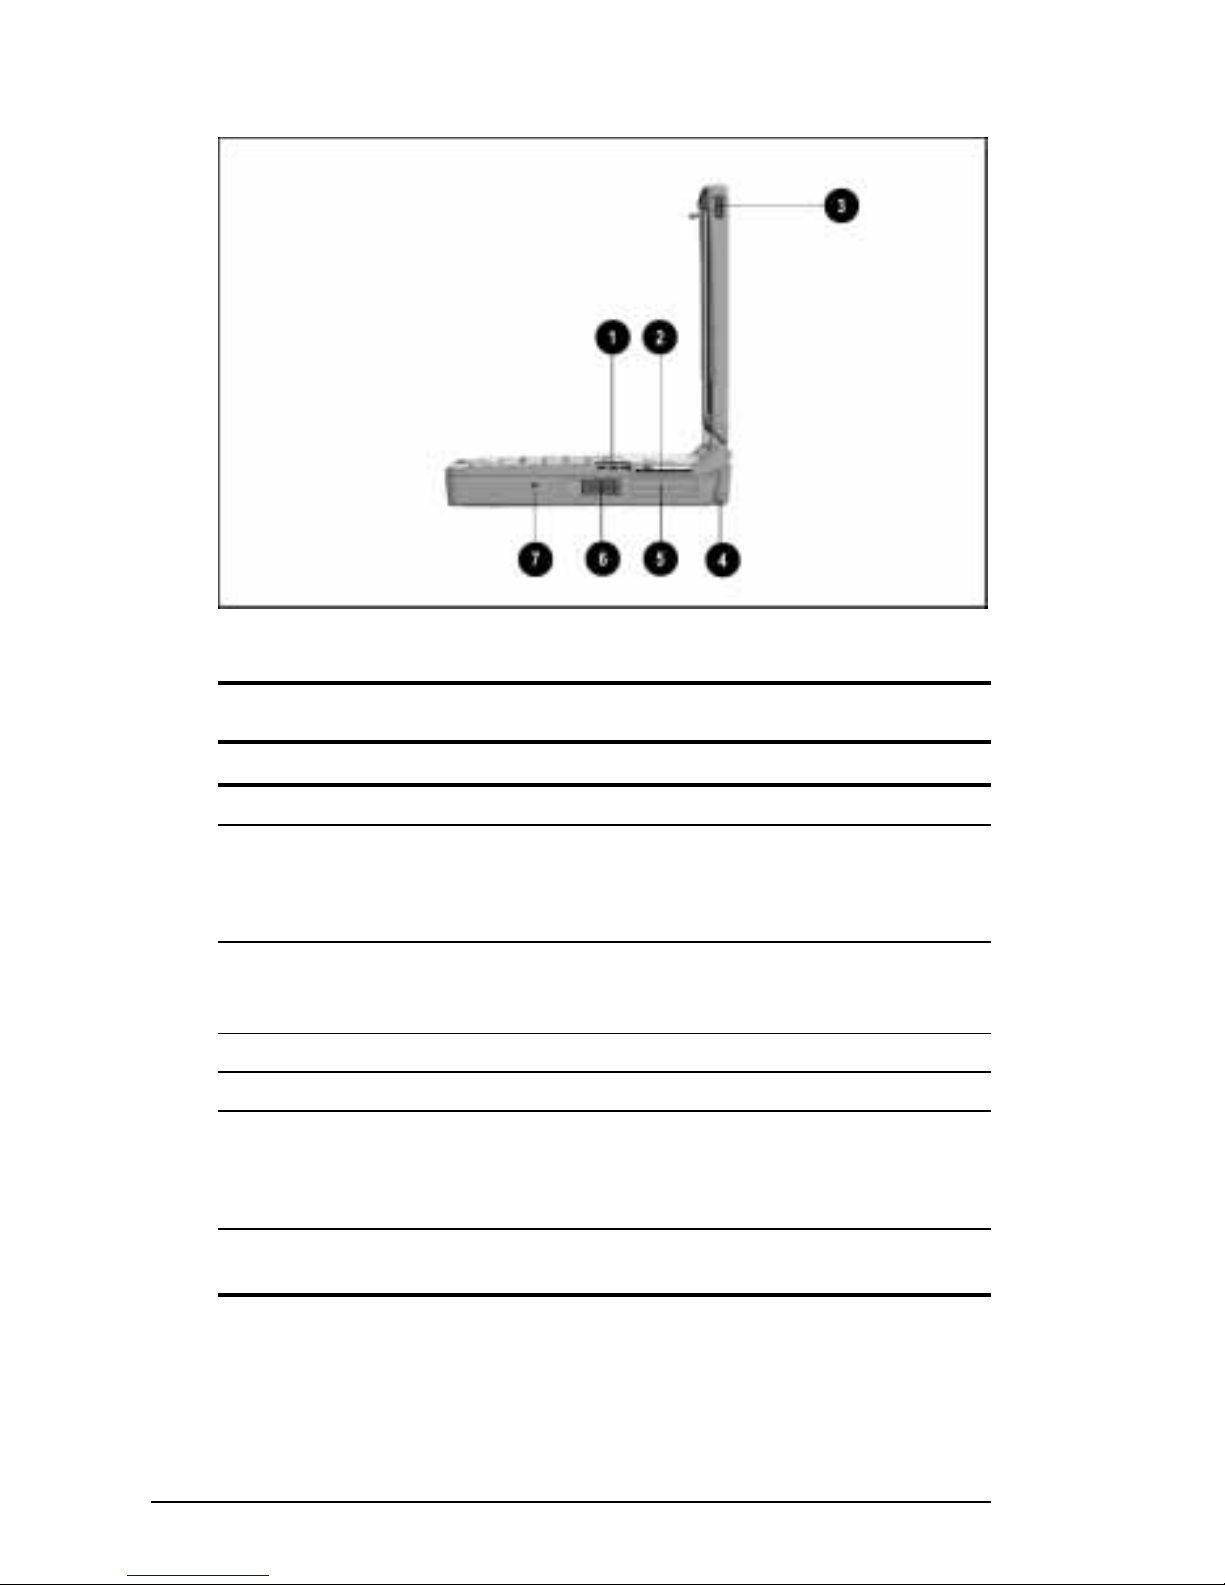
Right Side Components
Right Side Components
Right Side Components
Component Function
Vents (3) Cool internal components.
1
25-pin connector The availability and use of this
2
connector varies regionally. Please
refer to “Regional Differences” at the
end of this chapter.
Display release latch Opens the computer. (Use with the
3
corresponding display release latch on
the left side of the computer.)
Tilt feet (2) Tilt the computer for comfortable use.
4
PC Card slots (2) Support 32- and 16-bit PC Cards.
5
PC Card eject levers (2) Top lever ejects a PC Card from the
6
top PC Card slot; bottom lever ejects
PC Card from the bottom PC Card
slot.
Cable security slot Attaches an optional security cable to
7
the computer.
2-6 Taking a Look at the Computer
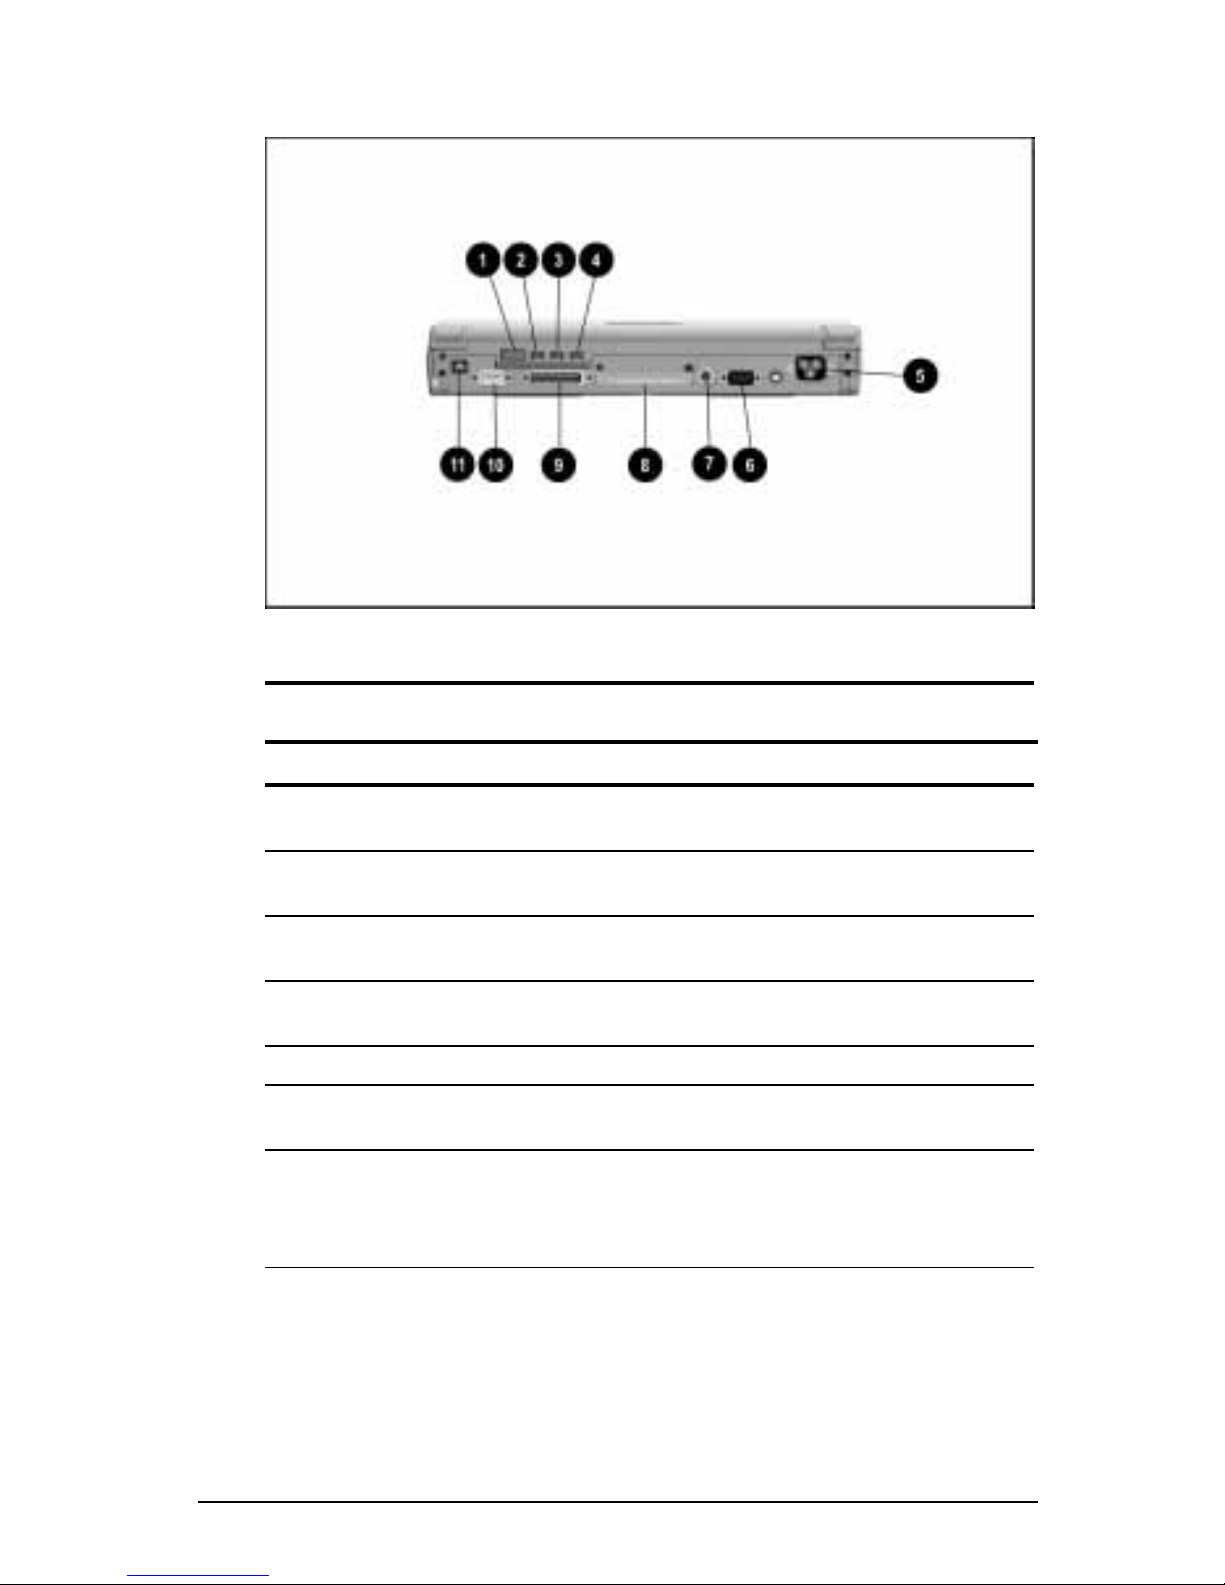
Rear Panel Components
Rear Panel Components
Rear Panel Components
Component Function
Infrared port Links to another IrDA-compliant device
1
for wireless communication.
Microphone jack Connects a single sound channel
2
(monaural) microphone.
Stereo speaker/
3
headphone jack
Stereo line-in jack Connects an external stereo player such
4
Power connector Connects external (AC) power.
5
External monitor
6
connector
Keyboard/mouse
7
connector
Connects stereo speakers, headphones,
or a headset.
as a CD player.
Connects an external monitor or
overhead projector.
Connects an external PS/2-compatible
device, such as a pointing device. (An
optional splitter/adapter can provide two
PS/2-compatible connectors.)
Continued
Taking a Look at the Computer 2-7

Rear Panel Components
Continued
Component Function
Docking connector Connects an optional ArmadaStation or
8
Armada MiniStation.
Parallel connector Connects a parallel device, such as a
9
parallel printer.
Serial connector Connects a serial device, such as a serial
:
mouse.
RJ-11 jack The availability and use of this connector
;
varies regionally. Please refer to
“Regional Differences” at the end of this
chapter.
2-8 Taking a Look at the Computer
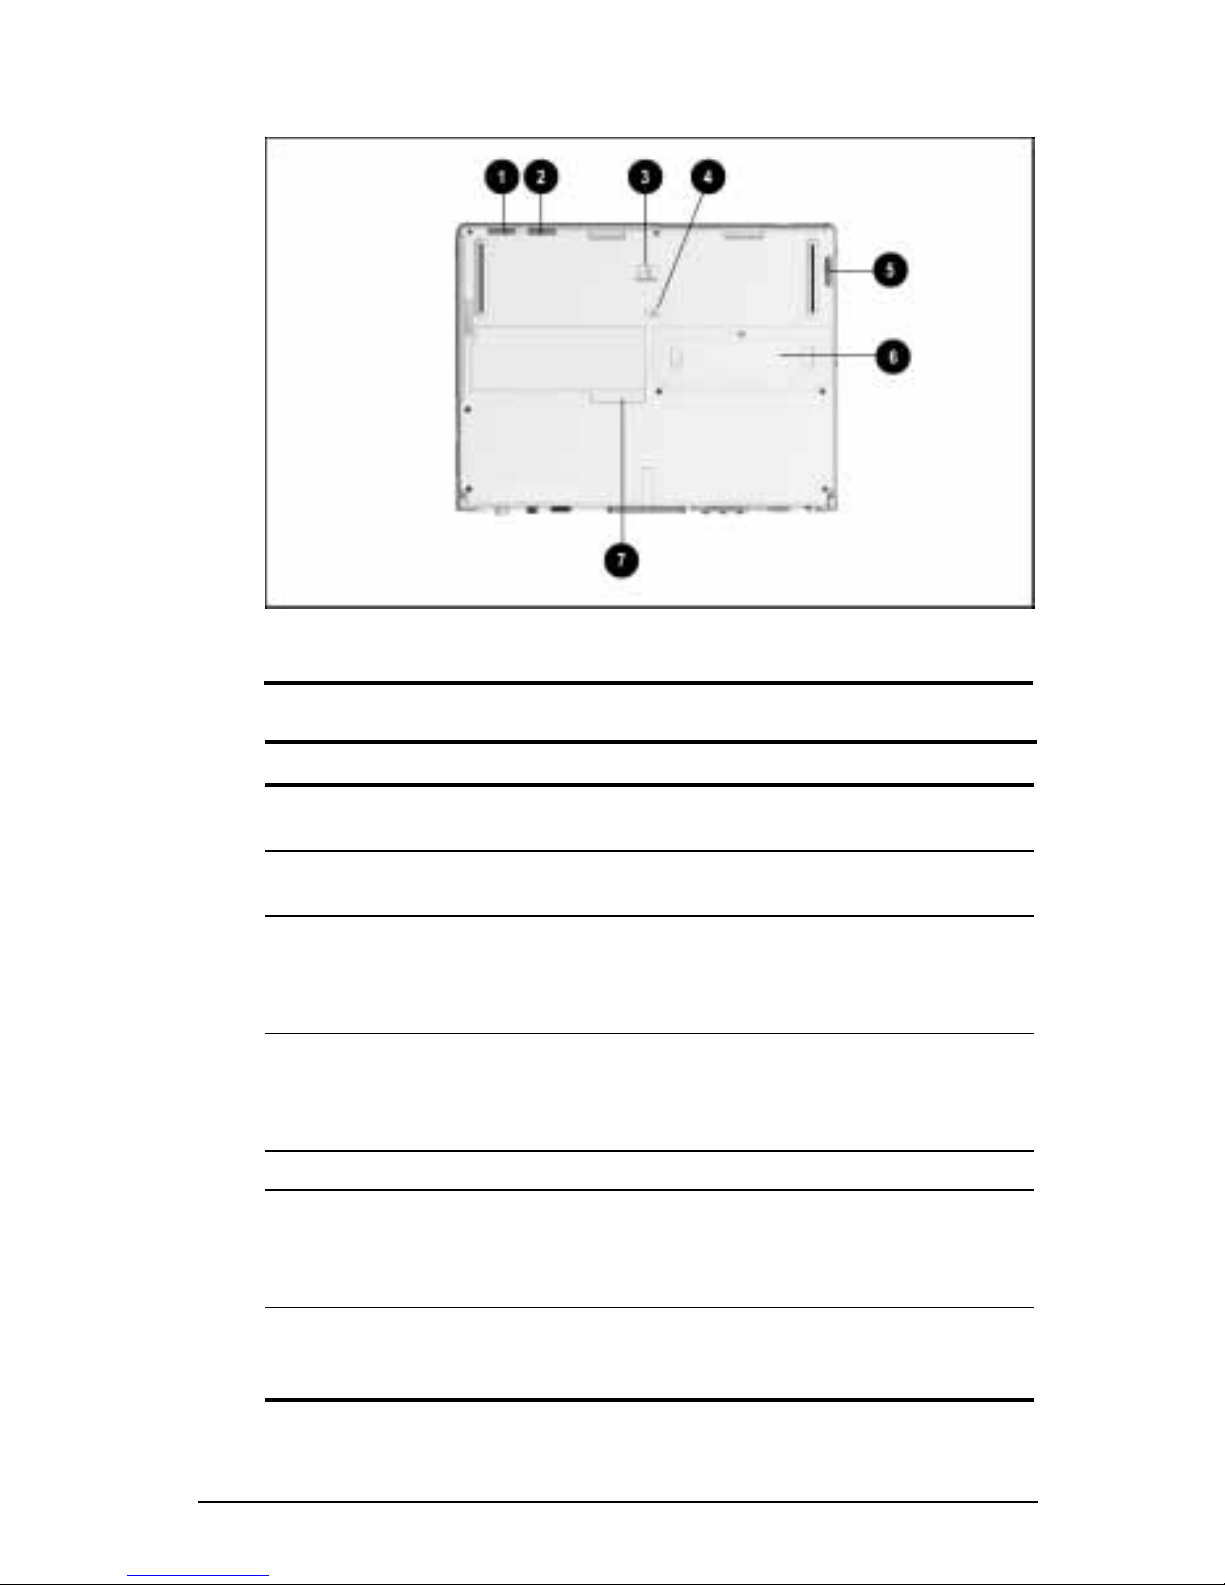
Bottom Components
Bottom Components
Bottom Components
Component Function
Battery release latch Releases a battery pack from the
1
battery bay.
Hard drive release latch Releases a removable hard drive
2
from the hard drive bay.
Docking restraint latch recess Helps secure the computer when it
3
is docked in an optional
ArmadaStation or Armada
MiniStation.
Security slot With the single-bay security screw or
4
dual-bay security screw, secures
devices installed in the MultiBay and
hard drive bay.
MultiBay release latch Releases devices from the MultiBay.
5
Memory expansion slot cover Covers the memory expansion
6
compartment, which contains two
memory expansion slots for memory
expansion boards.
Serial number Computer identification number;
7
needed when you call Compaq
customer support.
Taking a Look at the Computer 2-9

Regional Differences
Two connectors on the computer vary by region: the 25-pin
connector and the RJ-11 jack. These connectors are used for
modem and cellular phone connections.
Some computer models with an integrated modem feature both
■
an RJ-11 jack and a 25-pin connector.
Some computer models with an integrated modem feature only
■
an RJ-11 jack.
Some computer models, which can be used with an optional
■
PC Card modem, have neither an RJ-11 jack nor a 25-pin
connector.
However, all models can have modem functionality in all regions.
For information on using an integrated modem, using an optional
PC Card modem, and connecting an integrated modem to a
cellular phone, refer to Chapter 8, “Using a Modem.”
2-10 Taking a Look at the Computer
 Loading...