


Notice
The information in this guide is subject to change without notice.
COMPAQ COMPUTER CORPORATION SHALL NOT BE LIABLE
FOR TECHNICAL OR EDITORIAL ERRORS OR OMISSIONS
CONTAINED HEREIN; NOR FOR INCIDENTAL OR
CONSEQUENTIAL DAMAGES RESULTING FROM THE
FURNISHING, PERFORMANCE, OR USE OF THIS MATERIAL.
This guide contains information protected by copyright. No part of this
guide may be photocopied or reproduced in any form without prior
written consent from Compaq Computer Corporation.
©1998 Compaq Computer Corporation. All rights reserved. Printed in
Singapore.
Compaq and LTE are registered in the U.S. Patent and Trademark
Office. Armada is a trademark of Compaq Computer Corporation.
Microsoft, MS-DOS, and Windows are registered trademarks of
Microsoft Corporation.
The software described in this guide is furnished under a license
agreement or nondisclosure agreement. The software may be used or
copied only in accordance with the terms of the agreement.
Product names mentioned herein may be trademarks and/or registered
trademarks of their respective companies.
REFERENCE GUIDE
Compaq Armada 4200 Family of Personal Computers
First Edition (January 1998)
Part Number 290779-001
Compaq Computer Corporation

CONTENTS
preface
BEFORE YOU BEGIN
chapter 1
FINDING INFORMATION ABOUT YOUR COMPUTER
Printed and On lin e R eferen ces ...................................................1-1
Online Optio n s C atalo g ..............................................................1-2
Ordering Backup Software.........................................................1-2
chapter 2
TAKING A LOOK AT THE COMPUTER
Front and Left Side Components................................................2-2
Front and Right Side Components..............................................2-3
Keyboard Components...............................................................2-4
Status Pan el Lights .....................................................................2-6
Rear Components........................................................................2-7
Bottom Components...................................................................2-9
Versatile Handle .......................................................................2-1 0
External Diskette Driv e B ay.....................................................2-10
chapter 3
USING KE YBO ARD SHORTCUTS
User-Programmab le Keys...........................................................3-2
Assign in g P ro g rammab le Key s ..............................................3-2
Unassign i n g User-P ro g rammab le Key s..................................3-3
Adding S ch emes.....................................................................3-4
Removin g S ch e mes ................................................................3-4
Key Assign men ts o n th e Task b ar ...........................................3-4
Using the Ho tk ey s ......................................................................3-5
Using Sp ecial Fu n ctio n Key s ......................................................3 -7
Using the Nu meric Key p ad.........................................................3-8
Contents v

chapter 4
WORKING WIT H POINTING DEVICES
Mouse Utility ..............................................................................4-2
Touchpad Components ...............................................................4-3
Trackball Components................................................................4-4
Removin g a Po in tin g Dev i ce ...................................................... 4 -5
Installing a Po in tin g Dev ice........................................................4-7
chapter 5
MANAGING POWER
Power Butto n ..............................................................................5 -2
Power Cho i ces ........................................................................5-3
Suspen d B u tto n...........................................................................5 -3
How Suspen d Is In itiated........................................................5-4
Initiating Su sp en d................................................................... 5 -4
Exiting Su s p en d......................................................................5 -5
Hibernation .................................................................................5-6
Initiating Hib ern atio n .............................................................5-6
Exiting Hib ern atio n ................................................................ 5 -7
AC Power....................................................................................5 -7
Battery Power..............................................................................5 -9
Battery Ch arg in g / Dis ch arg in g ................................................5 -9
Comparin g B attery Ty p es..................................................... 5 -1 0
Resolvin g a Lo w-B attery C o n d itio n.....................................5-11
Extendin g B attery Pack Op eratin g Time ..............................5-12
Chargin g th e Ba ttery Pack (s )................................................5-13
Recycling Us ed Batteries in No rth America.........................5-14
Recycling Us ed B atteries in Eu ro p e .....................................5 -1 4
Power Properties Utility............................................................5 -1 5
Battery Statu s Tab.................................................................5-16
Setting Battery C o n s erv atio n Lev els ....................................5-1 7
Setting a Timeo u t..................................................................5 -1 8
Turning Hib ern atio n On o r Off.............................................5-1 9
The Battery Gauge Popup.....................................................5-20
chapter 6
USING THE HANDLE
Handle Fu n ctio n s ........................................................................6 -1
Attaching th e Han d le ..................................................................6-2
Detaching th e Han d le..................................................................6-3
vi Contents

Handle Tilt Feature.................................................................6-5
Removin g /In s ertin g th e Han d le B attery .....................................6-5
chapter 7
USING THE DUALBAY
Inserting/ R emo v in g th e Dis k ette Driv e ......................................7-2
Inserting a Dis k ette.....................................................................7-4
Removin g a Dis k ette...................................................................7 -4
Removing/Inserting the Modular Battery...................................7-5
chapter 8
USING THE EXTERNAL DISKETTE DRIVE BAY
Inserting the Diskette Drive into th e
External Diskette Driv e B ay.......................................................8-2
Removing the Diskette Drive from the
External Diskette Driv e B ay.......................................................8-3
chapter 9
ENJOYING COMPAQ AUDIO
Identifying Built-In Audio Components.....................................9-2
External Aud io J ack s..............................................................9 -3
Stereo Line-In J ack.................................................................9-4
Internal Microphone...............................................................9-5
Volume Co n tro l ..........................................................................9-6
Using the S tereo Sp eak ers ..........................................................9-7
chapter 10
CONNECT ING EXTERNAL DEVICES
Configu ratio n Utilities..............................................................10-2
Device Manager Utility ........................................................10 -2
Add New Hardware Utility...................................................10-2
Using PC C ard s ........................................................................10 -3
Understan d in g Plug and Play ...............................................1 0 -4
Managin g PC C ard P o wer ....................................................10-4
Inserting a PC C ard ..............................................................10 -5
Removin g a P C C ard ............................................................10-6
PC Card S o ftware .................................................................1 0 -7
USB CardB u s PC C ard.........................................................1 0 -7
Conn ectin g Vid eo.....................................................................10-7
Using the Vid eo Utility ........................................................10-7
Contents vii

Connectin g a TV o r VC R .....................................................10-8
Displayin g P ictu res...............................................................10-9
Conn ectin g In frared Eq u i p men t..........................................10 -1 0
chapter 11
ADDING SOFTWARE AND UPGRADES
Installing S o ftware....................................................................11 -2
Operating System Support........................................................11-2
Upgradin g Memo ry................................................................... 1 1 -3
Memory Upg rad e Op tio n s .................................................... 1 1 -3
Checkin g C u rren t Memo ry ...................................................11 -3
Adding Memo ry....................................................................1 1 -4
Upgrading th e Hard Driv e.........................................................1 1 -5
chapter 12
SETTING SECURITY FEATURES
Setting Pas s wo rd s Pro perties.................................................... 1 2 -2
Power-On Pas s wo rd..................................................................1 2 -2
Establishin g a P o wer-On Pas s wo rd ..................................... 1 2 -2
Entering th e Po wer-On Pa ss wo rd ......................................... 1 2 -3
Deleting/Ch an g in g Po wer-On P as sw o rd ..............................12-3
If You Forg et Your Power-On P as sw o rd..............................12-3
Establishin g a S etu p Pas s wo rd ..................................................1 2 -4
Deleting/Ch an g in g a Se tu p Pas s wo rd...................................12-5
Identifyin g Qu ick C o n tro ls .......................................................12 -5
Initiating Qu ick Co n t ro ls......................................................12-6
Using a Ca b le Lo ck...................................................................1 2 -7
chapter 13
CARING FO R T HE COMPUTER
Routin e C are .............................................................................1 3-2
Travel Guidelin es......................................................................1 3 -3
Shippin g Gu id elin es..................................................................13-4
chapter 14
COMPUTER SETUP AND DIAGNOSTICS
Setup and Diagnostics Utilities.................................................1 4-2
Accessing C o mp u ter S etu p .......................................................1 4 -2
Accessing Diagnostics Utilities................................................14-3
Diagnostics for Windows......................................................14-3
viii Contents

Compaq Diagnostics.............................................................14-4
Running Computer Checkup (TEST).......................................14-4
Running the View System Information
(Inspect Utility ) ........................................................................14-6
chapter 15
TROUBLE SHO OTING
Checklist...................................................................................15-1
Interpreting Mess ag es o n th e Sc reen .......................................15-2
Solving Minor Prob lems...........................................................15-3
Solving B a ttery Pro b l ems.....................................................15-3
Solving Disk ette/Dis k ette Driv e Pro b lems...........................15 -6
Solving Hard Driv e Pro b l ems...............................................15 -7
Solving Hard ware In s tallatio n Pro b l ems..............................15-8
Solving Keyboard and Embedded
Numeric Keypad P ro b lems...................................................1 5 -9
Solving Memory Prob lems .................................................15 -1 0
Running the Monitor Self-Test ...........................................15-10
Solving P C C ard Pro blems.................................................1 5 -1 1
Solving P o wer P ro b lems ....................................................15 -1 3
Solving P rin ter Pro blems....................................................15 -1 4
Solving Dis p lay Screen P ro b lems ......................................15-15
Solving So ftware Ap p licatio n P ro b lems ............................15-1 7
Solving Sound Problems....................................................15-17
Solving Po in tin g Dev i ce Pro b lems.....................................15-18
Cleaning th e Track b all .......................................................15-2 0
Cleaning In si d e th e Track b all As se mb ly............................15 -2 1
Servicing th e C o mp u ter......................................................1 5 -2 2
Preparing for a Call to Customer Support..........................15-23
chapter 16
INTELLIGENT MANAGEABILIT Y
Access to Intellig en t Man ag eab ility .........................................1 6 -1
Features and B en efits................................................................16 -1
Asset Manag emen t....................................................................16 -2
Fault Manag emen t ....................................................................16 -2
Security Mana g emen t ...............................................................16-3
Contents ix

appendix A
WORLDWIDE TELPHONE NUMBERS.....................................................A-1
appendix B
POST ERROR MESSAGES.................................................................B-1
appendix C
CONNECT O R PIN ASSIGNMENTS ........................................................ C-1
appendix D
POWER CORD SET REQ UIREME NT S
General Requ i remen ts................................................................D-1
Country-Specific Requirements.................................................D-2
appendix E
ELECT RO ST AT IC DISCHARGE
Preventing Electro s tatic Dis ch arg e ............................................ E-1
Grounding Methods................................................................... E-1
appendix F
AGENCY REGULAT O RY NOTICES
Agency Re g u lato ry Id en tificatio n Nu mb ers ...............................F-1
Battery Notice.............................................................................F-4
Energy St ar C o mp lian ce .............................................................F-5
appendix G
SPECIFICATIONS ..............................................................................G-1
rd appa.doc
INDEX................................................................................................ I-1
x Contents

preface
BEFORE YOU BEGIN
Some or all of the following f ormat c onventions are used in this
guide to distinguish elements of text :
■
Names of keys are shown in bold type as they appear on the
keyboard, for example,
■
Keys that you should press at the same time are represente d by
the key names and the plus (+) symbol, for exam ple,
Ctrl+Alt+Delete.
Ctrl, Backspace, Tab.
■
Commands are presented in lowercase, bold type as shown
here:
■
An arrow symbol is used to se parate ic ons or menu options
install or a:\inst all.
that you should select in succession, for example, click the
Start buttonÈSettingsÈControl Panel.
■
When you need to type i nformation without pre ssi ng the Enter
key, you are direct ed to “type” the information.
■
When you need to type information and press the Enter key,
you are directed to “enter” the information.
NOTE: Text set off in this manner present s c ommenta ry, sidelight s,
or intere sting points of inf ormation.
IMPORTANT: Text set off in this manner presents clarifying
information or specific instructions.
WARNING: Text set off in this manner indicates that failure to
!
follow directions could result in bodily harm or loss of life.
CAUTION: Text set off in this manner indicates that failure to follow
directions could result in damage to equipment or loss of
information.
Before You Begin xi

chapter
1
FINDING INFORMATION ABOUT
YOUR COMPUTER
In this chapter you will learn a bout the referenc e s that come with
your computer and where to find them.
Refere nc es are pr ovi ded for you in two forms:
■
As printed materials
■
As online information accessible from the computer screen
NOTE: The references that come with the computer vary by model.
Printed and Onl ine References
The foll owing printe d refer ences come with your computer :
■
A quick setup poste r
■
Reference Guide
■
Microsof t Windows Operating System Guide
■
Safety & Comfort Guide
■
Kensington Sec urity Card
■
Warranty and service information
The foll owing Compaq onli ne refe rences a re preinstalled on your
computer:
■
Compaq Reference Guide
■
Safety & Comfort Guide
■
Compaq Dictionary
■
Options Catalog
Finding Informati on A bout Your Computer 1-1

The online references installed on the computer include the user’s
guides, application help, software utilities help, and customer
support information. Ma ny are accessible from the Compaq
Information Center folder on the Sta rt menu. Others can be
accessed from the application or utility screens.
CAUTION: Most online references are available only through the
Windows interface. If you delete Windows, those references will also
be deleted. Therefore, Compaq recommends that you not delete
Windows software.
Online Options Catalog
To learn more about t he many Compa q opt i ons designed to
enhance your computer, go to the Compaq Information Ce nter on
the Start menu. Click the Options Catalog to see an illustration
and descri pt ion of the m any options for your compute r. Use t he
part number include d to order from your Compaq dealer, re seller,
or service provider.
Ordering Backup Sof tware
Compaq rec ommends that you create a backup of the softwar e
preinstalled on the computer. Or, for an additional cost , you can
order a ba ckup CD or diskett es from Compaq for al l softwar e
preinstalled on this computer.
To order ba ckup diskettes or CDs, refer to the “ Worldwide
Telephone Numbers” listed in Appendix A. If an orde r form is
included wi th your comput er, complete the form and return it. Or
call one of the numbers liste d on the order form.
IMPORTANT: Before calling Compaq to place your order, find the
serial number on the bottom of your computer. This number is
necessary for all backup diskette or CD purchases.
1-2 Finding Informat ion About Your Computer

chapter
2
TAKING A LOOK AT THE
COMPUTER
Your com put er is equipped with many features, including
hotkeys, progr ammabl e keys, light indicators, a nd c onnectors.
This chapter familiarizes you w ith the components on the
computer and how to use them.
Externa l devices such as a print er, port able expansi on uni t,
monitor, keyboard, or mouse can be connected to your com puter
to enhance its functionality. See Chapter 10, “Connecting External
Devices,” for more details.
Illustra tions and tables on t he following pages identify the
computer’s primary components, inc luding:
■
Front and left side c omponents
■
Front and r ight side components
■
Keyboard c omponents
■
Status panel lights
■
Rear components
■
Bottom components
■
Versatile handle
■
External Diskette Drive Bay
Taking a Look at the Computer 2-1
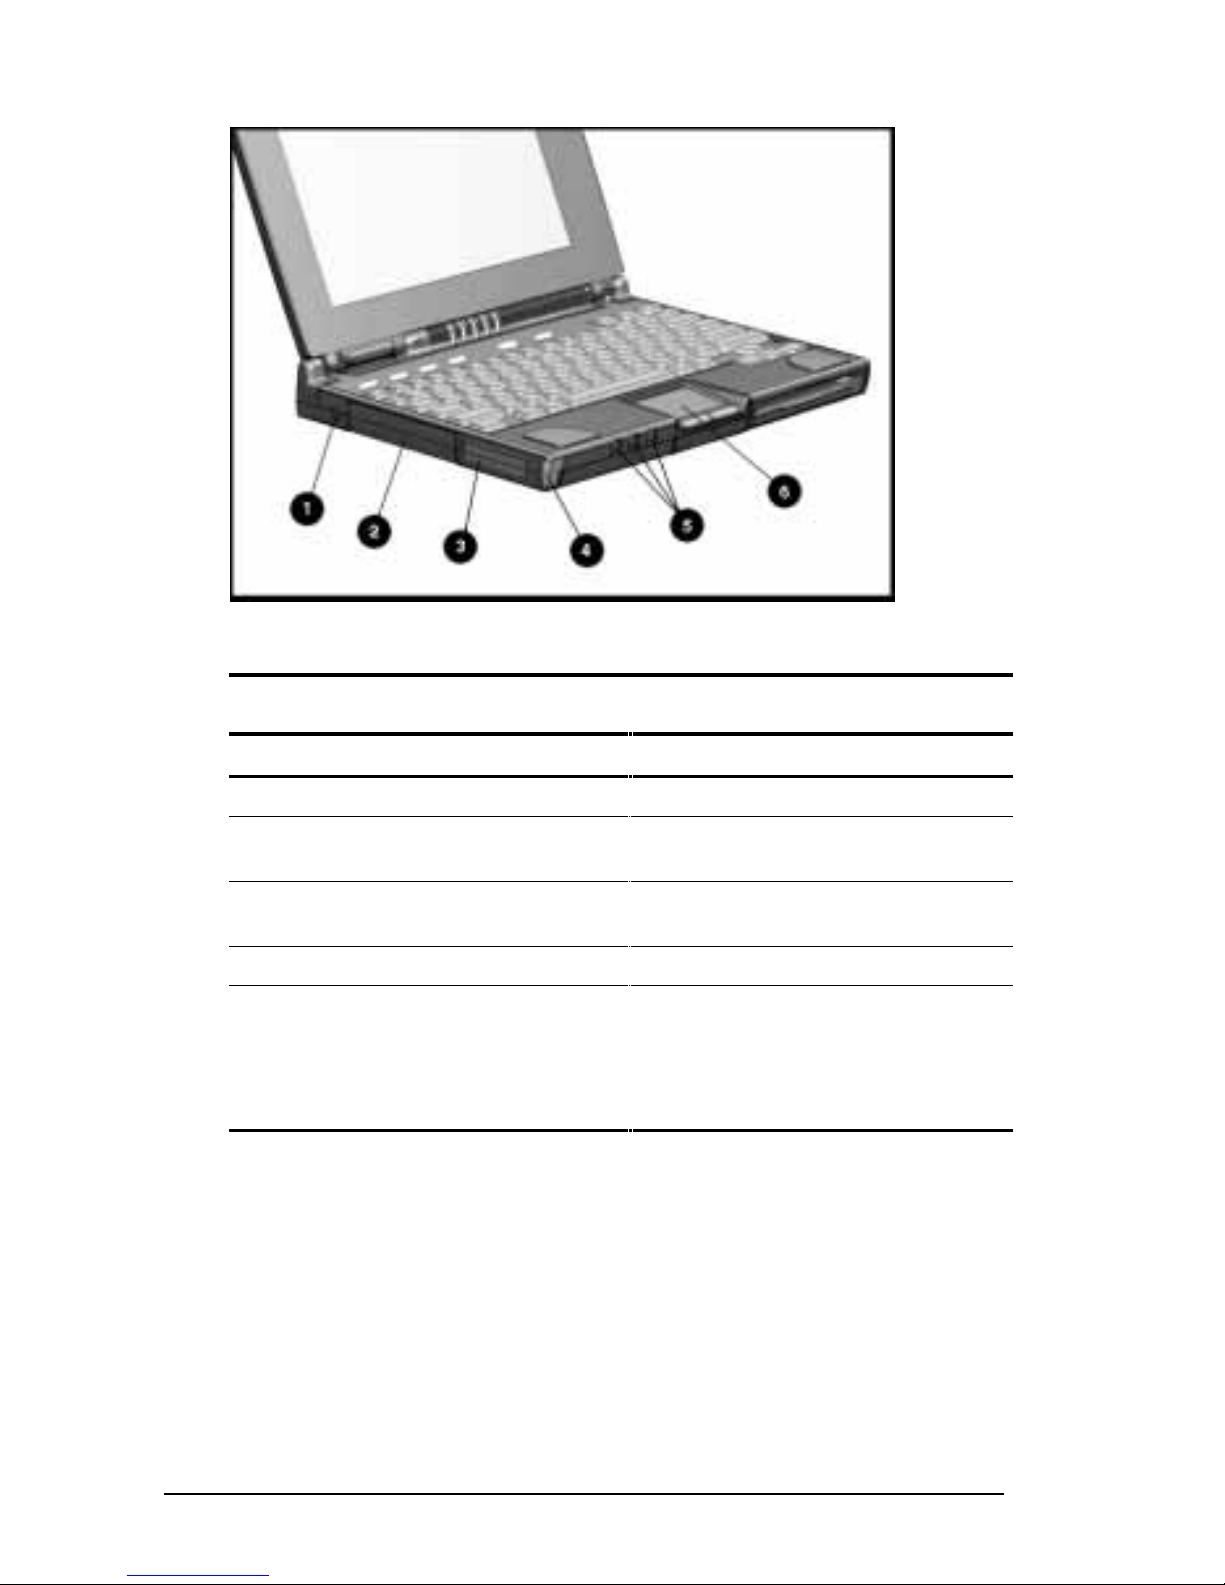
Front and Left Side Components
Front and Left Side Com ponent s
Front and Left Side of the Computer
Ref. Component Function
1 Cable lock provision Protects your computer from theft.
2 Hard drive Drive inside your computer that
stores data.
3 PC Card slots Accept one Type III, or two Type
II, or two Type I PC Cards.
4 PC Card eject buttons Release PC Cards.
5 Audio connectors Allow you to connect a
microphone, stereo, or headphone
to your computer. (See Chapter 9,
“Enjoying Compaq Audio,” for
details.)
2-2 Taking a Look at the Computer

Front and Right Side Components
Front and Right Side Components
Front and Right Side of the Computer
Ref. Component Function
1 DualBay Accepts an internal diskette drive
(3.5-inch diskettes) or modular
battery pack.
2 DualBay eject button Ejects the diskette drive or
modular battery pack.
3 AC power connector Connects the AC Adapter to the
computer. Use the power cord
extension included with your
computer when you need to reach
a distant electrical outlet to
connect the AC Adapter.
Taking a Look at the Computer 2-3

Keyboard Components
Keyboard
Keyboard Components
Ref.Component Function
1 Function keys
Fn+F1 - Fn+F10
2 User-programmable
keys
3 Suspend button When pressed once with the computer on,
4 Status panel lights Display computer status indicators.
5 Power button When pressed the first time, turns on the
Used for specific functions in applications
and operating systems.
Assign and launch applications or
documents quickly and emulate Windows
and Application Logo Keys.
initiates Suspend; when pressed the second
time, exits Suspend; when pressed
simultaneously with Fn, initiates Hibernation.
computer. (See chapter 5, “Managing
Power,” for details.)
NOTE: To turn off the computer, use Shut
Down from the Windows Start menu. In case
of a system lockup, when the mouse doesn’t
work and Ctrl+Alt+Del is not recognized by
the unit, press Power or Ctrl+Power to turn off
the unit.
6 Embedded numeric
keypad
2-4 Taking a Look at the Computer
Allows two operating modes, numeric (if
Fn+NumLk is on) and edit (if Fn+NumLk is off).

Continued
Taking a Look at the Computer 2-5

Keyboard Components Continued
Ref.Component Function
7 Arrow keys Allow cursor to move up, down, right, left.
8 Stereo speakers Produce high-quality stereo sound.
9 Pointing device The touchpad moves the pointer around the
screen and functions as a portable mouse.
2-6 Taking a Look at the Computer

Status Panel Li ghts
Status Panel Light s
Status Panel Lights
Ref. Indicator Function
1 Power/
Suspend
2 Battery
charge
3 Caps Lock Turns on when Caps Lock function is on.
4 Scroll Lock Turns on when the Scroll Lock function is on.
5 Num Lock Turns on when the NumLk function is on.
Turns on (solid) when power to the computer is
turned on; blinks in Suspend mode; turns off when
computer is in Hibernation or powered off.
Turns on (solid) when computer is turned on and
when battery is fast charging. If a low-battery point
is reached, light will flash 6 times and you’ll hear a
beep. If a critical low-battery state is reached,
you’ll hear a beep and the light will flash
constantly. If you do not attach an AC Adapter
within 20 seconds of this warning, the unit will
initiate Hibernation (unless Hibernation has been
disabled).
Taking a Look at the Computer 2-7

Rear Components
Rear Components
Rear of the Computer
Ref Component Function
1 Keyboard/mouse connector Connects an external keyboard,
mouse, or other compatible PS/2
pointing device.
2 Parallel connector Connects optional parallel devices,
such as a printer. Also connects the
External Diskette Drive Bay.
3 Serial connector Connects optional serial devices,
such as a mouse.
4 Infrared lens (IrDA
compliant)
5 External monitor connector Connects external monitor to computer
Sets up wireless data transfer for
printing.
Continued
2-8 Taking a Look at the Computer

Rear Components Continued
Ref Component Function
6 NTSC/PAL Video Connects the computer to TV, VCR,
camcorder, or laser disc, using the
NTSC (U.S.) and PAL (European)
formats. You can use the NTSC/PAL
cable included with your computer to
make video connections.
IMPORTANT: See “Connecting Video”
in Chapter 10, “Connecting External
Devices,” for information regarding
the U.S./European video connectors.
7 Status panel indicator
lights
Status panel lights remain in view
when the computer is closed.
Taking a Look at the Computer 2-9

Bottom Components
Bottom Components
Bottom of the Computer
Ref Component Function
1 DualBay Accepts an internal diskette drive
(3.5-inch diskettes) or modular
battery pack.
2 Pointing device The touchpad moves the pointer
around the screen; functions as a
mouse.
3 Memory compartment Stores the memory expansion
boards.
4 Expansion slot 120-pin connector interface for
the Mobile CD Expansion Unit
(MCD) or convenience base.
5 Hard drive compartment Contains the hard drive.
2-10 Taking a Look at the Computer

Versatile Handle
A multifunctional handle with a Lithium Ion battery pack inside
provides more porta bl e power by adding a second battery pack. In
addition, the handle moves to three convenient positions:
■
Creates a comfortable tilt f or working at the keyboar d. Fold
the handle ba ck and under the computer.
■
Provides a cover for the rear connectors. Place the handle in a
straight posit ion while the computer i s lying flat.
■
Enables you to carry the c omputer like a brief case.
NOTE: For more information about the handle, see Chapter 6,
“Using the Handle.”
Versatile Handle
External Di skette Drive Bay
When you want to ope rate on battery powe r but need to use the
diskette drive, install the drive in the external drive bay. It
includes a parallel cable that connects to the parallel port on the
rear of the computer.
See Chapter 8, “Using the External Diskette Drive Bay,” for
details on how to use this f eature.
Taking a Look at the Computer 2-11

chapter
3
USING KEYBOARD SHORTCUTS
Keyboard shor t cuts help you customize the keyboard. You ca n
use designated keys to change and se l ect computer settings, such
as speaker volume, battery c onservation, and popup windows.
This chapter familiarizes you w ith the following keyboard and
shortcut f eatures :
■
User- programmable keys
■
Hotkeys
■
Special function keys
■
Embedded numeric keypad
Using Keyboard Shortcuts 3-1

User-Programmable Keys
The four use r-programmable keys è at the top of the keyboar d
allow you to quickly open an appl i cation on your c omputer, bring
up a document , or em ul ate one of t he Microsoft Windows and
Applicati on Logo Keys.
User Programmable Keys
By assigning the programmed keys to schem es, you can cr eate
multiple sets of key assignments that will allow you to open
almost a ny applicati on or document on your compute r.
Assigning Progr ammable Keys
To assign user- programmable keys, f ol l ow t hese steps:
1. Access the Programmable Keys utility in the Control Panel on
the Windows Sta rt button.
2. Select the program mable key you w ant to assign or r eassign in
the current scheme by clicking the appropriate r adio button in
the Key assignments group box.
NOTE: To assign keys in other than the current scheme, place a
check in the Show advance d options checkbox and look in the
Scheme box t o see the scheme you are c urrently using. You can
create a new scheme or add/change key assignments in the current
scheme. If you have never created a scheme, the Default sche me
will be in effect.
3-2 Using Keyboard Shortcuts

3. Click the Assign but ton. A dialog box a ppears showing a l ist
of programs or documents from the Programs menu.
NOTE: To access a larger number of programs, click the Show
advanced options checkbox. This changes the Assign but ton
to the Browse button. By clic ki ng the Browse butt on, you can
access all applications on your computer. To em ulate one of
the Micr osoft Windows and Application Logo Keys, select the
appropriate file from the WINDOWS\CPQWIN directory.
4. Highlight the desired appl ication and click OK. The icon and
program na me you selected will appear beside the
programmable key’s radio button.
5. Click OK to exit this utility. When you push the
program mable key you just assigned, your a pplication or
document will appear on screen.
Unassigning User-P rogrammable Keys
To remove a programmable key assignment, follow these steps:
1. Access the Programmable Keys utility in the Control Panel.
2. Select the programmable key you wish to unassign by clicking
the appropriate r adio button in the Key assignments group
box.
NOTE: To assign keys in other than the current scheme, place a
check in the Show advance d options checkbox and look in the
Scheme box t o see the scheme you are c urrently using. You can
create a new scheme or add/change key assignments in the current
scheme. If you have never created a scheme, the Default sche me
will be in effect.
3. Click the Assign button, then select Unassigned from the list.
The icon and program name previousl y assigned to the key
will be removed.
NOTE: When the Show adva nced options box is checked, you can
unassign a programmabl e key by clicking t he Browse button a nd
selecting “U nassigned” in the WINDOWS\CPQWIN directory.
4. Click OK to exit the utility.
Using Keyboard Shortcuts 3-3

Adding Schemes
A scheme i s a program mable key a ssignment that you define and
is unique to your Windows user prof ile.
To add a new sc heme, do the following:
1. Access the Programmable Keys utility in the Control Panel.
2. Click the Show advanced options checkbox.
3. Click the Add button.
4. Type the name of your new sc heme in the popup dialog box
that appears.
5. Make your progra mmable key assignments .
6. When the assignments have been made, click OK to exit the
utility.
Removing Schemes
To remove a new scheme, do the following:
1. Access the Programmable Keys utility in the Control Panel.
2. Place a check in the Show advanced options checkbox if one
is not already there.
3. Be sure the scheme in the S cheme box is t he one you want to
delete. To view a different scheme, select a sc heme fr om the
drop-down li st.
NOTE: The Default sc heme is not removable .
4. Click the Remove button.
5. Click OK to exit the utility.
Key Assignments on the Taskbar
One convenient way to see your user-programmable key
assignments i s t o vi ew them in a popup window that you activate
from an icon in the system tray (taskbar). To enable the icon:
1. Access the Programmable Keys utility in the Control Panel.
2. Place a check in the Show key assignments in the System Tray
checkbox.
3. Click OK to exit the utility.
An icon appears in the taskba r. To view the popup window, c lick
the icon.
NOTE: The icon remains in the system tray (taskbar) until you
disable it by unc hecking Show Key Assignments in the System
Tray checkbox.
3-4 Using Keyboard Shortcuts

Using the Hotkeys
The hotkey combinations (Fn+F1 - F10) allow you to use the arrow
keys to quickly adjust computer settings using the Fn plus hotkeys
F1 through F10. To use the arrow keys to adj ust se ttings, hold
down the hotkeys w hile using the up, down, right, or left arr ow
keys.
Hotkeys
NOTE: When you press most hotke ys t he second time, the keys are
toggled off . An exception is the
Fn+F6 QuickLock/QuickBlank
hotkeys, which require t he power-on password to disable .
Hotkey Assignments and Functions
Feature Hotkeys Function
Popup icon
location
BIOS version Fn+F2 Displays the BIOS version number.
Switches displays Fn+F4 Toggles between computer display,
Speaker volume Fn+F5 Adjusts speaker volume up or down.
Fn+F1 Adjusts the popup icon location. Use
the arrow keys to move the icon up or
down, left or right.
external monitor display, both displays
at the same time, or TV screen.
Continued
Using Keyboard Shortcuts 3-5

Hotkey Functions and Assignments Continued
Feature Hotkeys Function
Quick Lock/
QuickBank
Battery
Conservation
Fn+F6 Initiates QuickLock, which disables the
keyboard and mouse, and QuickBlank,
which clears the screen. Enter poweron password to disable QuickLock and
QuickBlank and reactivate keyboard,
mouse, and screen.
Fn+F7 Displays the battery conservation
settings in a popup window. Use the
left and right arrow keys to select a
different setting.
NOTE: See Chapter 5, “Managing
Power,” for more information.
Battery Gauge Fn+F8 Press the right or down arrow keys to
select the next battery to be displayed.
If a battery is not present, its selection
will be skipped. Pressing left or up
arrow keys will select the previous
battery. If the user does not depress
any arrow keys for 5-7 seconds, the
popup will display the average
remaining capacity of all installed
batteries.
NOTE: See Chapter 5, “Managing
Power,” for more information.
Contrast Control Fn+F9 Adjusts the display contrast. Press the
right arrow key to increase contrast;
press the left arrow key to decrease
contrast.
NOTE: On models with active matrix
display, contrast control is not
applicable.
Brightness Control Fn+F10 Adjusts the display brightness. Press
the right arrow key to increase light
intensity; press the left arrow key to
decrease light intensity.
Hibernation Fn+
suspend
Num Lock Fn+Num Lk Enables and disables the embedded
Initiates Hibernation.
numeric keypad.
3-6 Using Keyboard Shortcuts

Using Special Funct ion Keys
Some keys on t he keyboard pr ovide special functions, depending
on the applica t i on you are using. These keys ar e described i n t he
following table:
Special Function Keys
Key Function
Alt Application dependent, used in combination with
another key for a specific function. Refer to the
documentation for the application you are using.
Backspace Moves the cursor left and deletes characters as it
moves left.
Caps Lock When the CapsLock indicator is on, all letters typed are
capitalized.
Ctrl Application dependent; used in combination with other
keys for specific functions. Refer to the documentation
for the application software you are using.
Esc Often assigned a specific task by the application.
Frequently used as an exit key.
F1 – F 12 Used for a specific function in applications and
operating systems. Check the documentation for the
application software you are using.
NumLk Activate this function by pressing Fn+NumLk. When the
NumLk indicator light is on, the embedded numeric
keypad is activated. Use this toggle key feature to
enable and disable the numeric keypad.
Pause Temporarily suspends screen scrolling. Activate this
function by pressing Fn+Pause. Deactivate Pause by
pressing any key.
PrtSc Prints the information on the screen line-by-line to a
local printer. Using this key will print only the
information on the screen. Activate this function by
pressing Fn+PrtSc.
Scroll When the Scroll Lock indicator light is on, prevents the
screen from scrolling. Access this function by pressing
Fn+Scroll.
Continued
Using Keyboard Shortcuts 3-7

Special Function Keys Continued
Key Function
Ctrl+Alt+Delete Restarts the system after the computer has been
turned on and is locked up while in MS-DOS mode.
NOTE: Shut Down on the Windows Start menu is
the recommended way to restart the computer while
in Windows. Also stops the restoration of information
when the computer exits Hibernation.
Fn + suspend Initiates Hibernation.
Ctrl+Power Resets the system in case of a system lockup, when
the mouse doesn’t work and Ctrl+Alt+Del is not
recognized by the unit.
Using the Numeri c Keypad
The embedded numeric keypad is a section of the keyboard t hat
converts to a numeri c keypad when t he NumLk function is
activate d. This is done by pressing Fn+NumLk. Us e this toggle key
function to enable and disable the embedded numeric keypad.
Embedded Numeric Keypad
3-8 Using Keyboard Shortcuts

chapter
4
WORKING WITH
POINTING DEVICES
The pointing device on your c omputer is a versatile feat ure that
eliminates the need to carry a mouse when traveling. It moves the
cursor around the screen and can be used w ith either hand.
This com puter can use either a modular touchpad or trackball
pointing device. Your c omputer comes wit h a touchpad.
This chapter familiarizes you w ith trackball and touchpad
features, incl uding:
■
Accessing the mouse utility
■
Identif ying touchpad components
■
Identif ying trackba ll components
■
Removing the pointing device
■
Installi ng a pointing device
Working with Pointing Devices 4-1
 Loading...