

Page 1

. . . . . . . . . . . . . . . . . . . . . . . . . .
Reference Guide
Compaq Armada 4100 Family of Personal Computers
• Components and Features
• Maximizing Battery Life
• Computer Upgrades
• Diagnostics
• Troubleshooting
Page 2

. . . . . . . . . . . . . . . . . . . . . . . . .
Notice
The information in this guide is subject to change without notice.
COMPAQ COMPUTER CORPORATION SHALL NOT BE LIABLE
FOR TECHNICAL OR EDITORIAL ERRORS OR OMISSIONS
CONTAINED HEREIN; NOR FOR INCIDENTAL OR
CONSEQUENTIAL DAMAGES RESULTING FROM THE
FURNISHING, PERFORMANCE, OR USE OF THIS MATERIAL.
This guide contains information protected by copyright. No part of this
guide may be photocopied or reproduced in any form without prior written
consent from Compaq Computer Corporation.
1996 Compaq Computer Corporation.
All rights reserved. Printed in the U.S.A.
Compaq, Deskpro, LTE, Contura
Registered U. S. Patent and Trademark Office.
Presario is a trademark of Compaq Computer Corporation.
Contura Registered in the Philippines Patent Office.
Armada is a trademark of Compaq Computer Corporation.
Microsoft and MS-DOS are registered trademarks of Microsoft Corporation.
Windows is a trademark of Microsoft Corporation.
The software described in this guide is furnished under a license
agreement or nondisclosure agreement. The software may be used or
copied only in accordance with the terms of the agreement.
Product names mentioned herein may be trademarks and/or registered
trademarks of their respective companies.
Reference Guide
Compaq Armada 4100 Family of
Personal Computers
Third Edition (November 1996)
First Edition (May 1996)
Part Number 228988-003
Compaq Computer Corporation
Page 3

Page 4

. . . . . . . . . . . . . . . . . . . . . . . . .
Agency
Federal Communications Commission Notice
This equipment has been tested and found to comply with the
limits for a Class B digital device, pursuant to Part 15 of the FCC
Rules. These limits are designed to provide reasonable protection
against harmful interference in a residential installation. This
equipment generates, uses, and can radiate radio frequency energy
and, if not installed and used in accordance with the instructions,
may cause harmful interference to radio communications.
However, there is no guarantee that interference will not occur in a
particular installation. If this equipment does cause harmful
interference to radio or television reception, which can be
determined by turning the equipment off and on, the user is
encouraged to try to correct the interference by one or more of the
following measures:
■ Reorient or relocate the receiving antenna.
■ Increase the separation between the equipment and the receiver.
■ Connect the equipment into an outlet on a circuit different from
that to which the receiver is connected.
■ Consult the dealer or an experienced radio or television
technician for help.
Modifications
The FCC requires the user to be notified that any changes or
modifications made to this device that are not expressly approved by
Compaq Computer Corporation may void the user's authority to
operate the equipment.
Declaration of Conformity - United States Only
This device complies with Part 15 of the FCC Rules. Operation is subject
to the following two conditions: (1) this device may not cause harmful
interference, and (2) this device must accept any interference received,
including interference that may cause undesired operation.
For questions regarding this declaration, contact:
Compaq Computer Corporation
P.O. Box 692000, Mail Stop 510101
Houston, Texas 77269-2000
Or call 514-3333
To identify this product, refer to the Series number found on the product.
Cables
v
Page 5

. . . . . . . . . . . . . . . . . . . . . . . . .
Connections to this device must be made with shielded cables with
metallic RFI/EMI connector hoods to maintain compliance with FCC
Rules and Regulations.
Airline Travel Notice
Use of electronic equipment aboard commercial aircraft is at the
discretion of the airline.
European Notice
Products with the CE Marking comply with both the EMC Directive
(89/336/EEC) and the Low Voltage Directive (73/23/EEC) issued by
the Commission of the European Community.
Compliance with these directives implies conformity to the
following European Norms:
■ EN55022 (CISPR 22)-Radio Frequency Interference
■ EN50082-1 (IEC801-2, IEC801-3, IEC801-4)-Electromagnetic
Immunity
■ EN60950 (IEC950)-Product Safety
Canadian Notice
This Class B digital apparatus meets all requirements of the
Canadian Interference-Causing Equipment Regulations.
Avis Canadien
Cet appareil numérique de la classe B respecte toutes les exigences
du Règlement sur le matériel brouilleur du Canada.
Japanese Notice
Title: NOTICE.EPS
Creator: CorelDRAW!
CreationDate: Thu May 12 13:24:40 1994
vi
Page 6

. . . . . . . . . . . . . . . . . . . . . . . . .
Battery Notice
WARNING: Your computer is provided with a Lithium battery-powered
!
Real-Time Clock circuit. There is a danger of explosion and risk of
personal injury if the battery is incorrectly replaced or not handled
properly. Do not attempt to recharge the battery, disassemble it,
immerse it in water, or dispose of it in fire. Replacement is to be done
by a Compaq authorized service provider using the Compaq spare
designated for this product.
WARNING: Your computer contains an internal Nickel Metal Hydride
!
or Lithium Ion Battery Pack. There is risk of fire and chemical burns if
the battery pack is not handled properly. Do not disassemble, crush,
puncture, short external contacts, or dispose of in fire or water. Do
not expose to temperatures higher than 60° C.
Battery packs and the Real Time Clock Battery should be recycled
or disposed of according to local regulations.
Energy Star Compliance
Compaq notebook computers are compliant with the U.S.
Environmental Protection Agency’s (EPA) Energy Star Computers
Program. The Energy Star Computers Program was created by the
EPA to promote energy efficiency and reduce air pollution through
more energy-efficient equipment in homes, offices and factories.
Compaq products achieve this by reducing the power consumption
when not being used. Using the power-saving features will reduce
energy use and maximize battery life.
vii
Page 7

Page 8

. . . . . . . . . . . . . . . . . . . . . . . . .
Contents
Preface
Using This Guide........................................................ xv
Chapter 1
Finding Information About Your Computer
Printed and Online References...................................1-1
Ordering Backup Diskettes........................................ 1-2
Customer Registration Material................................. 1-2
Online Options Guide................................................ 1-2
Worldwide Telephone Numbers ................................1-3
Chapter 2
Taking a Look at the Computer
Front and Left Side Components ...............................2-2
Front and Right Side Components............................. 2-3
Keyboard Components...............................................2-4
Status Panel Lights.....................................................2-5
Rear Components....................................................... 2-6
Bottom Components..................................................2-7
Versatile Handle ........................................................2-8
Chapter 3
Using Keyboard Shortcuts
User-Programmable Keys.......................................... 3-2
Assigning Programmable Keys........................... 3-2
Unassigning User-Programmable Keys............... 3-3
Adding Schemes..................................................3-4
Removing Schemes.............................................3-4
Key Assignments on the Taskbar........................ 3-4
Using the Hotkeys...................................................... 3-5
Customizing the Popup Window.........................3-7
Using Special Function Keys.....................................3-7
Using the Numeric Keypad........................................3-9
Chapter 4
Working with Pointing Devices
Mouse Utility.............................................................4-2
Touchpad Components ..............................................4-3
Table of Contents ix
Page 9

. . . . . . . . . . . . . . . . . . . . . . . . .
Trackball Components...............................................4-4
Removing a Pointing Device .....................................4-5
Installing a Pointing Device.......................................4-7
Chapter 5
Managing Power
Using the Power Button.............................................5-2
Power Choices..................................................... 5-2
Using the Suspend Button.......................................... 5-3
How Suspend Is Initiated ....................................5-3
Initiating Suspend................................................5-4
Exiting Suspend ..................................................5-4
Using Hibernation...................................................... 5-5
Initiating Hibernation.......................................... 5-5
Exiting Hibernation.............................................5-6
Using AC Power........................................................ 5-7
Using Battery Power..................................................5-9
Battery Charging/Discharging.............................5-9
Removing and Inserting Battery Packs.............. 5-10
Removing the DualBay Battery......................... 5-12
Inserting a DualBay Battery.............................. 5-13
Removing the MCD Weight Saver Module ......5-14
Inserting a Modular Battery in the MCD........... 5-15
Resolving a Low-Battery Condition..................5-16
Extending Battery Pack Operating Time........... 5-17
Charging the Battery Pack(s)............................. 5-18
Recycling Used Batteries in North America...... 5-19
Recycling Used Batteries in Europe.................. 5-19
x Table of Contents
Page 10

. . . . . . . . . . . . . . . . . . . . . . . . .
Power Properties Utility........................................... 5-20
Battery Status Tab............................................. 5-20
Setting Battery Conservation Levels................. 5-21
Setting a Timeout.............................................. 5-22
Turning Hibernation On or Off .........................5-23
Using the AC Energy Saver ..............................5-24
The Battery Gauge Popup .................................5-25
Chapter 6
Working with Removable Devices
Working with the Handle...........................................6-2
Detaching the Handle.......................................... 6-2
Attaching the Handle........................................... 6-4
DualBay Devices .......................................................6-6
Removing the Diskette Drive
from the DualBay................................................6-6
Inserting the Diskette Drive
into the DualBay .................................................6-7
Using the Diskette Drive Externally ..........................6-8
Chapter 7
Maximizing Your Mobile CD Expansion Unit (MCD)
MCD Components..................................................... 7-2
Front and Left Side Components......................... 7-2
Right and Back Side Components.......................7-3
Attaching the Computer to the MCD......................... 7-4
Detaching the Computer from the MCD....................7-7
Chapter 8
Enjoying Compaq Audio
Identifying Built-in Audio Components ....................8-2
External Audio Jacks........................................... 8-3
Stereo Line-In Jack..............................................8-4
Internal Microphone............................................8-5
Volume Control .........................................................8-6
Using the Stereo Speakers..........................................8-7
Chapter 9
Connecting External Equipment
Device Manager Utility.............................................. 9-2
Add New Hardware Icon ...........................................9-2
Using PC Cards..........................................................9-3
Table of Contents xi
Page 11

. . . . . . . . . . . . . . . . . . . . . . . . .
Inserting a PC Card............................................. 9-4
Removing a PC Card........................................... 9-4
PC Card Software................................................ 9-5
Using Telephony Features...................................9-5
Connecting a TV or VCR....................................9-6
Connecting Infrared Equipment ..........................9-7
Chapter 10
Adding Software and Upgrades
Installing Software...................................................10-2
Operating System Support....................................... 10-2
Adding Memory....................................................... 10-2
Upgrading................................................................ 10-3
Chapter 11
Setting Security Features
Setting Passwords Properties ...................................11-2
Power-On Password................................................. 11-2
Establishing a Power-On Password ..................11-2
Entering the Power-On Password......................11-3
Deleting/Changing Power-On Password...........11-3
If You Forget Your Power-On Password ..........11-3
Establishing a Setup Password................................. 11-4
Deleting/Changing a Setup Password................ 11-5
Identifying Quick Controls ......................................11-5
Initiating Quick Controls................................... 11-6
Using a Cable Lock.................................................. 11-7
xii Table of Contents
Page 12

. . . . . . . . . . . . . . . . . . . . . . . . .
Chapter 12
Caring for the Computer
Routine Care............................................................ 12-2
Travel Guidelines..................................................... 12-3
Shipping Guidelines................................................. 12-4
Chapter 13
Diagnostics
Accessing Diagnostics .............................................13-1
Accessing Diagnostics from Windows..............13-1
Running Computer Checkup (TEST)....................... 13-2
Running The View System Information
(Inspect Utility)........................................................ 13-4
Chapter 14
Troubleshooting
Checklist.................................................................. 14-1
Interpreting Messages on the Screen....................... 14-2
Solving Minor Problems..........................................14-2
Solving Battery Problems.................................. 14-3
Solving Diskette/Diskette Drive Problems........ 14-6
Solving Hard Drive Problems ...........................14-7
Solving Hardware Installation Problems........... 14-8
Solving Keyboard and Embedded
Numeric Keypad Problems................................14-9
Solving Memory Problems.............................. 14-10
Running the Monitor Self-Test........................ 14-10
Solving PC Card Problems.............................. 14-11
Solving Power Problems................................. 14-13
Solving Printer Problems.................................14-14
Solving Display Screen Problems ...................14-15
Solving Software Application Problems ......... 14-17
Solving Sound Problems................................. 14-17
Table of Contents xiii
Page 13

. . . . . . . . . . . . . . . . . . . . . . . . .
Solving Pointing Device Problems.................. 14-18
Cleaning the Trackball ....................................14-20
Cleaning Inside the Trackball Assembly......... 14-21
Servicing the Computer................................... 14-22
Preparing for a Call to Customer Support .......14-23
POST Error Messages
Connector Pin Asgnments
..................................................................A-1
...........................................................B-1
Appendix C
Power Cord Set Requirements
General Requirements............................................... C-1
Country-Specific Requirements................................ C-2
Appendix D
Electrostatic Discharge
Preventing Electrostatic Discharge ...........................D-1
Grounding Methods.................................................. D-1
Appendix E
Regulatory Agency Identification Numbers
...............................E-1
Appendix F
Specifications
..............................................................................................I-1
Index
..............................................................................F-1
xiv Table of Contents
Page 14

. . . . . . . . . . . . . . . . . . . . . . . . .
Preface
Using This Guide
The following format conventions distinguish elements of the text
throughout this guide:
Key names appear in a boldfaced type looking very much the
■
way they appear on the keyboard; for example,
Backspace, Tab.
When keys must be pressed at the same time, the action is
■
represented by the key names and the plus (+) symbol; for
example,
Drive letters that are not in command lines are presented in
■
uppercase type as shown here: drive A.
Directory names that are not in command lines are presented in
■
uppercase type as shown here: DIRECTORY.
The file names are presented in uppercase italic type
■
as shown here: FILENAME.
The names of commands are presented in lowercase, bold type as
■
shown here:
entered at the system prompt may be shown on a separate line.
Ctrl+Alt+Delete.
, or
install
a:\install.
Commands that are to be
Home, End,
When you need to type information without pressing the
■
key, you are directed to "type" the information.
When you need to type information and press the
■
are directed to "enter" the information.
The following words and symbols mark special messages
throughout this guide:
WARNING: Text set off in this manner indicates that failure to
!
follow directions could result in bodily harm or loss of life.
CAUTION: Text set off in this manner indicates that failure to
follow directions could result in damage to equipment or loss of
information.
Enter
Enter
key, you
Preface
xv
Page 15

. . . . . . . . . . . . . . . . . . . . . . . . .
Text set off in this manner presents clarifying
IMPORTANT:
information or specific instructions.
NOTE:
or interesting points of information.
Text set off in this manner presents commentary, sidelights,
xvi
Preface
Page 16

. . . . . . . . . . . . . . . . . . . . . . . . .
Chapter 1
Finding Information About Your Computer
In this chapter you will learn about the references that come with
your computer and where to find them.
References are provided for you in two ways:
As printed materials
■
As online information accessible from the computer screen
■
: The printed and online references that come with the
NOTE
computer vary by model.
Printed and Online References
The following printed references come with your computer:
Quick Setup
■
Reference Guide
■
Introducing Microsoft Windows 95
■
Safety & Comfort Guide
■
Compaq Answers Your PC Card Questions
■
Backup Diskettes Card
■
Kensington Security Card
■
Warranty and service information
■
The following Compaq online references are preinstalled on your
computer:
Compaq Reference Guide
■
Microsoft Windows 95
■
Safety & Comfort Guide
■
Compaq Dictionary
■
Product Tutorial
■
Options Catalog
■
The online references installed on the computer include tutorials,
user's guides, application help, software utilities help, and customer
support information. Many are accessible from the Compaq
Information Center folder on the Start menu. Others can be accessed
from the application or utility screens.
Finding Information About Your Computer
1-1
Page 17

. . . . . . . . . . . . . . . . . . . . . . . . .
CAUTION: Most online references are available only through the
Windows interface. If you delete Windows, those references will
also be deleted. Therefore, Compaq recommends that you not
delete Windows software.
Ordering Backup Diskettes
Compaq recommends that you create a backup of the software
preinstalled on the computer. Or, for an additional cost, you can
order a backup CD or diskettes from Compaq for all software
preinstalled on this computer.
To order backup diskettes or CDs, refer to the Worldwide Telephone
Numbers listed in this chapter. If an order form is included with
your computer, complete the form and return it. Or call one of the
numbers listed on the order form.
IMPORTANT
serial number on the bottom of your computer. This number is
necessary for all backup diskette or CD purchases.
: Before calling Compaq to place your order, find the
Customer Registration Material
In North America Compaq provides a fast, toll-free number to
register your new product: Call 1-800-AT-COMPAQ to register
with one of our representatives. Our convenient toll-free number has
operators standing by to take your registration.
Online Options Guide
To learn more about the many Compaq options designed to enhance
your computer, go to Compaq Information Center on the Windows
Start menu.
1-2
Finding Information About Your Computer
Page 18

. . . . . . . . . . . . . . . . . . . . . . . . .
Worldwide Telephone Numbers
Locate your geographical area from the following table and use one
of the telephone numbers for Compaq assistance.
General Information Numbers—Product information, technical
assistance, and the location of your nearest Compaq authorized
dealer, reseller, or service provider.
Technical Support Numbers—Hardware technical support in
analyzing system configuration and diagnostic problems or
troubleshooting.
Customer Support Numbers—Information on service and support
programs including warranty, product catalogs, and white papers.
PaqFax Numbers—Automatic facsimile response system for
technical and product specific information that is transmitted to any
fax machine. PaqFax is available 24 hours a day.
Telephone numbers are subject to change without notice.
NOTE:
Worldwide Telephone Numbers
Location Telephone Number
Argentina
General Information 54-1-796-1616
Technical Support 54-1-796-1717
Australia
General Information 61-2-911-1999
Technical Support 61-2-911-1955
PaqFax 61-2-911-1982
Austria
General Information 0222/8 78-16 16
Technical Support 0222/8 78-16-16
Ordering backup diskettes 0031/55/38 43 39
Bahrain
General Information 973-210-214
Continued
Finding Information About Your Computer
1-3
Page 19

. . . . . . . . . . . . . . . . . . . . . . . . .
Worldwide Telephone Numbers
Continued
Location Telephone Number
Belgium
General Information 32-2-725-1690
Technical Support 02-716-96-96
Brazil
General Information 55-11-246-7866
Canada
General Information 416-733-7876
Technical Support 1-800-OKCOMPAQ
(1-800-652-6672)
Customer Support 1-800-263-5868
Ordering backup diskettes 1-800-952-7689
Battery pack recycling 1-800-263-5868
Caribbean
General Information 011-713-374-4220
Technical Support 011-713-378-2200
Chile
General Information 56-2-274-1911
Technical Support 56-2-274-3007
China
General Information 861-849-2928
Technical Support 861-849-2913
Colombia
General Information 57-1-312-0201
Technical Support 57-1-345-0266
Czech Republic
General Information 42-2-232-8772
Technical Support 42-2-232-8772
Denmark
General Information 45-45-90-45-90
Technical Support 45-45-90-45-45
Continued
1-4
Finding Information About Your Computer
Page 20

. . . . . . . . . . . . . . . . . . . . . . . . .
Worldwide Telephone Numbers
Continued
Location Telephone Number
Finland
General Information 358-0-615-599
Technical Support 9800-206-720
France
General Information 33-1-41-33-4100
Technical Support 33-1-41334455
Germany
InfoLine (General Information) 0130/68 68
Technical Support 0180/5 21 21 11
QuickLine 089/99 33-13 80
Ordering backup diskettes 0130/81 10 81
Hong Kong
General Information 852-28681382
Technical Support 852-90116633
PaqFax 852-28671648
Hungary
General Information 36-1-201-8776
Technical Support 36-1-201-8776
India
General Information 91-80-559-6023
91-80-559-6024
Italy
General Information 39-2-57-59-03-61
Technical Support 02-575-90300
Customer Support 01-6782-5012
Japan
General Information 81-3-5402-5700
Technical Support 81-0120-101589
PaqFax 81-3-5402-0991
Continued
Finding Information About Your Computer
1-5
Page 21

. . . . . . . . . . . . . . . . . . . . . . . . .
Worldwide Telephone Numbers
Continued
Location Telephone Number
Korea
General Information 82-2-523-3571
Technical Support 82-2-523-3571
Malaysia
General Information 603-717-1188
Technical Support 603-718-1636
Mexico
General Information 525-229-7900
Technical Support 525-229-7910
PaqFax 525-229-7920
Netherlands
General Information 0182-565805
Presario
Customer Support 06-32023091 (75 ct/min)
Fax 06-8212391 (40 ct/min)
All other products
Customer Support 06-91681616 (75 ct/min)
Fax 06-8991116 (40 ct/min)
QuickLine Bulletin Board 0182-572366
Customer Support 01820-65805
QuickLine Bulletin Board 01820-72366
PaqFax 01820-65805
New Zealand
General Information 64-9-307-3969
Norway
General Information 47-22-07-20-00
Technical Support 47-22-07-20-20
Poland
General Information 48-2-630-3535
Technical Support 48-2-630-3535
Portugal
General Information 351-1-4120132
Technical Support 351-1-4120132
82-2-3272-7304
Continued
1-6
Finding Information About Your Computer
Page 22

. . . . . . . . . . . . . . . . . . . . . . . . .
Worldwide Telephone Numbers
Continued
Location Telephone Number
Singapore
General Information 65-7536688
Technical Support 65-7503030
PaqFax 65-7504514
South Africa
General Information 27-11-728-6999
Technical Support 27-11-728-6999
Spain
General Information 34-1-640-1500
Technical Support 34-1-640-1302
Sweden
General Information 46-8-703-5200
Technical Support 46-8-703-5240
PaqFax 46-8-703-5225
Switzerland
Technical Support 01/8 38-22 22
QuickLine 01/8 38-24 21
Ordering backup diskettes 155/62-06
PaqFax 01/8 38-22 38
Taiwan
General Information 886-2-7351000
Technical Support 886-2-3761170
Bulletin Board Service 886-2-3761175
Thailand
General Information 62-2-679-6222
United Kingdom
General Information 44-181-332-3000
Technical Support 44-181-332-3888
PaqFax 44-181-332-3550
Continued
Finding Information About Your Computer
1-7
Page 23

. . . . . . . . . . . . . . . . . . . . . . . . .
Worldwide Telephone Numbers
Continued
Location Telephone Number
United States
General Information 1-713-374-6864
Technical Support 1-800-OKCOMPAQ
(1-800-652-6672)
Customer Support 1-800-345-1518
PaqFax 1-800-345-1518, Option 1
Download Facility (modem access only,
2400/9600/14400 bps) 1-713-378-1418
Ordering backup diskettes 1-800-952-7689
Battery pack recycling 1-800-524-9859
Venezuela
General Information 58-2-953-6944
1-8
Finding Information About Your Computer
Page 24

. . . . . . . . . . . . . . . . . . . . . . . . .
Chapter 2
Taking a Look at the Computer
Your computer is equipped with many features, including hotkeys,
programmable keys, light indicators, and connectors. This chapter
familiarizes you with the components on the computer and how to
use them.
External devices such as a printer, portable expansion unit, monitor,
keyboard, or mouse can be connected to your computer to enhance
its functionality. See Chapter 9, Connecting External Equipment,
for more details.
Illustrations and tables on the following pages identify the
computer's primary components, including:
Front and left side components
■
Front and right side components
■
Keyboard components
■
Status panel lights
■
Rear components
■
Bottom components
■
Versatile handle
■
Taking a Look at the Computer
2-1
Page 25
. . . . . . . . . . . . . . . . . . . . . . . . .
Front and Left Side Components
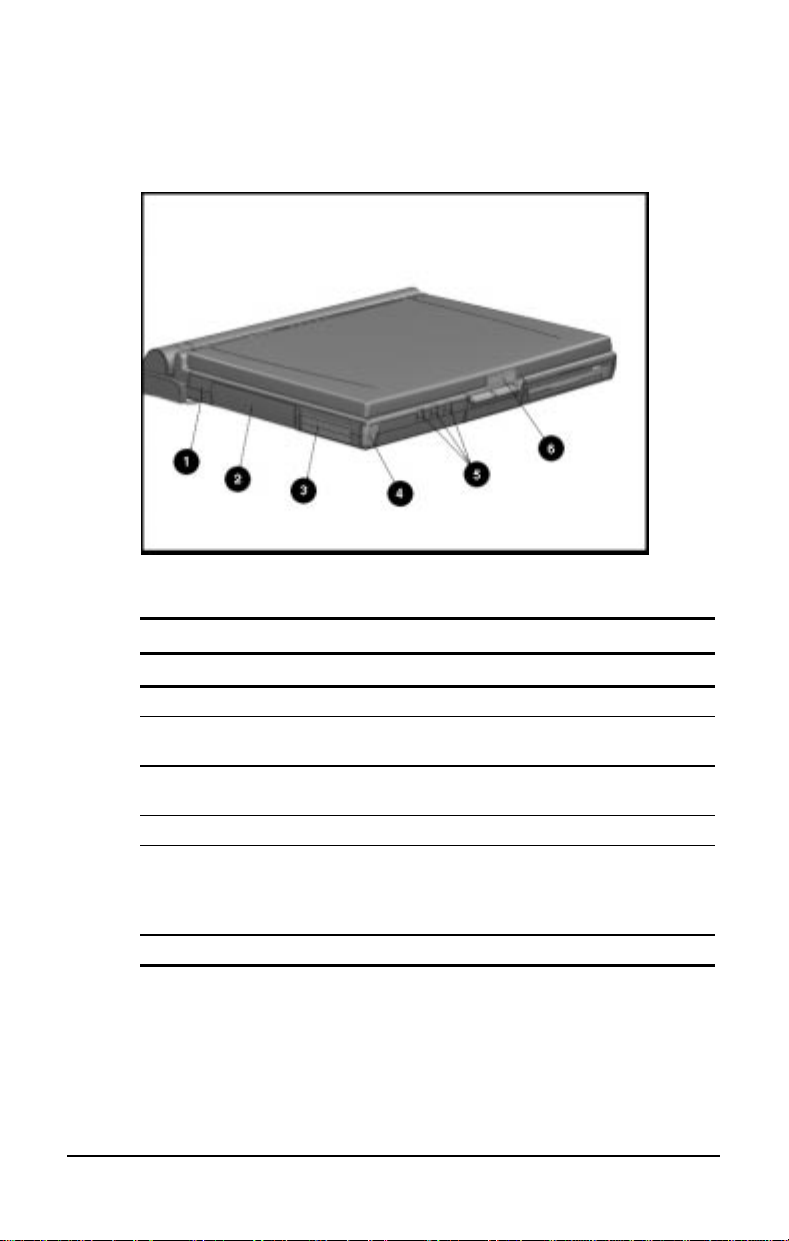
Front and Left Side Components
Front and Left Side of the Computer
Ref. Component Function
➊
➋
➌
➍
➎
➏
Cable lock provision Protects your computer from theft.
Hard drive Drive inside your computer that stores
data.
PC Card slots Accept one Type III, or two Type II, or
two Type I PC Cards.
PC Card eject buttons Release PC Cards
Audio connectors Allow you to connect a microphone,
stereo, or headphone to your
computer. (See Chapter 8,
Compaq Audio
Display latch Opens the computer.
for details.)
Enjoying
2-2
Taking a Look at the Computer
Page 26
. . . . . . . . . . . . . . . . . . . . . . . . .
Front and Right Side Components
Front and Right Side Components
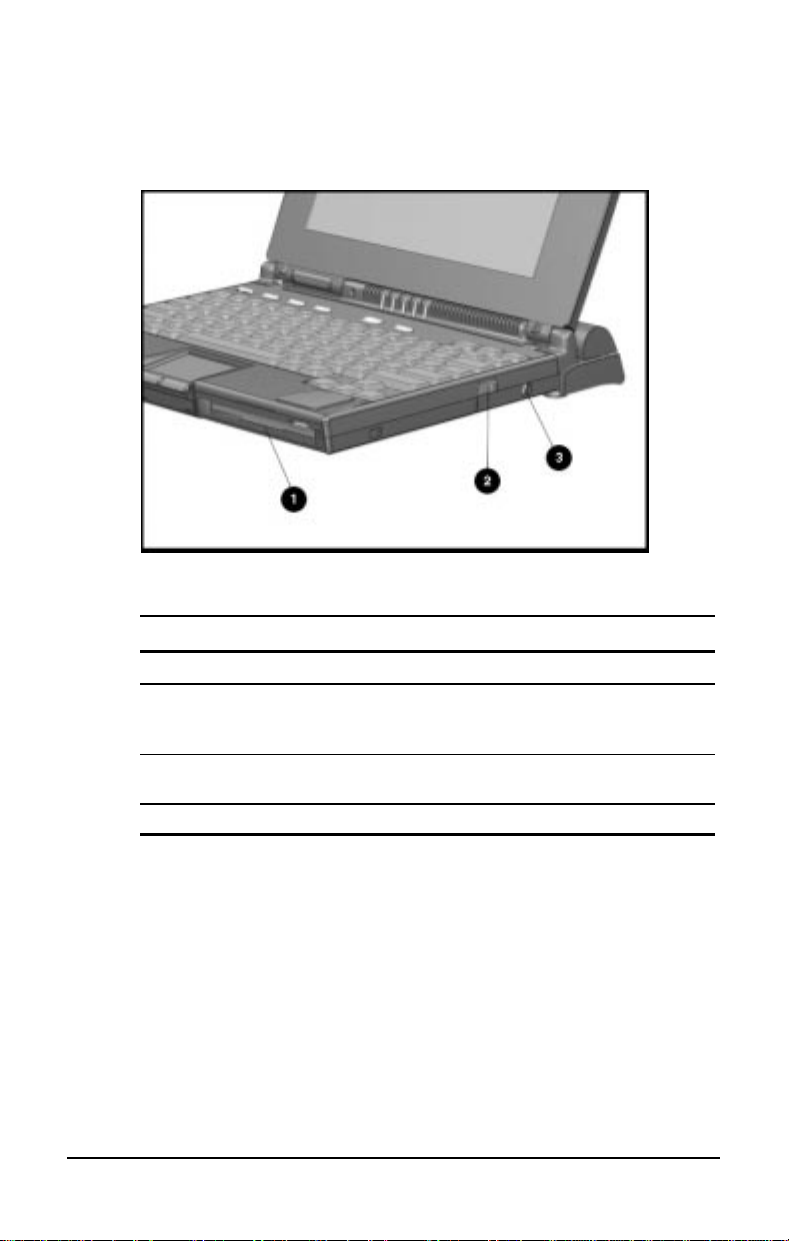
Front and Right Side of the Computer
Ref. Component Function
➊
➋
➌
DualBay Accepts an internal diskette drive
(3.5-inch diskettes) or optional
modular battery pack.
DualBay Eject Button Ejects the diskette drive or
optional modular battery pack.
AC power connector Connects the AC Adapter cable.
Taking a Look at the Computer
2-3
Page 27
. . . . . . . . . . . . . . . . . . . . . . . . .
A
A
A
A
Keyboard Components
Keyboard
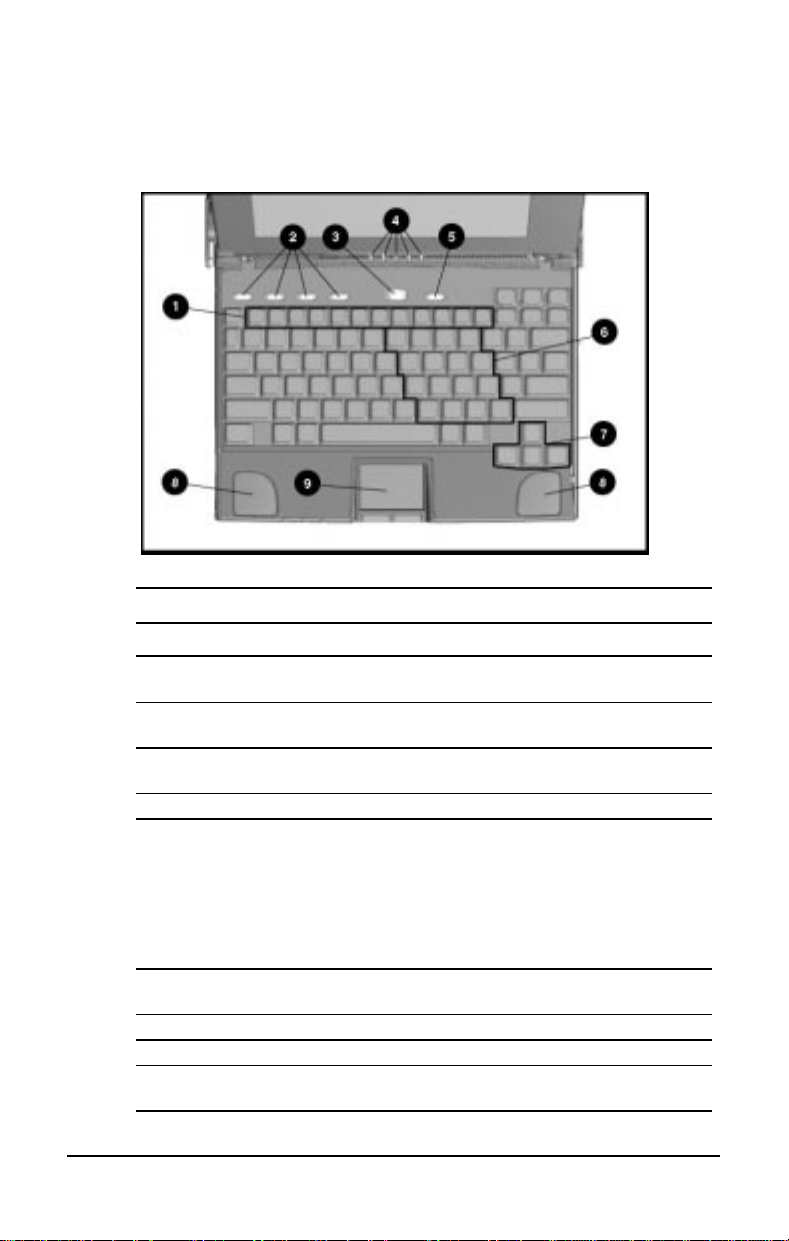
Keyboard Components
Ref. Component Function
Function keys
➊
Fn+F4 - Fn+F10
User-programmable
➋
keys
Suspend button When pressed once, initiates Suspend; when pressed
➌
Status panel lights Display computer status indicators.
➍
Power button When pressed the first time, turns on the computer. (See
➎
Embedded numeric
➏
keypad
rrow keys
➐
Stereo speakers Produce high-quality stereo sound.
➑
Pointing Device The modular touchpad or trackball move the pointer
➒
Used for specific functions in applications and
operating systems.
ssign and launch applications and emulate Windows
and Application Logo Keys.
the second time, exits Suspend.
chapter 5,
NOTE: To turn off the computer, use Shut Down from the
Windows Start menu. In case of a system lock-up, when
the mouse doesn't work and Ctrl+Alt+Del is not
recognized by the unit, press the power button to turn off
the unit.
key is on) and edit (if Fn+NumLk key is off).
around the screen and function as a portable mouse.
Managing Power
llows two operating modes, numeric (if Fn+NumLk
llow cursor to move up, down, right, left.
, for details.)
2-4
Taking a Look at the Computer
Page 28
. . . . . . . . . . . . . . . . . . . . . . . . .
A
Status Panel Lights
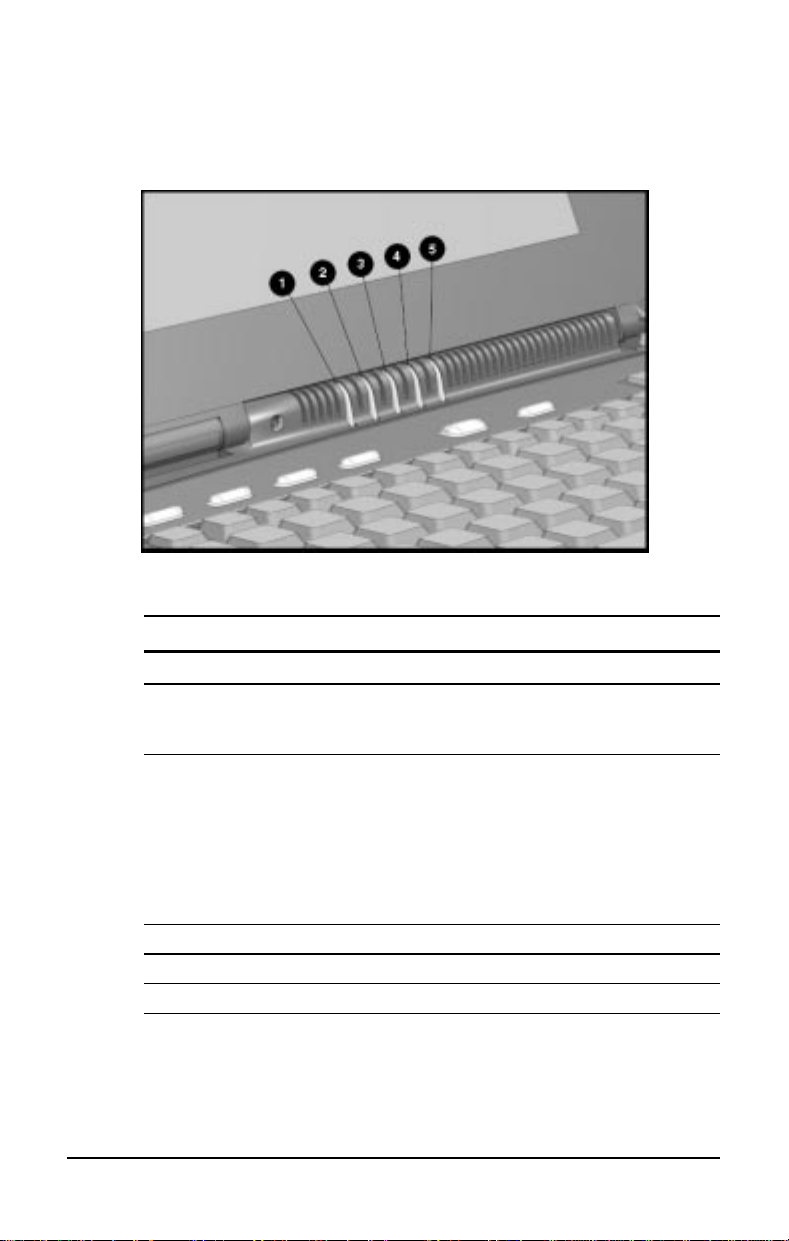
Status Panel Lights
Status Panel Lights
Ref. Indicator Function
Power/
➊
Suspend
Battery
➋
charge
Caps Lock Turns on when Caps Lock function is on.
➌
Scroll Lock Turns on when the Scroll key is pressed.
➍
Num Lock Turns on when the NumLk function is on.
➎
Turns on (solid) when power to the computer is turned
on; blinks in Suspend mode; turns off when computer is
in Hibernation or powered off.
Turns on (solid) when computer is turned on and when
battery is fast charging. If a low-battery point is reached,
light will flash 6 times and you'll hear a beep. If a critical
low-battery state is reached, you'll hear a beep and the
light will flash constantly. If you do not attach an AC
dapter within 20 seconds of this warning, the unit will
initiate Hibernation (unless Hibernation has been
disabled).
Taking a Look at the Computer
2-5
Page 29
. . . . . . . . . . . . . . . . . . . . . . . . .
A
Rear Components
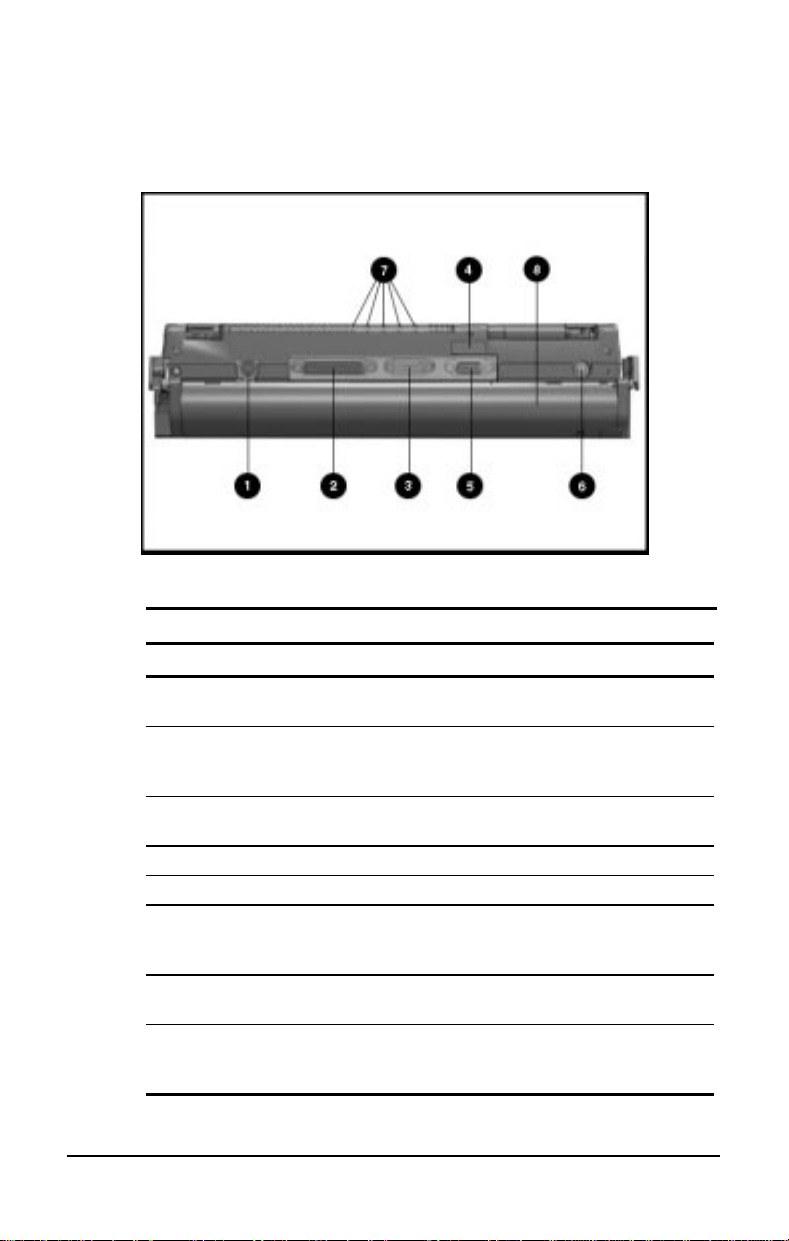
Rear Components
Rear of the Computer
Ref Component Function
Keyboard/mouse connector Connects an external keyboard, mouse,
➊
or other pointing device.
Parallel connector Connects optional parallel devices,
➋
Serial connector Connects optional serial devices, such
➌
Infrared lens (IrDA compliant) Sets up wireless data transfer for printing.
➍
External monitor connector Connects external monitor to computer.
➎
NTSC/PAL Video Connects the computer to TV, VCR, and
➏
Status panel indicator lights Status panel lights visible when the
➐
Handle
➑
such as a printer. Also connects the
diskette drive as an external feature.
as a mouse.
camcorder using the NTSC (U.S.) and
PAL (Europe) formats.
computer is closed.
ccepts main battery pack. Can be used as
carrying handle, tilt for keyboard, and
cover for rear connectors.
2-6
Taking a Look at the Computer
Page 30
. . . . . . . . . . . . . . . . . . . . . . . . .
A
Bottom Components
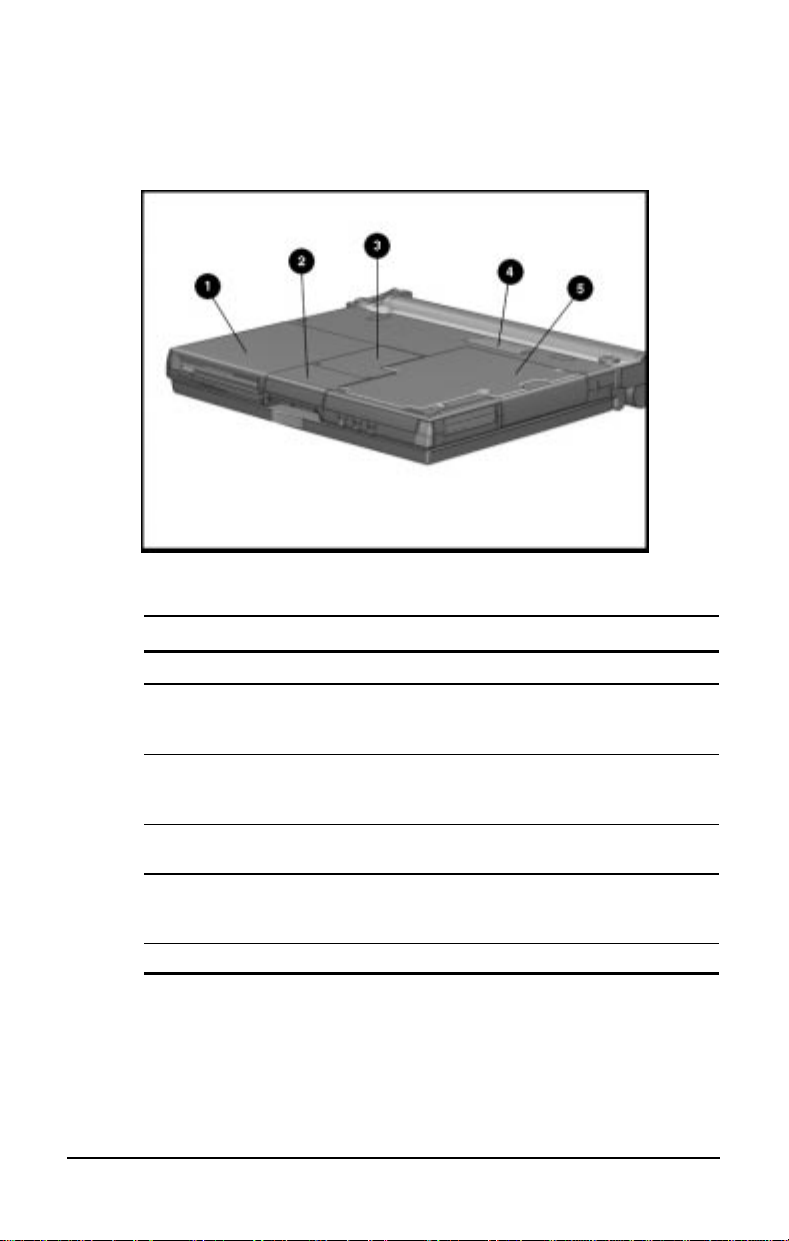
Bottom Components
Bottom of the Computer
Ref Component Function
DualBay
➊
Pointing device The modular touchpad or trackball
➋
Memory compartment Compartment for the optional memory
➌
Expansion slot 120-pin connector interface for the
➍
Hard drive compartment Contains the hard drive.
➎
ccepts an internal diskette drive
(3.5-inch diskettes) or modular battery
pack.
moves the pointer around the screen;
functions as a mouse.
expansion boards.
Mobile CD Expansion Unit (MCD) or
convenience base.
Taking a Look at the Computer
2-7
Page 31

. . . . . . . . . . . . . . . . . . . . . . . . .
Versatile Handle
Tilting the Keyboard with the Handle
The handle is a multifunctional feature of your computer. To
provide more portable power, the handle houses the main battery
pack. In addition, the handle moves to three convenient positions:
2-8
Creates a comfortable tilt for working at the keyboard. Fold the
■
handle back and under the computer.
Provides a cover for the rear connectors. Place the handle in a
■
straight position while the computer is lying flat.
Enables you to carry the computer like a briefcase.
■
Taking a Look at the Computer
Page 32

. . . . . . . . . . . . . . . . . . . . . . . . .
Chapter 3
Using Keyboard Shortcuts
Keyboard shortcuts help you customize the keyboard. You can use
designated keys to change and select computer settings, such as
speaker volume, battery conservation, and popup windows. This
chapter familiarizes you with the following keyboard and shortcut
features:
User-Programmable keys
■
Hotkeys
■
Special Function Keys
■
Embedded numeric keypad
■
Using Shortcut Keys
3-1
Page 33

. . . . . . . . . . . . . . . . . . . . . . . . .
User-Programmable Keys
The four user-programmable keys n at the top of the keyboard
allow you to quickly open an application on your computer, bring
up a document, or emulate one of the Microsoft Windows and
Application Logo Keys.
User Programmable Keys
By assigning the programmed keys to schemes, you can create
multiple sets of key assignments that will allow you to open almost
any application or document on your computer.
Assigning Programmable Keys
To assign user-programmable keys, follow these steps:
1. Access the Programmable Keys utility in the Control Panel on
the Windows Start button.
2. Select the programmable key you want to assign or reassign in
the current scheme by clicking the appropriate radio button in
the Key assignments group box.
3-2
Using Shortcut Keys
Page 34

. . . . . . . . . . . . . . . . . . . . . . . . .
: To assign keys in other than the current scheme, place a
NOTE
check in the Show advanced options checkbox and look in the
Scheme box to see the scheme you are currently using. You can
create a new scheme or add/change key assignments in the
current scheme. If you have never created a scheme, the Default
scheme will be in effect.
3. Click the Assign button. A dialog box appears showing a list of
programs or documents from the Programs menu.
: To access a larger number of programs, click the Show
NOTE
advanced options checkbox. This changes the Assign button to
the Browse button. By clicking the Browse button, you can
access all applications on your computer. To emulate one of the
Microsoft Windows and Application Logo Keys, select the
appropriate file from the WINDOWS\CPQWIN directory.
4. Highlight the desired application and click OK. The icon and
program name you selected will appear beside the programmable
key's radio button.
5. Click OK to exit this utility. When you push the programmable
key you just assigned, your application or document will appear
on screen.
Unassigning User-Programmable Keys
To remove a programmable key assignment, follow these steps:
1. Access the Programmable Keys utility in the Control Panel.
2. Select the programmable key you wish to unassign by clicking
the appropriate radio button in the Key assignments group box.
: To assign keys in other than the current scheme, place a
NOTE
check in the Show advanced options checkbox and look in the
Scheme box to see the scheme you are currently using. You can
create a new scheme or add/change key assignments in the
current scheme. If you have never created a scheme, the Default
scheme will be in effect.
3. Click the Assign button, then select Unassigned from the list. The
icon and program name previously assigned to the key will be
removed.
: When the Show advanced options box is checked, you can
NOTE
unassign a programmable key by clicking the Browse button and
selecting "Unassigned" in the WINDOWS\CPQWIN directory.
4. Click OK to exit the utility.
Using Shortcut Keys
3-3
Page 35

. . . . . . . . . . . . . . . . . . . . . . . . .
Adding Schemes
To add a new scheme, do the following:
1. Access the Programmable Keys utility in the Control Panel.
2. Click the Show advanced options checkbox.
3. Click the Add button.
4. Type the name of your new scheme in the popup dialog box that
appears.
5. Make your programmable key assignments.
6. When the assignments have been made, click OK to exit the
utility.
Removing Schemes
To remove a new scheme, do the following:
1. Access the Programmable Keys utility in the Control Panel.
2. Place a check in the Show advanced options checkbox if one is
not already there.
3. Be sure the scheme in the Scheme box is the one you want to
delete. To view a different scheme, select a scheme from the
drop-down list.
: The Default scheme is not removable.
NOTE
4. Click the Remove button.
5. Click OK to exit the utility.
Key Assignments on the Taskbar
One convenient way to see your user-programmable key
assignments is to view them in a popup window that you activate
from an icon in the system tray (taskbar). To enable the icon:
1. Access the Programmable Keys utility in the Control Panel.
2. Place a check in the Show key assignments in the System Tray
checkbox.
3. Click OK to exit the utility.
An icon appears in the taskbar. To view the popup window, click
the icon.
The icon remains in the system tray (taskbar) until you
NOTE:
disable it by unchecking Show key assignments in the System Tray
checkbox.
3-4
Using Shortcut Keys
Page 36

. . . . . . . . . . . . . . . . . . . . . . . . .
Using the Hotkeys
The hotkey combinations (
Fn+F4 - F10
computer settings using the Fn plus hotkeys
Hotkeys
) allow you to quickly adjust
through
F4
F10
.
Hotkey Assignments and Functions
Feature Hotkeys Function
Hibernation
Switching to the
external monitor
Speaker volume
Quick Lock/
QuickBlank
Fn+
suspend
Fn+F4
Fn+F5
Fn+F6
Initiates Hibernation
Toggles three ways between computer
display, external monitor display, or (on
some models) simultaneous display.
Adjusts speaker volume up or down.
Initiates QuickLock, which disables the
keyboard and mouse, and QuickBlank,
which clears the screen. Enter power-on
password to disable QuickLock and
QuickBlank and reactivate keyboard,
mouse, and screen.
Continued
Using Shortcut Keys
3-5
Page 37

. . . . . . . . . . . . . . . . . . . . . . . . .
Hotkey Functions and Assignments
Feature Hotkeys Function
Battery Conservation
Battery Gauge
Contrast Control
Brightness Control
Fn+F7
Fn+F8
Fn+F9
Fn+F10
Continued
Displays the battery conservation settings
in a popup window. Use the left and right
arrow keys to select a different setting.
: See Chapter 5,
NOTE
for more information.
Press the
select the next battery to be displayed. If a
battery is not present, its selection will be
skipped. Pressing
will select the previous battery. If the user
does not depress any arrow keys for 5-7
seconds, the popup will display the
average remaining capacity of all installed
batteries.
: See Chapter 5,
NOTE
for more information.
Adjusts the display contrast. Press the
right arrow key to increase contrast; press
the left arrow key to decrease contrast.
On models with color TFT
NOTE:
displays, contrast control is not
applicable.
Adjusts the display brightness. Press
the right arrow key to increase light
intensity; press the left arrow key to
decrease light intensity.
right
Managing Powe
or
down
or up arrow keys
left
Managing Power,
r,
arrow keys to
3-6
Using Shortcut Keys
Page 38

. . . . . . . . . . . . . . . . . . . . . . . . .
A
A
Customizing the Popup Window
Your computer includes a feature that allows you to set or change the
location of popup windows. To access this feature, follow these
steps:
1. Double-click the tab labeled Hotkey Popup Utility under the
Display icon in the Control Panel.
2. Click the tab that sets the location of the popup window.
3. Make the desired changes.
4. Click OK to save your changes.
IMPORTANT
: Popup windows associated with hotkeys display
correctly only from within applications that support the popup video
mode. If a popup does not display correctly, exit the application and
press the hotkeys again to invoke the popup window.
Using Special Function Keys
Some keys on the keyboard provide special functions, depending on
the application you are using. These keys are described in the
following table:
Special Function Keys
Key Function
Alt
Backspace
Caps Lock
Ctrl
Esc
F1 – F12
pplication dependent, used in combination with another key for
a specific function. Refer to the documentation for the
application you are using.
Moves the cursor left and deletes characters as it moves left.
When the
capitalized.
specific functions. Refer to the documentation for the
application software you are using.
Often assigned a specific task by the application. Frequently
used as an exit key.
Used for a specific function in applications and operating
systems. Check the documentation for the application software
you are using.
CapsLock
pplication dependent; used in combination with other keys for
indicator is on, all letters typed are
Continued
Using Shortcut Keys
3-7
Page 39

. . . . . . . . . . . . . . . . . . . . . . . . .
A
Special Function Keys
Continued
Key Function
NumLk
Pause
PrtSc
Scroll
Ctrl+Alt+Delete
Fn + suspend
ctivate this function by pressing
indicator light is on, the embedded numeric keypad is activated.
Use this toggle key feature to enable and disable the numeric
keypad.
Temporarily suspends screen scrolling. Activate this function by
pressing
Prints the information on the screen line-by-line to a local
printer. Using this key will print only the information on the
screen. Activate this function by pressing
When the
from scrolling. Access this function by pressing
Restarts the system after the computer has been turned on and
is locked up while in MS-DOS mode.
Windows Start menu is the recommended way to restart the
computer while in Windows.
Initiates Hibernation.
Fn+Pause.
Scroll Lock
Fn+NumLk.
Deactivate Pause by pressing any key.
indicator light is on, prevents the screen
NOTE:
When the
Fn+PrtSc.
Fn+Scroll.
Shut Down on the
NumLk
3-8
Using Shortcut Keys
Page 40

. . . . . . . . . . . . . . . . . . . . . . . . .
Using the Numeric Keypad
The embedded numeric keypad is a section of the keyboard that
converts to a numeric keypad when the
This is done by pressing
enable and disable the embedded numeric keypad.
Fn+NumLk.
Use this toggle key function to
function is activated.
NumLk
Embedded Numeric Keypad
Using Shortcut Keys
3-9
Page 41

Page 42

. . . . . . . . . . . . . . . . . . . . . . . . .
Chapter 4
Working with Pointing Devices
The modular pointing device on your computer is a versatile feature
that eliminates the need to carry a mouse when traveling. It moves
the cursor around the screen and can be used with either hand.
This computer can use either a modular touchpad or trackball
pointing device. Depending on the model, one will come standard,
and the other will be available as an option.
This chapter familiarizes you with trackball and touchpad features,
including:
Accessing the Mouse utility
■
Identifying touchpad components
■
Identifying trackball components
■
Removing the pointing device
■
Installing a pointing device
■
Working with Pointing Devices
4-1
Page 43

. . . . . . . . . . . . . . . . . . . . . . . . .
Mouse Utility
Button functions and other touchpad/trackball features can be
customized using the Mouse utility located in the Control Panel on
the Windows Start menu. To access this utility using the touchpad
or trackball, follow these steps.
Using the trackball:
1. Roll the ball down to move the cursor to Start. With the top
button, click Start.
2. Roll the ball up to highlight Settings, then Control Panel.
3. Roll the ball to the Mouse icon. Press the top button twice to
double click. Click the General tab, then Options, and follow the
instructions on the screen. Refer to the online Compaq Reference
Guide for more information.
Using the touchpad:
1. Move your finger across the active surface of the touchpad to
move the cursor to Start. With the left button, click Start or tap
the touchpad on the Start button.
2. Move your finger up to highlight Settings, then Control Panel.
4-2
3. Move your finger across the touchpad to the Mouse icon on the
Control Panel. Press the left button twice or double tap the
touchpad. Click with the left button (or tap) on General tab, then
Options, and follow the instructions on the screen. Refer to the
online Compaq Reference Guide for more information.
Working with Pointing Devices
Page 44
. . . . . . . . . . . . . . . . . . . . . . . . .
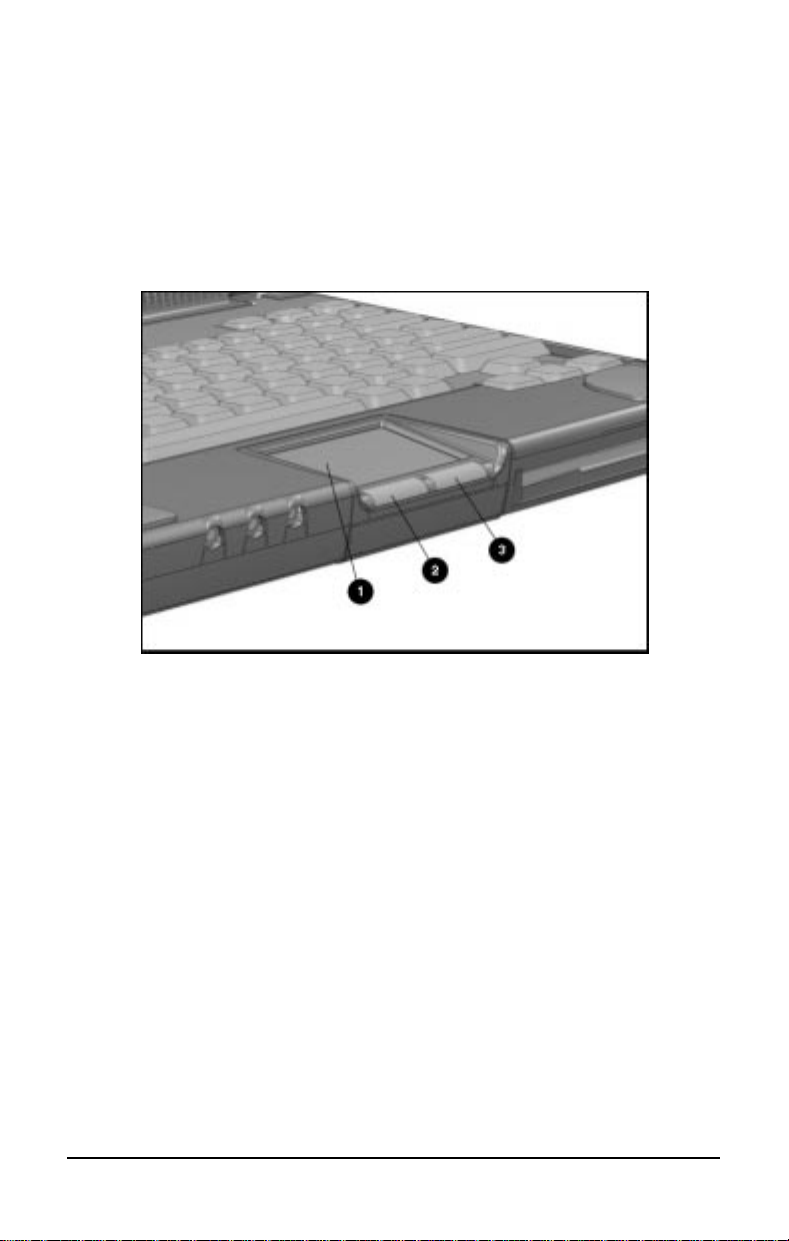
Touchpad Components
The modular touchpad features a flat active pad surface ➊, and your
fingertip acts as the pointing device. The left button ➋ functions
like the left mouse button. The right button ➌ works like the right
mouse button.
Touchpad Components
For more information on customizing touchpad settings, refer to the
Help in the Mouse utility or to the online Compaq Reference Guide.
To clean the touchpad, spray a lint-free cloth with a non-abrasive
cleaner and wipe the surface of the touchpad. To remove a more
serious stain or mark, use a damp (not wet) cloth and a small
amount of dishwashing detergent.
To prevent damage to the electrical system, do not spray
:
NOTE
cleaner directly on the touchpad or keyboard.
Working with Pointing Devices
4-3
Page 45

. . . . . . . . . . . . . . . . . . . . . . . . .
Trackball Components
The modular trackball is similar to the touchpad but uses a ball to
control the cursor. The top button ➊ functions as a left mouse button,
and the bottom button➌ acts as a right mouse button. The ball ➋,
rolled with the thumb, controls the cursor and can be used with either
hand.
4-4
Modular Trackball Components
See Chapter 14, Troubleshooting, for information on cleaning the
trackball. Refer to the Mouse utility in the Control Panel to
configure button settings and double-click speed, to customize the
pointer and control pointer motion. For further information, refer to
the Help in the online Compaq Reference Guide.
Working with Pointing Devices
Page 46

. . . . . . . . . . . . . . . . . . . . . . . . .
Removing a Pointing Device
If you prefer a different pointing device, you can replace the
pointing device easily. Before removing the pointing device from
the computer, remove the device in the DualBay. Follow these steps
to remove a device from the DualBay.
1. Initiate Suspend.
:
If you are removing a battery from the DualBay, and it is
NOTE
the only power source, connect external power.
2. Press the DualBay eject button
computer.
:
The DualBay can accommodate either a modular battery
NOTE
pack or a diskette drive.
Pull the DualBay device out of the DualBay
3.
on the right side of the
➊
.
➋
Removing a DualBay Device (Diskette Drive)
Working with Pointing Devices
4-5
Page 47

. . . . . . . . . . . . . . . . . . . . . . . . .
4. Press in the metal retaining clip ➊ located in the wall between the
DualBay and the pointing device bay, to release the pointing device.
Pull the pointing device ➋ and remove it.
Removing the Pointing Device (Touchpad)
4-6
Working with Pointing Devices
Page 48

. . . . . . . . . . . . . . . . . . . . . . . . .
Installing a Pointing Device
1. With the computer in Suspend and the DualBay empty, align the
slots in the sides of the pointing device with the guide rails in the
pointing device bay.
2. Slide the pointing device forward into the bay until it snaps into
place.
Installing the Pointing Device (Trackball)
3. Replace the DualBay device.
4. Press the suspend button again to exit Suspend, and resume your
work.
Working with Pointing Devices
4-7
Page 49

Page 50

. . . . . . . . . . . . . . . . . . . . . . . . .
Chapter 5
Managing Power
This computer has convenient features that allow you to manage
power consumption and maximize battery operating time. The
Power Properties icon in the Control Panel includes the power
settings for your computer.
This chapter describes the following power management features:
Power button
■
Suspend button
■
Hibernation
■
AC power
■
Battery power
■
Power Properties utility
■
Managing Power
5-1
Page 51

. . . . . . . . . . . . . . . . . . . . . . . . .
Using the Power Button
Press the power button ➊ once to turn on the computer. When the
power/suspend light ➋ turns on, the computer is on. To turn off or
restart the computer while working in Windows, click Shut Down
on the Windows Start menu and follow the directions on the screen.
If you are using a non-Windows application or experience a system
lockup in Windows, press the power button to turn off the
computer. When the power/suspend light goes off, the computer is
off.
Power Button and Power/Suspend Indicator Light
Power Choices
To decide when to turn off the computer or initiate Suspend, consider:
■
■
■
5-2
Managing Power
If you use the computer frequently and want "instant-on"
convenience, you do not have to turn off the computer. Simply
initiate Suspend when you're not using it.
If external power is not connected, the batteries continue to drain while
the computer is in Suspend, but at a much slower rate. If you want to
charge the batteries while you're not using the computer, connect to
external power. The battery packs charge whether the computer is on
or off. But they charge faster when the computer is off.
If you plan to store the computer for six months or more, turn off
the computer and remove the battery packs. This reduces a
battery's discharge rate and extends its operating life.
Page 52

. . . . . . . . . . . . . . . . . . . . . . . . .
Using the Suspend Button
When you finish working, or if you want to pause in the middle of
your applications, initiate Suspend.
Suspend has the following benefits:
This feature puts the computer to sleep (for up to 100 hours with
■
fully charged Nickel Metal Hydride battery packs; up to 168
hours with Lithium Ion battery packs), uses very little power,
and saves your place in your applications.
During Suspend, most of the major components (hard drive,
■
processor, and display) shut down.
How Suspend Is Initiated
Suspend is initiated in one of three ways:
Manually, at any time, by pressing the suspend button ➊ once.
■
The power/suspend indicator light ➋ will blink slowly.
Suspend Button and Power/Suspend Indicator Light
Automatically, when a predefined timeout has been reached.
■
You can set the Suspend timeout period in Power Properties.
Or refer to Setting a Timeout in this chapter.
■
Manually, by clicking suspend from the Windows Start menu.
Managing Power
5-3
Page 53

. . . . . . . . . . . . . . . . . . . . . . . . .
Initiating Suspend
When Suspend is initiated, the following occurs:
The computer beeps twice.
■
: If speakers are turned off, beeps are not audible.
NOTE
The screen blanks.
■
The power/suspend indicator light blinks.
■
Exiting Suspend
Exit suspend by pressing the suspend button once. When you exit
Suspend, the following occurs:
The computer beeps twice.
■
The power/suspend indicator turns on (continuous).
■
The "instant-on" feature lets you pick up your work right where you
■
left off. No information is lost.
IMPORTANT
external power is not connected. In this case, you must find a new power
source for the computer. When a new power source is connected, press
the suspend button once to return your information to the screen.
If the computer is in Suspend, and a low-battery condition occurs, the
computer automatically initiates Hibernation (unless Hibernation has
been disabled), saves your information to the hard disk, and turns off the
computer. When you install a fully charged battery or connect to an
external power source, your information returns to the screen at the point
where Suspend was initiated. No information is lost.
: The computer will not exit Suspend if the battery is low and
5-4
Managing Power
Page 54

. . . . . . . . . . . . . . . . . . . . . . . . .
Using Hibernation
Hibernation is a safeguard condition during which all information in
system memory is saved to the hard drive and power to the computer
is turned off. When you resume work, your information is returned to
the screen exactly where you left off. No information is lost.
Hibernation has the following benefits:
Since the computer is turned off and there is no drain on battery
■
packs, your computer can stay in Hibernation for an unlimited time.
You can manually save your place in any application or when
■
making a presentation.
Information is automatically saved when the computer reaches a
■
critical low-battery condition (as long as Hibernation has not been
turned off).
Initiating Hibernation
To initiate Hibernation:
Press
■
marks your place in your applications and turns power off
completely to your computer.
System-initiated Hibernation occurs when the computer reaches
■
a critical low-battery condition. To protect against loss of
information, the computer automatically saves all information in
system memory to the hard drive and then turns off. Press the
power button once to resume work.
: Batteries that have not been fully charged may not have
NOTE
enough power to support a system-initiated Hibernation at critical
low battery.
: If the Hibernation timeout has been set to the Suspend timeout, the
NOTE
computer will go into Hibernation after a specified time in Suspend.
(Click the Conservation Settings tab in the Power Properties icon on the
Control Panel to set both Suspend and Hibernation timeouts.)
suspend to initiate Hibernation manually. Hibernation
Fn+
Managing Power
5-5
Page 55

. . . . . . . . . . . . . . . . . . . . . . . . .
Exiting Hibernation
To resume work after Hibernation is initiated, do the following:
1. While the computer is still in Hibernation, install a fully charged
battery pack or connect to an external power source, if installed
batteries aren't sufficiently charged.
2. Turn on the computer by pressing the power button once. The
computer exits Hibernation. Information saved to the hard drive
returns to the screen at the point where Hibernation was initiated.
: To stop the restoration of information, press
NOTE
Fn+Ctrl+Break.
5-6
Managing Power
Page 56

. . . . . . . . . . . . . . . . . . . . . . . . .
Using AC Power
CAUTION: Ensure that the electrical outlet you plug the power cord
into is easily accessible to you at all times. When you want to
disconnect power from the computer or Mobile CD Expansion Unit,
unplug the power cord from the electrical outlet.
WARNING: To reduce the risk of electric shock or damage to your
!
equipment, do not disable the power cord grounding feature. This
computer is designed to be connected to a grounded (earthed) outlet
that is easily accessible. The grounding plug is an important safety
feature.
You can connect your computer to an electrical outlet with the AC
Adapter that came with your computer. To connect the AC Adapter:
1. Connect the small end n of the AC power cord into the AC Adapter.
2. Connect the AC Adapter to the AC power connector o.
: If the computer is attached to a Mobile CD Expansion Unit (MCD),
NOTE
connect the AC Adapter to the MCD. If the computer (either alone or with
the MCD) is docked in the convenience base, connect the AC Adapter to
the convenience base.
3. Plug the power cord into a wall outlet p.
4. Turn on the computer.
Do not place anything on power cords or cables. Arrange
NOTE
:
them so that no one may accidentally trip on them. Do not pull
on a cord or cable. When unplugging from the electrical outlet,
grasp the cord by the plug
.
Managing Power
5-7
Page 57

. . . . . . . . . . . . . . . . . . . . . . . . .
Connecting an AC Adapter to the Computer
: Keep the battery packs in the computer while you're using
NOTE
AC power. This supplies the battery packs with a constant charge.
When the battery indicator light turns off, the battery packs are
charged.
5-8
Managing Power
Page 58

. . . . . . . . . . . . . . . . . . . . . . . . .
Using Battery Power
Your computer can accommodate from one to three battery packs.
The three battery power sources are:
1. Handle battery pack
2. Modular battery pack in the DualBay
3. Modular battery pack in the Mobile CD Expansion Unit (MCD)
on some models.
WARNING: To reduce the risk of injury or damage to the battery
!
pack, do not crush, puncture, or incinerate the battery pack or
short the metal contacts. In addition, do not attempt to open or
service the battery pack.
: Actual run time of each battery pack will vary according to
NOTE
how you use your computer and the power conservation options you
select. On average, since each battery pack delivers the same
capacity, users can expect to double their battery life with two
battery packs and triple their battery life with three installed.
Battery Charging/Discharging
The handle battery pack is the primary power source. Batteries
charge (if all three batteries are installed) beginning with battery in
the handle, then the modular battery in the DualBay, and last the
modular battery in the Mobile CD Expansion Unit (MCD).
Battery power is depleted (if all three batteries are installed)
beginning with the modular battery pack in the MCD, then the
modular battery in the DualBay, and last the battery in the handle.
Managing Power
5-9
Page 59

. . . . . . . . . . . . . . . . . . . . . . . . .
Removing and Inserting Battery Packs
Removing/Inserting the Handle Battery
CAUTION: If no other battery is installed and computer is not
attached to external power, save your work, exit all applications,
turn off the computer, and disconnect external devices.
To remove the battery pack from the handle:
1. Lay the computer flat with the handle in the carry position.
2. Grasp the handle battery cap on the top and bottom and pull the
battery out of the handle.
: For details on detaching or attaching the handle, see
NOTE
Chapter 6, Working with Removable Devices.
5-10
Removing the Battery from the Handle
IMPORTANT
harmful. Disposal of used battery packs should comply with
country, state, province, or local regulations. Refer to Recycling
Used Battery Packs later in this chapter for more details.
Managing Power
Battery components are considered environmentally
:
Page 60

. . . . . . . . . . . . . . . . . . . . . . . . .
3. With the battery contacts facing in toward the computer, insert a
fully charged battery pack into the handle until it clicks into
place.
Inserting a Battery Pack in the Handle
4. Turn on the computer, attach external devices, and resume your
work.
Managing Power
5-11
Page 61

. . . . . . . . . . . . . . . . . . . . . . . . .
Removing the DualBay Battery
The optional modular battery can be used in the DualBay of your
computer or in the Mobile CD Expansion Unit (MCD), depending
on the model. To remove the modular battery from the DualBay,
follow these steps:
CAUTION: If no other battery is installed and computer is not
attached to external power, save your work, exit all applications,
turn off the computer, and disconnect external devices.
1.
2
Removing the DualBay Battery
3. Insert a fully charged battery pack, turn the computer on,
the DualBay eject button ➊ on the right side of the
Press
computer.
.
Pull the modular battery ➋ out of the DualBay.
connect external devices, and resume your work.
5-12
Managing Power
Page 62

. . . . . . . . . . . . . . . . . . . . . . . . .
Inserting a DualBay Battery
To insert a modular battery in the DualBay:
1. Lay the computer flat with the label on the battery pack facing
up and the battery contacts facing the computer:
2. Align the battery pack with the metal rails in the DualBay and
push the battery pack into the computer until it clicks into place.
Inserting the Modular Battery into the DualBay
Managing Power
5-13
Page 63

. . . . . . . . . . . . . . . . . . . . . . . . .
Removing the MCD Weight Saver Module
Your Mobile CD Expansion Unit (MCD) comes with a weight saver
module that protects the battery bay until a battery is inserted. To
remove this module, follow these steps:
1. Turn the computer and MCD over, bottom side up.
2. Slide the battery bay latch on the bottom of the MCD to the open
position.
3. Carefully remove the weight saver module from the MCD
battery bay.
Follow the same procedure to remove a modular battery pack
NOTE
:
from the MCD.
5-14
Removing the Weight Saver Module from the MCD
Managing Power
Page 64

. . . . . . . . . . . . . . . . . . . . . . . . .
Inserting a Modular Battery in the MCD
To insert a modular battery pack in the Mobile CD Expansion Unit
(MCD), follow these steps:
1. With the label on the battery pack facing up and the battery
contacts facing in, slide the modular battery pack into the MCD
battery bay until it clicks into place
.
Inserting the Modular Battery into the MCD
Managing Power
5-15
Page 65

. . . . . . . . . . . . . . . . . . . . . . . . .
Resolving a Low-Battery Condition
When you operate the computer on battery power and the battery
charge runs low, the computer beeps (unless speakers have been
turned off or disabled) and the battery charge indicator on the status
panel begins to blink. These signs indicate a low-battery condition.
When this occurs, save all work immediately and initiate
Hibernation. Resolve the low-battery condition with a fully charged
battery pack or external power.
Resolving a low-battery condition
with external power
If you are near a power source, connect the AC Adapter or the auto
adapter to the computer until a fully charged battery can be
installed.
Resolving a low-battery condition
with a charged battery pack
If a fully charged battery pack is available, do the following:
1. To avoid interrupting work, initiate Hibernation by pressing
the suspend button. Hibernation is complete when the
Fn+
battery charge indicator and power/suspend lights turn off.
2. Remove the discharged battery pack.
3. Insert a fully charged battery pack in the computer or portable
expansion unit.
4. Exit Hibernation by pressing the power button once. The
power/suspend light turns on to indicate that full power is
restored.
5-16
Resolving a low-battery condition
when a battery pack is unavailable
If a fully charged battery pack is not available, do the following:
1. Save your information.
2. Exit your applications.
3. Turn off the computer by clicking Shut Down from the
Windows Start menu or initiate Hibernation until external power
or a fully charged battery pack is available.
Managing Power
Page 66

. . . . . . . . . . . . . . . . . . . . . . . . .
Extending Battery Pack Operating Time
Battery pack operating time can be extended by following these
guidelines:
Select the High level of power conservation. See Selecting a Battery
■
Conservation Level in this chapter.
Initiate Suspend or Hibernation or turn off the computer when not in
■
use for several hours.
Reduce the brightness of the display.
■
Select a shorter screen save timeout.
■
Avoid unnecessary fast-charge cycles, which reduce the cycle life of
■
the battery.
Keep a battery pack in the computer when using it with external
■
power to supply it with a constant charge.
When not in use, disconnect any external equipment without its own
■
power source to avoid draining the battery pack.
Exit modem programs when not in use.
■
Remove the PC Card when not in use or turn off power to the
■
PC Card slots. See Chapter 9, Connecting External Devices, for
more information about PC Cards.
Store the battery pack in a cool, dry place when not in use. High
■
temperatures reduce the life of the battery pack and cause it to
lose its charge more quickly. If you are storing the battery for
less than one month, the recommended storage temperature is
32°F to 122°F (0°C to 50°C); for no more than three months, the
recommended temperature is 32°F to 104°F (0°C to 40°C); for
an unlimited time, the recommended temperature is 32°F to
86°F (0°C to 30°C).
Use the AC Adapter when possible.
■
Managing Power
5-17
Page 67

. . . . . . . . . . . . . . . . . . . . . . . . .
Charging the Battery Pack(s)
Follow these steps to fully charge the battery packs:
1. Connect the AC Adapter to the computer and plug it into an
electrical outlet.
2. Turn on the computer if you want to use it while the battery
packs are charging.
3. If more than one battery is installed in the system, only one
battery will charge at a time, beginning with the battery pack in
the handle, then the battery pack in the computer DualBay, and
finally the battery pack in the Mobile CD Expansion Unit
(MCD).
When the battery charge indicator turns off, the battery packs are no
longer being fast-charged, but may not be fully charged. It takes up
to 3.5 hours to fast-charge a battery pack when the computer is
turned off. It takes up to 6 hours to charge a battery pack when the
computer is turned on.
: Battery packs should be recycled or disposed of according to
NOTE
local regulations. Refer to the Recycling Used Battery Packs section
that follows for more information.
5-18
Managing Power
Page 68

. . . . . . . . . . . . . . . . . . . . . . . . .
Recycling Used Batteries in North America
Disposal of Nickel Metal Hydride or Lithium Ion battery packs
should comply with country, state, province, or local regulations.
The battery recycling program provides a safe and easy method for
disposing of used batteries. Check the worldwide telephone numbers in
Chapter 1, Finding Information About Your Computer, to take
advantage of the battery recycling program. You will be provided with
a postage-paid battery pack mailer that is preaddressed to a reclamation
facility where the metals are recycled.
WARNING: To reduce the risk of injury or damage to the battery pack,
!
do not crush, puncture, or incinerate the battery pack or short the metal
contacts. In addition, do not attempt to open or service the battery pack.
Recycling Used Batteries in Europe
Disposal of Nickel Metal Hydride or Lithium Ion battery packs should
comply with the country, state, province, or local regulations.
The battery recycling program provides a safe and easy method for
disposing of used batteries. Check with your Compaq authorized
service provider to take advantage of the battery take-back program.
Managing Power
5-19
Page 69

. . . . . . . . . . . . . . . . . . . . . . . . .
Power Properties Utility
The Power icon includes features that allow you to monitor how AC
and battery power are used in your computer. It controls most of the
computer components, including hard drive, processor, and display.
To conserve the battery, the computer can be preset to shut down
power to a component after a specified period of inactivity (called a
timeout). In addition to other features, Power Properties allows you
to preset timeouts.
To get to Power Properties:
1. Click Start.
2. Click Settings.
3. Click Control Panel.
4. Double-click the Power icon.
Power contains several tabs that allow you to view or set the
following:
If You Want To: Click This Tab:
Set battery conservation levels and
enable/disable warning beeps
Select Hibernation Settings Hibernation
Show suspend on the Start menu or
power status on the taskbar
Enable and disable the AC Energy Saver
and customize Energy Save monitor
values
Display the status of installed batteries Battery Status
Battery Conservation Settings
Power
AC Energy Saver
Battery Status Tab
The Battery Status Tab on the Power icon is a Compaq application
for Windows that provides information on the status of each
installed battery. The utility includes: an illustration of each battery,
showing where it's installed in the computer; the life remaining in
each battery; and which battery (if any) is currently charging.
5-20
Managing Power
Page 70

. . . . . . . . . . . . . . . . . . . . . . . . .
1
3
2
4
Setting Battery Conservation Levels
To extend the life of your battery, customize the level of battery conservation or
click one of three preset conservation levels. Medium is the factory setting, in
effect until you change it.
You can change the default levels of battery conservation by
pressing
level. Use the left or right arrow keys to select a different level.
to display a popup window indicating the current
Fn+F7
High Conservation: Saves the most battery power. This level
■
supplies the most battery life from a single charge.
Medium Conservation: Provides a balance between system
■
performance and battery life. This is the factory setting.
None (Drain): Turns off battery conservation features, and the
■
system runs at full speed. Hibernation is the factory setting on
your computer, and your system also initiates Hibernation
automatically when it reaches a low-battery condition. However,
in the None (Drain) setting, the computer will not initiate
Hibernation automatically if it has been manually disabled.
CAUTION: Before setting your battery conservation level to None
(Drain), make sure the Hibernation feature has not been disabled.
Managing Power
5-21
Page 71

. . . . . . . . . . . . . . . . . . . . . . . . .
Custom: Saves battery power according to your specifications by
■
setting timeouts. This setting remains in effect until you change
it. (See the following section for more information on timeouts.)
High, Medium, Drain, or Custom settings remain in effect
NOTE
:
until you change them.
Setting a Timeout
Timeouts are specified periods of system or component inactivity
designed to conserve power. When a timeout period has expired,
battery conservation shuts down the system or the specified
components to save power.
For example, the hard disk idle default timeout is two minutes. If an
application does not access information on the hard disk for two
minutes, the hard disk shuts down until it is accessed again.
Timeouts are set through the Conservation Settings or Hibernation
tabs in Power Properties. Use timeouts in the following ways:
1. Use a preset timeout provided with the medium (default) or high
level of battery conservation.
2. Set your own timeouts through the custom level of battery
conservation so that the computer works more efficiently with
your applications.
Programs with the autosave feature, or those that automatically
NOTE
:
write data to the hard disk, can cause the hard disk timer to reset when
data is written to the hard disk
.
5-22
Managing Power
Page 72

. . . . . . . . . . . . . . . . . . . . . . . . .
Turning Hibernation On or Off
Hibernation is automatically turned on when you first set up your
computer. In order for Hibernation to work, it must allocate space
on your hard drive equal to the amount of RAM installed. To free
up this disk space, you can click the Hibernation tab in Power
Properties and turn off Hibernation. However, Compaq does not
recommend this, because it could result in lost data.
CAUTION: Turning off Hibernation is not recommended. If the
computer reaches a low-battery condition and Hibernation is turned
off, unsaved information is lost.
When you restart the computer, the system first upgrades your
memory, then should automatically allocate or update your
computer's disk space to adjust to the new amount of memory.
However, if you experience problems with Hibernation after
upgrading your memory, run the Power Conservation utility and
click the Hibernation tab to reset the system memory.
Managing Power
5-23
Page 73

. . . . . . . . . . . . . . . . . . . . . . . . .
Using the AC Energy Saver
You can turn on or off the Energy Saver feature through the AC
Energy Saver tab in Power Properties. The Energy Saver feature is
supported in MS-DOS, Windows 3.1, and Windows 95 operating
systems.
The energy saver feature is network compatible when used in
conjunction with the Compaq Convenience Base with Ethernet
model, meaning that you will not be logged off the network when
the Energy Saver features are enabled. The Energy Saver feature is
network compatible when using network PC Cards, when the PC
Card power setting is set to the "on" position.
The Energy Saver feature when used in conjunction with an external
Energy Star compliant monitor will support the power down
features of the monitor. Enabling the Energy Save Monitor feature
allows the external monitor to go into low-power mode when the
screen Save timeout occurs.
To take advantage of this energy savings, the external monitor
feature has been preset to power down after 10 minutes. This setting
can be modified or disabled by accessing the AC Energy Saver tab
in Power Properties.
The AC Energy Saver feature allows the hard disk idle and screen
save timeouts to initiate after a period of computer inactivity while
the computer is connected to AC power. Enabling this feature saves
money on your electric bill.
5-24
CAUTION: Using the Energy Save Monitor feature with non-Energy Star
compliant monitors may cause video distortion when the Screen Save
timeout occurs.
Managing Power
Page 74

. . . . . . . . . . . . . . . . . . . . . . . . .
The Battery Gauge Popup
The Battery Gauge popup is a hotkey (press
similar to the Battery Status tab in the Power icon on the Control
Panel. It also provides the status of installed batteries, but, unlike a
Windows utility, the Battery Gauge popup is accessible from any
application or operating system. (Press
Fn+F8
popup.)
The Battery Gauge Popup displays three numbered boxes:
Box 1, the primary battery in handle
■
Box 2, the modular battery in the DualBay
■
Box 3, the modular battery in the Mobile CD Expansion Unit (MCD)
■
) with functions
Fn+F8
to exit the Battery Gauge
Battery Gauge Popup
Press the right or down arrow key to view the status of the next battery.
(Batteries not present in the system cannot be selected.) Press the left
or up arrow key to select the previous battery.
The box representing the selected battery will be depressed, and the
number inside the box will be black. Numbers in other boxes will be
grayed out. If the selected battery is charging, a lightning bolt appears to
the right of the box. The percentage of remaining battery capacity is
shown at the bottom. In the popup above, the battery in the handle has 60
percent remaining capacity. The modular battery in the MCD is charging.
If you do not depress any arrow keys for five to seven seconds, the
NOTE
:
Battery Gauge popup will display the average remaining capacity of all
installed batteries.
Managing Power
5-25
Page 75

Page 76

. . . . . . . . . . . . . . . . . . . . . . . . .
Chapter 6
Working with Removable Devices
Removable devices give your computer an added degree of
functionality and more flexibility in the way you work. This
chapter provides guidelines for working with removable devices in
the computer and (depending on the model) the Mobile CD
Expansion Unit (MCD). These devices include:
Handle
■
■
DualBay Devices
: For procedures on removing and inserting the modular
NOTE
battery pack in the DualBay or the MCD, see Chapter 5, Managing
Power.
Working with Removable Devices
6-1
Page 77

. . . . . . . . . . . . . . . . . . . . . . . . .
Working with the Handle
Detaching the Handle
CAUTION: If no other battery is installed and computer is not
attached to external power, save your work, exit all applications, turn
off the computer, and disconnect external devices.
To remove the handle from the computer, follow these steps:
Close the computer and turn it over, bottom side up, with the
1.
handle in the carry position.
2. Remove the battery from the handle. (See Chapter 5, Managing
Power, for instructions.)
Loosen the thumbscrews on the metal strip along the back of the
3.
computer by turning them counterclockwise.
6-2
Turning Thumbscrews to Loosen Handle
Working with Removable Devices
Page 78

. . . . . . . . . . . . . . . . . . . . . . . . .
4. Lift the handle and remove.
5. Turn the computer over, open the display, turn on the computer,
and attach external devices.
Removing the Handle
Working with Removable Devices
6-3
Page 79

. . . . . . . . . . . . . . . . . . . . . . . . .
Attaching the Handle
To attach the handle to the computer, follow these steps:
1. If a charged battery is installed in the DualBay, initiate Suspend.
(If not, initiate Hibernation by pressing
computer, detach external devices, and turn it over, bottom side
up.
Line up the metal tabs on the handle with the slots on the back of
2.
the computer.
3. Attach the handle to the computer and insert the battery. (See
Chapter 5,
battery.)
Managing Power,
for instructions on inserting the
suspend.) Close the
Fn+
6-4
Attaching the Handle to the Computer
Working with Removable Devices
Page 80

. . . . . . . . . . . . . . . . . . . . . . . . .
4. Tighten the thumbscrews on the handle by turning them
clockwise.
5. Turn the computer over, open the display, attach external
devices, and press the suspend button to exit Suspend (or press
the power button to exit Hibernation).
Turning Thumbscrews to Tighten Handle
Working with Removable Devices
6-5
Page 81

. . . . . . . . . . . . . . . . . . . . . . . . .
DualBay Devices
The DualBay on your computer can accommodate either the
diskette drive that came with the computer or an optional modular
battery pack. (See Chapter 5,
inserting a modular battery pack in the DualBay.)
Managing Power,
Removing the Diskette Drive from the DualBay
To remove the diskette drive from the DualBay, follow these steps:
1. Initiate Suspend by pressing the suspend button once.
2. Press the DualBay eject button ➊ on the right side of the
computer.
3. Pull the diskette drive ➋ from the DualBay.
for information on
6-6
Removing the Diskette Drive from the DualBay
4. Exit Suspend by pressing the suspend button to return your
information to the screen.
Working with Removable Devices
Page 82

. . . . . . . . . . . . . . . . . . . . . . . . .
Inserting the Diskette Drive into the DualBay
To insert the diskette drive into the DualBay:
1. Initiate Suspend by pressing the suspend button.
2. Align the diskette drive with the metal rails in the DualBay
3. Push diskette drive into the computer until it clicks into place.
4. Exit Suspend by pressing the suspend button.
Inserting the Diskette Drive into the DualBay
Working with Removable Devices
6-7
Page 83

. . . . . . . . . . . . . . . . . . . . . . . . .
Using the Diskette Drive Externally
When you want to place a modular battery pack in the DualBay but
also need the diskette drive, you can use the diskette drive as an
external device by connecting it to the parallel port. Contact your
Compaq authorized dealer, reseller, or service provider for
information about the option that allows you to use your diskette
drive externally.
6-8
Working with Removable Devices
Page 84

. . . . . . . . . . . . . . . . . . . . . . . . .
Chapter 7
Maximizing Your Mobile CD Expansion Unit (MCD)
Create interactive presentations, play full motion video games, or
listen to your favorite music CDs on the versatile, powerful Mobile
CD Expansion Unit (MCD). This unit adds CD multimedia
capabilities to your computer and supports most popular software.
A CD-ROM, integrated stereo speakers, a game/MIDI port,
dedicated battery bay, and connections to the convenience base are
among the features on the MCD. This chapter familiarizes you with
the MCD, including:
MCD components
■
Attaching the computer to the MCD
■
Detaching the computer from the MCD
■
Maximizing Your Portable Expansion Unit
7-1
Page 85

. . . . . . . . . . . . . . . . . . . . . . . . .
MCD Components
The Mobile CD Expansion Unit (MCD) provides additional
functionality to your computer, including a CD-ROM, integrated
stereo speakers, and connections to the convenience base
Front and Left Side Components
Front and left side components of the MCD include:
CD-ROM drive
➊
Integrated stereo speakers
➋
➌
Computer expansion posts
.
7-2
Components on Front and Left Side of the MCD
Maximizing Your Portable Expansion Unit
Page 86

. . . . . . . . . . . . . . . . . . . . . . . . .
Right and Back Side Components
Components on the right and back side of the MCD include:
Dedicated battery bay
➊
: Remove the weight saver module from the battery bay
NOTE
before inserting the battery pack
Game/MIDI port (joystick connection)
➋
AC power connector
➌
Expansion connector to attach the unit to the convenience base
➍
Eject lever to release the computer from the MCD
➎
Components on Right Side and Back of the MCD
Maximizing Your Portable Expansion Unit
7-3
Page 87

. . . . . . . . . . . . . . . . . . . . . . . . .
Attaching the Computer to the MCD
To attach the computer to the MCD, follow these steps:
1. Turn off the computer and disconnect external devices.
2. Close the computer and ensure that the handle is in the carry
position.
3. Turn the computer over, bottom side up.
. Slide open the expansion slot cover on the bottom of the computer.
4
7-4
Opening the Expansion Slot Cover
Maximizing Your Portable Expansion Unit
Page 88

. . . . . . . . . . . . . . . . . . . . . . . . .
5. Turn the computer over, right side up.
6. Tilt the computer at an angle to line up the two notches on the
computer ➊ with the guide hooks on the right side of the MCD.
7. Lower the computer o onto the MCD. Be sure that the expansion
connector slot on the bottom of the computer is aligned with the
connector posts on top of the MCD.
Attaching the Computer to the MCD
Maximizing Your Portable Expansion Unit
7-5
Page 89

. . . . . . . . . . . . . . . . . . . . . . . . .
8. Turn the computer and MCD over, bottom side up.
9. Tighten the two thumbscrews on the bottom of the MCD by turning
them clockwise to securely attach the MCD to the computer.
10. Turn the computer back over, right side up. Attach external devices.
Open the display.
11. Turn on the computer.
7-6
Tightening the Thumbscrews on the Bottom of the MCD
Maximizing Your Portable Expansion Unit
Page 90

. . . . . . . . . . . . . . . . . . . . . . . . .
Detaching the Computer from the MCD
Detach the computer from the MCD according to these steps:
1. Turn off the computer and disconnect external devices.
2. Close the computer and ensure that the handle is in the up
position.
3. Turn the computer and MCD over, bottom side up. Turn the two
thumbscrews on the bottom of the MCD counterclockwise to
loosen the MCD from the computer.
4. Turn the computer and MCD over again, right side up.
5. Rotate the eject lever on the back of the MCD n down. Remove
the computer from the guide hooks on the MCD by sliding the
computer o up and away from the right side of the MCD.
6. Reach underneath the computer and close the expansion slot on the
bottom of the computer.
7. Open the display and turn on the computer. Connect external
devices.
Detaching the Computer from the MCD
Maximizing Your Portable Expansion Unit
7-7
Page 91

Page 92

. . . . . . . . . . . . . . . . . . . . . . . . .
Chapter 8
Enjoying Compaq Audio
Your computer has both internal and external audio capabilities that
allow you to record, play back, and edit voice, music, and other
sounds in digital audio files.
These capabilities allow you to take advantage of the newest
business programs, presentation software, and multimedia
educational and entertainment software. This chapter familiarizes
you with the audio features on the computer, including:
Audio components
■
Internal/external microphones
■
Audio volume/audio software
■
Stereo speakers
■
Enjoying Compaq Audio
8-1
Page 93

. . . . . . . . . . . . . . . . . . . . . . . . .
Identifying Built-in Audio Components
The computer features the following audio components:
➊ Internal electric condenser microphone with standard sensitivity
of 67 dB.
➋ Internal stereo speakers on the computer (and on the Mobile CD
Expansion Unit (MCD).
➌ Output jacks for external stereo headphones or speakers that
have a 3.5-mm, 3-conductor plug.
➍ External microphone input jack that accepts a 2-conductor,
3.5-mm plug from an electret condenser microphone.
➎ External audio input jack that accepts a 3-conductor, 3.5-mm
plug.
8-2
Audio Components
Enjoying Compaq Audio
Page 94

. . . . . . . . . . . . . . . . . . . . . . . . .
External Audio Jacks
The computer allows you to connect external equipment to enhance
a multimedia presentation or quietly enjoy your favorite CDs using
the following connectors:
Mono microphone jack can also be used to record voice or
➊
sound through an external electret condenser microphone.
Stereo speaker/headphone jack supports stereo headphones or
➋
external stereo speakers.
Stereo line-in jack accepts sounds from external audio devices
➌
such as a CD player, tape deck, or tuner.
Audio Jacks
Enjoying Compaq Audio
8-3
Page 95

. . . . . . . . . . . . . . . . . . . . . . . . .
j
Stereo Line-In Jack
The stereo line-in jack is the input line for devices such as a CD
player, tape player, or tuner. The input device must supply levels
compliant with the line input level specification of 0.5 to 4.25 volts.
The line output of most devices meets this specification.
Make sure you plug in a stereo component only to your computer. A
stereo connector has a colored band. The mono plug does not.
CAUTION: Use only a 3.5-mm stereo plug in the stereo line-in
ack, which has a colored band around the connector post. A
mono plug used in the stereo line-in jack may damage the input
device.
Stereo Plug Versus Mono Plug
8-4
Enjoying Compaq Audio
Page 96

. . . . . . . . . . . . . . . . . . . . . . . . .
Internal Microphone
You can record voice or sound through the internal mono
microphone ➊ or by plugging an external electret condenser
microphone into the mono microphone jack. The internal
microphone also supports speakerphone features. (See Chapter 9,
Connecting External Devices,
speakerphone capabilities.)
for more information on
Internal Microphone
Enjoying Compaq Audio
8-5
Page 97

. . . . . . . . . . . . . . . . . . . . . . . . .
Volume Control
The volume control hotkeys,
or down (using the arrow keys), and are the master volume control
for your computer. Volume is also controlled by a Windows utility,
the Audio icon, in the Control Panel on the Windows Start menu.
There is no manual volume control on the computer. Volume
:
NOTE
can only be controlled by the software.
WARNING: To reduce the risk of personal injury, adjust the
!
volume control before putting on headphones.
, adjust the computer volume up
Fn+F5
8-6
Volume Control with Hotkeys
Enjoying Compaq Audio
Page 98

. . . . . . . . . . . . . . . . . . . . . . . . .
Using the Stereo Speakers
The integrated stereo speakers n support playback of recorded
sounds, audio for games and business programs, and line-out
devices such as a CD player, tape deck, or stereo tuner.
The speakers are disabled when you connect external speakers or
headphones to the stereo speaker/headphone jack. Speakers are also
disabled when you attach the computer to the Mobile CD Expansion
Unit (MCD).
If the computer is attached to the MCD, the system audio is played
through the MCD speakers ➋.
Speakers on the Computer and MCD
Some software applications, such as game programs, include
:
NOTE
their own volume controls. You may need to make adjustments
within these applications to get the desired sound levels.
IMPORTANT:
be audible.
If volume is turned down, low-battery beeps may not
Enjoying Compaq Audio
8-7
Page 99

Page 100

. . . . . . . . . . . . . . . . . . . . . . . . .
Chapter 9
Connecting External Equipment
To enhance the functionality of your computer, connectors on the
rear of the computer support numerous external devices. This
chapter familiarizes you with the utilities and procedures needed for
connecting or configuring external equipment to your computer,
using the following:
Device Manager utility
■
Add New Hardware icon
■
PC Cards
■
Telephony features
■
: For more complete information about the optional equipment
NOTE
compatible with your computer, see the online Compaq Options
Catalog.
Connecting External Equipment
9-1
 Loading...