

Page 1
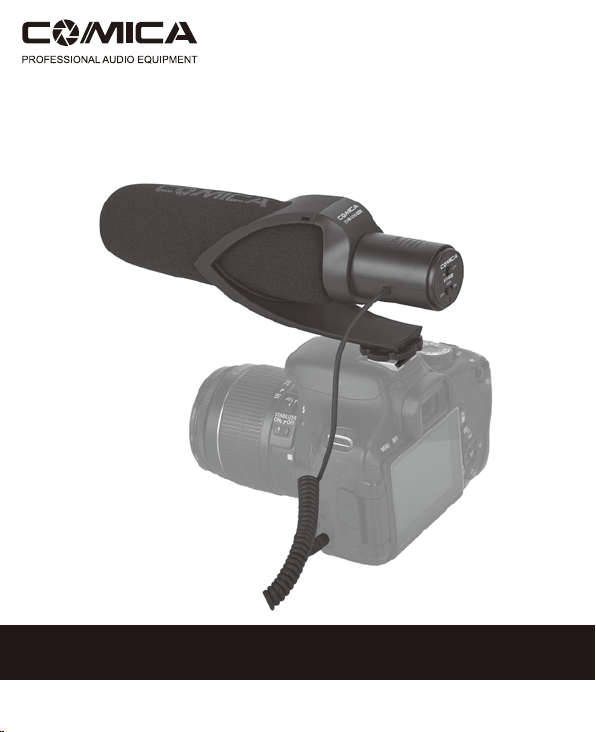
CVM-V30 PRO
Directional Condenser Shotgun Video Microphone
USER MANUAL
Page 2

Foreword
Thanks for purchasing COMICA CVM-V30 PRO Cardioid Directional Microphone,
the item is specially designed for professional DSLR, Camcorder to work for review,
meeting, video,etc. It comes with very sensitive directing and built-in electric circuit
design, which takes you extra multi-functions like ‘Adjusted sensitivity’, ‘Low-cut
Filter’ ,etc, and make your audio with good-quality.
Main Features
. Super Cardioid Polar Pattern
. Low-cut Filter
. 10dB Adjustable Sensitivity
. Low Self-noise
. Super Anti-interference
. Special Design for Excellent Shock-absorbing
. Packed with Wind-Screen and Wind-Muff
. Cold-shoe Design with 1/4 Thread at Bottom
Super Cardioid Excellent
Shock-absorbing
10dB Adjustable
Sensitivity
Super
Anti-Interference
Low-cut Filter Wind Muff Low Self-noise Easy to install
1
Page 3
Notice
Please carefully read this user manual before using
The LED Indicator light will keep on with green color to help you check if the item
or power normally work
The product is belong to the super accurate instrument,please pay attention to
avoid any dropping, collision or thump
Please do not put the device beside the heat or interference source, like radiator,
Roaster or air-condition etc
Please keep this product in the dry environment
Do not expose this device in rain or moist environment
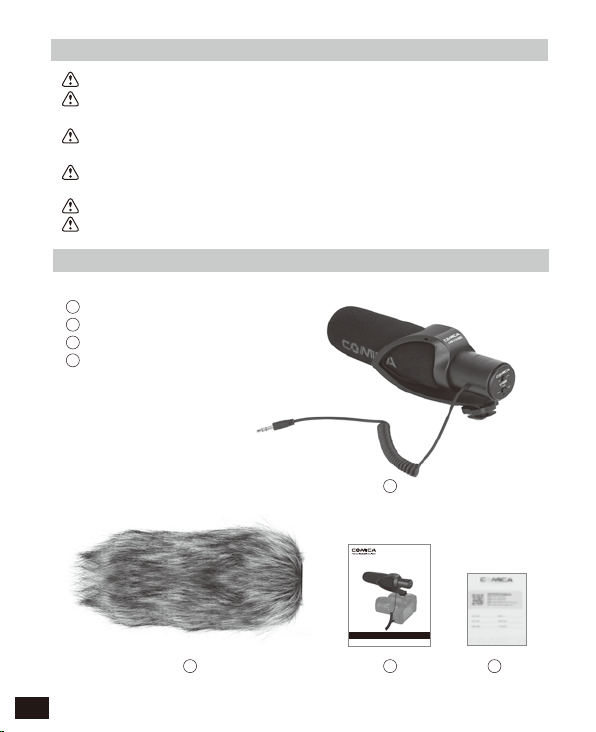
Package Contents
Mic Body (Including Windscreen)
1
Wind Muff
2
User Manual
3
Warranty Card
4
1
CVM-V30 PRO
Directional Condenser Shotgun Video Microphone
USER MANUAL
2 3
4
2
Page 4
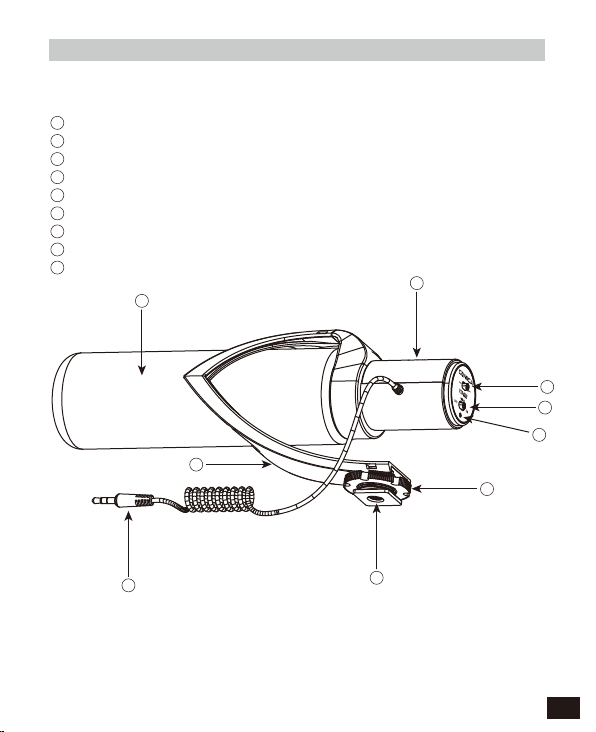
Mic Body
1
Mic Body and Windscreen
2
AAA Battery Holder
3
Low-cut Filter Button
4
Power/Sensitivity Button
5
Working Indication
6
Fixing Screw
7
1/4 Cold-shoe Mount
8
Shock Mount
9
3.5mm Audio Output Cable
1
Components and Instruction
2
3
4
5
8
6
9
7
3
Page 5
Installation and Usage
1.Installation
1.1 Put Batteries into Microphone
1.11 Refer to the illustration, Press down the battery door and follow
the arrow to push outward, then the battery door is opened
4
Page 6

1.12 Put into the batteries, and then push forward to close the battery
door
5
Page 7

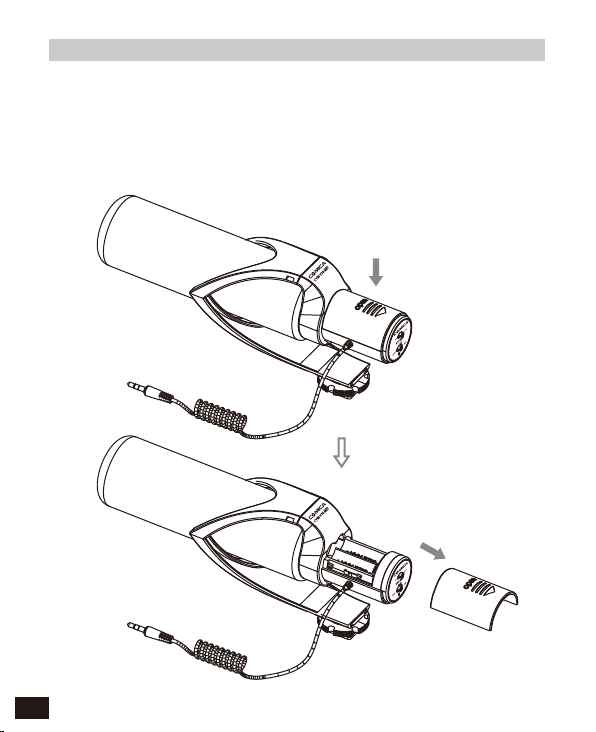
1.2 Install the Wind-Muff to Microphone
1.21 Open the Wind Muff from the "INSERT HERE"
1.22 Insert the mic into the Wind Muff
6
Page 8

1.23 Stretch the end of the wind Muff
7
Page 9

1.24 Wrap the end of the mic with the end of Wind Muff
8
Page 10

1.3 Install the Mic onto Camera
1.31 Connect the Mic onto the Camera via cold-shoe,
then fasten the fixing screw
9
Page 11

1.32 Connect the 3.5mm audio cable of Mic into the Camera
10
Page 12

2.Operation
2.1 Low-cut Filter function
Refer to the illustration, switch the low-cut filter function button to
right position, then the function works
Low-cut Filter Note:
Filter background frequencies lower than 80Hz, such as unwanted
noise produced by wind, focusing, traffic, etc.
Recording maybe be adversely affected by using the
low-cut filter, so only use as needed
2.2 Indication Lamp Status
switch the low-cut filter function
button to right position
Normal Working Status: Green
Low-power Working Status: Red
(Be aware to replace batteries now)
11
Page 13

2.3 Power/+10 dB Sensitivity Adjusting Function
2.31 Switch the button to ‘on’ position, then the mic go into the
normal voice picking-up status
normal voice picking-up
2.32 Switch the button to ‘+10 dB’ position, then the sensitivity
can be increased with 10 dB,The recording sound will be
increased accordingly
increased with 10 dB
2.33 Switch the button to ‘off’ position, then the mic is powered off
powered off
12
Page 14

Specification:
Polar Pattern
Frequency Range
Sensitivity
Output Impedance
Dynamic Range
Max. SPL
Signal to Noise Ratio
Audio Output
Battery
Battery Life
Weight
Dimension
Specification
Super Cardioid
40Hz~20,000Hz
-33dB±2dB/-23dB±2dB
200 Ω
100dB
114dB
78dB
3.5mm
AAA 1.5V x 2
200h
114g
210 x 62 x 80mm
13
Page 15

Frequency Response:
10
0
-1 0
-2 0
-3 0
dB re 1 V./Pa
-4 0
20 Hz 100 1000 10 000 20 000
Polar Pattern :
+5.0
0.0
-2.0
-4.0
-6.0
-8.0
-10.0
-12.0
-14.0
-16.0
-18.0
-20.0
-22.0
-24.0
-25.0
90 270
dB rel. 1V/Pa
Frequency:
500 Hz :
1000 Hz :
2000 Hz :
8000 Hz :
14000 Hz :
0
-2.0
-10.0
-20.0
180
14
Page 16

Email: support@comica-audio.com
 Loading...