

Page 1
IT
MANUALE
TECNICO
EN
TECHNICAL
MANUAL
FR
MANUEL
TECHNIQUE
NL
TECHNISCHE
HANDLEIDING
DE
TECHNISCHES
HANDBUCH
ES
MANUAL
TÉCNICO
PT
MANUAL
TÉCNICO
Manuale utilizzo kit iPower Art. 8595 / 8596
User Manual for iPower kit Art. 8595 / 8596
Manuel d’utilisation kit iPower Art. 8595 / 8596
Gebruikshandleiding iPower-kit Art. 8595 / 8596
Gebrauchsanleitung iPower-Set Art. 8595 / 8596
Manual de uso del kit iPower arts. 8595 y 8596
Manual de utilização kit iPower art. 8595/8596
Assistenza tecnica Italia 0346/750090
Commerciale Italia 0346/750091
Comelit Group S.p.A. - Via Don Arrigoni 5 - 24020 Rovetta S. Lorenzo BG Italy - tel. (+39) 0346 750 011 - fax (+39) 0346 71436
www.comelit.eu www.simplehome.eu [email protected] [email protected] [email protected]
Technical service abroad (+39) 0346750092
Export department (+39) 0346750093
Page 2
IT
1. Descrizione monitor e funzioni citofoniche dei pulsanti ................................................................. 2
2. Rispondere ad una chiamata ........................................................................................................ 3
3. Funzione Autoaccensione ............................................................................................................. 3
4. Effettuare una chiamata intercomunicante con i pulsanti 1 o 2 ..................................................... 3
5. Impostazione lingua menu ............................................................................................................ 4
6. Descrizione menu ......................................................................................................................... 4
7. Menu di stato ................................................................................................................................. 4
8. Registrare il messaggio per assente ............................................................................................. 5
9. Attivare messaggio per assente .................................................................................................... 5
10. Effettuare una chiamata intercomunicante .................................................................................... 6
11. Modifi care nome nella rubrica intercomunicante........................................................................... 6
12. Impostare data e ora ..................................................................................................................... 6
13. Attivare video segreteria ...............................................................................................................7
14. Visualizzare registrazioni della video segreteria ........................................................................... 7
15. Registrazione manuale .................................................................................................................8
16. Confi gurare melodie ...................................................................................................................... 8
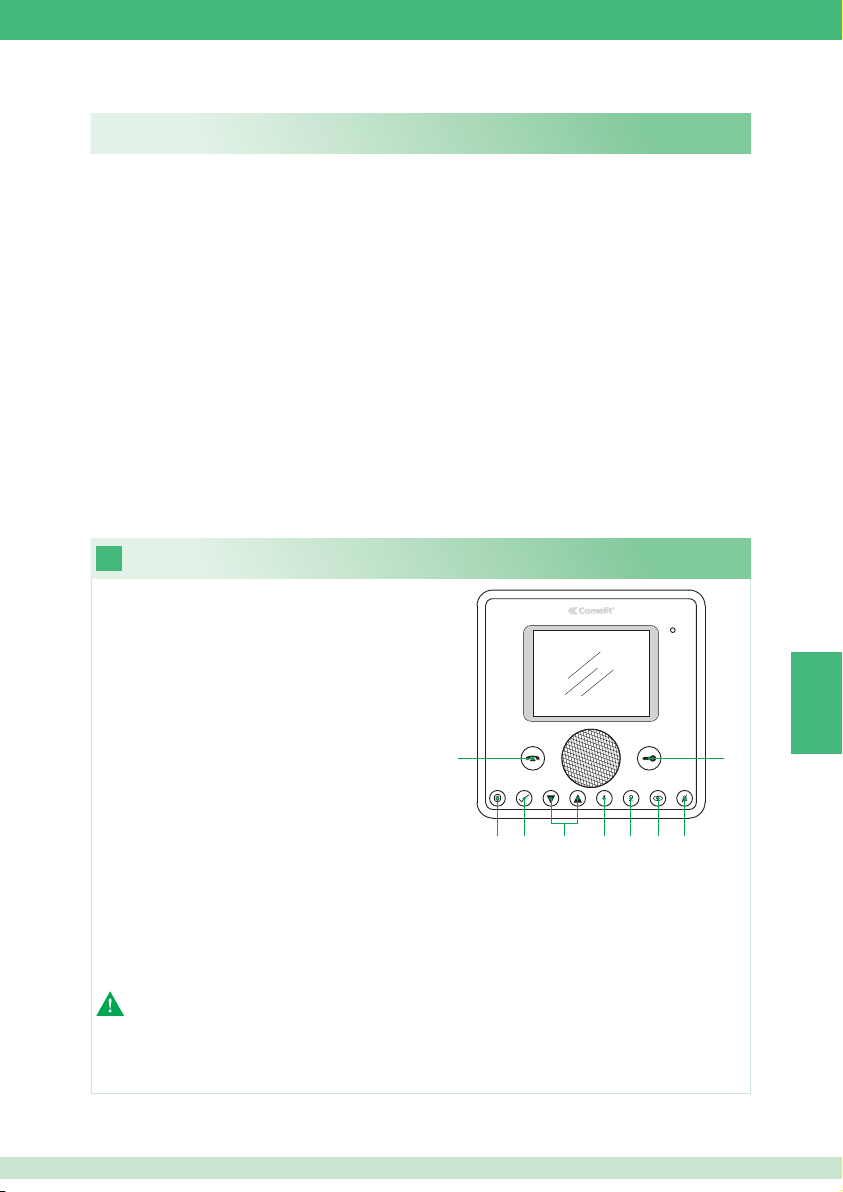
1
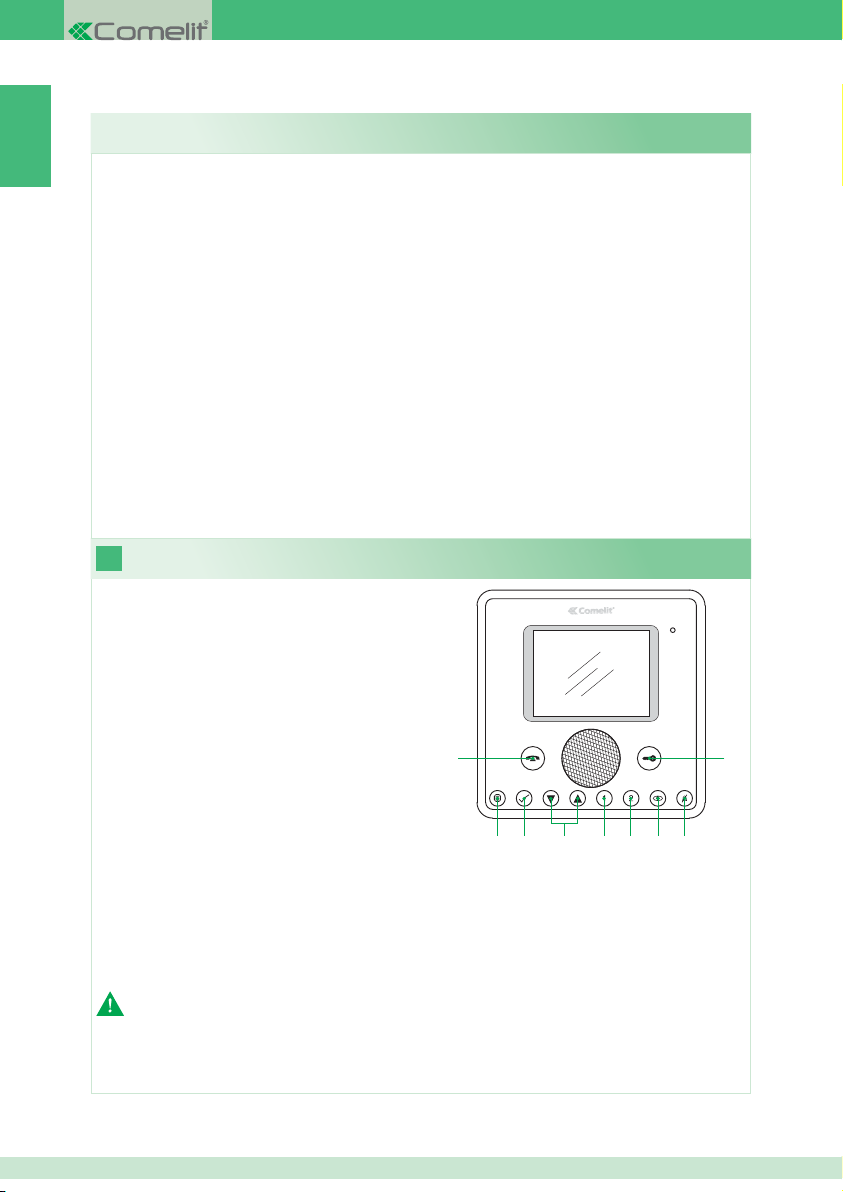
1 Pulsante fonica. Permette di attivare o
disattivare la conversazione.
2 Pulsante menu. Permette di accedere,
uscire e salire di un livello nel menu.
3 Pulsante conferma. Permette di confermare
una selezione all'interno del menu.
4 Pulsanti navigazione. Permettono di
navigare / modifi care valori all’interno del
menu.
5 Pulsante 1. Chiamata Generale Interna. *
6 Pulsante 2. Chiamata Generale Esterna. *
7 Pulsante Autoaccensione. *
8 Pulsante Privacy / Dottore. *
• La funzione Privacy permette l’esclusione
della suoneria su chiamata dal posto esterno
e intercomunicante.
• La funzione Dottore permette l’azionamento automatico dell’apriporta su chiamata da posto
esterno.
• La funzione Privacy + Dottore oltre a disattivare la suoneria come nella funzione Privacy, permette
l’azionamento automatico dell’apriporta su chiamata da posto esterno.
9 Pulsante Serratura. Permette di attivare la serratura del posto esterno. *
* Programmabile, rivolgersi al proprio installatore di fi ducia.
N. B. Le funzioni citofoniche dei pulsanti sono disponibili solo a menu spento.
Descrizione monitor e funzioni citofoniche dei pulsanti
SOMMARIO
1
23 4 56 78
9
Attenzione! Al fi ne di ridurre il rischio di guasti e scosse elettriche:
• Non aprire l’apparecchio o effettuare personalmente riparazioni. In caso di necessità richiedere
l’intervento di personale qualifi cato.
• Non inserire oggetti né versare liquidi all’interno del dispositivo.
• Pulire con un panno inumidito con acqua. Evitare Alcool e altri prodotti aggressivi.
2
Page 3
Rispondere ad una chiamata
2
Funzione Autoaccensione
3
IT
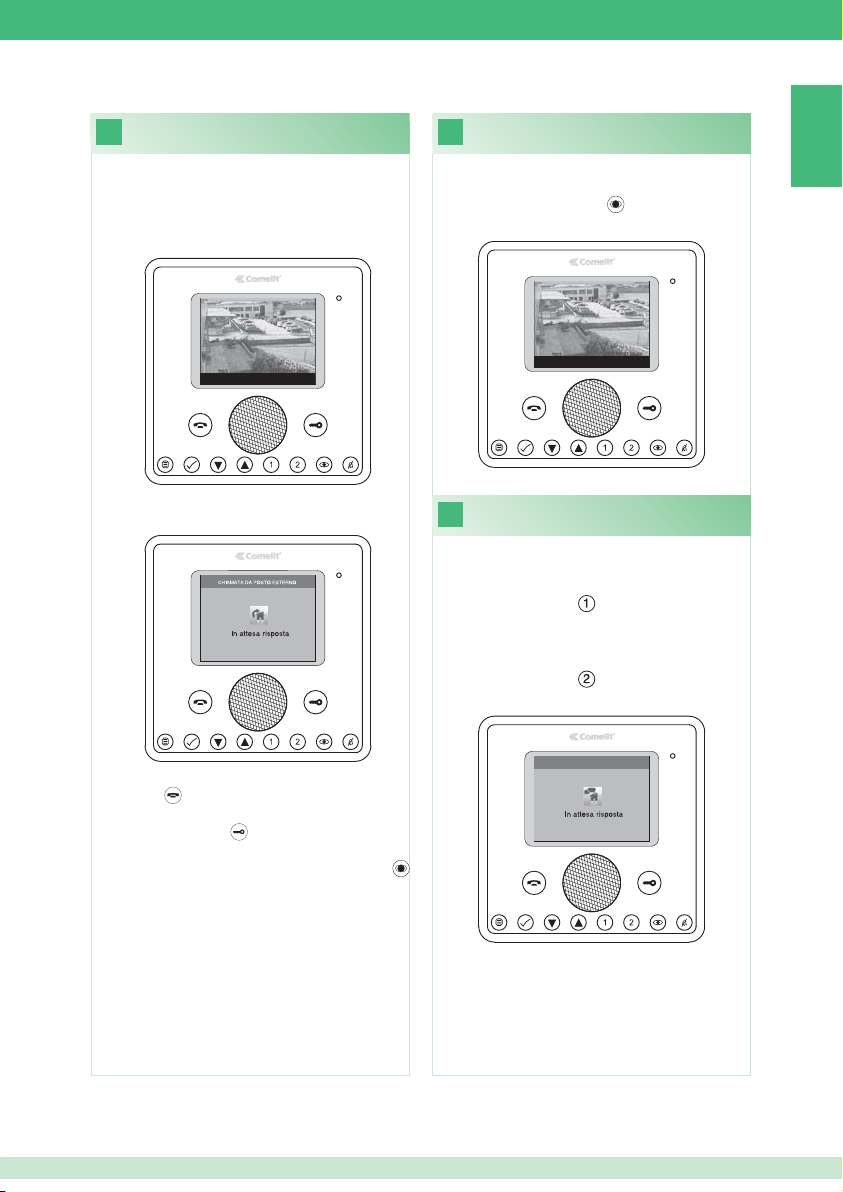
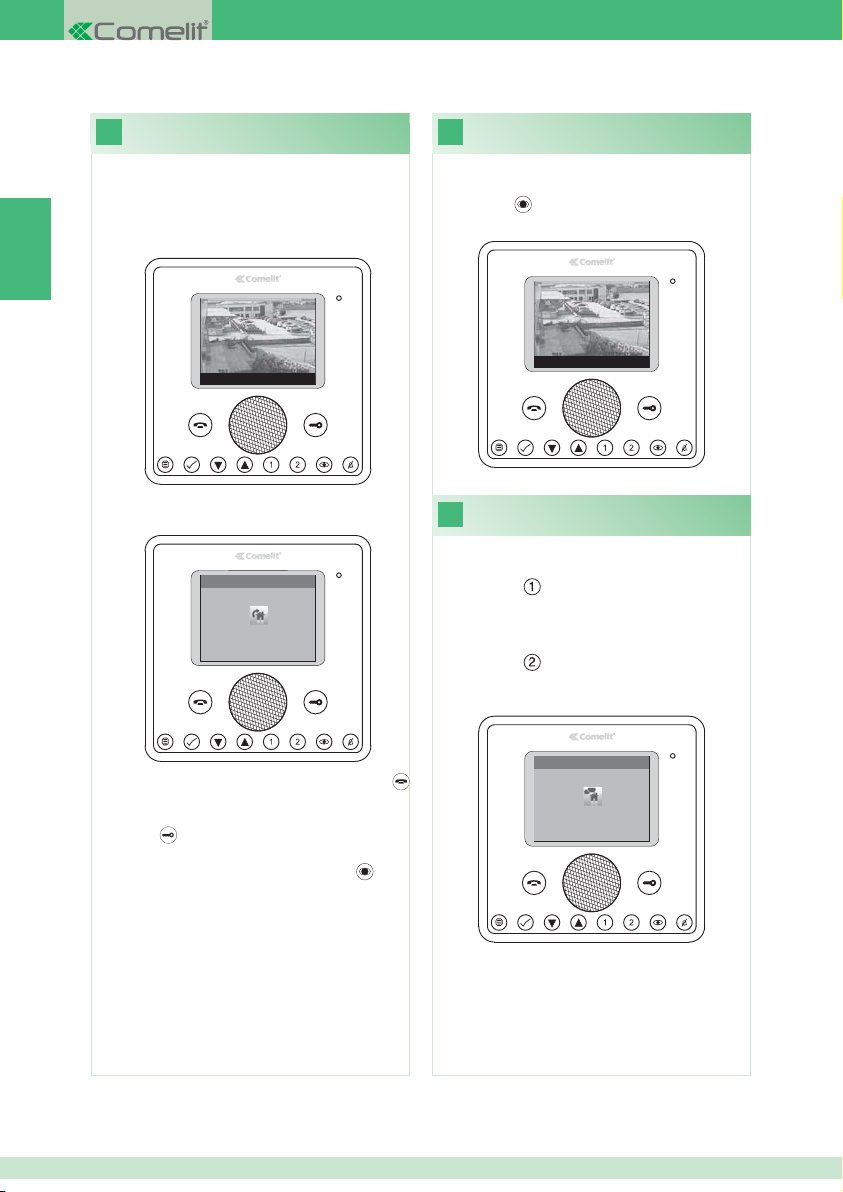
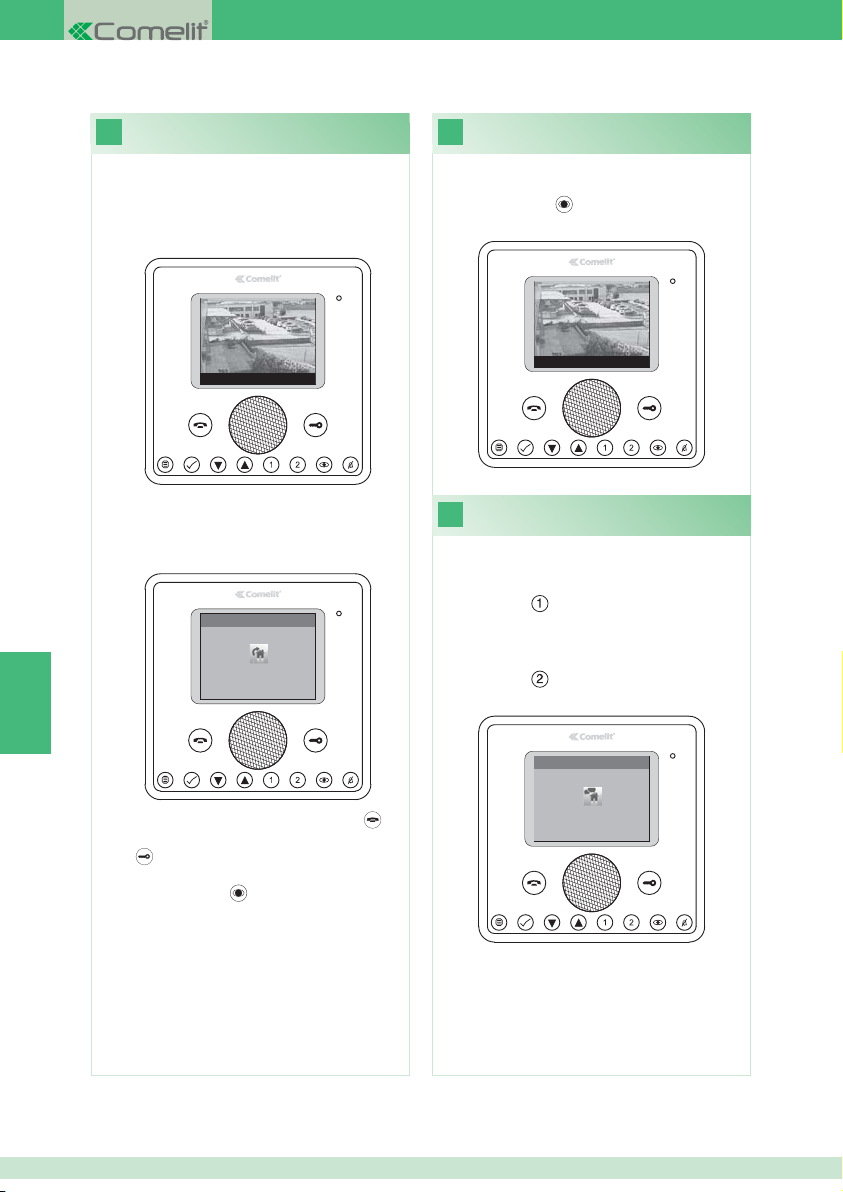
Alla ricezione di una chiamata da posto esterno:
• Nel caso di un monitor principale (MAX 1
per appartamento) viene automaticamente
visualizzata sul monitor l’immagine proveniente
da posto esterno.
Porta 1 : In attesa risposta
• Nel caso di un monitor secondario compare
l’indicazione di una chiamata dal posto esterno.
Port a 1
Con impianto a riposo per visualizzare l’immagine
da posto esterno:
} Premere il pulsante
(se mantenute le
impostazioni di fabbrica).
Porta 1 : In attesa risposta
Effettuare una chiamata
4
intercomunicante con i pulsanti 1 o 2
Per effettuare una chiamata generale interna a
tutti gli apparecchi dello stesso appartamento (se
mantenute le impostazioni di fabbrica):
} Premere il pulsante
Per effettuare una chiamata generale esterna a
tutti gli apparecchi dell’altro appartamento (se
mantenute le impostazioni di fabbrica):
} Premere il pulsante
} Per attivare / disattivare la fonica premere il
pulsante
.
} Per attivare la serratura del posto esterno
premere il pulsante
.
} Per visualizzare l’immagine senza attivare la
fonica con il posto esterno premere il pulsante
(solo monitor secondario).
CHIAMATA INTERCOMUNICANTE
Generale interna
3
Page 4
Impostazione lingua menu Descrizione menu
IT
5
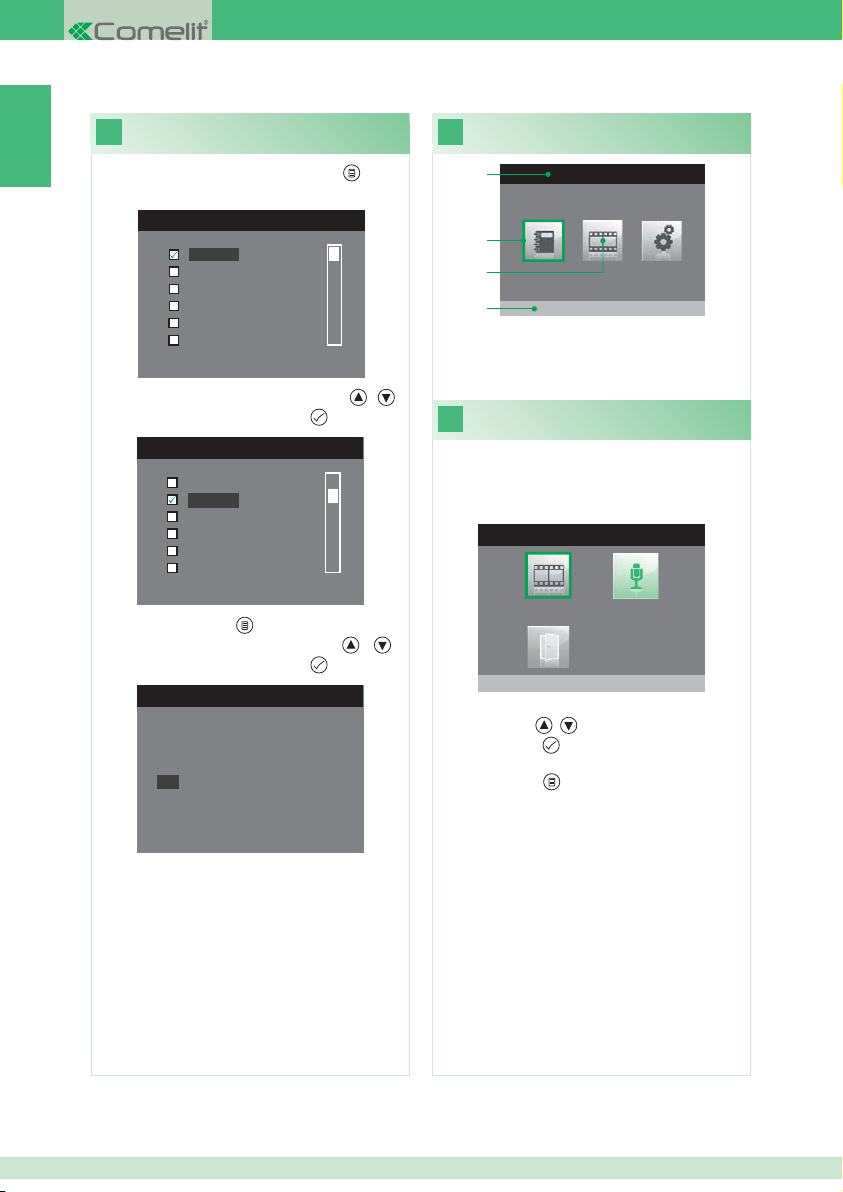
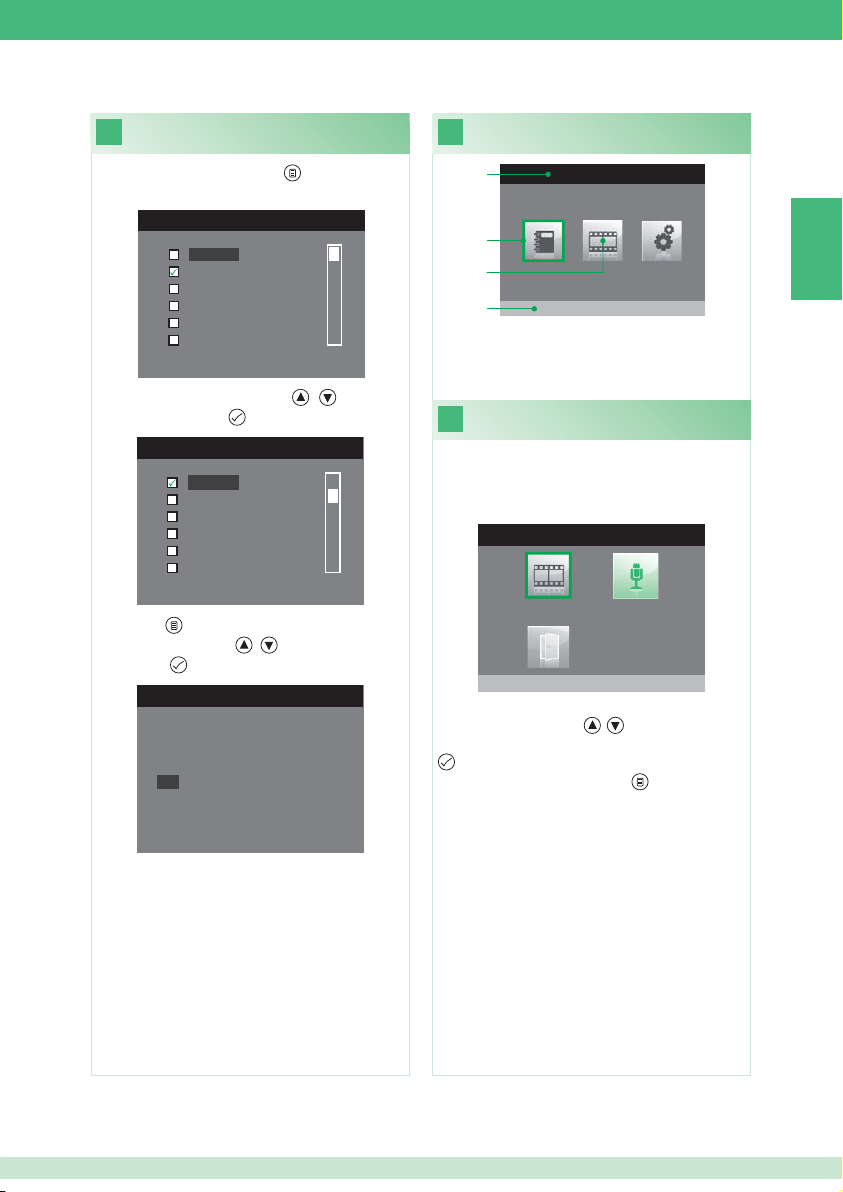
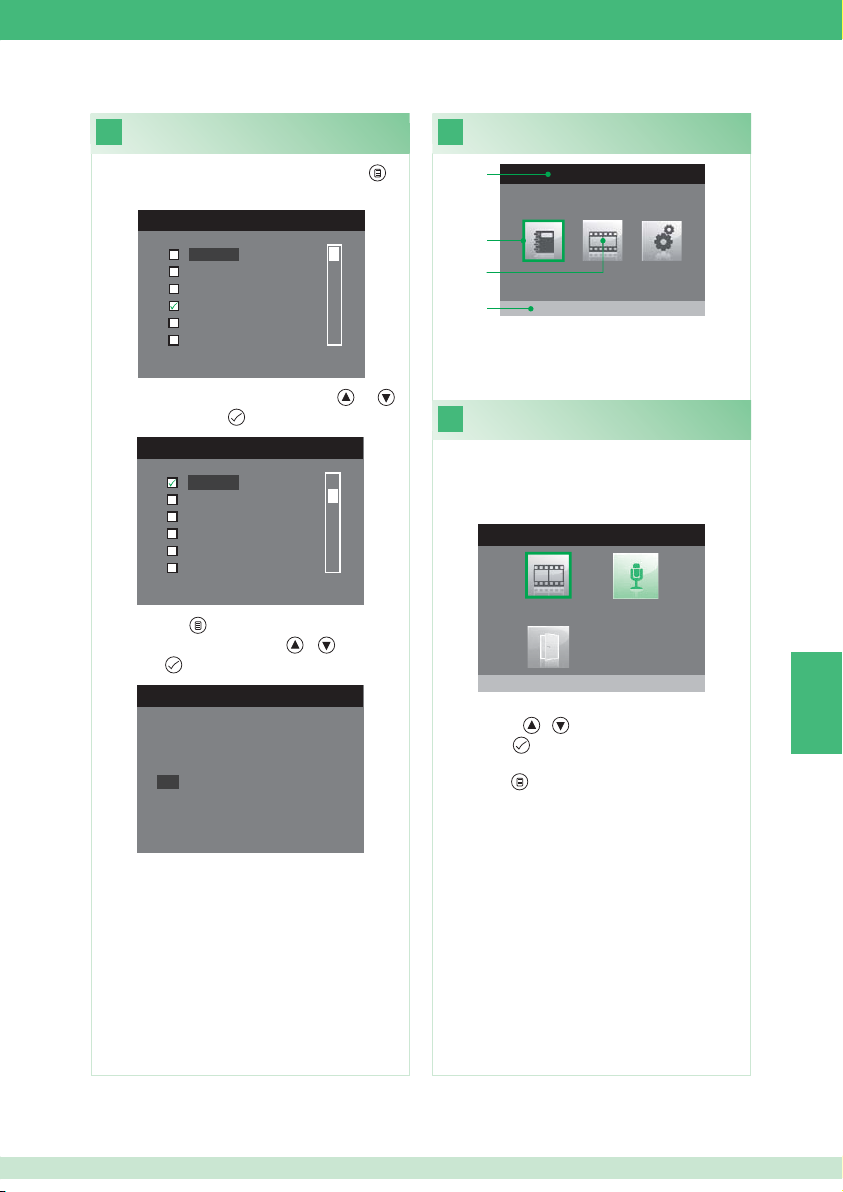
Al primo accesso al menu (pulsante ), viene
richiesto di impostare la lingua di utilizzo.
MENU LINGUE
Italiano
English
Français
Español
Português
Deutsch
1. Selezionare la lingua con i pulsanti
confermare premendo il pulsante
LANGUAGES MENU
Italiano
English
Français
Español
Português
Deutsch
2. Premere il pulsante per uscire.
3. Selezionare “OK” con i pulsanti
confermare premendo il pulsante
English
NO
OK
.
.
, e
, e
6
1
2
3
4
1 Titolo menu attualmente aperto.
2 Cornice indicante il menu selezionato.
3 Icone menu.
4 Titolo menu selezionato.
7
Accessibile solo quando:
• È attiva la funzione Messaggio per assente.
• C’è un nuovo video messaggio in segreteria.
• Porta aperta.
Da questo menu è possibile:
• Con i pulsanti
• Con il pulsante
i video registrati.
• Con il pulsante
MENU PRINCIPALE
Rubrica intercomunicante
Menu di stato
MENU DI STATO
Nuovi messagi presenti
, selezionare le funzioni.
disattivare le funzioni e vedere
tornare al menu principale.
4
Page 5
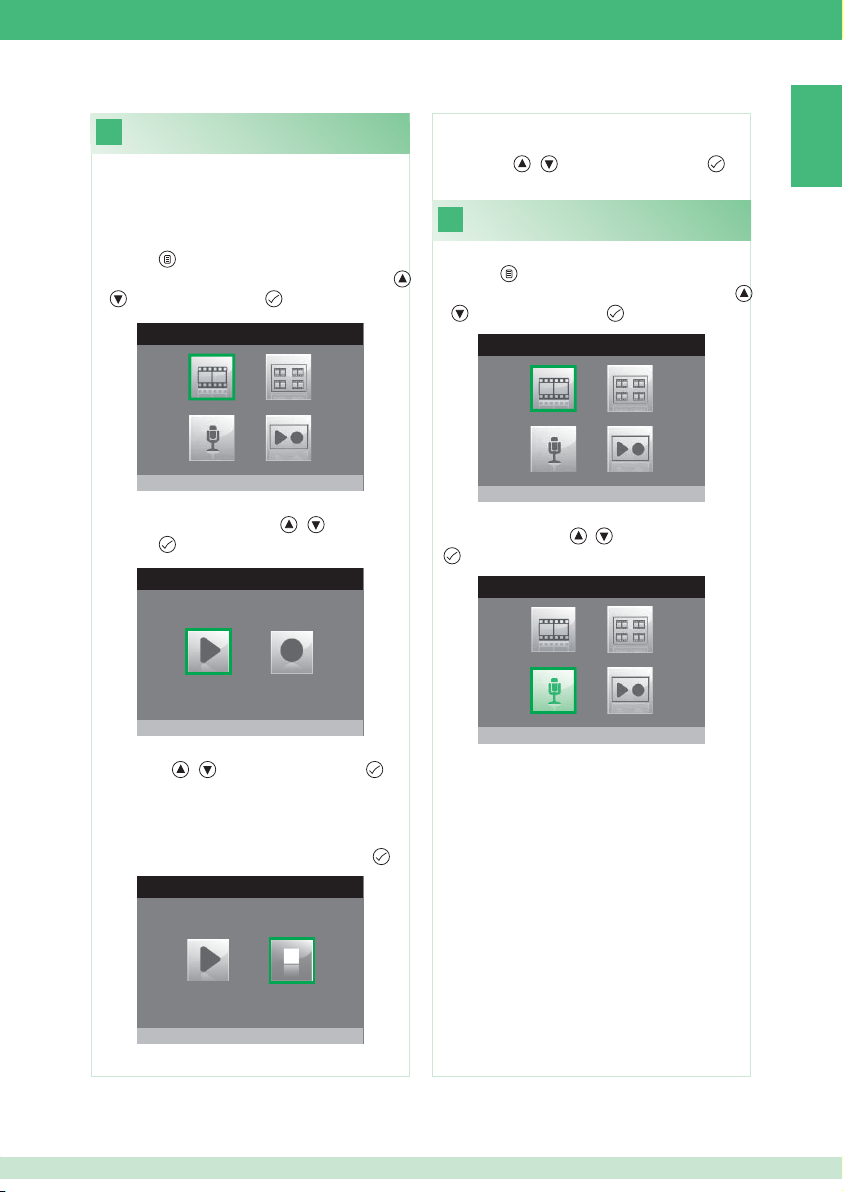
Registrare il messaggio per assente
8
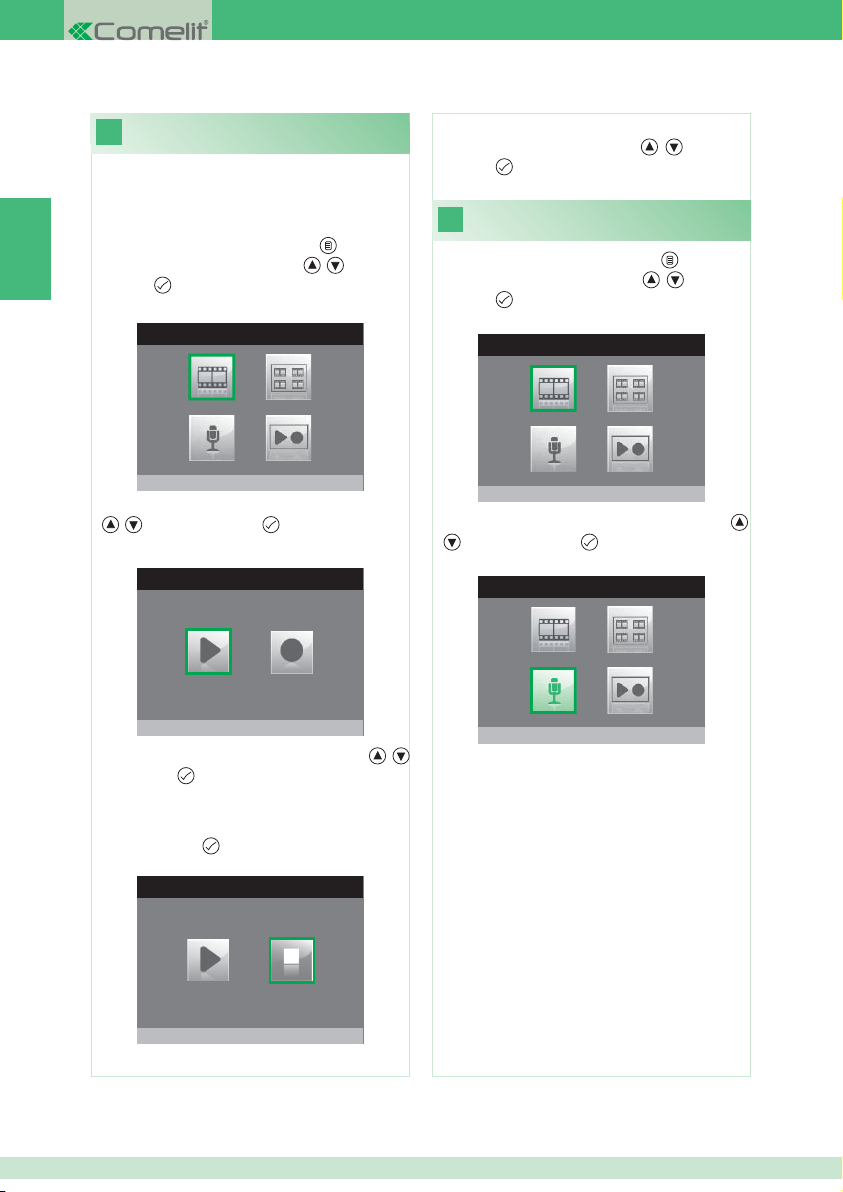
La funzione messaggio per assente, se attivata,
permette di riprodurre un messaggio registrato
sull’altoparlante del posto esterno nel momento in
cui viene inviata una chiamata.
1. Accedere al menu principale premendo il
pulsante
.
2. Selezionare il menu Segreteria con i pulsanti
, e premere il pulsante per accedere.
SEGRETERIA
7. Per riascoltare il messaggio registrato
selezionare l’icona Ascolta registrazione con
i pulsanti , e premere il pulsante per
confermare.
Attivare messaggio per assente
9
1. Accedere al menu principale premendo il
pulsante
.
2. Selezionare il menu Segreteria con i pulsanti
, e premere il pulsante per accedere.
SEGRETERIA
IT
Video segreteria non attiva
3. Selezionare il menu Ascolta registra
messaggio con i pulsanti
pulsante
per accedere.
MESSAGGIO PER ASSENTE
Ascolta registrazione
, e premere il
4. Selezionare l’icona Avvia registrazione con
i pulsanti
, e premere il pulsante per
confermare.
5. Parlare al microfono del monitor per registrare il
messaggio (Max 20 sec.)
6. Per interrompere la registrazione prima dello
scadere dei 20 secondi premere il pulsante
MESSAGGIO PER ASSENTE
Ferma registrazione
.
Video segreteria non attiva
3. Selezionare l’icona Messaggio per assente
OFF con i pulsanti , e premere il pulsante
per confermare.
SEGRETERIA
Messaggio per assente ON
5
Page 6
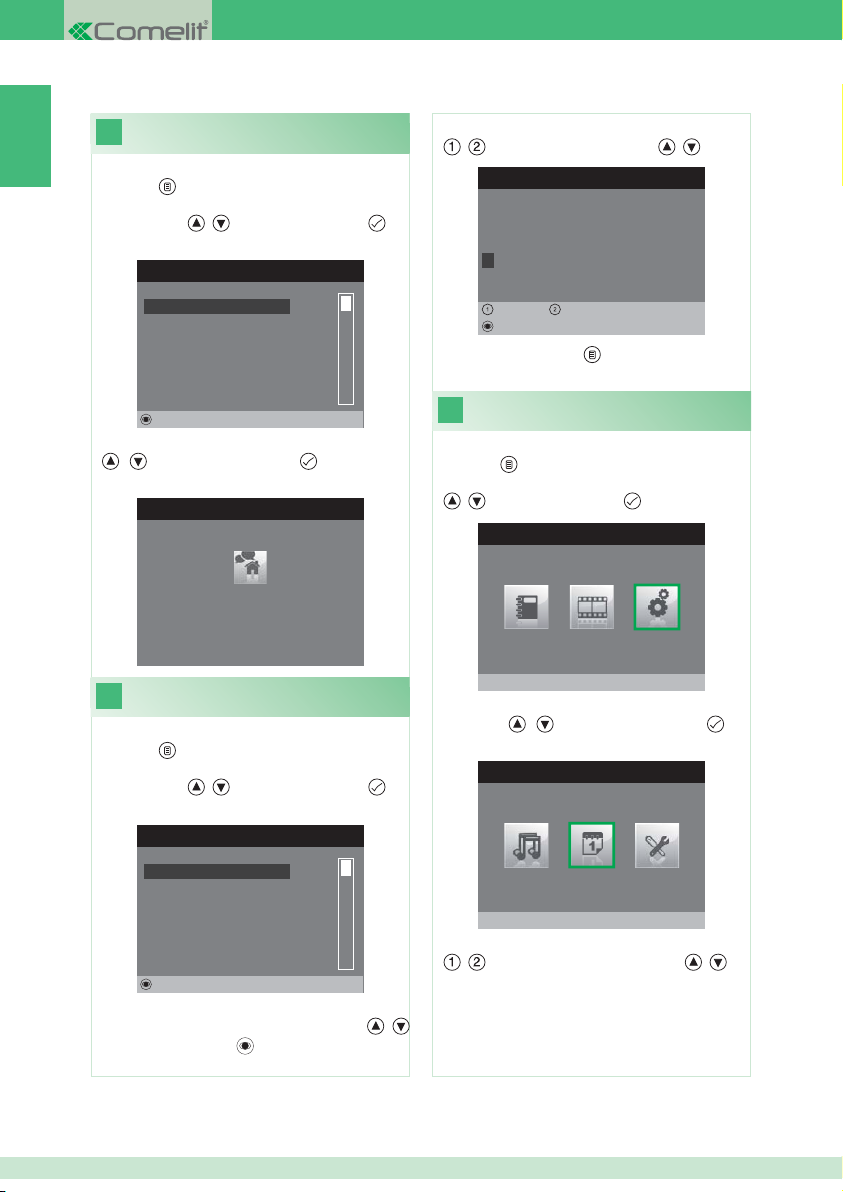
IT
intercomunicante
1. Accedere al menu principale premendo il
pulsante
2. Selezionare il menu Rubrica intercomunicante
con i pulsanti , e premere il pulsante per
accedere.
.
RUBRICA CHIAMATE INTERCOM
Effettuare una chiamata
10
4. Selezionare la lettera desiderata con i pulsanti
, e modifi carla con i pulsanti , .
MODIFICA VOCE
Configura Nome
G E N E R A L E I N T E R N A
GENERALE INTERNA
GENERALE ESTERNA
PRINCIPALE
SECONDARIO 1
SECONDARIO 2
SECONDARIO 3
Modifica
3. Selezionare la voce desiderata con i pulsanti
, e premere il pulsante per inviare la
chiamata.
CHIAMATA INTERCOMUNICANTE
Generale interna
In attesa risposta
Modifi care nome nella rubrica
11
intercomunicante
1. Accedere al menu principale premendo il
pulsante
2. Selezionare il menu Rubrica intercomunicante
con i pulsanti
accedere.
.
, e premere il pulsante per
RUBRICA CHIAMATE INTERCOM
GENERALE INTERNA
GENERALE ESTERNA
PRINCIPALE
SECONDARIO 1
SECONDARIO 2
SECONDARIO 3
Modifica
3. Selezionare la voce della rubrica per cui si
desidera modifi care il nome con i pulsanti
e premere il pulsante
per accedere.
,
Sinistra Destra
Cancella
5. Premere il pulsante
modifi che.
12
1. Accedere al menu principale premendo il
pulsante
2. Selezionare il menu Impostazioni con i pulsanti
3. Selezionare il menu Confi gura data e ora con
i pulsanti
accedere.
4. Selezionare il campo da modifi care con i pulsanti
Impostare data e ora
.
, e premere il pulsante per accedere.
MENU PRINCIPALE
, e premere il pulsante per
MENU IMPOSTAZIONI
Configura data e ora
, e variare il valore con i pulsanti , .
per uscire e salvare le
Impostazioni
6
Page 7
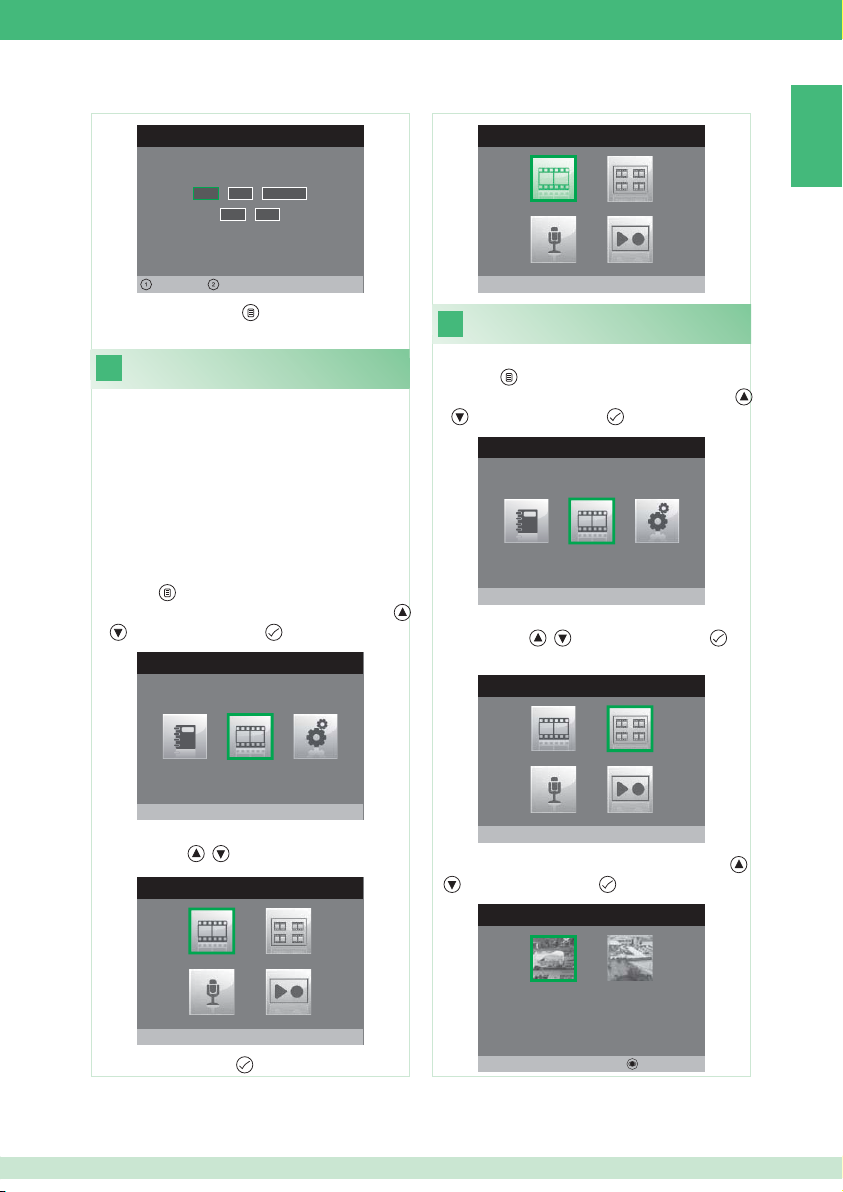
IMPOSTA DATA E ORA
0 2 / 0 2 / 2 0 1 1
1 0: 0 2
SEGRETERIA
IT
Sinistra Destra
5. Premere il pulsante per uscire e salvare le
modifi che.
Attivare video segreteria
13
La funzione video segreteria, se attivata, permette
di registrare l’immagine dal posto esterno nel
momento in cui viene ricevuta una chiamata (Max
8 secondi).
Le registrazioni vengono salvate in formato
.avi nella scheda SD sotto la cartella “video” e
possono essere visualizzate anche su pc con
Windows Media Player. In assenza della scheda
SD le registrazioni vengono salvate nella fl ash del
monitor (Max 8 registrazioni).
1. Accedere al menu principale premendo il
pulsante
.
2. Selezionare il menu Segreteria con i pulsanti
, e premere il pulsante per accedere.
MENU PRINCIPALE
Segreteria
3. Selezionare l’icona Video segreteria non attiva
con i pulsanti , .
SEGRETERIA
Video segreteria attiva
Visualizzare registrazioni
14
della video segreteria
1. Accedere al menu principale premendo il
pulsante
.
2. Selezionare il menu Segreteria con i pulsanti
, e premere il pulsante per accedere.
MENU PRINCIPALE
Segreteria
3. Selezionare l’icona Guarda video messaggi
con i pulsanti
, e premere il pulsante per
accedere.
SEGRETERIA
Guarda video messaggi
4. Selezionare il video desiderato con i pulsanti ,
e premere il pulsante per confermare.
SEGRETERIA
Video segreteria non attiva
4. Premere il pulsante
per attivare.
02/02/2011 10:48
Cancella
7
Page 8
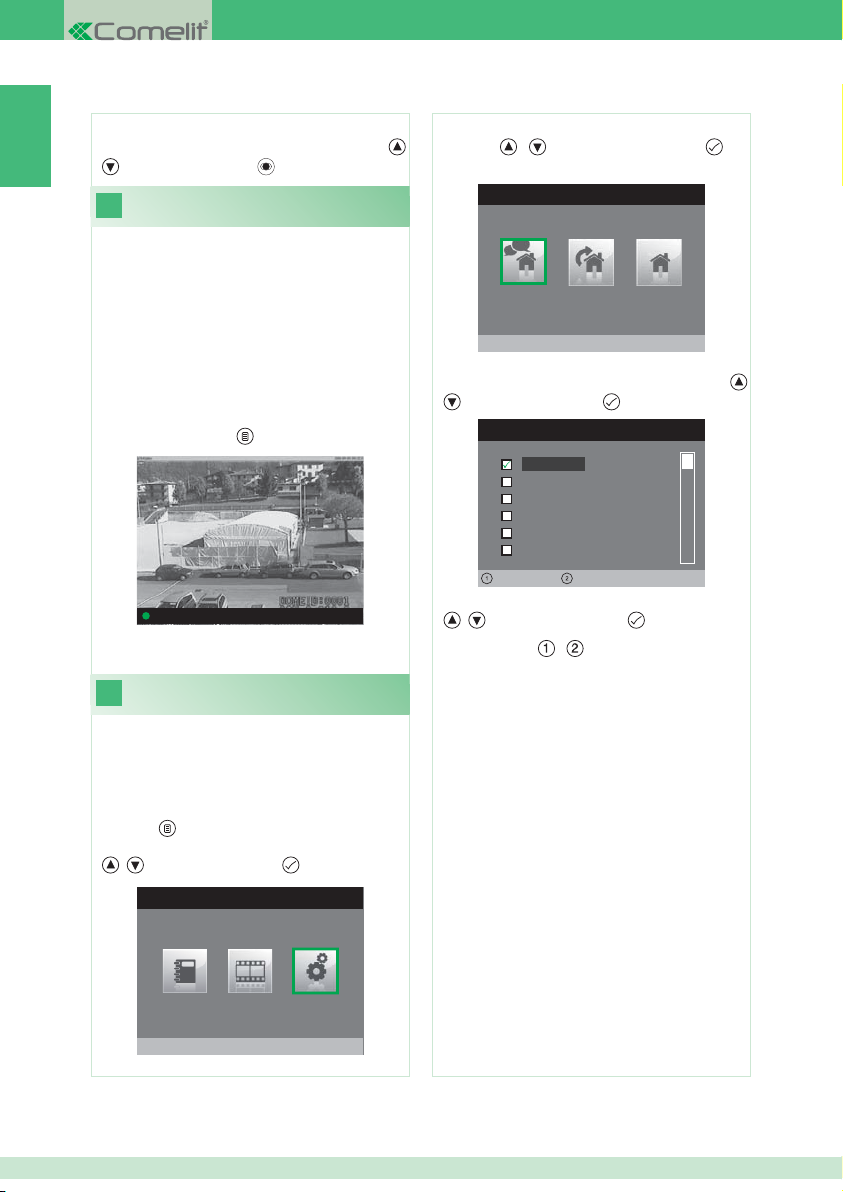
Per cancellare un video:
IT
} Selezionare il video desiderato con i pulsanti
e premere il pulsante per confermare.
15
È possibile registrare manualmente una chiamata
con il posto esterno.
La funzione è disponibile nelle seguenti situazioni:
• Se attivato da un monitor principale la
funzione registrerà sia l’audio che il video.
1. • Se attivato da un monitor secondario, per
registrare l’audio occorre essere in fonica con
il posto esterno
procedura descritta al punto 14.
16
È possibile personalizzare le melodie per:
• Chiamata intercomunicante.
• Chiamata da posto esterno.
• Chiamata fuori porta.
1. Accedere al menu principale premendo il
pulsante
2. Selezionare il menu Impostazioni con i pulsanti
Registrazione manuale
√ Chiamata da posto esterno.
√ Durante Autoaccensione.
} Premere il pulsante
Porta1: In comunicazione
} Per visualizzare i video registrati seguire la
per iniziare a registrare.
Confi gurare melodie
.
, e premere il pulsante per accedere.
MENU PRINCIPALE
3. Selezionare il menu Imposta melodie con i
,
pulsanti
accedere.
4. Selezionare il tipo di chiamata per la quale si
desidera modifi care la melodia con i pulsanti
, e premere il pulsante per
MENU MELODIE
Chiamata intercomunicante
e premere il pulsante per accedere.
MELODIA CHIAMATA INTERCOM
Melodia 1
Melodia 2
Melodia 3
Vibey
Amazing
Bomba
Volume -
5. Selezionare la melodia desiderata con i pulsanti
, e premere il pulsante per confermare.
Con i pulsanti
diminuire il volume della suoneria.
È possibile aggiungere delle suonerie
personalizzate.
√ I fi le devono essere in formato .wav da 8Khz
mono 16 bit.
} Inserire le melodie nella cartella “wav” della
scheda SD per visualizzarle nell’apposito menu.
Volume +
, è possibile aumentare o
,
Impostazioni
8
Page 9
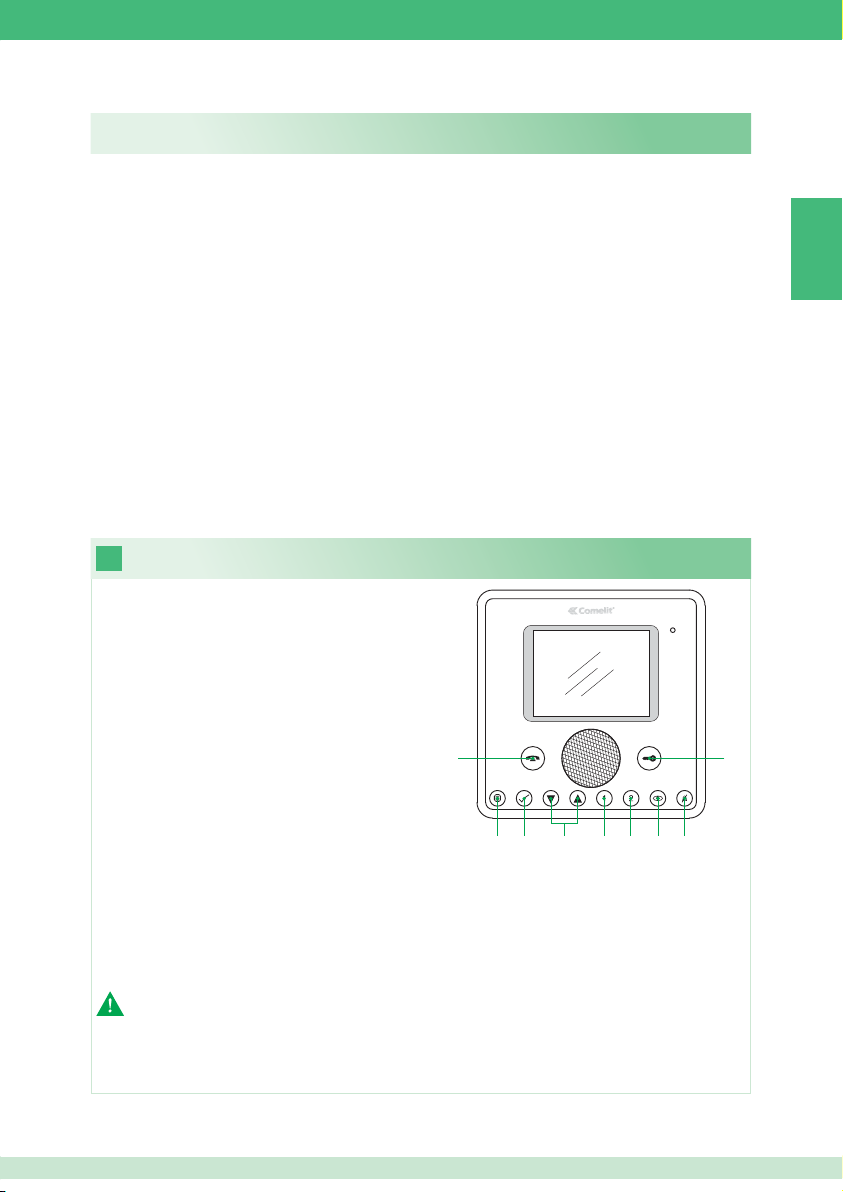
TABLE OF CONTENTS
1. Description of monitor and button door entry functions ................................................................9
2. Answering a call .......................................................................................................................... 10
3. Self-Ignition function.................................................................................................................... 10
4. Making an intercom call using buttons 1 or 2 .............................................................................. 10
5. Setting the menu language ......................................................................................................... 11
6. Description of menu .................................................................................................................... 11
7. Condition menu ........................................................................................................................... 11
8. Recording the absent message .................................................................................................. 12
9. Activating the absent message ...................................................................................................12
10. Changing a name in the intercom directory ................................................................................13
11. Making an intercom call ..............................................................................................................13
12. Setting the date and time ............................................................................................................ 13
13. Activating video memory ............................................................................................................. 14
14. Viewing recordings stored in the video memory .........................................................................14
15. Manual recording ........................................................................................................................ 15
16. Confi guring melodies .................................................................................................................. 15
1
1 Speech button. Enables or disables
conversation.
2 Menu button. Used to access, exit or go up one
level in the menu.
3 Confi rmation button. Confi rms a selection in
the menu.
4 Navigation buttons. For navigating items /
editing values in the menu.
5 Button 1. General Internal Call. *
6 Button 2. General External Call. *
7 Self-Ignition button. *
8 Privacy / Doctor button. *
• The Privacy function mutes the ringtone when
an external unit call or intercom call is received.
• The Doctor function enables automatic activation of the lock release in response to a call from the external unit.
• The Privacy + Doctor function, apart from disabling the ringtone as in the Privacy function, enables automatic
activation of the lock release in response to a call from the external unit.
9 Door Lock button. Used to activate the door lock associated with the external unit. *
* Programmable, contact your usual installer.
NOTE: The door entry functions associated with the buttons are only available when the menu is switched off.
Description of monitor and button door entry functions
1
23 4 56 78
EN
9
Caution! In order to reduce the risk of faults and electric shocks:
• Do not open the apparatus or carry out any repairs yourself. If necessary, request the services of qualifi ed personnel.
• Do not insert objects or pour liquids into the device.
• Clean using a damp cloth. Do not use alcohol or other aggressive products.
9
Page 10
2
Answering a call
3
Self-Ignition function
When a call is received from the external unit:
• In the case of a main monitor (MAX 1 per apartment), the
image from the external unit is automatically displayed on
the monitor.
EN
Door 1: Waiting for reply
• In the case of a secondary monitor, the device indicates
that a call has been received from the external unit.
EXTERNAL UNIT CALL
Door 1
Waiting for reply
When the system is in standby, to display the image from
the external unit:
} Press the
button (if the factory settings have been
kept).
Door 1: Waiting for reply
Making an intercom call using
4
buttons 1 or 2
To make a general internal call to all devices in the same
apartment (if the factory settings have been kept):
} Press button
To make a general external call to all devices in another
apartment (if the factory settings have been kept):
} Press button
} To enable / disable audio communication press the
button.
} To activate the door lock associated with the external unit
press the
button.
} To display the image without activating audio
communication with the external unit press the
(secondary monitor only).
10
button
INTERCOM CALL
General internal
Waiting for Reply
Page 11
Setting the menu language
5
6
Description of menu
When you fi rst access the menu ( button), you will be
asked to set the language.
LANGUAGES MENU
Italiano
English
Français
Español
Português
Deutsch
1. Select the language using the
confi rm by pressing the
button.
MENU LINGUE
, buttons and
Italiano
English
Français
Español
Português
Deutsch
2. Press the button to exit.
3. Select “OK” using the
pressing the
button.
, buttons and confi rm by
Italiano
NO
OK
1
2
3
4
MAIN MENU
Intercom Directory
1 Title of currently open menu.
2 Frame indicating selected menu.
3 Menu icons.
4 Title of selected menu.
7
Condition menu
Can only be accessed when:
• The Absent Message function is activated.
• There is a new video message in the memory.
• Door open.
CONDITION MENU
New Messages in Video Memory
From this menu it is possible to:
• Select functions using the
, buttons.
• Deactivate functions and watch recorded video using the
buttons.
• Return to the main menu using the
button.
EN
11
Page 12
Recording the absent message
8
The Absent Message function, if activated, can be used
to play a recorded message over the loudspeaker of the
external unit when a call is sent.
1. Access the main menu by pressing the
EN
2. Select the Memory menu using the
press the
button to access it.
MEMORY MENU
button.
, buttons and
7. To listen to the recorded message select the Listen
Recorded Message icon using the
press the
9
button to confi rm.
Activating the absent message
, buttons and
1. Access the main menu by pressing the button.
2. Select the Memory menu with the
press the
button to access it.
MEMORY MENU
, buttons and
Video Memory OFF
3. Select the Listen recorded message menu using the
, buttons and press the button to access it.
ABSENT MESSAGE
Listen Recorded Message
4. Select the Record Message icon using buttons
and press the
button to confi rm.
,
5. Speak into the monitor’s microphone to record the
message (max 20 secs)
6. To stop the recording before the 20 seconds have
elapsed, press the
button.
ABSENT MESSAGE
Stop Recording
Video Memory OFF
3. Select the Absent Message OFF button using the ,
buttons and press the button to confi rm.
MEMORY MENU
Absent Message ON
12
Page 13
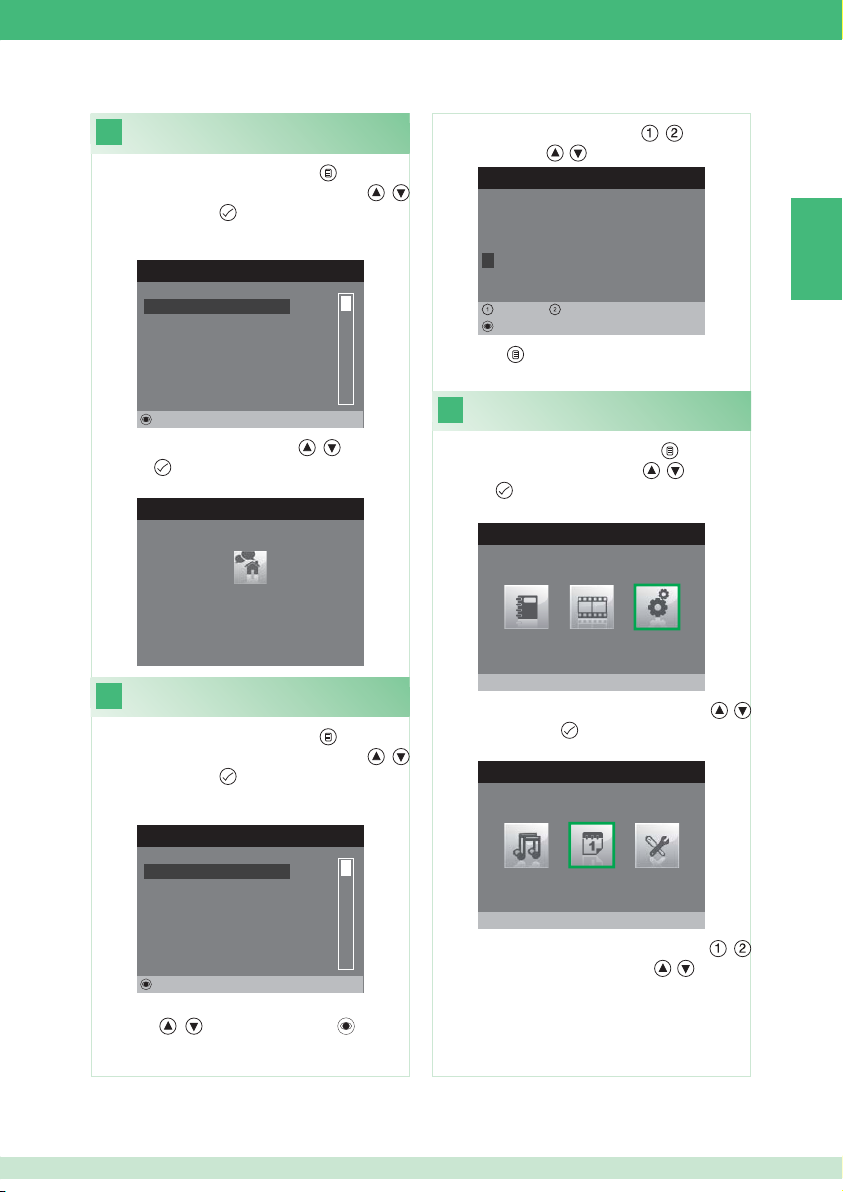
10
1. Access the main menu by pressing the button.
2. Select the Intercom Directory menu with the ,
Making an intercom call
buttons and press the
INTERCOM DIRECTORY
button to access it.
4. Select the desired letter using the , buttons and
change it using the
, buttons.
MODIFY NAME
Configure name
G E N E R A L I N T E R N A L
EN
GENERAL INTERNAL
GENERAL EXTERNAL
MAIN
SECONDARY 1
SECONDARY 2
SECONDARY 3
Modify
3. Select the desired item using the
press the
11
1. Access the main menu by pressing the button.
2. Select the Intercom Directory menu with the
buttons and press the
button to send the call.
INTERCOM CALL
GENERAL INTERNAL
Waiting for Reply
Changing a name in the
intercom directory
button to access it.
INTERCOM DIRECTORY
GENERAL INTERNAL
GENERAL EXTERNAL
, buttons and
,
MAIN
SECONDARY 1
SECONDARY 2
SECONDARY 3
Modify
3. Select the directory item whose name you want to edit
using the
access it.
, buttons and press the button to
Left Right
Delete
5. Press the
12
1. Access the main menu by pressing the button.
2. Select the Settings menu with the
press the
3. Select the Date & Time Settings menu with the ,
buttons and press the
4. Select the fi eld that you want to edit using the
buttons and change the value using the
button to exit and save the changes.
Setting the date and time
, buttons and
button to access it.
MAIN MENU
Settings
button to access it.
SETTINGS MENU
Date & Time Settings
,
, buttons.
13
Page 14
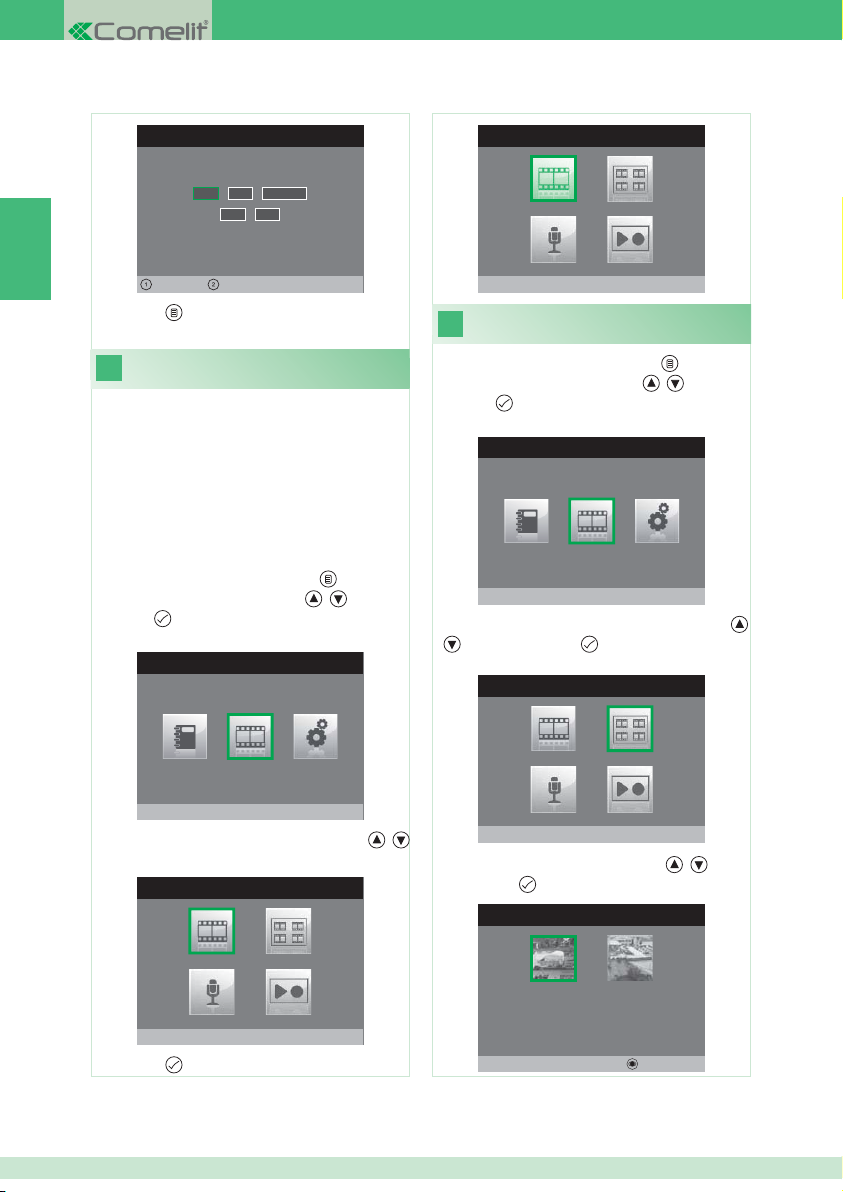
SET DATE & TIME
0 2 / 0 2 / 2 0 1 1
1 0: 0 2
EN
Left Right
5. Press the button to exit and save the changes.
Activating video memory
13
The video memory function, if activated, can be used
to record the image from the external unit when a call is
received (max 8 seconds).
Recordings are saved in .avi format on the SD card, in
the "video" folder, and may also be viewed on a PC using
Windows Media Player. If there is no SD card the recordings
will be saved in the fl ash memory of the monitor (max 8
records).
MEMORY MENU
Video Memory ON
Viewing recordings stored
14
in the video memory
1. Access the main menu by pressing the button.
2. Select the Memory menu with the
press the
button to access it.
MAIN MENU
, buttons and
1. Access the main menu by pressing the button.
2. Select the Memory menu with the
press the
button to access it.
MAIN MENU
Memory menu
, button and
3. Select the Video Memory OFF icon using the ,
buttons.
MEMORY MENU
Video Memory OFF
4. Press the
button to activate the function.
Memory menu
3. Select the Watch video messages icon using the
buttons and press the button to access it.
MEMORY MENU
Watch video messages
4. Select the desired recording using the
and press the
button to confi rm.
MEMORY MENU
02/02/2011 10:48
, buttons
Delete
,
14
Page 15
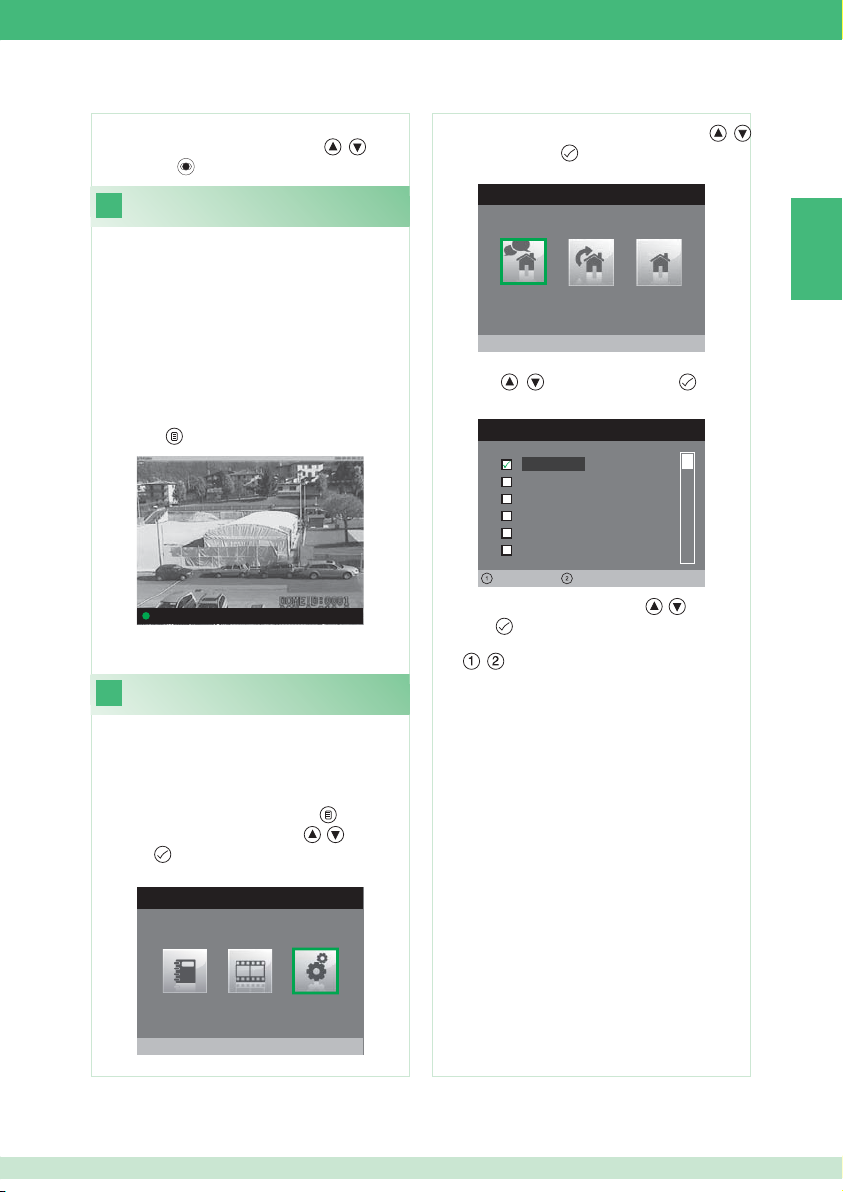
To delete a video recording:
} Select the desired recording using the
and press the
15
It is possible to manually record a call with the external unit.
The function is available in the following situations:
√ External unit call.
√ During self-ignition.
• If activated from a main monitor, the function will
record both audio and video.
• If activated from a secondary monitor, to record audio
it is necessary to be in communication with the external
unit,
} Press the
} To display recorded video follow the procedure described
in point 14.
16
It is possible to customise the melodies for:
• Intercom call.
• External unit call.
• Floor door call.
1. Access the main menu by pressing the button.
2. Select the Settings menu using the
press the
button to confi rm.
Manual recording
button to start recording.
Door 1: Call connected
Confi guring melodies
button to access it.
, buttons
, buttons and
3. Select the Melodies Settings menu using the
buttons and press the
4. Select the type of call whose melody you want to change
using the
access it.
, buttons and press the button to
INTERCOM CALL MELODIES
button to access it.
MELODIES MENU
Intercom Call
,
Melody 1
Melody 2
Melody 3
Vibey
Amazing
Bomba
Volume -
5. Select the desired melody using the
press the
The , buttons can be used to increase or decrease
the ringtone volume.
Customised ringtones may be added.
√ Files must be 8 Khz mono 16 bit, in .wav format.
} Place the melodies in the "wav" folder on the SD card to
display them in the relevant menu.
button to confi rm.
Volume +
, buttons and
EN
MAIN MENU
Settings
15
Page 16
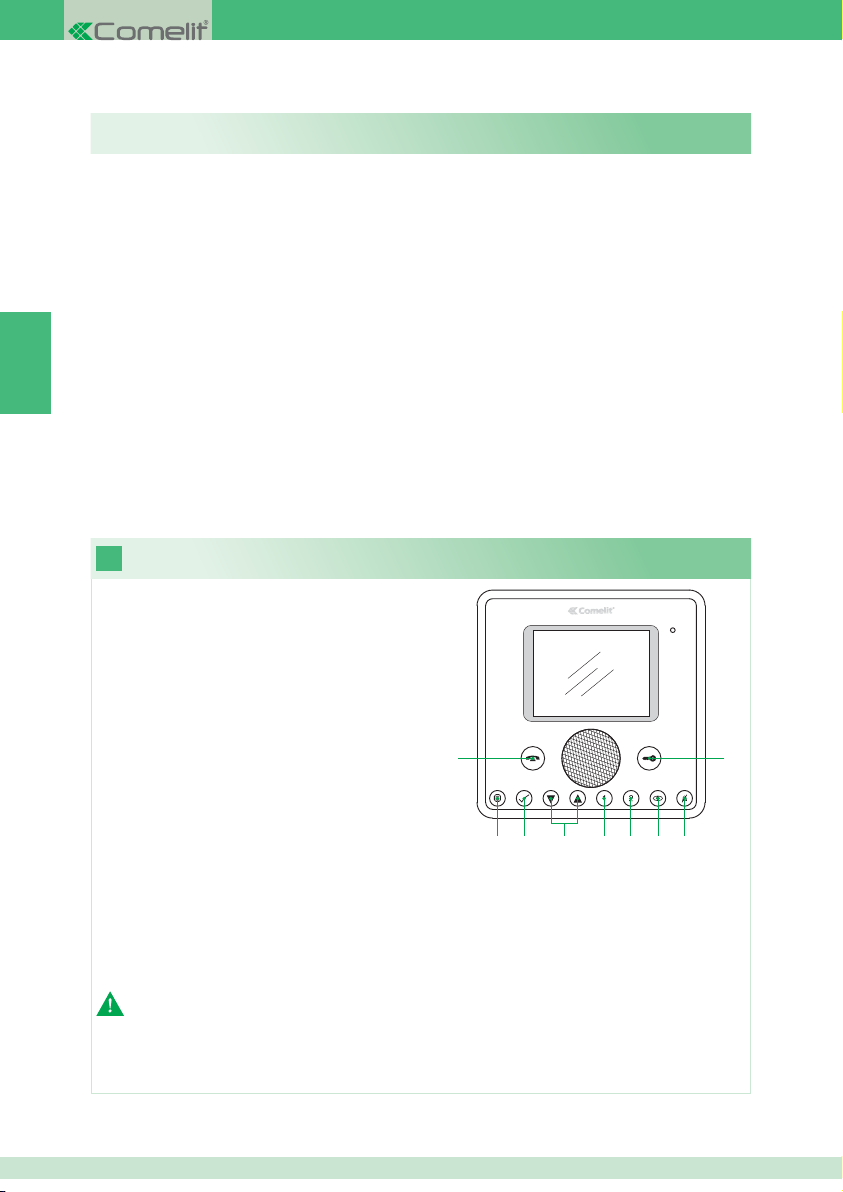
SOMMAIRE
1. Description moniteur et fonction parlophonique des touches ..................................................... 16
2. Répondre à un appel................................................................................................................... 17
3. Fonction d’Auto-allumage ............................................................................................................ 17
4. Effectuer un appel intercommunicant avec les touches 1 ou 2 ................................................... 17
5. Confi guration de la langue du menu ...........................................................................................18
6. Description du menu ................................................................................................................... 18
7. Menu d'état ................................................................................................................................. 18
8. Enregistrer le message pour absent ........................................................................................... 19
9. Activer message pour absent ...................................................................................................... 19
FR
10. Modifi er un nom dans le répertoire appels intercommunicants .................................................. 20
11. Effectuer un appel intercommunicant .......................................................................................... 20
12. Confi gurer la date et l’heure ....................................................................................................... 20
13. Activer vidéo répondeur .............................................................................................................. 21
14. Affi cher les enregistrements vidéo répondeur ............................................................................. 21
15. Enregistrement manuel ............................................................................................................... 22
16. Confi gurer les mélodies .............................................................................................................. 22
1
1 Touche phonie. Permet d'activer ou de désactiver
la conversation.
2 Touche menu. Permet d'accéder au menu, de
sortir du menu et de monter d'un niveau dans le
menu.
3 Touche confi rmation. Permet de confi rmer une
sélection dans le menu.
4 Touches navigation. Permettent de naviguer /
modifi er les valeurs dans le menu.
5 Touche 1. Appel général interne. *
6 Touche 2. Appel général externe. *
7 Touche Auto-allumage. *
8 Touche Privacy / Docteur. *
• La fonction Privacy permet d'exclure la sonnerie
sur appel du poste externe et intercommunicant.
• La fonction Docteur permet l'activation automatique de l'ouvre-porte sur appel du poste externe.
• La fonction Privacy + Docteur permet non seulement de désactiver la sonnerie comme dans la fonction Privacy, mais
aussi d'activer automatiquement l'ouvre-porte sur appel du poste externe.
9 Touche Gâche. Permet d'activer la gâche du poste externe. *
* Programmable, s'adresser à un installateur de confi ance.
N.B. : Les fonctions parlophoniques des touches ne sont disponibles que menu éteint.
Description moniteur et fonction parlophonique des touches
1
23 4 56 78
9
Attention ! Afi n de réduire le risque de pannes et les électrocutions :
• Ne pas ouvrir l'appareil ni effectuer personnellement les réparations. En cas de nécessité, demander l'intervention de
techniciens spécialisés.
• Ne jamais introduire d'objets ni verser des liquides à l'intérieur du dispositif.
• Nettoyer avec un chiffon humidifi é avec de l'eau. Éviter d'utiliser de l'alcool ou d'autres produits agressifs.
16
Page 17
2
Répondre à un appel
Fonction d'Auto-allumage
3
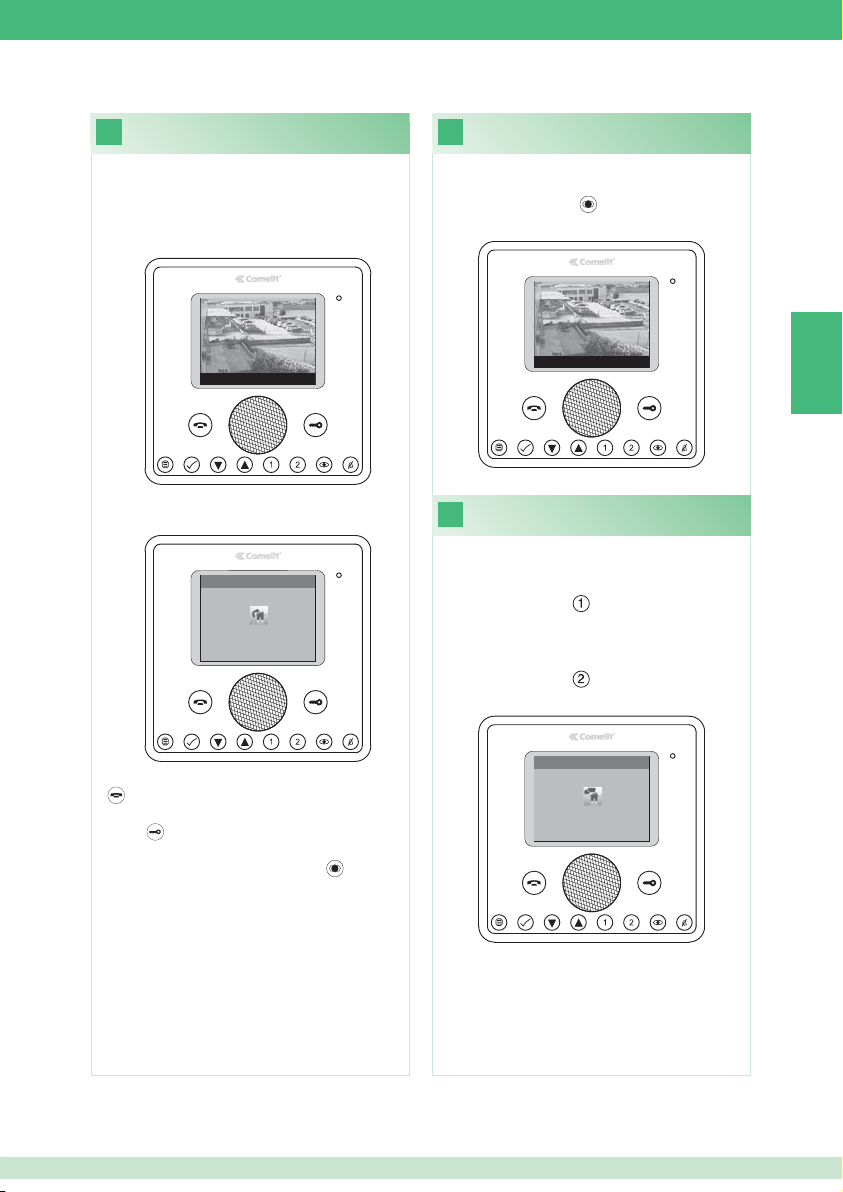
À la réception d'un appel du poste externe :
• Dans le cas d'un moniteur principal (1 par appartement
au maximum), l'image provenant du poste externe est
automatiquement visualisée sur le moniteur.
Porte 1: En attente de réponse
• Dans le cas d'un moniteur secondaire, l'indication d'un
appel du poste externe apparaît alors.
APPEL DU POSTE EXTERNE
Port e 1
En attente de réponse
Pour visualiser l'image à partir du poste externe, l'installation
étant au repos :
} Appuyer sur la touche
(si les paramétrages d'usine
sont maintenus).
Porte 1: En attente de réponse
Effectuer un appel intercommunicant
4
avec les touches 1 ou 2
Pour effectuer un appel général interne à tous les appareils
du même appartement (si les paramétrages d'usine sont
maintenus) :
} Appuyer sur la touche
Pour effectuer un appel général externe à tous les appareils
de l'autre appartement (si les paramétrages d'usine sont
maintenus) :
} Appuyer sur la touche
FR
} Pour activer / désactiver la phonie, appuyer sur la touche
.
} Pour activer la gâche du poste externe, appuyer sur la
.
touche
} Pour visualiser l'image sans activer la phonie avec le
poste externe, appuyer sur la touche
(seulement
moniteur secondaire).
APPEL INTERCOMMUNICANT
General interne
En Attente de Réponse
17
Page 18
Confi guration de la langue du menu Description du menu
5
6
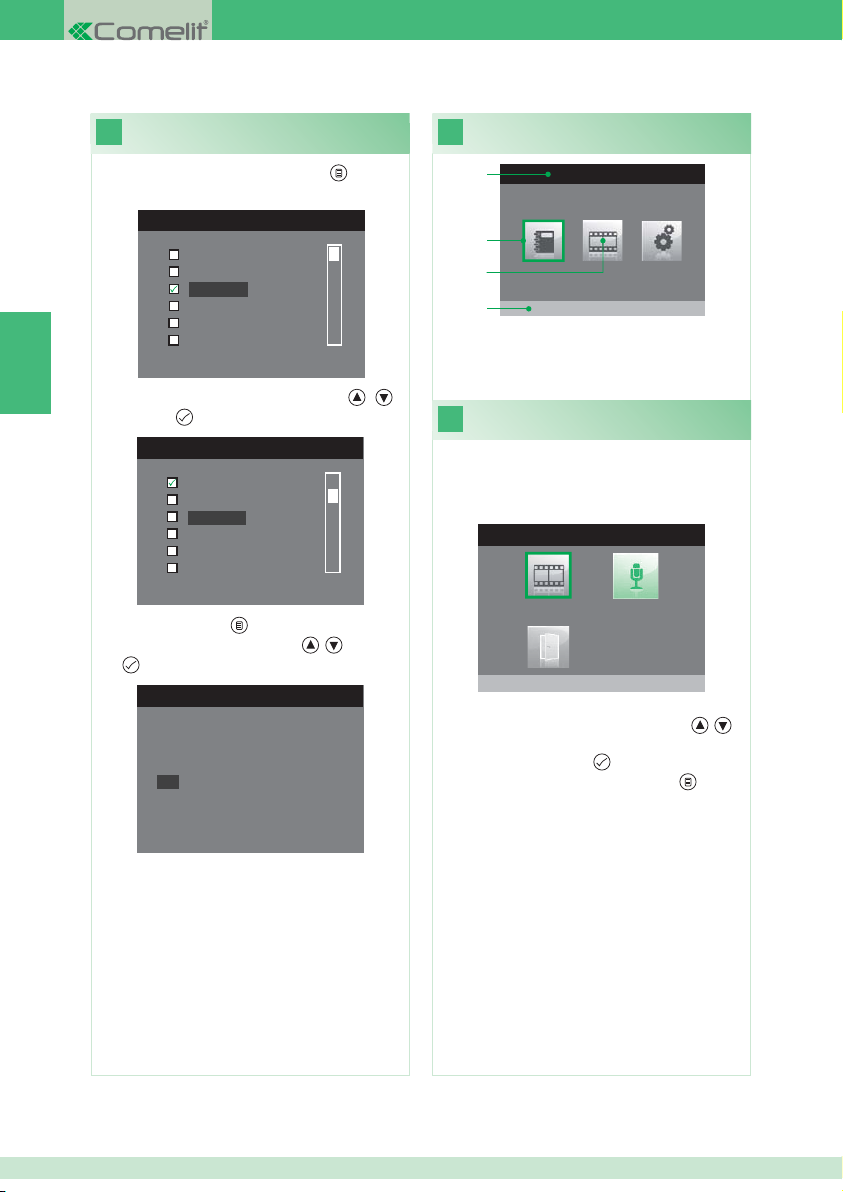
Lors du premier accès au menu (touche ), choisir la
langue que l'on désire utiliser.
MENU LANGUE
Italiano
English
Français
Español
Português
Deutsch
FR
1. Sélectionner la langue avec les touches
confi rmer par
2. Appuyer sur la touche pour sortir.
3. Sélectionner “OK” avec les touches
par
.
MENU LINGUE
Italiano
English
Français
Español
Português
Deutsch
.
Français
NO
OK
, et
, et confi rmer
1
2
3
4
MENU PRINCIPAL
Repertoire Intercommunicant
1 Titre du menu actuellement ouvert.
2 Bordure (cadre) indiquant le menu sélectionné.
3 Icône menu.
4 Titre du menu sélectionné.
7
Menu d'état
Accessible seulement quand :
• La fonction Message pour absent est active (ON).
• Un nouveau message vidéo est enregistré dans le répondeur.
• Porte ouverte.
MENU D’ETAT
Nouveaux Messages Présents
À partir de ce menu, il est possible :
• De sélectionner les fonctions avec les touches
, .
• De désactiver les fonctions et regarder les vidéos
enregistrées avec la touche
• De revenir au menu principal avec la touche
.
.
18
Page 19
Enregistrer le message pour absent
8
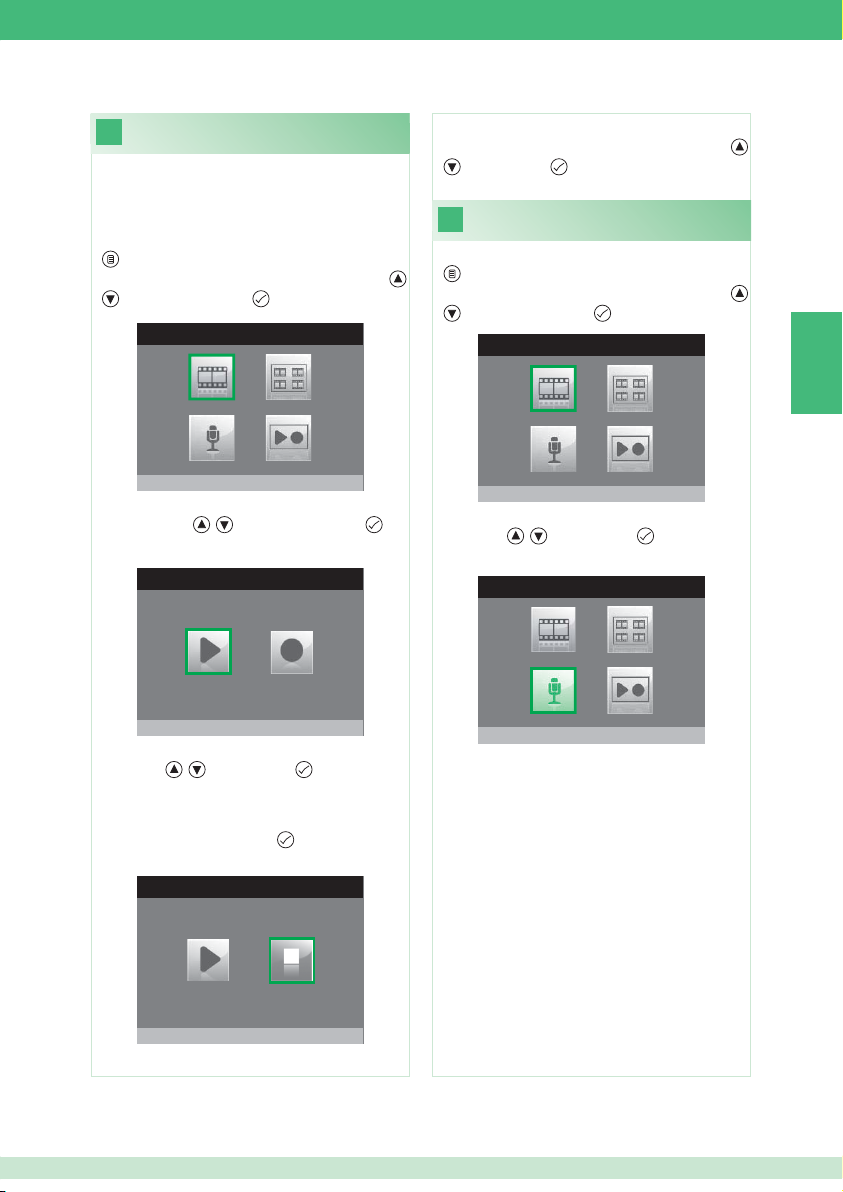
La fonction message pour absent, si active, permet de
reproduire un message sur l'haut-parleur du poste externe
lorsqu'un appel est envoyé.
1. Accéder au menu principal en appuyant sur la touche
.
2. Sélectionner le menu Répondeur avec les touches
et appuyer sur la touche pour y accéder.
REPONDEUR
7. Pour réécouter le message enregistré, sélectionner
l'icône Écouter l'enregistrement avec les touches ,
et confi rmer par .
Activer message pour absent
9
1. Accéder au menu principal en appuyant sur la touche
.
,
2. Sélectionner le menu Répondeur avec les touches
et appuyer sur la touche pour y accéder.
REPONDEUR
,
FR
Vidéo répondeur OFF
3. Sélectionner le menu Écouter enregistrer message
avec les touches
, et appuyer sur la touche pour
y accéder.
MESSAGE POUR ABSENT
Ecouter l'enregistrement
4. Sélectionner l'icône Démarrer l'enregistrement avec
les touches
, et confi rmer par .
5. Parler au microphone du moniteur pour enregistrer le
message (20 s au maximum)
6. Pour interrompre l'enregistrement avant le délai de 20
secondes, appuyer sur la touche
MESSAGE POUR ABSENT
Arrêter l'enregistrement
.
Vidéo répondeur OFF
3. Sélectionner l'icône Message pour absent OFF avec
les touches , et confi rmer par .
REPONDEUR
Message pour absent ON
19
Page 20
10
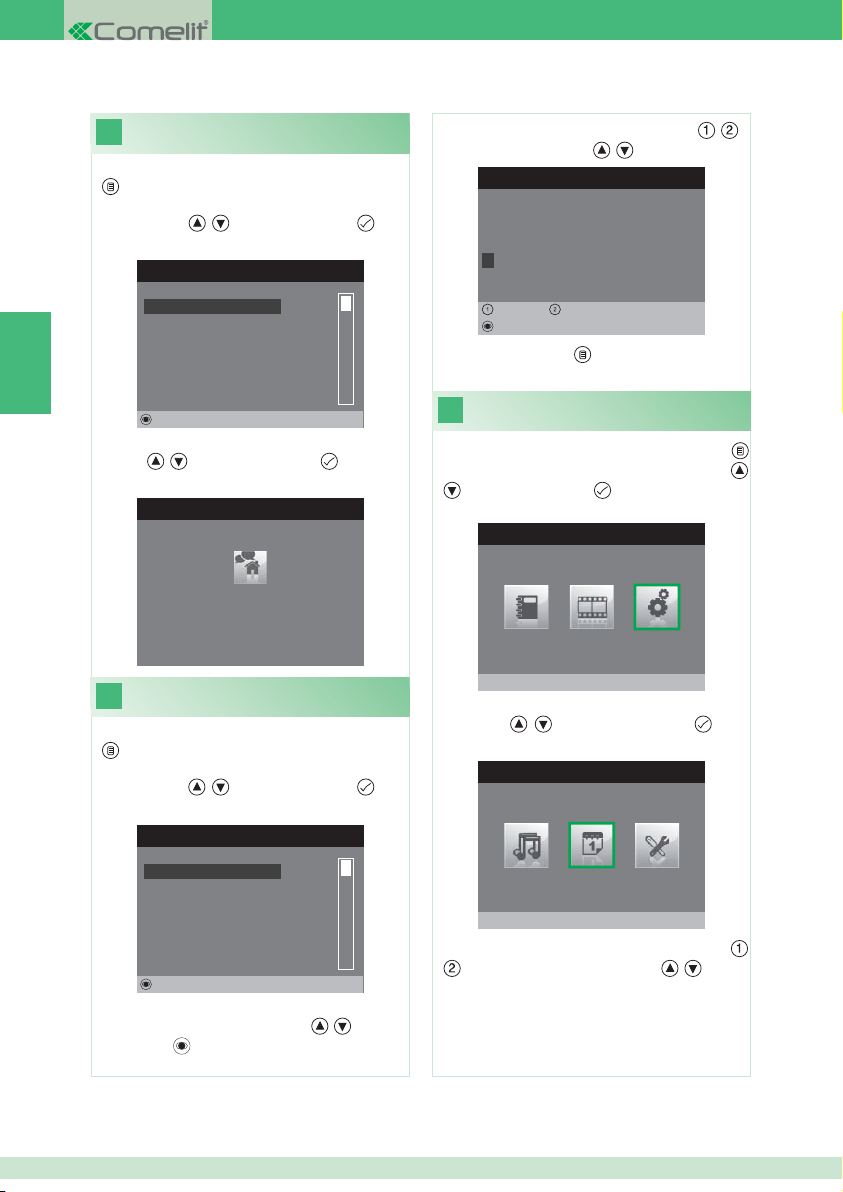
1. Accéder au menu principal en appuyant sur la touche
2. Sélectionner le menu Répertoire appels intercommunicants
avec les touches
accéder.
Effectuer un appel
intercommunicant
.
, et appuyer sur la touche pour y
REPERT. APPELS INTERCOM
4. Sélectionner la lettre désirée avec les touches
la modifi er avec les touches
CHANGER ELEMENT
, .
Configurer nom
G E N E R A L I N T E R N E
, et
GENERAL INTERNE
GENERAL EXTERNE
PRINCIPAL
SECONDAIRE 1
FR
SECONDAIRE 2
SECONDAIRE 3
Modifier
3. Sélectionner la rubrique (l’élément) désirée avec les
touches
l'appel.
11
1. Accéder au menu principal en appuyant sur la touche
2. Sélectionner le menu Répertoire appels intercommunicants
avec les touches
accéder.
, et appuyer sur la touche pour envoyer
APPEL INTERCOMMUNICANT
General interne
En Attente de Réponse
Modifi er un nom dans le répertoire
appels intercommunicants
.
, et appuyer sur la touche pour y
REPERT. APPELS INTERCOM
GENERAL INTERNE
GENERAL EXTERNE
PRINCIPAL
SECONDAIRE 1
SECONDAIRE 2
SECONDAIRE 3
Modifier
3. Sélectionner la rubrique (l'élément) du répertoire dont on
désire modifi er le nom avec les touches
sur la touche
pour y accéder.
, et appuyer
Gauche Droit
Effacer
5. Appuyer sur la touche
modifi cations.
Confi gurer la date et l’heure
12
1. Accéder au menu principal en appuyant sur la touche .
2. Sélectionner le menu Réglages avec les touches ,
et appuyer sur la touche pour y accéder.
3. Sélectionner le menu Confi gurer date et heure avec
les touches
accéder.
4. Sélectionner le champ à modifi er avec les touches
et modifi er la valeur avec les touches , .
, et appuyer sur la touche pour y
Configurer Date et Heure
pour sortir et sauvegarder les
MENU PRINCIPAL
Réglages
MENU REGLAGES
,
20
Page 21
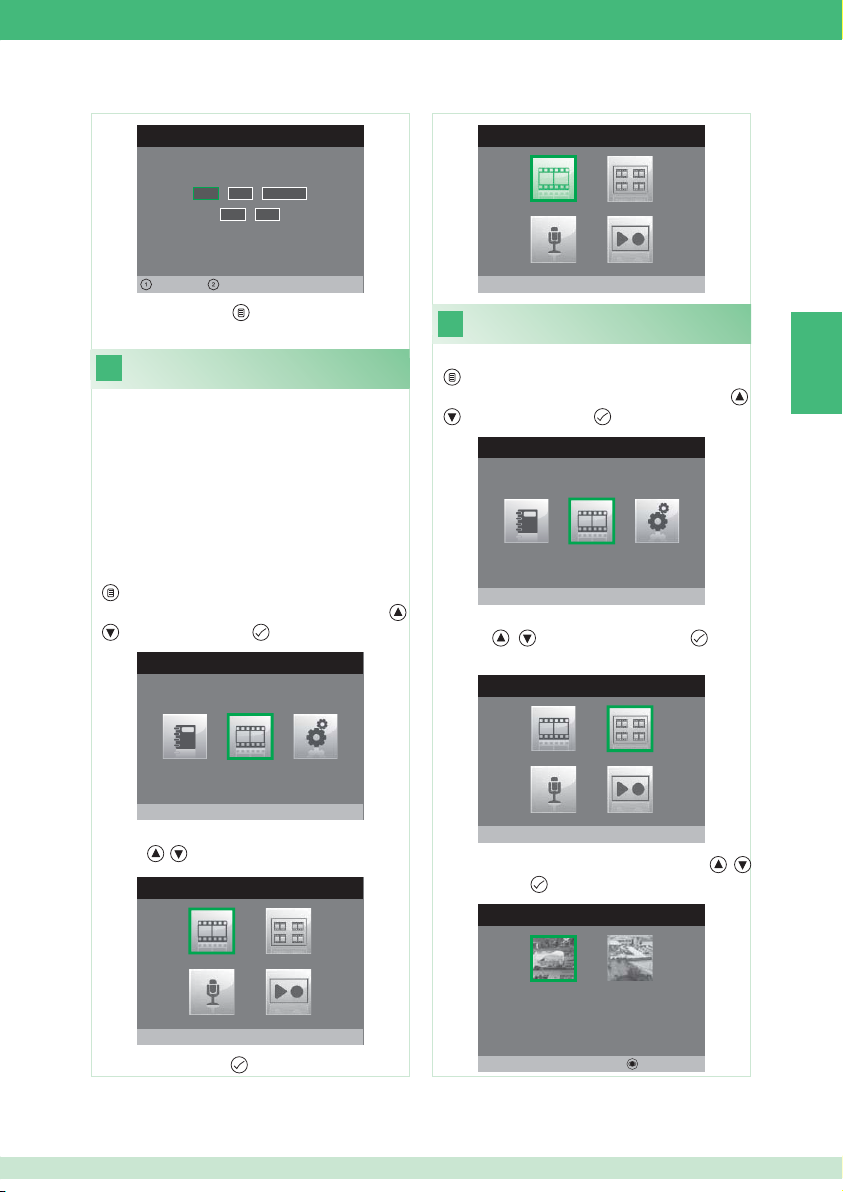
CONFIGURER DATE ET HEURE
0 2 / 0 2 / 2 0 1 1
1 0: 0 2
REPONDEUR
Gauche Droit
5. Appuyer sur la touche pour sortir et sauvegarder les
modifi cations.
13
Activer vidéo répondeur
La fonction vidéo répondeur, si ON, permet d'enregistrer
l'image depuis le poste externe lorsqu'un appel est envoyé
(8 secondes au maximum).
Les enregistrements sont sauvegardés en format .avi dans
la carte SD du dossier "video" et ils peuvent être également
affi chés sur un PC avec Windows Media Player. À défaut
de la carte SD, les enregistrements sont sauvegardés
dans la mémoire fl ash du moniteur (8 enregistrements au
maximum).
1. Accéder au menu principal en appuyant sur la touche
.
2. Sélectionner le menu Répondeur avec les touches
et appuyer sur la touche pour y accéder.
MENU PRINCIPAL
Repondeur
3. Sélectionner l'icône vidéo répondeur OFF avec les
touches , .
REPONDEUR
Vidéo répondeur ON
Affi cher les enregistrements
14
vidéo répondeur
1. Accéder au menu principal en appuyant sur la touche
.
2. Sélectionner le menu Répondeur avec les touches
et appuyer sur la touche pour y accéder.
MENU PRINCIPAL
Repondeur
,
3. Sélectionner l'icône Voir vidéo messages avec les
touches
, et appuyer sur la touche pour y
accéder.
REPONDEUR
Voir vidéo messages
4. Sélectionner la vidéo désirée avec les touches ,
et confi rmer par
.
REPONDEUR
FR
,
Vidéo répondeur OFF
4. Appuyer sur la touche
pour activer.
02/02/2011 10:48
Effacer
21
Page 22
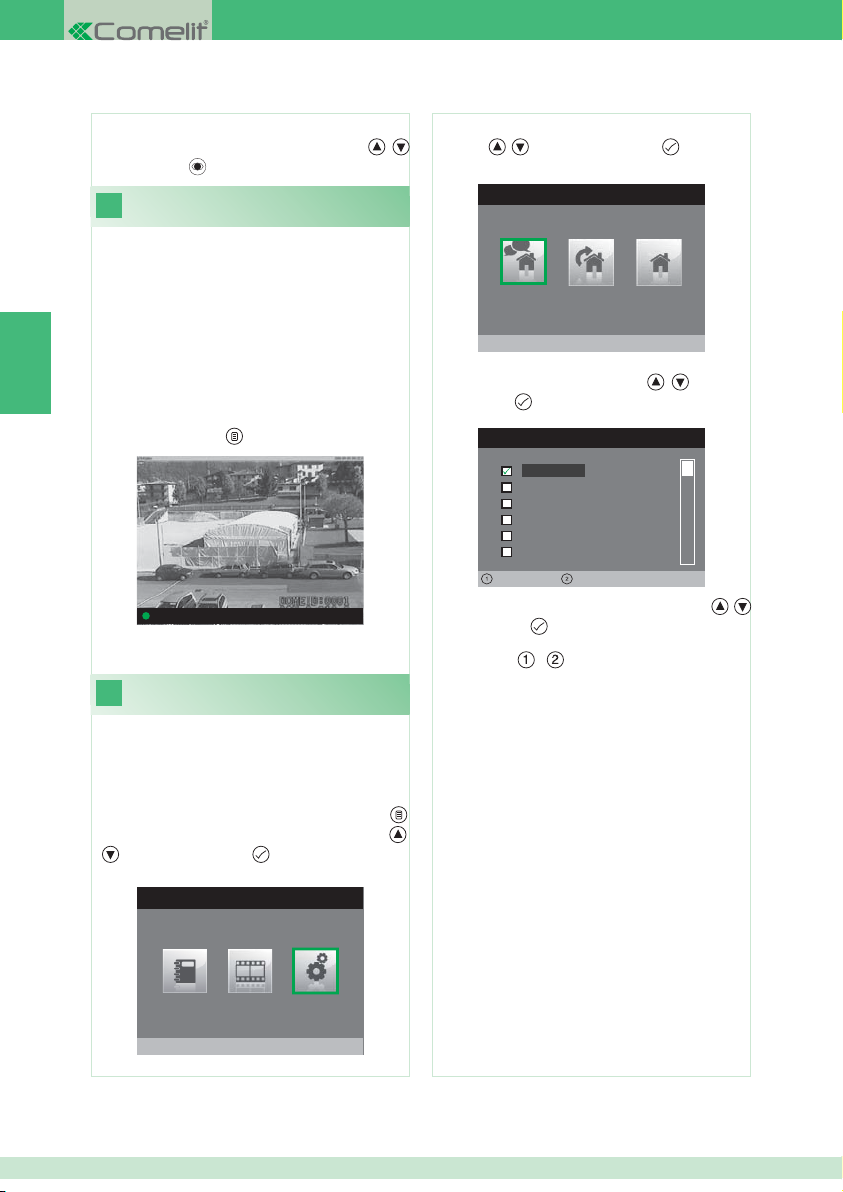
Pour effacer une vidéo :
} Sélectionner la vidéo désirée avec les touches
et confi rmer par
15
.
Enregistrement manuel
Il est possible d'enregistrer manuellement un appel avec le
poste externe.
La fonction est disponible dans les situations suivantes :
√ Appel du poste externe.
√ Pendant l'auto-allumage.
• Si activée à partir d'un moniteur principal, la fonction
enregistrera tant l'audio que la vidéo.
FR
• Si activée à partir d'un moniteur secondaire, le
poste externe devra être mis en phonie pour pouvoir
enregistrer l'audio,
} Appuyer sur la touche pour commencer à enregistrer.
Porte 1: En communication
} Pour affi cher les vidéos enregistrées, suivre la procédure
décrite au point 14.
16
Confi gurer les mélodies
Il est possible de personnaliser les mélodies pour :
• Appel intercommunicant.
• Appel du poste externe
• Appel palier.
1. Accéder au menu principal en appuyant sur la touche .
2. Sélectionner le menu Réglages avec les touches
et appuyer sur la touche pour y accéder.
3. Sélectionner le menu Confi gurer mélodies avec les
,
touches
, et appuyer sur la touche our accéder.
MENU MELODIES
Appel Intercommunicant
4. Sélectionner le type d'appel pour lequel on désire
modifi er la mélodie avec les touches
sur la touche
pour y accéder.
MELODIE APPEL INTERCOM
Melodie 1
Melodie 2
Melodie 3
Vibey
Amazing
Bomba
Volume -
Volume +
5. Sélectionner la mélodie désirée avec les touches
et confi rmer par
Les touches
.
, permettent d'augmenter ou de
diminuer le volume de la sonnerie.
Il est possible d'ajouter des sonneries personnalisées.
√ Les fi chiers doivent être en format .wav de 8Khz mono
16 bits.
} Saisir les mélodies dans le dossier "wav" de la carte SD
pour les affi cher dans le menu spécial.
,
, et appuyer
,
22
MENU PRINCIPAL
Réglages
Page 23
INHOUD
1. Beschrijving van de monitor en deurtelefoonfuncties van de knoppen ....................................... 23
2. Een oproep beantwoorden .......................................................................................................... 24
3. Beeldoproepfunctie ..................................................................................................................... 24
4. Een intercomoproep uitvoeren met de knoppen 1 of 2 ............................................................... 24
5. Taalinstelling menu ...................................................................................................................... 25
6. Menubeschrijving ........................................................................................................................ 25
7. Menu Bedrijfsstatus..................................................................................................................... 25
8. Het afwezigheidsbericht opnemen .............................................................................................. 26
9. Afwezigheidsbericht inschakelen ................................................................................................ 26
10. Een intercomoproep uitvoeren .................................................................................................... 27
11. Een naam in het namenregister van de intercom wijzigen .......................................................... 27
12. Datum en tijd instellen ................................................................................................................. 27
13. Het videogeheugen inschakelen ................................................................................................. 28
14. Opnamen van het videogeheugen weergeven ............................................................................ 28
15. Handmatige opname ................................................................................................................... 29
16. Beltonen confi gureren .................................................................................................................29
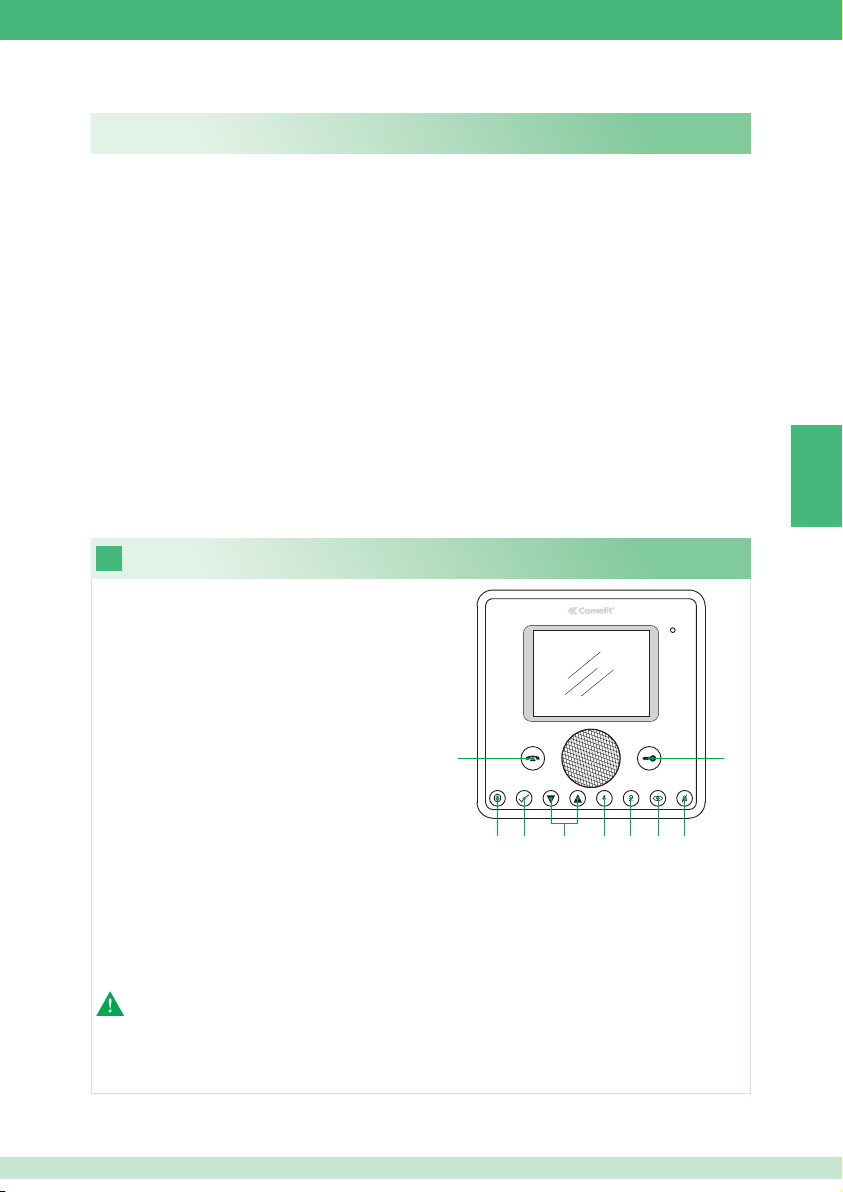
Beschrijving van de monitor en deurtelefoonfuncties van de knoppen
1
1 Spreekknop. Hiermee kan het gesprek in- of
uitgeschakeld worden.
2 Menuknop. Hiermee kan een menu geopend
of afgesloten worden, of kan naar een hoger
menuniveau worden gegaan.
3 Bevestigingsknop. Hiermee kan een selectie in een
menu bevestigd worden.
4 Navigatieknoppen. Hiermee is het mogelijk te
navigeren / waarden te wijzigen in het menu.
5 Drukknop 1. Algemene interne oproep. *
6 Drukknop 2. Algemene externe oproep. *
7 Drukknop Beeldoproep. *
8 Drukknop Privacy / Arts. *
• Met de privacyfunctie kan de beltoon vanaf
het entreepaneel en van de intercomoproep
uitgeschakeld worden.
• Met de artsfunctie kan de deuropener automatisch in werking treden bij een oproep vanaf het entreepaneel.
• Met de privacy- en artsfunctie kan, naast de uitschakeling van de beltoon zoals bij de privacyfunctie, de deuropener
automatisch in werking treden bij een oproep vanaf het entreepaneel.
9 Drukknop Slot. Hiermee kan het slot van het entreepaneel worden ingeschakeld. *
* Programmeerbaar, wend u tot uw installateur.
N. B. De intercomfuncties van de knoppen zijn alleen beschikbaar als het menu uitgezet is.
1
23 4 56 78
NL
9
Let op! Neem het volgende in acht om het risico van storingen en elektrische schokken tot een minimum te beperken:
• Maak het toestel niet open en voer niet zelf reparaties uit. Schakel indien nodig gekwalifi ceerd personeel in.
• Voorkom het binnendringen van vreemde voorwerpen of vloeistoffen in de toestellen.
• Reinigen met een met water bevochtigde doek. Vermijd het gebruik van alcohol en andere agressieve producten.
23
Page 24
Een oproep beantwoorden
2
3
Beeldoproepfunctie
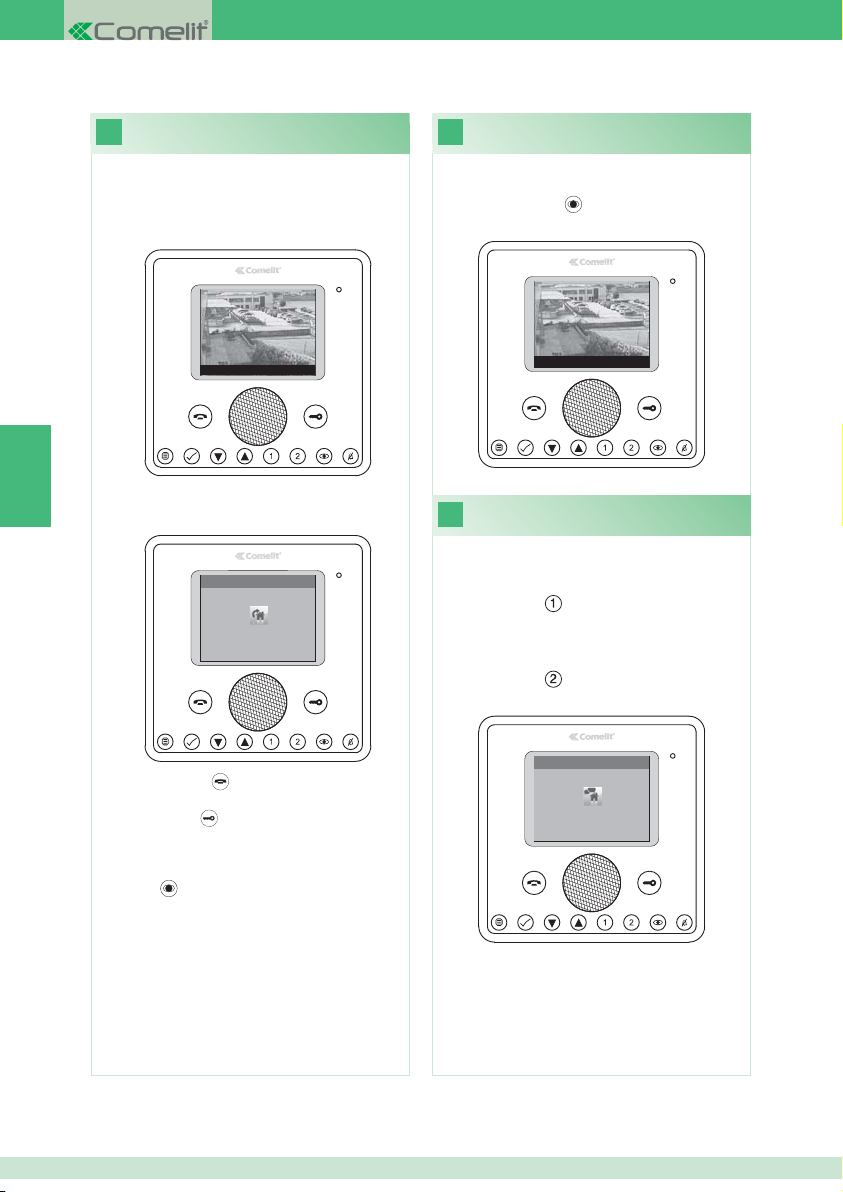
Bij ontvangst van een oproep vanaf het entreepaneel:
• Op een hoofdmonitor (max. 1 per appartement) wordt
automatisch het beeld weergegeven dat afkomstig is van
het entreepaneel.
Deur 1: Wacht op antwoord
NL
• In het geval van een secundaire monitor verschijnt de
aanwijzing dat er een oproep wordt gedaan vanaf het
entreepaneel.
OPROEP VANAF ENTREEPANEEL
Deur 1
Wacht op antwoord
Doe het volgende om de beelden weer te geven vanaf het
entreepaneel terwijl de installatie in ruststand is:
} Druk op de knop
(indien de fabrieksinstellingen
gehandhaafd zijn).
Deur 1: Wacht op antwoord
Een intercomoproep uitvoeren met
4
de knoppen 1 of 2
Om een algemene interne oproep uit te voeren naar
alle toestellen van het zelfde appartement (indien de
fabrieksinstellingen gehandhaafd zijn):
} Druk op de knop
Om een algemene externe oproep uit te voeren naar
alle toestellen van het andere appartement (indien de
fabrieksinstellingen gehandhaafd zijn):
} Druk op de knop
} Druk op de knop
om de audioverbinding in/uit te
schakelen.
} Druk op de knop
om het slot van het entreepaneel in
te schakelen.
} Om het beeld weer te geven zonder de audioverbinding
met het entreepaneel in te schakelen, drukt u op de
drukknop
(alleen secundaire monitor).
24
INTERCOMOPROEP
Algemeen intern
Wacht op antwoord
Page 25
5
Taalinstelling menu Menubeschrijving
6
Als het menu voor het eerst geopend wordt (knop ),
wordt gevraagd om de taal in te stellen.
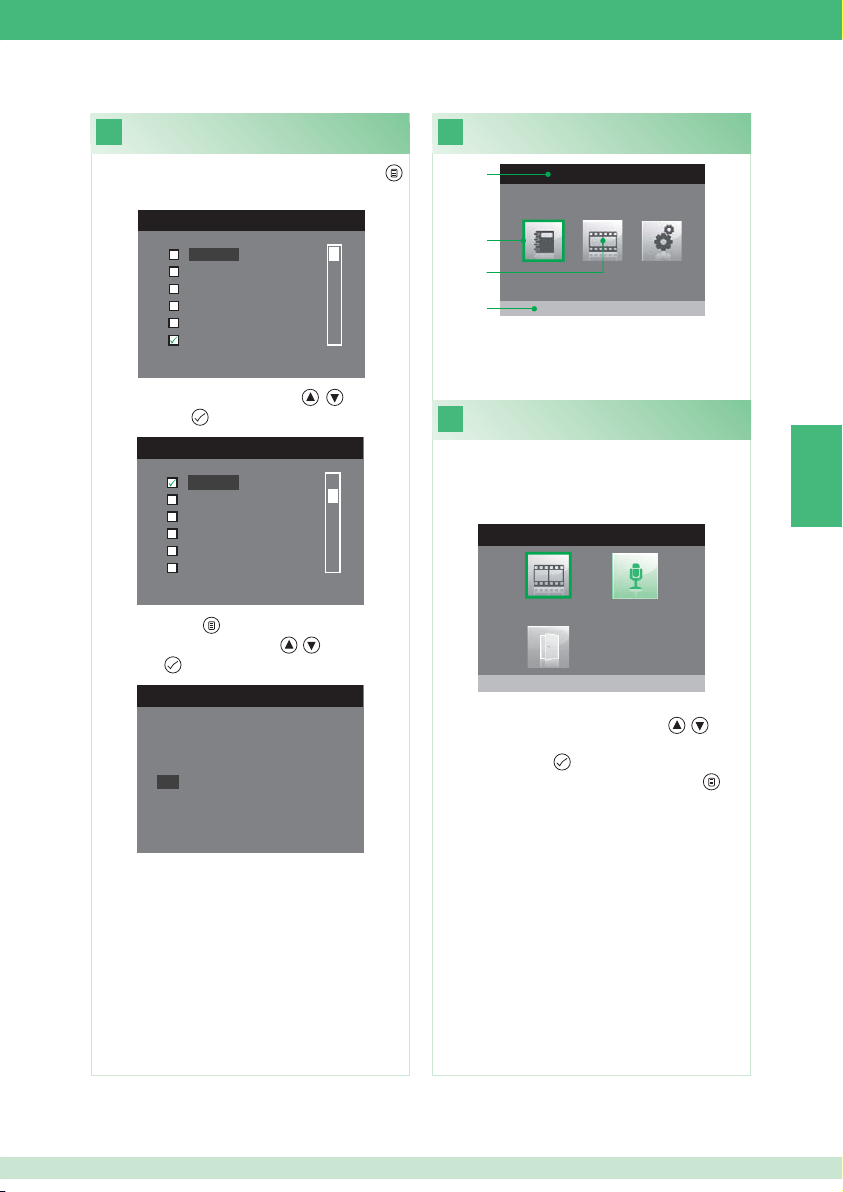
MENU TALEN
English
Français
Español
Português
Deutsch
Nederlands
1. Selecteer de taal met de knoppen
door op de knop
te drukken.
MENU LINGUE
, en bevestig
Italiano
English
Français
Español
Português
Deutsch
2. Druk op de knop om af te sluiten.
3. Selecteer “OK” met de knoppen
op de knop
te drukken.
Italiano
, en bevestig door
NO
OK
1
2
3
4
HOOFDMENU
Namenlijst voor intercom
1 Titel van het geopende menu.
2 Lijst die het geselecteerde menu aangeeft.
3 Menusymbolen.
4 Titel van het geselecteerde menu.
7
Menu Bedrijfsstatus
Alleen toegankelijk als:
• De functie Afwezigheidsbericht actief is.
• Er een nieuw videobericht in het geheugen is.
• Deur open.
MENU BEDRIJFSSTATUS
Nieuwe berichten aanwezig
Vanuit dit menu is het volgende mogelijk:
• De functies te selecteren met de knoppen
, .
• De functies uit te schakelen en de opgenomen video's te
bekijken met de knop
• Terug te keren naar het hoofdmenu met de knop
.
.
NL
25
Page 26
Het afwezigheidsbericht opnemen
8
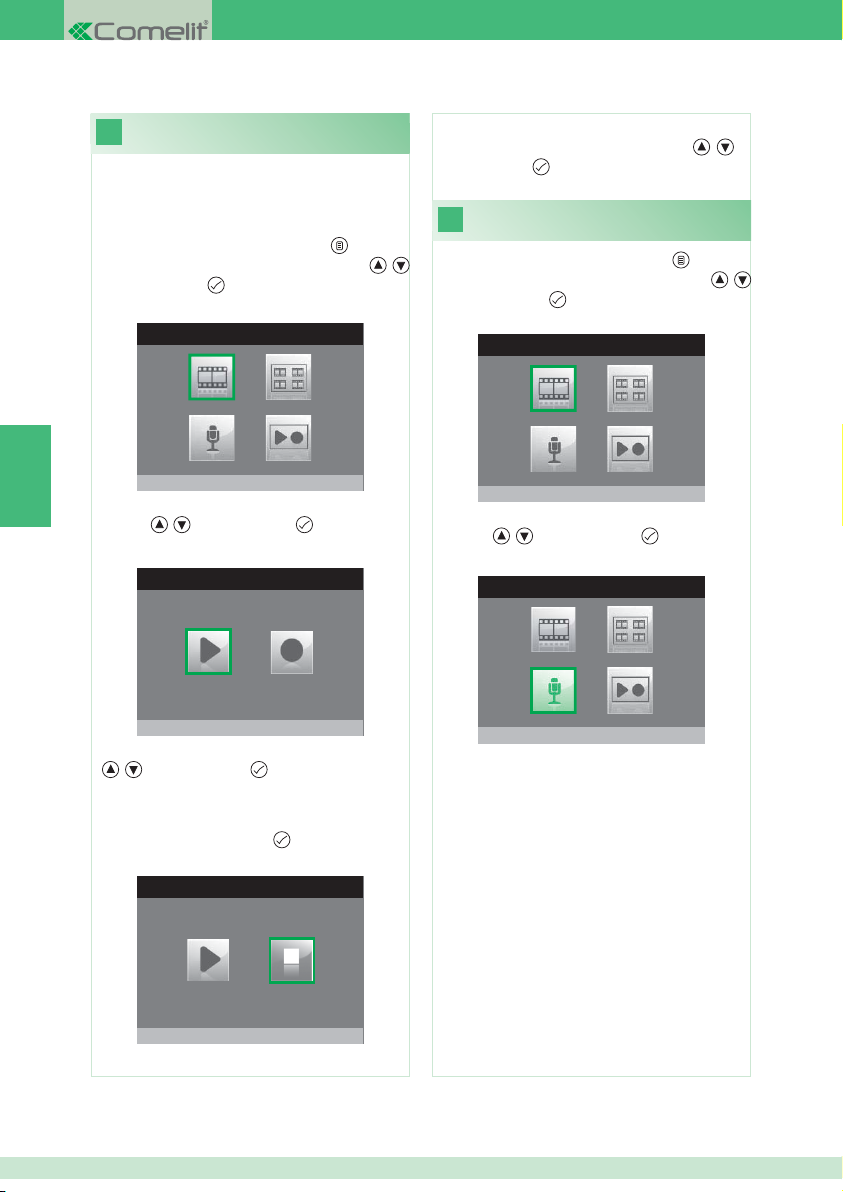
Als de afwezigheidsberichtfunctie ingeschakeld is, kan een
opgenomen bericht worden afgespeeld op de luidspreker
van het entreepaneel op het moment dat er een oproep
wordt uitgevoerd.
1. Ga naar het hoofdmenu door op de knop
2. Selecteer het menu Geheugen met de knoppen
en druk op de knop
om het te openen.
GEHEUGEN
te drukken.
,
7. Om het opgenomen bericht af te luisteren, selecteer het
symbool Bericht afl uisteren met de knoppen , en
druk op de knop
Afwezigheidsbericht inschakelen
9
ter bevestiging.
1. Ga naar het hoofdmenu door op de knop te drukken.
2. Selecteer het menu Geheugen met de knoppen
en druk op de knop
om het te openen.
GEHEUGEN
,
NL
Videogeheugen uit
3. Selecteer het menu Afspelen opnemen bericht met de
knoppen
, en druk op de knop om het te openen.
AFWEZIGHEIDSBERICHT
Bericht afluisteren
4. Selecteer het symbool Opname starten met de knoppen
, en druk op de knop ter bevestiging.
5. Spreek in de microfoon van de monitor om het bericht op
te nemen (max. 20 sec.)
6. Om de opname te stoppen voordat de 20 seconden
verstreken zijn, druk op de knop
AFWEZIGHEIDSBERICHT
Opname stoppen
Videogeheugen uit
3. Selecteer het symbool Afwezigheidsbericht UIT met de
knoppen , en druk op de knop ter bevestiging.
GEHEUGEN
Afwezigheidsbericht AAN
.
26
Page 27
Een intercomoproep uitvoeren
10
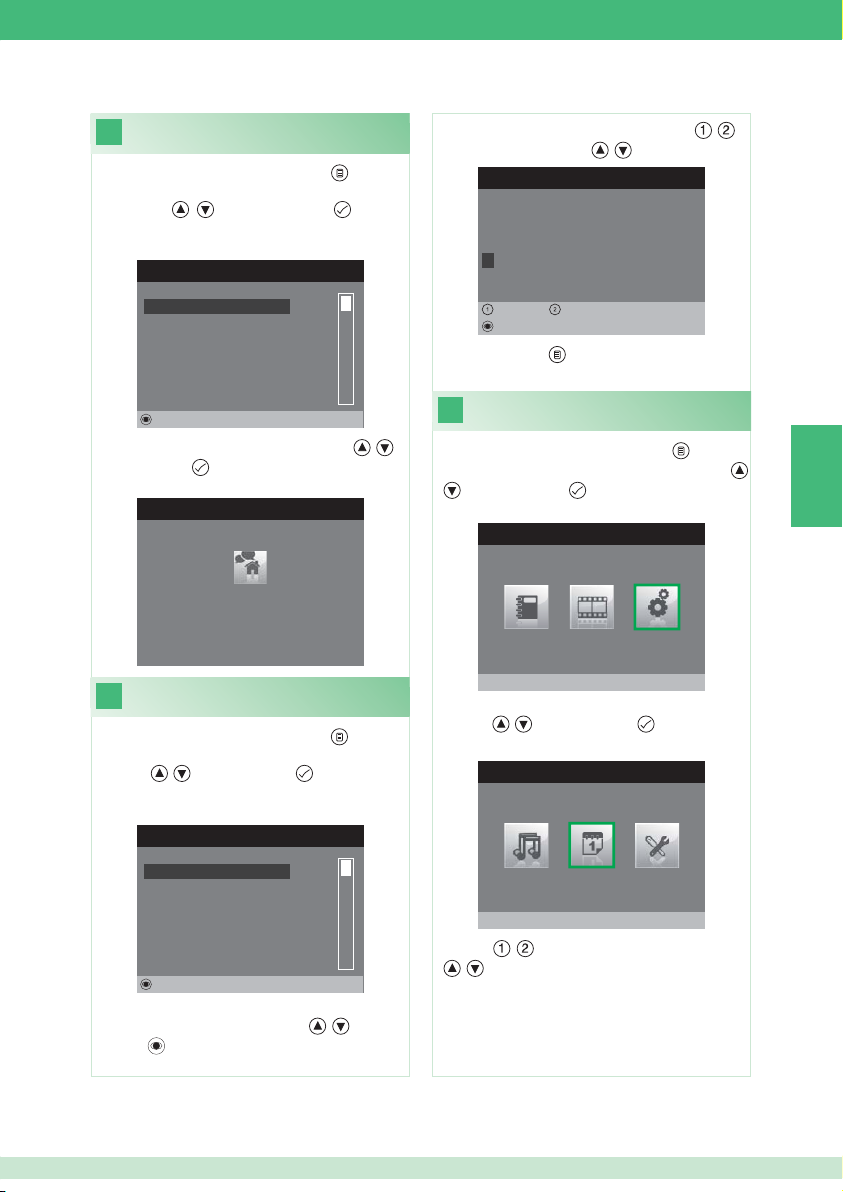
1. Ga naar het hoofdmenu door op de knop te drukken.
2. Selecteer het menu Namenlijst voor intercom met
de knoppen , en druk op de knop om het te
openen.
NAMENLIJST INTERCOMOPROEPEN
4. Selecteer de gewenste letter met de knoppen
wijzig hem met de knoppen
NAAM WIJZIGEN
, .
Naam configureren
A L G E M E E N I N T E R N
, en
ALGEMEEN INTERN
ALGEMEEN EXTERN
PRIMAIRE
SECUNDAIRE 1
SECUNDAIRE 2
SECUNDAIRE 3
Wijzigen
3. Selecteer het gewenste item met de knoppen
druk op de knop
Een naam in het namenregister
11
van de intercom wijzigen
1. Ga naar het hoofdmenu door op de knop te drukken.
2. Selecteer het menu Namenlijst voor intercom met de
knoppen
ALGEMEEN INTERN
ALGEMEEN EXTERN
om de oproep te verzenden.
INTERCOMOPROEP
Algemeen intern
Wacht op antwoord
, en druk op de knop om het te openen.
NAMENLIJST INTERCOMOPROEPEN
, en
PRIMAIRE
SECUNDAIRE 1
SECUNDAIRE 2
SECUNDAIRE 3
Wijzigen
3. Selecteer het item in het namenregister waarvan u de
naam wilt veranderen met de knoppen
de knop
om het te openen.
, en druk op
Links Rechts
Wissen
5. Druk op de knop om af te sluiten en de wijzigingen
op te slaan.
12
1. Ga naar het hoofdmenu door op de knop
2. Selecteer het menu Instellingen met de knoppen
3. Selecteer het menu Datum en tijd instellen met de
knoppen
4. Selecteer het veld dat veranderd moet worden met de
knoppen
Datum en tijd instellen
te drukken.
en druk op de knop om het te openen.
HOOFDMENU
Instellingen
, en druk op de knop om het te openen.
MENU INSTELLINGEN
Datum en tijd instellen
, en verander de waarde met de knoppen
, .
NL
,
27
Page 28
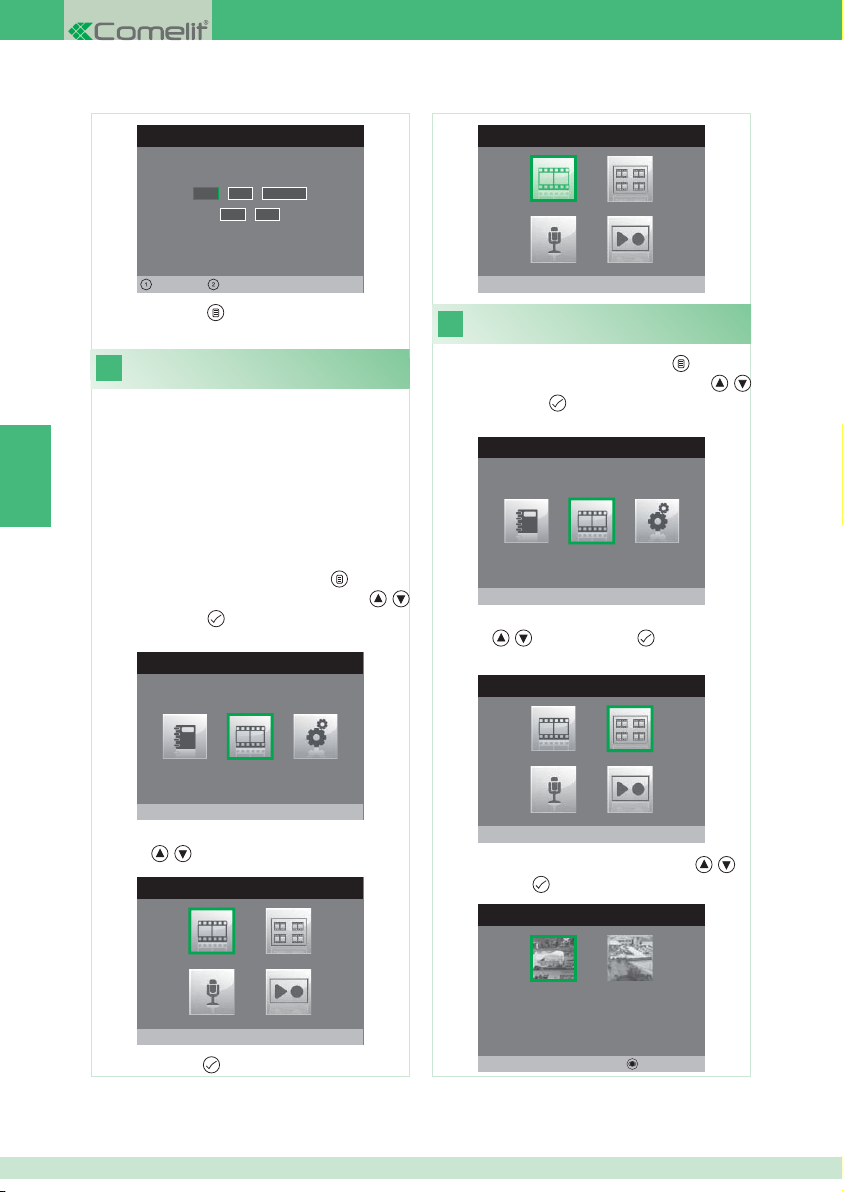
DATUM EN TIJD INSTELLEN
0 2 / 0 2 / 2 0 1 1
1 0: 0 2
GEHEUGEN
Links Rechts
5. Druk op de knop om af te sluiten en de wijzigingen
op te slaan.
Het videogeheugen inschakelen
13
Als de functie videogeheugen geactiveerd is, kan het beeld
vanaf het entreepaneel worden opgenomen op het moment
waarop een oproep wordt ontvangen (max. 8 seconden).
De opnames worden in .avi-formaat op de SD-kaart in de
NL
map "video" opgeslagen en kunnen ook op een pc met
Windows Media Player worden afgespeeld. Als er geen
SD-kaart is, worden de opnames opgeslagen in het fl ashgeheugen van de monitor (Max. 8 opnames).
1. Ga naar het hoofdmenu door op de knop te drukken.
2. Selecteer het menu Geheugen met de knoppen
en druk op de knop
om het te openen.
HOOFDMENU
Geheugen
3. Selecteer het symbool Videogeheugen uit met de
knoppen , .
GEHEUGEN
Videogeheugen aan
Opnamen van het
14
videogeheugen weergeven
1. Ga naar het hoofdmenu door op de knop te drukken.
2. Selecteer het menu Geheugen met de knoppen
en druk op de knop
,
om het te openen.
HOOFDMENU
Geheugen
3. Selecteer het menu Bekijk video berichten met de
knoppen
, en druk op de knop om het te openen.
GEHEUGEN
Bekijk video berichten
4. Selecteer de gewenste video met de knoppen , en
druk op de knop
ter bevestiging.
GEHEUGEN
,
4. Druk op de knop
28
Videogeheugen uit
om dit in te schakelen.
02/02/2011 10:48
Wissen
Page 29
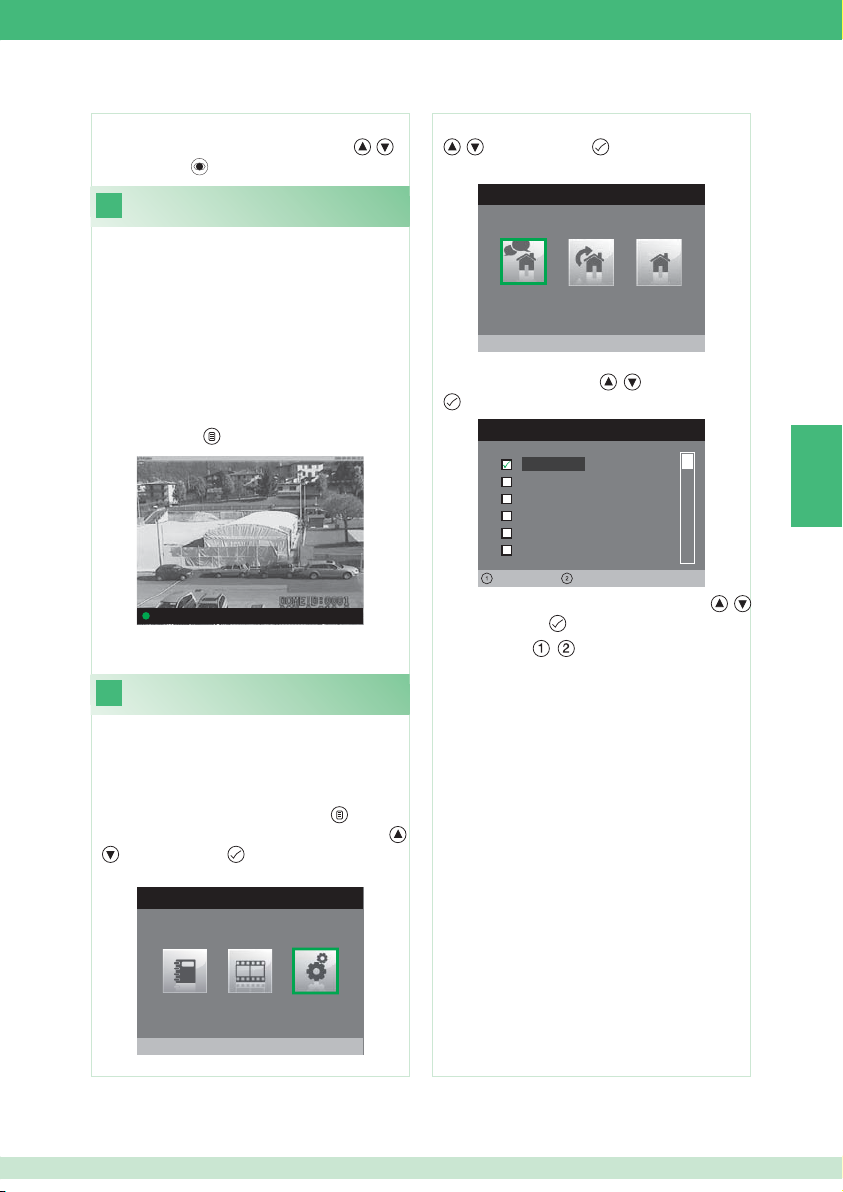
Om een video te wissen:
} Selecteer de gewenste video met de knoppen
druk op de knop
15
Een oproep met het entreepaneel kan met de hand worden
opgenomen.
De functie is in de volgende situaties beschikbaar:
√ Oproep vanaf entreepaneel.
√ Tijdens beeldoproep.
• Bij activering vanaf een hoofdmonitor neemt de
functie zowel de audio als de video op.
• Bij activering vanaf een secundaire monitor moet er
een intercomverbinding met het entreepaneel zijn om
de audio op te nemen,
} Druk op de knop
} Om de opgenomen video's weer te geven, volgt u de
procedure die beschreven is onder punt 14.
16
ter bevestiging.
Handmatige opname
om het opnemen te beginnen.
Deur 1: In gesprek
Beltonen confi gureren
, en
3. Selecteer het menu Beltonen instellen met de knoppen
, en druk op de knop om het te openen.
MENU BELTONEN
Intercomoproep
4. Selecteer het type oproep waarvoor u de beltoon wilt
veranderen met de knoppen
om het te openen.
BELTOON INTERCOMOPROEP
, en druk op de knop
Beltoon 1
Beltoon 2
Beltoon 3
Vibey
Amazing
Bomba
Volume -
5. Selecteer de gewenste beltoon met de knoppen ,
en druk op de knop
Met de knoppen
worden verhoogd of verlaagd.
Er kunnen aangepaste beltonen worden toegevoegd.
Volume +
ter bevestiging.
, kan het volume van de beltoon
NL
Het is mogelijk de beltonen aan te passen voor:
• Intercomoproep.
• Oproep vanaf entreepaneel.
• Etagebel.
1. Ga naar het hoofdmenu door op de knop te drukken.
2. Selecteer het menu Instellingen met de knoppen
en druk op de knop om het te openen.
HOOFDMENU
Instellingen
√ De bestanden moeten in .wav-formaat, 8Khz, mono, 16
bit, zijn.
} Plaats de beltonen in de map "wav" van de SD-kaart om
ze in het desbetreffende menu weer te geven.
,
29
Page 30
INHALTSVERZEICHNIS
1. Beschreibung des Monitors und Sprechfunktionen der Tasten ................................................... 30
2. Ruf entgegennehmen.................................................................................................................. 31
3. Funktion Selbsteinschaltung ....................................................................................................... 31
4. Mit den Tasten 1 oder 2 einen Internruf tätigen ........................................................................... 31
5. Einstellung der Menüsprache ...................................................................................................... 32
6. Beschreibung des Menüs ............................................................................................................ 32
7. Statusmenü ................................................................................................................................. 32
8. Nachricht bei Abwesenheit aufzeichnen ..................................................................................... 33
9. Nachricht bei Abwesenheit aktivieren ......................................................................................... 33
10. Namen im Intercom-Telefonbuch ändern .................................................................................... 34
11. Einen Internruf tätigen ................................................................................................................. 34
12. Datum und Uhrzeit einstellen ...................................................................................................... 34
13. Video Sekretär aktivieren ............................................................................................................ 35
14. Aufzeichnungen des Video Sekretärs ansehen........................................................................... 35
15. Manuelle Aufzeichnung ............................................................................................................... 36
16. Melodien konfi gurieren ................................................................................................................ 36
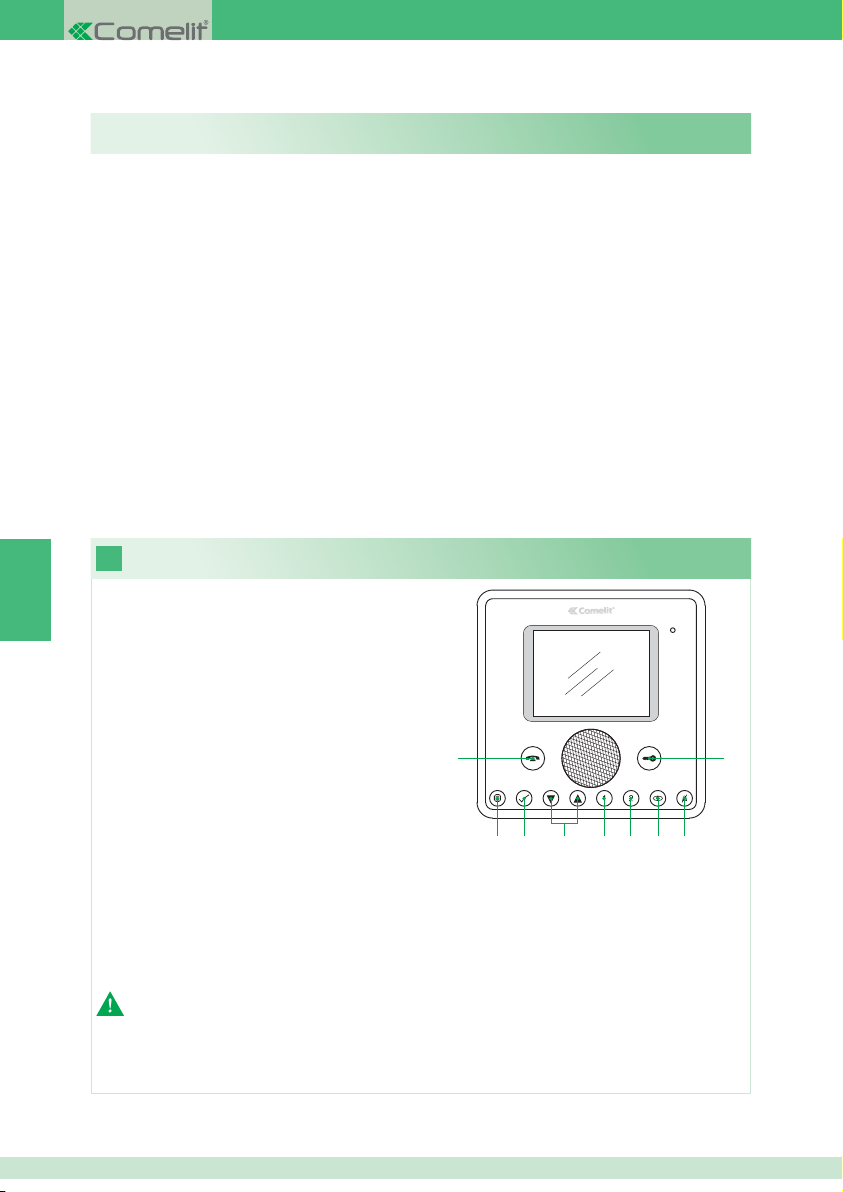
1
1 Sprechtaste. Dient zum Aktivieren bzw. Deaktivieren
DE
des Gesprächs.
2 Menütaste. Dient zum Öffnen und Beenden des
Menüs sowie zum Weitergehen auf die nächsthöhere
Menüebene.
3 Bestätigungstaste. Dient zur Bestätigung einer Wahl
innerhalb des Menüs.
4 Navigationstasten. Dienen zum Navigieren durch
das Menü / Ändern von Werten innerhalb des Menüs.
5 Taste 1. Allgemeiner interner Ruf. *
6 Taste 2. Allgemeiner externer Ruf. *
7 Taste Selbsteinschaltung. *
8 Taste Privacy / Arztruf. *
• Die Funktion Privacy dient zum Abschalten des
Läutwerks bei Ruf von der Außenstelle bzw. bei
Internruf.
• Der Arztruf ermöglicht die automatische Betätigung des Türöffners bei einem Ruf von der Außenstelle.
• Mit der Funktion Privacy + Arztruf wird das Läutwerk wie bei der Funktion Privacy deaktiviert und darüber hinaus
gestattet sie die automatische Betätigung des Türöffners bei Ruf von der Außenstelle.
9 Türöffnertaste. Dient zur Aktivierung des Türschlosses der Außenstelle. *
* Programmierbar. Fragen Sie Ihren Elektroinstallateur.
Hinweis. Die Sprechfunktionen sind nur verfügbar, wenn das Menü nicht aktiv ist.
Achtung! So vermeiden Sie mögliche Schäden am Gerät und einen elektrischen Schlag:
• Öffnen Sie das Gerät nicht und nehmen Sie keine Reparaturen daran vor. Wenden Sie sich bei Bedarf an einen Fachmann.
• Stecken Sie keine spitzen Gegenstände in das Gerät und sorgen Sie dafür, dass keine Flüssigkeiten hineingelangen
können.
• Das Gerät mit einem feuchten Tuch reinigen. Verwenden Sie dazu keinen Alkohol oder ähnliche aggressive Substanzen.
Beschreibung des Monitors und Sprechfunktionen der Tasten
1
23 4 56 78
9
30
Page 31
2
Ruf entgegennehmen
Funktion Selbsteinschaltung
3
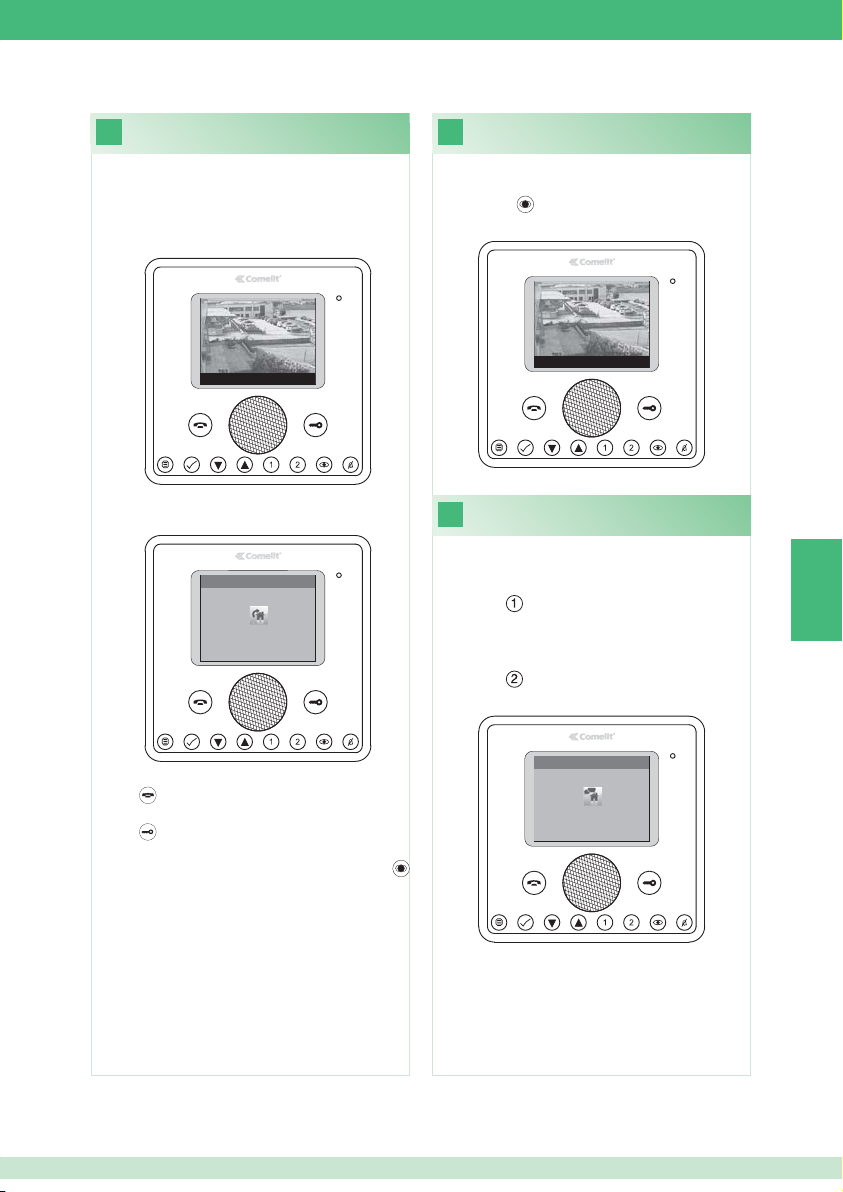
Bei Eingang eines Rufs von einer Außenstelle:
• Im Fall eines Hauptmonitors (max. 1 pro Wohnung)
wird am Monitor automatisch das von der Außenstelle
eingehende Bild angezeigt.
Tür 1: Warten auf Antwort
• Im Fall eines Zusatzmonitors erscheint die Anzeige eines
Rufs von der Außenstelle.
ANRUF VON AUSSENSTELLE
Tür 1
Warten auf Antwort
Anzeige des Bildes von der Außenstelle bei Anlage auf
Standby:
} Die Taste
drücken (wenn die Werkseinstellungen
beibehalten wurden).
Tür 1: Warten auf Antwort
Mit den Tasten 1 oder 2 einen
4
Internruf tätigen
Durchführung eines allgemeinen internen Rufs an
alle Apparate der gleichen Wohnung (wenn die
Werkseinstellungen beibehalten wurden):
} Die Taste drücken
Durchführung eines allgemeinen externen Rufs
an alle Apparate der anderen Wohnung (wenn die
Werkseinstellungen beibehalten wurden):
} Die Taste
drücken
DE
} Zur Aktivierung/Deaktivierung der Sprechverbindung die
drücken.
Taste
} Zur Aktivierung des Türschlosses der Außenstelle die
drücken.
Taste
} Zur Anzeige des Bildes ohne Aktivierung der
Sprechverbindung mit der Außenstelle die Taste
drücken (nur Zusatzmonitor).
ANRUF INTERCOM
Allgemein intern
Warten auf Antwort
31
Page 32
Einstellung der Menüsprache Beschreibung des Menüs
5
6
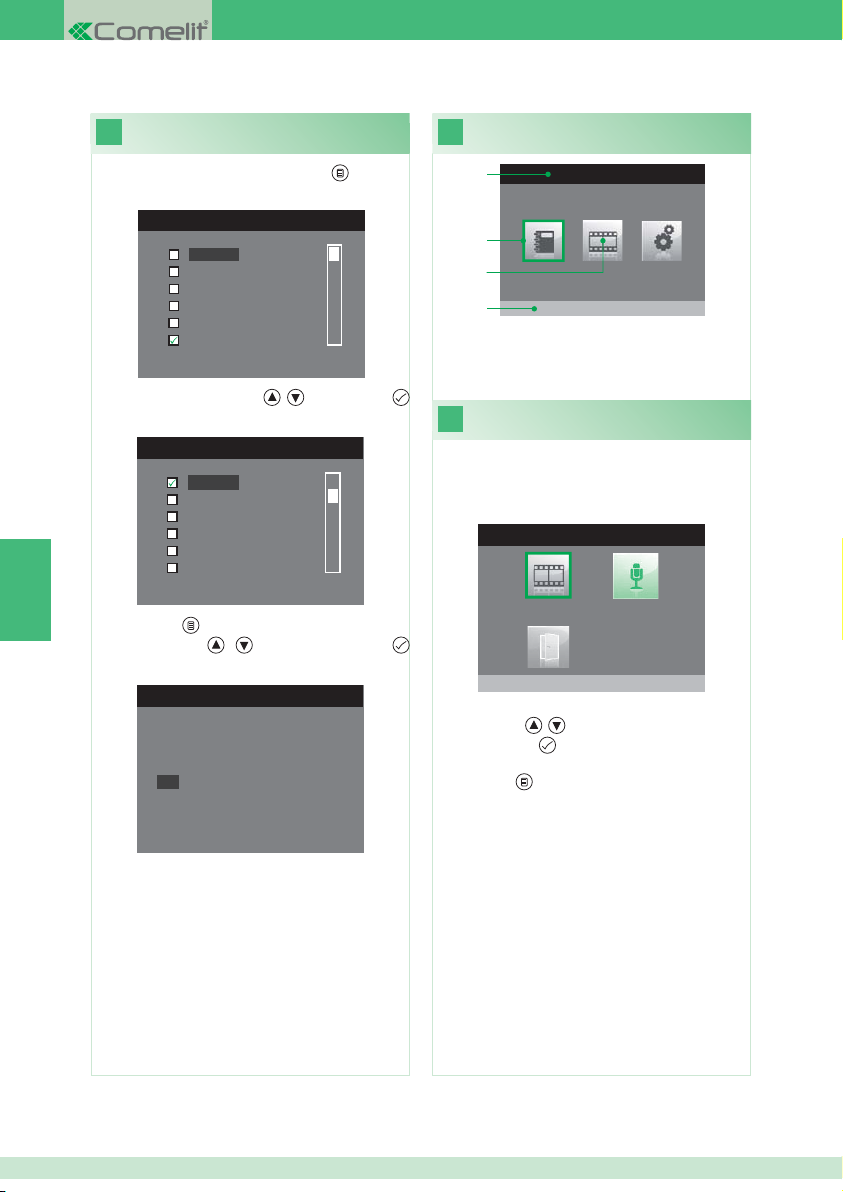
Beim ersten Zugang zum Menü (Taste ), wird die
Einstellung der zu verwendenden Sprache verlangt.
MENÜ SPRACH
Italiano
English
Français
Español
Português
Deutsch
1. Die Sprache mit den Tasten
, wählen und mit
bestätigen.
MENU LINGUE
Italiano
English
Français
Español
Português
Deutsch
DE
2. Mit der Taste
3. Mit den Tasten
bestätigen.
beenden.
, “OK” wählen und mit
Italiano
NO
OK
1
2
3
4
HAUPTMENÜ
Telefonbuch Intercom
1 Titel des momentan geöffneten Menüs.
2 Rahmen, mit dem das ausgewählte Menü markiert ist.
3 Menüsymbole.
4 Gewählter Menütitel.
7
Statusmenü
Nur verfügbar wenn:
• Die Funktion Nachricht bei Abwesenheit aktiv ist.
• Der Sekretär enthält eine neue Video-Nachricht.
• Tür offen.
STATUSMENÜ
Neue Nachrichten vorh.
Von diesem Menü sind folgende Vorgänge möglich:
• Mit den Tasten
• Mit der Taste
, die Funktionen wählen.
Funktionen deaktivieren und die
aufgezeichneten Videos ansehen.
• Mit der Taste
zum Hauptmenü zurückkehren.
32
Page 33
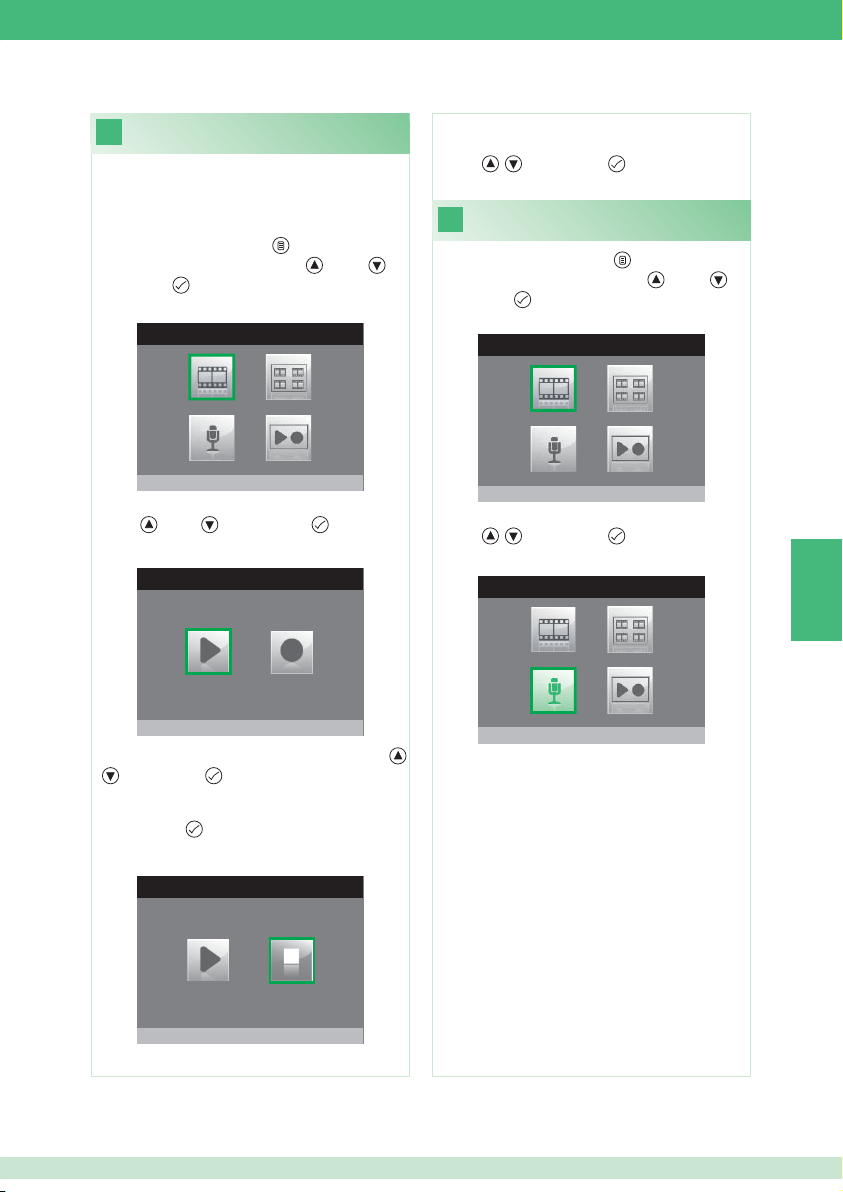
Nachricht bei Abwesenheit
8
aufzeichnen
Wenn die Funktion Nachricht bei Abwesenheit aktiviert
wurde, wird am Lautsprecher der Außenstelle eine
aufzeichnete Nachricht abgespielt, wenn ein Ruf getätigt
wird.
1. Das Hauptmenü mit der Taste
2. Das Menü Sekretär mit den Tasten
mit der Taste
öffnen.
SEKRETÄR
öffnen.
wählen und
7. Um die aufgezeichnete Nachricht noch einmal
anzuhören, das Symbol Aufzeichnung anhören mit den
Tasten
, wählen und mit bestätigen.
Nachricht bei Abwesenheit aktivieren
9
1. Das Hauptmenü mit der Taste öffnen.
2. Das Menü Sekretär mit den Tasten
mit der Taste
öffnen.
SEKRETÄR
wählen und
Video Sekretär. nicht aktiv
3. Das Menü Nachricht abspielen aufzeichnen mit den
wählen und mit der Taste öffnen.
Tasten
NACHRICHT B. ABWESEN.
Aufzeichnung anhören
4. Das Symbol Aufzeichnung starten mit den Tasten
wählen und mit bestätigen.
5. In das Mikrofon des Monitors sprechen, um die Nachricht
aufzuzeichnen (max. 20 Sek.)
6. Mit der Taste
kann die Aufzeichnung vor Ablauf der
20 Sekunden abgebrochen werden.
NACHRICHT B. ABWESEN.
Aufzeichnung stoppen
Video Sekretär. nicht aktiv
3. Das Symbol Nachricht bei Abwesenheit OFF mit den
Tasten , wählen und mit bestätigen.
DE
SEKRETÄR
Nachricht b. Abwesen. ON
,
33
Page 34
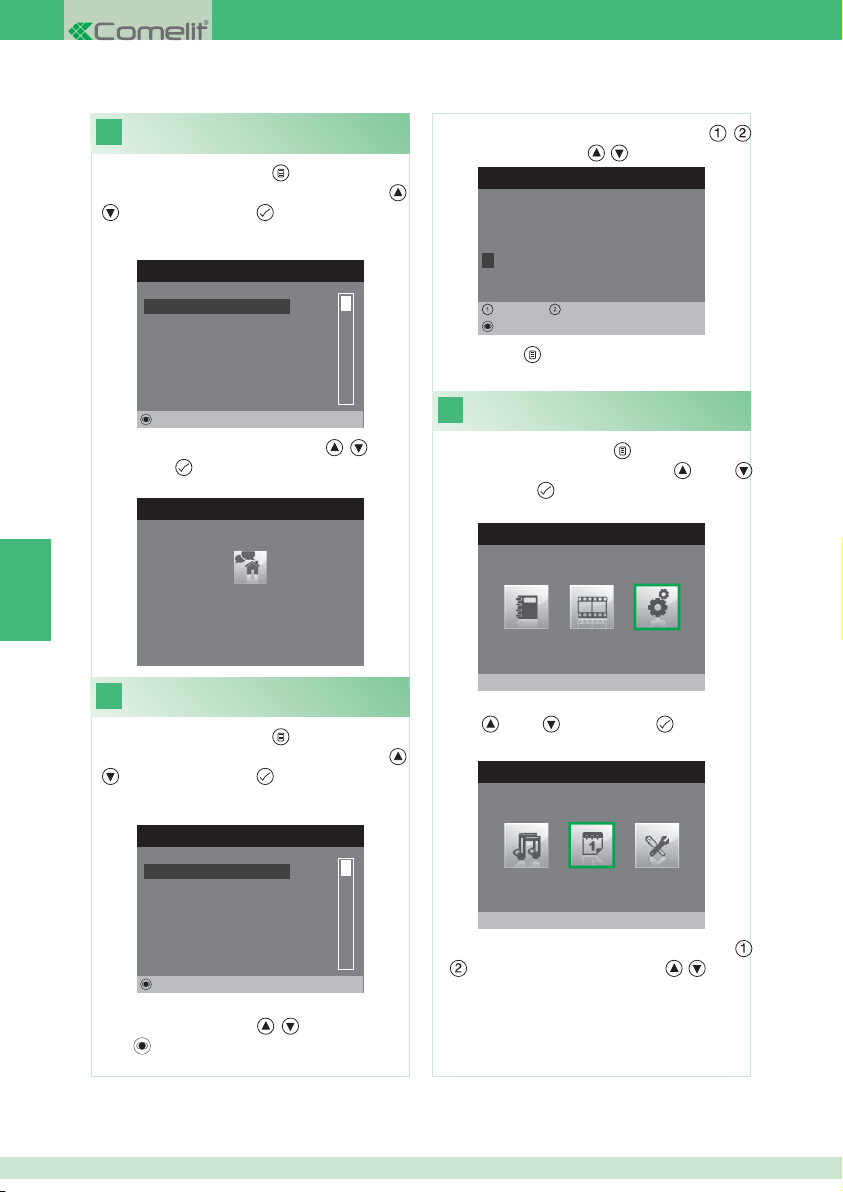
10
1. Das Hauptmenü mit der Taste öffnen.
2. Das Menü Telefonbuch Intercom mit den Tasten ,
Einen Internruf tätigen
wählen und mit der Taste öffnen.
INTERCOM TELEFONBUCH
4. Den gewünschten Buchstaben mit den Tasten
wählen und mit den Tasten
, ändern.
NAME ÄNDERN
Name konfigurieren
A L L G E M E I N I N T E R N
,
ALLGEMEIN INTERN
ALLGEMEIN EXTERN
PRIMÄR
SEKUNDÄR 1
SEKUNDÄR 2
SEKUNDÄR 3
Ändern
3. Die gewünschte Option mit den Tasten
und die Taste
DE
Namen im Intercom-Telefonbuch
11
ändern
1. Das Hauptmenü mit der Taste öffnen.
2. Das Menü Telefonbuch Intercom mit den Tasten
wählen und mit der Taste öffnen.
drücken, um den Ruf zu tätigen.
ANRUF INTERCOM
Allgemein intern
Warten auf Antwort
INTERCOM TELEFONBUCH
ALLGEMEIN INTERN
ALLGEMEIN EXTERN
PRIMÄR
SEKUNDÄR 1
SEKUNDÄR 2
SEKUNDÄR 3
Ändern
3. Den Telefonbucheintrag, dessen Namen geändert
werden soll, mit den Tasten
Taste
öffnen.
, wählen und mit der
, wählen
Links Rechts
Löschen
5. Mit der Taste
12
1. Das Hauptmenü mit der Taste
2. Das Menü Einstellungen mit den Tasten
und mit der Taste öffnen.
3. Das Menü Datum und Uhrzeit konfi gurieren mit den
Tasten
,
4. Das Feld, das geändert werden soll, mit den Tasten
, wählen und den Wert mit den Tasten , ändern.
beenden und Änderungen speichern.
Datum und Uhrzeit einstellen
öffnen.
HAUPTMENÜ
Einstellungen
wählen und mit der Taste öffnen.
MENÜ EINSTELLUNGEN
Datum/Uhrzeit konfigurieren
wählen
34
Page 35
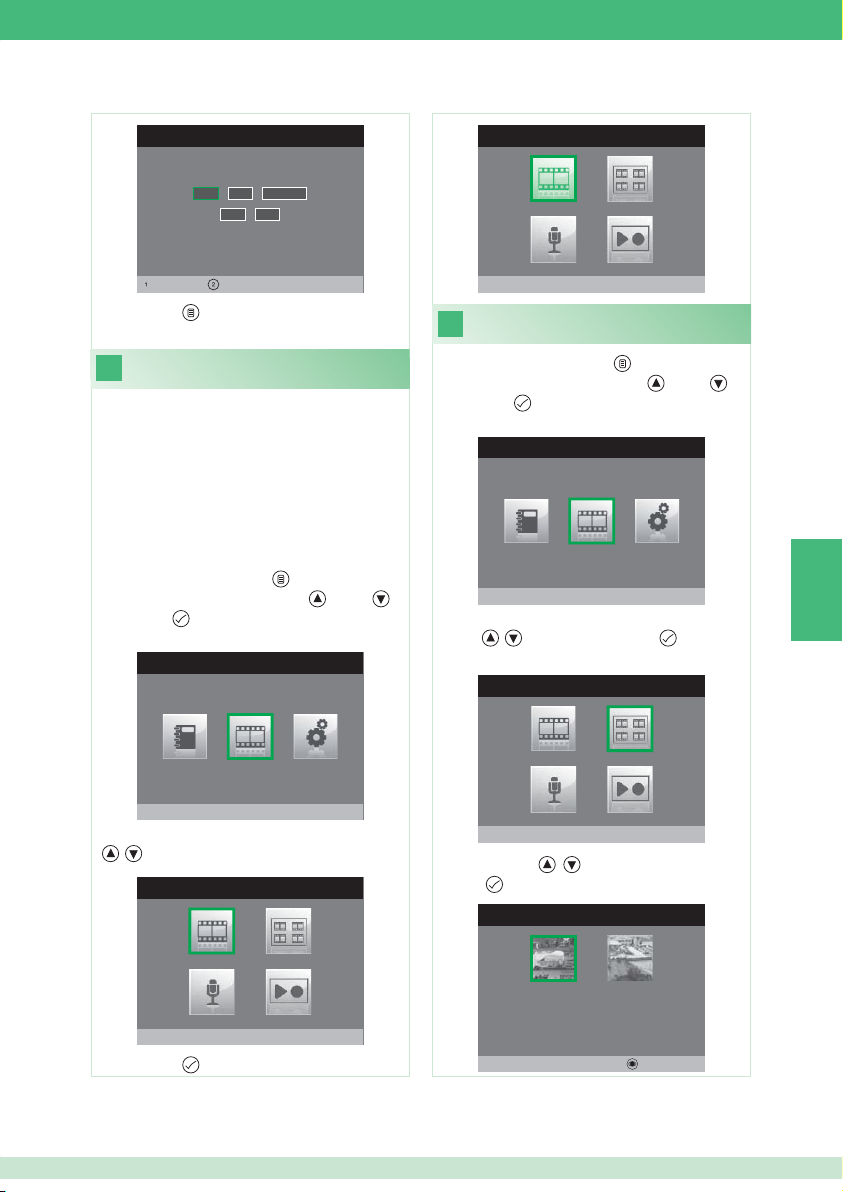
DATUM/UHRZEIT EINSTELLEN
0 2 / 0 2 / 2 0 1 1
1 0: 0 2
SEKRETÄR
Links Rechts
5. Mit der Taste beenden und Änderungen speichern.
Video Sekretär aktivieren
13
Wenn die Funktion Video Sekretär aktiviert wurde, wird das
Bild von der Außenstelle in dem Augenblick aufgenommen,
in dem ein Ruf eingeht (max. 8 Sekunden).
Die Aufzeichnungen werden im Format .avi auf der SD
Speicherkarte im Ordner “video” gespeichert und können
auch im PC mit Windows Media Player abgespielt werden.
Wenn keine SD Speicherkarte vorhanden ist, werden
die Aufzeichnungen im Flash-Speicher des Monitors
gespeichert (Max 8 Aufzeichnungen).
1. Das Hauptmenü mit der Taste öffnen.
2. Das Menü Sekretär mit den Tasten
mit der Taste
öffnen.
HAUPTMENÜ
SEKRETÄR
wählen und
3. Das Symbol Video Sekretär nicht aktiv mit den Tasten
, wählen.
SEKRETÄR
Video Sekretär. aktiv
Aufzeichnungen des Video
14
Sekretärs ansehen
1. Das Hauptmenü mit der Taste öffnen.
2. Das Menü Sekretär mit den Tasten
mit der Taste
öffnen.
HAUPTMENÜ
SEKRETÄR
wählen und
3. Das Symbol Video-Nachrichten ansehen mit den
Tasten
, wählen und mit der Taste öffnen.
SEKRETÄR
Watch video-Nachrichten
4. Mit den Tasten , das gewünschte Video wählen
bestätigen.
und mit
SEKRETÄR
DE
4. Mit der Taste
Video Sekretär. nicht aktiv
aktivieren.
02/02/2011 10:48
Löschen
35
Page 36
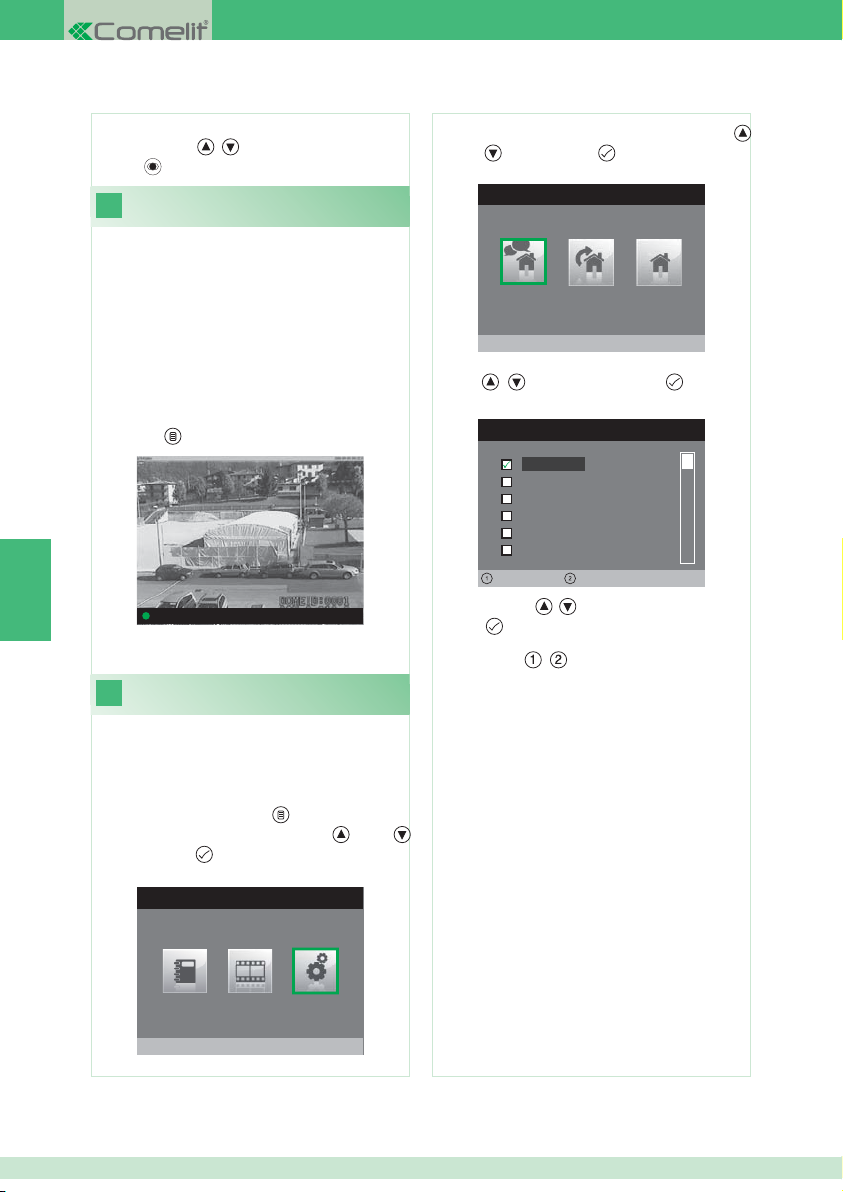
Löschen eines Videos:
} Mit den Tasten
und mit
15
Ein Ruf mit der Außenstelle kann von Hand aufgezeichnet
werden.
Die Funktion ist in folgenden Situationen verfügbar:
√ Anruf von Außenstelle.
√ Während der Selbsteinschaltung.
• Wenn sie von einem Hauptmonitor aktiviert wurde,
nimmt die Funktion sowohl Audio als auch Video auf.
• Wenn sie von einem Zusatzmonitor aktiviert wurde,
muss eine Sprechverbindung mit der Außenstelle
bestehen, um das Audio aufzunehmen.
} Die Taste
DE
} Zum Abspielen der aufgezeichneten Videos wie unter
Punkt 14 beschrieben vorgehen.
16
Folgende Melodien können personalisiert werden:
• Internruf.
• Anruf von Außenstelle.
• Etagenruf.
1. Das Hauptmenü mit der Taste öffnen.
2. Das Menü Einstellungen mit den Tasten
und mit der Taste öffnen.
, das gewünschte Video wählen
bestätigen.
Manuelle Aufzeichnung
drücken, um die Aufnahme zu starten.
Tür 1: Komm. hergest.
Melodien konfi gurieren
wählen
3. Das Menü Melodien einstellen mit den Tasten
4. Die Rufart, deren Melodie geändert werden soll, mit den
und mit der Taste öffnen.
wählen
MENÜ MELODIE
Anruf Intercom
, wählen und mit der Taste öffnen.
Tasten
MELODIE INTERCOM ANRUF
Melodie 1
Melodie 2
Melodie 3
Vibey
Amazing
Bomba
Lautstärke -
5. Mit den Tasten
Mit den Tasten
bzw. verringert werden.
Es können personalisierte Läutwerke hinzugefügt werden.
bestätigen.
und mit
√ Die Dateien müssen das Format .wav da 8 kHz Mono
16 bit haben.
} Die Melodien in den Ordner “wav” der SD Speicherkarte
einfügen, um sie im entsprechenden Menü anzuzeigen.
Lautstärke +
, die gewünschte Melodie wählen
, kann die Ruftonlautstärke erhöht
36
HAUPTMENÜ
Einstellungen
Page 37
ÍNDICE
1. Descripción del monitor y de las funciones de portero de las teclas ......................................... 37
2. Responder a una llamada ........................................................................................................... 38
3. Función autoencendido ............................................................................................................... 38
4. Efectuar una llamada intercomunicante con las teclas 1 o 2 .....................................................38
5. Confi guración del idioma de los menús ......................................................................................39
6. Descripción de los menús ........................................................................................................... 39
7. Menú de estado .......................................................................................................................... 39
8. Grabar mensaje para ausente .................................................................................................... 40
9. Activar el mensaje para ausente ................................................................................................. 40
10. Modifi car un nombre en el directorio intercomunicante .............................................................. 41
11. Efectuar una llamada intercomunicante ......................................................................................41
12. Confi gurar fecha y hora ............................................................................................................... 41
13. Activar el vídeo contestador ........................................................................................................ 42
14. Visualizar las grabaciones del vídeo contestador ....................................................................... 42
15. Grabación manual ....................................................................................................................... 43
16. Confi gurar melodías .................................................................................................................... 43
1
1 Tecla audio. Permite activar o desactivar la
2 Tecla menú. Permite entrar y salir del menú y
3 Tecla de confi rmación. Permite confi rmar una
4 Teclas de navegación. Permiten navegar /
5 Tecla 1. Llamada general interna. *
6 Tecla 2. Llamada general externa. *
7 Tecla Autoencendido. *
8 Tecla Privacidad/Doctor *
• La función Privacidad permite excluir
• La función Doctor permite accionar automáticamente el abrepuertas tras una llamada desde la unidad
• La función Privacidad + Doctor, además de desactivar el tono de llamada, como en la función Privacidad, permite
9 Tecla abrepuertas. Permite activar la cerradura de la unidad externa. *
* Se puede confi gurar. Para ello, ponerse en contacto con su instalador habitual.
N.B.: las funciones de portero de las teclas solo están disponibles con el menú apagado.
Descripción del monitor y de las funciones de portero de las teclas
conversación.
retroceder un nivel en el menú.
selección en un menú.
modifi car los valores dentro de un menú.
1
la llamada desde la unidad externa o la
intercomunicante.
externa.
accionar automáticamente el abrepuertas tras una llamada desde la unidad externa.
23 4 56 78
ES
9
¡Atención! Para reducir el riesgo de averías y descargas eléctricas, se aconseja:
• No quitar la tapa ni efectuar personalmente ninguna reparación. En caso de necesidad, pedir la intervención de personal
cualifi cado.
• No introducir objetos ni echar líquidos en el interior del dispositivo.
• Limpiar con un paño humedecido en agua. Evitar alcohol y otros productos agresivos.
37
Page 38
Responder a una llamada
2
Función autoencendido
3
Cuando se recibe una llamada desde la unidad externa:
• Si se trata del monitor principal (uno por vivienda como
máximo), la imagen procedente de la unidad externa se
visualiza automáticamente.
Puerta 1: En espera respuesta
• Si se trata de un monitor secundario, se visualiza un
mensaje que informa que hay una llamada desde la
unidad externa.
LLAMADA DESDE UNID. EXTERNA
Puerta 1
En espera respuesta
ES
Con la instalación en reposo, para visualizar la imagen de
la unidad externa:
} Pulsar la tecla
si no se han modifi cado las
confi guraciones de fábrica.
Puerta 1: En espera respuesta
Efectuar una llamada
4
intercomunicante con las teclas 1 o 2
Para efectuar una llamada general interna, es decir,
para llamar a todos los aparatos de una misma vivienda,
si no se han modifi cado las confi guraciones de fábrica:
} Pulsar la tecla
Para efectuar una llamada general externa, es decir, para
llamar a todos los aparatos de otra vivienda, si no se han
modifi cado las confi guraciones de fábrica:
} Pulsar la tecla
} Para activar o desactivar el audio, pulsar la tecla
} Para activar la cerradura de la unidad externa, pulsar la
.
tecla
} Para visualizar la imagen sin activar el audio de la unidad
externa, pulsar la tecla
(solo monitor secundario).
38
LLAMADA INTERCOMUNICANTE
General interna
.
En espera respuesta
Page 39
Confi guración del idioma de los menús
5
Descripción de los menús
6
Cuando se accede al menú por primera vez (tecla ), se
solicita que se elija el idioma.
MENÚ IDIOMA
Italiano
English
Français
Español
Português
Deutsch
1. Seleccionar el idioma con las teclas
confi rmarlo con la tecla
.
MENU LINGUE
y y
Italiano
English
Français
Español
Português
Deutsch
2. Pulsar la tecla para salir.
3. Seleccionar “OK” con las teclas
con la tecla
.
Italiano
y y confi rmarlo
NO
OK
1
2
3
4
MENÚ PRINCIPAL
Directorio intercomunicante
1 Título del menú actualmente abierto.
2 Marco que indica el menú seleccionado
3 Iconos del menú.
4 Título del menú seleccionado.
7
Menú de estado
Solo es posible acceder a este menú cuando:
• La función Mensaje para ausente está activada.
• Hay un nuevo mensaje en el vídeo contestador.
• La puerta está abierta.
MENÚ ESTADO
Nuevos mensajes presentes
Desde este menú es posible:
• Con las teclas
• Con la tecla
y , seleccionar las funciones.
, desactivar las funciones y ver los vídeos
grabados.
• Con la tecla
, regresar al menú principal.
ES
39
Page 40
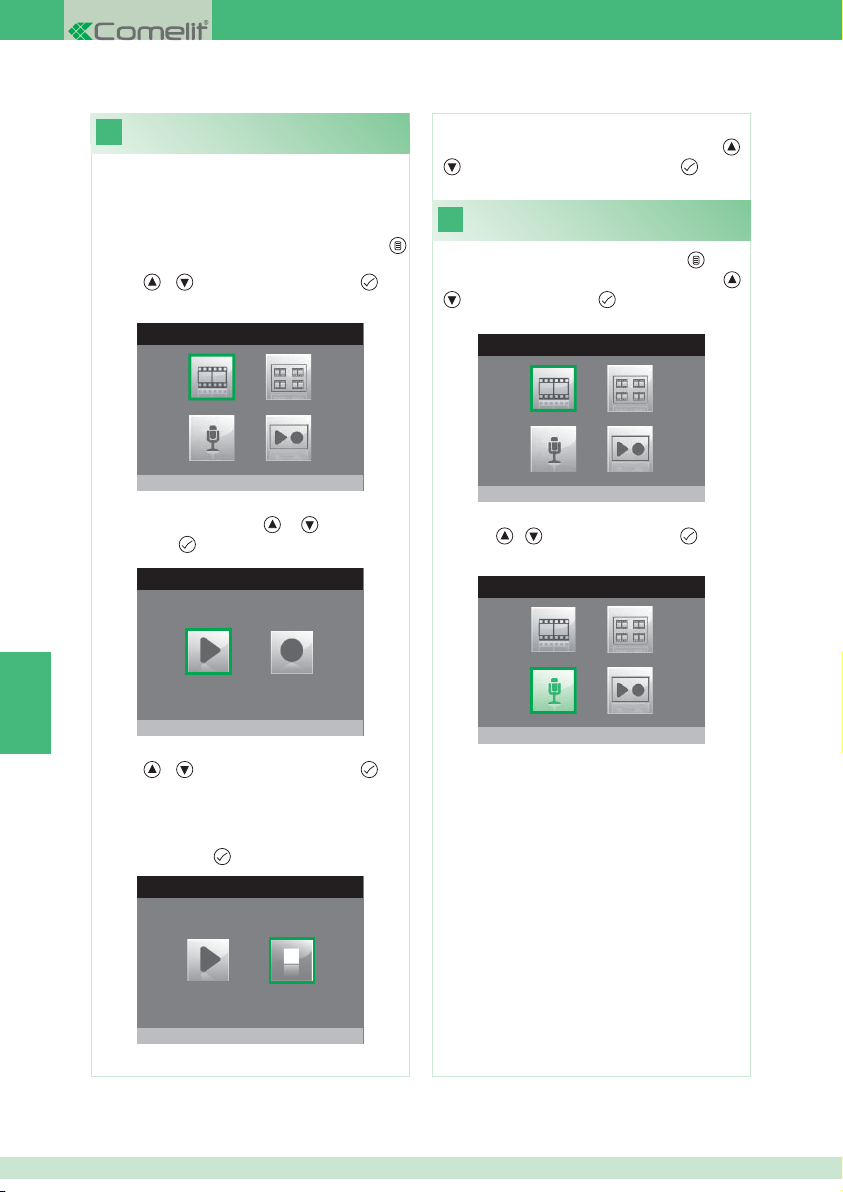
Grabar mensaje para ausente
8
Si la función mensaje para ausente está activada, cuando
alguien llama desde la unidad externa se oye el mensaje
grabado.
1. Acceder al menú Principal pulsando la tecla .
2. Seleccionar el menú Contestador con las
y y confi rmarlo con la tecla .
teclas
CONTESTADOR
7. Para escuchar el mensaje grabado, seleccionar
el icono Escucha grabación con las teclas y
y confi rmar la selección pulsando .
Activar el mensaje para ausente
9
1. Acceder al menú Principal pulsando la tecla .
2. Seleccionar el menú Contestador con las teclas
y confi rmarlo con la tecla .
CONTESTADOR
y
Vídeo contestador no activo
3. Seleccionar el menú Reproducir o grabar
y y confi rmarlo
ES
mensaje con las teclas
con la tecla
.
MENSAJE PARA AUSENTE
Escucha grabación
4. Seleccionar el icono Inicio grabación con las
y y confi rmarlo con la tecla .
teclas
5. Hablar por el micrófono del monitor para grabar
el mensaje (máximo 20 s).
6. Es posible interrumpir la grabación del mensaje,
antes de que transcurran los 20 segundos,
pulsando la tecla
.
MENSAJE PARA AUSENTE
Para grabación
Vídeo contestador no activo
3. Seleccionar el icono Mensaje para ausente OFF con
las teclas y y confi rmarlo con la tecla .
CONTESTADOR
Mensaje para ausente ON
40
Page 41
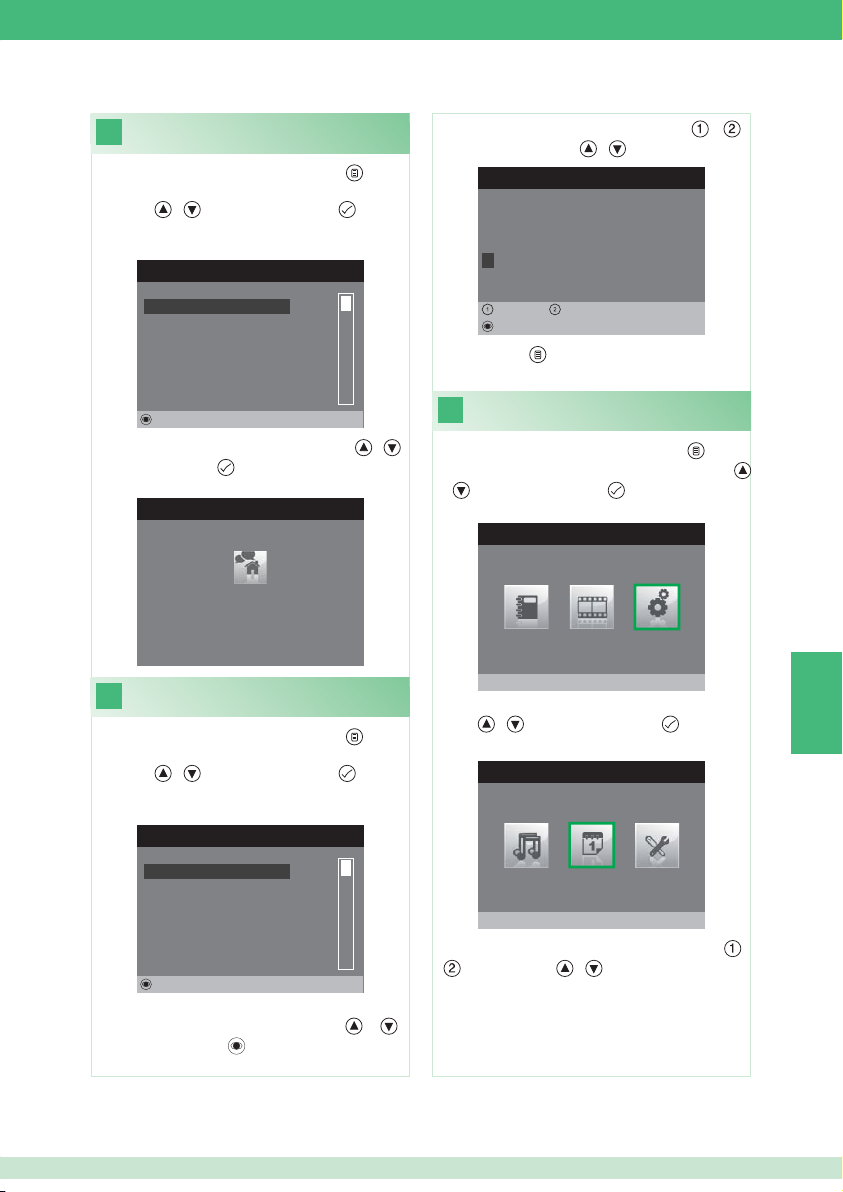
10
1. Acceder al menú Principal pulsando la tecla .
2. Seleccionar el menú Directorio intercomunicante con
las teclas y y confi rmarlo con la tecla .
Efectuar una llamada
intercomunicante
DIRECTORIO LLAMADAS INTERCOM
4. Seleccionar la letra deseada con las teclas
modifi carla con las teclas
y .
MODIFICA VOZ
Configura nombre
G E N E R A L I N T E R N A
y y
GENERAL INTERNA
GENERAL EXTERNA
PRINCIPAL
SECUNDARIA 1
SECUNDARIA 2
SECUNDARIA 3
Modificar
3. Seleccionar el registro deseado con las teclas
enviar la llamada con
LLAMADA INTERCOMUNICANTE
Modifi car un nombre en el directorio
11
intercomunicante
1. Acceder al menú Principal pulsando la tecla .
2. Seleccionar el menú Directorio intercomunicante con
las teclas
y y confi rmarlo con la tecla .
DIRECTORIO LLAMADAS INTERCOM
GENERAL INTERNA
GENERAL EXTERNA
.
General interna
En espera respuesta
y y
PRINCIPAL
SECUNDARIA 1
SECUNDARIA 2
SECUNDARIA 3
Modificar
3. Seleccionar el registro del directorio/agenda cuyo
nombre se desea modifi car con las teclas
confi rmarlo con la tecla
.
y y
Izquierda Derecha
Borrar
5. Pulsar la tecla
12
1. Acceder al menú Principal pulsando la tecla
2. Seleccionar el menú Programaciones con las teclas
y
y confi rmarlo con la tecla .
3. Seleccionar el menú Confi gura fecha y hora con las
teclas
4. Seleccionar el campo por modifi car con las teclas
y modifi carlo con y .
para salir y guardar las modifi caciones.
Confi gurar fecha y hora
.
MENÚ PRINCIPAL
Programaciones
y y confi rmarlo con la tecla .
MENÚ PROGRAMACIONES
Configura fecha y hora
y
ES
41
Page 42
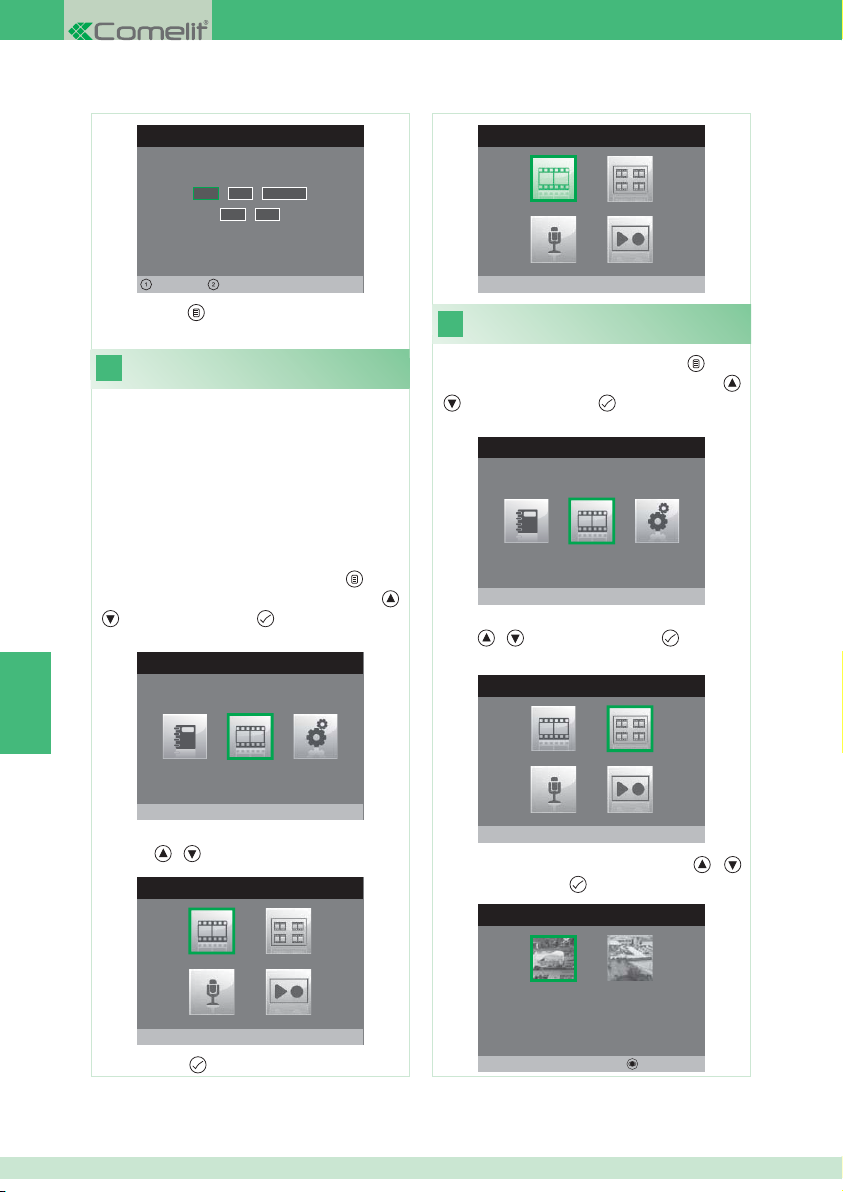
PROGRAMA FECHA Y HORA
0 2 / 0 2 / 2 0 1 1
1 0: 0 2
CONTESTADOR
Izquierda Derecha
5. Pulsar la tecla para salir y guardar las modifi caciones.
Activar el vídeo contestador
13
La función Vídeo contestador, si está activada, permite
grabar la imagen de la unidad externa cuando se efectúa
una llamada (máximo 8 segundos).
Las grabaciones se guardan en formato .avi en la carpeta
"Vídeos" de la tarjeta SD y también se pueden ver en el
ordenador personal con el programa Windows Media
Player. Si no hay tarjeta SD, las grabaciones se guardan en
la memoria fl ash del monitor (máximo 8 vídeos).
1. Acceder al menú Principal pulsando la tecla .
2. Seleccionar el menú Contestador con las teclas
y confi rmarlo con la tecla .
MENÚ PRINCIPAL
ES
Contestador
3. Seleccionar el icono Vídeo contestador no activo con
las teclas y .
CONTESTADOR
Vídeo contestador activo
Visualizar las grabaciones
14
del vídeo contestador
1. Acceder al menú Principal pulsando la tecla .
2. Seleccionar el menú Contestador con las teclas
y confi rmarlo con la tecla .
MENÚ PRINCIPAL
y
Contestador
3. Seleccionar el menú Ver mensajes de vídeo con las
teclas
y y confi rmarlo con la tecla .
CONTESTADOR
Ver mensajes de vídeo
4. Seleccionar el vídeo deseado con las teclas y y
confi rmarlo con la tecla
.
CONTESTADOR
y
4. Pulsar la tecla
42
Vídeo contestador no activo
para activarlo.
02/02/2011 10:48
Borrar
Page 43
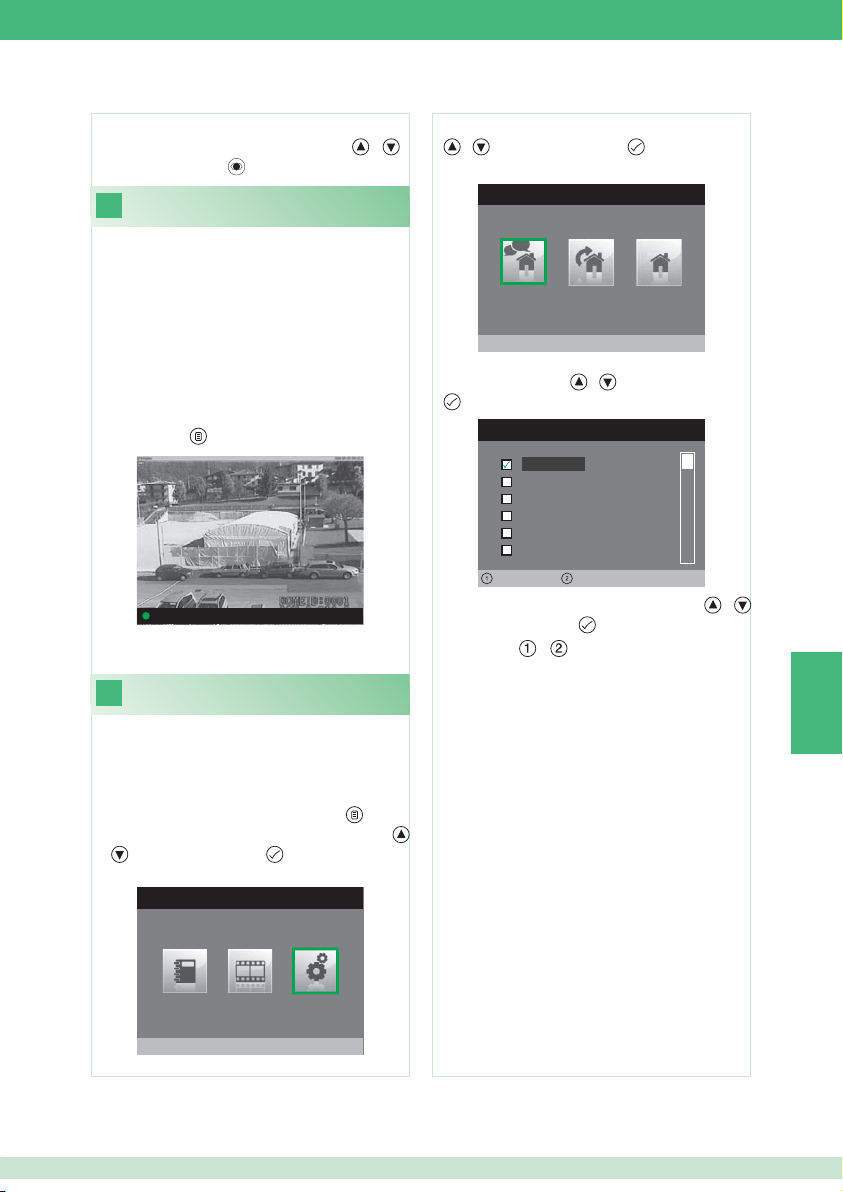
Para borrar un vídeo:
} Seleccionar el vídeo deseado con las teclas
confi rmarlo con la tecla
15
Es posible grabar manualmente una llamada desde la
unidad externa.
La función se encuentra disponible para:
√ Llamada desde unidad externa.
√ Autoencendido.
• Si la grabación se activa desde el monitor principal,
será de tipo audio/vídeo.
• Si la grabación se activa desde un monitor secundario,
para grabar el audio es necesario que la comunicación
audio con la unidad externa esté activada.
} Pulsar la tecla
} Para ver los vídeos grabados, efectuar las operaciones
descritas en el punto 14.
16
Grabación manual
Puerta 1: En comunicación
Confi gurar melodías
.
para iniciar la grabación.
y y
3. Seleccionar el menú Programa melodías con las teclas
y y confi rmarlo con la tecla .
MENÚ MELODÍAS
Llamada intercomunicante
4. Seleccionar el tipo de llamada cuya melodía se desea
modifi car con las teclas
.
MELODÍA LLAMADA INTERCOM
y y confi rmarlo con la tecla
Melodia 1
Melodia 2
Melodia 3
Vibey
Amazing
Bomba
Volumem -
5. Seleccionar la melodía deseada con las teclas
y confi rmarla con la tecla
Con las teclas
del tono de llamada.
Es posible añadir tonos de llamada personalizados.
Volumem +
y
.
y , aumentar o disminuir el volumen
ES
Es posible personalizar las melodías para:
• Llamada intercomunicante.
• Llamada desde unidad externa.
• Llamada timbre de planta.
1. Acceder al menú Principal pulsando la tecla .
2. Seleccionar el menú Programaciones con las teclas
y confi rmarlo con la tecla .
y
MENÚ PRINCIPAL
Programaciones
√ Los archivos tienen que ser en formato .wav, 8 kHz, 16
bits y mono.
} Guardar las melodías en la carpeta "wav" de la tarjeta
SD para poderlas visualizar en el correspondiente menú.
43
Page 44
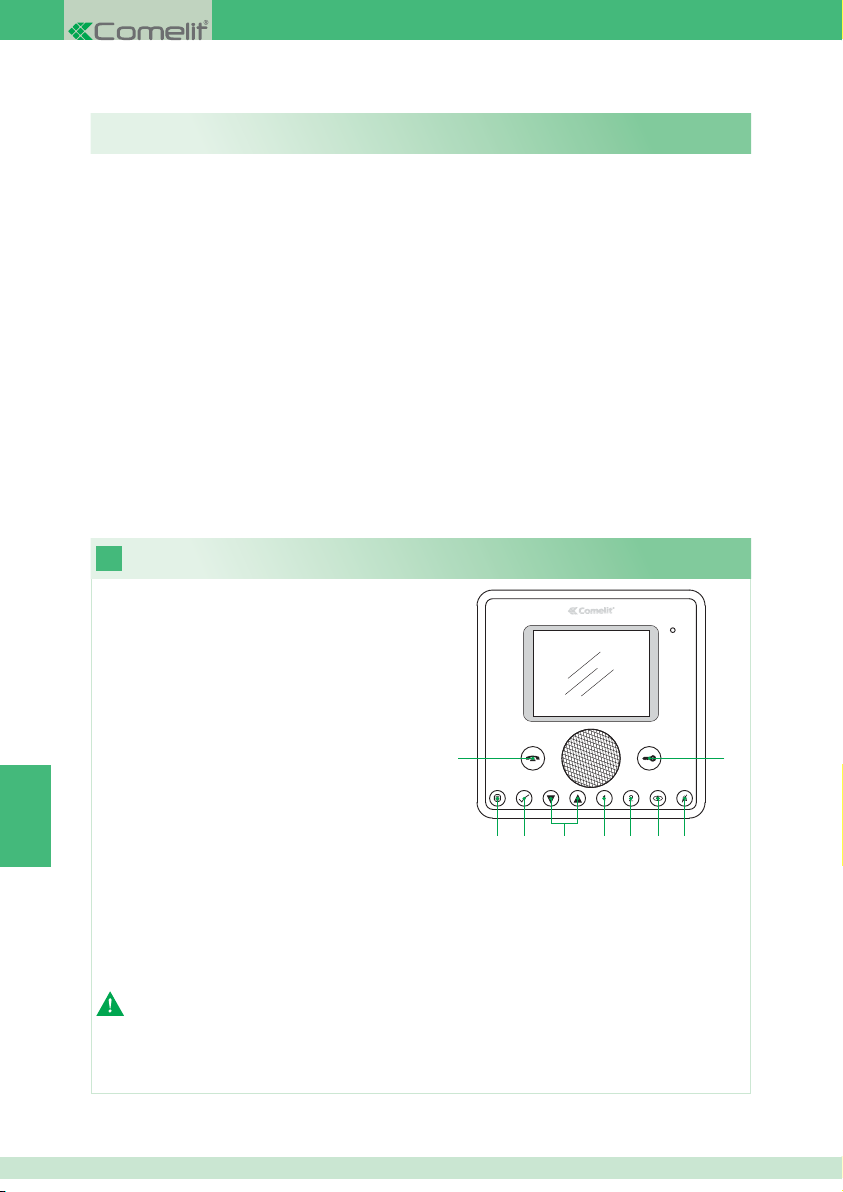
ÍNDICE
1. Descrição do monitor e funções de intercomunicação das teclas .............................................. 44
2. Responder a uma chamada ........................................................................................................ 45
3. Função de autoligação ................................................................................................................ 45
4. Realizar uma chamada intercomunicante com as teclas 1 ou 2 ................................................. 45
5. Confi guração do idioma do menu ...............................................................................................46
6. Descrição do menu ..................................................................................................................... 46
7. Menu de estado .......................................................................................................................... 46
8. Gravar mensagem para ausente ................................................................................................. 47
9. Activar a mensagem para ausente .............................................................................................47
10. Modifi car o nome no directório intercomunicante ....................................................................... 48
11. Realizar uma chamada intercomunicante ................................................................................... 48
12. Confi gurar data e hora ................................................................................................................ 48
13. Activar vídeo secretária ............................................................................................................... 49
14. Visualizar as gravações do vídeo secretária ............................................................................... 49
15. Gravação manual ........................................................................................................................ 50
16. Confi gurar melodias .................................................................................................................... 50
1
1 Tecla áudio. Permite activar ou desactivar a
2 Tecla menu. Permite aceder, sair e subir um nível
3 Tecla de confi rmação. Permite confi rmar uma
4 Teclas de navegação. Permitem navegar/
5 Tecla 1. Chamada geral interna. *
6 Tecla 2. Chamada geral externa. *
7 Tecla de Autoligação. *
8 Tecla Privacidade/Médico. *
• A função Privacidade permite excluir a
PT
• A função Médico permite o accionamento automático da abertura da porta aquando de uma chamada do ponto
• A função Privacidade + Médico, além de desactivar a campainha, como na função Privacidade, permite a activação
9 Tecla fechadura. Permite activar a fechadura do ponto externo. *
* Programável, contactar um instalador qualifi cado.
Nota: as funções de intercomunicação das teclas só se encontram disponíveis com o menu desligado.
Descrição do monitor e funções de intercomunicação das teclas
comunicação.
no menu.
selecção no interior do menu.
modifi car valores no interior do menu.
1
campainha em chamadas do ponto externo e de
intercomunicação.
23 4 56 78
externo.
automática da abertura da porta aquando de uma chamada do ponto externo.
9
Atenção! Para reduzir o risco de avarias e de choques eléctricos:
• Não abrir o aparelho ou realizar pessoalmente reparações. Em caso de necessidade, pedir a intervenção de pessoal
qualifi cado.
• Não introduzir objectos, nem derramar líquidos no interior do dispositivo.
• Limpar com um pano humedecido em água. Não utilizar álcool e outros produtos agressivos.
44
Page 45
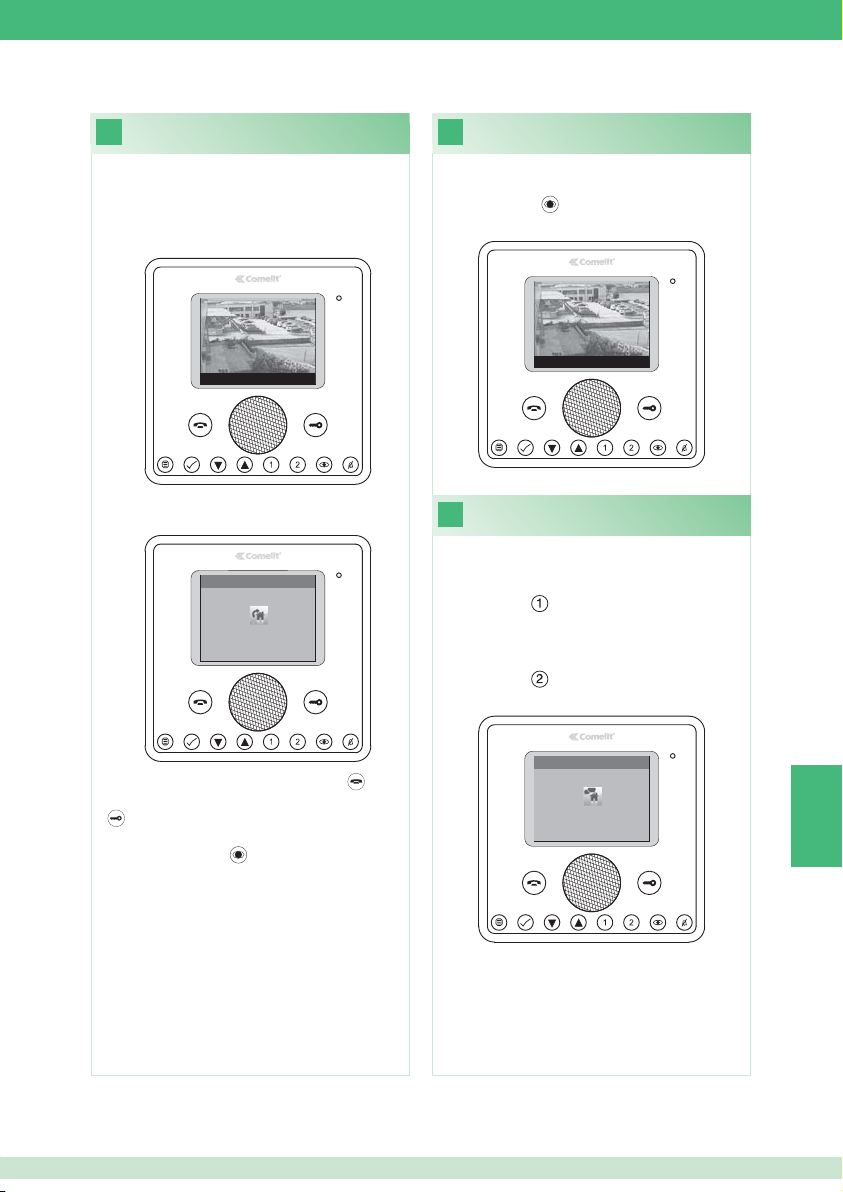
Responder a uma chamada
2
3
Função de autoligação
Aquando da recepção de uma chamada do ponto externo:
• No caso de um monitor principal (máx. 1 por unidade
habitacional), a imagem proveniente do ponto externo é
automaticamente visualizada no monitor.
Porta 1: À espera de resposta
• No caso de um monitor secundário, surge a indicação
de uma chamada do ponto externo.
CHAMADA POR PONTO EXTERNO
Port a 1
À espera de resposta
Com o equipamento em repouso, para visualizar a imagem
do ponto externo:
} Premir a tecla
(se mantidas as confi gurações de
fábrica).
Porta 1: À espera de resposta
Realizar uma chamada
4
intercomunicante com as teclas 1 ou 2
Para realizar uma chamada geral interna a todos os
aparelhos da mesma unidade habitacional (se mantidas as
confi gurações de fábrica).
} Premir a tecla
Para realizar uma chamada geral externa a todos os
aparelhos de outra unidade habitacional (se mantidas as
confi gurações de fábrica):
} Premir a tecla
} Para activar/desactivar o som, premir a tecla
.
} Para activar a fechadura do ponto externo, premir a tecla
.
} Para visualizar a imagem sem activar o som com o ponto
externo, premir a tecla
(apenas monitor secundário).
CHAMADA INTERCOMUNICANTE
Geral interna
À espera de resposta
PT
45
Page 46
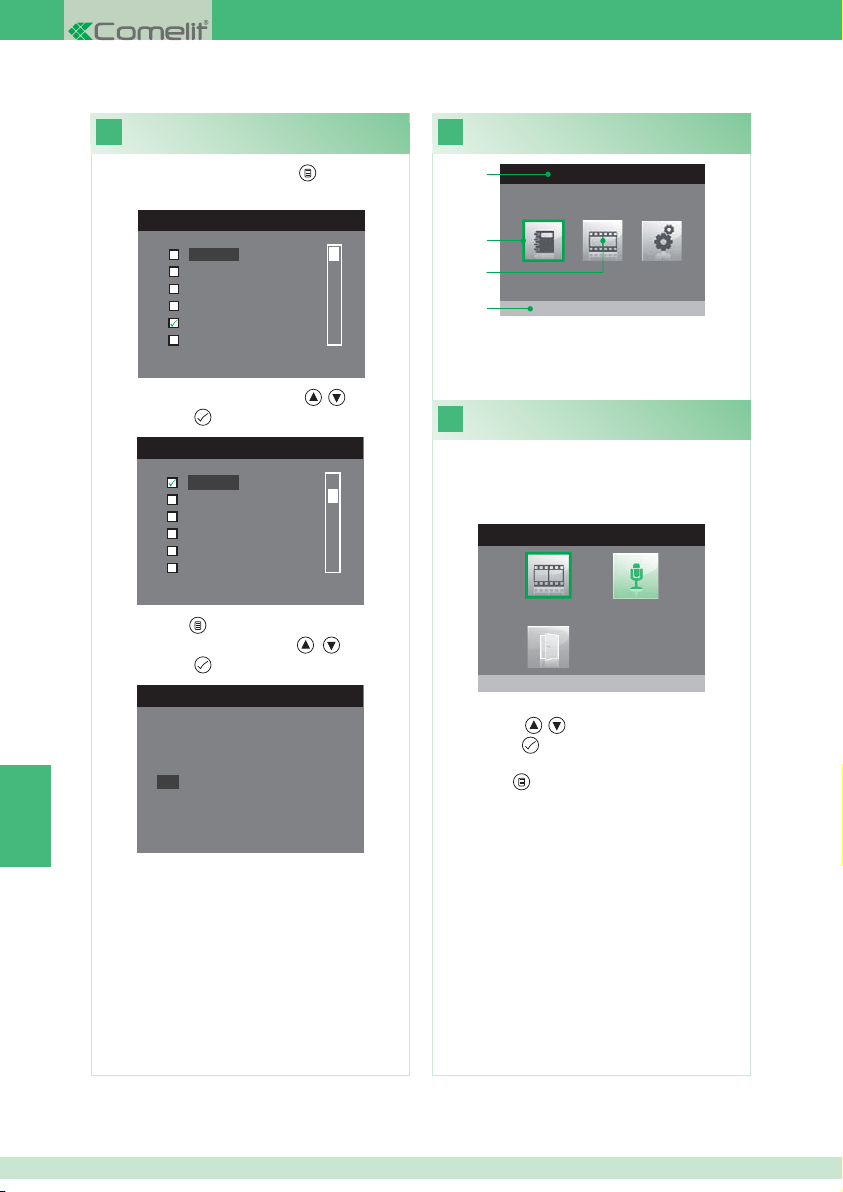
Confi guração do idioma do menu Descrição do menu
5
6
No primeiro acesso ao menu (tecla ), é solicitada ao
utilizador a confi guração do idioma de utilização.
MENU IDIOMA
Italiano
English
Français
Español
Português
Deutsch
1. Seleccionar o idioma com as teclas
premindo a tecla
.
MENU LINGUE
, e confi rmar
Italiano
English
Français
Español
Português
Deutsch
2. Premir a tecla para sair.
3. Seleccionar “OK” com as teclas
premindo a tecla
.
Italiano
, e confi rmar
NO
OK
1
2
3
4
MENU PRINCIPAL
Directório Intercomunicante
1 Título do menu actualmente aberto.
2 Moldura com a indicação do menu seleccionado.
3 Ícone do menu.
4 Título do menu seleccionado.
7
Menu de estado
Acessível apenas quando:
• A função Mensagem para ausente se encontra activada.
• Existe uma nova mensagem de vídeo na secretária.
• Porta aberta.
MENU ESTADO
Novas mensagens presentes
A partir deste menu é possível:
• Com as teclas
• Com a tecla
, seleccionar as funções.
desactivar as funções e visualizar os
vídeos gravados.
• Com a tecla
regressar ao menu principal.
PT
46
Page 47
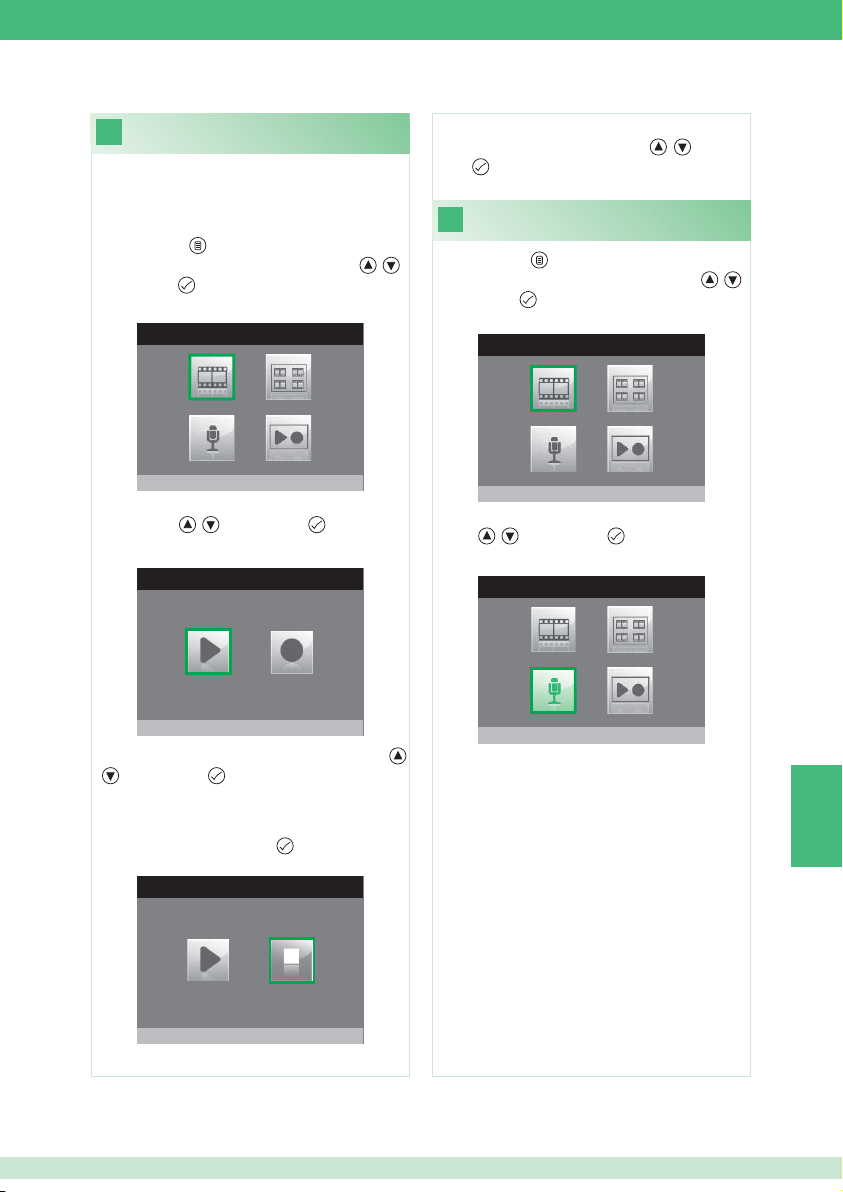
Gravar mensagem para ausente
8
A função mensagem para ausente, se activada, permite
reproduzir uma mensagem gravada no altifalante do ponto
externo no momento em que é recebida uma chamada.
1. Premir a tecla
2. Seleccionar o menu Secretária com as teclas
premir a tecla
para aceder ao menu principal.
, e
para aceder.
SECRETÁRIA
7. Para voltar a ouvir a mensagem gravada, seleccionar o
ícone Ouvir gravação com as teclas
para confi rmar.
tecla
Activar a mensagem para ausente
9
, e premir a
1. Premir a tecla para aceder ao menu principal.
2. Seleccionar o menu Secretária com as teclas
premir a tecla
para aceder.
SECRETÁRIA
, e
Vídeo secretaria não activa
3. Seleccionar o menu Reproduzir gravar mensagem
com as teclas
, e premir a tecla para aceder.
MENSAGEM PARA AUSENTE
Ouvir gravação
4. Seleccionar o ícone Ouvir gravação com as teclas
e premir a tecla para confi rmar.
5. Falar ao microfone do monitor para gravar a mensagem
(máx. 20 seg.)
6. Para interromper a gravação da mensagem antes do fi m
dos 20 segundos, premir a tecla
MENSAGEM PARA AUSENTE
Parar gravação
.
Vídeo secretaria não activa
3. Seleccionar o ícone Mensagem para ausente com as
teclas , e premir a tecla para confi rmar.
SECRETÁRIA
Mensagem para ausente ON
,
PT
47
Page 48
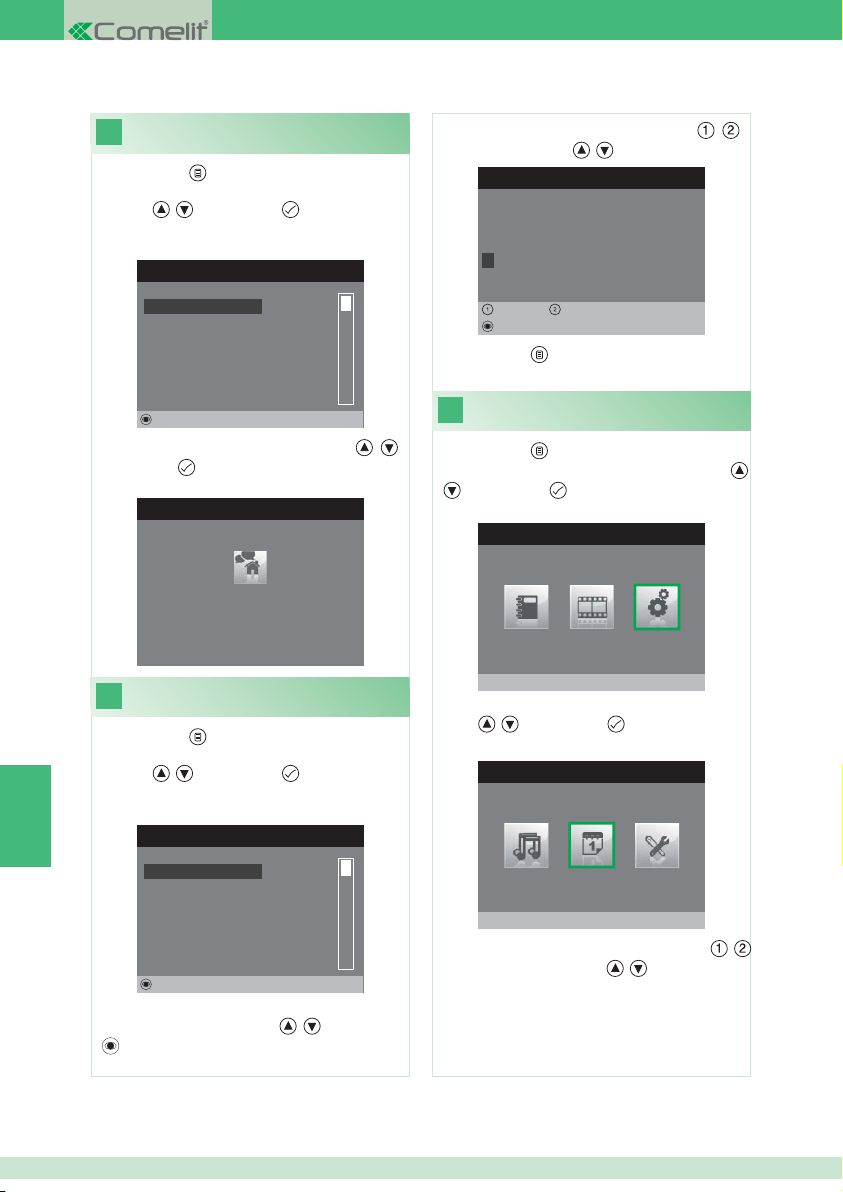
10
1. Premir a tecla para aceder ao menu principal.
2. Seleccionar o menu Directório Intercomunicante com
as teclas , e premir a tecla para aceder.
Realizar uma chamada
intercomunicante
DIRECTÓRIO CHAMADAS INTERCOM
4. Seleccionar a letra desejada com as teclas
modifi car com as teclas
, .
ALTERA NOME
Configura nome
G E R A L I N T E R N A
, e
GERAL INTERNA
GERAL EXTERNA
PRINCIPAL
SECUNDÁRIO 1
SECUNDÁRIO 2
SECUNDÁRIO 3
Alterar
3. Seleccionar o item desejado com as teclas
premir a tecla
Modifi car o nome no directório
11
intercomunicante
1. Premir a tecla para aceder ao menu principal.
2. Seleccionar o menu Directório Intercomunicante com
as teclas
PT
para enviar a chamada.
CHAMADA INTERCOMUNICANTE
GERAL INTERNA
À espera de resposta
, e premir a tecla para aceder.
DIRECTÓRIO CHAMADAS INTERCOM
GERAL INTERNA
GERAL EXTERNA
PRINCIPAL
SECUNDÁRIO 1
SECUNDÁRIO 2
SECUNDÁRIO 3
Alterar
3. Seleccionar o item do directório do qual se deseja
modifi car o nome com as teclas
per aceder.
, e
, e premir a tecla
Esquerda Direita
Apagar
5. Premir a tecla
12
1. Premir a tecla
2. Seleccionar o menu Confi gurações com as teclas
e premir a tecla para aceder.
3. Seleccionar o menu Confi gura data e hora com as
teclas
4. Seleccionar o campo a modifi car com as teclas
e alterar o valor com as teclas
para sair e guardar as modifi cações.
Confi gurar data e hora
para aceder ao menu principal.
MENU PRINCIPAL
Configurações
, e premir a tecla para aceder.
MENU CONFIGURAÇÕES
Configura data e hora
,
, .
,
48
Page 49
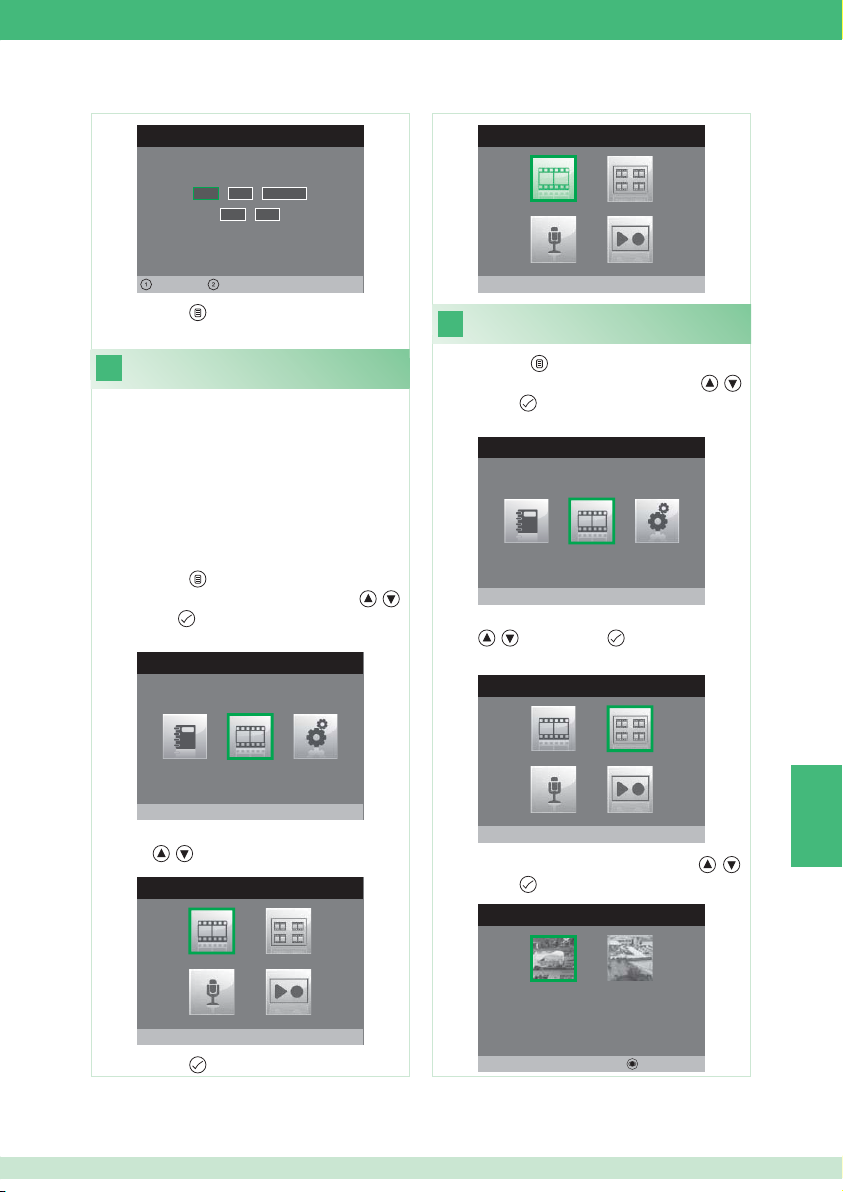
CONFIGURA DATA E HORA
0 2 / 0 2 / 2 0 1 1
1 0: 0 2
SECRETÁRIA
Esquerda Direita
5. Premir a tecla para sair e guardar as modifi cações.
13
Activar vídeo secretária
A função vídeo-secretária, se activada, permite gravar a
imagem do ponto exterior no momento em que é recebida
uma chamada (no máx. 8 segundos).
As gravações são guardadas no formato formato .avi, no
cartão SD na pasta "Vídeo" e podem ser visualizadas
também num computador com o Windows Media Player.
Caso não exista cartão SD, as gravações são guardadas
na memória do monitor (8 gravações no máx).
1. Premir a tecla para aceder ao menu principal.
2. Seleccionar o menu Secretária com as teclas
premir a tecla
para aceder.
MENU PRINCIPAL
SECRETÁRIA
, e
3. Seleccionar o ícone Vídeo secretária não activa com
as teclas , .
SECRETÁRIA
Vídeo secretaria activa
Visualizar as gravações
14
do vídeo secretária
1. Premir a tecla para aceder ao menu principal.
2. Seleccionar o menu Secretária com as teclas
premir a tecla
para aceder.
MENU PRINCIPAL
SECRETÁRIA
, e
3. Seleccionar o ícone Ver mensagens de vídeo com as
teclas
, e premir a tecla para aceder.
SECRETÁRIA
Ver mensagens de vídeo
4. Seleccionar o vídeo desejado com as teclas , e
premir a tecla
para confi rmar.
SECRETÁRIA
PT
Vídeo secretaria não activa
4. Premir a tecla
para activar.
02/02/2011 10:48
Apagar
49
Page 50
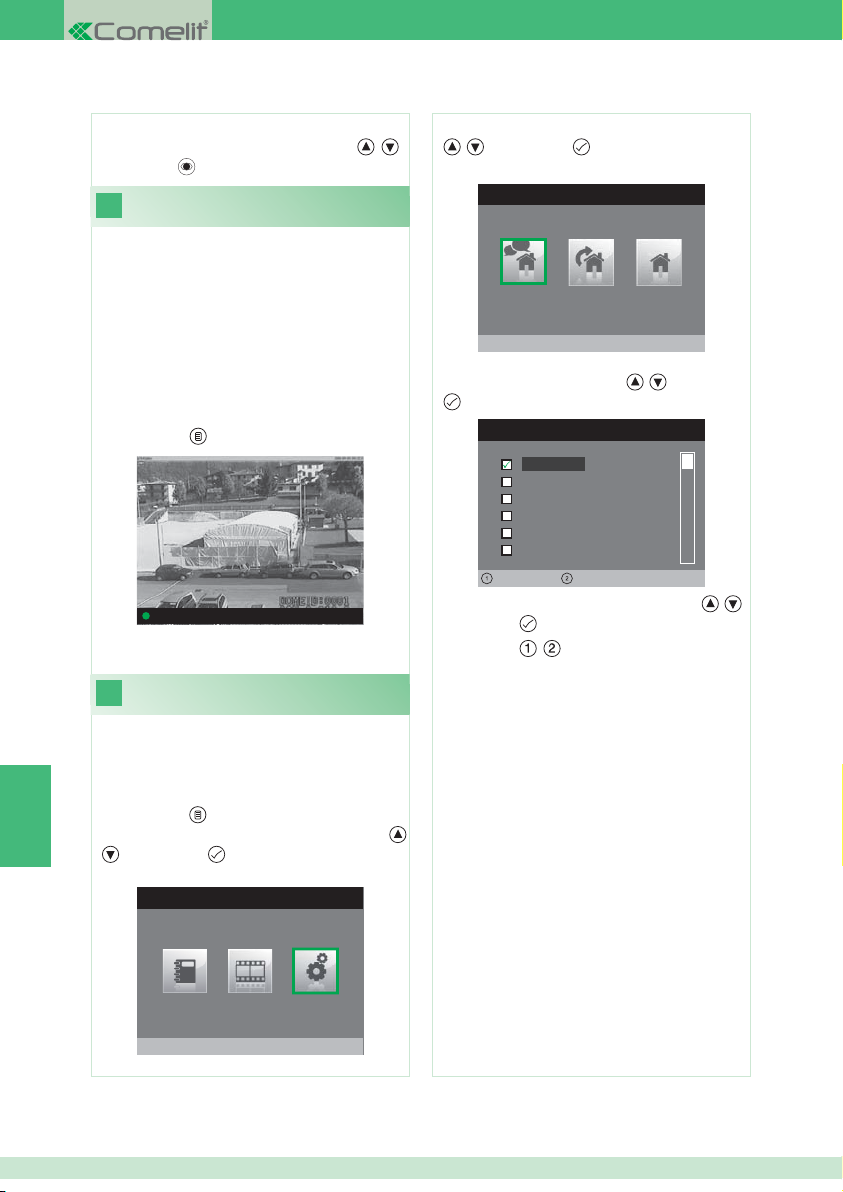
Para cancelar um vídeo:
} Seleccionar o vídeo desejado com as teclas
premir a tecla
15
É possível gravar manualmente uma chamada com o
ponto externo.
A função está disponível nas seguintes situações:
√ Chamada por ponto externo.
√ Durante Autoligação.
• Se tiver sido activado a partir de um monitor principal,
a função gravará quer áudio, quer vídeo.
• Se tiver sido activado a partir de um monitor
secundário, para gravar áudio é necessário estar em
comunicação áudio com o ponto externo.
} Premir a tecla
} Para visualizar os vídeos gravados, seguir o
procedimento descrito no ponto 14.
16
para confi rmar.
Gravação manual
para iniciar a gravação.
Porta 1: Em comunicação
Confi gurar melodias
, e
3. Seleccionar o menu Confi gura melodias com as teclas
, e premir a tecla para aceder.
MENU MELODIAS
Chamada intercomunicante
4. Seleccionar o tipo de chamada para o qual se deseja
modifi car a melodia com as teclas
para aceder.
MELODIA CHAMADA INTERCOM
, e premir a tecla
Melodia 1
Melodia 2
Melodia 3
Vibey
Amazing
Bomba
Volume -
5. Seleccionar a melodia desejada com as teclas , e
premir a tecla
Com as teclas
volume da campainha.
É possível adicionar campainhas personalizáveis.
Volume +
para confi rmar.
, , é possível aumentar ou diminuir o
É possível personalizar as melodias para:
• Chamada intercomunicante.
• Chamada por ponto externo.
• Chamada campainha externa.
1. Premir a tecla para aceder ao menu principal.
PT
2. Seleccionar o menu Confi gurações com as teclas
e premir a tecla para aceder.
MENU PRINCIPAL
Configurações
50
√ Os fi cheiros devem estar no formato formato .wav com
8 Khz mono 16 bits.
} Introduzir as melodias na pasta "wav" do cartão SD para
visualizá-las no devido menu.
,
Page 51

Fonts are (c) Bitstream (see below). DejaVu changes are in public domain.
Glyphs imported from Arev fonts are (c) Tavmjong Bah (see below)
Bitstream Vera Fonts Copyright
------------------------------
Copyright (c) 2003 by Bitstream, Inc. All Rights Reserved. Bitstream Vera is a trademark of Bitstream, Inc.
Permission is hereby granted, free of charge, to any person obtaining a copy of the fonts accompanying this license (“Fonts”) and associated
documentation fi les (the “Font Software”), to reproduce and distribute the Font Software, including without limitation the rights to use, copy, merge,
publish, distribute, and/or sell copies of the Font Software, and to permit persons to whom the Font Software is furnished to do so, subject to the
following conditions:
The above copyright and trademark notices and this permission notice shall be included in all copies of one or more of the Font Software typefaces.
The Font Software may be modifi ed, altered, or added to, and in particular the designs of glyphs or
characters in the Fonts may be modifi ed and additional glyphs or characters may be added to the Fonts, only if the fonts are renamed to names not
containing either the words “Bitstream” or the word “Vera”.
This License becomes null and void to the extent applicable to Fonts or Font Software that has been modifi ed and is distributed under the “Bitstream
Vera” names.
The Font Software may be sold as part of a larger software package but no copy of one or more of the Font Software typefaces may be sold by itself.
THE FONT SOFTWARE IS PROVIDED “AS IS”, WITHOUT WARRANTY OF ANY KIND, EXPRESS OR IMPLIED, INCLUDING BUT NOT LIMITED
TO ANY WARRANTIES OF MERCHANTABILITY, FITNESS FOR A PARTICULAR PURPOSE AND NONINFRINGEMENT OF COPYRIGHT,
PATENT, TRADEMARK, OR OTHER RIGHT. IN NO EVENT SHALL BITSTREAM OR THE GNOME FOUNDATION BE LIABLE FOR ANY CLAIM,
DAMAGES OR OTHER LIABILITY, INCLUDING ANY GENERAL, SPECIAL, INDIRECT,
INCIDENTAL, OR CONSEQUENTIAL DAMAGES, WHETHER IN AN ACTION OF CONTRACT, TORT OR
OTHERWISE, ARISING FROM, OUT OF THE USE OR INABILITY TO USE THE FONT SOFTWARE OR
FROM OTHER DEALINGS IN THE FONT SOFTWARE.
Except as contained in this notice, the names of Gnome, the Gnome Foundation, and Bitstream Inc., shall not be used in advertising or otherwise
to promote the sale, use or other dealings in this Font Software without prior written authorization from the Gnome Foundation or Bitstream Inc.,
respectively. For further information, contact: fonts at gnome dot org.
Arev Fonts Copyright
------------------------------
Copyright (c) 2006 by Tavmjong Bah. All Rights Reserved.
Permission is hereby granted, free of charge, to any person obtaining a copy of the fonts accompanying this license (“Fonts”) and associated
documentation fi les (the “Font Software”), to reproduce and distribute the modifi cations to the Bitstream Vera Font Software, including without
limitation the rights to use, copy, merge, publish, distribute, and/or sell copies of the Font Software, and to permit persons to whom the Font Software
is furnished to do so, subject to the following conditions:
The above copyright and trademark notices and this permission notice shall be included in all copies of one or more of the Font Software typefaces.
The Font Software may be modifi ed, altered, or added to, and in particular the designs of glyphs or characters in the Fonts may be modifi ed and
additional glyphs or characters may be added to the Fonts, only if the fonts are renamed to names not containing either the words “Tavmjong Bah”
or the word “Arev”.
This License becomes null and void to the extent applicable to Fonts or Font Software that has been modifi ed and is distributed under the “Tavmjong
Bah Arev” names.
The Font Software may be sold as part of a larger software package but no copy of one or more of the Font Software typefaces may be sold by itself.
THE FONT SOFTWARE IS PROVIDED “AS IS”, WITHOUT WARRANTY OF ANY KIND, EXPRESS OR IMPLIED, INCLUDING BUT NOT LIMITED
TO ANY WARRANTIES OF MERCHANTABILITY, FITNESS FOR A PARTICULAR PURPOSE AND NONINFRINGEMENT OF COPYRIGHT,
PATENT, TRADEMARK, OR OTHER RIGHT. IN NO EVENT SHALL TAVMJONG BAH BE LIABLE FOR ANY CLAIM, DAMAGES OR OTHER
LIABILITY, INCLUDING ANY GENERAL, SPECIAL, INDIRECT, INCIDENTAL, OR CONSEQUENTIAL DAMAGES, WHETHER IN AN ACTION OF
CONTRACT, TORT OR OTHERWISE, ARISING FROM, OUT OF THE USE OR INABILITY TO USE THE FONT SOFTWARE OR FROM OTHER
DEALINGS IN THE FONT SOFTWARE.
Except as contained in this notice, the name of Tavmjong Bah shall not be used in advertising or otherwise
to promote the sale, use or other dealings in this Font Software without prior written authorization from
Tavmjong Bah. For further information, contact: tavmjong @ free. fr.
51
Page 52

1° edizione 02/2011 cod. 2G40000304
Assistenza tecnica Italia 0346/750090
Commerciale Italia 0346/750091
Comelit Group S.p.A.
[ I ]
Via Don Arrigoni 5
24020 Rovetta S. Lorenzo (BG)
Tel. +39 0346 750011
Fax +39 0346 71436
www.comelit.eu
[email protected]
Comelit Group Belgium
[ B ]
Z.3 Doornveld 170
1731 Zellik ( Asse)
Tel. +32 (0) 24115099 - Fax +32 (0) 24115097
www.comelit.be - [email protected]
Comelit Group Germany GmbH
[ D ]
Brusseler Allee 23- 41812 Erkelenz
Tel. +49 (0) 243190151-23 • +49 (0) 243190151-24
Fax +49 (0) 24319015125
www.comelit.de - [email protected]
Comelit Espana S.L.
[ E ]
Josep Estivill 67-69 - 08027 Barcelona
Tel. +34 932 430 376 - Fax +34 934 084 683
www.comelit.es - [email protected]
Comelit Immotec
[ F ]
Siège: 18, rue Séjourné- 94000 CRETEIL CEDEX
Tél. +33 (0) 1 43 53 97 97
Fax +33 (0) 1 43 53 97 87
www.comelit.fr - [email protected]
Comelit Hellas
[ GR ]
9 Epiru str.
16452 Argiroupolis - Athens Greece
Tel. +30 210 99 68 605-6
Fax +30 210 99 45 560
www.comelit.gr - [email protected]
Comelit Ireland
[ IRL ]
Suite 3 Herbert Hall
16 Herbert Street - Dublin 2
Tel. +353 (0) 1 619 0204
Fax +353 (0) 1 619 0298
www.comelit.ie - [email protected]
Comelit Nederland BV
[ NL ]
buitendijks 1-3356 lx Papendrecht
Tel. +31 (0) 786511201
Fax +31 (0) 786170955
www.comelit.nl - [email protected]
Technical service abroad (+39) 0346750092
Export department (+39) 0346750093
Comelit (Shanghai)
[ PRC ]
Electronics Co.,Ltd
5 Floor No. 4 Building No.30,
Hongcao Road, Hi-Tech Park Caohejing,
Shanghai, China
Tel. +86-21-64519192/9737/3527
Fax +86-21-64517710
www.comelit.com.cn [email protected]
Comelit Russia
[ RU ]
Partiyniy per., n.1, korp.58, stroenie 1,
6 fl oor, off. 21, 115093, Moscow
+7(495)644-20-97
www.comelit.ru - [email protected]
Comelit Far East
[ SG ]
Block 1160, Depot Road #06-04
Telok Blangah Industrial Estate
Singapore 109674
Tel. +65-6748 8563 - Fax +65-6748 8584
offi [email protected]
Comelit Group U.A.E.
[ UAE ]
Middle East Offi ce
P.O. Box 54433
Dubai U.A.E.
Tel. +971 4 299 7533 Fax +971 4 299 7534
www.comelit.ae
[email protected]
Comelit Group UK Ltd
[ UK ]
Unit 4 Mallow Park
Watchmead Welwyn
Garden City Herts
AL7 1GX
Tel: +44 (0)1707377203
Fax: +44 (0)1707377204
www.comelitgroup.co.uk
[email protected]
Comelit Usa
[ USA ]
250 W. Duarte Rd. Suite B
Monrovia, CA 91016
Tel. +1 626 930 0388
Fax +1 626 930 0488
www.comelitusa.com
[email protected]
 Loading...