

Page 1

IT
MANUALE
TECNICO
EN
TECHNICAL
MANUAL
FR
MANUEL
TECHNIQUE
www.comelitgroup.com
Centralino di portineria Art. 1998V, 1998VC
Porter switchboard Art. 1998V, 1998VC
Standard de conciergerie Art. 1998V, 1998VC
Page 2
IT
EN
FR
2
Avvertenze
• Effettuare l’installazione seguendo scrupolosamente le istruzioni fornite dal costruttore ed in conformità alle norme
vigenti.
• Tutti gli apparecchi devono essere destinati esclusivamente all’uso per cui sono stati concepiti. Comelit Group S.p.A.
declina ogni responsabilità per un utilizzo improprio degli apparecchi, per modifi che effettuate da altri a qualunque titolo
e scopo, per l’uso di accessori e materiali non originali.
• Tutti i prodotti sono conformi alle prescrizioni delle direttive 2006/95/CE (che sostituisce la direttiva 73/23/CEE e
successivi emendamenti) e ciò è attestato dalla presenza della marcatura CE sugli stessi.
• Evitare di porre i fi li di montante in prossimità di cavi di alimentazione (230/400V).
• Gli interventi di installazione, montaggio e assistenza agli apparecchi elettrici devono essere eseguiti esclusivamente da
elettricisti specializzati.
• Nell' impianto ellettrico dell'edifi cio deve essere previsto un interruttore di rete onnipolare con un'apertura di contatto di
almeno 3mm in grado di sezionare l'alimentazione del dispositivo.
• Togliere l’alimentazione prima di effettuare qualsiasi manutenzione.
• Rimettere le protezioni sui morsetti e chiudere lo sportellino di ispezione dopo ogni intervento.
• Il dispositivo è conforme alla norma EN60950-1 relativa alla sicurezza di apparecchiature per la tecnologia
dell'informazione.
• Non tenere premuto il gancio fonica con la cornetta sollevata.
Warning
• Install the equipment by carefully following the instructions given by the manufacturer and in compliance with the
standards in force.
• All the equipment must only be used for the purpose it was designed for. Comelit Group S.p.A. declines any responsibility
for improper use of the apparatus, for modifi cations made by third parties for any reason or purpose, and for the use of
non-original accessories and materials.
• All the products comply with the requirements of the 2006/95/CE directives (which replace directive 73/23/CEE and
subsequent amendments), as certifi ed by the CE mark on the products.
• Do not route riser wires in proximity to power supply cables (230/400V).
• Installation, mounting and assistance procedures for electrical devices must only be performed by specialised electricians.
• The electrical system of the building must be fi tted with an omnipolar mains switch with a contact opening of at least 3mm,
which is capable of isolating the power supply of the device.
• Cut off the power supply before carrying out any maintenance work.
• Place the protection back over the terminals and close the inspection door after every procedure.
• The device conforms to standard EN60950-1 relating to the safety of information technology equipment.
• Do not press and hold the audio hook while the handset is lifted.
Avertissements
• Effectuer l’installation en suivant scrupuleusement les instructions fournies par le constructeur et conformément aux
normes en vigueur.
• Tous les appareils doivent être strictement destinés à l’emploi pour lequel ils ont été conçus. La société Comelit Group
S.p.A. décline toute responsabilité en cas de mauvais usage des appareils, pour des modifi cations effectuées par
d’autres personnes pour n’importe quelle raison et pour l’utilisation d’accessoires et matériaux non d’origine.
• Tous les produits sont conformes aux prescriptions de la directive 2006/95/CE (qui remplace la directive 73/23/CEE et
amendements successifs). Cela est attesté par la présence du marquage CE sur les produits.
• Éviter de placer les fi ls de montant à proximité des câbles d’alimentation (230/400V).
• Les interventions d’installation, de montage et d’assistance aux appareils électriques doivent être effectuées
exclusivement par des électriciens spécialisés.
• L’installation électrique du bâtiment doit être munie d’un interrupteur de réseau omnipolaire avec une ouverture de
contact d’au moins 3mm en mesure de sectionner l’alimentation du dispositif.
• Couper l’alimentation avant d’effectuer toute opération d’entretien.
• Remettre les protections sur les bornes et fermer la porte d’inspection après chaque intervention.
• Le dispositif est conforme à la norme EN60950-1 relative à la sécurité des équipements pour la technologie de
l’information.
• Ne pas maintenir le crochet phonie enfoncé lorsque le combiné est décroché.
Page 3

3
IT
SOMMARIO
• INTRODUZIONE
- Vista generale 4
- Descrizione morsettiera 4
- Tasti di programmazione e display 5
- Tastiera alfanumerica 5
- Descrizione generica 5
• UTILIZZO
U
1
Come rispondere a una chiamata da posto
interno
6
U2 Come rispondere a una chiamata da posto
esterno
6
U3 Come chiamare un posto interno 7
U4 Come inoltrare una chiamata da posto esterno a
posto interno
8
U5 Come mettere in comunicazione 2 interni tra loro
(funzione intercomunicante)
8
U6 Come chiamare un posto interno presente nelle
chiamate ricevute
9
U7 Come chiamare un centralino secondario da
centralino principale
10
U8 Come chiamare un centralino principale da
centralino secondario
11
U9 Come rispondere a una chiamata da centralino
secondario a centralino principale
11
U10 Come rispondere a una chiamata da centralino
principale a centralino secondario
12
U11 Come attivare o disattivare i centralini principali 12
U12 Come utilizzare l’apriporta 13
U13 Come attivare la funzione “Seguimi” (FollowMe) 13
U14 Come attivare un relé supplementare 13
• RUBRICA
- Albero schermate menu RUBRICA
14
U15
Come utilizzare la rubrica 14
U16 Come cercare un nome in rubrica 14
U17 Come inserire un nome in rubrica 15
U18 Come cancellare un nome in rubrica 15
U19 Come modifi care un nome in rubrica 16
U20 Cancellazione rubrica 17
U21 Info rubrica 17
U22 Registrazione numeri brevi 18
• CHIAMATE RICEVUTE
- Albero schermate menu CHIAMATE RICEVUTE
18
U23 Visualizzazione chiamate ricevute 18
U24 Cancellazione lista chiamate ricevute 19
• ALLARMI
- Albero schermate menu ALLARMI 20
U25
Visualizzazione allarmi 20
U26 Cancellazione lista allarmi ricevuti 20
• IMPOSTAZIONI
- Albero schermate menu IMPOSTAZIONI 21
I
1 - Modifica lingua 22
I2 - Impostazioni video 22
I3 - Impostazioni audio 23
I4 - Impostazioni suoni 23
I5 - Modifica data 24
I6 - Modifica ora 24
I7 - Impostazione tema 25
I8 - Regolazione tempi (fonica, attesa reset, standby,
attivazione relé, ripetizione chiamata)
•
25
I9 - Impostazione modalità giornaliera
26
I10 - Impostazione commut. automatica 26
I1
1 - Reset impostazioni 27
• CONFIGURAZIONI INSTALLATORE
- Albero schermate menu CONFIGURAZIONI 28
- C1 - Tipo di centralino (modalità Simplebus Top) 29
- C2 - Come confi gurare un centralino principale o
secondario
30
- C3 - Come confi gurare un centralino come singolo,
parallelo o serie
30
- C4 - Chiamata tramite codice Simplebus o indiretto 31
- C5 - Retrocompatibilità 31
- C6 - Chiamata audio o video 32
- Tabella articoli Simplebus TOP 32
- C7 - Confi gurazione servizi (FollowMe, ripetizione di
chiamata, accensione interni, chiamata tripla, aiuto
codici)
33
• SCHEMI DI COLLEGAMENTO
- SB2V/EN/103M Impianto videocitofonico Simplebus b/n
con 1ingresso principale e centralino di portineria.
96
- SB2V/EN/103SMC Impianto videocitofonico Simplebus
Color con 1 ingresso principale e centralino di portineria.
97
- SB2V/EN/105M Impianto videocitofonico Simplebus b/n
con 2 ingressi principali e centralino di portineria.
98
- SB2V/EN/105SMC Impianto videocitofonico Simplebus
Color con 2 ingressi principali e centralino di portineria.
99
- SB2V/018ASMC Impianto Simplebus Color con modulo
telecamera scorporata Art. 1259C in modalità attuatore
generico e centralino di portineria.
100
- SB2V/026SMC Impianto videocitofonico con 1
ingresso principale e centralino di portineria abbinato
al centralino telefonico Art. 2906 per follow-me.
101
- SB2V/EN/101M Impianto videocitofonico Simplebus
b/n con 1 ingresso principale, 3 secondari video e
centralino di portineria.
102
- SB2V/EN/101SMC Impianto videocitofonico Simplebus
Color con 1 ingresso principale, 3 secondari video e
centralino di portineria.
104
- SB2V/EN/121DM Impianto videocitofonico Simplebus
b/n con 2 ingressi principali, 3 secondari audio e
centralino di portineria.
106
- SB2V/EN/121DSMC Impianto videocitofonico
Simplebus Color con 2 ingressi principali, 3 secondari
audio e centralino di portineria.
108
- SBTOP/001DSMC Impianto videocitofonico Simplebus
TOP con 1 ingresso principale, 4 secondari e relativi
centralini di portineria secondari.
110
- SBTOP/002DSMC Impianto videocitofonico Simplebus
TOP con 2 ingressi principali, 4 secondari e centralino
di portineria principale.
112
- SBTOP/003DSMC Impianto videocitofonico Simplebus
TOP con 2 ingressi principali, 1 centralino di portineria
principale, 2 secondari e relativi centralini di portineria
secondari.
114
- SBTOP/004DSMC Impianto videocitofonico Simplebus
TOP con 1 ingresso principale, 4 secondari e 2 centralini
di portineria principali in confi gurazione SERIE.
116
- SBTOP/005DSMC Impianto videocitofonico Simplebus
TOP con 1 ingresso principale, 3 secondari e 2 centralini
di portineria principali in confi gurazione PARALLELO.
118
Page 4
4
IT
0
1
2
3
4
5
6
789
#
ABC
DEF
MNO
JKL
GHI
WXYZTUVPQRS
ON/OFF
MENU
ESC OK
CANC
5
3
1
1
2
3
4
5
6
7
8
21
2
11
12
13
14
68 109 4
18
1920
16
15
7
17
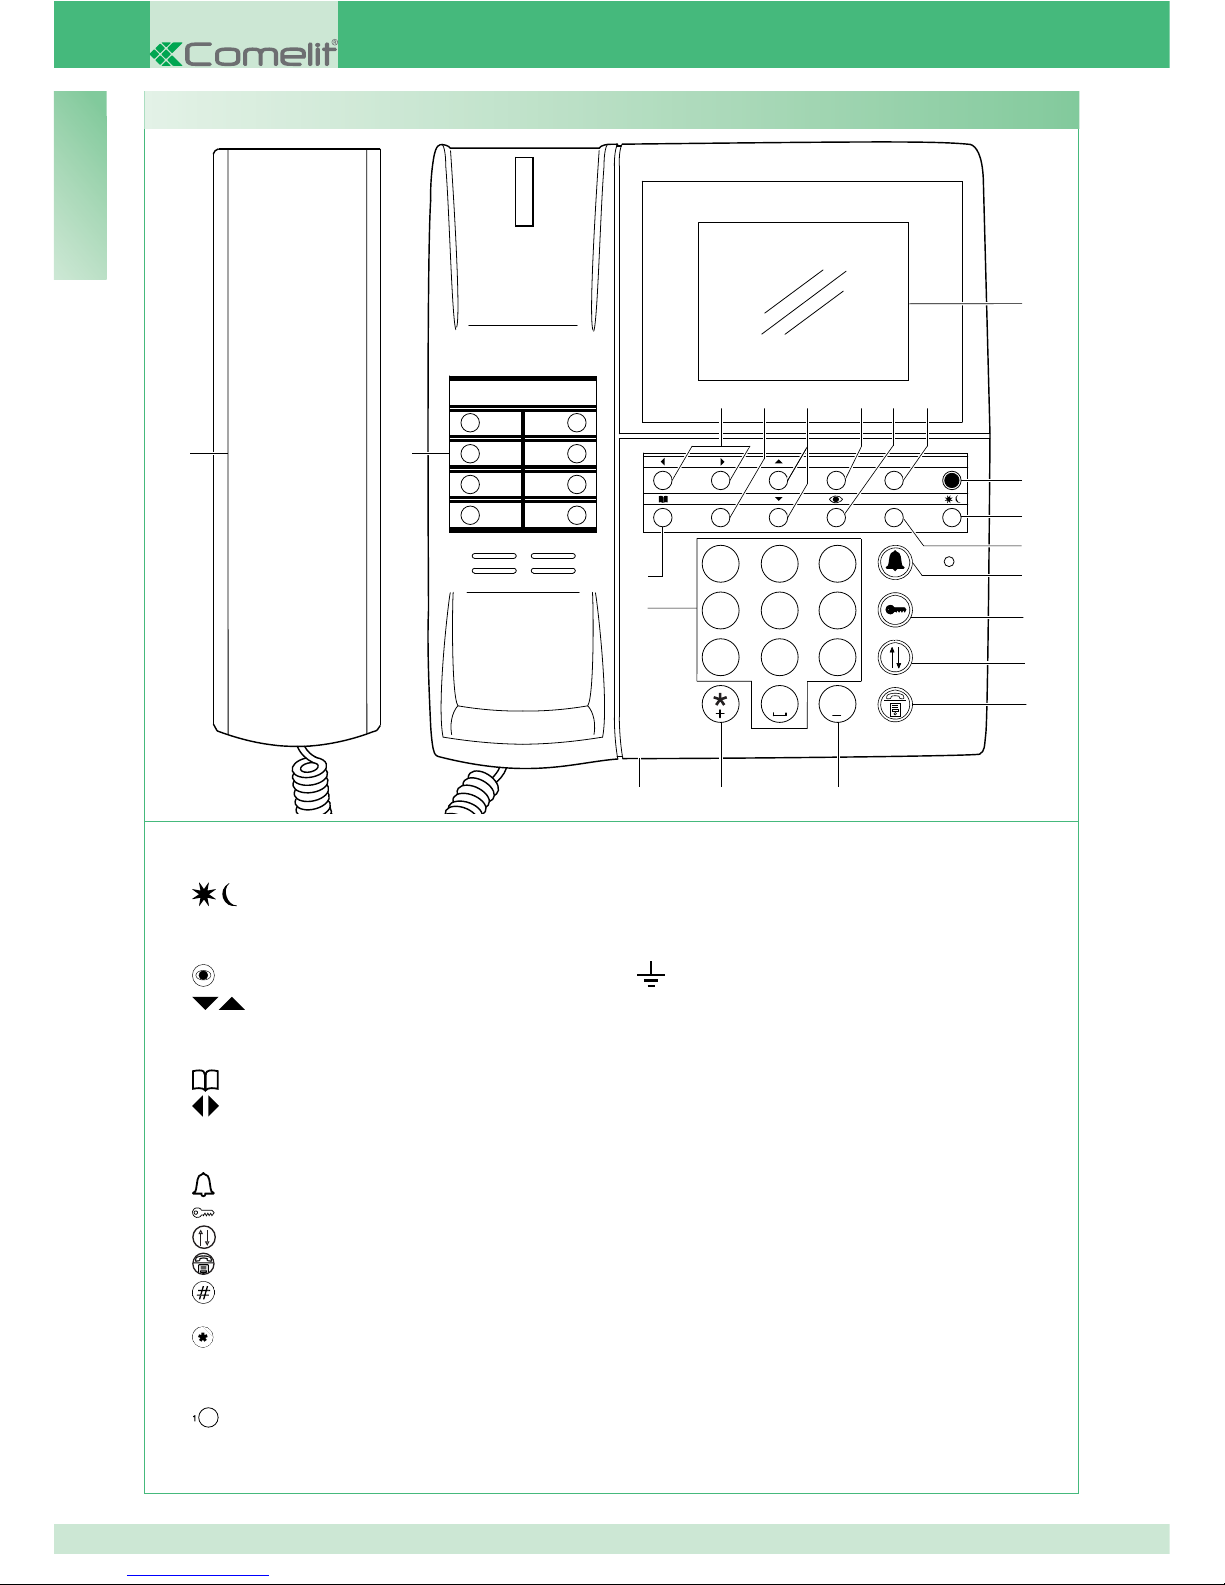
Vista generale
Descrizione morsettiera:
C NO Contatto normalmente aperto per funzione
“SEGUIMI” (Follow me)
24 ~ Alimentazione 24V AC
0 ~ Alimentazione 0V AC
Messa a terra
OUT OUT Contatto normalmente aperto che si
chiude inviando una chiamata video dal centralino
verso un interno
CH CH Contatto libero per “ripetizione di chiamata” o
“abilitazione monitor esterno”
LM LM Linea dati verso i montanti
LP1 LP2 Linea dati in arrivo da posto esterno
GND TX RX Seriale rs232 da connettere al
centralino remoto negli impianti multicentralino in
serie o in parallelo.
1 ON/OFF Accensione/spegnimento (tenere
premuto per 2 secondi)
2
Tasto per attivare la modalità GIORNO o
NOTTE
3 Tasto MENU
4
Tasto per attivare l’autoaccensione
5
Tasti per scorrimento menu
6 CANC Tasto di annullamento chiamata o
cancellazione dati inseriti
7
Tasto rubrica
8
Tasti per scorrimento opzioni menu
9 ESC Tasto di uscita dai menu
10 OK Tasto conferma
11
Tasto per invio chiamata
12
Tasto per apriporta
13
Tasto per trasferimento di chiamata
14
Tasto per mettere in attesa una chiamata
15
Tasto per chiamare il centralino Simplebus
Top dal centralino Simplebus
16 Tasto per attivare un relé supplementare
17 Rotella regolazione volume suoneria
18 Tastiera alfanumerica
19
Numeri brevi
20 Cornetta
21 Display segnalazione messaggi
Page 5
5
IT
MENU Per entrare nei menu di programmazione
Permettono di selezionare le varie opzioni dei menu
Permettono di spostare il cursore per modifi care i dati inseriti
OK Conferma della selezione visualizzata o inserimento dati
CANC Cancellazione dei dati immessi
ESC Annullamento della selezione e uscita dai menu di programmazione
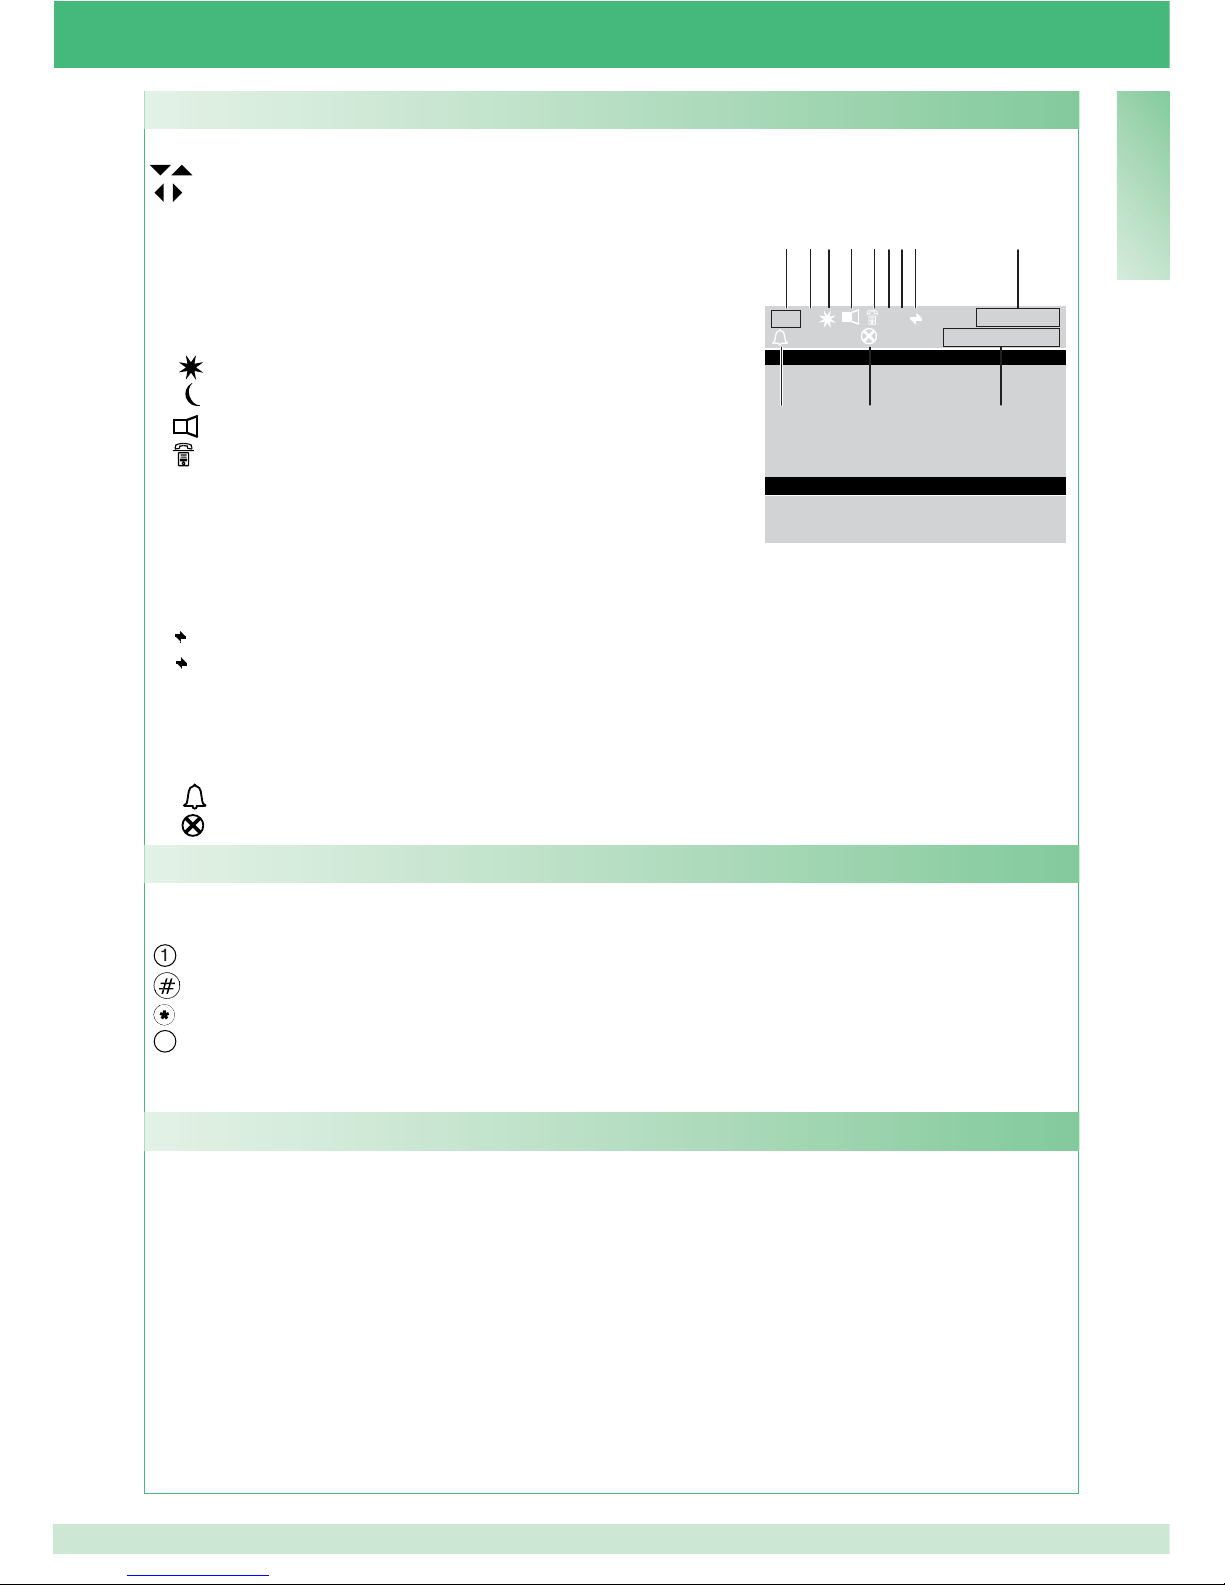
Visualizzazioni da display del centralino:
L P V ?P 14 :15 : 26
= 3 = 04 Lun 12 Mar 12
Tasti di programmazione e display
Per alcune funzioni la tastiera consente di digitare sia numeri che lettere, questo avviene premendo più volte
lo stesso tasto, ad esempio premendo il tasto 2, sul display appariranno in successione a, b, c, A - B - C - 2;
tasto per inserire i simboli .,;:?!()
tasto per inserire un trattino
tasto per inserire il simbolo +
0
tasto per inserire uno spazio tra i caratteri
OK Conferma i dati inseriti
CANC Cancella i dati inseriti
Tastiera alfanumerica
Le funzioni principali del centralino sono le seguenti:
• chiamare un posto interno
• ricevere chiamate dai posti esterni ed inoltrarle eventualmente ai posti interni
• ricevere chiamate ordinarie o di allarme dai posti interni
• comandare l’elettroserratura dei posti esterni
• attivare un relè
Il centralino di portineria prevede inoltre:
• una gestione GIORNO/NOTTE che consente di abilitare le funzioni del centralino solo in deteminate fasce
orarie programmabili dall’utente;
• una CODA CHIAMATE, nella quale vengono memorizzate le chiamate provenienti dai posti interni alle quali
non è stato possibile rispondere;
• una RUBRICA la cui programmazione consente di identifi
care facilmente l’utente chiamante.
Descrizione generica
12 6
110
2347 89 5
1 A modalità AUDIO
V modalità VIDEO
2
modalità GIORNO
modalità NOTTE
3
indica la fonica attiva
4
indica la funzione “FollowMe” attiva
5 ora (ore: minuti:secondi)
6 nome del giorno (Lun, Mar, ecc.) e data (giorno/mese/anno)
7 ! si ha una confi gurazione tra i 2 centralini NON compatibile
? il centralino non ha ancora rilevato la presenza del centralino remoto
8 P indica il centralino confi gurato in parallelo
S indica il centralino confi gurato in serie
9
fi ssa indica il corretto funzionamento della linea seriale
lampeggiante indica il malfunzionamento della linea seriale
10 LM lampeggiante indica un corto circuito sulla linea montante, la scritta è accompagnata dalla ripetizione di
un tono acustico. Il centralino rifi uta qualsiasi tentativo di chiamata o inoltro della stessa verso i posti interni,
vengono invece gestite normalmente tutte le chiamate in arrivo dal posto esterno.
LP lampeggiante indica che il posto esterno non è collegato
11
=5 lampeggiante indica il numero di chiamate non risposte in modalità GIORNO e NOTTE
12
=1 lampeggiante indica il numero di allarmi ricevuti e non evasi
11
Page 6
6
IT
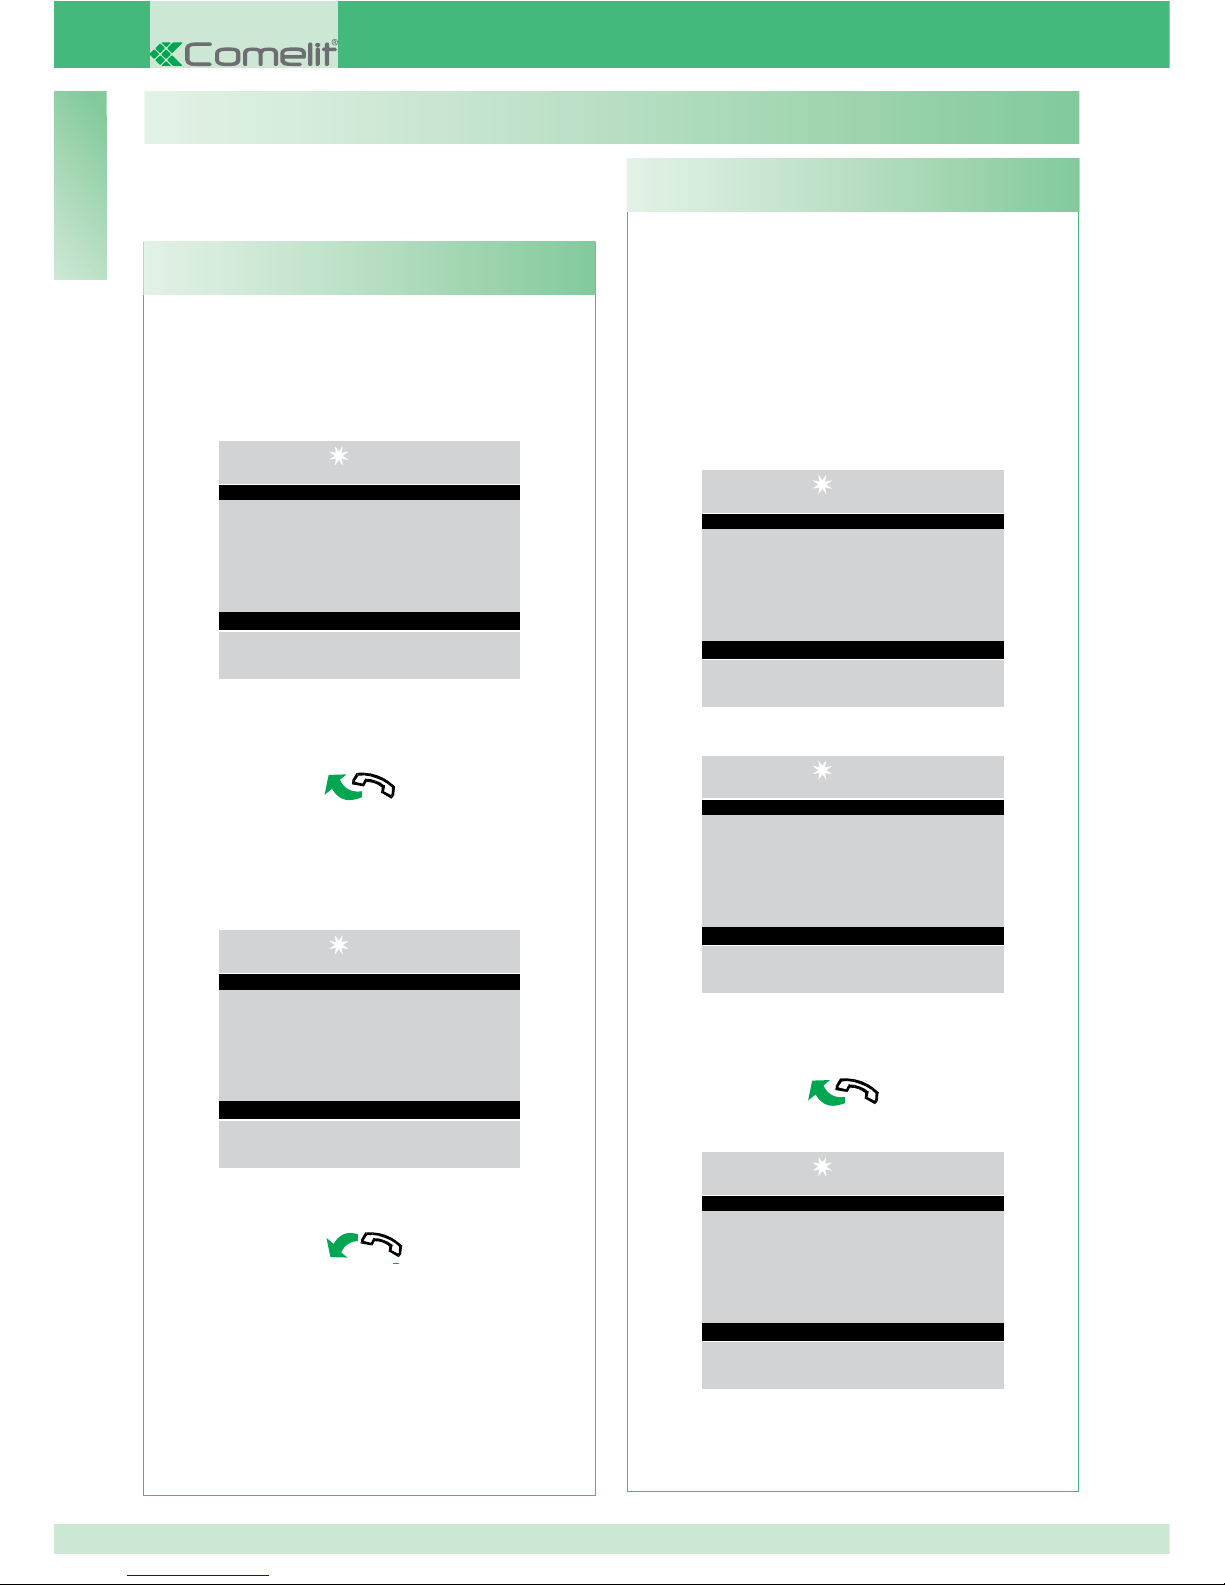
Quando il centralino riceve una chiamata da un posto
interno:
- viene visualizzato il nome del posto interno da cui
giunge la chiamata se inserito nella rubrica (vedi
“U17 Come inserire un nome in rubrica” pag. 15)
oppure l’indirizzo del chiamante (es. 002).
14 :15 : 26
Lun 12 Mar 12
Chiamata da 002
- per rispondere alla chiamata proveniente dal posto
interno sollevare la cornetta entro 30 secondi;
- il centralino va in comunicazione con l’interno, la
durata massima della conversazione è pari al tempo
di fonica impostato sul centralino principale (MENU/
Impostazioni/Tempi/Fonica - min. 10 secondi max.
90 secondi).
14 :15 : 26
Lun 12 Mar 12
In comunicazione con
002
- per terminare la conversazione riagganciare la
cornetta.
- per rifi utare la chiamata premere CANC.
ATTENZIONE!
Se il centralino è occupato o il centralinista è
momentaneamente assente e non può rispondere
entro 30 secondi, la chiamata verrà inserita nelle
chiamate ricevute, vedi “U6 Come chiamare un
posto interno presente nelle chiamate ricevute”
pag. 9.
U2 COME RISPONDERE A UNA CHIAMATA DA POSTO
ESTERNO
Il centralino deve essere in modalità GIORNO, in
modalità NOTTE potrà rispondere alle sole chiamate
dirette al centralino.
Il centralino può ricevere una chiamata da un posto
esterno:
- indirizzata direttamente a un posto interno e in
questo caso viene visualizzato il NOME del chiamato
(se esiste in rubrica un nominativo associato al
codice chiamato, vedi “U17 Come inserire un nome
in rubrica” pag. 15) o l’indirizzo del chiamato stesso
(es. 002).
14 :15 : 26
Lun 12 Mar 12
Chiamata per Sergio Rossi
- oppure indirizzata direttamente al centralino
(indirizzo=240)
14 :15 : 26
Lun 12 Mar 12
Chiamata per centralino
- per rispondere alla chiamata proveniente dal posto
esterno sollevare la cornetta;
- il centralino va in comunicazione con l’esterno;
14 :15 : 26
Lun 12 Mar 12
In comunicazione con
posto esterno
- premere eventualmente il tasto A per attivare
l’elettroserratura del posto esterno; se l’apriporta
viene eseguito si udirà un tono di conferma;
UTILIZZO
Le seguenti funzioni sono quelle che caratterizzano
il centralino ed il suo modo di operare, sono tutte
accessibili in modo diretto senza ricorrere ai menu.
U2 Come rispondere a una chiamata da posto
esterno
U1 Come rispondere a una chiamata da posto
interno
Page 7
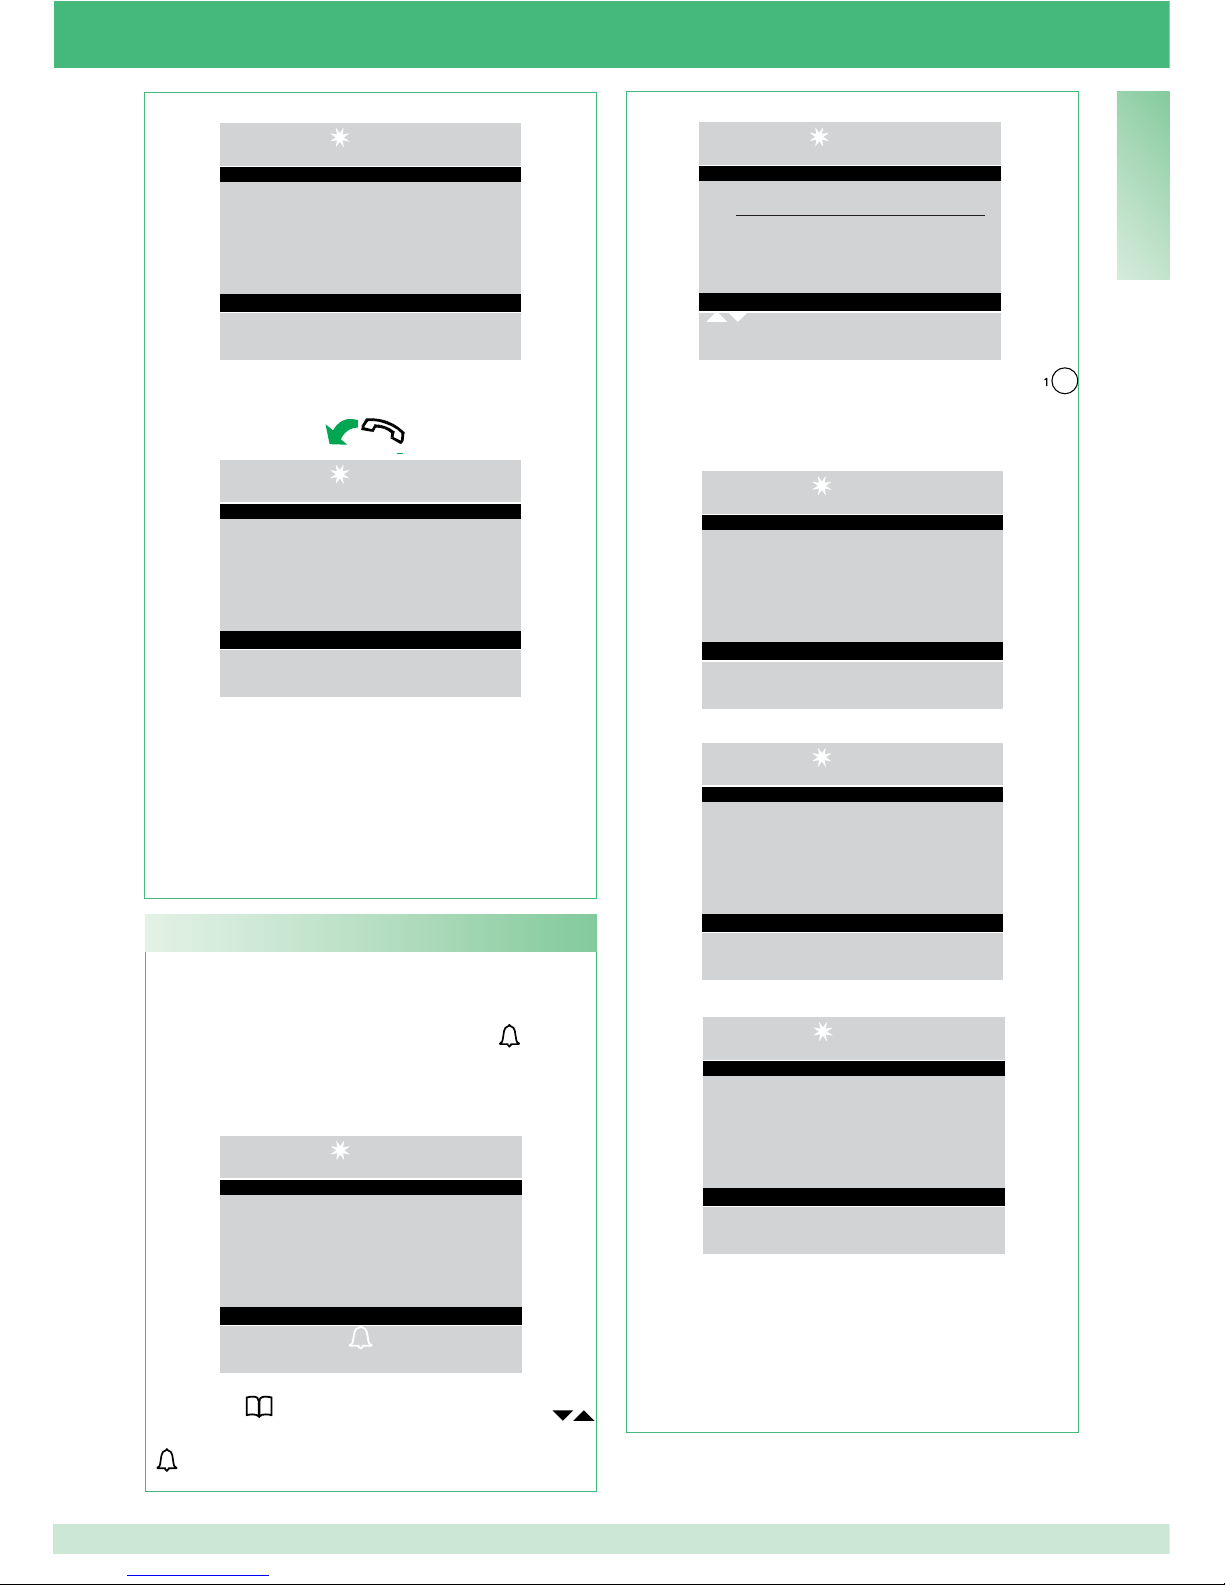
7
IT
14 :15 : 26
Lun 12 Mar 12
Apriporta eseguito
- per terminare la conversazione riagganciare la
cornetta.
14 :15 : 26
Lun 12 Mar 12
Fine comunicazione
- per rifi utare la chiamata premere CANC.
ATTENZIONE!
In modalità NOTTE (vedi “I9 - Impostazione
modalitá giornaliera” pag. 26) le chiamate da
posto esterno indirizzate a un posto interno
vengono visualizzate sul display, ma non possono
esser intercettate dal centralino.
Per chiamare un posto interno il centralino può
utilizzare 3 modalità differenti:
- digitare il numero di interno* e premere .
*Il numero da digitare dipende dalla confi gurazione
del centralino vedi “C4 - Chiamata tramite codice
Simplebus o indiretto” pag. 31; contattare il proprio
installatore di fi ducia.
14 :15 : 26
Lun 12 Mar 12
Utente : 002
Per chiamare
- premere e scorrere la rubrica con i tasti
fi no a visualizzare il nominativo desiderato e premere
.
U3 Come chiamare un posto interno
14:15:26
Lun 12 Mar 12
________________________
Sergio Rossi
Codice 012
Scorri Menù
- premere il numero breve corrispondente (es.
numero breve 1= codice memorizzato “002”, vedi
“U22 Registrazione numeri brevi” pag. 18).
- se la chiamata è avvenuta correttamente:
14 :15 : 26
Lun 12 Mar 12
Utente : 002
Chiamato utente Sergio Rossi
- se la chiamata non è avvenuta correttamente:
14 :15 : 26
Lun 12 Mar 12
Utente non disponibile
- se l’interno è occupato:
14 :15 : 26
Lun 12 Mar 12
Linea occupata
Quando l’interno chiamato entra in fonica,
va in comunicazione con il centralino, la durata
massima della conversazione è pari al tempo di
fonica impostato sul centralino principale (MENU/
Impostazioni/Tempi/Fonica - min. 10 secondi max.
90 secondi).
Page 8
8
IT
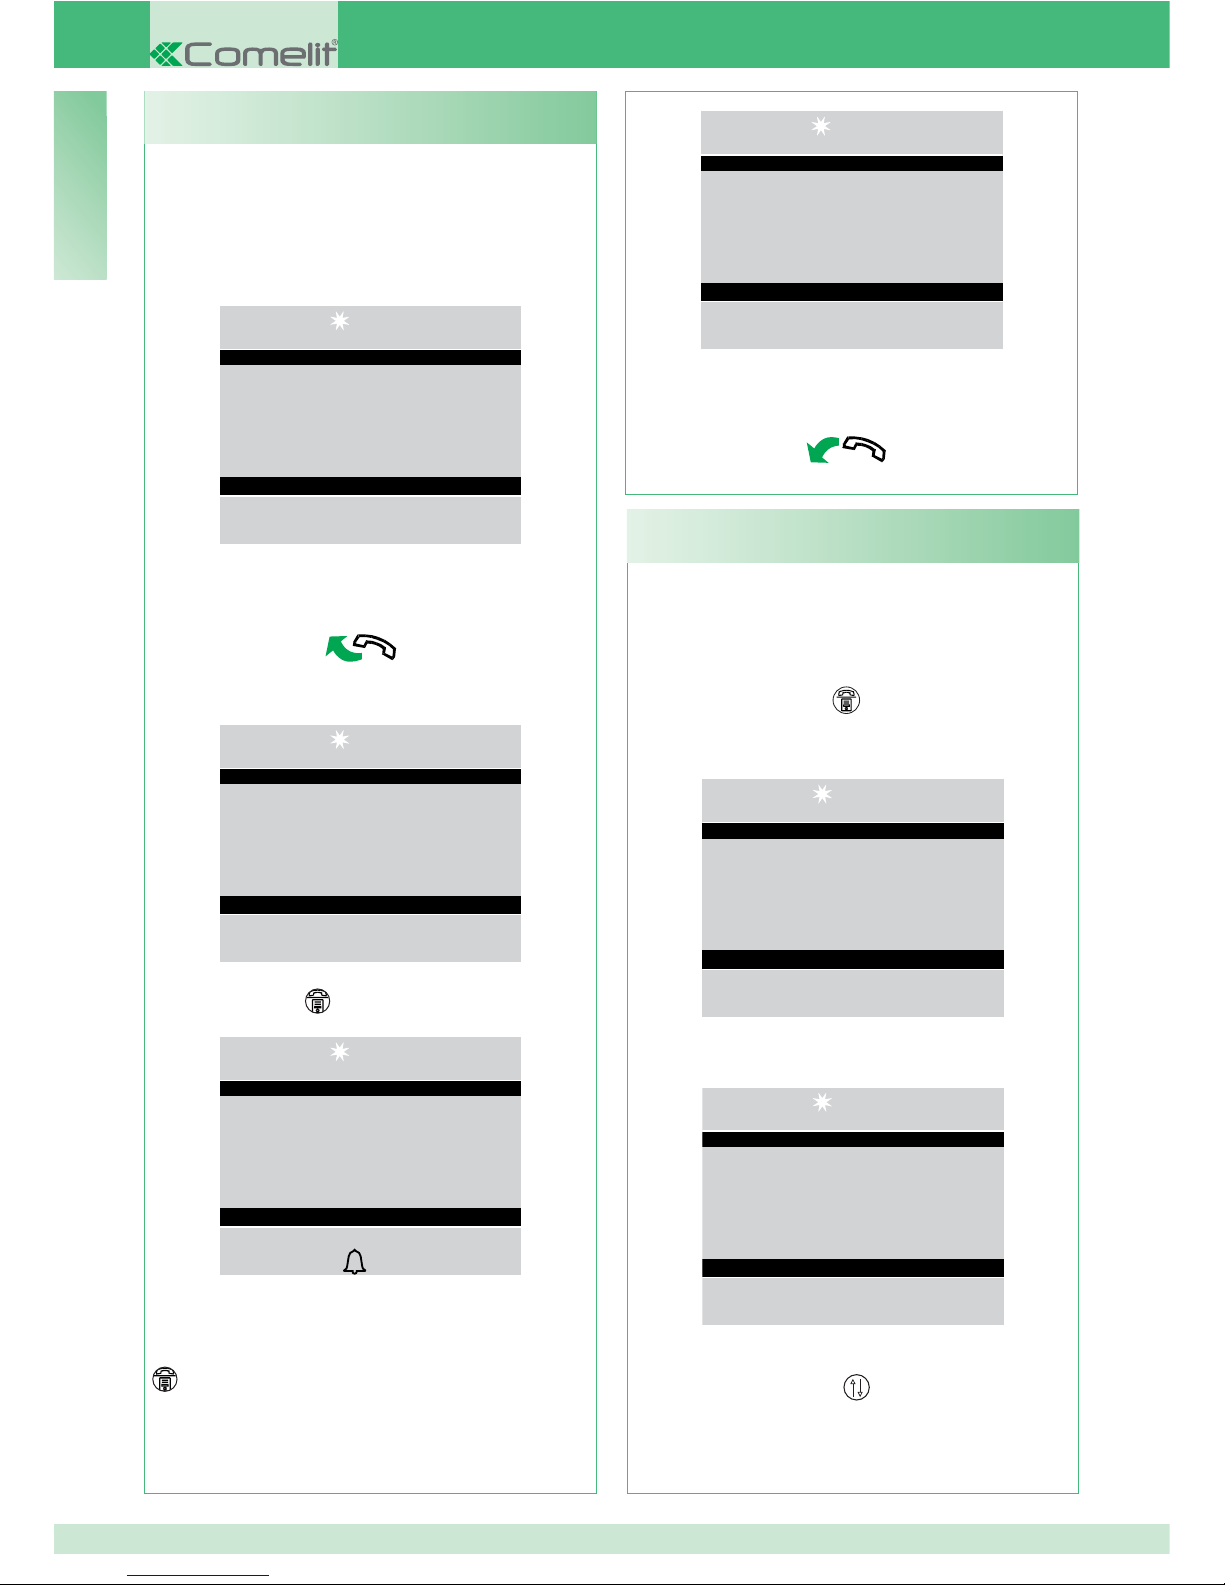
14 :15 : 26
Lun 12 Mar 12
In comunicazione con
posto esterno
- per terminare la conversazione riagganciare la
cornetta.
Quando il centralino è in comunicazione con un posto
interno (es. 002) che desidera parlare con un altro
posto interno (es. 003):
- mettere in attesa l’interno con cui si è in linea (es.
002), premendo il tasto
;
- chiamare il posto interno desiderato (es. 003, vedi
“U3 Come chiamare un posto interno” pag. 7);
14 :15 : 26
Lun 12 Mar 12
Chiamato utente 003
Quando l’interno chiamato entra in fonica, va in
comunicazione con il centralino;
14 :15 : 26
Lun 12 Mar 12
In comunicazione con
utente 003
Per inoltrare la conversazione verso l’altro posto
interno premere il tasto
; il posto interno (003)
entra in comunicazione col posto interno (002); la
durata massima della comunicazione è di 2,5 minuti;
U5 Come mettere in comunicazione 2 interni tra
loro (funzione intercomunicante)
Quando il centralino riceve una chiamata da un
posto esterno indirizzata a un posto interno:
- viene visualizzato il NOME del chiamato (se
esiste in rubrica un nominativo associato al codice
chiamato, vedi “U17 Come inserire un nome in
rubrica” pag. 15).
14 :15 : 26
Lun 12 Mar 12
Chiamata per Sergio Rossi
- per rispondere alla chiamata proveniente dal
posto esterno sollevare la cornetta entro 60 secondi;
- il centralino va in comunicazione con l’esterno, la
durata massima della conversazione è di 90 secondi;
14 :15 : 26
Lun 12 Mar 12
In comunicazione con
posto esterno
- premere il tasto
per mettere in attesa il posto
esterno;
14 :15 : 26
Lun 12 Mar 12
Posto esterno in attesa
Per chiamare
Se l’interno non accetta l’inoltro della conversazione,
il posto esterno rimane in attesa; chiudere la
conversazione col posto interno e premere il tasto
per rimettersi in comunicazione col posto esterno;
U4 Come inoltrare una chiamata da posto esterno
a posto interno
Page 9
9
IT
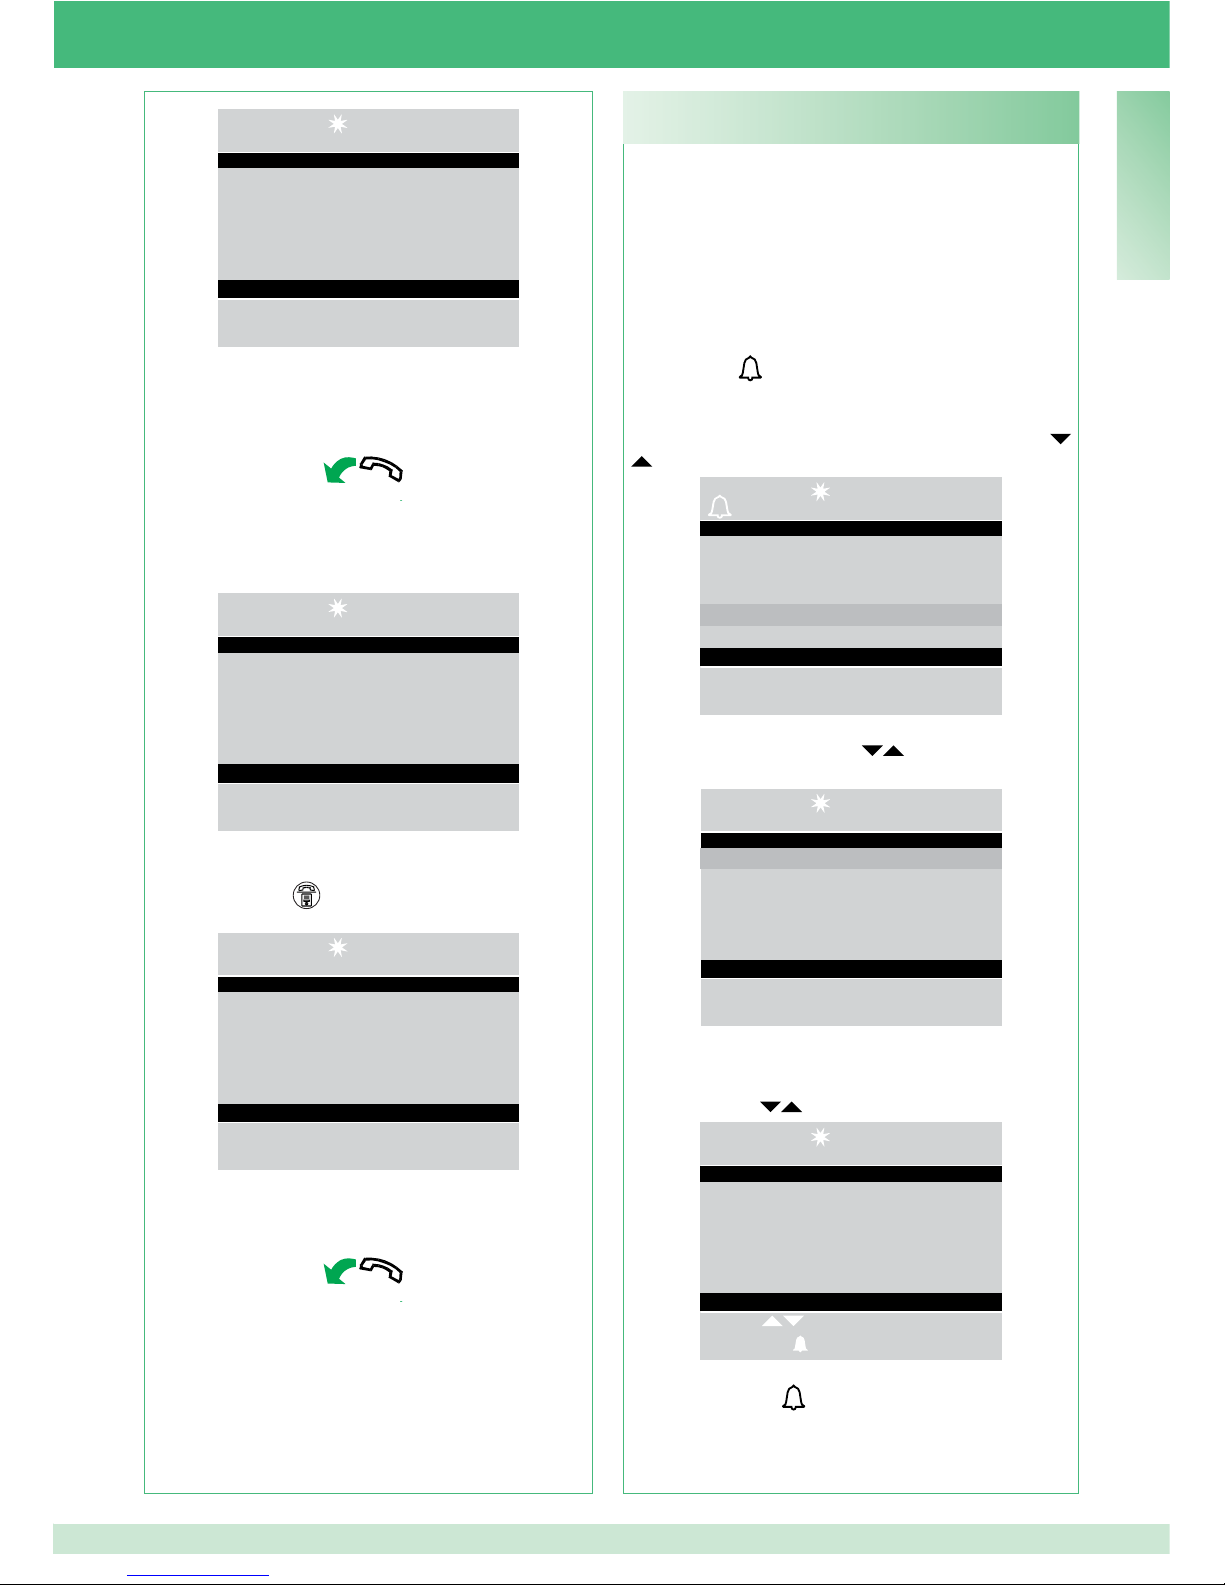
Quando il centralino riceve una chiamata da posto
interno che non viene gestita entro 30 sec. (operatore
momentaneamente assente o occupato in altra
conversazione), questa viene automaticamente
memorizzata nel menu Chiamate ricevute.
Il centralino può memorizzare un numero massimo
di 10 chiamate inevase. L’undicesima chiamata
sostituisce la prima.
Sul display verrà indicato il numero delle chiamate
ricevute (es.
=3 lampeggiante).
Per chiamare i posti interni presenti nelle chiamate
ricevute occorre:
- premere il tasto MENU e visualizzare tramite i tasti
il menu Chiamate ricevute, premere il tasto OK;
14 :15 : 26
= 3 Lun 12 Mar 12
• Impostazioni
• Configurazioni
• Rubrica
• Chiamate ricevute
• Allarmi
- visualizzare tramite i tasti
la voce Visualizza,
premere il tasto OK;
14 :15 : 26
Lun 12 Mar 12
• Visualizza
• Elimina tutto
- verranno visualizzate in ordine cronologico le
chiamate in entrata a partire dall’ultima ricevuta;
utilizzare i tasti per scorrere la lista.
14:15:26
Lun 12 Mar 12
Chiamante Sergio Rossi
Codice 012
Ricevuta Lun 12 Mar 12
Alle ore 13 : 15 : 11
Scorri
Chiamata Menù
- premere il tasto
per chiamare il posto interno vi-
sualizzato.
U6 Come chiamare un posto interno presente
nelle chiamate ricevute
14 :15 : 26
Lun 12 Mar 12
Intercomunicante attivo
- riagganciare la cornetta.
Premere CANC per resettare una chiamata
intercomunicante attiva da più di un minuto.
Se l’interno non accetta l’inoltro della conversazione
o quando l’impianto è occupato o se la chiamata
non è avvenuta correttamente, il posto interno
(002) rimane in attesa;
14 :15 : 26
Lun 12 Mar 12
Interno in attesa
- chiudere la comunicazione col posto interno (003) e
premere il tasto
per rimettersi in comunicazione
col posto interno (002);
14 :15 : 26
Lun 12 Mar 12
In comunicazione con
002
- per terminare la conversazione riagganciare la
cornetta.
ATTENZIONE!
Se il posto esterno chiama il centralino durante
una chiamata intercomunicante tra posti
interni attiva da più di un minuto, questa viene
automaticamente resettata per permettere al
centralino di gestire la chiamata in arrivo.
Page 10
10
IT
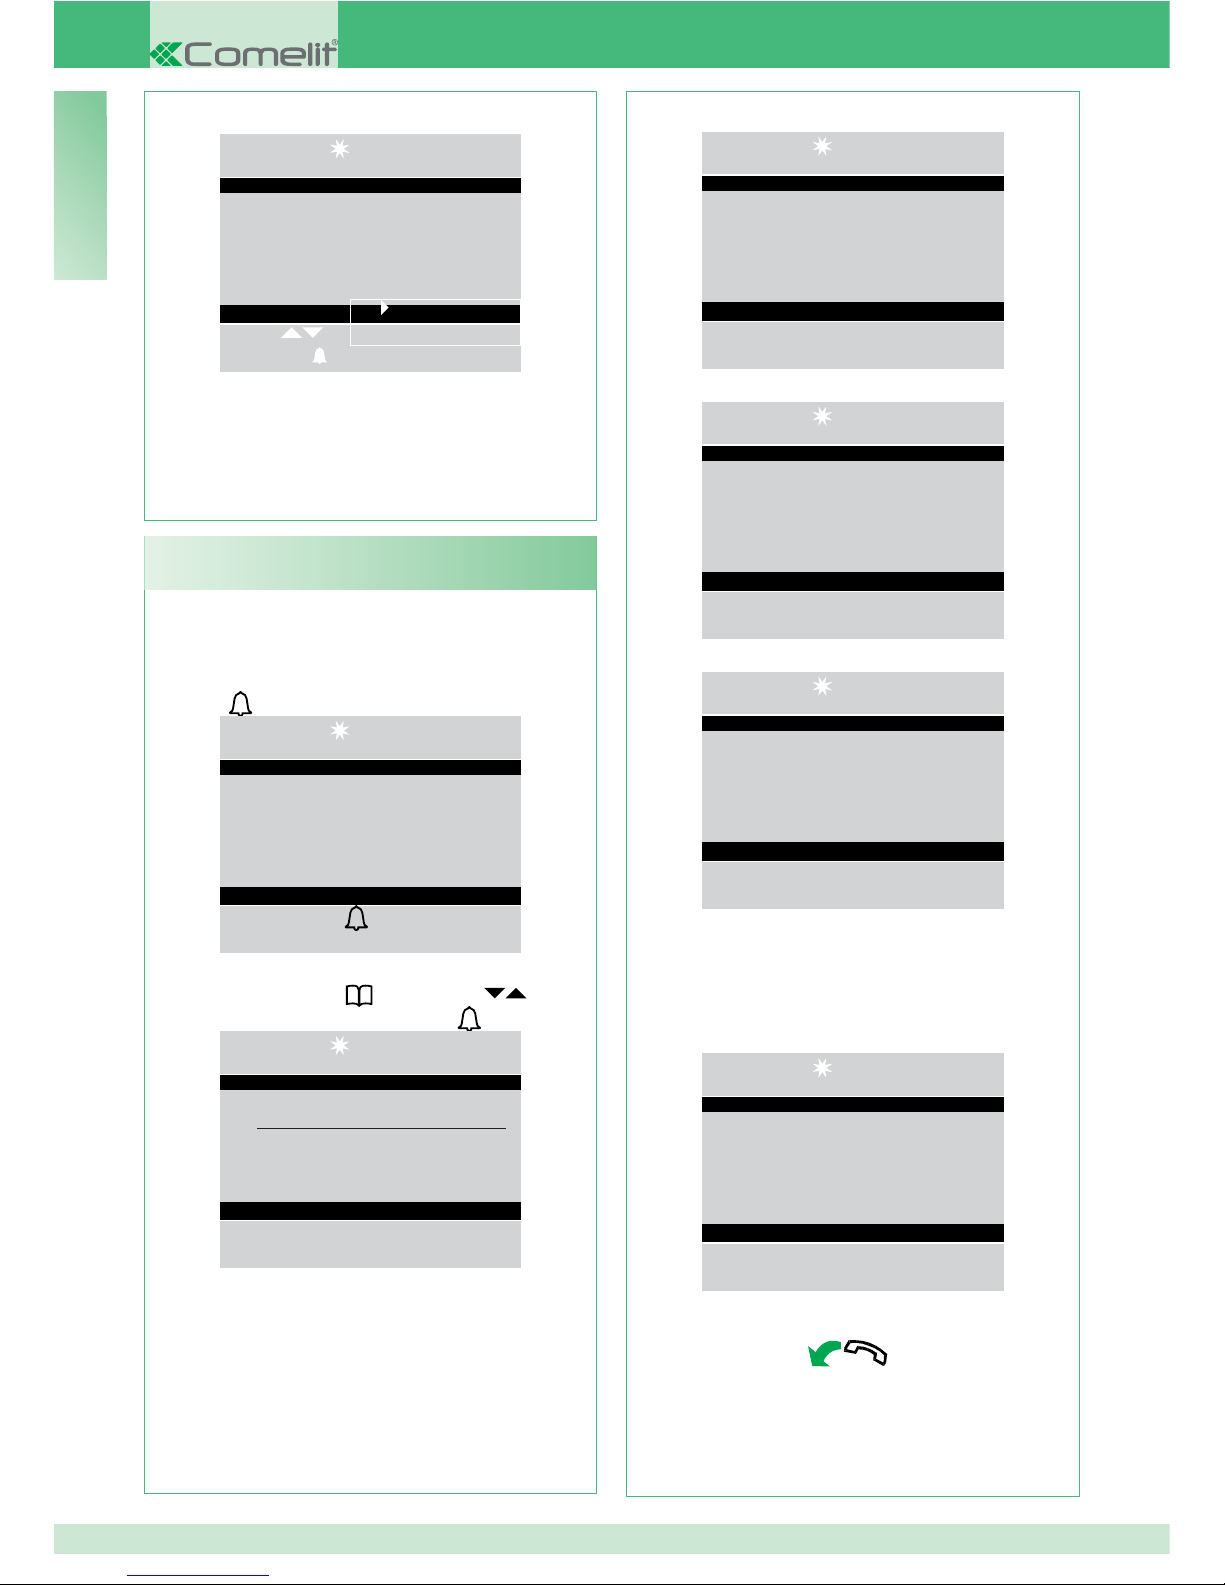
Per chiamare un centralino secondario, il centralino
principale può utilizzare una delle 3 seguenti modalità:
1 digitare il numero del centralino (es. 005 240) e
premere
:
14 :15 : 26
Lun 12 Mar 12
Utente : 005 240
Per chiamare
2 scorrere la rubrica
con i tasti
fi no a
visualizzare il nominativo e premere
:
14:15:26
Lun 12 Mar 12
________________________
centralino
Codice 005 240
Chiamato utente centralino
3 premere il numero breve corrispondente (vedi
“U22- Registrazione numeri brevi” pag. 18).
U7 Come chiamare un centralino secondario da
centralino principale
- premendo il tasto MENU viene visualizzata una
schermata nell’angolo in basso a destra.
14:15:26
Lun 12 Mar 12
Chiamante Sergio Rossi
Codice 012
Ricevuta Lun 12 Mar 12
Alle ore 13
Scorri
Chiamata
- premere il tasto OK per confermare le impostazioni;
- premere ripetutamente il tasto ESC per tornare alla
schermata principale.
Elimina voce
Elimina tutto
- Se la chiamata è avvenuta correttamente:
14:15:26
Lun 12 Mar 12
Chiamato utente centralino
- se la chiamata non è avvenuta correttamente:
14:15:26
Lun 12 Mar 12
Utente non disponibile
- se l’impianto è occupato:
14:15:26
Lun 12 Mar 12
Linea occupata
Quando il centralino chiamato solleva la cornetta,
va in comunicazione con il centralino principale, la
durata massima della conversazione è pari al tempo
di fonica impostato sul centralino principale (MENU/
Impostazioni/Tempi/Fonica - min. 10 secondi max.
90 secondi).
14:15:26
Lun 12 Mar 12
In comunicazione con
centralino principale
- per terminare la conversazione riagganciare la cornetta.
ATTENZIONE!
Il centralino secondario e il centralino principale
in comunicazione tra di loro, non possono
inoltrare le chiamate o metterle in attesa.
Page 11
11
IT
Per chiamare un centralino principale da centralino
secondario premere
.
Quando il centralino principale chiamato solleva
la cornetta, va in comunicazione con il centralino
secondario,
la durata massima della conversazione
è pari al tempo di fonica impostato sul centralino
principale (MENU/Impostazioni/Tempi/Fonica -
min. 10 secondi max. 90 secondi).
14:15:26
Lun 12 Mar 12
In comunicazione con
005 240
- per terminare la conversazione riagganciare la cornetta.
ATTENZIONE!
Il centralino secondario e il centralino principale
in comunicazione tra di loro, non possono
inoltrare le chiamate o metterle in attesa.
U8 Come chiamare un centralino principale da
centralino secondario
Quando il centralino principale riceve una chiamata
dal centralino secondario:
- viene visualizzato il NOME del centralino
secondario da cui giunge la chiamata (se inserito
nella rubrica, vedi “U17 Come inserire un nome in
rubrica” pag. 15) oppure l’indirizzo del centralino
chiamante (es. 005 240).
14:15:26
Lun 12 Mar 12
Chiamata da 005 240
005= indica la “zona”
240= indica l’ID generico del centralino
- per rifi utare la chiamata premere CANC;
- per rispondere alla chiamata proveniente dal
centralino secondario sollevare la cornetta;
- il centralino principale va in comunicazione con
il centralino secondario, la durata massima della
conversazione è pari al tempo di fonica impostato sul
centralino principale (MENU/Impostazioni/Tempi/
Fonica - min. 10 secondi max. 90 secondi);
14:15:26
Lun 12 Mar 12
In comunicazione con
005 240
- per terminare la conversazione riagganciare la
cornetta.
ATTENZIONE!
Se il centralino è occupato o il Centralinista è
momentaneamente assente e non può rispondere
entro 30 secondi, essa verrà inserita nella coda
chiamate (vedi “U6 Come chiamare un posto
interno presente nelle chiamate ricevute” pag. 9).
U9 Come rispondere a una chiamata da centralino
secondario a centralino principale
Page 12
12
IT
Quando il centralino secondario riceve una chiamata
dal centralino principale:
14:15:26
Lun 12 Mar 12
Chiamata per centralino
- per rispondere alla chiamata proveniente del
centralino principale sollevare la cornetta;
- per terminare la conversazione riagganciare la
cornetta.
ATTENZIONE!
Se il centralino è occupato o il Centralinista è
momentaneamente assente e non può rispondere
entro 30 secondi, essa verrà inserita nella coda
chiamate (vedi “U6 Come chiamare un posto
interno presente nelle chiamate ricevute” pag. 9).
U10 Come rispondere a una chiamata da
centralino principale a centralino secondario
Nel caso di 2 centralini principali in confi gurazione
serie (vedi pag. 116), agire in uno dei seguenti modi:
1 - premere il tasto MENU del centralino attivo e
visualizzare tramite i tasti
il menu Confi gurazioni,
premere il tasto OK;
14 :15 : 26
Lun 12 Mar 12
• Impostazioni
• Configurazioni
• Rubrica
• Chiamate ricevute
• Allarmi
- visualizzare tramite i tasti il menu Sistema,
premere il tasto OK;
U11 Come attivare o disattivare i centralini
principali
14 :15 : 26
Lun 12 Mar 12
• Sistema
• Servizi
- visualizzare tramite i tasti
il menu Link,
premere il tasto OK;
14 :15 : 26
Lun 12 Mar 12
Sistema Simplebus
Link Serie slave
Chiamata Simplebus
A/V Audio
Retrocom.
Esc Ok
- selezionare Serie slave con i tasti
per renderlo
inattivo.
Il centralino si spegne mentre l’altro centralino si
accende in automatico diventando Serie master.
- premere il tasto OK per confermare le impostazioni;
- premere ripetutamente il tasto ESC per tornare alla
schermata principale.
o
1 - premere il tasto MENU del centralino inattivo e
visualizzare tramite i tasti
il menu Confi gurazioni,
premere il tasto OK;
14 :15 : 26
Lun 12 Mar 12
• Impostazioni
• Configurazioni
• Rubrica
• Chiamate ricevute
• Allarmi
- visualizzare tramite i tasti il menu Sistema,
premere il tasto OK;
14 :15 : 26
Lun 12 Mar 12
• Sistema
• Servizi
Page 13
13
IT
É possibile comandare l’elettroserratura del posto
esterno premendo il tasto A ; se il comando viene
eseguito si udirà un tono di conferma.
U12 Come utilizzare l’apriporta
Tramite questa funzione è possibile deviare le
chiamate destinate al centralino verso apparecchi
telefonici locali o remoti.
ATTENZIONE!
Per l’utilizzo di questa funzione deve essere
presente la centrale Art. 2906 con interfaccia Art.
2912. Rivolgersi al proprio installatore di fi ducia.
Questa funzione è attivabile solo sul centralino
impostato come secondario (vedi “C1 Tipo di
centralino” pag. 29).
Per attivare questa funzione:
- premere il tasto MENU e visualizzare tramite i tasti
il menu Confi gurazioni, premere il tasto OK;
14 :15 : 26
Lun 12 Mar 12
• Impostazioni
• Configurazioni
• Rubrica
• Chiamate ricevute
• Allarmi
- visualizzare tramite i tasti
il menu Servizi,
premere il tasto OK;
U13 Come attivare la funzione “Seguimi”
(FollowMe)
Gli attuatori si possono attivare sia in modalità di
riposo, sia in modalità di conversazione verso il
posto esterno.
ATTENZIONE!
Per l’utilizzo di questa funzione deve essere presente
un posto esterno principale e degli attuatori Art.
1256. Rivolgersi al proprio installatore di fi ducia.
Per attivare l’attuatore:
- premere il tasto
, verrà richiesto l’inserimento del
codice per attivare un attuatore specifi co, in caso di
codice mancante verrà attivato un attuatore generico;
U14 Come attivare un relè supplementare (es. per
attivare in modo indipendente e con un comando
dedicato: luci, contatti di allarme TVCC, cancelli
carrai, ingressi senza posto esterno o altri
dispositivi)
- visualizzare tramite i tasti
il menu Link,
premere il tasto OK;
14 :15 : 26
Lun 12 Mar 12
Sistema Simplebus
Link Serie slave
Chiamata Simplebus
A/V Audio
Retrocom.
Esc Ok
- selezionare Serie master con i tasti
per
confermare che il centralino deve essere attivo.
L’altro centralino si disattiva in automatico diventando
Serie slave.
- premere il tasto OK per confermare le impostazioni;
- premere ripetutamente il tasto ESC per tornare alla
schermata principale.
14 :15 : 26
Lun 12 Mar 12
• Sistema
• Servizi
- visualizzare tramite i tasti
il servizio FollowMe.
Attivare il servizio con il tasto .
Disabilitare con
.
14 :15 : 26
Lun 12 Mar 12
FollowMe
Ripetizione chiamata
Accensione interni
Chiamata tripla
Aiuto codici
Esc Ok
- premere il tasto OK per confermare le impostazioni;
- premere ripetutamente il tasto ESC per tornare alla
schermata principale.
A seguito di una chiamata, il centralino suonerà
comunque e fi nchè l’apparecchio remoto non entra in
comunicazione, è possibile rispondere alla chiamata
dal centralino annullando la funzione ”Seguimi”.
Page 14
14
IT
- visualizzare tramite i tasti la voce Visualizza,
premere il tasto OK;
14 :15 : 26
Lun 12 Mar 12
• Visualizza
• Nuova voce
• Numeri brevi
• Elimina tutto
• Info
- verranno visualizzati in ordine alfabetico i nominativi
memorizzati in rubrica; utilizzare i tasti
per scorrere la lista.
Per velocizzare lo scorrimento dei nominativi, tener
premuto il tasto
o .
14:15:26
Lun 12 Mar 12
________________________
Sergio Rossi
Codice 012
Scorri Menù
Oppure
- inserire il nome anche con parte dell’estensione;
Se sono presenti più utenti con l’iniziale inserita, è
possibile scorrere la lista coi tasti
.
- premendo il tasto MENU viene visualizzata una
schermata nell’angolo in basso a destra.
14:15:26
Lun 12 Mar 12
________________________
Sergio Rossi
Codice 012
Scorri Menù
É possibile inserire una nuova voce, eliminare la voce
selezionata, modificarla o cancellare l’intera rubrica.
Selezionare l’operazione desiderata coi tasti
,
premere il tasto OK.
- premere ripetutamente il tasto ESC per tornare alla
schermata principale.
Nuova voce
Elimina voce
Modifica voce
Elimina tutto
Possono essere inseriti al massimo 4000 nomi che
abbiano al massimo 13 caratteri alfanumerici, ad
ogni nominativo deve essere associato un codice
che corrisponde a quello dell’interno desiderato.
U15 Come utilizzare la rubrica
Elimina tutto?
Numero nomi 0022
• Visualizza
_______________
Sergio Rossi
Codice 012
Rubrica
• Nuova voce
• Numeri brevi
Nome ________
Codice ___
Numero breve 1
Codice 125...
• Elimina tutto
• Info
Per visualizzare la rubrica premere il tasto e
scorrere la lista degli utenti con i tasti ; per
aumentare la velocità di scorrimento tener premuto il
tasto. Verranno visualizzati in serie il NOME e il
CODICE associati ad ogni utente.
Oppure
- premere il tasto MENU e visualizzare tramite i tasti
il menu Rubrica, premere il tasto OK;
14 :15 : 26
Lun 12 Mar 12
• Impostazioni
• Configurazioni
• Rubrica
• Chiamate ricevute
• Allarmi
U16 Come cercare un nome in rubrica
14:15:26
Lun 12 Mar 12
Codice attuatore_________
Per attuatore
- per confermare l’attivazione dell’attuatore premere
il tasto
.
Page 15
15
IT
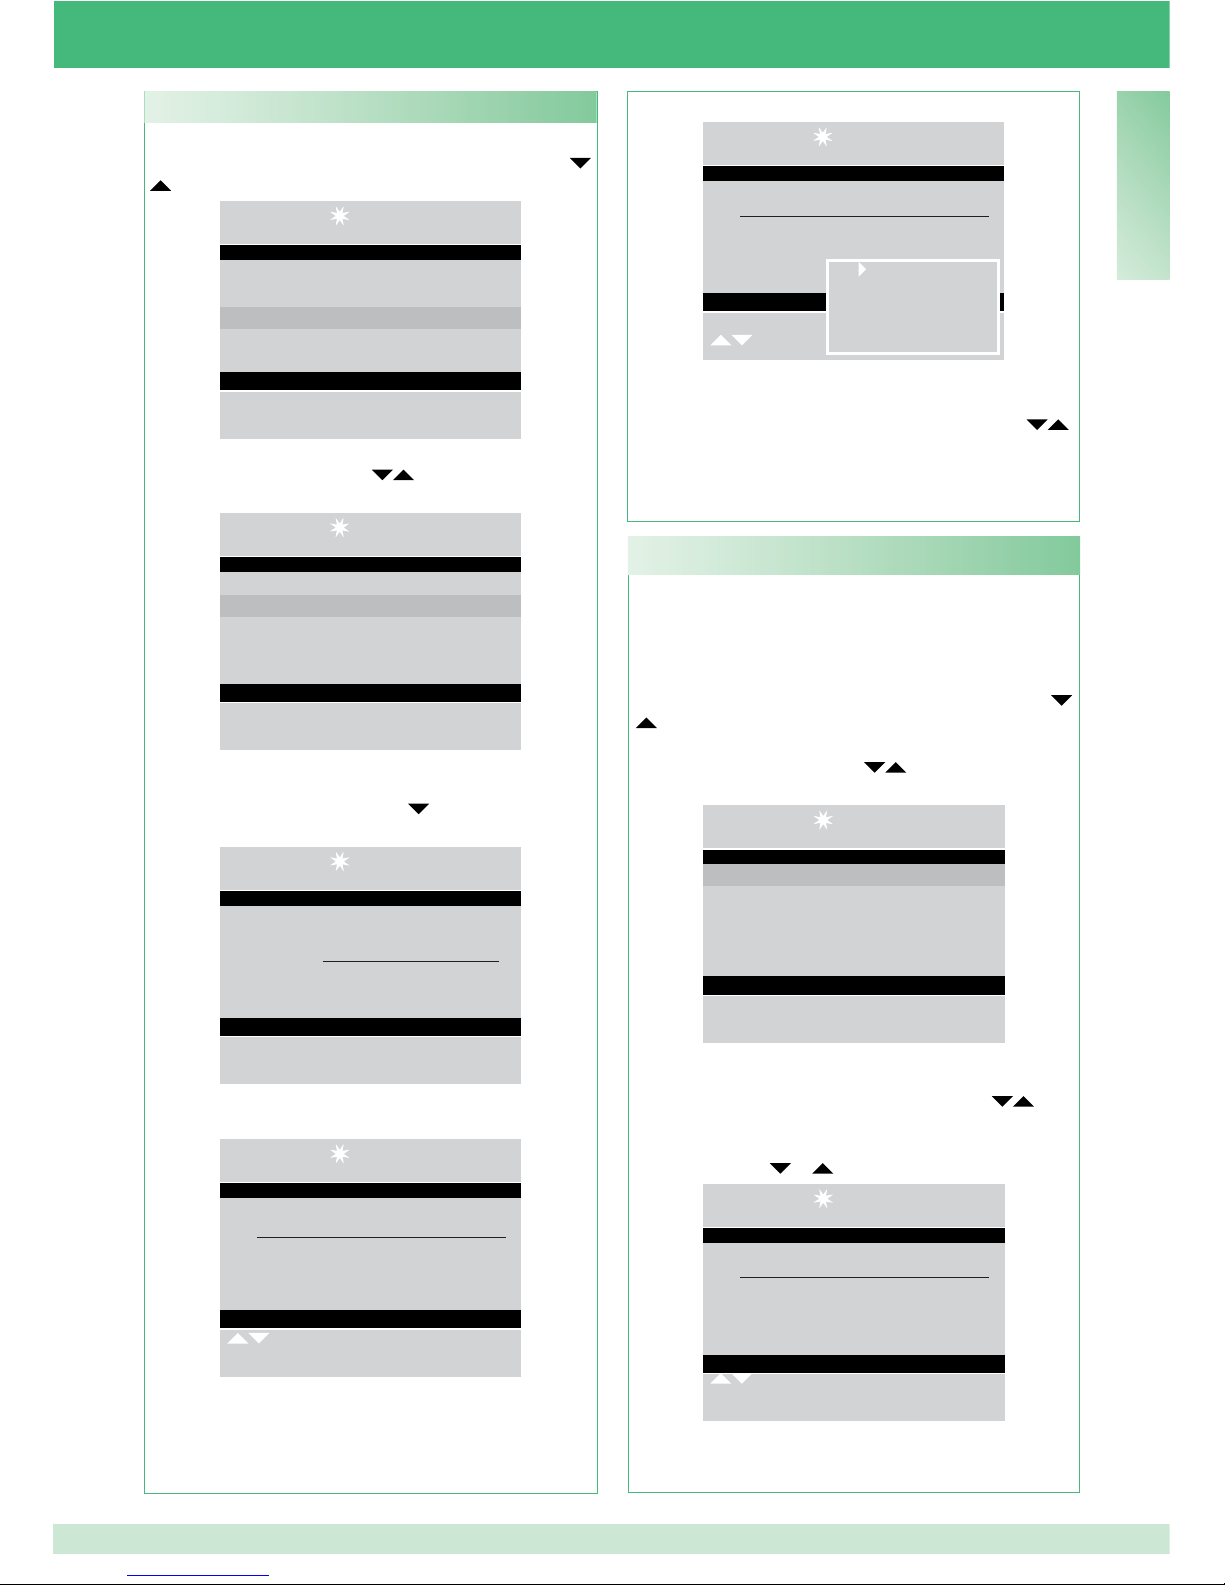
Se si vuole inserire un nome in rubrica:
- premere il tasto MENU e visualizzare tramite i tasti
il menu Rubrica, premere il tasto OK;
14 :15 : 26
Lun 12 Mar 12
• Impostazioni
• Configurazioni
• Rubrica
• Chiamate ricevute
• Allarmi
- visualizzare tramite i tasti
la voce Nuova voce,
premere il tasto OK;
14 :15 : 26
Lun 12 Mar 12
• Visualizza
• Nuova voce
• Numeri brevi
• Elimina tutto
• Info
- inserire il nuovo nominativo utilizzando la tastiera
alfanumerica; premere il tasto
e inserire il codice
mediante la tastiera.
14:15:26
Lun 12 Mar 12
Nome _________________
Codice ___
Inserisci voce
- premere il tasto OK per confermare le impostazioni;
14:15:26
Lun 12 Mar 12
________________________
Sergio Rossi
Codice 012
Scorri Menù
- premendo il tasto MENU viene visualizzata una
schermata nell’angolo in basso a destra.
ATTENZIONE!
Per la cancellazione dell’intera rubrica vedi “U20
- Cancellazione rubrica” pag. 17.
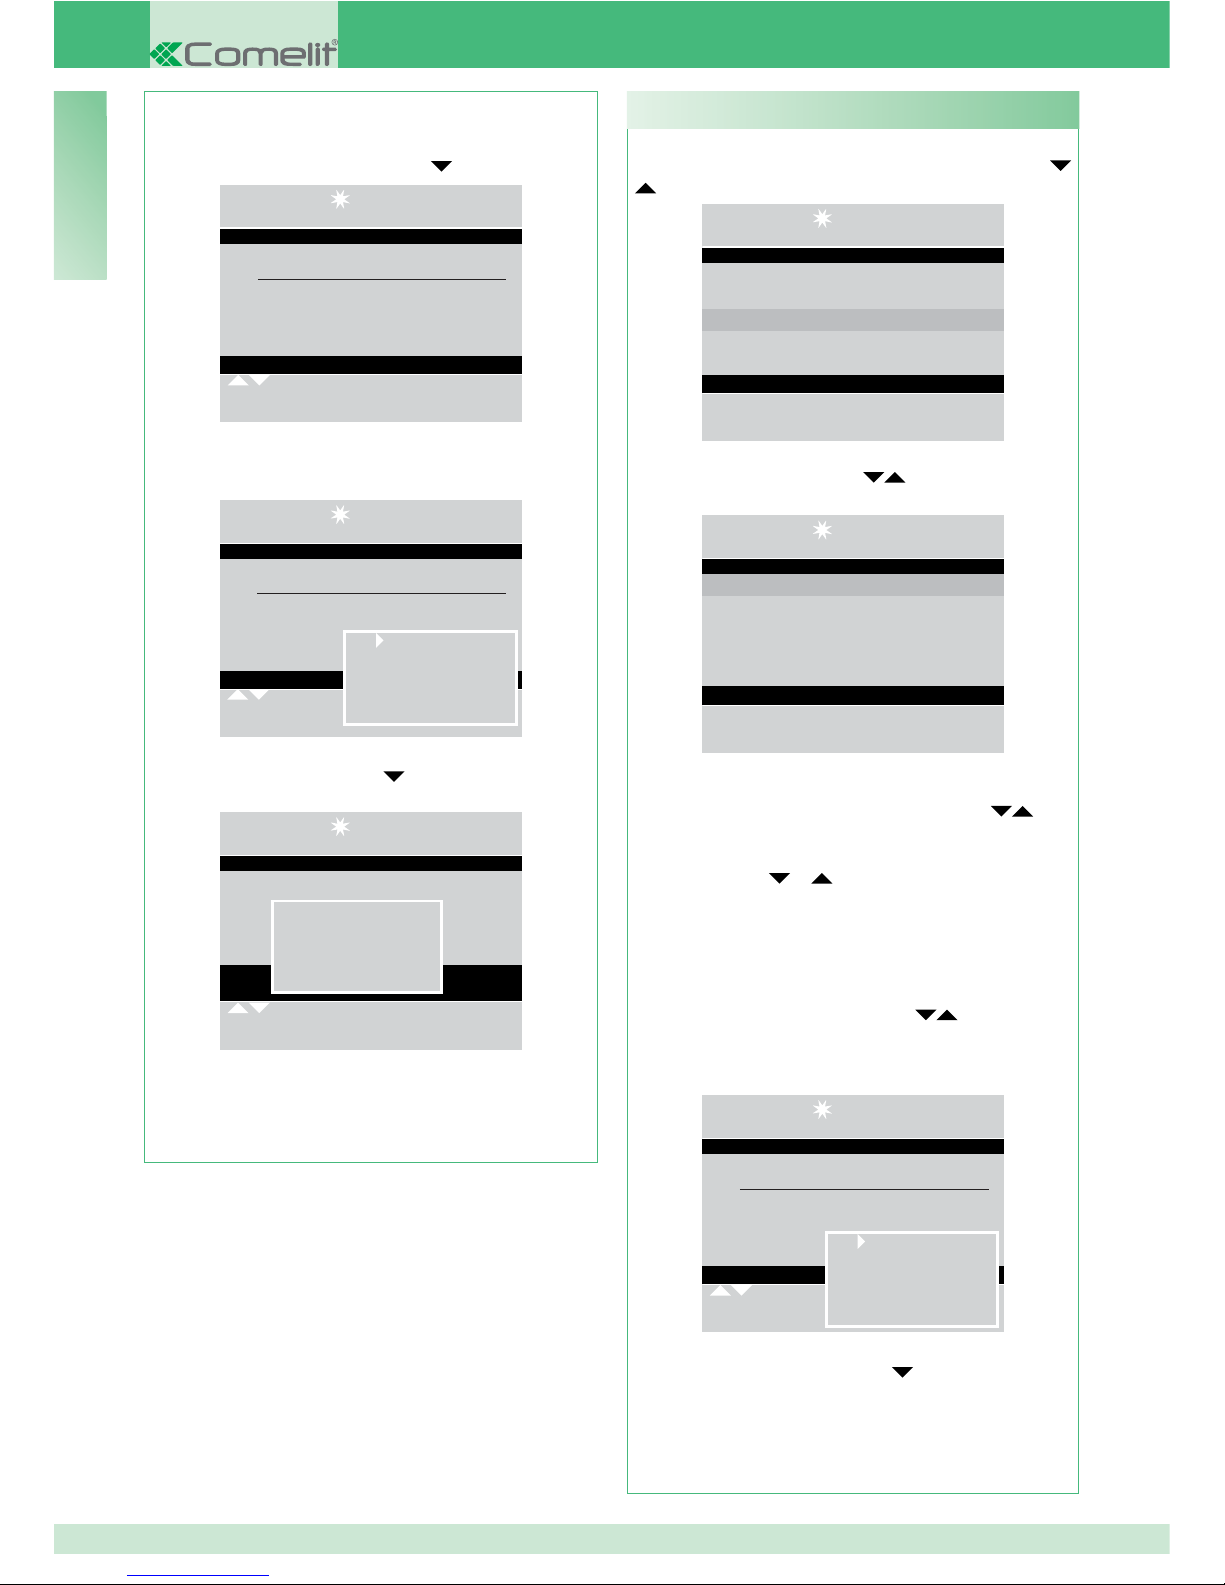
Se si vuole cancellare un nome in rubrica:
- premere il tasto MENU e visualizzare tramite i tasti
il menu Rubrica, premere il tasto OK;
- visualizzare tramite i tasti
la voce Visualizza,
premere il tasto OK;
14 :15 : 26
Lun 12 Mar 12
• Visualizza
• Nuova voce
• Numeri brevi
• Elimina tutto
• Info
- verranno visualizzati in ordine alfabetico i nominativi
memorizzati in rubrica; utilizzare i tasti
per
scorrere la lista.
Per velocizzare lo scorrimento dei nominativi, tener
premuto il tasto
o .
14:15:26
Lun 12 Mar 12
________________________
Sergio Rossi
Codice 012
Scorri Menù
Oppure
U18 Come cancellare un nome in rubrica
14:15:26
Lun 12 Mar 12
________________________
Sergio Rossi
Codice 012
Scorri
É possibile inserire una nuova voce, eliminare la voce
selezionata, modificarla o cancellare l’intera rubrica.
Selezionare l’operazione desiderata coi tasti
,
premere il tasto OK.
- premere ripetutamente il tasto ESC per tornare alla
schermata principale.
Nuova voce
Elimina voce
Modifica voce
Elimina tutto
U17 Come inserire un nome in rubrica
Page 16
16
IT
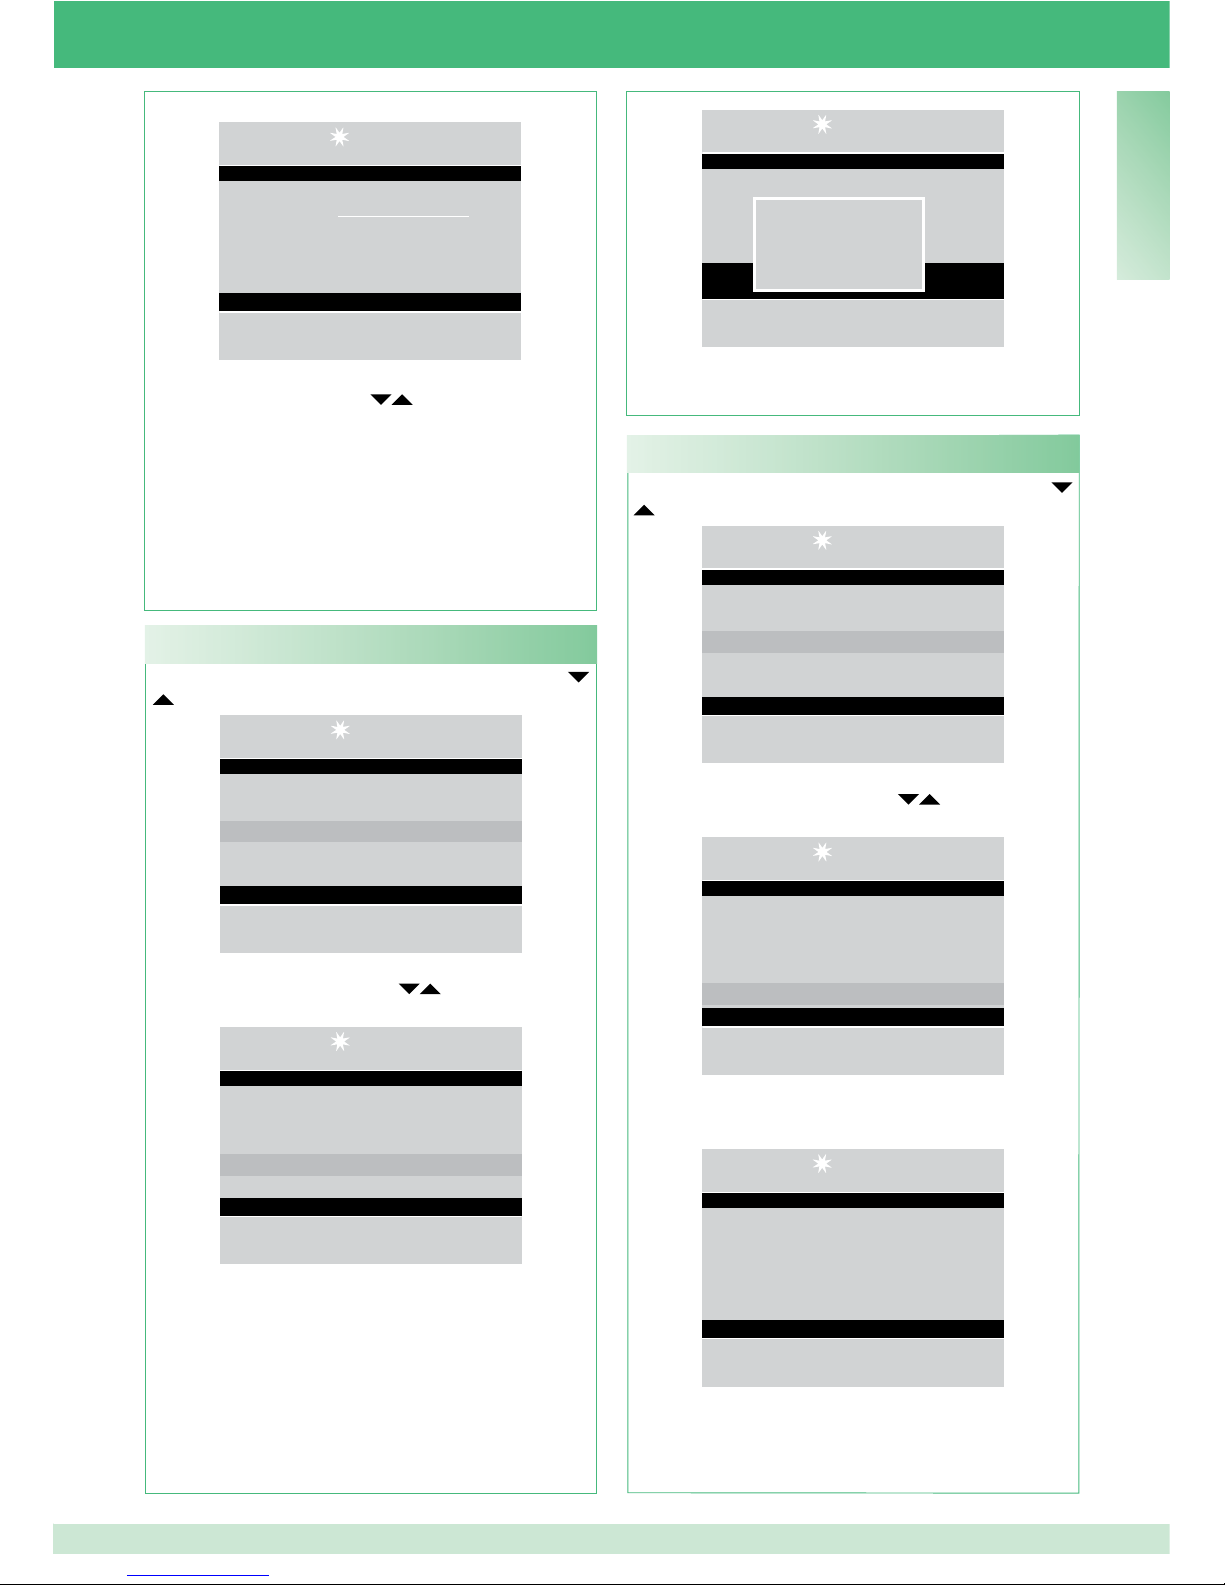
Se si vuole modifi care un nome in rubrica:
- premere il tasto MENU e visualizzare tramite i tasti
il menu Rubrica, premere il tasto OK
14 :15 : 26
Lun 12 Mar 12
• Impostazioni
• Configurazioni
• Rubrica
• Chiamate ricevute
• Allarmi
- visualizzare tramite i tasti
la voce Visualizza,
premere il tasto OK;
14 :15 : 26
Lun 12 Mar 12
• Visualizza
• Nuova voce
• Numeri brevi
• Elimina tutto
• Info
- verranno visualizzati in ordine alfabetico i nominativi
memorizzati in rubrica; utilizzare i tasti
per
scorrere la lista.
Per velocizzare lo scorrimento dei nominativi, tener
premuto il tasto
o .
Oppure
- inserire il nome anche con parte dell’estensione;
Se sono presenti più utenti con l’iniziale inserita, è
possibile scorrere la lista coi tasti
.
- premendo il tasto MENU viene visualizzata una
schermata nell’angolo in basso a destra.
14:15:26
Lun 12 Mar 12
________________________
Sergio Rossi
Codice 012
Scorri Menù
- visualizzare tramite il tasto
la voce Modifi ca
voce, premere il tasto OK;
U19 Come modifi care un nome in rubrica
Nuova voce
Elimina voce
Modifica voce
Elimina tutto
- inserire il nome anche con parte dell’estensione;
Se sono presenti più utenti con l’iniziale inserita, è
possibile scorrere la lista coi tasti
.
14:15:26
Lun 12 Mar 12
________________________
Sergio Rossi
Codice 012
Scorri Menù
- premendo il tasto MENU viene visualizzata una
schermata nell’angolo in basso a destra.
14:15:26
Lun 12 Mar 12
________________________
Sergio Rossi
Codice 012
Scorri Menù
- visualizzare tramite il tasto
la voce Elimina voce,
premere il tasto OK;
14 :15 : 26
Lun 12 Mar 12
SERGIO ROSSI
Codice 012
Scorri Menù
Elimina voce?
Ok Esc
- per confermare l’eliminazione premere il tasto OK;
- premere ripetutamente il tasto ESC per tornare alla
schermata principale.
Nuova voce
Elimina voce
Modifica voce
Elimina tutto
Page 17
17
IT
14:15:26
Lun 12 Mar 12
Nome Sergio Rossi
Codice 012
Modifica voce
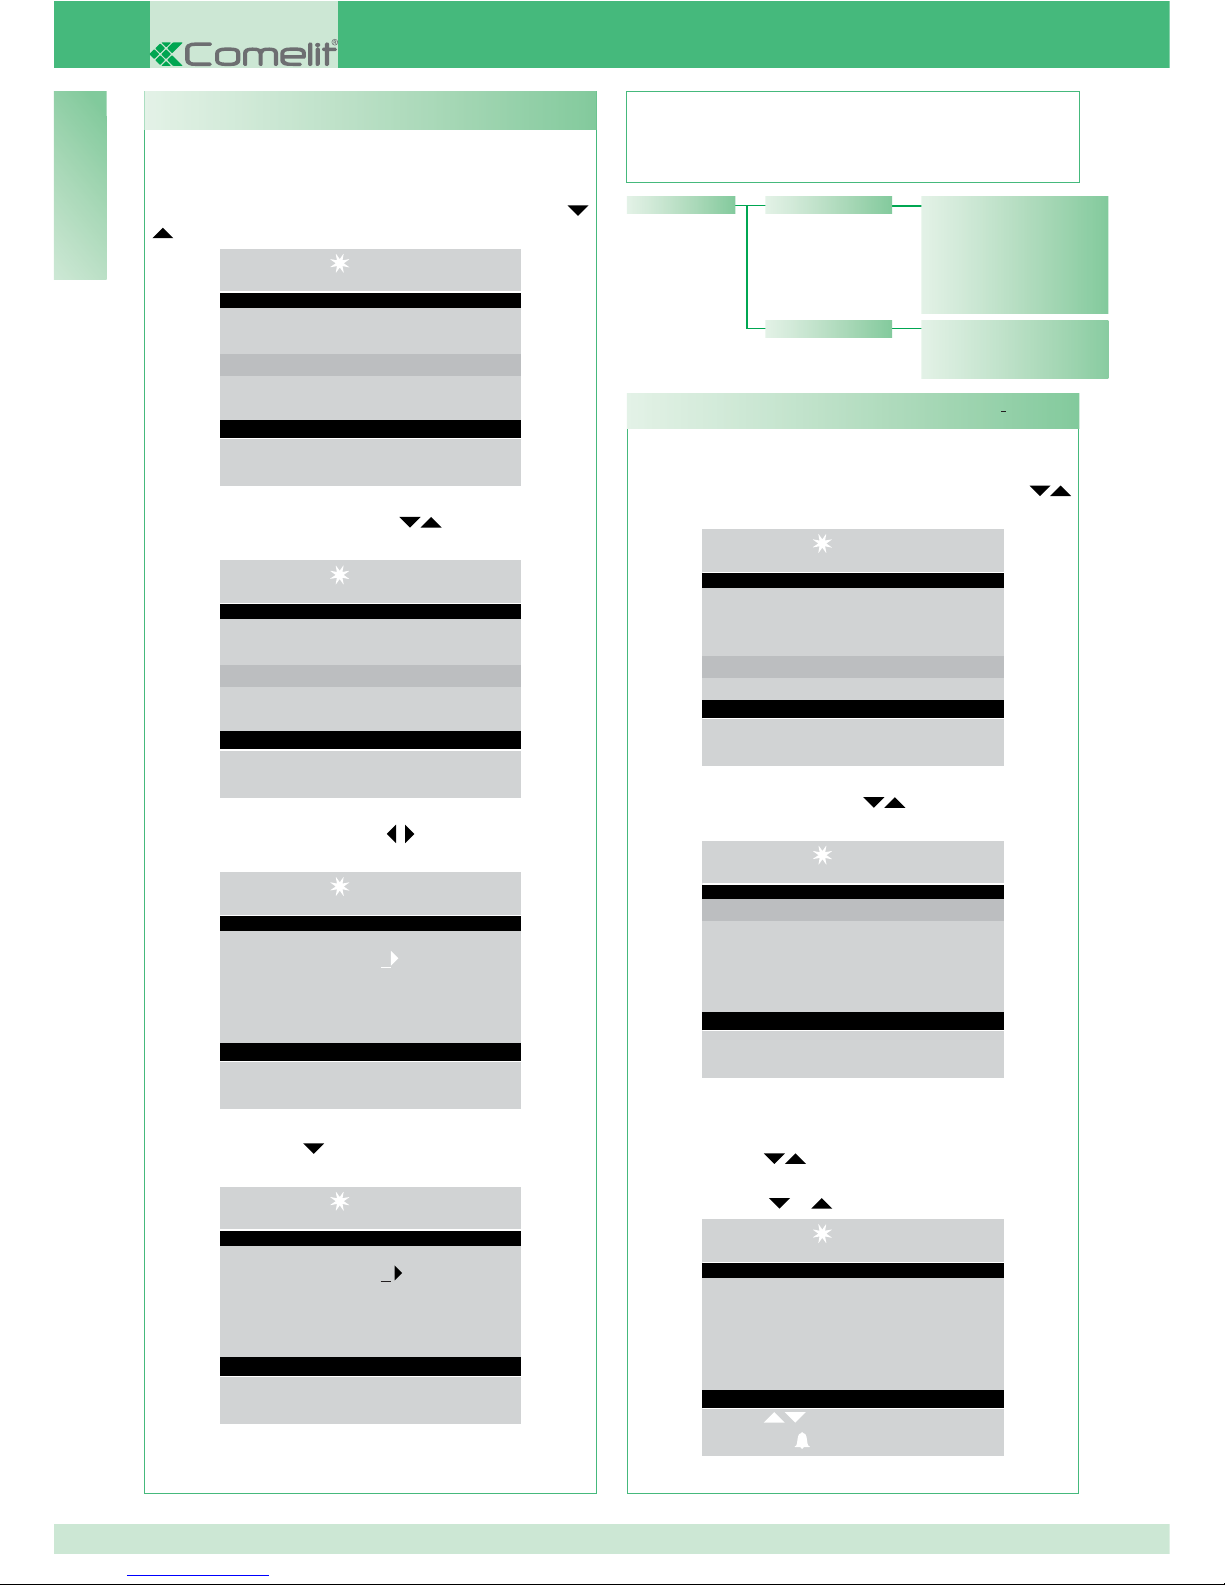
- visualizzare tramite i tasti
la voce da modifi care
(nome o codice).
- premere CANC per cancellare la voce selezionata
e inserire il nuovo nome o codice tramite la tastiera
alfanumerica ;
- per confermare la modifi ca del nome premere il tasto
OK; premere ESC per uscire.
- premere il tasto MENU e visualizzare tramite i tasti
il menu Rubrica, premere il tasto OK;
14 :15 : 26
Lun 12 Mar 12
• Impostazioni
• Configurazioni
• Rubrica
• Chiamate ricevute
• Allarmi
- visualizzare tramite i tasti
la voce Elimina
tutto, premere il tasto OK;
14 :15 : 26
Lun 12 Mar 12
• Visualizza
• Nuova voce
• Numeri brevi
• Elimina tutto
• Info
- comparirà una schermata in cui verrà chiesto se
si vuole eliminare l’intera rubrica; confermare con il
tasto OK oppure annullare con il tasto ESC;
U20 Cancellazione rubrica
- premere il tasto MENU e visualizzare tramite i tasti
il menu Rubrica, premere il tasto OK;
14 :15 : 26
Lun 12 Mar 12
• Impostazioni
• Configurazioni
• Rubrica
• Chiamate ricevute
• Allarmi
- visualizzare tramite i tasti
la voce Info,
premere il tasto OK;
14 :15 : 26
Lun 12 Mar 12
• Visualizza
• Nuova voce
• Numeri brevi
• Elimina tutto
• Info
- comparirà una schermata in cui verrà indicato il
numero dei nominativi memorizzati in rubrica;
14 :15 : 26
Lun 12 Mar 12
Numero nomi 0022
- premere ripetutamente il tasto ESC per tornare alla
schermata principale.
U21 Info rubrica
14 :15 : 26
Lun 12 Mar 12
Elimina tutto?
Ok Esc
- premere ripetutamente il tasto ESC per tornare alla
schermata principale.
Page 18
18
IT
- Per accedere velocemente alla visualizzazione delle
chiamate ricevute premere il tasto MENU + tasto 2 oppure
premere il tasto MENU e visualizzare tramite i tasti
il menu Chiamate ricevute, premere il tasto OK;
14 :15 : 26
Lun 12 Mar 12
• Impostazioni
• Configurazioni
• Rubrica
• Chiamate ricevute
• Allarmi
- visualizzare tramite i tasti
la voce Visualizza,
premere il tasto OK;
14 :15 : 26
Lun 12 Mar 12
• Visualizza
• Elimina tutto
- verranno visualizzate in ordine cronologico le
chiamate in entrata a partire dall’ultima ricevuta;
utilizzare i tasti
per scorrere la lista.
Per velocizzare lo scorrimento dei nominativi, tener
premuto il tasto o .
14:15:26
Lun 12 Mar 12
Chiamante Sergio Rossi
Codice 012
Ricevuta Lun 12 Mar 12
Alle ore 13 : 15 : 11
Scorri
Chiamata Menù
U23 - Visualizzazione chiamate ricevute
Tramite questa funzione è possibile memorizzare
modifi care e cancellare i numeri brevi.
- premere il tasto MENU e visualizzare tramite i tasti
il menu Rubrica, premere il tasto OK;
14 :15 : 26
Lun 12 Mar 12
• Impostazioni
• Configurazioni
• Rubrica
• Chiamate ricevute
• Allarmi
- visualizzare tramite i tasti
la voce Numeri
brevi, premere il tasto OK;
14 :15 : 26
Lun 12 Mar 12
• Visualizza
• Nuova voce
• Numeri brevi
• Elimina tutto
• Info
- visualizzare tramite i tasti
il numero breve (da
1 a 8) a cui abbinare un codice;
14:15:26
Lun 12 Mar 12
Numero breve 1
Codice ___
Imposta numeri brevi
- premere il tasto
e inserire il codice mediante la
tastiera;
14:15:26
Lun 12 Mar 12
Numero breve 1
Codice ___
Imposta numeri brevi
U22 Registrazione numeri brevi
- premere il tasto OK per confermare le impostazioni;
- premere ripetutamente il tasto ESC per tornare alla
schermata principale.
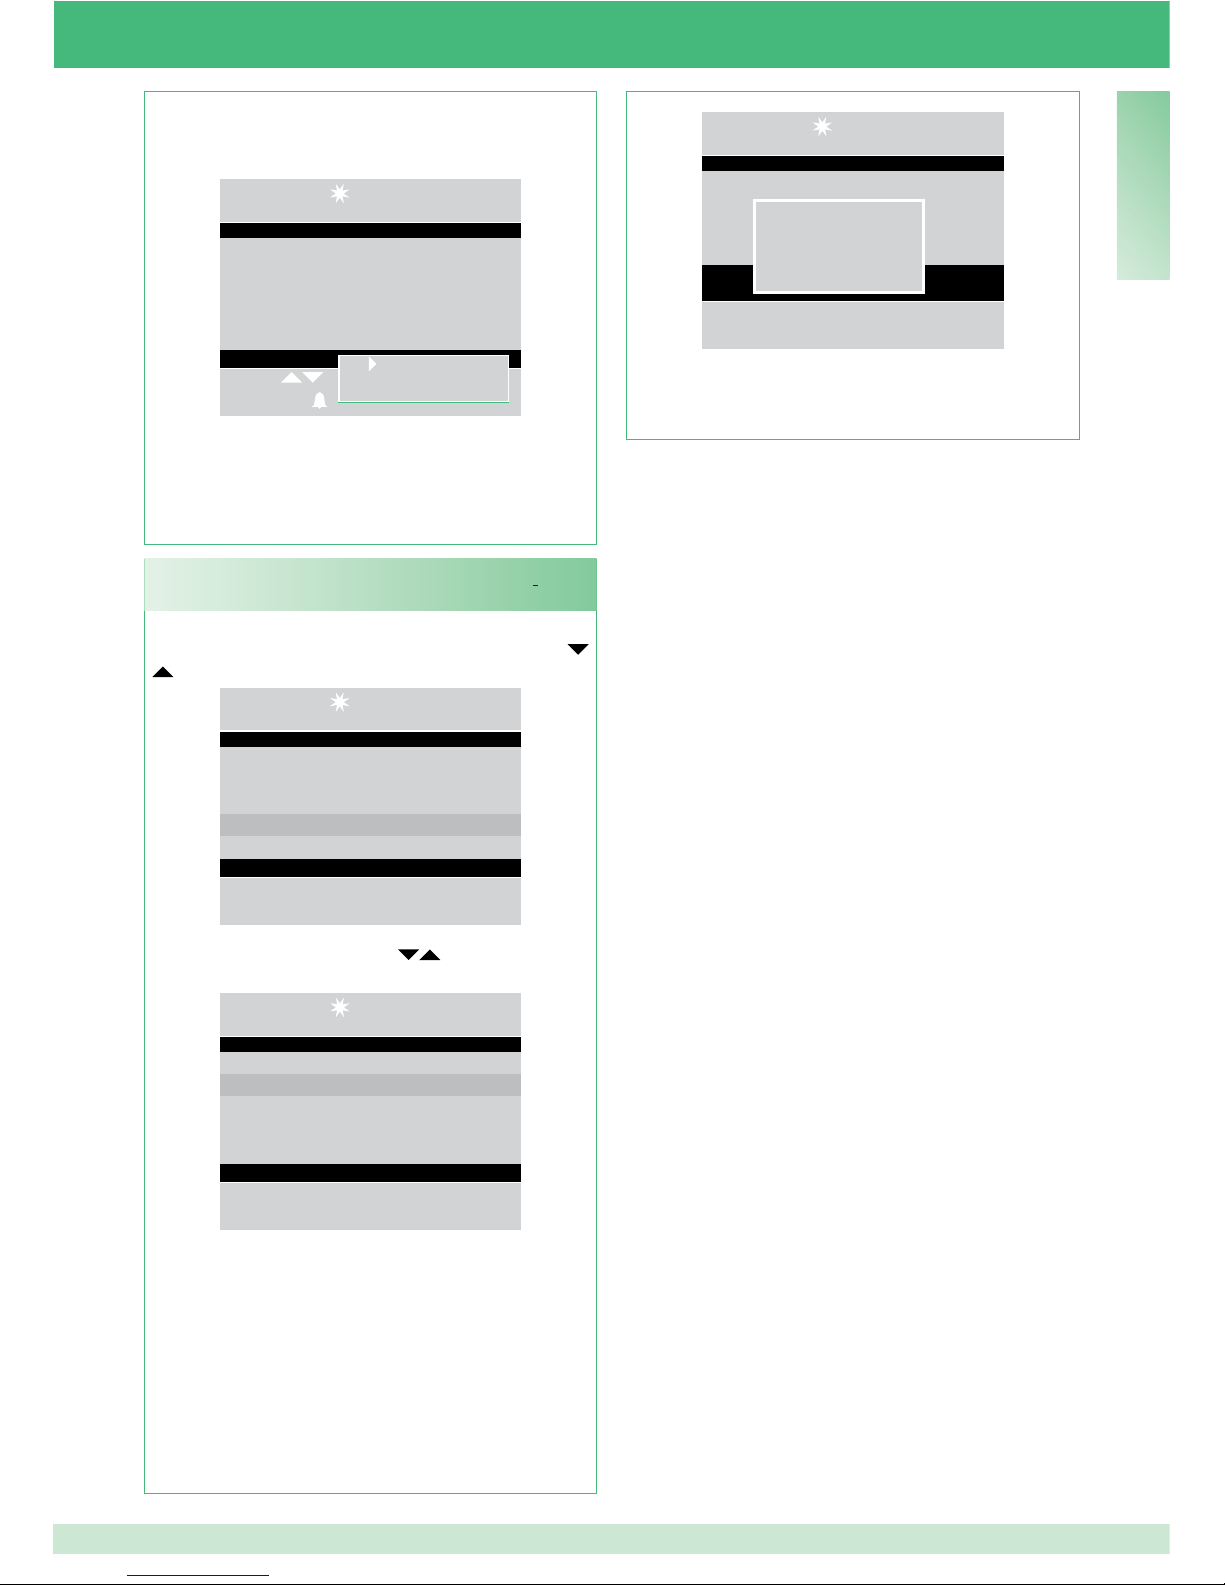
Chiamate Sergio Rossi
Codice 012
Ricevuta Lun 12 Mar. 12
Alle ore 14 : 15 : 26
Elimina tutto?
• Elimina tutto
Chiamate ricevute
• Visualizza
Page 19
19
IT
- premere il tasto MENU e visualizzare tramite i tasti
il menu Chiamate ricevute, premere il tasto OK;
14 :15 : 26
Lun 12 Mar 12
• Impostazioni
• Configurazioni
• Rubrica
• Chiamate ricevute
• Allarmi
- visualizzare tramite i tasti
la voce Elimina
tutto, premere il tasto OK;
14 :15 : 26
Lun 12 Mar 12
• Visualizza
• Elimina tutto
- comparirà una schermata in cui verrà chiesto se
si vuole eliminare la lista delle chiamate entranti;
confermare con il tasto OK oppure annullare con il
tasto ESC;
U24 - Cancellazione lista chiamate ricevute
- premendo il tasto MENU viene visualizzata una
schermata nell’angolo in basso a destra.
14:15:26
Lun 12 Mar 12
Chiamante Sergio Rossi
Codice 012
Ricevuta Lun 12 Mar 12
alle ore 13 : 15 : 11
Scorri
Chiamata Menù
- premere il tasto OK per confermare le impostazioni;
- premere ripetutamente il tasto ESC per tornare alla
schermata principale.
Elimina voce
Elimina tutto
14 :15 : 26
Lun 12 Mar 12
Elimina tutto?
Ok Esc
- premere ripetutamente il tasto ESC per tornare alla
schermata principale.
Page 20
20
IT
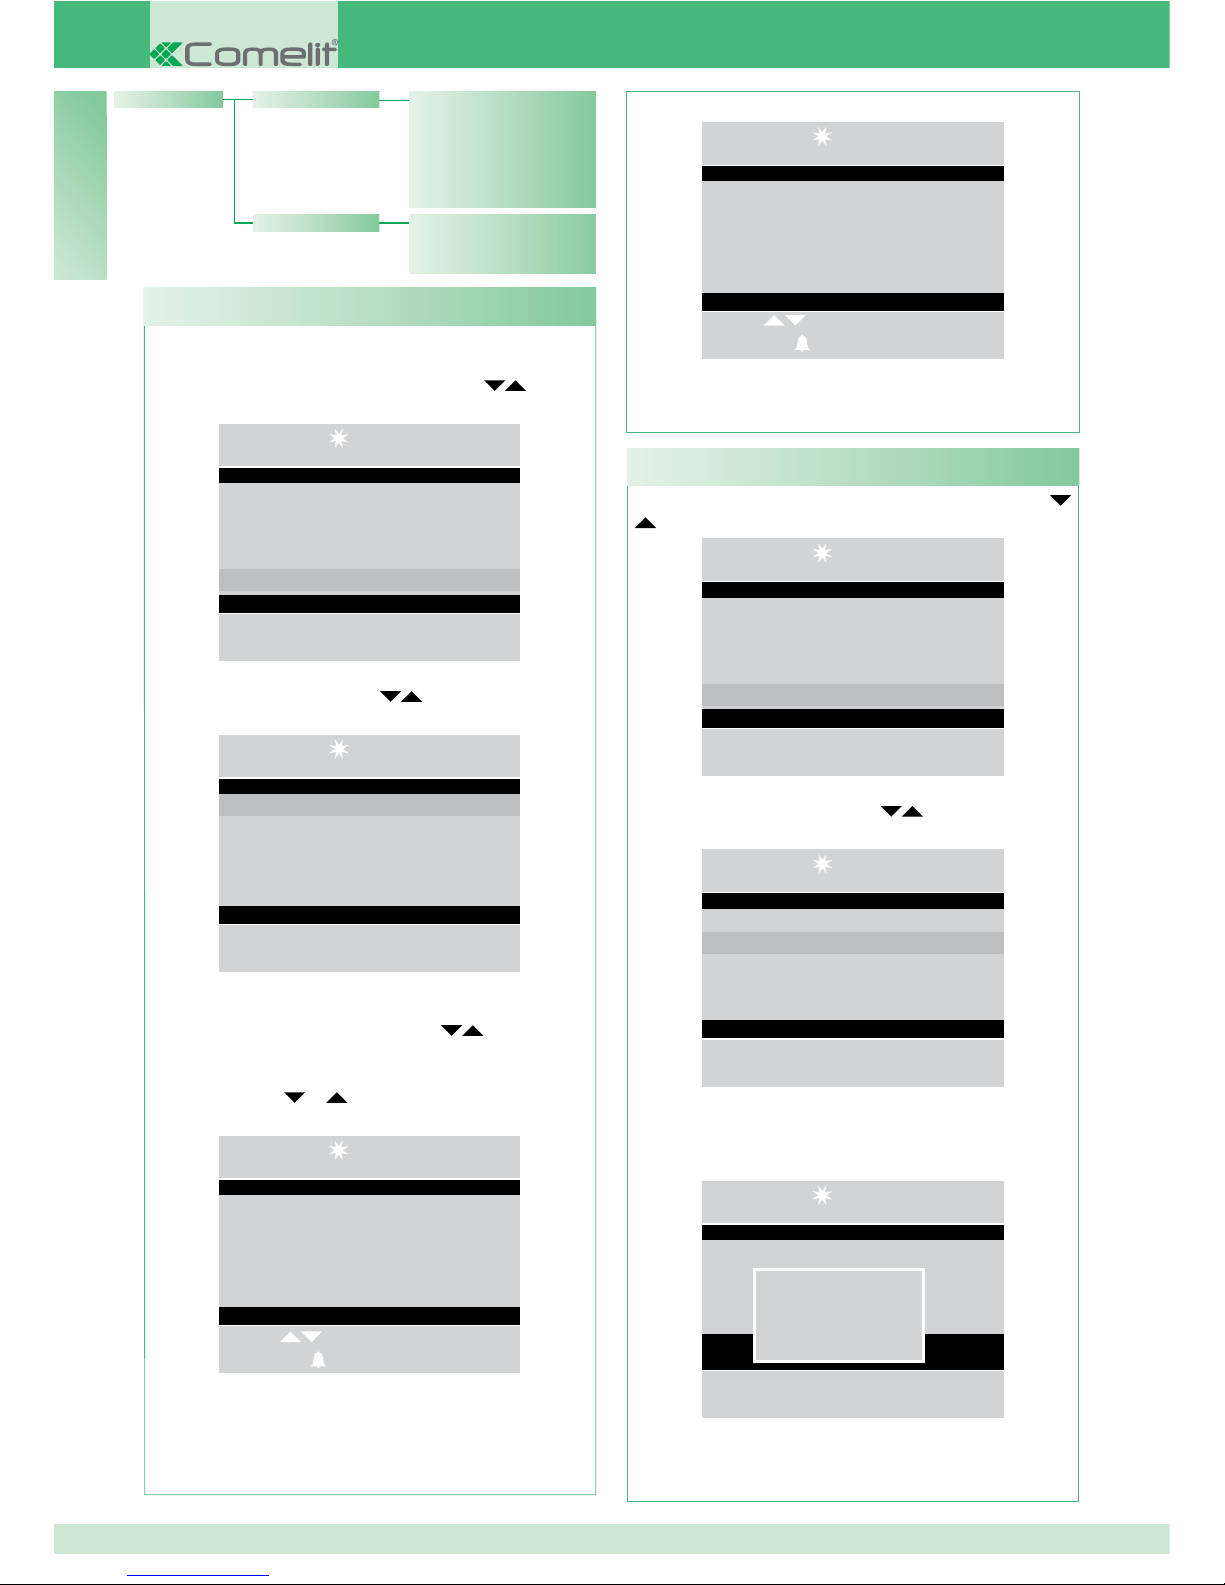
- premere il tasto MENU e visualizzare tramite i tasti
il menu Allarmi, premere il tasto OK;
14 :15 : 26
Lun 12 Mar 12
• Impostazioni
• Configurazioni
• Rubrica
• Chiamate ricevute
• Allarmi
- visualizzare tramite i tasti
la voce Elimina
tutto, premere il tasto OK;
14 :15 : 26
Lun 12 Mar 12
• Visualizza
• Elimina tutto
- comparirà una schermata in cui verrà chiesto
se si vuole eliminare la lista degli allarmi entranti;
confermare con il tasto OK oppure annullare con il
tasto ESC;
14 :15 : 26
Lun 12 Mar 12
Elimina tutto?
Ok Esc
- premere ripetutamente il tasto ESC per tornare alla
schermata principale.
- Per accedere velocemente alla visualizzazione degli
allarmi premere il tasto MENU + tasto 1 oppure premere
il tasto MENU e visualizzare tramite i tasti
il menu
Allarmi, premere il tasto OK;
14 :15 : 26
Lun 12 Mar 12
• Impostazioni
• Configurazioni
• Rubrica
• Chiamate ricevute
• Allarmi
- visualizzare tramite i tasti
la voce Visualizza,
premere il tasto OK;
14 :15 : 26
Lun 12 Mar 12
• Visualizza
• Elimina tutto
- verranno visualizzati in ordine cronologico a partire
dall’ultimo ricevuto; utilizzare i tasti
per scorrere
la lista.
Per velocizzare lo scorrimento dei nominativi, tener
premuto il tasto o .
14 :15 : 26
Lun 12 Mar 12
Allarme Sergio Rossi
Codice 012
Ricevuto Lun 12 Mar 12
Alle ore 13 : 15 : 11
Scorri
Chiamata Menù
- premendo il tasto MENU viene visualizzata una
schermata nell’angolo in basso a destra.
U25 - Visualizzazione allarmi
U26 - Cancellazione lista allarmi ricevuti
14:15:26
Lun 12 Mar 12
Allarme Sergio Rossi
Codice 012
Ricevuto Lun 12 Mar 12
Alle ore 13 : 15 : 11
Scorri
Chiamata
- premere ripetutamente il tasto ESC per tornare alla
schermata principale.
Allarme Sergio Rossi
Codice 012
Ricevuto Lun 12 Mar. 12
Alle ore 14 : 15 : 26
Elimina tutto?
• Elimina tutto
Allarmi • Visualizza
Page 21
21
IT
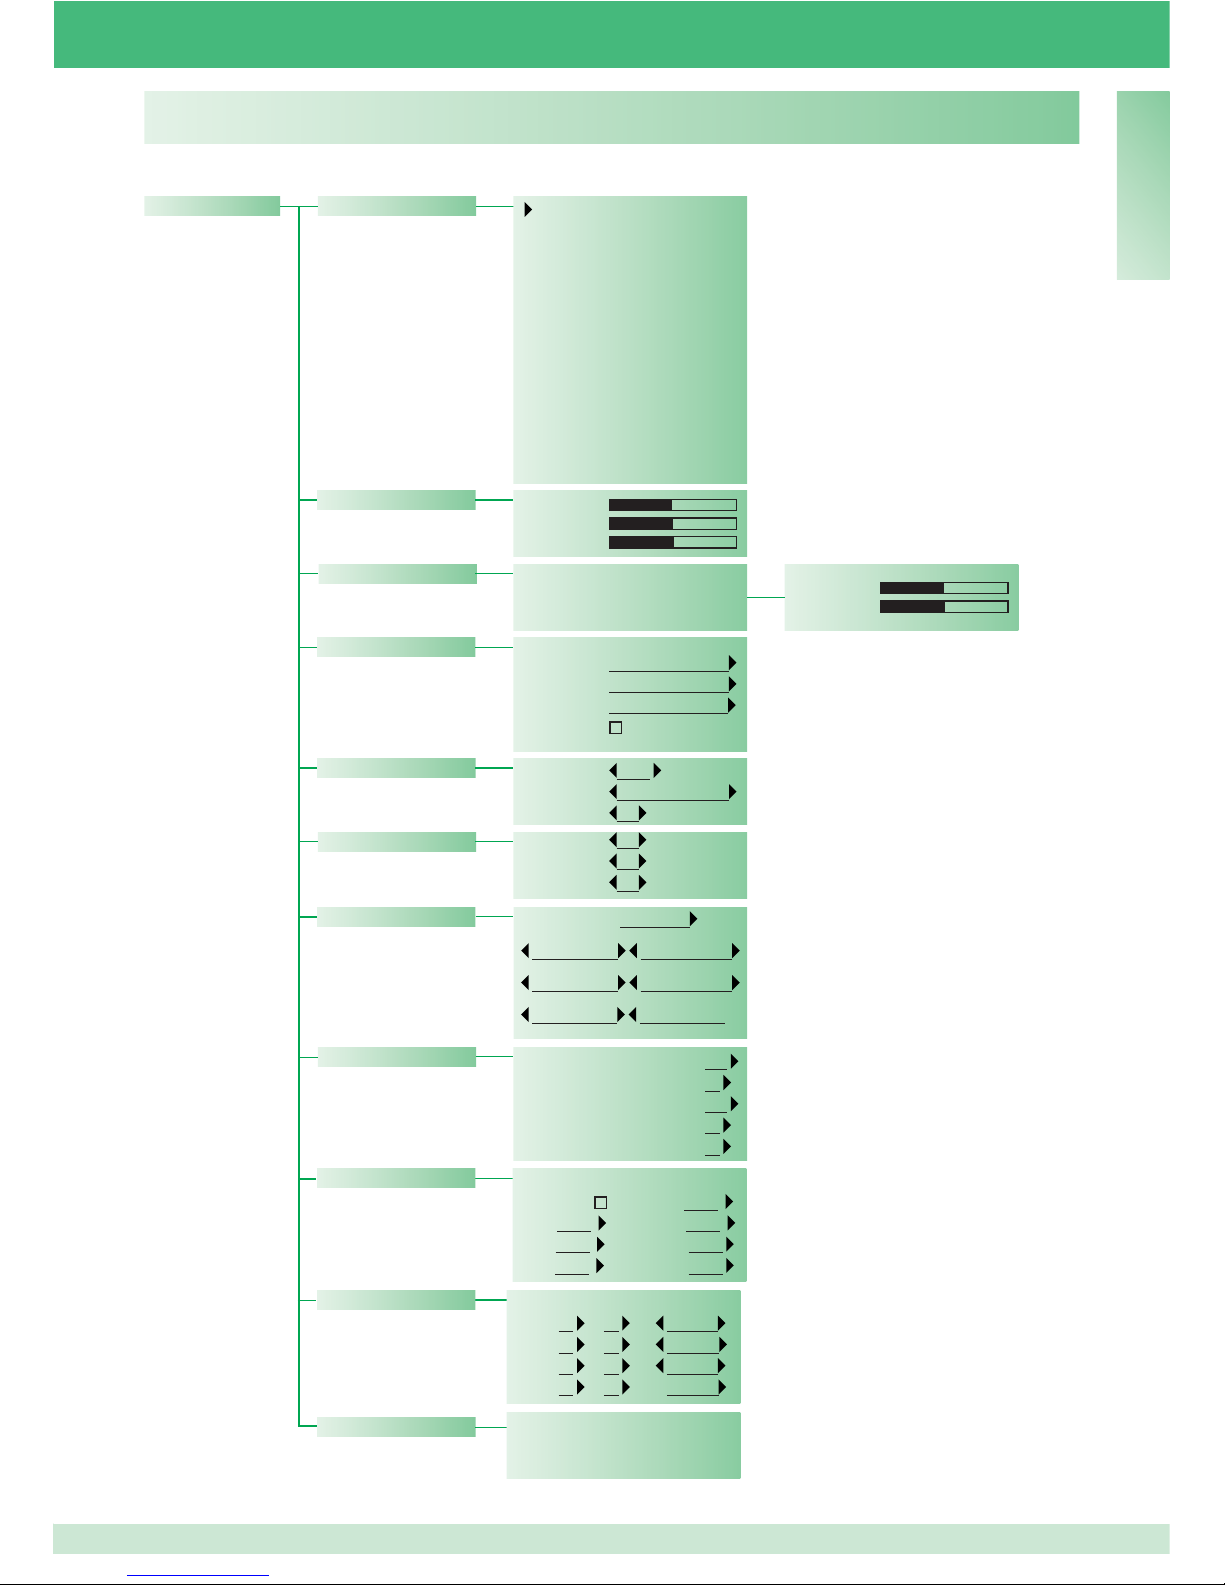
IMPOSTAZIONI
• Lingua
Italiano
English
Français
Deutsch
Español
Portoghese
Olandese
Danese
Norvegese
Finlandese
Svedese
Turco
Russo
Polacco
Croato
Impostazioni
• Video
Luminosità
Contrasto
Colore
• Audio
• Interno
• Esterno
Microfono
Altoparlante
• Suoni
Esterno La primavera
Interno La primavera
Allarme Allarme 1
Tono tasti
• Data
Anno 2010
Mese Marzo
Giorno 12
• Ora
Ore 14
Minuti 15
Secondi 26
• Modalità giornaliera
Abilita
Dom Notte
Lun Notte
Mar Notte
Mer Notte
Giov Notte
Ven Notte
Sab Notte
• Temi
• Reset impostazioni
Reset?
• Commut. automatica
Cmt 1 00 : 00 Giorno
Cmt 2 00 : 00 Notte
Cmt 3 00 : 00 Giorno
Cmt 4 00 : 00
Temi Tema blue
Tema Planux Tema Green
Tema Red Tema Yellow
Tema Pink Tema Orange
• Tempi
Fonica 010
Attesa reset 01
Standby 010
Attivazione rele 01
Ripetizione chiamat 01
Page 22
22
IT
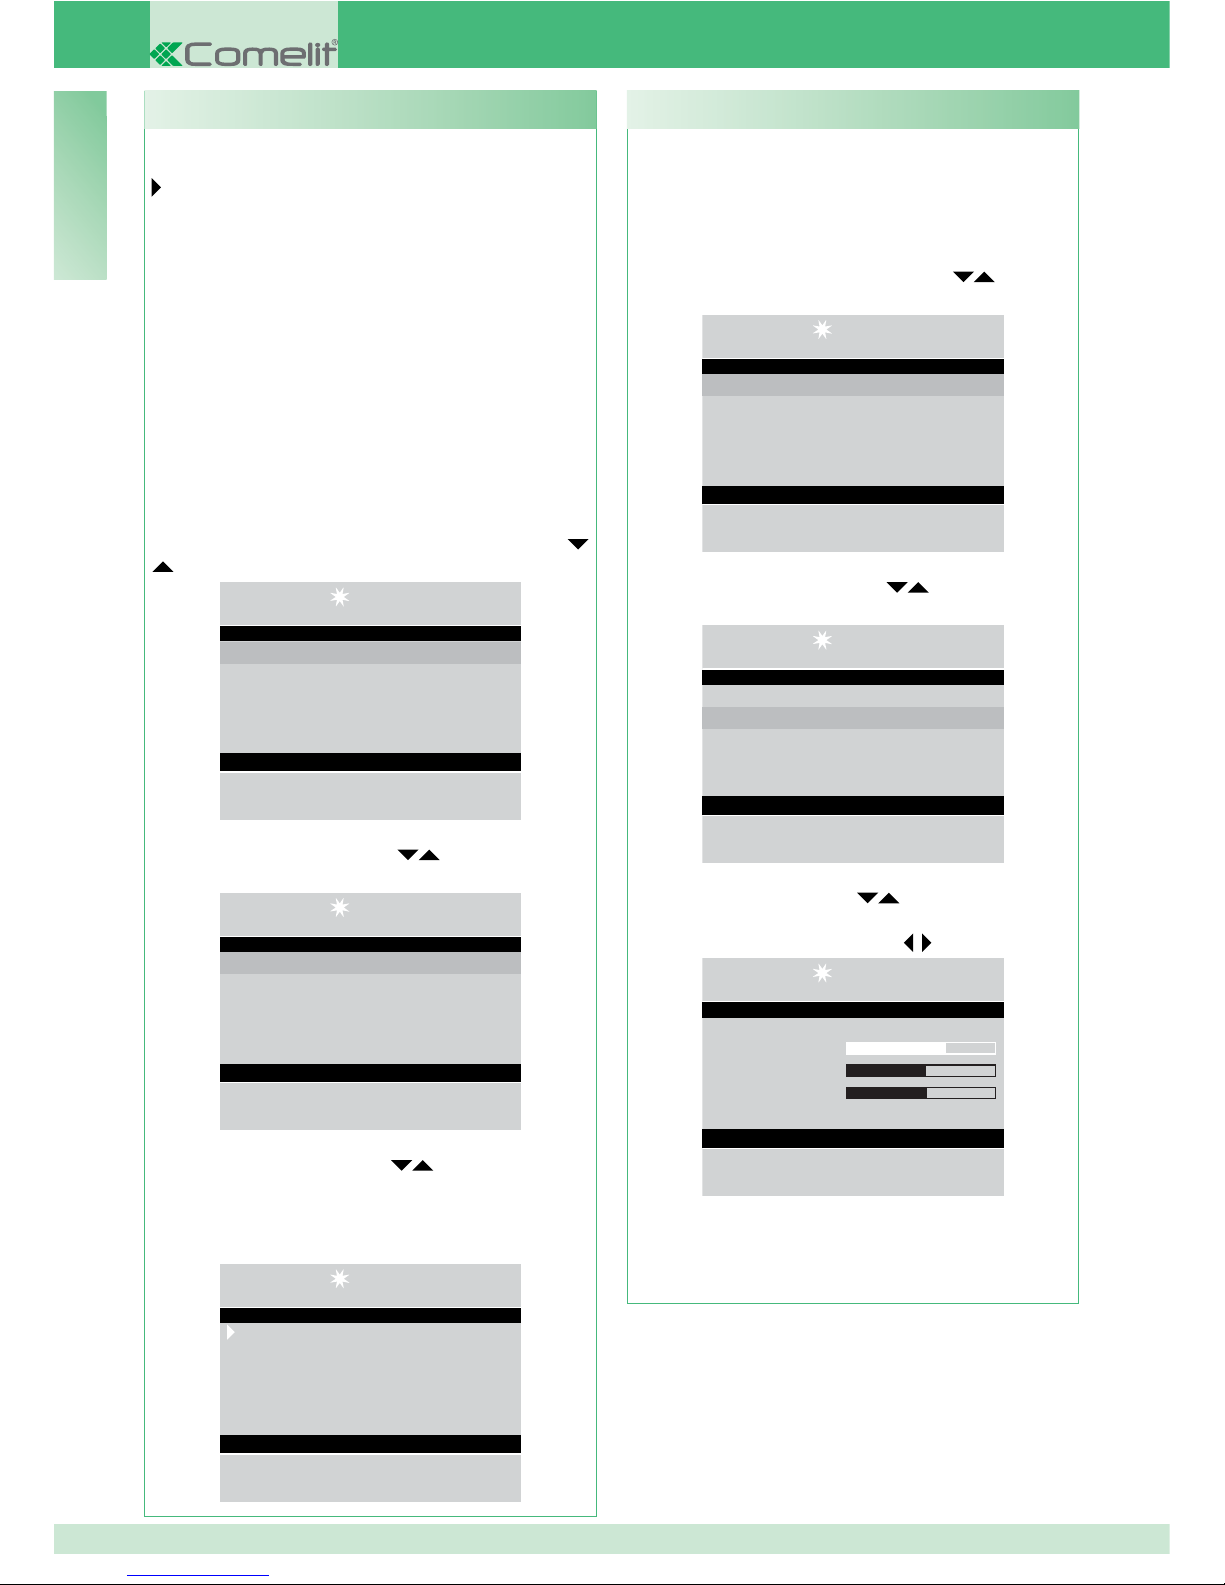
Tramite questa funzione è possibile regolare la
luminosità, il contrasto e il colore del monitor del
centralino.
- Per accedere velocemente alle impostazioni video
premere il tasto MENU + tasto 3 oppure premere il tasto
MENU e visualizzare tramite i tasti
il menu
Impostazioni, premere il tasto OK;
14 :15 : 26
Lun 12 Mar 12
• Impostazioni
• Configurazioni
• Rubrica
• Chiamate ricevute
• Allarmi
- visualizzare tramite i tasti
il menu Video,
premere il tasto OK;
14 :15 : 26
Lun 12 Mar 12
• Lingua
• Video
• Audio
• Suoni
• Data
- visualizzare tramite i tasti
l’impostazione video
da regolare (luminosità, contrasto, colore) e diminuire
o aumentare il valore con i tasti
;
14 :15 : 26
Lun 12 Mar 12
Luminosita
Contrasto
Colore
Impostazioni video
- premere il tasto OK per confermare le impostazioni;
- premere ripetutamente il tasto ESC per tornare alla
schermata principale.
I2 - Impostazioni video
É possibile impostare la lingua selezionandola tra
le seguenti:
Italiano (default)
English
Français
Deutsch
Español
Portoghese
Olandese
Danese
Norvegese
Finlandese
Svedese
Turco
Russo
Polacco
Croato
- premere il tasto MENU e visualizzare tramite i tasti
il menu Impostazioni, premere il tasto OK;
14 :15 : 26
Lun 12 Mar 12
• Impostazioni
• Configurazioni
• Rubrica
• Chiamate ricevute
• Allarmi
- visualizzare tramite i tasti
il menu Lingua,
premere il tasto OK;
14 :15 : 26
Lun 12 Mar 12
• Lingua
• Video
• Audio
• Suoni
• Data
- visualizzare tramite i tasti
la lingua scelta e
premere il tasto OK per confermare;
- premere ripetutamente il tasto ESC per tornare alla
schermata principale.
14 :15 : 26
Lun 12 Mar 12
Italiano
English
Français
Deutsch
Español
Selezione lingua
I1 - Modifica lingua
Page 23
23
IT
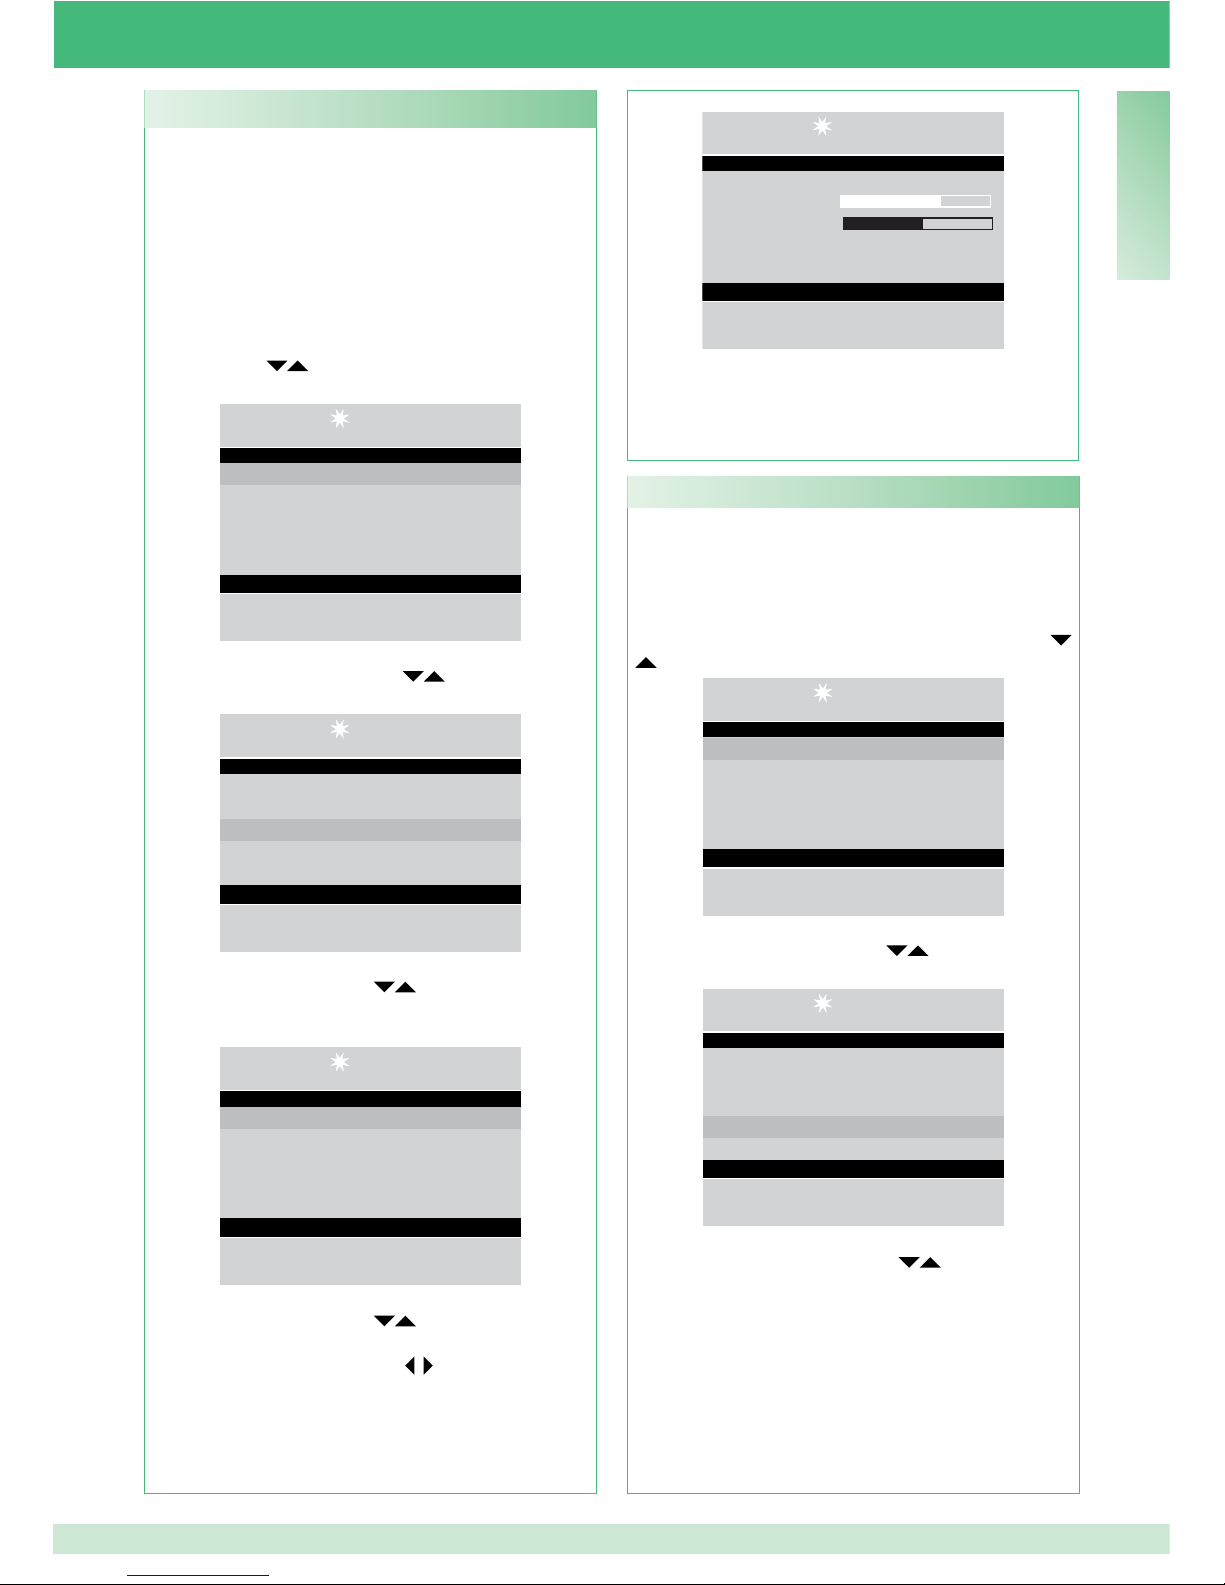
Tramite questa funzione è possibile regolare il volume
del microfono e dell’altoparlante del centralino verso i
posti interni e verso il posto esterno.
N.B. Per modifi care i volumi il centralino deve
essere in comunicazione con il posto interno o il
posto esterno.
- Per accedere velocemente alle impostazioni audio
premere il tasto MENU + tasto 4 (esterno) tasto 5
(interno) oppure premere il tasto MENU e visualizzare
tramite i tasti
il menu Impostazioni, premere il
tasto OK;
14 :15 : 26
Lun 12 Mar 12
• Impostazioni
• Configurazioni
• Rubrica
• Chiamate ricevute
• Allarmi
- visualizzare tramite i tasti
il menu Audio,
premere il tasto OK;
14 :15 : 26
Lun 12 Mar 12
• Lingua
• Video
• Audio
• Suoni
• Data
- visualizzare tramite i tasti
l’impostazione audio
da regolare (interno e/o esterno), premere il tasto
OK;
14 :15 : 26
Lun 12 Mar 12
• Interno
• Esterno
- visualizzare tramite i tasti
l’impostazione audio
da regolare (microfono e/o altoparlante) e diminuire o
aumentare il valore con i tasti ;
I3 - Impostazioni audio
14 :15 : 26
Lun 12 Mar 12
Microfono
Altoparlante
Impostazioni audio
- premere il tasto OK per confermare le impostazioni;
- premere ripetutamente il tasto ESC per tornare alla
schermata principale.
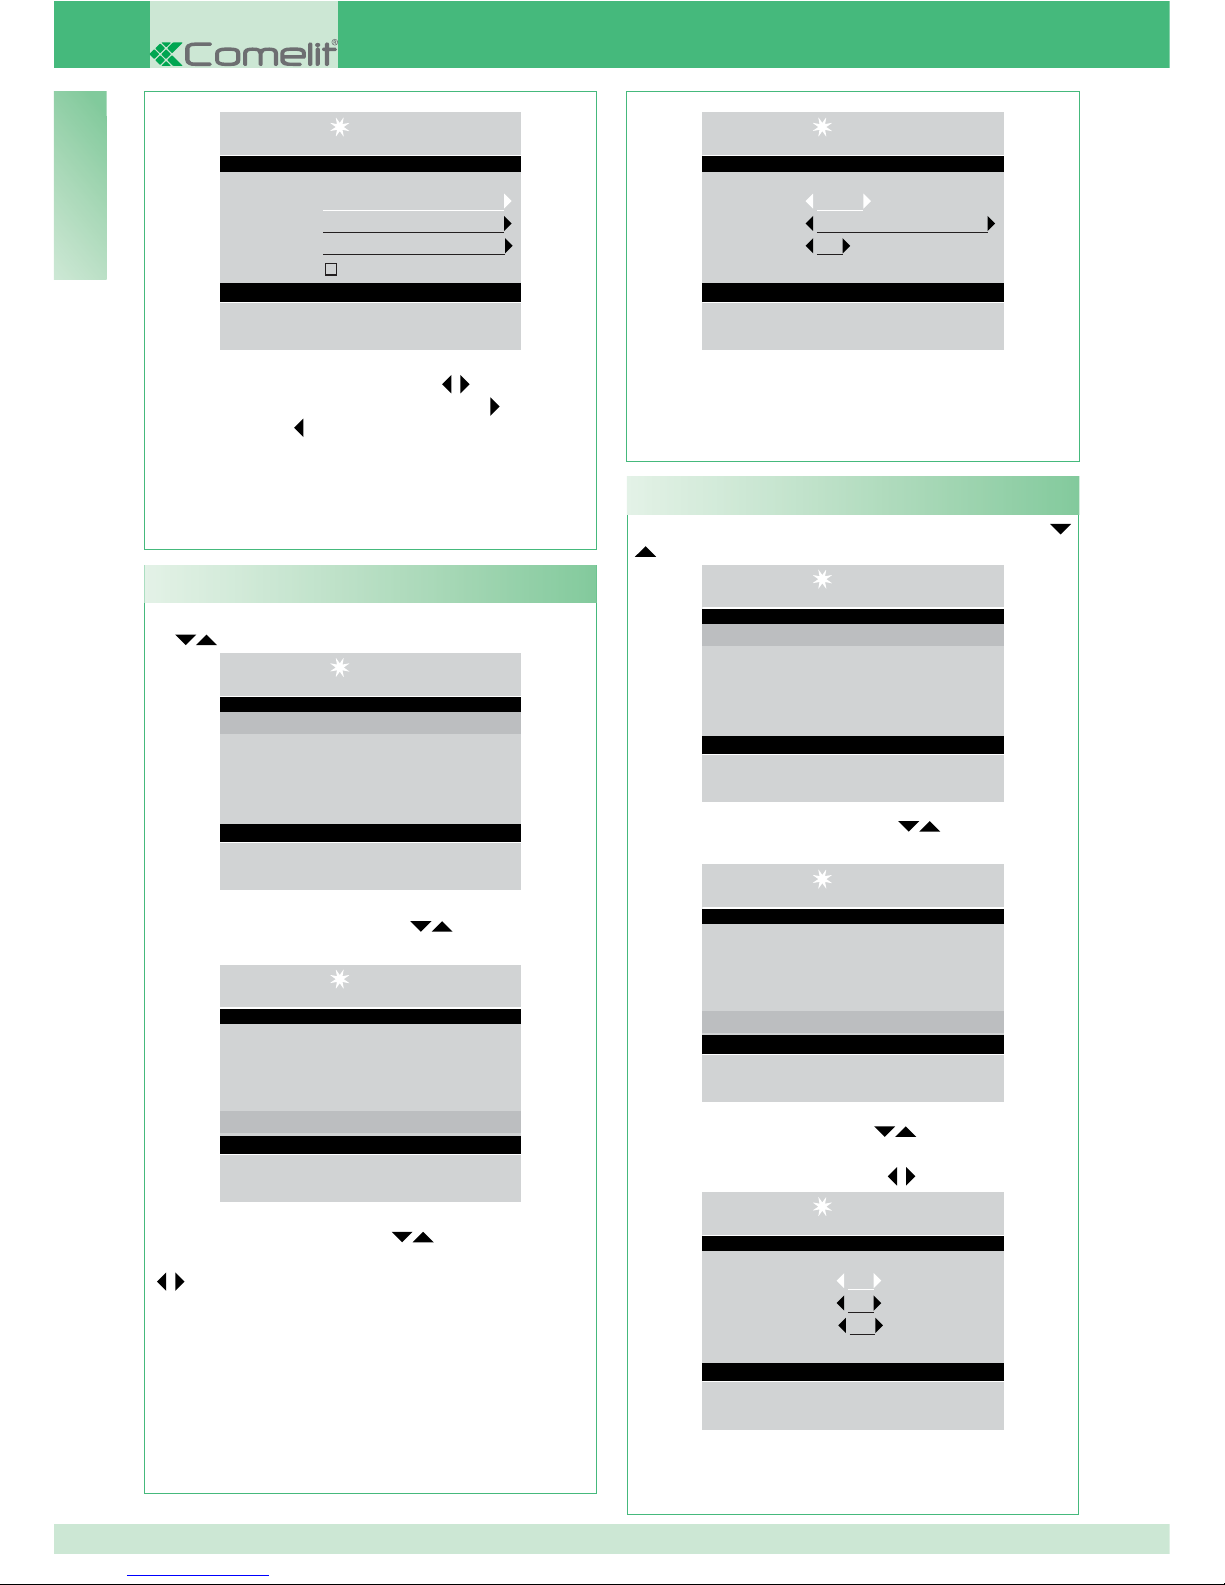
Tramite questa funzione è possibile impostare la
melodia delle chiamate in ingresso dai posti interni,
dal posto esterno e delle chiamate di allarme; è inoltre
possibile attivare o disattivare il tono tasti.
- premere il tasto MENU e visualizzare tramite i tasti
il menu Impostazioni, premere il tasto OK;
14 :15 : 26
Lun 12 Mar 12
• Impostazioni
• Configurazioni
• Rubrica
• Chiamate ricevute
• Allarmi
- visualizzare tramite i tasti
il menu Suoni,
premere il tasto OK;
14 :15 : 26
Lun 12 Mar 12
• Lingua
• Video
• Audio
• Suoni
• Data
- visualizzare tramite i tasti
l’impostazione
suono da regolare (esterno, interno, allarme o tono
tasti);
I4 - Impostazioni suoni
Page 24
24
IT
- premere il tasto MENU e visualizzare tramite i tasti
il menu Impostazioni, premere il tasto OK;
14 :15 : 26
Lun 12 Mar 12
• Impostazioni
• Configurazioni
• Rubrica
• Chiamate ricevute
• Allarmi
- visualizzare tramite i tasti
il menu Data,
premere il tasto OK;
14 :15 : 26
Lun 12 Mar 12
• Lingua
• Video
• Audio
• Suoni
• Data
- visualizzare tramite i tasti
l’impostazione da
regolare (anno, mese, giorno) e modifi care con i tasti
;
I5 - Modifi ca data
- premere il tasto MENU e visualizzare tramite i tasti
il menu Impostazioni, premere il tasto OK;
14 :15 : 26
Lun 12 Mar 12
• Impostazioni
• Configurazioni
• Rubrica
• Chiamate ricevute
• Allarmi
- visualizzare tramite i tasti
il menu Ora,
premere il tasto OK;
14 :15 : 26
Lun 12 Mar 12
• Video
• Audio
• Suoni
• Data
• Ora
- visualizzare tramite i tasti
l’impostazione da
regolare (ore, minuti, secondi) e diminuire o
aumentare il valore con i tasti
;
14 :15 : 26
Lun 12 Mar 12
Ore 14
Minuti 15
Secondi 26
Impostazione ora
- premere il tasto OK per confermare le impostazioni;
- premere ripetutamente il tasto ESC per tornare alla
schermata principale.
I6 - Modifi ca ora
14 :15 : 26
Lun 12 Mar 12
Esterno La primavera
Interno La primavera
Allarme Allarme 1
Tono tasti
Esc Ok
- selezionare la melodia con i tasti
.
Attivare il servizio Tono tasti con il tasto .
Disabilitare con
;
- premere il tasto OK per confermare le impostazioni;
- premere ripetutamente il tasto ESC per tornare alla
schermata principale.
14 :15 : 26
Lun 12 Mar 12
Anno 2012
Mese Marzo
Giorno 12
Impostazione data
- premere il tasto OK per confermare le impostazioni;
- premere ripetutamente il tasto ESC per tornare alla
schermata principale.
Page 25
25
IT
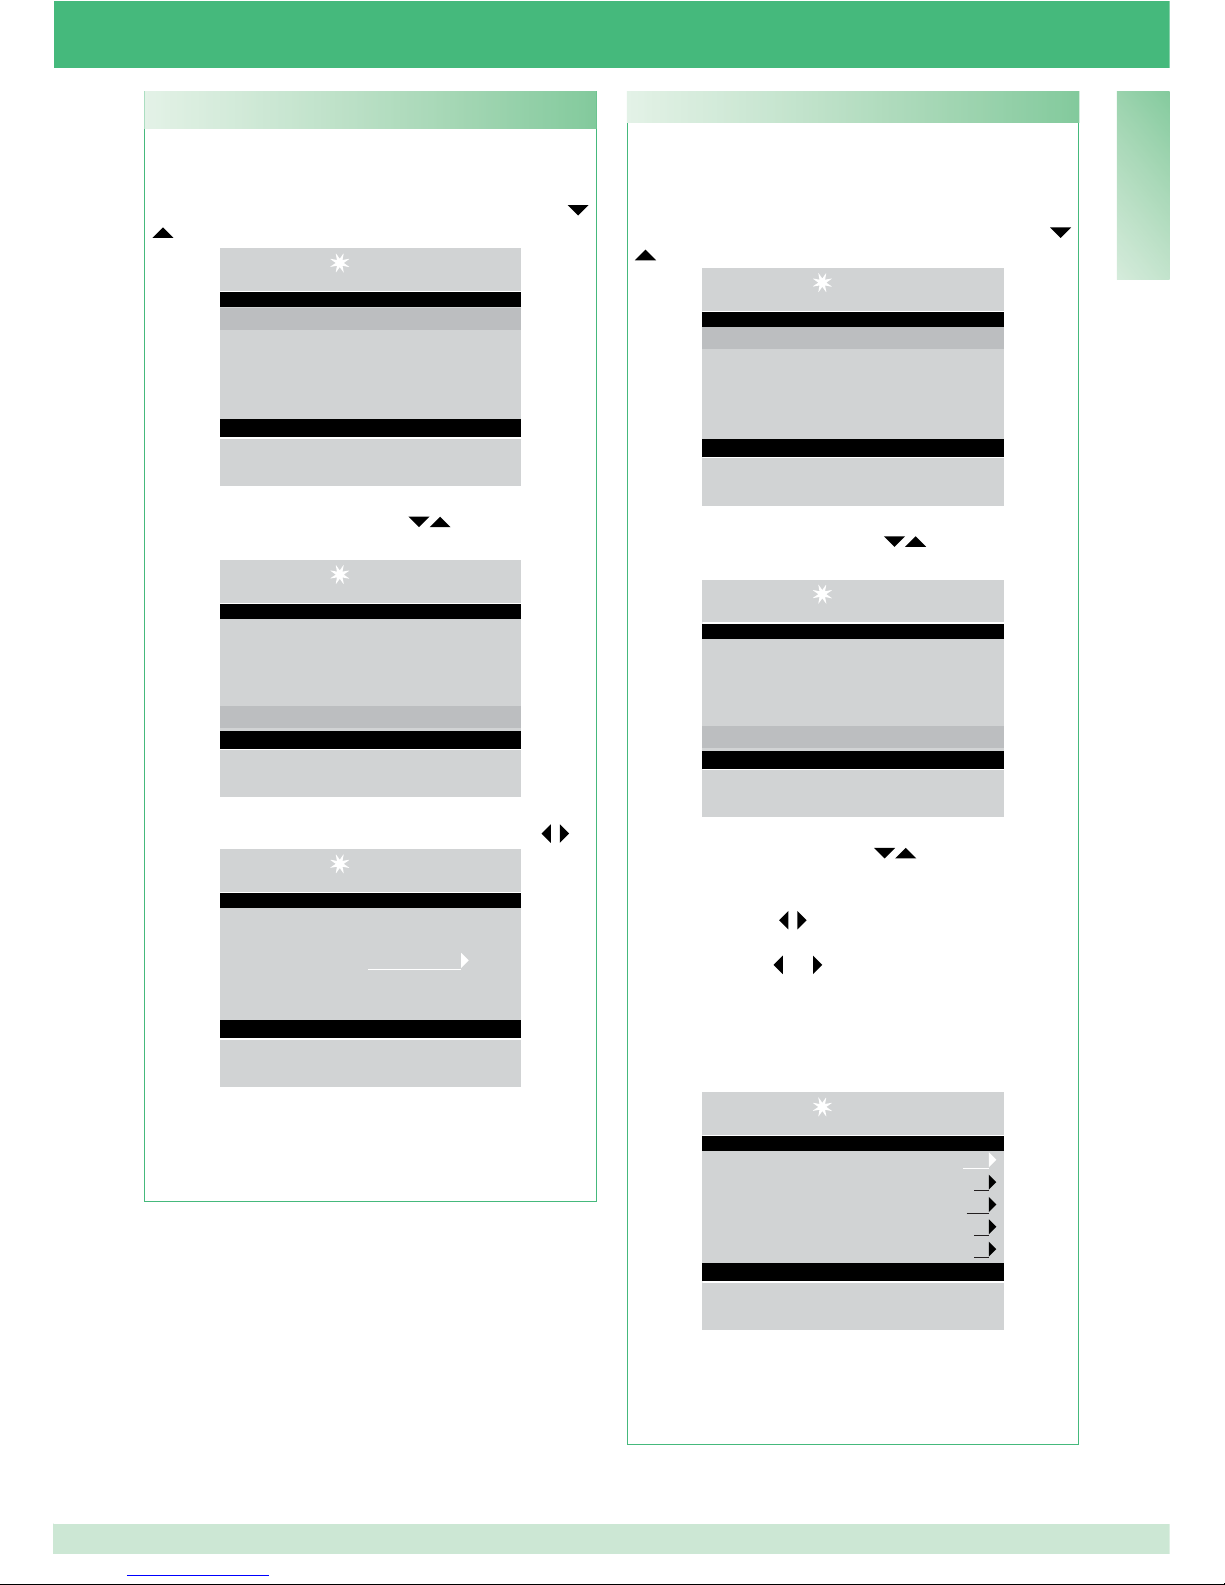
Tramite questa funzione è possibile modifi care i colori
delle schermate dei menu.
- premere il tasto MENU e visualizzare tramite i tasti
il menu Impostazioni, premere il tasto OK;
14 :15 : 26
Lun 12 Mar 12
• Impostazioni
• Configurazioni
• Rubrica
• Chiamate ricevute
• Allarmi
- visualizzare tramite i tasti
il menu Temi,
premere il tasto OK;
14 :15 : 26
Lun 12 Mar 12
• Audio
• Suoni
• Data
• Ora
• Temi
- selezionare il tema desiderato tramite i tasti
;
14 :15 : 26
Lun 12 Mar 12
Temi Tema blue
Esc Ok
- premere il tasto OK per confermare l’impostazione;
- premere ripetutamente il tasto ESC per tornare alla
schermata principale.
I7 - Impostazione tema
Tramite questa funzione è possibile impostare i tempi
di fonica, attesa reset, standby, attivazione relè e di
ripetizione di chiamata.
- premere il tasto MENU e visualizzare tramite i tasti
il menu Impostazioni, premere il tasto OK;
14 :15 : 26
Lun 12 Mar 12
• Impostazioni
• Configurazioni
• Rubrica
• Chiamate ricevute
• Allarmi
- visualizzare tramite i tasti
il menu Tempi,
premere il tasto OK;
14 :15 : 26
Lun 12 Mar 12
• Suoni
• Data
• Ora
• Temi
• Tempi
- visualizzare tramite i tasti
l’impostazione da
regolare (fonica, attesa reset, standby, attivazione relè,
ripetizione di chiamata) e diminuire o aumentare il
valore con i tasti .
Per velocizzare lo scorrimento dei valori, tener
premuto il tasto o .
Valori di fonica: 10’’-180’’ max
Valori di attesa reset: 1’’-10’’max
Valori di standby: 10’’-120’’max
Valori di attivazione relè: 1’’- 20’’max
Valori di ripetizione di chiamata: 1’’- 30’’max
14 :15 : 26
Lun 12 Mar 12
Fonica 010
Attesa reset 01
Standby 010
Attivazione rele 01
Ripetizione chiamat 01
Esc Ok
- premere il tasto OK per confermare le impostazioni;
- premere ripetutamente il tasto ESC per tornare alla
schermata principale.
I8 - Regolazione tempi
Page 26
26
IT
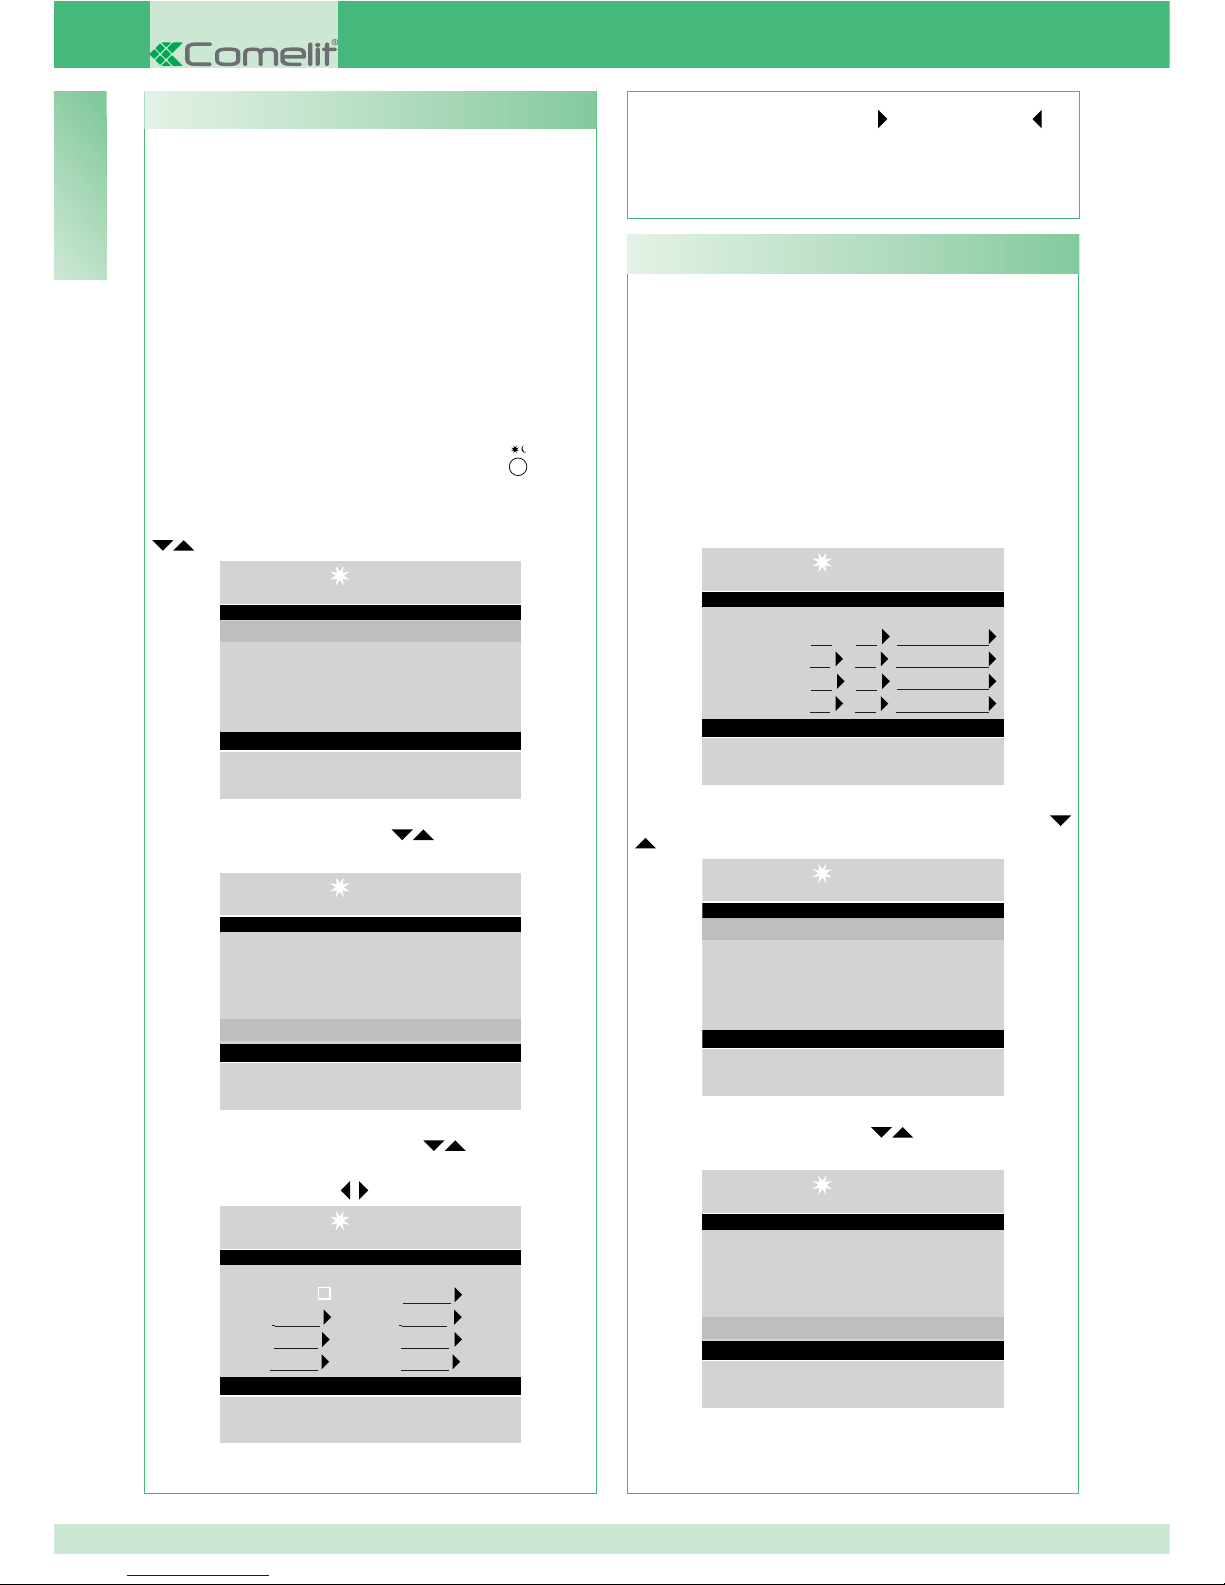
É possibile impostare il sistema per consentire il
passaggio automatico dalla modalità GIORNO alla
modalità NOTTE in determinati orari programmabili
dall’utente. Gli ORARI impostabili possono essere al
MAX 4, e di ognuno andrà impostato la modalità di
commutazione (Giorno o Notte).
Esempio:
Si vuole impostare il Centalino con questi parametri:
07:00 -12:00 Funzionamento Giorno
13:00 - 22:00 Funzionamento Giorno
14 :15 : 26
Lun 12 Mar 12
Cmt1 07 : 00 Giorno
Cmt2 12 : 00 Notte
Cmt3 13 : 00 Giorno
Cmt4 22 : 00 Notte
Esc Ok
- premere il tasto MENU e visualizzare tramite i tasti
il menu Impostazioni, premere il tasto OK;
14 :15 : 26
Lun 12 Mar 12
• Impostazioni
• Configurazioni
• Rubrica
• Chiamate ricevute
• Allarmi
- visualizzare tramite i tasti
il menu Commut.
automatica, premere il tasto OK;
14 :15 : 26
Lun 12 Mar 12
• Ora
• Temi
• Tempi
• Modalita giornaliera
• Commut automatica
- il cursore si posizionerà in automatico sull’ora min.
della commut. 1; diminuire o aumentare il valore con
I10 - Impostazione commut. automatica
programmazione con il tasto , per disabilitare ;
- premere il tasto OK per confermare le impostazioni;
- premere ripetutamente il tasto ESC per tornare alla
schermata principale.
Si può decidere di organizzare la settimana scegliendo
per ogni giorno una delle seguenti 3 modalità di
funzionamento:
• AUTO: il sistema passa dalla modalità GIORNO alla
modalità NOTTE negli orari programmati.
• NOTTE: il sistema è in questa modalità per tutta la
giornata.
• GIORNO: il sistema è in questa modalità per tutta la
giornata.
Nel caso in cui venga scelta l’impostazione “auto”,
la modalità di funzionamento all’interno della
giornata commuterà a orari prestabiliti, in base alla
programmazione impostata secondo il paragrafo “I10 Impostazione commut. automatica” a pag. 26.
Per disattivare la funzione premere il tasto
.
Per attivarla:
- premere il tasto MENU e visualizzare tramite i tasti
il menu Impostazioni, premere il tasto OK;
14 :15 : 26
Lun 12 Mar 12
• Impostazioni
• Configurazioni
• Rubrica
• Chiamate ricevute
• Allarmi
- visualizzare tramite i tasti
il menu Modalità
giornaliera, premere il tasto OK;
14 :15 : 26
Lun 12 Mar 12
• Data
• Ora
• Temi
• Tempi
• Modalita giornaliera
- visualizzare tramite i tasti
il giorno da
impostare e selezionare la modalità notte, giorno o
auto utilizzando i tasti .
14 :15 : 26
Lun 12 Mar 12
Abilita Mer Notte
Dom Notte Gio Notte
Lun Notte Ven Notte
Mar Notte Sab Notte
Esc Ok
- fi nita la programmazione per ogni giorno della settimana,
posizionarsi sulla voce Abilita e attivare l’intera
I9 - Impostazione modalitá giornaliera
Page 27
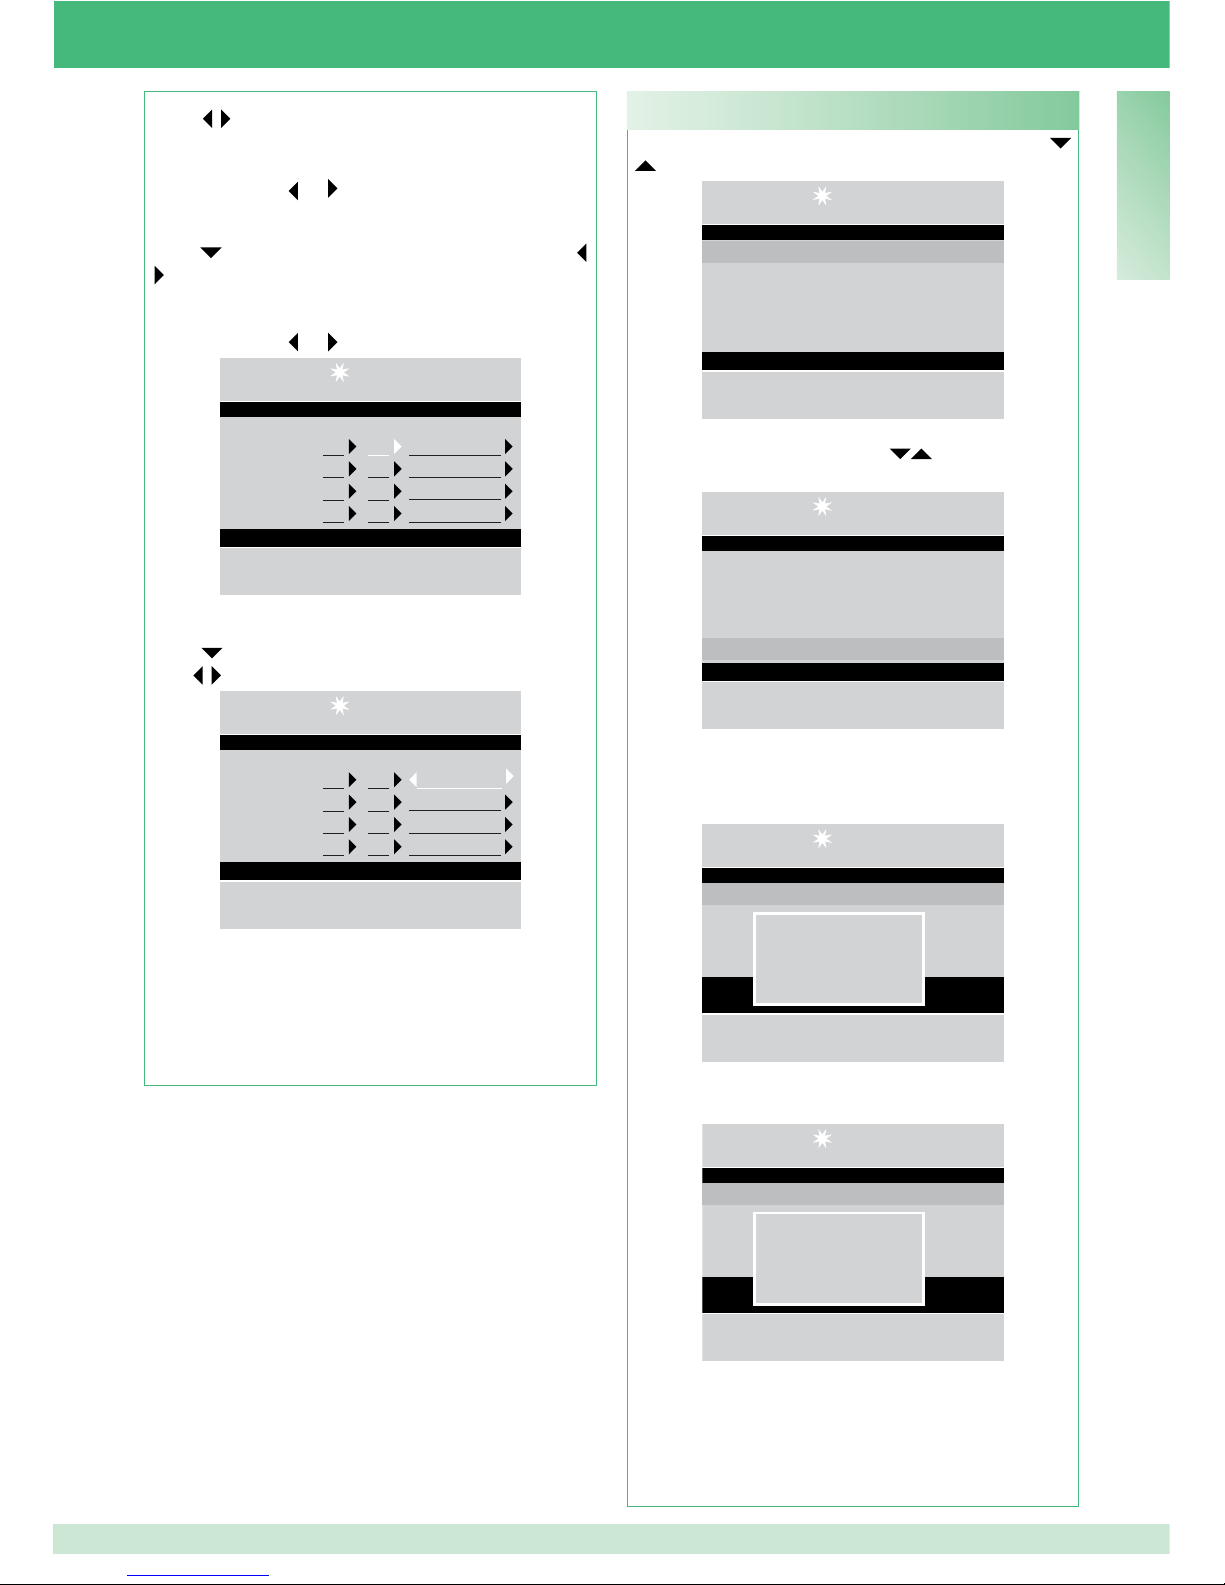
27
IT
- premere il tasto MENU e visualizzare tramite i tasti
il menu Impostazioni, premere il tasto OK;
14 :15 : 26
Lun 12 Mar 12
• Impostazioni
• Configurazioni
• Rubrica
• Chiamate ricevute
• Allarmi
- visualizzare tramite i tasti
il menu Reset
impostazioni, premere il tasto OK;
14 :15 : 26
Lun 12 Mar 12
• Temi
• Tempi
• Modalita giornaliera
• Commut. automatica
• Reset impostazioni
- comparirà una schermata in cui verrà chiesto se
si vuole resettare le impostazioni; confermare con il
tasto OK oppure annullare con il tasto ESC;
14 :15 : 26
Lun 12 Mar 12
• Tempi
• Mod
• Com
Reset?
Ok Esc
- se si preme OK, seguirà la schemata di riavvio del
sistema;
14 :15 : 26
Lun 12 Mar 12
• Tempi
• Mod
• Com
Riavvia sistema
Ok Esc
- confermare il riavvio del sistema con il tasto OK
oppure annullare con il tasto ESC;
- premere ripetutamente il tasto ESC per tornare alla
schermata principale.
I11 - Reset impostazioni
i tasti
.
Il valore va da 00 a 23.
Per velocizzare lo scorrimento dei valori, tener
premuto il tasto
o .
- posizionarsi sul valore in minuti della commut. 1 col
tasto
, diminuire o aumentare il valore con i tasti
.
Il valore va da 00 a 59.
Per velocizzare lo scorrimento dei valori, tener
premuto il tasto
o .
14 :15 : 26
Lun 12 Mar 12
Cmt1 00 : 00
Cmt2 00 : 00
Cmt3 00 : 00
Cmt4 00 : 00
Esc Ok
- posizionarsi sull’ultima voce della commut. 1 col
tasto
, selezionare la modalità (giorno, notte) con i
tasti
.
14 :15 : 26
Lun 12 Mar 12
Cmt1 00 : 00 Notte
Cmt2 00 : 00
Cmt3 00 : 00
Cmt4 00 : 00
Esc Ok
- seguire la procedura fi n qui descritta per tutte le com-
mutazioni necessarie;
- premere il tasto
OK per confermare le impostazioni;
- premere ripetutamente il tasto ESC per tornare alla
schermata principale.
Page 28
28
IT
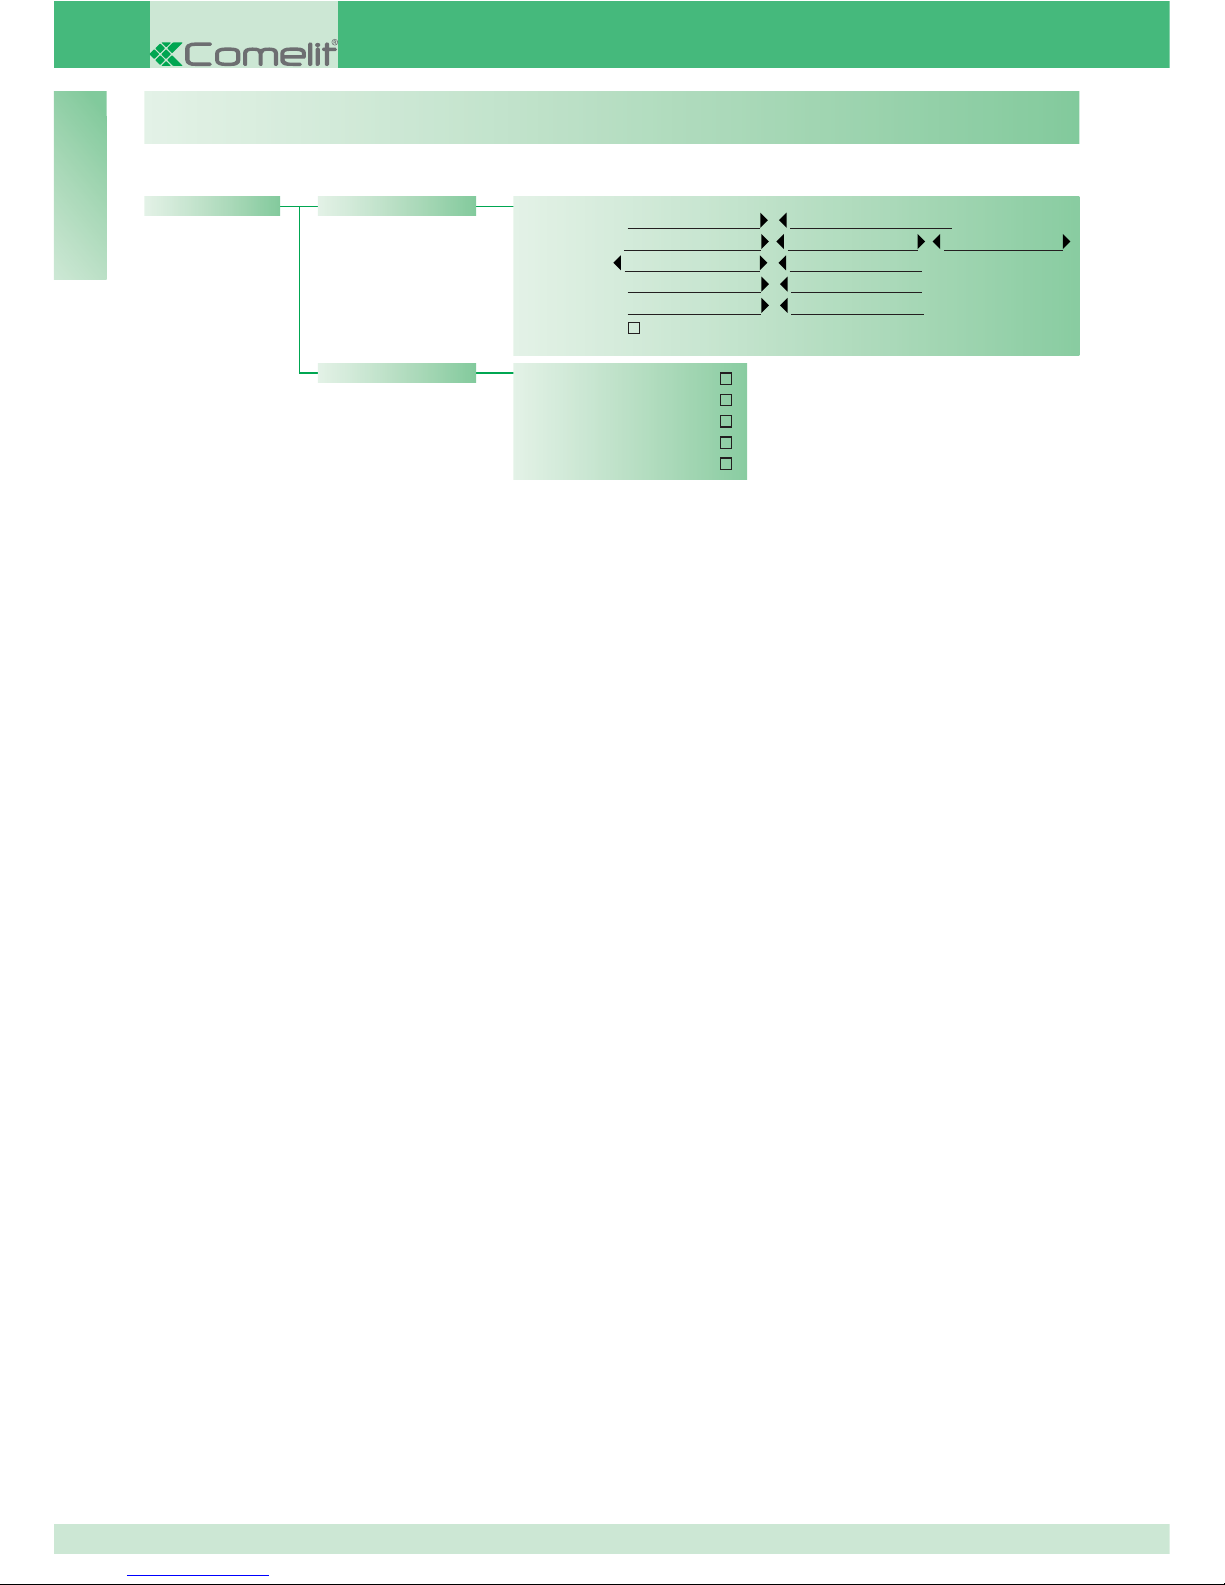
CONFIGURAZIONI INSTALLATORE
• Sistema
Sistema Simplebus Simplebus Top
Link Singolo Parall. LS-IN Parall. LP-IN
Serie master Serie slave
Chiamata Simplebus Indiretto
A/V Audio Video
Retrocom.
Confi gurazioni
• Servizi
FollowMe
Ripetizione chiamata
Accensione interni
Chiamata tripla
Aiuto codici
Page 29

29
IT
Questo capitolo è indirizzato al personale
qualifi cato che, dopo l’installazione, procederà alla
programmazione del centralino di portineria, tramite
menu guidati e visualizzati sul display raggiungibili
dal menu principale.
Il centralino può essere secondario o principale.
• Impostare Simplebus quando il centralino è
utilizzato come secondario, in uscita dai morsetti
LM-LM degli scambi Art. 1424 (impianto Simplebus
TOP) (vedi schema SBTOP/001DSMC pag. 110);
oppure quando il centralino è utilizzato in impianti
Simplebus con scambi Art. 1224A o in un impianto
con singolo montante e in assenza di scambi.
ATTENZIONE! il centralino secondario non può
essere confi gurato come centralino in parallelo.
• Impostare Simplebus top quando il centralino è
utilizzato come principale in impianto Simplebus
top, quindi posizionato nella tratta prima degli
scambi Art. 1424 che defi niscono le zone/montanti
(vedi schema SBTOP/002DSMC pag. 112).
Il centralino secondario o principale deve essere poi
confi gurato come:
1- SINGOLO
2- PARALLELO
3- SERIE.
1- Selezionare singolo quando il centralino è l’unico
presente sull’impianto oppure l’unico che serve un
determinato montante.
2- In presenza di 2 centralini principali o secondari che
servono il medesimo montante, la confi gurazione
parallelo, implica che entrambi i centralini saranno
operativi con le stesse funzionalità (vedi schema
SBTOP/005DSMC pag. 118).
Il primo dei due che risponde a una chiamata
precluderà all’altro la possibilità di effettuare la
stessa operazione.
L’accensione o lo spegnimento di uno dei 2
provocherà automaticamente l’accensione o lo
spegnimento dell’altro.
Impostare come Parall. LS-IN il centralino
collegato sotto la linea LS-LS dello scambio Art.
1424; impostare come Parall. LP-IN quello posto
sotto la linea LPin-LPin dello scambio Art. 1424.
Per il centralino parallelo non è possibile la
commutazione in NOTTE e la funzione GIORNO/
NOTTE AUTOMATICO (vedi “I9- Impostazione
modalitá giornaliera” pag. 26).
Nella schermata di riposo dei due centralini dovrà
comparire P, che indica il centralino confi gurato in
parallelo e l’icona fi ssa
.
3- In presenza di 2 centralini principali o secondari che
servono il medesimo montante, la confi gurazione
serie, implica che solo 1 dei 2 può essere operativo
C1 - Tipo di centralino (modalità Simplebus Top)
(Serie master), mentre l’altro è disattivo (Serie
slave) (vedi schema SBTOP/004DSMC pag. 116).
Per commutare un centralino da master a slave e
viceversa vedi “U11 Come attivare o disattivare i
centralini principali” pag. 12.
Nella schermata di riposo dei due centralini dovrà
comparire S, che indica il centralino confi gurato in
serie e l’icona fi ssa .
ATTENZIONE!
- se
lampeggia indica che i 2 centralini non
comunicano correttamente.
- se compare l’icona ! c’è un problema di
confi gurazione dei 2 centralini (es. entrambi Serie
master o slave, Parall. LP-IN o Parall. LS-IN oppure
uno serie e l’altro parallelo).
- se in un impianto Simplebus TOP (con scambi
Art. 1424), sono presenti sia centralini principali che
secondari (vedi schema SBTOP/003DSMC pag.
114); per il corretto funzionamento dell’impianto è
necessario attivare su tutti i centralini l’impostazione
“C5- Retrocompatibilitá” pag. 31.
CONFIGURAZIONI INSTALLATORE
Page 30
30
IT
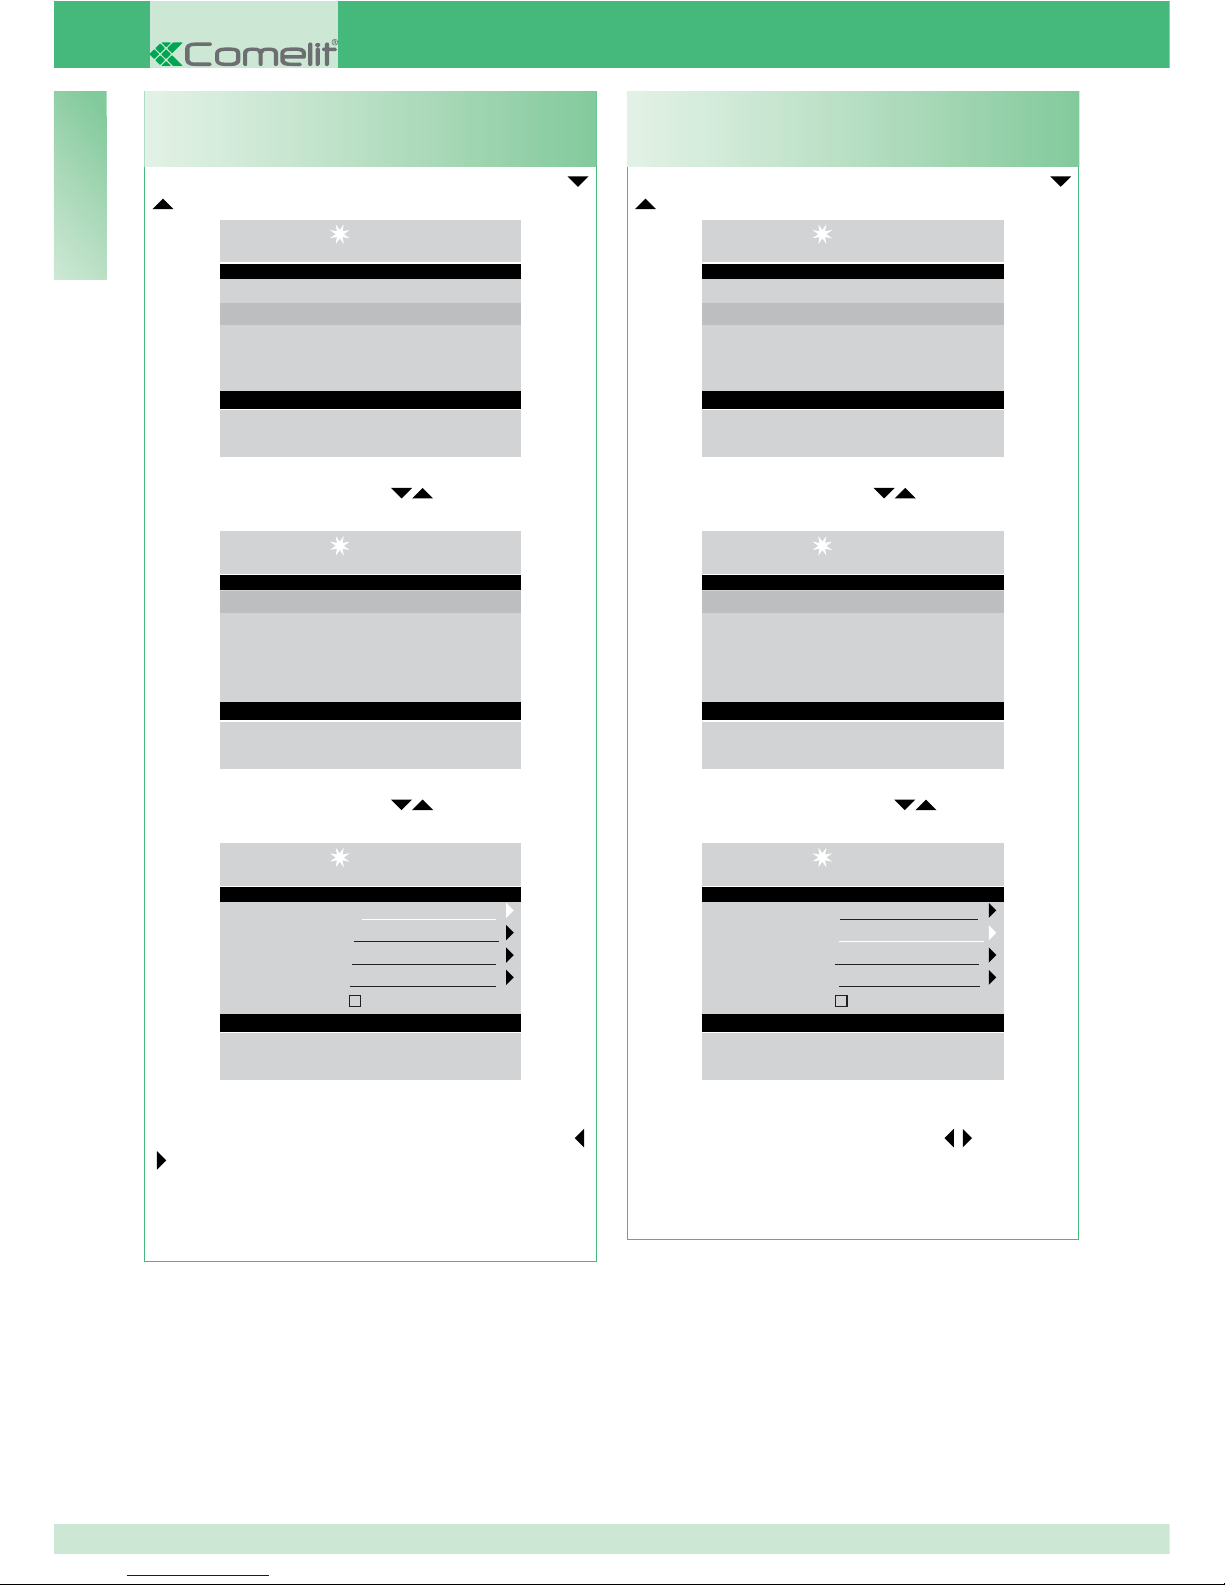
- premere il tasto MENU e visualizzare tramite i tasti
il menu Confi gurazioni, premere il tasto OK;
14 :15 : 26
Lun 12 Mar 12
• Impostazioni
• Configurazioni
• Rubrica
• Chiamate ricevute
• Allarmi
- visualizzare tramite i tasti
il menu Sistema,
premere il tasto OK;
14 :15 : 26
Lun 12 Mar 12
• Sistema
• Servizi
- visualizzare tramite i tasti
il menu Sistema,
premere il tasto OK;
14 :15 : 26
Lun 12 Mar 12
Sistema Simplebus
Link Singolo
Chiamata Simplebus
A/V Audio
Retrocom.
Esc Ok
- selezionare Simplebus (per centralino secondario) o
Simplebus Top (per centralino principale) con i tasti
.
- premere il tasto OK per confermare le impostazioni;
- premere ripetutamente il tasto ESC per tornare alla
schermata principale.
C2 - Come confi gurare un centralino principale o
secondario
- premere il tasto MENU e visualizzare tramite i tasti
il menu Confi gurazioni, premere il tasto OK;
14 :15 : 26
Lun 12 Mar 12
• Impostazioni
• Configurazioni
• Rubrica
• Chiamate ricevute
• Allarmi
- visualizzare tramite i tasti
il menu Sistema,
premere il tasto OK;
14 :15 : 26
Lun 12 Mar 12
• Sistema
• Servizi
- visualizzare tramite i tasti
il menu Link,
premere il tasto OK;
14 :15 : 26
Lun 12 Mar 12
Sistema Simplebus
Link Singolo
Chiamata Simplebus
A/V Audio
Retrocom.
Esc Ok
- selezionare Singolo, Parall. LS-IN, Parall. LP-IN,
Serie master, Serie slave con i tasti
.
- premere il tasto OK per confermare le impostazioni;
- premere ripetutamente il tasto ESC per tornare alla
schermata principale.
C3 - Come confi gurare un centralino come
singolo, parallelo o serie
Page 31
31
IT
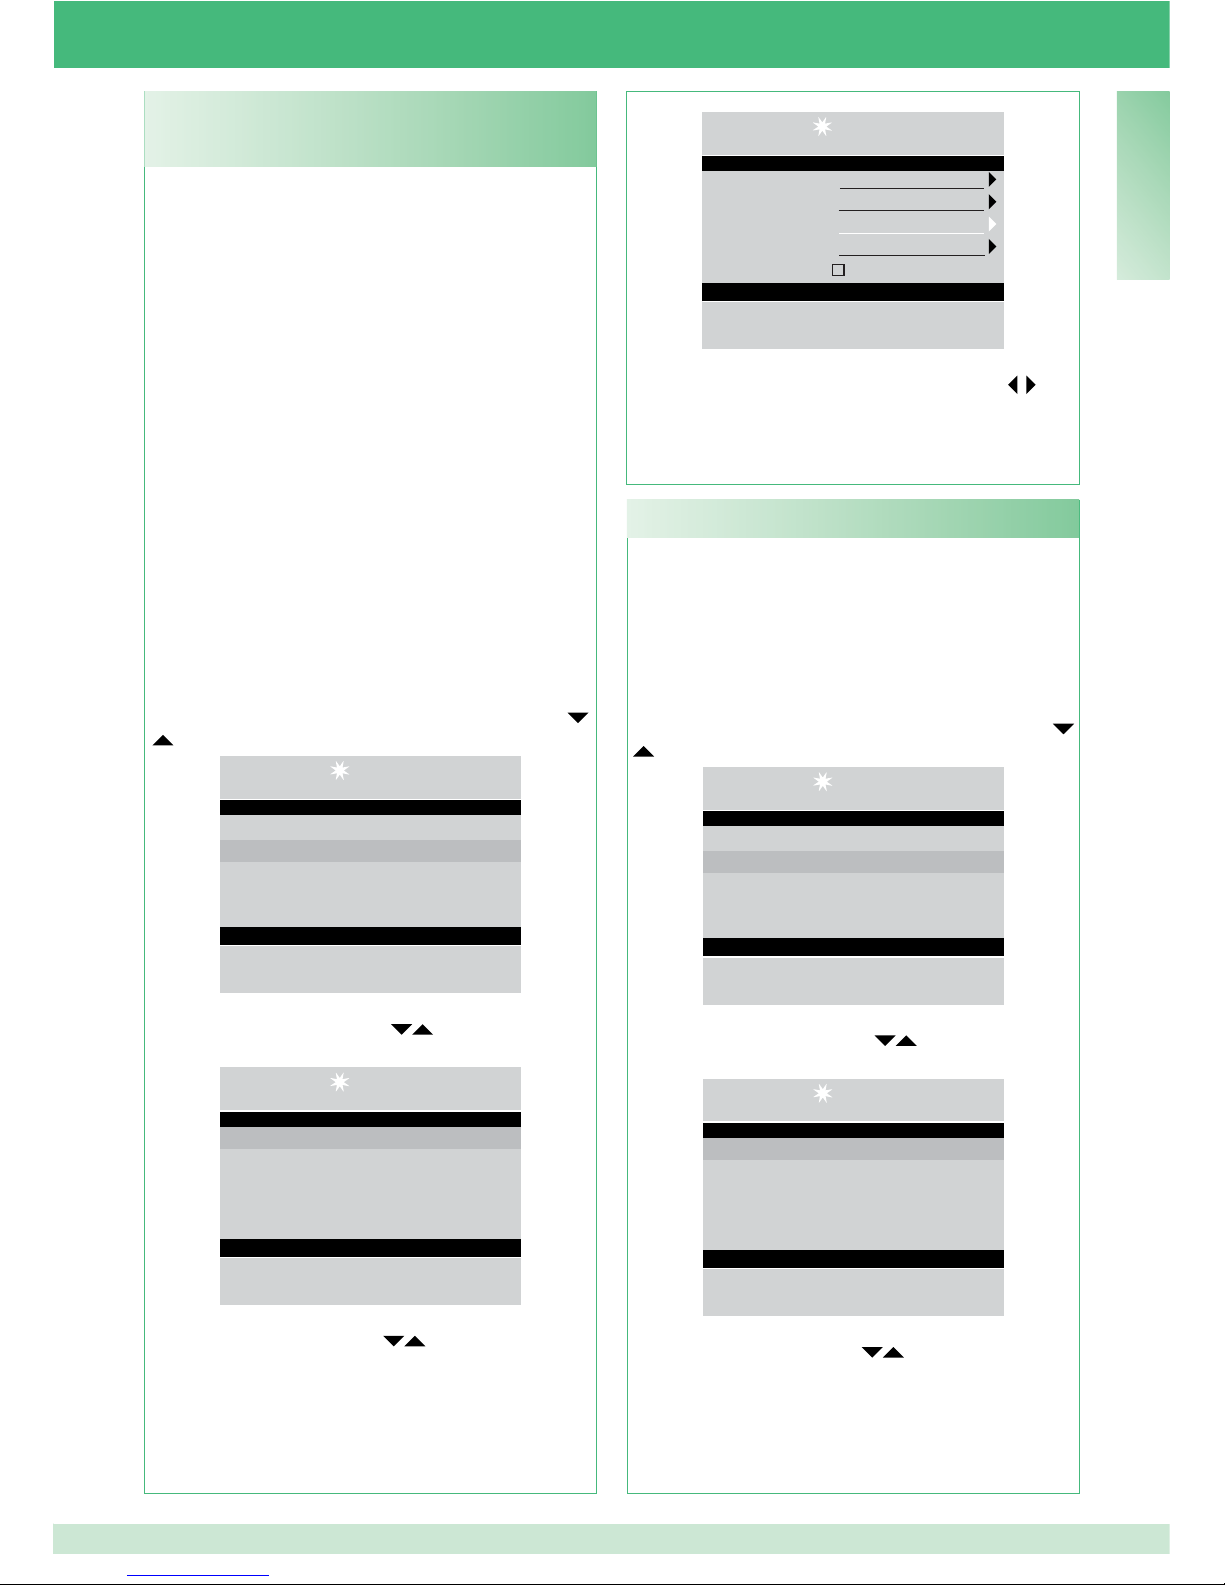
É disattivata di default.
ATTENZIONE!
Questa funzione deve essere abilitata per evitare
malfunzionamenti nel caso siano presenti articoli
con indice di revisione (IR.) inferiore a quelli
elencati nella tabella a pag. 32.
Per attivare la funzione:
- premere il tasto MENU e visualizzare tramite i tasti
il menu Confi gurazioni, premere il tasto OK;
14 :15 : 26
Lun 12 Mar 12
• Impostazioni
• Configurazioni
• Rubrica
• Chiamate ricevute
• Allarmi
- visualizzare tramite i tasti
il menu Sistema,
premere il tasto OK;
14 :15 : 26
Lun 12 Mar 12
• Sistema
• Servizi
- visualizzare tramite i tasti
il menu Retrocom.,
premere il tasto OK;
Tramite questa funzione si sceglie la modalità di
chiamata manuale del centralino, tra 2 diverse
modalità:
1- Chiamata Simplebus (di default), la chiamata
avviene digitando il codice abbinato ad ogni utente.
• Se il tipo di impianto è Simplebus l’utente
citofonico è identifi cato da un campo Nome Utente
(opzionale) e da un campo Codice di 3 cifre
massimo (compreso tra 1 e 240).
ESEMPIO: Nome utente = Rossi; Codice = 015.
• Nel caso di impianto Simplebus top l’utente
citofonico è identifi cato dai campi Nome Utente
(opzionale) e da un campo Codice composto da
due parti: campo zona di 3 cifre massimo (compreso
tra 1 e 500) e campo utente tassativamente di 3
cifre (compreso tra 1 e 240).
ESEMPIO: Nome utente = Rossi; Codice = 25 015.
2- Chiamata indiretto, la chiamata avviene digitando
il codice indiretto di 6 cifre massimo. Questo
codice deve essere presente in rubrica e associato
all’utente provvisto di nome (obbligatorio) e di
codice Simplebus (o Simplebus TOP).
Per attivare la funzione:
- premere il tasto MENU e visualizzare tramite i tasti
il menu Confi gurazioni, premere il tasto OK;
14 :15 : 26
Lun 12 Mar 12
• Impostazioni
• Configurazioni
• Rubrica
• Chiamate ricevute
• Allarmi
- visualizzare tramite i tasti
il menu Sistema,
premere il tasto OK;
14 :15 : 26
Lun 12 Mar 12
• Sistema
• Servizi
- visualizzare tramite i tasti
il menu Chiamata,
premere il tasto OK;
14 :15 : 26
Lun 12 Mar 12
Sistema Simplebus
Link Singolo
Chiamata Indiretto
A/V Audio
Retrocom.
Esc Ok
- selezionare Simplebus o Indiretto con i tasti
.
- premere il tasto OK per confermare le impostazioni;
- premere ripetutamente il tasto ESC per tornare alla
schermata principale.
C4 - Chiamata tramite codice Simplebus o
indiretto
C5 - Retrocompatibilità
Page 32
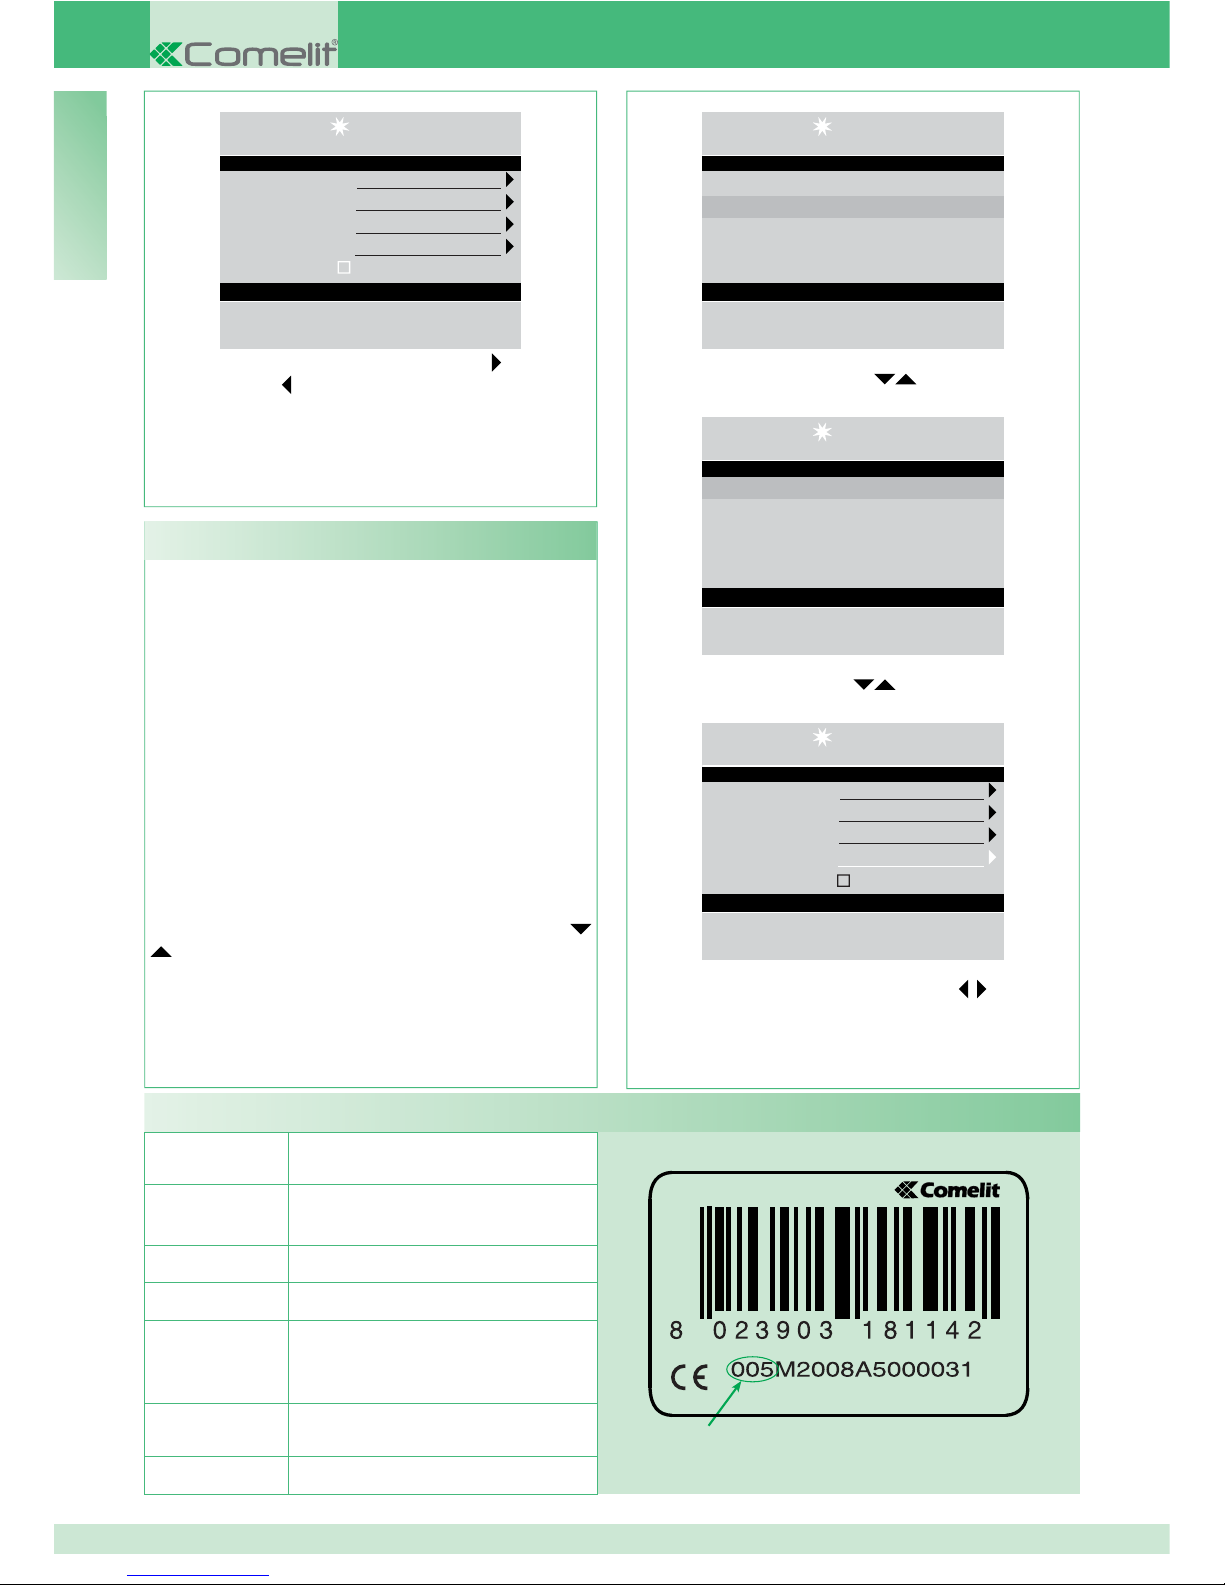
32
IT
IR
Chiamata audio di default.
Attivando la chiamata video sarà possibile effettuare
una chiamata video verso un posto interno. Il monitor
chiamato dal centralino si accenderà consentendo ad
es. la visione delle telecamere scorporate abbinate
all’Art. 1259/A o all’Art. 1259C (vedi FT/SB/13 o FT/
SBC/05).
Con la retrocompatibilità disattivata - di default (vedi
C5 - Retrocompatibilità pag. 31), all’atto della chiamata da centralino al posto interno il video si accende
immediatamente.
Con la retrocompatibilità attivata, all’atto della chiamata da centralino al posto interno il video si accende
su presa fonica.
Per attivare la chiamata audio o video:
- premere il tasto MENU e visualizzare tramite i tasti
il menu Confi gurazioni, premere il tasto OK;
Tabella articoli Simplebus TOP
Staffe
Art. 5714C IR. 007 - Art. 5814C IR. 002
Art. 6114C IR. 015
Citofoni
Art. 2608 IR. 006 - Art. 2610 IR. 008
Art. 2619 IR. 000 - Art. 2628 IR. 005
Art. 2638 IR. 006
Scambi
Art. 1424 IR. 002
Miscelatori
Art. 4888C IR. 013
Posti esterni
Art. 1602 IR. 027 - Art. 1602VCF IR. 002
Art. 3340 IR. 021 - Art. 3342 IR. 021
Art. 3070/A IR. 010 - Art. 3072/A IR. 010
Art. 4660C IR. 013
Centralini
Art. 1998A IR. 006 - Art. 1998V IR. 001
Art. 1998VC IR. 001
Software
Art. 1249/A IR. 002
C6 - Chiamata audio o video
14 :15 : 26
Lun 12 Mar 12
Sistema Simplebus
Link Singolo
Chiamata Indiretto
A/V Audio
Retrocom.
Esc Ok
Attivare il servizio Retrocom. con il tasto
.
Disabilitare con .
- premere il tasto OK per confermare le impostazioni;
- premere ripetutamente il tasto ESC per tornare alla
schermata principale.
14 :15 : 26
Lun 12 Mar 12
• Impostazioni
• Configurazioni
• Rubrica
• Chiamate ricevute
• Allarmi
- visualizzare tramite i tasti
il menu Sistema,
premere il tasto OK;
14 :15 : 26
Lun 12 Mar 12
• Sistema
• Servizi
- visualizzare tramite i tasti
il menu A/V, premere
il tasto OK;
14 :15 : 26
Lun 12 Mar 12
Sistema Simplebus
Link Singolo
Chiamata Indiretto
A/V Audio
Retrocom.
Esc Ok
- selezionare Audio o Video con i tasti
.
- premere il tasto OK per confermare le impostazioni;
- premere ripetutamente il tasto ESC per tornare alla
schermata principale.
Page 33
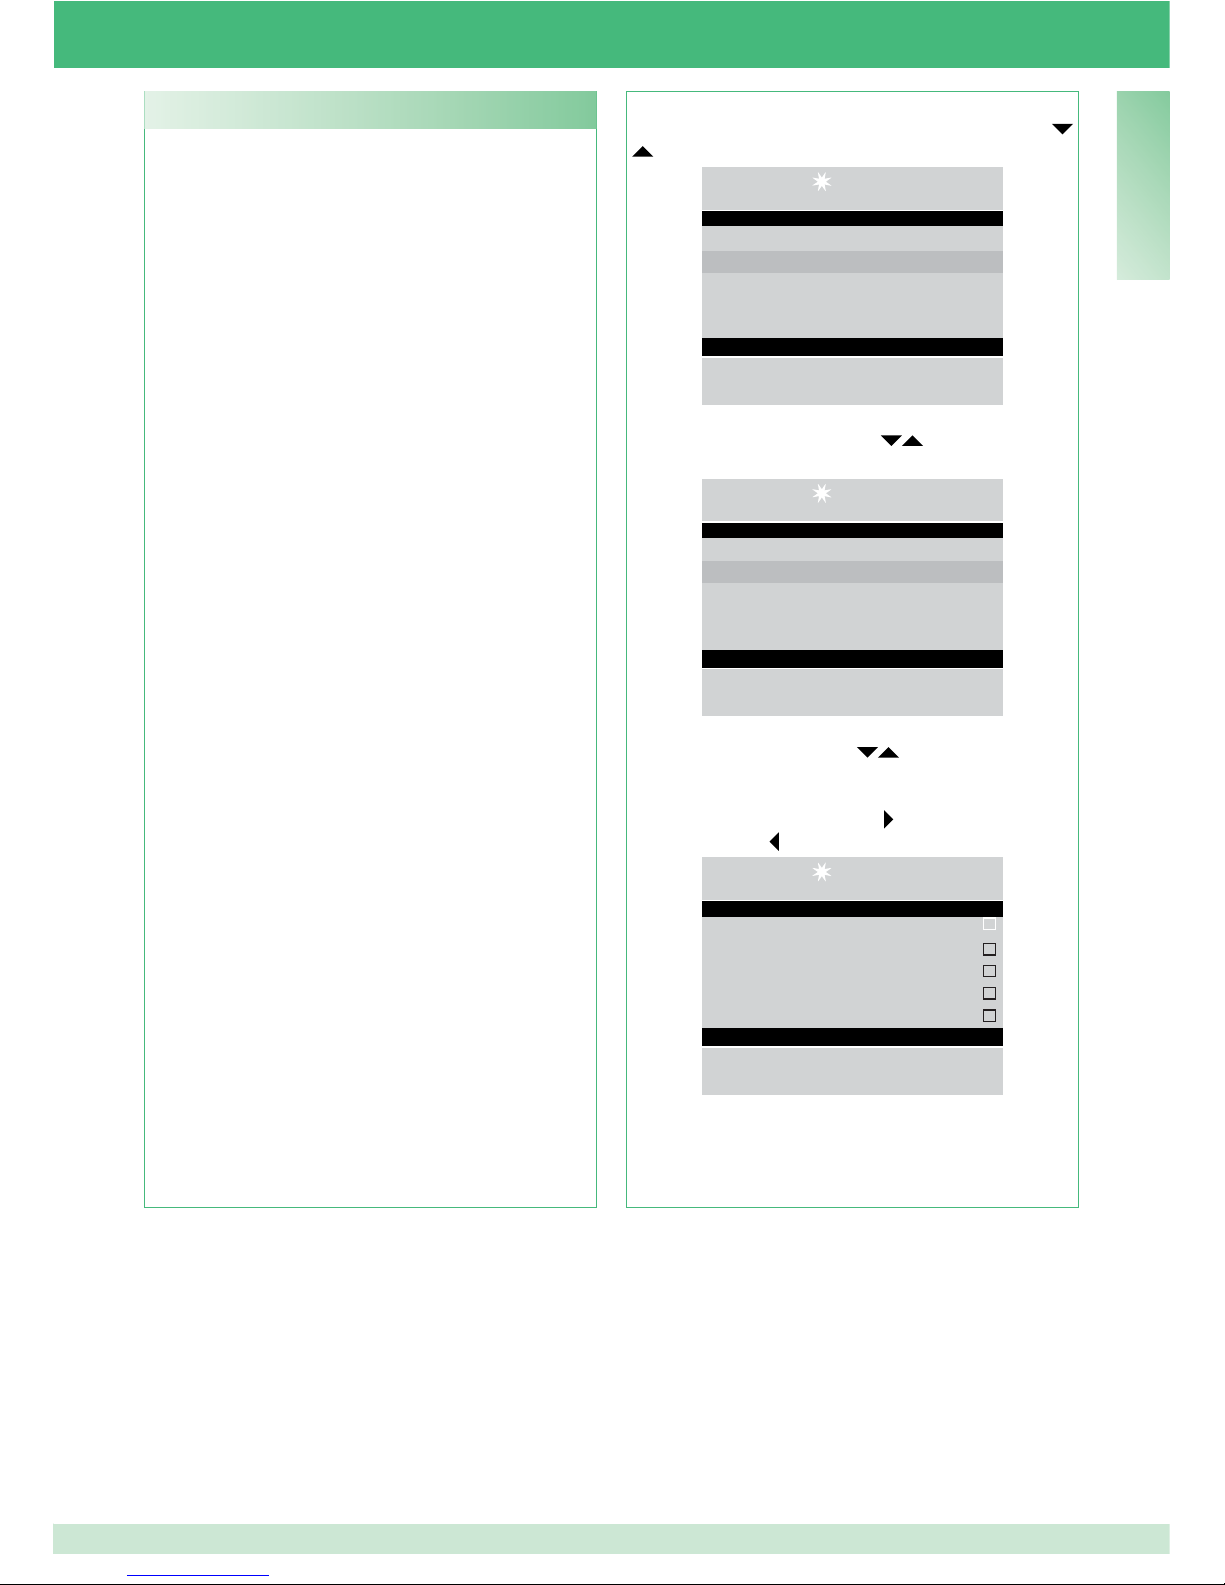
33
IT
FollowMe (“Seguimi”):
É disattivata di default.
ATTENZIONE!
Per l’utilizzo di questa funzione deve essere
presente la centrale Art. 2906 con interfaccia Art.
2912. Rivolgersi al proprio installatore di fi ducia.
Questa funzione è attivabile solo sul centralino
impostato come secondario (vedi “C1 Tipo di
centralino” pag. 29).
Tramite questa funzione è possibile deviare le
chiamate destinate al centralino verso apparecchi
telefonici locali o remoti.
A seguito di una chiamata, il centralino suonerà
comunque e fi nchè l’apparecchio remoto non entra in
comunicazione, è possibile rispondere alla chiamata
dal centralino annullando la funzione ”Seguimi”.
_________________________________________________________________________
Ripetizione di chiamata:
si potrà scegliere la temporizzazione della chiusura
del contatto tra 1 e 30 secondi (vedi “I8 - Regolazione
tempi” pag. 25).
_________________________________________________________________________
Accensione interni:
É disattivata di default.
ATTENZIONE!
Questa funzione è disponibile solo per impianti
Simplebus non TOP ed è necessaria la presenza
delll’Art. 1259 per la visione ciclica di telecamere
scorporate.
Tramite questa funzione è possibile attivare o
disattivare l’autoaccensione inviata dai posti interni
con centralino in modalità GIORNO.
_________________________________________________________________________
Chiamata tripla:
É disattivata di default.
Tramite questa funzione è possibile attivare o
disattivare la chiamata tripla del centralino verso i
posti interni.
La chiamata verrà così effettuata 3 volte consecutive
(nel caso di chiamata video: le prime 2 saranno
audio, la terza sarà video).
_________________________________________________________________________
Aiuto codici:
É disattivata di default.
Serve per ampliare i codici Simplebus sulla linea
montante.
C7- Configurazione servizi
Per attivare i servizi:
- premere il tasto MENU e visualizzare tramite i tasti
il menu Confi gurazioni, premere il tasto OK;
14 :15 : 26
Lun 12 Mar 12
• Impostazioni
• Configurazioni
• Rubrica
• Chiamate ricevute
• Allarmi
- visualizzare tramite i tasti
il menu Servizi,
premere il tasto OK;
14 :15 : 26
Lun 12 Mar 12
• Sistema
• Servizi
- visualizzare tramite i tasti
il servizio da attivare
(followMe, ripetizione di chiamata, accensione interni,
chiamata tripla, aiuto codici).
Attivare il servizio con il tasto
.
Disabilitare con .
14 :15 : 26
Lun 12 Mar 12
FollowMe
Ripetizione chiamata
Accensione interni
Chiamata tripla
Aiuto codici
Esc Ok
- premere il tasto OK per confermare le impostazioni;
- premere ripetutamente il tasto ESC per tornare alla
schermata principale.
Page 34

34
EN
TABLE OF CONTENTS
• INTRODUCTION
- Overall view
35
- Description of terminal block
35
- Programming keys and display
36
- Alphanumeric keypad
36
- General description
36
• USE
U1
How to answer a call from an internal unit
37
U2
How to answer a call from an external unit
37
U3 How to call an internal unit
38
U4 How to transfer a call from the external unit to an
internal unit
39
U5 How to set up communication between 2 internal
units (intercom function)
39
U6 How to call an internal unit listed in the received calls log
40
U7 How to call a secondary switchboard from a main
switchboard
41
U8 How to call a main switchboard from a secondary
switchboard
42
U9 How to answer a call made from the secondary
switchboard to the main switchboard
42
U10 How to answer a call made from the main
switchboard to the secondary switchboard
43
U11 How to activate or deactivate the main switchboards
43
U12 How to use the lock-release
44
U13 How to activate the “Follow Me” function
44
U14 How to activate an additional relay
44
• DIRECTORY
- Tree diagram of DIRECTORY menu screens
45
U15
How to use the directory
45
U16 How
to fi nd a name in the directory
45
U17 How to enter a name in the directory
46
U18 How to delete a name in the directory
46
U19 How to edit a name in the directory
47
U20 Delete directory
48
U21 Directory info
48
U22 Record speed numbers
49
• RECEIVED CALLS
- Tree diagram of RECEIVED CALLS menu screens
49
U23 View received
calls
49
U24 Delete received
calls list
50
• ALARMS
- Tree diagram of ALARMS menu screens
51
U25
View alarms
51
U26
Delete alarms received list
51
• SETTINGS
- Tree diagram of SETTINGS menu screens
52
I
1 - C
hange language
I2 - Video settings
53
I3 - Audio settings
54
I4 - Tone settings
54
I5 - Change date
55
I6 - Change time
55
I7 - Set skin
56
I8 - Adjust timers (audio, reset wait time, standby, relay
activation, call repeat)
56
I9 - Set daily mode
57
I10 - Set automatic switching
57
I11 - Reset settings
58
• INSTALLER CONFIGURATIONS
- Tree diagram of CONFIGURATIONS menu screens
59
- C1 - Type of switchboard (Simplebus Top mode)
60
- C2 - How to confi
gure a main or secondary switchboard
61
- C3 - How to confi gure a switchboard as single, parallel
or series
61
- C4 - Call via Simplebus or indirect code
62
- C5 - Backwards compatibility
62
- C6 - Audio or video call
63
- Table of Simplebus TOP products
63
- C7 - Confi gure services (FollowMe, call repeat, internal
units on, triple call, codes help)
64
• WIRING DIAGRAMS
- SB2V/EN/103M Simplebus B/W video entry phone
system with 1 main input and porter switchboard.
96
- SB2V/EN/103SMC Simplebus Color video entry phone
system with 1 main input and porter switchboard.
97
- SB2V/EN/105M Simplebus B/W video entry phone
system with 2 main inputs and porter switchboard.
98
- SB2V/EN/105SMC Simplebus Color video entry phone
system with 2 main inputs and porter switchboard.
99
- SB2V/018ASMC Simplebus Color system with remote
camera module Art. 1259C in generic actuator mode
and porter switchboard.
100
- SB2V/026SMC Video entry phone system with 1 main
input and porter switchboard used in conjunction with
telephone switchboard Art. 2906 for Follow Me mode.
101
- SB2V/EN/101M Simplebus B/W video entry phone
system with 1 main input, 3 secondary video inputs and
porter switchboard.
102
- SB2V/EN/101SMC Simplebus Color video entry phone
system with 1 main input, 3 secondary video inputs and
porter switchboard.
104
- SB2V/EN/121DM Simplebus B/W video entry phone
system with 2 main inputs, 3 secondary audio inputs
and porter switchboard.
106
- SB2V/EN/121DSMC Simplebus Color video entry
phone system with 2 main inputs, 3 secondary audio
inputs and porter switchboard.
108
- SBTOP/001DSMC Simplebus TOP video entry phone
system with 1 main input, 4 secondary inputs and
corresponding secondary porter switchboards.
110
- SBTOP/002DSMC Simplebus TOP video entry phone
system with 2 main inputs, 4 secondary inputs and
corresponding main porter switchboard.
112
- SBTOP/003DSMC Simplebus TOP video entry phone
system with 2 main inputs, 1 main porter switchboard, 2
secondary inputs and corresponding secondary porter
switchboards.
114
- SBTOP/004DSMC Simplebus TOP video entry phone
system with 1 main input, 4 secondary inputs and 2
main porter switchboards in SERIES confi guration.
116
- SBTOP/005DSMC Simplebus TOP video entry phone
system with 1 main input, 3 secondary inputs and 2
main porter switchboards in PARALLEL confi guration.
118
Page 35
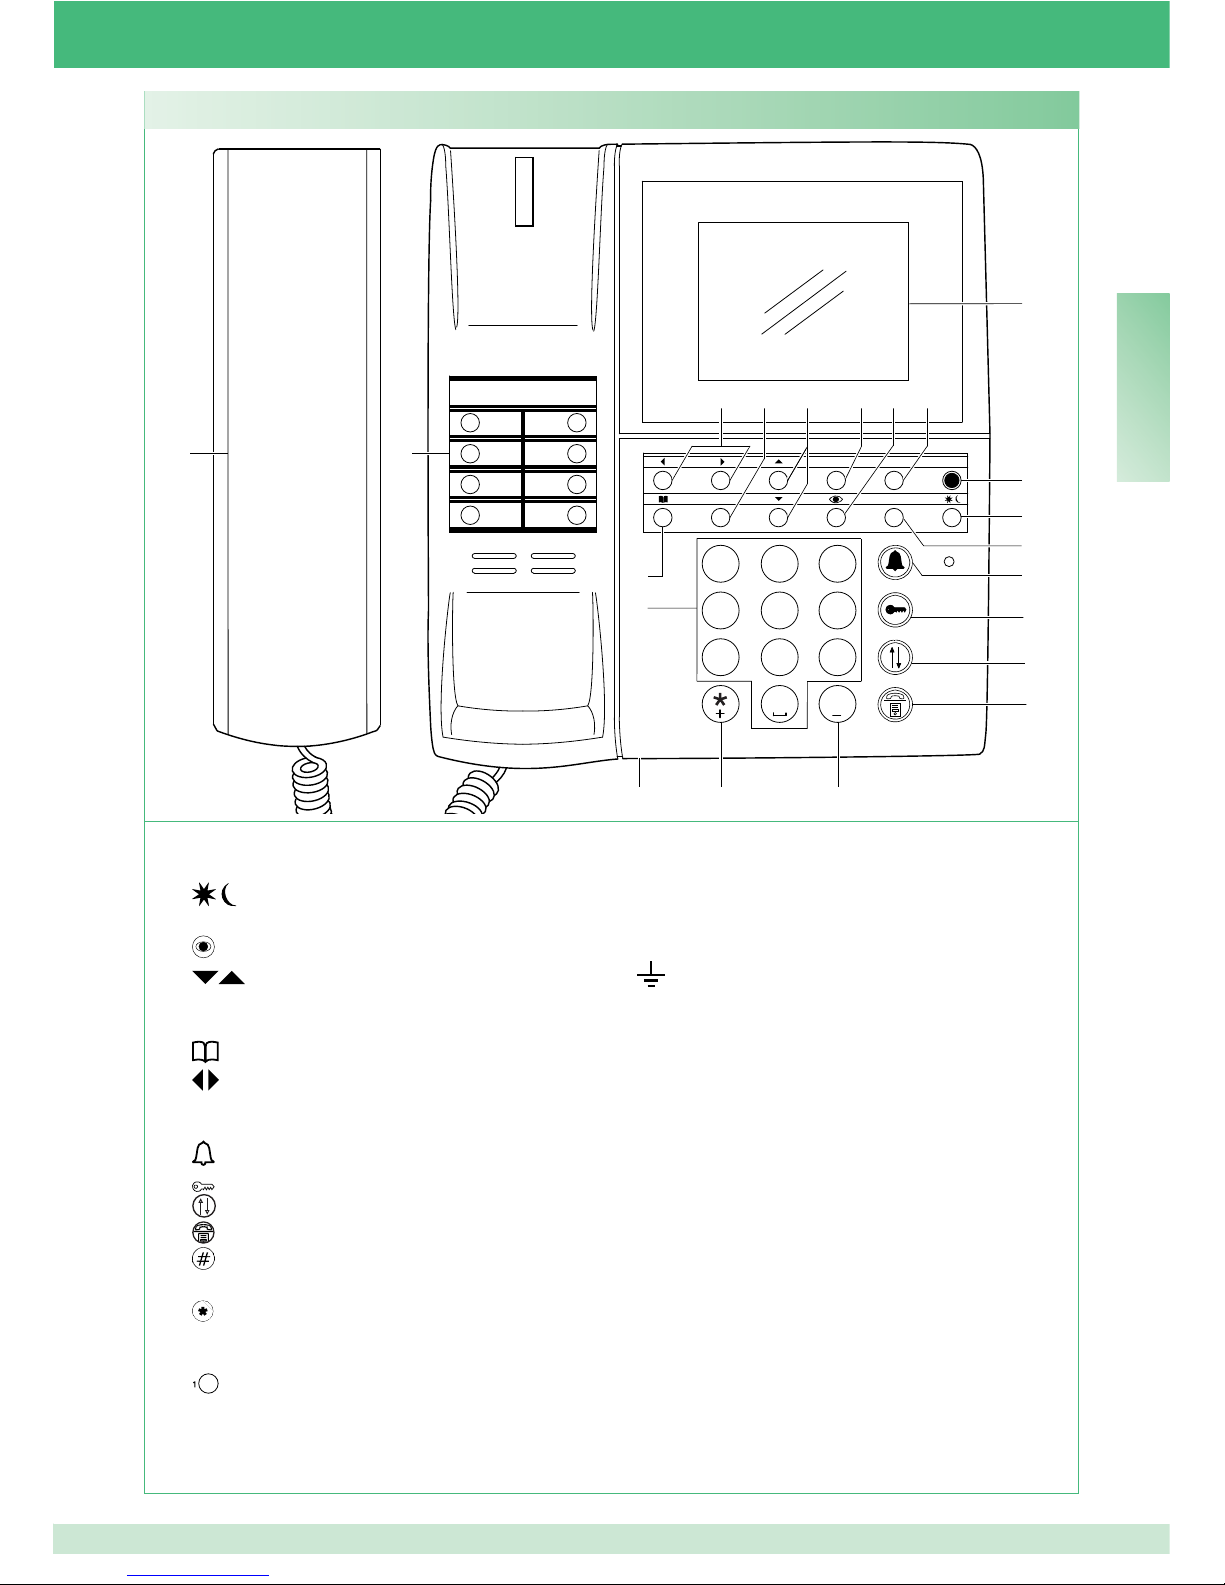
35
EN
0
1
2
3
4
5
6
789
#
ABC
DEF
MNO
JKL
GHI
WXYZTUVPQRS
ON/OFF
MENU
ESC OK
CANC
5
3
1
1
2
3
4
5
6
7
8
21
2
11
12
13
14
68 109 4
18
1920
16
15
7
17
Overall view
Description of terminal block:
C NO Normally open contact for “FOLLOW ME”
function
24 ~ 24 V AC power supply
0 ~ 0 V AC power supply
Earthing
OUT OUT N.O. contact which closes, sending a
video call from the switchboard to an internal unit
CH CH Free contact for “call repeat” or “enable
external monitor”
LM LM Data line to risers
LP1 LP2 Incoming data line from external unit
GND TX RX RS232 serial port for connection to
the remote switchboard in systems with multiple
switchboards in series or in parallel.
1 ON/OFF Power on/off (press and hold for 2
seconds)
2
Key activating DAY or NIGHT mode
3 MENU key
4
Key activating self-ignition
5
Menu navigation keys
6 CANC Key used to cancel a call or delete
entered data
7
Directory key
8
Menu option navigation keys
9 ESC Exit menu key
10 OK Confi rm key
11
Call key
12
Lock-release key
13 Follow Me key
14
Call hold key
15
Key for calling the Simplebus Top
switchboard from the Simplebus switchboard
16
Key used to activate an additional relay
17 Wheel for call volume adjustment
18 Alphanumeric keypad
19
Speed numbers
20 Handset
21 Message indication display
Page 36
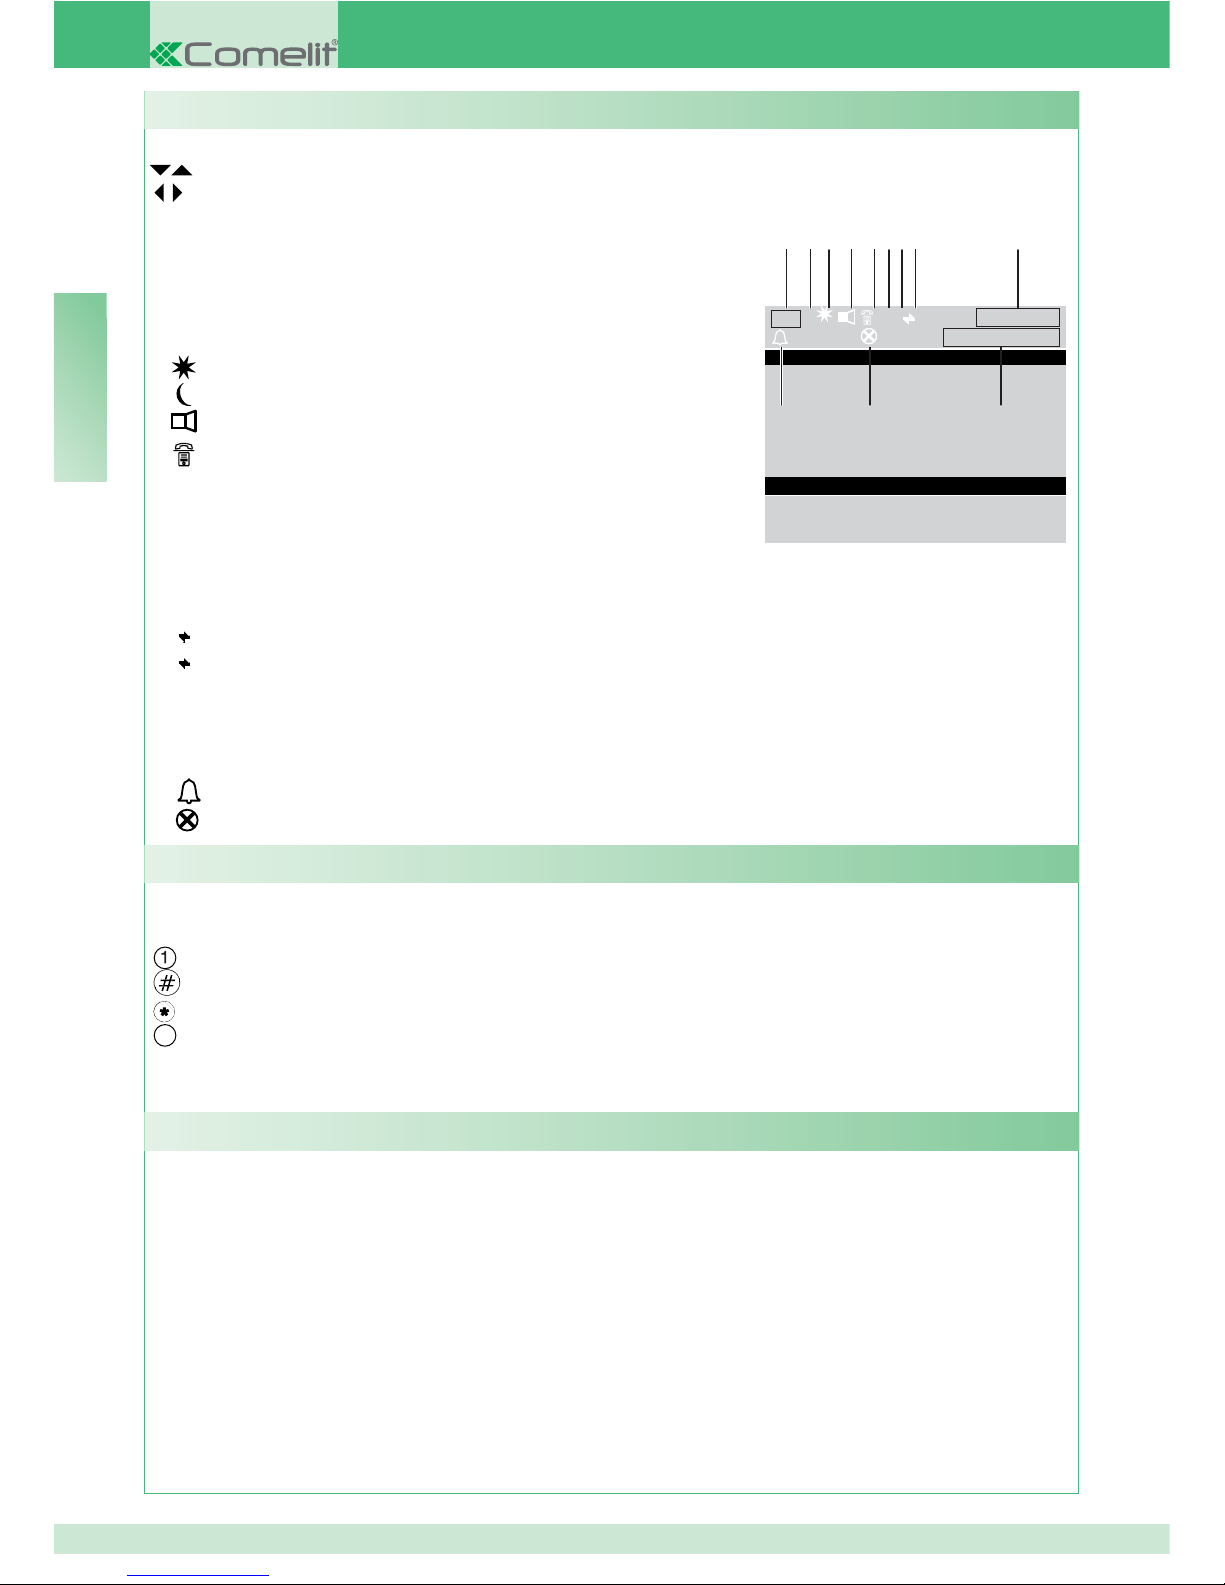
36
EN
MENU To enter the programming menus
Can be used to select the various menu options
Can be used to move the cursor in order to change the entered data
OK Confi rm the displayed information or data entered
CANC Delete the data entered
ESC Cancel the selected option and exit the programming menu
Switchboard display screens:
L P V ?P 14 :15 : 26
= 3 = 04 Mon 12 Mar 12
Programming keys and display
For several of the functions, the keypad can be used to enter both numbers and letters; this can be done by pressing the
same button several times, for example if you press key 2 several times, a, b, c, A – B - C - 2 will appear in succession.
key for entering symbols .,;:?!()
key for entering a dash
key for entering the + symbol
0
key for entering a space between characters
OK Confi rms the data entered
CANC Deletes the data entered
Alphanumeric keypad
The main functions of the switchboard are as follows:
• call an internal unit
• receive calls from external units and transfer them to internal units as necessary
• receive routine or alarm calls from the internal units
• control external unit electric locks
• activate a relay
The porter switchboard also offers:
• DA
Y/NIGHT operation, which can only be used to enable switchboard functions in specifi
c time bands
programmed by the user;
• a CALL LOG, in which the calls from internal units which could not be answered are stored;
• a DIRECTORY which can be programmed so as to identify the caller easily.
General description
12 6
110
2347 89 5
1 A AUDIO mode
V VIDEO mode
2
DAY mode
NIGHT mode
3
indicates audio active
4
indicates “FollowMe” function active
5 time (hours:minutes:seconds)
6 day (Mon, Tue, etc.) and date (day/month/year)
7 ! the 2 switchboards confi gured are NOT compatible
? the switchboard has not yet detected the presence of the remote switchboard
8 P indicates that the switchboard is confi gured in parallel
S indicates that the switchboard is confi gured in series
9
fi xed indicates correct operation of the serial line
fl ashing indicates malfunctioning of the serial line
10 LM fl ashing indicates a short circuit on the riser line, the text is accompanied by a tone which sounds
repeatedly. The switchboard rejects any attempts to call or transfer calls to internal units; however, all
incoming calls from the external unit will be dealt with normally.
LP fl ashingindicates that the external unit is not connected
11
= 5 fl ashing indicates the number of unanswered calls in DAY and NIGHT mode
12
= 1 fl ashing indicates the number of alarms received and not implemented
11
Page 37
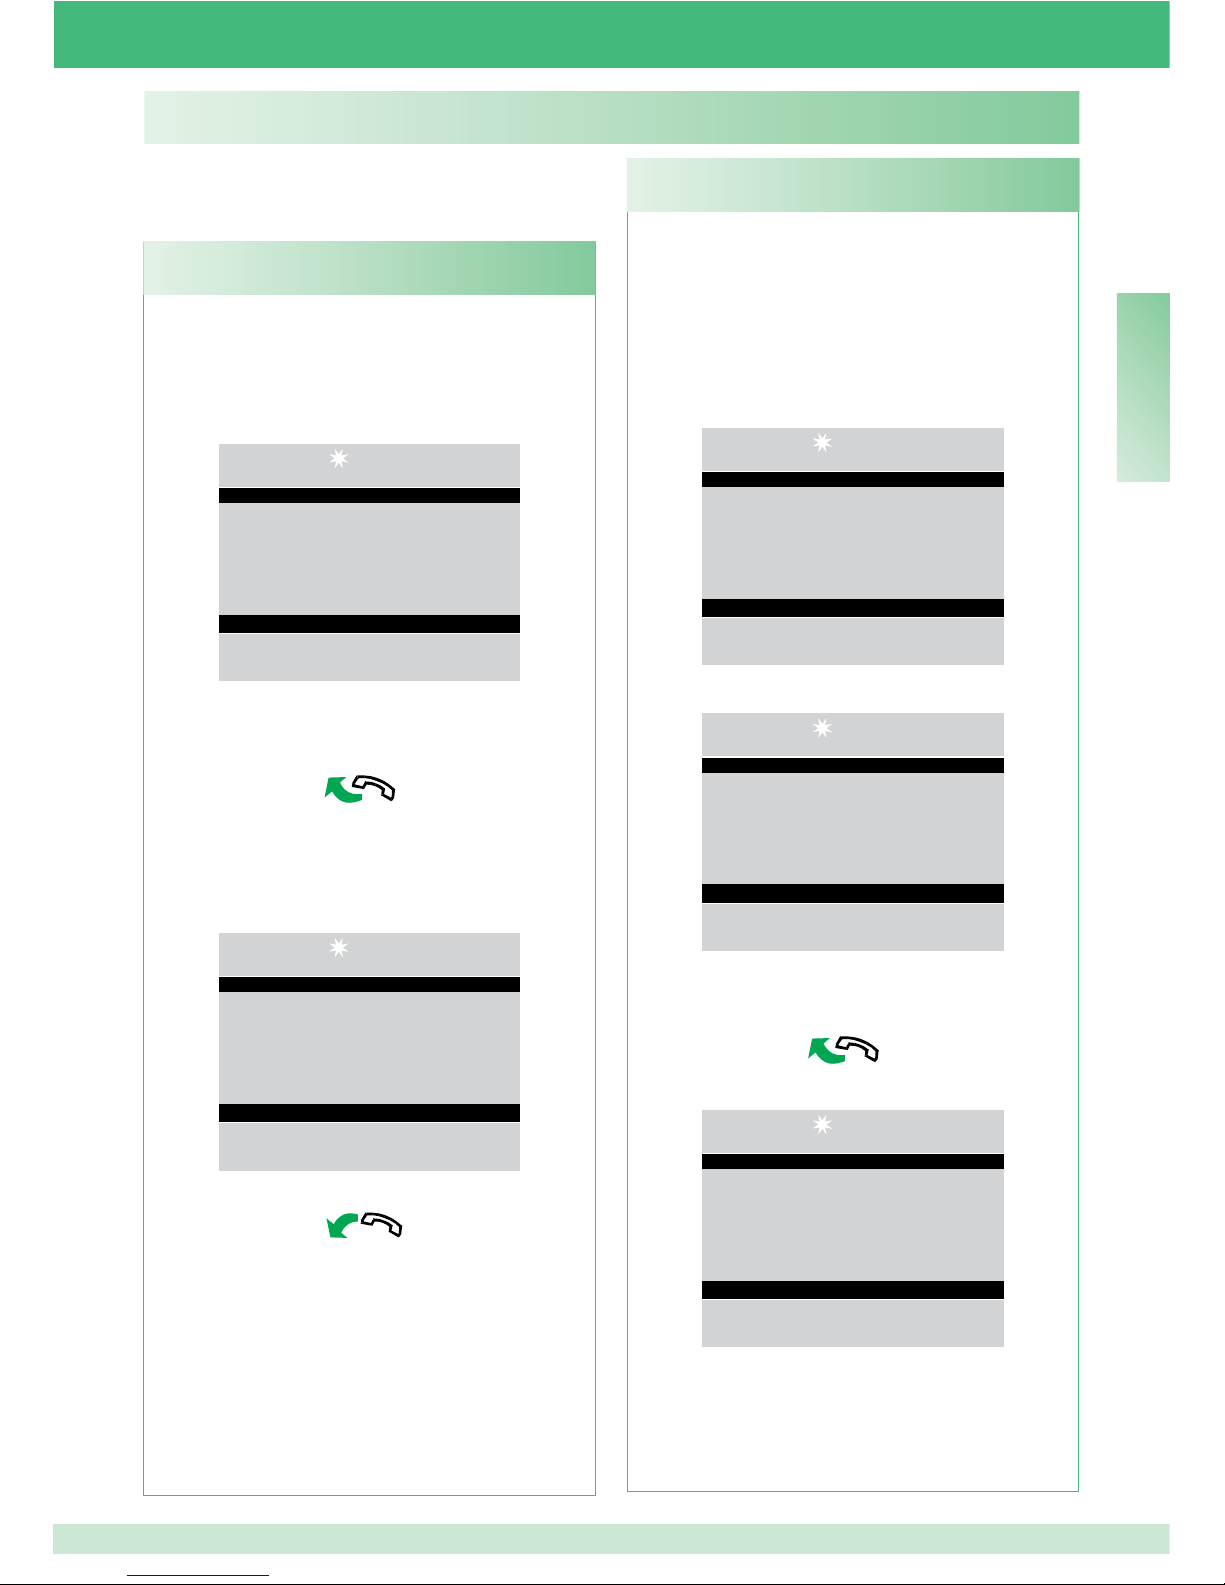
37
EN
When the switchboard receives a call from an internal
unit:
- the name of the internal unit from which the call is
being made, if it is listed in the directory (see “U17
How to enter a name in the directory”, page 46), or
the address making the call (e.g. 002) is displayed;
14 :15 : 26
Mon 12 Mar 12
Call from 002
- to answer the call originating from the internal unit,
lift the handset within 30 seconds;
- the switchboard communicates with the internal
unit,
with a maximum conversation time equal to
the audio time set on the main switchboard (MENU/
Settings/Timers/Audio - min. 10 seconds, max. 90
seconds).
14 :15 : 26
Mon 12 Mar 12
Communicating with
002
- to end the conversation, hang up the handset;
- to reject the call, press CANC.
CAUTION!
If the switchboard is busy or the switchboard
operator is momentarily absent and cannot
answer within 30 seconds, the call will be added
to the received call log (see “U6 How to call
an internal unit listed in the received call log”,
page 40).
U2 HOW TO ANSWER A CALL FROM AN EXTERNAL UNIT
The switchboard must be in DAY mode, in NIGHT
mode it will only answer direct switchboard calls.
The switchboard can receive a call from an external
unit:
- addressed directly to an internal unit, in which case
the NAME of the called unit (if a name in the directory
has been assigned to the called code, see “U17
How to enter a name in the directory”, page 46) or
the address of the called unit (e.g. 002) is displayed;
14 :15 : 26
Mon 12 Mar 12
Call for Sergio Rossi
- or addressed directly to the switchboard
(address=240);
14 :15 : 26
Mon 12 Mar 12
Switchboard call
- to answer the call coming from the external unit, lift
the handset;
- the switchboard communicates with outside;
14 :15 : 26
Mon 12 Mar 12
Communicating with
external unit
- press key A if necessary, to activate external
unit electric lock; if the lock-release takes place, a
confi rmation tone sounds;
USE
The following functions are the main features of the
switchboard and its operating mode, which can all be
accessed directly without using the menus.
U2 How to answer a call from an external unit
U1 How to answer a call from an internal unit
Page 38
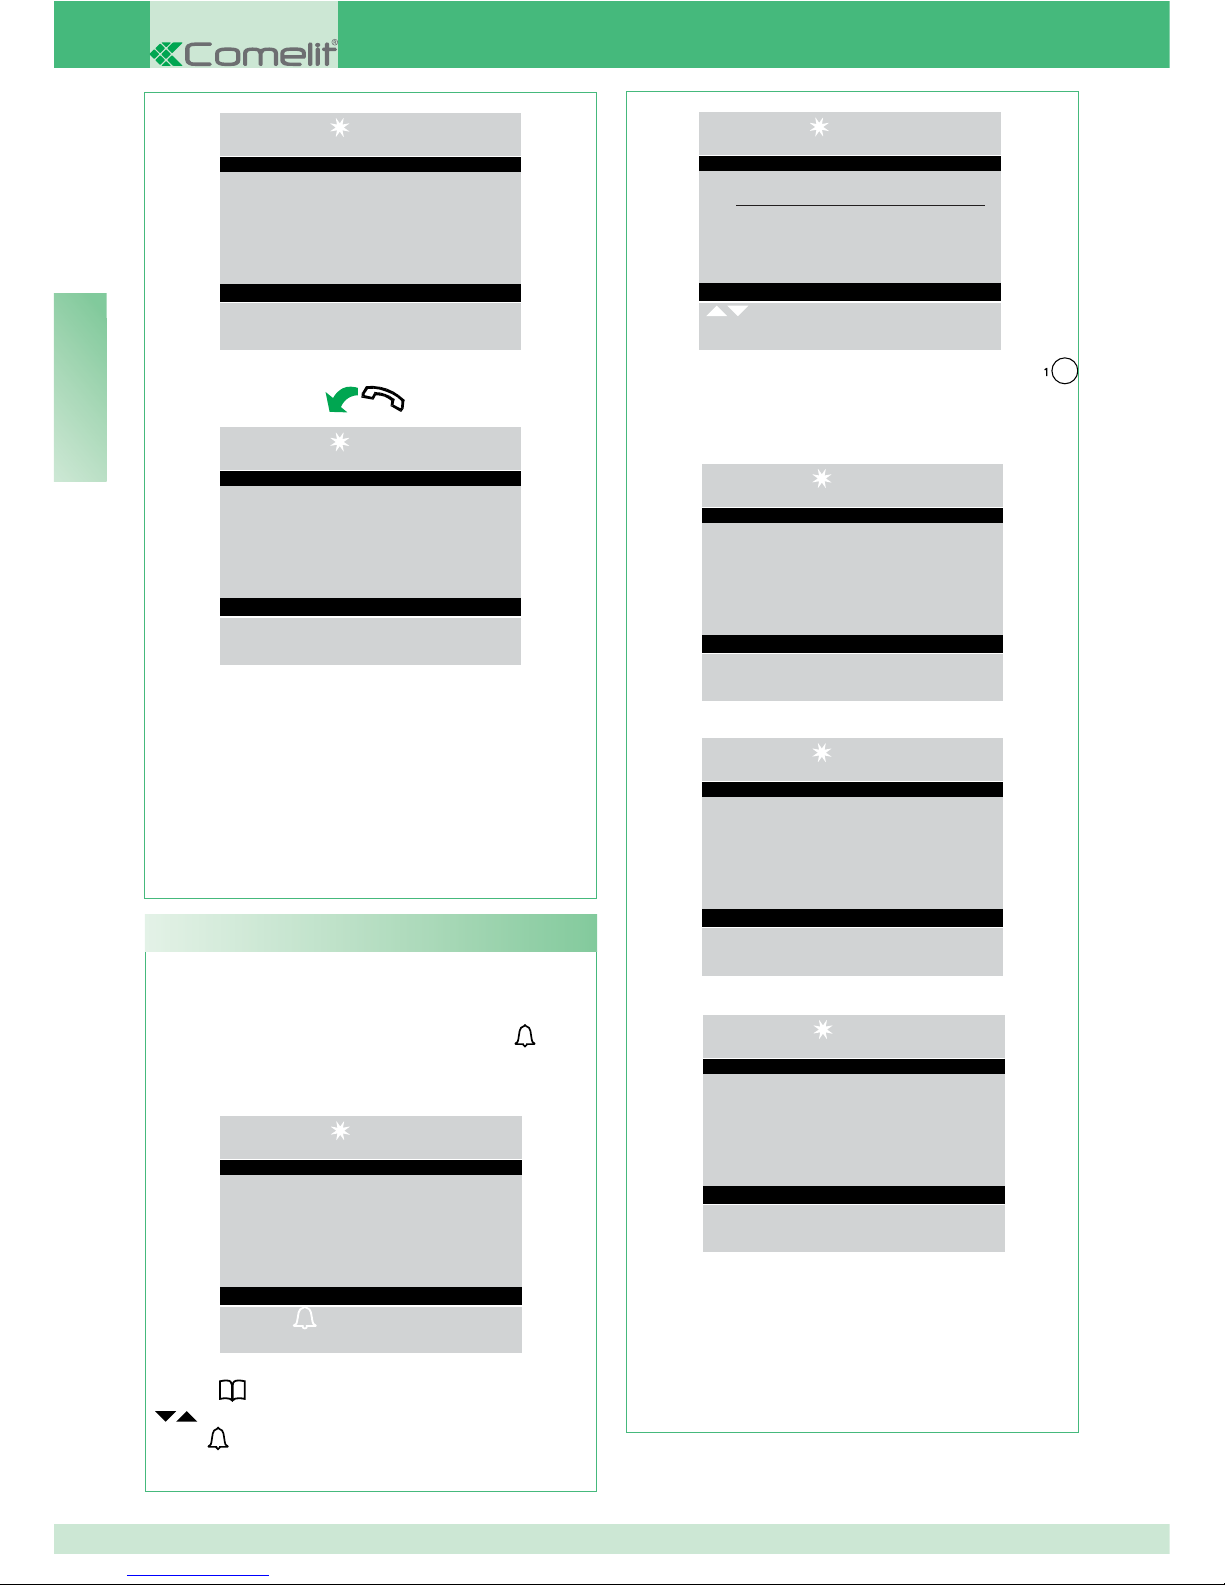
38
EN
14 :15 : 26
Mon 12 Mar 12
Lock released
- to end the conversation, hang up the handset;
14 :15 : 26
Mon 12 Mar 12
End communication
- to reject the call, press CANC.
CAUTION!
In NIGHT mode (see “I9 - Set daily mode”, page
57), calls from the external unit addressed to an
internal unit appear on the display, but cannot be
intercepted from the switchboard.
The switchboard can use 3 different methods to call
an internal unit:
- enter the internal unit number* and press .
*The number entered depends on the switchboard
confi guration, see “C4 - Call via Simplebus or indirect
code” , page 62; contact your regular installer.
14 :15 : 26
Mon 12 Mar 12
User: 002
To call
- press and scroll through the directory using the
keys until the desired name is displayed and
press ;
U3 How to call an internal unit
14:15:26
Mon 12 Mar 12
________________________
Sergio Rossi
Code 012
Scroll Menu
- press the corresponding speed number (e.g.
speed number 1= stored code “002”, see “U22 Record
speed numbers”, page 49);
- if the call has taken place correctly:
14 :15 : 26
Mon 12 Mar 12
User: 002
User called Sergio Rossi
- if the call has not taken place correctly:
14 :15 : 26
Mon 12 Mar 12
User not available
- if the internal unit is busy:
14 :15 : 26
Mon 12 Mar 12
Line busy
When the internal unit called enters audio mode,
it communicates with the switchboard, the maximum
duration of the conversation is equal to the audio
time set on the main switchboard (MENU/Settings/
Timers/Audio - min. 10 seconds, max. 90 seconds).
Page 39
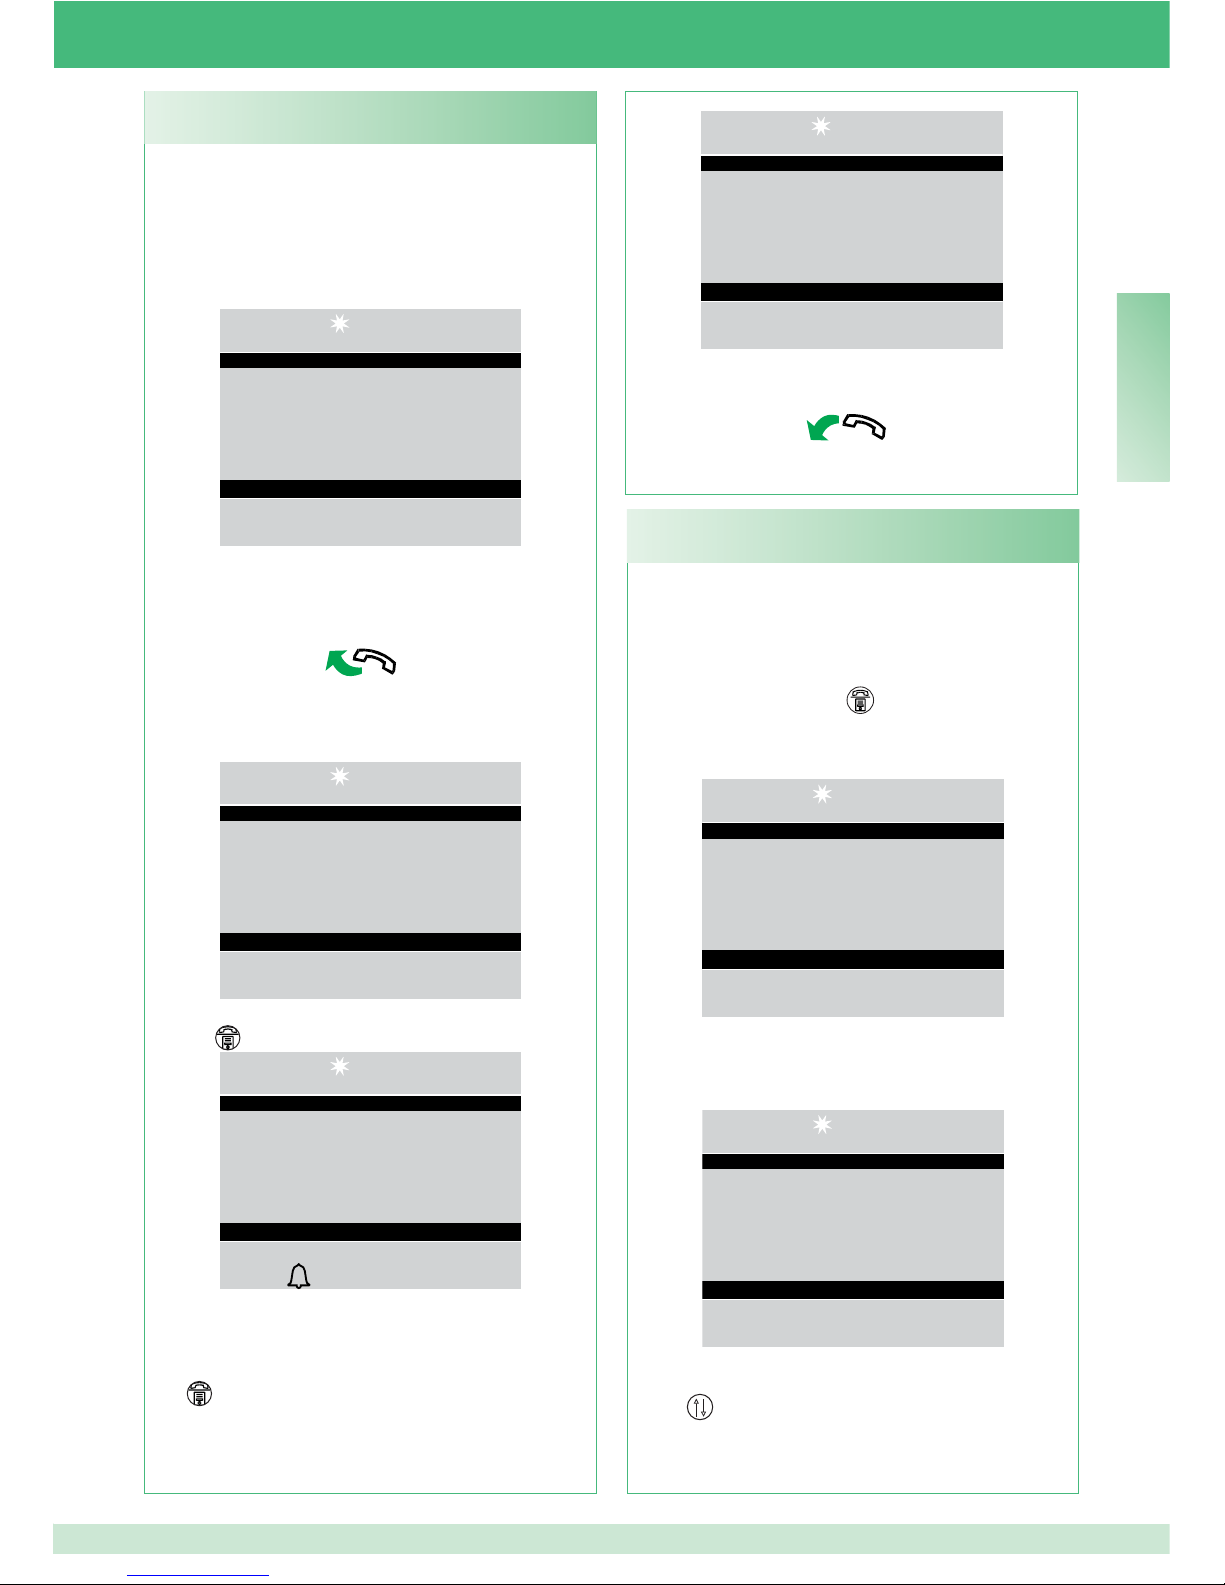
39
EN
14 :15 : 26
Mon 12 Mar 12
Communicating with
external unit
- to end the conversation, hang up the handset.
When the switchboard is communicating with an
internal unit (e.g. 002) which is trying to speak with
another internal unit (e.g. 003):
- put the internal unit which is already connected (e.g.
002) on hold by pressing
;
- call the desired internal unit (e.g. 003, see “U3 How
to call an internal unit”, page 38);
14 :15 : 26
Mon 12 Mar 12
User called 003
When the internal unit receiving the call is
connected to the audio line, it begins communicating
with the switchboard;
14 :15 : 26
Mon 12 Mar 12
Communicating with
user 003
To transfer the conversation to the other internal unit,
press
; internal unit (003) begins communicating
with internal unit (002); the maximum duration of this
communication is 2.5 minutes;
U5 How to set up communication between 2
internal units (intercom function)
When the switchboard receives a call from an
external unit, directed to an internal unit:
- the NAME of the call recipient appears (if a name
has been assigned to the corresponding code in
the directory, see “U17 How to enter a name in the
directory”, page 46);
14 :15 : 26
Mon 12 Mar 12
Call for Sergio Rossi
- to answer the call originating from the external unit,
lift the handset within 60 seconds;
- the switchboard begins communicating with
the external unit, the maximum duration of the
conversation is 90 seconds;
14 :15 : 26
Mon 12 Mar 12
Communicating with
external unit
- press
to put the external unit on hold;
14 :15 : 26
Mon 12 Mar 12
External on hold
To call
If the internal unit does not accept the transferred
conversation, the external unit remains on hold; end
the conversation with the internal unit and press
the
key to re-establish communication with the
external unit;
U4 How to transfer a call from the external unit to
an internal unit
Page 40
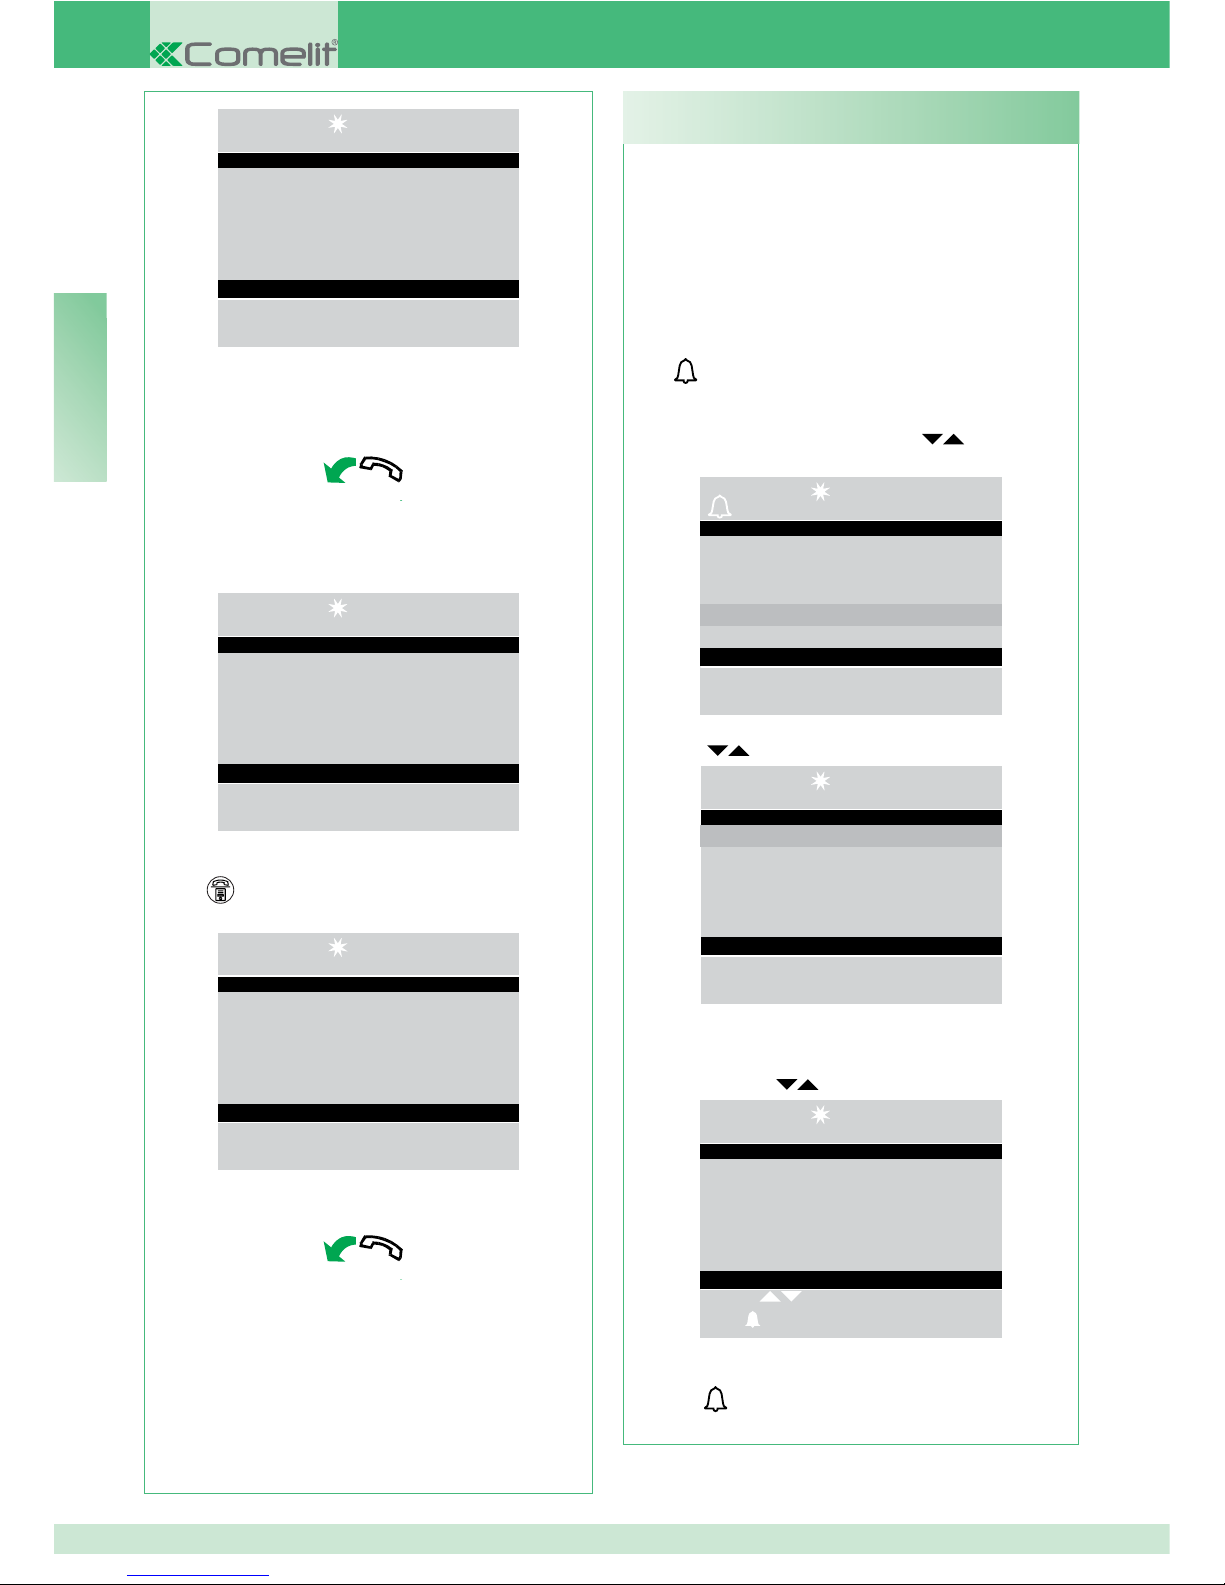
40
EN
When the switchboard receives a call from an internal
unit and it is not dealt with in the space of 30 sec.
(operator momentarily absent or busy with another
conversation), this is automatically stored in the
Received calls menu.
The switchboard can log a maximum of 10
unsuccessful calls. The eleventh call replaces the
fi rst.
The display will show the number of the received calls
(e.g.
=3 fl ashing).
To call the internal units listed in the received
calls log, proceed as follows:
- press the MENU key and use the
keys to view
the Receivedcalls menu, press OK;
14 :15 : 26
= 3 Mon 12 Mar 12
• Settings
• Configurations
• Directory
• Received calls
• Alarms
- use the
keys to view the View entry, press OK;
14 :15 : 26
Mon 12 Mar 12
• View
• Delete all
- the calls received and made are displayed in
chronological order, beginning with the most recent call
received; use the
keys to scroll through the list;
14:15:26
Mon 12 Mar 12
Caller Sergio Rossi
Code 012
Received Mon 12 Mar 12
At 13 : 15 : 11
Scroll
Call Menu
- press
to call the displayed internal unit.
U6 How to call an internal unit listed in the
received calls log
14 :15 : 26
Mon 12 Mar 12
Intercom active
- hang up the handset.
Press CANC to reset an intercom call which has been
active for more than one minute.
If the internal unit does not accept the transferred
conversation, or when the system is busy, or if the
call has not taken place correctly, internal unit
(002) remains on hold;
14 :15 : 26
Mon 12 Mar 12
Internal on hold
- cut off communication with internal unit (003) and
press
to resume communication with internal
unit (002);
14 :15 : 26
Mon 12 Mar 12
Communicating with
002
- to end the conversation, hang up the handset.
CAUTION!
If the external unit calls the switchboard during
an intercom call between internal units which has
been underway for more than one minute, the
intercom call will be reset so that the switchboard
can deal with the incoming call.
Page 41
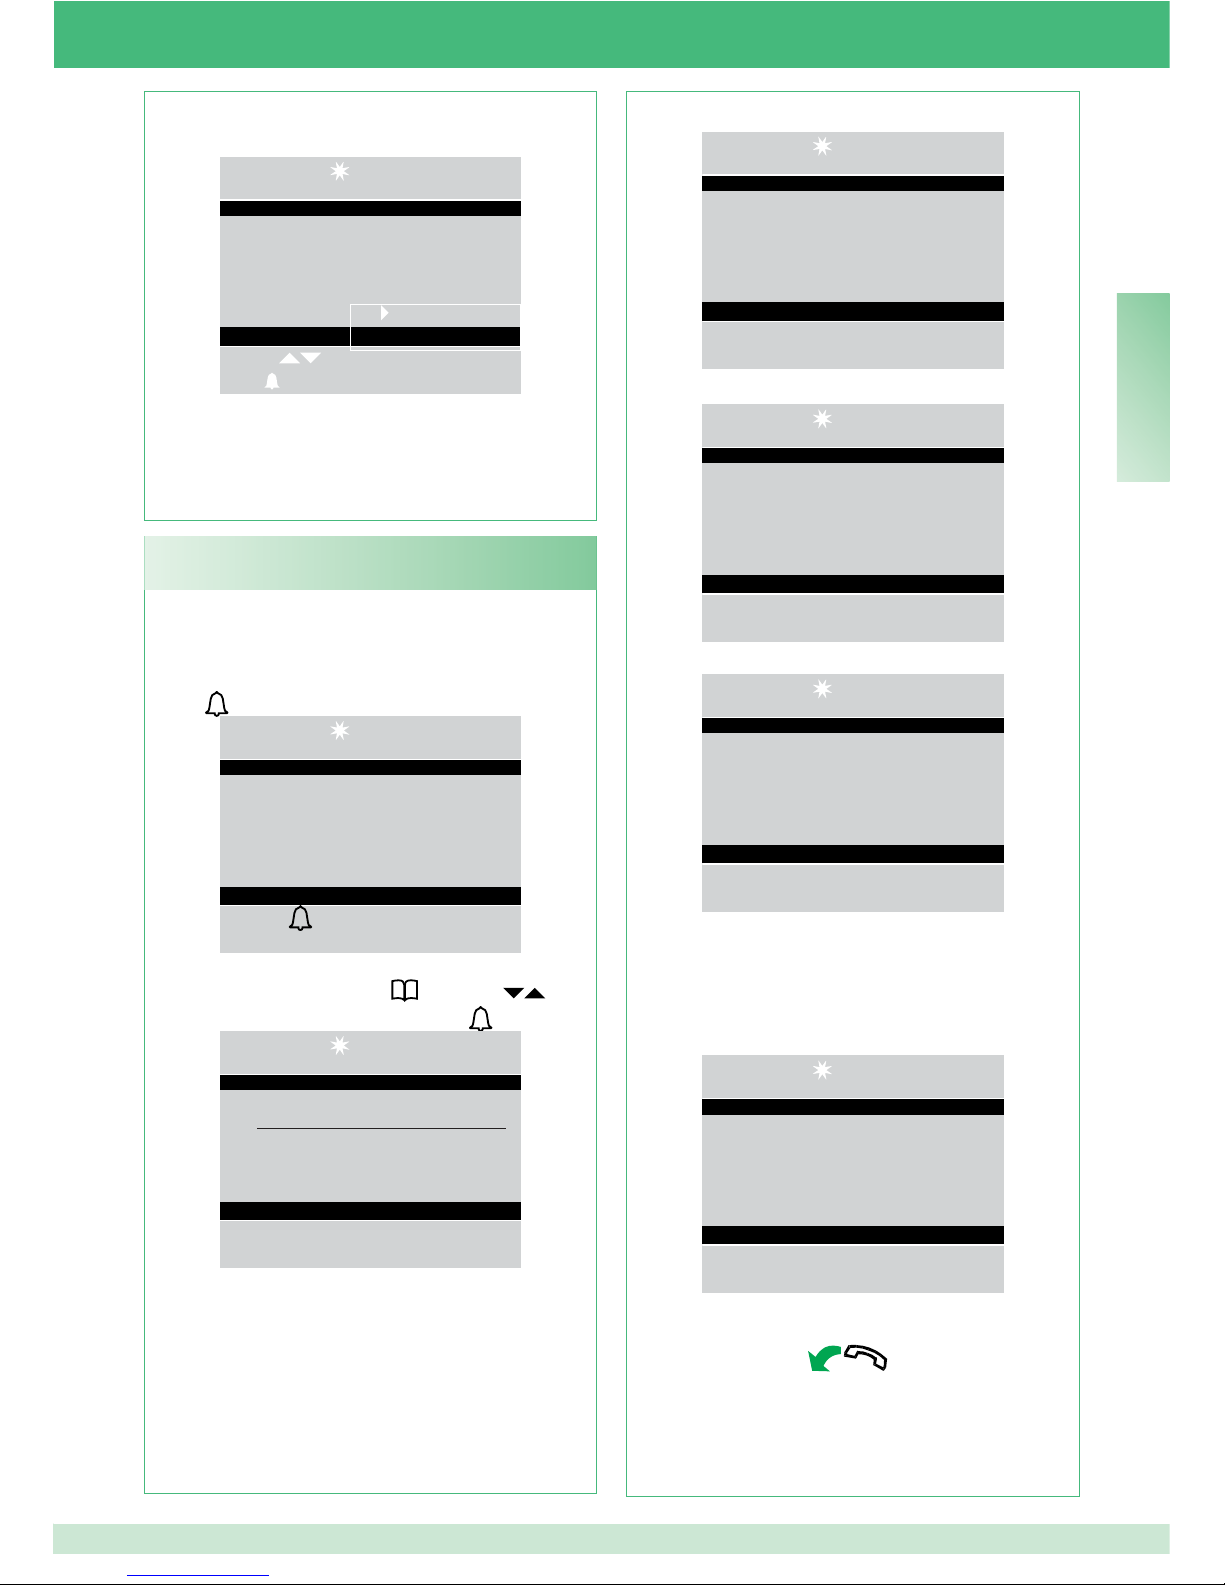
41
EN
When calling a secondary switchboard, the main
switchboard may use one of the 3 following methods:
1 enter the switchboard number (e.g. 005 240) and
press
:
14 :15 : 26
Mon 12 Mar 12
User: 005 240
To call
2 scroll through the directory using the keys
until the name is displayed and press
:
14:15:26
Mon 12 Mar 12
________________________
switchboard
Code 005 240
User called switchboard
3 press the corresponding speed number (see “U22Record speed numbers”, page 49).
U7 How to call a secondary switchboard from a
main switchboard
- press the MENU key to display a screen in the
bottom right-hand corner;
14:15:26
Mon 12 Mar 12
Caller Sergio Rossi
Code 012
Received Mon 12 Mar 12
At 13
Scroll
Call
- press OK to confi rm the settings;
- press ESC repeatedly to return to the main screen.
Delete entry
Delete all
- If the call has taken place correctly:
14:15:26
Mon 12 Mar 12
Calling user switchboard
- if the call has not taken place correctly:
14:15:26
Mon 12 Mar 12
User not available
- if the system is busy:
14:15:26
Mon 12 Mar 12
Line busy
When the handset of the switchboard called is
lifted, it communicates with the main switchboard,
the maximum duration of the conversation is equal to
the audio time set on the main switchboard (MENU/
Settings/Timers/Audio - min. 10 seconds, max. 90
seconds).
14:15:26
Mon 12 Mar 12
Communicating with
main switchboard
- to end the conversation, hang up the handset.
CAUTION!
When the secondary switchboard and main
switchboard are communicating with each other,
calls cannot be transferred or put on hold.
Page 42
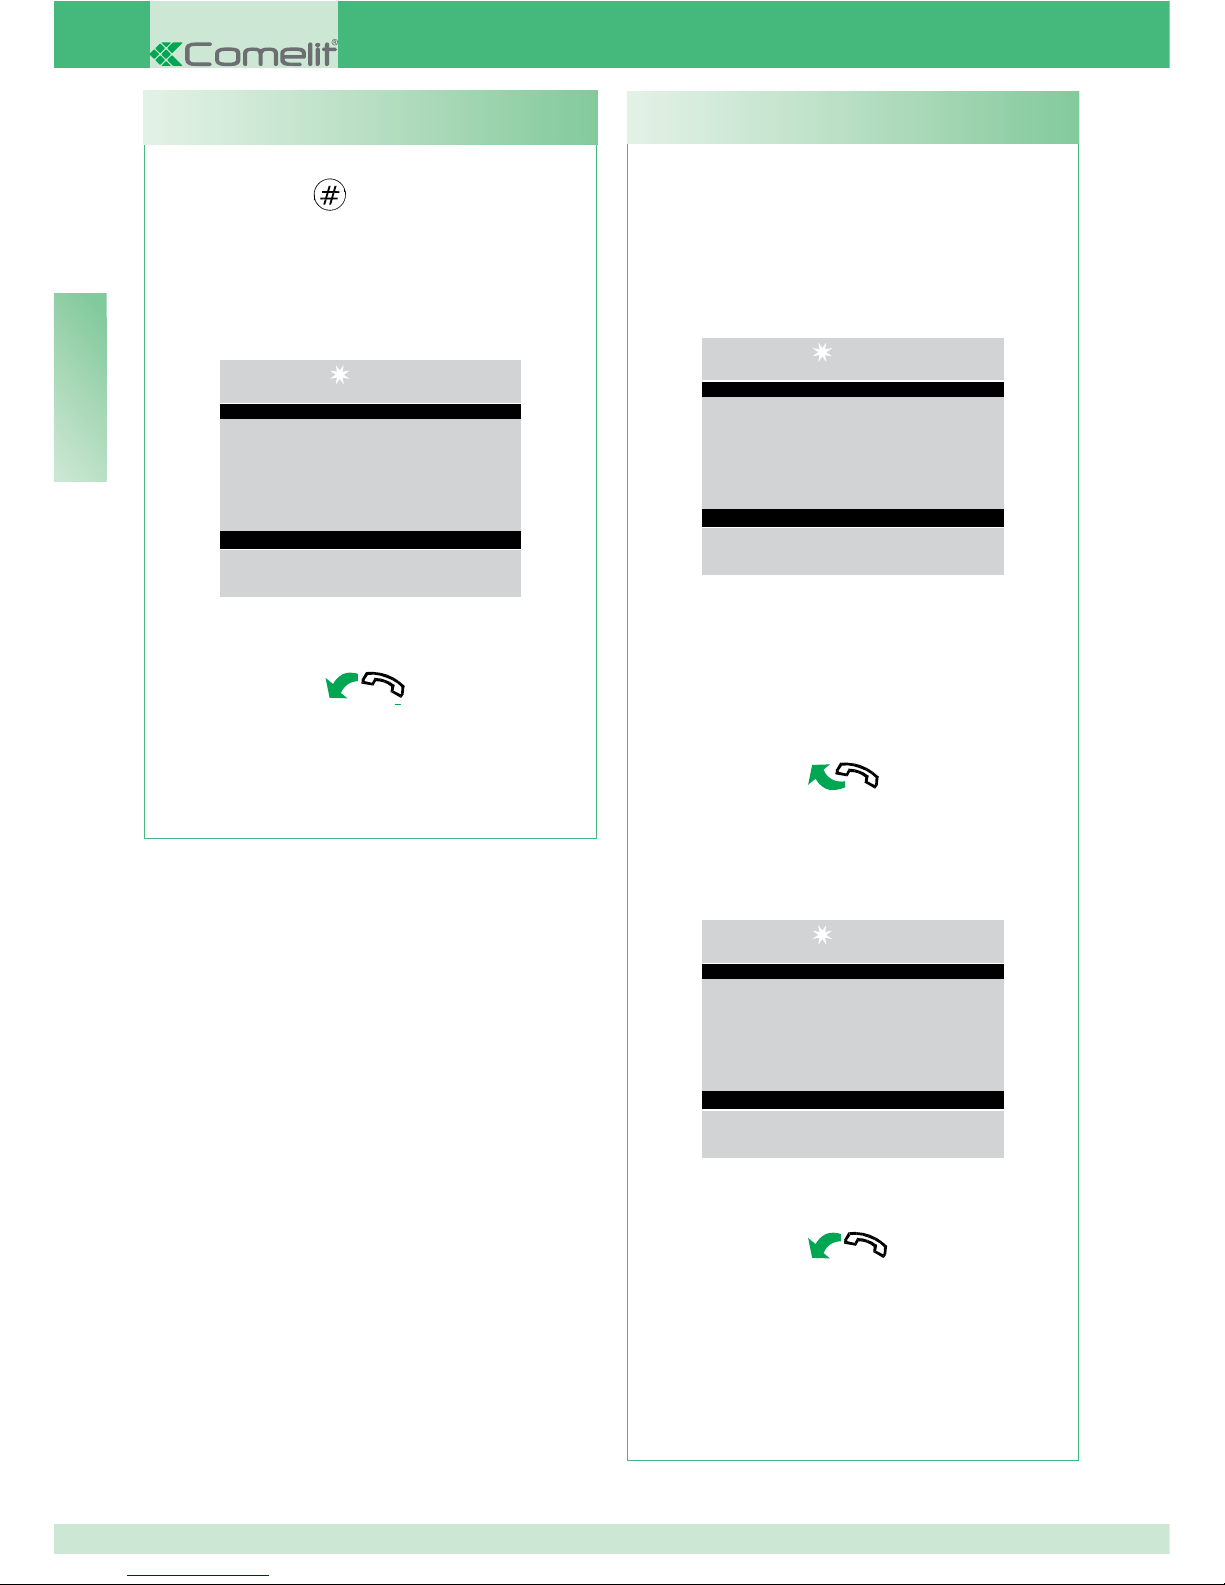
42
EN
To call a main switchboard from a secondary
switchboard, press
.
When the handset of the main switchboard
called is lifted, it communicates with the secondary
switchboard,
the maximum duration of the
conversation is equal to the audio time set on the
main switchboard (MENU/Settings/Timers/Audio-
min. 10 seconds, max. 90 seconds).
14:15:26
Mon 12 Mar 12
Communicating with
005 240
- to end the conversation, hang up the handset.
CAUTION!
When the secondary switchboard and main
switchboard are communicating with each other,
calls cannot be transferred or put on hold.
U8 How to call a main switchboard from a
secondary switchboard
When the main switchboard receives a call from the
secondary switchboard:
- the NAME of the secondary switchboard from which
the call is being made, if it is listed in the directory
(see “U17 How to enter a name in the directory”,
page 46), or the address of the switchboard making
the call (e.g. 005 240) is displayed;
14:15:26
Mon 12 Mar 12
Call from 005 240
005= indicates the “zone”
240= indicates the general switchboard ID
- to reject the call, press CANC;
- to answer the call coming from the secondary
switchboard, lift the handset;
- the main switchboard communicates with the
secondary switchboard, with a maximum
conversation time equal to the audio time set on the
main switchboard (MENU/Settings/Timers/Audio -
min. 10 seconds, max. 90 seconds);
14:15:26
Mon 12 Mar 12
Communicating with
005 240
- to end the conversation, hang up the handset.
CAUTION!
If the switchboard is busy or the switchboard
operator is momentarily absent and cannot
answer within 30 seconds, it will be added to
the call queue (see “U6 How to call an internal unit
listed in the received calls log”, page 40).
U9 How to answer a call made from the secondary
switchboard to the main switchboard
Page 43
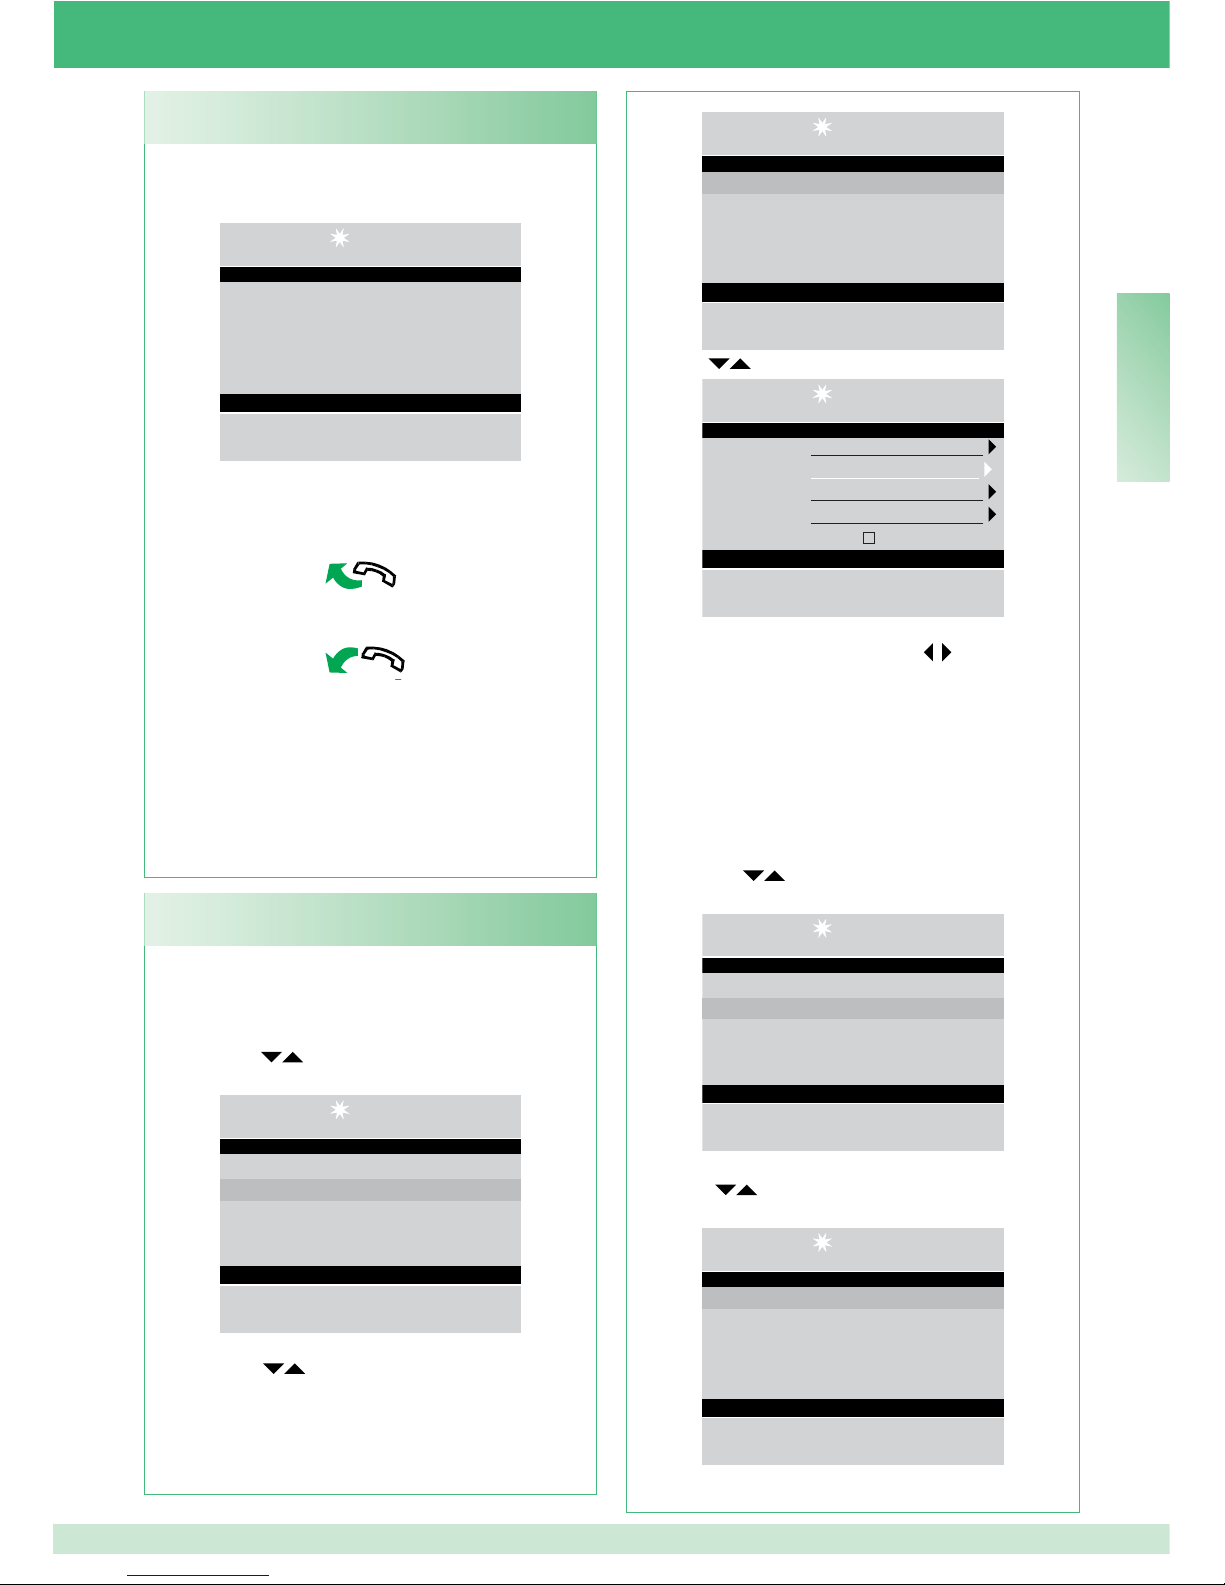
43
EN
When the secondary switchboard receives a call from
the main switchboard:
14:15:26
Mon 12 Mar 12
Switchboard call
- to answer the call coming from the main
switchboard, lift the handset;
- to end the conversation, hang up the handset.
CAUTION!
If the switchboard is busy or the switchboard
operator is momentarily absent and cannot
answer within 30 seconds, it will be added to the
call queue (see “U6 How to call an internal unit listed
in the received calls log”, page 40).
U10 How to answer a call made from the main
switchboard to the secondary switchboard
When using 2 main switchboards confi gured in series
(see page 116), use one of the following methods:
1 - press the MENU key for the active switchboard
and use the
keys to view the Confi gurations
menu, press OK;
14 :15 : 26
Mon 12 Mar 12
• Settings
• Configurations
• Directory
• Received calls
• Alarms
- use the keys to view the System menu,
press OK;
U11 How to activate or deactivate the main
switchboards
14 :15 : 26
Mon 12 Mar 12
• System
• Services
- use the
keys to view the Link menu, press OK;
14 :15 : 26
Mon 12 Mar 12
System Simplebus
Link Slave in series
Call Simplebus
A/V Audio
Backwards com.
Esc Ok
- select Slave in series using the keys to make
it inactive.
The switchboard will switch off, while the other
switchboard will switch on automatically to become
the Master in series;
- press OK to confi rm the settings;
- press ESC repeatedly to return to the main screen.
or
1 - press the MENU key for the inactive switchboard
and use the keys to view the Confi gurations
menu, press OK;
14 :15 : 26
Mon 12 Mar 12
• Settings
• Configurations
• Directory
• Received calls
• Alarms
- use the keys to view the System menu, press
OK;
14 :15 : 26
Mon 12 Mar 12
• System
• Services
Page 44
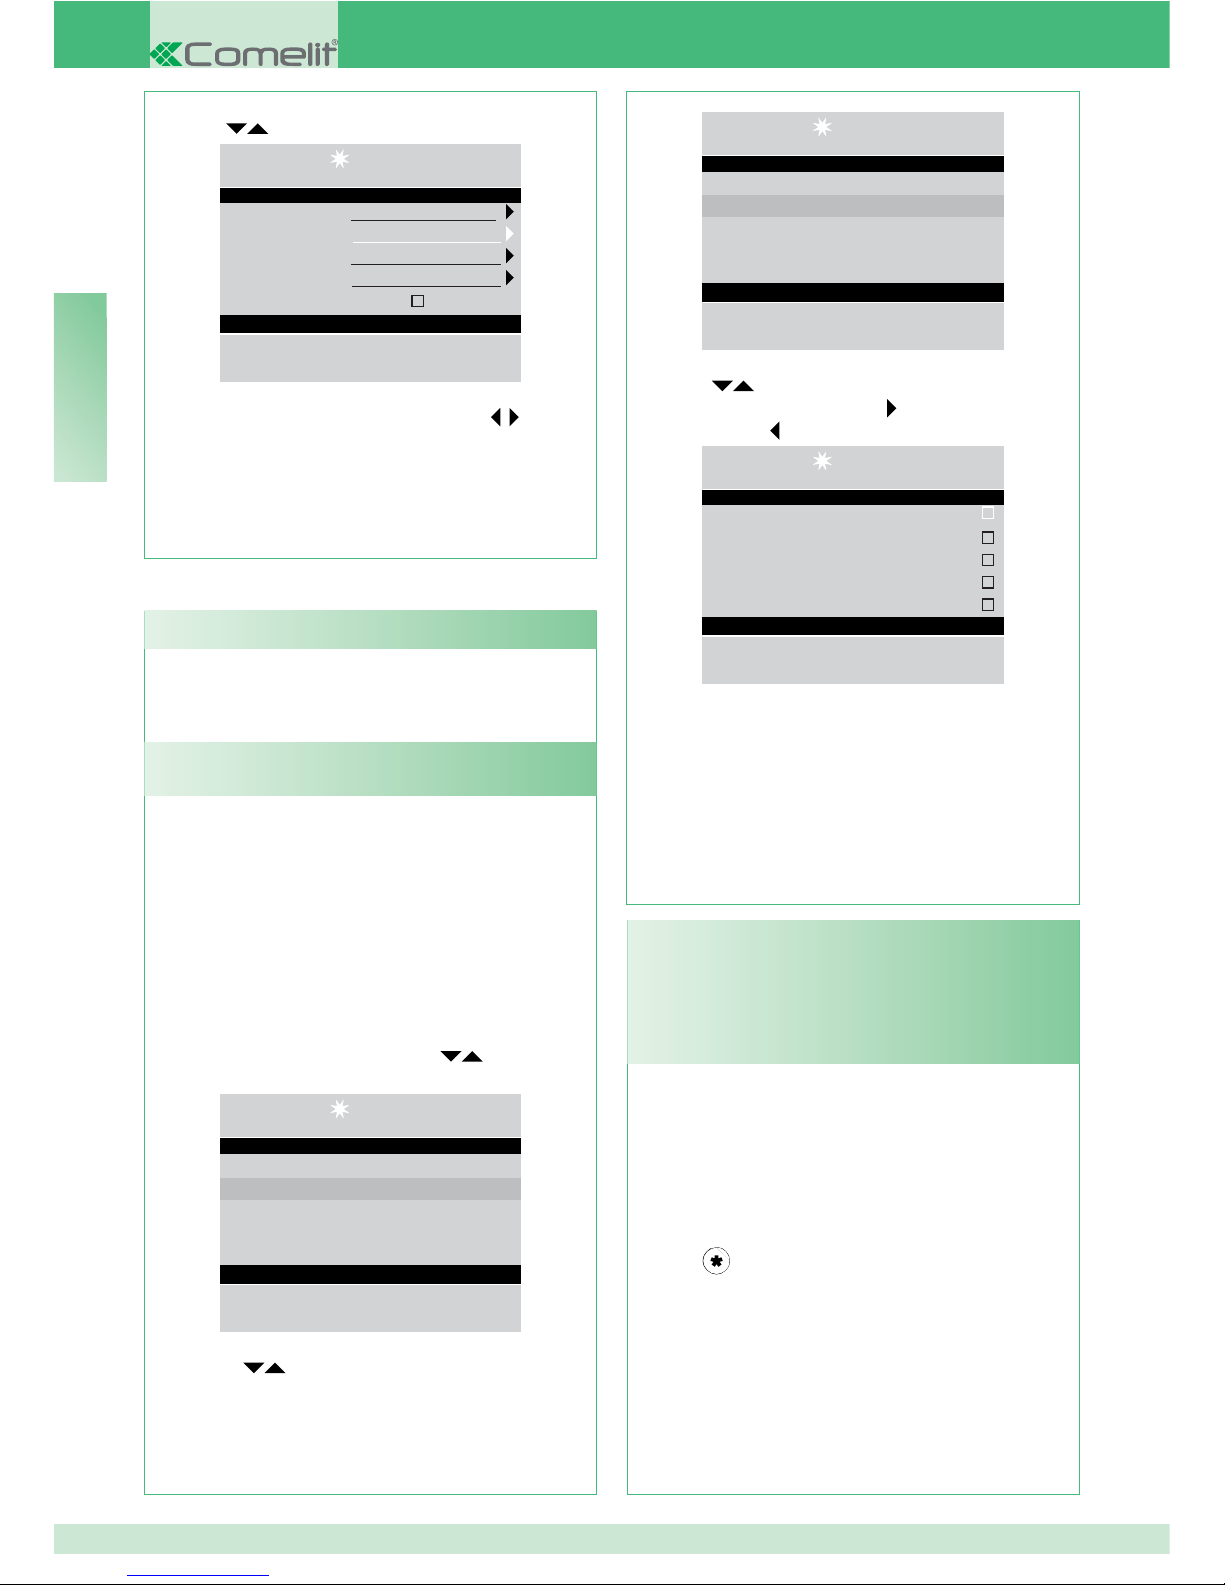
44
EN
The external unit electric lock can be controlled
by pressing key A; if the command is executed a
confi rmation tone sounds.
U12 How to use the lock-release
This function can be used to divert calls for the
switchboard to local or remote telephones.
CAUTION!
To use this function, telephone switchboard
Art. 2906 and interface Art. 2912 must be fi tted.
Contact your usual installer.
This function can only activated for the
switchboard set as secondary
(see “C1 Type of
switchboard”, page 60).
To activate this function:
- press the MENU key and use the keys to view
the Confi gurations menu, press OK;
14 :15 : 26
Mon 12 Mar 12
• Settings
• Configurations
• Directory
• Received calls
• Alarms
- use the
keys to view the Services menu,
press OK;
U13 How to activate the “Follow Me” function
(FollowMe)
Actuators can be activated in standby mode and
during conversation with an external unit.
CAUTION!
To use this function, there must be a main
external unit and actuators Art. 1256. Contact
your usual installer.
To activate the actuator:
- press
, you will be asked to enter the code to
activate a specifi c actuator. If there is no code a
generic actuator will be activated;
U14 How to activate an additional relay (e.g.
to activate independently using a specifi c
command: lights, CCTV alarm contacts, vehicle
barriers, entrances without an external unit or
other devices)
- use the
keys to view the Link menu, press OK;
14 :15 : 26
Mon 12 Mar 12
System Simplebus
Link Slave in series
Call Simplebus
A/V Audio
Backwards com.
Esc Ok
- select the Master in series using the keys to
confi rm that the switchboard should be active.
The other switchboard will be deactivated
automatically, to become the Slave in series;
- press OK to confi rm the settings;
- press ESC repeatedly to return to the main screen.
14 :15 : 26
Mon 12 Mar 12
• System
• Services
- use the
keys to view the FollowMe service.
Activate the service using the key.
Disable it using
;
14 :15 : 26
Mon 12 Mar 12
FollowMe
Call repeat
Internal units on
Triple call
Codes help
Esc Ok
- press OK to confi rm the settings;
- press
ESC repeatedly to return to the main screen.
Once a call has been made, the switchboard will
ring until the remote device begins communicating;
the call can be answered from the switchboard by
cancelling the “Follow me” function.
Page 45
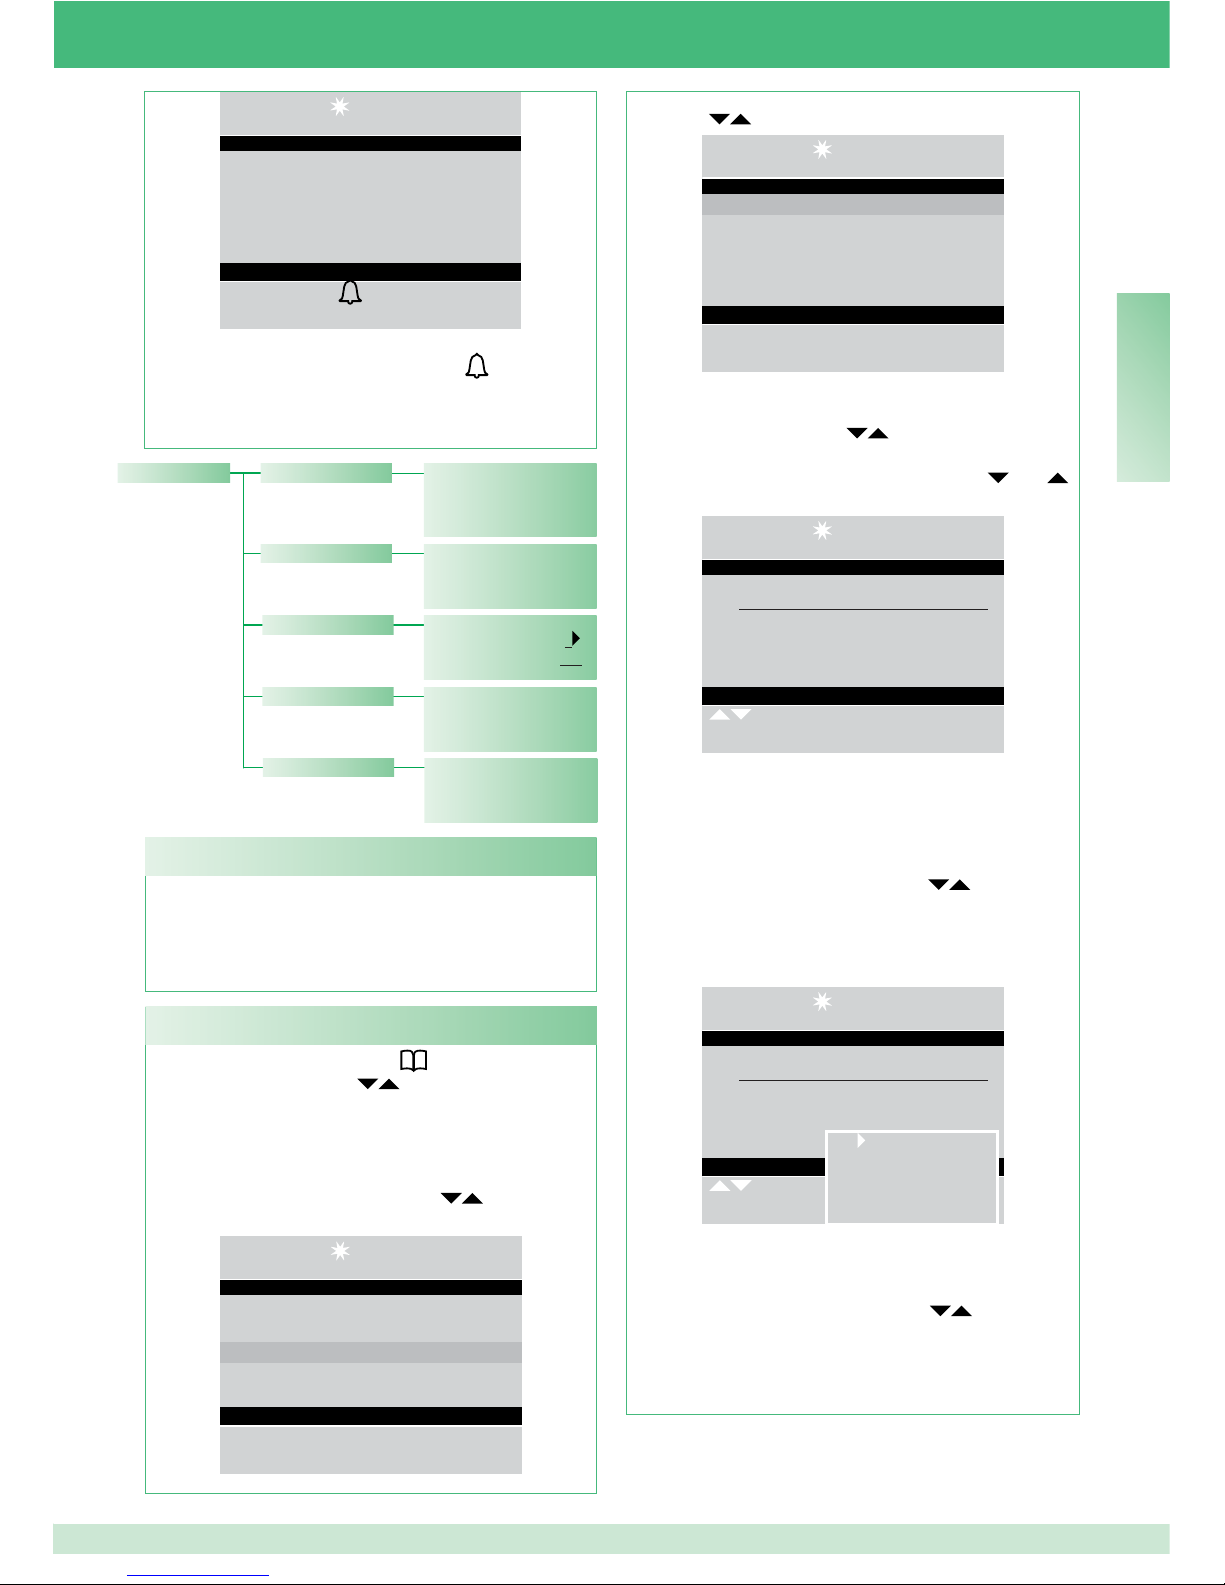
45
EN
- use the keys to view the View entry, press OK;
14 :15 : 26
Mon 12 Mar 12
• View
• New entry
• Speed numbers
• Delete all
• Info
- the names stored in the directory will be displayed in
alphabetic order; use the
keys to scroll through
the list.
To speed up scrolling, press and hold
or ;
14:15:26
Mon 12 Mar 12
________________________
Sergio Rossi
Code 012
Scroll Menu
Or
- enter the name, even using just part of the extension.
If there are several users with the same initial, you
can scroll through the list using the
keys;
- press the MENU key to display a screen in the
bottom right-hand corner.
14:15:26
Mon 12 Mar 12
________________________
Sergio Rossi
Code 012
Scroll Menu
A new entry can be added, the selected entry deleted
or edited, or the entire directory deleted.
Select the desired option using the keys, press
OK.
- press ESC repeatedly to return to the main screen.
New entry
Delete entry
Edit entry
Delete all
Up to 4000 names with a maximum of 13
alphanumeric characters can be entered, a code
must be associated to each name in correspondence
with the desired internal unit.
U15 How to use the directory
Delete all?
Number of names 0022
• View
_______________
Sergio Rossi
Code 012
Directory
• New entry
• Speed numbers
Name ________
Code ___
Speed number 1
Code 125...
• Delete all
• Info
To view the directory, press and scroll through
the list of users with the keys; press hand hold
the key to speed up scrolling. The NAME and CODE
associated with each user will be displayed in
sequence.
Or
- press the MENU key and use the
keys to view
the Directory menu, press OK;
14 :15 : 26
Mon 12 Mar 12
• Settings
• Configurations
• Directory
• Received calls
• Alarms
U16 How to fi nd a name in the directory
14:15:26
Mon 12 Mar 12
Actuator code_________
For actuator
- to confi rm actuator activation, press .
Page 46
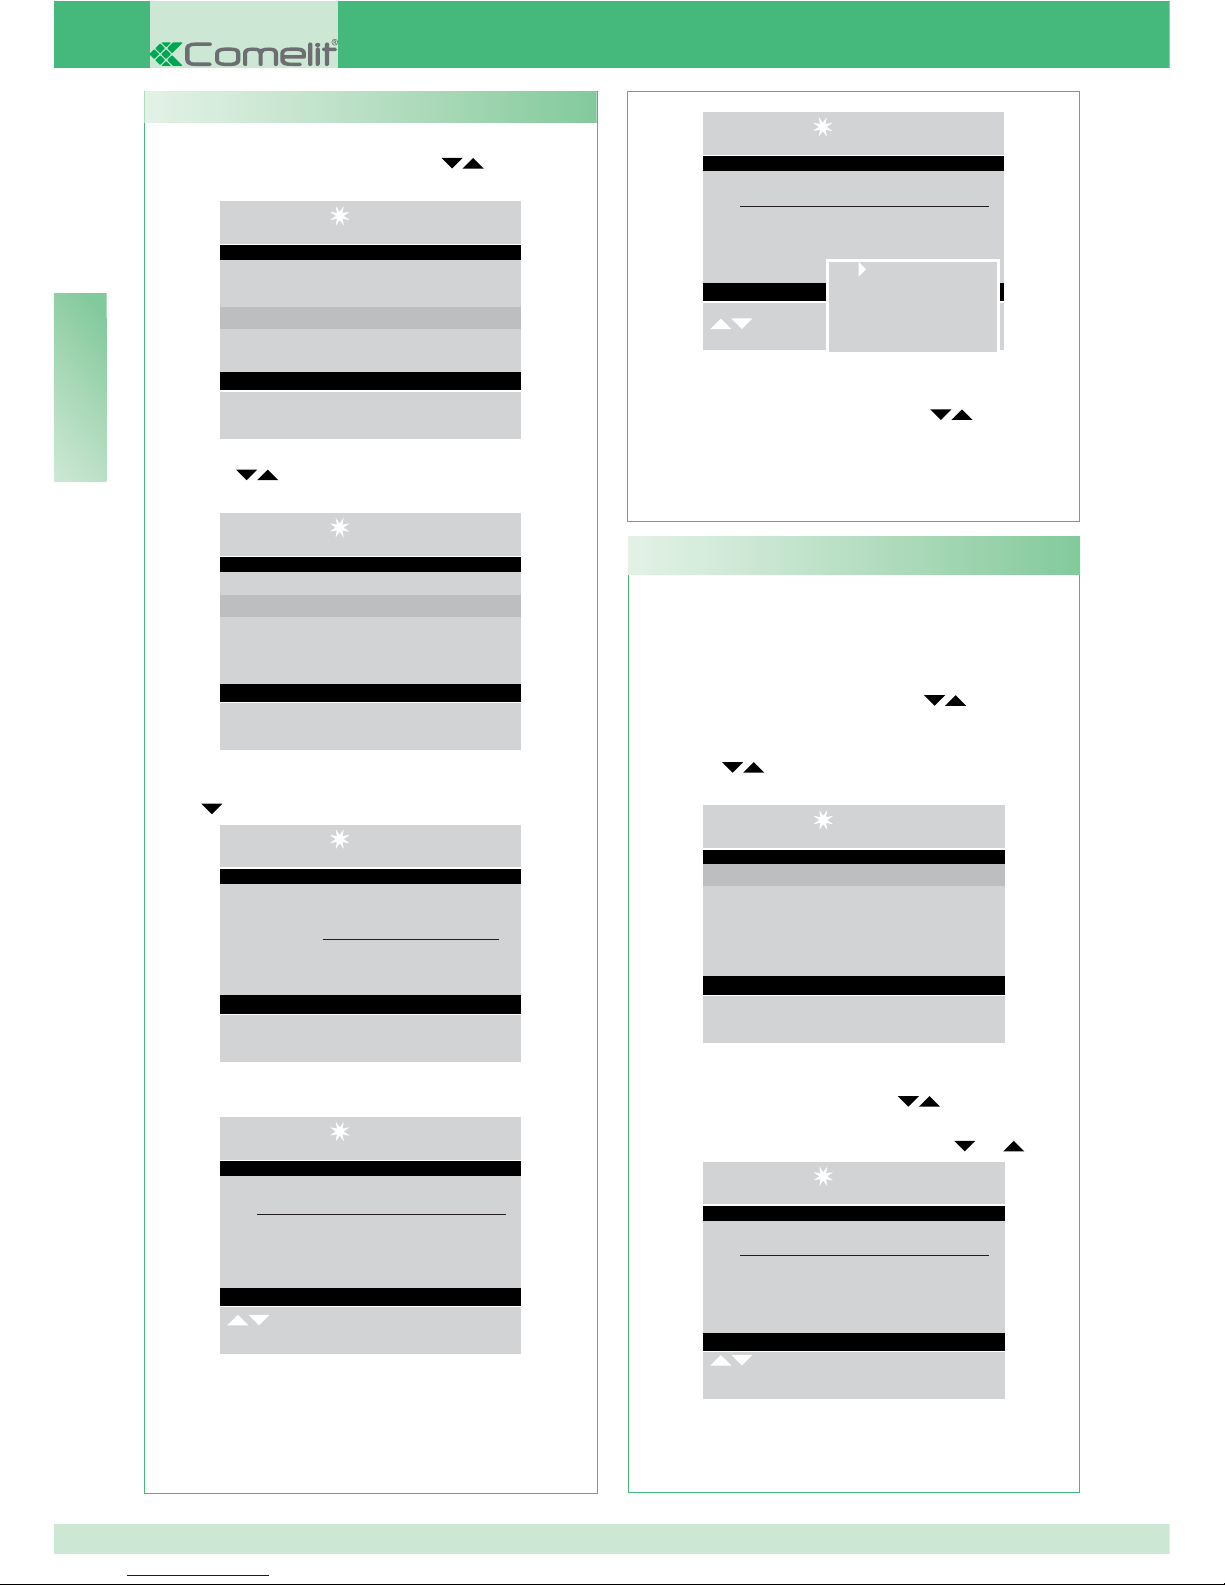
46
EN
If you wish to enter a name in the directory:
- press the MENU key and use the
keys to view
the Directory menu, press OK;
14 :15 : 26
Mon 12 Mar 12
• Settings
• Configurations
• Directory
• Calls received
• Alarms
- use the
keys to view the New entry option,
press OK;
14 :15 : 26
Mon 12 Mar 12
• View
• New entry
• Speed numbers
• Delete all
• Info
- enter the new name using the alphanumeric keypad;
press
and enter the code using the keypad;
14:15:26
Mon 12 Mar 12
Name _________________
Code ___
Insert entry
- press OK to confi rm the settings;
14:15:26
Mon 12 Mar 12
________________________
Sergio Rossi
Code 012
Scroll Menu
- press the MENU key to display a screen in the
bottom right-hand corner.
CAUTION!
To delete the entire directory, see “U20 - Delete
directory”, page 48.
If you wish to delete a name in the directory:
- press the MENU key and use the
keys to view
the Directory menu, press OK;
- use the
keys to view the View entry, press
OK;
14 :15 : 26
Mon 12 Mar 12
• View
• New entry
• Speed numbers
• Delete all
• Info
- the names stored in the directory will be displayed
in alphabetic order; use the
keys to scroll
through the list.
To speed up scrolling, press and hold or .
14:15:26
Mon 12 Mar 12
________________________
Sergio Rossi
Code 012
Scroll Menu
Or
U18 How to delete a name in the directory
14:15:26
Mon 12 Mar 12
________________________
Sergio Rossi
Code 012
Scroll
A new entry can be added, the selected entry deleted
or edited, or the entire directory deleted.
Select the desired option using the
keys, press
OK.
- press ESC repeatedly to return to the main screen.
New entry
Delete entry
Edit entry
Delete all
U17 How to enter a name in the directory
Page 47
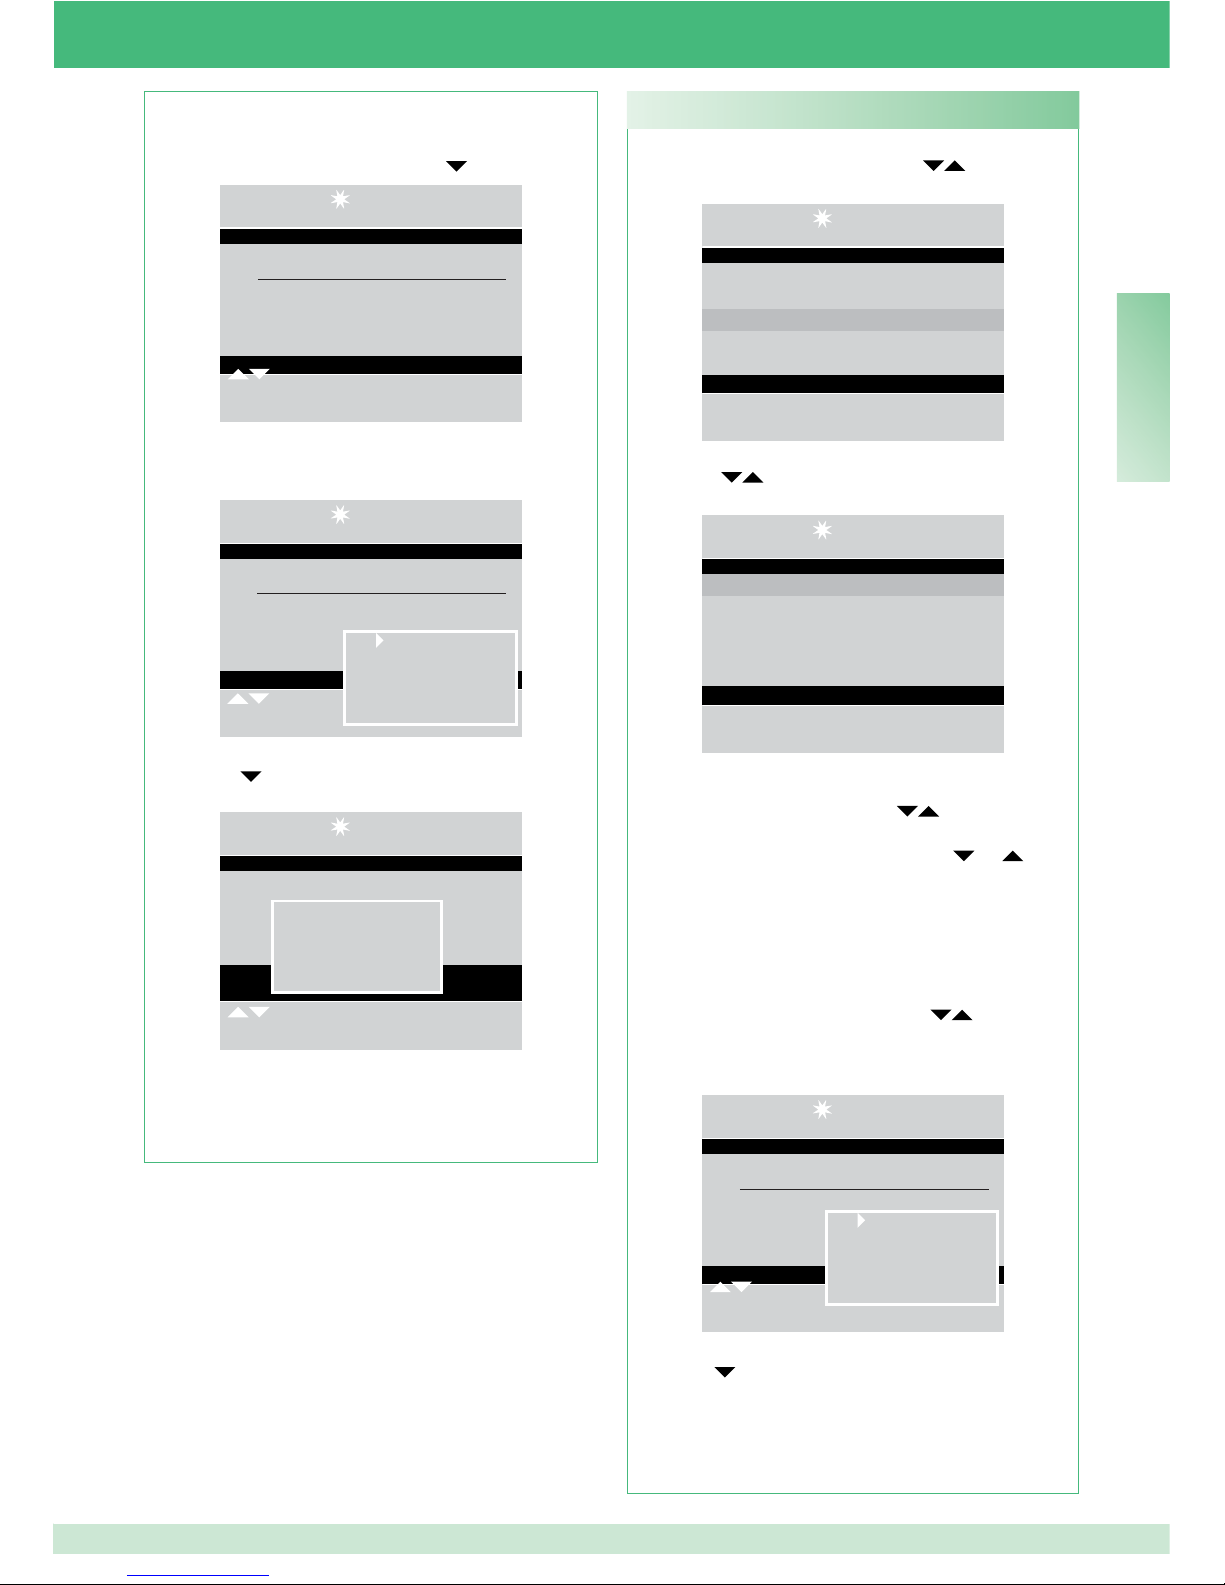
47
EN
If you wish to edit a name in the directory:
- press the MENU key and use the
keys to view
the Directory menu, press OK;
• Settings
• Configurations
• Directory
• Received calls
• Alarms
- use the
keys to view the View entry, press
OK;
• View
• New entry
• Speed numbers
• Delete all
• Info
- the names stored in the directory will be displayed
in alphabetic order; use the
keys to scroll
through the list.
To speed up scrolling, press and hold
or .
Or
- enter the name, even using just part of the
extension.
If there are several users with the same initial, you
can scroll through the list using the
keys;
- press the MENU key to display a screen in the
bottom right-hand corner;
________________________
Sergio Rossi
Code 012
Scroll Menu
- use the key to view the Edit entry option, press
OK;
U19 How to edit a name in the directory
New entry
Delete entry
Edit entry
Delete all
- enter the name, even using just part of the extension;
If there are several users with the same initial, you
can scroll through the list using the
keys;
14:15:26
Mon 12 Mar 12
________________________
Sergio Rossi
Code 012
Scroll Menu
- press the MENU key to display a screen in the
bottom right-hand corner;
14:15:26
Mon 12 Mar 12
________________________
Sergio Rossi
Code 012
Scroll Menu
- use the key to view the Delete entry option,
press OK;
14 :15 : 26
Mon 12 Mar 12
Sergio Rossi
Code 012
Scroll Menu
Delete entry?
Ok Esc
- to confi rm deletion press
OK;
- press ESC repeatedly to return to the main screen.
New entry
Delete entry
Edit entry
Delete all
Page 48
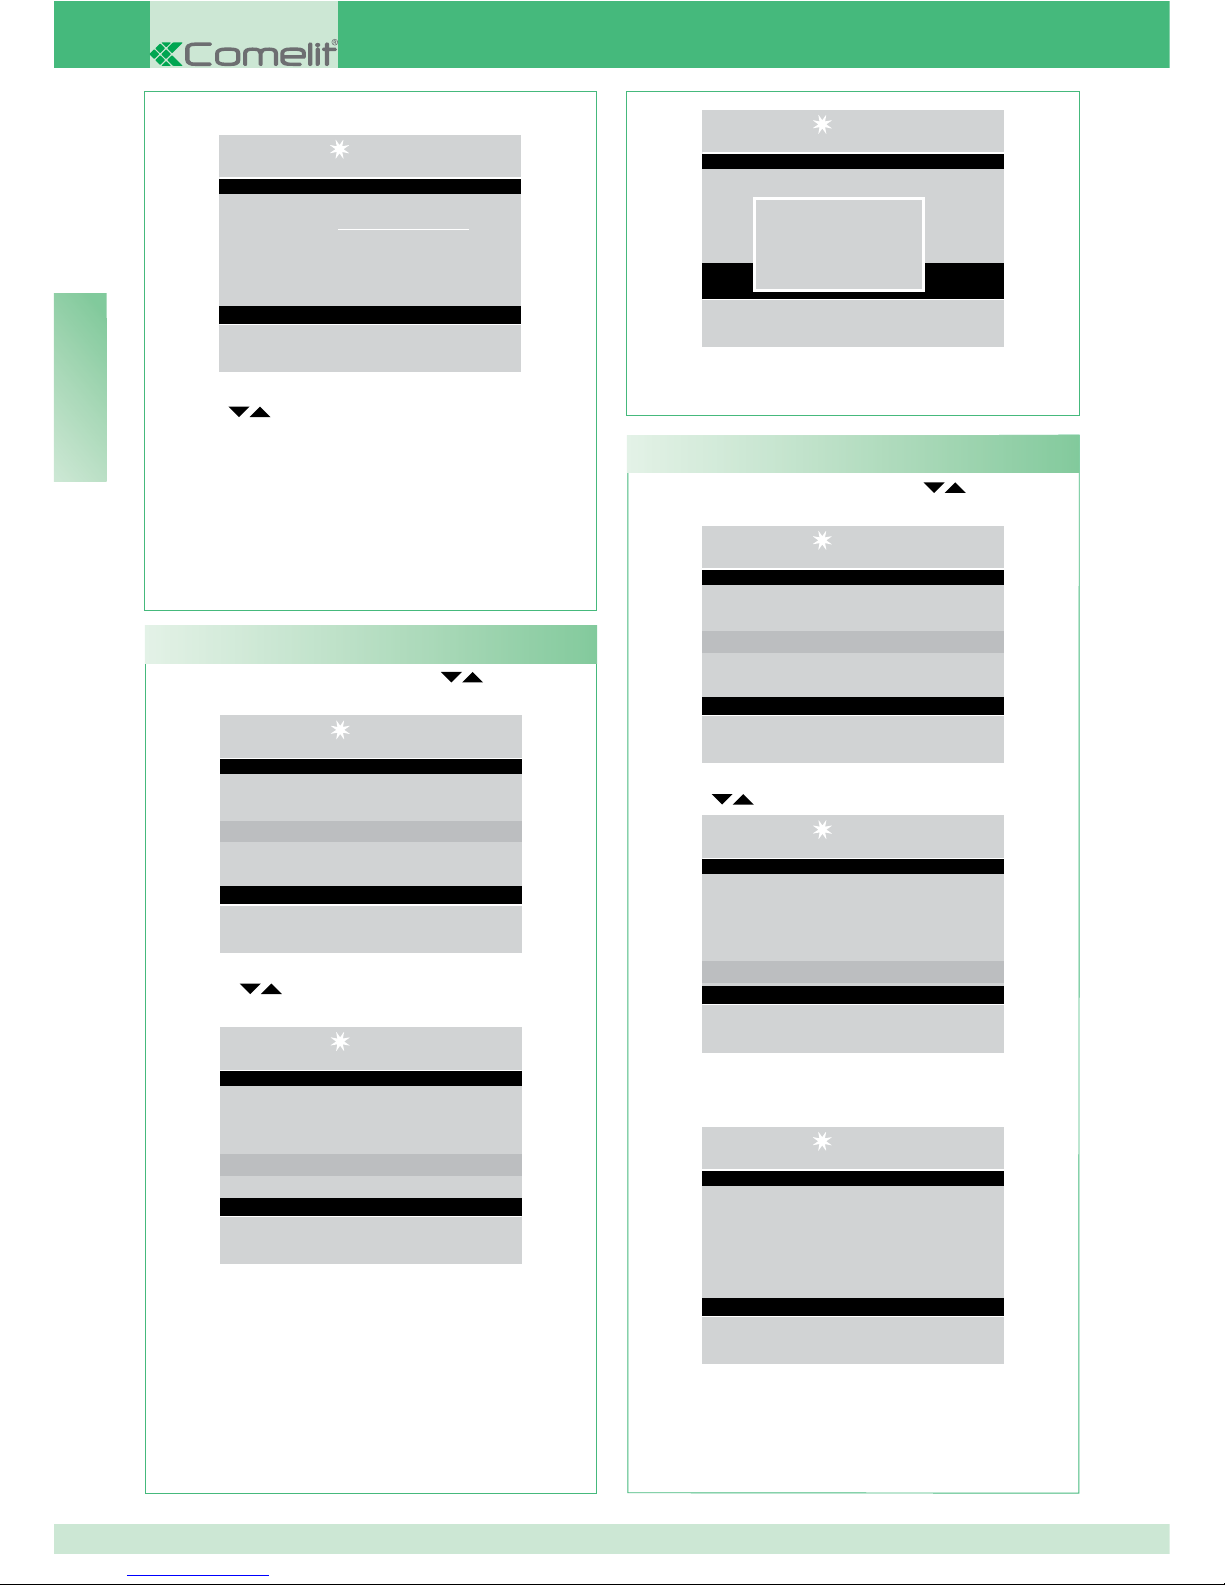
48
EN
Name Sergio Rossi
Code 012
Edit entry
- use the
keys to view the entry you wish to edit
(name or code);
- press CANC
to delete the selected entry and enter
the new name or code using the alphanumeric keypad;
- to confi rm the edited name, press OK; press ESC
to exit.
- press the MENU key and use the keys to view
the Directory menu, press OK;
14 :15 : 26
Mon 12 Mar 12
• Settings
• Configurations
• Directory
• Received calls
• Alarms
- use the
keys to view the Delete all option,
press OK;
• View
• New entry
• Speed numbers
• Delete all
• Info
- a screen will appear, asking if you wish to delete
the entire directory; confi rm using OK or cancel
using ESC
;
U20 Delete directory
- press the MENU key and use the
keys to view
the Directory menu, press OK;
14 :15 : 26
Mon 12 Mar 12
• Settings
• Configurations
• Directory
• Received calls
• Alarms
- use the
keys to view the Info entry, press OK;
14 :15 : 26
Mon 12 Mar 12
• View
• New entry
• Speed numbers
• Delete all
• Info
- a screen will appear, indicating the number of
names stored in the directory;
14 :15 : 26
Mon 12 Mar 12
Number of names
0022
- press ESC repeatedly to return to the main screen.
U21 Directory info
Delete all?
Ok Esc
- press ESC repeatedly to return to the main screen.
Page 49
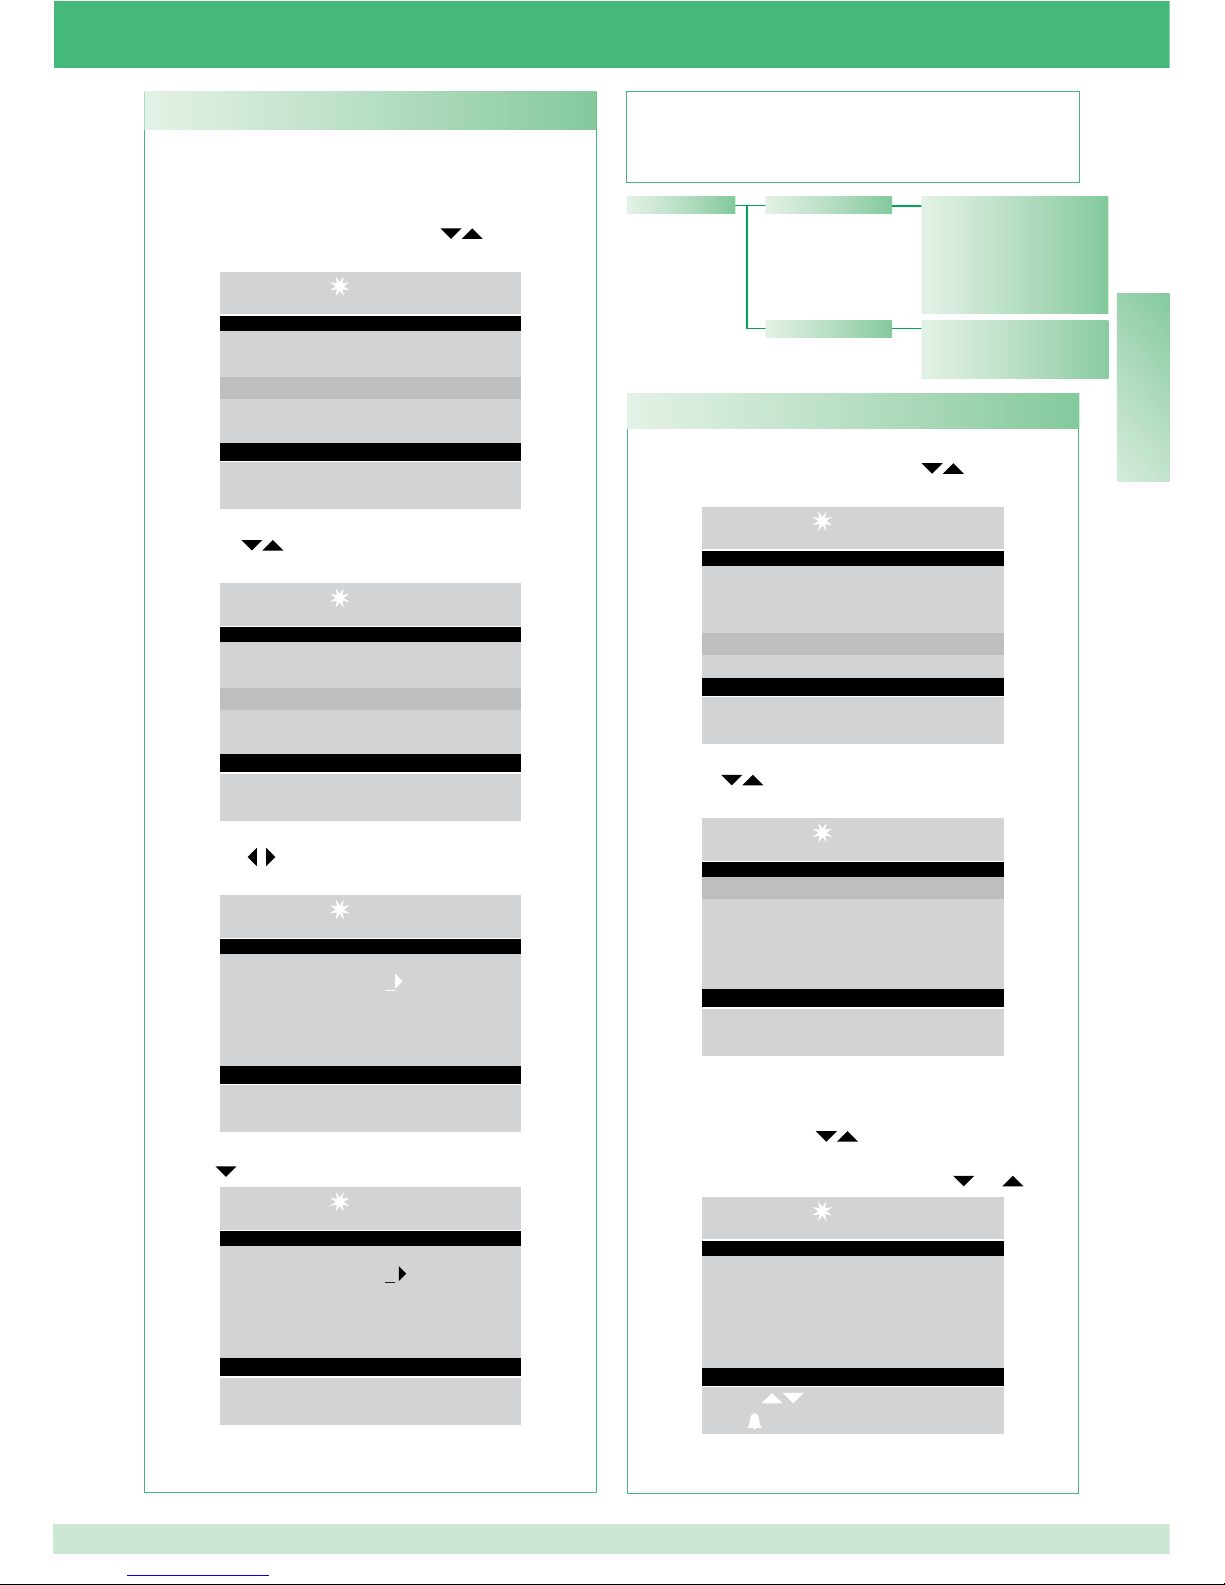
49
EN
- To access the received calls quickly, press MENU +
key 2 or press MENU and use the keys to view
the Received calls menu , press OK;
14 :15 : 26
Mon 12 Mar 12
• Settings
• Configurations
• Directory
• Received calls
• Alarms
- use the
keys to view the View entry, press
OK;
14 :15 : 26
Mon 12 Mar 12
• View
• Delete all
- the calls received and made are displayed in
chronological order, beginning with the most recent
call received; use the
keys to scroll through the
list.
To speed up scrolling, press and hold or ;
14:15:26
Mon 12 Mar 12
Caller Sergio Rossi
Code 012
Received Mon 12 Mar 12
At 13 : 15 : 11
Scroll
Call Menu
U23 - View received calls
This function can be used to store, edit and delete
speed numbers.
- press the MENU key and use the
keys to view
the Directory menu, press OK;
14 :15 : 26
Mon 12 Mar 12
• Settings
• Configurations
• Directory
• Calls received
• Alarms
- use the
keys to view the Speed numbers
option, press OK;
14 :15 : 26
Mon 12 Mar 12
• View
• New entry
• Speed numbers
• Delete all
• Info
- use the
keys to display the speed number
(from 1 to 8) to which a code will be assigned;
14:15:26
Mon 12 Mar 12
Speed number 1
Code ___
Set speed numbers
- press
and enter the code using the keypad;
14:15:26
Mon 12 Mar 12
Speed number 1
Code ___
Set speed numbers
U22 Record speed numbers
- press OK to confi rm the settings;
- press ESC repeatedly to return to the main screen.
Call Sergio Rossi
Code 012
Received Mon 12 Mar. 12
At 14 : 15 : 26
Delete all?
• Delete all
Received calls • View
Page 50
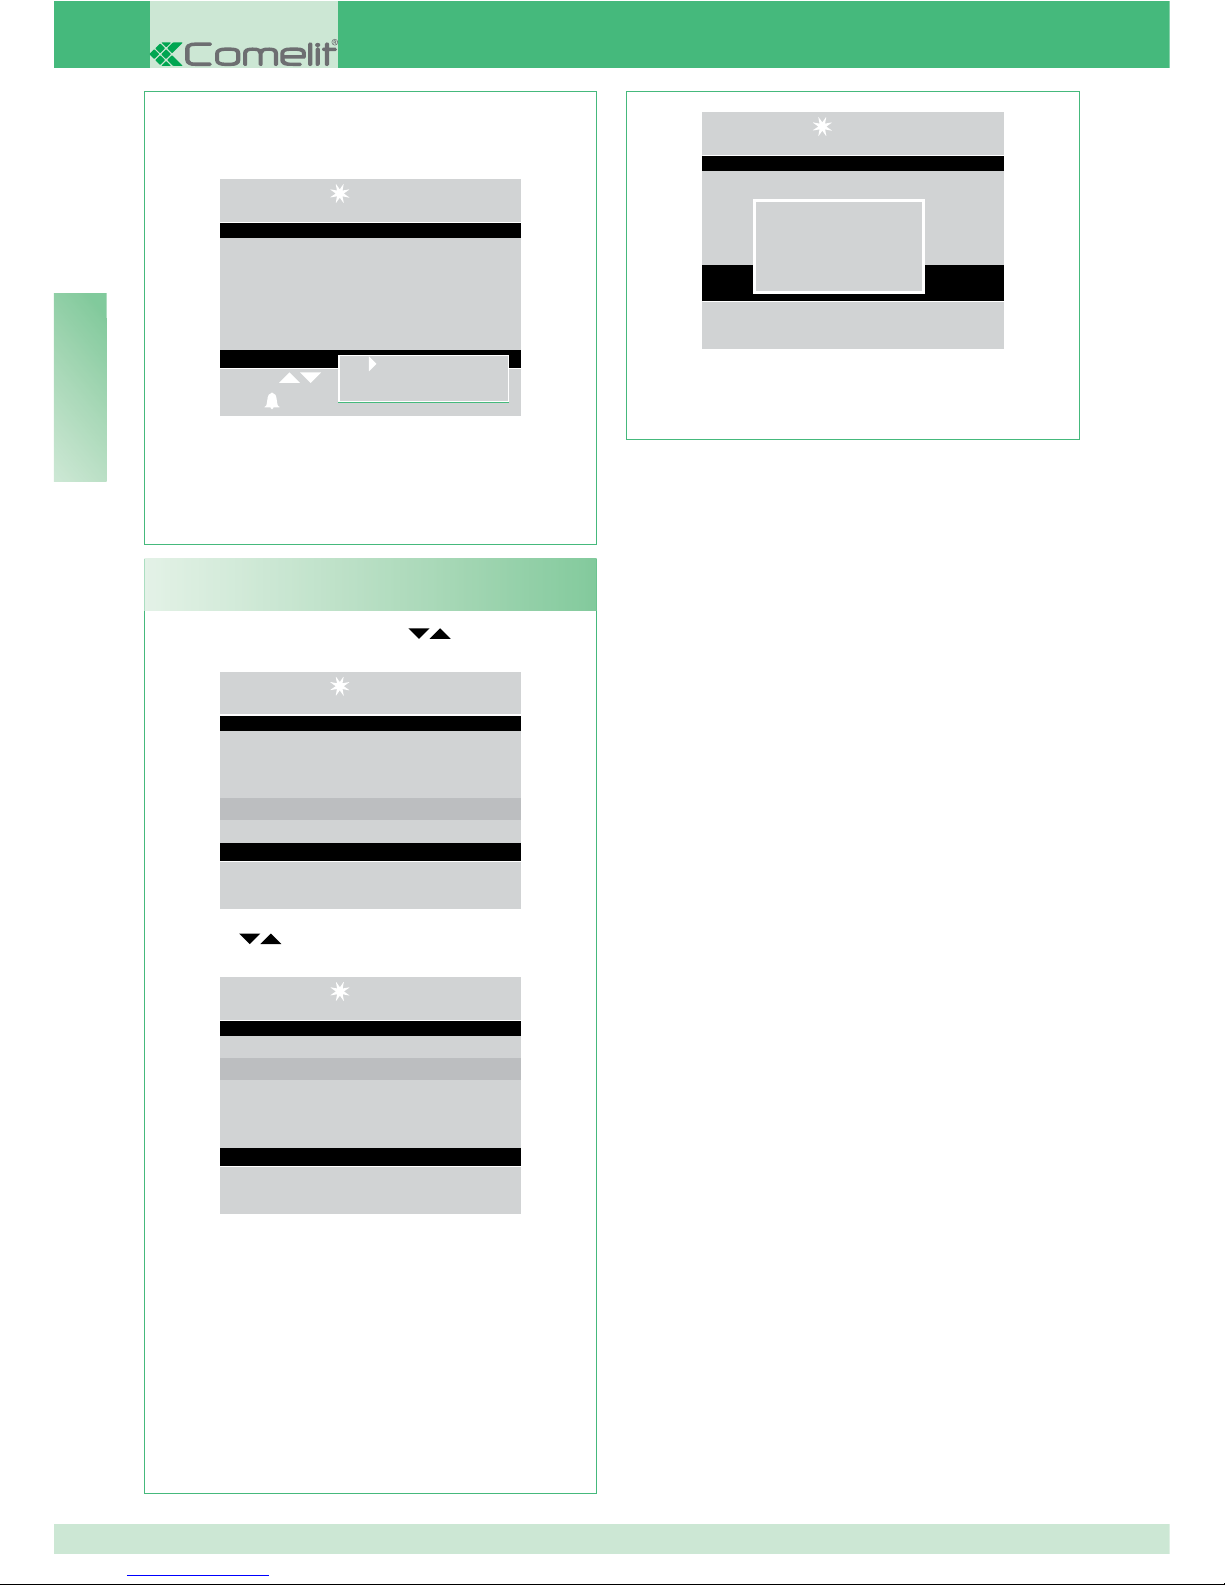
50
EN
- press the MENU and use the keys to view the
Received calls menu, press OK;
14 :15 : 26
Mon 12 Mar 12
• Settings
• Configurations
• Directory
• Received calls
• Alarms
- use the
keys to view the Delete all option,
press OK;
14 :15 : 26
Mon 12 Mar 12
• View
• Delete all
- a screen will appear, asking if you wish to delete
the list of incoming calls; confi rm using OK or cancel
using ESC
;
U24 - Delete received calls list
- press the MENU key to display a screen in the
bottom right-hand corner.
14:15:26
Mon 12 Mar 12
Caller Sergio Rossi
Code 012
Received Mon 12 Mar 12
at 13 : 15 : 11
Scroll
Call
Menu
- press OK to confi rm the settings;
- press
ESC repeatedly to return to the main screen.
Delete entry
Delete all
14 :15 : 26
Mon 12 Mar 12
Delete all?
Ok Esc
- press ESC repeatedly to return to the main screen.
Page 51
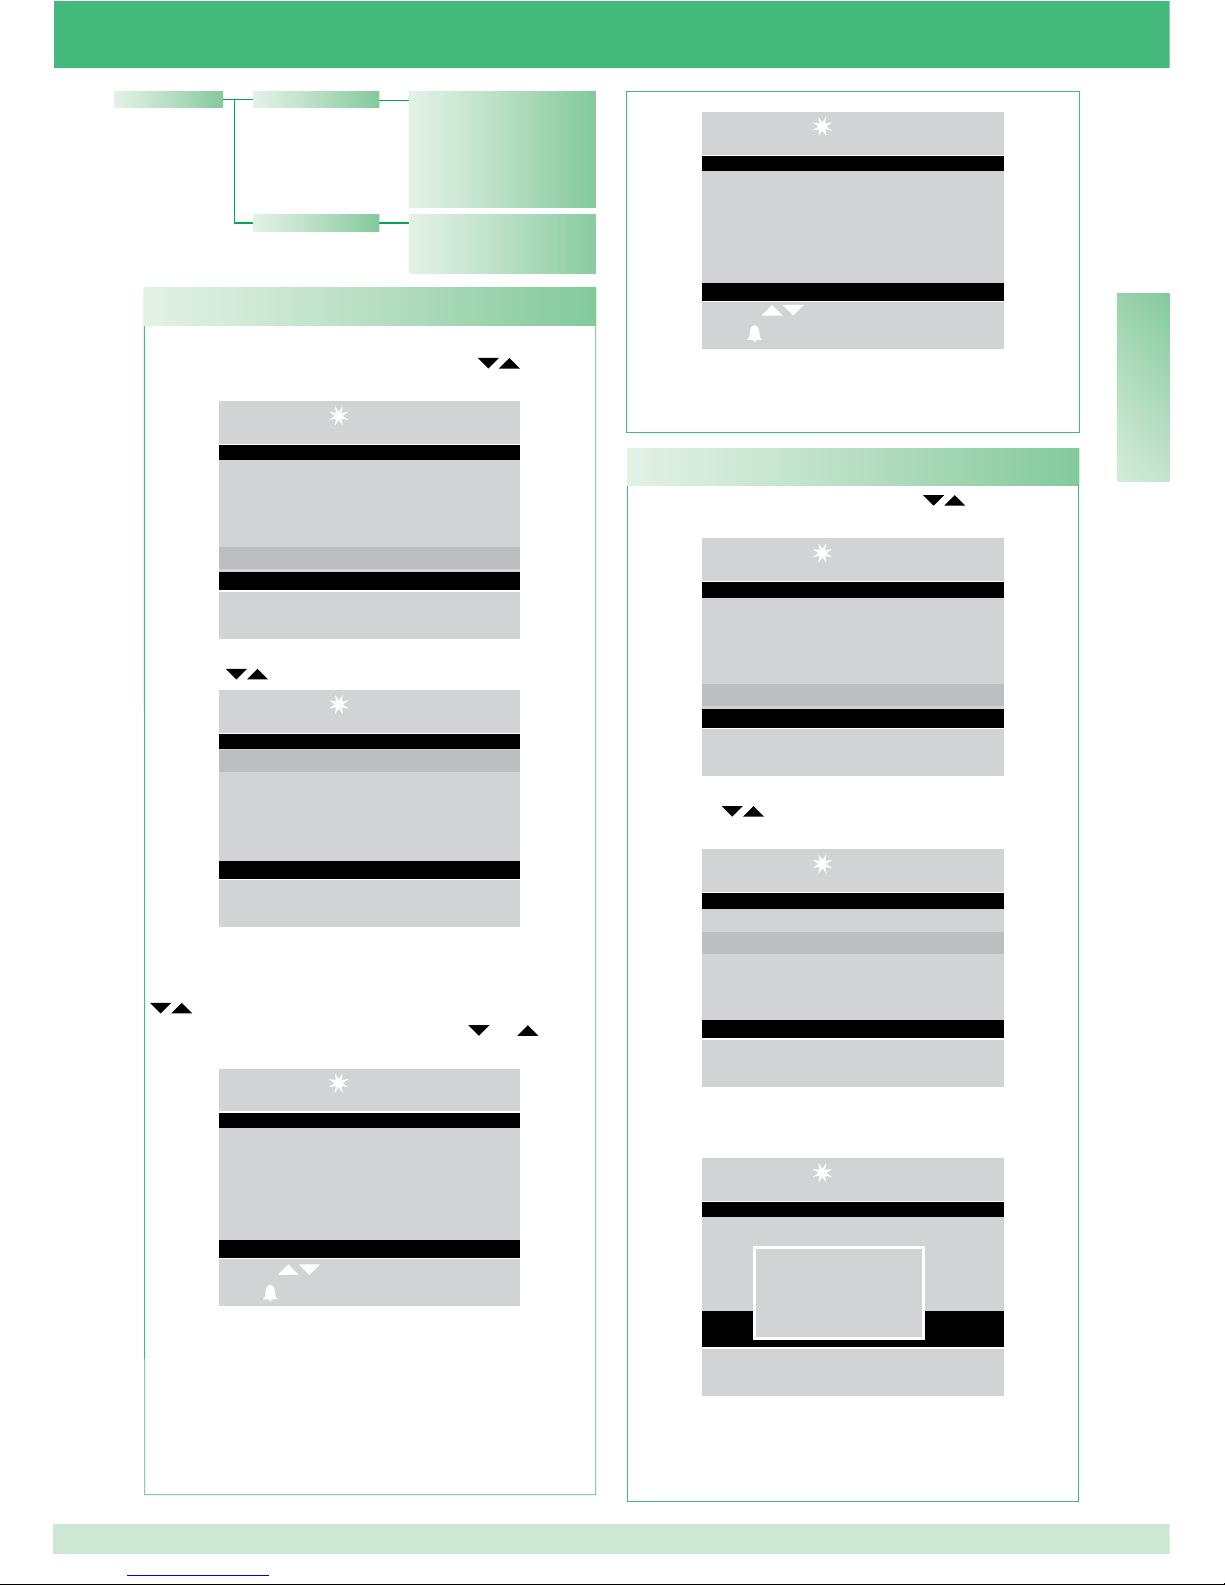
51
EN
- press the MENU key and use the keys to view
the Alarms menu, press OK;
14 :15 : 26
Mon 12 Mar 12
• Settings
• Configurations
• Directory
• Received calls
• Alarms
- use the
keys to view the Delete all option,
press OK;
14 :15 : 26
Mon 12 Mar 12
• View
• Delete all
- a screen will appear, asking if you wish to delete the
list of incoming alarms; confi rm using OK or cancel
using ESC
;
14 :15 : 26
Mon 12 Mar 12
Delete all?
Ok Esc
- press ESC repeatedly to return to the main screen.
- To access alarm viewing mode quickly, press MENU
+ key 1, or press MENU and use the
keys to
view the Alarms menu, press OK;
14 :15 : 26
Mon 12 Mar 12
• Settings
• Configurations
• Directory
• Received calls
• Alarms
- use the
keys to view the View entry, press OK;
14 :15 : 26
Mon 12 Mar 12
• View
• Delete all
- the calls are displayed in chronological order,
beginning with the most recent call received; use the
keys to scroll through the list.
To speed up scrolling, press and hold
or ;
14 :15 : 26
Mon 12 Mar 12
Alarm Sergio Rossi
Code 012
Received Mon 12 Mar 12
At 13 : 15 : 11
Scroll
Call
Menu
- press the MENU key to display a screen in the
bottom right-hand corner;
U25 - View alarms
U26 - Delete alarms received list
14:15:26
Mon 12 Mar 12
Alarm Sergio Rossi
Code 012
Received Mon 12 Mar 12
At 13 : 15 : 11
Scroll
Call
- press ESC repeatedly to return to the main screen.
Call Sergio Rossi
Code 012
Received Mon 12 Mar. 12
At 14 : 15 : 26
Delete all?
• Delete all
Alarms • View
Page 52
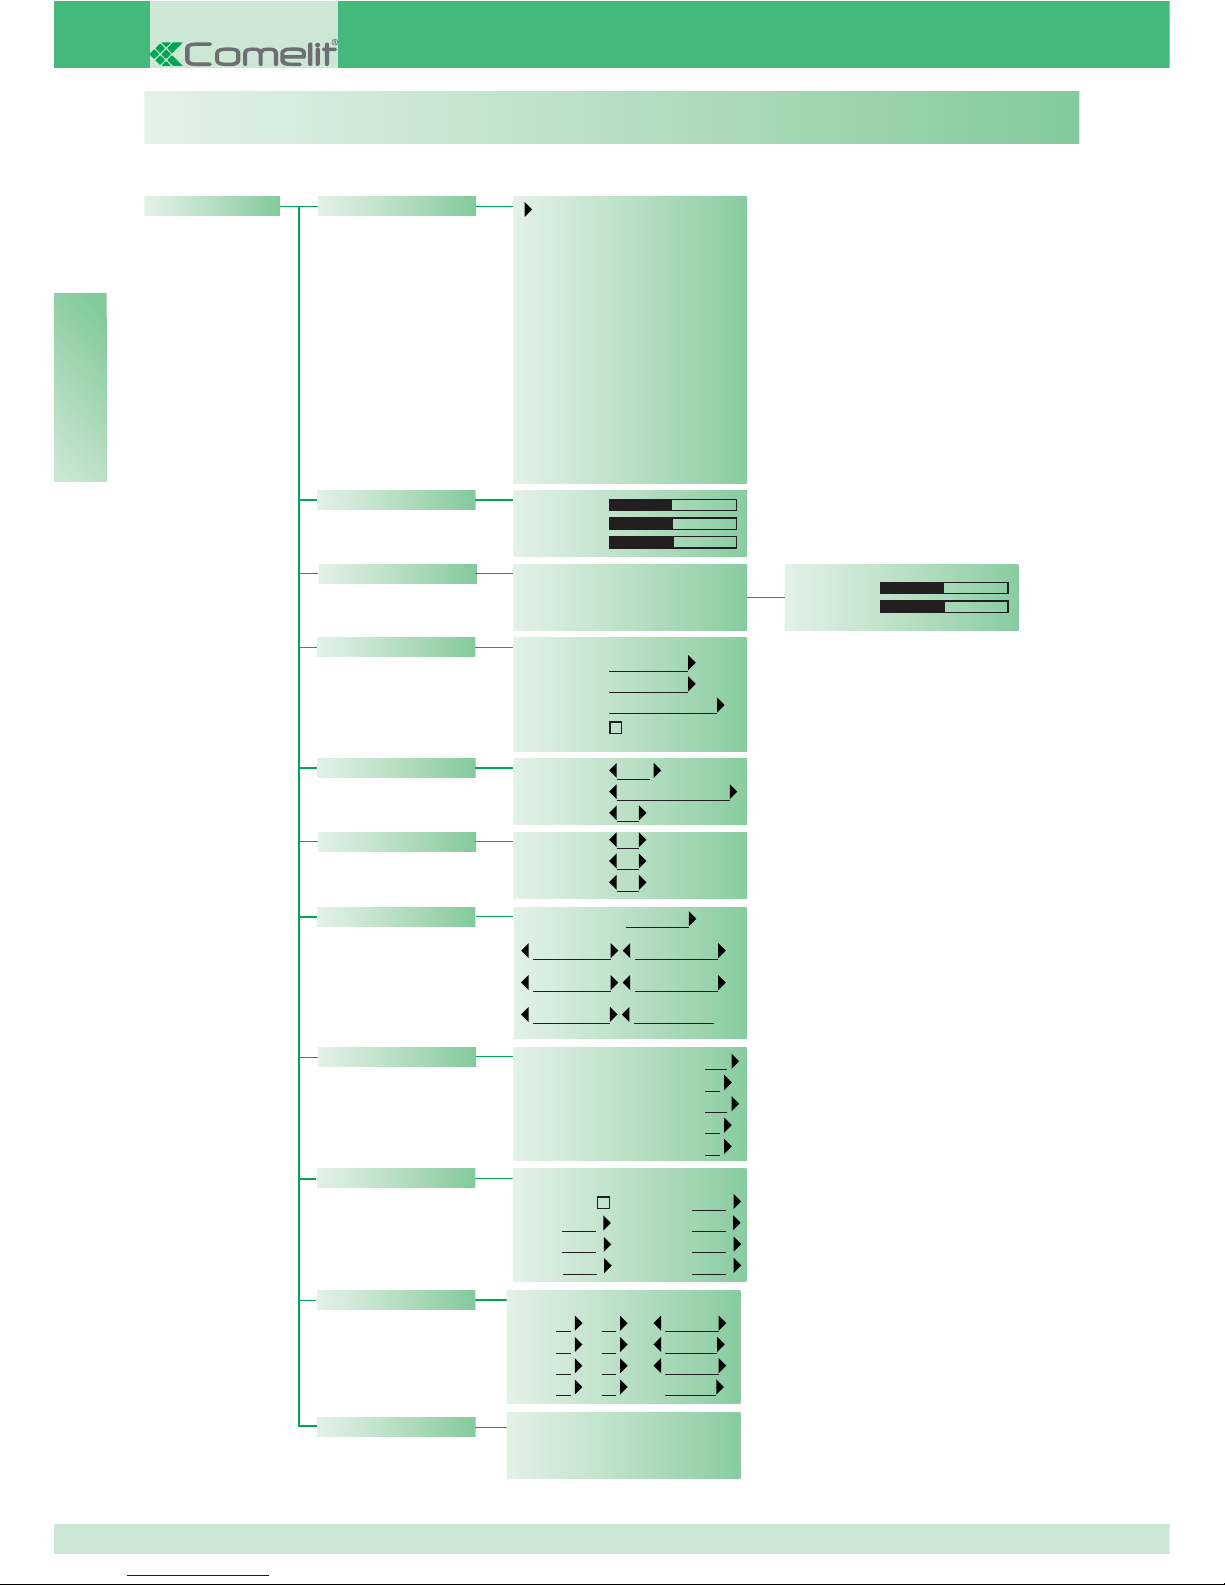
52
EN
SETTINGS
• Language
Italiano
English
Français
Deutsch
Español
Portuguese
Dutch
Danish
Norwegian
Finnish
Swedish
Turkish
Russian
Polish
Croatian
Settings
• Video
Brightness
Contrast
Colour
• Audio
• Internal
• External
Microphone
Loudspeaker
• Tones
External Spring
Internal Spring
Alarm Alarm 1
Key tone
• Date
Year 2010
Month March
Day 12
• Time
Hours 14
Minutes 15
Seconds 26
• Daily mode
Enable
Sun Night
Mon Night
Tue Night
Wed Night
Thur Night
Fri Night
Sat Night
• Skins
• Reset settings
Reset?
• Automatic switching
Swt 1 00 : 00 Day
Swt 2 00 : 00 Night
Swt 3 00 : 00 Day
Swt 4 00 : 00
Skins Blue skin
Planux skin Green skin
Red skin Yellow skin
Pink skin Orange skin
• Timers
Audio 010
Reset wait time 01
Standby 010
Relay activation 01
Call repeat 01
Page 53
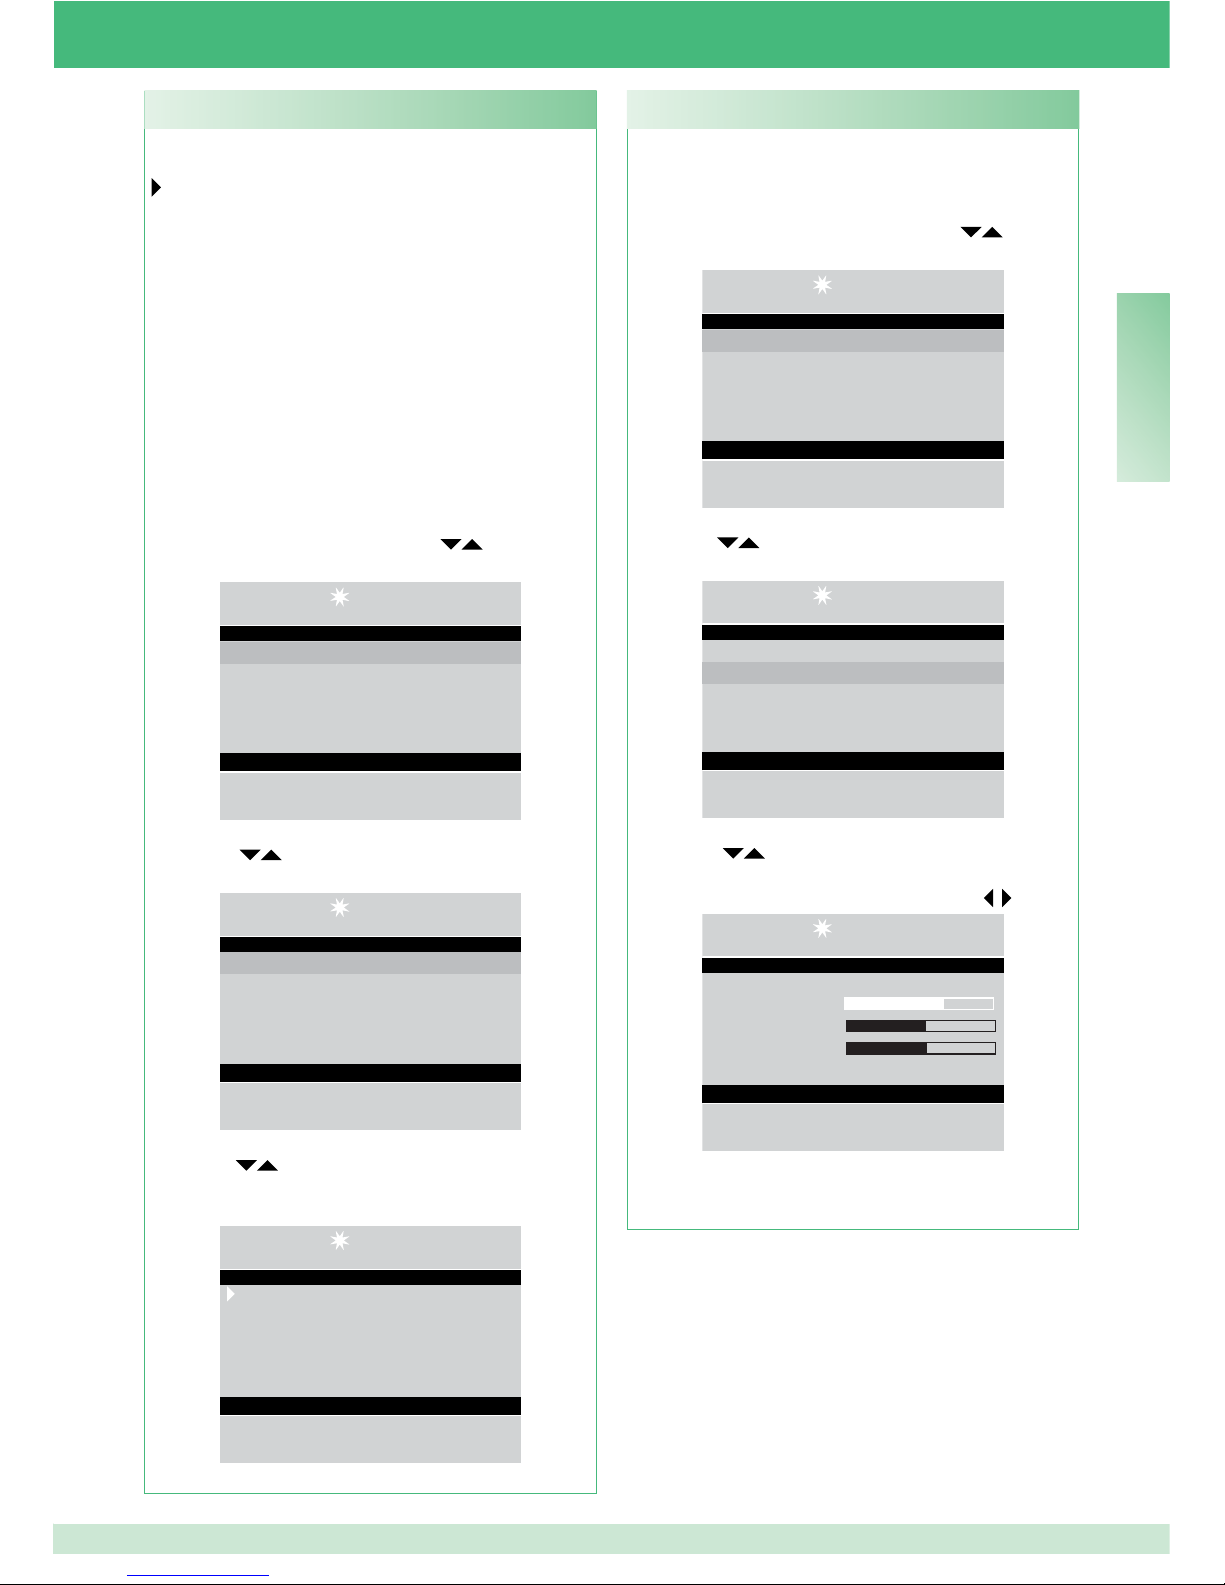
53
EN
This function can be used to adjust the brightness,
contrast and colour of the switchboard monitor.
- To access the video settings quickly, press MENU
+ key 3, or press MENU and use the
keys to
view the Settings menu, press OK;
14 :15 : 26
Mon 12 Mar 12
• Settings
• Configurations
• Directory
• Received calls
• Alarms
- use the
keys to view the Video menu, press
OK;
14 :15 : 26
Mon 12 Mar 12
• Language
• Video
• Audio
• Tones
• Date
- use the
keys to view the video setting you
wish to adjust (brightness, contrast, colour) and
decrease or increase the value using the
keys;
14 :15 : 26
Mon 12 Mar 12
Brightness
Contrast
Colour
Video settings
- press OK to confi rm the settings;
- press
ESC repeatedly to return to the main screen.
I2 - Video settings
The switchboard language can be selected from the
following list:
Italiano (default)
English
Français
Deutsch
Español
Portuguese
Dutch
Danish
Norwegian
Finnish
Swedish
Turkish
Russian
Polish
Croatian
- press the MENU key and use the
keys to view
the Settings menu, press OK;
14 :15 : 26
Mon 12 Mar 12
• Settings
• Configurations
• Directory
• Received calls
• Alarms
- use the
keys to view the Language menu,
press OK;
14 :15 : 26
Mon 12 Mar 12
• Language
• Video
• Audio
• Tones
• Date
- use the
keys to view the selected language,
press OK to confi rm;
- press ESC repeatedly to return to the main screen.
14 :15 : 26
Mon 12 Mar 12
Italiano
English
Français
Deutsch
Español
Select language
I1 - Change language
Page 54
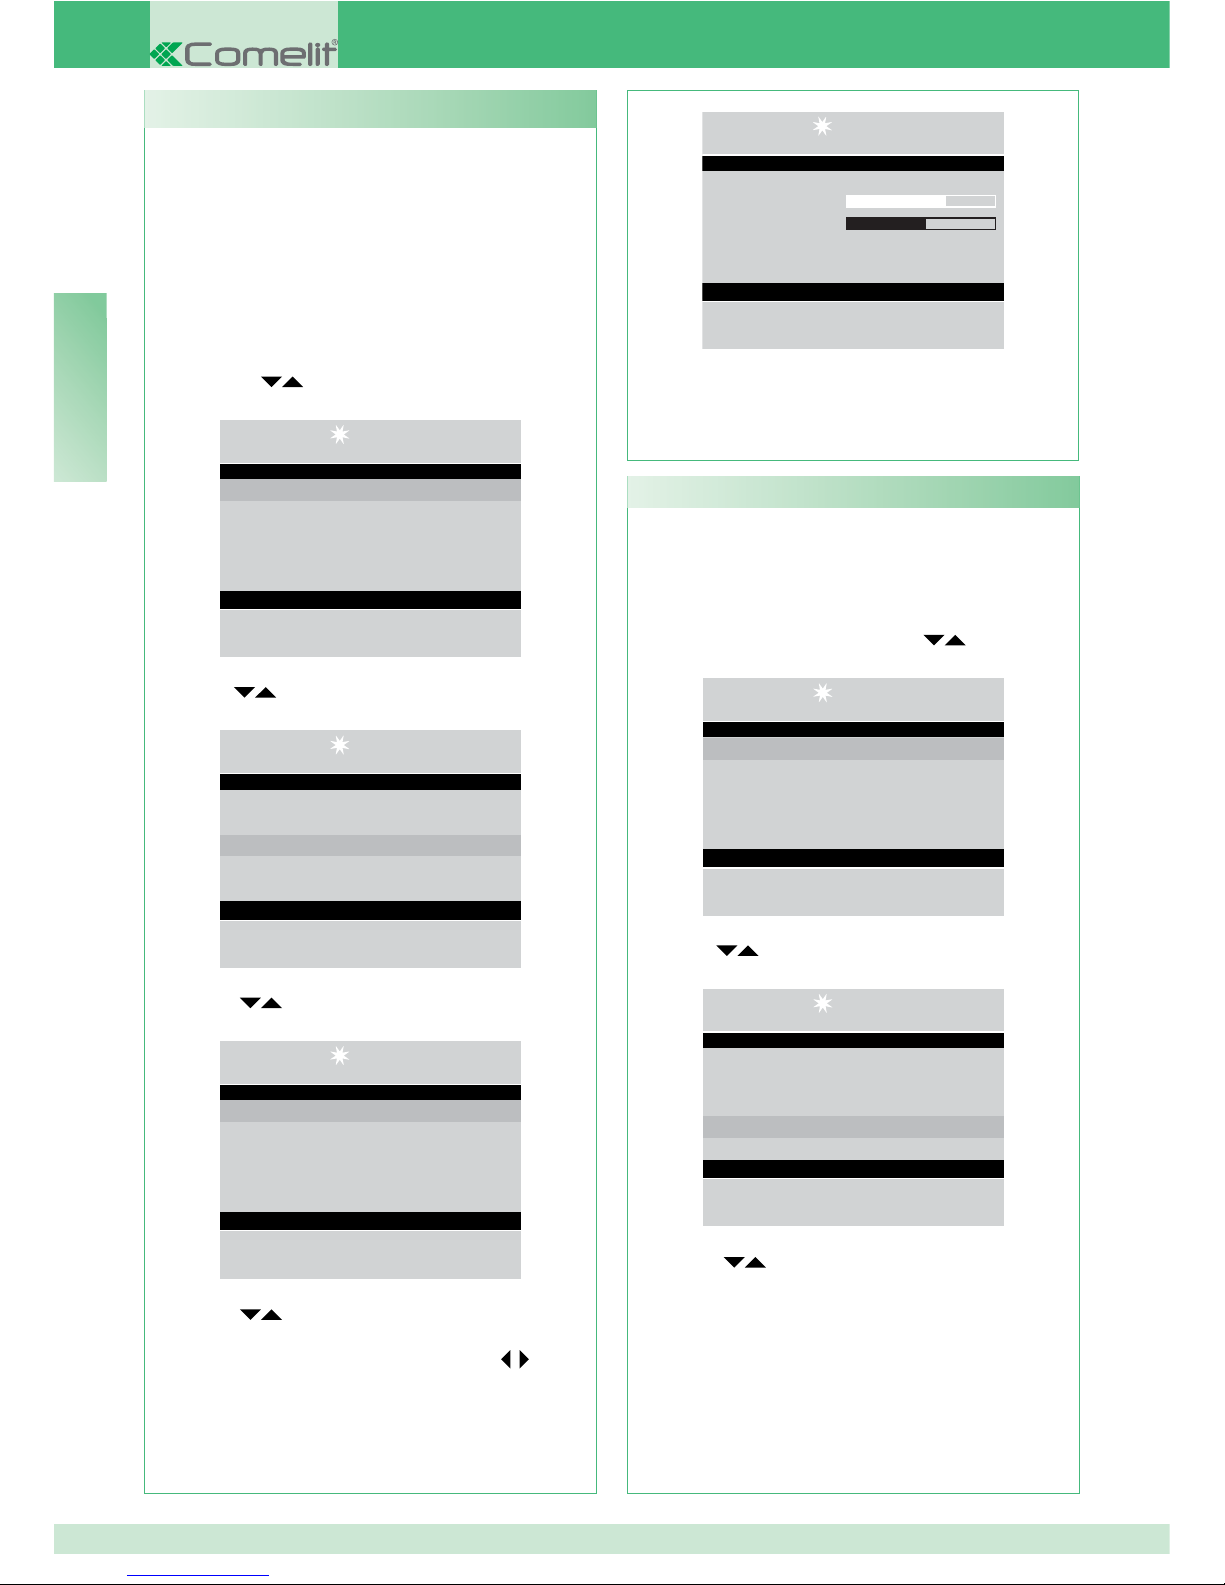
54
EN
This function can be used to adjust the volume of
the switchboard microphone and loudspeaker as it
communicates with the internal units and the external
unit.
N.B. For volume adjustment to take place, the
switchboard must be in communication with the
internal unit or the external unit.
- To access the audio settings quickly, press MENU
+ key 4 (external), key 5 (internal) or press MENU
and use the
keys to view the Settings menu,
press OK;
14 :15 : 26
Mon 12 Mar 12
• Settings
• Configurations
• Directory
• Received calls
• Alarms
- use the
keys to view the Audio menu, press
OK;
14 :15 : 26
Mon 12 Mar 12
• Language
• Video
• Audio
• Tones
• Date
- use the
keys to view the audio setting you
wish to adjust (internal and/or external), press OK;
14 :15 : 26
Mon 12 Mar 12
• Internal
• External
- use the
keys to view the audio setting you
wish to adjust (microphone and/or loudspeaker) and
decrease or increase the value using the keys;
I3 - Audio settings
14 :15 : 26
Mon 12 Mar 12
Microphone
Loudspeaker
Audio settings
- press OK to confi rm the settings;
- press
ESC repeatedly to return to the main screen.
This function can be used to set the melody for
incoming calls made from the internal units, and the
external unit, as well as alarm calls; it is also possible
to activate or deactivate the key tone.
- press the MENU key and use the keys to view
the Settings menu, press OK;
14 :15 : 26
Mon 12 Mar 12
• Settings
• Configurations
• Directory
• Received calls
• Alarms
- use the
keys to view the Tones menu, press
OK;
14 :15 : 26
Mon 12 Mar 12
• Language
• Video
• Audio
• Tones
• Date
- use the
keys to view the tone you wish to
adjust (external, internal, alarm or key tone);
I4 - Tone settings
Page 55
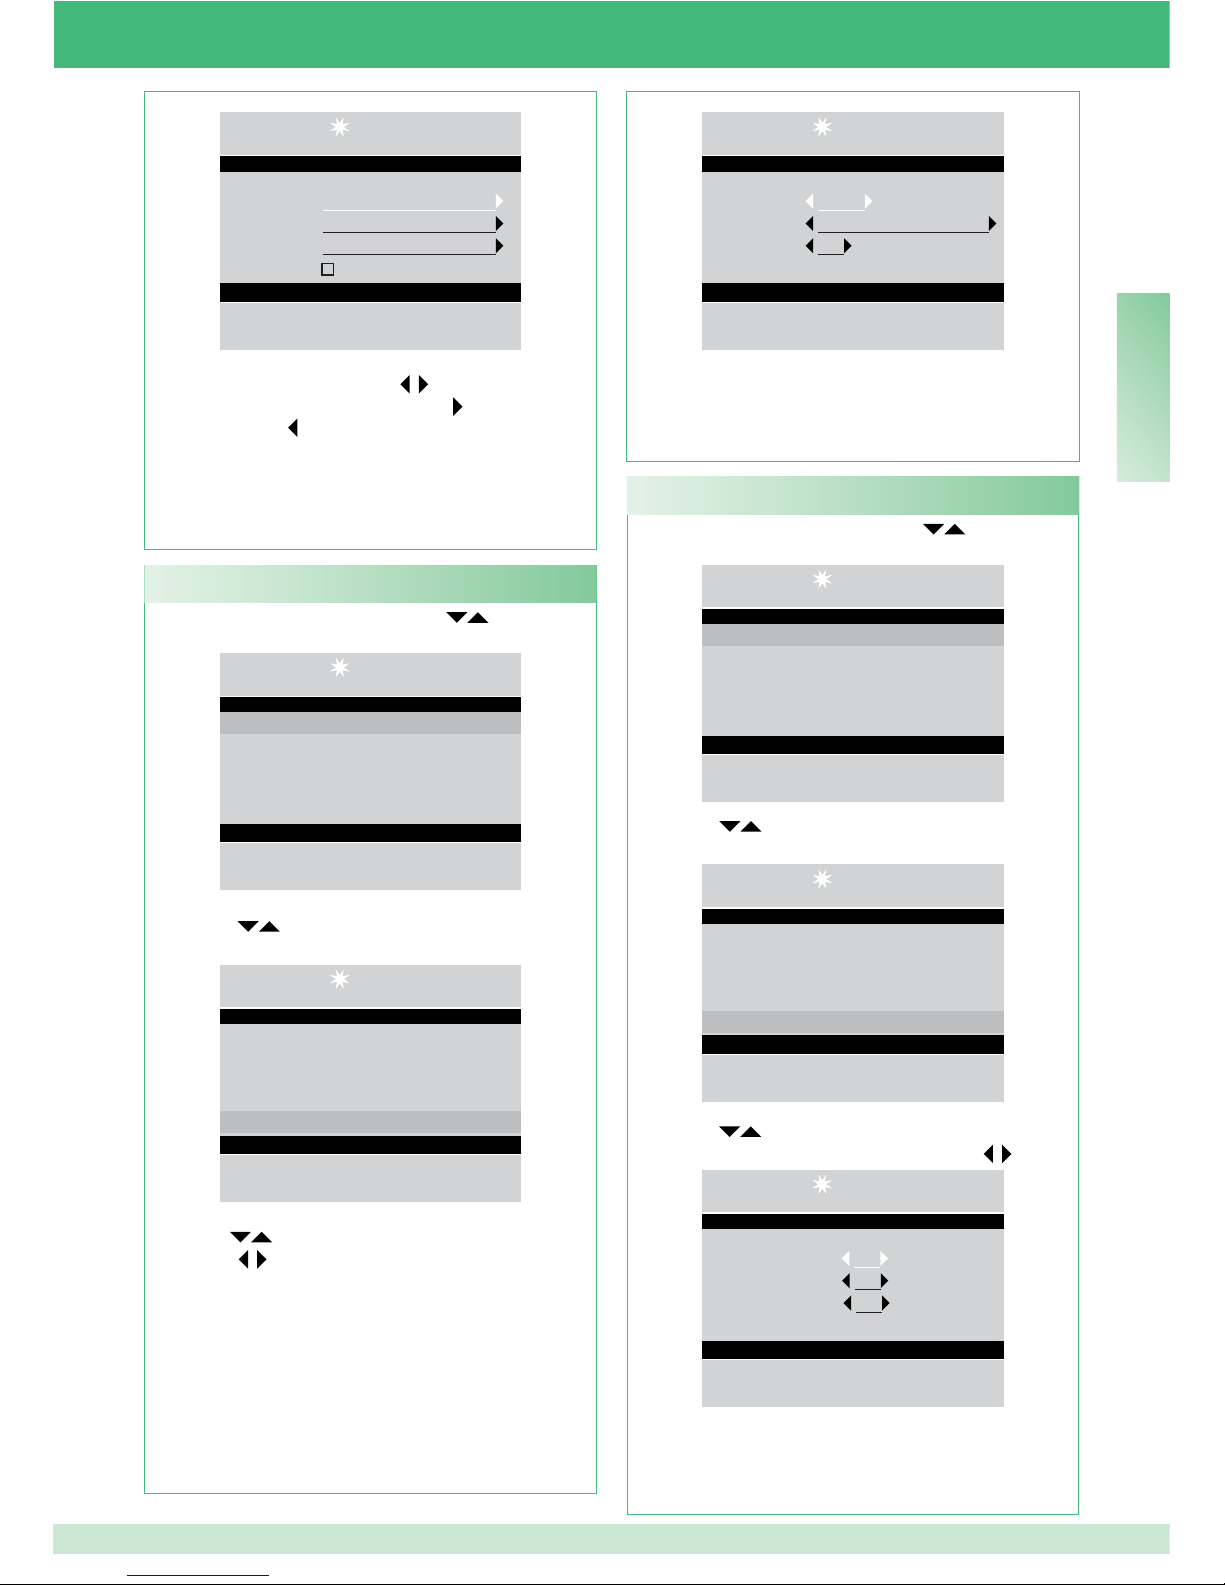
55
EN
- press the MENU key and use the keys to
view the Settings menu, press OK;
14 :15 : 26
Mon 12 Mar 12
• Settings
• Configurations
• Directory
• Received calls
• Alarms
- use the
keys to view the Date menu, press
OK;
14 :15 : 26
Mon 12 Mar 12
• Language
• Video
• Audio
• Tones
• Date
- use the
keys (year, month, day) and change it
using the keys;
I5 - Change date
- press the MENU key and use the keys to view
the Settings menu, press OK;
14 :15 : 26
Mon 12 Mar 12
• Settings
• Configurations
• Directory
• Received calls
• Alarms
- use the
keys to view the Time menu, press
OK;
14 :15 : 26
Mon 12 Mar 12
• Video
• Audio
• Tones
• Date
• Time
- use the
keys (hours, minutes, seconds) and
decrease or increase the value using the
keys;
14 :15 : 26
Mon 12 Mar 12
Hours 14
Minutes 15
Seconds 26
Set time
- press OK to confi rm the settings;
- press
ESC repeatedly to return to the main screen.
I6 - Change time
14 :15 : 26
Mon 12 Mar 12
External Spring
Internal Spring
Alarm Alarm 1
Key tone
Esc Ok
- select the melody using the
keys.
Activate the Tone service using the key.
Disable it using
;
- press OK to confi rm the settings;
- press ESC repeatedly to return to the main screen.
14 :15 : 26
Mon 12 Mar 12
Year 2012
Month March
Day 12
Set date
- press OK to confi rm the settings;
- press
ESC repeatedly to return to the main screen.
Page 56
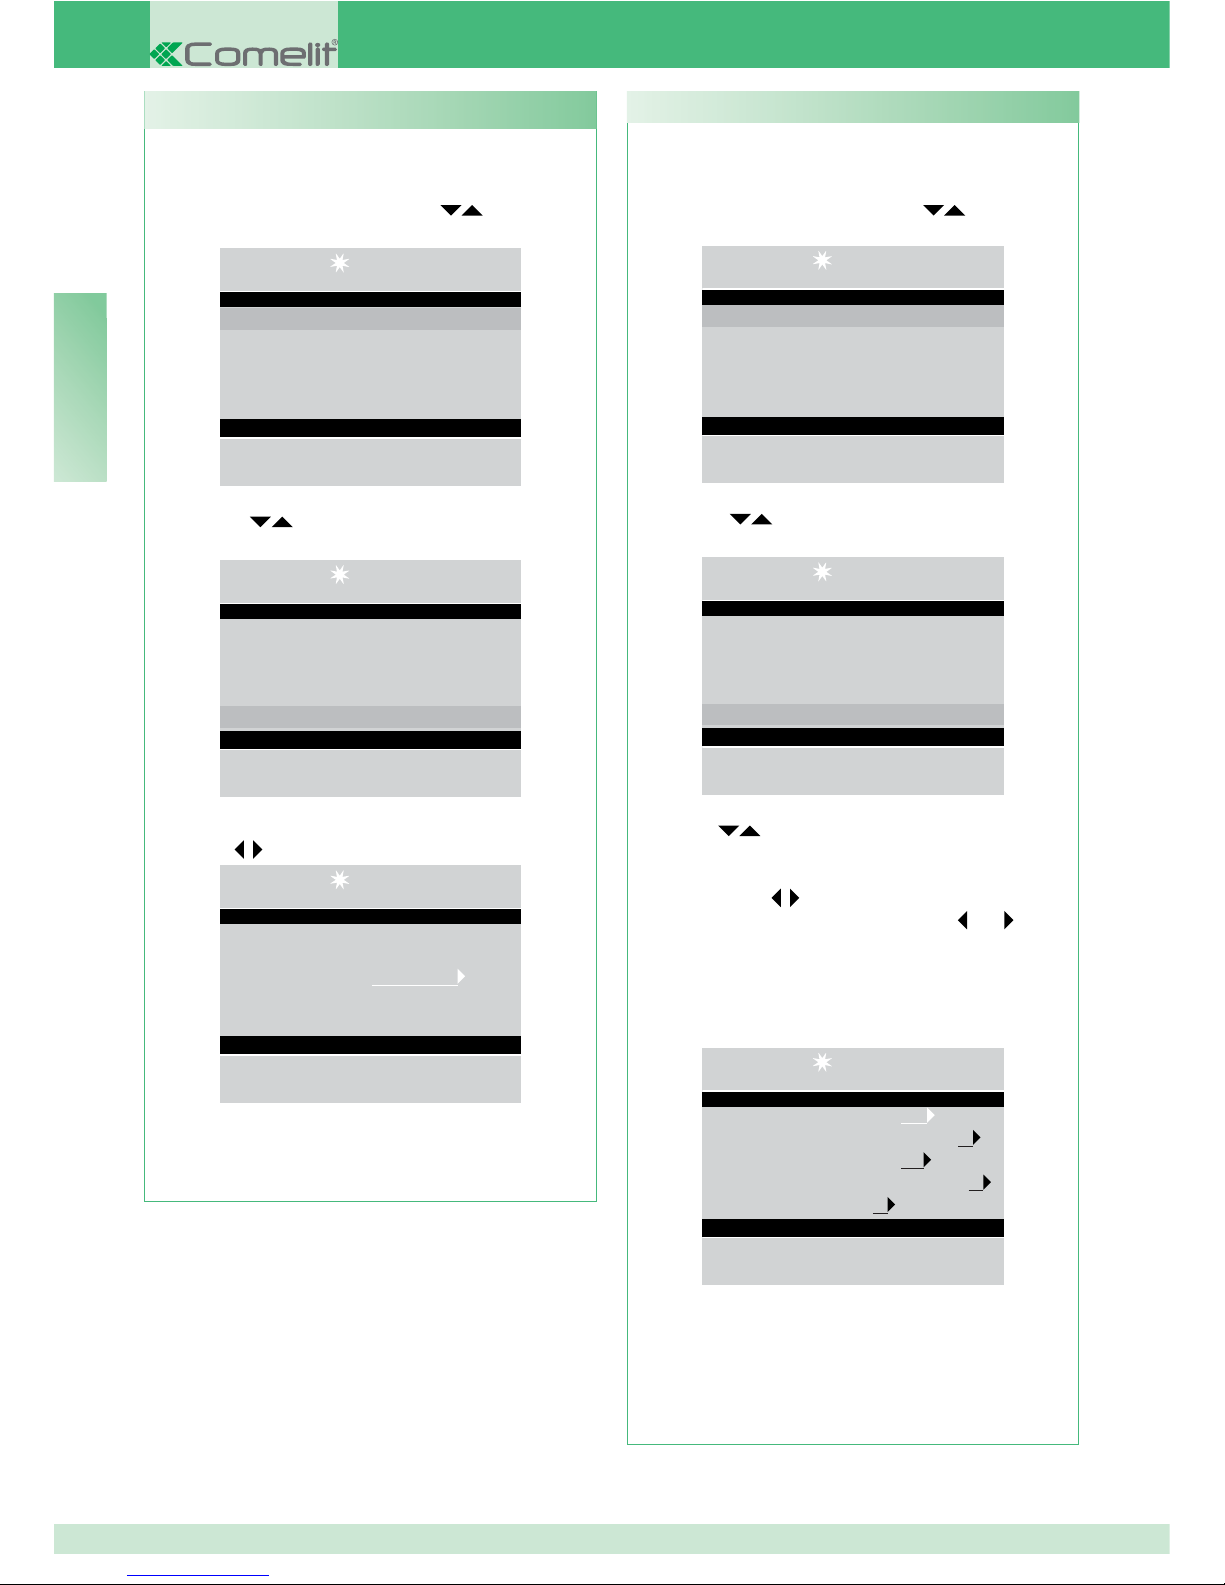
56
EN
This function can be used to change the colour of the
menu screens.
- press the MENU key and use the
keys to view
the Settings menu, press OK;
14 :15 : 26
Mon 12 Mar 12
• Settings
• Configurations
• Directory
• Received calls
• Alarms
- use the
keys to view the Skins menu,
press OK;
14 :15 : 26
Mon 12 Mar 12
• Audio
• Tones
• Date
• Time
• Skins
- use the
keys to select the desired skin;
14 :15 : 26
Mon 12 Mar 12
Skins Blue skin
Esc Ok
-
press OK to confi rm the setting;
- press ESC repeatedly to return to the main screen.
I7 - Set skin
This function can be used to set the audio, reset wait
time, standby, relay activation and call repeat timers.
- press the MENU key and use the
keys to view
the Settings menu, press OK;
14 :15 : 26
Mon 12 Mar 12
• Settings
• Configurations
• Directory
• Received calls
• Alarms
- use the
keys to view the Timers menu,
press OK;
14 :15 : 26
Mon 12 Mar 12
• Tones
• Date
• Time
• Skins
• Timers
- use the
keys to view the setting you wish to
adjust (audio, reset wait time, standby, relay
activation, call repeat) and decrease or increase the
value using the
keys.
To speed up scrolling, press and hold or .
Audio values: 10’’-180’’ max.
Reset wait time values: 1’’-10’’ max.
Standby values: 10’’-120’’ max.
Relay activation values: 1’’-20’’ max.
Call repeat values: 1’’-30’’ max;
14 :15 : 26
Mon 12 Mar 12
Audio 010
Reset wait time 01
Standby 010
Relay activation 01
Call repeat 01
Esc Ok
- press OK to confi rm the settings;
- press
ESC repeatedly to return to the main screen.
I8 - Adjust timers
Page 57
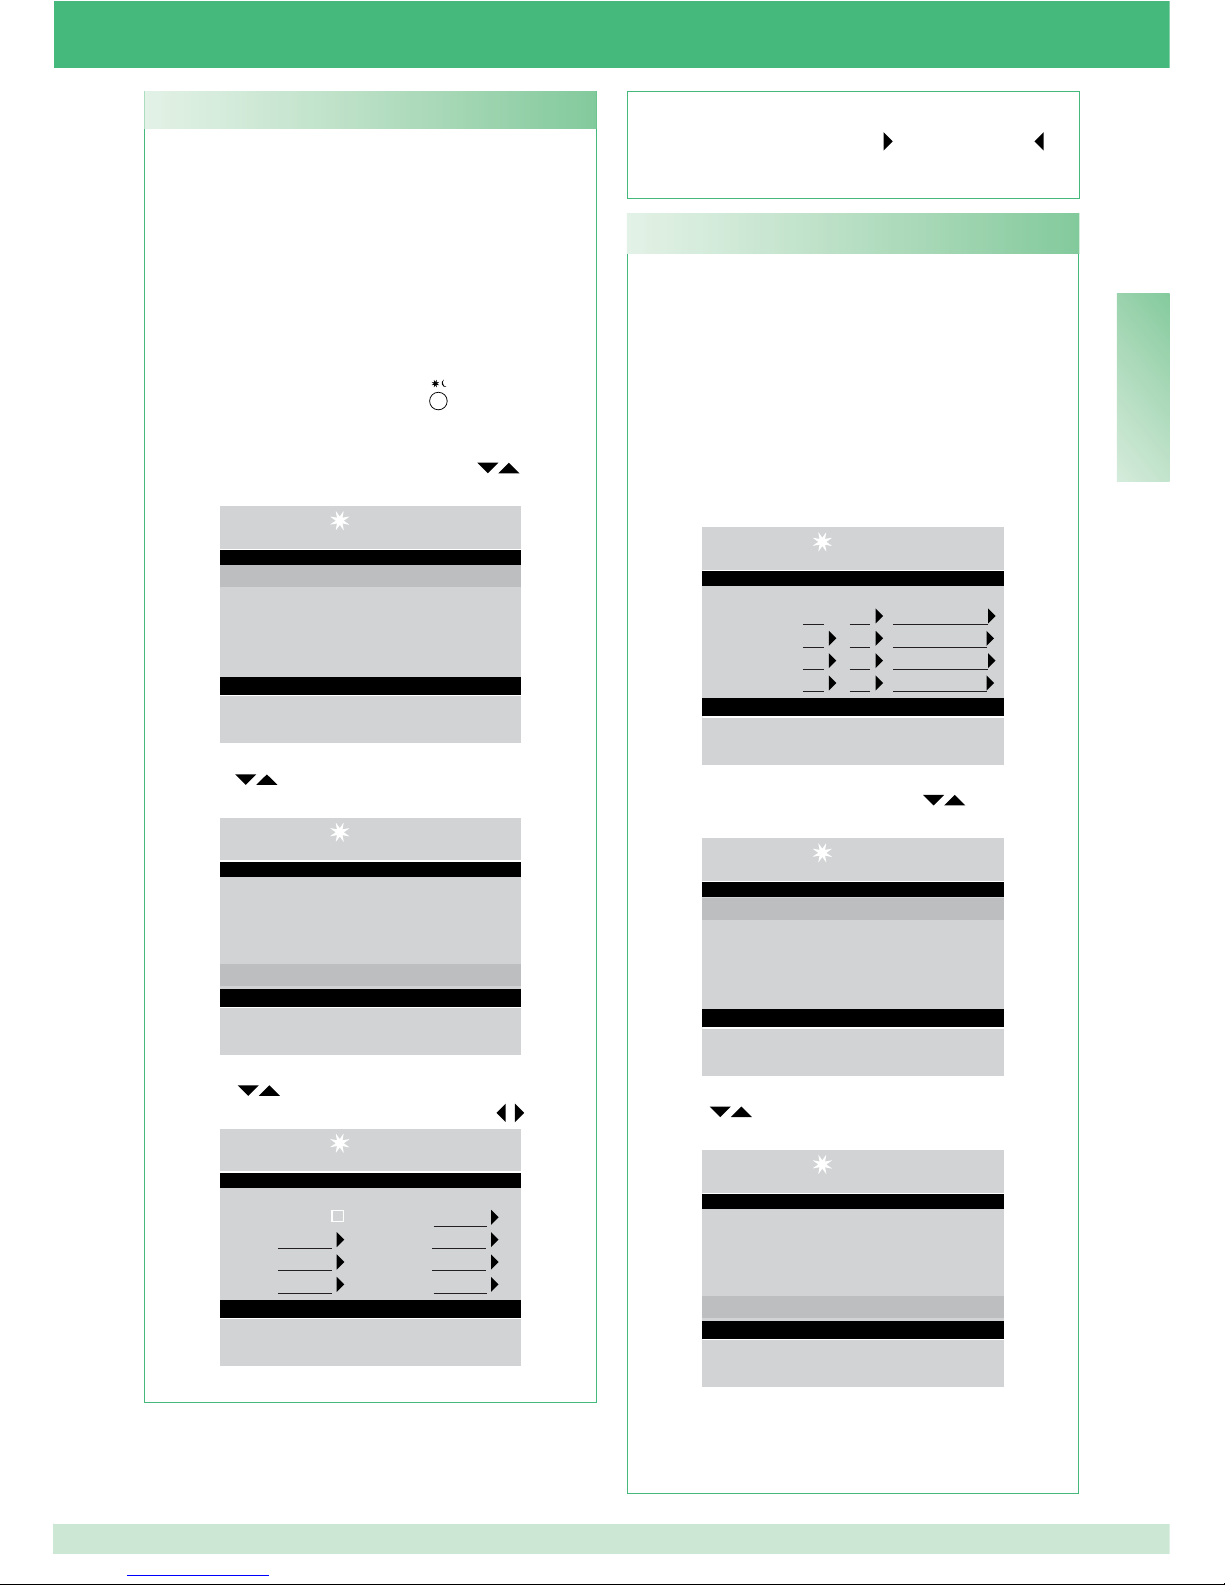
57
EN
The system can be set to allow automatic passage
from DAY mode to NIGHT mode at specifi c times
which can be programmed by the user. Up to 4
TIMETABLES can be set, and switching mode will be
set for each on (Day or Night).
Example:
You want to confi gure the switchboard with the follow-
ing parameters:
07:00 - 12:00 Day mode operation
13:00 - 22:00 Day mode operation
14 :15 : 26
Mon 12 Mar 12
Swt1 07 : 00 Day
Swt2 12 : 00 Night
Swt3 13 : 00 Day
Swt4 22 : 00 Night
Esc Ok
- press the MENU key and use the
keys to view
the Settings menu, press OK;
14 :15 : 26
Mon 12 Mar 12
• Settings
• Configurations
• Directory
• Received calls
• Alarms
- use the
keys to view the Automatic switching
menu, press OK;
14 :15 : 26
Mon 12 Mar 12
• Time
• Skins
• Timers
• Daily mode
• Automatic switching
- the cursor will automatically be positioned on the
min. time for switching 1; decrease or increase the
value using
I10 - Set automatic switching
complete, select Enable and activate the whole
programming schedule using
, to disable use ;
- press OK to confi rm the settings;
- press ESC repeatedly to return to the main screen.
You can decide to organise the week by selecting
one of these 3 operating modes for each day:
• AUTO: the system passes from DAY mode to
NIGHT mode at the programmed times.
• NIGHT: the system is in this mode for the whole day.
• DAY: the system is in this mode for the whole day.
If the “auto” setting is selected, throughout the day
the operating mode will switch at pre-set times, on
the basis of the programming set in accordance
with paragraph “I10 - Set automatic switching” on
page 57.
To deactivate the function, press
.
To activate it:
- press the MENU key and use the
keys to
view the Settings menu, press OK;
14 :15 : 26
Mon 12 Mar 12
• Settings
• Configurations
• Directory
• Received calls
• Alarms
- use the
keys to view the Daily mode menu,
press OK;
14 :15 : 26
Mon 12 Mar 12
• Date
• Time
• Skins
• Timers
• Daily mode
- use the
keys to view the day to be set and
select night, day or auto mode using the
keys;
14 :15 : 26
Mon 12 Mar 12
Enable Wed Night
Sun Night Thu Night
Mon Night Fri Night
Tue Night Sat Night
Esc Ok
- once programming for each day of the week is
I9 - Set daily mode
Page 58
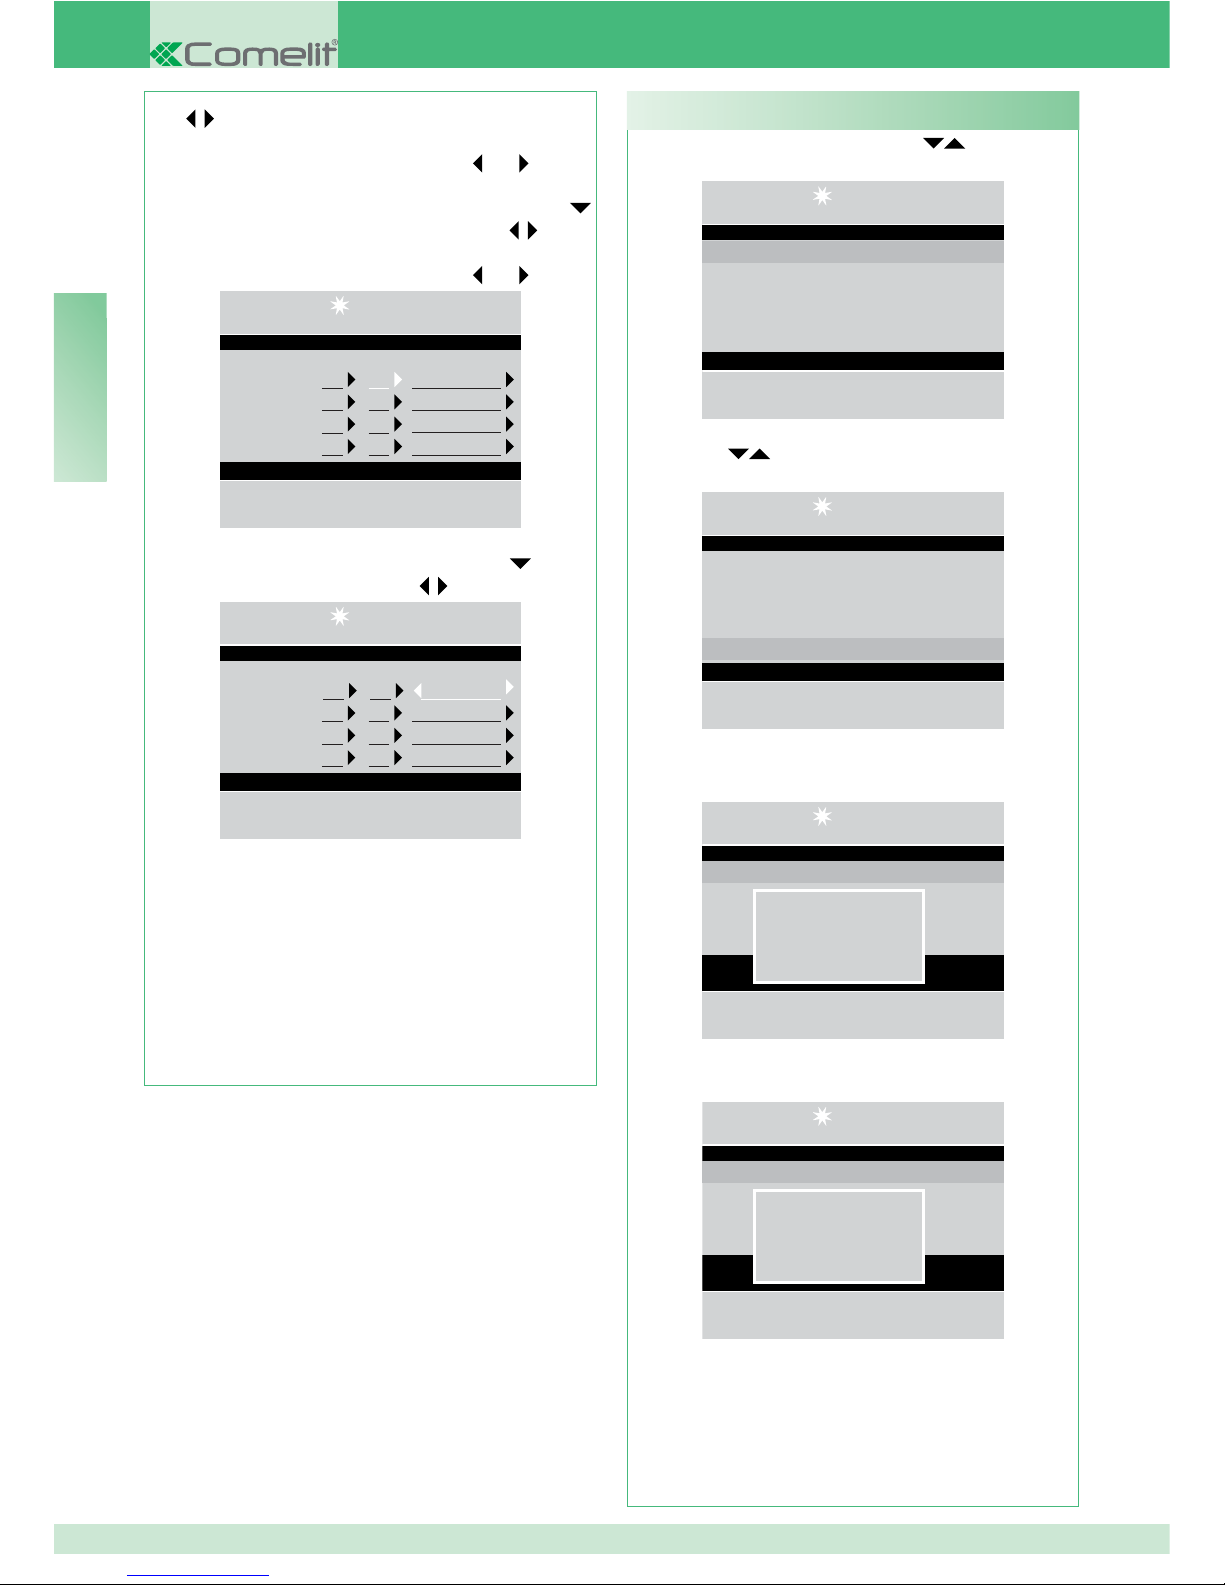
58
EN
- press the MENU key and use the keys to view
the Settings menu, press OK;
14 :15 : 26
Mon 12 Mar 12
• Settings
• Configurations
• Directory
• Received calls
• Alarms
- use the
keys to view the Reset settings
menu, press OK;
14 :15 : 26
Mon 12 Mar 12
• Skins
• Timers
• Daily mode
• Automatic switching
• Reset settings
- a screen will appear, asking if you wish to reset
the settings; confi rm using OK or cancel using ESC
;
14 :15 : 26
Mon 12 Mar 12
• Timers
• Mod
• Swt
Reset?
Ok Esc
- if you press OK, the system reboot screen will
appear;
14 :15 : 26
Mon 12 Mar 12
• Timers
• Mod
• Swt
Reboot system
Ok Esc
- confi rm the system reboot using OK or cancel
using ESC;
- press ESC repeatedly to return to the main screen.
I11 - Reset settings
the
keys.
The value ranges from 00 to 23.
To speed up scrolling, press and hold
or ;
- select the value, in minutes, of switching 1 using
, decrease or increase the value using the keys.
The value ranges from 00 to 59.
To speed up scrolling, press and hold
or ;
14 :15 : 26
Mon 12 Mar 12
Swt1 00 : 00
Swt2 00 : 00
Swt3 00 : 00
Swt4 00 : 00
Esc Ok
- select the last entry for switching 1 using
, select
the mode (day, night) using the keys;
14 :15 : 26
Mon 12 Mar 12
Swt1 00 : 00 Night
Swt2 00 : 00
Swt3 00 : 00
Swt4 00 : 00
Esc Ok
- follow the procedure described up to this point for all
necessary switching procedures;
- press OK to confi rm the settings;
- press
ESC repeatedly to return to the main screen.
Page 59

59
EN
INSTALLER CONFIGURATIONS
• System
System Simplebus Simplebus Top
Link Single Parall. LS-IN Parall. LP-IN
Master in series Slave in series
Call Simplebus Indirect
A/V Audio Video
Backwards com.
Confi gurations
• Services
FollowMe
Call repeat
Internal units on
Triple call
Codes help
Page 60
60
EN
This section is aimed at qualifi ed technicians who,
after installing the product, will program the porter
switchboard using guided menus, which can be
viewed on the display by navigating the main menu.
The switchboard may be secondary or main.
• Set Simplebus when the switchboard is used as
secondary, as output from the LM-LM terminals
of switching devices Art. 1424 (Simplebus TOP
system) (see SBTOP/001DSMC diagram, page
110); or when the switchboard is used in Simplebus
systems with switching devices Art. 1224A or in a
system with a single riser and no switching devices.
CAUTION! the secondary switchboard cannot be
confi gured as a switchboard in parallel.
• Set Simplebus top when the switchboard is used
as main in a Simplebus top system, and therefore
positioned upline of switching devices Art. 1424
marking the zones/risers (see SBTOP/002DSMC
digram, page 112).
The secondary or main switchboard must then be
confi gured as:
1- SINGLE
2- PARALLEL
3- SERIES
1- Select single when the switchboard is the only one
in the system, or the only one serving a specifi c
riser.
2- If there are 2 main or secondary switchboards
serving the same riser, the parallel confi guration
means that both switchboards will be operating
with the same functions (see SBTOP/005DSMC
diagram, page 118).
The fi rst of the two to answer a call will preclude
the possibility of the other one performing the same
procedure.
If one of the 2 devices is switched on or off, the
other will automatically follow suit.
Set the switchboard connected under the LS-LS
line of switching device Art. 1424 as Parall. LS-IN;
set the switchboard located under the LPin-LPin
line of switching device Art. 1424 as Parall. LP-IN.
For the parallel switchboard, switching to NIGHT
and the AUTOMATIC DAY/NIGHT function is not
possible (see “I9- Set daily mode”, page 57).
A P should appear on the standby screen of the
two switchboards, indicating that the switchboard
is confi gured in parallel, in addition to the fi xed icon
.
3- If there are 2 main or secondary switchboards
serving the same riser, the series confi guration
means that only 1 of the 2 can operate at one time
C1 - Type of switchboard (Simplebus Top mode)
(Master in series), while the other is deactivated
(Slave in series) (see SBTOP/004DSMC diagram,
page 116).
To change a switchboard from master to slave and
vice-versa, see “U11 How to activate or deactivate
the main switchboards”, page 43.
An S should appear on the standby screen of the
two switchboards, indicating that the switchboard is
confi gured in
series, in addition to the fi xed icon
.
CAUTION!
- if
fl ashes, it is indicating that the 2 switchboards
are not communicating correctly.
- if the icon ! appears, there is a problem with the
confi guration of the 2 switchboards (e.g. both master
or slave in series, Parall. LP-IN or Parall. LS-IN or
one in series and the other parallel).
- if in a Simplebus TOP system (with switching
devices Art. 1424), both main and secondary
switchboards are present (see SBTOP/003DSMC
diagram page 114); for correct system operation the
setting “C5- Backwards compatibility”, page 62, must
be activated on all switchboards.
INSTALLER CONFIGURATIONS
Page 61

60A
Codice/
Code
Dip switch ON Nome/Name
Codice/
Code
Dip switch ON Nome/Name
1 1 31 1,2,3,4,5
2 2 32 6
3 1,2 33 1,6
4 3 34 2,6
5 1,3 35 1,2,6
6 2,3 36 3,6
7 1,2,3 37 1,3,6
8 4 38 2,3,6
9 1,4 39 1,2,3,6
10 2,4 40 4,6
11 1,2,4 41 1,4,6
12 3,4 42 2,4,6
13 1,3,4 43 1,2,4,6
14 2,3,4 44 3,4,6
15 1,2,3,4 45 1,3,4,6
16 5 46 2,3,4,6
17 1,5 47 1,2,3,4,6
18 2,5 48 5,6
19 1,2,5 49 1,5,6
20 3,5 50 2,5,6
21 1,3,5 51 1,2,5,6
22 2,3,5 52 3,5,6
23 1,2,3,5 53 1,3,5,6
24 4,5 54 2,3,5,6
25 1,4,5 55 1,2,3,5,6
26 2,4,5 56 4,5,6
27 1,2,4,5 57 1,4,5,6
28 3,4,5 58 2,4,5,6
29 1,3,4,5 59 1,2,4,5,6
30 2,3,4,5 60 3,4,5,6
IT
EN
FR
Tabella di programmazione dei dip switch.
COMPILARE E CONSERVARE
NELL’IMPIANTO
Dip switch programming table.
COMPLETE AND
KEEP WITH UNIT
Tableau de programmation des DIP switches.
REMPLIR ET CONSERVER
DANS L’INSTALLATION
Page 62

60B
Codice/
Code
Dip switch ON Nome/Name
Codice/
Code
Dip switch ON Nome/Name
61 1,3,4,5,6 91 1,2,4,5,7
62 2,3,4,5,6 92 3,4,5,7
63 1,2,3,4,5,6 93 1,3,4,5,7
64 7 94 2,3,4,5,7
65 1,7 95 1,2,3,4,5,7
66 2,7 96 6,7
67 1,2,7 97 1,6,7
68 3,7 98 2,6,7
69 1,3,7 99 1,2,6,7
70 2,3,7 100 3,6,7
71 1,2,3,7 101 1,3,6,7
72 4,7 102 2,3,6,7
73 1,4,7 103 1,2,3,6,7
74 2,4,7 104 4,6,7
75 1,2,4,7 105 1,4,6,7
76 3,4,7 106 2,4,6,7
77 1,3,4,7 107 1,2,4,6,7
78 2,3,4,7 108 3,4,6,7
79 1,2,3,4,7 109 1,3,4,6,7
80 5,7 110 2,3,4,6,7
81 1,5,7 111 1,2,3,4,6,7
82 2,5,7 112 5,6,7
83 1,2,5,7 113 1,5,6,7
84 3,5,7 114 2,5,6,7
85 1,3,5,7 115 1,2,5,6,7
86 2,3,5,7 116 3,5,6,7
87 1,2,3,5,7 117 1,3,5,6,7
88 4,5,7 118 2,3,5,6,7
89 1,4,5,7 119 1,2,3,5,6,7
90 2,4,5,7 120 4,5,6,7
COMPILARE E CONSERVARE
NELL’IMPIANTO
COMPLETE AND
KEEP WITH UNIT
REMPLIR ET CONSERVER
DANS L’INSTALLATION
Page 63

60C
Codice/
Code
Dip switch ON Nome/Name
Codice/
Code
Dip switch ON Nome/Name
121 1,4,5,6,7 151 1,2,3,5,8
122 2,4,5,6,7 152 4,5,8
123 1,2,4,5,6,7 153 1,4,5,8
124 3,4,5,6,7 154 2,4,5,8
125 1,3,4,5,6,7 155 1,2,4,5,8
126 2,3,4,5,6,7 156 3,4,5,8
127 1,2,3,4,5,6,7 157 1,3,4,5,8
128 8 158 2,3,4,5,8
129 1,8 159 1,2,3,4,5,8
130 2,8 160 6,8
131 1,2,8 161 1,6,8
132 3,8 162 2,6,8
133 1,3,8 163 1,2,6,8
134 2,3,8 164 3,6,8
135 1,2,3,8 165 1,3,6,8
136 4,8 166 2,3,6,8
137 1,4,8 167 1,2,3,6,8
138 2,4,8 168 4,6,8
139 1,2,4,8 169 1,4,6,8
140 3,4,8 170 2,4,6,8
141 1,3,4,8 171 1,2,4,6,8
142 2,3,4,8 172 3,4,6,8
143 1,2,3,4,8 173 1,3,4,6,8
144 5,8 174 2,3,4,6,8
145 1,5,8 175 1,2,3,4,6,8
146 2,5,8 176 5,6,8
147 1,2,5,8 177 1,5,6,8
148 3,5,8 178 2,5,6,8
149 1,3,5,8 179 1,2,5,6,8
150 2,3,5,8 180 3,5,6,8
COMPILARE E CONSERVARE
NELL’IMPIANTO
COMPLETE AND
KEEP WITH UNIT
REMPLIR ET CONSERVER
DANS L’INSTALLATION
Page 64

60D
Codice/
Code
Dip switch ON Nome/Name
Codice/
Code
Dip switch ON Nome/Name
181 1,3,5,6,8 211 1,2,5,7,8
182 2,3,5,6,8 212 3,5,7,8
183 1,2,3,5,6,8 213 1,3,5,7,8
184 4,5,6,8 214 2,3,5,7,8
185 1,4,5,6,8 215 1,2,3,5,7,8
186 2,4,5,6,8 216 4,5,7,8
187 1,2,4,5,6,8 217 1,4,5,7,8
188 3,4,5,6,8 218 2,4,5,7,8
189 1,3,4,5,6,8 219 1,2,4,5,7,8
190 2,3,4,5,6,8 220 3,4,5,7,8
191 1,2,3,4,5,6,8 221 1,3,4,5,7,8
192 7,8 222 2,3,4,5,7,8
193 1,7,8 223 1,2,3,4,5,7,8
194 2,7,8 224 6,7,8
195 1,2,7,8 225 1,6,7,8
196 3,7,8 226 2,6,7,8
197 1,3,7,8 227 1,2,6,7,8
198 2,3,7,8 228 3,6,7,8
199 1,2,3,7,8 229 1,3,6,7,8
200 4,7,8 230 2,3,6,7,8
201 1,4,7,8 231 1,2,3,6,7,8
202 2,4,7,8 232 4,6,7,8
203 1,2,4,7,8 233 1,4,6,7,8
204 3,4,7,8 234 2,4,6,7,8
205 1,3,4,7,8 235 1,2,4,6,7,8
206 2,3,4,7,8 236 3,4,6,7,8
207 1,2,3,4,7,8 237 1,3,4,6,7,8
208 5,7,8 238 2,3,4,6,7,8
209 1,5,7,8¸¸¸¸ 239 1,2,3,4,6,7,8
210 2,5,78 *240 5,6,7,8
*1998/A
COMPILARE E CONSERVARE
NELL’IMPIANTO
COMPLETE AND
KEEP WITH UNIT
REMPLIR ET CONSERVER
DANS L’INSTALLATION
Page 65
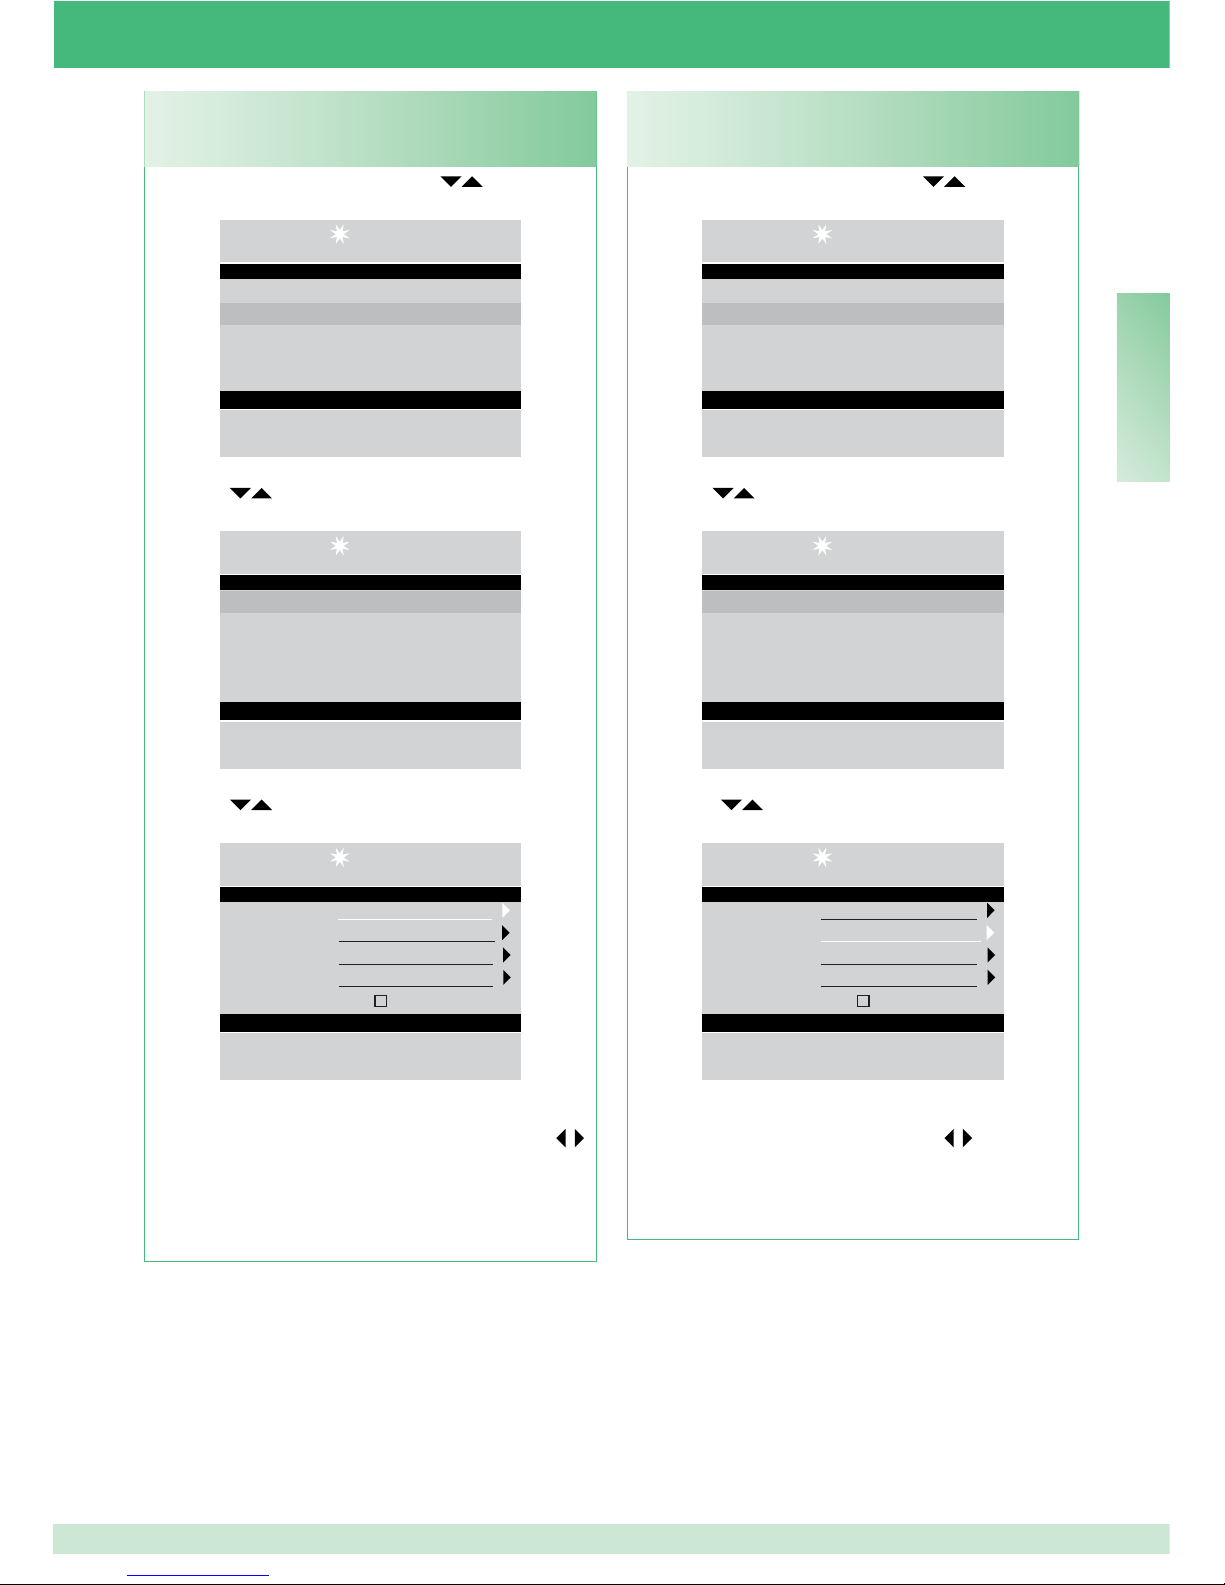
61
EN
- press the MENU key and use the keys to view
the Confi gurations menu, press OK;
14 :15 : 26
Mon 12 Mar 12
• Settings
• Configurations
• Directory
• Received calls
• Alarms
- use the
keys to view the System menu, press
OK;
14 :15 : 26
Mon 12 Mar 12
• System
• Services
- use the
keys to view the System menu, press
OK;
14 :15 : 26
Mon 12 Mar 12
System Simplebus
Link Single
Call Simplebus
A/V Audio
Backwards com.
Esc Ok
- select Simplebus (for secondary switchboard) or
Simplebus Top (for main switchboard) using the
keys;
- press OK to confi rm the settings;
- press ESC repeatedly to return to the main screen.
C2 - How to confi gure a main or secondary
switchboard
- press the MENU key and use the keys to view
the Confi gurations menu, press OK;
14 :15 : 26
Mon 12 Mar 12
• Settings
• Configurations
• Directory
• Received calls
• Alarms
- use the
keys to view the System menu, press
OK;
14 :15 : 26
Mon 12 Mar 12
• System
• Services
- use the
keys to view the Link menu, press
OK;
14 :15 : 26
Mon 12 Mar 12
System Simplebus
Link Single
Call Simplebus
A/V Audio
Backwards com.
Esc Ok
- select Single, Parall. LS-IN, Parall. LP-IN, Master
in series, Slave in series using the
keys;
- press OK to confi rm the settings;
- press ESC repeatedly to return to the main screen.
C3 - How to confi gure a switchboard as single,
parallel or series
Page 66
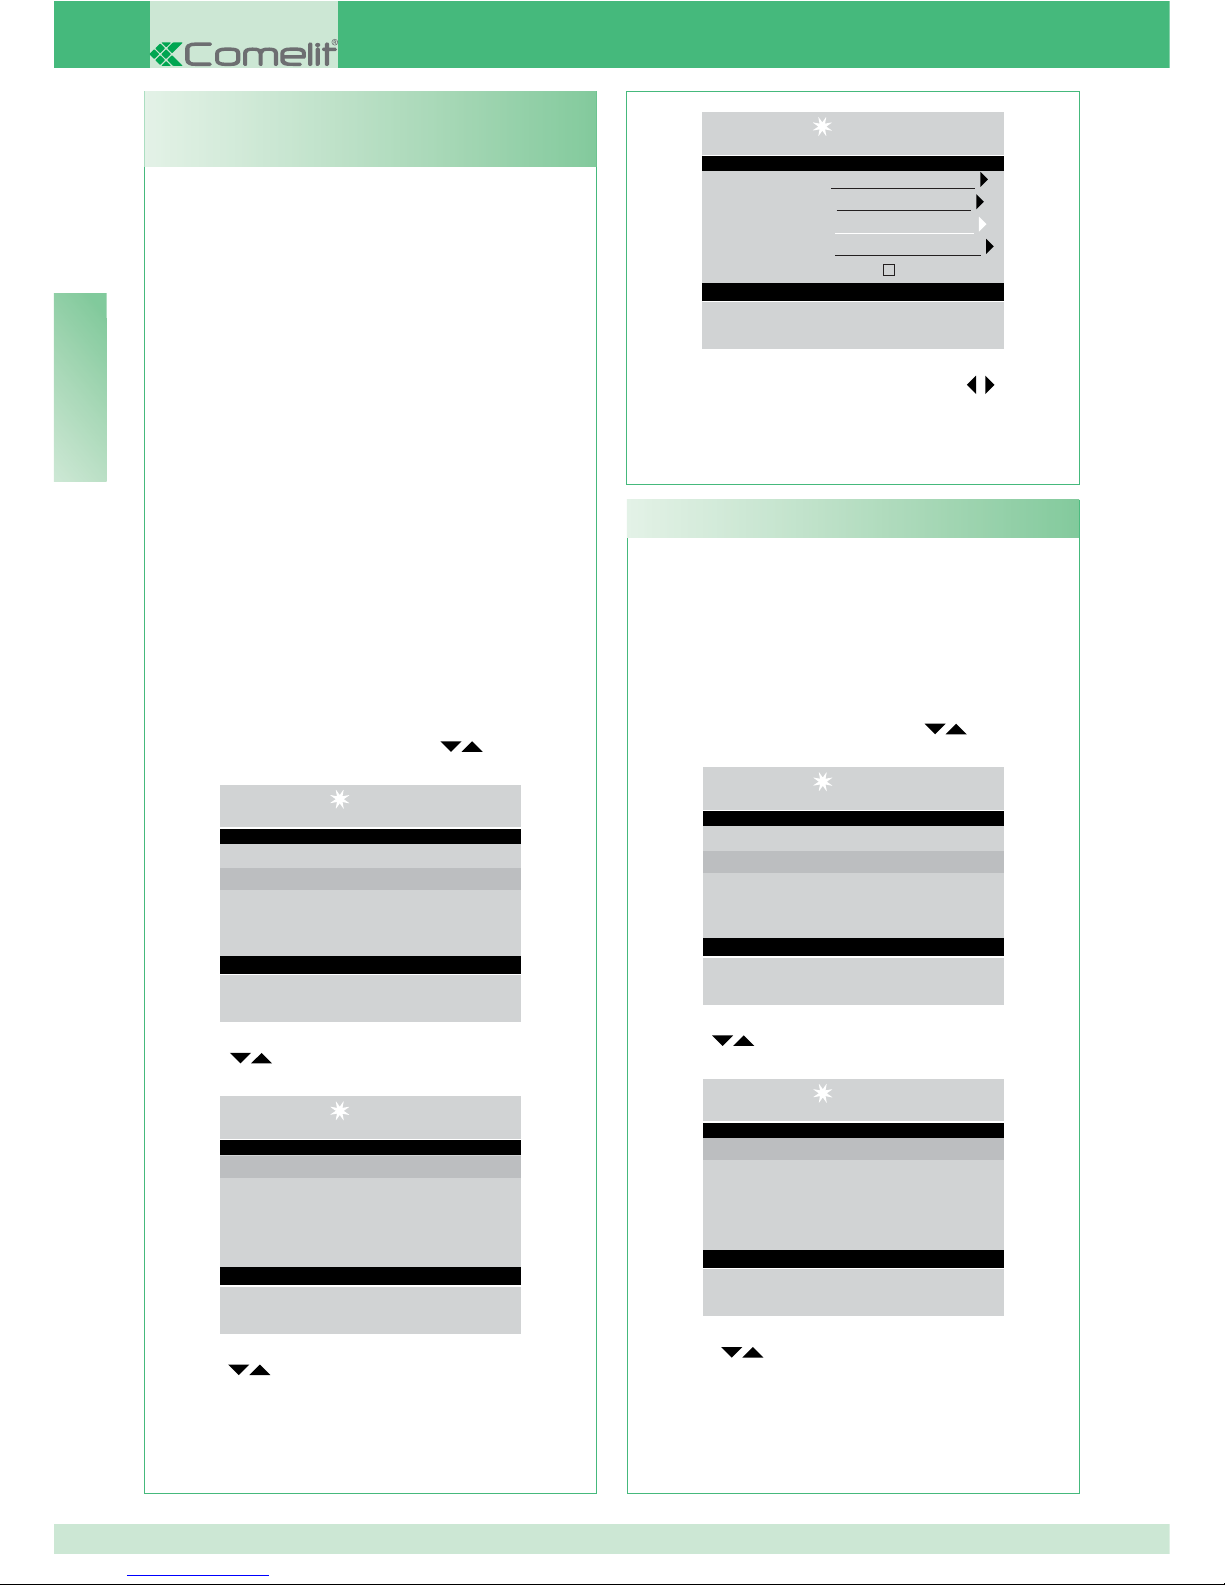
62
EN
This is disabled by default.
CAUTION!
This function must be enabled to prevent
malfunctioning if there are items with a revision
index (R.I.) lower than those listed in the table
on page 63.
To activate the function:
- press the MENU key and use the
keys to view
the Confi gurations menu, press OK;
14 :15 : 26
Mon 12 Mar 12
• Settings
• Configurations
• Directory
• Received calls
• Alarms
- use the
keys to view the System menu, press
OK;
14 :15 : 26
Mon 12 Mar 12
• System
• Services
- use the
keys to view the Backwards com.
menu, press OK;
This function can be used to select the manual
switchboard calling mode, from the 2 options
available:
1- Simplebus call (default), the call is made by
entering the code corresponding to each user.
• If the system is a Simplebus type, the door-entry
phone user is identifi ed by a User Name fi eld
(optional) and a Code fi eld no longer than 3 digits
(between 1 and 240).
EXAMPLE: User name = Smith; Code = 015.
• If using a Simplebus top system, the door-entry
phone user is identifi ed by the User Name fi eld
(optional) and a Code fi eld consisting of 2 parts, a
zone fi eld with up to 3 digits (between 1 and 500)
and a user fi eld which must have 3 digits (between
1 and 240).
EXAMPLE: User name = Smith; Code = 25 015.
2- Indirect call, the call is made by entering the
indirect code, which should have a maximum of
6 digits. This code must be stored in the memory
and associated with the user who has been given
a name (compulsory) and Simplebus (or Simplebus
TOP code).
To activate the function:
- press the MENU key and use the
keys to view
the Confi gurations menu, press OK;
14 :15 : 26
Mon 12 Mar 12
• Settings
• Configurations
• Directory
• Received calls
• Alarms
- use the
keys to view the System menu, press
OK;
14 :15 : 26
Mon 12 Mar 12
• System
• Services
- use the
keys to view the Call menu, press OK;
14 :15 : 26
Mon 12 Mar 12
System Simplebus
Link Single
Call Indirect
A/V Audio
Backwards com.
Esc Ok
- select Simplebus or Indirect using the
keys;
- press OK to confi rm the settings;
- press ESC repeatedly to return to the main screen.
C4 - Call via Simplebus or indirect code
C5 - Backwards compatibility
Page 67
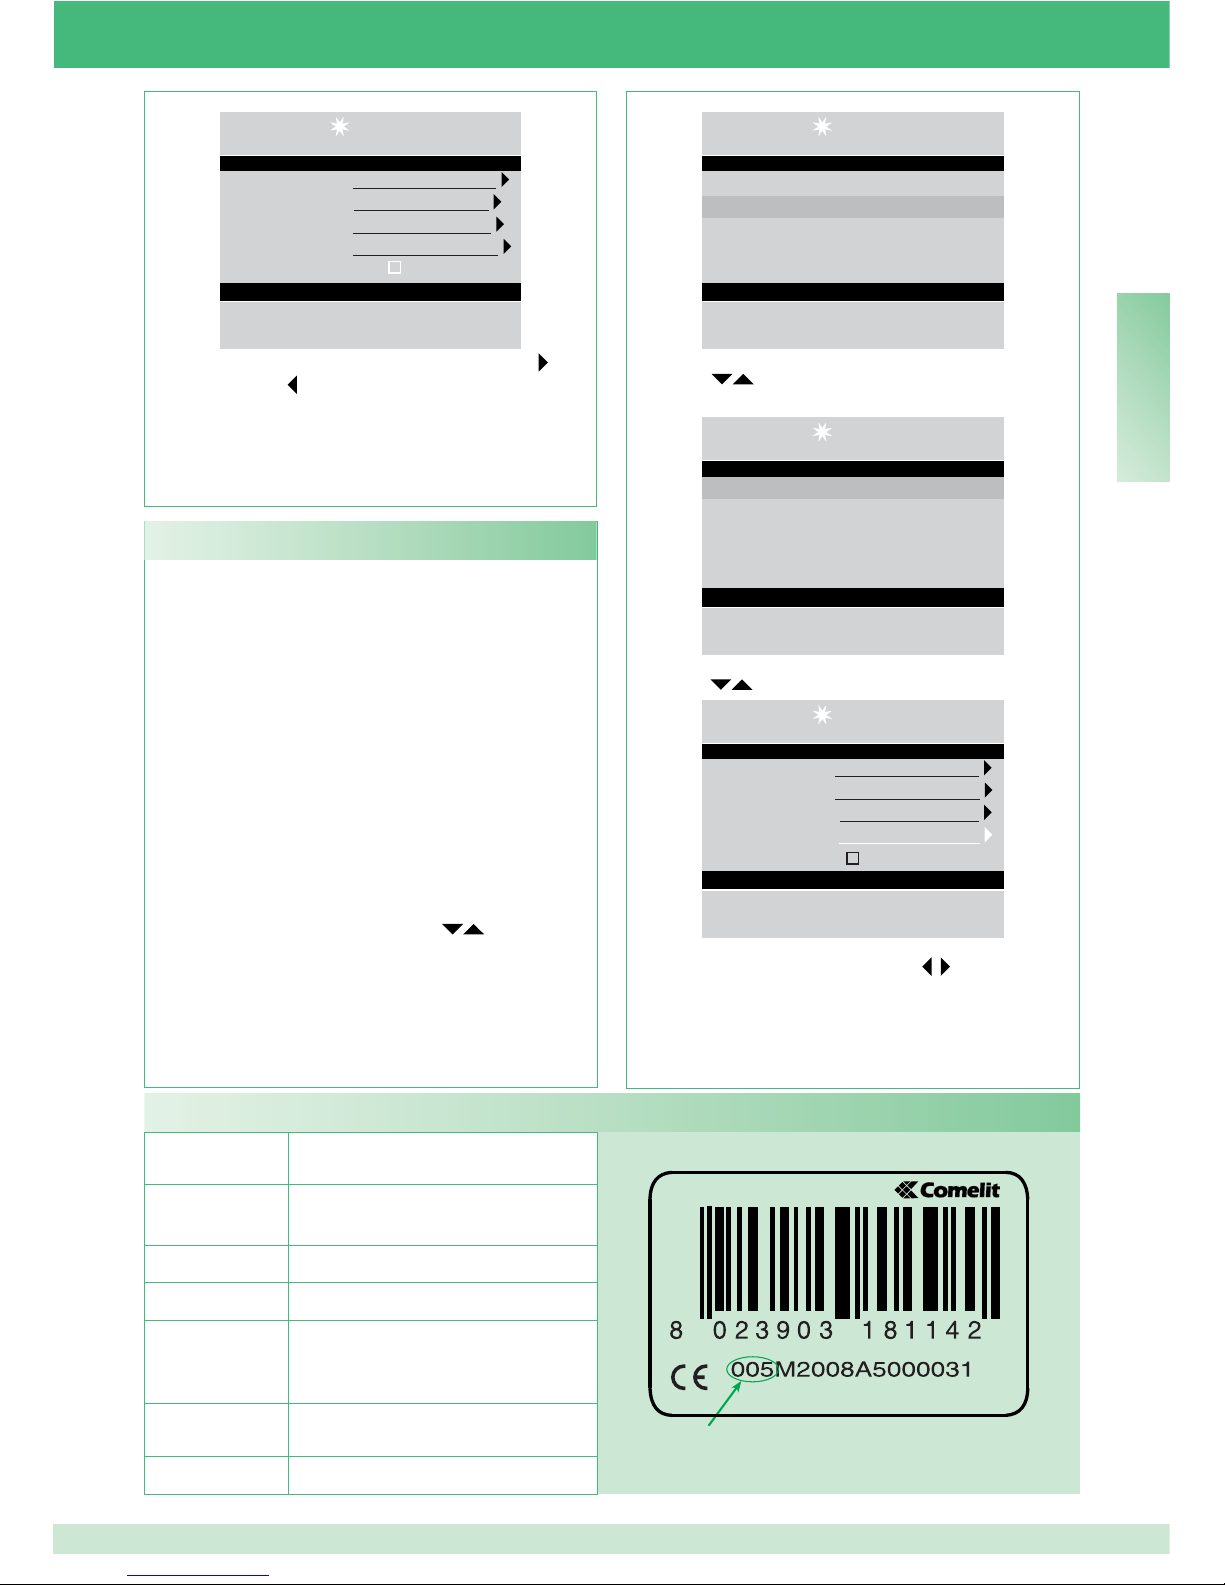
63
EN
IR
Audio call by default.
Activating video calling will allow you to make a video
call to an internal unit. The monitor called by the
switchboard will switch on, making it possible to view,
for example, the images from the remote cameras
connected to Art. 1259/A or Art. 1259C (see FT/SB/13
or FT/SBC/05).
When backwards compatibility is deactivated (see C5
- Backwards compatibility, page 62), when the internal
unit receives a call from the switchboard, the video
comes on immediately by default.
When backwards compatibility is activated, when the
internal unit receives a call from the switchboard, the
video comes on when the handset is lifted.
To activate audio or video calling:
- press the MENU key and use the
keys to view
the Confi gurations menu, press OK;
Table of Simplebus TOP products
Brackets
Art. 5714C R.I. 007 - Art. 5814C R.I.
002 Art. 6114C R.I. 015
Door-entry
phones
Art. 2608 R.I. 006 - Art. 2610 R.I. 008
Art. 2619 R.I. 000 - Art. 2628 R.I. 005
Art. 2638 R.I. 006
Switching
devices
Art. 1424 R.I. 002
Mixers
Art. 4888C R.I. 013
External units
Art. 1602 R.I. 027 - Art. 1602VCF R.I. 002
Art. 3340 R.I. 021 - Art. 3342 R.I. 021
Art. 3070/A R.I. 010 - Art. 3072/A R.I. 010
Art. 4660C R.I. 013
Switchboards
Art. 1998A R.I. 006 - Art. 1998V R.I. 001
Art. 1998VC R.I. 001
Software
Art. 1249/A R.I. 002
C6 - Audio or video call
14 :15 : 26
Mon 12 Mar 12
System Simplebus
Link Single
Call Indirect
A/V Audio
Backwards com.
Esc Ok
Activate the Backwards com. service using the
key.
Disable it using ;
- press OK to confi rm the settings;
- press ESC repeatedly to return to the main screen.
14 :15 : 26
Mon 12 Mar 12
• Settings
• Configurations
• Directory
• Received calls
• Alarms
- use the
keys to view the System menu, press
OK;
14 :15 : 26
Mon 12 Mar 12
• System
• Services
- use the
keys to view the A/V menu, press OK;
14 :15 : 26
Mon 12 Mar 12
System Simplebus
Link Single
Call Indirect
A/V Audio
Backwards com.
Esc Ok
- select Audio or Video using the
keys;
- press OK to confi rm the settings;
- press ESC repeatedly to return to the main screen.
Page 68
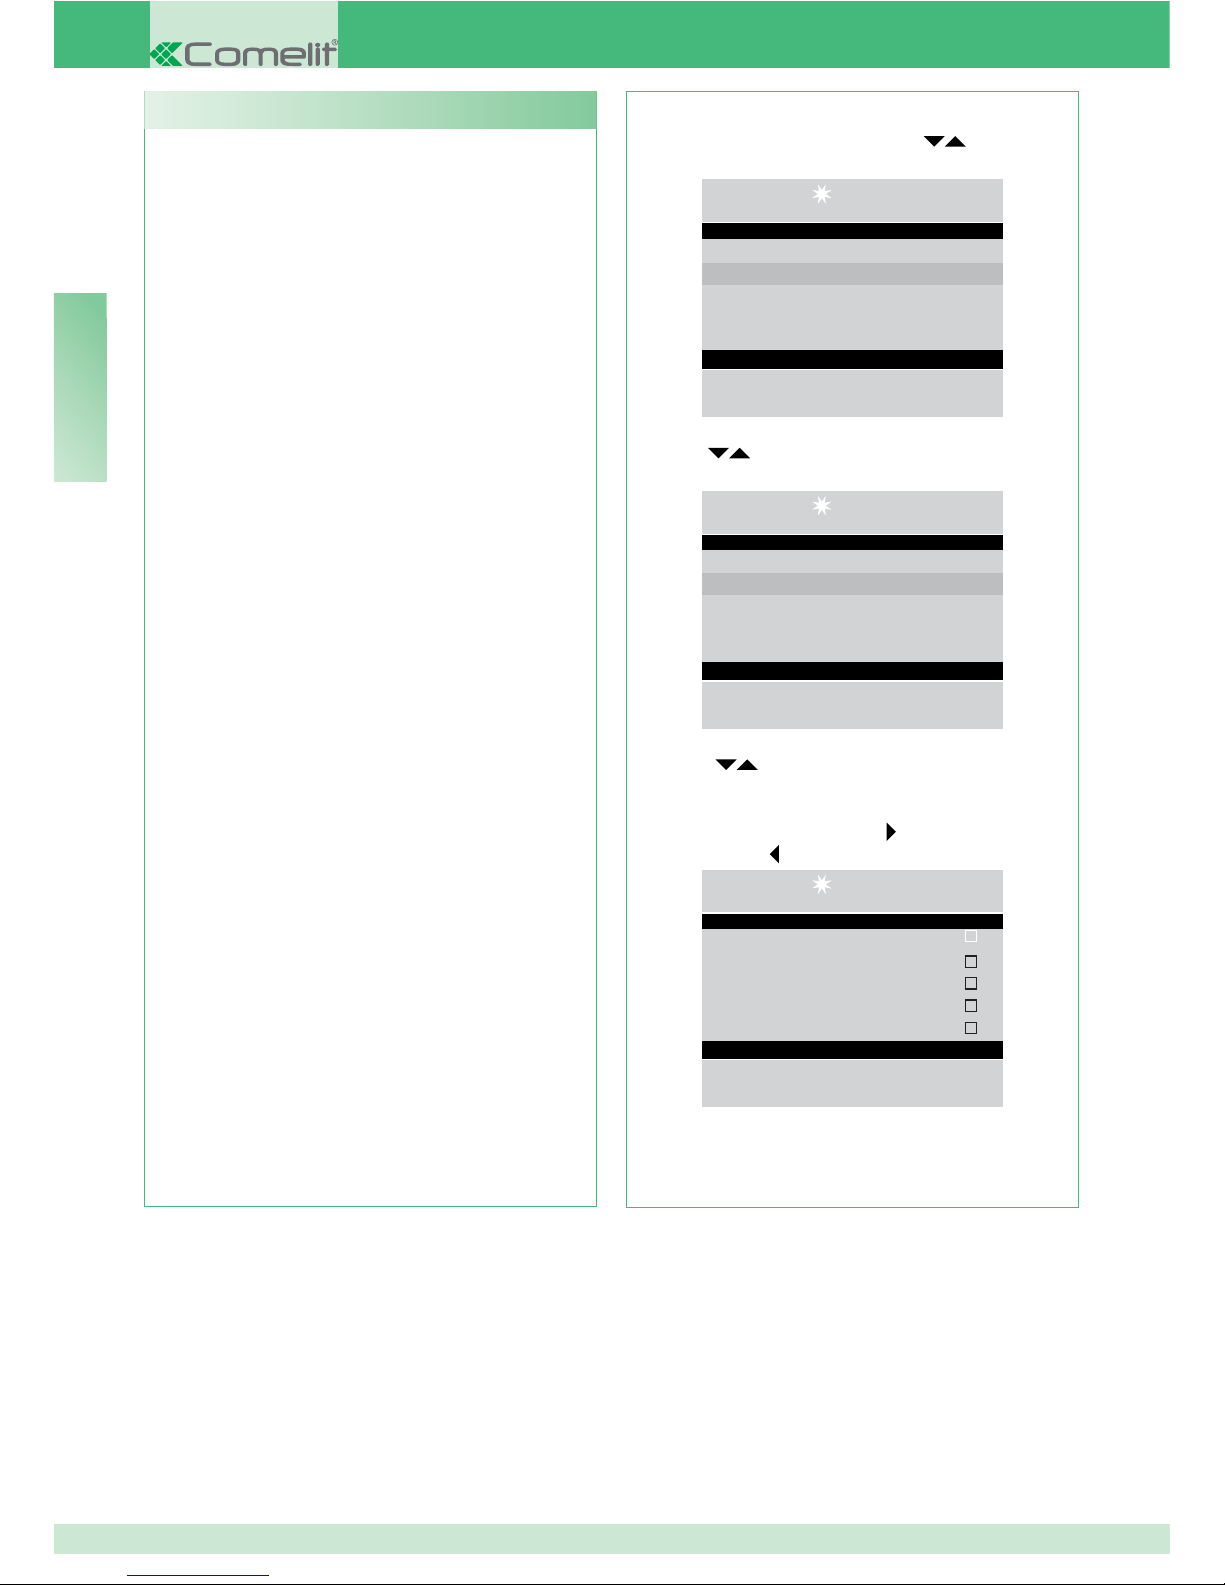
64
EN
FollowMe:
This is disabled by default.
CAUTION!
To use this function, telephone switchboard
Art. 2906 and interface Art. 2912 must be fi tted.
Contact your usual installer.
This function can only activated for the switchboard
set as secondary (see “C1 Type of switchboard”,
page 60).
This function can be used to divert calls for the
switchboard to local or remote telephones.
Once a call has been made, the switchboard will
ring until the remote device begins communicating;
the call can be answered from the switchboard by
cancelling the “Follow me” function.
_________________________________________________________________________
Call repeat:
timed contact closure between 1 and 30 seconds
can be selected (see “I8 - Adjust timers”, page 56).
_________________________________________________________________________
Internal units on:
This is disabled by default.
CAUTION!
This function is only available for non-TOP
Simplebus systems and requires Art. 1259 for
the cyclic displaying of images from remote
cameras.
This function can be used to activate or deactivate
the self-ignition transmitted by the internal units with
the switchboard in DAY mode.
_________________________________________________________________________
Triple call:
This is disabled by default.
This function can be used to activate or deactivate
the triple call made by the switchboard to the internal
units.
The call will therefore take place on consecutive
occasions (in the case of video calls: the fi rst will be
audio calls and the third will be a video call).
_________________________________________________________________________
Codes help:
This is disabled by default.
It is used to expand the Simplebus codes on the
riser line.
C7- Configure services
To activate the services:
- press the MENU key and use the
keys to view
the Confi gurations menu, press OK;
14 :15 : 26
Mon 12 Mar 12
• Settings
• Configurations
• Directory
• Received calls
• Alarms
- use the
keys to view the Services menu, press
OK;
14 :15 : 26
Mon 12 Mar 12
• System
• Services
- use the
keys to view the service you wish to
activate (FollowMe, call repeat, internal units on, triple
call, codes help).
Activate the service using the
key.
Disable it using
;
14 :15 : 26
Mon 12 Mar 12
FollowMe
Call repeat
Internal units on
Triple call
Codes help
Esc Ok
- press OK to confi rm the settings;
- press
ESC repeatedly to return to the main screen.
Page 69

FR
65
SOMMAIRE
• INTRODUCTION
- Vue générale
66
- Description bornier
66
- Touches de programmation et affi cheur
67
- Clavier alphanumérique
67
- Description générale
67
• UTILISATION
U1
Comment répondre à un appel d'un poste intérieur
68
U
2 Comment répondre à un appel d'une platine
extérieure
68
U3 Comment appeler un poste intérieur
69
U4 Comment passer un appel de la platine extérieure
au poste intérieur
70
U5 Comment mettre en communication 2 postes
intérieurs (fonction intercommunicante)
70
U6 Comment appeler un poste intérieur présent dans
les appels reçus
71
U7 Comment appeler un standard secondaire depuis le
standard principal
72
U8 Comment appeler le standard principal depuis un
standard secondaire
73
U9 Comment répondre à un appel du standard
secondaire au standard principal
73
U10 Comment répondre à un appel du standard principal
au standard secondaire
74
U11 Comment activer ou désactiver les standards
principaux
74
U12 Comment utiliser l'ouvre-porte
75
U13 Comment activer la fonction « Suivi » (FollowMe)
75
U14 Comment activer un relais supplémentaire
75
• RÉPERTOIRE
- Arbre des pages menu RÉPERTOIRE
76
U15 Comment utiliser le répertoire
76
U16
Comment chercher un nom en répertoire
76
U17 Comment insérer un nom au répertoire
77
U18 Comment effacer un nom du répertoire
77
U19 Comment modifi er un nom en répertoire
78
U20 Effacer le répertoire
79
U21 Info répertoire
79
U22 Enregistrement numéros brefs
80
• APPELS REÇUS
- Arbre des pages menu APPELS REÇUS
80
U23 Affi
chage appels reçus
80
U24 Effacement liste des appels reçus
81
• ALARMES
- Arbre des pages menu ALARMES
82
U25
Af
fi chage alarmes
82
U26 Effacement liste alarmes reçues
82
• RÉGLAGES
- Arbre des pages menu RÉGLAGES
83
I
1 - M
odifier langue
84
I2 - Réglages vidéo
84
I3 - Réglages audio
85
I4 - Réglages sons
85
I5 - Modifier date
86
I6 - Modifier heure
86
I7 - Réglage thème
87
I8 - Réglage des temps (phonie, attente de reset, veille,
activation relais, répétition d'appel)
87
I9 - Réglage modalité quotidienne
88
I10 - Réglage commut. automatique
88
I11 - Reset des réglages
89
• CONFIGURATIONS INSTALLATEUR
- Arbre des pages menu CONFIGURATIONS
90
- C1 - Type de standard (mode Simplebus Top)
91
- C2 - Comment confi
gurer un standard principal ou
secondaire
92
- C3 - Comment confi gurer un standard simple, en
parallèle ou en série
92
- C4 - Appel via code Simplebus ou indirect
93
- C5 - Rétrocompatibilité
93
- C6 - Appel audio ou vidéo
94
- Tableau articles Simplebus TOP
94
- C7 - Confi guration services (FollowMe, répétition d'appel,
allumage postes intérieurs, appel triple, aide codes)
95
• SCHÉMAS DE CONNEXION
- SB2V/EN/103M Installation visiophonique Simplebus
n/b avec 1 entrée principale et standard de conciergerie.
96
- SB2V/EN/103M Installation visiophonique Simplebus
couleurs avec 1 entrée principale et standard de
conciergerie.
97
- SB2V/EN/105M Installation visiophonique Simplebus
n/b avec 2 entrées principales et standard de
conciergerie.
98
- SB2V/EN/105SMC Installation visiophonique Simplebus
couleurs avec 2 entrées principales et standard de
conciergerie.
99
- SB2V/018ASMC Installation Simplebus couleurs avec
module caméra déportée art. 1259C en modalité
actionneur générique avec standard de conciergerie
100
- SB2V/026SMC Installation visiophonique avec 1
entrée principale et standard de conciergerie associé
au standard téléphonique art. 2906 pour follow-me.
101
- SB2V/EN/101M Installation visiophonique Simplebus
n/b avec 1 entrée principale, 3 secondaires vidéo et
standard de conciergerie.
102
- SB2V/EN/101SMC Installation visiophonique Simplebus
couleurs avec 1 entrée principale, 3 secondaires vidéo
et standard de conciergerie.
104
- SB2V/EN/121DM Installation visiophonique Simplebus
n/b avec 2 entrées principales, 3 secondaires audio et
standard de conciergerie.
106
- SB2V/EN/121DSMC Installation visiophonique
Simplebus couleurs avec 2 entrées principales, 3
secondaires audio et standard de conciergerie.
108
- SBTOP/001DSMC Installation visiophonique Simplebus
TOP avec 1 entrée principale, 4 secondaires et
standards de conciergerie secondaires correspondants.
110
- SBTOP/002DSMC Installation visiophonique Simplebus
TOP avec 2 entrées principales, 4 secondaires et
standard de conciergerie principal.
112
- SBTOP/003DSMC Installation visiophonique Simplebus
TOP avec 2 entrées principales, 1 standard de
conciergerie principal, 2 secondaires et standards de
conciergerie secondaires correspondants.
114
- SBTOP/004DSMC Installation visiophonique Simplebus
TOP avec 1 entrée principale, 4 secondaires et 2
standards de conciergerie principaux en confi guration
SÉRIE.
116
- SBTOP/005DSMC Installation visiophonique Simplebus
TOP avec 1 entrée principale, 3 secondaires et 2
standards de conciergerie principaux en confi guration
PARALLÈLE.
118
Page 70
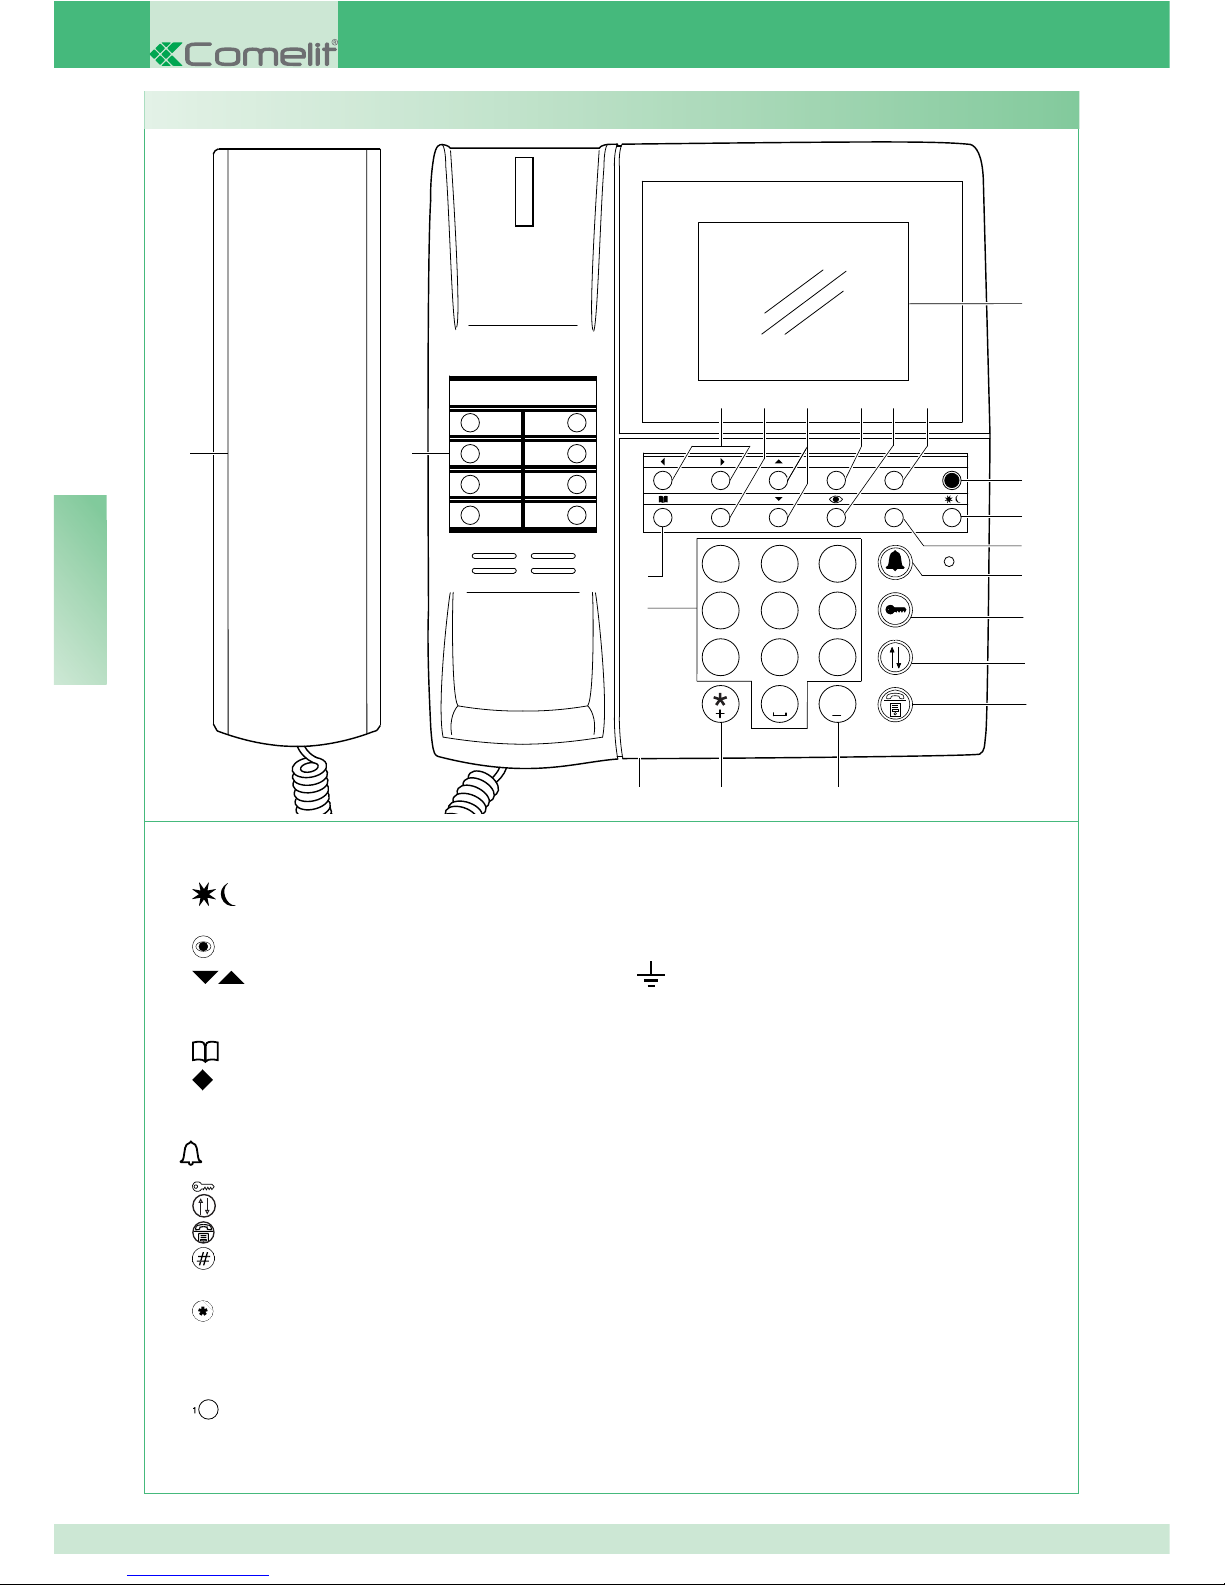
FR
66
0
1
2
3
4
5
6
789
#
ABC
DEF
MNO
JKL
GHI
WXYZTUVPQRS
ON/OFF
MENU
ESC OK
CANC
5
3
1
1
2
3
4
5
6
7
8
21
2
11
12
13
14
68 109 4
18
1920
16
15
7
17
Vue générale
Description bornier :
C NO Contact normalement ouvert pour fonction
« SUIVI » (Follow me))
24~ Alimentation 24V CA
0~ Alimentation 0V CA
Mise à la terre
OUT OUT Contact normalement ouvert qui se ferme
en envoyant un appel vidéo du standard vers un
poste intérieur
CH CH Contact libre pour « répétition d'appel » ou
« validation moniteur extérieur »
LM LM Ligne données vers les montants
LP1 LP2 Ligne données venant de la platine
extérieure
GND TX RX Sériel rs232 à connecter au standard à
distance sur les installations à plusieurs standards
en série ou en parallèle.
1 ON/OFF Allumage/extinction (Appuyer dessus 2
secondes)
2
Touche validant la modalité JOUR ou NUIT
3 Touche MENU
4
Touche validant l’auto-allumage
5
Touches de déroulement menus.
6 CANC Touche d'annulation appel ou effacement
données saisies
7
Touche répertoire
8
Touches de déroulement des options de menu
9 ESC Touche de sortie des menus
10 OK Touche confi rmation
11
Touche pour envoi appel
12
Touche pour ouvre-porte
13
Touche pour transfert d'appel
14
Touche pour mettre un appel en attente
15
Touche pour appeler le standard Simplebus
Top du standard Simplebus
16
Touche pour activer un relais supplémentaire
17 Potentiomètre de réglage du volume de la
sonnerie.
18 Clavier alphanumérique
19
Numéros brefs
20 Combiné
21 Affi cheur signalisation messages
Page 71
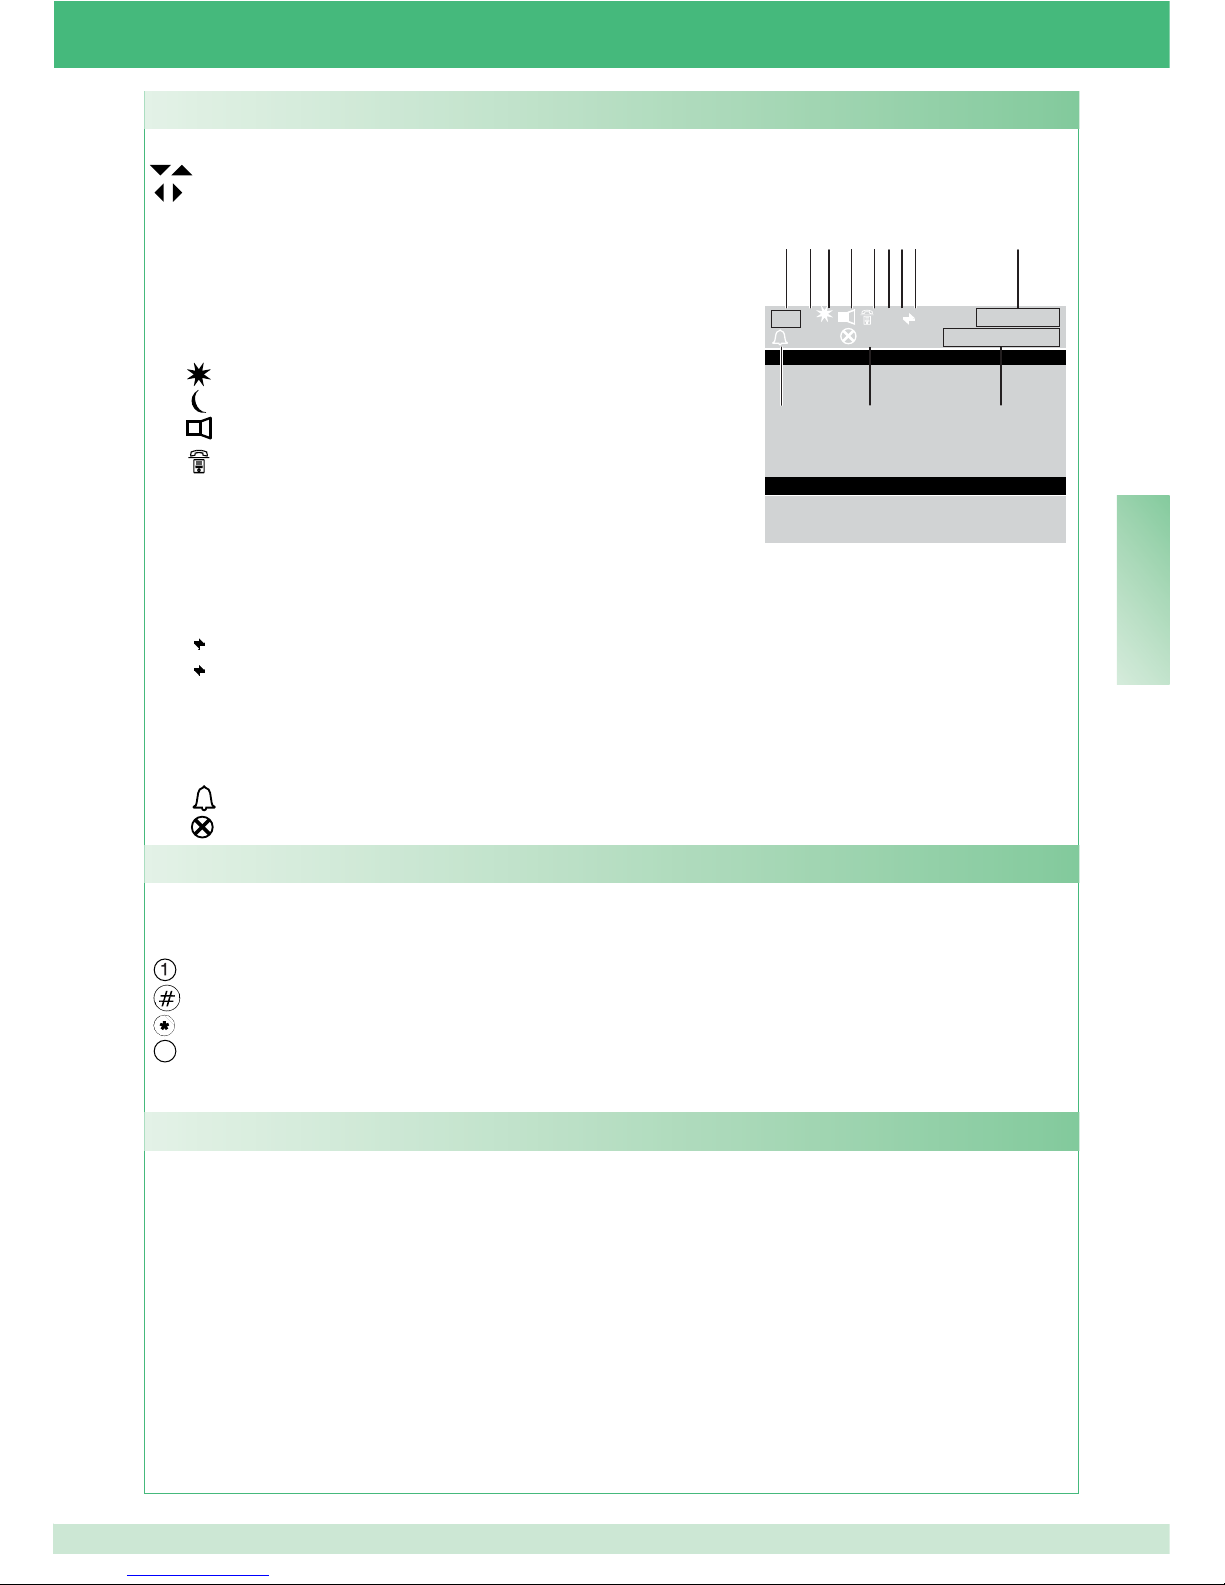
FR
67
MENUS Pour entrer dans les menus de programmation
Permettent de sélectionner les différentes options des menus
Permettent de déplacer le curseur pour modifi er les données saisies
OK Confi rmation de la sélection visualisée ou de la saisie données
CANC Effacement des données saisies
ESC Annulation de la sélection et sortie des menus de programmation
Visualisations par affi cheur du standard :
L P V ?P 14 :15 : 26
= 3 = 04 Lun 12/03/12
Touches de programmation et affi cheur
Pour certaines fonctions, le clavier permet de saisir des chiffres et des lettres ; il suffi t d'appuyer plusieurs fois
sur la même touche, par exemple en appuyant sur la touche 2, on aura en succession sur l'affi cheur a, b, c,
A - B - C - 2 ;
touche pour saisir les symboles .,;:?!()
touche pour saisir un tiret
touche pour saisir le symbole +
0
touche pour ajouter un espace entre les caractères
OK Confi rmation des données saisies
CANC Effacement des données saisies
Clavier alphanumérique
Les fonctions principales du standard sont les suivantes :
• appeler un poste intérieur
• recevoir des appels des platines extérieures et les transmettre éventuellement aux postes intérieurs
• recevoir des appels ordinaires ou d'alarme des postes intérieurs
• commander la gâche électrique des platines extérieures
• activer un relais
Le standard de conciergerie prévoit également :
• une gestion JOUR/NUIT
qui permet de valider les fonctions du standard uniquement dans des tranches
horaires déterminées programmables par l'usager ;
•
une LISTE D'APPELS dans laquelle sont mémorisés les appels provenant des postes intérieurs auxquels il
n'a pas été possible de répondre ;
• un RÉPERTOIRE dont la programmation permet d'identifi
er facilement l'usager appelant.
Description générale
12 6
110
2347 89 5
1 A modalité AUDIO
V modalité VIDÉO
2
modalité JOUR
modalité NUIT
3
indique la phonie validée
4
indique la fonction « FollowMe » validée
5 heure (heures: minutes:secondes)
6 nom du jour (Lun, Mar, etc.) et date (jour/mois/année)
7 ! on a une confi guration entre les 2 standards NON compatible
? le standard n'a pas encore relevé la présence du standard à distance
8 P indique le standard confi guré en parallèle
S indique le standard confi guré en série
9
fi xe indique le fonctionnement correct de la ligne série
clignotant indique le dysfonctionnement de la ligne série
10 LM clignotant indique un court-circuit sur la ligne montant, l'inscription est accompagnée par la répétition
d'une tonalité. Le standard refuse tout essai d'appel ou de transfert de l'appel vers les postes intérieurs ; au
contraire, tous les appels arrivant de la platine extérieure sont gérés normalement.
LP clignotant indique que la platine extérieure n'est pas connectée
11
=5 clignotant indique le nombre d'appels sans réponse en modalité JOUR et NUIT
12
=1 clignotant indique le nombre d'alarmes reçues et non résolues
11
Page 72
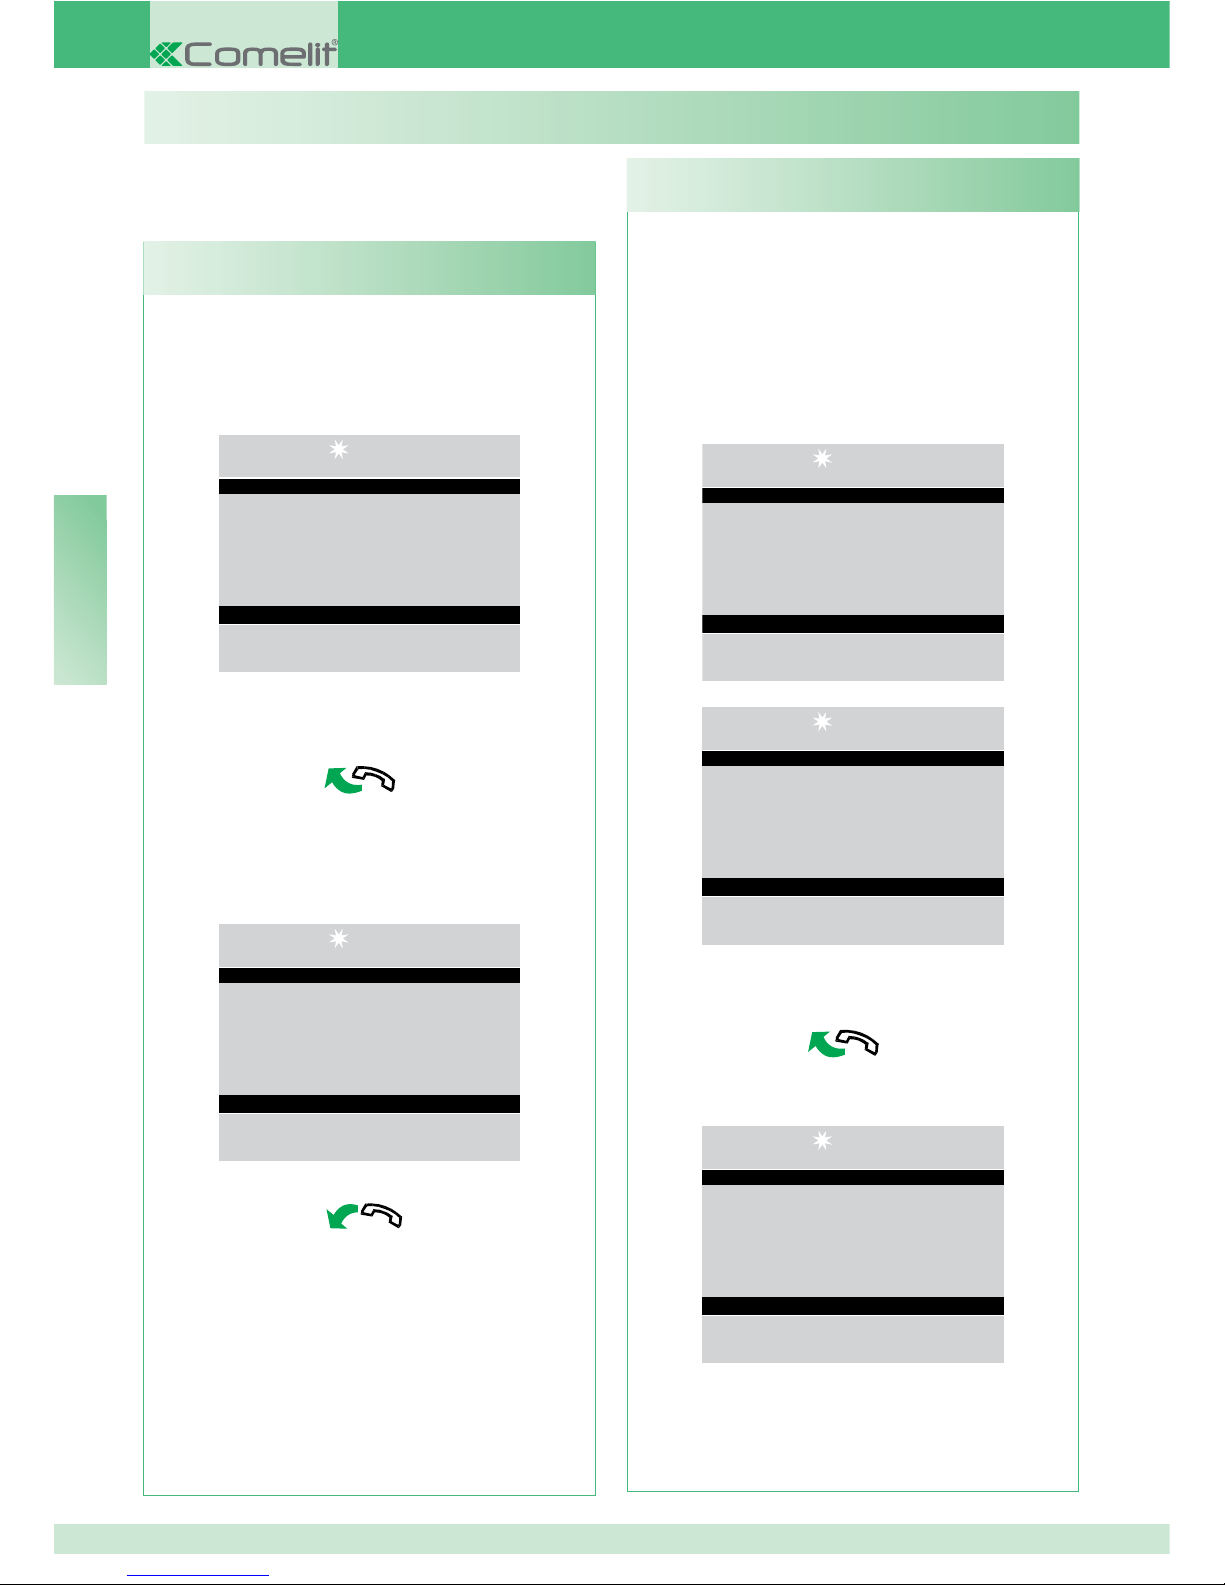
FR
68
Lorsque le standard reçoit un appel d'un poste
intérieur :
- le nom du poste intérieur d'où provient l'appel est
visualisé, s'il a été saisi dans le répertoire (voir « U17
Comment insérer un nom au répertoire » page 77) ou
l'adresse de l'appelant (ex. 002).
14 : 15 : 26
Lun 12/03/12
Appel depuis 002
- pour répondre à l'appel provenant du poste
intérieur, soulever le combiné dans les 30 secondes ;
- le standard entre en communication avec le poste
intérieur,
la durée maximum de la conversation
correspond au temps de phonie programmé sur le
standard principal (MENU/Réglages/Temps/Phonie
- min. 10 secondes, max. 90 secondes).
14 : 15 : 26
Lun 12/03/12
En communication avec
002
- raccrocher pour terminer la conversation.
- pour refuser l'appel, appuyer sur CANC.
ATTENTION !
Si le standard est occupé ou le/la standardiste
est momentanément absent/e et ne peut pas
répondre dans les 30 secondes, l'appel sera
inséré dans les appels reçus, voir « U6 Comment
appeler un poste intérieur présent dans les
appels reçus » page 71.
U2 COMMENT RÉPONDRE À UN APPEL D'UNE PLATINE
EXTÉRIEURE
Le standard doit être en modalité JOUR, en modalité
NUIT il ne pourra répondre qu'aux appels adressés
au standard.
Le standard peut recevoir un appel d'une platine
extérieure :
- adressé directement à un poste intérieur, dans ce
cas, le NOM de l'appelé s'affi che (si le répertoire
contient un nom associé au code appelé, voir « U17
Comment saisir un nom au répertoire » page 77) ou
l’adresse de l'appelé (par ex. 002).
14 : 15 : 26
Lun 12/03/12
Appel pour Sergio Rossi
- ou adressé directement au standard (adresse=240)
14 : 15 : 26
Lun 12/03/12
Appel pour standard
- pour répondre à l'appel provenant de la platine
extérieure, soulever le combiné ;
- le standard entre en communication avec la platine
extérieure ;
14 : 15 : 26
Lun 12/03/12
En communication avec
platine extérieure
- appuyer éventuellement sur la touche A pour
valider la gâche électrique de la platine extérieure ; si
l'ouvre-porte est effectué, une tonalité de confi rmation
retentira ;
UTILISATION
Les fonctions suivantes sont celles qui caractérisent le
standard et son mode d'opérer ; elles sont toutes accessibles
en mode direct sans avoir besoin de recourir aux menus.
U2 Comment répondre à un appel d'une platine
extérieure
U1 Comment répondre à un appel d'un poste
intérieur
Page 73
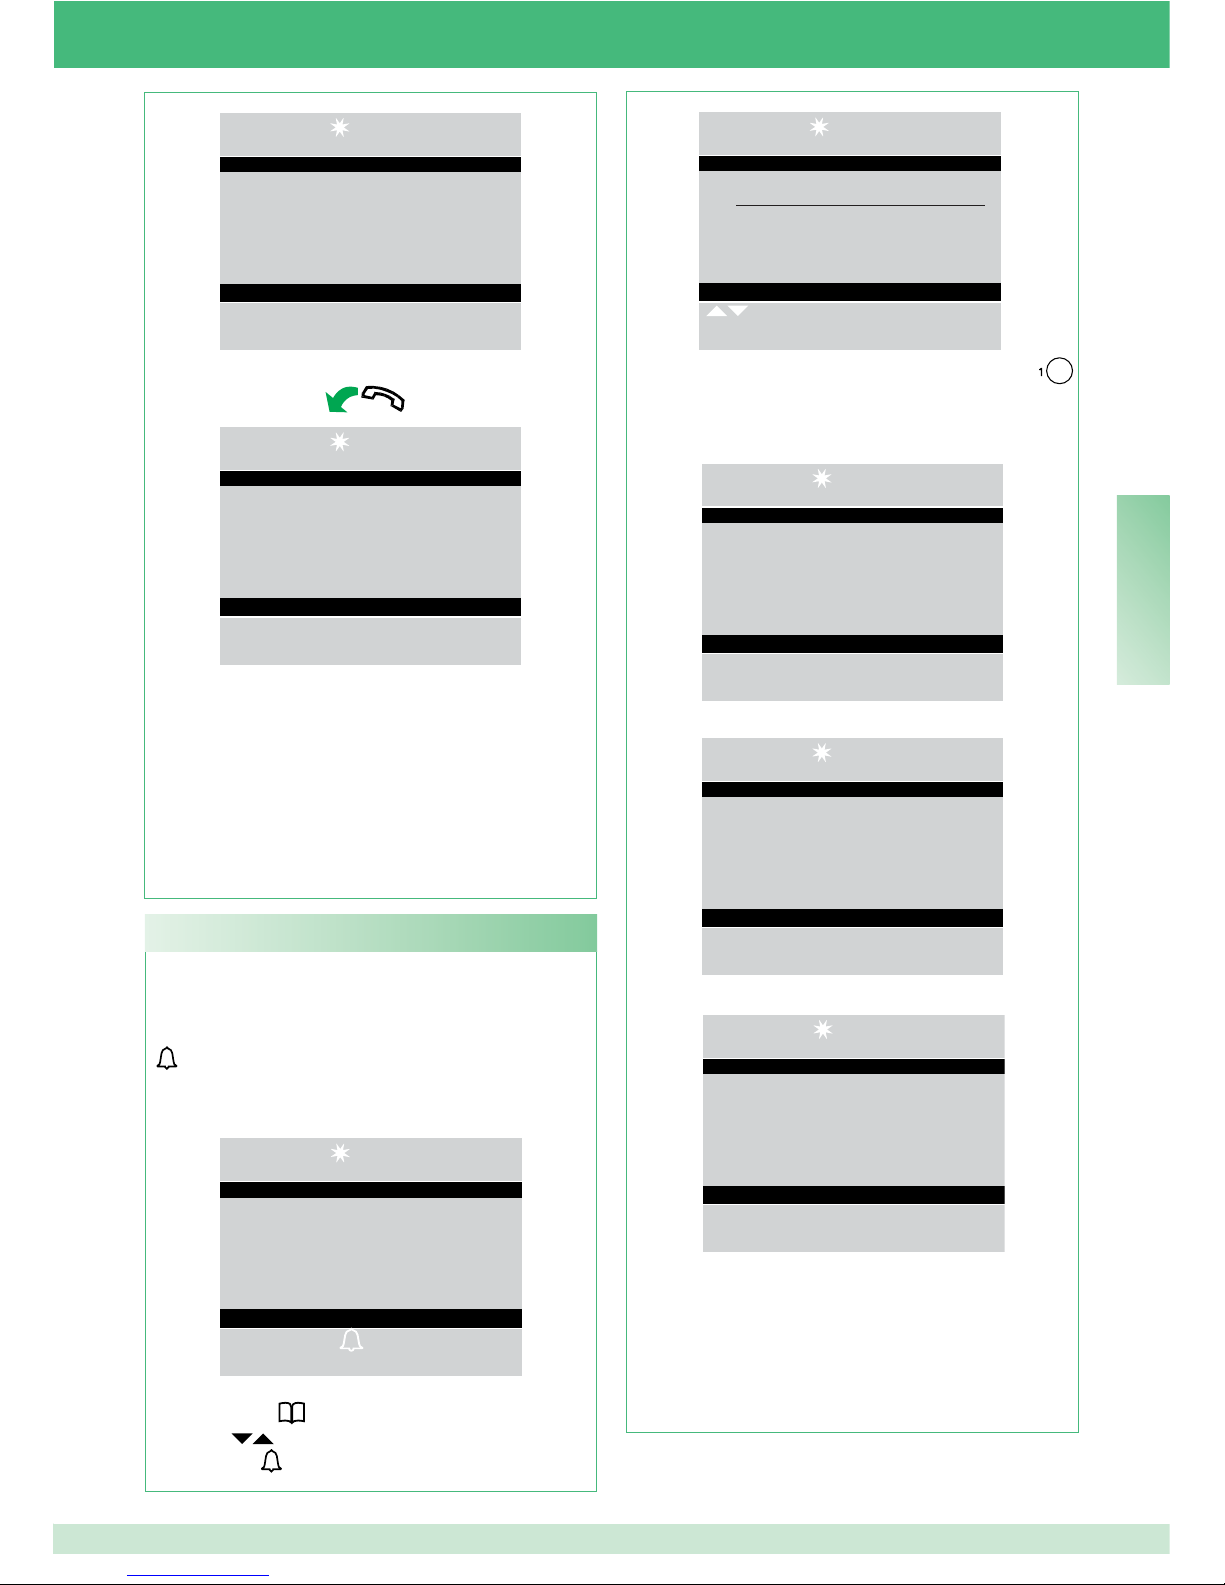
FR
69
14 : 15 : 26
Lun 12/03/12
Ouv.-porte effectué
- raccrocher pour terminer la conversation.
14 : 15 : 26
Lun 12/03/12
Fin communication
- pour refuser l'appel, appuyer sur CANC.
ATTENTION !
En modalité NUIT (voir « I9 - Réglage modalité
quotidienne » page 88), les appels depuis la
platine extérieure adressés à un poste intérieur
s'af
fi chent à l'écran mais ne peuvent pas être
interceptés par le standard.
Pour appeler un poste intérieur, le standard peut
utiliser 3 modalités différentes :
- taper le numéro du poste intérieur* et appuyer sur
.
*Le numéro à taper dépend de la confi guration du
standard, voir « C4 - Appel via code Simplebus ou
indirect » page 93 ; contacter l'installateur.
14 : 15 : 26
Lun 12/03/12
Usager : 002
Pour appeler
- appuyer sur et dérouler le répertoire avec les
touches jusqu'à visualiser le nom désiré et
appuyer sur .
U3 Comment appeler un poste intérieur
14:15:26
Lun 12/03/12
________________________
Sergio Rossi
Code 012
Dérouler Menu
- appuyer sur le numéro bref correspondant (ex.
numéro bref 1= code mémorisé « 002 », voir « U22
Enregistrement numéros brefs » page 80).
- si l'appel a eu lieu correctement :
14 : 15 : 26
Lun 12/03/12
Usager : 002
Appel pour l'usager Sergio Rossi
- si l'appel n'a pas eu lieu correctement :
14 : 15 : 26
Lun 12/03/12
Usager pas disp.
- si le poste intérieur est occupé :
14 : 15 : 26
Lun 12/03/12
Ligne occupée
Lorsque le poste intérieur appelé entre en phonie,
il entre en communication avec le standard, la
durée maximum de la conversation correspond
au temps de phonie programmé sur le standard
principal (MENU/Réglages/Temps/Phonie - min. 10
secondes, max. 90 secondes).
Page 74
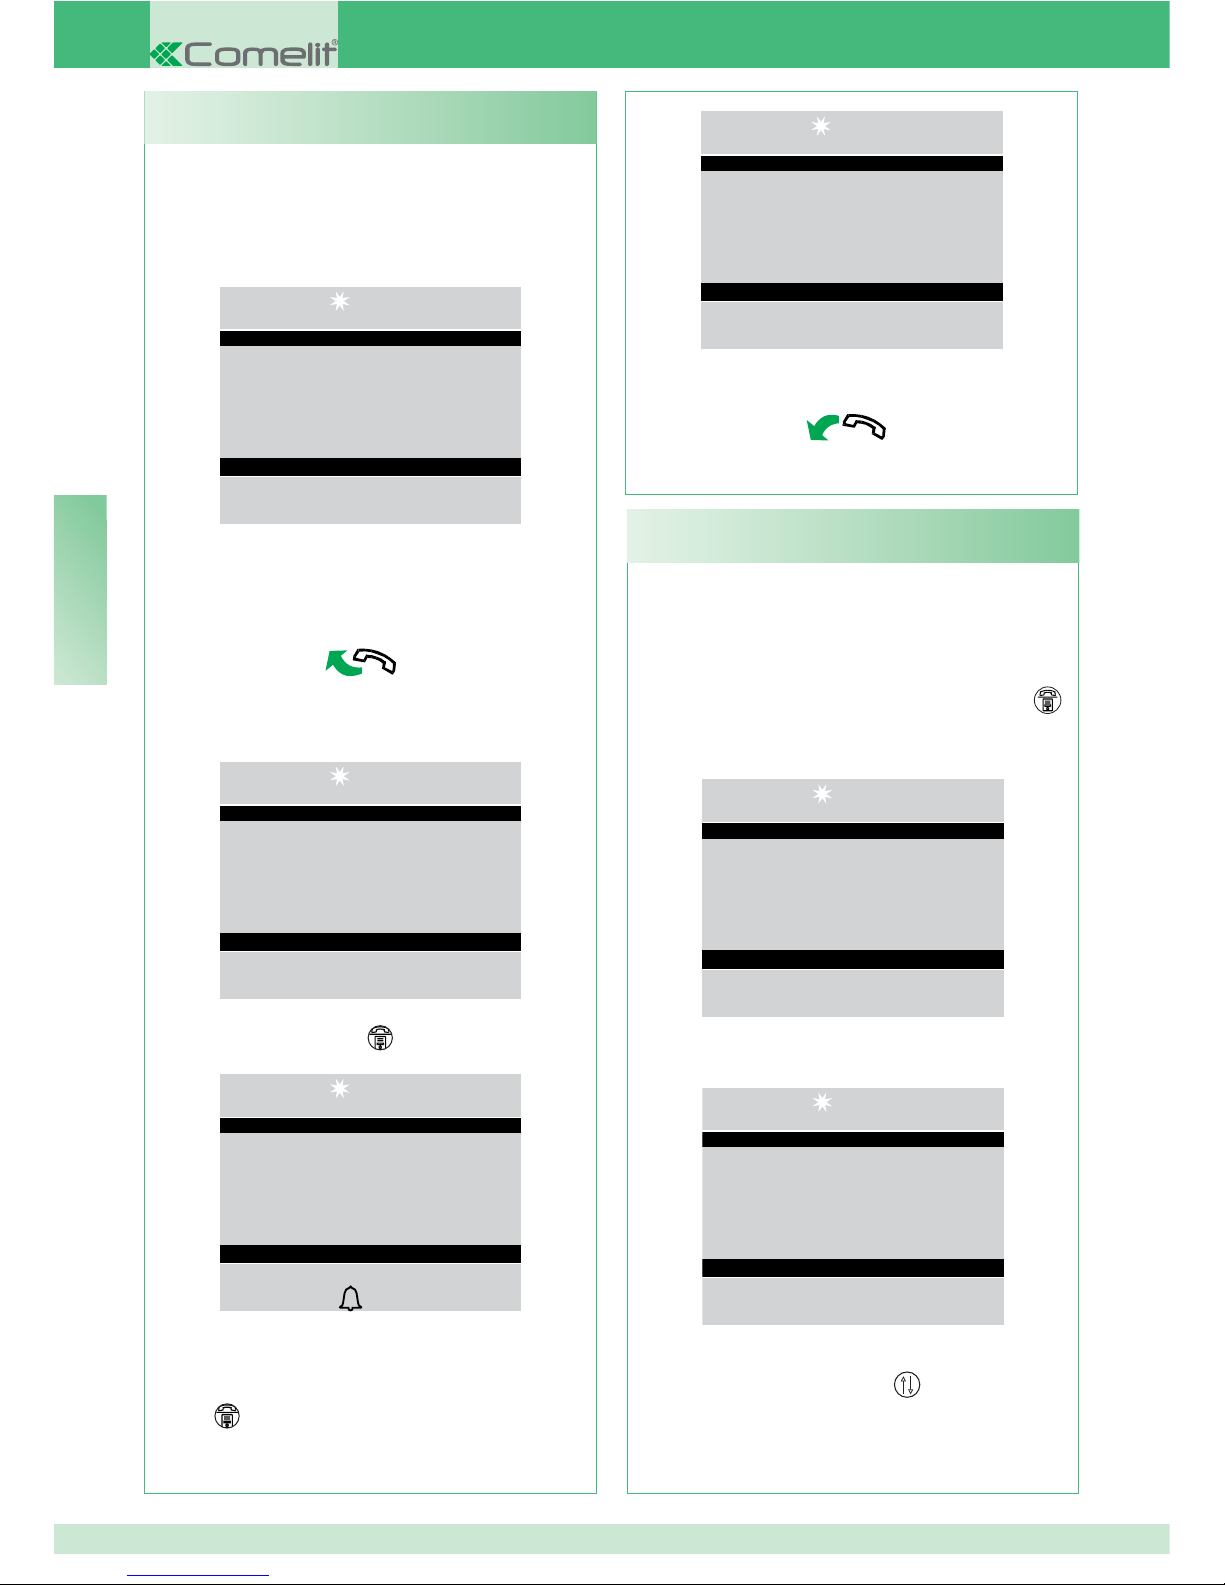
FR
70
14 : 15 : 26
Lun 12/03/12
En communication avec
platine extérieure
- raccrocher pour terminer la conversation.
Lorsque le standard est en communication avec un
poste intérieur (ex. 002) qui désire parler avec un
autre poste intérieur (ex. 003) :
- mettre en attente le poste intérieur avec lequel on
est en ligne (ex. 002), en appuyant sur la touche
;
- appeler le poste intérieur désiré (ex. 003), voir « U3
Comment appeler un poste intérieur » page 69) ;
14 : 15 : 26
Lun 12/03/12
Usager 003 appelé
Lorsque le poste intérieur appelé entre en phonie,
il se met en communication avec le standard ;
14 : 15 : 26
Lun 12/03/12
En communication avec
usager 003
Pour lancer la conversation vers l’autre poste
intérieur, appuyer sur la touche
; le poste intérieur
(003) entre en communication avec le poste intérieur
(002) ; la durée maximale de la communication est
de 2,5 minutes ;
U5 Comment mettre en communication 2 postes
intérieurs (fonction intercommunicante)
Lorsque le standard reçoit un appel d'une platine
extérieure adressé à un poste intérieur :
- le NOM de l'appelé s'affi che (s'il existe au répertoire
un nom associé au code appelé, voir « U17 Comment
insérer un nom au répertoire » page 77).
14 : 15 : 26
Lun 12/03/12
Appel pour Sergio Rossi
- pour répondre à l'appel provenant de la platine
extérieure, soulever le combiné dans les 60
secondes ;
- le standard entre en communication avec la platine
extérieure, la durée maximum de la conversation est
de 90 secondes ;
14 : 15 : 26
Lun 12/03/12
En communication avec
platine extérieure
- appuyer sur la touche
pour mettre la platine
extérieure en attente ;
14 : 15 : 26
Lun 12/03/12
Platine ext. en attente
Pour appeler
Si le poste intérieur n'accepte pas la conversation,
la platine extérieure reste en attente ; bloquer la
conversation avec le poste intérieur et appuyer sur la
touche
pour reprendre la communication avec la
platine extérieure ;
U4 Comment passer un appel de la platine
extérieure au poste intérieur
Page 75
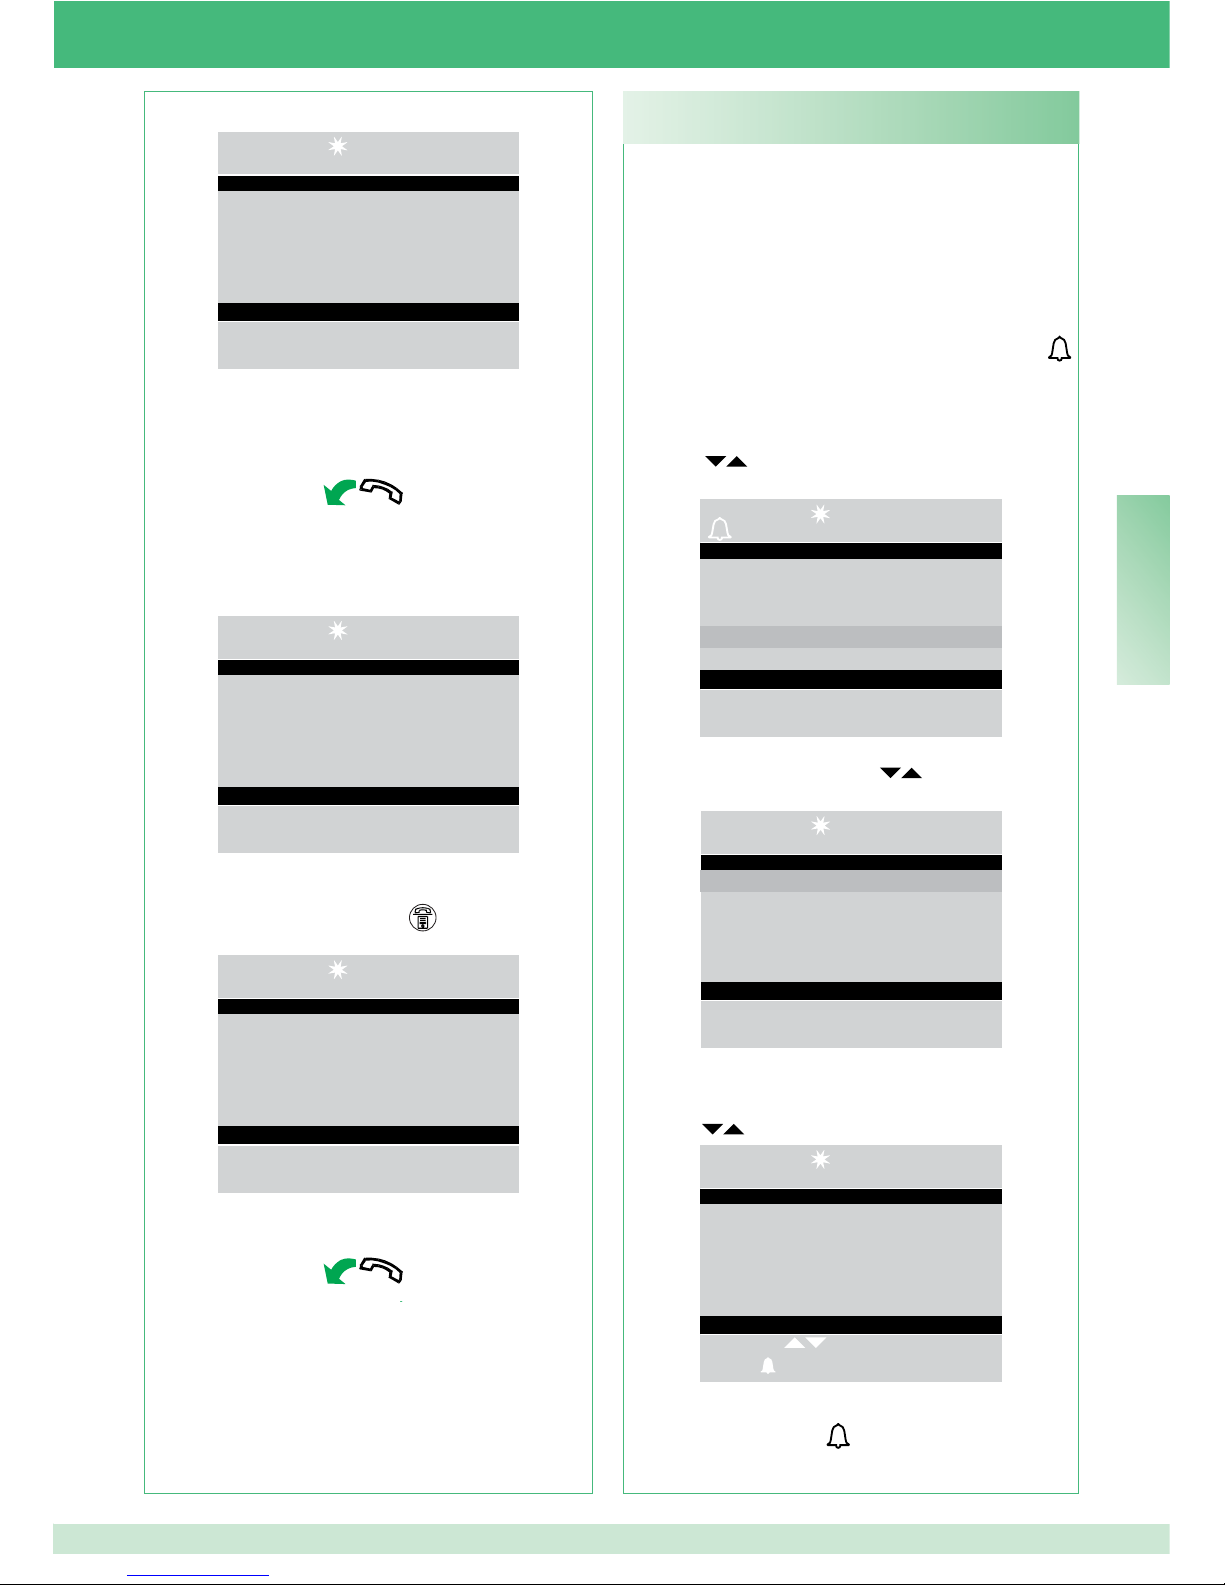
FR
71
Lorsque le standard reçoit un appel du poste intérieur
qui n'est pas géré dans les 30 sec. (opérateur
momentanément absent ou occupé dans une autre
conversation), ledit appel est automatiquement
mémorisé dans le menu Appels reçus.
Le standard peut mémoriser un nombre maximum
de 10 appels sans réponse. Le onzième appel se
substitue au premier.
L'affi cheur indique le nombre d'appels reçus (ex.
=3 clignotant).
Pour appeler les postes intérieurs présents dans les
appels reçus, il faut :
- appuyer sur la touche MENU et appuyer sur les
touches
pour affi cher le menu Appels reçus
puis appuyer sur la touche OK ;
14 : 15 : 26
= 3 Lun 12/03/12
• Réglages
• Configurations
• Répertoire
• Appels reçus
• Alarmes
- appuyer sur les touches
pour affi cher la
rubrique Affi cher puis appuyer sur OK ;
14 : 15 : 26
Lun 12/03/12
• Afficher
• Éliminer tout
- les appels entrants s'affi cheront dans l'ordre
chronologique à partir du dernier reçu ; utiliser les
touches
pour dérouler la liste.
14:15:26
Lun 12/03/12
Appelant Sergio Rossi
Code 012
Reçu Lun 12/03/12
à 13 : 15 : 11
Dérouler
Appel
Menu
- appuyer sur la touche pour appeler le poste inté-
rieur qui s'affi che.
U6 Comment appeler un poste intérieur présent
dans les appels reçus
14 : 15 : 26
Lun 12/03/12
Intercomm. actif
- raccrocher le combiné.
Appuyer sur CANC pour remettre à zéro un appel
intercommunicant actif depuis plus d'une minute.
Si le poste intérieur n'accepte pas l'envoi de la
conversation ou lorsque la ligne est occupée ou
si l'appel n'a pas eu lieu correctement, le poste
intérieur (002) reste en attente ;
14 : 15 : 26
Lun 12/03/12
Poste int. en attente
- terminer la communication avec le poste intérieur
(003) et appuyer sur la touche
pour reprendre la
communication avec le poste intérieur (002) ;
14 : 15 : 26
Lun 12/03/12
En communication avec
002
- raccrocher pour terminer la conversation.
ATTENTION !
Si la platine extérieure appelle le standard
durant un appel intercommunicant entre postes
intérieurs en cours depuis plus d'une minute,
ledit appel est automatiquement interrompu pour
permettre au standard de gérer l'appel entrant.
Page 76
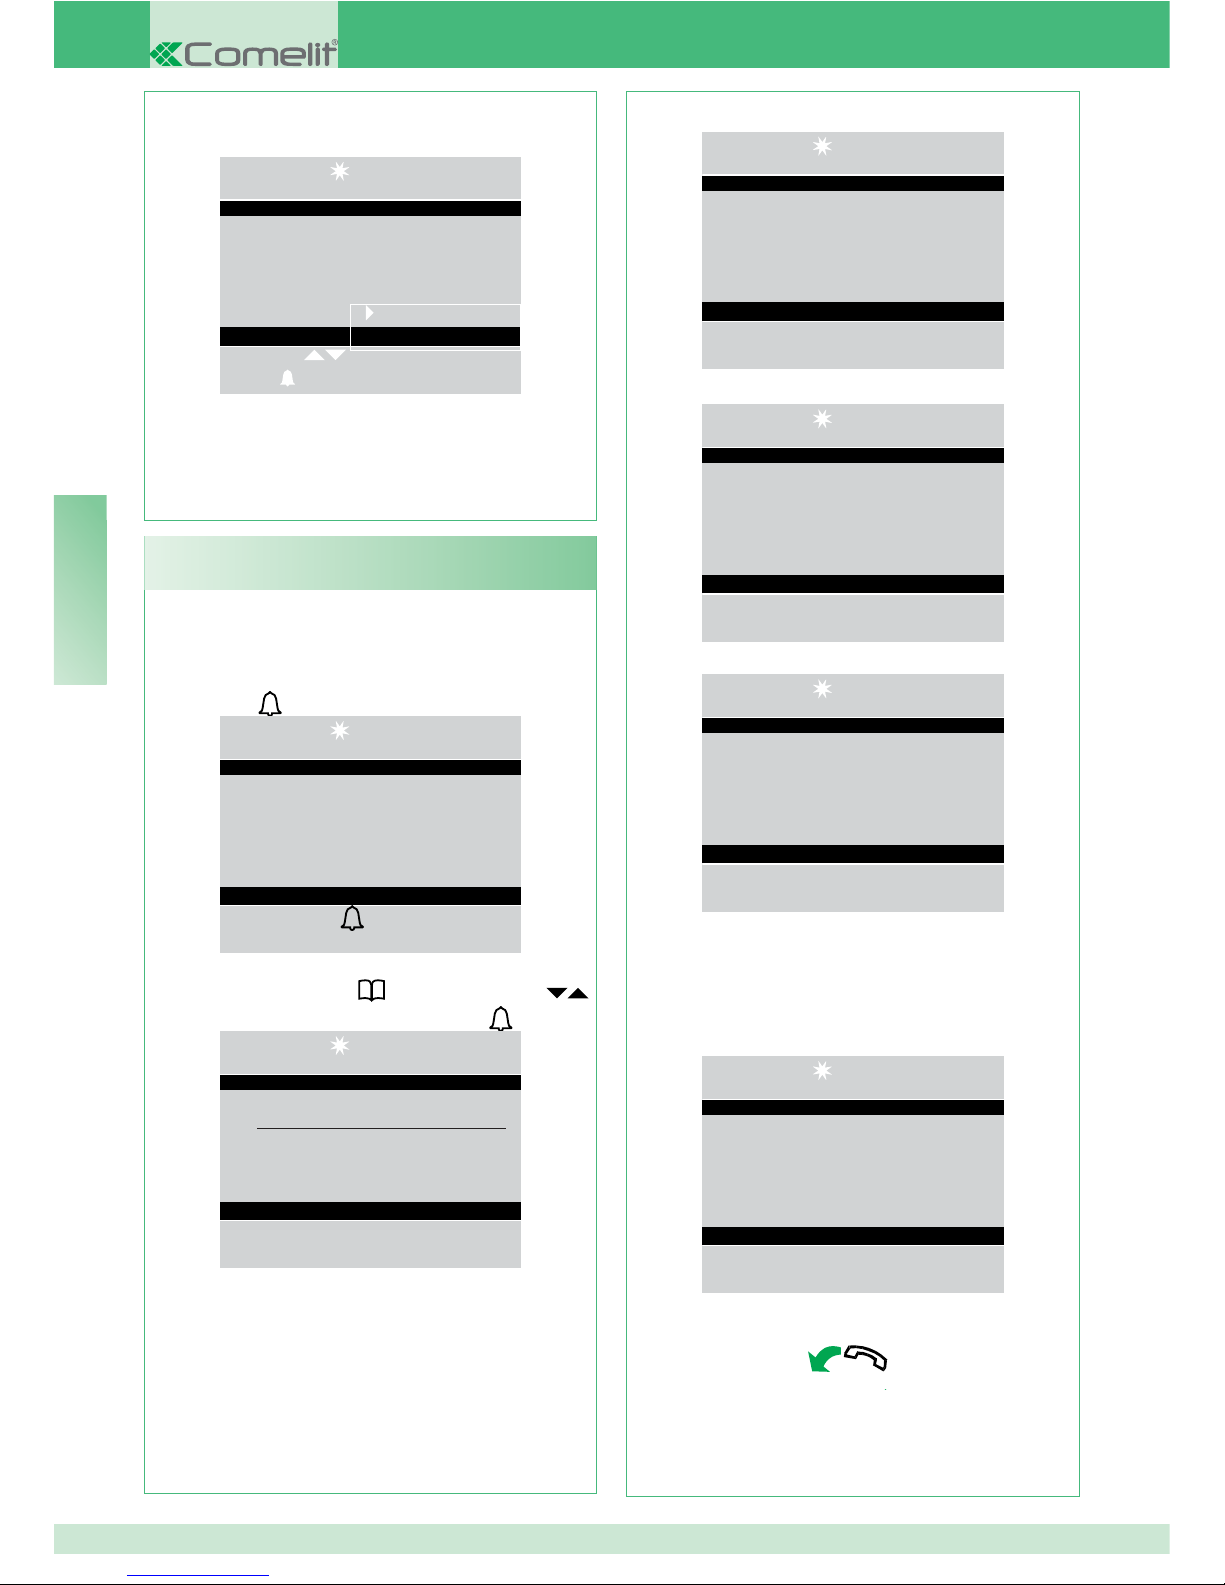
FR
72
Pour appeler un standard secondaire, le standard
principal peut utiliser l'une des 3 modalités suivantes :
1 taper le numéro du standard (ex. 005 240) et
appuyer sur
:
14 : 15 : 26
Lun 12/03/12
Usager : 005 240
Pour appeler
2 dérouler le répertoire avec les touches
jusqu'à visualiser le nom et appuyer sur
:
14:15:26
Lun 12/03/12
________________________
standard
Code 005 240
Usager standard appelé
3 appuyer sur le numéro bref correspondant (voir
« U22- Enregistrement numéros brefs » page 80).
U7 Comment appeler un standard secondaire
depuis le standard principal
- appuyer sur la touche MENU pour affi cher une
fenêtre en bas à droite.
14:15:26
Lun 12/03/12
Appelant Sergio Rossi
Code 012
Reçu Lun 12/03/12
à 13
Dérouler
Appel
- appuyer sur la touche OK pour confi rmer les
réglages ;
- appuyer plusieurs fois sur la touche ESC pour
retourner à la page principale.
Éliminer rubrique
Éliminer tout
- Si l'appel a eu lieu correctement :
14:15:26
Lun 12/03/12
Usager standard appelé
- si l'appel n'a pas eu lieu correctement :
14:15:26
Lun 12/03/12
Usager pas disp.
- si la ligne est occupée :
14:15:26
Lun 12/03/12
Ligne occupée
Lorsque le standard appelé soulève le combiné, il
entre en communication avec le standard principal,
la durée maximum de la conversation correspond
au temps de phonie programmé sur le standard
principal (MENU/Réglages/Temps/Phonie - min. 10
secondes, max. 90 secondes).
14:15:26
Lun 12/03/12
En communication avec
standard principal
- raccrocher pour terminer la conversation.
ATTENTION !
Le standard secondaire et le standard principal
en communication entre eux ne peuvent ni
envoyer les appels ni les mettre en attente.
Page 77
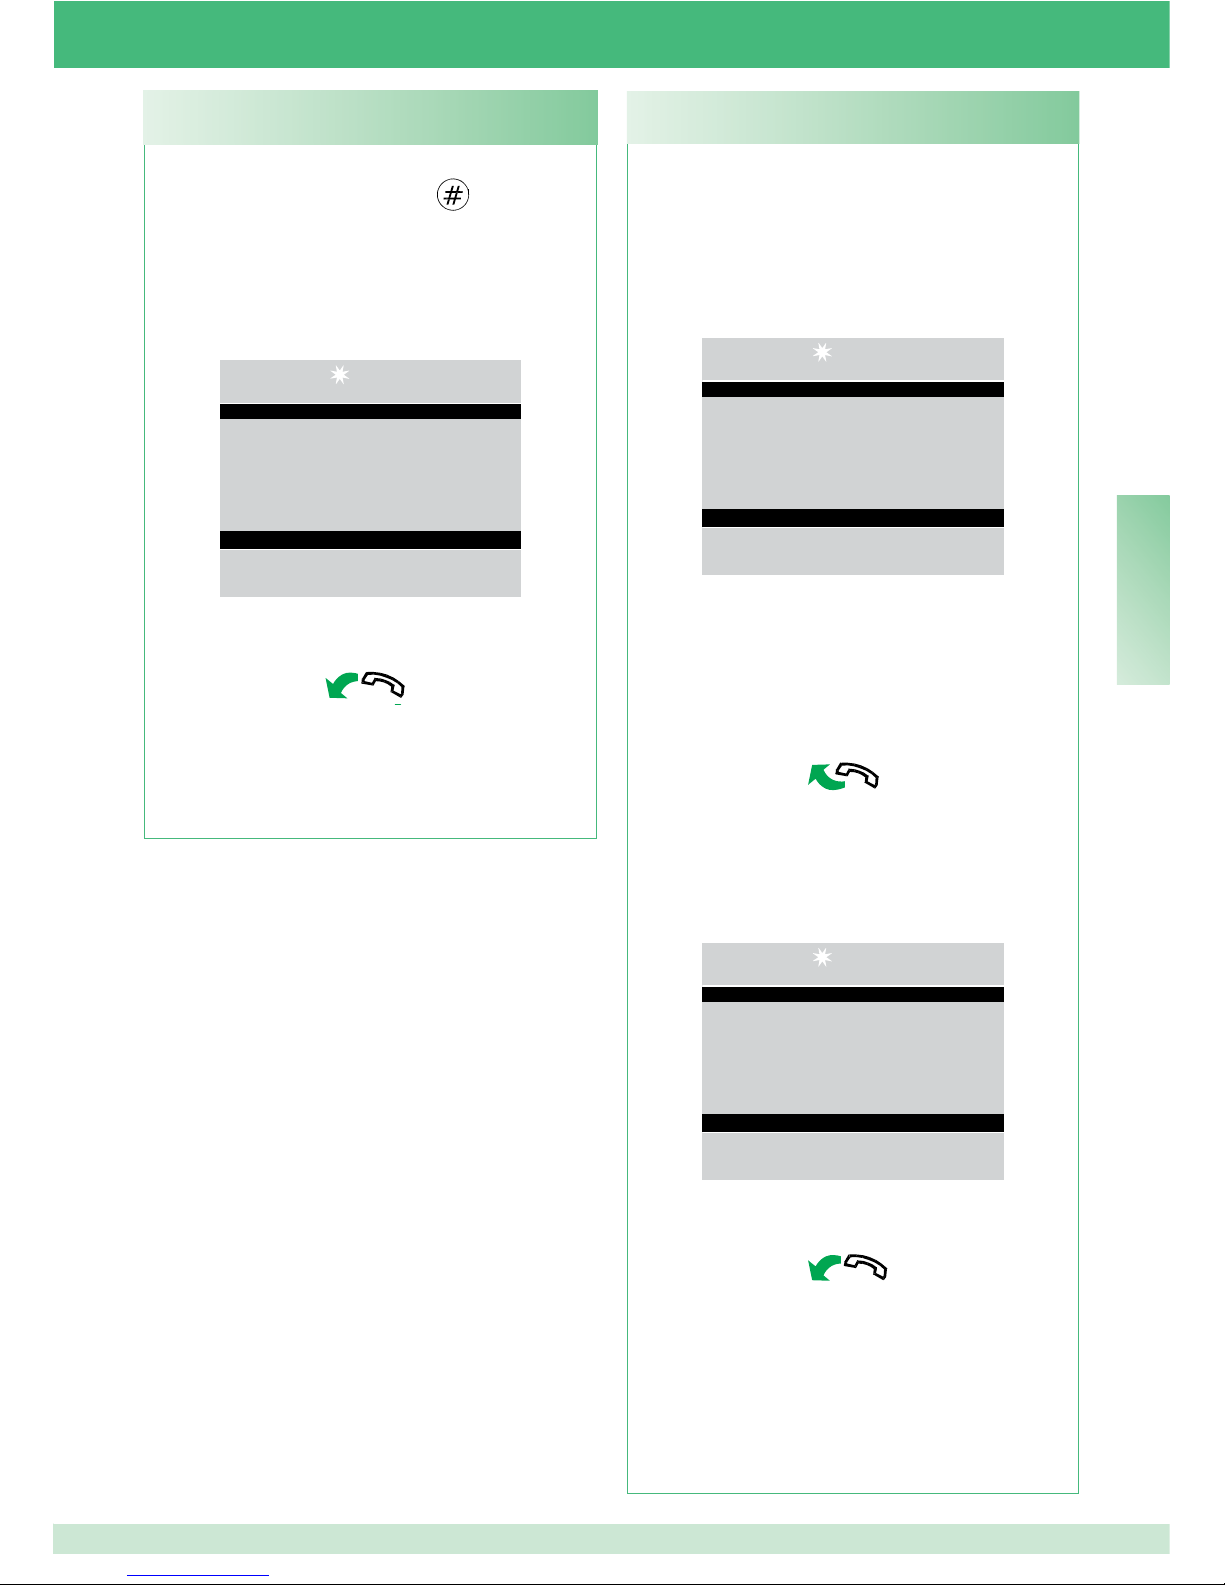
FR
73
Pour appeler un standard principal depuis un
standard secondaire, appuyer sur
.
Lorsque le standard principal appelé soulève le
combiné, il entre en communication avec le standard
secondaire,
la durée maximum de la conversation
correspond au temps de phonie programmé sur le
standard principal (MENU/Réglages/Temps/Phonie
- min. 10 secondes, max. 90 secondes).
14:15:26
Lun 12/03/12
En communication avec
005 240
- raccrocher pour terminer la conversation.
ATTENTION !
Le standard secondaire et le standard principal
en communication entre eux ne peuvent ni
envoyer les appels ni les mettre en attente.
U8 Comment appeler le standard principal depuis
un standard secondaire
Lorsque le standard principal reçoit un appel du
standard secondaire :
- le NOM du standard secondaire d'où provient
l'appel est visualisé, s'il a été saisi dans le répertoire
(voir « U17 Comment insérer un nom au répertoire »
page 77) ou l'adresse du standard appelant (ex.
005 240).
14:15:26
Lun 12/03/12
Appel depuis 005 240
005 = indique la « zone »
240 = indique l’ID générique du standard
- pour refuser l'appel, appuyer sur CANC.
- pour répondre à l'appel provenant du standard
secondaire, soulever le combiné ;
- le standard principal entre en communication
avec le standard secondaire, la durée maximum
de la conversation correspond au temps de phonie
programmé sur le standard principal (MENU/
Réglages/Temps/Phonie - min. 10 secondes, max.
90 secondes).
14:15:26
Lun 12/03/12
En communication avec
005 240
- raccrocher pour terminer la conversation.
ATTENTION !
Si le standard est occupé ou le/la standardiste est
momentanément absent/e et ne peut pas répondre
dans les 30 secondes, l'appel sera inséré dans la
liste des appels (voir « U6 Comment appeler un
poste intérieur présent dans les appels reçus »
page 71).
U9 Comment répondre à un appel du standard
secondaire au standard principal
Page 78
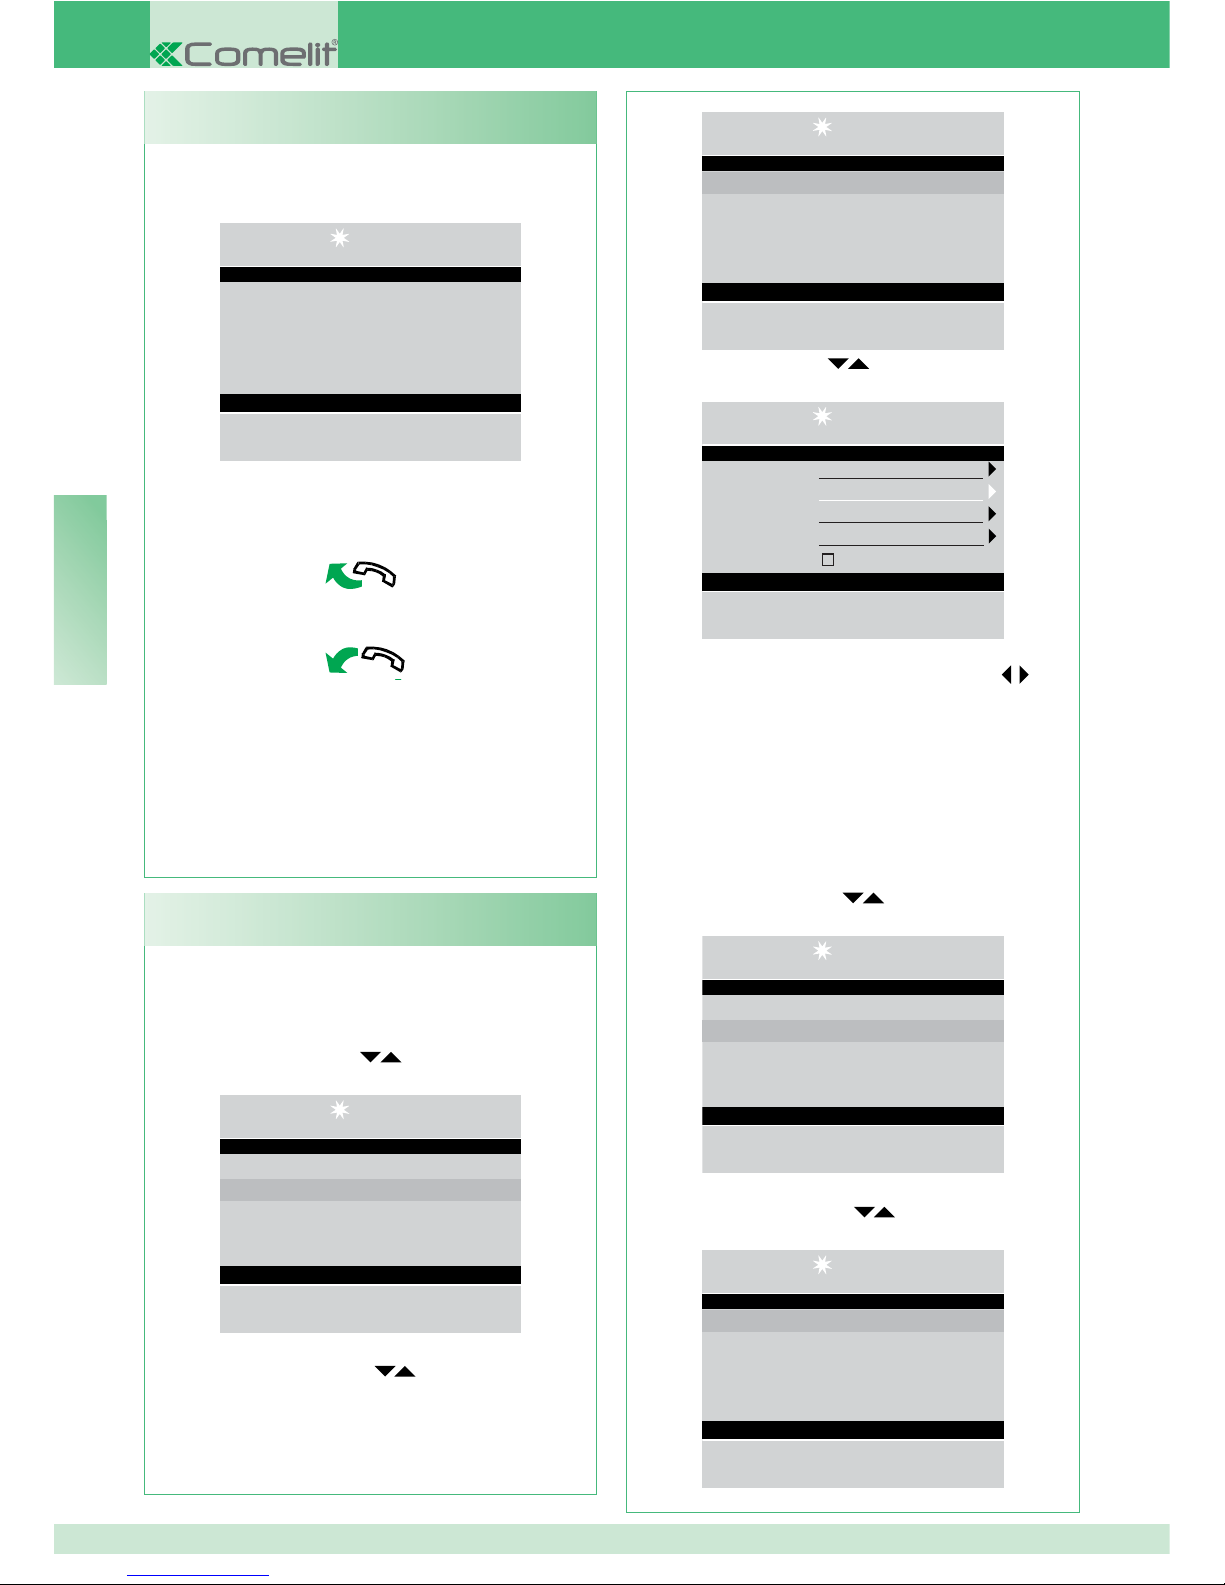
FR
74
Lorsque le standard secondaire reçoit un appel du
standard principal :
14:15:26
Lun 12/03/12
Appel pour standard
- pour répondre à l'appel provenant du standard
principal, soulever le combiné ;
- raccrocher pour terminer la conversation.
ATTENTION !
Si le standard est occupé ou le/la standardiste
est momentanément absent/e et ne peut pas
répondre dans les 30 secondes, l'appel sera
inséré dans la liste des appels (voir « U6 Comment
appeler un poste intérieur présent dans les appels
reçus » page 71).
U10 Comment répondre à un appel du standard
principal au standard secondaire
En cas de 2 standards principaux en confi guration série
(voir page 116), procéder selon une des façons suivantes :
1 - appuyer sur la touche MENU du standard actif et
appuyer sur les touches
pour affi cher le menu
Confi gurations puis appuyer sur la touche OK ;
14 : 15 : 26
Lun 12/03/12
• Réglages
• Configurations
• Répertoire
• Appels reçus
• Alarmes
- appuyer sur les touches pour affi cher le menu
Système puis appuyer sur OK ;
U11 Comment activer ou désactiver les standards
principaux
14 : 15 : 26
Lun 12/03/12
• Système
• Services
- appuyer sur les touches
pour affi cher le menu Link
puis appuyer sur OK ;
14 : 15 : 26
Lun 12/03/12
Système Simplebus
Link Série slave
Appel Simplebus
A/V Audio
Rétrocom.
Esc Ok
- sélectionner Série slave à l'aide des touches
pour
le désactiver.
Le standard s'éteint alors que l'autre standard s'allume en
automatique et devient Série master..
- appuyer sur la touche OK pour confi rmer les réglages ;
- appuyer plusieurs fois sur la touche ESC pour retourner
à la page principale.
ou
1 - appuyer sur la touche MENU du standard inactif et
appuyer sur les touches pour affi cher le menu
Confi gurations puis appuyer sur la touche OK ;
14 : 15 : 26
Lun 12/03/12
• Réglages
• Configurations
• Répertoire
• Appels reçus
• Alarmes
- appuyer sur les touches pour affi cher le menu
Système puis appuyer sur OK ;
14 : 15 : 26
Lun 12/03/12
• Système
• Services
Page 79
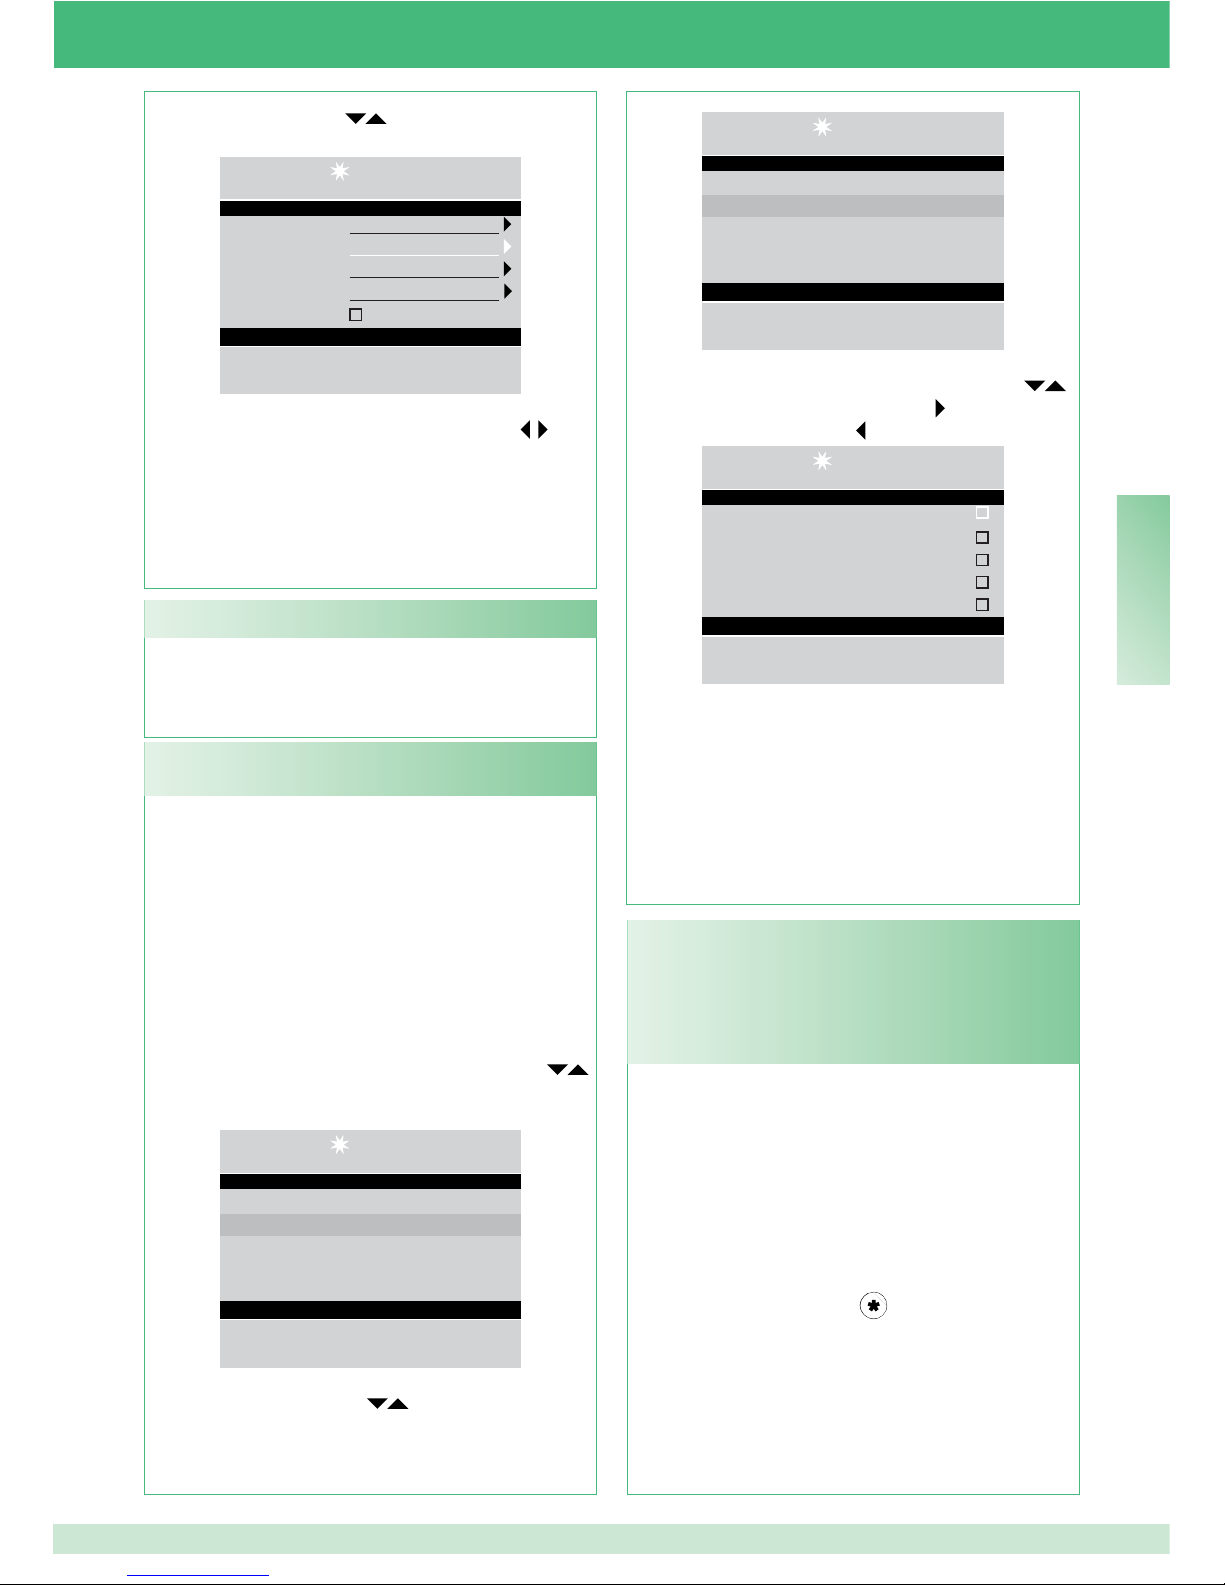
FR
75
Possibilité de commander la gâche électrique à partir
de la platine extérieure en appuyant sur la touche
A ; si la commande est obtenue, une tonalité de
confi rmation retentira.
U12 Comment utiliser l'ouvre-porte
Cette fonction permet de dévier les appels destinés au
standard vers les appareils téléphoniques locaux ou à
distance.
ATTENTION !
Pour utiliser cette fonction, la centrale Art. 2906 avec
interface Art. 2912 doit être présente. S'adresser à
l'installateur de confi ance.
Cette fonction n'est activable que sur le standard
programmé comme secondaire
(voir « C1 Type de
standard » page 91).
Pour valider cette fonction :
- appuyer sur la touche MENU et sur les touches
pour affi cher le menu Confi gurations puis appuyer sur
la touche OK ;
14 : 15 : 26
Lun 12/03/12
• Réglages
• Configurations
• Répertoire
• Appels reçus
• Alarmes
- appuyer sur les touches
pour affi cher le menu
Services puis appuyer sur OK ;
U13 Comment activer la fonction « Suivi »
(FollowMe)
Les actionneurs peuvent être activés tant en modalité
de repos qu'en modalité de conversation vers la
platine extérieure.
ATTENTION !
Pour utiliser cette fonction, il est nécessaire
d'avoir une platine extérieure principale et des
actionneurs Art. 1256. S'adresser à l'installateur
de confi ance.
Pour activer l'actionneur :
- appuyer sur la touche
, saisir le code pour
activer un actionneur spécifi que ; en cas de code
manquant, un actionneur générique sera activé ;
U14 Comment activer un relais supplémentaire
(par ex. pour activer en mode indépendant et
avec une commande dédiée : éclairage, contacts
d'alarme TVCC, grilles de sortie de garage, entrées
sans platine extérieure ou autres dispositifs)
- appuyer sur les touches
pour affi cher le menu Link
puis appuyer sur OK ;
14 : 15 : 26
Lun 12/03/12
Système Simplebus
Link Série slave
Appel Simplebus
A/V Audio
Rétrocom.
Esc Ok
- sélectionner Série master à l'aide des touches
pour
confi rmer que le standard doit être validé.
L'autre standard se désactive en automatique et devient
Série slave.
- appuyer sur la touche OK pour confi rmer les réglages ;
- appuyer plusieurs fois sur la touche ESC pour retourner
à la page principale.
14 : 15 : 26
Lun 12/03/12
• Système
• Services
- affi cher le service FollowMe à l'aide des touches
.
Valider le service à l'aide de la touche .
Désactiver en appuyant sur
.
14 : 15 : 26
Lun 12/03/12
FollowMe
Répétition appel
Allumage postes int.
Appel triple
Aide codes
Esc Ok
- appuyer sur la touche OK pour confi rmer les réglages ;
- appuyer plusieurs fois sur la touche ESC
pour retourner
à la page principale.
À la suite d'un appel, le standard sonnera de toute
manière et tant que l'appareil à distance n'entrera pas
en communication, il sera possible de répondre à l'appel
depuis le standard en annulant la fonction « Suivi ».
Page 80
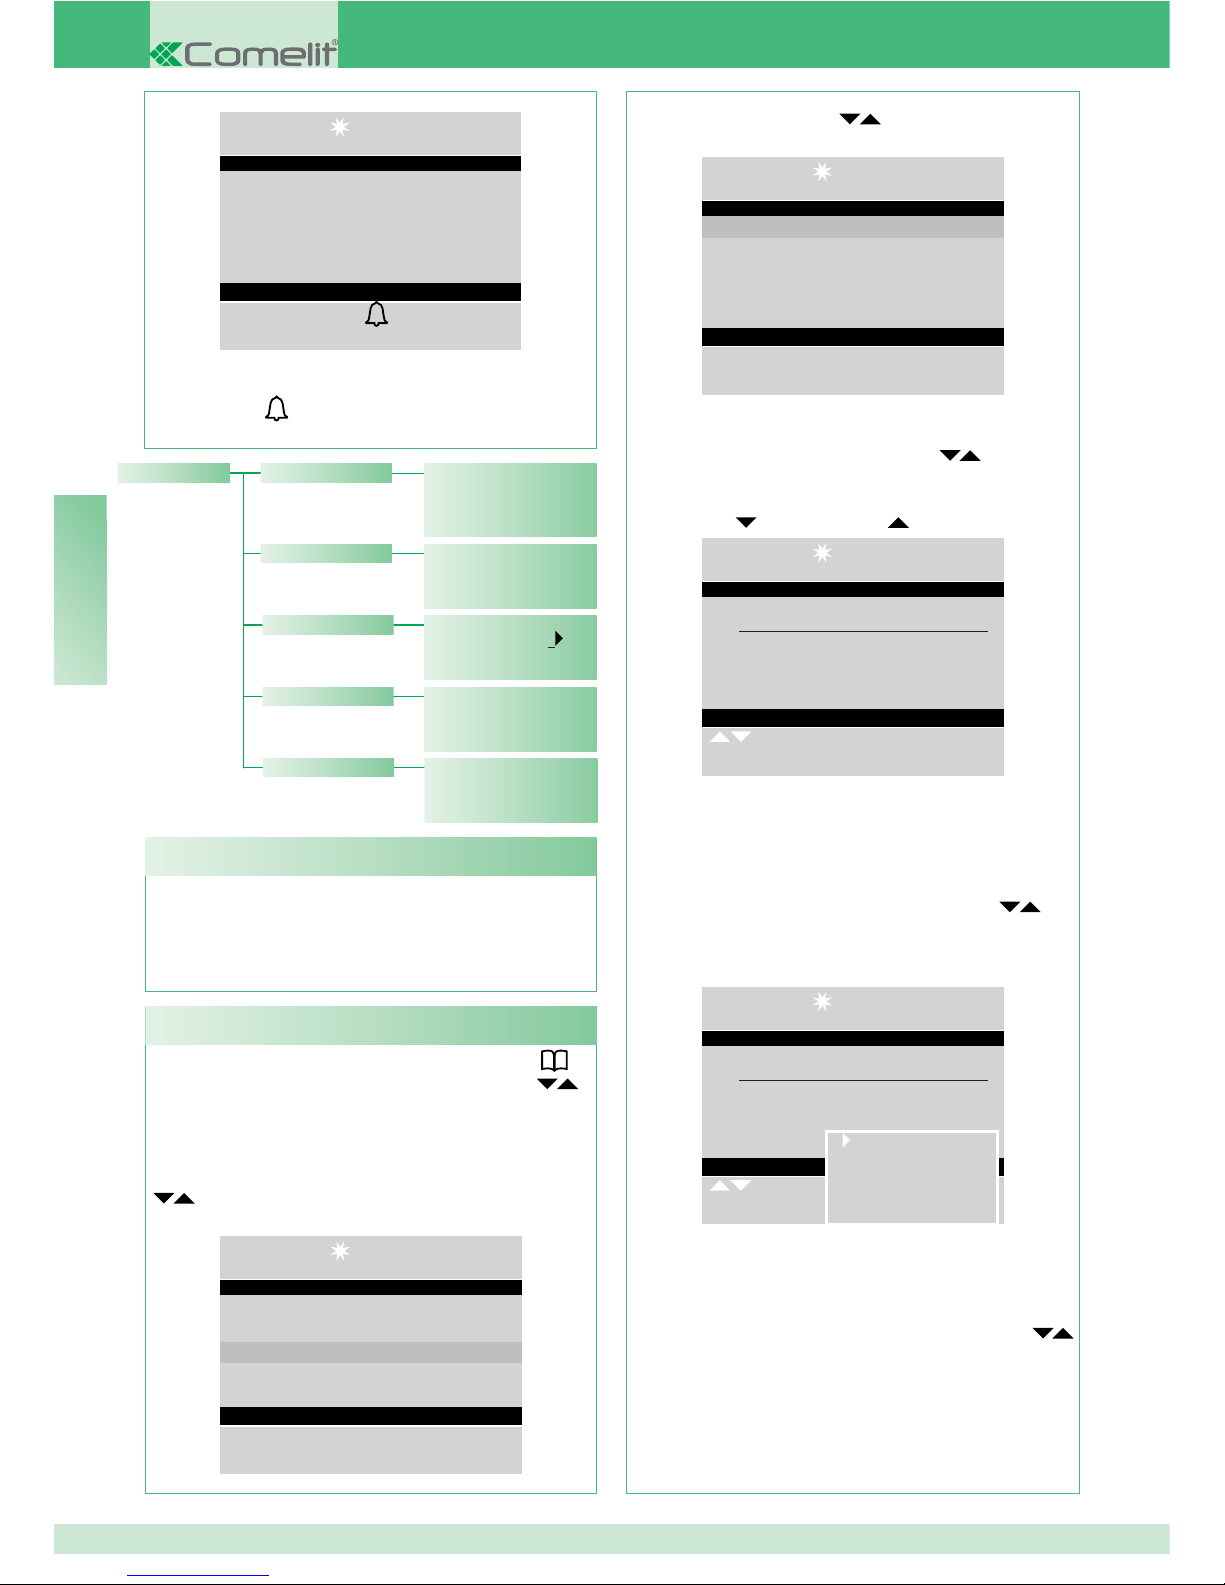
FR
76
- appuyer sur les touches pour affi cher la rubrique
Affi cher puis appuyer sur OK ;
14 : 15 : 26
Lun 12/03/12
• Afficher
• Nouvelle rubrique
• Numéros brefs
• Éliminer tout
• Info
- les noms mémorisés dans le répertoire s'affi cheront dans
l'ordre alphabétique ; utiliser les touches pour dérou-
ler la liste.
Pour accélérer le déroulement de la liste de noms, appuyer
sur la touche
ou sur la touche .
14:15:26
Lun 12/03/12
________________________
Sergio Rossi
Code 012
Dérouler Menu
Ou
- saisir le nom également avec une partie de l'extension ;
S'il existe plusieurs usagers avec l'initiale saisie, il est
possible de dérouler la liste à l'aide des touches
.
- appuyer sur la touche MENU pour affi cher une fenêtre
en bas à droite.
14:15:26
Lun 12/03/12
________________________
Sergio Rossi
Code 012
Dérouler Menu
Possibilité d'ajouter une nouvelle rubrique, d'éliminer la
rubrique sélectionnée, de la modifier ou d'effacer tout le
répertoire.
Sélectionner l’opération désirée à l'aide des touches
puis appuyer sur la touche OK.
- appuyer plusieurs fois sur la touche ESC pour retourner
à la page principale.
Nouvelle rubrique
Éliminer rubrique
Modifier rubrique
Éliminer tout
Possibilité de saisir jusqu'à 4000 noms ayant au
maximum 13 caractères alphanumériques, en
associant à chaque nom un code qui correspond à
celui du poste intérieur désiré.
U15 Comment utiliser le répertoire
Éliminer tout ?
Nombre de noms 0022
• Affi cher
_______________
Sergio Rossi
Code 012
Répertoire
• Nouvelle rubrique
• Numéros brefs
Nom ________
Code ___
Numéro bref 1
Code 125...
• Éliminer tout
• Info
Pour affi cher le répertoire, appuyer sur la touche et
dérouler la liste des usagers à l'aide des touches ;
pour accélérer l'opération, garder le doigt sur la touche. Le
NOM et le CODE associé à chaque usager sont affi chés.
Ou
- appuyer sur la touche MENU et appuyer sur les touches
pour affi cher le menu Répertoire puis appuyer sur
la touche OK ;
14 : 15 : 26
Lun 12/03/12
• Réglages
• Configurations
• Répertoire
• Appels reçus
• Alarmes
U16 Comment chercher un nom en répertoire
14:15:26
Lun 12/03/12
Code actionneur_________
Pour actionneur
- pour confi rmer l'activation de l'actionneur, appuyer
sur la touche
.
Page 81
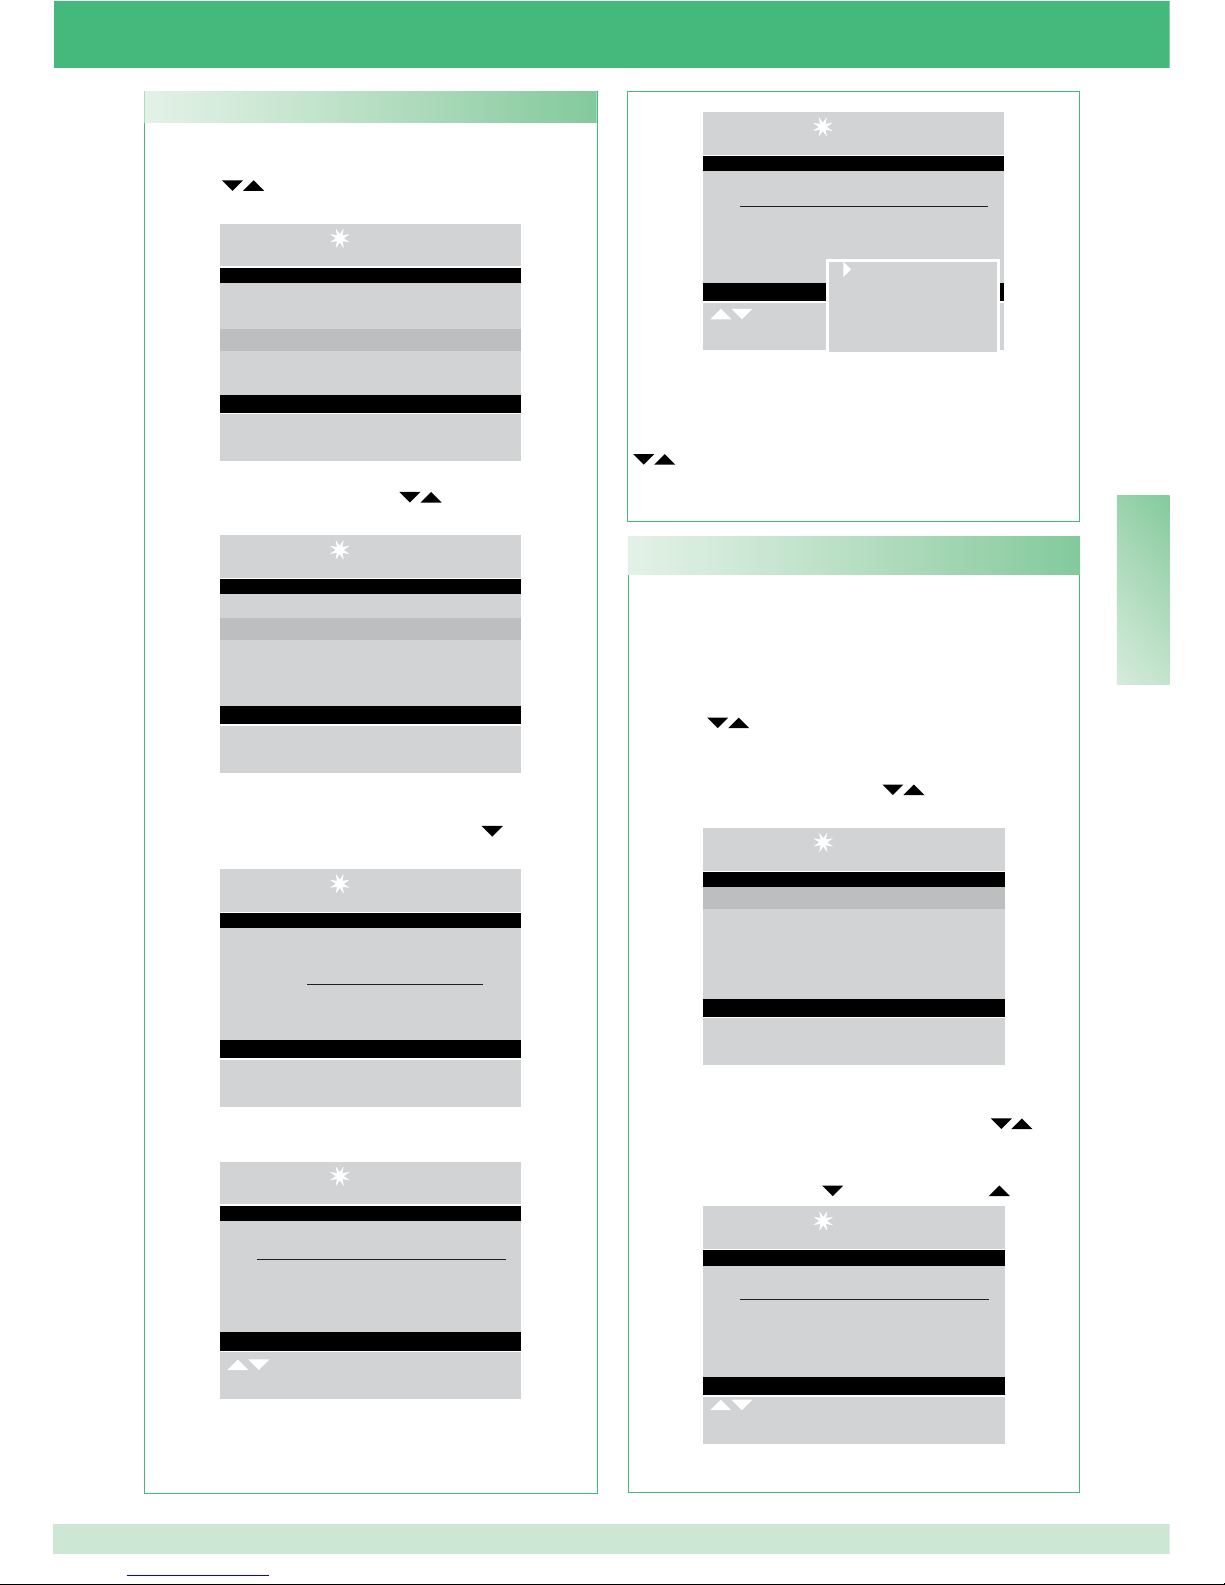
FR
77
Si l'on désire insérer un nom en répertoire :
- appuyer sur la touche MENU et appuyer sur les
touches
pour affi cher le menu Répertoire puis
appuyer sur la touche OK ;
14 : 15 : 26
Lun 12/03/12
• Réglages
• Configurations
• Répertoire
• Appels reçus
• Alarmes
- appuyer sur les touches
pour affi cher la
rubrique Nouvelle rubrique puis appuyer sur OK ;
14 : 15 : 26
Lun 12/03/12
• Afficher
• Nouvelle rubrique
• Numéros brefs
• Éliminer tout
• Info
- saisir le nouveau nom à l'aide du clavier
alphanumérique ; appuyer sur la touche
et saisir le
code à l'aide du clavier.
14:15:26
Lun 12/03/12
Nom _________________
Code ___
Insérer rubrique
- appuyer sur la touche OK pour confi rmer les réglages ;
14:15:26
Lun 12/03/12
________________________
Sergio Rossi
Code 012
Dérouler Menu
- appuyer sur la touche MENU pour affi cher une
fenêtre en bas à droite.
ATTENTION !
Pour effacer le répertoire complet, voir « U20 Effacer répertoire » page 79.
Si l'on veut effacer un nom en répertoire :
- appuyer sur la touche MENU et appuyer sur les
touches
pour affi cher le menu Répertoire puis
appuyer sur la touche OK ;
- appuyer sur les touches
pour affi cher la
rubrique Affi cher puis appuyer sur OK ;
14 : 15 : 26
Lun 12/03/12
• Afficher
• Nouvelle rubrique
• Numéros brefs
• Éliminer tout
• Info
- les noms mémorisés dans le répertoire s'affi cheront
dans l'ordre alphabétique ; utiliser les touches
pour
dérouler la liste.
Pour accélérer le déroulement de la liste de noms,
appuyer sur la touche ou sur la touche .
14:15:26
Lun 12/03/12
________________________
Sergio Rossi
Code 012
Dérouler Menu
U18 Comment effacer un nom du répertoire
14:15:26
Lun 12/03/12
________________________
Sergio Rossi
Code 012
Dérouler
Possibilité d'ajouter une nouvelle rubrique, d'éliminer
la rubrique sélectionnée, de la modifier ou d'effacer
tout le répertoire.
Sélectionner l’opération désirée à l'aide des touches
puis appuyer sur la touche OK.
- appuyer plusieurs fois sur la touche ESC pour
retourner à la page principale.
Nouvelle rubrique
Éliminer rubrique
Modifier rubrique
Éliminer tout
U17 Comment insérer un nom au répertoire
Page 82
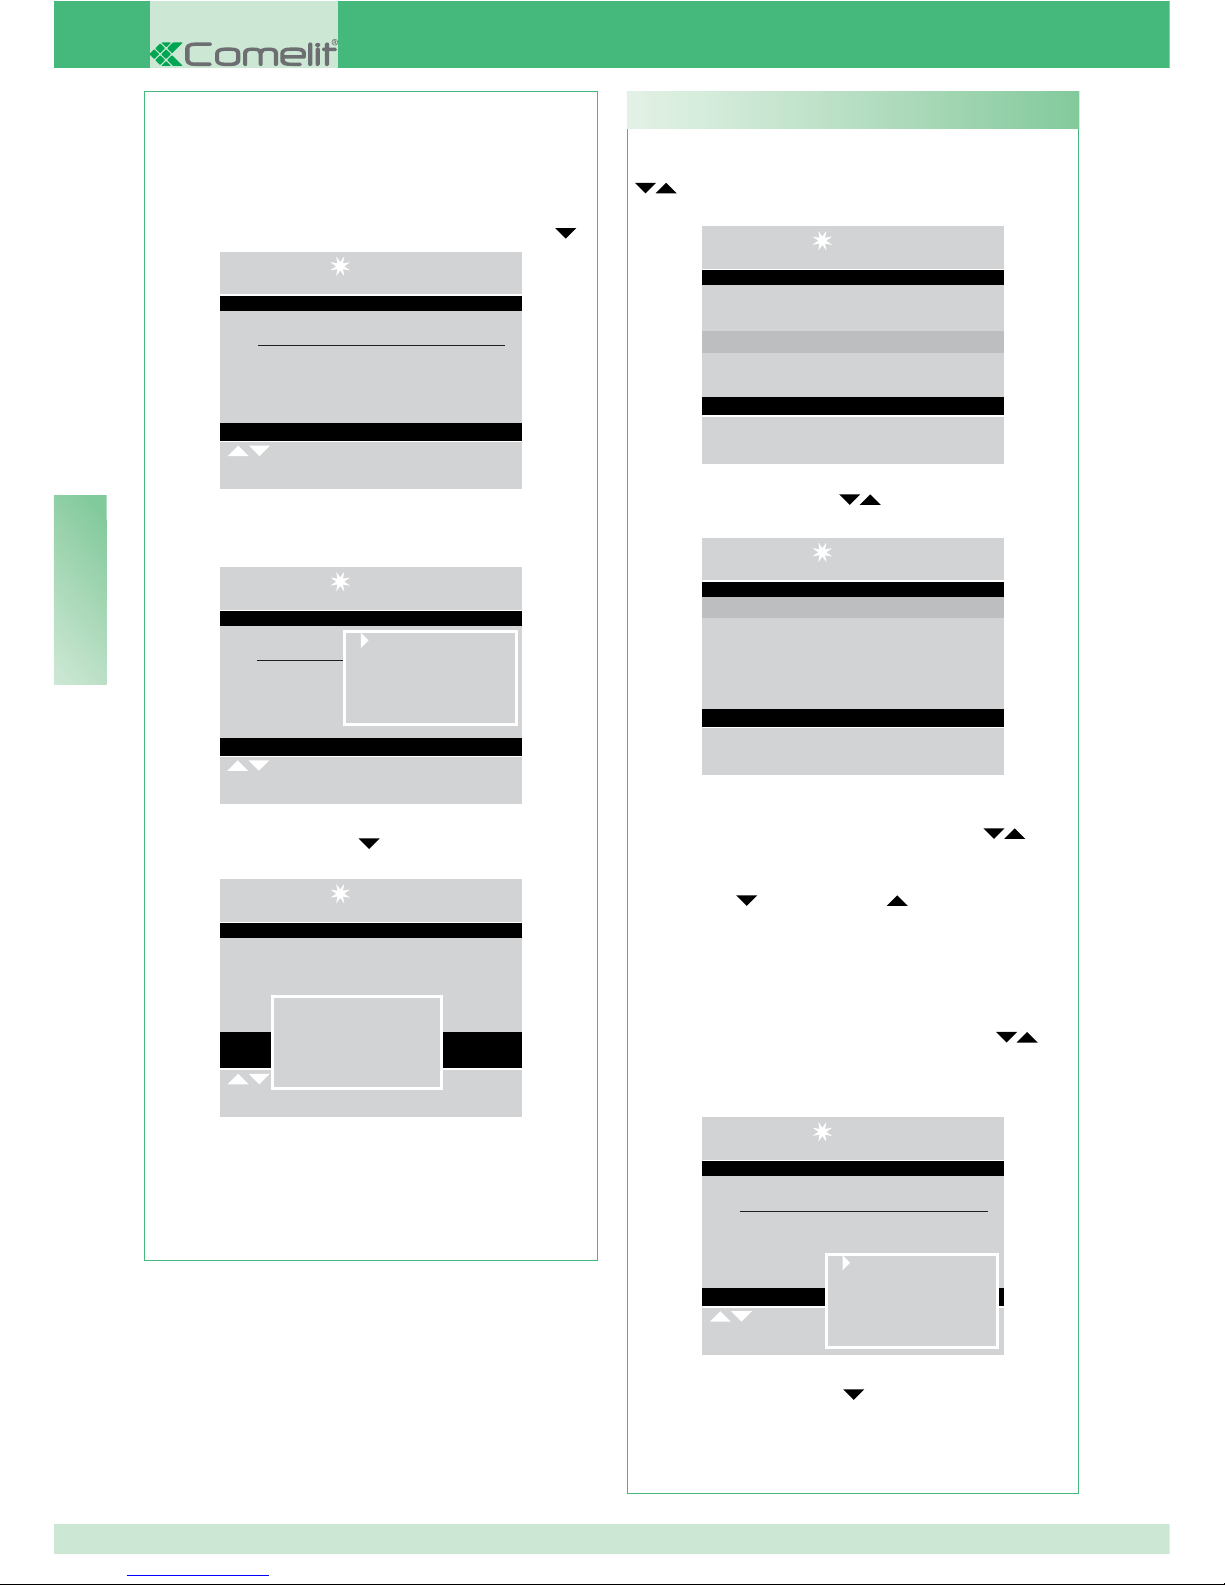
FR
78
Si l'on désire modifi er un nom en répertoire :
- appuyer sur la touche MENU et appuyer sur les touches
pour affi cher le menu Répertoire puis appuyer sur la
touche OK ;
14 : 15 : 26
Lun 12/03/12
• Réglages
• Configurations
• Répertoire
• Appels reçus
• Alarmes
- appuyer sur les touches pour affi cher la rubrique
Affi cher puis appuyer sur OK ;
14 : 15 : 26
Lun 12/03/12
• Afficher
• Nouvelle rubrique
• Numéros brefs
• Éliminer tout
• Info
- les noms mémorisés dans le répertoire s'affi cheront dans
l'ordre alphabétique ; utiliser les touches pour
dérouler la liste.
Pour accélérer le déroulement de la liste de noms, appuyer
sur la touche ou sur la touche .
Ou
- saisir le nom également avec une partie de l'extension ;
S'il existe plusieurs usagers avec l'initiale saisie, il est
possible de dérouler la liste à l'aide des touches
.
- appuyer sur la touche MENU pour affi cher une fenêtre
en bas à droite.
14:15:26
Lun 12/03/12
________________________
Sergio Rossi
Code 012
Dérouler Menu
- appuyer sur la touche pour affi cher la rubrique
Modifi er rubrique puis appuyer sur OK ;
U19 Comment modifi er un nom en répertoire
Nouvelle rubrique
Éliminer rubrique
Modifier rubrique
Éliminer tout
Ou
- saisir le nom également avec une partie de
l'extension ;
S'il existe plusieurs usagers avec l'initiale saisie, il est
possible de dérouler la liste à l'aide des touches .
14:15:26
Lun 12/03/12
________________________
Sergio Rossi
Code 012
Dérouler Menu
- appuyer sur la touche MENU pour affi cher une
fenêtre en bas à droite.
14:15:26
Lun 12/03/12
________________________
Sergio Rossi
Code 012
Dérouler Menu
- appuyer sur la touche pour affi cher la rubrique
Éliminer rubrique puis appuyer sur OK ;
14 : 15 : 26
Lun 12/03/12
SERGIO ROSSI
Code 012
Dérouler Menu
Éliminer rubrique ?
Ok Esc
- pour confi rmer l'effacement, appuyer sur la touche
OK ;
- appuyer plusieurs fois sur la touche ESC pour
retourner à la page principale.
Nouvelle rubrique
Éliminer rubrique
Modifier rubrique
Éliminer tout
Page 83
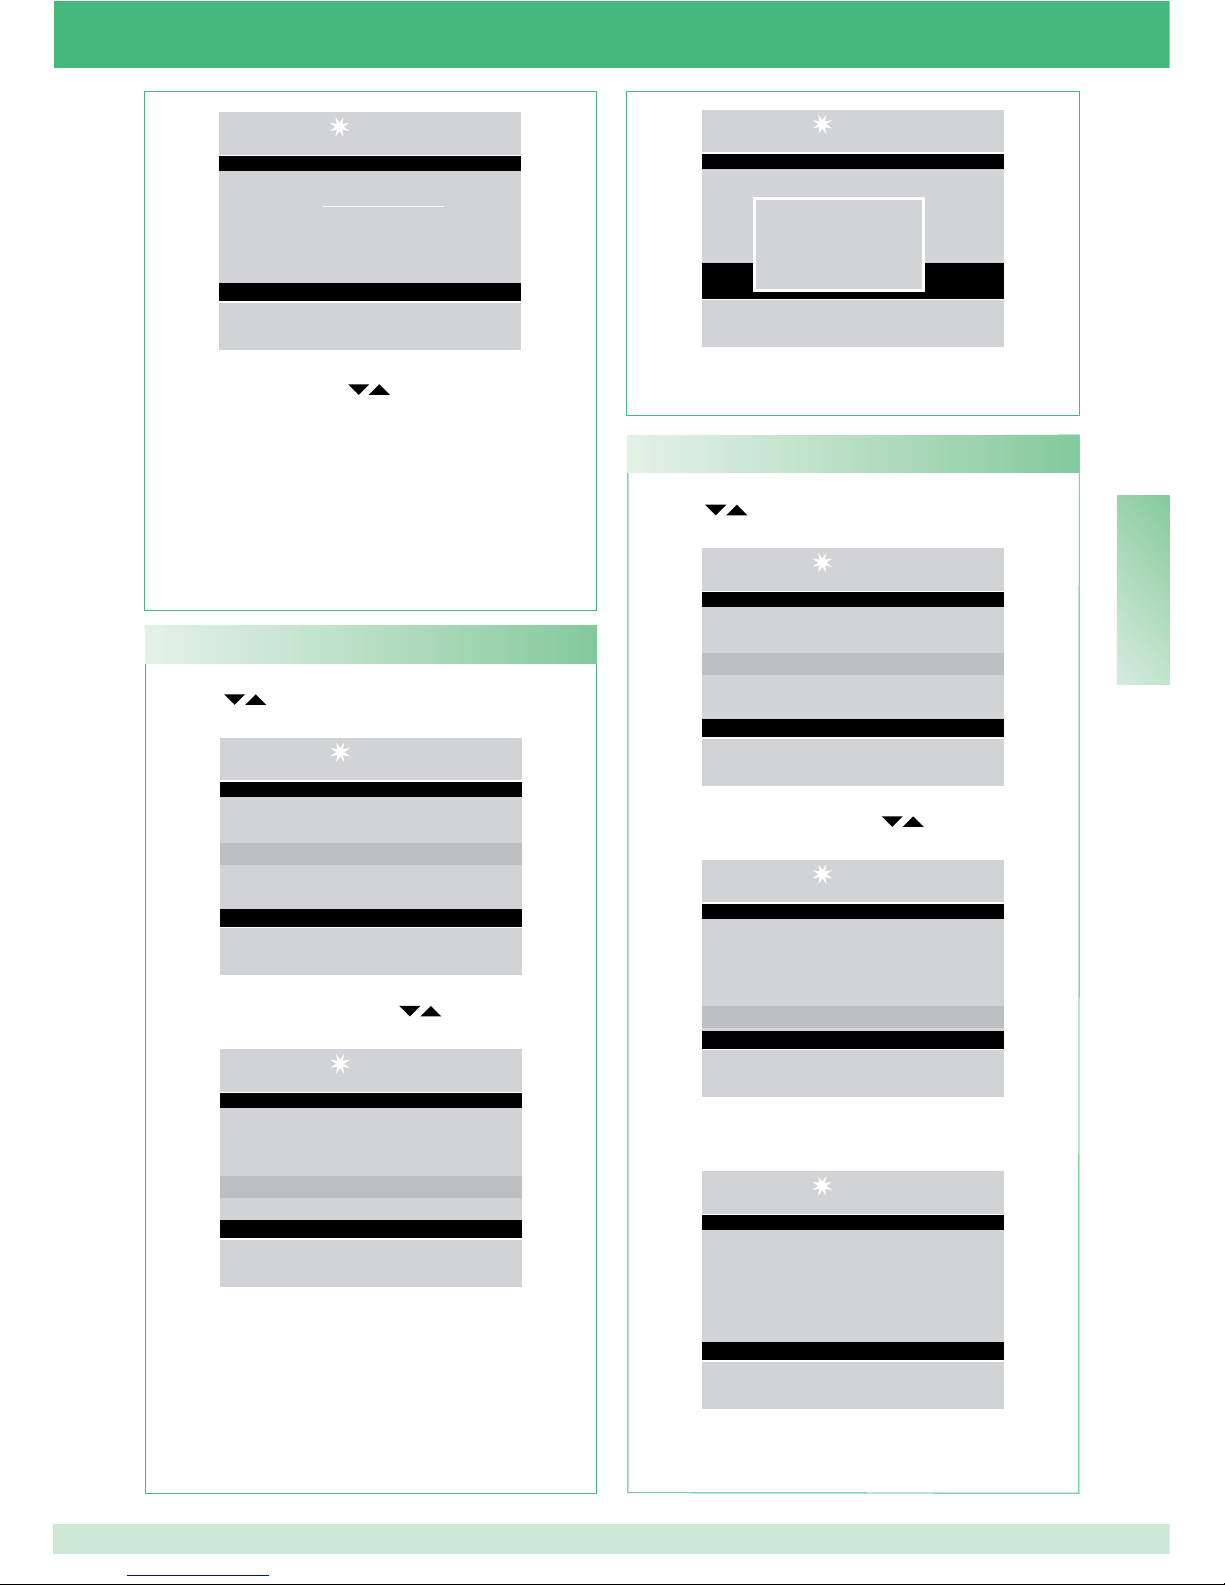
FR
79
14:15:26
Lun 12/03/12
Nom Sergio Rossi
Code 012
Modifier rubrique
- appuyer sur les touches pour affi cher la rubrique à
modifi er (nom ou code).
- appuyer sur CANC
pour effacer la rubrique sélectionnée et
saisir le nouveau nom ou code au clavier alphanumérique ;
- pour confi rmer la modifi cation du nom, appuyer sur OK
puis appuyer sur ESC pour sortir.
- appuyer sur la touche MENU et appuyer sur les
touches pour affi cher le menu Répertoire puis
appuyer sur la touche OK ;
14 : 15 : 26
Lun 12/03/12
• Réglages
• Configurations
• Répertoire
• Appels reçus
• Alarmes
- appuyer sur les touches
pour affi cher la
rubrique Éliminer tout puis appuyer sur OK ;
14 : 15 : 26
Lun 12/03/12
• Afficher
• Nouvelle rubrique
• Numéros brefs
• Éliminer tout
• Info
- une page demandant de confi rmer l'élimination de
tout le répertoire s’affi che ; con
fi rmer en appuyant sur
OK ou annuler en appuyant sur ESC ;
U20 Effacer le répertoire
- appuyer sur la touche MENU et appuyer sur les
touches
pour affi cher le menu Répertoire puis
appuyer sur la touche OK ;
14 : 15 : 26
Lun 12/03/12
• Réglages
• Configurations
• Répertoire
• Appels reçus
• Alarmes
- appuyer sur les touches
pour affi cher la
rubrique Info puis appuyer sur OK ;
14 : 15 : 26
Lun 12/03/12
• Afficher
• Nouvelle rubrique
• Numéros brefs
• Éliminer tout
• Info
- une page indiquant le nombre de noms mémorisés
dans le répertoire s'affi che ;
14 : 15 : 26
Lun 12/03/12
Nombre de noms 0022
- appuyer plusieurs fois sur la touche ESC pour
retourner à la page principale.
U21 Info répertoire
14 : 15 : 26
Lun 12/03/12
Éliminer tout ?
Ok Esc
- appuyer plusieurs fois sur la touche ESC pour
retourner à la page principale.
Page 84
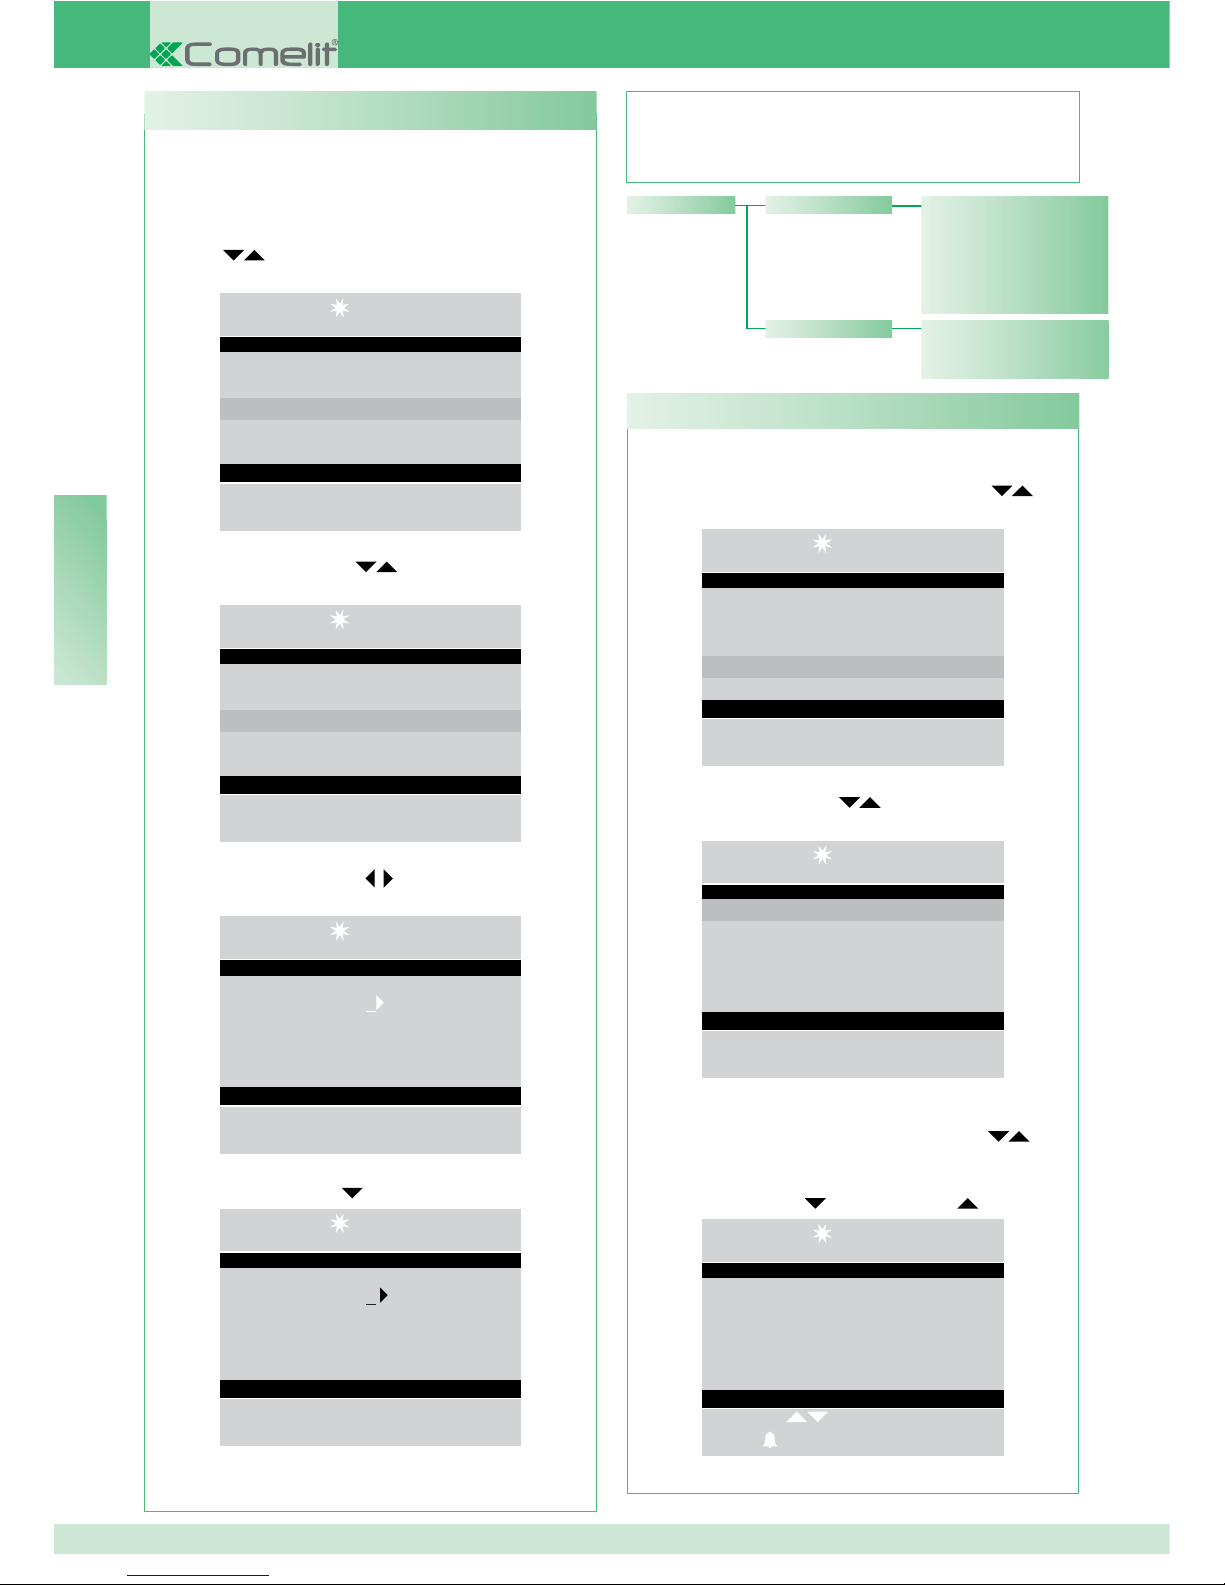
FR
80
- Pour accéder rapidement à l'affi chage des appels en
attente, appuyer sur la touche MENU + touche 2 ou
appuyer sur la touche MENU et sur les touches
pour
affi cher le menu Appels reçus puis appuyer sur OK ;
14 : 15 : 26
Lun 12/03/12
• Réglages
• Configurations
• Répertoire
• Appels reçus
• Alarmes
- appuyer sur les touches
pour affi cher la rubrique
Affi cher puis appuyer sur OK ;
14 : 15 : 26
Lun 12/03/12
• Afficher
• Éliminer tout
- les appels entrant s'affi cheront dans l'ordre chronologique
à partir du dernier reçu ; utiliser les touches
pour
dérouler la liste.
Pour accélérer le déroulement de la liste de noms,
appuyer sur la touche ou sur la touche .
14:15:26
Lun 12/03/12
Appelant Sergio Rossi
Code 012
Reçu Lun 12/03/12
À 13 : 15 : 11
Dérouler
Appel
Menu
U23 - Affichage appels reçus
Cette fonction permet de mémoriser, modifi er et effacer
les numéros brefs.
- appuyer sur la touche MENU et appuyer sur les
touches
pour affi cher le menu Répertoire puis
appuyer sur la touche OK ;
14 : 15 : 26
Lun 12/03/12
• Réglages
• Configurations
• Répertoire
• Appels reçus
• Alarmes
- appuyer sur les touches
pour affi cher la rubrique
Numéros brefs puis appuyer sur OK ;
14 : 15 : 26
Lun 12/03/12
• Afficher
• Nouvelle rubrique
• Numéros brefs
• Éliminer tout
• Info
- appuyer sur les touches
pour affi cher le numéro
bref (de 1 à 8) auquel associer un code ;
14:15:26
Lun 12/03/12
Numéro bref 1
Code ___
Régler num. brefs
- appuyer sur la touche et saisir le code au clavier ;
14:15:26
Lun 12/03/12
Numéro bref 1
Code ___
Régler num. brefs
U22 Enregistrement numéros brefs
- appuyer sur la touche OK pour confi rmer les réglages ;
- appuyer plusieurs fois sur la touche ESC pour retourner
à la page principale.
Appels Sergio Rossi
Code 012
Reçu Lun 12/03 12
À 14 : 15 : 26
Éliminer tout ?
• Éliminer tout
Appels reçus • Affi cher
Page 85
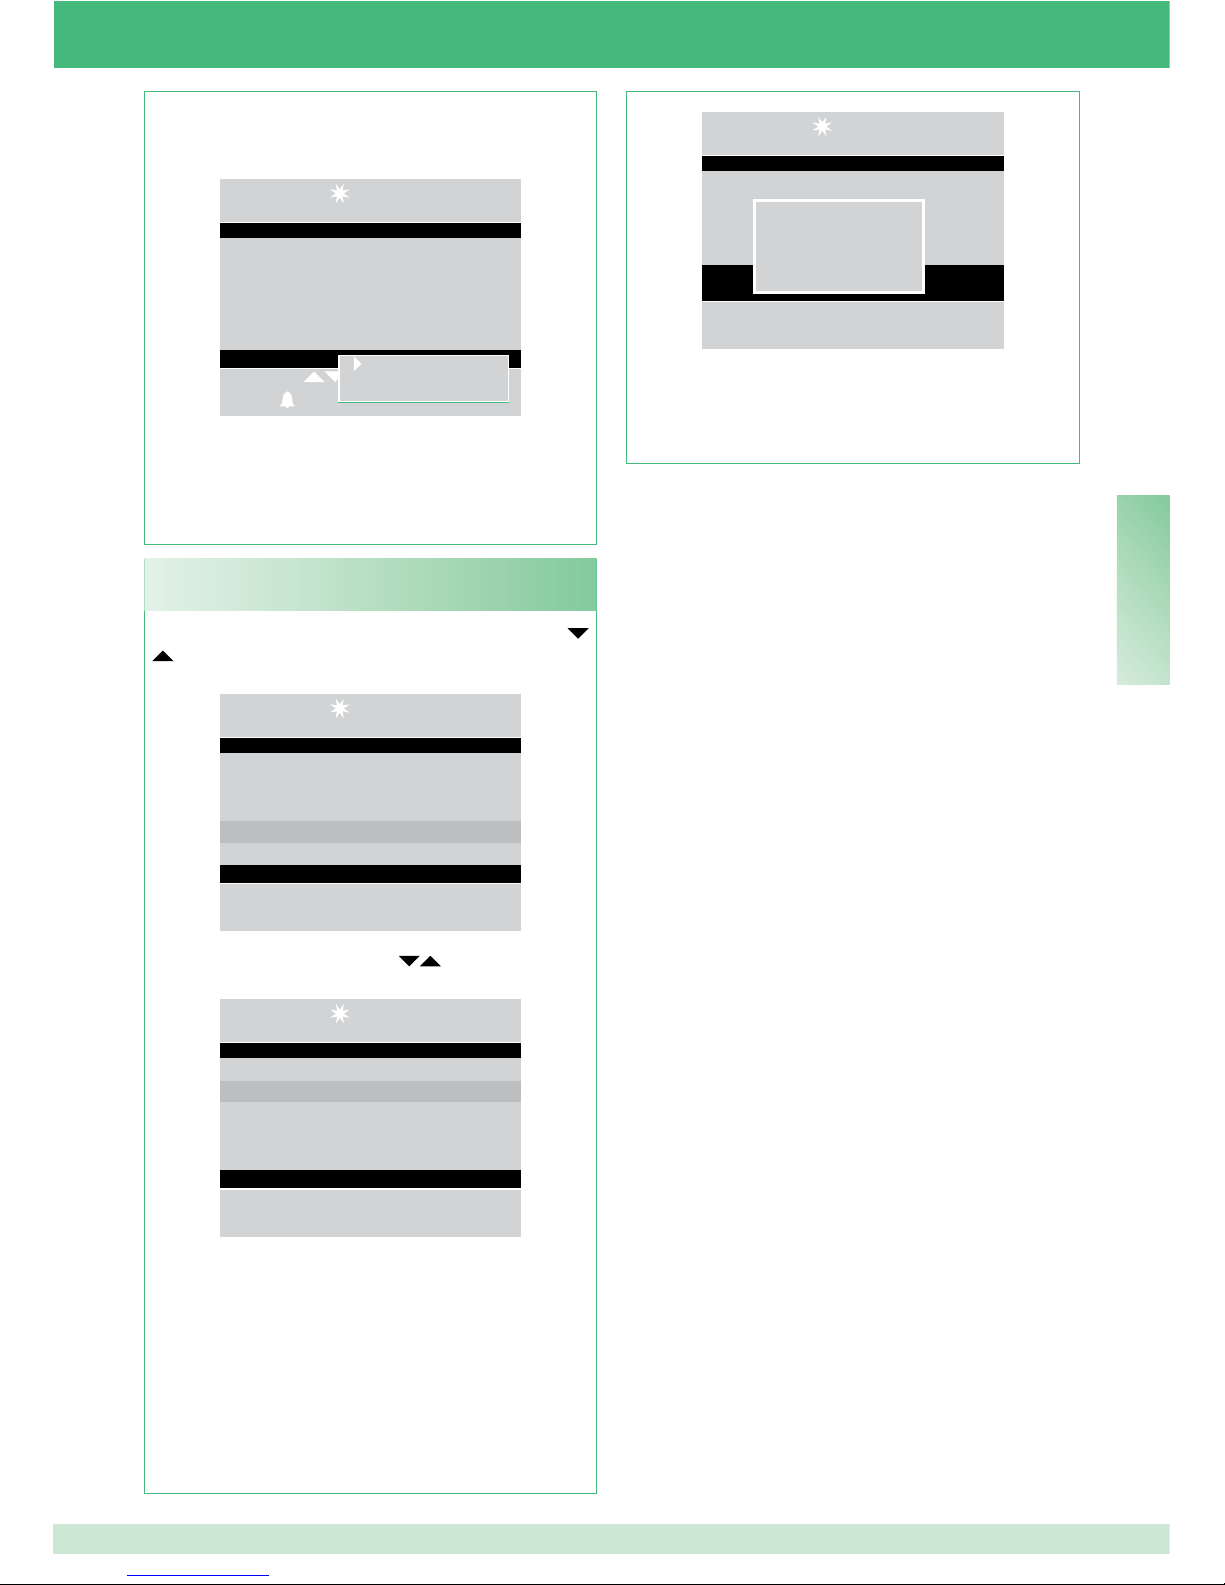
FR
81
- appuyer sur la touche MENU et sur les touches
pour affi cher le menu Appels reçus puis appuyer
sur la touche OK ;
14 : 15 : 26
Lun 12/03/12
• Réglages
• Configurations
• Répertoire
• Appels reçus
• Alarmes
- appuyer sur les touches
pour affi cher la
rubrique Éliminer tout puis appuyer sur OK ;
14 : 15 : 26
Lun 12/03/12
• Afficher
• Éliminer tout
- une page demandant de confi rmer l'élimination
de la liste des appels reçus s'affi
che ; confi rmer en
appuyant sur OK ou annuler en appuyant sur ESC ;
U24 - Effacement liste des appels reçus
- appuyer sur la touche MENU pour affi cher une fenêtre
en bas à droite.
14:15:26
Lun 12/03/12
Appelant Sergio Rossi
Code 012
Reçu Lun 12/03/12
à 13 : 15 : 11
Dérouler
Appel
Menu
- appuyer sur la touche OK pour confi rmer les réglages ;
- appuyer plusieurs fois sur la touche ESC pour retourner
à la page principale.
Éliminer rubrique
Éliminer tout
14 : 15 : 26
Lun 12/03/12
Éliminer tout ?
Ok Esc
- appuyer plusieurs fois sur la touche ESC pour
retourner à la page principale.
Page 86
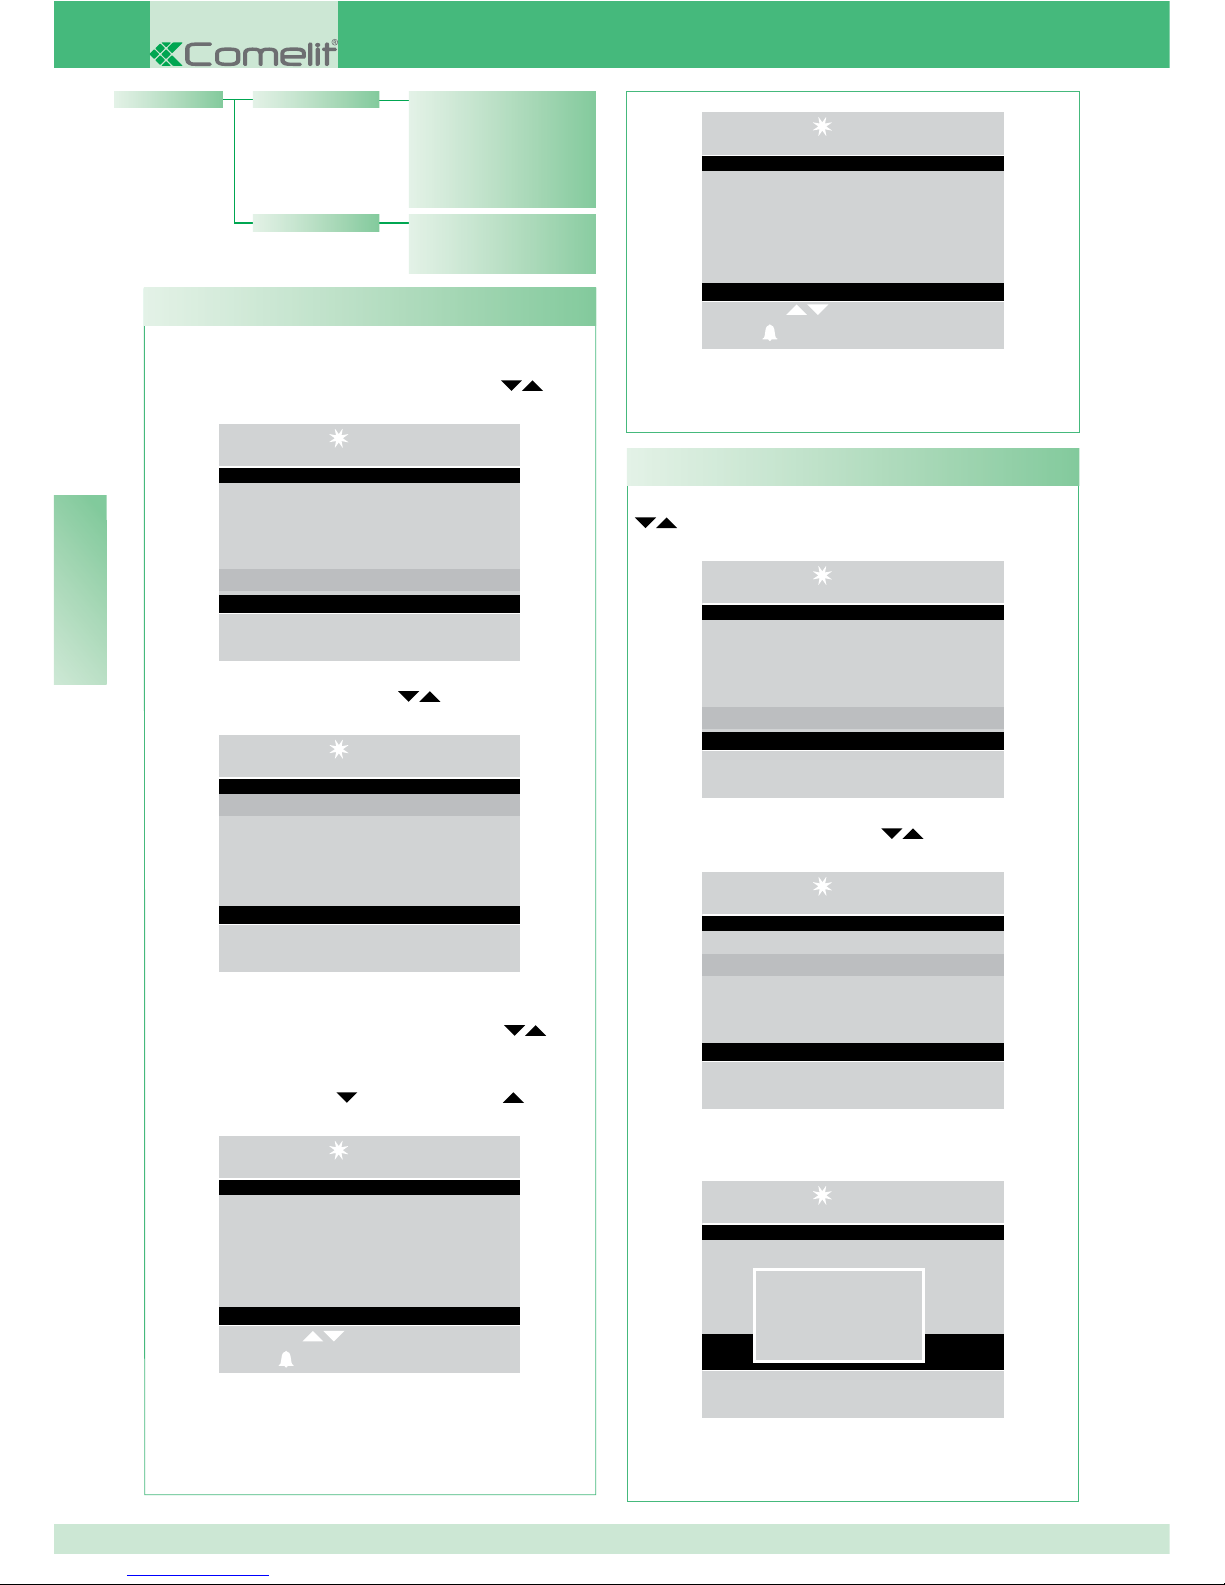
FR
82
- appuyer sur la touche MENU puis sur les touches
pour affi cher le menu Alarmes puis appuyer
sur la touche OK ;
14 : 15 : 26
Lun 12/03/12
• Réglages
• Configurations
• Répertoire
• Appels reçus
• Alarmes
- appuyer sur les touches
pour affi cher la
rubrique Éliminer tout puis appuyer sur OK ;
14 : 15 : 26
Lun 12/03/12
• Afficher
• Éliminer tout
- une page demandant de confi rmer l'élimination de
la liste des alarmes s'affi
che ; confi rmer en appuyant
sur OK ou annuler en appuyant sur ESC ;
14 : 15 : 26
Lun 12/03/12
Éliminer tout ?
Ok Esc
- appuyer plusieurs fois sur la touche ESC pour
retourner à la page principale.
- Pour accéder rapidement à l'affi chage des alarmes,
appuyer sur la touche MENU + touche 1 ou appuyer
sur la touche MENU et sur les touches
pour
affi cher le menu Alarmes puis appuyer sur OK ;
14 : 15 : 26
Lun 12/03/12
• Réglages
• Configurations
• Répertoire
• Appels reçus
• Alarmes
- appuyer sur les touches
pour affi cher la
rubrique Affi cher puis appuyer sur OK ;
14 : 15 : 26
Lun 12/03/12
• Afficher
• Éliminer tout
- les alarmes s'affi cheront dans l'ordre chronologique
à partir de la dernière ; utiliser les touches
pour
dérouler la liste.
Pour accélérer le déroulement de la liste de noms,
appuyer sur la touche ou sur la touche .
14 : 15 : 26
Lun 12/03/12
Alarme Sergio Rossi
Code 012
Reçu Lun 12/03/12
À 13 : 15 : 11
Dérouler
Appel
Menu
- appuyer sur la touche MENU pour affi cher une
fenêtre en bas à droite.
U25 - Affichage des alarmes
U26 - Effacement liste alarmes reçues
14:15:26
Lun 12/03/12
Alarme Sergio Rossi
Code 012
Reçu Lun 12/03/12
à 13 : 15 : 11
Dérouler
Appel
- appuyer plusieurs fois sur la touche ESC pour
retourner à la page principale.
Alarme Sergio Rossi
Code 012
Reçu Lun 12/03 12
À 14 : 15 : 26
Éliminer tout ?
• Éliminer tout
Alarmes • Affi cher
Page 87
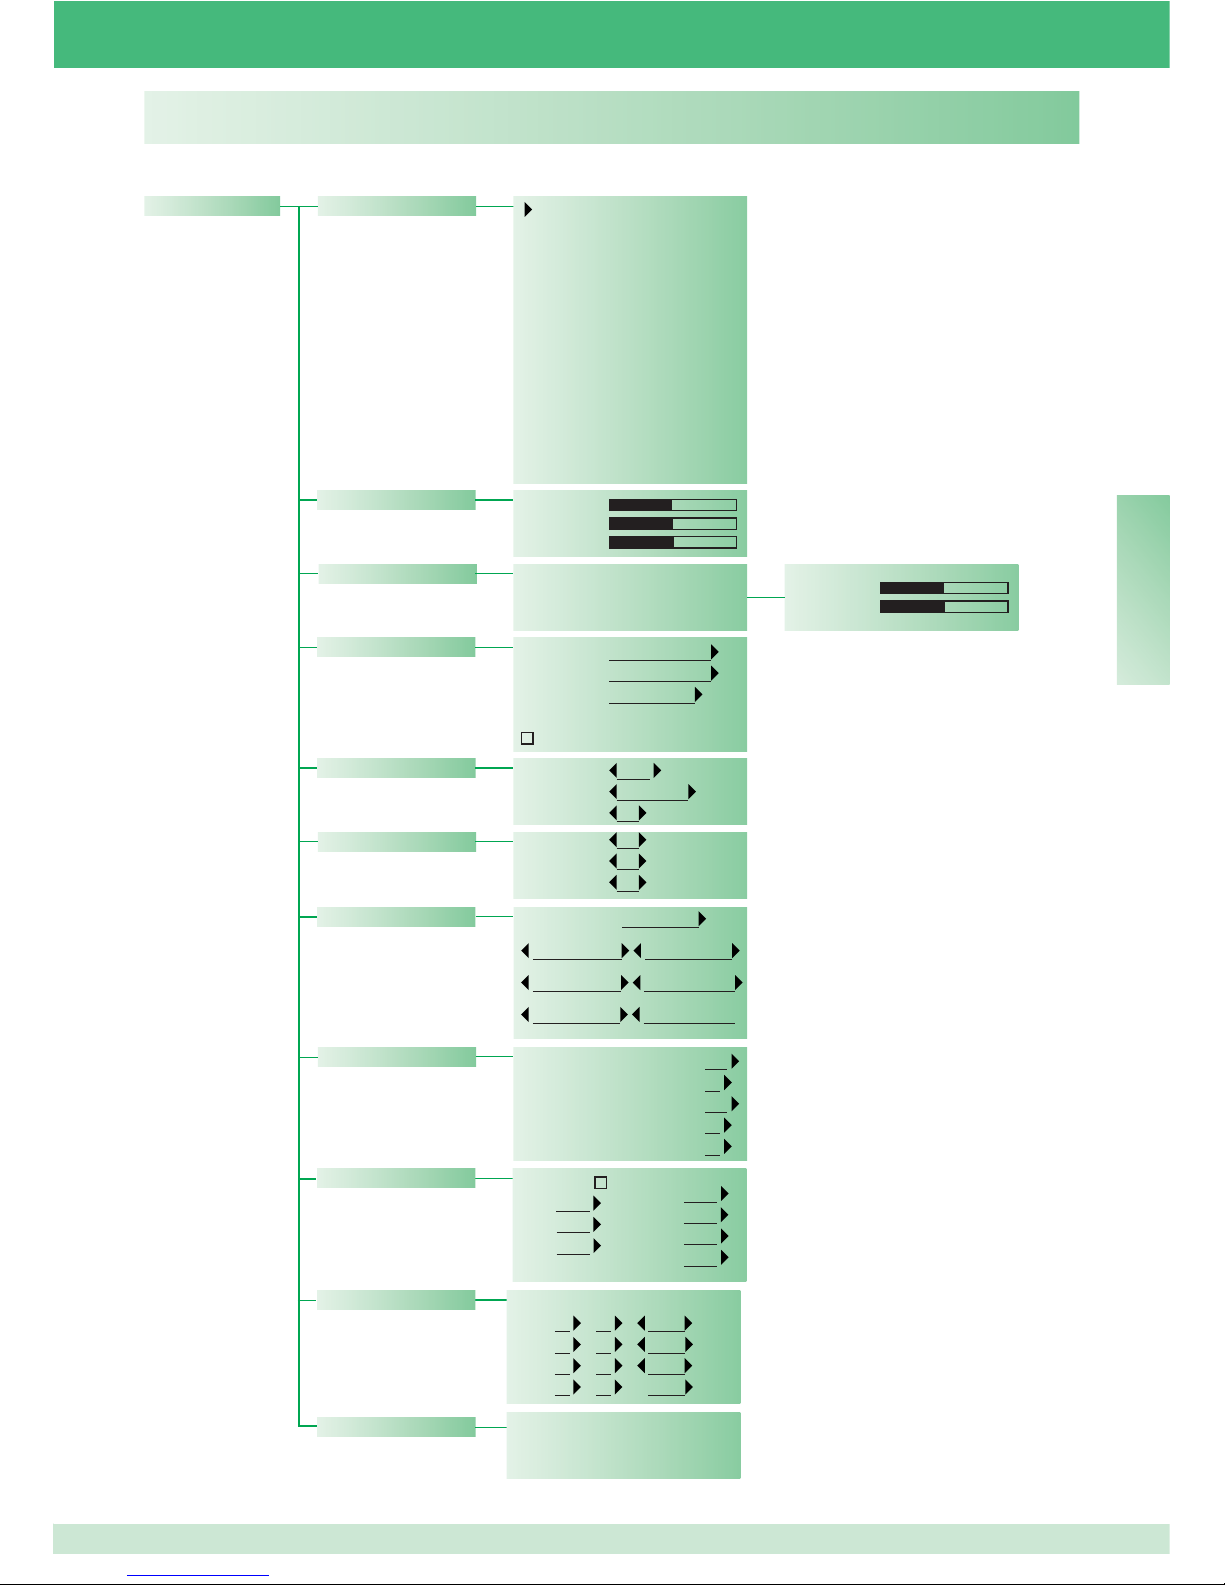
FR
83
RÉGLAGES
Langue
Italiano
English
Français
Deutsch
Español
Portugais
Hollandais
Danois
Norvégien
Finlandais
Suédois
Turc
Russe
Polonais
Croate
Paramétrage
• Vidéo
Luminosité
Contraste
Couleur
• Audio
• Intérieur
• Extérieur
Micro
Haut-parleur
• Sons
Extérieur Le printemps
Intérieur Le printemps
Alarme Alarme 1
Tonalité touches
• Date
Année 2010
Mois Mars
Jour 12
• Heure
Heures 14
Minutes 15
Secondes 26
• Mod. quotidienne
Valider
Dim Nuit
Lun Nuit
Mar Nuit
Mer Nuit
Jeu Nuit
Ven Nuit
Sam Nuit
• Thèmes
• Reset paramétrage
Réinitialiser ?
• Commut. automatique
Cmt 1 00 : 00 Jour
Cmt 2 00 : 00 Nuit
Cmt 3 00 : 00 Jour
Cmt 4 00 : 00
Thèmes Thème blue
Thème Planux Thème Green
Thème Red Thème Yellow
Thème Pink Thème Orange
• Temps
Phonie 010
Attente reset 01
Veille 010
Activation relais 01
Répétition appel 01
Page 88
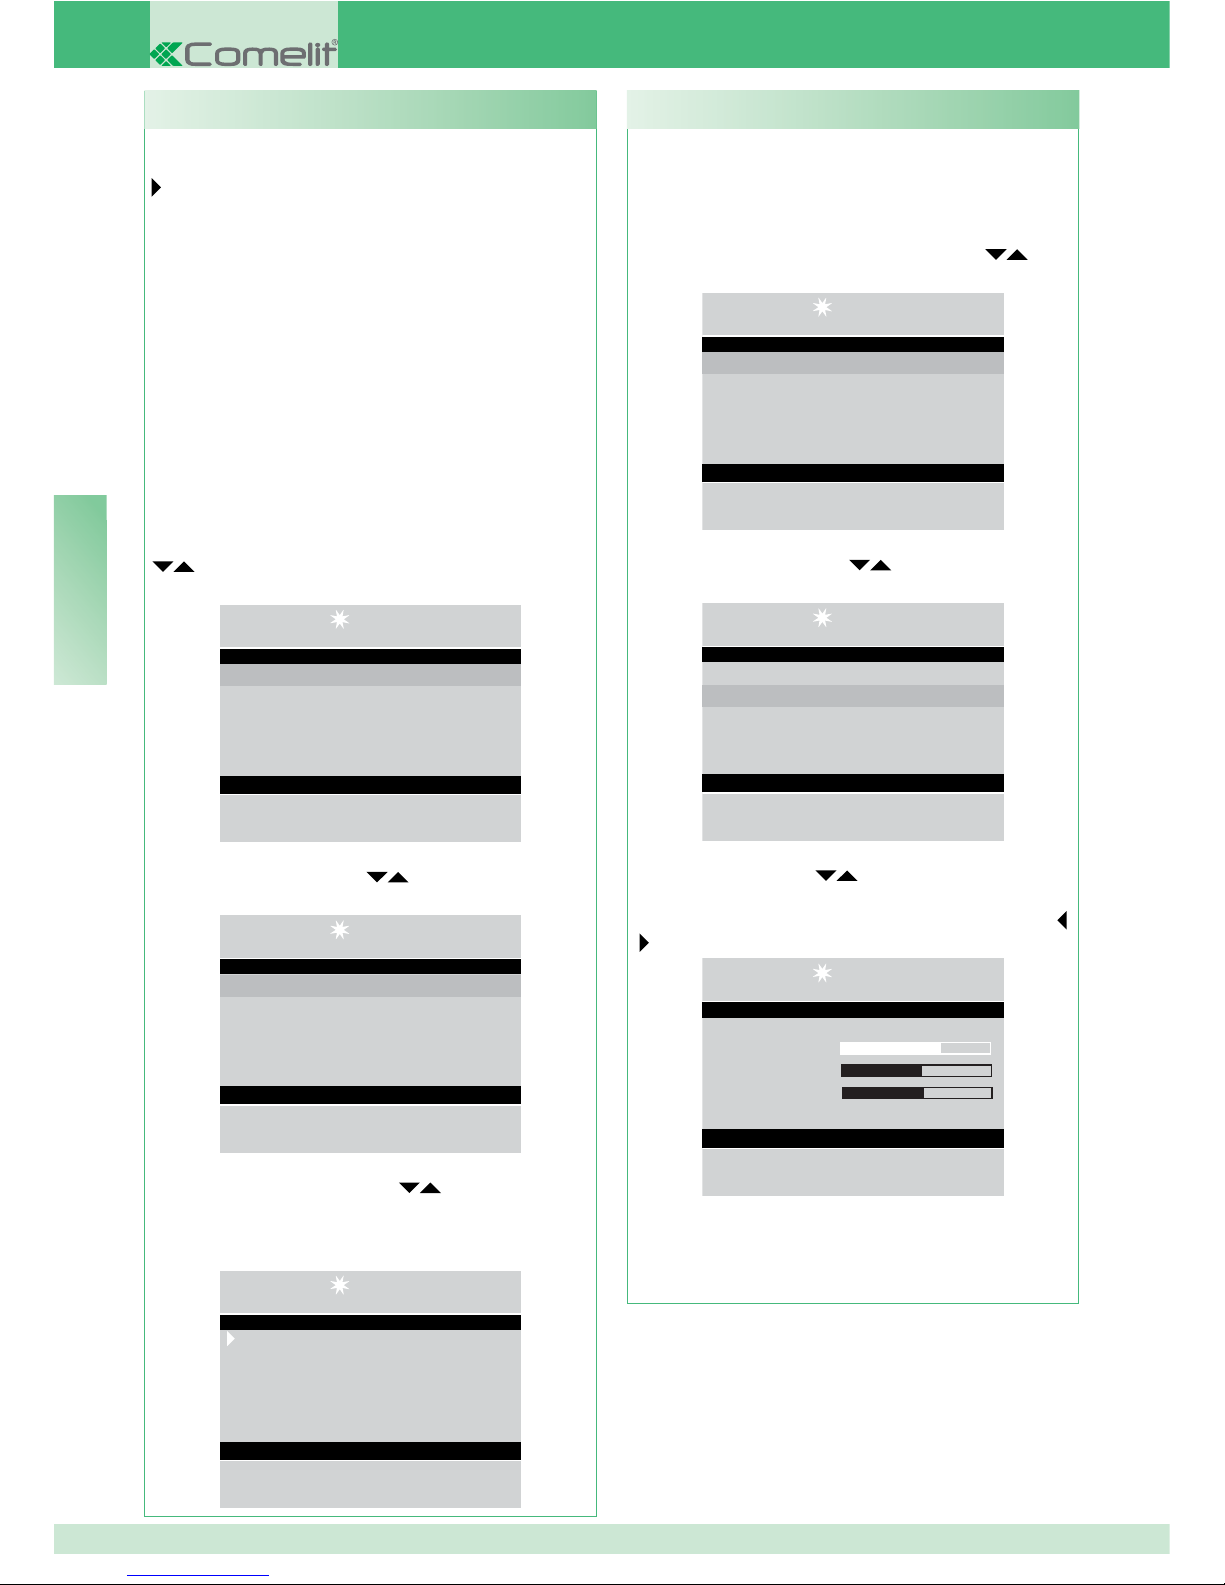
FR
84
Cette fonction permet de régler la luminosité, le
contraste et la couleur du moniteur du standard.
- Pour accéder rapidement aux réglages vidéo,
appuyer sur la touche MENU + touche 3 ou appuyer
sur la touche MENU puis sur les touches
pour
affi cher le menu Réglages puis appuyer sur OK ;
14 : 15 : 26
Lun 12/03/12
• Réglages
• Configurations
• Répertoire
• Appels reçus
• Alarmes
- appuyer sur les touches
pour affi cher le menu
Vidéo puis appuyer sur OK ;
14 : 15 : 26
Lun 12/03/12
• Langue
• Vidéo
• Audio
• Sons
• Date
- utiliser les touches
pour affi cher les valeurs
vidéo à régler (luminosité, contraste, couleur) et les
diminuer ou les augmenter à l'aide des touches
;
14 : 15 : 26
Lun 12/03/12
Luminosité
Contraste
Couleur
Paramétrage vidéo
- appuyer sur la touche OK pour confi rmer les
réglages ;
- appuyer plusieurs fois sur la touche ESC
pour
retourner à la page principale.
I2 - Réglages vidéo
Il est possible de programmer la langue en la
sélectionnant parmi les suivantes :
Italiano (défaut)
English
Français
Deutsch
Español
Portugais
Hollandais
Danois
Norvégien
Finlandais
Suédois
Turc
Russe
Polonais
Croate
- appuyer sur la touche MENU puis sur les touches
pour affi cher le menu Réglages puis appuyer
sur la touche OK ;
14 : 15 : 26
Lun 12/03/12
• Réglages
• Configurations
• Répertoire
• Appels reçus
• Alarmes
- appuyer sur les touches
pour affi cher le menu
Langue puis appuyer sur OK ;
14 : 15 : 26
Lun 12/03/12
• Langue
• Vidéo
• Audio
• Sons
• Date
- appuyer sur les touches
pour affi cher la
langue choisie puis appuyer sur OK pour confi rmer ;
- appuyer plusieurs fois sur la touche ESC pour
retourner à la page principale.
14 : 15 : 26
Lun 12/03/12
Italiano
English
Français
Deutsch
Español
Sélection langue
I1 - Modifier langue
Page 89
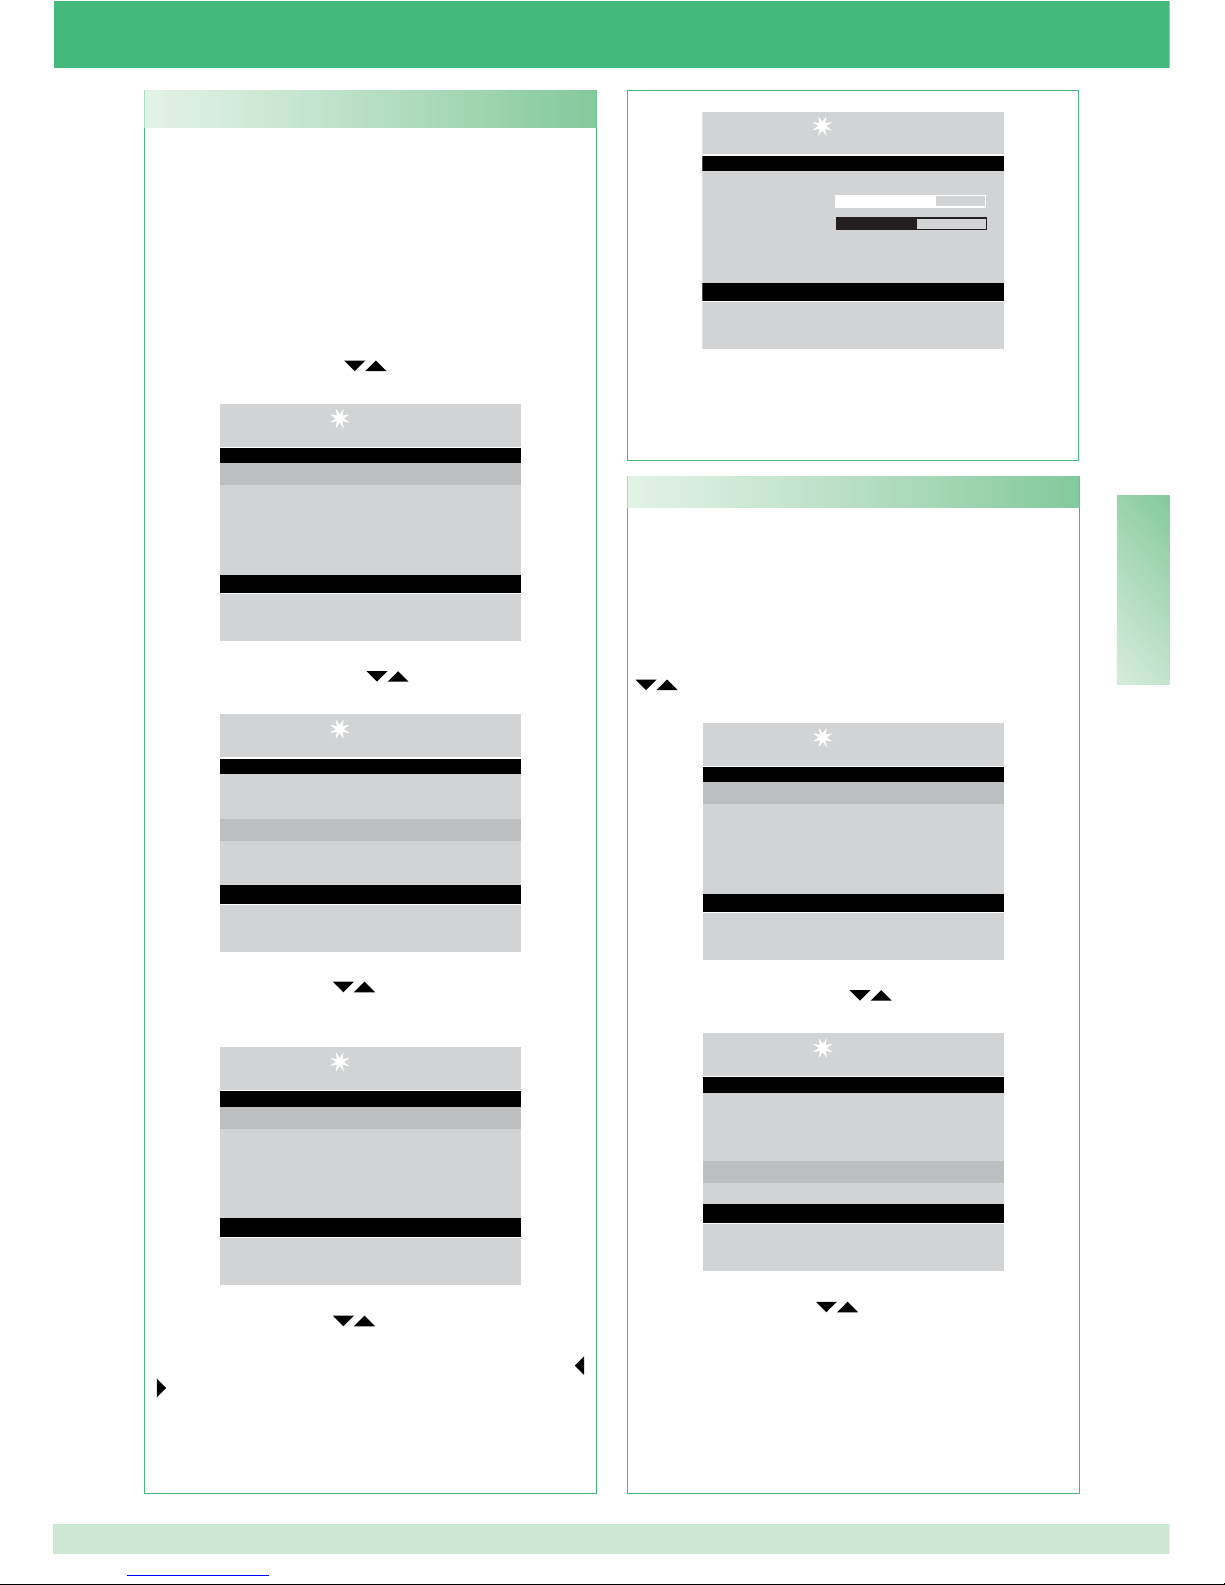
FR
85
Cette fonction permet de régler le volume du micro et
du haut-parleur du standard vers les postes intérieurs
et vers la platine extérieure.
Pour modifi er les volumes, le standard doit être
en communication avec un poste intérieur ou une
plaque de rue.
- Pour accéder rapidement aux réglages audio,
appuyer sur la touche MENU + touche 4 (extérieur)
touche 5 (intérieur) ou appuyer sur la touche MENU
puis sur les touches
pour affi cher le menu
Réglages puis appuyer sur OK ;
14 : 15 : 26
Lun 12/03/12
• Réglages
• Configurations
• Répertoire
• Appels reçus
• Alarmes
- appuyer sur les touches
pour affi cher le menu
Audio puis appuyer sur OK ;
14 : 15 : 26
Lun 12/03/12
• Langue
• Vidéo
• Audio
• Sons
• Date
- utiliser les touches
pour affi cher les valeurs
audio à régler (intérieur et/ou extérieur) puis appuyer
sur OK ;
14 : 15 : 26
Lun 12/03/12
• Intérieur
• Extérieur
- utiliser les touches
pour affi cher les valeurs
audio à régler (micro et/ou haut-parleur) et les
diminuer ou les augmenter à l'aide des touches
;
I3 - Réglages audio
14 : 15 : 26
Lun 12/03/12
Micro
Haut-parleur
Paramétrage audio
- appuyer sur la touche OK pour confi rmer les
réglages ;
- appuyer plusieurs fois sur la touche ESC
pour
retourner à la page principale.
Cette fonction permet de confi gurer la mélodie des
appels entrants des postes intérieurs, de la platine
extérieure et des appels d'alarme ; elle permet
également de valider ou de désactiver la tonalité
des touches.
- appuyer sur la touche MENU puis sur les touches
pour affi cher le menu Réglages puis appuyer
sur la touche OK ;
14 : 15 : 26
Lun 12/03/12
• Réglages
• Configurations
• Répertoire
• Appels reçus
• Alarmes
- appuyer sur les touches
pour affi cher le menu
Sons puis appuyer sur OK ;
14 : 15 : 26
Lun 12/03/12
• Langue
• Vidéo
• Audio
• Sons
• Date
- utiliser les touches
pour affi cher les valeurs
sons à régler (extérieur, intérieur, alarme ou tonalité
touches) ;
I4 - Réglages sons
Page 90
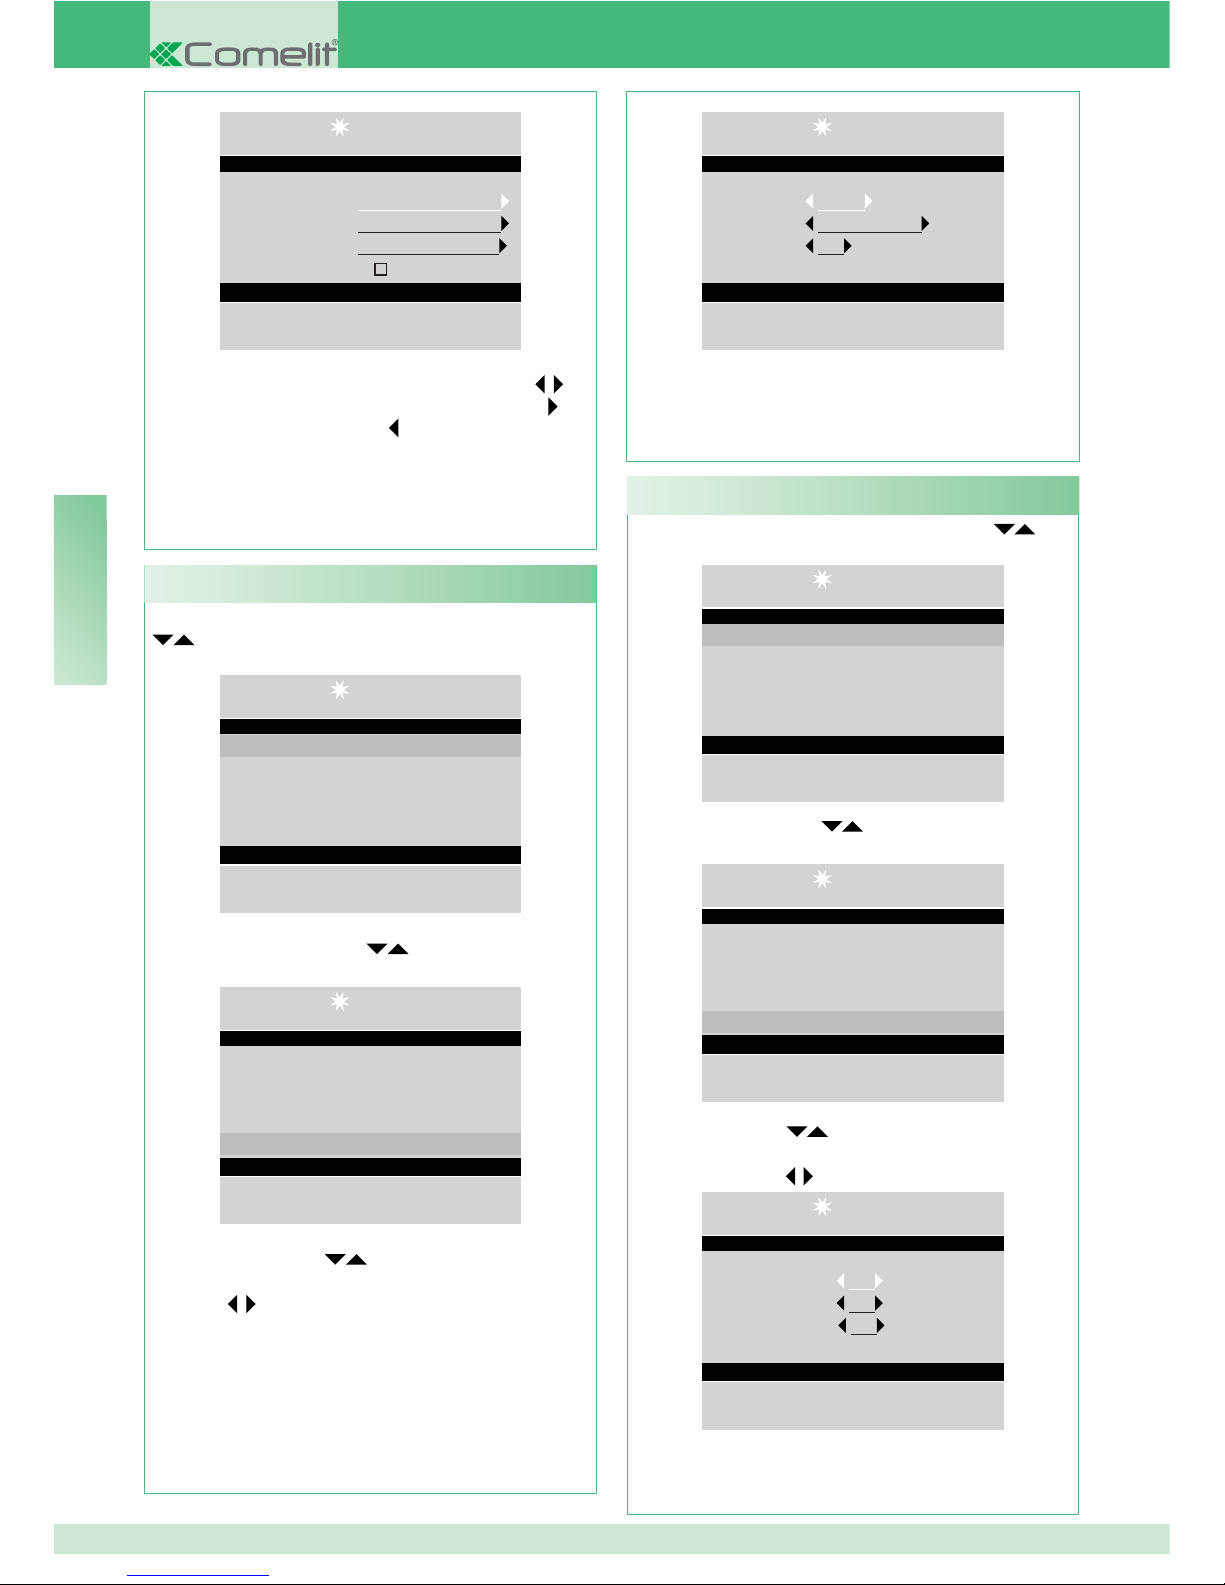
FR
86
- appuyer sur la touche MENU puis sur les touches
pour affi cher le menu Réglages puis appuyer
sur la touche OK ;
14 : 15 : 26
Lun 12/03/12
• Réglages
• Configurations
• Répertoire
• Appels reçus
• Alarmes
- appuyer sur les touches
pour affi cher le menu
Date puis appuyer sur OK ;
14 : 15 : 26
Lun 12/03/12
• Langue
• Vidéo
• Audio
• Sons
• Date
- utiliser les touches
pour affi cher les valeurs à
régler année, mois, jours) et les modifi er à l'aide des
touches ;
I5 - Modifi er date
- appuyer sur la touche MENU puis sur les touches pour
affi cher le menu Réglages puis appuyer sur la touche OK ;
14 : 15 : 26
Lun 12/03/12
• Réglages
• Configurations
• Répertoire
• Appels reçus
• Alarmes
- appuyer sur les touches pour affi cher le menu Heure
puis appuyer sur OK ;
14 : 15 : 26
Lun 12/03/12
• Vidéo
• Audio
• Sons
• Date
• Heure
- utiliser les touches pour affi cher les valeurs à régler
heures, minutes, secondes) et les diminuer ou les augmenter
à l'aide des touches
;
14 : 15 : 26
Lun 12/03/12
Heures 14
Minutes 15
Secondes 26
Réglage heure
- appuyer sur la touche OK pour confi rmer les réglages ;
- appuyer plusieurs fois sur la touche ESC pour retourner à
la page principale.
I6 - Modifi er heure
14 : 15 : 26
Lun 12/03/12
Extérieur Le printemps
Intérieur Le printemps
Alarme Alarme 1
Tonalité touches
Esc Ok
- sélectionner la mélodie à l'aide des touches
.
Valider le service Tonalité à l'aide de la touche .
Désactiver en appuyant sur
.
- appuyer sur la touche OK pour confi rmer les
réglages ;
- appuyer plusieurs fois sur la touche ESC pour
retourner à la page principale.
14 : 15 : 26
Lun 12/03/12
Année 2012
Mois Mars
Jour 12
Réglage date
- appuyer sur la touche OK pour confi rmer les réglages ;
- appuyer plusieurs fois sur la touche ESC pour
retourner à la page principale.
Page 91
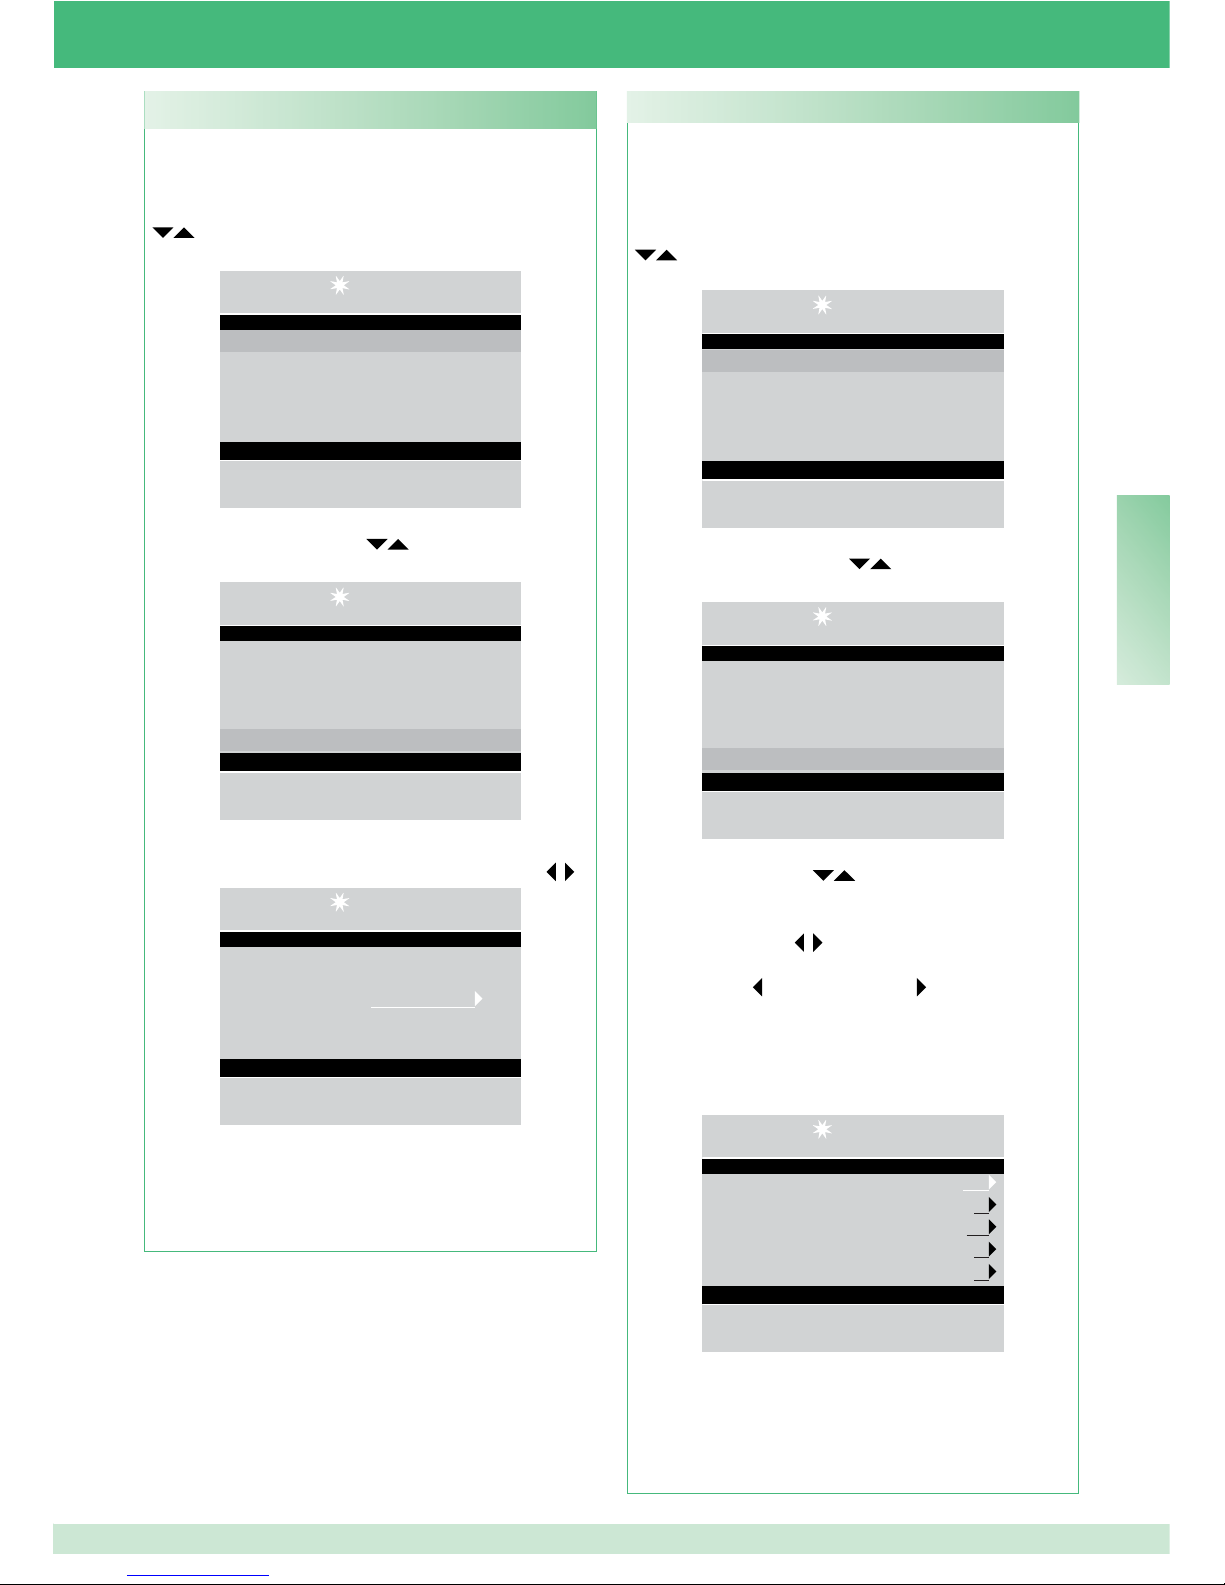
FR
87
Cette fonction permet de modifi er les couleurs des
pages des menus.
- appuyer sur la touche MENU puis sur les touches
pour affi cher le menu Réglages puis appuyer
sur la touche OK ;
14 : 15 : 26
Lun 12/03/12
• Réglages
• Configurations
• Répertoire
• Appels reçus
• Alarmes
- appuyer sur les touches
pour affi cher le menu
Thèmes puis appuyer sur OK ;
14 :15 : 26
Lun 12/03/12
• Audio
• Sons
• Date
• Heure
• Thèmes
- sélectionner le thème choisi avec les touches
;
14 : 15 : 26
Lun 12/03/12
Thèmes Thème blue
Esc Ok
- appuyer sur la touche OK pour confi rmer les
réglages;
- appuyer plusieurs fois sur la touche ESC pour
retourner à la page principale.
I7 - Réglage thème
Cette fonction permet de régler les temps de phonie,
attente reset, veille, activation relais et répétition
d'appel.
- appuyer sur la touche MENU puis sur les touches
pour affi cher le menu Réglages puis appuyer
sur la touche OK ;
14 : 15 : 26
Lun 12/03/12
• Réglages
• Configurations
• Répertoire
• Appels reçus
• Alarmes
- appuyer sur les touches
pour affi cher le menu
Temps puis appuyer sur OK ;
14 : 15 : 26
Lun 12/03/12
• Sons
• Date
• Heure
• Thèmes
• Temps
- utiliser les touches
pour affi cher le menu de
réglage (phonie, attente reset, veille, activation relais,
répétition d'appel) et les diminuer ou les augmenter à
l'aide des touches
.
Pour dérouler plus rapidement les valeurs, appuyer
sur la touche
ou sur la touche .
Valeurs de phonie : 10’’-180’’ max
Valeurs d'attente reset : 1’’-10’’ max
Valeurs de veille : 10’’-120’’ max
Valeurs d'activation relais : 1’’20’’ max
Valeurs de répétition d'appel : 1’’30’’ max
14 : 15 : 26
Lun 12/03/12
Phonie 010
Attente reset 01
Veille 010
Activation relais 01
Répétition appel 01
Esc Ok
- appuyer sur la touche OK pour confi rmer les
réglages ;
- appuyer plusieurs fois sur la touche ESC
pour
retourner à la page principale.
I8 - Réglage temps
Page 92
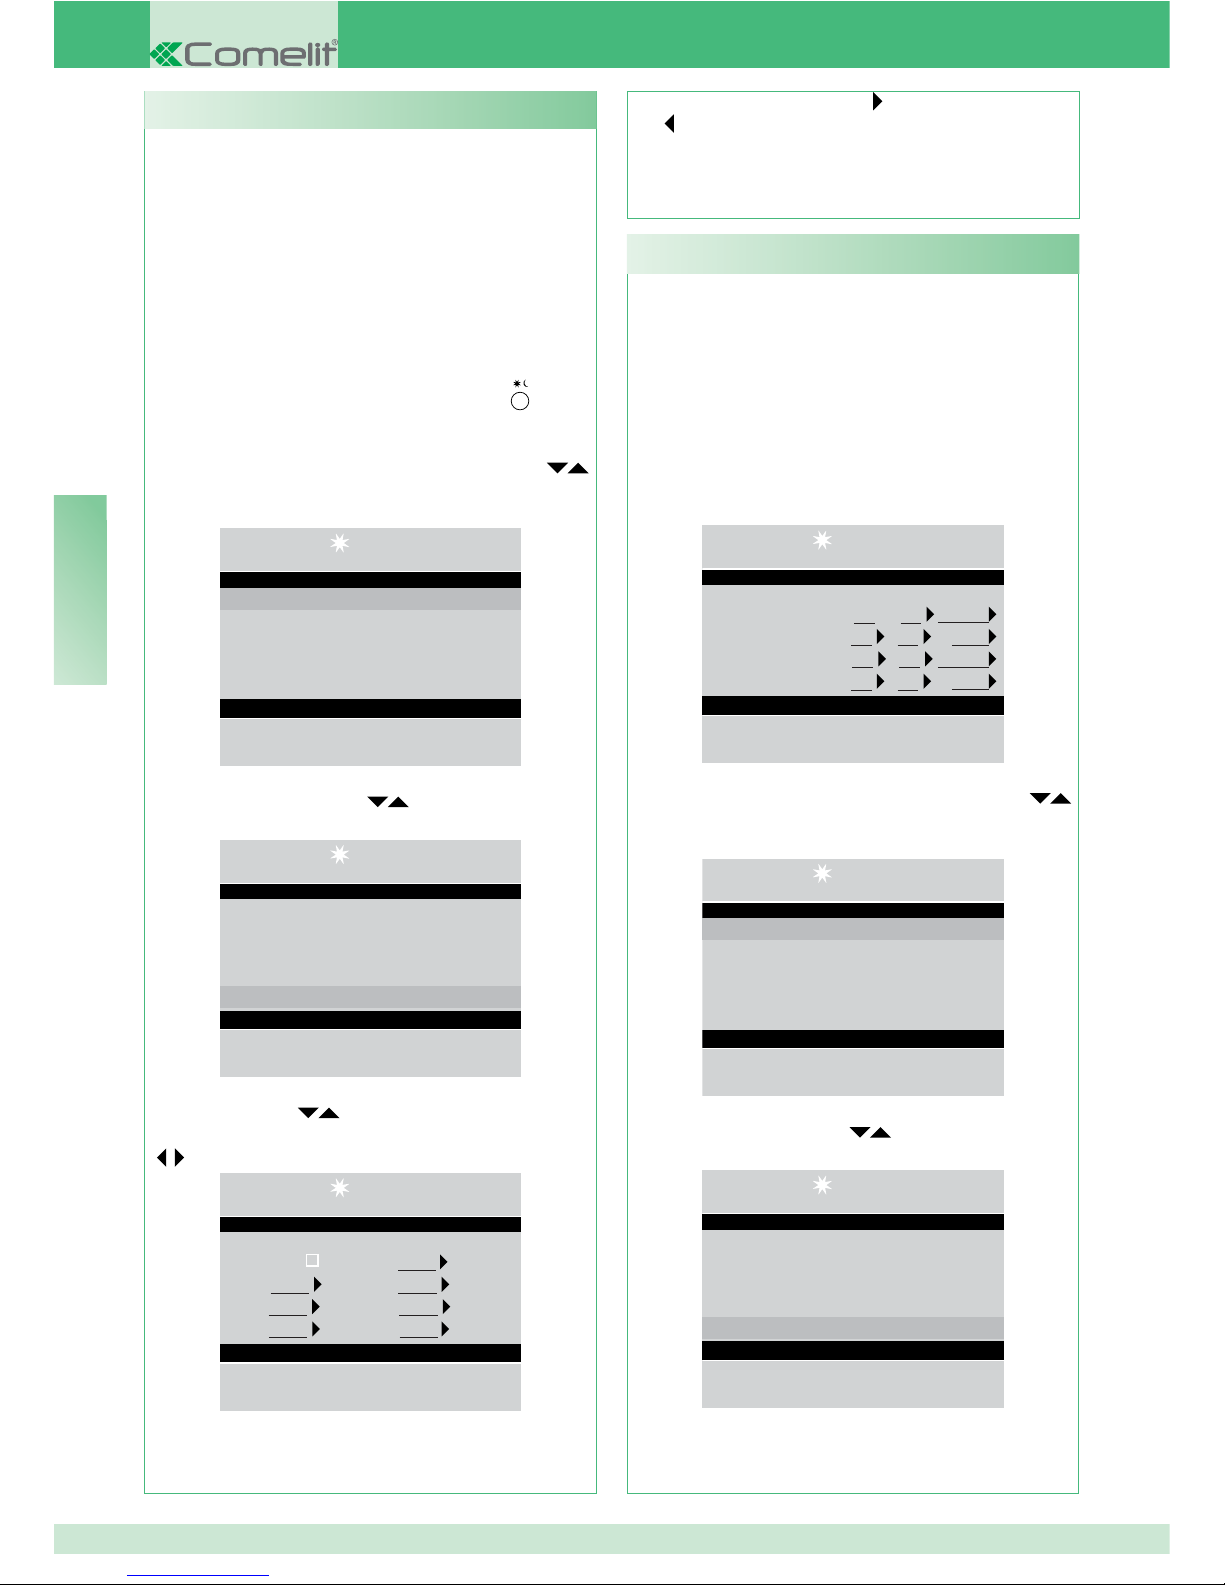
FR
88
Possibilité de programmer le passage automatique de
la modalité JOUR à la modalité NUIT à des horaires
déterminés programmables par l’usager. Il est possible de
programmer jusqu'à 4 HORAIRES par jour pour lesquels
il faudra régler le mode de commutation (Jour ou Nuit).
Exemple :
Pour programmer le standard avec ces paramètres :
07:00 -12:00 Fonctionnement Jour
13:00 - 22:00 Fonctionnement Jour
14 : 15 : 26
Lun 12/03/12
Cmt1 07 : 00 Jour
Cmt2 12 : 00 Nuit
Cmt3 13 : 00 Jour
Cmt4 22 : 00 Nuit
Esc Ok
- appuyer sur la touche MENU puis sur les touches
pour affi cher le menu Réglages puis appuyer sur la
touche OK ;
14 : 15 : 26
Lun 12/03/12
• Réglages
• Configurations
• Répertoire
• Appels reçus
• Alarmes
- appuyer sur les touches
pour affi cher le menu
Commut. automatique puis appuyer sur OK ;
14 : 15 : 26
Lun 12/03/12
• Heure
• Thèmes
• Temps
• Mod. quotidienne
• Commut. automatique
- le curseur se met automatiquement sur l'heure min. de
la commut. 1 ; diminuer ou augmenter la valeur à l'aide
I10 - Réglage commut. automatique
programmation en appuyant sur , pour désactiver, appuyer
sur
;
- appuyer sur la touche OK pour confi rmer les réglages ;
- appuyer plusieurs fois sur la touche ESC pour retourner à la
page principale.
On peut décider d'organiser la semaine en choisissant,
pour chaque jour, l'une des 3 modalités suivantes de
fonctionnement :
• AUTO : le système passe de la modalité JOUR à la modalité
NUIT aux heures programmées.
• NUIT : le système reste dans cette modalité toute la journée.
• JOUR : le système reste dans cette modalité toute la journée.
Si le choix porte sur « auto », la modalité de fonctionnement
commutera aux horaires fi xés dans le cadre de la journée, en
fonction de la programmation effectuée selon le paragraphe
« I10 - Réglage commut. automatique » page 88.
Pour désactiver la fonction, appuyer sur la touche
.
Pour la valider :
- appuyer sur la touche MENU puis sur les touches
pour affi cher le menu Réglages puis appuyer sur la touche
OK ;
14 : 15 : 26
Lun 12/03/12
• Réglages
• Configurations
• Répertoire
• Appels reçus
• Alarmes
- appuyer sur les touches pour affi cher le menu
Modalité quotidienne puis appuyer sur OK ;
14 : 15 : 26
Lun 12/03/12
• Date
• Heure
• Thèmes
• Temps
• Mod. quotidienne
- utiliser les touches pour affi cher le jour à confi gurer et
sélectionner la modalité nuit, jour ou auto à l'aide des touches
.
14 : 15 : 26
Lun 12/03/12
Valider Mer Nuit
Dim Nuit Jeu Nuit
Lun Nuit Ven Nuit
Mar Nuit Sam Nuit
Esc Ok
- après avoir terminé la programmation de chaque jour de la
semaine, se placer sur la rubrique Valider et valider toute la
I9 - Réglage modalité quotidienne
Page 93
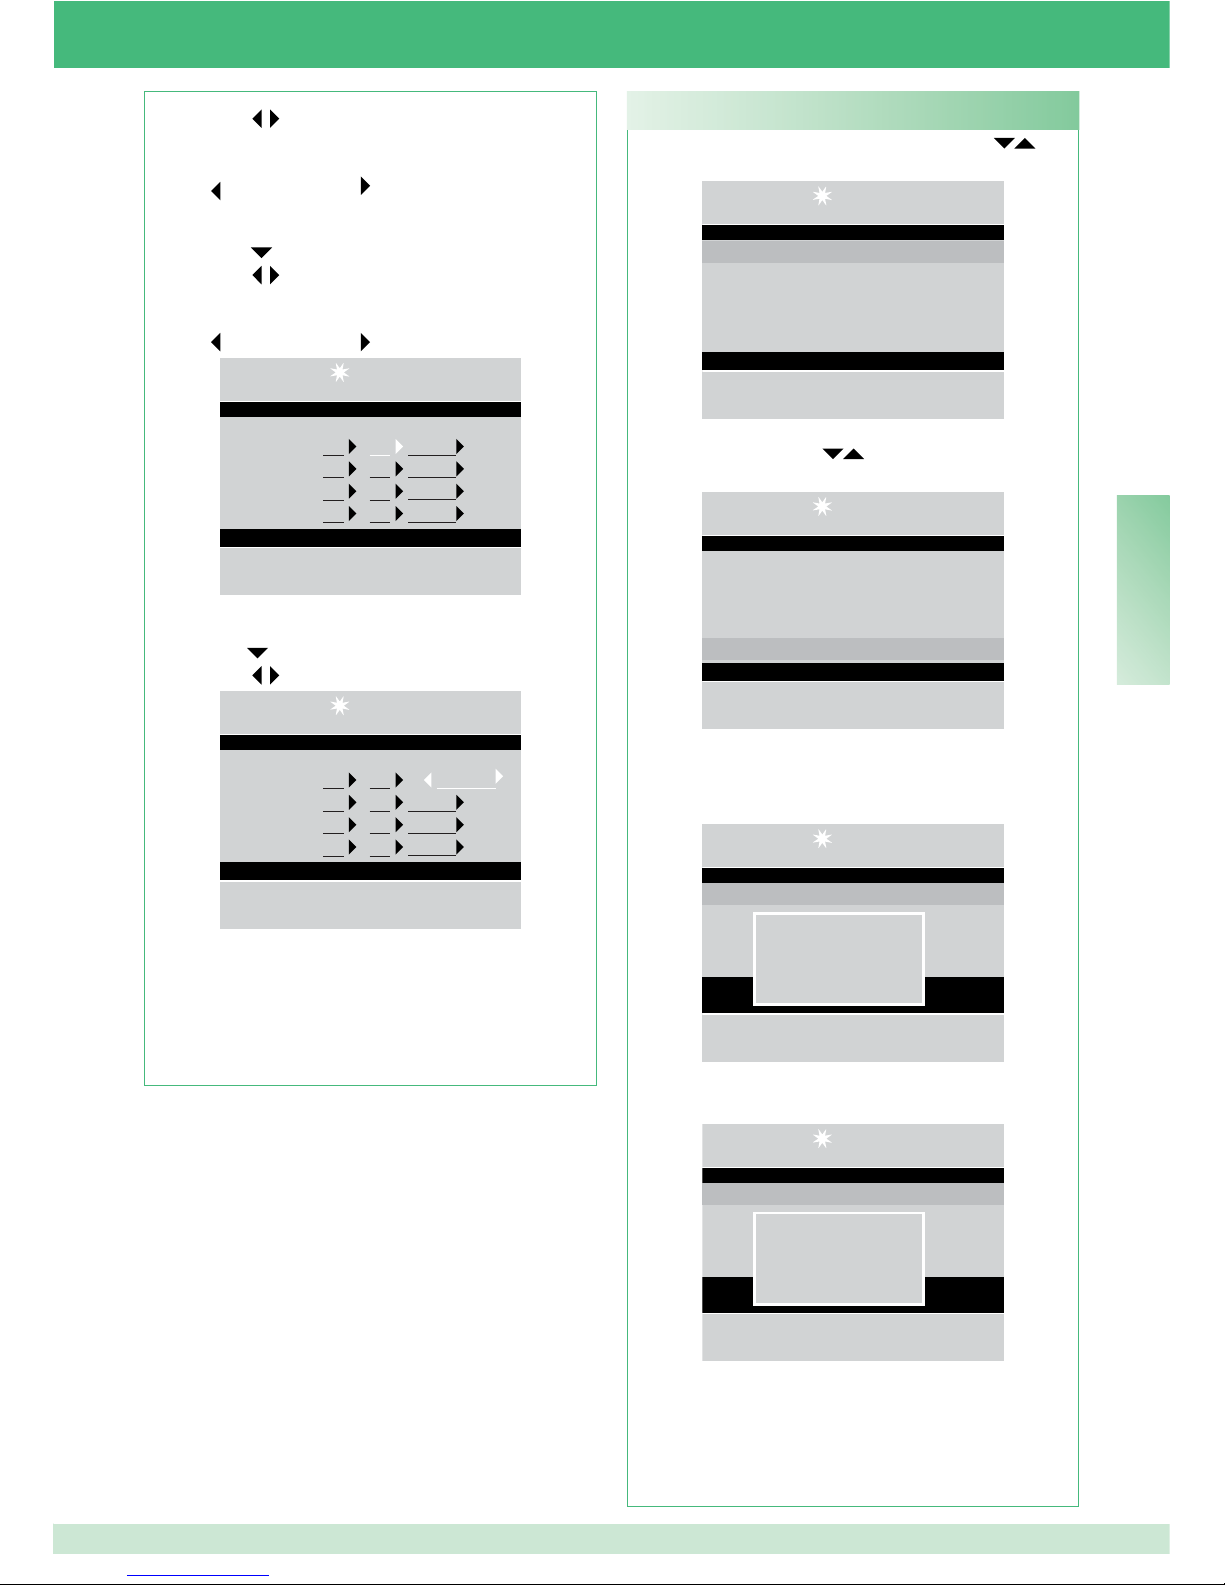
FR
89
- appuyer sur la touche MENU puis sur les touches pour
affi cher le menu Réglages puis appuyer sur la touche OK ;
14 : 15 : 26
Lun 12/03/12
• Réglages
• Configurations
• Répertoire
• Appels reçus
• Alarmes
- appuyer sur les touches pour affi cher le menu Reset
réglages puis appuyer sur OK ;
14 : 15 : 26
Lun 12/03/12
• Thèmes
• Temps
• Mod. quotidienne
• Commut. automatique
• Reset réglages
- une page demandant de confi rmer le reset des réglages
s'affi che ; confi rmer en appuyant sur OK ou annuler en
appuyant sur ESC ;
14 : 15 : 26
Lun 12/03/12
• Temps
• Mod
• Com
Réinitialiser ?
Ok Esc
- en appuyant sur OK, la page de redémarrage du système
s'affi che ;
14 : 15 : 26
Lun 12/03/12
• Temps
• Mod
• Com
Redémarr.
système
Ok Esc
- confi rmer le redémarrage du système en appuyant sur OK
ou annuler en appuyant sur ESC ;
- appuyer plusieurs fois sur la touche ESC pour retourner à
la page principale.
I11 - Reset des réglages
des touches
.
La valeur peut varier de 00 à 23.
Pour dérouler plus rapidement les valeurs, appuyer sur la
touche
ou sur la touche .
- se mettre sur la valeur en minutes de la commut. 1 à l'aide
de la touche
, diminuer ou augmenter la valeur à l'aide
des touches
.
La valeur peut varier de 00 à 59.
Pour dérouler plus rapidement les valeurs, appuyer sur la
touche
ou sur la touche .
14 : 15 : 26
Lun 12/03/12
Cmt1 00 : 00
Cmt2 00 : 00
Cmt3 00 : 00
Cmt4 00 : 00
Esc Ok
- se mettre sur la dernière rubrique de la commut. 1 à l'aide
de la touche
, sélectionner la modalité (jour, nuit) à l'aide
des touches
.
14 : 15 : 26
Lun 12/03/12
Cmt1 00 : 00 Nuit
Cmt2 00 : 00
Cmt3 00 : 00
Cmt4 00 : 00
Esc Ok
- suivre cette procédure pour toutes les commutations
nécessaires ;
- appuyer sur la touche OK pour confi rmer les réglages ;
- appuyer plusieurs fois sur la touche ESC
pour retourner
à la page principale.
Page 94

FR
90
CONFIGURATIONS INSTALLATEUR
• Système
Système Simplebus Simplebus Top
Link Simple Parall. LS-IN Parall. LP-IN
Série master Série slave
Appel Simplebus Indirect
A/V Audio Vidéo
Rétrocom.
Confi gurations
• Services
FollowMe
Répétition appel
Allumage postes intérieurs
Appel triple
Aide codes
Page 95

FR
91
Ce chapitre s'adresse au personnel qualifi é qui,
après l'installation, procèdera à la programmation
du standard de conciergerie au moyen de menus
guidés et affi chés sur l'écran, disponibles à partir du
menu principal.
Le standard peut être secondaire ou principal.
• Configurer Simplebus lorsque le standard est
utilisé comme secondaire, à la sortie des
bornes LM-LM des commutateurs Art. 1424
(installation Simplebus TOP) (voir schéma
SBTOP/001DSMC page 110) ; ou lorsque
le standard est utilisé sur des installations
Simplebus avec les commutateurs Art. 1224A
ou sur une installation avec montant simple
sans commutateur.
ATTENTION ! le standard SECONDAIRE ne
peut pas être configuré comme standard en
parallèle.
• Configurer Simplebus top lorsque le standard
est utilisé comme principal sur une installation
Simplebus top, positionné sur le tronçon
en amont des commutateurs Art. 1424 qui
définissent les zones/montants (voir schéma
SBTOP/002DSMC page 112).
Le standard secondaire ou principal doit être
ensuite configuré comme :
1- SIMPLE
2- PARALLÈLE
3- SÉRIE.
1- Sélectionner simple lorsque le standard est le
seul présent dans l'installation ou bien le seul
desservant un montant déterminé.
2- En présence de 2 standards principaux ou
secondaires desservant le même montant, la
configuration parallèle implique que les deux
standards auront les mêmes fonctions (voir
schéma SBTOP/005DSMC page 118).
Le premier des deux qui répond à un appel
empêche l'autre d'effectuer la même opération.
L'allumage ou l'extinction de l'un des 2
provoquera automatiquement l'allumage ou
l'extinction de l'autre.
Configurer comme Parall. LS-IN le standard
relié sous la ligne LS-LS du commutateur Art.
1424 ; configurer comme Parall. LP-IN celui
qui est sous la ligne LPin-LPin du commutateur
Art. 1424.
Pour le standard parallèle, la commutation en
NUIT et la fonction JOUR/NUIT AUTOMATIQUE
ne sont pas possibles (voir « I9- Réglage
modalité quotidienne » page 88).
Dans la page de repos des deux standards, on
devra avoir P, qui indique le standard configuré
en parallèle et l'icône fixe .
C1 - Type de standard (mode Simplebus Top)
3- En présence de 2 standards principaux ou
secondaires desservant le même montant, la
configuration série implique que seulement 1
des 2 peut être opérationnel (Série master),
alors que l'autre est désactivé (Série slave)
(voir schéma SBTOP/004DSMC page 116).
Pour commuter un standard de MASTER à
SLAVE et vice versa, voir « U11 Comment
activer ou désactiver les standards
principaux » page 74.
Dans la page de repos des deux standards, il
devra y avoir S, qui indique le standard
configuré en
série et l'icône fixe .
ATTENTION !
- si
clignote, cela indique que les 2 standards
ne communiquent pas correctement.
- si l'icône ! s'affiche, il y a un problème de
configuration des 2 standards (par ex, les deux
Séries master ou slave, Parall. LP-IN ou Parall.
LS-IN ou
un série et l’autre parallèle).
- si une installation Simplebus TOP (avec
commutateurs Art. 1424) disposent de standards
principaux et secondaires (voir schéma
SBTOP/003DSMC page 114) ; configurer « C5Rétrocompatibilité » page 93 pour assurer le
fonctionnement correct de l'installation.
CONFIGURATIONS INSTALLATEUR
Page 96
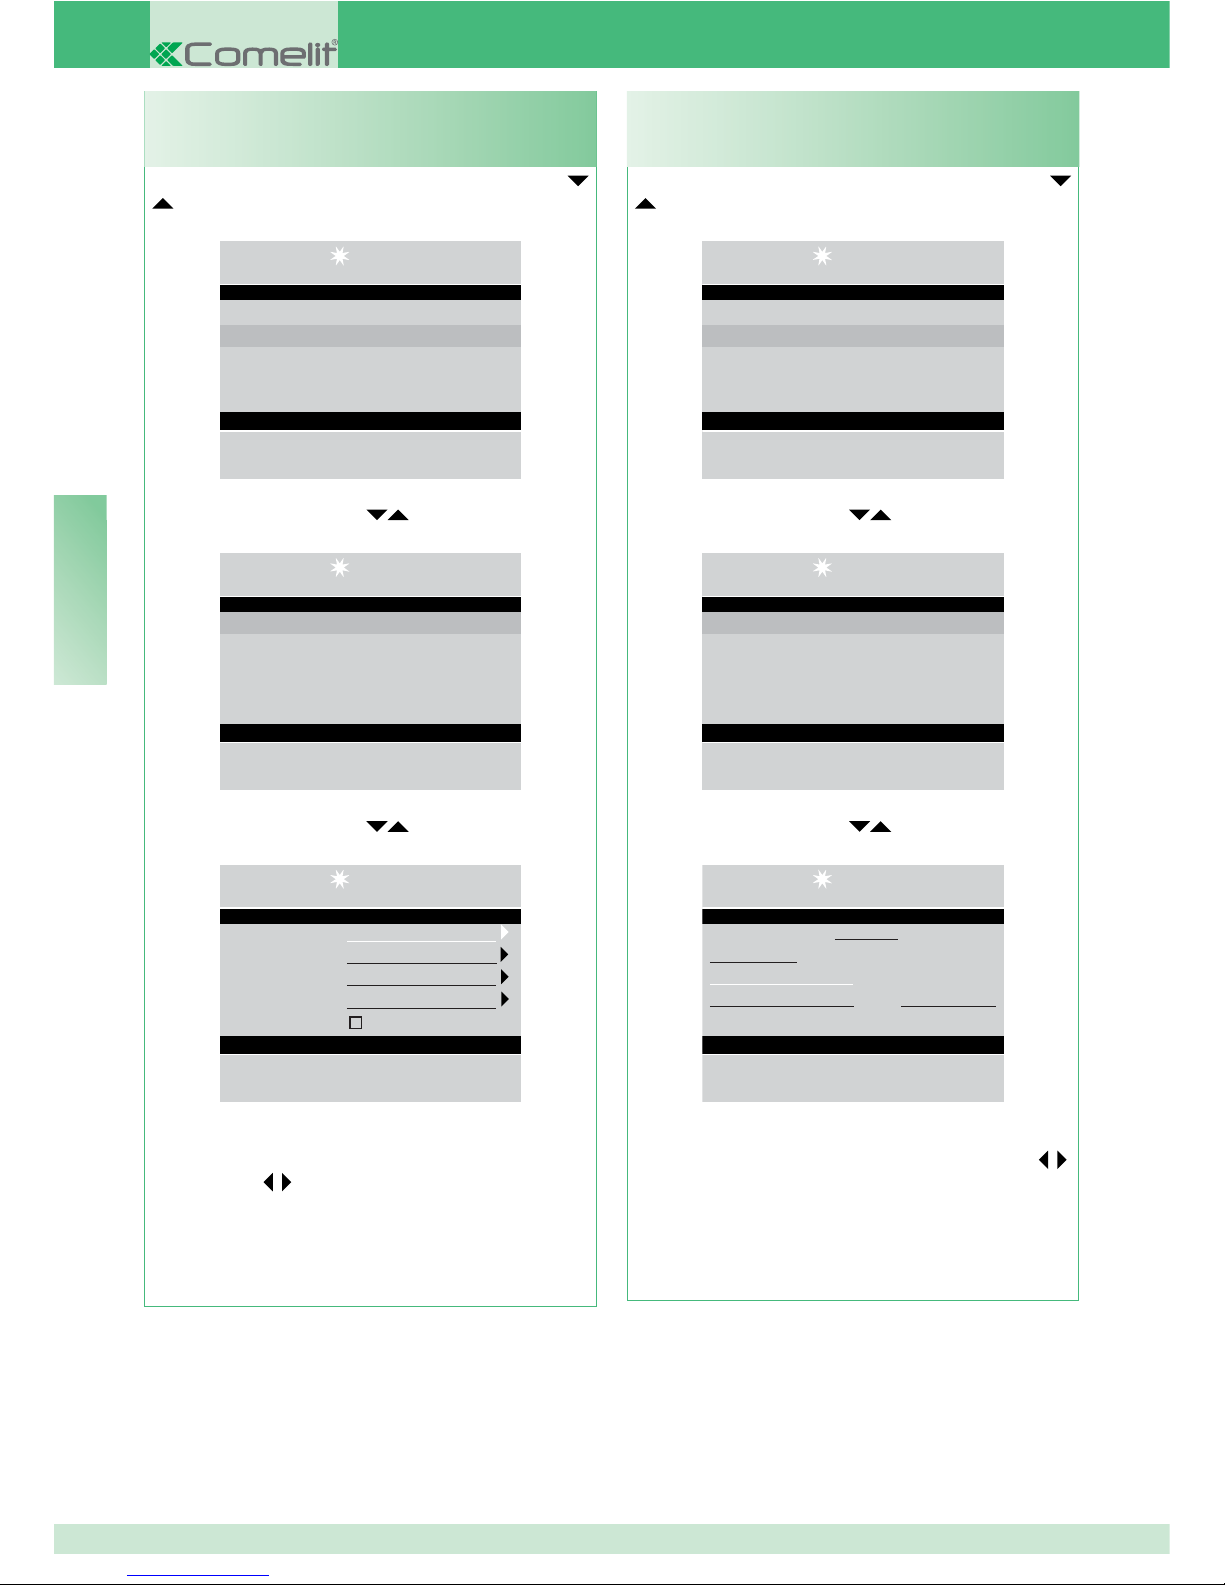
FR
92
- appuyer sur la touche MENU et sur les touches
pour affi cher le menu Confi gurations puis
appuyer sur la touche OK ;
: 26
Lun 12/03/12
• Réglages
• Configurations
• Répertoire
• Appels reçus
• Alarmes
- appuyer sur les touches
pour affi cher le menu
Système puis appuyer sur OK ;
: 26
Lun 12/03/12
• Système
• Services
- appuyer sur les touches
pour affi cher le menu
Système puis appuyer sur OK ;
14 : 15 : 26
Lun 12/03/12
Système Simplebus
Link Simple
Appel Simplebus
A/V Audio
Rétrocom.
Esc Ok
- sélectionner Simplebus (pour standard secondaire)
ou Simplebus Top (pour standard principal) à l'aide
des touches
.
- appuyer sur la touche OK pour confi rmer les
réglages ;
- appuyer plusieurs fois sur la touche ESC pour
retourner à la page principale.
C2 - Comment confi gurer un standard principal
ou secondaire
- appuyer sur la touche MENU et sur les touches
pour affi cher le menu Confi gurations puis
appuyer sur la touche OK ;
14 : 15 : 26
Lun 12/03/12
• Réglages
• Configurations
• Répertoire
• Appels reçus
• Alarmes
- appuyer sur les touches
pour affi cher le menu
Système puis appuyer sur OK ;
14 : 15 : 26
Lun 12/03/12
• Système
• Services
- appuyer sur les touches
pour affi cher le menu
Link puis appuyer sur OK ;
: 26
Lun 12/03/12
Système Simple-
bus Link
Simple
Appel
Simplebus A/V Audio
Rétrocom. Esc
Ok
- sélectionner Simple, Parall. LS-IN, Parall. LP-IN,
Série master, Série slave à l'aide des touches
.
- appuyer sur la touche OK pour confi rmer les
réglages ;
- appuyer plusieurs fois sur la touche ESC pour
retourner à la page principale.
C3 - Comment confi gurer un standard simple, en
parallèle ou en série
Page 97
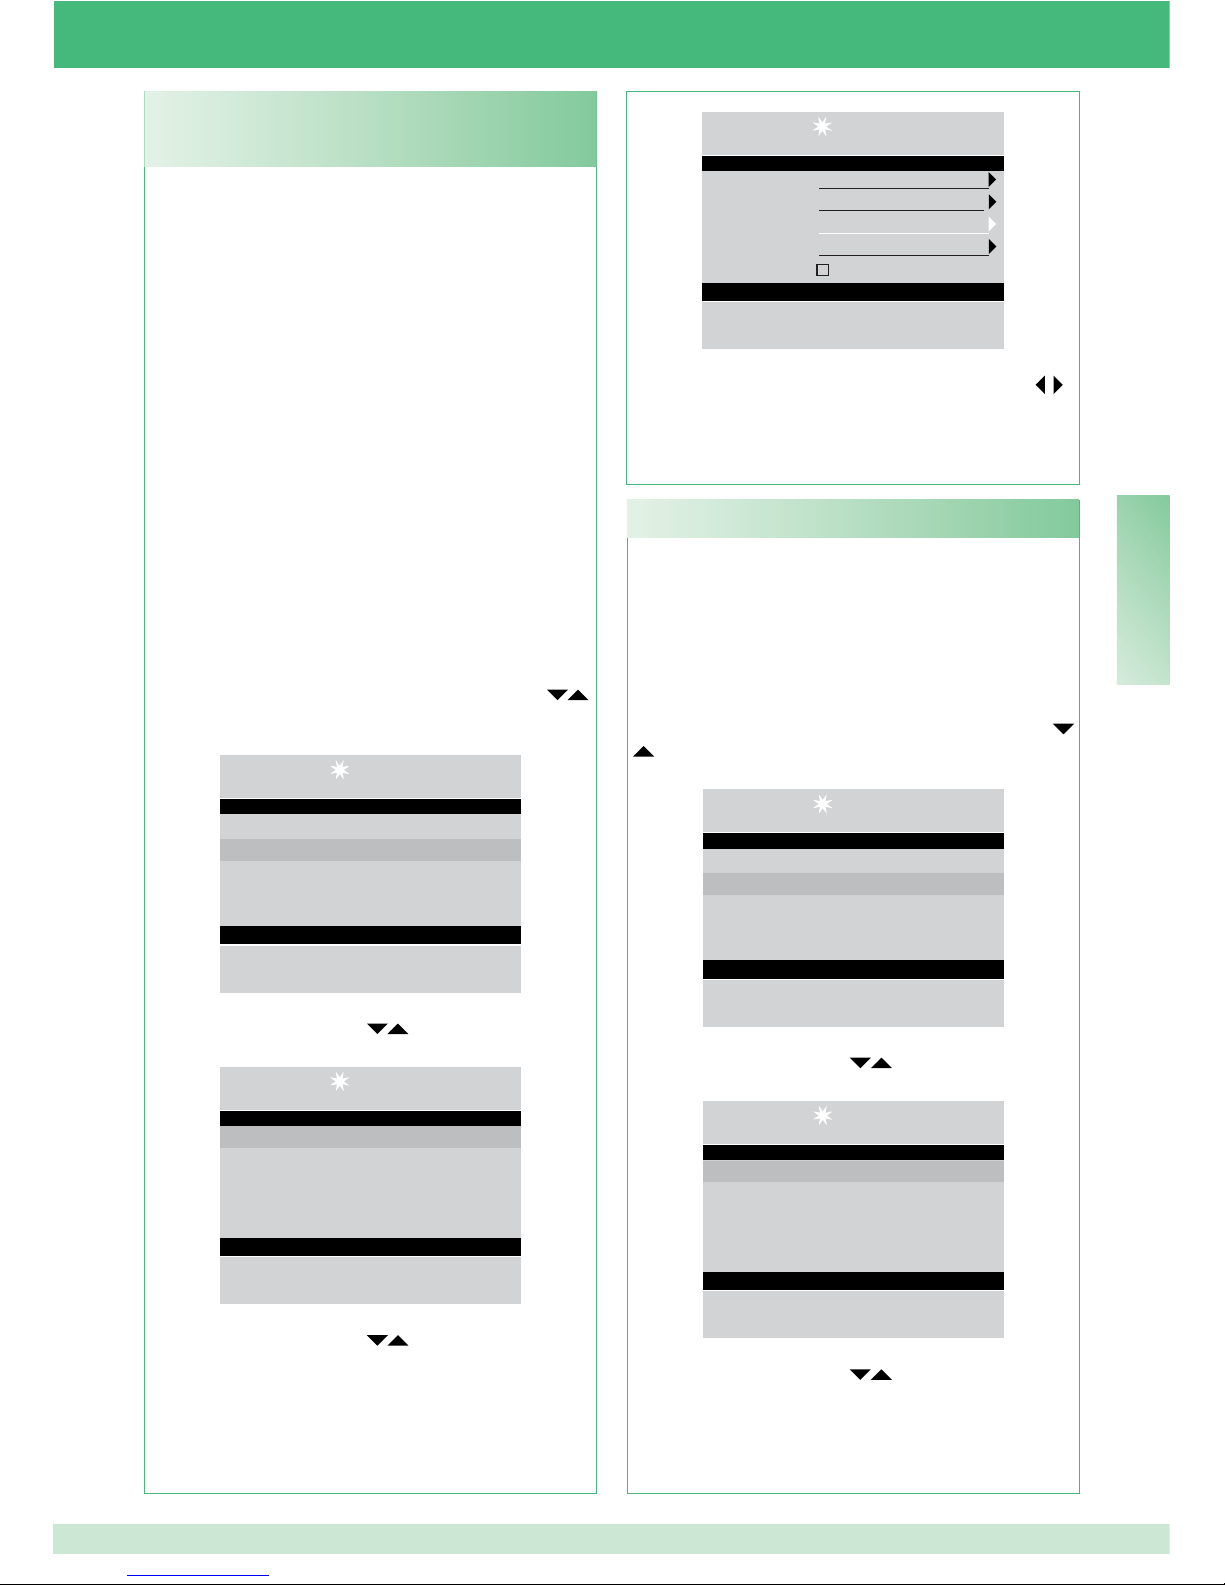
FR
93
Elle est désactivée par défaut.
ATTENTION !
Valider cette fonction pour éviter tout
dysfonctionnement en cas de présence d'articles
ayant un indice de révision (IR.) inférieur à ceux
qui sont mentionnés dans le tableau page 94.
Pour valider la fonction :
- appuyer sur la touche MENU et sur les touches
pour affi cher le menu Confi gurations puis
appuyer sur la touche OK ;
14 : 15 : 26
Lun 12/03/12
• Réglages
• Configurations
• Répertoire
• Appels reçus
• Alarmes
- appuyer sur les touches
pour affi cher le menu
Système puis appuyer sur OK ;
14 : 15 : 26
Lun 12/03/12
• Système
• Services
- appuyer sur les touches
pour affi cher le menu
Rétrocom. puis appuyer sur OK ;
Cette fonction permet de choisir la modalité manuelle
d'appel du standard, entre 2 modalités différentes :
1- Appel Simplebus (par défaut), l'appel a lieu en
saisissant le code associé à chaque usager.
• Si le type d'installation est Simplebus, l'usager est
identifi é par un champ Nom Usager (optionnel) et par
un champ Code à 3 chiffres maximum (compris entre
1 et 240).
EXEMPLE : Nom usager = Rossi ; Code = 015.
• Dans le cas d'une installation Simplebus top, l'usager
est identifi é par les champs Nom Usager (option) et par
un champ Code comprenant 2 parties ; champ zone de
3 chiffres maximum (compris entre 1 et 500 ) et champ
usager comptant impérativement 3 chiffres (compris
entre 1 et 240).
EXEMPLE : Nom usager = Rossi ; Code = 25 015 ;
2- Appel indirect, l'appel a lieu en tapant le code indirect
à 6 chiffres maximum. Ce code doit être présent au
répertoire et associé à l'usager possédant un nom
(obligatoire) et un code Simplebus (ou Simplebus
TOP).
Pour activer la fonction :
- appuyer sur la touche MENU et sur les touches
pour affi cher le menu Confi gurations puis appuyer sur
la touche OK ;
14 : 15 : 26
Lun 12/03/12
• Réglages
• Configurations
• Répertoire
• Appels reçus
• Alarmes
- appuyer sur les touches
pour affi cher le menu
Système puis appuyer sur OK ;
14 : 15 : 26
Lun 12/03/12
• Système
• Services
- appuyer sur les touches
pour affi cher le menu
Appel puis appuyer sur OK ;
14 : 15 : 26
Lun 12/03/12
Système Simplebus
Link Simple
Appel Indirect
A/V Audio
Rétrocom.
Esc Ok
- sélectionner Simplebus ou Indirect à l'aide des touches .
- appuyer sur la touche OK pour confi rmer les réglages ;
- appuyer plusieurs fois sur la touche ESC pour retourner
à la page principale.
C4 - Appel via code Simplebus ou indirect
C5 - Rétrocompatibilité
Page 98
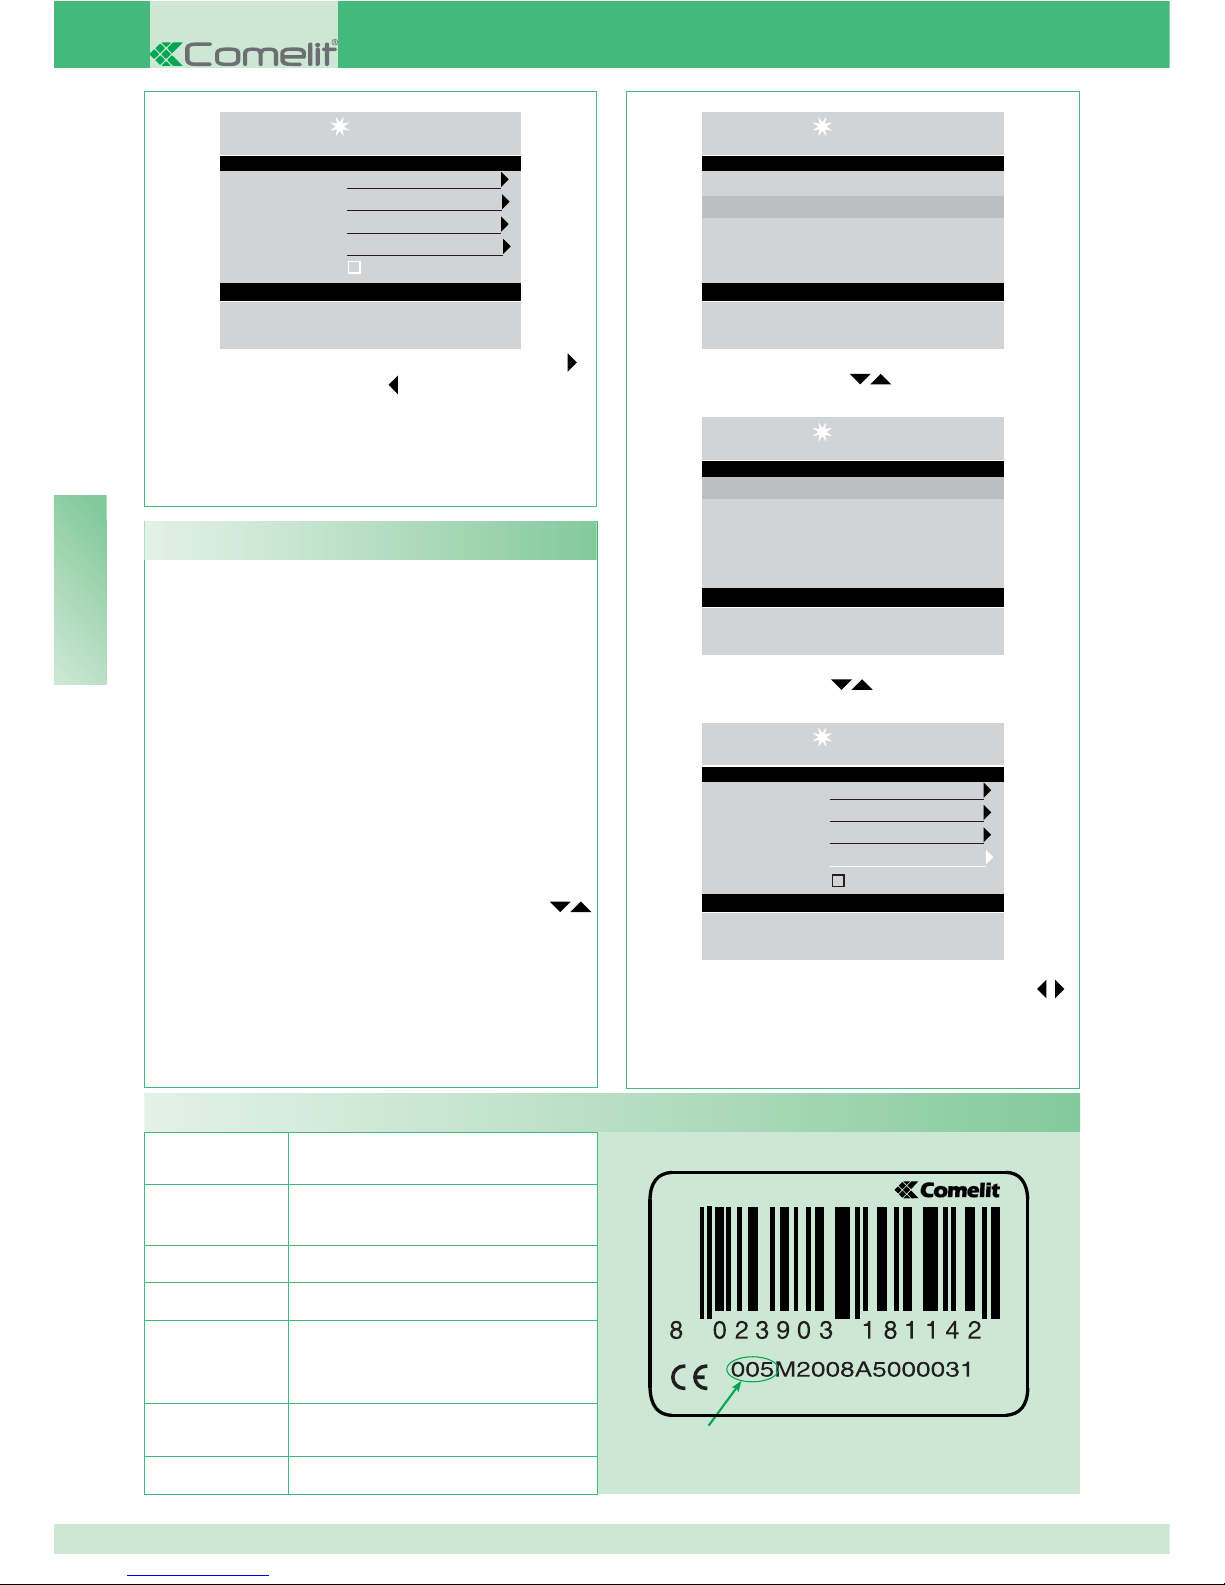
FR
94
IR
Appel audio par défaut.
En activant l'appel vidéo, il sera possible d'effectuer un
appel vidéo vers un poste intérieur. Le moniteur appelé
par le standard s'allumera en permettant par exemple de
voir les caméras déportées associées à l’Art. 1259/A ou
à l’Art. 1259C (voir FT/SB/13 ou FT/SBC/05).
Lorsque la rétrocompatibilité est désactivée - par défaut
(voir C5 - Rétrocompatibilité page 93), le vidéo s'allume
immédiatement au moment de l'appel entre standard et
poste intérieur.
Lorsque la rétrocompatibilité est validée, le vidéo s'allume
sur prise phonie au moment de l'appel entre standard et
poste intérieur.
Pour valider l'appel audio ou vidéo :
- appuyer sur la touche MENU et sur les touches
pour affi cher le menu Confi gurations puis appuyer sur la
touche OK ;
Tableau articles Simplebus TOP
Étriers
Art. 5714C IR. 007 - Art. 5814C IR. 002, Art.
6114C IR. 015
Combinés
parlophoniques
Art. 2608 IR. 006 - Art. 2610 IR. 008
Art. 2619 IR. 000 - Art. 2628 IR. 005
Art. 2638 IR. 006
Commutateurs
Art. 1424 IR. 002
Mélangeurs
Art. 4888C IR. 013
Platines de rue
Art. 1602 IR. 027 - Art. 1602VCF IR. 002, Art.
3340 IR. 021 - Art. 3342 IR. 021
Art. 3070/A IR. 010 - Art. 3072/A IR. 010, Art.
4660C IR. 013
Standards
Art. 1998A IR. 006 - Art. 1998V IR. 001, Art.
1998VC IR. 001
Logiciel
Art. 1249/A IR. 002
C6 - Appel audio ou vidéo
14 : 15 : 26
Lun 12/03/12
Système Simplebus
Link Simple
Appel Indirect
A/V Audio
Rétrocom.
Esc Ok
Valider le service Rétrocom. à l'aide de la touche
.
Désactiver en appuyant sur .
- appuyer sur la touche OK pour confi rmer les réglages ;
- appuyer plusieurs fois sur la touche ESC pour
retourner à la page principale.
14 : 15 : 26
Lun 12/03/12
• Réglages
• Configurations
• Répertoire
• Appels reçus
• Alarmes
- appuyer sur les touches
pour affi cher le menu
Système puis appuyer sur OK ;
14 : 15 : 26
Lun 12/03/12
• Système
• Services
- appuyer sur les touches
pour affi cher le menu A/V
puis appuyer sur OK ;
14 : 15 : 26
Lun 12/03/12
Système Simplebus
Link Simple
Appel Indirect
A/V Audio
Rétrocom.
Esc Ok
- sélectionner Audio ou Vidéo à l'aide des touches
.
- appuyer sur la touche OK pour confi rmer les réglages ;
- appuyer plusieurs fois sur la touche ESC pour retourner
à la page principale.
Page 99
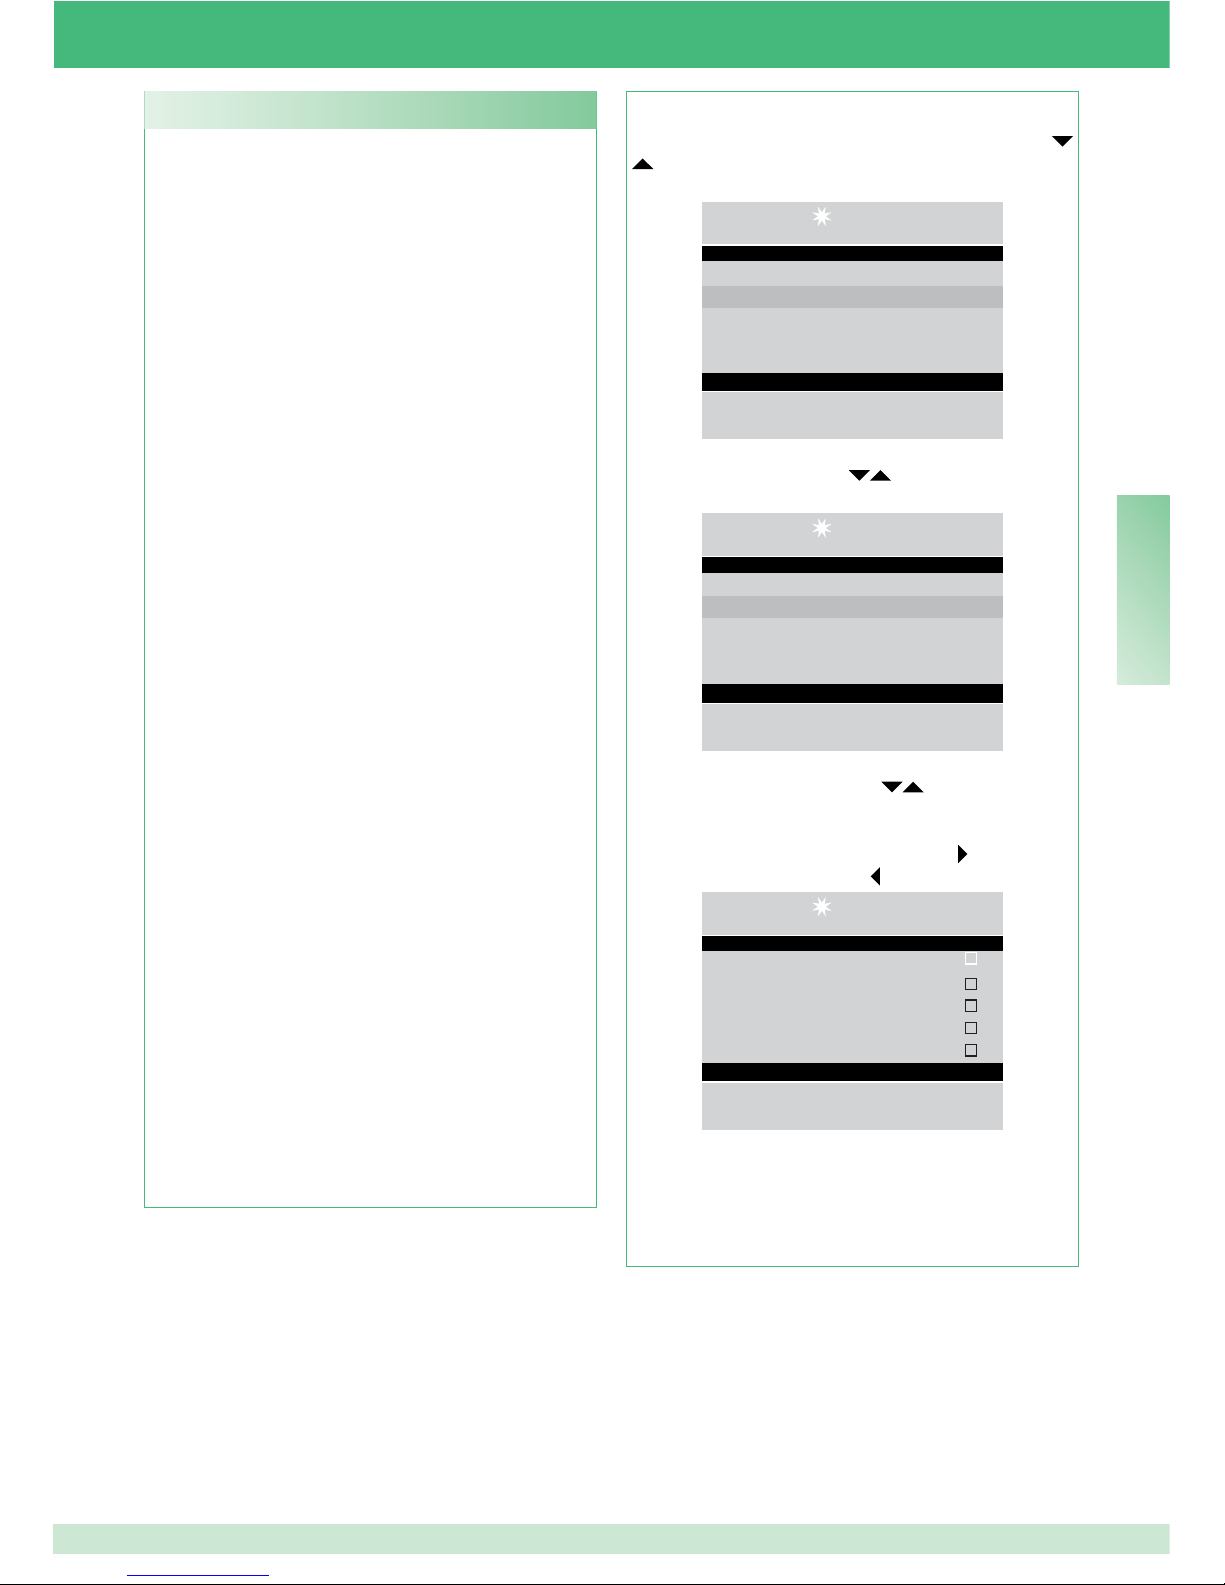
FR
95
FollowMe (« Suivi ») :
Elle est désactivée par défaut.
ATTENTION !
Pour utiliser cette fonction, la centrale Art.
2906 avec interface Art. 2912 doit être présente.
S'adresser à l'installateur de confi ance.
Cette fonction n'est activable que sur le standard
programmé comme secondaire (voir « C1 Type de
standard » page 91).
Cette fonction permet de dévier les appels destinés
au standard vers les appareils téléphoniques locaux
ou à distance.
À la suite d'un appel, le standard sonnera de toute
manière et tant que l'appareil à distance n'entrera
pas en communication, il sera possible de répondre
à l'appel depuis le standard en annulant la fonction
« Suivi ».
_________________________________________________________________________
Répétition d'appel :
permet de choisir la temporisation de la fermeture du
contact entre 1 et 30 secondes (voir « I8 - Réglage
temps » page 87).
_________________________________________________________________________
Allumage postes int. :
Elle est désactivée par défaut.
ATTENTION !
Cette fonction n'est disponible que pour les
installations Simplebus non TOP et la présence de
l'Art. 1259 est nécessaire pour la vision cyclique
des caméras déportées.
Cette fonction permet d'activer ou de désactiver
l'auto-allumage envoyé par les postes intérieurs avec
standard en modalité JOUR.
_________________________________________________________________________
Appel triple :
Elle est désactivée par défaut.
Cette fonction permet d'activer ou de désactiver
l'appel triple du standard vers les postes intérieurs.
L'appel sera effectué 3 fois de suite (en cas d'appel
vidéo : les 2 premiers seront audio, le troisième sera
vidéo).
_________________________________________________________________________
Aide codes :
Elle est désactivée par défaut.
Permet d'augmenter les codes Simplebus sur la ligne
montant.
C7- Configuration services
Pour valider les services :
- appuyer sur la touche MENU et sur les touches
pour affi cher le menu Confi gurations puis
appuyer sur la touche OK ;
14 : 15 : 26
Lun 12/03/12
• Réglages
• Configurations
• Répertoire
• Appels reçus
• Alarmes
- appuyer sur les touches
pour affi cher le menu
Services puis appuyer sur OK ;
14 : 15 : 26
Lun 12/03/12
• Système
• Services
- appuyer sur les touches
pour affi cher le
service à valider (followMe, répétition d'appel,
allumage postes intérieurs, appel triple, aide codes).
Valider le service à l'aide de la touche
.
Désactiver en appuyant sur
.
14 : 15 : 26
Lun 12/03/12
FollowMe
Répétition appel
Allumage postes int.
Appel triple
Aide codes
Esc Ok
- appuyer sur la touche OK pour confi rmer les réglages ;
- appuyer plusieurs fois sur la touche ESC pour
retourner à la page principale.
Page 100
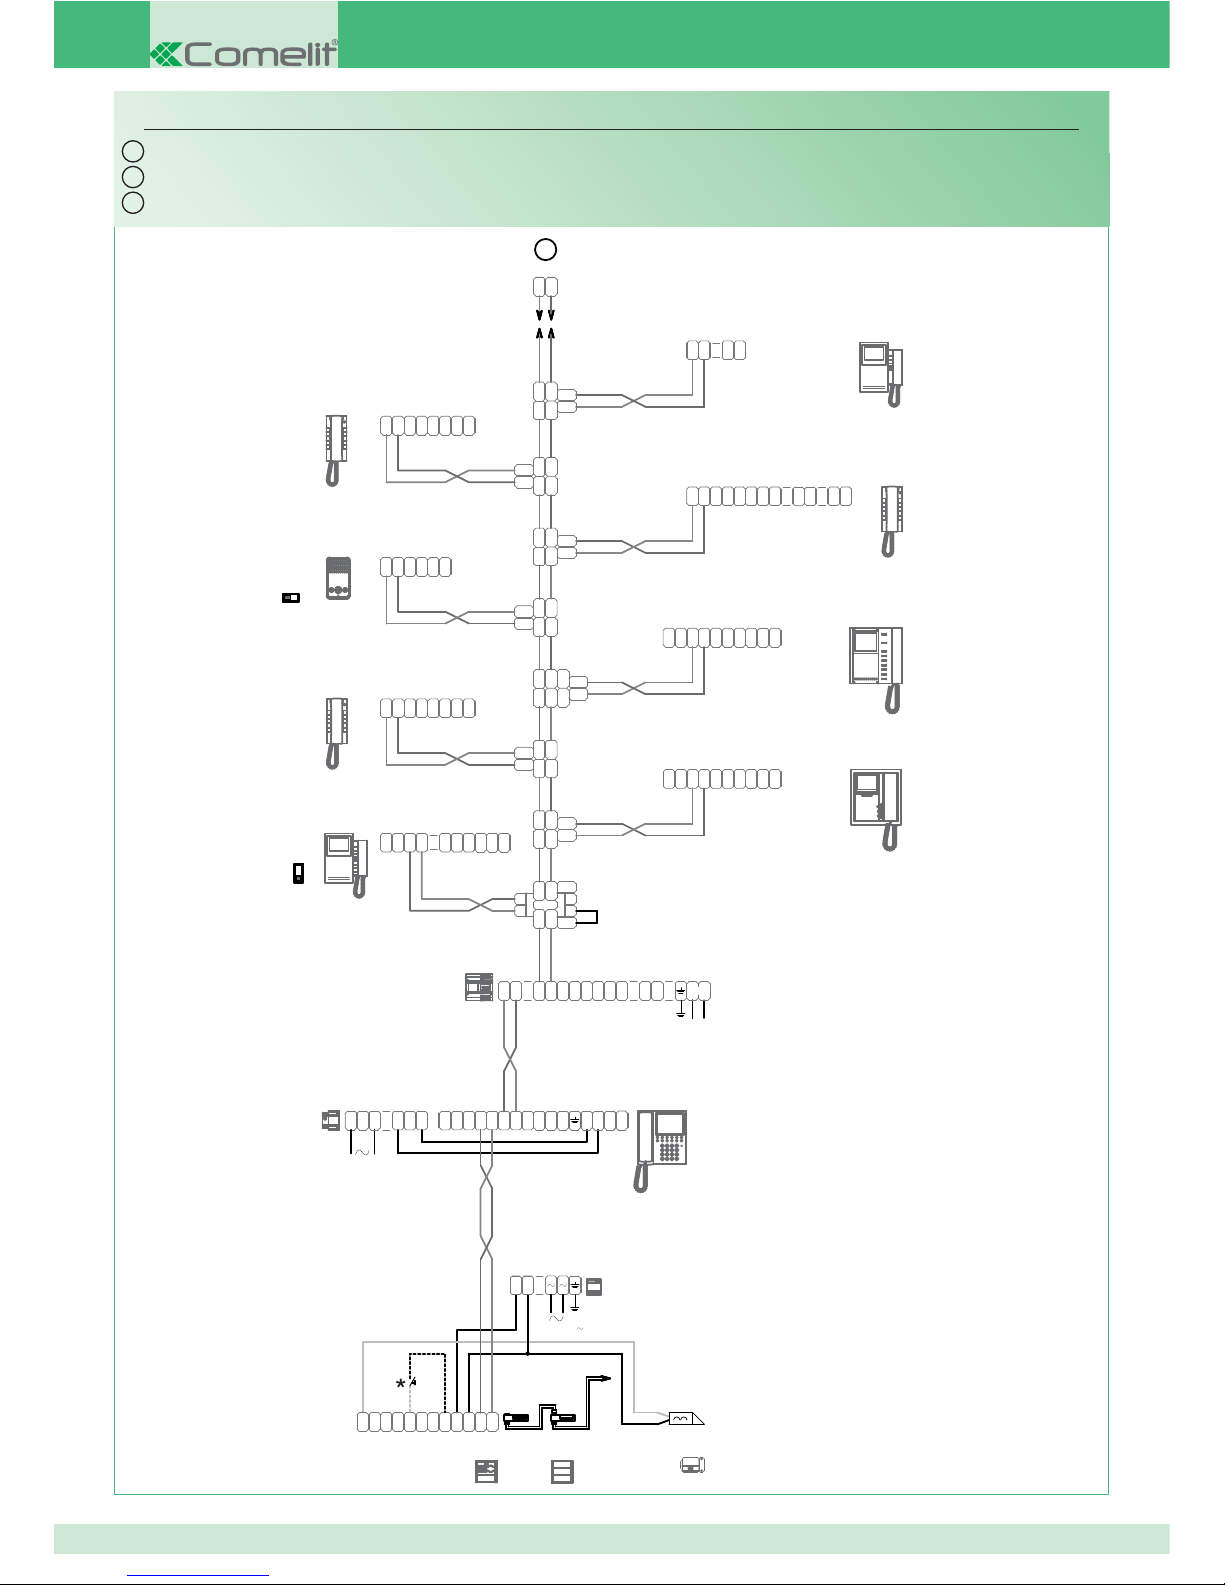
96
+
-
4888
~
1LINLIN
L
4L3L2L1L3L2
L
4
L
230V~~
NO C
1998V
D
N
G
1195
4
2
0
0
3
2
0
21XRX
T
T
U
O
T
U
O
2
LP
HCHCMLM
L
0~24
~
1
LP
LL
J1
J2
33436
J1
J2
E
S
NC NO
D
N
G
R
P
R
T
E
-
VV
+
M
O
C
D
O
4680
1595
+
-
120-230 V
1215
OUT
+
ININ
LM
LM
KIT
+
IN
SBC
L
OUT
LL
L
OUT
LM
LM
2
+
-
1
P
F
C
LL
P
F
C
-
S+S
P1C1
6401E
S1
S2
SW3
1214/2C
2619
8
P
S
-
LL
C
F
P
C
F
P
S
+
D
E
L
+
-
L
E
D
C
89CP9
6401B
C
F
P
LL
C
F
P
1
2
LM
LM
OUT
L
INLIN
L
OUT
L
1216
LL
LM
LM
OUT
L
INLIN
L
OUT
L
1214/2C
33
PC S
-
LL
C
F
P
C
F
P
S
+
2610
1214/2C
L
OUT
LINL
IN
L
OUT
LM
LM
5801+
1214/2
+
+
LM
LM
OUT
L
INLIN
L
OUT
L
LM
LM
1214/2G
OUT
L
INLIN
L
OUT
L
5701+
5714
S+S
-
+
20
C
F
P
LL0
C
F
P
P1C
1
33
PC S
-
LL
C
F
P
C
F
P
S
+
2628/
1
2638
1C1
P
P
F
C
0LL
P
F
C
20
+
-
S+S
5714
S1S2
SW1
P
F
C
LL
P
F
C
-
S+S
6228W
6228B
1214/2C
L
OUT
LINL
IN
L
OUT
LM
LM
LM
LM
1214/2G
OUT
L
INLIN
L
OUT
L
IT
EN
FR
SB2V/EN/103M
Impianto videocitofonico Simplebus b/n con 1 ingresso principale e centralino di portineria
* Pulsante comando apriporta locale
Simplebus B/W video entry phone system with 1 main input and porter switchboard
* Local lock-release button
Installation parlophonique et visiophonique Simplebus n/b avec 1 entrée principale e standard de conciergerie
* Bouton commande ouvre-porte local
 Loading...