

Page 1

R
Welcome to VVP
COMDIAL Small Office & VVP
Serial Integration For DSU II
Featuring Visual Voice Mail
User’s Guide
Page 2

This user’s guide applies to the following
system and telephone models:
System Model:
DSU II Digital Telephone System with
software revision 2A and later
Telephone Models:
ImpactLCD,DigiTechLCD,Impression
LCD
Voice Mail Models:
Small Office & VVP 8.1, revision 3b
Contact yourComdial dealer forupdates of
☞
this as well as other Comdial publications
Page 3

Table Of Contents
Introducing The Versatile Voice Processing
GettingStarted ............................. 3
EnteringYourVoiceMailbox................. 4
ListeningToYourMessages .................. 6
UsingYourKeypadToListenToYour
SendingMessages ........................... 8
ChangingYourOptions...................... 10
RecordingYourName....................... 11
UnderstandingOtherFeatures................ 19
PersonalDirectory........................... 23
System Featuring Visual Voice Mail. . . . . 1
WhatIsVoiceProcessing?.............. 1
HowDoIUseVoiceMail? ............. 1
UsingVoiceMailEtiquette ............. 1
About Your Telephone . . . . . . . . . . . . . . . . . 1
Using The Visual Voice Mail (VVM)
Feature............................ 2
Using Your Keypad To Enter Your Voice
Mailbox........................... 5
Messages ........................... 7
Using Your Keypad To Send Messages. . . . 9
Recording Your Greeting . . . . . . . . . . . . . . . 12
ChangingYourPassword............... 14
UsingCallTransfer.................... 15
UsingMessageNotification............. 16
Reviewing Messages For Future Delivery. . 17
UsingTheTutorial.................... 18
Calling Your Mailbox From Another
Location........................... 19
SettingUpDistributionLists............ 19
Using The Call Screening Feature . . . . . . . . 19
UsingYourDirectory.................. 20
Understanding Your Mailbox Schedules . . . 20
UsingTheMessageWaitingLight........ 20
UsingTheRecordFeature.............. 21
ListeningToIncomingMessages......... 22
ImportantNumbers ......................... 24
MultipleGreetingsRecord.................... 24
Page 4

Page 5

GCA70–339 Small Office & VVP User's Guide
IntroducingThe V ersatileVoice Processing
System Featuring Visual V oiceMail
Congratulations and thank you for using a Comdial voice mail system. This is
a powerful system that can greet your callers and record your messages. Using
the visual display and interactive buttons on your telephone along with the
voice prompts, you’ll find the Versatile Voice Processing (VVP) system with
Visual Voice Mail (VVM) feature quick and easy to use.
What Is Voice Processing?
Voice processing increases your productivity and efficiency when using your
telephone system. Voice processing allows you to direct calls to your parties
without delays caused by the operator handling other calls. You can retrieve
and record messagesin a voicemailbox 24 hoursper day, sevendays per week.
Messages you record in your own voice are accurate, detailed, and more
personal than a third party message.
How Do I Use Voice Mail?
You are assigned a voice mailbox. Your voice mailbox is similar to the
extension number for your telephone. To access your voice mailbox,you must
first dial up the voice mail system and enter your password if you wish to have
one. This is called logging on to your mailbox. Voice mail greets your callers
and records their messages.
Using Voice Mail Etiquette
It is important that you exercise good voice mail etiquette at all times. Voice
mail is intended to enhance productivity. When someone leaves a message in
yourvoice mailbox, itis your responsibilityto reply promptlyand courteously.
If voice mail is abused, the result can be frustrated callers and unhappy users.
To avoid any possible frustration, please be patient and courteous to all callers
until they become used to your new voice mail system.
About Your Telephone
To get the maximum benefit from VVP, you will need a Comdial proprietary
phone with a two-line, 32-character liquid crystal display (LCD) and three
interactive buttons. When using an industry standard touch tone phone, or
calling in from another telephone system, you can still use VVP by listening
to the voice prompts and entering your selections from the telephone keypad.
The keypad selections are also included in this guide.
Small Office & VVP User's Guide – 1
Page 6

Small Office & VVP User's Guide GCA70–339
Using The Visual Voice Mail (VVM) Feature
You will quickly learn that as every voice menu or prompt plays, you will see
a different message on your telephone display. Most of these messages offer
you a choice of three different options. You select the option you want by
simply pressing the interactive button adjacent to the desired item on your
display. For example, suppose you are playing a message you received from
another party. Your display will be as follows:
Playing message
Rplay Save Del
Press left button to hear
your message again
Part of the way through the message you were distracted by some noise in the
office and you want to hear the message again. In this example, you need only
to press the interactive button under Rplay (for replay) on your display and
the message will start playing again from the beginning. After hearing your
message, you can then save it or delete it by pressing Save or Del as
appropriate.
You will soon discover that using the interactive buttons with your displayed
options in this manner is faster and more convenient than making all choices
fromyour telephone keypadeven though youcan use thismethod if you prefer.
In the above example, you could achieve the same results by pressing 1 to
replay the message, 3 to save it and 4 to delete the message. You will always
know which keypad button to press from the VVP voice prompts.
Because many of the menus have more than three options, only the most
popular options are displayed. You can select menu options that are not
presentedon your display by pressingthe applicable buttons onyour telephone
keypad. You will soon learn which ones they are from looking through this
manual and listening to the various voice menus. For example, when listening
to a message as in the above example, you can press “8”torewindthemessage
five seconds, press “9” to fast forward the message five seconds, or press “0”
to pause the playback for approximately 30 seconds.
2 – Small Office & VVP User's Guide
Page 7
GCA70–339 Small Office & VVP User's Guide
Getting Started
The password you will use to log on to your mailbox the first time will be the
same as your mailbox number which is your extension number. You can
record this number in the space provided at the end of this guide.
As soon as possible, you should personalize your mailbox by recording your
name, greeting, and a new password.
When you call voice mail and enter your password, you will hear a welcome
greeting followed by the tutorial. The tutorial prompts you to enter your name,
greeting, and a new password, if you choose to use a password. You can delete
or change any of these items as often as you like. After you become familiar
with the operation of your voice mail system, you may want toturn the tutorial
off. See Using The Tutorial in this guide.
We strongly recommend that you use a password and that you choose
☞
one known only by you to keep your messages private.
To personalize your mailbox,
1. Press VMAIL to call voice mail.
2. Enter your password when prompted.
3. Follow the system’s voice prompts for
entering your name, greeting, and new
password.
Write your greeting here (see examples on page 17):
Small Office & VVP User's Guide – 3
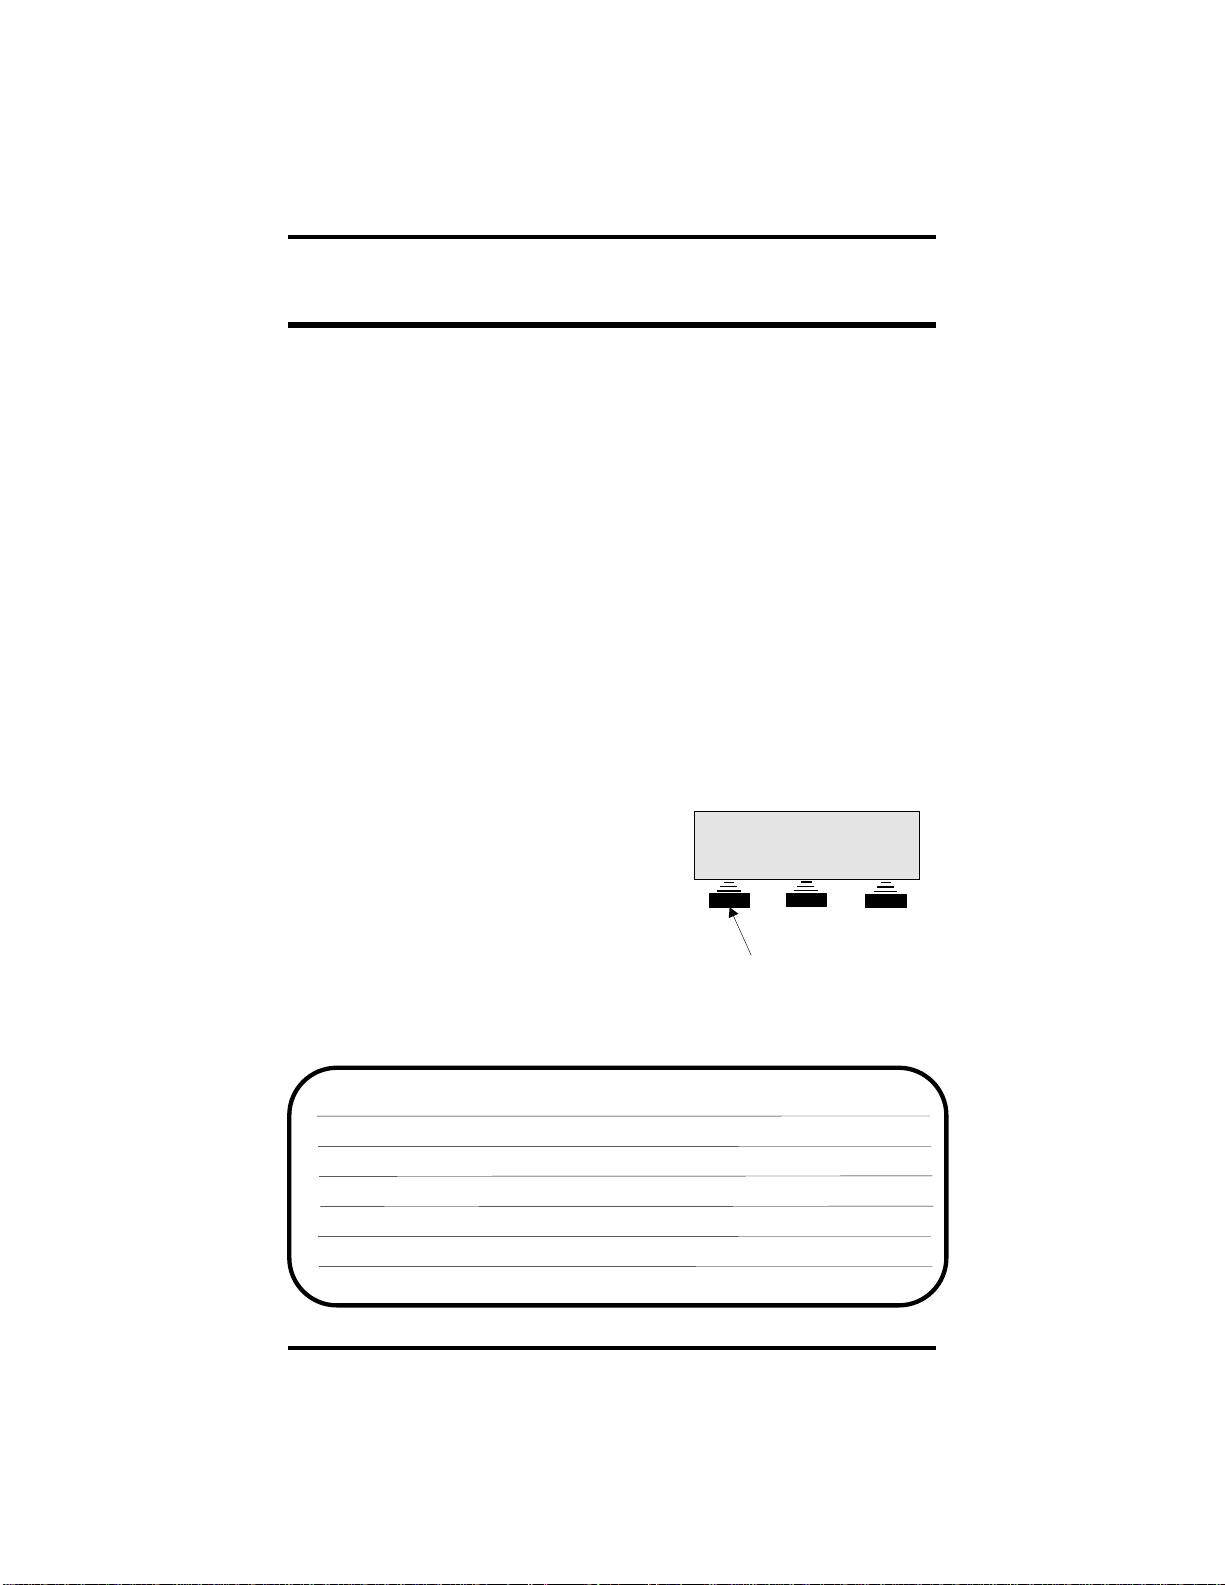
Thu 25 8:25
VMAIL OPTIONS
Press this interactive
button to call voice mail
Page 8
Small Office & VVP User's Guide GCA70–339
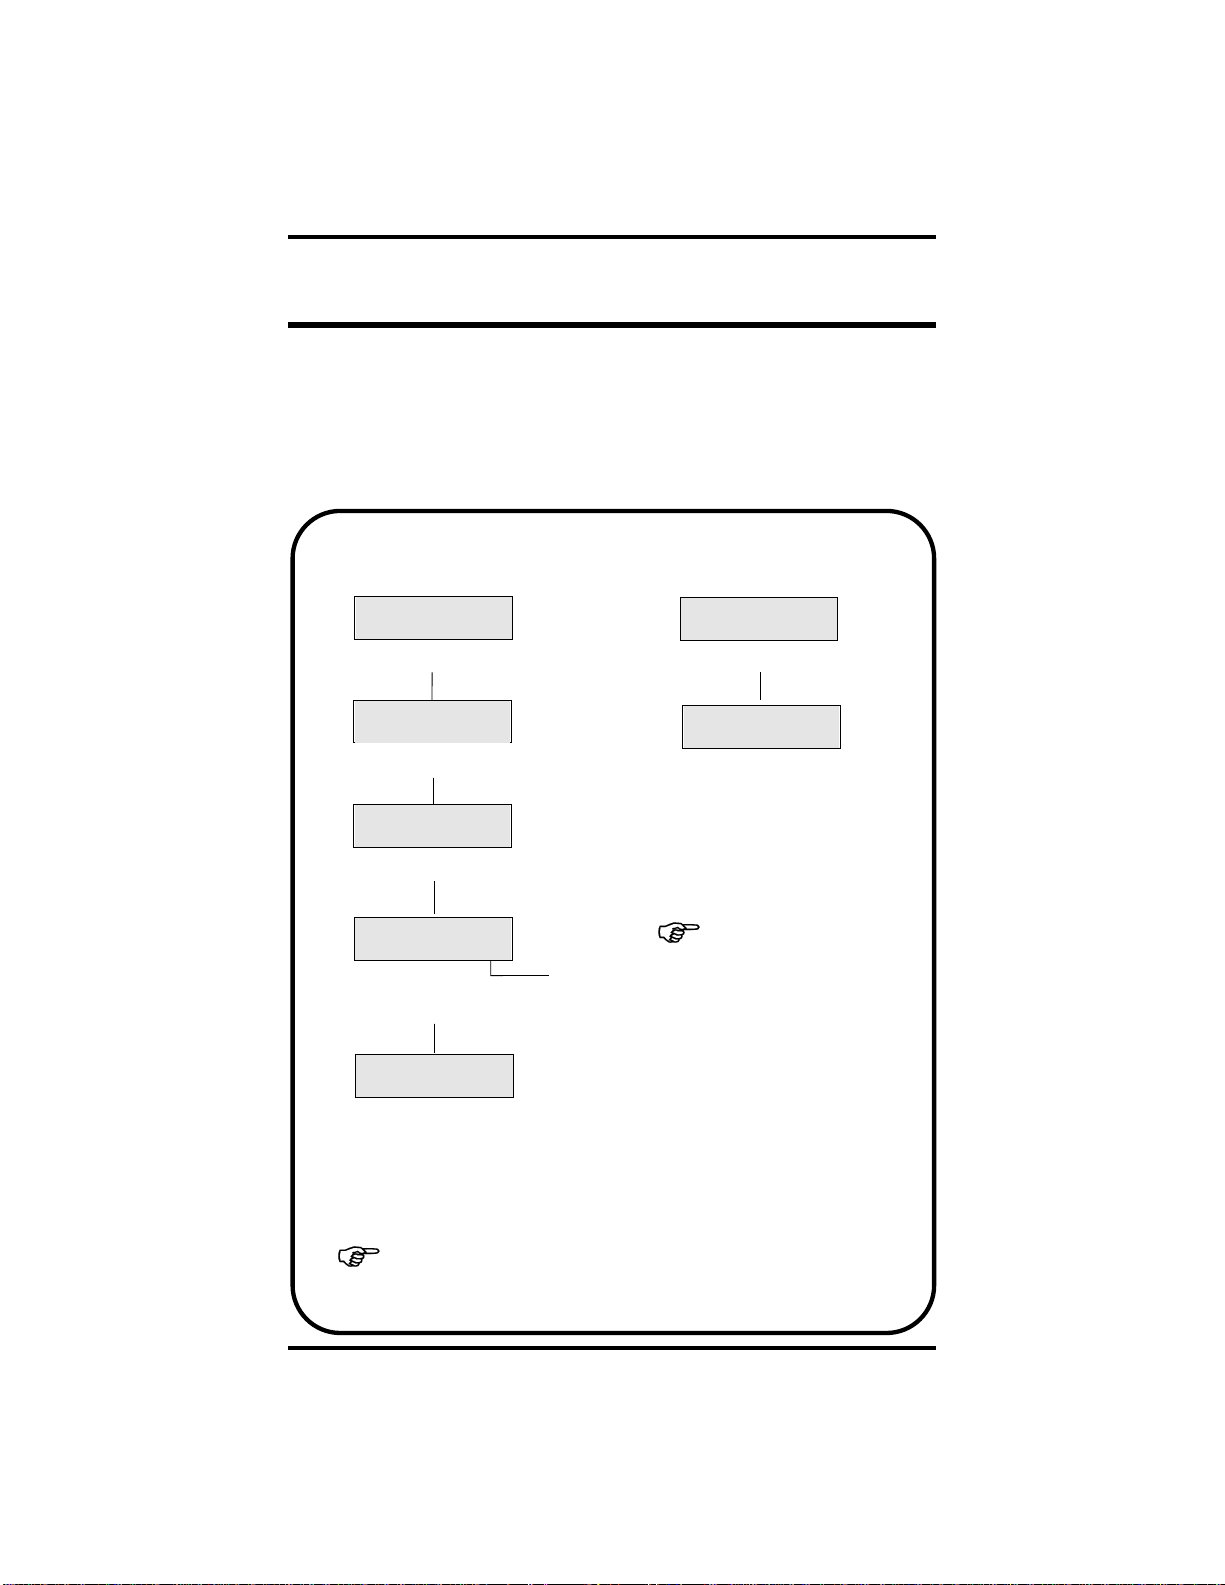
EnteringYour V oiceMailbox
Before you can perform any task on your voice mail system, you must enter
your mailbox, or log on to your mailbox. After logging on, you will then be
able to listen to messages left in your mailbox, send messages to other
subscriber’s mailboxes, and change any of your mailbox options, such as your
name or greeting. You can auto-logon by pressing the left button under your
display. Two auto-logon examples follow:
No New Messages in Mailbox
and Tutorial Turned On
Display 1
Thu 25 8:25
VMAIL OPTIONS
Press (see note 1)VMAIL
Display 2
Enter your
password
Enter your password
Display 3
Welcome to VVP
Hear welcome message
Display 4
Tutorial menu
Yes No Exit
Hear tutorial
(only if option is
turned on)
Display 5
Main menu
Msgs Send Opts
Select the following from
the Main Menu:
- Listening to messages
- Sending messages
- Changing mailbox options
Display 5
New Messages in Mailbox
and Tutorial Turned Off
Display 1
Thu 25 8:25
5 MSG OPTIONS
Press (see note 1)5 MSG
Display 2
Enter your
password
Enter your password and
immediately hear first new
message (no additional
button presses required.)
See note 2.
Note 2:
Displays 3, 4, and 5
appear the same as they do
in the example on the left
when the tutorial is turned on.
The tutorial plays the first time
you log on to help you personalize your mailbox. You can
choose to leave it on or turn it
off (see page 21).
Note 1:
VMAIL
messages are in your mailbox (example, means five new messages
are in your mailbox).
is replaced by the new message count indicator when new
4 – Small Office & VVP User's Guide
5 MSG
Page 9

GCA70–339 Small Office & VVP User's Guide
UsingYourKeypadToEnterYourVoiceMailbox
Normally, you will auto-logon when entering your mailbox as described on
the facing page. However, you can enter your mailbox from your telephone
keypad as follows:
1. PressINTERCOManddialtheextension number for voicemail.Your
system administrator can provide you with this number.
2. If you are using a password, dial this number when prompted by VVP.
3. You will hear a welcome message and VVP will inform you of the
number of new messages and saved messages in your mailbox. You
will then hear voice prompts to help you complete various tasks from
your main menu.
Selecting Tasks From Your Main Menu
• To listen to your messages, press 1. This is for listening to new and
saved (old) messages.
• To send a message, press 2. This allows you to send a message to
another subscriber’s mailbox in the VVP system. You can choose
immediate or future delivery options.
• To change your mailbox options, press 3. Options are—
- Record your name
- Record your greeting
- Change your password
- Change the call transfer feature
- Change the message notification feature
- Change the Tracker pager feature
• To begin immediate playback of new messages, press 9.
• To exit the main menu, press #.
Small Office & VVP User's Guide – 5
Page 10
Small Office & VVP User's Guide GCA70–339
ListeningToYourMessages
Once you have logged onto your mailbox, you can listen to any messages left
there by your callers. The following chart illustrates the relationship between
the displays you will see when playing your messages. However, when new
messages are pending, and your tutorial is turned off, VVP goes immediately
to display 3 (Playing message) and starts playing your first new message.
Display 1
Main menu
Msgs Send Opts
Press for
Msgs
Message menu
Display 2
Press Msgs
Old or new
New Old Exit
Press or
New Old
to listen to messages
Display 3
Playing message
Rplay Save Del
Press to hear message again
Rplay
Press to save message and hear
Save
next message
Press to delete message
Del
Display 4
Message options
Rplay Save Del
Press to hear message again
Rplay
Press to save message and hear
Save
next message
Press to delete message
Del
6 – Small Office & VVP User's Guide
Display 1
Page 11

GCA70–339 Small Office & VVP User's Guide
Using Your Keypad To Listen To Your Messages
After logging on to your mailbox, you can hear and process your received
messages—new or saved (old).
From the main menu—
•
To enter the message menu, press 1.
From the message menu—
To hear new messages, press 1.
•
• To hear saved (old) messages, press 2.
• To return to the main menu, press #.
When you select either 1 or 2 from the message menu, you will hear each of
your messages followed by additional menu choices as follows:
To replay the entire message, press 1.
•
• To save this message, skip over it, and begin playing the next message,
press 2.
• To save this message as a new message, press 3. Use this feature when you
want to save a message as new that you have asked the system to delete.
The system provides enough time to do this before it actually deletes the
message after your delete request. (See next option.)
• Delete this message and select the next message. You can retrieve a deleted
message if you have not hung up. To un-delete the message, go back to the
Main Menu, select Listen to Saved Messages (old), and save it as new.
• For time and date that this message was received, press 5.
• To forward a copy of this message to another mailbox on VVP, press 61.
• To send a reply to the message you just listened to, providing the message
was sent from another subscriber on VVP via their mailbox, press 62.
• To transfer this call to the person who sent this message, press 63.
• To tag one or more documents that you want sent to a fax machine at the
end of your call, press 7. Requires the Faxmail option.
• To get tagged faxmail documents when using Fax-Back on the same call,
press 9. Requires the Faxmail option.
While the message is playing—
• To rewind 5 seconds, press 8.
• To fast forward 5 seconds, press 9.
• To pause the playback for approximately 30 seconds, press 0.
Restart the message any time during the pause by pressing 0 again.
Small Office & VVP User's Guide – 7
Page 12

Small Office & VVP User's Guide GCA70–339
Sending Messages
After logging onto your voice mailbox, you can send messages to t he
mailboxes of other VVP subscribers.
Display 1
Main menu
Msgs Send Opts
Press Send
Then, dial mailbox number of
intended receiver. VVP plays
recorded name for entered
mailbox number and asks for
confirmation.
Display 2
Yes No
Display 1
Press to confirm nameYesPress to confirm name
Yes
Press to return to main menu
No
Display 4
Display 5
Send Rcrd Cncl
Display 6
Urgnt Futur Norm
. . . or . . .
Dial for dial-by-name
directory.
Display 3
Directory menu
Yes No Exit
Press to select name
Press to hear next name
Recording
Press#tostop
Record your message
Send options
Press to send message
Send
Press to re-record message
Rcrd
Press tocancel sending the
Cncl
message
Send options
Press for urgent delivery
Urgnt
Press for future delivery
Futur
Press for immediate delivery
Norm
Yes
No
Display 1
8 – Small Office & VVP User's Guide
Page 13

GCA70–339 Small Office & VVP User's Guide
UsingYourKeypadToSendMessages
You can send a message to another subscriber’s mailbox by pressing 2 from
the main menu. VVP will ask you to enter the mailbox number of the person
you want to receive the message; or to press ✻ ifyouwanttousethe
dial-by-name directory. Press 1 to confirm your mailbox selection. Record the
mailbox numbers that you call frequently on the personal directory page
provided in the back of this guide.
After recording the message, press # for more options as follows:
• To send this message, press 1. You will hear voice prompts for
delivery options (press 1 for normal, press 2 for urgent, press ✻ for
future delivery).
• To replay this message, press 2.
• To re-record this message from the beginning, press 3.
• To cancel this message, press 4.
• To receive notification when your party has received this message,
press 5.
• To send this message to several mailboxes without re-recording it,
press 6.
• To add a fax document to the message being sent, press 7. Requires
the Faxmail option.
• To resume recording where you left off, press 8. This allows you to
listen to what you have recorded, then add to the message.
• To play the last 5 seconds of the message press 9. This allows you to
continue recording.
• To send the message so that it arrives at a future time and date,
press ✻ . This feature allows you to record the message now, but
have Versatile Voice Processing deliver it at your specified date and
time in the future.
Small Office & VVP User's Guide – 9
Page 14

Small Office & VVP User's Guide GCA70–339
ChangingYour Options
There are many voice mailbox options you can change such as your name or
greeting. Many of these options you can change directly from the interactive
buttons under yourdisplay, whileothers require youto pressone of thebuttons
on your telephone keypad. These option changes and their associated displays
are illustrated below.
Display 1
Main menu
Msgs Send Opts
Press Opts
Display 2
Options menu
Xfer Greet Exit
Display 1
1
Press to record name ( )
2
Press or to record greeting ( )
Press to record password ( )
Press or to change call transfer ( )
Press for message notification ( )
Press for pager feature ( )
Press for future delivery ( )
Press to enable tutorial ( )
Greet
3
3
4
Xfer
5
6
7
9
Display 3
Display 5
Display 5
Display 7
Display 5
Display 4
Display 6
Display 6
Display 3
Name options
Play Rcrd Exit
Press to hear name
Play
Press to r e-record name
Rcrd
Display 5
Listen for
instructions
Display 2
Display 7
Display 7
Schedule menu
Play Next Exit
Press to hear message scheduled for future delivery
Play
Press tohear next message
Next
10 – Small Office & VVP User's Guide
Display 4
Greeting options
Play Swap Exit
Press to hear greeting
Play
Press to select another
Swap
greeting
Display 6
Options
Chng OnOff Exit
Press tochange call
Chng
transfer number
Press to turn call transfer
OnOff
feature on or off (when off, all
calls go to your mailbox)l
Display 2
Display 2
Display 2
Page 15

GCA70–339 Small Office & VVP User's Guide
Recording Your Name
You need to record your name so the system can inform callers that they are
indeed leaving a message or being transferred to the correct person. By
recording your name, you will then be included in the directory.
1. Log on to your mailbox. The following display will appear:
Main Menu
Msgs Send Opts
2. Press Opts from the main menu and the options menu appears:
Options menu
Xfer Greet Exit
3. Press1on yourtelephonekeypad whilethe options menu is active. The
following menu appears:
Name options
Play Rcrd Exit
4. Press Rcrd to record your name. You may listen to your recording
(press Play) as many times as you like until you are satisfied with the
results. Press Exit to return to the options menu.
You can achieve the same results by using the voice prompts and your
telephone keypad as follows:
Press 1 to replay the message.
Press 2 to re-record the message.
Press 3 to delete the message.
Press # to exit to the options menu.
SmallOffice&VVPUser'sGuide–11
Page 16

Small Office & VVP User's Guide GCA70–339
Recording Your Greeting
You can record up to ten greetings for your mailbox if your mailbox class of
service allows this feature. You may want to record at least two greetings. It
is not necessary to record any greeting at all, but it is more personal if your
callers hear a message from you in your voice. If you record more than one
greeting, you can select which greeting will be played. If you want to play a
different greeting, simply select which one—0 through 9.
1. To record your greeting, logon toyour mailbox. The following display
will appear:
Main Menu
Msgs Send Opts
2. Press Opts from the main menu and the options menu appears:
Options menu
Xfer Greet Exit
3. To record your greeting, press Greet from the options menu. The
following menu appears with play and swap choices.
Greeting options
Play Swap Exit
Follow the instructions in the voice menu and enter your choices as
follows:
*To replay the greeting, press 1 (or Play).
*To re-record the greeting, press 2.
*To delete the greeting, press 3.
*To choose a new greeting, press 5 (or Swap).
To return to the options menu, press # (or Exit).
*Theseoperations will promptyou to enter yourgreetingnumber (0–9)
if your mailbox has been configured to allow multiple greetings.
Youmay listen to yourrecordedgreetingandre-recordit as many times
as you like until you are satisfied.
12 – Small Office & VVP User's Guide
Page 17

GCA70–339 Small Office & VVP User's Guide
Sample Greeting 0
“Hello, this is Bob. I’m either on the phone or away from my desk.
Please leave me a detailed message at the tone and I will return your
call right away.”
Sample Greeting 1
“Hello, this is Bob. Today is August 15 and I’ll be out of the office all day.
Please leave me a detailed message at the tone and I’ll get back to you as soon
as I can.”
Greetings can be changed as often as you like. Replacing a greeting with
another, (that is, greeting 0 with greeting 1) is an example of the system’s
flexibility. The greetings canbe changed from your phone at workor from any
touch tone phone anywhere. This means that you could change your greetings
while out of town, or at home. Record your numbered greetings in the space
provided on page 26 for future reference.
Remember, if you record a greeting to your satisfaction, don’t record
☞
over it unless you want to change it. Also, your mailbox must be configured
through class of service programming to allow use of multiple greetings.
You can also record your greeting by using the voice prompts and your
telephone keypad as follows:
Press 1 to replay the message.
Press 2 to re-record the message.
Press 3 to delete the message.
Press 5 to choose a new greeting.
Press # to return to the options menu.
SmallOffice&VVPUser'sGuide–13
Page 18

Small Office & VVP User's Guide GCA70–339
Changing Your Password
To change your password, log on to your mailbox. The following menu will
appear.
Main Menu
Msgs Send Opts
Press Opts from the main menu to select the options menu.
Options menu
Xfer Greet Exit
To enter a new password, press 3 on your telephone keypad while the options
menu is active, and follow the voice prompts.
Always make your password at least four digits and select one
☞
that is known only by you, but one you can easily remember.
14 – Small Office & VVP User's Guide
Page 19

GCA70–339 Small Office & VVP User's Guide
Using Call Transfer
When a call is received by Versatile Voice Processing, the call is either
transferred to you at your desk and/or put in your mailbox if you are not
available. If you are going to be away from your desk for an extended period,
ordonot wish to be disturbed,youcandivertthecallsfromyourdesktoanother
phone or directly to your mailbox so Versatile Voice Processing can take a
message. To block calls to your extension, press Xfer from the options menu,
then press OnOff.TheOnOff button toggles call blocking on and off. When
this feature is off, calls are automatically transferred to your mailbox. To send
your calls to another extension, or phone number, press Chng from the
message delivery options menu and enter the new number when prompted by
the voice menu. Consult your system administrator if you need additional
information on this feature.
1. Log on to your mailbox.
Main Menu
Msgs Send Opts
2. Press Opts from the main menu for the options menu.
Options menu
Xfer Greet Exit
3. Press Xfer for the message delivery options menu.
Options
hng OnOff Exit
C
4. Press Chng to change your call transfer number or OnOff to turn the
feature on or off. Press Exit to return to the Options menu.
You can achieve the same results by using the voice prompts and your
telephone keypad as follows:
Press 1 to change your call transfer number.
Press ✻ to turn the feature on or off.
Press # when you are satisfied with your choice.
SmallOffice&VVPUser'sGuide–15
Page 20

Small Office & VVP User's Guide GCA70–339
Using Message Notification
Message notification will call you at another telephone (at home or at the
office) and inform you that you have messages in your mailbox. Your mailbox
must be configured to provide this feature. It maybe necessaryto consult your
dealer for advanced applications of this feature.
1. Log on to your mailbox.
Main Menu
Msgs Send Opts
2. Press Opts from the main menu for the options menu.
Options menu
Xfer Greet Exit
3. Press5 on your telephonekeypad whilethe options menuis active, and
listen for instructions. VVP will voice announce which number is
currently programmed. For example, “pause, one, one, pause, . . . ”
Options
hng OnOff Exit
C
4. Press Chng to change your notification number or OnOff to turn the
feature on or off. Press Exit to return to the Options menu.
You can achieve the same results by using the voice prompts and your
telephone keypad as follows:
Press 1 to change your call transfer number.
Press ✻ to turn the feature on or off.
Press # when you are satisfied with your choice.
16 – Small Office & VVP User's Guide
Page 21

GCA70–339 Small Office & VVP User's Guide
Reviewing Messages For Future Delivery
You can record messages and save them for future delivery. Versatile Voice
Processing will allow you to review these messages by using the review future
delivery option.
1. Log on to your mailbox.
Main Menu
Msgs Send Opts
2. Press Opts from the main menu for the options menu.
Options menu
Xfer Greet Exit
3. Press 7 on your telephone keypad while the options menu isactive and
followthe voice promptsfor specifying message destinationand future
delivery date and time.
Schedule menu
Play Next Exit
4. Press Play to hear the first message marked for future delivery. Press
Next to hear the next message marked for future delivery. Press Exit
to return to the Options menu.
You can achieve the same results by using the voice prompts and your
telephone keypad as follows:
Press 1 to hear message scheduled for future delivery.
Press 2 to hear the next message.
Press 4 to cancel the future delivery.
Press # to return to the options menu.
SmallOffice&VVPUser'sGuide–17
Page 22

Small Office & VVP User's Guide GCA70–339
Using The Tutorial
Versatile Voice Processing hasa tutorial to help you personalize your mailbox
when you first get it, and to learn some of the many and varied operations of
thevoice mail system.When enabled, thetutorial will play automaticallyevery
time you log on to your mailbox. You can press ✻ any time while the tutorial
is playing to turn it off. You can re-enable the tutorial by selecting the options
menu from the main menu and then pressing 9 from the options menu.
1. Log on to your mailbox and get the welcome greeting.
Welcome to VVP
2. The tutorial starts to play automatically following the welcome
greeting. While the tutorial is playing, you will be prompted to enter
your name, greeting, or a new password.
Tutorial menu
Yes No Exit
3. Press Exit to stop the tutorial while it is playing. This will not prevent
thetutorial from playing the nexttime you log on toyour mailbox. You
are informed about any new messages, if present, and the main menu
will appear following the tutorial.
Main Menu
Msgs Send Opts
18 – Small Office & VVP User's Guide
Page 23

GCA70–339 Small Office & VVP User's Guide
Understanding Other Features
This section contains descriptions of some of the other features of your
Versatile Voice Processing voice mail system. Consult your system
administrator or your dealerif you need additional information on any of these
features. Your system may not have all of these features.
Calling Your Mailbox From Another Location
You can callyour voice mailboxwhen you areaway from theoffice—at home,
in your car, or from a public pay station. You can hear your messages the same
as you would if you were sitting right at your desk! Also, you can send
messages or change your mailbox options, such as your greeting, from any
touch tone telephone having a 12-button keypad.
1. Call your office phone.
2. While the greeting is playing, press the # button on the keypad of the
telephone you are using.
3. You will be prompted to enter your mailbox number.
4. After entering your mailbox number, you will be prompted to enter
your password, if your mailbox uses one.
5. After you enter your password, you will hear the welcome message
and the main menu will play giving you all of the identical options you
have when you are using your office phone.
Remember, even if the telephone you are using to call your office has
☞
a display and interactive buttons, you will not see the proper displays or be
able to use the interactive buttons as you can on your office phone.
Setting Up Distribution Lists
Your voice mail system can be set up with a list of mailboxes that can be
included in certain messages. For instance, if you are a manager, you could
create a list of all people that report to you so that you could send one message
to everyone at once.
Using The Call Screening Feature
Versatile Voice Processing can get the caller’s name prior to transferring the
call to your extension, and then call your extension to tell you who is calling;
giving you the option of accepting the call or having the voice mail system
take a message.
SmallOffice&VVPUser'sGuide–19
Page 24

Small Office & VVP User's Guide GCA70–339
Using Your Directory
Recording your name will activate the appearance of your mailbox in the
company directory. If you can’t remember the mailbox number of someone
else in the system to whom you want to send a message, access the directory
by pressing ✻ from the voice menu for messages. Versatile Voice Processing
will ask you to enter the first few letters ofthe last name of theperson to which
you wish tospeak to.You will then hear possiblematches thatyou can respond
to with yes or no replies by pressing the interactive buttons on your directory
display.
Understanding Your Mailbox Schedules
Versatile Voice Processing can be set up to transfer calls to your extension,
forward messages to another mailbox, or notify you that you have messages
in your mailbox. All of these features have the ability to be on a separate
schedule to function the way you need during specified time periods. Consult
your system administrator or dealer for additional details.
Using The Message Waiting Light
TheVersatile Voice Processingsystem will turnon your messagewaiting light
and cause it to flash anytime you have new messages waiting. After you have
listened to the last message, and return to the main menu, the message waiting
light will turn off.
20 – Small Office & VVP User's Guide
Page 25

GCA70–339 Small Office & VVP User's Guide
Using The Record Feature
The Record Feature enables you to record conversations and save them.
Versatile Voice Processing allows you to listen to the recorded conversations
by accessing your mailbox and listening to the conversations as you would a
voicemailmessage.
1. When you answer an incoming call or make an outgoing call, one of
the following displays appears:
LINE 11
REC TIMER
Incoming Call Display
LINE 11
ARDL REC TIMER
Outgoing Call Display
2. Press the REC softkey to record the conversation into your mailbox
(depending on system programming, a recurring tone may sound to
indicate the call is being recorded) . The system will display the words
RECORDING, PAUSE,andSTOP. You can pause or stop the
recording by pressing the appropriate softkey. If the system is unable
to record, it will display an error message for 2 seconds.
RECORDING
PAUSE STOP
Recording Call Display
3. If you press the PAUSE softkey, recording will be paused and the
system will display the words RECORDING PAUSED, RESUME,
and STOP. Pressing RESUME will restart recording; pressing STOP
will stop the recording.
RECORDING PAUSED
RESUME STOP
Recording Paused Display
SmallOffice&VVPUser'sGuide–21
Page 26

Small Office & VVP User's Guide GCA70–339
Listening To Incoming Messages
The listen feature allows you to screen the calls ringing in to your extension
by listening to an incoming message and determining if the call needs your
immediate attention. If you wish to speak to the person leaving the message,
simply press the softkey to cancel the recording and take the call.
1. When a calling party is leaving a message, the system will display the
following screen:
LINE5INVM
LISTEN CLEAR
2. Select the LISTENsoftkey to listento the party leavingyou a message.
Select the CLEAR option to clear the LCD and display the date and
time.
3. During the listening mode, the system will display the PICKUP and
CLEAR options. Pressing the PICKUP softkey allows you to take the
call and cancels the recording. The CLEAR option allows you to stop
listening and continue recording the message.
LISTENING
PICKUP STOP
22 – Small Office & VVP User's Guide
Page 27

GCA70–339 Small Office & VVP User's Guide
Personal Directory
Mailbox
Name
Number
SmallOffice&VVPUser'sGuide–23
Page 28

Small Office & VVP User's Guide GCA70–339
Important Numbers
VVP’s Extension
My mailbox #
My password
Number Record Multiple Greetings Here
24 – Small Office & VVP User's Guide
Page 29

NOTES
Page 30

NOTES
Page 31

This manual has been developed by Comdial Corporation
(the“Company”)andisintendedforthe use of its customers
and service personnel. The information in this manual is
subject to change without notice. While every effort has
been made to eliminate errors, the Company disclaims
liability for any difficulties arising from the interpretation of
the information contained herein.
The information contained herein does not purport to cover
all details or variations in equipment or to provide for every
possible contingency to be met in connection with
installation, operation, or maintenance. Should further
information be desired, or should particular problems arise
which are not covered sufficiently for the purchaser’s
purposes, contact Comdial, Inside Sales Department, P.O.
Box 7266, Charlottesville, Virginia 22906.
Page 32

R
Charlottesville, Virginia 22901-2829
World Wide Web: http://www.comdial.com/
Printed in U.S.A.
GCA 70-339.01
12/96
 Loading...