

Page 1

Key Voice”
Voice Processing
DEBUT AND
S
YSTEM
AND
S
UPERVISOR
GUIDE
Page 2
Page 3
Page 4

Page 5
Page 6
Page 7
SYSTEM INSTALLATION AND SUPERVISOR G UIDE 9.0 VER. 1
1. System Overview
This document discusses features and functionality provided in Small Office
systems. Note that both these systems include the same feature set, and the system setup and
maintenance procedures are identical between systems. For documentation ease, these two
systems are collectively referred to as the Life system in this guide.
and
1.1 What Does the Lite System Do?
In its simplest form, the Lite system acts like a telephone receptionist. The system answers
incoming calls and transfers them to the appropriate extension.
available (busy or no answer), the system offers to take a message or try an alternative
extension.
Lite system functionality includes:
l
Automated attendant features
l Voice mail features
These two functions work together to provide smooth call coverage for your application.
If the called extension is not
1.1.1 What is an Automated Attendant?
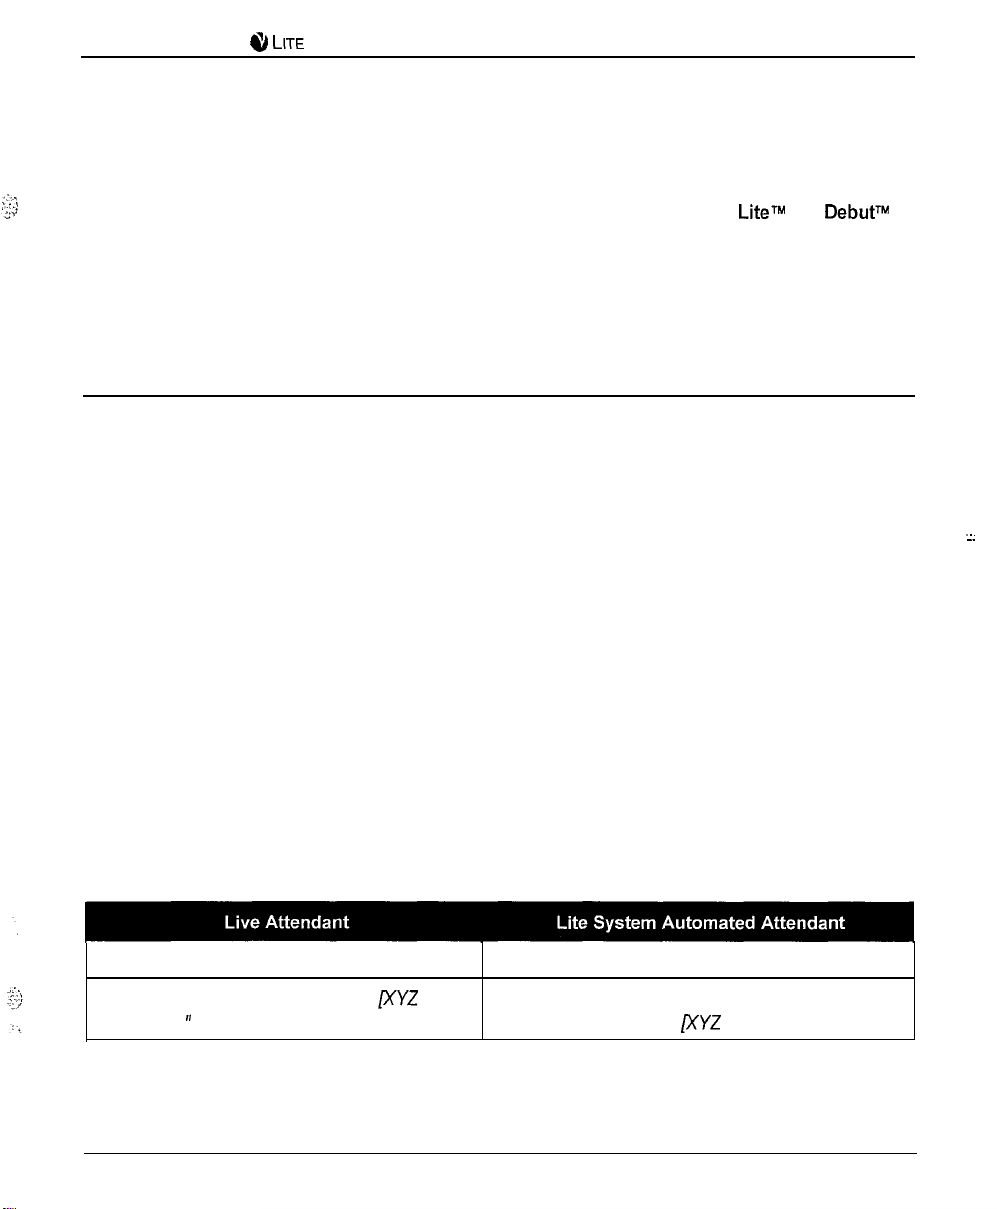
The Lite system automated attendant features perform the tasks of a live attendant. The
following table illustrates how.
Answers an incoming
Greets the caller with “Welcome to
Company].
call by lifting telephone.
Answers an incoming call
Greets the caller by playing a pre-recorded
greeting, “Welcome to
1
by going “off-hook.”
Company].”
Page 8
SYSTEM INSTALLATION AND SUPERVISOR GUIDE 9.0 VER. 1
2. System Setup Instructions
,
.
The Lite system contains a default database with a setup configuration that allows the Lite
system to efficiently perform fundamental call processing tasks with minimal system
adjustments by the installing technician. This default database configuration includes 2
defined classes of service (0 and
boxes--800, 801, 821. Information provided in this document explain how these pre-set
defaults function on the Lite system.
As you proceed through these setup instructions, you may decide to make adjustments to
specific information relating to the default setup. You may even decide to set up the other 2
available Routing boxes to perform additional call routing tasks. As you make any changes,
keep in mind that we urge
80 1. and 821, class of service 7, and supervisor mailbox 70. This configuration allows
the Lite system to efficiently perform fundamental call processing tasks. Maintaining it helps
both you, the technician, and Lite system technical support to efficiently
and resolve any call processing issues. For these reasons we urge you not to deviate from this
general system setup default configuration.
Information on setting up and using box types other than Routing boxes and mailboxes is
provided in the Installation and Maintenance Manual,
Note: Section 2.6 provides an overview of the default database setup shipped on
Lite system units.
1 supervisor mailbox (mailbox
to maintain the initial general configuration of
and 3 Routing
boxes
the system
.
. .
up
2.1 Available System Setup Techniques
There are two techniques you can use to set up Lite systems:
l
Attach a laptop to the Lite system
System PBX Setup utility then complete System Information and Box Setup screens
and use the program’s screen interface to run the
Page 9
SYSTEM INSTALLATION AND SUPERVISOR GUIDE 9.0 VER. 1
l
Call into the Lite system and use the Teleparameter feature to run the System PBX Setup
utility then enter parameter codes and corresponding values to set up system and box
information
This document provides instructions for using either system setup technique.
Technicians who have experience setting up Corporate Office, Small Office, or Lite systems
may prefer to use the Teleparameter feature to quickly make modifications and get the Lite
system up and running at the customer’s site. Be advised, however, that since this technique
involves inputting codes that represent system parameters and corresponding values to which
parameters are to be set, it is a bit more difficult to use effectively if you are unfamiliar with
setting up Corporate Office, Small Office, or Lite systems. For this reason, we recommend
that technicians unfamiliar with Corporate Office, Small Off-ice, or Lite systems attach a
laptop to the PC and use the instructions provided here to complete all necessary system setup
steps through the screen interface.
Note:
If you choose to set up the system using the Teleparameter feature, be sure
to first review
the default database included on the Lite system unit.
section
2.5.6.2 and 2.6 so you clearly understand the setup of
Note that if you choose to initially set up the system by connecting it to a laptop and using the
screen interface, you can later make additional modifications by simply calling into the Lite
system and using options on the Supervisor menu (see section 3) or using the
feature (see section 2.7.2).
2.2 Preparing for System Setup
To install, set up, and maintain a Lite system voice processing system, you need the
following equipment:
Equipment Needed
l
Lite system unit
l
Portable diskette drive
Should an unusual situation arise, it may be necessary for you to service the Lite .
6
Page 10
SYSTEM INSTALLATION AND SUPERVISOR GUIDE 9.0 VER. 1
system by attaching a portable diskette drive to the Lite system unit. Therefore, we
strongly recommended that technicians servicing Lite system units have access to a
portable diskette drive.
l
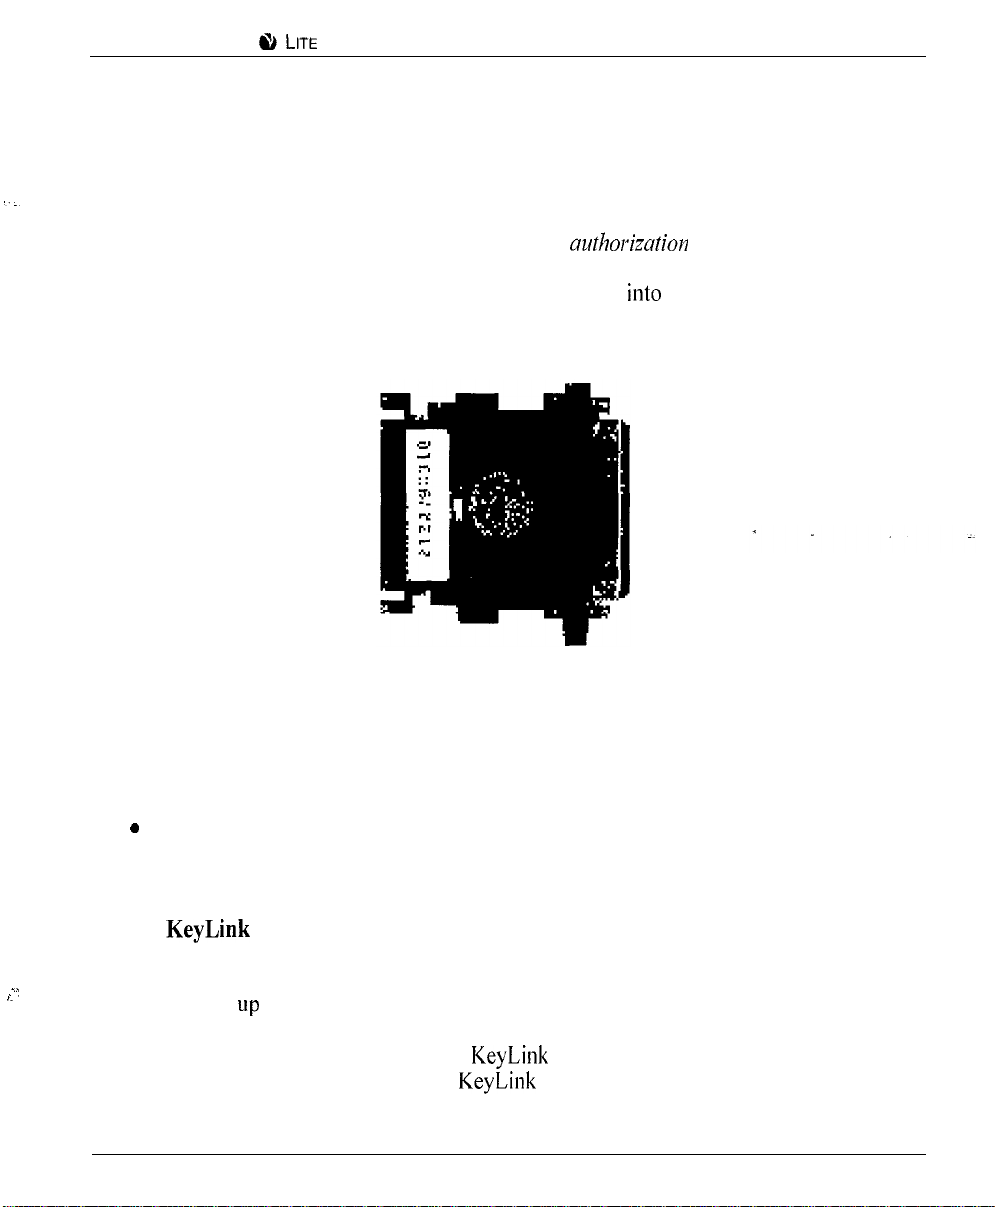
Authorization key (Small Office Lite systems only)
The Small Office Lite system runs only if the
key is attached to the
PC’s parallel port. This key is shipped in the packaging with the Lite system unit.
To attach the authorization key, simply plug the key
the parallel port in the back
of the PC. (Debut units do not require an authorization key.)
. .
.
. . .
. .
Authorization Key
If you choose to set up the system by connecting a laptop to the Lite system unit, you need
the following additioual equipment:
Laptop computer
l
Null modem serial cable
l
communications software (provided with the Lite system)
This additional equipment is necessary because the Lite system does not have a keyboard and
monitor. To set
the system using a laptop, you must use a null modem serial cable to
attach the laptop PC to the Lite system unit. So that the laptop computer can communicate
with the Lite system unit, you must install
the Lite system, onto the laptop PC. The
communication software, provided with
installation procedure is provided in this
document.
7
Page 11
SYSTEM INSTALLATION AND SUPERVISOR GUIDE 9.0 VER. 1
Once the system is set up and tested, the system supervisor on-site can maintain the day-today aspects of the system (adding, deleting, modifying mailboxes; modifying greetings and
call routing; etc.) by simply calling into the system using a telephone. No special
Teleparameter modification instructions or laptop computers are necessary for regular daily
maintenance of the Lite system.
2.3 Connecting the Lite System Unit to the Telephone
Svstem
The Lite system unit can be connected directly to local telephone lines, typically
service, or behind a Key System or PBX. (For simplicity, the term “PBX” is used herein to
mean “PBX or Key System”).
2.3.1 Connecting Directly to the Central Office (C.O.)
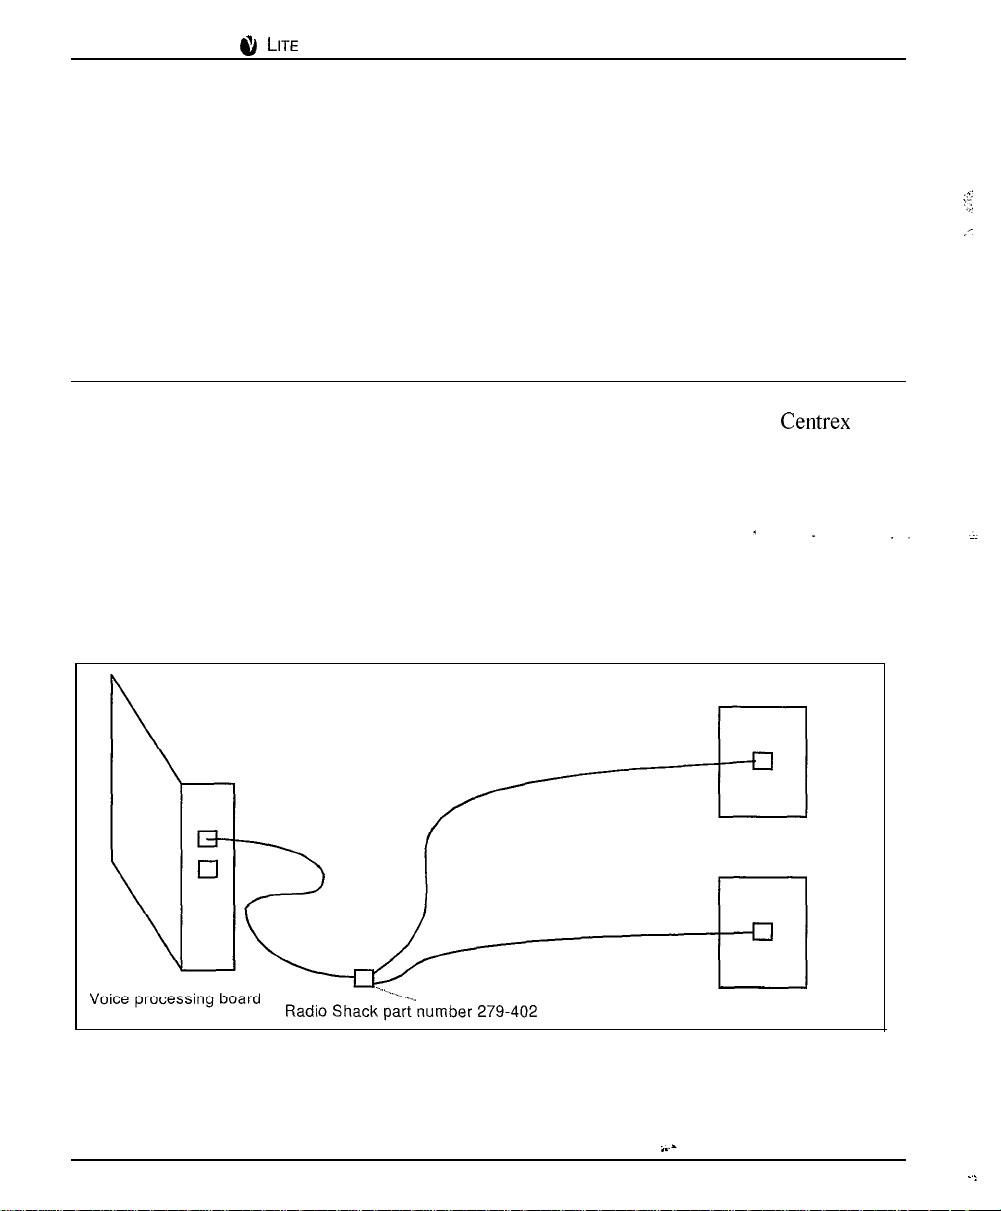
The Lite system unit can be connected directly to the telephone lines as shown below.
Connecting the Lite System Directly to Telephone Lines
a
Line 1
Line 2
Page 12
SYSTEM INSTALLATION AND SUPERVISOR GUIDE
9.0 VER. 1
Note that the modular input connectors on the voice boards are RJ-I 4 jacks which contain
two independent telephone lines. The modular adapter shown (or its equivalent) must be
used if the telephone lines are terminated with RJ-1
(single line) jacks.
If you want the Lite system to be able to transfer calls, make sure the telephone line has
either the call-transfer or three-way calling feature. If you are unsure whether the lines have
these capabilities, contact the local telephone company.
Local C.O. lines connected to the Lite system should not have the call-waiting feature
assigned. Once again, if in doubt, contact the local telephone company.
2.3.2 Connecting the Lite System to a PBX or Key System
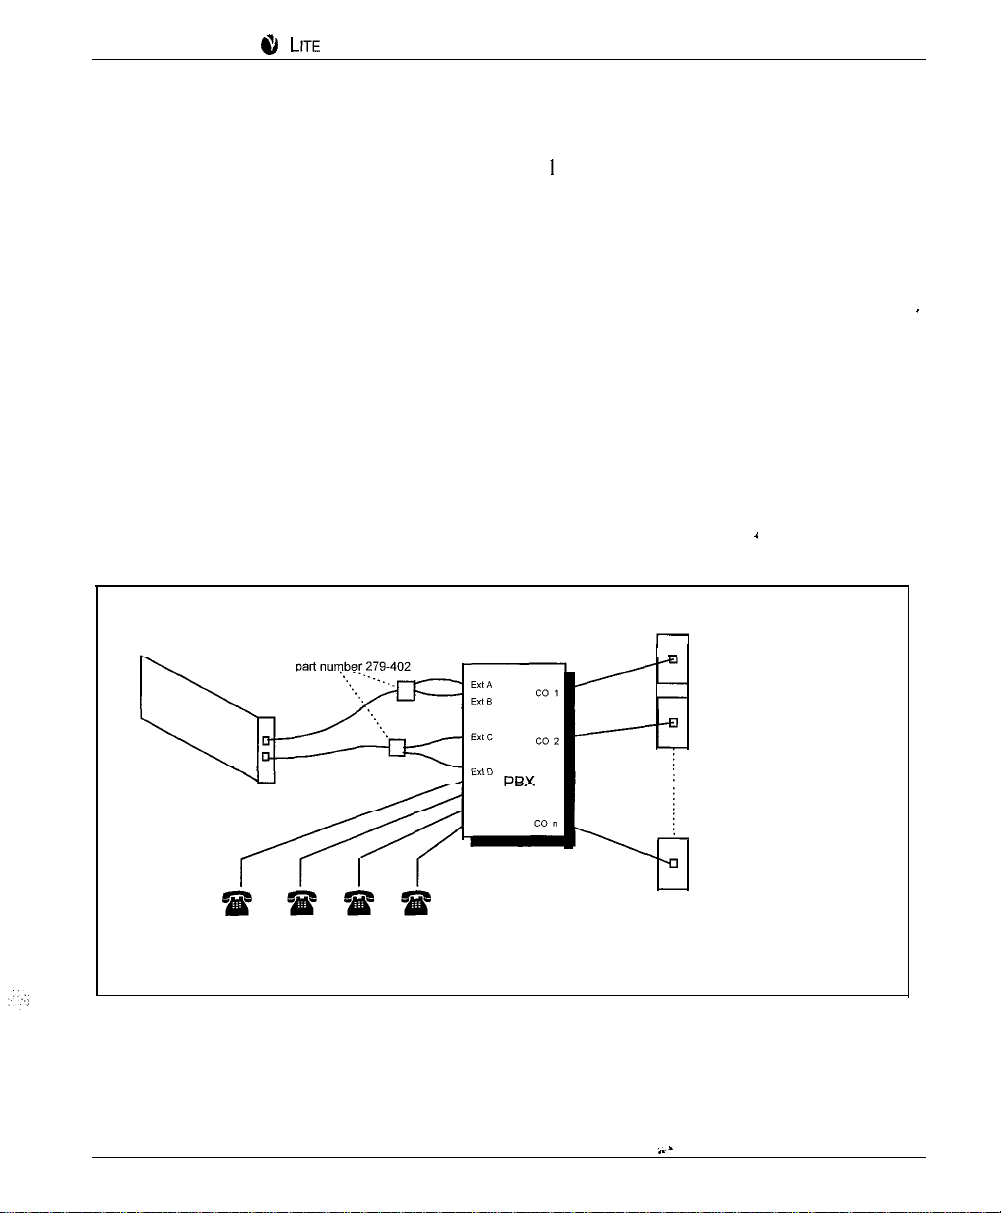
The Lite system unit connects to PBX station ports (each line to the Lite system unit looks
like an extension to the PBX), as shown below. The Lite system thus functions as one or
more extensions on the PBX.
Radio Shack
Voice processing board
Normal PBX extensions
Connecting the Lite System Behind a Key System or PBX
Line 1
Line 2
Central
Office
Line n
Note that the modular input connectors on the voice boards are RJ-14 jacks, which contain
two independent telephone lines. The modular adapter shown (or its equivalent) must be
used if the PBX extensions are terminated with RJ-1 1 (single line) jacks.
9
Page 13
SYSTEM INSTALLATION AND SUPERVISOR GUIDE 9.0 VER. 1
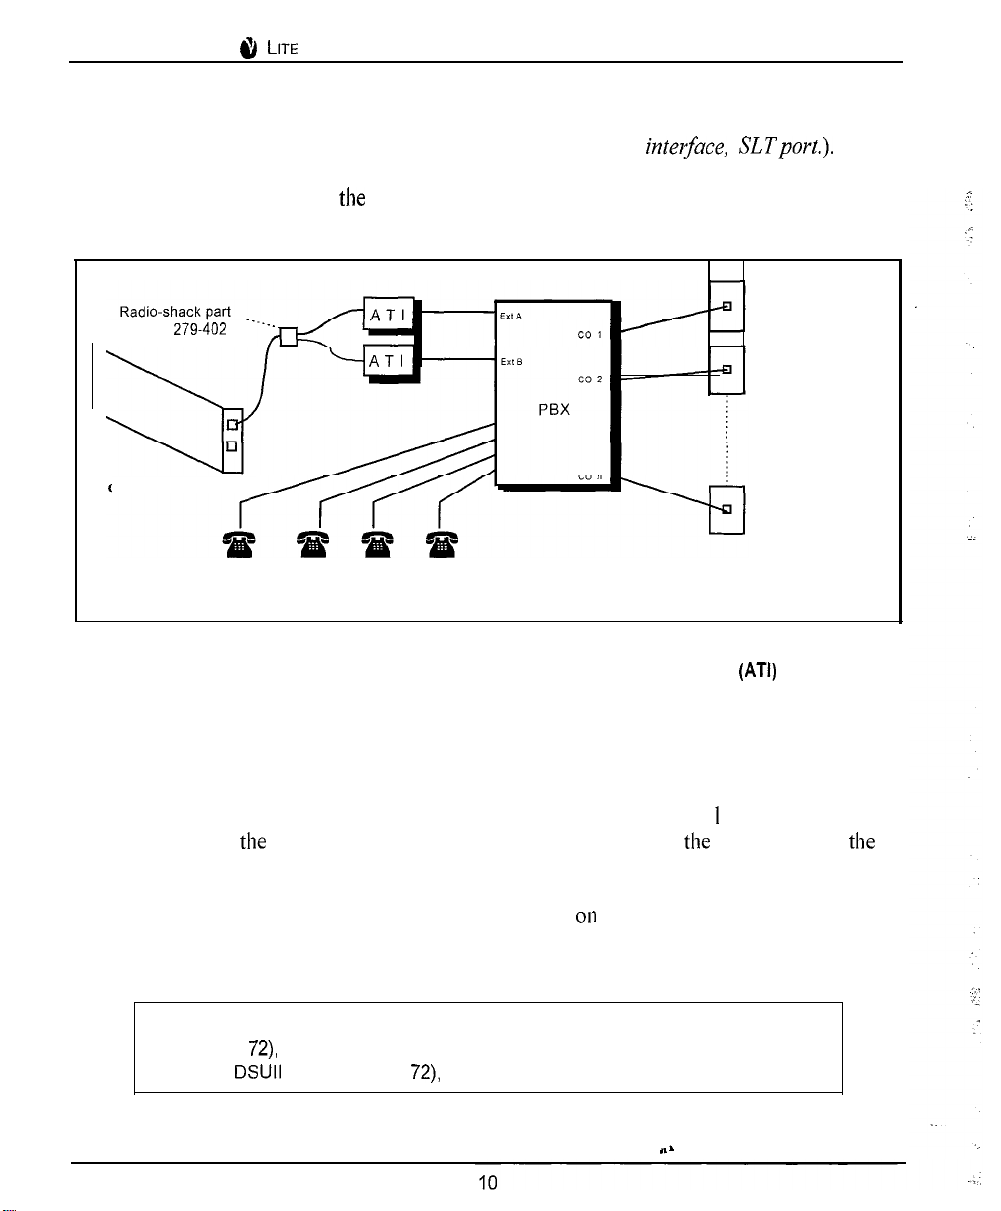
Each line to the Lite system unit requires an industry-standard-telephone port on the PBX
(this is also known by other names such as
analogport, 2500 set interjbce, SLTport.). Some
telephone systems do not provide single-line-telephone ports, and they require a special
analog interface box between
PBX and the voice-mail system, as shown below. If in
doubt, contact the local PBX manufacturer’s representative.
number 279-402
ce-processing board
Normal PBX extensions
Connecting the Lite System to a PBX via External Analog Telephone Interface (ATI) Equipment
Line 1
Line 2
Central
Office
Line n
Connecting the Serial Cable Between the Lite System Unit and PBX
If you are establishing a serial integration, you must attach a serial cable between the Lite
system unit and the PBX. The Lite system unit is set up to use the COM
communicate with
phone system. Therefore, you should connect
Lite system unit’s COM 1 port.
port to
serial cable to
Consult the phone system documentation for instructions
phone system COM port.
Note:
If the phone system you are working with is a Comdial DSU (Impression
48, 72),
attach the serial cable to COM 1 on the DSU. If the phone system is
a DSUII (Impact 24, 48, 72), attach the serial cable
attaching the serial cable to the
24,
to
COM 3 on the DSUII.
-
Page 14

LITESYSTEMINSTALLATIONANDSUPERVISORGUIDE~.~ VER. 1
Typical Setup
For typical automated attendant service, the PBX is programmed so that incoming calls are
routed via the PBX to ring the Lite system. The Lite system answers the call and asks the
caller to enter the required extension (or mailbox) number. The caller enters the number, and
the Lite system transfers the call just as a live attendant would.
2.4 Collecting Necessary Customer Information
While setting up the Lite system, you may need to adjust default settings for the customer’s
regular business
boxes to handle incoming calls and set up mailboxes for subscribers who will be using the
system. The following worksheets are provided to help the installing technician collect this
information from the system supervisor.
hours and business closed hours. You also need to set up Routing
11
Page 15
SYSTEM INSTALLATION AND SUPERVISOR GUIDE 9.0 VER. 1
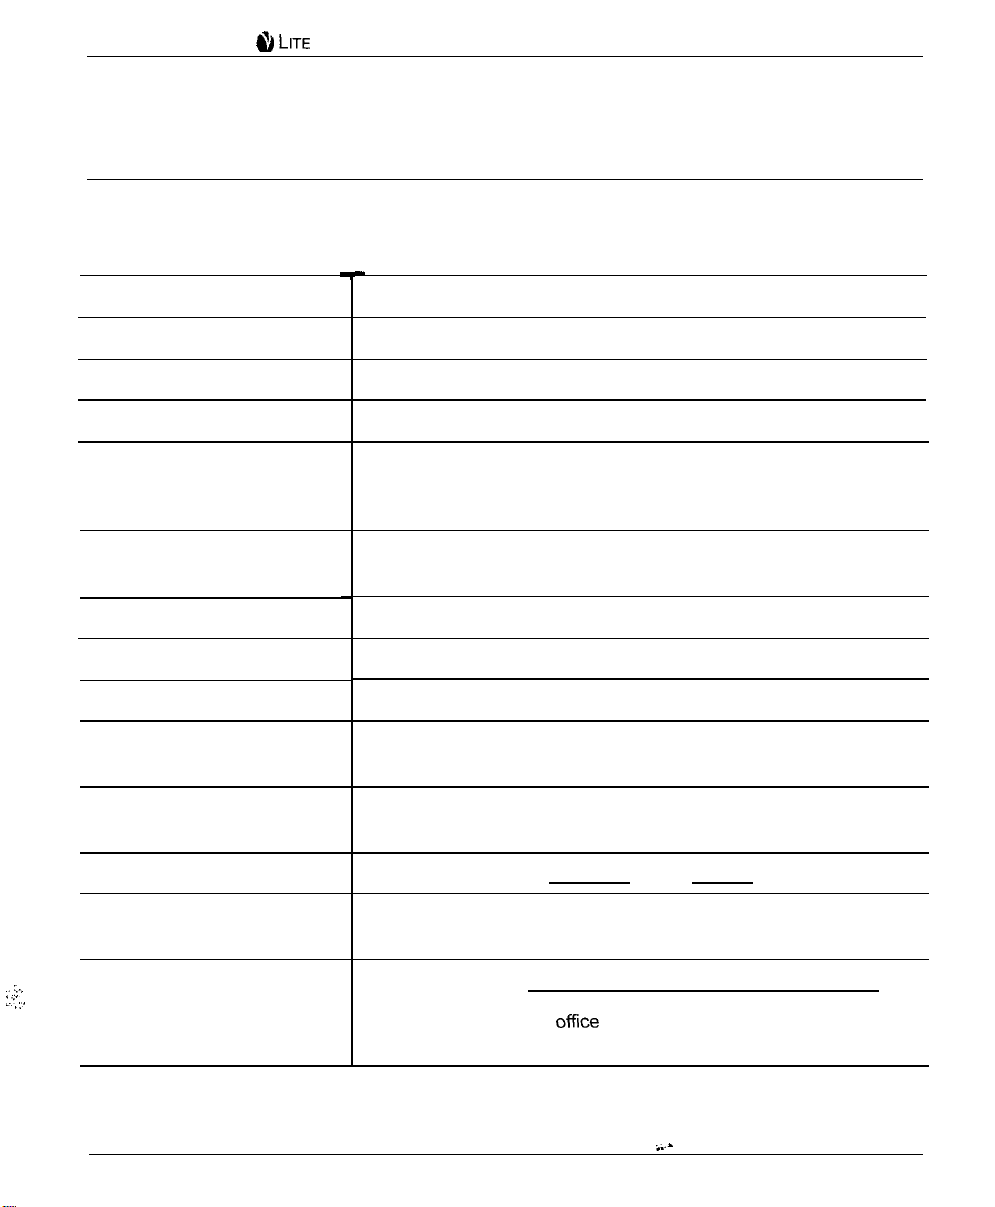
Subscriber Ma
(System Supervisor Comp
ilbox Information Worksheet
etes)
Photocopy this page, then complete the form for each subscriber who is to have a mailbox.
Subscriber Data
First name:
Last name:
Extension number:
Should the system announce
the caller’s name to the
subscriber upon transfer?
Should all conversations be
recorded?
Paging Data
Pager number
Pager type (circle one)
(complete only if subscriber is to use the feature)
TONE
DIGITAL
Paging schedule (circle one)
Auto Message Forward and
Message Delivery Data
Auto forward new messages:
Auto forward new messages
schedule (circle one):
Message delivery schedule 1:
When should delivery be
active? (circle one):
Always During office open hours During closed hours
Schedule*: A BCD
(complete only if subscriber is to use these features)
To box:
Always During office open hours During closed hours
Schedule*: A BCD
Number to call:
Always During
Schedule*: A BCD
Continued on back
15
After hours
open hours During closed hours
Page 16

SYSTEM INSTALLATION AND SUPERVISOR GUIDE 9.0 V ER. 1
Message delivery schedule 2:
When should delivery be
active? (circle one):
Message delivery schedule 3:
When should delivery be
active? (circle one):
Message delivery schedule 4:
When should delivery be
active? (circle one):
Message delivery schedule 5:
When should delivery be
active?
(circle one):
*If specifying a particular schedule, complete a subscriber schedule worksheet for the
individual.
Number to call:
Always During office open hours During closed hours
Schedule*: A BCD
Number to call:
Always During office open hours During closed hours
Schedule*: A
Number to call:
Always During office open hours During closed hours
Schedule*: A BCD
Number to call:
Always During office open hours During closed hours
Schedule*: A BCD
B CD
16
Page 17
SYSTEM INSTALLATION AND SUPERVISOR GUIDE 9.0 VER. 1
.
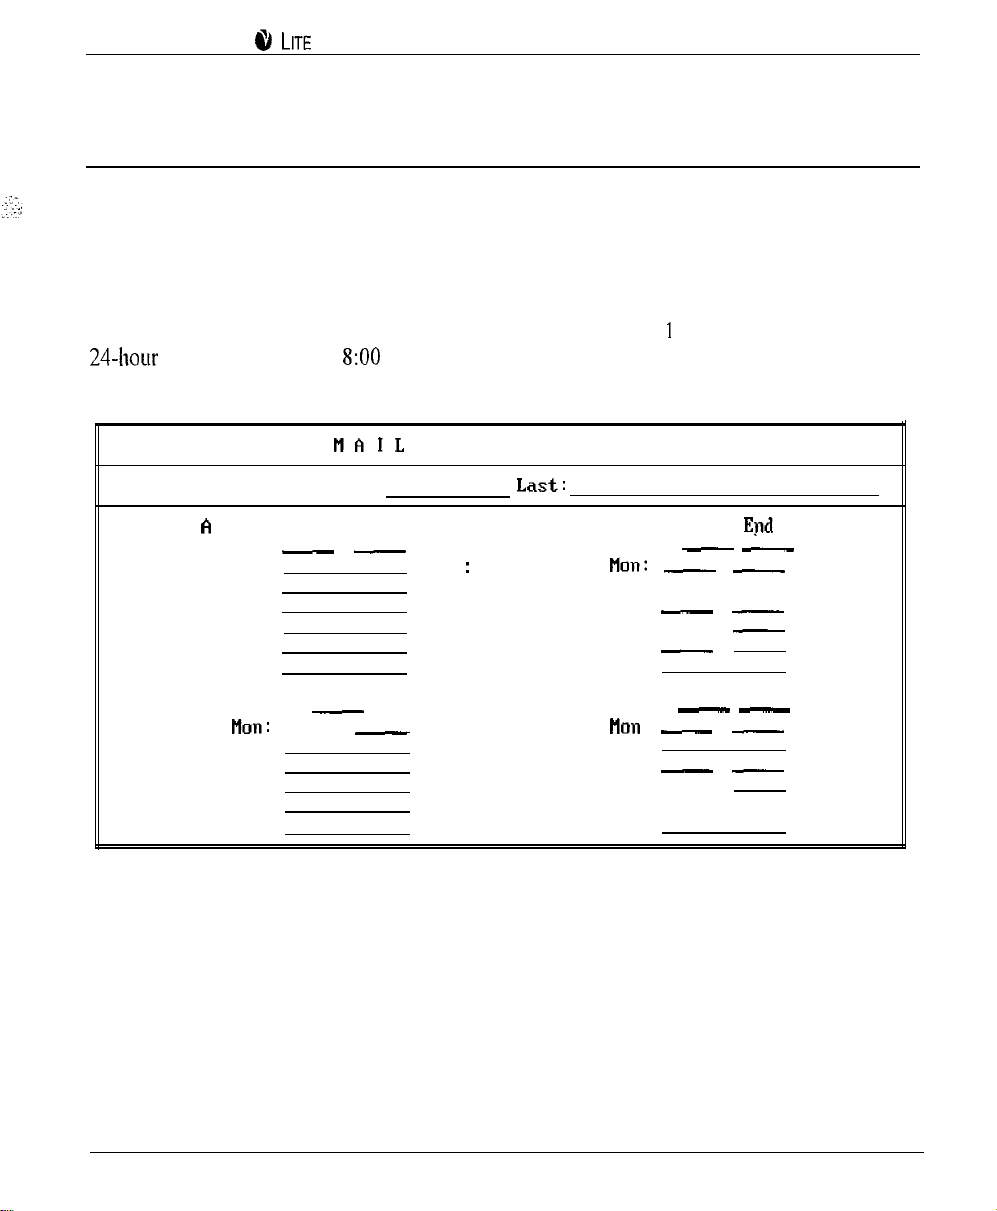
Subscriber Schedule Worksheet
(System Supervisor Completes)
Photocopy this page, then complete the form for each subscriber who is using the Paging,
Auto Message Forwarding, or Message Delivery out-calling features according to a particular
schedule, as indicated on his/her Subscriber Mailbox Information sheet.
You can designate up to 4 different schedules below, then apply one schedule to each out-
calling feature the subscriber will be using. Enter information for
format (for example
NUMBER field.
PM is 20:OO). You do not need to complete the BOX
to 4 schedules below in
'ox number:
SCHEDULE
First
Name:
Start End SCHEDULE B Start End
SUN :
Mon
Tue:
Wed:
Thu:
Fri:
Sat:
SCHEDULE C Start End
Sun :
Tue :
___
Wed:
Thu:
Fri:
Sat:
BOX
Page 3
Sun:
Tue: __ ___
Wed:
Thu: __
Fri:
Sat:
SCHEDULE D Start End
Sun:
:
Tue:
Wed:
Thu: __
Fri: __ ___
Sat:
17
Page 18
SYSTEM INSTALLATION AND SUPERVISOR G UIDE 9.0 VER. 1
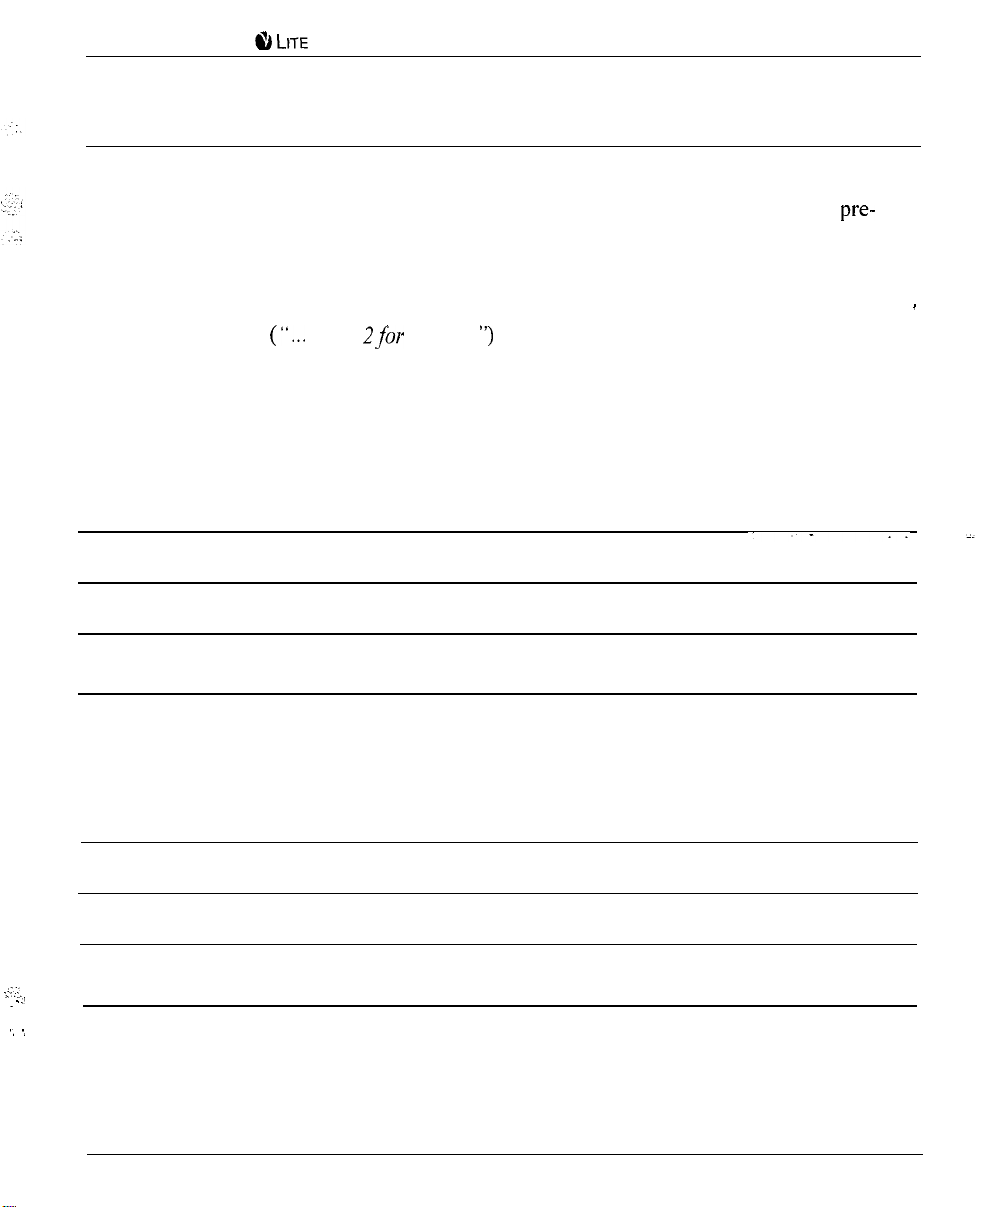
Routing Worksheet
(System Supervisor Completes)
Refer to section 3.2 to familiarize yourself with the function of Routing boxes. This section
also provides a sample of greetings that are typically recorded in the 3 Routing boxes
configured on the Lite system. After reviewing this information, complete this worksheet to
indicate the wording for the greetings you want this Lite system to voice.
Note that you should indicate in your greeting any single-digit call routing options you want
to provide to callers
Press
Sales...
and identify the extension to which a caller
pressing that single-digit number should be transferred.
Office Open Greeting:
Single digit routing paths:
Office Closed Greeting:
Single digit routing paths:
Continued on
19
back
--
Page 19

SYSTEM INSTALLATION AND SUPERVISOR GUIDE 9.0 VER. 1
Office Holiday Greeting:
Single digit routing paths:
Page 20
SYSTEM INSTALLATION AND SUPERVISOR G UIDE 9.0 VER. 1
.
2.5 Setting Up the System by Attaching a Laptop
Use the information in this section to complete all necessary system setup steps by attaching a
laptop computer to the Lite system unit and using the Lite system’s screen interface to run the
PBX Setup utility and to complete System Information and Box Setup screens.
2.51 Installing
I.
Insert the
diskette drive by typing A: then pressing <Enter> (where A is the drive letter for the
diskette drive).
2.
To start the installation process, type INSTALL then press <Enter>. The
remote system communication program creates the \KEYLINK directory on the laptop’s
hard drive, then copies the
directory. (The
system.)
3.
When all the necessary files have been copied to the
displays indicating the installation is complete.
diskette into the diskette drive on the laptop computer. Change to the
Software onto the Laptop
remote system communication program to that
host system communication program is pre-loaded on the Lite
directory, a message
2.52 Connecting the Laptop to the Lite System Unit
You connect the Lite system unit to the laptop computer using a null modem serial cable.
When you install
COM
port on the laptop. Therefore, unless you change this default, you should connect one
end of the null modem serial cable to the laptop’s COM 1 port. Attach the other end of null
modem cable to the COM 2 port if you are using the Small Office Lite system unit or the
COM 1 port if you are using the Debut system.
Establishing a Communication Link Between the Laptop and Lite System Unit:
software on the laptop computer, the program defaults to using the
1.
To access the Lite system program screens from the laptop PC, change to the \KEYLINK
directory, then type REMOTE and press <Enter>.
21
Page 21
SYSTEM INSTALLATION AND SUPERVISOR GUIDE 9.0 VER. 1
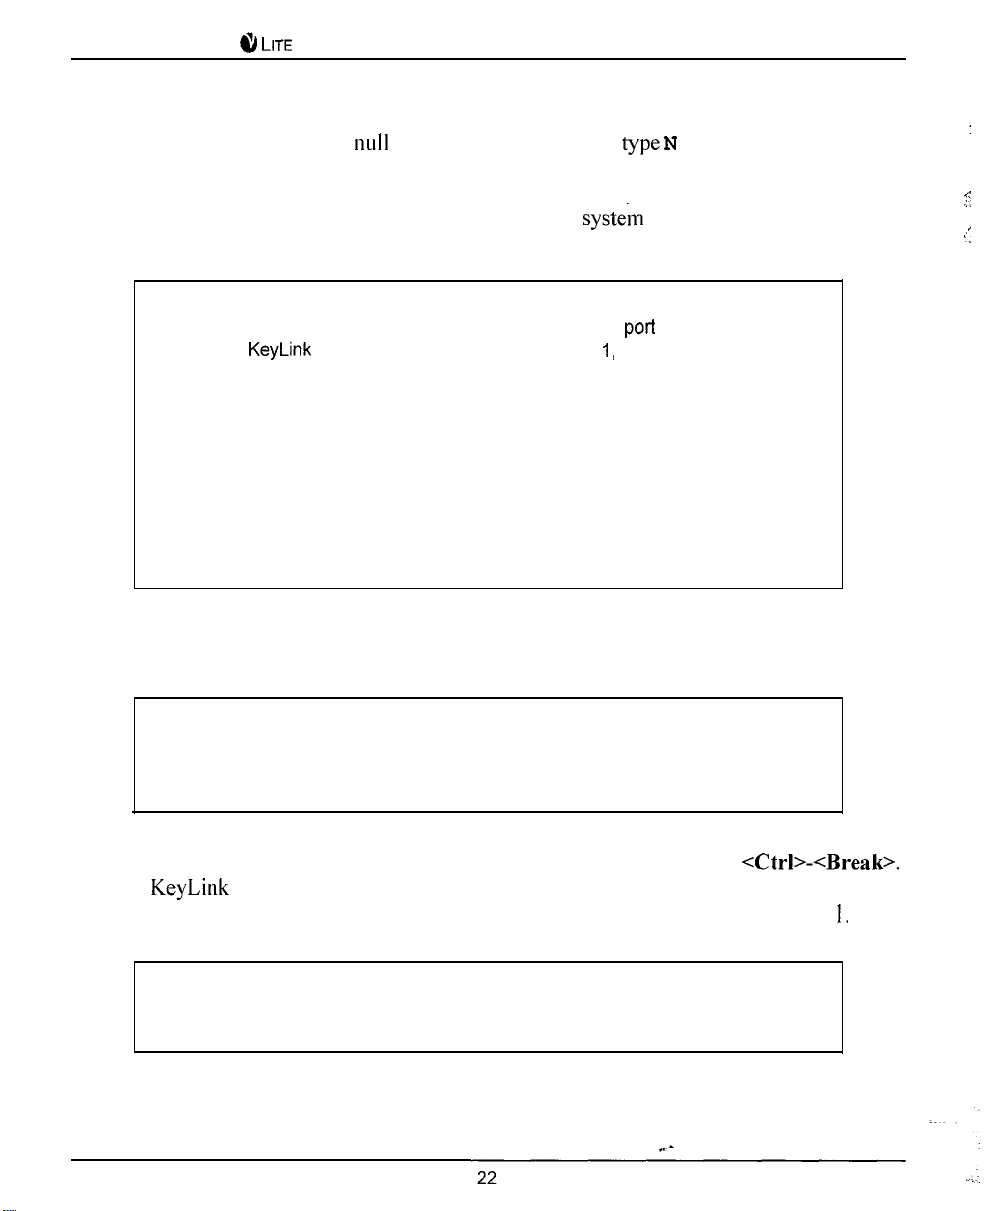
2. A screen displays, prompting you to indicate the type of connection you are establishing.
To indicate you are using a
3.
The screen refreshes with a display that emulates the Lite system unit. The keyboard and
monitor of the laptop now effectively control the Lite
modem cable connection,
then press <Enter>.
unit.
Note:
4.
Follow the procedures in this document to set up the Lite system.
Note:
5.
To break the connection between the laptop and Lite system unit, press
The
If the screen displays a message indicating the program is shutting down
communications, you may need to adjust the COM
the
Port Assignments (instead of
select the COM port to which the null modem cable is installed, then press
<Enter>. Repeat steps 2 and 3.
If the appropriate COM port combination is specified, and you still cannot
establish communication with the Lite system unit, verify that you are using a
true
modem cables from other serial cables, some users mistakenly use the
wrong cable type.
If you type EDIT to invoke a DOS editor on the Lite system unit, you will
invoke a special editor pre-installed on the unit. This editor was developed
specifically for use with a null modem cable. (Traditional DOS editors
cannot communicate effectively over a null modem cable.)
program. Do this by repeating step
N)
in step 2. Using, the up and down arrows,
null modem
cable. Because it is difficult to visually distinguish null
settings specified in
then typing P to select
program ends its communication with the Lite system unit, and the laptop
screen refreshes. To re-establish communication with the Lite system, repeat step
Note:
For information on transferring files between the Lite system and the
attached PC, refer to section 10 of the Installation and Maintenance Manual
or contact Key Voice technical support.
Page 22

SYSTEM INSTALLATION AND SUPERVISOR G UIDE 9.0 VER. 1
2.5.3 Completing the First Time Setup Procedure
Once you connect the Lite system to the phone system and access the Lite system using a
laptop computer, you are ready to begin customizing the system. Customizing the system
involves:
l
Running the PBX Setup utility
Specifying System Information
l
Specifying Routing Box and Mailbox Information
2.5.4 Running the PBX Setup Utility
The Lite system voice processing software is pre-installed
the Lite system unit before it is
shipped to you. You must, however, run the PBX Setup utility so you can configure certain
installation parameters for each specific customer’s site.
On Debut units, you must run the PBX Setup utility using the teleparameter feature. See
section 2.7.1 and section 2.7.1.1 for procedures. Once you run the utility, continue with
section 2.5.5 for information
On Small Office Lite systems you can run the PBX Setup utility through the screen interface
or using the teleparameter feature discussed in section 2.7.
system information.
. To run the utility through the
screen interface, use the following procedure.
1.
Make the Lite system unit hard disk the current drive, by typing C : then pressing
<Enter>.
2.
To switch to the VM directory, type
3.
To invoke the Install program, type INSTALL then press <Enter>.
4.
When the main Install menu displays, use the
then press <Enter>.
key to highlight FIRST TIME SETUP then
press <Enter>.
5.
When prompted, type C :
then press <Enter> to indicate the directory in which the
Lite system is installed.
23
Page 23

LITESYSTEMINSTALLATIONANDSUPERVISORGUIDE~.~ VER. 1
6.
The system warns that it may over-write some changes to the Lite system database. To
continue, press
7.
At the system prompt for the number of digits in the extension numbers, enter the
appropriate number, then press <Enter>. At
prompt to confirm your entry,
press <Enter>.
8.
A list of telephone systems displays. Note that you can use the <PgUp> and <PgDn>
keys to scroll through all available selections.
Enter the number corresponding to the
telephone system with which you are working, then press <Enter>. If the phone system
is not on the list, select option 0 DON’T KNOW (OR UNLISTED) then press <Enter>.
9.
The system prompts you to confirm your selection. To continue, press
10. At the system prompt regarding message waiting lights, press
1
The system prompts you to indicate the number of telephone lines connected to the Lite
system. Enter the appropriate number, then press <Enter>.
12. The system prompts you for the number of digits you want to use in mailbox passwords.
Indicate the number of digits subscribers are to use, then press <Enter>. (You may want
to consult the system supervisor, in case he/she has a digit-length preference.)
.
13. The system prompts you to confirm your selection. To continue, press
14. The system prompts you to automatically create mailboxes at this point. Though you
may elect to create mailboxes now, we strongly recommend that you select No, so
you can first make any necessary modifications to the prototype mailbox, which
serves as a template for creating mailboxes. By properly setting up the prototype
mailbox, you simplify the number of adjustments you must make to refine the mailboxes
for each user. To continue without setting up mailboxes at this time, press
Depending on the phone system you selected, you may be prompted for additional
information. Enter the appropriate responses.
16. The system prompts you to use U.S. Daylight-Savings Time. To have the system
automatically adjust the clock so it accommodates Daylight-Savings Time for the next
years, press
If you do not want the system to automatically adjust for U.S.
Daylight-Savings Time, press
17. The main Install program screen displays. To continue, select Exit then press <Enter>.
24
.
Page 24

SYSTEM INSTALLATION AND SUPERVISOR GUIDE
9.0 VER. 1
18. The Install program must reboot the Lite system unit to make the changes indicated.
Press
when the system displays the reboot prompt. After the system reboots, the
Line Status screen displays.
2.5.5 Specifying System Information
System Information screens contain system setup information that applies system-wide, to all’
boxes set up on the system. There are six System Information screens:
General Information Screen
Line Information Screen
l Business Hours Screen
l Call Transfer Screen
Class of Service Screen(s)
Other Customizations Screen
Before you set up Routing boxes and mailboxes, it is best to ensure all System Information
screens are properly completed.
Note:
Because the default information on System Information screens is set so the
Lite system is operational with as few changes as possible, the procedures
provided in this document for entering data on System Information screens
do not go into detail about all the screen entries. Instead, the procedures
guide you through accessing and reviewing pertinent fields on certain
screens, so you can verify that default data is properly set and modify it if
absolutely necessary. If you need to make additional changes to the System
Information screens, refer to information provided in the installation and
Maintenance Manual.
Note that you can access online help at any time by pressing
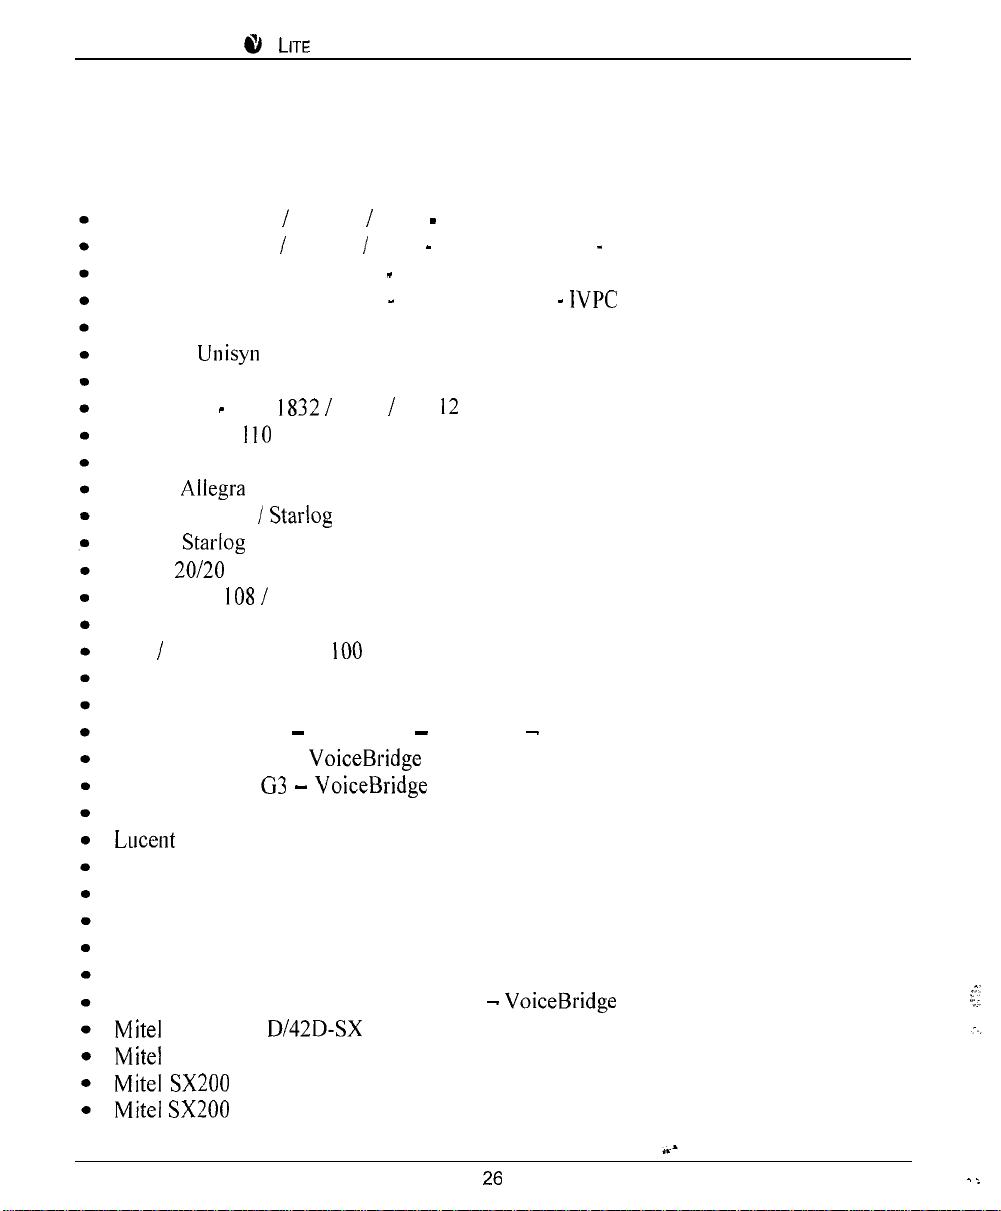
2.5.5.1 Integration Defaults Set by the Integration Program
When you run the PBX Setup utility (previous procedure), you are prompted to indicate the
type of telephone system the customer is using. If you are installing the Lite system on one
25
Page 25
S
YSTEM INSTALLATION AND SUPERVISOR GUIDE
9.0 VER. 1
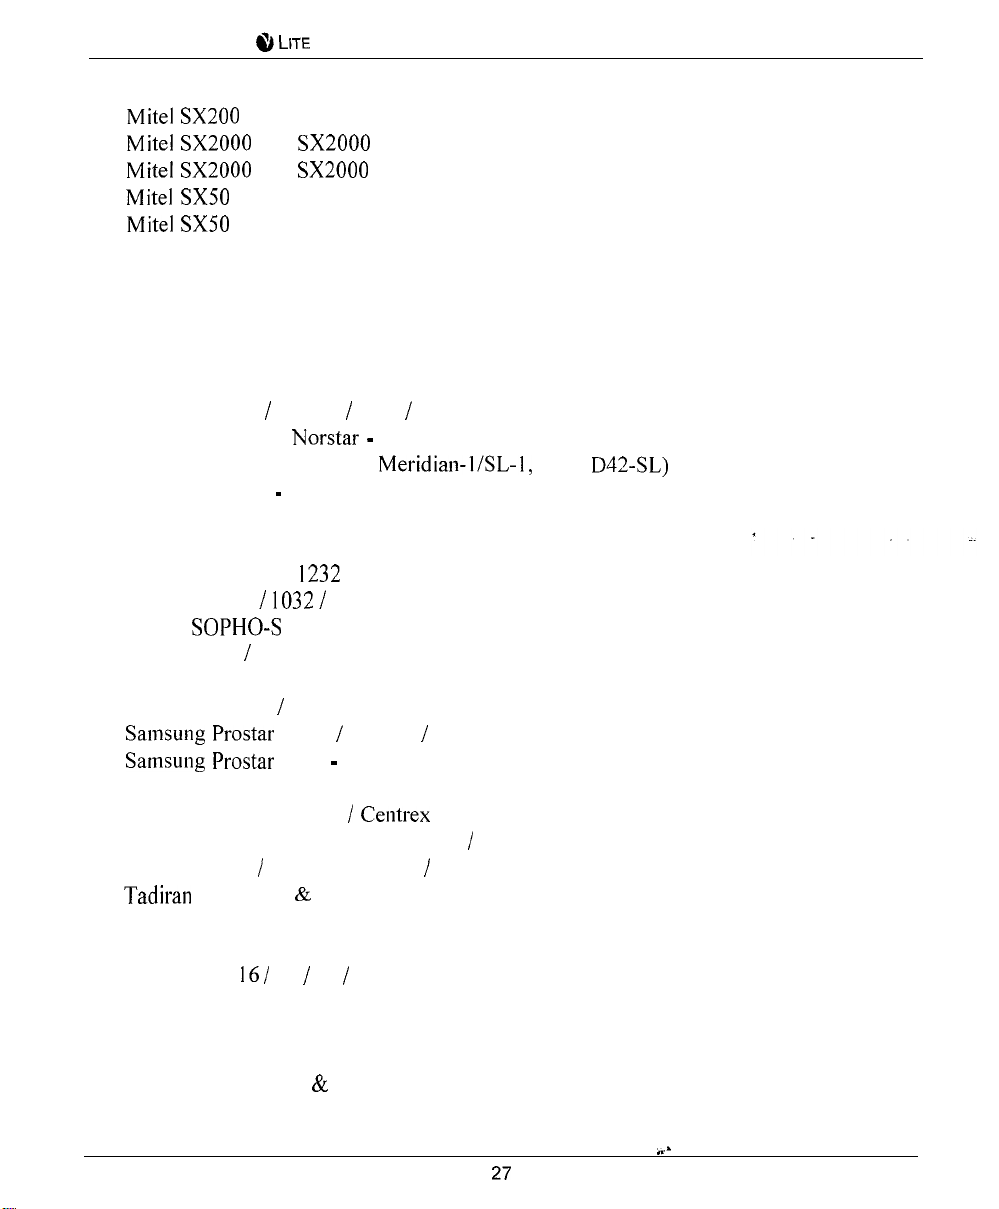
of the phone systems identified below, the Integration program automatically sets fields on
several System Information screens to the phone system’s default settings. Unless you
customize the phone system defaults, you probably do not need to modify these settings.
Comdial DigiTech
Comdial DigiTech
Comdial DXP, DXP Plus, FX
Comdial DXP, DXP Plus, FX
Impact
Impact
DSU
DSU
Serial Integration
Serial Integration
Serial Integration
Serial Integration
Comdial Executech 2000
Comdial
Cortelco Aries
Encore CX
Ericsson MD-
ECX
3672
361
Fujitsu 9600 with Serial Integration
Fujitsu
Fujitsu Series 3
26
Fujitsu
Harris
Isoetec IDS
228
Isoetec System 96
ITT
Cortelco System 3
Iwatsu ADIX
Iwatsu ZT-D
Lucent Definity G3
Lucent Definity G3
Lucent Definity
Calista Box
Vectoring
-Vectoring
Lucent Merlin II
Merlin Legend
Lucent Partner ACS
Lucent Partner II
Lucent Partner Plus
Lucent System 25
Lucent System 75
Lucent System 85 and Definity Generic 2
COV with
Voice Boards
SX 100 Digital PABX with ONS Integration
Light with COV Integration
Light with DNIC Integration
IVPC
Bridged Mode
Bridged Mode
Page 26
SYSTEM INSTALLATION AND SUPERVISOR G UIDE 9.0 VER. 1
l
.
l
.
.
l
.
l
l
.
.
l
.
l
l
.
l
l
l
.
l
l
.
.
l
.
.
.
.
l
l
.
l
.
.
l
l
l
Light with ONS Integration
and
and
Light with COV Integration
Light with DNIC Integration
with COV Integration
with DNIC Integration
NEC Electra Professional Level I
NEC Electra Professional Level II
NEC Mark II
NEC NEAX- 1400 IMS
NEC NEAX-2000
NEC NEAX-2400 Serial Integration
Nitsuko DSO-I
Northern Telecom
ONYX
124i
With VMI Adapters
Northern Telecom SL-1 and
Panasonic 1232
Analog
Panasonic DBS
Panasonic KXT-336
Panasonic KX-TD
Panther II 820
Digital
2064 Release IV
Philips
Premier ESP
Intertel GMX
Redwood 3.2
Rolm 9200 BCS
Siemens HCM 200
56EX
DCS
120MX
Digital
Siemens Saturn I, 11, III
SMDI Installation Guide
Southwestern Bell Landmark DKS 308
Sprint Protege
Coral I, II,
Macrotel MT360
III
Telrad 2464
Telrad Digital Key BX, 200 Digital
Toshiba DK- 24
56
96
Toshiba DK-280
Toshiba Perception E
Toshiba Perception EX
Toshiba Perception I
II
Vodavi DHS
384i
(with
1224
6 16
824 KSU
Page 27

SYSTEM INSTALLATION AND SUPERVISOR GUIDE 9.0 VER. 1
l
Vodavi Infinite DVXI, DVX2,
l
Vodavi
l Vodavi
l Vodavi
l Win
2448EX
96EX
Digital
4896EX
DVX3
If you are using a telephone system that is not listed here, the Integration program sets fields
on System Information screens to commonly used defaults. You may need to adjust these
settings.
For detailed information on integrating the Lite system with the phone system, refer to both
the
Manual and the technical bulletin for the phone system.
2.5.5.2 Using Technical Bulletin Information
For almost every phone system supported by the Lite system, there is a technical bulletin that
details system-specific installation information and considerations. This information is
particularly useful if you are working with a phone system that is not on the list shown in the
previous section, since you may more likely need to adjust certain settings on System
Information screens.
You can obtain technical bulletins through the Key Voice fax distribution system. To access
this system, phone (941) 922-3800 and press 7 at the main greeting. Follow the system
prompts and, when requested, enter the number corresponding to the bulletin for the phone
system with which you are working. To obtain a listing of all available bulletins and their
associated bulletin numbers, request document 01.
2.553 Accessing System Information Screens
From the Line Status screen, press
The Main menu displays, and you are
prompted to enter a system password.
2.
At the prompt to enter the system password, press <Enter>. (The default Customer level
password is blank. The default Technician level password is 1234 on Small Office Lite
systems or,
Debut units, the last four digits of the bar code
the white sticker on
the bottom of the unit.)
Page 28

LITESYSTEMINSTALLATIONANDSUPERVISORGUIDE~II VER. 1
3.
From the Main Menu, select SYSTEM INFORMATION. The System Information menu
displays.
2.5.5.4 Setting Up the General Information Screen
1.
From the System Information menu, select GENERAL. The General Information setup
screen displays.
2.
Press <Enter> to move the cursor to the AUTOMATICALLY
TO DOS AT field. Enter
the time at which the Lite system should exit to DOS to perform its auditing functions.
The default setting is 3:00 AM.
3.
To save the information and exit the screen, press
The System Information
menu displays.
2.5.5.5 Setting Up the Line Information Screen
I.
From the System Information menu, select LINE INFORMATION. The Line Information
setup screen displays. Each row on this screen corresponds to one line connected to the
Lite system.
.
: :
2.
Press <Enter> to move the cursor to the Initial Box field under Day Service for line
Verify that 800 displays in this field, indicating that calls received during Day Service
hours are to go to Routing box 800.
3.
Press <Enter> to move the cursor to Initial Box field under Night Service for line 1.
Verify that 801 displays in this field, indicating that calls received after the day service
hours are to go to Routing box
4.
Press <Enter> to move the cursor to the Initial Box field under Lunch Service for line 1.
1.
Verify that 800 displays in this field, indicating that calls received during Lunch Service
are also to go to Routing box 800.
5.
Press <Enter> to move the cursor to the OUTGOING ALLOWED field for line 1. Verify
this field is set to No.
6.
Repeat steps 3 through 5 for each line on the screen. For the last line, however, be sure to
verify that Yes in the OUTGOING ALLOWED field.
29
Page 29

SYSTEM INSTALLATION AND SUPERVISOR GUIDE 9.0 VER. 1
7.
To save the information and exit the screen, press
The System Information
menu displays.
2.5.5.6 Setting Up the Business Hours Screen
1.
From the System Information menu, select
BUSINESS HOURS.
The Business Hours setup
screen displays.
2.
For each day of the week, enter the office opening time
the DAY SERVICE BEGINS
field and the office closing time in the DAY SERVICE ENDS field. The default is au office
open time of 8:00 AM
handled in the same way day and night, enter
and office closing time of 17:OO (5:OO
PM).
the DAY SERVICE BEGINS field,
If you want calls to be
and 24:00 in the DAY SERVICE ENDS field. Refer to the Business Hours Worksheet
completed by the system supervisor for specific information.
3.
To save the information and exit the screen, press
The System Information
menu displays.
2.5.5.7 Setting Up the Call Transfer Screen
1.
From the System Information menu, select CALL TRANSFER. The Call Transfer setup
screen displays.
2.
The fields in the top half of the screen list the sequences that the Lite system is to dial to
calls (the
signifies
and the comma
one
Typically, these settings are appropriate for most telephone systems without any
modification. If you
the actual sequences required by the telephone system, and
they are different from those shown, make the changes as necessary.
3.
To save the information and exit the screen, press
The System Information
menu displays.
2.5.5.8 Setting Up the Class of Service Screen
Each mailbox on the system is assigned a class of service. The class of service assigned to
the box dictates which Lite system features the mailbox owner has access to and how he/she
can use those features.
30
Page 30

LITESYSTEMINSTALLATIONAND SUPERVISORGUIDE~.~ VER. 1
There are 8 classes of services (0 through 7) that can be set up then applied to mailboxes on
the Lite system. Two of them are pre-configured on the system. Class of service 0 is
assigned by default to the prototype mailbox 9994, which serves as a template for every
mailbox that you create on the system. Class of service 7 is assigned supervisor mailbox
privileges. This class of service is assigned to mailbox 70, which is also pre-configured on
the system. Mailbox 70, therefore, serves as the supervisor mailbox. By calling into the
system and accessing the supervisor mailbox, the system supervisor can make necessary
to-day modifications to the voice processing system, such as adding mailboxes, changing
Routing box greetings, etc. See section 3 for details.
I. From the System Information menu, select
CLASS OF SERVICE.
The Class of Service
setup screen displays.
2.
Use the information provided below to review and, if necessary, adjust the fields on two
different Class of Service screens. First, review class of service 0, which
class of service that will be assigned to subscriber mailboxes on the system. When you
reviewed the screen for class of service 0, press
to progress through the classes of
service and go to the setup screen for class of service 7.
Review and, if necessary, adjust class of service 7. Ensure that in class of service 7 the
SUPERVISOR STATUS? field is set to Yes. This allows the owner of the mailbox assigned
this class of service to access the Supervisor menu over the telephone. Using this menu,
the system supervisor can call into the system to perform day-to-day maintenance on the
system.
as the
31
Page 31

SYSTEM INSTALLATION AND SUPERVISOR GUIDE 9.0 VER. 1
CLASS OF SERVICE
Class-of
Maximum number
Max lines allowed to hold for one box:
CLASS OF SERVICE NUMBER
ice number :
lete
NEW
of greetings :
SS-OF-SERVICE NAME:
Digits allowed while holding:
This field indicates the number of the class of service you are currently working with. To
move to the next class of service number, press
Once you assign a class of service to a
mailbox, the mailbox inherits all the privileges and restrictions defined in the class of service.
CLASS OF SERVICE NAME
Use this field to give the class of service a
purpose for the class of service. Sample names include
MAXIMUM NUMBER OF GREETINGS
name. This helps remind you of the
Subscribers, etc.
A mailbox can have up to 10 pre-recorded personal greetings. The mailbox owner may
record these greetings, store them in the mailbox, then choose the greeting that is to be active
at any specific time. You may want to offer use of all
greetiiigs to users or restrict them to
fewer greetings. Use this field to define how many personal greetings users with this class of
service should be allowed to record. If you set the field to 0, then callers who route to a
32
Page 32

LITESYSTEMINSTALLATIONAND S
UPERVISOR
GUIDE~.~ VER. 1
mailbox belonging to this class of service always hear the pre-recorded system prompt, “That
extension is not available...
The default setting is 10.
Note that in class of service 7, this field must be set to allow at least 2 greetings. Class of
service 7 is assigned to mailbox 70, the supervisor mailbox that controls the Routing boxes
on the system. Because you will be setting up these Routing boxes with at least 2 greetings,
this parameter must be set to at least 2 in the supervisor mailbox class of service.
MAXIMUM GREETING LENGTH
When a mailbox owner calls in to re-record his/her personal greeting, the Lite system limits
the length of the new greeting to the value entered in this field. The default setting is 60.
MAXIMUM NUMBER OF MESSAGES
The Lite system can hold up to 200 messages per mailbox. However, you may want to
restrict some mailboxes to a lower limit (to conserve disk space). Use this field to define the
maximum number of messages that can be stored in mailboxes assigned this class of service;
Once the limit is reached for a particular mailbox, callers attempting to leave more messages
in the mailbox are told that the box is full. The default setting is 200.
MAXIMUM MESSAGE LENGTH
The value in this field defines the maximum length of a message (in seconds) that a caller can
leave for mailboxes belonging to this class of service. The default setting is 60.
AUTOMATICALLY DELETE OLD MESSAGES FROM SYSTEM AFTER X DAYS
The Lite system deletes messages saved as Old from mailboxes belonging to this class of
service after the number of days you specify. An old message is one the mailbox owner has
listened to, but has not yet deleted. If you enter 0 in this field, an old message is deleted at
midnight on the day the message became old. If you enter 1 in this field, an old message is
deleted at midnight on the day following the day the message became old.
To disable deletion of Old messages, enter 99 in this field. However, do this with caution,
since accumulating messages may create disk storage problems. The default setting
33
.
Page 33

SYSTEM INSTALLATION AND SUPERVISOR GUIDE 9.0 VER. 1
AUTOMATICALLY DELETE NEW MESSAGES AFTER X DAYS
Note: Use this parameter with caution. Improper use may cause important
messages to be lost.
The Lite system deletes new messages from mailboxes belonging to this class of service after
the number of days you specify. A new message is one the mailbox owner has not yet
listened to. If you enter 0
this field, a new message is deleted at midnight on the day the
message was received. If you enter 1 in this field, a new message is deleted at midnight on
the day following the day the message was received.
To disable the deletion of new messages, retain the default setting of99 in this field. This is
the default operating mode. If
enter a number other than 99 in this field, remember that
messages are deleted whether or not the mailbox owner has listened to them.
SUPERVISOR STATUS
This field defines whether mailboxes belonging to this class of service should have supervisor
privileges. A supervisor can perform certain actions not available to regular mailbox owners.
For example, a supervisor can add a mailbox or delete a mailbox by calling in from any
telephone. Additional information on supervisor functions is provided in section 3. The
default setting in class of service 0 is No, in class of service 7 is Yes.
ACCESS TO GROUP BOXES
By setting this field to Yes, you allow subscribers assigned this class of service to access any
Group boxes set up on the system. For information on setting up and using Group boxes,
refer to the
DIAL-OUT ALLOWED
Installation and Maintenance Manual.
The default setting is Yes.
This field indicates whether the owner of a mailbox belonging to this class of service is
allowed to place outgoing calls from the mailbox. The default setting is No.
ACCESS TO P.A.
When a caller is listening to a mailbox owner’s greeting, one of the features the Lite system
offers is the option to have the call announced over the P.A. system. Use this field to allow
Page 34

SYSTEM INSTALLATION AND SUPERVISOR GUIDE 9.0 VER. 1
or deny access to the P.A. feature for callers to mailboxes belonging to this class of service.
The default setting is Yes.
PLAY MENU AFTER GREETING
If an extension is busy or does not answer, the Lite system plays the mailbox owner’s
personal greeting. After playing the greeting, it can announce the options available to the
caller (for example,
press 3, or to speak with an operator,
would like to leave a message, press 1. To try another extension,
If the mailbox owners do not record these
options as part of their greetings, set this field to Yes so that the Lite system plays the menu.
If you want to allow each mailbox owner to decide which options to offer, set this field
and instruct each mailbox owner to include the options in his/her personal greeting. The
default setting is No.
ALLOWED TO RECEIVE
The Lite system users should retain the default setting No in this field.
OPERATOR
(DAY) (NI GH T)
When a caller is listening to a mailbox greeting, one of the options is to dial zero to reach an
operator. Use these fields to indicate the mailbox to which the call should be routed if the
caller indicates that he/she wishes to speak with an operator. The default setting is 888.
WHEN EXITING OPEN MAILBOX, GO TO BOX
When a mailbox owner has logged in to his/her box, has concluded listening to messages,
changing options, etc., and has selected to exit from the Main menu, this field tells the Lite
system where to send the call. The Lite system users should retain the default setting in this
field as 821.
MAX LINES ALLOWED TO HOLD FOR ONE BOX
You can limit the number of lines that can simultaneously hold for a mailbox belonging to
this class of service. For example, if you set this number to 3, and lines
holding for a mailbox, then subsequent callers are not offered the option to hold. Instead,
3, and 6 are
they hear the personal greeting recorded for the box, so they can leave a message, try another
extension, etc. The default setting is 2.
35
Page 35

SYSTEM INSTALLATION AND SUPERVISOR GUIDE 9.0 VER. 1
Note:
If you want to disable the Call Queuing feature for the class of service, set
this field to 0.
DIGITS ALLOWED WHILE HOLDING
While a caller is in the queue holding for an extension, he/she can press a digit to leave the
queue and process the call differently. By default, the options open to the caller are the same
as those available when the caller hears the personal greeting
message, press
To try another extension, press 3, or to speak with an operator, press
would like to leave a
If you want to restrict the caller to fewer choices while in the queue, use this field to specify
which digits are allowed. All other digits are ignored by the Lite system while the caller is in
the queue. For example, if you enter 13 in this field, the only options available to the
are:
To leave a message
3 To try another extension
WHILE IN QUEUE, SAY POSITION IN LINE
While a caller is in the queue, holding for an extension, the Lite system can keep him/her
informed on the progress of the call. If you set this field to Yes, the Lite system announces to
the caller:
“That extension is still busy. You are
in line. If you would prefer to leave
a message, press I, or to speak with an operator, press 0.”
If you select No in this field, the Lite system voices:
“That
speak with an operator,
is still
If you
0.
prefer to leave a message, press
or to
The default setting is No.
TRY EXTENSION X TIMES, BEFORE GOING BACK TO CALLER
This parameter applies only if the MAX LINES ALLOWED TO HOLD field is greater than 0. If
the caller chooses to hold, the Lite system plays a series of hold prompts to the caller (these
are typically music or commercials). At the end of each hold prompt, the Lite system tries
the extension again. If it is busy, then the next hold prompt is played to the caller.
36
.
Page 36

LITESYSTEMINSTALLATIONANDSUPERVISORGUIDE~.OVER. 1
After the defined number of hold prompts have been played, the Lite system goes back to the
caller and offers the options to remain on hold, try another extension etc. This field allows
you to specify the number of hold prompts that should be played before the Lite system offers
these options to the caller.
As shipped, the Lite system has only one hold prompt recorded (system prompt # 146, see the
Installation and Maintenance Manual). Therefore, if you enter 3 in this field, a caller queued
to a busy station hears this same prompt three times before being offered the options again.
you record the second hold prompt (#
then the caller hears prompt # 146, #
then
# 146 again before being offered the options. You may record up to 100 different hold
prompts, which are played in sequence. (Remember: At the end of each hold prompt, the
Lite system tries the extension again). After the Lite system plays the highest number hold
prompt recorded, it returns to the lowest number after the next try. The default setting is 3.
Note: The time between tries to a busy extension is determined by the length of
each hold prompt recorded.
The
prompt supplied with the Lite sygtem
RESTRICTED NUMBERS
When a mailbox owner calls in to change his/her call-transfer number, pager number, or
message notification number, you may want to prevent him/her from changing it to certain
numbers, such as long-distance numbers.
These fields allow you to define digit sequences that are to be blocked. The Lite system
looks at each of these Digits fields to determine if any of them match the number entered by
the mailbox owner. If the number entered by the caller begins with the digits specified in the
Digits field, the Lite system defines the number entered as a match.
For example, if you enter the digits 1900 in
12
If you enter the digit 0 in one of the digits fields, the Lite system considers all numbers
12, 1-900-l 23-4567, 1-900-l 1 l-2222 to be matches. Telephone number l-90
would not be considered a match.
the Digits fields, the Lite system considers
beginning with 0 to be matches. This would include calls to the operator (0), calls to the long-
distance operator (00), international calls (01 I), and any operator-assisted call (0 followed by
telephone number).
37
.
Page 37

SYSTEM INSTALLATION AND SUPERVISOR GUIDE 9.0 VER. 1
If the caller enters a number that matches one of the digit strings you enter here, the Lite
system informs the mailbox owner that the number is not acceptable and retains the current
set up.
Once you review and adjust all fields on both Class ‘of Service setup screen 0 and Class of
Service setup screen 7, press
to save the information and exit. The System
Information menu displays.
Y
have now reviewed the necessary entries on the System lnformation screens. To return
to the Line Information screen, press
2.5.6 Specifying Box Information
2.5.6.1 What Is a Box?
When the Lite system answers a call, it processes it by sending it to a box. Each box
performs a specific function (for example, playing a menu to the caller and waiting for a
response). It then passes the call to another box, which in turn performs its specific function,
etc.
Depending on the configuration purchased, the Lite system provides 5 Routing boxes and 25
mailboxes or 5 Routing boxes and 50 mailboxes. The Routing boxes are used to answer
incoming calls, play a listing of option to callers, and route the call to a specific mailbox
based on the digits dialed by the caller. The mailboxes transfer calls to their associated
extensions and store messages for system subscribers, and they can be set
to forward calls
to another phone or extension number, deliver messages to another phone or pager, play one
of 9 pre-recorded greetings to callers, screen calls, queue calls when the extension is busy, or
record call conversations.
2.5.6.2 Understanding Routing Box 800, 801, and 821
According to the entries specified on the Line Information screen, the Lite system will route
all incoming calls to Routing box 800. This box answers calls during the day and lunch
service hours and plays a greeting to callers. After day/lunch service hours, the system routes
. .
--
Page 38

LITESYSTEMINSTALLATIONAND S
UPERVISOR
GUIDE~.~ VER. 1
calls to Routing box 801. Typically, companies offer more extensive call routing options to
callers during day/lunch service hours than during closed hours. Often, for example,
digit call routing
2 for Sales...
is not offered during closed hours. Therefore, the
greeting voiced by and options available in Routing box 801 are often different than those in
Routing box 800.
So that the system supervisor can alter the system to voice a generic holiday greeting on
holidays the office is closed, you will set up both Routing box 800 and 801 to include a
holiday greeting alternative. Therefore, procedures in this document guide you through
recording two greetings in both boxes 800 and 80
: an office open greeting and a holiday
greeting in box 800, and an office closed greeting and a holiday greeting in box 801. (Keep
in mind that holidays last 24 hours, therefore calls received on a holiday may be processed by
either box 800 or 80
greeting must be recorded in both box 800 and
depending on when the call is received. For this reason, a holiday
Sample greetings for these boxes are
provided in section 3.2.1.
Routing Box 821 is designed by default to take over and route calls once they have passed
through Routing box 800 or 801. A call may go to Routing box 82 I, for
after the
caller leaves a voice message in a subscriber’s mailbox. Routing box 821 offers callers a
menu similar to Routing box 800, but box 82 1 is pre-configured so if a caller does not enter
an extension or select a menu option, the call is disconnected. In Routing box 800 and
callers who do not enter an extension or select an option are transferred to the operator. This
is a safety measure designed to assist callers who use rotary phones or are too slow to respond
to system prompts. By disconnecting non-responsive callers in box 821, the system simply
that the caller knew how to select menu options in box 800 or 80
since no option was selected in box 82
the caller hung up.
and therefore,
Because we recommend you record two greetings in both Routing box 800 and 80 I, you will
not use the GREETING RECORDED field on the Routing Box setup screens. This field allows
you to record only one greeting for the Routing box. Instead you will record all necessary
greetings by following the steps in the section 2.5.6.9, which you will complete after you
review and set up the Routing boxes and mailboxes.
2.5.6.3 Accessing Box Information Screens
1.
From the Line Status screen, press
prompted to enter a system password.
2.
At the prompt to enter the system password, press <Enter>.
The Main menu displays and you are
39
Page 39

SYSTEM INSTALLATION AND SUPERVISOR GUIDE 9.0 VER. 1
3.
From the Main Menu, select BOX INFORMATION. The Box Information menu displays.
You should review the setup for the following boxes:
l Routing Box 800
l
Routing Box 801
l Routing Box 821
l
Prototype Mailbox 9994
l
Supervisor mailbox 70
After you review and, if necessary, adjust prototype mailbox 9994, you use it to set up
subscriber mailboxes. You then make necessary adjustments to these mailboxes to customize
them for system subscribers. This section details the steps you must follow to set up all
necessary boxes and make the required adjustments.
The following procedures identify screen setup entries necessary for the Lite system to
effectively process calls. Fields that are not specifically discussed contain default values that
should be appropriate in nearly all setup situations. Detailed information on all fields on
Routing Box and Mail Box setup screens is provided in the Installation
Manual. You can also access online help on any screen by pressing
Page 40

SYSTEM INSTALLATION AND SUPERVISOR GUIDE 9.0 VER. 1
2.5.6.4 Reviewing Routing Box 800, 801, and 821 and Setting Up Single-Digit
Call Routing
1.
From the Box Information menu, select ROUTING BOX. The Routing Box setup screen
displays.
ROUTING
Box number :
Greeting recorded :
Number of times to play the greeting :
Number
If no digits dialed,
If inualid digit dial
Route the call based
When digit
Destination for digit 1 :
seconds to wait for a digit:
BOX NAME : .
wait for
:
3 :
4 :
2.
Press
5 :
to access the box selection screen. A small window displays prompting you
a
BOX
I
Owner:
digits?
6 :
7 :
:
8 :
9 : Voice:
:
l
for the box number. Type 800 then press <Enter>.
3.
Press <Enter> to move the cursor moves to the OWNER field. So that more than one
greeting can be recorded and stored for use with this Routing box, this box should be
identified as being owned by the supervisor mailbox, mailbox 70. By specifying a
mailbox owner for this Routing box, the box takes on certain “mailbox” attributes, which
include being allowed to house the same number of greetings as the mailbox owner’s
mailbox. (You specified this number when you set up class of service 7.)
4.
Press <Enter> to move the cursor to the DESTINATION FOR DIGIT fields.
you are
setting up the system to provide single-digit call routing options to callers, complete these
fields. Refer to the Routing Worksheet completed by the system supervisor for specific
information
and
fields.
entries for these fields. Do not modify the DESTINATION FOR DIGIT
41
Page 41

SYSTEM INSTALLATION AND SUPERVISOR GUIDE 9.0 VER. 1
5.
Repeat steps 2 through 5 to set up Routing box 821. In step 2, type 821 (instead of
to access box 82
In the DESTINATION FOR DIGITS field, we recommend you make the
same entries as you did on the setup screen for box 800.
6.
Repeat steps 2 through 5 to set up Routing box 80 1. In step 2, type 801 (instead of 800)
to access box 80 1. In the DESTINATION FOR DIGITS field, you may decide to modify or
simply not include the single-digit dialing options, since this box will control how calls
are routed when the office is closed. If you choose to use the same single-digit dialing
options, simply re-enter them here.
7.
To save all setup entries and exit the Routing Box setup screen, press
The Box
Information menu displays.
2.5.6.5 Setting Up Prototype Mailbox 9994
You need to create a mailbox for each subscriber who will use the system to
Since most of the setup information will be the same for every mailbox you need, you should
review the system’s prototype mailbox, which is used as the mailbox setup model. The
prototype mailbox is box number 9994. Every time you select to create a new mailbox, the
system does so by making a copy of mailbox 9994.
From the Box Information menu, select MAIL BOX. The Mail Box setup screen displays
with the Page Number menu.
2.
Press
to access the box selection screen. A small window displays prompting you
for the box number. Type 9994 then press <Enter>.
Press <Enter> to move the cursor to the TRANSFER TYPE field. When a call is routed to
the mailbox, the first action taken is to transfer the call to the number specified in the TO:
field. The Lite system offers several options as to how the call can be transferred. When
you move the cursor to this field, the various options are presented in a menu.
All transfer type options are described below. Use this information to select a transfer
type. Note that in almost all system setups, you should select either the Blind or Wait
for
transfer
so the system can function most
The default setting is
Wait for Ring.
.
42
Page 42

Page 43

SYSTEM INSTALLATION AND SUPERVISOR GUIDE 9.0 VER. 1
5.
Repeat steps 3 through 5 for each subscriber mailbox you want to create.
6.
Once you create all necessary mailboxes, continue with the next procedure, below.
2.5.6.7 Customizing Subscriber Mailboxes
Using information the system supervisor provides on the Mailbox Setup Worksheets, you can
now customize the mailboxes you created for each subscriber on the system.
The procedure below identifies the fields you should be sure to customize for each mailbox.
Fields that are not specifically discussed contain default values that should be appropriate in
nearly all setup situations. Therefore, it is unlikely that you need to modify these fields.
Detailed information on completing all fields on Mail Box setup screens is provided in the
Installation
pressing
Maintenance Manual. You can also access online help on any screen by
To access the mailbox you want to customize, press
A small window displays
prompting you for the box number. Type the box number then press <Enter>. The Mail
Box Page
setup screen displays.
46
Page 44

LITE S
YSTEM INSTALLATION AND SUPERVISOR
G
UIDE
9.0
VER. 1
OX
FIRST
TRANSFER
Transfer tune:
To:
Rings to
Use 3-way calling?
answer:
Get caller's name?
MAIL BOX
Page 1
Last:
PERSONAL
Password:
Name
recorded:
Greeting recorded:
PRIVILEGES
Record conversation?
Currently enabled?
Transfer schedule: ,
Sequence
to turn ON message-waiting
Class of
Restricted - Client of:
Sequence to turn OFF message-waiting lamp:
2.
Press <Enter> to move the cursor to the FIRST NAME field. Enter the mailbox owner’s
FV=Next page
first name. Press <Enter> to move the cursor to the LAST field. Enter the mailbox
owner’s last name.
New:
Old:
3.
To go to Page 2 of the Mail Box setup screen, press
47
The Page 2 screen displays.
Page 45

SYSTEM INSTALLATION AND SUPERVISOR GUIDE 9.0 VER. 1
HAIL BOX
lox number :
PAGER NUMBER:
Times to
playing greeting:
If cal ler chooses “other opt ions” :
After leauing message,
If call is uia D.I.D. play greeting in language:
Auto-forward NEW msgs to box
DELIVERY
Cal
Cal
Cal
Cal
Cal
Run
4.
Press <Enter> to move the cursor to the PAGER NUMBER field. If the subscriber is to use
the
First Name
Hins between calls:
Where and When Repeat Interua 1 Schedule
feature, use the following information to complete this section of the Mail
Last
after
hours.
Schedule
Box setup screen.
PAGER NUMBER
Enter the telephone number of the paging service. The mailbox
may change the
number remotely. Normally, access codes for outside lines are not required here.
Instead, that information should be entered on the System Information
General setup
screen.
To restrict pager calls to use lines in a particular line group, enter the letter (A, B, C, or
D) of the line group in braces before the telephone number (for example,
Tone or Voice pagers may be used with the Message Delivery feature discussed later in
this section.
48
Page 46

S
YSTEM INSTALLATION AND SUPERVISOR GUIDE
9.0 VER. 1
pager number you enter can contain the digits 0 through 9, star
the following special characters:
call progress tones during the course of the call. When
hed dialing, the system immediately assumes
pager system has answered.
Specifies a line group is to be used (for example, {A}555-1212
indicates “choose any line in line group A, and dial the number
pound
and
Can be used for punctuation and is ignored.
PAGER TYPE
The Lite system supports both Tone and Digital pagers in this section of the mailbox
programming. Specify here which type of pager the mailbox owner has (Digital, Tone or
None).
When a caller asks the Lite system to page a mailbox owner, the Lite system looks for a
free line on which to call the paging service.
system queues the request and re-tries every 10 seconds for approximately
no lines are free to make the call, the Lite
minutes.
49
Page 47

SYSTEM INSTALLATION AND SUPERVISOR GUIDE 9.0 VER. 1
NUMBER OF TIMES TO CALL
The Lite system calls the pager the number of times you specify in this field. Repetitive
paging may be useful if the pager is turned off periodically or is out of pager range.
Note: This field is used to tell the Lite system how many successful calls it should
make to the paging service. Do not confuse this with the pager-retry feature. If
the Lite system calls the pager number and does not hear it ring and answer,
then it automatically re-tries the call at IO-second intervals, for a pre-defined
number of times.
MINUTES BETWEEN CALLS
If you enter a number greater than
in the TIMES TO CALL field, this field instructs the
Lite system how long it should wait between re-calls.
Note: This field tells the Lite system how long to wait between successful calls to the
paging service. Do not confuse this with the pager-retry feature.
CALL SCHEDULE
The Pager notification feature follows a time schedule. The
ALWAYS
DAY SERVICE
NIGHT SERVICE Pager notification is available only during non-day/lunch service,
SCHEDULE A, B, C, or D
Pager notification is available at all times.
Pager notification is available only during day/lunch service, as
defined in the System Information
as defined in the System Information I Business Hours screen.
Pager notification is available only during the schedule defined
on Page 3 of the Mail Box setup screen for this mailbox.
are:
Business Hours screen.
50
Page 48

ENABLED
INSTALLATION AND SUPERVISOR GUIDE 9.0 V ER. 1
Set this field to Yes to indicate that the pager feature for this mailbox is currently on. Set
the field to No to indicate that the pager feature is off. The mailbox owner can also
toggle this field on and off by calling into the system.
If this field is set to No, it
overrides the call schedule set in the previous field.
5.
Press <Enter> to move the cursor to the first MESSAGE DELIVERY field. If the subscriber
is to use the Message Delivery feature, use the following information to complete this
section of the Mail Box setup screen.
CALL
Enter the telephone number the Lite system should call to inform the mailbox owner that
there are new messages in his/her mailbox.
and
The number can contain the DTMF digits 0
9, *
plus any of the following special
characters:
Use pulse (also known as ‘rotary’) dialing.
T
Use tone
dialing (the default).
I
Short pause (duration can be changed in Technical Information screen.
Default is 1 second).
Medium pause (equal in length to 4 commas).
L
H
M Answering machine. This must be the last character in the telephone
Long pause (equal in length to 8 commas).
Hookflash.
Enclosing the number in brackets prevents the mailbox owner from being
able to call in and change the number.
Specifies a line group is to be used (for example, {A}555-1212 indicates
“choose any line in line group A, and dial the number 555-1212”).
Hang up immediately after dialing the number (must be last character).
number. It tells the Lite system that the number being called has an
answering machine attached. When the Lite system calls the number, it
announces that there are messages, as usual. If the Lite system has not
51
I
I
Page 49

SYSTEM~NSTALIATIONAND S
received aDTMF digit (1 for Yes, anything else for No), by the end of the
announcement cycle(s), it assumes that it is talking to an answering
machine, and proceeds to play each new message in turn.
UPERVISOR
GUIDE~.~ VER. 1
V
I
E
N
any other
character
Voice pager. This must be the last character in the telephone number.
Details of voice pager programming are found later in this section.
Internal (must be the first character). Overrides the INTERNAL parameter (in
the configuration file
regardless of the number of digits. The Lite system does not dial the
sequence specified in the General Information
External Call field.
External (must be the first character). Overrides the INTERNAL parameter
(in the configuration file VM.CFG) and treats this number as an external call
regardless of the number of digits. The Lite system dials the sequence
specified in the General Information
field.
No progress tones (must be the last character). The Lite system ignores all
call progress tones during the course of the call.
Can be used for punctuation and is ignored.
and treats this number as an internal call
Digits To Get A Line On
Digits To Get A Line On External Call
The owner of a mailbox can call in and remotely change the first Message Notification
number, but cannot use or modify special characters.
REPEAT
Enter the number of successful calls to each telephone number. A successful call is
generally defined as one where the Lite system has seized an available line port, dialed
the number, and detected an answer. If the call is not successful (for example, the called
number was busy) the Lite system automatically re-tries every few seconds up to twenty
times.
INTERVAL
If the Repeat field contains a number greater than 1 or there are additional Call number
sequences, enter the interval (in minutes) between calls to this number and/or the interval
before proceeding to the next Call number sequence.
.
52
. .
Page 50

SYSTEM INSTALLATION AND SUPERVISOR GUIDE 9.0 VER. 1
SCHEDULE
Select when the Lite system should call this number. The options are:
The number is called any time a new message is left in the
mailbox.
DAY SERVICE
NIGHT SERVICE The number is called only during non-day/lunch service, as
SCHEDULE A, B, C, or D
RUN THIS SEQUENCE N TIMES
The number is called only during day/lunch service, as
defined in the System Information
defined in the System Information I Business Hours screen.
The number is called only during the schedule defined on
Page 3 of the Mail Box setup screen for this mailbox.
Business Hours screen.
Once the Lite system has called every number listed, it considers that it has run the
sequence one time. It will then check the value in this field. If this field is set to a number
higher than
the Lite system starts again and repeats the sequence the specified number
of times.
CURRENTLY ENABLED?
This field identifies which messages the Lite system is to deliver:
DISABLED The Lite system does not deliver messages.
URGENT MSGS ONLY
The Lite system delivers only messages marked urgent,
but does not call to deliver non-urgent messages.
ALL MESSAGES
Setting this field to DISABLED overrides the SCHEDULE field.
The Lite system calls every time a message is deposited
into the mailbox.
The owner of a mailbox can call in remotely and turn his/her Message Delivery feature
on or off, or change the first number to be called. The other telephone numbers, if in use,
cannot be changed remotely.
53
Page 51

SYSTEM INSTALLATION AND SUPERVISOR GUIDE 9.0 VER. 1
6.
To go to Page 3 of the Mail Box setup screen, press
The Page 3 screen displays.
MAIL BOX
Page 3
number: First Name:
SCHEDULE A
Start End
SUN :
:
Tue:
Wed
:
Thu :
Fri:
SCHEDULE B Start
Sun:
:
Tue:
Wed:
Thu:
Fri:
Sat:
SCHEDULE C
sun :
Hon :
Tue:
Wed
:
Thu :
Fri:
Sat:
7.
Press <Enter> to move the cursor to the first SCHEDULE A field. If the subscriber is to
SCHEDULE D Sat:
Hon :
Tue:
Wed :
Thu :
Fri:
Sat:
use the Pager or Message Delivery feature according to a particular schedule, use the
following information to complete the Mail Box Page 3 setup screen.
START
Enter the time at which this schedule should begin on this day. The time should be
entered in
END
format (for example, enter 20:00 for
PM).
Enter the time at which this schedule should end on this day. The time should be entered
in
format (for example, enter 20:00 for
Note:
If you
want
the schedule to be active all day, enter
time and 24:00 as the END time.
PM).
as the START
..I
Page 52

LITESYSTEMINSTALLATIONAND SUPERVISORGUIDE~.~ VER. 1
3.
To go to Page 4 of the Mail Box setup screen, press
The Page 4 screen displays.
ox
HAIL BOX
First
(Page 4)
Last
Hotel guest privileges only?
TIME:
4.
Confirm that the ENABLED field is set to Yes for all four personal distribution lists. This
Currently scheduled?
allows subscribers to create up to 4 personal distribution lists in their mailboxes, which
they can then use when sending messages to groups of subscribers.
5.
Repeat steps 1 through 9 to customize each mailbox you created for each subscriber on
the system. Once you customize all subscriber mailboxes, continue with the next
procedure.
2.5.6.8 Customizing the System Supervisor Mailbox
To access the system supervisor mailbox, press
A small window displays
prompting you for the box number. Type 70 then press <Enter>.
2.
Press <Enter> to move the cursor to the FIRST NAME field. Type SUPERVISOR in this
field. Press <Enter> to move the cursor to the LAST field. Enter the system supervisor’s
last name. Note that though you may type any name or words in these fields, using these
. .
55
Page 53

SYSTEM INSTALLATION AND SUPERVISOR GUIDE 9.0 VER. 1
entries identifies this mailbox as the supervisor mailbox and identifies the individual who
is currently acting as the on-site system supervisor.
3.
Press <Enter> to move the cursor to the CLASS OF SERVICE field. Verify that 7 is entered
in this field. This entry assigns class of service 7, which has supervisor privileges, to this
mailbox.
4.
To go to Page 2 of the Mail Box setup screen, press
5.
To complete the supervisor mailbox setup, repeat steps 4 through 9 of the previous
The Page 2 screen displays.
procedure.
6.
To save all mailbox customizations and exit the Mail Box setup screen, press
The Box Information menu displays.
2.5.6.9 Recording Routing Box Greetings
As described in section 2.5.6.2, the following procedure guides you through recording two
greetings in both Routing boxes 800 and 801: an office open greeting and a holiday greeting
in box 800, and an office closed greeting and a holiday greeting in box 801. Sample
greetings for these boxes and for box 82
are provided in section 3.2.1.
Note: When you record Routing box greetings, you must include instructions that
identify any single-digit call routing options available to the caller.
From a telephone, call into voice mail and log into supervisor mailbox 70. Note that the
default password for the mailbox is the same as the mailbox number, 70.
2.
The Lite system tutorial session starts. Complete the tutorial. When prompted to record
the name and greeting, you may elect to identify this as the supervisor mailbox. When
changing the password, be sure to inform the system supervisor of the number you select.
When you complete the tutorial, press
to prevent it
voicing the next time the
box is accessed.
3.
The system voices the Main menu:
“To listen to
messages press
To send a message press 2. To change your options
press 3.
56
.
Page 54

Page 55

SYSTEM INSTALLATION AND SUPERVISOR GUIDE 9.0 VER . 1
9. To record greeting(s) for Routing box
press
to exit the menu shown above and
return to the Options menu. Then repeat steps 4 through 7 above. In step 5, press 801 to
indicate you want to work with Routing box 801.
In
step 7,
record the office closed
greeting, instead of the office open greeting.
10. To record the holiday greeting for Routing box 801, repeat step 7, select greeting
number 1, and record the holiday greeting.
11. To record the greeting for Routing box 82
press
to exit the menu shown above and
return to the Options menu. Then repeat steps 4 through 7 above. In step 5, press 821 to
indicate you want to work with Routing box 821. In step 7, record the office open
greeting call routing options, omitting the introductory remarks “Welcome to . . .
12. When you have recorded all necessary greetings, press
menu, then press
to return to the Main menu.
Be sure to instruct the system supervisor to refer to section 3.2 for detailed
to
to the Options
.
changing the active Routing box greetings and recording new greetings.
2.6 Default Database Structure Overview
on
As mentioned previously, the Lite system contains a default database with a setup
configuration that allows the Lite system to efficiently perform fundamental call processing
tasks with minimal system adjustments by the installing technician. Information in this
section highlights portions of this default database configuration. More detailed information
on the purpose of Routing boxes and mailboxes and how box settings and other default
settings affect system functionality is provided earlier in this document.
Note:
Though you may make adjustments to specific information relating to this
default setup, you are
Routina boxes 800,801, and
mailbox 70.
fundamental call processing tasks. Maintaining it helps both you, the
technician, and the Lite system technical support to efficiently service the
system and resolve any call processing issues.
This configuration allows the Lite system to efficiently perform
to maintain the aeneral
class of service 7, and
58
of
Page 56

SYSTEM INSTALLATION AND SUPERVISOR GUIDE 9.0 VER. 1
l Technician Password:
*
Small Office Lite systems:
*
Debut systems: the last 4 digits of the bar code on the white sticker on the bottom of
the unit
l
Business Hours (specified on System Information
5:00
PM
l
Routing Box 800:
*
Answers all incoming calls during day/lunch hours (specified on System Information
Business Hours screen)
*
Owned by mailbox 70
l
Routing Box 801:
*
Answers all incoming calls during non-day/lunch hours (specified on System
Information
*
Owned by mailbox 70
l
Routing Box 821:
*
Routes calls that have already passed through Routing box 800 or 801
*
Owned by mailbox 70
Business Hours screen)
Business Hours screen):
Class of Service 0:
Set up with the following parameter settings (for information on specific parameter
fields, refer to
section 2.5.5.8):
10
MAXIMUMNUMBEROFMESSAGES: 200
60
60
S
UPERVISORSTATUS
?
N
O
Yes
DIAL-OUTALLOWED? NO
Yes
PLAYMENUAFTERGREETING? No
N
O
O
PERATOR
Box
(DAY): 888 (N
IGHT
): 888
821
59
Page 57

MAXLINESALLOWEDTOHOLDFORONEBOX: 2
TRYEXTENSION 3 TIMESBEFOREGOINGBACKTOCALLER
Class of Service 7:
Set up with the class of service 0 options, but with SUPERVISOR STATUS? enabled.
l Extension Length:
* 3 digits
l Password Length:
* 4 digits
l Default Passwords:
*
Equal the mailbox
l Mailbox 70:
*
Set up as the Supervisor mailbox with
SYSTEM INSTALLATION AND SUPERVISOR GUIDE 9.0 VER. 1
No
[None]
CLASS OF SERVICE:
l
Prototype mailbox 9994 (features automatically assigned to all mailboxes created):
TRANSFERTYPE:
To:
the mailbox number)
CURRENTLYENABLED: Yes
TRANSFERSCHEDULE: Always
PASSWORD: x (signifies the mailbox
AFTERPLAYINGGREETING: Waitfordigit
2.7 Setting Up the System Using the Teleparameter
Feature
This section provides instructions on using the teleparameter feature to set up a new system at
a customer site or to later make modifications to the system. Using the teleparameter feature,
you can change the parameter values that affect system-wide setup information, box setups,
and VM.CFG file data by simply calling into the system. You simply log into supervisor
mailbox 70 over the telephone, select to modify system parameters, then, as prompted, enter
60
Page 58

SYSTEM INSTALLATION AND SUPERVISOR GUIDE 9.0 V ER. 1
codes that identify each parameter you want to change and the new value to which you want
to set the parameter. The screen illustrations and parameter value table provided in this
section indicate the parameters and their associated codes.
Technicians who have experience setting up Corporate Office, Small Office, or the Lite
systems may prefer to use the Teleparameter feature to quickly make modifications and get
the Lite system up and running at the customer’s site. Be advised, however, that since this
technique involves inputting codes that represent system parameters and corresponding
values to which parameters are to be set, it is a bit more difficult to use effectively if you are
unfamiliar with setting up Corporate Office, Small Office, or Lite systems. For this reason,
we recommend that technicians unfamiliar with Corporate Office, Small Office, or Lite
systems attach a laptop to the PC and use the instructions provided in the previous sections to
complete all necessary system setup steps.
Note:
If you choose to set up the system using the Teleparameter feature, be sure
to first review
setup of the default database included on the Lite system unit.
section
2.5.6.2 and
section 2.6 so you clearly und?rstand the
2.7.1 Using the Teleparameter Feature to Set up a New
System
2.7.1.1 Running the PBX Setup Utility
The Lite system voice processing software is pre-installed on the Lite system unit before it is
shipped to you. You must, however, run the PBX Setup utility so you can configure certain
installation parameters for each specific customer’s site. Use the following procedure to run
this utility by calling into the system over the telephone:
1.
From a telephone, call into voice mail and log into supervisor mailbox 70. Note that the
default password for the mailbox is the same as the mailbox number, 70.
2.
The Lite system tutorial session starts. Complete the tutorial. When prompted to record
the name and greeting, you may elect to identify this as the supervisor mailbox. When
changing the password, be sure to inform the system supervisor of the number you select.
.
Page 59

SYSTEM INSTALLATION AND SUPERVISOR GUIDE 9.0 VER. 1
When you complete the tutorial, press
to prevent it from voicing
next time
box is accessed.
3.
system voices
“To listen to
Main menu:
messages press I. To send a message press 2. To change your
press 3.
To access the Supervisor menu, press 6 (this option is not voiced). The system voices
4.
the Supervisor menu options:
Supervisor Menu
For Mailbox Administration
For Routing Box Administration
For Question Box Administration
For Port Administration
To Change the System Broadcast Message
To Change the Voice Mail Day
To Change the System Time
To Change the System Date
To Modify System Parameters
To Perform First-Time Setup
Night Service
Press 1
Press 2
Press 3
Press 4
Press 5
Press 6
Press 7
Press 8
Press 9
Press 0
5.
From the Supervisors menu, press 0 to perform first time setup. The system prompts you
to enter the Technician password. By default, this password is 1234
Lite systems or, on Debut units, the last four digits of the bar code on
Small Office
white sticker
on the bottom of the unit.
6.
the prompts and enter the requested information. When you are prompted to
indicate the type of phone system with which you are working, enter the number from the
following list that corresponds to the phone system:
08
76
11
74
Comdial DigiTech
Comdial DigiTech
Comdial DXP, DXP Plus, FX
Comdial DXP, DXP Plus, FX
Impact
impact
DSU
62
DSU
Serial Integration
Serial Integration
Serial Integration
Serial Integration
IVPC
Page 60

SYSTEM INSTALLATION AND SUPERVISOR GUIDE 9.0 V ER. 1
22 Comdial Executech 2000
44 Comdial Unisyn
79 Cortelco Aries
45
77 Ericsson MD-l 10
75 Fujitsu 9600 with Serial Integration
96
78 Fujitsu Series 3
41
80
55 lsoetec IDS 108
49 lsoetec System 96
30 ITT
28 lwatsu
Encore CX ECX 1832
Fujitsu Allegra 26
Starlog
Fujitsu Starlog
Harris 20120
228
Cortelco System 3100
3672
36112
20
94
92
89 Mite1
Lucent Definity G3
Lucent Definity G3
Calista Box
Light with
Vectoring
Integration
I
Bridged Mode
Page 61

SYSTEM INSTALLATION AND SUPERVISOR GUIDE 9.0 VER. 1
Page 62

SYSTEM INSTALLATION AND SUPERVISOR GUIDE 9.0 VER. 1
59
68 Telrad 2464
64 Telrad Digital Key BX, 200 Digital
46
16
26 Toshiba Perception E
95 Toshiba Perception EX
57 Toshiba Perception I & II
87
43
48
58
14
62
7.
Once you enter all necessary information, press 1 as prompted to reboot the PC. You
Toshiba DK-280
Vodavi
Coral I, II,
Toshiba DK-16
Vodavi
Vodavi
III
DVX2,
2448EX
96EX
Digital
DVX3
must allow the system to reboot so it can reset several parameters based on the
information you entered. When the system reboots, your call into it is disconnected.
Continue with the next procedure.
I
I
2.7.1.2 Adjusting System Information
You may need to customize certain fields on the System Information screens. Use the
following procedure:
1.
From a telephone, call into voice mail and log into the supervisor mailbox 70. The
system voices the Main menu:
“To listen to your messages press 1. To send a message press 2.
To change your options
press 3.
65
Page 63

SYSTEM INSTALLATION AND SUPERVISOR GUIDE 9.0 VER. 1
2.
To access the Supervisor menu, press 6 (this option is not voiced). The system voices
the Supervisor menu options:
Supervisor
For Mailbox Administration
For Routing Box Administration
For Question Box Administration
For Port Administration
To Change the System Broadcast Message
To Change the voice mail Day
To Change the System Time
To Change the System Date
To Modify System Parameters
To Perform First-Time Setup
To Exit
3.
From the Supervisors menu, press 9 to modify system parameters. The system prompts
Menu
Night Service
Press 1
Press 2
Press 3
Press 4
Press 5
Press 6
Press 7
Press 8
Press 9
Press 0
Press #
you to enter the Technician password. By default, this password is 1234 on Small
Office Lite systems or, on Debut units, the last four digits of the bar code on the white
sticker on the bottom of the unit.
4.
At the prompt, enter the number of the parameter you want to change, then, as prompted,
the value to which you want to change the parameter. Parameter information is provided
in a comprehensive table shown in section 2.7.2.
When you complete all modifications, press # to return to the Supervisor’s menu.
Note:
Refer to
parameters and for information on adjusting parameters in the
For detailed information on each field of System Information screens, refer to
the Installation and Maintenance Manual.
section
2.7.2 for information on values you can specify for certain
file.
66
Page 64

SYSTEM INSTALLATION AND SUPERVISOR G UIDE 9.0 VER. 1
2.7.1.3 Adjusting Routing Box Information
As indicated in section 2.5.6.2, you need to adjust Routing Boxes 800, 801, and 82
include any single-digit call routing options you want to provide to callers. You must also
record the necessary greetings for these boxes. Sample Routing box greetings are provided in
to
section 3.2.1.
To record Routing box greetings, follow the procedure provided in section 3.2.2.
To modify single-digit call routing, you can follow the procedure in section 3.2.3 or you can
use the Teleparameter feature. To use the Teleparameter feature, follow steps
through 4 in
the previous procedure, referring to the parameter numbers provided in section 2.7.2.
detailed information on each field of this screen, refer to the Installation
Manual.
Note:
Note:
If you enter a parameter number for a parameter that affects a particular
box, the system prompts you to enter the Item number. The Item
identifies the particular box in which you want to change the parameter. At
the Item number prompt, enter the
Refer to
parameters and for information on adjusting parameters in the VM.CFG file.
For detailed information on each field of Routing Box screens, refer to the
Installation and Maintenance Manual.
section
2.7.2 for information on values you can specify for certain
number of the box.
2.7.1.4 Creating and Adjusting Mailbox Box Information
To create mailboxes on the system, follow the procedure in section 3.1.1.
you create
mailboxes, you can make detailed modifications to the box setups using the Teleparameter
feature. To use the Teleparameter feature to adjust mailbox information
created on the system, follow steps
through 4 in the procedure in section 2.7.1.2.
boxes you have
specific parameters you can adjust, refer to section 2.7.2. For detailed information on each
field of these screens, refer to the Installation and Maintenance Manual.
-
67
Page 65

SYSTEM INSTALLATION AND SUPERVISOR GUIDE 9.0 VER. 1
Note:
Note:
If you enter a parameter number for a parameter that affects a particular
box, the system prompts you to enter the
identifies the particular box in which you want to change the parameter. At
the Item number prompt, enter the
Refer to
parameters and for information on adjusting parameters in the VM.CFG file.
For detailed information on each field of Box Setup screens, refer to the
section
2.7.2 for information on values you can specify for certain
Item number.
The Item number
2.7.1.5 Creating Other Box Types and Adjusting Information
To create other types of boxes, you must first follow the procedures presented earlier in this
document to connect a laptop computer to the Lite system unit and access Box Information
setup screens. Once you create the boxes using this technique, you can make detailed
modifications to the box setups using the Teleparameter feature. To use the Teleparameter
feature to adjust information in boxes already created on the system, follow steps 1 through 4
in the procedure in section 2.7.1.2. For specific parameters you can adjust, refer to section
2.7.2. For detailed information on each field of these screens, refer to the Installation and
Maintenance Manual.
Note:
Note:
If you enter a parameter number for a parameter that affects a particular
box, the system prompts you to enter the
identifies the particular box in which you want to change the parameter. At
the Item number prompt, enter the
Refer to
parameters and for information on adjusting parameters in the VM.CFG file.
For detailed information on each field of Box Setup screens, refer to the
section
2.7.2 for information on values you can specify for certain
number of the box.
68
Item number.
The Item number
Page 66

SYSTEM INSTALLATION AND SUPERVISOR GUIDE 9.0 VER. 1
2.7.2 Teleparameter Value Tables
The following table identifies all parameters you
.
and the entries you can make to indicate specific values for each parameter. Refer to
adjust using the teleparameter feature
information after this table for additional entries you can make in some fields.
Account
Number Box
Setup
Account
Number Box
Setup
Account
Number Box
Setup
Account
Number Box
Setup
Account
Number Box
Setup
Account
Number Box
Setup
Account
Number Box
Setup
2700
2701
2703
2704
2705
2706
Minimum number of digits
required for valid entry
determination
Maximum number of digits
required for valid entry
determination
Number of seconds to wait
before determining all digits
are entered
Action to take after
maximum retry attempts if
invalid account number is
entered
Box associated with
parameter 2703
Retry attempts to allow if
invalid account number
entered
Number of mailbox that
owns the Account Number
box
0 = Return
1 = Say ‘Goodbye’
2 = Go to another box
3 = Hang up
(Valid mailbox
number)
o-9
(Valid mailbox
number)
A prompt for the
Item number refers
to the box number.
Enter the box
number.
A prompt for the
Item number refers
to the box number.
Enter the box
number.
A prompt for the
Item number refers
to the box number.
Enter the box
number.
A prompt for the
Item number refers
to the box number.
Enter the box
number.
A prompt for the
Item number refers
to the box number.
Enter the box
number.
A prompt for the
Item number refers
to the box number.
Enter the box
number.
A prompt for the
Item number refers
to the box number.
Enter the box
number.
69
Page 67

LITESYSTEMINSTALLATIONANDSUPERVISORGUIDE~.OVER. 1
Account
Number Box
Setup
Account
Number Box
Setup
Account
Number Box
Setup
Account
Number Box
Setup
ACD Box Setup 2520 Number of mailbox that
ACD Box Setup
ACD Box Setup
ACD Box Setup 2523 Number of announcements
ACD Box Setup 2524 Rings permitted before no
2707
2708
2001 Action to take if valid
2002 Box associated with
2521
2522
Action to take if account
number was previously
collected during call
Repeat number entered for
confirmation?
account number is entered
parameter number 2001
owns the ACD box
Action to take when trying
extension
Criteria by which hunt is
started
after which caller is offered
other options
answer determination
0 = Use the existing
account number
1 = Ask for a new
account number
1 = Yes
0 = Return
1 = Say ‘Goodbye’
2 = Go to another box
3 = Hang up
(Valid box number)
(Valid mailbox
number)
1 = Blind
2 = Wait for answer
3 = Screen
4 = Wait for ring
0
first agent in group
1 = Start hunting from
previous agent
0
0
Start hunting from
99
99
A prompt for the
Item number refers
to the box number.
Enter the box
number.
A prompt for the
Item number refers
to the box number.
Enter the box
number.
A prompt for the
Item number refers
to the box number.
Enter the box
number.
A prompt for the
Item number refers
to the box number.
Enter the box
number.
A prompt for the
Item number refers
to the box number.
Enter the box
number.
A prompt for the
Item number refers
to the box number.
Enter the box
number.
A prompt for the
Item number refers
to the box number.
Enter the box
number.
A prompt for the
Item number refers
to the box number.
Enter the box
number.
A prompt for the
Item number refers
to the box number.
Enter the box
number.
70
-
Page 68

SYSTEM INSTALLATION AND SUPERVISOR GUIDE 9.0 V ER. 1
ACD Box Setup
ACD Box Setup
ACD Box Setup
ACD Box Setup
ACD Box Setup
ACD Box Setup
ACD Box Setup
Business Hours
Setup
2526
2527
2528
2529
2530
2531
2501 to
2512
5042
Box default operator during
day service
Box default operator during
night service
Action to take if all
extensions are busy
Box associated with
parameter 2527
Action to take if caller elects
not to remain in queue
Box associated with
parameter 2529
If call is queued, state
position in line?
ACD rotation box members
Hour day service begins
(Valid mailbox
number)
(Valid mailbox
number)
0 = Queue the call
1
= Go to another box
(Valid box number)
0 = Return
1 = Say ‘Goodbye’
2 = Go to another box
3 = Hang up
(Valid box number)
1 = Yes
0 = No
(Valid mailbox
numbers)
00-24
A prompt for the
Item number refers
to the box number.
Enter the box
number.
A prompt for the
Item number refers
to the box number.
Enter the box
number.
A prompt for the
Item number refers
to the box number.
Enter the box
number.
A prompt for the
Item number refers
to the box number.
Enter the box
number.
A prompt for the
Item number refers
to the box number.
Enter the box
number.
A prompt for the
Item number refers
to the box number.
Enter the box
number.
A prompt for the
Item number refers
to the box number.
Enter the box
number.
A prompt for the
Item number refers
to the box number.
Enter the box
number.
A prompt for the
Item number refers
to the day of the
week. Enter 0
(Sunday) through
6 (Saturday).
71
.
Page 69

SYSTEM INSTALLATION AND SUPERVISOR GUIDE 9.0 VER. 1
Business Hours
Setup
Business Hours 5044 Hour day service ends
Setup
Business Hours
Setup
Business Hours
Setup
Business Hours
Setup
5046 Hour lunch service begins
5047 (With parameter 5046)
5048 Hour lunch service ends 00
(With parameter 5042)
Minute day service begins
Minute lunch service begins
00
00
24
24
59
24
A prompt for the
Item number refers
to the day of the
week. Enter 0
(Sunday) through
6 (Saturday).
A prompt for the
Item number refers
to the day of the
week. Enter 0
(Sunday) through
6 (Saturday).
A prompt for the
item number refers
to the day of the
week. Enter 0
(Sunday) through
6 (Saturday).
A prompi for the
Item number refers
to the day of the
week. Enter 0
(Sunday) through
6 (Saturday).
A prompt for the
Item number refers
to the day of the
week. Enter 0
(Sunday) through
6 (Saturday).
A prompt for the
Item number refers
to the day of the
week. Enter 0
(Sunday) through
Business Hours
Setup
5049 (With parameter 5048)
Minute lunch service ends
72
00
59
Item number refers
week. Enter 0
(Sunday) through
Page 70

SYSTEM INSTALLATION AND SUPERVISOR GUIDE 9.0 V ER. 1
Business Hours
Setup
Business Hours
Setup
Information
Setup
Call Transfer
Information
Setup
Call Transfer
Information
Setup
Call Transfer
Information
information
Setup
I
I
5067
5068
5002
5003
Hour at which greeting is to
change to good evening
(With parameter 5067)
Minute at which greeting is
to change to good evening
Sequence to initiate an
internal transfer
Sequence to initiate an
external transfer
Sequence to complete an
internal transfer
Sequence to complete an
external transfer
Sequence to return from no
answer on an internal call
Sequence to return from no
answer on an external call
Sequence to return from
busy on an internal call
Sequence to return from
busy on an external call
Sequence to return from
call screening on an
internal call
Sequence to return from
call screening on an
external call
00-24
(Refer to technical
bulletin and phone
documentation)
(Refer to technical
bulletin and phone
documentation)
(Refer to technical
bulletin and phone
documentation)
(Refer to technical
bulletin and phone
documentation)
(Refer to technical
bulletin and phone
documentation)
(Refer to technical
bulletin and phone
documentation)
(Refer to technical
bulletin and phone
documentation)
(Refer to technical
bulletin and phone
documentation)
(Refer to technical
bulletin and phone
documentation)
(Refer to technical
bulletin and phone
documentation)
A prompt for the
Item number refers
to the day of the
week. Enter 0
(Sunday) through
6 (Saturday).
A prompt for the
Item number refers
to the day of the
week. Enter 0
(Sunday) through
6 (Saturday).
73
Page 71

SYSTEM INSTALLATION AND SUPERVISOR GUIDE 9.0 VER. 1
Call Transfer
Information
Setup
Call Transfer
Information
Setup
Call Transfer
Information
Setup
Call Transfer
Information
Setup
Call Transfer
Information
Setup
Call Transfer
Information
Setup
Class of
Service Setup
Class of
Service Setup
Class of
Service Setup
Class of
Service Setup
Class of
Service Setup
5010
Sequence to transfer an
internal 3-way call
5011
5023 Confirmation digits meaning
Sequence to transfer an
external 3-way call
Should VP system detect
dial tone?
‘Yes’
bulletin and phone
1 =Yes
0 = No
(Refer to technical
bulletin and phone
documentation)
Should VP system use
transfer bypass digit?
0 = None
1 = First
2 = Last
Maximum time for 3-way
call (minutes)
7000
Number of days after which
0
Old messages are auto-
deleted
7001
Number of days after which
0
New messages are auto-
deleted
7002 Maximum message length
0
(seconds) for a message
7003 Maximum number of
0
messages allowed in
mailbox
7004 Maximum greeting length
0
(seconds)
99 A prompt for the
Item number refers
to the Class of
Service number.
Enter 0
7.
99 A prompt for the
Item number refers
to the Class of
Service number.
Enter 0
7.
999 A prompt for the
Item number refers
to the Class of
Service number.
200
Enter 0
A prompt for the
7.
Item number refers
to the Class of
Service number.
Enter 0
7.
999 A prompt for the
Item number refers
to the Class of
Service number.
Enter 0
7.
74
Page 72

SYSTEM INSTALLATION AND SUPERVISOR GUIDE 9.0
1
Class of
Service Setup
Class of
Service Setup
Class of
Service Setup
Class of
Service Setup
Class of
Service Setup
Class of
Service Setup
Class of
Service Setup
Class of
Service Setup
Class of
Service Setup
7005
7006
7007
7008
7009
7010
7011
7012
7013
Maximum number of
personal greetings allowed
Play menu after greeting to 1 = Yes
callers? 0 = No
Maximum lines allowed to
hold for mailbox
Number of times to try 0
extension before returning
to queued caller
Say position in line to calls 1 = Yes
in queue?
Access to Group boxes 1 = Yes
allowed? 0 = No
Supervisor status allowed?
Caller access to P.A 1 = Yes
system allowed? 0 = No
Dial-out allowed?
0
32
99
0 = No
1 = Yes
0 = No
1 = Yes
0 = No
A prompt for the
Item number refers
to the Class of
Service number.
Enter 0
A prompt for the
Item number refers
to the Class of
Service number.
Enter 0
A prompt for the
Item number refers
to the Class of
Service number.
Enter 0
A prompt for the
Item number refers
to the Class of
Service number..
Enter 0
A prompt for the
Item number refers
to the Class of
Service number.
Enter 0
A prompt for the
Item number refers
to the Class of
Service number.
Enter 0
A prompt for the
Item number refers
to the Class of
Service number.
Enter 0
A prompt for the
Item number refers
to the Class of
Service number.
Enter 0
A prompt for the
Item number refers
to the Class of
Service number.
Enter 0
7.
7.
7.
7.
7.
7.
7.
7.
7.
Page 73

SYSTEM INSTALLATION AND SUPERVISOR GUIDE 9.0 VER. 1
Class of
Service Setup
Class of
Service Setup
Class of
Service Setup
Class of
Service Setup
Class of
Service Setup
Class of
Service Setup
Directory Box
Setup
Directory Box
Setup
Directory Box
Setup
Default operator box during
day service hours
Default operator box during
night service hours
7017 When exiting open mailbox,
go to box #
7018 Digits callers can press
while holding
7020 to Restricted outcalling
7029 numbers
2001 Action to take if no digits
are dialed
2002 Box associated with
parameter 2001
2600 Number of time to play
greeting
0 = No
(Valid mailbox
number)
(Valid mailbox
number)
(Valid box number) A prompt for the
(Any digits) A prompt for the
0 = Return
1 = Say ‘Goodbye’
2 = Go to another box
3 = Hang up
(Valid box number) A prompt for the
l-3
A prompt for the
Item number refers
to the Class of
Service number.
Enter 0
A prompt for the
Item number refers
to the Class of
Service number.
Enter 0
A prompt for the
Item number refers
to the Class of
Service number.
Enter 0
Item number refers
to the Class of
Service number.
Enter 0
A prompt for the
Item number refers
to the Class of
Service number.
Enter 0
item number refers
to the Class of
Service number.
Enter 0
A prompt for the
Item number refers
to the box number.
Enter the box
number.
Item number refers
to the box number.
Enter the box
number.
A prompt for the
Item number refers
to the box number.
Enter the box
number.
7.
7.
7.
7.
7.
76
Page 74

S
YSTEM
INSTALLATION AND SUPERVISOR GUIDE 9.0 VER. 1
Directory Box
Setup
Directory Box
Setup
Directory Box
Setup
Directory Box
Setup
2601
Box associated with
parameter 2602
2602 Action to take if requested 0 = Return
name is not found
2603 Say box number before
transferring call? 0 = No
2604 Allow callers to hear 1 = Yes
complete directory listing? 0 = No
Directory Box 2605 Maximum number of digits
Setup to collect from callers
General
Information
5017 Fast-forwarded I rewind
seconds
Setup
General
5024 Technician password Up to 10 digits
Information
Setuo
General
5025 Customer password Up to 10 digits
Information
Setup
General
Information
5027
Digits needed to get line for (Refer to technical
external call bulletin and phone
Setup
General
5053
Store call log to: 0 = None
Information
Setup
General
Information
Setup
5056 (With parameter 5057) 0
Maximum number of
minutes call can last before
being rerouted
(Valid box number)
A prompt for the
Item number refers
to the box number.
number.
A prompt for the
1 = Say ‘Goodbye’
2 = Go to another box
to the box number.
3 = Hang up
1 =Yes
A prompt for the
to the box number.
A prompt for the
to the-box number.
l-9
A prompt for the
to the box number.
o- 10
documentation)
1 = File
2 = Printer
30
Enter the box
Item number refers
Enter the box
number.
Item number refers
Enter the box
number.
Item number refers
Enter the box
number.
Item number refers
Enter the box
77
Page 75

SYSTEM INSTALLATION AND SUPERVISOR GUIDE 9.0 VER. 1
General
Information
Setup
General
Information
Setup
General
Information
Setup
Group Box
Setup
Group Box
Setup
Holiday
Schedule Setup
Holiday
Schedule Setup
Holiday
Schedule Setup
Line Information
Setup
Line Information
Setup
5065
5066
2800
2801 to
2850
5050
5051
5052
1000
1001
(With parameter 5056) Box
(Valid box number)
to which calls are re-routed
Exit to DOS hour
00-23
Exit to DOS minutes
Maximum length of a
message (seconds) that
can be sent to this box
Group box members
(With parameter 5051)
(Valid box numbers)
00-12
Holiday month
(With parameter 5050)
01-31
Holiday date
Box to which calls are
(Valid box number)
routed during holiday
Box to which calls on this
(Valid box number)
line are routed during day
service hours
Box to which calls on this
(Valid box number)
line are routed during night
service hours
A prompt for the
Item number refers
to the box number.
Enter the box
number.
A prompt for the
Item number refers
to the box number.
box
number.
A prompt for the
Item number refers
to the holiday
number. Enter 1
through 20.
A prompt for the
Item number refers
to the holiday
number. Enter 1
through 20.
A prompt for the
Item number refers
to the holiday
number. Enter 1
through 20.
A prompt for the
Item number refers
to the line number.
Enter the line
number.
A prompt for the
Item number refers
to the line number.
Enter the line
number.
78
.
Page 76

SYSTEM INSTALLATION AND SUPERVISOR GUIDE 9.0 VER. 1
Line Information
Setup
Box to which calls on this
(Valid box number)
line are routed during lunch
service hours
A prompt for the
Item number refers
to the line number.
Enter the line
number.
A
Line Information
Setup
Rings before call is
answered during day
service hours
prompt for the
Item number refers
to the line number.
Enter the line
number.
A
Line Information
Setup
Rings before call is
answered during night
service hours
prompt for the
Item number refers
to the line number.
Enter the line
number.
Line information
Setup
Rings before call is
answered during lunch
service hours
A prompt for the
Item number refers
to the
number.
Enter the line
number.
Line Information
Setup
1006
Outgoing calls allowed on 1 =Yes
this line? 0 = No
A prompt for the
Item number refers
to the line number.
Enter the line
number.
Line Information
Setup
1007
Line belongs to Line Group 1 = Yes
A? 0 = No
A prompt for the
Item number refers
to the line number.
Enter the line
number.
Line Information
Setup
1008
Line belongs to Line Group 1 = Yes
B? 0 = No
A prompt for the
Item number refers
to the line number.
Enter the line
number.
Line Information
Setup
1009
Line belongs to Line Group 1 = Yes
A prompt for the
Item number refers
to the line number.
Line Information
Setup
1010
Line belongs to Line Group 1 =Yes
D? 0= No
Enter the line
number.
A prompt for the
item number refers
to the line number.
Enter the line
number.
79
Page 77

SYSTEM INSTALLATION AND SUPERVISOR GUIDE
9.0 VER. 1
Mailbox Setup Mailbox owner’s last name (Digits that will allow A prompt for the
Mailbox Setup Action to be taken after
Mailbox Setup
Mailbox Setup
Mailbox Setup
Mailbox Setup
Mailbox Setup
Mailbox Setup
2100
2101
2102
2110
2111
caller leaves message
Box associated with
parameter 2001
Mailbox password (Up to maximum A prompt for the
Sequence to turn on
message waiting lamp
Sequence to turn off
message waiting lamp
Box associated with
parameter 2111
Action to be taken if caller
chooses “other options”
the Dial-by-Name Item number refers
directory feature to the box number.
access this mailbox) Enter the box
0 = Return A prompt for the
1 = Say ‘Goodbye’ Item number refers
2 = Go to another box to the box number.
3 = Hang up Enter the box
(Valid box number) A prompt for the
digits specified during Item number refers
setup) to the box number..
(See technical
bulletin or phone
documentation)
(See technical
bulletin or phone
documentation)
(Valid box number) A prompt for the
0 = Return A prompt for the
1 = Say ‘Goodbye’ Item number refers
2 = Go to another box to the box number.
3 = Hang up Enter the box
number.
number.
Item number refers
to the box number.
Enter the box
number.
Enter the box
number.
A prompt for the
Item number refers
to the box number.
Enter the box
number.
A prompt for the
Item number refers
to the box number.
Enter the box
number.
Item number refers
to the box number.
Enter the box
number.
number.
80
Page 78

SYSTEM INSTALLATION AND SUPERVISOR GUIDE 9.0 VER. 1
Mailbox Setup
Mailbox Setup
Mailbox Setup 2114
Mailbox Setup 2115
Mailbox Setup
Mailbox Setup 2122
2113
2120
Mailbox has access to only
Hotel guest privileges?
Class of service assigned
to mailbox
Mailbox to which this
mailbox is a client, if this is
a restricted mailbox
Language in which greeting
is to play if call is via D.I.D
Type of transfer
Number of rings within
which called party must
answer before system
determines a no answer
condition
3-way calling used
1 =Yes
0 = No
(Valid mailbox
number)
o-9
0 =
1=Blind
2 = Wait for answer to the box number.
3 =
4 = Wait for ring number.
0 =
1 = Day only
2 = Night only
3 = Schedule A
4 = Schedule B
5 = Schedule C
6 = Schedule
0 =
1 = Day only
2 = Night only
3 = Schedule A
4 = Schedule B
6 = Schedule D
A prompt for the
Item number refers
to the box number.
Enter the box
number.
You can modify
only one personal
distribution list for
the mailbox using
the Teleparameter
feature
A prompt for the
Item number refers
to the box number.
Enter the box
number.
A prompt for the
Item number refers
to the box number.
Enter the box
number.
A prompt for the
Item number refers
to the box number.
Enter the box
number.
None A prompt for the
Screen
Always
Always
= Schedule C
Item number refers
Enter the box
A prompt for the
Item number refers
to the box number.
Enter the box
number.
A prompt for the
Item number refers
to the box number.
Enter the box
number.
81
Page 79

SYSTEM INSTALLATION AND SUPERVISOR GUIDE 9.0 VER. 1
Mailbox Setup
Mailbox Setup 2124
Mailbox Setup 2125
Mailbox Setup 2126
Mailbox Setup 2130 (With parameter 2134)
Mailbox Setup
Mailbox Setup
Mailbox Setup
2123
2131
2132 (With parameter 2134)
2133 (With parameter 2134)
Call transfer schedule
Caller’s name voiced upon
Record conversation?
Transfer destination Extension number
Type of pager
(With parameter 2134)
Minutes between calls to
Number of times to call
Schedule during which calls
should be sent to pager
0 =
Always
1 = Day only
2 = Night only
3 = Schedule A
4 = Schedule B
5 = Schedule C
6 = Schedule D
1 = Yes
0 = No
0 = No
0 = None
1 = Tone-only pager
(no display)
2 = Display pager
00
20
00
99
0 =
Always
1 = Day only
2 = Night only
3 = Schedule A
4 = Schedule B
5 = Schedule C
6 = Schedule D
A prompt for the
item number refers
to the box number.
Enter the box
number.
A prompt for the
Item number refers
to the box number.
Enter the box
number
A prompt for the
Item number refers
to the box number.
Enter the box
number.
A prompt for the
Item number refers
to the box number.
Enter the box
number.
A prompt for the
Item number refers
to the box number.
Enter the box
number.
A prompt for the
Item number refers
to the box number.
Enter the box
number.
A prompt for the
Item number refers
to the box number.
Enter the box
number.
A prompt for the
Item number refers
to the box number.
Enter the box
number.
82
-
Page 80

SYSTEM INSTALLATION AND SUPERVISOR GUIDE
9.0 VER. 1
Mailbox Setup
Mailbox Setup
Mailbox Setup
Mailbox Setup
Mailbox Setup
Mailbox Setup
2134
2141
2142
2143
2144
2150
Mailbox owner’s pager
number
Action to be taken after
personal greeting is played
Hours after which
messages are to be auto-
forwarded
(With parameter 2142) Box
to which new messages are
to be auto-forwarded
(With parameters 2142 and
2143) Schedule during
which auto-forwarding is to
be active
Number to call for message
delivery
(Pager number)
0 = Wait for a digit
1 = Begin recording a
message
2 = Page the mailbox
owner
3 = Record a
message, then page
the mailbox owner
0
(Valid mailbox
number)
0 =
1 = Day only
2 = Night only
3 = Schedule A
4 = Schedule B
5 = Schedule C
6 = Schedule D
(Phone or beeper
number)
999
Always
A prompt for the
Item number refers
to the box number.
Enter the box
number.
A prompt for the
Item number refers
to the box number.
Enter the box
number.
A prompt for the
Item number refers
to the box number.
Enter the box
number.
A prompt for the
Item number refers
to the box number.
Enter the box
number.
A prompt for the
Item number refers
to the box number.
Enter the box
number.
A prompt for the
Item number refers
to the box number.
Enter the box
number.
You can modify
only one message
delivery set up for
the mailbox using
the Teleparameter
feature.
83
Page 81

SYSTEM INSTALLATION AND SUPERVISOR GUIDE 9.0 V ER. 1
Mailbox Setup
Mailbox Setup
Mailbox Setup
2151
2152
2153
2154
nessage delivery cycle.
[With parameter 2150)
0
Number of times number is
be called
(With parameter 5152)
2
Minutes in between calls to
number
(With parameter 5150)
Schedule during which
message delivery is active
0 =
1 = Day only
2 = Night only
3 = Schedule A
4 = Schedule B
5 = Schedule C
6 = Schedule D
99
99
Always
4 prompt for the
Item number refers
the box number.
Enter the box
You can modify
delivery set up for
the mailbox using
the Teleparameter
feature.
A prompt for the
Item number refers
to the box number.
Enter the box
number.
You can modify
only one message
delivery set up
the mailbox using
the Teleparameter
feature.
A prompt for the
Item number refers
to the box number.
Enter the box
number.
You can modify
only one message
delivery set up for
the mailbox using
the Teleparameter
feature.
A prompt for the
Item number refers
to the box number.
Enter the box
number.
You can modify
only one message
delivery set up for
the mailbox using
the Teleparameter
feature.
84
Page 82

SYSTEM INSTALLATION AND SUPERVISOR GUIDE 9.0 V ER. 1
Mailbox Setup
Mailbox Setup
Customizations
Setup
Other
Customizations
Setup
Other
Customizations
Setup
Other
Customizations
Setup
Other
Customizations
2160 to Personal distribution list 1
2179 members
5018
5019
5021
5022
Personal distribution list 1
enabled for mailbox?
Maximum box length caller
can dial
Seconds of initial pause
before main greeting is
played
When VP system should
play time and date
Play called party’s name
when call is answered?
Announce call when call is
answered?
1 =Yes
0 = No
(Valid mailbox
numbers)
2-4
O-IO
0 = When caller asks
1 = Before each
message
2 = After each
message
1=Yes
0= No
1=Yes
0 =
A prompt for the
Item number refers
to the box number.
Enter the box
number.
You can modify
only one personal
distribution list for
the mailbox using
the Teleparameter
feature
A prompt for the
Item number refers
to the box number.
Enter the box
number.
No
Customizations
Customizations
5076 to
5079
5086 to
5089
Custom field (use under
direction of technical
Debug field (use under
direction of technical
a5
Page 83

SYSTEM INSTALLATION AND SUPERVISOR GUIDE 9.0 VER. 1
Question Box
Setup
Question Box
Setup
Question Box
Setup
Question Box
Setup
Question Box
Setup
Question Box
Setup
Question Box
Setup
Question Box
Setup
Question Box
Setup
2001
2002
2400
2401
2402
2403
2404
2410
2411
to take after
Box associated with
parameter 2404
Number of mailbox that
owns the Question box
Replay digit answers for
verification?
Voice answers? (versus
digit)
Trigger owner mailbox
notification of answers in
this box?
Digits caller can press to
exit this box
Answer type for Question
10
Answer type for Question 1
0 = Return
1 = Say ‘Goodbye’
2 = Go to another box
3 = Hang up
(Valid box number)
(Valid mailbox
number)
1 = Yes
0= No
1 = Yes
0 = No
1 = Yes
0 = No
0
9,
0 = Voice
1 = Digits
0 = Voice
1 = Digits
A prompt for the
Item number refers
to the box number.
Enter the box
number.
A prompt for the
Item number refers
to the box number.
Enter the box
number.
A prompt for the
Item number refers
to the box number.
Enter the box
number.
A prompt for the
Item number refers
to the box number..
Enter the box
number.
A prompt for the
Item number refers
to the box number.
Enter the box
number.
A prompt for the
to the box number.
A prompt for the
to the box number.
A prompt for the
to the box number.
A prompt for the
to the box number.
Item number refers
Enter the box
number.
Item number refers
Enter the box
number.
Item number refers
Enter the box
number.
Item number refers
Enter the box
number.
86
-
Page 84

SYSTEM INSTALLATION AND SUPERVISOR GUIDE 9.0 VER. 1
Question Box
Setup
Question Box
Setup
Question Box
Setup
Question Box
Setup
Question Box
Setup
Question Box
Setup
Question Box
Setup
Question Box
Setup
Question Box
Setup
2412
2413 Answer type for Question 3 0 = Voice
2414
2415
2416 Answer type for Question 6 0 = Voice
2417
2418
2419 Answer type for Question 9 0 = Voice
2420 If the answer type is digits,
Answer type for Question 2
Answer type for Question 4 0 = Voice
Answer type for Question 5 0 = Voice
Answer type for Question 7 0 = Voice
Answer type for Question 8
minimum number of digits
that must be entered for
valid answer to question 10.
0 = Voice
1 = Digits
1 = Digits
1 = Digits
1 = Digits
1 = Digits
1 = Digits
0 = Voice
1 = Digits
1 = Digits
1-999
A
prompt for the
Item number refers
to the box number.
Enter the box
number.
A
prompt for the
Item number refers
to the box number.
Enter the box
number.
A
prompt for the
Item number refers
to the box number.
Enter the box
number.
A prompt for the
Item number refers
to the box number.
Enter
number.
A prompt for the
Item number refers
to the box number.
Enter the box
number.
A prompt for the
Item number refers
to the box number.
Enter the box
number.
A prompt for the
Item number refers
to the box number.
Enter the box
number.
A prompt for the
Item number refers
to the box number.
Enter the box
number.
A prompt for the
Item number refers
to the box number.
Enter the box
number.
box
87
Page 85

SYSTEM INSTALLATION AND SUPERVISOR GUIDE 9.0 VER. 1
Question Box
Setup
Question Box
Setup
Question Box
Setup
Question Box
Setup
Question Box
Setup
Question Box
Setup
Question Box
Setup
Question Box
Setup
Question Box
Setup
2421
If the answer type is digits,
minimum number of digits
that must be entered for
valid answer to question 1.
2422
If the answer type is digits,
minimum number of digits
that must be entered for
valid answer to question 2.
2423
If the answer type is digits,
minimum number of digits
that must be entered for
valid answer to question 3.
2424 1
If the answer type is digits,
minimum number of digits
that must be entered for
valid answer to question 4.
2425
If the answer type is digits,
minimum number of digits
that must be entered for
valid answer to question 5.
2426 1
If the answer type is digits,
minimum number of digits
that must be entered for
valid answer to question 6.
2427 1
If the answer type is digits,
minimum number of digits
that must be entered for
valid answer to question 7.
2428
If the answer type is digits,
minimum number of digits
that must be entered for
valid answer to question 8.
2429
If the answer type is digits,
minimum number of digits
that must be entered for
valid answer to question 9.
999
1
999
1
999
999
1
999
999
999
1-999
1
999
A prompt for the
Item number refers
to the box number.
Enter the box
number.
A prompt for the
Item number refers
to the box number.
Enter the box
number.
A prompt for the
Item number refers
to the box number.
Enter the box
number.
A prompt for the
Item number refers
to the box number..
Enter the box
number.
A prompt for the
to the box number.
Enter the box
number.
A prompt for the
Item number refers
to the box number.
Enter the box
number.
A prompt for the
Item number refers
to the box number.
Enter the box
number.
A prompt for the
Item number refers
to the box number.
Enter the box
number.
A prompt for the
Item number refers
to the box number.
Enter the box
number.
88
-
Page 86

SYSTEM INSTALLATION AND SUPERVISOR GUIDE 9.0 V ER. 1
Question Box
Setup
Question Box
Setup
Question Box
Setup
Question Box
Setup
Question Box
Setup
Question Box
Setup
Question Box
Setup
Question Box
Setup
Question Box
Setup
2430
2431
2432
2433
2434
2435
2436
2437
2438
If the answer type is digits,
maximum number of digits
that can be entered for valid
answer to question 10.
If the answer type is digits,
1
maximum number of digits
that can be entered for valid
answer to question 1.
If the answer type is digits,
1
maximum number of digits
that can be entered for valid
answer to question 2.
If the answer type is digits,
1
maximum number of digits
that can be entered for valid
answer to question 3.
If the answer type is digits,
1
maximum number of digits
that can be entered for valid
answer to question 4.
If the answer type is digits,
1
maximum number of digits
that can be entered for valid
answer to question 5.
If the answer type is digits,
1
maximum number of digits
that can be entered for valid
answer to question 6.
If the answer type is digits,
1
maximum number of digits
that can be entered for valid
answer to question 7.
If the answer tyise is digits,
1
maximum number of digits
that can be entered for valid
answer to question 8.
999
999
999
999
999
999
999 .
999
A prompt for the
Item number refers
to the box number.
Enter the box
number.
A prompt for the
Item number refers
to the box number.
Enter the box
number.
A prompt for the
Item number refers
to the box number.
Enter the box
number.
A prompt for the
Item number refers
to the box number.
Enter ihe box
number.
A prompt for the
Item number refers
to the box number.
Enter the box
number.
A prompt for the
Item number refers
to the box number.
Enter the box
number.
A prompt for the
Item number refers
to the box number.
Enter the box
number.
A prompt for the
Item number refers
to the box number.
Enter the box
number.
A prompt for the
Item number refers
to the box number.
Enter the box
number.
89
.
Page 87

Question Box
Question Box
Setup
Question Box 1 2441
Setup
Question Box
2442
Setup
Question Box
2443
Setup
Question Box
2444
Setup
SYSTEM INSTALLATION AND SUPERVISOR GUIDE 9.0 V ER. 1
1
If the answer type is digits,
999
maximum number of digits
that can be entered for valid
answer to question 9.
Number of seconds of
1-99
silence before VP system
determines caller has
finished entering digits or
speaking the answer for
question 10.
Number of seconds of
1-99
silence before VP system
determines caller has
finished entering digits or
speaking the answer for
question 1.
Number of seconds of
1-99
silence before VP system
determines caller has
finished entering digits or
speaking the answer for
question 2.
1
Number of seconds of
99
silence before VP system
determines caller has
finished entering digits or
speaking the answer for
question 3.
Number of seconds of
1
99
silence before VP system
determines caller has
finished entering digits or
speaking the answer for
question 4.
Number of seconds of
1-99
silence before VP system
determines caller has
finished entering digits or
speaking the answer for
question 5.
A prompt for the
Item number refers
to the box number.
Enter the box
number.
A prompt for the
Item number refers
to the box number.
Enter the box
number.
A prompt for the
item number refers
to the box number.
Enter the box
number.
A prompt for the
Item number refers
to the box number.
Enter the box
number.
A prompt for the
Item number refers
to the box number.
Enter the box
number.
A prompt for the
Item number refers
to the box number.
Enter the box
number.
A prompt for the
Item number refers
to the box number.
Enter the box
number.
Page 88

SYSTEM INSTALLATION AND SUPERVISOR GUIDE 9.0 V ER. 1
Question Box
Setup
Question Box
Setup
Question Box
Setup
Question Box
Setup
Routing Box
Setup
Routing Box
Setup
Routing Box
Setup
Routing Box
Setup
Routing Box
Setup
2447
2448
2449
2001
2002
2300
2301
2302
Number of seconds of
silence before VP system
determines caller has
finished entering digits or
speaking the answer for
question 6.
Number of seconds of
silence before VP system
determines caller has
finished entering digits or
speaking the answer for
question 7.
Number of seconds of
silence before VP system
determines caller has
finished entering digits or
speaking the answer for
question 8.
Number of seconds of
silence before VP system
determines caller has
finished entering digits or
speaking the answer for
question 9.
Action to take if no digits
dialed
Box associated with
parameter 2001
Single-digit dialing
destination for digit 0
Single-digit dialing
destination for digit 1
Single-digit dialing
destination for digit 2
4 prompt for the
Enter the box
lumber.
1-99
1-99
1-99
0 = Return
1 = Say ‘Goodbye’
2 = Go to another box
3 = Hang up
(Valid box number)
(Valid box number)
(Valid box number)
(Valid box number)
4 prompt for the
Item number refers
to the box number.
Enter the box
number.
A prompt for the
Item number refers
to the box number.
Enter the box
number.
Item number refers
to the box number.
Enter the box
number.
A prompt for the
Item number refers
to the box number.
Enter the box
number.
A prompt for the
Item number refers
to the box number.
number.
A prompt for the
to the box number.
number refers
the box number.
Enter the box
Item number refers
Enter the box
number.
91
Page 89

SYSTEM INSTALLATION AND SUPERVISOR GUIDE 9.0 V ER. 1
Technical 5063
Information automatically updates MWI
Setup
Technical 5064
Information
VM.CMG Setup
Setup
VM.CMG SetupI9004Iignorenonsilence
VM.CMG Setup
VM.CMG Setup
VM.CMG Setup 9012
VM.CMG Setup
VM.CMG Setup 9015 greetsil=
VM.CMG SetupI9017
VM.CMG Setup 9026 responsetime=
I I
9001
9003
9007
9011
9014 maxpasswordlength=
Hour at which system
(With parameter 5063)
Minute at which system
transbypass=
dtmfon=
internal=
pagetime=
pagerretry=
notifyreps=
See the installation
Manual.
See the Installation
Manual.
See the Installation
Manual.
See the Installation
Manual.
See the Installation
Manual.
See the Installation
Manual.
See the Installation
Manual.
See the Installation
Manual.
I
I
Setup 9099 pa.init=
VM.CMG Setup
VM.CMG Setup
VM.CMG Setup 9102 pa.repeats=
1 9100
9101
See the Installation
Manual.
See the Installation
Manual.
See the Installation
Manual.
I
I
I
Page 90

SYSTEM INSTALLATION AND SUPERVISOR GUIDE 9.0 VER. 1
VM.CMG Setup 9126
VM.CMG Setup 9127
VM.CMG Setup
VM.CMG Setup
VM.CMG Setup
VM.CMG Setup 9150
9135
9144
9146
lunchoperatorisday See the Installation
ignoredisconnects
nonametransfer
norecordbeep
repeatmw=
remotepause=
See the Installation
Manual.
See the Installation
Manual.
See the Installation
Manual.
See the Installation
Manual.
See the Installation
Manual.
See the Installation
Manual.
Page 91

SYSTEM INSTALLATION AND SUPERVISOR GUIDE 9.0 VER. 1
VM.CMG Setup 9160
9161
VM.CMG Setup 9162 assumepageconfirm See the Installation
Setup 9163
Setup 9165 externalfax See the Installation
VM.CMG Setup
VM.CMG Setup 9174 cdspeed=
VM.CMG Setup
VM.CMG Setup 9192 24hourclockdisplay
VM.CMG Setup
VM.CMG Setup 9206 qboxposconfirm
9167 nopcbeep See the Installation
9182
I
9190
9203 linesconnecfed= See the Installation
9207
I
notifyrings=
assumehold= See the Installation
ignoreinitialdisconnect
I
lineaccessontransfer
qboxdataprint See the Installation
I
See the Installation
Manual.
See the Installation
Manual.
Manual.
Manual.
Manual.
Manual.
Manual.
See the Installation
Manual.
See the Installation
Manual.
See the Installation
I
Manual.
See the Installation
Manual.
Manual.
See the Installation
Manual.
Manual.
I I
I
96
See the Installation
.
Page 92

SYSTEM INSTALLATION AND SUPERVISOR GUIDE 9.0 VER. 1
VM.CMG Setup
VM.CMG Setup
VM.CMG SetupI9222 cp.dnd=
VM.CMG Setup
VM.CMG Setup
VM.CMG Setup
VM.CMG Setup 9232 senddisconnect=
VM.CMG Setup
9219
9220 cp. busy=
9221
9223
9224
9256
cp.ans=
cp.initring=
playbackdelay=
See the Installation
Manual.
See the Installation
Manual.
See the Installation
Manual.
See the Installation
Manual.
See the Installation
Manual.
I
I
I
I
I
VM.CMG Setup
I
VM.CMG Setup 9282 qboxdataprinteject
VM.CMG Setup
VM.CMG Setup 1 9296 1 mboxdefaultdigit=
VM.CMG Setup
9283 qboxuseconfirmnumbers
9301
cp.disconnect=
I
greeting.noanswer=
See the Installation
Manual.
See the installation
Manual.
I
Page 93

SYSTEM INSTALLATION AND SUPERVISOR GUIDE 9.0
VER. 1
VM.CMG Setup
VM.CMG Setup
VM.CMG Setup 9337 noaccountinlog See the Installation
VM.CMG Setup
VM.CMG Setup
VM.CMG Setup
VM.CMG Setup
VM.CMG Setup
VM.CMG Setup
VM.CMG Setup
VM.CMG Setup
Setup 9353 messagepausetime=
VM.CMG Setup
VM.CMG Setup
VM.CMG Setup
VM.CMG Setup
VM.CMG Setup 9364 serviceobservecode=
VM.CMG Setup 9365 acdpause=
Setup
9302 greeting.busy=
9303 greeting.dnd=
9339 greeting.night= See the Installation
9340 faxpause= See the Installation
9342 samecallfaxok
9343 mwonreps= See the Installation
9344 mwoffreps=
9346
faxprefix= 1
9349 faxgeneraldelivery= See the Installation
9351
9352 directoryidp= See the Installation
9354 sharefaxports See the Installation
9359 flowcontrol= See the Installation
9360 fastacdtransfer
9361
9383 wakeuprings=
initialpauseidp=
pmsviatextfiles
See the installation
Manual.
See the Installation
Manual.
Manual.
Manual.
Manual.
See the Installation
Manual.
Manual.
See the Installation
Manual.
Installation
Manual.
See the Installation
Manual.
Manual.
See the Installation
Manual.
Manual.
Manual.
See the Installation
Manual.
See the Installation
Manual.
See the Installation
Manual.
See the Installation
Manual.
See the Installation
Manual.
Page 94

VM.CMG Setu
SYSTEM INSTALLATION AND SUPERVISOR GUIDE 9.0 VER.
See the Installation
Manual.
See the installation
Manual.
See the Installation
Manual.
See the Installation
Manual.
(Code supplied by Code found on
Key Voice) invoice.
I
(Code supplied by
Key Voice)
that controls the number of
authorizing the software for
certain phone system-
related features.
(Code supplied by
Key Voice)
(Code supplied by
Key Voice)
Code found on
invoice.
Code found on
invoice.
Code found on
invoice.
The following table identifies additional values you can specify to indicate special characters
or information in some fields:
99
Page 95

Page 96

SYSTEM INSTALLATION AND SUPERVISOR G UIDE 9.0 VER. 1
values. For information on day-to-day modifications that can be made using Supervisor
menu options (and not the Teleparameter feature), refer to section 3.
2.8 Upgrading 2 Port Systems to 4 Ports
You can upgrade 2-port Lite systems to
sales representative for information. When you purchase a system port upgrade, you are
provided a code number (located
This code enables the additional 2 ports for service.
To enter the upgrade code, use teleparameter 400
When prompted, simply enter the code provided on the invoice.
the invoice), which you must enter into the Lite system.
as 4-port systems. Contact the Lite system
as described earlier
this document.
,
101
Page 97

S
YSTEM INSTALLATION AND SUPERVISOR GUIDE
9.0 VER. 1
3. System Supervisor Instructions
The procedures provided in this section indicate how a system supervisor can make changes
to the system setup by calling into the system using a telephone. Each of these procedures
can also be performed by accessing the Lite system software screens through a serial
connection to a laptop PC. For procedures on making modifications through the screen
interface, refer to procedures earlier in this document, or to the Installation and Maintenance
Manual or Supervisor’s Guide.
3.1 Working with Mailboxes
Adding, Deleting, or Modifying
1.
From a telephone, call into voice mail and log into the supervisor mailbox 70. The
system voices the Main menu:
“To listen to your messages press 1.
press 3.
To
a message press 2.
l
To change
options
103
-
Page 98

SYSTEM INSTALLATION AND SUPERVISOR GUIDE 9.0 VER. 1
2.
To access the Supervisor menu, press 6 (this option is not voiced). The system voices
the Supervisor menu options:
Supervisor Menu
For Mailbox Administration
For Routing Box Administration
For Question Box Administration
For Port Administration
To Change the System Broadcast Message
To Change the Voice Mail Day
To Change the System Time
To Change the System Date
To Modify System Parameters
To Perform First-Time Setup
3.
From the Supervisors menu, press 1 for Mailbox Administration.
Night Service
Press 1
Press 2
Press 3
Press 4
Press 5
Press 6
Press 7
Press 8
Press 9
Press 0
4.
When prompted, enter the number of the mailbox you want to add, modify, or delete.
The system voices the number back to you.
5.
When prompted, press 1 to confirm the number you entered or press # if the number you
entered was incorrect. Once you press
to confirm, the system voices the Mailbox menu
options:
Mailbox Menu
To Add
To Delete Press 2
To Modify
To Suspend Press 4
To Restore Press 5
To Reset Press 6
To Exit
Press 1
Press 3
Press #
-
104
.
Page 99

SYSTEM INSTALLATION AND SUPERVISOR GUIDE 9.0 V ER. 1
6.
To add a new the mailbox to the system, press 1. The system adds the new mailbox to
the mailbox database. All default settings
the mailbox are set to the default parameters
settings specified in prototype mailbox 9994. The default password for the mailbox is the
same as the mailbox number.
To delete the mailbox from the system, press 2. The system deletes the mailbox from the
mailbox database.
To modify the mailbox on the system, press 3. The system voices the Options menu:
Options Menu
To Record Your Name
To Record Your Greeting
To Change Your Password
To Change Your Call-Transfer Feature
To Change Your Message Notification Feature
To Change Your Pager Feature
To Review Msgs Scheduled for Future Delivery
To Change your Personal Distribution Lists
To Retrieve a Message Previously Sent
To Return to the Main Menu
Press 1
Press 2
Press 3
Press 4
Press 5
Press 6
Press 7
Press 8
Press *
Press #
7.
To record the mailbox owner’s name, press 1. (Note that each mailbox owner can also
log into the mailbox and complete this task-this does not need to be performed by a
system supervisor.)
8.
Once you record the name, the system voices the following prompts:
To Re-Record Press 2
Follow the prompts to complete the procedure.
105
Page 100

SYSTEM INSTALLATION AND SUPERVISOR GUIDE 9.0 VER. 1
9.
To record a personal greeting for the mailbox, press 2. You can record up to 10 personal
greetings for the mailbox (0 through 9). (Note that each mailbox owner can also log into
the mailbox and complete this task-this does not need to be performed by a system
supervisor.)
Once you record a greeting, the system voices the following prompts:
Press 1
To Re-Record the Greeting
To Delete the Greeting
To Choose a New Greeting
Press 2
Press 3
Press 5
Press #
Follow the prompts to complete the procedure.
1. To change the mailbox password, press 3. Note that to change the password,
must
first enter the current password when prompted by the system. By default, the mailbox
password is the same as the mailbox number. (Also note that each mailbox owner can
log into the mailbox and complete this task-this does not need to be performed by a
system supervisor.)
Once you enter a new mailbox password and confirm the entry as prompted, the system
voices a prompt informing you that the new password will be in effect the next time the
mailbox is accessed.
12. To change the call transfer feature, press 4. (Note that each mailbox owner can also log
into the mailbox and complete this task-this does not need to be performed by a system
supervisor.)
13. The system voices a prompt
the current call transfer set up, then voices the
call transfer options:
Press 1 if you would like to change the number
Follow the prompts to complete the procedure.
.
106
 Loading...