

Page 1
GCA70245.07 06/03
Printed in U.S.A.
DSU II Digital Expandable Systems
Attendant Manual
Page 2

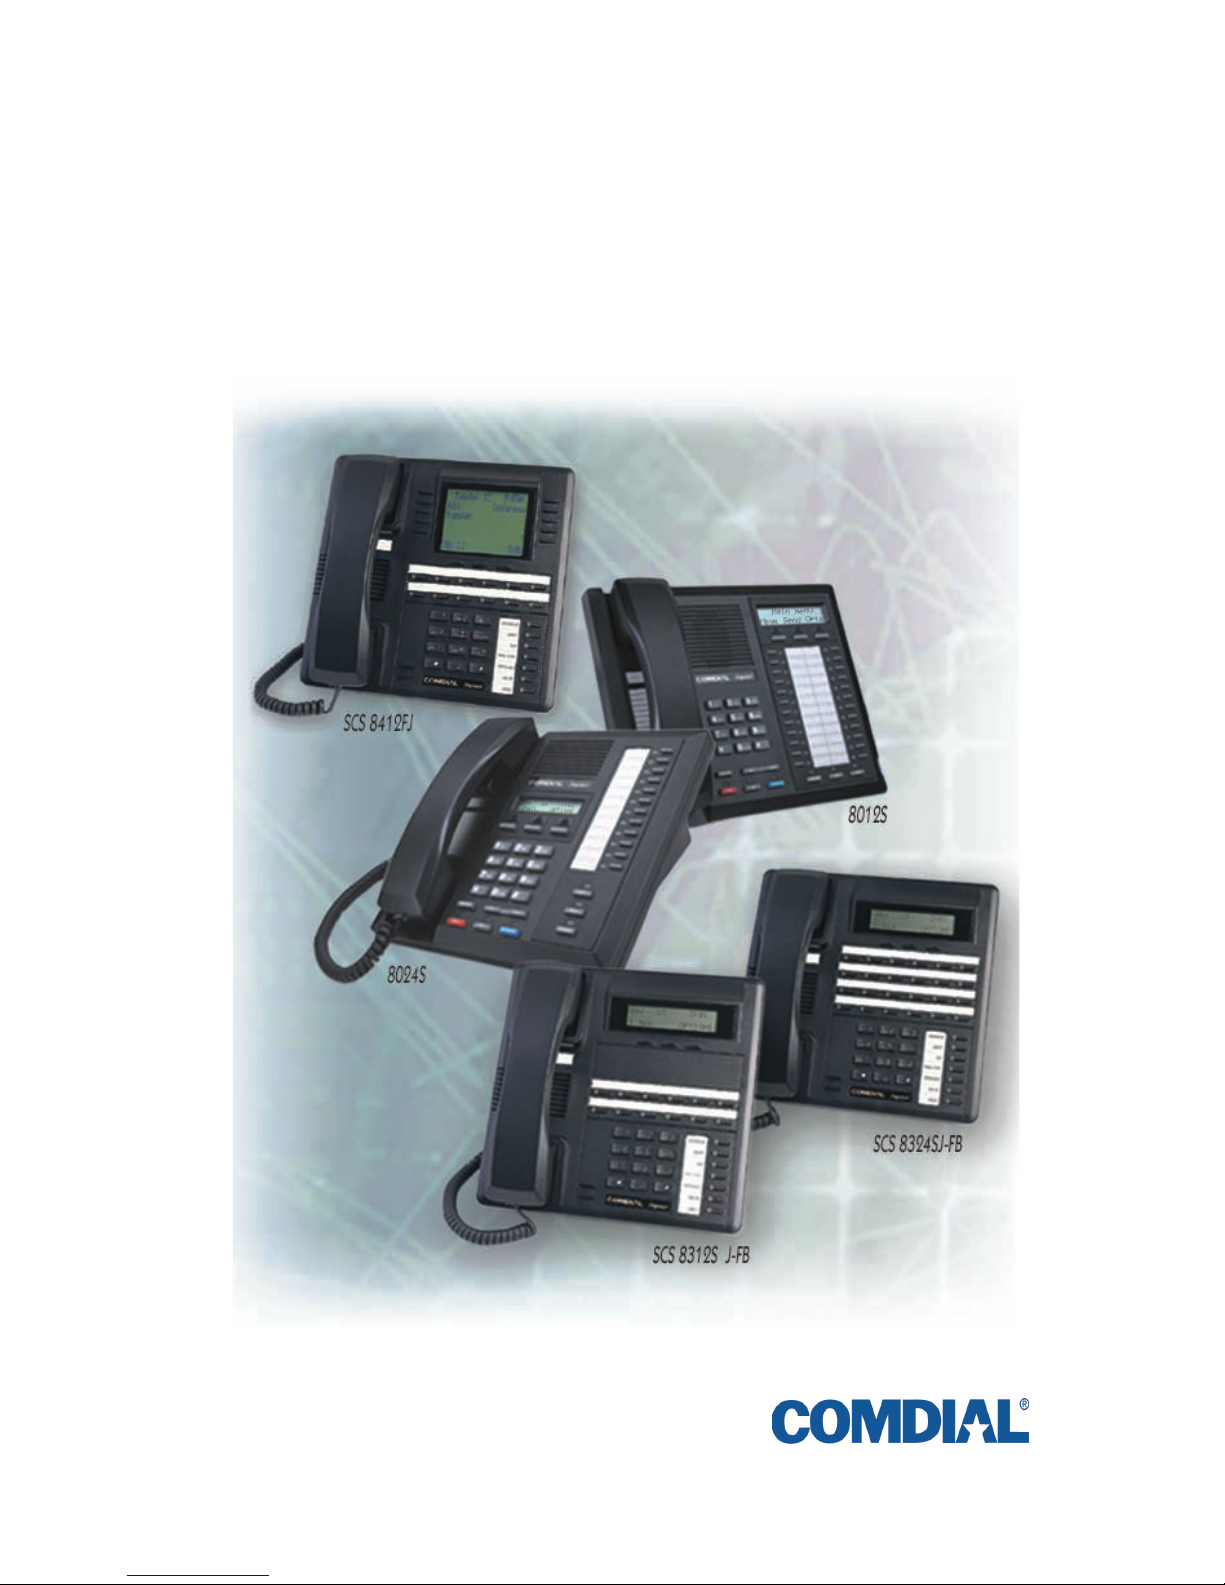
This user’s guide is for the following system:
DSU II Digital Expandable Systems
This user’s guide applies to the following telephone models:
•Impact 8012S-** Rev. A and later.
•Impact 8024S-** Rev. A and later.
•Impact SCS 8324S-** Rev. A and later
•Impact SCS 8312S-** Rev. A and later
•Impact SCS 8324F-** Rev. A and later
Contact your Comdial dealer for updates of this as well as other
Comdial publications.
Copyright © 2003 Comdial Corporation
All rights reserved. Unauthorized use of this document is prohibited.
Comdial Corporation
106 Cattlemen Road, Sarasota, FL 34232
(941)554-5000 or (800)266-3425
-Notice-
Comdial reserves the right to make any changes and improvements in the
product described in this document at any time and without prior notice.
Impact is a trademark of Comdial Corporation. All other product names
are trademarks of their respective owners.
Page 3

Table of Contents
1. Getting Started ...................................................................... 1
1.1 Setting Up Your Speakerphone .................................................. 1
1.1.1 Positioning Your Speakerphone ........................................ 2
1.1.2 Setting Display Contrast .................................................... 3
1.1.3 Setting a Personal Ringing Tone........................................ 4
1.1.4 Setting Volume Levels....................................................... 5
1.1.5 Answering and Making Calls............................................. 6
1.2 Understanding the Basic Functions ............................................ 7
1.3 Your Speakerphone’s Buttons .................................................... 9
1.4 Your Speakerphone’s Display Lights ...................................... 12
1.5 Understanding the Rings Patterns ............................................ 14
2. Answering Calls .................................................................. 15
2.1 Answering Outside Calls .......................................................... 15
2.2 Answering Intercom Calls ........................................................ 16
2.3 Monitored Stations ................................................................... 17
2.4 Holding Calls ............................................................................ 18
2.4.1 Exclusive Hold................................................................. 18
2.4.2 Hold Recalls..................................................................... 19
2.4.3 Directed Hold................................................................... 20
2.5 Night Transferred Calls - Line Answer From Any Station ...... 21
2.6 Caller ID (Automatic Number Identification) .......................... 21
2.7 Call Pickup ............................................................................... 22
2.7.1 Group Call Pickup............................................................ 22
2.7.2 Directed Call Pickup ........................................................ 22
2.8 Receiving Subdued Off-Hook Voice Announcements
(SOHVA) .................................................................................. 24
2.8.1 Handling an Incoming SOHVA....................................... 24
2.8.2 Blocking a SOHVA ......................................................... 26
2.9 Voice Announce Blocking ....................................................... 27
3. Making Calls ........................................................................ 29
3.1 Making Outside Calls ............................................................... 29
3.2 Making Intercom Calls ............................................................. 30
3.3 Automatic Dialing .................................................................... 31
3.4 Redialing .................................................................................. 32
Page 4

3.4.1 Redial - Last-Dialed Number .......................................... 32
3.4.2 Automatic Redial............................................................. 32
3.4.3 Redial Programming (Storing Numbers) ........................ 33
3.5 Sending Subdued Off-Hook Voice Announcements
(SOHVA) 34
3.6 Camping On and Queuing ........................................................ 35
3.6.1 Busy or Idle Station, Automatic Callback....................... 35
3.6.2 Busy Station, Wait For An Answer (Call Waiting) ........ 36
3.7 Executive Override ...................................................................37
4. Advanced Call Handling...................................................... 39
4.1 Waiting for a Line (Queuing) ................................................... 39
4.2 Call Transferring .......................................................................40
4.2.1 Screened Call Transfers .................................................. 40
4.2.2 Unscreened Call Transfers .............................................. 42
4.3 Conferencing ............................................................................ 43
4.3.1 Creating a Conference Call ............................................. 43
4.3.2 Unsupervised Conference Calls ...................................... 44
4.4 Call Parking ..............................................................................45
4.4.1 Handling Park Recalls..................................................... 45
4.5 Call Forwarding ........................................................................ 47
4.5.1 Forwarding a Call............................................................ 47
4.6 Call Forward Outside System (CFOS) ..................................... 49
5. Nonverbal Messaging.......................................................... 51
5.1 Station-to-Station Message Delivery ........................................51
5.2 Message Waiting Light and Messaging .................................... 52
5.3 LCD Message Delivery ............................................................ 54
5.4 Assist Button Message Delivery ...............................................56
5.5 Response Message Delivery .....................................................56
6. rogramming.......................................................................... 57
6.1 DSS Numbers ...........................................................................57
6.2 Autodial And Speed Dial Numbers ........................................58
6.3 Feature Access Codes ............................................................... 60
6.4 Feature Buttons .........................................................................62
6.4.1 Response Message Button............................................... 64
6.4.2 Transfer Button ............................................................... 64
6.4.3 Subdued Off-Hook Voice Announce (SOHVA) Button. 65
6.4.4 Group Listening Button................................................... 65
Page 5

6.4.5 Assist Button.................................................................... 66
6.4.6 Automatic Redial Button ................................................. 67
7. Other Features..................................................................... 69
7.1 Line Groups .............................................................................. 69
7.2 Volume Control ........................................................................ 70
7.2.1 Setting Current Volume Level ......................................... 70
7.2.2 Muting Your Speakerphone............................................. 71
7.3 Default Volume Control ........................................................... 72
7.4 Background Music ................................................................... 73
7.5 Do Not Disturb Condition ........................................................ 74
7.6 Account Codes ......................................................................... 75
7.7 Paging ....................................................................................... 76
7.8 Tracker Paging System ............................................................. 78
7.9 Auxiliary Jack .......................................................................... 81
7.10 Automatic Set Relocation ....................................................... 83
7.11 Service Observing .................................................................. 84
7.12 Switching The Dialing Mode Between Pulse And Tone ....... 84
7.13 Toll Restriction Override ....................................................... 85
7.14 Dial By Name ......................................................................... 86
7.15 Programmed Button Display .................................................. 87
7.15.1 Button Functions Display (Button Query).................... 87
7.16 Data Interface Unit ................................................................. 88
7.17 IMIST Module ........................................................................ 89
7.18 DSS/BLF Console Operation ................................................. 90
7.18.1 Accessing The DSS/BLF Console Button Levels ........ 91
8. Attendant Features.............................................................. 93
8.1 LCD Message Creation ............................................................ 93
8.1.1 LCD Message Creation Examples.................................. 94
8.2 System Telephone Naming ...................................................... 96
8.3 Night Transfer .......................................................................... 98
8.4 Call Transfer - Voice Mail System .......................................... 99
8.5 Call Transfer - Transferring Recalls to a Secondary Attendant
Telephone ............................................................................... 100
8.6 System Speed Dial Numbers .................................................. 101
8.7 System Clock .......................................................................... 103
8.8 Music On Hold ....................................................................... 103
8.9 Station Message Detail Accounting (SMDA) Printout .......... 104
Page 6

8.10 System Alarm Reporting ......................................................105
8.11 Direct Inward Station Dialing (DISD) ..................................106
8.12 Digital Voice Announcing (DVA) .......................................107
8.12.1 Day answer messages.................................................. 108
8.12.2 Night answer messages ............................................... 108
8.12.3 Recall messages........................................................... 108
8.12.4 Drop message .............................................................. 109
Appendix A Feature Access Codes ..................................... 111
Appendix B Display Abbreviations...................................... 115
Appendix C Speakerphone Characteristics ........................ 119
8.13 Full-Duplex Speakerphone Characteristics ..........................119
8.14 Speakerphone User Guidelines .............................................120
Appendix D Glossary ............................................................ 123
Index .......................................................................................... 133
Page 7

GCA70245
August, 03 Comdial i
ABOUT THIS BOOK
As a system attendant, you must be familiar with the operation of
your individual station and the entire digital communication system.
This attendant manual serves as both an introduction to the individual
speakerphone and system for new users and a reference for experi
-
enced users.
Introduction
The first chapter of the manual describes the initial setup and adjustments necessary to begin using your speakerphone.
1 Getting Started
Basic Operation
The basic operation chapters define often-used features and provide
instructions for their use. These chapters are titled as follows:
2 Answering Calls
3 Making Calls
Advanced Operation
The chapters that describe the advanced features of the DXP, DXP
Plus, and FX Series systems are as follows:
4 Advanced Call Handling
5 Nonverbal Messaging
6Programming
7 Other Features
In addition to the chapters which describe the advanced features of
individual stations, this manual also includes a chapter to describe the
features of the system which are programmed by the attendant.
8 Attendant Features
Page 8

ii Comdial August, 03
Following the advanced feature descriptions are two reference tables
that provide a summary and reference of features.
Appendix A Quick Reference Guide
Appendix B Display Abbreviations
Also, tips on speakerphone use for the new users are described in
Appendix C and many general phrases and abbreviations which may
not be familiar to users are defined in the glossary. Finally, an index
completes the reference section.
Appendix C Speakerphone Characteristics
Appendix D Glossary
Appendix E Feature Networking Support
Index
What is an Attendant?
The attendant of a telephone system is typically the first person to
answer an incoming call and usually directs incoming calls to the
proper person or department within the system. In addition to call
control, the attendant controls system-wide operating features such as
night transfer (of ringing) and the system clock. Additionally, the
attendant is responsible for programming such items as system speed
dial numbers and LCD messages that are available to many of the
system users.
The system provides two fixed attendant positions at default (stations
1 and 2, intercom 1001 and 1002); however, installers can assign any
or all stations (up to 96 total) as attendant stations if they wish.
Installers can also assign up to four DSS/BLF consoles to each
attendant position where needed. In addition to the many installerenabled feature buttons that the system can make available at any
station, the system provides the attendant position with several
special purpose installer-enabled feature buttons to enhance call pro
-
cessing. These special purpose buttons are described in Chapter 8.
Page 9

GCA70245
August, 03 Comdial iii
The system also provides capabilities for either a local stand-alone
system or a system-to-system network. System-to-system net
working connects several DXP, DXP Plus, FXS, FXT, and FXII
systems together in an arrangement that allows unified communica
tions through the system. For a complete list of features and their
properties, see Appendix E, Feature Networking Support.
Page 10

iv Comdial August, 03
Notes
Page 11

DSUII Attendant User’s Guide
August, 03 Comdial 1
1. GETTING STARTED
Congratulations and thank you for using a Comdial telephone system!
Your digital speakerphone is supported by a communication system
with hundreds of built-in, standard features. This manual serves as a
helpful guide for using these various functions. The sections in this
introductory chapter help you initially set up your speakerphone and
become familiar with the controls and indicators. The remaining sec
-
tions are titled as follows:
• Setting Up Your Speakerphone
• Understanding the Basic Functions
• Your Speakerphone’s Buttons
• Your Speakerphone’s Display Lights
• Understanding What the Rings Mean
After setting up your individual station, you are ready to begin your
duties as the system attendant. Chapter 8, Attendant Features, con
tains instructions on station and line enabling, station naming, and
other system level actions that you should accomplish to effectively
begin operation of your Comdial digital system.
1.1 Setting Up Your Speakerphone
When your new speakerphone
arrives,
the system installer
unpacks your speakerphone and
connects the line to a system jack.
The following sections describe a
few initial adjustments that allow
you to quickly begin making and
answering calls with some of the
most basic features.
Impact 8024 LCD Speakerphone
Page 12
Getting Started GCA70-245
2 Comdial August, 03
1.1.1 POSITIONING YOUR SPEAKERPHONE
You should adjust the position of the speakerphone on your desk or
table to suit your individual needs and maximize the performance of
the sound activated features. When using your speakerphone, the
microphone and loudspeaker are farther from you than when you use
a handset. Some positioning tips to consider include:
• For the microphone to best detect your voice, speak within three
feet of it and face the speakerphone.
• Background noise may prevent the sound-activated switches
from operating properly. Avoid placing the speakerphone where
it will detect sounds from typewriters, keyboards, printers,
paging systems, and other equipment.
• Place the telephone on a hard surface and away from table
edges. Do not place the telephone in corners or enclosures. Do
not let obstructions come between you and the microphone.
If you are using an Impact SCS model, your telephone has an
adjustable pedestal to allow you to select the most comfortable
viewing angle. When you receive the telephone, the pedestal is in its
lowest position—flush against the pedestal.
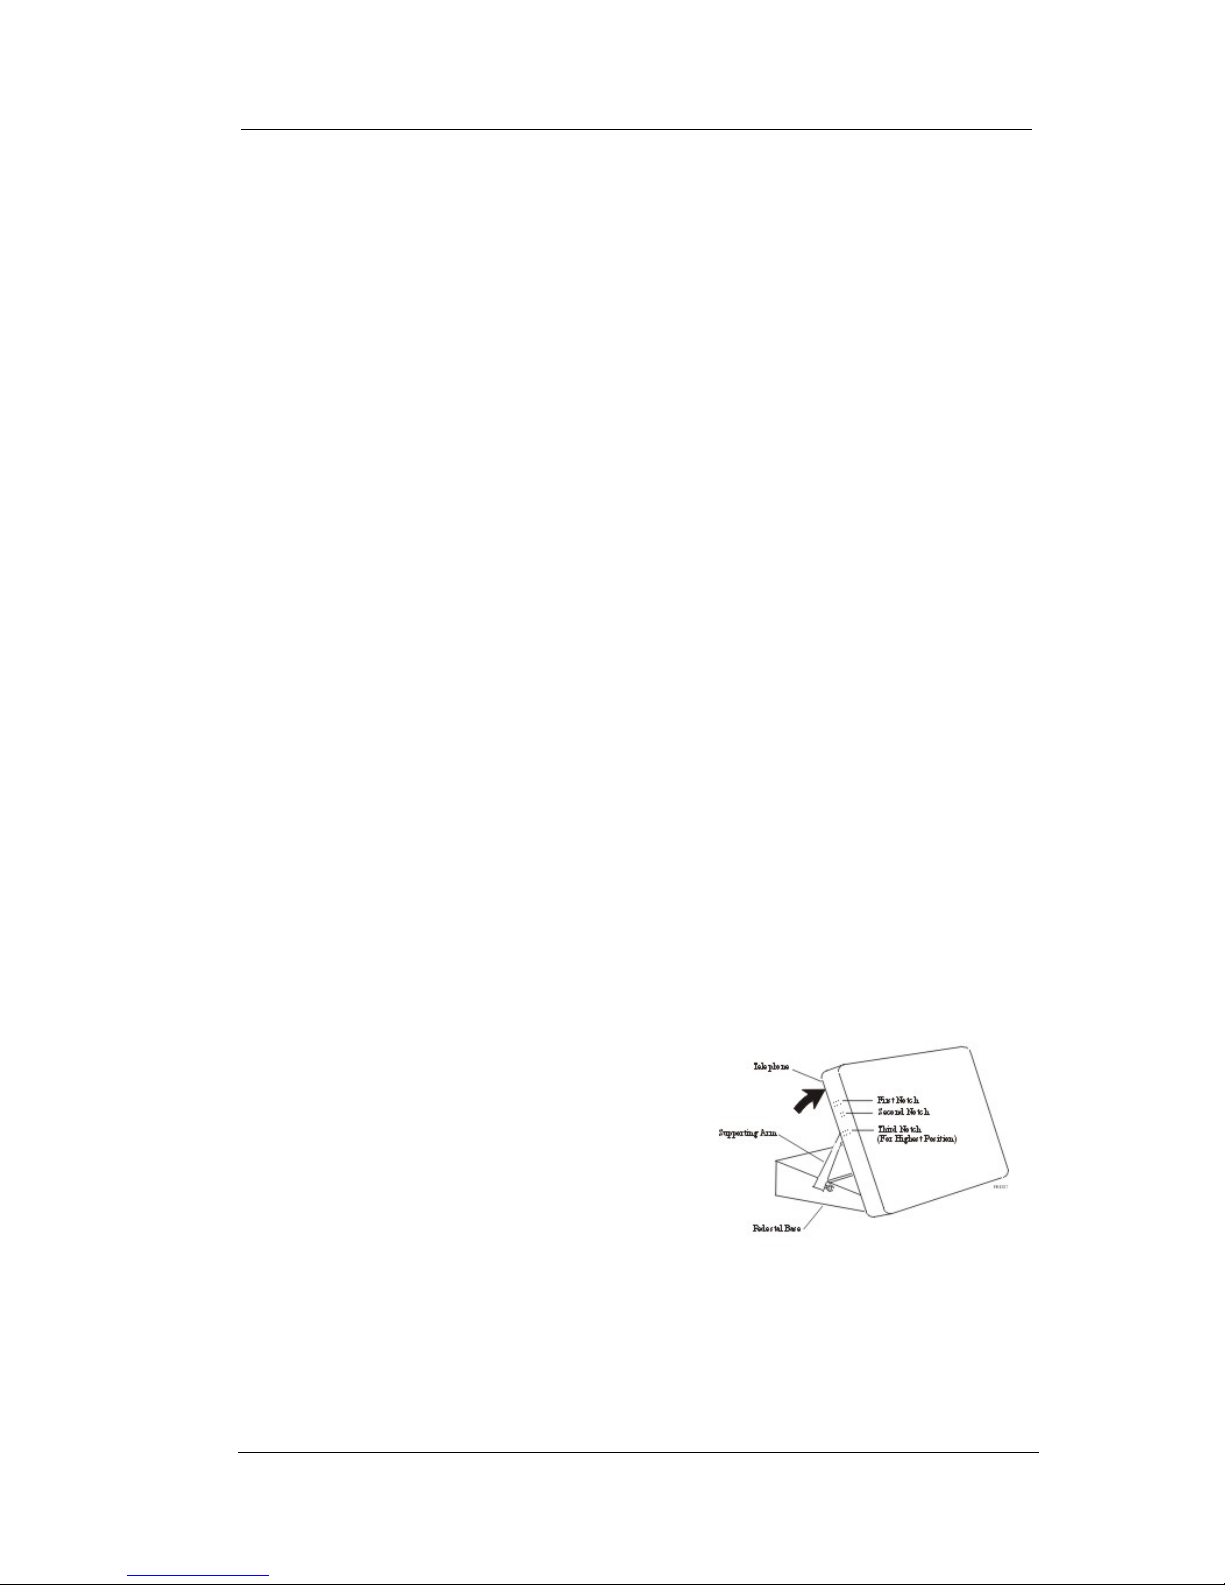
• To adjust the pedestal (Models 8312S, 8324S and 8324F
only),
1. GRASP the rear of the pedestal
base firmly with one hand AND
LIFT the rear portion of the tele
phone upward with your other
hand.
2. LIFT the telephone upward with
one hand AND RAISE the tele
phone supporting arms upward
with your other hand. (Notice there
are three sets of notches under the
telephone corresponding to the three positions available.)
Adjusting the Pedestal
Page 13
DSUII Attendant User’s Guide
August, 03 Comdial 3
3. When the telephone is at the desired height, SELECT the closest pair
of notches AND INSERT the supporting arms in the notches. PRESS
DOWN slightly on the telephone until you feel the supporting arms
snap into place.
Also remember, as with any piece of electronic equipment, your telephone may be damaged by contact with liquids. So please try to place
the telephone in an area that is free from the danger of spills.
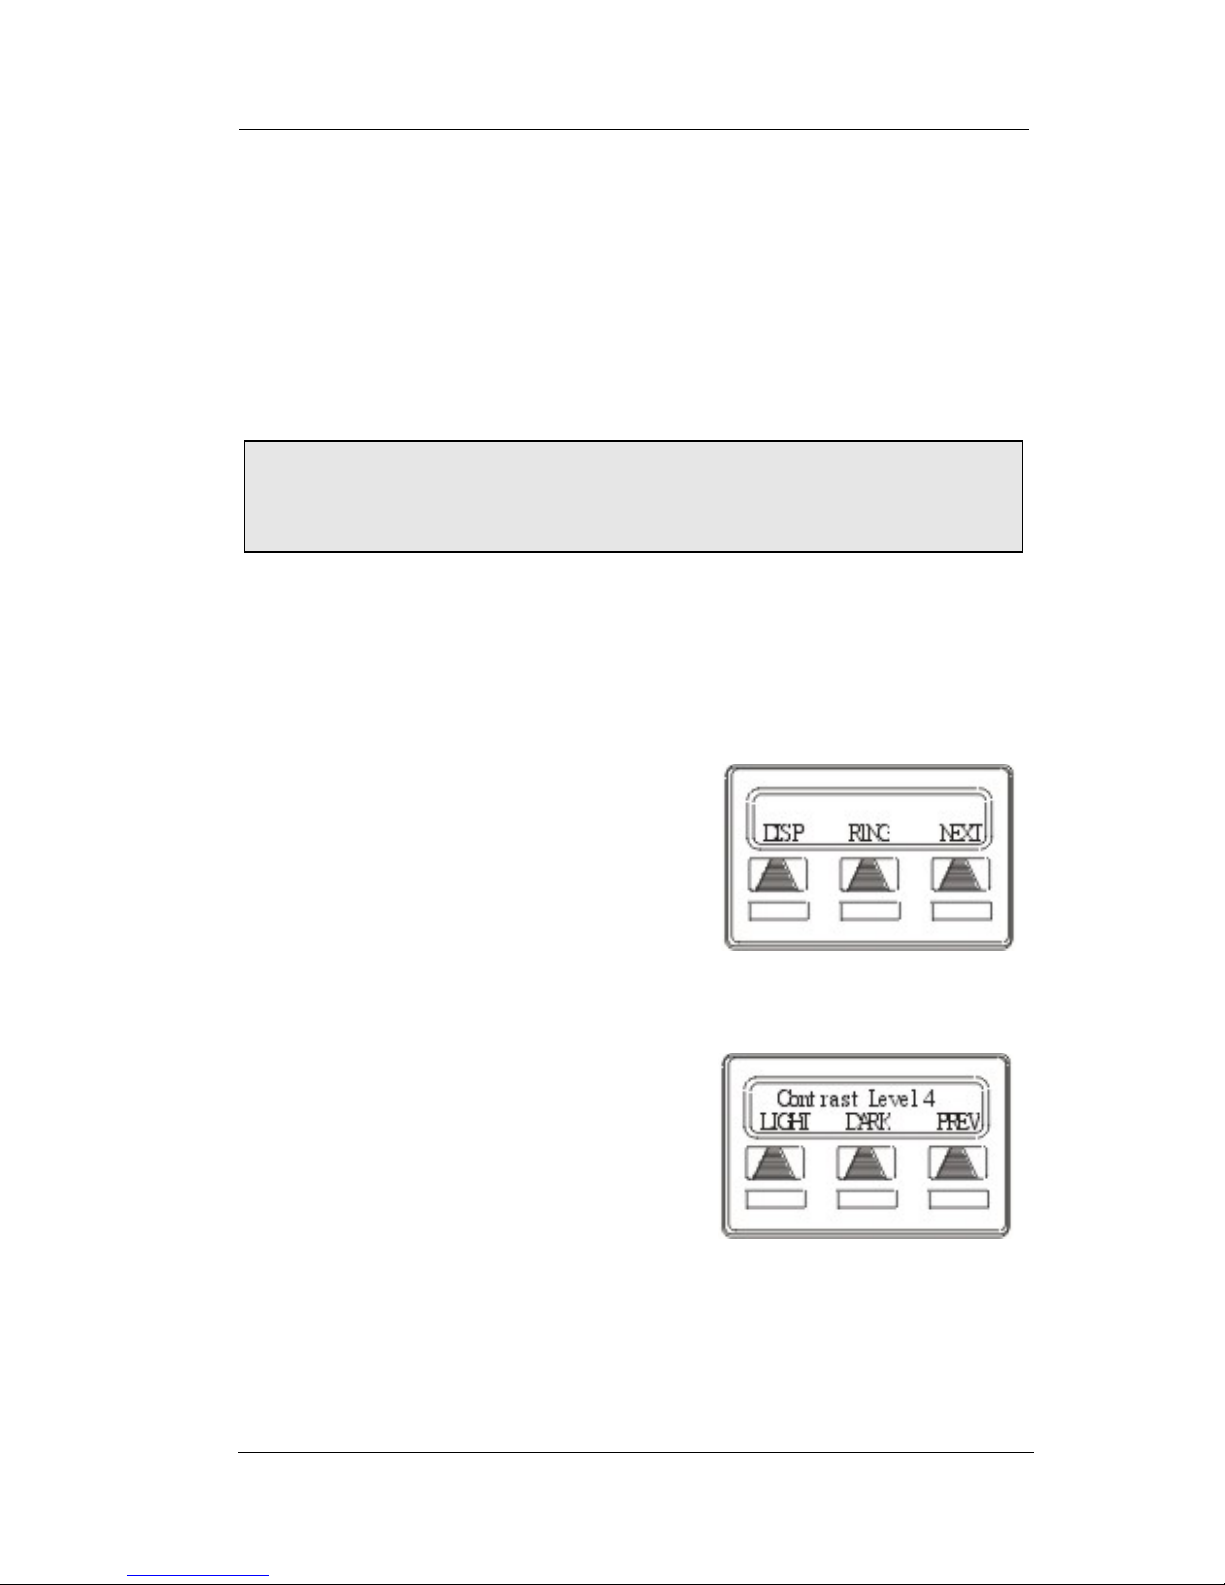
1.1.2 SETTING DISPLAY CONTRAST
You can darken or lighten the contrast of the display for best viewing.
• To adjust the display contrast,
1. SELECT OPTIONS.
2. SELECT NEXT until the DISP
option appears.
3. SELECT DISP. Your display will
read
CONTRAST LEVEL
.
4. SELECT LIGHT or DARK once for
each degree of change desired.
5. SELECT PREV to return to main
display.
6. PRESS SPEAKER to end.
Note: For more tips and information on speakerphone use,
including the use of a Full-Duplex Speakerphone, see Appendix
C, Speakerphone Characteristics.
Select Display
Setting the Contrast Level
Page 14
Getting Started GCA70-245
4 Comdial August, 03
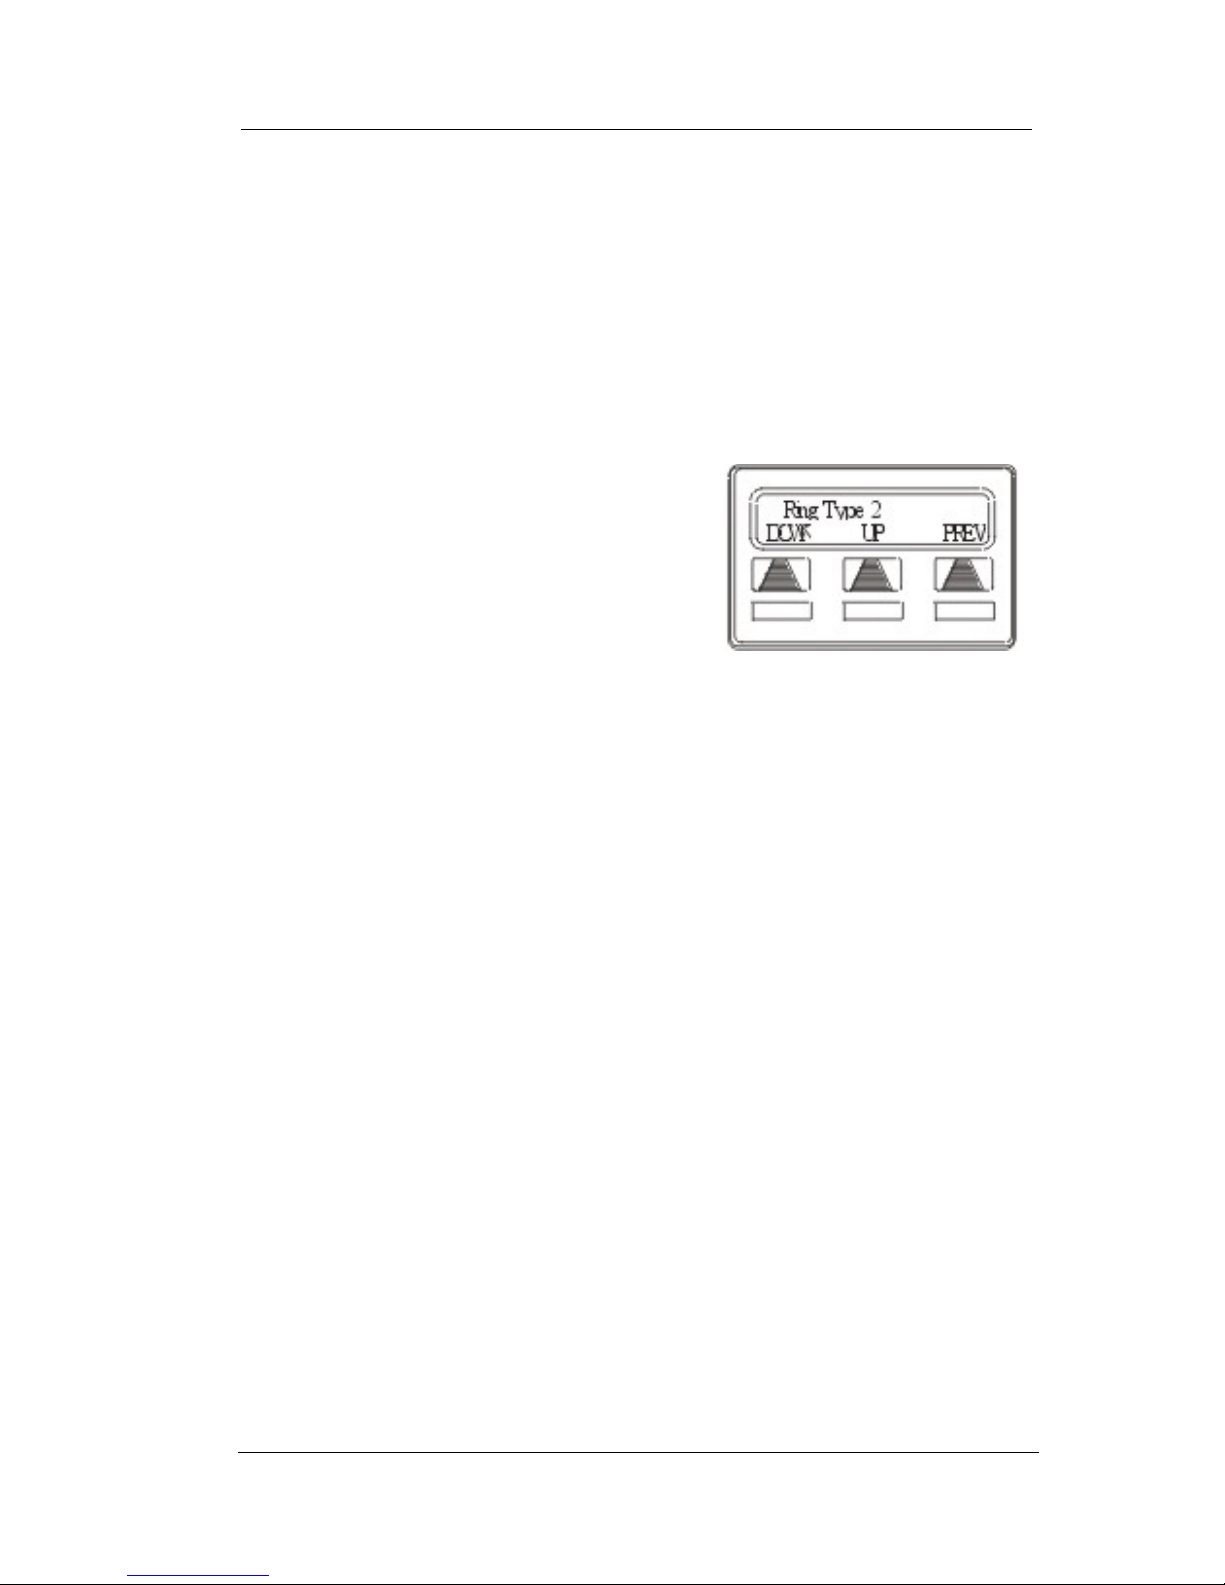
1.1.3 SETTING A PERSONAL RINGING TONE
You can choose one of six different ring tones for your telephone.
Often, when several telephones are located close together, each user
chooses a different personal ring tone.
• To select one of the ring tones, proceed as follows:
1. SELECT OPTIONS.
2. SELECT NEXT until the RING
option appears.
3. SELECT RING.
4. SELECT UP OR DOWN to choose
ring tone in display (a new tone will
sound at each up or down press).
5. SELECT PREV to return to main
display.
6. PRESS SPEAKER to end.
Selecting the Ring Tone
Page 15
DSUII Attendant User’s Guide
August, 03 Comdial 5
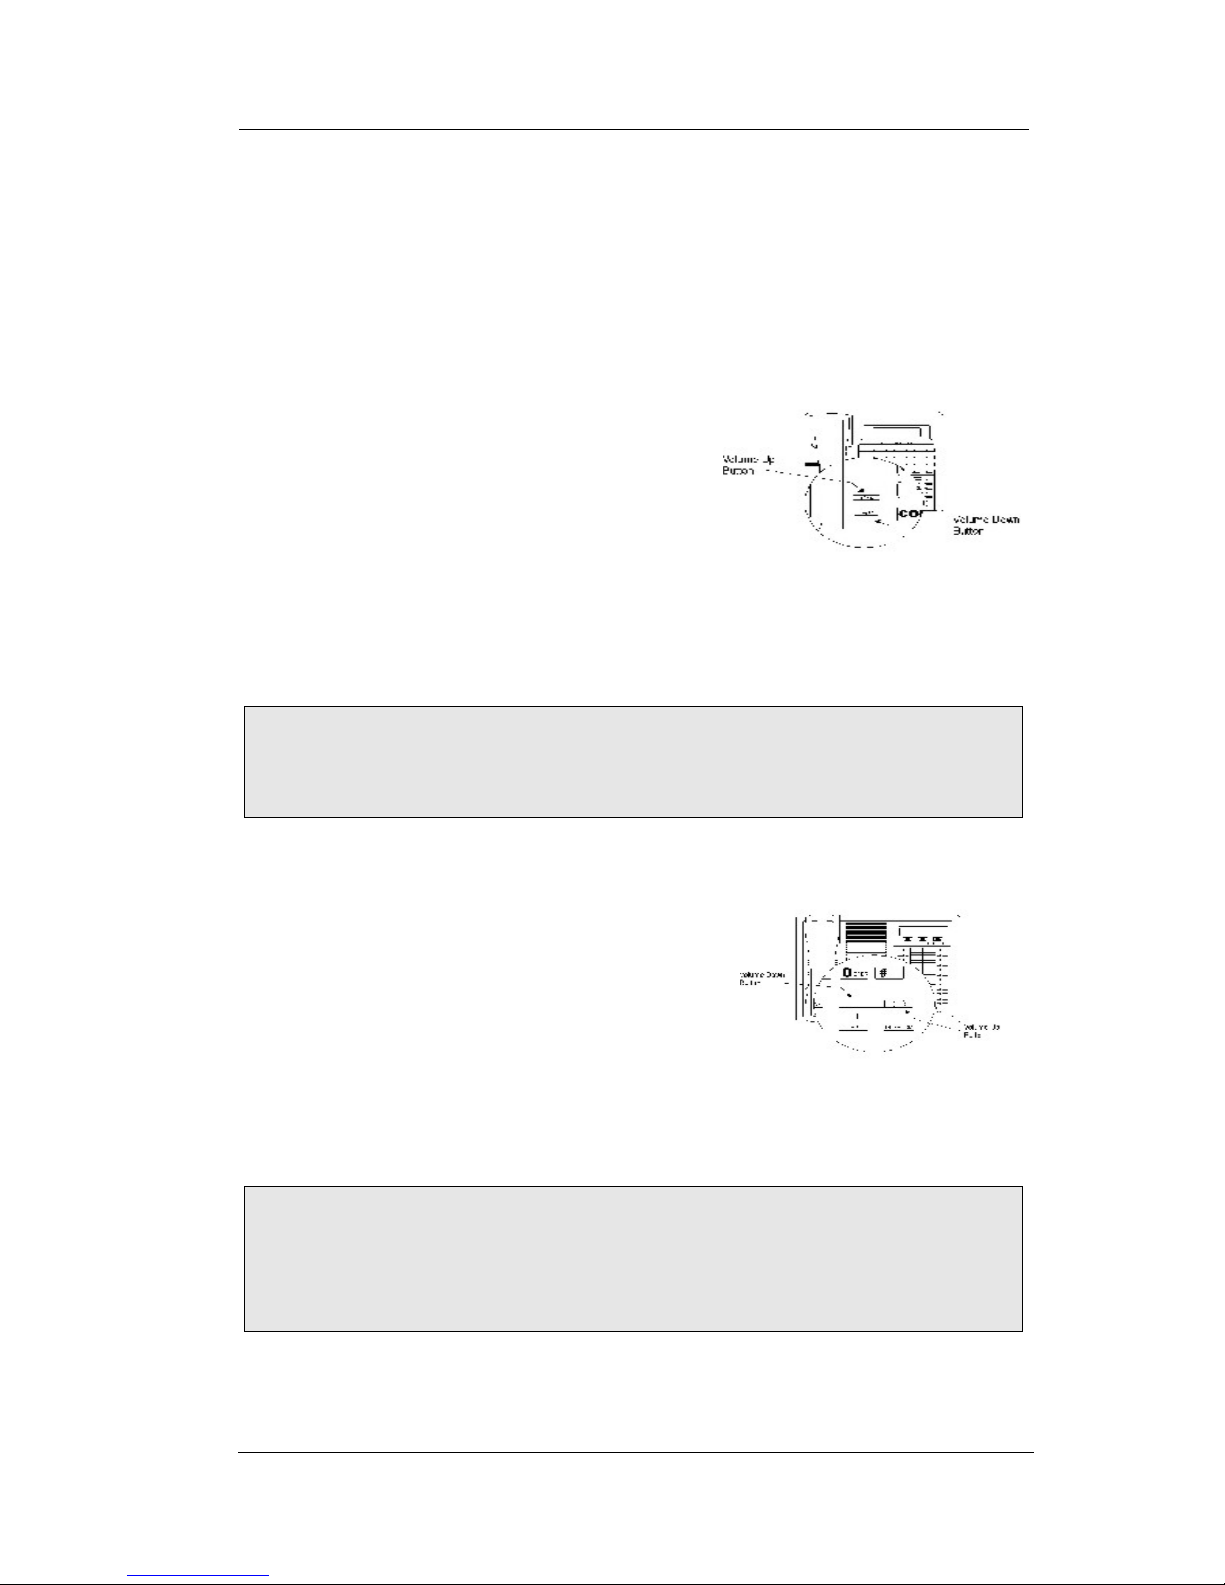
1.1.4 SETTING VOLUME LEVELS
The volume control on your telephone is a multipurpose control you
can use to set the volume (loudness) of the ringer, the speaker, and the
handset.
• To set the ringer loudness
level,
—While your telephone is on-hook
and idle, PRESS the VOLUME
UP OR VOLUME DOWN button
once for each change in loudness
you desire. The ringer sounds
once for each change as an exam
-
ple of the current setting.
• To set the speaker and handset loudness levels,
1. PRESS INTERCOM button.
2. PRESS the VOLUME UP OR VOL-
UME DOWN button once for each
change in speaker volume that you
desire.
3. LIFT handset.
4. PRESS the VOLUME UP OR VOL-
UME DOWN button once for each
change in handset volume that you desire.
Note: If you set the ringer to the OFF position, your telephone
sounds a short ring burst once for each call you receive at your
station.
Note: When a call ends, the system resets the speaker and handset
volume of all future calls to the programmed (default) setting.
For instructions in setting your speakerphone’s default volume,
see Default Volume Control on page 72.
Impact SCS Volume Button
s
Impact Volume Buttons
Page 16

Getting Started GCA70-245
6 Comdial August, 03
1.1.5 ANSWERING AND MAKING CALLS
Your speakerphone is now properly configured to answer and making
calls to both stations within your system (intercom calls) and outside
lines. Remember that when dialing an outside number, you must first
select a line to connect your system to the local exchange.
• When you hear outside ringing (single long bursts),
1. PRESS flashing line button.
2. SPEAK toward telephone OR LIFT handset if privacy is desired.
• When you hear intercom ringing (two short bursts),
1. PRESS INTERCOM.
2. SPEAK toward telephone OR LIFT handset if privacy is desired.
• To dial an outside number manually,
1. PRESS INTERCOM.
2. DIAL 9 OR PRESS other line button to select line (See Line Groups
section on page 69 for more information on selecting an outside line).
Page 17

DSUII Attendant User’s Guide
August, 03 Comdial 7
1.2 Understanding the Basic Functions
Your speakerphone provides many versatile features for your use.
These features are explained in terms of what they allow you to do.
Alphanumeric Display (Liquid Crystal Display—LCD)
• Displays time, day, date, and active call information.
• Keeps you apprized of the status of your telephone.
• Provides programming prompts.
Auxiliary Jack (available only on Impact 8024S and Impact
SCS Models)
• Allows you to connect a headset, an external amplified ringer, a
tape recorder, or an external paging amplifier to your telephone.
Message-Waiting Light
• Indicates that a message awaits pick up.
Microphone Opening
• Allows hands-free operation of speakerphone (speak clearly
toward microphone opening).
Speaker
• Sounds distant party’s voice.
• Sounds ringing and call-in-progress tones.
Page 18
Getting Started GCA70-245
8 Comdial August, 03
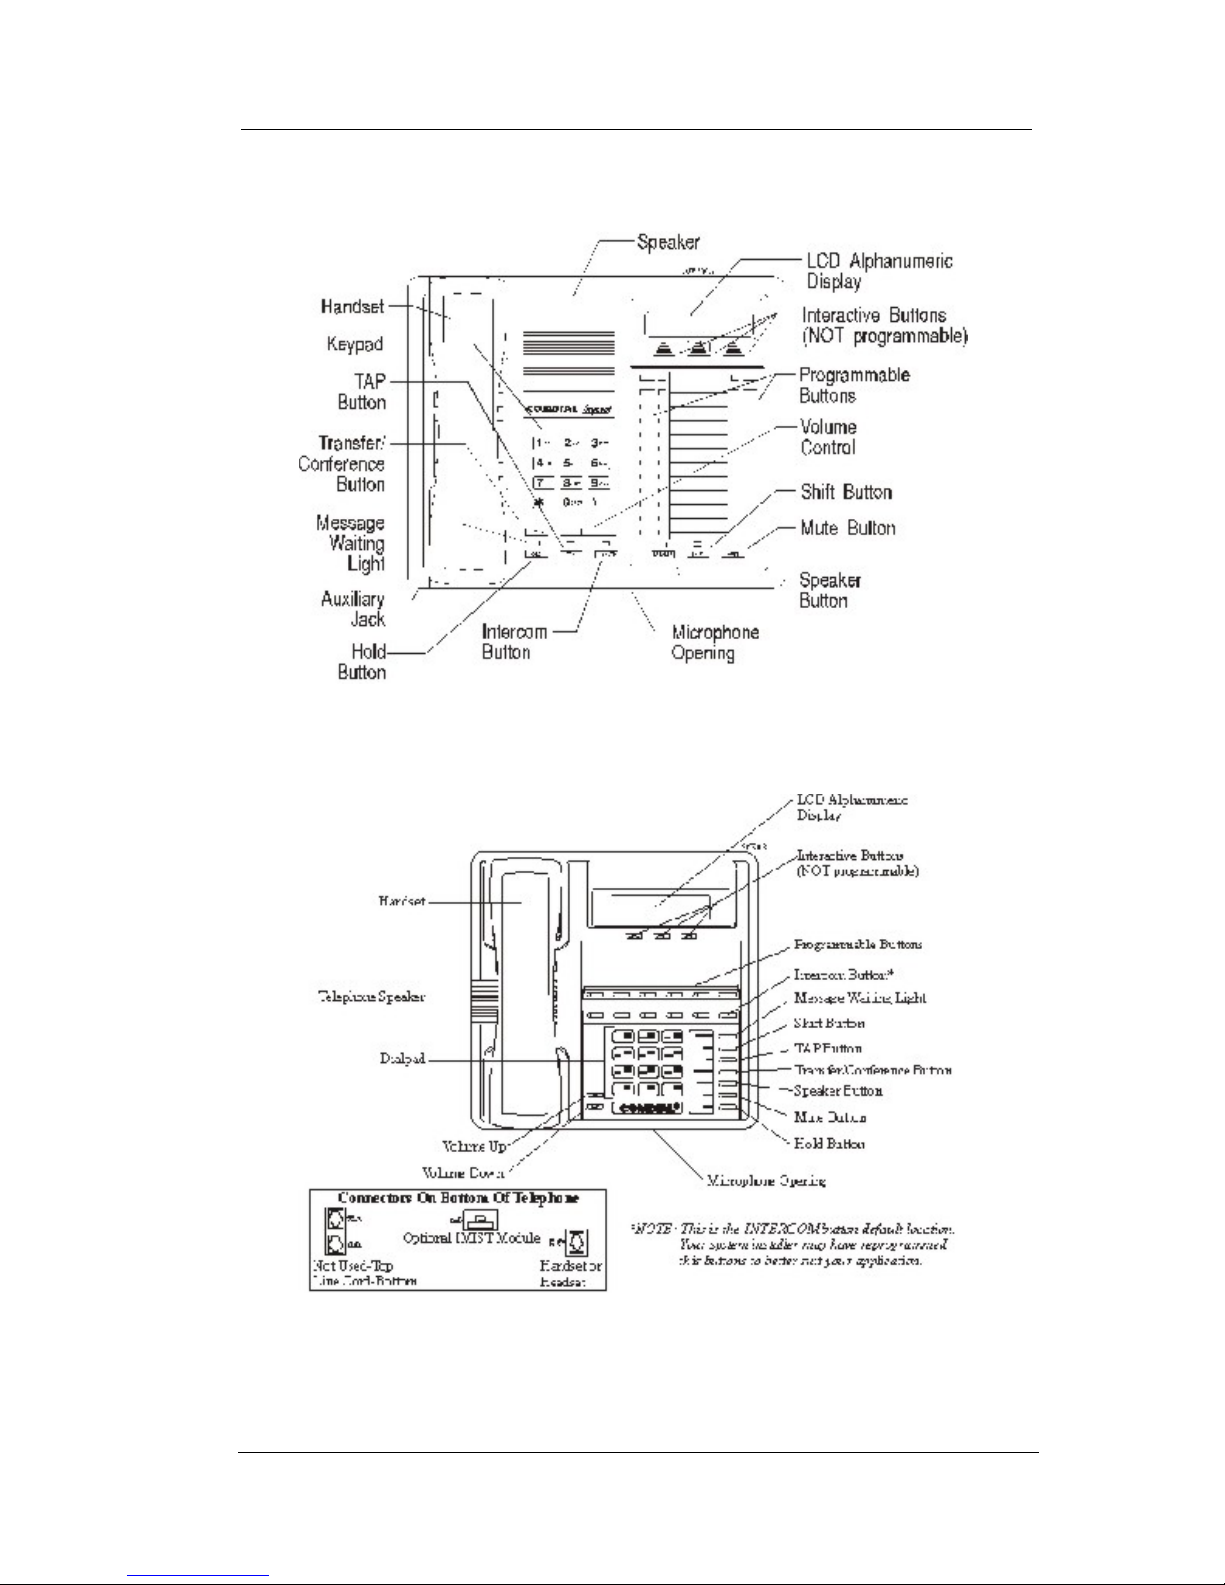
Impact 8024S-** LCD Speakerphone
Impact SCS 8312S=** LCD Speakerphone
Page 19

DSUII Attendant User’s Guide
August, 03 Comdial 9
1.3 Your Speakerphone’s Buttons
Hold Button (HOLD)
• Places a line or intercom call on hold.
• Stores pauses in number sequences during programming.
Interactive Buttons (located below alphanumeric display)
• Provide quick and easy access to system features.
• Provide straightforward button programming without dialing
codes (the interactive buttons themselves, however, are not
programmable).
Intercom Button (INTERCOM)
• Selects an intercom line.
• Allows you to initiate many of the telephone’s features.
Mute Button (MUTE)
• Keeps the person on the line from hearing your conversation.
• Reply to a Subdued Off Hook Voice Announcement (SOHVA).
Programmable Buttons
(also known as Direct Station Select/Busy Lamp Field
(DSS/BLF) Buttons)
• Allow you to store numbers for automatic dialing functions.
• Allow you to store telephone extension numbers for Direct
Station Selection (DSS).
• May be programmed as a feature button.
• May be designated a line button by your system installer.
Page 20

Getting Started GCA70-245
10 Comdial August, 03
Shift Button (SHIFT)
• Allows you to access an autodial number programmed in the
second tier under a DSS button. (That is, you can store an
autodial number at every programmable DSS button location—
a DSS in the regular tier and an autodial in the second tier). You
activate the shift function by pressing this button and turning
the shift light on before automatically dialing an autodial
number from the second tier.
Speaker Button (SPEAKER)
• Turns your speaker on or off.
• Disconnects a call when you are on a hands-free call.
• Ends or cancels programming.
• Activates group listening feature.
Tap Button (TAP)
• Recalls dial tone or generates a hookflash.
• Retrieves held calls or last call placed on hold.
Transfer/Conference Button (TRNS/CONF)
• Transfers calls.
• Sets up conference calls.
Page 21
DSUII Attendant User’s Guide
August, 03 Comdial 11
Volume Control (VOLUME UP or VOLUME DOWN)
• Regulates the volume of the ringer, speaker, handset, headset,
and group listening mode.
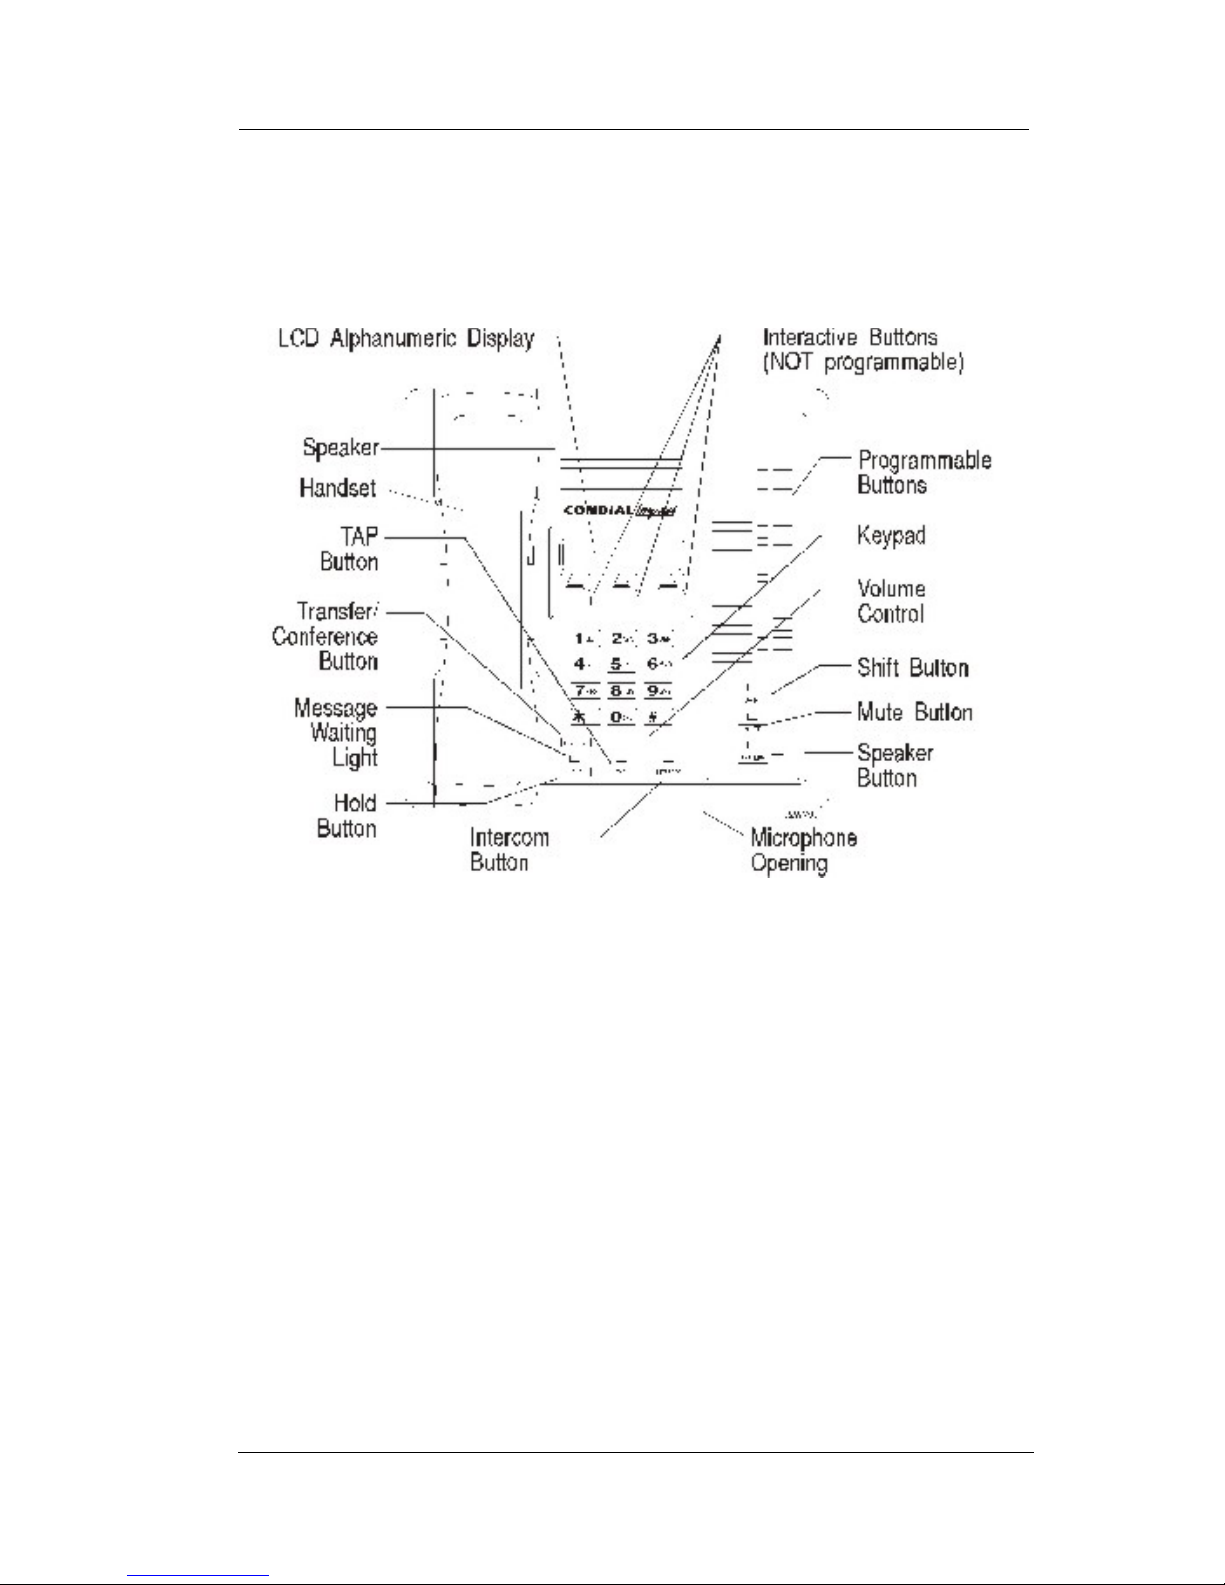
Impact 8012S-** LCD Speakerphone
Page 22

Getting Started GCA70-245
12 Comdial August, 03
1.4 Your Speakerphone’s Display Lights
The lights (LEDs) on your LCD speakerphone indicate the status of
lines, features, and intercoms.
Busy Lamp Field (BLF) lights (next to a programmable
Direct Station Select button):
• Steady red = station is in use or in Do Not Disturb.
• Flashing red = station is receiving a call or calling you.
• Fluttering red = station-to-station messaging has been set by the
station associated with this programmable button
Next to a line button:
• Steady green = this is your line, either on-hook (in a hands-free
mode) or off-hook, when the line is active.
• Steady red = another station is using this line.
• Flashing red = a call is coming in on this line.
• Flashing orange = this line will be answered when you lift the
handset.
• Winking green = your line is on hold.
• Winking red = the call has been placed on hold by another
station.
• Fluttering green = your line has recalled from hold.
• Fluttering red = the line put on hold by another station has
recalled.
Note: You can find the programmable buttons that the installer
designates line buttons in the same location as the DSS/BLF but
tons. Ensure that these buttons are labeled correctly to indicate
their unique features.
Page 23

DSUII Attendant User’s Guide
August, 03 Comdial 13
Next to a fixed feature or programmable feature button:
• Steady red = the feature is on.
• Steady off = the feature is off.
Above the MUTE button:
• On steady = called party cannot hear your conversation.
Next to INTERCOM button:
• Steady red with a quick flash = you are using your intercom.
• Winking red = an LCD message is set on your telephone for
others to receive when calling.
• Flashing red = someone is calling your extension
• Fluttering red = auto-redial is in use or system is in night mode.
Above the HOLD button:
• Flashing red (non-SCS Models only) = message awaits pick up.
• Fluttering red = automatic station relocation has been set.
Next to the MESSAGE button (SCS models only)
• Flashing red = message awaits pick up.
Above the SPEAKER button:
• On steady (with the telephone on hook and busy) =
speakerphone mode is active.
• On steady (with telephone on hook and idle) = background
music is turned on.
NOTE: You can find the programmable buttons that the installer
designates feature buttons through user programming in the
same location as the DSS/BLF buttons. Ensure that these buttons
are labeled correctly to indicate their unique features.
Page 24

Getting Started GCA70-245
14 Comdial August, 03
1.5 Understanding the Rings Patterns
• Two short rings = intercom call.
• Single longer ring = outside call.
• One short ring burst = voice announce.
• Three short ring bursts = ring back from a held call, callback
from a queued call.
You can vary the ringing tone of your telephone, choosing from one
of six different rings. This way, you can identify your ring even
though you may not be close to your telephone.
Additionally, so you won’t be disturbed when you’re busy on a call
and another call rings at your station, the ring volume is subdued
automatically.
Page 25

DSUII Attendant User’s Guide
August, 03 Comdial 15
2. ANSWERING CALLS
2.1 Answering Outside Calls
A call that rings on an outside line sounds long, single-tone bursts and
lights the line status light. If the installer enabled ringing line pref
erence at your station, an orange light flashes next to the line that your
station answers when you lift the handset; a red light flashes for any
other ringing line.
Also, when an outside call rings at your station, the LCD screen displays any caller ID information that your station is programmed to
receive.
• When you hear outside ringing (long bursts) and
observe an orange flashing light,
1. For speakerphone, PRESS flashing line button AND SPEAK toward
telephone.
2. For privacy, LIFT handset.
• When you hear outside ringing (long bursts) and
observe a red flashing light,
1. PRESS flashing line button.
2. SPEAK toward telephone OR LIFT handset if privacy is desired.
Note: For more information on setting DND at your station, see
section titled Do Not Disturb Condition on page 74.
Page 26

Answering Calls GCA70-245
16 Comdial August, 03
2.2 Answering Intercom Calls
An intercom call is one that is made from one system telephone to
another. Your station receives intercom calls in one of two ways
depending upon system programming. With a tone-first setting, the
telephone rings in a distinctive pattern and the user of the receiving
station must take action to answer.
• When you hear intercom ringing (two short bursts),
1. PRESS INTERCOM.
2. SPEAK toward telephone OR LIFT handset if privacy is desired.
In a voice-first setting, a short tone is followed by the caller’s voice
heard on the speaker. As with an incoming outside call, the LCD
screen displays caller ID information and your other options for
answering the call.
• When you hear an intercom tone followed by a caller’s
voice,
—SPEAK toward the telephone to answer OR LIFT handset if
privacy is desired.
When your system installer makes the option available to system
users, you can block all voice announce intercom calls to your station
if you wish. See the section titled Voice Announce Blocking on page
27.
Note: For more information on setting DND at your station, see
section titled Do Not Disturb Condition on page 74.
Page 27

DSUII Attendant User’s Guide
August, 03 Comdial 17
2.3 Monitored Stations
When the installer assigns the personal intercom number of one telephone to appear at a button on another telephone, the button and its
associated light provide a direct station select (DSS) busy lamp field
(BLF) feature. With this feature, the user can monitor the status of
the appearing station.
When the station monitoring feature is off, the status light shows the
state of the monitored telephone.
When the station monitoring feature is on, the status light shows
activity status (idle, ringing, busy, and hold) of the monitored tele
-
phone.
• To monitor another telephone,
1. OBSERVE the BLF light indications next to the Direct Station Select
(DSS/BLF) button:
• Off = Station is idle.
• Flashing (if enabled) = Station has an incoming call.
• On = Station is busy.
Your telephone may have the personal intercom number of another
telephone appearing at a programmable button location. You can
press the DSS/BLF button to call that telephone or to answer a call
that is ringing at the monitored station if you wish.
• To call an idle monitored station or to answer one that
is ringing,
1. NOTE the BLF light condition.
2. PRESS assigned DSS/BLF button.
3. SPEAK toward telephone OR LIFT handset if privacy is desired.
Page 28

Answering Calls GCA70-245
18 Comdial August, 03
2.4 Holding Calls
This feature allows you to temporarily disconnect from a current call
yet retain it so that it can be retrieved. When you place a call on hold,
you are free to use your telephone for other calls or features and then
return to the held call. At a multiline telephone, you can put a call on
hold manually, by pressing the HOLD button, or automatically (if
programmed), by pressing another line button.
You can place a call on hold in either an exclusive or non-exclusive
manner. With a regular or non-exclusive hold, you can pick up the
held call at your telephone or another user can pick the call up at a
telephone sharing the held call line.
• To place a call on hold (non-exclusive),
—PRESS HOLD. The light above your line button begins to blink.
• To retrieve a held call,
1. PRESS line button of the held call (with winking light), OR PRESS
TAP.
2. SPEAK toward telephone OR LIFT handset if privacy is desired.
2.4.1 EXCLUSIVE HOLD
Exclusive hold prohibits a user from retrieving a held call at any
station other than the one where someone placed it on hold. The
exclusive hold condition also links the held call to the timed hold
recall time-out feature. After time-out, audible and visual signaling
occurs and the exclusive hold condition reverts to a normal hold con
dition. The installer enables or disables exclusive hold as a class of
service feature.
• To place a call on exclusive hold,
—PRESS HOLD twice.
• To retrieve exclusive hold,
1. PRESS line button of held call (with winking light), OR PRESS TAP.
2. SPEAK toward telephone OR LIFT handset if privacy is desired.
Page 29

DSUII Attendant User’s Guide
August, 03 Comdial 19
2.4.2 HOLD RECALLS
After a call has been on hold for the period of time (set by the installer
of your system), the system causes three quick hold recall tone bursts
to sound at your telephone and the flash rate of the line button
becomes faster.
If the call is on exclusive hold, it will revert to manual hold after the
hold recall period. Calls that revert to manual hold can be picked up
from any telephone with line appearance for the recalling line.
• If a held line is recalling,
choose one of the following:
1. SELECT HOLD (interactive button)
to place the call on hold at your sta
-
tion and restart hold timer.
2. PRESS line button (with fluttering
green light) OR SELECT ANS to
retrieve the call.
R
ecall L123
HOLD ANS
A Recalling Held Line
Page 30

Answering Calls GCA70-245
20 Comdial August, 03
2.4.3 DIRECTED HOLD
This feature allows you to pick up the last call a user placed on hold at
another station. This feature does not allow you to pick up exclusive
hold calls or calls that are in the process of being transferred. In
addition, this feature allows you to place a call on hold at another
station and have this call appear to be the one that has been on hold
there for the longest time. Features such as hold recall apply to the
station that received the directed hold call and not to the station that
sent the directed hold call.
• To place a call on hold at another telephone (directed
hold),
1. While on line, PRESS INTERCOM OR TRNS/CONF if intercom
call.
2. DIAL *90.
3. DIAL extension number of telephone to receive held call.
You can pick this call back up if you need to. To do this,
1. DIAL *4.
2. DIAL extension number of that telephone.
3. ANSWER call as desired OR PRESS SPEAKER to hang up.
• To pick up a call that was placed on hold at your
telephone by a user at another telephone,
—PRESS INTERCOM AND DIAL #90.
Page 31

DSUII Attendant User’s Guide
August, 03 Comdial 21
2.5 Night Transferred Calls - Line
Answer From Any Station
When you, as the attendant, program the system for nighttime operation using the night transfer of ringing feature, the line answer from
any station feature is made active. With this feature, you can dial an
access code over the intercom line to allow you to answer any ringing
outside line. The line need not be ringing at the your station for this
feature to be used.
• When you hear ringing,
1. PRESS INTERCOM.
2. DIAL 80.
3. SPEAK toward telephone to answer call OR LIFT handset if privacy
is desired.
2.6 Caller ID (Automatic Number
Identification)
When installed by system programming, the Caller ID feature allows
you to view incoming call numbers before you answer them.
Incoming call numbers flash in the lower half of the LCD. If you
answer the call, the number appears in the upper half of the LCD.
If another call rings in while on a call, the second caller’s number
flashes on the LCD for five seconds. The system stores the last
caller’s number.
• To dial the number of the last incoming call while on an
active call,
1. PRESS HOLD.
2. PRESS programmed SAVED NUMBER REDIAL button. (See Fea-
ture Buttons section on page 87 for programming.)
Page 32

Answering Calls GCA70-245
22 Comdial August, 03
2.7 Call Pickup
In addition to using your speakerphone’s DSS/BLF buttons to access
calls, the system offers two other distinct methods to answer
incoming calls that are ringing at other stations.
2.7.1 GROUP CALL PICKUP
The installer often arranges several telephones together in a user
group. Up to four different groups can exist with any number of sta
tions in a group. If your telephone is so arranged, you can answer
calls that are ringing at other stations within your particular group.
• To answer a call that is ringing within your group,
1. PRESS INTERCOM.
2. DIAL #4.
3. SPEAK toward telephone OR LIFT handset if privacy is desired.
2.7.2 DIRECTED CALL PICKUP
Also, you can answer a call that is ringing at any telephone in the
system if you know the ringing telephone’s extension number.
To answer a call that is ringing at any telephone in the system,
1. PRESS INTERCOM.
2. DIAL *4.
3. DIAL extension number of ringing telephone.
4. SPEAK toward telephone OR LIFT handset if privacy is desired.
Page 33

DSUII Attendant User’s Guide
August, 03 Comdial 23
If you have programmed a PICK UP button on your telephone (see
Feature Buttons on page 87 of this guide), you may make a call
pickup (either within your group or at a specific station inside or
outside your group) using that button.
For a discussion on using a DSS/BLF button to answer an incoming
call, see Monitored Stations section on page 17.
Your
Station
Ringing
Station
If ringing telephone
is within your designated
calling group...
...DIAL # 4
For any ringing telephone...
...DIAL 4 + extension code
✳
If you have programmed
a DSS/BLF button for
the ringing telephone...
...PRESS
flashing
DSS/BLF
button
Answering Calls for Other Stations
Page 34

Answering Calls GCA70-245
24 Comdial August, 03
2.8 Receiving Subdued Off-Hook Voice
Announcements (SOHVA)
2.8.1 HANDLING AN INCOMING SOHVA
This feature allows an intercom caller to break into your call by
making an announcement through your handset receiver. With
SOHVA, the announcement is delivered and responded to in a
subdued manner that prevents the distant party from hearing either
the announcement or the response. A tone alert precedes the
announcement and is delivered to the handset receiver of the tele
-
phone ahead of the announcement.
You can respond to the announcement in a verbal or non-verbal
manner. You deliver a verbal response by pressing and holding the
MUTE button or appropriate interactive button and speaking into the
handset.
• To respond to a SOHVA
verbally,
1. SELECT AND HOLD MUTE.
2. SPEAK into handset. Distant party
cannot hear your response.
3. RELEASE MUTE after response is
complete to return to distant party.
S
12 Calling
BLOCK
MSG
Incoming SOHVA
Page 35

DSUII Attendant User’s Guide
August, 03 Comdial 25
You can respond with a non-verbal response by pressing a programmed button to send a message to be shown on the display of the
announcing station (if it is an LCD speakerphone).
• To respond to a SOHVA
nonverbally through
Response Messaging,
1. SELECT MSG.
2. SELECT HVHLD OR TKMSG OR
CLBK. (Message appears in the dis
play of the telephone making the
SOHVA).
3. CONTINUE your current call with distant party. (SOHVA caller is
automatically disconnected from your telephone).
NOTE: A station that is currently active in speakerphone mode or
has Voice Announce Block set CAN NOT receive a SOHVA.
S12 Calling
HVHLD
TKMSG CLBK
Message Response
Page 36

Answering Calls GCA70-245
26 Comdial August, 03
2.8.2 BLOCKING A SOHVA
You can also block an incoming SOHVA with the interactive buttons
or by previously programming your speakerphone for Voice
Announce Block. See Voice Announce Blocking section on page 27
for more information.
• To respond to a SOHVA by blocking,
—SELECT BLOCK when you hear SOHVA tone. (SOHVA call
is disconnected).
Yo ur
Station
SOHVA
Delivering
Station
INCOMING
SOHVA
VERBAL
NONVERBAL
BLOCK
SOHVA RESPONSES
Press and Hold MUTE
While Speaking
Select MSG And
Choose Message
To De l iv er
Select BLOCK
To Disconnect
Answering aa SOHVA
Page 37

DSUII Attendant User’s Guide
August, 03 Comdial 27
2.9 Voice Announce Blocking
If your system installer makes this feature available, you can prevent
voice announcements such as voice-first intercom calls from
sounding over your telephone speaker if you wish. This feature also
blocks Subdued Off-Hook Voice Announcements (SOHVA) and
denies access in response to attempted SOHVAs.
• To block all voice-announced
calls,
1. SELECT OPTIONS.
2. SELECT NEXT until VAB appears.
3. SELECT VAB.
4. SELECT ON to block.
5. PRESS SPEAKER to end.
• To unblock all voice-announced calls,
1. SELECT OPTIONS.
2. SELECT NEXT until VAB appears.
3. SELECT VAB.
4. SELECT OFF to unblock.
5. PRESS SPEAKER to end.
Voice Ann. Block
ON OFF< EXIT
Page 38

Answering Calls GCA70-245
28 Comdial August, 03
Notes:
Page 39

DSUII Attendant User’s Guide
August, 03 Comdial 29
3. MAKING CALLS
3.1 Making Outside Calls
You can manually dial a number over any telephone line you select.
Or, if the installer assigned a prime line or the idle line preference
feature to your LCD speakerphone, the system automatically selects a
line for use when you lift the handset.
• To dial an outside number manually,
1. PRESS INTERCOM.
2. DIAL 9 OR other line button to
select line (See Line Groups section
for more information on selecting an
outside line).
3. LISTEN for dial tone.
4. DIAL number.
5. LIFT handset if privacy is desired.
If your station has an assigned prime line, you will not have to select a
line before dialing outside your system.
• To dial an outside number using your prime line,
1. LIFT handset if privacy is desired. Outside line is automatically
selected.
2. LISTEN for dial tone.
3. DIAL number.
Line 2
SAVEARDL
Outside Dialing Display
Page 40

Making Calls GCA70-245
30 Comdial August, 03
3.2 Making Intercom Calls
There are two methods for making an intercom call. One causes the
called telephone to ring (tone-first). The other causes your voice to
sound out at the called telephone (voice-first). Your installer can set
the system to deliver either tone-first or voice-first calling.
• To manually cause the other
telephone to ring (tone
calling),
1. PRESS INTERCOM.
2. DIAL extension number (called telephone will ring).
• To tone call automatically,
—PRESS DSS/BLF button (called telephone will ring).
• To voice announce manually,
1. PRESS INTERCOM.
2. DIAL extension number.
3. SPEAK your announcement.
• To voice announce automatically,
1. PRESS DSS/BLF button.
2. SPEAK your announcement.
NOTE: The following instructions assume a tone-first setting. You
can change a call to voice announce signaling for that call simply
by pressing the INTERCOM button again after dialing the exten
-
sion number or by pressing the DSS/BLF button again.
NOTE: The following instructions assume a voice-first default
setting. Any user can change a call to a tone signaling for that
call simply by pressing the INTERCOM button again after dialing
the extension number or by pressing the DSS/BLF button again.
J
Doe
T
RACK CAMP MSG
Calling J Doe
W
ed 12 10:42
J Doe
Connected to J Doe
Page 41

DSUII Attendant User’s Guide
August, 03 Comdial 31
3.3 Automatic Dialing
This feature provides one- or two-button speed dialing using programmable buttons at which you have previously stored numbers.
There are two types of speed dial numbers: (1) numbers that you store
for your own use (personal speed dial numbers and autodial
numbers), and (2) numbers that the system attendant stores for
everyone’s use (system speed dial numbers).
• To automatically dial an autodial number from one of
the programmable buttons on your station, choose one
of the following:
1. PRESS programmed autodial button (line selection is usually a part of
the stored speed dial number).
2. PRESS SHIFT AND programmed autodial button (to choose number
stored as second choice at that button).
• To speed dial a personal speed dial number from the dial pad,
—While on hook, DIAL speed dial number on dial pad (0 to 9).
• To speed dial a system speed dial number from the dial pad,
—While on hook, DIAL * AND system speed dial number
(01 – 99).
NOTE: If you manually choose a line for dialing, press HOLD
before using a speed dial. If you place a call on hold prior to
using your speed dial, pause several seconds before you press the
speed dial button; if you immediately press the speed dial button,
the system will choose the line that you have on hold to place your
speed dial call.
OR
Speed Dial Numbers
DIAL desired number
for personal speed dial
DIAL and number
for system speed dial
✳
Autodial Numbers
PRESS button of
desired number
to dial directly
Page 42

Making Calls GCA70-245
32 Comdial August, 03
3.4 Redialing
3.4.1 REDIAL - LAST-DIALED NUMBER
The system provides each station with a last number redial feature.
This feature saves 16 digits of the last outside number dialed at the
station.
A newly dialed number always replaces a previously dialed
number.
When you press the last number redial button, the system
will choose a line and redial the saved number.
• To redial the last-dialed
number,
1. PRESS SPEAKER OR HANG UP
handset to disconnect current ringing
or busy tone.
2. DIAL #.
3. LISTEN for ringing or busy tone over
the telephone speaker:
3.4.2 AUTOMATIC REDIAL
• To redial the number once a minute for 10 minutes,
1. SELECT ARDL OR PRESS programmed AUTOMATIC REDIAL
button. (See page 67 for directions on programming an Automatic
Redial button.)
2. The number will be dialed once a minute for 10 minutes (INTERCOM light flashes).
3. Listen for ringing or busy tone over the monitor speaker.
• To cancel this automatic redial action,
1. LIFT AND REPLACE handset OR, USE the telephone for some
other function.
2. The INTERCOM light then turns off and the phone returns to idle.
NOTE: You must pick up the handset once the call is connected,
or the system will disconnect the call after 30 seconds.
918045551212
ARDL
SAVE
Automatic Redial Option
Page 43

DSUII Attendant User’s Guide
August, 03 Comdial 33
3.4.3 REDIAL PROGRAMMING (STORING NUMBERS)
When you use last number redial, you will overwrite the temporary
system-saved number with subsequent dialing activity. However, you
can also permanently save a number that remains available until you
overwrite it by saving a different number at the same storage location.
To save a number, you press a SAVE button before hanging up after
you dial the number.
To dial the saved number, press HOLD then
press the same button and the system automatically dials the saved
number
• To permanently store a number you’ve just dialed,
—SELECT SAVE.
• To dial the saved number,
1. PRESS HOLD.
2. PRESS programmed SAVE NUMBER REDIAL button. (See page
62 for instructions on programming a SAVE NUMBER REDIAL but
-
ton.)
Page 44

Making Calls GCA70-245
34 Comdial August, 03
3.5 Sending Subdued Off-Hook Voice
Announcements (SOHVA)
You can make a private voice announcement to another station that is
off-hook and busy on a call if the installer has arranged the system to
provide this feature. With SOHVA, the announcement is delivered
and responded to in a subdued manner that prevents the distant party
from hearing either the announcement or the response.
A tone alert
precedes the announcement and is delivered to the handset receiver of
the telephone ahead of the announcement.
• Make a SOHVA
announcement using the
SOHVA button as follows:
1. MAKE intercom call AND HEAR
busy tone. If called station is on out
side line, ring-back tone is heard, but
SOHVA is still available.
2. SELECT SOHVA AND HEAR several quick tone bursts.
3. MAKE announcement (busy tone means that your SOHVA has been
denied through system programming or that the called party has
blocked your SOHVA).
4. WAIT on line for reply (either verbal or LCD reply).
The receiving station can respond to the
announcement in a verbal or
non-verbal
manner. They affect a verbal response
by pressing and holding the MUTE
button and speaking into the handset.
They effect non-verbal response by
pressing a programmed button to send a
message to be shown on the display of
the announcing station (if it is an LCD speakerphone).
The
announcing station is automatically disconnected after the response
message is displayed.
J
Doe Is Busy
SOHVA
CAMP NEXT
Making a SOHVA
I Will Call Back
12
Wed 10:42
Receiving an LCD Reply
Page 45

DSUII Attendant User’s Guide
August, 03 Comdial 35
3.6 Camping On and Queuing
3.6.1 BUSY OR IDLE STATION, AUTOMATIC CALLBACK
If the telephone you have called on an intercom line is busy or rings
with no answer, you can have the system ring your telephone when
the called station becomes idle (if it was busy) or when there is any
activity initiated at that telephone (if it rang with no answer before).
• To camp on at a busy or no answer station,
1. MAKE intercom call.
2. SELECT CAMP.
3. Your telephone immediately hangs
up. When the telephone you called
becomes idle, your telephone will
ring with five short ring bursts.
4. PRESS INTERCOM when you hear
the ring bursts. The other telephone
will start ringing.
• To cancel automatic ringback,
—PRESS INTERCOM AND DIAL #6.
• To camp on at a station with a Do Not Disturb
condition set,
1. MAKE intercom call.
2. SELECT CAMP. A callback will occur when called station is no
longer set in the Do Not Disturb mode.
NOTE: If you make a call in the voice-announce mode and
receive no answer at the called station, press INTERCOM before
selecting CAMP button in order to camp-on at that station.
J
Doe Is Busy
SOHVA
CAMP NEXT
Selecting Camp-On
Page 46

Making Calls GCA70-245
36 Comdial August, 03
3.6.2 BUSY STATION, WAIT FOR AN ANSWER (CALL
WAITING)
If the telephone you have called is busy, you can send a call waiting
tone to that busy telephone and wait on the line for an answer.
• To camp on when you hear a
busy signal,
1. SELECT NEXT until CWAIT
appears.
2. SELECT CWAIT.
3. WAIT on line for reply.
4. Called party can place the current call
on hold or disconnect from the call to answer your call-waiting tone,
or choose to ignore your call-waiting tone and continue current con
-
versation.
J
Doe Is Busy
CWAIT
OVER MSG
Sending Call Waiting Signal
1
2
3
4
5
6
7
8
9
0
*
#
Your
Station
Idle
Station
Busy
Station
To W ai t F or
Callback...
...Select CAMP
and Disconnect
To S en d Ca ll
Waiting Tone.. .
...Select CWAIT
and Wait for Repl y
To W ai t F or
Callback...
...Select CAMP
and Disconnect
When idle,
your call
is connected.
Busy station
hears tone
and may respond
or ignore.
When any activity
occurs at station,
your call is
connected.
BUSY
NO ANSWER
Camp-On Options
Page 47

DSUII Attendant User’s Guide
August, 03 Comdial 37
3.7 Executive Override
You can override a call in progress or a Do Not Disturb condition at
another telephone if the system installer has enabled the executive
override feature at your telephone. (If the feature is not enabled, an
error tone sounds and screen options remains displayed.) Conditions
for executive override are as follows:
Calling station has class of service that enables busy override.
Calling station is switched to override voice path.
When the calling party dials the override code, the called party
receives six tone bursts. The called party may respond and will be
heard by the calling station and outside party.
• To override an in-progress call at another telephone,
1. MAKE intercom call AND HEAR a busy signal.
2. DIAL *03 OR SELECT NEXT until you can SELECT OVER (all
parties will hear several tone bursts).
3. JOIN in-progress call.
• To override a Do Not Disturb condition at another
station,
1. SELECT OVER to disable the Do Not Disturb condition at the called
station.
2. SPEAK your announcement (if in voice-first mode) OR HEAR ringback tone (if in tone-first mode).
NOTE: This action disables DND condition at the other telephone until DND is reset.
Page 48

Making Calls GCA70-245
38 Comdial August, 03
Notes:
Page 49

DSUII Attendant User’s Guide
August, 03 Comdial 39
4. ADVANCED CALL HANDLING
4.1 Waiting for a Line (Queuing)
If all the lines in a line group are busy, you can place your telephone
in a queue to await an idle line in the line group.
• To queue for a line group,
1. PRESS INTERCOM.
2. DIAL line group access code (9, 81, 82, 83).
3. HEAR busy tone.
4. DIAL *8 and hang up.
5. When line group is free, your telephone sounds several short ring
bursts.
6. LIFT the handset, LISTEN for dial tone AND MAKE call.
• To cancel line group queuing,
—PRESS INTERCOM, DIAL #8 AND HANG UP.
• To queue for a line that appears on your telephone,
1. PRESS HOLD.
2. PRESS line button of busy line.
3. HEAR short tone.
4. When the line is free, your telephone sounds five short ring bursts telling you that you can use your line.
5. LIFT handset to answer. If you no longer need the line, ignore the ring
burst.
Page 50

Advanced Call Handling GCA70-245
40 Comdial August, 03
4.2 Call Transferring
4.2.1 SCREENED CALL TRANSFERS
You can answer a call at your LCD speakerphone and transfer it to
another telephone. If you first identify the caller to the party receiving
the transfer (giving that user the opportunity to prepare for the call),
you have made a screened transfer.
• To screen and transfer a call
to another telephone in the
system,
1. ANSWER call.
2. PRESS TRNS/CONF (call is automatically placed on hold).
3. DIAL extension number of telephone
to receive transfer, OR PRESS DSS/BLF button for that extension.
4. ANNOUNCE call when intercom party answers.
5. PRESS SPEAKER to disconnect (if in speakerphone mode), OR
HANG UP.
The intercom party then has the call (if
he or she answered the
screened transfer
with the handset). If you announce the
transfer over the speaker, the intercom
party’s telephone will ring with the
transferred call after you hang up.
Push T/C To CONF
SPKR To Transfer
Selecting a Transfer
J
Doe Is Busy
SOHVA
CAMP NEXT
Unable to Transfer
Page 51

DSUII Attendant User’s Guide
August, 03 Comdial 41
• If the intercom party is busy, take one of the following
steps (if made available at your telephone by installer
programming):
1. SELECT RECON to reconnect the
call to your station,
2. SELECT SOHVA to interrupt the
call and tell the intercom party that a
call awaits,
3. SELECT MSG to leave a message-
waiting indication at the called sta
-
tion.
4. SELECT CAMP to camp-on to that station.
5. SELECT OVER to override the busy signal and join the call in
progress.
If the intercom party does not answer
their telephone when ringing,
take one
of the following steps:
1. SELECT CAMP to Camp-on to that
station.
2. SELECT MSG to leave a message-
waiting indication at the station.
J
Doe Is Busy
RECON OVER MSG
More Transfer Options
J
Doe
CAMP MSG
T
RACK
No Answer from J Doe
Page 52

Advanced Call Handling GCA70-245
42 Comdial August, 03
4.2.2 UNSCREENED CALL TRANSFERS
Unscreened call transfer allows you to transfer both line and intercom
calls from your station to another station or group without first
announcing them. The unscreened transferred call appears at the
other station where it rings if that station is idle or automatically
camps-on and awaits an answer if that station is busy.
• To transfer an unscreened call to another system
telephone,
1. ANSWER call.
2. PRESS TRNS/CONF (call is automatically placed on hold).
3. DIAL extension number of telephone to receive transfer, OR PRESS
DSS/BLF button for that extension.
4. PRESS SPEAKER to disconnect (if in speakerphone mode), OR
HANG UP. The transfer will ring at the called telephone.
The call automatically rings back to your station after a programmed
recall period. There is no limit as to how many calls that can be
camped onto another station.
• If an unscreened transfer call is not answered and
recalls to your telephone, you can take one of the
following steps:
1. PRESS HOLD to place the call on
hold at your telephone.
2. SELECT ANS to return to the call.
3. SELECT SEND to retry the transfer.
R
ecall Line 2
SEND HOLD ANS
Attempted Transfer of Line 2
to J Doe is Recalling
Page 53

DSUII Attendant User’s Guide
August, 03 Comdial 43
4.3 Conferencing
4.3.1 CREATING A CONFERENCE CALL
When your telephone is joined together with several other telephones
on the same call, the effect is called conferencing. You can make con
ference calls that involve up to five parties, including you as the originating party, in any combination of outside lines and intercom
parties.
• To set up a conference call that includes both outside
lines and intercom parties, outside lines alone, or
intercom parties alone,
1. MAKE first call.
2. PRESS TRNS/CONF (call is placed
on hold automatically).
3. MAKE next call.
4. PRESS TRNS/CONF to establish
conference.
5. REPEAT the last three procedures to
add up to two more parties, establish
-
ing a 5-party conference (including yourself).
• To continue conversation on
remaining line after other
outside lines have dropped
out of conference,
—PRESS the line button of the remain-
ing party.
• To retrieve a line from hold
and bring that party back into the conference,
1. PRESS TRNS/CONF.
2. PRESS line button.
NOTE: When setting up a conference call with outside lines and
internal telephones, you must call the outside lines first.
Push T/C To CONF
SPKR To Transfer
Setting a Conference
Conference
J Doe J Smith
Active Conference
Page 54

Advanced Call Handling GCA70-245
44 Comdial August, 03
3. PRESS TRNS/CONF.
4.3.2 UNSUPERVISED CONFERENCE CALLS
If you are involved in a conference call with two outside lines, you
can drop out of this established conference call and leave the outside
lines in the conference with each other. This is known as an “unsuper
-
vised conference” call.
• To drop out of a conference call between you and two
outside lines (creating an unsupervised conference),
—DIAL # AND HANG UP (lines remain lighted/in use until
one or both outside parties disconnect).
• To rejoin an unsupervised conference between two
outside lines,
—PRESS one of the lighted buttons where conference is taking
place.
Managing a
Conference
Call
Other
Station
Other
Station
Your
Station
To Add a Caller
to a Conference...
To Remove a Caller
From A Conference...
To Drop Out of
A Conference...
... Press TRNS/CONF
...Select Line Button
and Disconnect Line
...Dial #
Managing a Conference Call
Page 55

DSUII Attendant User’s Guide
August, 03 Comdial 45
4.4 Call Parking
You can place a call on hold in the system so that it can be answered
from any station, even though that station may not have a line
appearance for the call. You accomplish this by placing the call in one
of many park orbits, where the call remains until it is answered.
You park calls in predefined zones and then retrieve them by dialing
an intercom feature code or by pressing a preprogrammed call park
button. The system can hold up to nine calls in park zones (also
referred to as orbits) where they are retrievable by all users in the
system.
• To place a call on hold within the system where it can
be answered at any telephone in the system (parking a
call in orbit),
1. While on the call, PRESS INTERCOM AND DIAL *.
2. DIAL code for park location (orbit) (91 to 99 for orbit 1–9).
3. REMEMBER the code for later use OR MAKE IT KNOWN to those
who need to know in order to retrieve the call.
• To retrieve a call that was placed on hold in the system
(parked),
1. From any station, PRESS INTERCOM AND DIAL #.
2. DIAL code for orbit 1–9 (91 to 99).
4.4.1 HANDLING PARK RECALLS
If a call remains unanswered after the park recall time has ended, the
system returns the call to the parking station where it rings. If that
telephone includes an LCD display, a message appears on the display
that shows the line number. The system installer sets the call park
recall times.
• To answer a park recall,
—SELECT ANS. The call will then connect to your station.
Page 56

Advanced Call Handling GCA70-245
46 Comdial August, 03
• To place a park recall on hold at your station,
—SELECT HOLD. After the call
remains on hold for a period
of
time, it rings back to your telephone as a hold recall.
R
ecall Li
HOLD ANS
Outside
Caller
Y
our
Station
Other
Stations
Parking
Orbit
To Place Call
In a Parking Orbit...
To Retrieve a
Parked Call From
Any Other Station...
If the Parked Call
Is Not Answered
Within a Set Time,
It Recalls To Your
Station
...DIAL and
Orbit Number
(91-99)
✳
...DIAL # and
Orbit Number
(91-99)
Parking Calls
Page 57

DSUII Attendant User’s Guide
August, 03 Comdial 47
4.5 Call Forwarding
4.5.1 FORWARDING A CALL
You can forward the calls that normally ring at your telephone to
another telephone for answering. Call forwarding provides several
options that can be programmed by you locally at your station. For
example, you can forward just your prime line and intercom calls or
forward every call that rings at your station.
For each internal call received while call forward is enabled, the forwarding telephone sounds a ring reminder (short tone burst) to
remind the users that their calls are being forwarded.
• To forward your calls,
1. SELECT OPTIONS.
2. SELECT NEXT until CFWD
appears.
3. SELECT CFWD.
4. SELECT PERS for prime line and
intercom calls, OR SELECT ALL for
all calls.
5. SELECT SET to enable call forwarding.
6. DIAL extension number of telephone
to receive your forwarded calls.
7. PRESS SPEAKER to end. (Your telephone will ring a short ring burst each
time an intercom call is forwarded to
remind you that this is happening).
Call Forward
PERS ALL PREV
Selecting Call Forwarding
Call Forward
SET CLEAR PREV
Call Forwarding Options
Page 58

Advanced Call Handling GCA70-245
48 Comdial August, 03
• To cancel call forwarding,
1. SELECT OPTIONS.
2. SELECT NEXT until CFWD
appears.
3. SELECT CFWD.
4. SELECT PERS for prime line and
intercom calls, OR SELECT ALL for
all calls.
5. SELECT CLEAR to disable call forwarding.
6. PRESS SPEAKER to end.
The installer can assign a call forward button to individual telephones. If your telephone has a call forward button available at a programmable button location that includes an associated light, the light
turns on when you press the button.
Your LCD display shows a call forwarding message along with the
extension number or name of the station receiving the forwarded
calls.
F
WD to J Doe
MON
24 12:35
Call Forwarding Active
Caller
Your
Station
Internal
Forward
Station
PERS
ALL
CFOS
Forward Only Your
Prime Line and
Intercom Calls
Forward All Calls
That RIng At Your
Station
Forward Calls
To a Location Outside
Your System
External
Forward
Statio
n
Call Forwarding Options
Page 59

DSUII Attendant User’s Guide
August, 03 Comdial 49
4.6 Call Forward Outside System
(CFOS)
The Call Forward Outside System (CFOS)* feature allows you to
forward incoming or transferred line calls to telephone numbers that
are outside the system. The CFOS feature forwards calls over any
available outbound lines or line groups. Since CFOS involves out
bound calls, those calls are subject to all line access and toll
restriction normally imposed on your calls.
You activate or deactivate CFOS by dialing a feature code or pressing
a preprogrammed button. Once you activate CFOS, you select the
outbound line or line group in any of the normal line selections
methods. You also designate the forward destination by dialing the
number or pressing a speed dial button. (If you do not make a line and
destination choice, the system uses the most recently used selections.)
• To activate the CFOS feature,
1. PRESS INTERCOM *07.
2. PRESS the speed dial button programmed with the target number, OR
SELECT a line AND DIAL number (max 16 digits).
3. PRESS HOLD for Pause OR PRESS TAP for Flash.
4. PRESS SPEAKER to end.
• To deactivate the CFOS feature,
—PRESS INTERCOM #07.
* Comdial has taken reasonable step in the design of all product features,
including CFOS, which protect against unauthorized or fraudulent access
to, or use of, a system, or which protect against unauthorized, fraudulent or
unaccounted-for access to, or use of, long distance lines. However, no sys
tem is entirely invulnerable or immune from unauthorized or fraudulent
access or use, or unaccounted-for access or use, and therefore Comdial dis
claims any and all liability, and makes no warranty, express or implied,
relating to unauthorized or fraudulent access or use, or unaccounted-for
access or use.
NOTE: CFOS must be initiated by installer programming.
Page 60

Advanced Call Handling GCA70-245
50 Comdial August, 03
Notes:
Page 61

DSUII Attendant User’s Guide
August, 03 Comdial 51
5. NONVERBAL MESSAGING
5.1 Station-to-Station Message Delivery
When you call another telephone and receive no answer, you may
leave a reminder that you have called. Do this by turning on the BLF
light at the called telephone. This light indicates that you have
requested a callback. The system automatically turns the light off if a
successful callback is made.
If your telephone is not stored as a DSS/BLF button at the called telephone, your messaging call goes to the central message desk, if one is
programmed. The central message desk (usually the system
attendant) takes your message and turns on the message waiting light
of the telephone that you originally called. If there is no central
message desk assigned, no action will occur.
• To turn on message light,
1. MAKE intercom call AND RECEIVE no answer.
2. DIAL *7 (BLF light at called station flutters).
• To turn off message light,
1. PRESS INTERCOM.
2. DIAL #7.
3. DIAL extension number of telephone (BLF light turns off).
• If you are the recipient of a station-to-station message
reminder (a BLF light is fluttering), answer it as
follows:
—PRESS DSS/BLF button associated with lighted BLF light.
Page 62

Nonverbal Messaging GCA70-245
52 Comdial August, 03
5.2 Message Waiting Light and
Messaging
A special feature access code allows you to control the message
waiting (MW) light at other stations in the system.
When the
message waiting light is turned on at a station, the user can automati
cally call the station that turned it on. Stations that include an LCD
display show the source of the message.
The installer can program one station as the central message desk and
arrange it for exclusive message waiting control.
The central
message desk user (often the system attendant) can control message
waiting lights and deliver messages to and from all other stations in
the system.
• To turn on the message waiting light at another
telephone when that station is busy,
1. HEAR the busy tone AND REMAIN
on the line.
2. SELECT NEXT.
3. SELECT MSG.
4. HANG UP handset.
• To turn on the message
waiting light at another
telephone when that station rings with no answer,
1. SELECT MSG.
2. HANG UP handset.
J
Doe Is Busy
CWAIT
OVER MSG
Delivering a Message
Page 63

DSUII Attendant User’s Guide
August, 03 Comdial 53
• To turn on the message waiting light at an idle
telephone,
1. PRESS INTERCOM AND DIAL *3 OR PRESS MESSAGE for
Impact SCS models.
2. DIAL extension number of station to be alerted. The message waiting
light of called station will flash.
• To turn off the message waiting light at a busy or idle
station,
1. PRESS INTERCOM AND DIAL #3 OR PRESS MESSAGE for
Impact SCS models.
2. DIAL extension number of station that was alerted. The message
waiting light of called station will turn off.
• To turn off the message waiting light during messagedelivering conversation,
—PRESS INTERCOM.
• To receive a message at an alert
1. OBSERVE flashing message waiting light.
2. PRESS INTERCOM AND HOLD OR PRESS MESSAGE for Impact
SCS models.
Connection to the station that left message is automatic.
Page 64

Nonverbal Messaging GCA70-245
54 Comdial August, 03
5.3 LCD Message Delivery
You can set standard and system supplied custom display messages
by dialing a specific code at your telephone. When another user
places a call from an LCD speakerphone, the preset LCD message
from your station will flash on the caller’s LCD. When you set a
message, the intercom light at your telephone flashes to indicate that
the feature is active.
• To turn message on,
1. PRESS INTERCOM.
2. DIAL *02.
3. DIAL the desired number from your message list. The default mes-
sages of “Back At” and “Call” may be used:
• For default message 1, which is “Back At,” dial time in twelve-hour
format using the # as a colon.
• For default message 2, which is “Call,” dial the telephone number of
where you will be.
4. PRESS SPEAKER to end message. Intercom light flashes steadily.
• To turn off message and your intercom light,
1. PRESS INTERCOM.
2. DIAL #02.
Page 65

DSUII Attendant User’s Guide
August, 03 Comdial 55
LCD Message List
(Write attendant supplied messages here)
Dial
Code
Message
0
1 Back At
2 Call
3
4
5
6
7
8
9
Page 66

Nonverbal Messaging GCA70-245
56 Comdial August, 03
5.4 Assist Button Message Delivery
If you have preprogrammed an ASSIST button on your telephone,
you can use it to send a message to your supervisor, asking for assis
tance while you are on a call. Your message shows in the supervisor’s
telephone display.
• To send a message for assistance,
1. PRESS ASSIST button that you have programmed.
2. PRESS DSS/BLF of the telephone user you need help from. (This is
not necessary when the desired extension number was stored along
with the ASSIST button programming.)
3. If the assisting telephone is idle, a ring burst sounds and a message
appears in its display. If it is busy, the message appears when it
becomes idle.
For instructions on programming an ASSIST button, see page 66 in
the Programming chapter.
5.5 Response Message Delivery
By programming a RESPONSE MESSAGE button on your LCD
speakerphone, you can respond with a message to many calling situa
tions. (See page 58 for instructions on programming a dedicated
RESPONSE MESSAGE button).
• To send an LCD message when you call and receive
busy signal or no answer,
—While still on the call, PRESS the appropriate RESPONSE MES-
SAGE button to send a message to the other telephone.
• To send an LCD message to a caller who has initiated a
SOHVA or intercom call from another LCD telephone,
1. HEAR the SOHVA tone or voice announcement in your handset or
headset.
2. PRESS the appropriate RESPONSE MESSAGE button to send a pre-
selected message to the calling telephone.
Page 67

DSUII Attendant User’s Guide
August, 03 Comdial 57
6. ROGRAMMING
6.1 DSS Numbers
Storing another station extension number at a DSS/BLF programmable location allows you to monitor that station, dial it with the
press of one button, or pick up or hold calls at that station quickly and
conveniently.
• To store an intercom extension number as a DSS
number, proceed as follows:
1. SELECT OPTIONS.
2. SELECT NEXT until DSS appears.
3. SELECT DSS.
4. PRESS programmable button to choose location.
5. DIAL extension number.
6. PRESS next location button AND STORE next DSS number.
7. REPEAT the previous step until all DSS numbers are stored, OR
PRESS SPEAKER to end.
CAUTION
Do not attempt to program interactive buttons;
doing so can cause the system to make features
unavailable. If you inadvertently program interac-
tive buttons, you can retrieve their functions in the following manner:
1. PRESS INTERCOM **1
2. PRESS desired interactive button to reprogram
3. DIAL 91, 92, or 93 to program buttons from left to right.
Page 68

rogramming GCA70-245
58 Comdial August, 03
6.2 Autodial And Speed Dial Numbers
Automatic dialing is a feature that lets you store and dial frequently
called numbers using one or two buttons. You can store numbers for
speed dialing at any programmable button that is not now assigned as
a line button or other feature by the system administrator or installer
or at the keypad numbers.
Autodial and speed dial buttons can store up to 16 digits plus an
intercom or line selection. Stored digits include 0–9, S and #. The
system stores a pause at any point where the HOLD button is pressed,
and stores a hookflash at any point where the TAP button is pressed.
Outside numbers and feature codes are commonly referred to as
autodial numbers when stored at the programmable button locations;
however, they are referred to as personal speed dial numbers when
stored at the 10 keypad number locations.
• To store an outside number or a feature code as an
autodial or speed dial number, follow the display
prompts and proceed as follows:
1. SELECT OPTIONS.
2. SELECT NEXT until ADIAL and
SDIAL is displayed.
3. SELECT ADIAL to choose autodial
programming, OR SDIAL to choose
speed dial programming.
NOTE: The Federal Communications Commission (FCC)
requires that when programming emergency numbers and (or)
making test calls to emergency numbers:
1. Remain on the line and briefly explain to the dispatcher the
reason for the call;
2. Perform such activities in the off-peak hours, such as early
morning or late evening.
A
DIAL
S
DIAL
NEXT
Choosing Mode
Page 69

DSUII Attendant User’s Guide
August, 03 Comdial 59
4. PRESS programmable button or key-
pad button to choose storage location.
5. SELECT line button to dial out on or
press INTERCOM.
—OR—
If your system provides line groups,
dial 1, 2, 3, or 4 for line group 1, 2,
3, or 4, or dial 0 to have the system automatically choose the line
for you.
6. DIAL any number up to 16 digits long (include * and # if needed).
7. SELECT SAVE to store number.
8. PRESS next location button AND
STORE next number.
9. REPEAT previous step until all num-
bers are stored, OR PRESS
SPEAKER to end.
NOTE: You may need a pause between numbers to compensate
for differences in response time between your system and the host
system (ask your attendant about this). To store a pause, press
HOLD, then continue dialing. If your system is behind a host sys
tem that needs a hookflash to access a feature, press TAP to store
a hookflash, then continue dialing. Also, you may need to erase
the typed digits appearing in your display to correct them. If you
do, select BKSP once for each digit to be removed.
S
elect Location
PREV
Selecting a Location
SAVE BKSP
PREV
918049782200
Entering a Number
OR
Speed Dial Numbers
DIAL desired number
for personal speed dial
DIAL and number
for system speed dial
✳
Autodial Numbers
PRESS button of
desired number
to dial directly
Speed Dial and Autodial Programmable Locations
Page 70

rogramming GCA70-245
60 Comdial August, 03
6.3 Feature Access Codes
In addition to the system features which may be programmed using
the interactive buttons, several other features may be programmed by
using their access codes. The feature codes are programmed like
speed dial numbers and can occupy the same programmable buttons
on your telephone.
• To store a system feature access code,
1. SELECT OPTIONS.
2. SELECT NEXT until SDIAL option
appears.
3. SELECT SDIAL or ADIAL.
4. PRESS programmable button OR dial
pad button (0–9) to choose storage
location.
5. DIAL access code associated with
feature.
6. SELECT SAVE to store the number.
7. REPEAT previous steps until all
numbers are stored, OR SELECT
EXIT.
8. PRESS SPEAKER to end
.
NOTE: Access codes are listed in Appendix C, Quick Reference
Guide - DSU II Digital Expandable Systems found on page 119.
NOTE: The telephone system allows only one autodial number at
a programmable button; however, you can store an autodial num
ber or feature code at a second level of a location where a DSS is
already stored; just repeat the programming procedure.
S
elect Location
PREV
Choose a Location
Enter Number
PREV
Page 71

DSUII Attendant User’s Guide
August, 03 Comdial 61
As you program numbers, fill in the identification strips on your telephone as well as these tables.
Autodial Numbers, Features or DSS Locations
(Programmable Buttons)
1 13
2 14
3 15
4 16
5 17
6 18
7 19
8 20
9 21
10 22
11 23
12 24
Personal Speed Dial Numbers
(Keypad Buttons)
1 6
2 7
3 8
4 9
5 0
Page 72

rogramming GCA70-245
62 Comdial August, 03
6.4 Feature Buttons
If you find that you are using certain miscellaneous features often,
access buttons may make operation easier. To create feature buttons,
use the interactive buttons to select the feature you want to store, and
then store the feature on a programmable button (see the instructions
on the next page).
• Account Code Button (ACCT)—allows you to enter an
account code for call record purposes.
• Automatic Call-Back (Camp On) Button (CAMP)—arranges
the system to ring your and another’s telephones as soon as their
telephone becomes idle.
• Call Forward Button (CFWD)—provides one-button
forwarding of all of your calls to another telephone.
• Call Park Orbit Button (PARK)—places a call in a system
hold for pick up.
• Do Not Disturb Button (DND)—prevents other telephones
from ringing your telephone.
• Page Button (PAGE)—provides one-button access to paging.
• Privacy Button (PRIV)—releases privacy for current call.
• Saved Number Redial Button (SAVE)—redials saved lastdialed number.
• Voice-Announce Block Button (VAB)—blocks voice
announcements.
Programming of the feature access buttons may require several selections involving many LCD screens. If an abbreviation used is not
familiar to you, consult Appendix B, Display Abbreviations - DSU II
Digital Expandable Systems on page 115.
Page 73

DSUII Attendant User’s Guide
August, 03 Comdial 63
• To create standard feature access buttons proceed as
follows:
1. SELECT OPTIONS.
2. SELECT NEXT until FEAT
appears.
3. SELECT FEAT.
4. SELECT NEXT until desired feature
choice is displayed.
5. SELECT one of the buttons below the
currently displayed selections to
choose your desired selection.
6. RESPOND to any menu prompts associated with feature (such as des-
ignating a Zone for PAGE).
7. PRESS programmable button for
storage location.
8. SELECT PREV OR NEXT until
next feature choice is displayed or
until EXIT is displayed.
9. REPEAT last two steps until all fea-
ture buttons are programmed, OR
SELECT EXIT to end.
Be sure to record the function of programmed buttons on your telephone’s paper designation strip.
• To clear a feature button assignment,
—REPEAT the above procedure, BUT SELECT CLEAR before
selecting storage location button.
Program Button
DND PRIV NEXT
Selecting a Feature
Page
ZONE ALL PREV
Responding to Selections
Required for Paging
Page 74

rogramming GCA70-245
64 Comdial August, 03
6.4.1 RESPONSE MESSAGE BUTTON
Response messaging allows you to reply in a non-verbal manner to a
voice announce or tone-signaled intercom call or to a subdued offhook voice announce call if the intercom caller is using an LCD
speakerphone. You can press a programmable button in response to
an intercom call and send a message to be shown on the display of the
calling station.
• To assign a button for nonverbal response:
1. PRESS INTERCOM AND DIAL **1.
2. PRESS the programmable button you want to use for message access.
3. DIAL 5.
4. DIAL a message number (0 through 9).
5. PRESS SPEAKER to end.
6.4.2 TRANSFER BUTTON
This program lets you set up a button to be used for transferring to a
third party. Most often, this feature is used for transferring calls you
wish to retain to voice mail.
• To assign a “transfer to voice mail” button:
1. PRESS INTERCOM AND DIAL **1.
2. PRESS the programmable button you want to use.
3. DIAL 6.
4. DIAL extension number.
5. PRESS SPEAKER to end.
NOTE: Programmed messages available for use are created by
you, the system attendant and are listed in a table on page 93.
Page 75

DSUII Attendant User’s Guide
August, 03 Comdial 65
6.4.3 SUBDUED OFF-HOOK VOICE ANNOUNCE
(SOHVA) BUTTON
This feature allows you to program a button at your station that you
must press before delivering a SOHVA call. This SOHVA enabled
button allows you, after hearing a busy signal, to decide whether to
interrupt the called party in a SOHVA manner. If you decide to
interrupt the call, you can press the button and complete the SOHVA
call. This button, along with SOHVA groups, allows greater control
of the callers that are allowed to make SOHVA calls and of the situa
-
tions in which they are allowed to make them.
• To program a SOHVA button,
1. PRESS INTERCOM AND DIAL **1.
2. PRESS desired programmable button.
3. DIAL 8.
4. PRESS SPEAKER to end programming.
6.4.4 GROUP LISTENING BUTTON
Group listening allows others to listen to a conversation over your
telephone speaker while allowing the distant party to hear only that
conversation that is sent through the handset speaker.
• To program a group listening button,
1. PRESS INTERCOM AND DIAL **1.
2. PRESS desired programmable button.
3. DIAL 98.
4. PRESS SPEAKER to end.
Page 76

rogramming GCA70-245
66 Comdial August, 03
6.4.5 ASSIST BUTTON
This feature allows you to program a button to be used for sending a
message to an LCD speakerphone. Once programmed, you can press
the ASSIST button at anytime to sound a tone burst at the called
station and present a preprogrammed message in the station display.
You can send a message while on a call without alerting the distant
party. This feature is useful for requesting assistance while engaging
on a call. For example, a customer service representative could
request assistance from a supervisor while talking to a problem caller.
The supervisor, upon receiving the tone and noting the display
message, could perform an executive override or service observing
action to join the call or monitor it.
• To program an assist button,
1. PRESS INTERCOM AND DIAL **1.
2. PRESS programmable button you want as assist button.
3. DIAL 7.
4. CHOOSE from one of the following
options to select the type of
message
that will be delivered with the
ASSIST button:
• DIAL * to choose systemprovided message (ASSIST plus
name or extension number of
station sending message)
• DIAL keypad number (1, 2, 3 etc.) to choose preprogrammed
message (see attendant or table on page 93 for list of LCD
messages).
5. IF one particular station must always receive message, DIAL extension number of that station.
6. PRESS SPEAKER to end.
Assist J Doe
MON
24 12:35
Default Call for Assistance
Page 77

DSUII Attendant User’s Guide
August, 03 Comdial 67
6.4.6 AUTOMATIC REDIAL BUTTON
You can automatically redial a busy number or unanswered call by
activating this feature. Once you activate automatic redial, your
station selects the line, automatically dials the number, and waits for a
response. It will do this twice unless you deactivate the feature by
pressing that button or another button or by lifting the handset.
The automatic redial button is a designated programmable button
position and the user must program its location to make it active.
• To program a button on your telephone for redialing
calls you make that are either busy or do not answer,
1. PRESS INTERCOM AND DIAL **1.
2. PRESS programmable button.
3. DIAL #.
4. PRESS SPEAKER to end.
Page 78

rogramming GCA70-245
68 Comdial August, 03
NOTES:
Page 79

DSUII Attendant User’s Guide
August, 03 Comdial 69
7. OTHER FEATURES
7.1 Line Groups
Some systems have telephone lines arranged into line groups which
may be accessed for outside calling instead of selecting an individual
line button.
The installer can use this feature to reserve certain lines
for certain clusters of stations for a tenant-service arrangement.
• To access a system line group,
1. Press INTERCOM.
2. Dial desired line group access code:
3. LISTEN for outside dial tone.
4. DIAL desired number.
Line Group Access Codes
Line Group Default Code
19
281
382
483
Page 80

Other Features GCA70-245
70 Comdial August, 03
7.2 Volume Control
7.2.1 SETTING CURRENT VOLUME LEVEL
The volume control on your telephone is a multipurpose control you
can use to set the volume (loudness) of the ringer, the speaker, the
handset, the headset, and the group listening mode.
• There are four ringer
loudness levels (plus an off
position). Set these levels as
follows:
—While your telephone is on-hook
and idle, PRESS the VOLUME UP
OR VOLUME DOWN button once
for each change in loudness you desire. The ringer sounds once for
each change as an example of the current setting.
• There are eight speaker loudness levels. Set these levels
for the current call as follows:
—While on a call and in speakerphone mode, PRESS the VOLUME UP
OR VOLUME DOWN button once for each change in loudness that
you desire.
• There are at least eight handset loudness levels that you
can set for the current call as follows:
—While on a call and in handset mode, PRESS the VOLUME UP OR
VOLUME DOWN button once for each change in loudness that you
desire.
NOTE: If you set the ringer to the OFF position, your telephone
sounds a short ring burst once for each call you receive at your
station while the ringer is off.
NOTE: When the call ends, the system resets the loudness of all future
calls to the programmed (default) setting. For instructions in setting
your speakerphone’s default volume, see Default Volume Control section
in the system specific Advanced Features chapter.
Impact SCS Volume Buttons
Page 81

DSUII Attendant User’s Guide
August, 03 Comdial 71
• There are at least eight headset loudness levels that you
can set for the current call as follows:
—While on a call and in headset mode,
PRESS the VOLUME UP OR
VOLUME DOWN button once for each
change in loudness that you desire.
• There are eight group
listening loudness levels. Set
the level for the current call
as follows:
—While on a call and in the group listening mode, PRESS VOLUME
UP OR VOLUME DOWN button once for each change in loudness
you desire.
7.2.2 MUTING YOUR SPEAKERPHONE
By using the MUTE button, you can block transmission of your voice
to the distant party. You can do this whether you are using the handset
or the speaker.
• To mute your station,
—PRESS MUTE (mute function and light turn on). You can still hear
the distant party, but he or she cannot hear you.
• To speak to the distant party,
—PRESS MUTE again (mute function and light turn off).
MUTESHIFT
TAP
HOLD
TUVPRS WXY
DEF
A
BCQZ
MNOJKLGHI
#
COMDIAL
Volum e Up
Button
Volume Down
Button
Impact Volume Buttons
Page 82

Other Features GCA70-245
72 Comdial August, 03
7.3 Default Volume Control
When you change the loudness, that change remains in effect until
you change it again (referred to as default setting).
• Set the speaker, headset, handset, or group listening
loudness for all future calls using the following steps:
1. PRESS INTERCOM.
2. CHOOSE speaker, headset, handset, or group listen mode to be
affected.
3. While in that mode, PRESS VOLUME UP OR VOLUME DOWN to
adjust loudness.
4. DIAL **5 to hold the loudness at the last setting for all future calls
(until it is changed again).
5. REPEAT this procedure in each mode until all default volume levels
have been properly set.
NOTE: You may adjust the volume of a call in any mode (over
speaker, headset, handset or group listen), at any time during the
call, by pressing VOLUME UP or VOLUME DOWN.
When the call
ends, the volume of all future calls is reset to the programmed (default)
setting.
Page 83

DSUII Attendant User’s Guide
August, 03 Comdial 73
7.4 Background Music
If the telephone system supplies background music, you can turn it on
at your LCD speakerphone while on-hook and idle. The system
automatically turns background music off during calls and voice
announcements.
• To turn the music on,
1. SELECT OPTIONS.
2. SELECT NEXT until the MUSIC
option appears.
3. SELECT MUSIC.
4. SELECT ON.
5. PRESS SPEAKER to end (the
speaker light turns on when back
-
ground music is on).
6. ADJUST music volume with the volume buttons.
• To turn the music off,
1. SELECT OPTIONS.
2. SELECT NEXT until the MUSIC option appears.
3. SELECT MUSIC.
4. SELECT OFF.
5. PRESS SPEAKER to end (the speaker light turns off when background music is off).
Background Music
ON OFF< PREV
Setting Background Music
Page 84

Other Features GCA70-245
74 Comdial August, 03
7.5 Do Not Disturb Condition
You can set your telephone to a do not disturb mode using the designated interactive or programmable button. The associated indicator
turns on as an indication of active DND and an appropriate message
appears in the display of LCD speakerphones. Under the DND con
dition, an outside call forwards to another station according to the call
forwarding feature. An intercom number call doesn’t ring a DND
station and the system sends a fast busy signal to the caller to distin
guish the DND condition from a standard busy line. No paging
announcements are received on the DND station. Even though your
station is in the DND mode, you can still make outgoing calls and
access other features.
• To enable DND, proceed as follows:
1. SELECT OPTIONS.
2. SELECT NEXT until the DND
option appears.
3. SELECT DND.
4. SELECT ON.
5. SELECT EXIT.
6. PRESS SPEAKER to end.
• To disable the DND condition,
—REPEAT the above procedure, BUT
SELECT OFF instead of ON at step
4.
• To set a Do Not Disturb
condition at your telephone
when a call rings at your
station,
1. Hear ringing and notice incoming call information in display.
2. PRESS programmed DO NOT DISTURB button. (See Feature Buttons section on page 62 for programming instructions.)
Setting Do Not Disturb
Station with DND Set
Page 85

DSUII Attendant User’s Guide
August, 03 Comdial 75
7.6 Account Codes
If the installer has arranged your system for account code entry, your
display may prompt you to enter an account code after answering a
call.
• To enter account code on an incoming call,
1. IF available, PRESS programmed ACCOUNT CODE button (the call
in progress is not interrupted).
2. IF not available, PRESS INTERCOM AND DIAL *04 (call is automatically placed on hold).
3. DIAL Account Code. Your telephone automatically returns to the call
after you’ve dialed the complete account code.
If the installer has arranged your system for account code entry, your
display may prompt you to enter an account code before dialing.
Depending upon how the installer has programmed your system,
these account codes may be “forced”(mandatory) for dialing outside
numbers.
• To enter account code on an outgoing call,
1. DIAL 9 OR other line button (the display will prompt for “Account
Code” if programmed to do so).
2. PRESS INTERCOM (call is automatically placed on hold) and DIAL
*04 OR PRESS programmed ACCOUNT CODE button.
3. DIAL Account Code.
4. LISTEN for dial tone AND DIAL number you are calling.
NOTE: See Feature Buttons section on page 62 for instructions
on programming a dedicated ACCOUNT CODE button.
Page 86

Other Features GCA70-245
76 Comdial August, 03
7.7 Paging
Your system provides an all-call or a zone page feature that you
access by dialing special codes. This arrangement sounds your voice
announcement through the telephone speakers or through an external
paging unit.
Your system installer can interface a dedicated paging port or a spare
line port with an external paging amplifier. You can then access the
paging amplifier and select specific zones for paging, if applicable,
by dialing codes on your station. The dedicated paging port does not
support any “talk-back’ capability even if such a feature is provided
by the external equipment. Your system installer can also arrange a
line port for external paging interface. The system precedes an
announcement through the paging port with an alerting tone and
installers can choose between an intercom tone or a DTMF signaling
tone for this paging alert tone. They usually choose the intercom tone
for a soft alert and choose the DTMF tone for a loud alert.
• If your system provides an external paging unit,
1. LIFT handset.
2. PRESS INTERCOM AND CHOOSE one of the following options:
• DIAL extension number of station equipped and enabled for paging
(see programming section of this user’s guide), or
• PRESS paging button assigned by the installer, or
• DIAL 89 for special paging port.
3. MAKE announcement.
4. HANG UP to end.
All-call paging allows you to receive announcements through the
station speaker at once. The system can also send all-call paging to
the paging port where it applies it to the input of an external paging
amplifier. Origination of announcements must be via your station
handset. The system installer enables your station’s ability to receive
and originate all-call paging at a station.
Page 87

DSUII Attendant User’s Guide
August, 03 Comdial 77
Zone paging allows groups of stations to receive announcements
through the station speakers. Your system installer can enable zone
paging in up to four different zones. Zone paging can also be received
at the paging port where it can be connected to the input of an
external paging amplifier. Installer’s control the ability of each station
to originate and/or receive a page and the arrangement of the paging
into different zones.
• If your system provides all-call or zone paging,
1. LIFT handset.
2. PRESS INTERCOM.
3. DIAL 87 for all-call, OR DIAL 84, 85, or 86 for zone 1, 2, or 3.
4. MAKE announcement.
5. STAY on line if awaiting a reply (known as Meet-Me page), OR
HANG UP to end.
You can dial a special code number in response to an all-call or zone
page and be connected to the paging party in a private conversation.
All-call or zone paging is provided to the stations through the station
class of service programming.
• To make a reply to a Meet-Me page,
1. LIFT handset of nearest telephone.
2. PRESS INTERCOM.
3. DIAL 88.
4. Meet paging party on line.
Page 88

Other Features GCA70-245
78 Comdial August, 03
7.8 Tracker Paging System
When installed with your system, the Tracker Paging System option
allows you to send call back and parked call messages to Tracker
pagers assigned to station extension numbers. Along with the parked
call message, the system parks the call in orbit for retrieval by the
paged party. The type of message that the system delivers (either
alphanumeric or numeric-only) is dependent upon the Tracker pager
model in use at the station.
When outside callers call into a system that has both a Tracker Paging
option and a voice mail option installed, the system gives these callers
the option of either leaving a message or tracking the person that they
are calling.
If you have a Tracker pager assigned to your personal intercom
number, you can receive messages that someone else sends you. The
system automatically installs the Tracker pager for your use;
however, you can disable it when you do not wish to receive paged
messages and when you leave at the end of your day. Of course, if
you do disable your Tracker pager at the end of your day, be sure to
enable it at the beginning of your next day.
• To enable a Tracker Pager at your station,
1. PRESS INTERCOM.
2. DIAL *06.
• To disable a Tracker Pager at your station,
1. PRESS INTERCOM.
2. DIAL #06.
Page 89

DSUII Attendant User’s Guide
August, 03 Comdial 79
• To send a call back message to someone’s Tracker
Pager after receiving a ring no answer,
1. MAKE an intercom call to someone and receive no answer.
2. PRESS programmed TRACK button OR DIAL #01.
3. After your station returns to idle* hang up handset or press SPEAKER
to end. The Tracker Pager system will transmit your station extension
number to called party’s Tracker Pager display. (Some models will
also display your station name if the system is programmed to include
station names.)
* If the Tracker paging system does not accept your actions, an error
tone sounds at your telephone.
• To send a call back message to someone’s Tracker
Pager without first calling them,
1. PRESS INTERCOM.
2. DIAL #01.
3. DIAL station extension number.
4. HANG UP handset OR PRESS SPEAKER to end. The Tracker Pager
system will transmit your station extension number to the caller’s
Tracker Pager display. (Some models will also display your station
name if the system is programmed to include station names.)
Page 90

Other Features GCA70-245
80 Comdial August, 03
• To park a call and have Tracker Pager tell someone to
retrieve the call,
1. ANSWER call AND PRESS TRNS/CONF.
2. DIAL Extension.
3. PRESS programmed TRACK button OR DIAL #01.
4. Your display shows park orbit (91 through 99) and then returns to
idle*.
5. Hang up handset or press SPEAKER to end. The Tracker Pager system will transmit orbit dialing code and caller ID information, if available, to called party’s Tracker Pager display. (Alphanumeric models
display #91 through #99 while numeric-only models display -91
through -99.)
* If the Tracker paging system does not accept your actions, an error
tone will sound at your telephone.
• To respond when your Tracker Pager displays park
orbit dialing code,
1. From any system station, PRESS INTERCOM.
2. DIAL #.
3. DIAL displayed orbit code (91 to 99).
4. RETRIEVE call.
Page 91

DSUII Attendant User’s Guide
August, 03 Comdial 81
7.9 Auxiliary Jack
The auxiliary jack provides an interface for a headset, a tape recorder,
an external ringer or an external pager. Any one of these auxiliary
devices may be connected by you or by your system installer.
You
must program one of the programmable buttons to serve as an enable/
disable button for each auxiliary device that is or will be connected to
your telephone.
The following modes are programmable with the auxiliary jack:
• The headset mode allows you to operate your telephone with a
headset instead of as a speakerphone. Lifting the handset will
turn off the headset and activate the handset.
• The recorder mode allows you to send your voice and that of the
distant party to a tape recording machine.
• The ringer mode allows an external speaker to sound the ringing
of your telephone.
• The pager mode allows an external paging device to sound all
voice announcements (all-call, zone paging, voice-announced
intercom calls) sent to your telephone.
NOTE: Some telephones have an auxiliary jack. All other model
telephones use the handset jack to plug in a headset.
NOTE: The recorder, external ringer, or pager requires external
power.
Auxiliary Jack Location
Page 92

Other Features GCA70-245
82 Comdial August, 03
• Program the enable/disable buttons (at any blank
programmable button location) as follows:
1. PRESS INTERCOM.
2. DIAL **1.
3. PRESS programmable button.
4. DIAL a feature code
94 = Headset Button,
95 = External Ringer Button,
96 = Tape Recorder Button,
97 = External Pager Button.
5. PRESS TRNS/CONF.
6. REPEATEDLY PRESS programmable button AND DIAL separate
codes until all four buttons are programmed, OR PRESS SPEAKER
to end.
• To use a feature button,
1. PRESS desired button to enable mode. The display denotes the fea-
ture and shows it to be enabled.
2. To disable any active mode, press the corresponding feature button to
alternate off.
CAUTION
With the exception of a headset microphone,
do not connect the audio output of any external
device to the auxiliary jack. Also, do not connect the tip
and ring leads of a telephone line to the auxiliary jack. Do not connect
any devices to the auxiliary jack other than those mentioned above
Page 93

DSUII Attendant User’s Guide
August, 03 Comdial 83
7.10 Automatic Set Relocation
If your installer has equipped your system with automatic set relocation, when you move your telephone to a new location, the system
gives you a choice (through a display prompt) as to whether you want
to keep your previous programming or use the programming in the
new location.
• To maintain the extension number and programming
features from the old location,
1. CONNECT the telephone line cord to the new jack.
2. OBSERVE the flashing HOLD light AND PRESS HOLD while the
light is still flashing (your telephone immediately assumed the fea
-
tures from the previous location).
• To assume the extension number and programming
features from the new location,
1. CONNECT the telephone line cord to the new jack.
2. OBSERVE the flashing HOLD light AND DIAL # while the light is
still flashing (your telephone immediately assumes the features from
the new location).
NOTE: If you do not select a button after installing the telephone,
the system automatically defaults to the programming from the
previous location.
Page 94

Other Features GCA70-245
84 Comdial August, 03
7.11 Service Observing
If your LCD speakerphone provides the installer–programmed
service observing feature, you can use it to monitor a conversation or
activity at another telephone in an undetected manner. You can use
this feature while you are in the speakerphone mode or off-hook.
• To monitor another station at any time,
1. PRESS INTERCOM.
2. DIAL #03.
3. DIAL extension number of telephone to be monitored.
4. PRESS SPEAKER to end monitoring.
5. Your system installer may also program a dedicated SERVICE
OBSERVE button that may be used in place of the feature access
code.
7.12 Switching The Dialing Mode
Between Pulse And Tone
If the telephone service in your locality is pulse (rotary dialing), the
installer arranges your telephone to dial in this manner. If you need to
send tones during a dialing sequence (for example, to send bank-bytelephone tones), you can convert to tone dialing mode while dialing.
The system will switch back to pulse dialing when you end your call.
You can store a ‘#’ as part of a speed dial number to cause an automatic switch from pulse to tone where needed in a number sequence.
• To convert to tone dialing at any time during dialing or
while on an active call,
—DIAL #.
Page 95

DSUII Attendant User’s Guide
August, 03 Comdial 85
7.13 Toll Restriction Override
You can override one station’s toll restriction assignment by dialing a
programmed four-digit TRO code at another station prior to dialing
your desired number. When you do this, the system replaces the toll
restriction requirements of the station that you are using with those
that match your home station.
After entering a TRO code at another station, you will get your own
prime line or idle line preference and its accompanying toll restriction
assignment. You then have 15 seconds to dial an outgoing call. Once
you hang up from a call, you have 15 seconds to make another call
without re-entering your TRO code.
If you transfer a TRO call or
place it on hold and pick it up at another station, the call belongs to
the new station.
• To use TRO at a station,
1. PRESS INTERCOM,
2. DIAL **6.
3. DIAL your station extension number.
4. DIAL your TRO code number (as is shown).
5. Within 15 second timeout period, DIAL desired outgoing line number.
6. HANG UP handset OR PRESS SPEAKER to end call. You will have
15 seconds in which you can make another call without
re-entering your TRO code.
• To clear the TRO code,
1. PRESS INTERCOM,
2. DIAL **6.
3. PRESS SPEAKER.
Page 96

Other Features GCA70-245
86 Comdial August, 03
7.14 Dial By Name
The dial by name feature allows you to use the display and interactive
buttons of your LCD speakerphone to search through a prepro
grammed index of intercom or system speed dial names, locate a
desired name, and automatically call the located name.
• To use dial by name,
1. SELECT OPTIONS to enter the dial
by name menu.
2. From the dial by name menu,
SELECT INT button for intercom
calling, OR SELECT EXT for sys
-
tem speed dial calling.
3. DIAL three digits for the first three
letters of the name you want to locate
(for example, dial 266 for Comdial).
4. The display shows the first existing
name match to the dialed digits or
shows a No Match message if the
system can not find a match. IF the
display says No Match, SELECT
PREV OR ENTER three new digits to select a new name.
5. SELECT NEXT to display the subsequent names in the list until you reach
the name you need, OR SELECT
ALL to view the name list from the
beginning.
6. SELECT DIAL to call the displayed
name.
Dial by Name
INT EXT NEXT
Selecting Option
Enter Digits
ALL EXIT
Entering Digits
No Match
ALL BACK
RETURN
Searching for a Match
Page 97

DSUII Attendant User’s Guide
August, 03 Comdial 87
7.15 Programmed Button Display
7.15.1 BUTTON FUNCTIONS DISPLAY
(BUTTON QUERY)
You can cause the display to identify the function of each button on
your telephone.
• To button query your telephone,
1. SELECT OPTIONS.
2. SELECT NEXT until the QUERY
option appears.
3. SELECT QUERY.
4. PRESS the button in question.
5. READ the displayed information
(display will hold for few seconds
before the telephone returns to idle).
Button Query
Press Any Button
Button Query
Page 98

Other Features GCA70-245
88 Comdial August, 03
7.16 Data Interface Unit
The Data Interface Unit, or DIU, is an optional external device that
may be part of your system installation. It provides connections for
both your telephone and an IST device such as a standard single-line
telephone, a FAX machine, a data modem, a cordless telephone, or an
answering machine.
If the installer has arranged your station in this manner, you can
switch between your telephone and the IST device by pressing the
DATA button that the installer has programmed on your telephone.
The light associated with the DATA button provides status indications
for your reference.
• To select your telephone if the DATA light is on or is
flashing,
—Press the DATA button. If a call is in progress on the IST device, it
transfers to your telephone if you have your telephone handset lifted
or have your telephone in speakerphone mode. If you do not, the call
drops.
• To select the IST device if the DATA light is off,
—Press the DATA button. If a call is in progress on your telephone, it
transfers to the IST device if the device is off-hook; otherwise, the
call drops. Your telephone still provides visual messages and indica
-
tions even though its voice path is routed to the IST device.
DATA Light Tel ep ho ne Sta tu s
OFF Your telephone is selected for operation
On Green Your IST device is selected but is idle
On Red Your IST device is selected and is busy
Flashing Red Your IST device is ringing
Page 99

DSUII Attendant User’s Guide
August, 03 Comdial 89
7.17 IMIST Module
Impact SCS 8324F-**, 8324S-**, and 8312S-** speakerphones
equipped with the optional IMIST module can support an IST device
(modem, FAX machine, industry-standard telephone, etc.) in addition
to the LCD speakerphone. Depending on system programming, the
IST device may be used to make outgoing calls and receive incoming
calls.
The IMIST module does not have its own extension number and does
not function simultaneously with the speakerphone.
Switch between your telephone and the IST device by pressing the
DATA button that the installer has programmed on your telephone.
The light associated with the DATA button provides status indications
for your reference.
Note: Impact SCS phone model 8324SJ Rev. D and later, and
model 8312SJ Rev. D and later, will not support the IMIST mod
-
ule.
NOTE: The IMIST module does not provide voltage to light a
message waiting light. Message waiting lights on devices plugged
into the IMIST module will not function.
DATA Light Tel ep hon e St atu s
OFF Your telephone is selected for operation
On Green Your IST device is selected but is idle
On Red Your IST device is selected and is busy
Flashing Red Your IST device is ringing
IMIST Module
Page 100

Other Features GCA70-245
90 Comdial August, 03
7.18 DSS/BLF Console Operation
The IB64X, IB48X, and IB24X DSS/BLF consoles have additional
buttons and status lights that extend the memory button capability of
an adjacent companion telephone. The buttons can be programmed
for automatic dialing (speed dial) or direct station selection (DSS)
with busy lamp field (BLF) using the instructions provided previ
-
ously in this guide.
When the installer assigns a DSS/BLF console to a station port, the
system recognizes it as such and automatically designates the console
buttons as DSS buttons so that you can store numbers at the buttons
as you need them.
The DSS/BLF console will not operate in a bridged mode.
IB64X DSS/BLF Console
 Loading...