

Page 1
Interchange
Supervisor’s User Guide
Page 2

Interchange
Supervisor’s User Guide
Copyright © 2003 Comdial Corporation
All rights reserved. Unauthorized use of this
document is prohibited.
Comdial Corporation
106 Cattleman Road, Sarasota, FL 34232
(941) 554-5000 or (800) 266-3425
-Notice-
Comdial reserves the right to make any
changes and improvements in the product
described in this document at any time and
without prior notice.
Interchange is a trademark of Comdial Corporation. All other product
names are trademarks of their respected owners.
First Edition
March, 2003
Printed in the USA
ii GCA70-391 Mar ‘03
Page 3

This Interchange Supervisor’s User Guide is applicable for the following
system models.
Product Required Software Version
Interchange Software versions 11.1 and greater
GCA70-391 Mar ‘03 iii
Page 4

Document Revision History
Date Affected Pages Change
Mar 2003 i-128 Original Release
iv GCA70-391 Mar ‘03
Page 5

Interchange Supervisor
TABLE OF CONTENTS
Chapter 1. System Supervisor Overview
1.1 What Does Interchange Do? ................................... 1
1.1.1 What is an Automated Attendant? ......................... 2
1.1.2 What is Voice Mail? ............................................... 3
1.2 Understanding Supervisor Responsibilities ............ 5
1.2.1 Creating, Modifying, and Deleting Mailbox
Owner Mailboxes ................................................... 5
1.2.2 Creating and Maintaining Group Distribution Lists .. 5
1.2.3 Issuing Broadcast Messages................................... 6
1.2.4 Disabling Ports and Re-enabling Ports.................. 6
1.2.5 Temporarily Forcing the System into Day, Lunch,
or Night Service Mode ............................................ 6
1.2.6 Changing Designated Company Business Hours.... 7
1.2.7 Changing Designated Company Holidays............... 7
1.2.8 Changing the Greeting Played by a Routing Box .... 8
1.2.9 Changing the Routing in a Routing Box................... 8
1.2.10 Controlling Mailbox Owner Access to System
Features ............................................................... 9
Chapter 2. Using the Telephone to Perform
Supervisor Functions
2.1 Creating, Changing, or Deleting a Mailbox ............. 14
2.2 Creating a Broadcast Message .............................. 19
2.3 Disabling or Re-Enabling a Port ............................. 20
2.4 Temporarily Forcing the System into Day, Lunch, or
Night Service Mode ............................................... 21
Mar ‘03 Comdial v
Page 6

Contents
2.5 Changing the Greeting Played by a Routing Box ... 22
2.6 Changing the Single-Digit Call Routing in a Routing
Box ........................................................................ 25
Chapter 3. Using the PC to Perform Supervisor
Functions
3.1 Creating, Changing, or Deleting a Mailbox ........... 31
3.1.1 Setting up Call Transfers ...................................... 39
3.1.2 Setting up Follow Me Mode .................................. 44
3.1.3 Setting up Recording ............................................ 51
3.1.4 Setting up Message Delivery ................................ 55
3.1.5 Setting up Pager Notification ................................ 58
3.1.6 Setting up Distribution Lists .................................. 60
3.1.7 Setting up Hotel Feature ....................................... 62
3.1.8 Setting up Enhanced Features ............................. 63
3.1.9 Setting up e-Mail Features .................................... 64
3.1.10 Setting up Schedules .......................................... 67
3.2 Controlling Mailbox Owner Access to Features .... 68
3.2.1 Controlling Messages ........................................... 71
3.2.2 Controlling Greetings ............................................ 73
3.2.3 Controlling Call Holds ........................................... 75
3.2.4 Restricting Calls .................................................... 77
3.3 Creating, Changing, or Deleting a Group Box ...... 79
3.4 Changing Company Business Hours ..................... 83
3.5 Changing Company Holidays ............................... 84
3.6 Changing the Greeting Played by a Routing Box . 86
vi Comdial Mar ‘03
Page 7

Interchange Supervisor
3.7 Changing the Routing in a Routing Box ................ 88
3.7.1 Routing Calls Based On Digits Dialed .................. 92
3.7.2 Routing Calls Based On Call Sequence Number . 94
3.7.3 Routing Calls Based On Day of Week .................. 96
3.7.4 Routing Calls Based On Date ............................... 97
3.7.5 Routing Calls Based On Time of Day ................... 99
3.7.6 Routing Calls Based On Database Lookup ........ 100
3.7.7 Routing Calls Based On Day/Night Service ........ 101
Chapter 4. System Reports
4.1 Generating Reports .............................................. 103
4.2 Accessing Reports ............................................... 104
4.3 Setting up Report Defaults ................................... 104
4.4 Viewing and Working with Reports ....................... 105
4.5 Customizing Reports ............................................ 106
4.6 Report Types ........................................................ 108
4.6.1 System Reports .................................................. 108
4.6.1.1 Class of Service Report ....................................... 109
4.6.1.2 Port Activity Report ..............................................111
4.6.1.3 Hourly Statistics Report ........................................ 113
4.6.1.4 Port Contention Report ........................................115
4.6.1.5 Port Contention Trend by Month Report .............. 116
4.6.1.6 Port Contention Trend by Day of Week Report .... 117
4.6.2 Mailbox Reports .................................................. 118
4.6.2.1 Mailbox Information Report ..................................118
4.6.2.2 Mailbox Usage Report .......................................... 119
4.6.2.3 Message Delivery Report ..................................... 121
4.6.2.4 Login Failure Report ............................................. 122
4.6.2.5 Default Password Report ..................................... 123
Mar ‘03 Comdial vii
Page 8

Contents
List of Figures
Structure of Supervisor Menus ....................................................................13
Interchange System Menus .........................................................................30
Mailbox Screen, General Tab ......................................................................32
Mailbox Screen, Call Transfer Tab .............................................................39
Mailbox Screen, Follow Me Tab .................................................................44
Transfer Configuration Screen ....................................................................45
Mailbox Screen, Recording Tab ..................................................................51
Mailbox Screen, Message Delivery Tab .....................................................55
Mailbox Screen, Pager Tab .........................................................................57
Mailbox Screen, Distribution Lists Tab ......................................................60
Mailbox Screen, Hotel Tab .........................................................................61
Mailbox Screen, Enhanced Tab ..................................................................62
Mailbox Screen, e-Mail Tab ........................................................................63
Schedules Screen .........................................................................................67
Class of Service Screen .............................................................................69
Class of Service Screen, Messages Tab ..................................................71
Class of Service Screen, Greetings Tab .....................................................73
Class of Service Screen, Call Holding Tab ...............................................75
Class of Service Screen, Call Restrictions Tab ........................................77
Group Box Screen .....................................................................................80
Business Hours Screen ................................................................................83
Holidays Screen ...........................................................................................85
Routing Box Screen .................................................................................. 87
Routing Box Screen ....................................................................................89
Report Customization Screen ....................................................................100
Class of Service Report, Top of Screen ....................................................104
Class of Service Report, Bottom of Screen ...............................................105
Port Activity Report ..................................................................................107
Hourly Statistics Report ............................................................................109
Port Contention Report ..............................................................................111
Port Contention Trend by Month Report ..................................................112
Port Contention Trend by Day of Week Report ........................................113
Mailbox Information Report .....................................................................115
Mailbox Usage Report ..............................................................................116
Mailbox Delivery Report ..........................................................................117
Login Failure Report .................................................................................118
Default Password Report ...........................................................................119
viii Comdial Mar ‘03
Page 9

Interchange Supervisor
1. SYSTEM SUPERVISOR
OVERVIEW
Once the installing technician sets up the Interchange system at a site,
an on site system supervisor must be appointed to perform day-to-day
system maintenance tasks. This manual defines the tasks that you,
the System Supervisor, may need to perform. It also provides information about how to complete each task.
Before you attempt to perform any system supervisor functions, you
must be familiar with the basic capabilities and structure of the Interchange system.
1.1 What Does Interchange Do?
In its simplest form, Interchange acts like a telephone receptionist. It
answers incoming calls and transfers them to the appropriate
extension. If the called extension is not available (busy or no
answer), Interchange offers to take a message or try an alternative
extension.
Interchange functionality includes:
• Automated attendant features
• Voice mail features
These two functions work together to provide smooth call coverage at
an Interchange site.
Mar ‘03 Comdial 1
Page 10
System Supervisor Overview
1.1.1 WHAT IS AN AUTOMATED ATTENDANT?
The automated attendant features perform the tasks of a live
attendant.
Live Attendant Interchange Automated
Attendant
Answers an incoming call by
lifting telephone.
Greets the caller with a phrase
such as, “Welcome to [XYZ
Company].”
Asks to whom the caller wishes
to speak.
Listens to the caller’s response. Listens to the digits dialed by the
Says, “Please hold.” Plays a pre-recorded phrase,
Calls the required extension by
hook-flashing and dialing the
extension number.
Listens for busy tone, ring tone,
answer, etc.
If the extension is busy, offers to
let the caller hold. If the
extension does not answer, offers
to take a message or try another
extension.
Answers an incoming call by going
“off-hook.”
Greets the caller by playing a prerecorded greeting such as,
“Welcome to [XYZ Company].”
Plays a pre-recorded greeting that
prompts the caller to either:
• dial the extension of the party
they are trying to reach, or
• choose from a list of voiced
options.
caller.
“Please hold...”
Calls the required extension by
hook-flashing and dialing the
extension number.
Listens for busy tone, ring tone,
answer, etc.
If the extension is busy, plays a
pre-recorded prompt offering the
option to hold. If the extension
does not answer, plays a prerecorded prompt offering to take a
message or try another extension.
2 Comdial Mar ‘03
Page 11
Interchange Supervisor
1.1.2 WHAT IS VOICE MAIL?
The term voice mail refers to systems that can record a voice message
and treat it like a mail message.
In a typical office environment, the live attendant takes a message
from a caller and writes it down on a piece of paper. The attendant
then places the slip in the recipient’s in-box or mailbox. The box
owner then retrieves and reads the message placed in the box.
In contrast, the Interchange records a message from a caller and
places it in a voice mailbox. The mailbox owner can later retrieve the
message by calling into the system and listening to the recording.
The following table compares how Interchange processes voice messages compared to a live attendant.
Live Attendant Interchange Voice Mail
Attendant listens as the callers
dictates their messages, writing
it down on a piece of paper.
Attendant places the message
slip in a mailbox belonging to
the recipient.
Attendant dials the code to turn
on message waiting lamp on the
recipient’s telephone.
Recipient sees the message
waiting lamp is on, and retrieves
message slips from the message
mailbox.
Recipient reads messages left on
message slips.
Interchange records the message
as the caller speaks.
Interchange stores the voice
message electronically in the
recipient’s voice mailbox.
Interchange dials the code to
turn on the message waiting
lamp on the recipient’s
telephone.
Recipient sees the message
waiting lamp is on and dials
Interchange to retrieve
messages.
Interchange plays messages
recorded by callers in the voice
mailbox.
Mar ‘03 Comdial 3
Page 12

System Supervisor Overview
Interchange is designed using the Box concept. A box contains a set
of instructions that tells the program what to do with a call it is handling. By sending calls to different boxes created on the system, the
system effectively processes calls—including playing certain prompts
or greetings to callers, collecting information and messages from
callers, and routing calls to certain extensions based on digits dialed
by callers.
When you use the automated attendant capabilities in Interchange, the
system uses routing boxes to answer incoming calls, play a listing of
options to callers, and route each call to a specific mailbox (or another
type of box on the system) based on either digits dialed by the caller,
or on other criteria the technician defined when the system was set up.
The mailboxes transfer calls to their associated extensions and store
messages for system mailbox owners. Each mailbox can also be set
up to forward calls to another phone or extension number, deliver
messages to another phone or pager, play one of 10 pre-recorded
greetings to callers, screen calls, queue calls when the extension is
busy, or record call conversations.
In addition to routing boxes and mailboxes, the Interchange provides
several other types of boxes:
• Question box
• Directory box
• Account Number box
• Group box
• Customer Service box.
This document discusses how you can make modifications to mailboxes and routing boxes, which are the two most commonly used box
types. Because the other types of boxes are used in conjunction with
more intricate system setups, adjusting their functionality is best left
to a certified Interchange technician. Therefore, if you need to adjust
the operation of any boxes other than mailboxes or routing boxes,
contact your Interchange technician.
4 Comdial Mar ‘03
Page 13

Interchange Supervisor
1.2 Understanding Supervisor Responsibilities
You can perform most administrative functions over the telephone, by
simply calling into the system and logging into a supervisor mailbox.
Other functions, however, must be performed from the Interchange
PC because they require you to make adjustments to fields on Interchange program screens.
1.2.1 CREATING, MODIFYING, AND DELETING
MAILBOX OWNER MAILBOXES
All employees are assigned a mailbox in the system. They can use
Interchange to record voice mail messages in a mailbox, or to forward
calls to other phones or extension numbers. As employees join and
leave the company, you must create or delete their associated mailboxes. If employees’ need to access certain system features changes,
you may need to modify their mailboxes. You must also modify mailboxes when employees want to change numbers the system uses with
its message delivery and pager notification features.
While you can perform most modifications by calling into the system
over the telephone, certain modifications require you to use the Interchange PC (such as modifying the second through fifth phone or
pager numbers for message delivery).
1.2.2 CREATING AND MAINTAINING GROUP
DISTRIBUTION LISTS
Group distribution lists provide mailbox owners an easy way to send
one message they record to multiple individuals, without specifying
each individual recipient’s extension. Though mailbox owners can
set up one to four personal distribution lists specific to their needs,
many organizations also set up group distribution lists that can be
used by all company employees. A group list a company maintains
Mar ‘03 Comdial 5
Page 14

System Supervisor Overview
may contain, for example, the names of all company employees, of all
employees in a particular department, of all employees that work a
specified shift, etc. You must update these group distribution lists as
employees join or leave your organization.
You must create and maintain group distribution lists using the Interchange PC (you cannot call into the system over the telephone to
create/modify them).
1.2.3 ISSUING BROADCAST MESSAGES
The broadcast message feature allows you to easily distribute informational messages to all mailboxes on the system. Only a system
supervisor has access to this feature.
You must issue broadcast messages by calling into the system over
the telephone.
1.2.4 DISABLING PORTS AND RE-ENABLING
PORTS
Should a telephone line or port be malfunctioning, the Interchange
system technician may ask you to disable the line until it can be serviced.
You can only disable ports by calling into the system over the telephone.
1.2.5 TEMPORARILY FORCING THE SYSTEM INTO
DAY, LUNCH, OR NIGHT SERVICE MODE
Interchange can be set up to play different greetings and to process
calls differently according to the time of day each call is received.
Three different modes can be set up on the system: Day Service,
Lunch Service, and Night Service. Each service mode is assigned a
specific time segment of the day. Calls received within a mode’s time
segment are routed to a particular box, which plays a particular
greeting. Many systems, for instance, have calls route to a different
6 Comdial Mar ‘03
Page 15

Interchange Supervisor
box that plays an Office Closed greeting during the Night Service
hours. Occasionally you may need to force Interchange to temporarily process calls according to a service mode that is other than the
current mode (to extend the Lunch hour mode for example).
You can only temporarily change the service mode by calling into the
system over the telephone.
1.2.6 CHANGING DESIGNATED COMPANY
BUSINESS HOURS
You may need to permanently change the hours associated with the
Day Service, Lunch Service, and Night Service modes. If, for
example, your company extends its business hours from 5:00 PM to
6:00 PM during a particular time of the year, you may need to extend
the Day Service hours (during which the system routes calls to a box
that plays an Office Open greeting) to last until 6:00 PM.
To permanently adjust the business hours you must use the Interchange PC to access the Business Hours screen.
1.2.7 CHANGING DESIGNATED COMPANY
HOLIDAYS
Up to 20 holiday dates can be defined on the system. On each
holiday, calls can be routed to a special Routing box, in which you
can record a specific holiday greeting. From time to time, especially
from year to year, you may need to add, modify, or delete specified
holiday dates.
You must use the Interchange PC to modify the holiday dates. (You
can record holiday greetings over the telephone, however.)
Mar ‘03 Comdial 7
Page 16

System Supervisor Overview
1.2.8 CHANGING THE GREETING PLAYED BY A
ROUTING BOX
When a call comes into Interchange, it is processed by a routing box,
which plays a greeting to the caller and may offer the caller options
on how the call can proceed (“Press 2 for Sales,” for example). You
may need to modify the greeting played by a particular routing box.
For example, you may want to customize the greeting played by the
routing box that answers calls on a particular holiday. Or, you may
need to add or eliminate a routing option voiced to callers (such as,
“Press 5 for Customer Service”).
You may use either the Interchange PC to modify the holiday dates or
you can call in over the telephone.
1.2.9 CHANGING THE ROUTING IN A ROUTING BOX
At times you may need to add or eliminate a routing option available
to callers (such as, “Press 5 for Customer Service”). Or, you may
need to modify the box to which the call is routed when callers select
the option (you may want to send the call to mailbox 399 instead of
395, for example). Remember that when you change single-digit key
routing, you must also change the greeting voiced by the routing box
(as described in Section 1.2.8, Changing the Greeting Played by a
Routing Box).
You may use either the Interchange PC to modify single-digit call
routing or you can call in over the telephone. However, you can only
modify the routing technique (routing based on day of week, call
sequence, etc.), through the screen interface.
8 Comdial Mar ‘03
Page 17

Interchange Supervisor
1.2.10 CONTROLLING MAILBOX OWNER ACCESS
TO SYSTEM FEATURES
You can modify the features to which a group of mailbox owners is
permitted access by modifying the class of service assigned to the
mailbox owners. Making class of service modifications allows you to
also prevent the system from dialing certain phone numbers, such as
long distance numbers, when making outgoing calls from a mailbox
owner’s mailbox. Outgoing calls may be made by the system to
deliver messages to a mailbox owner, page a mailbox owner, or to
have the system place an outgoing call (when the mailbox owner calls
into the mailbox and selects this option).
You must use the Interchange PC to adjust the Class of Service
screen.
Mar ‘03 Comdial 9
Page 18

System Supervisor Overview
THIS PAGE INTENTIONALLY LEFT BLANK
Figure 1-1
10 Comdial Mar ‘03
Page 19

Interchange Supervisor
2. USING THE TELEPHONE TO
PERFORM SUPERVISOR
FUNCTIONS
To access system supervisor functions by calling into the system, you
must log into a supervisor mailbox. A supervisor mailbox is any
mailbox that has been assigned supervisor privileges in the mailbox’s
assigned class of service. (The mailbox’s assigned class of service
defines the features and options to which the mailbox owner is permitted access.) Consult with the technician who installed the Interchange system for a list of which mailboxes have been assigned
supervisor privileges.
To log into a supervisor mailbox from the telephone, and access
supervisor functions, perform the following steps.
1. From a telephone, call into voice mail and log into a supervisor
mailbox. The system voices the Main Menu:
“To listen to your messages press 1. To send a message press
2. To change your options press 3.”
Mar ‘03 Comdial 11
Page 20

Using the Telephone to Perform Supervisor Functions
2. To access the Supervisor menu, press 6 (the system does not
voice this option).
Next, the system voices the Supervisor menu options:
Supervisor Menu
For Mailbox Administration Press 1
For Routing box Administration Press 2
For Question box Administration Press 3
For Port Administration Press 4
To Change the System Broadcast Message Press 5
To Change the voice mail Day / Night Service Press 6
To Change the System Time Press 7
To Change the System Date Press 8
To Modify System Parameters Press 9
To Perform First Time Setup Press 0
To Exit Press #
The following illustration shows the structure of the Supervisor
menus.
12 Comdial Mar ‘03
Page 21
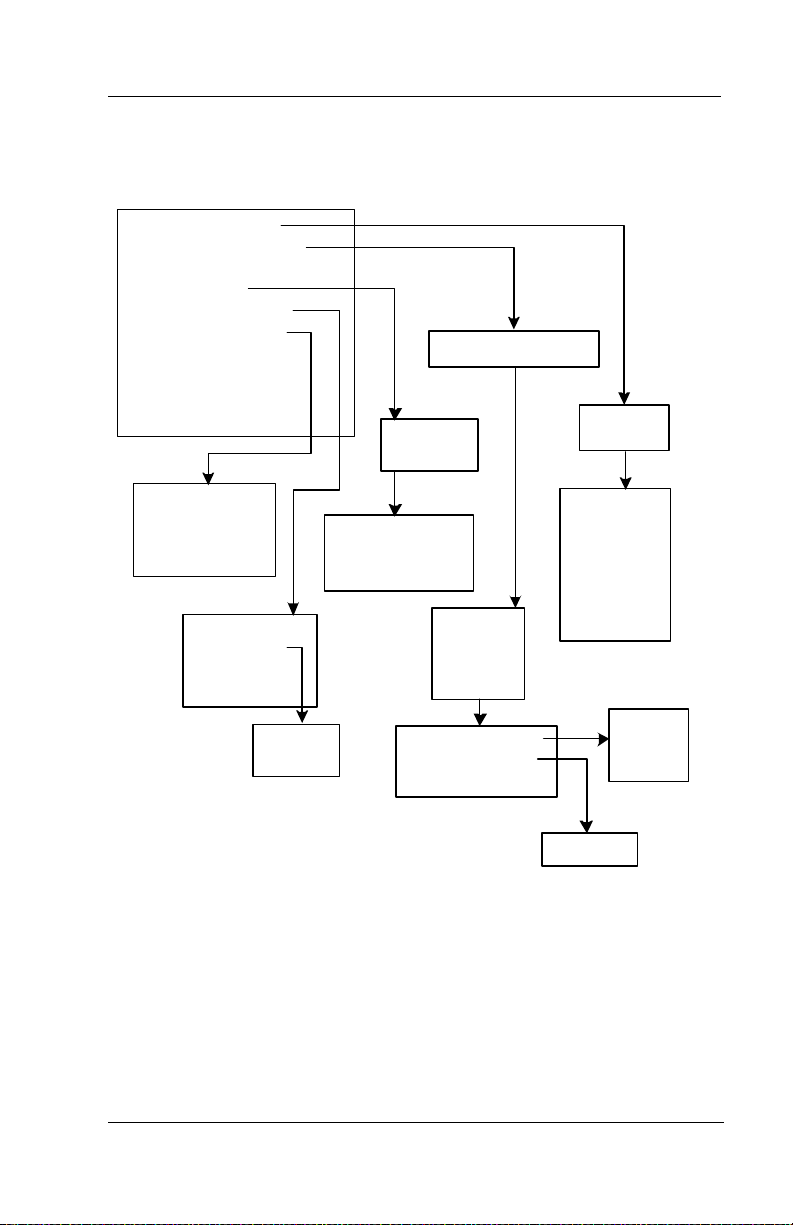
Figure 2-1 Structure of Supervisor Menus
1. Mailbox Functions
2. Routing box f unctions
3. Question box f unctions*
4. Port f unctions
5. Broadcast functions
6. Night/day functions
7. System time*
8. System date*
9. System parameters*
0. First time setup*
Enter box number
Enter port
number
Interchange Supervisor
Enter bo x
number
1. Day serv ice
2. Night service
3. Lunch serv ice
# Ex it
1. Hear Current
2. Re-recor d
3. Delete
# Ex it
Re co r d
messag
e
*CAUTION: Select and modif y these options ONLY under the guidance of
your system tec hnician. Using these options incorrectly may keep the
sy stem from eff ectively pr ocessing calls and perf orming messaging
functions. This guide does not include information on w orking w ith these
options.
1. Disable a port
2. Enable a port
# Ex it
1. Add
2. Delete
3. Modify
# Exit
1. Modify greeting
2. Modify routing
# Ex it
1. Add
2. Delete
3. Modify
4. Suspend
5. Restore
6. Reset
# Ex it
En t e r
greeting
number
Enter di g it
Mar ‘03 Comdial 13
Page 22

Using the Telephone to Perform Supervisor Functions
2.1 Creating, Changing, or Deleting a Mailbox
You can create, modify, or delete a mailbox using options on the
Mailbox Administration menu. Specifically, you can use this menu
to:
• add or delete a mailbox,
• change a mailbox greeting (the mailbox owner can also perform
this function by logging into the mailbox),
• change a mailbox password (the mailbox owner can also
perform this function by logging into the mailbox),
• change the call transfer, pager, and message notification
numbers (the mailbox owner can also perform this function by
logging into the mailbox), or
• suspend a mailbox (making it inaccessible to the mailbox
owner) and restore access to a suspended mailbox.
To create, modify, or delete a mailbox over the telephone, perform the
following steps.
1. From the Supervisors menu, press 1 for Mailbox Administra-
tion.
2. When prompted, enter the number of the mailbox you want to
add, modify, or delete. The system repeats the number back to
you.
14 Comdial Mar ‘03
Page 23

Interchange Supervisor
3. When prompted, press 1 to confirm the number or press # if the
number you entered was incorrect. Once you confirm, the system tells you the Mailbox menu options:
Mailbox Menu
To Add Press 1
To Delete Press 2
To Modify Press 3
To Suspend Press 4
To Restore Press 5
To Reset Press 6
To Exit Press #
4. To add a new the mailbox to the system, press 1. The system
adds the new mailbox to the mailbox database. All default settings in the mailbox are set to the default parameters settings
specified in prototype mailbox 9994. The default password for
the mailbox is the same as the mailbox number.
5. To delete the mailbox from the system, press 2. The system
deletes the mailbox from the mailbox database.
Mar ‘03 Comdial 15
Page 24
Using the Telephone to Perform Supervisor Functions
6. To modify the mailbox on the system, press 3. The system tells
you the Options Menu choices.
Options Menu
To Record your Name Press 1
To Record your Greeting Press 2
To Change your Password Press 3
To Change your Call-Transfer feature Press 4
To Change your Message Notification feature Press 5
To Change your Pager feature Press 6
To Review msgs scheduled for Future Delivery Press 7
To Change your Personal Distribution Lists Press 8
To Retrieve a Message Previously Sent Press *
To Return to the Main Menu Press #
7. To record the mailbox owner’s name, press 1. Note: Each
mailbox owner can also log into the mailbox and complete this
task—this does not need to be performed by a system supervisor.
Once you record the name, the system speaks the following
prompts:
To Replay Press 1
To Re-record Press 2
To Delete Pr ess 3
To Exit Pr ess #
Follow the prompts to complete the procedure.
8. To record a personal greeting for the mailbox, press 2. You can
record up to ten personal greetings for the mailbox (numbered
0 through 9). Note: Each mailbox owner can also log into the
mailbox and complete this task—this does not need to be performed by a system supervisor.
16 Comdial Mar ‘03
Page 25

Interchange Supervisor
Once you record a greeting, the system gives you the following
options:
To Replay the Greeting Press 1
To Re-record the Greeting Press 2
To Delete the Greeting Press 3
To Choose a New Greeting Press 5
To Exit Press #
Follow the prompts to complete the procedure.
9. To change the mailbox password, press 3. Note that to change
the password, you must first enter the current password when
prompted by the system. By default, the mailbox password is
the same as the mailbox number. Note: Each mailbox owner
can log into the mailbox and complete this task—this does not
need to be performed by a system supervisor.
Once you enter a new mailbox password and confirm the entry
as prompted, the system tells you that the new password will
be in effect the next time the mailbox is accessed.
10. To change the call transfer feature, press 4. Note: Each mail-
box owner can also log into the mailbox and complete this
task—this does not need to be performed by a system supervisor.
The system tells you the current call transfer set up, then gives
you options:
Press 1 if you would like to change the number
Press * to turn this feature on or off, or
Press # if you are satisfied
Follow the prompts to complete the procedure.
11. To change the message notification feature, press 5. Note:
Each mailbox owner can also log into the mailbox and complete this task—this does not need to be performed by a system
supervisor.
Mar ‘03 Comdial 17
Page 26

Using the Telephone to Perform Supervisor Functions
The system identifies the current message notification setup,
then tells you the notification options:
Press 1 if you would like to change the number
Press * to turn this feature on or off, or
Press # if you are satisfied
Follow the prompts to complete the procedure.
12. To change the pager feature, press 6. Note: Each mailbox
owner can also log into the mailbox and complete this task—
this does not need to be performed by a system supervisor.
The system voices a prompt identifying the current pager set
up, then voices the paging options:
Press 1 if you would like to change the number
Press * to turn this feature on or off, or
Press # if you are satisfied
Follow the prompts to complete the procedure.
13. To review messages scheduled for future delivery, press 7.
Note: Each mailbox owner can also log into the mailbox and
complete this task—this does not need to be performed by a
system supervisor.
The system identifies any message scheduled for future delivery, then lists your options:
To Listen to the Message Press 1
To Hear the Next Message
(scheduled for future delivery) Press 2
To Cancel the Message Press 4
To Exit Press #
Follow the prompts to complete the procedure.
18 Comdial Mar ‘03
Page 27

Interchange Supervisor
2.2 Creating a Broadcast Message
A broadcast message is heard by all mailbox owners when they open
their mailboxes. The broadcast message can only be recorded by a
mailbox owner with supervisor privileges. This type of message is
different from any other message in the system in the following ways:
• The broadcast message does not activate any mailbox
notification services (message waiting lamps, pagers, etc.).
• The mailbox owner’s new and old message counts are not
affected by a broadcast message.
• The broadcast message is sent to all mailboxes. It is not possible
to select which mailboxes are to receive the broadcast message.
Once you record a broadcast message, the system plays it to all
mailbox owners the next time they open their mailboxes. The system
plays the message only one time to mailbox owners. The next time
owners log in to their mailboxes, the system does not repeat the
broadcast message.
Note:If you record a broadcast message, each new mailbox that you
later create will receive that broadcast message. To prevent newly
created mailboxes from receiving a currently recorded broadcast
message, you must first delete the broadcast message before creating
the new mailboxes.
To issue a broadcast message perform the following steps.
1. From the Supervisors menu, press 5 for System Broadcast Mes-
sage. The system voices the following options.
To Hear the Current Broadcast Message Press 1
To Re-record the Broadcast Message Press 2
To Delete the Broadcast Message Press 3
To Exit Press #
2. To record a broadcast message, press 2. Follow the prompts to
complete the procedure.
Mar ‘03 Comdial 19
Page 28

Using the Telephone to Perform Supervisor Functions
2.3 Disabling or Re-Enabling a Port
If you want to prevent Interchange from answering calls on one or
more of its ports (usually because the port is not functioning
properly), you can disable the port(s) over the telephone. If you want
to later re-enable a port that you previously disabled, you can also
perform this function by calling into the system.
To disable or re-enable a port perform the following steps.
1. From the Supervisors menu, press 4 for Port Administration.
2. When prompted, enter the number of the line with which you
want to work.
3. When prompted, press 1 to confirm the number you entered or
press # if the number you entered was incorrect. Once you
press 1 to confirm, the system tells you the port administration
options.
To Disable a Port Press 1
To Enable a Port Press 2
To Exit Press #
4. To shut down a port, press 1 to disable it. If you disable a port,
all calls using that port are immediately terminated.
5. To enable a port that is currently shut down, press 2.
20 Comdial Mar ‘03
Page 29

Interchange Supervisor
2.4 Temporarily Forcing the System into Day, Lunch, or Night Service Mode
You can override the regular Day Service, Lunch Service, or Night
Service mode by forcing Interchange into another mode. The system
switches to the new service mode and remains in that mode until the
next scheduled mode change. For example, assume that Day Service
mode runs from 8:00
from noon until 1:00
Day Service mode) and force the system into Night Service mode, the
system remains in Night Service mode until noon. It then automatically switches to Lunch Service mode.
To force Interchange into Day Service, Lunch Service, or Night
Service mode, perform the following steps.
1. From the Supervisors menu, press 6 for Day / Night service.
The system gives you the following options.
To Change to Day Service Mode Press 1
To Change to Night Service Mode Press 2
To Change to Lunch Service Mode Press 3
To Exit Pr ess #
AM until 5:00 PM, and Lunch Service mode runs
PM. If you call in at 9:00 AM (the system is in
2. Press a number to indicate the mode in which you want the sys-
tem to temporarily operate. Follow the prompts to complete
the procedure.
Mar ‘03 Comdial 21
Page 30
Using the Telephone to Perform Supervisor Functions
2.5 Changing the Greeting Played by a Routing Box
Understanding the Routing Box Setup and Routing Box
Greetings
By default, Interchange is pre-configured with 3 routing boxes to
process calls. Routing box 800 answers calls during office open
business hours (Day Service), box 801 answers calls after Day
Service hours, and box 821 routes calls after they have already passed
through box 800 or 801.
The Interchange technician who set up the system can familiarize you
with modifications that were made to this routing box structure,
including additional routing boxes that were created.
Up to 10 different greetings can be recorded and stored in each
routing box. The following chart is provided for you to note routing
box greetings set up on your system.
Box Greeting
Number
22 Comdial Mar ‘03
Greeting
Page 31

Interchange Supervisor
Box Greeting
Number
Greeting
To record routing box greetings or change currently active greetings,
perform the following steps.
1. From the Supervisors menu, press 2 for routing box administration.
2. When prompted, enter the number of the routing box you want
to add, modify, or delete. The system repeats the number back
to you.
3. When prompted, press 1 to confirm the number you entered or
press # if the number you entered was incorrect. Once you
confirm, the system tells you the routing box administration
menu options.
Routing Box Menu
To Add Pr ess 1
To Delete Press 2
To Modify Press 3
To Exit Pr ess #
4. To record a greeting for the routing box, press 3. The system
lists the Options menu.
Options Menu
To Record your Name Press 1
To Record your Greeting Press 2
To Change your Password Press 3
To Change your Call-Transfer feature Press 4
Mar ‘03 Comdial 23
Page 32

Using the Telephone to Perform Supervisor Functions
Options Menu
To Change your Message Notification feature Press 5
To Change your Pager feature Press 6
To Review msgs scheduled for Future Delivery Press 7
To Change your Personal Distribution Lists Press 8
To Retrieve a Message Previously Sent Press *
To Return to the Main Menu Press #
5. From the Options menu, press 2.
6. When prompted, enter the number of the routing box whose
greeting you want to create or change.
7. When prompted, press 1 to confirm the number you entered or
press # if the number you entered was incorrect. Once you
press 1 to confirm, the system gives you options that relate to
the currently active greeting.
To Replay the Greeting Press 1
To Re-record the Greeting Press 2
To Delete the Greeting Press 3
To Choose a New Greeting Press 5
To Exit Press #
8. If you want to re-record the greeting, first press 1 to replay it.
By replaying the greeting, you can:
• be sure you are re-recording the greeting you intended to
modify, and
• note all the call routing options that are currently provided in
the greeting, so you can make sure the same routing options
are available in the new greeting (for example, “…Press 2 for
Sales…”). If you need to change the call routing options
(single-digit), see Section 2.6, Changing the Single-Digit
Call Routing in a Routing Box.
24 Comdial Mar ‘03
Page 33

Interchange Supervisor
Next, to re-record the greeting, press 2. The system prompts
you to enter the number of the greeting you want to re-record.
Enter the greeting number (0 through 9). Then, follow the
prompts to complete the procedure.
9. To choose a new greeting to play as the currently active greeting, press 5. The system prompts you to enter the number of
the greeting you would like to activate or to press star for the
currently active greeting. If you press *, the system plays the
currently active greeting number and greeting, and then repeats
the current options.
To Replay the Greeting Press 1
To Re-record the Greeting Press 2
To Delete the Greeting Press 3
To Choose a New Greeting Press 5
To Exit Press #
Once you press 5 and enter a new greeting number, the system
confirms the greeting number and plays the now-active greeting.
2.6 Changing the Single-Digit Call Routing in a Routing Box
Interchange can be set up to play greetings to callers that include
single-digit call routing options, such as, “Press 2 for Sales…” In
this setup, a call is transferred to a specific mailbox when the caller
presses 2 during or after the greeting. You can control the digits
callers can dial, and the path their calls subsequently take using the
following procedure.
Note: If you change the single-digit call routing set up, you must also
update the routing box greeting to relay new instructions to the caller.
See Section 2.5, Changing the Greeting Played by a Routing Box to
update the greeting as necessary.
Mar ‘03 Comdial 25
Page 34

Using the Telephone to Perform Supervisor Functions
1. From the Supervisors menu, press 2 for routing box administration.
2. When prompted, enter the number of the routing box you want
to add, modify, or delete. The system repeats the number back
to you.
3. When prompted, press 1 to confirm the number you entered or
press # if the number you entered was incorrect. Once you
confirm, the system tells you the routing box administration
menu options.
Routing Box Menu
To Add Pr ess 1
To Delete Press 2
To Modify Press 3
To Exit Pr ess #
4. To make modifications to the routing box, press 3. The system
lists your options.
To Change the Greeting Press 1
To Change the Routing Press 2
To Exit Press #
5. To change the routing structure, press 2. The system prompts,
“For digits zero through nine, please enter the digit, or press *
for special routing options.”
6. Press the digit for which you want to modify the call routing.
The system identifies the current call routing set up for the
digit.
7. When prompted, press 1 to change the routing for the digit.
Then, when prompted, enter the number of the box to which
you now want callers who press the digit to route. The system
states the new call routing structure.
26 Comdial Mar ‘03
Page 35

Interchange Supervisor
Note that you can make special call routing refinements by pressing * in step 2. The system announces the following special routing options.
To change the destination for the star digit Press *
To change the destination for the pound digit Press #
To change the No Digits Destination Press 1
To change the Invalid Digit Destination Press 2
To change the Voice Detected Destination Press 3
CAUTION
Once you access this menu, DO NOT press
# to exit it, since the # key invokes a change
to the destination for the pound key. If you want to return to the
previous menu, simply make no entry when you hear the
special routing options prompt.
Mar ‘03 Comdial 27
Page 36

Using the Telephone to Perform Supervisor Functions
THIS PAGE INTENTIONALLY LEFT BLANK
28 Comdial Mar ‘03
Page 37

Interchange Supervisor
3. USING THE PC TO PERFORM SUPERVISOR FUNCTIONS
To access program screens on which you can perform supervisor
functions, you must log onto the Interchange PC using the Administrator password. The technician who installed the system can provide
this password to you.
CAUTION
It is critical that you do not modify any field
on any screen or any file on the system
unless you are directed to by this guide or by the
Interchange System Technician.
Incorrect modifications you make may impair the system’s
ability to perform call processing and messaging functions.
To access Interchange screens perform the following steps.
1. From the Windows desktop, double-click the Database Administrator icon. The system prompts you to enter a password.
2. Type the Administrator password then press Enter to log on to
the system. The Main screen displays.
Mar ‘03 Comdial 29
Page 38

Using the PC to Perform Supervisor Functions
Figure 4-1 shows the structure of the Interchange system menus.
Note that depending on the type of system installed and the password
you entered to log on, you may or may not have access to all menus
and options.
Figure 3-1
Figure 4-1 Interchange System Menus
Main Menu
Box Menu System Menu
Mail Box
Question Box
Routing Box
Group Box
Directory Box
Customer Service Box
Ac count Box
Optional Features
File
Boxes
System
Diagnos tics
Hel p
General
Lines
Business Hours
Holidays
IMA P4 S erv er s
Class Of Service
PBX Information
Optional Features
System Prompts
Ex i t
Hel p Syst em
Diagnostics
Menu
Trace Setup
Cus tom
Flag s
30 Comdial Mar ‘03
Page 39

Interchange Supervisor
3.1 Creating, Changing, or Deleting a Mailbox
You can make intricate technical modifications to the mailbox using
the PC that you cannot make through the telephone interface. This
guide includes instructions on making entries in fields that do not
require an in-depth knowledge of the system. Before making changes
to fields other than those documented here, contact your Interchange
System Technician.
To create, modify, or delete a mailbox through the Interchange system
screens, perform the following steps.
1. From the Main screen, click on the Boxes pull-down menu.
2. Select Mailbox from the Boxes menu.
3. Click on the New button at the top of the screen to create a new
box. When prompted, enter the number of the box you want to
create. The system makes a copy of prototype mailbox 9994
and displays the new box.
To modify or delete an existing box, click on the Select button
and click on the box number from the drop down list. The system then displays the specified box.
To delete a box, first make sure you are viewing the box you
want to delete. Then click on the Delete button. When the system prompts you to confirm the deletion, click on Yes.
For further details on how to change the setups for a specific
mailbox, see Section 3.1.1, Setting up Call Transfers through
Section 3.1.9, Setting up e-Mail Features.
You can also use the system’s help file at any time by pressing
F1.
4. When you have made necessary modifications, click on Save to
save your changes.
The Mailbox screen allows you to control the settings for each individual mailbox on the system.
Mar ‘03 Comdial 31
Page 40

Using the PC to Perform Supervisor Functions
Figure 4-2 Mailbox Screen, General Tab
The Box number field shows the mailbox whose setups you are currently viewing. Every box has its own unique box number, which can
range from 1 to 9899. You cannot edit this field. To view a different
mailbox, press Prev (previous mailbox), or Next (next mailbox). If
you want to add a new mailbox, press New (add).
32 Comdial Mar ‘03
Page 41

Interchange Supervisor
The box number is the number an outside caller dials to reach the
mailbox owner. The system looks inside the mailbox specified for the
owner’s extension number and transfers the call to that number. The
mailbox number can be the same as its owner’s extension number, or
it can be different. For example, an arbitrary range of mailbox
numbers 5100 through 5109 can transfer calls to extensions 20
through 29.
HINT
For setup and system maintenance ease,
create mailboxes with numbers that match
the extensions to which they transfer calls.
The Name (first) field contains the first name of the individual to
which the mailbox is assigned. Interchange uses this name for
record-keeping, and it appears on the database listing.
Prior to initiating a transfer, in standard operation the system plays the
system prompt “Please hold while I transfer your call to [name],”
inserting the called party’s name.
If you insert the @ symbol before the name in this field (@Mary), the
recorded name is substituted with the system prompt “that
extension.”
If you insert the & symbol before the first name (&Mary), the system
does not play either the name or “that extension.”
The Name (last) field contains the last name of the individual to
which the mailbox is assigned. Interchange uses the last name in conjunction with the Directory box feature. It also appears on the
database listing.
The mailbox is not included in the system directory Interchange provides to callers if you inset the @ symbol before the first letter of the
last name (@Jones). (Interchange also does not include the mailbox
in the system directory if the name prompt has not been recorded for
the mailbox.)
Mar ‘03 Comdial 33
Page 42

Using the PC to Perform Supervisor Functions
When mailbox owners try to open their mailboxes to retrieve messages, the system asks for a password. Enter this password in the
Password field. It can be up to 10 digits long, and can consist of the
digits 0 through 9 and the character *. For security reasons, it is recommended that box owners use passwords at least 4 characters long,
and that they change them regularly.
If you set the password to 0000 (four zeros), Interchange allows
access to the mailbox without asking for a password.
CAUTION
Use this feature with caution, as it can allow
unauthorized access to a mailbox.
If you enclose the password in brackets [ ], it cannot be changed
remotely over the telephone.
The Record Name button indicates whether mailbox owners have
recorded their own names. The system indicates an existing
recording by a displaying a red light on the button.
The system uses the mailbox owner’s name in the following
instances.
• When the system initiates a transfer:
“Please hold while I transfer your call to [name].”
• When the called party is busy:
“[Name] is busy. You are number [number] in line.”
• When the called party does not answer and there is no personal
greeting recorded:
“[Name] is not available right now. If you would like to leave a
message press 1.”
• When the system calls owners to deliver their new messages
(message notification):
“Message for [name]. Press 1 if you would like to hear your
messages.”
34 Comdial Mar ‘03
Page 43

Interchange Supervisor
• When another mailbox owner uses the send message feature to
send a message to this box. The system plays the name for this
box and asks for confirmation:
“[Name]—if this is correct, press 1.”
• When callers use the directory feature. The system plays each
name that matches the letters entered by the caller.
“[Name]—if this is the person you want, press 1.”
• When mailbox owners open their mailboxes.
“[Name]—You have [number] new messages.”
Note:If there is no name recorded for the mailbox, the system does not
include the mailbox in the system directory and uses “that extension”
instead of the name in various phrases.
You can record the name by clicking on the Record Name button, then
using the controls on the Sound Recorder dialog box. At the lower
right of the dialog, click on the red circle button to begin recording.
Click on the rectangle button (to the left of the circle button) to end
the recording.
This Class of Service field allows you to assign a class of service to
the current mailbox. A class of service is a set of privileges that are
assigned to the mailbox owner. There are 32 classes of service
available, numbered 0 through 31. You can view and modify the
available classes of service by clicking on the Review Class of
Service button.
For example, suppose you use class of service 7 for supervisor privileges. You would assign this class of service only to mailboxes
whose owners are to be provided access to the supervisor menu functions. Suppose you assign class of service 1 to mailboxes that are
issued to temporary employees. As such, you could set up class of
service to provide its mailboxes with access to only one personal
greeting and no other additional privileges. Suppose you assign class
of service 3 to most “average” employees. You could set up this class
of service to provide its mailboxes access to a certain set of features,
such as call queuing and P.A. call announce capabilities. And, you
Mar ‘03 Comdial 35
Page 44

Using the PC to Perform Supervisor Functions
could assign class of service 4 to company executives. This class of
service could provide all the features allowed for the “average”
employee, plus additional features pertaining to immediate access and
high amounts of travel, such as Find Me Follow Me.
The Use Language field indicates the language that callers hear when
a call is routed to this mailbox via direct in dial. This entry is
required, since the direct-in-dial digits are received before the system
is able to ask callers which language they want to use. Consult your
Interchange System Technician for information on completing this
field.
The Message Playback field allows you to specify the order in which
messages are played to the mailbox owner. The options available
include the following.
Option Order of Playback
First In
First Out
FIFO
Last In
First Out
LIFO
Any urgent messages are played first (oldest
first), then any non-urgent messages are played
(oldest first).
Any urgent messages are played first (newest
first), then any non-urgent messages are played
(newest first).
The Uses Client desktop applications field indicates whether the
mailbox owner is permitted to use the VCM feature, the Mailbox
Administration/Call Control feature, and/or the Unified Messaging
feature. Note: These client desktop applications are available as
optional add-on features to Interchange. Access to these features is
sold on a per-dedicated-seat license. Do not exceed the licensing by
activating these features for more boxes than are licensed.
Interchange will monitor system usage to ensure licensing requirements for each desktop application are not exceeded. If they are,
Interchange will de-activate feature access to mailboxes exceeding
licensing limits.
36 Comdial Mar ‘03
Page 45

Interchange Supervisor
Though you can check the Uses Client desktop applications field on
as many user mailbox setup screens as you like, the system will not
permit access to the feature by more users than the number of licenses
purchased with the system. If, for example, a 5-seat unified messaging license was purchased with the system, only 5 users can have
the unified messaging feature running with their desktop Inbox at one
time. Similarly, access to the e-mail reader feature is sold on a byport license. If a 2-port license is purchased, for example, up to 2
users can access use the e-mail reader feature to hear their e-mail over
the telephone at one time.
The Mailbox Suspended field tells you whether this mailbox is currently in a lock-out state. Interchange suspends a mailbox when a
caller has tried to log in three times unsuccessfully because of a
password failure. This is a safeguard to prevent unauthorized access
to a mailbox. The suspension can last from 0 to 7 days (the default is
30 minutes). If mailbox owners are reporting they are locked out of
their mailboxes, you can check if the system has suspended the
mailbox by looking at this field. If the mailbox is currently suspended, the system displays a checkmark here. You can reinstate the
mailbox by removing the checkbox.
The Non-UM, Dual Message Store, and Single Message Store fields
indicate whether the mailbox owner is permitted to use the unified
messaging feature, and if so, how the mailbox owner’s voice mail and
faxmail messages are to be stored.
• Non-UM
The mailbox owner is not permitted to use the unified messaging feature.
Mar ‘03 Comdial 37
Page 46

Using the PC to Perform Supervisor Functions
• Dual Message Store
The mailbox owner’s voice mail and fax mail messages are
stored on the Interchange system PC and the client PC. The
mailbox owner can access these voice mail and fax mail messages, along with e-mail messages, from a Microsoft Outlook email inbox application. The system unified messaging client
software must be properly configured on the mailbox owner’s
client PC.
• Single Message Store/TUI Browser option
The mailbox owner’s voice mail and fax mail messages are
copied and sent to an e-mail address. These messages are
accessible, along with e-mail messages the mailbox owner
receives, from any client PC e-mail inbox application.
Note: You must also complete the e-Mail tab and the System
IMAP4 Configuration screen for this option to work. See Section 3.1.9, Setting up e-Mail Features further details.
Consult your Interchange Technician if you have any questions about
how to complete these fields.
If a valid mailbox number is entered into the Restricted Access field,
the mailbox can receive messages only from other mailbox owners.
Also, a restricted mailbox can send messages only to its host mailbox,
which is the mailbox number entered in the client of Mailbox field.
The restricted mailbox cannot perform any other mailbox functions.
The Sequence to Turn on/off Message-Waiting Lamp fields
indicate the sequence of digits the system uses to turn on/off the
message-waiting lamp at the extension associated with this mailbox.
Consult your Interchange System Technician for information on the
entry that must be made in this field.
The New Messages field indicates the number of new messages in
the mailbox, and is a read-only field (you cannot change it). A
message is new if the mailbox owner has not yet listened to it. Once
the owner has listened to the message, it becomes an old message. A
mailbox can hold a maximum of 200 messages.
38 Comdial Mar ‘03
Page 47

Interchange Supervisor
The Old Messages field indicates the number of old messages in the
mailbox, and is a read-only field (you cannot change it). Once the
owner has listened to and/or saved a message, it becomes an old
message. A mailbox can hold a maximum of 200 messages.
3.1.1 SETTING UP CALL TRANSFERS
Interchange provides you with the capability to set up call transfers
per mailbox owner. To do so, access the Mailbox screen for the
mailbox owner’s mailbox number. Then click on the Call transfer
tab.
Figure 4-3 Mailbox Screen, Call Transfer Tab
The Transfer to field contains the number to which Interchange
transfers incoming calls from the auto attendant menu (in most cases,
this is the extension number). If mailbox owners are working in a
different location, they can specify another extension number or an
external phone number instead of their office extensions.
Mar ‘03 Comdial 39
Page 48

Using the PC to Perform Supervisor Functions
Mailbox owners can also call in and remotely change the number in
this field (unless you enclose the number in brackets). After logging
into a mailbox and selecting the Options menu, they are prompted,
“To change your call transfer feature, press 4.”
Valid entries for this field are 0 through 9, *, #, and ten special characters:
P pulse (rotary) dialing,
T tone dialing (default),
, (comma) short pause,
% medium pause (= 4 commas),
L long pause (= 8 commas),
! hook-flash,
\F long hook-flash,
N no progress tones (must be last character),
[] no call in change capability (enclose number inside brackets),
{} specify line group (enclose line group inside brackets).
Interchange ignores all other characters, so you can use them for
punctuation. Note: To dial an external number, you must enter an E
as the first character and then the phone number.
The during this schedule field allows you to specify when calls are
transferred for the mailbox. Note: If the mailbox transfer type is set
to No transfer or if the Currently enabled? field is unchecked, the
system does not transfer calls no matter what you enter in this field
(instead it plays the greeting and takes a message).
The schedule options are as follows.
Schedule Result
Always Calls to this mailbox are transferred at all times.
Day service Calls are transferred only during Day Service, as
defined in the
Night service Calls are transferred only during Night Service,
as defined in the
SCHEDULE A, B,
or D
C,
40 Comdial Mar ‘03
Calls are transferred only during the schedule, as
defined by pressing the View Schedules button.
Business Hours screen.
Business Hours screen.
Page 49

Interchange Supervisor
When the system routes a call to the mailbox, it transfers the call to
the number specified in the Tra nsfer to:field. Interchange offers
several transfer options in the Transf er t ype field.
• No transfer—Interchange does not transfer the call. It plays the
personal greeting immediately (instead of attempting to transfer
the call and then playing the greeting). Note: If you select this
option, Interchange will not ring the mailbox owner’s extension
for incoming calls. Interchange also turns off the Find Me
Follow Me (FMFM) mode.
• Blind—Interchange transfers the call by dialing the number,
then dropping out of the call. Interchange does not wait to
determine if there is an answer, if the line is busy, etc. before
releasing the call. The caller will hear the busy signal, or ring
no answer, or will be routed to the messaging solution for that
number. For example, mailbox owners could use this option if
they want all their calls to end up at their cell phone or home
phone (and routed to their cell phone mailbox or home
answering machine) instead of their Interchange mailbox.
Note: If you select this option, Interchange stops the FMFM
mode after dialing this number on mailbox owners’ lists.
• Wait for answer—Interchange transfers the call by dialing the
number, and monitoring the line. If Interchange detects an
answer, it performs a blind transfer and drops out of the call. If
the receiving line is busy or does not answer, Interchange pulls
the call back and attempts the next valid number on the FMFM
call list (if enabled). If there are no other valid numbers on the
FMFM call list, Interchange offers options to the caller (hold,
leave message, call another extension, etc.).
Mar ‘03 Comdial 41
Page 50

Using the PC to Perform Supervisor Functions
• Screen the call—Interchange transfers the call by dialing the
number, and monitoring the line. If the mailbox owner answers,
it gives the owner the following screening options.
Screening Options
Press To
1
accept the call
2
play the currently active greeting
3
transfer this caller to the number in the Follow
me only when the caller requests to field
4
select one of the personal greetings (number 0-
9)
5
enter an extension number where mailbox
owners want Interchange to transfer the caller
6
accept the call. Interchange remains
connected and records the conversation as a
message in the mailbox owner’s mailbox.
If the receiving line is busy or does not answer, Interchange
pulls the call back and attempts the next valid number the
FMFM call list (if enabled). If there are no other valid numbers
on the FMFM call list, Interchange offers options to the caller
(hold, leave message, call another extension, etc.).
• Wait for ring—Interchange transfers the call by dialing the
number and monitoring the line. If Interchange detects a ring, it
releases the call. If Interchange detects a busy signal, it pulls
the call back and attempts the next valid number on the FMFM
call list (if enabled). If there are no other valid numbers on the
call list, Interchange offers options to the caller (hold, leave
message, call another extension, etc.). For example, mailbox
owners may use this option when they want all their calls to end
up at their cell phone or home phone (and routed to their cell
phone mailbox or home answering machine instead of their
Interchange mailbox) AND they want Interchange to make sure
the line is not busy before releasing the call.
42 Comdial Mar ‘03
Page 51

Interchange Supervisor
Use the Currently Enabled field to turn the call transfer service on
or off. Mailbox owners can also call in and remotely change their call
transfer setup. If you check this field, the system transfers calls to the
specified number. If you do not check this field, the system does not
transfer calls, but takes messages instead.
If you check the Get caller’s name field, the system prompts callers
for their names before transferring calls (if the callers do not speak a
name, the system transfers the call anyway). If the transfer type is set
to Screen the call, when the called party answers, the system prompts:
“I have a call from [caller’s name] for [mailbox owner’s name].
Press 1 to take the call, press 2 if you would like me to take a
message...”
If the transfer type is set to Wait for answer, when the called party
answers, the system simply announces the caller’s name and connects
the call.
If you check the Record every call field, the system remains on the
line after completing the transfer and records the conversation. The
system then stores the recorded conversation as a message in the
mailbox.
The Use 3-way calling field allows three-way calling for this
mailbox. Three-way calling is simply a conference call involving
three parties, where one of the parties is an Interchange mailbox. If
your system is connected directly to a residential (R1) line, a single
business (B1) line, or multiple business lines assigned to a multi-line
hunt group, it is likely that the call transfer service is not available. If
it is available, do not use three-way calling. When in doubt, consult
your Interchange System Technician for information on completing
this field.
If the transfer type is Wait for answer or Screen the call, the Assume
no-answer after X rings field tells Interchange how long to wait for
the called party to answer before abandoning the transfer. Note:
Units indicated are rings, except in certain integrations when the
units are in seconds.
Mar ‘03 Comdial 43
Page 52

Using the PC to Perform Supervisor Functions
When enabled, the Override Class of Service Operator field overrides the operator designated by the mailbox’s class of service,
allowing you to specify an operator on a mailbox by mailbox basis.
To designate an operator other than the operator specified by the
mailbox class of service, enter the alternate operator’s extension
number in Operator Box.
3.1.2 SETTING UP FOLLOW ME MODE
Interchange allows you to control the Find Me Follow Me (FMFM)
feature, per mailbox owner. To do so, access the Mailbox screen for
the mailbox owner’s mailbox number. Then click on the Follow-Me
tab.
Figure 4-4 Mailbox Screen, Follow Me Tab
The Transfer to and during this schedule fields show the current
transfer information already set up via the Call transfer tab.
44 Comdial Mar ‘03
Page 53

Interchange Supervisor
First, select when you want Interchange to forward the mailbox
owner’s calls to another location. Available options include:
• Do not Follow Me—turns FMFM mode off.
• Follow me automatically—when a specified number of rings
go unanswered on the mailbox owner’s extension. The number
of rings is set in the Assume no-answer after X rings field on the
Transfer Configuration screen.
• Follow me only when caller requests to—when the caller
presses 4 while listening to the personal message. This option
allows mailbox owners to transfer only those calls most
important to them, such as ones from a boss, co-worker, etc.
They can choose to tell the person beforehand that they will
have the FMFM mode on (and how to activate it by pressing 4
during the personal greeting), or mailbox owners can add the
instructions to their active personal greeting. If owners do not
include the instructions in their active personal greeting, all
other callers will not know that the FMFM mode is on, will not
press 4, and so will be sent to owners’ voice mail if they are
unable to take the call.
Next, you will set up the first transfer Interchange is to make when
FMFM is enabled. Select the first row of the table, and click on the
Edit button. The Transfer Configuration screen appears.
Mar ‘03 Comdial 45
Page 54

Using the PC to Perform Supervisor Functions
Figure 4-5 Transfer Configuration Screen
In the Transfer to field, enter the number for the call transfer. If
mailbox owners are working in a different location, they can specify
another extension number or an external phone number instead of
their office extensions.
Mailbox owners can also call in and remotely change the number in
this field (unless you enclose the number in brackets). Valid entries
for this field are 0 through 9, *, #, and ten special characters:
P pulse (rotary) dialing,
T tone dialing (default),
, (comma) short pause,
% medium pause (= 4 commas),
L long pause (= 8 commas),
! hook-flash,
\F long hook-flash,
N no progress tones (must be last character),
[] no call in change capability (enclose number inside brackets),
{} specify line group (enclose line group inside brackets).
Interchange ignores all other characters, so you can use them for
punctuation. Note: To dial an external number, you must enter an E
as the first character and then the phone number.
46 Comdial Mar ‘03
Page 55

Interchange Supervisor
In the during this schedule field, select the schedule during which
you want Interchange to forward the incoming call. Available options
include:
• Always—calls transferred at all times.
• Day Service—calls transferred only during day service, which is
your company's normal business hours. You define these times
on the Schedules page.
• Night Service—calls transferred only during night service,
which is your company's normal evenings hours. You define
these times on the Schedules page.
• Schedules A through D—calls transferred only during certain
time periods, such as early morning, lunch, afternoons, etc. You
define these times on the Schedules page.
In the Transfer type field, select how you want the call processed:
• No transfer—Interchange does not transfer the call. It plays
your personal greeting immediately (instead of attempting to
transfer the call and then playing the greeting). If you select this
option, you are turning off the FMFM mode.
• Blind—Interchange transfers the call by dialing the number,
then dropping out of the call. If you select this option,
Interchange stops the FMFM mode after dialing the this number
on your list. Interchange does not wait to determine if you
answer, the line is busy, etc. before releasing the call. The caller
will hear the busy signal, or ring no answer, or will be routed to
the messaging solution for that number. For example, use this
option if you want all your calls to end up at your cell phone or
home phone (and routed to your cell phone mailbox or home
answering machine) instead of your Interchange mailbox.
• Wait for answer—Interchange transfers the call by dialing the
number, and monitoring the line. If Interchange detects an
answer, it performs a blind transfer and drops out of the call. If
the receiving line is busy or does not answer, Interchange pulls
Mar ‘03 Comdial 47
Page 56

Using the PC to Perform Supervisor Functions
the call back and attempts the next valid number on your
FMFM call list. If there are no other valid numbers on your
call list, Interchange offers options to the caller (hold, leave
message, call another extension, etc.).
• Screen the call—Interchange transfers the call by dialing the
number, and monitoring the line. If you answer, it plays a
system prompt giving you six screening options (Press 1 to
accept the call, Press 2 to play currently active greeting, Press 3
to transfer this caller to the number in the Follow me only when
the caller requests to field [on the Follow-Me tab], Press 4 to
play a personal greeting [number 0-9], Press 5 to enter an
extension number to which Interchange will transfer the caller.,
or Press 6 to accept the call. Interchange remains connected and
records the conversation as a message in the mailbox.). If the
receiving line is busy or does not answer, Interchange pulls the
call back and attempts the next valid number on your FMFM
call list. If there are no other valid numbers on your call list,
Interchange offers options to the caller (hold, leave message,
call another extension, etc.).
• Wait for ring—Interchange transfers the call by dialing the
number and monitoring the line. If Interchange detects a ring, it
releases the call. If Interchange detects a busy signal, it pulls
the call back and attempts the next valid number on your
FMFM call list. If there are no other valid numbers on your call
list, Interchange offers options to the caller (hold, leave
message, call another extension, etc.). For example, use this
option if you want all the calls to end up at the mailbox owners
cell phone or home phone (and routed to their cell phone
mailbox or home answering machine instead of their
Interchange mailbox) AND you want Interchange to make sure
the line is not busy before releasing the call.
48 Comdial Mar ‘03
Page 57

Interchange Supervisor
In the Assume no-answer after X rings field, enter the number of
rings you want to allow before Interchange considers the attempted
transfer a no answer. The Follow me mode field and the Wait for
Answer and Screen the Call options on the Transfer type field use this
number.
If you selected Screen the Call or Wait for Answer as the type of
transfer, you can enter further instructions for the transfer in the Get
Caller’s Name, Record Conversation, Prompt for Password, Disable
Call Progress, and Cancel digits fields. Note: If you selected No
Transfer, Blind, or Wait for Ring as the transfer type, Interchange
does not let you select any of these other fields.
The Get caller’s name field is used for Wait for Answer and Screen
the Call transfer types only. If you set this field on (checked), Inter-
change asks callers for their name and then announces the name to
you before connecting the call.
The Record Conversation field is used for Wait for Answer and
Screen the Call transfer types only. If you set this field on (checked),
Interchange remains on the line after completing the transfer, records
the conversation, and stores it as a message the mailbox owner’s
mailbox.
The Prompt for Password field is used for Screen the Call transfer
types only. If you set this field on (checked), Interchange prompts
mailbox owners to enter their mailbox password before transferring
the call.
The Disable Call Progress field is used for Screen the Call transfer
types only. If you set this field on (checked), Interchange does not try
to detect call progress tones (i.e., ringing) after dialing the FMFM
number. Select this option if the FMFM number Interchange must
call has unusual ringing patterns that the system may not recognize.
Otherwise, if Interchange does not effectively detect ringing, it will
not wait for an answer to connect the caller to the number, and will
proceed instead with attempting to dial the next Follow Me number
entered on the screen.
Mar ‘03 Comdial 49
Page 58

Using the PC to Perform Supervisor Functions
The Cancel digits field is used for Screen the Call transfer types only.
If you enter a string of numbers in this field, Interchange sends the
DTMF tones for those digits to the calling number if the system does
not detect a keypress response after playing the screening options.
These cancel digits prevent the calling number from recording a
message of Interchange’s voice prompts.
Use this field if, for example, mailbox owners want to avoid a blank
message in their cell phone mailbox. Enter the appropriate stop
message code in this field. Once Interchange detects no response to
the screening options, it sends out the DTMF tones to their cell phone
number (which stops their cell phone mailbox from recording a
message), and then pulls the call back to continue on with the Follow
Me mode. If you do not know the DTMF code for stopping a
message recording in the cell phone mailbox, have the mailbox owner
contact their cell phone service provider.
Next, set up any additional transfers you want Interchange to attempt
when FMFM is enabled (up a maximum of ten transfers). In the subsequent rows of the table, complete the fields in the same manner as
for the first transfer. Interchange will attempt each transfer in the
order you set them up on the Transfer page, and based on whatever
schedule you associate with any given number. If Interchange cannot
reach the mailbox owner at any of the alternate numbers (no answer),
Interchange will return the caller to the owner’s personal mailbox and
instruct the caller to leave a message.
Note: Mailbox owners can only use the FMFM feature if you permit
them to use it. If FMFM is allowed for an owner’s class of service,
owners can change their FMFM settings at will using the Personal
Administration Tool or using the phone menus. If you want to turn off
FMFM for a specific mailbox owner, change the owner’s class of
service to one that does not allow FMFM. If you do not change the
class of service, and only check the Do not Follow Me field, the
mailbox owner will still have access to the FMFM settings and can
turn FMFM back on.
50 Comdial Mar ‘03
Page 59

Interchange Supervisor
3.1.3 SETTING UP RECORDING
Interchange allows you to set up the recording options per mailbox
owner. To do so, access the Mailbox screen for the mailbox owner’s
mailbox number. Then click on the Recording tab.
Figure 4-6 Mailbox Screen, Recording Tab
The After Playing Greeting area shows the options available to the
caller after the system plays the mailbox owner’s greeting. When
callers have been routed to a mailbox and are listening to the greeting,
they always have various options available by dialing the appropriate
digit. If the caller does not dial a digit by the time the system finishes
playing the greeting, the system immediately takes whatever action is
specified in this field. If the caller does dial a valid digit from the
available options, his/her selection overrides the action entered in this
field.
Mar ‘03 Comdial 51
Page 60

Using the PC to Perform Supervisor Functions
If you select the Record Immediately option, the system plays the
prompt, “Please speak after the tone,” and records the caller’s
message. Note: If the caller hangs up while the system is playing the
mailbox greeting, the system might begin recording a message before
it detects that the call has ended. When this happens, the mailbox
ends up containing a short, blank message. You can eliminate these
false messages by selecting the Wait for a Digit option rather than
Record Immediately.
If you check the Wait for a digit field, the system gives the caller
more time to enter a digit. Use this option only when the mailbox
owner, in the personal greeting, instructs the caller to choose an
option. If the caller does not enter a digit, the system then takes
whatever action is specified in the After Leaving Message field. If
the caller hangs up while the system is playing the mailbox greeting,
the system might begin recording a message before it detects that the
call has ended. When this happens, the mailbox ends up containing a
short, blank message. You can eliminate these false messages by
selecting the Wait for a Digit option rather than Record Immediately.
If you select the Page Immediately field, the system looks at what
type of pager this mailbox is using. If the Pager Type field is set to
None or the Pager Number field is blank, the system takes whatever
action is specified in the After Recording Message field.
If the Pager Type field is set to Tone , the system takes a message and
calls the mailbox owner’s pager.
If the Pager Type field is set to Display/Digital, the system asks the
caller to enter his/her own telephone number then calls the mailbox
owner’s pager and relays that number (no message is taken). Note: If
the Pager Type field is set to Display/Digital and the Pager notification service is currently turned off (either manually or due to the
call schedule), callers hear the system prompt, “I’m sorry, I am
unable to page that party right now,” and continues the call by taking
whatever action is specified in the After Recording Message field.
52 Comdial Mar ‘03
Page 61

Interchange Supervisor
If you select the Record message then page option, the system looks
at what type of pager this mailbox is using. If the Pager Type field is
set to None or the Pager Number field is blank, the system records a
message, but does not activate the pager.
If the Pager Type field is set to Tone , the system takes a message and
calls the mailbox owner’s pager.
If the Pager Type field is set to Display/Digital, the system records a
message, then calls the pager. It sends the mailbox number to the
pager display.
The If caller chooses “other options” field gives callers more
options, if they press 3 during the mailbox greeting. These other
options include the following.
Option Action Indicated
Go to box Allows the call to route to another box. The new
box number is entered in the next field to the
right. This box is usually a routing box
containing a greeting or menu, or it is the mailbox
number of an individual taking calls for this
mailbox owner.
Say goodbye The system says, “Good-bye,” and hangs up.
Return The system goes back to the previous box that
handled this call (usually a routing box).
Hang up The system immediately terminates the call by
going on-hook.
The After Recording Message field gives callers more options after
they record a message. These other options include the following.
Option Action Indicated
Go to box Allows the call to route to another box. The new
box number is entered in the next field to the
right. This box is usually a routing box
containing a greeting or menu, or it is the mailbox
number of an individual taking calls for this
mailbox owner.
Mar ‘03 Comdial 53
Page 62

Using the PC to Perform Supervisor Functions
Option Action Indicated
Say goodbye The system says, “Good-bye,” and hangs up.
Return The system goes back to the previous box that
handled this call (usually a routing box).
Hang up The system immediately terminates the call by
going on-hook.
The system follows the action specified here when:
• Callers have recorded their message, pressed # for further
options, and pressed 1 to send or 4 to cancel the message.
• The After Playing Greeting field is set to Wait for digit, and the
caller did not enter a digit.
• The After Playing Greeting field is set for a paging option, but
the pager’s Enabled field is set to No (in this case, the caller first
hears the system prompt, “I am not able to page that party right
now.”).
If a message has been in a mailbox for the number of hours specified
in the Automatically X new messages to box/SMTP address X
after X hours, during this schedule field and has not yet been listened to by the owner, the system forwards/moves/copies the message
to another mailbox or to a group box. To disable the auto-forward/
move/copy feature, leave this field blank. Note: If you have this field
set to forward, the system automatically deletes the original copy
from the original mailbox. When a mailbox receives a message that
the system has auto-forwarded, the system informs the mailbox owner
by saying, “This message was automatically forwarded from [name
of original recipient].”
54 Comdial Mar ‘03
Page 63

Interchange Supervisor
You can specify when you want the system to automatically forward/
move/copy new messages. Your options include the following.
Schedule Result
Always Automatically forward/move/copy is available at all
times.
Day service Automatically forward/move/copy is available only
during Day Service, as defined on the Business
Hours
screen.
Night service Automatically forward/move/copy is available only
during Night Service, as defined on the Business
screen.
Hours
Schedule A,
B, C, or D
Automatically forward/move/copy is available only
during the schedule, as defined on the View
Schedules button.
3.1.4 SETTING UP MESSAGE DELIVERY
Interchange allows you to set up the message delivery options per
mailbox owner. To do so, access the Mailbox screen for the mailbox
owner’s mailbox number. Then click on the Message delivery tab.
Note: You must have the Currently Enabled box checked on the
Transfer Tab if you want to use message delivery. If you do not check
that box, the system ignores whatever settings you enter on this
screen.
Mar ‘03 Comdial 55
Page 64

Using the PC to Perform Supervisor Functions
Figure 4-7 Mailbox Screen, Message Delivery Tab
In the Call field, enter the telephone number you want Interchange to
call to inform the mailbox owners that there are new message in their
mailboxes. This field can contain the DTMF digits 0-9, the characters * and #, and other special characters. Consult your Interchange
System Technician for information on completing this field.
The owner of a mailbox can call in and remotely change only the first
Call number, and cannot indicate special characters.
The X times field indicates the number of successful attempts that the
system is to make to each telephone number. A successful attempt is
generally defined as one where the system has seized an available line
port, dialed the number, and detected ringing. If the attempt is not
successful (for example, the called number was busy) the system
automatically re-tries every few seconds up to twenty times.
The At intervals of field indicates the interval (in minutes) between
calls to this number and/or the interval before proceeding to the next
call number sequence.
56 Comdial Mar ‘03
Page 65

Interchange Supervisor
The during X field indicates when the system is to deliver messages
to this number. The options are as follows.
Schedule Result
Always Message delivery is available at all times.
Day service Message delivery is available only during Day
Service, as defined on the
Night service Message delivery is available only during Night
Service, as defined on the
Schedule A, B,
C, or D
Message delivery is available only during the
schedule, as defined on the View Schedules button.
BUSINESS HOURS screen.
BUSINESS HOURS screen.
The Run this cycle X times field indicates the number of times the
system is to run the message delivery sequence. Once the system
calls every number listed, it has run the message delivery sequence
one time.
The Deliver These Messages field indicates which messages the
system is to deliver. Your options include the following.
Option Action Indicated
Voice The system delivers voice messages received in the
mailbox.
e-Mail The system delivers e-mail messages received in
the mailbox via the unified messaging feature.
Only when marked
urgent
The system delivers only messages voice mail and/
or e-mail messages marked as urgent. Non-urgent
messages are not delivered.
A mailbox owner can call in remotely and turn the message delivery
feature on or off, or change the first number to be called. The other
telephone numbers, if in use, cannot be changed remotely.
Mar ‘03 Comdial 57
Page 66
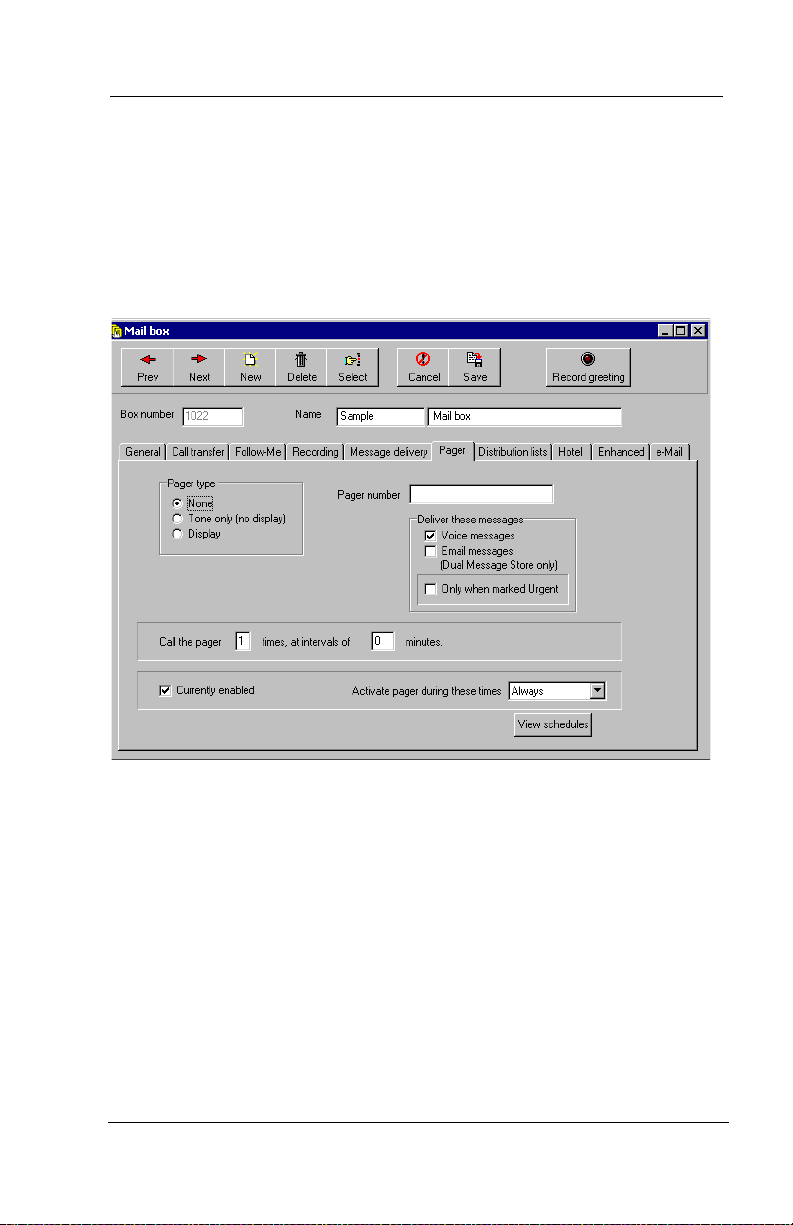
Using the PC to Perform Supervisor Functions
3.1.5 SETTING UP PAGER NOTIFICATION
Interchange allows you to set up pager notifications per mailbox
owner. To do so, access the Mailbox screen for the mailbox owner’s
mailbox number. Then click on the Pager tab.
Figure 4-8 Mailbox Screen, Pager Tab
The Pager type area allows you to choose what type of pager the
mailbox owner has.
When a caller asks the system to page a mailbox owner, the system
looks for a free line on which to call the paging service. If no lines
are free to make the call, the system queues the request and re-tries
every 10 seconds for about 10 minutes.
58 Comdial Mar ‘03
Page 67

Interchange Supervisor
Enter the telephone number of the paging service in the Pager
Number field. The mailbox owner may change this number
remotely. Normally, access codes for outside lines are not required
here. To restrict pager calls to use lines in a particular line group,
enter the letter (A, B, C, or D) of the line group in braces { } before
the telephone number (for example, {A}5551212). Consult your
Interchange System Technician for more information.
You can set up tone or voice pagers in the Message Delivery portion
of this screen. Consult your Interchange System Technician for more
information.
The pager number can contain the digits 0 through 9 and the characters * and pound #, as well as the several special characters.
Consult your Interchange System Technician for more information.
The system calls the pager the number of times indicated in the Call
the pager X times field. This can be useful in circumstances when
the pager is turned off for a period or is temporarily out of pager
range.
The At intervals of field indicates the interval (in minutes) between
calls to this number and/or the interval before proceeding to the next
call number sequence.
The Activate pager during these times field indicates when the
system is to deliver pager notification to this number. The options are
as follows.
Schedule Result
Always Pager notification is available at all times.
Day service Pager notification is available only during Day
Service, as defined on the Business Hours
Night service Pager notification is available only during Night
Service, as defined on the Business Hours
Schedule A, B,
C, or D
Mar ‘03 Comdial 59
Pager notification is available only during the
schedule, as defined on the View Schedules button.
screen.
screen.
Page 68

Using the PC to Perform Supervisor Functions
Use the Currently enabled field to turn the service on or off from the
keyboard. If this field is set checked, the pager feature for this
mailbox is currently on. If this field is unchecked, the pager feature is
off. Note that the mailbox owner also can call in and remotely turn
the pager notification service on or off.
Setting this field off overrides the call schedule set in the previous
field.
3.1.6 SETTING UP DISTRIBUTION LISTS
Interchange allows you to set up distribution lists per mailbox owner.
To do so, access the Mailbox screen for the mailbox owner’s mailbox
number. Then click on the Distribution lists tab.
60 Comdial Mar ‘03
Page 69

Interchange Supervisor
Figure 4-9 Mailbox Screen, Distribution Lists Tab
Each mailbox owner can create up to four personal distribution lists,
each containing up to 20 mailbox numbers. The Enabled field indicates whether the corresponding distribution list below the field is
available to the mailbox owner. (If Enabled is checked, the list is
active for the mailbox owner; if Enabled is not checked, the list is not
active for the mailbox owner.)
The fields below the Enabled field indicate the mailboxes currently
included as part of the distribution list. Only mailboxes can be
members of a personal distribution list (you cannot include a group
box on the list).
Mar ‘03 Comdial 61
Page 70

Using the PC to Perform Supervisor Functions
3.1.7 SETTING UP HOTEL FEATURE
Interchange allows you to set up the hotel feature per mailbox owner.
To do so, access the Mailbox screen for the mailbox owner’s mailbox
number. Then click on the Hotel tab.
Figure 4-10 Mailbox Screen, Hotel Tab
If you check the Hotel guest privileges only field, the system
restricts the options available to the mailbox. When the mailbox
owner opens the mailbox, the only options are listening to messages
or scheduling a wake-up call.
The Wake-up time field displays the time the system places a call the
extension listed in the Transfer to field. Interchange does not actually
place the call at the time specified here unless the wake-up time is
currently scheduled. The mailbox owner can also schedule a wake-up
call by calling into the system.
If you check the Currently Scheduled field, the system calls the
extension listed in the Transfer to field, at the time specified in the
Wake-up time field.
62 Comdial Mar ‘03
Page 71

Interchange Supervisor
3.1.8 SETTING UP ENHANCED FEATURES
Interchange allows you to set up enhanced features per mailbox
owner. To do so, access the Mailbox screen for the mailbox owner’s
mailbox number. Then click on the Enhanced tab.
Figure 4-11 Mailbox Screen, Enhanced Tab
This screen contains fields that are functional only with certain phone
systems that provide call recording capabilities. Field entries indicate
whether the mailbox owner is permitted to use the record call feature;
whether and how often a beep, audible to all conversation participants, is to sound during recordings; the minimum length in seconds a
recording must be to be retained on the system; the maximum number
of recording minutes allowed per call; and whether, when a caller is
prompted to leave a message in the mailbox, a short ringburst is to
sound on the mailbox owner’s phone. Each recorded call is stored as
a new message in the mailbox owner’s voice mailbox.
Mar ‘03 Comdial 63
Page 72

Using the PC to Perform Supervisor Functions
3.1.9 SETTING UP E-MAIL FEATURES
Interchange allows you to set up e-Mail features per mailbox owner.
To do so, access the Mailbox screen for the mailbox owner’s mailbox
number. Then click on the e-Mail tab.
Figure 4-12 Mailbox Screen, e-Mail Tab
If the mailbox owner has more than one e-mail account, the e-Mail
tab can include information for up to three different accounts. Once
all fields are completed on this screen for the first e-mail account, you
can access a second and third e-mail tab to enter information for additional accounts by clicking on the left and right arrow buttons next to
the Account number field. Note: The e-mail reader will not be able
to play e-mail over the telephone for any account that is not set up on
the mailbox owner’s desktop.
The Is account active? field indicates whether the account that is an
active account for the mailbox owner. The e-mail reader will not
access voice and e-mails for inactive accounts.
64 Comdial Mar ‘03
Page 73

Interchange Supervisor
The Friendly Name field indicates what name the system uses to
display in the From field, on messages recipients receive in their email Inbox from this mailbox owner. Typically, the Friendly Name is
simply the mailbox owner’s first and last name.
Enter the e-mail address you want the system to use to send the
mailbox owner’s e-mail messages in the e-Mail address field.
The Default account for outgoing mail field is active only if more
than one e-Mail account is active for this mailbox owner. Check the
field on the appropriate e-Mail tab to indicate which account you
want the system to use when sending outgoing e-mail.
The Account type field in the Outgoing Mail section is used for
Unified Messaging and Single Store Messaging; it tells the system
what method to use when sending messages to the e-mail server.
Your input in this field should correspond to what message store
options you chose on the General tab of the Mailbox menu (i.e., nonUM, Dual Message Store, or Single Message Store). Consult your
Interchange System Technician if you have any questions about how
to complete this field.
The Host name field in the Outgoing Mail section indicates the name
assigned to the e-mail server that is to be used to send the mailbox
owner’s outgoing e-mail.
The Account type field in the Incoming Mail section is used for
Unified Messaging and Single Store Messaging; it tells the system
what method to use when communicating with the e-mail server.
Your input in this field should correspond to what message store
options you chose on the General tab of the Mailbox menu (i.e., nonUM, Dual Message Store, or Single Message Store).
When a mailbox is set up to use Single Message Store, Interchange
communicates with e-mail servers via POP3 or IMAP4 technology.
When TUI Browser is enabled, the system must use IMAP4 technology. Note: You will tell the system how to log into the mailbox
owner’s e-mail account on the e-mail server in the User name and
Password fields. Although you can select POP3, IMAP4, or IMAP4
WITH ADMINISTRATOR ID
Mar ‘03 Comdial 65
from this drop down menu, Comdial
Page 74

Using the PC to Perform Supervisor Functions
recommends IMAP4 WITH ADMINISTRATOR ID. If you select
POP3 or IMAP4 in this field, you must update the Password field
manually each time mailbox owners change their e-mail login passwords. If you do not update it, e-mails can no longer be retrieved for
the mailbox owner. To avoid the issues associated with password
changes, select IMAP4 W/ ADMINISTRATOR ID
in this field and set
up a user with Administrator login rights on the IMAP4 e-mail server.
Consult your Interchange System Technician if you need more information.
The Host name field in the Incoming Mail section indicates the name
assigned to the e-mail server that receives the mailbox owner’s
incoming e-mail.
The User name field in the Incoming Mail section indicates the user
name the mailbox owner uses to log on to the e-mail server that
receives the mailbox owner’s incoming e-mail.
The Password field in the Incoming Mail section indicates the
password the mailbox owner uses to log on to the e-mail server that
receives the mailbox owner’s incoming e-mail.
Note: Alert mailbox owners that if they change their e-mail server
access password at any time, you must update it on e-Mail tab. If the
password is not up-to-date, mailbox owners attempting a system log
in may find that their computer is locked. This occurs because when
the Inbox is not up and running on a client PC desktop, the PEC
attempts to access e-mails from the e-mail server on the client PC’s
behalf. It must log on to e-mail server using the password you provide here. If it attempts to log on with the password you enter in this
field after this password has been changed by the mailbox owner,
after several log in attempts, the server may lock down the client PC.
Be particularly aware of this in an Exchange Server environment,
since anytime mailbox owners change their network login password
in this setting, they must inform you.
66 Comdial Mar ‘03
Page 75

Interchange Supervisor
If you click on the Advanced button from the e-Mail tab, the system
displays the Advanced Properties screen. This screen is only applicable in environments where an Exchange Server e-mail server is
used with the Exchange Service. Do not alter the defaults on this
screen unless authorized to do so by your Interchange System Technician.
3.1.10 SETTING UP SCHEDULES
Interchange allows you to set up schedules per mailbox owner. These
schedules can then be used to allow or disallow certain functions,
such as call transfers, pager notifications, message delivery, etc. To
set up the schedules, access the Mailbox screen for the mailbox
owner’s mailbox number. Then click on the View schedules button
on any of the following tabs: Call transfer, Follow-Me, Recording,
Message delivery, or Pager. The system responds by displaying the
Schedules screen.
Figure 4-13 Schedules Screen
The four schedules (A, B, C, and D) can be applied to any of five features: call transfer, find-me-follow-me, pager notification, automatic
forwarding of new messages, and message delivery. The feature or
features assigned to a schedule operate only between the Begin and
End times for the days specified.
Mar ‘03 Comdial 67
Page 76

Using the PC to Perform Supervisor Functions
The Begin field indicates the time at which this schedule begins on
the day. Time is indicated in 24-hour format (for example, 8:00
specified as 20:00).
The End field indicates the time at which this schedule ends on the
day. Time is indicated in 24-hour format (for example, 8:00
specified as 20:00).
Note:If you want the schedule to be active all day, enter 00:00 for the
Begin time and 24:00 for the End time.
PM is
PM is
3.2 Controlling Mailbox Owner Access to Features
Each mailbox on the system is assigned a class of service. The class
of service assigned to the box dictates which system features the
mailbox owners have access to and how they can use those features.
To control a mailbox owner’s (or a group of mailbox owners’) access
to certain system features, modify the class of service assigned to the
mailbox. (Keep in mind that the class of service modifications you
make affect all mailboxes assigned that class of service.)
There are 32 classes of services (0 through 31) that you can set up and
then apply to mailboxes on the system. Two of them are pre-configured on the system. Class of service 0 is assigned by default to the
prototype mailbox 9994, which serves as a template for every
mailbox that you create on the system. Class of service 7 is assigned
supervisor mailbox privileges by default.
You can view and change the class of service number assigned to a
mailbox by accessing the Mailbox screen for the mailbox. For further
details on changing a mailbox setup, see Section 3.1, Creating,
Changing, or Deleting a Mailbox.
To modify the classes of service, perform the following.
1. From the Main screen, access the System pull-down menu.
2. Select Class of Service from the menu. The class of service
screen displays.
68 Comdial Mar ‘03
Page 77

Interchange Supervisor
3. Make changes to the Class of Service screen to modify classes
of service you assign to mailboxes. For further details on how
to change the setups for a specific class of service, see Section
3.2.1, Controlling Messages through Section 3.2.4, Restricting
Calls.
You can also use the system’s help file at any time by pressing
F1.
Figure 4-14 Class of Service Screen
The Class of service number field shows the current class of service.
To move to the next class of service number, click on Next. To move
to the previous class of service number, click on Prev.
Once you assign a class of service to a mailbox, the mailbox inherits
all the privileges and restrictions defined in the class of service.
Use the Class of service name field to give the class of service a
meaningful name. This helps remind you of the purpose for the class
of service. Sample names include Supervisors, Mailbox Owners, etc.
Mar ‘03 Comdial 69
Page 78

Using the PC to Perform Supervisor Functions
When a caller is listening to a mailbox greeting, one of the options is
to dial zero to reach an operator. Use the Operator box (day) and the
Operator box (night) fields to tell Interchange where to route the
call if the caller dials zero. The default setting is 888.
When mailbox owners have called in to their boxes, have concluded
listening to messages, changing options, etc., and have elected to exit
from the Main Menu, the When exiting open Mail box, go to box
field tells the system where to send the call. Retain the default setting
in this field as 821.
The Supervisor status field defines whether mailboxes belonging to
this class of service should have supervisor privileges. A supervisor
can perform certain actions not available to regular mailbox owners.
For example, a supervisor can add a mailbox or delete a mailbox by
calling in from any telephone. The default setting in class of service 0
is no (unchecked), and in class of service 7 is yes (checked).
By setting the Access to Group boxes field on (checked), you allow
mailbox owners assigned this class of service to access all group
boxes set up on the system. If you set the field off (unchecked), the
mailbox owners in this class of service will not be able to access any
group boxes. The default setting is on.
The Dial-out allowed field indicates whether the owner of a mailbox
belonging to this class of service is allowed to place outgoing calls
from the mailbox. The default setting is off (unchecked).
When a caller is listening to a mailbox owner’s greeting, one of the
features the system offers is the option to have the call announced
over the P.A. system. Use the Callers can page via PA system field
to allow or deny access to the P.A. feature for callers to mailboxes
belonging to this class of service. The default setting is on (checked).
The Allowed to receive Fax-mail field applies only if your system
has the optional FaxMail module installed. If you want to allow
mailboxes in this class of service to receive FaxMail, check this field
to turn it on. Make sure it is unchecked if you do not want callers to
be able to send fax documents into these mailboxes. The default
setting is off (unchecked).
70 Comdial Mar ‘03
Page 79

Interchange Supervisor
Check the allowed to use Follow Me field if you want the mailboxes
in this class of service to be allowed to use the Find Me Follow Me
feature. Make sure it is unchecked if you want to restrict the Follow
Me feature from this class of service. The default setting is off
(unchecked).
3.2.1 CONTROLLING MESSAGES
To control how what types of messages are allowed for a particular
class of service, access the Class of Service screen for that class of
service, and click on the Messages tab.
Figure 4-15 Class of Service Screen, Messages Tab
The system can hold up to 250 messages per mailbox. However, you
may want to restrict some mailboxes to a lower limit (to conserve
disk space). Use the Maximum number of messages field to set the
maximum number of messages that can be stored in mailboxes
assigned this class of service. Once the limit is reached for a particular mailbox, callers attempting to leave more messages in the
mailbox are told that the box is full. The default setting is 200.
Mar ‘03 Comdial 71
Page 80

Using the PC to Perform Supervisor Functions
The value in the Maximum message length X seconds field defines
the maximum length of a message (in seconds) that a caller can leave
for mailboxes belonging to this class of service. The default setting is
60 seconds.
The system deletes old messages from mailboxes belonging to this
class of service after the number of days you specify in the Automat-
ically delete OLD messages from system after X days field. An old
message is one the mailbox owner has listened to, but has not yet
deleted. If you enter 0 in this field, an old message is deleted at midnight on the day the message became old. If you enter 1 in this field,
an old message is deleted at midnight on the day following the day
the message became old.
To disable deletion of old messages, enter 99 in this field. However,
do this with caution, since accumulating messages may create disk
storage problems. The default setting is 30.
The system deletes new messages from mailboxes belonging to this
class of service after the number of days you specify in the Automat-
ically delete NEW messages from system after X days field. A
new message is one the mailbox owner has not yet listened to. If you
enter 0 in this field, a new message is deleted at midnight on the day
the message was received. If you enter 1 in this field, a new message
is deleted at midnight on the day following the day the message was
received. Note:Use this field with caution. Improper use may cause
important messages to be lost.
To disable the deletion of new messages, retain the default setting of
99 in this field. Note: If you enter a number other than 99 in this
field, remember that messages are deleted whether or not the mailbox
owner has listened to them.
72 Comdial Mar ‘03
Page 81

Interchange Supervisor
3.2.2 CONTROLLING GREETINGS
To control how many greetings are allowed for a particular class of
service, access the Class of Service screen for that class of service,
and click on the Greetings tab.
Figure 4-16 Class of Service Screen, Greetings Tab
A mailbox can have up to 10 pre-recorded personal greetings. The
mailbox owner may record these greetings, store them in the mailbox,
and choose the greeting that is to be active at any specific time. You
may want to offer use of all 10 greetings to users, or you may want to
restrict them to fewer greetings. Use the Maximum number of
greetings field to define how many personal greetings users with this
class of service should be allowed to record. If you set the field to 0,
callers who route to a mailbox belonging to this class of service
always hear the pre-recorded system prompt, “That extension is not
available...” The default setting is 1.
Mar ‘03 Comdial 73
Page 82

Using the PC to Perform Supervisor Functions
Note that in class of service 7, this field must be set to allow at least 2
greetings. Class of service 7 is assigned to mailbox 70, the supervisor
mailbox that by default controls the routing boxes on the system.
Because you usually set up routing boxes with at least 2 greetings,
this parameter must be set to at least 2 in the supervisor mailbox class
of service.
When a mailbox owner calls in to re-record his/her personal greeting,
the system limits the length of the new greeting to the value you enter
in the Maximum greeting length field. The default setting is 60.
If an extension is busy or does not answer, Interchange plays the
mailbox owner’s personal greeting. After playing the greeting, it can
announce the options available to the caller (for example, “If you
would like to leave a message, press 1. To try another extension, press
3, or to speak with an operator, press 0.”). If the mailbox owners do
not record these options as part of their greetings, check Play system
menu again after personal greeting so that the system plays the
menu. If you want to allow your mailbox owners to decide which
options to offer, do not check this field and instruct them to include
the options in their personal greetings. The default setting is
unchecked.
74 Comdial Mar ‘03
Page 83

Interchange Supervisor
3.2.3 CONTROLLING CALL HOLDS
To control the call holding for a particular class of service, access the
Class of Service screen for that class of service, and click on the Call
holding tab.
Figure 4-17 Class of Service Screen, Call Holding Tab
You can limit the number of lines that can simultaneously hold for a
mailbox belonging to this class of service. For example, if you set the
Maximum number of lines allowed to hold for this Mailbox field
to 3, and lines 1, 3, and 6 are holding for a mailbox, subsequent
callers are not offered the option to hold. Instead, they hear the personal greeting recorded for the box, so they can leave a message, try
another extension, etc. The default setting is 2. Note: If you want to
disable the call queuing feature for the class of service, set this field
to 0.
While callers are in the queue holding for an extension, they can press
a digit to leave the queue and process the call differently. By default,
the options open to the caller are the same as those available when the
caller hears the personal greeting (“If you would like to leave a
Mar ‘03 Comdial 75
Page 84

Using the PC to Perform Supervisor Functions
message, press 1. To try another extension, press 3, or to speak with
an operator, press 0.”). If you want to restrict the caller to fewer
choices while in the queue, use the Digits caller can dial while
holding field to specify which digits are allowed. All other digits are
ignored by the system while the caller is in the queue.
For example, if you enter 13 in this field, the only options available to
the caller are:
1 To leave a message
3 To try another extension
The Try extension X times before going back to caller field applies
only if the Max lines allowed to hold field is greater than 0. If the
caller chooses to hold, the system plays a series of hold prompts to the
caller (these are typically music or commercials). At the end of each
hold prompt, the system tries the extension again. If it is busy, the
system plays the next hold prompt to the caller.
After the defined number of hold prompts have been played, the
system goes back to the caller and offers the options to remain on
hold, try another extension etc. This field allows you to specify the
number of hold prompts that should be played before the system
offers these options to the caller.
Interchange is shipped with only one hold prompt recorded.
Therefore, if you enter 3 in this field, a caller queued to a busy station
hears this same prompt three times before being offered the options
again. If you record the second hold prompt (147), the caller hears
prompt 146, 147, 146 again before being offered the options. You
may record up to 100 different hold prompts, which are played in
sequence. (Remember: At the end of each hold prompt, the system
tries the extension again). After the system plays the highest number
hold prompt recorded, it returns to the lowest number after the next
try. The default setting is 3.
Note:The time between tries to a busy extension is determined by the
length of each hold prompt recorded. The prompt supplied with the
system (prompt 146) is approximately 30 seconds.
76 Comdial Mar ‘03
Page 85

Interchange Supervisor
While callers are in the queue and holding for an extension, Interchange can keep them informed on the progress of their call. If you
check the While in queue announce position in line field, Interchange announces to the caller:
“That extension is still busy. You are number [#] in line. If you
would prefer to leave a message, press 1, or to speak with an
operator, press 0.”
If you do not check this field, the system says:
“That extension is still busy. If you would prefer to leave a message,
press 1, or to speak with an operator, press 0.”
The default setting is unchecked.
3.2.4 RESTRICTING CALLS
To restrict calls for a particular class of service, access the Class of
Service screen for that class of service, and click on the Call restric-
tions tab.
Mar ‘03 Comdial 77
Page 86

Using the PC to Perform Supervisor Functions
Figure 4-18 Class of Service Screen, Call Restrictions Tab
When mailbox owners call in to change their call-transfer number,
follow-me numbers, pager number, or message notification number,
you may want to prevent them from changing it to certain numbers,
such as long-distance numbers.
The Mailbox owner cannot transfer to numbers which begin with
these digits: fields allow you to define digit sequences that Interchange blocks on system-generated outgoing calls. Interchange looks
at each of these digits fields to determine if any of them match the
number entered by the mailbox owner. If the number entered by the
caller begins with the digits specified in the digits field, the system
defines the number entered as a match.
For example, if you enter the digits 1900 in one of the Digits fields,
the system considers the telephone numbers 1-900-555-1212,
1-900-123-4567, 1-900-111-2222 to be matches. Telephone number
1-901-555-1212 would not be considered a match.
78 Comdial Mar ‘03
Page 87

Interchange Supervisor
If you enter the digit 0 in one of the Digits fields, the system considers
all numbers beginning with 0 to be matches. This would include calls
to the operator (0), calls to the long-distance operator (00), international calls (011), and any operator-assisted call (0 followed by telephone number).
If the mailbox owner enters a number that matches one of the digit
strings you enter here, Interchange informs the owner that the number
is not acceptable and does not allow the owner to change the existing
call transfer setup.
These blocking digits are used to block Interchange from making
automated calls; they do not block the mailbox owner from dialing
the numbers directly from their own extensions. For example, a
mailbox owner can dial 911 from their extension and complete the
call, even though you have entered 911 here in a digits field. The
block here keeps Interchange from dialing 911, if for example
mailbox owners have listed 911 in their call transfer field, as a followme number, as a pager number, etc. The 911 block is delivered with
the system as a default. Comdial highly recommends that you keep
this 911 block to avoid your voice mail system calling an emergency
line, and the fines that may result if this occurs.
3.3 Creating, Changing, or Deleting a Group Box
Group distribution lists, which are defined in a group box, provide
mailbox owners an easy way to send one message they record to multiple individuals, without specifying each individual recipient’s
extension. Though mailbox owners can set up one to four personal
distribution lists specific to their needs in their mailbox, many organizations also set up group distribution lists that can be used by all
company employees. A group list a company maintains may, for
example, contain the mailobx numbers of all company employees, of
all employees in a particular department, of all employees that work a
specified shift, etc.
Mar ‘03 Comdial 79
Page 88

Using the PC to Perform Supervisor Functions
When mailbox owners want to send a message to a group box, they
log into their mailbox, then select the option to send the message. At
the prompt, “Please enter the box number,” the mailbox owner enters
the number of the group box containing the mailboxes to which the
message is to be sent.
To create, modify, or delete a group box, perform the following steps
1. From the Main screen, access the Boxes pull-down menu.
2. Select Group Box from the Boxes menu.
3. Select the New button at the top of the screen to create a new
box. When prompted, enter the number of the box you want to
create. The system displays the new box. To modify or delete
an existing group box, click on the Select button and choose the
number of the box you want to modify or delete. The box displays on-screen. To delete a group box, verify you are viewing
the group box you want to delete, then select the Delete button.
When you are prompted to confirm the deletion, select the Yes
button.
4. When you have made necessary modifications, select the Save
button to save the changes.
80 Comdial Mar ‘03
Page 89

Interchange Supervisor
Figure 4-19 Group Box Screen
The Box number field displays the group box number. A box
number can be any number between 1 and 9899 (boxes 9900 - 9999
are reserved for the system). You cannot change the box number on
the screen.
To move to the next group box number, click on Next. To move to the
previous group box number, click on Prev. To create a new group
box, click on New.
The Record name button identifies whether the name of the group
box has been recorded. The system plays the name as soon as a caller
elects to send a message to the group box.
Interchange signifies an existing recording by displaying a red light
on the button.
You can record the name by clicking on the Record Name button,
then using the controls on the Sound Recorder dialog box. At the
lower right of the dialog, click on the circle button to begin recording.
Click on the rectangle button (to the left of the circle button) to end
the recording.
Mar ‘03 Comdial 81
Page 90

Using the PC to Perform Supervisor Functions
The Number of messages currently in box field cannot be changed
from the keyboard. It indicates the number of messages in the group
box.
You can limit the length of messages that are sent to this group box.
To do so, enter the lenght (in seconds) in the Max message length X
seconds field.
The member fields on the right side of the Group box menu show the
current members of the group box. To add a mailbox to the group,
enter the mailbox number on this list. To delete a mailbox from the
group, move the cursor to the mailbox number to be deleted, and
delete the number from the field. A group box can contain up to 50
members.
To send messages to groups containing more than 50 mailboxes, use
one of the following methods:
• Use the Send to Multiple Mailboxes option to send the message
to additional group boxes. After selecting the first group box
and recording the message, press the # key for more options.
From the menu that plays, choose option 6 to send the message
to several mailboxes or group boxes.
• Connect a group box to a text file, which can contain an
unlimited number of members. Create a text file in the
C:\VM\
directory with the name GboxXXXXXXXXX.LST, where
xxxxxxxxx is the number of an existing group box. Note that if
the existing group box number is less than nine digits, you must
include leading zeros before the mailbox number in this
filename. For example, to create an extended member file for
group box 601, create a text file named Gbox000000601.LST
and list each additional mailbox on a separate line in the file (do
not duplicate members in the group box screen and the text file).
82 Comdial Mar ‘03
Page 91

Interchange Supervisor
3.4 Changing Company Business Hours
Interchange allows you to set up or change the business hours your
company uses, including Day Service and Lunch Service. By default,
any period not defined as part of Day Service or Lunch Service is
considered part of Night Service mode.
The system automatically switches between Day Service, Night
Service, and Lunch Service based on the times you enter in these
fields. (See Section 1.2, Understanding Supervisor Responsibilities
for more information on how the system uses service modes and the
hours you designate.)
To modify the company business hours perform the following steps.
1. From the Main screen, access the System pull-down menu.
2. Select Business Hours from the menu. The business hours
screen displays.
3. Change the business hours on the Business Hours screen.
When you have made necessary modifications, select the Save
button to save the changes.
Mar ‘03 Comdial 83
Page 92

Using the PC to Perform Supervisor Functions
Figure 4-20 Business Hours Screen
For each day of the week, enter the opening and closing times for the
business. If the business is closed all day, enter 00:00 in both the Day
service begins and Day service ends fields. This places the system
in the Night Service mode for that entire day. Note: All times must be
entered in 24-hour format—for example, enter 8:00
PM as 20:00).
If your business is open 24 hours on a particular day, enter 00:00 for
the Day service begins and 24:00 for Day service ends times.
3.5 Changing Company Holidays
In addition to answering calls differently during different times of
day, Interchange can answer calls in a special way during various holidays. For example, on New Year’s day, your company may be
working with a smaller staff, so you may want the system to greet
customers with:
84 Comdial Mar ‘03
Page 93

Interchange Supervisor
“The XYZ Company wishes all its customers a Happy New Year. Our
service personnel are not available today, but will be back as usual
tomorrow. For Sales, press 1, or press 0 to speak to an operator.”
You can pre-define up to 20 holiday dates. For each holiday, you can
specify a different routing box to which calls will be sent. During the
holiday, Interchange uses the greeting and call routing scheme you
have defined in that routing box
Figure 4-21 Holidays Screen
To modify the designated company holidays, perform the following
steps.
1. From the Main screen, access the System pull-down menu.
2. Select Holiday Schedule from the menu. The holiday schedule
screen displays.
3. Modify the company holidays on the
HOLIDAY SCHEDULE
screen. When you have made necessary modifications, click on
the Save button to save your changes.
Mar ‘03 Comdial 85
Page 94

Using the PC to Perform Supervisor Functions
The following example shows how to set up a New Year’s holiday
greeting to play on January 1.
1. Access the Holiday Schedule screen and select January as the
month, then enter 1 to indicate the first day of the month. Note:
Holiday greetings are in effect for the entire 24-hour period of
the calendar day.
2. In the Inital box field, enter a spare box number. In this example, box number 8500 is used.
Interchange is now advised of the New Year’s holiday. Each
time a call arrives on January 1, the system routes the call to
box 8500.
3. To complete this example, you must create routing box 8500.
You add routing boxes by accessing the Routing Box screen.
Click on Add and type 8500 in the window that displays. Once
you create a routing box, you can record a greeting in it (in this
example, a New Year’s specific holiday greeting) and set up the
various routing options as described in Section 3.7, Changing
the Routing in a Routing Box.
3.6 Changing the Greeting Played by a Routing Box
Before modifying any routing box greetings, refer to Section 1.2.8,
Changing the Greeting Played by a Routing Box and Section 1.2.9,
Changing the Routing in a Routing Box for information on the routing
box setups on the system and routing box greetings.
Note that if you use the following procedure to change the greeting in
a routing box, you must update the routing box call routing structure
to relay new instructions to the caller. See Section 3.7, Changing the
Routing in a Routing Box for more details.
To modify a Routing box greeting, perform the following steps.
1. From the Main screen, select the Boxes pull-down menu.
2. Select Routing Box from the Boxes menu.
86 Comdial Mar ‘03
Page 95

Interchange Supervisor
3. Click on the Select button and choose the number of the box
whose greeting you want to modify. The box displays onscreen.
4. Adjust the greeting using the Routing Box screen. When you
have made necessary modifications, click on the Save button to
save your changes.
Figure 4-22 Routing Box Screen
The Record greeting button in the upper right corner identifies
whether a greeting has been recorded for this routing box. An
existing recording is signified by a red light displaying on the button.
The greeting is played as soon as a caller is routed to the routing box.
You can record the greeting by clicking on the Record Greeting
button, then using the controls on the Sound Recorder dialog box. At
the lower right of the dialog, click on the circle button to begin
recording. Click on the rectangle button (to the left of the circle
button) to end the recording.
Mar ‘03 Comdial 87
Page 96

Using the PC to Perform Supervisor Functions
The greeting can also be recorded remotely by the owner of the
routing box. Note that once a routing box has been assigned an
owner, the routing box is allowed the same number of greetings as the
owner mailbox, as defined in the mailbox’s assigned class of service.
Once the system has finished playing the greeting, it may optionally
play the time or date, depending on the contents of the Box Name
field.
3.7 Changing the Routing in a Routing Box
Interchange uses routing boxes to send (route) calls to boxes
throughout the system. Typically, routing boxes are set up to play an
announcement (greeting) to callers that prompts them to select a
single-digit choice from a list of options. For example:
“You have reached our service department. If you are calling to
inquire about the status of a repair, please press 1. For all other
inquiries, please press 2. If you need assistance, please press 3.”
When a system set up this way, a call is transferred to a certain
mailbox when the caller presses 2 during or after the greeting. You
can control the digit(s) callers can dial and the route their calls will
subsequently take.
Interchange can also route calls based on certain criteria, such as the
time of day or day of week on which the call is received, the order in
which the call is received, etc.
Use caution when changing the routing boxes set up on your system
by your Interchange System Technician. If you have any questions,
contact that technician proir to making changes. And, if you do
change the call routing set up, you must update the routing box
greeting to relay new instructions to the caller. (See Section 3.6,
Changing the Greeting Played by a Routing Box for futher details.)
To modify call routing, perform the following steps.
88 Comdial Mar ‘03
Page 97

Interchange Supervisor
1. From the Main screen, access the Boxes pull-down menu.
2. Select Routing Box from the Boxes menu.
3. Click on the Select button and choose the number of the box
you want to modify or delete. The box’s setup screen displays.
4. Make changes to the Routing Box screen to modify the call
routing used when calls are sent to this box. When you have
made any necessary modifications, click on the Save button to
save your changes.
Figure 4-23 Routing Box Screen
The Box number field displays the routing box number. A box
number can be any number between 1 and 999999999 (boxes in the
range 9970 - 9999 and 0 are reserved for the system). You cannot
change the box number field. To view another routing box, click Next
to view the next sequential routing box, click Prev to view the pre-
vious routing box. To add a new Routing box, click New.
Mar ‘03 Comdial 89
Page 98

Using the PC to Perform Supervisor Functions
The Box name field contains the name assigned to the routing box.
The name appears on the database listing and is used for record
keeping.
If you want the system to announce the current time after it plays the
routing box greeting, insert the word Time
inside brackets before the
box name (for example, if the box name is New Products, change it to
[Time] New Products. If you want the system to play the current
date, insert [Date] before the box name. A single routing box can
play the time or the date, but not both. By connecting two routing
boxes together, however, you can play both the time and the date to
the caller. Ask your Interchange System Technician if you would like
more information on how to do this.
The Owner field contains the mailbox number of the owner of the
routing box. The owner has the ability to call in to the system to rerecord the routing box greeting or select a different active greeting. If
you do not want to provide this remote administration option, or if not
more than one greeting is required for the routing box, leave this field
blank.
While Interchange is playing the greeting for the routing box, it also
listens for the caller to enter a digit. If the system gets to the end of
the greeting without detecting a digit from the caller, it waits the
amount of time specified in the wait X seconds for a digit field. If no
digits are detected before this time has elapsed, the system repeats the
routing box greeting the number of times specified in the Play
greeting X times field.
In the wait x seconds for a digit field, enter the number of seconds
you want Interchange to wait to detect the first digit from the caller.
Once the system receives the first digit, it either waits for additional
digits or immediately routes the call based on the other fields in the
routing box.
90 Comdial Mar ‘03
Page 99

Interchange Supervisor
If the caller dials a digit, the system checks the If digit received, wait
for more digits before routing call field:
• If this field is not checked, the system immediately attempts to
route the call based on the single digit dialed. If the Destination
for dialed digit field contains a valid box number, the call is
immediately sent to the new box. This means that menu
selections take priority over extension numbers (for example, if
the destination for digit 1 is a valid box, the caller cannot dial
mailboxes beginning with a 1, as the system routes the call as
soon as it receives the first 1 in the extension number).
If this field is checked, the system waits to see if the caller is dialing a
sequence of digits (for example, entering a box number). If the
system detects additional digits, and they correspond to a valid
mailbox, routing box, etc., it routes the call to that box. If the system
detects only one digit, it consults the Destination for dialed digits
fields and routes the call to the box specified. Since the system must
wait for additional digits, call routing is not executed as quickly as
when this field is unchecked.
The bottom portion of the Routing Box menu allows you to specify
how you want Interchange to route the calls. The fields on the right
side of the menu will change, based on what you select in the left side
of the menu under Route call based on.
This area allows you to specify how you want Interchange to route a
call to this box. There are five techniques you can use to route calls:
• Based on the digit(s) dialed by the caller,
• Based on the call’s sequence number (first call goes to box
[number], second call goes to box [number], etc.),
• Based on the day-of-week (Sunday, Monday, etc.) the call is
received,
• Based on the date that the call is received,
• Based on the time of day the call is received,
• Based on the results of a database lookup, or
Mar ‘03 Comdial 91
Page 100

Using the PC to Perform Supervisor Functions
• Based on whether the system is in Day Service, Lunch Service,
or Night Service or whether the call is received on a defined
holiday.
3.7.1 ROUTING CALLS BASED ON DIGITS DIALED
When you select the Digits dialed field, Interchange displays the
related field on the right of the menu.
Figure 4-24 Routing Based on Digits Dialed
If you select this field, callers can press a key at any time to make a
selection from the menu (or they can dial a mailbox directly) while
the system is playing the routing box greeting. When the caller
presses a key, Interchange immediately stops playing the greeting and
processes the dialed digit.
92 Comdial Mar ‘03
 Loading...