

Page 1

Please start by reading this guide.
It describes basic operations.
Quick Guide
060-36033
Page 2

CAUTION
After reading this guide, keep it in handy for future reference.
The "Safety Precautions" are provided in the supplemental
Safety Information. Be sure to read through them prior to use.
ComColor FW Series Quick Guide
Page 3
Preface
Please start by reading this guide.
It describes basic operations.
Quick Guide
060-36033
This guide describes total operation features
and specifications.
User's Guide
060-36034
This guide describes the machine settings and options (IC card reader, scanner, etc.)
to be performed by the administrator.
Administrator’s Guide
060-36036
This guide describes the action to take
when a paper jam or other problem occurs.
Troubleshooting Guide
060-36035
Thank you for using a ComColor FW Series product.
This ComColor FW Series product is a network-compatible inkjet printer that performs high-speed, color
printing. This machine is equipped with a variety of functions designed to meet various customer needs,
such as the ability to print the data and monitor printer operations from a computer.
In addition, using the machine with the optional scanner provides additional functions such as the ability
to copy originals, and save and use the scanned data.
About the Guides
The ve guides described below are supplied with this machine.
Quick Guide (this guide)
This guide describes basic machine operations and how to replace consumables.
Keep this guide handy, such as near the machine, for easy reference.
Start by reading this guide.
User's Guide
This guide describes handling precautions and specications, as well as the operations
and settings of each function.
Read this guide for a more detailed understanding of the machine.
Administrator's Guide
This guide describes the machine settings and optional equipment (IC card reader,
scanner, etc.) to be congured by the administrator.
Troubleshooting Guide
This guide describes the actions to take when a paper jam or other problem
occurs.
Safety Information
This guide describes safety precautions and specications.
About This Guide
(1) This guide may not be reproduced in whole or in part without the permission of RISO KAGAKU CORPORATION.
(2) The contents of this manual may be changed without prior notice due to product improvements.
(3) RISO KAGAKU CORPORATION shall not be liable for any consequence of using this guide or the machine.
1
ComColor FW Series Quick Guide
Page 4
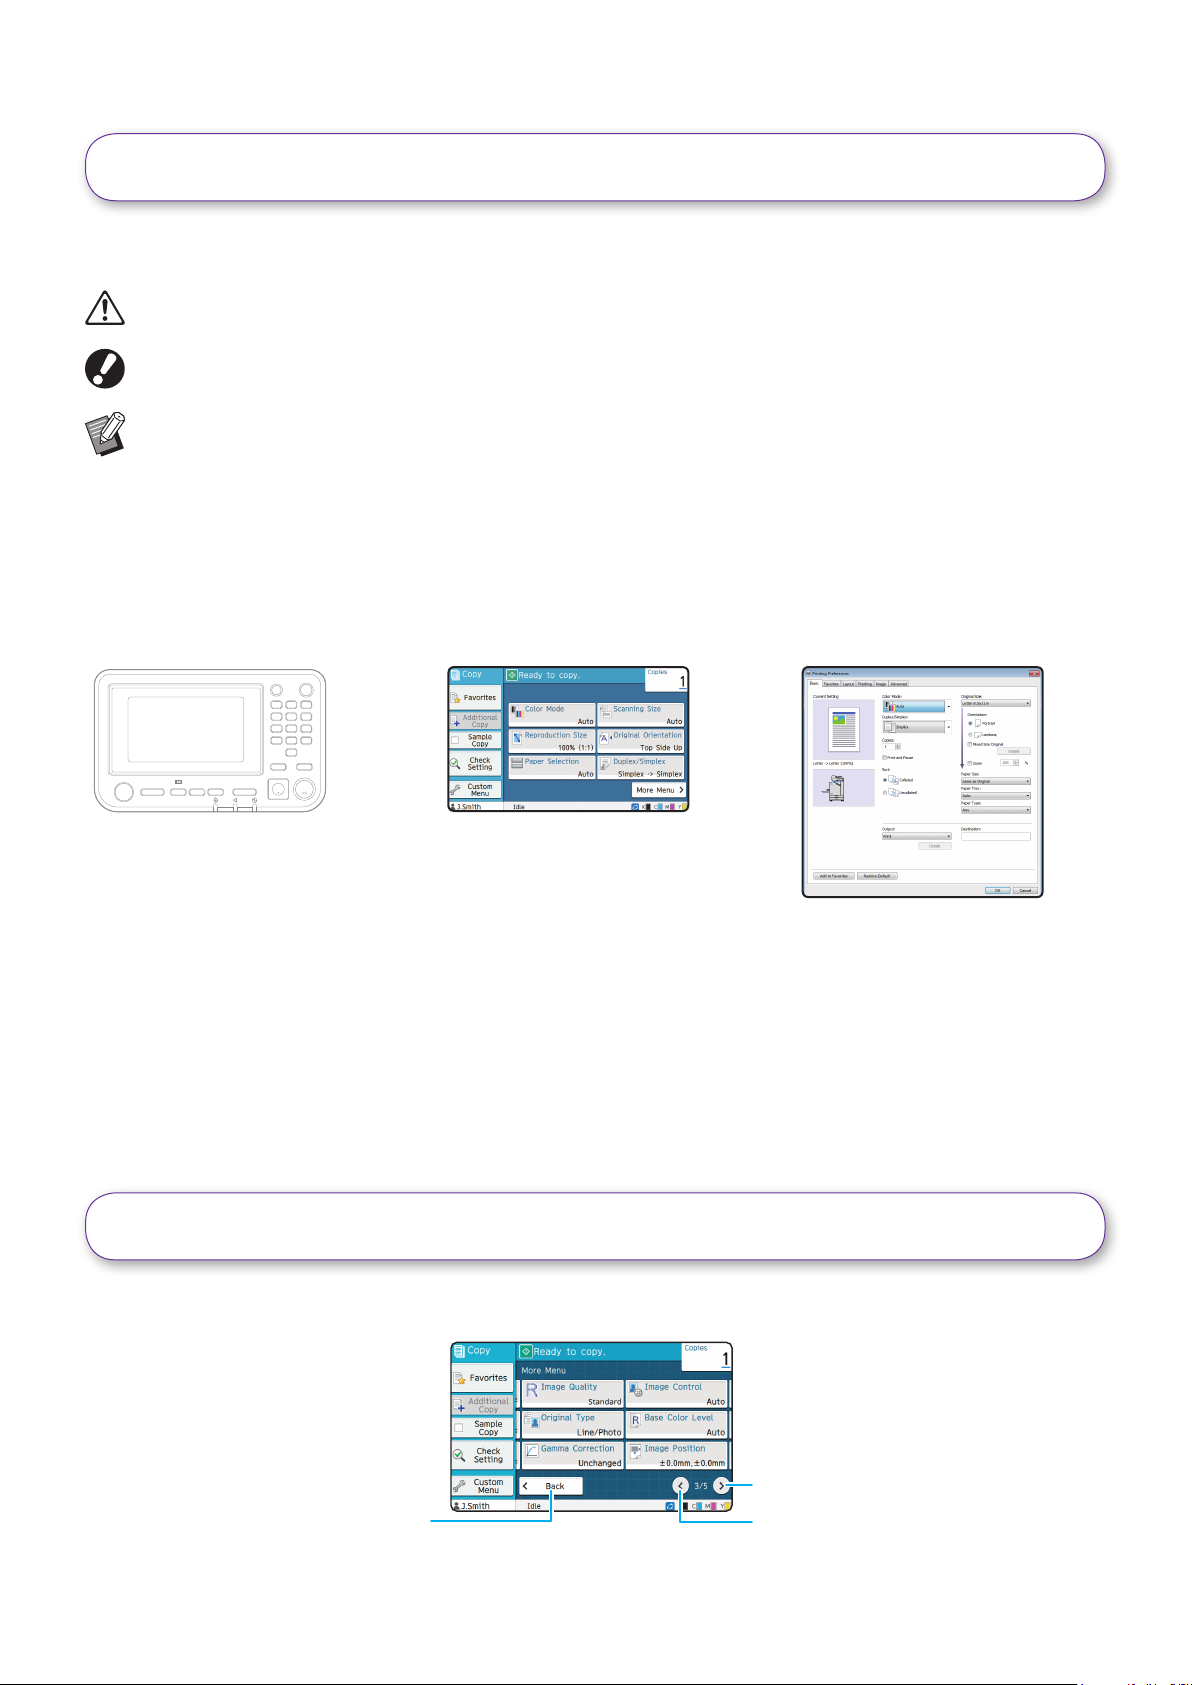
Symbols, Notations, and Screenshots Used in This
Symbols Used in This Guide
Indicates cautions that should be noted for safe use of this machine.
Indicates important items that should be noted or are prohibited.
Indicates useful or additional information.
Names of Keys and Buttons
The names of hard keys on the operation panel and buttons on the touch panel screen or computer window are
indicated with square brackets [ ].
Guide
● Operation panel
Example: Press the [Stop] key.
Illustrations and Operating Procedures in This Guide
• The operating procedures, screenshots, and illustrations in this guide are for the ComColor FW5230/FW5230R
with the optional scanner connected. This guide also assumes that each function is set to the factory setting, and
that [Login Setting] is set to [ON].
• The screenshots and illustrations in this guide may vary depending on the machine model and usage
environment, including the connected optional equipment.
● Touch panel screen
Example: Touch [Color Mode].
● Computer window
Example: Select the [Mixed Size
Original] check box.
Switching the Touch Panel Screen
Touch [More Menu] to display additional setting buttons that are not displayed on the initial screen.
Next page
Return to the initial screen of each mode Previous page
2
ComColor FW Series Quick Guide
Page 5

Contents
Preparation
► About This Machine ………………………………………………………………………4
► Turning On the Power ……………………………………………………………………6
► Logging In …………………………………………………………………………………7
► Loading Originals …………………………………………………………………………8
Getting Started
► Copying ……………………………………………………………………………………9
► About the Various Copying Functions ……………………………………………… 10
► Scanning ………………………………………………………………………………… 12
What is the [Favorites] Function? ……………………………………………………… 13
► Printing ………………………………………………………………………………… 14
► About the Various Printing Functions ………………………………………………… 16
► Using Storage ………………………………………………………………………… 18
► Using a USB Flash Drive ……………………………………………………………… 20
Routine Care
► When Paper Runs Out ………………………………………………………………… 22
► When Ink Runs Out …………………………………………………………………… 24
► Scanner Care …………………………………………………………………………… 26
Useful Tips
Loading Orientation of Originals and Paper …………………………………………………………… 27
RISO Console ……………………………………………………………………………………………… 28
Storing Consumables …………………………………………………………………………………… 28
Originals That May Not Be Copied ……………………………………………………………………… 28
ComColor FW Series Quick Guide
3
Page 6
Preparation
About This Machine
This section describes the main parts of the machine. For more information on each part name and function, see
the "User's Guide".
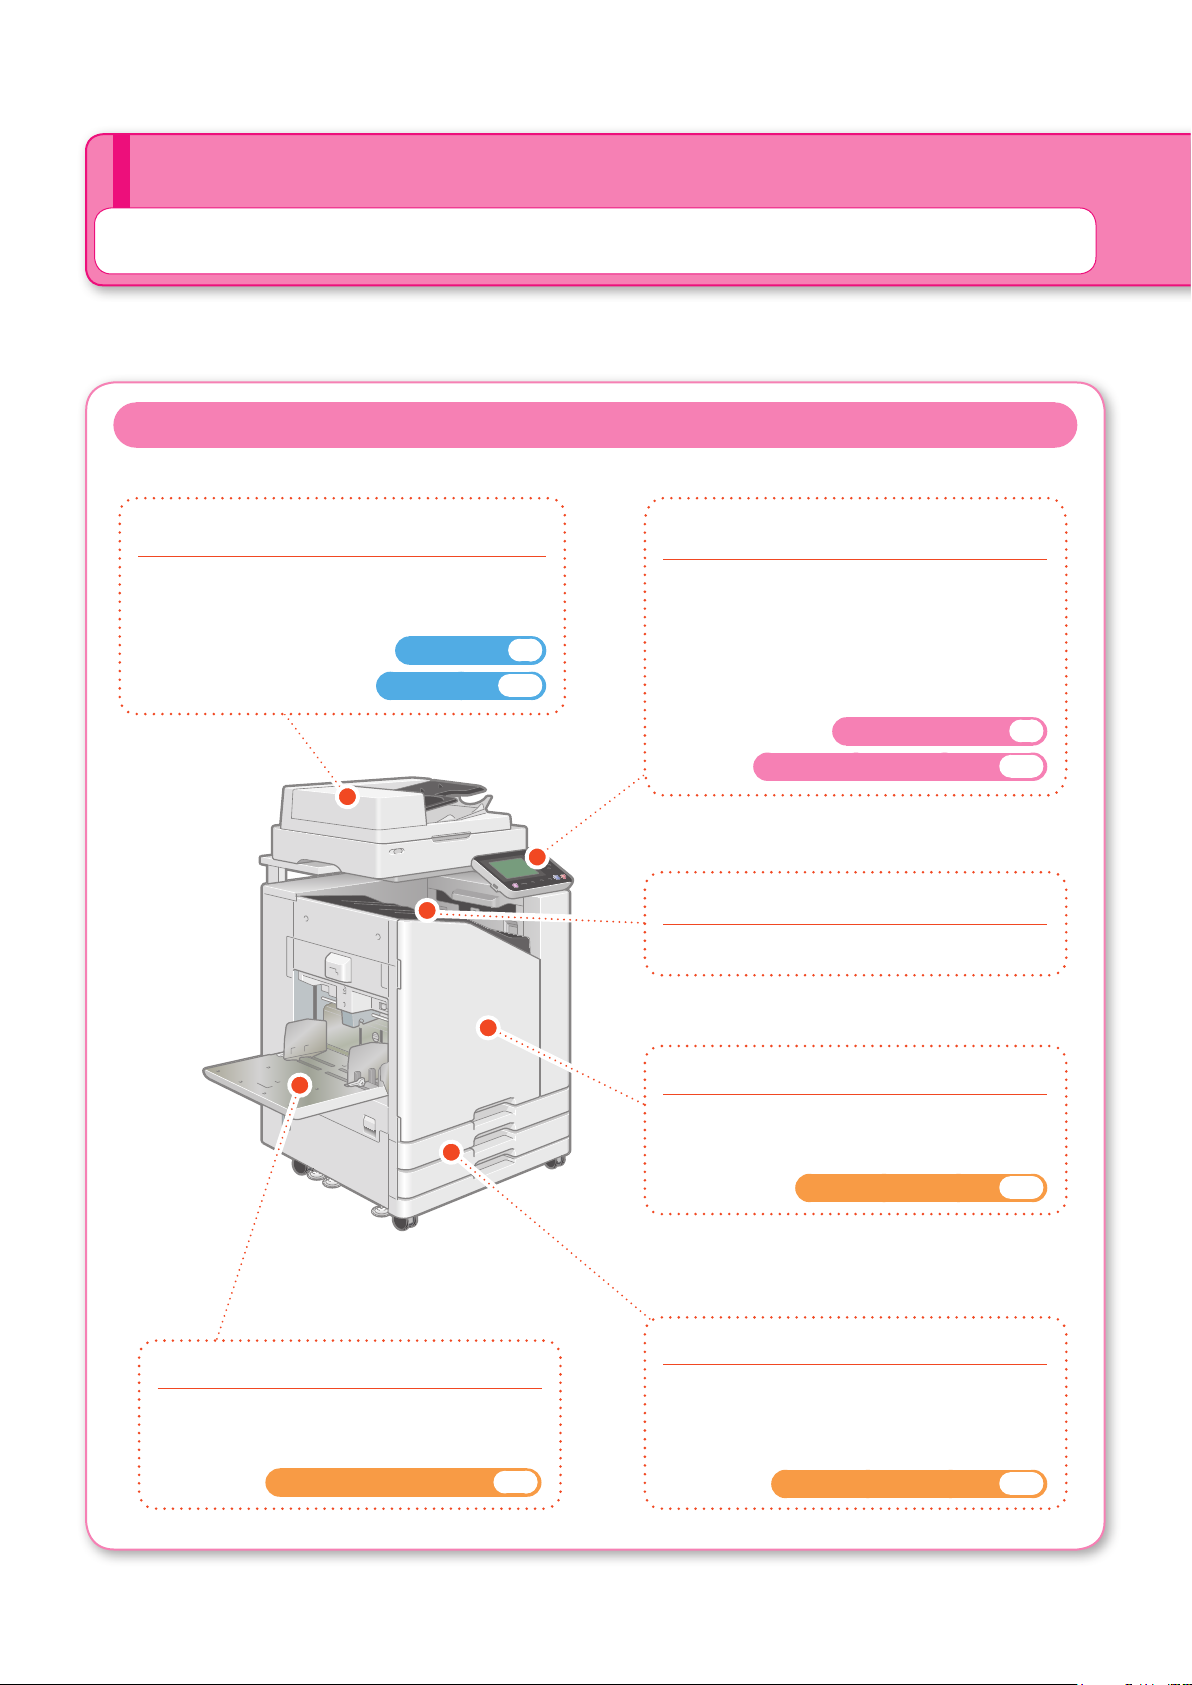
This Machine
● Scanner
Use the scanner to copy or scan documents
that are read from the platen glass or the ADF.
Copying►► p.9
Scanning►► p.12
● Operation panel
Use to perform operations or congure
settings.
The viewing angle can be adjusted for
improved visibility.
The USB port is located on the left side.
Operation Panel►► p.5
Using a USB Flash Drive►► p.20
● Face down tray
Printouts are output face down.
● Front cover
Open when paper is jammed or when
replacing an ink cartridge.
4
● Standard tray
Load special paper (thick paper, envelopes,
etc.) here. You can also load plain paper.
When Paper Runs Out►► p.22
When Ink Runs Out►► p.24
● Feed tray 1, Feed tray 2
Load the paper to be used for printing here.
Special paper such as thick paper cannot
be loaded.
When Paper Runs Out►► p.22
ComColor FW Series Quick Guide
Page 7
About This Machine
You can operate the machine by using the touch panel and keys on the operation panel. To use a button on the
touch panel, touch it with your nger.
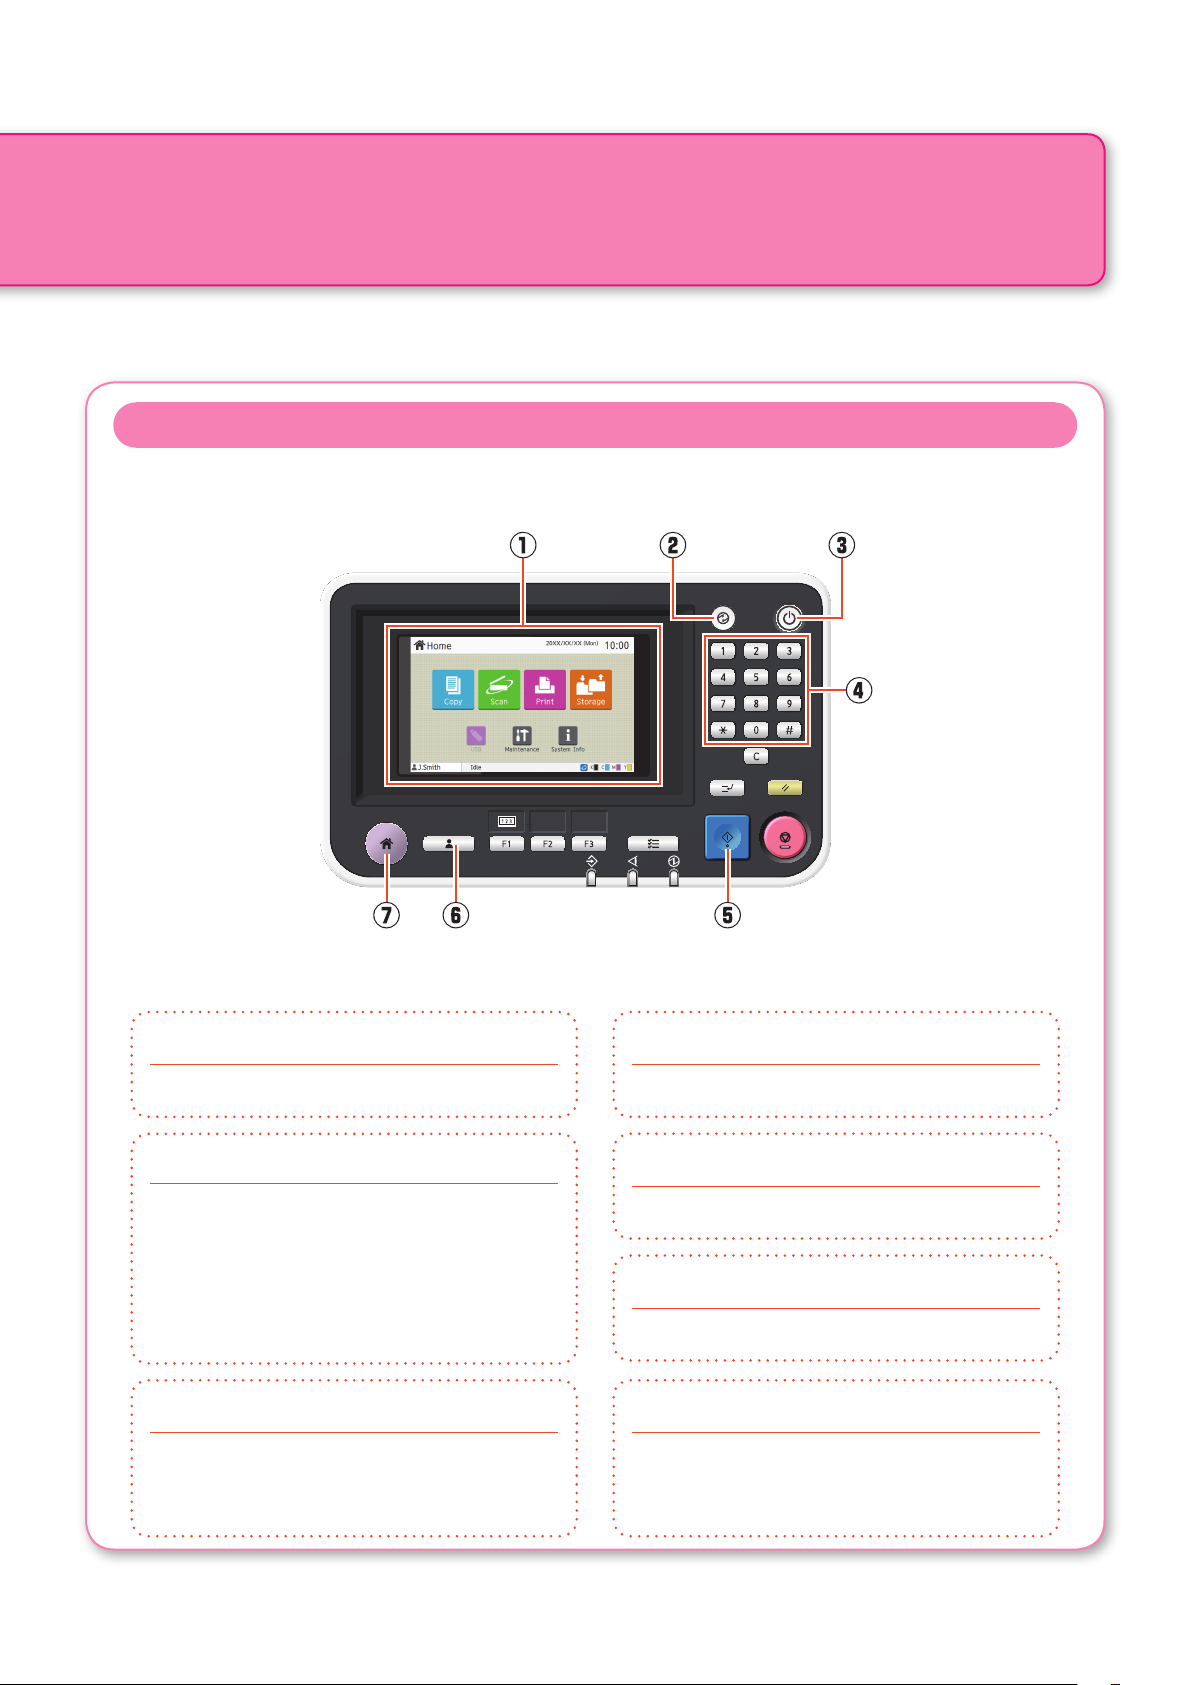
Operation Panel
Touch panel
a
Use to perform operations or congure settings.
Wake Up key
b
This key lights up when this machine is in
power saving mode.
Pressing this key when it is lit makes the
machine ready for operation.
Pressing this key when it is not lit puts the
machine into sleep state.
Power key
c
When pressed, the power turns on and the
key lights up.
To turn off the power, press and hold the key.
Numeric keys
d
Use these keys to enter numbers.
Start key
e
Press this key to start an operation.
Login / Logout key
f
Press this key to log in or log out.
Home key
g
Press this key to return to the [Home] screen
(initial screen) from the screen for each
function.
5
ComColor FW Series Quick Guide
Page 8
Preparation
Turning On the Power
Turn on the power to start the machine.
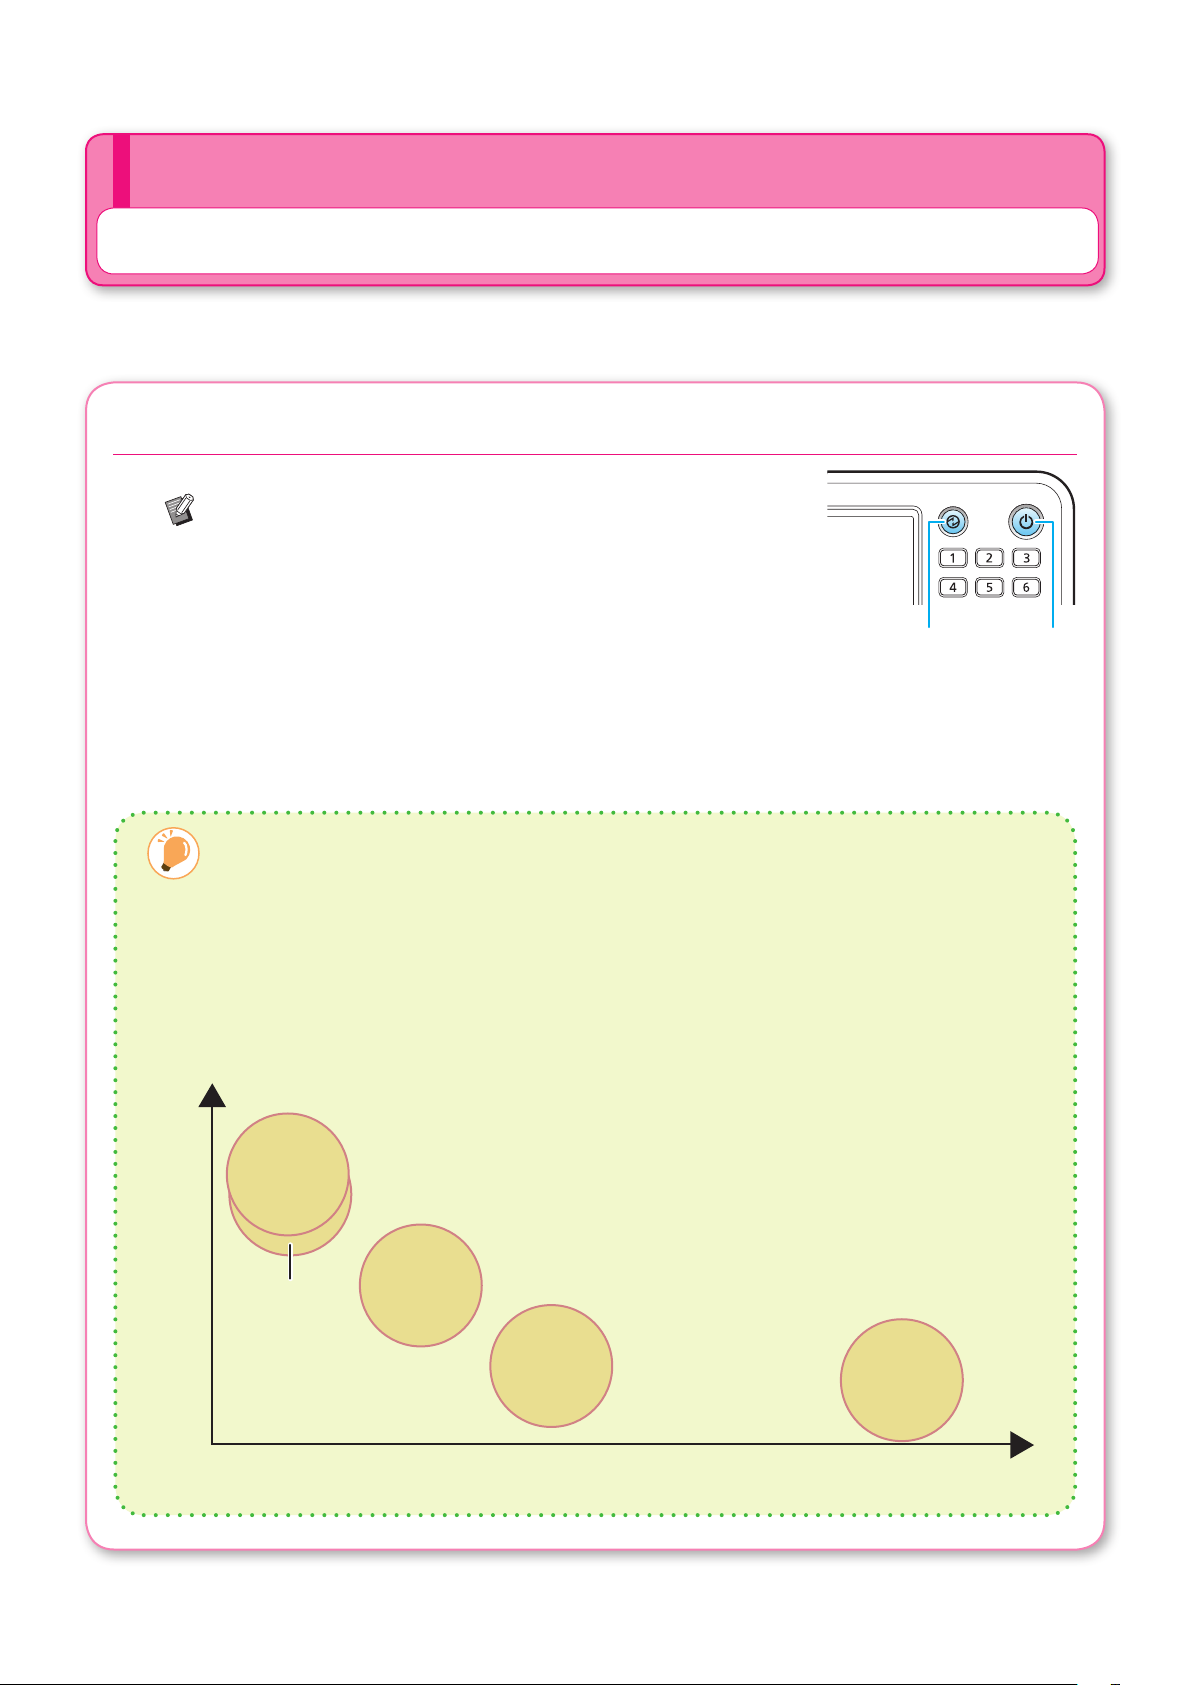
1. Press the [Power] key on the operation panel.
The [Home] screen is displayed after the startup screen.
The machine automatically enters power saving mode if
you leave it unattended for some time. Press the [Wake
Up] key to operate the machine.
Wake Up Power
Reducing power consumption
You can reduce the machine's level of power consumption by setting the power saving mode.
For the power saving mode, you can select the backlight OFF state and one of two types of sleep
states with different levels of power consumption ([Low] or [Standard]). The amount of time that
elapses before the machine enters each state, as well as the power consumption value, are set by
the administrator.
It takes longer for the machine to resume operations after sleep state than backlight OFF state, but
power consumption is lower.
High
Ready state
150 W or less
Sleep
Backlight OFF
147 W or less
Power consumption
Low
[Standard]
65 W or less
Sleep
[Low]
4 W or less
Standby
0.5 W or less
6
Recovery time LongShort
ComColor FW Series Quick Guide
Page 9
Logging In
Login is required when using functions indicated with the (lock icon).
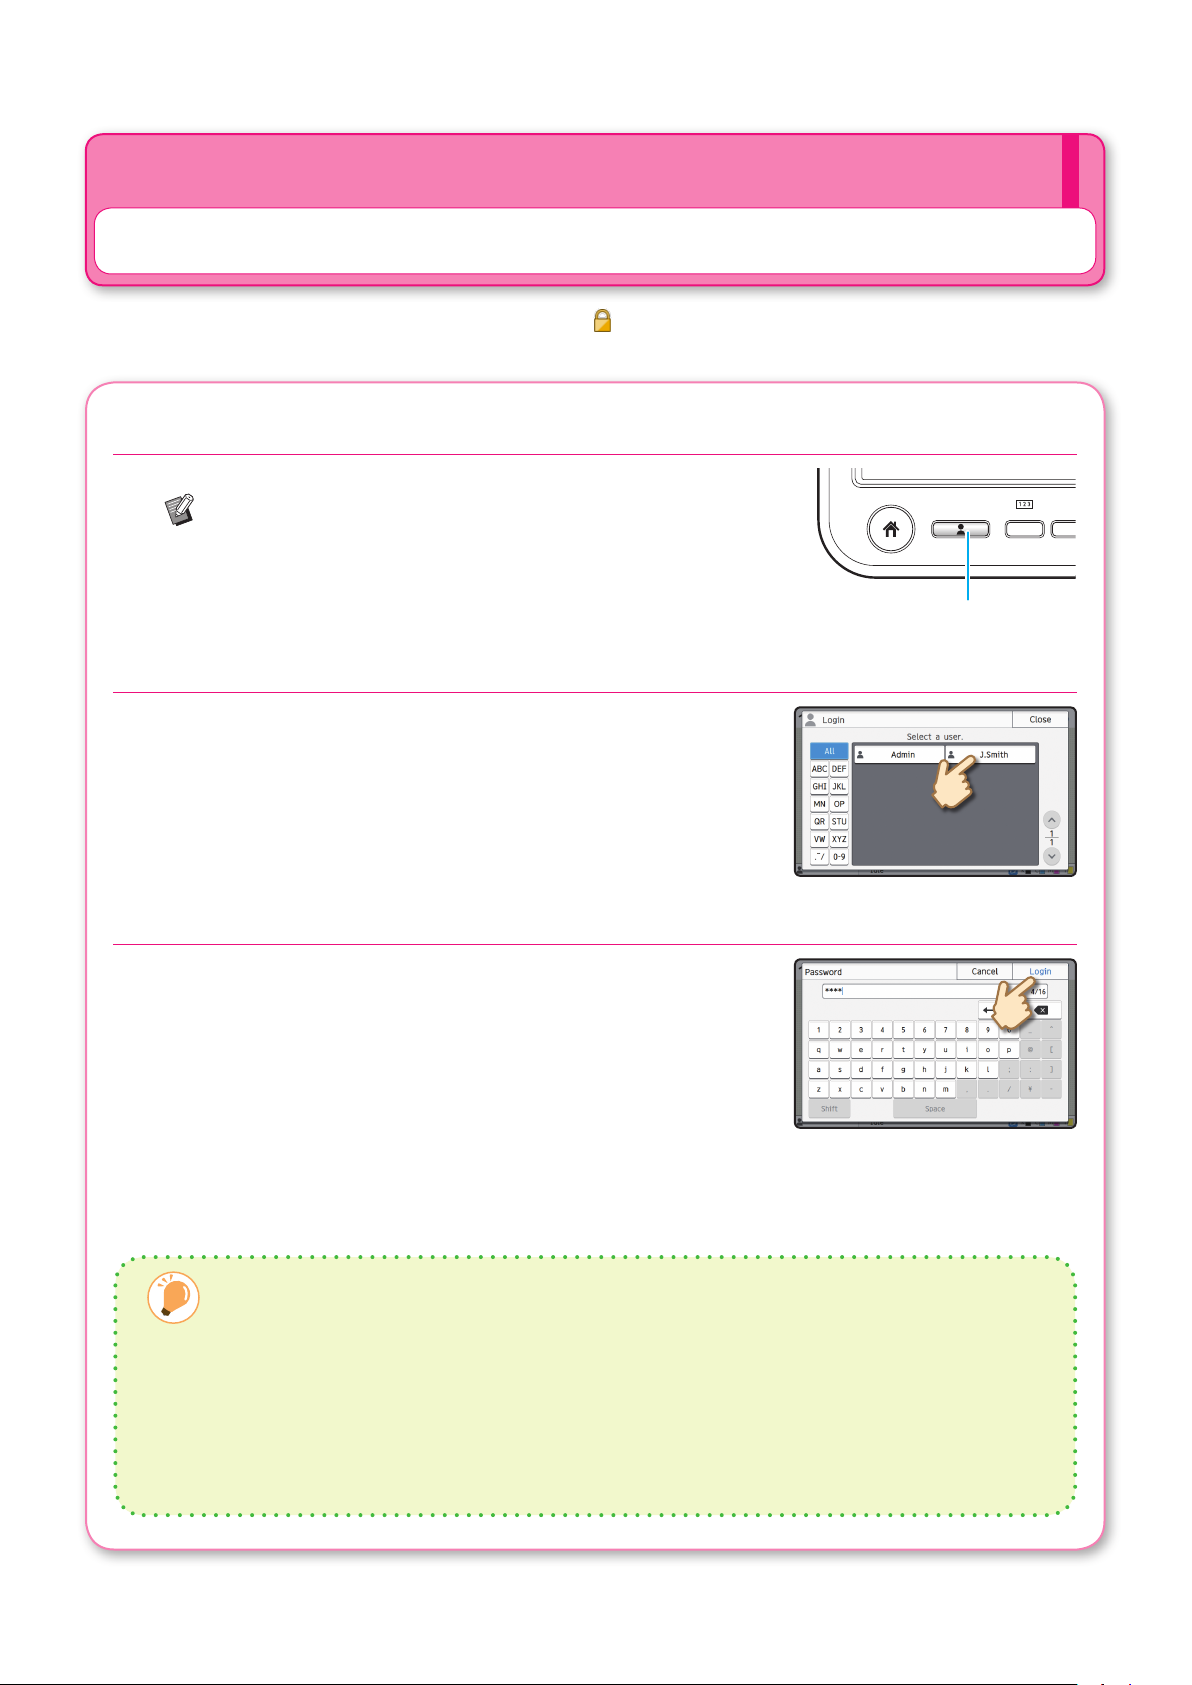
1. Press the [Login/Logout] key.
The [Login] screen is displayed.
The [Login] screen can be displayed regardless of the
mode button that is touched.
2. Select the user name.
Preparation
F2F1
Login / Logout
3. Enter your password and touch [Login].
To log out, press the [Login/Logout] key.
When Logging In for the First Time
Change the temporary password provided by the administrator to a password of your own choosing.
1. Enter the temporary password on the [Password] screen, and touch [Login].
The [Change Password] screen is displayed.
2. Enter the new password and touch [Next].
3. Enter the new password again and touch [OK].
ComColor FW Series Quick Guide
7
Page 10
Preparation
Loading Originals
Load the original in the ADF (auto document feeder) or place it on the platen glass.
If you used ink or correction uid on the original, make sure that it has fully dried before loading it.
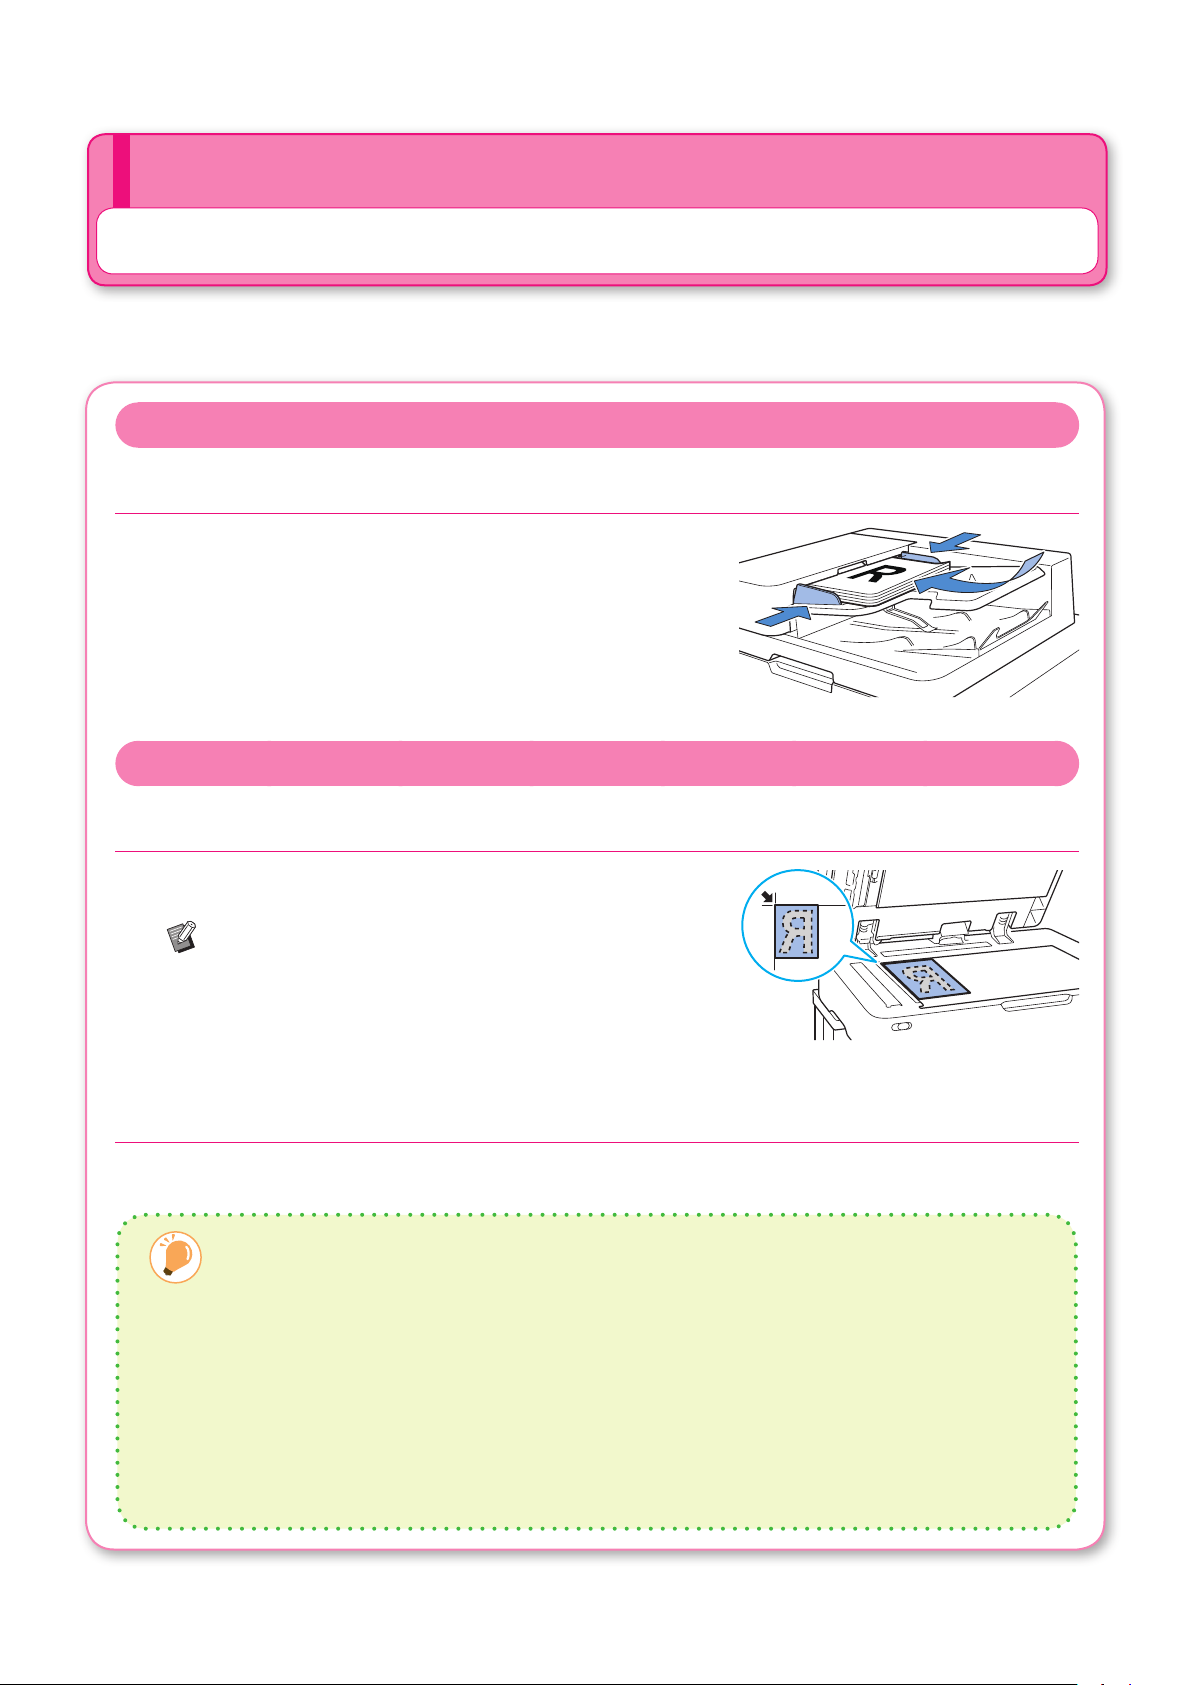
Loading in the ADF
1. Load the original so that the side that you want to scan is facing up.
Slide the ADF original guides to match the width of the original.
Loading on the Platen Glass
1. Place the original so that the side that you want to scan is facing down.
Align the corner of the original with the arrow at the top left
corner of the glass.
• When placing a transparency, set white paper behind it
so that the original can be clearly read.
• If the original is extremely thin, the rear surface may be
visible in the image. You can prevent this by placing
black paper behind the original.
2. Close the original cover.
Types of Originals That Cannot Be Loaded in the ADF
The originals listed below cannot be scanned using the ADF. Set them on the platen glass.
• Originals that have been cut and pasted
• Originals with signicant wrinkling or curling
• Bent originals
• Glued originals
• Originals with holes
• Torn originals or originals with jagged edges
• Highly transparent originals such as transparencies
or tracing paper
• Originals with a coating on the front or rear, such as
art paper or coated paper
• Thermal paper used in facsimiles or word processors
• Originals with signicant bumps on the surface
8
ComColor FW Series Quick Guide
Page 11
Copying
This section describes the basic copy procedure.
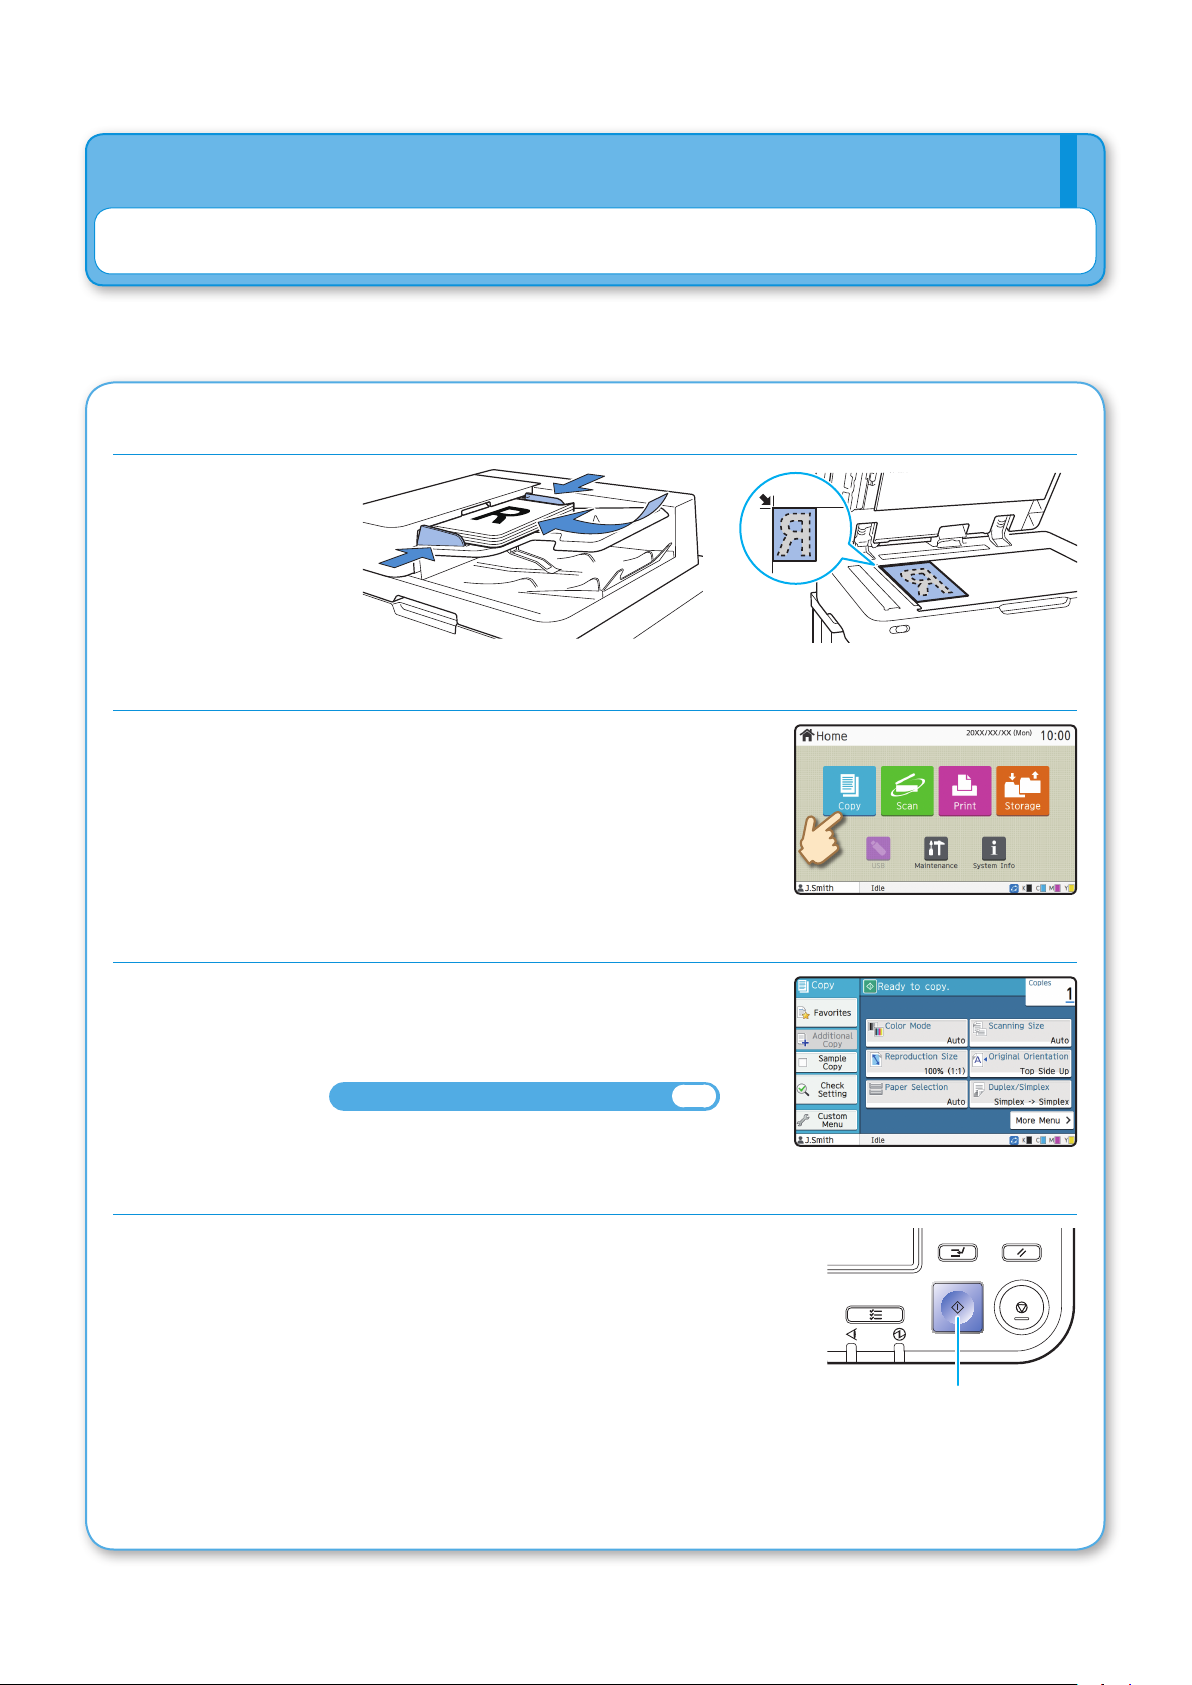
1. Load the original.
2. Touch [Copy] on the [Home] screen.
Getting Started
3. Change the settings as needed.
Enter the number of copies using the numeric keys.
Touch [More Menu] to display other settings that are available
when copying.
About the Various Copying Functions►► p.10
4. Press the [Start] key.
Start
ComColor FW Series Quick Guide
9
Page 12
4
3
2
1
4
3
2
1
4
3
2
1
4
3
2
1
Getting Started
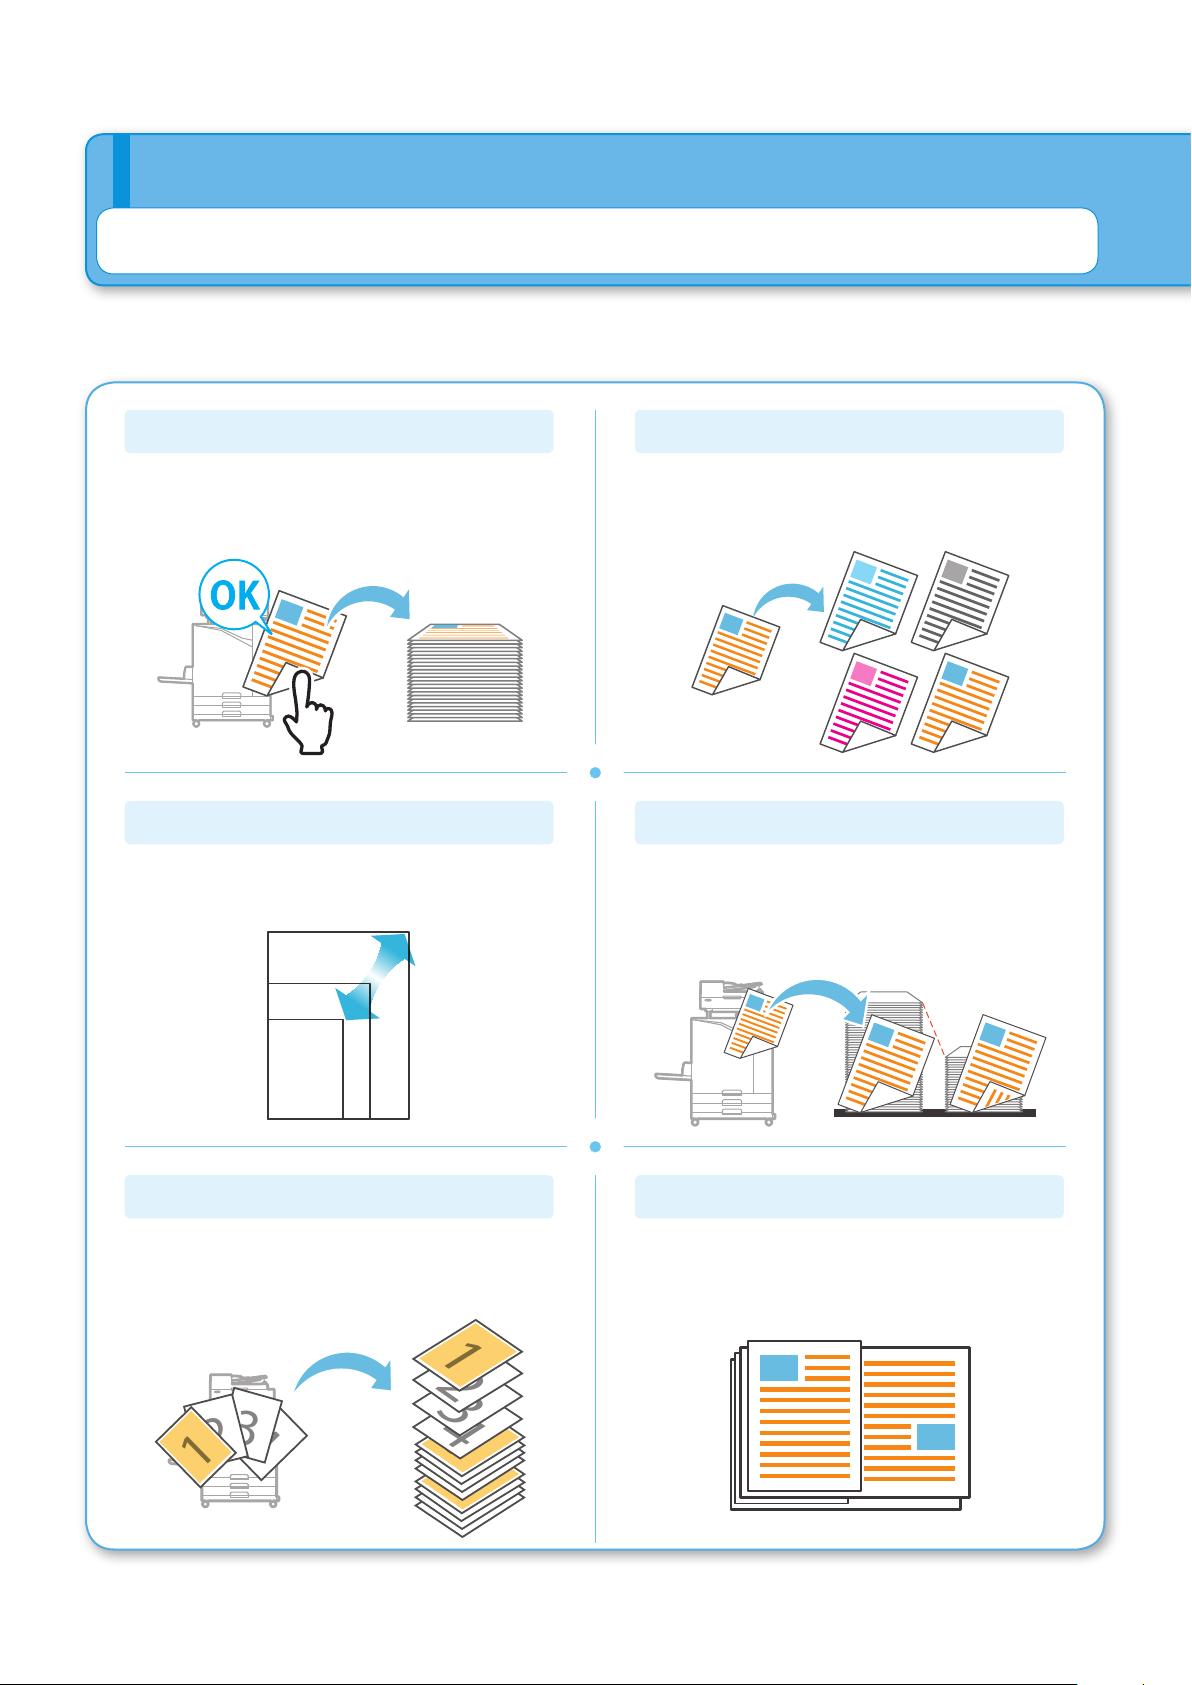
About the Various Copying Functions
This section describes some of the operations that you can perform using the copy functions of this machine.
For more information on each function, see the "User's Guide".
Sample Copy
Output one sample before making a large number of
copies.
This enables you to check the results and settings.
Reproduction Size
Reduce or enlarge the copied image.
You can specify the reproduction size.
Color Mode
Select color or monochrome printing.
Duplex/Simplex
Specify how to scan originals and output copies.
You can save paper by copying on both sides of the
paper.
10
Sort
When making multiple copies of multi-page originals,
you can specify whether to print by the page or by the
set.
Mixed Size Original
Scan originals that consist of pages that vary in size.
ComColor FW Series Quick Guide
Page 13
20XX/X/XX
About the Various Copying Functions
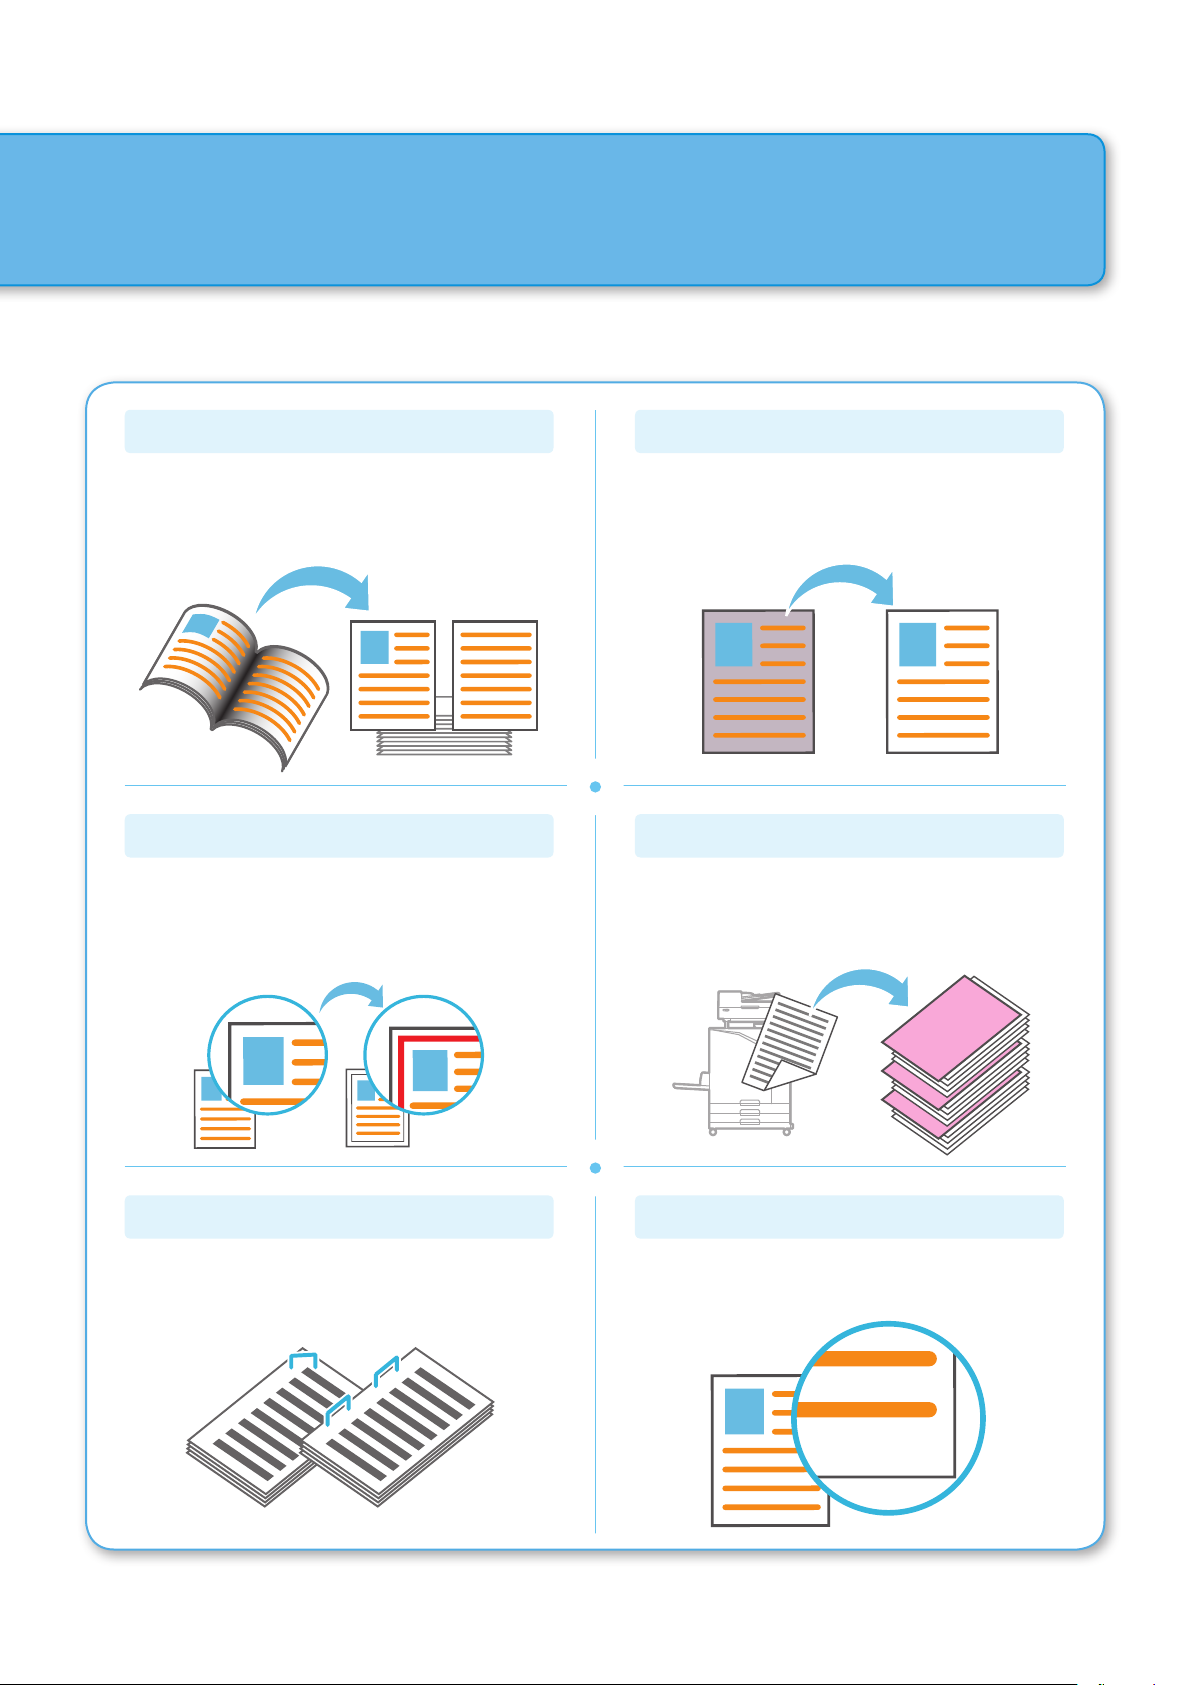
Page Split
When copying double-spread pages of documents
such as booklets, split the pages into two parts (left
and right) and copy them separately.
Page Border
Add a border line in the margins of the paper.
This enables you to make posters and signs stand
out.
Base Color Level
Make the background color (base color) lighter when
scanning an original with a background color.
Slip Sheet
Insert a slip sheet between sets of copies.
This enables you to quickly separate a large amount
of meeting documents or handouts.
Staple the printed paper.
The face down nisher (optional) is required in order
to use this function.
Staple (optional)
Stamp
Stamp the page number and date on the header or
footer.
11
ComColor FW Series Quick Guide
Page 14
Getting Started
Scanning
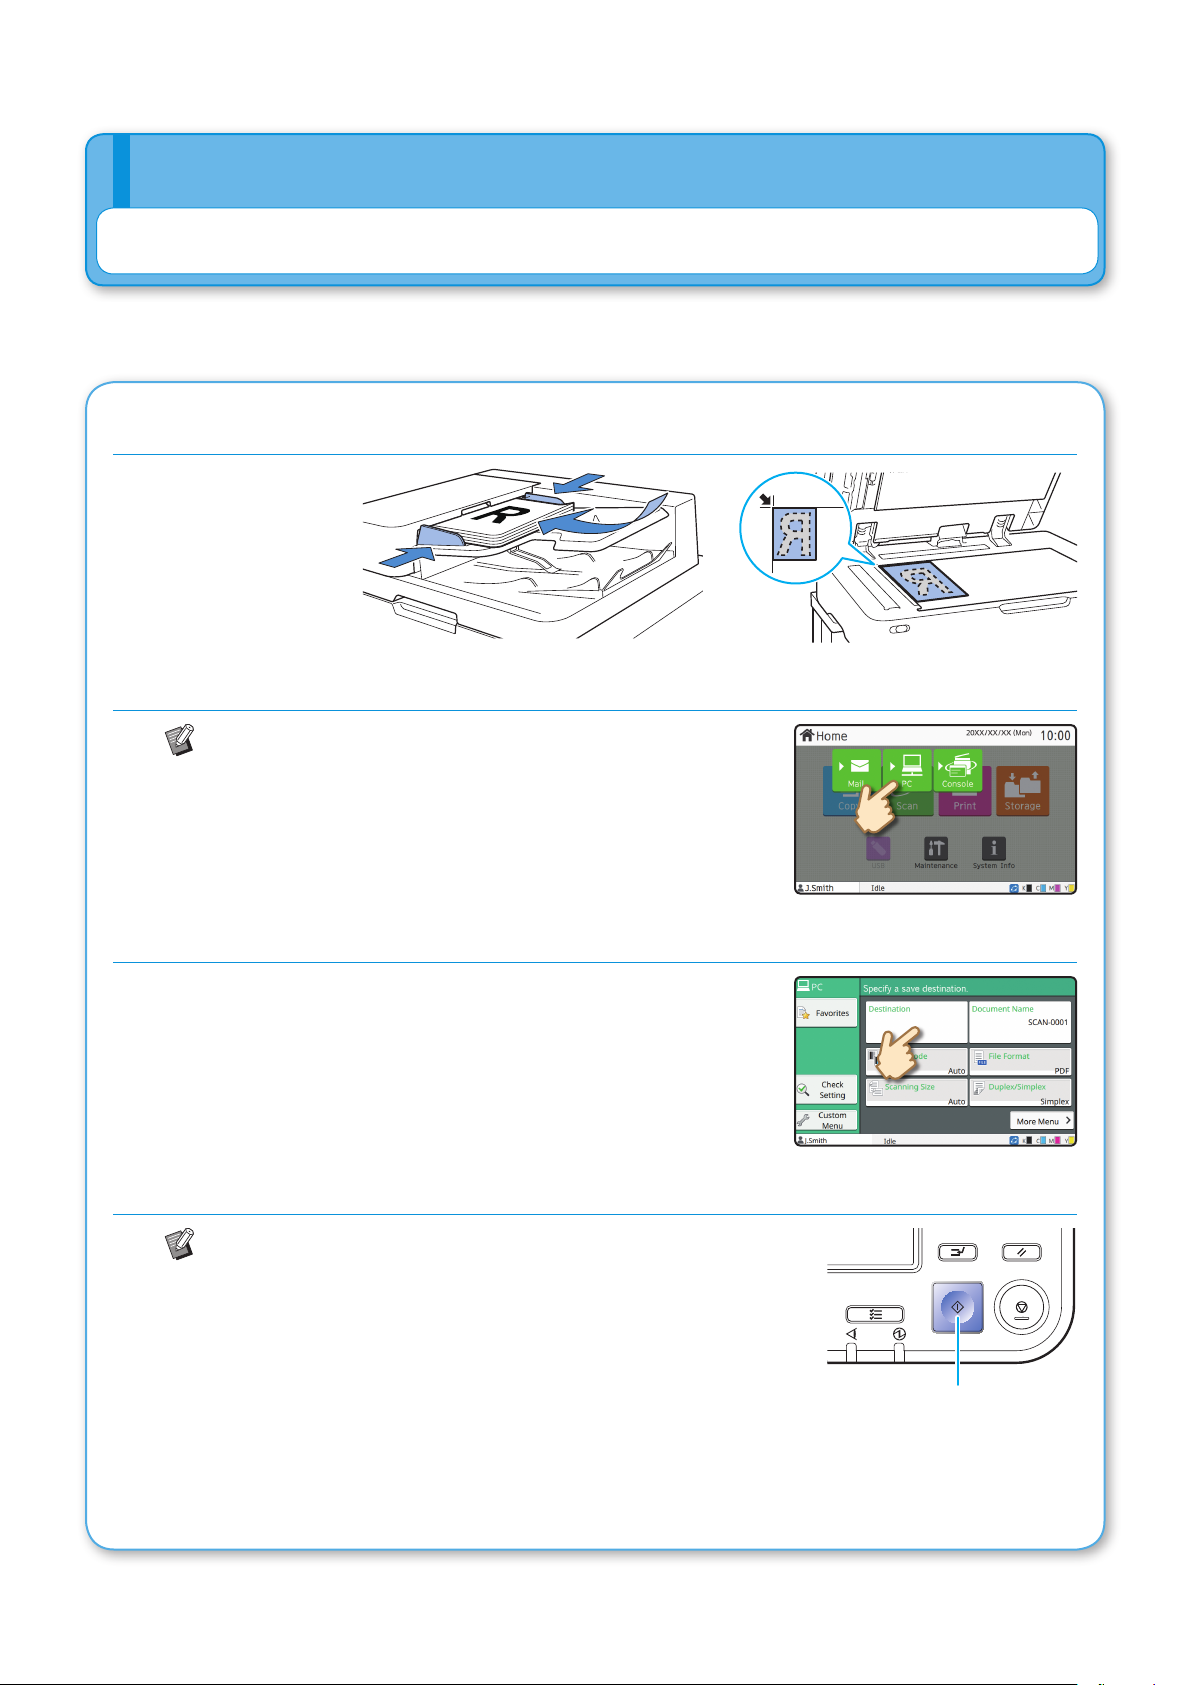
For scanning, you can select either [Mail], [PC], or [Console] as the destination for sending or storing the data.
In this section, the procedure for sending the data to a computer is described as an example.
1. Load the original.
2. Touch [Scan] - [PC] on the [Home] screen.
Select [Mail] to send the scanned data by e-mail, or
select [Console] to save the scanned data to the
internal hard disk of this machine.
3. Touch [Destination], and select the destination.
Change the settings as needed.
Touch [More Menu] to display other settings that are available
when scanning.
4. Press the [Start] key.
For more information on the procedure for sending the
scanned data with [Mail] and [Console], see the "User's
Guide".
Start
12
ComColor FW Series Quick Guide
Page 15
What is the [Favorites] Function?
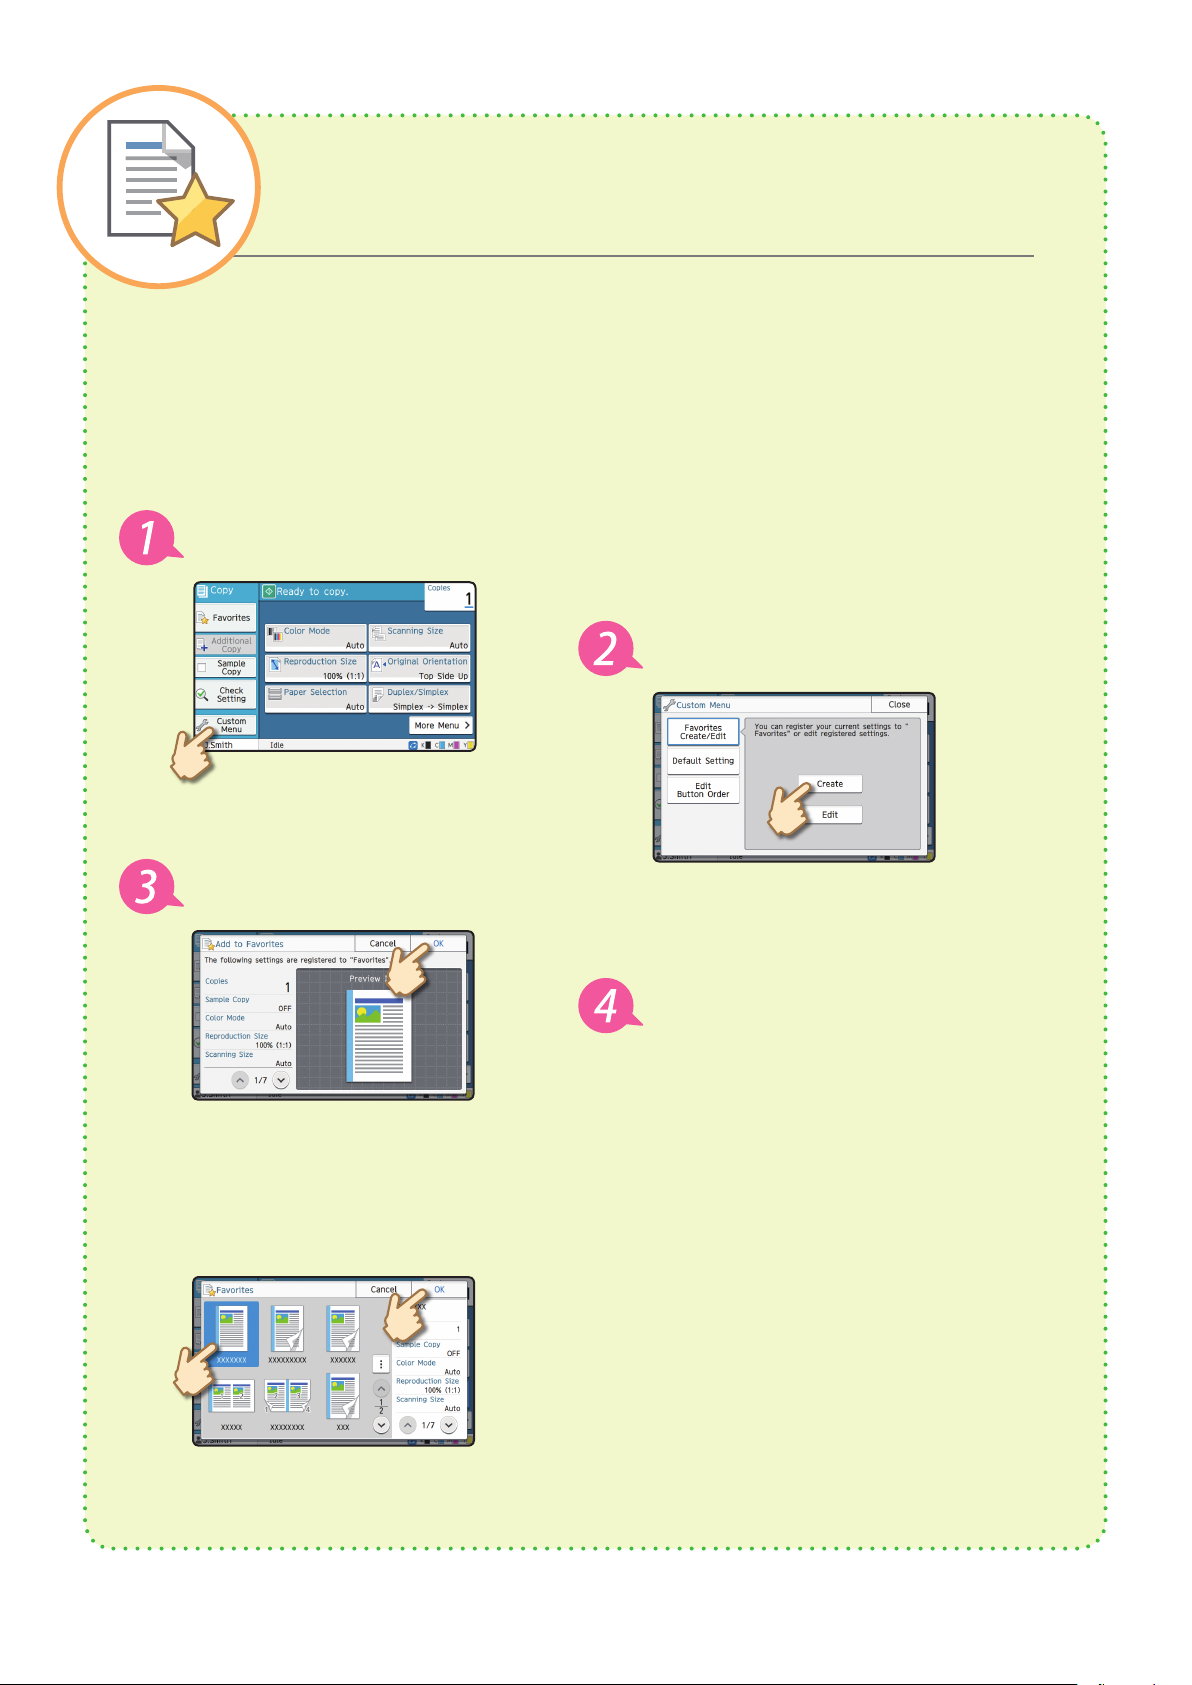
The [Favorites] button is located in the top left area of screens such as the [Copy] screen or [Scan] screen.
Once you register your preferred settings in [Favorites], you can retrieve them whenever you like.
If you register frequently used settings, you can eliminate the need to congure the same settings each time.
Registering the current settings for future use
The procedure for registering settings to [Favorites] is described below, using copy settings as an example.
Touch [Custom Menu].
Touch [Create].
Check the settings, and touch [OK].
Enter the registration name, and touch
[OK].
The settings are registered to [Favorites].
Retrieving [Favorites] settings for easy copying
Touch [Favorites] on the [Copy] screen. Select the desired settings, and touch [OK].
Press the [Start] key.
Copies are made using the registered settings.
ComColor FW Series Quick Guide
13
Page 16
Getting Started
Printing
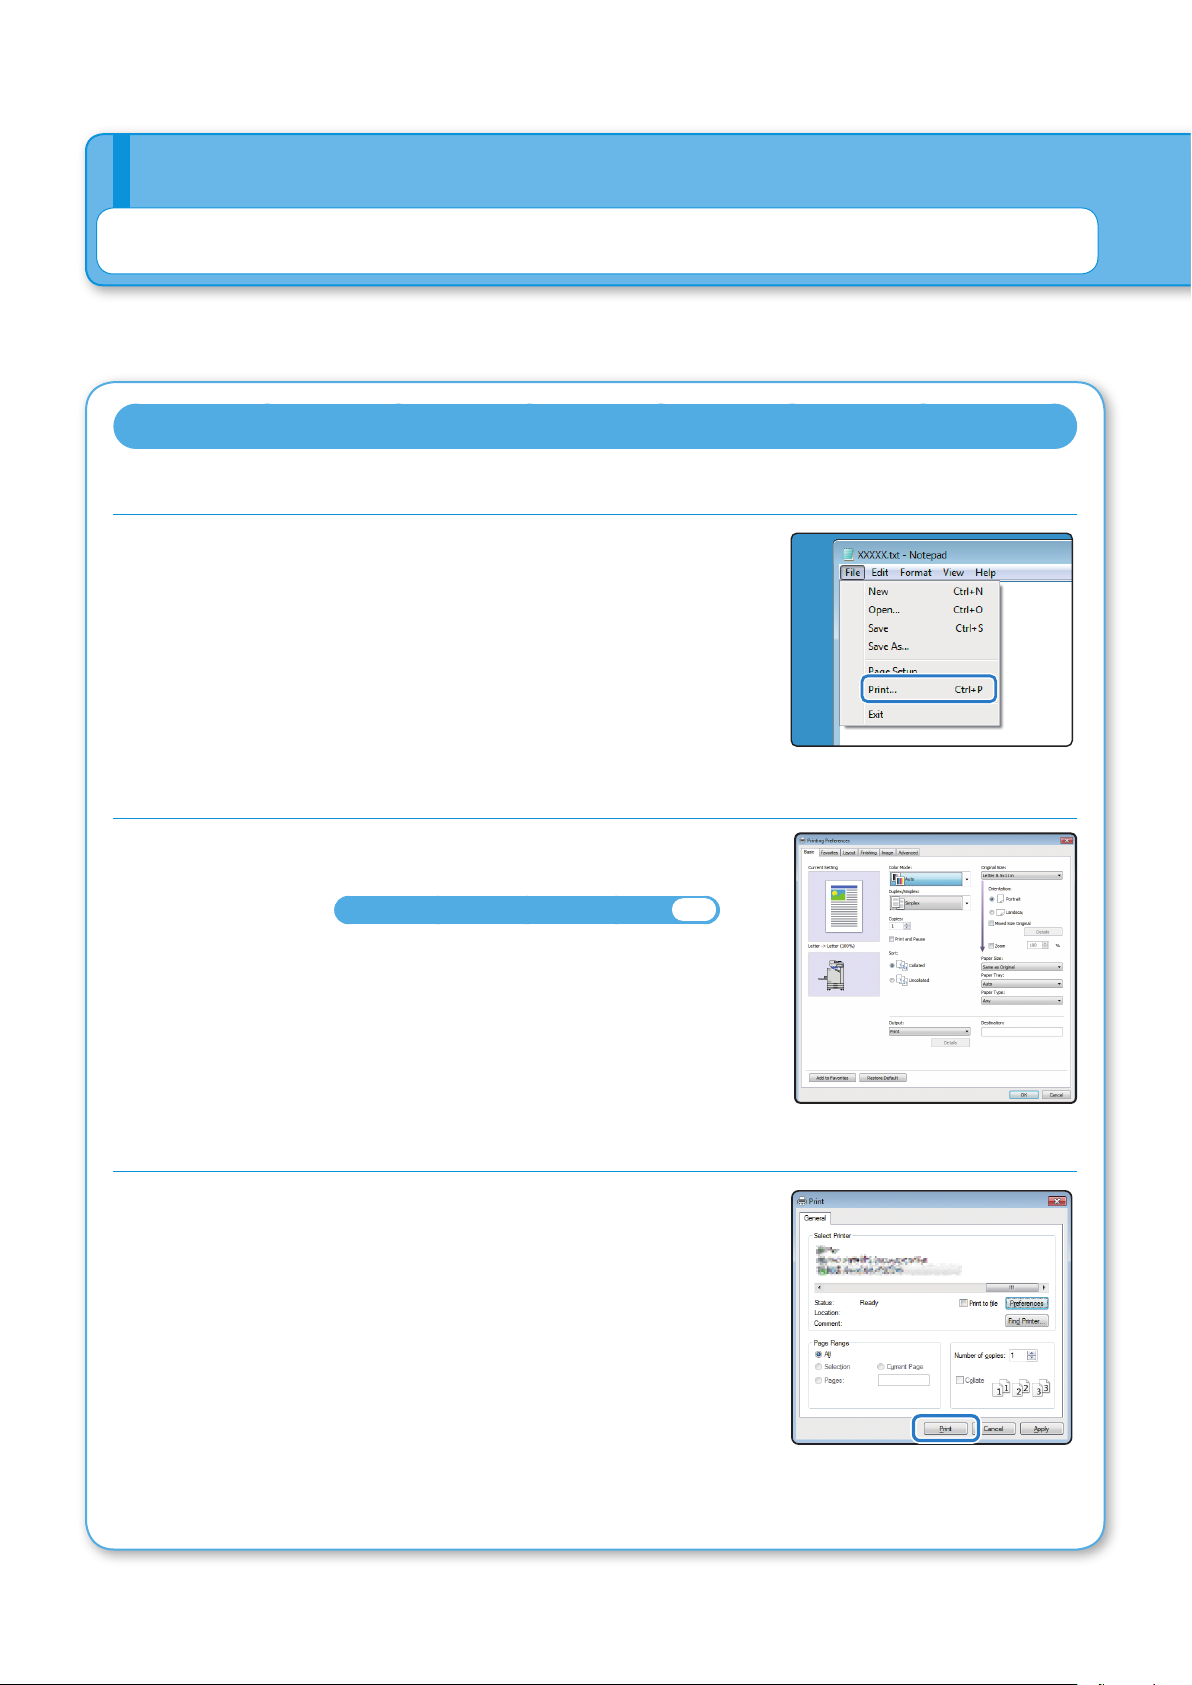
In this section, the procedure for printing from the Microsoft® Windows® 7 Notepad application is described as an
example.
Sending Data to This Machine
1. Click [Print...] in the [File] menu.
2. Click [Preferences], and check the settings.
After conrming the settings, click [OK] and close the printer
driver screen.
About the Various Printing Functions►► p.16
3. Click [Print].
The print data is sent to this machine.
14
ComColor FW Series Quick Guide
Page 17
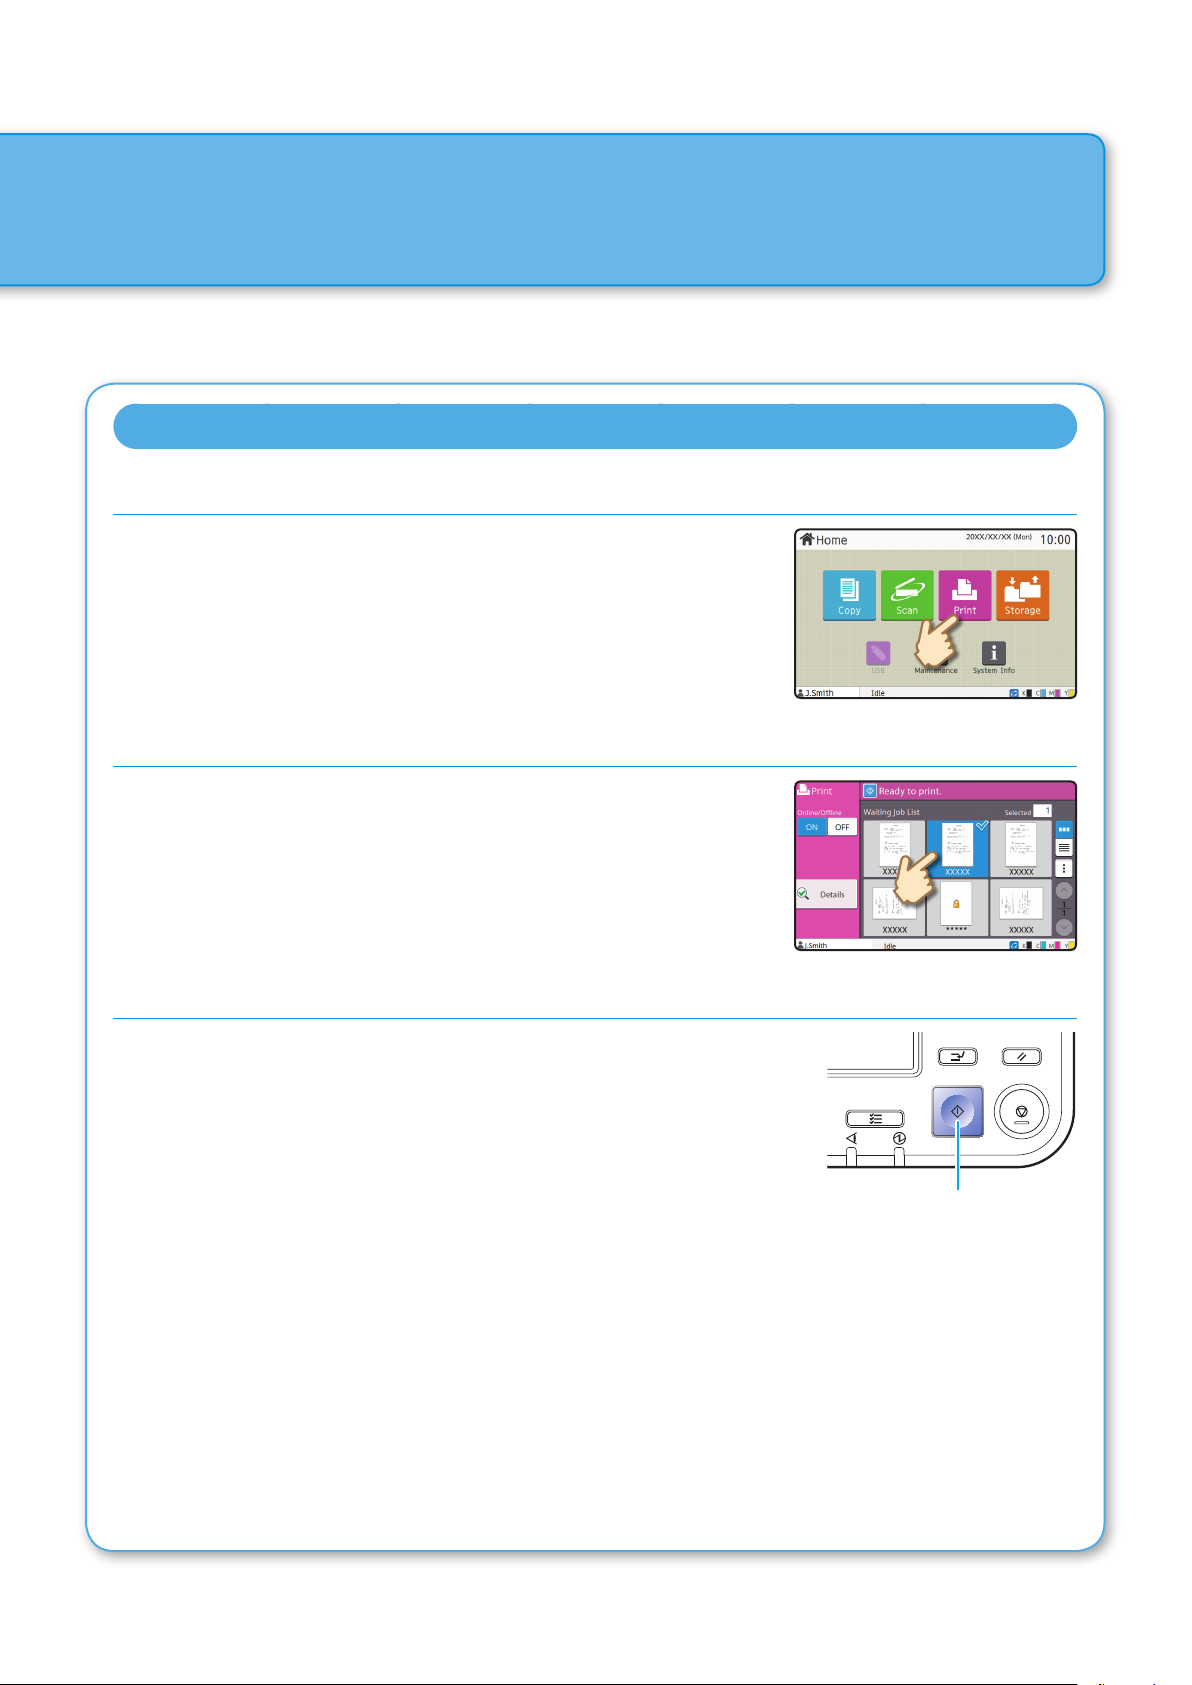
At the factory settings, the machine starts printing automatically when you log in.
If printing does not start automatically when you log in, perform the procedure below.
Printing From This Machine
1. Touch [Print] on the [Home] screen.
2. Select the job.
Touch [Details] to display the details of the job.
Printing
3. Press the [Start] key.
Start
ComColor FW Series Quick Guide
15
Page 18
Getting Started
About the Various Printing Functions
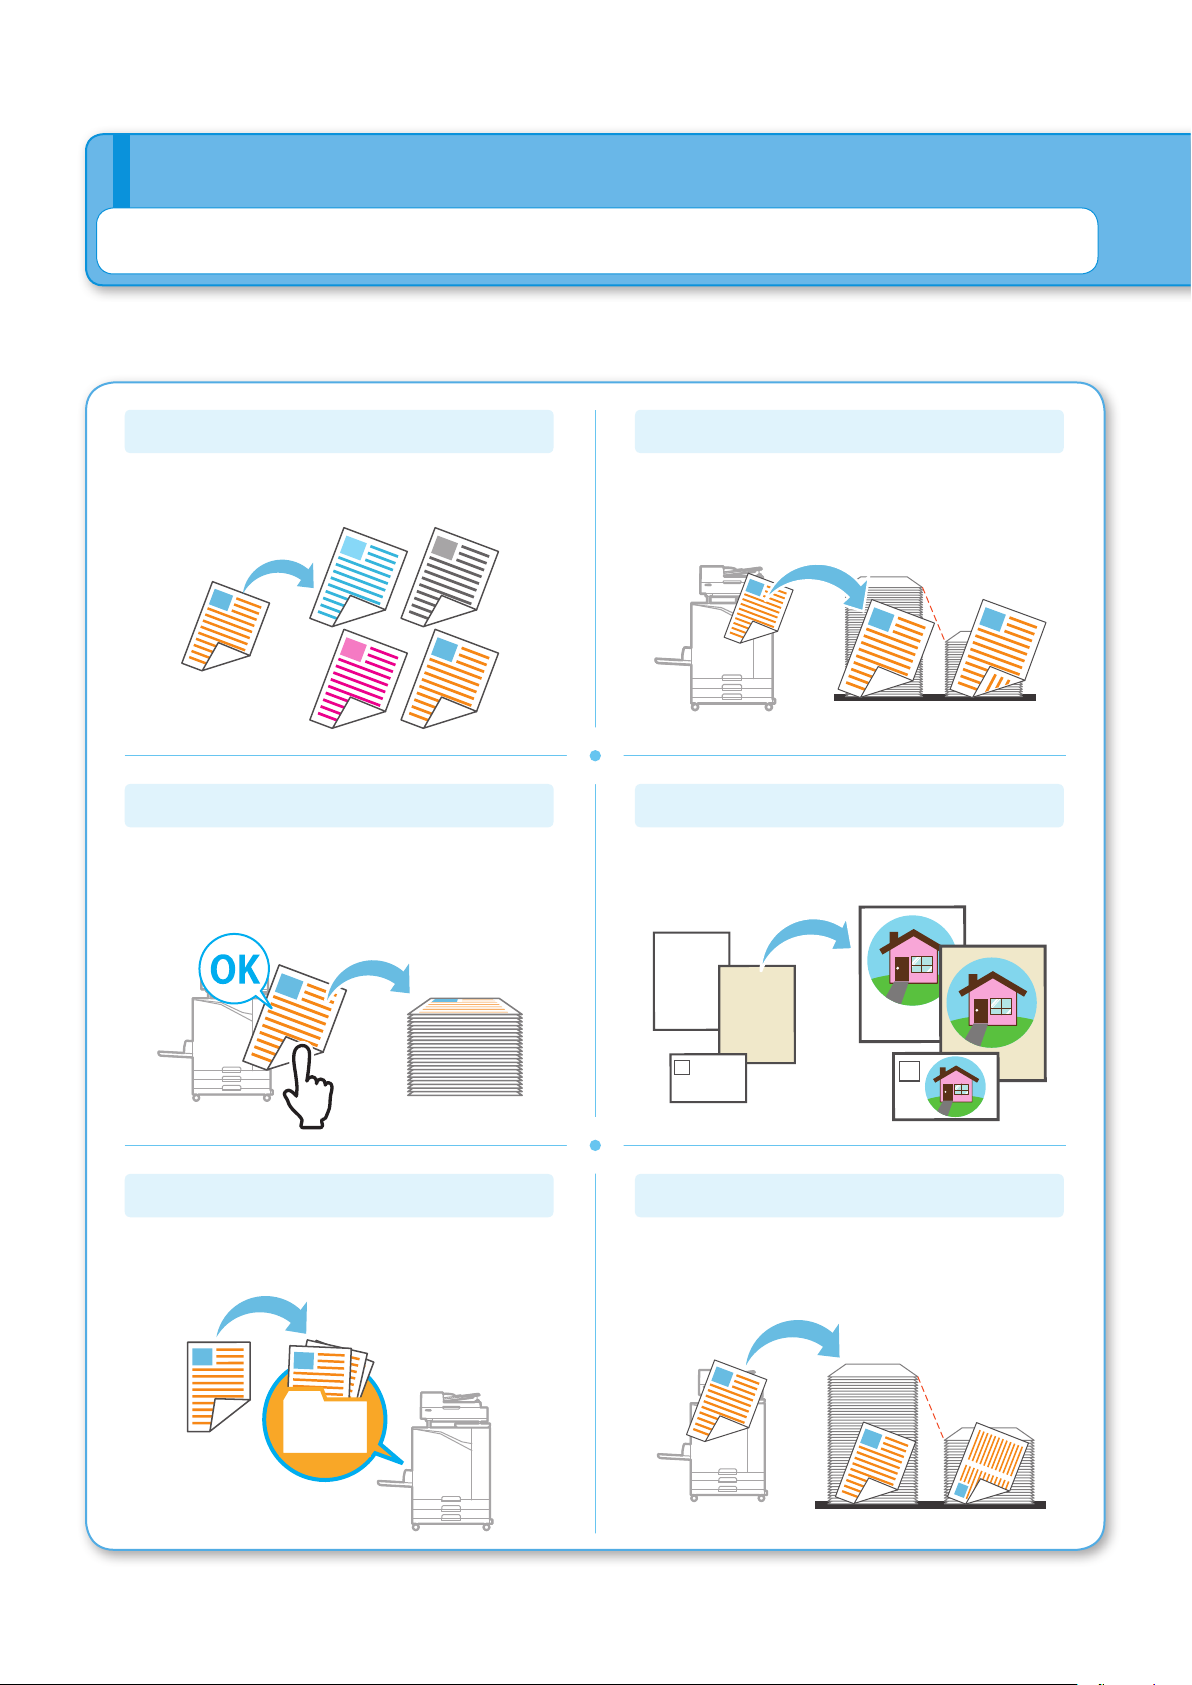
This section describes some of the functions that are available when using the printer driver of this machine.
For more information on each function, see the "User's Guide".
Color Mode
Select color or monochrome printing.
Print and Pause
Print one sample before printing a large number of
pages.
This enables you to check the results and settings.
Duplex/Simplex
Specify simplex or duplex printing.
You can save paper by using duplex printing.
Paper Type
Print using the optimal colors for the type of paper
that is selected.
16
Storage
Save documents in a folder on the machine.
You can print the data when needed.
Combine
Print continuous pages together on one sheet. You
can use this setting to save paper.
ComColor FW Series Quick Guide
Page 19
About the Various Printing Functions
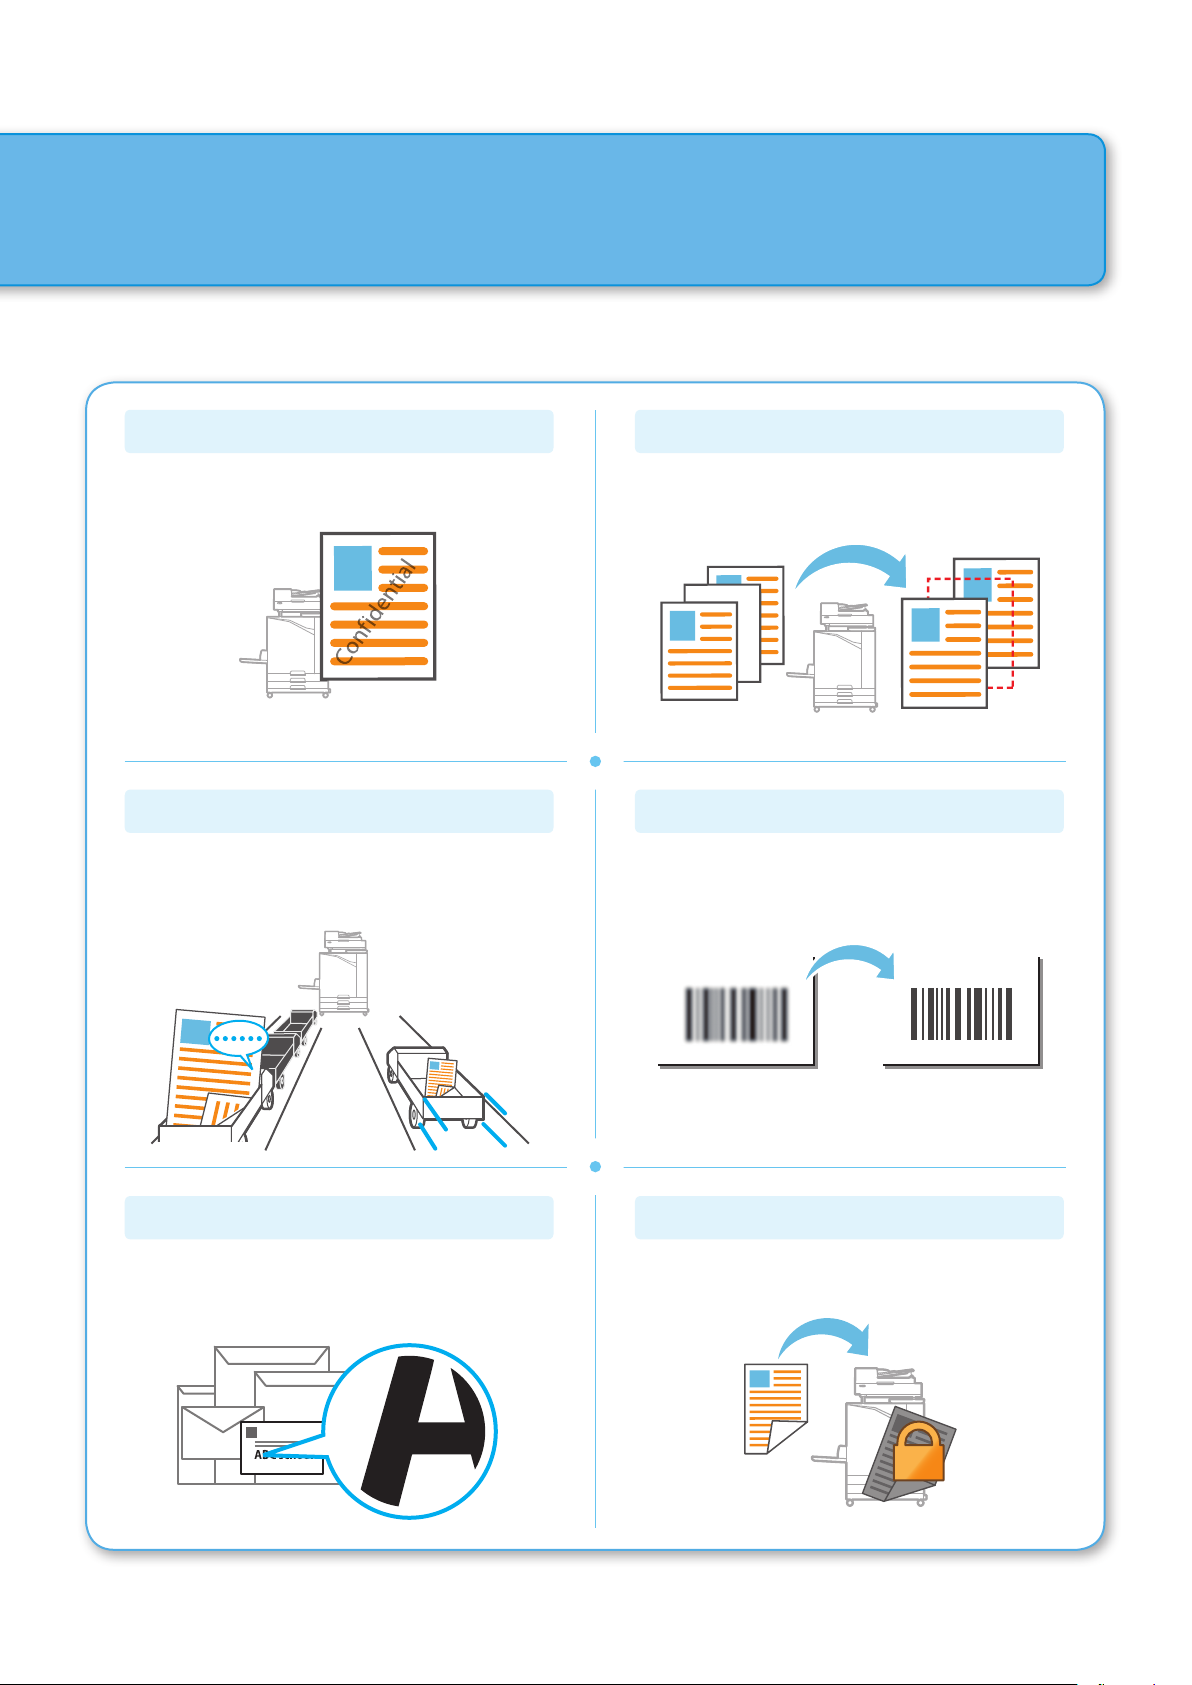
Watermark
Add a watermark to printouts.
Data Compression
Reduce the data le size and prioritize network
communication speed over image quality when you
print.
Blank Page Detection
Specify this to prevent blank pages of the original
from being printed.
Barcode Area Denition
Output a highly readable barcode by scanning a le
created using the Barcode Area Denition Software.
Envelope Imaging
Minimize blurring and smudging when printing on
envelopes.
PIN Code
Assign a PIN code to a job to prevent others from
viewing it.
17
ComColor FW Series Quick Guide
Page 20
Getting Started
Using Storage
You can save the scanned data to the internal hard disk of this machine. The settings are saved for each job,
making it easy to print later with the same settings.
Saving Scanned Data to Storage
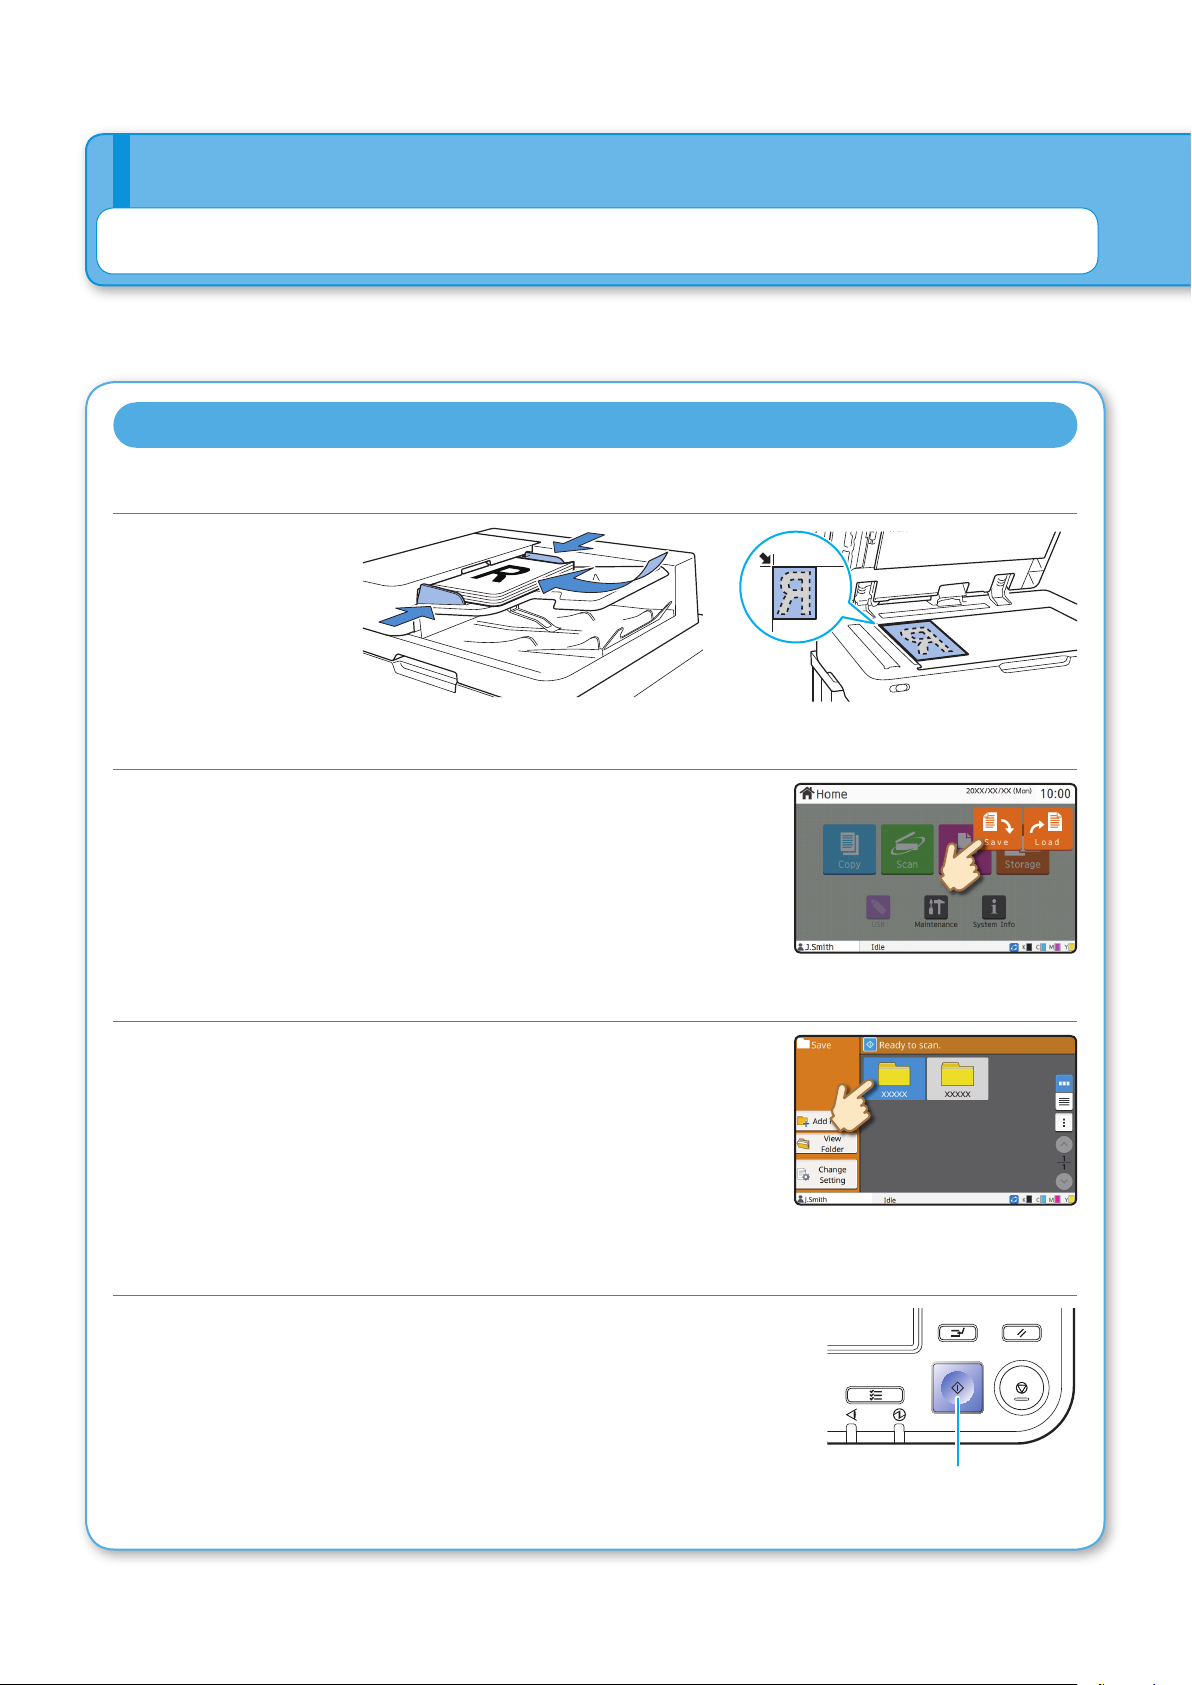
1. Load the original.
2. Touch [Storage] - [Save] on the [Home] screen.
3. Select the destination folder.
You can touch [Add Folder] to create a new folder to use as the
destination.
Touch [View Folder] to display a list of documents in a folder.
This enables you to ensure that the selected folder is the
appropriate destination for the data.
You can touch [Change Setting] to change the settings.
4. Press the [Start] key.
Start
18
ComColor FW Series Quick Guide
Page 21
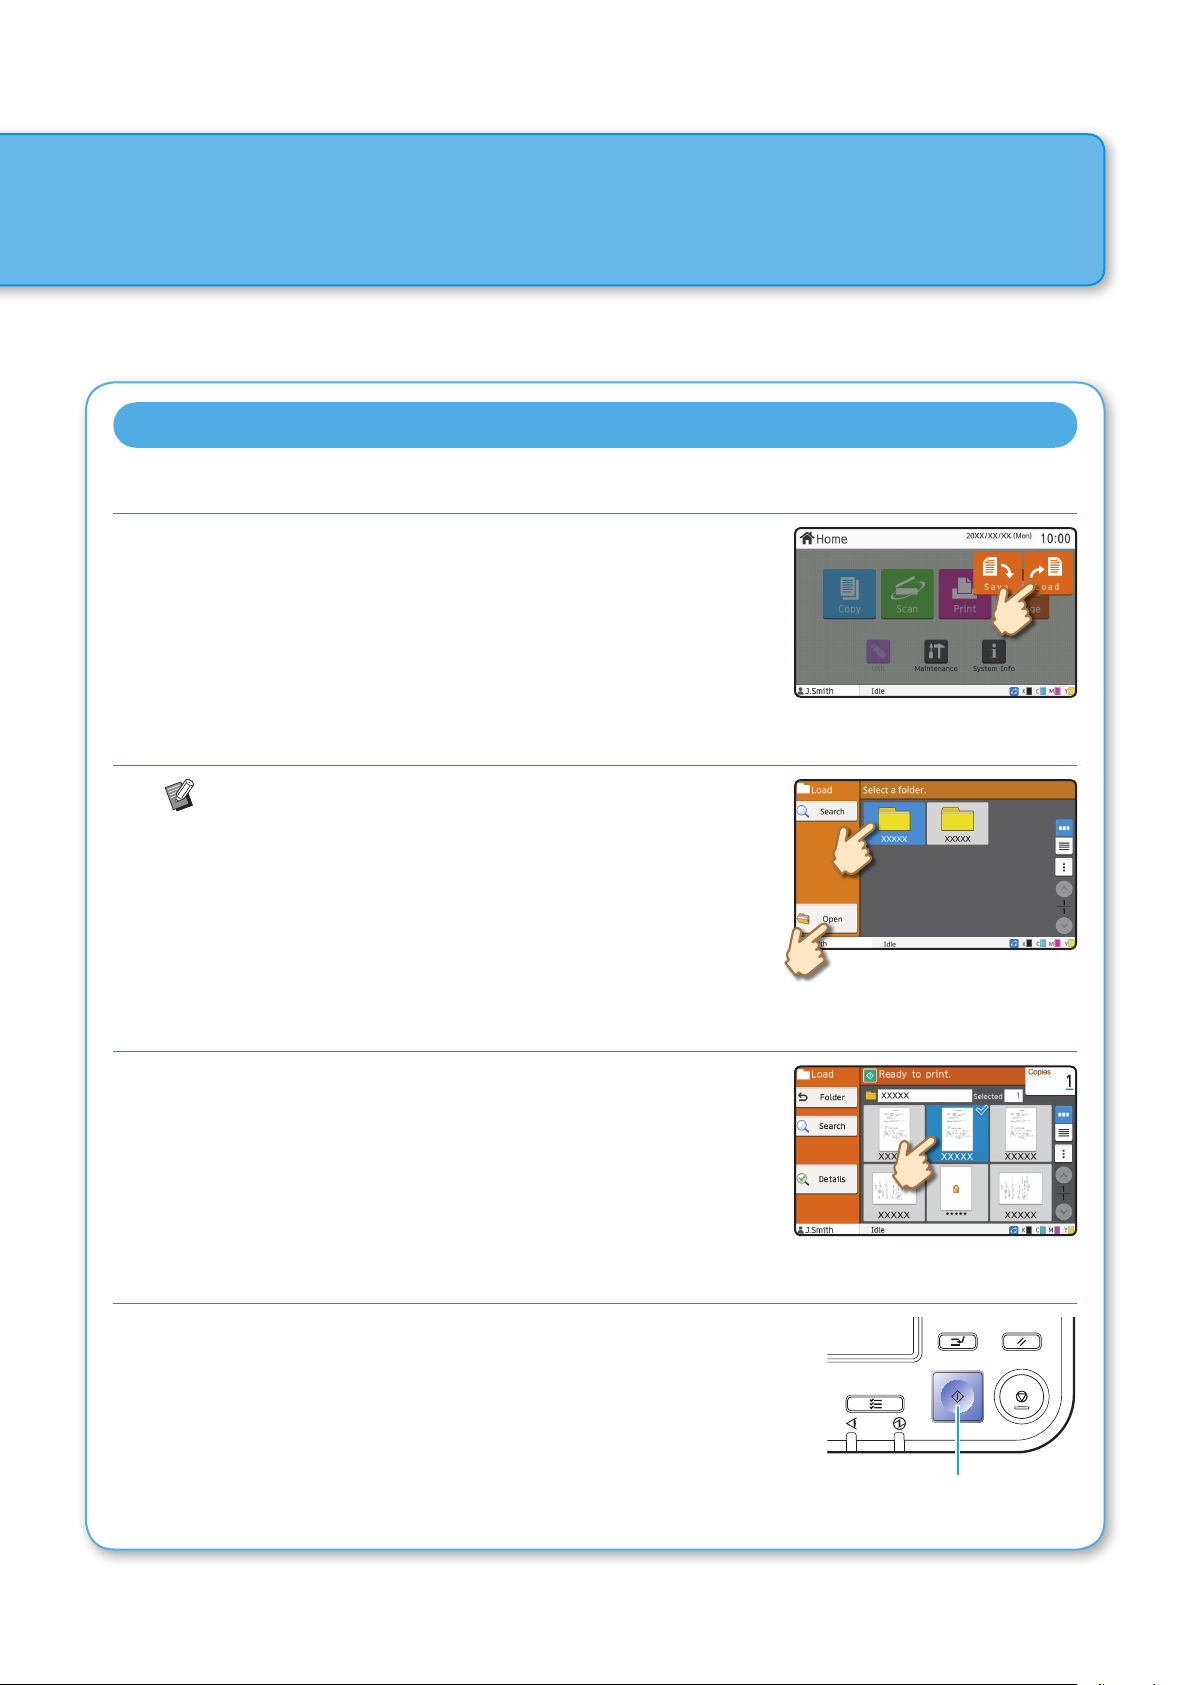
Printing Data Saved to Storage
1. Touch [Storage] - [Load] on the [Home] screen.
2. Select the folder that you want to load, and touch [Open].
You can touch [Search] to search the documents in a
folder. For more information, see the "User's Guide".
Using Storage
3. Select the document.
Touch [Details] to display the details of the document.
Enter the number of copies using the numeric keys.
4. Press the [Start] key.
Start
19
ComColor FW Series Quick Guide
Page 22
Getting Started
Using a USB Flash Drive
You can save the scanned data to a USB ash drive.
You can also print PRN les saved to a USB ash drive from the printer driver.
Saving Scanned Data to a USB Flash Drive
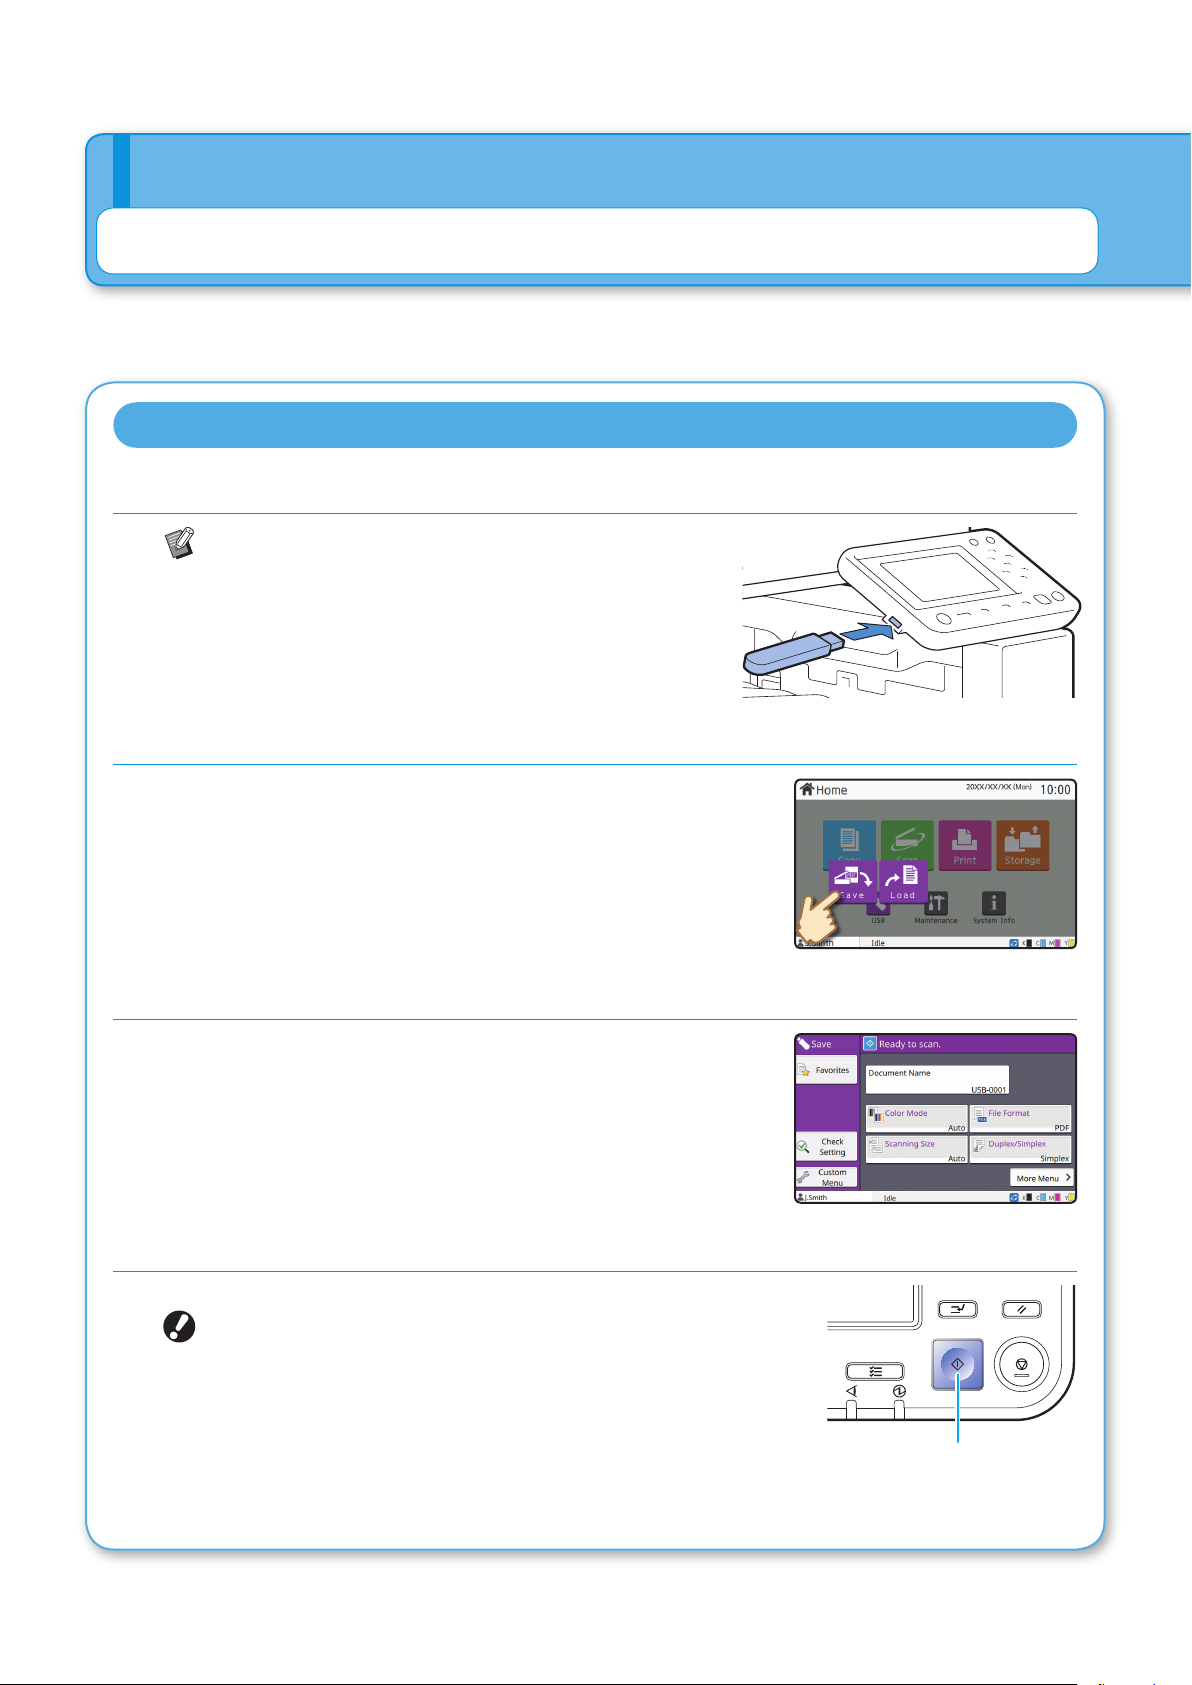
1. Load the original and connect a USB ash drive to the machine.
You can use a USB ash drive compatible with Mass
Storage Class and USB 2.0 or 3.0 specications.
2. Touch [USB] - [Save] on the [Home] screen.
3. Change the settings as needed.
Touch [More Menu] to display additional settings that can be
used with [Save] for the USB mode.
4. Press the [Start] key.
The data is saved to the USB ash drive.
Do not remove the USB ash drive until saving is
nished.
Start
20
ComColor FW Series Quick Guide
Page 23
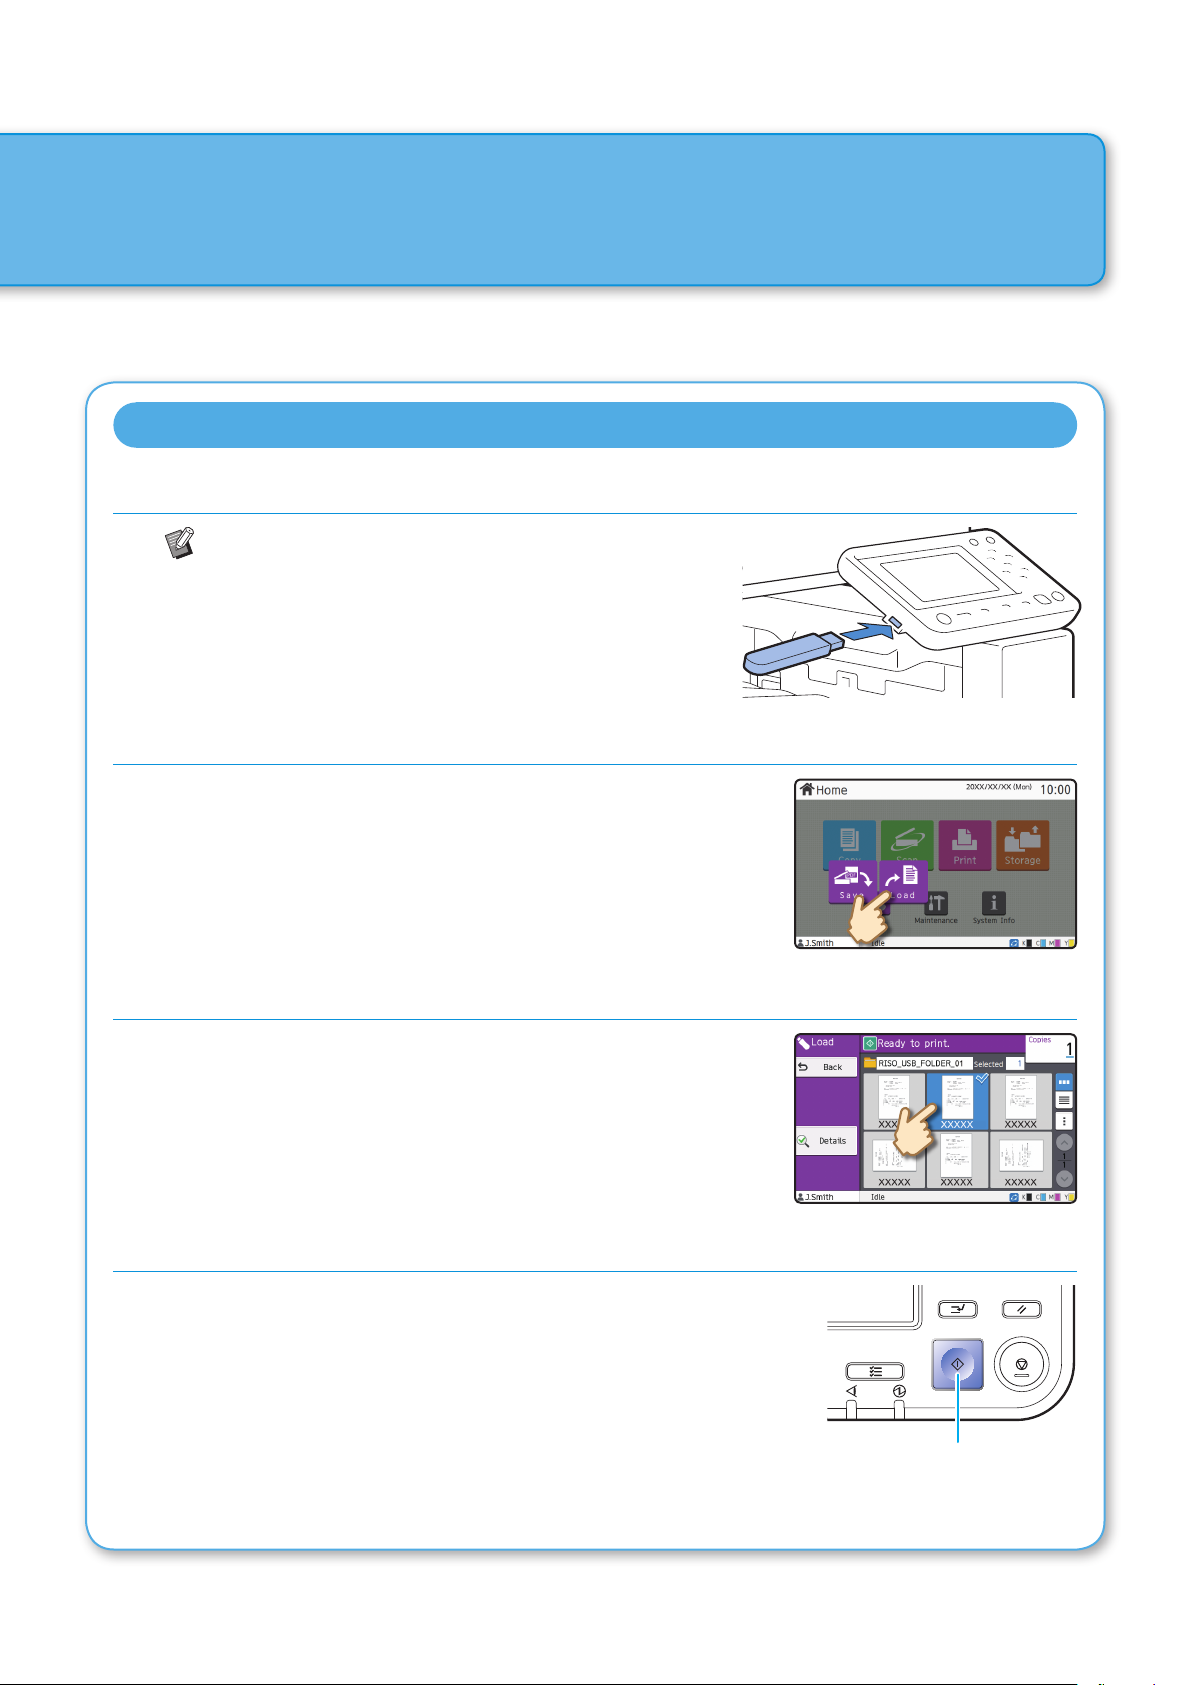
Printing Data from a USB Flash Drive
1. Connect a USB ash drive to the machine.
PRN les saved to the USB ash drive from the printer
driver can be printed.
2. Touch [USB] - [Load] on the [Home] screen.
Using a USB Flash Drive
3. Select the document to print.
Select the folder, and touch [Open].
Touch [Details] to display the details of the document.
Enter the number of copies using the numeric keys.
4. Press the [Start] key.
Start
ComColor FW Series Quick Guide
21
Page 24
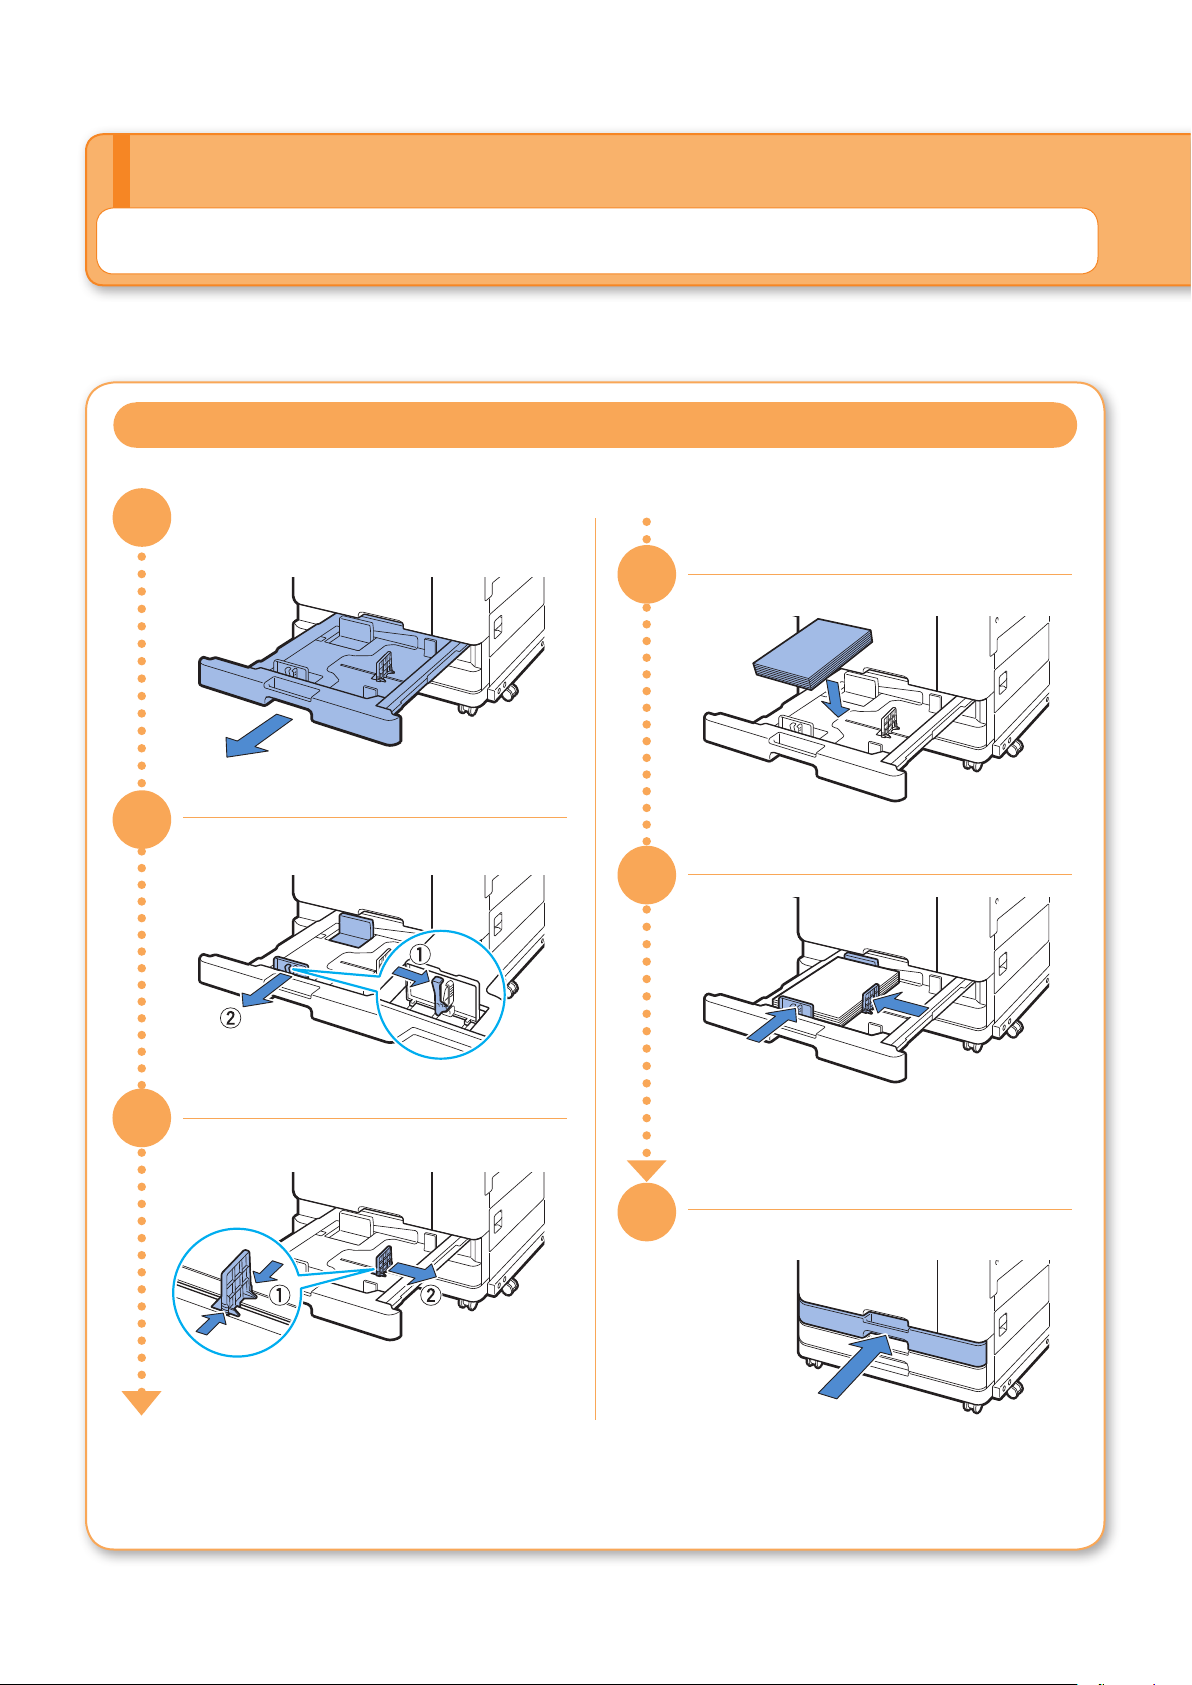
Routine Care
When Paper Runs Out
Load paper in the feed trays or standard tray.
We recommend loading the feed trays with the types of paper you use most often.
Loading Paper in the Feed Tray
31
34
32
33
When using A4
35
The machine detects the size of the paper
based on the stopper position. Make sure
to position the stopper against the edge of
the paper.
36
22
ComColor FW Series Quick Guide
Page 25
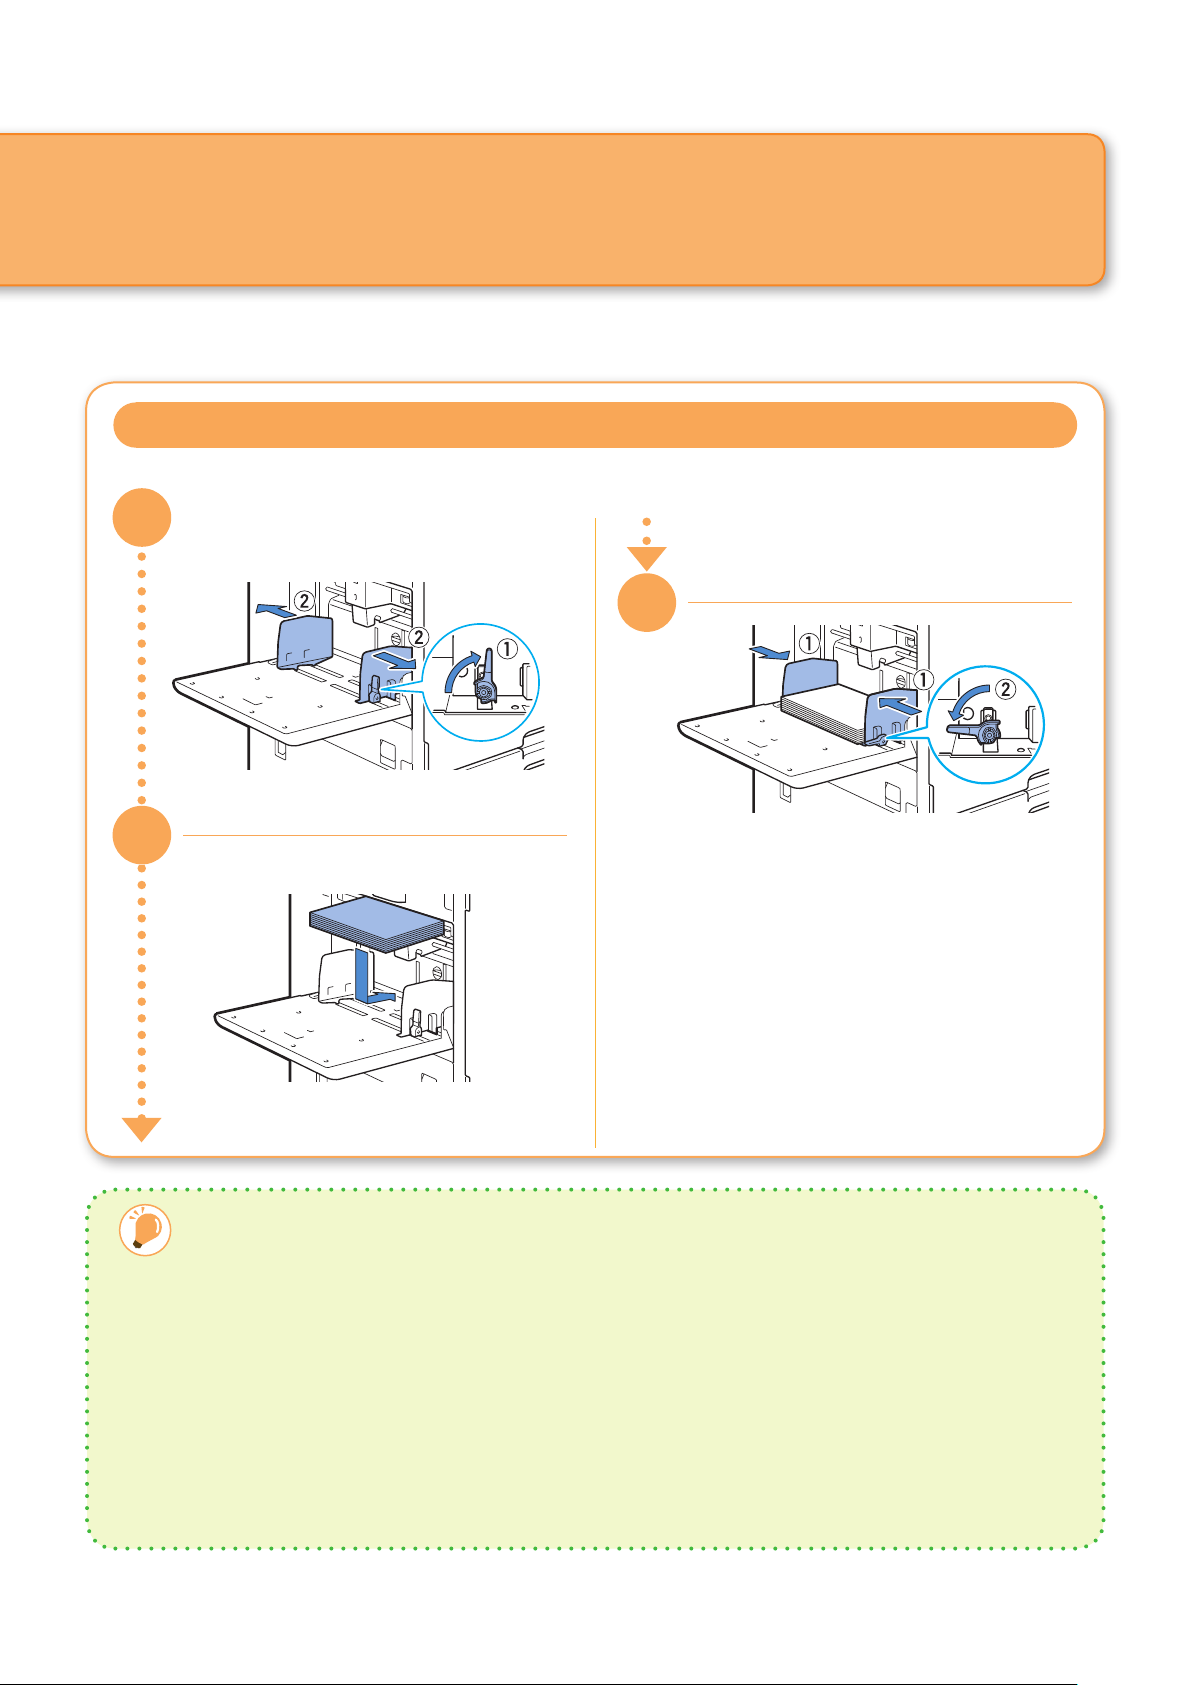
Load the standard tray with special paper such as thick paper, postcards, or envelopes.
Loading Paper in the Standard Tray
31
33
When Paper Runs Out
32
❷
Do Not Use These Paper Types
Using these paper types may cause problems such as paper jams.
• Paper that does not comply with the conditions in the
basic specications*
• Paper with a processed surface, such as thermal paper
or carbon paper
• Curled paper (3 mm (1/8") or more)
• Paper with wrinkles
• Bent paper
• Torn paper
• Paper with ripples
• Coated paper such as art paper
• Paper with jagged edges
• Glued paper
• Paper with holes
• Gloss paper for photographs
• Transparencies
• Synthesized paper (Yupo)
The machine detects the paper size based
on the guide position. Make sure to
position the guides against the edges of
the paper.
* For more information on basic specications, see the "User's Guide".
23
ComColor FW Series Quick Guide
Page 26
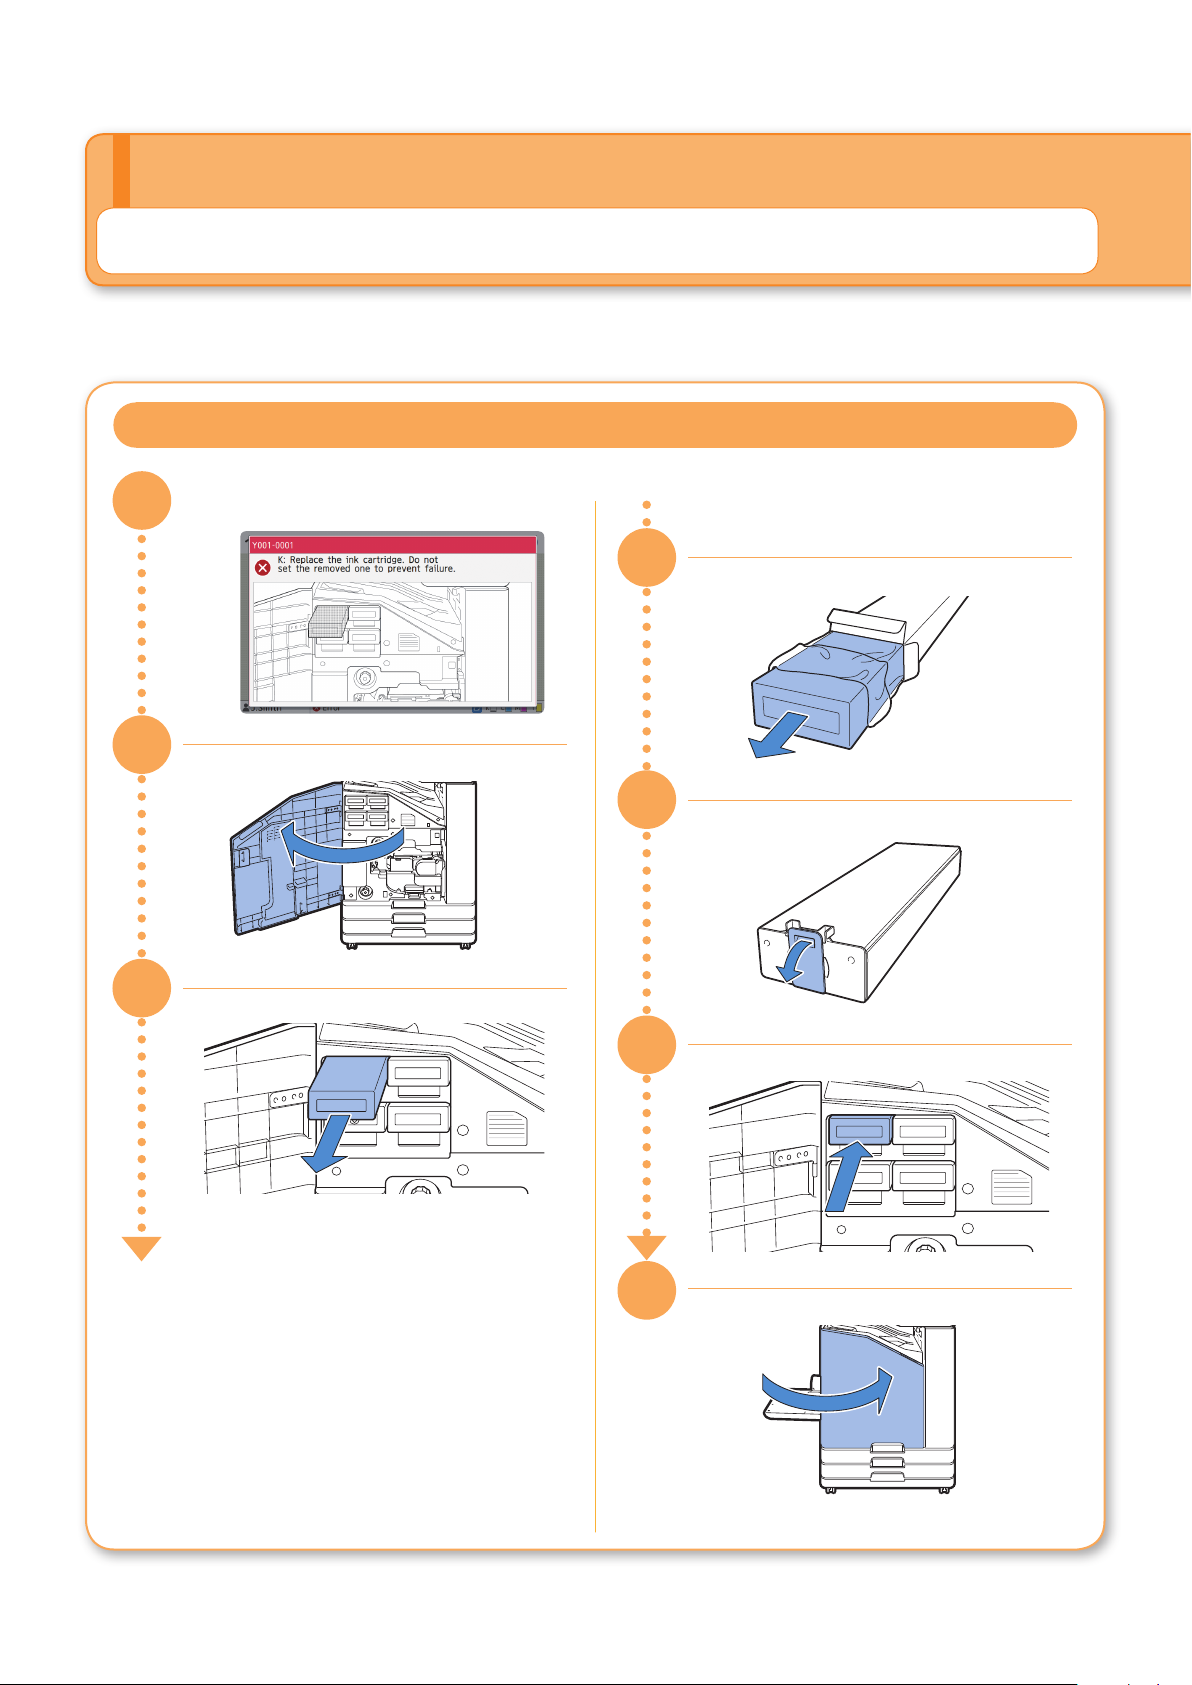
Routine Care
When Ink Runs Out
When ink runs out, the ink replacement message is displayed and printing stops. Replace the cartridge of the color
shown.
Replacing the Ink Cartridge
31
4
3
32
33
New ink cartridge
35
C
Y
36
37
24
ComColor FW Series Quick Guide
Page 27
When Ink Runs Out
Handling the Ink Cartridge
Pay attention to the following when handling the ink cartridge.
CAUTION
• Avoid getting ink on your skin or in your eyes.
• Ensure adequate ventilation during printing.
• If you start to feel ill when using the machine, consult a physician immediately.
• We recommend using genuine RISO ink.
• Using ink other than RISO ink may prevent optimal printer performance. Malfunctions and reduced
performance resulting from the use of non-RISO ink are not covered by the product warranty or
service contract.
• Do not remove the ink cartridge until the ink replacement message is displayed.
• Do not shake the ink cartridge. Shaking will create air bubbles, which may prevent the ink from
discharging properly and result in blurred printing.
• The ink cartridge is made from paper and plastic. Do not drop or damage it.
• Remove the ink cartridge from its plastic bag immediately before inserting it into the machine.
• Do not remove the ink cartridge cap until immediately before using the cartridge.
• After removing the ink cartridge cap, keep the ink supply outlet facing up. If the outlet faces down, ink
may leak out.
• There may be ink on the area where you removed the protective cap. Do not touch it.
Ink coming in contact with clothes will result in permanent stains.
• Do not attempt to rell the ink cartridge.
• Use the ink cartridge within 24 months from the date of manufacture (when preserved under room
temperature). To maintain good printing quality, check the manufacture date and use soon after
purchase. You can nd the date of manufacture on the ink cartridge.
For additional precautions related to the ink cartridges, also see the "User's Guide".
ComColor FW Series Quick Guide
25
Page 28
Routine Care
Scanner Care
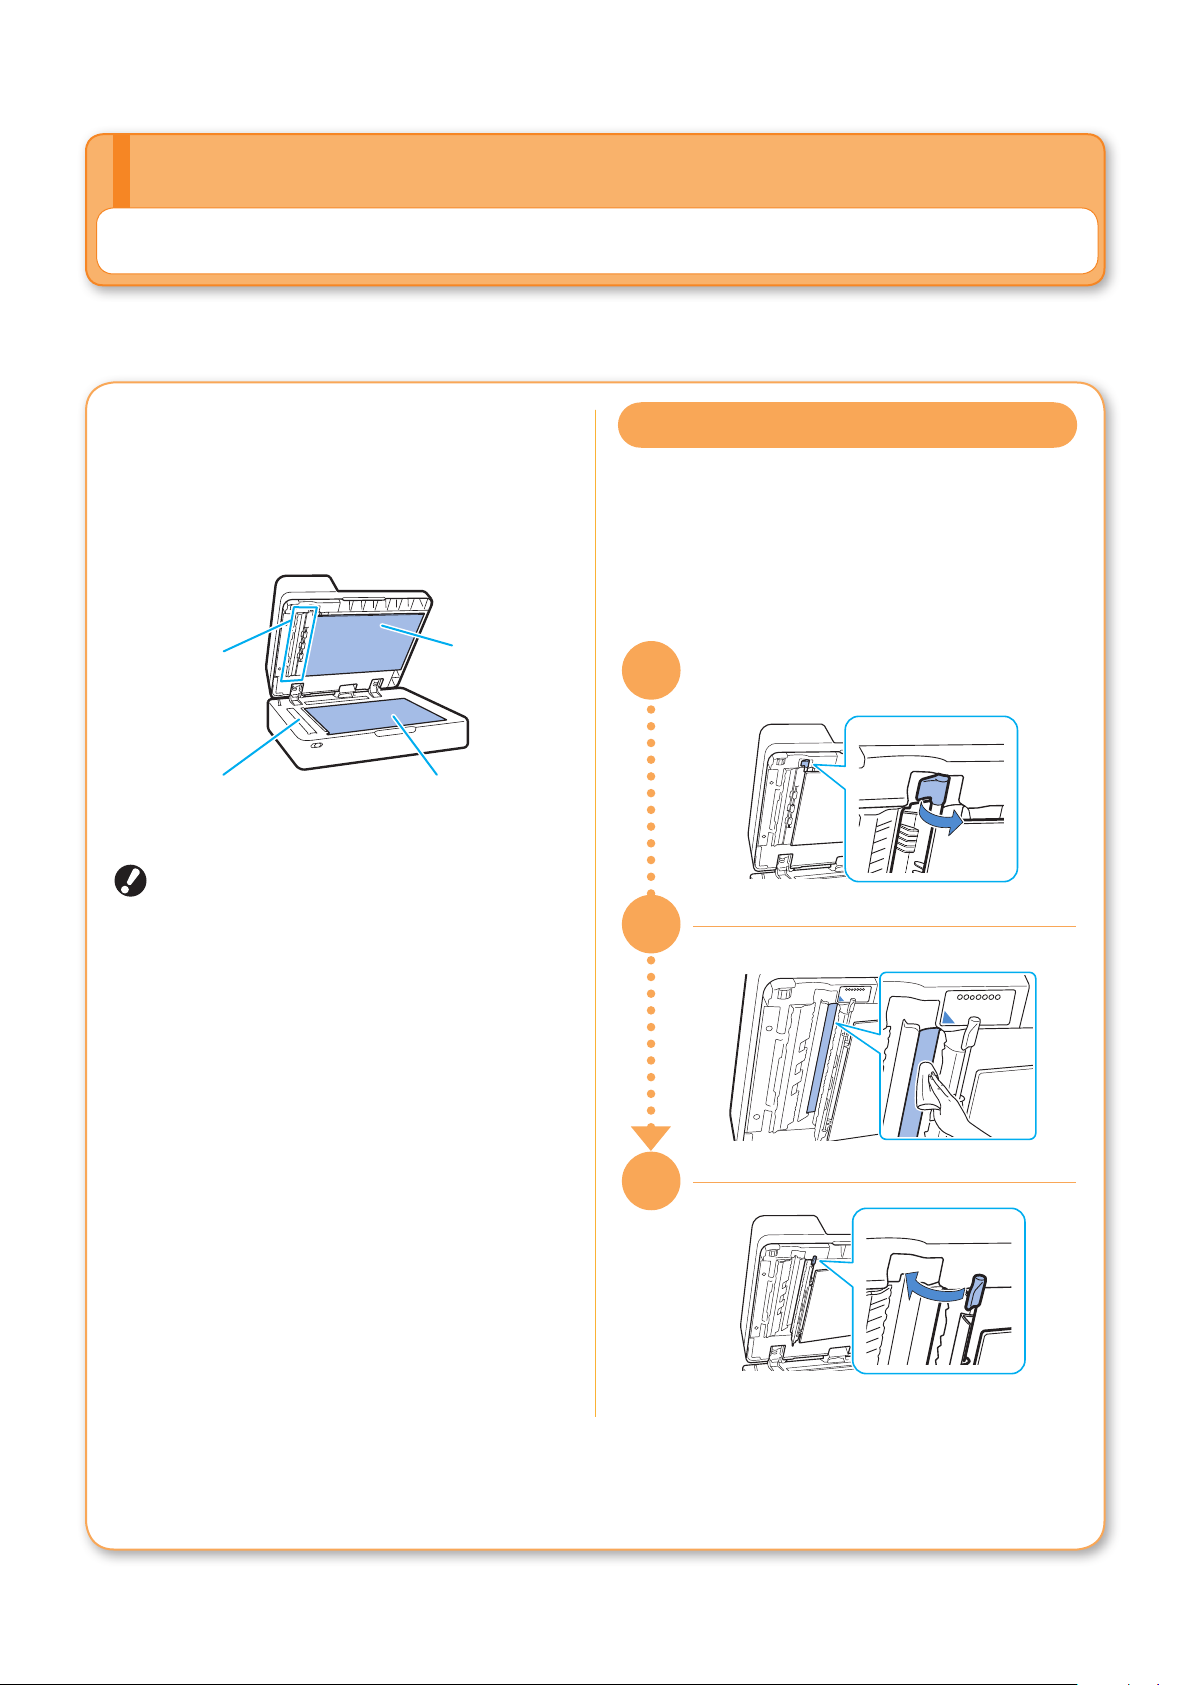
Periodically clean the scanner to ensure optimal image quality for copies and scans.
Foreign matter such as dust, dirt, ink, glue or
correction uid on the platen glass or white sheet of
the ADF may reduce the quality of copies or scans.
Gently wipe the areas indicated below several times
with a soft cloth.
White sheet
Scanner glass
Scanner glass
• Do not perform operations other than those
described in this guide. To adjust or repair
this machine, make sure to contact your
dealer or authorized service representative.
• The platen glass is fragile. Never touch it
with hard objects or expose it to impact.
Platen glass
Original pad
Scanner Glass
If the scanner glass is dirty, black streaks may
appear on copies and scans.
Wipe the scanner glass with a soft cloth.
Follow the procedure below when wiping the
scanner glass on the top part of the scanner.
31
32
26
33
ComColor FW Series Quick Guide
Page 29
Useful Tips
Useful Tips
Loading Orientation of Originals and Paper
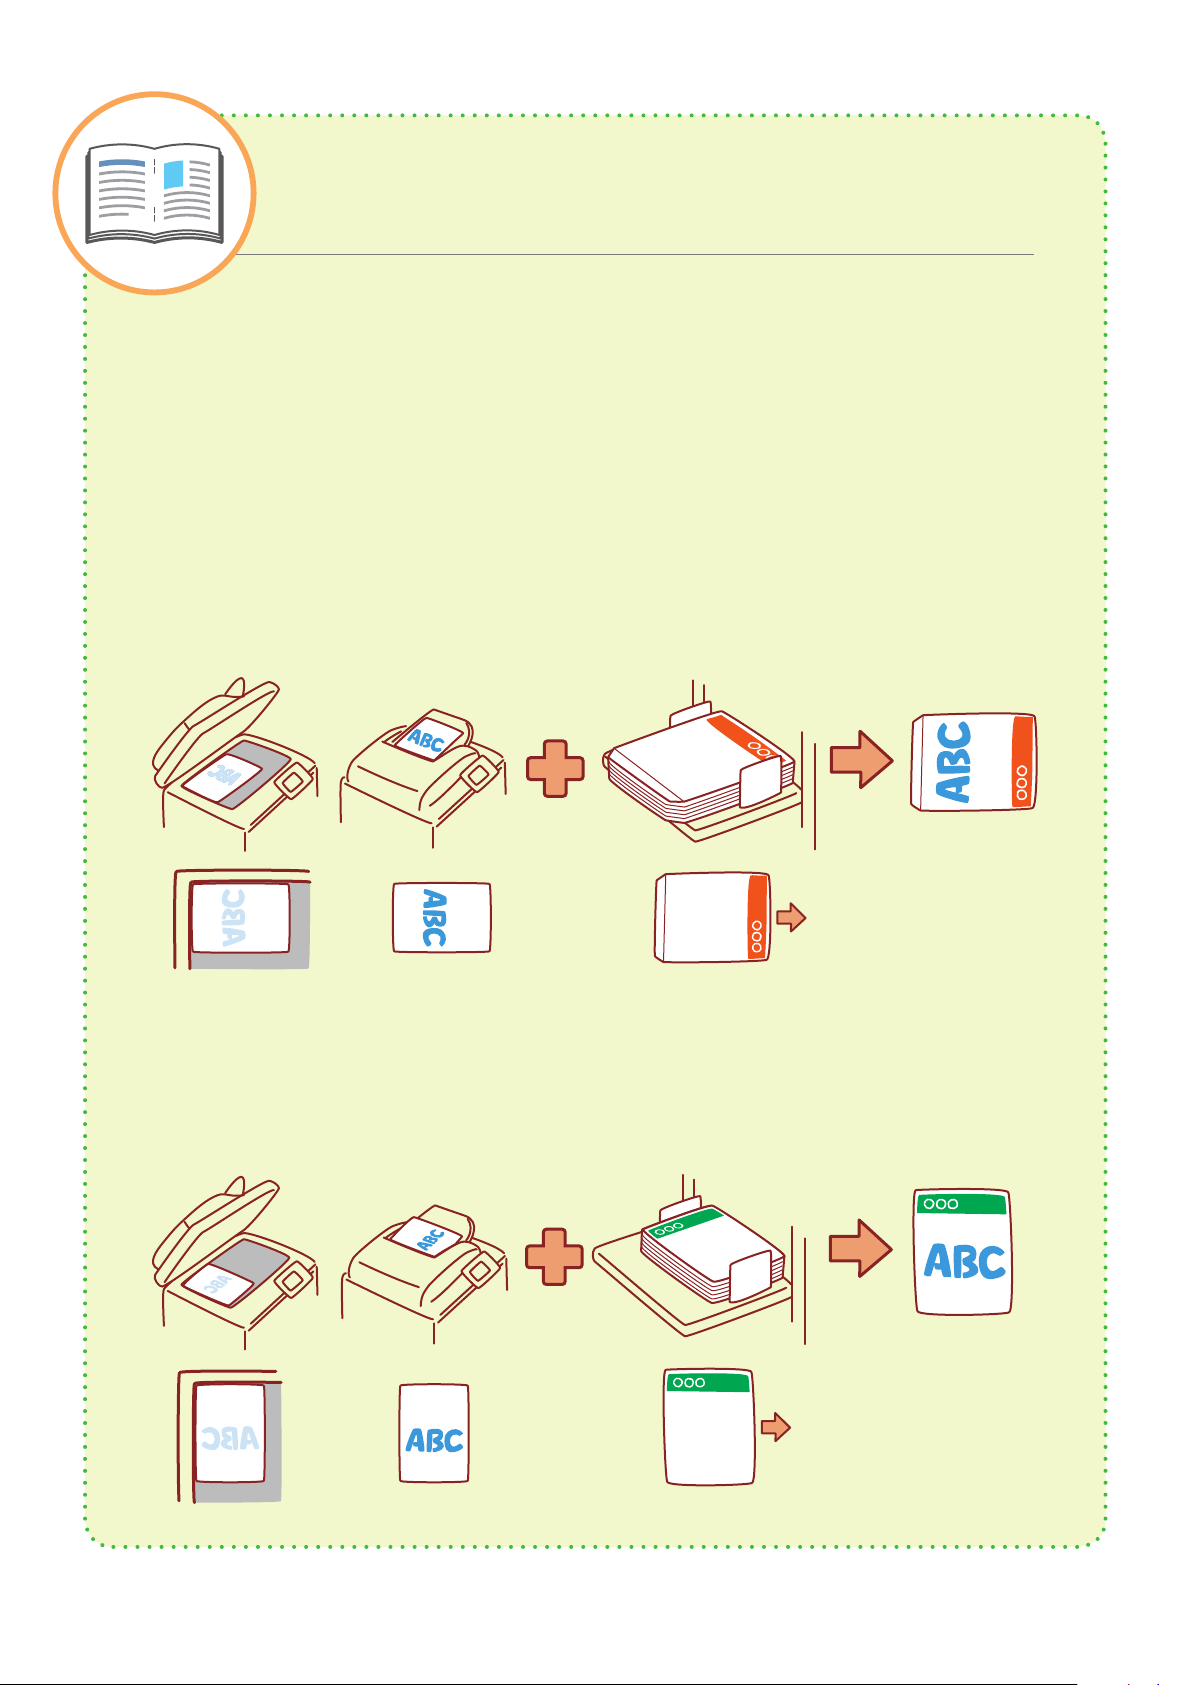
When you are copying on letterhead paper, envelopes, or other paper with a pre-printed logo, the orientation
of the original and paper is important.
The orientation of the original and paper is described below, using an example of copying a single-sided
original.
● Example of Loading Envelopes
On the touch panel, set [Original Orientation] to [Top Side Left].
Original orientation
Load originals so that the bottom
edge is scanned rst.
● Example of Loading Letterhead Paper
On the touch panel, set [Original Orientation] to [Top Side Up].
Original orientation Paper loading orientation Output orientation
Envelope loading orientation
Load envelopes so that the bottom
edge enters the machine rst.
Output
orientation
(when output face up)
ComColor FW Series Quick Guide
27
Page 30
RISO Console
Originals That May Not Be Copied
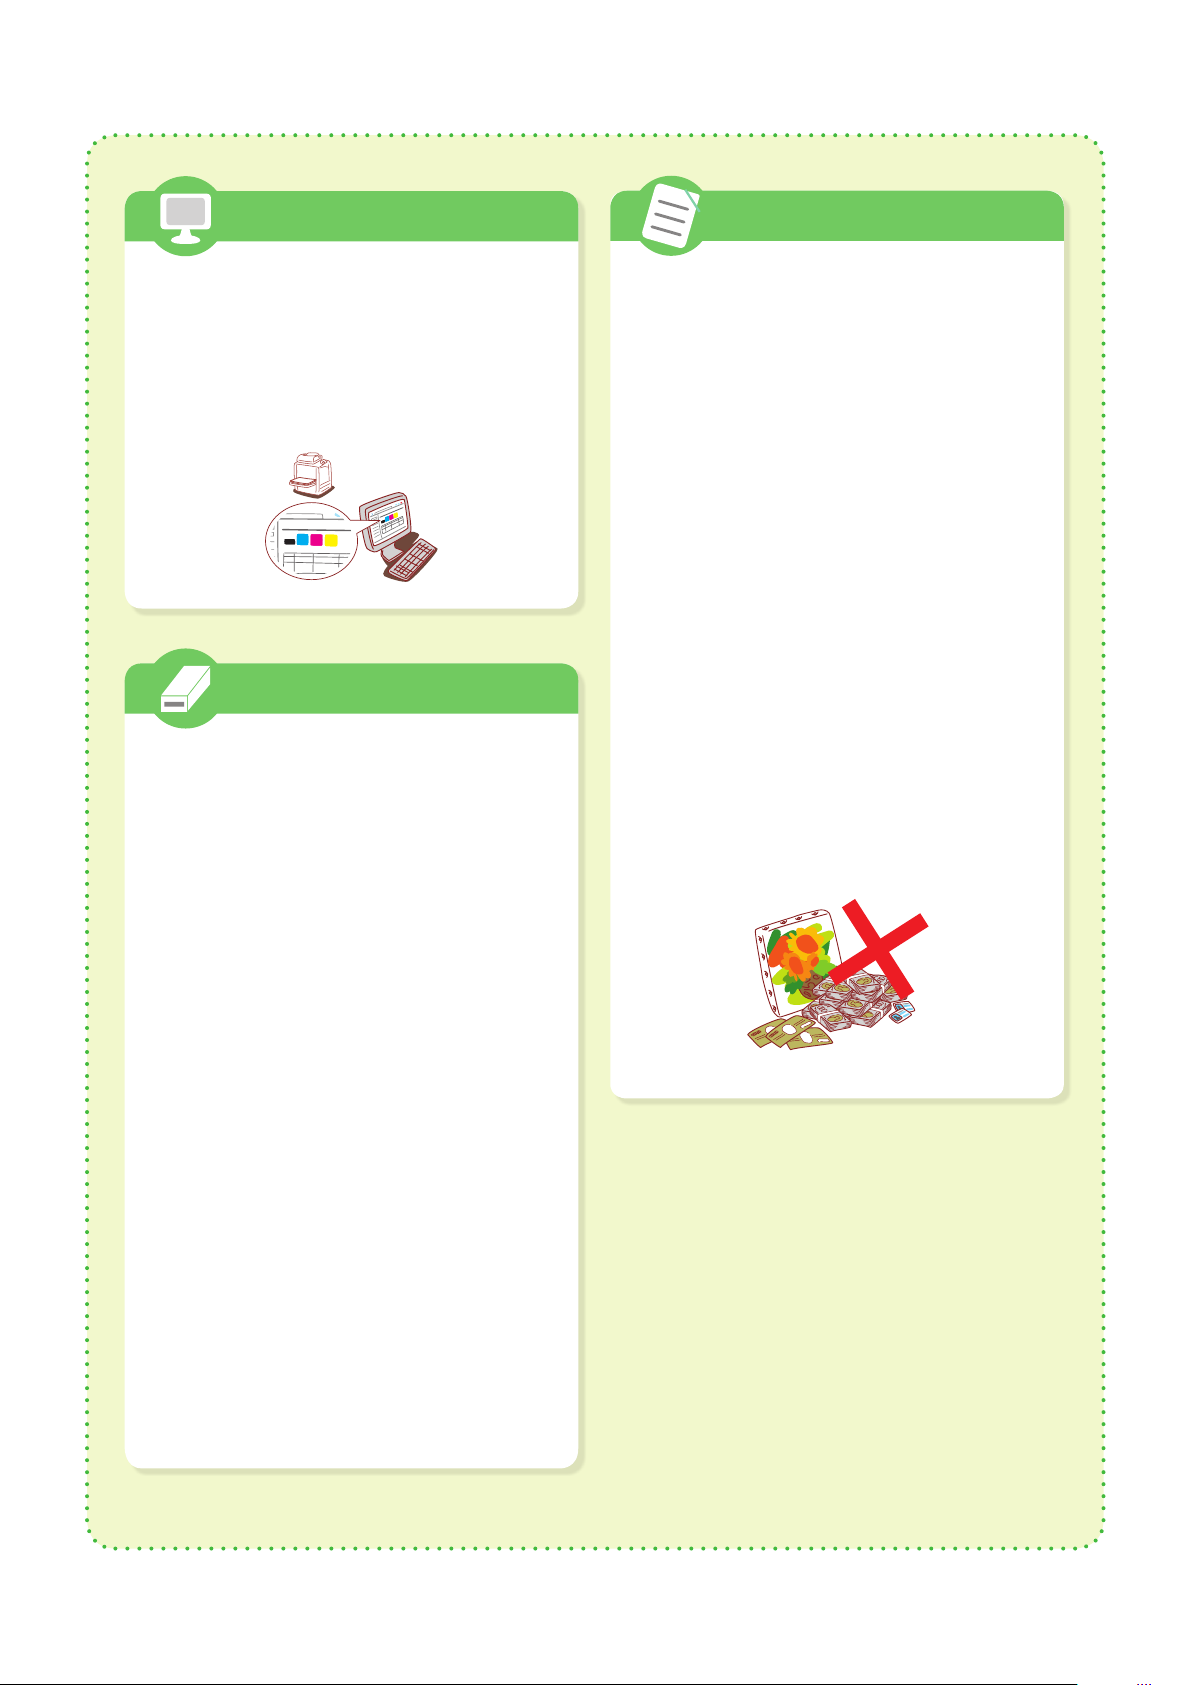
The RISO Console provides remote access to the
machine via your computer's web browser,
enabling you to check the machine's status and
settings, as well as handle data, from a different
location.
To use the RISO Console, make sure the machine
has been connected to the network.
Storing Consumables
● Paper Storage and Handling
• Always use paper from a sealed package.
• After you nish printing, remove the unused
paper from the standard tray, place it back in the
original package, and store it until you need it
again. If you leave the paper in the standard tray,
the paper may curl, causing a paper jam.
• If the paper is not cut very well or if the paper
has a textured surface (such as drawing paper),
fan the paper before use.
• Store the paper at in a location that is not hot,
humid, or exposed to direct sunlight.
● Do not use the equipment in any manner
that violates the law or infringes on
established copyrights, even when
making copies for personal use. Consult
your dealer or authorized service
representative for further details. In
general, use discretion and common
sense.
● Do not use the machine to make copies
of the following items.
• Copies of business-related documents, such as
publicly issued stock certicates, drafts, and
checks, other than copies required for business
use
• Copies of government-issued passports; motor
vehicle licenses, permits, and personal
identication documents issued by public or
private organizations; and pass tickets, food
tickets, and other tickets
• Copies of copyrighted items, such as
publications, music, works of art, prints,
drawings, and photographs, other than for
personal or household use
28
● Storing Ink Cartridges
Because the ink cartridges are partially made of
paper, they may become deformed and unusable if
stored incorrectly or in an unsuitable environment.
Store the ink cartridges correctly following the
guidelines below.
• Store the ink cartridges in their original package,
and make sure to keep them level with the "this
side up" mark oriented properly.
• Avoid freezing and direct sunlight. Store in a
location with a temperature between 5°C and
35°C (41°F and 95°F). Do not store in a location
subject to extreme changes in temperature.
• When storing ink after removing it from the
plastic bag, keep it in the orientation indicated on
the cartridge and load it in the machine promptly.
060-36033-000
ComColor FW Series Quick Guide
Page 31
Trademark Credits
Microsoft and Windows are the trademarks or registered trademarks of Microsoft
Corporation in the U.S., Japan, and/or other countries.
Mac, Mac OS, OS X, and Safari are the trademarks of Apple Inc.
Adobe, the Adobe logo, and PostScript are the trademarks or registered trademarks of
Adobe Systems Incorporated in the U.S. and other countries.
ColorSet is a trademark of Monotype Imaging Inc. registered in the U.S. Patent & Trademark
Ofce and may be registered in certain jurisdictions.
FeliCa is a registered trademark of Sony Corporation.
Mifare is a registered trademark of Royal Philips Electronics.
, , ComColor, and FORCEJET are trademarks or registered trademarks of RISO
KAGAKU CORPORATION in the United States and other countries.
All other product names and company names in this document are the trademarks or
registered trademarks of their respective companies.
As an ENERGY STAR
product meets the ENERGY STAR
®
Partner, RISO KAGAKU CORPORATION has determined that this
®
guidelines for energy efciency.
Acquisition of Color Universal Design Certication
The ComColor FW5230/FW5230R/FW5231/FW5231R/FW5000/FW5000R (machine and
option*) are recognized by the incorporated non-prot organization Color Universal Design
Organization (CUDO) in achieving Color Universal Design.
* Certied optional equipment
Scanner/Face down nisher
ComColor FW Series Quick Guide
Page 32

Please contact the following for supplies and service:
© Copyright 2016 RISO KAGAKU CORPORATION
 Loading...