

Page 1
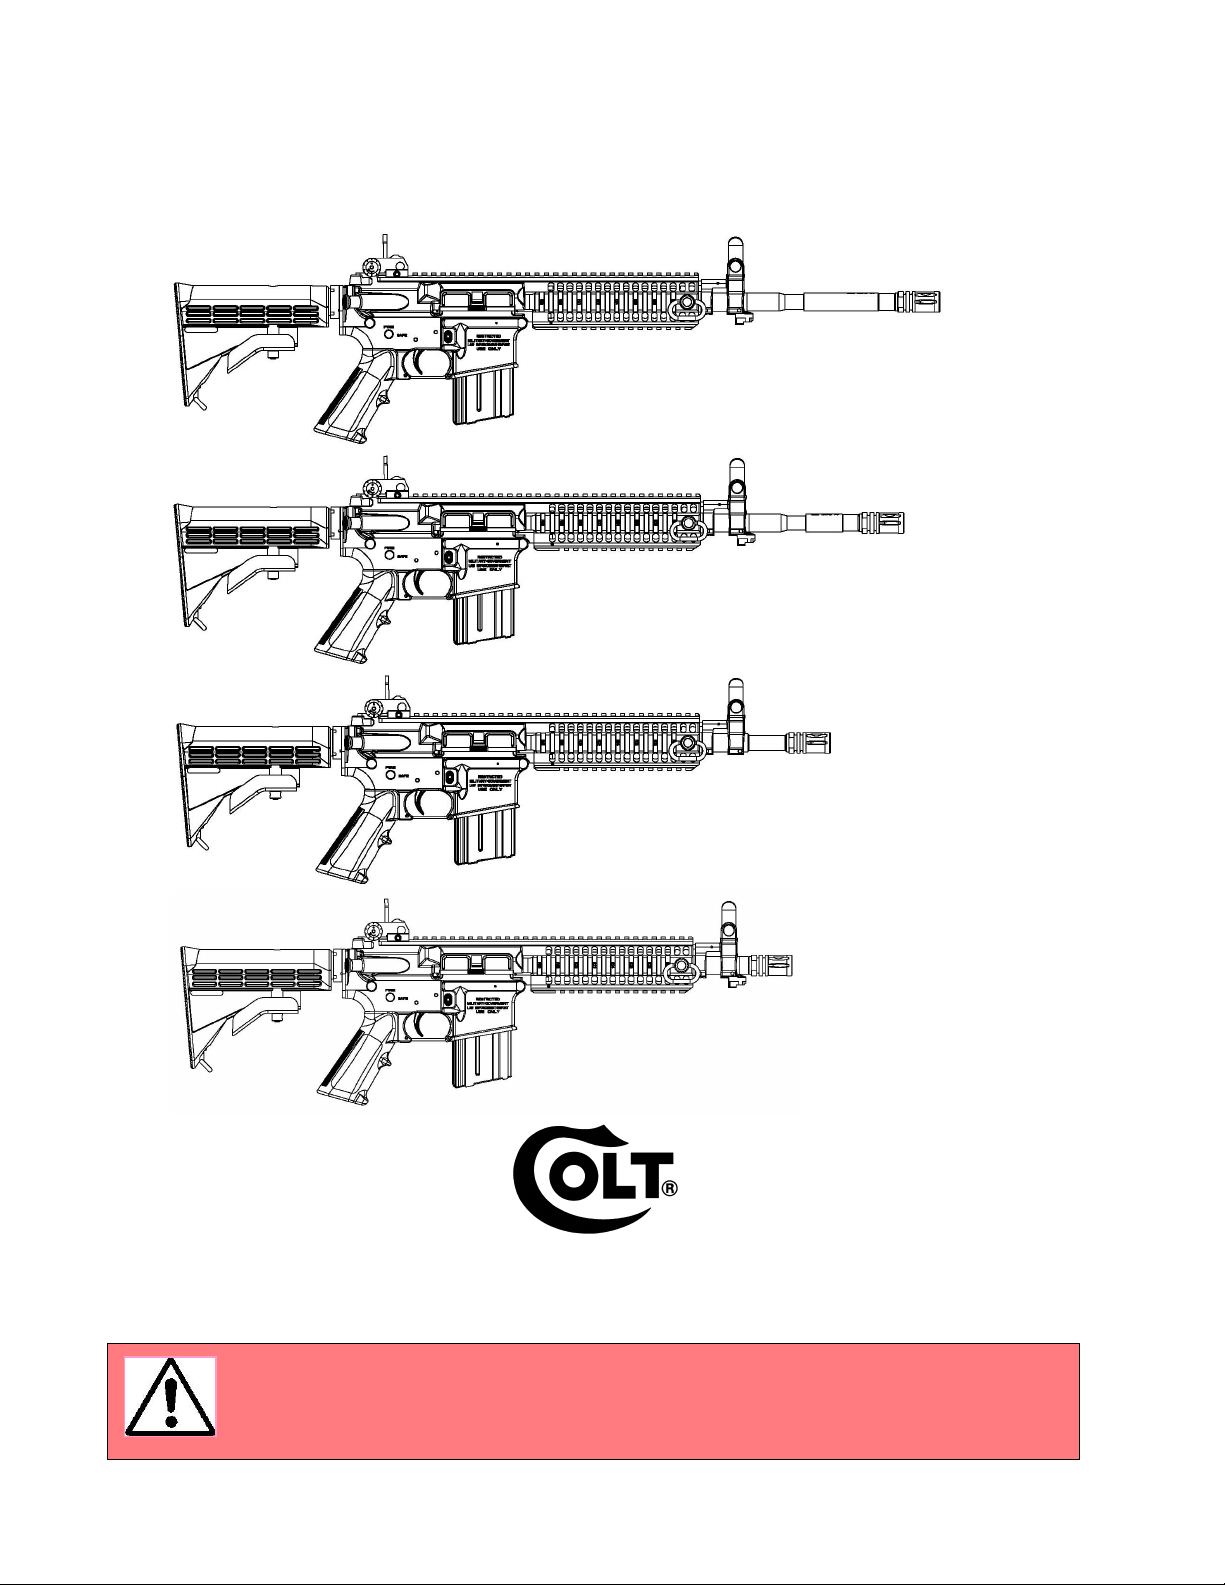
OPERATOR’S MANUAL FOR:
Colt® Advanced Law Enforcement Carbines
LE6940™
LE6944™
LE6943™
LE6945CQB™ & LE6946CQB™
COPYRIGHT© 2010 COLT DEFENSE LLC ALL RIGHTS RESERVED
“Information contained in this publication is free of "ITAR" restricted data"
Read the instructions, warnings and cautions in this manual
CAREFULLY BEFORE using this firearm.
Page 2

SAFETY DEPENDS ON YOU
NOTICE
Colt shall not be responsible for injury, death, or damage to property resulting
from either intentional or accidental discharge of this firearm, or from its function
when used for purposes or subjected to treatment for which it was not
designed. Colt will not honor claims involving this firearm, which result from
careless or improper handling, unauthorized adjustment or parts replacement,
corrosion, neglect, or the use of wrong caliber ammunition, or the use of
ammunition other than high quality commercially manufactured ammunition in
good condition, or any combination thereof. Colt will not honor claims involving
this firearm for any reason or cause when such claims are made by the second
or subsequent owner.
IMPORTANT
Before it left the factory this firearm was tested, carefully inspected, and
packaged. Colt cannot control product handling after it leaves the factory;
therefore, please examine this firearm carefully at the time of purchase to insure
that it is unloaded and undamaged. The dealer will be pleased to assist you in
making this examination and endeavor to answer your further questions.
This instruction manual should always accompany this firearm. When you lend,
give, or sell this firearm, be sure this manual goes with it. If you need a
replacement manual, see page 60 for advice.
READ AND UNDERSTAND ALL THE FOLLOWING WARNINGS AND
CAUTIONS BEFORE REMOVING THIS FIREARM FROM ITS PACKAGE
This Colt product is classified as a Firearm by the Bureau of Alcohol,
Tobacco, Firearms, and Explosives. You must follow the safety
instructions for your safety and the safety of others.
- 2 -
Page 3
SAFETY DEPENDS ON YOU
About WARNINGS and CAUTIONS
Throughout this Operator’s Manual, you will find WARNINGS and
CAUTIONS in bold print. All WARNINGS and CAUTIONS must be read
carefully and followed completely. WARNINGS discuss issues that could
result in damage to your firearm, or serious injury or death to you or a
bystander. CAUTIONS discuss issues that could result in damage or
malfunction of your firearm or cause injury. Read and understand all the
WARNINGS and CAUTIONS before removing the firearm from its package.
WARNING: IF THIS FIREARM IS CARELESSLY OR IMPROPERLY HANDLED,
UNINTENTIONAL DISCHARGE COULD RESULT AND COULD CAUSE INJURY,
DEATH, OR DAMAGE TO PROPERTY.
WARNING: IF THE BARREL IS VERY HOT FROM FIRING THERE IS A RISK
THAT A CARTRIDGE IN THE CHAMBER COULD DISCHARGE BY ABSORBING
HEAT FROM THE BARREL (“COOK-OFF”). THIS CAN OCCUR AT ANY TIME.
WHEN COOK-OFF IS SUSPECTED, THE CHAMBER MUST BE CLEARED
IMMEDIATELY AFTER FIRING. (See pages 54 & 55 for more information).
WARNING: ALWAYS BE AWARE OF POSSIBLE RISK FROM DROPPING
YOUR FIREARM. SOME PARTS OF THE MECHANISM COULD BE DAMAGED
ALTHOUGH YOU MAY NOT SEE THE DAMAGE. A DAMAGED FIREARM COULD
DISCHARGE AND CAUSE INJURY, DEATH OR DAMAGE TO PROPERTY. If your
firearm has been dropped, have your firearm examined by a competent
gunsmith or return it to Colt for Service.
WARNING: DO NOT ALTER PARTS AS THIS MAY RESULT IN THE
PREMATURE WEARING OF PARTS OR REDUCE THE LEVEL OF SAFETY,
CAUSING THE FIREARM TO MALFUNCTION. A MALFUNCTION CAN RESULT
IN AN ACCIDENTAL DISCHARGE, WHICH COULD CAUSE SERIOUS INJURY,
DEATH OR DAMAGE TO PROPERTY. If any parts do not function properly, have
your firearm examined by a competent gunsmith or return it to Colt for Service.
WARNING: WHEN YOU SQUEEZE THE TRIGGER, YOU MUST EXPECT THE
FIREARM TO FIRE, AND YOU MUST TAKE FULL RESPONSIBILITY FOR FIRING
IT. YOUR CARE CAN AVOID ACCIDENTAL DISCHARGE, AND YOU WILL
THEREBY AVOID ACCIDENTAL INJURY AND DEATH.
WARNING: THIS FIREARM MAY DISCHARGE ACCIDENTALLY WHEN A
ROUND IS FED INTO THE CHAMBER, IF IT IS DROPPED OR RECEIVES A BLOW
TO THE MUZZLE OR FRONT OF THE FIREARM. This can occur regardless of
the position of the hammer or any of the various safety devices. Therefore,
extra care and strict adherence to these instructions by the firearm user is
mandatory for minimizing the risk of accidents.
- 3 -
Page 4
SAFETY DEPENDS ON YOU
WARNING: KEEP CLEAR AND KEEP OTHERS CLEAR OF THE EJECTION
PORT. Spent cartridges are ejected with enough force to cause injury, and the
ejection port must be unobstructed by your hand to insure safe ejection. Never
place fingers in ejection port; they could be burned by hot metal or injured by
the bolt moving forward.
WARNING: NEVER DRY FIRE YOUR FIREARM WHEN THE RECEIVERS ARE
OPEN as the level of safety could be reduced.
WARNING: ALWAYS HANDLE YOUR FIREARM AS IF IT WERE LOADED so
that you never fire it accidentally when you think it is unloaded.
WARNING: NEVER POINT YOUR FIREARM AT ANYTHING YOU DO NOT
INTEND TO SHOOT to prevent injury or death in the event of an accidental
discharge.
WARNING: NEVER LEAVE A LOADED FIREARM UNATTENDED. Someone,
especially a child, may fire it and cause injury, death, or damage to property.
WARNING: NEVER LEAVE A FIREARM COCKED READY TO FIRE as this
condition is extremely dangerous, and the firearm could easily be accidentally
discharged, causing injury, death, or damage to property.
WARNING: NEVER TAKE ANYONE’S WORD THAT A FIREARM IS
UNLOADED; check for yourself with your finger off the trigger and firearm
pointed in a safe direction, so that you never fire the firearm accidentally when
you think it is unloaded.
WARNING: ALWAYS BE SURE YOUR BACKSTOP IS ADEQUATE to stop
and contain bullets before firing so that you do not hit anything outside your
shooting area. A bullet can travel through or past your target up to 3 miles… if
in doubt, don’t shoot
WARNING: NEVER DRINK ALCOHOLIC BEVERAGES OR TAKE DRUGS
BEFORE OR DURING SHOOTING, as your judgment, vision, and motor skills
could be seriously impaired making your firearm handling unsafe.
WARNING: NEVER SHOOT AT A HARD SURFACE SUCH AS ROCK, OR A
LIQUID SURFACE SUCH AS WATER. A bullet may ricochet and travel in any
direction to strike you, or an object you cannot see, causing injury, death, or
damage to property.
WARNING: NEVER DISCHARGE A FIREARM NEAR FLAMMABLE
MATERIAL. Flame and sparks erupt from the firearm when it is discharged.
Which could ignite flammable materials or cause gasses to explode.
WARNING: ALWAYS WEAR AND ENCOURAGE OTHERS TO WEAR EYE
AND EAR PROTECTION.
- 4 -
Page 5

SAFETY DEPENDS ON YOU
TABLE OF CONTENTS
TITLE PAGE NO.
Cover 1
About Warnings and Cautions 2-4
Table of Contents 5
Illustration of Firearm 6
Description 7
Characteristics of Firearm 7-9
Firing Characteristics 10
Operating Features 11-14
Maintenance:
Field Stripping 15-20
Cleaning Materials 21
Cleaning Procedure 21-23
Lubrication 24-25
Assembly 26-30
Reversible Selector Lever 31-32
Functional Checks 33-36
Malfunctions and Trouble Shooting 37-42
Magazine 43-44
Operation:
Folding Sights 45-46
Loading 47-48
Aiming and Firing 49-50
Unloading 51-52
Stoppages and Immediate Actions 53
Dangerous Situations 54-56
Misfires and Cook-offs 54-55
Bore obstructions 56
Health and Environmental 56
Storage 57
Firearms Record 57
Limited Lifetime Service Agreement 57
Servicing and Repair 58
- 5 -
Page 6
SAFETY DEPENDS ON YOU
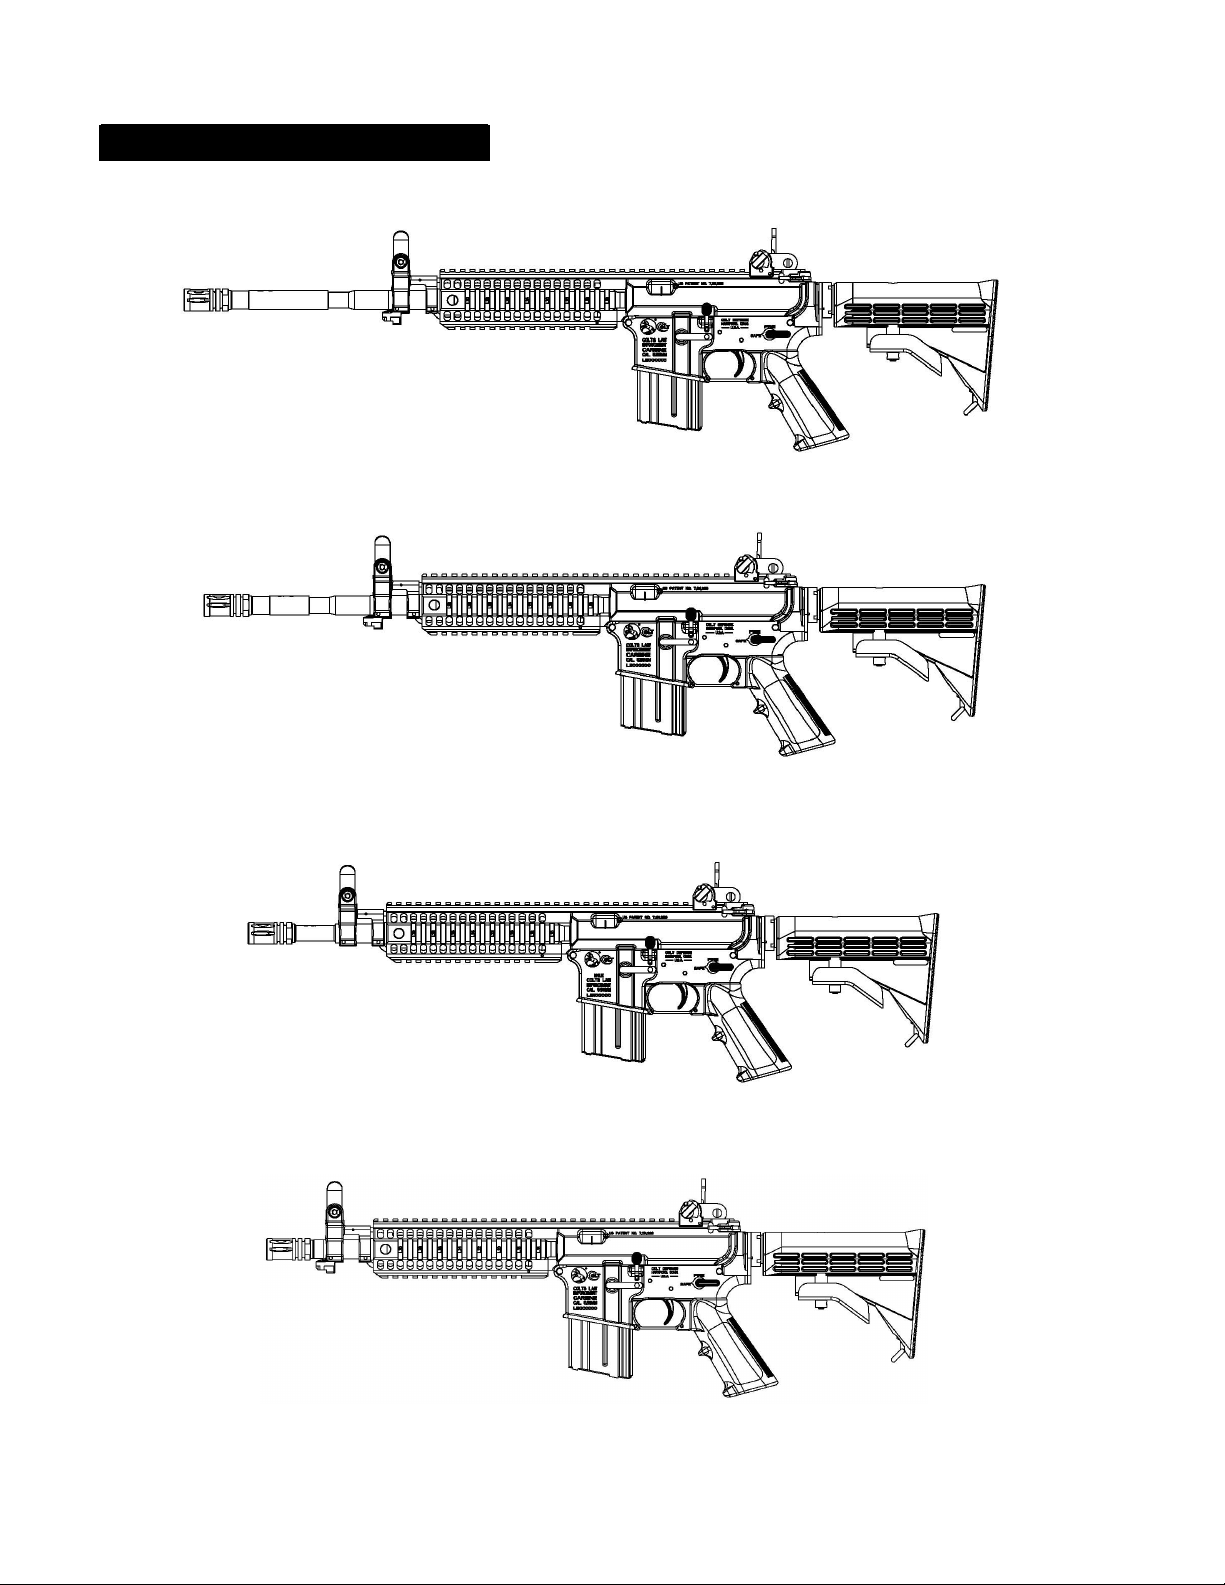
ILLUSTRATION OF FIREARM
COLT ADVANCED LAW ENFORCEMENT CARBINES
LEFT SIDE VIEW (LE6940™)
LEFT SIDE VIEW (LE6944™)
LEFT SIDE VIEW (LE6943™)
LEFT SIDE VIEW (LE6945CQB™ & LE6946CQB™)
- 6 -
Page 7

SAFETY DEPENDS ON YOU
DESCRIPTION:
This operator’s manual describes the Colt Advanced Law Enforcement
Carbines and includes information on their features.
The Colt Advanced Law Enforcement Carbines are lightweight, gas operated,
magazine fed, 5.56 x 45mm caliber carbines. They are based on the M16/M4
series of rifles and incorporate the same safety features as those firearms. The
unique design of the Colt Advanced Law Enforcement Carbines feature a
monolithic upper receiver with MIL-STD-1913 rails at the 12, 3, and 9 o’clock
positions as well as a lower rail system with a MIL-STD-1913 rail at the 6
o’clock position.
CHARACTERISTICS OF FIREARM:
TYPE OF FIREARM:
Gas operated, 5.56x45mm caliber, using a gas operated bolt and
carrier system.
Air-cooled, magazine fed, and semi-automatic action.
Adjustable back-up iron sight (BUIS) and front sight are provided
along with MIL-STD-1913 rails for mounting optical sights and other
accessories.
- 7 -
Page 8
SAFETY DEPENDS ON YOU
CHARACTERISTICS OF FIREARM (Cont.)
LE6940 Specifications:
Length: 35.5 inches extended 32.0 inches retracted
Barrel Length: 16.1 inches (rifling 1 in 7 twist)
Weight: 6.85 lbs (unloaded)
LE6944 Specifications:
Length: 34.0 inches extended 30.5 inches retracted
Barrel Length: 14.5 inches (rifling 1 in 7 twist)
Weight: 6.60 lbs (unloaded)
LE6943 Specifications:
Length: 31.0 inches extended 27.5 inches retracted
Barrel Length: 11.5 inches (rifling 1 in 7 twist)
Weight: 6.45 lbs (unloaded)
LE6945CQB & LE6946CQB Specifications:
Length: 29.5 inches extended 26.0 inches retracted
Barrel Length: 10.3 inches (rifling 1 in 7 twist)
Weight: 6.25 lbs (unloaded)
FIRING CHARACTERISTICS- FIRE CONTROLS:
LE6940: “SAFE” & “FIRE” (semi-auto)
LE6944: “SAFE” & “FIRE” (semi-auto)
LE6943: “SAFE” & “FIRE” (semi-auto)
LE6945CQB: “SAFE” & “FIRE” (semi-auto)
LE6946CQB: “SAFE”, “SEMI”, & “AUTO”
- 8 -
Page 9
SAFETY DEPENDS ON YOU
CHARACTERISTICS OF FIREARM (Cont.)
AMMUNITION:
5.56 x 45mm NATO Cartridge
&
.223 Rem.
The Colt Advanced Law Enforcement Carbines are chambered with a longer
throat to accommodate the 5.56x45mm NATO military M193, M855, SS109,
and MK262 ammunitions. As a result, these Carbines also can safely use .223
Remington sporting cartridges having a lower chamber pressure.
WARNING: NEVER USE AMMUNITION NOT SPECIFICALLY
DESIGNATED FOR USE IN YOUR FIREARM. FAILURE TO USE CORRECT
TYPE OR CALIBER OF AMMUNITION MAY CAUSE THE FIREARM TO JAM,
FAIL TO FIRE OR MAY GENERATE EXCESSIVE PRESSURE WHICH CAN
DAMAGE OR EVEN RUPTURE YOUR FIREARM, CAUSING PERSONAL
INJURY, DEATH, OR PROPERTY DAMAGE. To protect you from danger
and your rifle from damage, Colt does not recommend the use of
handloads or remanufactured ammunition.
- 9 -
Page 10

SAFETY DEPENDS ON YOU
FIRING CHARACTERISTICS:
Cyclic Rate of Fire:
700-900 rounds per minute (this is the theoretical number of cartridges
which could be fired automatically in one minute).
Maximum Effective Rate Of Fire:
Semi-Automatic 45-65 Rounds Per Minute
Fully-Automatic 150-200 Rounds Per Minute
Sustained Rate Of Fire 12-15 Rounds Per Minute
(Sustained Rate Of Fire- The actual rate of fire that the firearm can fire for an
indefinite length of time without serious overheating of the barrel.)
With a 1 turn in 7-inch twist for rifling, M193, M855, MK262, and .223
Remington ammunition may be fired. Muzzle velocity, muzzle energy, and
maximum effective range will vary depending on barrel length and ammunition
used.
MUZZLE VELOCITY AND ENERGY
5.56 X 45mm NATO
AMMUNITION
M855 or SS109
Muzzle Velocity:
feet/sec. Meters/sec.
LE6940 2920 890
LE6944 2870 875
LE6943 2610 796
LE6945CQB & LE6946CQB 2600 792
Muzzle Energy foot-pounds joules
LE6940 1174 1592
LE6944 1136 1540
LE6943 938 1272
LE6945CQB & LE6946CQB 931 1263
- 10 -
Page 11

SAFETY DEPENDS ON YOU
OPERATING FEATURES:
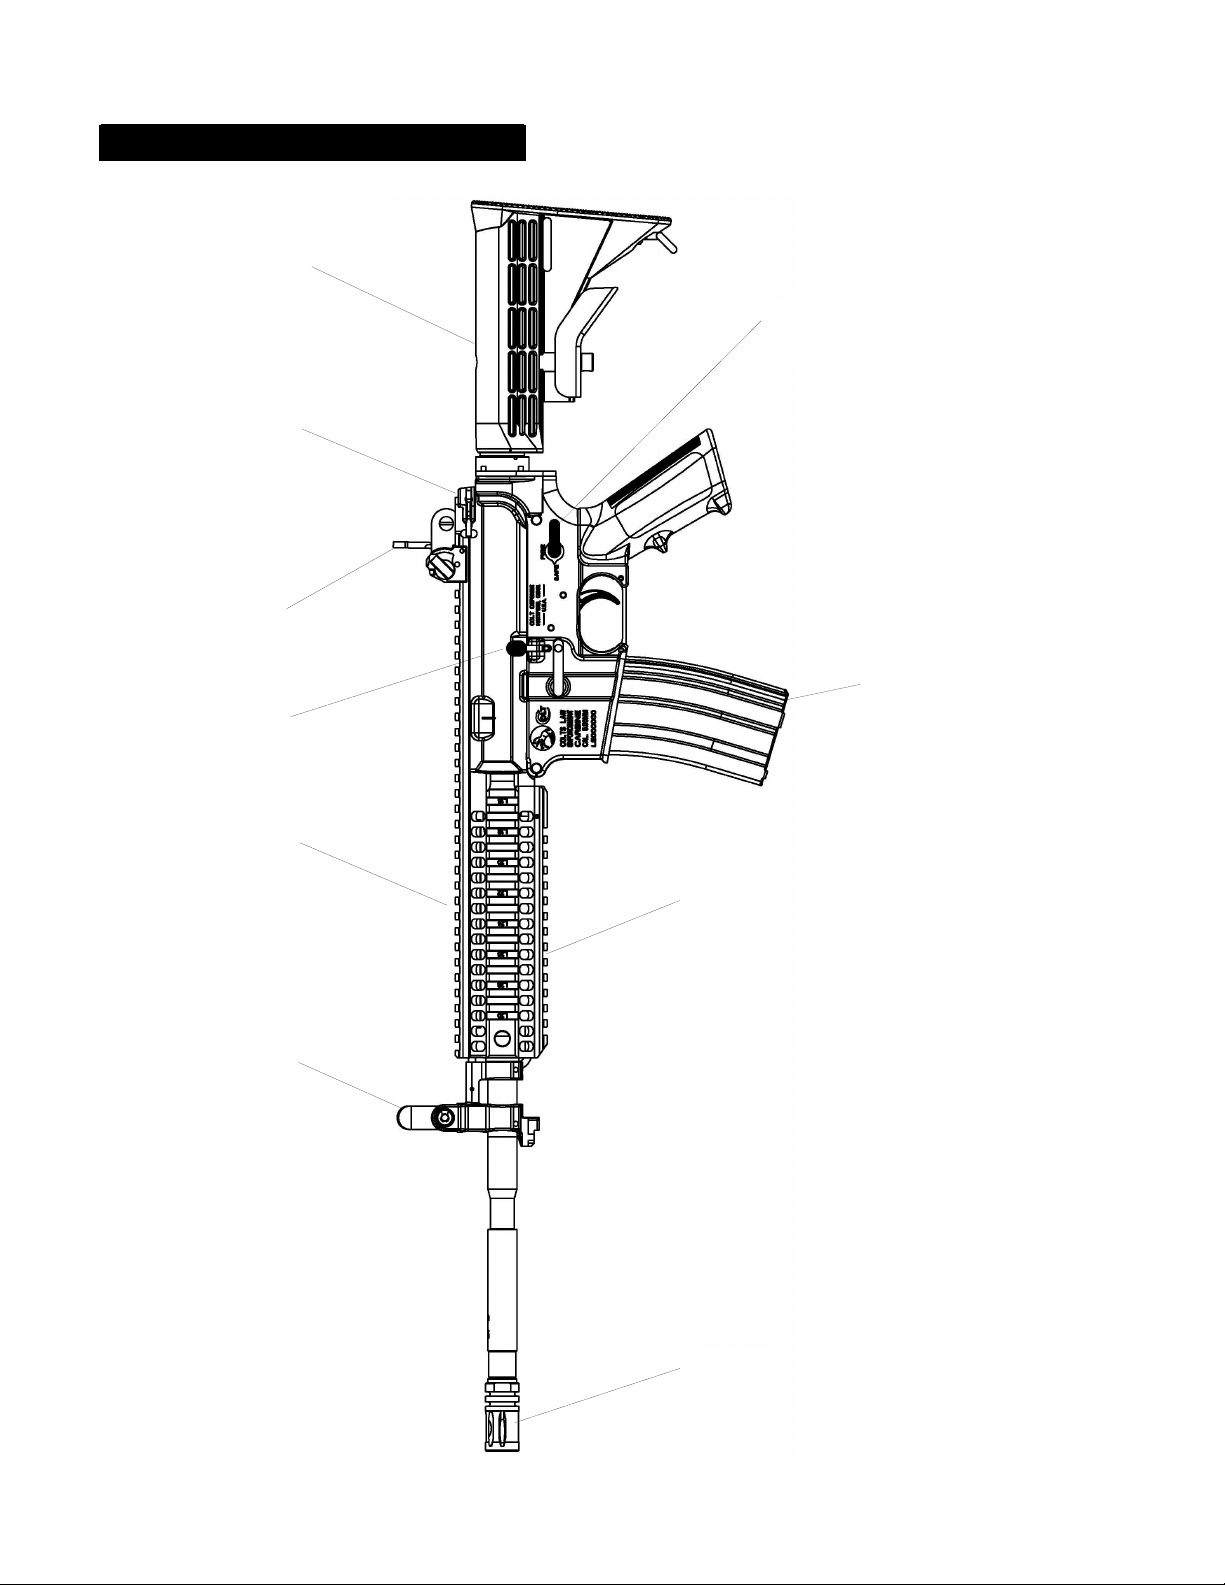
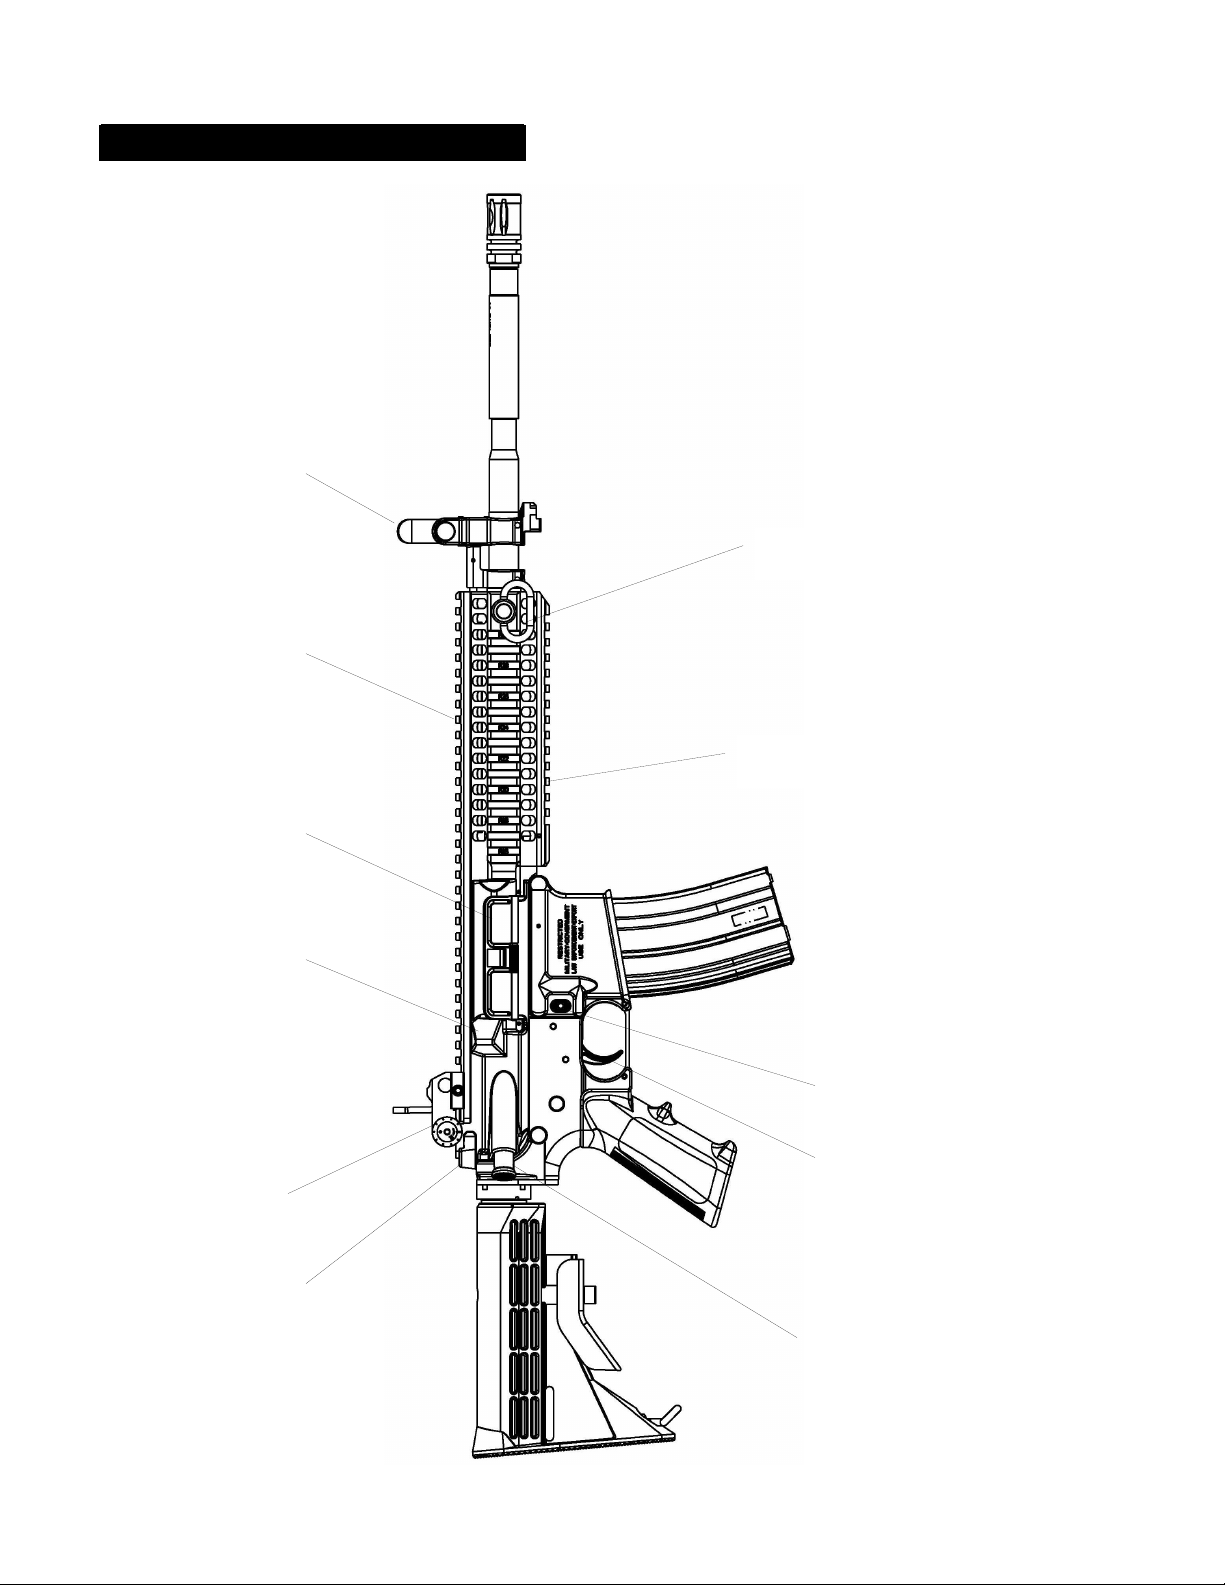
NAME OF COMPONENT AND DESCRIPTION OF ITS FUNCTION (numbers in
parentheses correspond with diagrams on pages 13 & 14):
Charging Handle (1): Retracts bolt carrier.
Sights (2,4): Used to align firearm with target. Rear sight (2) is fully
adjustable. The front sight is adjusted only on zeroing. Both sights may
be folded down when not in use. The front sight (4) is Colt’s proprietary
folding design containing an adjustable front sight post. There is a MILSTD-1913 rail (2a) built into the monolithic upper receiver to which
various optical sights or other accessories can be secured. There are
markings on these rails to show locations for mounting accessories. The
markings allow the user to safely place the accessory back in the same
location where it was mounted before being removed. Additional rails are
located on both sides and the bottom.
Bolt & Bolt Carrier Assembly (3): Provides stripping, chambering, locking,
firing, extraction and ejection of cartridges using the action spring and
projectile gases for power.
Compensator (5): Reduces muzzle flash, helps keep muzzle from rising during
firing, protects muzzle end of barrel and reduces signature when firing.
Ejection Port Dust Cover (6): Keeps dirt and dust out of chamber. Opens
automatically when bolt carrier moves forward or rearward.
Fired Cartridge Case Deflector (6a): Deflects fired cartridge cases clear when
firing.
Magazine (7): Compatible with standard 20 round (NSN 1005-00-056-2237) &
optional 30 round capacity M16/M4 Aluminum Magazines (NSN 1005-00921-5004)
Magazine Release Button (8): Releases the magazine for removal.
- 11 -
Page 12

SAFETY DEPENDS ON YOU
OPERATING FEATURES (Cont.)
Forward Assist Assembly (9): Provides a means of pushing bolt carrier
forward if the bolt fails to close and lock. Note: When you need to use
the forward assist, it is usually time to clean your firearm or a sign of a
defective cartridge. Always check the ammunition for damage before
using the forward assist.
WARNING: FORCING DAMAGED AMMUNITION INTO THE CHAMBER
COULD DAMAGE YOUR FIREARM AND COULD RESULT IN INJURY,
DEATH, OR DAMAGE TO PROPERTY.
Bolt Catch (10): Holds bolt carrier in open position.
Selector Lever (11): Selects mode of operation:
“SAFE” -- TRIGGER LOCKED
“SEMI” or “FIRE” -- SEMI-AUTOMATIC (Single Shot)
“AUTO” -- FULLY AUTOMATIC
Note that the selector lever on the “semi-auto” models is reversible and
may be changed from one side to the other. See assembly instruction on
pages 31 & 32.
Buttstock Assembly (12): Sliding buttstock has four positions and may be
positioned to suit the operator
Quick Detach Sling Swivel (52): Allows the user to place the sling mount on
either the 9 or 3 o’clock rails of the upper receiver/handguard.
Lower Rail (62): Provides protection from the barrel heat and provides Mil-Std-
1913 rails at the 6 o’clock position.
- 12 -
Page 13
SAFETY DEPENDS ON YOU
OPERATING FEATURES (Cont.)
12
1
2
11
10
2a
7
62
4
5
- 13 -
Page 14
SAFETY DEPENDS ON YOU
OPERATING FEATURES (Cont.)
4
2a
52
6a
2
62
6
8
36
1
9
- 14 -
Page 15
SAFETY DEPENDS ON YOU
MAINTENANCE:
Maintenance instructions tell the operator how to field strip, clean, lubricate,
assemble and do a functional check on the firearm. Like any other precision
mechanism, your firearm will perform better, last longer, and remain safer when
it is properly maintained. Follow the instruction in this section to keep your
firearm in good condition. A table at the end of this section deals with
malfunctions and troubleshooting.
Tools Required: Cleaning kit.
Materials required: Dry, lint free cloth.
Break-Free® CLP or equivalent.
Note: If firearm has been used in salt air, water, mud, or sand, it must be
completely disassembled, cleaned and inspected.
WARNING: ALWAYS ENSURE THAT THE FIREARM IS UNLOADED
BEFORE FIELD STRIPPING, CLEANING, LUBRICATING, AND/OR
ASSEMBLING. ALWAYS KEEP THE MUZZLE POINTED IN A SAFE
DIRECTION. IF THIS FIREARM IS CARELESSLY OR IMPROPERLY
HANDLED, AN ACCIDENTAL DISCHARGE COULD RESULT AND COULD
CAUSE SERIOUS INJURY, DEATH, OR DAMAGE TO PROPERTY.
WARNING: WEAR SAFETY GLASSES IN CASE YOU LOSE CONTOL
OF SOME SPRING LOADED COMPONENTS WHICH COULD CAUSE
INJURY.
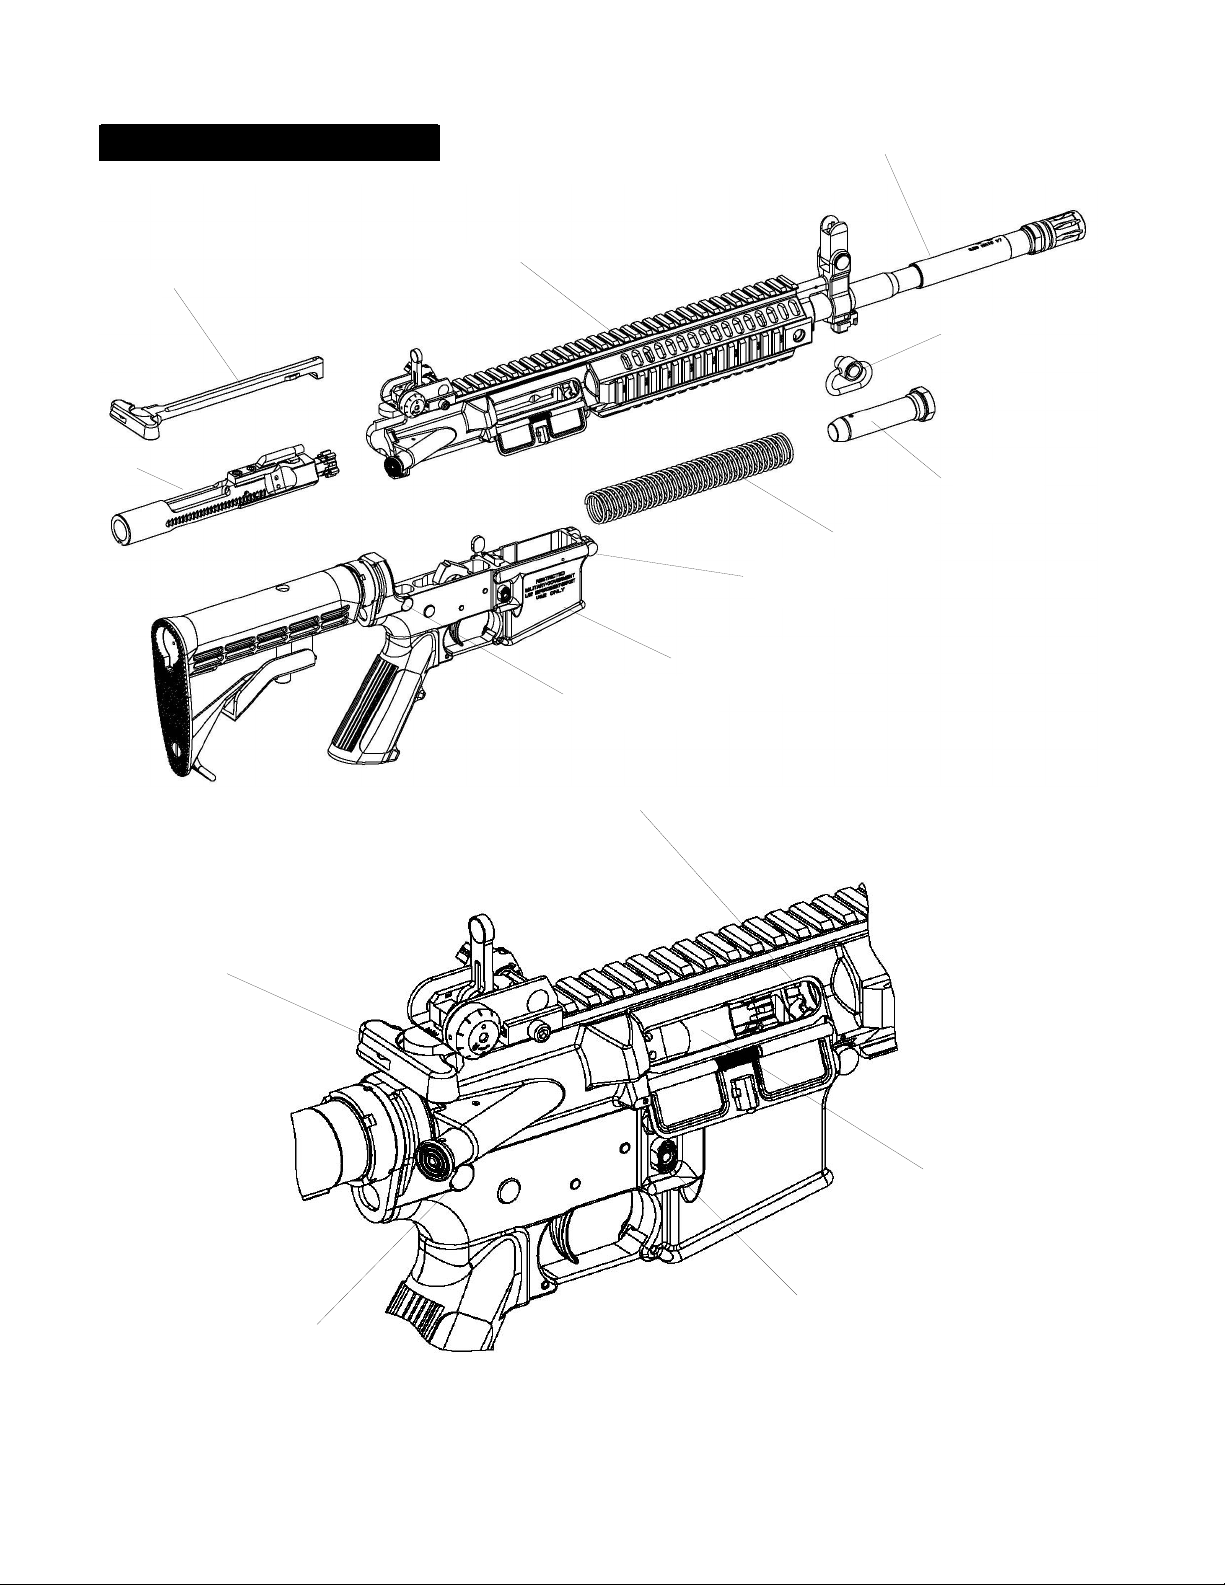
FIELD STRIPPING:
1. Rotate selector (11) to “SAFE” position.
2. Press magazine release button (8) and remove magazine (7).
3. Pull charging handle (1) rearward; check that chamber (15) is empty;
release charging handle.
4. Ensure bolt is fully forward, push left end of takedown pin (13) into receiver.
Pull pin to right until stopped by detent. Pivot upper receiver (29) from lower
receiver (32) to expose the rear of the bolt carrier assembly (3).
5. Pull charging handle (1) about three inches rearward, remove bolt carrier
assembly (3).
6. Remove charging handle (1) by aligning with slot in upper receiver and
pulling down and to the rear.
Note: When an optical sight or other accessory is installed, it can be left in
place for routine cleaning or it can be removed from the MIL-STD-1913 sight rail
(2a).
- 15 -
Page 16
SAFETY DEPENDS ON YOU
FIELD STRIPPING (Cont.)
1
70
29
52
3
23
24
27
32
13
15
1
3
8
13
- 16 -
Page 17
SAFETY DEPENDS ON YOU
FIELD STRIPPING (Cont.)
19
18
33
21
20
26
17
16
14
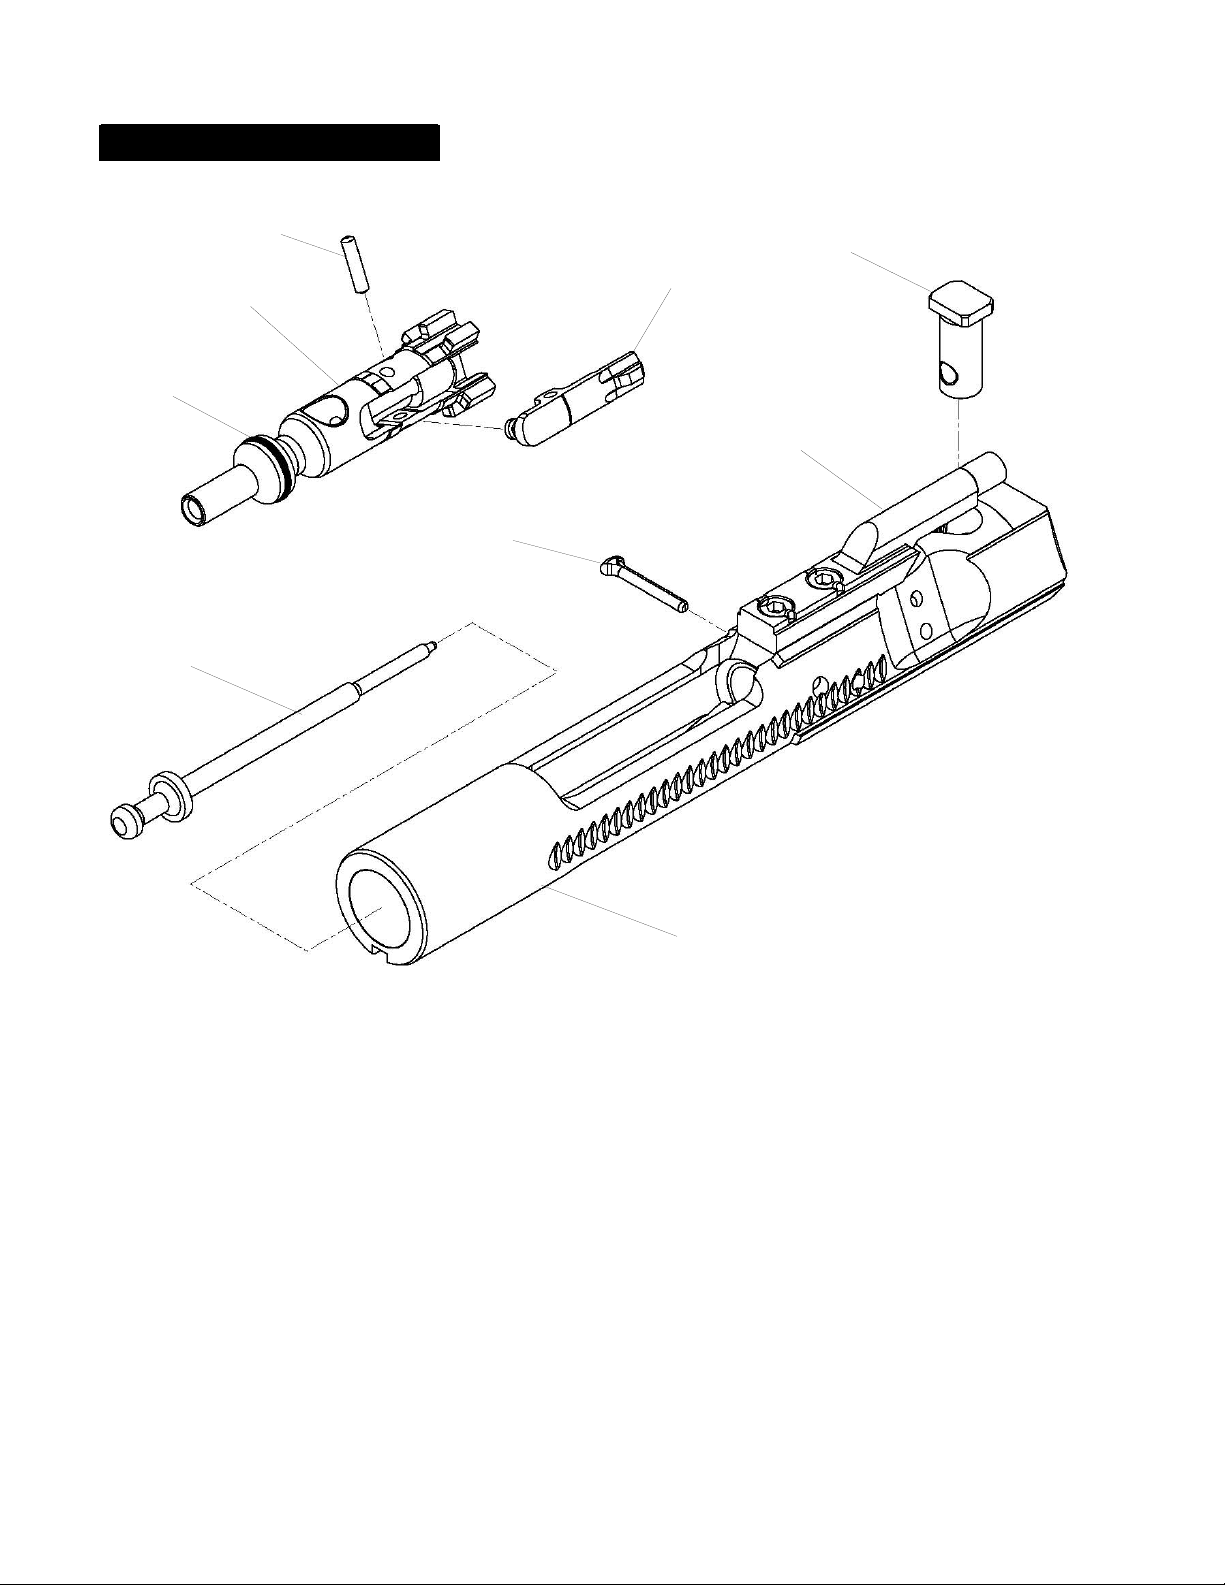
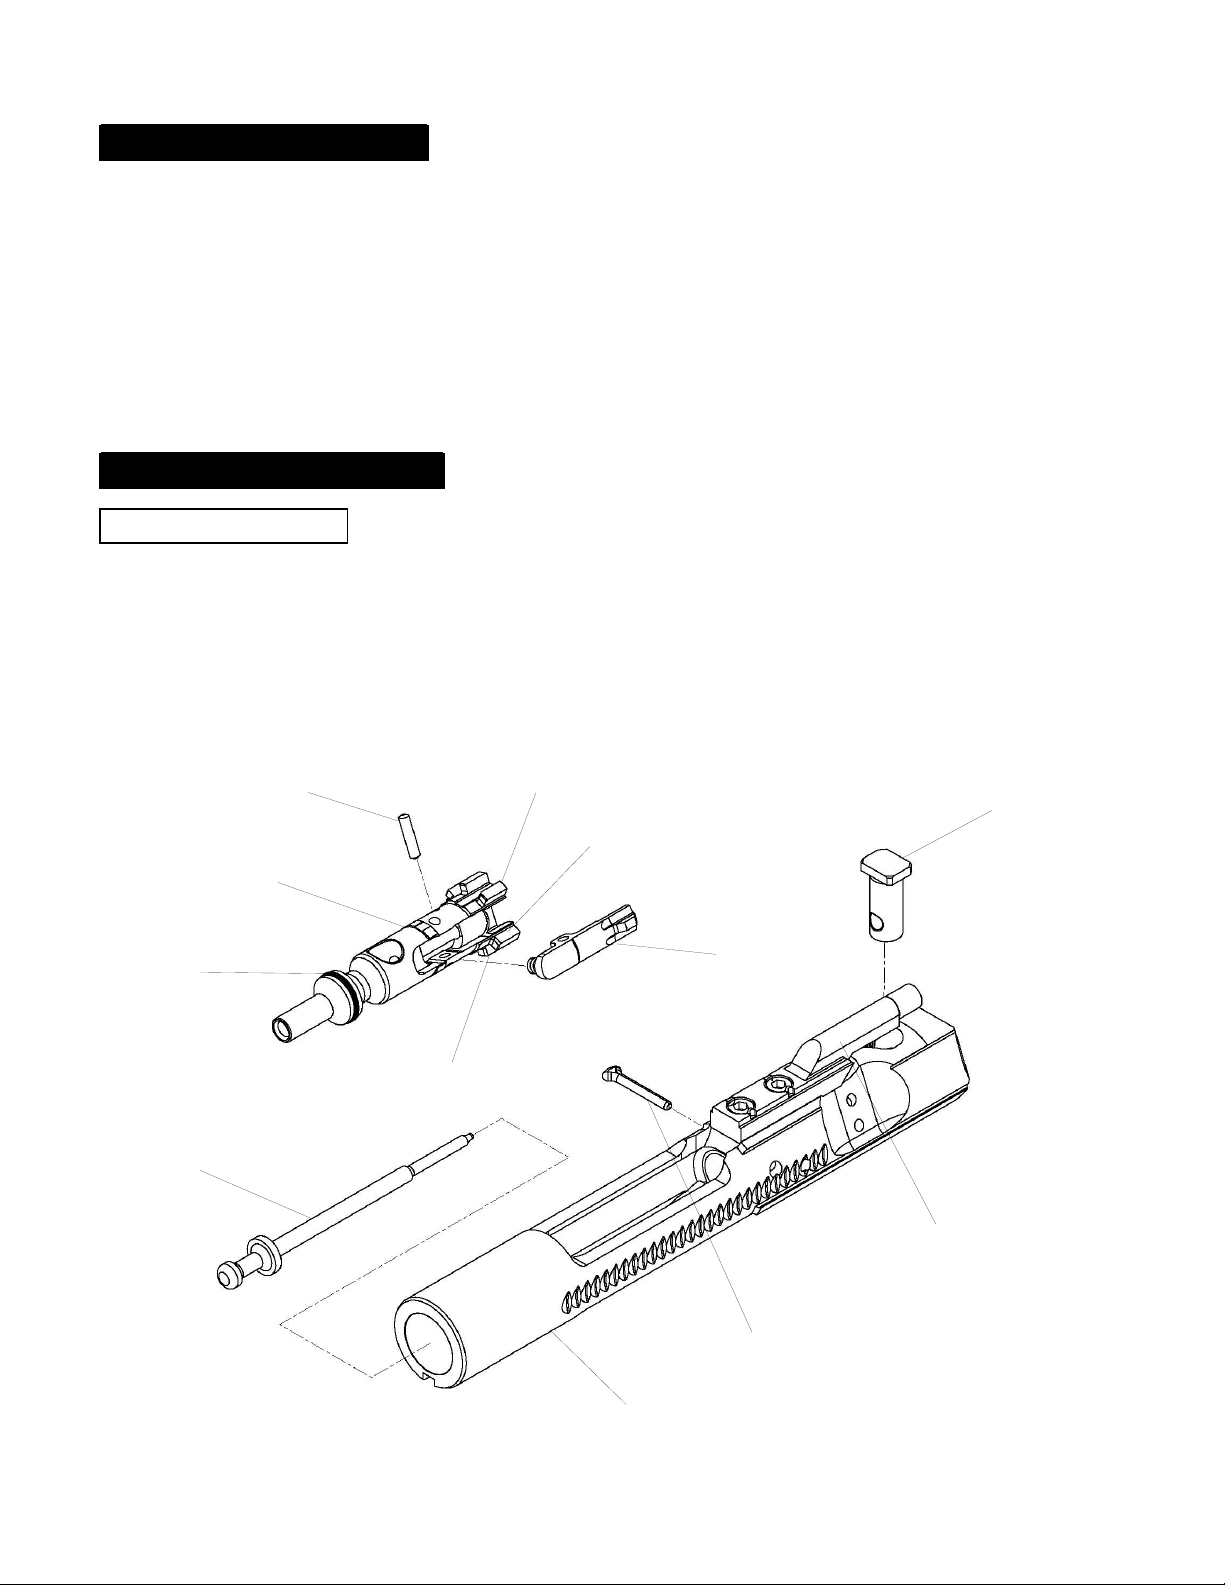
7. BOLT AND BOLT CARRIER
A. Push out firing pin retaining pin (17).
B. Drop firing pin (16), out of the bolt carrier.
C. Rotate bolt (21) until cam pin (18) is clear of bolt carrier key (26).
Rotate cam pin (18) ¼ turn and remove cam pin.
D. Pull bolt (21) from bolt carrier (14).
E. Hold the extractor (20) down to control the spring tension, carefully
push out extractor pin (19) and remove extractor (20). Do not
remove extractor spring/buffer from extractor.
IMPORTANT: Do not attempt to remove ejector retaining pin.
8. Push pivot pin (27) to right and pull out as far as it will go. Separate
receivers. (Receivers need not be completely separated for routine
cleaning.)
- 17 -
Page 18
SAFETY DEPENDS ON YOU
FIELD STRIPPING (Cont.)
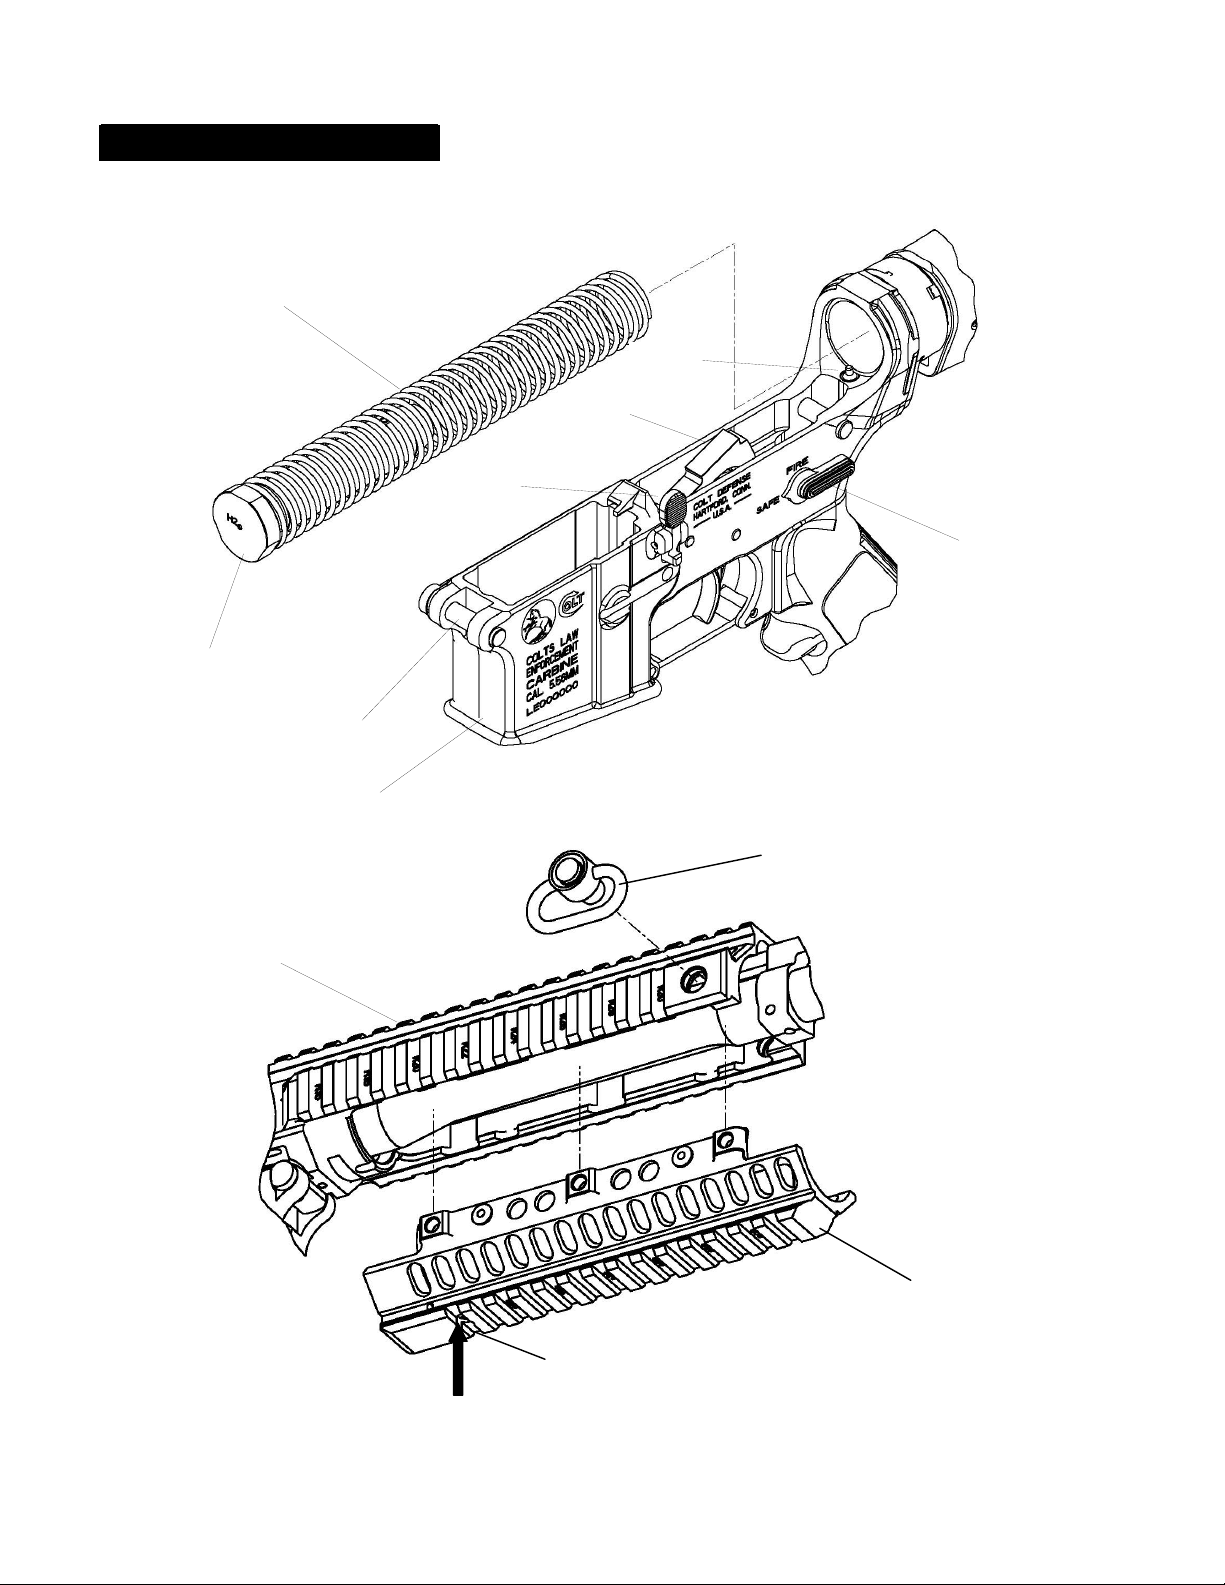
9. With hammer (22) in cocked position, push buffer assembly (23) rearward
to control the spring tension. Press buffer retainer (25) down. Slowly
ease buffer forward until clear of retainer.
10. Continue to hold buffer against spring tension, press hammer (22) down
just enough to clear buffer and remove buffer assembly (23) and action
spring (24) from the receiver extension tube (31).
11. Removal of Lower Rail (Optional- not necessary for routine cleaning)
A. First remove the quick detach sling swivel (52), if rail covers are
mounted on the 9 and 3 o’clock rails, they must also be removed to
allow the lower rail (62) to drop freely from the upper receiver (29)
B. Then push in the lower rail lock (53) with a cartridge or a pin punch
(see arrow)
C. Then slide the lower rail (62) forward approximately 3/8” while
pushing in on the lower rail lock (53) and pull down to remove.
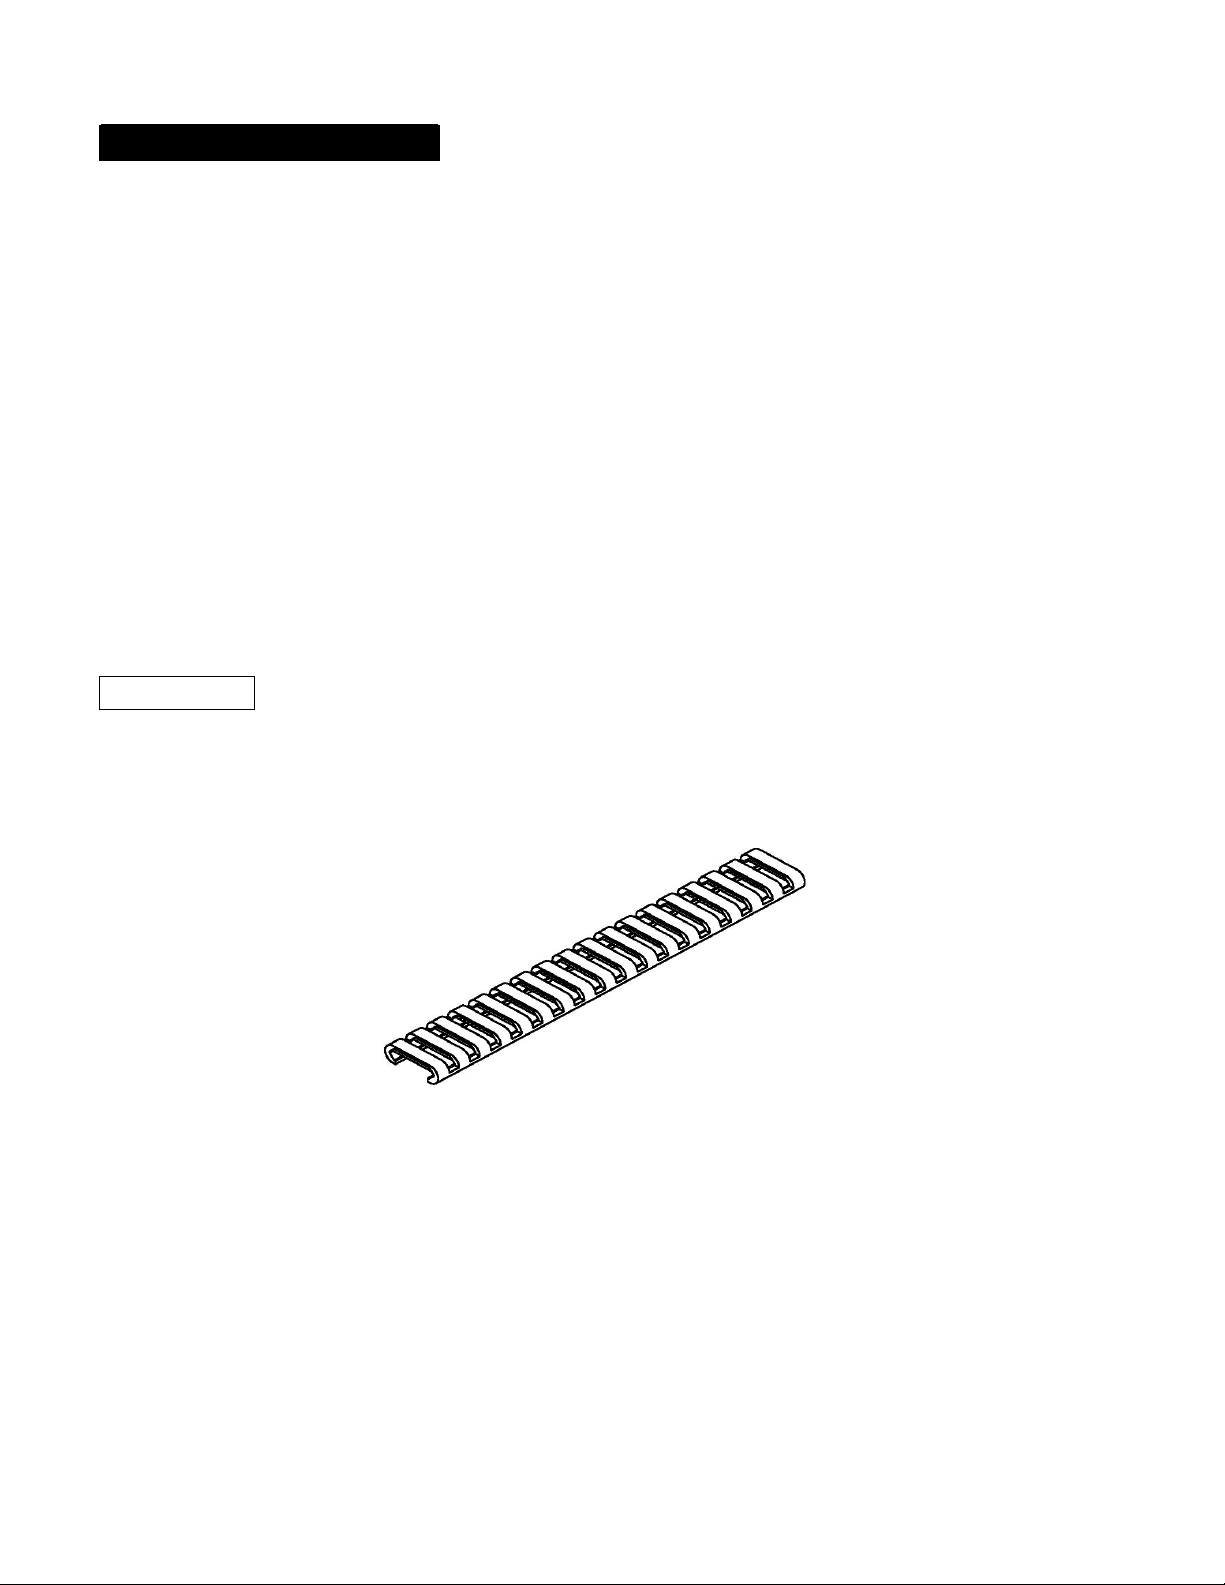
Rail Covers
There are three rail covers provided in the accessory kit. The rail covers
are 7 inches in length and will cover 17 slots of the rail. They are
designed to be cut for custom fitting to the rail and can be cut with
scissors or a sharp knife.
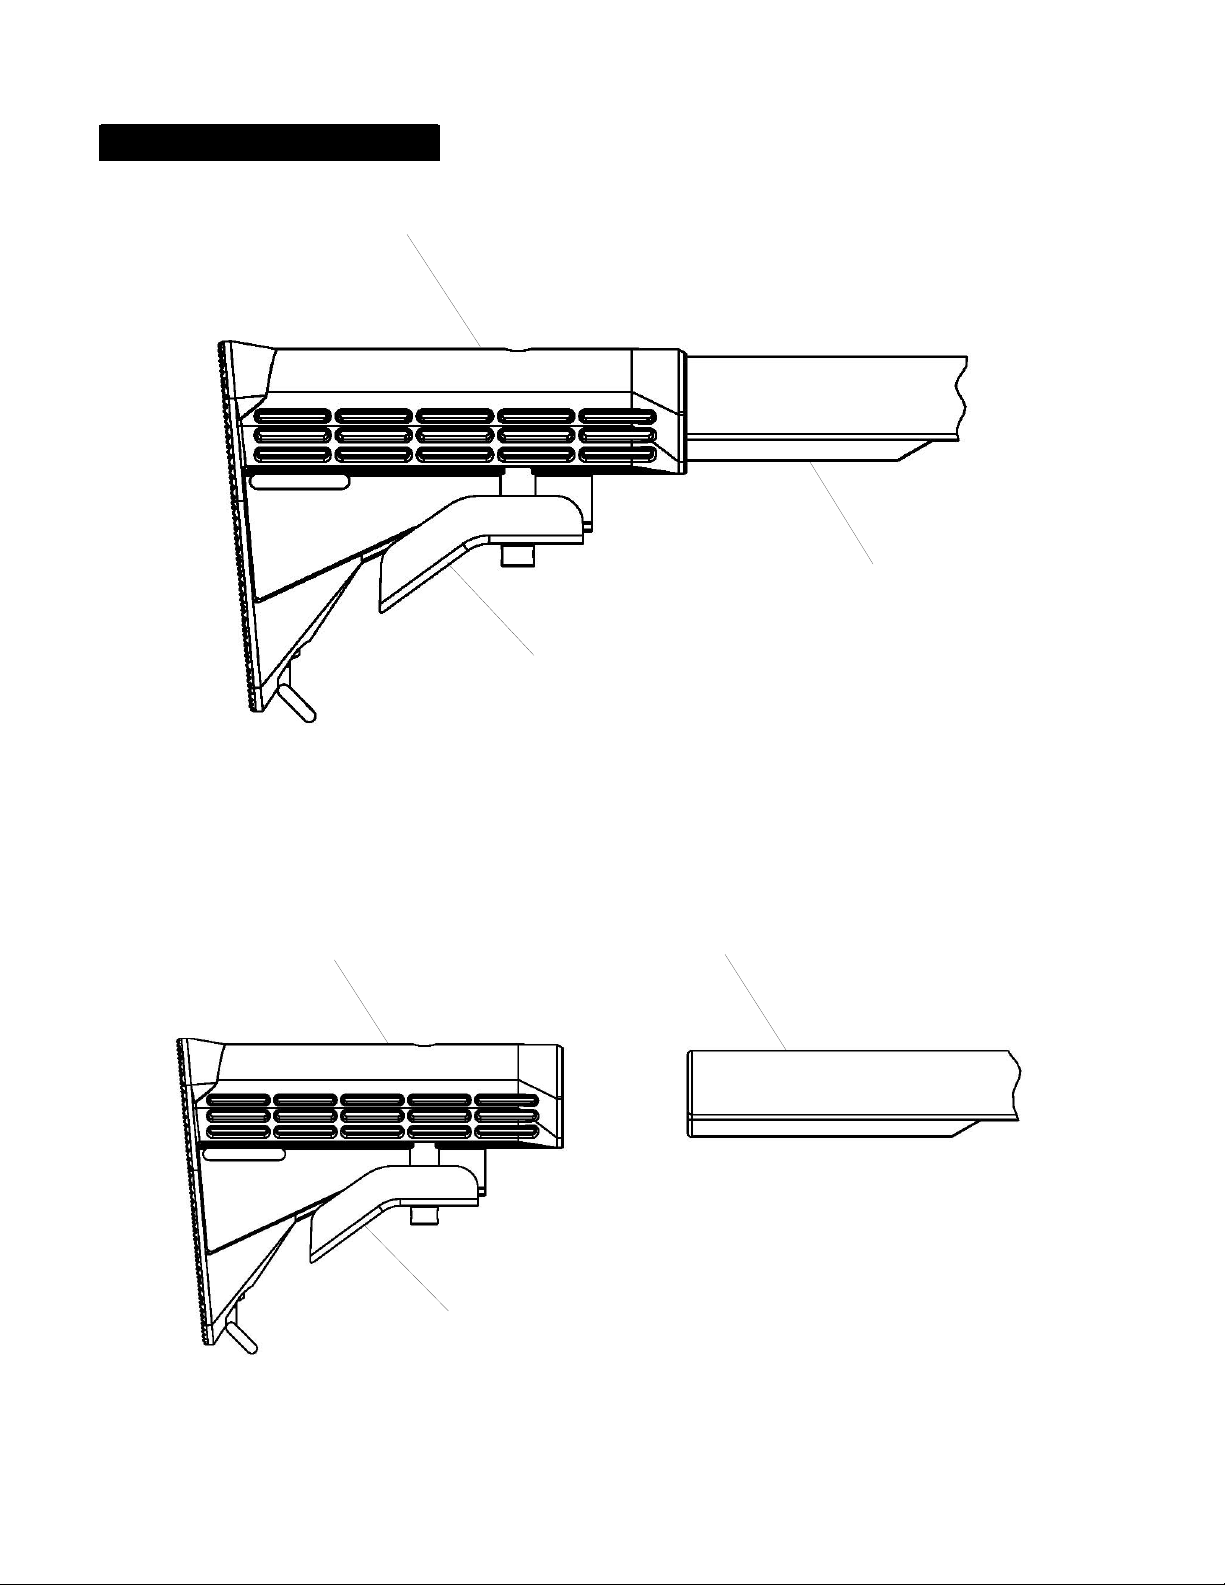
12. Pull lever (30) down and slide the buttstock assembly (12) rearward off
receiver extension tube (31).
IMPORTANT: Do not field strip your firearm further than previously described. If
you do so you may void your limited lifetime service agreement. If additional
maintenance is required, make sure that the firearm is NOT LOADED and
return it to Colt for service. For spare parts, seek advice from the Dealer who
should have information on how to obtain genuine Colt parts, or contact Colt
Customer Service.
- 18 -
Page 19
SAFETY DEPENDS ON YOU
FIELD STRIPPING (Cont.)
23
25
22
10
11
27
32
52
29
62
53
- 19 -
Page 20
SAFETY DEPENDS ON YOU
FIELD STRIPPING (Cont.)
12
31
30
REMOVAL/INSTALLATION OF BUTTSTOCK
12
30
31
- 20 -
Page 21
SAFETY DEPENDS ON YOU
CLEANING MATERIALS:
Cleaning should be performed according to instructions in this manual, using
Break-Free® CLP or equivalent cleaner.
Use the cleaning kit that has been provided or cleaning equipment designed to
clean M4 or M16 firearms. The cleaning kit should contain, a good quality gun
oil, cleaning rods, bore patches, small brush, a bore brush, and a chamber
brush at a minimum.
CLEANING PROCEDURE:
WHEN TO CLEAN:
After Firing- Clean your firearm as soon as possible, this will lessen the
opportunity for corrosion to start.
Periodically- We suggest you clean your firearm when necessary and at least
once or twice a year in a temperate climate, or as often as once a week in a
tropical climate. If you get your firearm wet, clean it as soon as possible.
19
21a
18
21c
21
20
33
21b
16
26
17
14
- 21 -
Page 22

SAFETY DEPENDS ON YOU
CLEANING PROCEDURE (Cont.)
1. Use brush to clean the bolt (21). Also clean the following parts:
Rear and face of bolt lugs (21a & 21b)
Locking lugs (21c)
Face of extractor (20)
Firing Pin (16)
Note: Do not attempt to remove heat discoloration from bolt carrier.
2. Install patch on patch holder and wet with bore cleaner. Clean bolt carrier
(14) inside and out.
3. Use clean cloth to wipe bolt (21) and bolt carrier (14) clean and dry.
4. Wet chamber brush with bore cleaner and push brush into chamber and
rotate several times to clean chamber. Then pull brush straight through
chamber several times to clean between locking lugs. Wipe the parts clean
and dry with a clean cloth.
5. Push brush through entire length of bore from chamber end (15) towards
muzzle end of barrel (70).
6. Repeat previous step three times.
7. Install clean patch on patch holder and insert into bore from chamber end.
8. Pull patch through entire length of bore.
9. Install a clean patch in holder and repeat previous step until a patch comes
out of the bore clean and dry.
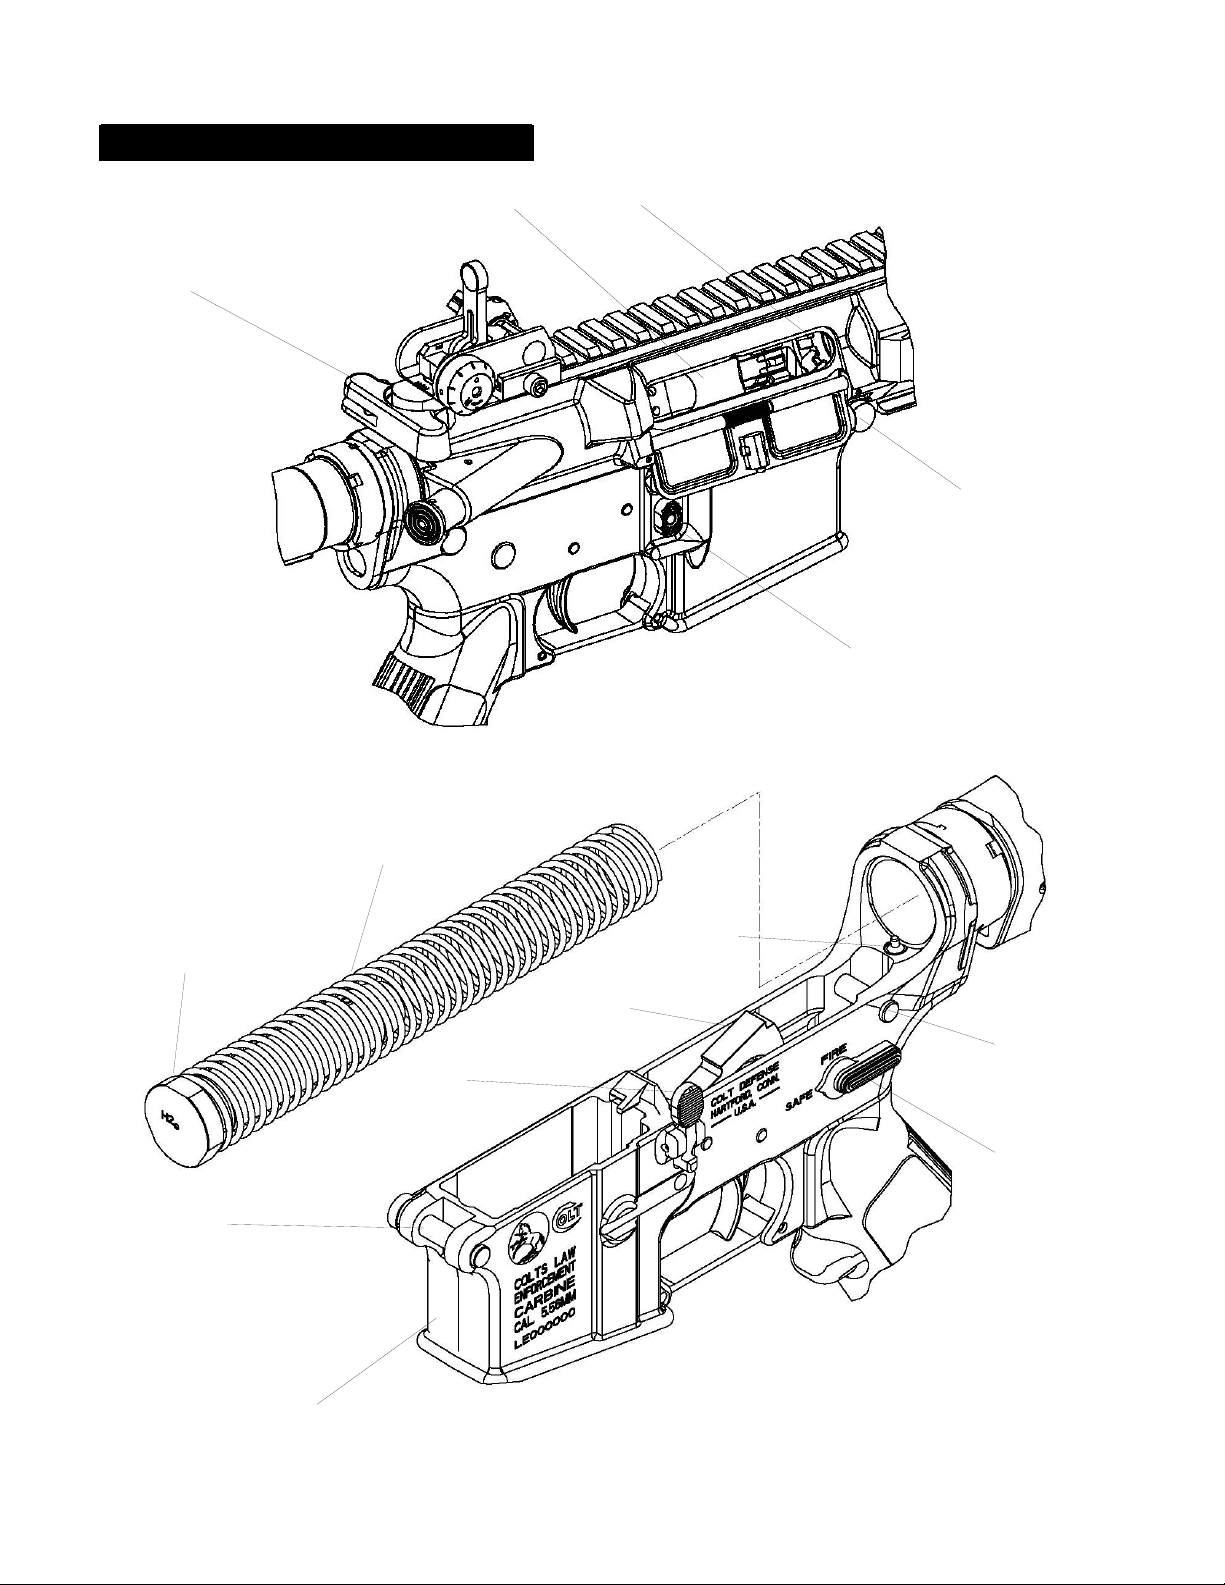
10. Wipe the buffer assembly (23), action spring (24), and lower receiver (32)
and remove any dirt.
11. Clean inside of the lower receiver (32) and around its assembled parts.
12. Clean receiver extension tube (31) with a dry cloth.
13. Clean buttstock assembly (12) with a dry cloth.
14. Wipe all surfaces of upper receiver (29), lower receiver (32), and lower rail
(62) clean and dry.
- 22 -
Page 23
SAFETY DEPENDS ON YOU
CLEANING PROCEDURE (Cont.)
14
15
1
27
8
25
23
22
13
10
11
27
32
- 23 -
Page 24

SAFETY DEPENDS ON YOU
LUBRICATION:
Lubrication should be performed according to instructions in this manual, using
Break-Free® CLP or equivalent lubricant.
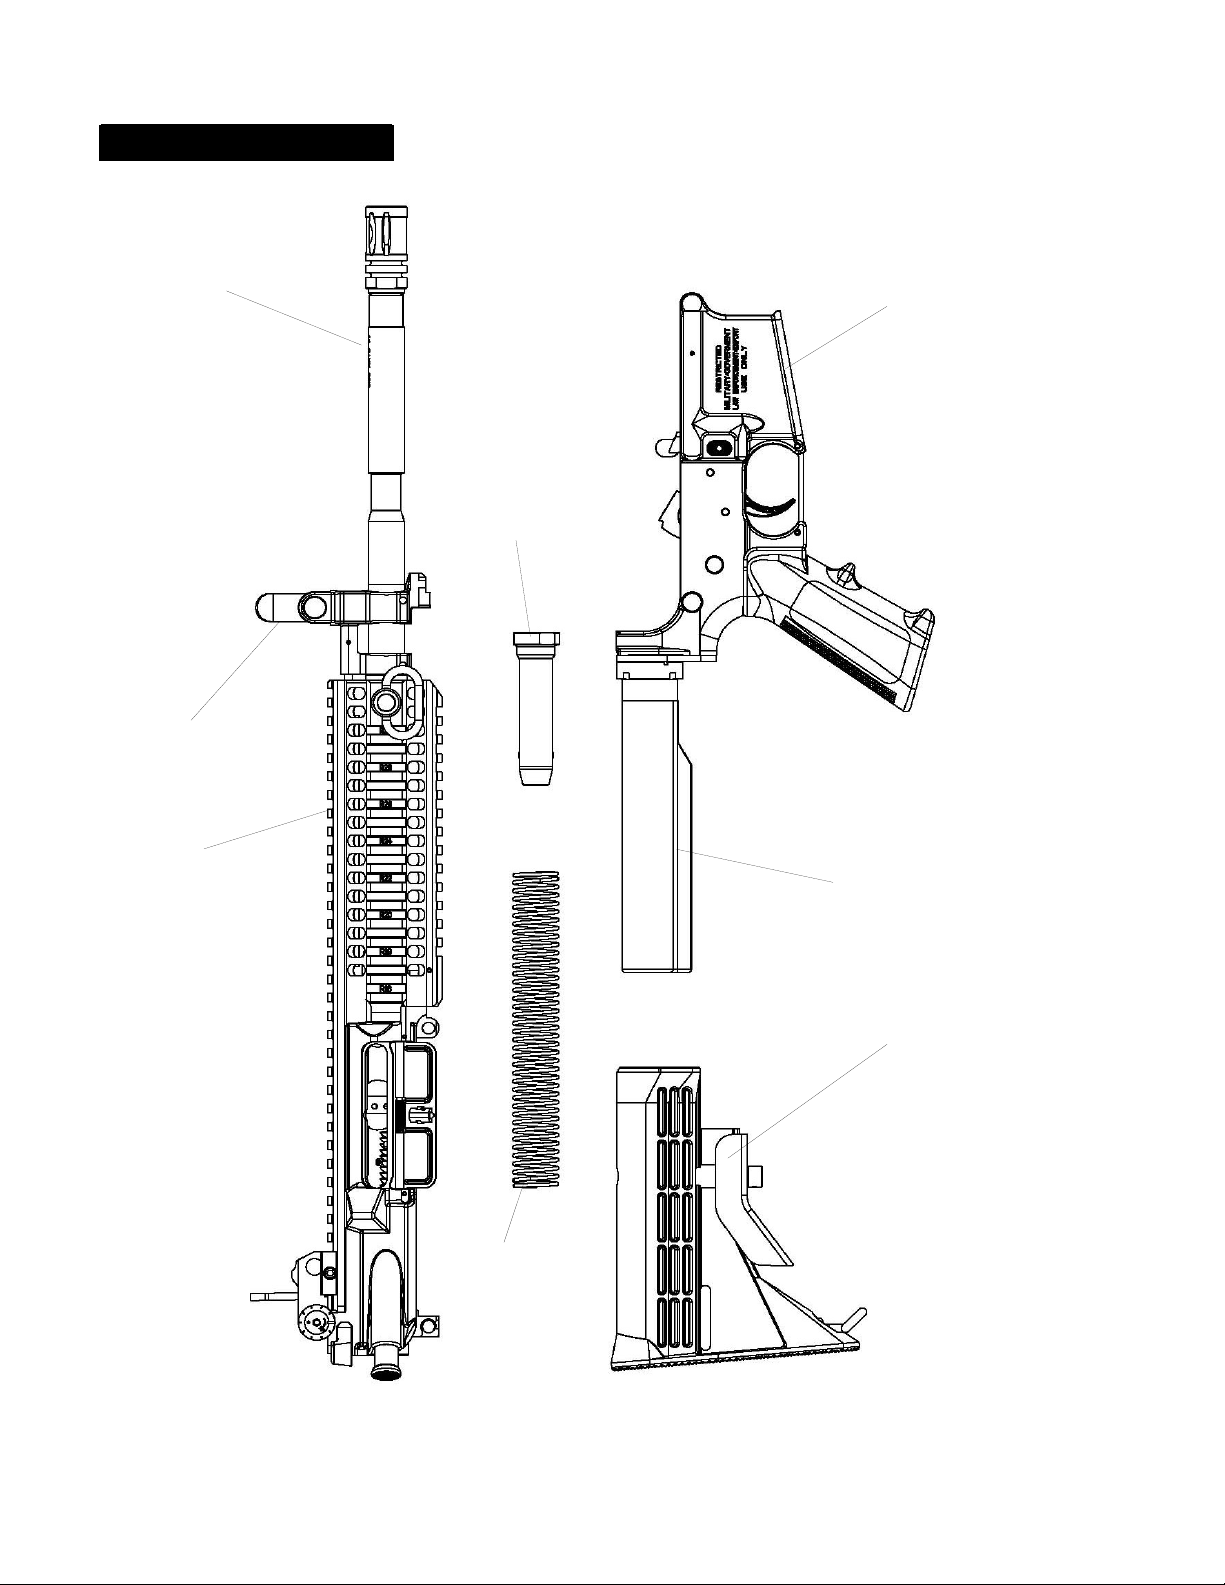
1. Run a lightly oiled patch through the bore. Be sure the chamber (15)
remains dry.
2. Wipe one drop of oil on each bolt carrier (14) track.
3. Lightly lubricate inside the upper receiver (29), outer surfaces of the barrel
(70) and front sight (4).
4. One drop of lubricant on front sight detent.
5. Place one drop of lubricant in the carrier key (26).
6. Generously lubricate cam pin hole, bolt rings (33) and outside of the bolt
body (21) and a light coat on the extractor (20) and pin (19).
7. Lightly lubricate charging handle (1) and inner and outer surfaces of the
bolt carrier (14). Generously lubricate sides and cam pin area of bolt
carrier.
8. Lightly lubricate inside receiver extension tube (31).
9. Generously lubricate takedown (13) and pivot (27) pins and detents. Also
lightly lubricate all moving parts inside the lower receiver (32) and their
pivot pins.
- 24 -
Page 25
LUBRICATION (Cont.)
SAFETY DEPENDS ON YOU
4
29
70
32
23
31
12
24
- 25 -
Page 26

SAFETY DEPENDS ON YOU
ASSEMBLY:
BOLT CARRIER
WARNING: DO NOT ATTEMPT TO FIRE THE CARBINE WITHOUT THE
CAM PIN INSTALLED IN THE BOLT GROUP. DOING SO COULD RUPTURE
THE CARTRIDGE INSIDE THE CHAMBER, RELEASING HIGH PRESSURED
GAS TOWARDS THE SHOOTER, CAUSING DAMAGE TO PROPERTY OR
SERIOUS INJURY OR DEATH.
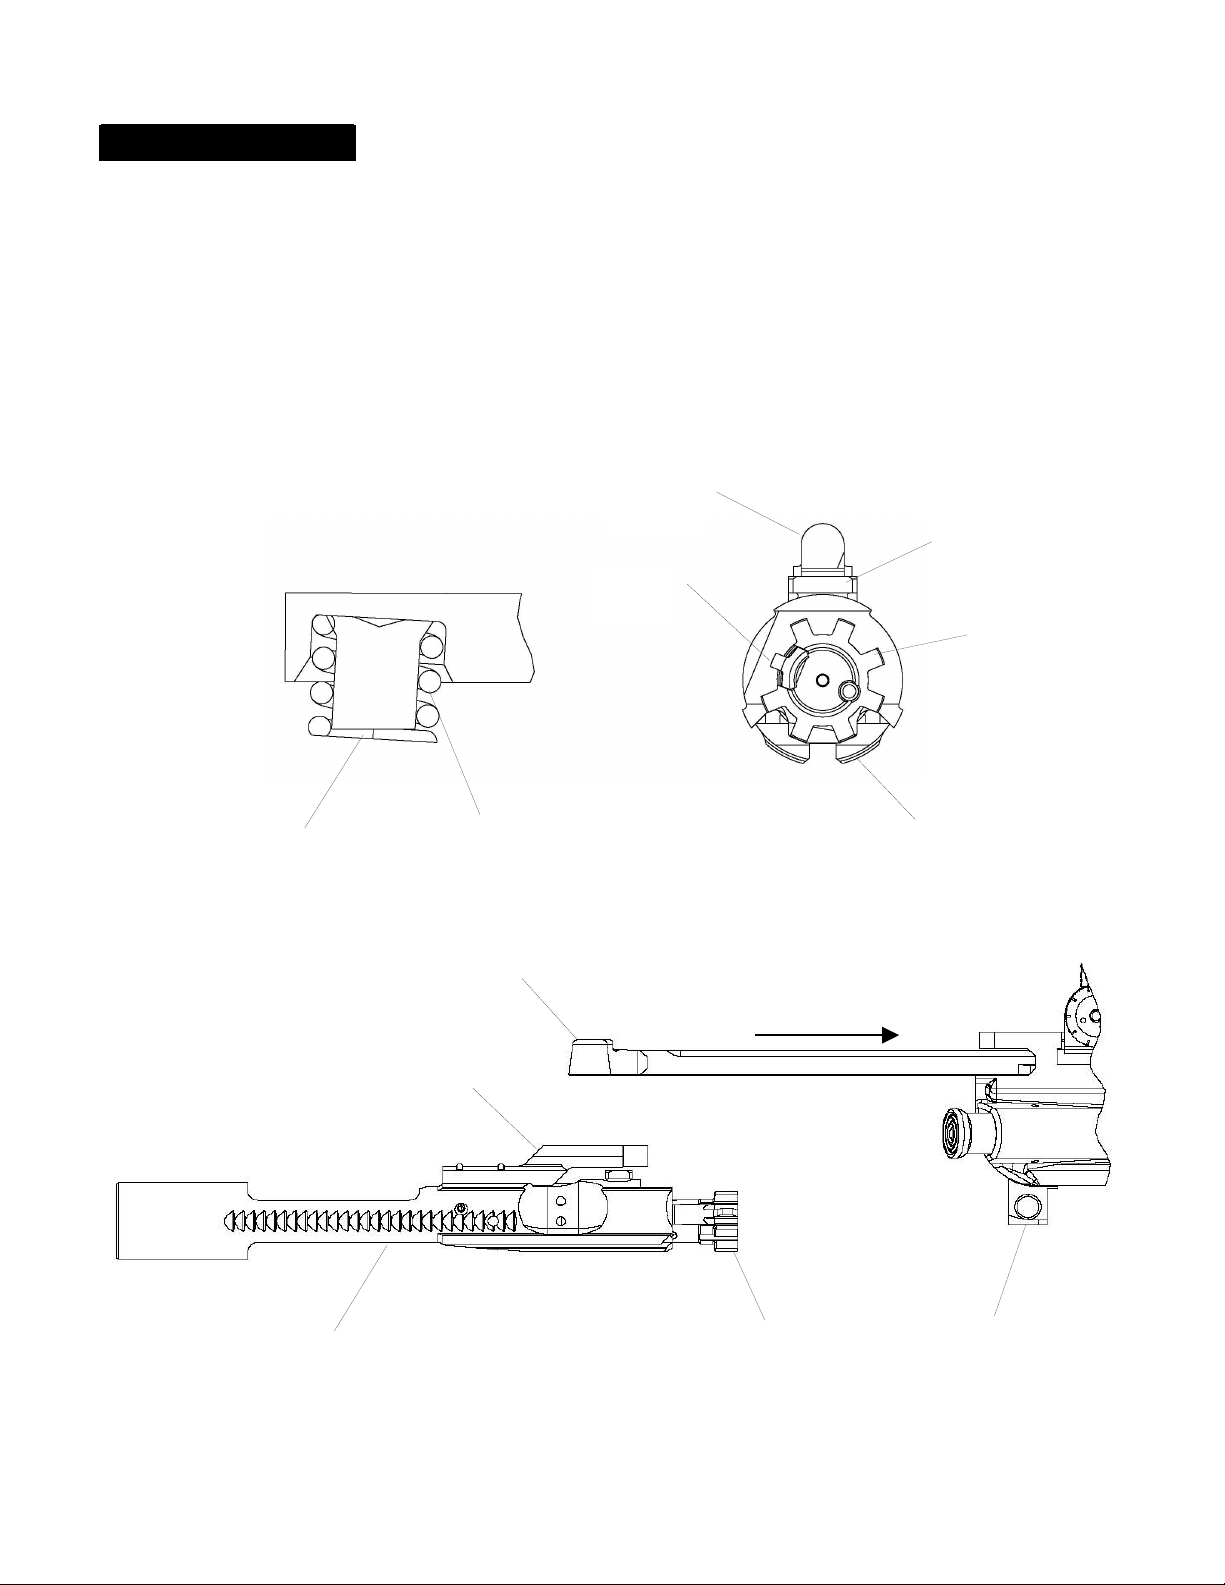
1. To assemble bolt (21), first look at the underside of the extractor (20) and
ensure rubber insert (20a) and extractor spring (20b) are in place. They
should NOT have been removed from the extractor.
2. While holding extractor assembly (20) in place on bolt (21), insert extractor
pin (19) through bolt and extractor.
Note: Stagger gaps on gas rings (33) to prevent gas loss.
3. With bolt (21) oriented to bolt carrier (14), as shown in sketch (Page 27),
insert bolt in bolt carrier.
4. With the extractor (20) at the 10 o’clock position, align the cam pin hole in
bolt (21) with end of cam slot in carrier furthest offset from carrier key (26).
5. Insert cam pin (18) and rotate ¼ turn.
6. Rotate bolt (21) until cam pin (18) is under bolt carrier key.
7. Insert firing pin (16) through rear of bolt carrier (14) and assemble firing pin
to bolt (21). Push firing pin fully forward in bolt and install firing pin
retaining pin (17).
UPPER RECEIVER
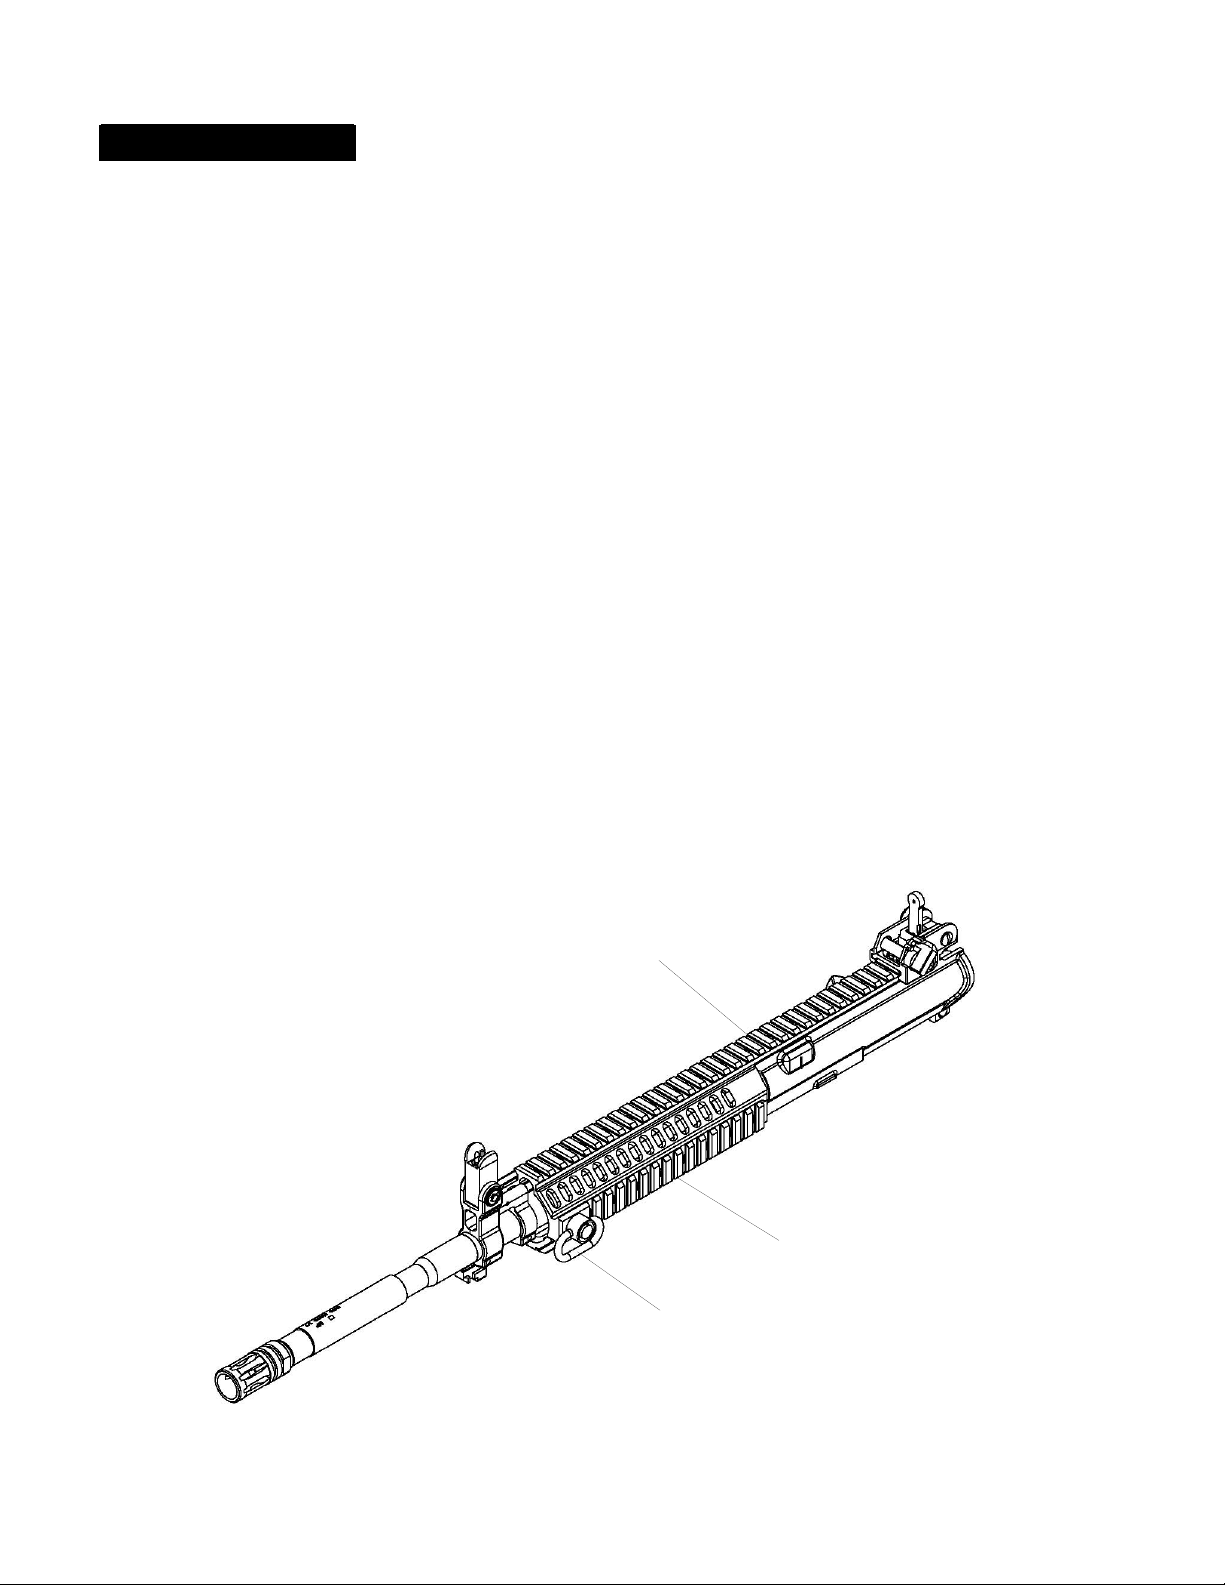
8. Re-install lower rail (62) if removed for cleaning, by inserting tabs into
upper receiver (29) and slide the lower rail (62) rearward until it latches with
the upper receiver (29).
9. Insert quick detachable sling swivel (52) into either the 9 or 3 o’clock rail of
the upper receiver (29).
- 26 -
Page 27
SAFETY DEPENDS ON YOU
ASSEMBLY (Cont.)
10. Place charging handle (1) in upper receiver (29). Push charging handle
forward until three inches from full forward position.
11. Pull the bolt (21) out into the unlocked position (extended). Place the carrier
assembly (3) with the carrier key (26) in slot of charging handle (1). Push
forward on bolt carrier assembly (3) and charging handle (1) until the bolt
fully closes and locks (carrier should be flush with the back of the upper
receiver).
26
18
20
21
20a
20b
1
26
3
21
14
29
- 27 -
Page 28
SAFETY DEPENDS ON YOU
ASSEMBLY (Cont.)
LOWER RECEIVER
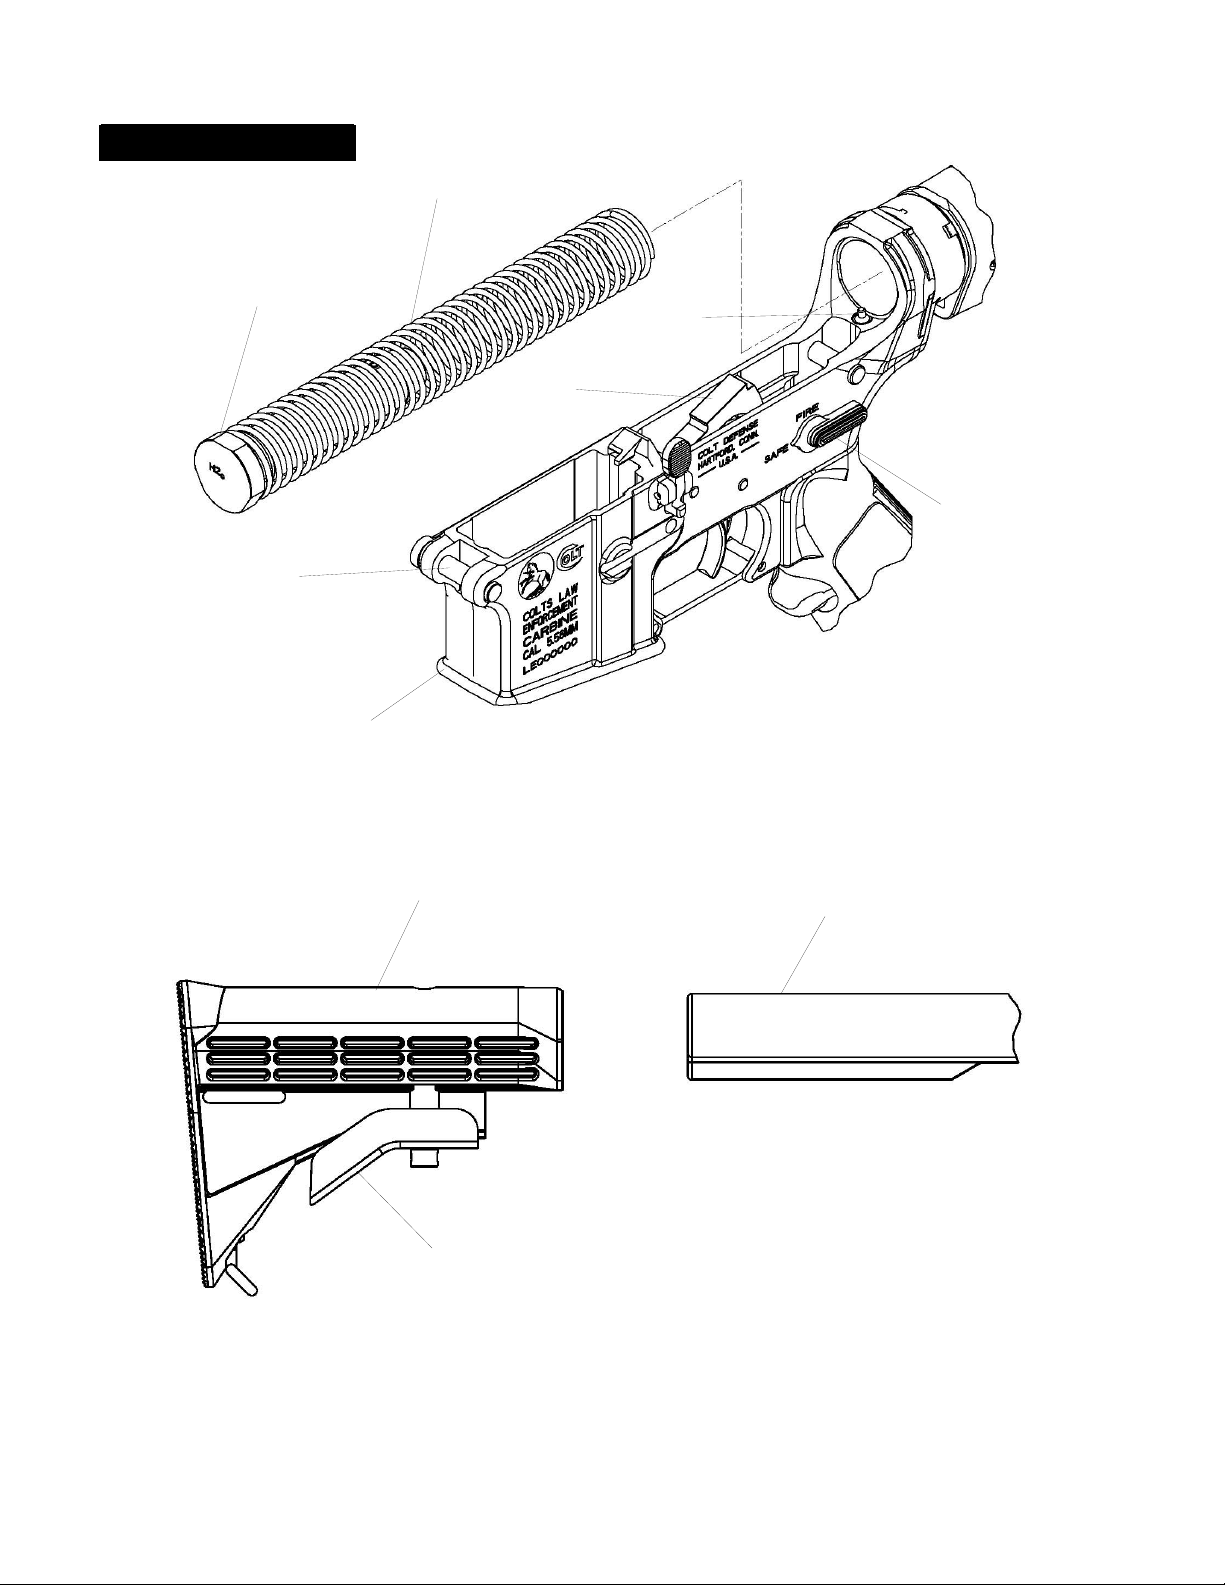
12. Insert buffer assembly (23) into action spring (24) until the spring snaps
onto the collar of the buffer and slide them into lower receiver (32) and
receiver extension tube (31). Push buffer inward until buffer retainer (25)
snaps up to hold buffer assembly (23) in place.
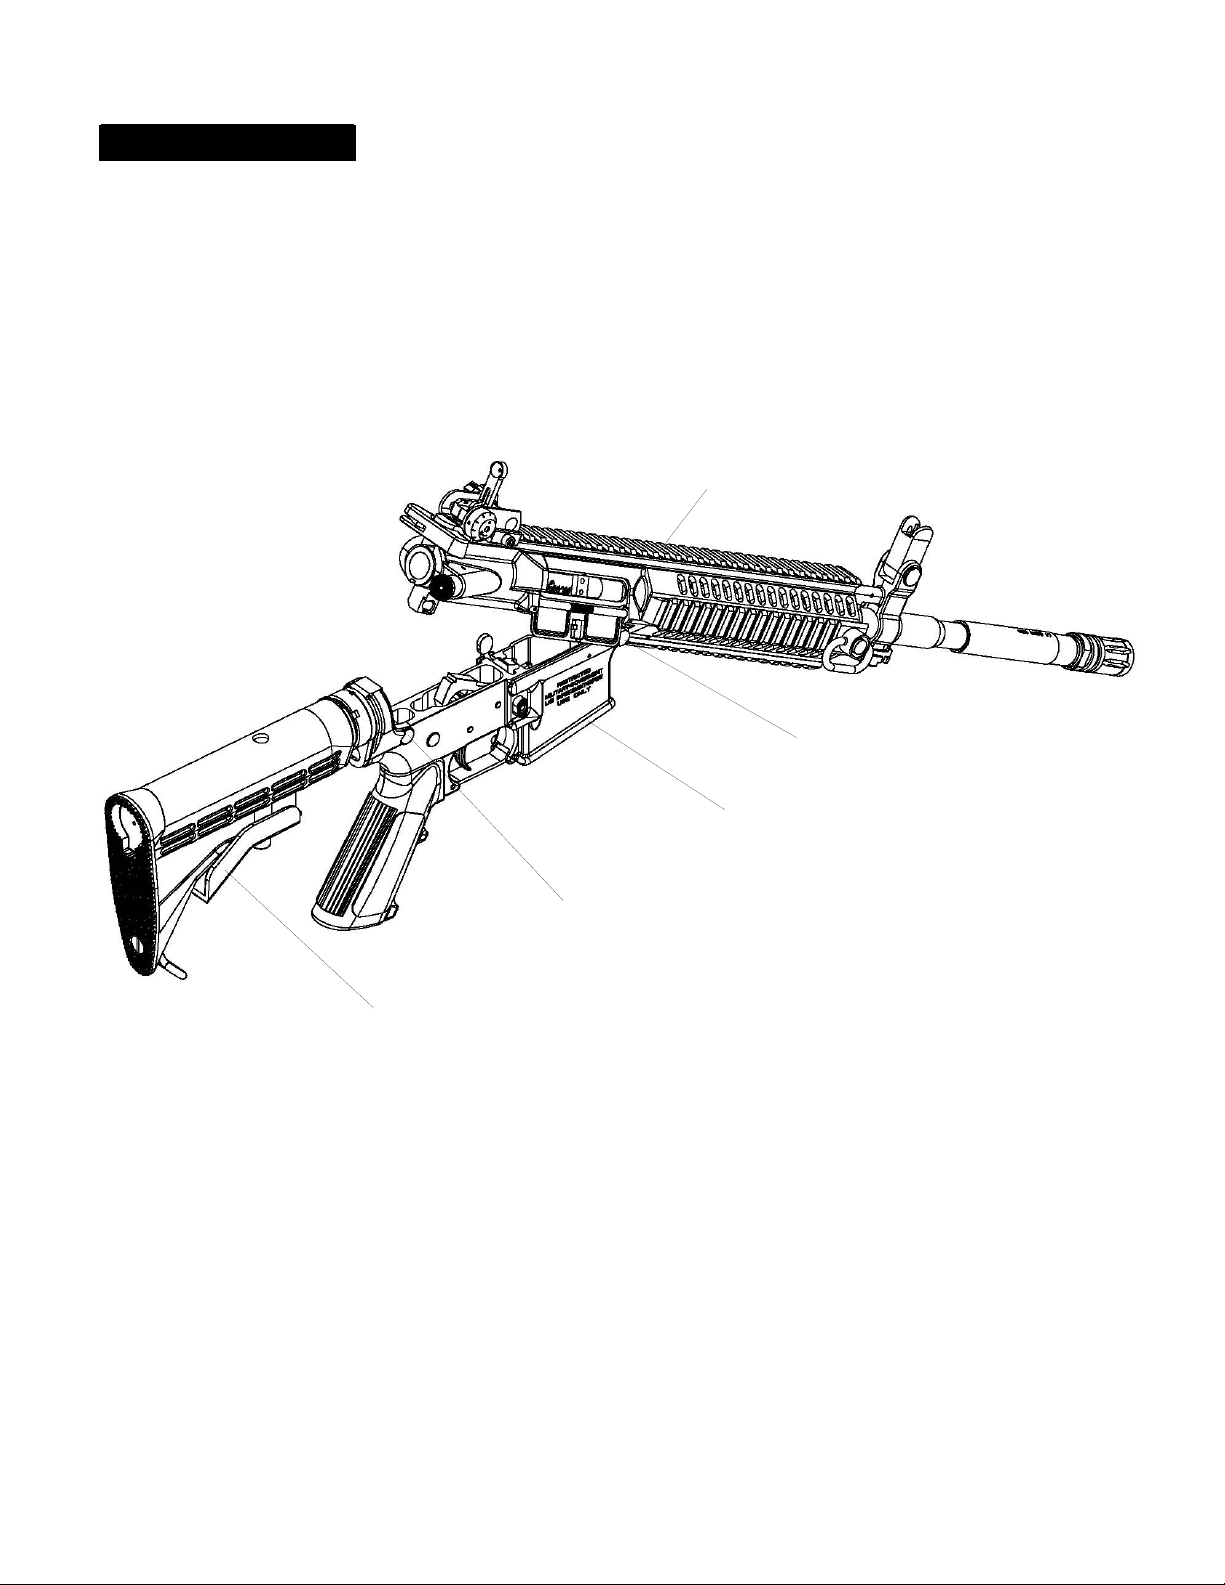
13. Pull buttstock lever (30) down and slide buttstock assembly (12) onto
receiver extension tube (31).
UPPER & LOWER RECEIVERS
14. Rotate hammer (22) rearward until it locks in the cocked position.
15. Rotate selector lever (11) to “SAFE”.
16. Assemble upper receiver (29) to lower receiver (32) so that pivot pin holes
are aligned. Push pivot pin (27) inward until it is flush with the lower
receiver.
17. Close receivers and press takedown pin (13) inward until it is flush with the
lower receiver (32).
29
62
52
- 28 -
Page 29
ASSEMBLY (Cont.)
SAFETY DEPENDS ON YOU
23
25
22
11
27
32
12
31
30
- 29 -
Page 30
ASSEMBLY (Cont.)
SAFETY DEPENDS ON YOU
29
27
32
13
12
- 30 -
Page 31
SAFETY DEPENDS ON YOU
ASSEMBLY (Cont.)
REVERSIBLE SELECTOR LEVER- “SEMI-AUTO” Models Only
The selector lever is reversible, for either left or right hand use. As shipped from
the factory, the selector lever is installed on the left side of the carbine (when
viewed from the rear). The following procedure describes how to disassemble
and reinstall the selector lever to the right side of the carbine.
WARNING: ALWAYS ENSURE THAT THE FIREARM IS UNLOADED
BEFORE DISASSEMBLING. ALWAYS KEEP THE MUZZLE POINTED IN A
SAFE DIRECTION. IF THIS FIREARM IS CARELESSLY OR IMPROPERLY
HANDLED, AN ACCIDENTAL DISCHARGE COULD RESULT AND COULD
CAUSE SERIOUS INJURY, DEATH, OR DAMAGE TO PROPERTY.
1. Rotate selector (11) to “SAFE” position.
2. Press magazine release button (8) and remove magazine (7).
3. Pull charging handle (1) rearward; check that chamber (15) is empty;
release charging handle.
4. Ensure bolt is fully forward, push left end of takedown pin (13) into
receiver. Pull pin to right until stopped by detent.
5. Push pivot pin (27) to right and pull out as far as it will go. Separate
receivers.
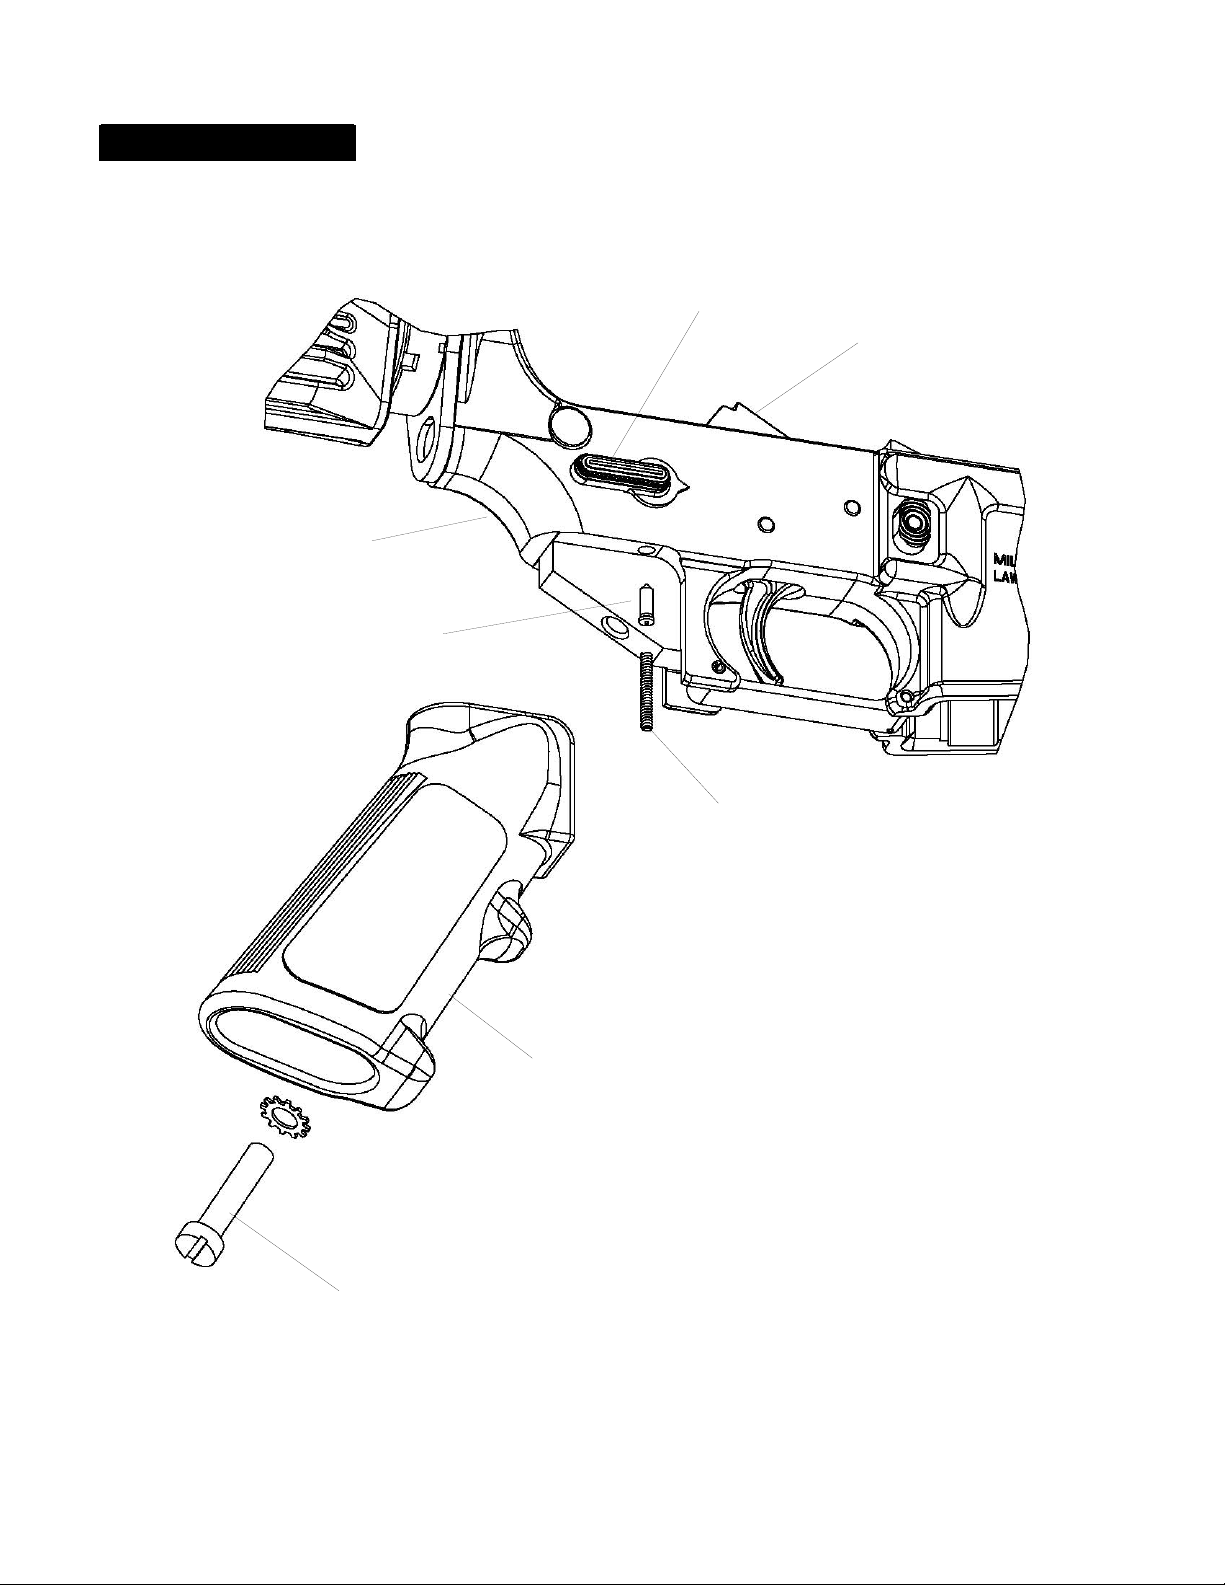
6. Remove pistol grip (25) from lower receiver (32) by removing the pistol
grip screw (45) located inside the pistol grip (25). Be careful not to lose
the selector detent (46) and selector spring (47).
7. With the selector (11) in the “SAFE” position, cock the hammer (22). This
will allow the selector (11) to be removed. If necessary depress the
hammer (22) while pulling the selector (11) out.
8. The selector (11) can now be installed into the selector hole on the right
side of the carbine. Once the selector (11) is inserted into the hole, rotate
the selector (11) so that the indicator point is rotated to the “SAFE”
position (pointing towards the front of the carbine)
9. With the selector (11) installed in the “SAFE” position, reinstall the
selector detent (46) into the lower receiver (32) and then install the
selector spring (47) into the pistol grip (25).
10. Slide the pistol grip (25) onto the lower receiver (32), be careful, do not
kink the detent spring (47) when installing the pistol grip (25).
11. Tighten the pistol grip screw (45), minimum torque of 65 in. lbs.
12. Function test the selector (11) as described on pages 33 & 34, to ensure
that it functions properly.
- 31 -
Page 32
SAFETY DEPENDS ON YOU
ASSEMBLY (Cont.)
REVERSIBLE SELECTOR LEVER (Cont.)
“SEMI-AUTO” Models Only
32
46
11
22
47
25
45
- 32 -
Page 33

SAFETY DEPENDS ON YOU
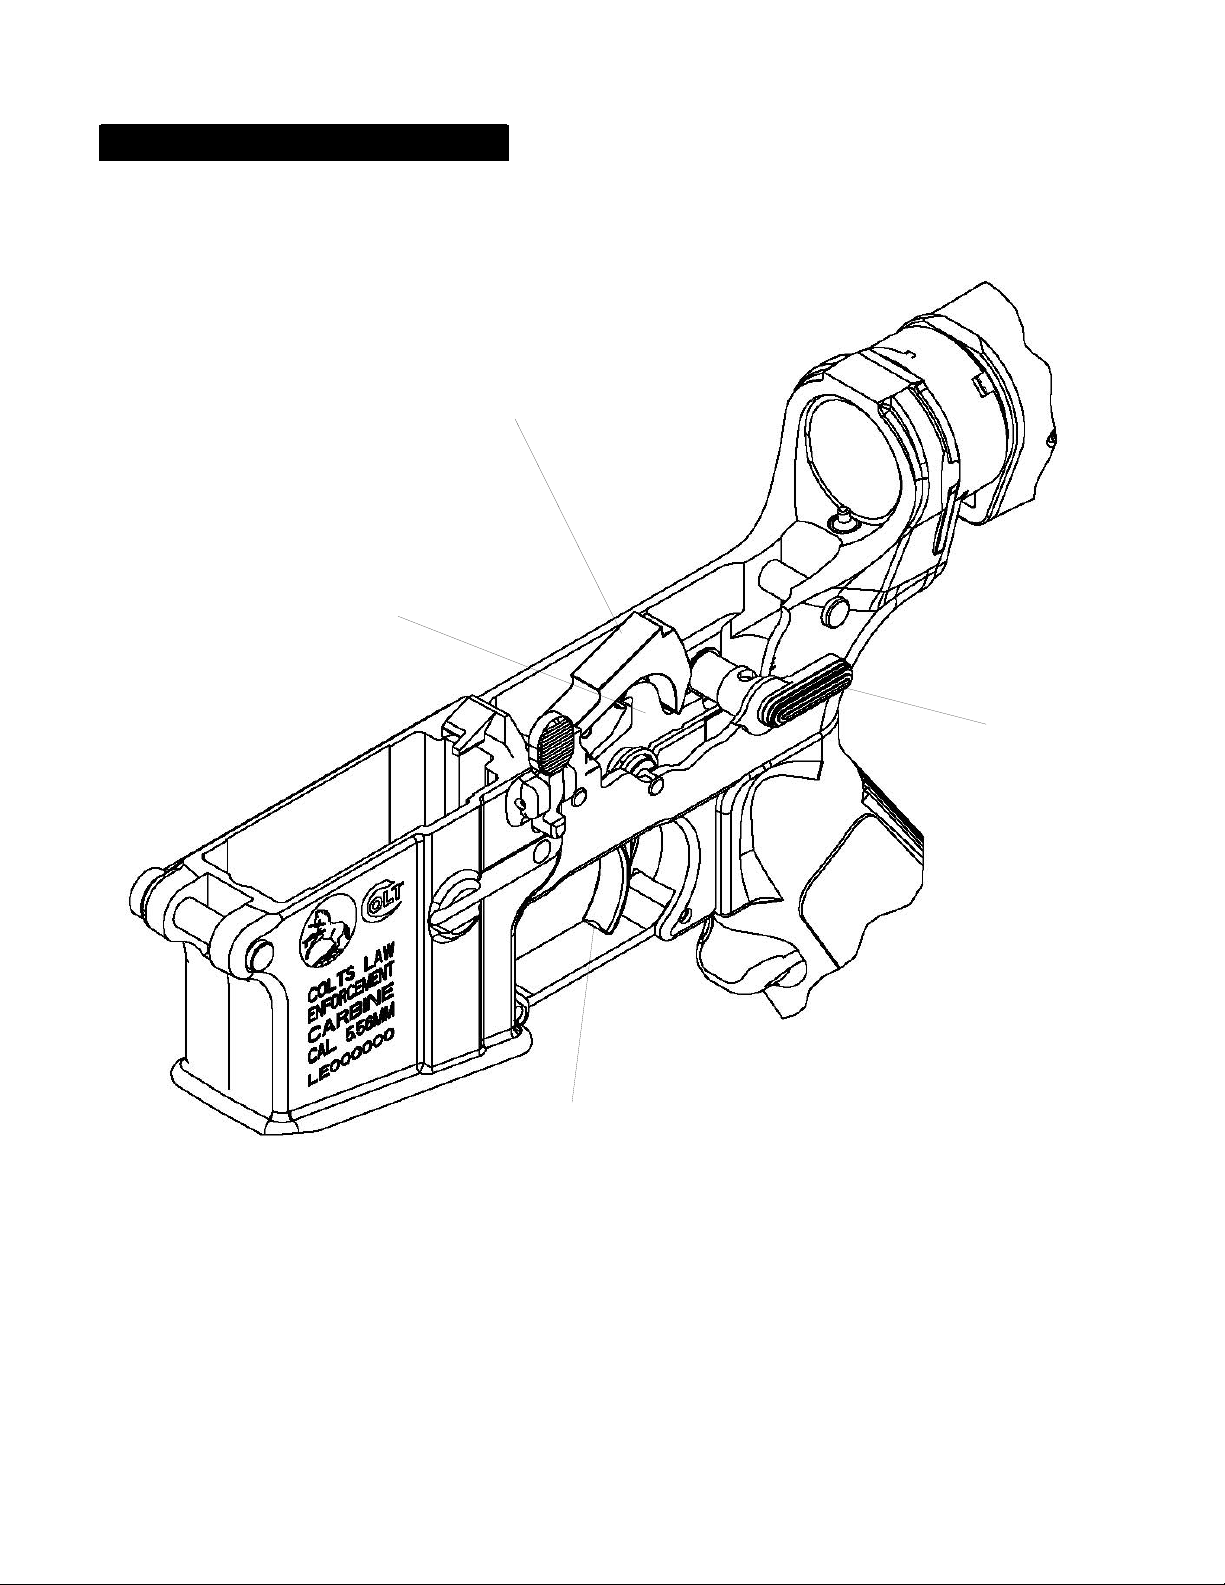
FUNCTIONAL CHECKS
WARNING: ALWAYS ENSURE THAT THE FIREARM IS UNLOADED
BEFORE PERFORMING FUNCTIONAL CHECKS AND ALWAYS KEEP THE
MUZZLE POINTED IN A SAFE DIRECTION. IF THIS FIREARM IS
CARELESSLY OR IMPROPERLY HANDLED, AN ACCIDENTAL
DISCHARGE COULD RESULT AND COULD CAUSE SERIOUS INJURY,
DEATH, OR DAMAGE TO PROPERTY.
The functional checks should always be done after cleaning and assembling the
firearm. If the firearm fails any functional check, make sure the firearm is clean
and assembled properly. If it still fails, have your firearm examined by a
competent gunsmith or return it to Colt for service.
1. Remove magazine and clear the chamber to ensure carbine is not
loaded, as described on page 15 (Actions 1, 2 & 3).
Checking Selector (SAFE)
2. Pull charging handle (1) to rear and release it.
3. Rotate selector lever (11) to “SAFE”.
4. Pull trigger (36). You should hear nothing, as hammer (22) should not fall.
Release trigger (36).
Checking Selector (FIRE OR SEMI)
5. Rotate selector lever (11) to “FIRE” or “SEMI”.
6. Pull and hold trigger (36). You should hear an audible click as hammer (22)
falls.
7. Pull charging handle (1) to rear and release it while keeping trigger (36)
pulled. Hammer (22) should not fall but be held by the disconnector (37).
8. Release trigger (36). You should hear a light audible click as hammer (22) is
released from the disconnector (37) and drops part way to engage with
trigger.
9. Pull trigger (36). You should hear an audible click as hammer (22) falls.
- 33 -
Page 34
SAFETY DEPENDS ON YOU
FUNCTIONAL CHECKS (Cont.)
Checking Selector (AUTO)
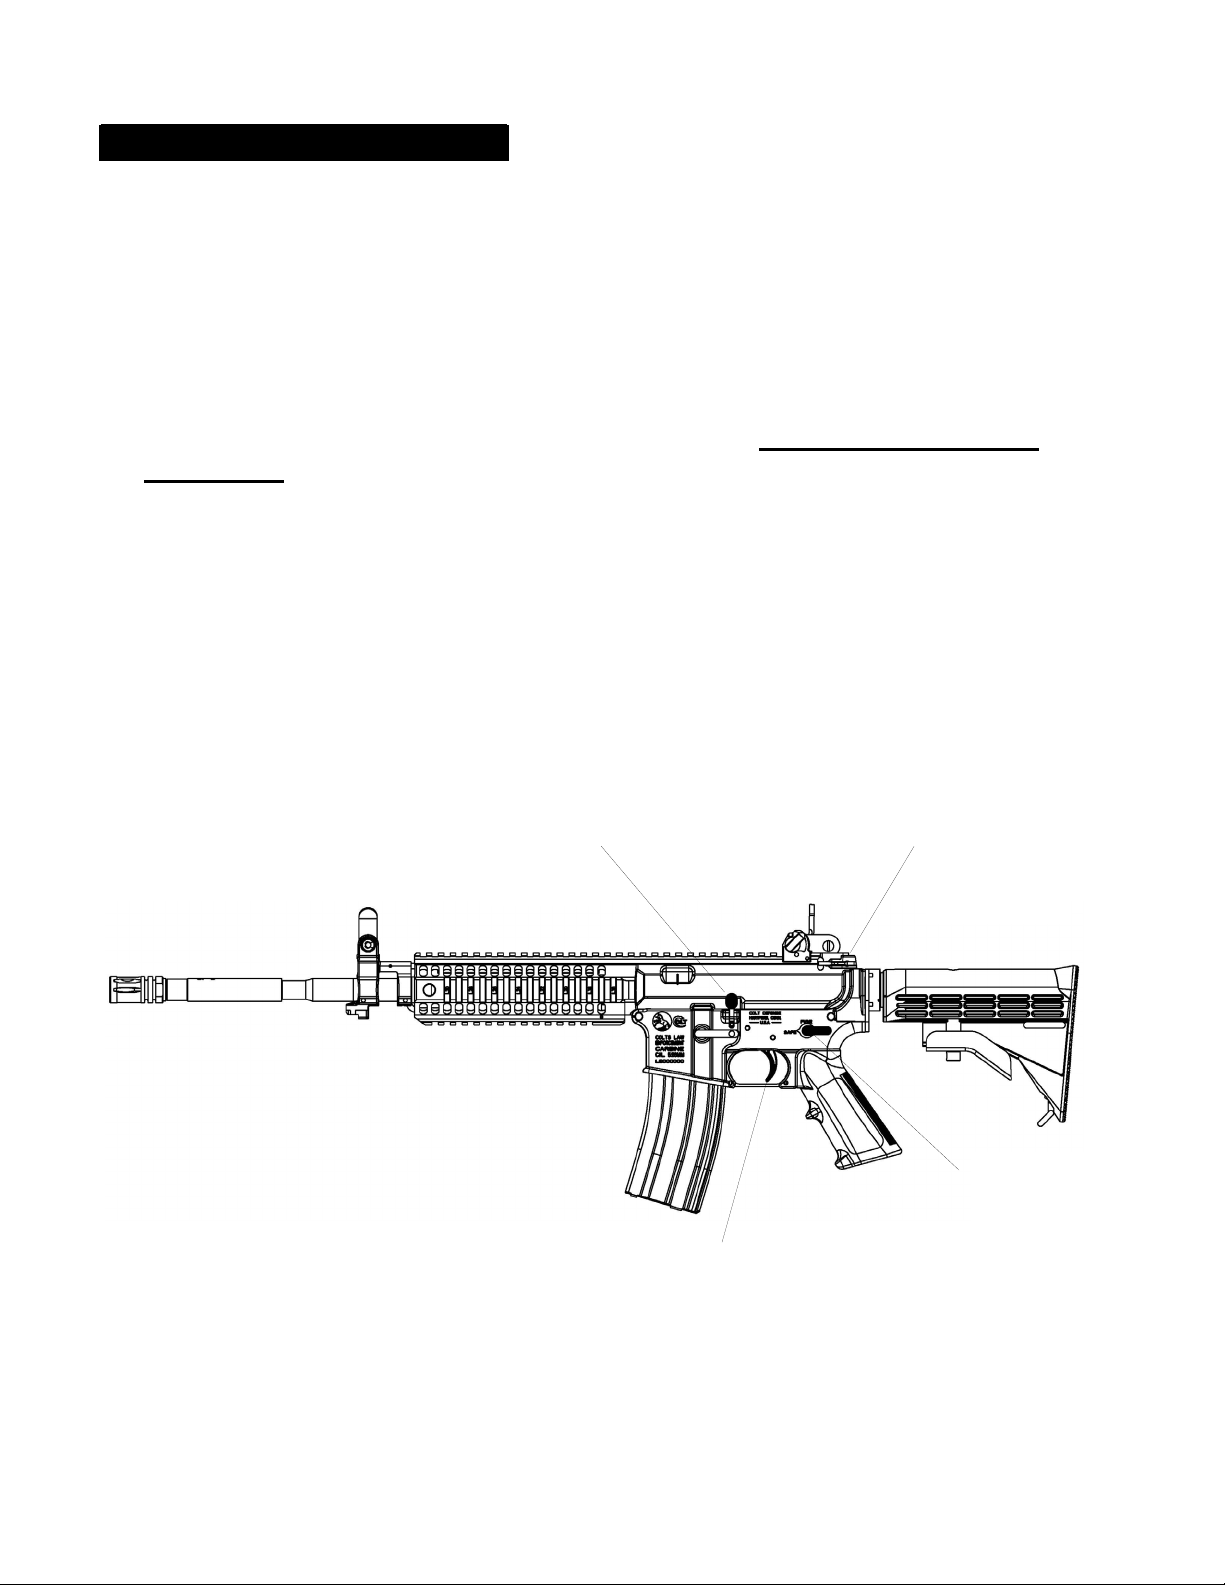
10. Rotate selector lever (11) to “AUTO”.
11. Pull and hold trigger (36). You should hear a loud click as hammer (22)
falls.
12. Pull charging handle (1) to rear and release it while keeping trigger
(36) pulled.
13. Release trigger (36), no click should be heard.
14. Pull trigger (36), no click should be heard.
15. Pull and release charging handle (1) while keeping trigger (36) pulled.
16. Release trigger (36), no click should be heard.
10
1
11
36
- 34 -
Page 35
SAFETY DEPENDS ON YOU
FUNCTIONAL CHECKS (Cont.)
22
37
11
36
- 35 -
Page 36
SAFETY DEPENDS ON YOU
FUNCTIONAL CHECKS (Cont.)
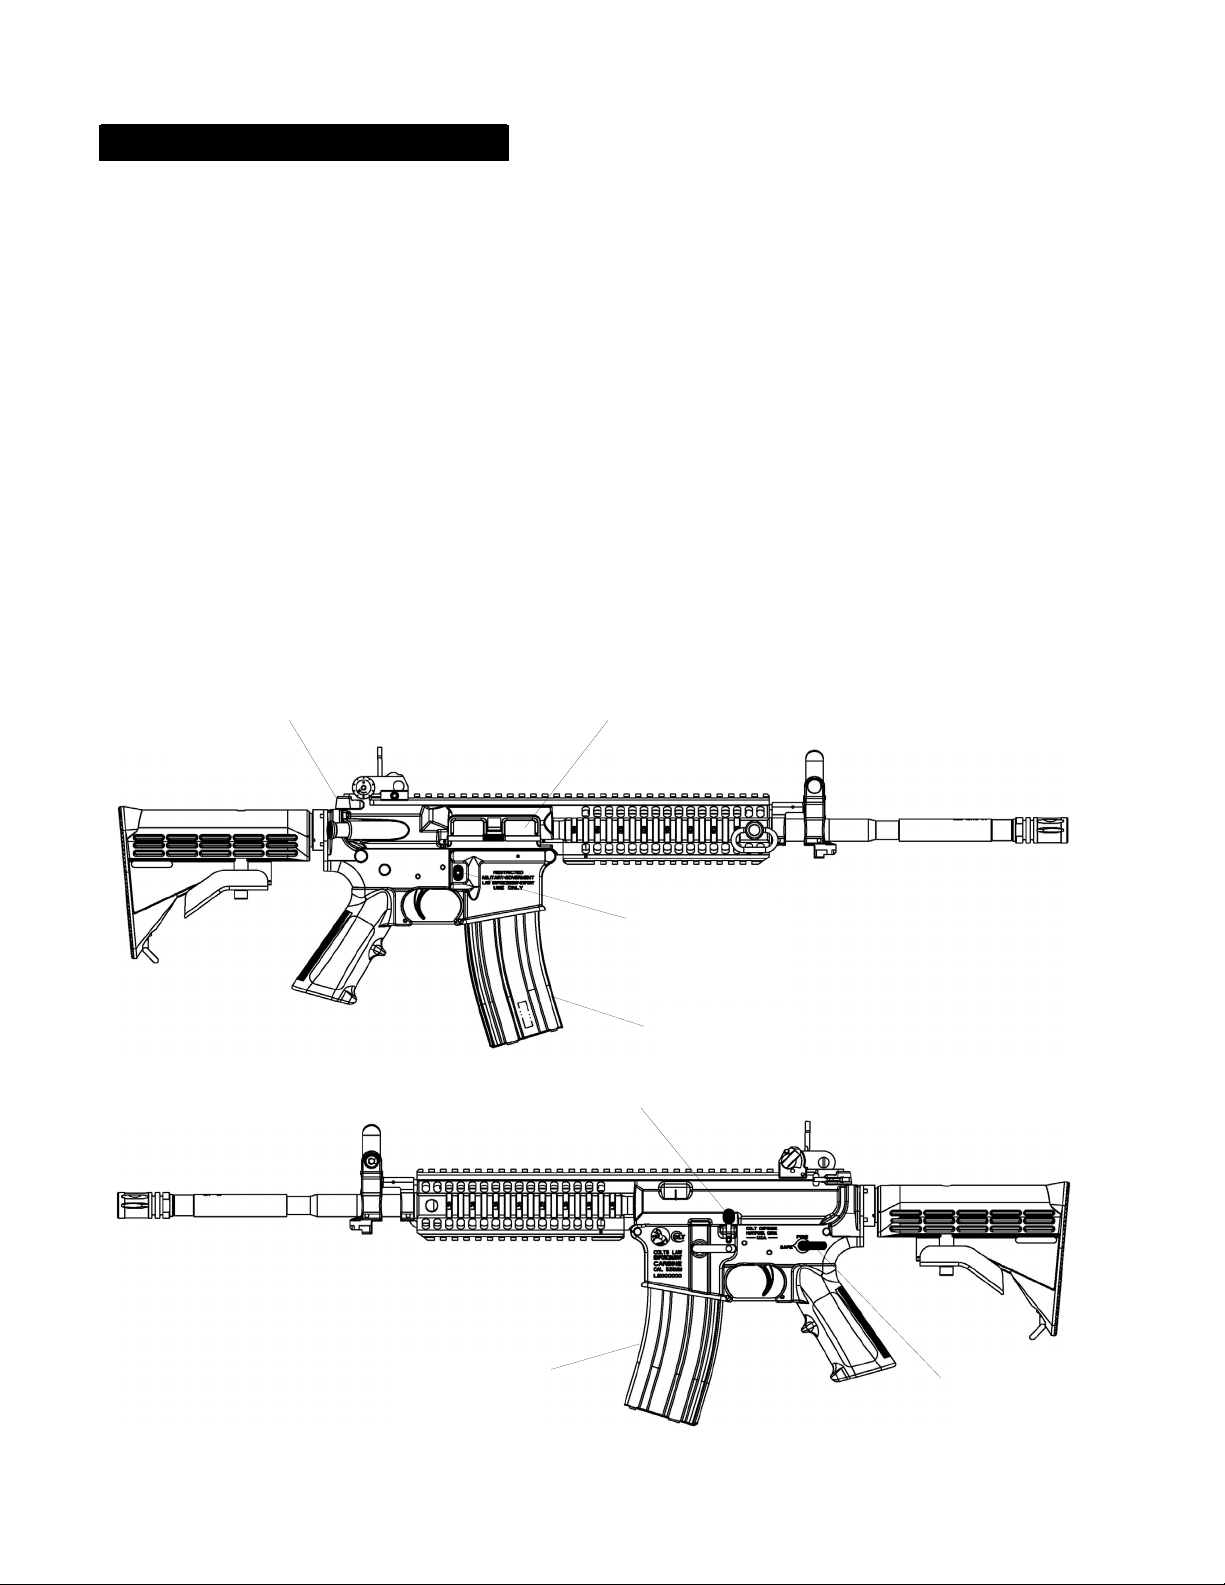
Checking Magazine Catch and Bolt Catch
17. Install an empty magazine and check that it is locked in place by the
magazine catch (8).
18. With empty magazine installed, rotate fire control selector (11) to “FIRE” or
“SEMI”.
19. Pull charging handle (1) fully back and then push it forward into locked
position. Bolt carrier assembly (3) should be held to the rear by the bolt
catch (10).
20. KEEP FINGERS CLEAR OF EJECTION PORT. Push top of bolt catch
(10) in to release bolt carrier assembly (3), so that the carrier assembly
moves forward into the locked position. Release top of bolt catch (10).
21. Rotate fire control selector (11) to “SAFE”.
22. Close ejection port dust cover (6).
1 6
8
7
7
- 36 -
10
11
Page 37

SAFETY DEPENDS ON YOU
MALFUNCTION AND TROUBLESHOOTING
MALFUNCTION
Failure to fire.
Failure to unlock (bolt seizes –
will not rotate from locked
position).
WARNING: MAKE CERTAIN TO BE CLEAR OF THE
MUZZLE SO THAT IF THERE IS AN ACCIDENTAL
DISCHARGE OF FIREARM, YOU AND OTHERS WILL
AVOID INJURY, DEATH OR DAMAGE TO PROPERTY.
STRIKE BUTT SQUARELY ON GROUND TO PREVENT
DAMAGE TO BUTTSTOCK.
PROBABLE CAUSE
1. Selector lever on SAFE.
2. Damaged firing pin.
3. Improper assembly of firing
pin in bolt carrier group.
4. Fire control mechanism
improperly assembled or with
worn, broken or missing
parts.
5. Trigger pin improperly
installed.
1. Bolt group, firing pin, or barrel
burred, dirty or carbon fouled.
- 37 -
CORRECTIVE ACTION
Rotate selector to “FIRE”,
“SEMI”, or “AUTO”
Replace.
Remove firing pin and install
correctly. Inspect retaining pin
for damage.
Take or send the firearm to Colt
for service.
Take or send the firearm to Colt
for service.
Rotate selector lever (11) to
“SAFE”. Remove magazine.
Hold firearm pointing up (stay
clear of muzzle) and strike butt
sharply and squarely on ground
while pulling back on charging
handle.
Remove bolt group, clean and
lubricate.
Page 38

SAFETY DEPENDS ON YOU
MALFUNCTION AND TROUBLESHOOTING (Cont.)
Failure to extract. 1. Dirty or corroded Ammunition. Remove ammunition from magazine
and clean both.
2. Carbon and dirt build-up in Clean chamber.
chamber.
3. Carbon and dirt build-up in Disassemble and clean.
extractor recess or extractor
lip.
4. Defective extractor, extractor Replace.
spring or pin.
5. Rubber insert not assembled in Replace.
extractor spring.
6. Due to badly pitted chamber. Take or send the firearm to Colt for
service.
7. Separated cartridge case. Take or send the firearm to Colt for
service.
Failure to eject. 1. Broken ejector. Take or send the firearm to Colt for
2. Jammed ejector. Service.
3. Weak or broken ejector spring.
4. Short recoil. See “Short Recoil” in malfunction
column.
- 38 -
Page 39

SAFETY DEPENDS ON YOU
MALFUNCTION AND TROUBLESHOOTING (Cont.)
Failure to remain cocked. 1. Worn, broken, or missing parts Take or send the firearm to Colt for
in fire control mechanism. Service.
2. Hammer pin incorrectly installed. Remove and install correctly.
Failure to feed. 1. Magazine not seated properly. Magazine catch may not be
properly adjusted. Take or send the
firearm to Colt for adjustment.
2. Dirty or corroded ammunition. Remove ammunition from
magazine and clean both.
3. Dirty magazine. Disassemble and clean.
4. Defective magazine. Replace.
5. Too many cartridges in magazine. Reload.
CAUTION: Do not load the magazine beyond its rated capacity. Overloading a
magazine can damage the feed lips and cause the firearm to malfunction.
6. Restricted buffer action. Remove and clean
buffer and action spring.
7. Short recoil. See “Short Recoil” in malfunction
column.
- 39 -
Page 40

SAFETY DEPENDS ON YOU
MALFUNCTION AND TROUBLESHOOTING (Cont.)
Double feed. 1. Defective magazine. Replace magazine.
Failure to chamber.
1. Dirty or corroded ammunition.
Remove ammunition from magazine
and clean both.
2. Restricted movement of bolt
carrier group.
Disassemble and thoroughly clean and
lubricate the firearm. Remove charging
handle from upper receiver, point
receiver upward, and install bolt carrier
group in receiver. Slowly slide carrier
into receiver to check alignment and
free movement of carrier. If binding
occurs, take or send the firearm to Colt
for service.
3. Bolt cam pin missing.
Replace.
4. Loose or damaged bolt carrier key.
5. Improperly assembled extractor
Take or send the firearm to Colt for
service.
Check for proper installation.
spring.
6. Damaged ammunition. Replace.
7. Carbon build-up in chamber. Clean chamber.
- 40 -
Page 41

SAFETY DEPENDS ON YOU
MALFUNCTION AND TROUBLESHOOTING (Cont.)
Failure to lock.
1. Dirt, corrosion and carbon build-
up on bolt or barrel locking lugs.
2. Jammed extractor.
Clean.
Clean and lubricate.
3. Dirt on bolt face. Clean.
4. Jammed ejector. Take or send the firearm to Colt for
service.
5. Restricted buffer movement. Remove and clean and lubricate buffer,
action spring and inside receiver
extension.
6. Damaged ammunition. Replace.
7. Weak or broken action spring.
Replace.
Short recoil. 1. Restricted movement of bolt
carrier group or buffer.
See “Failure to Lock” in malfunction
column.
2. Missing or loose carrier key. Take or send the firearm to Colt for
service.
- 41 -
Page 42

SAFETY DEPENDS ON YOU
MALFUNCTION AND TROUBLESHOOTING (Cont.)
Bolt fails to lock to rear after
last shot fired.
1. Dirty or corroded bolt catch. Clean and lubricate. If further
disassembly is necessary. Take or send
the firearm to Colt for service.
2. Faulty magazine. Replace.
Fires with selector set on
“SAFE”.
1. Worn, broken or missing parts in
fire control mechanism.
Take or send the firearm to Colt for
service.
With selector on “FIRE”,
fires when trigger is
1. Worn, broken or missing part in
fire control mechanism.
Take or send the firearm to Colt for
service.
released.
Selector lever binds. 1. Lack of cleanliness. Clean.
Note: Most of the malfunctions noted could also be caused by damaged, faulty or dirty ammunition. Where
this is especially likely, a particular note has been included. But in all instances it is good practice to make
sure that the ammunition is not the problem before investigating the firearm.
- 42 -
Page 43
SAFETY DEPENDS ON YOU
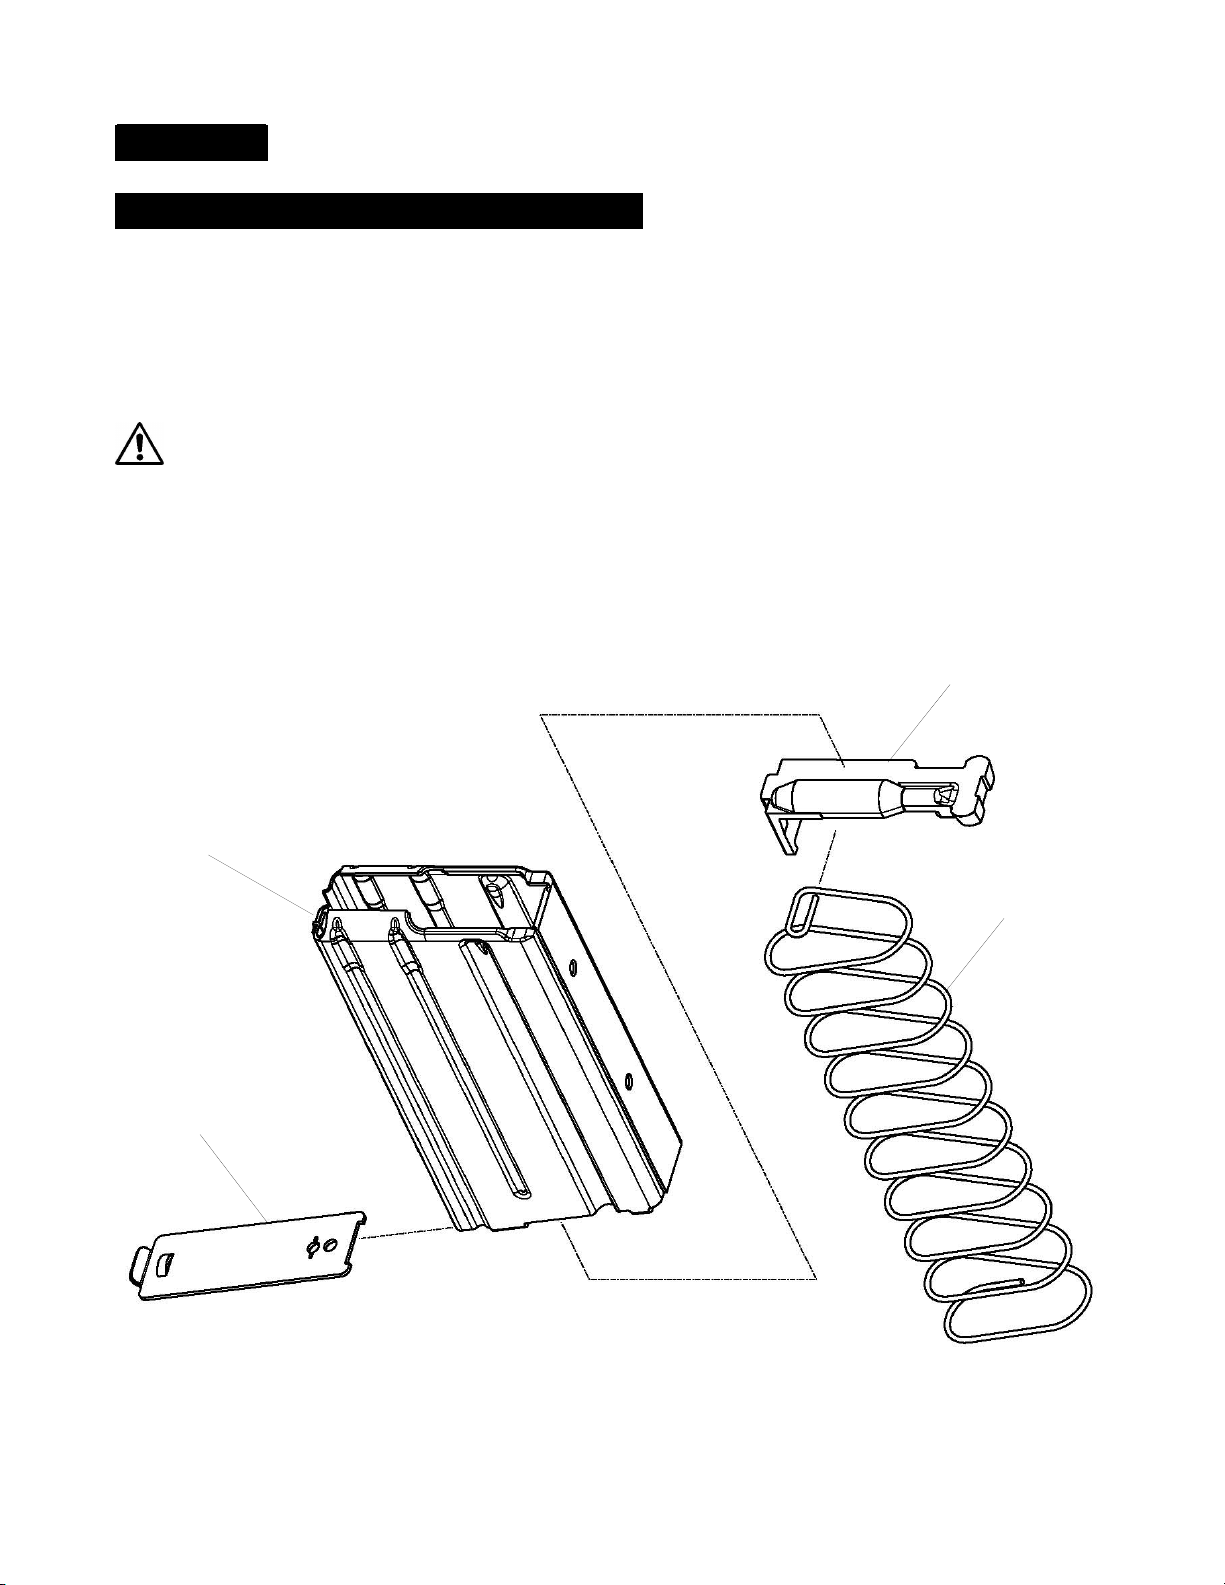
MAGAZINE
Standard M4/M16 Aluminum Magazines
The Colt Advanced Law Enforcement Carbines are fully compatible with
standard issue M4/M16 magazines.
1. Pry upward on the rear of the magazine floorplate (39) and slide the
floorplate off the rear of the magazine body (7).
WARNING: Spring is under pressure and failure to exercise caution
could result in serious injury.
2. Remove magazine spring (40) and follower (41).
Standard 20 Round Magazine
7
40
39
- 43 -
Page 44
SAFETY DEPENDS ON YOU
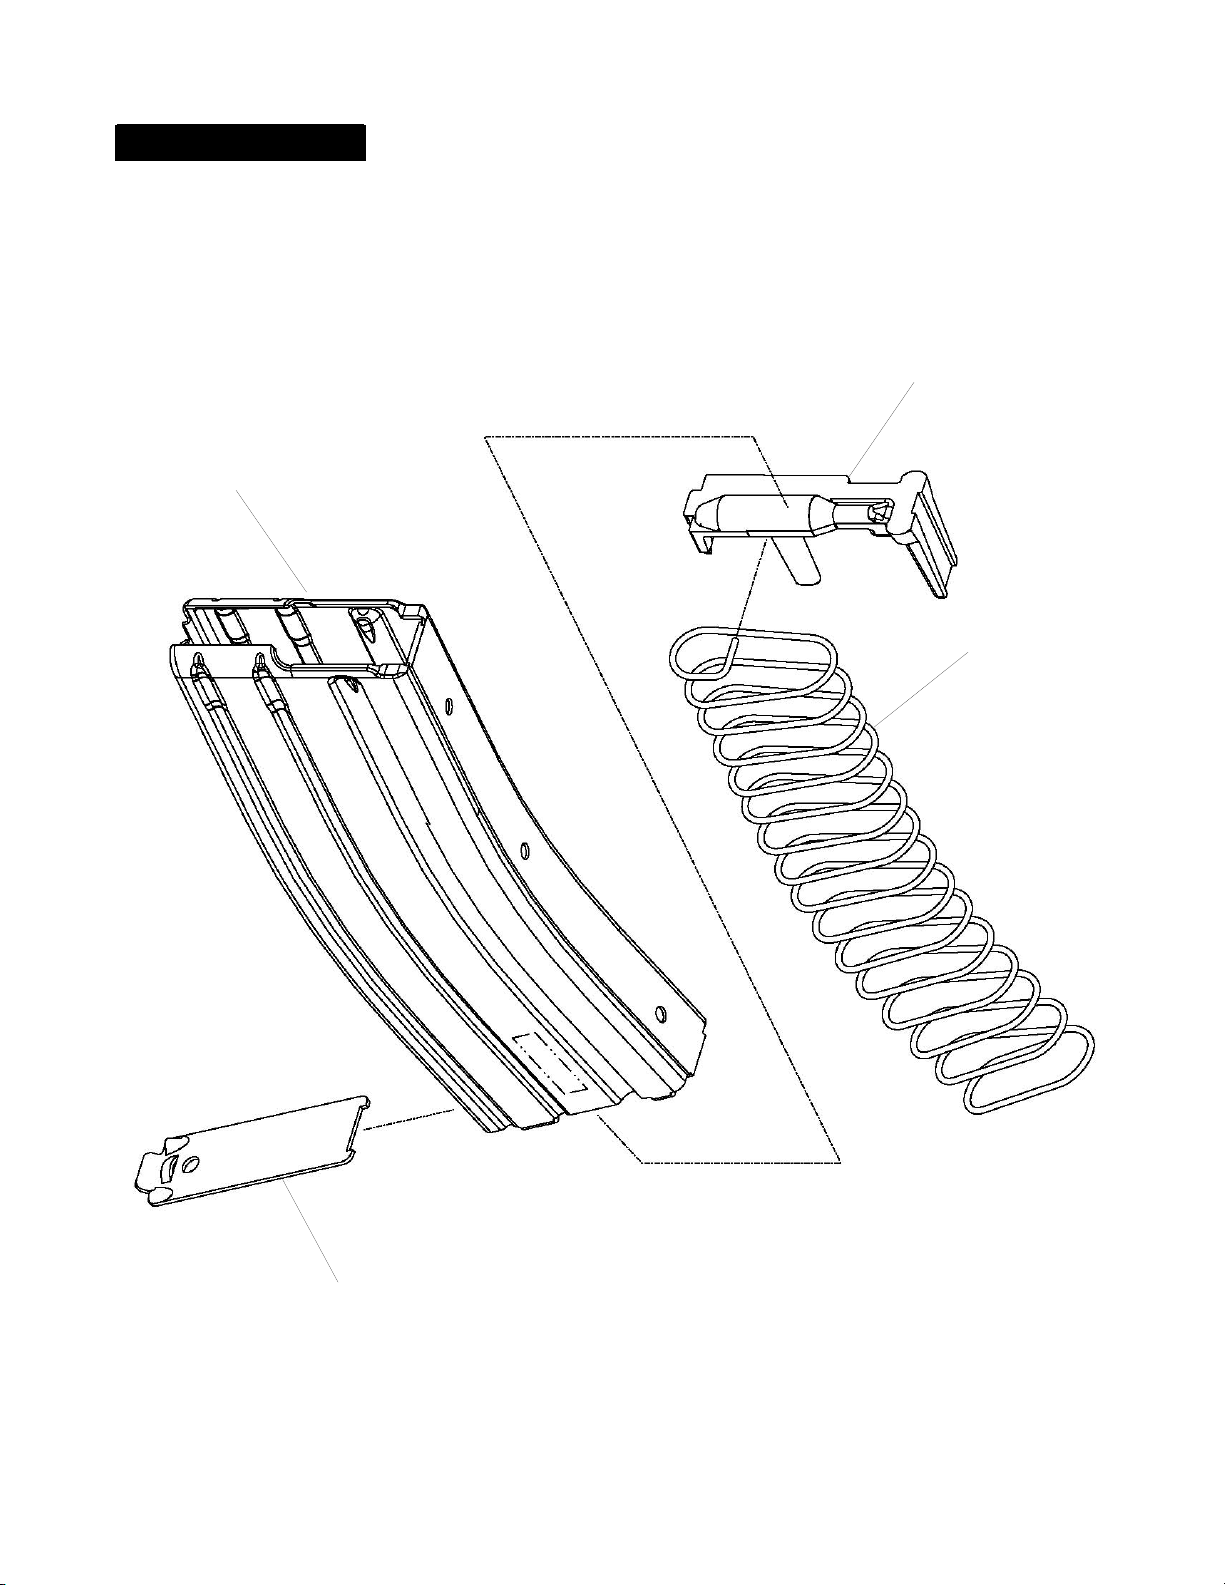
MAGAZINE (Cont.)
Optional 30 Round Magazine
7
41
40
39
- 44 -
Page 45
OPERATION
FOLDING SIGHTS
SAFETY DEPENDS ON YOU
68
69
69
2
4
66
67
66
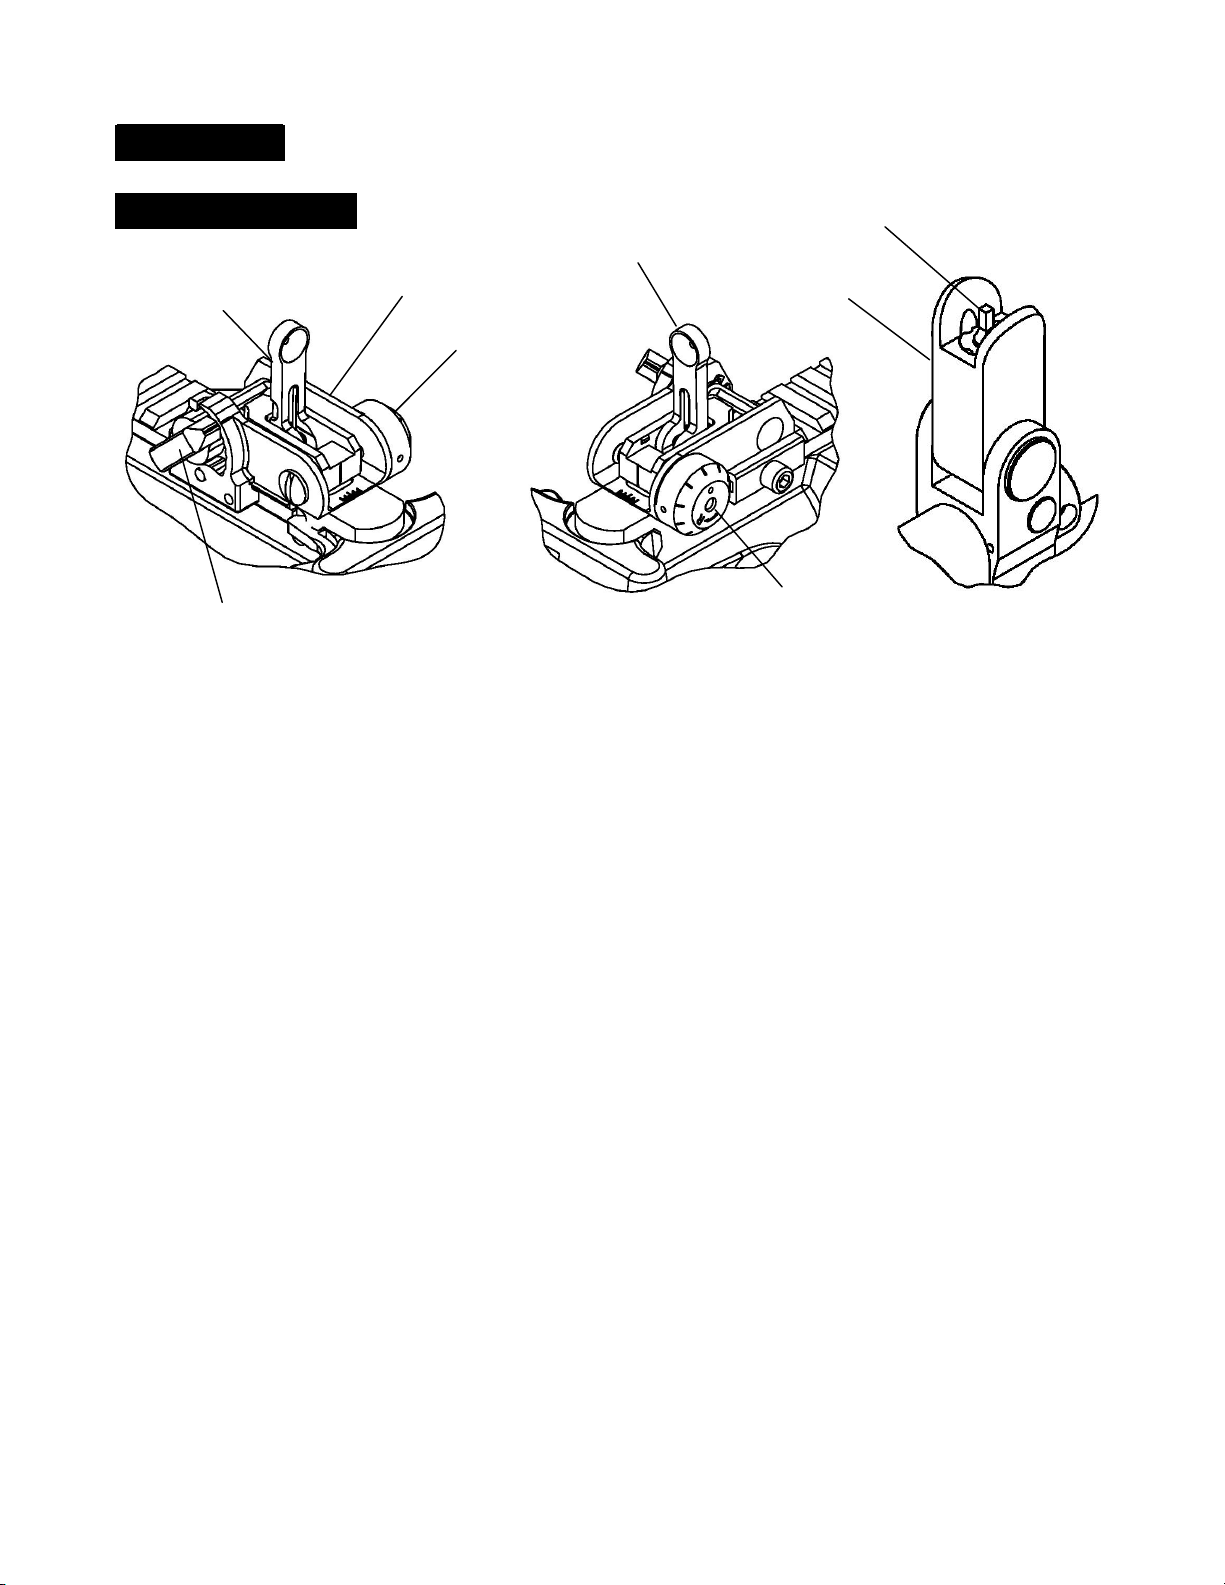
Backup Iron Sight (BUIS) Front Sight- Adjustable
Adjustable for windage and elevation for elevation only
1. Rear sight (2) is adjustable for windage (66) and elevation (67). The sight
is calibrated to make effective use of M855 ball ammunition.
2. The windage knob (66) is adjustable such that each click moves point of
impact horizontally on the target. To move point of impact to right, turn
windage knob clockwise; to move point of impact to left, turn windage
knob counter-clockwise.
3. The front sight post (68) is adjustable in elevation for zeroing only. It is
not used to adjust elevation at any other time. To raise the strike of the
bullet, depress the front sight detent and rotate the front sight post
clockwise. Reverse the direction of rotation to lower the strike of the
bullet.
4. To zero with M855 ammunition, use the M4 25 Meter Zero Target at 25M.
5. The rear aperture (69) should be up and the rear sight should be set at the
line below the 300-meter mark. Any changes in elevation will be made
with the front sight post (68) during zeroing.
- 45 -
Page 46
SAFETY DEPENDS ON YOU
FOLDING SIGHTS (Cont.)
6. Aim at the center of the target. Adjust your shot group with the front sight
post (68) and rear sight windage knob (66) to hit the white dot in the
center of the target. Turn the windage knob counterclockwise in order to
move the shot group to the left. Turn clockwise to move the group to the
right. When your group is centered, your firearm is zeroed for 300 meters.
7. When zeroing at 10M, set the sights so that M855 groups approximately 5
blocks below the center.
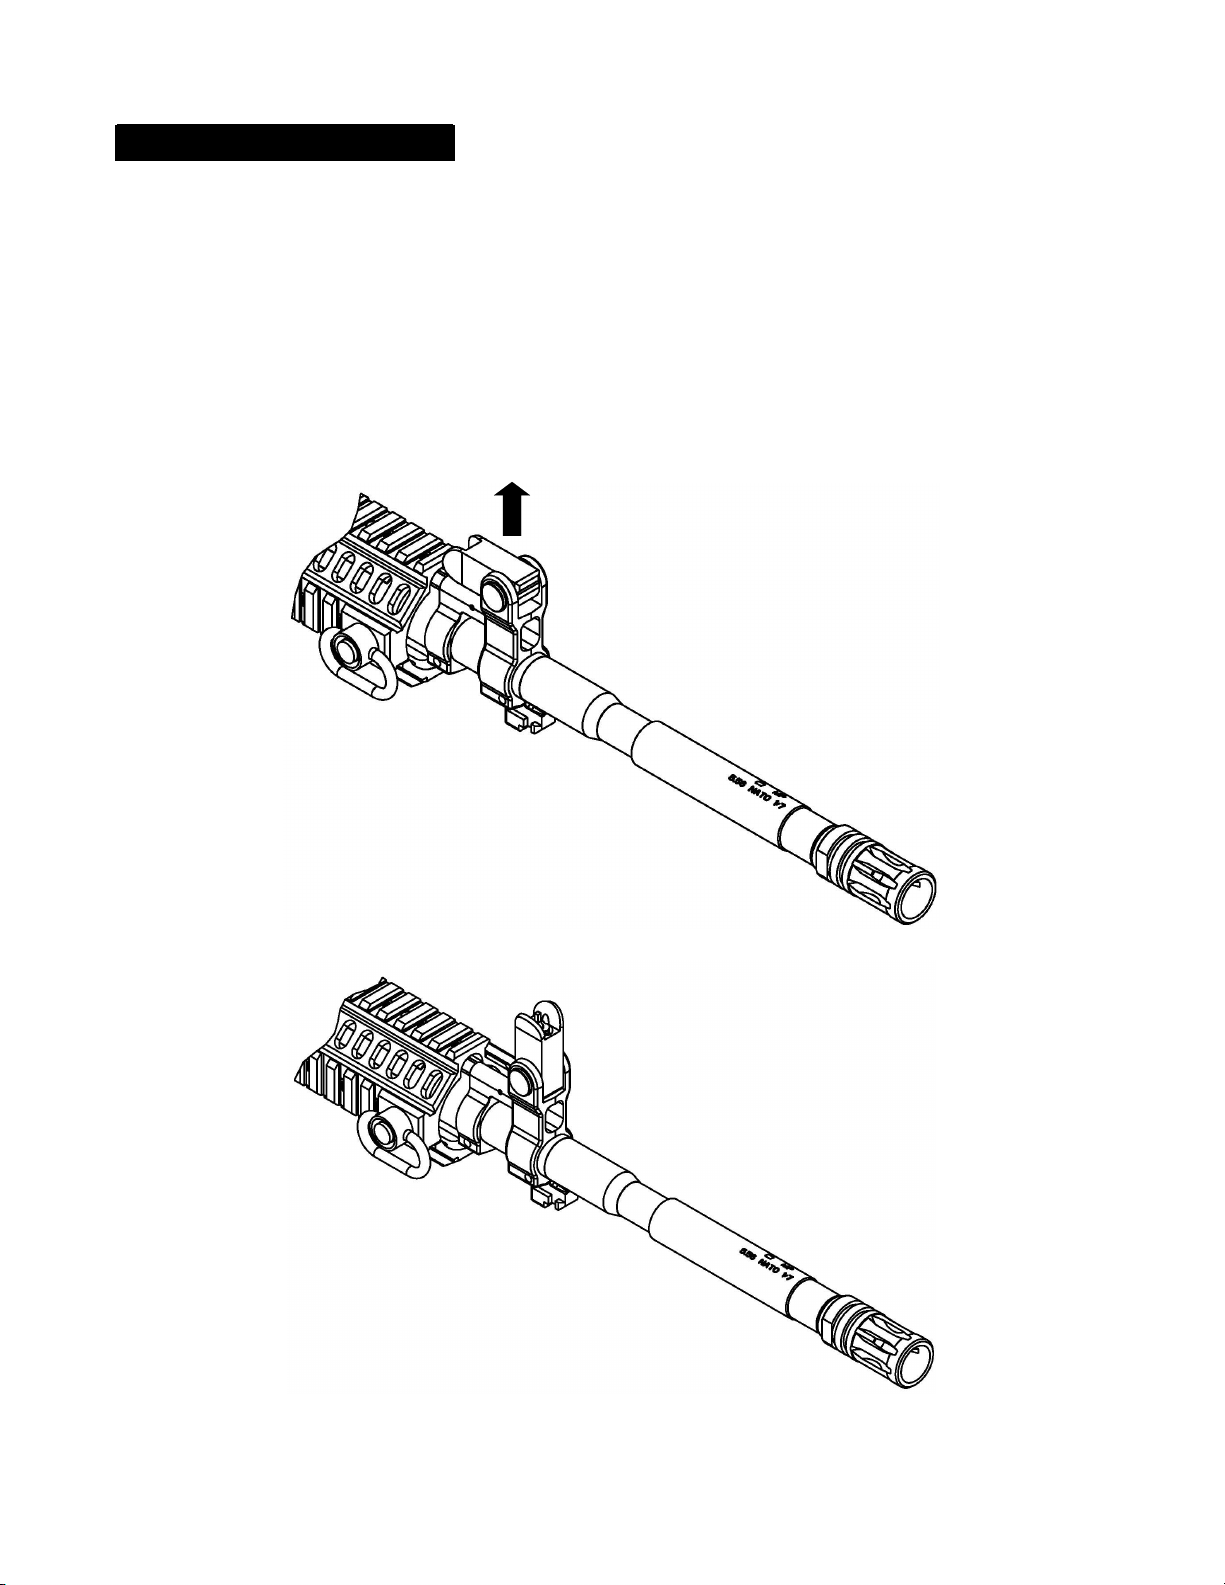
To engage the front sight (4) lift upward on the folding front sight.
- 46 -
Page 47
SAFETY DEPENDS ON YOU
OPERATION (Cont.)
LOADING
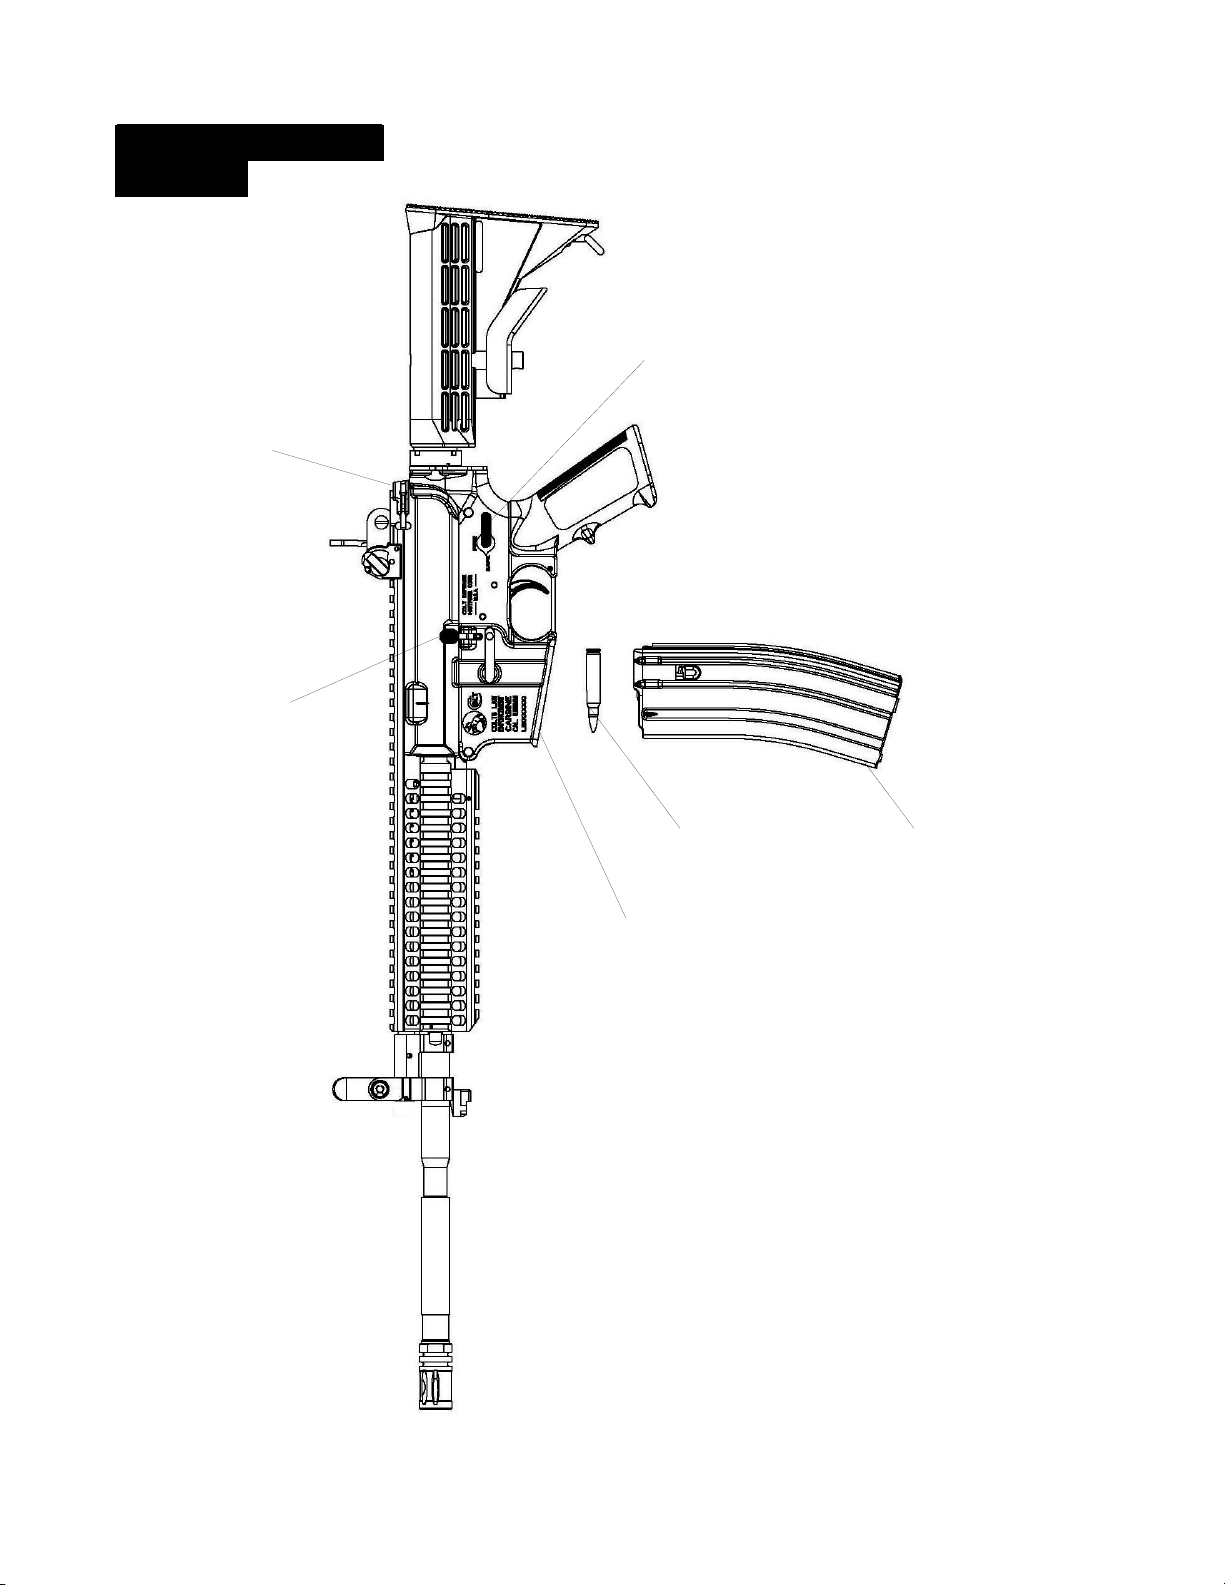
1. Place cartridge (61) in magazine (7) and press down.
2. Repeat step 1 until magazine is loaded with required number of
cartridges.
CAUTION: DO NOT LOAD MORE CARTRIDGES THAN DESIGNATED
INTO THE MAGAZINE. THIS CAN DAMAGE THE MAGAZINE FEED LIPS
AND CAUSE THE FIREARM TO MALFUNCTION.
3. Pull charging handle (1) to rear. Push in lower portion of bolt catch (10).
Push charging handle forward to latched position.
WARNING: BE SURE FIRE CONTROL SELECTOR (11) IS IN SAFE
POSITION PRIOR TO LOADING. IF THIS FIREARM IS CARELESSLY OR
IMPROPERLY HANDLED, AN ACCIDENTAL DISCHARGE COULD RESULT
AND COULD CAUSE SERIOUS INJURY, DEATH, OR DAMAGE TO
PROPERTY.
4. Rotate fire control selector lever (11) to “SAFE”.
5. Insert magazine (7) into magazine well (32a) and ensure magazine catch
(8) is engaged.
6. Press upper portion of bolt catch (10) to release bolt and chamber
cartridge.
WARNING: FIREARM IS NOW LOADED. IF IT IS NOT TO BE FIRED,
UNLOAD THE FIREARM AS EXPLAINED ON PAGE 51. IF THIS FIREARM
IS CARELESSLY OR IMPROPERLY HANDLED, UNINTENTIONAL
DISCHARGE COULD RESULT AND COULD CAUSE INJURY, DEATH OR
DAMAGE TO PROPERTY. (Also see pages 3 & 4 for more
WARNINGS)
WARNING: IF THE BARREL IS VERY HOT FROM FIRING THERE IS A
RISK THAT A CARTRIDGE IN THE CHAMBER COULD DISCHARGE BY
ABSORBING HEAT FROM THE BARREL (“COOK-OFF”). THIS CAN
OCCUR AT ANT TIME. WHEN COOK-OFF IS SUSPECTED, THE CHAMBER
MUST BE CLEARED IMMEDIATELY AFTER FIRING. ALWAYS KEEP THE
FIREARM POINTED IN A SAFE DIRECTION TO PREVENT SERIOUS
INJURY OR DEATH.
- 47 -
Page 48
OPERATION (Cont.)
LOADING
1
SAFETY DEPENDS ON YOU
11
10
7 61
32a
- 48 -
Page 49
SAFETY DEPENDS ON YOU
OPERATION (Cont.)
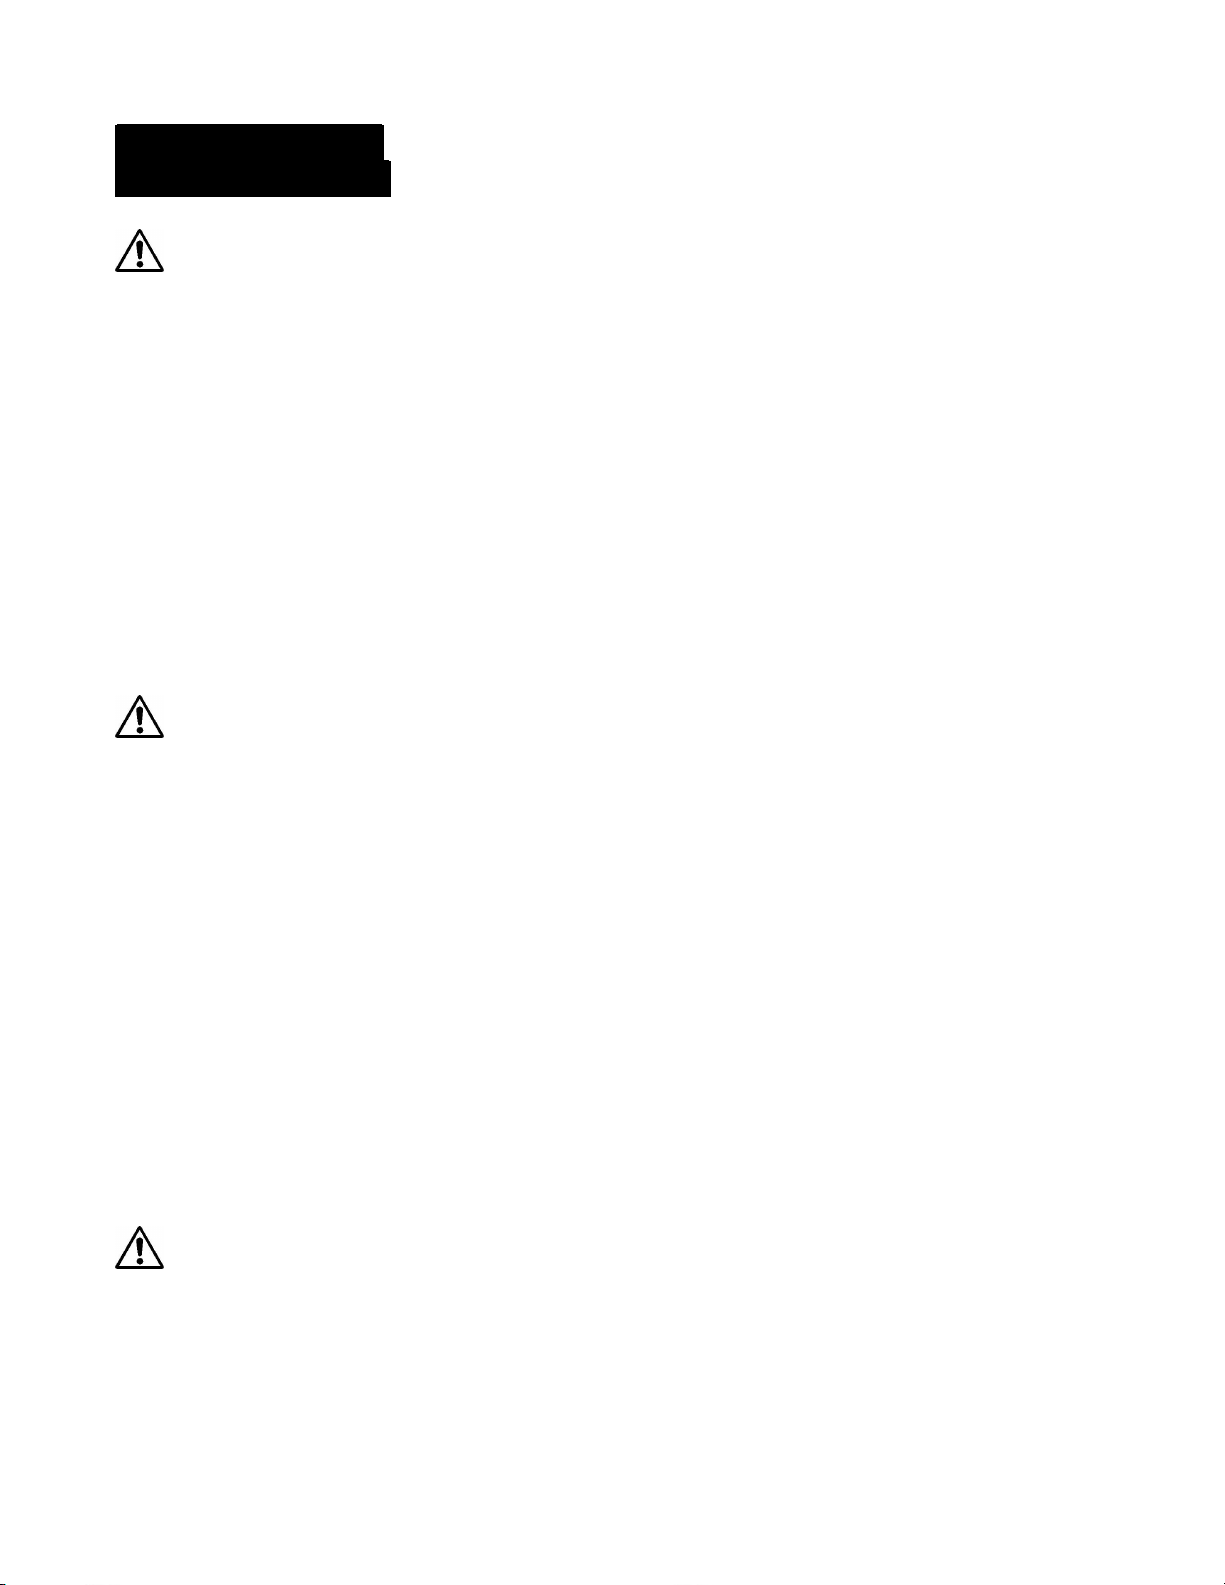
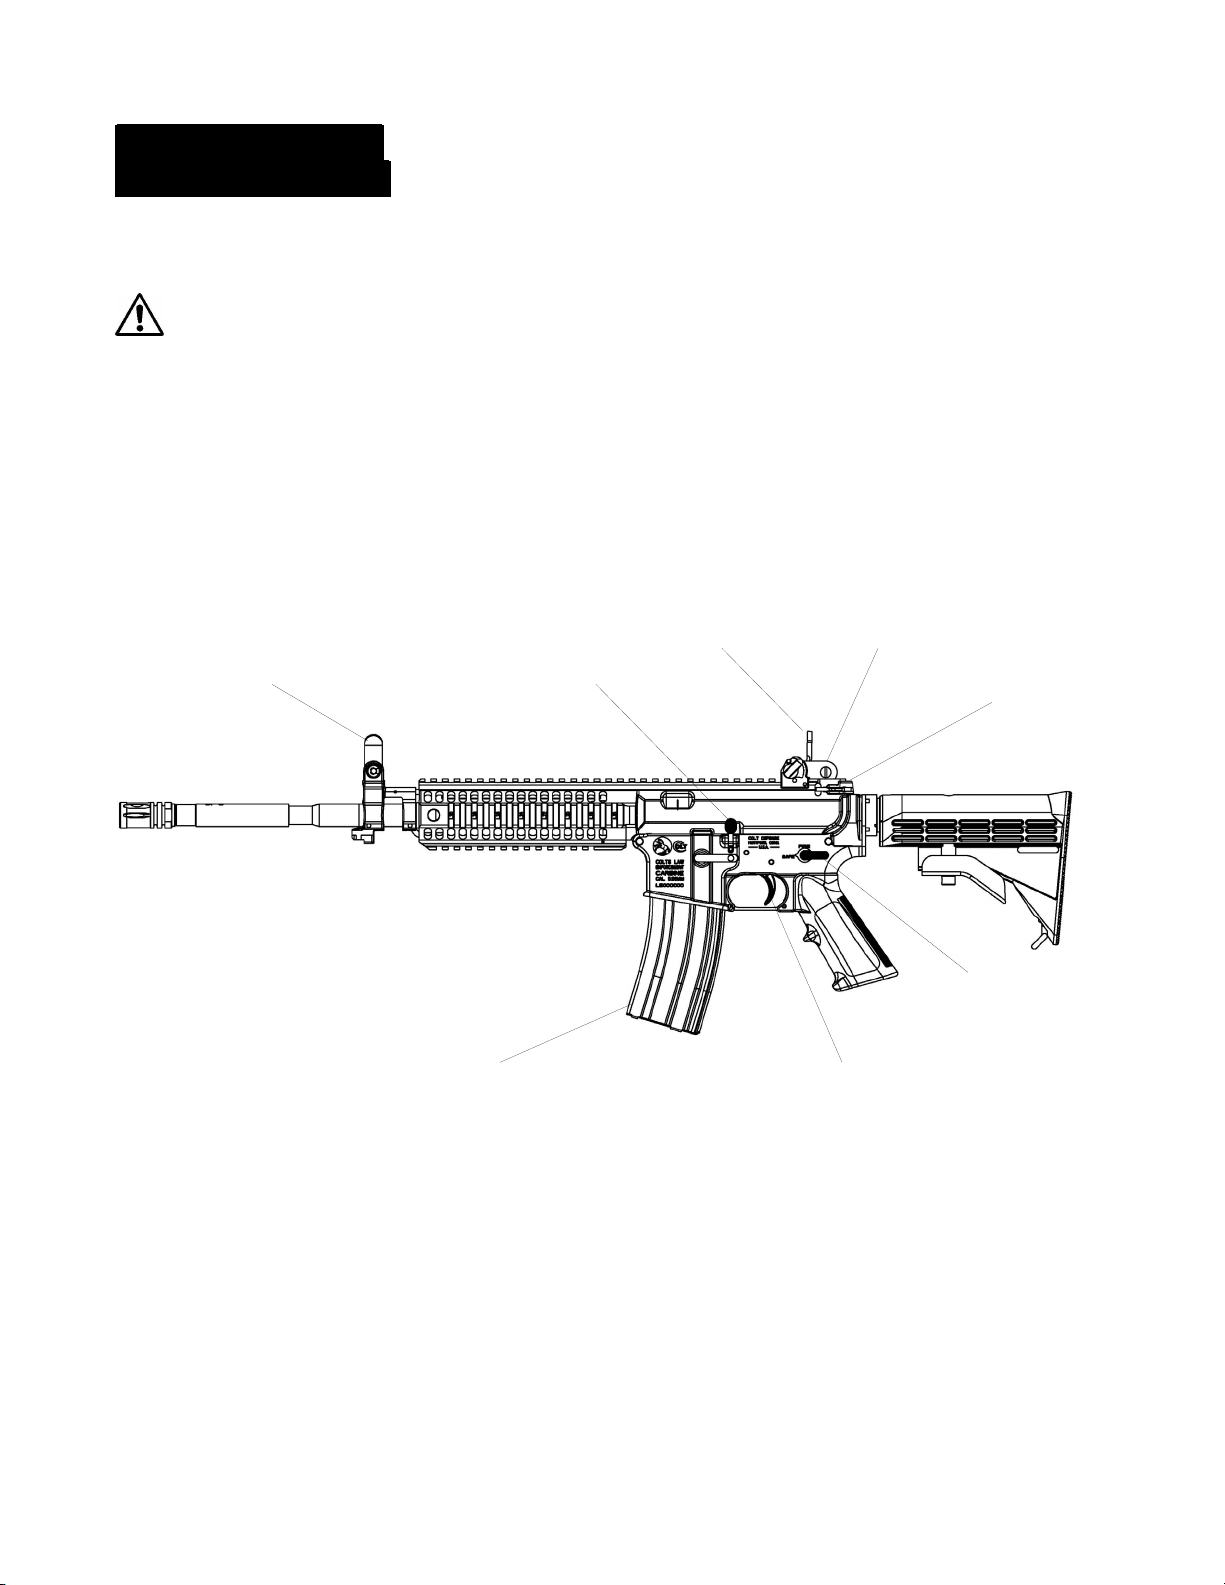
AIMING AND FIRING
WARNING: KEEP FIREARM POINTING IN A SAFE DIRECTION AND
LOAD A CARTRIDGE INTO THE CHAMBER. DO NOT TOUCH TRIGGER
AND KEEP HANDS AWAY FROM EJECTION PORT WHILE LOADING (See
steps 1, 2, 3, but if cartridge is already in chamber, skip to step 4). IF THIS
FIREARM IS CARELESSLY OR IMPROPERLY HANDLED, AN ACCIDENTAL
DISCHARGE COULD RESULT AND COULD CAUSE SERIOUS INJURY,
DEATH, OR DAMAGE TO PROPERTY.
1. Pull charging handle (1) to rear. Press lower portion of bolt catch (10).
Push charging handle forward to latched position.
2. Rotate fire control selector lever (11) to “SAFE”.
3. Insert loaded magazine (7) into the magazine well (32A) and push upper
portion of bolt catch (10) to release bolt, and chamber a cartridge.
WARNING: FIREARM IS NOW READY TO FIRE. ALWAYS KEEP
MUZZLE POINTING IN A SAFE DIRECTION. IF THIS FIREARM IS
CARELESSLY OR IMPROPERLY HANDLED, AN ACCIDENTAL
DISCHARGE COULD RESULT AND COULD CAUSE SERIOUS INJURY,
DEATH, OR DAMAGE TO PROPERTY.
4. Assess range to target and set sights (Sights are described on pages 45
and 46).
5. Rotate fire control selector lever (11) to “FIRE”, “SEMI”, or “AUTO”.
6. Hold firearm with both hands; one hand on the lower handguard, the other
on the pistol grip.
7. Align the target with top of front sight post (68) and center of rear peep
sight aperture (69).
8. Pull trigger (36) to fire 1 cartridge when selector is set to “SEMI” or “FIRE”
or any number of cartridges on “AUTO” up to the magazine capacity.
WARNING: THIS IS A SEMI-AUTOMATIC FIREARM AND IS
IMMEDIATELY LOADED AND READY TO FIRE AFTER EACH SHOT UNTIL
THE MAGAZINE IS EMPTY. IF THIS FIREARM IS CARELESSLY OR
IMPROPERLY HANDLED, AN ACCIDENTAL DISCHARGE COULD RESULT
AND COULD CAUSE SERIOUS INJURY, DEATH, OR DAMAGE TO
PROPERTY.
- 49 -
Page 50
SAFETY DEPENDS ON YOU
OPERATION (Cont.)
AIMING AND FIRING
9. Release trigger (36) and rotate fire control selector lever (11) to “SAFE”.
WARNING: IF YOR FIREARM FAILS TO FIRE, HOLD IT, KEEP IT
POINTED IN A SAFE DIRECTION AND REFER TO THE MISFIRE SECTION
ON PAGE 54. IF THIS FIREARM IS CARELESSLY OR IMPROPERLY
HANDLED, AN ACCIDENTAL DISCHARGE COULD RESULT AND COULD
CAUSE SERIOUS INJURY, DEATH, OR DAMAGE TO PROPERTY.
1068
2 69
1
11
36 7
- 50 -
Page 51
SAFETY DEPENDS ON YOU
OPERATION (Cont.)
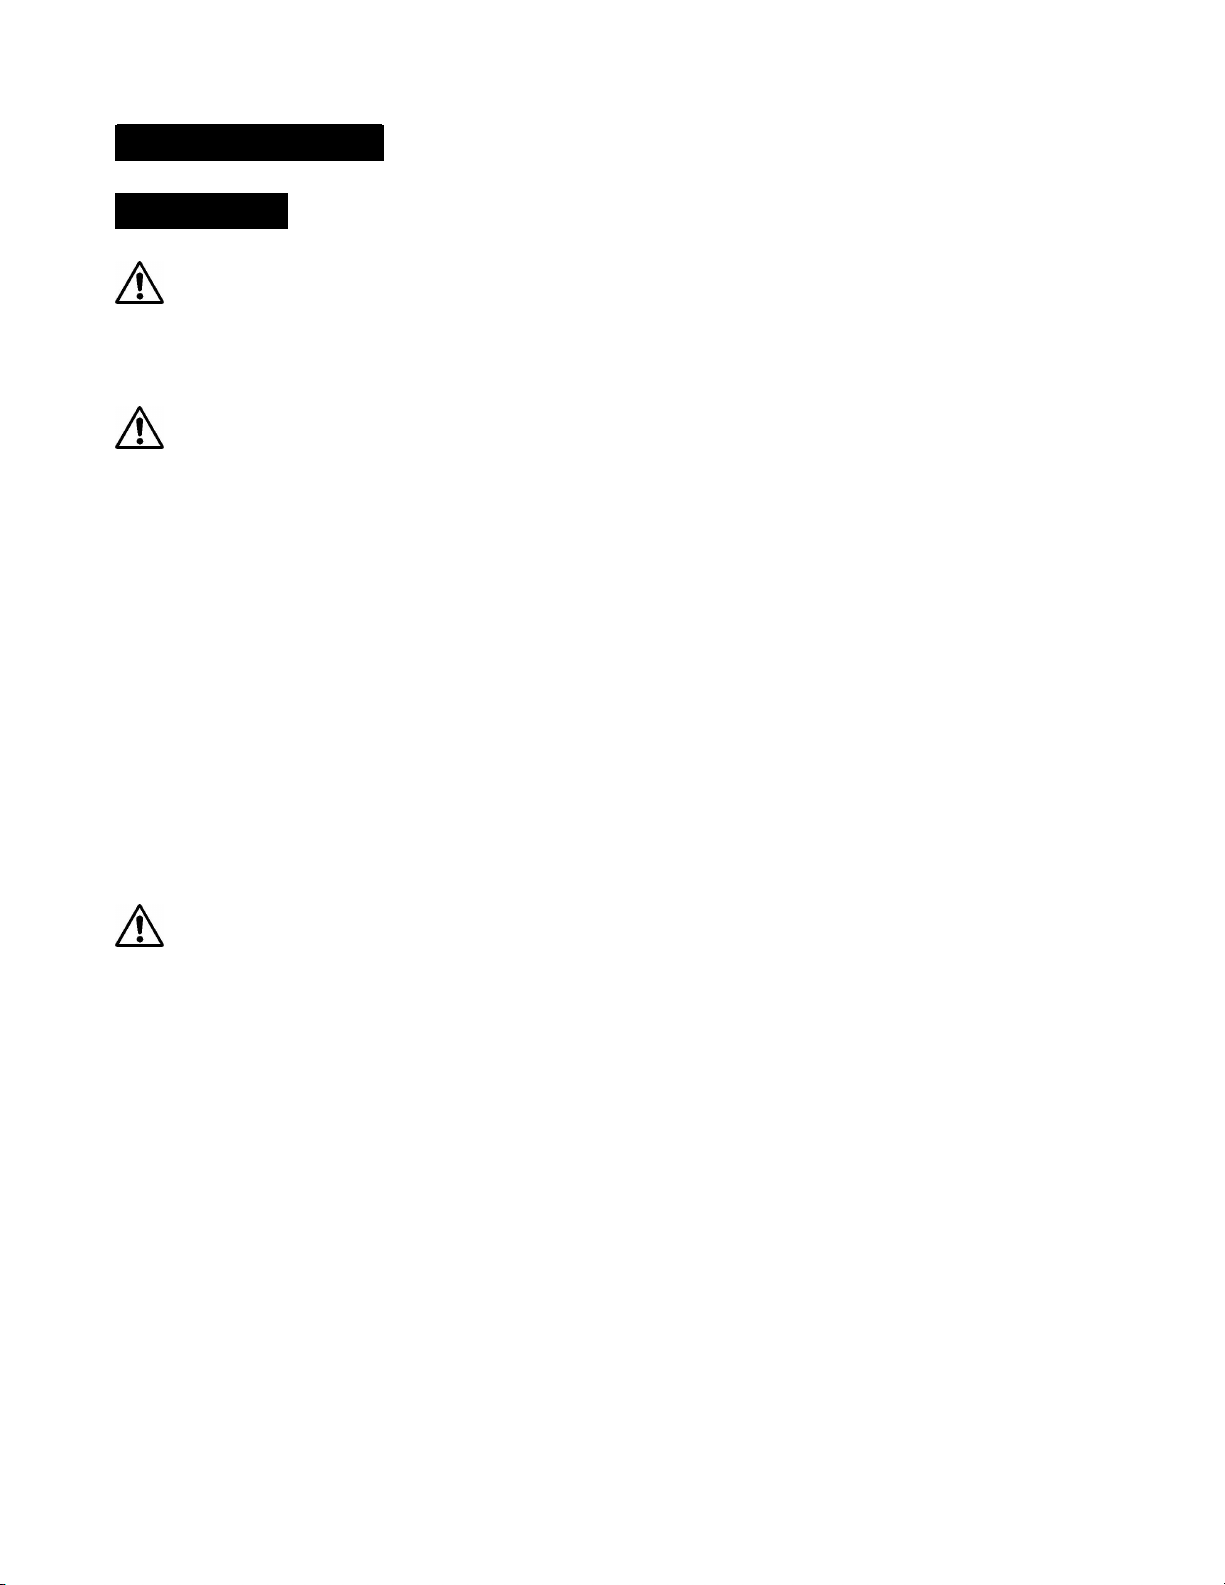
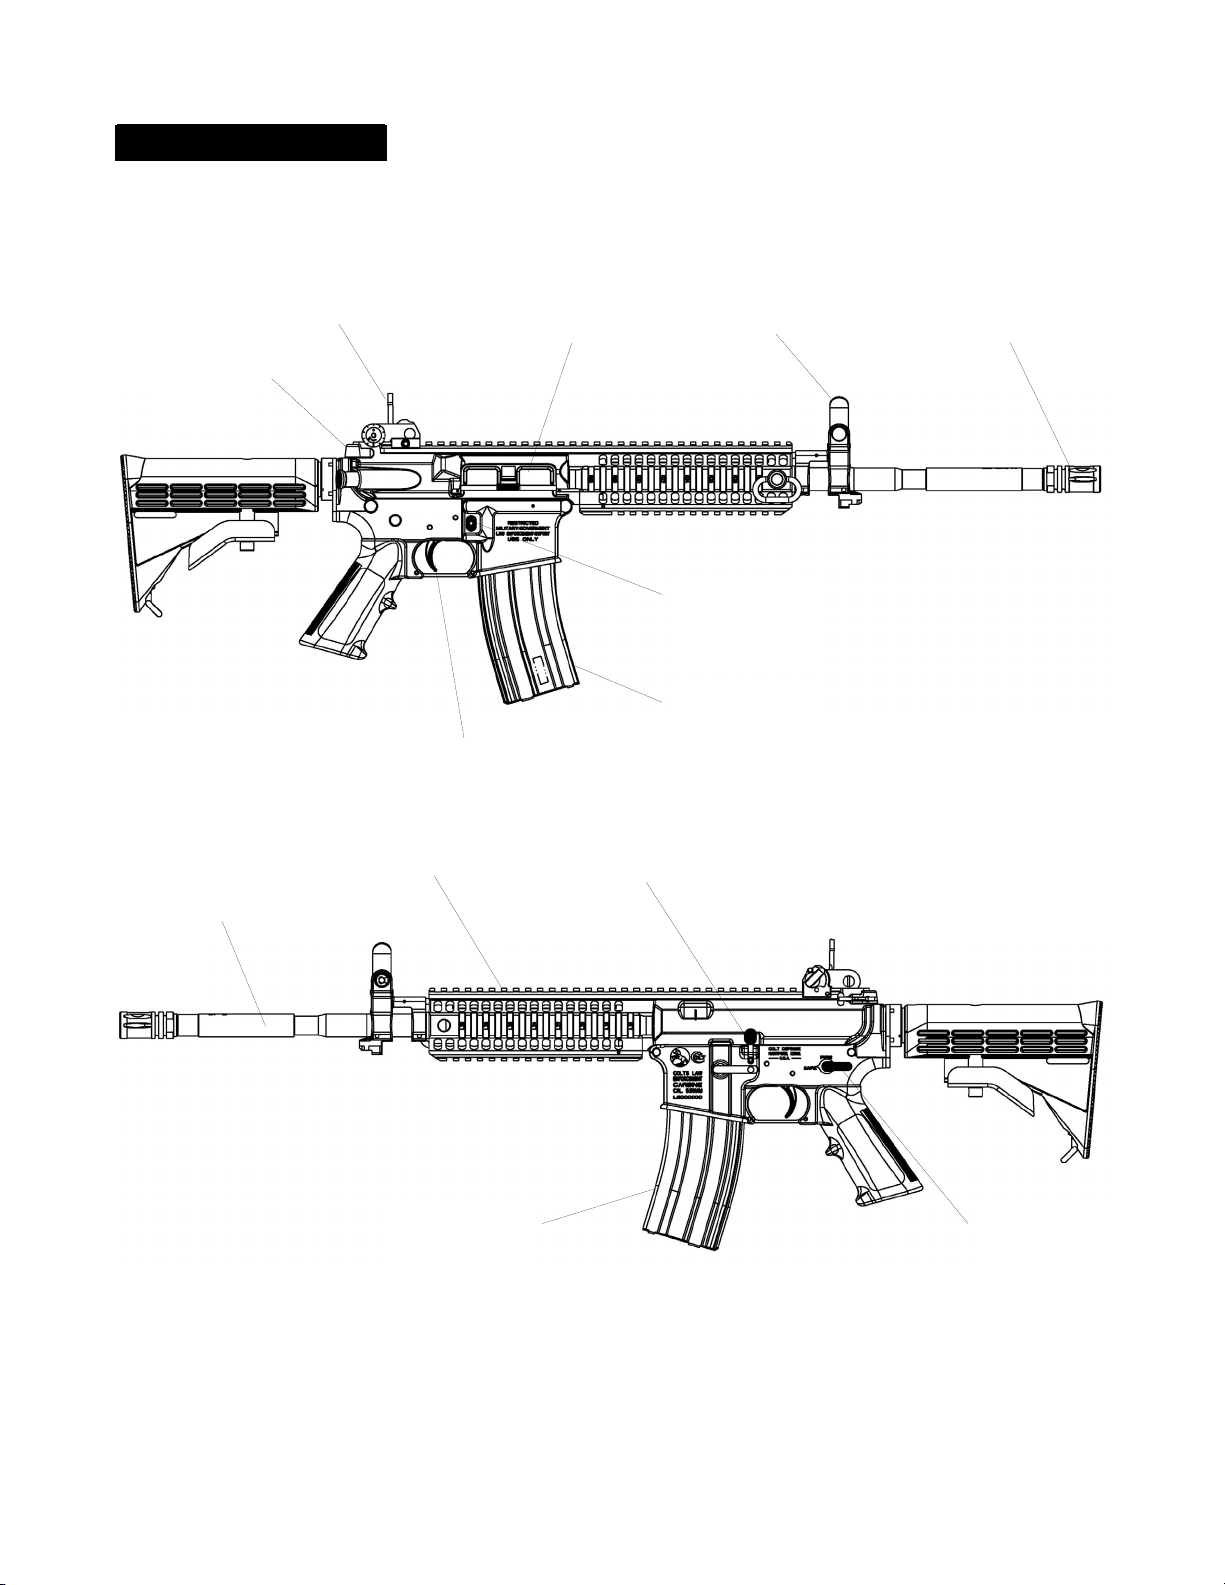
UNLOADING
WARNING: ALWAYS KEEP MUZZLE POINTING IN A SAFE
DIRECTION. IF THIS FIREARM IS CARELESSLY OR IMPROPERLY
HANDLED, AN ACCIDENTAL DISCHARGE COULD RESULT AND COULD
CAUSE SERIOUS INJURY, DEATH, OR DAMAGE TO PROPERTY.
WARNING: ALWAYS UNLOAD YOUR FIREARM IMMEDIATELY AFTER
USE AND PRIOR TO CLEANING AND STORAGE TO MINIMIZE THE RISK
OF ACCIDENTAL DISCHARGE. IF THIS FIREARM IS CARELESSLY OR
IMPROPERLY HANDLED, AN ACCIDENTAL DISCHARGE COULD RESULT
AND COULD CAUSE SERIOUS INJURY, DEATH, OR DAMAGE TO
PROPERTY.
1. Rotate fire control selector lever (11) to “SAFE” and keep firearm pointing
in a safe direction.
2. Press magazine catch (8) and remove magazine (7).
3. Pull charging handle (1) to rear. Check that cartridge is ejected from
chamber (15).
4. While holding charging handle to rear, push in lower portion of bolt catch
(10). Push charging handle forward into the latched position.
WARNING: FIREARM IS CLEAR ONLY WHEN CHAMBER (15) IS
EMPTY, MAGAZINE (7) REMOVED, BOLT CARRIER (3) IS LOCKED TO THE
REAR AND FIRE CONTROL SELECTOR LEVER (11) IS IN THE “SAFE”
POSITION. IF THIS FIREARM IS CARELESSLY OR IMPROPERLY
HANDLED, AN ACCIDENTAL DISCHARGE COULD RESULT AND COULD
CAUSE SERIOUS INJURY, DEATH, OR DAMAGE TO PROPERTY.
Note: If cartridge is not ejected, ensure barrel is cool to avoid risk from cook-
offs, then proceed as follows:
1. Pull charging handle (1) to rear. While holding charging handle to rear,
push in lower portion of bolt catch (10). Push charging handle forward
to latched position.
2. Insert a cleaning rod through the compensator (5) into the chamber
(15) and tap the cartridge out.
3. Cartridge should NOT be used again because it may be damaged, and
should be disposed of properly.
- 51 -
Page 52
UNLOADING (Cont.)
1
2
SAFETY DEPENDS ON YOU
6
4
8
5
7
36
70
29
10
11 7
- 52 -
Page 53
SAFETY DEPENDS ON YOU
OPERATION (Cont.)
STOPPAGE and IMMEDIATE ACTIONS
WARNING: ALWAYS KEEP THE MUZZLE POINTED IN A SAFE
DIRECTION. IF THIS FIREARM IS CARELESSLY OR IMPROPERLY
HANDLED, AN ACCIDENTAL DISCHARGE COULD RESULT AND COULD
CAUSE SERIOUS INJURY, DEATH, OR DAMAGE TO PROPERTY.
WARNING: NEVER USE YOUR FIREARM IF IT FAILS TO FUNCTION
PROPERLY AND NEVER FORCE A JAMMED ACTION, AS A ROUND MAY
EXPLODE CAUSING SERIOUS INJURY, POSSIBLE DEATH, OR SEVERE
DAMAGE TO YOUR FIREARM.
Stoppage – a stoppage is any unintentional interruption of firing.
Immediate Action – immediate action is the action taken as rapidly as possible
to correct a stoppage without analyzing the cause. Immediate action is as
follows:
1. Tap upward on the bottom of the magazine (7) to be sure it is locked in
position. Pull charging handle (1) fully and sharply to the rear. Watch for
ejection of a fired or unfired cartridge.
2. If a cartridge or case is ejected, release the charging handle (1) sharply to
chamber a new cartridge (do not “ride” the charging handle as it goes
forward.)
3. Strike forward assist (9) to ensure bolt carrier (3) closure.
4. Attempt to fire. If firearm fails to fire, inspect to determine the cause of the
malfunction and take appropriate action. Refer to the Malfunctions and
Troubleshooting section on pages 37-42.
5. If a cartridge or case is not ejected, check to see if there is a cartridge in
the chamber. If the chamber is clear, release the charging handle to feed
a new cartridge and attempt to fire. If the firearm still fails to fire, refer to
the Malfunction and Troubleshooting section.
6. If a cartridge or case is seen in the chamber, and the barrel is cool or just
warm, the cartridge or case should be removed as explained on page 51.
WARNING: SEE DANGEROUS SITUATIONS ON PAGES 54-56 FOR
EMERGENCY ACTIONS.
- 53 -
Page 54

SAFETY DEPENDS ON YOU
OPERATION (Cont.)
DANGEROUS SITUATIONS
WARNING: A COOK-OFF CAN OCCUR ANY TIME AFTER
CHAMBERING A CARTRIDGE IN A VERY HOT BARREL, SO ALWAYS
KEEP THE MUZZLE POINTED IN A SAFE DIRECTION. IF THIS FIREARM IS
CARELESSLY OR IMPROPERLY HANDLED, AN ACCIDENTAL
DISCHARGE COULD RESULT AND COULD CAUSE SERIOUS INJURY,
DEATH, OR DAMAGE TO PROPERTY.
Misfires and Cook-offs
Although misfires are rarely encountered with properly maintained firearms and
clean ammunition, misfires and cook-offs are potentially dangerous, particularly
if a heavy firing schedule is being followed. It is important that proper corrective
action be taken rapidly.
Misfire – A misfire is a failure to fire when the hammer falls due to mechanism
malfunction or faulty cartridge. Keep muzzle pointed in a safe direction for 2
minutes with the bolt closed. This will avoid having the cartridge explode due to
a slow burning primer when ejected, preventing injury or possible death. If the
barrel is hot, see cool-off procedure on page 55 notes 6 and 7. Unload the
firearm as previously described in this manual. Examine the unfired cartridge, if
the firing pin indent appears normal assume the misfire is the result of faulty
ammunition, reload and carry on firing. If the firing pin indent is light, misaligned
or nonexistent, load another cartridge and fire the firearm, if another misfire
occurs, have your firearm examined by a competent gunsmith or return it to Colt
for service.
NOTE: It is normal for a light firing pin indent to appear on the primer of
cartridges that have been fed into the chamber of the firearm but not fired.
NOTE: Dispose of the misfired cartridges in accordance with the ammunition
manufacturer’s instructions.
Cook-Off- A cook-off is accidental firing of a chambered cartridge caused by
the cartridge absorbing excess heat from a very hot barrel. The live cartridge
may have failed to eject when clearing the firearm, or it may have been fed into
the chamber ready for the next shot. It may also remain in the chamber if it
misfired or failed to fire. For whatever reason, if a live cartridge remains in the
chamber when the barrel is very hot there is a risk of accidental discharge.
- 54 -
Page 55
SAFETY DEPENDS ON YOU
DANGEROUS SITUATIONS (Cont.)
Cook-Off (Cont.)
Immediate Action – To prevent damage or injury from a cook-off when barrel
becomes very hot complete the following actions immediately.
1. Remove magazine (7).
2. Pull charging handle (1) fully rearward. If chamber (15) is empty, lock
action open by pressing in bottom of bolt catch (10). If cartridge remains
in chamber, skip step 3.
3. Allow barrel to cool for 15 minutes.
4. If cartridge remains in chamber, release charging handle, allow bolt to
move forward.
5. Fire cartridge if safe to do so. If not safe, see step 6.
6. If not safe to fire – lay the firearm on the ground pointing in a safe
direction with ejection port toward the ground, and step back.
7. Stand clear, and wait 15 minutes for barrel to cool.
WARNING: COOK-OFF COULD OCCUR DURING THIS COOLING
PERIOD. ALWAYS KEEP THE MUZZLE POINTED IN A SAFE DIRECTION.
IF THIS FIREARM IS CARELESSLY OR IMPROPERLY HANDLED, AN
ACCIDENTAL DISCHARGE COULD RESULT AND COULD CAUSE
SERIOUS INJURY, DEATH, OR DAMAGE TO PROPERTY.
After barrel is cool, remove cartridge from chamber, then have the firearm
examined by a competent gunsmith or return it to Colt for service.
NOTE: Dispose of the unfired cartridges in accordance with the ammunition
manufacturer’s instructions.
- 55 -
Page 56
SAFETY DEPENDS ON YOU
DANGEROUS SITUATIONS (Cont.)
Bore Obstructions
WARNING: SNOW, MUD, SAND OR OTHER OBSTRUCTION MUST BE
REMOVED FROM THE BARREL BORE BEFORE FIRING. If you attempt to
fire with an obstruction in the barrel, it may BULGE or BURST THE
BARREL AND COULD CAUSE SERIOUS INJURY, DEATH, OR DAMAGE TO
PROPERTY.
1. To remove water from the barrel (70), hold the carbine muzzle down, pull
the charging handle (1) to the rear about one half (.500) inch, (1.2cm) to
vent the barrel and at the same time shake the weapon vigorously.
2. Release charging handle (1).
3. The weapon can now be fired.
Note: Clean and lubricate the weapon as soon as possible after clearing any
obstruction, or whenever it has been exposed to water.
Bullet in Barrel
If a noticeable difference in sound or recoil is experienced or if there is any
reason to suspect that a bullet is stuck in the barrel, immediately unload
the firearm and look through the bore, not just in the chamber. A bullet
may be lodged down the barrel that cannot be easily seen. If a bullet is
stuck in the barrel, bring the firearm to a competent gunsmith to dislodge
the bullet.
WARNING: IF A BULLET IS STUCK IN THE BARREL, DO NOT
ATTEMPT TO SHOOT IT OUT BY USING ANOTHER CARTRIDGE, OR BY
BLOWING IT OUT WITH A BLANK, AS DOING SO COULD GENERATE
EXCESS PRESSURE, CAUSE DAMAGE TO THE FIREARM, OR CAUSE
SERIOUS PERSONAL INJURY OR DEATH.
HEALTH AND ENVIRONMENTAL
WARNING: DISCHARGING OR CLEANING FIREARMS OR HANDLING
AMMUNITION IN POORLY VENTILATED AREAS, MAY RESULT IN
EXPOSURE TO LEAD AND OTHER SUBSTANCES KNOWN TO CAUSE
BIRTH DEFECTS, REPRODUCTIVE HARM, CANCER, AND OTHER
SERIOUS PHYSICAL INJURY. HAVE ADEQUATE VENTILATION AT ALL
TIMES. CLEAN HANDS THOROUGHLY AFTER EXPOSURE.
- 56 -
Page 57

SAFETY DEPENDS ON YOU
STORAGE
CAUTION: MAKE SURE THE FIREARM IS UNLOADED BEFORE
STORING AND STORE AMMUNITION SEPARATELY
Store your firearm and ammunition securely locked in separate locations out of
reach and sight of children and untrained persons, to minimize the risk that the
firearm will be used by unauthorized persons.
NOTE: Various Federal and State laws and local ordinances may govern the
proper storage of firearms, so take the advice of a Dealer in you state on how to
store your firearm.
FIREARMS RECORD
Colt Model Number ______________________________________
Serial Number ______________________________________
Caliber ______________________________________
Purchased From ______________________________________
Date Purchased ______________________________________
LIMITED LIFETIME SERVICE AGREEMENT
Colt will repair any factory defective part(s) of your Colt firearm, but cosmetic
corrections and grip replacement will be made only during the first year. This
agreement will not apply to your Colt firearm when it is altered, abused, willfully
damaged or damaged by overpressure ammunition. Moreover, this agreement
will not apply to those parts of your Colt firearm that have been “tuned” or
“gunsmithed” for performance, other than customized tuning and other services
provided by Colt Custom Gun Shop, owned and operated by Colt’s
Manufacturing Company LLC. This agreement is not transferable, its benefits
apply to only the original retail purchaser and it applies only to firearms
manufactured after 1996.
- 57 -
Page 58
SAFETY DEPENDS ON YOU
SERVICING AND REPAIR
Should your firearm require adjustment or repair, make sure it is NOT LOADED
and send it to CDLLC, attention Product Service, 2 Talcott Rd., West Hartford,
CT 06110. It is recommended that you contact Product Service at 1-800-962COLT before shipping any firearm. (Do not include “Colt” or indicate the
contents of the package anywhere on the package)
Before shipping your firearm, here are some points to remember:
CAUTION: MAKE SURE THE FIREARM IS UNLOADED AND THE
MAGAZINE IS EMPTY BEFORE SHIPPING
o Include a letter explaining the problem and your requirements in as much
detail as possible. Include the model name and serial number of your
firearm together with your return address, day time telephone number,
and email address, then enclose the letter with the firearm in a well
padded package.
o Insure the package and its contents against theft or loss.
o Do not send presentation boxes, accessories, or explosive components.
IMPORTANT: If you make unauthorized adjustments or use unauthorized parts
in your firearm, Colt will not assume responsibility for the functioning of the
firearm.
NOTE: This firearm is manufactured to perform properly with the original parts
as designed. It is your duty to make sure any parts you buy are installed
correctly and that neither replacements nor originals are altered or changed.
That is why we strongly recommend that you have your firearm serviced
by Colt. Your firearm is a complex tool with many parts that must relate
correctly to other parts. Assembling a firearm wrong or with modified parts
can result in a damaged firearm, danger, and injury or death to you and
others through malfunction. Always have a qualified gunsmith work on your
firearm. Any work that you suspect was not performed by a gunsmith should be,
checked by a competent gunsmith or returned to Colt for inspection.
NOTE: Various federal and state laws and local ordinances govern the transfer
and transportation of firearms, so take the advice of a Dealer in your state on
how to send or transport your firearm to Colt.
- 58 -
Page 59

SAFETY DEPENDS ON YOU
NOTES
- 59 -
Page 60

SAFETY DEPENDS ON YOU
If your instruction manual becomes lost or destroyed, obtain a replacement by
writing to Colt Defense LLC, P.O. Box 118, Hartford, Connecticut 06141-0118,
USA or call 1-800-241-2485. When requesting a manual, include the
information which is on the left side of your firearm together with its serial
number or quote the part number as shown on the back of this manual.
COLT, COLT (stylized “C”), and the RAMPANT COLT (design)
are the exclusive property of New Colt Holding Corp. and licensed to Colt
Defense LLC. Other trademarks used herein are owned by Colt Defense LLC.
For permission to reprint for noncommercial instructional purposes, prior
approval from Colt Defense LLC is required.
This instruction manual should always accompany this firearm. When you lend,
give or sell this firearm, be sure this manual goes with it.
- 60 -
Page 61

SAFETY DEPENDS ON YOU
FIVE BASIC SAFETY RULES:
1. ALWAYS KEEP THE GUN POINTED IN A SAFE DIRECTION.
2. KEEP FIRE CONTROL SELECTOR ON “SAFE” UNTIL READY TO
FIRE.
3. UNLOAD WHEN NOT IN USE.
4. ALWAYS ENSURE A GUN IS NOT LOADED BEFORE CLEANING,
DISMANTLING OR STORING.
5. PRACTICE HANDLING AN EMPTY GUN BEFORE ATTEMPTING TO
FIRE.
WARNING: IF THERE IS ANYTHING YOU DO NOT UNDERSTAND, GET
HELP FROM SOMEONE QUALIFIED IN THE SAFE HANDLING OF
FIREARMS. IF NECESSARY, CONTACT COLT DEFENSE LLC AT:
HARTFORD, CT 06141-0118
Customer Service
P. O. BOX 118
Product Service
2 Talcott Rd
West Hartford, CT 06110
OR
Tel: 1-800-241-2485
Fax: 1-860-244-1449
E-Mail: [email protected]
Webpage: www.colt.com
Part No. 96241 Rev C April 2010
- 61 -
 Loading...