

Page 1
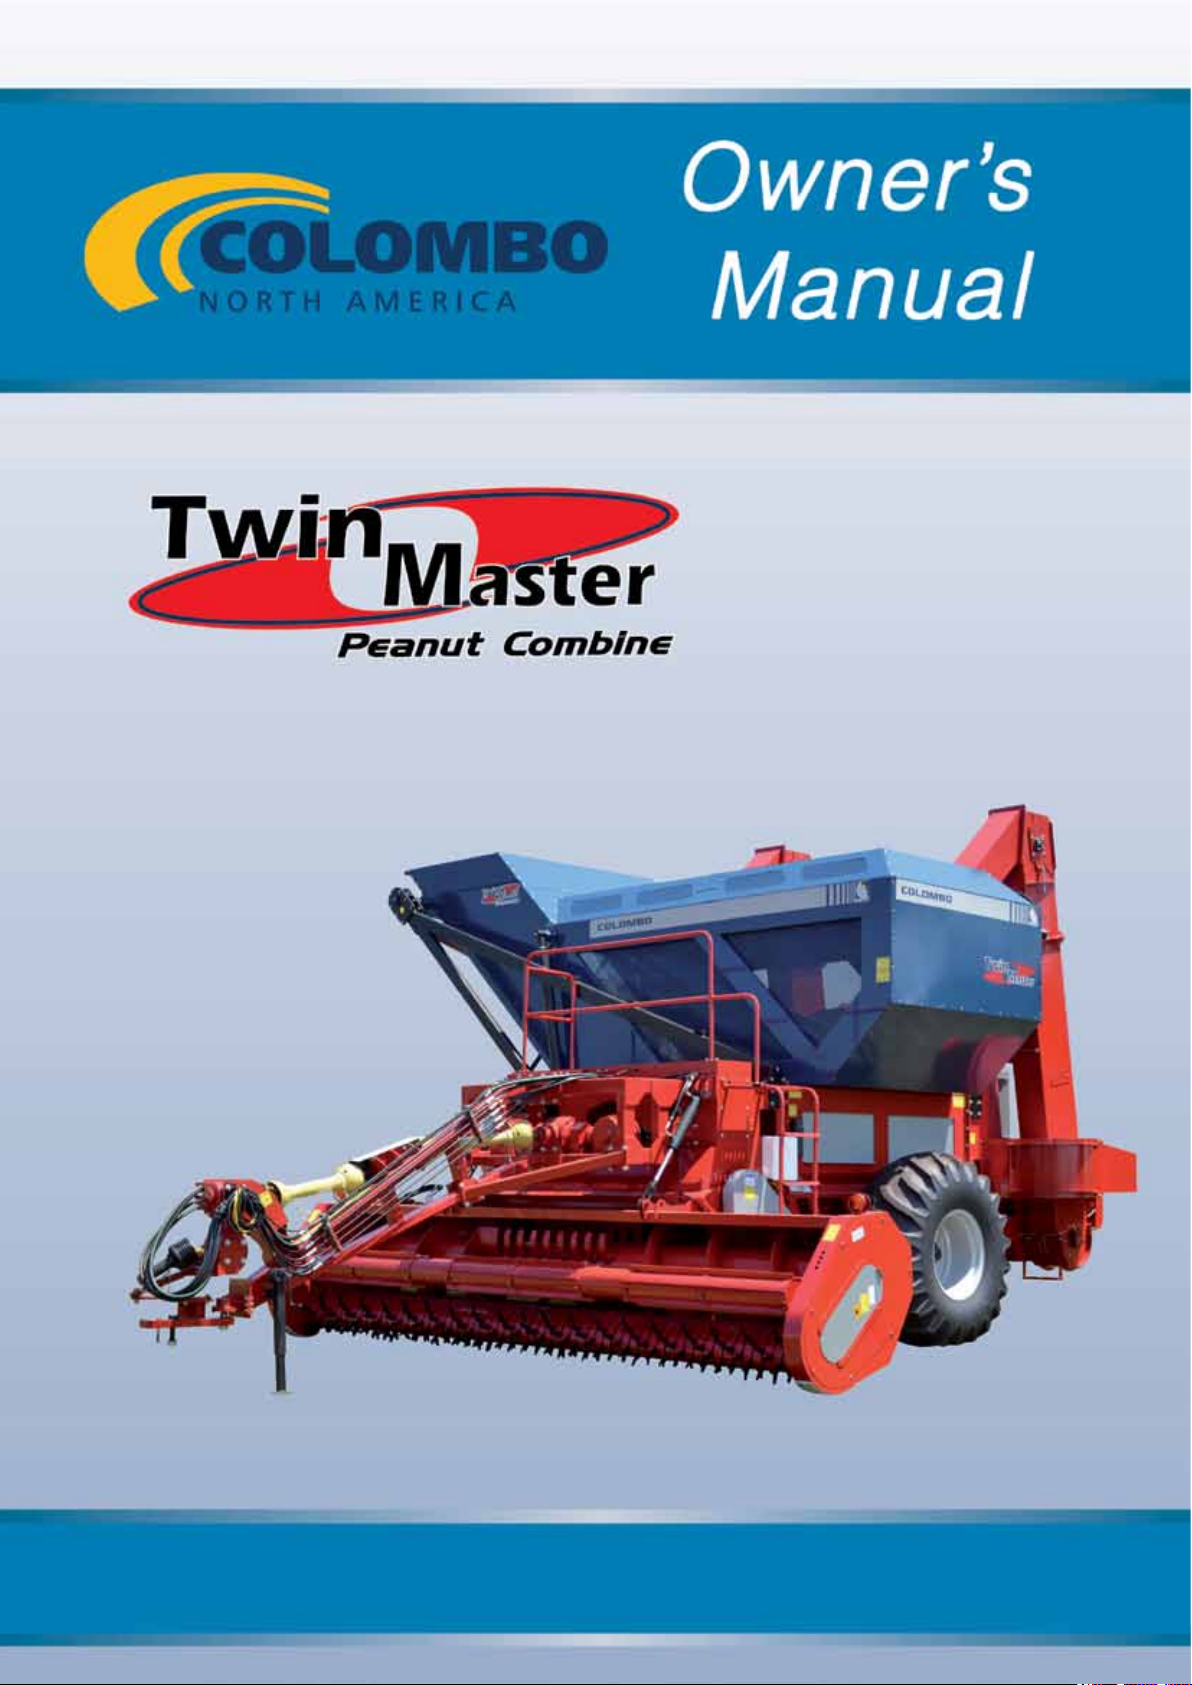
Instruction Manual - Twin Master
1
Page 2

2
Instruction Manual - Twin Master
Page 3
1 - Introduction
Congratulations on your purchase! We are sure you have made an excellent purchase choosing the TWIN MASTER PEANUT COMBINE, a machine designed and made
with the best technology and quality there is.
This Manual contains the operation and maintenance instructions of your Combine,
which will help you to get the best performance and durability.
Because of that, carefully read it before starting operating.
In case you need better explanations about the Combine operation, COLOMBO has
a Technical Assistance Service at your disposal.
Consult our technicians whenever there is need.
We thank you for choosing a machine that really meets your needs.
Colombo North America, INC.
1301, Industrial Blvd - Adel, GA - 31620
Phone: 229 896-2277 - Fax: 229 896-1375
[email protected]
www.colombona.com
Instruction Manual - Twin Master
3
Page 4

Index
1 - Introduction ................................................................................... 4
2 - Safety instructions .......................................................................... 6
2.1 - When reading the Instruction Manual ......................................... 6
2.2 - Safety decals found on the Combine .......................................... 6
2.3 - When operating the machine ..................................................... 7
2.4 - When performing machine maintenance ..................................... 8
2.5 - Transport of the machine towed by tractor on public roads and
streets ......................................................................................... 9
2.6 - Transport on truck ................................................................... 9
3 - Identication, features and technical specications .............................. 10
3.1 - Components identication......................................................... 10
3.2 - Running principle .................................................................... 11
3.3 - Technical specications............................................................. 12
4 - Work conditions .............................................................................. 14
4.1 - Soil characteristics .................................................................. 14
4.2 - Recommendations for a good mechanical harvest ....................... 15
5 - Machine preparation ........................................................................ 16
5.1 - Leveling and coupling to the tractor ........................................... 16
5.2 - Hydraulic coupling ................................................................... 17
5.3 - Removing the hydraulic hoses ................................................... 18
5.4 - Grain elevator assembly ........................................................... 19
5.5 - Pickup unit assembly ............................................................... 20
5.6 - Cardan length adjustment ........................................................ 20
6 - Adjustments to start the operation .................................................... 21
6.1 - Power take off rotation ............................................................. 21
6.2 - Tractor work speed .................................................................. 21
6.3 - Pickup unit ............................................................................. 21
6.4 - Beating cylinder (FABI) ............................................................ 22
6.5 - Cleaning system ...................................................................... 24
4
7 - Operating the combine ..................................................................... 25
Instruction Manual - Twin Master
Page 5

8 - Combine maintenance ..................................................................... 27
8.1 - Periodic maintenance items ...................................................... 27
8.2 - Gearboxes maintenance ........................................................... 28
8.3 - Grease lubrication points .......................................................... 29
8.4 - Belts maintenance ................................................................... 31
8.5 - Chains maintenance ................................................................. 33
8.6 - Maintenance of the threshing system and cleaning ....................... 35
8.7 - Grain elevator maintenance ...................................................... 36
8.8 - Tires pressure check ................................................................ 37
8.9 - Machine preservation in the period between crops ....................... 37
9 - Troubleshooting .............................................................................. 39
10 - Technical Assistance ........................................................................ 41
10.1 - Machine series number ........................................................... 41
Note:
COLOMBO aims to constantly update and improve its products, reserving itself the
right of introducing changes in any of its products without previous notice.
5
Instruction Manual - Twin Master
Page 6
2 - Safety instructions
We all know that safety is very important when handling mechanic equipments.
Because of that, carefully read all topics mentioned.
In addition to the recommendations included here, follow all recommendations of
your tractor Manual.
2.1 - When reading the Instruction Manual
Notice the following symbols:
Note:
2.2 - Safety decals found on the Combine
It means that an operational or safety detail will be presented.
Warning:
It means that your life or parts of your body can be in danger.
Pay close attention to this symbol.
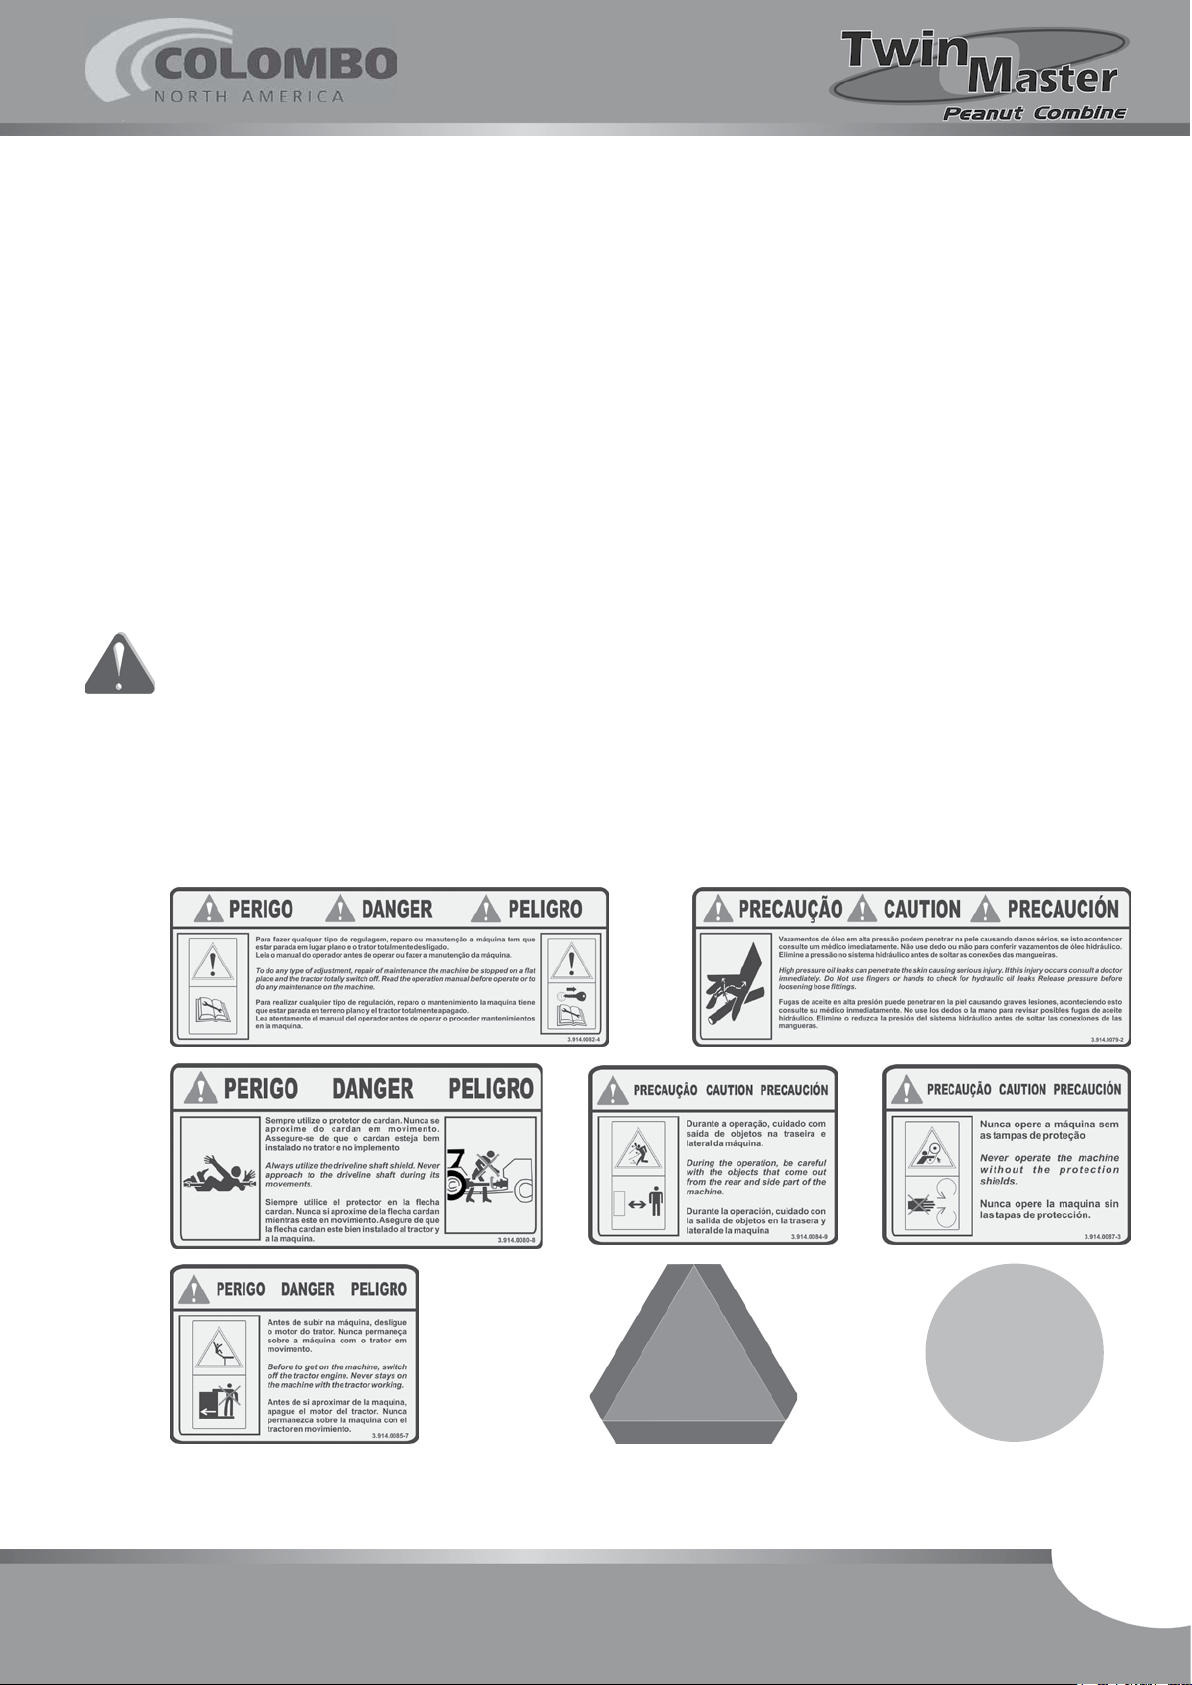
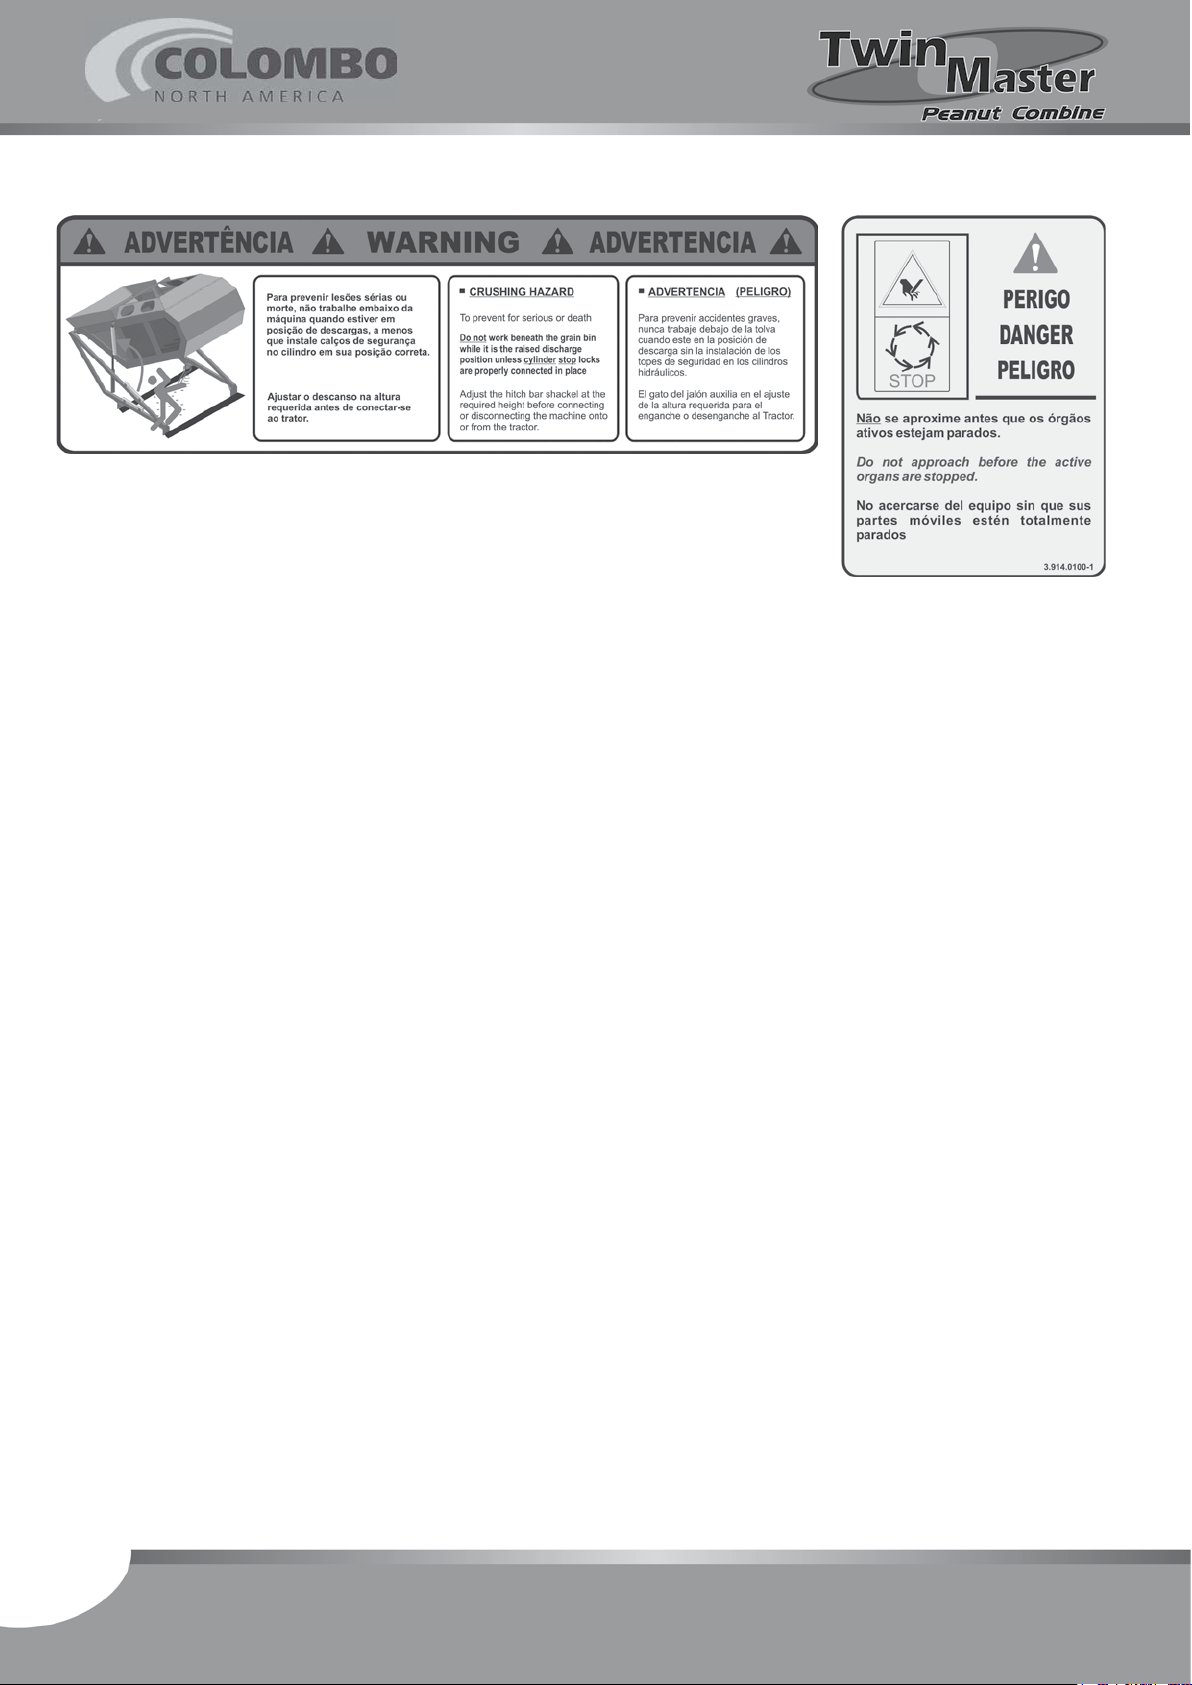
Pay attention to all the safety decals found on the Combine and strictly follow
the instructions described on them. See the gures in the sequence.
Instruction Manual - Twin Master
6
Page 7
2.3 - When operating the machine
1 - Turn the tractor engine off before starting any type of service (adjustment,
maintenance, etc...) on the Gatherer.
2 - Loose clothes and long hair can be caught by mechanisms in movement.
Because of that, never get close to the Combine in such conditions.
3 - Be aware of the Combine correct operation and maintenance. Before using it
for the rst time, show this Manual and instruct the peoples who are going
to operate it.
4 - Never allow non-skilled people to operate the Combine neither the tractor.
5 - Do not allow children or curious people to get close to the Combine when
it is in operation or movement.
6 - Do not transit with people on the Combine inspection platform. This place
should be only accessed with the machine stopped.
7 - Keep your Combine always in perfect preservation conditions.
8 - Before beginning any movement with the Gatherer, check whether there
are no peoples, animals, obstacles or objects on the way.
9 - Couple the Combine on a at and leveled place because it makes the pro-
cedure easier and safer.
7
Instruction Manual - Twin Master
Page 8
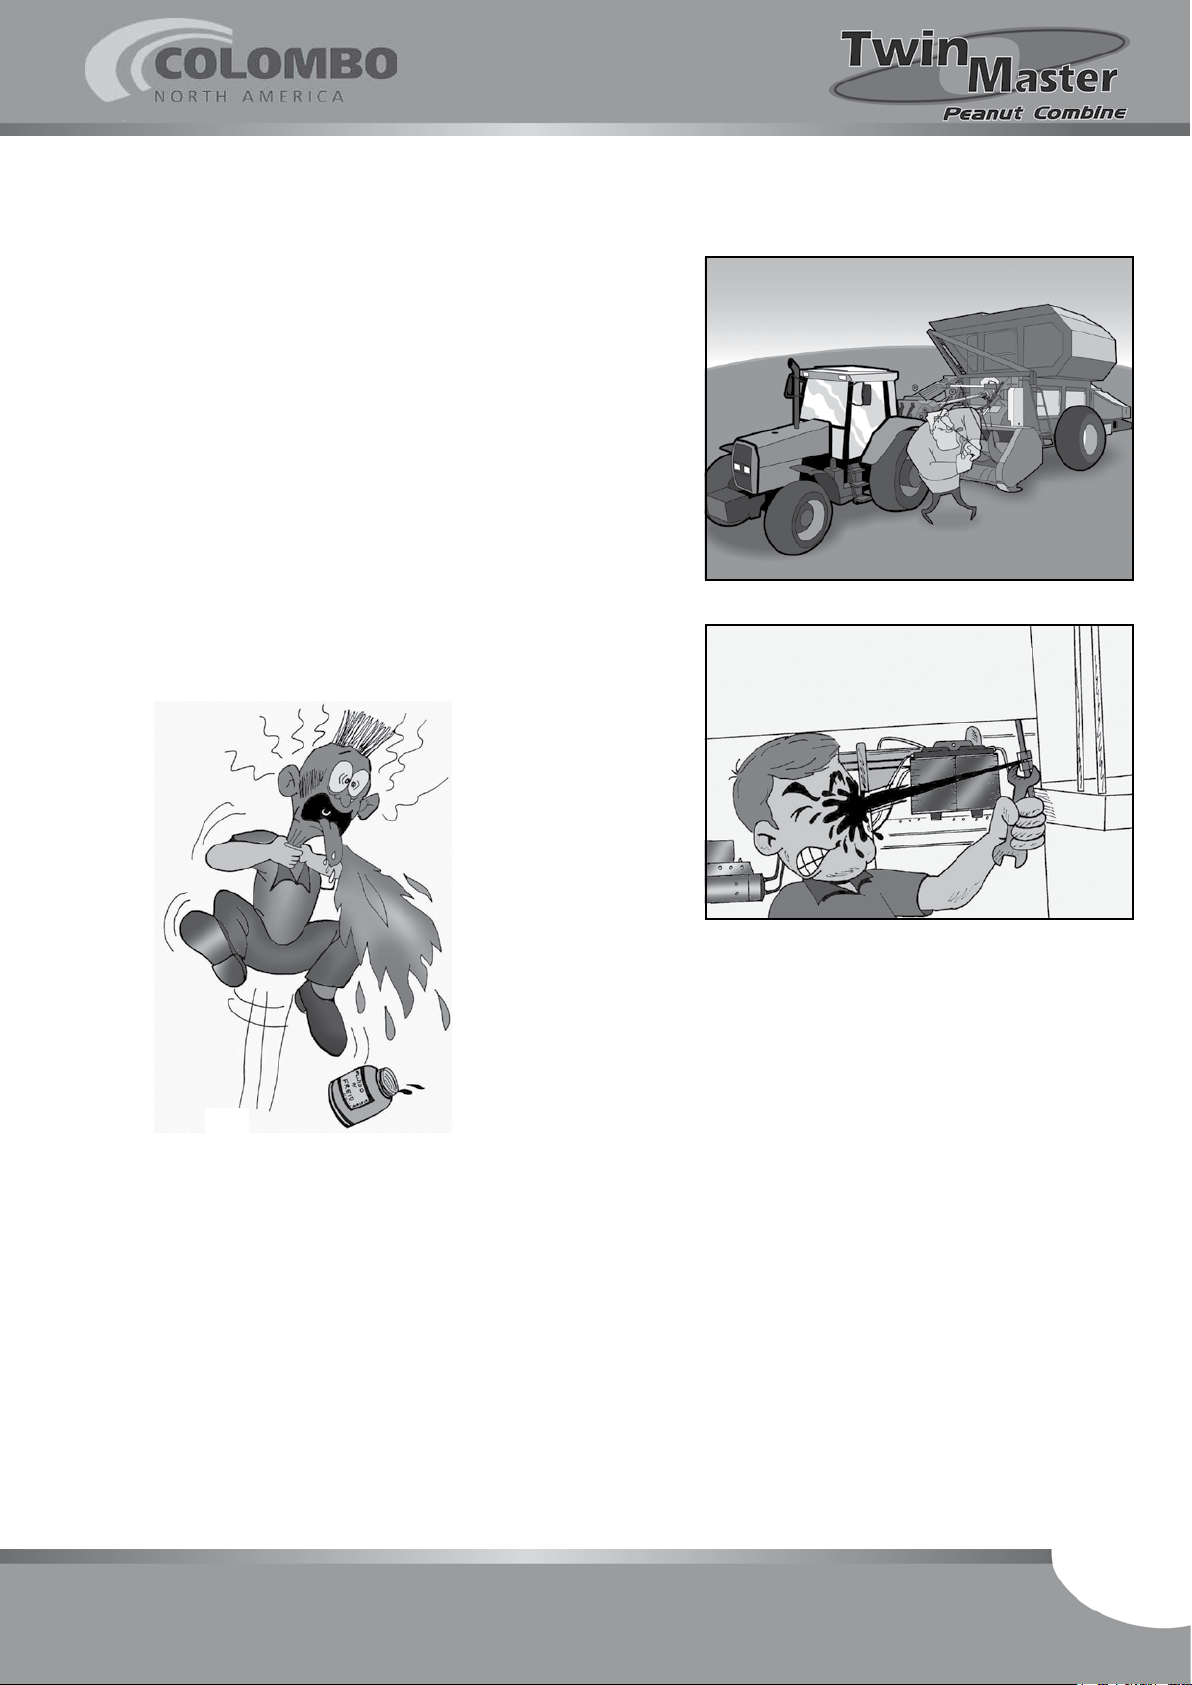
2.4 - When performing machine maintenance
1 - ATTENTION: Always turn the tractor engine off before
starting any type of service on the Gatherer.
2 - Observe the correct lubricant types and amounts
recommended for each one of the several components.
3 - Be careful at handling hydraulic oil and greases because
they have carcinogenic chemical components. In case
of accidental contact with eyes or ingestion, immediately
look for medical assistance.
4 - Follow all the instructions there are on the Combine
safety decals.
Instruction Manual - Twin Master
8
Page 9

2.5 - Transport of the machine towed by tractor on public roads
and streets.
Warning:
Never exceed the speed of 30 km/h on even surfaces.
On uneven surfaces, reduce the speed in a such way to meet the safety con-
ditions.
When transporting, you should be careful with the Combine height, preventing
crashes against trees, overpasses, etc. Check the Combine height in page 12.
Consult the local trafc department about the rules and laws in force in your
region, whether it is possible or not to transport the Combine with the tractor
on certain parts of the road, preventing serious troubles. Request guidance,
authorizations and procedures in writing.
2.6 - Transport on truck
Whenever there is need for transporting the machine for longer distances,
when there is need for using public roads, the transport should be done
on a truck or wagon.
Note:
Transport on truck or wagon can only be done after you comply with all the rules
about machine transport, according to the local trafc department rules. Get
informed!
When transporting on wagon, you should be careful with the Combine height,
preventing crashes against trees, overpasses, etc.
Check the Combine height in page 12.
Scotch the Combine wheels (in case the wheels are mounted) and fasten it to the
body with ropes, chains or belts. Remember to fold the grain elevator to transport
the Combine (see page 18).
Combine should be fully on the truck or wagon body (it can not exceed on the sides
and/or rear part). Combine weight must be well distributed.
To transport the Twin Master Peanut Combine on trucks, the pickup unit should be
uncoupled and the grain box should be removed.
Such parts should be transported apart to avoid side excess.
9
Instruction Manual - Twin Master
Page 10
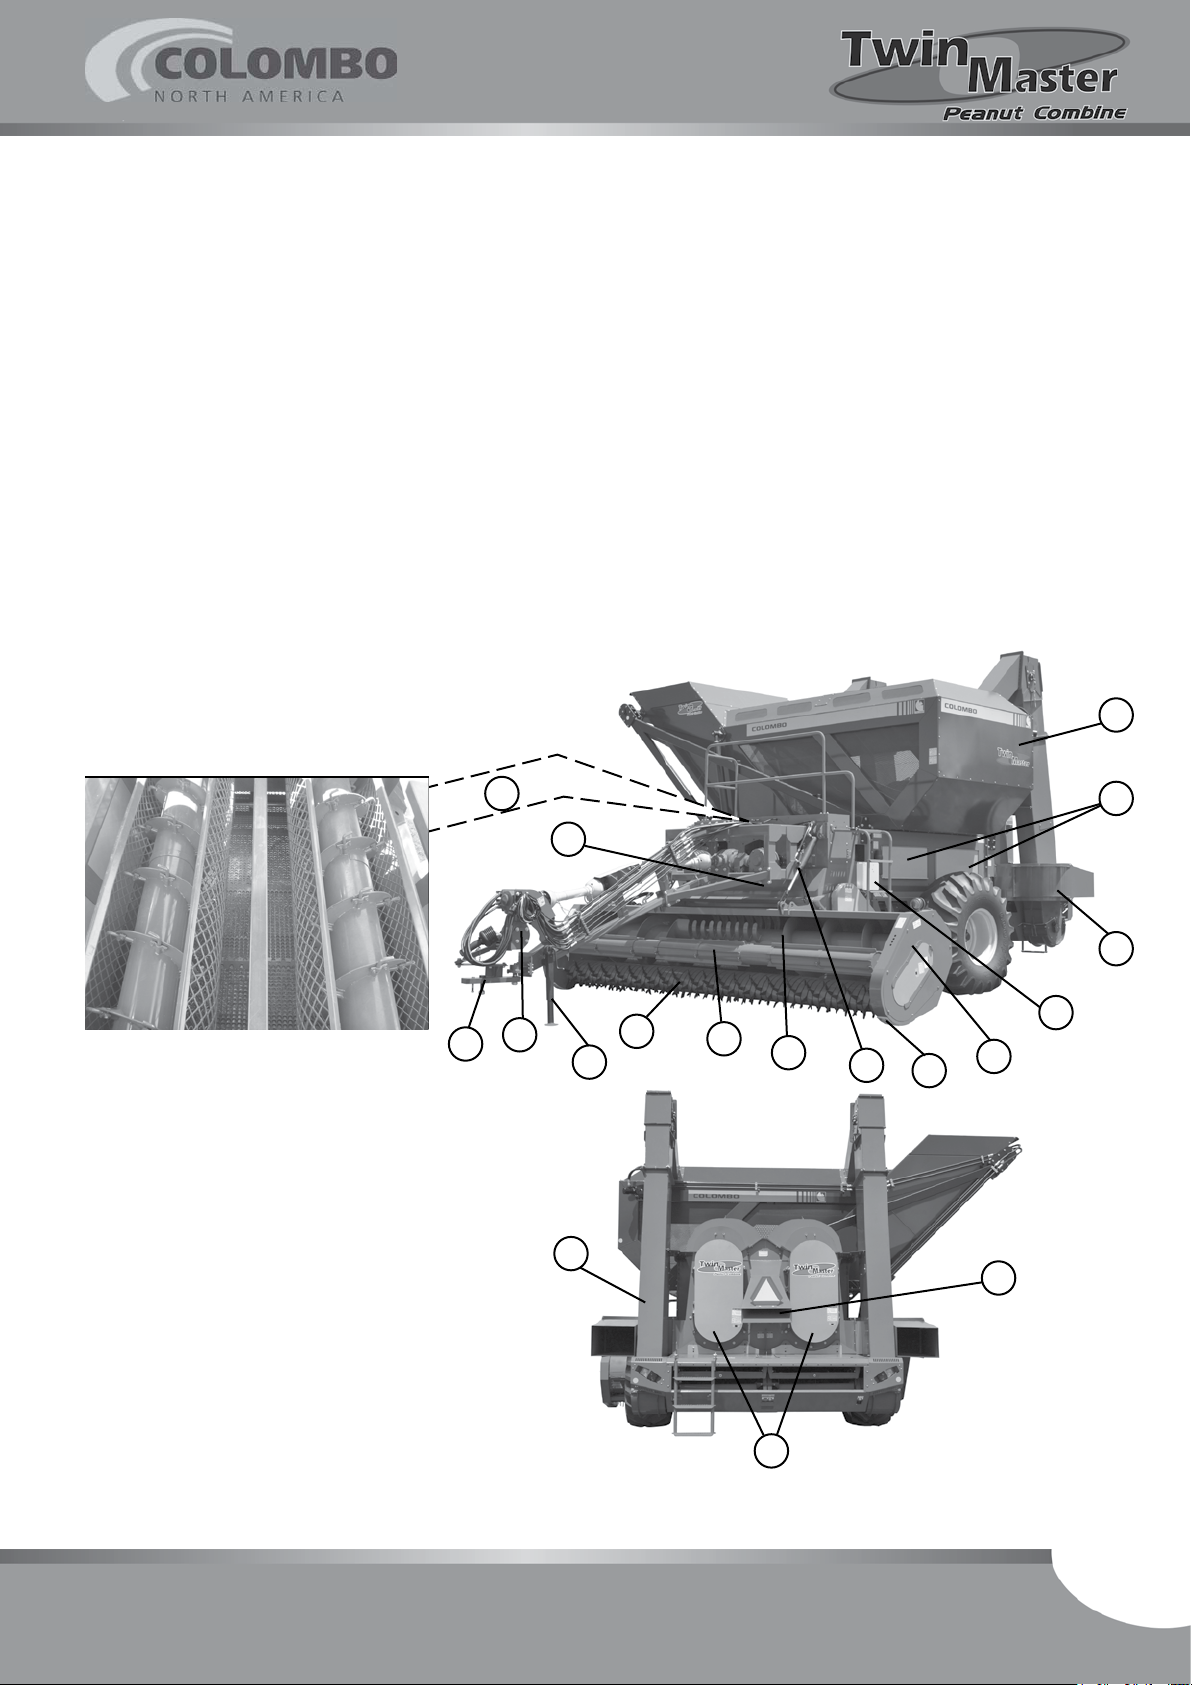
3 - Identication, features and technical specications
3.1 - Components identication
1 - Auger
2 - Pickup cylinder
3 - Driving cardan
4 - Coupling header
5 - Header Stand Jack
6 - Pickup unit intermediate cylinder
7 - Thick straw outlet
8 - Inspection windows
9 - Grain box
10 - Ladder
11 - Thin straw outlet
Note:
Whenever the terms “left” and “right”
are used, the tractor moving direction
is considered as reference point.
12 - Grain elevator
14
4
13 - Compartments of the driving belts of
the cleaning system and sieve.
14 - FABI type threshing cylinder (Axial
Flow of Low Impact), located under
the grain box (9).
15 - Guiding cylinder.
16 - Sliding shoes.
9
8
15
7
3
12
2
5
6
1
18
16
17
10
11
17 - Pickup unit.
18 - Pickup unit raising cylinder.
Instruction Manual - Twin Master
13
10
Page 11

3.2 - Running principle
Combine main features Twin Master Peanut Combine are:
Peanut pickup is carried out by a cylinder with pickup ngers of plates that throw
the product up to the auger, from where it is put on the way to the conditioning
cylinder that, at last, directs it to the threshing cylinder.
Sliding shoes allow the pickup unit to follow up the terrain unevenness, making
the pickup ngers to work very close to the soil surface, picking up the plants that
should be arranged in furrows form.
Threshing occurs through the Axial Flow of Low Impact system (FABI). Beating
pins, arranged along the whole helicoidal cylinder length, make the threshing and
keep the screen around it from being obstructed by the straw, besides adjusting
threshing time.
Peanut passes by the screen around the threshing cylinder and falls on the vibrating
sieve, occurring the separation of the “peanut + thin straw” from the thick straw
which is eliminated by the cylinder.
Cleaning fan sucks the light particles of dirt (thin straw), allowing only the peanut
to be led to the Combine rear part.
In the rear part, below the sieve, there is a deposit from where the product is
transported to the elevator through a auger.
That elevator transports the peanut up to the grain box. Product unloading occurs
through the box tilting by means of hydraulic cylinders.
11
Instruction Manual - Twin Master
Page 12

3.3 - Technical specications
Model ................................................................................................Twin Master Peanut
Engine required power ...................................................................................... 150 - 170 cv
Coupling .......................................................................................... draw-bar/TdP (850 rpm)
Remote control valves required .......................................................................................... 3
Cardans ............................................................................................................series 6000
Pickup unit
Hold system ..................................................................................................... sliding shoes
L 1 - Work width .................................................................................................. 5.450 mm
Pickup nger type .........................................................................................................hard
Threshing system and separation
Beating cylinder diameter .................................................................... 2 concaves of 700 mm
Beating cylinder length ...................................................................... 2 cylinders of 3,600 mm
Work rotation ......................................................................................................... 430 rpm
Threshing screen (concave) holes diameter ........................................................... 50 x 70 mm
Cleaning system
Main sieve cleaning area .......................................................................................... 6,98 m²
Vibrating sieve hole diameter .................................................................half moon - 5x30 mm
Air ow .............................................................................................................. adjustable
Turbine diameter ................................................................................2 turbines of 700 mm
Storage system
Grain elevator ...................................................................................................... 2 foldable
Amount and type of mugs ..............................................................................45 polyethylene
Mug fastening ..................................................................................................2 side chains
Grain box capacity .................................................................. (160 bags of 25 kg.) 4,000 kg.
Dimensions and Weight
Sizes.................................................................................................................. 3.514 mm
A 1 - Work height ................................................................................................ 4.770 mm
A 2 - Transport height .......................................................................................... 4.458 mm
A 3 - Unloading height ......................................................................................... 4.082 mm
C - Length .......................................................................................................... 9.100 mm
L 2 - Width ....................................................................................................... 6.709 mm
Weight ................................................................................................................10.100 kg
Wheels ............................................................................................................ 23.1 x 26”
* See the pictures in the next page.
Instruction Manual - Twin Master
12
Page 13
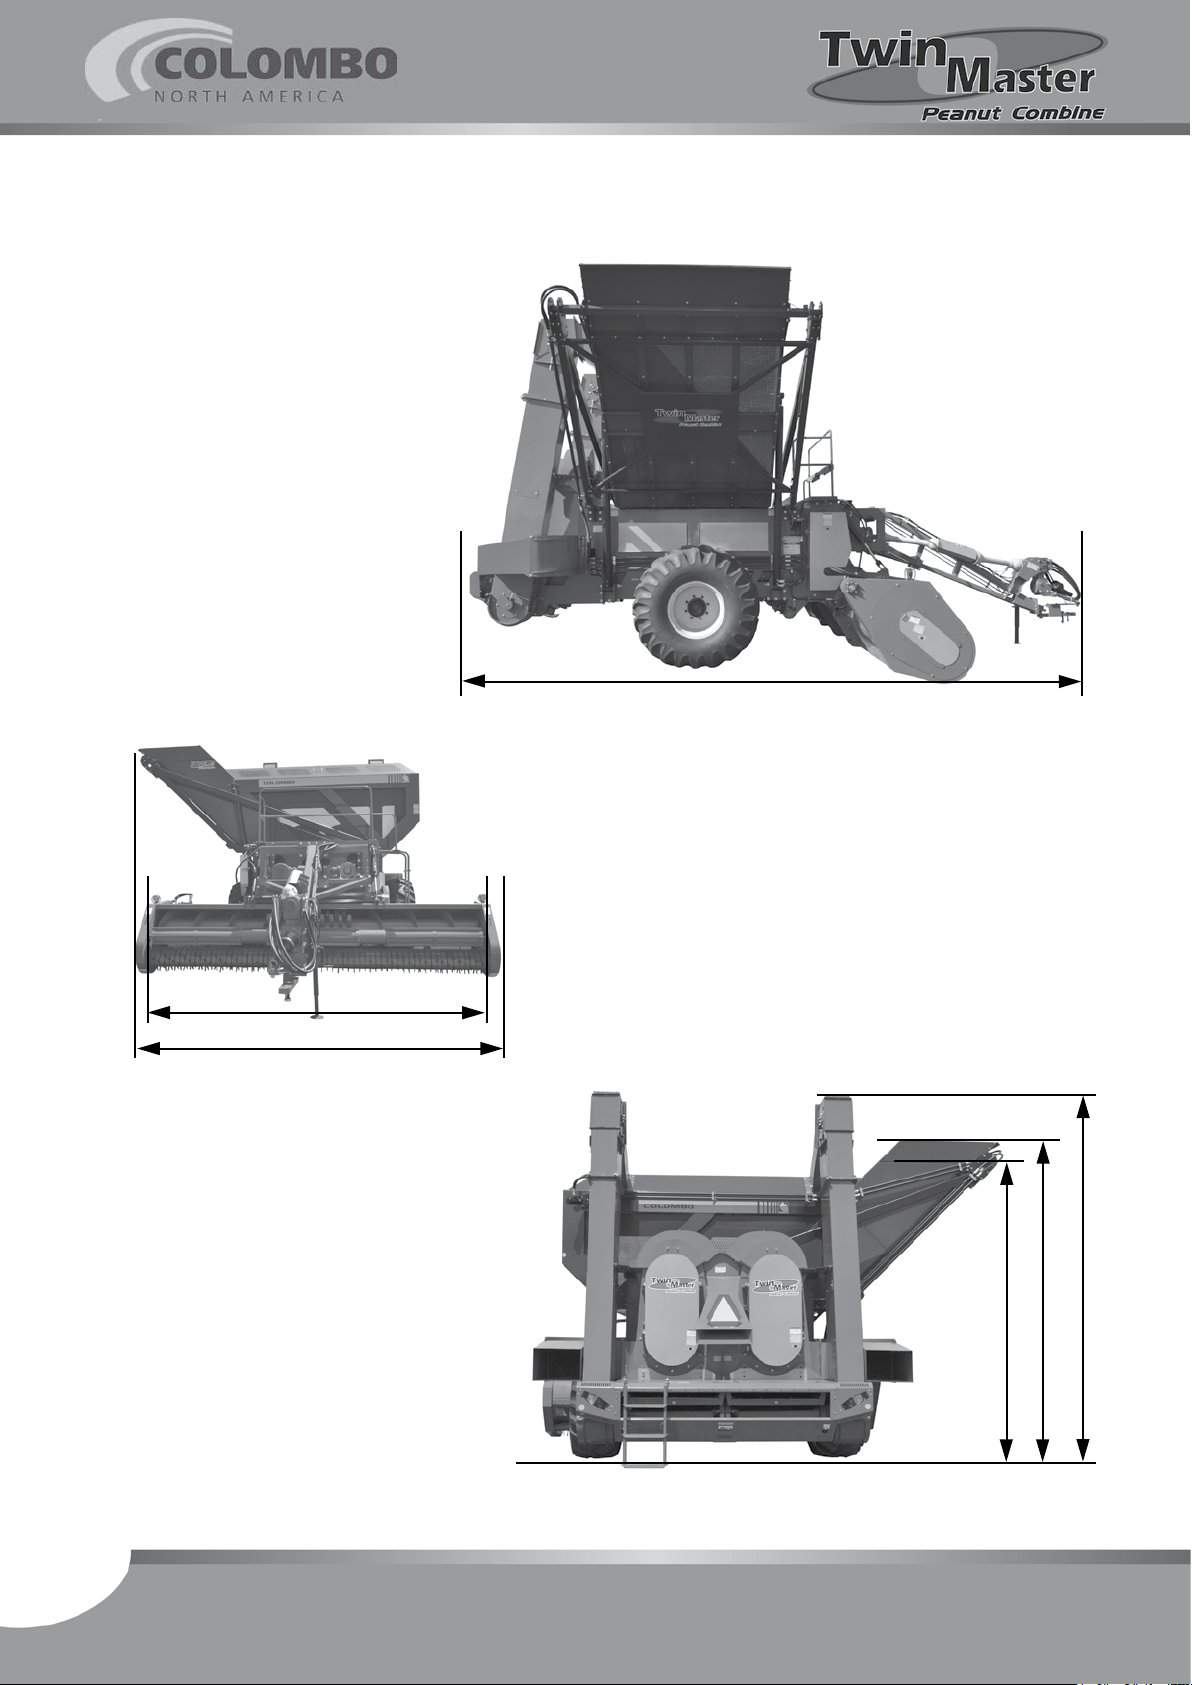
L1
L2
Vista frontal
C
Left side
13
Rear view
Instruction Manual - Twin Master
A3
A1
A2
Page 14
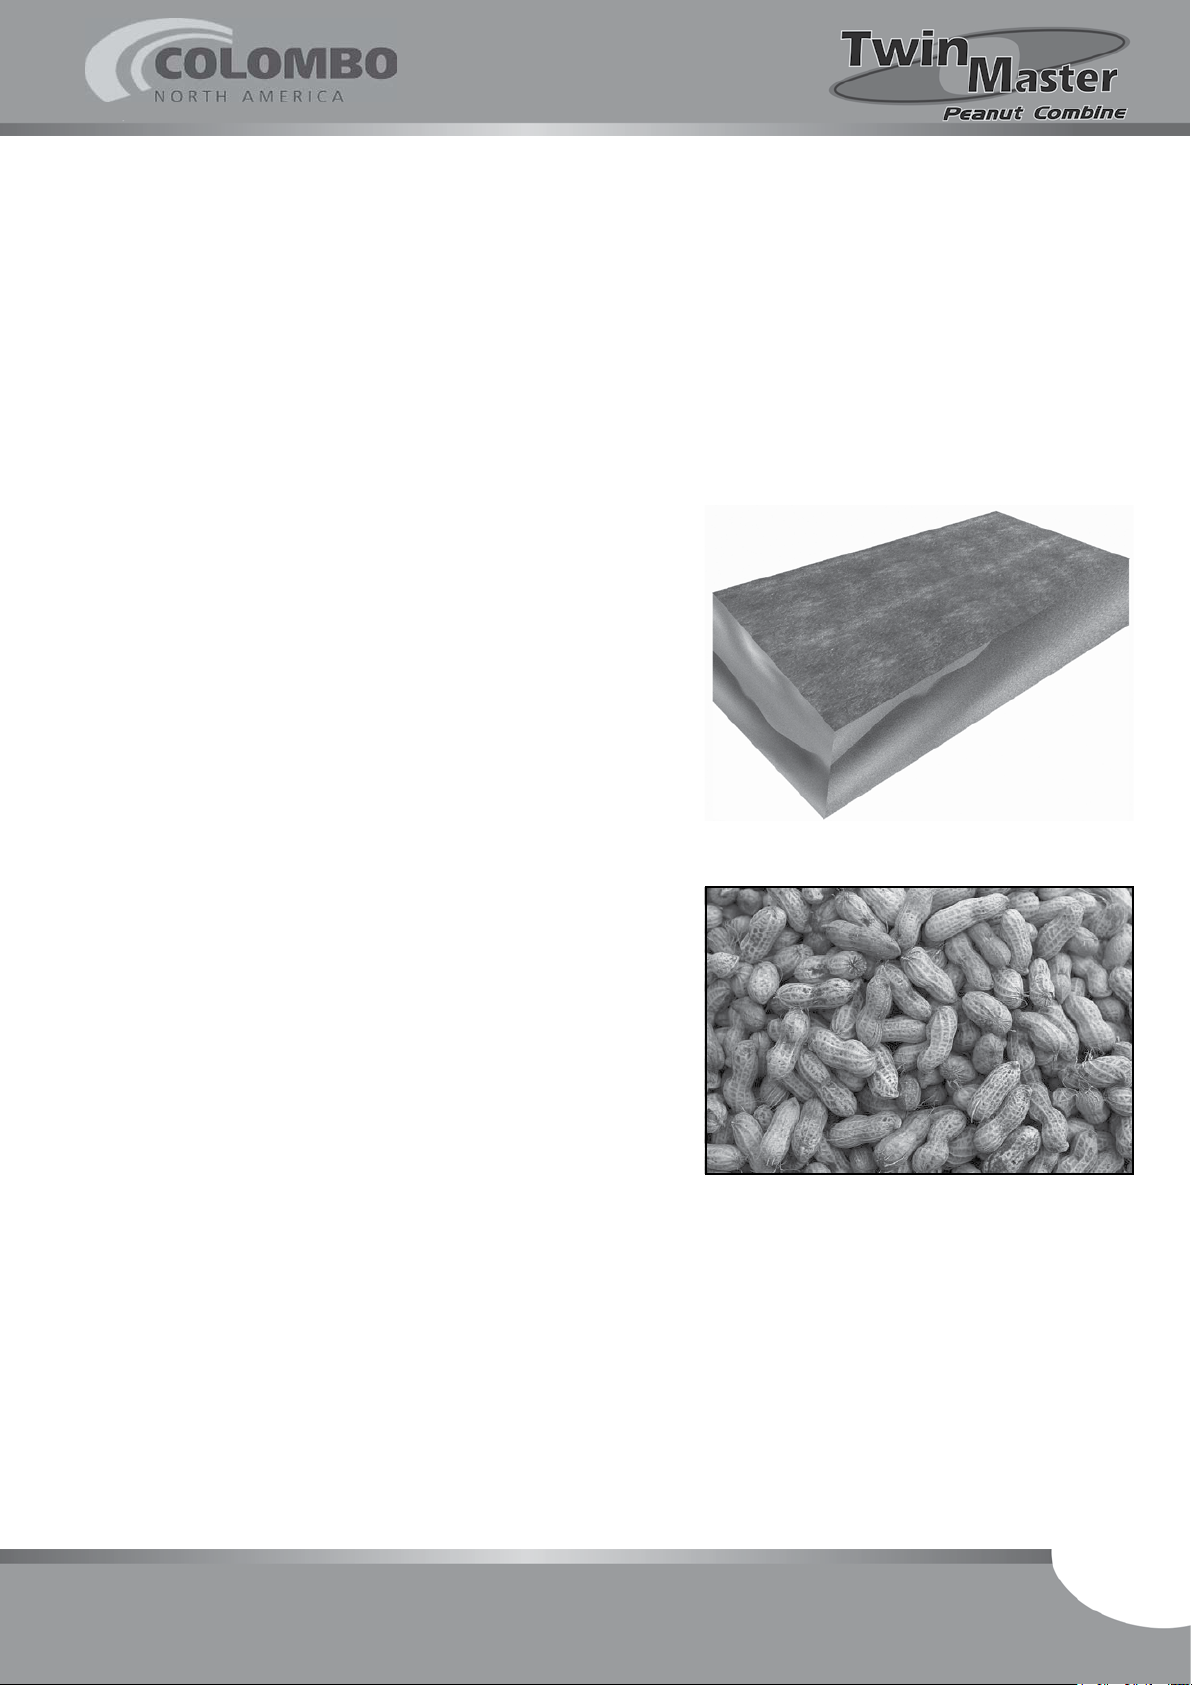
4 - Work conditions
Combine most output Twin Master Peanut Combine in your crop depends on
several factors among which the main ones are: terrain general characteristics,
peanut characteristics, moisture and Combine moving speed.
Carefully fulll all topics below.
4.1 - Soil characteristics
A - Surface evenness
More even is the soil surface, less will be the pod loss and
better will be machine running during pickup.
Every crop, during soil preparation, try to make surface even
getting rid of unevenness.
B - Moisture conditions
Do not wait for all the product in furrows to get to an ideal
and even moisture level to gather it. Start picking up with
the moisture level a little higher than the ideal one because
the product dries along the process. Avoid getting to the
end of the work with the material much dry because it can
cause break and loss of pods.
By the way, moisture conditions change along the day. Early
in the morning, there is the dew inuence which increases
the moisture of the product and delays the beginning of
the threshing.
According to the region, pickup starts only after 10:00,
11:00 or even 12:00 o’clock.
Instruction Manual - Twin Master
14
Page 15
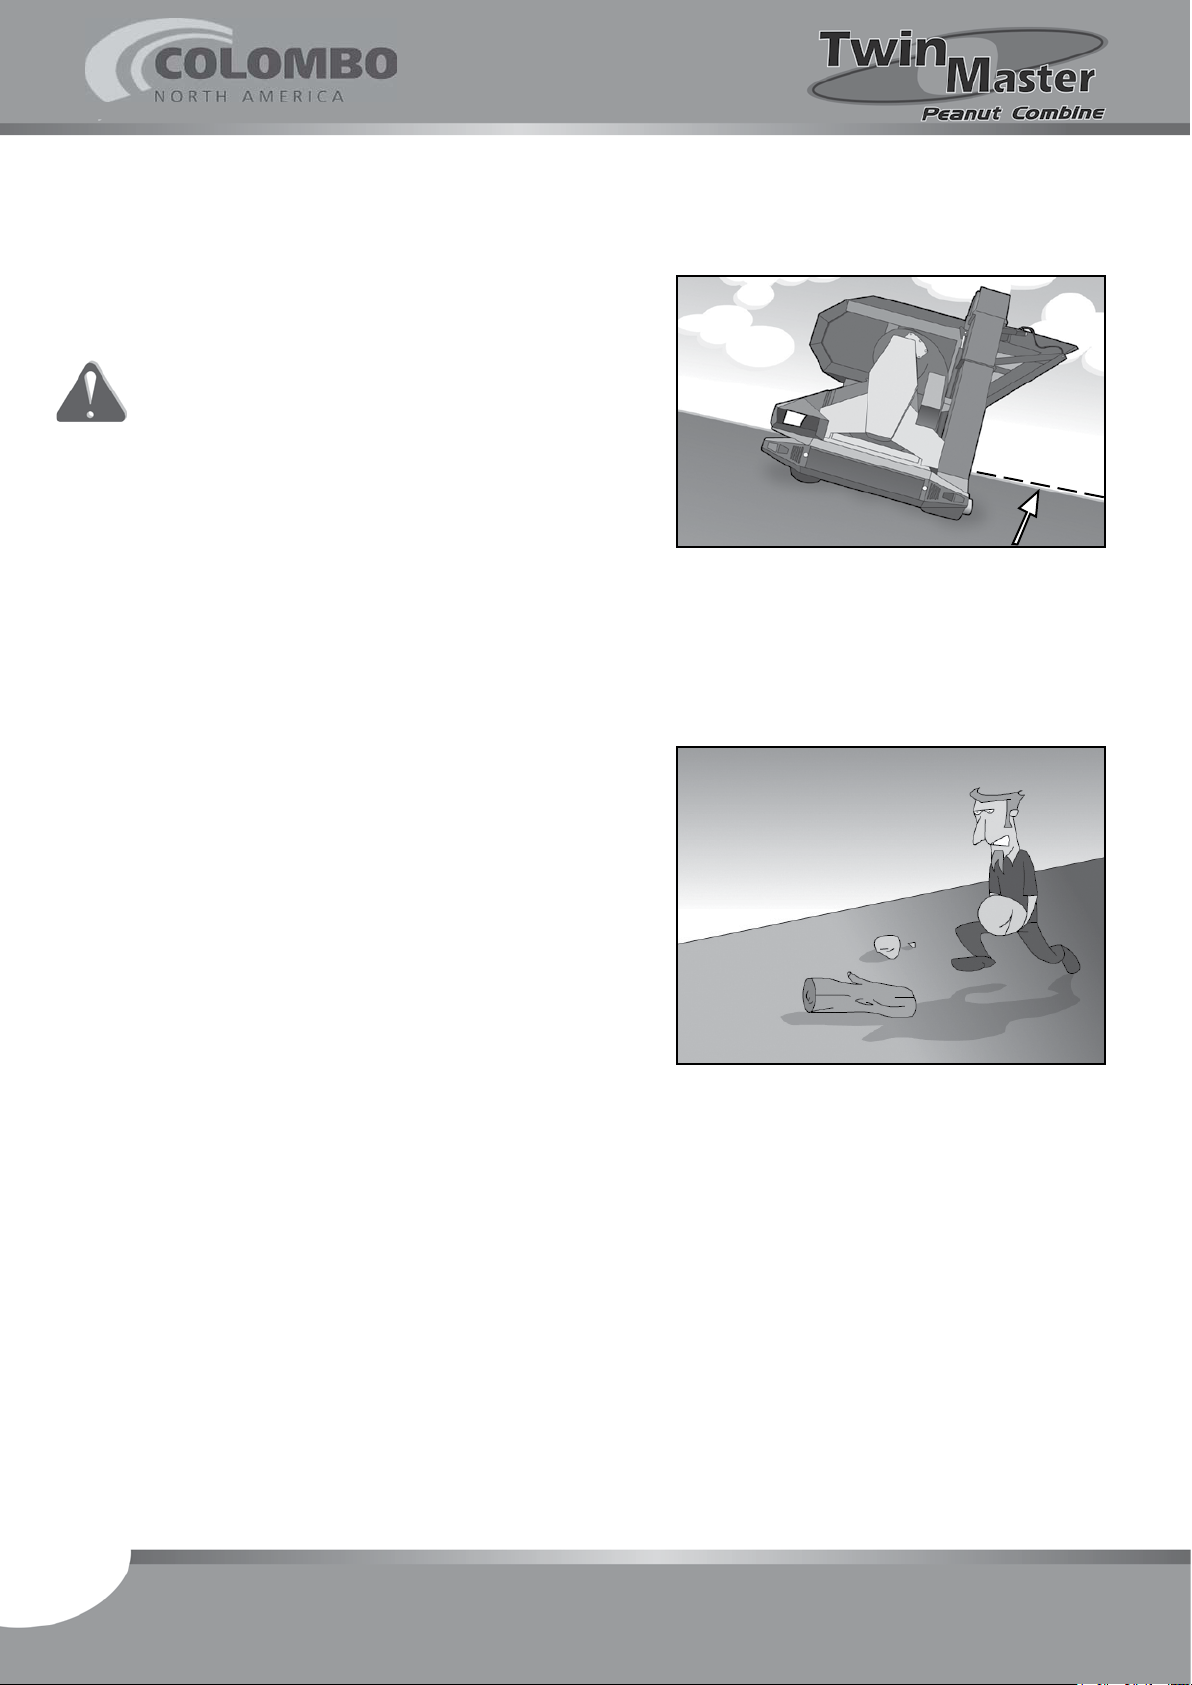
C - Side tilt
Soils that present side tilt greater than 10 % (see gure
on the side) can cause the Combine to overturn.
Therefore, avoid working in such situations.
Warning:
Be careful with holes and swells on the soil.
4.2 - Recommendations for a good mechanical harvest
A good mechanical harvest begins by correct soil preparation. Below there are some important procedures that aim
to increase the crop output:
Try to level the soil up to the most possible, getting
rid of natural soil waviness.
Continuously remove stubs, stones and any other type
of obstacle there is in the area.
In case of direct planting, handle the straw in a such way
to make the surface even and prevent high rootstock
from appearing because it will mix with the furrows.
For instance: corn stalks that remain after harvest.
Be careful with the ruts left by the pivot wheels.
When crossing them, reduce the tractor speed to prevent a more violent impact.
Avoid gaps along the furrows because they make the
threshing cylinder to work idle for short periods of time
and it can cause break and/or loss of grains.
10º
A - Considerations about work capacity
Twin Master Combine work capacity depends on the soil conditions, crop characteristics and operator’s skill with this type of equipment.
Operator should work at the highest speed possible, according to moisture conditions, safety and product characteristics, aiming to not harm machine running
neither cause losses in the eld.
It is better to work at a lower speed, harvesting a smaller area per day than speed
up and increase loss level to above acceptable. Machine work can also be harmed,
causing unnecessary maintenance service.
15
Instruction Manual - Twin Master
Page 16
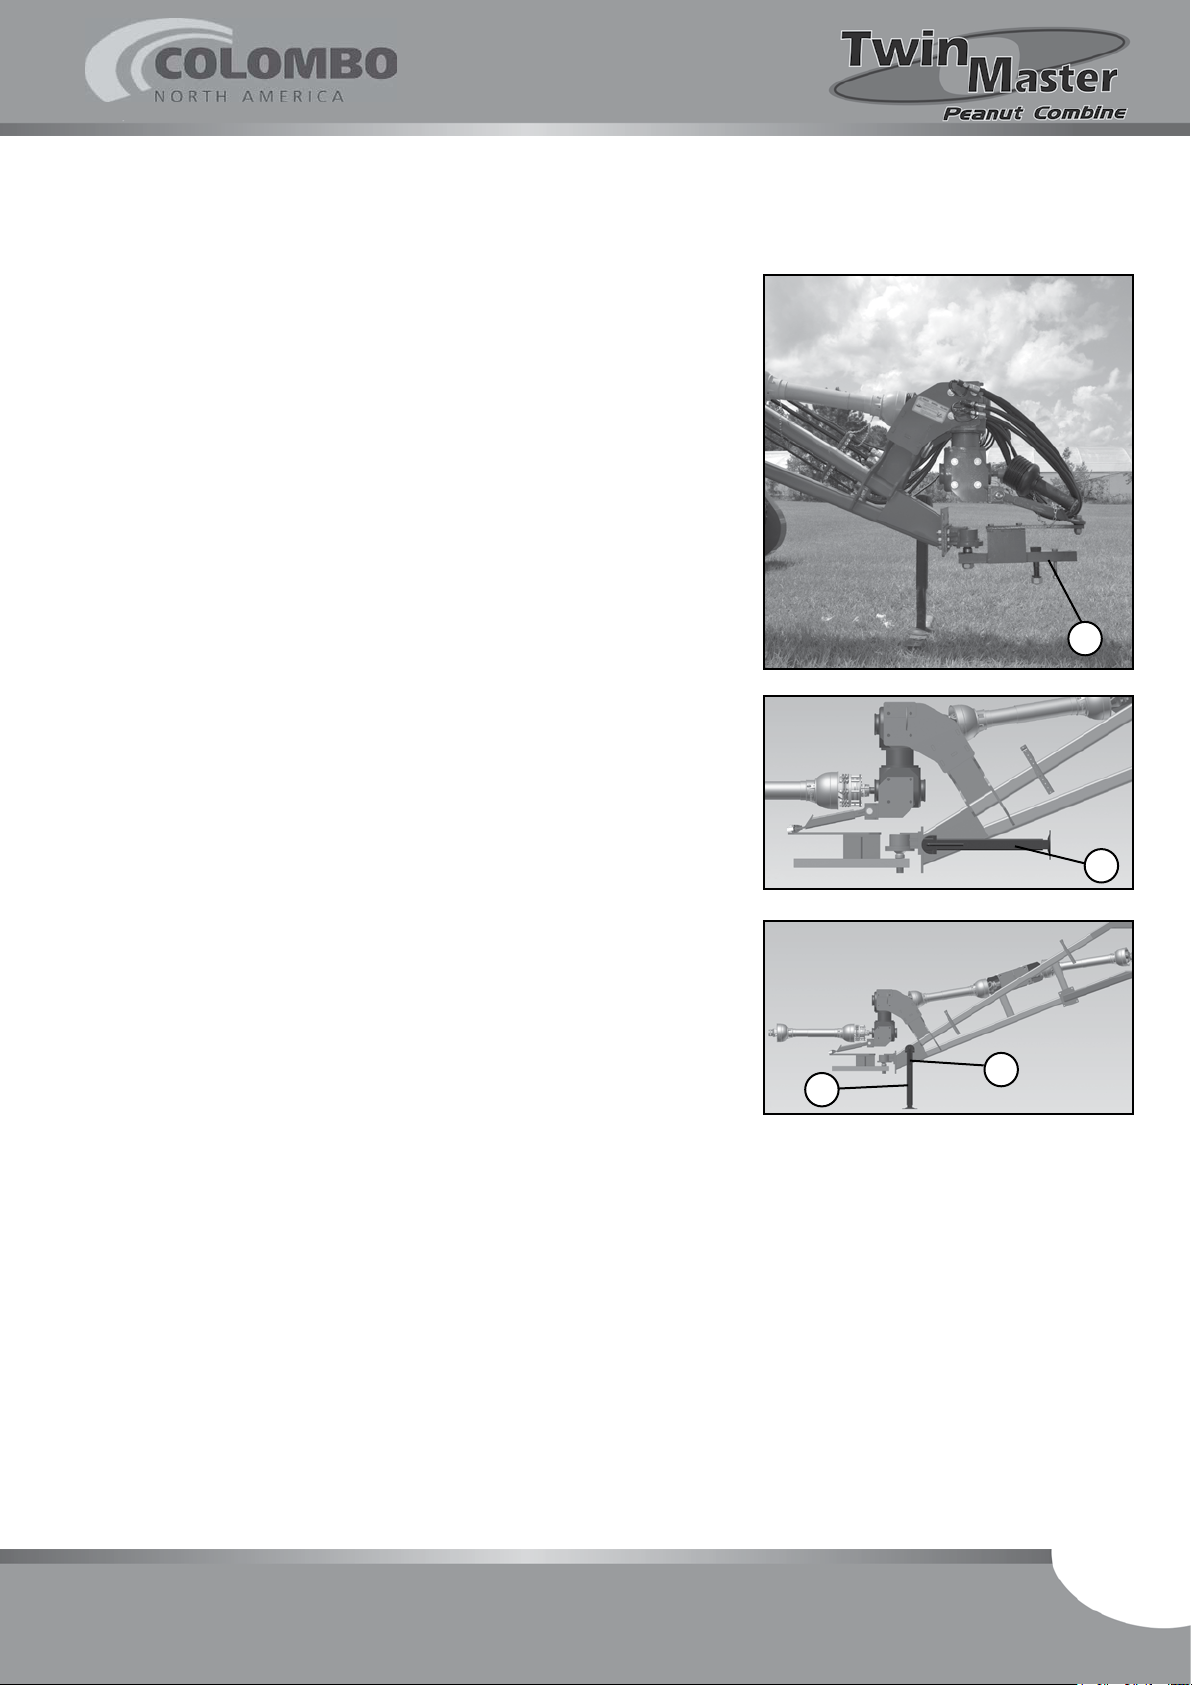
5 - Machine preparation
5.1 - Leveling and coupling to the tractor
a) On a rm and at place, turn the crank (1) of the stand
jack (2) in a such way that the Combine be leveled
(parallel) in relation to the soil.
b) Put the tractor near the Gatherer. Draw-bar should
coincide with the coupling terminal of the header (3).
In case there is need, adjust the draw-bar according
to your tractor Instruction Manual.
c) Couple the tractor draw-bar with the coupling system
of the Combine and put the lock.
d) Release the stand jack using the crank, release the
pin and put it in transporting position (4).
3
4
1
2
Instruction Manual - Twin Master
16
Page 17
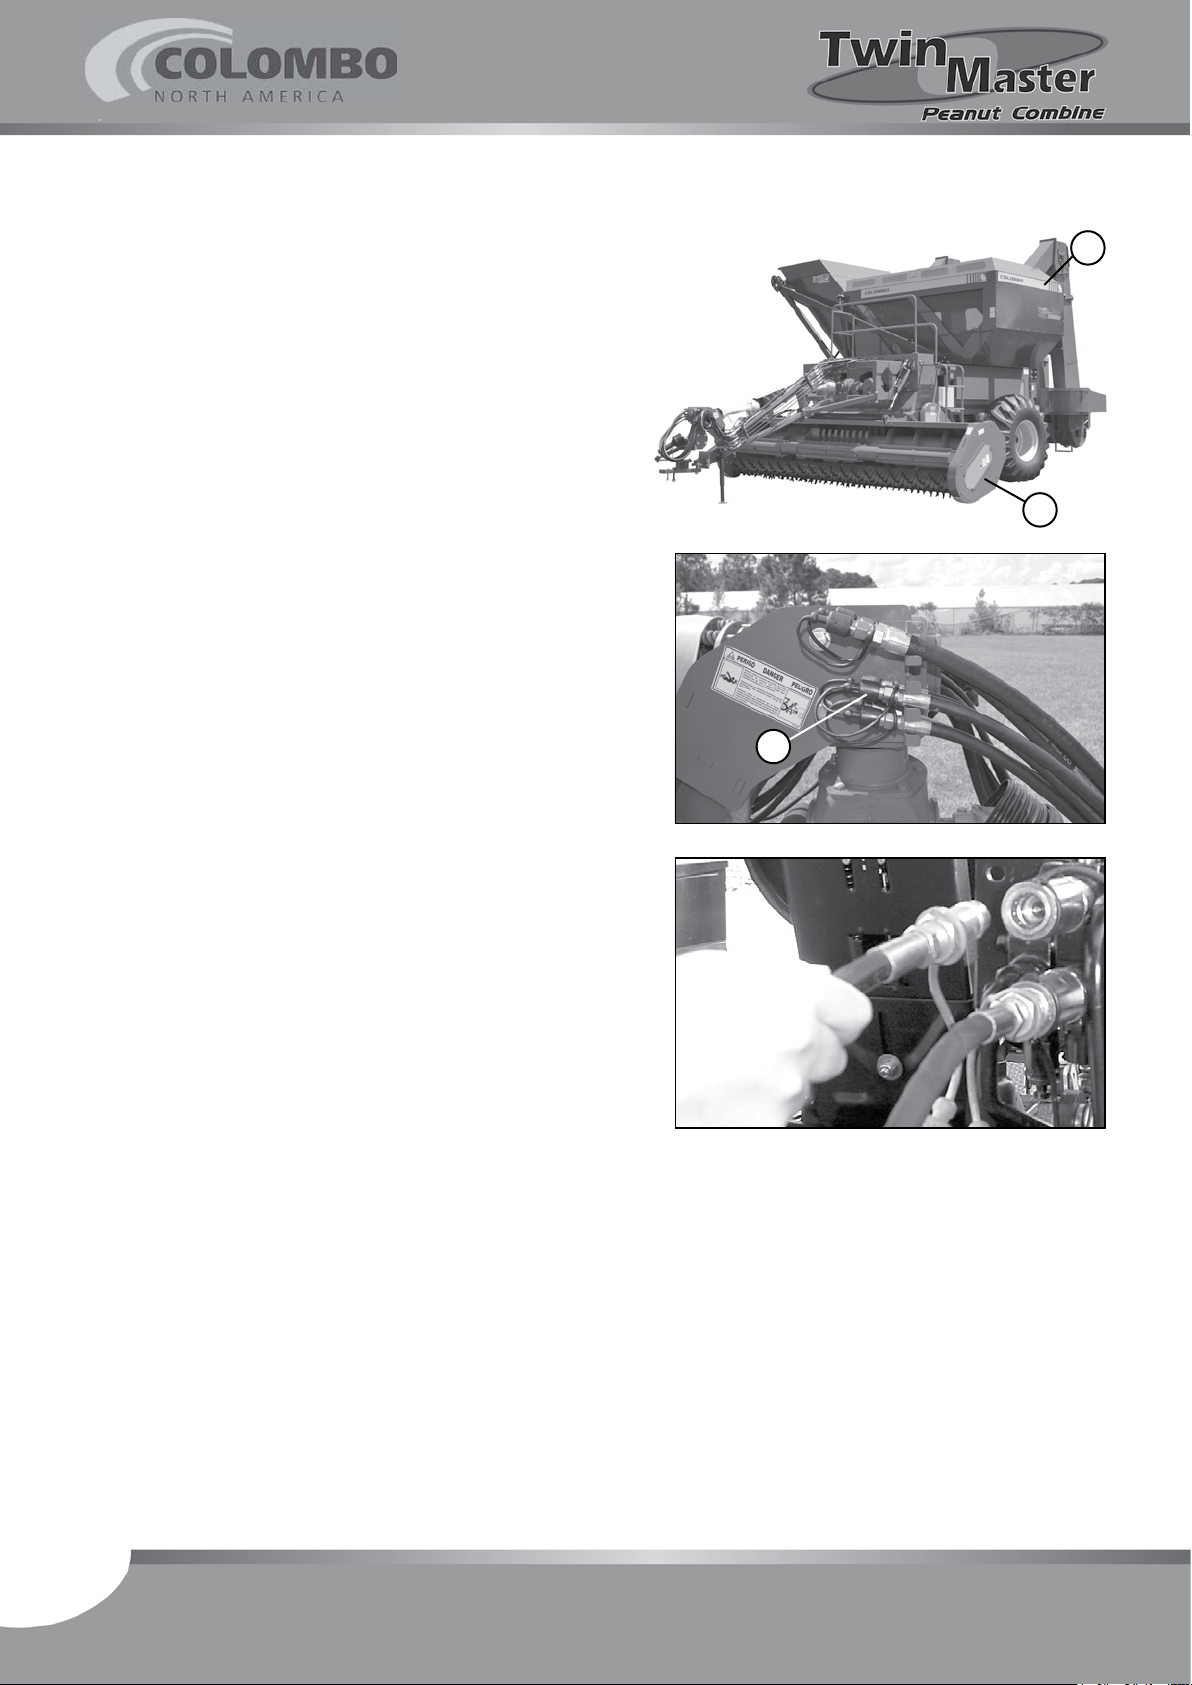
5.2 - Hydraulic coupling
In the tractor remote control, use the three hydraulic lines,
connecting the hoses like this:
Line nº 1 - for driving:
- Tilt (raise and lower) of the pickup unit (6).
7
Line nº 2 - for driving:
- Tilt (raise and lower) of the grain box (7).
Line nº 3 (optional) for driving:
- Hydraulic motor for driving the pickup cylinder of the
pickup unit.
- Hydraulic motor to drive the spreading auger that
spreads the peanut pods (grain tank).
a) Remove the protecting plugs (5) from the three pairs
of hoses of the machine and from the tractor remote
control terminals.
b) Connect the hoses rmly pushing their terminals against
the remote control terminals (according to gure 1).
6
5
17
gure 1
Instruction Manual - Twin Master
Page 18

5.3 - Removing the hydraulic hoses
a) Move the respective remote control levers to lower the grain tank (7) and
the pickup unit (6), in case they are raised.
b) Turn the tractor machine off.
c) Move the remote control levers in both directions to relieve the residual
pressure in the circuit.
d) Remove the hoses and put all the protecting plugs (5) back.
Warning:
1 - If pressure remains in the hoses, relieve such pressure before connecting them
again. It can be done compressing the check valve of the ends of the hoses
against the bottom of a clean recipient (bucket or can), protecting yourself from
the resulting oil jet.
2 - Never remove the hoses of the tractor remote control with the system pressu-
rized.
3 - Oil jets under pressure can penetrate skin causing serious injuries. Because of
that, it is important to relive the pressure before performing any maintenance
in hydraulic systems. If even with all caution there is penetration of hydraulic
uid in your skin, seek for a doctor.
Instruction Manual - Twin Master
18
Page 19
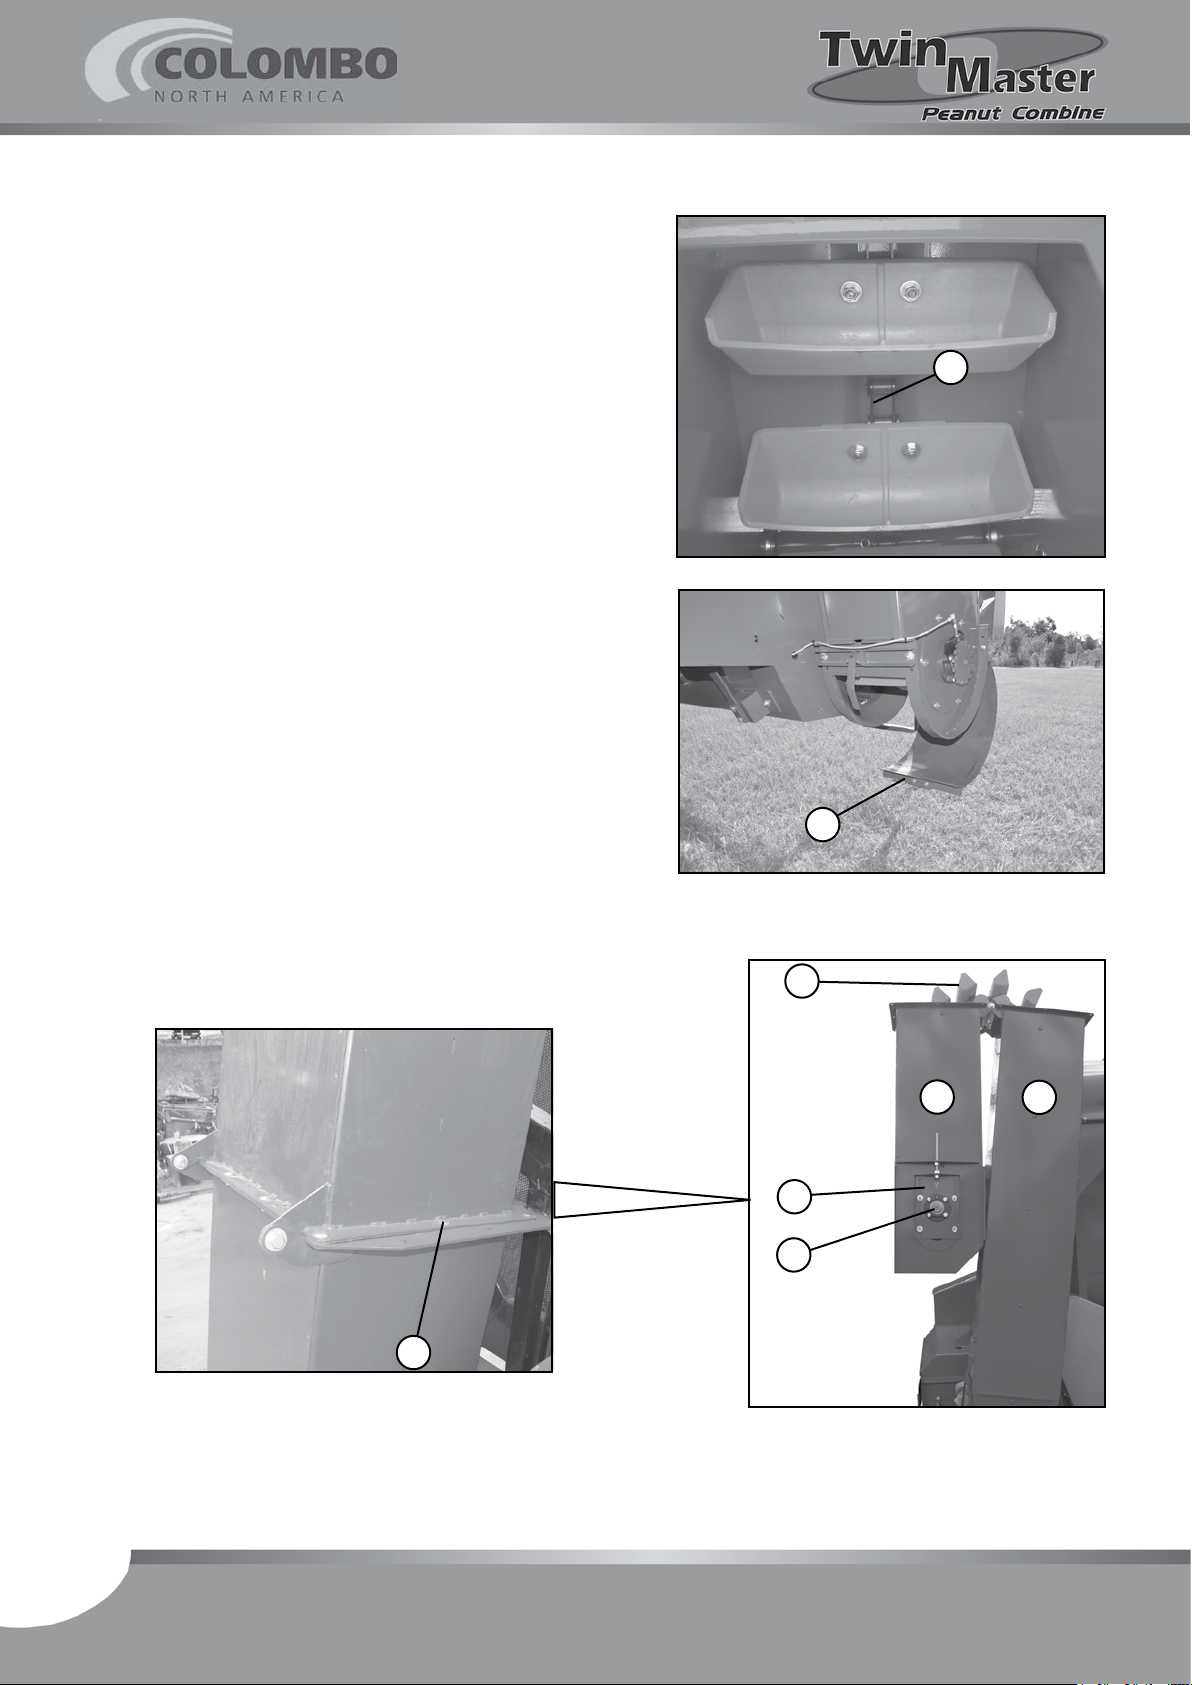
5.4 - Grain elevator assembly
Elevator (8) is not disassembled for Combine transport, but
it is folded according to side gure.
Put the elevator in work position according to the following:
a) Tie the ends of the chain (9) with wire or rope, preven-
ting the mugs (10) from displacing inside the elevator.
b) Fully unfold the elevator (8).
c) Install the screws + nuts (11) to fasten the upper part
of the elevator (8), according to the gures below.
d) Remove the bottom inspection cover (12).
e) Remove the wire or rope and splice the chain (9).
NOTE:
f) Adjust the chains play (9) using the side stretchers
See in page 32 some information about the correct chain splicing.
(13), according to instructions in page 34.
9
12
NOTE:
Upper bearings (14) should be aligned.
11
10
13
14
8
8
19
Instruction Manual - Twin Master
Page 20
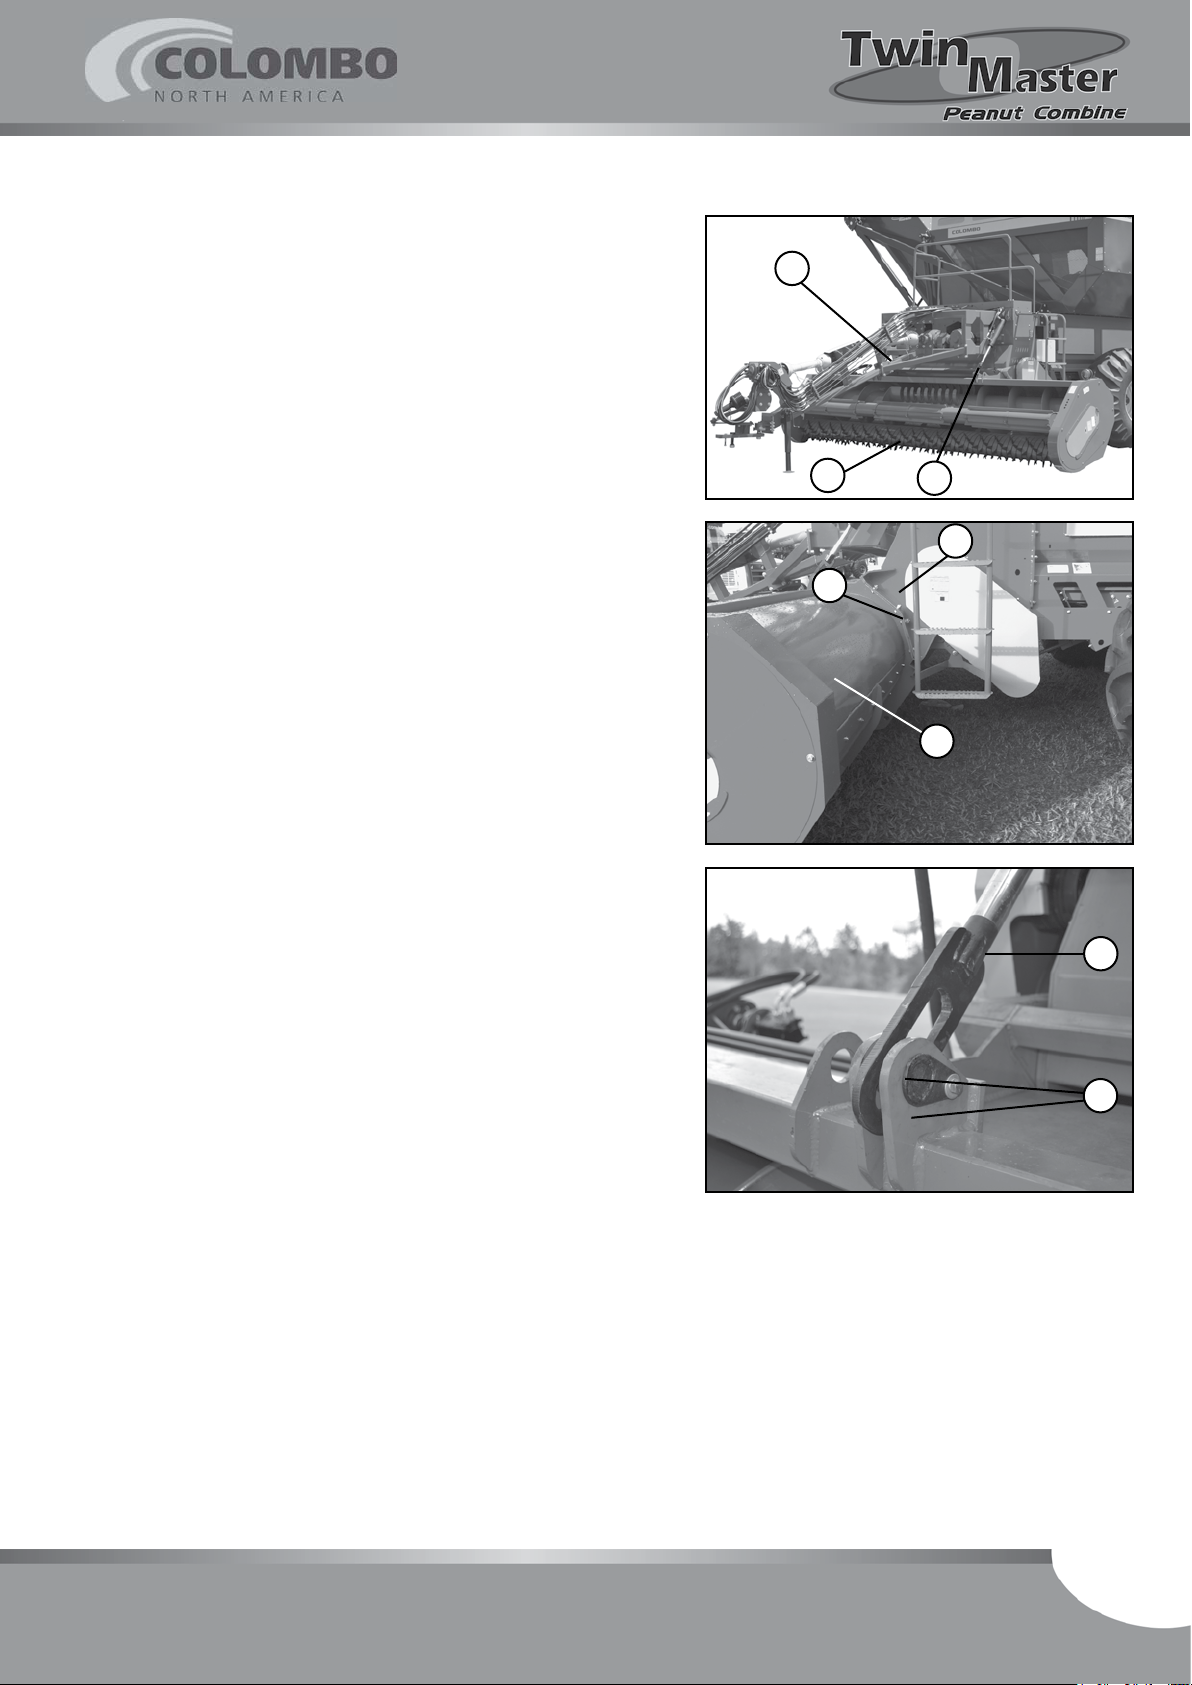
5.5 - Pickup unit assembly
In case the pickup unit (15) comes disassembled from the
machine, assemble it according to instructions as follows.
Note:
a) Couple the Combine to the tractor according to instruc-
b) Safely hang the pickup unit (15) (with a tractor equi-
c) Fasten the pickup unit (15) to the Combine side stand
Perform this procedure on a at and rm ground.
tions in page 15 and scotch the wheels with wooden
wedges.
pped with “boom” and a cork belt, for instance) and
position it under the header (16), in a such way that
it stays aligned in relation to the Gatherer.
points (17), using four screws (18) + washers + nuts
on each side.
16
15
18
19
17
15
d) Fasten the terminal with the oblong seat of the raise
cylinder (19) to the pickup unit stand point (15), using
the pin + washer + screw kit (20).
5.6 - Cardan length adjustment
About the adjustment, refer to the cardan shaft manual
instructions.
19
20
Instruction Manual - Twin Master
20
Page 21
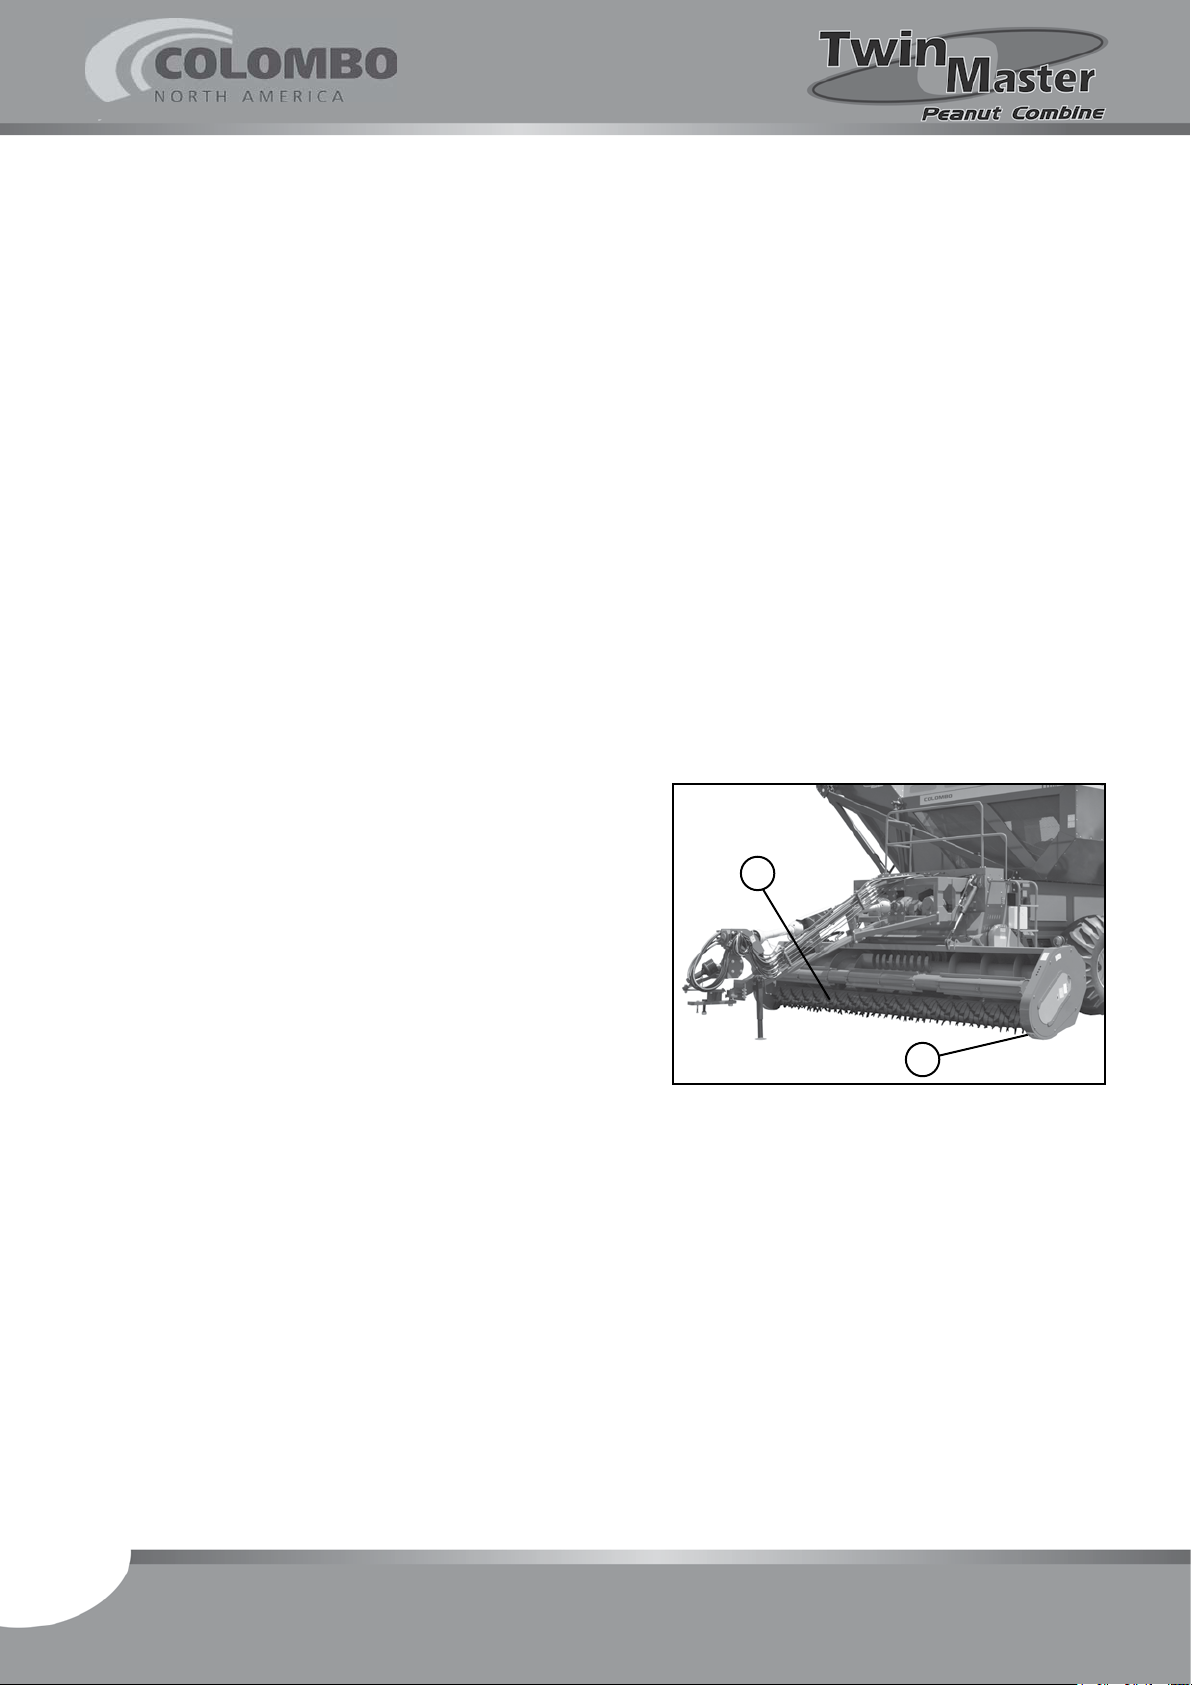
6 - Adjustments to start the operation
6.1 - Power take off rotation
During the operation, the power take off rotation should be kept constant at 850
rpm.
6.2 - Tractor work speed
Correct tractor moving speed is one of the factors that directly inuences
the gathered product nal quality. Recommended speed is around 3,0 to 8,0 km/h.
6.3 - Pickup unit
A - Point of support identication
1 - Sliding shoes: support the pickup unit, making it to
slide on the soil.
B - Adjustment of the pickup ngers height
in relation to the soil
To get full pickup of the peanut furrows, the recommended
distance from the end of the pickup ngers (2) in relation
to the soil be between 25 to 50 mm.
Such height adjustment should be done through the lever
corresponding to the line nº 1 of the tractor remote control
(see page 16): fully hang the pickup unit and then slowly
lower it up to reach the spacing measure described above.
Such measure check can be done visually or using a measuring tape, in case there is need.
Reaching the proper measure, keep the remote control lever
in that position during the work.
2
1
21
Instruction Manual - Twin Master
Page 22
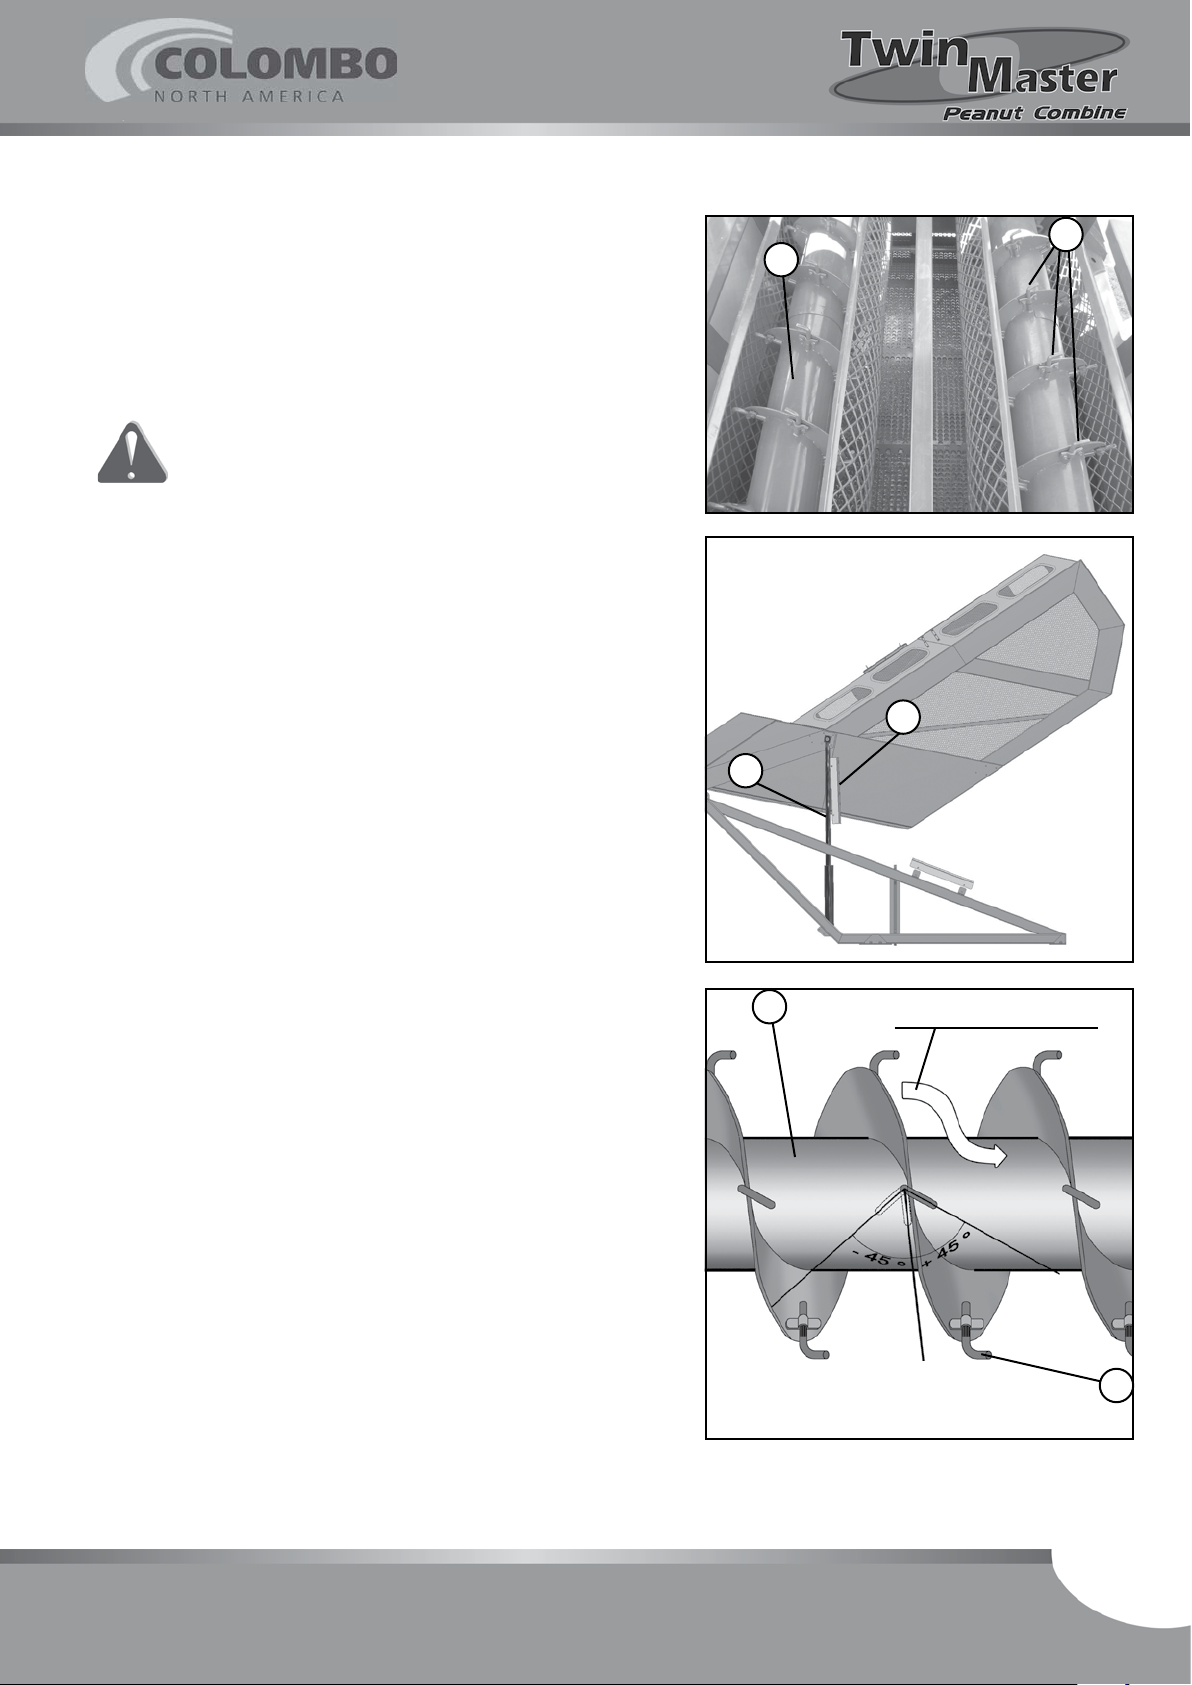
6.4 - Beating cylinder (FABI)
High performance cylinder of Axial Flow of Low Impact. The
only item that requires adjustment in the threshing cylinders
(3) are the beating pins (4).
A - Beating pins position
Warning:
Never work under the grain tank before
tting the safety lock (5) on the hydraulic
cylinders rod (6).
NOTE:
Beating cylinders turn in reverse direction. The
right cylinder turns counterclockwise (in relation
to whom is sitting in the tractor seat) and the
left one turns clockwise. Therefore, the beating
ngers also stay in reverse position comparing
to both cylinders.
4
3
5
The pins (4) have three work positions, dened from the
product conditions.
Those positions are:
Position A: Pins at (+45º) in relation to the auger in
the material movement direction.
Provide a shorter threshing time because the material passes
quicker through the system. Indicated to less productive
peanut crops, with less amount of mass and dryer.
Position B: Pins (4) at (0º) in relation to the auger (3).
Provide an ideal threshing speed to the peanuts that are
within the ideal moisture range.
Positiom C: Pins at (-45º) in relation to the auger in
the material movement direction.
Provide a longer threshing time (because the material
passes slower through the system), preventing grain loss
along with the straw that is thrown away at the end of the
process.
Indicated to much productive peanut crops, with great
amount of mass and moisture above ideal level.
6
3
Front
Moving direction
C
B
Lateral esquerda da máquina
Rear
A
4
Instruction Manual - Twin Master
22
Page 23
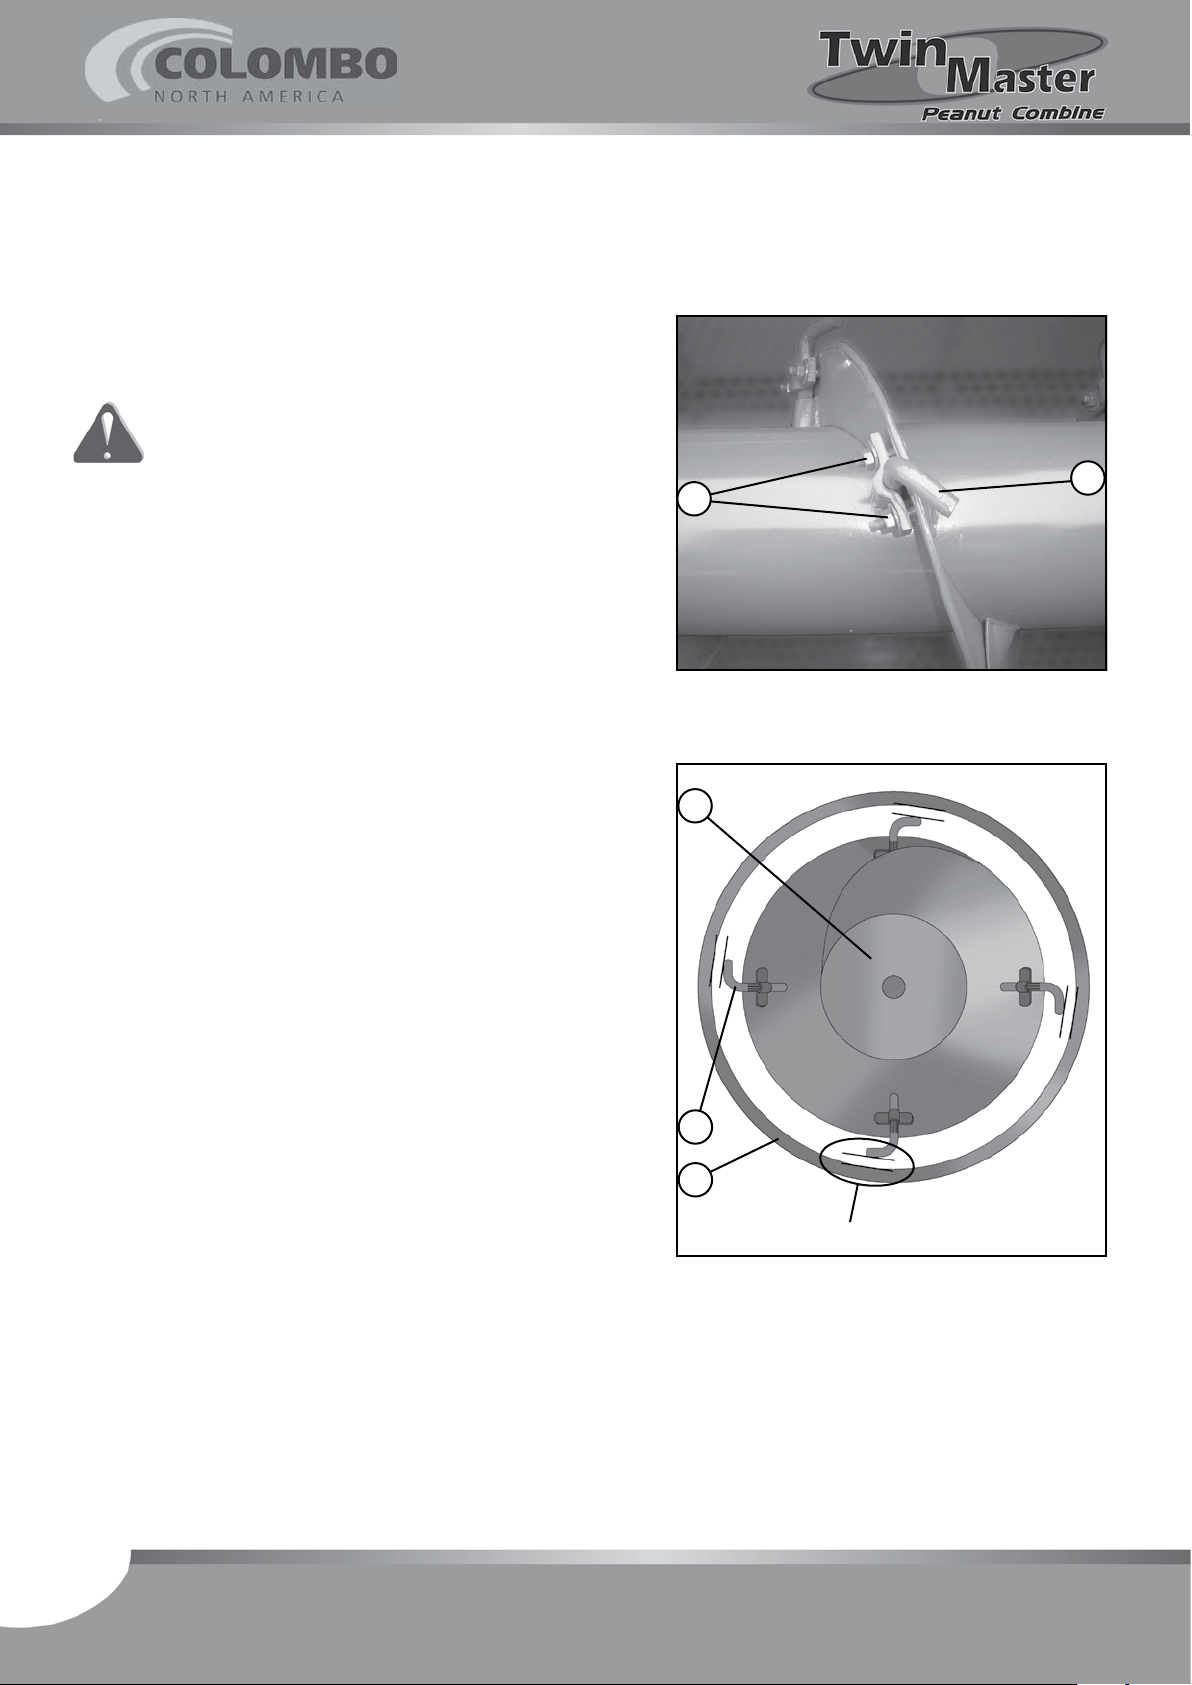
B - Beating pins adjustment
Note:
a) Release the pins (4), loosening the nuts (7).
b) Adjust the pins (4) in the desired position (inclination)
c) Adjust the distance between the pins (4) and the screen
d) Re-tighten the nuts (7).
Pins (4) adjustment should begin by the front
part of the beating cylinder (3), with the tractor
engine turned off and cylinder safety lock in place.
Warning:
Never work under the grain tank before t-
ting the safety lock on the hydraulic cylinders
rod, according to gure in the previous page.
(A, B or C - see previous page).
(8) according to topic “C” below.
4
7
C - Distance between the beating pins and
cleaning screen
When the distance from the pins (4) in relation to the screen
(8) is short, there will be a more severe threshing. As the
distance is increased, threshing gets softer, but a straw
coat can build up along the screen, making difcult the pods
pass. Position the pins at 2 cm and change it, in case there
is need, after beginning eld work.
Procedure:
a) Release the pins (4), loosening the nuts (7).
b) Change the distance between the pins (4) and screen
(8) according to needs.
c) IMPORTANT: Re-tighten all nuts (3).
Note:
If the distance from the pins (4) in relation to the
screen (8) is much long, a straw coat can build
up around the cylinder (3), making difcult the
pods pass.
3
4
8
Distance
23
Instruction Manual - Twin Master
Page 24
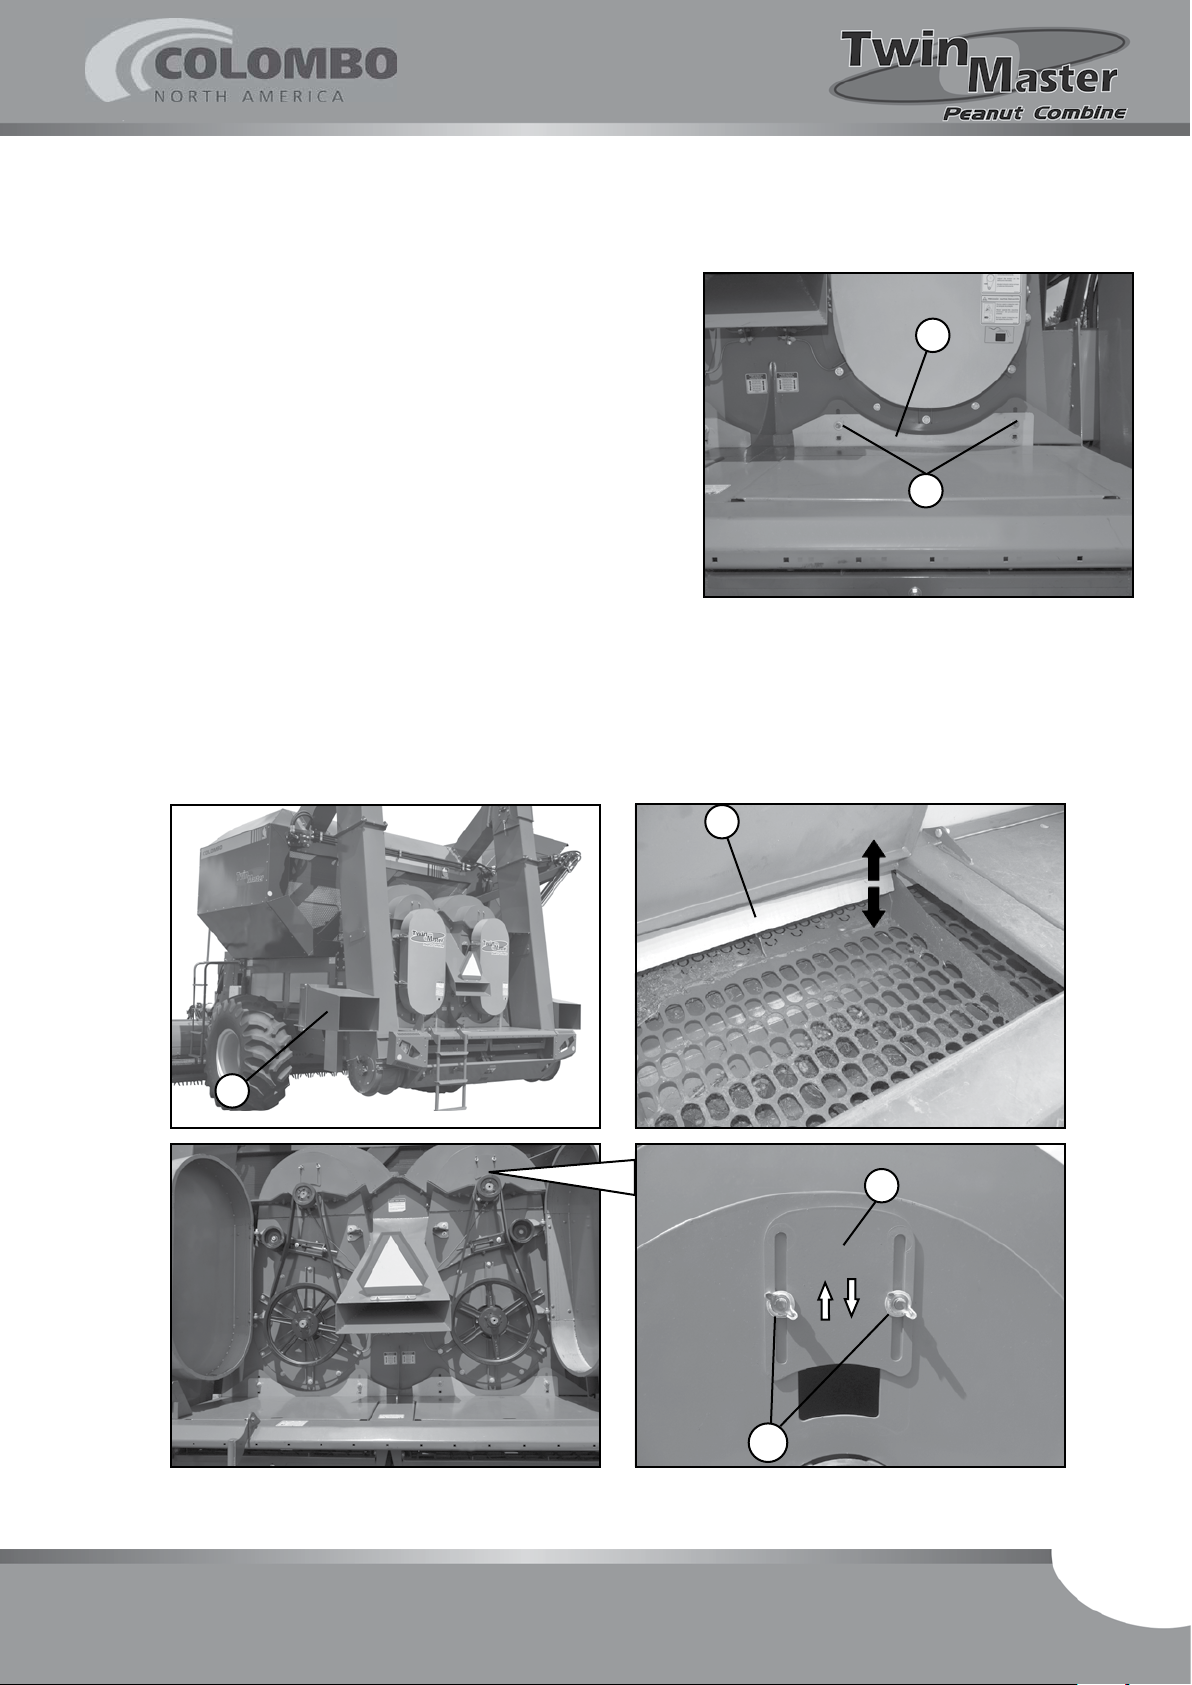
6.5 - Cleaning system
Bottom plate (9) and upper windows (10), mounted in the
Combine rear part, are in charge of the adjustment of the
air ow for product cleaning.
Adjust the plate (9) position along with windows (10) position in a such way to have a satisfactory cleaning with the
least air ow possible.
The more close the plate (9) and windows (10) are, the higher the suction power and, therefore, better is the cleaning.
The more opened the plate (9) and windows (10) are, lthe
lower the suction power and, therefore, lower is the cleaning power.
Release the nuts (9a) and both wing nuts (10a), adjust
according to need and after that re-tighten the nuts.
Note:
Excessive air ow can cause grain loss by the fan,
being thrown by the straw outlet (11).
9
9a
11
9
10
10a
Instruction Manual - Twin Master
24
Page 25
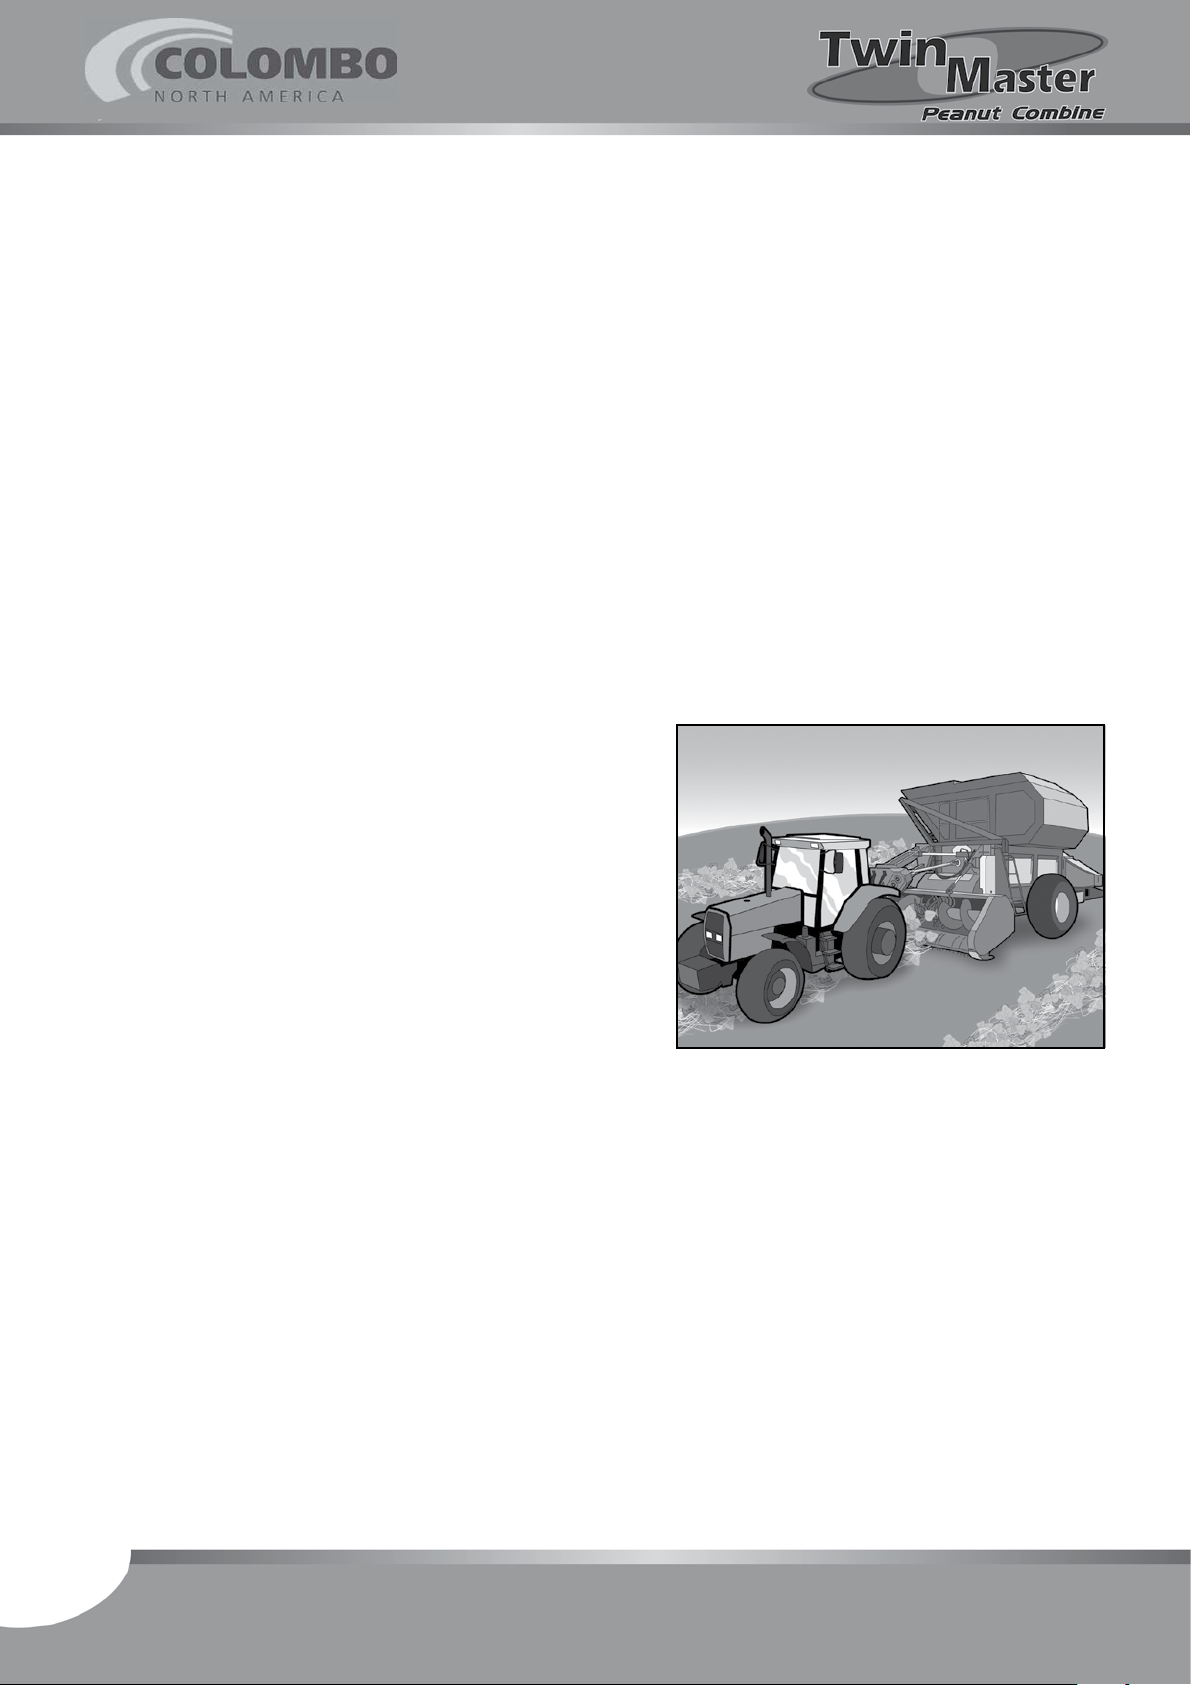
7 - Operating the combine
Notes:
4 - Put the lever corresponding to line nº 3 of the remote
control in "oating" position (see page 16).
- Operator should suit these procedures to his needs.
- Be aware of all safety instructions before operating the Combine for the rst
time.
1 - Before starting the Gatherer, make sure preparation, adjustments and lu-
brication are correctly done.
2 - Start the tractor and drive the power take off, putting it in the suitable
rotation (850 rpm).
3 - Align the Combine in front of the rst furrow.
Note:
Avoid gaps in the furrows because the beating cylinder should not work without
product.
5 - Adjust the pickup ngers height in relation to the soil
using the lever of the line nº 1 of the remote control,
according to instructions in page 16.
6 - Perform the pickup moving the tractor in suitable
speed, according to guidance in page 20.
Note:
7 - When carrying out maneuvers, always raise the pi-
Threshing system efciency largely depends on
the evenness of the machine feeding.
ckup unit (see instructions in page 16), turn off the
power take off and hold on around 30 seconds till all
material held inside the Combine be processed.
Note:
If the driving cardan is "homokinetic" type, there
is no need for turning off the power take off.
25
Instruction Manual - Twin Master
Page 26
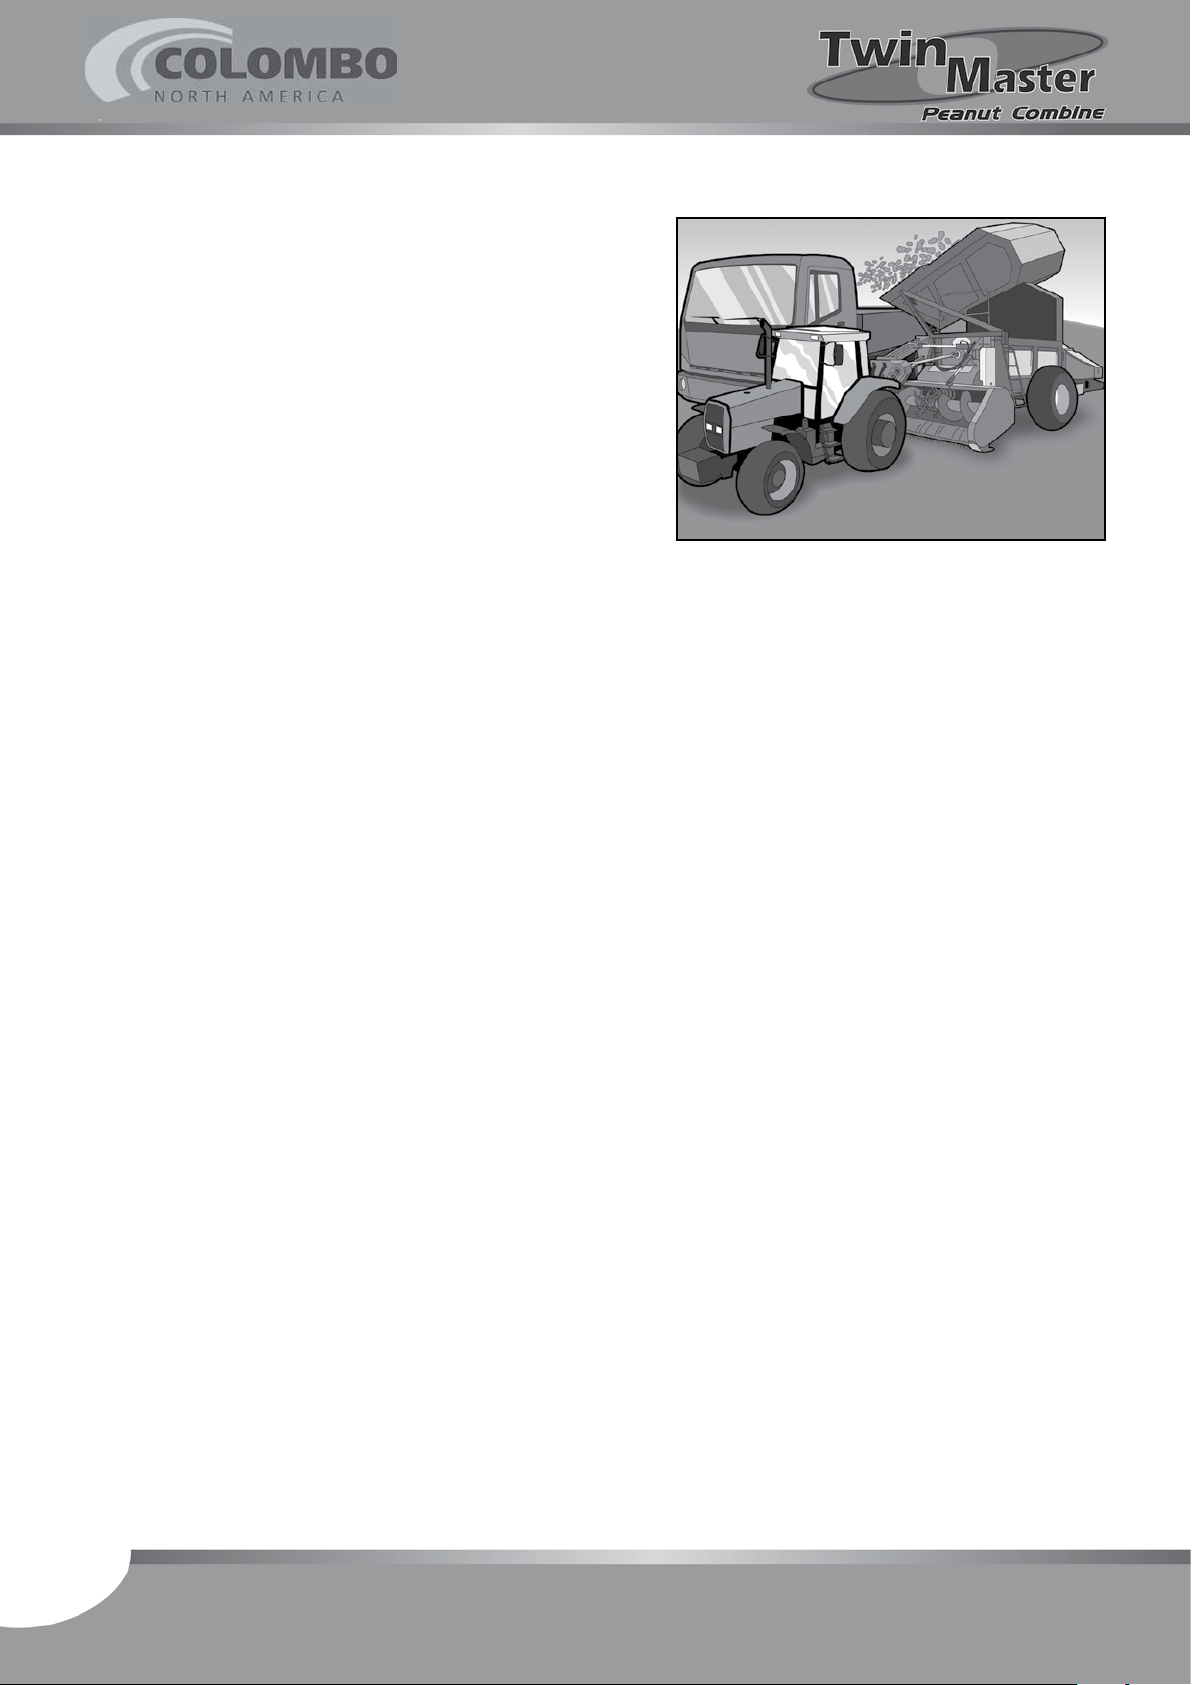
8 - After full grain tank loading, move tractor out of the
furrow and hold on around 30 seconds till all material
held inside the Combine be processed.
9 - Unload the grains on a at place:
Move the lever corresponding to the line nº2 of the
remote control backward till you completely raise the
grain tank.
After all grains have been thrown out, move the lever
frontward till you completely lower the grain tank.
Note:
10 - Avoid excessively transit with the Combine, outside
The most distance between the wagon and grain
tank should be of 500 mm.
or inside the harvesting area.
Note:
Never turn the machine off till work ow has
been concluded, otherwise residues volume
inside the machine increases.
26
Instruction Manual - Twin Master
Page 27

8 - Combine maintenance
8.1 - Periodic maintenance items
Every 8 work hours or daily:
Lubricate all points specied in page 28.
Lubricate all chains with the oil recommended in page 31.
Check nuts and screws torque, fastening and components condition in ge-
neral.
Check all hydraulic connections.
Check and clean the pickup unit, vibrating sieve (located under the Combi-
ne), screen around the threshing cylinder and fan of the cleaning system.
Check the alignment between pulleys. See page 30.
Every 50 work hours or weekly:
Check the gearboxes oil level. See page 26.
Check the tires pressure according to page 35.
Check and adjust, in case there is need, the chains and belts stretch, ac-
cording to pages from 29 to 32.
Every 200 work hours or every 800 ha gathered:
Check the ball bearings for noise level and heating.
Every 1,000 work hours or every 4,000 ha gathered:
Check and replace, in case there is need, the spring plates of the vibrating
sieve.
Change the gearboxes oil. See page 26.
Note:
The rst change of such oil should be done after the rst 50 work hours.
After the harvest or work day, see the Combine preservation:
See page 35.
Instruction Manual - Twin Master
27
Page 28
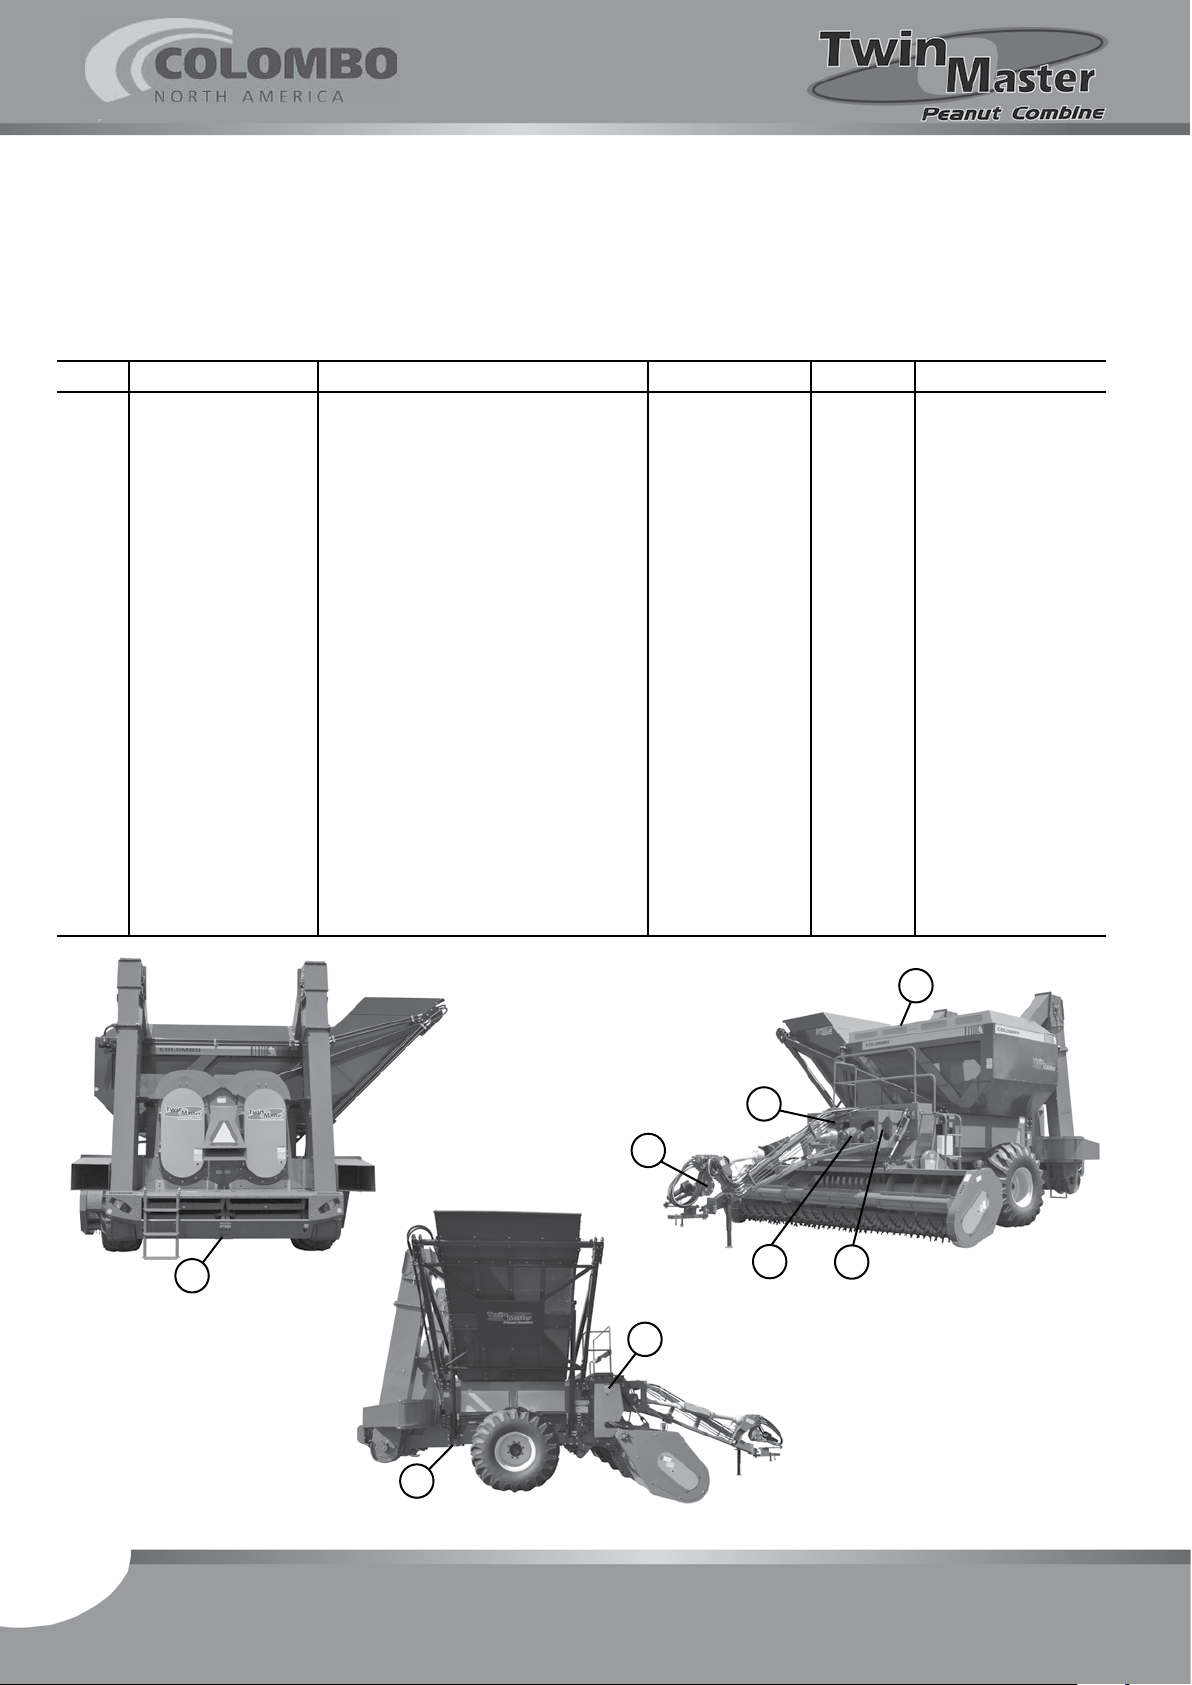
8.2 - Gearboxes maintenance.
Twin Master has 8 gearboxes identied in the table below:
Table 8.1: Gearboxes
Item Colombo code Description Lubricant Quantity Change interval
01
111.026-3
swivel gearbox
(header)
SAE 80W90
4,2
500 hrs.
02
03
04
05
06
07
08
111.007-8
111.008-1
111.009-5
X04A20003
X03A20003
X03B20003
X02A20003
ctv relation 1/2 summer 90
(left cylinder)
ctv relation 1/2 winter 90
(right cylinder)
ctv relation 1/1 winter 180
(central)
ctv 90
(roll joint)
ctv Te
(straw stirrer gearbox semi-axis)
ctv 90
(grain transporting
auger / conductor)
ctv 90
(grain tank auger)
SAE 80W90
SAE 80W90
SAE 80W90
Bardahl C0 10
Bardahl C0 10
Bardahl C0 10
Bardahl C0 10
4,2
4,2
4,2
1,8
0,35
0,35
0,35
500 hrs.
500 hrs.
500 hrs.
500 hrs.
500 hrs.
500 hrs.
500 hrs.
08
28
07
03
01
04
05
06
Instruction Manual - Twin Master
02
Page 29
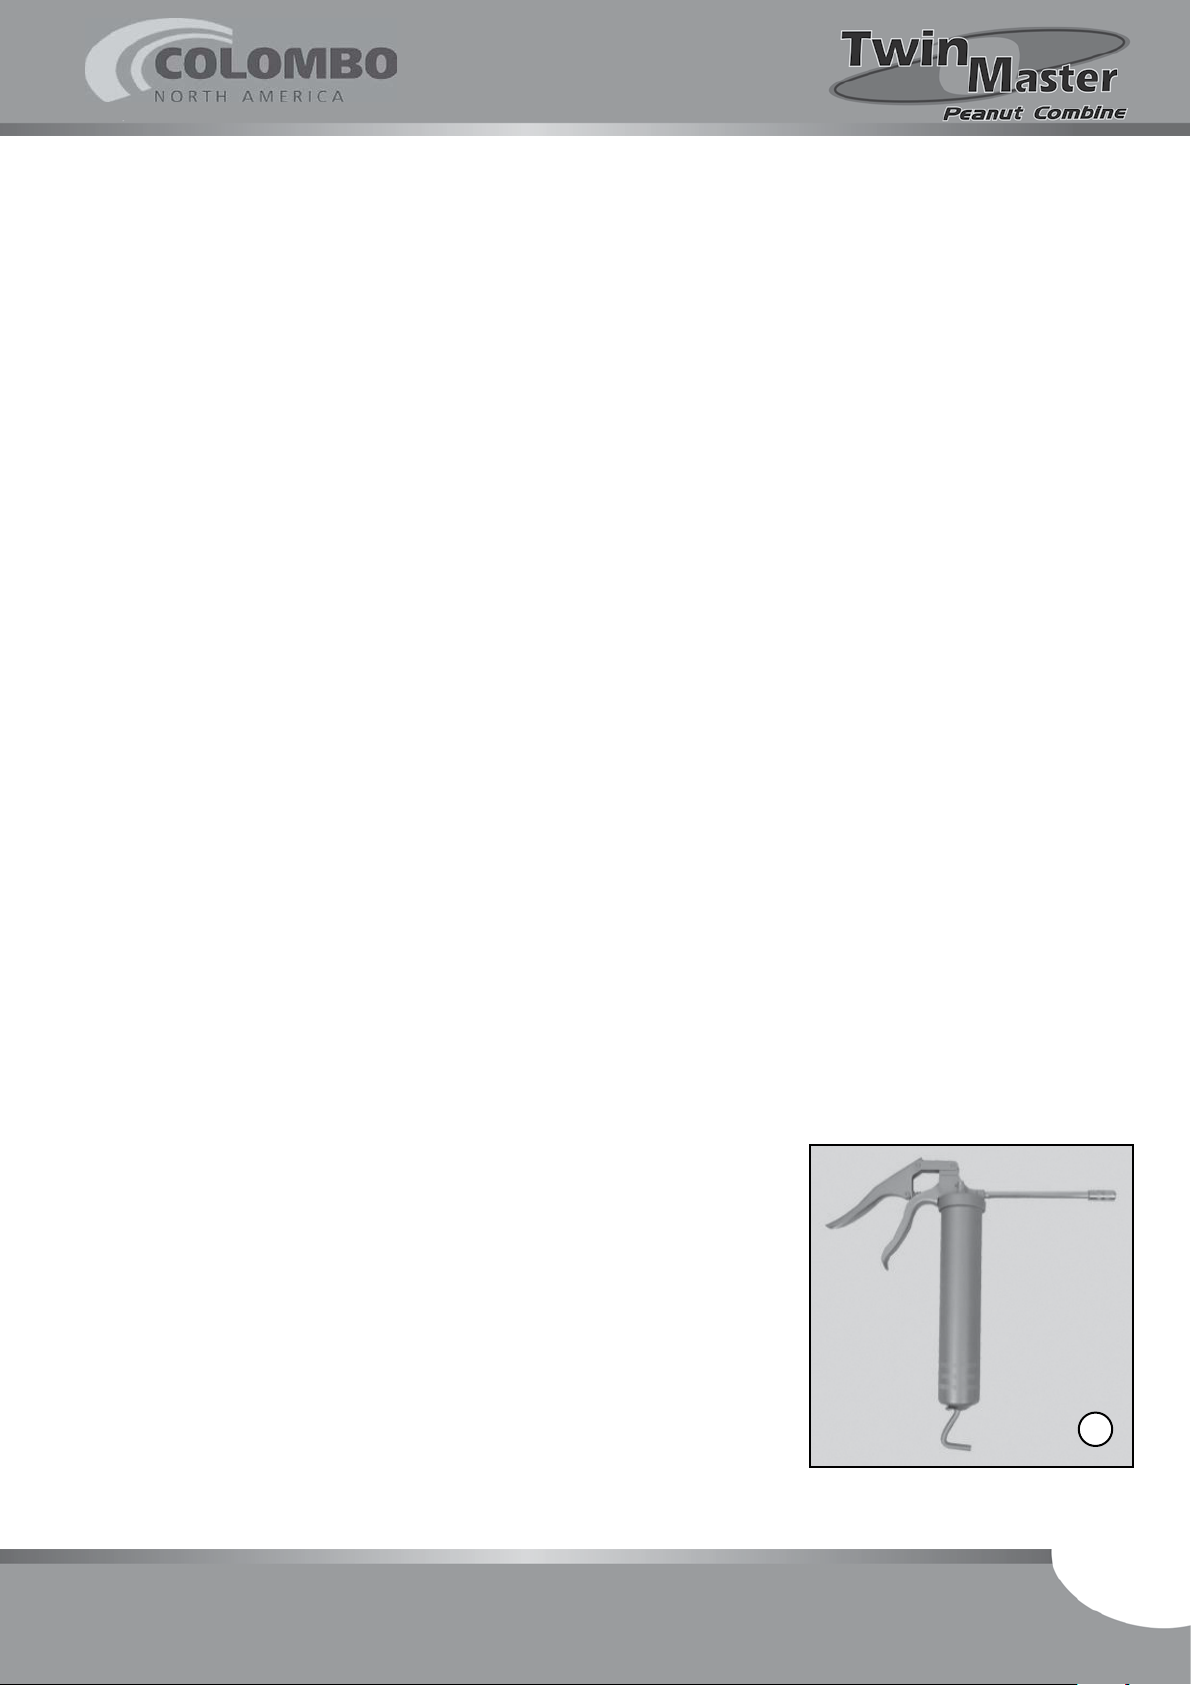
Oil change
Follow the procedure below to change the oil in all gearboxes, according to the
change interval specied in Table 8.1.
Note:
Change the oil after a long running period of the gearboxes. This way, oil drainage
is more efcient.
a) Remove the level plug (I) and, using a exible hose, drain the oil into a
proper recipient.
b) Remove the plug or breather (II) and ll up with the recommended oil up
to the level reaches the low edge of the level plug (I).
c) Re-put the plugs and keep the breather always unobstructed.
Oil recommended by Colombo - Class SAE 140
Manufacturer ............................ Specication
IPIRANGA ...................................... Ipirgerol SP SAE 140
Ipirgerol EP SAE 140
TEXACO ......................................... Universal EP SAE 140
Multigear EP SAE 85W 140
Multigear STO SAE 85W 140
Multigear LS SAE 85W 140
Meropa EP 320
SHELL ............................................ Spirax AX SAE 85W 140
Spirax G SAE 140
Spirax ST SAE 85W 140
ESSO ............................................. Gear Oil GX 85W 140
Gear Oil GX 140
Gear Oil GX 140
PETROBRAS .................................... Lubrax TRM-5 SAE 140
Lubrax GOLD 85W 140
Lubrax GL-5 SAE 140
Lubrax GL-5 SAE 85W 140
8.3 - Grease lubrication points
Apply grease in all points specied in page 28 using a
grease pump (1).
Lubricate right after a Combine work period while it still
hot because this way the grease will ow better between
the movable parts.
Recommended grease
Lithium complex base grease with extreme pressure properties: Grade NGL II. Drop point: Greater than 260o C.
Instruction Manual - Twin Master
1
29
Page 30
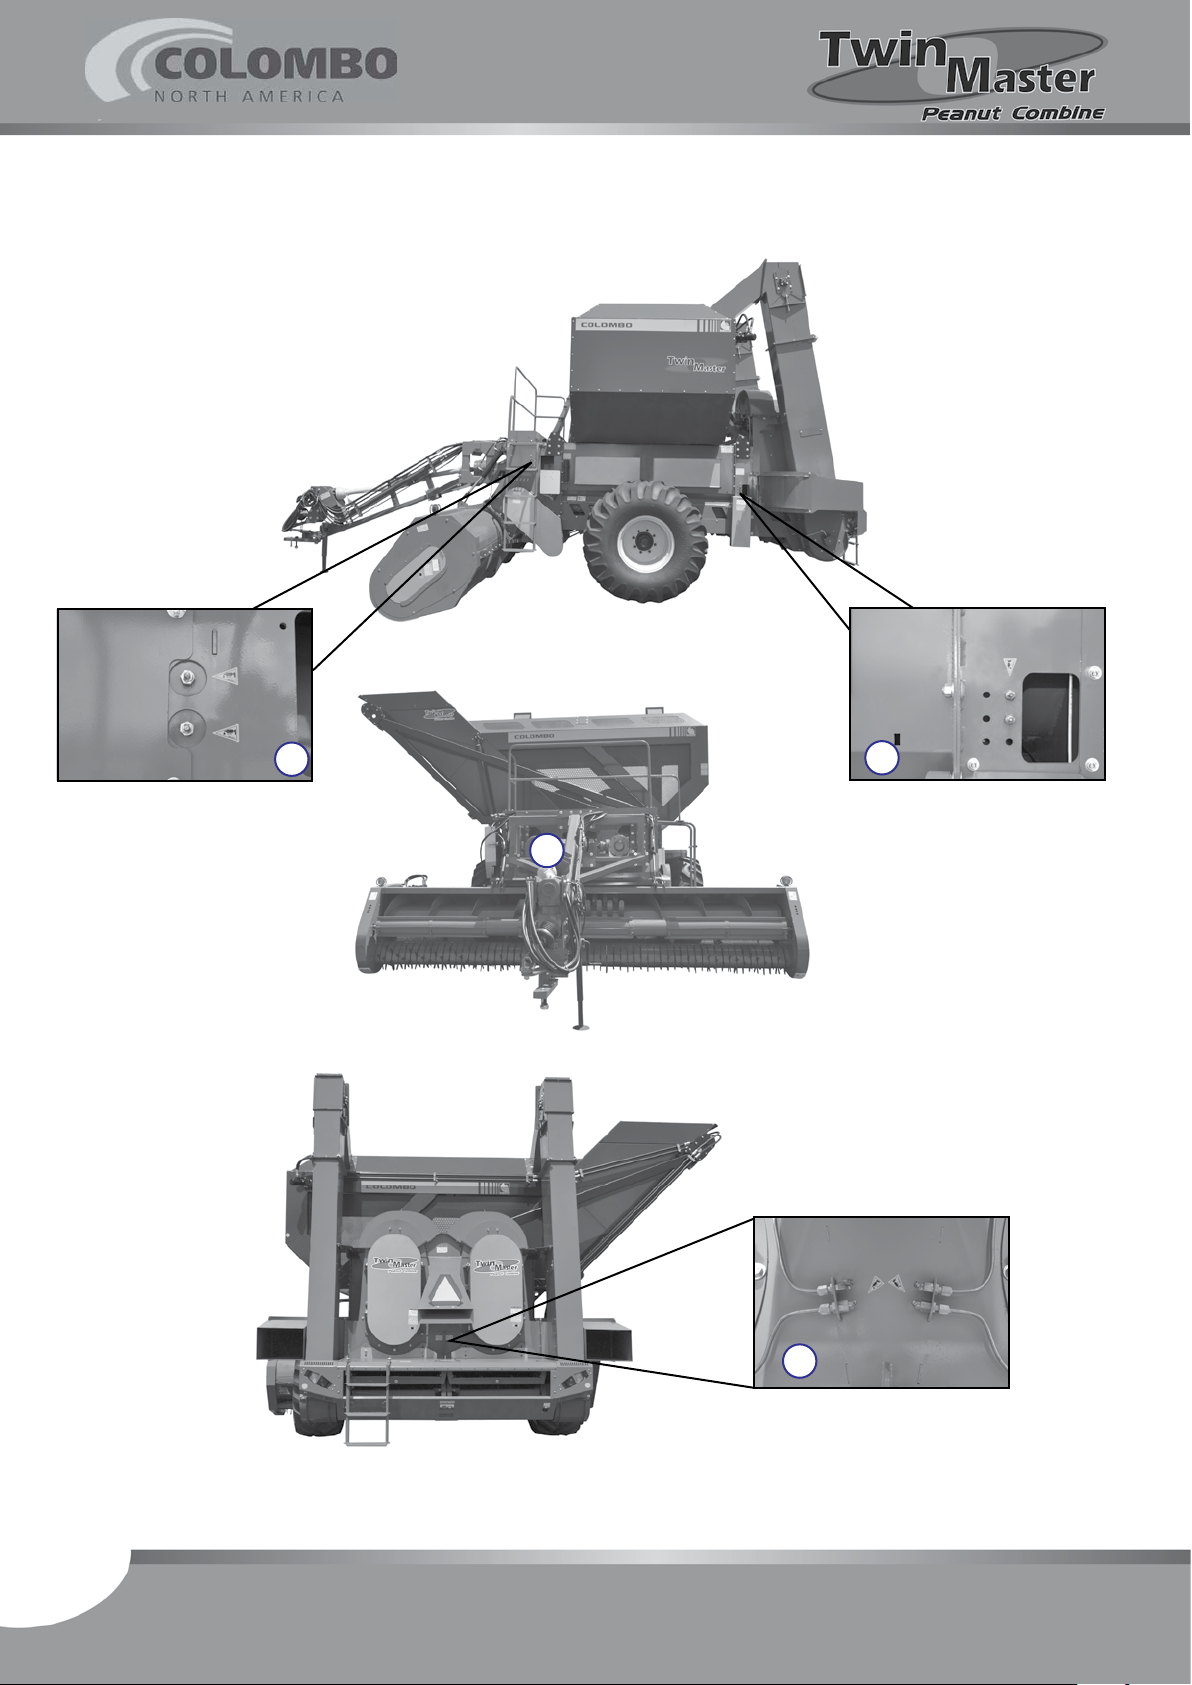
Grease points identication
L
L
L
30
L
Instruction Manual - Twin Master
Page 31
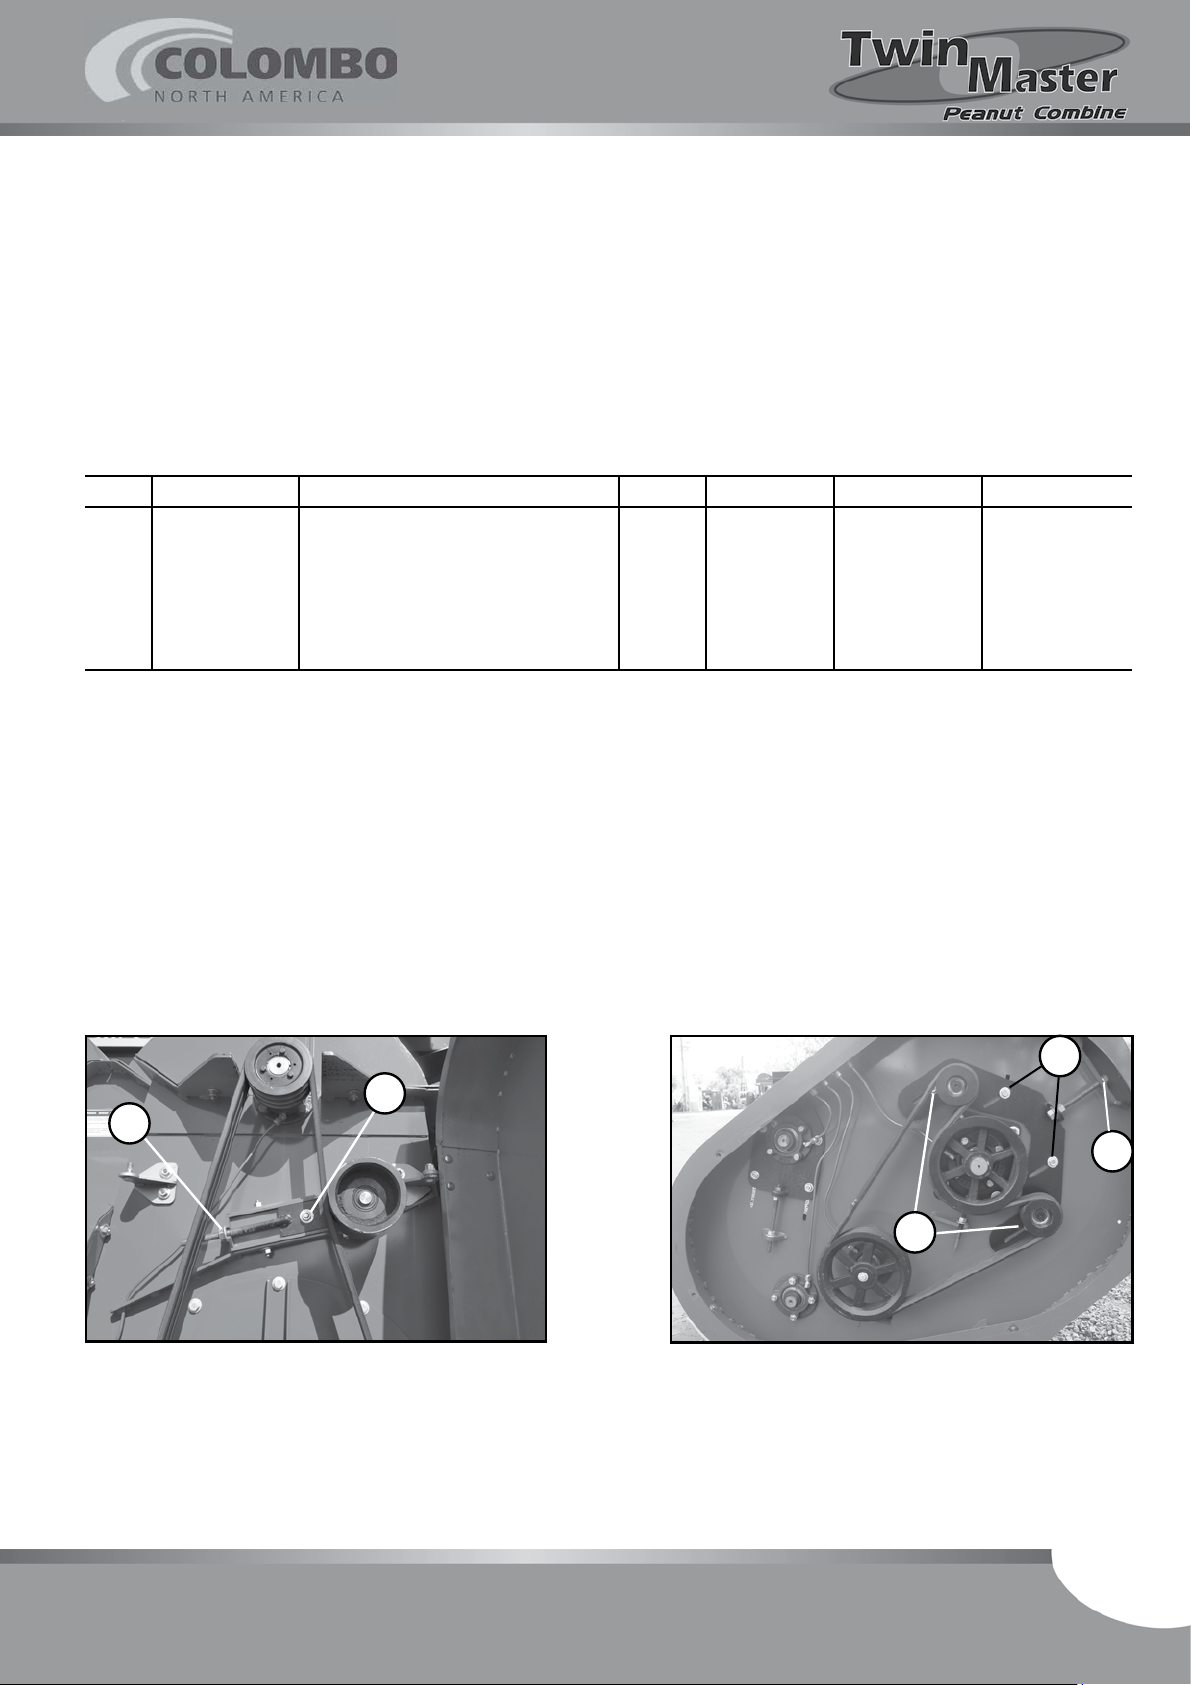
8.4 - Belts maintenance
Check the belts stretch (deection value) in the interval specied in page 25, pressing them with your thumb on the central point between the pulleys.
Also check the belts general condition. In case they present excessive wear, drying
or loose bers, replace them.
Keep the belts always clean, free of greases and oils because such products harm
their composition causing premature wear. The table below presents the characteristics of all the machine belts.
Item Código Place / Function Type Quantity Model Play (cm)
01
053.656-7
helicoidal roll plat. for plain roll
V
3
BB - 86
10 à 20
02
03
04
101.650-0
047.601-0
032.992-2
ctv 90 for roll joint
roll joint for vibrang cam sha
threshing cylinder for turbine
Procedure for adjustment
Adjust the belts stretch using the respective stretchers as follows: To adjust the
turbine drive belt, release the nut (2) and turn the nut (3) to stretch or loosen the
belt, according to need. After reaching the deection recommended above, re-
-tighten the nut (2).
To adjust the pickup platform belts, release the 4 nuts (2a) and turn the nut (3a)
to stretch or loosen the belts, according to need.
After reaching the deection recommended above, re-tighten the nuts (2a).
2
3
V
V
V
3
3
3
C - 84
B - 92
B - 103
10 à 20
10 à 20
10 à 20
2a
3a
For the other belts use the same procedure.
Instruction Manual - Twin Master
2a
31
Page 32
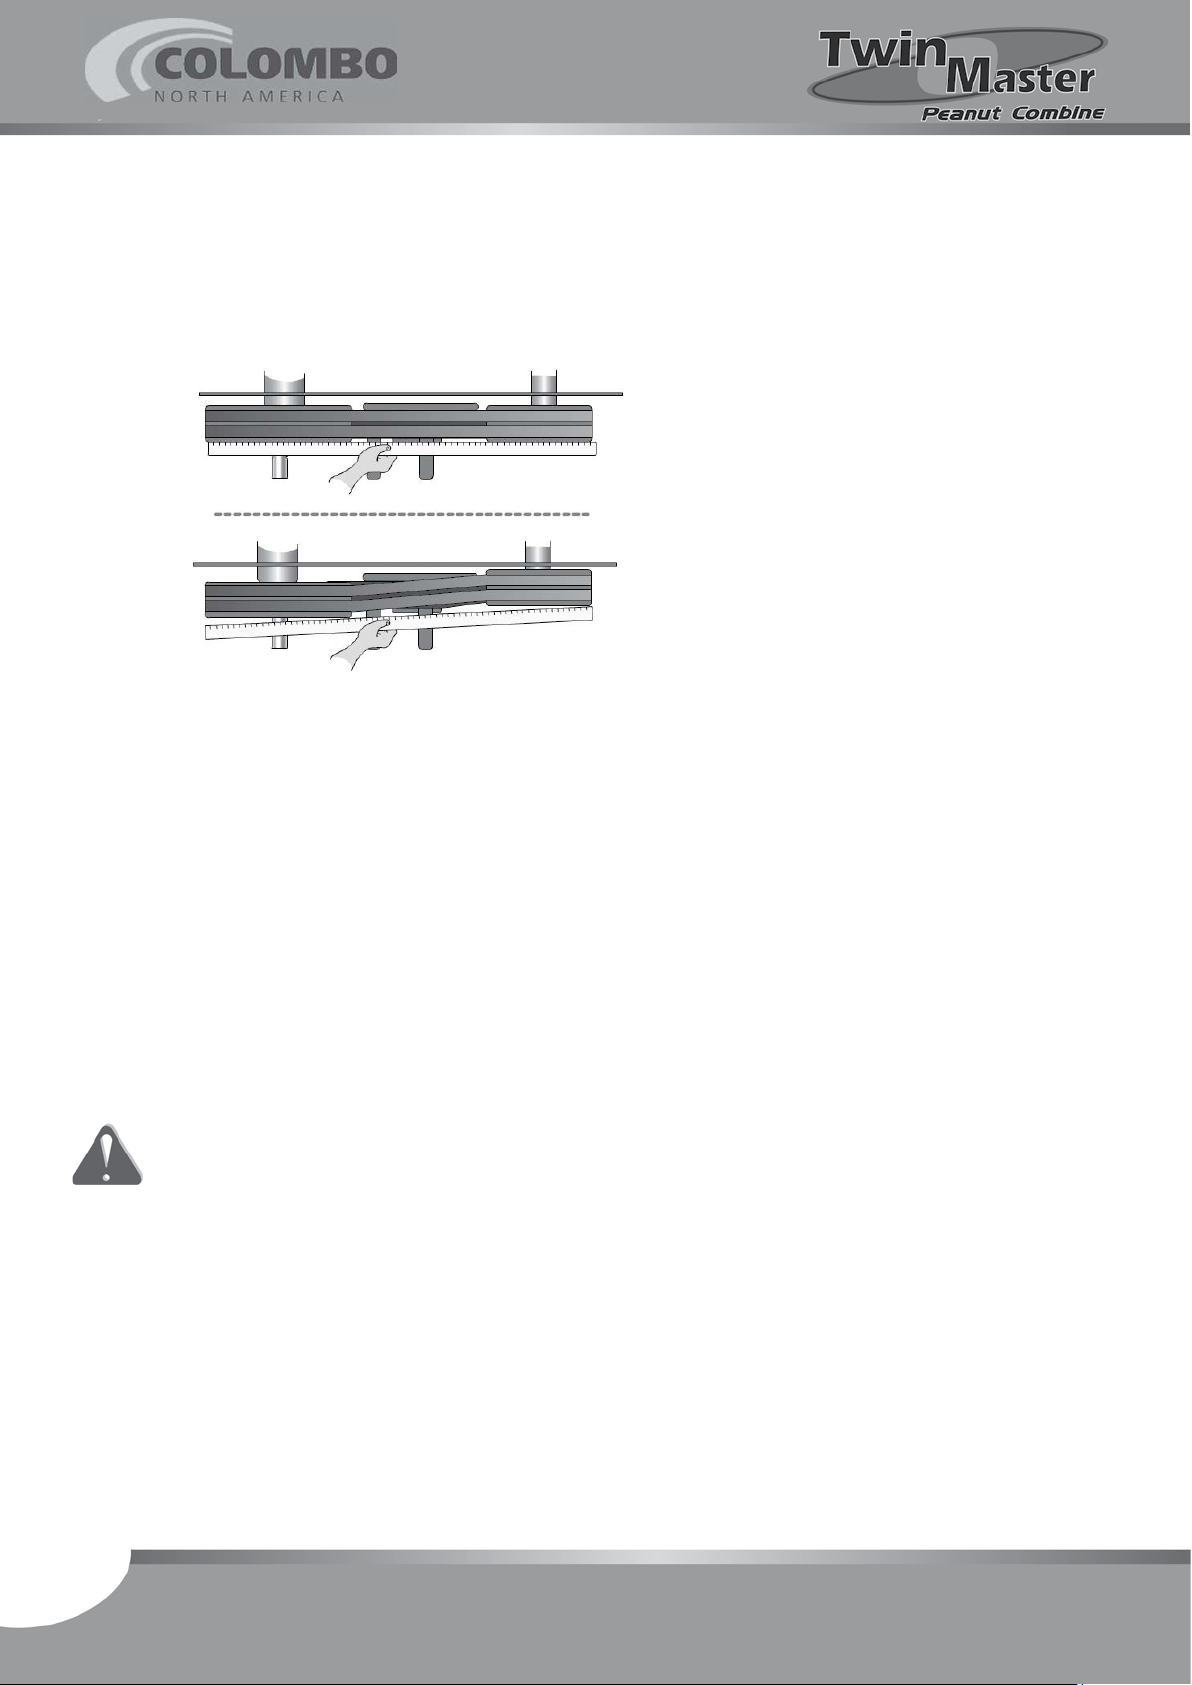
Alignment between pulleys
Misalignment between pulleys also causes belt premature wear.
To check the alignment, lean a ruler face against the pulleys face according to the
example below.
Alignment between pulleys is done through their displacement on the shaft they
are fastened on.
To displace them, release the fastening screw or remove the key, according to the
case. After adjustment, fasten the pulley again.
Aligned pulleys:
Correct
Misaligned pulleys:
Incorrect
Belt replacement
Before removing the belts, loose them using the stretchers (previous page).
Always install genuine new belts, according to specication recommended by the
machine manufacturer.
After installing new belts, adjust the stretch according to previously described.
Also check the alignment between pulleys, according to described above.
Warning:
Where there are belts working together (on pulleys of two or more channels), never
replace only one of the belts.
Always replace the WHOLE SET, even if only one of the belts is damaged.
32
Instruction Manual - Twin Master
Page 33
8.5 - Chains maintenance
Chains require some simple care, aiming to prolong their useful life, once they work
in a dusty environment and many times it is abrasive dust.
A chain working with improper stretch, besides having premature wear, it causes
noise and can even get out of the gear.
Check the chains play in the interval specied in page 25, pressing them with your
thumb on the central point between the gears. The table below identies all the
machine chains.
Item Code Place / Function Type S / D Length (mm) Play (mm)
01
020.935-6
right cylinder for ctv roll
joint
ASA 60/2
double
1480 mm
10 à 20
02
03
04
05
06
07
08
09
054.309-1
027.635-4
053.969-0
065.965-0
030.661-6
033.675-4
106.573-7
017.109-0
left cylinder for conductor
gearbox semi-axis
CTV semi-axis for
branches stirrer
conductor gearbox semi-
axis for
front low transversal
semi-axis
conductor low transversal
semi-axis
track gearbox side semi-
axis for track helicoidal
roll
track helicoidal roll for
track compressor roll
plain roll for track pickup
roll
plain roll for track pickup
roll
ASA 60/1
ASA 50/1
ASA 60/1
ASA 50/2
ASA 60/1
ASA 50/1
ASA 60/1
ASA 60/1
single
single
single
double
single
single
single
single
1680 mm
1395 mm
2485 mm
330 mm
2170 mm
1485 mm
1060 mm
950 mm
10 à 20
10 à 20
10 à 20
10 à 20
10 à 20
10 à 20
10 à 20
10 à 20
Instruction Manual - Twin Master
33
Page 34
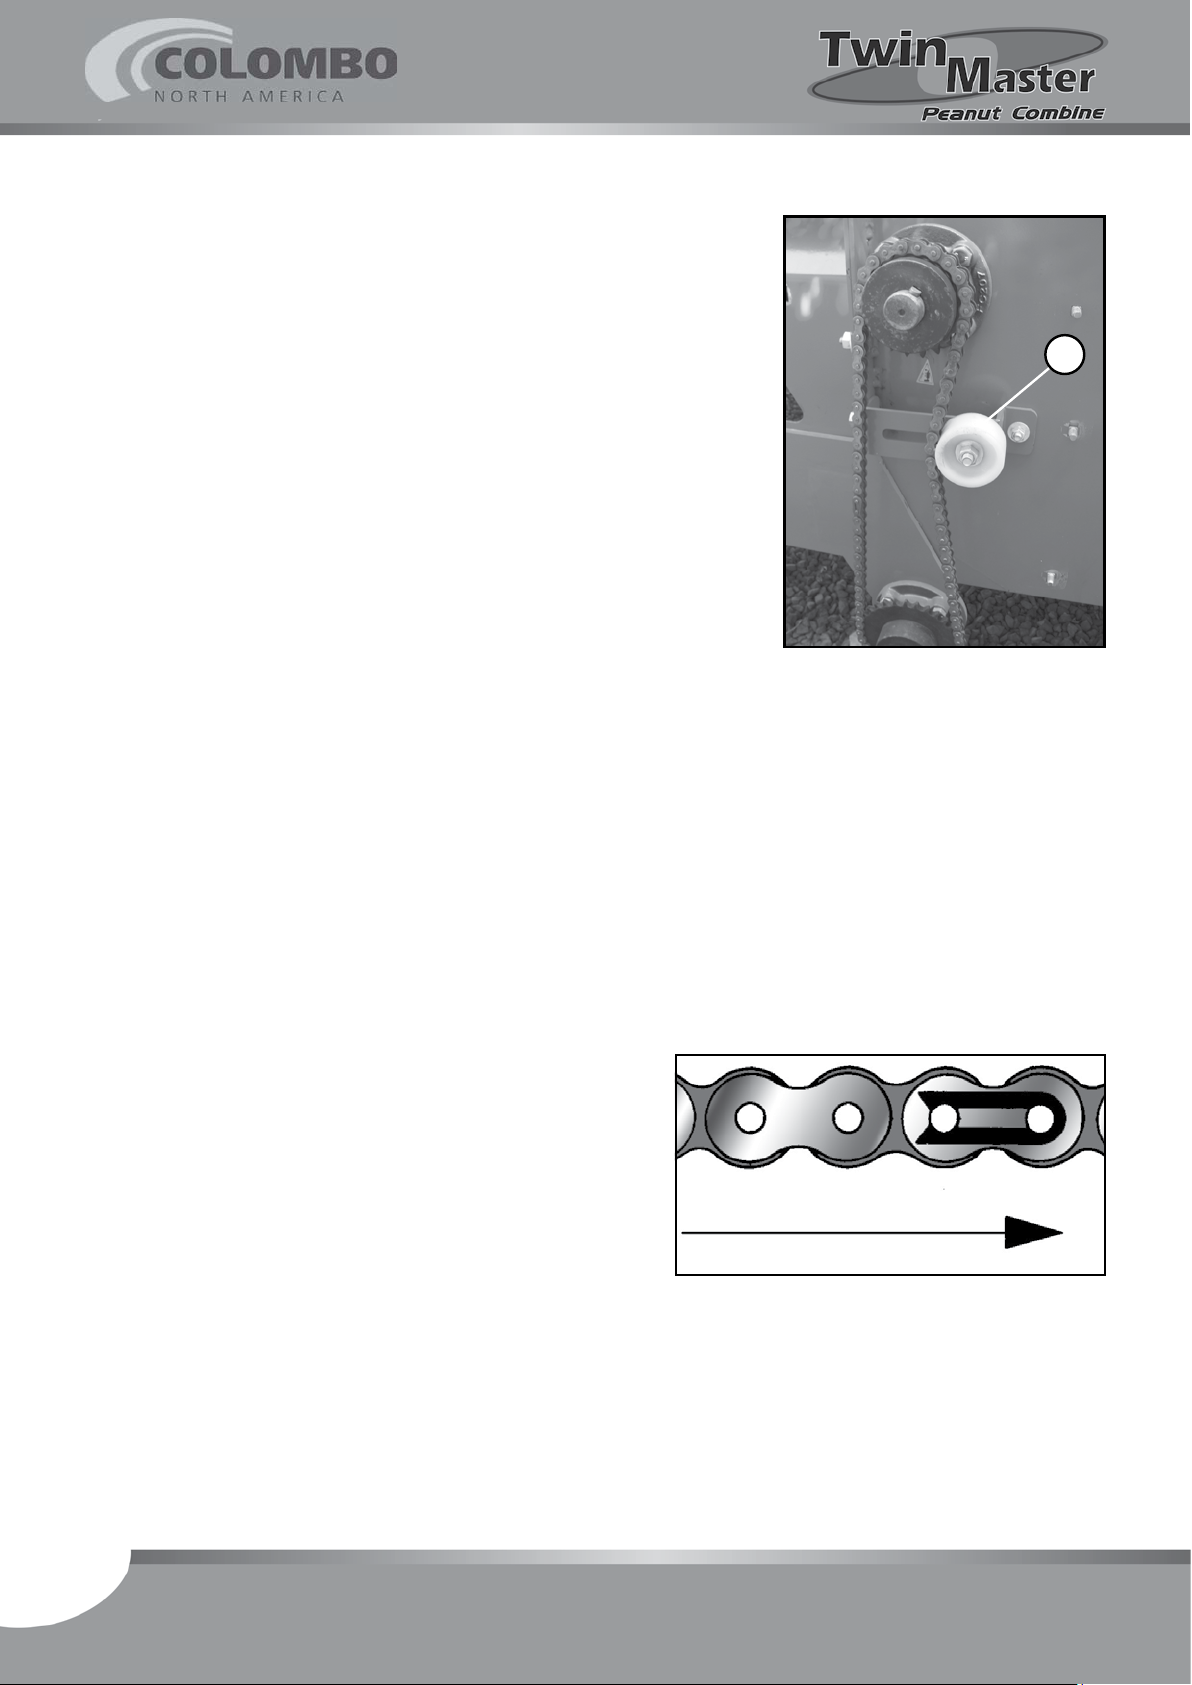
Procedure for adjustment
Adjust the play using the stretching rollers (4). For that,
loosen (do not remove) the nut located in front of them
and move them upward and downward, according to need.
After reaching the play recommended above, re-tighten
the roller nuts.
For the other chains, use the same procedure
D - Cleaning and lubrication
Keep the chains clean. Wash them with a brush and kerosene or diesel oil, whenever there is need. Following, dry
them with compressed air or by natural outow.
If possible, apply a thin coat of chain special oil, such as
the MAXLUB ND-03.
4
Note:
Do not use grease in chains because it does not
penetrate in links and pins, besides making easier
dirt buildup.
Joining link clamp s should be with their openings
toward the opposite side of the chain rotation
direction, according to side gure.
E - Correct mounting of the joining links of
a chain
Joining link clamps should be with their openings toward
the opposite side of the chain rotation direction, according
to side gure.
Chain rotation direction
34
Instruction Manual - Twin Master
Page 35
8.6 - Maintenance of the threshing system and cleaning
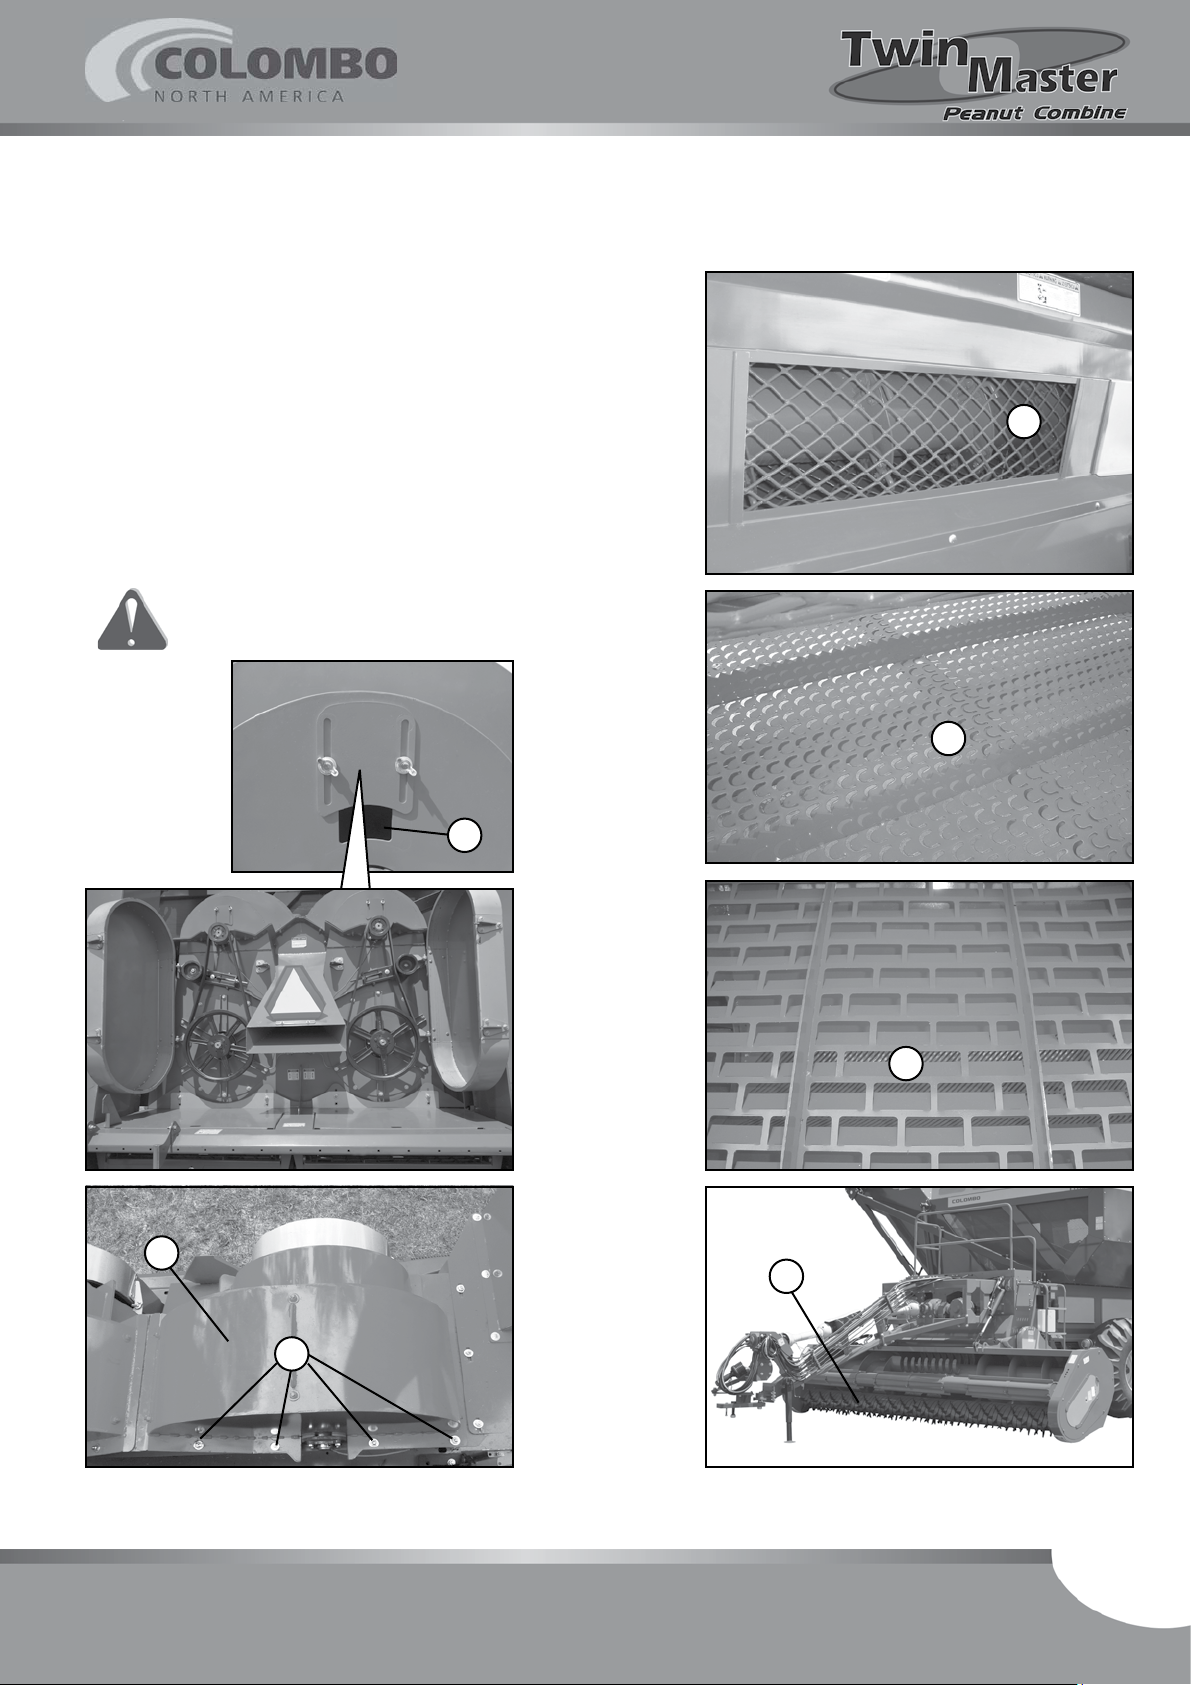
Perform a full check inside the machine. Manually remove
residue buildup or branches from the threshing cylinder
screen (5), vibrating sieve (6), rear sieves (7), pickup unit
sieve (8) and fan (9).
Also check the sieves (5, 6, 7 and 8) condition, check whether they are damaged.
To clean the fan (9), release the eight nuts (9a) and remove
the cover (9b). After cleaning, put the cover (9b) back and
following put and tighten the nuts (9a).
Weekly wash the machine with water jets and allow it to
dry in the sun.
Warning:
Always turn the machine off to clean it.
5
6
9b
9
7
8
9a
Instruction Manual - Twin Master
35
Page 36
8.7 - Grain elevator maintenance
A - Check
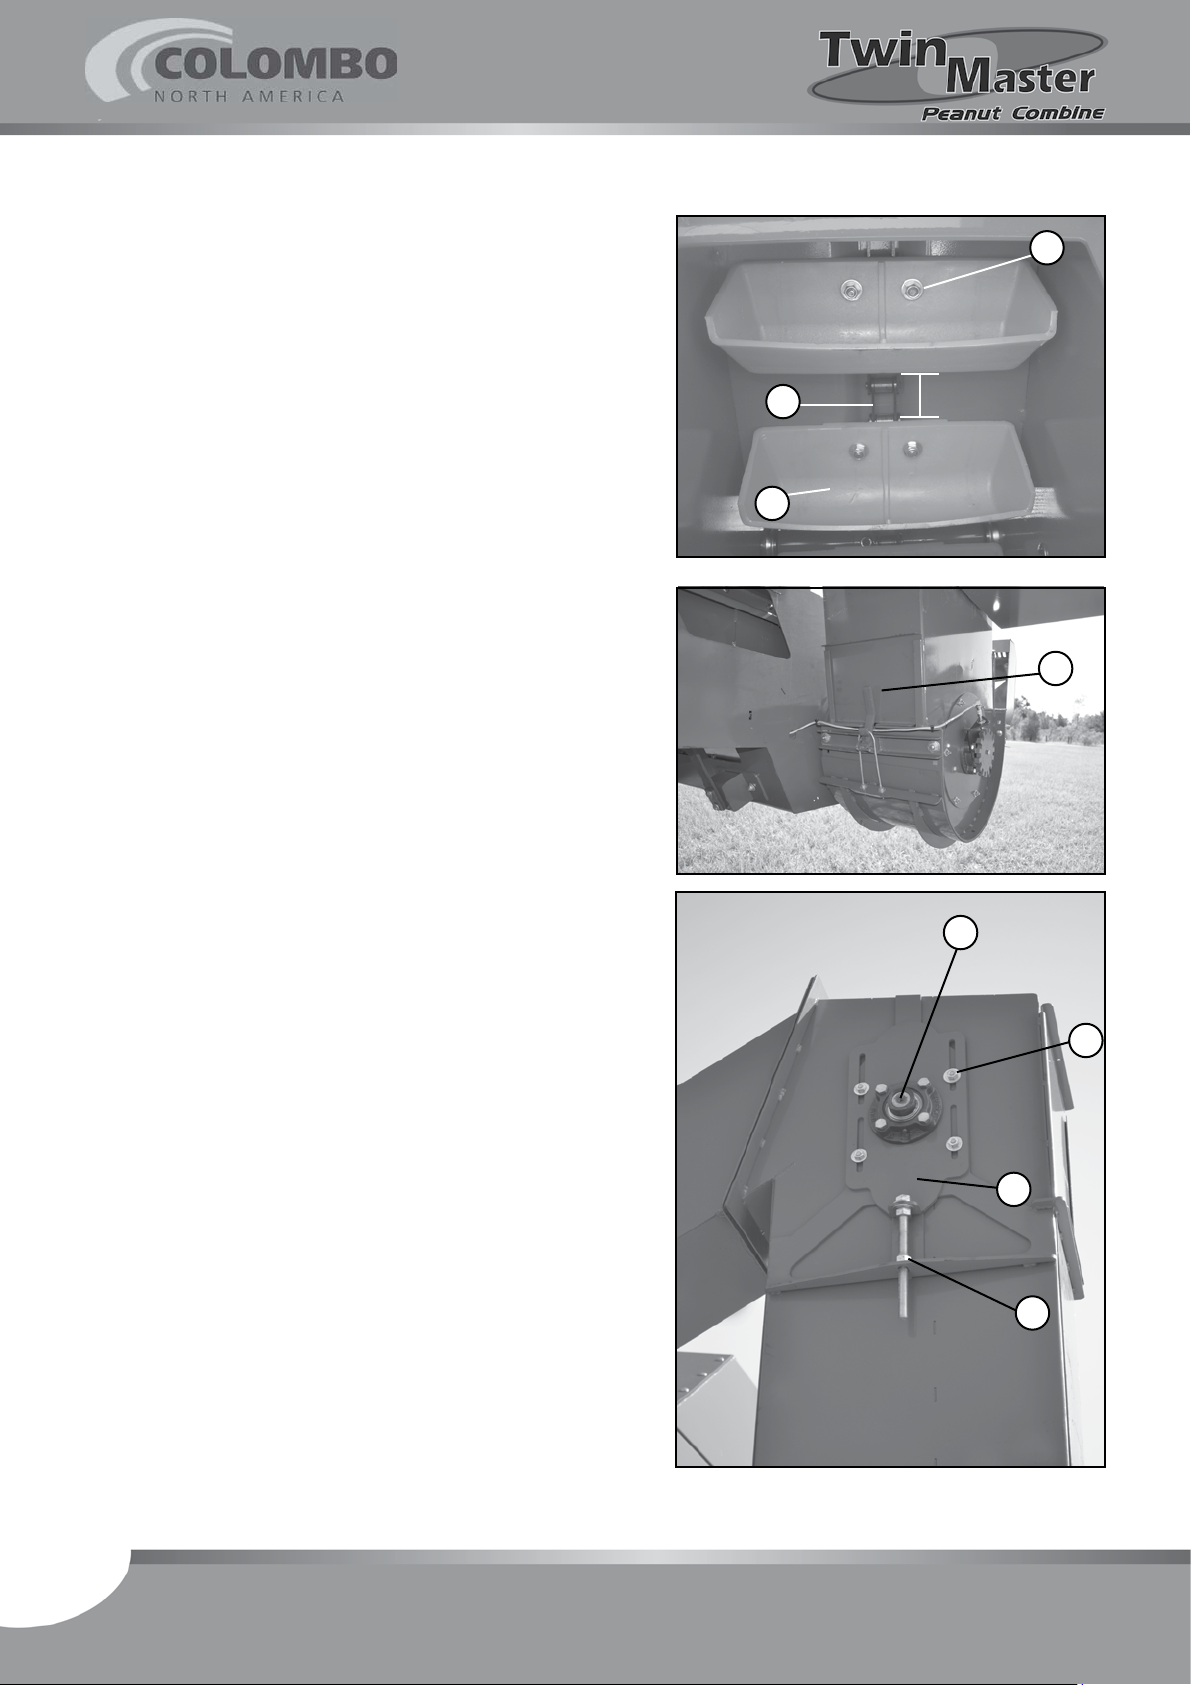
Check whether the mugs (10) are in good preservation
conditions and whether the nuts (11) are well tightened.
Also check the preservation conditions of chain links (12).
In case they present excessive wear or play, they should be
replaced to prevent troubles during the harvest.
Remove the low checking cover (13) of the elevator to clean
the mugs (10).
10
12
11
A
13
B - Stretch adjustment and centralization
Loosen the nuts (14) of both stretchers (15).
Turn both nuts (16) up to the bearings (17) are leveled,
providing alignment to the mugs (10).
To test the leveling, move the elevator in low rotation and
watch the mugs (10) positioning in relation to its walls.
Measure “A” (distance between the low and upper
mugs) should be the same on both sides of the
mugs (10), according to side image.
17
14
15
16
36
Instruction Manual - Twin Master
Page 37
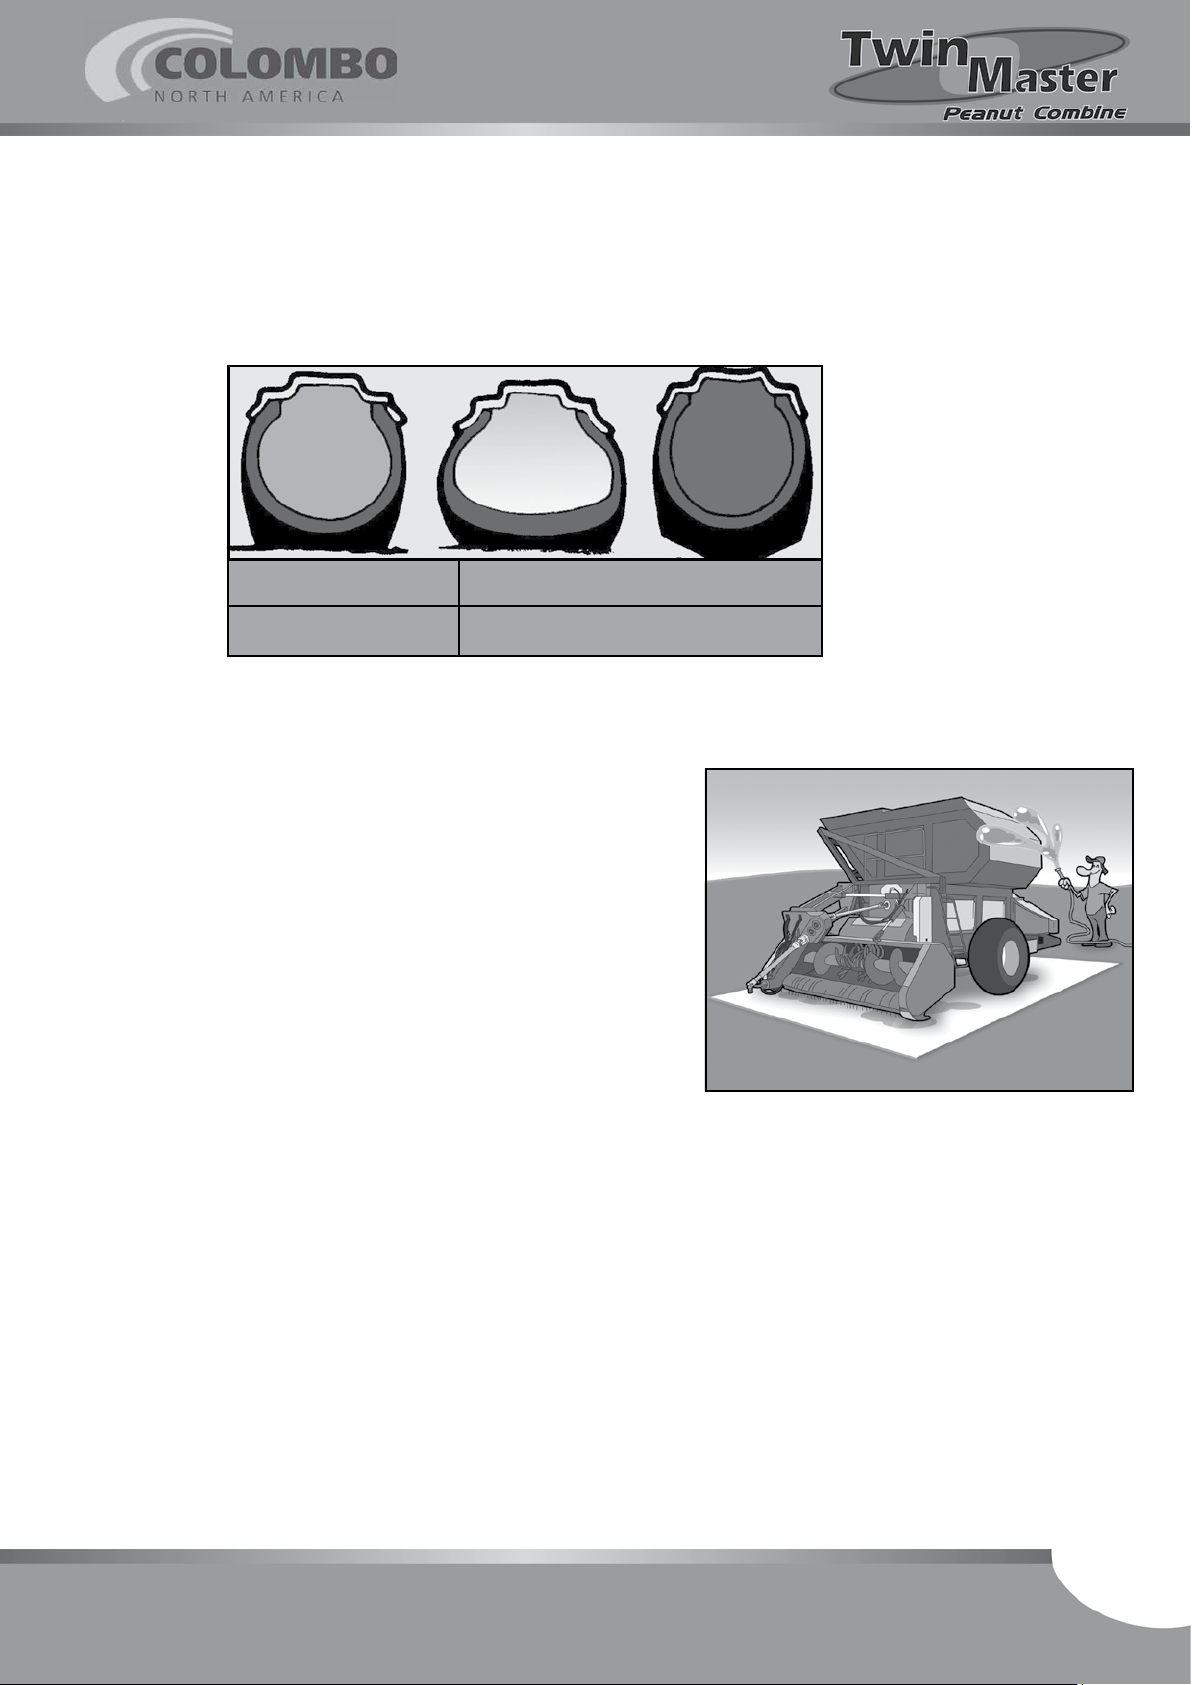
8.8 - Tires pressure check
Tires pressure check largely determines their useful life duration.
Check the pressure in the interval specied in page 25 and, in case there is need,
adjust the pressure with the tires cold according to the table below.
Correct Low Excessive
Tire type
23.1
Recommended pressure
26 psi
8.9 - Machine preservation in the period between crops
Preservation is as important as preventive maintenance.
Therefore, shelter the Combine from the weather and protect
it from the corrosive effects of some products.
Take the following care:
Lubricate all the points specied in page 28.
Clean out all the residues of product that remained
inside the machine, inside the grain tank and on the
pickup unit.
Fully and rigorously wash the Combine and allow it to
dry in the sun.
Repaint the points where there is need, preventing rust
stains.
Spray the movable parts with oil or any other lubricant.
Remove the chains, wash them with kerosene or diesel oil and after that, dry them with compressed
air or natural outow.
At last, lubricate them with a thin coat of chain special oil such as
MAXLUB ND-03.
Very important: Always keep the machine in a dry place, sheltered from sun and rain. Without such
care, there is no preservation.
Remember: The period between crops is the best moment to perform preventive maintenance in
the machine, leaving it in perfect conditions for the next harvest.
37
Instruction Manual - Twin Master
Page 38

A - When returning to work, observe the following items
Re-tighten nuts and screws in general.
Re-put the chains and adjust their play according to instructions in page
32.
Check the adjustments for operation described from page 20 of this Manual.
Allow the machine to run (idle) for some minutes and then, after turning
it off, lubricate all grease points and chains.
Check the gearboxes oil level and ll it up in case there is need.
Check the tires pressure according to page 35.
38
Instruction Manual - Twin Master
Page 39

9 - Troubleshooting
Fail Possible causes Possible solutions
Furrow is inside hole or
Pickup roll does not
gather all material of
the furrow.
waviness.
Springs of the shock
absorbing arms with much
pressure.
Pickup unit much raised in
relation to the soil.
Furrow the product on even
ground.
Adjust the pickup unit height
using the hydraulic raise.
Gathered product has
great volume of land.
Product loss when
picking up.
Grain loss through
the straw outlet.
Pickup ngers scraping the
soil.
Springs of the shock
absorbing arms with little
pressure.
Excess of clods in the
furrows.
Furrow much dry (under
10 % of moisture).
Threshing cylinder screen
is much dirty.
Beating pins working
with little aggressiveness
(wrong position/
inclination).
Threshing time much
short.
Furrow much bulky.
Adjust the pickup unit height
using the hydraulic raise.
If the peanut is well dry,
reduce the threshing time,
preventing the clods from
dismantling during the
process.
Preferably harvest when
the furrows are with higher
moisture level (early in the
morning and at the end of the
afternoon).
Reduce the tractor moving
speed.
Furrow the plants in a such
way that they do not stay
much dispersed.
Clean the whole threshing
system.
Adjust the distance between
the beating pins and screen
according to page 22.
Adjust the pins to the most
position “C” according to
pages 21 and 22.
Increase the threshing time
adjusting the beating pins
according to pages 21 and 22.
Reduce the tractor moving
speed.
Instruction Manual - Twin Master
39
Page 40

Anormalidade Possíveis causas Possíveis soluções
Grain loss through
the fan outlet.
Cleaning air ow much high
Tractor TDP rotation above
540 rpm.
Adjust the air ow intensity
according to page 23.
Adjust the PTO rotation.
Grain breakage.
Beating pins much near the
threshing cylinder screen.
Excessive threshing time.
Tractor TDP rotation above
540 rpm.
Furrows with little product
quantity.
Adjust the distance between
the pins and screen according
to page 22.
Reduce the threshing time
according to pages 21 and
22.
Adjust the PTO rotation
according to page 20.
Increase the quantity of
product in the furrows
remounting them or increase
the tractor moving speed.
40
Instruction Manual - Twin Master
Page 41
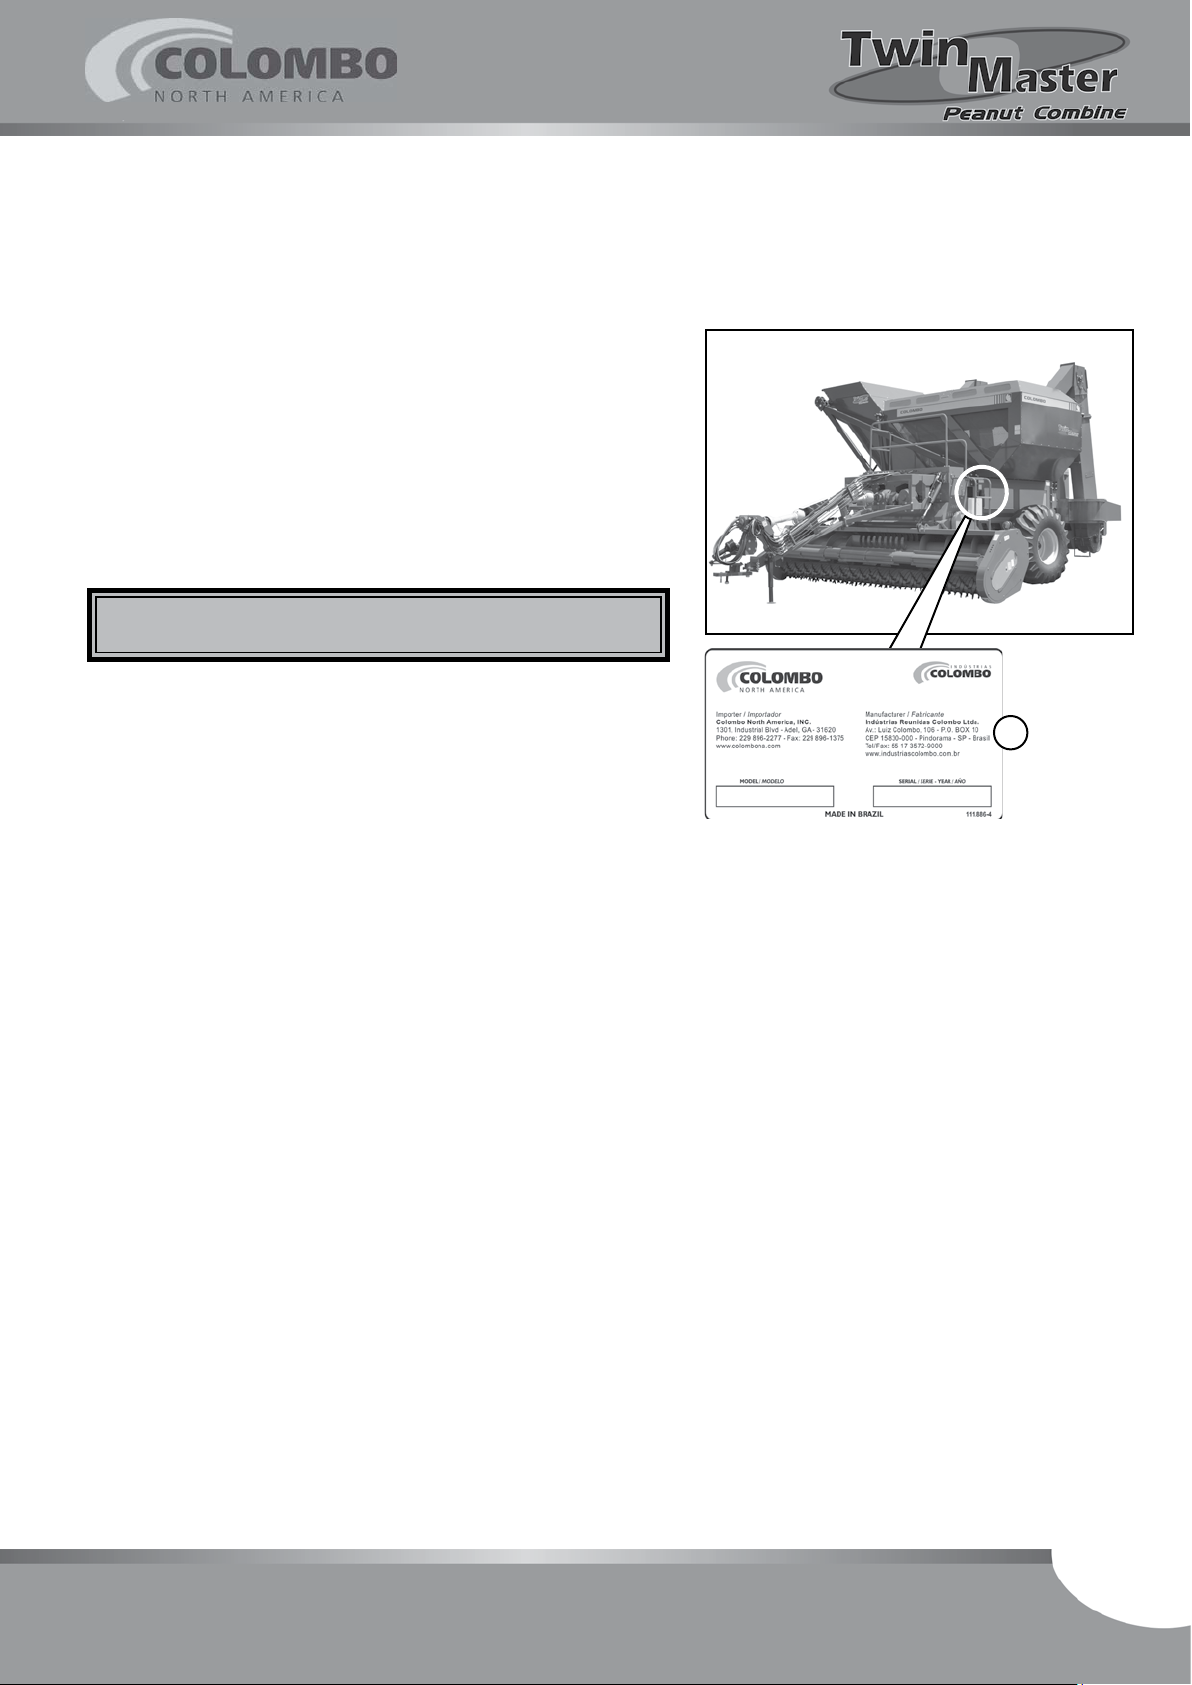
10 - Technical Assistance
10.1 - Machine series number
The Combine is identied by a Series Number, what makes
possible to keep accurate records of eventual changes introduced in the components and of its constructive features.
Series Number is stamped in a plate (1) fastened to the
right side of the Combine.
Write down here the Series Number of your machine.
Notes:
1- Whenever sending communications or
requesting the aid of COLOMBO Technical Assistance, always inform the series
number and model that are in the machine
identication plate (1).
1
2- Whenever replacing parts, always use
genuine COLOMBO items.
Instruction Manual - Twin Master
41
Page 42

Notes
___________________________________________________________________________________
___________________________________________________________________________________
___________________________________________________________________________________
___________________________________________________________________________________
___________________________________________________________________________________
___________________________________________________________________________________
___________________________________________________________________________________
___________________________________________________________________________________
___________________________________________________________________________________
___________________________________________________________________________________
___________________________________________________________________________________
___________________________________________________________________________________
___________________________________________________________________________________
___________________________________________________________________________________
___________________________________________________________________________________
___________________________________________________________________________________
___________________________________________________________________________________
___________________________________________________________________________________
___________________________________________________________________________________
___________________________________________________________________________________
___________________________________________________________________________________
___________________________________________________________________________________
___________________________________________________________________________________
___________________________________________________________________________________
___________________________________________________________________________________
___________________________________________________________________________________
___________________________________________________________________________________
___________________________________________________________________________________
____________________________________________________________________________________
____________________________________________________________________________________
____________________________________________________________________________________
____________________________________________________________________________________
____________________________________________________________________________________
____________________________________________________________________________________
____________________________________________________________________________________
____________________________________________________________________________________
____________________________________________________________________________________
____________________________________________________________________________________
____________________________________________________________________________________
____________________________________________________________________________________
____________________________________________________________________________________
Instruction Manual - Twin Master
42
Page 43

Instruction Manual - Twin Master
43
Page 44

Colombo North America, INC.
1301, Industrial Blvd - Adel, GA - 31620
Phone: 229 896- 2277 - Fax: 229 896-1375
[email protected]
www.colombona.com
44
Marketing Colombo 117.349-8 - rev.1 - 02/12
Instruction Manual - Twin Master
 Loading...