

Collomix CX 10, CX 20, CX 60, CX 40 Operating Instructions Manual
Collomix Rühr- und Mischgeräte GmbH
Daimlerstrasse 9 • 85080 Gaimersheim
Postfach 11 46 • 85078 Gaimersheim
Germany
Telefon: ++49 (0) 84 58 / 32 98-0
Telefax: ++49 (0) 84 58 / 32 98-30
E-mail: info@collomix.de Internet: www.collomix.de
Artikelnr. 07029 Ausgabe: 03.2002 © by Collomix GmbH, Printed in Germany
Bedienungsanleitung Elektronisches Handrührwerk
Operating Instructions Electronic hand-mixer
Notice d’utilisation Mélangeurs électroportatifs
Instrucciones de uso Mezcladora manual electrónica
Instruções de utilização Misturadora manual electrónica
Istruzioni d’uso Agitatore manuale elettronico
Handleiding Elektronische handmenger
Betjeningsvejledning Elektronisk håndholdt røreværk
Bruksanvisning Elektronisk handomrörare
Käyttöohje Elektroninen käsisekoitin
Bruksanvising Elektronisk håndrøremaskin
쮕
CX 10 • CX 20
CX 40 • CX 60

Maschinenelemente
Technische Daten
Zusätzliche Sicherheitshinweise
Bestimmungsmäßiger Gebrauch
Vor Inbetriebnahme
1 Gangwahlschalter 6 Befestigungsschrauben für Schutzbügel
2 Schutzbügel 7 Maschinenhals
3 EIN/AUS Schalter mit Elektronik 8 Rührwelle mit M14 Innengewinde
4 Knopf für Einschaltsperre 9 Rührer
5 Lüftungsschlitze
Nennleistung/Stromaufnahme:
Spannung:
Gänge:
Drehzahl unter Last:
empf. Rührer:
Spindelhals Ø:
Schutzklasse:
Schalldruckpegel nach EN 50144:
Schallleistungspegel nach EN 50144:
Hand-Arm-Vibration:
/II
/II
/II /II
Gefahrloses Arbeiten mit dem Gerät ist nur möglich, wenn Sie die Bedienungsanleitung und
die Sicherheitshinweise vollständig lesen und die Anweisungen strikt befolgen.
Zusätzlich müssen die beigelegten, allgemeinen Sicherheitshinweise befolgt werden.
Achten Sie darauf, daß die auf dem Leistungsschild angegebene Stromspannung mit der Netzspannung übereinstimmt.
Das Gerät nicht in einer Umgebung mit explosionsgefährlicher Atmosphäre betreiben. Keine Lösemittel oder lösemittelhalti-
gen Stoffe mit einem Flammpunkt unter 21° C mischen.
Legen Sie keine Kabel um irgendwelche Körperteile.
Nur ein für den Außenbereich zugelassenes Verlängerungskabel verwenden.
Das Gerät nur im Mischgefäß an-/auslaufen lassen. Für einen festen und sicheren Stand des Mischgefäßes sorgen.
Bei laufenden Mischarbeiten nicht mit den Händen, oder Gegenständen in das Mischgefäß greifen.
Falls der Schalldruckpegel am Arbeitsplatz 85 dB (A) überschreitet, Gehörschutz tragen!
Bei der Arbeit mit dem Rührwerk ist das Tragen von Arbeitshandschuhen und einer Schutzbrille empfohlen. Tragen
von enganliegender Kleidung ist Vorschrift.
Die Maschine ist zum Anmischen von flüssigen und pulverförmigen Baustoffen wie Farben, Mörtel, Kleber, Putze und ähnlichen Substanzen bestimmt. Je nach Materialkonsistenz und Mischmenge, ist der passende Rührer mit entsprechender
Mischwirkung einzusetzen. Bei der Wahl der Rührergröße (Durchmesser) die Angaben in den technischen Daten beachten.
Die beiden Schutzbügel (2) mit jeweils 4 Schrauben in richtiger Stellung, an die vorgesehenen Bohrungen (6) befestigen
(siehe Grafik). Der Schutzbügel schützt das Maschinengehäuse vor Bruch und Verschmutzung. Ferner begünstigt er das einfach Ablegen und Aufnehmen der Maschine.
Den Rührer mit M-14 Außengewinde (9) in die Rührwelle (8) fest einschrauben. Dazu zwei Gabelschlüssel SW 24 zur Hilfe
nehmen. Einen Gabelschlüssel an der Rührwelle ansetzen, den zweiten an der 6-Kant-Aufnahme am Rührer und festziehen.
Zum Lösen bzw. Wechseln des Rührers sinngemäß umgekehrt verfahren.
Die Maschine an das Stromnetz mit 230 Volt anschließen. 230 Volt-Geräte können auch bei 220 Volt betrieben werden.
D
CX 10 CX 20 CX 40 CX 60
1000 W/4A 1000 W 1200 W 1600 W
230 V 230 V 230 V 230 V
1222
0 - 670 min
-1
0 - 400 min-10 - 400 min
-1
0 - 350 min
-1
0 - 700 min-10 - 600 min
-1
0 - 500 min
-1
Ø 120 mm Ø 120 mm Ø 140 mm Ø 160 mm
42 mm 52 mm 52 mm 52 mm
84 dB(A) 84 dB(A) 89 dB(A) 89 dB(A)
97 dB(A) 97 dB(A) 102 dB(A) 102 dB(A)
< 2,5m
2
< 2,5m
2
< 2,5m
2
< 2,5m
2
1
3
4
5
6
7
8
9
2
Richtige Montage des Schutzbügels:
Correctly fitted guard handle:
Montage correct de l’étrier de protection:
Montaje correcto del estribo de protección:
Montagem correcta do estribo de protecção:
Montaggio corretto del supporto di protezione:
Juiste montage van de beschermbeugel :
Rigtig montering af rygbøjle:
Rätt montering av skyddsbygeln:
Suojakaaren oikea asennus:
Korrekt montering av vernebøylen:
Maschinenelemente:
Machine elements:
Eléments de la machine:
Componentes de la máquina:
Elementos da máquina:
Elementi dell’apparecchio:
Machine-elementen:
Maskinens bestanddele:
Maskinelement:
Koneen rakenneosat:
Maskinelementer:
6
8x
Using for the first time
Care and maintenance
Warranty
Disposal
CE - Declaration of Conformity
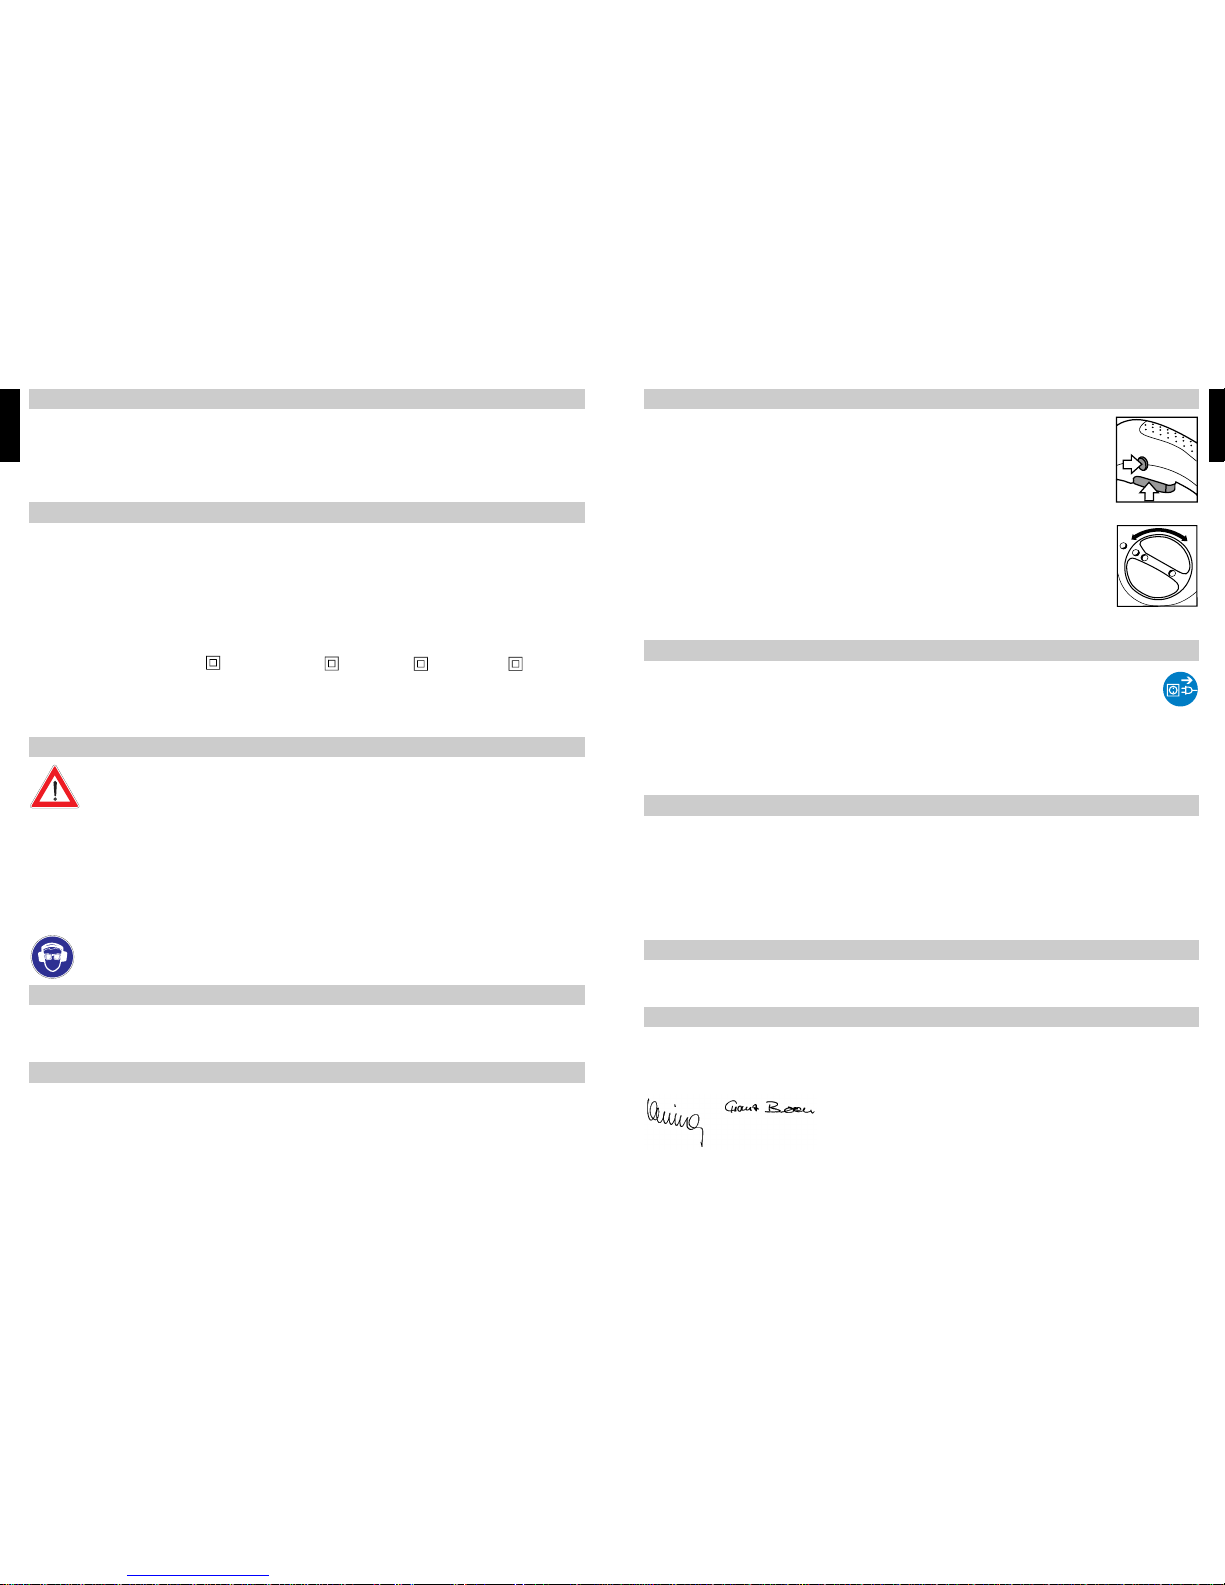
Always hold the machine with both hands.
Press the starting lockout button (1). Press the ON/OFF switch (2). The integrated electronic controls
will start up the machine in a controlled fashion. The more pressure you apply to the ON/OFF switch,
the faster the machine will run.
To stop working, release the ON/OFF switch.
Machines with 2-speed gear units have two maximum speeds available (First gear: Slow / Second
gear: Fast). To change from one gear to the other, turn the gear selection lever through 180°.
Always reduce the speed when submerging the mixing tool in the mixing material or lifting it out. Once
the mixing tool is fully submerged, increase the speed again to ensure that the motor is adequately
cooled.
During mixing you should guide the machine around the mixing container. Continue mixing until all of
the mixing material is completed mixed.
Clean the mixing tool after you have finished your mixing work.
1
2
2.
1.
ON/OFF switch
Gear selection lever
Keep the machine and mixing tool clean.
Keep the ventilation slits (5) clean so that the machine can be properly cooled.
Before you carry out any operations on the machine, including changing the mixing tool, always pull out the
mains plug first.
The machine is equipped with self-deactivating carbon brushes. This means that the machine will shut itself down once a
certain level of wear is reached. The carbon brushes can be replaced by an authorized customer service center or by the
Collomix Service center.
Have repairs carried out only by an approved workshop or by your Collomix Service.
Only use original Collomix replacement parts.
The manufacturer provides a warranty within the framework of his terms and conditions of delivery in accordance with the
requirements of statutory/country-specific provisions.
Should you need to make a claim under the warranty, please provide us with your invoice or delivery note.
On no account will any warranty claims be accepted if any repairs are carried out by third parties. In the event of any irregularities, please send the machine to us.
The warranty does not apply to damages caused by natural wear, overloading or improper handling.
Complaints can only be accepted if the device is sent to the Collomix Service center undismantled.
The device, accessories and packaging should all be consigned for environment-friendly recycling.
Unusable devices can be sent for recycling, paid delivery home, to the address shown below.
We declare, with sole responsibility, that this product complies with the following standards or normative products:
EN 50144, EN 55014; EN 60555, HD 400 in accordance with the provisions of directives 73/23/EEC, 89/336/EEC,
98/37/EC.
J. Essing F. Beron
Collomix Rühr- und Mischgeräte GmbH
Daimlerstr. 9
D-85080 Gaimersheim
Germany
Subject to change
GB
Machine elements
Technical data
Supplementary safety instructions
Intendend use
Before using for the first time
1 Gear selection switch 6 Fastening screws for the guard handle
2 Guard handle 7 Neck of the machine
3 ON/OFF switch with electronics 8 Mixing shaft with M14 female thread
4 Button for starting lockout 9 Mixing tool
5 Ventilation slits
Rated power/Current consumption:
Voltage:
Gears:
Rpm under load:
Recommended mixing tool Ø:
Spindle neck Ø:
Protection class:
Sound pressure level
acc.to EN 50144:
Noise emission level acc.to EN 50144:
Hand-arm vibration:
CX 10 CX 20 CX 40 CX 60
1000 W/4A 1000 W 1200 W 1600 W
230 V 230 V 230 V 230 V
1222
0 - 670 min
-1
0 - 400 min-10 - 400 min
-1
0 - 350 min
-1
0 - 700 min-10 - 600 min
-1
0 - 500 min
-1
Ø 120 mm Ø 120 mm Ø 140 mm Ø 160 mm
42 mm 52 mm 52 mm 52 mm
84 dB(A) 84 dB(A) 89 dB(A) 89 dB(A)
97 dB(A) 97 dB(A) 102 dB(A) 102 dB(A)
< 2,5m
2
< 2,5m
2
< 2,5m
2
< 2,5m
2
/II
/II
/II /II
To be able to use the machine safely it is essential that you read these safety instructions thoroughly and comply with all of them.
In addition, you must also comply with the general safety instructions also included with the
machine.
Take care to ensure that the current voltage indicated on the rating plate corresponds to that of the mains power supply.
Do not use the device in any environments with potentially explosive atmospheres. Do not mix any solvents or solvent-containing substances with a flash point of below 21° C.
Do not wind cables or leads around any parts of the body.
Use only cables approved for outdoor use.
Start up and run down the machine in the mixing container only. Ensure that the mixing container is stood in a firm and
secure position.
Do not reach into the mixing container with your hands or insert any other objects into it while mixing is in progress.
If the sound pressure level should exceed 85 dB (A) where you are working, use ear protection!
We recommend that you wear work gloves and protective goggles when using the mixer. Regulations require that
you wear close-fitting clothing.
The machine is designed for mixing liquid and powder-based building products such as paints, mortar, adhesives, plaster
and similar substances. Use the right mixing tool for the consistency of the material and the quantity to be mixed. Please
refer to the information in the technical data when choosing the size of mixing tool (diameter).
Fix the two guard handles (2) in the correct position on the holes provided (6) using 4 screws for each (see illustration).
The guard handle is designed to protect the machine casing from breakage and soiling. In addition, it also makes it easier
to pick up and put down the machine.
Screw the mixing tool with a size M14 male thread (9) firmly into the mixing shaft (8). To do this you will require two SW
24 open-ended wrenches. Place one open-ended wrench on the mixing shaft and the other on the hexagonal holding fixture and tighten. To release or change the mixing tools, follow this sequence in reverse order.
Connect the machine to the 230 volt mains power supply. 230 volt devices can also be used with a 220 volt supply.
GB

Mise en service
Maintenance et entretien
Garantie
Recylage
Déclaration de conformité CE
Tenir toujours la machine à 2 mains.
Appuyer sur le bouton de verrouillage de commutation (1). Enfoncer l’interrupteur MARCHE/ARRÊT
(2). Le variateur intégré permet de contrôler le démarrage de la machine. Plus l’interrupteur est enfoncé, plus la machine tourne vite.
Pour arrêter le travail, relâcher l’interrupteur MARCHE/ARRÊT.
Les machines équipées de 2 vitesses disposent de deux plages de régime (Vitesse 1: régime
lent/Vitesse 2: régime rapide. Pour changer de vitesse, faire pivoter la molette de changement de vitesse à 180°.
Réduire la vitesse de rotation lorsqu’on plonge ou retire la turbine de la matière. Lorsque la turbine est
entièrement plongée dans la matière, accélérer la vitesse au maximum, de manière à obtenir un
refroidissement correct du moteur.
Pendant le mélange, guider la machine en tous sens dans le récipient de mélange. Mélanger jusqu’à
ce que toute la matière ait été traitée.
Après avoir terminé le mélange, procéder au nettoyage de la turbine.
1
2
2.
1.
Maintenir la machine et la turbine propres.
Maintenir les fentes d’aération (5) propres pour garantir un refroidissement suffisant.
Pour tous travaux sur la machine et pour changer la turbine, débrancher la machine.
La machine est équipée de charbons autocommutants. Arrivés à un certain niveau d’usure, la machine disjoncte. Laisser rem-
placer les charbons par un réparateur agréé Collomix.
Les réparations devront être assurées seulement par un réparateur agréé Collomix.
N’utiliser que des pièces détachées d’origine Collomix.
Dans le cadre de ses conditions de ventes, le fabricant offre une garantie conformément aux directives légales/spécifiques
aux pays. En cas de recours à la garantie, joindre la facture ou le bon de livraison.
Des réparations effectuées par un tiers nous dégage de toute obligation de garantie. Pour toutes irrégularités, prière de nous
retourner la machine.
Les dégâts dus à l’usure normale, à une surutilisation ou à une utilisation non conforme ne sont pas couverts par la garantie.
Les réclamations ne seront prises en compte que si la machine est retournée non démontée au SAV Collomix.
La machine, ses accesoires et emballage seront recyclés dans le respect de l’environnement.
Les machines hors d’état de fonctionner pourront être retournées à l’adresse ci-dessous en vue de recyclage.
Nous déclarons en responsabilité unique que ce produit est en conformité avec les normes et produits normatifs suivants:
EN 50144, EN 55014, EN 60555, HD 400 selon les spécifications des directives 73/23/EWG, 89/336/EWG,
98/37/EG.
J. Essing F. Beron
Collomix Rühr- und Mischgeräte GmbH
Daimlerstr. 9
D-85080 Gaimersheim
Allemagne
Sous réserve de modifications
F
Eléments de la machine
Données techniques
Remarques complémentaires sur la sécurité
Domaine d’utilisation préconisé
Avant la mise en service
1 Commande de changement de vitesse 6 Vis de fixation de l’étrier de protection
2 Etrier de protection 7 Col de la machine
3 Interrupteur à variateur MARCHE/ARRÊT 8 Arbre à filetage interne M 14
4 Bouton de verrouillage de commutation 9 Turbine
5 Fentes d’aération
Puissance nominale
Tension:
Vitesses:
Regime en charge
Turbine recommandée:
Col de l’axe Ø:
Classe de protection:
Niveau de pression accoustique:
Niveau de puissance accoustique:
Vibration main-bras:
CX 10 CX 20 CX 40 CX 60
1000 W/4A 1000 W 1200 W 1600 W
230 V 230 V 230 V 230 V
1222
0 - 670 min
-1
0 - 400 min-10 - 400 min
-1
0 - 350 min
-1
0 - 700 min-10 - 600 min
-1
0 - 500 min
-1
Ø 120 mm Ø 120 mm Ø 140 mm Ø 160 mm
42 mm 52 mm 52 mm 52 mm
84 dB(A) 84 dB(A) 89 dB(A) 89 dB(A)
97 dB(A) 97 dB(A) 102 dB(A) 102 dB(A)
< 2,5m
2
< 2,5m
2
< 2,5m
2
< 2,5m
2
/II
/II
/II /II
Un travail sans danger avec cet appareil n’est possible que si vous lisez entièrement cette
notice et les remarques sur la sécurité et que vous suivez scrupuleusement les consignes.
En outre, les consignes générales de sécurité jointes doivent être suivies.
Vérifiez que la tension du courant indiqué sur la plaque de la machine correspond à la tension du secteur.
Nepas utiliser l’appareil dans un environnement dans lequel règne une atmosphère avec rique d’explosion. Ne pas mélanger de produits solvants ou à base de solvants ayant un point d’inflammation inférieur à 21° C.
Ne pas enrouler le câble d’alimentation autour d’une partie quelconque du corps.
N’utiliser que des câbles de rallonge homologués pour l’extérieur.
L’appareil doit être mis en route et arrêté à l’intérieur du récipient de mélange. S’assurer que le récipient de mélange soit
stable et fixe.
Pendant le mélange, ne pas introduire les mains ou des objets dans le récipient de mélange.
Si le niveau sonore dépasse 85 dB (A) sur le lieu de travail, mettre une protection auditive!
Pendant le travail avec le mélangeur, il est recommandé de porter des gants et des lunettes de protection!
Le port de vêtements moulants est obligatoire.
La machine est concue pour le mélange de matériaux liquides et poudreux tels que peintures, mortiers, colles, enduits ou autres substances similaires. Selon la consistance de la matière et la quantité à mélanger, il y a lieu d’utiliser la turbine appropriée. Pour choisir le diamètre de la turbine, se reporter aux données techniques.
Fixer les deux étriers de protection (2) avec les séries de 4 vis, en bonne position dans les perforations (6) prévues à cet
effet. Les étriers protègent la machine contre la casse et l’encrassement. En outre, ils facilitent la dépose et la préhension de
la machine.
Visser la turbine à filetage M 14 (9) mâle dans le filetage femelle (8) de l’arbre. Utiliser pour cela 2 clés plates de 24.
Maintenir l’arbre à l’aide d’une des clés puis serrer la turbine avec la deuxième clé au niveau de 6 pans. Pour changer la
turbine, procéder de manière inverse.
Brancher la machine au secteur 230 V. Les machines en 230 V peuvent fonctionner en 220 V.
F
 Loading...