

Page 1
MP822-4G | MP822-8G | MP822-16G
EN
3” Touch Screen Video MP3 Player
Quick Setup Guide ............................................Page 2
ES
3” Reproductor de Video y MP3 con
Pantalla Táctil
Guía Rápida de Uso ..................................... Página 30
Please read carefully before use • Léa el manual antes de usar •
Veuillez lire ce livret avant utilisation
Page 2

Page 2 Coby Electronics Corporation
English
www.cobyusa.com Page 3
Thank You
Congratulations on your purchase of a Coby MP Video
MP Player. This guide is provided to help you get started
quickly with your player; for more detailed instructions,
please refer to the instruction manual stored as a PDF on
your player. The manual is also available for download at
the Coby website: www.cobyusa.com.
To view PDF documents, download and install the free
Adobe Acrobat reader from the Adobe website at
www.adobe.com.
Page 3
www.cobyusa.com Page 3
English
Thank You
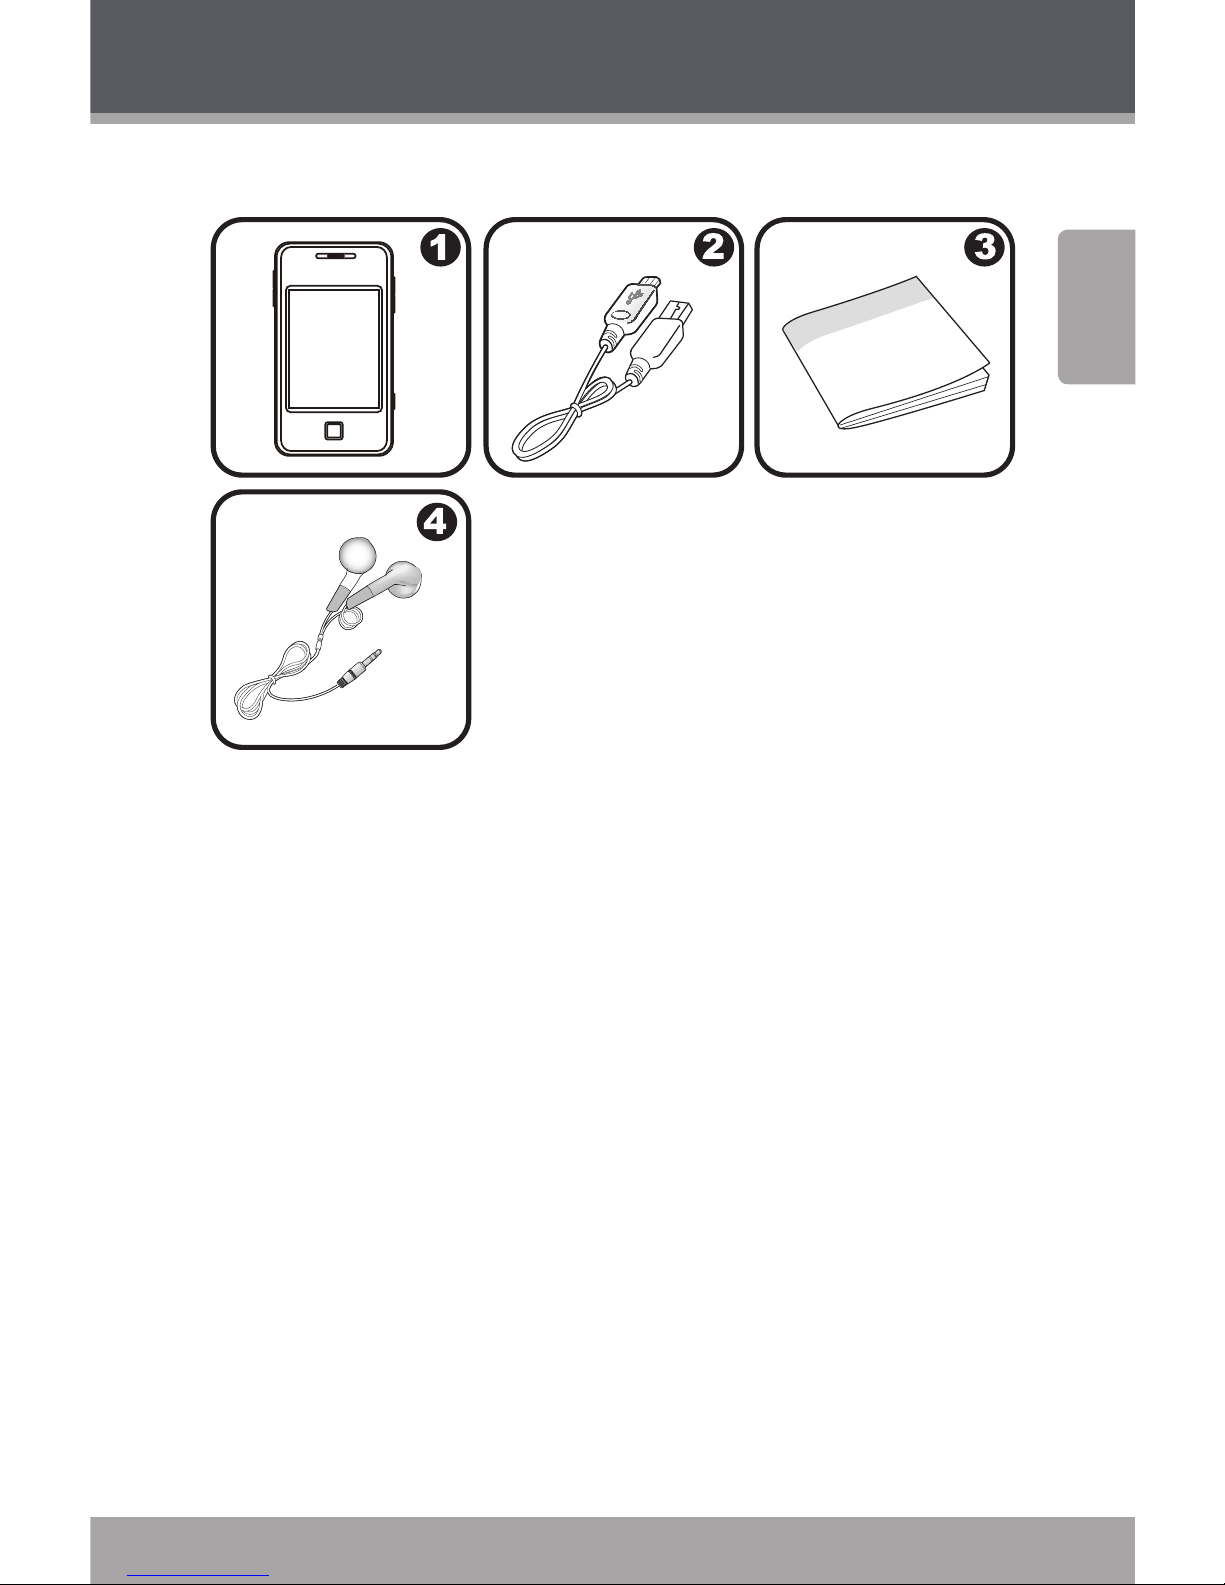
Package Contents
COBY Player
USB Cable
Instruction Manual
Professional Stereo Earphones
Should one of the above items be missing, please contact
the retailer from whom you purchased this product.
Page 4
Page 4 Coby Electronics Corporation
English
www.cobyusa.com Page 5
Controls at a Glance
2 3
1
4
5
6
7
8
9
1 1
1 2
1 3
1 4
1 0
Page 5

www.cobyusa.com Page 5
English
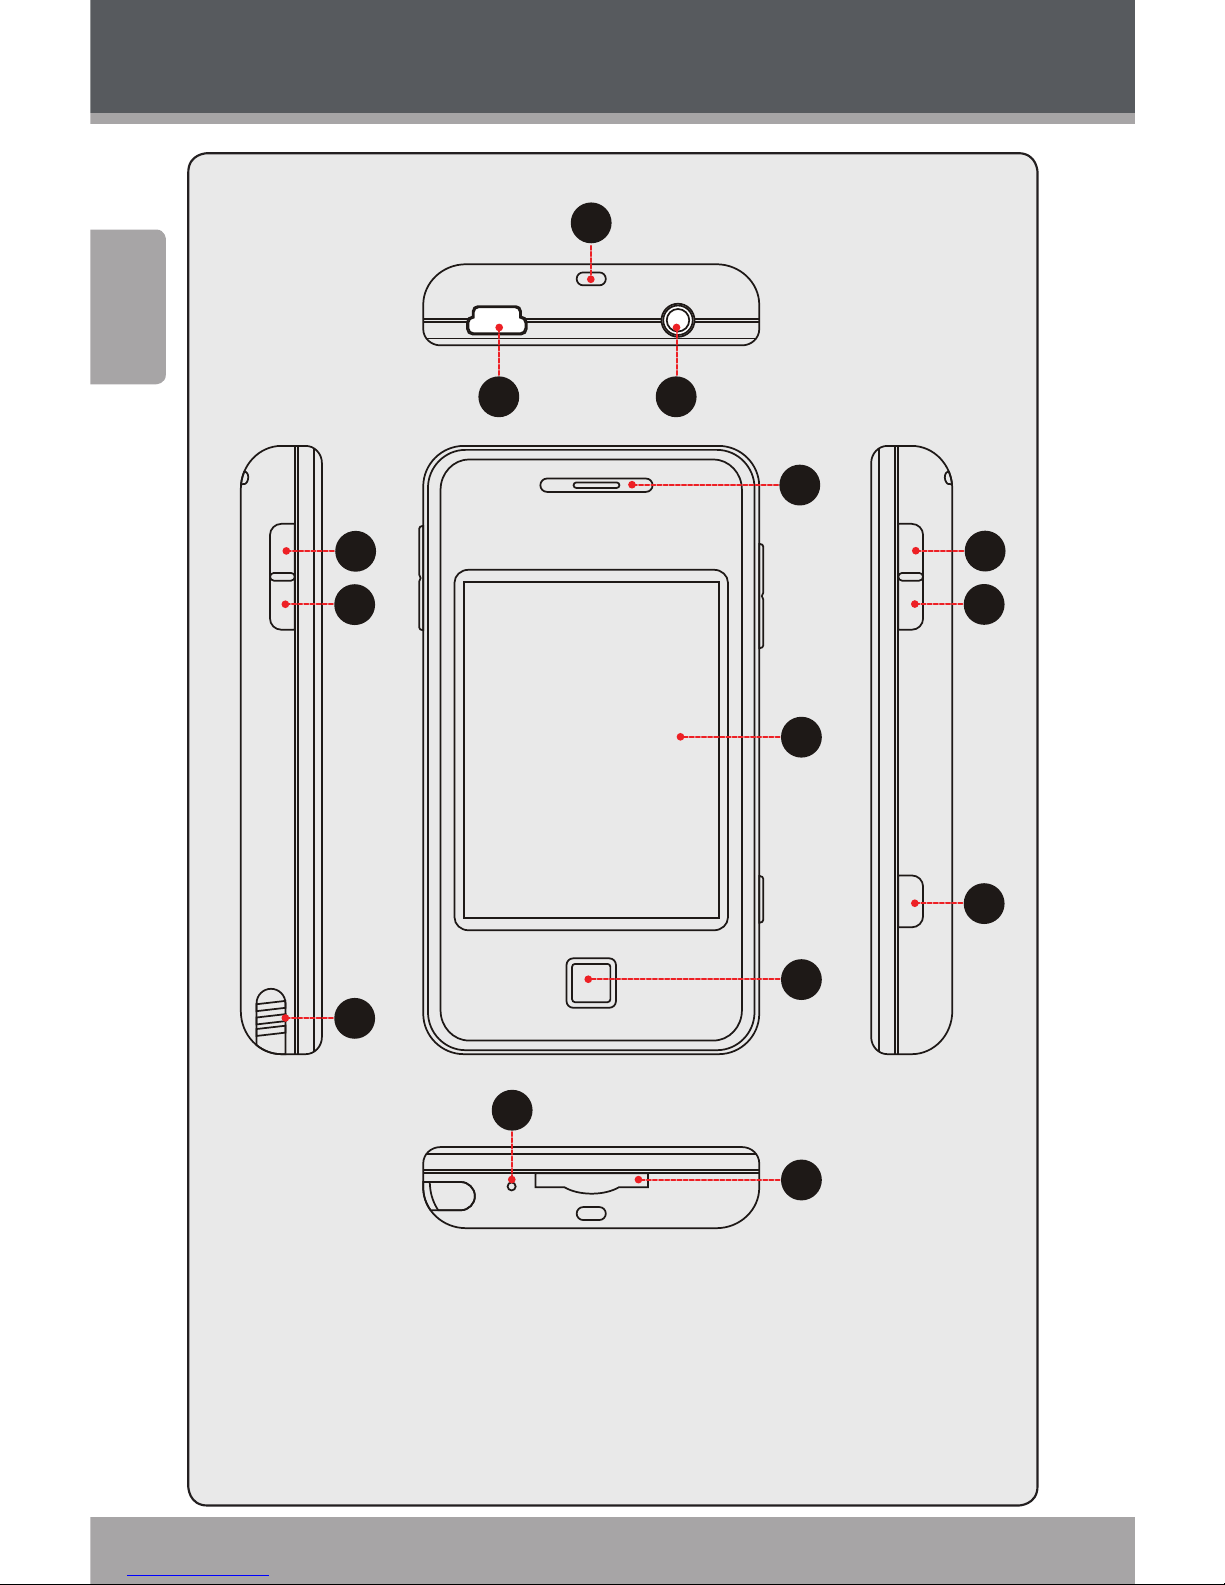
Controls at a Glance
Top View
Neckstrap Insert 1.
USB Port 2.
Connect to a computer to transfer media les to
the player.
3.5mm Headphone Jack3.
Left View
Menu Navigation: Up 4.
Menu Navigation: Down 5.
Stylus6.
Front View
Speaker7.
LCD Touchscreen8.
Tap the display with your nger to activate the
on-screen control.
OK Button9.
Bottom View
Reset Button10.
miniSD Card Slot11.
Load a miniSD memory card here to upgrade
the memory capacity of the player.
Page 6

Page 6 Coby Electronics Corporation
English
www.cobyusa.com Page 7
Right View
Power Button12.
Press and hold to power the player on/o.
Volume Button 13.
Menu/Hold Button14.
Press and hold to disable the player controls.
Press again to re-enable.
Controls at a Glance
Page 7
www.cobyusa.com Page 7
English
Getting Started
Charging the Battery
Your player has an integrated rechargeable battery. Upon
initial use, the battery should be charged fully to ensure
optimal performance and battery life. If the player has not
been used for a long period of time, the battery may need to
be recharged. Upon initial use, the battery should be charged
fully ( hours) to ensure optimal performance and battery life.
The battery used in this device may present a re or
chemical burn if mistreated. Do not disassemble,
incinerate, or heat the battery. Do not leave the battery in a place subject to direct sunlight, or in a car
with its windows closed. Do not connect the player
to a power source other than that which is indicated
here or on the label as this may result in the risk of re
or electric shock.
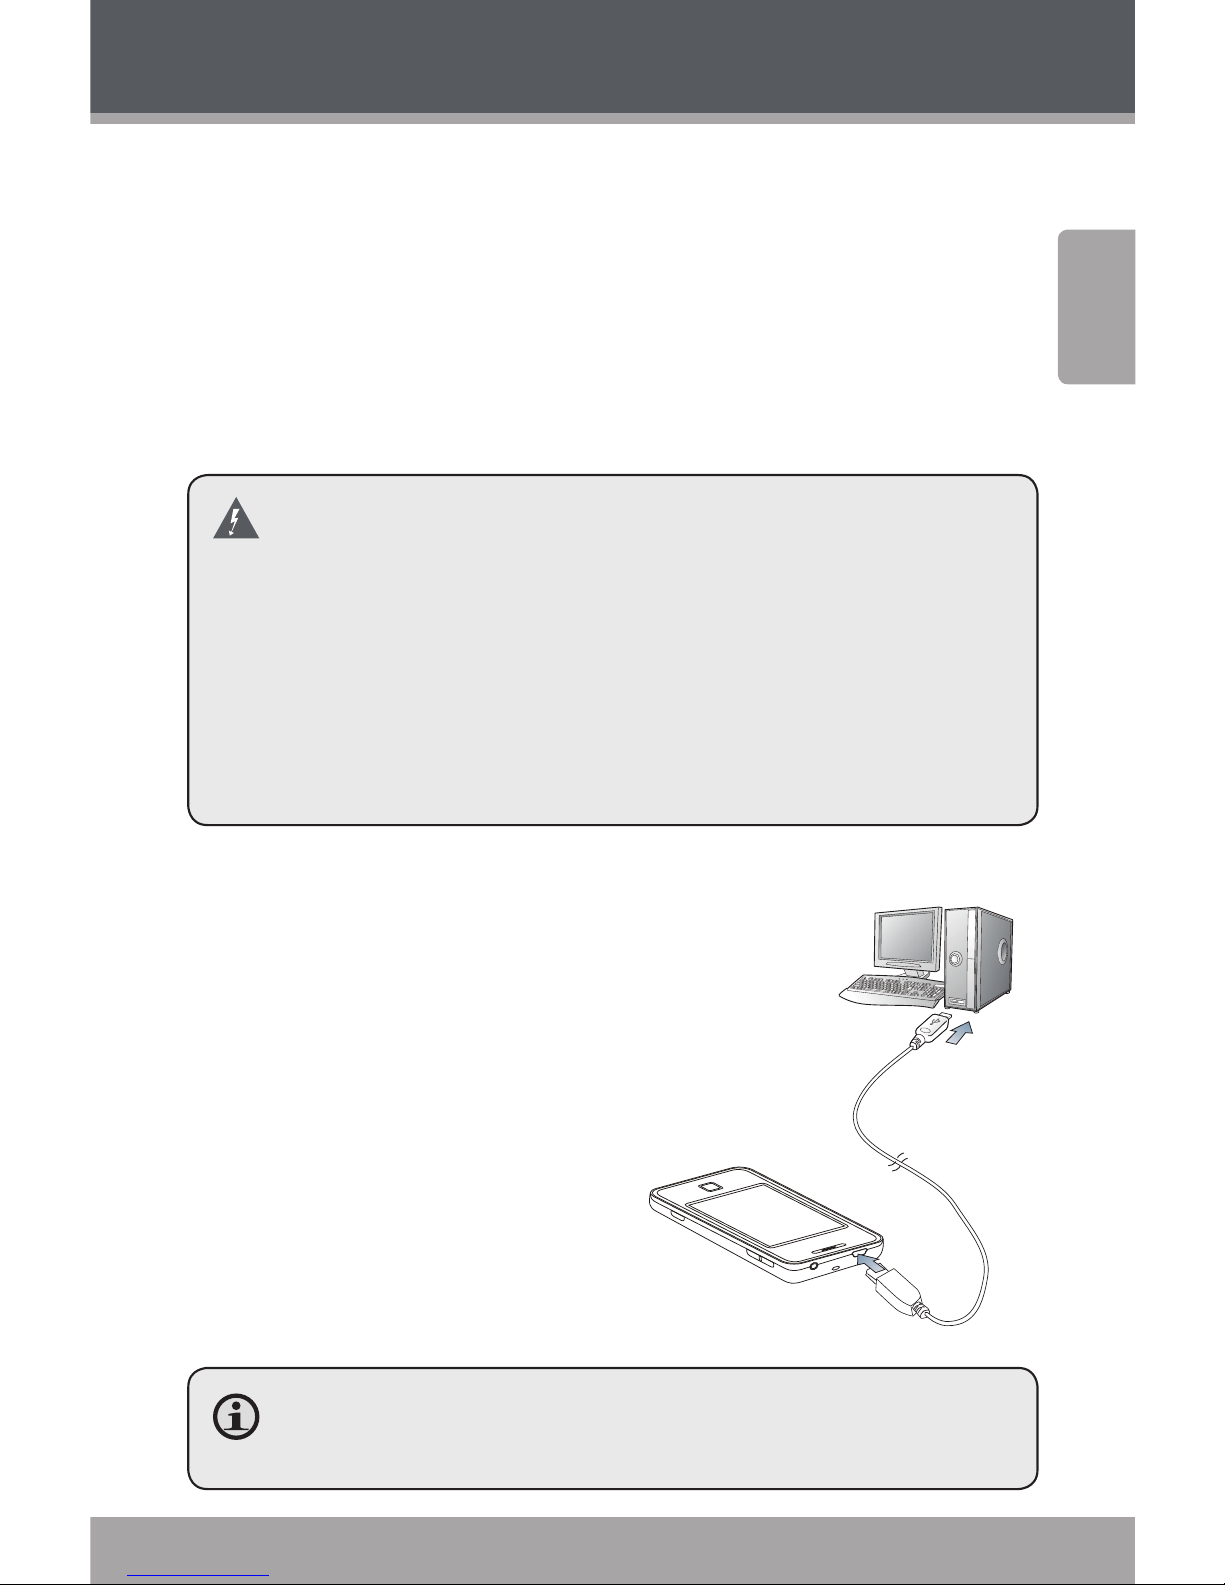
Charging with a Computer
Your player can be charged through a USB
computer connection. Use the supplied
USB cable to connect the player to your
computer’s USB port. The computer must
be powered on and not in sleep
mode. When the player is
connected and charging, a
USB symbol will be displayed
on the player’s screen.
When connected to a USB hub, the hub must be self-
powered to charge the player’s battery.
USB Port
USB Port
Page 8

Page 8 Coby Electronics Corporation
English
www.cobyusa.com Page 9
Getting Started
Turning Your Player On/Off
To turn the player on, press and hold the <POWER> button
until the screen turns on.
To turn the player o, press and hold the <POWER> button
until the screen turns o.
Resetting the Player
If your player freezes and fails to respond, or in the event
of a malfunction, you will need to perform the reset function. To reset:
Disconnect your player if it is connected to a 1.
computer.
Use a paper clip to gently press the Reset button 2.
located on the bottom of the player.
Using the Touchscreen Controls
Your video MP player comes equipped with an easy-touse touchscreen which allows access to the player’s functions. Use your nger tip or the stylus to tap the area of
the screen where a control icon is displayed. If you tap and
hold an icon, it will register as a continuous button press.
You can also use your nger to swipe up/down or left/right
to move the selection up/down or left/right, respectively.
To avoid damaging the screen, do not touch it with
excessive force or with any object other than your
nger or the stylus. For best response, make sure
your hands are clean before using the touchscreen
controls.
Page 9
www.cobyusa.com Page 9
English
Getting Started
Disabling the Controls (Hold)
When the Hold button is engaged, the player’s controls
are disabled.
To disable the controls, press and hold the <MENU>
button.
To enable the controls, press and hold the <MENU>
button again.
You may want to disable the controls to avoid acti-
vating the controls when the player is in your pocket
or bag.
“Keyboard Locked!“ will appear on the screen if you
attempt to use the controls after they have been disabled. Re-enable the controls to continue.
Page 10
Page 10 Coby Electronics Corporation
English
www.cobyusa.com Page 11
Transferring Files to the Player
Connect the player to your computer with the supplied
USB cable. Upon connection:
Your computer will automatically recognize the
player as a removable disk. An icon representing your
player will appear under “Audio Devices” when you
open “My Computer”.
It may take Windows several minutes to recognize
and set up the device the rst time it is connected
depending on your hardware conguration.
If your computer is running Windows 98 SE, you may
need to download and install a USB Driver from the
Coby website: www.cobyusa.com.
The USB . Hi-Speed connection makes it easy to transfer
music, video, photo, and text les (or any other data)
quickly between the player and your computer. Simply use
the player as you would a oppy disk using basic operating system commands.
If you need further assistance with transferring les, please
refer to your operating system’s instruction manual or onscreen help. If you are using media management software
such as iTunes, Winamp, or Windows Media Player, please
refer to their documentation for support.
If you are using Coby Media Manager software, please refer
to the documentation included either on the player or the
CD, or download it from our website at www.cobyusa.com.
Page 11

www.cobyusa.com Page 11
English
Transferring Files to the Player
Do not disconnect or otherwise interrupt the player
during transmission—this could damage or corrupt
the player’s rmware or your les. If the player is accidentally disconnected and is not working properly,
try resetting the player.
Content owners use Windows Media digital rights
management technology (WMDRM) to protect their
intellectual property, including copyrights. This device
uses WMDRM software to access WMDRM-protected
content. If the WMDRM software fails to protect the
content, content owners may ask Microsoft to revoke
the software’s ability to use WMDRM to play or copy
protected content. Revocation does not aect unprotected content. When you download licenses for protected content, you agree that Microsoft may include
a revocation list with the licenses. Content owners
may require you to upgrade WMDRM to access their
content. If you decline an upgrade, you will not be
able to access content that requires the upgrade.
Page 12
Page 12 Coby Electronics Corporation
English
www.cobyusa.com Page 13
Using the Player
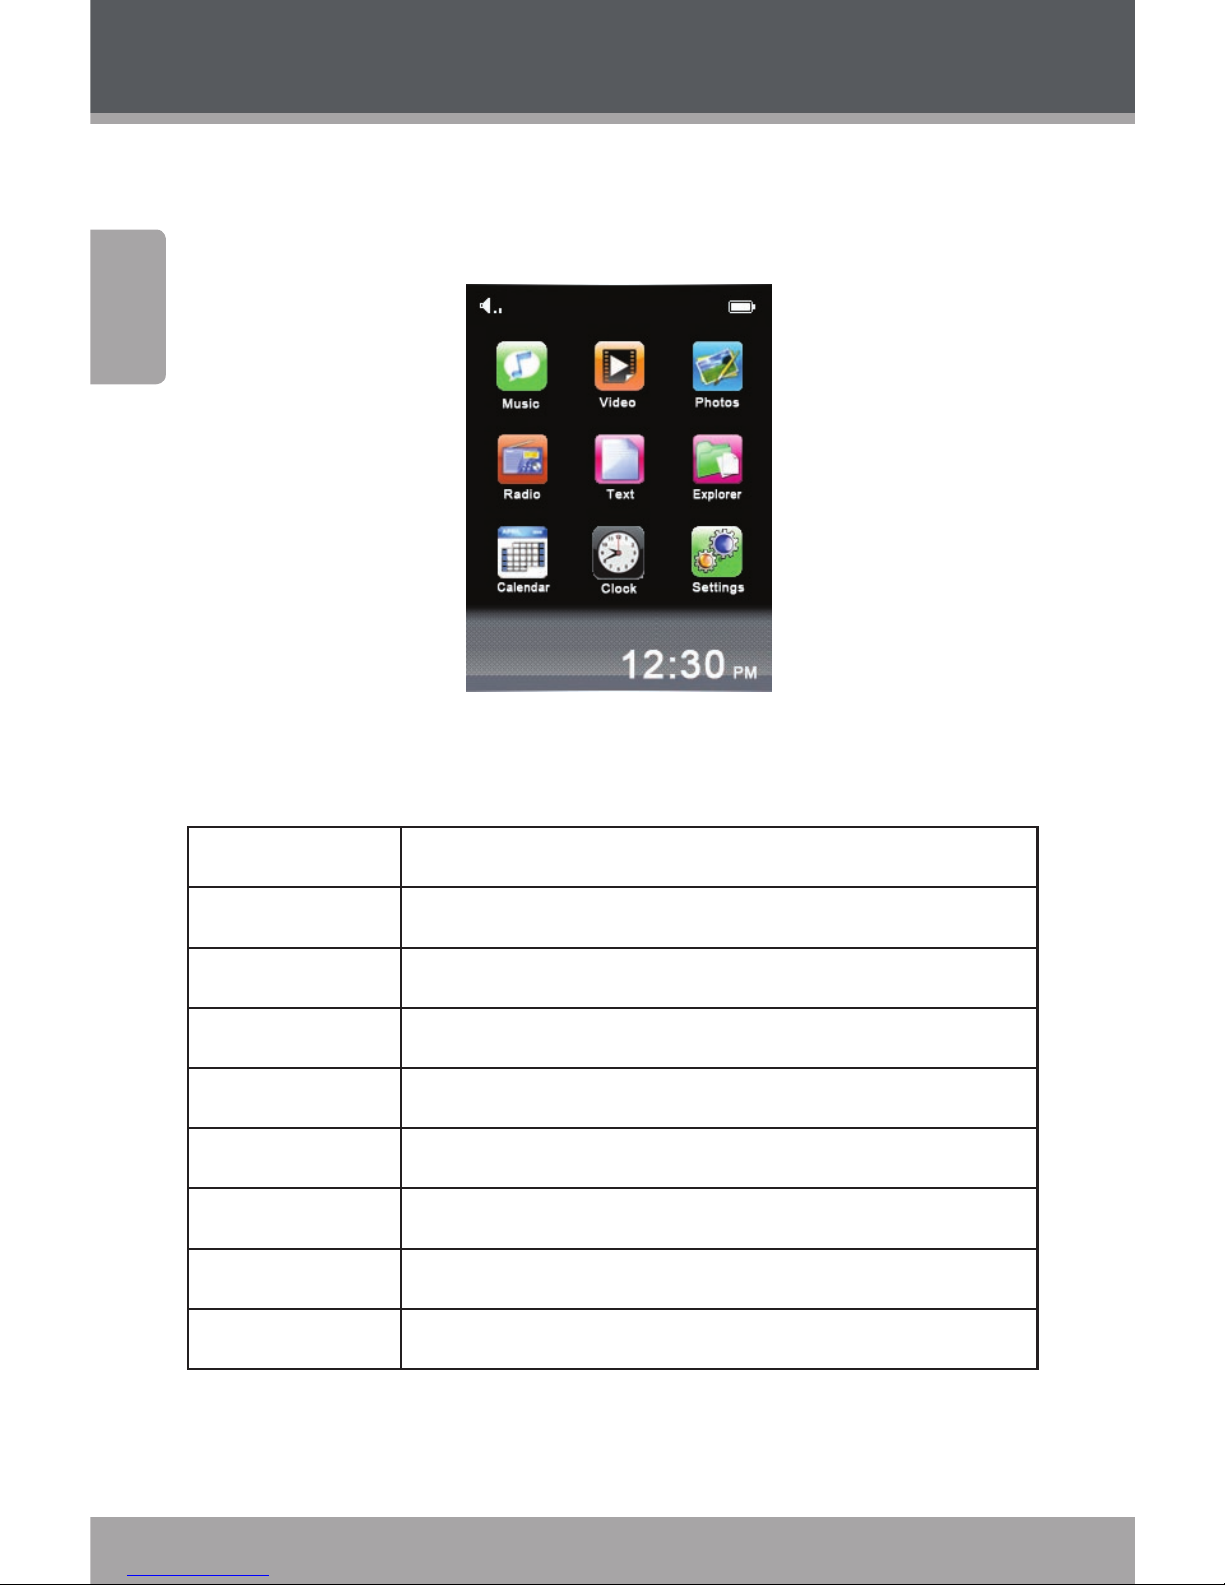
Main Menu
When you turn on the player, you will see the Main menu.
From the Main menu, you can access each of your MP
player’s function modes. These modes are:
Music Browse and play music
Photos Browse and view pictures
Video Browse and play movies
Radio Listen to FM radio broadcasts
Text Browse and read text les
Files Browse all les
Calendar Launch the calendar program
Clock Set the internal date and time
Settings Adjust the player’s options
Page 13

www.cobyusa.com Page 13
English
Using the Player
Main Menu Controls
Each function mode is represented by an icon on the Main
Menu screen. To enter a mode, tap the icon with your
nger. You may also use the player’s standard controls to
access each mode: Press the <UP> or <DOWN> button to
move the selection, then press <OK> to conrm.
For information about loading music onto your
player, please refer to the section “Transferring Files
to the Player”.
Music Mode
Music Browser Controls
When you choose MUSIC mode
from the Main menu, you will
see the Music Browser screen.
You may browse through a
list using any of the following methods:
Press the <UP> or
<DOWN> button on
the unit.
Tap directly on an
item within the list.
Tap the Arrow Up <
> or Arrow Down < >
icons at the bottom of the screen.
Page 14

Page 14 Coby Electronics Corporation
English
www.cobyusa.com Page 15
Using the Player
To conrm a selection, press <OK> or tap the desired
selection on the LCD screen.
To return to the previous screen, press the <POWER>
button or tap the Back Icon (
) in the top
lefthand corner of the display screen.
If your music les contain ID song information tags, you
will be able to view your music les by Artist, Album, Track
(song title) or Genre.
To view all les (including those that do not contain ID information), select “All Songs” or use the Folder Explorer option.
If music is already playing, you will have the additional
option to return to the Now Playing screen.
Page 15
www.cobyusa.com Page 15
English
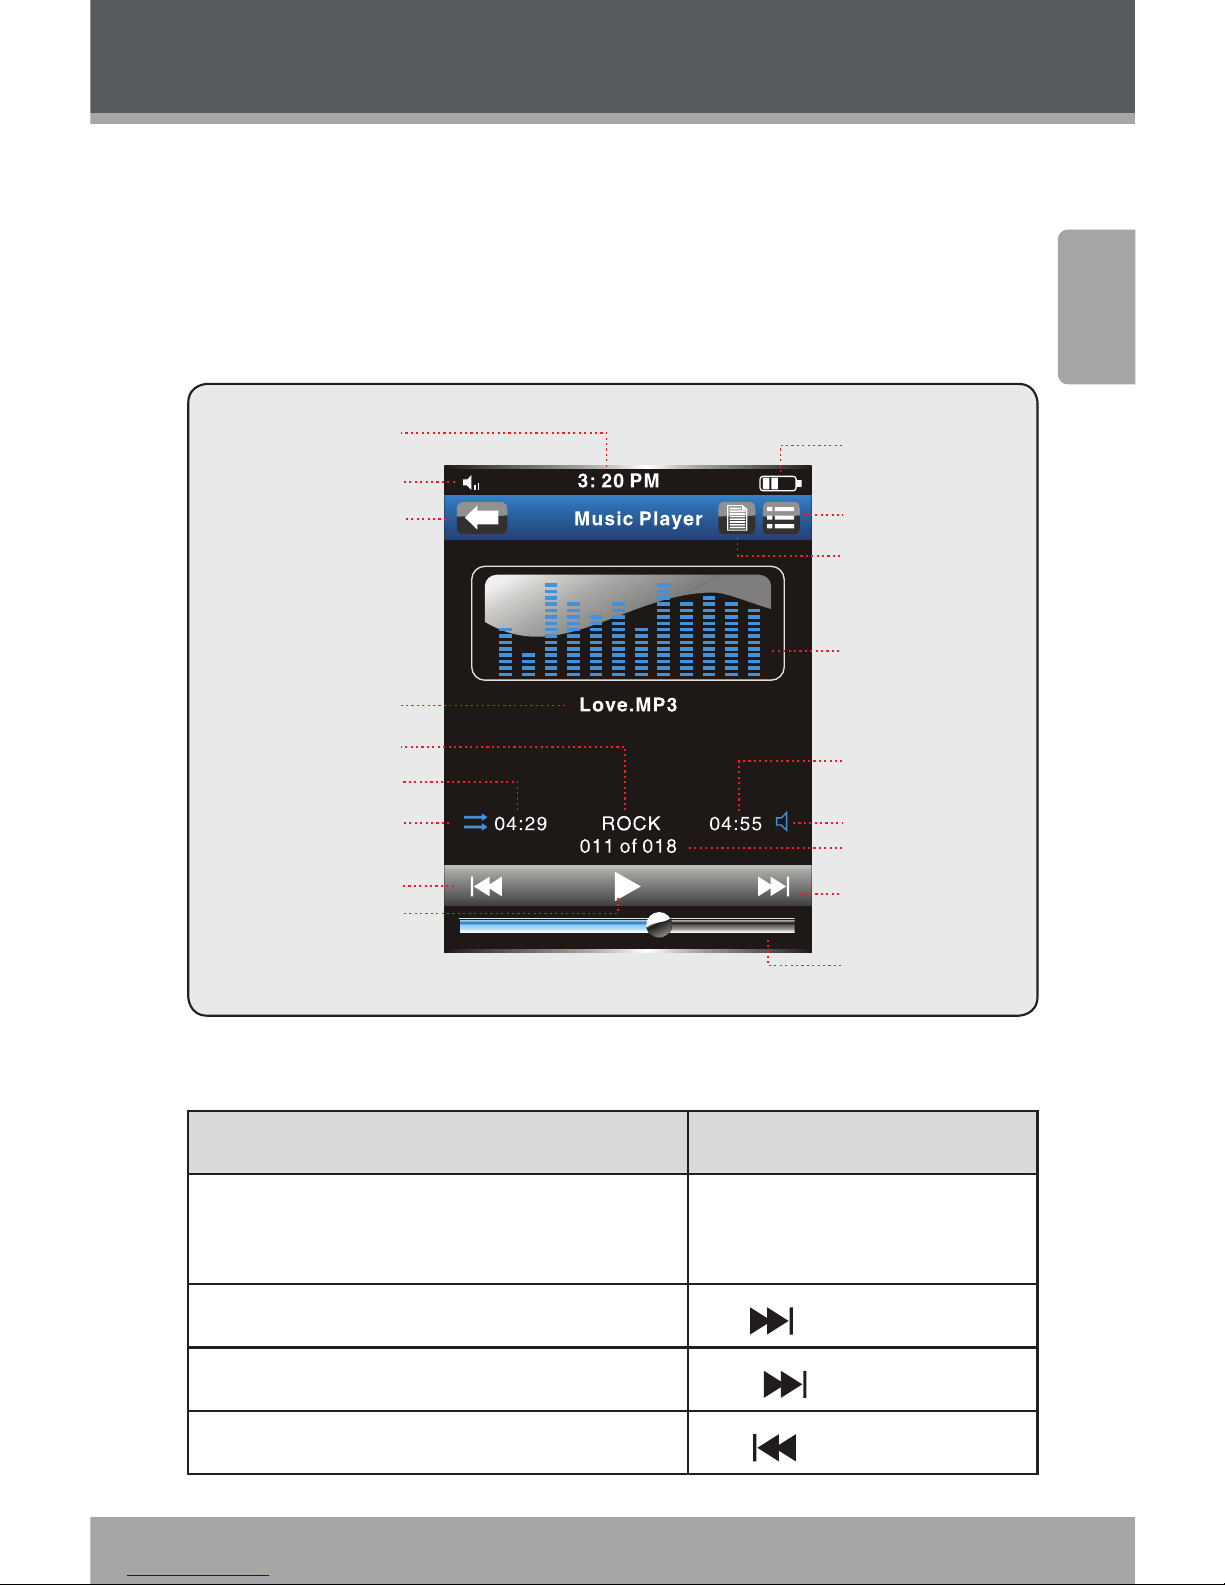
Now Playing Controls (Music Playback)
To start playing music, browse for a song and then touch
<ENTER> to start playback.
When a song is playing, the Now Playing screen appears:
Volume Level Indicator
Time Display
Battery Level
Equalizer Frequency
Bands
Total Time
Volume Icon
Current track/
Total Tracks
Next Icon
Progress Bar
Play/Pause Icon
Previous Icon
Play Mode
Elapsed Time
Equalizer Icon
File Name
Back Icon
Quick Option Icon
File Browser Icon
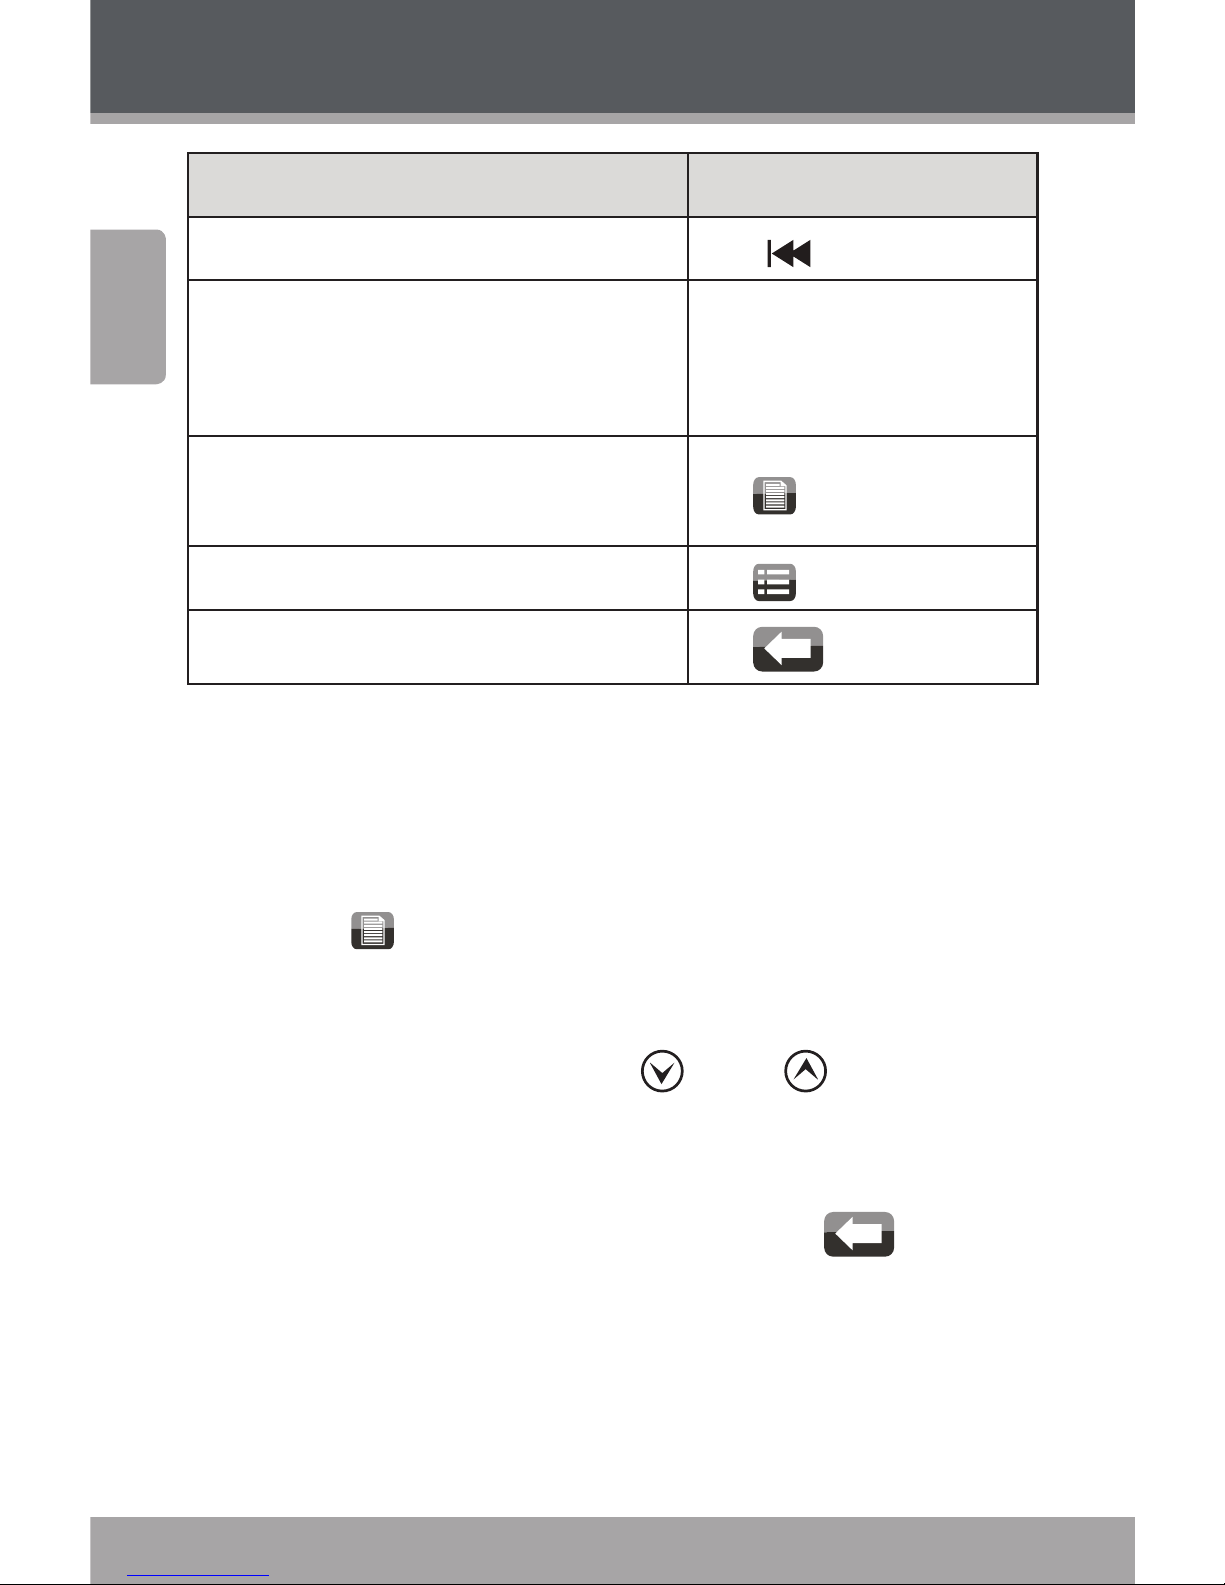
Use the following controls during music playback.
Function Key Action
To pause/resume playback
Press <OK> or tap the
Play/Pause Icon on screen
To play the next track Tap
on screen
To forward-scan through the track Hold
on screen
To play the previous track Tap
on screen
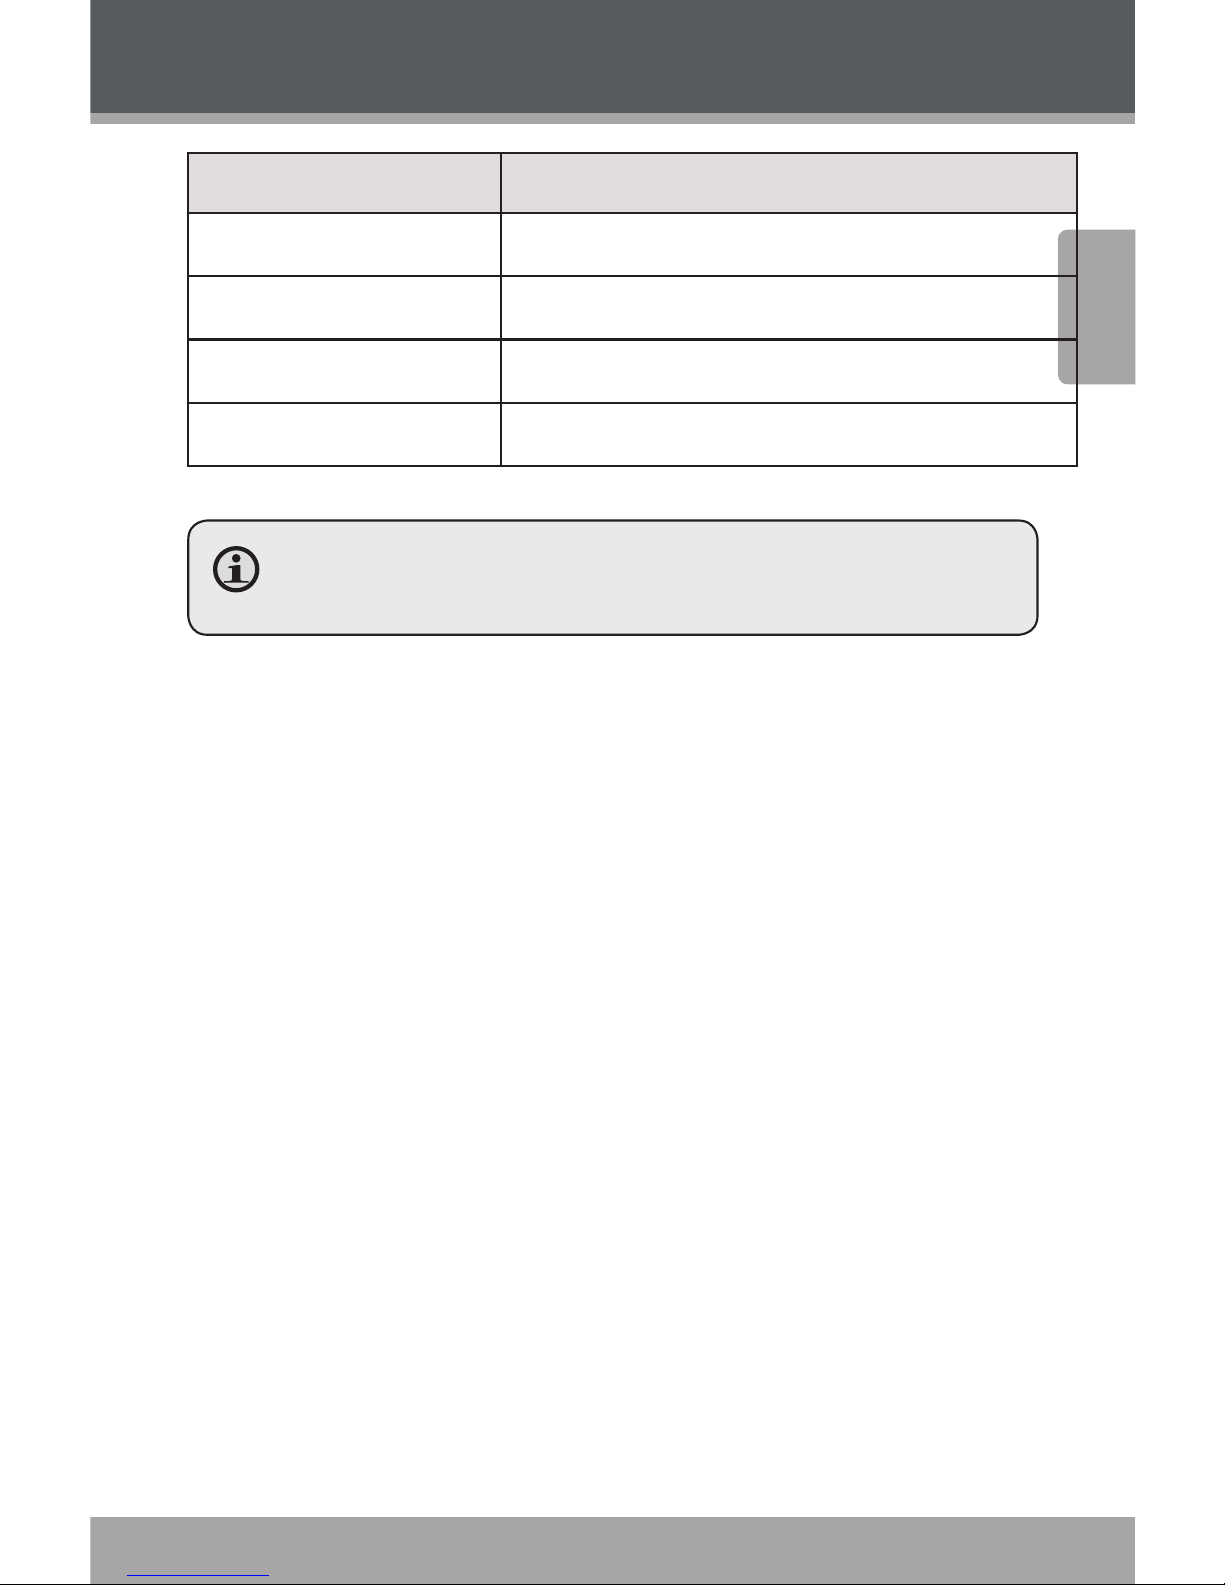
Using the Player
Page 16
Page 16 Coby Electronics Corporation
English
www.cobyusa.com Page 17
Using the Player
Function Key Action
To reverse-scan through the track Hold
on screen
To adjust the volume level
Press <VOL>, then press
the <UP> or <DOWN>
button.
To access the Quick Option menu (see
section below for details)
Tap
on screen
To return to the Music Explorer screen Tap
on screen
To return to the previous screen
Tap
on screen
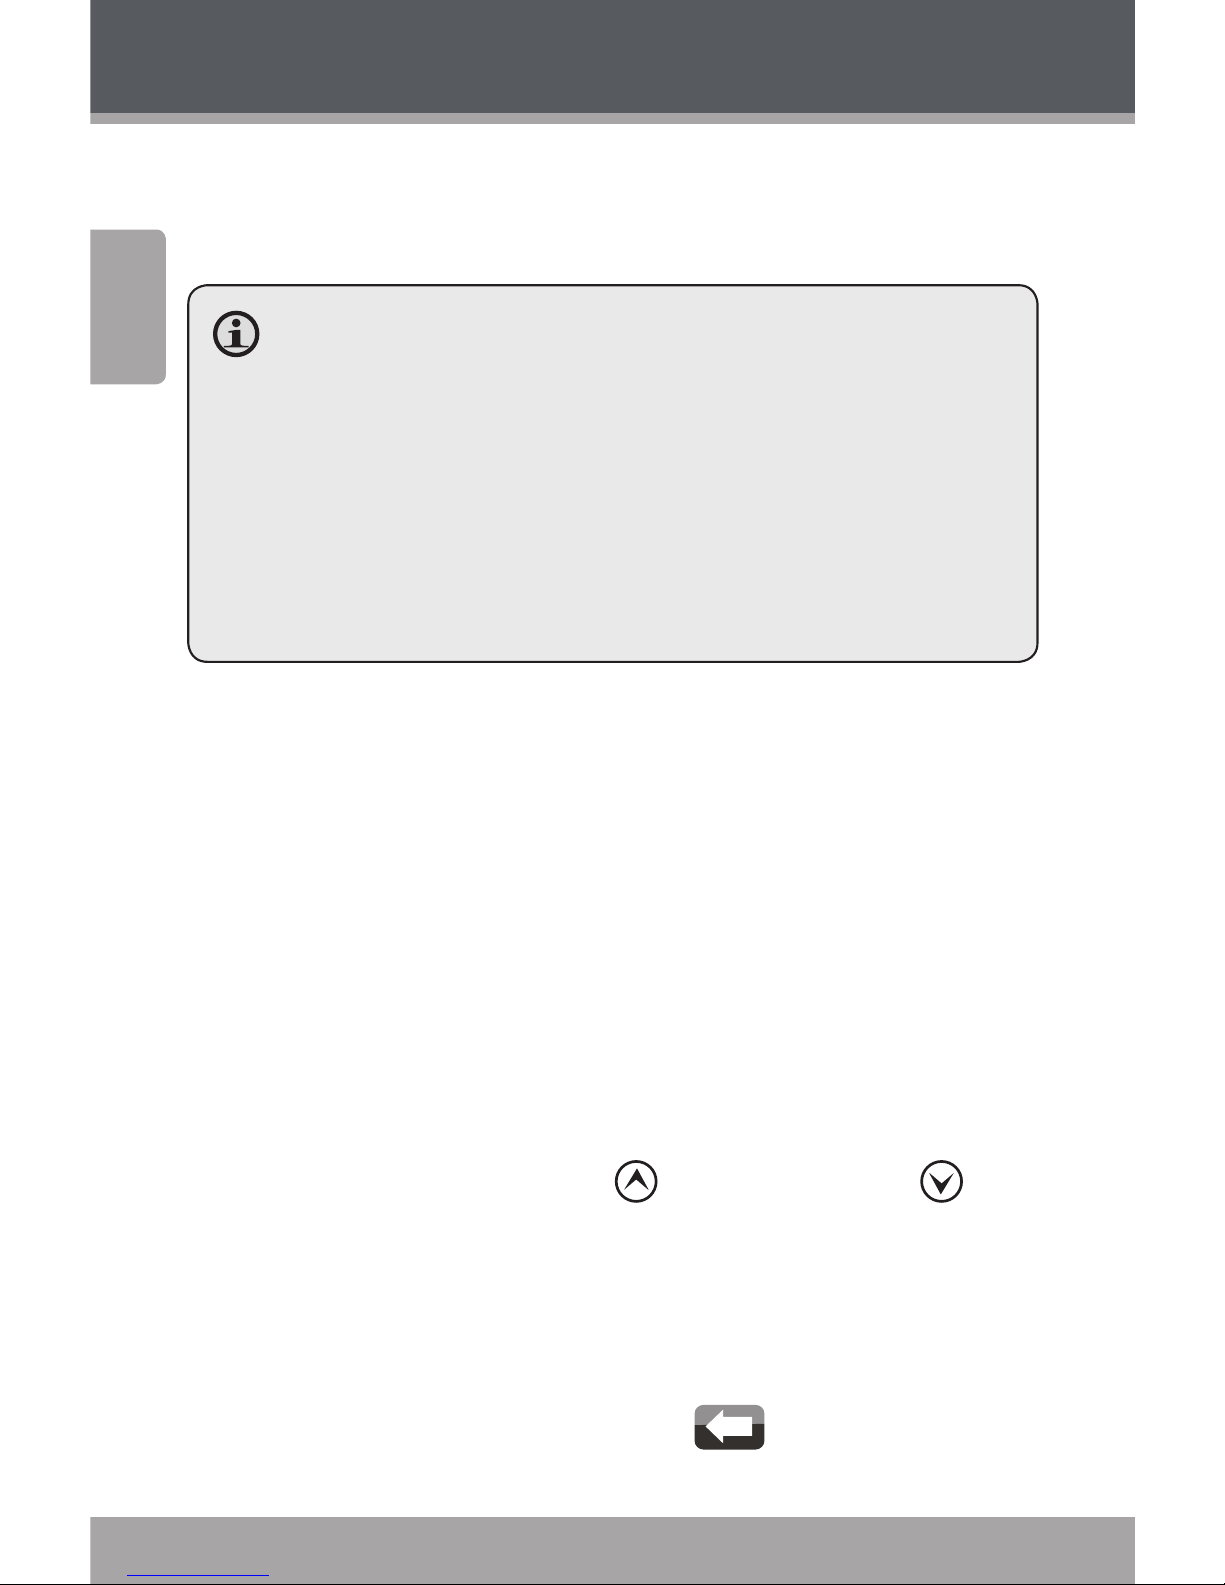
Quick Option Menu
The Quick Option menu gives you easy access to your
player’s option settings.
Tap <
> to access the Quick Option menu during
music playback.
To browse through the settings, press the <UP> or
<DOWN> button or tap <
> or < > on screen.
To select a setting, press the <OK> button or tap the
desired selection on screen.
To return to the previous screen, tap <
> on
screen.
Repeat Mode
Change the repeat options to adjust the order in which
tracks are played.
Page 17
www.cobyusa.com Page 17
English
Using the Player
Item Description
Normal Play tracks in normal order
Single Play the current track repeatedly
Random Play tracks in random order
All Play all tracks repeatedly
You may also toggle between settings by tapping the
onscreen Play Mode icon.
Page 18
Page 18 Coby Electronics Corporation
English
www.cobyusa.com Page 19
Video Mode
Browse for and play your video les.
Your player supports AVI les encoded with XviD at
320 x 240 and 30 fps. Videos may need to be encoded
with the included software for device playback.
For more information about converting video, please
refer to the section “Video Conversion”.
For more information about loading video les onto
your player, please refer to the section “Transferring
Files to the Player”.
Video Browser Controls
When you choose VIDEO mode from the Main menu, you
will see the Video Browser screen. Use the Video Browser
to nd all folders and video les loaded on your player.
You may browse through a list using any of the fol-
lowing methods:
Press the <UP> or <DOWN> button on the unit.
Tap directly on an item within the list.
Tap the Arrow Up (
) or Arrow Down ( )
icons at the bottom of the screen.
·To conrm a selection, press <OK> or tap the desired
selection on the LCD screen.
To return to the previous screen, press the <POWER>
button or tap the Back Icon <
> in the top
lefthand corner of the display screen.
Using the Player
Page 19

www.cobyusa.com Page 19
English
Using the Player
Video Playback Controls
When a video is playing, the Now Playing screen appears:
Video 001.avi
00:01:30 00:10:00
Elapsed Time Total Time
Video Playing Window
Page 20

Page 20 Coby Electronics Corporation
English
www.cobyusa.com Page 21
Use the following controls during video playback.
Function Key Action
To pause/resume playback
Tap
/ , or press the <OK>
button
To play the next video
Tap
on LCD, or press the
<DOWN> button
To forward-scan through
the video
Hold
on LCD, or hold the
<DOWN> button
To play the previous video
Tap
on LCD, or press the <UP>
button
To reverse-scan through
the video
Hold
on LCD, or hold the <UP>
button
To adjust the volume level
Tap
on LCD or press the <VOL>
button, then press the <UP> or
<DOWN> button.
To rotate the video playing
window
Tap
on LCD
To return to the Video Explorer
screen
Tap
on LCD
To view the controls when the video is playing, tap
the screen once.
Using the Player
Page 21

www.cobyusa.com Page 21
English
Using the Player
Setting Mode
Enter SETTING mode to set your player’s system options.
To enter Setting mode, select SETTING from the Main menu.
To select a setting:
Press the <UP> or <DOWN> button on the unit.
Tap directly on an item within the list.
Tap the Arrow Up (
) or Arrow Down ( )
icons at the bottom of the screen.
To conrm a selection, press <OK> or tap the desired
selection on the LCD screen.
To return to the previous screen, press the <POWER>
button or tap the Back Icon (
) in the top
lefthand corner of the display screen.
Page 22

Page 22 Coby Electronics Corporation
English
www.cobyusa.com Page 23
Support
If you have a problem with this device, please read the
troubleshooting guide included in the player’s manual and
check our website at www.cobyusa.com for Frequently
Asked Questions (FAQs) and rmware updates. If these
resources do not resolve the problem, please contact
Technical Support.
Address
Coby Electronics Technical Support
56-65 Rust Street
Maspeth, NY 11378
Email
techsupport@cobyusa.com
Web
www.cobyusa.com
Phon e
800-727-3592: Mon–Fri, 8:30AM–9:00PM EST
Sat, 9:00AM–5:30PM EST
718-416-3197: Mon–Fri, 8:00AM–5:30PM EST
Page 23

www.cobyusa.com Page 23
English
Specications
Display Type 2.4” Full-Color TFT @ 320x240
Memory MP822-4G: 4GB Flash
MP822-8G: 8GB Flash
MP822-16G:
16GB Flash
Audio Format Support MP3, WMA
Video Format Support MPEG-4 (AVI/XviD): 320x240@30fps
Photo Format Support JPG, GIF, PNG, BMP
Text Format Support TXT
DRM Support --
Song Info Support ID3, Windows Media
FM Frequency Range 87.5 - 108.0MHz
PC Interface USB 2.0
Plug and Play Support Windows 2000/XP/Vista
Macintosh OS X
Audio Output 3.5mm Stereo (Headphone)
Power Supply Rechargeable Lithium-Polymer
Battery
USB Charge
Unit Dimensions 2.2” x 4.0” x 0.6” (WHD)
Design, specications and manual are subject to change without notice.
Page 24

Page 24 Coby Electronics Corporation
English
www.cobyusa.com Page 25
The lightning ash with arrowhead symbol within an equilateral
triangle is intended to alert the user to the presence of uninsulated “dangerous voltage” within the product’s enclosure that may
be of sufcient magnitude to constitute a risk of electric shock.
The exclamation point within an equilateral triangle is intended to
alert the user to the presence of important operation and servicing instructions in the literature accompanying the appliance.
For Customer Use:
Enter below the serial number that is located on the rear
of the unit. Retain this information for future reference.
Model No.
Serial No.
WARNING: To prevent re or shock hazard, do not expose this device to rain or moisture. Dangerous high voltage is present inside the enclosure. Do not open the cabinet.
CAUTION: To prevent electric shock, match wide blade of plug to wide slot of outlet
and fully insert.
WARNING: Handling the cords on this product will expose you to lead, a chemical
known to the State of California to cause cancer, and birth defects or other reproductive
harm. Wash hands after handling.
Safety Notices
Page 25

www.cobyusa.com Page 25
English
Protect your hearing: Hearing experts advise against the constant use of personal stereos
played at high volume. Constant exposure to high volumes can lead to hearing loss. If you
should experience ringing in the ears or hearing loss, discontinue use and seek medical
advice.
Note: If the product suddenly has no response or powers off, an electrostatic discharge
may be the cause. In this circumstance, please follow the procedures below for
recovery:
Use a paper clip to press the Reset button located on the rear of the unit.•
Turn the unit on again•
For recycling or disposal information about this product, please contact
your local authorities or the Electronics Industries Alliance: www.eiae.org.
NOTICE:
This product is protected by certain intellectual property rights of Microsoft. Use or distribution of such technology outside of this product is prohibited without a license from Microsoft.
Content owners use Windows Media digital rights management technology (WMDRM) to
protect their intellectual property, including copyrights. This device uses WMDRM software
to access WMDRM-protected content. If the WMDRM software fails to protect the content,
content owners may ask Microsoft to revoke the software’s ability to use WMDRM to play
or copy protected content. Revocation does not affect unprotected content. When you
download licenses for protected content, you agree that Microsoft may include a revocation
list with the licenses. Content owners may require you to upgrade WMDRM to access their
content. If you decline an upgrade, you will not be able to access content that requires the
upgrade.
Safety Notices
Page 26

Page 26 Coby Electronics Corporation
English
www.cobyusa.com Page 27
Safety Notices
FCC Statement:
This device complies with Part 15 of the FCC Rules. Operation is subject to the following two conditions:
(1) This device may not cause harmful interference, and
(2) This device must accept any interference received, including interference that
may cause undesired operation.
Note: This equipment has been tested and found to comply with the limits for Class
B digital devices, pursuant to Part 15 of the FCC rules. These limits are designed to
provide reasonable protection against harmful interference in a residential installation.
This equipment generates, uses and can radiate radio frequency energy and, if not
installed and used in accordance with the instructions, may cause harmful interference
to radio communications. However, there is no guarantee that interference will not
occur in a particular installation. If this equipment does cause harmful interference to
radio or television reception, which can be determined by turning the equipment off
and on, the user is encouraged to try to correct the interference by one or more of the
following measures:
Reorient or relocate the receiving antenna.•
Increase the separation between the equipment and receiver.•
Connect the equipment into an outlet on a circuit dierent from that to which the receiver is •
connected.
Consult the dealer or an experienced radio/TV technician for help•
Use of shielded cable is required to comply with Class B limits in Subpart B of Part 15
of the FCC rules.
Do not make any changes or modications to the equipment unless otherwise specied
in the manual. If such changes or modications should be made, you could be required
to stop operation of the equipment.
Page 27

www.cobyusa.com Page 27
English
Safety Notices
Important Safety Instructions
Read Instructions: All the safety and operating instructions should be 1.
read before the product is operated.
Retain Instructions: The safety and operating instructions should be 2.
retained for future reference.
Heed Warnings: All warnings on the product and in the operating 3.
instructions should be adhered to.
Follow Instructions: All operating and usage instructions should be 4.
followed.
Cleaning: Unplug this product from the wall outlet before cleaning. 5.
Do not use liquid cleaners or aerosol cleaners. Use a damp cloth
for cleaning.
Attachments: Use only attachments recommended by the manufac-6.
turer. Use of other attachments may be hazardous.
Water and Moisture: Do not use this product near water (e.g., near 7.
a bath tub, washbowl, kitchen sink, laundry tub, in wet basements,
near a swimming pool, etc).
Ventilation: Slots and openings in the cabinet are provided for venti-8.
lation to ensure reliable operation of the product and to protect it from
overheating. These openings should never be blocked by placing the
product on a bed, sofa, rug, or other similar surface. This product
should not be placed in a built-in installation such as a bookcase
or rack unless proper ventilation is provided or the manufacturer
instructions have been adhered to.
Power Sources: This product should be operated only from the type 9.
of power source indicated on the rating label. If you are not sure of
the type of power supply to your home, consult your product dealer or
local power company. For products intended to operate from battery
power or other sources, refer to the operating instructions.
Overloading: Do not overload wall outlets, extension cords, or in-10.
tegral convenience receptacles as this can result in a risk of re or
electric shock.
Object and Liquid Entry: Never push objects of any kind into this 11.
product through openings as they may touch dangerous voltage
points or parts that could result in a re or electric shock. Never spill
liquid of any kind on the product.
Page 28

Page 28 Coby Electronics Corporation
English
www.cobyusa.com Page 29
Safety Notices
Servicing: Do not attempt to service this product yourself as opening 12.
or removing covers may expose you to dangerous voltage or other
hazards. Refer all servicing to qualied service personnel.
Damage Requiring Service: Unplug this product from the wall outlet 13.
and refer servicing to qualied service personnel under the following
conditions: a) when the power-supply or plug is damaged; b) if liquid
has been spilled or if objects have fallen into the product; c) if the
product has been exposed to rain or water; d) if the product does
not operate normally by following the operating instructions. Adjust
only those controls that are covered by the operating instructions as
improper adjustment of other controls may result in damage and will
often require extensive work by a qualied technician to restore the
product to its normal operation; e) if the product has been dropped or
damaged in any way; f) when the product exhibits a distinct change
in performance—this indicates a need for service.
Replacement Parts: When replacement parts are required, be sure 14.
that your service technician has used replacement parts specied
by the manufacturer or have the same characteristics as the original
part. Unauthorized substitutions may result in re, electric shock, or
other hazards.
Safety Check: Upon completion of any service or repairs to this prod-15.
uct, ask the service technician to perform safety checks to ensure
that the product is in proper operating condition.
Heat: The product should be situated away from heat sources such 16.
as radiators, heat registers, stoves, or other products (including am-
pliers) that produce heat.
Page 29

www.cobyusa.com Page 29
English
Page 30

Page 30 Coby Electronics Corporation
Español
www.cobyusa.com Page 31
Muchas Gracias
Felicitaciones por su compra del reproductor de video
y MP Coby MP. Esta guía se ofrece para ayudarle a
empezar rápidamente con su reproductor, para obtener
instrucciones más detalladas, por favor, consulte el manual
de instrucciones almacenadas en formato PDF en su
reproductor. El manual también está disponible para su
descarga en el sitio web de Coby: www.cobyusa.com.
Para visualizar los documentos PDF, bajar e instalar
gratuitamente el lector Adobe Acrobat la página
Adobe es: www.adobe.com.
Page 31

www.cobyusa.com Page 31
Español
Contenidos del Paquete
Reproductor COBY
Cable USB
Manual de instrucciones
Audífonos estéreo profesionales
Si faltara alguno de los artículos mencionados anteriormente, comuníquese con el minorista local a quien
compró el producto.
Muchas Gracias
Page 32

Page 32 Coby Electronics Corporation
Español
www.cobyusa.com Page 33
Panorama de los Controles
2 3
1
4
5
6
7
8
9
1 1
1 2
1 3
1 4
1 0
Page 33

www.cobyusa.com Page 33
Español
Panorama de los Controles
Vista superior
Inserto de la correa para el cuello. 1.
Puerto USB 2.
Conéctelo a una computadora para transferir
los archivos de medios al reproductor.
Enchufe para auriculares de 3.5 mm3.
Vista desde la izquierda
Navegación del menú: Up (arriba) 4.
Navegación del menú: Down (abajo) 5.
Lápiz óptico6.
Parte Frontal
Altavoz7.
Pantalla táctil LCD8.
Toque la pantalla con el dedo para activar el
control en pantalla.
Botón OK9.
Vista inferior
Botón de reinicio10.
Ranura para tarjeta de memoria miniSD11.
Cargue una tarjeta de memoria miniSD para
aumentar la capacidad de la memoria del
reproductor.
Page 34

Page 34 Coby Electronics Corporation
Español
www.cobyusa.com Page 35
Panorama de los Controles
Right View
Botón de la potencia12.
Presione y sosténgase para accionar al jugador
con./desc.
Botón del volumen13.
Botón del menú/del asimiento14.
Presione y sosténgase para invalidar los con-
troles del jugador. Presione otra vez para volver
a permitir.
Page 35

www.cobyusa.com Page 35
Español
Para Empezar
Carga de la batería
El reproductor cuenta con una batería recargable integrada.
Luego del primer uso, la batería debe cargarse completamente
para garantizar que el rendimiento y la vida útil de la batería
sean óptimos. Si el reproductor no se ha utilizado por un
tiempo, se deberá recargar la batería. Luego del primer uso, la
batería debe cargarse completamente ( horas) para garantizar
que su rendimiento y vida útil sean óptimos.
La batería utilizada en este dispositivo puede pro-
ducir incendios o quemaduras químicas si se la
trata de manera incorrecta. No desarme, incinere ni
caliente la batería. No deje la batería en lugares con
luz solar directa o en un vehículo con las ventanas
cerradas. No conecte el reproductor a una fuente de
alimentación que no sea la indicada en este manual
o en la etiqueta, ya que puede tener como resultado
un riesgo de incendio o descarga eléctrica.
Carga con una computadora
El reproductor puede cargarse a través de
una conexión USB a una computadora.
Utilice el cable USB provisto para conectar el reproductor al puerto USB de la
computadora. La computadora debe estar
encendida y no en modo de hibernación.
Cuando el reproductor esté conectado y
cargando, aparecerá un
símbolo USB en la pantalla
del reproductor.
USB Port
USB Port
Page 36

Page 36 Coby Electronics Corporation
Español
www.cobyusa.com Page 37
Para Empezar
Cuando esté conectado a un concentrador USB, éste
debe accionarse automáticamente para cargar la
batería del reproductor.
Encendido/apagado del reproductor
Para encender el reproductor, mantenga presionado el
interruptor <POWER> (encendido) hasta que se encienda
la pantalla.
Para apagar el reproductor, mantenga presionado el interruptor <POWER> hasta que se apague la pantalla.
Reinicio del reproductor
Si el reproductor se congela y no responde, o si funciona
mal, deberá reiniciar el reproductor. Para reiniciar:
Desconecte el reproductor si está conectado a una 1.
computadora.
Use un clip de papel para presionar suavemente 2.
el botón de reinicio que se encuentra en la parte
inferior del reproductor.
Page 37

www.cobyusa.com Page 37
Español
Para Empezar
Uso de los controles en la pantalla táctil
El reproductor de video y MP está equipado con una
pantalla táctil fácil de usar que permite el acceso a las
funciones del reproductor. Use la punta del dedo o el lápiz
óptico para tocar el área de la pantalla en donde se muestra el ícono de los controles. Si toca y mantiene presionado
un ícono, se registrará como un toque continuo de botón.
También puede deslizar el dedo hacia arriba/abajo o hacia
la izquierda/derecha para mover la selección hacia arriba/
abajo o hacia la izquierda/derecha, respectivamente.
Para evitar dañar la pantalla, no la toque con fuerza
excesiva o con algún objeto que no sea el dedo o
el lápiz óptico. Para obtener una mejor respuesta,
asegúrese de tener las manos limpias antes de utilizar los controles de la pantalla táctil.
Desactivación de los controles (Espera)
Cuando el interruptor Espera está activado, los controles
del reproductor están desactivados.
Para desactivar los controles, mantenga presionado
el botón <MENU> (menú).
Para activar los controles, mantenga presionado el
botón <MENU> nuevamente.
Si lo desea, puede desactivar los controles para evitar
activarlos accidentalmente cuando el reproductor
esté en su bolsillo o bolso.
Vuelva a activar los controles para continuar.
Page 38

Page 38 Coby Electronics Corporation
Español
www.cobyusa.com Page 39
Transferencia de Archivos al Reproductor
Conecte el reproductor a su computadora con el cable
USB provisto. Cuando conecte el reproductor:
Su computadora reconocerá automáticamente el
reproductor como un dispositivo MTP. Aparecerá
un icono que representa a su reproductor en
“Dispositivos de audio” cuando abra “Mi computadora”.
Windows puede demorar varios minutos en recono-
cer y congurar el dispositivo la primera vez que se
lo conecte, dependiendo de la conguración del
hardware.
La conexión de alta velocidad USB , facilita la transferencia veloz de música, videos, fotos y archivos de texto (o
cualquier otro dato) entre el reproductor y la computadora. Simplemente, utilice el reproductor como si fuera un
disco de memoria removible mediante comandos básicos
del sistema operativo.
Si necesita mayor ayuda con la transferencia de archivos,
consulte el manual de instrucciones o la ayuda en pantalla
de su sistema operativo. Si está utilizando software
de administración de medios como iTunes, Winamp o
Windows Media Player, consulte su documentación para
obtener ayuda.
Si su computadora ejecuta Windows 98 SE, es posible
que deba descargar e instalar un controlador USB del
sitio Web de Coby: www.cobyusa.com.
Page 39

www.cobyusa.com Page 39
Español
Transferencia de Archivos al Reproductor
Si está utilizando Coby El software Media Manager,
consulte la documentación que se incluye ya sea en el
reproductor o el CD, o descargar desde nuestro sitio web
en www.cobyusa.com.
No desconecte o interrumpa el reproductor durante la
transmisión, ya que esto podría dañar o corromper el
rmware del reproductor o sus archivos. Si el reproductor se desconecta por accidente y no funciona correctamente, intente reiniciar el reproductor.
Los propietarios de contenidos utilizan la tecnología
de administración de derechos digital Windows Media
(WMDRM) para proteger su propiedad intelectual, lo
que incluye los derechos de propiedad intelectual. Este
dispositivo utiliza software WMDRM para acceder a
contenido protegido WMDRM. Si el software fallara en
proteger el contenido, los propietarios del contenido
pueden solicitar a Microsoft que revoque la capacidad
del software de usar WMDRM para reproducir o copiar
contenido protegido. La revocación no afecta al contenido no protegido. Cuando descarga licencias de contenido protegido, usted acuerda que Microsoft puede
incluir una lista de revocación con las licencias. Los
propietarios de contenido pueden requerir una actualización del WMDRM para dar acceso a su contenido. Si
usted rechaza la actualización, no podrá acceder a contenido que requiera dicha actualización.
Page 40

Page 40 Coby Electronics Corporation
Español
www.cobyusa.com Page 41
Como Usar el Reproductor
Menú principal
Cuando encienda el reproductor, verá el menú
principal.
Desde el menú principal puede acceder a cada uno de los
modos de función del reproductor de MP. Estos modos son:
Música
Buscar y reproducir música.
Fotos
Buscar y ver imágenes.
Video
Buscar y reproducir películas.
Radio
Escuchar transmisiones de radio FM.
Texto
Buscar y leer archivos de texto.
Archivos
Buscar todos los archivos.
Calendario
Activar el programa del calendario.
Reloj
Establecer la fecha y el horario internos.
Conguración
Ajustar las opciones del reproductor.
Esta guía solo cubre como reproducir música y video
en su reproductor. Para instrucciones más completas
sobre como usar su reproductor, por favor reerase al
manual de instrucciones que acompaña al reproductor. Usted tambien podrá descargar el manual dl website de COBY: www.cobyusa.com.
Page 41

www.cobyusa.com Page 41
Español
Como Usar el Reproductor
Controles del menú principal
Cada modo de función está
representado por un ícono en
la pantalla del menú principal.
Para ingresar un modo, toque
el ícono con el dedo. También
puede utilizar los controles
estándares del reproductor
para acceder a cada modo:
Presione los botones <UP>
o <DOWN> (arriba o abajo)
para mover la selección,
luego presione <OK> para
conrmar.
Modo Música
Busque y reproduzca sus archivos de música.
Para obtener información sobre cómo cargar música
en su reproductor, consulte la sección “Transferencia de
archivos al reproductor”.
Controles del navegador de música
Cuando seleccione el modo MÚSICA del menú principal,
verá la pantalla del navegador de música.
Puede navegar en una lista utilizando alguno de
estos métodos:
Page 42

Page 42 Coby Electronics Corporation
Español
www.cobyusa.com Page 43
Como Usar el Reproductor
Presione los
botones <UP> o
<DOWN> (arriba o
abajo) en la unidad.
Toque directamente
un elemento de la
lista.
Toque los íconos
echa hacia arriba
<
> o echa
hacia abajo < >
que aparecen en la
parte inferior de la
pantalla.
Para conrmar la selección, presione <OK> o toque la
selección deseada en la pantalla LCD.
Para regresar a la pantalla anterior, presione el botón
<POWER> (encendido) o toque el ícono de retorno
<
> en la equina izquierda superior de la
pantalla.
Si sus archivos de música contienen etiquetas de información de canción ID, podrá ver los archivos de música
por artista, álbum, pista (título de la canción) o género.
Para ver todos los archivos (incluso los que no contienen
información ID), seleccione “All Songs” (todas las canciones) o utilice la opción de explorador de carpetas.
Si ya está reproduciendo música, tendrá la opción de
regresar a la pantalla de reproducción actual.
Page 43

www.cobyusa.com Page 43
Español
Como Usar el Reproductor
Controles de reproducción actual
(Reproducción de música)
Para comenzar a reproducir canciones, busque el archivo
MP que desee y toque el título de la canción para dar
inicio a la reproducción.
Cuando se está reproduciendo una canción, aparece la
pantalla de reproducción actual.
Indicador del nivel
de volumen
Visualización del tiempo
Indicador de hora y
de carga de la batería
Frecuencia del ecualizador
Bandas
Tiempo total
Ícono de Volume(volumen)
Pista actual
/Total de pistas
Ícono Next (siguiente)
Barra de progreso
Ícono Reproducir
/Pausa (Play/Pause)
Ícono Previous
(anterior)
Modo de reproducción
Tiempo transcurrido
Ícono Equalizer
(ecualizador)
Nombre del archivo
Ícono Back (retorno)
Ícono Quick Option
(opciones rápidas)
Ícono File Browser
(navegador de archivos)
Utilice los siguientes controles durante la reproducción de
música.
Función Activación
Pausar o reanudar la
reproducción.
Presione <OK> o toque el ícono Play/
Pause (Reproducir/Pausa) en la pantalla.
Reproducir la siguiente
pista
Toque
(siguiente) en la pantalla.
Page 44

Page 44 Coby Electronics Corporation
Español
www.cobyusa.com Page 45
Como Usar el Reproductor
Adelantar-buscar en
la pista
Mantenga presionado (siguiente) en
la pantalla.
Reproducir la pista
anterior
Toque
(anterior) en la PANTALLA.
Retroceder-buscar en
la pista
Mantenga presionado
(anterior) en
la pantalla.
Ajustar el nivel de
volumen
Presione <VOL>, luego presione los
botones <UP> o <DOWN> (arriba o
abajo).
Acceder al menú de
Opciones Rápidas (vea
la sección que aparece a
continuación para más
detalles)
Toque
en la pantalla.
Regresar a la
pantalla del explorador
de música
Toque
en la pantalla.
Regresar a la pantalla
anterior
Toque
en la pantalla.
Menú de Opciones Rápidas
El Menú de Opciones Rápidas le brinda fácil acceso a las
conguraciones de su reproductor.
Toque < > para acceder al menú de Opciones
Rápidas durante la reproducción de música.
Page 45

www.cobyusa.com Page 45
Español
Como Usar el Reproductor
Para navegar en la conguración, presione los
botones <UP> o <DOWN> (arriba o abajo), o toque <
> o < > en la pantalla.
Para seleccionar una conguración, presione el
botón <OK> o toque la selección deseada en la
pantalla.
Para regresar a la pantalla anterior, toque <
> en
la pantalla.
Modo Repetición
Cambie las opciones de repetición para ajustar el orden en
el que se reproducirán las pistas.
Elemento Descripción
Normal Reproduce las pistas en orden normal.
Simple Reproduce la pista actual varias veces.
Aleatorio Reproduce las pistas en orden aleatorio.
Todo Reproduce todas las pistas varias veces.
También puede cambiar para alternar entre las con-
guraciones si toca el ícono Play Mode (modo de reproducción) en la pantalla.
Page 46

Page 46 Coby Electronics Corporation
Español
www.cobyusa.com Page 47
Modo Video
Busque y reproduzca sus archivos de película.
Su reproductor es compatible con archivos AVI codi-
cados con XviD a 320 x 240 y 30 fps. Es posible que los
archivos deban codicarse con el software incluido
para poder reproducirlos en el dispositivo.
Para obtener mayor información sobre la conversión
de videos, consulte la sección “Conversión de video”.
Para obtener más información sobre cómo cargar
archivos de video en su reproductor, consulte la sección “Transferencia de archivos al reproductor”.
Controles del navegador de video
Cuando seleccione el modo VIDEO del menú principal,
verá la pantalla del navegador de video. Utilice el navegador de videos para buscar todas las carpetas y archivos de
video cargados en su reproductor.
Puede navegar en una lista utilizando alguno de
estos métodos:
Presione los botones <UP> o <DOWN> (arriba o
abajo) en la unidad.
Toque directamente un elemento de la lista.
Toque los íconos echa hacia arriba <
> o
echa hacia abajo < > que aparecen en la
parte inferior de la pantalla.
Para conrmar la selección, presione <OK> o toque la
selección deseada en la pantalla LCD.
Como Usar el Reproductor
Page 47

www.cobyusa.com Page 47
Español
Para regresar a la pantalla anterior, presione el botón
<POWER> (encendido) o toque el ícono de retorno
<
> en la equina izquierda superior de la
pantalla.
Controles de reproducción de video
Cuando se está reproduciendo un video, aparece la
pantalla de reproducción actual.
Video 001.avi
00:01:30 00:10:00
Tiempo transcurrido Tiempo total
Ventana de reproducción de video
Como Usar el Reproductor
Page 48

Page 48 Coby Electronics Corporation
Español
www.cobyusa.com Page 49
Utilice los siguientes controles durante la reproducción de
videos.
Función Activación
Pausar o reanudar la
reproducción.
Toque
/ , o presione el botón
<O K>.
Reproducir el siguiente
video
Toque
, o presione el botón
<DOWN> (abajo).
Adelantar-buscar en el
video
Mantenga presionado
, o
mantenga presionado el botón
<DOWN> (abajo).
Reproducir el video
anterior
Toque
, o presione el botón
<UP> (arriba).
Retroceder-buscar en el
video
Mantenga presionado
, o
mantenga presionado el botón
<UP> (arriba).
Ajustar el nivel de volumen
Toque
; o presione el botón
<VOL>, luego presione los botones
<UP> o <DOWN> (arriba o abajo).
Girar la ventana de
reproducción del video
Toque
, o presione el botón
<MENU> (menú).
Regresar a la pantalla del
explorador de video
Toque
Para ver los controles cuando se reproduce el video, toque
la pantalla una vez.
Como Usar el Reproductor
Page 49

www.cobyusa.com Page 49
Español
Modo Conguración
Ingrese al modo CONFIGURACIÓN para establecer las
opciones de sistema de su reproductor.
Para ingresar al modo Conguración, seleccione SETTING
(CONFIGURACIÓN) desde el menú principal.
Para seleccionar una conguración:
Presione los botones <UP> o <DOWN> (arriba o
abajo) en la unidad.
Toque directamente un elemento de la lista.
Toque los íconos echa hacia arriba <
> o
echa hacia abajo < > que aparecen en la
parte inferior de la pantalla.
Para conrmar la selección, presione <OK> o toque la
selección deseada en la pantalla LCD.
Para regresar a la pantalla anterior, presione el botón
<POWER> (encendido) o toque el ícono de retorno
<
> en la equina izquierda superior de la
pantalla.
Como Usar el Reproductor
Page 50

Page 50 Coby Electronics Corporation
Español
www.cobyusa.com Page 51
Soporte
Si usted encuentra algún problema con esta unidad, por
favor visite nuestra página en la red www.cobyusa.com
para preguntas más frecuentes (FAQs) y puesta al día sobre
novedades. Si esto no resolviese el problema, por favor
contacte con nuestro servicio técnico.
Dirección
Soporte Técnico Coby Electronics
- Rust Street
Maspeth, NY
Email
techsupport@cobyusa.com
Web
www.cobyusa.com
Teléfono
--: De Lun–Vie, :–: EST
Sab, :–: EST
--: De Lun–Vie de, :–: EST
Page 51

www.cobyusa.com Page 51
Español
Tipo de pantalla TFT a color de 2.4” a 320x240
Memoria MP822-4G: 4GB Flash
MP822-8G: 8GB Flash
MP822-16G: 16GB Flash
Formatos de audio
compatibles
MP3, WMA
Formatos de video
compatibles
MPEG-4 (AVI / XviD): 320x240 a 30fps
Formatos de foto compatibles JPG, GIF, PNG, BMP
Formatos de textos
compatibles
TXT
DRM compatibles --
Información de canciones
compatible
ID3, Windows Media
Rango de frecuencia FM 87.5 - 108.0MHz
Interfaz de PC USB 2.0
Compatibilidad Plug and Pl ay Windows 2000/XP/Vista
Macintosh OS X
Salida de audio Estéreo de 3.5 mm (auriculares)
Fuente de alimentación Batería de litio-polímero recargable
Carga por USB
Dimensiones de la unidad 2.2” (22 cm) x 4.0” (3.5 cm) x 0.6” (16 cm)
(ancho, alto, profundidad)
El diseño, las especicaciones y el manual estan sujetos a cambios sín
previo aviso.
Especicaciones
Page 52

Page 52 Coby Electronics Corporation
Español
www.cobyusa.com Page 53
El relámpago con el símbolo de echa dentro de un triángulo equilátero
tiene el propósito de advertir al usuario de la presencia de voltaje peligroso no aislado dentro del gabinete del producto que puede ser de suciente magnitud como para constituir un riesgo de descarga eléctrica.
El signo de exclamación dentro de un triángulo equilátero tiene el
propósito de advertir al usuario de la presencia de instrucciones de
funcionamiento y reparación importantes en el material impreso que
acompaña al artefacto.
Para uso de los clientes:
Ingrese a continuación el número de serie que se encuentra en la parte
trasera de la unidad. Conserve esta información para referencias futuras
Nº de modelo
Nº de serie
ADVERTENCIA: Para prevenir el riesgo de descarga eléctrica, no exponga este
dispositivo a la lluvia ni a la humedad. Adentro del gabinete se encuentra alto voltaje
peligroso. No lo abra.
ADVERTENCIA: Para prevenir descargas eléctricas, haga coincidir la paleta ancha del
enchufe con la ranura ancha e insértela completamente.
ADVERTENCIA: La manipulación de los cables de este producto lo expondrá al
plomo, un químico que, de acuerdo con el Estado de California, puede causar cáncer y
defectos congénitos u otros daños en el aparato reproductor. Lávese las manos luego
de manipular el dispositivo.
Avisos de la Seguridad
Page 53

www.cobyusa.com Page 53
Español
Proteja su audición: Los expertos en audición advierten contra el uso constante de
estéreos personales a volumen alto. La exposición constante al volumen alto puede
llevar a la pérdida de la audición. Si le zumban los oídos o sufre una pérdida de
audición, suspenda el uso y busque asesoramiento médico.
Nota: Si el producto repentinamente no responde o se apaga, es posible que la causa
sea una descarga electrostática. En tal caso, siga los procedimientos que se detallan a
continuación para la recuperación:
Use un clip de papel para presionar el botón de reinicio que se encuentra en la •
parte trasera de la unidad
Encienda nuevamente la unidad.•
Para obtener información de reciclaje o eliminación sobre este producto,
comuníquese con sus autoridades locales o con la Alianza de Industrias
Electrónicas: www.eiae.org.
NOTICE:
Este producto está protegido por determinados derechos de propiedad intelectual de
Microsoft. Uso o distribución de dicha tecnología fuera de este producto está prohibida sin
una licencia de Microsoft.
Los propietarios de contenidos utilizan la tecnología de administración de derechos
digital Windows Media (WMDRM) para proteger su propiedad intelectual, lo que incluye
los derechos de propiedad intelectual. Este dispositivo utiliza software WMDRM para
acceder a contenido protegido WMDRM. Si el software fallara en proteger el contenido,
los propietarios del contenido pueden solicitar a Microsoft que revoque la capacidad del
software de usar WMDRM para reproducir o copiar contenido protegido. La revocación
no afecta al contenido no protegido. Cuando descarga licencias de contenido protegido,
usted acuerda que Microsoft puede incluir una lista de revocación con las licencias. Los
propietarios de contenido pueden requerir una actualización del WMDRM para dar acceso
a su contenido. Si usted rechaza la actualización, no podrá acceder a contenido que
requiera dicha actualización.
Avisos de la Seguridad
Page 54

Page 54 Coby Electronics Corporation
Español
www.cobyusa.com Page 55
Declaración de la FCC
Este dispositivo cumple con la Parte 15 de las Normas de la FCC. El funcionamiento
está sujeto a las siguientes dos condiciones:
(1) Este dispositivo puede no causar interferencias perjudiciales, y
(2) Este dispositivo debe aceptar cualquier interferencia recibida, inclusive aquella
que podría causar funcionamiento no deseado.
Nota: Este equipo fue probado y cumple con todos los límites para dispositivos
digitales clase B, conforme a la Parte 15 de las normas de la FCC. Estos límites
fueron diseñados para brindar protección razonable contra la interferencia perjudicial
en una instalación residencial. Este equipo genera, emplea y puede irradiar energía
de frecuencia de radio y, si no se instala y emplea según las instrucciones, puede
ocasionar interferencia perjudicial para las comunicaciones de radio. Sin embargo, no
hay ninguna garantía de que no ocurrirá en una instalación en particular. Si este equipo
causa interferencia perjudicial para la recepción de radio o televisión, lo cual puede
determinarse al apagar o encender el equipo, el usuario puede tratar de corregir la
interferencia con una o más de las siguientes medidas:
Reorientar o reubicar la antena receptora. •
Aumentar la distancia entre el equipo y el receptor. •
Conectar el equipo en un tomacorriente en un circuito diferente del que está •
conectado el receptor.
Consultar al distribuidor o a un técnico con experiencia en radio y TV para obtener •
ayuda.
Se requiere el uso de cable blindado, para cumplir con los límites de la clase B, en la
sub parte B de la Parte 15 de las normas de la FCC.
No efectúe cambios ni modicaciones al equipo, excepto en caso de que así lo especique el manual. Si se deben efectuar tales cambios o modicaciones, se le solicitará
que detenga el funcionamiento del equipo.
Avisos de la Seguridad
Page 55

www.cobyusa.com Page 55
Español
Consignes de Sécurité Importantes
Lea las instrucciones: Deberá leer todas las instrucciones de se-1.
guridad y funcionamiento, antes de poner en funcionamiento este
producto.
Conserve las instrucciones: Deberá conservar las instrucciones de 2.
seguridad y funcionamiento para referencia futura.
Preste atención a las advertencias: Deberá respetar todas las 3.
advertencias contenidas en el producto y en las instrucciones de
funcionamiento.
Siga las instrucciones: Deberá seguir todas las instrucciones de uso 4.
y funcionamiento.
Limpieza: Desconecte este producto del tomacorriente de pared 5.
antes de la limpieza. No utilice productos de limpieza líquidos o en
aerosol. Utilice un paño húmedo para la limpieza.
Complementos: Utilice sólo complementos recomendados por el 6.
fabricante. El uso de otros complementos puede ser peligroso.
Agua y humedad: No utilice este producto cerca del agua (por ejem-7.
plo: cerca de una bañera, lavatorio, lavaplatos o tina para lavar ropa,
en un sótano mojado ni cerca de una piscina, etc.).
Ventilación: El gabinete posee ranuras y aberturas para asegurar 8.
la correcta ventilación del producto, su bien funcionamiento y para
protegerlo del recalentamiento. Nunca se deben bloquear estas
aberturas al colocar el producto sobre una cama, sofá, alfombra
u otras supercies similares. No se debe colocar este producto en
un mueble empotrado, tal como biblioteca o estante, salvo que se
proporcione una ventilación correcta o se cumplan las instrucciones
del fabricante del producto.
Fuentes de alimentación: Este producto debe utilizarse sólo con 9.
el tipo de fuente de alimentación indicada en la etiqueta de clasicación. Si no está seguro del tipo de alimentación de energía eléctrica en su hogar, consulte con el distribuidor del producto o con la
compañía eléctrica local. Para los productos que funcionan a batería
o con otras fuentes de alimentación, consulte las instrucciones de
funcionamiento.
Sobrecarga: No sobrecargue los tomacorrientes de pared, alargues 10.
o tomacorrientes múltiples, ya que esto puede tener como resultado
un riesgo de incendio o descarga eléctrica.
Avisos de la Seguridad
Page 56

Page 56 Coby Electronics Corporation
Español
www.cobyusa.com Page 57
Entrada de objetos y líquido: Nunca introduzca objetos de ningún tipo 11.
dentro de este producto a través de las aberturas, ya que pueden
ponerse en contacto con puntos de voltaje peligrosos o piezas que
ocasionarían incendios o descargas eléctricas. No derrame nunca
líquido de ningún tipo sobre el producto.
Reparaciones: No intente reparar este producto usted mismo, ya 12.
que al abrir o quitar las cubiertas se expondría a voltaje peligroso u
otros peligros. Para cualquier reparación, póngase en contacto con
el personal técnico calicado.
Daños que requieran servicio técnico: Desconecte este producto del 13.
enchufe de pared y contáctese con personal técnico calicado en
las siguientes situaciones: a) cuando la fuente de alimentación o el
enchufe estén dañados; b) si se ha derramado líquido, han caído
objetos dentro del producto; c) si el producto ha sido expuesto a
lluvia o al agua; d) si el producto no funciona normalmente al seguir
las instrucciones de funcionamiento. Ajuste sólo aquellos controles
incluidos en las instrucciones de funcionamiento, ya que el ajuste
inadecuado de otros controles puede ocasionar daños y requerir con
frecuencia un trabajo profundo por parte de un técnico calicado
para restaurar el funcionamiento normal del producto; e) si el producto se ha caído o ha sufrido algún daño; f) cuando el producto
presenta un cambio marcado en su rendimiento; esto indica que
necesita mantenimiento.
Repuestos: Cuando se requieren repuestos, asegúrese de que el 14.
servicio técnico haya utilizado las piezas de reemplazo especicadas por el fabricante o que posean las mismas características que
la pieza original. Las sustituciones no autorizadas pueden provocar
incendio, descarga eléctrica u otros riesgos.
Controles de seguridad: Una vez completado el servicio o las 15.
reparaciones de este producto, solicite al servicio técnico que realice controles de seguridad para asegurar que se encuentra en
condición de funcionamiento correcto.
Calor: El producto debe ubicarse lejos de fuentes de calor tales 16.
como radiadores, rejillas de aire caliente, calentadores u otros pro-
ductos (incluyendo los amplicadores) que produzcan calor.
Avisos de la Seguridad
Page 57

www.cobyusa.com Page 57
Español
Page 58

Page 58 Coby Electronics Corporation
Español
www.cobyusa.com Page 59
Page 59

www.cobyusa.com Page 59
Español
Page 60

Coby is a registered trademark of Coby Electronics
Corporation. Printed in China.
COBY es la marca registrada de COBY Electronics
Corporation. Imprimido en China.
Coby Electronics Corporation
1991 Marcus Ave, Suite 301
Lake Success, NY 11042
www.cobyusa.com
www.ecoby.com
 Loading...