

Page 1
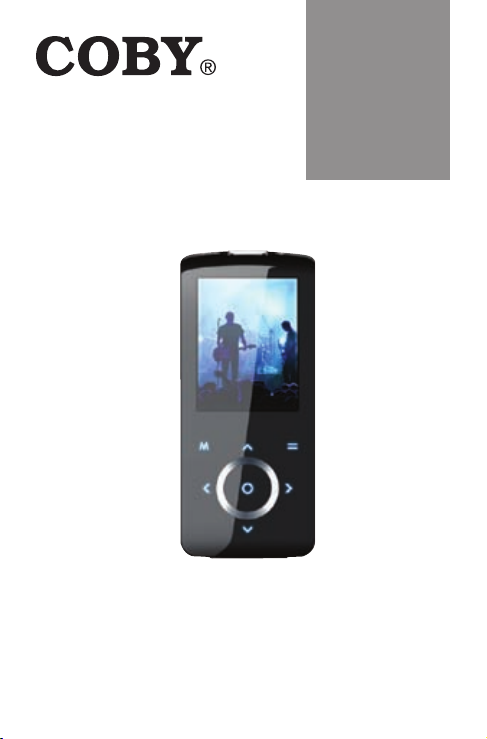
Super-Slim MP3 and Video
Player with Touchpad Control
MP-705-1G
MP-705-2G
MP-705-4G
Instruction Manual
Please read t his m anua l care ful ly bef ore op eration
Page 2

www.cobyusa.com Page 3
Precautions
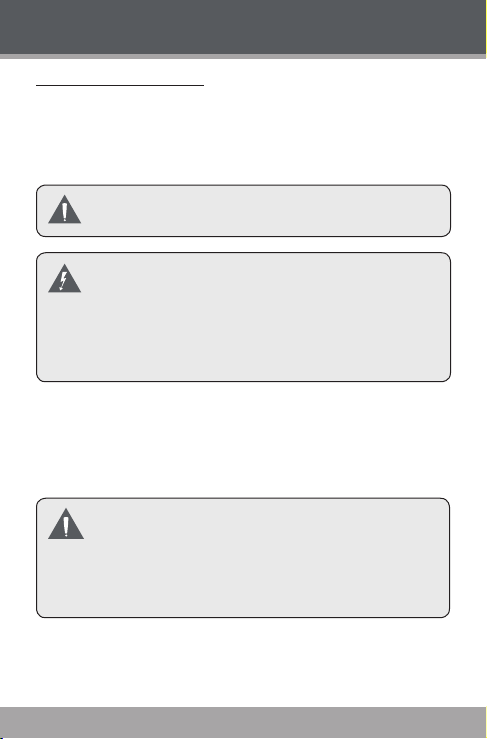
The lightni ng ash wit h arrow head symbol within an equilateral tria ngle
is intende d to alert the us er to the prese nce of uninsulated “dangerous voltage” within t he produ ct’s enclosure that may be of sufcient
magnitu de to constitute a risk of el ectric shock .
The exclam ation point with in an equilateral t riangle is intended to aler t
the use r to the prese nce of impor tant operati on and servi cing instruc tions in t he literature ac companying the a ppliance.
For Customer Use:
Enter below the serial number that is located on the rear
of the unit. Retain this information for future reference.
Model No.
Serial No.
WARNING: To p revent re or shock hazard , do not expose this devic e to rain or moistu re.
Danger ous high voltage is present i nside the enclo sure. Do not open the cabinet.
CAUTION: To prev ent elect ric sho ck, match wide blade o f plug to wide slot of outlet a nd
fully insert.
WARNING: Handling the c ords on this pro duct will expose y ou to lead, a chemic al known to
the State of California t o cause cancer, and birt h defects or other repro ductive harm. Wash
hands after h andling.
Page 2 Coby Electron ics Co rpo rati on
Page 3

Precautions
NOTICE:
This product is protected by certain intellectual property rights of Microsoft . Use or distribut ion
of such technology outside of this product is prohibited with out a license from Microsoft.
Content owners use Windows Media digital rights management technology (WMD RM) to
protect their intellectual prope rty, includi ng copyright s. This devic e uses WMDRM sof tware
to acc ess WMDRM-pr otected cont ent. If the WMDRM sof tware fails to protect the content,
content owners may ask Mi crosoft to rev oke the software’s abili ty to use WMDR M to play or
copy protec ted cont ent. Revocation does not affect unpr otected content. When you downlo ad
licens es for protected content, you agree th at Mic rosoft may include a revocation li st with the
licens es. Content owners may require you to upgrade WMDR M to acces s their content. If you
declin e an upgrade, you wil l not be able to acce ss content that re quires the upgra de.
Protect your hearing:
Hearing experts advise against the constant use of personal stereos played at high volume.
Constant exposure to high volumes can lead to hearing loss. If you should experience ringing in
the ears or hearing loss, discontinue use and seek medical advice.
Note: If th e pro duct suddenly has no respons e or powe rs off, an electro static dischar ge may
be the cause. In thi s circumstanc e, please follow t he procedures below for recover y:
Turn off the unit by push ing and holding th e slide button at t he right (Power of f position)
•
for 15 seco nds.
Turn on the uni t again
•
Notic e:
is a trade mark of SRS Labs, Inc.
SRS WOW tec hnology is incorporated unde r license from SRS Labs, In c.
For recycling or disposal informat ion ab out thi s prod uct, please contac t
your loc al authoritie s or the Electron ics Industries Allia nce: www.eiae.org.
www.cobyusa.com Page 3
Page 4

www.cobyusa.com Page 5
Precautions
FCC Stat ement:
This device c omplies w ith Part 15 of the FCC Rules. O peration is subject to the fo llowing
two conditions:
(1) This devi ce may not cause har mful interfe rence, and
(2) This device must accept a ny interference received, including interf erence tha t may
cause un desired operat ion.
Note: This equipmen t has bee n test ed and found to comply wi th the limits for Clas s B digit al
device s, pursuant to Par t 15 o f the FCC ru les. The se limit s are designed to pr ovide re asonabl e protection against harm ful interfe rence in a r esidential installa tion. This e quipment
generat es, uses and can radiate radio f requency energy and, if not in stalled and used in
accor dance with the instruction s, may cause har mful interfe rence to radio c ommunications.
However, t here is no guarante e that inter ference wil l not occur in a parti cular instal lation. If
this equipme nt does cause h armful inte rference to radio or television reception, which ca n
be deter mined by tur ning the equipment of f and on, th e user is encouraged to tr y to correc t
the inter ference by one o r more of the follow ing measures:
Reorie nt or relocate the receiv ing antenna.
•
Increa se the separation betwe en the equipment a nd receiver.
•
Connec t the equipment into an outle t on a circuit different fr om that to which th e
•
receiv er is connected.
Consult the deal er or an experienc ed radio/T V technician for h elp
•
Use of shielde d cable is requ ired to comply with Class B limits in Subpar t B of Part 15 of
the FCC ru les.
Do no t make any changes o r modications to the e quipment unless otherwise specied in
the manual. If such change s or modicati ons should be made , you could be requ ired to stop
operat ion of the equipme nt.
Page 4 Coby Electron ics Co rpo rati on
Page 5

Important Safety Instructions
Read Instructions: All the saf ety and oper ating instructi ons shou ld be
1.
read befo re the product is o perate d.
Retain Instr uctions: The safety and operating instructions shoul d be
2.
retaine d for fut ure refer ence.
Heed Warnings: All warnin gs on the product and in the o perating in-
3.
struc tions sh ould be ad hered to.
Follow Instr uctio ns: Al l ope rating and usage instr uctio ns should b e fol -
4.
lowed.
Cleaning: Unplug this product from the wall outlet before cleaning. Do not
5.
use liquid cleaners or aerosol cleaners. Use a damp cloth for cleaning.
Attac hments: Use only attachments recom mended by the manufa cturer.
6.
Use of othe r attac hments m ay be haza rdous.
Water and Moisture: Do not use this pro duct near water (e.g., near a bath
7.
tub, washbowl, kitc hen sink, laundry tub, in wet basements, or near a
swimmin g pool an d the like).
Acces sorie s: Do n ot plac e this produ ct on a n unstable
8.
cart , stand, tripod, bracket , or table. Use only with
cart s, st ands, tripo ds, brackets, or t ables recom mended by t he manufacturer or sold with the product. Any mounting of the product should follow the
manufac turer ’s in struc tions and shoul d u se a mounting accessor y recommende d by the manuf acture r.
A product and car t combinat ion should be moved with care . Quick stops,
excessi ve for ce, a nd uneven sur faces may cause the produc t and car t
combin ation to overtur n.
Ventilati on: S lots and open ings in the cabi net are provid ed for ventila -
9.
tion to ensure reliable operation of the product and to protect it from
overheating. These openi ngs should never be blo cked by plac ing the
produc t on a bed, sofa, rug, or other simila r surfac e. This produc t should
not be placed in a built- in installation such as a bookc ase or rack unless prop er ventilation is prov ided or the ma nufact urer inst ructi ons have
been adhe red to.
Power S ource s: Thi s pro duct should be operated only from the ty pe of
10.
power source indicated on the rating label. If you are not sure of the type
of power supply to your home, consul t your product dealer or local power
company. For products inte nded to operate from ba tter y power or other
source s, refer to t he operating ins truct ions.
Ground ing or Pola rization: This pr oduct may b e equ ipped with a po lar-
11.
ized alternating- current line plug that has one blade wider than the other.
www.cobyusa.com Page 5
Page 6
www.cobyusa.com Page 7
Important Safety Instructions
This plug will only t int o the power outlet in one direction. This is a
safety fe ature. If you ar e unable to insert the plug fully into the outlet, try
reversing the directio n of the plug. If the plug should still fail to t, contact
an electrician to repl ace the obs olete outlet. Do not def eat the safety
purpose of the polarize d plug.
Power-C ord Protection: Power suppl y c ords should be routed so that
12.
they a re no t like ly to be walked on or pi nched by i tems placed upo n or
against t hem, payin g part icular at tenti on to cord s at plugs, c onvenience
recept acles, and at the point whic h they exit f rom the product .
Protective Attachment Plug: The produc t may be equipped with an at-
13.
tachment plug with over load protec tion. This is a safet y feature. See the
operating instructions for replacement or directions to reset the protective
device. If replac ement of the plug is required, be sure the service technician has used a r eplacement plug that has the same overload protection
as the original plug as specied by the manufacturer.
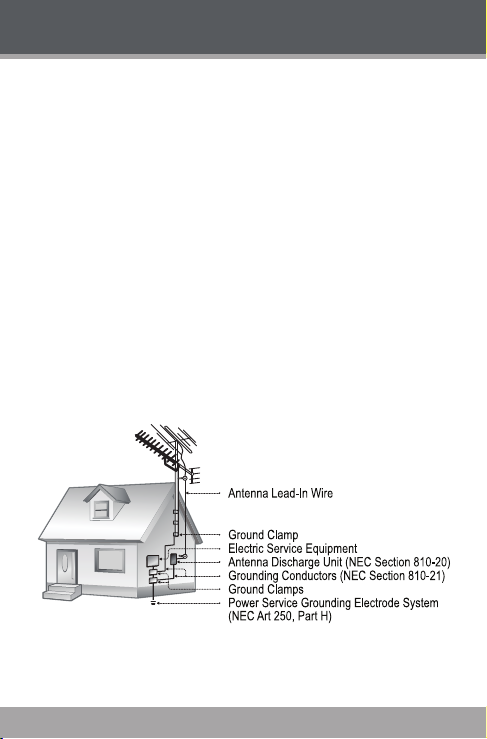
Outdoor Antenna Grounding: If an outside antenna is connected to the
14.
product, be sure the antenna system is grounded so as to provide some
protection against voltage surges and built-up static charges. Article 810 of
the National Electrical Code, ANS/NFPA 70 provides information with regard to proper grounding of the mast and supporting structure, grounding of
the lead-in wire to an antenna-discharge unit, size of grounding conductors,
location of antenna-discharge unit, connection to grounding electrodes,
and requirements for the grounding electrode (see gure).
Lightning: For added protection for this product, unplug it from the wall outlet
15.
and disconnect the antenna or cable system during a lightning storm or when
it is left unattended and unused for long periods of time. This will prevent
damage to the product due to lightning or power-line surges.
Page 6 Coby Electron ics Co rpo rati on
Page 7

Important Safety Instructions
Power Lines: A n outside antenna system sho uld not be loc ated in the
16.
vicini ty of overhe ad power lin es or other elect ric l ight o r powe r circ uits,
or whe re it can fall i nto suc h power lines or circuits. W hen installi ng an
outsid e anten na system, extreme care shoul d be taken to keep from
touchin g such power lines or ci rcuits, as co ntact with them might be
fatal.
Overlo ading: Do not overl oad wall outle ts, extension cords , or integral
17.
conveni ence receptacl es as this can resul t in a risk of re or electric
shock.
Object and Liquid Entr y: Never push objects of any kind into this pro duct
18.
throug h openings as they may touch dan gerous voltage points or shout -
out par ts th at coul d resul t in a re or el ectri c shock. Never spill liquid of
any kind on t he produ ct.
Serv icing: D o not attempt to service this produc t yourself as op ening or
19.
removin g covers may expose you to dangerous voltage or other haz-
ards. Refe r all ser vicin g to quali ed ser vice p ersonnel.
Damage Req uiring Se rvic e: Unplug this produc t from the wall outlet and
20.
refer se rvic ing to qualie d ser vice p ersonnel unde r the fo llowin g conditions: a) when the powe r-suppl y or plug is damaged; b) if liquid has be en
spilled or if obje cts have fallen into the produc t; c) if the produc t has been
exposed to rain or water ; d) if t he prod uct does not operate n ormal ly by
following th e ope rating instructi ons. A djust only those controls that a re
covered by the operating instructi ons as improp er adjustment of other
controls may resu lt in damage and will often requi re ex tensive work by
a qua lied technician to restor e th e pr oduct to its normal operatio n; e)
if the product has been dro pped or dama ged in any way; f) whe n the
produc t exhibits a distinct chan ge in performance —thi s indicates a need
for ser vice.
Replacement Par ts: When replacement parts are required, be sure that
21.
your service technician has used replacement parts specied by the manufacturer or have the same characteristics as the original part. Unauthorized
substitutions may result in re, electric shock, or other hazards.
Safety Che ck: Upon co mpleti on of any servic e or repairs to thi s product ,
22.
ask t he s ervi ce technician to p erfo rm safety checks to ensure that t he
produc t is in prop er operating co nditio n.
Wall or Ceilin g M ounting: The p roduct sh ould be mount ed to a wall or
23.
ceilin g only as recommended by the m anufac turer.
Heat: The produc t sho uld b e sit uated away f rom heat s ource s suc h as
24.
radiato rs, heat register s, stoves, or other products ( including ampli ers)
that pro duce hea t.
www.cobyusa.com Page 7
Page 8

www.cobyusa.com Page 9
Table of Contents
PRECAUTIONS ................................................................. 2
IMPORTANT SAFETY INSTRUCTIONS ..............................
TABLE OF CONTENTS .......................................................
PACKAGE CONTENTS ...................................................
FEATURES .......................................................................
GETTING STARTED .........................................................
Controls at a Glance ................................................... 12
Charging Your Player ................................................... 14
Turning Your Player On/Off ......................................... 15
Locking/Unlocking Your Player’s Keys (Hold) ........... 15
Resetting Your Player ...................................................16
Using the Touchpad Controls ..................................... 16
Using the Controls to Navigate .......................... 16
MAIN MENU ..................................................................
MUSIC MODE ................................................................
Music Explorer Controls ...............................................20
Now Playing Controls (Music Playback) ................... 21
Quick Option Menu .............................................22
PICTURES MODE ............................................................
Picture Explorer Controls ............................................. 24
Picture Display Controls ..............................................24
Quick Option Menu .............................................25
MOVIES MODE ..............................................................
Movie Explorer Controls ..............................................27
Movie Playback Controls ............................................ 28
Quick Option Menu .............................................29
10
11
12
18
19
24
27
5
8
Page 8 Coby Electron ics Co rpo rati on
Page 9

Table of Contents
RADIO MODE ................................................................30
Radio Controls ..............................................................30
Quick Option Menu .............................................31
E-BOOK MODE ..............................................................
EBook List ....................................................................... 32
EBook Controls ..............................................................32
Manual Mode Display ......................................... 32
Auto Mode Display ..............................................33
Adding a Bookmark .............................................33
Quick Option Menu .............................................33
EXPLORER MODE ..........................................................
Browser Controls ...........................................................34
SETUP MODE ..................................................................
USB CONNECTIONS ......................................................
USB Driver Installation (Win 98 SE Only) ..................... 37
Connecting to a Computer........................................3 8
Transferring Files.................................................... 38
Disconnecting from a Computer .............................. 41
VIDEO CONVERSION ...................................................
Installation .....................................................................44
Converting Video .........................................................45
WINDOWS MEDIA PLAYER ............................................
FIRMWARE UPGRADES ..................................................
ABOUT MP3/WMA FILES ...............................................
TROUBLESHOOTING ......................................................
SPECIFICATIONS ...........................................................
32
34
35
37
43
48
49
50
51
54
www.cobyusa.com Page 9
Page 10
www.cobyusa.com Page 11
Package Contents
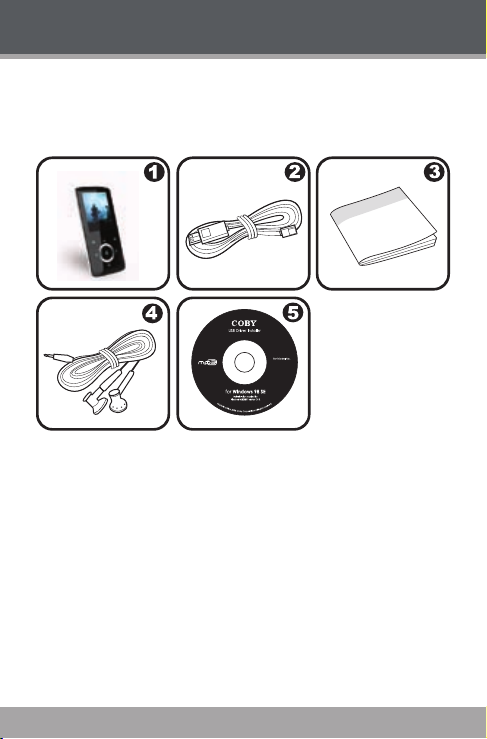
Please make sure that the items shown below are included in the package. Should an item be missing, please
contact the local retailer from which you purchased this
product.
COBY MP3 Player
1.
USB Cable
2.
Instruction Manual
3.
Professional Stereo Earphones
4.
Installation CD
5.
Page 10 Coby Electron ics Co rpo rati on
Page 11

Features
Integrated Flash Memor y
Touchpad controls with backlight
2” TFT LCD Full-color display
Plays Music, Video, Photos and Text
Plays Digital Music from most online stores and
subscription services*
ID3 and LRC Support for song and synchronized
lyric information display
Integrated FM Radio
USB 2.0 Hi-speed for fast le transfers
* Music Ser vice must suppor t Windows Media DRM
(WMDRM). WMDRM10 requires Windows XP and Windows Media Player 10 or newer.
www.cobyusa.com Page 11
Page 12
www.cobyusa.com Page 13
Controls at a Glance
10
2
4
8
9
1
11
12
3
5
6
7
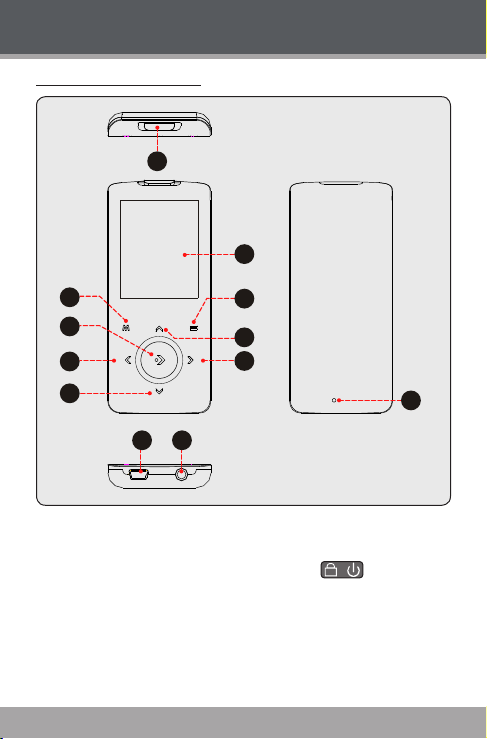
Top View
Hold / Power Switch
1.
Getting Started
Page 12 Coby Electron ics Co rpo rati on
Page 13

Front View
LCD Display
2.
3.
Menu
Option
4.
OK
5.
Left / Previous
6.
Down / Volume Down
7.
Up / Volume Up
8.
Right / Previous
9.
Bottom View
USB Port
10.
Headphone Jack
11.
Rear View
Reset Button
12.
Getting Started
www.cobyusa.com Page 13
Page 14
www.cobyusa.com Page 15
Getting Started
Charging Your Player
Your player can be charged through a PC USB connec tion. Plug one end of the USB cable into the player’s
USB Port and plug the other end into the USB port of a
powered- on computer.
When connected to a USB hub, the hub must be self-
powered to charge the player’s bat tery.
The battery use d in thi s devic e may pr esent a fire
or chemical burn if mistreated. Do not disassemble,
incinerate, or heat the batter y.
Do not connect the player to a power source other
than that which is indicated here or on the label as
this may result in the risk of re or electric shock.
Your player has an integrated rechargeable battery. Typical
music playtime is up to 8 hours (when playing an MP3
encoded at 128 kbps and the battery is fully charged)
Upon initial use, the battery should be charged fully (12
hours) to ensure optimal performance and battery life.
Music play time is an estimated value. Actual play
time may var y depending on encoding method used
and other factors.
Page 14 Coby Electron ics Co rpo rati on
Page 15
Getting Started
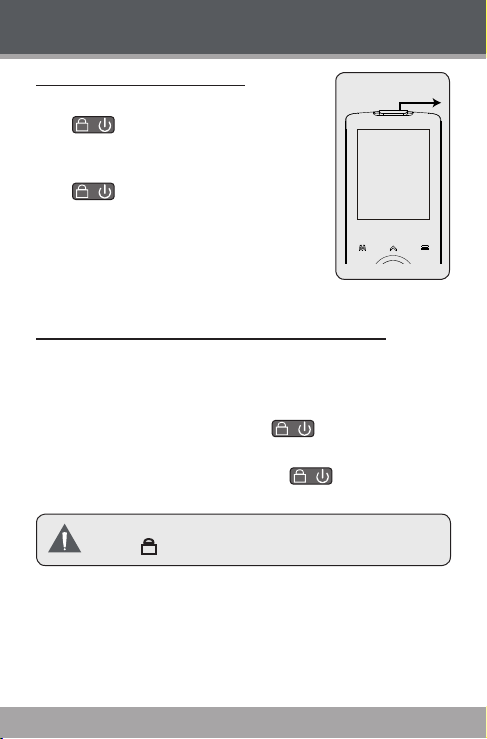
Slide switch to the
right & hold
Turning Your Player On/Off
To turn the player on, slide the
Locking/Unlocking Your Player’s Keys (Hold)
When the Hold switch is engaged, the Key Lock feature
disables your player’s controls to prevent accidental key
presses when it is in your pocket or bag.
switch to the right and
hold it until the screen turns on.
To turn the player off, slide the
switch to the right and
hold it until the screen turns off.
To lock the player, slide the switch to the left
until it clicks into the HOLD position.
To unlock the player, slide the switch to the
right to release it from the HOLD position.
If a key is pressed while the player is locked, the Lock
icon [ ] will appear on screen.
www.cobyusa.com Page 15
Page 16

www.cobyusa.com Page 17
Getting Started
Resetting Your Player
Reset your player if it should freeze and not respond or
otherwise malfunction.
Disconnect your player if it is connected to a
1.
computer.
Use a paper clip to gently press the Reset button lo-
2.
cated on the rear of the player.
Using the Touchpad Controls
Your player comes equipped with a touch-sensitive
control pad. To use the controls, touch the arrow keys on
the front of the player lightly just as you would a button
and the controls will light up. If you touch and hold a key,
it will register as a continuous button press.
Using the Controls to Navigate
To navigate through the different menu options and les
on your player:
Touch the Arrow keys to move the selection in the
direction of the arrow.
Move the selection up.
Move the selection down.
Move the selection right.
Move the selection down.
Page 16 Coby Electron ics Co rpo rati on
Page 17

Getting Started
Touch to conrm a selection.
Touch and hold to return to the Main Menu at
any time.
www.cobyusa.com Page 17
Page 18
www.cobyusa.com Page 19
Main Menu
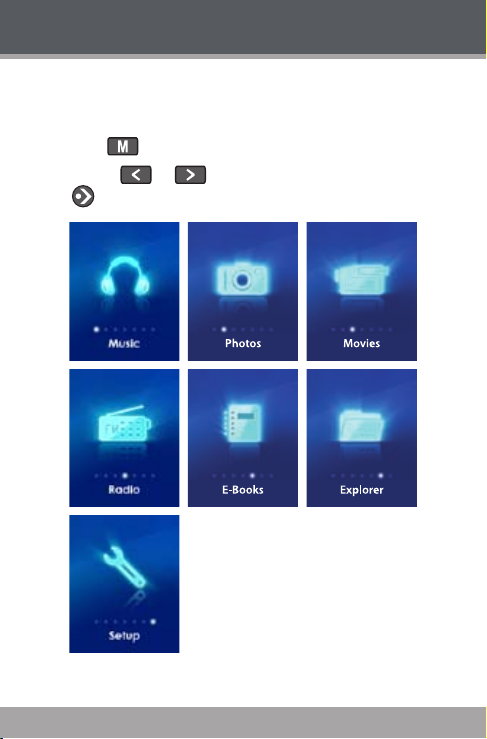
The Main Menu gives you access to the different function
modes of your player.
To access the Main Menu at any time, touch and
hold .
Touch or to select a mode and then touch
to conrm.
Page 18 Coby Electron ics Co rpo rati on
Page 19
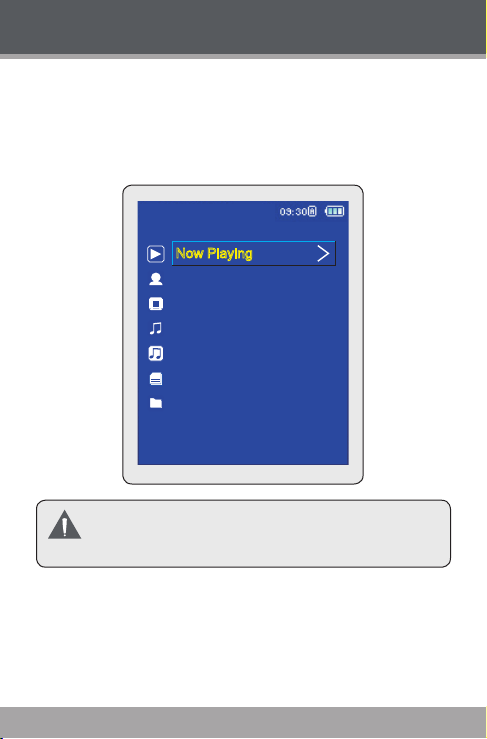
MUSIC
Artist
Album
Tracks
Genre
Playlist
Folder Explorer
Now Playing
Music Mode
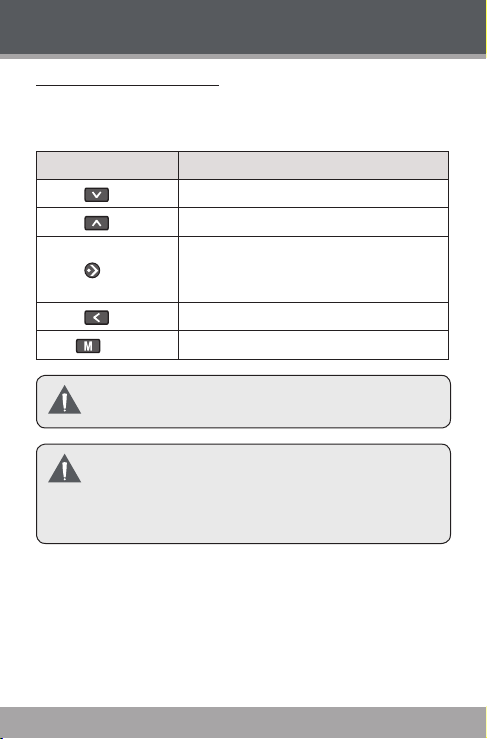
Enter Music mode from the Main menu to play your
MP3, WMA, or WAV audio les.
To enter MUSIC mode, select and conrm MUSIC from
the Main Menu. The main Music Explorer screen will
appear.
For more information about how to get music onto
your player, please refer to the section “USB Connections > Transferring Files”.
www.cobyusa.com Page 19
Page 20
www.cobyusa.com Page 21
Music Mode
Music Explorer Controls
Use the Music Explorer to view all compatible music tracks
loaded on your player.
Key Function
Touch
Touch
Touch
Touch
Hold
To acc ess the Now Playing screen, select the “Now
Playing” option from the main Music Explorer screen.
If your music les contain ID3 song information tags,
you will be able to view your tracks by Artist, Album,
or Genre. To view all les (including those that do not
contain ID3 information), select “Tracks” or use the
Folder Explorer option.
Move the selection down.
Move the selection up.
Display folder contents if a folder is
selected.
Start track playback if a track is selected.
Return to the previous screen.
Return to Main Menu.
Page 20 Coby Electron ics Co rpo rati on
Page 21
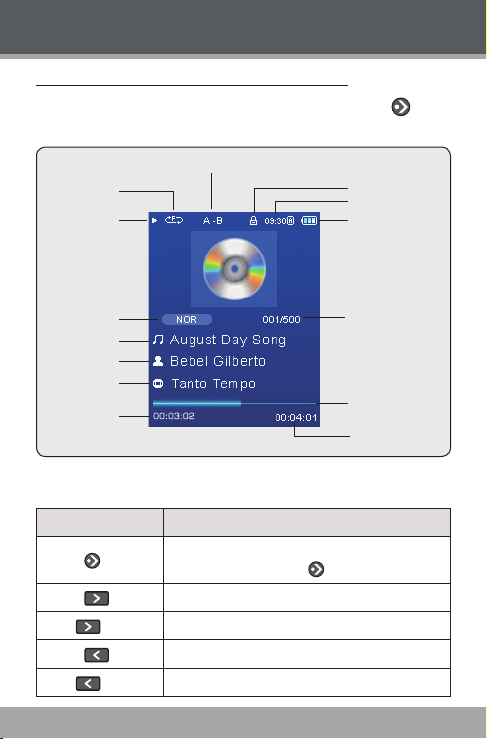
Play Status
Play Mode
A-B Repeat Indicator
Lock Icon
Time Clock
Battery Level
Equalizer
File Name
Artist
Album
Elapsed Time
Total Time
Progress Bar
Current Track /
Total Tracks
Music Mode
Now Playing Controls (Music Playback)
Select a track from the Music Explorer and touch to
start playback. The Now Playing screen will appear.
Use the following controls during music playback.
Key Function
Touch
Touch
Hold
Touch
Hold
www.cobyusa.com Page 21
Start /Resume track playback.
During playback, touch to pause playback.
Play the next track.
Fast-forward through the current track.
Play the previous track.
Reverse through the current track.
Page 22
www.cobyusa.com Page 23
Music Mode
Key Function
Touch
Touch
Touch
Hold
Touch
Hold
Quick Option Menu
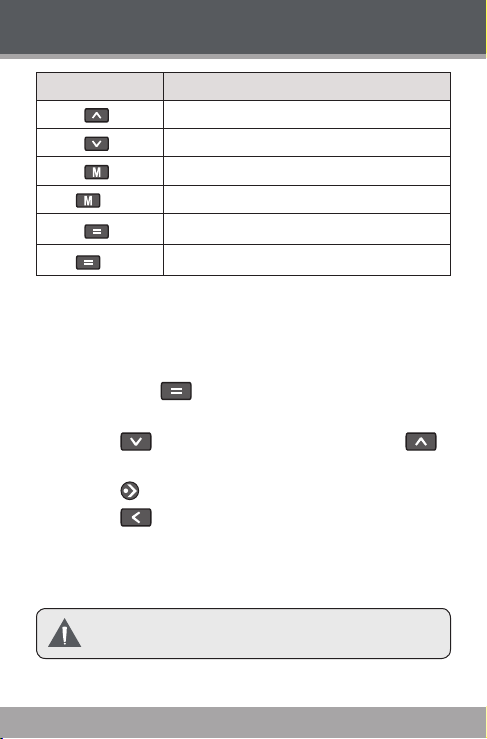
The Quick Option menu gives you easy access to your
player’s option settings.
Touch and hold to access the Quick Option
menu during music playback.
Touch to move the selection down; touch
to move the selection up.
Touch to conrm a selection.
Touch to return to the previous screen.
Favorite
Select Favorite to add a song to your “Favorite” playlist.
Increase the volume level.
Decrease the volume level.
Return to the Music Explorer screen.
Return to the Main Menu.
Start A-B Repeat mode.
Access the Quick Option Menu.
You can access your playlists by selecting the “ Playl-
ists” option from the Music Explorer screen.
Page 22 Coby Electron ics Co rpo rati on
Page 23
Music Mode
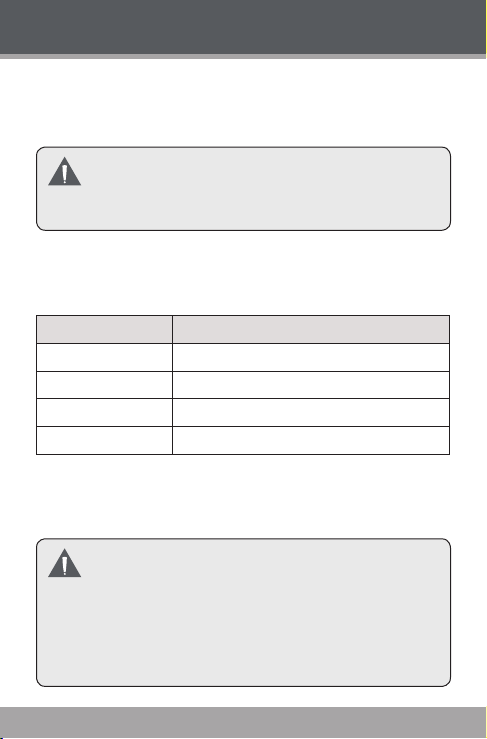
Equalizer
Select a digital equalizer preset. The options are: Normal,
Classic, Jazz, Rock, Pop, Bass, and SRS.
SRS WOW® improves the dynamic audio perfor-
mance of compressed and unc ompressed audio by
expanding the size of the audio image and creating a
deep, rich bass response.
Repeat
Adjust the Repeat settings to change the repeat options.
Item Description
Normal Play tracks in normal order.
Repeat One Play the current track repeatedly.
Repeat All Play all tracks repeatedly.
Random Play tracks in random order.
Lyric
Set song lyric display support on or off.
Lyric display requires a “.LRC” lyric le which may be
found on the inter net or may be created with a Lyric
le editor. Lyric les can contain synchronized timing
information as well as lyric information.
Lyric les must have the same name as its correspond
ing music le (e.g., “SongTitle1.lrc” and “SongTitle1.
mp3”) and must be placed in the same directory.
-
www.cobyusa.com Page 23
Page 24
www.cobyusa.com Page 25
Pictures Mode
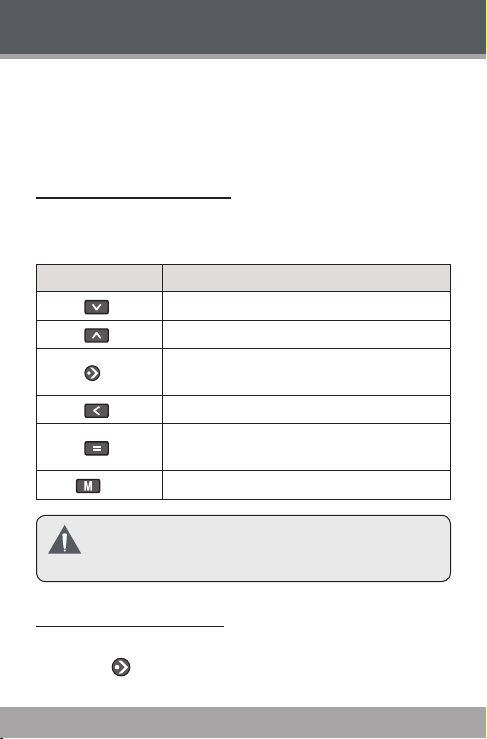
Enter PICTURES mode from the Main Menu to nd
and display JPEG image les loaded on your player.
To enter Pictures mode, select and conrm PICTURES from
the Main Menu. The Picture Explorer screen will appear.
Picture Explorer Controls
Use the Picture Explorer to view all picture les loaded
on your player.
Key Function
Touch
Touch
Touch
Touch
Touch
Hold
Select the “ALL PICTURES ” option to view all of the
pictures on your player regardless of which folder
they are in.
Move the selection down.
Move the selection up.
Display folder contents if a folder is selected.
View a picture if a picture le is selected.
Return to the previous screen.
Change between thumbnail and le list
browser.
Return to Main Menu.
Picture Display Controls
To display a picture, select it from the Picture Explorer
and touch to conrm. Use the following controls to
view your pictures.
Page 24 Coby Electron ics Co rpo rati on
Page 25
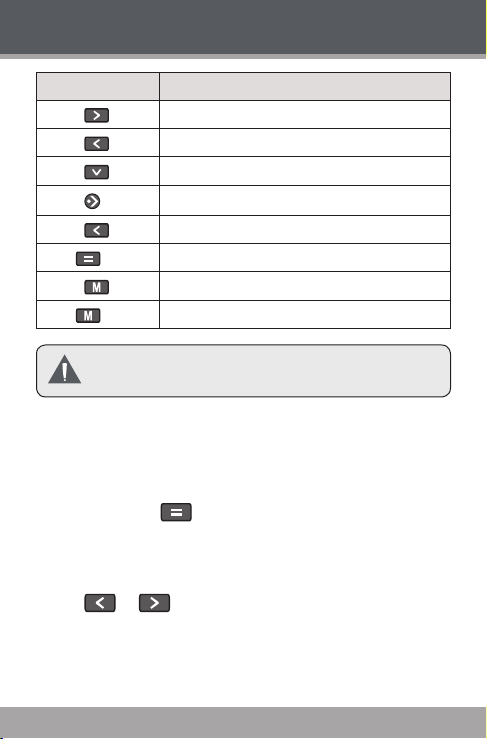
Photo Mode
Key Function
Touch
Touch
Touch
Touch
Touch
Hold
Touch
Hold
You can change the duration of time between pictures
during Slideshow mode from the Quick Option menu.
Quick Option Menu
The Quick Option menu gives you easy access to your
player’s option settings.
Touch and hold to access the Quick Option
menu during while a picture is displayed.
Brightness
Touch or to adjust the brightness of the screen.
Display the next picture.
Display the previous picture.
Rotate the picture.
Start or stop slideshow mode.
Return to the previous screen.
Access the Quick Option Menu.
Return to the Picture Explorer.
Return to Main Menu.
Slideshow
Turn slideshow mode on.
www.cobyusa.com Page 25
Page 26

www.cobyusa.com Page 27
Photo Mode
Showtimer
Touch or to adjust the amount of time between
pictures during slideshow mode.
Zoom
Magnify the picture (Zoom In or Zoom Out).
While the picture is magnied:
Use the arrow keys to pan around the magnied
picture.
Touch to return to Normal (100%) magnication.
Touch and hold to access the Quick Option
menu.
Rotate
Rotate the picture.
View Mode
Adjust the orientation of the player during picture display.
Horizontal: Hold the player horizontally. The direc-
tion of the control keys will change in this mode.
Auto: Hold the player vertically.
Page 26 Coby Electron ics Co rpo rati on
Page 27
Movies Mode
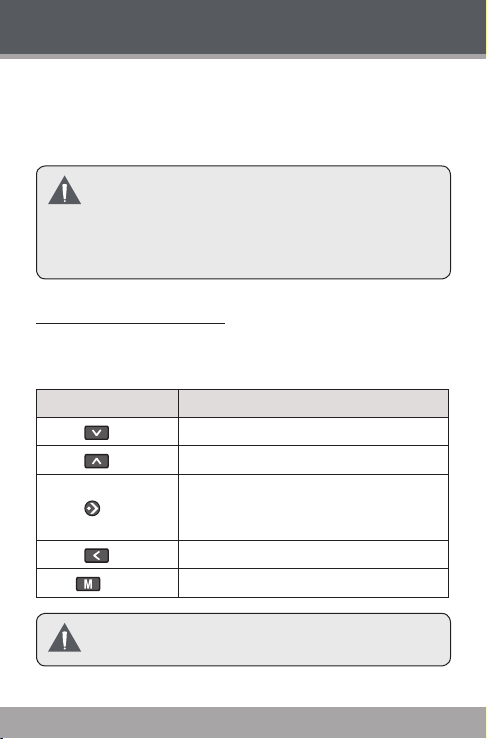
Enter Movies mode to play AVI video les loaded on
your player.
To enter Movie mode, select and conrm MOVIE from the
Main Menu. The Movie Explorer will appear on screen.
Your player supports AVI les encoded with XviD at
220 x 176 and 3 0 fps. V ideos must be encoded with
the included software for device playback.
For more information about converting video, please
refer to the section “Movie Conversion”.
Movie Explorer Controls
Use the Movie Explorer to view all compatible video les
loaded on your player.
Key Function
Touch
Touch
Touch
Touch
Hold
Move the selection down.
Move the selection up.
Display folder contents if a folder is
selected.
Start video playback if a le is selected.
Return to the previous screen.
Return to Main Menu.
To acc ess the Now Playing screen, select the “Now
Playing” option from the main Music Explorer screen.
www.cobyusa.com Page 27
Page 28
www.cobyusa.com Page 29
Movie Mode
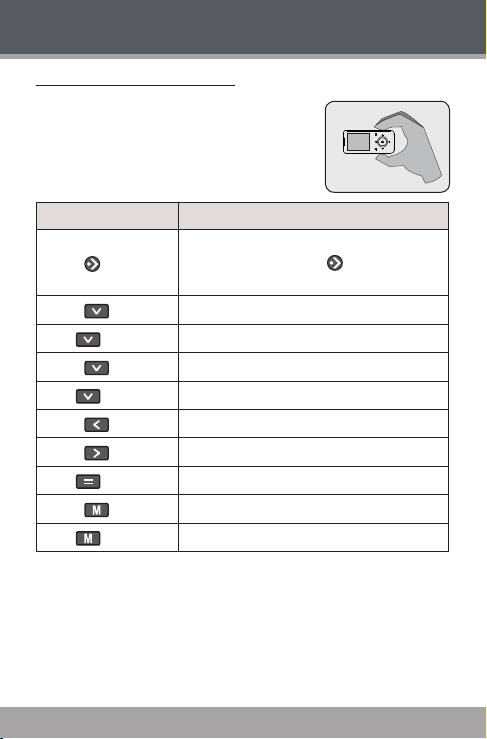
Movie Playback Controls
When a movie is playing, hold the
player horizontally.
Use the following controls during
movie playback.
Key Function
Start /Resume video playback.
Touch
Touch
Hold
Touch
Hold
Touch
Touch
Hold
Touch
Hold
During playback, touch to pause
playback.
Play the next video.
Fast-forward through the current video.
Play the previous video.
Reverse through the current video.
Decrease the volume level.
Increase the volume level.
Access the Quick Option Menu.
Return to the Movie Explorer screen.
Return to the Main Menu.
Page 28 Coby Electron ics Co rpo rati on
Page 29

Movie Mode
Quick Option Menu
The Quick Option menu gives you easy access to your
player’s option settings.
Touch and hold to access the Quick Option
menu during while a movie is being played.
Brightness
Touch or to adjust the brightness of the screen.
www.cobyusa.com Page 29
Page 30
www.cobyusa.com Pag e 31
Radio Mode
Enter Radio Mode to listen to FM radio broadcasts.
To enter Radio mode, select and conrm RADIO from the
Main Menu.
You must have a pair of headphones connected to the
headphone jack to receive FM broadcasts; your player will utilize the headphone cord as an antenna.
Radio Controls
Upon entering FM Radio mode, you can tune to stations
manually or to preset stations.
You must save preset stations prior to using preset
tuning mode. See the Quick Option Menu section be low for details.
Touch to change between tuning modes:
Manual: Touch or to tune to stations
manually. To auto-seek to the next available
broadcast station, touch and hold or .
Preset: Touch or to tune to the next
Preset Station. You must save Preset Stations
prior to using this tuning method.
Touch or to adjust the volume level.
Touch to mute the volume.
Touch and hold to access the Quick Option
menu.
Touch and hold to return to the Main menu.
Page 30 Coby Electron ics Co rpo rati on
Page 31

Radio Mode
Quick Option Menu
The Quick Option menu gives you easy access to your
player’s option settings.
Touch and hold to access the Quick Option menu.
Add/Delete Preset
Save or delete the current station to/from the Preset
Station list.
FM Preset
View the Preset Station list. Select a preset from the list
to tune to the station.
Sensitivity
Set the sensitivity of the Auto Scan feature.
Auto Scan
Scan for all stations in broadcast reception range. The
player will automatically seek and save all frequencies
with a broadcast signal to the Preset Station list.
The auto scan feat ure will overw rite any previo usly
stored Preset Stations.
Area
Set the FM frequency range area (US/World, Europe/
Others, Japan).
www.cobyusa.com Pag e 31
Page 32
www.cobyusa.com Page 33
E-Book Mode
Enter E-BOOK mode from the Main Menu to play text
les (TXT) loaded on your player.
EBook List
Use the EBook List to view all text les loaded on your
player. Touch while in EBOOK Mode to view the
EBook List.
Touch to move the selection up; touch to
move the selection down.
Touch to conrm and play a selection. Touch
EBook Controls
The player can display text les with manual control or as a
slideshow (text les automatically advance to the next page).
Manual Mode Display
to return to the previous screen.
Hold to return to the Main Menu.
Touch to toggle between Auto and Manual Mode.
To display a text le, select and conrm the le from
the EBook List.
Touch to skip back one line.
Touch to skip forward one line.
Touch to skip to the next page.
Touch to skip to the previous page.
Touch to return to the EBook List.
Page 32 Coby Electron ics Co rpo rati on
Page 33
E-Book Mode
Auto Mode Display
Select a le from the EBook List and touch to
conrm.
Touch to start the slideshow. Touch again to
stop the slideshow.
You can change the duration of time between the text
les in the Quick Options menu.
Adding a Bookmark
Touch to save the current location as a book-
mark tag. “Tag has been saved!” will appear on the
screen.
Quick Option Menu
The Quick Option menu gives you easy access to your
player’s option settings.
Touch and hold to access the Quick Option menu.
Bookmark
Open (go to) or delete a bookmark.
Auto Page
Set the duration between pages in Auto Mode.
www.cobyusa.com Page 33
Page 34
www.cobyusa.com Page 35
Explorer Mode
Enter Explorer mode to view all folders and les
loaded on your player.
To enter Explorer mode, select and conrm EXPLORER
from the Main Menu.
If a compatible le is selected and conrmed, the le will
be played in its corresponding mode.
Music Mode: MP3, WMA
Video Mode: AVI
Photo Mode: JPEG
EBook Mode: TXT
Browser Controls
Touch to move the selection up; touch to
move the selection down.
Touch to conrm a selection.
If a folder has been selected, the contents of
the folder will be displayed.
If a compatible le has been selected, the le
will be played in its corresponding mode.
Touch to cancel a screen and return to the
previous folder.
Touch and hold to return to the Main Menu.
Page 34 Coby Electron ics Co rpo rati on
Page 35
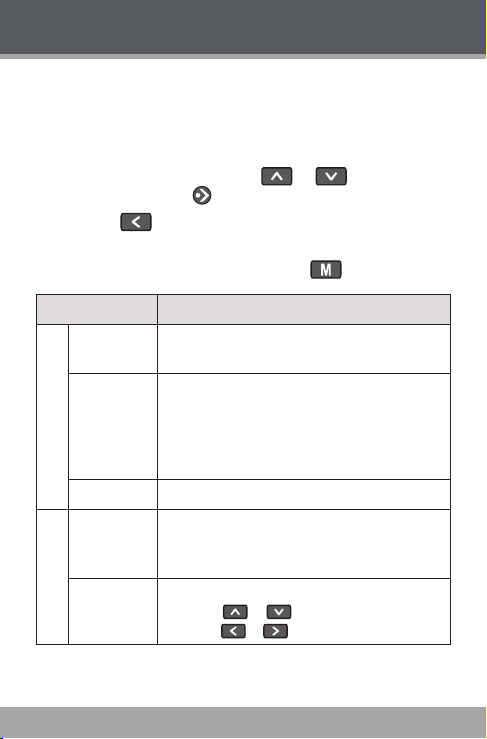
Setup Mode
Enter the Setup mode to set your player’s system
options.
To enter Setup mode, select and conrm SETUP in the
Main menu.
To select an option, touch or . To conrm
and enter, touch .
Touch to cancel and return to the previous
screen.
To return to the Main Menu, hold .
Item Description
Equalizer
Repeat
Sound
Mode
Lyric Set the Lyric display on or off.
Sleep
Time
Date &
Clock
Set a digital equalizer preset (Normal, Classic,
Jazz, Rock, Pop, Bass, SRS).
Set a Repeat Mode option.
Normal: Play all tracks in sequential order.
Repeat One: Repeat the current track.
Repeat All: Play all tracks repeatedly.
Random: Play tracks in random order.
Set the duration of time (in minutes) that the
player will remain on when it is idle. The settng
of "OFF" will disable the Power Saving feature.
Set the internal clock of the player.
Touch or to select a eld to adjust.
•
Touch or to adjust the selected eld.
•
www.cobyusa.com Page 35
Page 36
www.cobyusa.com Page 37
Setup Mode
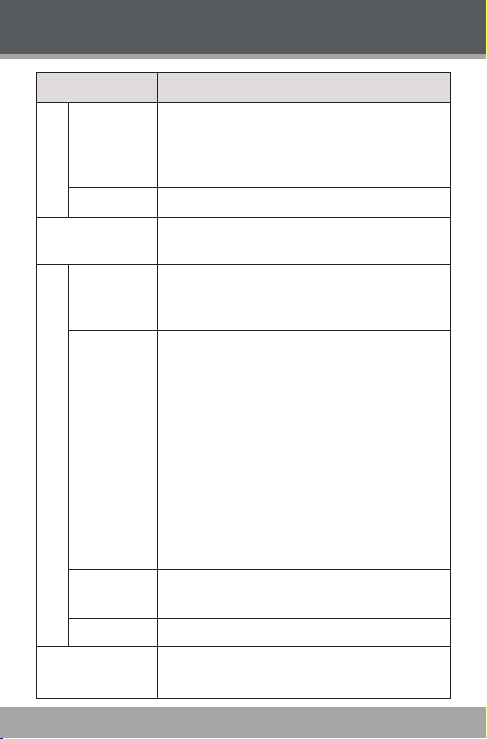
Item Description
Adjust the duration of time (in seconds) that
Backlight
Display
Brightness
Langauge
Music Auto
Play
USB Mode
System
Default
Information View Firmware & Memory Usage information.
System
Information
Page 36 Coby Electron ics Co rpo rati on
the backlight will remain on after a key press.
A setting of “Always On” will keep the backlight
on continuously.
Adjust the brightness of the display.
Set the language that the on-screen menus
appear in.
Set the Auto Play feature on or off. When Auto
Play is set to ON, you player will automatically
resume playback when it wakes from standby.
Set the USB connection mode (Auto or MSC)
when connecting the player to a computer.
Auto (MTP): The player will utilize an MTP
•
connection if it is available. The MTP connection mode enables advanced synchronization features if you are using Windows
Media Player 10 (WMP10) or newer.
If an MTP connection is not available, the
player will rever t to MSC.
MSC. This setting enables the widest compat-
•
ibility with all systems, and allows the player
to be used as a removable storage device.
Res to re all of the player's sett in gs to their
factory-default state.
Select to view the Firmware, Data, Memory
information of your player.
Page 37

USB Connections
Connect the Coby player to a computer with the USB 2.0
cable provided to:
Transfer les to and from your player
Perform basic le management functions.
USB Driver Installation (Win 98 SE Only)
It is not necessary to install the USB driver if your computer is
running Microsoft Windows ME/2000/XP/Vista, or Macintosh
OS X. Computers running these operating systems will recog-
nize your player automatically when connected.
If your computer is running Windows 98 SE:
Insert the Installation CD into your computer’s CD
1.
or DVD drive. Make sure to place the mini-CD in the
center, recessed well of the drive tray.
Navigate to MY COMPUTER and double-c lick on
2.
the CD/DVD drive icon (usually “D:”).
Double- click on the folder “ Win98 USB Drivers” to
3.
open it.
Fi n d ou t an d do uble-click on the SE TUP i c o n
4.
( W in 9 8D r iv e r . E XE ) to st ar t th e US B dr i ver
installation program.
Follow the on-screen instr uctions to complete the
5.
installation and then restart your computer.
Mini-CDs should only be used in normal tray-loading
CD/DVD drives. Mini-CDs may be used in slot-loading
drives with the proper adapter; please contact your
computer or drive manufacturer for more information.
www.cobyusa.com Page 37
Page 38
www.cobyusa.com Page 39
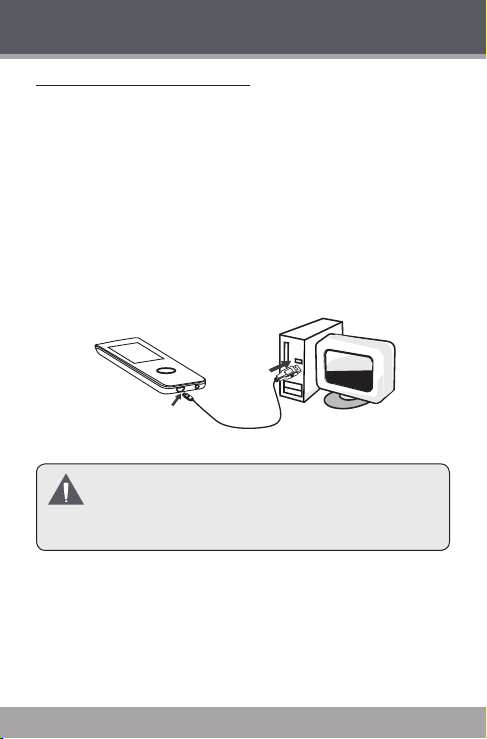
USB Port
USB Port
Computer
USB Connections
Connecting to a Computer
Connect the player to your computer with the supplied
USB cable. Upon connection:
Your computer will automatically recognize the
player as an MTP Device. An icon representing your
player will appear under “Audio Devices” when you
open “My Computer”.
It may take Windows several minutes to recognize
and set up the device the rst time it is connected
depending on your hardware conguration.
For more information and support regarding music
transfer and synchronize with Windows Media Player
(WMP), please see the help section including with WMP
(Click Help > Synchronizing Content to Devices).
Transferring Files
The USB 2.0 Hi-Speed connection makes it easy to trans-
fer music, video, photo, and text les (or any other data)
quickly between the player and your computer. Simply use
the player as you would a oppy disk using basic operating system commands.
Page 38 Coby Electron ics Co rpo rati on
Page 39
USB Connections
If you need further assistance with transferring les,
please refer to your operating system’s instruction manual
or on-screen help. If you are using media management
software such as iTunes, Winamp, or Windows Media
Player, please refer to their documentation for support.
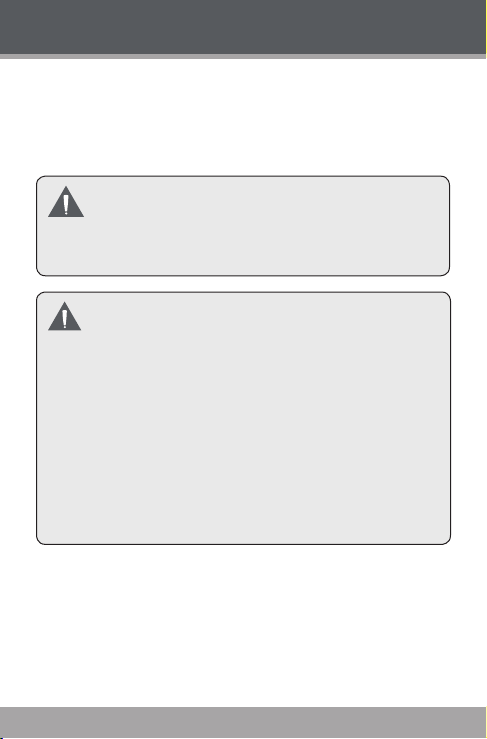
Do not disconnect or other wise interrupt the player
during transmission— this could damage or corrupt
the player’s rmware or your les. If the player is accidentally disconnected and is not working properly,
try resetting the player.
Content owners use Windows Media digital rights
management technology (WMDRM) to protect their
intellectual proper ty, including copyr ights. This device
uses WMDRM sof tware to access WMDRM -protected content. If the WMDRM software fails to protect
the content, c ontent owners may ask Microsoft to revoke the software’s ability to use W MDRM to play or
copy protected content. Revocation does not af fect
unprotected content. When you download licenses for
protected content, you agree that Microsoft may in clude a revocation list with the licenses. Content owners may require you to upgrade WM DRM to access
their content. If you decline an upgrade, you will not
be able to access content that requires the upgrade.
Microsoft Windows
Double-click the “My Computer” icon on your desk-
1.
top and then double-click the icon that represents
your Coby player (e.g., MP-705) (MTP Multimedia
Player).
www.cobyusa.com Page 39
Page 40
www.cobyusa.com Pag e 41
USB Connections
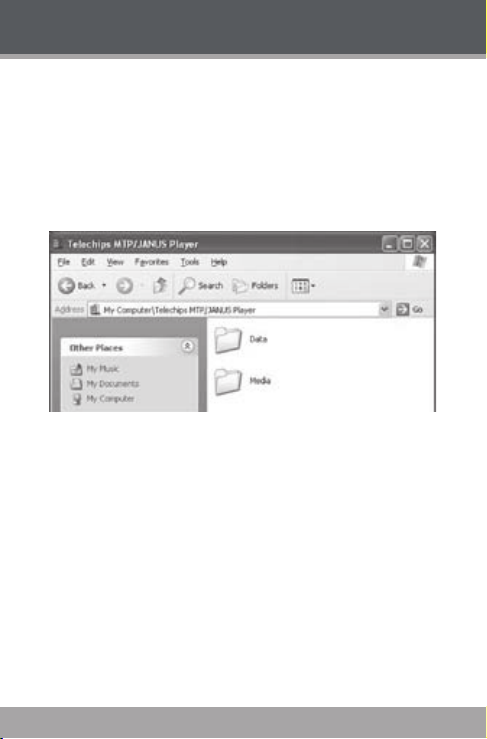
Your player contains two folders: Data and Media.
2.
Drag your media les to the Media folder (e.g.,
MP3, WMA les).
Drag all other types of les to the Data folder
for storage. Data les are only visible from a
computer; these les will not be available from
within the player itself.
Macintosh OS X
Open a nder window. Located the les you would
1.
like to transfer from your computer. Select the
les/folders with the mouse and press APPLE-C
(copy) on the keyboard.
Click on the Removable Disk icon located on the left
2.
side of the nder window. The computer will display
all les and folders currently stored in the player.
Press APPLE-V (paste) on the keyboard to transfer
3.
the les you selected in Step 1 to the player.
Page 40 Coby Electron ics Co rpo rati on
Page 41
USB Connections
Disconnecting from a Computer
Disconnect your player as instructed below to detect data
loss or le/rmware corruption.
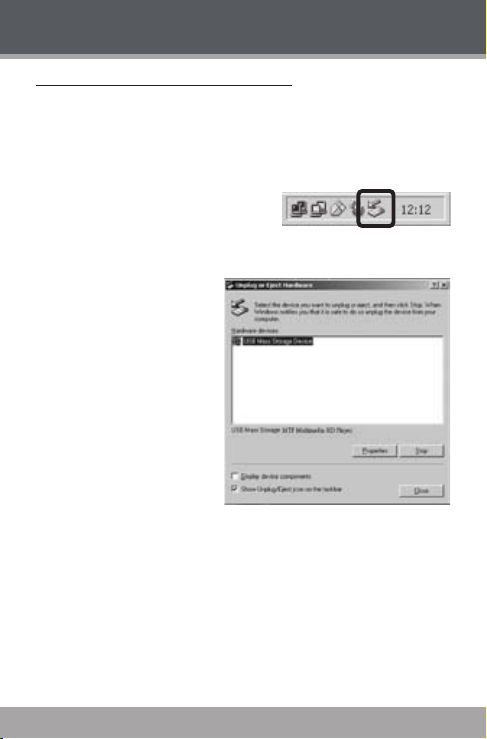
Microsoft Windows
Double-click the green ar-
1.
row in the taskbar located
on the lower-right side of
the computer screen (Safely Remove Hardware).
Safely Remove
2.
Hardware:
Select “USB Mass
Storage Device”
from the list that
appears and then
click on “Stop”.
Stop a Hardware Device:
Select “USB Mass
Storage Device”
from the list that
appears and then click on “OK”.
When the “Safe to Remove Hardware” window ap-
3.
pears, click the OK button and disconnect the USB
cable from the player and your computer.
www.cobyusa.com Pag e 41
Page 42

www.cobyusa.com Page 43
USB Connections
Macintosh OS X
On the left side of the Finder Window, identify the
1.
appropriate Removable Disk icon.
Click on the “Eject”
2.
arrow on the right of the
Removable Disk icon.
Disconnect the USB
3.
cable from the player
and your computer.
Page 42 Coby Electron ics Co rpo rati on
Page 43
Video Conversion
Use the video conversion software utility included on the
Installation CD to create video les that are suitable for
playback on the player.
Your player supports XviD -encoded AVI les with the
following specications:
220 x 176 resolution at 30 frames per second (fps).
The video conversion software is included for your conve-
nience and is compatible with Microsoft Windows operating
systems only. There are many other video conversion utilities available for download or purchase on the internet.
Because the program is licensed free of charge, there is
no warranty for the program, to the extent permitted by
applicable law. E xcept when otherwise stated in writing the copyright holders and/or other parties provide
the program “as is” without warrant y of any kind, either
expressed or implied, including, but not limited to, the
implied warranties of merchantability and tness for a
particular purpose. The entire risk as to the qualit y and
performanc e of the program is with you. Should the
program prove defective, you assume the cost of all
necessary servicing, repair or cor rection.
In no event unless required by applicable law or agreed
to in writing will any copyright holder, or any other party
who may modify and/or redistribute the program as permitted above, be liable to you for damages, including
any general, special, incidental or consequential damages arising out of the use or inability to use the program
(including but not limited to loss of data or data being
rendered inaccurate or losses sustained by you or third
parties or a failure of the program to operate with any
other programs), even if such holder or other party has
been advised of the possibility of such damages.
www.cobyusa.com Page 43
Page 44
www.cobyusa.com Page 45
Video Conversion
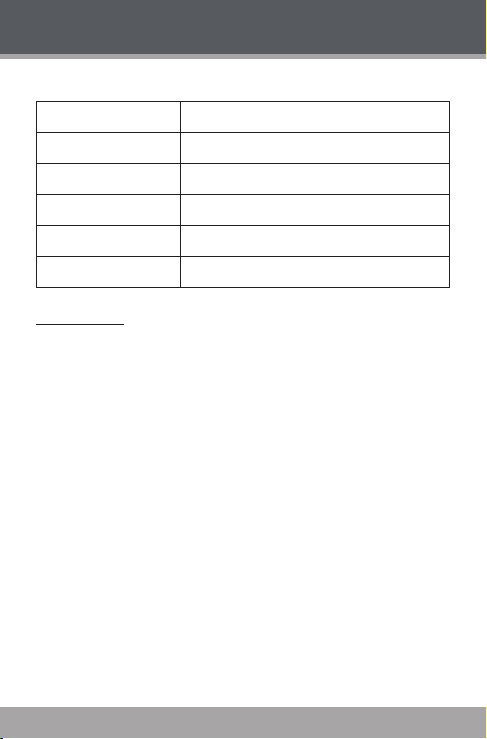
Minimum System Requirements
OS Support
CPU
Memor y (RAM)
Free HD Space
Video
WMP
Installation
Locate the MP3 Player Utilities setup le on the
1.
Installation CD: setup.exe.
Double-click the le to start the installation process.
2.
Follow the on-screen instructions to complete the
3.
installation process.
Microsoft 2000/XP/Vista (32-bit only)
Pentium class equivalent or better
> 64MB
10MB
24-bit color adapter
Windows Media Player 9 or better
Page 44 Coby Electron ics Co rpo rati on
Page 45
Video Conversion
Converting Video
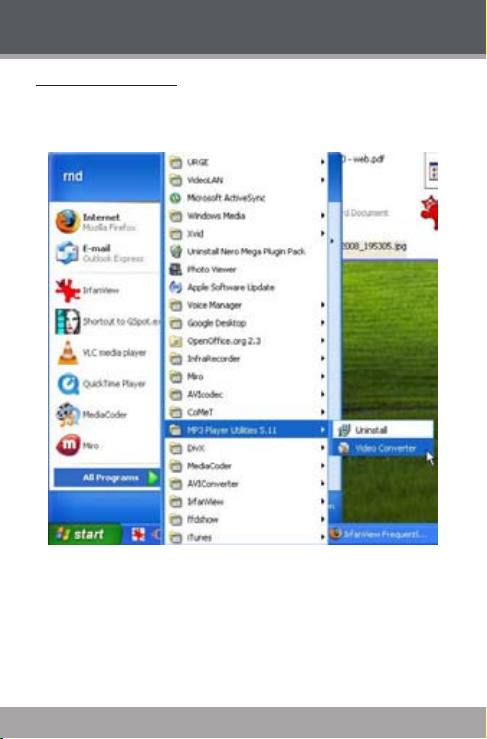
To start the program, locate the Video Converter program
in your Windows Start menu.
www.cobyusa.com Page 45
Page 46
www.cobyusa.com Page 47
2
4
6
3
1
5
Video Conversion
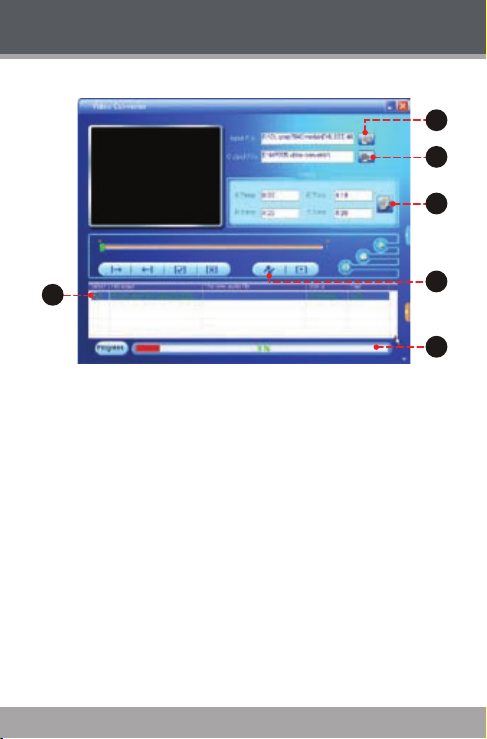
The application window shown below will appear.
Click the “Input File” button to select the source
1.
video le to convert.
The source le must be one of the following
video types: AVI, RM, RMVB, MPG, MPEG,
MP4, ASF, WMV, MKV, DAT, or VOB.
DirectX 9.0, Media Player 9.0, and other codecs
must be installed to support all media types.
Click the “Output File” button to choose a name and
2.
location for the completed le af ter conversion.
This conversion will be added to the Job Queue.
3.
Repeat Steps 1 and 2 to continue adding conversion
jobs until you are nished.
Page 46 Coby Electron ics Co rpo rati on
Page 47

Video Conversion
[Optional] Click the “Settings” button to change the
4.
conversion options. Do not change these settings if
you are not familiar with digital video conversions.
Click the “Convert” button to begin converting all of
5.
the les in the Job Queue.
The progress bar displays the progress of the con-
6.
version job. When the progress bar reaches “100%”,
the conversion job has been completed.
www.cobyusa.com Page 47
Page 48
www.cobyusa.com Page 49
Windows Media Player
You can use Windows Media Player and a USB-MTP
connection to manage your music media library with
Microsoft Windows XP or newer.
The latest version of Windows Media Player can be
downloaded from the Microsoft website:
http://www.microsof t.com/windows/windowsmedia/default.mspx
Please refer to the Quick Start Guide included with your
player for more information.
For more information and support regarding music
transfer and synchronization with Windows Media
Player (WM P), please see the help section included
with WMP (click “Help > Synchronizing Content to Devices”).
Page 48 Coby Electron ics Co rpo rati on
Page 49
Firmware Upgrades
From time to time, COBY may release rmware upgrades
to improve the per formance of the Player or to add
additional features. Please check the COBY website
periodically at www.cobyusa.com to see if new rmware
has been released for your player. If you are experiencing
abnormal behavior with your player, you may choose to
restore (format) your player before updating its rmware.
Do not interrupt the rmware upgrade process—doing
so could damage your player and render it inoperable.
See the documentation that is included with the rm
ware upgrade le for detailed instructions.
-
www.cobyusa.com Page 49
Page 50

www.cobyusa.com Page 51
About MP3/WMA Files
For more information about digital MP3 and WMA les,
please visit our website at w ww.cobyusa.com.
Page 50 Coby Electron ics Co rpo rati on
Page 51

Troubleshooting
If you have a problem with this device, please read the
troubleshooting guide below and check our website
at www.cobyusa.com for Frequently Asked Questions
(FAQs) and rmware updates. If these resources do not
resolve the problem, please contact Technical Support.
Address COBY Electronics Technical Support
Email [email protected]
Web www.cobyusa.c om
Phone 800 -727-359 2: Weekdays 8:00AM–11:00PM EST
56- 65 Rust Street
Maspeth, NY 11378
Weekends 9:0 0AM –5:3 0PM EST
718-416-3197: Weekdays 8:0 0AM –5:30PM EST
The player does not turn on.
Ensure that the player is fully charged. Try charging
the player overnight (8 hours).
Ensure that the Power switch is set to the “On”
position.
Reset the player (use a paper clip to gently press the
Reset button on the rear of the player) and try again.
The buttons do not work.
Ensure that the Hold switch is disengaged.
Reset the player (use a paper clip to gently press the
Reset button on the rear of the player) and try again.
www.cobyusa.com Page 51
Page 52

www.cobyusa.com Page 53
Troubleshooting
I cannot transfer les to the player.
Ensure that your computer is running a supported
operating system.
If using a USB extension cable, ensure that it is
securely attached to the player and the PC, or try
using another USB cable.
If you have connected the player through a USB
hub, try connecting the player directly to your
computer.
Ensure that the player’s memory capacity is not full.
Ensure that the Hold switch is disengaged.
There is no sound during playback.
Check the volume level.
Ensure that the headphones are attached securely
to the player.
The sound quality of the music is poor.
Try playing the le on your computer. If the sound
quality is still poor, try downloading the le again or
re-encoding the le yourself.
Ensure that the bit rate of the le is not too low. The
higher the bit rate of the le, the better it will sound.
The minimum recommended bitrate is 128kbps for
MP3s and 96kbps for WMAs.
Try lowering the volume of the player.
Page 52 Coby Electron ics Co rpo rati on
Page 53

Troubleshooting
Ensure that the headphones are attached securely
to the player.
The player will not play my music le.
Ensure that the le is in a compatible format.
The le may be copy-protected and you no longer
have authorization to play this le. If you feel this is
in error, please contact the service from which you
downloaded the le.
The LCD characters are corrupted or something is
wrong with the display.
Ensure that the correct menu language has been set.
Reset the player (use a paper clip to gently press the
Reset button on the rear of the player) and try again.
The player has malfunctioned.
Reset the player (use a paper clip to gently press the
Reset button on the rear of the player) and try again.
Try updating the player’s rmware. Please refer to
the Firmware Upgrades section of this manual for
instructions.
www.cobyusa.com Page 53
Page 54
www.cobyusa.com Page 55
Specications
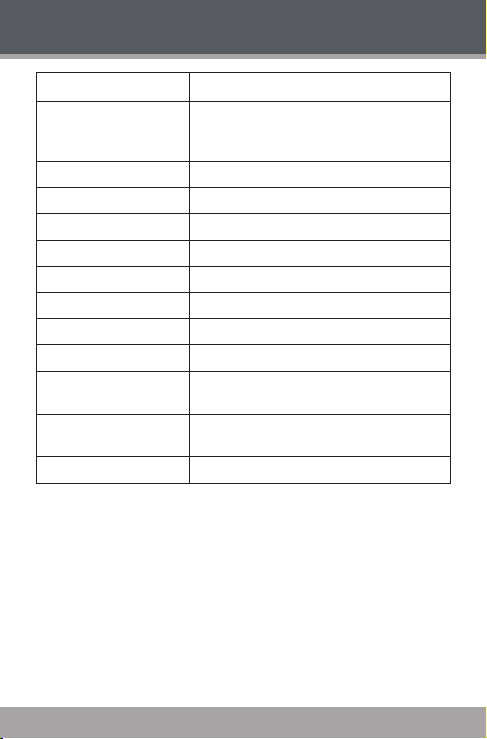
Display Type 2” Full- Color TFT @ 176x220
Memor y MP705 -1G: 1GB Flash
Audio Format Support MP3, WMA, WMA-DRM, WAV
Video For mat Support MPEG- 4 (XviD): 220x176, 30fps
Photo Format Suppor t JPEG
DRM Support WMDRM10*
Song Info Suppor t ID3, Windows Media
FM Frequency Range 87.5 - 108.0MHz
PC Interface USB 2.0 (MSC or MTP)
OS Support Windows 2000/XP/Vista
Audio Output 3.5mm Stereo (Headphone)
Power Supply Rechargeable Lithium- ion Battery
Unit Dimensions 1.65” x 3.74” x 0.38” (WHD)
Speci catio ns and manu al are sub ject to ch ange wit hout not ice.
MP705 -2G: 2GB Flash
MP705 -4G: 4GB Flash
Integrated Stereo Speakers
USB Charge
Page 54 Coby Electron ics Co rpo rati on
Page 55

Notes
www.cobyusa.com Page 55
Page 56

www.cobyusa.com Page 57
Notes
Page 56 Coby Electron ics Co rpo rati on
Page 57

Notes
www.cobyusa.com Page 57
Page 58

Coby Electronics Corporation
56- 65 Rust Street
Maspeth, NY 11378
ww w.cobyusa.com
ww w.ecoby.com
Coby is a re gis tered t rademar k of
Coby El ectronic s Corporat ion.
Printed in Ch ina.
7051GACD10
7052GACD10
7054 GACD10
 Loading...