

Page 1
Coby Media Manager user guide
Last update : September 2008
Copyright ©2006-2008 DigDash SAS 1
Page 2

Contents
Coby Media Manager user guide...................................................................................1
Contents......................................................................................................................2
I. Device content.........................................................................................................5
1. Device properties..............................................................................................5
2. Device explorer.................................................................................................6
II. The music library ..................................................................................................7
1. Importing files...................................................................................................7
1.1 Importing all files.......................................................................................7
1.2 Importing individual files...........................................................................8
2. Displaying files.................................................................................................8
2.1 Displaying files by category.......................................................................8
2.2 Sorting your music files.............................................................................8
2.3 Hiding/showing files in your library..........................................................9
2.4 Displaying files as thumbnails or a list......................................................9
3. Playing a music file...........................................................................................9
4. Managing playlists..........................................................................................10
5. Synchronizing music files to your player.......................................................10
5.1 Synchronizing individual files.................................................................10
5.2 Synchronizing an album...........................................................................10
5.3 Synchronizing a playlist...........................................................................11
5.4 Synchronizing files with no DRM protection .........................................11
5.5 Synchronizing files protected with DRM.................................................11
6. Extracting tracks from an Audio CD..............................................................12
6.1. Set up.......................................................................................................12
6.2. Extraction................................................................................................13
7. Editing MP3 tags.............................................................................................13
8. Searching for music files................................................................................14
III. The movie library...............................................................................................16
1. Importing files.................................................................................................16
1.1 Importing all files.....................................................................................16
1.2 Importing individual files.........................................................................17
2. Displaying files...............................................................................................17
2.1 Displaying files by category.....................................................................17
2.2 Sorting your video files............................................................................17
2.3 Hiding/showing files in your library........................................................17
2.4 Displaying files as thumbnails or a list....................................................18
3. Playing a video file.........................................................................................18
4. Synchronizing video files to your player........................................................18
4.1 Synchronizing individual files.................................................................18
4.2 Synchronizing all videos of a folder........................................................18
5. Searching for video files.................................................................................18
IV. The pictures library............................................................................................20
1. Importing files.................................................................................................20
1.1 Importing all files.....................................................................................20
1.2 Importing individual files.........................................................................21
2. Displaying files...............................................................................................21
2.1 Displaying files by category.....................................................................21
Copyright ©2006-2008 DigDash SAS 2
Page 3

2.2 Sorting your picture files..........................................................................21
2.3 Hiding/Showing library files....................................................................21
2.4 Displaying files as thumbnails or a list....................................................21
3. Viewing a picture file......................................................................................22
4. Synchronizing picture files to your player......................................................22
4.1 Synchronizing individual files.................................................................22
4.2 Synchronizing all files..............................................................................22
5. Searching for picture files...............................................................................22
V. Configuring your mobile device..........................................................................23
1. Automatic installation.....................................................................................23
2. Adding a mobile device to the favorite devices list........................................23
3. Configuring a mobile device...........................................................................24
3.1 Configuring synchronization....................................................................24
3.2 Configuring the output file format...........................................................24
4. Removing a mobile device..............................................................................25
VI. Registration and software update.......................................................................26
VII. Tabs in Coby Media Manager..........................................................................27
VIII. Menus..............................................................................................................31
1. File..................................................................................................................32
2. Edit..................................................................................................................32
3. View................................................................................................................32
4. Music...............................................................................................................32
5. Movie..............................................................................................................33
6. Picture.............................................................................................................33
7. Tools...............................................................................................................33
8. Help.................................................................................................................35
IX. Shortcut keys in Coby Media Manager..............................................................37
Copyright ©2006-2008 DigDash SAS 3
Page 4

Coby Media Manager is designed for users who want to listen to music or watch
video.
In a few clicks, you can play your favorite files or transfer them to your Coby mobile
device to listen to them later (automatic file conversion into a format compatible with
your device).
With Coby Media Manager, you can also directly access the Coby web site and the
online music store.
Coby Media Manager supports the following data sources:
● Movies and other video files
● Music and other audio files
● Photos and other image files
Coby Media Manager supports the following devices:
Supported Coby devices:
● MP-200
● MP-300
● MP-305
● MP-345
● MP-550
● MP-565
● MP-705
● MP-715
● MP-735
● MP-805
● MP-C7085
● MP-835
Copyright ©2006-2008 DigDash SAS 4
Page 5
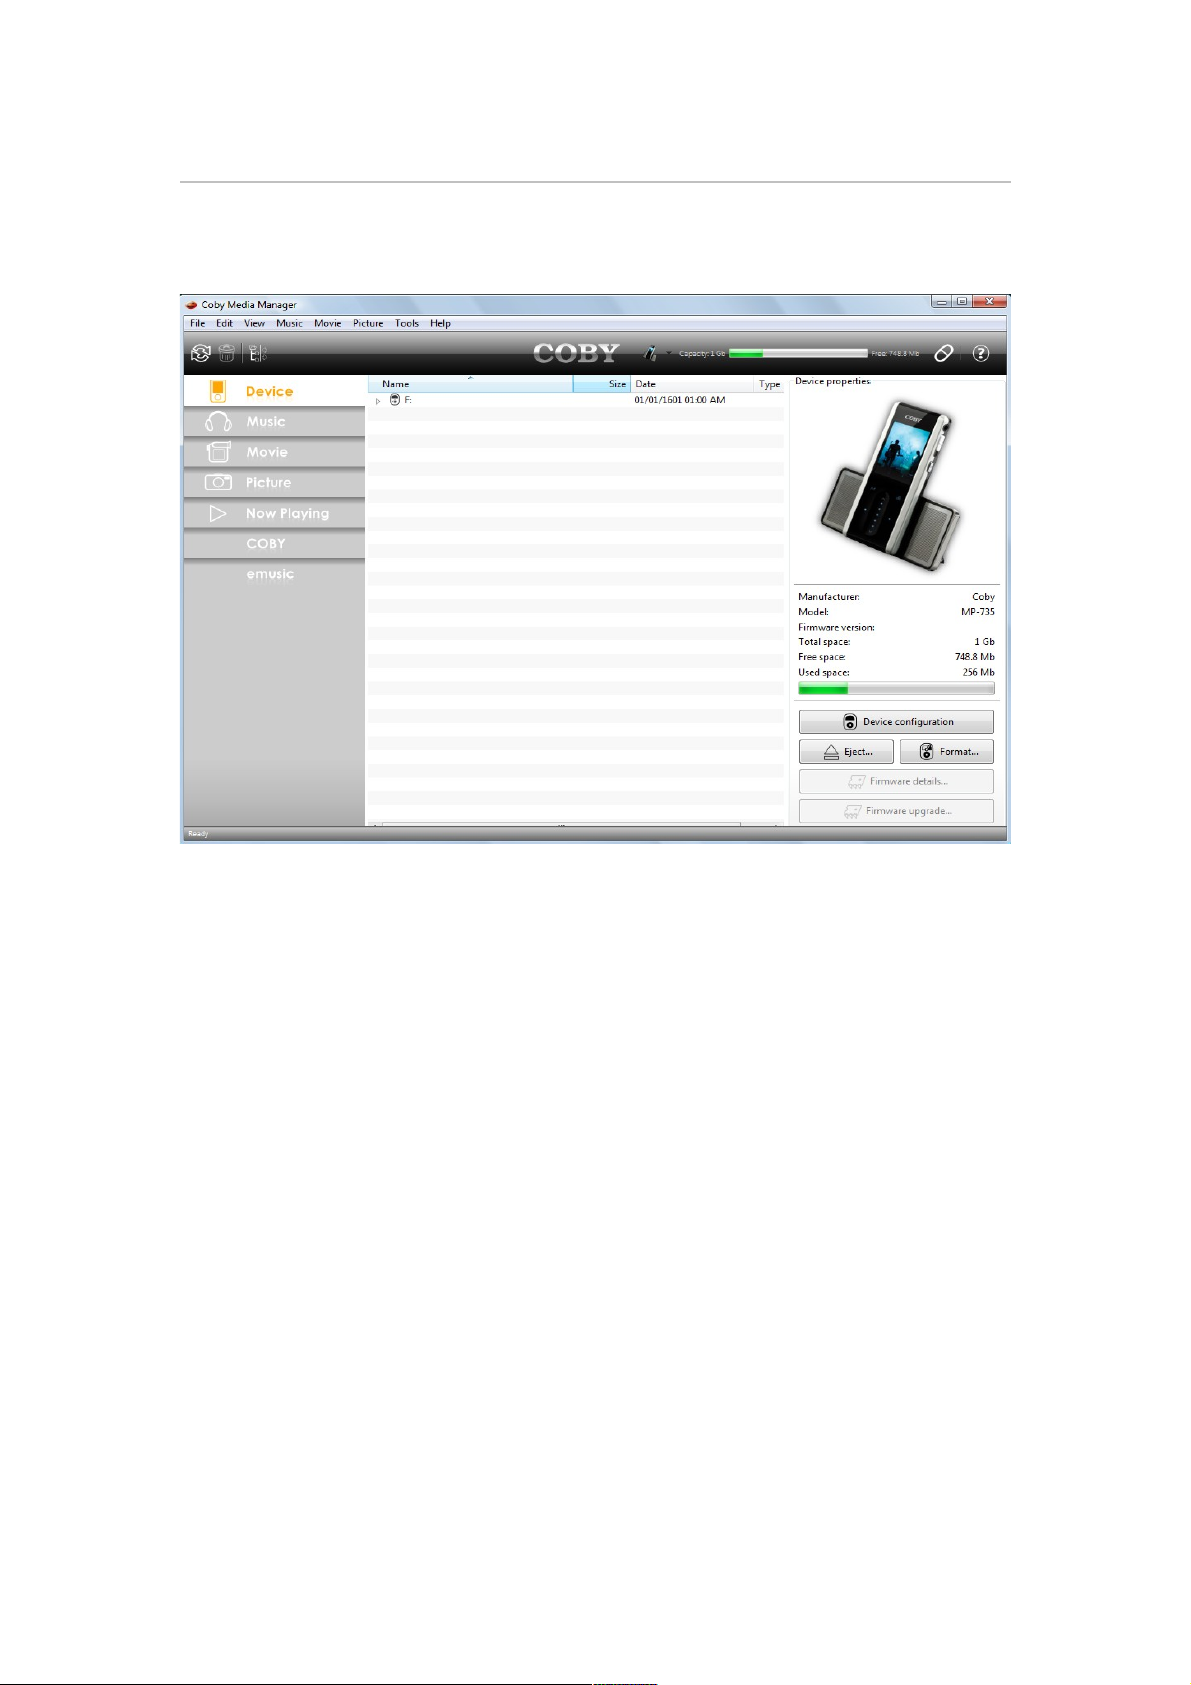
I. Device content
Open the player tab to display its contents (the device must be plugged into your
computer).
1. Device properties
When your device is plugged in, you can see its name and picture as well as its
available, used and total storage space.
The Eject... button allows you to safely unplug the device from the computer
(available only for USB Mass Storage). It is highly recommended to use it before
unplugging the USB cable.
The Format... button lets you erase all the files on your device. Be careful: this
operation can't be reversed. You will have to copy all of the files back to the device
from your computer.
The Device Configuration button allows you to configure your device:
you can choose its location (the automatic device detection is set by default) and
specify an output file format (wma for example). For more information, refer to the
chapter Configuring your mobile device.
Two firmware options are available:
Firmware upgrade lets you download the latest version of the firmware (only if you
have registered Coby Media Manager).
Firmware details gives you information about your player's firmware; this
information may be asked for by support in the case of a problem.
Copyright ©2006-2008 DigDash SAS 5
Page 6

Note: In the top right corner of Coby Media Manager, the following pieces of
information are displayed:
– the device you are using;
– the available storage space on your device (if the indicator is full, no free space is
left. You will have to delete files before adding new ones);
– the connection state of your device: connected or disconnected .
2. Device explorer
When your device is plugged in, you can see its content in the Device Explorer.
You can execute the following actions on your player files:
Rename
You can change the file or folder name. Select the file or folder you want to rename,
then right click and select Rename. You can also press the F2 keyboard key.
Move
You can drag and drop files from one folder to another. Select the file(s) and move it
(them) holding the mouse left button, then release it when you are on the destination
folder.
Copy
Select the files you want to copy, then right click and select Copy. Go to the
destination folder, then right click and select Paste.
Delete
You can delete files from the player. Select the files you want to delete, then right
click and select Delete.
This action deletes files from your player only and not from your computer.
Copyright ©2006-2008 DigDash SAS 6
Page 7
II. The music library
You can access the music library by clicking the Music tab.
1. Importing files
You can import files already on your computer to your music library.
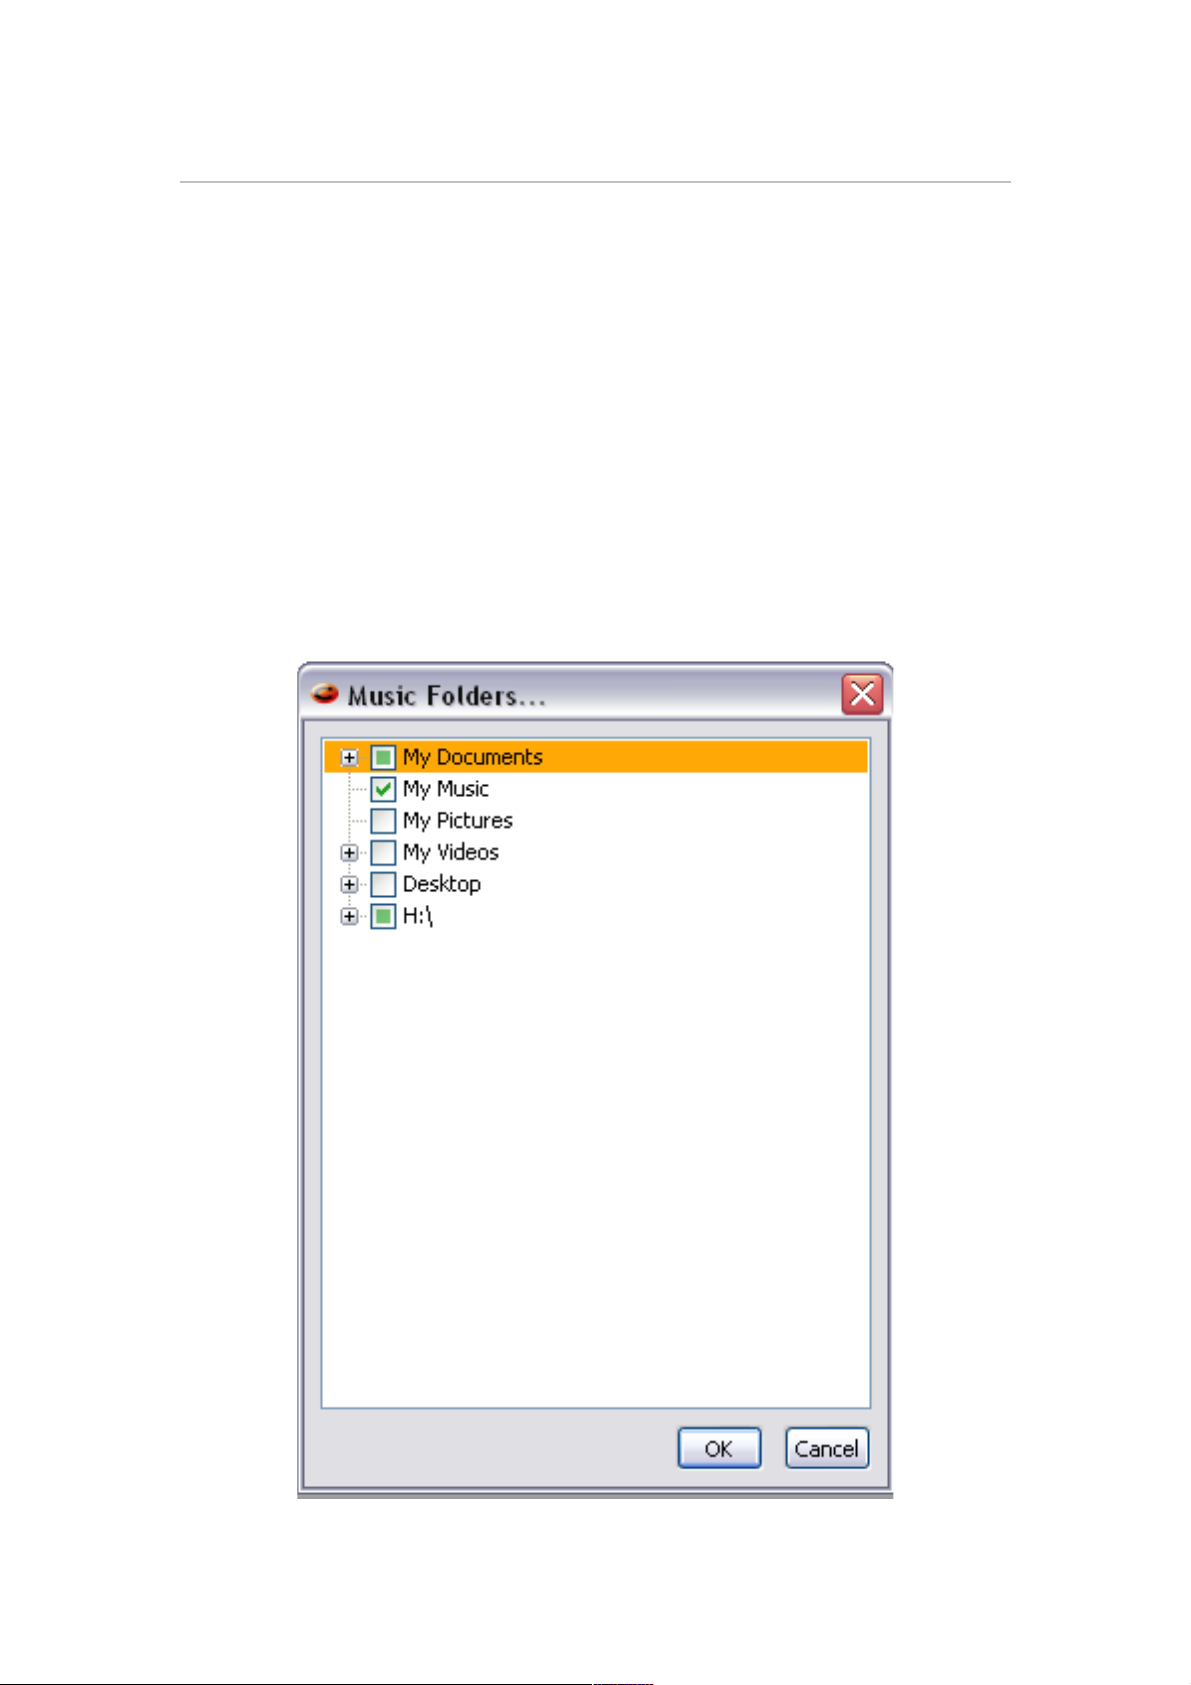
1.1 Importing all files
To import all audio files to a folder, select the Music - Music folders menu and check
the folders containing your audio files.
Copyright ©2006-2008 DigDash SAS 7
Page 8

1.2 Importing individual files
To import individual files, go to Music - Add an audio file and select the file on your
computer.
You can also drag and drop files from your windows explorer to your music library.
2. Displaying files
The files you have selected are displayed in the music library.
The meaning of the different file icons are described below:
• indicates a file with no protection. You can directly synchronize this file to
your player.
• indicates a file protected with DRM (Digital Right Management). To
synchronize this file, you need to have a DRM player and a valid licence.
• indicates a file with no licence. You will have to acquire the licence
before you can synchonize this file to your player.
2.1 Displaying files by category
To facilitate browsing, you can use the tree located on the left side of your Coby
Media Manager window
You can display all songs from an artist, an album or a musical genre. It also allows
you to display all audio files from a sub-folder of your library.
2.2 Sorting your music files
Coby Media Manager displays the following information (when available) for each
music file:
Copyright ©2006-2008 DigDash SAS 8
Page 9
• Title
• Status
• Artist
• Album
• Genre
• Track
• Size
• Date
• Type
To sort the files, select the column header by which to sort the list. For example, if
you want to sort your files by artist, click the Artist column header.
Click the column header again to reverse the sort order.
2.3 Hiding/showing files in your library
To hide items in your library, select them, right click and choose Hide.
To display them again, click the Show hidden files button on the toolbar .
Hidden files appear grayed out. Select the ones you want to display again, right click
and choose Show.
2.4 Displaying files as thumbnails or a list
You can display files as a list or thumbnails. To display files as thumbnails, click the
Display thumbnails/list icon on the toolbar.
The album art will be displayed. Coby Media Manager searches for the album art
from the Amazon website. The search is based on the title and artist name.
If the album art is not available, you can search for it (specifying a new artist and/or
album name) from the Amazon website, or you can import it from your local hard
drive. To do so, right click the file, choose Properties, click the album art, and then
Import from Internet or Browse file.
To display the files as a list, click the Display thumbnails/list icon again.
Note: the album art set-up is available for MP3 files only.
3. Playing a music file
Select the music file and then double-click it (or click the Play button on the toolbar
).
If the file is protected with DRM (Digital Rights Management) and has no licence,
you will be asked to acquire the licence.
Note: Your media file is played in the now playing tab. To change the media player (if
you want to use VLC or another media player), select Tools - Options from the menu
bar.
Copyright ©2006-2008 DigDash SAS 9
Page 10
4. Managing playlists
You can create playlists to group songs (example “My favorite songs”).
To create a playlist, right click in the Playlists section (located on the left side of your
Coby Media Manager window), and choose Add. A playlist is created. You can
rename it using the F2 keyboard key.
To add songs to your playlists, select the songs in your library, right click and choose
Add to playlist. You can also drag and drop files from your library to your playlist.
Playlist can be synchronized to your device. To do so, select the playlist, then right
click and choose Synchronize.
To play all songs of a playlist, select the playlist, then right click and choose Play.
5. Synchronizing music files to your player
5.1 Synchronizing individual files
To synchronize individual files, select them, then right click and choose Synchronize.
You can also click the Synchronize selection button on the toolbar .
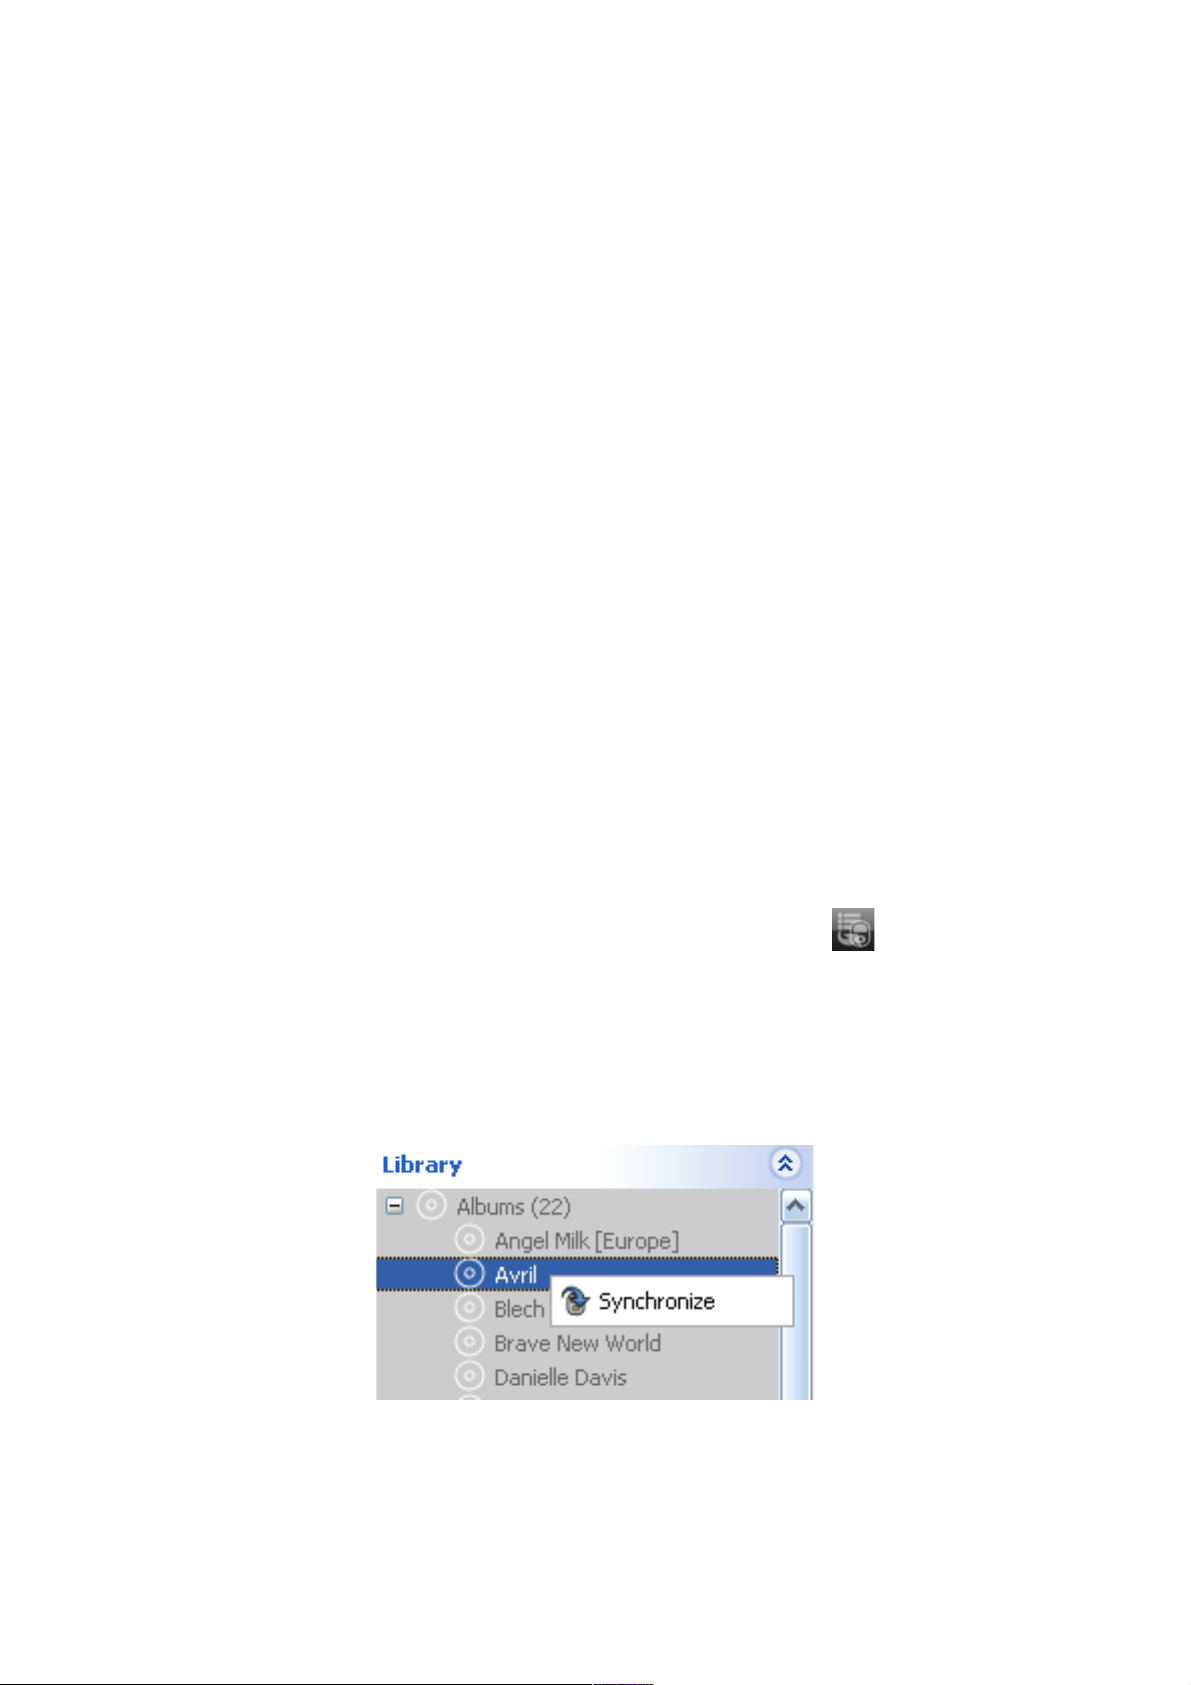
5.2 Synchronizing an album
Select the album in the Library section located to the left of your Coby Media
Manager window, then right click and choose Synchronize.
Copyright ©2006-2008 DigDash SAS 10
Page 11

5.3 Synchronizing a playlist
Select the playlist, then right-click and choose Synchronize.
5.4 Synchronizing files with no DRM protection
Titles with no DRM protection are displayed with an icon beside their names.
You can synchronize them directly to your player. You do not need to acquire licence
first.
5.5 Synchronizing files protected with DRM
Titles protected with DRM are displayed with an icon.
Titles with no licence are displayed with an icon.
To synchronize these titles:
• Make sure your player is DRM compatible
• Acquire licences for all titles you want to synchronize. To do so, select the
titles, then right click and choose Acquire licence
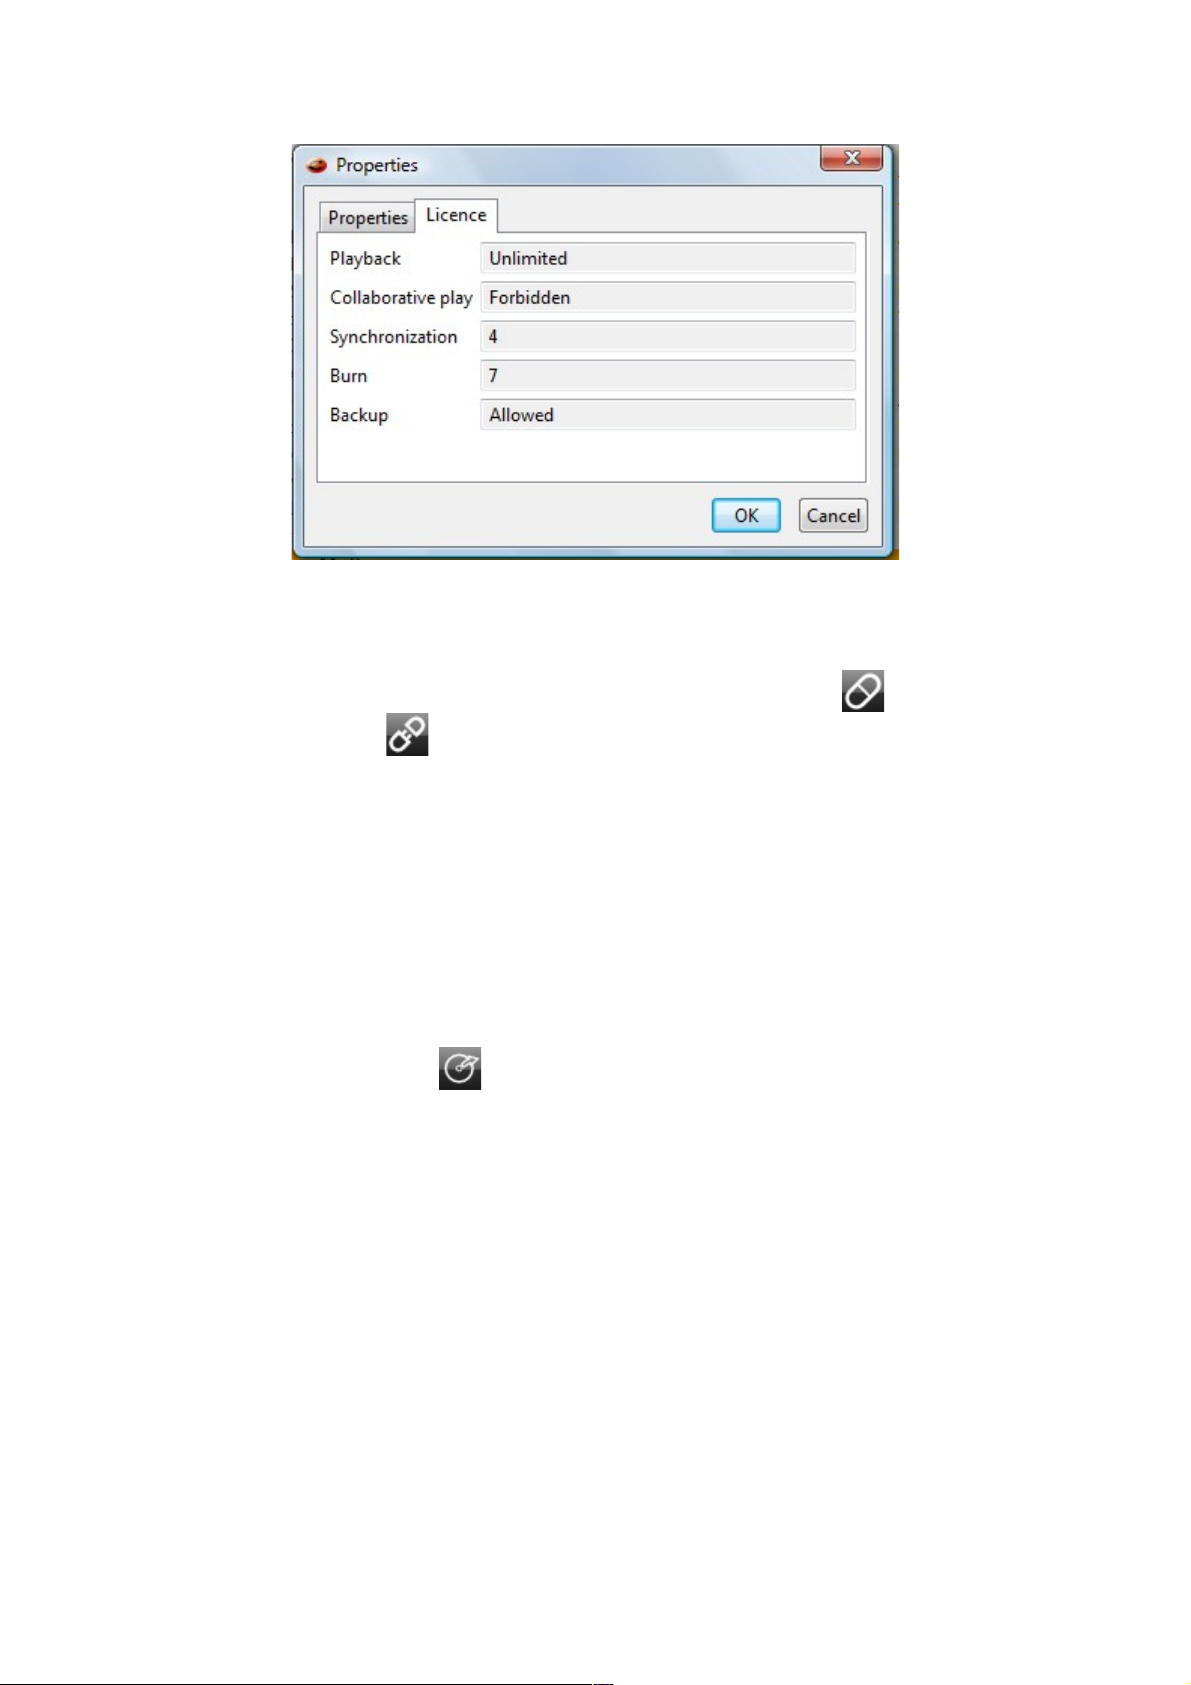
• Make sure the licence is valid for synchronization. To display a licence, select
the file, then right click and choose Properties. Open the Licence tab.
Copyright ©2006-2008 DigDash SAS 11
Page 12
Note: Your player must be connected to your computer during synchronization.
(check the device connection state on the toolbar: Connected device or
Disconnected device ).
6. Extracting tracks from an Audio CD
CD Rip allows you to extract CD tracks from your CD/DVD drive, and copy them to
your music library.
In the Music tab, click the icon (Extract songs from an audio CD).
The Audio CD Extraction window shows up.
In the General section, your CD/DVD drive is selected.
Note: If you have several CD/DVD drives, select the one with the CD tracks you
would like to extract.
6.1. Set up
Modifying the album information
In the Details section, information about the album, artist and genre should
automatically be displayed (provided that you have an internet connection, and
that this information is available in our server database). Otherwise, you can type
the different values.
To specify the Genre, select it in the list, or type its name.
Copyright ©2006-2008 DigDash SAS 12
Page 13

Choosing Album Art
Your CD sleeve should automatically be displayed in the Album Art section
(provided that it is available in our database server).
Otherwise, click the Album Art section, then specify the location of the picture
you want to use. The picture should then be displayed in the frame.
Selecting an audio format
In the Options section, you can choose the audio format (MP3, WMA, OGG) as
well as the audio quality in which you would like to extract your files. The mp3
format is recommended for its compatibility with the widest range of devices.
6.2. Extraction
Extracting tracks
1. By default, all CD tracks are selected. To unselect some tracks, uncheck them.
You can also click the Title column header to unselect all the tracks, then only
select the tracks you would like to extract.
2. Click Extract to start the extraction. The Status column displays the
percentage of download complete , and then likewise for the
transformation .
3. At the end of the extraction, the icon is displayed if it succeeded or the
icon is displayed if it failed. Move the mouse over this icon to view the
error details.
Synchronizing selected tracks
You can choose to synchronize to your device the tracks that you have selected.
To do so, check the Synchronize selected tracks box under Options.
Canceling an extraction
To cancel an extraction, click Cancel. The icon shows up in the Status
column.
Refreshing CD contents
If you change CDs, click the Refresh button to display the tracks of the new
CD.
7. Editing MP3 tags
You can edit and change the different information available for your MP3 tags. To do
so, select your file, right click, and select Properties.
Copyright ©2006-2008 DigDash SAS 13
Page 14

In the right part, you can modify the following fields: the title, the artist name, the
album name, the genre, and the track number.
In the left part, you can import album art. Coby Media Manager searches for the
album art from the Amazon website. The search is based on the title and artist name.
If the album art is not available, you can search for it (specifying a new artist and/or
album name) from the Amazon website, or you can import it from your local hard
drive. To do so, right click the file, choose Properties, click the album art, and then
Import from Internet or Browse file.
Each time you modify a field, the box next to it is automatically checked, to indicate
that the modification will be saved. If you do not wish to save the modification,
uncheck the box.
Note: You can modify the properties of several files at once. To do so, select the files,
then right click and choose Properties.
8. Searching for music files
To search for specific music files, click the magnifying glass icon on the toolbar:
the Title and keywords field is displayed. Then type the text you are searching for in
the Title and keywords field.
You can narrow your search by title, artist or album by using the Field drop-down or
by file type using the Type drop-down.
Copyright ©2006-2008 DigDash SAS 14
Page 15

To revert to the initial list of files, clear the text from the Title and keywords field.
You can hide the search bar by clicking the magnifying glass icon again.
Copyright ©2006-2008 DigDash SAS 15
Page 16

III. The movie library
You can access the video library by clicking the Movie tab.
1. Importing files
You can import files already on your computer to your video library.
1.1 Importing all files
To import all video files of a folder, select Video - Video folders... and check the
folders containing your video files.
Copyright ©2006-2008 DigDash SAS 16
Page 17

1.2 Importing individual files
To import individual files, choose Video - Add a video file and locate the file on your
computer. You can also drag files from your windows Explorer to your video library.
2. Displaying files
2.1 Displaying files by category
The Library tree on the left allows you to display files by category.
2.2 Sorting your video files
Coby Media Manager displays the following information (when available) for each
video file:
• Title
• Status
• Size
• Date
• Type
To sort the files, select the column header by which to sort the list. For example, if
you want to sort your files by title, click the Title column header.
Click the column header again to reverse the sort order.
2.3 Hiding/showing files in your library
To hide items in your library, select them, then right click and choose Hide.
To display them again, click the Show hidden files button on the toolbar .
Hidden files appear grayed out. To select the ones you want to display again, right
click and choose Show.
Copyright ©2006-2008 DigDash SAS 17
Page 18

2.4 Displaying files as thumbnails or a list
You can display files as a list or thumbnails. To display files as thumbnails, click the
Display thumbnails/list icon on the toolbar.
To display the files as a list, click the Display thumbnails/list icon again.
3. Playing a video file
Select the video file and then double-click it (or click the Play button on the toolbar
).
Note: Your media file is played in the now playing tab. To change the media player (if
you want to use VLC or another media player), select Tools - Options from the menu
bar.
4. Synchronizing video files to your player
4.1 Synchronizing individual files
To synchronize individual files, select them, then right click and choose Synchronize.
You can also click the Synchronize selection button on the toolbar .
4.2 Synchronizing all videos of a folder
Select the folder in the Library section located to the left of your Coby Media
Manager window, then right click and choose Synchronize.
Note: Your player must be connected to your computer during synchronization
(check the device connection state on the toolbar: Connected device or
Disconnected device ).
5. Searching for video files
To search for specific video files, click the magnifying glass icon on the toolbar:
the Title and keywords field is displayed. Then type the text you are searching for in
the Title and keywords field.
You can narrow your search by title by using the Field drop-down or by file type
using the Type drop-down.
Copyright ©2006-2008 DigDash SAS 18
Page 19

To revert to the initial list of files, clear the text from the Title and keywords field.
You can hide the search bar by clicking the magnifying glass icon again.
Copyright ©2006-2008 DigDash SAS 19
Page 20

IV. The pictures library
You can access the pictures library by clicking the Picture tab.
Coby Media Manager can read images with the following formats :
• JPG, JPEG
• BMP
• GIF
• TIFF
• PNG
1. Importing files
You can import files already on your computer to your library.
1.1 Importing all files
To import all picture files of a folder, select Picture - Image Folders... and check the
folders containing your picture files.
Copyright ©2006-2008 DigDash SAS 20
Page 21

1.2 Importing individual files
To import individual files, choose Picture - Add an Image file... and locate the file
on your computer. You can also drag files from your windows Explorer to your
picture library.
2. Displaying files
2.1 Displaying files by category
The Library tree on the left allows you to display files by category.
2.2 Sorting your picture files
Coby Media Manager displays the following information (when available) for each
file:
• Parent Folder
• Title
• Status
• Size
• Date
• Type
To sort the files, select the column header by which to sort the list. For example, if
you want to sort your files by date, click the Date column header.
Click the column header again to reverse the sort order.
2.3 Hiding/Showing library files
To hide items in your library, select them, then right click and choose Hide.
To display them again, click the Show hidden files button on the toolbar .
Hidden files appear grayed out. To select the ones you want to display again, right
click and choose Show.
2.4 Displaying files as thumbnails or a list
You can display files as a list or thumbnails. To display files as thumbnails, click the
Display thumbnails/list icon on the toolbar.
To display the files as a list, click the Display thumbnails/list icon again.
Copyright ©2006-2008 DigDash SAS 21
Page 22

3. Viewing a picture file
To view a picture, double-click it. You can then browse and display the next or
previous image. You can also rotate the image right or left.
4. Synchronizing picture files to your player
4.1 Synchronizing individual files
To synchronize individual files, select them, then right click and choose Synchronize.
You can also click the Synchronize selection button on the toolbar .
4.2 Synchronizing all files
Select the folder in the Library section located to the left of your Coby Media
Manager window, then right click and choose Synchronize.
Note: Your player must be connected to your computer during synchronization
(check the device connection state on the toolbar: Connected device or
Disconnected device ).
5. Searching for picture files
To search for specific picture files, click the magnifying glass icon on the
toolbar: the Title and keywords field is displayed. Then type the text you are
searching for in the Title and keywords field.
You can narrow your search by title or parent folder by using the Field drop-down or
by file type using the Type drop-down.
To revert to the initial list of files, clear the text from the Title and keywords field.
You can hide the search bar by clicking the magnifying glass icon again.
Copyright ©2006-2008 DigDash SAS 22
Page 23

V. Configuring your mobile device
You can configure your mobile device in the device manager dialog box available
from the Tools - Device manager menu.
The left pane Devices list shows the devices supported by Coby Media Manager.
1. Automatic installation
Your software is designed to automatically recognize your device and list it as the
favorite device. You can start using it right away.
If you have more than one Coby player, read the sections below to learn how to add
your device to your favorite devices list and how to configure them manually.
2. Adding a mobile device to the favorite devices list
To add a mobile to the favorite devices list: from the Tools - Device manager menu,
select your device in the left pane, then click the Add button. Coby Media Manager
should automatically detect the device.
Copyright ©2006-2008 DigDash SAS 23
Page 24

3. Configuring a mobile device
3.1 Configuring synchronization
To configure a device, select it and click the Configure button. The Synchronization
tab opens.
By default, the location of your device is automatically detected. Your files will be
transferred directly to this location during synchronization. If you want to specify a
different location, select the Manual device location button and specify the folder to
which you want to copy your audio and video files.
3.2 Configuring the output file format
You can specify an output file format for your files in the Output file format tab. By
default, the output type Automatic is selected. Coby Media Manager will use the
format that best suits your device when synchronizing files. For example, if your
player supports audio and video in the AVI and MP3 formats, AVI format will be
used when synchronizing video files and MP3 format will be used when
synchronizing audio files.
Copyright ©2006-2008 DigDash SAS 24
Page 25

You can force the use of a specific format by selecting the Forced button. You will
then have to choose the desired format. This format will be used during
synchronization of your audio files as well as your video files. For example, if you
select the MP3 format, videos will be read as audio tracks with no images.
4. Removing a mobile device
To remove a device from your favorite devices list, select the device you want to
remove and click the Remove button.
Copyright ©2006-2008 DigDash SAS 25
Page 26

VI. Registration and software update
When you launch Coby Media Manager for the first time, this window will appear:
Fill in all of the fields and then press OK (the mandatory fields MUST be filled in).
You need an Internet connection and a valid email address.
If you do not wish to register at once, select Register later.
Registration allows you to get the latest Coby Media Manager updates and to vadliate
your warranty.
When an update is released, a pop up window will ask you if you want to install the
newest version of the software. Press OK and follow the steps displayed on-screen.
If you want to look for an update manually, browse the Help menu and select
Software update.
Copyright ©2006-2008 DigDash SAS 26
Page 27

VII. Tabs in Coby Media Manager
This section gives a brief description of the tabs available in Coby Media Manager:
Device
Displays information about your device and its contents.
Copyright ©2006-2008 DigDash SAS 27
Page 28

Music
Displays the contents of your music library. Allows you to listen to music files and
synchronize them to your device.
Movie
Displays the contents of your video library. Allows you to watch video files and
synchronize them to your device.
Copyright ©2006-2008 DigDash SAS 28
Page 29

Picture
Displays the contents of your picture library. Allows you to view image files and to
synchronize them to your device.
Now playing
Displays Coby Media Manager media player. Allows you to navigate through the
files you have added to your now playing list and to play them.
Copyright ©2006-2008 DigDash SAS 29
Page 30

Coby
Gives you access to Coby web site.
emusic
Allows you to buy music on-line.
Copyright ©2006-2008 DigDash SAS 30
Page 31

VIII. Menus
The following section describes the menus and commands available in Coby Media
Manager:
File
Allows you to exit Coby Media Manager.
Edit
Allows you to edit device or media information.
View
Contains commands that apply to the toolbar, media view and page refresh.
Allows you to navigate through Coby Media Manager tabs.
Music
Contains commands that allow you to select your music files and synchronize them to
your device.
Movie
Contains commands that allow you to select your video files and synchronize them to
your device.
Picture
Contains commands that allow you to select your picture files and synchronize them
to your device.
Tools
Contains commands that apply to the device and options management.
Help
The help menu allows you to open the Coby Media Manager help. You can also
display some information regarding Coby Media Manager version and register your
software
Copyright ©2006-2008 DigDash SAS 31
Page 32

1. File
Exit
Closes the application.
2. Edit
The Edit menu contains commands to manage media files.
Copy
Copies the selected items (from the device tab) to the clipboard.
Paste
Pastes items from the clipboard.
Rename
Renames the item selected in the device tab.
Delete
Removes selected items.
Select all
Selects all the items in the page displayed.
Search
Searches item in the current page
3. View
Toolbar
The toolbar contains icons and options that let you quickly access Coby Media
Manager commands. You can hide the toolbar by unchecking the Toolbar entry in the
View menu.
Refresh
Refreshes the content of the active tab.
Tab
Displays the selected tab
4. Music
Music folders
Selects folders containing your music files. Those folders will be scanned and the
music contents will be added to your music library.
Copyright ©2006-2008 DigDash SAS 32
Page 33

Add an audio file
Selects a specific file to add to your music library.
Synchronize selection
Synchronizes the music files that are currently selected in the music library to your
Coby device.
Stop synchronization
Stops the current synchronization in progress.
5. Movie
Video folders
Selects folders containing your video files. Those folders will be scanned and the
video contents will be added to your video library.
Add a video file
Selects a specific file to add to your video library.
Synchronize selection
Synchronizes the video files that are currently selected in the video library to your
Coby device.
Stop synchronization
Stops the current synchronization in progress.
6. Picture
Image folders
Selects folders containing your picture files. Those folders will be scanned and the
picture contents will be added to your picture library.
Add an image file
Selects a specific file to add to your picture library.
Synchronize selection
Synchronizes the picture files that are currently selected in the picture library list to
your Coby device.
Stop synchronization
Stops the current synchronization in progress.
7. Tools
Device manager
Configures the device you want to use to synchronize media files.
Copyright ©2006-2008 DigDash SAS 33
Page 34

Extract songs from an audio CD
Launches the audio CD extraction dialog box.
Options
General
• Interface options: configures your preferences when starting and closing
the application.
• Language settings: selects the user interface language.
• Media player: If you want to use a specific media player (like VLC
media player), select "Another Media Player installed on the computer",
click the browse button and select your player.
Advanced
• HTTP Proxy Configuration: specifies your proxy server parameters. If
you do not use a proxy, select the Direct Internet connection option. If
you do use a proxy server, enter the host address and port number for a
manual configuration, or select the automatic detection of the proxy
setting, which will be done through Internet Explorer parameters. You
can also enter the .pac address of a proxy configuration script.
• Storage options: file histories are stored in the Application Data\Coby
Media Manager\history directory (the Application Data directory is the
Copyright ©2006-2008 DigDash SAS 34
Page 35

one belonging to the current user). You can change this storage directory
by typing a new path in the History path field. You can also define the
number of days you want to keep the history (by default, it will be kept
for 20 days).
• Automatic software update: by checking the Update software
automatically when a new version is available option, new Coby
Media Manager versions will be automatically downloaded to your
computer when available.
8. Help
Help content
Displays Coby Media Manager help document.
Free registration
Allows the free registration of Coby Media Manager to enable the full functionality of
your software, such as software updates.
Software update
Downloads a new version of Coby Media Manager if available. This menu is
available only if you have registered Coby Media Manager.
Copyright ©2006-2008 DigDash SAS 35
Page 36

About Coby Media Manager
Displays information regarding the Coby Media Manager version. You can also
register Coby Media Manager, and display its licence.
Copyright ©2006-2008 DigDash SAS 36
Page 37

IX. Shortcut keys in Coby Media Manager
You can use shortcut keys to access many functionalities of your application. Shortcut
keys are shown next to their respective menu items. For example, the Ctrl+O shortcut
keys are shown next to the File - Open menu. You can also read the list of shortcut
keys below.
List of Shortcut keys:
Shortcut keys Effect
(Enter) Activates the focused button in a dialog box.
(Esc) Cancels the action and closes the dialog box without
saving.
Arrow keys Changes the active control field in an option section
of a dialog box.
(Tab) Activates the next element in a dialog box.
(Shift)+(Tab) Activates the previous element in a dialog box.
(Del) Removes the selected items.
Alt+F4 Exits Coby Media Manager.
Ctrl+C Copies the selected items.
Ctrl+V Pastes the copied elements from the clipboard.
Ctrl+A Selects all the items in the folder you are browsing.
Ctrl+Z Undoes the last action.
Ctrl+Y Redoes the last action.
Ctrl+D Displays the device manager.
Copyright ©2006-2008 DigDash SAS 37
Page 38

Contextual menus
Some Coby Media Manager items have contextual menus. To access them, right click
the items as shown below:
Item Displayed contextual menu
Media file on device
Music file in library
Movie file in library
Picture file in library
Copyright ©2006-2008 DigDash SAS 38
 Loading...