

Page 1

IR825
EN
Wireless Internet Radio
Instruction Manual ..........................................Page 2
Please read carefully before use
Page 2

Page 2 Coby Electronics Corporation
English
www.cobyusa.com Page 3
Table of Contents
THANK YOU ........................................................................5
Features ...................................................................................................5
Warnings .................................................................................................6
PACKAGE CONTENTS ........................................................7
GETTING STARTED ............................................................8
Requirements ........................................................................................8
Using the Menu Controls ..................................................................9
Connect to Your Wireless Network ...............................................9
Step 1: Connecting Power ....................................................9
Step 2: Connecting to the Internet................................. 10
Step 3: Select Your Region .................................................. 10
Step 4: Select Your Network (SSID) .................................. 10
Step 5: Enter Your WEP/WPA Password .........................11
Troubleshooting your network connection ........................... 12
CONTROLS AT A GLANCE ................................................13
Front View ............................................................................................ 13
Rear View.............................................................................................. 13
Top View ............................................................................................... 14
INTERNET RADIO MODE .................................................16
Stations (Choosing a Station) ........................................................17
Podcasts (Choosing a Podcast) .................................................... 18
My Favourites ..................................................................................... 18
Browsing the My Favorites list .......................................... 18
Adding Stations or Podcasts to the My
Favorites List ............................................................................ 19
My Added Stations ........................................................................... 19
Viewing Station/Podcast Information ...................................... 19
Station Updates ................................................................................. 20
Page 3

www.cobyusa.com Page 3
English
Table of Contents
Preset Station Memory ................................................................... 21
Storing a Preset Station ....................................................... 21
Selecting a Preset station ................................................... 21
FM RADIO MODE ............................................................ 22
General Operation ............................................................................22
Access the FM Radio Menu ............................................................23
Scan Setting .............................................................................23
Audio Setting...........................................................................23
Preset Station Memory ................................................................... 24
Storing a Preset Station ....................................................... 24
Selecting a Preset station ................................................... 24
MUSIC PLAYER MODE .................................................... 25
Music Player Menu ...........................................................................25
Play shared media .................................................................. 26
Play shared folders ................................................................ 26
SETTING THE CLOCK .......................................................27
Manual Time/Date Setting ............................................................ 27
Automatic Time/Date Setting ...................................................... 28
Other Clock Options ........................................................................29
Using the Alarms/Timers ............................................................... 30
Setting the Alarms ................................................................. 30
Alarm Snooze/O................................................................... 31
Sleep Timer............................................................................... 31
SYSTEM SETTINGS...........................................................33
Network setup ..................................................................................33
Language ............................................................................................34
Factory reset .......................................................................................34
Software Updates ............................................................................. 35
SW Version and Radio ID ................................................................ 35
Page 4

Page 4 Coby Electronics Corporation
English
www.cobyusa.com Page 5
APPENDIX ....................................................................... 36
Set Up Media Sharing with Windows Media Player 11 ......36
Set Up Media Sharing with Mac OS X........................................ 39
Set up Windows File Sharing on a MAC ....................... 39
Accounts Setup ...................................................................... 39
Directory Setup .....................................................................40
Play Streaming Music on the Internet Radio .......................... 41
Frontier Silicon Internet Radio Portal ........................................ 42
TROUBLESHOOTING ...................................................... 44
SPECIFICATIONS ..............................................................47
SAFETY NOTICES ............................................................ 48
Table of Contents
Page 5

www.cobyusa.com Page 5
English
Thank You
Thank you for purchasing the Coby IR Wireless Internet
Radio. Please read these instructions before installing and
operating this system.
Features
Free wireless access to thousands of stations from
around the world
Instant wireless access to your computer’s music
library
Integrated FM radio
Optional station presets for Internet and FM radio
( total)
Full-range stereo speakers
Alarm clock with sleep and snooze functions
.mm headphone jack for private listening
¹ Requires a 64 Kbps internet connection or greater and an 802.11g wireless access
point
² Requires a computer running Windows Media Player 11.
Page 6

Page 6 Coby Electronics Corporation
English
www.cobyusa.com Page 7
Thank You
Warnings
If this Internet Radio has been moved from a cold
place to a warm place (e.g., from a cold car to a warm
room), do not plug it in for - hours. Moisture may
have condensed inside the radio, which can cause
internal damage to the system. To avoid damage,
please unpack your Internet Radio and allow it to
stand at room temperature for - hours before use.
Always ensure that the main plug is easily accessible.
Do not open the radio or remove any xed covers.
Doing so may cause risk of electric shock.
Unplug the radio during electrical storms.
Never use your Internet Radio if it is damaged in any
way. Always place the unit on a at, level surface
where it will not be subject to vibration.
Do not expose the system to extreme temperatures,
either hot or cold. Place your Internet Radio well away
from heat sources including radiators, replaces or
heat-producing devices (including ampliers).
Do not use the system in tropical climates.
Do not allow your Internet Radio to be exposed to
rain, moisture or dust. If any liquid is spilled into the
radio, disconnect it from the power supply immedi-
ately and contact a qualied repair person.
Do not open the system or attempt to perform re-
pairs yourself. Refer all repairs to qualied service
personnel only.
Page 7
www.cobyusa.com Page 7
English
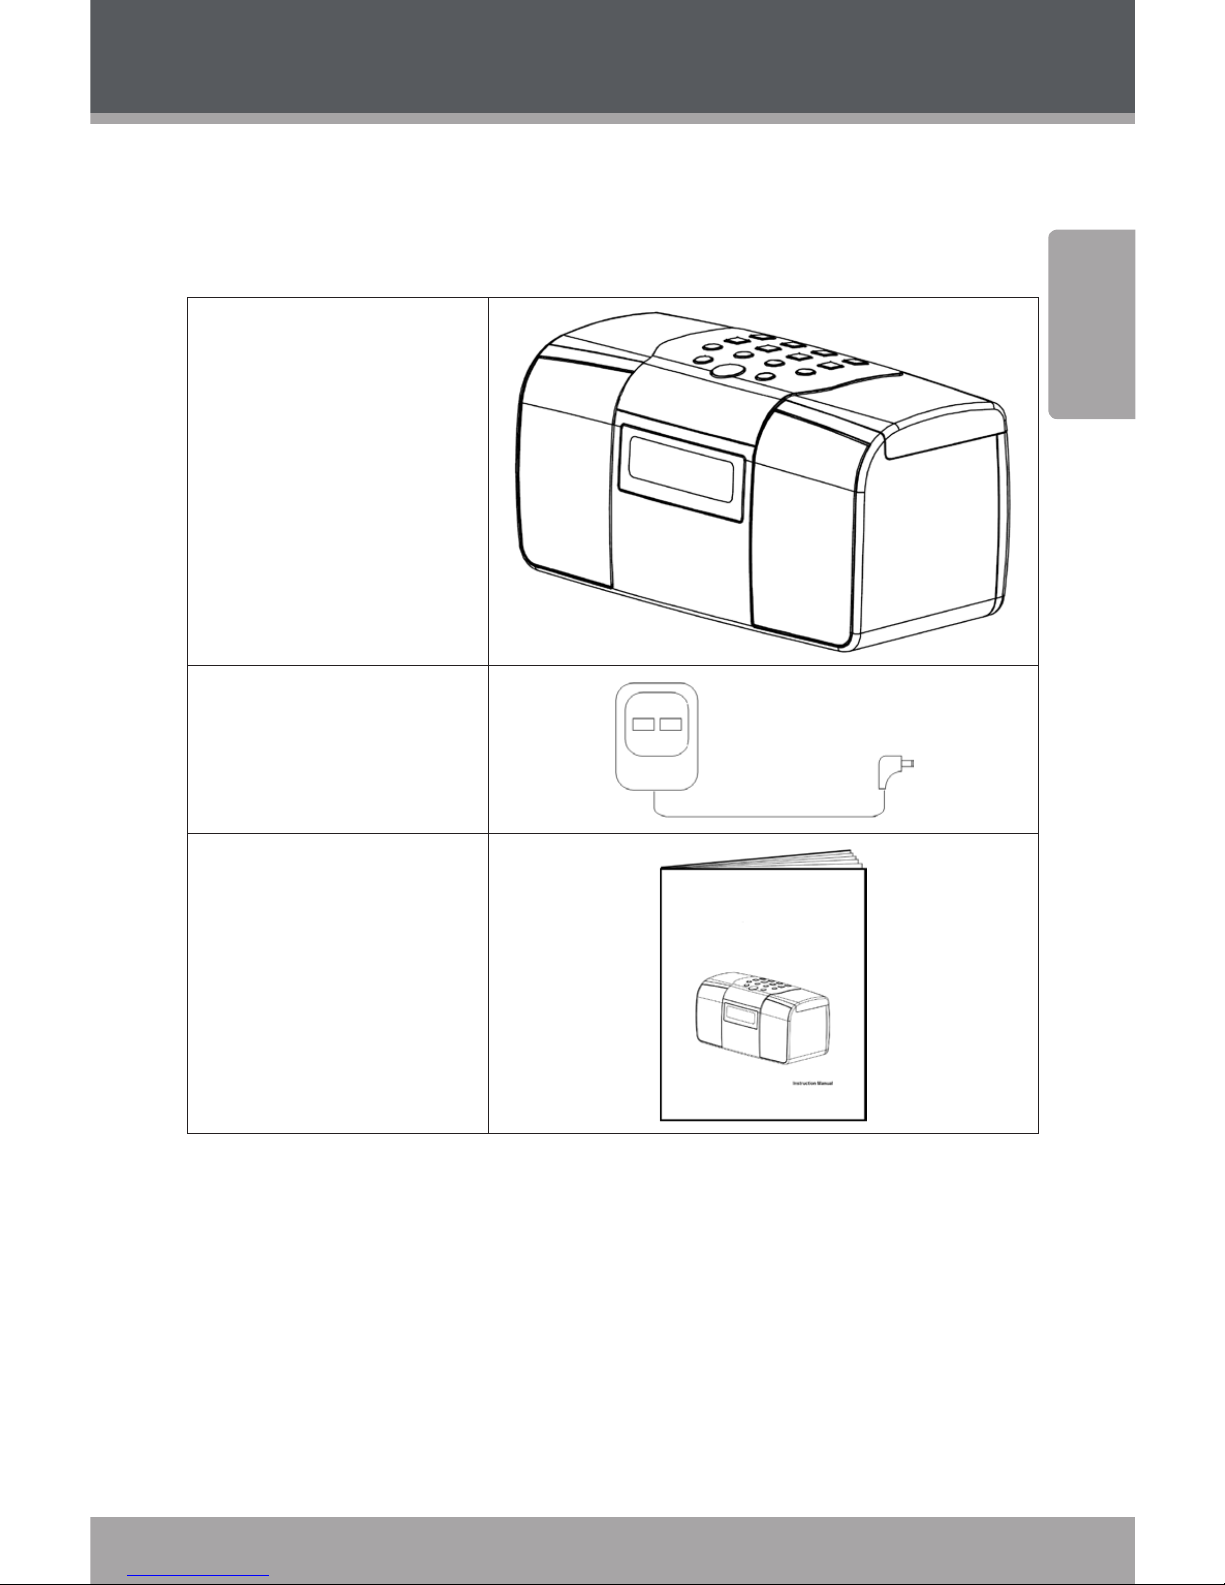
Package Contents
Please make sure that the items shown below are included
in the package. Should an item be missing, please contact
the local retailer from which you purchased this product.
Main unit
Power Adapter
Instruction manual
Page 8
Page 8 Coby Electronics Corporation
English
www.cobyusa.com Page 9
Getting Started
Requirements
Before you use your Internet Radio, you will need the
following:
A broadband Internet connection.
A wireless access point (Wi-Fi) connected to your
broadband Internet, preferably via a router.
If your wireless network is secured with Wired
Equivalent Privacy (WEP) or Wi-Fi Protected
Access (WPA) encryption, you will need to
enter the security key on the Internet Radio to
connect it to the network. WPA encryption is
recommended for better network security.
If your wireless network is congured for trust-
ed stations, you will need to enter the Radio’s
MAC address into your wireless access point. To
nd the Radio’s MAC address, enter the menu
as follows: Main menu > System settings >
Network > View settings > MAC Address.
For instructions on entering the MAC address into
your wireless access point, please refer to the manual supplied with your wireless internet router.
Before you continue, make sure that your wireless access point is powered up and connected to broadband
internet. For information on conguring this connection,
please refer to the manual supplied with your wireless
internet router.
Page 9
www.cobyusa.com Page 9
English
Getting Started
For uninterrupted Internet radio, a broadband
connection speed of at least 64kbps is recommended, although slower connection speeds may
still work.
If you need further assistance to set up your wireless
internet connection, please contact your internet
provider or wireless access point manufacturer.
Using the Menu Controls
To browse the menu options, press or .
To select a menu option, press
.
To return to a previous menu, press
.
Connect to Your Wireless Network
If you make a mistake at any point and wish to navigate
backward, press the key. This will return you to
the previous screen.
Step 1: Connecting Power
Plug one end of the power adapter into the Power jack
located on the bottom of the unit, then plug the other end
into an AC -V wall outlet. Press the button to turn
the radio on.
Page 10
Page 10 Coby Electronics Corporation
English
www.cobyusa.com Page 11
Getting Started
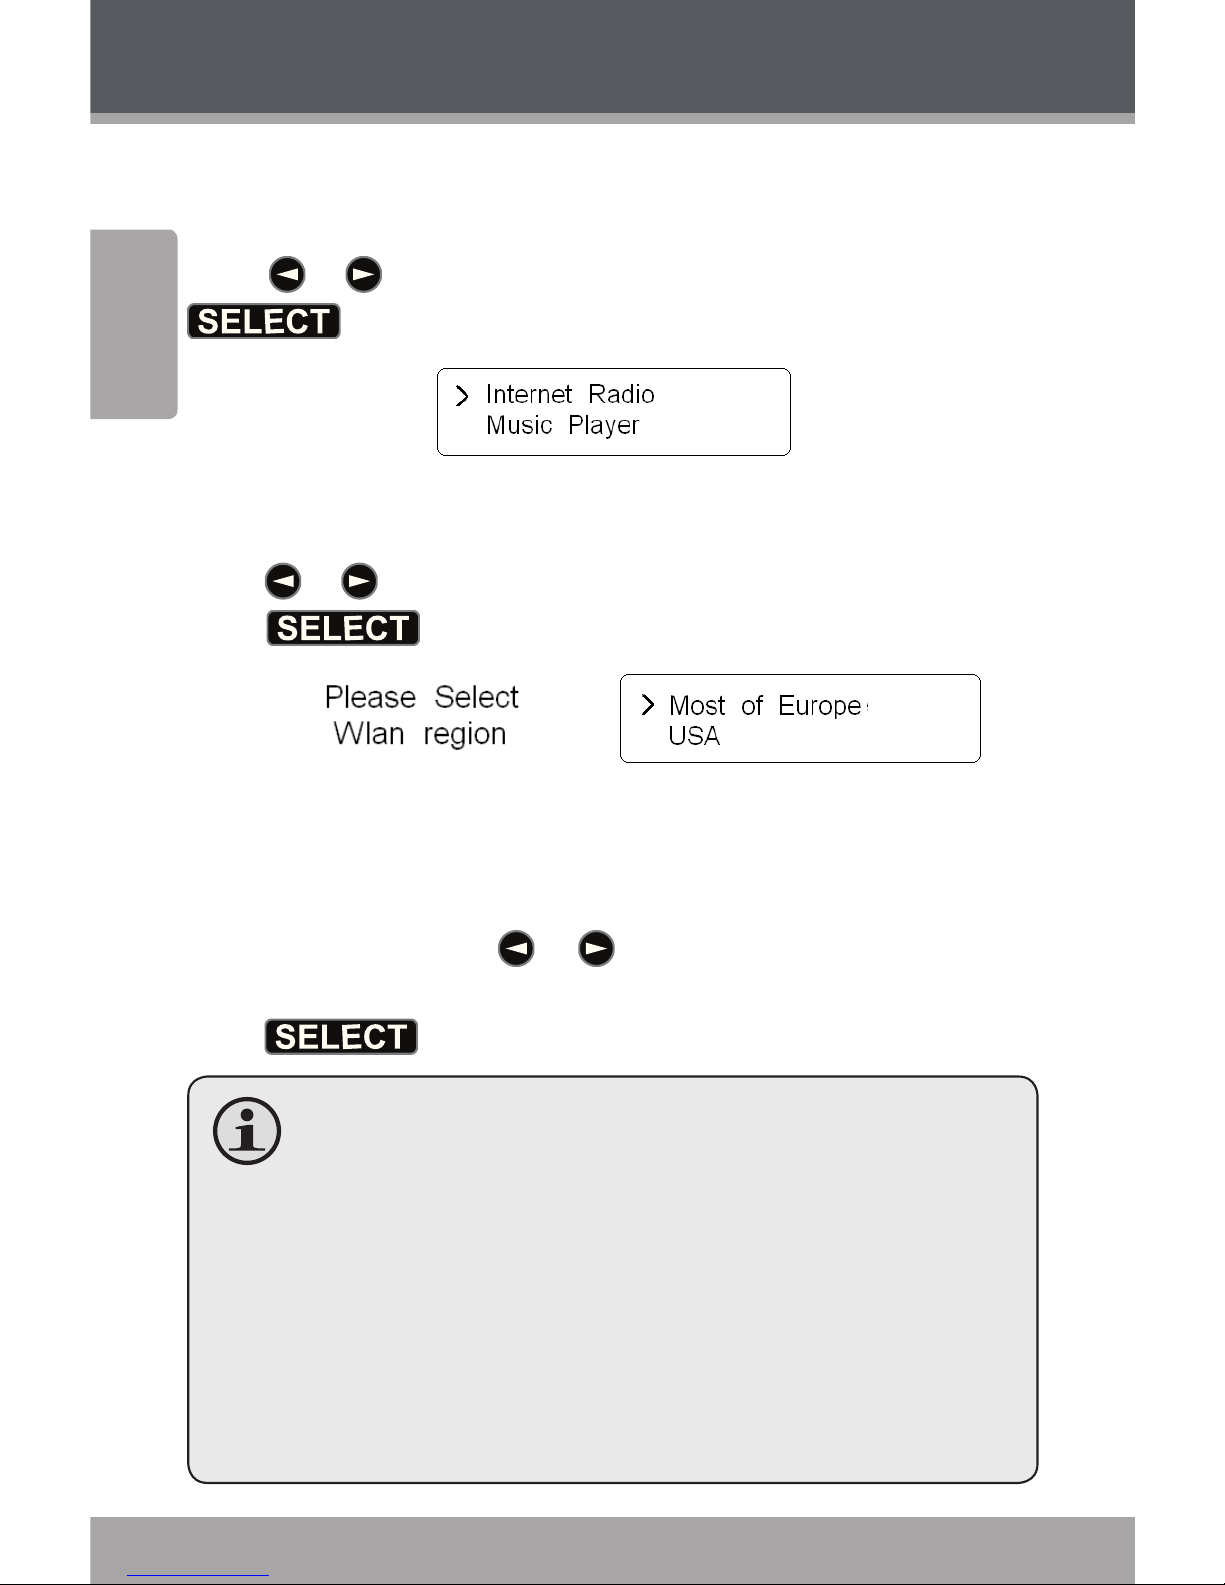
Step 2: Connecting to the Internet
When the unit turns on, the Main menu will be displayed.
Press or to choose <Internet Radio> then press
to conrm.
Step 3: Select Your Region
Press or to choose your region from the menu and then
press to conrm. The network wizard will launch.
Step 4: Select Your Network (SSID)
The unit will scan the area and display all available
networks. Press or to choose the name of
your network from the menu list and then press
to conrm.
The name of your network (SSID) is determined by
the SSID setting of your wireless access point.
If the name of your network does not appear in the
list, select <Rescan> to have the unit try to nd your
network again.
If you have congured your wireless access point to
hide the SSID name, you will need to enter your network settings manually. Choose <Manual cong>
from the menu and press [SELECT] to conrm.
Page 11
www.cobyusa.com Page 11
English
Getting Started
If your network does not have WEP or WPA security
enabled, the unit will nish connecting to the net-
work and return to the Internet Radio menu.
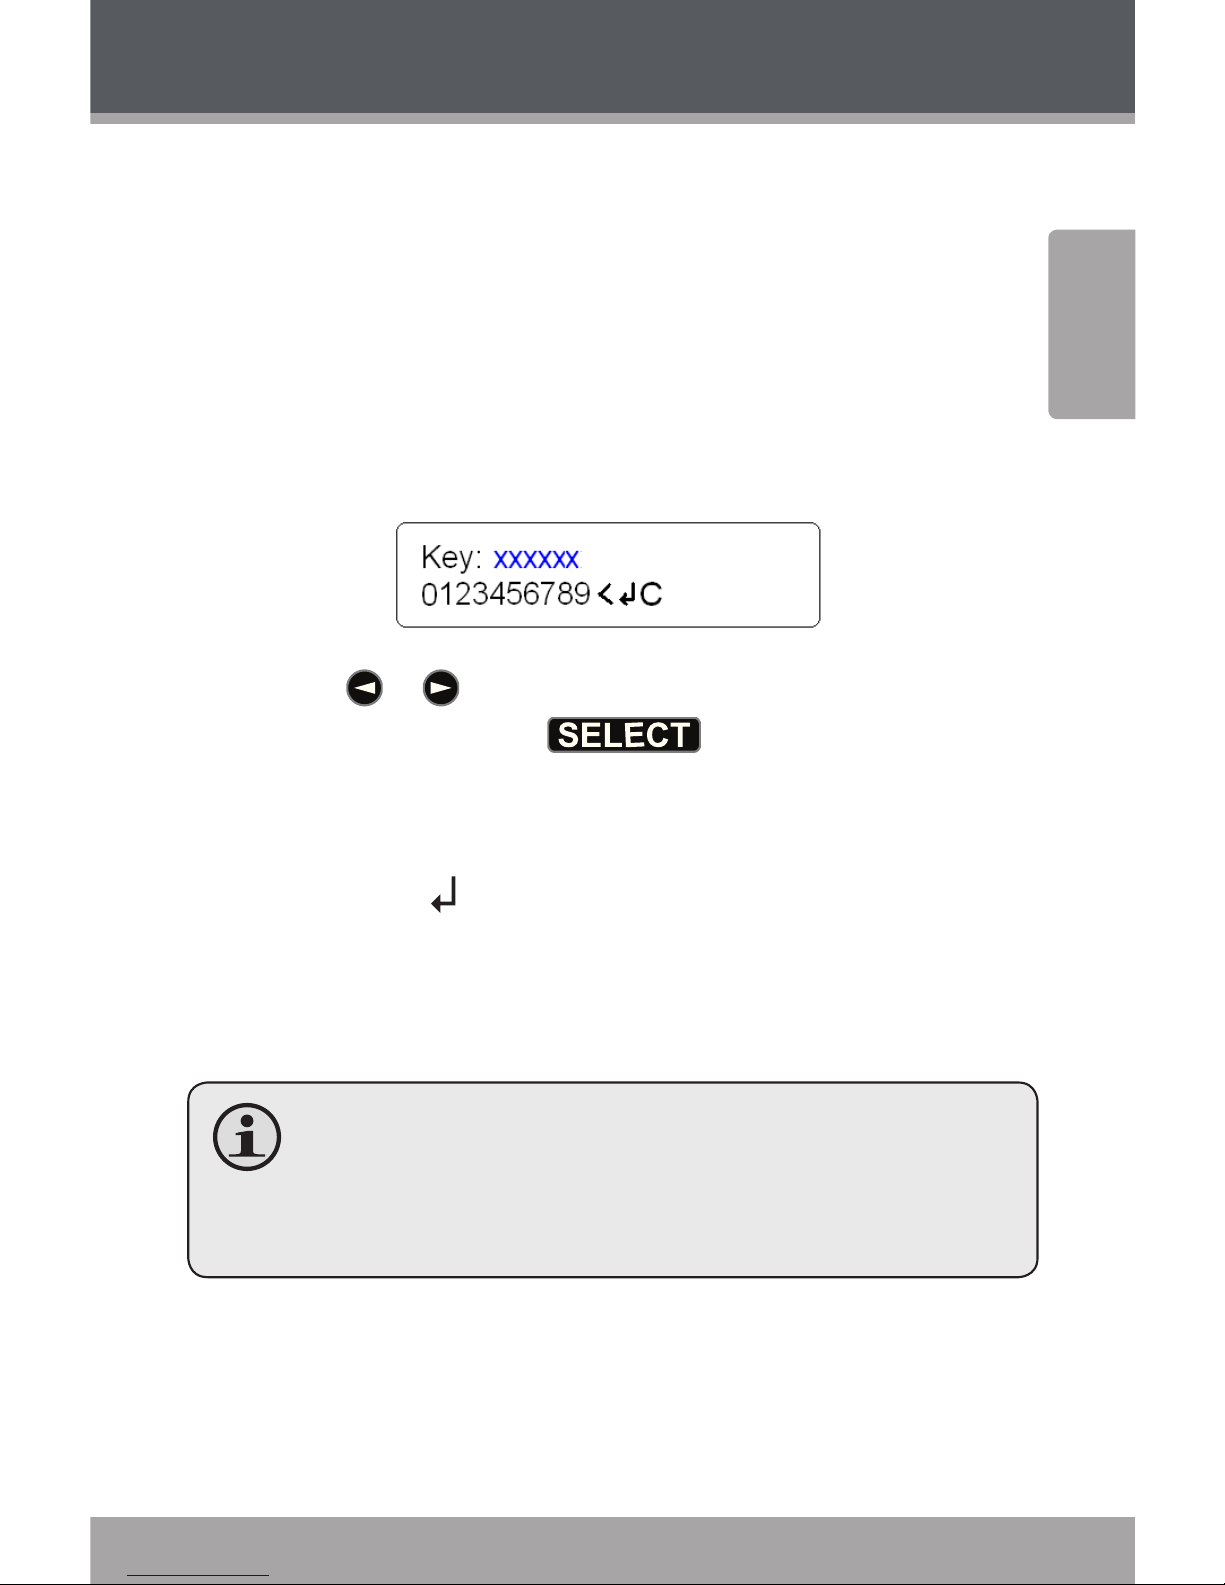
Step 5: Enter Your WEP/WPA Password
If security is enabled, you will be asked to input the WEP
or WPA password. A password entry screen will display as
follows:
Press or to cycle through the alphanumeric
character list. Press to input a character.
If you make a mistake while entering your password,
select the ‘ < ’ icon to delete the previous character.
Select the ‘
‘ icon when you have nished entering
your password,.
The unit will nish connecting to the network and return
to the Internet Radio menu.
The radio will automatically save your WEP or WPA
security key. You will not need to re-enter a WEP/
WPA key unless the radio’s <FACTORY RESET> function is selected.
Page 12
Page 12 Coby Electronics Corporation
English
www.cobyusa.com Page 13
Getting Started
Troubleshooting your network
connection
If after trying to connect to your wireless network, the display
reads “Failed to connect,” please take the following steps:
Ensure that your wireless access point and internet
modem are connected and working normally.
Try resetting your wireless access point and
internet modem (i.e., turn them o and then
back on again).
Move the radio to a location where the wireless
signal is stronger (e.g., closer to your wireless access
point).
Make sure that your password has been entered
correctly.
WEP/WPA passwords are case-sensitive.
To retrieve your access code or to get solutions
to frequently asked questions, move the display
highlight to the <HELP> menu and press [SELECT]
to conrm.
Page 13
www.cobyusa.com Page 13
English
Controls at a Glance
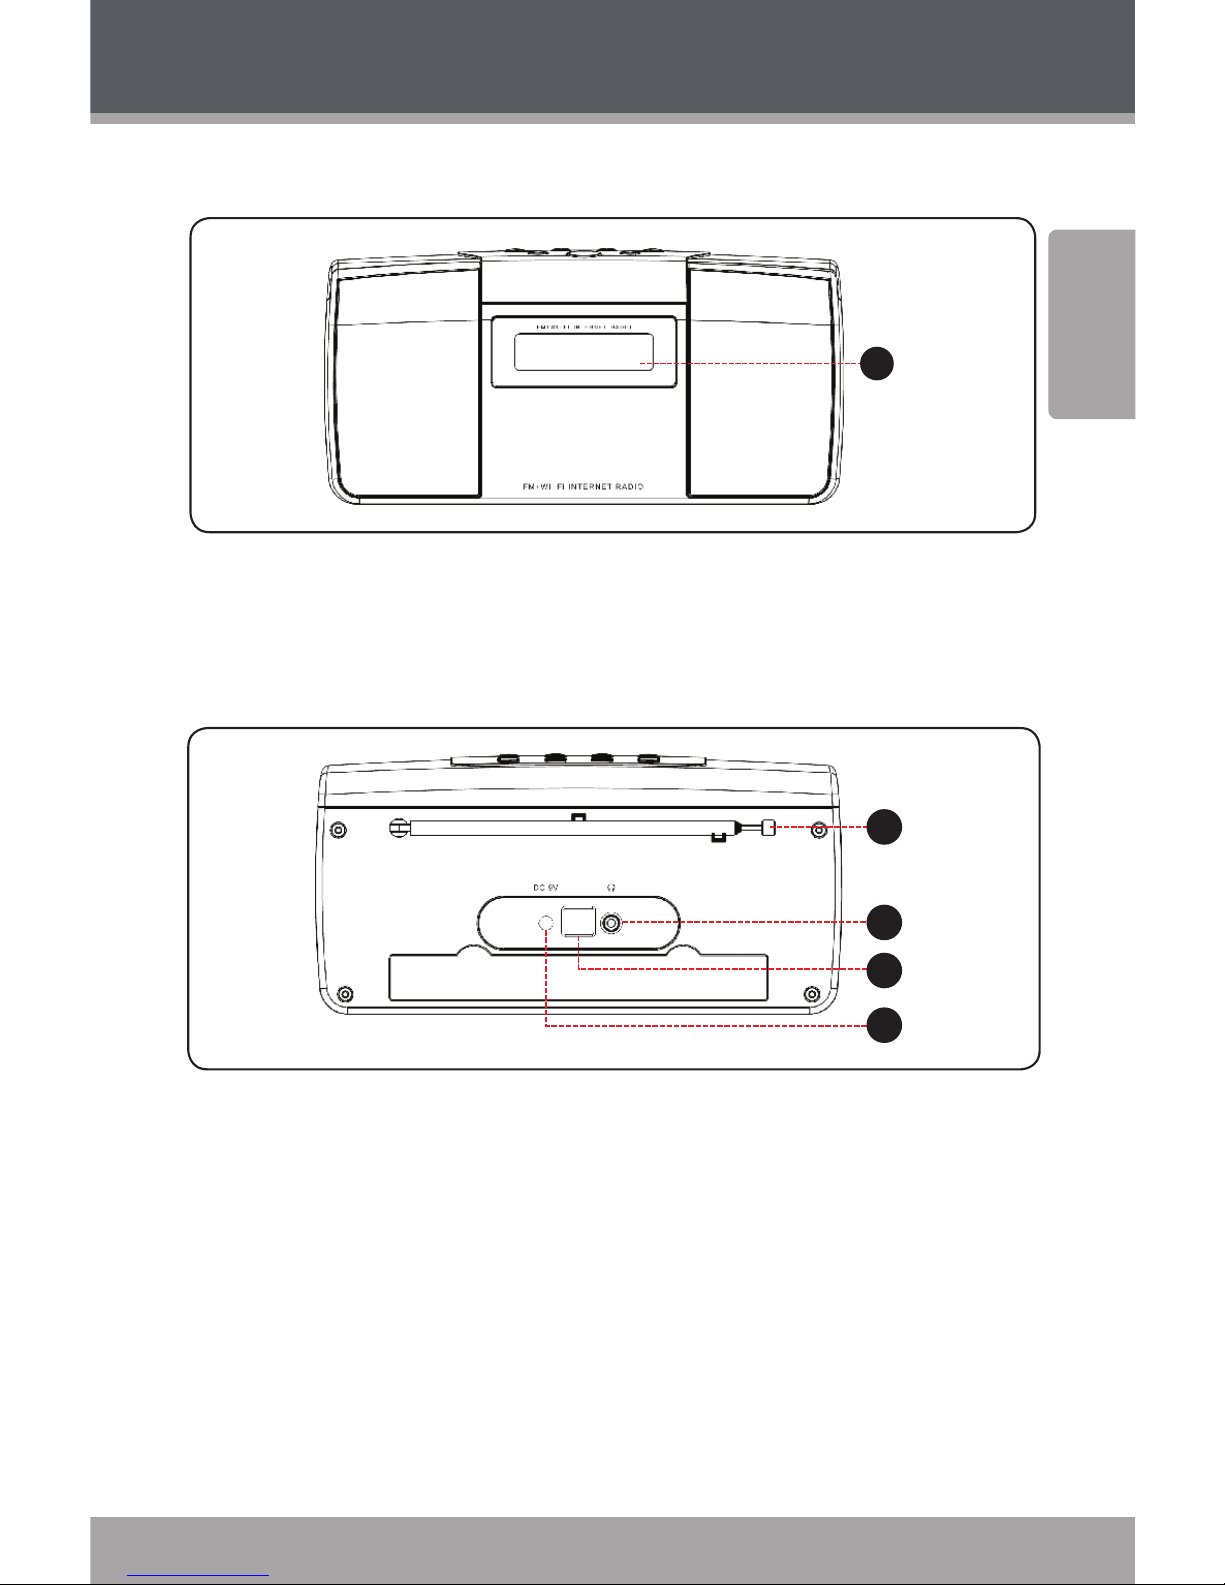
Front View
1
Display Screen1.
Rear View
1
2
3
4
Telescopic FM antenna1.
3.5mm headphone jack2.
Service port (for use by authorized service personnel 3.
only)
Power input (for use with supplied power adapter)4.
Page 14
Page 14 Coby Electronics Corporation
English
www.cobyusa.com Page 15
Controls at a Glance
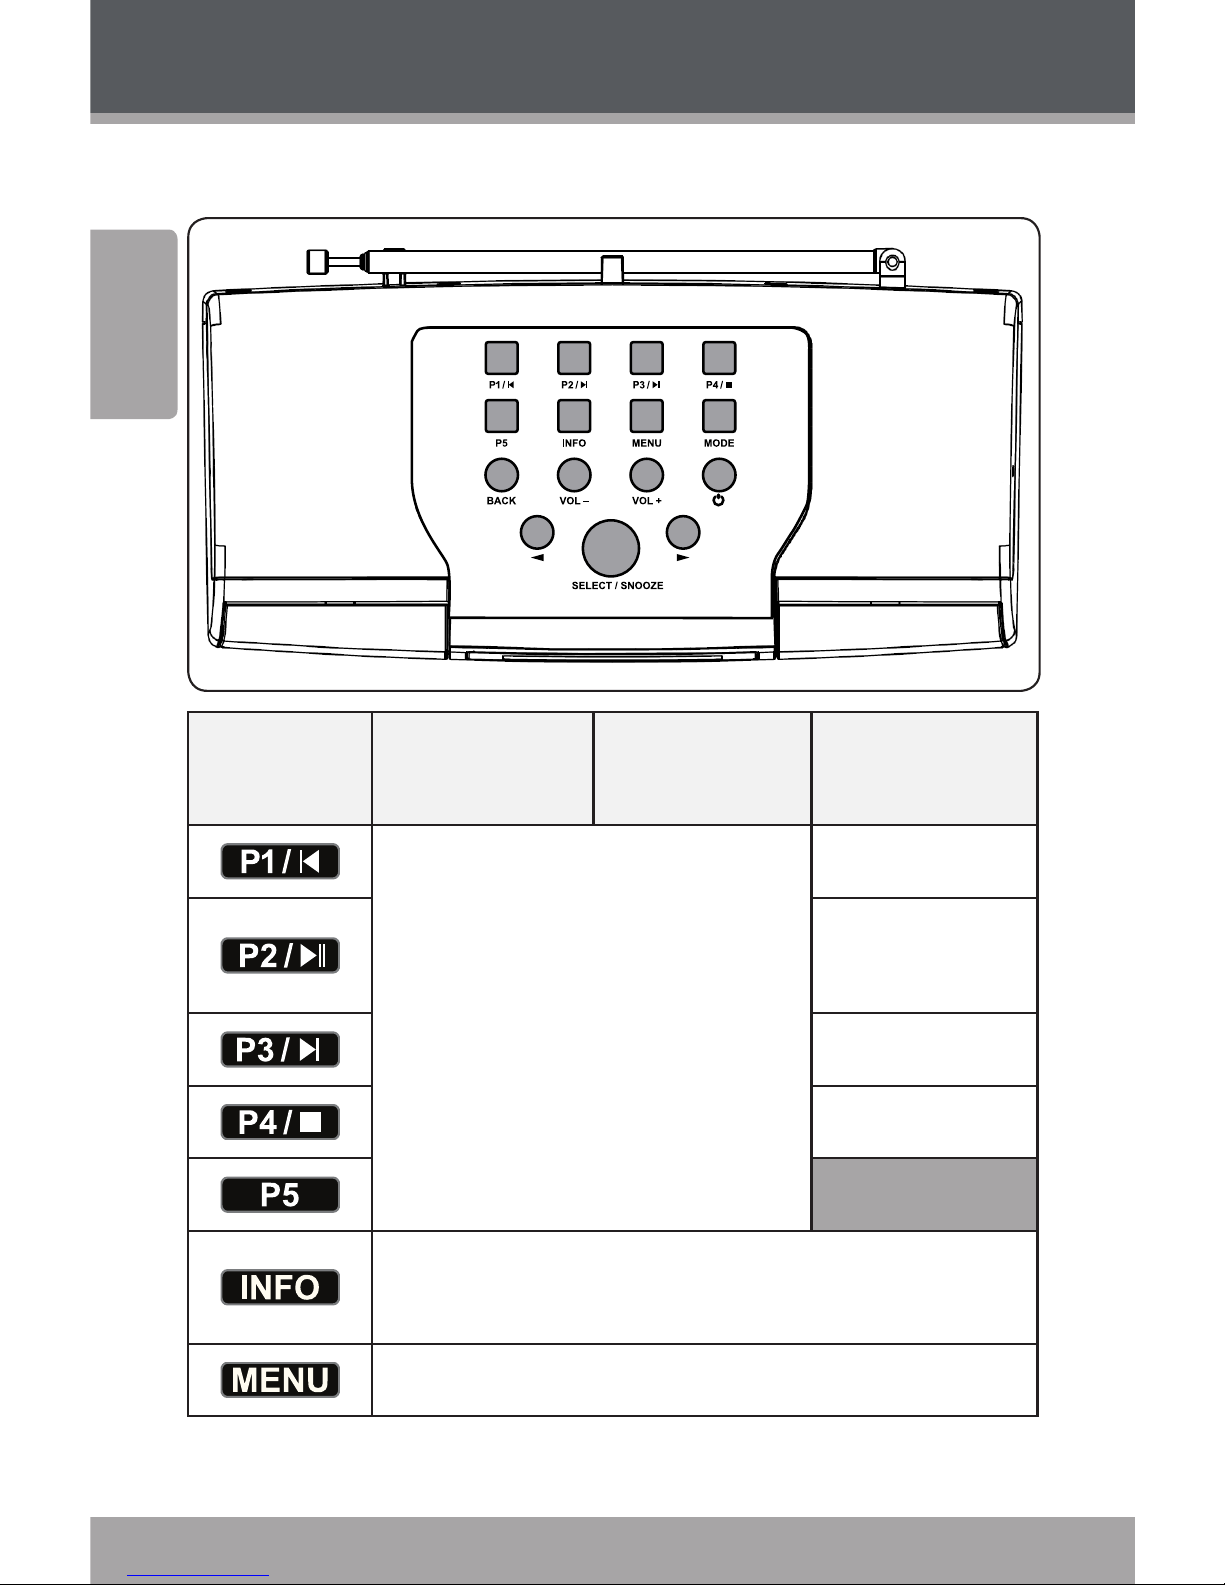
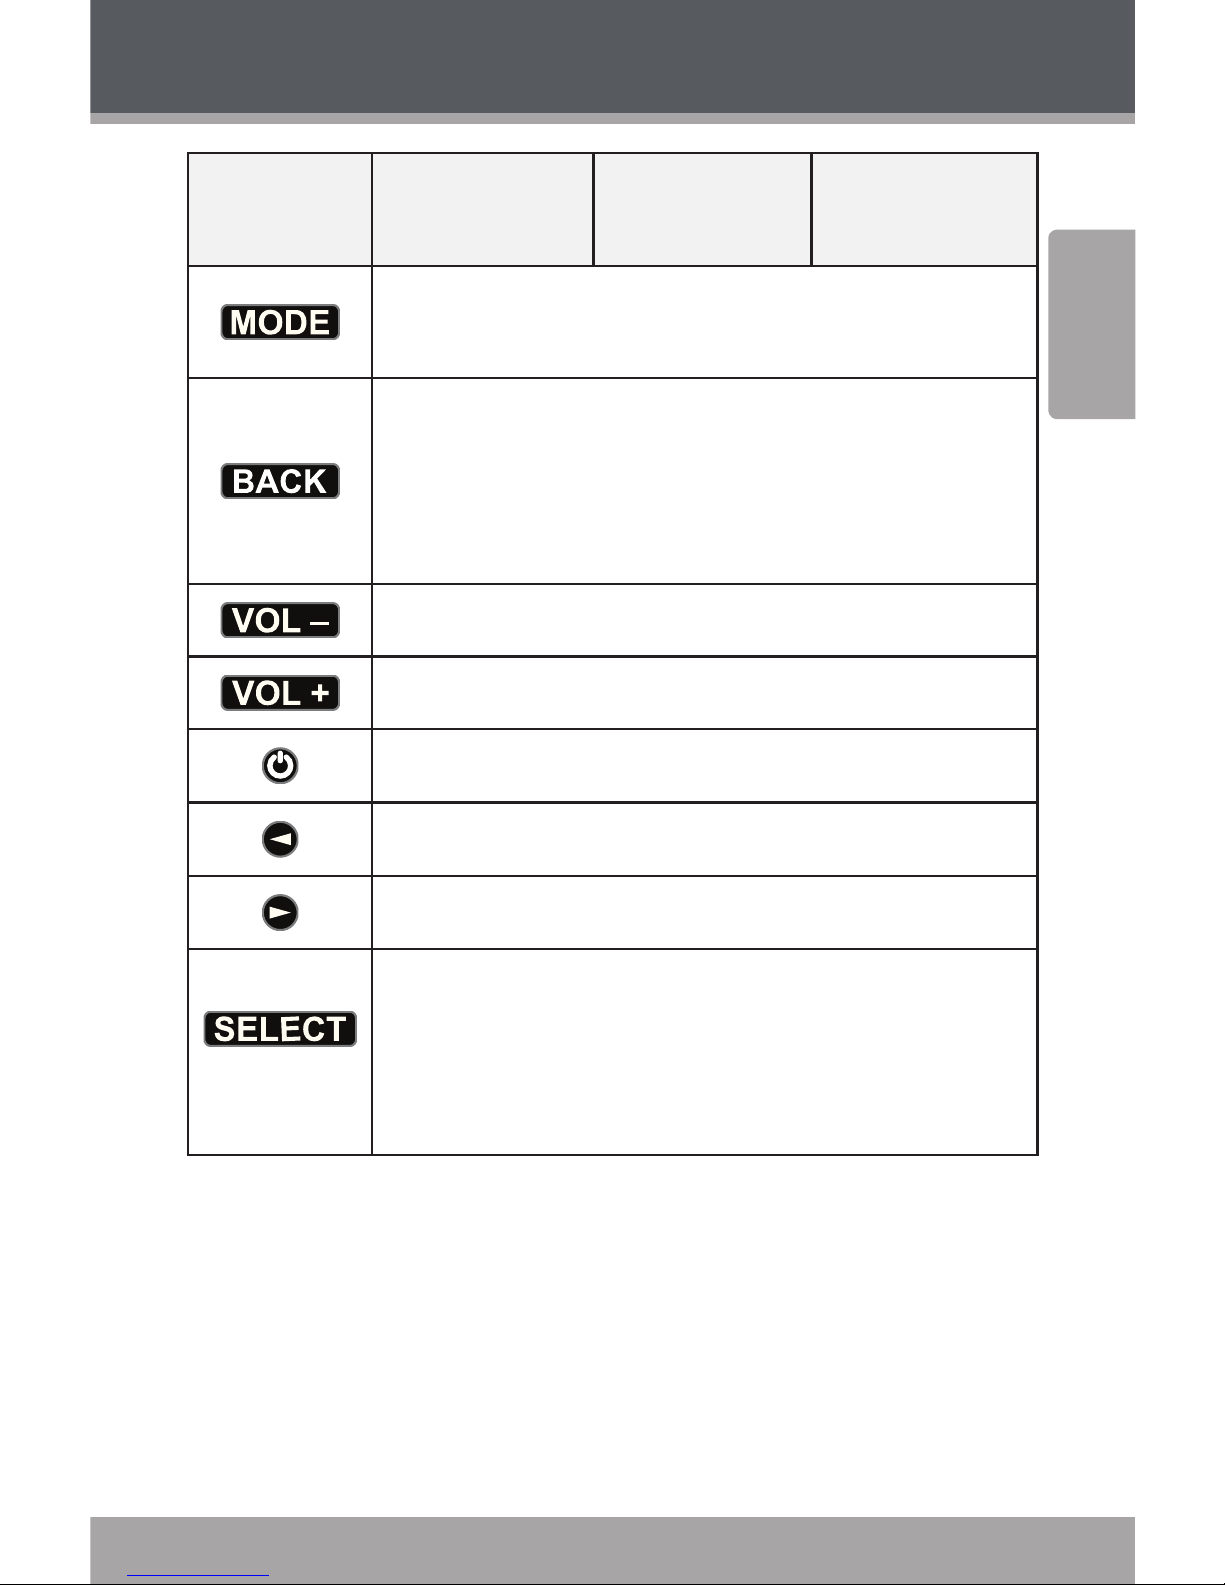
Top View
Control
Internet
Radio
FM Radio
Music
Player
Press and hold to save Preset
station 1-5;
Press to tune to Preset station 1-5.
Previous track
Play/Pause
Next track
Stop
No function.
Press to change information display (e.g., station
information, software version, etc.)
Press to access the menu.
Page 15
www.cobyusa.com Page 15
English
Controls at a Glance
Control
Internet
Radio
FM Radio
Music
Player
Press to toggle between Internet Radio, FM Radio,
and Media Player modes.
Press to return to a previous menu.
When entering a WEP or WPA network password,
press to scroll quickly through the alphanumeric
character list.
Press to decrease volume.
Press to increase volume.
Turn the radio on or o.
Scroll up when browsing a menu list.
Scroll down when browsing a menu list.
[SNOOZE]
Select a menu item.
FM mode: auto tune to the next available station.
Snooze: When alarm is sounding, press to delay the
alarm.
Page 16

Page 16 Coby Electronics Corporation
English
www.cobyusa.com Page 17
Internet Radio Mode
Press repeatedly until “Internet Radio” is displayed on the screen.
If you were previously listening to a station, the unit will
automatically try to reconnect to that station. Press to
return to the Internet Radio menu.
The Internet Radio menu contains the following items:
My Favourites: Select to listen to your favorite sta-
tions or podcast programming that you have saved.
Stations: Select to listen to internet radio streams.
Podcasts: Select to listen to podcast programming.
My Added Stations: Listen to stations added from the
Frontier Silicon website.
Help: Select to access a short FAQ about internet
radio stations, or get your access code to register at
the Frontier Silicon website.
For more information about each of these items, please
refer to each of their respective sections below.
Page 17

www.cobyusa.com Page 17
English
Internet Radio Mode
Stations (Choosing a Station)
Listen to internet radio streams from all over the world.
From the Internet radio menu, select <Stations> and then
press
to conrm
There are ve options available for station selection:
Location: Find and listen to a station by geographic •
location (e.g., Asia, Europe, North America, etc.)
Genre: Find and listen to a station by content •
category (e.g., Alternative, Blues, Business News,
Classical, etc.)
Search Stations: Find and listen to a station by name.•
Popular Stations: Browse and listen to the most •
popular stations.
New Stations: Browse and listen to the newest stations.•
Some radio stations do not broadcast 24 hours per
day, and some stations are not always available
on-line.
Stations with on-demand content may provide
the option of listening to programs that have already been broadcast.
Page 18

Page 18 Coby Electronics Corporation
English
www.cobyusa.com Page 19
Podcasts (Choosing a Podcast)
Listen to podcast programming from all over the world.
From the Station List menu, select <Podcasts> and press
to conrm.
There are three options available for podcast
selection:
Location: Find and listen to podcasts by geographic •
location (e.g., Asia, Europe, North America, etc.)
Genre: Find and listen to podcasts by content •
category (e.g., Alternative, Blues, Business News,
Classical, etc.)
Search podcasts: Find and listen to a podcast by •
name.
My Favourites
Listen to your favorite station or podcast programming. To
use this function, you must rst add stations or podcasts
to the My Favorites list.
Browsing the My Favorites list
From the Internet Radio menu, select <My Favorites> and
press to conrm.
Choose <Podcasts> or <Stations> and then press 1.
to conrm.
Find your favorite Podcast or Station in the list and 2.
press
to listen to it.
Internet Radio Mode
Page 19

www.cobyusa.com Page 19
English
Adding Stations or Podcasts to the My Favorites List
When you are listening to a station or podcast that you like,
press and hold to add it to the My Favorites list.
You can also add stations to the My Favorites list
from the Frontier Silicon website if you have a registered account and device (www.wiradio-fron-
tier.com). Please refer to the Appendix for more
information.
My Added Stations
Listen to stations added from the Frontier Silicon website
(www.wiradio-frontier.com). A registered account and
device is required. Please refer to the Appendix or visit the
website and follow the instructions there to register.
After you have added stations on the Frontier Silicon
website, go to the Station list menu:
Select <My Added Stations> and press 1.
to
conrm.
Find an added station in the list and press 2.
to listen to it.
Viewing Station/Podcast Information
While listening to a station or a podcast, press to
change the information displayed on the screen.
Internet Radio Mode
Page 20

Page 20 Coby Electronics Corporation
English
www.cobyusa.com Page 21
Description of Station •
Scrolling text information supplied by the Internet
station. It may include information on music titles or
program details. This information is provided by the
broadcaster.
Location of Station•
Description provided by either internet radio station
or broadcaster.
Reliability of Station•
Displays the degree of reliability of selected station.
Signal Information of Station•
Displays station’s digital bit rate and signal mode.
Playback Buer of Station•
Displays playback buer strength of current station.
Date of Station•
Displays the date; this information is provided by the
broadcaster to ensure accuracy.
Station Updates
Occasionally, the radio display will indicate that the system
is receiving an updated station list. This function is performed automatically and periodically, ensuring that your
Radio always has the latest station directory on-board.
Internet Radio Mode
Page 21

www.cobyusa.com Page 21
English
Preset Station Memory
Storing a Preset Station
Your radio can store Internet and FM stations. To store
the current station as a preset:
Press and hold one of the ve preset station buttons 1.
[
to ]. The current station will be
saved as a preset and the screen will display:
or
The station has now been saved as a preset station.
Selecting a Preset station
Simply press one of the ve preset station buttons
[
to ] to tune directly to the saved station.
Internet Radio Mode
Page 22

Page 22 Coby Electronics Corporation
English
www.cobyusa.com Page 23
FM Radio Mode
General Operation
Switch the radio on and press until <FM> is
displayed.
The rst time that FM Radio mode is selected, the
radio will tune to the beginning of the FM frequency range (87.50 MHz). Otherwise, the last FM
station you were listening to will be selected.
Press • or to increase or decrease the frequency
by . MHz per step.
To ‘SEEK’ active stations automatically, press and hold •
or .
You can also press to auto tune to ac-
tive stations.The unit will display the changing
frequency until it stops on the next station.
When the end of the frequency range is reached,
the radio will resume the search at the beginning.
Page 23

www.cobyusa.com Page 23
English
FM Radio Mode
Access the FM Radio Menu
Press at any time to access the FM Radio menu.
There are three items in the FM Radio menu:
Scan Setting: Select to change the auto scan options.
Audio Setting: Select to change the audio options.
Main Menu: Select to return to the Main menu.
Scan Setting
Set the sensitivity of the auto scan tuning feature.
Select <Strong station only> to auto scan to radio •
stations with a strong signal, only.
Select <All stations> to auto scan to all available •
radio stations.
This auto scan feature will overwrite all previously
stored preset stations.
Audio Setting
Set the radio reception mode to Stereo or Mono.
Select <Stereo or mono> to set the radio reception to •
Stereo. The radio will degrade the reception mode to
mono if necessary.
Select <Mono only> to set the radio reception mode •
to Mono. Selecting Mono may improve the reception
stability of weak radio station broadcasts.
Page 24

Page 24 Coby Electronics Corporation
English
www.cobyusa.com Page 25
Preset Station Memory
Storing a Preset Station
Your radio can store Internet and FM stations. To store
the current station as a preset:
Press and hold one of the ve preset station buttons 1.
[
to ]. The current station will be
saved as a preset and the screen will display:
or
The station has now been saved as a preset station.
Selecting a Preset station
Simply press one of the ve preset station buttons
[
to ] to tune directly to the saved station.
FM Radio Mode
Page 25

www.cobyusa.com Page 25
English
Music Player Mode
Music Player mode allows you to enjoy music from your
computer wirelessly over a network.
To use the Music Player streaming media func-
tions, you will need to set up media sharing on a
computer. Please set up media sharing rst (refer
to the Appendix for guidance), then follow the
instructions below to use the Music Player shared
media functions.
Music Player Menu
To enter Music Player mode, press repeatedly
until <Music Player Mode> is displayed on the screen. The
Music Player menu will appear.
Play Shared Media
Select <Shared media> to browse and play shared
media located on your computer.
Play Shared Folders
Select <Shared folders> to browse and play shared
folders located on your computer.
You may need to allow the radio to log in to your
computer in order to access its shared media and
folders. To enter your PC username and password,
go to: Main Menu > System Setup > Internet Setup
> PC Settings.
Page 26

Page 26 Coby Electronics Corporation
English
www.cobyusa.com Page 27
Music Player Mode
Play shared media
From the Music Player menu, select <Shared media>.1.
Press 2.
or to highlight the desired selection.
Press to conrm and play your music.
Play shared folders
From the Music Player menu, select <Shared folders>.1.
Press 2.
or to highlight the desired selection.
Press to conrm and play the folder.
Page 27

www.cobyusa.com Page 27
English
Setting the Clock
Manual Time/Date Setting
Press 1. to access the Main menu, then select
<System setup>.
Select <Time/Setup>. 2.
Select <Set Clock>. 3.
Press 4. or to adjust each time or date setting,
then press to save the setting and move
on to the next one. Repeat for each time setting
(Hours, Minutes).
To set the date, select <Set date> instead of <Set
clock) in step 3.
Page 28

Page 28 Coby Electronics Corporation
English
www.cobyusa.com Page 29
Automatic Time/Date Setting
To have the unit automatically update the time from an
internet server:
Press 1.
to access the Main menu, then select
<System Setup>.
To access the Main menu in FM radio mode,
press , then select <Main menu>
from the menu list.
Select <Time/Setup>. 2.
Select <Auto Update>. 3.
Select <Update from NET>. 4.
Setting the Clock
Page 29

www.cobyusa.com Page 29
English
Other Clock Options
Press 1. to access the Main menu, then select
<System Setup>.
Select <Time/Setup>. 2.
Select <Set format> to set the clock to -hour
or -hour display format.
Select <Set timezone> to set the clock to your
local time zone (if necessary, you refer to the
website wwp.greenwichmeantime.com).
Select <Daylight savings> to set the daylight
savings time adjustment on or o.
Setting the Clock
Page 30

Page 30 Coby Electronics Corporation
English
www.cobyusa.com Page 31
Using the Alarms/Timers
Setting the Alarms
Before setting the alarm, be sure that your clock settings
are correct. To set an alarm:
Press 1.
to access the Main menu, then select
<Alarms>. The current alarm status will be displayed.
To access the Main menu in FM radio mode,
press , then select <Main menu>
from the menu list.
Press 2. to change the alarm settings. There
are 5 options to adjust:
Select <Time> to set when the alarm will sound.
Select <On> or <O> to toggle the alarm on
or o.
Select <Mode> to set the alarm mode to wake
to (Buzzer, Internet radio, or FM).
Select <Last listened> or one of the Preset sta-
tions < to > to set a preset station to wake to.
Select <Volume> to set how loud the alarm will
sound.
Select <Save> after you have nished adjusting all of 3.
the alarm options.
Setting the Clock
Page 31

www.cobyusa.com Page 31
English
Setting the Clock
An alarm icon will be displayed on the Standby
screen (power o) if the alarm is enabled.
Alarm Snooze/O
When the alarm sounds:
Press
/ [SNOOZE] to delay the alarm. The
alarm will sound again after to minutes (this
delay can be adjusted). You can press /
[SNOOZE] again to see how much time is remaining
on the snooze timer.
Press any button to turn o the alarm.
To disable the alarm completely, you will need to set
the Alarm option to <O> in the Alarms menu. Please
refer to the previous section “Setting the Alarms” for
more information.
Sleep Timer
Set a sleep timer to turn the unit o automatically after
to minutes.
To set the sleep timer:
Press 1.
to access the Main menu, then select
<SLEEP>.
To access the Main menu in FM radio mode,
press , then select <Main menu>
from the menu list.
Page 32

Page 32 Coby Electronics Corporation
English
www.cobyusa.com Page 33
Press 2. or to change the “Set sleep time” option,
then press to conrm:
Sleep time o: Disable the sleep timer.
minutes
minutes
minutes
minutes
The radio will automatically turn itself o after the set 3.
sleep period has elapsed.
To resume listening once automatic shut-down
has occurred, press
.
Setting the Clock
Page 33

www.cobyusa.com Page 33
English
System Settings
Network setup
You can change the network settings if you need to
connect to another wireless network (e.g., if you relocate
the unit to another room or building. The radio will scan
for connection to another wireless network, or you may
congure the network parameters manually.
For Network Setup, enter the menu as follows: MAIN 1.
MENU > SYSTEM SETUP > Internet Setup. Press
to conrm.
Press 2.
or to highlight your desired selection.
Press to conrm.
Wizard: Launch the wireless setup wizard. Refer
to the “Getting Started” section for details.
PC settings: Enter PC login credentials (for use
with Music Player streaming mode). If your PC
has security enabled, you will need to enter
your username and password
View settings: View current network settings
(Active adapter, MAC address, DHCP, PC settings, SSID, IP settings, Wlan region).
Wlan region: Set your network location.
Manual settings: Congure your wireless
network settings manually instead of using the
Wizard option.
Page 34

Page 34 Coby Electronics Corporation
English
www.cobyusa.com Page 35
System Settings
Language
For language settings, enter the menu as follows: 1.
MAIN MENU > SYSTEM SETUP > Language. Press
to conrm.
Press 2.
or to highlight your desired selection.
Press to conrm.
Factory reset
Restore all options to their factory-default settings.
To perform factory reset, enter the menu as follows: 1.
MAIN MENU > SYSTEM SETUP > Factory Reset. Press
to conrm.
Press 2.
to conrm.
If you do not wish to continue, press any other
key.
Performing a factory reset will completely reset
your radio’s memory, clearing all WEP/WPA codes
and user settings.
Page 35

www.cobyusa.com Page 35
English
Software Updates
Connect to the update server to check for new software
versions.
Enter the menu as follows: MAIN MENU > SYSTEM 1.
SETUP > Software update. Press
to conrm.
The radio will connect to the update server and 2.
check for new versions. If a new software version is
found, the radio will download and install the new
software.
Your radio software is now up-to-date.
Software updates can take several minutes. Do
not interrupt the update or switch the radio o until the update is complete. Interrupting the update
may cause permanent damage to the system.
SW Version and Radio ID
View software version and Radio ID info.
Enter the menu as follows: MAIN MENU > SYSTEM SETUP >
Info. Press
to conrm.
SW version: View software version info.
Radio ID: View radio identication info.
You may need to note this information when deal-
ing with technical support issues.
System Settings
Page 36

Page 36 Coby Electronics Corporation
English
www.cobyusa.com Page 37
Appendix
Set Up Media Sharing with Windows
Media Player 11
After you download and install Windows Media Player
for Windows XP and connect your radio to the network,
you will need to set up media sharing so that the radio can
access your music library. The following steps describe
how to set up media sharing in Windows Media Player .
In Windows Media Player 11, click the small arrow 1.
below the Library tab, and then click Media Sharing.
In the Media Sharing dialogue box, select the ‘Share 2.
my media’ check box.
Page 37

www.cobyusa.com Page 37
English
Appendix
Check the “Share my media to” box, then select your 3.
radio model from the list. Click ‘Allow’. The selected
device will now show a green tick. Click ‘Apply’ to
conrm.
If your radio does not appear in the list of devices,
perform the following steps:
From the “Media Player” menu of your internet radio, 1.
select “UPNP Servers”. A list of available computers
will appear.
Select your computer. Your device will now appear 2.
in the list.
Page 38

Page 38 Coby Electronics Corporation
English
www.cobyusa.com Page 39
If you want to conrm that this is your radio, right click
on the device and select ‘Properties’. Your Radio’s MAC
address will be shown.
Appendix
Page 39

www.cobyusa.com Page 39
English
Set Up Media Sharing with Mac OS X
Using the Radio with a MAC will require Windows File
Sharing. MAC OS X versions . and later have Windows
File Sharing built in; if your operating system is MAC OS
version or earlier, you will require extra software to
perform this function.
Set up Windows File Sharing on a MAC
From the ‘Dock’, click on ‘System Preferences’. From 1.
the ‘System Preferences’ window, under the ‘Internet
& Network’ section, click on ‘Sharing’.
From the ‘Sharing’ window, perform the following 2.
steps:
Under the ‘Services’ section, enable ‘Personal
File Sharing’ and ‘Windows Sharing’. In order to
do this, tick the corresponding boxes or click on
‘Start’ for each of these services.
Under the ‘Firewall’ section, switch o the
rewall.
Under the ‘Internet’ section, switch o ‘Internet
Sharing’.
Accounts Setup
From the ‘System Preferences’ window, in the ‘System’ section, click on ‘Accounts’. Select an account and remember
its ‘Short Name’ and password. This will allow the radio to
connect to your MAC.
Appendix
Page 40

Page 40 Coby Electronics Corporation
English
www.cobyusa.com Page 41
Appendix
Directory Setup
From the ‘Dock’, click on ‘Finder’. From ‘Finder’, click 1.
on ‘Applications, and then ‘Utilities’.
Click on ‘More Info’ for ‘Directory Access’ and ensure 2.
that the ‘Read/Write’ option is enabled. Double-click
on ‘Directory Access’ and enable the following:
AppleTalk
LDAPv
SLP
SMB/CIFS
For ‘SMB/CIFS’, click on ‘Congure’ and select an 3.
appropriate workgroup.
Copy and paste the mp3 les to ‘Documents’ in the 4.
‘Finder’ window.
Turn on ‘AirPort’ (wireless sharing). 5.
Wait for a few minutes. 6.
In the ‘Media Player’ > ‘Windows Shares’ menu, enter 7.
the MAC account’s short name and password. The
Radio should then be able to connect to the MAC.
Page 41

www.cobyusa.com Page 41
English
Appendix
Play Streaming Music on the Internet
Radio
After installing and conguring your Radio and Windows
Media Player , you are now ready to play music via a wireless connection. The following steps describe how to play
music with your Radio.
Select “UPNP Servers” in the “Media Player” menu. 1.
Select the computer you wish to play the music les 2.
from.
Use the controls to browse according to the follow-3.
ing criteria: All Music, Genre, All Artists, Contributing
Artists, Album Artists, Composers, Albums, Playlists,
Folders or Star Ratings, and then press
to
conrm.
Select the tracks you wish to play, then press the 4.
button.
Enjoy the music!
Page 42

Page 42 Coby Electronics Corporation
English
www.cobyusa.com Page 43
Frontier Silicon Internet Radio Portal
Visit the Frontier Silicon web portal at www.wiradiofrontier.com to browse global stations and personalize
your favorites. You can also add additional stations to your
radio through the website.
You will need to create an account and register your
device to use the web portal.
Get the unique access code. 1.
Each IR825 unit has a unique access code ID.
Press
to access the Main menu, then
select INTERNET RADIO > HELP > Get access
code. Write down the access code that is
displayed on the screen.
To access the Main menu in FM radio mode,
press , then select <Main menu>
from the menu list.
On a computer, enter the URL 2. www.wiradiofrontier.com into a web browser. Click on the link
“Register here.”
Appendix
Page 43

www.cobyusa.com Page 43
English
Appendix
Fill out the registration form with the access code 3.
from step 1, as well as an email address, a new
password, and the internet radio model you are
using (e.g., Coby IR825).
When the form is complete, click the “Register” 4.
button to create your account.
Page 44

Page 44 Coby Electronics Corporation
English
www.cobyusa.com Page 45
Troubleshooting
If you have a problem with this device, please read the
troubleshooting guide below and check our website at
www.cobyusa.com for Frequently Asked Questions (FAQ)
and rmware updates. If these resources do not resolve
the problem, please contact Technical Support.
Address
Coby Electronics Technical Support
56-65 Rust Street
Maspeth, NY 11378
Email
techsupport@cobyusa.com
Web
www.cobyusa.com
Phon e
800-727-3592: Mon–Fri, 8:00AM–11:00PM EST
Saturdays, 9:00AM–5:30PM EST
718-416-3197: Mon–Fri, 8:00AM–5:30PM EST
For your safety, never attempt to repair the device
yourself. Attempting to do so will invalidate the
warranty. Internal components of the device carry
a risk of electric shock.
For additional help with your wireless Internet
radio, please visit the help section of the Frontier
Silicon webpage:
http://www.wiradio-frontier.com
Page 45

www.cobyusa.com Page 45
English
Troubleshooting
If you have trouble connecting the radio to your
wireless network, these steps may help to resolve
the problem:
Conrm that a Wi-Fi connected PC can access the 1.
Internet (i.e., can browse the web) using the same
network.
Check that a DHCP server is available, or that you 2.
have congured a static IP address on the radio. You
can congure a static IP address on the radio by entering System setup -> Network -> Manual setting->
Wireless, then selecting ‘DHCP disable’.
Check that your access point does not restrict con-3.
nections to particular MAC addresses. You can view
the radio’s MAC address by entering ‘System setup ->
Network -> View setting-> MAC address’.
If you have an encrypted network, check that you 4.
have entered the correct key or password into the
radio. Remember that text-format keys are case
sensitive. If, when attempting to connect to an
encrypted network, your radio displays: ‘Wireless error’ followed by a 5-digit number, then please ensure
that you enter the correct passcode for the network.
If the problem persists, you may need to consult your
network conguration.
If your radio can connect to the network successfully, but is unable to play particular stations, it
may be due to one of the following:
The station is not broadcasting at this time of the day •
(e.g., it is located in a dierent time zone).
Page 46

Page 46 Coby Electronics Corporation
English
www.cobyusa.com Page 47
Troubleshooting
The station has reached the maximum allowed •
number of simultaneous listeners.
The station is no longer broadcasting.•
The link on the radio is out of date.•
The Internet connection between the server (often •
located in a dierent country) and the radio is slow.
To conrm station status, try using a PC to access the station via the broadcaster’s web site.
If you can play back the station with a PC, use the form at
http://www.wiRadio-frontier.com to notify us so that we
can change the station data. Once this information has
been updated, the radio should be able to connect.
Page 47

www.cobyusa.com Page 47
English
Specications
Power Requirements AC 100-240V, 50-60HZ
(please use provided adapter )
Output: DC 9V, 1000mA
Frequency Range (FM) 87.5-108MHz
Rated Output Power 2W x 2 (RMS)
Speaker Impedance 8 Ω
Headphone Jack 3.5mm stereo, 32Ω
Dimension 8.9” x 4.1” x 4.4” (WHD)
Specications and manual are subject to change without notice.
Page 48

Page 48 Coby Electronics Corporation
English
www.cobyusa.com Page 49
The lightning ash with arrowhead symbol within an equilateral
triangle is intended to alert the user to the presence of uninsulated “dangerous voltage” within the product’s enclosure that may
be of sufcient magnitude to constitute a risk of electric shock.
The exclamation point within an equilateral triangle is intended to
alert the user to the presence of important operation and servicing instructions in the literature accompanying the appliance.
For Customer Use:
Enter below the serial number that is located on the rear
of the unit. Retain this information for future reference.
Model No. IR825
Serial No.
WARNING: To prevent re or shock hazard, do not expose this device to rain or moisture.
Dangerous high voltage is present inside the enclosure. Do not open the cabinet.
CAUTION: To prevent electric shock, match wide blade of plug to wide slot of outlet and
fully insert.
Protect your hearing: Hearing experts advise against the constant use of personal stereos
played at high volume. Constant exposure to high volumes can lead to hearing loss. If you
should experience ringing in the ears or hearing loss, discontinue use and seek medical advice.
At the end of its operating life, this product must be disposed of safely. Bring the product
to a collection point for recycling electrical and electronic equipment. Do not dispose of it
with household waste. By recycling this equipment and its components, you are making an
important contribution to the protection of our environment.
Safety Notices
Page 49

www.cobyusa.com Page 49
English
Safety Notices
For recycling or disposal information about this product, please contact
your local authorities or the Electronics Industries Alliance: www.eiae.org.
FCC Statement:
This device complies with Part 15 of the FCC Rules. Operation is subject to the following two conditions:
(1) This device may not cause harmful interference, and
(2) This device must accept any interference received, including interference that
may cause undesired operation.
Note: This equipment has been tested and found to comply with the limits for Class
B digital devices, pursuant to Part 15 of the FCC rules. These limits are designed to
provide reasonable protection against harmful interference in a residential installation.
This equipment generates, uses and can radiate radio frequency energy and, if not
installed and used in accordance with the instructions, may cause harmful interference
to radio communications. However, there is no guarantee that interference will not
occur in a particular installation. If this equipment does cause harmful interference to
radio or television reception, which can be determined by turning the equipment off
and on, the user is encouraged to try to correct the interference by one or more of the
following measures:
Reorient or relocate the receiving antenna.•
Increase the separation between the equipment and receiver.•
Connect the equipment into an outlet on a circuit dierent from that to which the receiver is •
connected.
Consult the dealer or an experienced radio/TV technician for help•
Use of shielded cable is required to comply with Class B limits in Subpart B of Part 15
of the FCC rules.
Do not make any changes or modications to the equipment unless otherwise specied
in the manual. If such changes or modications should be made, you could be required
to stop operation of the equipment.
Page 50

Page 50 Coby Electronics Corporation
English
www.cobyusa.com Page 51
Safety Notices
Important Safety Instructions
Read Instructions: All the safety and operating instructions should be 1.
read before the product is operated.
Retain Instructions: The safety and operating instructions should be 2.
retained for future reference.
Heed Warnings: All warnings on the product and in the operating 3.
instructions should be adhered to.
Follow Instructions: All operating and usage instructions should be 4.
followed.
Cleaning: Unplug this product from the wall outlet before cleaning. 5.
Do not use liquid cleaners or aerosol cleaners. Use a damp cloth
for cleaning.
Attachments: Use only attachments recommended by the manufac-6.
turer. Use of other attachments may be hazardous.
Water and Moisture: Do not use this product near water (e.g., near a 7.
bath tub, washbowl, kitchen sink, laundry tub, in wet basements, or
near a swimming pool and the like).
Ventilation: Slots and openings in the cabinet are provided for venti-8.
lation to ensure reliable operation of the product and to protect it from
overheating. These openings should never be blocked by placing the
product on a bed, sofa, rug, or other similar surface. This product
should not be placed in a built-in installation such as a bookcase
or rack unless proper ventilation is provided or the manufacturer
instructions have been adhered to.
Power Sources: This product should be operated only from the type 9.
of power source indicated on the rating label. If you are not sure of
the type of power supply to your home, consult your product dealer or
local power company. For products intended to operate from battery
power or other sources, refer to the operating instructions.
Power-Cord Protection: Power supply cords should be routed so 10.
that they are not likely to be walked on or pinched by items placed
upon or against them, paying particular attention to cords at plugs,
convenience receptacles, and at the point which they exit from the
product.
Lightning: For added protection for this product, unplug it from the 11.
wall outlet and disconnect the antenna or cable system during a lightning storm or when it is left unattended and unused for long periods
of time. This will prevent damage to the product due to lightning or
power-line surges.
Page 51

www.cobyusa.com Page 51
English
Overloading: Do not overload wall outlets, extension cords, or in-12.
tegral convenience receptacles as this can result in a risk of re or
electric shock.
Object and Liquid Entry: Never push objects of any kind into this 13.
product through openings as they may touch dangerous voltage
points or shout-out parts that could result in a re or electric shock.
Never spill liquid of any kind on the product.
Servicing: Do not attempt to service this product yourself as opening 14.
or removing covers may expose you to dangerous voltage or other
hazards. Refer all servicing to qualied service personnel.
Damage Requiring Service: Unplug this product from the wall outlet 15.
and refer servicing to qualied service personnel under the following
conditions: a) when the power-supply or plug is damaged; b) if liquid
has been spilled or if objects have fallen into the product; c) if the
product has been exposed to rain or water; d) if the product does
not operate normally by following the operating instructions. Adjust
only those controls that are covered by the operating instructions as
improper adjustment of other controls may result in damage and will
often require extensive work by a qualied technician to restore the
product to its normal operation; e) if the product has been dropped or
damaged in any way; f) when the product exhibits a distinct change
in performance—this indicates a need for service.
Replacement Parts: When replacement parts are required, be sure 16.
that your service technician has used replacement parts specied
by the manufacturer or have the same characteristics as the original
part. Unauthorized substitutions may result in re, electric shock, or
other hazards.
Safety Check: Upon completion of any service or repairs to this prod-17.
uct, ask the service technician to perform safety checks to ensure
that the product is in proper operating condition.
Heat: The product should be situated away from heat sources such 18.
as radiators, heat registers, stoves, or other products (including am-
pliers) that produce heat.
Safety Notices
Page 52

Print v1.0
Coby is a registered trademark of Coby Electronics
Corporation. Printed in China.
Coby Electronics Corporation
1991 Marcus Ave, Suite 301
Lake Success, NY 11042
www.cobyusa.com
www.ecoby.com
 Loading...