

Page 1
Portable AM/FM Radio with
HD Radio Technology
HDR-700
Instruction Manual
Please read t his m anua l care ful ly bef ore op eration
Page 2
www.cobyusa.com Page 3
Precautions
The lightning ash with arrowhead symbol within an equilateral
triangle is intended to alert the user to the presence of uninsulated “dangerous voltage” within the product’s enclosure that may
be of sufcient magnitude to constitute a risk of electric shock.
The exclamation point within an equilateral triangle is intended to alert the user to the presence of important operation
and servicing instructions in the literature accompanying the
appliance.
For Cust omer U se:
Enter below the ser ial number that is lo cated o n the rear of the
unit. Ret ain this informa tion for f uture re ferenc e.
Model N o. HDR-70 0
Serial N o.
WARNING: To p revent re or shock hazard , do not expose this devic e to rain or moistu re.
Danger ous high voltage is present i nside the enclo sure. Do not open the cabinet.
CAUTION: To prev ent elect ric sho ck, match wide blade o f plug to wide slot of outlet a nd
fully insert.
Protect your hearing: Hearing experts advise against the constant use of personal stereos
played at high volume. Constant exposure to high volumes can lead to hearing loss. If you should
experience ringing in the ears or hearing loss, discontinue use and seek medical advice.
Page 2 Coby Electron ics Co rpo rati on
Page 3

Precautions
FCC Stat ement:
This device c omplies w ith Part 15 of the FCC Rules. O peration is subject to the fo llowing
two conditions:
(1) This devi ce may not cause har mful interfe rence, and
(2) This device must accept a ny interference received, including interf erence tha t may
cause un desired operat ion.
Note: This equipmen t has been te sted and found to comp ly with the limits for Class B digita l
device s, pursuant to Par t 15 o f the FCC ru les. The se limit s are designed to pr ovide re asonabl e protection against harm ful interfe rence in a r esidential installa tion. This e quipment
generat es, uses and can radiate radio f requency energy and, if not in stalled and used in
accor dance with the instruction s, may cause har mful interfe rence to radio c ommunications.
However, t here is no guarante e that inter ference wil l not occur in a parti cular instal lation. If
this equipme nt does cause h armful inte rference to radio or television reception, which ca n
be deter mined by tur ning the equipment of f and on, th e user is encouraged to tr y to correc t
the inter ference by one o r more of the follow ing measures:
Reorie nt or relocate the receiv ing antenna.
•
Increa se the separation betwe en the equipment a nd receiver.
•
Connec t the equipment into an outle t on a circuit different fr om that to which th e
•
receiv er is connected.
Consult the deal er or an experienc ed radio/T V technician for h elp
•
Use of shielde d cable is requ ired to comply with Class B limits in Subpar t B of Part 15 of
the FCC ru les.
Do no t make any changes o r modications to the e quipment unless otherwise specied in
the manual. If such change s or modicati ons should be made , you could be requ ired to stop
operat ion of the equipme nt.
HD Ra dio™ Technology Manufacture d Under Li cense From iBiquity Digital Corp. U.S. an d
Foreign Patents. HD Radio™ and the HD Radio l ogo are pro prietary t rademarks of iBiq uity
Digita l Corp.
For recycling or disposal informat ion ab out thi s prod uct, please contac t
your loc al authoritie s or the Electron ics Industries Allia nce: www.eiae.org.
www.cobyusa.com Page 3
Page 4
www.cobyusa.com Page 5
Important Safety Instructions
Read Instructions: All the saf ety and oper ating instructi ons shou ld be
1.
read befo re the product is o perate d.
Retain Instr uctions: The safety and operating instructions shoul d be
2.
retaine d for fut ure refer ence.
Heed Warnings: All warnin gs on the product and in the o perating in-
3.
struc tions sh ould be ad hered to.
Follow Instr uctio ns: Al l ope rating and usage instr uctio ns should b e fol -
4.
lowed.
Cleaning: Unplug this product from the wall outlet before cleaning. Do not
5.
use liquid cleaners or aerosol cleaners. Use a damp cloth for cleaning.
Attac hments: Use only attachments recom mended by the manufa cturer.
6.
Use of othe r attac hments m ay be haza rdous.
Water and Moisture: Do not use this product near water (e.g., near a bath
7.
tub, washbowl, kitc hen sink, laundry tub, in wet basements, or near a
swimmin g pool an d the like).
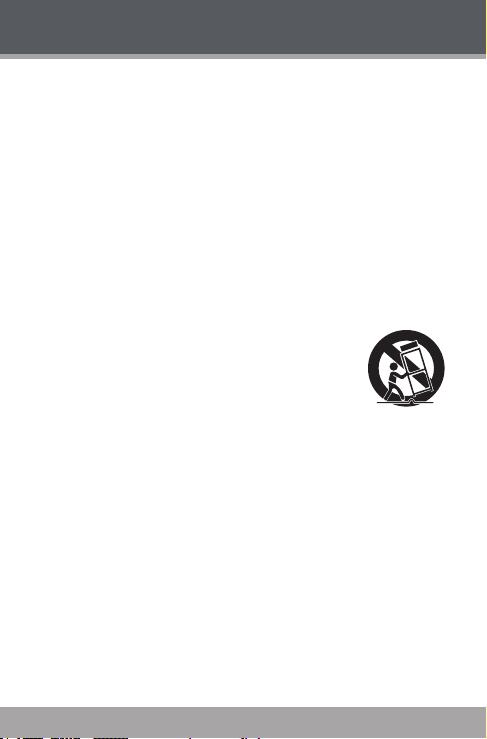
Acces sorie s: Do n ot plac e this produ ct on a n unstable
8.
cart , stand, tripod, bracket , or table. Use only with
cart s, st ands, tripo ds, brackets, or t ables recom mended by t he manufacturer or sold with the product. Any mounting of the product should follow the
manufac turer ’s in struc tions and shoul d u se a mounting accessor y recommende d by the manuf acture r.
A product and car t combinat ion should be moved with care . Quick stops,
excessi ve for ce, a nd uneven sur faces may cause the produc t and car t
combin ation to overtur n.
Ventilati on: S lots and open ings in the cabi net are provid ed for ventila -
9.
tion to ensure reliable operation of the product and to protect it from
overheating. These openi ngs should never be blo cked by plac ing the
produc t on a bed, sofa, rug, or other simila r surfac e. This produc t should
not be placed in a built- in installation such as a bookc ase or rack unless prop er ventilation is prov ided or the ma nufact urer inst ructi ons have
been adhe red to.
Power S ource s: Thi s pro duct should be operated only from the ty pe of
10.
power source indicated on the rating label. If you are not sure of the type
of power supply to your home, consul t your product dealer or local power
company. For products inte nded to operate from ba tter y power or other
source s, refer to t he operating ins truct ions.
Ground ing or Pola rization: This pr oduct may b e equ ipped with a po lar-
11.
ized alternating- current line plug that has one blade wider than the other.
Page 4 Coby Electron ics Co rpo rati on
Page 5
Important Safety Instructions
This plug will only t int o the power outlet in one direction. This is a
safety fe ature. If you ar e unable to insert the plug fully into the outlet, try
reversing the directio n of the plug. If the plug should still fail to t, contact
an electrician to repl ace the obs olete outlet. Do not def eat the safety
purpose of the polarize d plug.
Power-C ord Protection: Power suppl y c ords should be routed so that
12.
they a re no t like ly to be walked on or pi nched by i tems placed upo n or
against t hem, payin g part icular at tenti on to cord s at plugs, c onvenience
recept acles, and at the point whic h they exit f rom the product .
Protective Attachment Plug: The produc t may be equipped with an at-
13.
tachment plug with over load protec tion. This is a safet y feature. See the
operating instructions for replacement or directions to reset the protective
device. If replac ement of the plug is required, be sure the service technician has used a r eplacement plug that has the same overload protection
as the original plug as specied by the manufacturer.
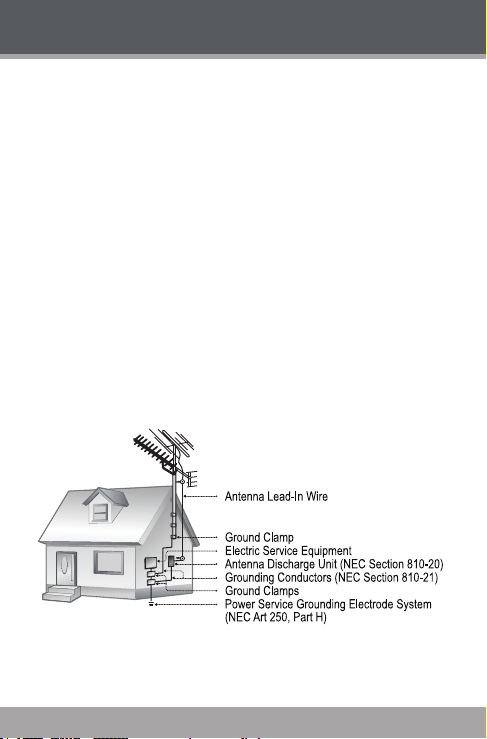
Outdoor Antenna Grounding: If an outside antenna is connected to the
14.
product, be sure the antenna system is grounded so as to provide som e
protection against voltage sur ges and built- up static char ges. Article 810
of the National Electrical Co de, ANS/ NFPA 70 provides information with
regard to proper grounding of the mast and supporting struc ture, grounding of the lead-in wire to an antenna- discharge unit, size of grounding
conductors, location of antenna- discharge unit, connectio n to grounding
electrodes, and requirements for the grounding electrode (see gure).
Lightning: For added protection for this product, unplug it from the wall outlet
15.
and disconnect the antenna or cable system during a lightning storm or when
it is left unattended and unused for long periods of time. This will prevent
damage to the product due to lightning or power-line surges.
www.cobyusa.com Page 5
Page 6

www.cobyusa.com Page 7
Important Safety Instructions
Overloading: Do not overload wall outlets, extension cords, or integral con-
16.
venience receptacles as this can result in a risk of re or electric shock.
Object and Liquid Entr y: Never push objects of any kind into this pro duct
17.
throug h openings as they may touch dan gerous voltage points or shout -
out par ts that co uld resul t in a re or elec tric shock. The ap paratu s shall
not be exposed to dripping or splashi ng and no objects lled with liquid s,
such as vas es, shall be place d on the app aratus.
Serv icing: D o not attempt to service this produc t yourself as op ening or
18.
removin g covers may expose you to dangerous voltage or other haz-
ards. Refe r all ser vicin g to quali ed ser vice p ersonnel.
Damage Req uiring Se rvic e: Unplug this produc t from the wall outlet and
19.
refer se rvic ing to qualie d ser vice p ersonnel unde r the fo llowin g conditions: a) when the powe r-suppl y or plug is damaged; b) if liquid has be en
spilled or if objec ts have fallen into the product; c) if the product has been
exposed to rain or water ; d) if t he prod uct does not operate n ormal ly by
following th e ope rating instructi ons. A djust only those controls that a re
covered by the operating instructi ons as improp er adjustment of other
controls may resu lt in damage and will often requi re ex tensive work by
a qua lied technician to restor e th e pr oduct to its normal operation; e)
if the product has been dro pped or dama ged in any way; f) whe n the
produc t exhibits a distinct chan ge in performance —thi s indicates a need
for ser vice.
Replacement Par ts: When replacement parts are required, be sure that
20.
your service technician has used replacement parts specied by the manufacturer or have the same characteristics as the original part. Unauthorized
substitutions may result in re, electric shock, or other hazards.
Safety Che ck: Upon co mpleti on of any servic e or repairs to thi s product ,
21.
ask t he s ervi ce technician to p erfo rm safety checks to ensure that t he
produc t is in prop er operating co nditio n.
Wall or Ceilin g M ounting: The p roduct sh ould be mount ed to a wall or
22.
ceilin g only as recommended by the m anufac turer.
Heat: The produc t sho uld b e sit uated away f rom heat s ource s suc h as
23.
radiato rs, heat register s, stoves, or other products ( including ampli ers)
that pro duce hea t.
The mains plug or an a ppliance c oupler is used as the d isconnect de-
24.
vice, th e disconnect dev ice shall remain r eadily operable.
Please re ad Rating L abels at th e bottom of the Sende r and Recei ver for
25.
power inp ut and othe r safet y inform ation.
Page 6 Coby Electron ics Co rpo rati on
Page 7

Table of Contents
PRECAUTIONS ................................................................. 2
IMPORTANT SAFETY INSTRUCTIONS ..............................4
TABLE OF CONTENTS ....................................................... 7
PACKAGE CONTENTS .....................................................9
FEATURES .......................................................................10
GETTING STARTED ......................................................... 11
HDR-700 at a Glance ................................................... 11
Front View .............................................................. 11
Rear View .............................................................. 12
Connections ..................................................................13
AM Antenna .......................................................... 13
FM Antenna ........................................................... 13
Headphones (optional) ..................................... 13
M-Port (AUX Input) (optional) ............................. 14
Connecting Power ............................................... 15
USING THE HDR-700 ...................................................... 16
Turning on the Radio .................................................... 16
Adjusting the Volume .................................................. 16
Selecting a Band (AM/FM) ......................................... 16
AM Mode ............................................................... 16
FM Mode ................................................................ 16
Tuning to a Station ........................................................ 17
Manual Tuning ...................................................... 17
Preset Tuning .........................................................18
HD Radio Multicast Stations ................................ 19
www.cobyusa.com Page 7
Page 8

www.cobyusa.com Page 9
Table of Contents
HDR-700 OPTIONS ........................................................21
Setting Station Presets .................................................. 21
Viewing Station Information .......................................22
Resetting the Unit .........................................................22
TROUBLESHOOTING ......................................................23
SPECIFICATIONS ...........................................................24
Page 8 Coby Electron ics Co rpo rati on
Page 9
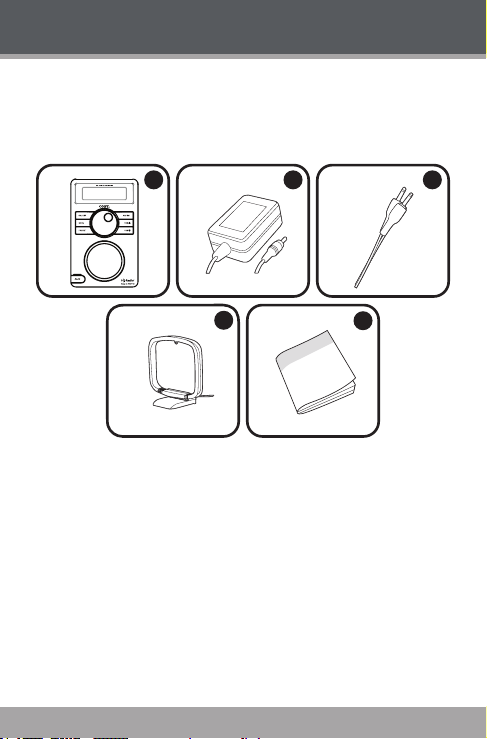
Package Contents
4
5
1
2
3
Please make sure that the items shown below are included in the package. Should an item be missing, please
contact the local retailer from which you purchased this
product.
HDR-700
1.
2.
3.
4.
100-240V AC Power Supply
AUX Cable (3.5mm)
AM Loop Antenna
Instruction Booklet
5.
www.cobyusa.com Page 9
Page 10

www.cobyusa.com Page 11
Features
HD Radio tuner receives crystal clear digital broad-
casts with no subscription fees.
FM multicasting support
Also receives AM/FM analog broadcasts
10-station digital preset memory
Integrated rechargeable batter y provides up to 5
hours of play time
Splash-proof housing allows for indoor and outdoor
use
Integrated full-range speaker system
3.5mm auxiliary input port allows for quick and easy
connection of an iPod® (or other MP3 player or
external audio device)
3.5mm headphone jack
Page 10 Coby Electron ics Co rpo rati on
Page 11

Getting Started
1
2
3
6
4
7
5
8
9
10
HDR-700 at a Glance
Front View
Display Screen
1.
Tuning Control Dial
2.
3.
Power On/Off
Menu
4.
Preset
5.
www.cobyusa.com Page 11
6.
7.
8.
9.
10.
AM/FM Band
Volume Up
Volume Down
Speaker
M-Port (Auxiliary Input)
Page 12
www.cobyusa.com Page 13
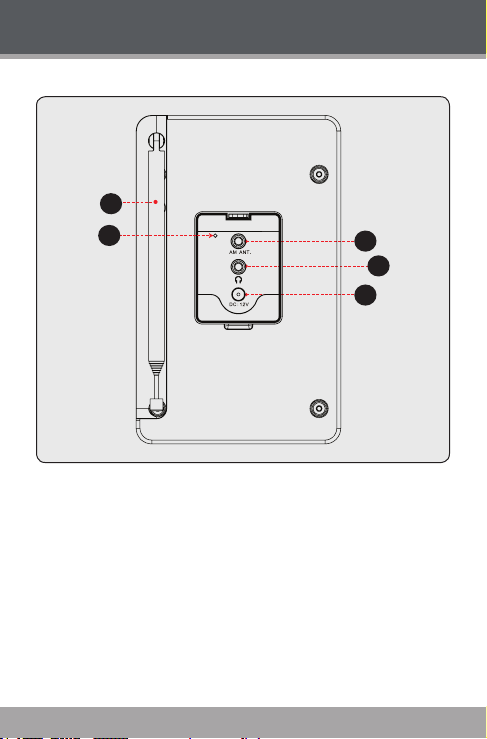
Rear View
3
5
4
2
1
FM Antenna
1.
Reset Button
2.
AM Antenna Input Port
3.
Getting Started
Headphone Out Jack
4.
DC 12V Power Input Jack
5.
Page 12 Coby Electron ics Co rpo rati on
Page 13

Getting Started
Connections
AM Antenna
The unit comes with an AM loop antenna designed
specically to receive AM signals.
Plug the AM loop antenna into the AM Antenna Input
1.
Port located on the rear of the unit.
Position and orient the antenna well away from the
2.
unit for best reception.
FM Antenna
The unit comes with a xed telescopic rod FM antenna.
Pull out and fully extend the FM antenna and adjust
its orientation for best reception.
Headphones (optional)
Connect headphones or earphones to the 3.5mm
Headphone Out Jack for private listening.
Lower the volume level before connecting head-
phones, then gradually increase the volume for
comfor table listening.
Hearing experts advise against the constant use of
personal stereos played at high volume.
Constant high-volume use can lead to hearing loss. If
you experience ringing in your ears or hearing loss, discontinue use immediately and seek medical advice.
www.cobyusa.com Page 13
Page 14

www.cobyusa.com Page 15
Getting Started
M-Por t (AUX Input) (optional)
The M-Port allows for quick and easy connection of an
iPod® (or other MP3 player or external sound sources).
Using the supplied AUX cable, your HD radio can be transformed into a high quality digital audio speaker system.
Connect one end of the AUX cable to the head-
1.
phone (or line out) socket of your source device, and
then connect the other end to the AUX Port on the
lower left-hand corner of your HD radio.
The LCD screen will now display the words “M-Port
2.
Active”.
Adjust the output volume level on both the source
3.
device and on your HD radio itself to gain optimal
volume level.
Page 14 Coby Electron ics Co rpo rati on
Page 15

Getting Started
Connecting Power
Connect the HDR-700 to an AC 100-240V wall outlet to
charge its internal battery or to operate the unit from AC
power.
Plug one end of the supplied power adapter to the DC
12V Power Input Jack located on the rear of the unit.
Plug the other end into an AC 100-240V wall outlet.
It will take approximately 8 hours to fully charge the
internal battery.
The battery use d in thi s devic e may pr esent a fire
or chemical burn if mistreated. Do not disassemble,
incinerate, or heat the batter y.
Do not c onnect this unit to a power source other than
that which is indicated here or on the label as this
may result in the risk of re or electric shock.
Use only the AC adapte r supplie d. Failure to do so
may cause a re or damage the unit.
Upon initial use, the batter y should be charged fully
(~8 hours) to ensure optimal per formance and battery life.
www.cobyusa.com Page 15
Page 16

www.cobyusa.com Page 17
AM 1180 KHz
FM 88.1 MHz
Using the HDR-700
Turning on the Radio
Press to turn on the radio. The current station will
be displayed on screen.
To turn off the radio, press again.
Adjusting the Volume
Adjust the radio volume to the desired level by pressing
or .
Selecting a Band (AM/FM)
AM Mode
Press until it displays an AM station.
FM Mode
Press until it displays an FM station.
Page 16 Coby Electron ics Co rpo rati on
Page 17

Using the HDR-700
T
u
n
e
t
o
l
o
w
e
r
s
t
a
t
i
o
n
s
T
u
n
e
t
o
h
i
g
h
e
r
s
t
a
t
i
o
n
s
Tuning to a Station
If no signal is found in your area, it may be necessary for
you to adjust the antenna or to relocate your radio.
HD Radio Technology enables AM and FM radio sta-
tions to broadcast their programs digitally —a tremendous technological leap from the analog broadcasts
of the past.
To nd stations broadcasting in your area, please visit
www.HDRadio.com and click on “Find a Station”.
Manual Tuning
Turn the tuning dial to cycle through the available stations.
Turn the dial clockwise to tune to a higher station
frequency or turn the dial counterclockwise to tune
to a lower station frequency.
www.cobyusa.com Page 17
Page 18

www.cobyusa.com Page 19
1. Push dial in 2. Rotate dial to auto-seek
Using the HDR-700
To auto-seek to the next available station frequency:
Press the tuning dial.
1.
Turn the tuning dial to tune.
2.
Preset Tuning
To select a stored AM/FM station:
Press .
1.
Turn the tuning dial to the desired preset.
2.
Press the tuning dial.
3.
To store station presets, see “Setting Station Presets”
on page 21.
Page 18 Coby Electron ics Co rpo rati on
Page 19

FM 105.9-1 HD
FM 105.9-2 HD
Using the HDR-700
HD Radio Multicast Stations
HD Radio technology allows for up to 8 simultaneous
broadcasts, thus expanding the number of programs
available to listeners under a single station frequency.
If a multicast station is available in your area, the station
number will be indicated on the display as follows:
Prim ar y Station
2nd HD radio s tat ion in FM 105.9
www.cobyusa.com Page 19
Page 20

www.cobyusa.com Page 21
* HD SEEK *
FM 101.1 MHz
HD SEEKING...
FM 101.1 MHz
Using the HDR-700
To seek for an HD radio station:
Press (“HD SEEK” will be selected). Press
1.
the tuning dial to conrm.
Turn the tuning dial to begin auto-seeking.
2.
The display will indicate “HD” when an HD radio
3.
station is available.
Page 20 Coby Electron ics Co rpo rati on
Page 21

HDR-700 Options
AM 1180 KHz
SET PRESET
01 AM 1180 KHz
01 AM 1180 KHz
Setting Station Presets
Your HD radio can store 10 AM and 10 FM presets. To
store the current station:
Tune to the station you would like to preset.
1.
Press and hold .
2.
Turn the tuning dial to the desired preset number
3.
and press the tuning dial to select. The station will
be preset to that number.
www.cobyusa.com Page 21
Page 22

www.cobyusa.com Page 23
*** MENU ***
FREQ DISPLAY
* FREQ DISPLAY *
TOGGLE
HDR-700 Options
Viewing Station Information
Press and then turn the tuning dial to select
1.
“FREQ DISPLAY”. Press the tuning dial to conrm.
Turn the dial to cycle through the “TOGGLE”, “ STA-
2.
TION NAME” and “FREQUENCY” options.
Set the display to alternate
between the current station
name and frequency .
Display the current station
name.
Display the current station
frequency.
Resetting the Unit
If the unit should freeze or otherwise behave abnormally,
use a paperclip to press the Reset button located on the
rear panel.
Page 22 Coby Electron ics Co rpo rati on
Page 23

Troubleshooting
If you have a problem with this device, please read the
troubleshooting guide below and check our website
at www.cobyusa.com for Frequently Asked Questions
(FAQs) and rmware updates. If these resources do not
resolve the problem, please contact Technical Support.
Address COBY Electronics Technical Support
Email techsupport@cobyusa.com
Web www.cobyusa.c om
Phone 800 -727-359 2: Weekdays 8:00AM–11:00PM EST
www.cobyusa.com Page 23
56- 65 Rust Street
Maspeth, NY 11378
Weekends 9:0 0AM –5:3 0PM EST
718-416-3197: Weekdays 8:00AM– 5:30PM EST
Page 24

www.cobyusa.com Page 25
Specications
General Stereo AM, FM radio
Audio Output 4W (8Ω)
Frequency Ranges AM (530 - 1710 KHz)
Antenna Telescopic FM antenna
H/P Output 3.5mm stereo headphone
LCD Display High resolution display
Power Supply 12V DC
Dimensions 4.1” x 6.6” x 3.9” (WHD)
Specications and manual are subject to change without
prior notice.
FM (87.7 – 107.9 MHz)
AM loop antenna
socket (32Ω)
Page 24 Coby Electron ics Co rpo rati on
Page 25

Notes
www.cobyusa.com Page 25
Page 26

www.cobyusa.com Page 27
Notes
Page 26 Coby Electron ics Co rpo rati on
Page 27

Notes
www.cobyusa.com Page 27
Page 28

Coby Electronics Corporation
1991 Marcus Avenue, Suite 301
Lake Success, NY 11042
ww w.cobyusa.com
ww w.ecoby.com
Coby is a re gis tered t rademar k of
Coby El ectronic s Corporat ion.
Printed in Ch ina.
 Loading...