

Page 1
10474 NAVONE 5000 VD_PH1.2.qxd 7/25/07 2:39 PM Page 1
OPERATING INSTRUCTION MANUAL
®
®
NNAAVVOONNE
E
55000000
Nothing Comes Close to a Cobra®| English
Page 2
10474 NAVONE 5000 VD_PH1.2.qxd 7/25/07 2:39 PM Page 2
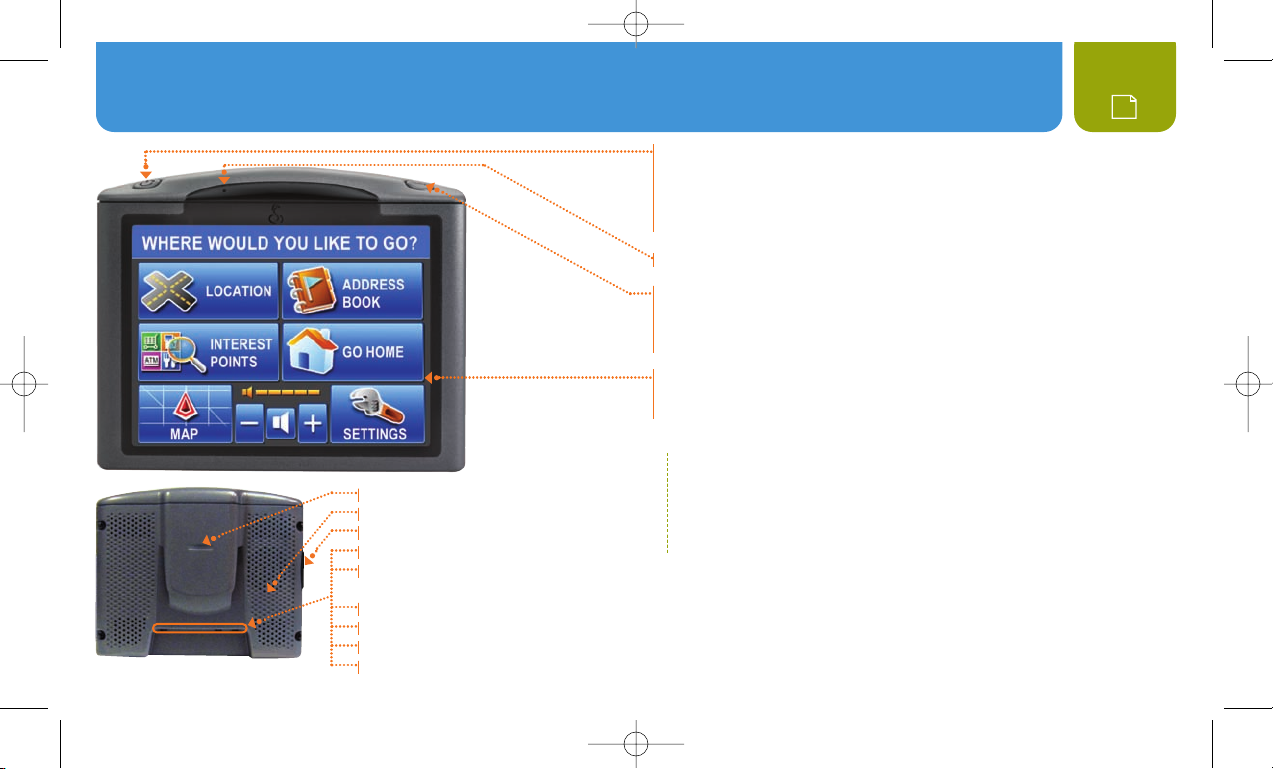
Controls and Indicators : About the NAV ONE System
Power Button
S Press to turn the unit On. Press and hold to turn it Off.
S Hold for ten seconds to reset the unit if necessary.
S When unit is On, tap to cycle through four levels of brightness.
S SmartPower default is Off. See ì NOTE below.
Microphone
Menu Button
S Press to go directly to the Main Menu. (While entering data or changing
preferences, a confirmation message will appear with the choice to
save changes or not before proceeding to the Main Menu).
Illuminated Touch Screen
S Touch the on-screen buttons and icons to activate unit functions.
S Main Menu is shown here.
ì NOTE
Bracket Mounting Lock
Speaker
SD Memory Card Expansion Slot
External GPS Antenna Connector
USB Connector for Data and Software updates
and for Optional Traffic Data Receiver
12V Power Connector
External Speaker Connector
External Microphone Connector
Connector for Optional Traffic Data Receiver
With SmartPower On, the system is shut down when there is a
combination of no vehicle motion and no button press for 15 minutes.
When SmartPower is Off, the system continues to operate until
it is turned Off with the Power button (or ignition).
2
Page 3

10474 NAVONE 5000 VD_PH1.2.qxd 7/25/07 2:39 PM Page 3
ABOUT THE NAV ONE SYSTEM
THANK YOU FOR PURCHASING THE NAV ONE 5000 SYSTEM.
The following items should be in the package:
1. The NAV ONE system unit.
2. A mounting bracket with suction cup.
3. Dash mounting disk.
4. Foam cushion strips.
5. 12V fused power cord.
6. A 120V AC auxiliary power supply
for use in home or office.
TRY IT OUT
Using the NAV ONE is the
most effective way to learn
about it. Don’t hesitate to
explore menus and add
entries to see how they work.
There are provisions for entries
to be deleted and, if things get really
tangled up, the factory defaults
can be reset using the sequence:
Main Menu S Settings S User
Preferences S Reset Factory Defaults
Or, use the Power button reset
(see page 2).
7. USB cable.
8. This Operating Instruction manual.
9. A warranty registration card. (Or
register online at www.cobra.com)
ì IMPORTANT NOTE FOR FIRST TIME USER
NAV ONE software provides a Demonstration
sequence at unit startup to introduce users
to the capabilities of the NAV ONE. The Demo
mode is On when the unit is shipped.
Pressing the Menu button while Demo mode
is On, will bring up the Demo menu rather
than the Main Menu.
Demo mode is turned Off automatically after
the unit has been driven for a short distance
while turned On, but the demonstration can
be recalled at any time with the View Demo
button on the initial screen.
Users can also turn Off Demo mode. Use
the sequence Main Menu S Settings S
User Settings S Demo Mode and change
the choice from Automatic to Manual.
Controls and Indicators : About the NAV ONE System
CONTENTS
Controls and Indicators . . . . . . . . . . . . . . . . . . . . . . . . . . . . . . . . . . . 2
About the NAV ONE System . . . . . . . . . . . . . . . . . . . . . . . . . . . . . . . . 3
Important Safety Information . . . . . . . . . . . . . . . . . . . . . . . . . . . . . . . 4
FCC Compliance . . . . . . . . . . . . . . . . . . . . . . . . . . . . . . . . . . . . . . . . . 5
Installation . . . . . . . . . . . . . . . . . . . . . . . . . . . . . . . . . . . . . . . . . . . . . 6
System Overview . . . . . . . . . . . . . . . . . . . . . . . . . . . . . . . . . . . . . . . . 8
Main Menu . . . . . . . . . . . . . . . . . . . . . . . . . . . . . . . . . . . . . . . . . . . . . 9
Lists . . . . . . . . . . . . . . . . . . . . . . . . . . . . . . . . . . . . . . . . . . . . . . . . . 10
Menu Choices. . . . . . . . . . . . . . . . . . . . . . . . . . . . . . . . . . . . . . . . . . 11
Interacting with the Map / Route Selection. . . . . . . . . . . . . . . . . . . . 16
Special Locations / Trail . . . . . . . . . . . . . . . . . . . . . . . . . . . . . . . . . . 18
Bluetooth . . . . . . . . . . . . . . . . . . . . . . . . . . . . . . . . . . . . . . . . . . . . . 20
Traffic Data / User Settings . . . . . . . . . . . . . . . . . . . . . . . . . . . . . . . . 22
Map Settings . . . . . . . . . . . . . . . . . . . . . . . . . . . . . . . . . . . . . . . . . . 24
Battery Operation / Maintenance. . . . . . . . . . . . . . . . . . . . . . . . . . . . 25
User License / Warranty . . . . . . . . . . . . . . . . . . . . . . . . . . . . . . . . . . 26
Troubleshooting / Product Service . . . . . . . . . . . . . . . . . . . . . . . . . . 28
Customer Assistance / Trademark Acknowledgement . . . . . . . . . . . . 30
Accessories . . . . . . . . . . . . . . . . . . . . . . . . . . . . . . . . . . . . . . . . . . . 31
Nothing Comes Close to a Cobra
®
3
Page 4
Warranty
Warranty
Warranty
10474 NAVONE 5000 VD_PH1.2.qxd 7/25/07 2:39 PM Page 4
Important Safety Information
4
IMPORTANT SAFETY INFORMATION
Before installing and using the Cobra NAV ONE system, please read these general warnings and precautions. Without reading this
important safety information, the user may be placed in a dangerous situation or may damage the unit before having any practical use
from it. Also read pages
6 to 9 in this manual to learn the basics of installing and operating the system. It is strongly recommended to
read this entire manual to be familiar with the system’s features and to know how to operate it.
WARNING
SYMBOLS AND
STATEMENTS
Please pay
special attention
to the WARNING
symbols and
statements in
this manual.
WARNING
Statements
identify conditions
that could result
in personal injury
or loss of life.
WARNINGS
n
DO NOT mount the unit over airbag panels or within airbag
expansion spaces. The force of an expanding airbag can thrust objects
in its path toward the driver or passengers with injurious result.
n
DO NOT think this NAV ONE is a substitute for personal judgment.
The route suggestions should never supersede any local traffic
regulation, personal judgment or knowledge of safe driving
practices. Before making any maneuvers suggested by the NAV
ONE system (for example, a U-turn or a left turn), verify that the
maneuver can be legally and safely completed. Do not follow route
suggestions if they suggest an unsafe or illegal maneuver, would
place the vehicle in an unsafe situation, or would route the vehicle
into an area that could be unsafe.
n
DO NOT program this NAV ONE while driving. Only a passenger
should operate controls or program the unit while the vehicle is
in motion. The driver should not program the system unless the
vehicle is parked in a safe location.
n
ONLY glance at the screen when necessary and safe to do so.
Listen to the computer voice guidance. If prolonged viewing is
necessary, pull off the road to a safe location.
WARNINGS
n
DO NOT depend on this NAV ONE system to locate emergency
services (such as police, fire stations, hospitals and clinics).
The database may not include all emergency service providers.
Use judgment and ask for directions in these situations.
n
DO NOT position the unit in a location that obstructs the driver’s
view of the road, instruments or controls to operate the vehicle.
n
DO NOT drive the vehicle unless the unit is securely attached
to the windshield with the supplied bracket and suction cup
or is fastened by other reliable means to keep it from becoming
a projectile hazard inside the vehicle in the event of a violent
maneuver or collision.
n
DO NOT disassemble or modify the system; personal injury or damage
could result. If a problem occurs, stop using the system immediately
and contact Cobra. Changes or modifications to the system may void
its compliance with FCC rules and make it illegal to use.
n
DO position the unit so the screen can be viewed with just
a quick glance.
n
DO set the volume at a level that will allow the hearing of
outside traffic and emergency services.
Page 5
A
ssistance
W
arranty
C
ustomer
A
ssistance
Assistance
Warranty
Customer
Assistance
Assistance
Warranty
Customer
Assistance
10474 NAVONE 5000 VD_PH1.2.qxd 7/25/07 2:39 PM Page 5
CAUTION
SYMBOLS AND
STATEMENTS
Please pay
special attention
to the CAUTION
symbols and
statements in
this manual.
CAUTIONS
n
The user is responsible for operating this product wisely. This NAV
ONE unit is intended for use only as a navigational aid and should
not be relied upon to the exclusion of other information. Be aware
of conditions around the vehicle and compare them to the
information provided by the NAV ONE system.
n
The Global Positioning System is provided and operated by the
U.S. government, which is solely responsible for its accuracy and
maintenance. That system is subject to changes, which could affect
the accuracy and performance of this NAV ONE unit.
n
This unit is not waterproof. Do not allow liquids to splash on it nor
CAUTION
Statements
identify conditions
that could cause
damage to the
system or other
equipment.
expose it to rain during operation or transfer from vehicle to vehicle.
n
This unit can be operated in temperatures between -4°F and 158°F
(-20°C and 70°C).
n
The NAV ONE’s map database provides information on suggested
routes without regard to some factors that may affect the user’s
driving experience. For example, the system does not reflect all
road detours, closures or construction, some road characteristics
(such as road surface, slope or grade, weight or height restrictions,
etc.), weather conditions and similar factors. The NAV ONE, when
equipped with the optional traffic receiver, overlays traffic
information on the Map. However, this data may be more or less
complete, depending on the provider. Use personal judgment or
the navigation system’s detour function to develop an alternate
route if necessary.
CAUTIONS
n
Dismount the unit when parked. This will not only minimize the
chance of theft but will also reduce the unit’s exposure to extreme
temperatures and strong sunlight which can shorten the life of the
internal components.
FCC COMPLIANCE
This device complies with Part 15 of the FCC interference limits
for Class B digital devices for home or office use. These limits are
designed to provide more reasonable protection against harmful
interference in a residential installation and are more stringent
than “outdoor” requirements.
Operation of this device is subject to the following conditions:
1. This device may not cause harmful interference, and
2. This device must accept any interference received, including
interference that may cause undesired operation.
Important Safety Information
Nothing Comes Close to a Cobra
®
5
Page 6
Warranty
10474 NAVONE 5000 VD_PH1.2.qxd 7/25/07 2:40 PM Page 6
Installation
Put the unit where it is visible at a glance.
Let the NAV ONE “see” the sky.
6
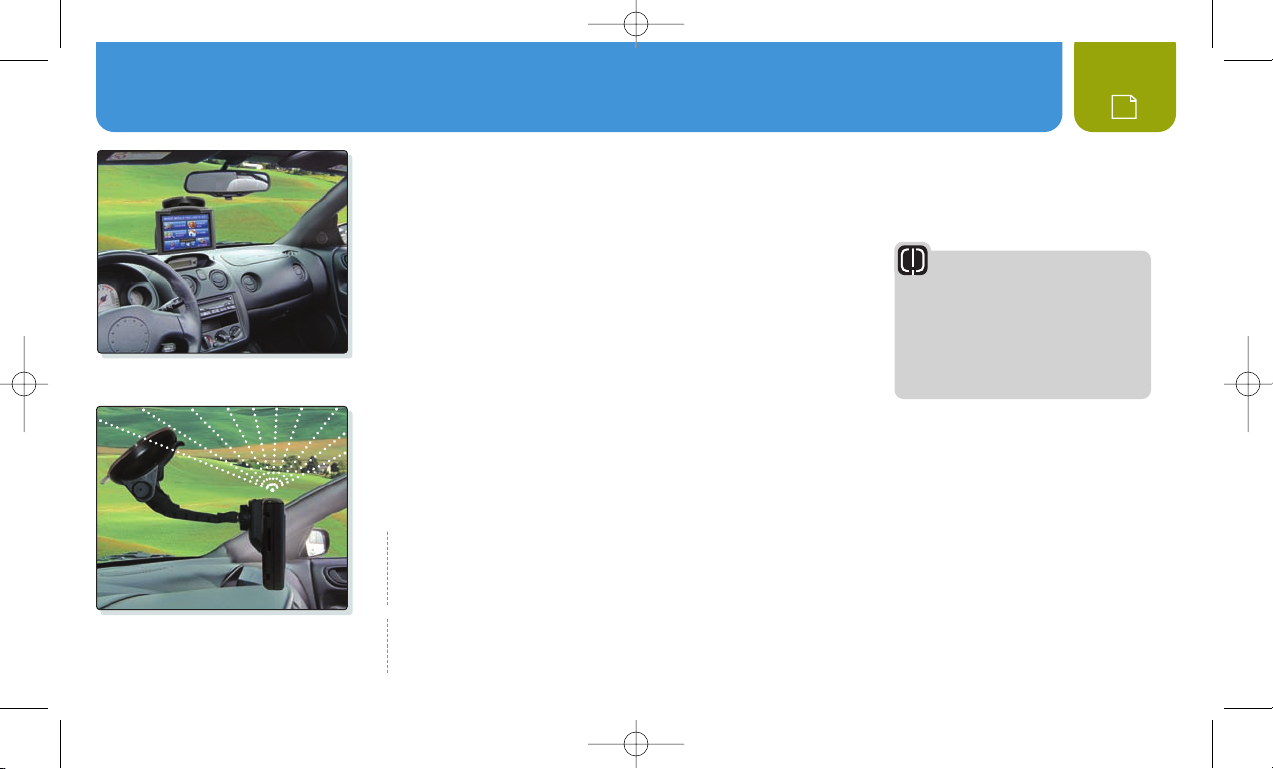
INSTALLATION
The NAV ONE requires very little installation beyond putting it at a convenient location and
securing it in place. The power cord can be connected to the vehicle’s 12-volt power connector.
When locating and securing the NAV ONE in the vehicle, keep in mind
the warnings and cautions on pages 4 and 5 to allow using the
NAV ONE safely while driving the vehicle:
n
Put the unit where it can be seen at a glance and the voice
instructions can be heard.
n
Do not put the unit where it will obstruct the driver’s view of the
road or interfere with the use of vehicle instruments and controls.
n
Do not put the unit over airbag panels or within airbag expansion spaces.
An important consideration in positioning the NAV ONE is its ability to “see” the sky. Radio signals from the GPS constellation
of satellites are weak and cannot penetrate the solid portions of a vehicle’s structure. The top of the NAV ONE contains the
GPS antenna and needs maximum exposure to the sky through the windshield. This will allow the unit to receive signals
from as many satellites as possible in various vehicle headings.
ì NOTE
Some vehicles have windshields with metallic coatings or integral heating systems that can block GPS satellite signals
even though the unit “sees” the sky. In those vehicles, an accessory external antenna will need to be mounted outside
the vehicle and connected to the unit. See accessories on page 31 for ordering information.
ì NOTE
Some states prohibit attachment of any articles to windshields or side or rear windows. Drivers should determine if such
restrictions apply to jurisdictions where they drive. If so, they should use the enclosed dash mounting disk.
WARNING
If the unit is not securely attached to
the vehicle, it can become a projectile
hazard to the vehicle’s occupants
during a violent maneuver or a
collision. The unit can cause serious
injury under such conditions.
Page 7
10474 NAVONE 5000 VD_PH1.2.qxd 7/25/07 2:40 PM Page 7
Installation
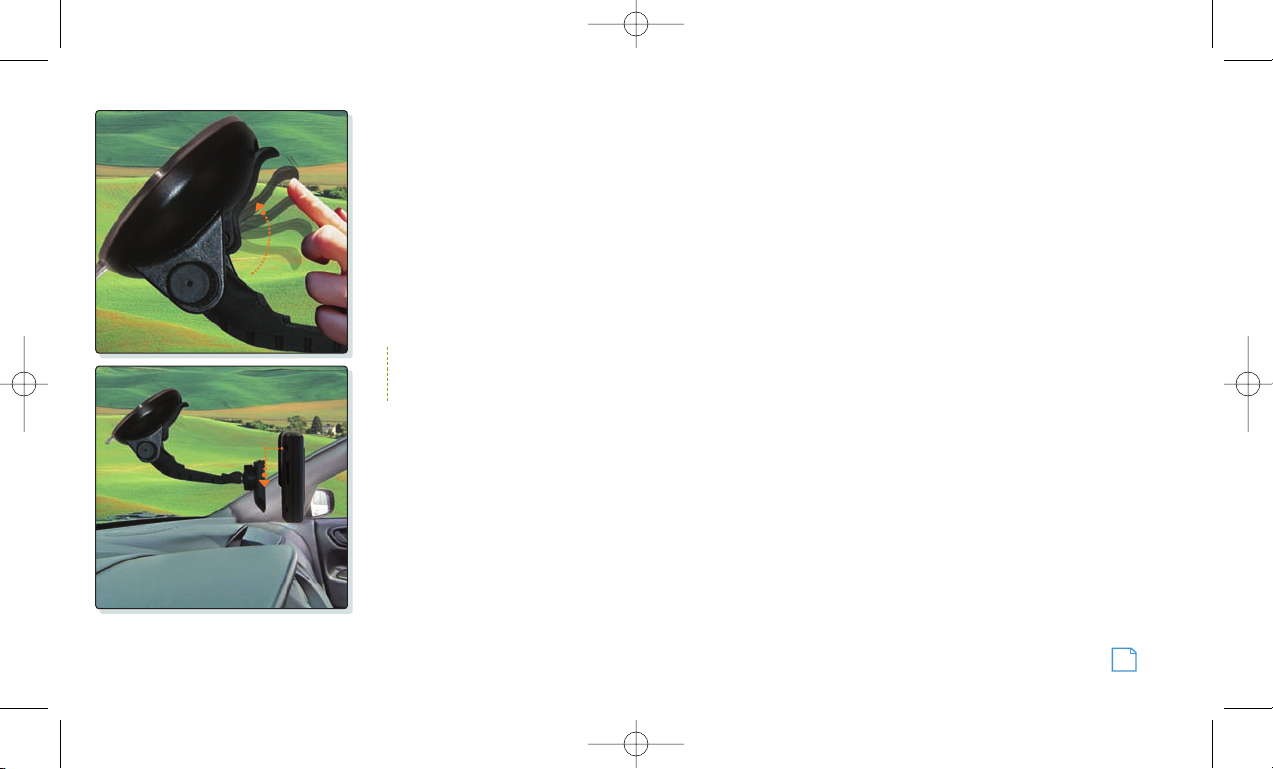
To secure and connect the NAV ONE:
1. Select and clean a suitable location where the unit can
be mounted.
2. Separate the mounting bracket from the unit.
3. Press the suction cup against the windshield and
pull the lock lever all the way back toward the
bracket arm UNTIL IT CLICKS.
4. Continue to press the suction cup firmly against the
5. Test suction cup adhesion by pulling on the bracket.
It should not wiggle.
6. Attach the unit to the bracket. Put the slot on the back of
the unit over the bracket arm and slide the unit down.
7. Adjust the unit position using the knobs and
tighten securely.
8. Plug the power cord into the unit and the vehicle’s
12-volt power connector.
windshield and rotate the lock lever all the way down
to the base.
ì NOTE
It is best to temporarily remove the NAV ONE unit when the vehicle is parked to prevent theft or component damage
due to temperature extremes. The bracket can be left attached to the windshield for quick reinstallation of the unit.
CHECKING GPS SIGNAL
Once the NAV ONE is installed and the vehicle is in an open area, turn the unit On and observe the GPS signal
indicator in the upper right corner of the map screen or view the GPS status screen from Settings on the Main Menu.
If the indicator is either yellow or red, the NAV ONE may not be “seeing” the sky and may need to be repositioned.
START-UP TIME
When the NAV ONE is new (or has been idle for more than seven days or has moved more than 500 miles while Off),
it can take up to five minutes for the system to lock onto the GPS satellites. After such a start-up, the system can
be left turned On for 20 minutes or more to download GPS satellite data. This data will allow much faster satellite
acquisition and lock — typically less than a minute — when the system is subsequently turned On.
Nothing Comes Close to a Cobra
®
7
Page 8
10474 NAVONE 5000 VD_PH1.2.qxd 7/25/07 2:40 PM Page 8
System Overview : Main Menu
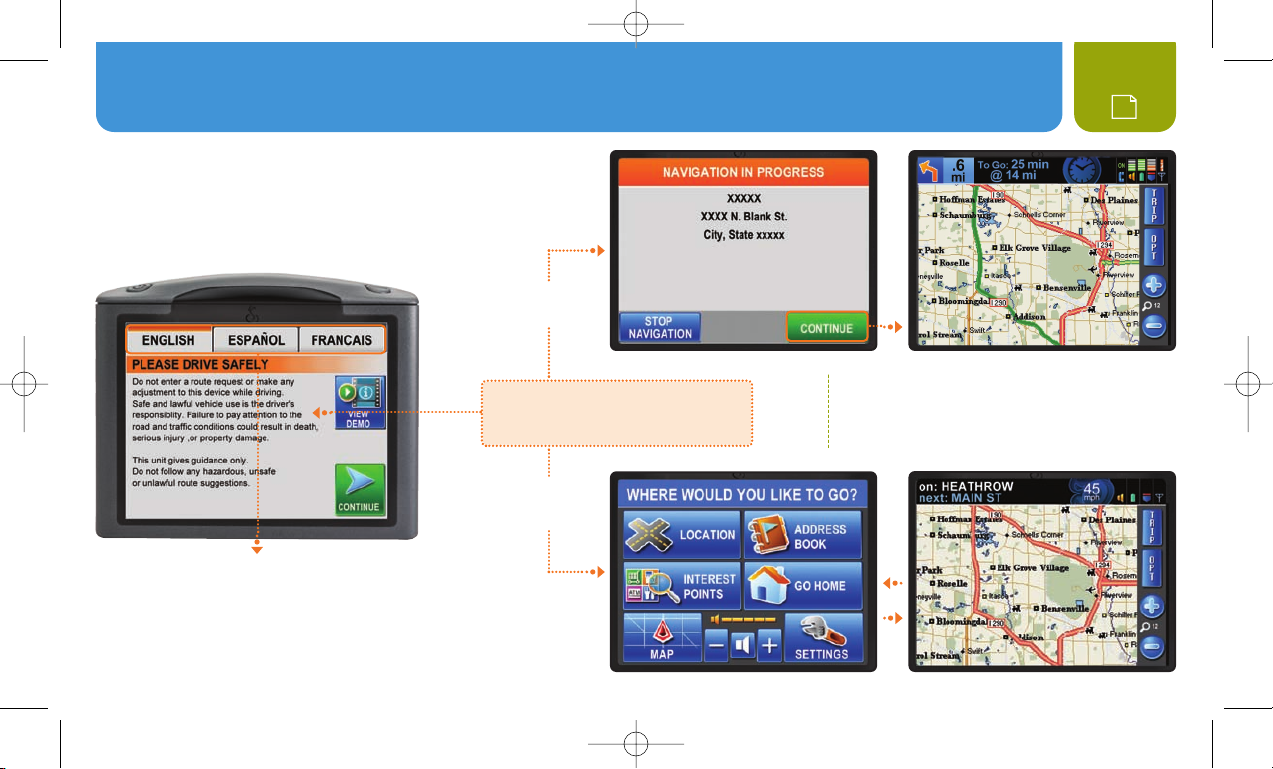
SYSTEM OVERVIEW
When the NAV ONE is turned On, an opening
message and safety warning are shown (below).
LANGUAGE CHOICES
At this display, the user has
the opportunity to change
the language from English
to Spanish or French.
NAVIGATION
IN PROGRESS
Continuation from the warning message
depends on whether or not a navigation
was in progress when the unit was last
turned Off.
NAVIGATION
WAS NOT IN
PROGRESS
8
ì NOTE
The Main Menu or the Map will be displayed
depending on which has been set as the Start
Screen in the User Preferences.
or
Page 9
10474 NAVONE 5000 VD_PH1.2.qxd 7/25/07 2:40 PM Page 9
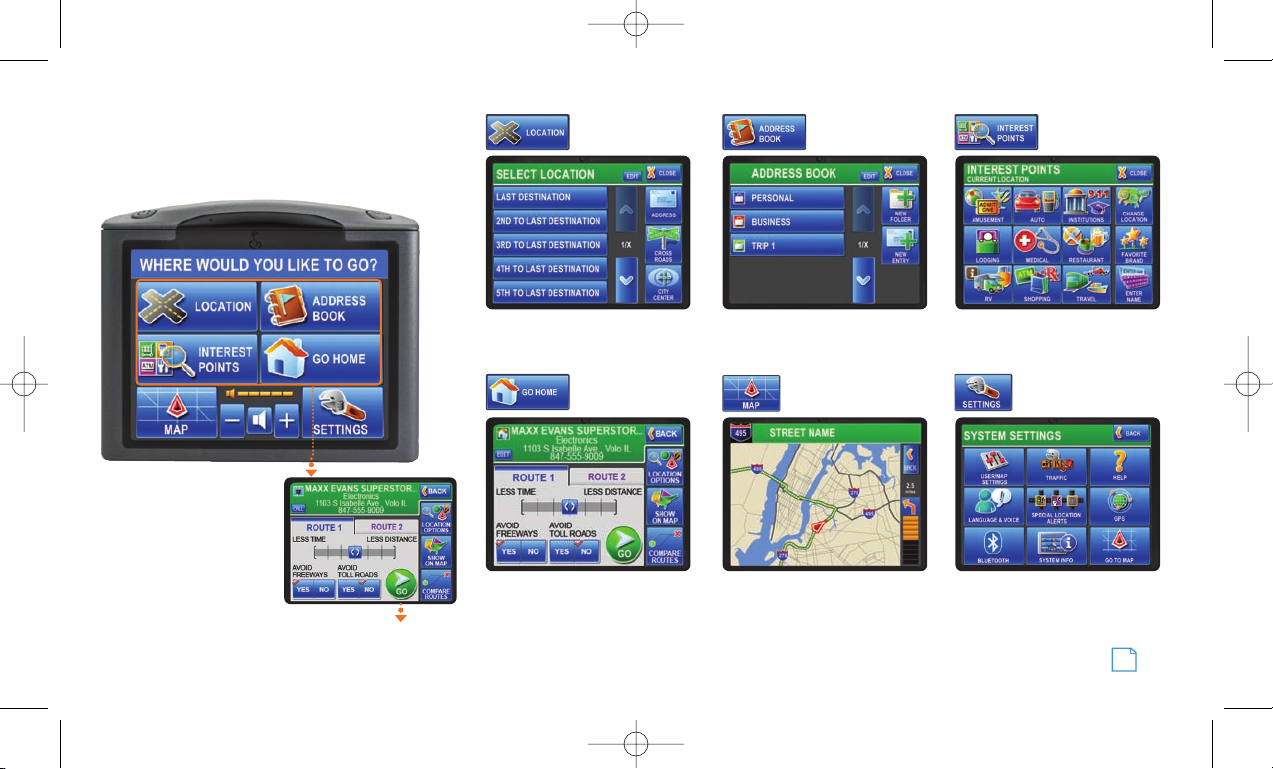
MAIN MENU
The starting point for
all system features.
The four upper buttons
are the entry points to
a trip. Once a destination
is selected by completing
one of these sequences,
Destination Review offers
choices of how to get there
(see page 16).
System Overview : Main Menu
Navigation to
Destination.
om a list of previous
Select fr
destinations or enter a ne
k home fr
Get bac
ywhere when home is
an
set in the Address Book.
om
w location.
Up to 1,000 entries can be created
ganized in up to 20 f
and or
Map is an easy-to-grasp
graphic guide
.
olders.
Interest points can be selected near
a location or along a r
millions in the system database.
e the system.
Customiz
Nothing Comes Close to a Cobra
oute from the
®
9
Page 10
10474 NAVONE 5000 VD_PH1.2.qxd 7/25/07 2:40 PM Page 10
Lists : Menu Choices
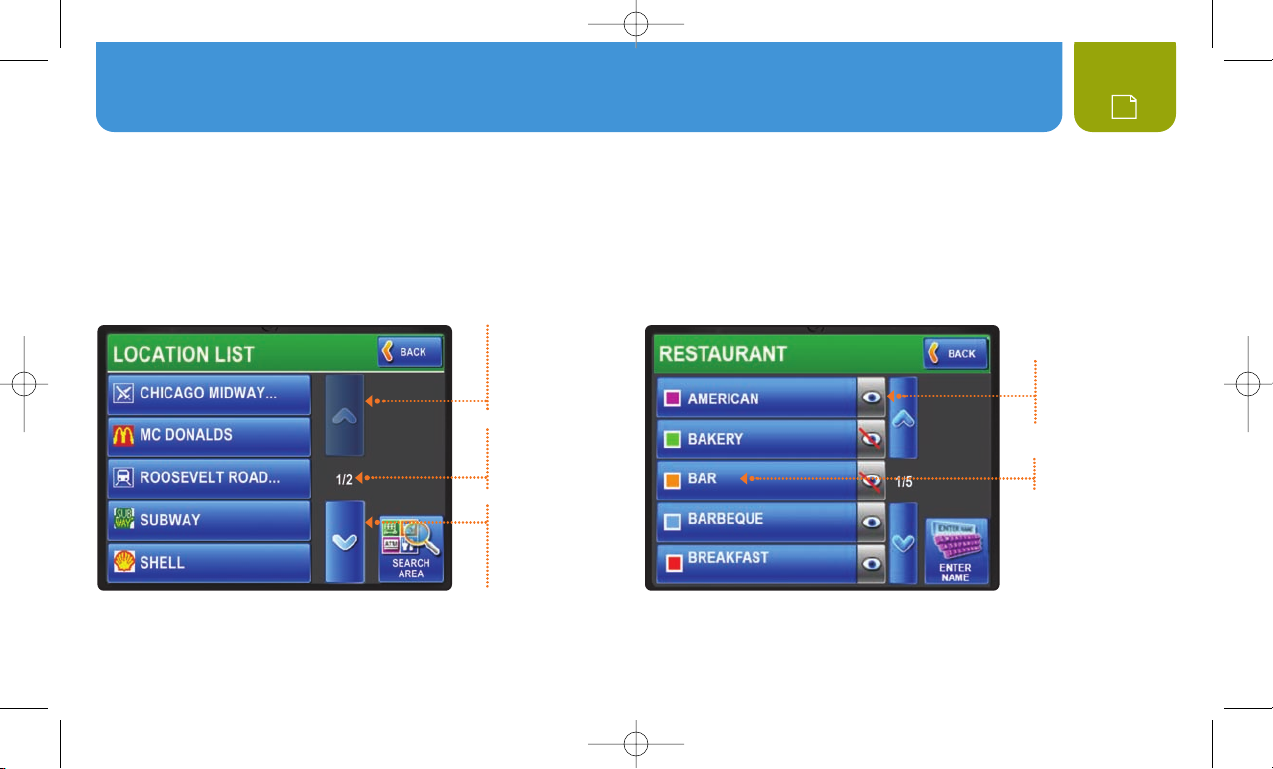
LISTS
Take a moment to become familiar with using lists on the NAV ONE.
Lists present information conveniently and allow choices to be selected by touching the desired item on the screen.
Once an item is selected, the system continues automatically to the next step in the process.
POINT OF INTEREST LISTLOCATION LIST
Up Button
Press to go back
one page. Press and
hold for rapid pageby-page advance.
Page Numbers
Current page /
total pages.
Down Button
Press to advance by
one page. Press and
hold for rapid pageby-page advance.
button is inactive at the top of the list.
The Up
The Down button is inactive at the bottom of the list.
Point of interest lists ha
ve added features.
10
Press to toggle
between showing
the item icon on
the Map or not.
Press to view
sub-categories.
Page 11

10474 NAVONE 5000 VD_PH1.2.qxd 7/25/07 2:40 PM Page 11
MENU CHOICES
This section briefly describes each of the major Menu choices and lists some explanations of the buttons associated with them.
A trip destination can be selected from a list of previously selected destinations or a new destination can be entered as an address,
a crossroad intersection or a city center.
Each location entry screen shows the currently selected state and provides a way to change it. The entry screens also allow numeric and text
entries by means of keypads on the touch screen. As these entries progress, the system presents only those subsequent characters on the
keypads for which entries exist in the database.
Returns to the
previous menu.
Returns to the
previous step.
Lists : Menu Choices
Allows entry
of an address.
Brings up
the alphabetic
keypad.
Allows entry of
an intersection.
On the alphabetic
keypad, switches
to the numeric
keypad.
Allows entry of a
city
name. The city's
central location will
be shown.
On the numeric
keypad, switches
to the alphabetic
keypad.
Moves the system
to the next step
for entering the
location.
Brings up a list based on the characters
already entered. Locations can be
selected from the list without further
text or numeric entries.
®
Nothing Comes Close to a Cobra
11
Page 12

10474 NAVONE 5000 VD_PH1.2.qxd 7/25/07 2:40 PM Page 12
Menu Choices
Stores and organizes up to 1,000 locations and up to 20 folders for later use. The
or deleted by the user. Locations can exist in more than one folder, but the exact same entry cannot exist more than once in any given folder.
Returns to the
previous menu.
Allows destination selection from a list of public places. Within the twelve general categories of places, there are about seven million
listings of Interest Points to which one might want to go.
Returns to the
Main Menu.
Allows creation
and naming of
folders within the
Address Book.
Allows researching
establishments in any
place other than the
unit’s current location
or along the current
route being navigated.
Allows setting
a location as the
designated home
point as the last
step of entering it in
Address Book.
the
Allows narrowing establishment selection
to those associated with specific brands.
For instance, Audi automobile dealers may
not include Audi in their names, but this
feature would bring them up without having
to scroll through all auto dealerships.
Is the means of adding a location to an
Address Book folder. From the display of
the selected folder, the Add Entry mode
allows choices from a specified location,
the unit’s current location, the list of
interest points or an Address Book entry.
12
Personal folder is permanent; all other folders can be added
Allows entry of an establishment name. For establishments
with multiple locations, such as a restaurant chain,
the system returns a list of locations near the current
or changed location. If "No Results" is shown, press the
Search Wider Area button to extend the search area.
Page 13

10474 NAVONE 5000 VD_PH1.2.qxd 7/25/07 2:41 PM Page 13
Provides immediate routing from any location to the place that has been designated as home.
Menu Choices
Returns to the
previous menu.
Displays the Map
and starts navigation.
Provides the user with the ability to customize system and map preferences, set the time zone and view information about the software and database.
Camera
Brings up a list
of available settings
and explanations
of available options.
Allows selection of
the local time zone
and toggling Daylight
Saving Time On or Off.
Allows selection of
the language used
for screen text and
voice prompts.
Brings up a list of
available settings
for this feature
(see page 18).
Determines whether and how special
location alerts will be displayed.
Traffic Overlay
Operational help
and tips.
Brings up a list of
available settings
for this feature.
On and Off buttons
determine if traffic
information will
overlay the Map.
Allows setup for
use with a Bluetooth
enabled cell phone
(see page 20).
Shows the currently
installed software version
and other system data.
Nothing Comes Close to a Cobra
®
13
Page 14

10474 NAVONE 5000 VD_PH1.2.qxd 7/25/07 2:41 PM Page 14
Menu Choices
Shows a segment of the entire Map as if through a window that can be moved to display any desired portion. The window can be
zoomed in or out to reveal greater detail or a larger area. The system defaults to the Map segment associated with the current activity.
When the system is in navigation to a destination, the route is highlighted on the Map and maneuver details are presented as they occur.
If the vehicle departs from the navigation route, the system will automatically recalculate and show the new route to the selected destination.
When not in navigation, the map shows the area around the vehicle and the system displays the name of the street on which the vehicle is traveling.
JUST TWO POWERFUL BUTTONS, AT THE RIGHT OF THE MAP DISPLAY, LEAD TO A WEALTH OF HELPFUL FUNCTIONS.
Brings up text displays to view and customize
Trip Data or to access a Turn-by-Turn maneuver
list. Touch a list item to see the turn location.
TRIP STATUS BAR SHOWS
FROM LEFT TO RIGHT:
S Next Maneuver Detail
S Distance to Next Maneuver
S Compass Heading
ì NOTE
Touching some of
the five level icons
above invokes the
related screen.
S Estimated Time of Arrival
S Distance to Destination
S Bluetooth Status
S Volume Level
S Battery Strength/Charging
S Traffic Signal Strength
S GPS Signal Strength
Switches from the Map to an array of options related to your trip,
viewing and saving information about the current location,
and activating Trail Recorder mode.
14
Page 15

10474 NAVONE 5000 VD_PH1.2.qxd 7/25/07 2:41 PM Page 15
THE FOLLOWING ARE THE PRINCIPAL BUTTONS THAT APPEAR IN PAGE AND MORE.
Menu Choices
Displays
information about
the current trip.
Displays address,
coordinates and
street information
for the vehicle’s
current location.
Displays a scrolling
list of maneuvers
from start to end
of the trip. Touch
any item to view.
Shows the
current location
and satellite
signal strengths.
Displays a list
of traffic events
ahead on the
current route.
Allows
out-of-vehicle trip
planning and route
simulation to and
from any location.
Enables the
user to stop
navigation.
Allows the user
to set preferences
for how the map
and other data are
displayed.
Allows the user to
force the system to
recalculate a trip in
progress to avoid
specific roads.
Is the final step in
changing a route
and proceeding to
Map.
the
Allows the
user the change
route options.
Shows details
of the traffic
information feed.
Touch any item to
select your choice
of data to display.
Nothing Comes Close to a Cobra
®
15
Page 16

10474 NAVONE 5000 VD_PH1.2.qxd 7/25/07 2:41 PM Page 16
Interacting with the Map : Route Selection
INTERACTING WITH THE MAP
When the Map is displayed, the touch-screen feature of the NAV
ONE makes it easy to work with. Touching the screen anywhere
Map opens Map Browse mode. Once in this mode, touch
on the
Map to show a list of locations at that place. Also the Map
the
can be moved in any of the eight arrow directions. Just touch any
arrow to move in that direction.
ACTIVATE MAP BROWSE MODE
The panning feature is activated
whenever the screen is touched.
Touch any arrow and the window
will move in that direction.
The Route button zooms the map
to show the entire route.
ì NOTE
Press the Return button at
any time to exit Map Browse mode.
16
ROUTE SELECTION
The Destination Review screen provides a choice of two routes
for a trip – you can select any routing options for each and compare
them. Press the
compared on the
Press one of the
Compare Routes button to see the two routes
Map.
Route buttons at the top of the Compare Routes
screen to select it and proceed to trip navigation.
DESTINATION REVIEW COMPARE ROUTES
Page 17

10474 NAVONE 5000 VD_PH1.2.qxd 7/25/07 2:41 PM Page 17
USING MAP BROWSE
The status bar at the top of
the screen will change to show
a single location or multiple
locations.
While in Map Browse, touch any spot on
the Map to see what destinations are there.
Interacting with the Map : Route Selection
SINGLE
LOCATION
MULTIPLE
LOCATIONS
Touch the location in the blue bar
to begin navigation to it.
Touch the b
to see a list of all destinations near the
point touched on the Map.
lue Multiple Locations bar
Allows navigation to the location.
y of the location b
Touch an
to begin navigation to it.
Nothing Comes Close to a Cobra
uttons
®
17
Page 18

10474 NAVONE 5000 VD_PH1.2.qxd 7/25/07 2:41 PM Page 18
Special Locations : Trail
SPECIAL LOCATIONS
Special locations include fixed speed cameras and red light
cameras. The alerts to these locations are intended to remind
users to exercise special caution when they are approached.
Alerts will be signaled by an icon on the screen as shown
at the lower left corner.You can change the distance for the
alert notification.
ì NOTE
Known locations of fixed speed cameras and red light cameras are set
in the unit memory at the time of manufacture. To update this database,
go to the Cobra website (www.cobra.com) and follow the directions
provided. This online data base is updated regularly and should be
visited from time to time.
18
SPECIAL LOCATION ALERT
Page 19

10474 NAVONE 5000 VD_PH1.2.qxd 7/25/07 2:41 PM Page 19
TRAIL
This feature can be used on or off the road to
record vehicle movements.
Instead of guiding the vehicle on a route
calculated in advance, it captures the route
actually taken. Once a trail is recorded and
saved, it can be used to retrace the route or
to repeat it in the future.
Trail mode by pressing:
Enter
Main Menu S Map S More S Trail
The system will prompt for a new trail to be
named, be assigned a color, be shown on
the
Map, and be saved.
Up to 100 trails can be saved in the system
memory and existing trails can be deleted or
have their characteristics edited at any time.
Map screen while a trail is being recorded.
Special Locations : Trail
Nothing Comes Close to a Cobra
®
19
Page 20

10474 NAVONE 5000 VD_PH1.2.qxd 7/25/07 2:42 PM Page 20
Bluetooth
BLUETOOTH
The NAV ONE can function as a speaker phone
for many Bluetooth enabled cell phones.
The first step is to set up a cell phone with the NAV ONE.
1. On the NAV ONE, go to Bluetooth Setup with the sequence
Main Menu S Settings S Bluetooth.
2. Press the Yes button to enable the NAV ONE to be
discovered by a cell phone.
3. Set the cell phone for Bluetooth pairing according
to your cell phone instructions.
4. Have your phone “discover” the Nav One.
5. After the two devices are connected, follow the on-screen
instructions and enter the password shown on the Nav One
screen into your phone when registered.
The Main Menu will now display a Phone button
and the
the status bar at the top of the
All future connections will be controlled by the
cell phone.
Bluetooth status icon will be added to
Map screens.
Whenever a device is paired with the NAV ONE, the
Main Menu screen changes to that shown here.
Calls are easy to initiate:
Press the Phone button.
1.
2. Dial the number using
the numeric pad presented
on the screen.
3. Press the Send button.
ì NOTE
Some cell phones may
have a variety of Bluetooth
that is incompatible with
that in the NAV ONE.
If pairing does not occur,
call Cobra customer support
for assistance.
20
Page 21

10474 NAVONE 5000 VD_PH1.2.qxd 7/25/07 2:42 PM Page 21
BLUETOOTH
The embedded numbers for Points Of Interest
recalled from the system's database can be
called directly. Press the
Call button on the
Destination Review screen after choosing
a POI location.
Incoming calls bring up the Answer / Ignore
screen with caller ID, if available from the cell
phone service provider.
INCOMING CALL FROM ANY SCREEN
The Map can be accessed from the On Call
screen and a blinking icon on the Map will
show that the call is in progress. Pressing the
Phone icon will return to the On Call screen
to end or switch to a waiting call.
MAP SCREEN WITH WITH PHONE BUTTON
When no call is in progress, the phone icon will
appear if Phone Button on Map Screen has been
turned On in Map Settings (page 24). Pressing the
icon will bring up the keypad to enable dialing a call.
Bluetooth
Nothing Comes Close to a Cobra
®
21
Page 22

10474 NAVONE 5000 VD_PH1.2.qxd 7/25/07 2:42 PM Page 22
Traffic : User Settings
When Traffic overlay is turned On (using Main Menu S Settings S Traffic Settings S On/Off), the NAV ONE will indicate
traffic conditions and incidents on the Map by colored segments and icons along the route. Changes that occur during navigation
will prompt voice alerts.
Touching the screen at any of the incident icons will bring up information about the cause of the incident. Press the options
button for re-route possibilities.
VIEW TRAFFIC LIST
Shows a list of all traffic
events along the current
trip route.
VIEW NEW ROUTES
Shows a comparison of the
current trip route and a
recalculated one to avoid
the traffic event.
RECALCULATE
Recalculates the route from
the current location using the
previously set route criteria.
Map in navigation.
ì NOTE
The NAV ONE displays traffic
information only when connected to
the optional traffic receiver that can
be purchased as an accessory. See
the Accessories section at page 31.
Touch the screen
to select an
alternate route
Re-route options.
ì NOTE
The traffic receiver continuously monitors any
available FM data channel for up-to-the-minute
traffic information. Traffic incident information
is available only in selected major cities. Check
www.cobra.com for the latest city list.
ì NOTE
For a demo of the Traffic feature
press: Main menu S Settings S
Traffic Settings S View Demo.
22
Page 23

10474 NAVONE 5000 VD_PH1.2.qxd 7/25/07 2:42 PM Page 23
USER SETTINGS
The following settings of user preferences are available. The list can be reached using the sequence: Main Menu S Settings S User/Map Settings
The Help button on the same screen opens a list of detailed explanations of the items. After selecting all desired settings, press the Save button.
USER PREFERENCES SETTINGS (DEFAULTS IN BOLD)
Audio Help
Key Click
Demo Mode
Adjust Volume with Speed
Brightness
Start Screen
Units
Keyboard Layout
Ask for City in Find Address
On
Beep
Auto
On
Adjust
Main Menu
US Standard
ABC
Yes
Off
Silent
Manual
Off
Map
Metric
QWER
No
TY
Traffic : User Settings
USER PREFERENCES SETTINGS (DEFAULTS IN BOLD)
Speed Alarm
Proximity Alarm
Smart Power
Battery Save
Time Zone
Reset Factory Defaults
Delete All User Data
Clear Recently Found List
Clear All Avoided Roads
–
On
On
On
Change
Reset
Delete
Clear
Clear
No
Off
Off
Off
Nothing Comes Close to a Cobra
+
+
®
23
Page 24

10474 NAVONE 5000 VD_PH1.2.qxd 7/25/07 2:42 PM Page 24
Map Settings : Battery Operation : Maintenance
MAP SETTINGS
The following settings of map preferences are available. The list can be reached using the sequence: Main Menu S Settings S User/Map Settings.
After selecting all desired settings, press the Save button.
MAP OPTIONS SETTINGS (DEFAULTS IN BOLD)
Map Direction
Map View
Map Details
Map Theme
Day/Night Colors
Scale
Vehicle Icon
Destination Time
Voice Prompt
North Up
Traditional
Less
Easy View
Change
On
Arrival T
More
ime
Direction Up
3D
More
Standard
Off
Change
Ti me Remaining
Less
ì NOTE
The Help button in settings provides detailed explanations of each item.
MAP OPTIONS SETTINGS (DEFAULTS IN BOLD)
Auto Zoom
Auto Map Re-Center
Phone Button on Map Screen
Show Current Street in Status Bar
Status Bar Data Items
Show Address Book Locations
Show Interest Point Icons on Map
Average Speed – Local
Average Speed – Highway
Manual
15 sec.
On
Yes
Select
On
On
-
-
Next Turn
30 sec.
Off
No
Off
Off
25
55
24
Never
+
+
Page 25

10474 NAVONE 5000 VD_PH1.2.qxd 7/25/07 2:42 PM Page 25
BATTERY OPERATION
The NAV ONE has a built-in rechargeable battery to allow operation without a power cord attached. The battery
automatically goes into Recharge mode whenever a power cord is plugged in to the unit.
When the battery is very cold or very hot, recharging could damage it. Under those conditions, an alert message
will be displayed and charging will be deferred until the battery temperature has returned to the charging range.
The unit can still be operated using the 12V cord.
MAINTENANCE
Very little maintenance
is required to keep this
S Keep the unit components clean by wiping with a soft lens cleaning cloth. Do not use
solvents or harsh or abrasive cleaners, which could damage the case or scratch the display.
NAV ONE system in good
operating condition.
S Protect the unit from moisture and from being dropped or struck by hard objects
to prevent damage.
S Consult the Cobra website (www.cobra.com) for the latest software and database updates.
Map Settings : Battery Operation : Maintenance
Nothing Comes Close to a Cobra
®
25
Page 26

10474 NAVONE 5000 VD_PH1.2.qxd 7/25/07 2:42 PM Page 26
User License : Warranty
USER LICENSE
This document and the software and data described in it may be subject to one or more
copyrights owned by or licensed to or from Cobra Electronics Corporation, Tele Atlas, Tele Atlas
Canada, Inc., Statistics Canada, Geomatics Canada, and/or Canada Post Corporation and are
furnished under license and may be used or copied only in accordance with such license. Except
as permitted by such license, the contents of this document, software and data may not be
disclosed to third parties, copied or duplicated in any form, in whole or in part, without the prior
written permission of Cobra Electronics Corporation. This document, software and DATA contain
proprietary and confidential information of Cobra Electronics Corporation and its licensors.
Cobra grants the purchaser a limited license for use of this document, software and data
incorporated in the NAV ONE for personal use, and not for resale, sublicense or commercial
By using the NAV ONE, the purchaser agrees to be bound by the terms and conditions
use.
of this license agreement.
software and data are the property of Cobra and its licensors and are protected by
copyright laws of the USA and international treaties. The purchaser agrees not to modify,
decompile, disassemble, reverse engineer or reduce to human readable form the software,
DATA or any part thereof, nor to create derivative works based on the contents of the
document, software or data, nor remove or obscure any copyright, trademark notice,
or restrictive legend.
The purchaser agrees not to export or re-export this document or the NAV ONE to any country in
violation of the export control laws of the U.S.A. Purchaser further agrees to use the NAV ONE
in compliance with all applicable federal state and local laws, rules and regulations.
The contents of this document, software and data are for informational use only and are
subject to change without notice. Cobra and its licensors intend to provide their customers
the most complete and accurate navigation information available at a reasonable cost from
The purchaser acknowledges that the content of this document,
26
government and private data sources. However, all data sources have limitations and some
have inaccuracies or are incomplete to some degree. These characteristics carry over to the
NAV ONE as well. As such, COBRA AND ITS LICENSORS SHALL NOT BE LIABLE TO THE
USER FOR ANY INCIDENTAL, CONSEQUENTIAL, SPECIAL, INDIRECT OR EXEMPLARY
DAMAGES ARISING FROM THE USE OF THE NAV ONE PRODUCT.
THE NAV ONE PRODUCT IS PROVIDED ON AN “AS IS” AND “WITH ALL FAULTS BASIS”
AND COBRA AND LICENSORS EXPRESSLY DISCLAIM ALL WARRANTIES, EXPRESS
OR IMPLIED, INCLUDING BUT NOT LIMITED TO, THE IMPLIED WARRANTIES OF NONINFRINGEMENT, MERCHANTABILITY, QUALITY, ACCURACY, TITLE AND FITNESS FOR A
PARTICULAR PURPOSE. NO ORAL OR WRITTEN ADVICE OR INFORMATION PROVIDED BY
COBRA AND/OR ITS LICENSORS OR ANY OF THEIR AGENTS, EMPLOYEES OR THIRD PARTY
PROVIDERS SHALL CREATE A WARRANTY, AND USER IS NOT ENTITLED TO RELY ON ANY
SUCH ADVICE OR INFORMATION. THIS DISCLAIMER OF WARRANTIES IS AN ESSENTIAL
CONDITION OF THE AGREEMENT.
Cobra encourages customers to report any errors found in our electronic maps by contacting
technical assistance (available in English and Spanish) at product info@cobra.com (e-mail),
by visiting our website: www. cobra.com, or by calling customer assistance (available in
English and Spanish) at 773-889-3087 between 8:00 a.m. and 6:00 p.m. Central Time,
Monday through Friday (except holidays).
If End User is the United States Government, then use, reproduction or disclosure of
this commercial product and accompanying documentation may be subject to DFARS
252.227-7014(a)(1); DFARS 227.7202-1; FAR 52.227-19; DFARS 252.227-7015;
FAR 52.227-14 Alternates I, II, and III; and/or FAR 12.211 and FAR 12.212 as applicable
and/or similar successor clauses in FAR, or the DOD or NASA FAR Supplement.
Page 27

10474 NAVONE 5000 VD_PH1.2.qxd 7/25/07 2:42 PM Page 27
WARRANTY
COBRA ELECTRONICS CORPORATION warrants that its Cobra NAV ONE, and the
component parts thereof, will be free of defects in workmanship and materials for
a term of one year from the date of first consumer purchase. This warranty may be
enforced by the first consumer purchaser, provided that the product is used solely
within the U.S.A. and Canada.
Cobra will, without charge, repair or replace, at its option, defective NAV ONE
products or component parts upon delivery to the Cobra Factory Service
Department, if accompanied by proof of the date of first consumer purchase,
such as a duplicated copy of a sales receipt. The consumer must pay any initial
shipping charges required to ship the product for warranty service. Return
shipping will be at Cobra’s expense if the product is repaired or replaced
under warranty.
This warranty gives the consumer specific rights, and he or she may also have
other rights which vary from state to state.
ì NOTE
COBRA MAKES NO WARRANTY AS TO THE ACCURACY OR
COMPLETENESS OF THE MAP DATA UTILIZED IN THE NAV ONE
PRODUCTS AND DISCLAIMS ALL EXPRESS, IMPLIED OR STATUTORY
WARRANTIES, INCLUDING ANY IMPLIED OR STATUTORY WARRANTIES
OF MERCHANTABILITY OR FITNESS FOR A PARTICULAR PURPOSE.
EXCLUSIONS – THIS LIMITED WARRANTY DOES NOT APPLY:
1. To any product damaged by accident;
2. In the event of misuse or abuse of the product or as a result of unauthorized
alterations or repairs;
3. If the serial number has been altered, defaced or removed;
4. If the owner of the product resides outside the U.S.A. and Canada.
All implied warranties, including warranties of merchantability and fitness for
a particular purpose are limited in duration to the term of this warranty. COBRA
SHALL NOT BE LIABLE FOR ANY INCIDENTAL, CONSEQUENTIAL OR OTHER
DAMAGES; INCLUDING, WITHOUT LIMITATION, DAMAGES RESULTING FROM
LOSS OF USE OR COST OF INSTALLATION. Some states do not allow limitations
on the duration of an implied warranty and/or do not allow the exclusion or
limitation of incidental or consequential damages. Part or all of the above
limitations may not apply to some consumers.
It is the user’s responsibility to use this product prudently and responsibly.
This product is intended to be used only as a travel aid and must not be used
for any purpose requiring precise measurement of direction, distance, location
and/or topography.
User License : Warranty
Nothing Comes Close to a Cobra
®
27
Page 28

10474 NAVONE 5000 VD_PH1.2.qxd 7/25/07 2:42 PM Page 28
Troubleshooting : Product Service
TROUBLESHOOTING
PROBLEM POSSIBLE CAUSE(S) SOLUTION(S)
Power switch is turned Off. Turn the unit On with the Power button.
Battery is discharged. Plug in 12V power and turn the unit
Display does
not power up.
GPS indicator will
not turn green.
System does not reflect
movement while driving.
Vehicle motion is not
evident or the Map is blank.
Fuse in 12V power cord is blown.
No voltage is present at the vehicle power
connector.
GPS antenna cannot “see” the sky.
GPS is not working properly.
Geographic area is not fully mapped.
Map is zoomed in too far. Zoom out.
Check for green LED on 12v power plug. Unscrew the fuse holder,
inspect the fuse and replace it if blown.
Troubleshoot vehicle wiring. NOTE for some power points,
ignition key must be at RUN position for the point to be energized.
Move vehicle to open area and make sure the GPS antenna
has a clear view of the sky.
Is GPS signal indicator green? If yes, go to next step.
If no, go to “GPS indicator will not turn green” step.
Drive to a main road. If the map shows the road, the system
is working properly, but the area is not fully mapped.
28
On.
Page 29

10474 NAVONE 5000 VD_PH1.2.qxd 7/25/07 2:42 PM Page 29
PRODUCT SERVICE
For any questions about operating or installing this new Cobra product, or if parts are missing
…
PLEASE CALL COBRA FIRST…do not return this product to the store.
If this product should require factory service, please call Cobra first before sending the product. This will ensure
the fastest turnaround time on any repair. If Cobra asks that the product be sent to its factory, the following must
be furnished to have the product serviced and returned:
1. For Warranty Repair include some form of proof-of-purchase,
such as a mechanical reproduction or carbon of a sales receipt.
Make sure the date of purchase and product model number are
clearly readable. If the originals are sent, they cannot be returned;
2. Send the entire product;
3. Enclose a description of what is happening with the product.
Include a typed or clearly printed name and address of where the
product is to be returned, with phone number (required for shipment).
4. Pack the product securely to prevent damage in transit. If possible,
use the original packing material;
Troubleshooting : Product Service
5. Ship prepaid and insured by way of a traceable carrier such as
United Parcel Service (UPS) or Priority Mail to avoid loss in transit to:
Cobra Factory Service
Cobra Electronics Corporation
6500 West Cortland Street
Chicago, Illinois 60707 U.S.A.;
6. If the product is in warranty, upon receipt of the product, it will either be
repaired or exchanged depending on the model. Please allow approximately
3 – 4 weeks before contacting Cobra for status. If the product is out of
warranty, a letter will automatically be sent with information as to the repair
charge or replacement charge.
For any questions, please call 773-889-3087 for assistance.
Nothing Comes Close to a Cobra
®
29
Page 30

10474 NAVONE 5000 VD_PH1.2.qxd 7/25/07 2:42 PM Page 30
Customer Assistance : Trademark Acknowledgement : Accessories
CUSTOMER ASSISTANCE
Should there be any problems with this product,
or its many features not be understood, please refer
to this owner’s manual. For further assistance after
reading this manual, Cobra Electronics offers the
following customer assistance services:
FOR ASSISTANCE IN THE U.S.A.
S Automated Help Desk (English only) 24 hours a day,
7 days a week at 773-889-3087 (phone).
S Customer Assistance Operators (English and Spanish)
8:00 a.m. to 6:00 p.m. Central Time, Mon. through Fri.
(except holidays) at 773-889-3087 (phone).
S Questions (English and Spanish)
Faxes can be received at 773-622-2269 (fax).
S Technical Assistance (English only) www.cobra.com
(on-line: Frequently Asked Questions).
S Technical Assistance (English and Spanish)
productinfo@cobra.com (e-mail).
FOR ASSISTANCE OUTSIDE THE U.S.A.
S Contact the local dealer
TRADEMARK ACKNOWLEDGEMENT
Cobra®, Intelligent Accelerated Satellite Acquisition Protocol
(iASAP) Technology®, NAV ONE®,Nothing Comes Close to a Cobra
and the snake design are registered trademarks of Cobra
Electronics Corporation, USA.
Cobra Electronics Corporation™ and SmartPower™ are
trademarks of Cobra Electronics Corporation, USA.
Windows®is a registered trademark of Microsoft Corporation.
Tele Atlas®is a registered trademark of Tele Atlas, N.V.
Tele Atlas True Time Maps™ is a trademark of Tele Atlas, N.V.
The Bluetooth®word mark and logos are registered trademarks
owned by Bluetooth SIG, Inc. and any use of such marks by
Cobra Electronics Corporation is under license.
Other trademarks and trade names are the property of their
respective owners.
30
®
Page 31

10474 NAVONE 5000 VD_PH1.2.qxd 7/25/07 2:42 PM Page 31
ACCESSORIES
These and other accessories are available for the NAV ONE from a local Cobra dealer or directly from Cobra.
Alternate mounting brackets are also available. See our website at www.cobra.com for details.
ì NOTE
For NAV ONE 5000 Map Update,
order Item # MNA UPD 5000.
MNA 2300 CS
Deluxe carrying case
organizes the NAV ONE
and its accessories.
MNA 2300 EXT
External antenna allows GPS
signal reception in heavily
shielded vehicles and those
with heated or metallic coated
windshields.
MNA CCFM2
Optional traffic receiver
overlays traffic information
on map when connected
to the NAV ONE.
ACCESSORIES ORDER INFO
Ordering From U.S.A.
Call 773-889-3087 for pricing or visit www.cobra.com.
For Credit Card Orders
Call 773-889-3087 [Press one from the main menu]
8:00 a.m. to 6:00 p.m. Central Time, Monday through Friday.
Make Check or Money Order Payable To
Cobra Electronics, Attn: Accessories Dept.,
6500 West Cortland Street, Chicago, IL 60707 U.S.A.
To Order Online
Please visit our website: www.cobra.com
Customer Assistance : Trademark Acknowledgement : Accessories
Nothing Comes Close to a Cobra
®
31
Page 32

10474 NAVONE 5000 VD_PH1.2.qxd 7/25/07 2:42 PM Page 32
THE COBRA LINE OF QUALITY
PRODUCTS INCLUDES:
CB Radios
microTALK®Radios
Radar/Laser Detectors
Safety Alert®Traffic Warning Systems
Mobile GPS Navigation Systems
HighGear®Accessories
CobraMarine®VHF Radios
Marine Chartplotters
Power Inverters
Accessories
For more information or to order any of
our products, please visit our website:
www.cobra.com
2007 Cobra Electronics Corporation
©
6500 West Cortland Street
Chicago, Illinois 60707 U.S.A.
Printed in China
Part No. 480-391-P
Version D
 Loading...