

Introduction
Operating Your Radio
Digital Select Calling (DSC)
Product Features
Setup
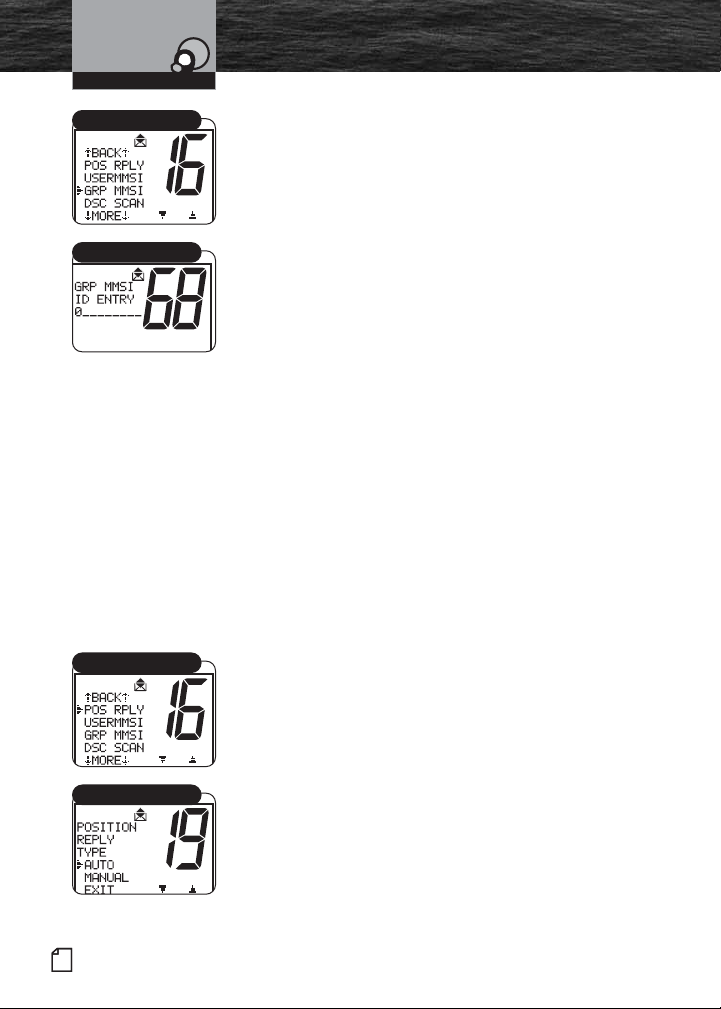
GRP MMSI Menu
GRP MMSI ID Entry
POS RPLY Menu
Position Reply Setting
To Enter a Group MMSI Number:
1. Enter the Setup menu and scroll to GRP MMSI menu.
2. Press the Enter button. A blinking cursor displays at the
first digit under GRP MMSI ID ENTRY. The leading zero
(0) will be entered automatically.
3. Turn the Channel knob or press microphone Channel
Up/Down buttons to scroll through the number list to the
digit of the Group MMSI number being entered.
4. Press the Enter button to select the digit.
5. Press the Channel Preset buttons to move within the
field.
6. Repeat steps 3, 4 and 5 until all nine (9) digits of the
Group MMSI number are entered.
7. Press the Enter button when all digits are listed.
8. Check that the number is entered correctly.
9. Press the Enter button to return to the Setup menu.
Position Request Reply Type
DSC radios with GPS send the position of a vessel to
another station. This is useful for rendezvous and rescue
situations.
Determine if the radio should automatically respond to all
Position Requests received or if it should provide a Position
Request alert and that can be manually selected and then
provide a response.
To Set the Position Request Reply Type:
1. Enter the Setup menu and scroll to POS RPLY menu.
2. Press the Enter button and observe the current setting —
AUTO or MANUAL.
3. Move the selection arrow to change the setting.
4. Press the Enter button to select the setting.
5. When the changes are complete, exit the POS RPLY
menu and return to the Setup menu.
60
English
Introduction
Operating Your Radio
Digital Select Calling (DSC)
Product Features
Setup
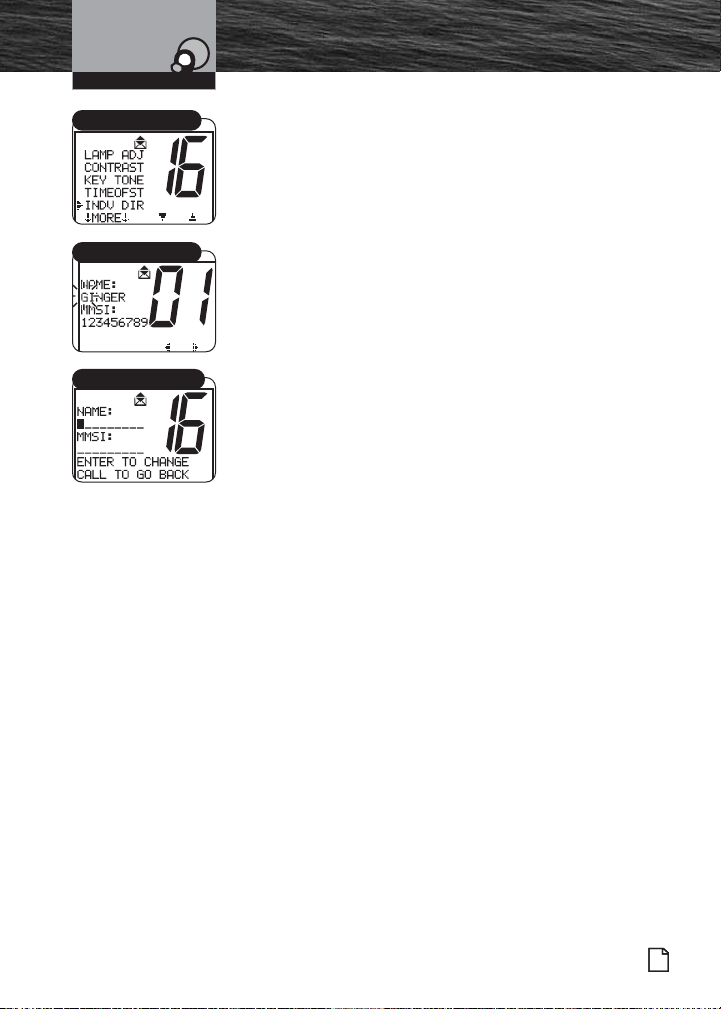
INDV DIR Menu
Name Select Menu
Individual Directory Entry
Individual Directory
DSC can be used to call another vessel or station directly.
This allows the user to make a call to a specific vessel that
could be monitoring any channel. An alarm will sound on
the receiving radio to make that station aware of your
individual call. Up to 20 names and associated MMSI
numbers may be stored in the radio for quick access.
To Enter or Edit Names or MMSI Numbers in the Individual
Directory:
1. Enter the Setup menu and scroll to INDV DIR menu.
2. Press Enter to enter the individual directory.
3. Name and MMSI contents of the current location shows
on the display
4. Press Enter to start entering Name data.
5. Rotate the Select button or the microphone up/down
buttons to select alpha or numeric characters.
6. Press F1 or F2 function buttons to advance to the next
character.
7. Repeat steps 5 and 6 until the complete Name entry has
been made.
8. Press the Enter button to enter characters in the MMSI
field.
9. Repeat steps 5 and 6 until the complete MMSI entry has
been made.
10. Press the Enter button to accept the entry.
11. When the changes are complete, exit the INDV DIR
menu and return to the Setup menu.
Nothing Comes Close to a Cobra
®
61
Introduction
Operating Your Radio
Digital Select Calling (DSC)
Product Features
Setup
Digital Select Calling (DSC) Operation
The Send menu displays when the Distress button is
pressed.
NOTE
This radio follows Class-D DSC protocol with a
dedicated Channel 70 receiver.
Sending Distress Calls
Sending and receiving distress calls and acknowledgements
on Channel 70 can be a lifesaver for mariners.
NOTE
The DSC call:
■
Sounds the distress alarm at all receiving stations.
■
Informs receiving stations of the sender’s identity
(MMSI).
■
Informs receiving stations of the nature of the
emergency.
■
Informs receiving stations of sending position
when a GPS device is connected or a position is
manually entered.
DSC operation does not provide receiving stations with
information like number of persons aboard or injuries. This
specific information must be communicated by voice on
Channel 16 to the station that acknowledges a DSC Distress
call.
To Send a DSC Distress Call:
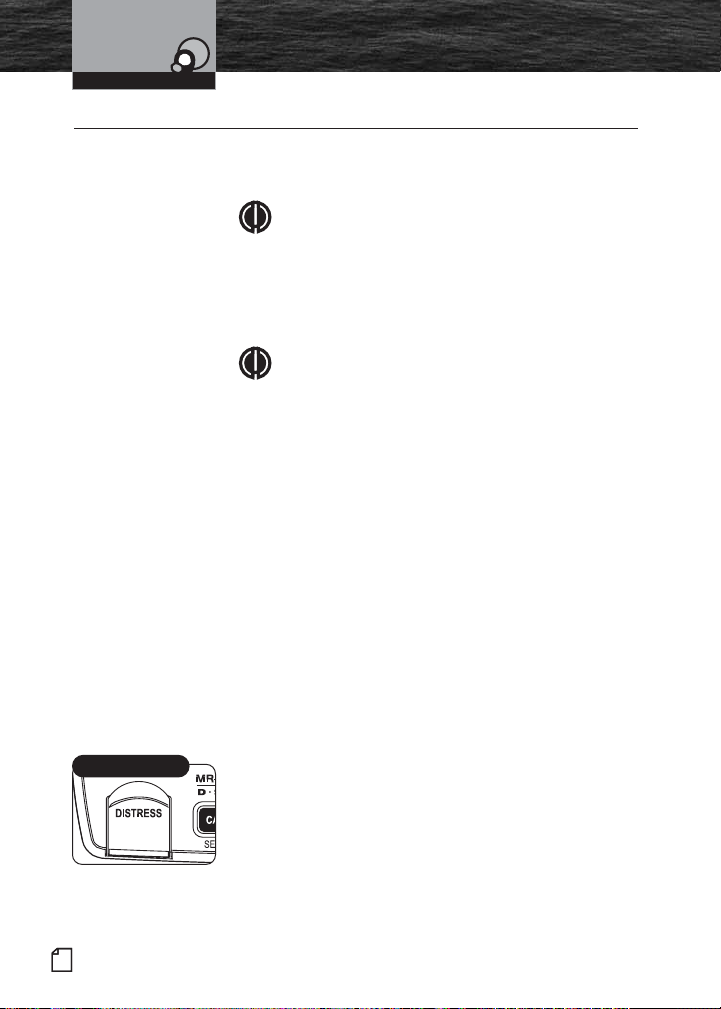
1. From Standby mode, lift the spring-loaded red door on
the transceiver and press the Distress button. The
Distress Button
Distress menu displays with an arrow pointing to SEND.
•
62
English
Introduction
Operating Your Radio
Digital Select Calling (DSC)
Product Features
Operation
Distress Button
Distress Send
Nature of Distress
Distress Quick Select
Distress Call Waiting
Distress Exit
There are three (3) choices:
■ Send a distress call automatically, with your position, if
you are connected to a GPS. Or send the call, without
your position, if not connected to a GPS.
■ Include a Nature of Distress message with the distress
call.
■ Abort the distress call process and return to Standby
mode.
2. Choose one of the following:
Send an Automatic Distress Call:
Press and hold the Distress button.
Include a Nature of Distress Message with Distress Call:
a. Turn the Channel knob or press the microphone
Channel Up/Down buttons to move the arrow to
MANUAL.
b. Press the Enter button to access the position entry
screen.
c. Turn the Channel knob or press the microphone
Channel Up/Down buttons to manually select from the
list of pre-programmed Nature of Distress calls —
UNDESIGN, FIRE, FLOODING, MORE..., COLLISION.
d. Press the Enter button to select the message.
e. Press and hold the Distress button when prompted.
Abort the Distress Call Process:
If the Distress button is pressed by mistake or to
discontinue resending an automatic distress message:
a. Turn the Channel knob or press the microphone
Channel Up/Down buttons to move the arrow to EXIT.
b. Press the Enter button to return to Standby mode.
NOTE
You may also press the ESC (escape) key to return to
the Standby mode.
Nothing Comes Close to a Cobra
®
63
Introduction
Operating Your Radio
Distress Call MMSI
Directory Match
Distress Call Received
Digital Select Calling (DSC)
Product Features
Operation
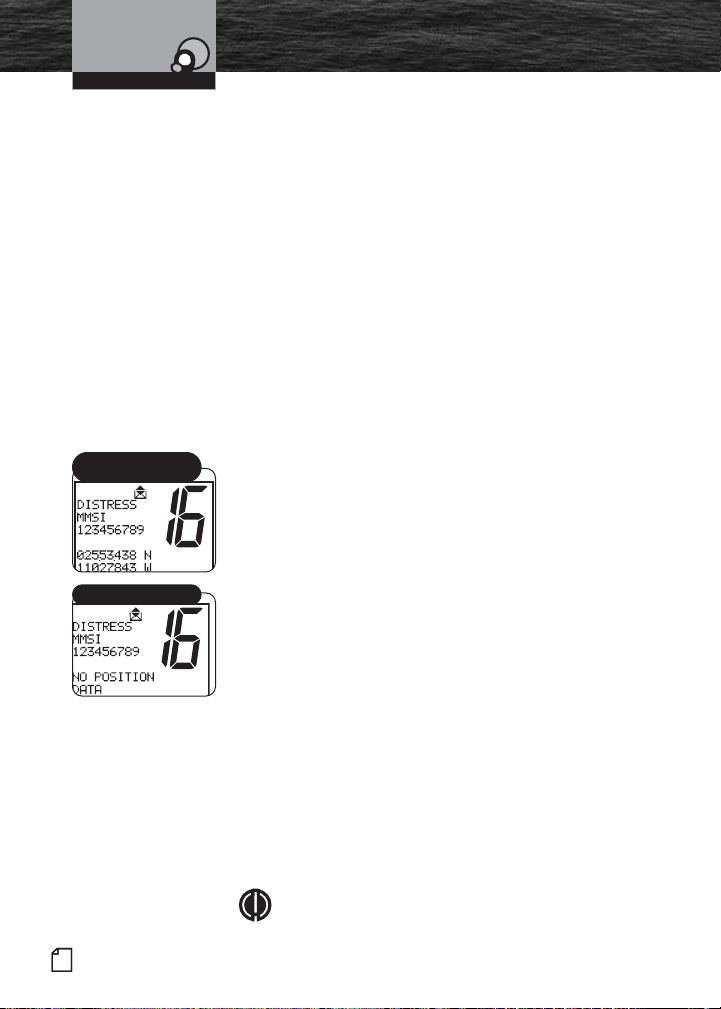
The Distress alarm sounds to confirm that the message is
transmitted. At the end of the transmission, the radio
maintains a watch on Channel 16 and Channel 70 for an
acknowledgement. Press any button to turn Off the alarm
and return to Standby mode.
■
If an acknowledgement is received, the Distress alarm
sounds again and the responding party’s MMSI number
displays on the LCD.
■
If no acknowledgement is received, the radio resends
the message at approximately five (5) minute intervals
until an acknowledgement is received or the Distress
call is aborted.
Receiving Distress Calls
When a vessel is within range of a DSC Distress call, the
radio receives the call, sounds the Distress alarm, and
switches to Channel 16. All DSC calls that are received will
sound one (1) alert alarm. See pages 35-36 for descriptions
of the different alarms. Press any button to turn Off the alarm.
The received call information continues to display on the LCD.
When a Distress Call is Received:
1. Press any button to turn Off the alarm and return to
Standby mode on Channel 16.
2. Read and write down the distress information that
displays on the LCD (position data may or may not be
shown); then determine whether to answer the call.
3. Respond, if appropriate, by pressing and holding the Ta lk
button to transmit on Channel 16.
4. The received information is placed into the Call Log. See
page 77 for more information on viewing the Call Log.
5. If MMSI (Maritime Mobile Service Identify) matches a
contact from the Individual Directory entry stored in your
radio, the name identification displays and the alarm
sounds to identify the Name of the matching MMSI
member.
6. Press ESC after viewing the display to return to normal
Standby mode.
64
NOTE
The radio automatically switches to Channel 16 upon
English
Introduction
Operating Your Radio
All Ships Call Menu
All Ships Call Select
Digital Select Calling (DSC)
Product Features
Operation
receiving a DSC Distress call and the alarm will sound
for approximately two (2) minutes. Press any button
to clear the Distress alarm instantly.
Regarding Distress Relay Calls
This radio cannot send Distress Relay calls. Only large ships
and shore stations, with specially equipped radios, can send
Distress Relay calls.
Receiving Distress Relay Calls
This radio does respond to a Distress Relay call just as it
responds to a Distress call.
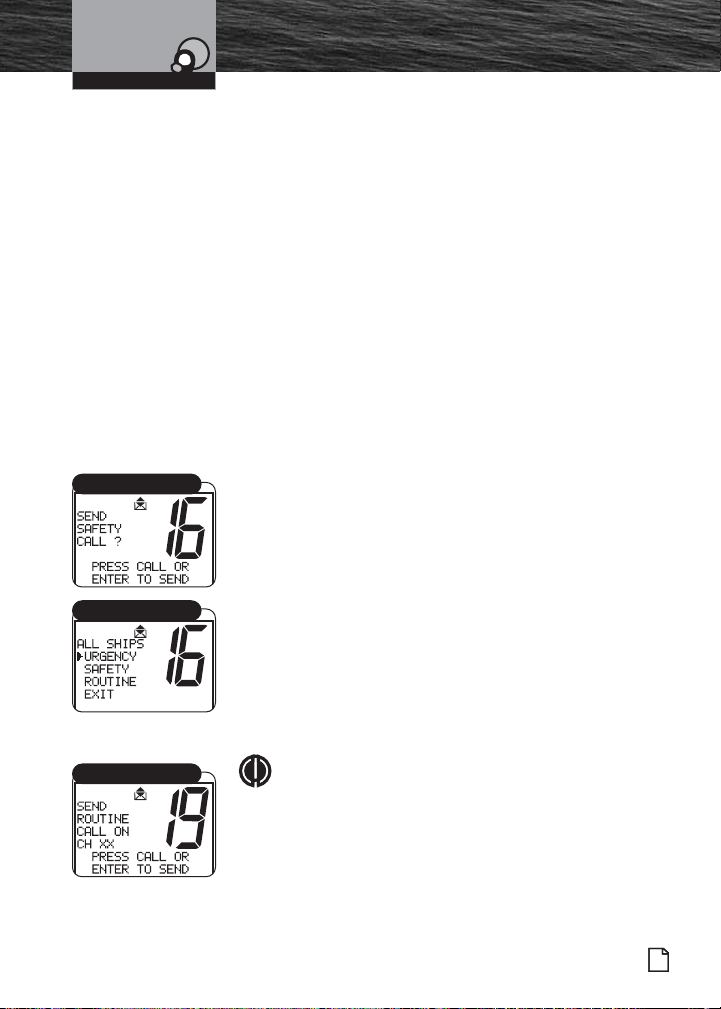
Sending an All Ships Call
Use the DSC All Ships call for the same urgency and safety
purposes as the Pan and Securite voice calls as well as
sending Routine messages to all stations at once. The DSC
All Ships call reaches all stations in radio range. Use the
DSC All Ships call for urgent, but not life-threatening
situations or to broadcast a safety warning to all vessels in
the area. Use the DSC All Ships call judiciously for Routine
calls.
To Send an All Ships Call:
1. In Standby mode, select a channel to communicate a
routine call. The radio uses Channel 16 for urgent and
safety calls.
2. Press the Call/Setup button to enter the Call Setup
menu.
3. Scroll to type of call. The display shows: URGENCY,
SAFETY, ROUTINE or EXIT. Select the type of call.
4. Press the Enter button to send a message.
All Ships Call Send
NOTE
The radio display requires confirmation before
sending Urgency and Safety calls.
Nothing Comes Close to a Cobra
®
65
Introduction
Operating Your Radio
All Ships Call MMSI
Directory Match
Digital Select Calling (DSC)
Product Features
Operation
5. Depending on the type of message selected, the radio
automatically switches to a voice channel.
a. After Urgency and Safety calls, the radio switches to
Channel 16. Once on channel, press the Tal k button to
send the Urgency or Safety voice message.
b. After a Routine call, the radio switches to the channel
selected in step 1. Once on channel, press the Tal k
button to send the Routine voice message.
DSC equipped radios that receive a DSC All Ships call
message are automatically switched to the channel selected
by the sender to hear a voice message.
To return to Standby mode, without sending a message,
scroll to EXIT and press the Enter button.
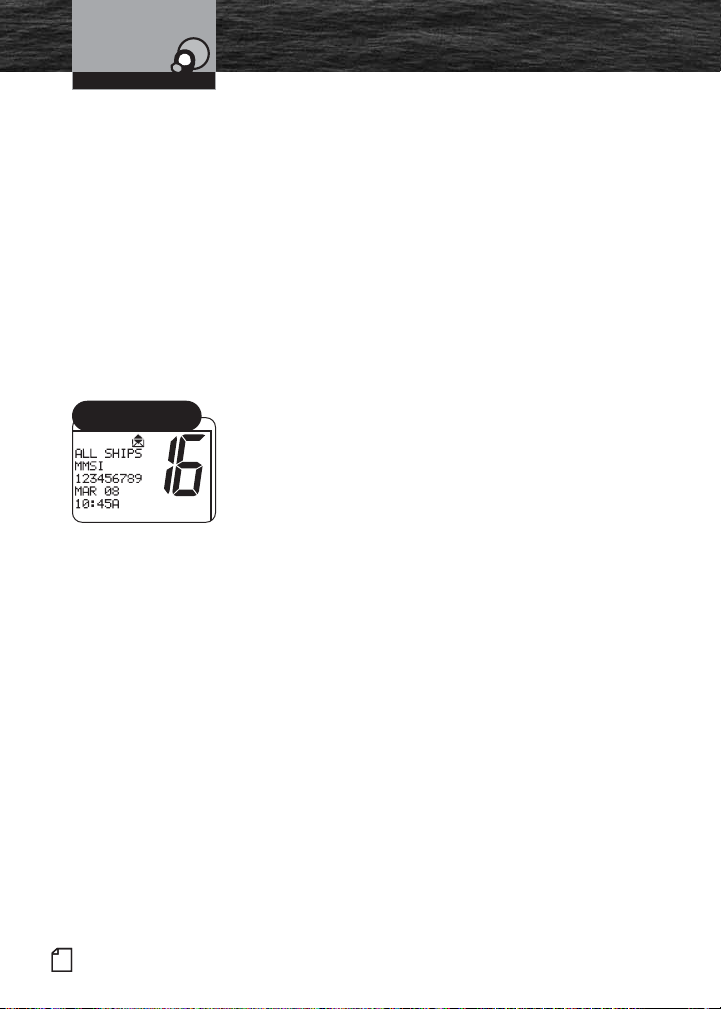
Receiving an All Ships Call
All Ships calls received from stations within range of the
radio sound the Distress alarm and switch the radio to
Channel 16.
When an All Ships Call is Heard:
1. Press any button to turn Off the alarm and return to
Standby mode.
2. Read and write down the MMSI information of the vessel
sending the call as well as the date and time of the call.
3. Listen to the incoming voice message on the channel the
radio selects for the incoming All Ships call.
66
English

Introduction
Operating Your Radio
Geographical Call Received
Digital Select Calling (DSC)
Product Features
Operation
Sending a Geographical Call
This radio does not send Geographical calls. Only large
ships and shore stations with specially equipped radios send
Geographical calls.
Receiving a Geographical Call
Geographical calls are transmitted by specially equipped
radios to all stations in a particular area to alert only those
stations of the call and not stations in unaffected
geographical areas. When in an area to which a
Geographical call is made, the radio sounds the
geographical alarm and switches to the channel chosen by
the transmitting station.
When a Geographical Call Sounds:
1. Press any button to turn Off the alarm.
2. Read and write down the MMSI information of the vessel
sending the call as well as the date and time of the call.
3. Listen to the incoming voice message on the channel the
radio selects for the incoming Geographical call.
4. Place call information in Call Log.
5. Press one (1) of the following buttons to switch from the
Geographical call received to the Standby mode: Channel
16/9 button or ESC button.
Nothing Comes Close to a Cobra
®
67

Introduction
Operating Your Radio
Digital Select Calling (DSC)
Product Features
Operation
INDV DIR Menu
Individual Directory
Call Type
Menu Select
Select Name
Individual Waiting
Send/Exit
Sending an Individual Call
Use the DSC Individual call feature to request
communication with one (1) exclusive station. The DSC
Individual call does not alert all other stations within range.
To Send an Individual Call:
1. In Standby mode, select a channel to communicate a call.
2. Press the Call/Setup button to enter the Call Setup
menu.
3. Press the Enter button to enter to the INDIV select
Directory.
4. Scroll to Select from Routine, Urgency or Safety as the
type of call to send.
5. Press Enter button to advance to Director or Manual
selection. Scroll to select either method to send call.
Press Enter button again.
6. Turn the Channel knob or press the Channel Preset
buttons to select a name to call from the directory.
7. Press the Enter button to send the message or return to
Standby mode if EXIT was chosen.
■
If the radio called sends back an automatic DSC
response “able to comply,” the individual alarm will
sound. Wait for a voice message from the called
station.
■
If the radio called does not send an “able to comply”
response, the radio waits eight seconds and resends
the message.
■
If an “unable to comply” response or no reply is
received, the radio display asks to resend the message
or exit the menu.
At the Unavailable menu, select SEND or EXIT with the
Enter button.
■
If SEND is selected, the radio restarts the individual call.
■
If EXIT is selected, the individual location on the Call
menu displays.
68
English

Introduction
Operating Your Radio
Digital Select Calling (DSC)
Product Features
Operation
Caller Identified
GRP MMSI Menu
Group Calling
Send/Exit
Group Waiting
Receiving an Individual Call
When another station makes an Individual call to the radio:
■
The Individual alarm sounds.
■
The caller is identified on the LCD.
■
The radio switches to the channel selected by the caller.
■
Call information is placed in the Call Log.
To Receive an Individual Call:
Press the Tal k button and greet the caller.
Sending a Group Call
Sending a Group call is like sending an Individual call, but
the group MMSI information is used and the resend and
DSC responses do not apply.See section 4 for creating and
entering a group MMSI.
To Send a Group Call:
1. In Standby mode, press the Call/Setup button to enter
the Group call menu.
2. Turn the Channel knob or press the microphone channel
UP/DOWN buttons to scroll to Group.
3. Press the Enter button to move to the channel select
menu.
4. Turn the Channel knob or press the microphone channel
UP/DOWN buttons to select a channel to communicate
the call.
5. Press the Enter button to send the message.
■
All radios switch to the channel selected in step 1.
Press and hold the Tal k button to send a voice message
to everyone in the group.
■
Anyone in the group can transmit on the channel.
Nothing Comes Close to a Cobra
®
69

Introduction
Operating Your Radio
Caller Identified
Standby Mode
POS RQST Menu
Individual Directory
Position Request
Digital Select Calling (DSC)
Product Features
Operation
Receiving a Group Call
When another station makes a Group call to the radio, the
Individual alarm sounds, the caller is identified on the LCD,
call information is placed in the Call Log, and the radio is
switched to the channel selected by the caller, similar to an
Individual call. Press any button to turn Off the alarm.
To Receive a Group Call:
1. Listen for the group voice message.
2. Press the Ta lk button and respond only if appropriate.
Sending a Position Request
Position Request mode enables a DSC radio to obtain the
position (latitude and longitude) of a station that has a GPS
device connected to the DSC radio at that station. In most
cases, a reply will be forthcoming. If for some reason, your
request is not acknowledged in five (5) minutes, the user
will be prompted to Resend the request or exit the menu.
To Request the Position of Another Station:
1. In Standby mode, select a channel on which you want to
communicate.
2. Press the Enter button to enter the Call Setup menu.
3. Scroll to POS RQST on the menu.
4. Press the Enter button to enter the POS RQST menu. This
will link you to the Individual Directory for you to make a
position request to one of your prior programmed
Individual Directory members.
5. Scroll to the name of the station whose position you want
to request.
6. Press the Enter button.
Your radio will send the Position Request and there will be
one (1) of three (3) possible responses:
■
You will receive the position.
■
You will receive a no position data response, meaning
the station you queried is not connected to a GPS
device and cannot send its position.
■
You will receive a no reply response, meaning the
operator of that station has chosen not to reply to your
request.
70
English

Introduction
Operating Your Radio
Digital Select Calling (DSC)
Product Features
Operation
Receiving a Position
If You Receive a Position:
The requested position with the station name and MMSI will
show on your screen.
Press the Enter button to return to Standby mode after you
have noted the station’s position.
NOTE
If the MRF80 is connected properly to your Cobra
chartplotter, you will see the requested position of the
other vessel indicated on the display.
Nothing Comes Close to a Cobra
®
71

Introduction
Operating Your Radio
Position Request
Position Request
Reply/Exit
Digital Select Calling (DSC)
Product Features
Operation
Receiving a Position Request
When you went through the DSC Setup process, you set a
position request reply type. (See page 61 to change your
setting.) Depending on the setting you chose, when a
Position Request message is received, your radio will enter
either:
■
The Auto Reply mode.
■
The Manual Reply mode.
When the Radio is in Auto Reply Mode:
A position request will sound the Position Request alarm
and show the name of the requesting station on the LCD.
Your radio will automatically respond. It will send your
position, if you have a GPS device connected to your radio,
or NO POS. DATA (no position data), if you do not have a
GPS device connected.
Press any button to silence the alarm and exit the display.
When the Radio is in the Manual Reply Mode:
A position request message will sound the Position Request
alarm and show the name of the requesting station. You can
choose to:
■
Reply and send your position.
■
Exit without sending your position.
If You Choose to Reply with Your Position:
1. Turn the Channel knob, or press the microphone Channel
Up/Down buttons or press the Function (F1/F2) button to
select REPLY.
2. Press the Call/Setup or Enter button to send your
position.
3. Press any button to return to Standby mode.
If You Choose Not to Reply:
1. Turn the Channel knob, or press the microphone Channel
Up/Down buttons or press the Function (F1/F2) button to
select EXIT.
2. Press the Enter button to exit and return to Standby
mode without sending your position.
72
English

Introduction
Operating Your Radio
Digital Select Calling (DSC)
Product Features
Operation
Standby Mode
Position Send
Individual Directory
Transmit Position
Send/Exit
Receive Position Send
Sending a Position Send
Position Send uses your connected GPS in similar fashion
to the Position Request function, except that you initiate the
activity to let another station know where you are.
To Send a Position Send Message:
1. In Standby mode, select a channel on which you want to
communicate.
2. Press the Enter button to enter the Call Setup menu.
3. Turn the Channel knob, or press the microphone Channel
Up/Down buttons or press the Function (F1/F2) button to
scroll to POS SEND (position send).
4. Press the Enter button to enter the Individual Directory.
5. Turn the Channel knob, or press the microphone Channel
Up/Down buttons or press the Function (F1/F2) button to
select the vessel/station to which you want to send your
position.
6. Press the Enter button to send your position.
After your position is sent, the LCD will show POS SEND
(position send). You will have two (2) choices.
■
Resend your position to the same station.
■
Exit from Position Send mode.
To Resend Your Position:
1. Turn the Channel knob, or press the microphone Channel
Up/Down buttons or press the Function (F1/F2) button to
select SEND.
2. Press the Enter button to resend your position.
To Exit From the Position Send Mode:
1. Turn the Channel knob, or press the microphone Channel
Up/Down buttons or press the Function (F1/F2) button to
select EXIT.
2. Press the Enter button to return to the Call Setup menu.
Receiving a Position Send
When another station sends you its position in Position Send
mode, the Individual alarm will sound and the station’s name
and position will be shown on the LCD. Press any button to
turn Off the alarm and return to Standby mode.
Nothing Comes Close to a Cobra
®
73

Operating Your Radio
Digital Select Calling (DSC)
Operation
Standby Mode Signal
If you will be away from your radio or otherwise unable to
answer calls, you can put the radio into DSC Standby mode.
When in DSC Standby mode, your radio will log all calls
received into its Call Log memory and respond
automatically to individual calls with an UNATTENDED
message. You will then be able to retrieve those calls from
the Call Log memory.
NOTE
The Call Log memory can retain up to 20 calls. See
the following section for information on Call Log.
Standby Mode
Standby Select
DSC Standby Mode
To Enter Standby Mode:
1. From Standby mode, press the Enter button to enter the
Call menu.
2. Turn the Channel knob, or press the microphone Channel
Up/Down buttons or press the Function (F1/F2) button to
select STANDBY.
3. Press the Enter button to enter DSC Standby mode.
The radio will then remain in DSC Standby mode until you
exit from that mode.
To Exit DSC Standby Mode:
From DSC Standby mode, press the Enter button to return
the radio to Standby mode.
74
English

Operating Your Radio
Digital Select Calling (DSC)
Operation
Call Log Menu
All Messages Viewed
Unread Messages
Call Log
Call Waiting functions similarly to the Caller ID function on
your telephone. It will capture the caller’s MMSI
identification number and any other data included in a DSC
message.
NOTE
The Call Log memory can hold up to 20 messages.
Once the memory becomes full, each new call will erase
the oldest call information on a first-in, first-out basis.
To Review Call Log Messages Received While in DSC
Standby Mode:
1. From Standby mode, press the Call button to enter the
Call menu.
2. Turn the Channel knob, or press the microphone Channel
Up/Down buttons to scroll to CALL LOG menu.
3. Press the Enter button to enter the Call Log.
NOTE
The fourth line will show the type of message.
4. Turn the Channel knob, or press the microphone Channel
Up/Down buttons to move from message to message in
the Call Log memory.
5. Press the Enter button to return to Standby mode.
To Clear Messages From The Call Log Memory:
1. From Standby mode, press the Call button to enter the
Call menu.
2. Turn the Channel knob, or press the microphone Channel
Up/Down buttons to scroll to CALL LOG menu.
3. Press the Enter button to enter the Call Log mode.
4. Turn the Channel knob, or press the microphone Channel
Up/Down buttons to select the message you want to
delete.
5. Press and hold the Memory Scan/Memory Clear button
for one (1) second or more.
Repeat steps 4 through 5 to delete additional messages.
6. Press the Enter button to return to Standby mode.
Nothing Comes Close to a Cobra
®
75

Introduction
Operating Your Radio
Maintenance and
Product Features
Troubleshooting
Maintenance
Very little maintenance is required to keep your CobraMarine VHF radio in good
operating condition.
■
Keep the radio clean by wiping with a soft cloth and mild detergent.
Rinse with fresh water. Do not use solvents or harsh or abrasive cleaners,
which could damage the case or scratch the LCD screen.
■
If the radio is exposed to salt water, rinse it in fresh water at least once
a day to prevent buildup of salt deposits, which could interfere with
button operation.
Troubleshooting
Problem Possible Cause(s) Solution(s)
No display on LCD when
radio is turned On
Will transmit at
1 watt, but not
at 25 watts
Will not transmit Selected channel is
No sound from speaker Volume level is too low or
No answer to calls Out of range of
Improper power
connection
Selected channel is
limited to 1 watt
limited to receive only
squelch level is too deep
other station
Signal is blocked
by terrain
Ensure power connections
are proper and secure
Switch to
another channel
Switch to
another channel
Readjust volume
and squelch
Switch to high power
(25 watts) or move closer
Move until you have
a “line-of-sight” to
the other station
•
•
DSC distress
cannot be sent
English
76
MMSI
(DSC self-identification)
number is not entered
Enter your MMSI number

Introduction
Operating Your Radio
Product Features
Specifications
Specifications
General
Number of Channels All U.S.A., Canadian, and International
NOAA Weather Channels
Channel Spacing 25 kHz
Modulation 5 kHz Max.
Input Voltage 13.8 VDC
Current Drain:
Stand-by 100 mA
Receive 500 mA
Transmit 5A @ High power 1A @ Low
Temperature Range -4˚F to 140˚F (-20˚C to 60˚C)
Unit Dimensions 6.25" x 2.25" x 7.125"
(15.9 cm x 5.7 cm x 18 cm)
Unit Weight 2 lbs., 6.8 oz. (1100 g)
Receiver
Frequency Range 156.050 to 163.275 MHz
Receiver Type Double Conversion Super-Heterodyne
Sensitivity:
20 dB Quieting 0.35 uV
12 dB Sinad 0.20 uV
Adjacent Channel Selectivity -60 dB
Intermodulation and Rejection -60 dB
Spurious and Image Rejection -60 dB
AF Output 4 Watts @ 8 Ohms
Transmitter
Frequency Range: TX 156.025 to 157.425 MHz
RF Output Power 1 and 25 Watts
Spurious Emissions -60 dB High -55 dB Low
Microphone Type Electret
Frequency Stability +/-10 ppm
FM Hum and Noise 40 dB
•
Nothing Comes Close to a Cobra
®
77

Introduction
Warranty
Warranty and Trademark
Product Features
Limited 3-Year Warranty
For Products Purchased in the U.S.A.
Cobra Electronics Corporation warrants that its CobraMarine VHF radio, and the
component parts thereof, will be free of defects in workmanship and materials
for a period of three years from the date of first consumer purchase. This
warranty may be enforced by the first consumer purchaser, provided that the
product is utilized within the U.S.A.
Cobra will, without charge, repair or replace, at its option, defective radios,
products or component parts upon delivery to the Cobra Factory Service
department, accompanied by proof of the date of first consumer purchase,
such as a duplicated copy of a sales receipt.
You must pay any initial shipping charges required to ship the product for warranty
service, but the return charges will be at Cobra’s expense, if the product is repaired
or replaced under warranty. This warranty gives you specific legal rights, and you
may also have other rights which may vary from state to state.
Exclusions: This limited warranty does not apply:
1. To any product damaged by accident.
2. In the event of misuse or abuse of the product or as a result
of unauthorized alterations or repairs.
3. If the serial number has been altered, defaced, or removed.
4. If the owner of the product resides outside the U.S.A.
All implied warranties, including warranties of merchantability and fitness for a
particular purpose are limited in duration to the length of this warranty. Cobra
shall not be liable for any incidental, consequential or other damages; including,
without limitation, damages resulting from loss of use or cost of installation.
Some states do not allow limitations on how long an implied warranty lasts and/or
do not allow the exclusion or limitation of incidental or consequential damages,
so the above limitations may not apply to you.
For Products Purchased Outside the U.S.A.
Please contact your local dealer for warranty information.
•
Trademark Acknowledgement
Cobra®, CobraMarine®, Nothing Comes Close to a Cobra®, and the snake design are
registered trademarks of Cobra Electronics Corporation, USA.
Cobra Electronics Corporation™, CobraMarine™ and Rewind-Say-Again™ are
trademarks of Cobra Electronics Corporation, USA.
English
78
•

Introduction
Customer Service
Product Features
Product Service
Product Service
If you have any questions about operation or installing your
new CobraMarine VHF product, or if you are missing parts…
Please call Cobra first! DO NOT RETURN THIS PRODUCT TO THE STORE!
See customer assistance on page A1.
If your product should require factory service, please call Cobra first before sending
your radio. This will ensure the fastest turn-around time on your repair. You may be
asked to send your radio to the Cobra factory. It will be necessary to furnish the
following to have the product serviced and returned:
1. For warranty repair include some form of proof-of-purchase, such as a copy of a
sales receipt. If you send the original receipt, it cannot be returned.
2. Send the entire product.
3. Enclose a description of what is happening with the radio. Include a typed
or clearly printed name and address of where the radio is to be returned.
4. Pack radio securely to prevent damage in transit. If possible, use the
original packing material.
5. Ship prepaid and insured by way of a traceable carrier such as United Parcel
Service (UPS) or Priority Mail to avoid loss in transit to: Cobra Factory Service,
Cobra Electronics Corporation, 6500 West Cortland Street, Chicago, Illinois
60707 U.S.A.
6. If the radio is in warranty, upon receipt of your radio it will either be repaired
or exchanged depending on the model. Please allow approximately three (3)
to four (4) weeks before contacting Cobra for status. If the radio is out of
warranty,
a letter will automatically be sent informing you of the repair charge or
replacement charge.
If you have any questions, please call 773-889-3087 for assistance.
•
Nothing Comes Close to a Cobra
®
79

Antes de cortar, compruebe que no haya instrumentos o cables en el área
Before cutting, be sure the area behind the flat surface is clear of any
instruments or wires that might be damaged in the process.
NOTICE
detrás de la superficie plana, que puedan resultar dañados durante el proceso.
PRECAUCIÓN
Use the supplied template to mark and cut an opening in the flat surface.
Flush Mount Template / Plantilla para montaje empotrado
Customer Service
English
80
Use la plantilla suministrada para marcar y cortar el agujero en la superficie plana.
 Loading...