

Please read through this user manual before using the product
and keep the manual for future reference. Product appearance
and/or specifications are subject to change without notice. Before
using this camera, please insert a micro SD card (class 10 card, no
larger than 32GB) into the Sports camera (WASPcam 5210) .
Camera functions will not work without a micro SD card inserted
into the camera. Please note the camera does not include a micro
SD card inside the package, the micro SD card must be purchased
separately.
Adventure Series by Cobra
6500 W. Cortland St., Chicago, IL 60707
1 (773) 889-3087

Table of Contents
Preface ......................................................................................................................3
Manual Disclaimer...................................................................................................3
Safety Precautions ...................................................................................................3
System Requirements .............................................................................................4
Features ....................................................................................................................5
Camera Function Quick Guide Diagram................................................................6
Accessories ...............................................................................................................8
Button Primary Functions.......................................................................................9
Basic Camera Functions ....................................................................................... 10
Installing the Micro SD Card........................................................................ 10
Battery.................................................................................................................... 10
Switching Camera On and Off............................................................................. 11
Switching Modes & Changing Settings .............................................................. 11
Camera Modes ...................................................................................................... 11
Video Recording Mode ................................................................................ 11
Photo Mode................................................................................................... 12
Video Playback Mode................................................................................... 12
Settings Menu ............................................................................................... 13
Downloading the Adventure HD App................................................................. 16
Download from iTunes................................ ................................................. 16
Download by iPhone .................................................................................... 16
Android Smartphone.................................................................................... 16
Using the Wi-Fi................................................................ ...................................... 17
Screen Icons................................ ........................................................................... 17
Video Mode Screen Icons ............................................................................ 17
Photo Mode Screen Icons............................................................................ 18
Review Mode Screen Icons................................................................ .......... 19
Connecting to External Devices .......................................................................... 20
Playback on HD TV........................................................................................ 20
View Files on PC / MAC................................................................................ 20
Webcam – P C Only ....................................................................................... 20
Technical Specifications ....................................................................................... 21
Copyright................................................................................................................ 22
01 August 2016 Page 2

l
Preface
This product is an action-s ports camera tailored to meet the demands
of today’s active lifestyles ! This action camera is perfect for vehicle
data recording, photography, outdoor sports, home security, and
watersports. It allows you to film anytime, anywhere.
Manual Disclaimer
Every effort has been made to ensure that the contents of this manual
are correct and up to date. However, no guarantee is made regarding
the accuracy of the contents. The manufacturer reserves the right to
change the manual contents and product s pecifications without notice.
Safety Precautions
Do not store the product in dus ty, dirty, or sandy areas, as its
internal components may be damaged.
Do not store the product in hot areas. High temperatures can
shorten the life of electronic devices, damage batteries and
warp or melt certain plastics.
Do not store the product in cold areas. When the product
warms up to its normal temperature, moisture can form inside,
which may damage the electronic circuits.
Do not attempt to open the casing or attempt your own repairs.
High-voltage internal components create the risk of electric
shock when exposed.
Do not drop or knock the product. Rough handling may
damage the internal components.
Do not use harsh chemicals, cleaning solvents or strong
detergents to clean the product. Wipe the product with
a slightly damp soft cloth.
Do not open the battery cover while an image is being
recorded. Doing so will not only make storage of the current
image impos sible, it can also corrupt other image data already
stored on the SD card.
01 August 2016 Page 3

If the product or any of its accessories are not working
properly, please contact Cobra Electronics at
(773) 889-3087. Our staff will assist you and if necessary,
arrange for the product to be repaired or replaced.
Test for proper operation before using the camera.
Cobra Electronics is not responsible for any collisions, damage or
personal injuries resulting from the use of the Adventure HD
Action Camera.
Cobra Electronics is not responsible for any legal repercussions
from use of the Adventure HD Action Camera or from the sharing
of footage.
Cobra Electronics is not responsible for any property damage or
lost/stolen Adventure HD Action Cameras.
System Requirements
The camera requires a computer with the following minimum
specifications for full HD video playback:
Windows® 7 / MAC OS X 10.8
Intel® Core Duo™ / AMD Dual-Core CPU
2 GB of RAM
DirectX 9 compatible graphics solution
Available hard disk space
01 August 2016 Page 4

The camera requires a computer with the following minimum
specifications for WVGA/VGA video playback:
Windows® Vista / MAC OS X 10.5
Intel® / AMD Dual-Core CPU
1 GB of RAM
DirectX 9 compatible graphics solution
Available hard disk space
Minimum requirements for connecting the camera to a PC or Mac:
Standard USB 2.0 port
Features
The camera and its included accessories offer a variety of features and
functions including:
A water-resistant case that allows you to film underwater up to 30
meters
Built-in Wi-Fi: Connects camera to Smartphones via Adventure HD App
High definition screen that displays and plays back recorded videos
Removable battery that is easy to replace with a spare to prolong the
recording time of the camera
Video recording while charging
Video recording while battery powered
HD wide-angle lens
HDMI output
Web camera
Supports memory cards up to 32GB maximum storage space, class 10
Multiple video recording formats: 1080P (interpolated) / 72 0P / WVGA
Records video in .AVI format
Multiple photo shooting modes: Single shot, Burst, and Continuous
Shooting (Time-lapse)
Compact size
01 August 2016 Page 5
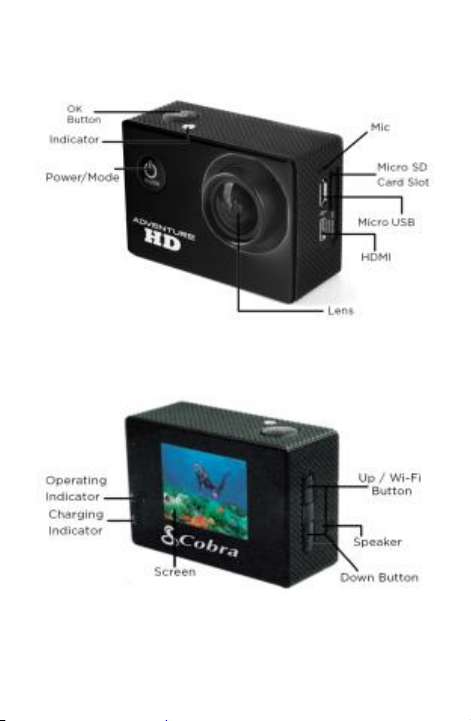
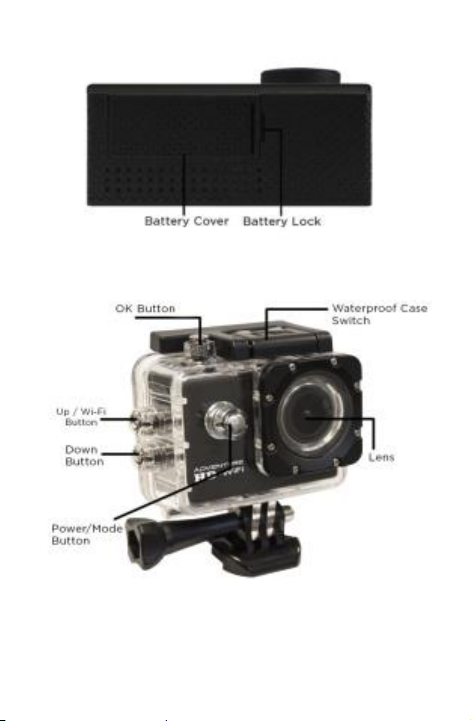
Camera Function Quick Guide Diagram
01 August 2016 Page 6
Adventure HD 5210 Wi-Fi User Manual
01 August 2016 Page 7

Adventure HD 5210 Wi-Fi User Manual
Accessories
The following items are included in the camera package. If any items are
missing or damaged, contact Cobra immediately.
Waterproof Camera Casing
Adventure HD Camera
Camera Holder
Straight Joint Mounts x3
J-Hook Buckle Mount
Tripod M ount
Basic Buckle Mount
Tripod M ount Adapter
Flat / Curved Adhesive Mounts
Velcro Straps x3
Micro USB Charging Cable
Cleaning Cloth
Adventure HD 521 0 Instruction Manual
Zip Ties x4 / 3M Stickers x2
01 August 2016 Page 8

OK Button
OK
Enter and confirm settings in
the s ettings menu.
Button Primary Functions
Button Function
Power / Mode Button
Turn the camera on & off.
Change between Video mode,
Photo mode, Playback mode,
and settings menu.
Up Button
Down Button
Scroll up through the settings.
Scroll through videos/photos in
playback mode.
Press to enter Wi-Fi mode
Scroll down through the
settings.
Scroll through videos/photos in
playback mode.
01 August 2016 Page 9

Basic Camera Functions
Installing the Micro SD Card
To insert the SD card
Find the Micro SD card slot
Insert the card into the slot (make sure the card is facing the
correct way)
Push the card into the slot until it clicks
**Note – Please use a minimum spee d Clas s 10 card, maximum 3 2GB
storage capacity. Cobra recommends a name brand card such as
Lexar®, SanDisk®, Kingston® or Gigastone.
Follow these steps in reverse order to remove the SD card
**Note - Please ensure that the SD Card is inserted in the correct
direction or you may damage the SD card and/or SD card reader.
Battery
Use only the type of battery that came with the camera.
Using any other type of
battery may damage the equipment and invalidate the
warranty.
Do not short the battery terminals. The battery could overheat.
Do not attempt to split or peel the outer casing.
Remove the battery if the camera is not going to be used for
a long time. If the battery is left unused for more than 3
months, charge the battery before us e.
1. Installing and Removing Batteries
a. Press on battery cap to open it
b. Correctly install the battery into the camera as directed by
the +/- symbols
c. Remove Battery: Open the battery cap to take the battery
out
01 August 2016 Page 10

2. Charging
a. Charging can be done by either connecting the camera to
a computer or USB power adapter
b. Charge the camera in a vehicle by connecting it to a USB
car charger
c. The camera can record video while charging
d. The camera will charge even when it’s powered off
Switching Camera On and Off
Press and hold the Power / Mode button for 3 seconds to turn it
on/off
Switching Modes & Changing Settings
Switch between video recording, photo, & playback modes and the
settings menu by pressing the Power / Mode button. An icon in the
upper left of the screen will show the current mode.
In the settings menu choose a setting with the Up/Down buttons and
select with the OK button. Press the Power / Mode button to exit the
settings menu.
Camera Modes
Video Recording Mode
Press OK to start recording. A record icon in the upper left
corner will start to flash. Press OK again to stop recording. The
record icon will disappear.
Video Recording Notes:
Resolution: Higher resolutions result in larger video files.
Loop Recording: When loop recording is turned on video files will be at
the specified length. When the SD card is full the oldest file(s) will be
deleted automatically s o new files can be recorded.
Exposure: In very bright environments set the Exposure Value (EV) as a
positive number. For very dark environments set the EV to a negative
01 August 2016 Page 11

number. The larger the value the greater the exposure value is
compensated.
Motion Detection: If motion detection is turned on, the camera will
only begin recording if it detects any movement. If the camera is
moved or if there is movement in the camera’s field of view, the
camera will record a short segment and stop recording once the
movement has stopped.
Photo Mode
Press OK to take photos.
Photo Notes:
Exposure: In very bright environments set the Exposure Value (EV) as a
positive number. For very dark environments set the EV to a negative
number. The larger the value the greater the exposure value is
compensated.
Quick Review: After taking a photo the photo will be displayed on the
screen for the selected number of seconds.
Date/Time: Sets the watermark for photos
Video Playback Mode
Press Up/Down to scroll through the files on the SD card
Press OK to playback a video file
During playback press Up/Down to adjust the volume
The Playback Mode menu allows files to be D eleted or Protected.
Protected files are not deleted from the SD card as a result of loop
recording or the Delete All function.
01 August 2016 Page 12

Settings Menu
(default setting in bold)
Press Up/Down buttons to scroll through the settings and select with
the OK button. Press the Mode button to go back and to exit the
menu.
MENU OPTION SETTINGS
Video Resolution 108 0FHD 1920x1080 (interpolated) / 1080P
Photo Resolution 12M 4082x3024 / 10M 3648x2736 / 8M
Burst Off / 3 Pictures / 5 Pictures (camera will take
Exposure +2.0 / +5/3 / +4/3 / +1.0 / +2/3 / +1/3 / +0.0 / -
Motion Detection Off / On
Looping
Time-lapse
WDR (Wide
Dynamic Range)
Record Audio
Date Stamp
Quality
144 0X1080 (interpolated) / 720P 128 0X720 /
WVGA 848 X48 0 / VGA 640X480
326 4x2448 / 5M 2592x1 944 / 3M 20 48x1586 /
2M HD 1920x1080 / 1.3M 1280x960 / VGA
640 x480
the selected number of pictures in sequence)
1/3 / -2/3 / -1.0 / -4/3 / -5/3 / -2.0 (used to
adjust the amount of light let into the camera
sensor, use positive setting in bright
conditions and negative setting in dark
conditions)
Off
/ 1 Minute / 2 Minutes / 3 Minutes
/ 5 Minutes / 10 Minutes
Off / 1 Second / 2 Seconds / 5 Seconds / 10
Seconds / 30 Seconds / 6 0 Seconds (Takes a
photo based on the selected time increment.)
Off / On (Wide Dynamic Range: imaging is a
method used to produce images that try to
recreate the full scene content in scenes that
have a dynamic range that cannot be captured
by standard cameras in one image.
Off / On
Off / On
Fine / Normal / Economy (Adjusts the overall
quality of the image. Use Fine for images that
01 August 2016 Page 13

are more clear, use Economy for lower quality
images that take up less storage space)
Sharpness Strong / Normal / Soft (Adjusts the sharpness
ISO Auto / 100 / 200 (The higher the ISO, the
more sensitive the camera sensor becomes to
light. Use a higher ISO in darker conditions to
make the footage/images appear brighter)
of the photos pixels. Use strong take make the
pixels appear sharp, use soft to make the pixels
appear more soft and blended together)
Anti-Shaking
White Balance
Frequency
Screen Icons
Screen Saver
Image Rotation
Auto Power Off Off /
Language
Beep Sound
Date/Time
Off / On (Helps to smooth footage and remove
excessive shaking)
Auto / Daylight / Cloudy / Tungsten /
Fluorescent (Helps balance color in certain
lighting to make footage/images look more
natural)
50H z / 60Hz (Changing the frequency to match
with the electrical frequency of your
environment will prevent your video from
flickering)
Off / On (When turned off, icons will not
appear on the LCD screen)
/ 3 Minutes / 5 Minutes / 10 Minutes
Off
Off / On (Rotates the image 180°)
1 Minute / 3 Minutes
English, French, German, Dutch, Portuguese,
Spanish, Italian, Simplified Chinese, Traditional
Chinese, Japanese, Russian, Korean
Off / On
Allows users to set the current date and time
01 August 2016 Page 14

Adventure HD 5210 Wi-Fi User Manual
TV Out Off / On (Connect the camera to a TV using a
TV Mode NTSC / PAL (There are two television display
Auto Rotate Off / On (The image on the LCD screen will
WIFI SSID Shows Wi-Fi network name
WIFI Password Shows Wi-Fi network password
Delete Delete Current (deletes mos t recent file) /
Format SD Card Cancel / OK (formats the SD card and erases
Default Setting Cancel / OK (Resets all settings to the default
Version Displays camera’s current version (YYYYMMDD
video cable and set this to On to view files on
a TV without HDMI)
systems in commercial use: PAL (common in
Europe and parts of Asia) delivers a frame rate
of 25 fps (frames per second) with 625 lines,
while NTSC (used in the U.S. and Canada)
delivers a frame rate of 30 fps using 525 lines.
Adjust this setting based on your TV to view
files correctly on your TV)
always appear right-side up, no matter which
way you move the camera.)
Delete All (deletes all files on the microSD
card)
all data from the SD card)
values)
VX.X)
Auto Power Off turns the camera off after a period of inactivity
Format will format the SD card and erase all data from the SD card
01 August 2016 Page 15

Downloading the Adventure HD App
Enter “Adventure HD App” into the search bar
Click download under the Adventure HD App Icon
Download from iTunes
Click iTunes icon to open iTunes
Click iTunes Store Icon to open the iTunes Store
Once it’s finished the Adventure HD App icon will
show on your home screen
Download by iPhone
Click the App Store icon
Click the search field and enter
Once it’s finished the Adventure HD App
Android Smartphone
Open the Google Play Store on your phone
Enter “Adventure HD App” into the s earch bar and hit
search
Click the install button to ins tall the Adventure HD App to
your phone
Once it’s finished, the Adventure HD App will
Click search icon
Adventure HD App, click the search
button
Click the icon and click download
icon will s how on your home screen
Click on the Adventure HD App icon to view
the app page
appear in your application menu.
01 August 2016 Page 16

Using the Wi-Fi
To enter the camera’s Wi-Fi interface, press and hold the OK button.
The camera’s LCD s creen will change to a Wi-Fi symbol. Once the Wi-Fi
has initialized on the camera, the LCD s creen will show the network
name (ssid) and password (pwd) required to connect a Smartphone to
the Wi-Fi.
Step 1: Initialize the Wi-Fi on the camera
Step 2: On a Smartphone, enter the Wi-Fi settings
Step 3: Connect the Smartphone to the Adventure HD camera’s Wi-Fi
network (network name is displayed on the camera’s LCD screen)
Step 4: Enter the password displayed on the cameras LCD screen
Step 5: Wait for the Smartphone to connect to the camera’s Wi-Fi
Step 6: Once Wi-Fi is connected, open the Adventure HD App. The app
will connect the Smartphone to the Adventure HD camera
Step 7: Once the connection is successful, the Smartphone will display
what the camera sees on the screen
Step 8: The camera photo/video recording can now be controlled from
the Smartphone
Screen Icons
Video Mode Screen Icons
Icon Des cription
Indicates that the camera is currently in video mode.
Displays current battery life.
Indicates that the camera is currently charging.
Displays the date stamp that appears on the footage.
01 August 2016 Page 17
Displays the time s tamp that will appear on the
footage.

Displays the current exposure value (EV) setting.
Indicates that a MicroSD card needs to be inserted
Indicates that loop recording is turned on. Also
Indicates “Record Audio” is turned on.
into the camera.
indicates the video duration for each recording.
Indicates “Record Audio” is turned off.
Indicates that a MicroSD card has been ins erted into
Displays the video resolution the camera is filming in.
the camera.
Displays the amount of recording time that is
available on the SD card.
Photo Mode Screen Icons
Icon Des cription
Indicates that the camera is currently in photo mode.
Displays the current ISO s etting of the camera.
01 August 2016 Page 18
Indicates that auto white balance is on.
Indicates that daylight white balance is on.
Indicates that cloudy white balance is on.
Indicates that tungsten white balance is on.
Indicates that fluorescent white balance is on.

Displays the current exposure value (EV) setting.
Indicates that the anti-shake function is turned on.
Displays current battery life.
Indicates that the camera is currently charging.
Indicates that the photo quality is set to “Economy”.
Indicates that the photo quality is set to “Normal”.
Indicates that the photo quality is set to “Fine”.
Indicates that a MicroSD card needs to be inserted
Displays the photo resolution the camera is shooting
Indicates that a MicroSD card has been inserted into
Indicates that the camera is in burst mode.
into the camera.
in.
Displays the total number of photos that can be
taken at the selected resolution.
the camera.
Review Mode Screen Icons
Indicates that the camera is in review mode.
Displays current battery life.
Indicates that the camera is currently charging.
Date stamp on footage.
01 August 2016 Page 19

Adventure HD 5210 Wi-Fi User Manual
Time s tamp on video footage.
Date stamp on photos .
File name of video.
File name of photo.
Press OK button for video playback. Displayed
Displays the photo resolution the camera is
Indicates photo playback.
Resolution of the video clip.
when reviewing a video file.
shooting in.
Time stamp on photos.
Connecting to External Devices
Playback on HD TV
Turn the camera on, connect the HDMI port in the camera to the TV
via an HD MI cable (not included) and choose HDMI mode on the TV.
The LCD screen on the camera will turn off automatically and now all
operations and functions can be seen on the TV.
01 August 2016 Page 20

Technical Specifications
Video Resolution
192 0*1080/30fps (interpolated)
144 0*1080/30fps (interpolated)
128 0*720/30fps
Screen 1.5inch LCD Screen
Lens 150°A + wide-angle lens
Language Options English / German / French / Spanish /
Video Format AVI
Compressed
Format of Videos
Resolution of
Photos
Storage MicroSD (Class 1 0 – max 3 2GB)
Shooting Modes Single Shot / Self-timer (2s / 5s / 10s )
Frequency 50H z / 60H z
USB Interface USB 2.0
Power Source
Interface
Battery Capacity 900mAh
Power Dissipation 260mA@4.2V
Recording Time 108 0P / About 70 minutes
Charging Time About 3 hours
Dimensions 29.8x59.2x41mm
01 August 2016 Page 21
Dutch / Korean / Italian / Portuguese /
Chinese Traditional / Chinese Simplified /
Japanese / Russian
848*480/30fps
640*480/30fps
MJPEG
12M/10M/8M/5M/3M
Continuous shooting (Time-lapse)
5V

Copyright
© Copyright 2016.
All r ights reserved. No part of this publication may be reproduced, t ransmi tted,
transcribed, stored in a r etrieval sy stem or translated into any language or
computer language, in any form or by any means, electronic, mechanical,
magnetic, optical, manual or otherwise, without the pri or written permission of
the Cobra Electronics.
© 2016 Cobra Electronics Corporation, 6500 W Cortland Str eet, Chicago, IL 60707
Cobra, the snake design, A dv enture HD logo are propriet ary trademarks of Cobra
Electronics Corporati on. A ll other trademark s and trade names are those of their
respective owners.
Cobra Electronics
(773) 889-3087
Apple, the A pple logo, iPhone, and iPod touch are t rademarks of Apple Inc.,
register ed in the U.S. and other count ries. App Store is a servi ce mar k of Apple Inc.
Android, Google Play and the Google Play l ogo are t rademarks of Google Inc.
HDMI, the HDM I logo, and High-Definition Multimedia Interface are tr adema rks or
register ed trademark s of HDMI Licensing, LLC in the United Stat es and/or other
countries.
SanDisk, the SanDisk logo, Store Your World in Ours Compact Flash, Cruzer,
ImageMate RescuePR SanDisk Extreme and SanDisk Ultra are tr ademarks of
SanDisk Corporation. © 2006 SanDisk Corporation All r ights reserved.
Lexar is a tra demark of Micron Technology, Inc.
Kingston is a tr adema rk of Kingston Technology Corporation.
01 August 2016 Page 22

FCC Statement
This device complies with part 15 of the FCC Rules. Operation is subject to the following
two conditions: (1) This device may not cause harmful interference, and (2) this device
must accept any interference received, including interference that may cause undesired
operation.
This equipment has been tested and found to comply with the limits for a Class B digital
device, pursuant to part 15 of the FCC Rules.
These limits are designed to provide reasonable protection against harmful interference in
a residential installation. This equipment generates uses and can radiate radio frequency
energy and, if not installed and used in accordance with the instructions, may cause
harmful interference to radio communications. However, there is no guarantee that
interference will not occur in a particular installation. If this equipment does cause
harmful interference to radio or television reception, which can be determined by turning
the equipment off and on, the user is encouraged to try to correct the interference by on e
or more of the following measures:
—Reorient or relocate the receiving antenna.
—Increase the separation between the equipment and receiver.
—Connect the equipment into an outlet on a circuit different from that to which the
receiver is connected.
—Consult the dealer or an experie nced radio/TV technic ian for help.
This device complies with part 15 of the FCC rules. Operation is subject to the following
two conditions (1)this device may not cause harmful interference, and (2) this device
must accept any interference received, including interference that may cause undesired
operation
SAR Max. Values: 1.30W/Kg(1g) for Body-worn
IC Statement
This device complies with Industry Canada’s licence-exempt RSSs. Operation is subject
to the following two conditions:
(1) This device may not cause interference; and
(2) This device must accept any interference, including interference that may
cause undesired operati o n of the devic e.
The term “IC: “ before the certification/registration number only signifies that the
Industry Canada technical specifications were met. This product meets the applicable
Industry Canada technical specifications.
Le présent appareil est conforme aux CNR d'Industrie Canada applicable aux appareils
radio exempts de licence. L'exploitation est autorisée aux deux conditions suivantes : (1)
l'appareil ne doit pas produire de brouillage,
et (2) l'utilisateur de l'appareil doit accepter tout brouillage radioélectrique subi, même si
le brouillage est susceptible d'en compromettre le fonctionnement
 Loading...