

Cobra XRS 9945 Operating Instructions Manual
XRS 9945
15 BAND
™
MAXIMUM PERFORMANCE
DIGITAL RADAR/LASER
DETECTOR WITH SUPER-XTREME
RANGE SUPERHETERODYNE
™
TECHNOLOGY
Nothing Comes Close to a Cobra
®
English
Operating Instructions
Printed in China
Part No. 480-494-P
Version A
15
Nothing Comes Close to a Cobra
®
English
For more information or to
order any of our products,
please visit our website:
www.cobra.com
The Cobra line of quality products includes:
Important Information and
Customer Assistance
Introduction
Nothing Comes Close to a Cobra
®
A1
Important Information
•
Federal Laws Governing the Use of Radar Detectors
It is not against federal law to receive radar transmissions with your Cobra radar/
laser detector. The Communications Act of 1924 guarantees your right to receive
radio transmissions on any frequency. Local laws that contravene this Act, while
illegal, may be enforced by your local law enforcement officials until and unless
they are prohibited from doing so by federal court action.
Safety/Strobe Alert
Use of this product is not intended to, and does not, ensure that motorists or
passengers will not be involved in traffic accidents. It is only intended to alert
the motorist that an emergency vehicle equipped with a Cobra Safety Alert,
3M or strobe transmitter is within range as defined by that product. Please call
local fire and police departments to learn if coverage exists in your area.
Safe Driving
Motorists, as well as operators of emergency or service vehicles, are expected to
exercise all due caution while using this product, and to obey all applicable traffic laws.
Security of Your Vehicle
Before leaving your vehicle, always remember to conceal your radar detector
in order to reduce the possibility of break-in and theft.
Customer Assistance
•
Should you encounter any problems with this product, or not understand its many features,
please refer to this owner’s manual. If you require further assistance after reading this
manual, Cobra Electronics offers the following customer assistance services:
For Assistance in the U.S.A.
Automated Help Desk English only. 24 hours a day, 7 days a week 773-889-3087 (phone).
Customer Assistance Operators English and Spanish. 8:00 a.m. to 6:00 p.m. Central Time
Mon. through Fri. (except holidays) 773-889-3087 (phone).
Questions English and Spanish. Faxes can be received at 773-622-2269 (fax).
Technical Assistance English only. www.cobra.com (on-line: Frequently Asked
Questions). English and Spanish. product info@cobra.com (e-mail).
For Assistance Outside the U.S.A.
Contact Your Local Dealer
©2009 Cobra Electronics Corporation
6500 West Cortland Street
Chicago
, Illinois 60707 USA
www.cobra.com
Customer Assistance
CB Radios
microTALK
®
Radios
Radar/Laser Detectors
Safety Alert
®
Traffic Warning Systems
Mobile GPS Navigation Systems
HighGear
®
Accessories
CobraMarine
®
VHF Radios
Marine Chartplotters
Power Inverters
Accessories
I
ntroduction
A2
English
Controls, Indicators,
Connections and Display
I
ntroduction
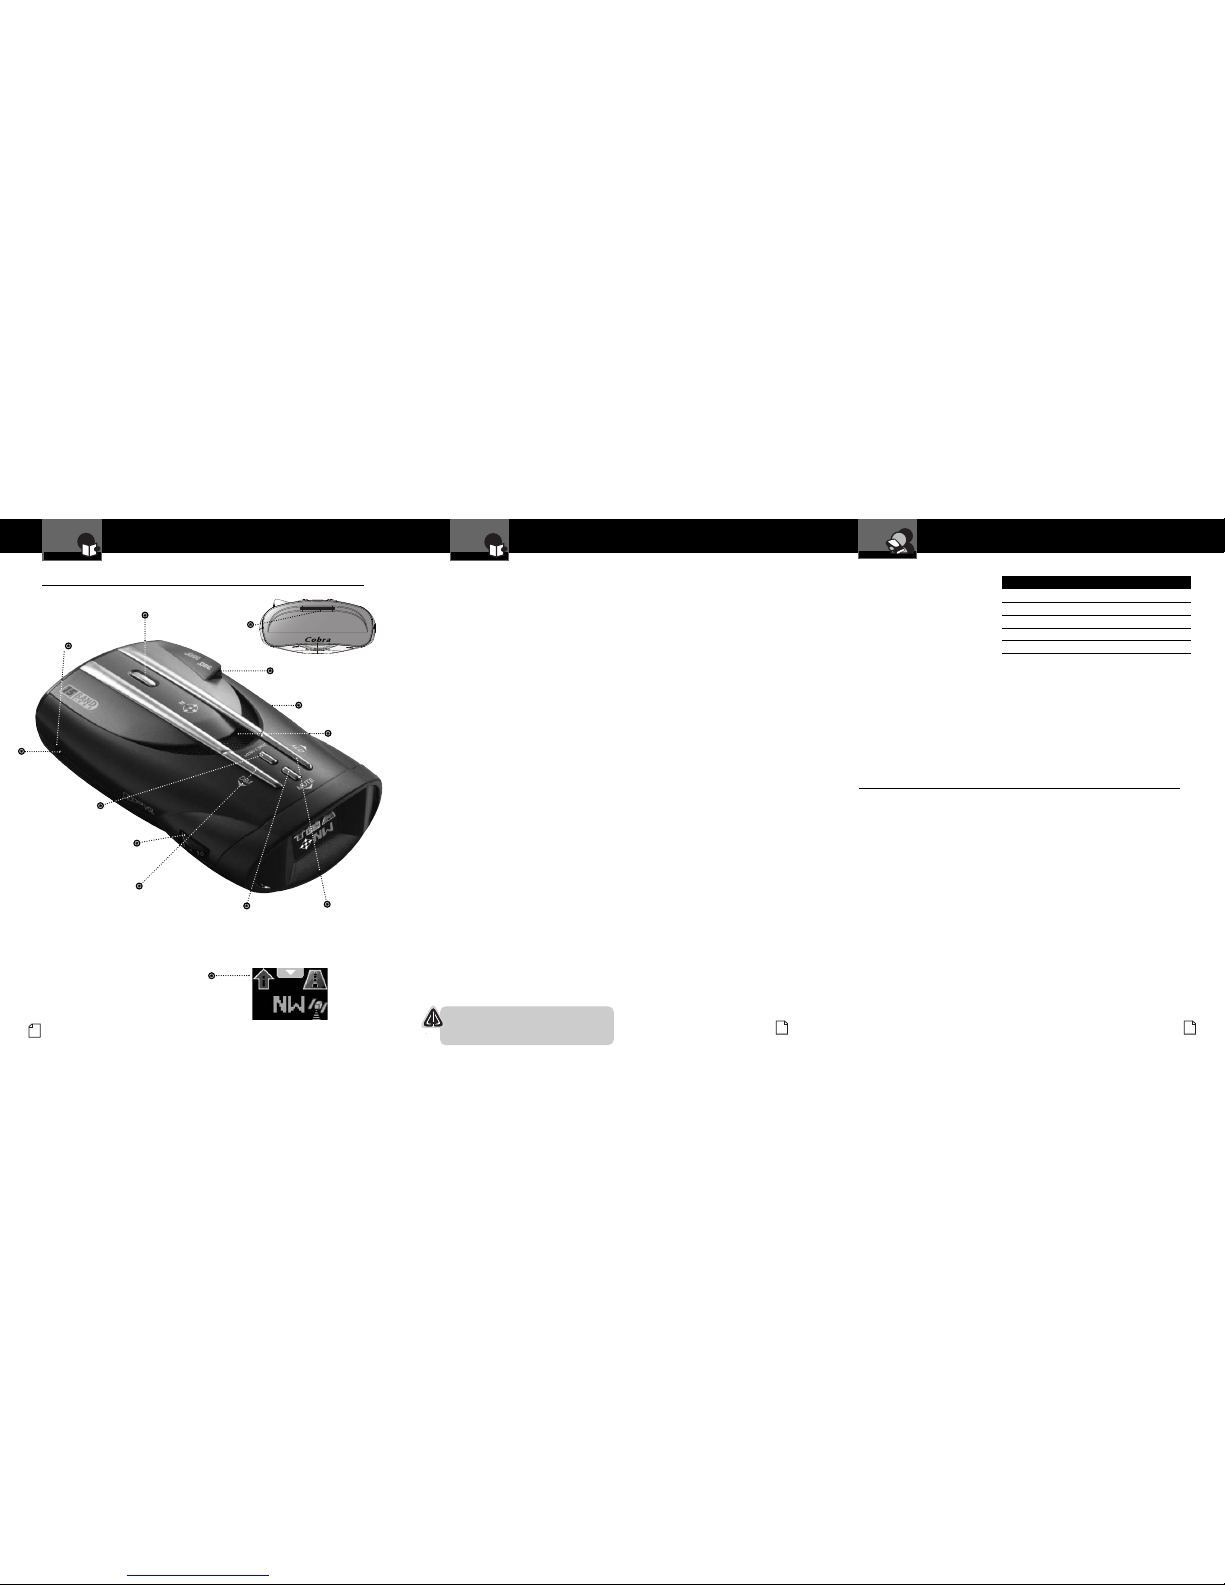
Controls, Indicators, Connections and Display
•
12V DC
Power Jack
On-Off/Volume Control
Allows user to adjust the volume
of the tone and voice alerts.
Mute6Button
For manual mute of audio alerts.
In Menu mode, steps
down through options for
the selected setting.
Menu/Save Button
Press once to enter
Menu mode. Press
again to save settings.
LaserEye
For 360° detection of
laser and strobe signals.
Windshield Bracket
Release Button
Speaker
Auxiliary Audio Jack
On right side of unit.
Dim3Button
Adjusts the display brightness.
In Menu mode, steps
backward through settings.
City4Button
Switches between Highway
and City modes.
In Menu mode, steps
forward through settings.
Windshield Bracket
Mounting Slot
ExtremeBright DataGrafixTMDisplay
Full color and sunlight-readable, extremely
bright display provides intuitive graphical
interaction and alert screens.
Nothing Comes Close to a Cobra
®
41
Product Features
I
ntroduction
Nothing Comes Close to a Cobra
®
A3
Introduction
Super-Xtreme Range
Superheterodyne Technology
With super-fast sweep circuitry,
S-XRS provides maximum detection range
and the best possible advance warning
to even the fastest radar guns
Maximum Performance
Provides advanced warning with maximum
detection range for total protection
Detection and Separate Alerts
For radar signals (X, K, Ka and Ku bands,
with signal strength indicated), Laser signals,
Safety Alert signals, Strobe Alert signals,
VG-2 signals, Spectre I & IV+ signals
8-Point Magnetic Compass
Displays direction of travel
LaserEye
For 360° detection of laser and strobe signals
Frequency Display Mode
Shows frequency of received Ka and
Laser signals
Instant-On Ready
Detects radar guns with “instant-On”
(very fast) speed monitoring capabilities
Pop Detection
Detects the latest super-fast instant-On
single pulse radar guns
Voice or Tone Alert
With adjustable volume
ExtremeBright DataGrafixTMDisplay
Easy-to-read graphical user interface
IntelliShield Highway/City Modes
Reduces falsing in urban areas with Highway
mode and three levels of City mode settings
Safety Alert
Traffic warning system distinguishes important
safety alerts from other K band signals
Strobe Alert
Emergency vehicle warning system
Manual Mute or Auto Mute
A mute function of audio alerts
IntelliMute
A mute function which automatically reduces
false audio alerts by sensing engine RPMs
Intellimute Pro
Prevents detection by radar detector detectors
(RDDs) when traveling at slower speeds
SmartPower
A timed power saving function that
saves your car’s battery
EasySet Menu
User-friendly mode selection and
setting with visual guidance
Car Battery Voltage
Displays your car battery voltage
Customizable Display Colors
Customize the display colors to match
yourdash illumination
Low Car Battery Voltage Warning
Alert can be provided when voltage goes
below 11.9 volts
Auxiliary Audio Jack
For external speaker connection
Mounting
Mounts easily on windshield or dashboard
Optional GPS Ready (See page 32)
The Optional GPS Locator unit adds:
Photo Enforced, Caution and User Location
Alerts; Speed Alert; GPS Compass and
Vehicle Location (Latitude & Longitude)
IntelliScope
Uses Optional GPS Locator to show
direction of Location Based Alerts relative
to your moving vehicle
Congratulations! You’ve made a smart choice by purchasing an ultra
performance digital radar/laser detector from Cobra. Just look at some of
the sophisticated features and capabilities your new unit includes:
Order Information and
Trademark Acknowledgement
Customer Assistance
Ordering From U.S.A.
Call 773-889-3087 for pricing
or visit www.cobra.com.
For Credit Card Orders
Call 773-889-3087
[Press one from the main menu]
8:00 a.m. to 6:00 p.m. Central Time,
Monday through Friday.
Make Check or Money Order
Payable To
Cobra Electronics
Attn: Accessories Dept.
6500 West Cortland Street
Chicago, IL 60707 U.S.A.
To Order Online
Please visit our website: www.cobra.com
Item # Description
RDA GPSL55 Plug-in GPS Locator Unit
420-030-N-001 Straight 12V Power Cord
420-026-N-001 Coiled 12V Power Cord
545-159-N-001 Windshield Mounting Bracket
CLP-2B Dual Port Power Adapter
USB Port
For connection
of
Optional GPS
Locator.
Trademark Acknowledgement
•
Cobra®, DigiView®, EasySet®, Extra Sensory Detection®, IntelliMute®, IntelliMute®Pro,
IntelliShield
®
, LaserEye®, Nothing Comes Close to a Cobra®, Safety Alert®Traffic Warning
System, Strobe Alert
®
, VG-2 Alert®, Xtreme Range Superheterodyne®and the snake design
are registered trademarks of Cobra Electronics Corporation, USA.
Cobra Electronics Corporation™, 14 Band™, 15 Band™, Extreme Bright DataGrafix™,
IntelliLink™, IntelliScope™, IntelliView™, Revolution™ Series, SmartPower™, Spectre
Alert™, Super-Xtreme Range Superheterodyne™, S-XRS™, UltraBright™, and Voice Alert™
are trademarks of C obra Electronics Corporation, USA.
Opticom™ is a trademark of 3M Corporation. Instaclear
®
for Ford is a registered
trademark of Ford Motor Company, Inc. Electriclear
®
for GM is a registered trademark of
General Motors Corporation. 20-20™ and Ultra-Lyte™ are trademarks of Laser Technology,
Inc. ProLaser™ and ProLaser III™ are trademarks of Kustom Signals, Inc. Bee III™ and
Pop™ are a trademarks of MPH Industries. Stalker™ LIDAR is a trademark of Applied
Concepts, Inc. Spectre I™ and Spectre IV+™ are trademarks of Stealth Micro Systems Pty. Ltd.
SpeedLaser™ is a trademark of Laser Atlanta, LLC. Interceptor VG-2™ is a trademark of
TechniSonic Industries LTD. Tomar
®
is a registered trademark of TOMAR Electronics, Inc.
Assistance
Warranty
Customer
Assistance
WARNING
Modifications or parts substitutions not approved by
Cobra Electronics Corporation may violate FCC Rules
and void your authority to operate this equipment.

Contents
I
ntroduction
Nothing Comes Close to a Cobra
®
1
Introduction
Important Information . . . . . . . . . . A1
Customer Assistance . . . . . . . . . . A1
Controls, Indicators,
Connections and Display . . . . . . A2
Product Features . . . . . . . . . . . . . A3
Overview . . . . . . . . . . . . . . . . . . . . . 2
Your Detector
Installation . . . . . . . . . . . . . . . . . . . . 3
Getting Started . . . . . . . . . . . . . . . . 6
Power On/Off and Audio Volume . 6
Standby Screen Icons . . . . . . . . . 7
Display Control . . . . . . . . . . . . . . . 9
Display Timeout . . . . . . . . . . . . . . . 9
IntelliShield Highway/City Modes . 10
Muting an Alert . . . . . . . . . . . . . 11
Auxiliary Audio Jack . . . . . . . . . 11
EasySet Menu . . . . . . . . . . . . . . . . 12
Menu Flow Diagrams . . . . . . . . . . 14
Settings . . . . . . . . . . . . . . . . . . . . . 16
User Settings . . . . . . . . . . . . . . . 16
IntelliShield City Mode Default 16
IntelliMute Mode . . . . . . . . . . 16
IntelliMute Pro Mode . . . . . . . 16
Set Activation Point . . . . . . . . 18
Auto Mute Mode . . . . . . . . . . 19
Voice or Tone Mode . . . . . . . . 19
Customizable Display Colors . 19
Display Timeout . . . . . . . . . . . 19
Frequency Display Mode . . . . 19
Compass Mode . . . . . . . . . . . 20
Set Compass . . . . . . . . . . . . . 20
SmartPower Mode . . . . . . . . . 21
Speed Units . . . . . . . . . . . . . . 21
Restore Factory Settings . . . . 21
Alert Settings . . . . . . . . . . . . . . . 22
Pop Alert . . . . . . . . . . . . . . . . 22
X Band Alert . . . . . . . . . . . . . . 22
Alert Settings Continued
K Band Alert . . . . . . . . . . . . . . 22
Ku Band Alert . . . . . . . . . . . . . 22
VG-2 Alert . . . . . . . . . . . . . . . 22
VG-2 Audio Mode . . . . . . . . . 22
Spectre I & IV+ Alerts . . . . . . 22
Spectre Audio Mode . . . . . . . 23
Safety Alert . . . . . . . . . . . . . . 23
Car Battery Low Voltage
Warning . . . . . . . . . . . . . . . . . 23
Detection . . . . . . . . . . . . . . . . . . . . 23
Signals Detected . . . . . . . . . . . . 23
Audio Alerts . . . . . . . . . . . . . . . . 23
Visual Display . . . . . . . . . . . . . . 23
Instant-On Detection . . . . . . . . . 27
Pop Detection . . . . . . . . . . . . . . 27
Responding to Alerts . . . . . . . . . 27
Understanding Radar and Laser . . 28
Maintenance . . . . . . . . . . . . . . . . . 30
Specifications . . . . . . . . . . . . . . . . 31
Optional Global Position
System Locator
Overview . . . . . . . . . . . . . . . . . . . . 32
Initial Satellite Lock . . . . . . . . . . . . 33
Optional GPS Locator
Activated Alerts . . . . . . . . . . . . . 33
Detection . . . . . . . . . . . . . . . . . . . . 35
IntelliScope . . . . . . . . . . . . . . . . . . 36
Warranty
Limited 1-Year Warranty . . . . . . . . 38
Customer Assistance
Product Service . . . . . . . . . . . . . . . 39
Optional Accessories
Optional Accessories . . . . . . . . . . . 40
Accessories Order Info . . . . . . . . . 41
Trademark Acknowledgement . . . . 41
Overview
I
ntroduction
2
English
This manual describes the simple steps for mounting, setting up and using your
detector. It also provides helpful information about how radar and laser guns are
used and how you can interpret the alerts you receive.
Before you begin your installation, please read the Important Information section
on page A1 and use the descriptions and feature lists on pages A2 and A3 to
become familiar with your new detector.
About Your Detector
•
Display
This detector’s innovative new display provides more, easier-to-use information
than any technology to date. Using an OLED (Organic Light Emitting Diode)
screen, the display offers large graphical alerts to signals as they are detected.
Do not be alarmed by the nearly blank display you see when you first turn the
unit On. The detector will function and alerts will appear as signals are detected.
You can also elect to turn On the built-in Compass, IntelliMute and IntelliMute
Pro, so that they appear during normal operation. The initial and startup screens
are shown on page 6.
EasySet Menu
EasySet Menu lets you conveniently customize the operation of your detector by
changing the settings. You may want to start using the detector with the factory
settings and then make changes after you are more familiar with the unit.
About This Manual
•
Once the detector is in use, the modular descriptions in this manual can
be used as a ready reference to individual topics as needed. Each topic is
completely covered in its section and cross-references to related topics are
included where appropriate.
Installation
Y
our Detector
Nothing Comes Close to a Cobra
®
3
Installation
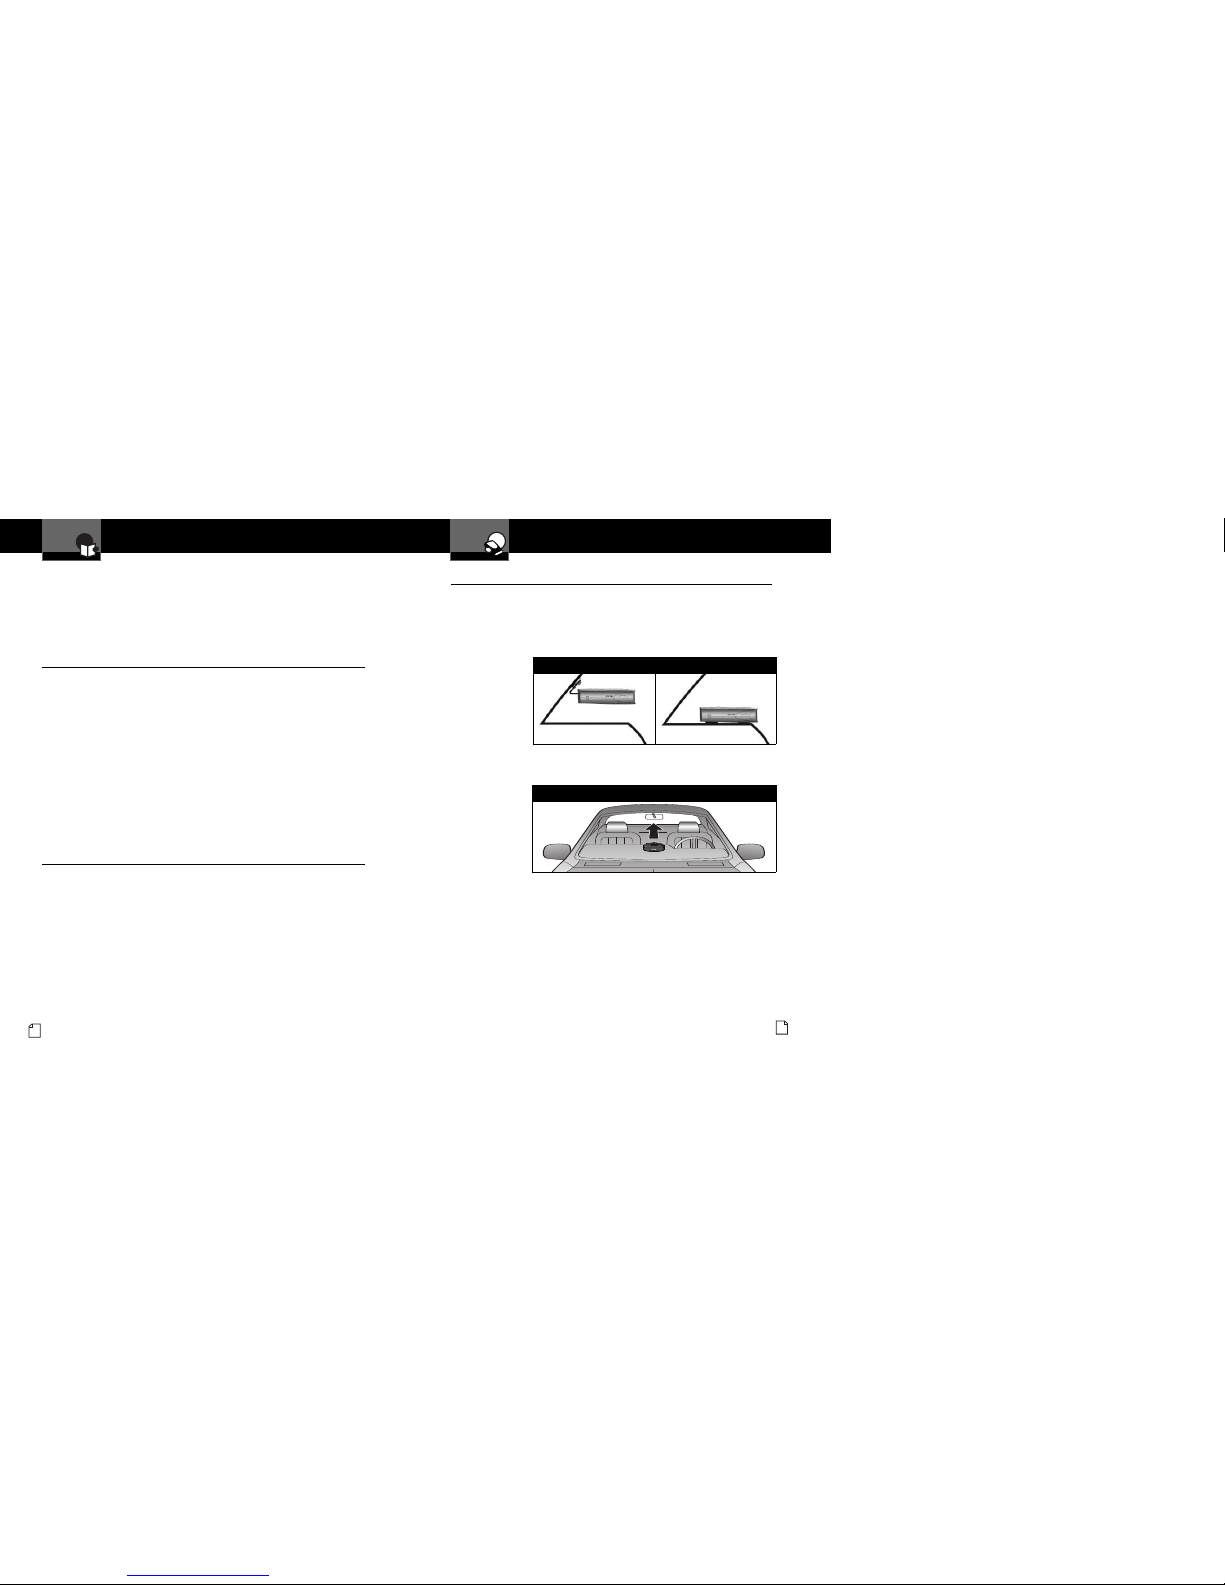
•
Where to Mount Your Unit
You will get optimum performance from your detector if you mount it at a
point approximately in the center of the vehicle, as low as possible on the
front windshield without obstructing the unit’s view of the road either to
the front or rear. You can also mount it directly on the dashboard.
The unit’s lens must not be blocked and the LaserEye should have a clear view
out the back window to allow 360° detection.
Radar and laser signals pass through glass but not through other materials
and objects. Objects that can block or weaken incoming signals include:
■
Windshield wiper blades
■
Mirrored sun screens
■
Dark tinting at the top of the windshield
■
Heated windshields currently available on some vehicles
(Instaclear for Ford, Electriclear for GM). Consult your dealer
to see if you have this option.
The LaserEye Should Have a Clear View
Windshield Mounting Dashboard Mounting
Installation
Y
our Detector
4
English
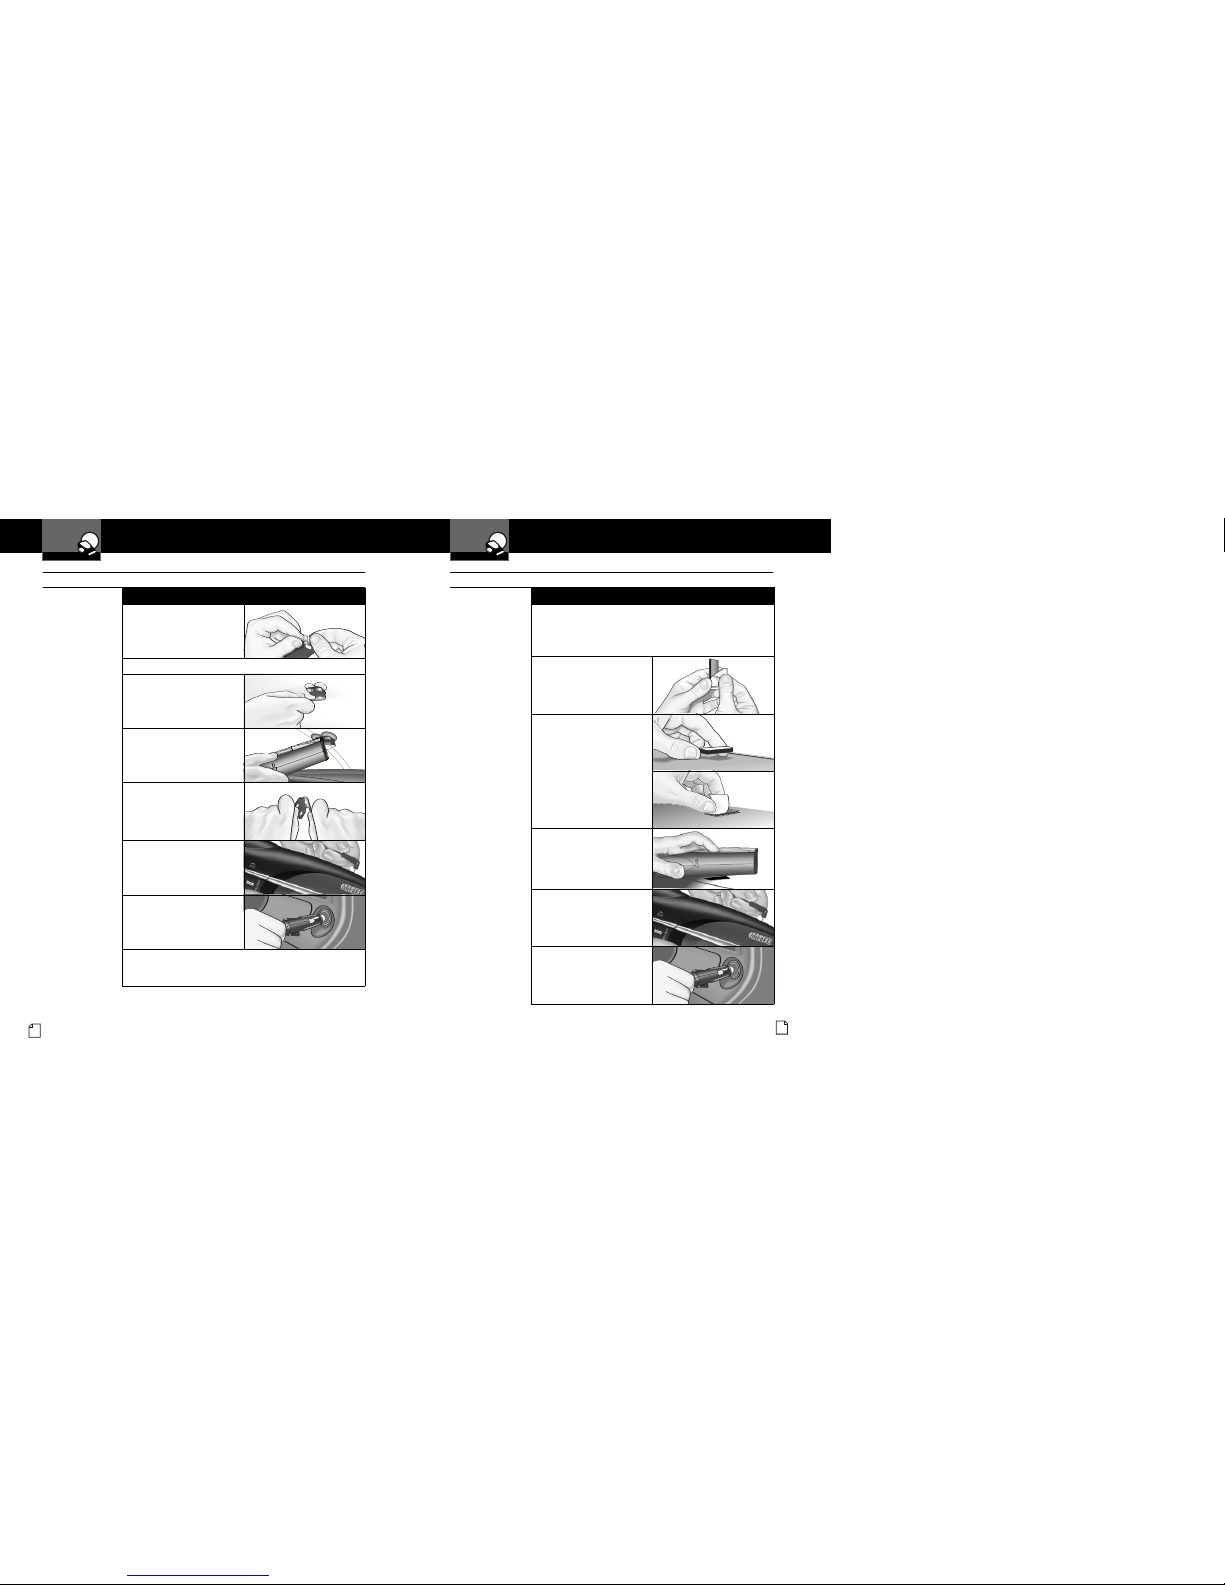
1. Attach the rubber
cups to the bracket.
2. Make sure the rubber cups and your windshield are clean.
3. Push the bracket firmly
onto the windshield.
4. Attach the detector to the
bracket. Check that the
unit is parallel to the
road's surface.
5. To adjust the angle if
necessary, gently push or
pull on the bracket to bend
it. DO NOT use the detector
to bend the bracket.
6. Plug the power cord
into the detector.
7. Plug the cigarette lighter
adapter on the power
cord into your vehicle’s
cigarette lighter.
8. You can temporarily remove the detector whenever you
wish by depressing the bracket release button and sliding
it off the bracket.
Windshield Mounting
Installation
Y
our Detector
Nothing Comes Close to a Cobra
®
5
1. Place the detector on the dashboard to find a location
where the unit has a clear view of the road and is parallel
to the road's surface. The angle CANNOT
be adjusted after mounting.
2. Remove the paper backing
from one side of the hookand-loop fastener.
3. Attach the pad to the
dashboard at your chosen
location and remove the
other paper backing.
4. Attach the detector to the
hook-and-loop fastener.
You can remove and
reattach the unit as
often as you like.
5. Plug the power cord
into the detector.
6. Plug the cigarette lighter
adapter on the power
cord into your vehicle’s
cigarette lighter.
Dashboard Mounting

To Turn on the Unit and Adjust the Audio Volume
Rotate the OnOff/Volume
control
clockwise (away
from you).
Unit will cycle through
the Power On/ Self Test.
Tone Visual Display Voice
None None
Alert settings changed
from factory defaults
will scroll; those still at
defaults will not show
.
Three beeps Testing,
then three beeps
Shows only when the
Optional GPS Locator
is installed. See page 32
for more information.
None None
Standby screen will show
City or Highway icon
and others as they
are activated. See note.
None System Ready
Display changes to
Display Timeout after
30 seconds (factory
default).
None None
Getting Started
Y
our Detector
Nothing Comes Close to a Cobra
®
7
Standby Screen Icons
•
City Mode
Highway Mode
Magnetic Compass
IntelliMute Above
Activation Point
IntelliMute Below
Activation Point
User and Alert
Settings Menu
Car Battery Voltage
Your detector uses the following icons to indicate modes and functions when set:
Sample Screen
(see note)
NOTE
For example, the sample screen indicates that IntelliMute is active, the Compass
is calibrated and your system is set to Highway mode. The satellite icon will
show only if the Optional GPS Locator is installed.
A
ssistance
W
arranty
Getting Started
Y
our Detector
6
English
NOTE
In some vehicles, power is supplied to the cigarette lighter even while the ignition is Off.
If this is the case with your vehicle and you have turned the SmartPower Off, you should
turn Off or unplug your detector when parking for lengthy periods. Cobra recommends
leaving SmartPower at the factory setting, which is On. See page 21.
Assistance
Warranty
NOTE
When the system is first turned On from new, only the CIty or Highway icon will show on the
screen because the Magnetic Compass, IntelliMute and IntelliMute Pro functions are set to Off
at the factory. These icons will be added to the Standby screen when turned On as described
on pages 10, 17 and 20. The satellite icon will show only if the Optional GPS Locator is installed.
Assistance
Warranty
Power On/Off and Audio Volume
•
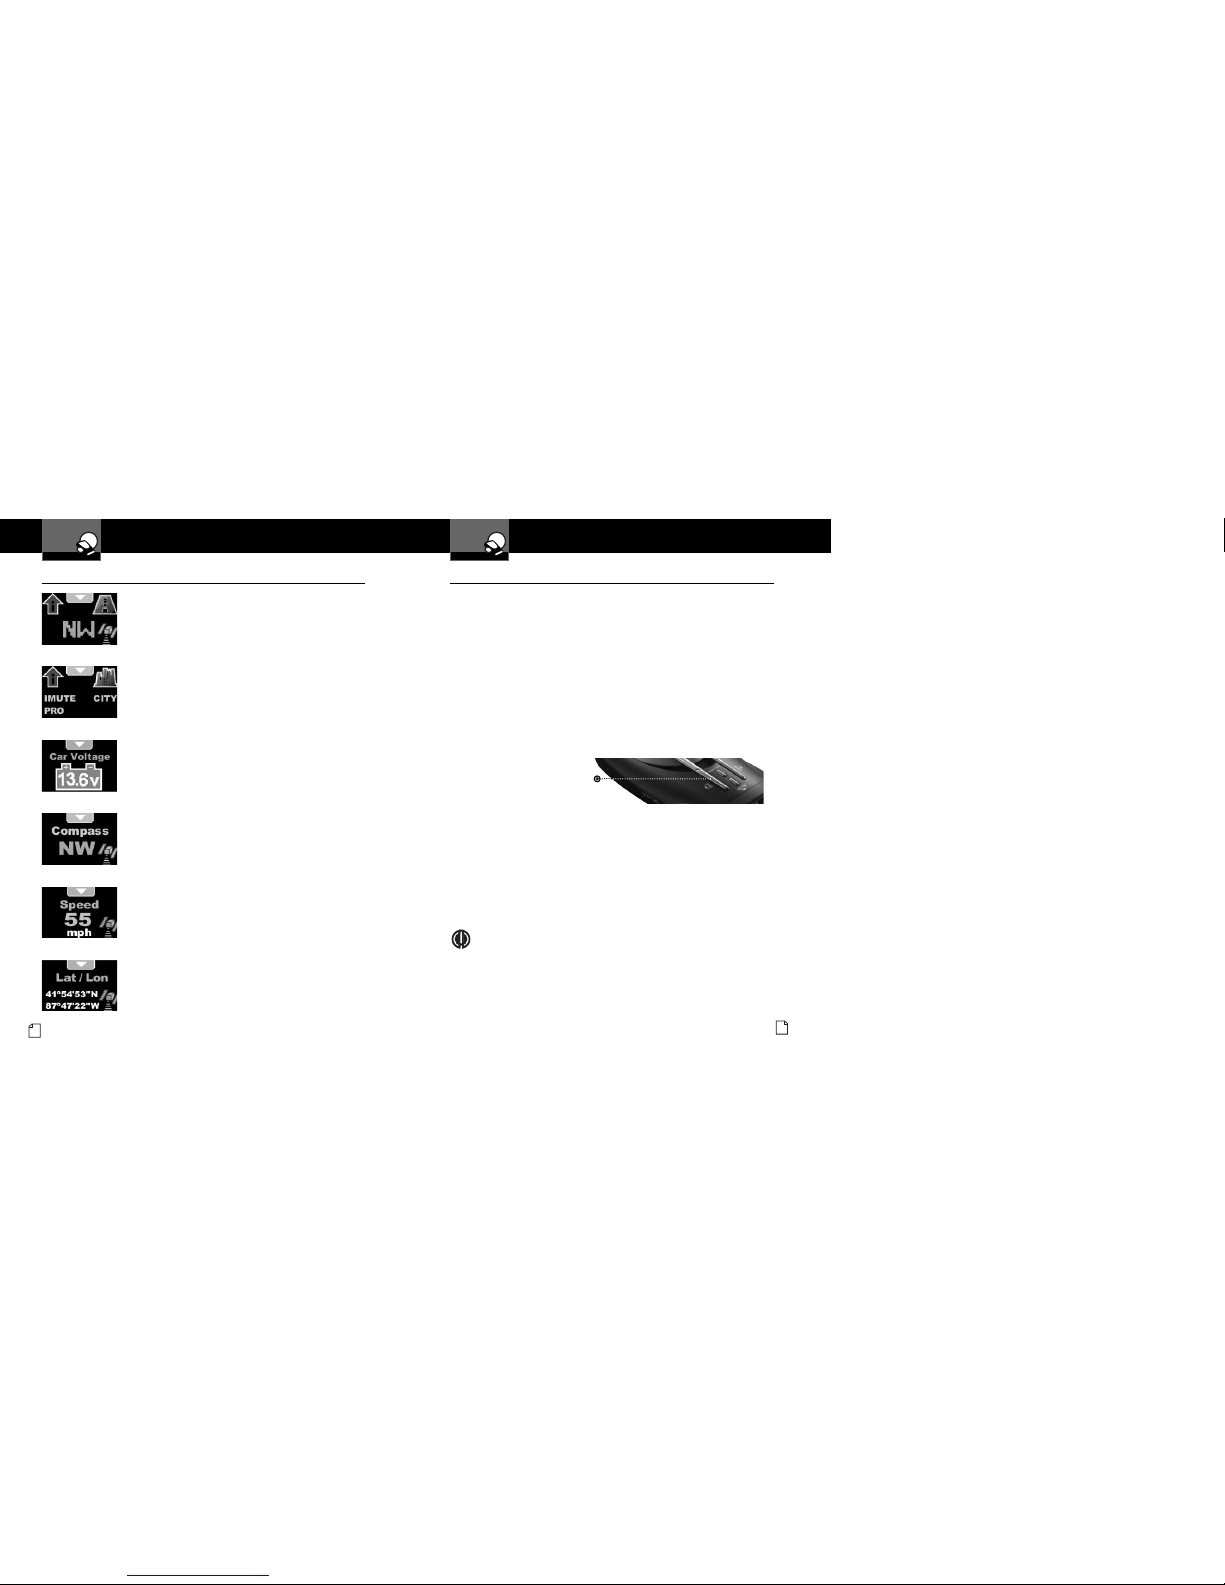
Standby Screens
•
Press Mute6 while the down arrowhead i s
displayed at the top center of any Standby
screen to cycle through and select a different
screen. The Standby screens will be displayed
in the order shown to the left.
NOTE
Compass will display if either the magnetic
compass in the detector unit is turned On and
calibrated or the Optional GPS Locator unit
is installed and receiving a signal. Speed and
and Latitude/Longitude (marked with an *)
will display only if the Optional GPS Locator
unit is installed and receiving a signal.
Assistance
Warranty
NOTE
Last Standby screen viewed will be displayed when
exiting Display Timeout mode.
Assistance
Warranty
Main Standby
Screen
Speed
Car
V
olta
g
e
I-Mute/I-Mute Pro
City/Hwy Mode
Latitude/Longitude
Compass
*
*
Dim3Button
Press and release
Getting Started
Y
our Detector
Getting Started
Y
our Detector
Main Standby Screen
Displays the maximum possible information about the
detector and its settings. The GPS icon will show only if
the
Optional GPS Locator unit is connected.
I-Mute or I-Mute Pro and City or Hwy Mode
Displays the status of alert filtering (City mode) and
automatic muting (IntelliMute or IntelliMute Pro mode).
See pages 10 and 17 to set these features.
Car Voltage
Displays voltage level of your car battery. See page 23
for Voltage Warning information.
Compass
The compass indicates driving direction if either the
magnetic compass in the detector unit is turned On
and calibrated or the
Optional GPS Locator unit is
installed and receiving a signal. If neither is active,
the center of the compass icon will show two bars.
Speed
If the Optional GPS Locator unit is installed and
receiving a signal, the vehicle's speed will be shown.
(You can select mph or km/h in Menu mode.)
See page 34 for Speed Alert information.
Lat/Lon
If the Optional GPS Locator unit is installed and receiving
a signal, the vehicle's present location will be shown.
Display Control
•
Illumination
The display illumination intensity can be adjusted to suit driving conditions:
■
Bright for daytime driving. (Factory default is Bright, then Display Timeout
after 30 seconds.)
■
Dim for dusk driving.
■
Dimmer for night driving.
■
Dark to blank the screen for discreet use. In this mode, alerts will sound,
but not show. (A dot will blink at the center of the screen to indicate the
detector is ON.)
You can adjust the illumination by pressing the
Dim3button to step through
the levels in the sequence listed above.
Display Timeout
Your detector has a Display Timeout mode. When Display Timeout is turned
On (factory default is 30 seconds), the screen will change to Dark from
Bright, Dim, or Dimmer after the time interval selected in Menu mode
(see page 12). The Display Timeout setting can be changed so the display
is always On.
In Display Timeout mode, the display will show a small dot moving slowly
back and forth near the center of the screen to indicate the unit is turned On.
NOTE
While at the Dark level under timer control, any alert will turn On the display
at the last brightness setting (Bright, Dim or Dimmer). Touching any button
will also turn On the the display.
Assistance
Warranty
Nothing Comes Close to a Cobra
®
9
8
English
Standby Screens
•
 Loading...