

Page 1

VnM®4 SignMaker
User Manual
Version 1.01
Updated 01/2014
Page 2

Table of Contents
Introduction ...............................................................................
®
VnM
4 SignMaker Quickstart ..................................................
®
VnM
4 SignMaker Overview ....................................................
Loading VnM®4 Ink Roll ...........................................................
Loading VnM®4 Media ..............................................................
®
VnM
4 SignMaker Setup ..........................................................
®
VnM
4 Keypad Navigation ......................................................
®
VnM
4 Keypad Templates .......................................................
A) 1 to 5 Line Horizontal ..........................................
B) 1 Line Vertical ......................................................
C) OSHA/ANSI Haz Com ..........................................
D) GHS Templates ....................................................
E) RTK Labels ..........................................................
F) Lock Out Tags .....................................................
G) Pipe Marking .......................................................
2
3
4
5
6
7
8
9-17
9
10
11
12
13
14
15
H) Barcode Labels ...................................................
I) VnM4 Apps ...........................................................
®
VnM
4 Print & Font Settings ...................................................
Fonts/Symbols ..........................................................................
OSHA/ANSI Safety Denitions .................................................
Pipe Marker Color Chart ...........................................................
Connecting to PC ......................................................................
Maintenance/Troubleshooting .................................................
Accessories ...............................................................................
Frequently Asked Questions ...................................................
Tech Support .............................................................................
1
16
17
18
19-20
21
22
23
24
25
25
26
Page 3

Introduction
Thank you for purchasing the VnM®4 SignMaker by Cobra Systems, Inc.
The compact, high-performance VnM®4 SignMaker System has been
developed to provide an easy, fast, and hassle free solution to all your
industrial applications.
It includes a pre-programmed smart keyboard and thermal transfer sign
applications via USB connection (not supported unless pruchased with
VnM® LabelDirect).
Specications
Dimensions: 2.36” (L) x 8.39” (W) x 7.40” (H)
Operating Conditions: 5°-40° C (41°-104° F)
Storage Conditions: -40°-60° C (-40°-140° F)
Resolution: 203 DPI
AC Input: 100 - 240V Power Supply
DC Output: 24V 3.75A (external adaptor)
Print Speed: 2, 3, 4, 5, 6, or 7 inches per second
Connections: VnM® Keypad, USB, LPT
Warranty
VnM®4 SignMaker comes with a 3-Year Printer Warranty, 1-Year Printhead
Warranty, 6-Month Cutter Warranty, and 1-Year Keypad Warranty.
Out of the Box
The VnM®4 SignMaker System includes:
®
1. VnM
2. VnM
with RS232 Cable (1)
3. Printer Power Supply (1)
4. Printer Power Cord (1)
5. Printer USB Cable for
PC Connection (1)
6. Take-Up Core for
VnM
7. VnM
Spindles (2)
4 SignMaker Printer (1)
®
4 SignMaker Keypad
®
Ink (1)
®
Ink Take-Up
1
6
7
5
4
23
2
Page 4
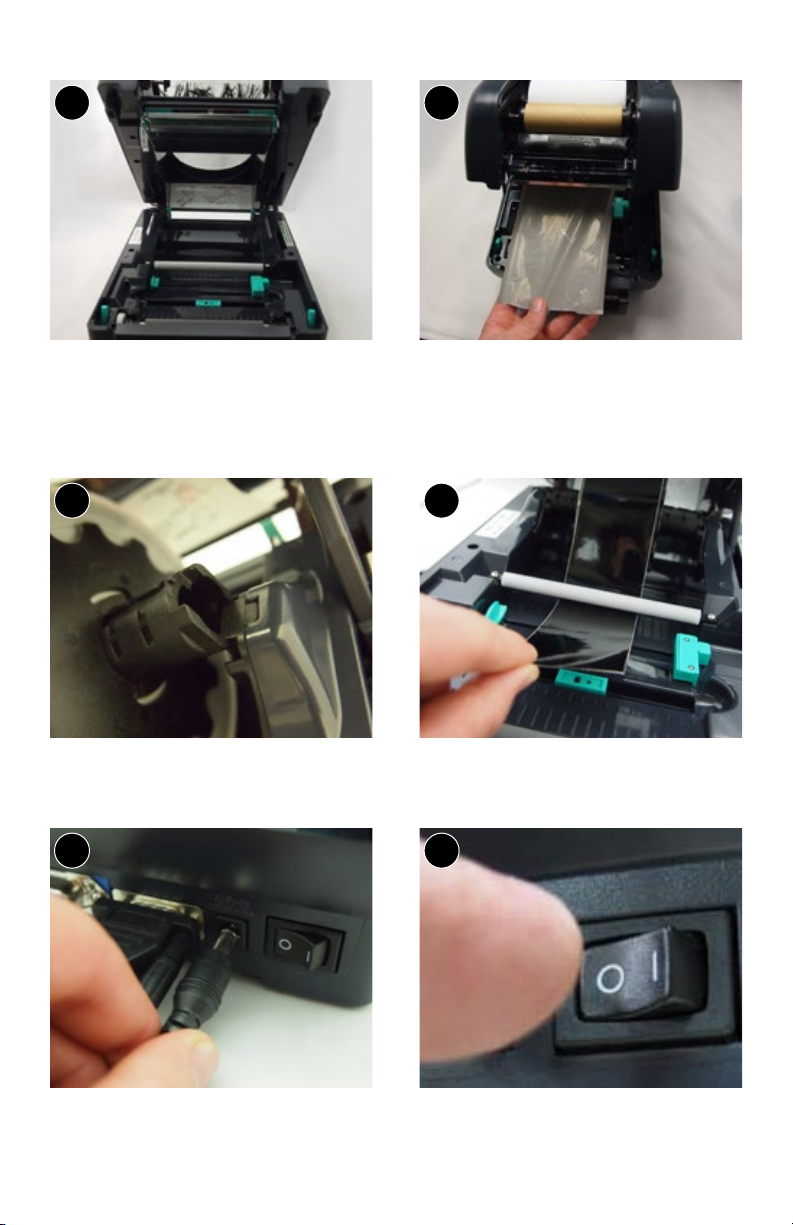
VnM®4 SignMaker Quickstart
1 2
PRINTER MUST BE TURNED OFF!
Open printer lid by pressing
the green tabs on each side
located toward the front
of the printer.
3 4
Easily slide new VnM Media
into roll mount.
5 6
Slide ink roll onto rst spindle and
set in rear hub. Pass ink roll leader
under the ink roll carriage, past the
printhead, and attach to the ink
roll take up core in front hub.
Feed media face up under the support
bar and through the cutter slot.
Plug VnM4 Keypad & the power
cord into AC power cord socket at
the rear of the VnM4 Printer.
3
Plug power cord into a properly
grounded power outlet. Turn on VnM4
Printer, choose template and print.
Page 5
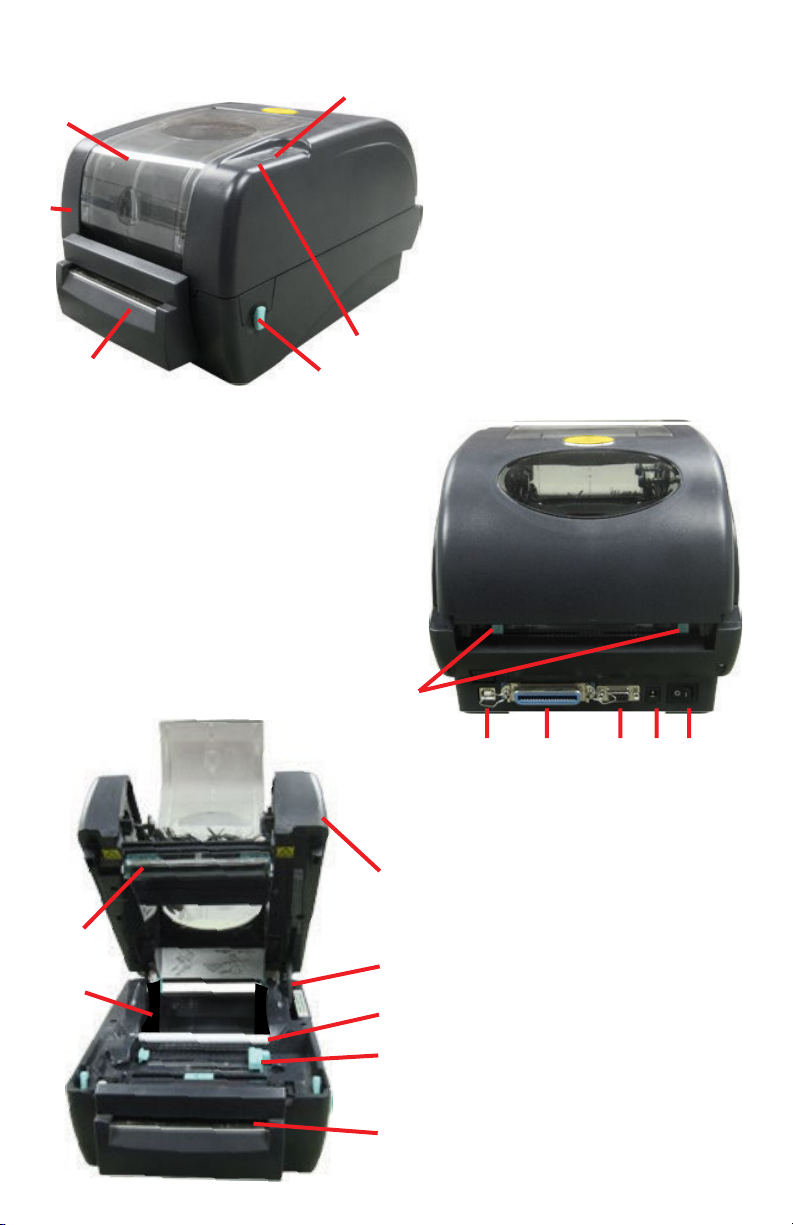
VnM®4 SignMaker Overview
2
1
VnM4 SignMaker Top View
4
6
VnM4 SignMaker Rear View
1. USB interface
2. Parallel interface
3. RS-232 DB-9 interface
4. Power jack
5. Power switch
6. Rear VnM media guide
1. Ribbon access cover
2. LED indicator
3. Feed button
4. Printer top cover
5. Top cover open lever
6. Cutter
3
5
6
1 2 3 4 5
VnM4 SignMaker Interior View
1
5
6
1. Top cover
2. Top cover support
3. VnM media guide
2
4. Cutter
7
5. Printer head
6. Roll mount
3
7. Teon bar
4
4
Page 6

Loading VnM®4 Ink Roll
/IMPORTANT
TURN OFF PRINTER WHEN
CHANGING INK ROLLS
1
3 4
PRINTER
MUST BE
TURNED
OFF!
Open
the VnM®4
SignMaker
Printer and
the ribbon
access cover.
Load rear
ink spindle
with the
unused
portion of
the ink roll.
2
/IMPORTANT
FOLLOW INSTRUCTIONAL
DIAGRAM INSIDE PRINTER
Load front
ink spindle
with an
empty
take-up
core.
Pull ink from
rear to the
front going
under the
print head
and up to
attach to the
mpty takeup core.
5 6
7 8
5
Tape or
adhere
rear ink to
front take
up ink
spindle.
Wind the
front ink
spindle to
take up the
slack, make
sure there
are no
wrinkles in
the ink.
Make sure
ink spindles
are as
shown,
note larger
circular end
on the right
side.
End Result:
close the
ink roll
access
cover.
Page 7
Loading VnM®4 Media
/IMPORTANT
HANDLE MEDIA ON THE SIDES
TO PREVENT BAD PRINTS
1
First, be
2
sure to
have the
correct
VnM®4
Media.
3 4
Pull media
to go under
the white
platten
roller.
5 6
Adjust media
guide to t
the VnM®4
Media being
used and
keep the
media
centered.
Simply drop
the new
VnM®4
media roll
into the
printers roll
mount.
Pull media
through
cutter as
shown on
photo.
Leave a
small piece
of media
hanging out
of the printer.
Wind up any
extra material
and keep
straight.
7 8
Close the
top cover
slowly by
lifting up
the push
lever. DO
NOT SLAM
SHUT!
Turn on your
VnM®4
Printer by
ipping the
power switch
located on the
back of the
printer. Start
printing your
instant signs.
6
Page 8
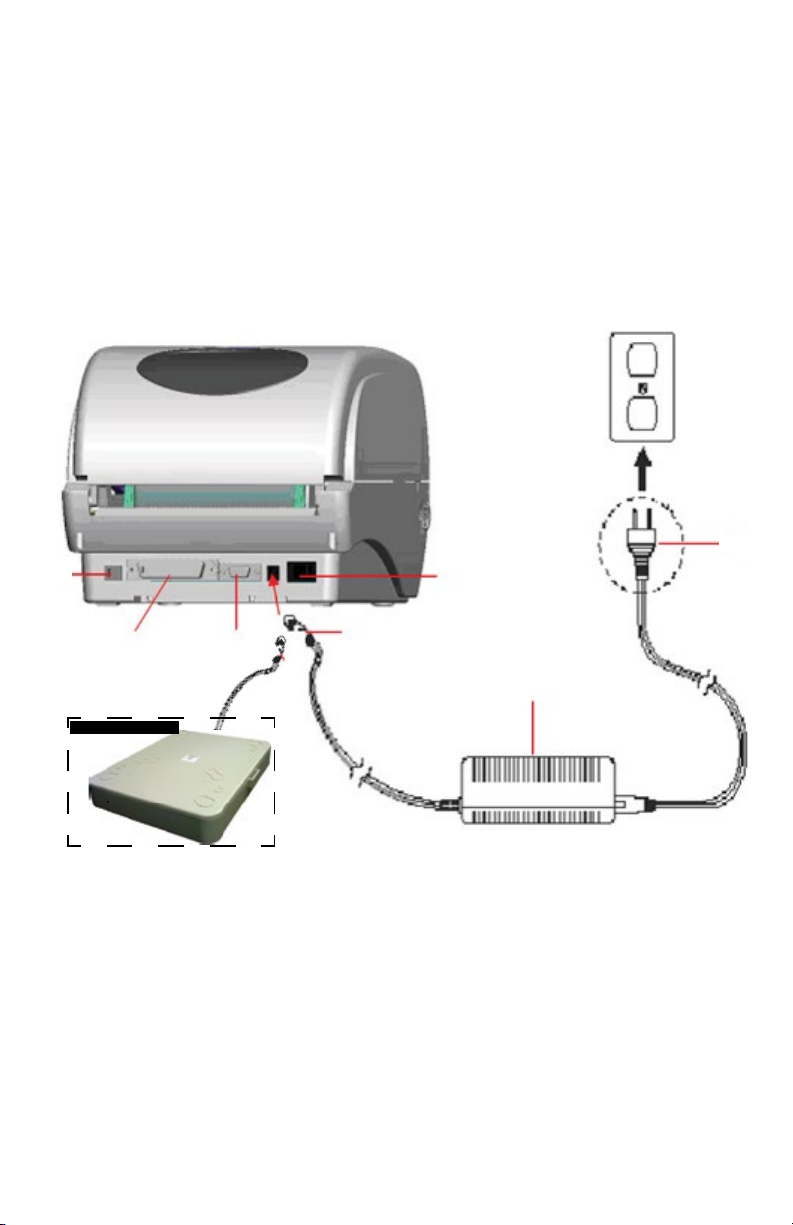
VnM®4 SignMaker Setup
Connecting VnM®4 Keypad and Power Up
1. Place printer on a at and secure surface.
2. Make sure the power switch is OFF.
3. Connect VnM4 Keypad to the VnM4 SignMaker RS-232 serial port.
4. Plug power cord into AC power cord socket at the rear of printer then
plug power cord into a properly grounded power outlet.
Plug
USB
Optional Battery Pack
Paralle
RS232
Power Switch
Power Cable
Power Supply
7
Page 9
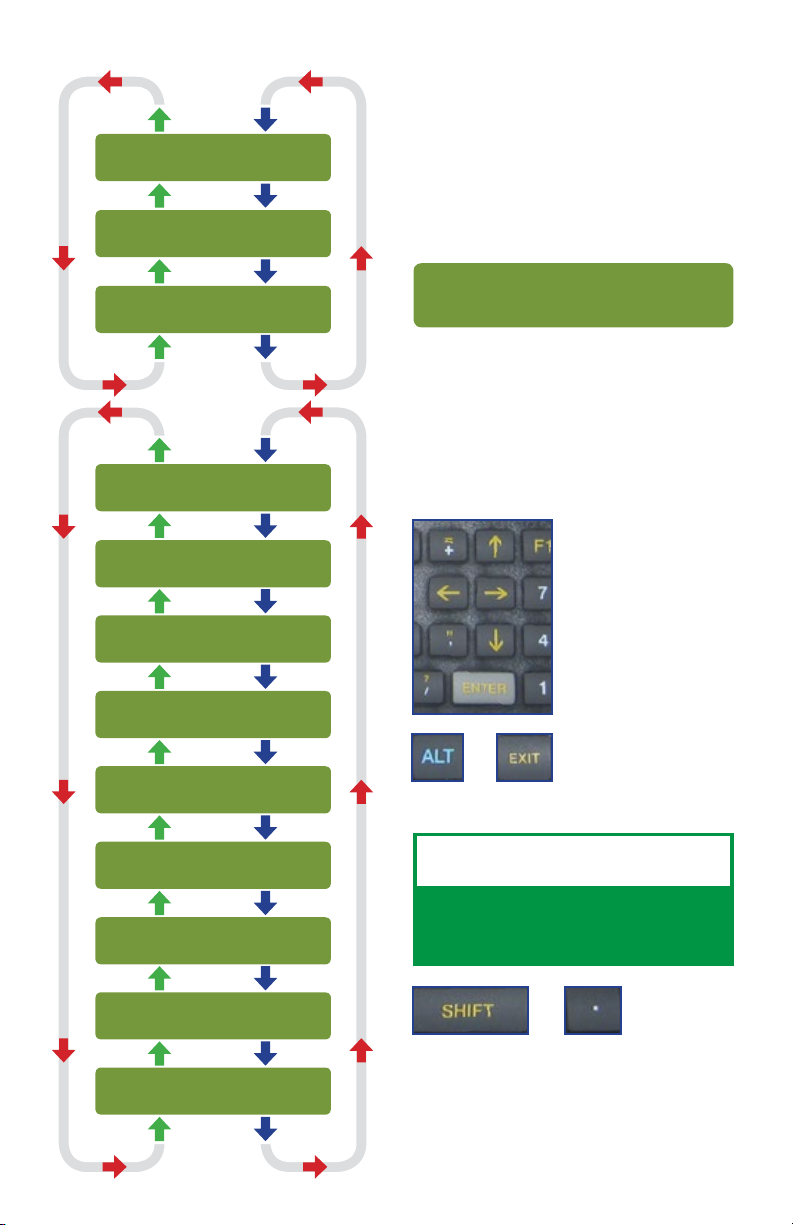
VnM®4 Keypad Navigation
SELECT MEDIA WIDTH:
PRESS 1,2,3, or 4
VNM PRINT SETTINGS
PRESS ENTER
The VnM®4 keypad navigation tree to
the left displays the ow and order of
all the available options/templates.
More detailed information about the
templates are found further in the manual.
Default VnM®4 SignMaker Prompt
SELECT FONT/SYMBOLS
PRESS ENTER
1 to 5 LINE HORIZONTAL
PRESS ENTER
1 LINE VERTICAL
PRESS ENTER
OSHA TEMPLATES
PRESS ENTER
GHS TEMPLATES
PRESS ENTER
RTK LABEL TEMPLATES
PRESS ENTER
LOCK OUT TEMPLATES
PRESS ENTER
SELECT MEDIA WIDTH:
PRESS 1,2,3, or 4
Select Media Width is the default
prompt when powering on the VnM
®
4
SignMaker and when pressing the
ALT + EXIT keys.
To begin printing, rst select the
size media loaded inside the printer.
Use the UP and
DOWN arrow keys on
the VnM®4 Keypad
to navigate through
the templates. Press
the ENTER key to
select your template
To get back to the main
+
menu (or if you made
a type error), press the
ALT key + EXIT key.
VnM4 Tips
.
PIPE MARKING TEMPLATES
PRESS ENTER
BARCODE TEMPLATES
PRESS ENTER
VnM4 APPS
PRESS ENTER
HOW TO PRINT
QUOTATIONS!
+
In order to print quotations (“) or inch
and foot marks, press the SHIFT key +
PERIOD key (on the numeric keypad).
Do not use the keypad QUOTATION
key, you will have blank text.
8
Page 10

VnM®4 Keypad Templates - 1 to 5 Line Horizontal
The 1 to 5 Line Horizontal template is the most versatile template for the VnM®4
SignMaker. Create anything from 1 to 5 lines of text and control the font size by
selecting the appropriate media size.
The sample sign below, a), was created by rst selecting the SYMBOLS1 font,
second selecting the 1 to 5 Line Horizontal template, then select the media width
and choosing 1 for how many lines, then typing, “/CAUTION” where the “/” on the
keypad screen represents / symbol.
a) 1 line template no reverse, symbols1 font
1 to 5 LINE HORIZONTAL
PRESS ENTER
XINCH HOW MANY LINES?
PRESS 1,2,3,4 OR 5
ENTER LINE l:
/CAUTION
ENTER QUANTITY TO PRINT:
1
RESERVE TEXT?
1.(Y)ES OR 2.(N)O
DANGER!
b) 1 line template reverse text (press Y)
1. Select the 1 to 5 Line Horizontal
template by pressing the ENTER
key on the VnM
Select how many lines by pressing the
2.
numbers 1, 2, 3, 4 or 5. Do not press
enter after pressing the amount of lines.
3. Enter the text/symbols for your sign
and once you nished the line or
sign, press the ENTER key.
4. Enter the quantity to print and
press ENTER.
5. Select if you would like reverse text.
Press Y or 1 for Yes.
Press N or 2 for No.
5 LINES OF TEXT
USE OF A COMPUTER
d) 5 Lines
®
4 Keypad.
PRINT UP TO
WITHOUT THE
OR SOFTWARE!
c) 1 line template no reverse text (press N)
9
VnM4 Tips
TO GET BACK TO THE MAIN
MENU PRESS AND HOLD
DOWN THE ALT KEY AND
EXIT BUTTON
Page 11

VnM®4 Keypad Templates - 1 Line Vertical
The 1 Line Vertical template allows you to easily create a vertical text on VnM®
Media. Below are samples created with the 1 Line Vertical template.
E
X
I
T
a) no reverse text
1 LINE VERTICAL
PRESS ENTER
ENTER TEXT:
EXIT
ENTER QUANTITY TO PRINT:
1
REVERSE TEXT?
(Y)ES OR (N)O
E
X
I
T
b) reverse text
P
%
z
5
9
1
c) symbols1 font
1. Select the 1 Line Vertical template
by pressing the ENTER key on the
®
4 Keypad.
VnM
2. Enter the text/symbols for your
vertical sign and once you nished
the sign, press the ENTER key.
3. Enter the quantity to print and
press ENTER.
4. Select if you would like reverse text.
Press Y or 1 for Yes.
Press N or 2 for No.
d) no reverse text
VnM4 Tips
IF YOU ARE USING A
4” MEDIA, TRY USING A
2” TEMPLATE TO GET
A SMALLER FONT
10
Page 12

VnM®4 Keypad Templates - OSHA/ANSI Haz Com
The OSHA/ANSI Haz Com is perfect for creating Warning, Danger, Caution,
Notice and Safety labels. Below are samples created with the OSHA templates.
/DANGER
HIGH
NOTICE
MUST WEAR
EAR AND EYE
VOLTAGE
a) OSHA/ANSI, DANGER, 2 Lines b) OSHA/ANSI, NOTICE, 3 Lines c) OSHA/ANSI, WARNING, 4 Lines
OSHA TEMPLATES
PRESS ENTER
OSHA/ANSI HAZ COM
PRESS ENTER
DIE CUT TEMPLATES
PRESS ENTER
DANGER HEADER?
PRESS ENTER
XINCH HOW MANY LINES?
PRESS 1.2,3, OR 4
PROTECTION
1. Select the OSHA templates by
pressing the ENTER key on the
VnM
2. Select the OSHA/ANSI Haz Com
template or Die Cut Templates
by pressing the ENTER key on the
VnM
or
Note:
media, select Die Cut Templates.
Select a header option. Choose from
3.
CAUTION, DANGER, NOTICE, SAFETY,
or
4.
Select how many lines by pressing the
numbers 1, 2, 3, or 4. Do not press
enter after pressing the amount of lines.
WARNING, then press ENTER.
w
UNAUTHORIZED
PERSONNEL
WILL BE
PROSECUTED
®
4 Keypad.
®
4 Keypad.
For our pre-printed OSHA/ANSI
ENTER LINE 1:
HIGH
ENTER LINE 2:
VOLTAGE
ENTER QUANTITY TO PRINT:
1
HOT
SURFACE
Die Cut, WARNING Die Cut, DANGER2Die Cut, DANGER Die Cut, CAUTION Die Cut, NOTICE
KEEP OUT
VOLTAGE
5. Enter the text/symbols for your rst
line of text, press the ENTER key
when the rst line is complete.
6.
Enter the text/symbols for your second
line of text, press the ENTER key
when the second line is complete.
7. Enter the quantity to print and
press ENTER.
HIGH
MUST WEAR
EAR AND EYE
PROTECTION
EMPLOYEES
11
ONLY
Page 13

VnM®4 Keypad Templates - GHS Templates
The GHS template is perfect for chemical labeling. The samples below were
created with our GHS template.
c) Flammablea) Explosive b) Toxic
GHS TEMPLATES
PRESS ENTER
CHOOSE PICTOGRAM
Explosive
ENTER QUANTITY TO PRINT:
1
d) Oxidizing g) Irritant
e) Compressed
Gas
f) Corrosive
1. Select the GHS templates by
pressing the ENTER key on the
VnM®4 Keypad.
2. Select a pictogram. Use the icons
above and below to reference your
choice of pictogram, then press ENTER.
5. Enter the quantity to print and
press ENTER.
h) Environmentally
Damaging
i) Health
Hazard
12
Page 14

VnM®4 Keypad Templates - RTK Labels
ENTER CHEMICAL NAME
4
4
4
4
a) HMIS Templates, 4x2 Label
CHEMICAL NAME
ENTER COMPANY
MANUFACTURE/COMPANY
04/20/2013
DATE
ENTER NOTE
NOTE
4
44
OXY
b) RTK Templates
4
44
OXY
Hazardous Chemical A
c) NFPA Templates, 4x3 Label
RTK LABEL TEMPLATES
PRESS ENTER
a) HMIS Templates b) RTK Templates
HMIS TEMPLATES
PRESS ENTER
2. Select the HMIS Templates and
press ENTER.
ENTER CHEMICAL NAME:
VNM SIGNMAKER
3.
Enter the chemical’s name, press ENTER.
ENTER FLAMMABILITY:
PRESS 0,1,2,3 or 4
4. Enter the numerical Flammability
value of the chemical, press ENTER.
ENTER HEALTH:
PRESS 0,1,2,3 or 4
5. Enter the numerical Health value of
the chemical, press ENTER.
ENTER INSTABILITY:
PRESS 0,1,2,3 or 4
6. Enter the numerical Instability value
of the chemical, press ENTER.
ENTER PPE:
PRESS 0,1,2,3 or 4
7. Enter the numerical PPE value of the
chemical, press ENTER.
ENTER MANUFACTURE:
VNM
8. Enter the chemical manufacture.
ENTER DATE:
06/13/12
9. Enter the current date.
ENTER NOTE:
EASY AND FAST PRINTING
10. Enter any additional notes.
ENTER QUANTITY TO PRINT:
1
11.
Enter the quantity to print, press ENTER.
RTK TEMPLATES
PRESS ENTER
2. Select the RTK Templates and
press ENTER.
ENTER FLAMMABILITY:
PRESS 0,1,2,3 or 4
3. Enter the numerical Flammability
value of the chemical, press ENTER.
ENTER HEALTH:
PRESS 0,1,2,3 or 4
4. Enter the numerical Health value of
the chemical, press ENTER.
ENTER INSTABILITY:
PRESS 0,1,2,3 or 4
5. Enter the numerical Instability value
of the chemical, press ENTER.
ENTER PPE:
PRESS 0,1,2,3 or 4
6. Enter the numerical PPE value of the
chemical, press ENTER.
ENTER QUANTITY TO PRINT:
1
7.
Enter the quantity to print, press ENTER.
13
1. Select the RTK Label Templates by
pressing the ENTER key on the
®
4 Keypad.
VnM
c) NFPA Templates
NFPA TEMPLATES
PRESS ENTER
2. Select the NFPA Templates and
press ENTER.
ENTER FLAMMABILITY:
PRESS 0,1,2,3 or 4
3. Enter the numerical Flammability
value of the chemical, press ENTER.
ENTER HEALTH:
PRESS 0,1,2,3 or 4
4. Enter the numerical Health value of
the chemical, press ENTER.
ENTER INSTABILITY:
PRESS 0,1,2,3 or 4
5. Enter the numerical Instability value
of the chemical, press ENTER.
WHITE BOX OPTION:
Oxidizer
6. Select a Specic Hazard...
Choose from Acid, Alkali, Corrosive,
Oxidizer,
User No Water, Blank/Empty, and
press ENTER.
ENTER QUANTITY TO PRINT:
1
7.
Polymerization,
Enter the quantity to print, press ENTER.
Radioactive,
Page 15

VnM®4 Keypad Templates - Lock Out Tags
THIS LOCK/TAG MAY ONLY
BE REMOVED BY:
NAME: JOHN DOE
DATE: 1/1/2014
JOB DESCRIPTION:
LOCATION ABC
GU143CM
ESTIMATED LENGTH OF JOB:
6/8/2014 9AM TO 12PM
OUT OF
SERVICE
DO NOT USE!
NAME: JOHN DOE
DATE: 1/1/2014
a) Lock Out Templates, LOTO Template 1
LOCK OUT TEMPLATES
PRESS ENTER
a) LOTO Template 1
LOTO TEMPLATE 1
PRESS ENTER
2. Select the LOTO Template 1 and
press ENTER.
ENTER NAME:
JOHN DOE
3.
Enter name of employee, press ENTER.
ENTER DATE:
1/1/2014
4. Enter the date and press ENTER.
NTER DESCRIPTION LINE 1:
LOCATION ABC
5. Enter the 1st line of job description
and press ENTER.
NTER DESCRIPTION LINE 2:
VALVE OPEN
6. Enter the 2nd line of job description
and press ENTER.
b) Lock Out Templates, LOTO Template 2
1. Select the Lock Out Templates by
pressing the ENTER key on the
®
4 Keypad.
VnM
b) LOTO Template 2
LOTO TEMPLATE 2
PRESS ENTER
2. Select the LOTO Template 2 and
press ENTER.
ENTER NAME:
JOHN DOE
3.
Enter name of employee, press ENTER.
ENTER DATE:
1/1/2014
4. Enter the date and press ENTER.
ENTER QUANTITY TO PRINT:
1
5. Enter the quantity to print and press
ENTER.
ENTER COMPLETION DATE:
6/8/2014 9AM TO 12PM
7. Enter the estimated completion date
for your job and press ENTER.
ENTER QUANTITY TO PRINT:
1
8. Enter the quantity to print and press
ENTER.
14
Page 16

VnM®4 Keypad Templates - Pipe Marking
The Pipe Markers Template meets ANSI/ASMI letter height standards and tape
lengths. Create any custom pipe marker with the appropriate template.
Below is a 2 x 12 pipe marker identifying the contents of the pipe as NITROGEN (a).
NITROGEN
a) 2 X 12 INCHES
PIPE MARKING TEMPLATES
PRESS ENTER
CHOOSE LABEL WIDTH:
4 X 32 INCHES (1-LINE)
CHOOSE LABEL WIDTH:
4 X 24 INCHES (1-LINE)
CHOOSE LABEL WIDTH:
3 X 24 INCHES (1-LINE)
CHOOSE LABEL WIDTH:
2 X 14 INCHES (1-LINE)
ENTER TEXT:
NITROGEN
ENTER QUANTITY TO PRINT:
1
CHOOSE LABEL WIDTH:
2 X 12 INCHES (1-LINE)
CHOOSE LABEL WIDTH:
1 X 7 INCHES (1-LINE)
2INCH Repeat Label
PRESS ENTER
1INCH Repeat Label
PRESS ENTER
FIRE SPRINKLER WATER
b) 1 x 7 INCHES
DOMESTIC CHILLED WATER
c) 3 x 24 INCHES
1. Select the Pipe Marking Templates
by pressing the ENTER key on the
®
VnM
4 Keypad.
2. Select the corresponding Pipe Marker
template with the diameter pipe your
are going to identify. Press the up and
down arrow key to go through the Pipe
Marker template selections.
3. Enter the text/symbols for the marker,
press the ENTER key when complete.
4. Enter the quantity to print and
press ENTER.
DOMESTIC CHILLED WATER
DOMESTIC CHILLED WATER
DOMESTIC CHILLED WATER
DOMESTIC CHILLED WATER
DOMESTIC CHILLED WATER
d) 2INCH Repeat Label
15
VnM4 Tips
IF YOU ARE NOT SURE
WHAT MARKING TEMPLATE
TO USE REFER THE VNM
PIPE MARKING GUIDE
Page 17

VnM®4 Keypad Templates - Barcode Labels
The Barcode Template includes a basic inventory/asset and a bin/shelf barcode
template utilizing the CODE39 symbology.
Below are samples of the 4 x 1 and 4 x 2 barcode templates.
PRODUCT ID LABEL
1789S412668
a) 4 X 1 ID LABEL b) 4 X 2 BIN LABEL
BARCODE TEMPLATES
PRESS ENTER
SELECT LABEL TYPE: 4INCH
4 X 1 ID LABEL
SELECT LABEL TYPE: 4INCH
4 X 2 BIN/SHELF LABEL
BIN / SHELF LABEL
487569512341
1. Select the Barcode Templates by
pressing the ENTER key on the
®
VnM
4 Keypad.
2.
Select the Barcode template you would
like by scrolling up and down.
a) 4 X 1 ID LABEL b) 4 X 2 ID BIN/SHELF LABEL
SELECT LABEL TYPE: 4INCH
4 X 1 ID LABEL
PRODUCT/ASSET ID:
PRODUCT ID LABEL
TER DESCRIPTION/COMPANY:
1789S412668
ENTER QUANTITY TO PRINT:
1
SELECT LABEL TYPE: 4INCH
4 X 2 BIN/SHELF LABEL
BARCODE NUMBER:
487569512341
ENTER DESCRIPTION:
BIN/SHELF LABEL
ENTER QUANTITY TO PRINT:
1
VnM4 Tips
USE 2”, 3” AND 4” VNM MEDIA
FOR THE BARCODE TEMPLATES
DEPENDING ON THE LENGTH
OF YOUR BARCODES
16
Page 18

VnM®4 Keypad Templates - VnM4 Apps
1. Ruler App
Scroll down to VnM4 Apps, press ENTER > Select Ruler App, press ENTER. Enter
number of feet you would like (up to 3ft.).
a) VnM Apps, Ruler
2. Fire Extinguisher App
Scroll down to VnM4 Apps, press ENTER >
For 4x12 Fire Extinguisher Sign (b)
Select 4x10 Fire Ext, press ENTER >
Enter quantity to print, press ENTER.
For 4x18 Fire Extinguisher Sign (c)
Select 4x18 Fire Ext, press ENTER >
Enter quantity to print, press ENTER.
Note: Must be using 4” Media.
b) VnM Apps, 4x12
3. Aisle Markers
Scroll down to VnM4 Apps, press ENTER >
Select Aisle Markers, press ENTER >
Select Floor Marker Style...
Press 1 for Arrow or Press 2 for Dash >
Enter quantity to print, press ENTER.
4. Arc Flash
Scroll down to VnM4 Apps, press ENTER >
Select Arc Flash, press ENTER >
Enter quantity to print, press ENTER.
Note: Must be using Die-Cut Header labels.
17
c) VnM Apps, 4x18
d) VnM Apps, Aisle Markers, (1) Arrow
e) VnM Apps, Aisle Markers, (2) Dash
Arc Flash and Shock Hazard
Appropriate PPE Required
Do not operate controls or open covers without
appropriate personal protection equipment.
Failure to comply may result in injury or death!
Refer to NFPA 70E for minimum PPE requirements.
f) VnM Apps, Arc Flash Template
Page 19

VnM®4 Print & Font Settings
To change VnM Print settings, including fonts and print speed and density, make
sure you are on the main default page by holding down ALT and pressing EXIT
on the keyboard.
A) To Change Print Settings
1.
This should be the rst screen you see.
SELECT MEDIA WIDTH:
PRESS 1,2,3, or 4
2.
Press the down arrow key until you see
the VnM Print Settings and press ENTER.
VNM PRINT SETTINGS
PRESS ENTER
3. To manually change the VnM speed
and density print settings, press ENTER
on the VnM Manual Settings.
VNM MANUAL SETTINGS
PRESS ENTER
4.
Enter the speed to have your VnM printer
print at and press ENTER. Recommended.
ENTER SPEED
2
5.
Enter the density to have your VnM printer
print at and press ENTER. Recommended
density based on the color ink in the VnM:
Black: 1-6, White: 7-14
Blue: 1-3, Green: 1-3, Red: 1-3
ENTER DENSITY
5
B) To Change Font Settings
1.
This should be the rst screen you see.
SELECT MEDIA WIDTH:
PRESS 1,2,3, or 4
2.
Press the down arrow key until you see
the font/symbols and press ENTER.
SELECT FONT/SYMBOLS
PRESS ENTER
3. Using the up and down arrows on the
keyboard, locate your desired font and
press ENTER. To get back to the main
screen after you have selected your font,
hold down ALT and press EXIT.
CHOOSE FONT/SYMBOLS:
BOLD
CHOOSE FONT/SYMBOLS:
SYMBOLS1
CHOOSE FONT/SYMBOLS:
SYMBOLS2
CHOOSE FONT/SYMBOLS:
SYMBOLS3
CHOOSE FONT/SYMBOLS:
NORMAL
CHOOSE FONT/SYMBOLS:
UTILITY
CHOOSE FONT/SYMBOLS:
ROMAN
CHOOSE FONT/SYMBOLS:
PIPE MARKER
18
Page 20

Fonts/Symbols
When the Select Font template is selected, you can make a selection of 5 different
fonts that contains symbols and different styles. After selecting your font, use the
legend below to ensure you are getting the proper symbol for your sign.
Keypad 1 2 3 4 5 6 7 8 9 - + !
Normal
Italic
Bold
Pipe Marker
Utility
Symbols 1
Symbols 2
Symbols 3
Keypad A B C D E F G H I J K L
Normal
Italic
Bold
Pipe Marker
1 2 3 4 5 6 7 8 9 - + !
1 2 3 4 5 6 7 8 9 - + !
1 2 3 4 5 6 7 8 9 - + !
1 2 3 4 5 6 7 8 9 - + !
1 2 3 4 5 6 7 8 9 - + !
1 2 3 4 5 6 7 8 9 -
1 2 3 4 5 6 7 8 9
!
- +
!
1 2 3 4 5 6 7 8 9 - + !
A B C D E F G H I J K L
A B C D E F G H I J K L
A B C D E F G H I J K L
A B C D E F G H I J K L
Utility
Symbols 1
Symbols 2
Symbols 3
Keypad a b c d e f g h i j k l
Normal
Italic
Bold
Pipe Marker
Utility
Symbols 1
Symbols 2
Symbols 3
A B C D E F G H I J K L
A B C D E F G H I J K L
A B C D E F G H I J K L
A B
a b c d e f g h i j k l
a b c d e f g h i j k l
a b c d e f g h i j k l
a b c d e f g h i j k l
C D
E
F G H I J K L
a b c d e f g h i j k l
a b c d e f g h i j k l
a b c d e f g h i
j
a b c d e f g h i j k l
19
k l
Page 21

Fonts/Symbols
NOTE: After selecting your font, keep in mind to use this font legend. The Keypad legend is
what you see for the required symbol below. What you see on the keypad will not show up
as a symbol. ie: Symbols1 font is chosen, press SHIFT + 1 key to get /. The Keypad lcd: !
@ # $ % ^ & * ( ) € = ; / ?
@
# $ % ^ & * ( ) € = ; / ?
@
# $ % ^ & * ( ) € = ; / ?
@
# $ % ^ & * ( ) € = ; / ?
@
# $ % ^ & * ( ) € = ; / ?
@ # $ % ^ & * ( ) € = ; / ?
@ # $ % ^
@ # $ % ^ &
@ # $ % ^ & * ( )
M N O P Q R S T U V W X Y Z
M
N O P Q R S T U V W X Y Z
M
N O P Q R S T U V W X Y Z
M
N O P Q R S T U V W X Y Z
M
N O P Q R S T U V W X Y Z
M N O P Q R S T U V W X Y Z
M
N O P Q R S T U V W X Y Z
M
N O P Q R S T U V W X Y Z
M N O P Q R
m n o p q r s t u v w x y z
m
n o p q r s t u v w x y z
m
n o p q r s t u v w x y z
&
( ) # = ; / ?
*
( ) = ;
€
= ; / ?
S
T U V W X Y Z
/
?
m
n o p q r s t u v w x y z
m
n o p q r s t u v w x y z
m n o p q r s t u v w x y z
m
n o p q r s t u v w x y
z
m n o p q r s t u v w x y z
m
n
o p
q r s
t
u v
w
x y z
20
Page 22

OSHA/ANSI Safety Sign Indications
Safety signs are an important element to safety and hazard identication.
Identifying hazards will cut down on employee injuries and most importantly
save lives. Below are the sign standards when indicating a certain situation
or hazard.
ANSI OSHA
DANGER
Indicates an immediate hazards that
has a high probability of severe
injury or death.
ANSI Danger for Arc Flash Labels
WARNING
Indicates a potentially hazardous
situation that if not avoided may
result in serious injury or death.
ANSI Warning for Arc Flash Labels
HIGH
VOLTAGE
HOT
SURFACE
HIGH
VOLTAGE
w
AUTHORIZED
PERSONNEL
ONLY
CAUTION
Indicates a potentially hazardous
situation that may result in minor
or moderate injury, but not death.
NOTICE
Indicates general information
necessary to avoid any confusion.
SAFETY
Indicates general information
necessary to avoid any confusion.
MUST WEAR
EAR AND EYE
PROTECTION
ANSI Caution for Arc Flash Labels
EMPLOYEES
ONLY
SAFETY
SAFELY IDENTIFYING
HAZARDS IS IMPORTANT
IN SAVING LIVES
CAUTION
MUST WEAR
EAR AND EYE
PROTECTION
ANSI and OSHA
header templates
are for the VnM4 and
VnM8 SIgnMakers
along with header die
cut media.
Create your sign in
seconds and save
money and time.
21
Page 23

Pipe Marker Color Chart
VnM Media Description Pipe Properties Example
YELLOW
VNMYL-XXXX
BROWN
VNMBN-XXXX
ORANGE
VNMON-XXXX
RED
VNMRD-XXXX
GREEN
VNMGN-XXXX
BLUE
VNMBL-XXXX
BLACK
VNMBK-XXXX
WHITE
VNMWT-XXXX
PURPLE
VNMPR-XXXX
GRAY
VNMGR-XXXX
Fluids which are a vapor or produce vapors
that can ignite and continue to burn in air.
Fluids that may burn but are not ammable.
Fluids which are corrosive or toxic or will
produce corrosive or toxic substances.
Water and other substances (i.e.: Halon, CO2)
used in sprinkler re ghting piping systems.
Any other water except for water used in
sprinkler & re ghting piping systems.
Any vapor or gas under pressure that does
not t a category above.
FLAMMABLE
COMBUSTIBLE
TOXIC & CORROSIVE
FIRE QUENCHING
OTHER WATER
COMPRESSED AIR
USER DEFINED
USER DEFINED
USER DEFINED
USER DEFINED
NATURAL GAS
OXYGEN
SULFURIC ACID
SPRINKLER WATER
DOMESTIC COLD WATER
COMPRESSED AIR
NITROGEN
ASBESTOS
RECLAIMED WATER
CARBON DIOXIDE
Pipe Marker Placement
Pipe markers must be placed in a manner where if the person
is looking down, up or eye level at a pipe that the marker
lettering faces the person and is easily identied.
Mark pipe adjacent to all valves and anges
Mark pipes at both
sides of oor or wall
intersections.
Mark pipes
adjacent to
changes in
directions
Mark pipes at 25’ to 50’ intervals on straight runs.
Outside Pipe Diameter
Including Covering
.75" - 1.25" (19 - 32 mm) 8" (203 mm) .5" (203 mm) 2" Repeat Template
1.5" - 2" (38 - 51 mm) 8" (203 mm) .75" (19 mm) 1" x 8" Template
2.5" - 6.0" (64 - 152 mm) 12" (305 mm) 1.25" (32 mm) 2" x 14" or 2" x 12" Template
8.0" - 10.0" (203 - 254 mm) 24" (610 mm) 2.5" (64 mm) 4" x 24" or 3" x 24" Template
Over 10.0" (Over 254 mm) 32" (813 mm) 3.5" (89 mm) 4" x 32" Template
Minimum Length of
Label Field Color
Minimum Height
of Letters
VnM4 Pipe Marking
Template
22
Page 24

Connecting to PC
PC Connection for additional template and printing options
1. Download & Install PC VnM SignMaker Print Driver from
http://www.cobrasystems.com/VnM
2. Once the Driver has been installed go to...
Start > Control Panel > Printers and Faxes.
Right mouse click on the VnM SignMaker Printer icon and click Properties.
3. Click on Printing Preferences, then click on the Stock Tab.
4. Set Stock Type to “Continuous”.
5. Set the Post-Print Action to “Cut” and the Occurrence to “After Every Page”.
6. Connect USB cable to the PC’s USB port.
7. Plug power cord into AC power cord socket at the rear of printer, then plug
power cord into a property grounded power outlet.
8. Print Signs a Labels to the VnM SignMaker using common programs such
as Microsoft Word, Adobe Illustrator, and other common label design software
applications such as NiceLabel.
*Please note that Cobra Systems does not support custom label design software
applications or programs. For technical support on software applications please
contact the respective software developer.
23
Page 25

Maintenance/Troubleshooting
Print Head Cleaning
The VnM SignMaker comes with a
cleaning pen for the print head. After
replacing or switching the VnM Ink
Roll, use the cleaning pen to gently
clean the surface of the print head.
Proper cleaning of the print head with
ensure a longer life span of the print
head and superior print quality.
Print Head
Element
Head Cleaner Pen
Print Head
Element
Storage
To prolong the life of your VnM SignMaker, it covered with a plastic a protective case
or cover when not in use. Cobra Systems recommends the VnM Travel Case for
proper storage and protection in any environment.
Handling
It is recommended to wear the included VnM gloves when changing out new VnM
Media and Ink Rolls. Using these protective gloves will ensure superior print quality.
Opening the Printer when Power is On
Please always turn the VnM Sign Maker off when opening the printer cover or
clear ink roll cover to change media, ink rolls, or for any other reason.
VnM SignMaker Troubleshooting
ISSUE: After loading a new Ink Roll the Ink Ribbon comes out through
the cutter.
Remedy: The Ink Roll was changed while the printer was powered on so the
printer’s ink sensor was not reset. Turn the printer off, re-tape the Ink
Roll to the take up core, and close the printer cover. Turn the power
back and the sensor should have reset.
ISSUE: The red light on the printer is ashing.
Remedy: Simply turn the SignMaker off and then turn it back on. Select the
template used and print your label.
ISSUE: After loading a new Media Roll the print quality is inconsistent
and blotchy.
Remedy: Always wear the VnM gloves included with your VnM Media to keep
skin oils away from the media as much as possible. Check the test print
section on the VnM Keyboard to use the right print setting. For optimal
print quality try to minimize direct contact to the unprinted media and
always using
ISSUE:
After changing the Ink Roll the print quality was faded or spotty.
Remedy: If you experience fades, spots, or lines in you printed signs try using the
Test Print Template to ne tune your VnM SignMaker to the new VnM
Ink Roll used. Try each test print setting until the desired print quality is
achieved.
24
Page 26

Accessories
®
VnM
4 SignMaker accessories sold separately include:
VnM® Travel
Case
VnM® Portable
Battery Pack
Frequently Asked Questions
Q: How do I get out of a VnM® template?
Q: I made a spelling mistake on a multi-line
template, how do I get back to the line I
made a spelling error?
Q: I am trying to make quotation marks on
the sign and when it prints, no text shows
up, what do I do?
VnM® Label Direct
Sign Software
A: Press and hold down the ALT key and
press EXIT at the same time.
A: Press and hold down the ALT key and
press EXIT at the same time and choose
the template again. You will have to
retype your sign.
A: In order to print quotation marks (“) you
must hold down the SHIFT key + (.)
PERIOD key to create an apostrophe (‘).
Repeat the process again to get (‘‘).
Q: The VnM
VnM® Media and is being cut, what do I
do?
Q: The print quality is splotchy and I notice
lines in the nal label, what should I do?
Q: The print quality is splotchy and I notice
lines in the nal label, what should I do?
Q: The print quality is splotchy and I notice
lines in the nal label, what should I do?
®
Ink Roll is coming out with the
25
A: Tape the cut ink to the take-up core with
a piece of scotch tape and wind up the
slack. Turn the printer OFF and wait two
seconds, then turn back ON. Print a label.
A: Make sure you are using the right print
setting with VnM
Also make sure the printhead is clean with
the provided cleaning pen and that you
have minimal skin contact with the media.
A: Make sure you are using the right print
setting with VnM® Ink Roll you are using.
Also make sure the printhead is clean with
the provided cleaning pen and that you
have minimal skin contact with the media.
A: Make sure you are using the right print
setting with VnM® Ink Roll you are using.
Also make sure the printhead is clean with
have minimal skin contact with the media.
®
Ink Roll you are using.
Page 27

Tech Support
For support, call the VnM® Service & Technical department at
800.262.7298 or your local distributor.
Cobra Systems, Inc.
Phone: 714-688-7999
Fax: 714-688-7998
Email: VnM@CobraSystems.com
Web: www.CobraSystems.com
____________________________________________________________
____________________________________________________________
____________________________________________________________
____________________________________________________________
____________________________________________________________
____________________________________________________________
____________________________________________________________
____________________________________________________________
____________________________________________________________
____________________________________________________________
____________________________________________________________
____________________________________________________________
____________________________________________________________
____________________________________________________________
____________________________________________________________
____________________________________________________________
____________________________________________________________
____________________________________________________________
____________________________________________________________
____________________________________________________________
____________________________________________________________
____________________________________________________________
____________________________________________________________
____________________________________________________________
____________________________________________________________
____________________________________________________________
____________________________________________________________
26
Page 28

Have questions or need product support?
800-262-7298
www.VnMSignMaker.com
VnM® SignMaker is a registered trademark of Cobra Systems, Inc.
For more information, please visit www.VnMSignMaker.com
 Loading...