

Page 1
How to Use Your Cobra
ESD Radar/Laser Detector
1
Features of This Product
• Safety Alert® Traffic
Warning System
• Strobe Alert
™
• Separate Visual and
Audio Alarms
• Laser Eye 360˚ De te ct i o n
• VG-2 Undete ct a b l e
• Au to and Manual Muting
• 3 Level Dim Bu t to n
• Superior Audio Volume
• Adjustable Windshield
Mounting Bra c ke t
Contents
Introduction..................................................................A1
Safety Alert®/Strobe Alert™
Federal Law Governing Radar Detectors
Included Accessories
Controls & Indicators................................................A2
Our Thanks to You......................................................A3
Customer Support ...................................................A3
Features.............................................................................1
Installation.......................................................................2
Quick Start .......................................................................5
LED Displays..................................................................6
Operation..........................................................................9
Turning On....................................................................9
Dim Button.................................................................10
Highway/City Mode.................................................11
Muting Mode.............................................................12
Detection........................................................................13
Band Detection.........................................................13
Audible Alarm Indicator.........................................13
Radar.............................................................................14
VG-2 Undetectable..................................................14
Safety Alert/Strobe Alert .......................................15
Laser Detection.........................................................15
Radar/VG-2/Laser Alerts.........................................16
Facts About Safety Alert®/Strobe Alert™........17
Radar Frequencies....................................................18
Facts About Lidar (Laser).......................................18
Maintenance.................................................................19
Specifications...............................................................20
Limited One Year Warranty ...................................21
Optional Accessories................................................22
Order Form....................................................................23
If You Think You Need Service.............Back C over
9100.MANUAL 8/9/00 12:12 PM Page 1
Page 2
Installation
3
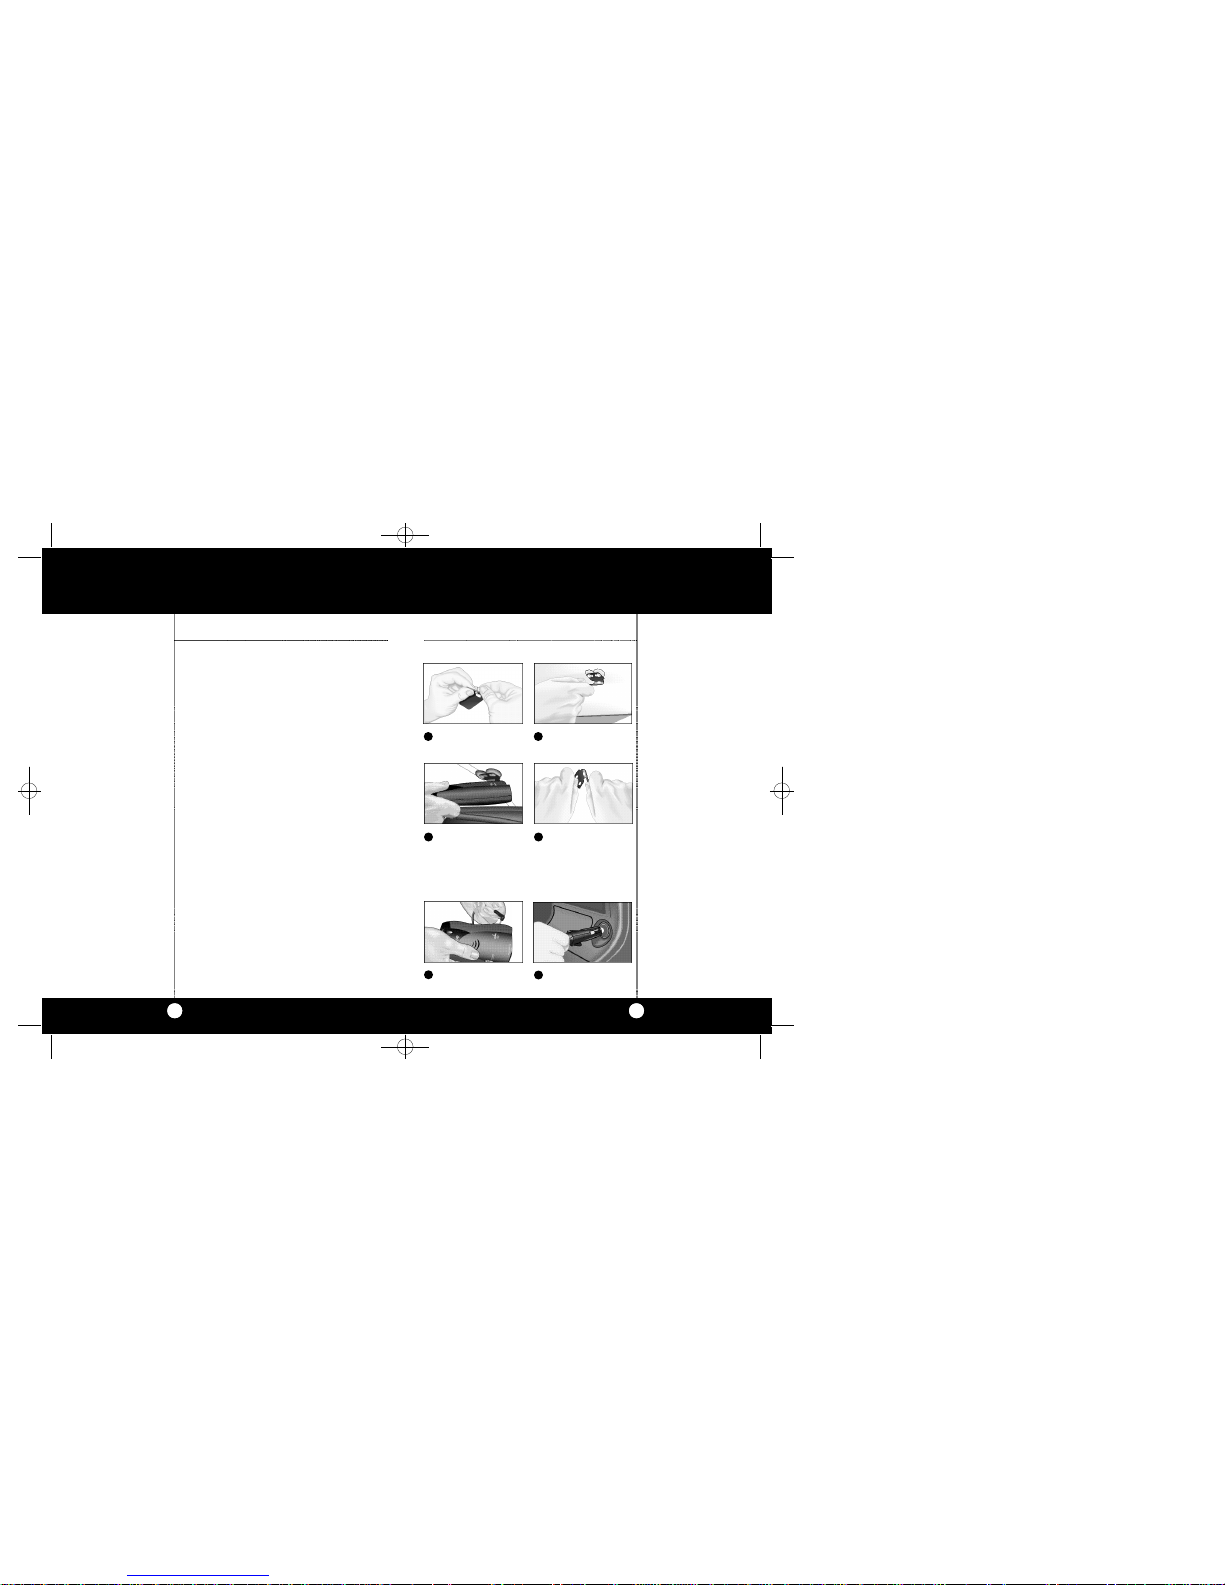
Installation
2
1 2
3 4
Attach cups to
bracket.
Attach detector
to bracket.
Plug power cord
into detector.
Attach bracket to
windshield.
Bend bracket for
correct detection
angle (if needed).
Do not use the
ESD-9100 to bend
bracket.
Plug power cord
i nto cigare t te lighte r.
5
6
Location
Selecting the proper location to mount the Cobra
ESD-9100 is very important for optimum performance. Both radar and laser transmissions pass
through glass but not through other objects.For
this reason the Cobra ESD-9100 lenses must not
be blocked. It should have a view of the rear window to take advantage of Laser Eye 360˚ detection. It is best to locate your detector as low on
the front windshield as possible.
Examples of metal in the windshield area that can
block or weaken incoming radar/laser signals:
1.Windshield wiper blades .
2. Mirrored sun screens.
3. Regular tinted glass does not affect radar
reception,although the darker tint at the
top of the tinted windshield prevents laser
light from penetrating.
4. Heated windshields,currently available as
an option for some Ford® (Instaclear) and
GM® (Electriclear vehicles act as an impenetrable barrier to radar signals). If in doubt,
check with your dealer to see if this applies
to your vehicle.
Windshield Mounting
Location Windshield
Mounting
9100.MANUAL 8/9/00 12:12 PM Page 2
Page 3
Quick Start
5
Turn On and Adjust Volume
Turn On and
Adjust Volume
Installation
4
Note
It will be easy for you to
remove and reinstall your
Cobra ESD-9100 detector at
any time using this hook
and loop material on the
dashboard.
Remember: Without the
means to adjust the angle
of the detector (when
mounted as above),be
sure you that your Cobra
ESD-9100 has a level,clear
view of the road before you
attach the hook and loop
material.
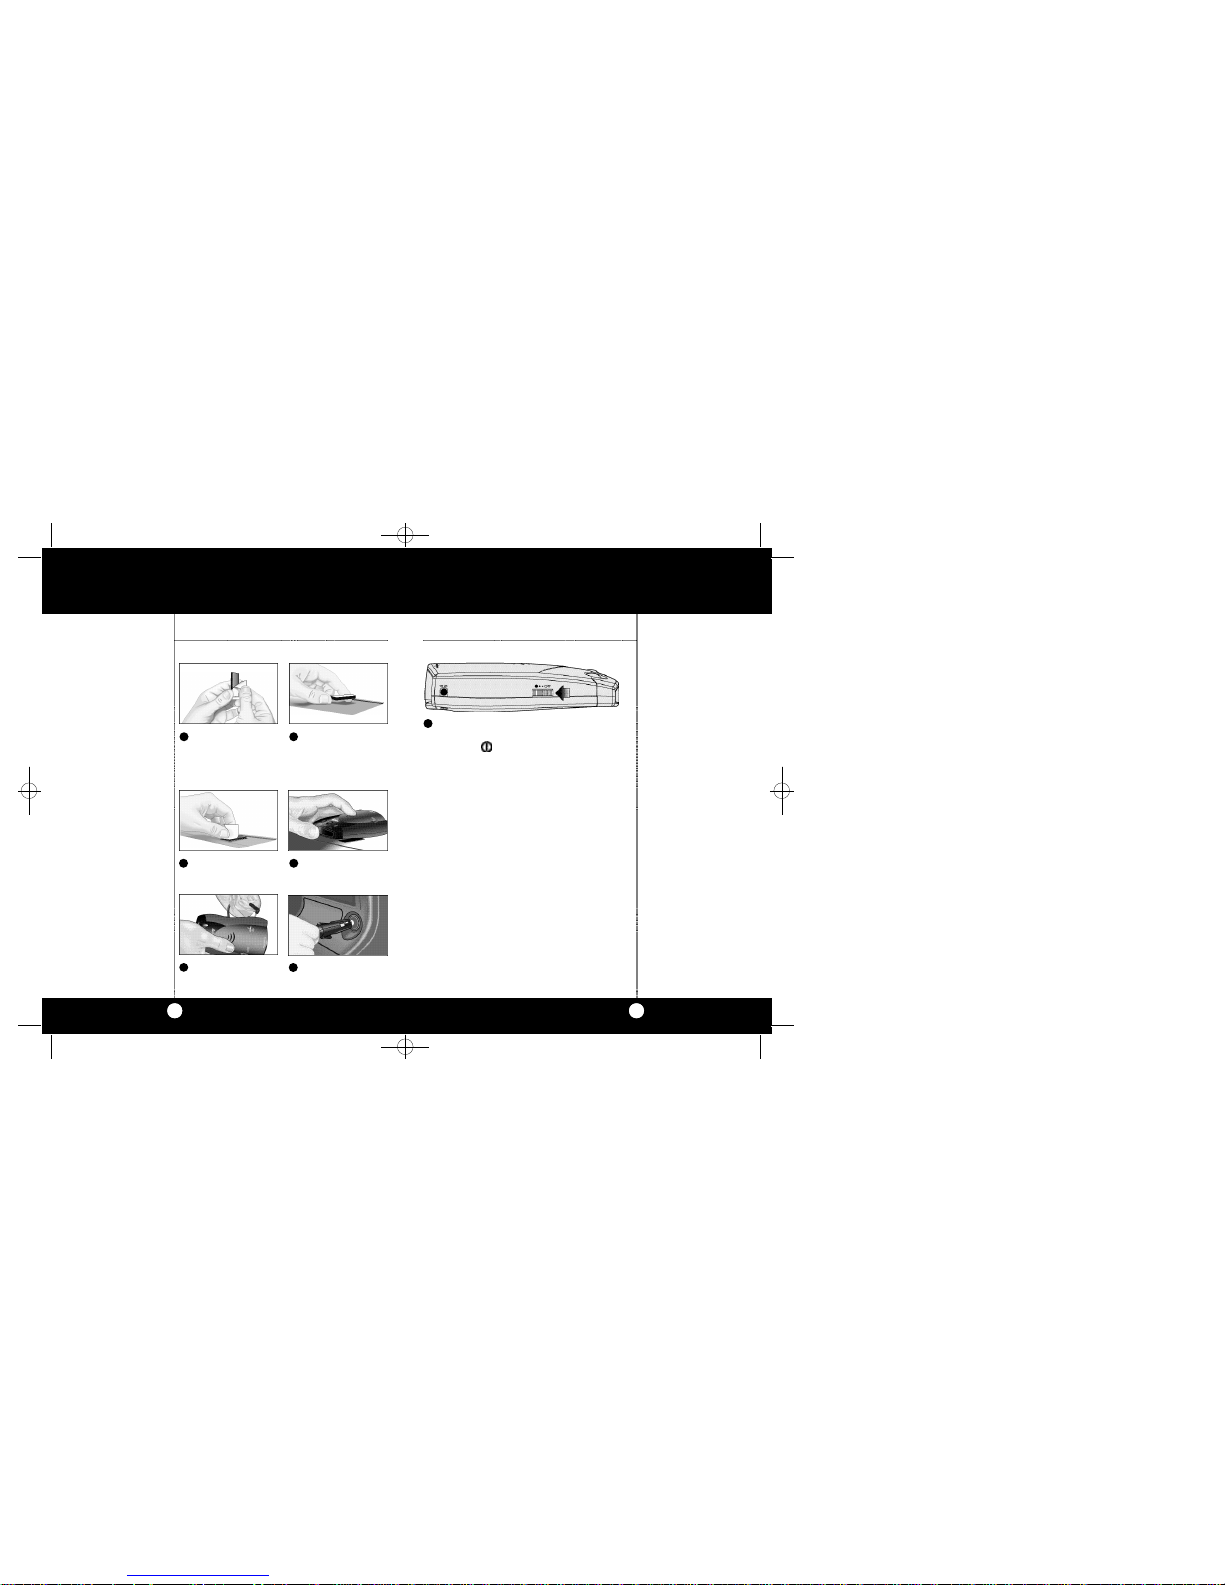
Dash Mounting
Dash
Mounting
Plug power cord
into detector.
Plug power cord
i nto cigare t te lighte r.
Peel protective
paper off one side
of hook and loop
material.
Place on dash.
Peel top paper off. Place detector on
hook and loop pad.
1 2
3 4
5 6
Rotate ON-OFF Volume Control to left (away
from you). An audible “tone” will indicate the
unit is on. PWR LED on front of unit
is illuminated.
1
9100.MANUAL 8/9/00 12:12 PM Page 4
Page 4
Quick Start
7
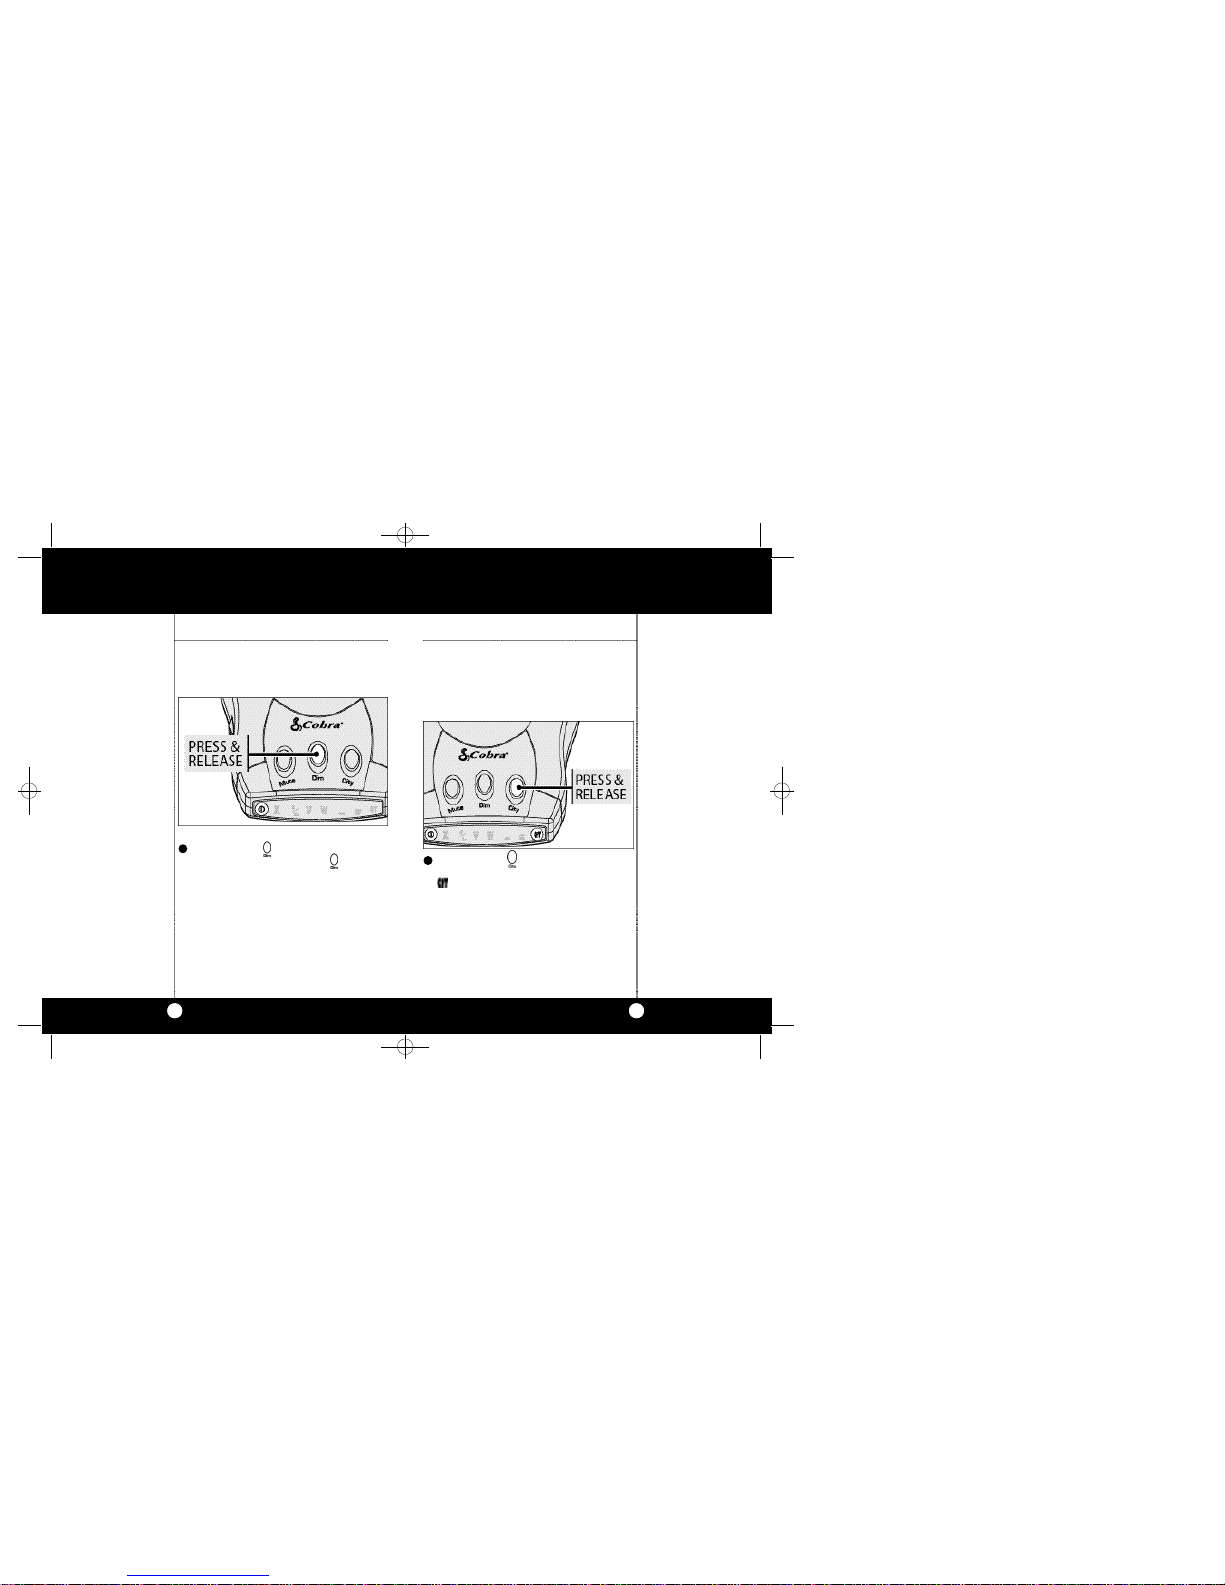
Set Highway/City Mode
City
For urban driving–reduces number of X-Band
audible alerts.
Set Highway/
City Mode
Quick Start
6
Set Display Brightness
Select from three levels of LED brightness for your
Cobra ESD-9100 display: Normal, Dim and Dark.
Set Display
Brightness
Highway
For all other driving.
Press and release Dim button to select
normal setting. Press and release Dim button
twice to select Dim setting. Press and release
Dim button a third time to select Dark setting.
Press and release CITY button.
CITY LED will illuminate orange while in
City mode
1
1
LED Displays
Note
A three position Dim mode
is provided for dusk or
night driving (please see
Dim Button,page 14 for
details).
9100.MANUAL 8/9/00 12:12 PM Page 6
Page 5

Quick Start
8
Set Muting Mode
Auto Muting
Automatically reduces volume of alert in progress
after 4 seconds.
Set Muting
Mode
Operation
9
Manual Muting
Press and release MUTE button to reduce
volume of alert in progress.
To Switch Between Modes
Press and release MUTE Button when no
signal is being received.
One “beep”= Mute
Two“beep” = Auto Mute
1
1
Turning
On Yo u r
E SD-9 1 0 0
Turning On Your ESD-9100
Plug power cord
into detector.
Plug power cord
i nto cigare t te lighte r.
2
ON mode
Rotate ON-OFF Volume Control to the left
(away from you). An audible “tone”will indicate the unit is on and the PWR LED on the
front of the unit will illuminate orange.
9100.MANUAL 8/9/00 12:12 PM Page 8
Page 6

Operation
11
Operation
10
Note
Normal = “Beep-Beep”
Dim = “Beep”
Dark = “Beep”
Note
The Normal (Bright) mode is
automatically engaged
when the unit is powered up.
Dim Button
You may select from three levels of bri g h tness fo r
your Co b ra ESD-9100 display: No rm a l , Di m , and Da rk .
Dim Button
Press and release DIM button a third time to
return led display to Normal.A double beep
confirms normal LED brightness.
1
2
3
Press and release DIM button to reduce the
LED display brightness to Dim.A single beep
confirms dim led brightness.
Press and release DIM button again to turn
LED display off. A single beep confirms no LED
display.The power LED will stay on dim.
Highway/City
Mode
Highway/City Mode
The Highway/City function is controlled by a
2 - s tep butto n .The Highway mode is auto m at i ca l l y
engaged when the unit is powered up. In the
City mode, false radar alerts will be reduced.
To engage City Mode:
Note
City =“Beep”
Highway =“Beep-Beep”
Note
Use City Mode in or near
cities where there are many
sources of false radar signals
such as microwave relay
towers and automatic door
openers.This will filter out
weak signals.
Press and release CITY button and the
LED on the front of the unit will illuminate
red.A single beep confirms City mode . The
X LED will be visible showing you are re ce i v i n g
a signal.
1
To reactivate the Highway Mode:
Press and release CITY button again.
A double beep confirms Highway Mode.
CITY LED
will illuminate
orange while
in CITY mode.
1
9100.MANUAL 8/9/00 12:12 PM Page 10
Page 7

Press and release MUTE button to reduce
volume.
Press and release MUTE button when no signal is being received. In Auto mode, the alarm
will be reduced in volume after three seconds.
AutoMute mode is automatically engaged
when the unit is powered up.
Detection
13
Operation
12
Muting Mode
Muting Mode
The ESD-9100 offers two Mute Modes; Auto and
Manual. To switch between these modes:
Note
Mute=“Beep”
OR
Auto Mute=“Beep-Beep”
1
1
Auto Mode
Manual Mode
Band Detection
This dete cto r is designed to dete ct X, K ,
S u pe rwide K a Band Ra d a r, Laser (includi ng LT I
2 0 - 2 0 * , U l t ra Ly te* and ProLaser* te c h n o l og i e s ) ,
VG - 2 , Sa fe ty Al e rt and St ro b e Al e rt* signals.
* 3 6 0˚ De te ct i o n
Begin Band
Detection
Audible Alarm Speaker
A diffe re nt alert tone will sound for X,K , Ka ,L a s e r
(plus a distinctly diffe re nt tone for each of the thre e
laser signals:LTI 20-20,U l t ra Ly te and Pro L a s e r ) ,
VG - 2 , and Sa fe ty / St ro be Al e rt signals.
Audible Alarm
Speaker
9100.MANUAL 8/9/00 12:12 PM Page 12
Page 8

Detection
15
Detection
14
Radar
Radar
The display will show the band (X,K/Ka).The signal
strength will first be indicated by the band being
illuminated, then the band plus , finally the band
plus and will be illuminated. At the same time
the frequency of the beeps will increase.
Laser
Indicator “W”is illumina ted.
Safety Alert
®
Tr a ff i cWa rn i n g
System and
Strobe Alert
™
Laser
Detection with
360˚ Laser
Eye
Note
The display does not
indicate signal strength.
VG-2 Undetectable
Th Co b ra ESD 9100 is undete ctable by po l i ce VG - 2
d e te ction dev i ce s.I t will alert you when one is in
use near your ve h i c l e.Du ring this time, the unit is
still on full alert and able to dete ct other signals.
The VG-2 LED on the front of the unit will
illuminate yellow.
VG-2 Alert
Note
The display does not
indicate signal strength.
Safety Alert® Traffic Warning System
and Strobe Alert™
Indicator “W”is illumina ted.
Instant-On Detection
The Cobra ESD-9100 is also designed to detect
Instant-on speed monitoring signals. Immediate
action is required when warning is given.
Laser will trigger 3 distinct audible signals;one
each for LTI 20-20,Ultra Lyte and ProLaser.
9100.MANUAL 8/9/00 12:12 PM Page 14
Page 9

Detection
17
Detection
16
Radar/VG-2/
Laser Alerts
Radar/VG-2/Laser Alerts
Type of Audible Signal Interpretation and Response
Your COBRA ESD-9100 starts to signal
slowly,then increases in rate very
rapidly.
Most likely police radar.
FULL ALERT.
Your COBRA ESD-9100
signals just once.
Most likely a false source,or could b e
pulsed radar.Exercise Caution.
Very fast signal rate instantly.
Slow signal rate as you approach
hill or bridge.Sharp increase in signal
rate as you reach hill or bridge.
Most likely police radar on other side
of hill or bridge. FULL ALERT.
Radar or VG-2 close by has been
suddenly switched on.FULL ALERT .
Short-term,weak signaling;
series of such signals.
Laser will trigger 3 distinct audible
signals;one each for LTI 20-20,Ultra
Lyte and ProLaser.
Use Full Caution.There are no false
laser signals.
Safety Alert and Strobe Alert have
their own unique “European
Emergency”signal.
An emergency vehicle is approaching,
you are in the vicinity of a railroad
crossing,or you are approaching a
road hazard (construction site, accident scene,etc.).
Most likely a false radar source.
Exercise Caution.
Facts About the Safety Alert® Traffic
Warning System
FCC-approved Safety Alert Transmitters emit
microwave radar signals to indicate the presence of a
safety-related concern. Depending on the frequency of
these signals, as set on the transmitter,the outgoing
signal can indicate whether the transmitter is on a
speeding emergency vehicle or train,or at a stationary
road hazard location. These microwave signals are
located in the K-band and as a result,any radar detec tor which detects K-band radar will detect these Safety
signals as standard K-band radar alerts.However, unlike
a standard radar detector, your Cobra ESD-9100 is
designed to differentiate between a standard K-band
alert and a Safety Alert warning.
Safety technology is relatively new so the number of
transmitters in operation is still growing. You may not
receive Safety Alert on a daily basis and should not be
surprised to encounter some emergency vehicles, road
hazards or trains not yet equipped with these transmitters,therefore failing to pr ovide a signal.As Safet y
Transmitters become more prevalent (the number of
operating transmitters is growing every day),these
Safety Alerts will become more common. The Safety
Alert Transmitter is in use in all 50 states in limited
quantities.
Facts About Strobe Alert™
Alerts motorists to over 50,000 emergency vehicles
equipped with strobe transmitters that activate red
lights at traffic intersections in emergency high speed
situations.
Note
Strobe Alert™ is available
in over 1,000 cities and
works with Tomar and
Opticom systems. Call your
local Fire/Police department for your area coverage or area in which you
will be traveling.
Facts About
Safety Alert
®
Tr a ff i cWa rn i n g
System
9100.MANUAL 8/9/00 12:12 PM Page 16
Page 10

Detection
19
Detection
18
Radar Frequencies
There are now three frequencies that have been
approved by the FCC (Federal Communications
Commission) for use in speed monitoring
equipment.They are:
X Band (10.525 GHz),K Band (24.150 GHz)
Ka Band (33.400-36.000 GHz)
Your Cobra ESD-9100 can detect signals in all
three radar bands including photo radar and
STALKER radar which use the Ka band, and
Cobra’s Safety Alert signals on the K band.
Facts About LIDAR (Laser)
What is LIDAR?
LIDAR stands for Light Detection And Ranging.
While everyone refers to it as LASER the correct
name is LIDAR.
How does LIDAR work?
LIDAR operates a lot like RADAR.Like RADAR,it
spreads out. Not as quickly, but it does spread,as
shown on the diagram below.
Radar
Frequencies
Facts About
LIDAR (Laser)
LIDARs must have a clear
line of sight to target a
vehicle during the entire
measurement interval.
Intervening objects such as
signposts,utility poles ,tree
branches,etc.,will prevent
a valid speed reading.
Maintenance
Facts About
LIDAR (Laser)
Does weather have any effect on LIDAR?
Yes,rain,snow, smoke,fog, and airborne dust
particles will all reduce the effective range, and
if sufficiently dense, may prevent its operation.
Can LIDAR operate through glass?
No, LIDAR guns cannot obtain readings through
any glass. But the laser pulse can be received
through glass to easily and quickly trigger a laser
detector's alarm.
Can LIDAR operate while moving?
No, since LIDAR is line of sight, an officer cannot
drive, aim,and shoot while driving.
Is a LIDAR DETECTOR legal to use?
Yes,it is legal in all 50 states.
Maintenance
Your COBRA ESD-9100 RADAR/LASER DETECTOR
will give you years of trouble-free service with
minimum maintenance.
Replacing Power Cord Fuse
Unscrew cap of cigarette lighter adapter and
remove fuse. Replace with 1-ampere fuse only.
Troubleshooting
If your COBRA LASER DETECTOR ESD-9100 isn’t
operating, we suggest you make the following
checks:
1. Is the power cord properly connected?
2. Is the fuse OK?
3. Is the cigarette lighter socket clean and free
from corrosion?
9100.MANUAL 8/9/00 12:12 PM Page 18
Page 11

Limited One Year Warranty
21
Specifications
20
GENERAL SPECIFICATIONS
A.FREQUENCIES
1. X BAND 10.525 GHz ± 50 MHz
2. K BAND 24.150 GHz ± 100 MHz
3. Ka BAND 33.4 - 36.0 GHz
4. VG-2 11.4 GHz - 11.7 GHz
5. Safety Alert 24.07,24.11,24.19 GHz
6. LTI 20-20 Laser 300 THz - 375 THz
7. Strobe Alert 300 THz - 770 THz
8. Ultra Lyte Laser 300 THz - 375 THz
9. ProLaser 300 THz - 375 THz
B.UNIT DIMENSIONS
3-3/16”W x 1-1/4”H x 5”D
Specifications
COBRA ELECTRONICS CORPORATIONwarrants that its
COBRA 9 Band Radar/Laser Detectors, and the component
parts thereof, will be free of defects in workmanship and
materials for period of one (1) year from the date of first
consumer purchase.This warranty may be enfor ced by the
first consumer purchaser,provided that the pr oduct is utilized within the U.S.A.
COBRA will,without charge,repair or replace, at its option,
defective 9 Band Radar/Laser Detectors, products or component parts upon delivery to the COBRA factory Service
Department, accompanied by proof of the date of first
consumer purchase, such as a duplicated copy of a sales
receipt.
You must pay any initial shipping charges required to ship
the product for warranty service, but the return charges
will be at Cobra's expense, if the product is repaired or
replaced under warranty.
Exclusions: This limited warranty does not apply; 1) to any
product damaged by accident;2) in the event of misuse or
abuse of the product or as a result of unauthorized alterations or repairs;3) if the serial number has been altered,
defaced or removed;4) if the owner of the product resides
outside the U.S.A.
All implied warranties, including warranties of
merchantability and fitness for a particular purpose
are limited in duration to the length of this warranty.
COBRA shall not be liable for any incidental, consequential or other damages;including,without limitation, damages resulting from loss of use or cost of
i n s t a l l at i o n .
Some states do not allow limitations on how long an
implied warranty lasts and/or do not allow the exclusion or limitation of incidental or consequential damages, so the above limitations may not apply to you.
Cobra Electronics
Corporation
6500 West Cortland Street
Chicago,Illinois 60707
www.cobraelec.com
9100.MANUAL 8/9/00 12:12 PM Page 20
Page 12

Optional Accessories
22
Accessory Order Form
23
You Can Find These Fine Accessories At Your Local
Cobra Dealer
If you wish, you can order directly from Cobra.
Order by phone
Call 1.773.889.3087 (Press 1 from the main menu)
8 a.m.-8 p.m. M-F CST. )
Order by mail or fax
Please fill out order form on next page,and mail/fax
directly to Cobra.
Windshield Mo unting Bra c ke t
Includes suction cups
545-139-N-001 $7.00
S t raight 12V DC Power Co rd
Includes plug and fuse
4 2 0 - 0 8 0 - N - 0 0 1 $ 1 0 . 0 0
Curled 12V DC Power Co rd
Includes plug and fuse
4 2 0 - 0 8 0 - N - 0 0 2 $ 1 0 . 0 0
Subtotal
(Tax if applicable)
Shipping/handling
$4.00
Total
Tax Table
Illinois residents add 7%
Cook Co.residents add .75% (7.75% total)
Chicago residents add 1% (8.75% total)
Indiana residents add 5%
Michigan residents add 4 %
Minnesota residents add 6%
Ohio residents add 6%
Wisconsin residents add 5%
Prices subject to change without notice.
420-080-N-001 St ra i g ht 12V Power Co rd $10.00
4 2 0 - 0 8 0 - N - 0 0 2 Cu rled 12V Power Co rd $ 1 0 . 0 0
5 4 5 - 1 3 9 - N - 0 0 1 Windshield Mo u nting Bra c ke t $ 7 . 0 0
Item # Description Cost Ea. Qty. Amount
Please print clearly
Name
Address (No P.O.Box)
City State
Zip
Telephone ( )
Credit Card No. Exp.Date
Customer Signature
Circle One: Visa MasterCard Discover
Allow 4 to 6 weeks for delivery.O ffer valid in Continental U.S.only.
For credit card orders fill out order form
and fax to: 1.773.622.2269
or call 1.773.889.3087
(Press 1 from the main menu)
8:00 am - 8:00 pm,M-F,CST.
Ma ke check or money order (no stamps)
payable to:
Cobra Electronics
6500 West Co rtland St .
Ch i ca g o,IL 60707
At t n :Ac ce s s o ries De p t .
9100.MANUAL 8/9/00 12:12 PM Page 22
Page 13

The Co b ra line of quality prod u cts
also includes:
• CB Ra d i o s
• Mi c ro Ta lk™Ra d i o s
• Ac ce s s o ri e s
• Sa fe ty Al e rt
™
Traffic Wa rning Sys te m s
Nothing comes close to a Co b ra
™
9100.MANUAL 8/9/00 12:12 PM Page 24
Page 14

Introduction
A1
Introduction
Congratulations! You have just purchased the
most sophisticated RADAR/LASER DETECTOR
available today.This booklet contains instructions
and information designed so that you will be able
to understand how the Cobra ESD™-9100 works
and how radar and (LIDAR) laser are used. Enjoy
your Cobra ESD-9100 Radar/Laser Detector and
drive safely.
Federal Law Governing Use of
Radar Detectors
It is not against Federal Law to receive radar
transmissions on your COBRA Radar Detector.
The Communications Act of 1934 guarantees
your right to receive radio transmissions on
any frequency.Loc al laws that contravene the
Communications Act of 1934,while illegal,may
be enforced by your local law enforcement officials until and unless they are prohibited from
doing so by Federal Court action.
WARNING: Before leaving your car, make sure
that you conceal your radar detector.This will
reduce the possibility of break-in and theft of
your unit.
Included with your ESD-9100
1. Windshield Bracket
2. Hook and Loop Material
3. Power Cord
M i c ro Ta l k
Radar/Laser Detector
Model ESD-9100
O pe rating Instru ctions for your Co b ra
9 Band Ext ra Se n s o ry De te ct i o n
Cobra Electronics Corp.© 1999
Printed in Thailand
Part No. 480-297-P-001
For te c h n i cal assistance,please call our Au to m a ted Help Desk which can assist
you by answering the most fre q u e n t l y asked questions about Co b ra prod u ct s.
(773) 889-3087
24 hours a day, 7 days a week.
A Consumer Service Representative can be reached through this same number 8:00 am - 8:00 pm,
Monday through Friday,CST.
Technical assistance is also available on-line in the Frequently Asked Questions (FAQ) section at
www.cobraelec.com or by e-mail to productinfo@cobraelec.com
If you think you need service call 1.773.889.3087
“If your product should require factory service please call Cobra first before sending your unit in.
This will ensure the fastest turn-around time on your repair.”
You may be asked to send your unit to the Cobra factory.It will be necessary to furnish the following in order to have the product serviced and returned.
1. For Warranty Repair include some form of proof-of-purchase, such as a mechanical reproduction
or carbon or a sales receipt. If you send the original receipt it cannot be returned.
2. Send the entire product.
3. Enclose a description of what is happening with the unit.Include a typed or clearly print name
and address of where the unit is to be returned.
4. Pack unit securely to prevent damage in transit. If possible, use the original packing material.
5. Ship prepaid and insured by way of a traceable car rier such as United Parcel Service (UPS) or First
Class Mail to: Cobra Factory Service, Cobra Electronics Corporation,6500 W.Cortland St., Chicago,
IL 60707.
6. If the unit is in warran ty,upon receipt of your unit it will either be repaired or exchanged
depending on the model. Please allow approximately 3 to 4 weeks before contacting us for
status.If the unit is out of warranty a letter will automatically be sent informing you of the
repair charge or replacement charge. If you have any questions,please call 1.773.889.3087 for
assistance.
If You Think You Need Servic e
and Strobe Alert™
Use of this product is not intended to,and does not, ensure that
the motorist and any passenger
will not be involved in a traffic
accident.It is only intended t o
alert the motorist that an emergency or service vehicle equipped
with a CODE 3,Strobe (Opticom*
or Tomar Preemption System)
or Cobra Safety Alert Transmitter
is in the area as defined by the
range of the product.Please call
your local Fire/Police department
to verify if coverage exists in your
area.Motorists are expected to
exercise all due caution while
using this product,and to ob serve and follow all applicable
traffic laws.Operators of emergency or service vehicles are also
expected to exercise
all due caution while using this
product,and to obser ve and
follow all applicable traffic laws.
*Opticom is a registered trademark
of 3M Corporation
1.
2.
3.
Nothing comes close to a Co b ra™
© 1999 Cobra Electronics Corporation
6500 West Cortland Street
Chicago, IL 60707
www.cobraelec.com
9100.MANUAL 8/9/00 12:12 PM Page 25
Page 15

1 0
Thank you for purchasing the Cobra ESD-9100
Radar/Laser Detector. Properly used, this Cobra
product will give you many years of reliable
service.
Customer Support
Should you encounter any problems with the
product or not understand its many features,
please refer to this owner’s manual. I f,after
referring to the manual, you still need help,
call Cobra Customer Service at 773.889.3087.
Our Thanks to You
A3
Cobra Customer Service
Live operators are available
M-F 8:00 am - 8:00 pm CST
at: 773.889.3087
Au to m a ted Te c h n i ca l
As s i s t a n ce available 24 hours
a day,s even days a we e k.
E-mail questions to:
p rod u ct i n fo @ co b ra e l e c. co m
Co b ra on the Wo rld Wide We b :
Frequently Asked Questions
(FAQ) can be found on-line
at: www.cobraelec.com
Controls and Indicators
A2
2
4
1
1. On/Off Volume Control
2. Mute Button
3. Dim Button
4. Audio Alerts Speaker
5. Highway/City Button
6. Band Indicators
7. Laser Eye
8. Signal Strength LEDs
9. Windshield Bra c ket
M o u n t
10. 12V DC Power Jack
6
5
9
8
3
7
9100.MANUAL 8/9/00 12:12 PM Page 28
 Loading...