

Page 1
COBRATRON
INSTALLATION AND MAINTENANCE GUIDE
EL-3010 S/D
TOUCH FREE PILLAR TYPE SOAP DISPENSER
MAPICS NR. 4222025
Page 2

INDEX
1 TECHNICAL DATA
2 PACK CONTENTS
3 PRE-INSTALLATION INFORMATION
4-6 INSTALLATION
7 FILLING THE SOAP TANK
8 SETTINGS ADJUSTMENT WITH A REMOTE CONTROL
9 MAINTENANCE
Care and cleaning of chrome and special finishes
10 LIMITED WARRANTY
11 TROUBLE SHOOTING
Page 3
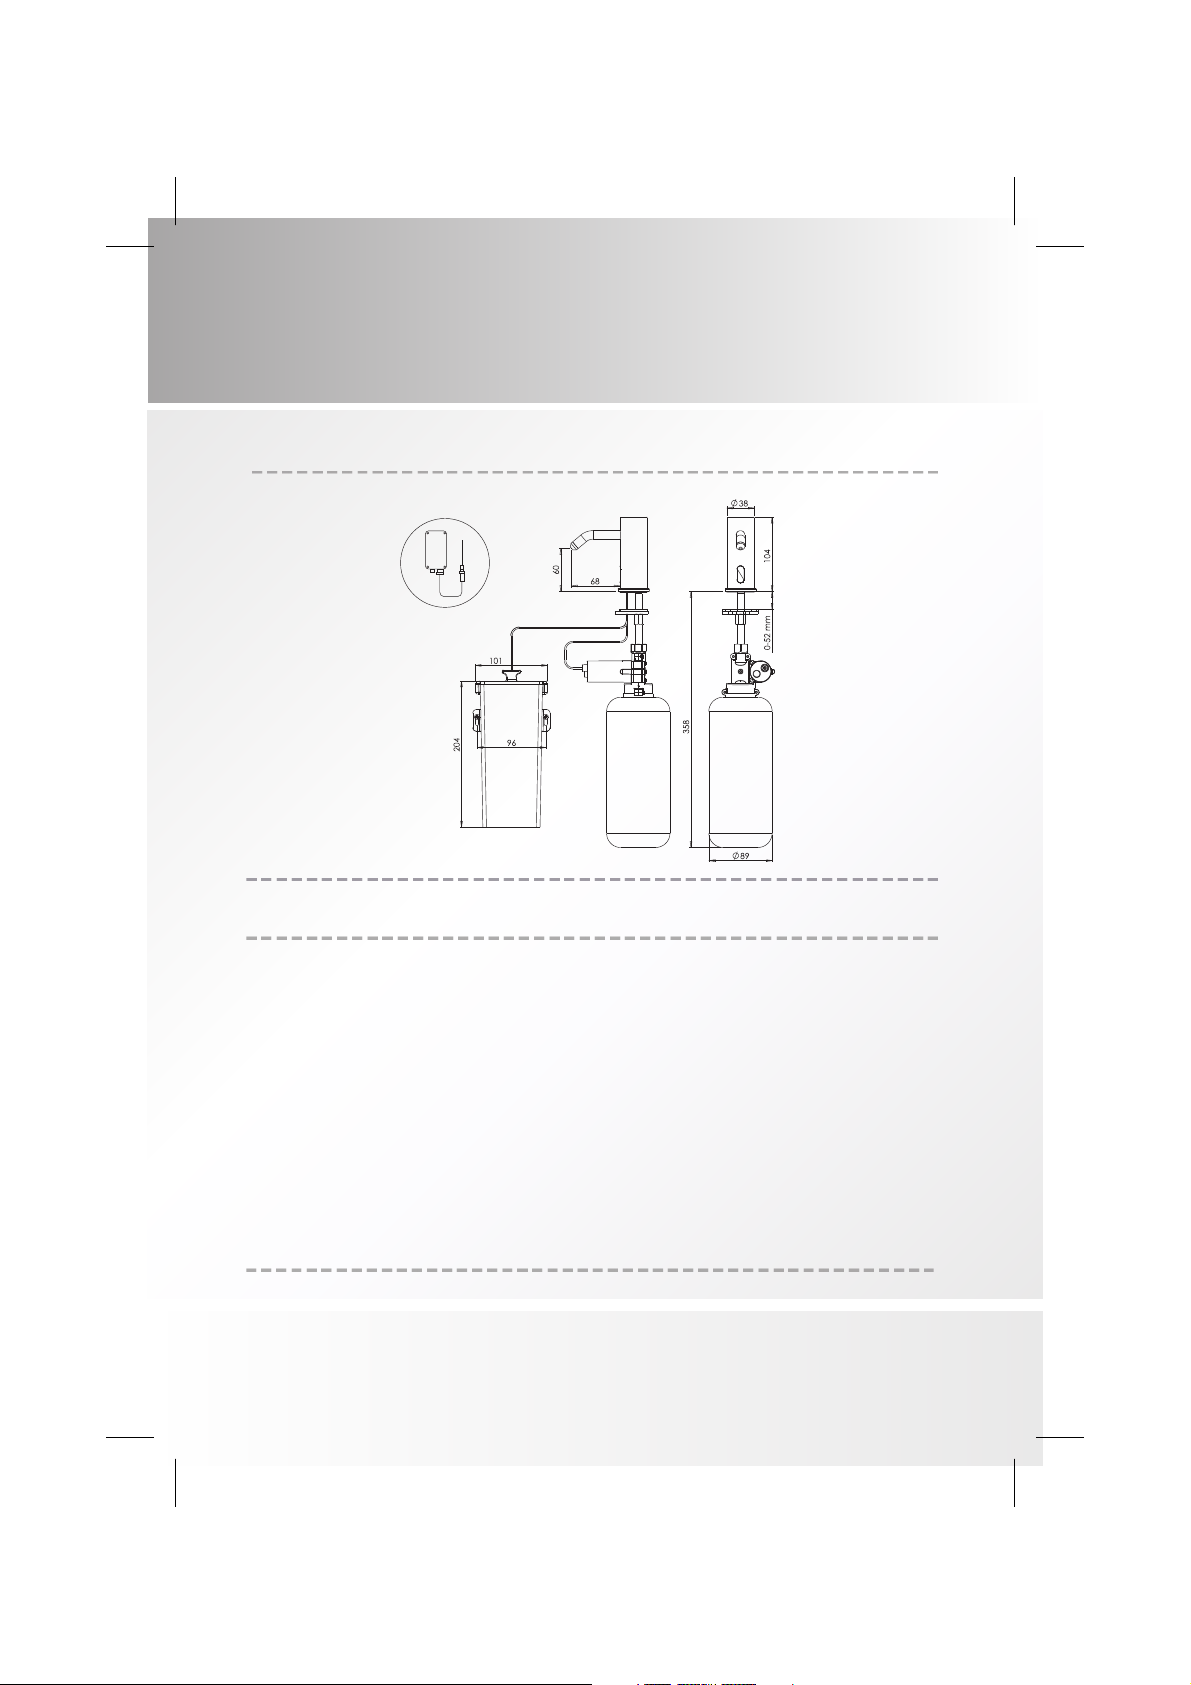
TECHNICAL DATA
EL-3010S/D
Capacity:
Power Supply:
Soap viscosity:
Standard discharge:
1 Liter
IP 67 Transformer
Box
100 – 3800 cPs
0.8cc, Adjustable
1
Page 4
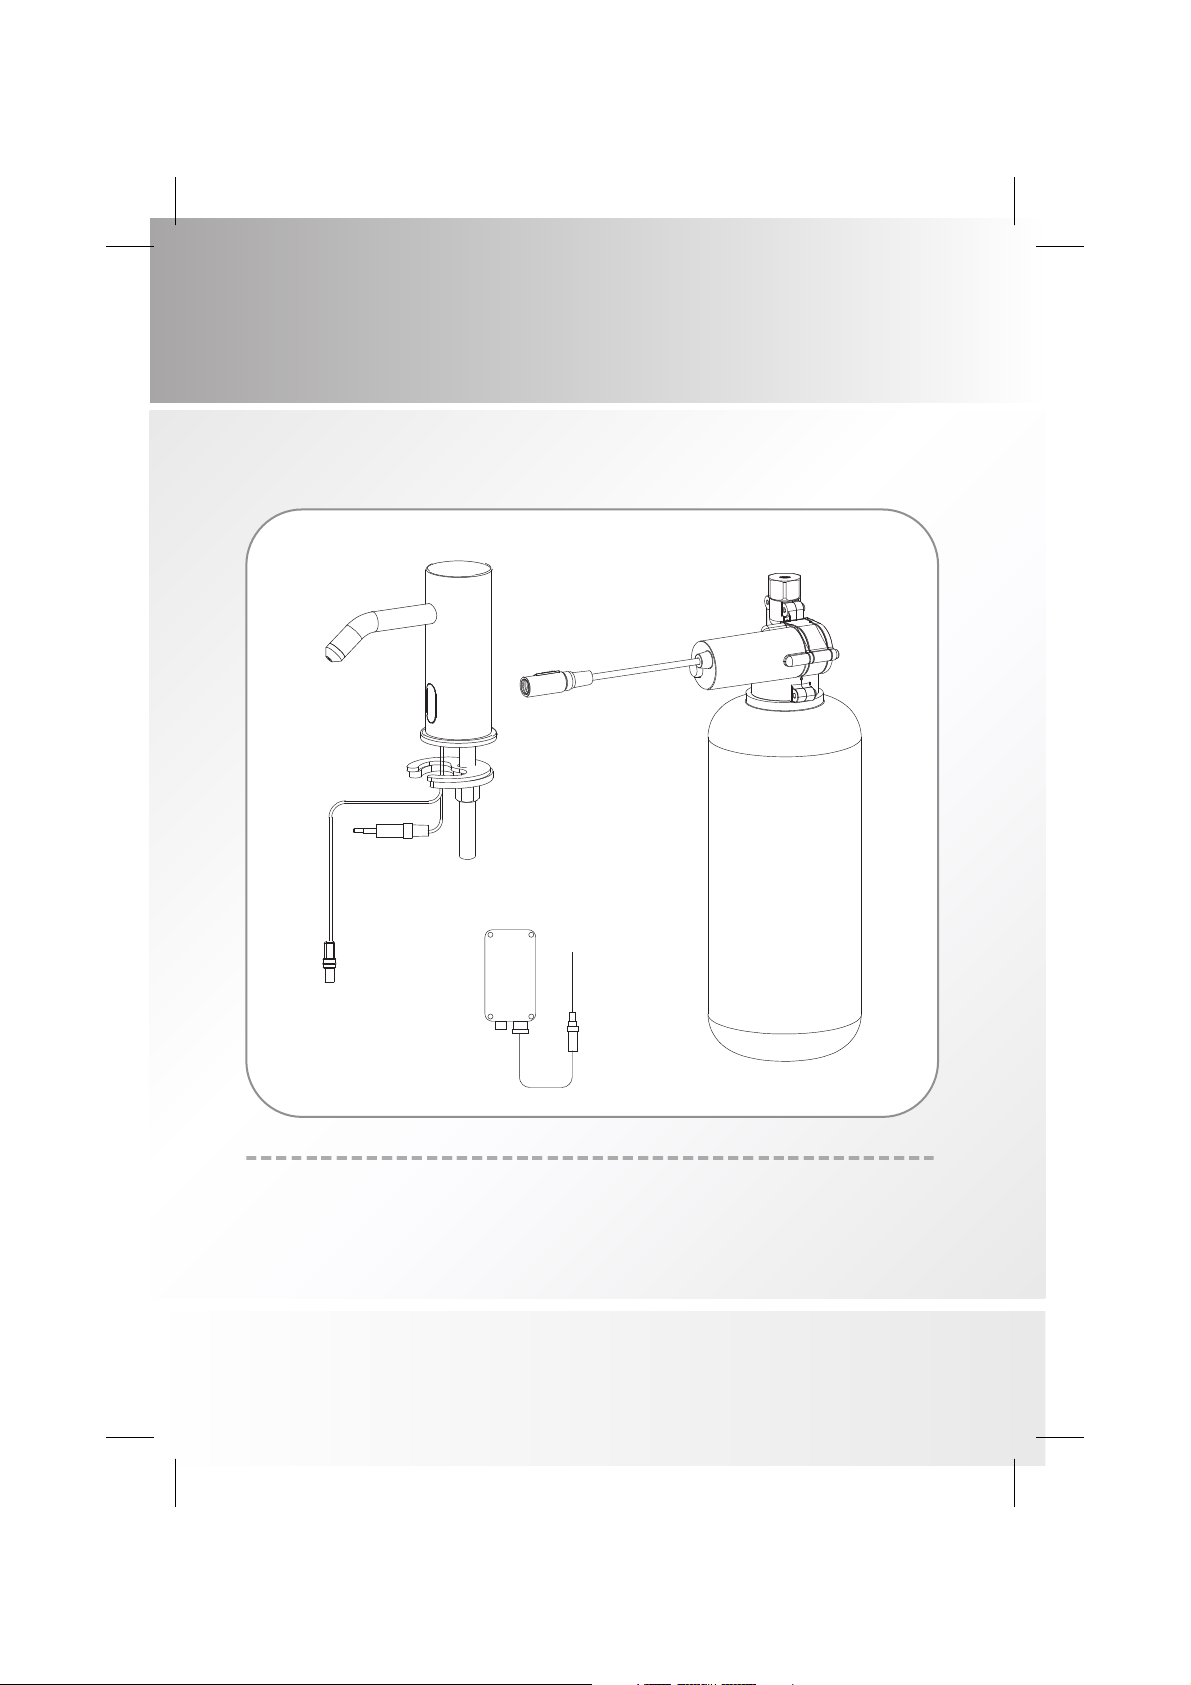
PACK CONTENTS
Familiarize yourself with the part names and confirm that the parts are
included.
1.
3.
1. 1 x Body and fixing accessories
2. 1 x Soap tank and pump assembly
3.1xIP67Transformer Box
2
2.
Page 5

PRE–INSTALLATION INFORMATION
Check contents
Separate all parts from the packaging and check each part with the
"Pack contents" section.
Make sure all parts are accounted for before discarding any
packaging material.
If any parts are missing, do not attempt to install your touch free soap
dispenser until you obtain the missing parts.
Warnings
Do not install the product facing a mirror or any other electronic
?
system operated by an infra-red sensor.
It is recommended to keep a minimum distance of 1.50 meters
?
between the soap dispenser and any other objects.
Important:
the tap/ mixer nearby should not interfere with the soap dispenser
sensor detection area.
Keep in mind that the location of the user hands, while using
3
Page 6

INSTALLATION
Step 1 – Remove all mounting hardware
Step 2 – Installing the soap dispenser
1. Place the soap dispenser body along with
the bottom ring into the hole in the deck or
basin.
2. Slide ruber pad and horse shoe over the
soap dispenser body nipple and secure the
hexagonal nut.
4
Page 7

INSTALLATION
3. Assemble the tube from the pump to the
soap dispenser.
4. Connect the extension cable.
5. Screw in the nut at the top of the soap
dispenser pump assembly to the soap
dispenser body nipple.
5
Page 8

INSTALLATION
Step 3 - Connecting the power source
Important: this product was supplied with a
self adjusting sensor. The ideal sensor range
for the specific location will be set
automatically. Right now, check that no
objects are in front of the sensor.
1. Remove the protective sticker covering
the sensor. Keep away from the sensor
range.
2. a. Connect the motor connector and
make sure to push the connector all
the way home.
b. Connect the transformer into the
electricity supply via an isolating
switch
OBJECTS
3. Wait about 10 seconds before you put
your hands within the sensor range.
6
Page 9

FILLING THE SOAP TANK
1. Unscrew the
soap tank from the
pump assembly.
3. Screw the soap
tank back to the
pump assembly.
Make sure the tank
is secured firmly in
place.
Note:Oncethe
soap in the soap
tank has reached
the bottom line the
soap tank should
be refilled. To refill
the soap tank
please refer to
steps 1-5.
2. Fill in the liquid
soap up to the top
line.
4. Press the refill
button located
at the back of the
pump assembly
until soap starts
coming out of the
soap dispenser
spout. This
operation can
also be done using the soap
dispenser remote control Refill
function.
7
Page 10

SETTINGS ADJUSTMENT
WITH A REMOTE CONTROL
If desired, use the remote control to adjust the soap dispenser settings.
Hold the remote control straight in front of the sensor in a distance of
about 10 - 15cm. Choose the function you want to adjust by pressing
on the function button as following:
1 SOAP QUANTITY
The 1- 4 drop keys allow the user to choose
the desired soap quantity.
1
0.2 to 0.4 0.7 to 0.9 1.2 to 1.6 2.1 to 2.3
Indication: continues blink of the red light
in the sensor eye.
* The exact soap dosage depends on the
soap viscosity.
2
This function allows coming back to soap
quantity factory settings. Press the ADJ
button.
Indication:
3
This function is ideal to perform any kind of activity in front of the sensor
without operating the system (for example, cleaning). The soap
dispenser will remain shut for 1 minute when this button is pressed once.
To cancel this function and to return to normal operation press the
On/Off button again or wait 1 minute.
Indication:
2
ADJ
2 blinks of the red light in the sensor eye.
TEMPORARY OFF FUNCTION
OFF – 2 fast blinks, ON – 4 fast blinks
3
4
2
2
4
3
EL-REMOTESD
4
Once the soap tank has been refilled, press the FILL button. The pump
would work for one minute in order for the soap to start coming out of
the soap dispenser spout. To stop this activity press the FILL button
again.
8
REFILL THE SOAP TANK
Note: EL-REMOTESD is not supplied with EL-3010S/D, available at
your local Cobra merchant
Page 11

MAINTENANCE
Cleaning and Maintenance
Cleaning
To maintain the lustre of chrome plated surfaces simply wipe occasionally
with a soft damp cloth using a mild dishwashing detergent or soap solution.
Rinse then dry and buff with a soft cloth.
Warning
Many household and industrial cleaners contain abrasives and or harsh
chemical compounds and acids. Do not use cleaners or they may
irreparably discolour, dissolve or scuff the chrome palte finish. Do not use
abrasive cloth or scouring pads.
Maintenance
The frequency and extend of maintenance required for this product will
vary according to prevailing site and operational conditions. No regular
maintenance required. Spare parts are available for key components.
SPARE PARTS LIST
EL-TRANS3-M IP67 transformer box with a 3 way splitter cable
9
Page 12

LIMITED WARRANTY
?
All goods are subjected to approved inspection/ test processes prior to
dispatch. All goods are warranted to be free of defects in material,
workmanship and design at the time of dispatch.
?
Defective goods will be replaced/ repaired at our discretion, free of charge at
the factory, but we are not liable for any damage of any other nature,
including consequential or indirect loss arising from any such defect. Our
obligation to repair/ replace is in lieu of all and any other liability on our part.
?
This warranty applies only to correctly installed and maintained goods. Wear
and tear considered normal at the locality of the installation is excluded from
the ambit of the warranty.
The warranty may be affected under the following conditions:
1) Water conditions are particularly aggressive either hard, soft or
other.
2) Products are not installed by a registered/ accredited installer
3) Hot water supply is excessive temperature
?
The warranty is valid for 2 years
10
Page 13

TROUBLE SHOOTING
PROBLEM INDICATOR CAUSE SOLUTION
No soap coming
out of the spout
Soap
coming
out from
the spout
does not
stop
Red light in the
sensor flashes
(once) and the
motor is
operating.
Red light in the
sensor does not
flash (once)
when user's
hands are within
the sensor's
range.
Soap has run
low or
completely out.
The soap tank
has been filled
but soap has not
reached the
spout.
Sensor is picking
up reflections
from the
washbasin or
another object.
Connectors
between the
electronic unit
and the pump
assembly
\transformer are
disconnected or
not properly
connected.
The black
connector
between the
pump assembly
and soap
dispenser are
not connected
all the way
through.
Refer to page 4
and refill the
soap tank.
Press the refill
button located
at the bottom of
the pump until
soap starts to
come out of the
spout again.
Eliminate cause
of reflection.
Connect the
electronic unit
connectors to
the pump
assembly and
transformer.
Connect the
black
connectors all
the way
through.
11
Page 14

Cobra Watertech (Pty) Limited
P.O. Box 1096, Krugersdorp 1740, South Africa
T: (011) 951 5000
E: marketing@cobrawatertech.co.za
www.cobra.co.za
Branches:
Johannesburg (Showroom & Sales)
T: (011) 875 7400
Cape Town (Showroom & Sales)
T: (021) 510 0970
Port Elizabeth (Showroom & Sales)
T: (041) 367 4730
Durban
T: (031) 303 8400
Bloemfontein
T: (051) 522 3385
Mpumalanga/ Limpopo
T: (011) 875 7400
International
T: (+2711) 951 5104
F: (+2711) 951 5002
E: export@cobrawatertech.co.za
After Sales Service
T: 0861 21 21 21
 Loading...