

Page 1

Digital Camera
DC5200
User’s Manual
www.cobradigital.com
Page 2

1
Contents
Chapter 1 Attention
1-1 Attention
1-2 Before using your camera
1-3 Copyright information
1-4 Caution when using the camera
Chapter 2 Getting to know your camera
2-1 Functional parts of the camera
2-2 Monitor screen display
Chapter 3 Preparing for use
3-1 Load batteries and Memory card
3-2 Turn on/off the camera
3-3 Set up
3-4 Using your digital camera
Chapter 4 How to install and use the
application
4-1 Installation of the driver
4-2 Installation of the application
Chapter 5 Specifications
Chapter 6 Q&A Section
Page 3

2
Chapter 1 Attention
Please read this manual carefully before using
the camera and follow its instructions closely
to avoid causing any damage.
1-1 Important
The software CD-ROM packaged with the
camera is designed for a PC only. Playing this
CD-ROM on a CD player may cause damage.
This camera is a precision electronic device;
do not attempt to repair this camera yourself,
as opening or removing covers may expose
you to dangerous voltage points or other risks.
Do not leave this camera exposed to direct
sunlight and avoid fire.
1-2 Before using your camera
Take some test pictures before you make a
formal recording, such as a wedding
ceremony; always test the camera beforehand
to ensure that it functions well. Any additional
losses caused by the malfunction of this
Page 4

3
camera (such as costs of photography or any
loss of benefit generated by the photography)
is not the responsibility of the manufacturer
and no compensation will be given for it.
1-3 Copyright information
Unless agreed by the copyright owner, no
pictures taken with this digital camera can be
used in violation of copyright law. Moreover,
when a < No Photography > restriction is
placed on a site, you cannot record any live
performances, improvisations or exhibits,
even for personal purpose. Any transfer of
pictures, or a memory card with data, must be
conducted under the constraints of copyright
law.
1-4 Caution when using the camera
This product consists of delicate electrical
parts. To ensure that the camera takes
photographs normally, do not drop or knock it
while taking pictures.
Page 5

4
● Avoid using or placing the camera in places
which are:
¾ Damp and dusty;
¾ Exposed to direct sunlight or
places subject to extremely high
temperatures or heat;
¾ Violently turbulent environments;
¾ Locations full of smoke, oil fumes
or steam;
¾ In raining or snowing
environments.
● Do not open the battery cover when the
camera is turned on.
● If water enters the camera, turn the power
off immediately and remove the batteries.
● How to maintain your camera:
¾ If the lens, LCD monitor or
viewfinder surface is dirty, please use a
lens brush or soft cloth to clean the
surface instead of touching the lens with
your fingers.
¾ Do not allow any solid object to
Page 6
5
make contact with the camera to avoid
scratching the lens, the LCD monitor or
the viewfinder surface.
¾ Do not use any detergents or
volatile solutions, which could affect
the camera case and cause paint to
dissolve or distort. Use a soft cloth only.
Chapter 2 Getting to know your camera
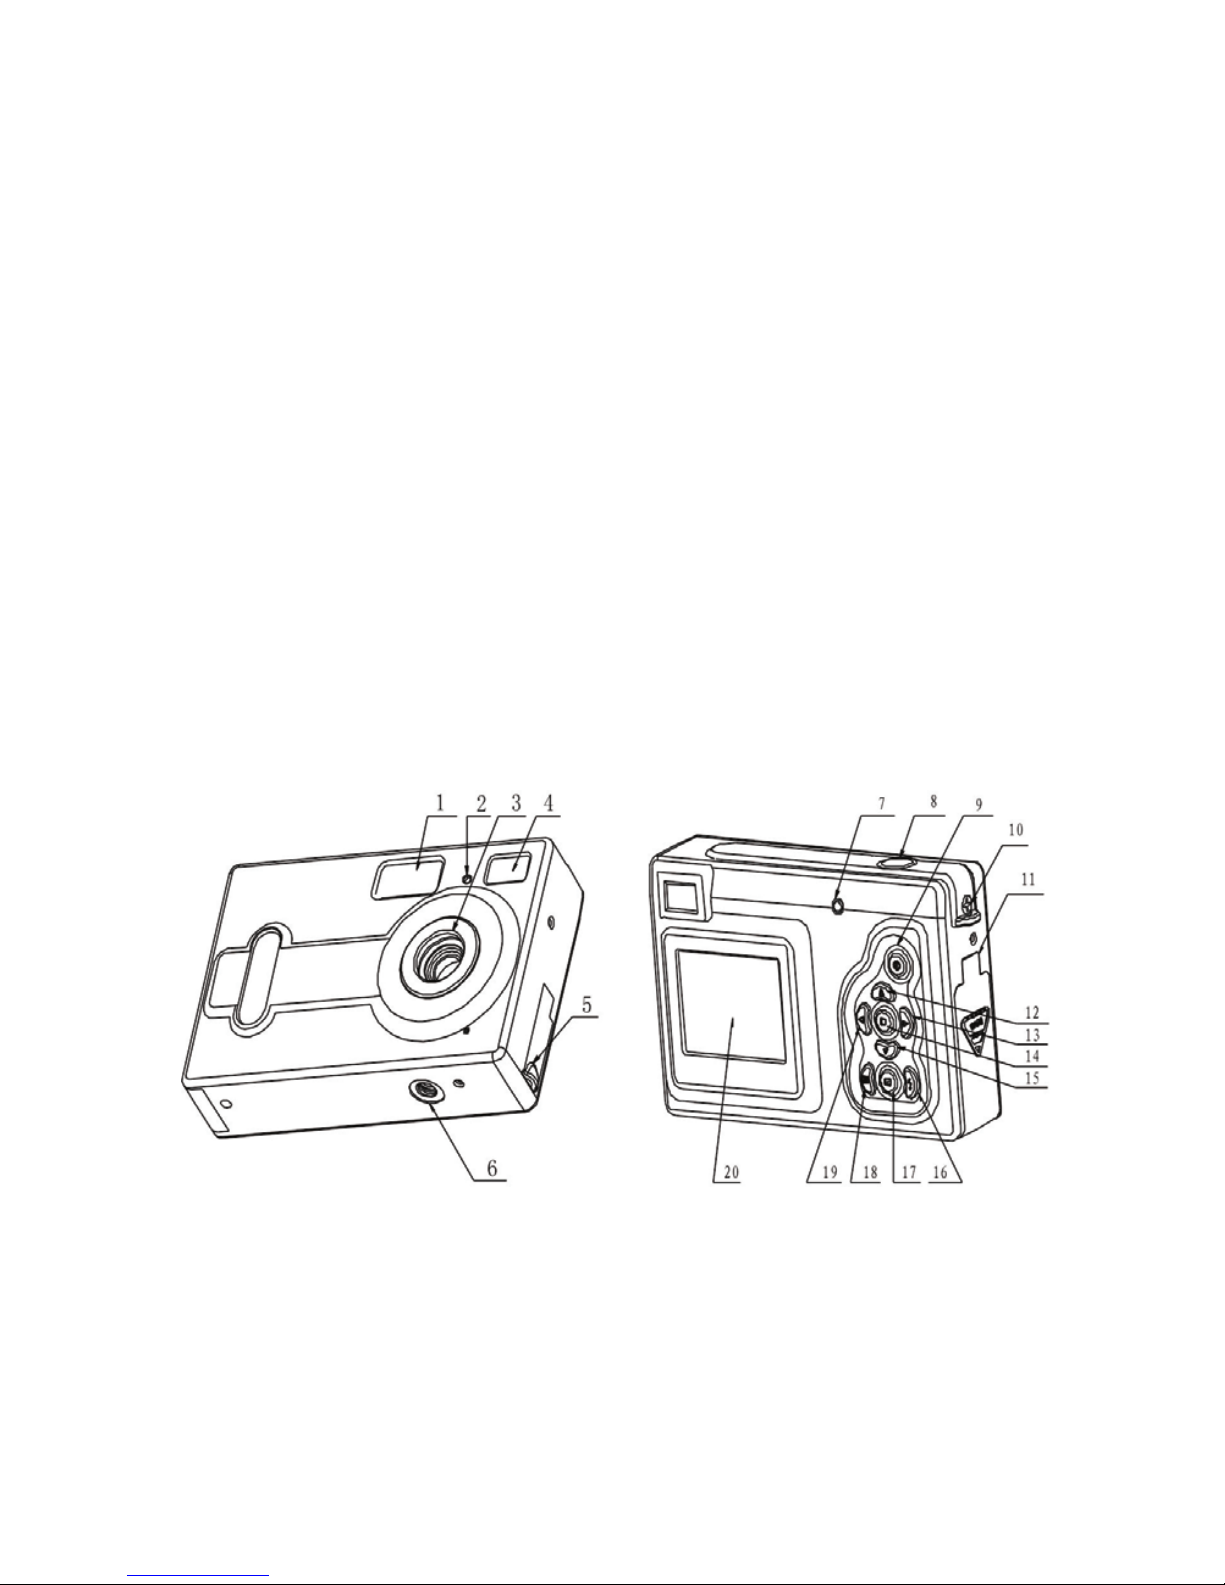
2-1 Functional parts of the camera
Page 7

6
1. Flash light 11. Battery cover
/Memory Card slot
2. Self-time LED 12. Up button
3. Lens 13. Right button
4. Viewfinder 14. Menu button
5. USB jack 15. Down button
6. Tripod socket 16. Flash button
7. Flash LED 17. Playback button
8. Shutter button 18. Display button
9. ON/OFF button 19. Left button
10. Strap bar 20. Monitor screen
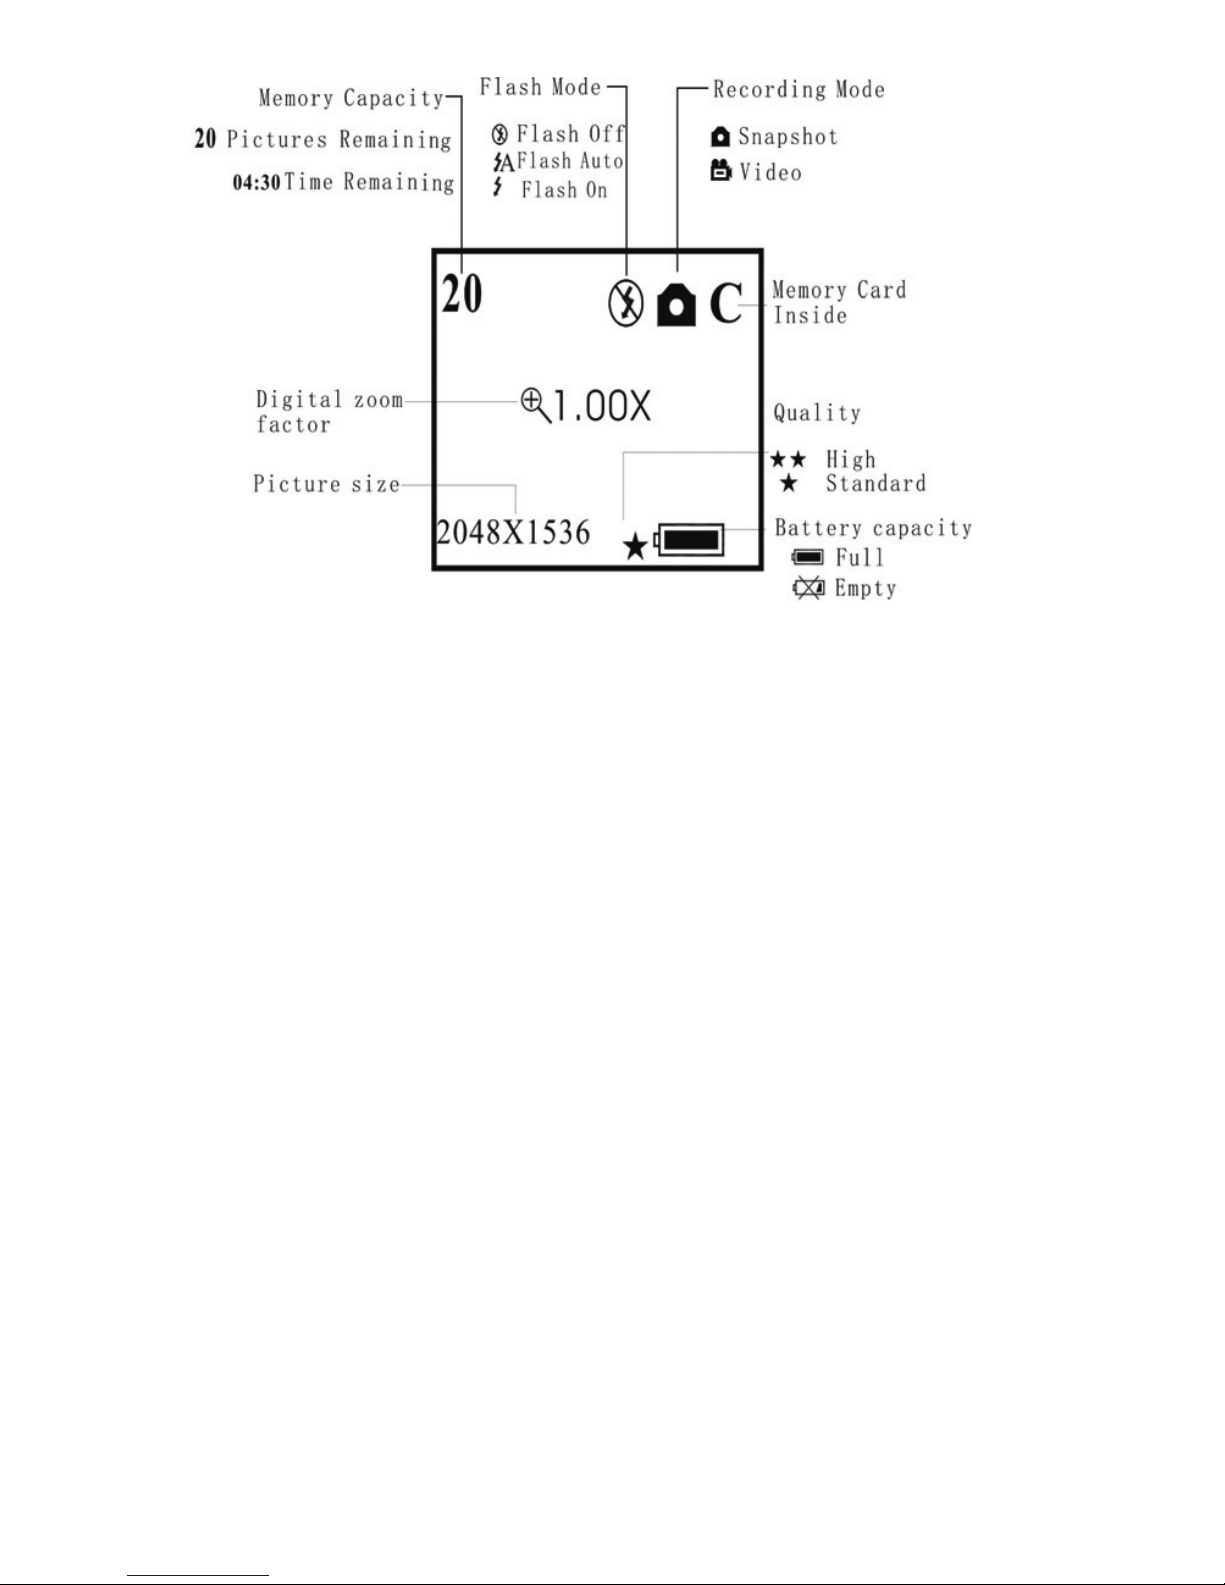
2-2 Monitor screen display
Page 8
7
Chapter 3 Preparing for use
3-1 Load batteries and Memory card
Open the battery cover and insert three new
AAA alkaline batteries into the battery
compartment with the polarity correctly
aligned as shown on the battery door.
When the batteries are low, there will have a
choice icon appear on the screen, you need to
select what kind of battery you want to use, if
you select alkaline battery, you should select
the 1, the battery capacity icon will display
Page 9

8
half , then you can not use the flash light, but
your still can take picture until the icon
display empty, if you choose rechargeable
battery, you need to select 2, then battery
capacity icon still display full, you still can
take picture until the icon display empty.
WARNING: If your camera use the
SDRAM for internal memory, it just can
save few pictures to test the camera, when
turn off the camera the picture in the
internal memory will lose, so if you want to
save the picture in the in the internal
memory, connect the computer with USB
cable before turning off the camera, and
transfer it to computer, If you use
SD/MMC card, the pictures will be saved
to SD/MMC card and will not lose during
turning off camera or replacing battery.
3-2 Turning on/off the camera
Press the <ON/OFF> button until the
Page 10

9
operation LED lights, when the camera is on,
press the ON/OFF button for 2 seconds will
turn off the camera, the camera will turn off
automatically after 30 seconds of inactivity if
not connected to USB, the time can set by the
AUTO POWER OFF function.
3-3 Set up
1. Taking pictures and the Recording
function
1.1 Capture option
Press the menu button will enter the capture
select window, press the UP or DOWN button
to select the capture mode, then press menu
button to confirm.
Press RIGHT button to enter next menu, press
the LEFT button to enter the preview menu.
Page 11

10
1.2 Colour option
Press the menu button will enter the capture
select window,
Press RIGHT button to enter colour menu.
Press UP or DOWN button to select the Auto,
then press menu button to confirm.
Note:
Using this function to make the items:
exposure ,White balance and sharpness to
default setting.
Page 12
11
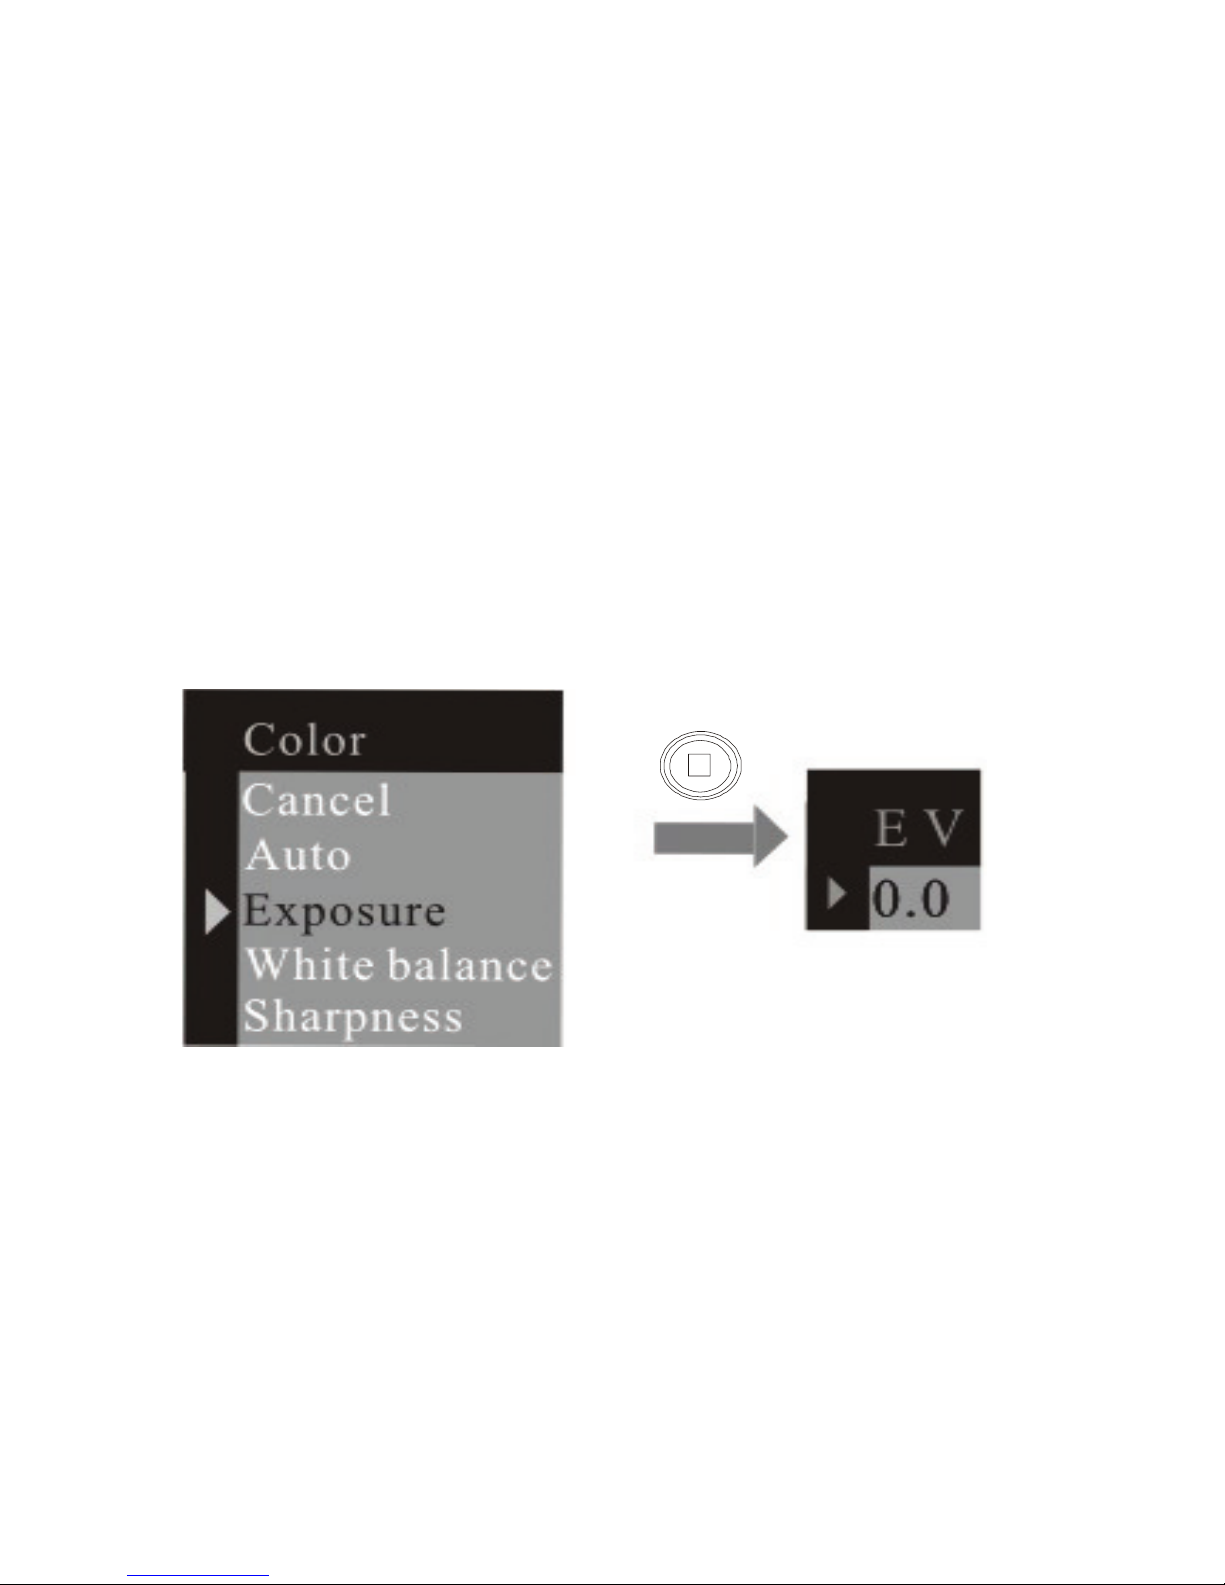
Adjusting the exposure value:
You can adjust the EV from -1.5 to 1.5
Press the menu button will enter the capture
select window,
Press RIGHT button to enter colour menu.
Press UP or DOWN button to select Exposure,
then press menu button to confirm. In the
submenu press the UP or DOWN button to
adjust the value.
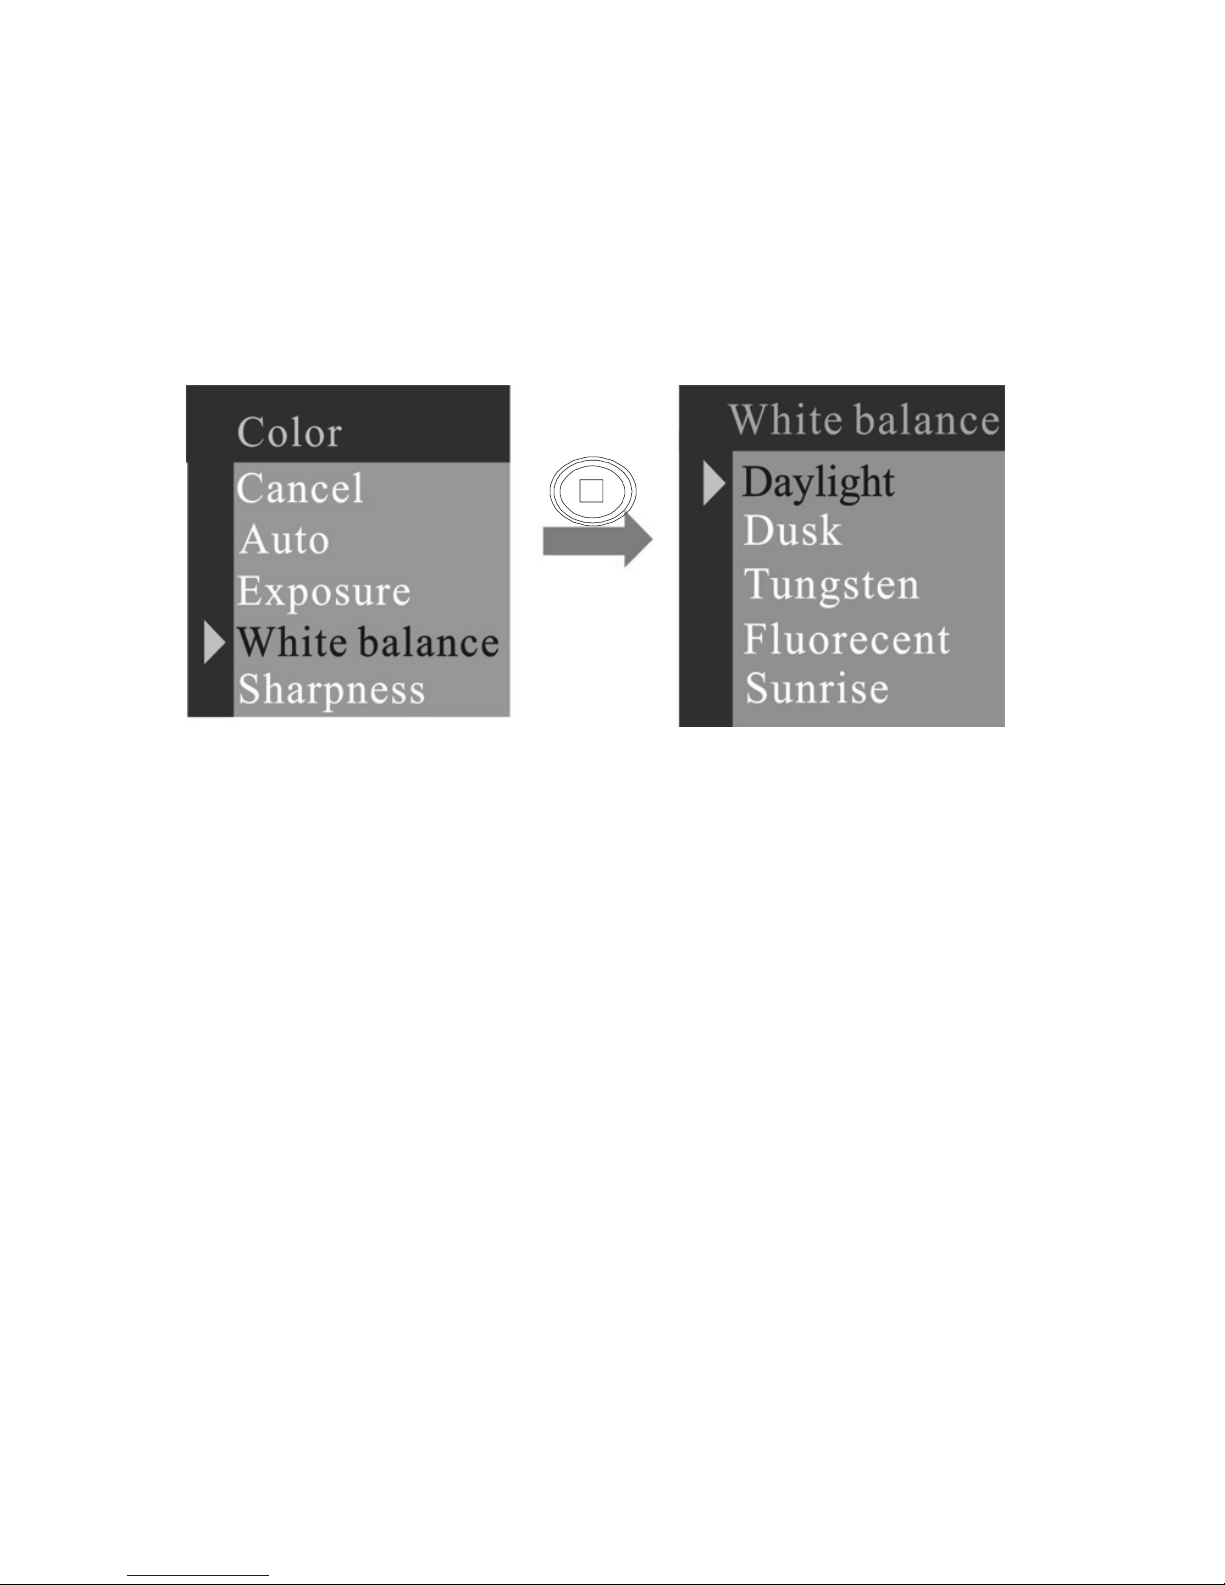
Selecting White balance option:
Press the menu button will enter the capture
select window,
Press RIGHT button to enter colour menu.
Press UP or DOWN button to select the White
balance, then press menu button to launch the
MENU
Page 13
12
submenu. In the submenu press the UP or
DOWN button to choose the item that you
want, and then press the MENU button to
confirm the setting.
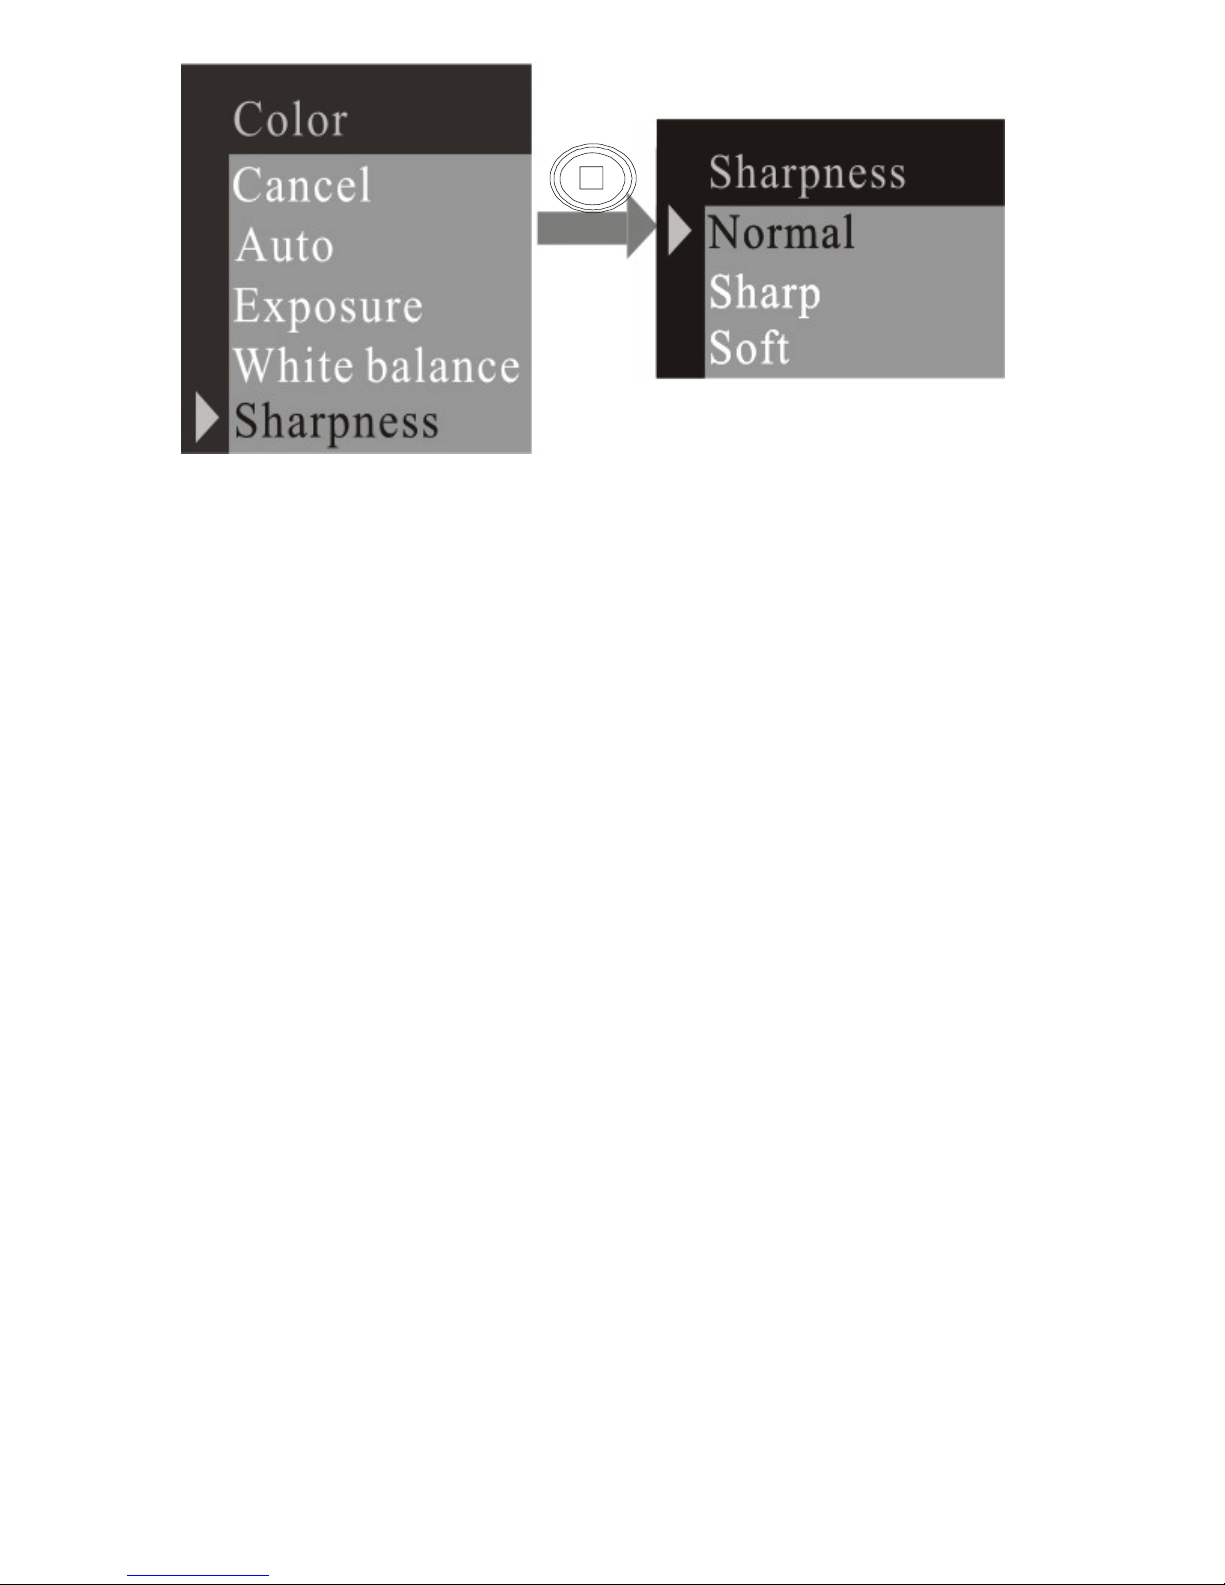
Adjusting Sharpness option:
Press the menu button will enter the capture
select window,
Press RIGHT button to enter colour menu.
Press UP or DOWN button to select the
Sharpness, then press menu button to launch
the submenu. In the submenu press the UP or
DOWN button to choose the item that you
want. And then press the MENU button to
confirm the setting.
MENU
Page 14
13
1.3 Resolution:
Press the menu button will enter the capture
select window, then press the RIGHT button
twice to enter the Resolution window. Press
UP or DOWN button to select the resolution
and then press the MENU button to confirm
the setting.
Super: 2592X 1944
High: 2048X 1536
Middle: 1600X 1200
Low: 1280X 1024
1.4 Quality:
Press the menu button will enter the capture
MENU
Page 15

14
select window, then press the RIGHT button
until the Quality menu appears.
Press the UP or DOWN button to select the
item that you want, and then press the MENU
button to confirm the setting.
1.5 Auto power off time:
Press the menu button will enter the capture
select window, then press the RIGHT button
until the Auto Power Off menu appears.
Press the DOWN button to select “Set”, and
press the menu button to enter the submenu of
Auto Power Off, Press the LEFT/RIGHT
buttons to select the item, press the
UP/DOWN button to change the value. And
then press the MENU button to confirm the
setting. As shown in the following steps:
Page 16

15
Auto Power Off
Cancel
Set
Auto Power Off
Cancel
Set
Auto Power Off
Auto Power Off
1.6 Date and Time:
Press the menu button will enter the capture
select window, then press the RIGHT button
until the Date& Time menu appears.
Press the DOWN button to select “Set”, and
press the menu button to enter the submenu of
Date& Time. Press the LEFT/RIGHT buttons
to select the item, press the UP/DOWN button
to change the value, finally press the MENU
button to confirm the setting. As shown in the
following steps
When you choose DISPLAY, the date& time
will show on the picture, otherwise choose
Page 17

16
NO DISPLAY.
Da te Time
Cancel
Set
Date Ti me
Cancel
Set
Auto Power Off
03:00
Aut o Power Off
2002 01
11:11:11
02
2002 01 01
11:11:11
UP/DOWN
UP/DOWN
DOWN
Menu
LEFT/RIGHT
Menu
Menu
Yes
No
LEFT/RIGHT
1.7 Frequency:
Set the anti-flicker frequency if you use
Fluorescent light.
Press the menu button will enter the capture
select window, then press the RIGHT button
until the window of Frequency appears. Press
UP or DOWN button to select the frequency.
And then press the MENU button to confirm
the setting.
Page 18

17
1.8 Language:
Press the menu button will enter the capture
select window, then press the RIGHT button
until the window of Language appears. Press
UP or DOWN button to select the language.
And then press the MENU button to confirm
the setting.
2 Playback function
In capture or video mode pressing the
PLAYBACK button
will enter the
Frequency
Cancel
60Hz
50Hz
Page 19

18
playback mode, the latest recording file will
be shown on the LCD .Press the RIGHT or
LEFT button to view the previous or next file.
In playback mode press the PLAYBACK
button again to return to recording mode.
2.1 Erase:
In playback mode press the MENU button to
enter the Erase window.
Press the RIGHT button to get into the next
menu.
In the Erase window press the UP or DOWN
button to select “One" (erase one) or "All"
Erase
Can ce l
one
All
Format
Protec t
Page 20

19
(erase all).Press the MENU button to confirm
the setting.
When you select “Format” the camera will
format the memory card if you have inserted a
memory card otherwise it will format the
internal memory.
Erase
Can cel
one
All
Form at
Protect
Protect mode:
If some file is important to you please use this
function to keep the file from been deleted by
accident.
Page 21

20
Erase
Can cel
one
All
Form at
Prot ect
If you want to cancel the protecting
function ,you can operate the camera as the
following steps:
Erase
Can cel
one
All
Form at
Unprot ect
2.2 Auto power off time
See the details on page 14.
2.3 Date and Time
Page 22

21
See the details on page 15.
2.4 DPOF
Press the menu button will enter the Erase
select window, then press the RIGHT button
until the window of DPOF appears. press
DOWN button to select “Set”, and then press
the MENU button to confirm the setting. You
can press the RIGHT or LEFT button to
choose the image to be printed, and you can
press the UP or DOWN button to set the
quantity, finally press the MENU button to
confirm.
2.5 Rotation
Press the menu button will enter the Erase
select window, then press the RIGHT button
until the window of Rotation appears. Press
UP or DOWN button to select the item. And
then press the MENU button rotate the picture.
The rotated picture can not be saved.
Page 23

22
2.6 Digital zoom
In the still image preview mode, Press the
menu button will enter the Erase select
window, then press the RIGHT button until
the window of ZOOM appears.
Press the DOWN button to select “Pan”. If
you want to activate the pan function you
must enlarge the image firstly.
* In Zoom mode: Use the UP button to
Page 24

23
enlarge the selected picture up to 4 times.
* In Pan mode: Press the DOWN button to
select “Pan” in zoom window, then press the
MENU button to confirm the setting. Now
press the UP/DOWN/LEFT/RIGHT buttons
to adjust the zooming area to each part of the
picture.
*To cancel the Pan function: Press the MENU
button to enter the <ZOOM/PAN> mode and
then press the DOWN button to select “Exit
Pan”.
3 Using your digital camera
3.1 Taking pictures
Turn on the camera. Press the PLAYBACK
button to change the mode between playback
mode and recording mode(including video
recording mode and capture mode).If the
camera is in video recording mode please
press the MENU button to enter the capture
window. Press the UP or DOWN button to
select “Single” then press the MENUN button
Page 25

24
to enter capture mode. Point the camera at the
subject, use the monitor screen or the
viewfinder to compose the image. While
holding the camera still, gently press the
Shutter button to take the picture. You will
hear a beep sound indicating that the snapshot
has been completed.
3.2 Self-Timer
In recording mode press the MENU button to
get into Capture window, press the UP or
DOWN button to select “Self-Timer”, then
press the MENU button to confirm. Press the
Shutter button; the Self-timer light blinks for
10 seconds before the picture is taken.
Note: Press the MENU button to get into
Capture window, press UP or DOWN button
to select “single” , the Self-Timer feature will
turns off .
4 Making a video
In recording mode press the MENU button to
Page 26

25
get into Capture window, press the UP or
DOWN button to select “Video 320x240” or
“Video 192x144”, then press the MENU
button to confirm. Press the Shutter button to
make the video. Press the Shutter button
again to stop recording.
Note: The video resolutions are (192x144)
and (320x240)
5 Using the flash
When you take pictures at night, or indoors or
outdoors in dark shadow, you can use the
flash. you could press the FLASH bottom
to change the state of flash light
Off --- The flash never fires (default).
Auto flash ---- The flash fires when
the lighting conditions require it.
Force flash ---- The flash fires every
Page 27

26
time you take a picture, regardless of the
lighting conditions.
6 Using the digital zoom
In the recording modes, you can use the
digital zoom. Press the UP button to zoom in;
press the DOWN button to zoom out.
7 Previewing pictures
The default setting of the Preview mode
automatically displays one image or video file
in the LCD screen. Press the DISPLAY button
the caption will disappear, and Press it again
get into Thumbnails mode.
If a video is selected in Thumbnails mode,
press the DISPLAY button
to play the
video file.
8 Downloading pictures
Page 28

27
In the Preview setting mode,
Set the camera to the Preview mode.
Connect the camera to the computer with a
USB cable. Turn on your camera. In
Windows 2000 / ME, double click the “My
Computer” icon on the desktop; the “My
Computer” windows should appear. In
Window XP, press “Start” and select “My
Computer”; the “My Computer” windows
should appear. When you see “Removable
Disk (F :)”, your camera (the Removable Disk
device) is ready. You can copy or move files
to your computer from the folder by the path
F:\DCIM|100PHOTO (assuming drive (F :) is
the Removable Disk).
In Windows 98SE, please install the camera
driver first.
Set the camera to the Preview mode. Connect
the camera to the computer with a USB cable.
The computer will find a new device as USB
mass storage device and install the device
Page 29

28
driver automatically. After the driver is
installed, the camera will be recognized as a
Removable Disk.
9 How to use the PC camera function
Please install the camera driver first. Connect
the camera to the computer with a USB cable,
run the program
Amcap under the folder <Sunplus Ca531a> in
the program, select the device as
Sunplus SPCA533.
Then select Options and Preview.
Page 30

29
If you want to change the imaging size, select
<Video Capture Pin> to change the Output
Size.
Page 31

30
Chapter 4 How to install and use the
application software
Insert the installation CD into your CD-ROM
drive; the installation CD menu should
appear.
If the menu does not appear, double-click the
CD drive icon in <My Computer> or run
D:\Autorun.exe to open the setup screen
(assuming that your CD-ROM drive is in
drive D:).
Double click the icon “Install Driver”
Page 32

31
Taking your computer system is WinXP for
example:
select “Win98/WinMe/Win2000/WinXP” then
click “Install”.
Page 33

32
This picture will appear, click “Next”
Page 34

33
When this picture appear, click “Next”.
When this picture appear, click “Finish”. The
installation of PC Camera drive is completed.
A icon
will appear on your computer
which can link to the website:
www.cobradigital.lifepics.com.
Page 35

34
4-2 Installation of the application
When you see the following screen, select
<Install Photo Express> to install the < Photo
Express 4.0> software. Follow the
instructions on the screen to finish the
installation.
Page 36

35
The <Language select> dialogue box will
appear. You can select a language you want,
such as <English> and then click <OK>.
Page 37

36
The "Welcome" message appears. Click
"Next" to continue.
The " License Agreement" dialogue box
appears; click <Yes> to accept it.
Page 38

37
The "Choose Destination Location" message
appears and according to the language
instruction, choose an installation route
(Optional). Click "Next".
Page 39

38
The interface changes into "Select
Components"; click "Next".
Page 40

39
"Select Program Folder” window appears;
click "Next" to install the driver.
Page 41

40
The “Setup Status” window appears ,
please wait a few minutes until the window
“InstallShield Wizard Complete” appear,
then click “Finish” to complete the
installation. Installed software will
automatically create an icon on the computer.
Page 42

41
Page 43

42
Chapter 5 Specifications
4-in-1 mode:
Digital Still Camera mode: image capturing
PC Camera mode: video capturing
conferencing
Camcorder mode: video clips
U-disk
Sensor: CMOS sensor, 3Mega pixel,
5Mega pixel via interpolation
Lens: F=3.0 f=8.35
Focus range: 1.5M to infinity
Illumination: 100-16000 (lux)
Shutter speed: Electronic shutter
1/20-1/6000 s
Image resolution:
¾ Super (2592X1944) / High (2048X1536)
/ Medium (1600X1200) / Low
Page 44

43
(1280X1024) for image capturing
¾ VGA (640X480) / QVGA (320X240)
for PC Camera mode
¾ QVGA (320X240) / QCIF(192X144)
for Video Recording mode
Memory: External - SD and MMC card
compatible
Self Timer: 10 sec.
ZOOM: 4 x Digital zoom
Colour LCD screen: 1.5 inch TFT
display
OSD languages: English, French,
German, Spanish, Italian, Dutch,
Portuguese
Flash mode: On/Auto/Off
Battery: 3 AAA (alkaline/ 1.5V)
batteries
Interface: USB 1.1
Page 45

44
PC requirements:
CPU: Pentium III 800MHz and higher
OS: Windows 98SE/2000/ME/XP/VISTA
Memory: 128MB and higher memory
Disk space: at least 250MB free space on
CD-ROM drive
Chapter 6 FAQ’s (Frequently asked
question)
6-1 The camera does not power on
1. The battery is not properly inserted ---
Remove and re-insert the batteries.
2. Insufficient battery voltage --- Do not
mix old and new batteries. Replace all the
batteries at the same time. Using rechargeable
batteries with a lower voltage is not
recommended.
Page 46

45
Note: Remove the batteries if the camera is
not going to be used for some time. This will
conserve battery life.
6-2 The flash does not fire
1. The flash is set to Off --- Set the flash to
Auto or On.
2. The flash icon doesn’t change and <low
battery level> pops up on the screen ---
Please use brand new batteries for
replacement.
3. Low batteries --- When the battery icon
does not show a fully charged battery, the
voltage level is too low and the camera will
not fire. Please replace with brand new
batteries.
6-3 The image is blurred / out of focus
Page 47

46
1. The subject is out of focus --- Ensure that
there is 1.5m (5ft) at least between the camera
lens and the subject.
2. The camera moved --- After pressing the
shutter button, keep your hand steady for 2
seconds to get the best result. When the flash
is on, hold the camera steady until the flash
has fired two times (the first flash is to reduce
a red-eye phenomenon and to detect the
brightness of the target).
6-4 The image taken is too dark and
unclear
Insufficient light for shooting --- Set the
flash to On, or adjust the EV to a positive
value (+) for exposure compensation.
6-5 Flickering on the LCD screen or
Page 48

47
recorded image
Incorrect frequency setting --- Select the
correct anti-flicker frequency (50Hz or 60Hz)
under fluorescent light setting.
6-6 Picture download problem
1. The computer does not recognize the
camera --- For Windows 98SE, the camera
driver needs to be installed first before
downloading any pictures. (Do not connect
the camera to the computer while the driver is
downloading.) In picture preview mode,
ensure that the USB mode is set to MSDC
before the camera is connected to the
computer.
In Windows 2000/ ME /XP/VISTA, the
camera is recognized as Plug & Play
Removable Disk without driver installation
Page 49

48
under MSDC mode.
It is always recommended that you disconnect
your digital camera from the computer on the
desktop using the safety unplug button, to
ensure that the USB port is released for future
interfaces.
2. The flash drive does not display recorded
images --- The camera will load two
Removable flash drives on your computer
under MSDC mode.
The first drive is the external SD or MMC
card and the second drive is the recorded
images saved in the built-in memory of the
camera. If the Removable flash drive names
coincide with those already assigned by the
computer in the network, you need to reassign
the name for the Removable flash disks as
follows:
Page 50

49
Right click [My Computer] > Manage > Disk
Management.
Right click blue bar of Removable disk
which is on line > Change Drive Letter &
Paths > Change > Assign the Following Drive
Letter (assign an unused drive name) > OK.
Open the new renamed Removable flash
drive to download the recorded pictures.
 Loading...