

Page 1
Instruction Manual
Forward Action
Professional
Staple & Nail Gun
8000
Guide d’utilisation
Manual de instrucciones
Page 2
Thank you for selecting
the Cobra
™
Forward Action
®
Professional Staple & Nail Gun
1
Your new Cobra™staple
and nail gun is designed to
give you full heavy duty
stapling performance with
ease and control never
before possible. The Cobra
™
staple and nail gun can be
used for many professional
applications. With proper
use and care the Cobra
™
staple and nail gun will give
you many years of reliable
performance. For safe
operation and best
performance, please read
all safety rules and
instructions carefully
before using the Cobra
™
staple and nail gun. Be
sure to send in your
registration card.
®
Page 3
WARNING: TO MINIMIZE THE RISK OF EYE INJURY, ALWAYS
USE EYE PROTECTION.
When using mechanical tools basic safety
precautions should always be followed to reduce the risk of personal
injury, including the following:
READ ALL INSTRUCTIONS
1. BE AWARE OF THE STAPLE EXIT POINT. The unique Cobra™forward
action®design puts the "high" part of the handle in the front. Be sure this
product is in the proper position in your hand before using.
2. POINT THE GUN AWAY FROM YOURSELF AND OTHERS at all times
and especially when opening the track to clear a jammed staple or nail. As the
track is opened, the jammed staple or nail may be shot out unexpectedly.
3. PLACE STAPLE EXIT POINT FIRMLY AGAINST WORK SURFACE
BEFORE FIRING. Staples fired "into the air" can cause serious injury.
4. ALWAYS USE THE PROPER STAPLE SIZE. This product accepts .05"
wire gauge heavy duty staples only. Do not try to use light duty (.03"), desk
or wire staples in this product.
5. KEEP WORK AREA CLEAN. Cluttered areas and benches invite injuries.
6. CONSIDER WORK AREA ENVIRONMENT. Don’t expose tool to rain.
Keep work area well lit.
7. KEEP CHILDREN AW AY. All visitors should be kept away from work area.
Do not let visitors contact tool.
8. STORE IDLE TOOLS. When not in use, tools should be stored in dry, high
or locked-up place — out of reach of children.
9. DON’T OVERREACH. Keep proper footing and balance at all times.
10. STAY ALERT. Watch what you are doing. Use common sense. Do not
operate tool when you are tired.
11. BE CAUTIOUS NOT TO STAPLE INTO ELECTRICAL WIRES especially
those which may be hidden from view.
SA VE THESE INSTRUCTIONS FOR FUTURE USE
IMPORTANT SAFETY INSTRUCTIONS
2
Page 4
3
*Arrow®T-50®are registered trademarks
of Arrow Fastener Company.
Using Your Cobra
™
Staple and Nail Gun
Selecting the Right Staple:
To maximize performance,
your Cobra™staple and nail gun
has been designed to work with
genuine Cobra
™
brand heavy
duty narrow crown staples in
various lengths from 1/4 inch to
9/16 inch and 9/16 brad nails.
The Cobra™staple/nail gun is
also compatible with other brands
of heavy duty narrow crown
staples such as Powershot
®
and
Arrow®T-50®*brand heavy duty
staples.
Selecting the Right Staple Length:
As a general guideline, when
stapling into wood, allow for leg
penetration of approximately
3/16 inch.
For additional tips on selecting
the right staple length for specific
applications, refer to the Staple
Selection Chart on page 5 of
this Instruction Manual.
Loading Staples and Nails
(Fig. 1, 2 and 3)
The Cobra™staple gun is
equipped with a Quick-Load
Staple Chamber (Fig. 1).
Make sure there are no staples
or nails jammed from previous
usage by checking the handle
operation.
CAUTION: If a staple or
nail is jammed, point the
gun away from yourself
and others before
opening the track as the
jammed staple or nail
may be fired out upon
opening.
If there are no jams, turn the gun
upside down so the bottom of the
gun is facing away from your face
and body. Open the staple
chamber by squeezing and
pulling the plastic track release
straight down away from the
base of the gun and sliding the
track back. (Fig. 1) Place staples
into chamber with point facing
upwards (Fig. 2).
To load nails,turn gun upside
down and tilt the gun so the side
with the nail icon “T” and staple
remaining window is facing down
(Fig. 3). Load by leaning rack of
nails tight against inside of staple
chamber in housing (Fig. 3). Be
sure to insert nails with point of
nail facing upwards. The gun may
jam if nails are inserted in the
wrong side of housing.
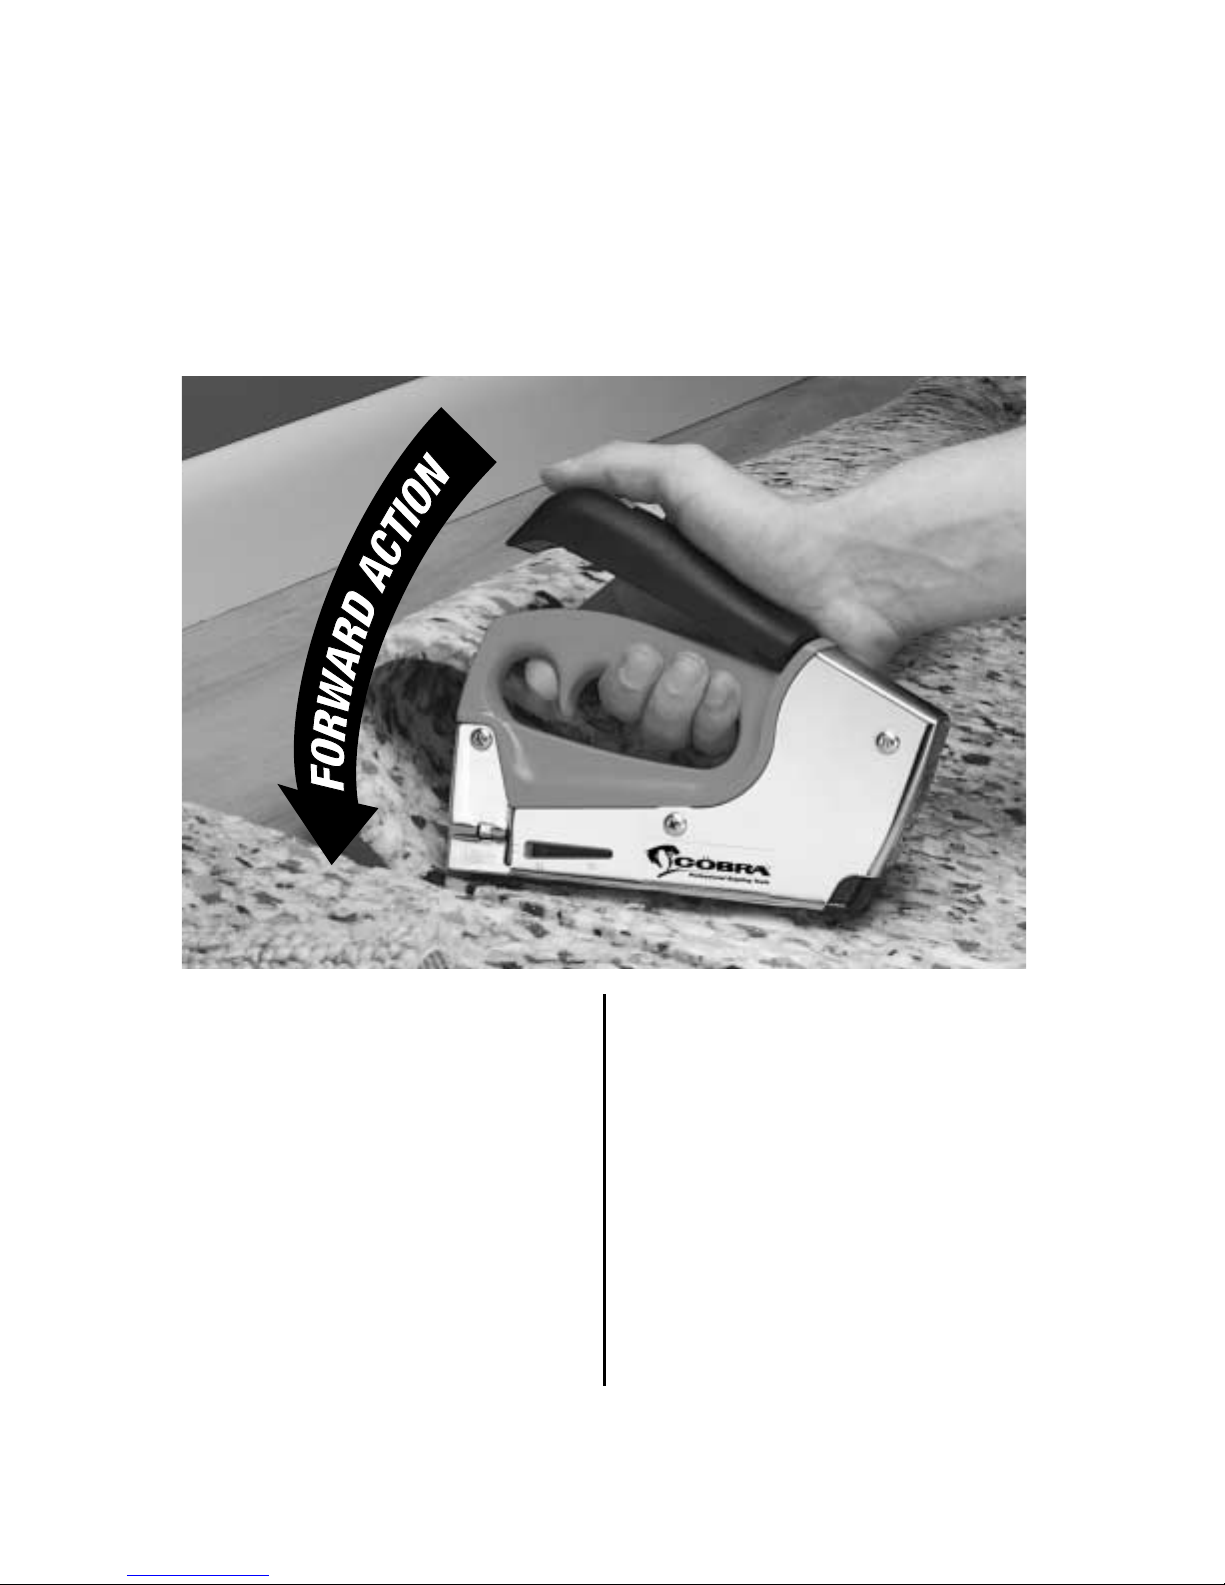
Firing Your Cobra™Staple
and Nail Gun (Fig. 4)
The Cobra™staple and nail gun has
been designed for unprecedented
ease of use and control. Simply grasp
the Cobra
™
staple and nail gun with
your hand on the forward part of the
gun (Fig. 4) and apply smooth, even
Page 5
pressure. Make sure the nosepiece
is placed firmly against the workpiece
before firing. Staple exits beneath your
hand.
Storing Your Cobra
™
Staple and Nail Gun
When finished using your Cobra
™
staple and nail gun, unload any
remaining staples or nails.
Store in a dry place, out of the
reach of children.
Clearing the Nail and
Staple Chamber
If, while using your Cobra™staple
and nail gun, it becomes necessary to
clear a jam from the staple chamber or
track, follow these instructions:
With the bottom of the gun
facing away from your face and
body, open the staple chamber by
squeezing and pulling the plastic
track release straight down away
from the base of the gun and
sliding the track back.(Fig 1)
(Note: the jammed staple or nail
may cause the track to be harder
to slide out than usual. Once the
staple or nail has been cleared,
the track will resume its normal,
free operation) Loose staples or
nails will be expelled from the
chamber.
Clear any remaining staples or
nails from the track and chamber
area.
Reload the Cobra staple and nail
gun and continue using.
Using the Wire Guide
Attachment (Fig. 6)
Use the wire guide attachment to
help prevent stapling into low
voltage wire. The guide provides a
groove, to place wire into before
stapling, to help prevent
puncturing the low voltage wire.
To use attachment: slide
attachment into front of stapler so
the groove is protruding under
staple exit point (fig.6)
Staple Exit Indicator: (Fig. 5)
Use the Staple Exit Indicator when
you need greater precision in placing
your staples. Staples will exit the gun
directly behind the noseplate.
Staples Remaining and
Staple Size Window:
Use the Staples Remaining
Window, located on the left side of the
gun, to determine when it’s time to
reload. Also use the window to see
what size staples are loaded.
IMPORTANT: POINT THE
GUN A W AY FROM
YOURSELF AND OTHERS
at all times and especially when
opening the track to clear a
jammed staple or nail. As the
track is opened, the jammed
staple or nail may be shot out
unexpectedly.
4
Page 6
COMMON APPLICA TIONS
FOR STAPLE LENGTH:
1⁄4" Display Signs, Window Shades, Window Screens, Draperies,
Shelf Paper, Light Upholstery, Lining, Plastic Film, Decorations.
5⁄16" Insulation, Upholstery, Weather stripping, Wall Decorations,
Crafts, Covering Cornices, Leatherettes, Webbing, Light Fabrics.
3⁄8" Insulation, Carpeting, Wire Mesh, Plastic or Canvas Coverings,
Roofing Paper, Felt Stripping, Low Voltage Wiring (Telephone,
Tele-communications), Weather Stripping.
1⁄2" Insulation, Carpet Underlayment, Low V oltage W iring
(T elephone/Telecommunications), Porch Screens, Picture Frames,
Wire Mesh; Netting, Roofing Paper , Paneling, Holiday Lights.
9⁄16" Ceiling Tile, Heavy Insulation, Insulation Board, Fencing, Trellises,
Roofing, Carpeting, Metal Lath, Cornerite, Heavy Wire Mesh.
COMMON APPLICA TIONS
BRAD NAILS:
9/16" Trim molding, Paneling, Picture Frames, Model Work, Any
Finish Nailing Application
5
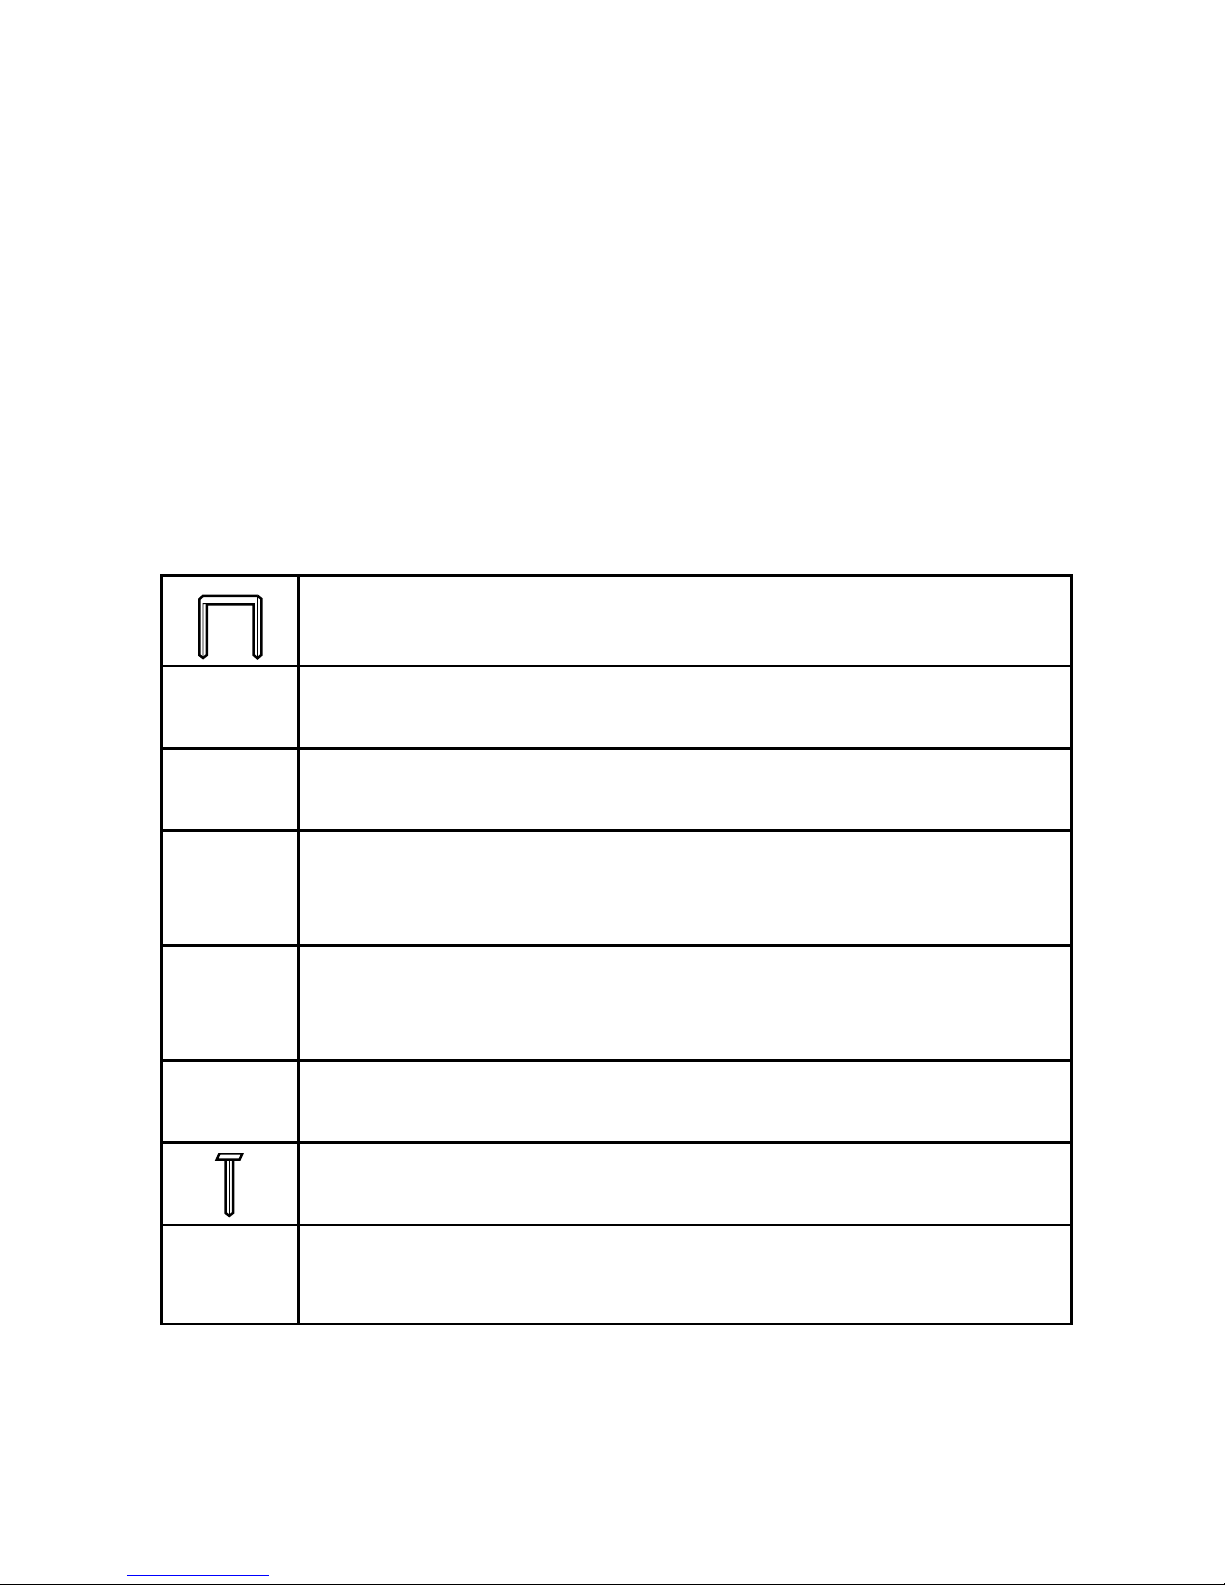
Staple Selection Guide
For best results the Cobra™Heavy Duty Staple and Nail Gun has been designed to
use Cobra™brand heavy duty .05" crown width staples. It will also accept other .05"
crown width heavy duty staples, including PowerShot
®
and Arrow®T -50®brand staples.
*Arrow®T-50®are registered trademarks of Arrow Fastener Company.
(14.4mm)
(14.2mm)
(12.7mm)
(9.54mm)
(7.93mm)
(6.36mm)
Warranty
30 Day Satisfaction Guarantee: If for any reason you are not completely satisfied
with your Cobra™Stapler simply return it to the place of purchase (if a participating
retailer) within 30 days for a full refund.
2-Y ear W arranty: PowerShot Tool Company warrants this product from any defects
due to faulty material or workmanship for a period of 2 years from purchase date.
Please return, transportation pre-paid, to the seller (if a participating retailer) for free
repair or replacement (proof of purchase required).
Page 7

6
FIG. 1
FIG. 2
FIG. 3
STAPLES REMAINING WINDOW
FIG. 4
EXIT
FIG. 5
STAPLE EXIT
INDICATOR
FIG. 6
GROOVE
INDICADOR DE SALIDA DE LAS GRAPAS
VENTANILLA INDICADORA DE
GRAPAS RESTANTES
SALIDA
INDICATEUR D’AGRAFES
SORTIE
ENCOCHE
INDICA TEUR DE SORTIE DES AGRAFES
RANURA
Page 8

Le agradecemos que haya seleccionado
la engrapadora y clavadora de acción
progresiva®profesional Cobra
™
7
Su nueva engrapadora y
clavadora Cobra
™
para trabajos
pesados está diseñada para
proporcionarle un rendimiento
superior al clavar o engrapar
con facilidad y control nunca
antes vistos. La engrapadora y
clavadora Cobra™puede utilizarse para muchas aplicaciones profesionales. Si se utiliza y cuida correctamente, la
A
C
C
I
Ó
N
P
R
O
G
R
E
S
I
V
A
engrapadora y clavadora Cobra
™
durará muchos años sin ningún
problema. Para su funcionamiento seguro y el mejor rendimiento, rogamos leer todas las
instrucciones y normas de
seguridad detenidamente antes
de utilizar la engrapadora y
clavadora Cobra™. No olvide
enviar su tarjeta de registro.
®
Page 9

ADVERTENCIA: PARA REDUCIR AL MÍNIMO LAS LESIONES A
LOS OJOS, SIEMPRE LLEVE PROTECCIÓN PARA LA VISTA.
Cuando use herramientas mecánicas, siempre debe seguir las
precauciones básicas de seguridad para reducir el riesgo de lesiones
personales, entre ellas:
LEA TODAS LAS INSTRUCCIONES
1. ESTÉ CONSCIENTE DEL PUNTO DE SALIDA DE LAS GRAPAS. El
diseño único de acción progresiva de la engrapadora Cobra
™
pone la
parte “alta” del mango al frente. Asegúrese de que esta herramienta esté
en la posición correcta en su mano antes de usarla.
2. APUNTE LA ENGRAPADORA ALEJADA DE SÍ MISMO Y DE LOS DEMÁS
en todo momento y sobre todo cuando abra la engrapadora para sacar
las grapas atascadas. Cuando abra el carril, las grapas atascadas se pueden
disparar inesperadamente.
3. UBIQUE EL PUNTO DE SALIDA DE LAS GRAPAS FIRMEMENTE CONTRA
LA SUPERFICIE A ENGRAPAR ANTES DE COMENZAR. Las grapas disparadas
“al aire” pueden causar lesiones graves.
4. SIEMPRE USE EL TAMAÑO APROPIADO DE GRAPAS. Este producto sólo
acepta grapas de alambre para trabajos pesados de 0,05 pulg (1,27 mm). No
intente usar grapas para aplicaciones livianas de 0,03 pulg (0,76 mm), grapas
de escritorio ni de alambre en esta engrapadora.
5. MANTENGA LIMPIA EL ÁREA DE TRABAJO. Las áreas y los bancos de trabajo
desordenados facilitan las lesiones.
6. CONSIDERE ELAMBIENTE DE TRABAJO. No exponga la herramienta
a la lluvia. Mantenga la zona de trabajo bien iluminada.
7. MANTENGAALEJADOS A LOS NIÑOS. Todos los visitantes deben mantenerse
lejos del área de trabajo. No permita que los visitantes toquen la herramienta.
8. GUARDE LA HERRAMIENTA DESPUÉS DE USARLA. Después de utilizar las
herramientas, éstas se deben guardar en un sitio seco, en alto, bajo llave
y fuera del alcance de los niños.
9. TRABAJE CÓMODAMENTE. Siempre mantenga su equilibrio y los pies bien
apoyados.
10. MANTÉNGASE ALERTA. Ponga atención a lo que hace. Use el sentido común.
No use la herramienta cuando esté cansando.
11. SEA PRECAVIDO Y NO ENGRAPE CABLES ELÉCTRICOS especialmente los
que no están a la vista.
GUARDE ESTAS INSTRUCCIONES PARA REFERENCIA FUTURA
INSTRUCCIONES IMPORTANTES DE SEGURIDAD
8
Page 10

*Arrow® T-50® son marcas registradas
de la Arrow Fastener Company.
Uso de la engrapadora y
clavadora Cobra
™
Selección de la grapa adecuada:
Para lograr los mejores resultados,
su engrapadora y clavadora Cobra™
ha sido diseñada para uso con las
grapas de cabeza estrecha para trabajos pesados genuinas marca
Cobra™ de diversos tamaños desde
1/4 pulg (6,35 mm) a 9/16 pulg
(14,28 mm) y clavos de 9/16 pulg
(14,28 mm).
La engrapadora/clavadora Cobra
™
también se puede usar con grapas
para trabajos pesados de otras marcas, como grapas para trabajos
pesados Powershot® y Arrow® T50®*.
Selección del tamaño apropiado
de las grapas:
Como regla general, para engrapar
en madera, calcule lograr una penetración de las patas de aproximadamente 3/16 pulg (4,76 mm).
Para obtener más sugerencias sobre
la selección del tamaño apropiado de
grapas para trabajos específicos,
consulte el cuadro de selección de
grapas en la página 11 de este manual de instrucciones.
PRECAUCIÓN: Si hay una
grapa o un clavo atascado,
apunte la engrapadora alejada
de sí mismo y de otros, ya que
la grapa o clavo atascado
puede salir disparada al
abrirla.
Si no hay atranques, gire la
pistola al revés, de manera que
la parte inferior de la misma esté
dirigida lejos de su cara y
cuerpo. Abra la cámara de
grapas apretando y halando el
liberador del riel plástico derecho
hacia abajo y fuera del la base
de la pistola y deslizando el riel
hacia atrás. (Fig. 1.) Coloque las
grapas dentro de la cámara con
las puntas hacia arriba (Fig. 2).
Para cargar clavos, gire la pistola al
revés e inclínela de manera que el
lado con el icono de clavos "T" y la
ventanilla de revisión de grapas
restantes esté mirando hacia abajo.
(Fig.3). Cárguela recostando
apretadamente la cremallera de
clavos contra el interior de la
cámara de grapas en la carcasa
(Fig.3). Asegúrese de insertar los
clavos con la punta mirando hacia
arriba. La pistola se puede atascar
si los clavos son insertadas en el
lado equivocado de la carcasa.
Carga de las grapas y clavos
(Fig. 1, 2 y 3)
La engrapadora Cobra™ posee una
cámara para el cambio rápido de
grapas (Fig. 1).
Revise el funcionamiento correcto
del mango para evitar que haya
grapas o clavos atascadas de usos
anteriores.
9
Uso de la engrapadora y
clavadora Cobra™ (Fig. 4)
La engrapadora y clavadora Cobra™
ha sido diseñada para facilitar al máximo
su uso y control. Para usarla, simplemente empuñe el mango de la engrapadora y clavadora Cobra™ apoyando su
Page 11

Form No. OM8000 Rev. 4/01 Printed in U.S.A.
Page 12

10
Uso del dispositivo de guía de
alambres (Fig. 6)
Utilice el dispositivo de guía de
alambres para evitar engrapar
alambres de bajo voltaje. La guía
proporciona una ranura, para
colocar el alambre antes de
engrapar , y así evitar dañar el
alambre de bajo voltaje.
Para utilizar el dispositivo: deslice el
dispositivo en la parte delantera de
la engrapadora de modo que la
ranura sobresale por debajo del
punto de salida de las grapas (fig.6).
Indicador de salida de las grapas:
(Fig. 5)
Utilice el indicador de salida de las grapas cuando necesite mayor precisión al
engrapar. Las grapas salen de la engrapadora justo detrás de la punta.
IMPORT ANTE: APUNTE LA
ENGRAP ADORAALEJADADE SÍ
MISMO Y DE LOS DEMÁS en todo
Cómo desatascar la engrapadora y clavadora
En caso de atasco de grapas al utilizar
su engrapadora y clavadora Cobra™,
asegúrese de seguir las siguientes instrucciones antes de intentar sacar las grapas
atascadas:
Apunte la parte inferior de la
engrapadora alejada de sí mismo y
luego abra la cámara de grapas
apretando y halando el liberador del
riel plástico derecho hacia abajo y
fuera del la base de la pistola y
deslizando el riel hacia atrás. (Fig. 1.)
(Nota: Las grapas o los clavos
atascados pueden dificultar aun más
el deslizamiento del carril. Una vez
que se haya sacado la grapa o el
clavo atascado, el carril funcionará
normalmente). Las grapas o los
clavos sueltos saldrán del carril.
Almacenamiento de su engrapadora y clavadora Cobra™
Cuando termine de utilizar su
engrapadora y clavadora Cobra™,
extraiga las grapas o clavos
sobrantes antes de guardar la
engrapadora.
Guárdela siempre en un sitio seco y
fuera del alcance de los niños.
Saque todas las grapas restantes del
carril y de la cámara.
Vuelva a cargar la engrapadora
Cobra™ y continúe utilizándola.
mano en la parte delantera del mango
(Fig. 4) y empuje en forma pareja.
Asegúrese de que la parte delantera de la
engrapadora esté colocada firmemente
sobre la pieza de trabajo antes de activarla. Las grapas salen debajo de su mano.
Ventanilla indicadora de grapas
restantes y tamaño de grapas
Utilice la ventanilla indicadora de grapas restantes, ubicada en el lado izquierdo de la engrapadora, para saber cuándo
es hora de cargar más grapas. También
puede usar la ventanilla para saber el
tamaño de las grapas que se cargan grapas. También puede usar la ventanilla
para saber el tamaño de las grapas que
se cargan.
momento y sobre todo cuando abra la
engrapadora para sacar las grapas o los
clavos atascados. Cuando abra el carril, las
grapas o los clavos atascados se pueden
disparar inesperadamente.
Page 13

11
USOS COMUNES SEGÚN
LOS T AMAÑOS DE LAS GRAPAS:
1⁄4" Exhibidores, persianas, pantallas de ventanas, cortinas, empapelados,
tapicerías ligeras, forros, plásticos, decoraciones.
5⁄16" Aislamientos, tapicerías, burletes, decoraciones de pared, artesanías,
cornisas, casi cuero, paños de red, telas livianas.
3⁄8"
Aislamientos, alfombrado, telas metálicas, cubiertas de plástico o lona,
empapelados para techos, cubiertas de fieltro, cableados de bajo
voltaje (teléfono, telecomunicaciones), burletes.
1⁄2"
Aislamientos, reforzamientos de alfombrados, cableados de bajo
voltaje (teléfono, telecomunicaciones), paneles de pórticos, marcos de
cuadros, telas metálicas, paños de red, empapelados para techos,
paneles, luces decorativas.
9⁄16"
Azulejos de techos, aislamientos fuertes, tablas de aislar , envallados,
enrejados, entretechados, alfombrados, listones metálicos, refuerzos
de ángulos, mallas metálicas fuertes.
USOS COMUNES DE
CLA VOS:
9/16" Molduras, paneles, marcos de cuadros, maquetas, todo trabajo de
acabado con clavos.
Guía de selección de grapas
Para lograr los mejores resultados, la engrapadora y clavadora Cobra™para trabajos pesados ha sido diseñada para utilizarse con grapas para trabajos pesados Cobra
™
con lomos
de 0,05 pulg (1,27 mm). También se pueden usar otras grapas para trabajos pesados con
lomos de 0,05 pulg (1,27 mm), incluyendo las grapas PowerShot
®
y Arrow®T -50®.
*Arrow®T-50®son marcas registradas de la Arrow Fastener Company.
(14.2mm)
(14.2mm)
(12.7mm)
(9.54mm)
(7.93mm)
(6.36mm)
Garantía
Garantía de 30 días: Si por cualquier motivo no está completamente satisfecho
con su engrapadora Cobra™, simplemente devuélvala al lugar donde la compró (si se trata
de un comerciante participante) dentro de los 30 días de su compra para obtener un reembolso total de su compra.
Garantía de 2 años: PowerShot Tool Company garantiza este producto contra cualquier
defecto debido a materiales o mano de obra defectuosos por un período de 2 años a partir
de la fecha de compra.Rogamos devolver, transporte previamente pagado, al comerciante
(si se trata de un comerciante participante) para que la herramienta sea reparada o reemplazada por otra (se exige el comprobante de compra).
Page 14

Merci d’avoir choisi l’agrafeuse-
pistolet cloueur professionnelle à
action constante
®
Cobra
™
12
Votre nouvelle agrafeuse-
pistolet cloueur Cobra
™
a été
conçue pour vous donner une
performance gros travaux avec
une facilité et un contrôle
jamais atteints auparavant.
L’agrafeuse-pistolet cloueur
Cobra
™
peut servir à de nombreuses applications professionnelles. Dans des conditions d’utilisations adéquates
A
C
T
I
O
N
C
O
N
S
T
A
N
T
E
et avec des soins appropriés,
l’agrafeuse-pistolet cloueur
Cobra™assurera de nombreuses années de service
fiable. Pour un emploi sûr et
une meilleure performance,
prière de lire toutes les règles
et mesures de sécurité avant
d’utiliser l’agrafeuse-pistolet
cloueur Cobra™. S’assurer
d’envoyer la carte réponse.
®
Page 15

AVERTISSEMENT : POUR RÉDUIRE LES RISQUES DE BLESSURE
AUX YEUX, TOUJOURS PORTER DES LUNETTES DE SÉCURITÉ.
Certaines précautions élémentaires sont à prendre pour l’utilisation d’outils
mécaniques afin de réduire les risques de blessure. En voici une liste :
LIRE TOUTES LES INSTRUCTIONS
1. REPÉRER L’ORIFICE DE SORTIE DES AGRAFES. La conception unique
d’action constante Cobra
™
place la partie « surélevée » de la poignée à
l’avant. S’assurer que cet outil est tenu dans le bon sens avant de l’utiliser.
2. ÉVITER DE DIRIGER L’AGRAFEUSE VERS SOI OU VERS QUELQU’UN
D’AUTRE, à tout moment, en particulier lors de l’ouverture du chargeur pour
débloquer une agrafe coincée. L’agrafe coincée peut être projetée avec force
lors de l’ouverture du chargeur.
3. NE PAS ACTIONNER L’AGRAFEUSE SI L’ORIFICE DE SORTIE N’EST PAS
SOLIDEMENT APPUYÉ CONTRE LA SURFACE DE TRAVAIL. Les agrafes
projetées « en l’air » peuvent provoquer des blessures graves.
4. UTILISER TOUJOURS LES AGRAFES APPROPRIÉES. Ce produit fonctionne uniquement avec des agrafes métalliques gros travaux calibre 0,05 po
(1 mm). Ne pas tenter d’utiliser des agrafes pour petits travaux, calibre 0,03
(0,8 mm), des agrafes de bureau ou des crampons métalliques.
5. MAINTENIR PROPRE LA ZONE DE TRAVAIL. Les zones et les établis
encombrés invitent les blessures.
6. TENIR COMPTE DU MILIEU DE TRAVAIL. Ne pas exposer l’outil à la pluie.
Bien éclairer la zone de travail.
7. ÉLOIGNER LES ENFANTS. Les visiteurs doivent être éloignés du secteur
de travail. Ne pas laisser les visiteurs toucher l’outil.
8. RANGER LES OUTILS INUTILISÉS. Les outils inutilisés doivent être rangés
dans un endroit sec, préférablement élevé ou fermé à clé — hors de portée
des enfants.
9. ÉVITER DE TRAVAILLER EN DÉSÉQUILIBRE. Toujours s’assurer de ne pas
perdre pied et de garder l’équilibre.
10. SOYEZ VIGILANT. Faites attention à ce que vous faites. Faites preuve de bon
sens. N’utilisez pas l’outil lorsque vous êtes fatigué.
11. PRENDRE GARDE DE NE PAS ENFONCER D’AGRAFES DANS LES FILS
ÉLECTRIQUES en particulier ceux qui peuvent être cachés.
CONSERVER CES DIRECTIVES POUR CONSULTATION ULTÉRIEURE
IMPORTANTES DIRECTIVES DE SÉCURITÉ
13
Page 16

*Arrow® et T -50® sont des marques
déposées de l’Arrow Fastener Company.
Utilisation de l’agrafeuse-pistolet cloueur Cobra™
Choix des agrafes appropriées:
Afin d’en optimiser la performance, votre
agrafeuse-pistolet cloueur Cobra™ a été
conçue pour travailler avec des agrafes à
tête étroite gros travaux de la marque
Cobra™ de longueurs variables, de 1/4 po
à 9/16 po (6,36 mm à 13,28 mm) et des
clous de 9/16 po (13,28 mm).
L’agrafeuse-pistolet cloueur Cobra™
accepte également des agrafes gros
travaux de marques différentes comme les
agrafes gros travaux des marques
Powershot® et Arrow® T -50®*.’
Choix de la longueur adéquate
de l’agrafe
D’une façon générale, pour une utilisation
dans le bois, l’agrafe doit pouvoir s’enfoncer sur environ 3/16 po (4,76 mm).
Pour des conseils supplémentaires concer-
nant le choix de la longueur appropriée de
l’agrafe pour des applications spécifiques,
consulter le tableau de sélection des
agrafes en page 16 du présent guide d’utilisation. des agrafes en page 16 du présent
guide d’utilisation.
S'il n'y a pas de blocage, retournez
le pistolet de façon à ce que la
partie inférieure ne soit pas face à
votre visage ou à votre corps.
Ouvrez la chambre en comprimant
et en écartant le bouton d'ouverture
en plastique de la base du pistolet
et en tirant sur la glissière. (Fig. 1).
Insérez les agrafes dans la
chambre, les pointes en haut(Fig.2).
Pour charger des clous, retournez
le pistolet et inclinez-le sur le côté
de manière à ce que le
pictogramme de clou "T" et
l'indicateur de niveau d'agrafes
soient tournés vers le bas (Fig.3).
Chargez la bande de clous en
l'appuyant contre la paroi interne de
la chambre (Fig.3). Assurez-vous de
charger le clou pointe vers le haut.
Insérez les clous dans le mauvais
sens peut bloquer le pistolet.
Chargement des agrafes et des
clous (Fig. 1, 2 et 3)
L’agrafeuse Cobra™ est équipée
d’une chambre de chargement
rapide (Fig. 1).
S’assurer qu’aucune agrafe ou clou
d’un emploi antérieur n’est coincé
en vérifiant le fonctionnement du
levier .
Utilisation de l’agrafeuse-pistolet cloueur Cobra™ (Fig. 4)
L’agrafeuse-pistolet cloueur Cobra™ a
été conçue pour permettre un emploi et
un contrôle d’une facilité sans précédent.
Saisir simplement l’agrafeuse dans la
main par sa partie avant (Fig. 4) et
exercer une pression douce et régulière.
S’assurer que le nez de l’agrafeuse est
bien appuyé contre la pièce à travailler
avant d’agrafer. Les agrafes sortent sous
votre main.
14
A TTENTION : si une agrafe ou
un clou est resté coincé,
orienter l’agrafeuse loin de soi
et des autres avant d’ouvrir le
chargeur puisque l’agrafe ou le
clou coincé risque d’être
projeté avec force au moment
de l’ouverture du chargeur .
Page 17

15
Utilisation du guide à encoche
pour câble (Fig. 6)
Utiliser le guide à encoche pour câble
pour éviter d’agrafer dans un câble de
faible tension. Ce guide possède une
encoche dans laquelle placer un
câble avant de l’agrafer pour éviter de
perforer le câble de basse tension.
Pour utiliser le guide : faire glisser le
guide à l’avant de l’agrafeuse de
façon que l’encoche fasse saillie sous
le point de sortie des agrafes (Fig. 6).
IMPORTANT : ÉVITER DE
DIRIGER L’AGRAFEUSE VERS
SOI OU VERS QUELQU’UN
D’AUTRE
en tout temps en particulier lors de l’ouverture du chargeur
pour débloquer une agrafe ou un
clou coincé. L’agrafe ou le clou
coincé peut être projeté avec force
lors de l’ouverture du chargeur.
Déblocage du chargeur
Si, pendant l’utilisation de l’agrafeusepistolet cloueur Cobra™ il s’avère nécessaire de décoincer une agrafe dans la
chambre ou le chargeur, appliquer la
procédure suivante :
Rangement de l’agrafeuse-pistolet cloueur Cobra™
Après l’utilisation de l’agrafeusepistolet cloueur Cobra™, vider toutes
les agrafes ou tous les clous restants.
La ranger dans un endroit sec, hors
de la portée des enfants.
Garantie
Garantie de satisfaction de 30 jours :
Si pour une raison quelconque vous n’êtes
pas complètement satisfait de votre
agrafeuse Cobra™ rapportez-la simplement au lieu d’achat (s’il s’agit d’un détaillant participant) dans les 30 jours pour un
remboursement complet.
Garantie de 2 ans : PowerShot Tool
Company garantit ce produit pendant deux
ans à compter de la date d’achat contre les
vices de matière ou de fabrication. Prière
de retourner l’outil, en port payé, au point
de vente (s’il s’agit d’un détaillant participant) pour obtenir une réparation gratuite
ou un remplacement (une preuve d’achat
peut être exigée).
Ôter toutes les agrafes restantes
dans le chargeur et dans la chambre.
Recharger l’agrafeuse-pistolet
cloueur Cobra et continuer
l’utilisation.
Indicateur de sortie des agrafes :
(Fig. 5)
Utiliser l’indicateur de sortie des
agrafes lorsqu’il est nécessaire de placer
vos agrafes avec plus de précision. Les
agrafes sortiront de l’agrafeuse directement derrière son nez.
Indicateur des agrafes :
Utiliser l’indicateur des agrafes situé
sur le côté gauche de l’agrafeuse afin
de déterminer s’il est temps de recharger. Utiliser ce même indicateur pour vérifier la taille des agrafes qui sont
chargées.
Avec la partie inférieure de
l’agrafeuse éloignée loin du visage
et du corps, ouvrez la chambre en
comprimant et en écartant le bouton
d'ouverture en plastique de la base
du pistolet et en tirant sur la
glissière. (Fig. 1).(Note : l’agrafe ou
le clou coincé peut bloquer le boîtier
et le rendre plus difficile à faire
glisser . Une fois l’agrafe ou le clou
enlevé, le chargeur retrouvera son
fonctionnement normal). Les
agrafes ou les clous détachés
seront expulsés de la chambre.
Page 18

APPLICATIONS COURANTES POUR CHAQUE
LONGUEUR D’AGRAFE :
1⁄4 po
Panneaux d’affichage, stores, moustiquaires, rideaux,
papier protecteurs, tissus, doublure, film plastique,
décorations.
5⁄16 po
Isolation, capitonnage, calfeutrage, décorations
murales, bricolage, recouvrement de corniche,
garnitures de feutre, alèses, tissus légers.
3⁄8 po
Isolation, moquettes, grillages, bâches en plastique
ou en toile, carton bitumé pour toiture, garnitures
de feutre, fils de basse tension (téléphone,
télécommunications), calfeutrage.
1⁄2 po
Isolation, sous-tapis, fils de basse tension (téléphone,
télécommunications), moustiquaires, cadres, grillages,
filets, carton bitumé pour toiture, contreplaqués,
lumières de Noël.
9⁄16 po
Carreaux de plafond, isolation haut rendement,
panneau isolant, clôtures, treillis, toitures, moquettes,
lattes métalliques, renforts d’angle, grillages de gros
calibre.
APPLICATIONS COURANTES
POUR LES CLOUS :
9/16 po
Moulures, contreplaqués, cadres, maquettes, toute
finition utilisant des clous.
16
Guide de sélection des agrafes
Pour obtenir les meilleurs résultats avec l’agrafeuse-pistolet cloueur Cobra™,
il est recommandé d’utiliser des agrafes gros travaux de calibre 0,05 po
(1,27 mm) de la marque Cobra
™
. L’agrafeuse accepte aussi des agrafes
gros travaux de calibre 0,05 po (1,27 mm) des marques PowerShot
®
et
Arrow
®
T -50®.
*Arrow®et T -50®sont des marques déposées de l’Arrow Fastener Company.
(14.2mm)
(14.2mm)
(12.7mm)
(9.54mm)
(7.93mm)
(6.36mm)
Page 19

Check out other great products from PowerShot Tool
Company on our website at www.PowerShot-Tool.com
Para ver más productos de la PowerShot Tool Company visite
nuestra página en Internet: www.PowerShot-Tool.com
Découvrez les autres fabuleux produits de PowerShot Tool
Company sur notre site Web à l’adresse www.PowerShot-Toolcom
Customer Assistance
If you have any questions concerning the operation or application of this product, please
contact: PowerShot Tool Company
Wytheville, VA 24382
Customer Service (800) 810-4099
Fax: (800) 811-0877
Asistencia al Cliente:
Si tiene alguna pregunta referente al
funcionamiento o aplicación de este
producto, rogamos contactar a:
PowerShot Tool Company
Wytheville, VA 24382
Servicios al Cliente (800) 810-4099
Fax: (800) 811-0877
Service à la clientèle:
Pour toute question concernant le
fonctionnement ou l’emploi de ce produit,
veuillez contacter :
PowerShot Tool Company
Wytheville, VA 24382
Service à la clientèle (800) 810-4099
Fax: (800) 811-0877
 Loading...