

Page 1

7700 PRO
Operating Hints
INSTALLATION
1 - Installation Hints
SYSTEM SET-UP
2 - Setting up a truck
3 - Description of weight settings
4 - Description of length settings
USING THE MAP SCREEN
5 - Panning
6 - Restriction Symbols
NAVIGATING
7 - Entering an address
8 - Entering an intersection
9 - Navigating to a city (no specific address)
10 - Preview a route (starting from your current location)
11 - Preview a route (starting from a different location)
12 - Viewing the turn list (while you are following a route)
13 - Changing the route criteria after you have programmed a destination
14 - How to do a detour
15 - Stopping a trip
16 - Adding an intermediate destination
17 - Multi-Route
18 - How to tap on the map screen and save the location into the address book
Page 2

POINT OF INTEREST (POI)
19 - Searching for POIs
20 - How to show / hide POI icons on the map screen
SOFTWARE & DATABASE UPDATES
21 - How to check the software version and update the software
22 - How to check the map version and update the maps
TROUBLESHOOTING
23 - It says “Some of the roads on this route are not on the National Network”
24 - Poor routing
25 - It says “Route Calculate Failure”
26 - My unit will not turn on
27 - How can I tell whether I am receiving satellites?
28 - Auto-brightness is not working properly
29 - I do not see POI icons on the map screen
30 - Trouble locking onto satellites
31 - How to do a Master Reset
MISC
32 - The STAA National Network
33 - Adjusting the volume
34 - Viewing your “current location”
35 - Observing satellite lock status
36 - Viewing the elevation
37 - Power light status
38 - Backing up the Address Book
OPTIONAL ACCESSORIES
39 - SD Card Slot
40 - External antenna
Page 3

Page 4

1) Installation Hints
Make sure to clean the windshield and suction cup before installation. Use glass cleaner or
rubbing alcohol.
To attach the bracket to the windshield:
1. Make sure the locking lever is in the UP position
2. Lightly moisten the suction cup
3. Firmly hold the suction cup against the windshield
4. Push the locking lever.
The 7700 PRO comes with a rubber bumper to protect your dash. If you let the unit rest on
the dash, stick the rubber bumper onto the bottom of your unit.
The GPS antenna is located at the top of the unit. During installation, arrange the mounting
bracket so that it does not block the top of your unit.
Using the Mounting Disc
Note: The adhesive pad is a separate piece. The pad must first be stuck to the disk.
1. Find a flat part of the dash to attach the mounting disc.
2. Clean the dash with the enclosed alcohol pad.
3. Clean the DULL side of the mounting disk with the alcohol pad (not the shiny side).
4. Peel the backing from one side of the adhesive pad and then press the pad onto the DULL
side of the mounting plate.
5. Peel the other backing from the adhesive pad and then press the mounting plate into position
on the dash.
6. Clean both the mounting plate and the suction cup with the alcohol pad.
7. The mounting bracket (suction cup) can now be attached to the mounting plate.
Once the plate is installed, it CANNOT be reused!
NOTE:
To create a secure mount, the plate uses a strong adhesive. Please note that should you ever want
to remove the plate, it might leave a mark on your dash. So please decide in advance whether
you really want to use it.
<back to menu>
Page 5
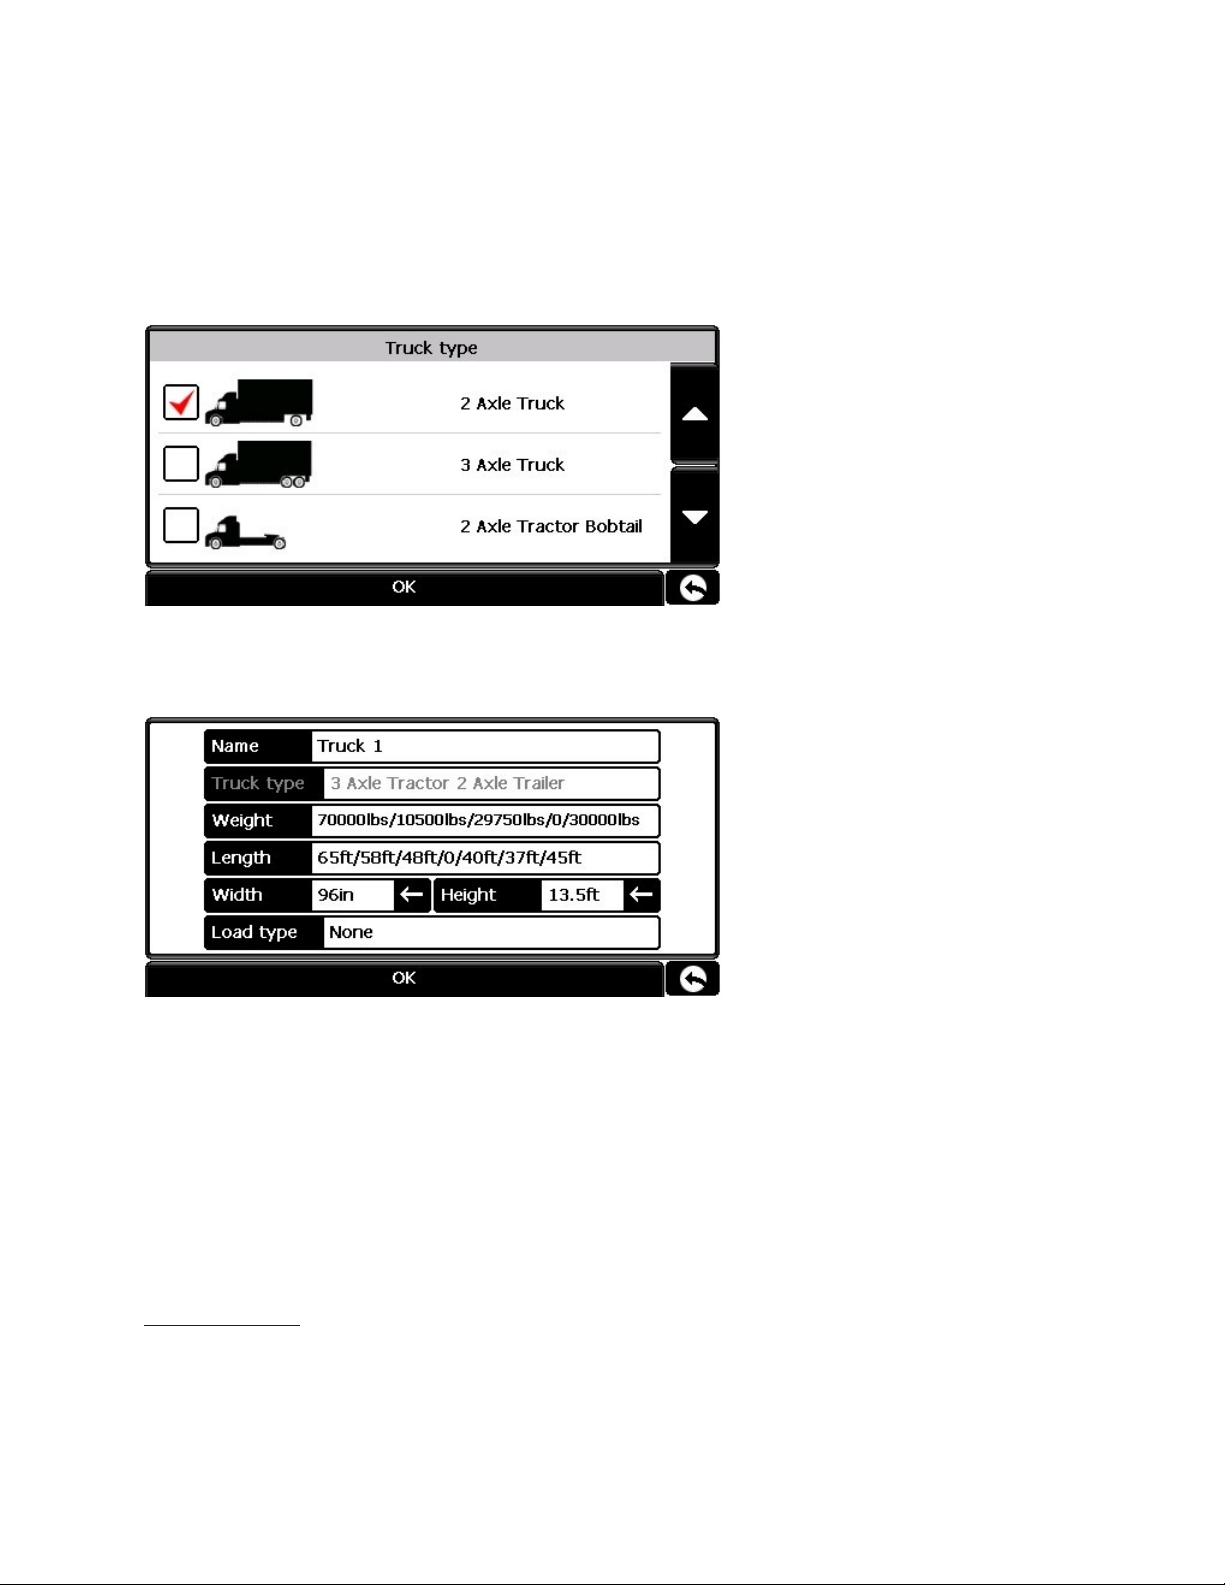
2) Setting up a truck
1. Tap anywhere on the map screen.
2. Tap on CONFIGURE.
3. Tap on TRUCK.
You should now bet at this screen:
Scroll through the pages to find your truck. After selecting the truck you will get this screen:
You can accept the default settings, or you can change them. To make a change, simply tap on
one of the fields.
If you are hauling hazardous material, then be sure to change the LOAD TYPE.
There are a lot of numbers for weight and length. If you tap on the weight field or the length
field you will see a breakdown. The next 2 pages gives an explanation of the different choices.
<back to menu>
Page 6
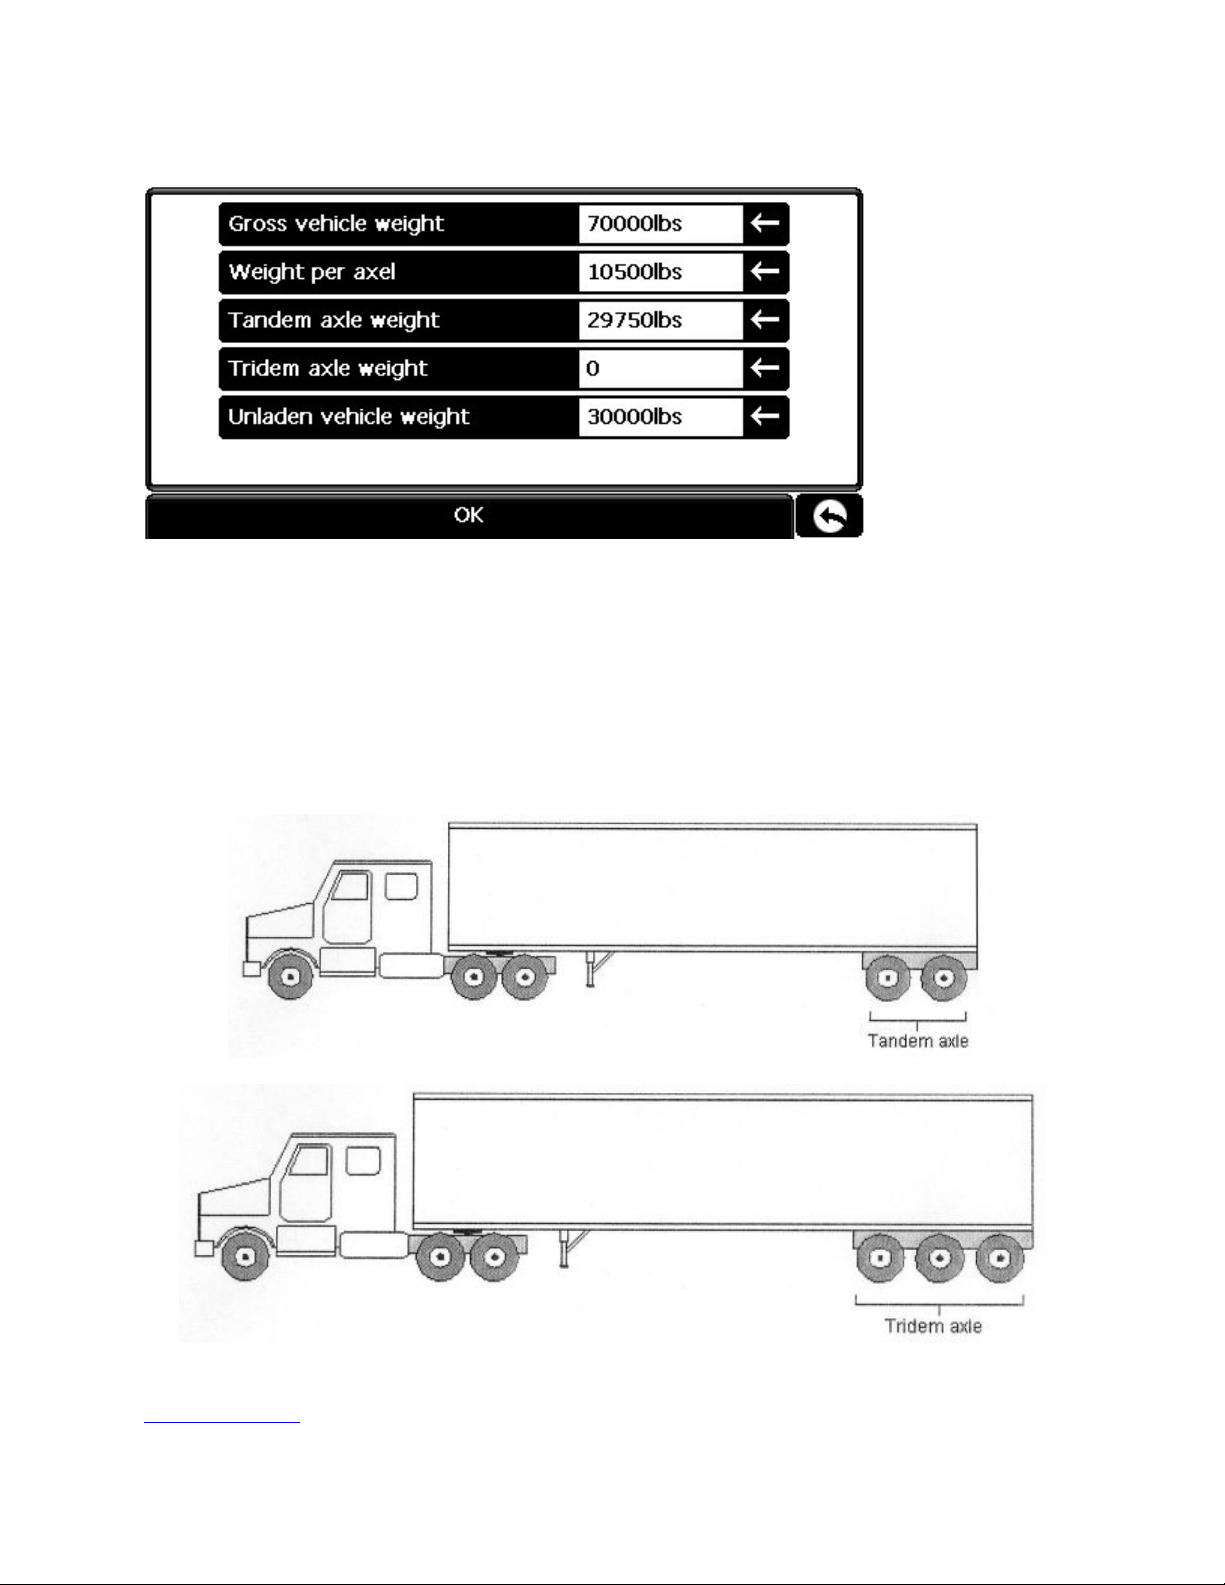
3) Description of Weight Settings
Gross vehicle weight: The total weight of the truck when it is loaded.
Weight per axle: You must calculate this using standard, accepted methods.
Tandem axle weight: The weight on the double-axle at the back of the truck.
Tridem axle weight: The weight on the triple-axle (see images below).
Unladen vehicle weight: The total weight of the truck when the trailer is empty.
<back to menu>
Page 7
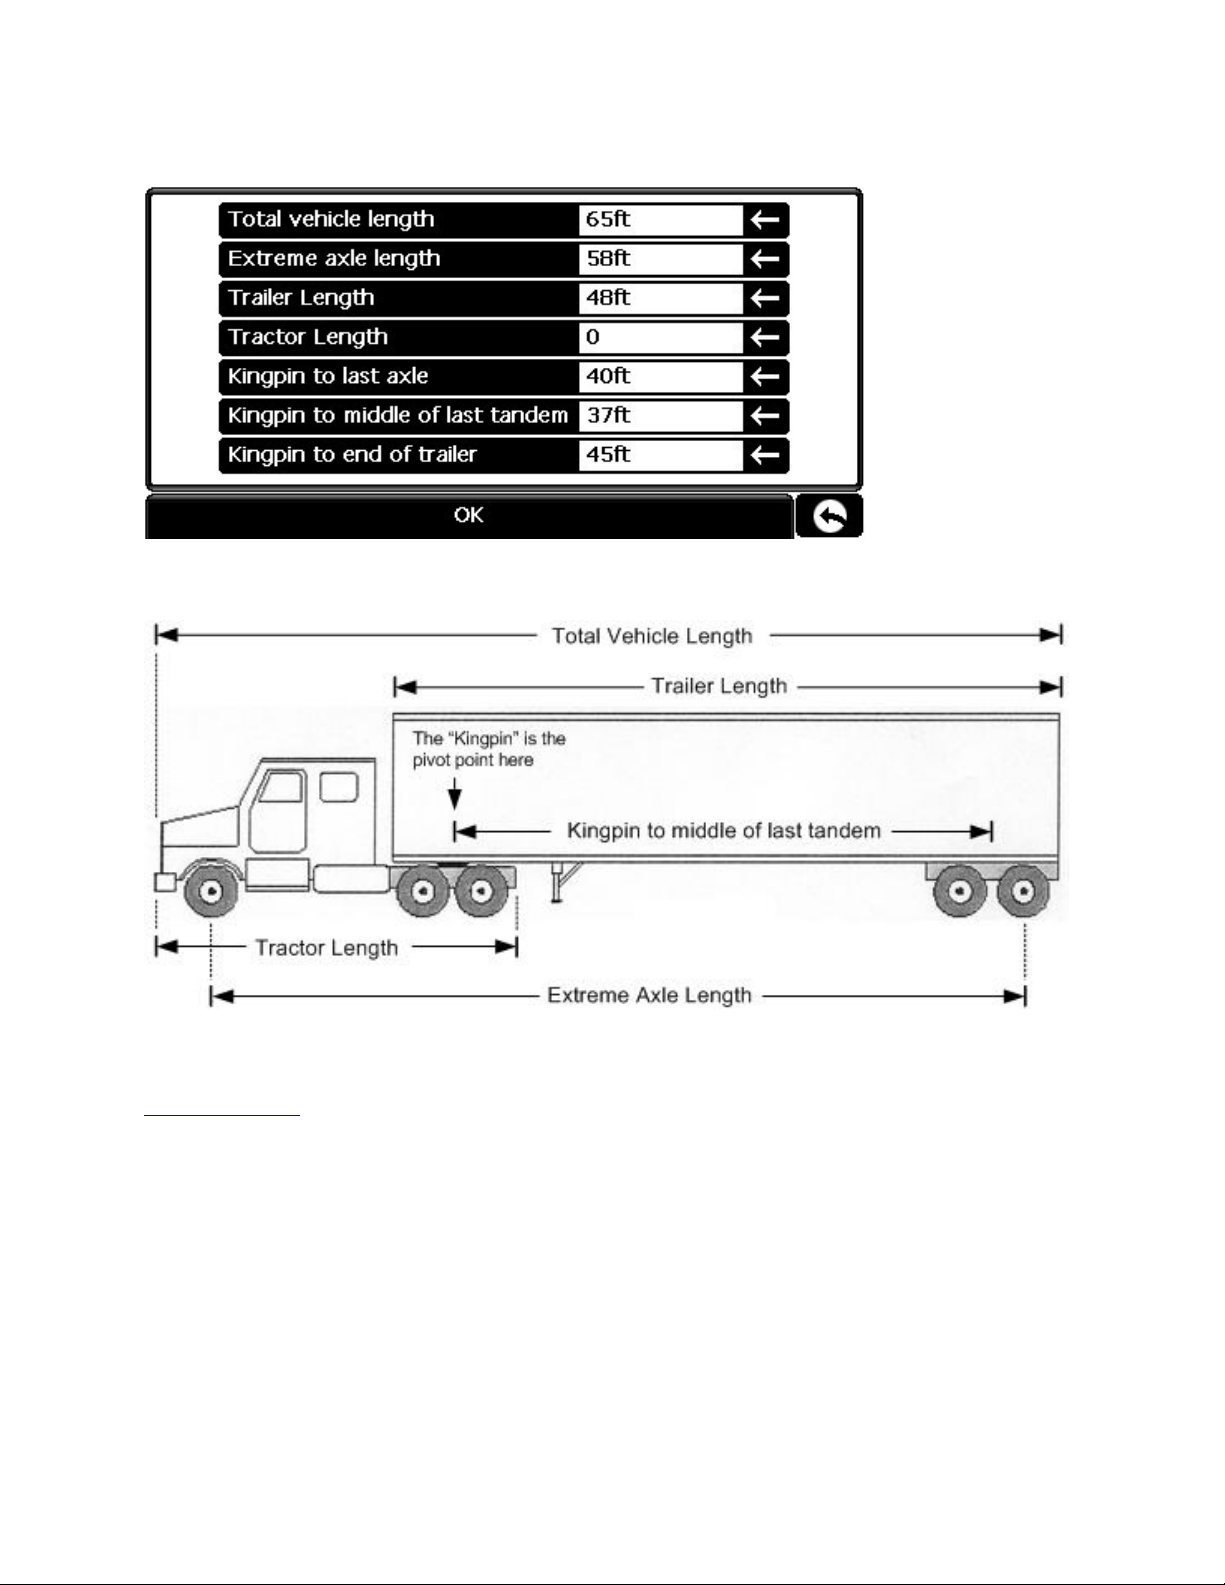
4) Description of Length Settings
<back to menu>
Page 8
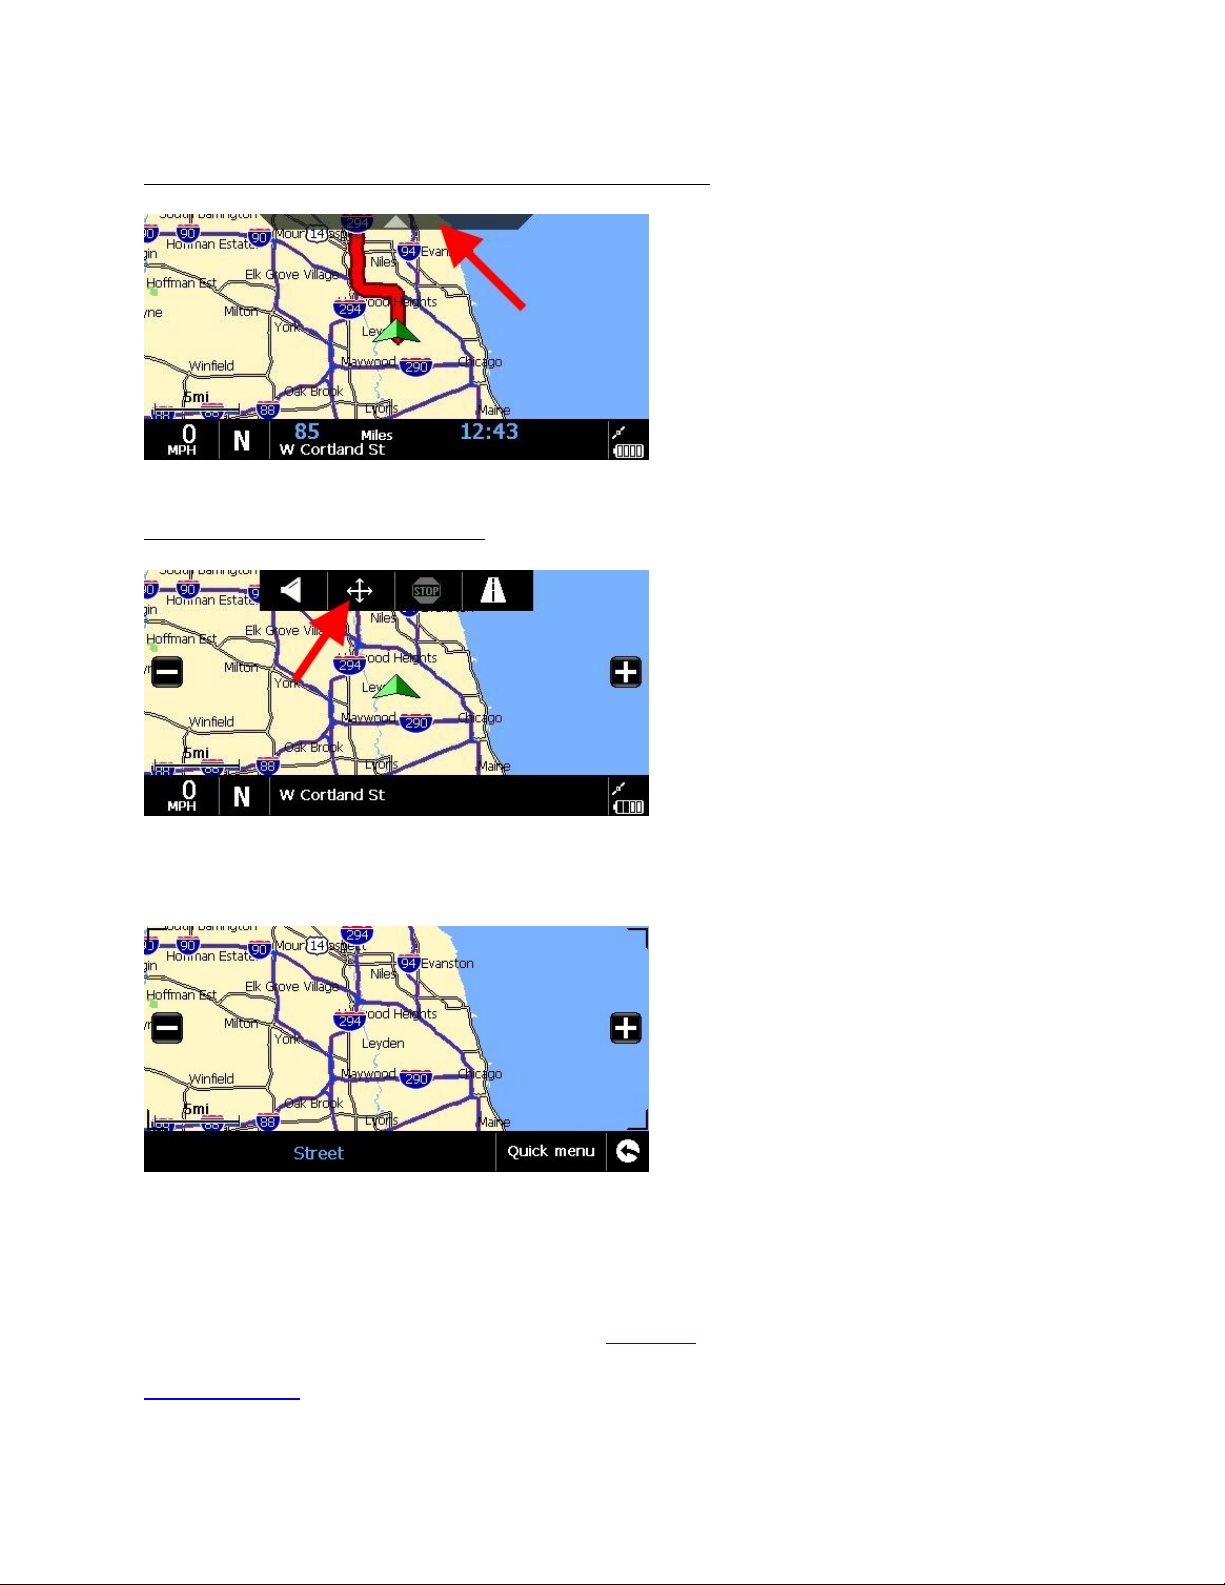
5) Panning
STEP 1 – Tap on the black bar at the top of the map screen
STEP 2 – Tap on the crosshair icon
Your screen should now look similar to this:
► To pan, drag your finger across the screen.
► Tap on the + and – buttons to zoom in and out.
► To exit, tap on the arrow in the lower-right corner.
For info about the QUICK MENU, please click <HERE>.
<back to menu>
Page 9
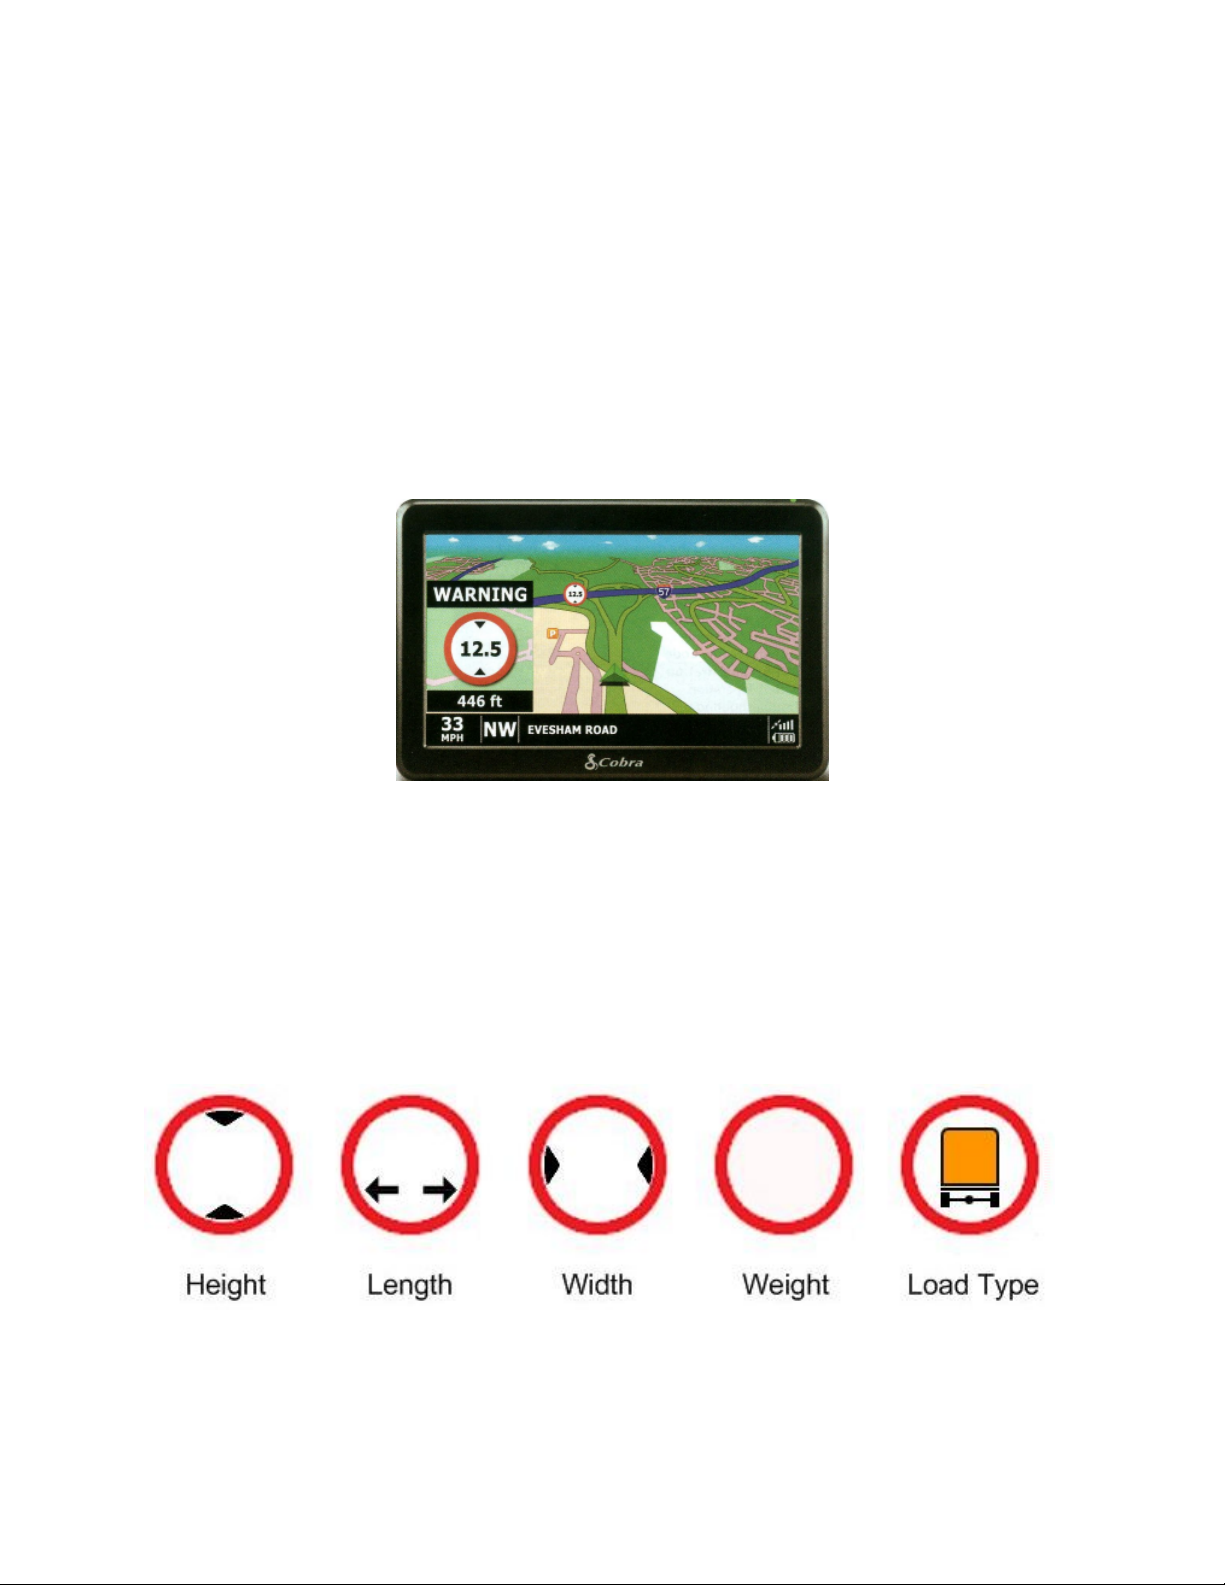
6) Restriction Symbols
When driving in truck mode, a “restriction symbol” may occasionally appear on the map screen.
The symbol is a warning of an impending truck restriction. The distance will count down to the
restriction. These are the types of restrictions you may encounter:
• Truck height
• Truck length
• Truck width
• Weight limit
• Load type (for example, restrictions on hazardous materials)
Here is a sample warning:
In the above example, there is a 12.5 foot height restriction which will happen in 446 feet.
It is probably a low bridge!
You should not encounter many restriction symbols when following a route, because the
7700 PRO is designed to calculate a route that avoids any restrictions. However if you are just
driving without following a route, then you may encounter restriction symbols.
Here are the different symbols:
The following page shows one more symbol.
Page 10
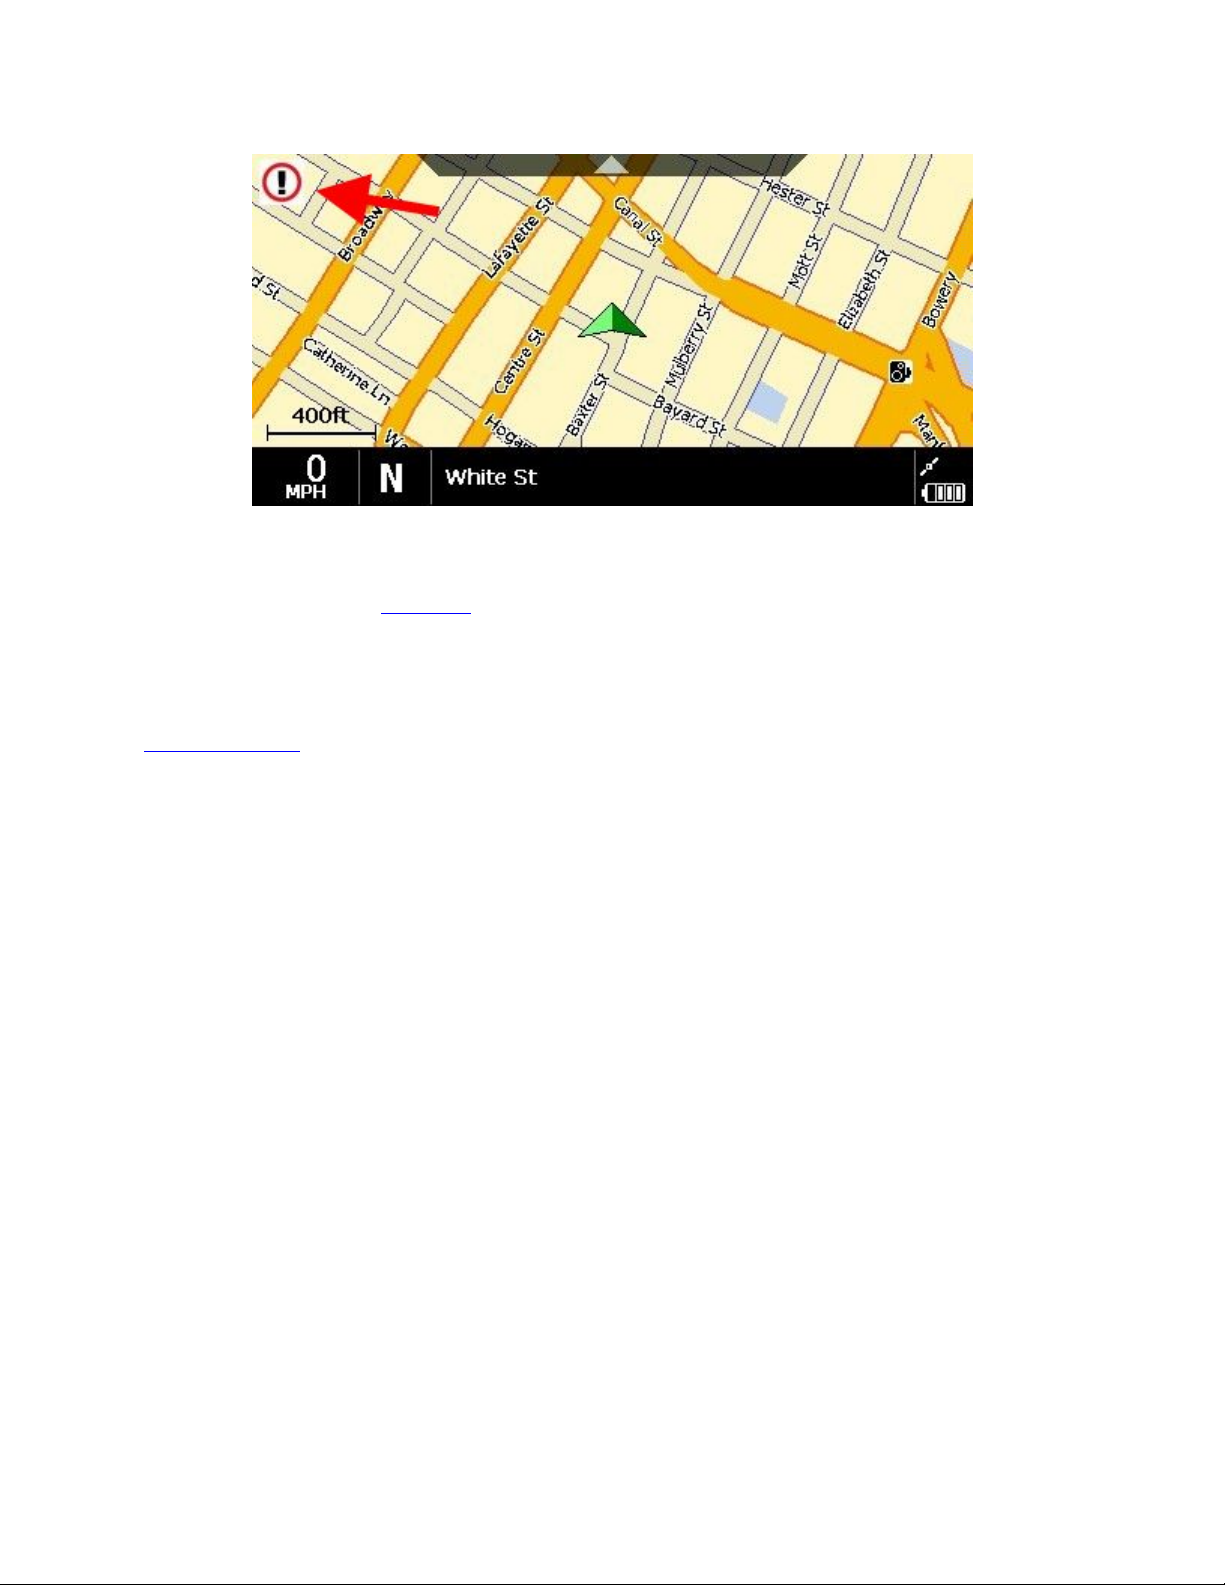
The above symbol indicates that you are not on the National Network. For information on the
National Network, click <HERE>.
When you are not on the National Network you should be careful to obey posted regulations.
<back to menu>
Page 11
7) Entering an Address
1. Tap anywhere on the MAP screen. A menu should pop up.
2. Tap on FIND
3. Tap on ADDRESS
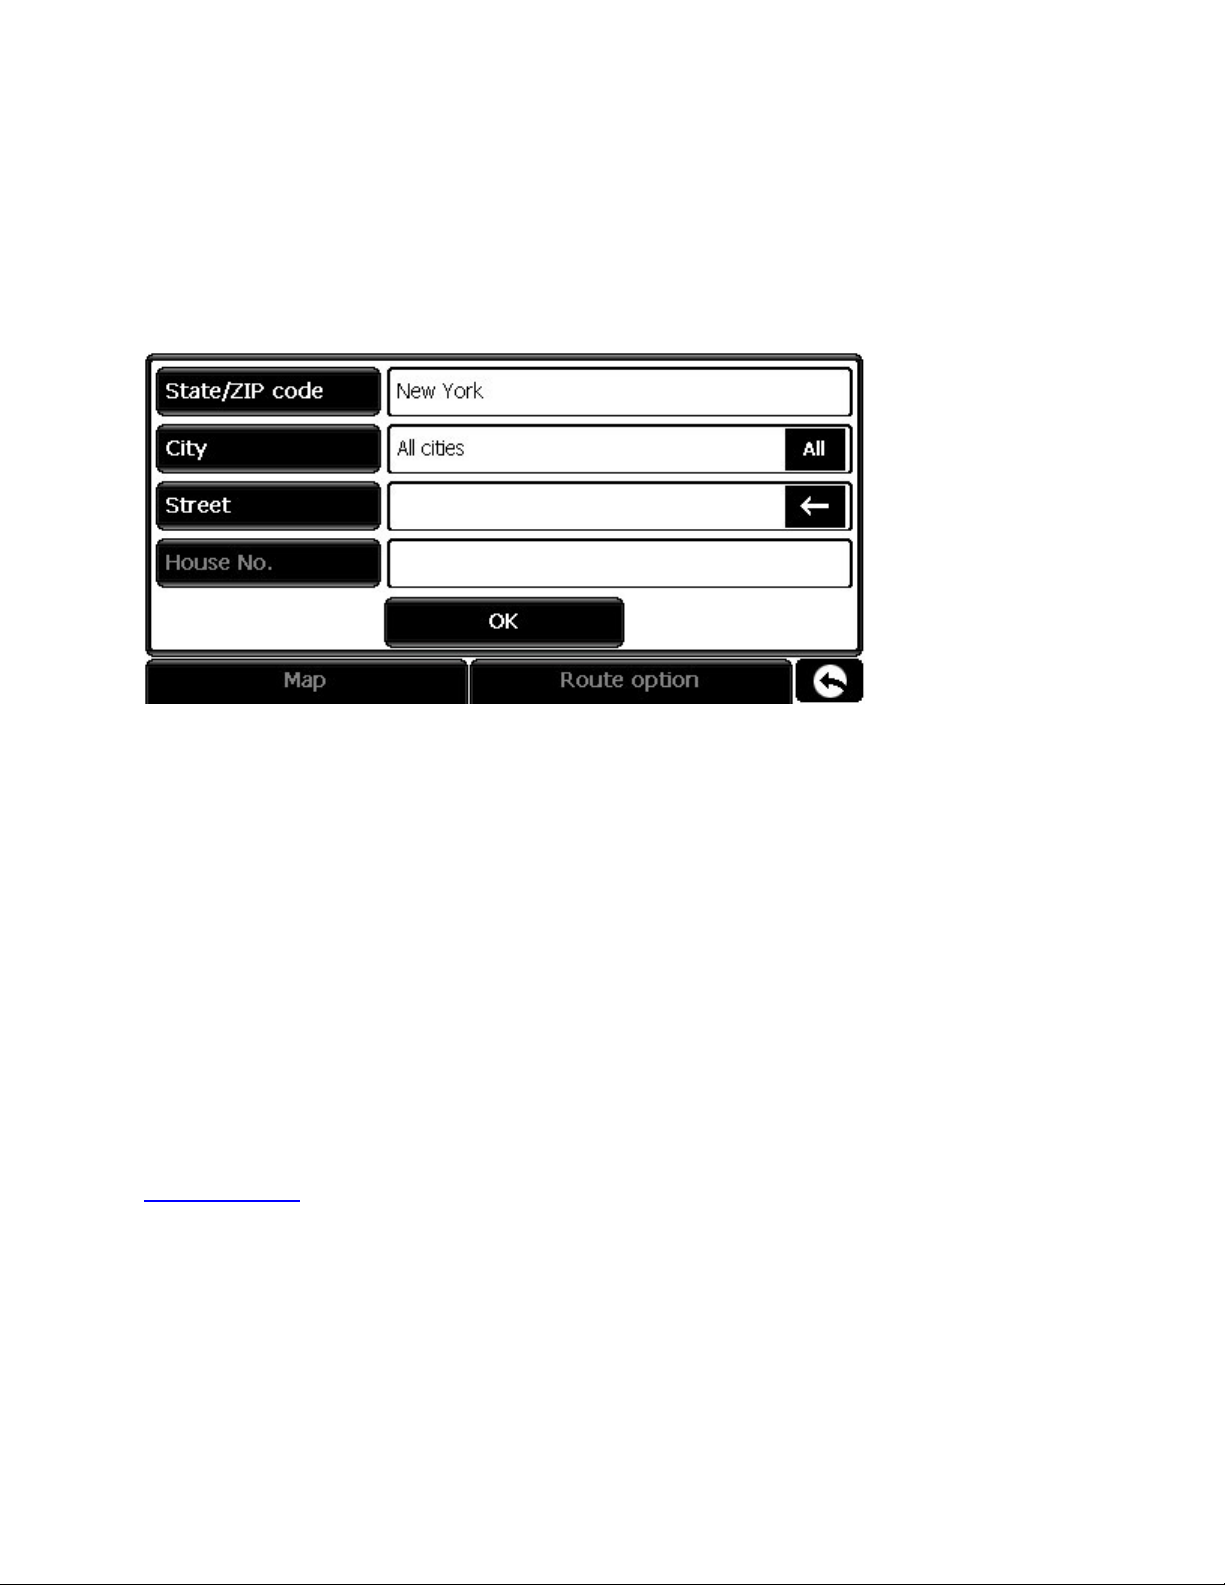
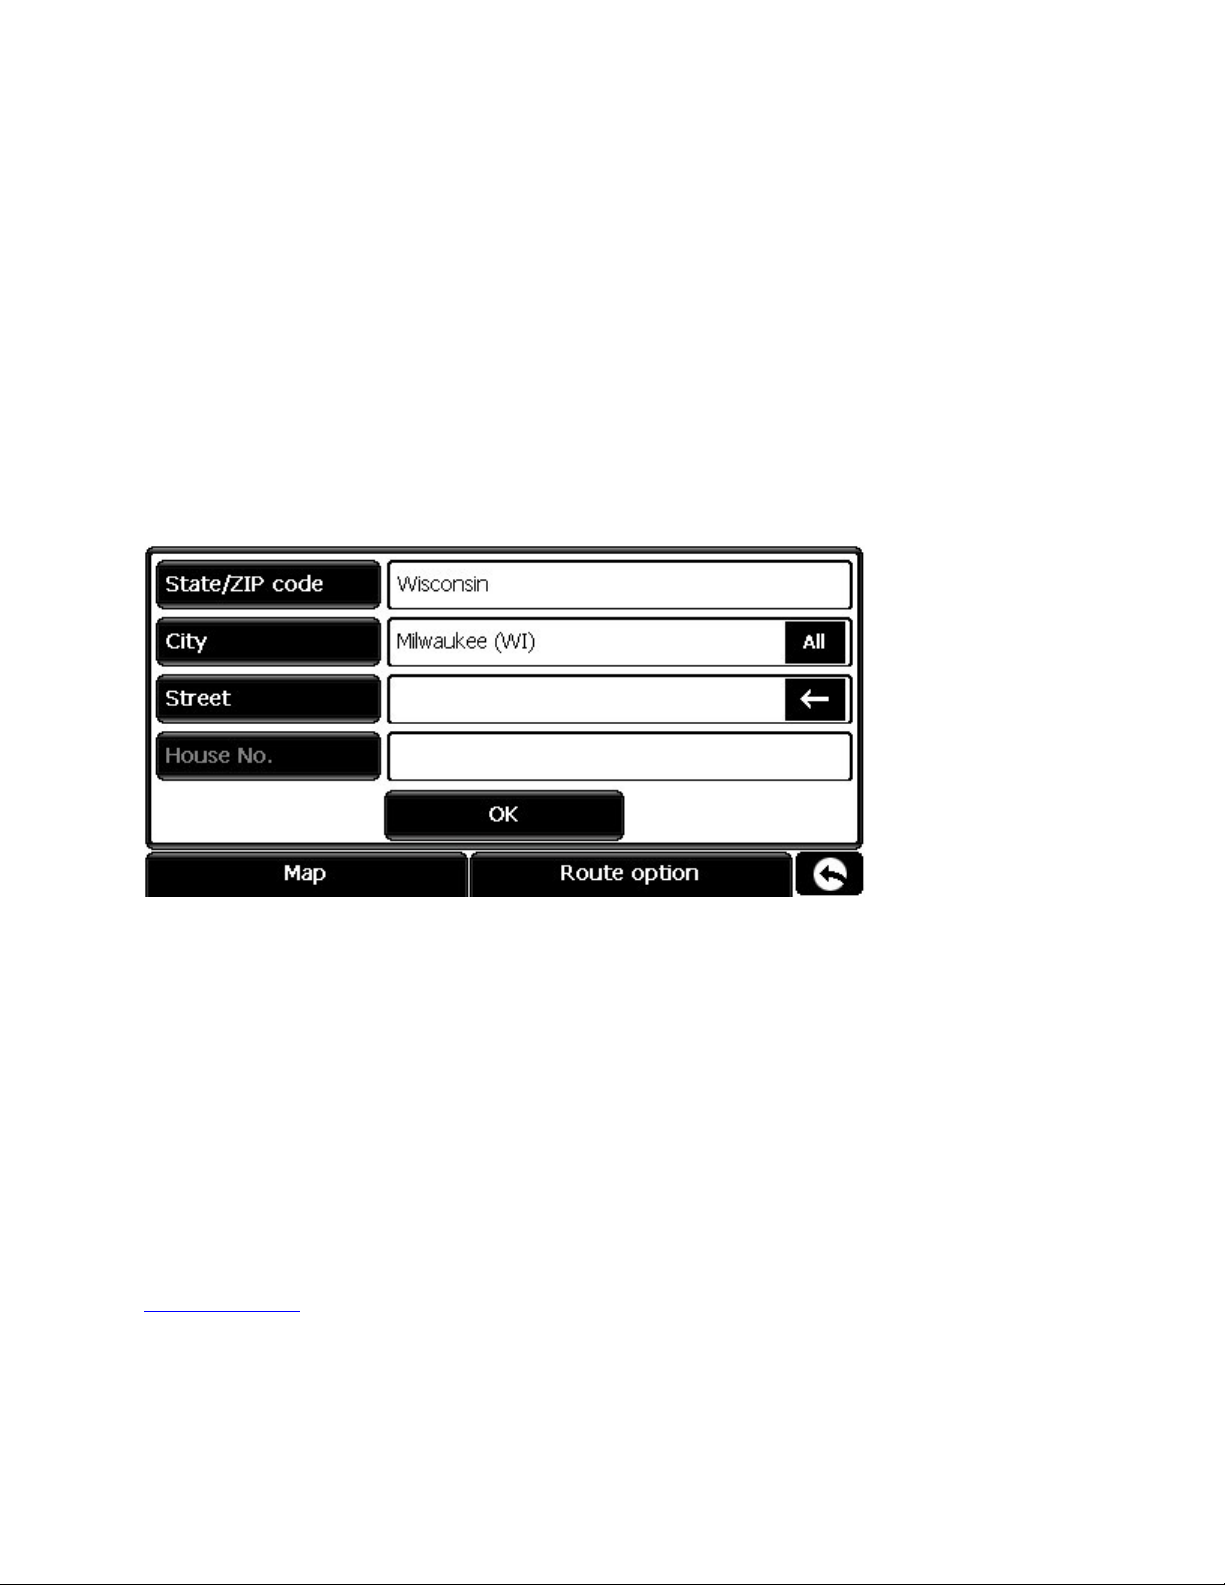
You should now be at this screen:
Tap on each field to enter the corresponding information.
When entering the street, just enter the basic street name. Here are some examples:
112 S. Main St. enter Main
5716 Highway 32 enter 32
1117 22nd Ave. enter 22nd
If you do not have a specific address, you can just enter the state and city.
When you are done, tap on OK or
− Tap on MAP to view the location on the map.
− Tap on ROUTE to change the routing criteria.
<back to menu>
Page 12
8) Entering an intersection
1. Tap anywhere on the MAP screen
2. Tap on FIND
3. Tap on INTERSECTION
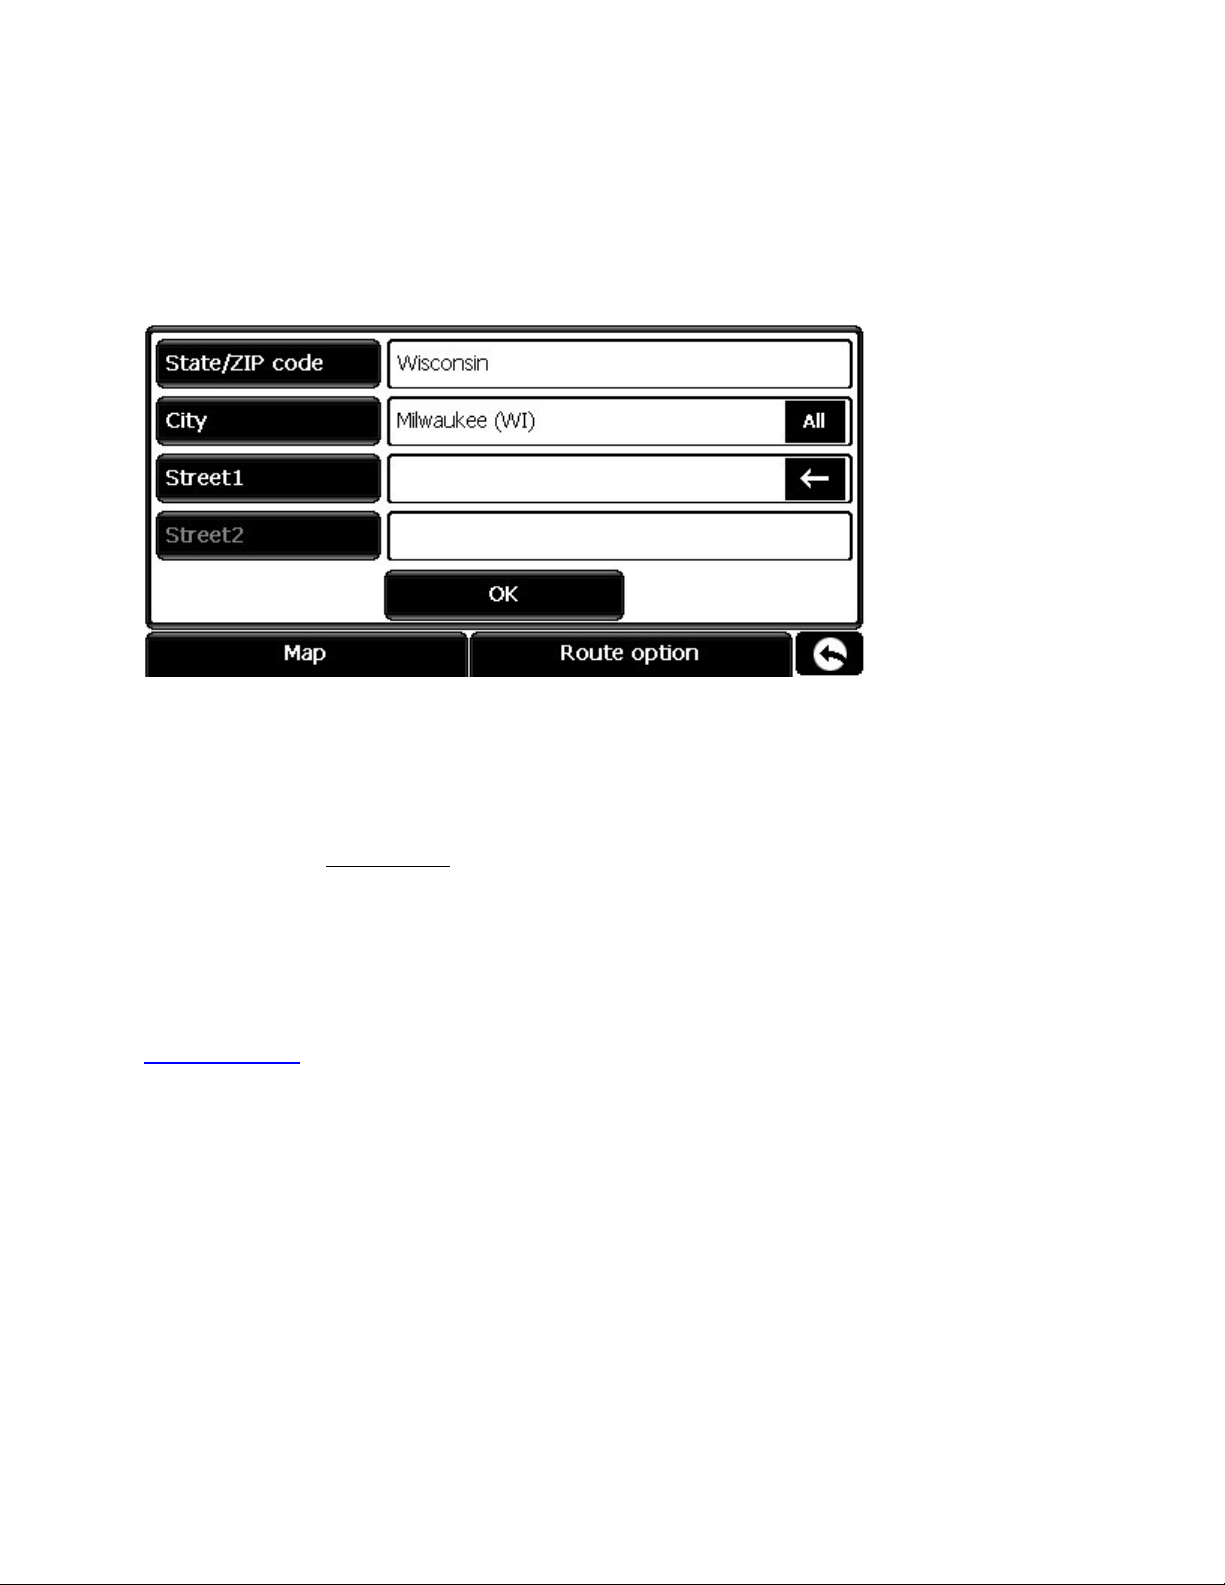
You should now be at this screen:
First choose the state and city.
Then enter the two streets.
NOTE: If one of the streets is a number (like 2nd Street or Route 12)
then enter it as the second street (Street2).
When you are done, tap on OK or
− Tap on MAP to view the location on the map.
− Tap on ROUTE to change the routing criteria.
<back to menu>
Page 13
9) Navigating to a city
If you want to navigate to a city without entering a specific address. The 7700 PRO will choose
an arbitrary address.
NOTE: In some rare occasions the 7700 PRO might choose an arbitrary address that has truck
restrictions for you. If you keep getting “Route Calculate Failure”, then try entering a specific
address. You could also try using Points of Interest and choosing a business within the target
city.
1. Tap anywhere on the MAP screen
2. Tap on FIND
3. Tap on ADDRESS
You should now be at this screen:
Enter only the state and city.
When you are done, tap on OK or
− Tap on MAP to view the location on the map.
− Tap on ROUTE to change the routing criteria.
IMPORTANT NOTE
The unit will choose an arbitrary address near the center of the city. Although rare, it is possible
to get a route calculation error if the address happens to be unreachable due to truck restrictions.
<back to menu>
Page 14
10) Preview a route (starting from your current location)
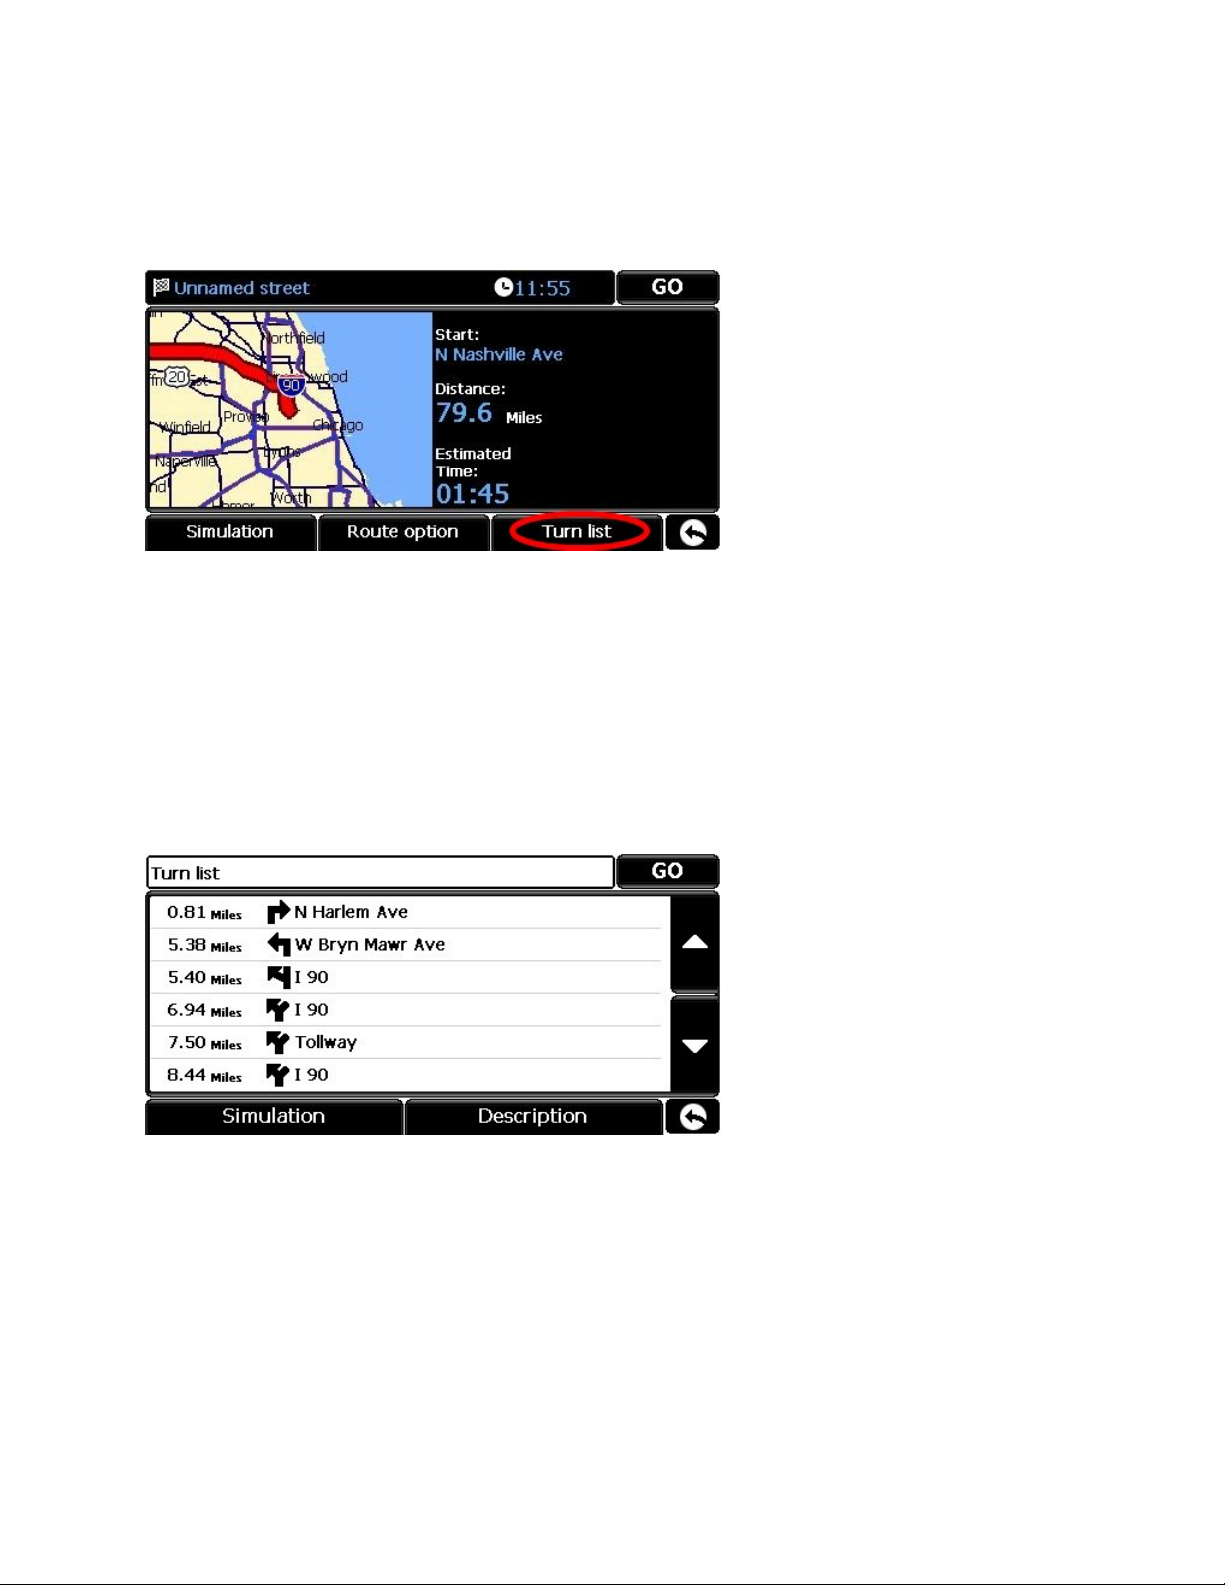
Enter an address and then click on CALCULATE. You should now be at this screen:
You have 2 options for previewing the route:
OPTION 1 – View the Turn List
If you tape on TURN LIST in the lower-right corner, you will see a list of the roads that the nav
unit will take to the destination:
Page 15
OPTION 2 – View the Map Screen
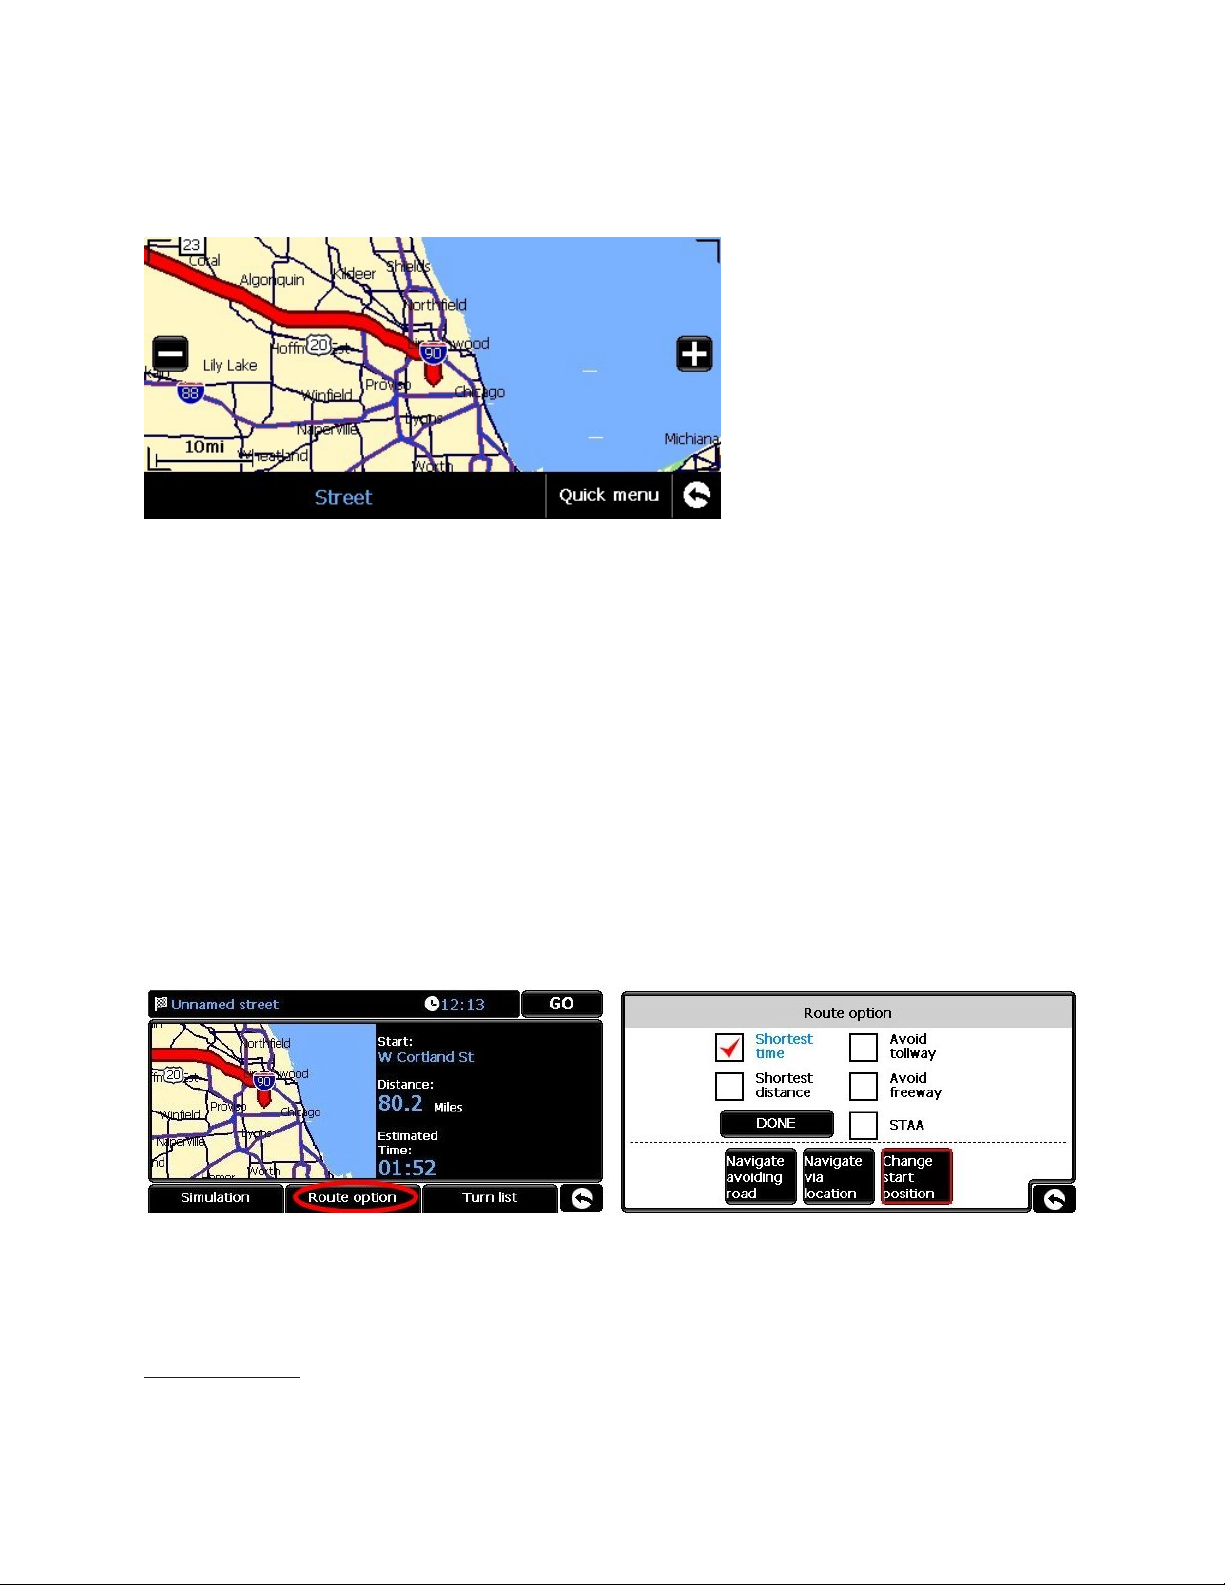
If you tap on the map, you will get this screen:
From here you can zoom in and out by tapping on the + and – buttons. You can also pan around
by dragging your finger across the screen.
When done, tap on the arrow in the lower-right corner.
After you are done previewing the route, you have 2 options:
OPTION 1 – Accept the Route
Simply tap on GO in the upper-right corner.
OPTION 2 – Change the Route Options
If you tap on ROUTE OPTION at the bottom of the screen, you will get this screen:
NOTE: If you tap on the “STAA” checkbox, the nav unit will try extra hard to keep you on the
National Network as much as possible.
<back to menu>
Page 16

11) Preview a route (starting from a different location)
It is possible to preview a route that starts from somewhere besides your current location. For
example maybe in a couple days you will be traveling from Nashville to Chicago, but your are
not in Nashville right now. You can tell the 7700 PRO to start from Nashville.
1. Enter the destination address as you normally would, and then tap on ROUTE OPTION
2. Tap on CHANGE START POSITION
3. Now enter the starting address and then let your unit calculate a route.
<back to menu>
Page 17

12) Viewing the turn list
The turn list is a list of all the streets that the nav unit plans to take to get you to the destination.
Obviously you can only see the turn list if you have programmed a destination.
STEP 1 – Tap on the black bar at the top of the map screen
STEP 2 – Tap on the road icon
STEP 3 – Tap on TURN LIST
<back to menu>
Page 18

13) Changing the routing after you have already programmed a destination
Perhaps the nav unit has calculated a route including toll roads, and now you have changed your
mind. Or maybe you just don’t like the route. Here is how to change the route options and
re-calculate a new route:
STEP 1 – Tap on the black bar at the top of the map screen
STEP 2 – Tap on the road icon
STEP 3 – Tap on CHANGE ROUTE OPTIONS
<back to menu>
Page 19

14) How to do a detour
Note: This can only be performed if you have already programmed a destination.
STEP 1 – Tap on the black bar at the top of the map screen
STEP 2 – Tap on the road icon
STEP 3 – Tap on DETOUR
You can then choose a specific road to avoid, or choose a range to avoid (like the next 10 miles).
<back to menu>
Page 20

15) Stopping a trip
To cancel a route:
STEP 1 – Tap on the black bar at the top of the map screen
STEP 2 – Tap on STOP
<back to menu>
Page 21

16) Adding an intermediate destination
Maybe you need to pick up a load before traveling to a final destination. You can program the
pickup point as an intermediate destination.
Or maybe you are traveling to your home terminal, but you want to stop off at Joe’s Smokey
Links for some of your favorite sausages.
1. Enter the final destination and then tap on ROUTE OPTION.
2. Tap on NAVIGATE VIA LOCATION.
3. Enter the intermediate destination.
4. Calculate the route.
The nav unit will first bring you to the intermediate destination, and then automatically direct
you to the final destination.
You can add only one intermediate destination.
If you need to add more than one, then choose Multi-Route instead.
<back to menu>
Page 22

17) Multi-Route
Multi-Route lets you add multiple destinations and then sort them.
1. Tap anywhere on the map screen.
2. Tap on the My Favorite tab.
3. Choose Multi-Route.
4. Tap on Create Multi-Route. (lower-left)
5. Tap on Add. (lower-left)
6. Enter a destination.
7. Repeat for other addresses.
Now auto-optimize the destinations by clicking on the following icon:
It will sort the destinations by distance “as the crow flies”. If you do not like the order, then you
can change it manually as described on the next page.
Page 23

To manually sort the destinations, tap on an address and then use the buttons
at the bottom of the screen:
When you are all done, don’t forget to give your Multi-Route a name. Just tap on EDIT NAME
in the upper-right corner.
<back to menu>
Page 24

18) How to tap on the map screen and save the location into the address book
You may tap on the map screen and then save the location into the address book. Please note
that you can only tap on streets and highways. No off-roading!
STEP 1 - Get into panning mode
Tap the black bar at the top of the screen… …and then tap on the crosshair icon.
STEP 2 – Adjust the zoom level
Tap on the + and – buttons to adjust the zoom level. You must be at 1000 ft or closer.
The zoom level is displayed in the lower-left corner.
STEP 3 – Tap on a street
You may now tap on a street or highway. If it is a valid location, then the street segment will
turn red and you will see the GPS coordinates in the upper-right corner.
Page 25

STEP 4 – Save it!
Tap on QUICK MENU, and then tap on ADD FAV.
Tap on NAME and give it a name. The location will be saved into the address book.
DONE!
<back to menu>
Page 26

19) Searching for POIs
1. Tap anywhere on the map screen
2. Tap on FIND (in the upper-left)
3. Tap on POINT OF INTEREST
When searching By Name, it is helpful to enter a state and city.
POIs will be listed by distance -- nearest ones first.
<back to menu>
Page 27

20) Show / hide POI icons
By default, the 7700 PRO will show all POI icons on the map screen. This makes for a very
cluttered screen.
1. Tap anywhere on the map screen.
2. Tap on CONFIGURE (in the upper-right).
3. Tap on SHOW POI.
You may now select which categories (if any) to show on the map screen.
In order to see POI icons, you must be zoomed-in far enough.
<back to menu>
Page 28

21) How to check the software version and update the software
Cobra offers free software updates which can be downloaded from our website. Please note that
the software is not the map data. The “software” is all the screens and features that you see. If a
software bug is discovered or if a new feature is added, you will see a new software update
available to download.
To view the software version:
1. Tap anywhere on the map screen.
2. Tap on CONFIGURE (in the upper-right).
3. Tap on the black triangle to scroll a couple pages until you see “Version”. Tap on Version.
The software version should now be visible:
To download the latest software, please visit the Cobra website here:
https://cobra.com/index.cfm?fuseaction=page.display&page_id=268
<back to top>
Page 29

22) How to check the map version and update the maps
To check the map version:
1. Tap anywhere on the map screen.
2. Tap on CONFIGURE (in the upper-right).
3. Tap on the black triangle to scroll a couple pages until you see “Version”. Tap on Version.
The map version should now visible:
The mapping database is much too large to download from the internet. Map updates are
supplied either on DVD or on an SD memory card. The SD memory card does not require a
computer, but there is a small charge for providing the memory card.
To order a map update, please call Cobra Customer Service at 773-889-3087.
<back to menu>
Page 30

23) It says “Some of the roads on this route are not on the National Network”
What this means is that part of the route is on secondary (local) roads. This is common when
making pickups and deliveries.
For information about the National Network, please click <HERE>.
<back to menu>
Page 31

24) Poor routing
Problem – “I know a better way”
As a general rule, a navigation product will usually not take the same route that you would
choose on your own. For example if you drive the same route every day, then you have learned
the best way to go based on traffic patterns. The nav unit will get you there, but it will probably
choose a different way.
Navigation units are not designed to show you the way to familiar destinations. If you always
know the best way to go, then you do not need a nav unit! Navigation units are very handy to
guide you to unfamiliar destinations. If you follow the turn-by-turn instructions, you will arrive
at your destination.
Problem – “I don’t like the route”
The 7700 PRO offers flexibility in calculating a route. You can change the routing options, and
you can also choose to avoid a particular road by choosing a “detour”.
For info on changing routing options, click <HERE>.
For info on doing a detour, click <HERE>.
Problem – “Route Calculate Failure”
Please click <HERE> for info.
<back to menu>
Page 32

25) “Route Calculate Failure”
Typically this error means that the nav unit cannot find a legal route based on the parameters of
your truck. Here is an example:
EXAMPLE
In West Virginia, the maximum legal truck length is 70 feet (due to the winding mountain roads).
If the you enter a length greater than 70 feet, the nav unit will not route anything into, out of, or
through West Virginia.
Recommendations
1. Double-check your truck settings.
a. Tap anywhere on the map screen.
b. Tap on CONFIGURE (in the upper-right).
c. Tap on TRUCK.
Make sure that you did not make a mistake when entering the length, width, or weight. For
info on the settings, click <HERE>.
2. Try setting up a new truck, and just use the default settings. If the nav unit now routes, then
you know that one of your settings was causing the problem.
3. Drive a little towards the destination and try again. This will only work if the restriction is
near your current location. If the restriction is near the destination, then you will continue
to get a Route Calculate Failure.
4. If you chose to travel to a city without entering a complete address, the nav unit may have
arbitrarily chosen an address that is inaccessible by truck. Try entering an actual address.
5. If you call Cobra Customer Service at 773-889-3087, we can double-check the route for
you. Please be prepared to provide the following information:
a. Your truck info (the truck type, weights, lengths, and load type).
b. The starting address (or at least the starting city).
c. The destination address.
<back to menu>
Page 33

26) My unit will not turn on
1. Check the power switch on the back of the unit. Make sure it is switched ON.
2. Try plugging the AC adapter into the nav unit. If the nav unit turns on, then you know that it
is good. If it does not turn on then there is a problem with the nav unit.
3. The cigarette socket may not have power. Try firmly pushing the cigarette plug into the
socket and twist it a little.
4. The power cord may be faulty. Try a replacement power cord.
<back to menu>
Page 34

27) Observing satellite lock status
1. Tap anywhere on the map screen.
2. Tap on CONFIGURE.
3. Scroll to the next page and choose GPS STATUS.
Take notice of the HEALTH status as shown above. It will tell you how many satellites are
locked.
At the bottom of the screen it will show individual satellite locks as follows:
White bar: The nav unit has locked onto that satellite.
Gray Bar: The nav unit is in the process of locking onto that satellite.
No Bar: There is no reception from that satellite.
The nav unit must lock onto at least 4 satellites before it will be ready to navigate.
The RESET button will reset the satellite receiver. You will immediately lose all satellite
reception. Do not press RESET unless you really want to reset the satellite receiver!
<back to menu>
Page 35

28) Auto-brightness is not working properly
The 7700 PRO will adjust the display brightness based on the time of day.
Your unit will not know the local time until it locks onto satellites, therefore the auto-brightness
will not function until satellite lock is achieved.
ALSO, be sure to check the brightness setting:
1. Tap anywhere on the map screen.
2. Tap on CONFIGURE.
3. Tap on BRIGHTNESS CONTROL.
4. Make sure it is set to AUTO.
<back to menu>
Page 36

29) I do not see POI icons on the map screen
By default, the 7700 PRO will show all POI icons on the map screen. This makes for a very
cluttered screen.
4. Tap anywhere on the map screen.
5. Tap on CONFIGURE (in the upper-right).
6. Tap on SHOW POI.
You may now select which categories (if any) to show on the map screen.
In order to see POI icons, you must be zoomed-in far enough.
<back to menu>
Page 37

30) Trouble locking onto satellites
There are several issues to check for:
1. When you purchased your nav unit, there was no satellite data stored inside. Your unit will
be slow to acquire satellites until it has an opportunity to store satellite data. To let it store
satellite data, simply let it run for at least 15 minutes AFTER it has locked onto satellites.
After that, it should find satellites much faster.
2. Although your nav unit is very sensitive, your installation may not allow enough of the
satellite signal to reach the unit. This can occur if the unit is not installed on the dash. For
best satellite reception, mount your unit at the windshield. You can also order the optional
external antenna, part number EXT GPS ANT. Click <HERE> for info.
3. The antenna is located at the top of your nav unit. During installation, please arrange the
mounting bracket so that it does not block the top of your unit.
To view satellite lock status in your unit, click <HERE>.
<back to menu>
Page 38

31) Master Reset
A master reset will clear everything in your nav unit.
All settings will be set to factory defaults.
All saved addresses will be erased.
1. Tap anywhere on the map screen.
2. Tap on CONFIGURE (in the upper-right).
3. Tap on the black arrow to scroll through the pages, to the last page.
4. Tap on RESET.
5. Tap on ALL.
6. Tap on OK.
7. The nav unit should turn off.
DONE!
<back to menu>
Page 39

32) STAA National Network
In 1982, Congress passed the Surface Transportation Assistance Act, which allows large trucks
to operate on the Interstate highways and certain primary routes. This road system is called the
“National Network”.
When driving on the National Network, you can be reasonably assured of trouble-free road
access. But to make local deliveries, you will probably need to leave the National Network and
drive on secondary (local) roads. You must be careful to follow local regulations.
Any nav unit can guide you on the National Network (the Interstate highway system). It is when
you get onto secondary roads that the 7700 PRO will really come in handy. The 7700 PRO will
calculate a legal route for you to follow.
<back to menu>
Page 40

33) Adjusting the volume
STEP 1 – Tap on the black bar at the top of the map screen
STEP 2 – Tap on the speaker icon
<back to menu>
Page 41

34) Current Location
To view your current location:
1. Tap anywhere on the map screen.
2. Tap on FIND (in the upper-left)
3. Tap on FIND ON MAP
You should see your GPS coordinates in the upper-right corner:
<back to menu>
Page 42

35) Observing satellite lock status
4. Tap anywhere on the map screen.
5. Tap on CONFIGURE.
6. Scroll to the next page and choose GPS STATUS.
Take notice of the HEALTH status as shown above. It will tell you how many satellites are
locked.
At the bottom of the screen it will show individual satellite locks as follows:
White bar: The nav unit has locked onto that satellite.
Gray Bar: The nav unit is in the process of locking onto that satellite.
No Bar: There is no reception from that satellite.
The nav unit must lock onto at least 4 satellites before it will be ready to navigate.
The RESET button will reset the satellite receiver. You will immediately lose all satellite
reception. Do not press RESET unless you really want to reset the satellite receiver!
<back to menu>
Page 43

36) Elevation
Get to the satellite screen:
1. Tap anywhere on the map screen.
2. Tap on CONFIGURE.
3. Scroll to the next page and choose GPS STATUS.
Please note that the elevation reading is an undocumented feature that is not described in the
manual. We do not directly support this undocumented feature. As such, the elevation only
reads in meters. The elevation may or may not continue to appear in future software updates.
The elevation accuracy is ± 150 feet.
<back to menu>
Page 44

37) Power light status
There is a power light on the top right corner of the GPS. The status of the light is as follows:
MAIN
POWER
Off Plugged in Charging RED
Off Plugged in Fully Charged OFF
On Plugged in Charging RED
On Plugged in Fully Charged GREEN
On Not plugged in n/a GREEN
The only time the power light is RED is when the battery is charging.
<back to menu>
POWER CORD
BATTERY
CONDITION
POWER
LIGHT
Page 45

38) Backing up the Address Book
For information on backing up the Address Book, please visit this link:
http://downloads.cobra.com/MobileNav/Nav7700/7700AddressBook.htm
<back to menu>
Page 46

39) SD Card Slot
There is an SD (Secure Digital) card slot on the left-hand side of the nav unit. The only function
of this card slot is for loading updates. If you do not have access to a computer, then an update
can be supplied on an SD card. Please note that there is a small charge for the SD card.
There is no other function for the SD card slot.
<back to menu>
Page 47

40) External antenna option
There is an antenna jack on the back of the 7700 PRO, at the top. It is covered by a rubber plug.
The part number of the external antenna is EXT GPS ANT. To order an external antenna,
please call Customer Service at 773-889-3087.
The antenna is only 1.5” x 1.75” and it has a magnetic base.
The cable is 13 feet long.
<back to menu>
 Loading...