

Page 1
Page 2
70OAF
Donated to www.orphancameras.com
INSTRUCTION BOOK
FOR FLASH PHOTOGRAPHY
WITH AF CAMERAS
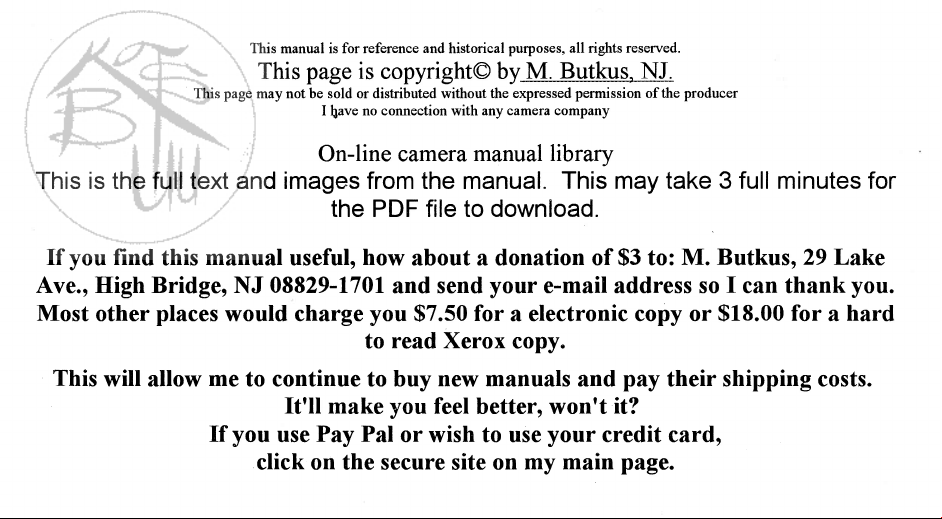
WHAT'S
1 Zoom head focal length scale
2 Bounce angle scale
3 Swivel action
4 Battery compartment cover
5 Film speed selector/distance scale
6 Flash test button
7 Flash ready light
8 ON/OFF Switch
9 Auto check indicator
10 Hotshoe locking wheel
11
'Flash
12 *Autofocus illuminator
13 Removable module
14 Module locking Switch
Notes* FOR EFFECTIVE FLASH PHOTOGRAPHY DO NOT OBSTRUCT
PARTS
11
tion your Cobra 700AF will switch over to standby mode after five
minutes. Simply press the
button (6) to restore power. For longer periods of time switch the
flashgun off using the ON/OFF switch (8).
Warning : There are no user-serviceable parts in this flashgun. Extremely high voltages are generated inside the unit, so never attempt
to dismantle or tamper with it. Any attempts to open the flashgun will
invalidate the guarantee.
WHAT ON THE COBRA 700AF
head
AND 12 WITH YOUR FINGERS. To reduce battery consump-
camera's
shutter button or the test flash
HOW TO USE COBRA 700AF
1.
LOAD THE BATTERIES
Slide the battery cover (4) towards the
front of the flash and insert the batteries according to the diagram inside the
compartment. Close the cover by sliding it firmly back into place.
Ensure that the batteries are fitted prop-
erly, and remove them when storing
the gun for a long period of time. The
majority of flash faults are caused by
leaking or incorrectly fitted batteries.
This flashgun takes four 1.5V AA size
Alkaline batteries or Ni-Cad equivalent.
We strongly advise against the use of
zinc-carbon batteries due to their short
life and tendency to leak.
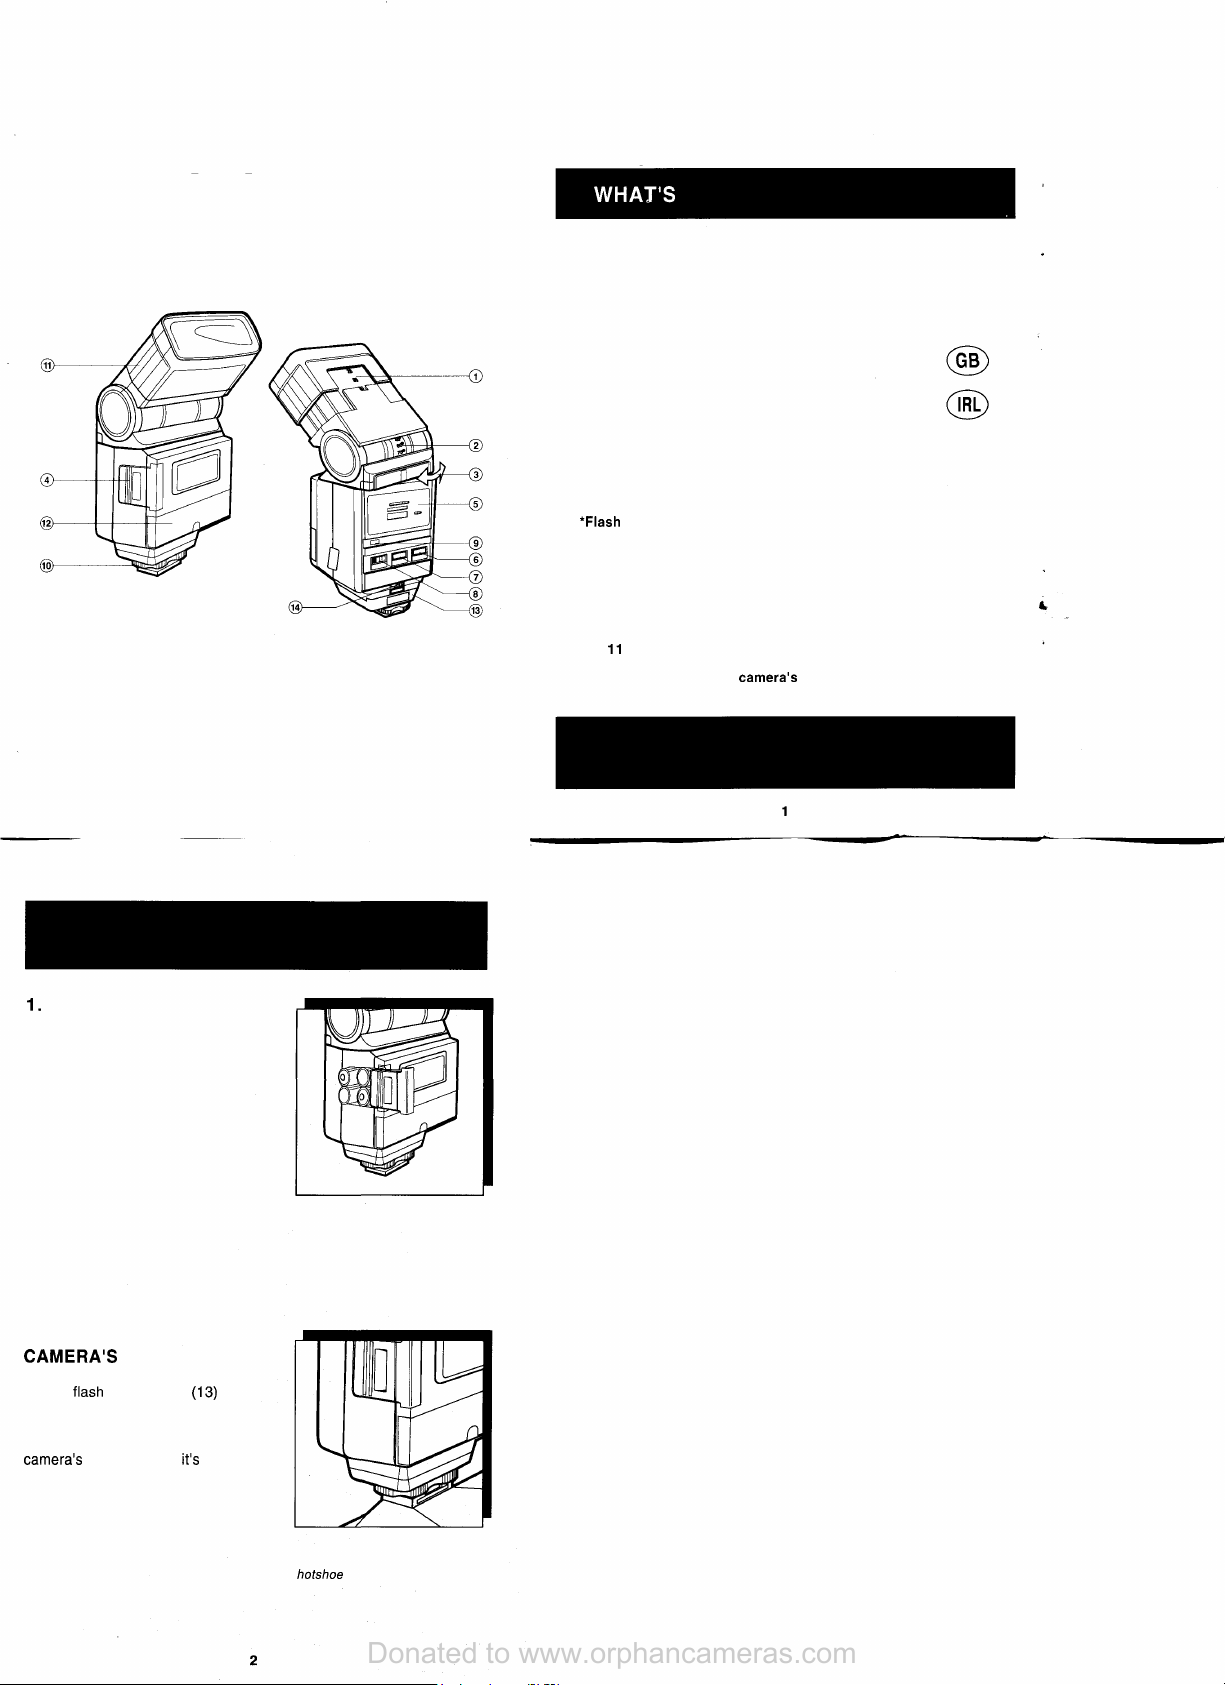
2. MOUNT THE FLASH ON THE
CAMERA'S
First switch off the gun. Then ensure
that the
in place, as marked on the flashgun.
Next rotate the locking wheel (10) up-
wards and slide the flash shoe into the
camera's
There should be no need to force it
into place. Rotate the locking wheel
(10) downwards to hold the flash on
the camera.
Note:With Dynax version slide catch
towards "LOCK"
HOT-SHOE
flash
shoe module
hot-shoe until
(13)
it's
fully home.
is locked
Make sure the batteries are fitted
correctly
Secure the flashgun on the
hotshoe
with the locking wheel
Page 3

3. SWITCH THE FLASH ON
Donated to www.orphancameras.com
Make sure that the camera is switched
on. Then simply slide the ON/OFF switch
(8) to the right. If the batteries are fresh
the gun will charge up in less than 12
sec. and the ready light (7) will glow. If
the gun is new, or hasn't been used for
a while, fire the flash with the test button (6) a couple of times to get the
flash working at full capacity.
Note:The flash exposure is controlled
via the camera's
and
"Off-the-film"
Though-the-lens
(TTL)
(OTF) systems. Therefore if the flash is tested on camera
without a film or test card loaded incorrect flash operation will result.
4.
HOW
TO POSITION THE BOUNCE
AND SWIVEL HEAD
The 700AF offers the advantages of a
zoom head with tilt and swivel facili-
ties.
Zoom head. By pre-setting the zoom
head to match the lens in use you can
obtain even light coverage with wideangle
lenses and still maximise the flashgun's
power output with longer lenses.
Simply set the number on the head
(1)
that most closely matches the focal length
of the lens. So if it's an 85mm lens or
longer, set 85; standard lens, set 50;
35mm lens, set 35; and 28mm
lens,
set 28. Don't forget to alter the zoom
head when using a zoom lens.
Note:For 24mm lenses set the zoom
head to 28 and fit the wideangle dif-
fuser. This will cause slight underexposure by about 1 stop, which is not
noticeable with colour print film.
Slide the on-off switch to the right
Set the zoom head to match the
focal length of the lens in use,
or its nearest equivalent. Don't
forget to alter the zoom head
when using a zoom
/ens'
Tilt and
swivel.The
700AF's head can be tilted upwards and swivelled
sideways to bounce the light off white or neutral coloured surfaces. This
gives a much more flattering result, preventing washed-out highlights
reducing harsh shadows and eliminating red-eye. The head can be
tilted from Odeg (straight ahead), through 45, 60 and 75deg to 90deg
(straight upwards). It will also swivel right through to
180deg,
useful for
bouncing the light off a wall.
5. SELECT AN EXPOSURE MODE
For simple point-and-shoot photography, leave your camera in Program
mode. However, the Cobra 700AF's advanced dedication allows you to
choose any other exposure mode
available
e.g. aperture priority, shutter priority and manual. Further details for using this flashgun with
specific cameras is provided overleaf.
6. FILM SPEED SELECTOR/DISTANCE SCALE (5)
This scale can be used as a guide to maximum shooting distances,
especially useful when using the camera in its TTL manual mode. The
scale is not electronically connected to the flash unit and its use will not
affect the flash output, which is completely controlled by the camera.
7. AF ILLUMINATOR
The 700AF has a built in autofocus
illuminator (12) to enable the camera
to judge the distance, and adjust the
focus of the lens in low ambient light or
total darkness. The illuminator fires a
red light when the shutter release button of the camera is pressed. The camera
can then adjust the focus of the lens
and when correct will fire the shutter
and the flash. The illuminator has an
effective distance of 7 metres. Beyond
this distance manual focus should be
used.
Bouncing the flash light off a
white wall or ceiling gives a more
flattering result to portraits
Page 4

HOW TO USE COBRA 700AF IN
Donated to www.orphancameras.com
DIFFERENT EXPOSURE MODES
NIKON AF CAMERAS
Nikon
F401,
The 700AF can be used in four modes with the above cameras. "Point
F401S, F401X,
and-shoot"
programmed mode, known as Program TTL (P) mode, Aper
ture priority TTL (A) mode, Shutter priority (S) mode and Manual
(M) mode where the user has control over both shutter speeds am
apertures.
PROGRAM TTL (P) MODE (Point and Shoot):
Set your camera to standard program (refer to camera's
book) and switch flash on. Once charged the flash ready signal (7
lights and a flash ready symbol will appear in the camera's
The flash sync speed will be set automatically. The exact speed wi
depend on the camera model.
APERTURE PRIORITY TTL (A) MODE:
This mode is useful when
camera to its A position (refer to camera's instruction book) and
desired aperture.
SHUTTER PRIORITY TTL (S) MODE (Not F501):
This mode allows you to increase the background exposure for bette
background detail and also creates a more natural lighting
between the subject and the background. Set camera to its S
(refer to camera's instruction book) and select any shutter speed be
tween the maximum sync and the B setting.
MANUAL TTL (M) MODE:
Set camera to manual M mode (refer to camera's instruction book).
combination of shutter speed (up to the maximum sync) and
may be selected. The film speed selector/distance scale (5) on the rea
of the gun can be used as a guide to maximum flash distances
most apertures.
METERING MODES-F601, F801, F801S, F4
Flash will operate in Matrix Fill
Centre Weighted TTL Flash, Matrix TTL flash and Spot TTL flash (F60
& F801S only). No "Background and Foreground balance compensa
tion"
facility available on F4, F801 and
F501,
F601,
depth-of-field
Flash,
F801,
F801S, F4, F90
instructioi
viewfindei
is an important factor. Set
balanci
apertun
Centre Weighted Fill Flash
F801S.
TTI
thi
selec
modi
An
witl
The following relates to the F601 only :
AUTOMATIC BALANCED FILL FLASH
While pressing shift button press mode/balanced fill flash, balanced fill
flash symbol will appear on the camera LCD panel.
SLOW SYNC
Slow sync allows you to increase the background exposure for better
background detail and also creates a more natural lighting balance
between the subject and the background.
Operates only in P, Pm, and A modes (also in Shutter priority S mode,
see earlier section for details). Press shift button and slow button
together.
REAR CURTAIN SYNC
Press shift button and rear curtain sync button at the same time.
All models :
EXPOSURE CHECK
If the flash exposure is sufficient the auto check indicator (9) will light
up. If it fails to light and the camera viewfinder flash signal blinks as a
warning, check that you are within flash range. In aperture priority and
manual modes a larger aperture may be selected allowing more light to
strike the film.
CANON AF CAMERAS
EOS 650, 620,
RT
The 700AF may be used with the above cameras in "Point and Shoot"
program TTL (P) mode, Aperture priority TTL (AV) mode, Shutter priority TTL (TV) mode, and Manual TTL (M) mode. Note : the EOS 850,
750 and 700 models provide TTL Programmed flash only.
NOTE: The EOS 5 and EOS 10 cameras will not operate the flash gun's
AF illuminators (12). Due to the nature of the focusing
1
cameras are designed to only utilise their own built in AF illuminators.
Batteries do not need to be inserted into the optional Pro-Grip AF
accessory if used in
Program TTL (P) MODE (Point and Shoot)
Select the " Green Square " mode on your camera (refer to camera's
instruction book). This puts the camera into
and can be used for general flash photography indoors and day light fill
flash outdoors. Switch on flash: once charged the ready light (7) will
glow and a flash ready symbol will appear in the camera's viewfinder. A
shutter sync speed will be set by the camera, the exact speed will
depend on the amount of ambient light present, usually the
600,1,
5,
10,
100,
conjunction
1000,
1000F,
1000FN, 850, 750, 700,
with these cameras.
"Point-and
systems.,
Shoot" mode,
these
maxi-
Page 5

mum sync for your particular camera will only be set in bright
Donated to www.orphancameras.com
conditions. The camera will also automatically select an
outdoi
appropria;
aperture. In this mode daylight fill flash is controlled by the camera.
APERTURE PRIORITY TTL (AV) MODE
It should be noted that the EOS system is so designed that in AV mod
a sync speed will not be set. The shutter speed selected by the earner
solely depends on the aperture selected and the amount of ambier
light present.
AV mode is useful when
camera on and select AV mode (refer to
Select desired aperture via the camera's input dial and switch the
on. The camera will select a shutter speed between 30 seconds and tht
maximum sync speed.
NOTE: If a small aperture is selected in low light conditions, the
depth-of-field
is an important factor. Switcl
camera's
instruction book)
flasl
earner;
will set a slow shutter speed. In this case either set a larger aperture o
ensure that your camera is mounted on a sturdy tripod to avoid
shake. If the maximum sync speed in the viewfinder blinks set a
aperture to avoid over-exposure.
SHUTTER PRIORITY TTL (TV) MODE
earner*
smalle
Like AV, TV mode reads ambient light and adjusts the aperture accord-
ingly. In low light conditions the camera will select a wide aperture - or
the aperture value may blink indicating that there is not enough light for
a correctly exposed picture. The only method of correction is to select a
slower shutter speed.
This mode allows you to increase the background exposure for better
background detail and also creates a more natural lighting balance
between the subject and the background. Switch camera on and select
TV mode (refer to camera's instruction book). Select desired shutter
speed from the maximum sync to 30 seconds via the cameras input dial
and switch flash on. If the minimum aperture can be seen blinking in the
viewfinder select a faster shutter speed. If the maximum aperture blinks
select a slower one.
MANUAL TTL (M) MODE
Switch camera on and select M mode (refer to camera's instruction
book). Select desired shutter
speed,
from the maximum sync to 30
seconds & B, and desired aperture. The film speed selector/distance
scale (5) on the rear of the gun can be used as a guide to maximum
flash distances with most apertures.
NOTES: The 700AF can also be used, when desired, with the PIC and
bar-code facilites offered by some EOS models. These modes will set
the camera up for a particular shooting condition and selects shutter
speed, aperture and film advance automatically. When flash is desired
with these simply select the command or bar-code desired, switch the
flash on and proceed, refering to your camera's instruction book and
the points mentioned in the above instructions.
Flash photography is not possible with the DEP mode offered by some
EOS models.
EXPOSURE CHECK
If the flash exposure is sufficient, the auto check lamp (9) will light up
briefly. If it fails to, check that you are within the maximum distance by
using the scale (5) on the rear of the flash. In AV and manual modes a
larger aperture can be selected allowing more light to strike the film.
MINOLTA DYNAX AF CAMERAS
Dynax
30001,
50001,
70001,
SOOOi,
1
The 700AF can be used with above cameras in
mode,known
as Program TTL (P) mode, Aperture priority TTL (A) mode,
Shutter priority TTL (S) mode, and Manual TTL (M) mode, where the
user has control over both shutter speed and apertures.
NOTE:
The
SOOOi
has
Program
program TTL (P) mode and Manual TTL (M) mode flash only.
PROGRAM TTL (P) MODE (Point and Shoot)
Switch camera on and select program (P) mode (refer to camera's
instruction book). This puts the camera
and can be used for general flash photography. Switch flash on, once
charged a flash symbol will appear in the viewfinder and the flash ready
light (7) will glow. A shutter sync speed and aperture will be automatically set by the camera. The exact sync speed set will depend on the
amount of available ambient light and the length of lens in use. Usually
the maximum sync for your particular camera will only be set in bright
conditions.
APERTURE PRIORITY TTL (A) MODE
This mode is useful when depth-of-field is an important factor. Switch
camera on and select A mode (refer to camera's instruction book).
Select desired aperture via tha camera's rocker or dial, and switch flash
on. The camera will select a sync speed depending on the Dynax
model. The scale (5) on the rear of the gun can be used to give a guide
to maximum shooting distances with most apertures.
SHUTTER PRIORITY TTL (S) MODE
Operates as per program TTL (P) mode. Shutter speed and aperture
are selected by the camera.
2xi, 3xi, SPxi, 5xi, 7xi, 9xi
"Point-and-Shoot"
TTL (P)
mode
flash
only,
.into
a "Point-and-Shoot" mode
and the
50001
Page 6

MANUAL TTL
Donated to www.orphancameras.com
Switch camera on and select manual (M) mode (refer to camera's
instruction book). Any combination of shutter speed (up to the maximum sync) and aperture may be selected. Refer to the scale (5) on the
rear of the gun to obtain maximum shooting distances.
SLOW-SHUTTER SYNC
50001,
Slow shutter sync is available on the above cameras. It allows you to
increase the background exposure for better background detail and
also creates a more natural lighting balance between the subject and
the background. Slow-shutter sync can be used in program (P) mode
with all the above cameras. For other modes consult your camera's
instruction book.
Select Program or desired mode available on your camera and switch
flash on. The above cameras will have either a SPOT button or an AEL
button located to the right of the viewfinder. When the flash has charged
a sync speed and aperture will be set by the camera. The pressing of
the SPOT/AEL button will cause the camera to set a slower speed (up
to slowest speed of particular model). Use a sturdy tripod with slower
speeds to avoid the danger of camera shake.
NOTE: The 700AF can be used in conjunction with certain Creative
Expansion Cards (available for some Dynax models). Simply mount the
flash and switch it on. The camera will select a shutter speed and
aperture according to the particular card being used. If in doubt refer to
your Minolta Dealer.
70001,
(M)
MODE
80001,
2xi, SPxi, 5xi, 7xi, 9xi
PENTAX AF CAMERAS:
The 700AF can be used in the following exposure modes with the Z-1
and
Z-20.
"
GREEN SQUARE OPERATION " PROGRAMMED AE/PROGRAMMED
AE, HYPER PROGRAMMED AE (Z-1 only), SHUTTER-PRIORITY AE,
APERTURE-PRIORITY AE, HYPER
the following modes with the SF7, SFX, and SFX-N
PROGRAMMED AE, SHUTTER-PRIORITY AE, APERTURE-PRIOR-
ITY AE, METERED MANUAL
and the following modes with the
PROGRAMMED AE, METERED MANUAL
"
GREEN SQUARE " PROGRAMMED
AE MODE (ALL MODELS)
Select PROGRAMMED AE mode on the camera (refer to camera's
instruction book), this is useful for general photography. In this mode
shutter sync speed and aperture are selected for you, any speed from
1/250th
sec to
1/30th
model and ambient lighting. Switch flash on and wait for the ready
signal 7) to glow then simply point, focus and shoot.
Note: The 700AF will also operate with the " PICTURE " modes of the
Z-20. Refer to the Z-20's instruction book for further information.
sec may be set depending on particular camera
MANUAL.MANUAL
Z-10
AE
MODE
(Z-1 & Z-20),
(BULB)
PROGRAMMED
EXPOSURE CHECK
If the flash exposure is sufficient, the auto check indicator (9) will light
up briefly. If it fails to, check that you are within the maximum distance
by refering to the scale (5) on the rear of the gun. In aperture priority or
manual modes a larger aperture may be selected allowing more light to
strike the film.
HYPER PROGRAMMED AE MODE (Z-1 ONLY)
This mode is similar to standard program but the user has the option of
altering the shutter speed and aperture without switching modes. Select HYPER PROGRAMMED AE on the camera (refer to
instruction book). Initially a shutter sync speed and aperture combination will be set by camera. If desired this can be changed by using the
TV and AV input dials on the front and rear of the camera.
Note: a safety shift feature on the Z-1 will not allow incorrect shutter
speed
/aperture
appear on the LCD information panel. For more information refer to the
camera's instruction book.
SHUTTER-PRIORITY AE MODE (ALL MODELS EXCEPT Z-10)
This mode allows the user to select any shutter speed from the maximum sync to the slowest speed. It is useful for increasing the back-
combinations to be set. If this happens an " S " will
camera's
10
Page 7

ground exposure for better background detail and also creates a more
Donated to www.orphancameras.com
natural lighting balance between the subject and the background.
Select SHUTTER-PRIORITY AE mode on the camera (refer to camera's instruction book) and select any shutter speed from the maximum
sync to the slowest speed of particular model. The camera will select
an appropriate aperture.
APERTURE-PRIORITY AE MODE (ALL MODELS EXCEPT
Z-10)
This mode allows the user to select any aperture and is useful when
depth-of-field
is an important factor. Select APERTURE-PRIORITY AE
mode on the camera (refer to camera's instruction book) and select any
aperture. The camera will select a sync speed. The distance scale (5)
on the rear of the gun can be used as a guide to maximum shooting
distances with most apertures.
Note: The sync speed set by the camera depends on the aperture
selected. A wide aperture i.e.
f1.7
will usually mean a fast sync speed
i.e. 1/125th sec, however selecting a narrow aperture, i.e. f16, will likely
result in 1/30th sec being set.
HYPER MANUAL
This mode allows the user to select both shutter speed and
(Z-1 & Z-20),
METERED MANUAL
(ALL
OTHER MODELS)
aperture.select
HYPER MANUAL/METERED MANUAL on the camera (refer to camera's instruction book) and select shutter speed and aperture desired.
The distance scale (5) on the rear of the gun can be used as a guide to
maximum shooting distances with most apertures, film speeds etc.
Note: The Z-1 will not allow incorrect shutter/aperture combinations to
be set and an " S " will appear on the camera's LCD information panel.
For more information refer to camera's instruction book.
MANUAL (BULB) (Z-1 & Z-20), BULB (ALL OTHER MODELS)
"
BULB " allows the shutter to be kept open indefinitely for long expo-
sure shots with or without flash.
Select"
BULB " on the camera (refer
to camera's instruction book). Select desired aperture.
Note: When the 700AF flash fires in this mode the auto check indicator
(9) will illuminate, this shows that the flash has correctly exposed the
subject as indicated by reflected light. It is not, however, an indication
of the over-all exposure, this will depend on the amount of time that the
shutter remains open and the reciprocity of the film in use. Some trial
and error may be required.
AF ILLUMINATION WITH 700AF
A) The 700AF's illuminator
Z-SERIES
(12
VERSION
) will only operate with the Z-10 (and
only when an FA-AF " Power-Zoom " lens is fitted).
B) The Z-1 will only operate its own AF spot beam which is located next
to the RTF. When AF illumination is required simply engage the RTF,
focus as normal, then retract the RTF. If the RTF is left in the
'up'
position there is a possibility that it will fire along with the 700AF.
C) Low light illumination is not possible with the 700AF and Z-20,
regardless of lens type in use.
D) When using the 700AF and Pro-Grip with any model other than the
Z-10, batteries need not be used in the grip.
IMPORTANT NOTICE:
Due to circuit board differences between the SF and Z series 700AF
Pentax guns, the two are not
interchangeable,
i.e. an SF series 700AF
cannot be used on a Z series camera, and vice versa.
EXPOSURE CHECK
If the flash exposure is sufficient the auto check indicator (9) will light
up. If it fails to light, check that you are within flash range. In aperture
priority and manual modes a larger aperture may be selected allowing
more light to strike the film.
THE FILTER PACK
Three coloured filters, a red green and blue, plus a wideangle
diffuser are included with your Cobra 700AF. These simply click
onto the front of the zoom head.
Note that the coloured filters will reduce the flashgun's light output
by about two stops, and the wideangle diffuser by about one stop.
WARNING:
of camera only. Dedication cannot be changed by simply changing
the removable module (13). The
housed in the body of the gun not the module. The module is
removable only to allow use with the optional Pro-Grip AF outfit.
Serious damage could result to both flash and camera if this warning
is not adhered to.
Your
700AF flashgun
is
flashgun's
dedicated
to one
brand
dedicated circuitry is
11
12
Page 8

SPECIFICATIONS
Donated to www.orphancameras.com
700AF PRO - GRIP
The 700AF PRO - GRIP is
It comprises of a sturdy grip and bracket which enables the 700
AF to be used off-camera, giving much improved illumination to
portraits and other subjects. All the programmed dedication between camera and gun is retained. The AF illuminator remains
on the camera for accuracy and is connected to the flash with an
extension lead.
an
optional accessory to your flashgun.
13
Dedication
Guide Number
(ISO 100 in meters)
Angles of coverage
(VxH)
Film speed settings
Flash duration
Recycling time
Number of flashes
Power source
Accessories
: TTL operation for AF SLRs.
: 25 (28 mm zoom head position)
: 30 (35 mm zoom head position)
35 (50 mm zoom head position)
42 (85 mm zoom head position)
: 28 mm 53 x 70 deg
35 mm 45 x 60 deg
50 mm 34 x 46 deg
85 mm 23 x 31 deg
Marked for ISO
1/1000 to 1/30,000 sec.
0.5 to 12
Over 80 per new set of alkaline
batteries.
4 x AA size alkaline batteries or
CAD equivalent.
Wide-angle diffuser and three
colour filters.
Cobra Europe Limited
5 Capstan Centre, Thurrock Park Way,
Tilbury, Essex RM18 7HH,
England
Tel:
(0375) 840540
14
sec.
50
-1000
Nl-
 Loading...