

Page 1
Cobra 3198 User Instructions
Dear customer,
Congratulations on purchasing this product which has been designed and manufactured to the highest
automotive standards utilising the latest technology for total reliability.
The manual is divided into 9 parts:
Your dealer will be pleased to clarify any queries you may have with the system or its operation.
The Cobra 3198 alarm system MUST be fitted with a previously installed Category 2 M.I.R.R.C listed
immobiliser to obtain Category 1 status for the vehicles security systems.
If there is no Category 2 Thatcham listed immobiliser fitted along with associated VSIB installation
certificate,Category 1 status cannot be claimed on fitment of alarm
The Cobra 3198 imobiliser system is a Category 2-1 MIRRC Thatcham listed security system. If the
installation of this product is modified or altered from the standard specifications, or non compliant
accessories are fitted, insurance approval will be invalidated.
Page 2 ________ INTRODUCTION
3 ________ ADDITIONAL PROTECTIONS
4 ________ BRIEF INSTRUCTIONS
6 ________ BASIC FUNCTIONS
7 ________ ADVANCED FUNCTIONS
9 ________ ALARM MEMORY
10 ________ EMERGENCY
11 ________ PERSONAL PIN CODE
12 ________ MAINTENANCE AND TROUBLE SHOOTING
Existing Immobiliser Make/Model: Thatcham MIRRC Evaluation No:
Page 2
2
1 - INTRODUCTION
The anti-intrusion alarm system is operated by a high-security radio control that utilises the latest generation of dynamic code. This new
technology offers an extremely high level of protection against any attempt to reproduce the code.
The radio control allows the system to be activated at a distance of 5-10 meters from the vehicle.
Other radio sources may cause interference which can reduce the effective range of the radio controls.
If the system can not be set/unset using the radio control try again close to the vehicle. If they still do not operate check if the radio control is
properly syncronized.
If automatic window closing is connected it is raccomended you to stay close to the vehicle while the windows are moving to ensure safety and
security.
The system have a protected self-learning feature which allows you to add or replace radio controls. The procedure is described in the fitting
instructions.
1.1 - Personal PIN code
Each of the 3000 series has a PIN-CODE that can be used for the emergency overide of the system. The PIN-CODE programmed in the factory
is 1111. We suggest that you replace this number with another commonly used by you (for ex. cellular phone, credit card, etc...).
as it would be easier to remember.
GLOBE 3100 1 - INTRODUCTION
MODEL
HOTWIRE PROTECTION VOLUMETRIC PROTECTION
CABLE CUT PROTECTION
PERIMETRIC PROTECTION
A3198
Page 3

3
2 - ADDITIONAL PROTECTIONS
You can increase the protection level of the system with the following additional sensors:
5452 Level monitor module
When the system is armed, this sensor will detect the vehicle being jacked up to tow it away or steal the wheels.
5462 Hyperfrequency module
When the system is armed, a microwave emission from the hyperfrequency module hidden in the passenger compartment willl ensure the
volumetric protection of the vehicle.
For use on convertible vehicles, the volumetric protection will be stable even with the soft top, windows or sunroof left open.
2980 Window lift module
When the radio key “A” button is pressed to arm the system, the car electric windows will raise automatically. It can be fitted to any car with
electrical windows.
2 - ADDITIONAL PROTECTIONS GLOBE 3100
Page 4
4
3 – BRIEF INSTRUCTIONS
3.1 - Arming
• Press button ‘A’ of the radio control
to lock the doors (if the vehicle has
central locking).
• The turn indicators will blink twice.
• The buzzer will issue two beeps (if
activated).
• The protections activate after a 40 s timer
has elapsed.
• The LED will come on constantly for 40 s
then it will flash.
3.2 - Protection
When armed the system will generate an acoustic and visual 30 s
alarm when the bonnet, boot or one of the doors is opened. System
with the volumetric sensor will generate the alarm in case of intrusion.
The system remains armed at the end of the cycle.
3.3 - Interrupting an alarm in progress
If the system generates an alarm , the siren can be deactivated by
pressing button “A” on the radio control once. The turn indicators
will also stop blinking but the alarm system remains armed. Thus, if
the system is activated (siren sounding), press the button twice to
unlock the vehicle. The first press will stop the siren, the second will
disarm the system and unlock the doors.
3.4 - Disarming
• Press button ‘A’ on the radio control to disarm the system and
unlock the doors.
• The turn indicators will blink once.
• The buzzer will beep once (if activated).
• The protection deactivate immediately.
• The LED will go OFF.
3.5 - Alarm memory
If an alarm has occurred the buzzer and the turn indicators
will give four signals instead of one (See page 9).
NOITCNUFLORTNOCOIDAR
nottuB
A
nottuB
B
mrA
•
mrasiD
•
tpurretnineriS
•
mralacinaP
•
dnarosnescirtemulovcinosartlU
fi(noisulcxerosneslanoitidda
)dellatsni
•
BRIEF INSTRUCTIONS
GLOBE 3100 3 - BRIEF INSTRUCTIONS
Page 5

5
3.6 - Deactivating the volumetric ultrasonic
sensor
The volumetric sensor can be
deactivated if you want to leave the
windows open or if someone remains
in the passenger compartment.
1) Arm the system pressing button
'A' of the radio control.
2) Press button 'B' on the radio control
within 40 s.
If hyperfrequency or level monitor
sensors are fitted, it is possible to
deactivate them by pressing ‘B’ button
twice within 40 s.
To confirm that the signal has been
received, there will be an acoustic
signal of the buzzer. The sensors have
been inhibited; all other
functions remain activated.
Sensors will be automatically armed on the
next arming of the system.
3 - BASIC INSTRUCTIONS GLOBE 3100
3.7 - Panic alarm
Each time button “B” on the radio key is pressed, except
for during the 40 s after the alarm has been armed, an
alarm cycle will be generated, the siren will sound and the
turn indicators will flash.
Press any button to interrupt the panic alarm.
3.8 - Garage function
The ‘garage’ function allows you to temporarily exclude
passive arming and anti-hi-jack functions. This can be useful
when you have to take the car for service interval without
having to leave the alarm system remote control.
IMPORTANT: never leave remote control key and PIN code
together with car keys in order to prevent copy of remote
key.
Before you leave the car, proceed as follows:
Switch ON the ignition, open a door and keep ‘A’ button
pressed for a minimum of 3 s. During this period the LED will
remain ON.
Confirmation of the function activation is given by a single blink of the
turn indicators.
This function is automatically deactivated when the system
is armed and disarmed by the remote control or the ignition
key is switched ON and OFF for 10 times.
Page 6

6
4.2 - Controlled windows lift (comfort)
Activated
Deactivated
Keep button ‘A’ pressed, when arming the alarm, the windows close in
a “controlled mode”. The windows will stop closing if the button is
released.
4.3 - Doors/bonnet/boot opened signal
Activated
Deactivated
If the doors, bonnet or boot are opened when you arm the system the
turn indicators will blink 5 times instead of 2. The buzzer will do the
same, if activated. If they are closed within 40 s there subsequent
opening will be signalled again; after the 40 s set up delay there is no
further trigger until they are closed and opened again.
4.4 - Arm/disarm blinker
Activated
Deactivated
The arming of the system is indicated by 2 blinks of the turn
indicators and disarm by 1 blink. If this function is deactivated,
the turn indicators will only blink during an alarm trigger.
4.5 - Automatic arming
Activated
Deactivated
The unit will automatically arm 2 minutes after the last door has
been closed after the engine is switched off, which ever is the
sooner.
4.6 - Immobiliser automatic arming
Activated
Deactivated
The engine immobilisation will automatically activate 4 minutes after
the ignition is switched off. The LED will flash. The engine will be
immobilised. Press button ‘A’ on the radio control with the ignition
switched ON to deactivate the system.
4.7 - Immobilizer alarm
Activated
Deactivated
An alarm function can be added to the immobilizer automatic arming.
25 s after the ignition is switched ON the alarm will trigger.
4.8 - Buzzer
Activated
Deactivated
If activated the buzzer will sound in synchronism with the
turn indicators to signal the arm and disarm of the system.
GLOBE 3100 4 - BASIC FUNCTIONS
4 - BASIC FUNCTIONS
4.1 - Introduction
As the standard working features of this system can be modified by the installer he should have indicated the differences with
the standard factory set-up (black squares) on this manual.
Page 7

7
5.5 - Autolock - Automatic door locking mode
Time
Speed
Automatic door locking according to speed or time delay.
5.6 - Automatic anti-hi-jack
Activated
Deactivated
The anti hi-jack is always active. To drive the vehicle, the first two digits
of the PIN code must be entered into the override button within 10 s of
the ignition being switched ON. Confirmation of acceptance is signelled
by a long blink of the LED; the vehicle can now be used
normally until the next ignition OFF/ON cycle.
If this procedure is not followed the radio controls will not
operate the alarm anymore and the vehicle can be driven for
4 minutes then the siren sounds for 30 s, if the ignition is
switched off the alarm stops sounding and the engine is
immediately immobilised. It is necessary to enter the PIN code
using the emergency button to disarm the system.
5 - ADVANCED FUNCTIONS
5.1 - Immobilizer auto re-arm
Activated
Deactivated
The immobiliser will automatically rearm if the ignition is not switched
on within 4 minutes after the system has been disarmed.
5.2 - Alarm auto re-arm
Activated
Deactivated
The immobiliser and the alarm system will automatically rearm if the
doors are not opened within 4 minutes after the system has been
disarmed. The 4 minutes timer will reset if the doors are opened and
closed.
5.3 - Alarm auto re-arm with door locking
Activated
Deactivated
This function adds automatic doors locking to the alarm auto re-arm
function.
5.4 - Autolock - Automatic door locking
Activated
Deactivated
The doors are locked at a set vehicle speed not later than 20
s after the ignition is switched ON (see chapter 5.5).
In either case the doors are automatically unlocked when the
ignition is switched OFF.
5 - ADVANCED FUNCTIONS GLOBE 3100
Page 8

8
5.7 - Voluntary anti-hi-jack
Activated
Deactivated
The driver can activate the anti hi-jack
function by pressing button ‘B’ of the
radio control with the ignition ON. The
LED will blink quickly to signal that anti
hi-jack is activated. If a door is opened,
the radio controls will not operate the
alarm anymore and the vehicle can be
driven for 4 minutes then the siren
sounds for 30 s, if the ignition is
switched off the alarm stops sounding
and the engine is immediately
immobilised. It is necessary to enter the
PIN code using the emergency button to
disarm the system.
If you need to open a door while the anti
hi-jack is active (the LED will flash
quickly) you can deactivate the function
by pressing one of the two radio control
buttons the LED will blink one long flash
and go out.
GLOBE 3100 5 - ADVANCED FUNCTIONS
5.8 - Anti hi-jack immobilisation controlled by vehicle speed
sensor. (VSS input)
Activated
Deactivated
The vehicle will be immobilised immediately when it stops
moving, when the anti hi-jack is activated.
NOTE: This working mode is available only for non EC
products model.
Page 9

9
6 - ALARM MEMORY
If an alarm trigger has occurred the buzzer and the turn
indicators will give four signals. The alarm status history is
displayed by LED when the system is disarmed, this is played
until the system will be rearmed or the ignition will be switched
ON.
LANGISDEL NOITPIRCSEDMRALA
knilb1 deneponeebevahtoob,srood
sknilb2
rosnescirtemulovcinosartlu
dereggirt
sknilb3 deneponeebsahtennob
sknilb4)eriwtoh/yeknoitingi(tratsotpmetta
sknilb5 mrala/tupnirosnestnemevom
sknilb6desuton
6 - ALARM MEMORY GLOBE 3100
Page 10

10
7 – EMERGENCY OVERRIDE
To deactivate the system without a remote control:
Push the button of the emergency panel the number of times corresponding to the first digit of your PIN code
. The led will blink
everytime you press the button, a longer blink will confirm that the right PIN code digit has been input. Proceed in the same way
with the 3 further digits.
The system will disarm as soon as the last digit is input.
EMERGENCY
GLOBE 3100 7 - EMERGENCY
Page 11

11
8 - PERSONAL PIN CODE
The PIN code should be personalised. The system is delivered
with the code 1111 and it must be replaced by a four digits
code without the number ‘0’ .
To program the system with your own four digit PIN code,
disarm the system, then proceed as follows:
• Open a door
• Turn the ignition On.
Keep the emergency panel button and button ‘A’ of the radio control
simultaneously pressed until a blink of the turn indicators occurs,
this indicates that you can now program a new PIN code.
• Push the button on the emergency panel for the number of times
corresponding to the first digit of the new PIN code.
The led will blink everytime you press the button, a longer blink will
confirm that the right PIN code digit has been input.
Proceed in the same way for the further 3 digits.
• Turn the ignition OFF at the ackowlegement of the fourth
digit.
• Repeat the new PIN code entry.
• If this PIN code is the same as the previous the system will
store it. The storage confirmation is given by a 3 s blink
of the turn indicators and of the LED.
To exit the program at any time, close the opened door and
the old PIN will not be modified.
8 - PERSONAL PIN CODE GLOBE 3100
PERSONAL PIN CODE
Page 12

12
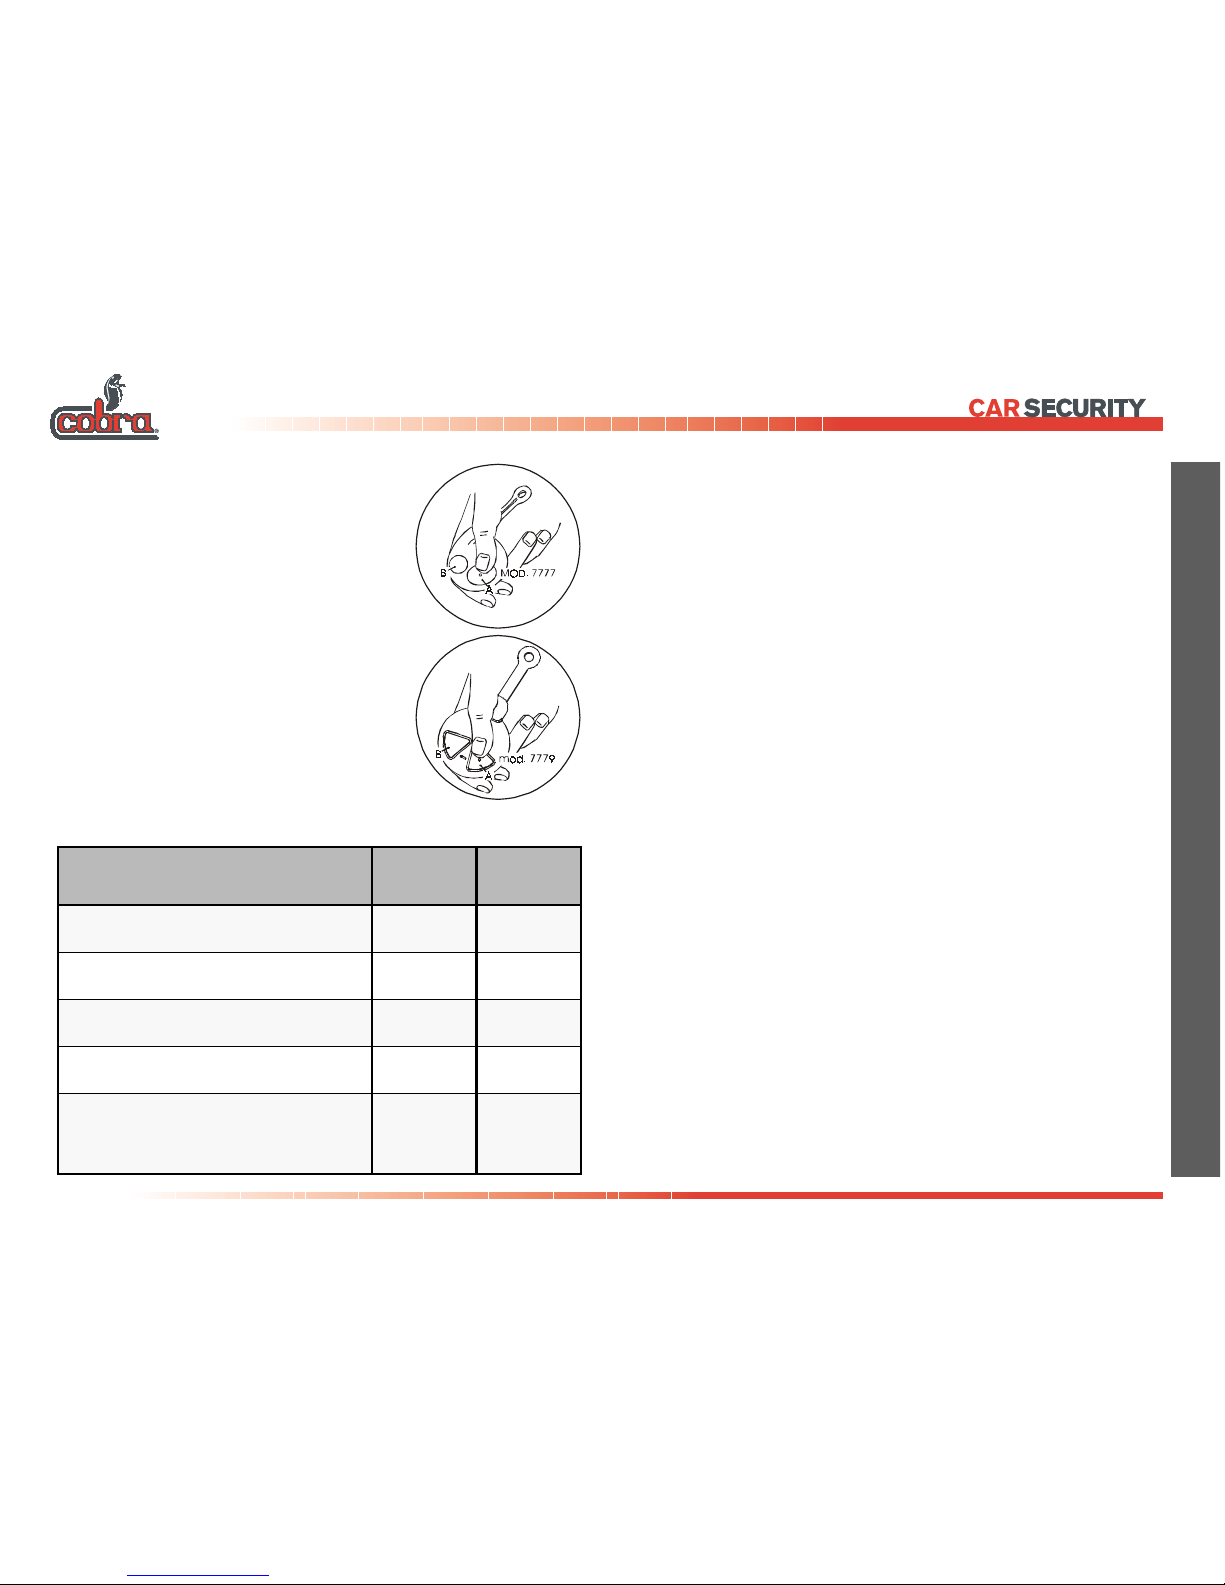
2. Remove the battery as indicated.
3. Wait for about 10 s.
4. Connect the new battery. Only touch it on the sides. Remember to
comply with the polarity indication, as shown in the figure.
5. Close the radio control and press button ‘A’ twice, check the
correct operation of the system. Do this operation standing by the
vehicle.
6. Dispose the old battery in the special containers.
9 - MAINTENANCE AND TROUBLE SHOOTING
9.1 - The radio control does not disarm the system
(Re-synchronization procedure)
If the radio control battery is not flat and the radio control doesn’t work,
proceed as follows keeping at a distance of 1 meter from the driver’s
window:
A) Press both buttons on the radio control until the LED on it
goes out. Release them (the LED will come on
permanently).
B) Press button ‘A’ of the radio control, the LED will flash. The re-
synchronization procedure has been completed.
C) Press button ‘A’ of the radio control again to verify that the system
operates correctly.
If the radio control doesn’t work, refer to the emergency overide (see
chapter 7).
9.2 - Radio control battery low
When the radio control battery becomes low, the radio control
LED will blink in an irregular way or only once instead of
permanently until the button is released. Replace the battery.
1. To change the battery, open the radio control as indicated
in the figure, levering in the zone marked “OPEN”.
GLOBE 3100 9 - MAINTENANCE AND TROUBLE SHOOTING
Page 13

noituloSA
.talfebyamyrettablortnocoidareht
.)72egap2.9retpahc(
noituloSB
tsolevahyamlortnocoidareht
.tinuehthtiwnoitasinorhcnys
.)72egap3.9retpahc(
noituloSC
oterudecorpycnegremeehtwollof
egap7retpahc(metsysehtmrasid
.relaedruoytcatnocnehtdna)52
noituloSA
,nwohssireggirtcirtemulovcinosartlufI
riadnafoornus,swodniwtahtkcehc
gnivomontahtdnadesolcerastnev
.elcihevehtnierastcejbo
ruoytcatnoctsisrepmelborpehtfI
.relaed
noituloSB
toob,srood(reggirttcatnoctceridfI
foeno,nwohssi)gninepotennobdna
.tnemetsujdaseriuqersehctiwseht
.relaedruoytcatnoC
The radio control will not arm/disarm the system
An alarm has triggered for no apparent reason
9 - MAINTENANCE AND TROUBLE SHOOTING GLOBE 3100
When you disarm the system the LED displays series a flash
code which indicates the cause of the trigger
).
9.6 - Trouble shooting
9.3 - Loss of the radio controls
If radio controls are lost, deactivate the system with the
emergency PIN code. Refer to the emergency overide.
.
9.4 - Loss of the PIN code
As the PIN code enables access to the system, it should not
be left in the unattended vehicle as it can be used to deactivate
the system or to add new radio controls without authorization.
In case of loss it is possible to replace the PIN code with the
following procedure:
1. Disarm the system using the radio control.
2. Open a door, leave it opened during programming.
3. Turn the ignition “ON”, and keep the emergency panel button pressed.
4. Press button ‘A’ of the radio control untill the turn indicators flash,
indicating entry into programming.
5. Set up the new PIN code:
• Push the button on the emergency panel for the number of times
corresponding to the first digit of the new PIN code.
The led will blink everytime you press the button, a longer
blink will
confirm that the right PIN code digit has been input.
Proceed in the same way for the further 3 figures.
• Turn the ignition OFF at the ackowlegement of the fourth
digit.
• Repeat the new PIN code entry. If this PIN code is the same as
the previous the system will store it. The storage confirmation is
given by a 3 s blink of the turn indicators and of the LED.
To exit the program at any time, close the opened door and the old PIN
will not be modified.
 Loading...