

Page 1

User Guide
For
BMW Accessport
06/25/2013
Page 2

Copyright © 2013 COBB Tuning Products LLC. All Rights Reserved. | www.cobbtuning.com
1
Table of Contents
Product Introduction ......................................................................................................................................................................
.................................................................................................................................................................................................. 3
In-Box Contents ........................................................................................................................................................................ 4
What Is A Map? ............................................................................................................................................................................ 5
Accessport Installation .................................................................................................................................................................. 6
Pre-Installation .......................................................................................................................................................................... 6
Getting Started ......................................................................................................................................................................... 7
Vehicle Identification .................................................................................................................................................................... 3
Supported Vehicle List 10
Map Selection ......................................................................................................................................................................... 10
Save Stock ECU Program Data ................................................................................................................................................ 10
Install Accessport Programming ............................................................................................................................................. 10
Installation Complete .............................................................................................................................................................. 11
Dealer Service/Visit ................................................................................................................................................................ 11
Accessport Features & Functionality .......................................................................................................................................... 12
Monitor ................................................................................................................................................................................... 12
Live Data ............................................................................................................................................................................. 12
Data Log .............................................................................................................................................................................. 12
Set Rev Warning .................................................................................................................................................................. 13
Set Live Data List ................................................................................................................................................................. 13
Set Data Log List .................................................................................................................................................................. 13
Reset Live List ...................................................................................................................................................................... 13
Reset Log List ...................................................................................................................................................................... 13
Performance ........................................................................................................................................................................... 14
Page 3

Copyright © 2013 COBB Tuning Products LLC. All Rights Reserved. | www.cobbtuning.com
2
0-60 MPH ............................................................................................................................................................................ 14
¼ Mile ................................................................................................................................................................................. 14
Tune ........................................................................................................................................................................................ 15
Change Map ........................................................................................................................................................................ 15
Show Current Map .............................................................................................................................................................. 15
Troubleshooting ...................................................................................................................................................................... 16
Reset ECU ............................................................................................................................................................................ 16
Read Codes ......................................................................................................................................................................... 16
Clear Codes ......................................................................................................................................................................... 16
Uninstall .................................................................................................................................................................................. 17
Uninstall .............................................................................................................................................................................. 17
Accessport ................................................................................................................................. Error! Bookmark not defined.
About .................................................................................................................................................................................. 18
Settings ............................................................................................................................................................................... 18
Accessport Troubleshooting ....................................................................................................................................................... 19
Support Contact Information ...................................................................................................................................................... 20
Environmental Information ........................................................................................................................................................ 21
Operating and Storage Temperatures ..................................................................................................................................... 21
Do Not Get Wet ...................................................................................................................................................................... 21
Handling and Storage .............................................................................................................................................................. 21
Do Not Attempt Repairs Yourself ............................................................................................................................................ 21
Page 4

Copyright © 2013 COBB Tuning Products LLC. All Rights Reserved. | www.cobbtuning.com
3
Product Introduction
Congratulations on the purchase of the new Accessport handheld programmer. The Accessport can:
• Reprogram the factory engine control unit (ECU) with improved tuning parameters t hrough the
on-board diagnostic (OBD-II) port
• Monitor vehicle sensor data
• Read and clear engine diagnostic trouble codes (DTCs)
Supported Vehicle List
• 2008-2010: twin-turbo 135i
• 2011: twin-turbo 1M
• 2011: single-turbo 135i
• 2007-2010: twin-turbo 335i
• 2007-2008: twin-turbo 335xi
• 2009-2010: twin-turbo 335i xDrive
• 2011-2013: twin-turbo 335is
• 2011: single-turbo 335i
• 2011: single-turbo 335xi
• 2008-2010: twin-turbo 535i
• 2008: twin-turbo 535xi
• 2009-2010: twin-turbo 535i xDrive
• 2009-2013: twin-turbo Z4i
• 2011-2013: twin-turbo Z4is
* Not all models will be supported at initial release. See http://cobbtuning.com for more
information.
Page 5
Copyright © 2013 COBB Tuning Products LLC. All Rights Reserved. | www.cobbtuning.com
4
WARNING!
Installation and use of the Accessport may void all or a portion of the
using the Accessport.
WARNING!
Use of the Accessport while operating a m o ving vehicle is strictly
Accessport.
WARNING!
The Accessport may not be able to function if the vehicle's wiring has
verify that all wiring to and from the ECU is correct and functional.
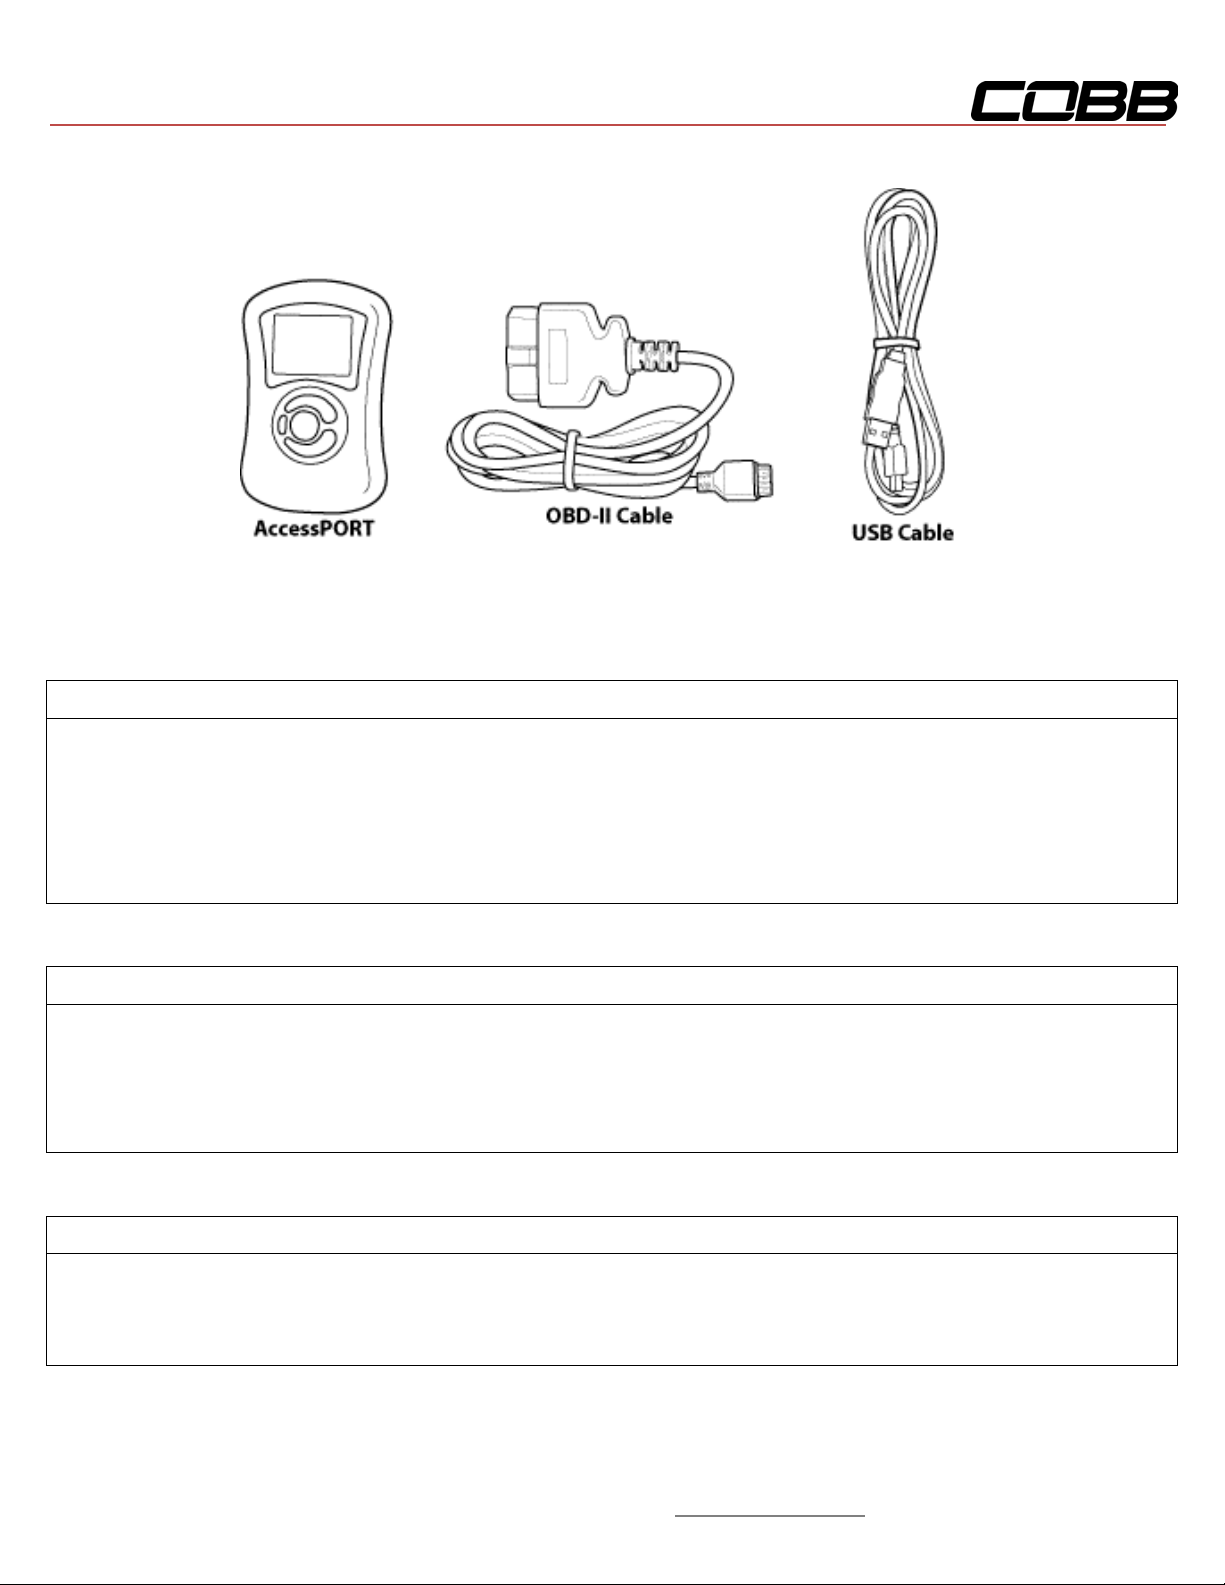
In-Box Contents
Accessport Version 2b
vehicle manufacturer's standard warranty. There is no guarantee
expressed or implied by COBB Tuning or any of its affiliates for the use
of the Accessport. The user accepts all risks and responsibilities when
prohibited by law. COBB Tuning and its affiliates accept no
responsibility for damages or injury caused by misuse of the
been modified. If problems occur while using the Accessport, please
Page 6

Copyright © 2013 COBB Tuning Products LLC. All Rights Reserved. | www.cobbtuning.com
5
What Is A Map?
The Accessport reprograms the tuning parameters inside the factory engine control unit (ECU) using
map files, which contain specially written instructions for the Accessport to follow during the
reprogramming process. A map file can contain information for any number of different modifications or
enhancements to a vehicle, ranging from a race map for a heavily modified vehicle to an economy map
for a stock vehicle. Through the use of the Accessport and different map files the ECU can be
reprogrammed to accommodate virtually any vehicle configuration.
Page 7

Copyright © 2013 COBB Tuning Products LLC. All Rights Reserved. | www.cobbtuning.com
6
IMPORTANT!
Before installing the Accessport on the vehicle, it is important to verify that the vehicle is
electronic device that uses the car battery for power.
Accessport Installation
Pre-Installation
The Accessport comes with the most up-to-date software available at the time of shipment. However, it
is possible that updated software and/or map files have been made available since the time of shipment.
Therefore, the recommended procedure is to connect the Accessport to the AP Manager software and
download the latest software and map files for the target vehicle.
adequately prepared for the installation process. Since the Accessport uses the vehicle's battery
for power and the ECU reprogramming process requires adequate battery power as well, it is
critical to verify that the vehicle's battery has a good charge. This can be done through the use
of a battery charger/conditioner or by driving the vehicle for a period of time prior to installation
to allow the alternator to recharge the battery. Furthermore, please ensure that all in-car
electronic devices are turned off to reduce power draw on the battery. This includes car stereos,
video screens, GPS units, radar detectors, interior and exterior vehicle lights, and any other
Page 8
Copyright © 2013 COBB Tuning Products LLC. All Rights Reserved. | www.cobbtuning.com
7
Getting Started
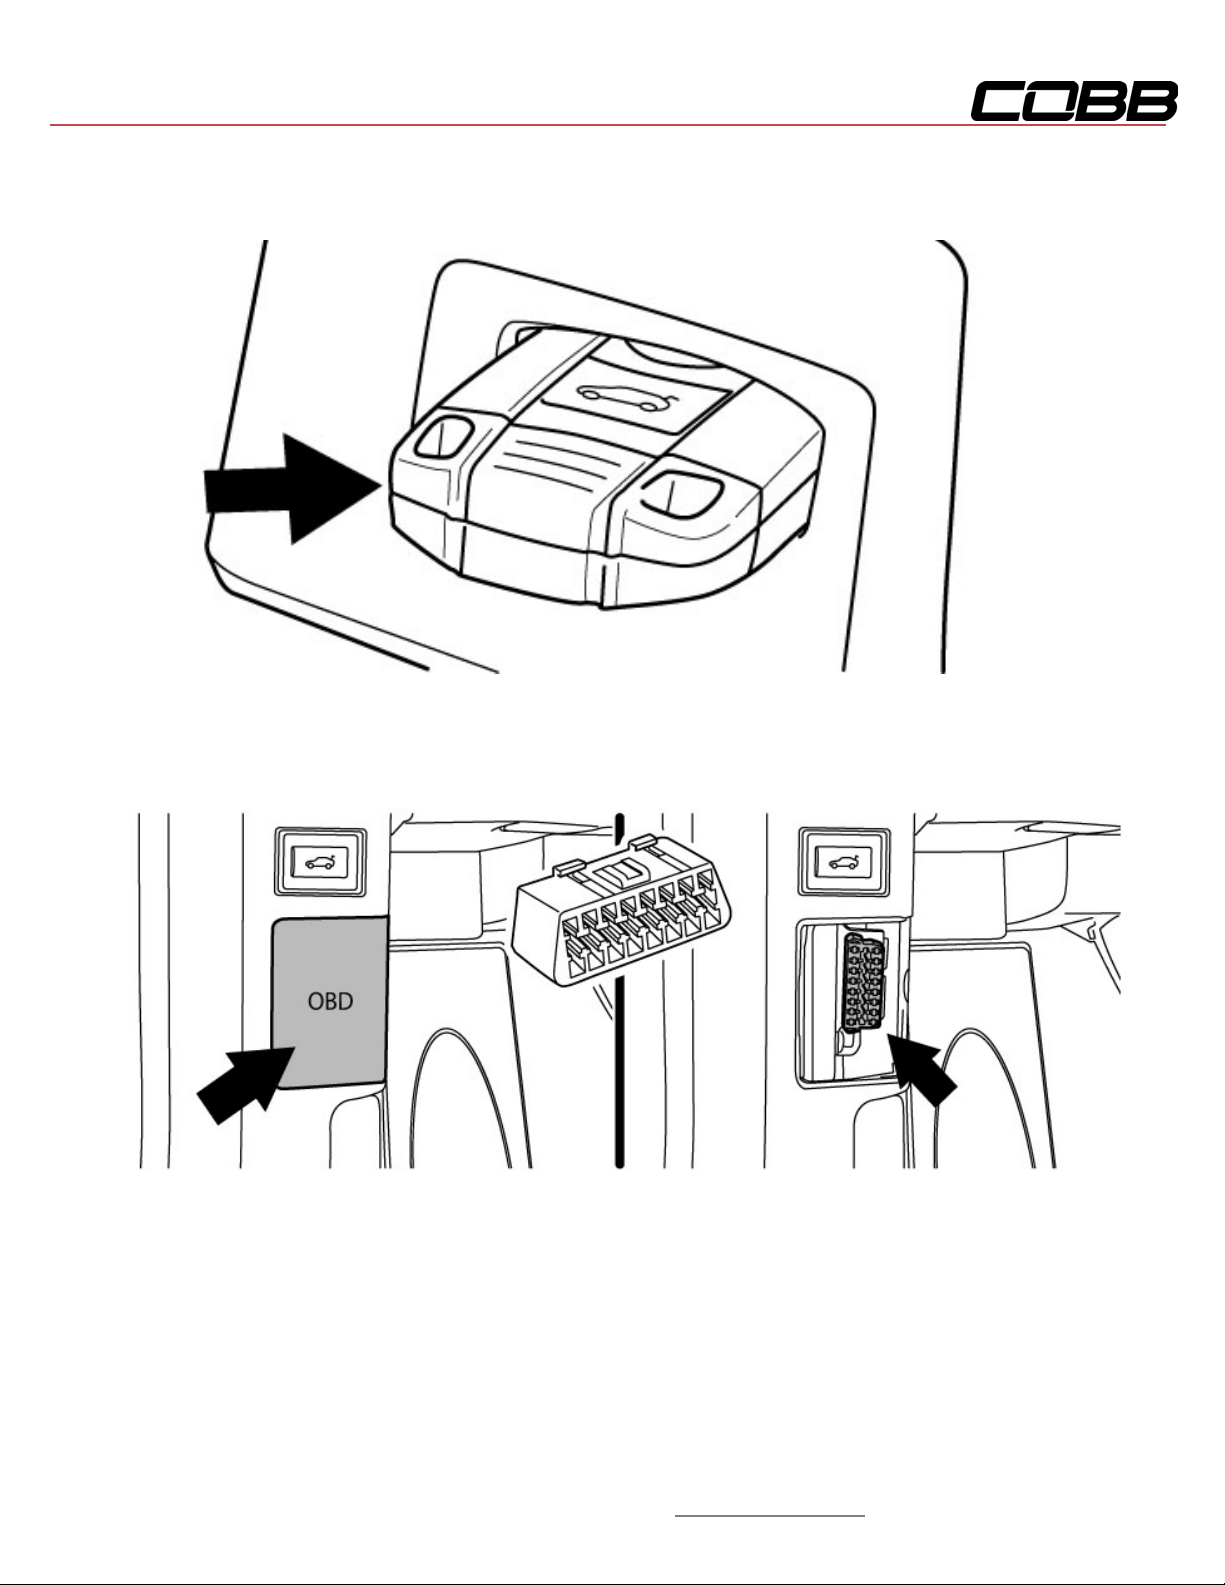
1. Insert the key into the vehicle's ignition.
2. Locate the driver side kick panel. Remove the small plastic cover to expose the OBD-II port.
Page 9
Copyright © 2013 COBB Tuning Products LLC. All Rights Reserved. | www.cobbtuning.com
8
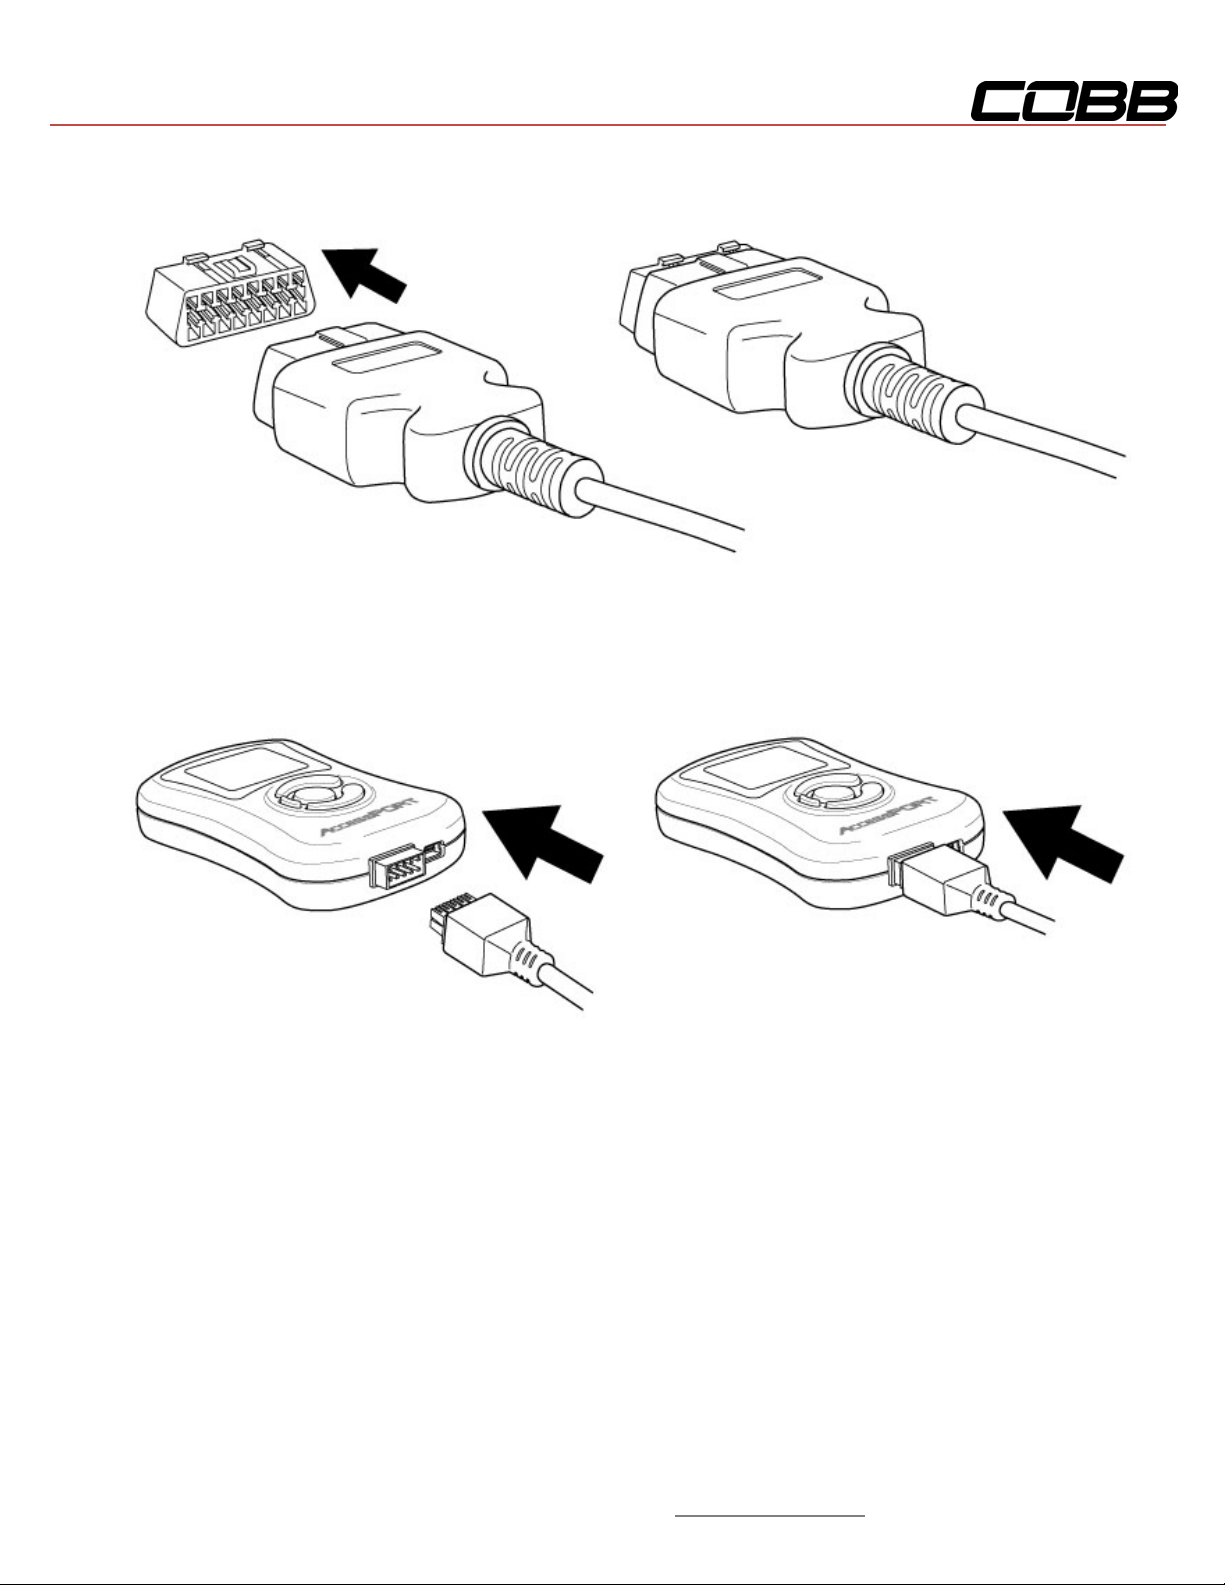
3. Plug the OBD-II cable into the OBD-II port under the dash.
4. Connect the small end of the OBD-II cable to the 10-pin port on the bottom of the Accessport. At
this point the Accessport will power up and after a few moments present the installation menu.
Page 10
Copyright © 2013 COBB Tuning Products LLC. All Rights Reserved. | www.cobbtuning.com
9
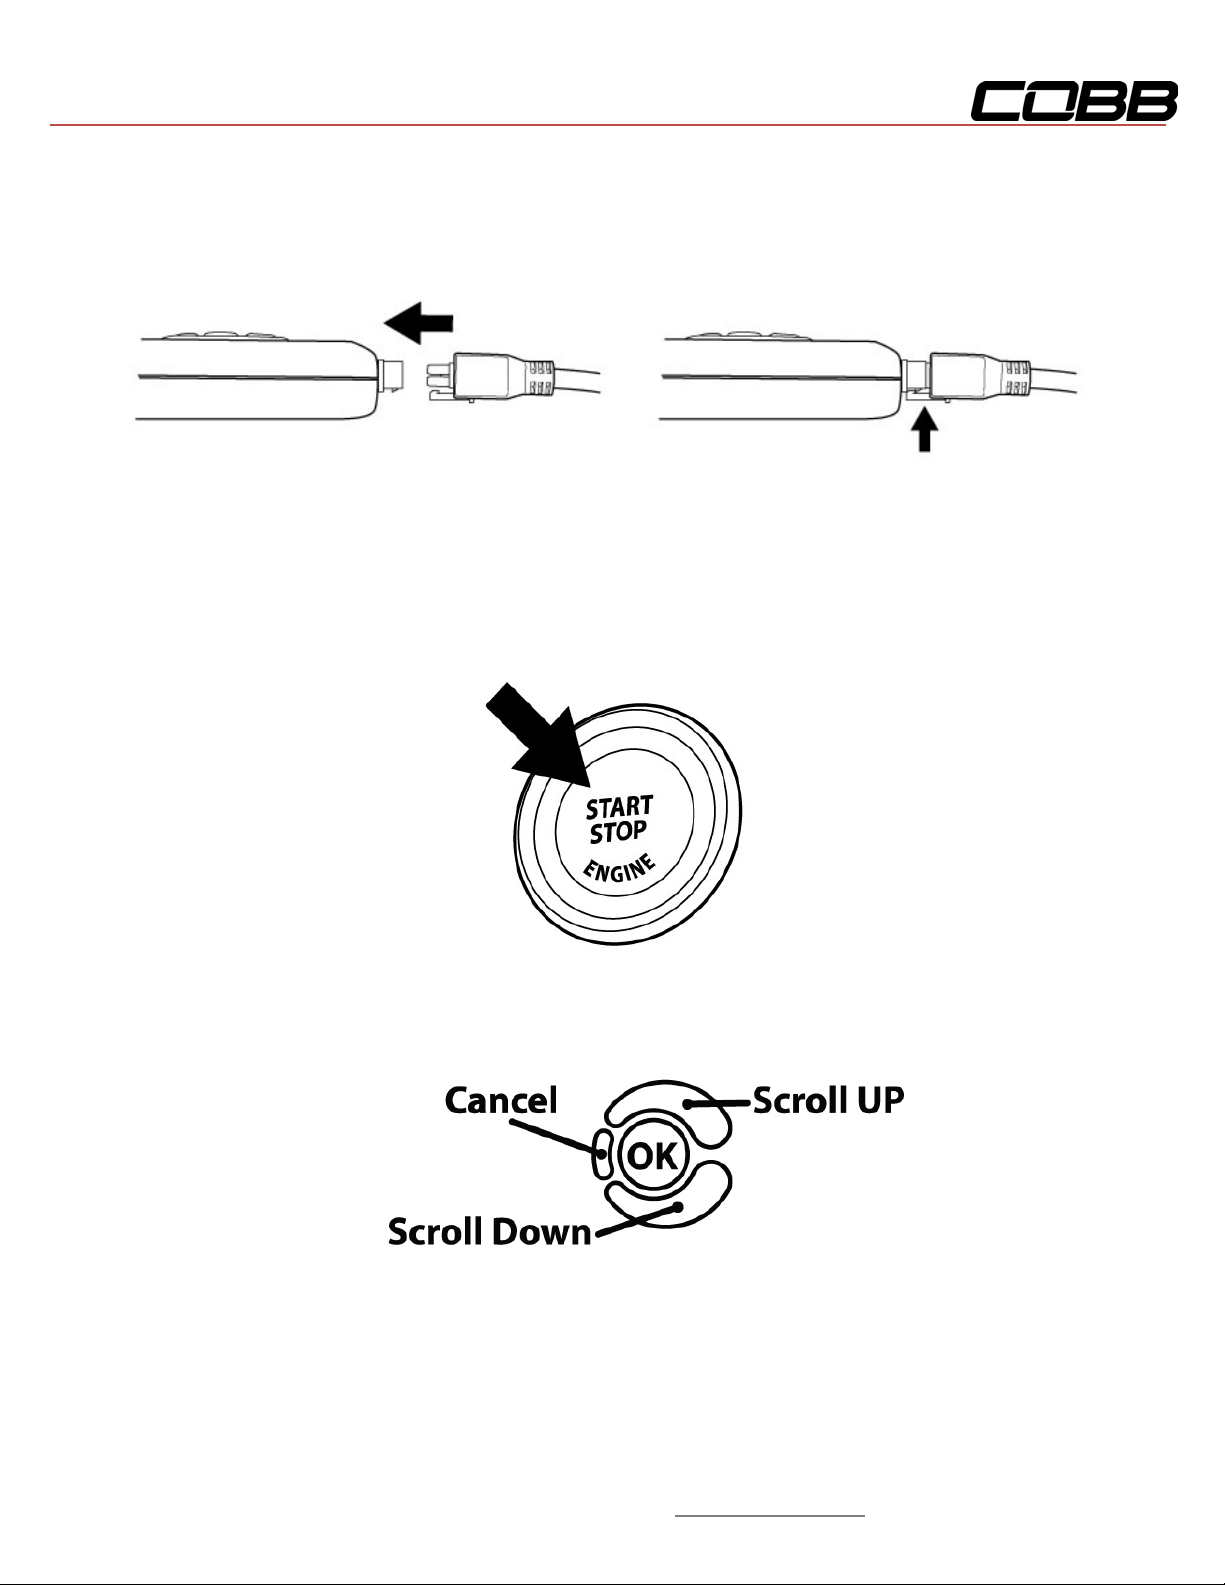
5. Make sure the clasp on the OBD-II cable firmly engages the tab on the 10-pin port.
6. Without touching the clutch or brake pedal press the START button once to put the car into the
ON position.
7. Select [Install] from the Accessport menu by pressing the [OK] button to proceed with
installation. Below is a diagram of the Accessport's keypad function.
8.
Page 11

Copyright © 2013 COBB Tuning Products LLC. All Rights Reserved. | www.cobbtuning.com
10
WARNING!
If a previous installation of an Accessport is detected, you will be given the option to overwrite it
program supplied on the Accessport will be used when you uninstall.
Vehicle Identification
The Accessport will attempt to automatically determine the target vehicle for installation.
If the Accessport successfully identifies the vehicle:
Verify that the identified vehicle is correct and press [OK] to confirm.
If an error occurs:
Please refer to [TROUBLESHOOTING SECTION] .
Map Selection
Once the Accessport determines the installation vehicle type, it will present a list of maps from which to
choose for installation. The Accessport reprograms the ECU with the calibration data from the map file
selected for installation. It is important to select the map file that most closely matches the modif ication
level of the target vehicle.
If you are unsure about which map applies to your modification level, please see the map notes and
their requirements for the modifications that will best fit your vehicle.
Select a map and press [OK] to view detailed information about that map. After confirming that the
selected map is correct, press [OK] again to proceed, or press [CANCEL] to return to the map selection
list.
Save Stock ECU Program Data
Once the vehicle is in ECU reprogramming mode, the Accessport will first download the current stock
ECU program data from the vehicle. The Accessport saves this data for use when uninstalling to ensure
that the vehicle is returned to the exact state it was in before the Accessport was installed. The
download process will take 8-9 minutes to complete.
with a new installation. Be aware that the previous installation will be permanently lost and
unrecoverable. This detection may occur prior to saving the stock ECU program data, in which
case the ECU program data will not be saved. In the case of a previous install, a stock ECU
Install Accessport Programming
After the Accessport downloads and saves the stock ECU program data, it will proceed with installation
to the vehicle. It is at this point that the Accessport reprograms the vehicle's ECU with the new program
Page 12

Copyright © 2013 COBB Tuning Products LLC. All Rights Reserved. | www.cobbtuning.com
11
WARNING!
Do not disturb the Accessport and the OBD-II cable while installation is taking place. Failure to
do so may result in incomplete ECU reprogramming which will render the vehicle inoperable.
WARNING!
Installing an Accessport may void powertrain and associated warranties. COBB Tuning makes
liability from voided or loss of warranty by your dealer or the manufacturer.
data and calibration parameters from the selected map file. This process will take 10 minutes to
complete.
Installation Complete
The Accessport is now fully installed and ready for use. Turn the key to the OFF position and unplug the
OBD-II cable from the vehicle.
The vehicle's ECU is now programmed with new calibration data. The Accessport does not need to be
plugged into the vehicle for the calibration to be in effect, however, there are other features of the device
that may be used at any time.
Please note that the Accessport is designed to work with only one vehicle at a time. Once the
Accessport is installed, it cannot be used with another vehicle until it is uninstalled from the
original vehicle.
Dealer Service/Visit
Prior to any visit to your dealer for service, COBB Tuning recommends uninstallation of the Accessport
from your vehicle. This will help minimize warranty complications with your modified vehicle.
Note: Occasionally, dealers will update the ROM revision on your vehicle's ECU. If this happens,
there is a chance that the new ROM revision is unrecognized by the Accessport, evidenced by
the fact that the Accessport will no longer successfully identify the vehicle during installation. If
this happens, please follow ROM-dump instructions here. Please note that it may take up to 5
work days for the new ROM revision to be supported.
no claim of liability for loss of warranty stemming from the use of the COBB Tuning Accessport
or associated parts. Installation of the COBB Tuning Accessport releases COBB Tuning from all
Page 13

Copyright © 2013 COBB Tuning Products LLC. All Rights Reserved. | www.cobbtuning.com
12
Accessport Features & Functionality
Monitor
Live Data
The Accessport can read sensor data from the factory ECU and display it as an on-screen gauge. This
feature allows the Accessport to function as an auxiliary gauge displaying boost, RPM, temperature, or
any number of other parameters.
To change which monitor is currently being d isplayed in Live Data, select the monitor using the up/down
buttons and press the OK button to activate the monitor.
Use 'Set Live Data List' in the 'Monitor' sub-menu to set which monitors are available for selecting in Live
Data.
NOTE: The Accessport is only capable of displaying live data while the ignition is turned to the “ON”
position. The Accessport will display an error message if it cannot communicate with the vehicle.
Data Log
The Accessport can record sensor data from the factory ECU while you drive. With the ability to store
multiple sessions, the Accessport can function as a complete engine datalogger and diagnostic tool. To
begin datalogging, press the OK button while in Live Data mode. An on screen prompt will notify you
when the Accessport is recording data. To view t he r es ult s of your datalog sessions, simply connect the
Accessport to your PC and retrieve the results using the AP Manager software. Data Log recordings are
stored in a .csv (Comma Separated Values) format and are easily viewed using any spreadsheet
application. Click here for step-by-step instruction.
Use 'Set Data Log List' in the 'Monitor' sub-menu to set which monitors are logged.
Page 14

Copyright © 2013 COBB Tuning Products LLC. All Rights Reserved. | www.cobbtuning.com
13
NOTE: The Accessport is only capable of datalogging while the ignition is turned to the “ON” position.
The Accessport will display an error message if it cannot communicate with the vehicle.
NOTE: Up to 10 log files can be stored on the Accessport. Use AP Manager to delete unneeded logs. If
datalogging is started when there are already 10 log files on the Accessport, the log file with the lowest
numerical value will be automatically overwritten.
NOTE: The 10 log files can be a combined length of 2+ hours long.
Set Rev Warning
Use this function to set the desired RPM value for Shift Light. The Shift Light function is available while
viewing Live Data. While the actual engine RPM exceeds the desired RPM limit, the Accessport screen
will flash, indicating an over-rev condition.
Set Live Data List
This list allows the user to enable and disable items for viewing in Live Data. Only monitors with a
checkbox will be in the list of available monitors to view while in Live Data. Highlight a monitor and press
the OK button to activate/deactivate it for logging.
Use 'Live Data' in the 'Monitor' sub-menu to view monitor data.
Set Data Log List
This list allows the user to enable and disable items for logging. Only monitors with a checkbox will be
recorded while using the Data Log feature. Highlight a monitor and press the OK button to
activate/deactivate it for logging.
Use 'Data Log' in the 'Monitor' sub-menu to start and stop logging.
NOTE: Datalogging performance is reduced as the number of items selected to datalog increases.
Reset Live List
Reset to default monitor list for viewing in Live Data. This item is grayed out and not selectable if the
default monitor list is already selected.
Reset Log List
Reset to default monitor list for logging in Data Log. This item is grayed out and not selectable if the
default monitor list is already selected.
Page 15

Copyright © 2013 COBB Tuning Products LLC. All Rights Reserved. | www.cobbtuning.com
14
Performance
The Accessport can calculate several performance measurements.
NOTE: The Accessport is only capable of calculating performance test results while the ig nit ion is t ur ned
to the “ON” position. The Accessport will display an error message if it cannot communicate with the
vehicle.
0-60 MPH
To record the 0-60 MPH performance, select this menu option and follow instructions. A time slip
showing the performance results will be displayed at the end of the performance test.
¼ Mile
To record the ¼ Mile performance, select this menu option and follow instructions. A time slip showing
the performance results will be displayed at the end of the performance test.
Page 16

Copyright © 2013 COBB Tuning Products LLC. All Rights Reserved. | www.cobbtuning.com
15
Tune
Enhance the performance of your car.
Change Map
To change the mapping on your ECU, select t his m enu option and follow the instructions. The ignition
must be turned to the “ON” position during the Change Map operation. You will be prompted to select a
pre-loaded map. The same warnings that apply to the installation process apply here as well (battery
charge level, turn accessories off, etc.). The Change Map process takes about 1 minute.
Show Current Map
To see what the last map that was flashed to your car, select this menu option. You can press the OK
button to see a detailed description of the map.
Page 17

Copyright © 2013 COBB Tuning Products LLC. All Rights Reserved. | www.cobbtuning.com
16
Troubleshooting
Use the Accessport as a diagnostic tool.
NOTE: The Accessport is only capable of displaying trouble codes while the ignition is turned to the
“ON” position. The Accessport will display an error message if it cannot communicate with the vehicle.
Reset ECU
Use this function to reset all diagnostic trouble codes (DTC).
Read Codes
Use this function to read trouble codes from the engine computer. Stored codes indicate a mechanical or
electrical fault. Use the up/down buttons to highlight a code and display a short description of the trouble
code (if available).
Clear Codes
Use this function to clear all active and pending codes.
Page 18

Copyright © 2013 COBB Tuning Products LLC. All Rights Reserved. | www.cobbtuning.com
17
Uninstall
Uninstall
Selecting this item will remove the Accessport programming from the vehicle on which it is installed and
return the ECU back to a stock state.
Page 19

Copyright © 2013 COBB Tuning Products LLC. All Rights Reserved. | www.cobbtuning.com
18
Accessport
About
Displays information about the Accessport firmware version, serial number, status (installed or
uninstalled) and vendor.
Settings
Change Accessport settings.
Language: Choose from an array of various languages. *
Units: Choose from Standard, Metric, and Metric with AFR.
* Not all menu entries are translated.
Page 20

Copyright © 2013 COBB Tuning Products LLC. All Rights Reserved. | www.cobbtuning.com
19
Symptom
Troubleshooting Steps
1. Check USB cable connection on both the Accessport
1. Follow all steps for “Accessport will not communicate
1. Ensure that the Accessport is running the most recent
Accessport Troubleshooting
and the OBD-II cable.
Accessport will not
communicate with vehicle.
Accessport cannot reflash
ECU.
Accessport cannot identify
vehicle during installation.
2. Ensure that the OBD-II cable is making good contact
inside the vehicle's OBD-II port.
3. Verify that the vehicle's ignition is turned to the “ON”
position.
with vehicle.”
2. Verify that all steps required for ECU reprogramming
mode were properly followed.
version of firmware. For more information, see COBB
Forums.
2. Some vehicles are not initially supported and will
require users to send in the ROM file. Please follow
ROM-download instructions here
.
3. For more information or assistance, please contact
tech support.
Page 21
Copyright © 2013 COBB Tuning Products LLC. All Rights Reserved. | www.cobbtuning.com
20
Web
http://www.cobbtuning.com/
E-Mail
Phone
866.922.3059
Support Contact Information
http://www.cobbforums.com/
Page 22

Copyright © 2013 COBB Tuning Products LLC. All Rights Reserved. | www.cobbtuning.com
21
Environmental Information
Operating and Storage Temperatures
The Accessport is designed to be operated at temperatures between 32° and 95° F (0° and 35° C) and
with a relative humidity below 90%. Using the Accessport outside of these recommendations may result
in damage.
When storing the Accessport, do so in a place where temperature is always between 0° and 115° F (-20°
and 45° C) and with a relative humidity below 90%.
Never store your Accessport in an area that receives direct sunlight.
Do Not Get Wet
Take care to prevent any liquids from com ing in cont act with the Accessport or any associated
equipment.
In the event your Accessport, or associated equipment, gets wet you may need to send it in for service.
Please contact technical support BEFORE attempting to use the Accessport.
Handling and Storage
Your Accessport may be damaged by improper storage or handling. Be careful not to drop your
Accessport or any associated parts.
Never store your Accessport in an area that experiences any noticeable levels of vibration, static
electricity, heat shock, or excessive swings in relative humidity.
Do Not Attempt Repairs Yourself
Never attempt to open your Accessport or any associated equipment. Doing so puts the components at
risk of damage from, but not limited to, static shock. No user-serviceable parts are inside. At no time will
ANY authorized representative of Cobb Tuning Products, LLC. ask you to open or
mechanically/electronically alter the Accessport.
Opening the Accessport will void any and all warranties for the device and its operation.
 Loading...