

Page 1

1601 J. P. Hennessy Drive, LaVergne, TN USA 37086 615/641-7533 800/688-6359 Manual Part No.: 85000454 02
HENNESSY INDUSTRIES INC. Manufacturer of AMMCO
®
, COATS®and BADA®Automotive Service Equipment and Tools. Revision: 08/09
PAX Kit 85000443
For use with COATS Model
APX Series Tire Changers
®
User Instructions
with Parts Identification
READ these instructions before placing unit in
service KEEP these and other materials delivered
with the unit in a binder near the machine for
ease of reference by supervisors and operators.
This is a supplement to your operating manual and covers the use of the PAX kit. If you do not have
your original operating manual, please call COATS at 1-800-688-6359 to request an additional copy.
Page 2
2 • COATS PAX Kit
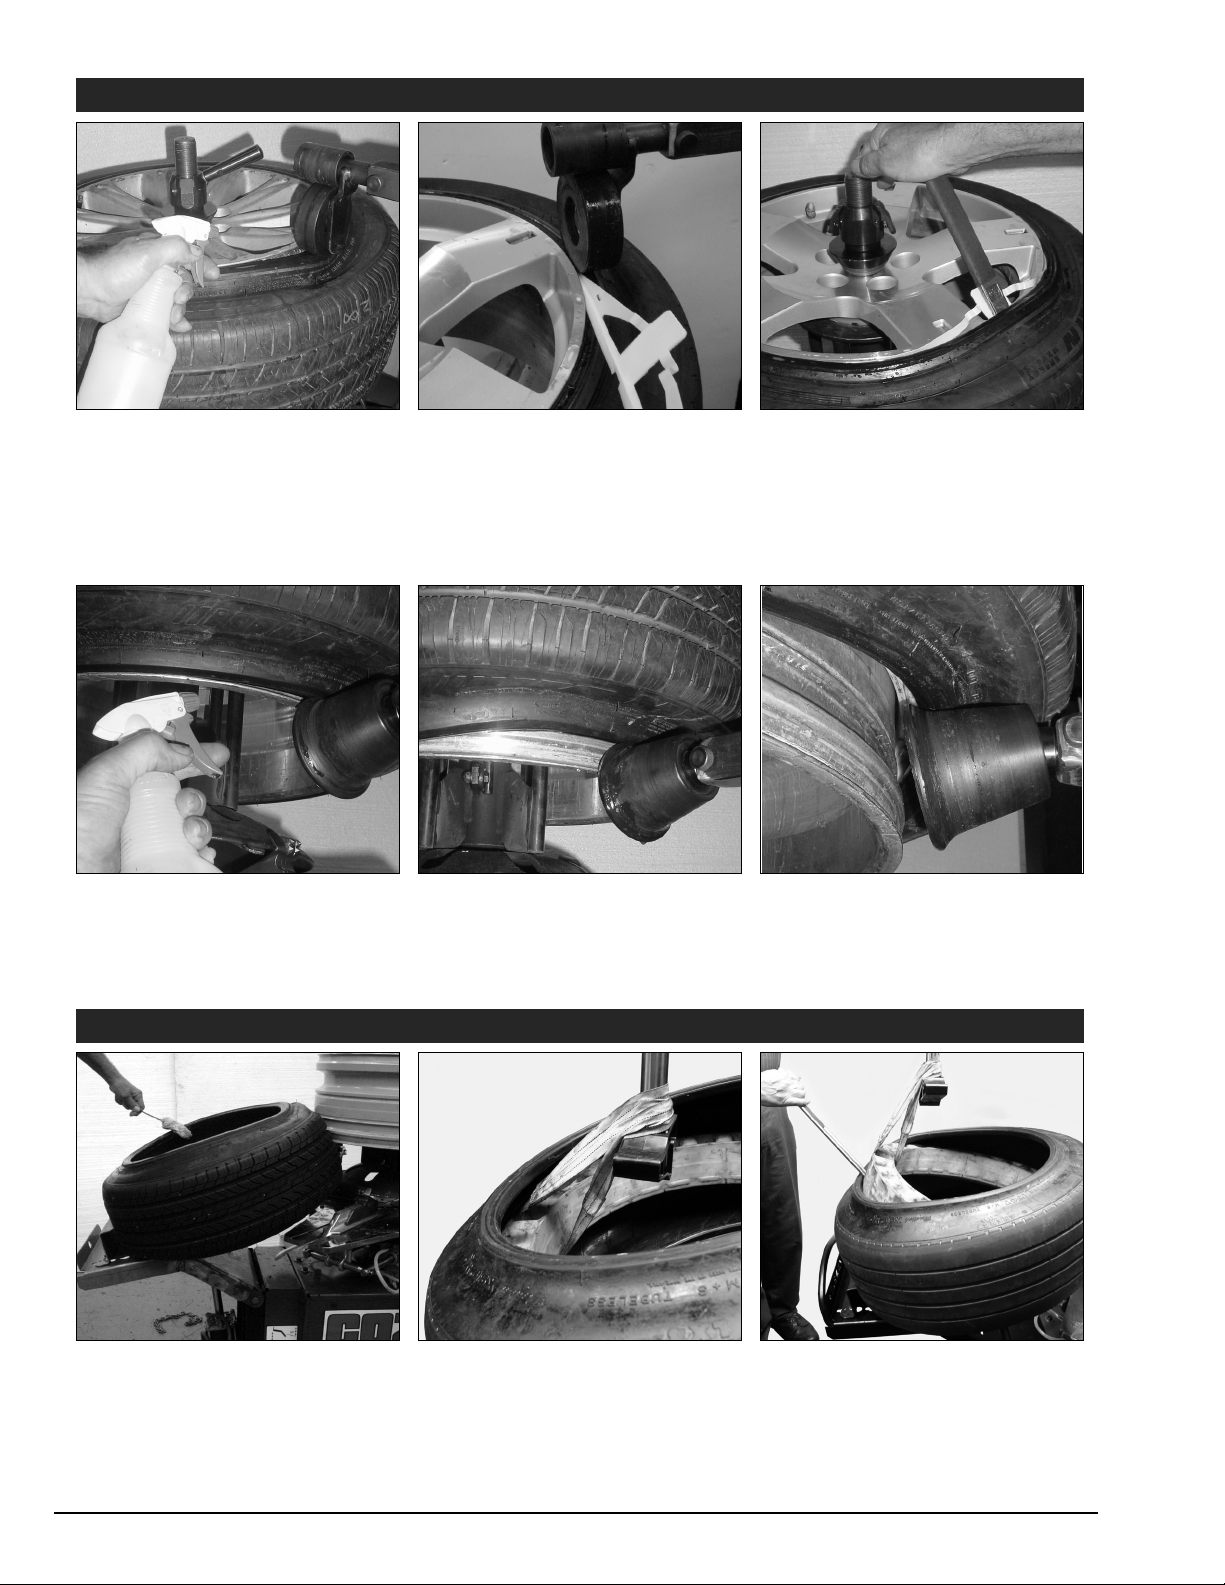
• Position riser on table top.
• Place large roller on tire at rim
edge, apply pressure and loosen
bead.
• Rotate tire; lubricate between tire
bead and rim.
• Insert end of plastic protector into
gap between tire and rim.
Note: Be sure slot for lifting tool is
toward rubber; not the rim.
• Rotate in reverse, allowing protector to insert fully.
• Using both hands, insert lift tool
between protector and tire.
• Slowly rotate lift tool toward center of rim; tire bead should slide
over top rim flange.
Demounting Tire With Support
Supplemental PAX Instruction
• Place tapered roller at lower rim
edge, apply pressure creating gap.
• Rotate tire and lubricate between
tire bead and rim.
• Continue to rotate and apply
upward force until the entire
lower tire bead is in the small drop
center area of the rim.
• Allow roller to contact inside edge
of support system.
• Apply pressure to dislodge clips;
push tire/support off rim.
• Rotate table top scallop facing lift.
• Place zee bracket on lift.
• Raise lift and wedge tire between
zee bracket and table top.
• Use Robo Arm and nylon web
sling; wrap sling around support.
• Insert lift tool between support
and tire; to guide support out of
tire as upward force is applied to
the nylon web sling.
• Completely remove the support
from the tire.
Remove Support From Tire
Page 3

COATS PAX Kit • 3
• Place large diameter side of
tire/support over small diameter of
wheel.
• Position roller and lubricate bead
area of tire.
• Rotate tire; push support system
into location.
Note: Small roller may contact rim.
Mounting Tire With Support
• Lubricate lower bead and make
sure bead is in small drop center.
• Flip lower bead to outside of rim.
• Place small roller against tire and
rim; lubricate tire bead, place
bead lock clip; rotate tire slow.
• Position roller over tire and rim
and lubricate bead area of tire.
• Use lock clip; slide bead in place.
• Add about 10 pounds of air pressure to tire with core in location.
• Using roller, apply a little force to
assure bead is in correct location.
• Repeat on lower bead.
Bead Position Prior To Inflation
• Raise lift and wedge tire.
• Lubricate tire bead edges.
• Use hands to pull tire sidewall up.
• Inspect to assure clips on support
match groove on wheel once tire is
installed on rim.
• Use lift tool to wedge support
completely into the tire.
Install Support Inside Tire
Page 4

85000454 02 08/09 © Copyright 2007 Hennessy Industries and COATS All Rights Reserved Printed in USA
Parts Identification
Kit 85000443 includes the following Items
Item Part No. Description
1 85000300 PAX Riser
2 85000203 Zee Bracket Assembly
3 85000447 Plastic Protectors
4 85000448 PAX Bead Lift Tool
5 85000449 Bead Flip Tool
6 85000451 Spring Loaded Bead Lock Tool
7 85000301 Removable Center Shaft
8 85000444 Centering Cone, 40-100 mm
9 85000446 Hub Nut
10 85000453 Dual Roller Tool
11 85000385 PAX Nylon Web Slings (2)
12 85000455 Plain Bead Lock Tool
13 85000456 Tapered Roller
14 85000445 Centering Cone, 88-175 mm
15 85000726 Tool Holder Pin
16 85000450 PVC Nylon Roller
2
3
4
5
6
7
8
9
10
11
12
13
14
15
16
1
 Loading...