

Page 1

INSTRUCTION MANUAL Ver 1.0
Interior Network Speed Dome Camera / IPM3063N(P)
(3810-0204A)
Page 2
Warnings
Cautions
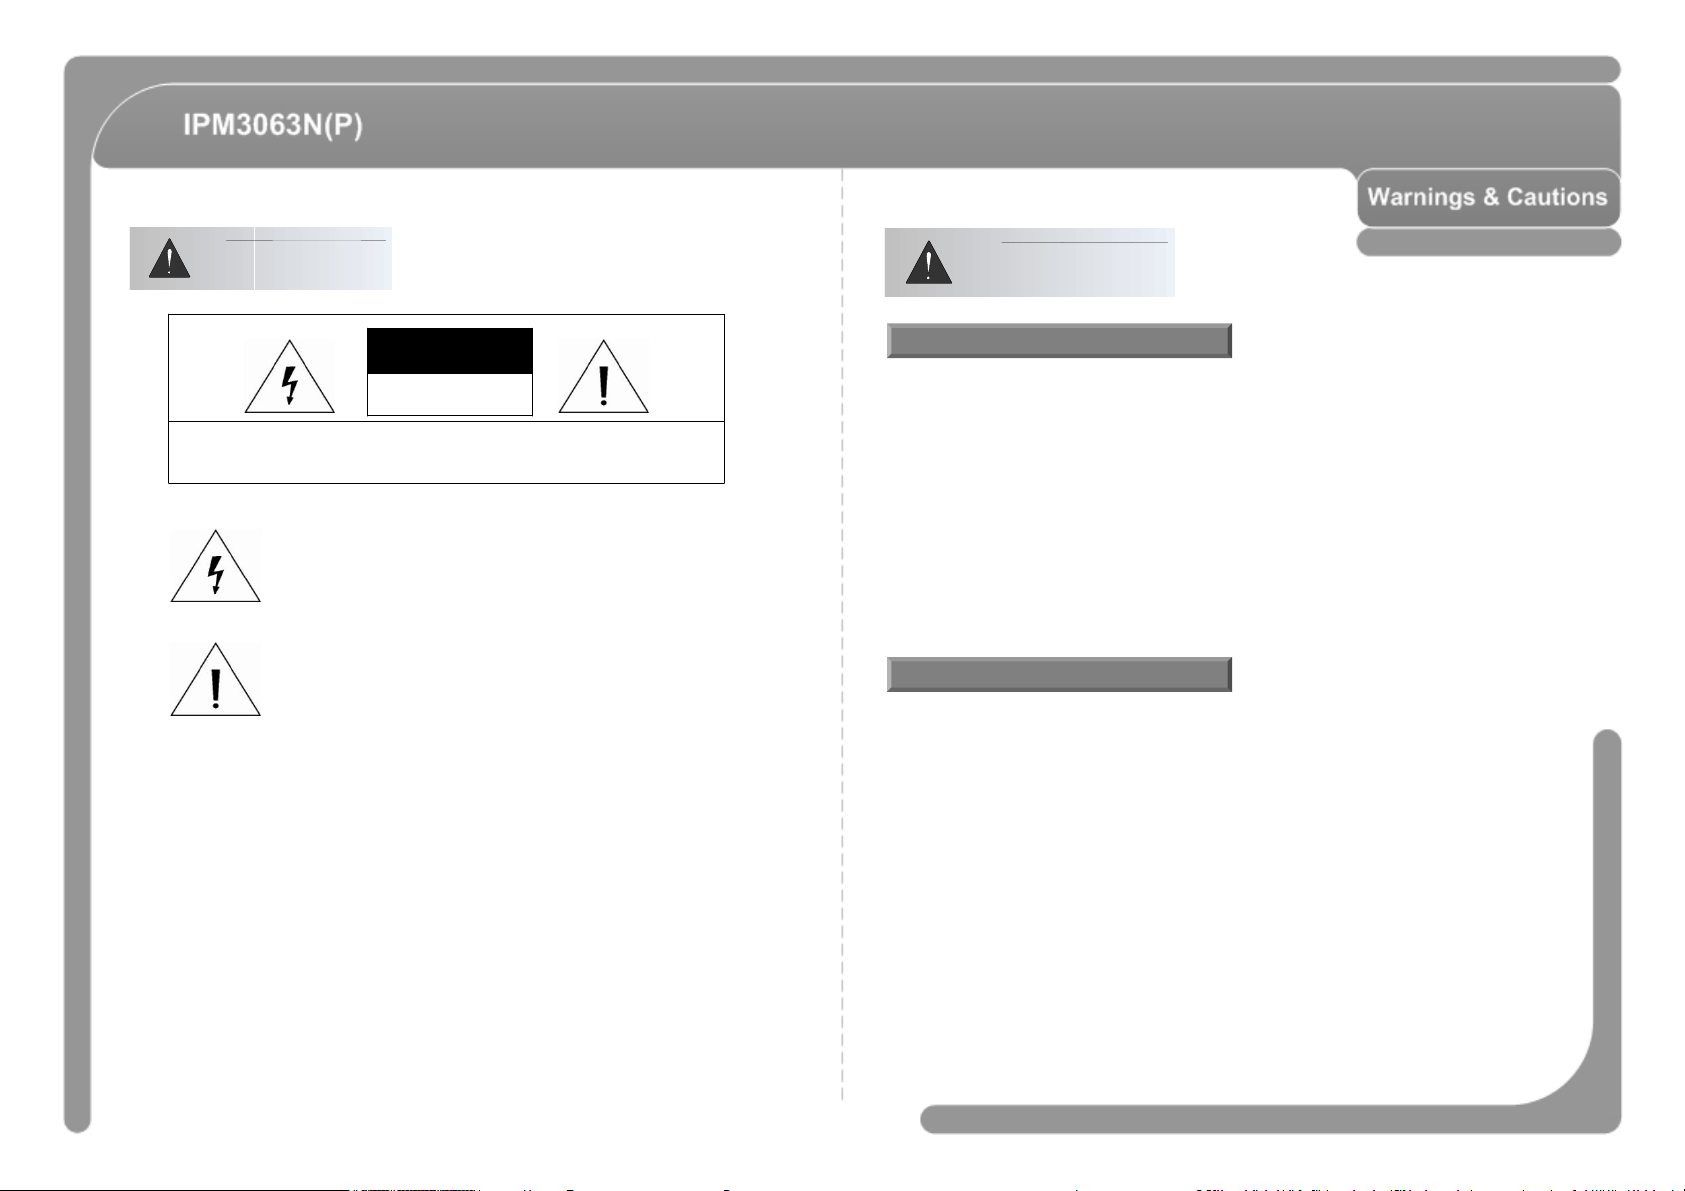
CAUTION
RISK OF ELECTRIC
SHOCK DO NOT OPEN
CAUTION : TO REDUCE THE RISK OF ELECTRICAL SHOCK, DO NOT OPEN COVE RS.
NO USER SERVICEABLE PARTS INSIDE.
REFER SERVICEING TO QUALIFIED SERVICE PER SONAL.
This lightning flash with arrowhead symbol is intended to alert the
user to the presence of un-insulated "dangerous voltage" within the
product's enclosure that may be of sufficient magnitude to constitute
a risk of electric shock to persons.
This exclamation point symbol is intended to alert the user to the
presence of important operating and maintenance (servicing)
instructions in the literature accompanying the appliance.
WARNING : TO PREVENT THE RISK OF FIRE OR ELECTRIC SHOCK HAZARD,
DO NOT EXPOSE THIS CAMERA TO RAIN OR MOISTURE.
Important Safeguard
◎ Read all of the safety and operating instructions before using the product.
◎ Save these instructions for future reference.
◎ Do not use attachments or accessories unless recommended by the appliance
manufacturer as they may cause hazards, damage product and void warranty.
◎ Do not use this product near water or moisture.
◎ Do not place or mount this product in or on an unstable or improperly supported location.
Improperly installed product may fall, causing serious injury to a child or adult, and
damage to the product. Use only with a mounting device recommended by the
manufacturer, or sold with the product. To insure proper mounting, follow the
manufacturer's instructions and use only mounting accessories recommended by
manufacturer.
◎ This product should be operated only from the type of power source indicated on the
marking label.
Precautions
◎ Before using, make sure power supply and others are properly connected.
◎ While operating, if any abnormal condition or malfunction is observed, stop using the
camera immediately and then contact your local dealer.
◎ Do not disassemble or tamper with parts inside the camera.
◎ Do not drop or subject the camera to shock and vibration as this can damage camera.
◎ Care must be taken when you clean the clear dome cover. Especially, scratch and dust
will ruin your quality of camera.
◎ Do not install the camera in areas of extreme temperature, which exceed the allowable
range.
◎ Avoid installing in humid or dusty places.
◎ Avoid installing in places where radiation is present.
◎ Avoid installing in places where there are strong magnetic fields and electric signals.
◎ Avoid installing in places where the camera would be subject to strong vibrations.
◎ Never expose the camera to rain and water.
◎ Don’t connect the RJ-45 cable to a terminal by constraint.
Page 3
Features
Product
Installation
------------------------------------------------- 6
------------------------------------------------- 8
------------------------------------------------- 9
Web Viewer
System Administration ----------------------------------------------------------------------------- 18
Configuring Speed Dome ------------------------------------------------------------------------- 20
21Page Access Authority -----------------------------------------------------------------------------Web Viewer ------------------------------------------------------------------------------------------- 22
Status Window --------------------------------------------------------------------------------------- 24
Configuring Users ------------------------------------------------------------------------------------ 25
Setting Date & Time --------------------------------------------------------------------------------- 27
Configuring Multi-Viewer --------------------------------------------------------------------------- 29
Configuring PTZ -------------------------------------------------------------------------------------- 29
Maintain Server Configurations ------------------------------------------------------------------ 33
35Generating Log Report -----------------------------------------------------------------------------
36Configuring Audio ------------------------------------------------------------------------------------
37Configuring Video ------------------------------------------------------------------------------------
39Configuring RTP/RTSP -----------------------------------------------------------------------------
40Configuring the Network (TCP/IP) parameters -----------------------------------------------
42Configuring IP Filtering -----------------------------------------------------------------------------
44Configuring HTTP ------------------------------------------------------------------------------------
45Configuring UPnP/DynDNS/Bonjour ------------------------------------------------------------
47Configuring CMS -------------------------------------------------------------------------------------
48Configuring Event Type ----------------------------------------------------------------------------
50SMTP Setup -------------------------------------------------------------------------------------------
52Configuring FTP --------------------------------------------------------------------------------------
53Configuring and operating PTZ ------------------------------------------------------------------
55Configuring Motion Detection area -------------------------------------------------------------Configuring Multi View Option -------------------------------------------------------------------- 57
Camera Operation
59Starting OSD Menu ----------------------------------------------------------------------------59PRESET ------------------------------------------------------------------------------------------60SWING --------------------------------------------------------------------------------------------60PATTERN ----------------------------------------------------------------------------------------61GROUP -------------------------------------------------------------------------------------------62Others Functions --------------------------------------------------------------------------------
63OSD Display of Main Screen ----------------------------------------------------------------General Rules of Key Operation for Menu ----------------------------------------------- 64
MAIN MENU ------------------------------------------------------------------------------------- 64
DISPLAY SETUP ------------------------------------------------------------------------------- 64
65Compass Direction Setup --------------------------------------------------------------------PRIVACY ZONE MASK SETUP ----------------------------------------------------------- 65
CAMERA SETUP ------------------------------------------------------------------------------- 66
MOTION SETUP ------------------------------------------------------------------------------- 68
PRESET SETUP ------------------------------------------------------------------------------- 70
SWING SETUP --------------------------------------------------------------------------------- 72
PATTERN SETUP ----------------------------------------------------------------------------- 72
GROUP SETUP -------------------------------------------------------------------------------- 73
SYSTEM INITIALIZE -------------------------------------------------------------------------- 76
Specifications
---------------------------------- 78
Page 4
Camera Specifications
Preset, Pattern, Swing, Group, Privacy Mask ..
◎ CCD Sensor : 1/4” Interline Transfer CCD
◎ 10x Optical Zoom, 10x Digital Zoom (Max. 100x Zoom)
◎ Day & Night Function
◎ Various Focus Mode : Auto-Focus / Manual Focus / Semi-Auto Focus.
◎ Independent & Simultaneous Camera Characteristic Setup in Preset operation
Network Specifications
◎ Support D1, CIF output resolution.
◎ MJPEG, MPEG4, H.264 codec selectable.
◎ Max. 30 frame/sec support.
◎ Support Dual Stream.
◎ Bi-direction audio support (ADPCM, G.726)
◎ Up to 10 users can be connected.
◎ Support protocols : IPv4, HTTP, TCP, RTSP, UDP, SMTP, FTP, ICMP, DHCP, UPnP,
Bonjour, ARP, DNS, DynDNS.
◎ Support Motion Detection (Up to 3 motion detection area can be defined).
◎ When event occurred, image save function (JPEG file, Internal memory, SD Card).
Powerful Pan/Tilt Functions
◎ Max. 360°/sec high speed Pan/Tilt Movement.
◎ Using Vector Drive Technology, Pan/Tilt motions are accomplished in a shortest path.
As a result, time to target view is reduced dramatically and the video on the monitor is
very natural to watch.
◎ For jog operation using screen jog, since ultra slow speed 0.05°/sec can be reached,
it is very easy to locate camera to desired target view. Additionally it is easy to move
camera to a desired position with zoom-proportional pan/tilt movement.
◎ Max. 127 Presets are assignable and characteristics of each preset can be set up
independently, such as White Balance, Auto Exposure, Label and so on.
◎ Max. 8 set of Swing action can be stored. This enables to move camera repetitively
between two preset positions with designated speed.
◎ Max. 4 of Patterns can be recorded and played back.
◎ Max. 8 set of Group action can be stored. This enables to move camera repetitively
with combination of Preset or Pattern or Swing. A Group is composed of max. 20
entities of Preset/Pattern/Swings.
◎ Privacy Masks are assignable, not to intrude on other’s privacy. (4 Privacy Zones)
OSD(On Screen Display) Menu
◎ OSD menu is provided to display the status of camera and to configure the functions
interactively.
◎ The information such as Camera ID, Pan/Tilt Angle, Iris, Alarm Input and Preset can
be displayed on screen.
Alarm In/Out Functions
◎ 4 alarm sensor Inputs and 1 alarm output relay are available.
◎ To reject external electric noise and shock perfectly, alarm sensor Input is decoupled
with photo coupler.
◎ To reject external electric noise and shock perfectly, alarm sensor Input is decoupled
with photo coupler.
◎ The signal range of sensor input is from DC 5.0 to 12.0 volts to adopt various
applications.
◎ Relay output is able to connect. (max. 125V AC/0.5A or 24V DC/1A)
◎ If an external sensor is activated, camera can be set to move to the corresponding
Preset position.
6
7
Page 5
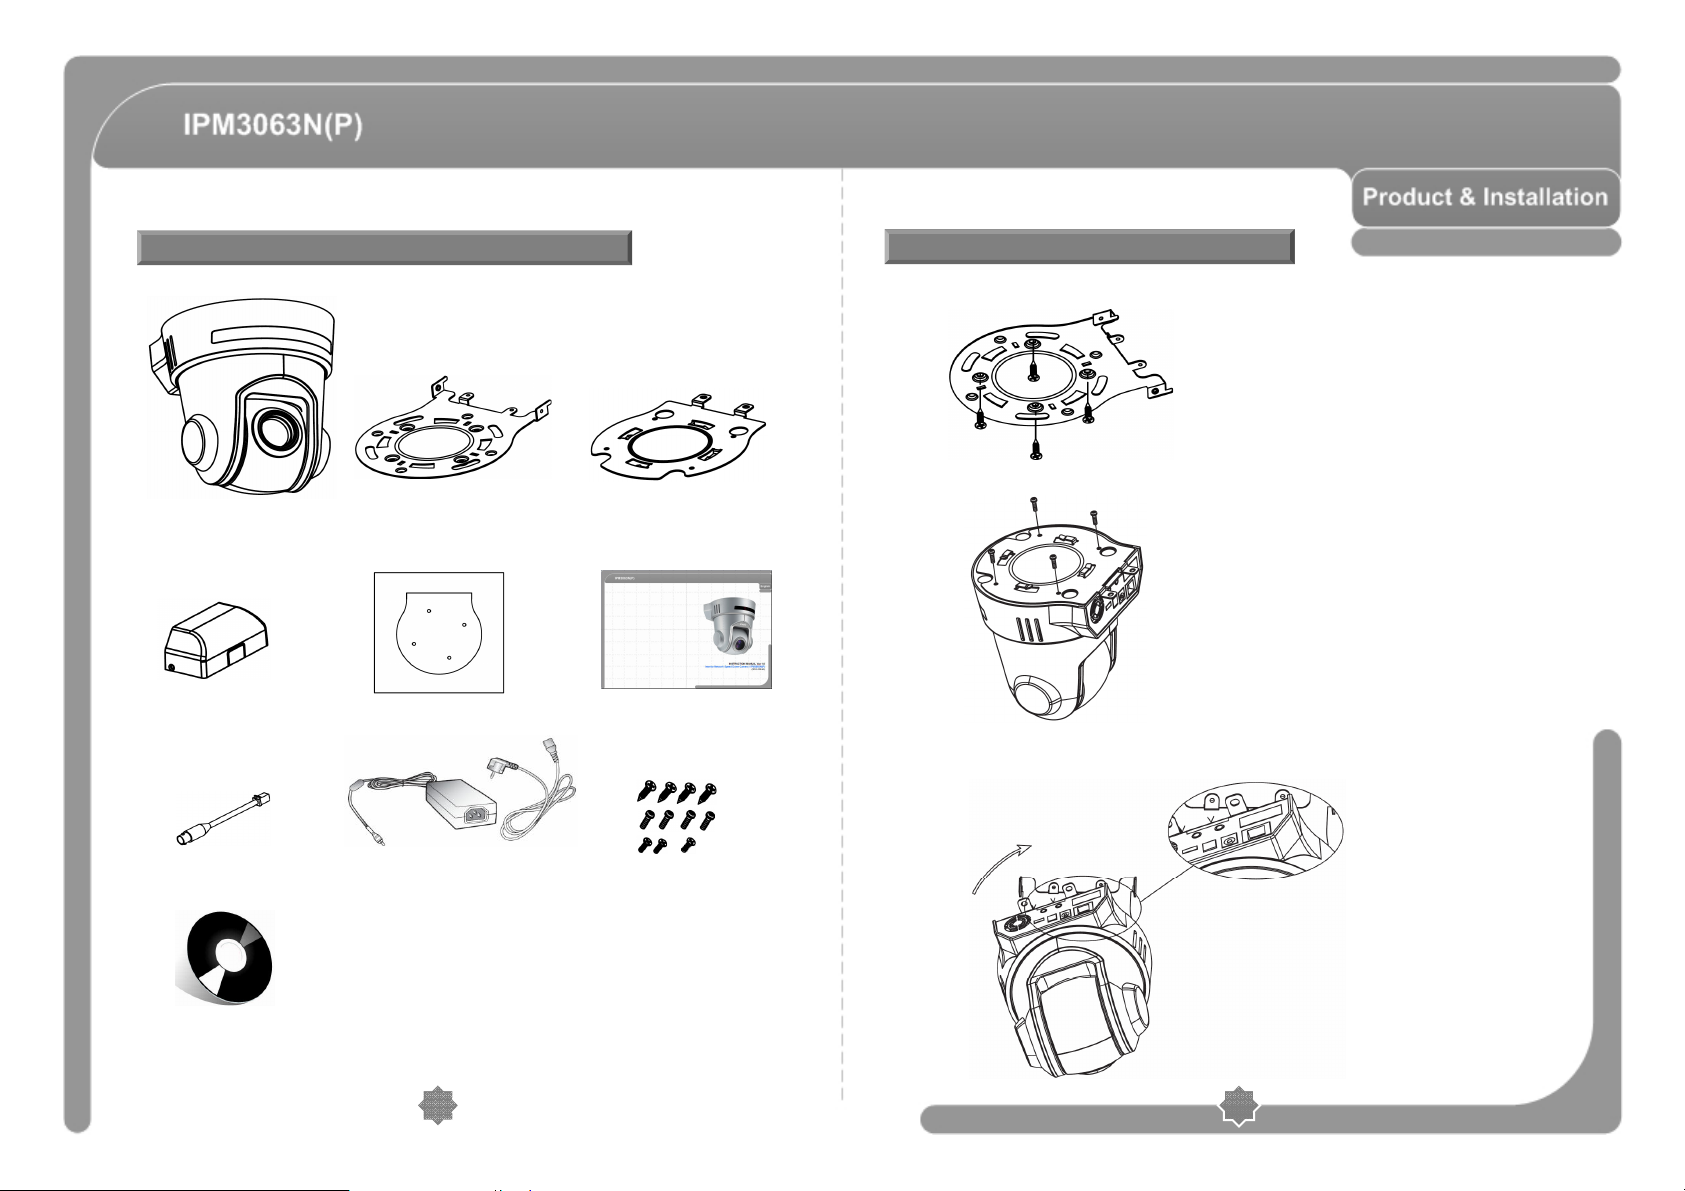
Basic Components
IPM3063N(P) Installation
① Install Ceiling Bracket on Ceiling.
② Attach the product installation bracket to the camera.
Main Body
Cable Cover Guide Pattern Manual
Video Connect
Install CD
Ceiling Bracket Product Bracket
DC Adaptor
Screws
③ Line up the mold lines and assemble main body to ceiling bracket. Turn main body
on its axis in CW (Clockwise) direction and after assembling then.
8
9
Page 6
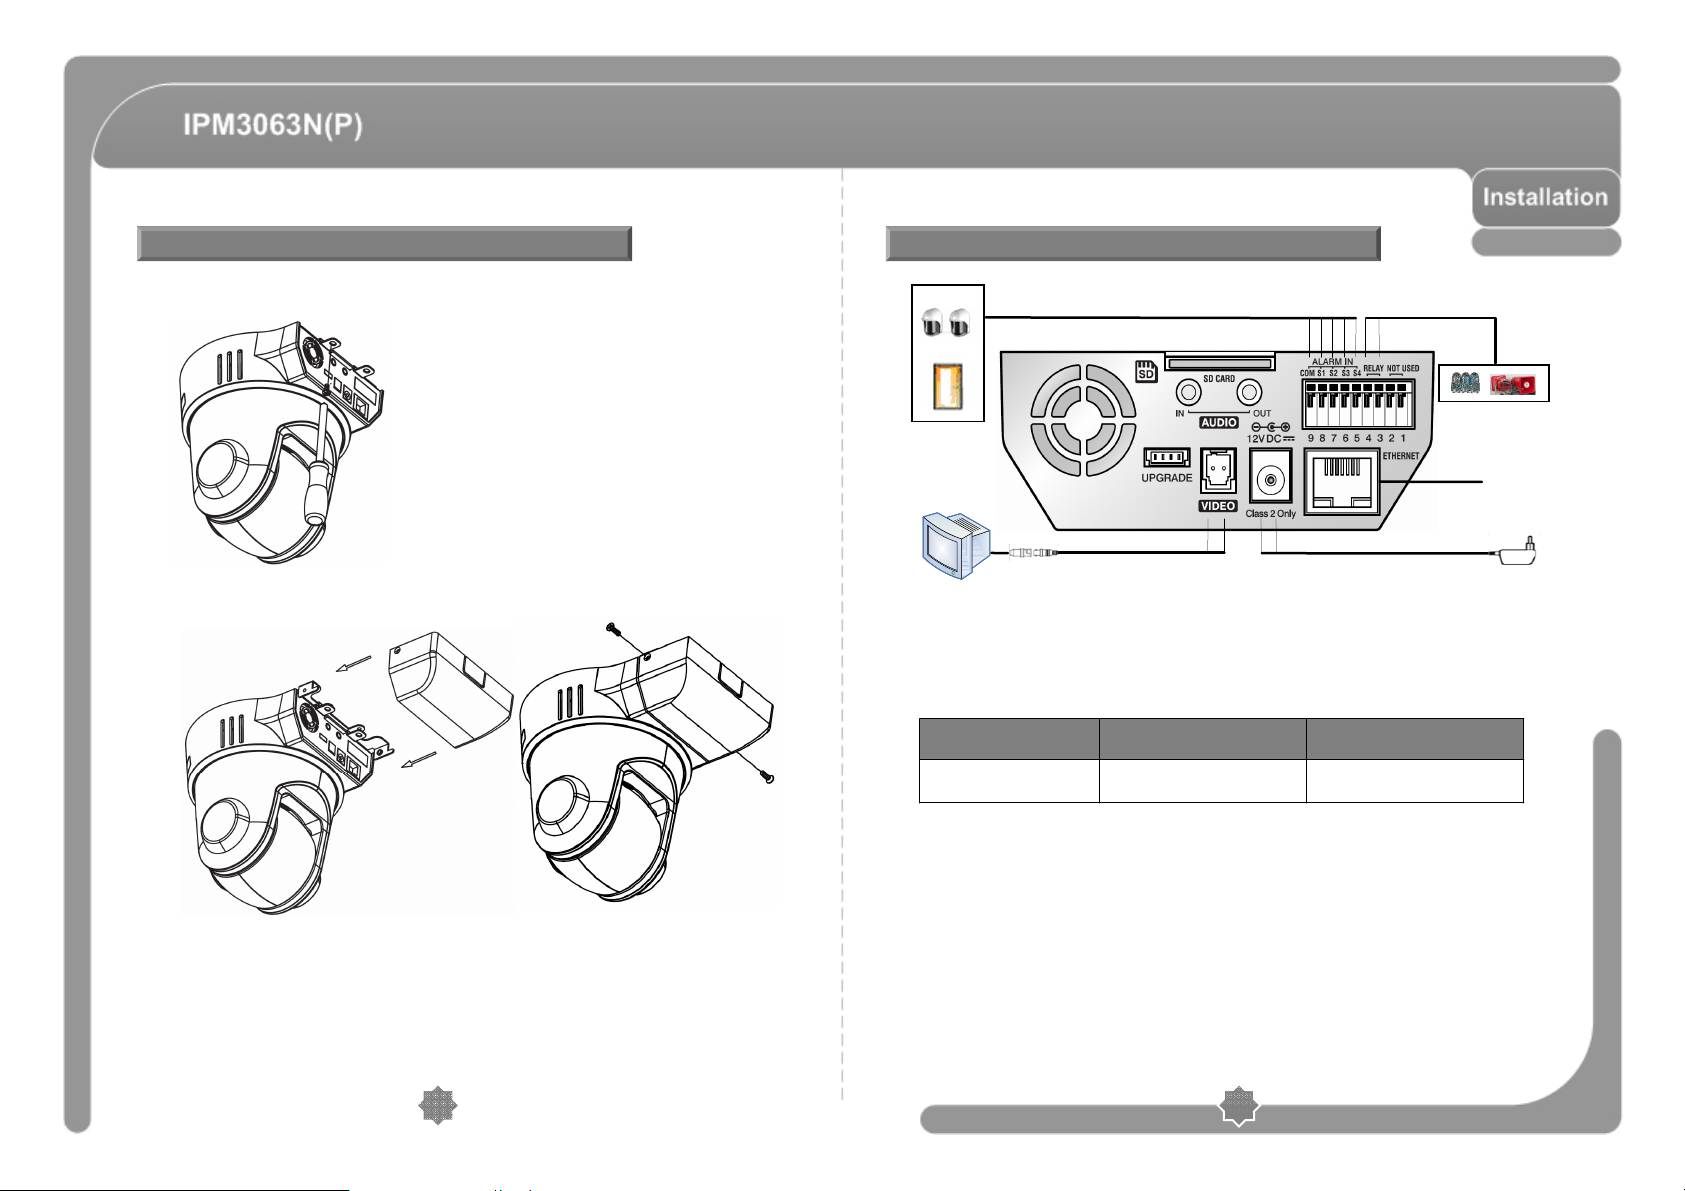
IPM3063N(P) Installation
Cabling
④ Fix the camera with the fixing screw.
⑤ Insert the Cable Cover into Ceiling Bracket. and fix it with the supplied fixing screw.
IrDA Sensor
Door Switch
Image Output Device (for installation)
◎ Power Connection
- The standard power for the system is 12V DC/1A
Please, check the voltage and current capacity of rated power carefully.
Rated power is included in the back of main unit.
RATED POWER INPUT VOLTAGE RANGE CURRENT CONSUMPTION
12V DC 11V ~ 18V DC 1A
◎ Video Connection
- Connect with the supplied Cable. (For installation)
Relay Output
Ethernet/LAN
POWER
10
◎ AUDIO IN/OUT
- Connect with audio input/output device.
11
Page 7
Cabling
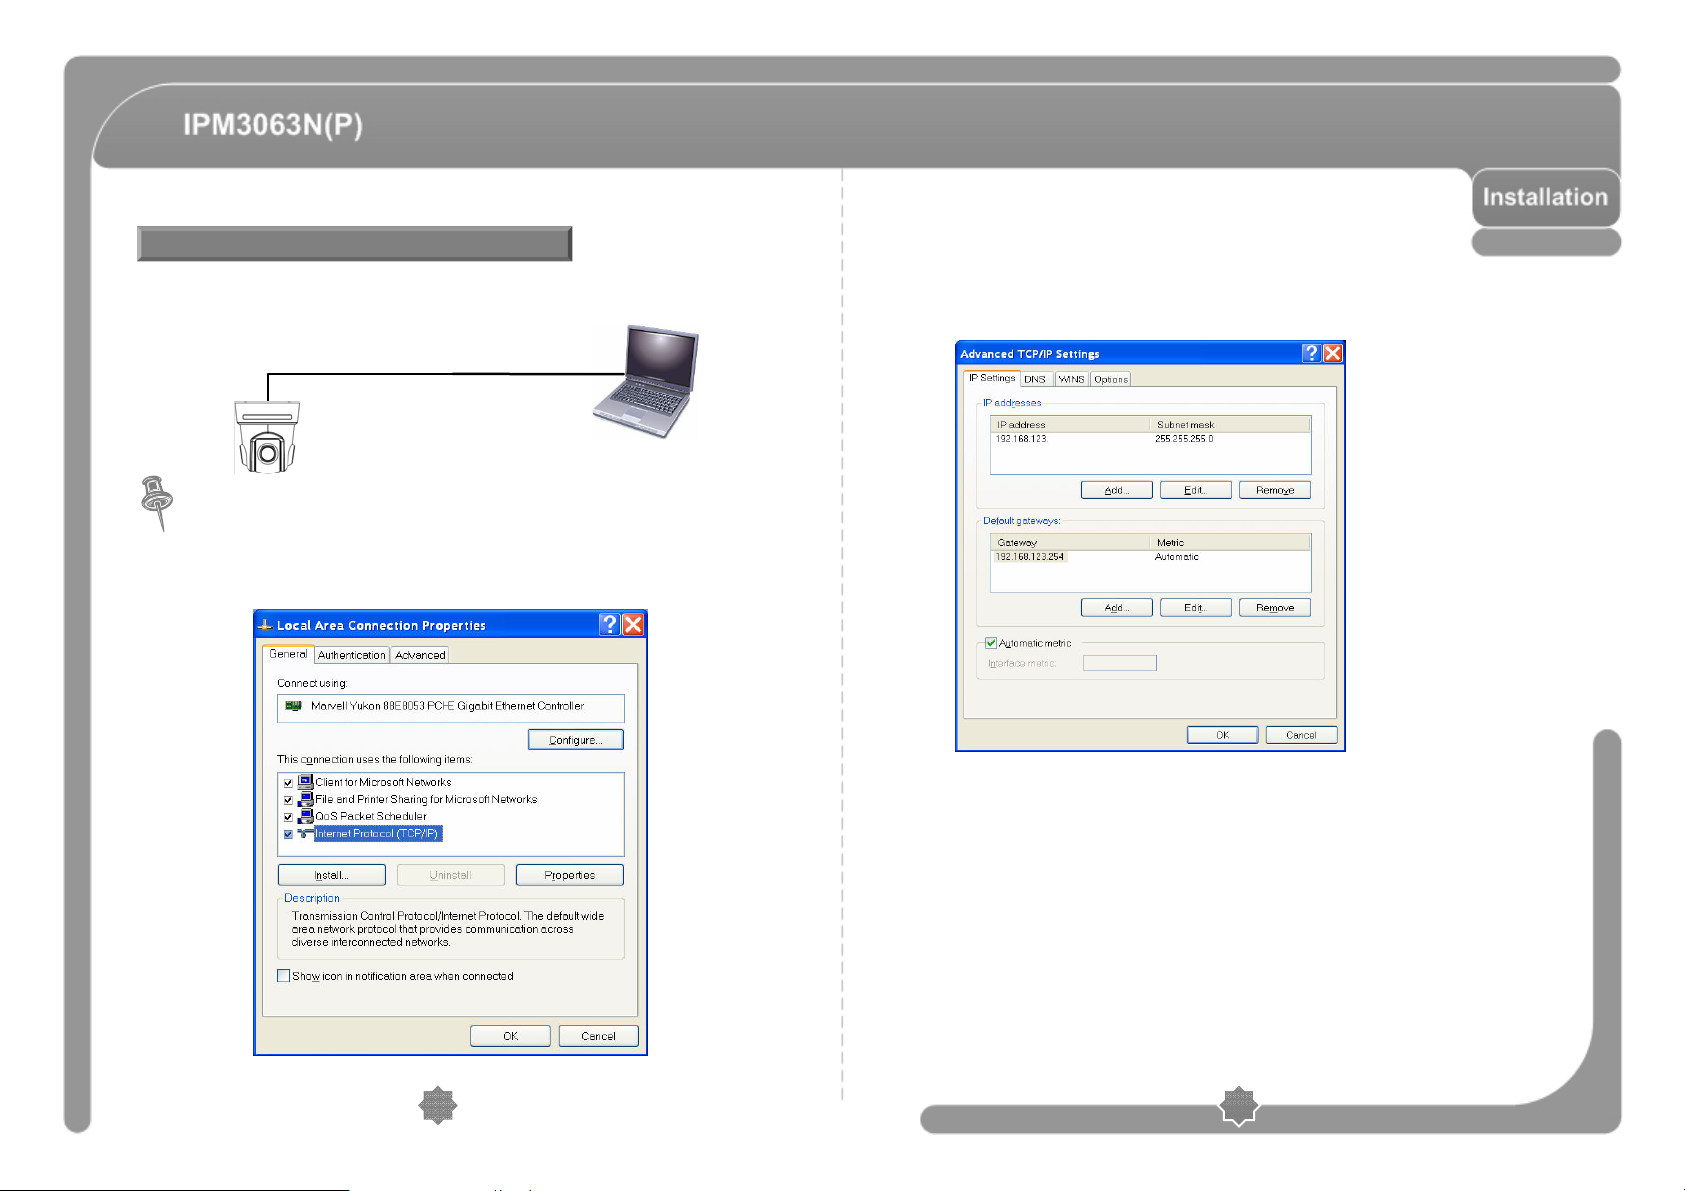
◎ LAN Connection
- Single Connection
LAN
Web Viewer / CMS
Notes.
ㆍ If single network connection, you must register the internal IP of your computer.
To register the IP, go to My Network Environment -> Properties -> Local Area
Connection -> Properties.
ㆍ Select Internet Protocol (TCP/IP) and click the “Properties” button below,
then press “Advanced…” to set advanced options for your PC.
XXX
ㆍ 192.168.123.XXX as the internal IP of your computer. 192.168.123.100 is the
IP address for the camera and will be unavailable as the internal IP address for
your computer.
12
13
Page 8
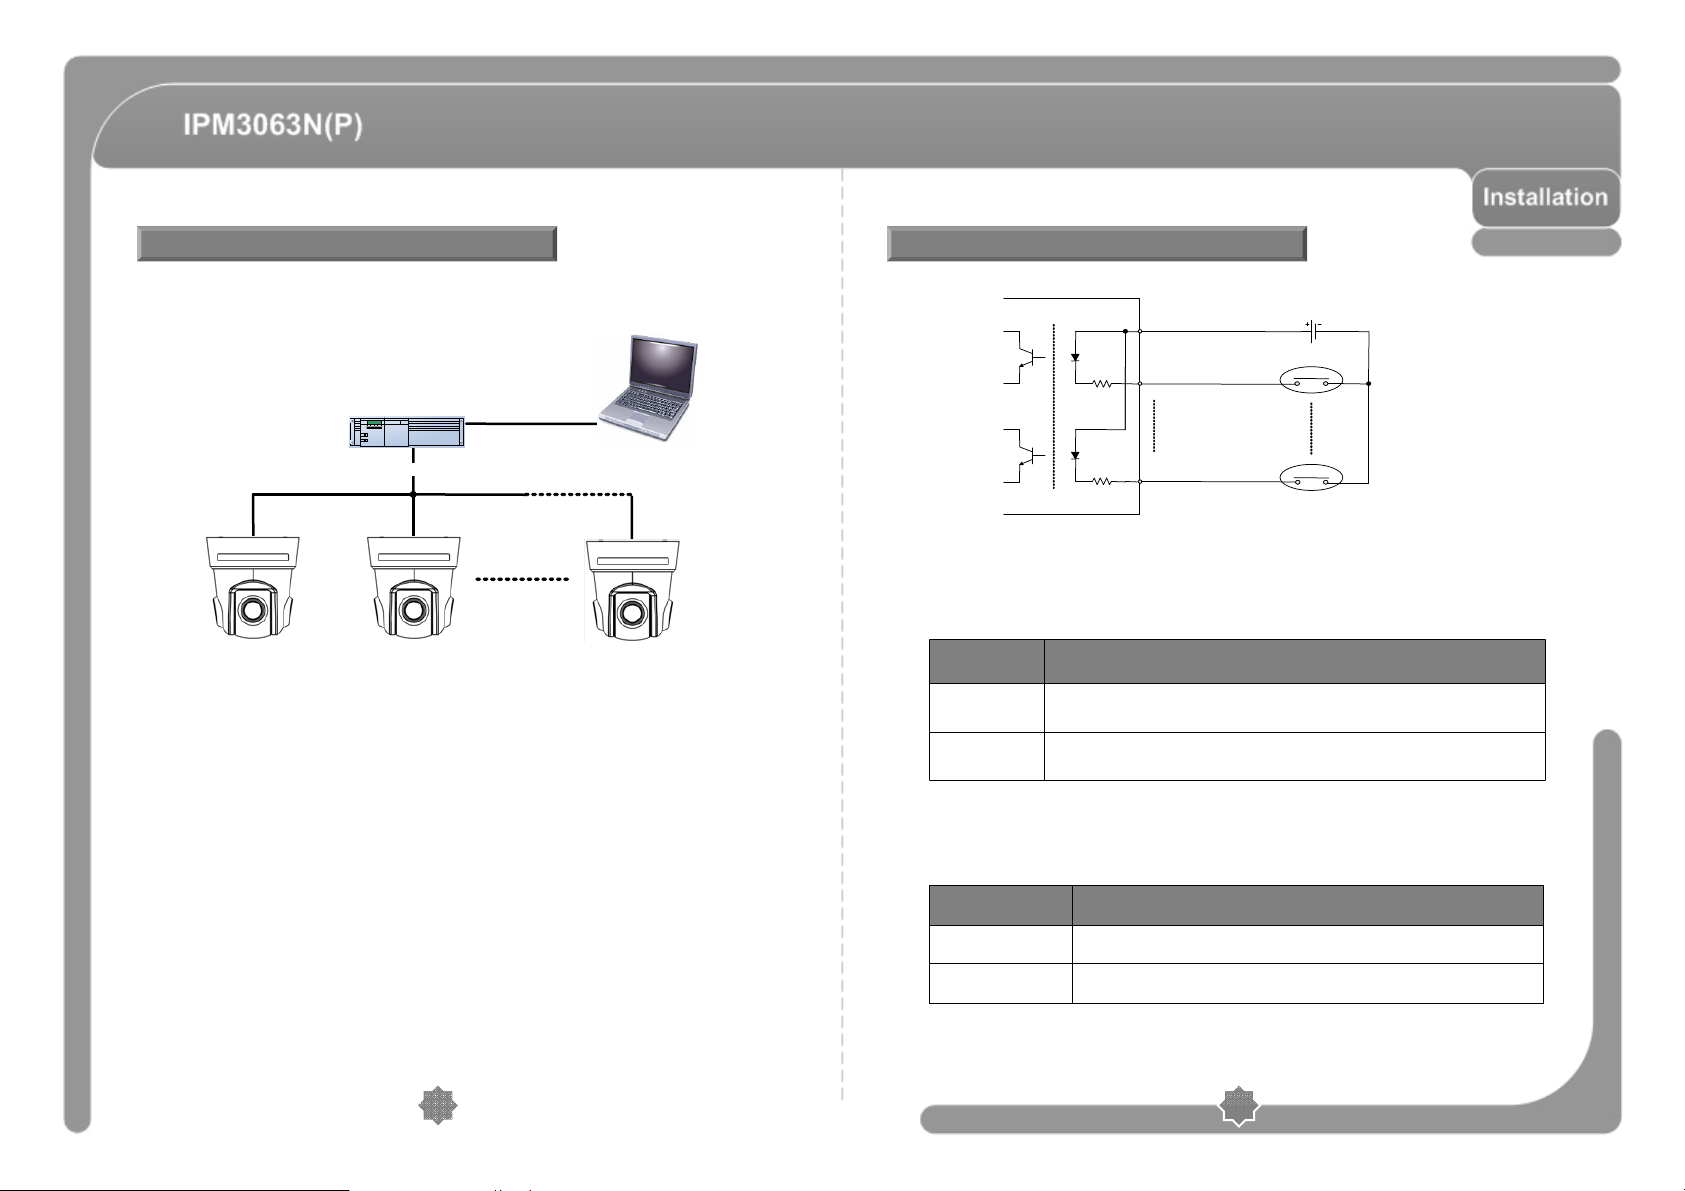
◎ LAN Connection
- Multiple Connection
.
Sensor InputCabling
Internal Circuit
IN COM+
+5V ~ 12V
ROUTER
LAN
LAN LAN
#1 #2
INTERNET
Web Viewer / CMS
#n
◎ SD CARD
- When the alarm input and Motion detection occurred, image save memory.
- SC Card is not provided in this product’s package. (512K~4G Bytes)
◎ UPGRADE
- Speed Dome Firmware Upgrade (Using Update Stick)
- This function is not supported now.
IN 1-
IN 4-
Sensor Output 1
Sensor Output 4
+ -
+
-
◎ Before connecting sensors, check driving voltage and output signal type of the sensor.
Since output signal types of the sensors are divided into Open Collector and Voltage
Output type in general, the cabling must be done properly after considering these
typed.
Signal Description
COM+
IN1-, IN2-,
IN3- , IN4-
◎ If you want to use Alarm Input, the types of sensor must be selected in OSD menu.
The sensor types are Normal Open and Normal. If sensor type is not selected properly,
the alarm can be activated reversely.
Connect (+) cable of electric power sources for Sensors to this port
as shown in the circuit above.
Connect output of sensors for each port as shown in the circuit
above.
DescriptionType
Normal Open Output Voltage is high state when sensor is activated
14
Normal Close Output Voltage is high state when sensor is not activated
15
Page 9
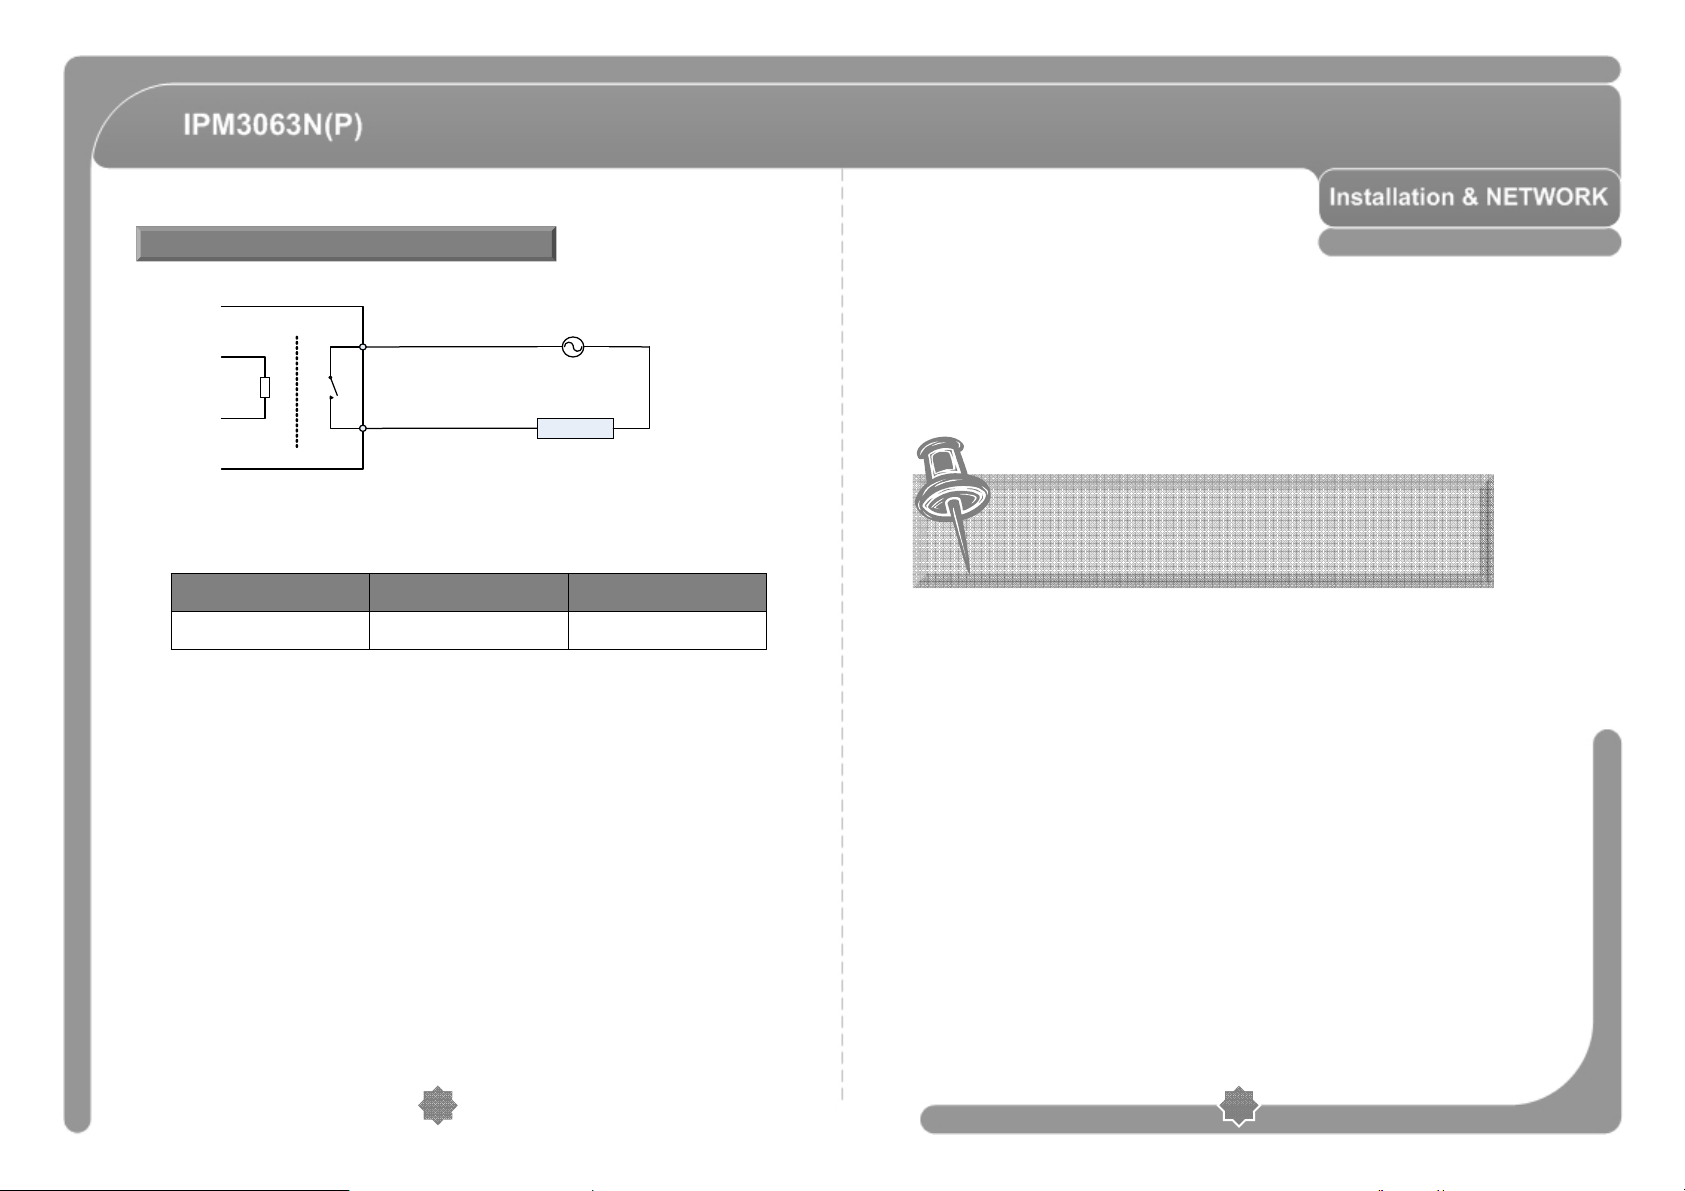
Relay Output
Internal Circuit
OUT 1
◎ Maximum allowable electrical load of relay is shown bellow table.
Driving Power DC 110V AC
Max. Load 24V DC, 1A 125V AC, 0.5A
AC or DC
LOAD
Web Viewer
16
17
Page 10

System Administration
◎ Logging On
ㆍYou can log on as an administrator using either Internet browser or ‘CMS’
software. (This manual will describe about using Internet browser only.)
◎ Using IP Installer
ㆍIf IP Installer execute, IP camera’s information is displayed.
◎ Using Internet Explorer
ㆍType the IP Address of the XPEED-XNET product in the address bar and press enter.
http://192.168.123.100
Ex) :
If the HTTP Port has been changed from the default value, enter the new port as
shown below.
IP Address of the XPEED-XNET Port No.
http://192,168.123.100:8080
Ex) :
◎ ID and Password
ㆍIf you are logging in as an administrator, the Log-In box will appear as shown
in following figure. Basic Setup page will appear when you enter id and password.
◎ The default user name and password is “root” and “admin” respectively.
For security purpose, it is recommended to change the administrator’s id and password
from their default values. Please be careful not to forget them or expose them to
others. Please refer to “User Setting” for detail
If you forget the administrator’s password, “Factory Reset” is the only way to regain
access. However, since this will retrieve all default settings, you need to configure the
network settings using IP installer software again.
18
19
Page 11

Configuring Speed Dome
Page Access Authority
◎ When you log in as an administrator, XPEED-XNET’s Basic Setup page will appear as
shown in below figure. Setup pages for different features can be accessed from this page.
Access to each feature are controlled by different user groups (Administrator,
Operator and Viewer)
Function (page)
Event Type
Access
ViewerOperatorAdministrator
OOOIndex
OOOMulti-Index
XOOPTZ
XOOMotion
OUsers
XOTCP / IP
XOIP Filtering
XOUPnP / DynDNS
OORTP
XX
XOODate&Time
XXOMulti-Viewer
XXOMaintain Server
XXOSystem / Log
XOOAudio
XOOVideo
X
X
XOOSMTP
XOOFTP
XXOHTTP
X
X
XXOCMS
XOO
XXOPTZ Configuration
O : Accessible
X : Not Accessible
Basic Setup Page can be accessed from Operator group level and up. If you want to
access Administrator level page in this user level, you need to log in as Administrator.
Please refer to the following table for access authority.
20
21
Page 12
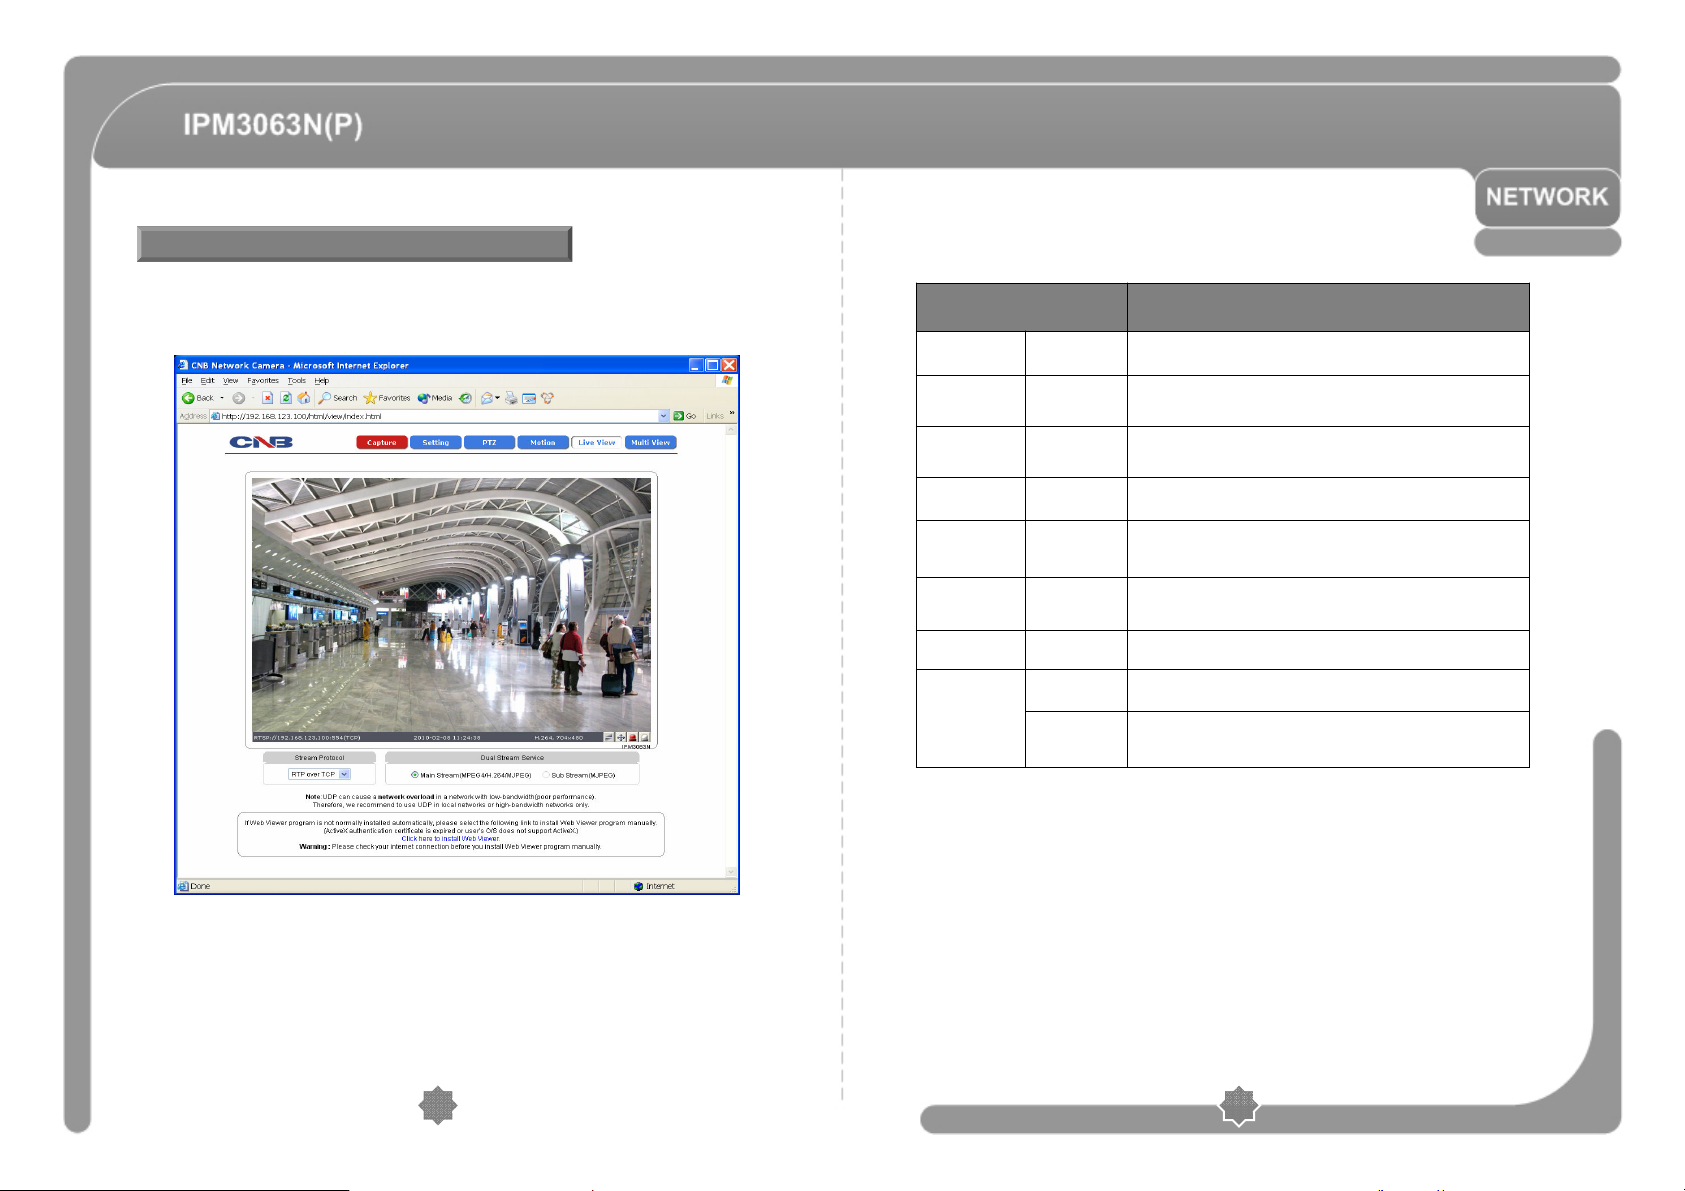
Web Viewer (Index.html)
◎ When you access an XPEED-XNET product, Web Viewer page will appear automatically.
Viewer area displays the video output from the camera, and menu bar contains
taps that lead to each feature setting page.
Dual Stream
Service
-Capture
-Setting
-PTZ
-Motion
-Live View
-Multi View
-Stream Protocol
Main Stream
Sub Stream
DESCRIPTIONITEM
Captures the still image and displays on a pop-up window.
[Save to] c:\xNetCapture
Opens up Basic Setup Page.
Setup page for each XPEED-XNET feature can be opened from this
Menu Screen.
Opens up PTZ page.
This page can set up digital PTZ of the network camera and control of
PTZ movement.
Opens up Motion Detection page.
You can add or delete areas for detecting motion in this page.
Opens up Index View page.
Index View Page will display Video as well as setting up Stream
Protocol (TCP /UDP) and Codec (When using Dual Stream).
Opens up Multi View page.
Multi View page will display up to 4 video signals set up in camera’s
Multi Video Player Setup Page.
A Stream Protocol can be selected when selecting edit box.
(RTP over TCP/RTP over UDP)
When this box is checked, Main Stream Video is displayed.
(MPEG4/H.264/MJPEG)
When this box is checked, Sun Stream Video is displayed, Dual-Codec
needs to be enabled in Video Setup Page in order for Sub Stream Video
to be displayed. (MJPEG)
22
23
Page 13
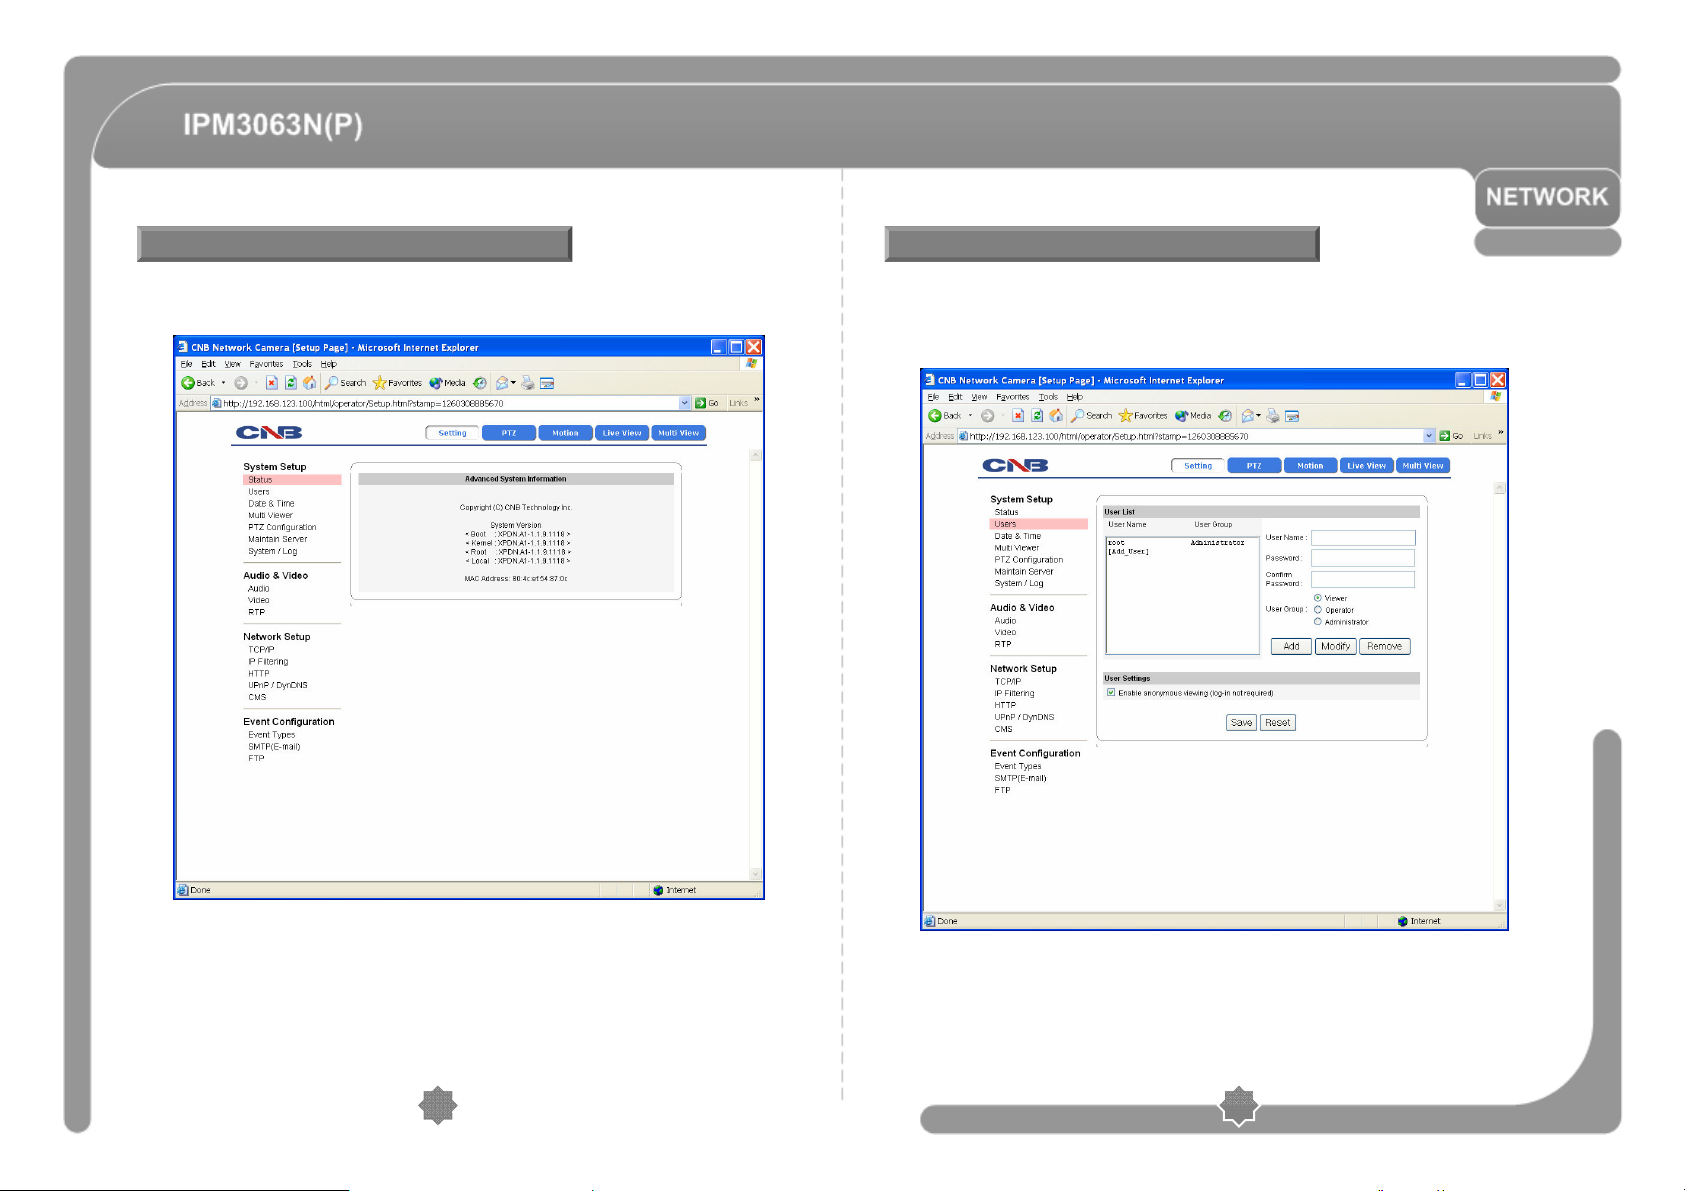
Status Window
Configuring Users
◎ Status page displays XPEED-XNET System’s Version and its Ethernet address.
Click [ Status] button to open the page shown in below figure.
◎ This can give or limit authority to users for controlling Video and other features of
the XPEED-XNET system.
Click [ Users] button to open the page shown in below figure.
24
25
Page 14
Configuring Users
Setting Date & Time
User List
User Settings
-Add
-Modify
-Remove
Enable
anonymous
viewer
login
DESCRIPTIONITEM
Displays list of registered users.
“root” is the system’s administrator. “root” cannot be added or deleted.
Only the password for “root” can be changed.
This adds a new user.
Select “[Add_User]” tap in User List Box. To add a new user, enter User
name, Password and User group then click Add button.
Updated User list can be viewed in User List box.
- Up to 10 users can be added.
- Authority of different User Groups.
∙ Administrator : Full control of the XPEED-XNET system.
∙ Operator : Control over Viewer, Audio&Video Setup and Event
Configuration.
∙ Viewer : View camera’s video signal only.
Modifies information for each user.
Select a user in User List box, enter new Password, User Group and click
modify button to save the changes.
Updated detail can be viewed in user List Box.
Removes a user.
Select a user in User List box and click remove button to remove.
Updated user list can be viewed in User List Box.
Turns Anonymous viewer mode on or off.
When enabled, Web Viewer can be accessed without a log-in prompt.
Applies and saves the configurations.-Save
Recalls previously saved configurations.-Reset
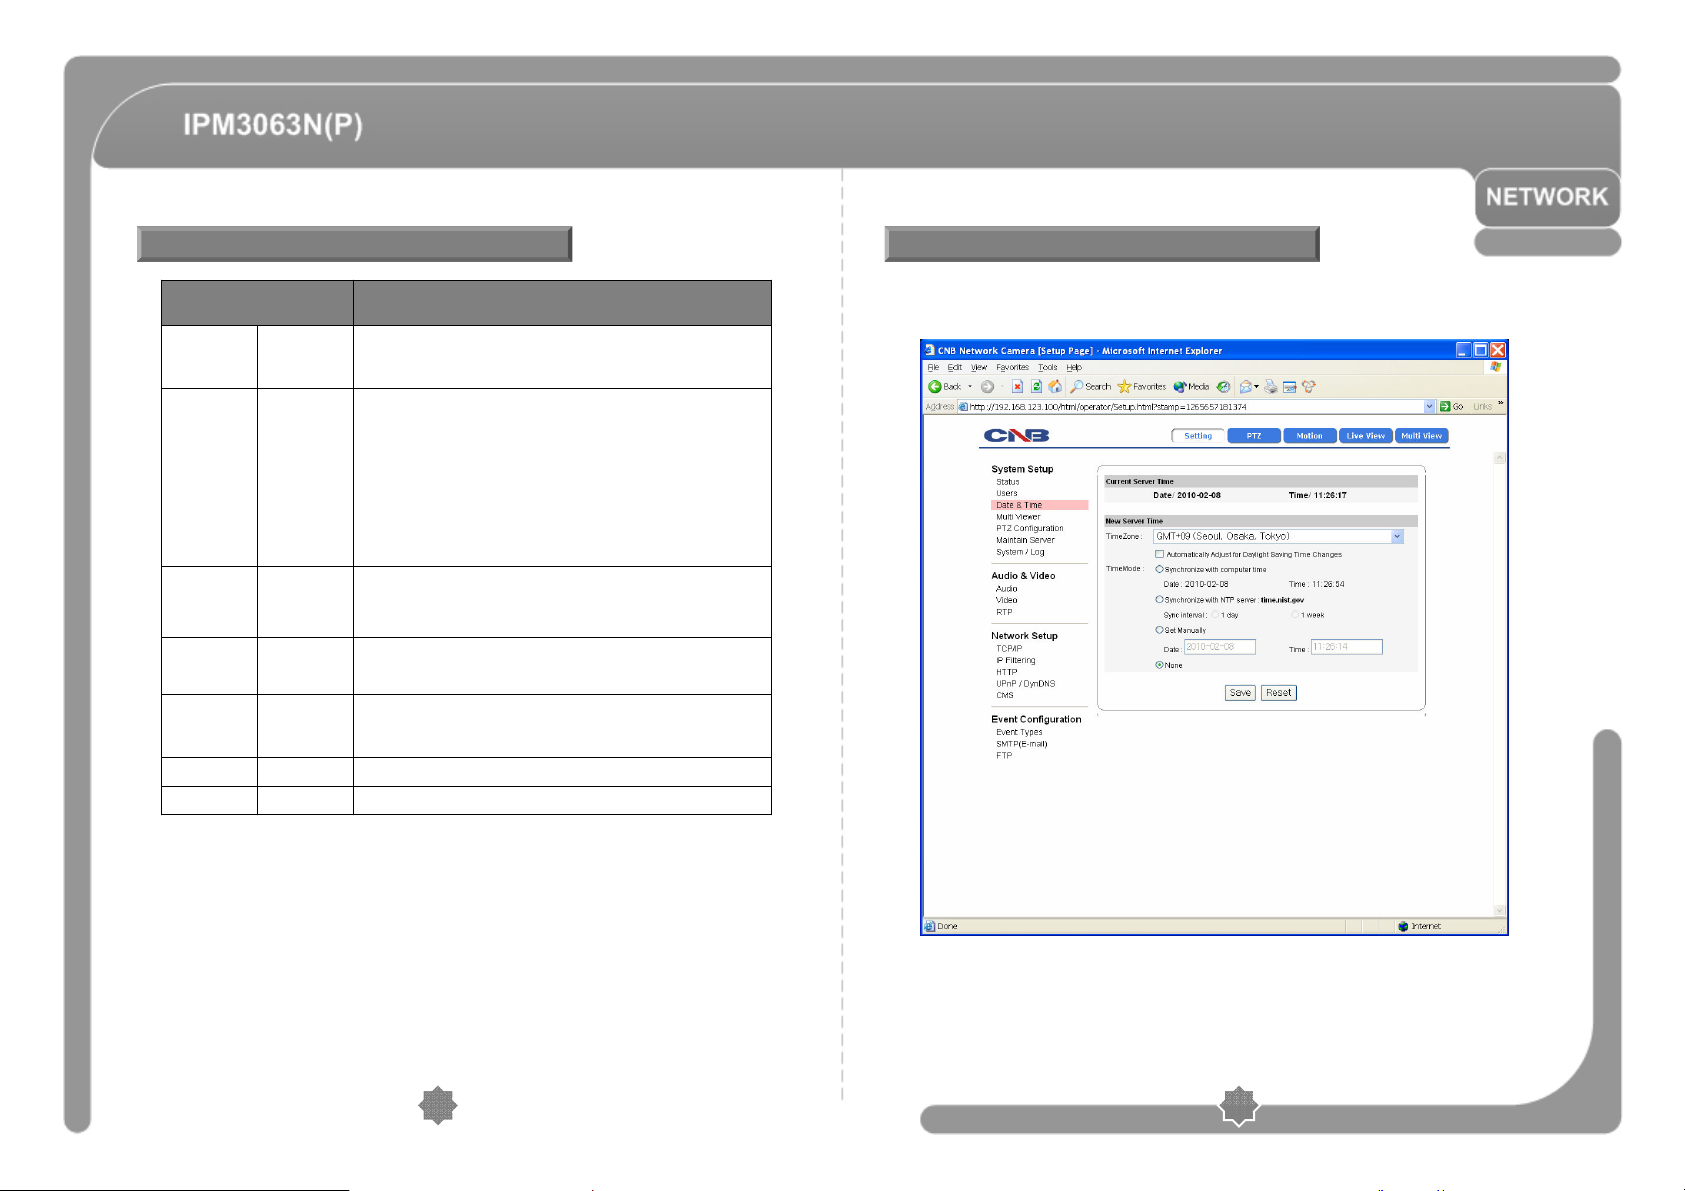
◎ This page will change Date and Time of the XPEED-XNET system.
Click [Date & Time] to open the page shown in below figure.
26
27
Page 15
Setting Date & Time
Configuring Multi-Viewer
Current Server
Time
New Server Time
Time Zone
Automatically
Adjust for Daylight
Saving Time
Changes
Time Mode
DESCRIPTIONITEM
Displays time of the XPEED-XNET system.-
Selects Time Zone.
<Default : GMT+09>
Enables/Disables Daylight Saving time.
Sets Date and Time of the Server.
<Default : None>
[Synchronize with computer time]
- Synchronizes time and date of Client PC to Server.
[Synchronize with NTP server]
- Synchronizes server’s time and date to NTP Server.
(Enter NTP server address in Network Setup Page)
[Set Manually]
- Set date and time of Server manually.
[None]
- Do not Change the Server Date, Time.
Applies and saves the configurations.-Save
Recalls previously saved configurations.-Reset
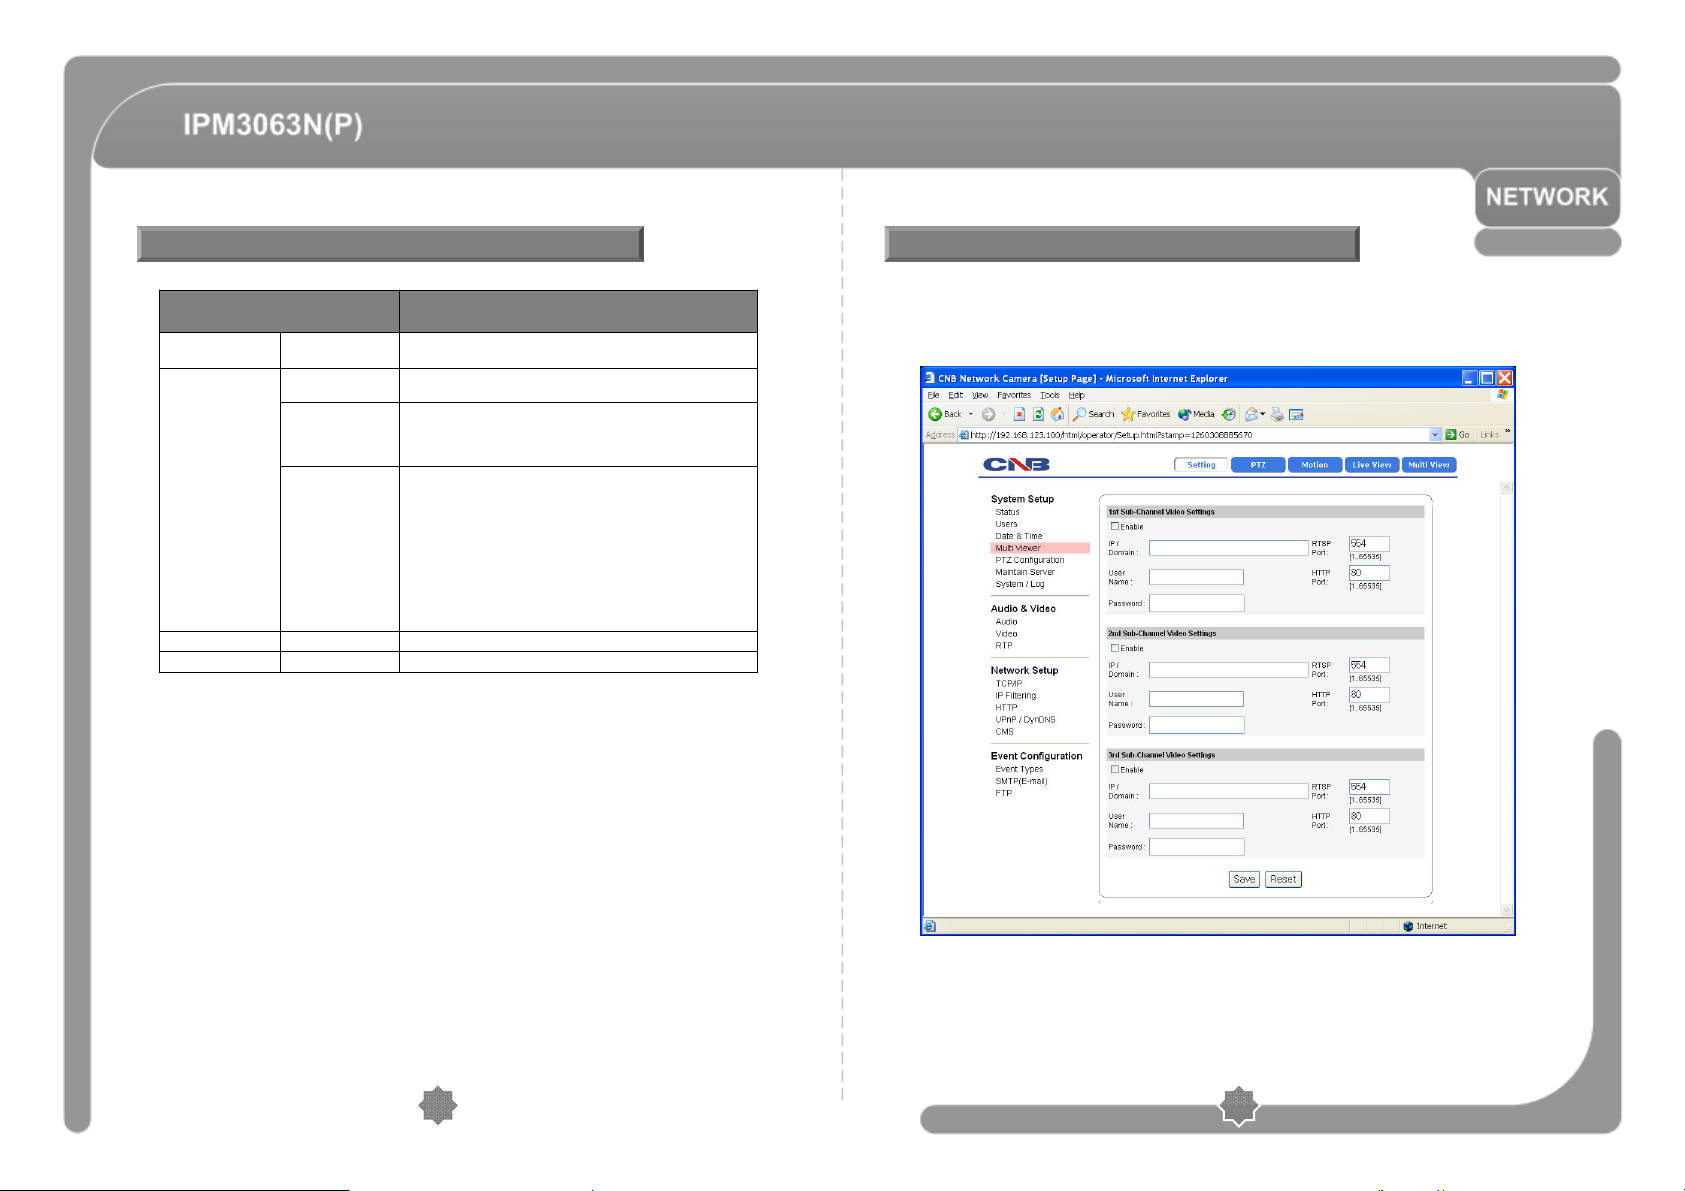
◎ Up to 3 cameras connected to XPEED-XNET’s network can be displayed as
sub-cameras simultaneously in Multi-View page.
Click [Multi Viewer] to open the page shown in below figure.
28
29
Page 16
Configuring Multi-Viewer
Configuring PTZ
1st Sub-Channel
Video Settings
2nd Sub-
Channel Video
Settings
3rd Sub-Channel
Video Settings
Enable 1st
Sub Channel
Video
Enable 2nd Sub
Channel Video
Enable 3rd
Sub Channel
Video
DESCRIPTIONITEM
Enables viewing of 1st sub Channel Video from the IP address entered.
This can only be enabled when IP Address,
User Name and password is properly entered.
<Default : Disable>
Enter 1st Channel’s IP Address.1st IP Address
Enter 1st Channel’s User name.1st User name
Enter 1st Channel’s Password.1st Password
Enter 1st Channel’s RTSP.1st RTSP Port
Enter 1st Channel’s HTTP.1st HTTP Port
Enables viewing of 2nd Channel Video from the IP address entered.
This can only be enabled when IP Address, User Name and password
is properly entered.
<Default : Disable>
Enter 2nd Channel’s IP Address2nd IP Address
Enter 2nd Channel’s User Name.2nd User name
Enter 2nd Channel’s Password.2nd Password
Enter 2nd Channel’s RTSP.2nd RTSP Port
Enter 2nd Channel’s HTTP.2nd HTTP Port
Enables viewing of 3rd sub Channel Video from the IP address entered.
This can only be enabled when IP Address,
User Name and password is properly entered.
<Default : Disable>
Enter 3rd Channel’s IP Address.3rd IP Address
Enter 3rd Channel’s User Name.3rd User name
Enter 3rd Channel’s Password.3rd Password
Enter 3rd Channel’s RTSP.3rd RTSP Port
Enter 3rd Channel’s HTTP.3rd HTTP Port
Applies and Saves the configurations.-Save
Recalls previously saved configurations.-Reset
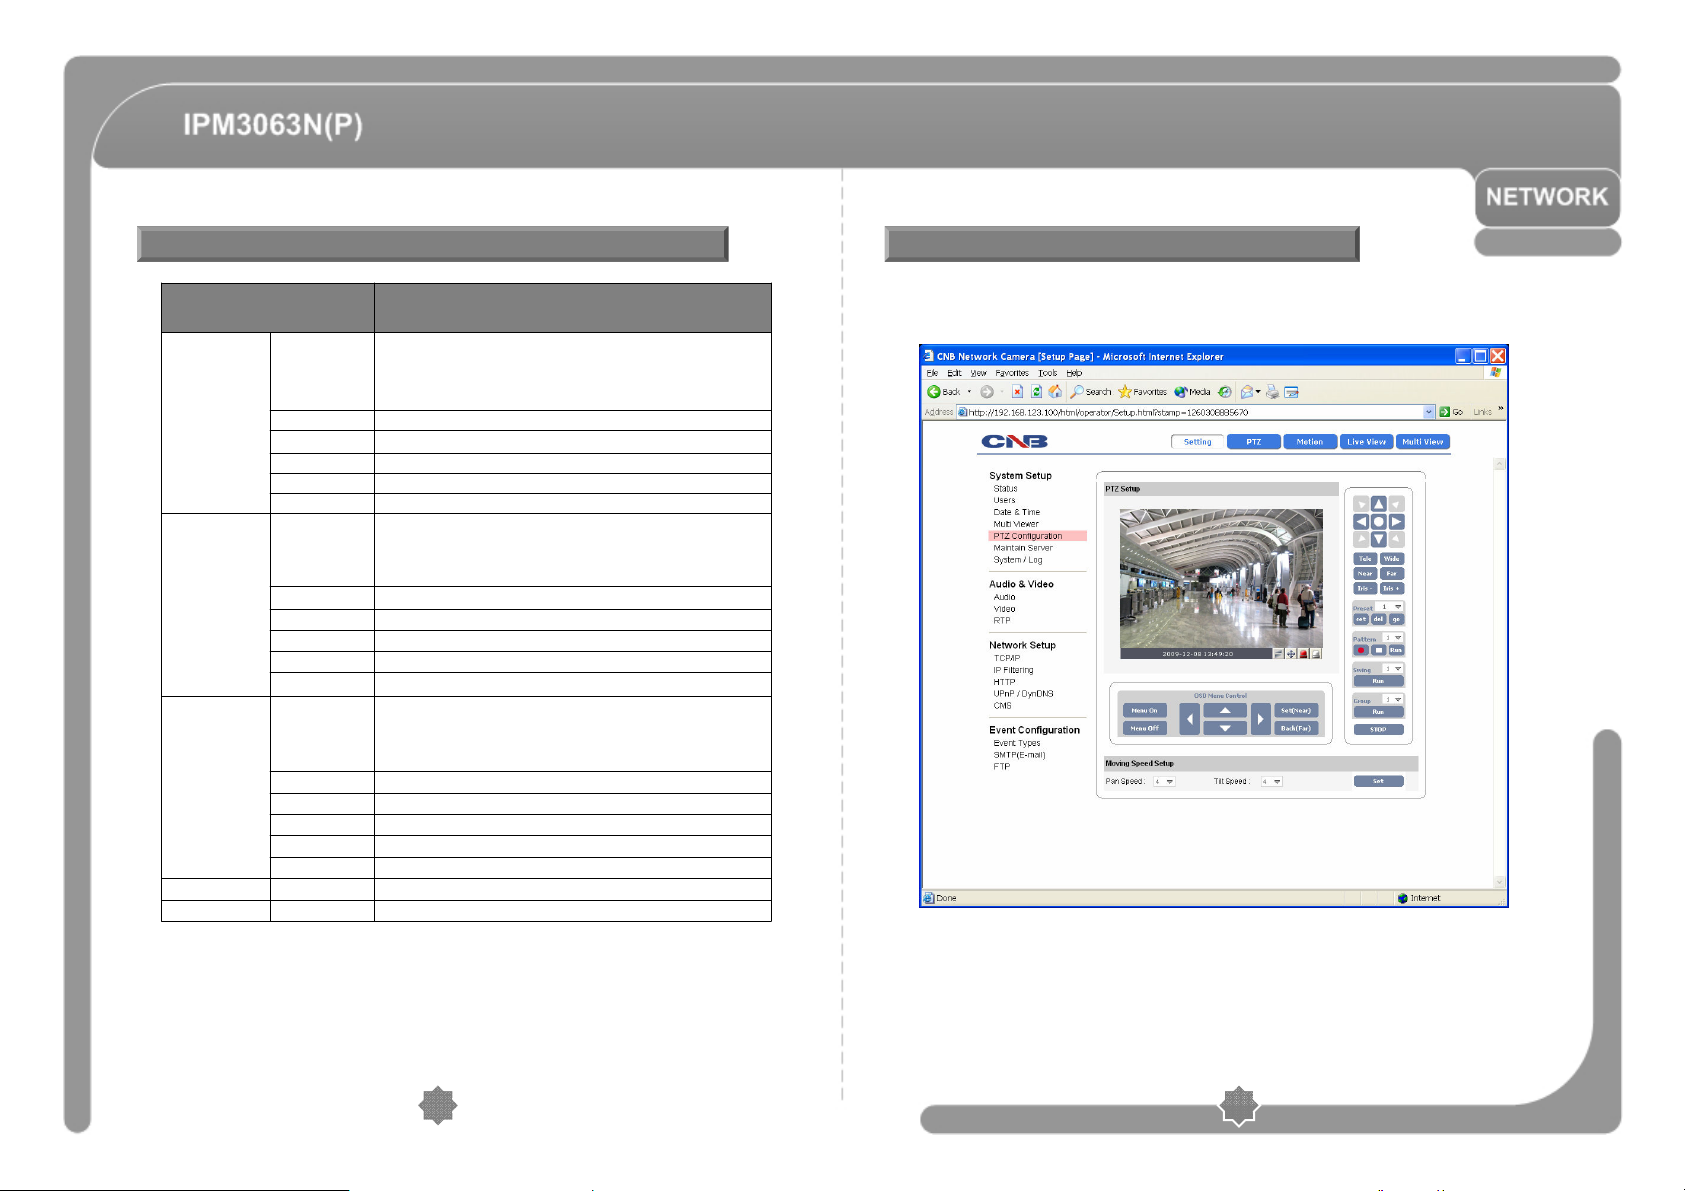
◎ This configures XPEED-XNET’s PTZ server information.
Click [PTZ Configuration] to open the page shown in below figure.
30
31
Page 17
Configuring PTZ
Maintain Server Configurations
Moving Setup
Direction Key
Tele/Wide
Near/Far
Iris-/Iris+
go
-
Tilt Speed
DESCRIPTIONITEM
Moves camera up/down/left/right.
Moves Origin.
Tele : Executes Tele zoom.
Wide : Executes Wide zoom.
Near : Executes Focus Near.
Far : Executes Focus Far.
Iris- : Executes Iris Close.
Iris+ : Executes Iris Open.
The current position is set to Preset NO.set
Current Preset No. is deleted.del
The camera moves to the specified Preset position.
Start pattern recording.
Save and stop pattern.
Run pattern.
Desired Swing is executed.-
Desired Group is executed.
Preset/Pattern/Swing/Group operation is stopped.
Menu On : Camera OSD Menu Open.
Menu Off : Camera OSD Menu Close.
: Move from items to item in OSD Menu.
Set(Near) : Save function in OSD Menu.
Back(Far) : Cancel function and move to the upper-menu in OSD Menu.
Set Pan Speed. Pan Speed
Set Tilt Speed.
Applies and saves setting value.Set
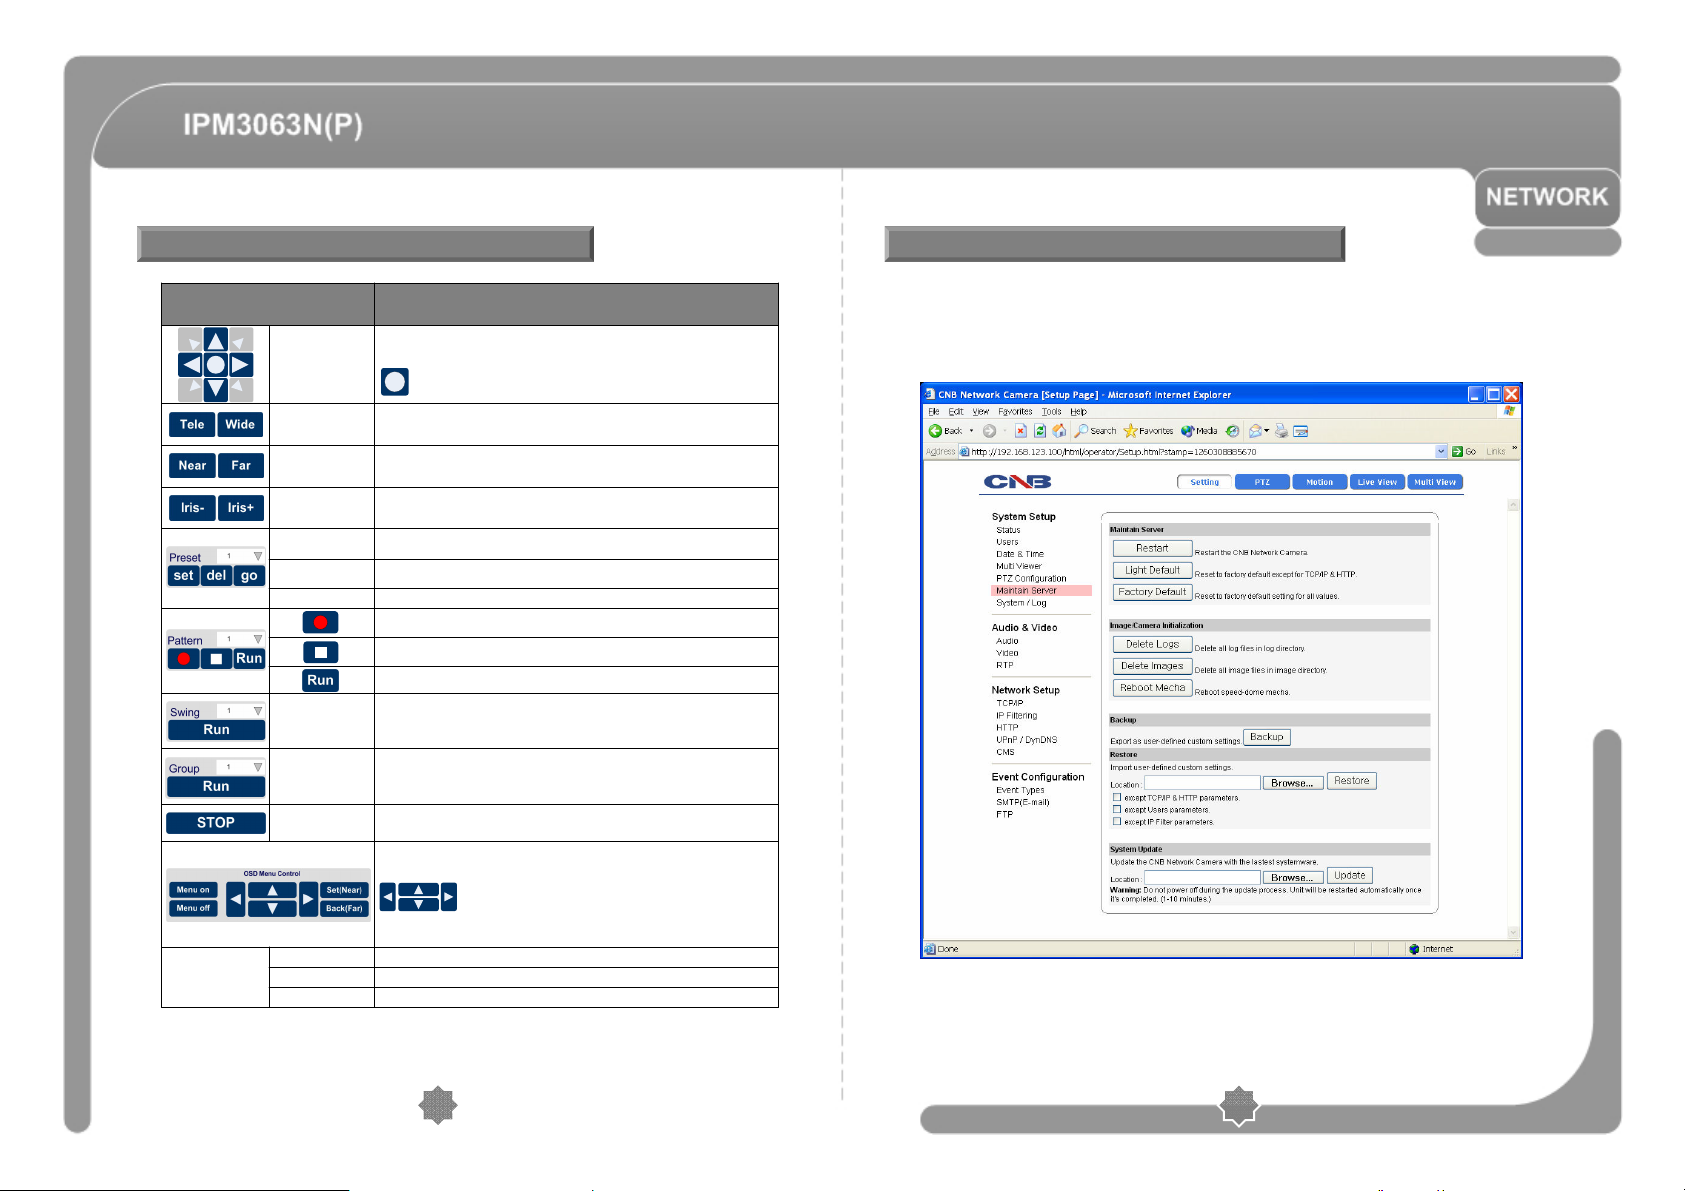
◎ This page configures system parameters such as system restart, factory default
settings, system upgrade, saving configurations, saving images and other
additional features.
Click [Maintain Server] to open the page shown in below figure.
3332
Page 18
Maintain Server Configurations
Generating Log Report
Maintain
Server
Image/Camera
Initialization
System
Upgrade
Restore
Default
Upgrade
BackupBackUp
RestoreRestore
DESCRIPTIONITEM
Restarts the system. It takes about 45 seconds.Restart
Resets all parameters except for TCP/IP settings.
This restore will be followed by a 45 seconds system reset.
Resets all parameters to Factory Default setting.
This will be follow by a 45 seconds system restart.
Deletes all Log Messages.Reset Log
Deletes all Alarm Images from the internal Flash Memory.Reset Image
Restarts speed dome Mecha.Reboot Mecha
Use this to upgrade the system.
Select location of Upgrade file in Client PC and click Upgrade
button.
This will be followed be one-minute system restart.
(Note) Please do not disconnect power and LAN cable from the
XPEED-XNET while the upgrade is in process. It might cause a
system error.
Upgrade File can be downloaded from
This saves current configurations in Client PC.
Back up file can be restored to other XPEED-XNET cameras.
This will be followed by a 45 seconds system reset.
This loads up settings from a saved Backup file.
Click restore button after selecting backup files in Client PC.
Optional check boxes can be used to select settings to be excluded
from the restore process.
- Except TCP/IP box : Exclude TCP/IP settings.
- Except Users box : Exclude Users setting.
- Except IP Filter box : exclude UP Filter settings.
This will be followed by a one-minute system reset.
http://www.cnbtec.com
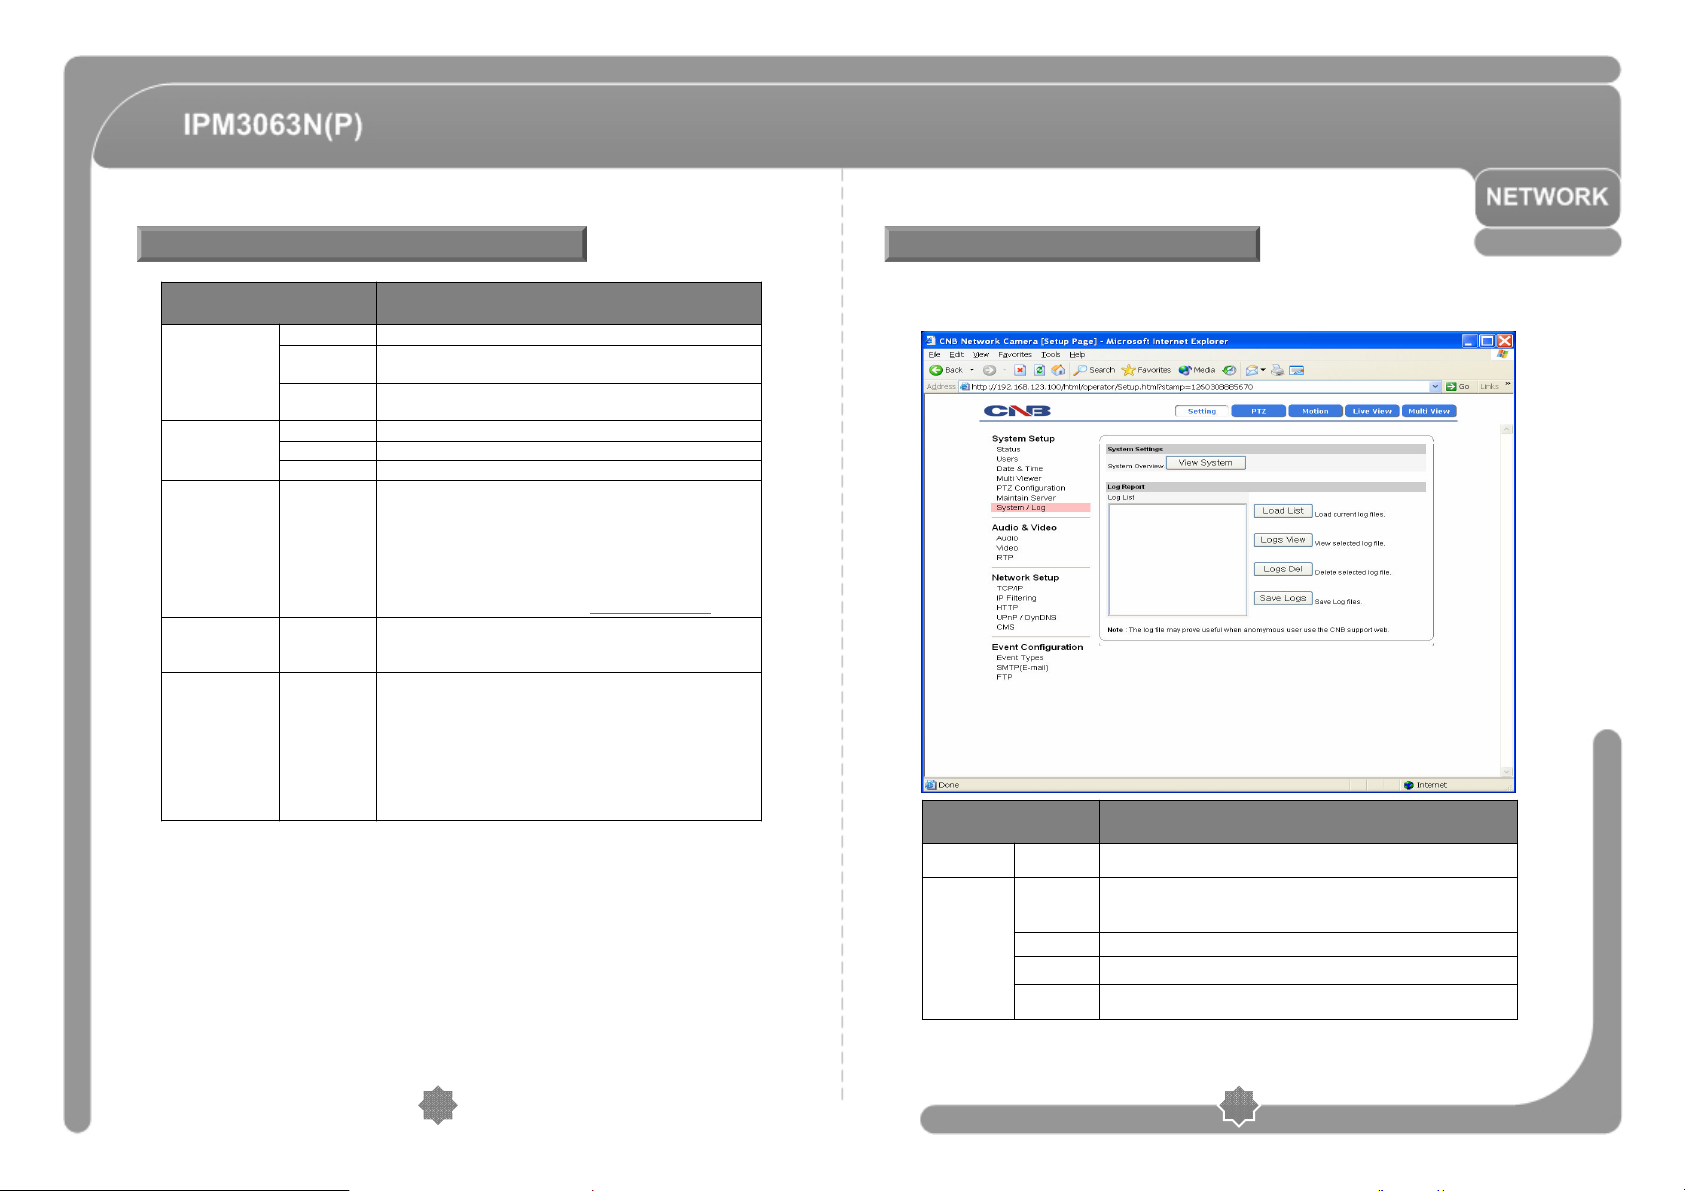
◎ Log report contains detailed information about XPEED-XNET’s image, setup and error.
Click [Log Report] button to open the page shown in below figure.
DescriptionITEM
System
Settings
Log Report
System
Overview
Load List
Save Logs
Displays current configurations for the XPEED-XNET option pages.
Loads up Log message file stored in the XPEED-XNET product.
Log Message file can be sorted with date and index.
Click Load List button to view message list in the List box.
Select a file from the Log List and click Logs view button to view.Logs View
Select a file from the Log List and click Delete button to delete.Logs Del
Select a file from the Log List and click Save Logs button to save the file to
PC.
3534
Page 19
Configuring Audio
Configuring Video
◎ XPEED-XNET’S Audio features can be configured in this page.
Click [Audio] button to open the page shown in below figure.
DESCRIPTIONITEM
Audio
Enable
Audio
Input
Enable audio
Source
Encoding
Enables of Disables Audio feature.
<Default : Disable>
Select audio input source between Microphone and line.
<Default : Microphone>
Microphone input can be used when users send their voice over the
XPEED-XNET system.
Line input takes the input from an audio device to send over XPEEDXNET.
Audio sent to XPEED-XNET can be played at a Client’s PC or
an audio device.
Selects audio input Encoding method.
<Default : G726>
Applies and saves changes.-Save
Recalls previously saved configurations. -Reset
◎ XPEED-XNET’s Video features can be configured in this page.
Click [Video] button to open the page shown in below figure.
3736
Page 20
Configuring Video
Configuring RTP/RTSP
Main Stream
Frame Rate
Control
MJPEG
Appearance
Mpeg4&H.264
Appearance
Frame Rate
Control
MJPEG
Appearance
Resolution
Codec
Enable
Dual-Codec
Frame rate
Bit rate
Frame rate
DESCRIPTIONITEM
Select a resolution of the video image.
D1, CIF(320x240) <Default : D1>
Selects Video Codec.
You can choose among MJPEG, MPEG4 and H.264.
Turn Sub Stream feature on or off. <Default : Disable>
Sub Stream output is in MJPEG with maximum 15 frame per second.
When configuring, select main Stream or Sub Stream in the index page.
“Enable Dual-Codec checkbox” is enabled when Codec is set
Up as MPEG4 or H.264.
Selects Frame rate of Video output.
1~30 Frame .
Select MJPEG’s video quality between 10 and 100.Quality
Selects bit rate for MPEG4 or H.264 video signal between 128kbps and
3Mbps.
Select resolution of sub stream video between D1 and CIF.ResolutionSub Stream
Select Frame rate of sub stream video between 1 and 15 frames per
second
Select sub stream video quality between 10 and 100.Quality
Applies and saves changes.-Save
Recalls previously saved configurations.-Reset
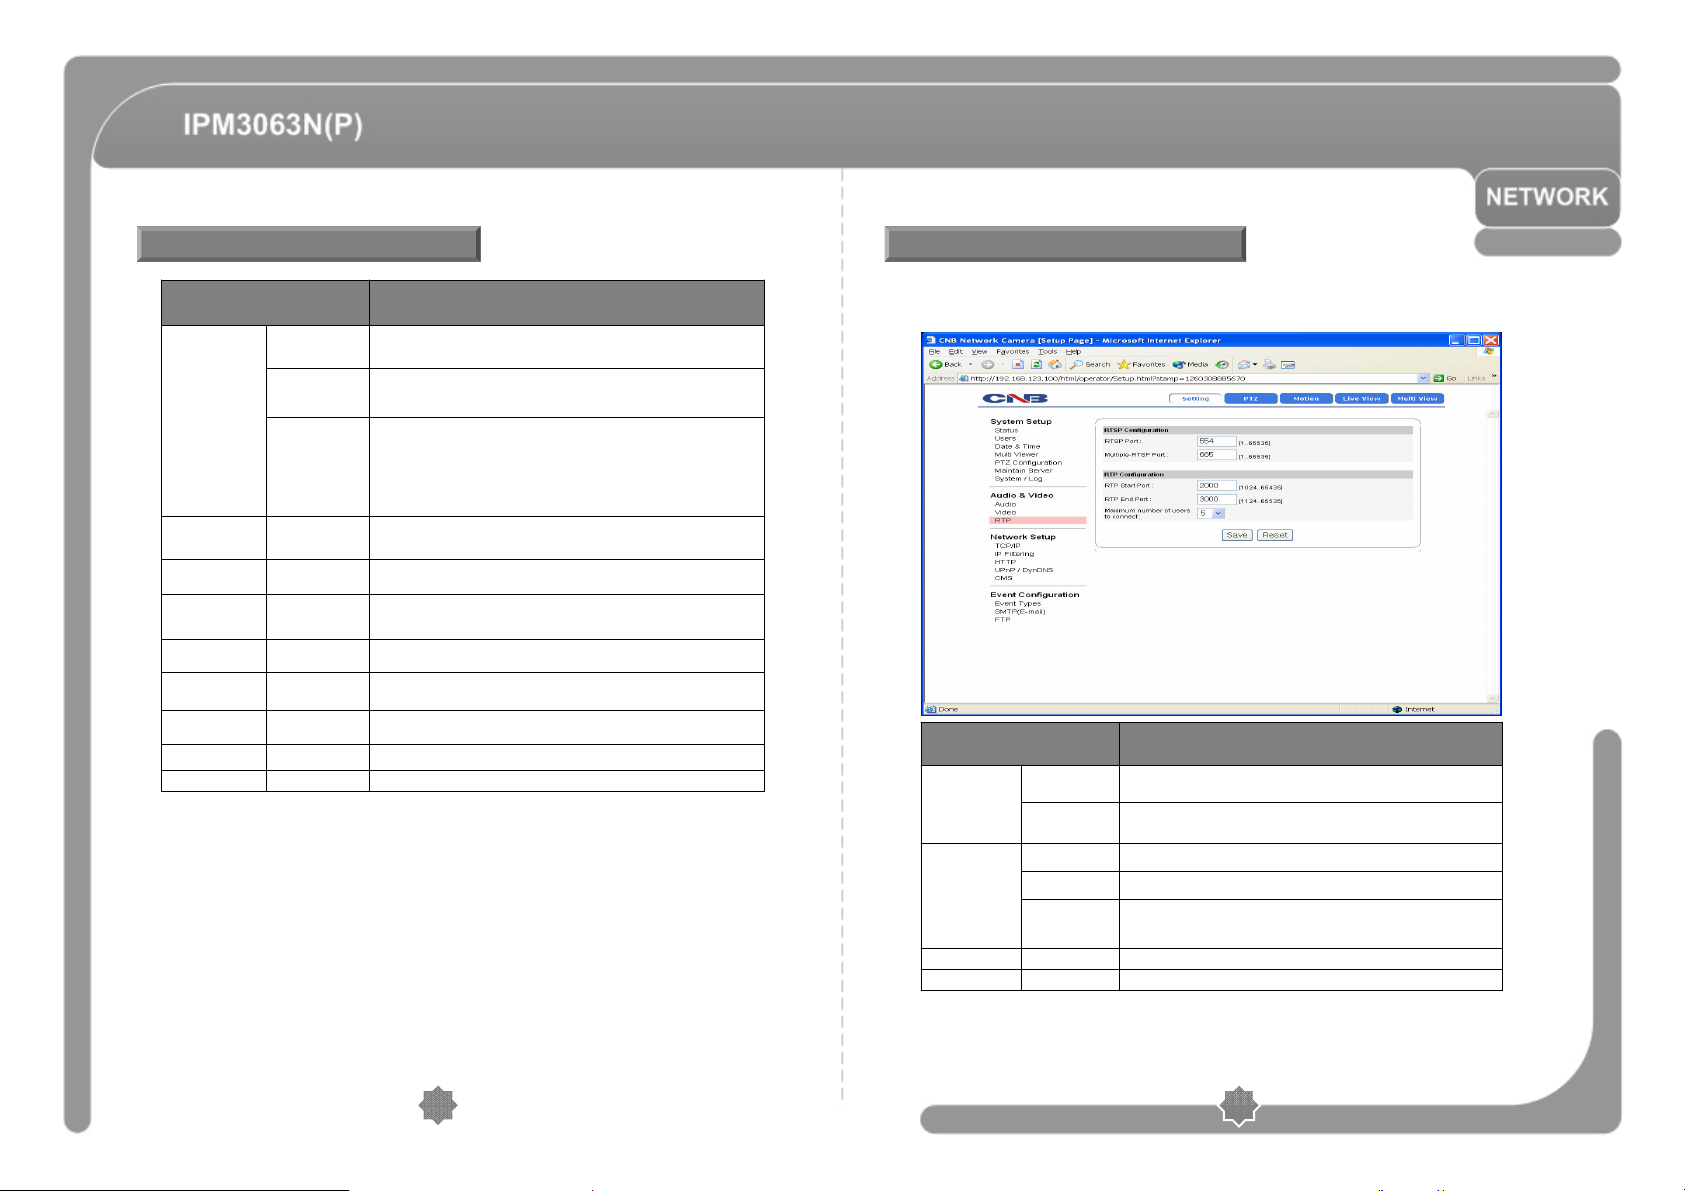
◎ This is related to XPEED-XNET’s DDNS server information.
Click [RTP/RTSP] button to open the page shown in below figure.
DESCRIPTIONITEM
Enter RTSP Port of the Main Stream between 1 and 65535.
The default is 554.
Enter RTSP Port of the Sub Stream between 1 and 65535.
The default is 665.
Enter RTP Start Port between 1024 and 65534. The default is 2000.RTP Start Port
Enter RTP End Port between 1124 and 65535. The default is 3000.RTP End Port
Enter the maximum allowable number of users connected to the
Stream between 1 and 10.
Applies and saves changes.-Save
Recalls previously saved configurations. -Reset
RTSP
Configuration
RTP
Configuration
RTSP Port
Multiple-RTSP
Port
Maximum
number of
Connection
3938
Page 21
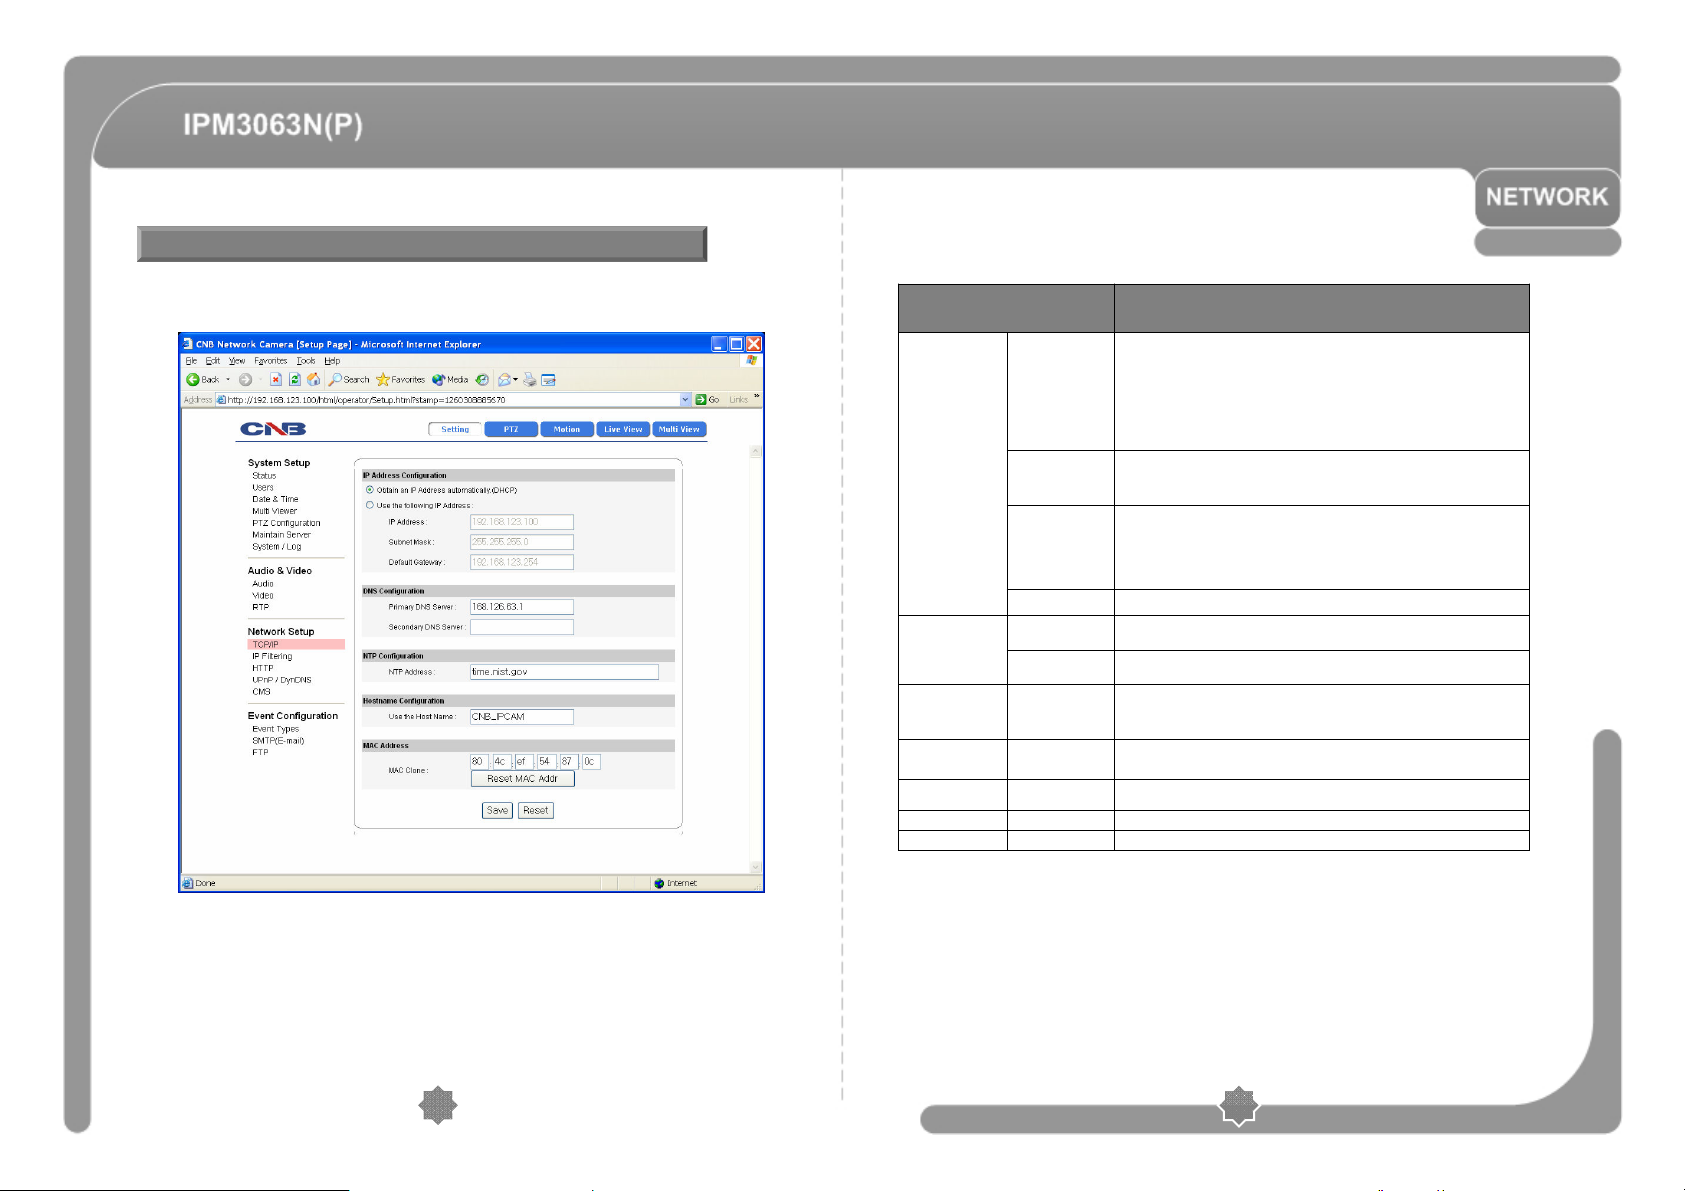
Configuring the Network (TCP/IP) parameters
◎ This configures XPEED-XNET’s network related parameters.
Click [TCP/IP] button to open the page shown in below figure.
IP Address
Configuration
DNS
Configuration
NTP
Configuration
Host name
Configuration
Enable DHCP
(default)
IP address
Subnet mask
Primary
DNS Server
Secondary DNS
Server
NTP address
User
the host name
MAC ClonMAC Address
DESCRIPTIONITEM
Turns DHCP on or off.
Check DHCP checkbox to get an IP address automatically from the
Network using DHCP protocol. Obtained IP address can be viewed by IP
Installer.
(Note) If the network does not use DHCP server, the product will wait for
server’s response for two minutes and restart with its previous IP Address.
Enter an IP address.
Configure IP address after checking IP address range configuration of the
router where the XPEED-XNET product is connected.
Enter Subnet mask.
Use this when you want to access only from the same subnet by Masking
out upper portion of the IP address.
Use 255.255.255.255 when you want to connect from on PC only.
Enter the address of Default gateway.Default gateway
Enter primary DNS address.
Enter secondary DNS address.
Enter address of NTP (Network Time Protocol Server).
NTP server is used when “Synchronize to NTP Server” is selected in
Date&Time page.
Enter Host name.
Enter Ethernet Address.
Applies and saves changes.-Save
Recalls previously saved configurations.-Reset
4140
Page 22
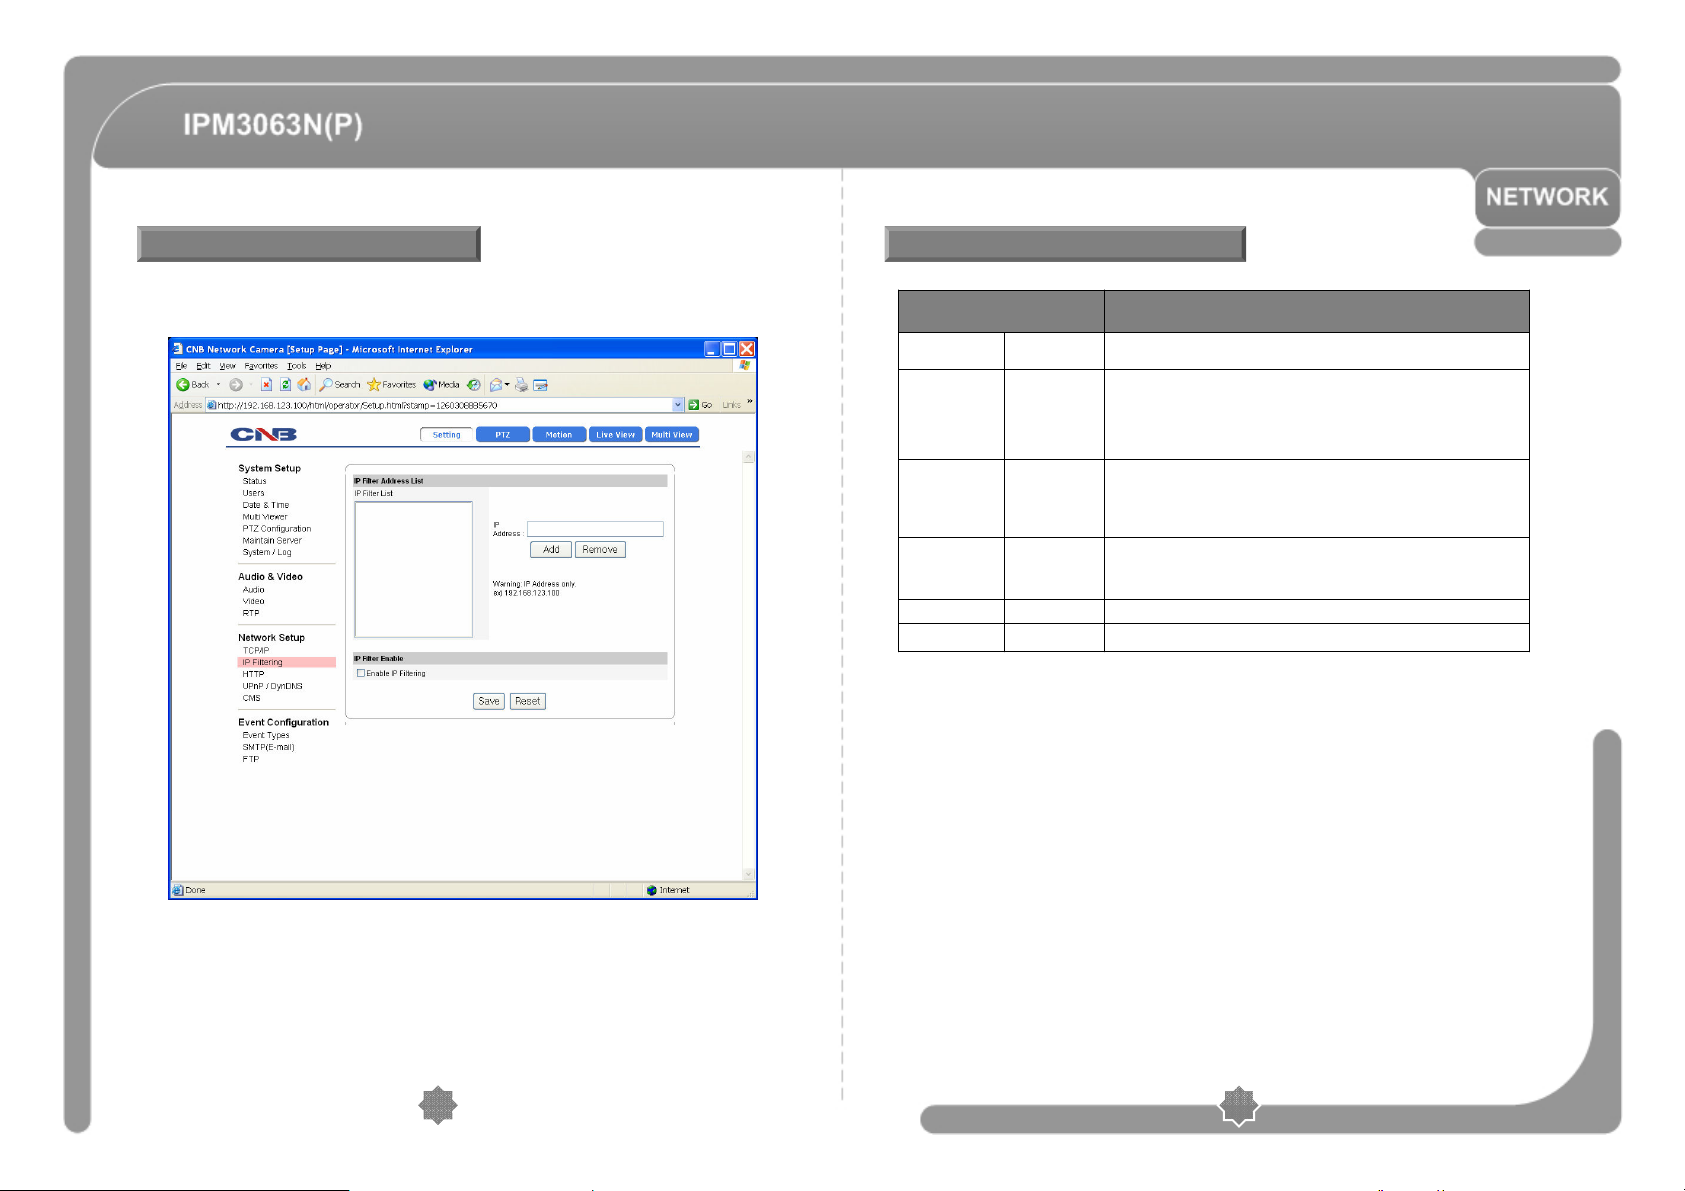
Configuring IP Filtering
◎ This configures IP Filters for XPEED-XNET product.
Click [IP Filtering] button to open the page shown in below figure.
Configuring IP Filtering
Filter IP
Addresses
IP Filter
Enable
Enable
IP
Filtering
Displays list of current established IP Filters.-
Adds an IP address to filter out.
Enter the IP Address to block and click add button to add it to IP Filtering
list box.
-Add
The updated list can be viewed in IP Address List box.
- Up to 20 IP addresses can be added.
Removes an IP address from IP Filtering list box.
Select the IP address to remove and click Remove button to remove it
-Remove
From the list.
The updated list can be viewed in IP Address List box.
Turns the IP Filter on or off.
When turned on, XPEED-XNET product will not be accessed from the IP
Addresses in IP Filtering List box.
Applies and saves changes.-Save
Recalls previously saved configurations.-Reset
DESCRIPTIONITEM
4342
Page 23
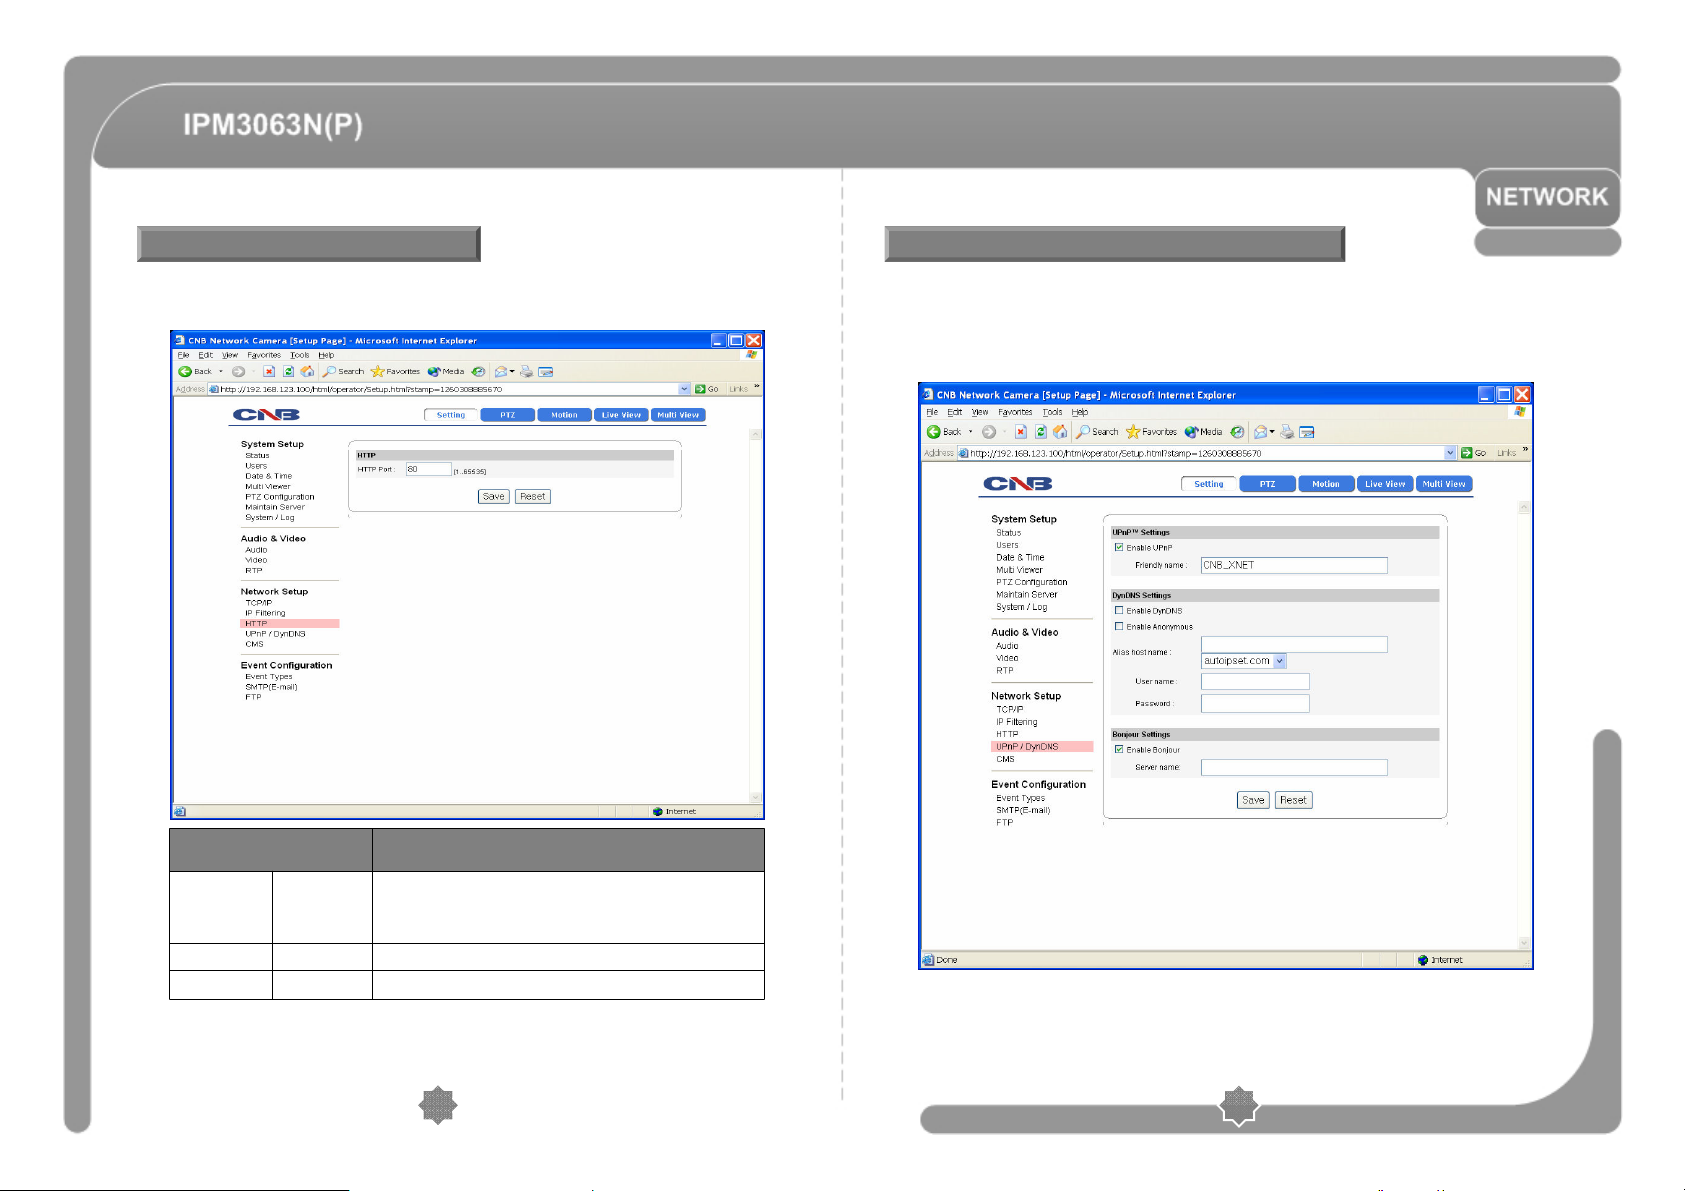
Configuring HTTP
Configuring UPnP/DynDNS/Bonjour
◎ This configures HTTP port to access XPEED-XNET’s webpage.
Click [HTTP] button to open the page shown in below figure.
DESCRIPTIONITEM
Enter HTTP Port to access the webpage.
HTTP
HTTP
port
Default port is 80, and any other port number has to be entered at the
end of the ip address when accessing.
(Ex: When using HTTP Port 8080, enter http://192.168.123.100:8080)
Applies and saves changes.-Save
Recalls previously saved configurations.-Res et
◎ UPnP is a protocol for IP installer software, You can enable or disable this UPnP,
and you can also use a Friendly Name.
DynDNS configures XPEED-XNET’s DDNS server information.
Click [UPnP/DynDNS] to open the page shown in below figure.
4544
Page 24
Configuring UPnP/DynDNS/Bonjour
Configuring CMS
UpnP
Setting
DynDNS
Setting
Bonjour
Setting
Enable UPnP
Enable
DynDNS
Enable
Anonymous
Alias Host
Name
Enable
Bonjour
DESCRIPTIONITEM
Enables or disables UPnP.
When enabled, you can IP installer’s XPEED-XNET Auto Search
feature.
Enter UPnP’s Friendly Name.Friendly Name
Enables or disables DynDNS.
When enable, you can automatically obtain a domain from DDNS
Server by simply registering the XPEED-XNET product.
Enables or disables DynDNS Anonymous feature. When enabled,
DDNS service is used without going through authentication at
Autoipset.com DDNS server.
Enter a Host Name for the DynDNS server.
Enter a user Name for the DynDNS server.User Name
Enter a password for the DynDNS server.Password
Enables or disables Bonjour.
When enabled, you can use IP installer’s XPEED-XNET Auto Search
feature.
Enter Bonjour’s Server Name.Server Name
Applies and saves changes.-Save
Recalls previously saved configurations.-Reset
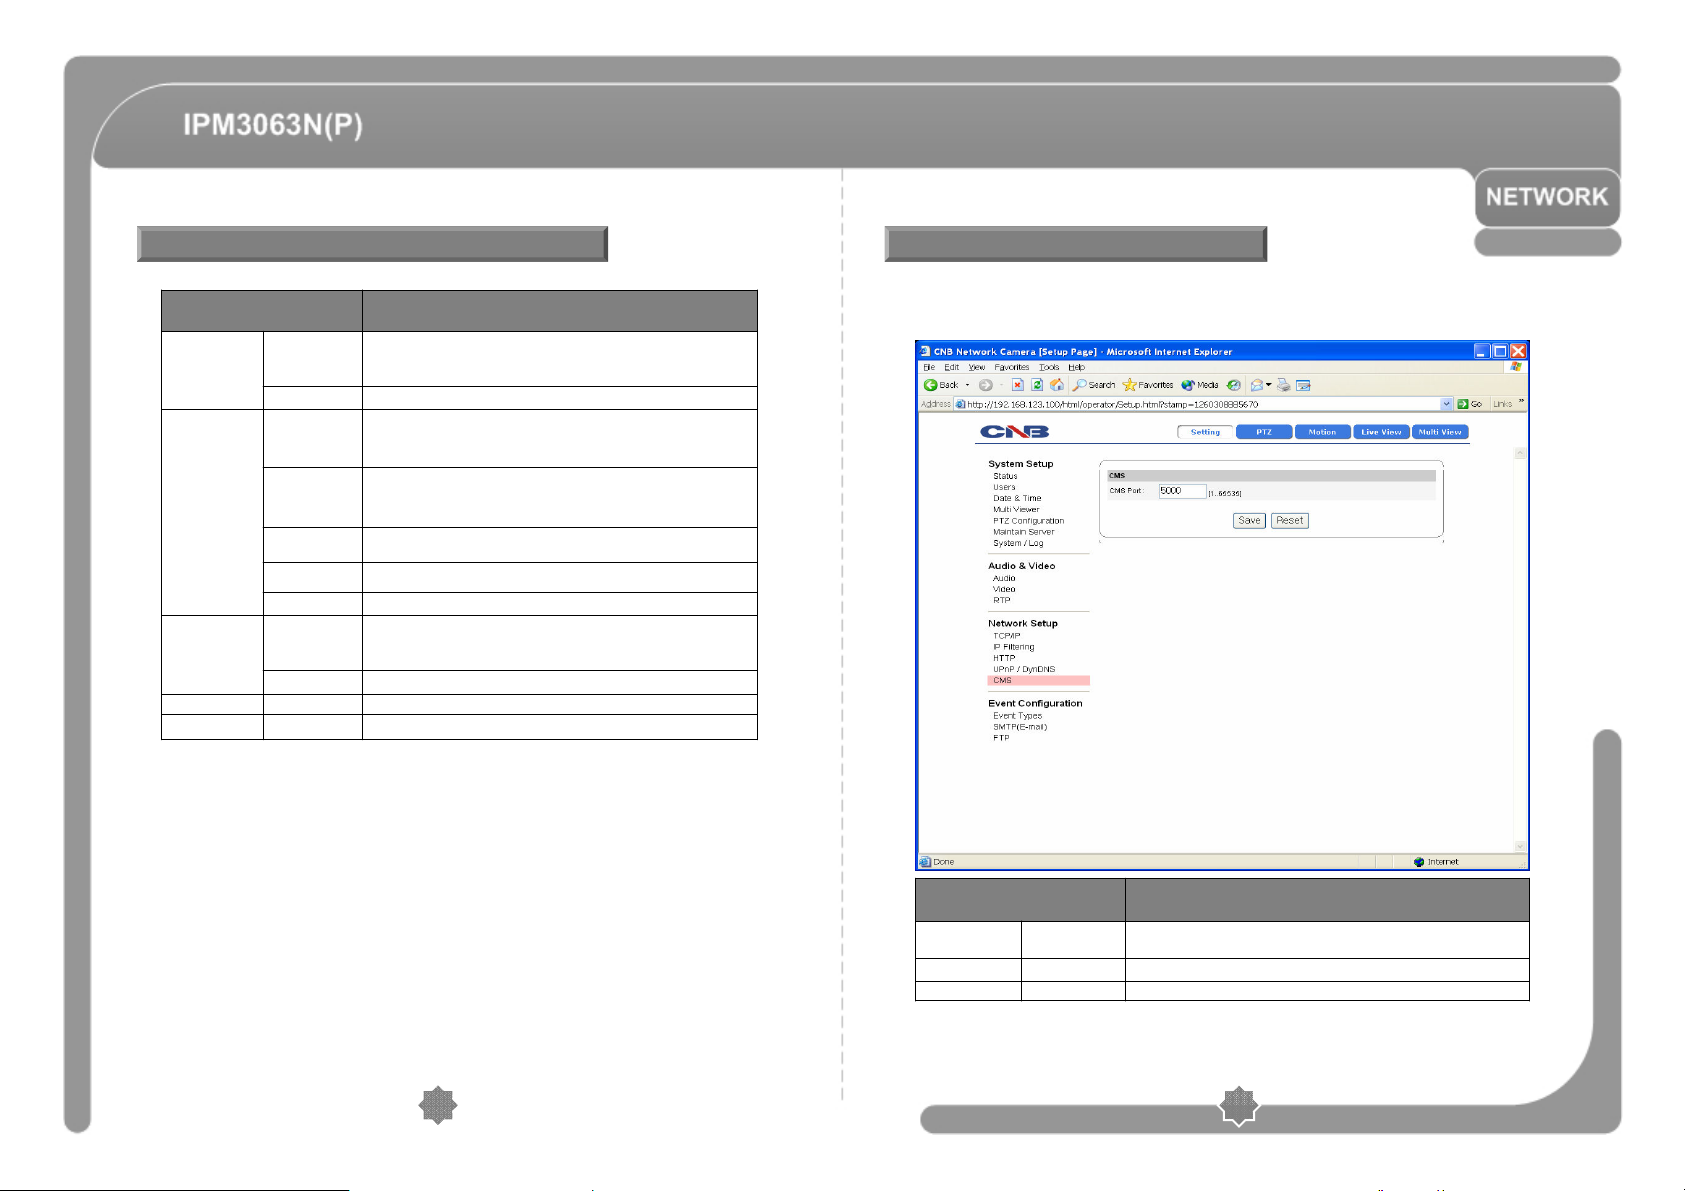
◎ This configures XPEED-XNET’S CMS Server information.
Click [CMS] to open the page shown in below figure.
DESCRIPTIONITEM
CMS PortCMS
Enter CMS port number for communication with CMS between 1 and
65535. The default is 5000.
Applies and saves changes.-Save
Recalls previously saved configurations.-Reset
4746
Page 25
Configuring Event Type
◎ This configures XPEED-XNET’s Event Types.
Click [Event Types] to view page shown in below figure.
Enables or disables event processing. <Default : Disable>Enable EventEvent Enable
Event Mode
Event Setting
Event Schedules
Event
Output
Select
Storage
Motion
Detection
Capture Frame
Pre-Alarm
Post-Alarm
Event
Schedules
Event
Schedules
Setting
Upload image to
FTP
Send Image to
Email
Save Image to
Internal Memory
Save Image to
SD Memory
Enables or disables the Alarm sensor.Sensor
Enables or disables Motion Detection.
When processing an event, this establishes the number of images to be
saved per second. It can be selected between 1 and 3.
When processing an event, this establishes saving images before the
occurance of the event.
It can be between 1 and 5 seconds before the event, and the number of
the images to be saved gets determined by the Capture Frame rate.
When processing an event, this establishes saving images after the
occurance of the event.
It can be between 1 and 8 seconds after the event, and the number of the
images to be saved gets determined by the Capture Frame rate.
Enables or disables scheduled event monitoring.
When always is selected while Event (Alarm) is activated, the unit will
monitor event (Alarm) all the time.
During Time is selected while Event (Alarm) is activated, the unit will
monitor event (Alarm) during the time period specified.
Specify schedule for Event (Alarm) monitoring. Event (Alarm) is
monitored according to the schedule specified here.
This allows Alarm images to be uploaded to an FTP server when
processing an event. The client PC has to run FTP server to receive the
Images and the information of the FTP server has to be accurately
Entered and saved at the FTP Configuration page.
This allows Alarm images to be sent out by an e-mail when processing
an event. Only one image file at the moment of the event gets sent out.
The e-mail address has to be accurately entered and saved at SMTP
configuration page.
This allows Alarm images to be saved in the internal memory.
Saved image can get transferred to the client’s PC by using save image
button at system configuration page.
This allows Alarm images to be saved in the external memory (SD Card) .
SD card has to be properly installed and recognized for this feature.
Applies and saves changes.-Save
Recalls previously saved configurations. -Reset
• When SD Card removes, disable the Event.
DESCRIPTIONITEM
4948
Page 26

SMTP Setup
◎ This configures mailing out method of Alarm Images once ‘event’ occurred in the
XPEED-XNET system.
Click [SMTP] button to open the page shown in below figure.
SMTP
Settings
E-mail
Address
Setting
Enable
Internal SMTP
Server
Enable
SMTP
Authorization
SMTP Server
Name
Email
Address
-Reset
DESCRIPTIONITEM
Turns internal SMTP Server on or off.
When this box is checked, Alarm Image gets mailed out through an
internal mail server. Mail Authentication cannot be used in this mode.
When this box is unchecked, Alarm Image gets mailed out through an
external mail server. Mail Authentication, port, user. Password, mail
address, etc needs to be configured.
Enables or disables the use of SMTP authorization when using external
mail server.
Enter the name of external mail server.
Enter the port number for the external mail server.SMTP Port
Enter the use name of the external mail server.User name
Enter the password of the external mail server user.Password
Enter the e-mail address of the external mail server user.
Applies and saves changes.-Save
Recalls previously saved configurations.
5150
Page 27

Configuring FTP
Configuring and operating PTZ
◎ This configures how the Alarm Images get sent out using FTP once ‘event’ occurred
in the XPEED-XNET’s system.
Click [FTP] button to open the page shown in below figure.
FTP
Server
Login
Information
ITEM
FTP
Name
FTP
Port
User Name
Password
Enter the address of the FTP server to send Alarm Images to in the
event processing.
The client PC at that IP address has to run the FTP server in order to
receive the Alarm Images.
Enter the port number for the FTP server to send Alarm Images to in
the event processing.
Enter the user name of the FTP server to send Alarm Images to in the
event processing.
Enter the password of the FTP server to send Alarm Images to in the
event processing.
Applies and saves changes.-Save
Recalls previously saved configurations.-Res et
DESCRIPTION
◎ This controls XPEED-XNET’s PTZ movement.
Click [PTZ] button in Operator mode to open the page shown in below figure.
5352
Page 28

Configuring and operating PTZ
Configuring Motion Detection area
ITEM
Direction Key
Tele/Wide
Near/Far
Iris-/Iris+
DESCRIPTION
Moves camera up/down/left/right.
Moves Origin.
Tele : Executes Tele zoom.
Wide : Executes Wide zoom.
Near : Executes Focus Near.
Far : Executes Focus Far.
Iris- : Executes Iris Close.
Iris+ : Executes Iris Open.
The current position is set to Preset No.set
Current preset NO. is deleted.del
The camera moves to the specified Preset position.go
Start pattern recording.
Save and Stop pattern.
Run pattern.
Desired Swing is executed.-
Desired Group is executed.-
Preset/Pattern/Swing/Group operation are stopped.
◎ This defines areas that detect motion and up to three different areas can be defined
in each channel.
Click [Motion] button in Administrator and Operator mode to open the page shown
in below figure.
5554
Page 29

Configuring Motion Detection area
Configuring Multi View Option
Area
Show
selected area
Sensitivity
Defining
Motion
Detection
Area
DESCRIPTIONITEM
Displays currently defined Motion Detection area.
When an area is selected from the list, its defined area gets displayed
and highlighted in viewer window.
Up to 3 motion detection area can be defined.
When this is checked, only the selected area gets displayed in viewer
window.
Enter designation for each area.Caption
Sets sensitivity for detection motions. “1” being the least sensitive and
“10” being the most sensitive. The user needs to configure this according
to their applications and circumstances.
1. Enter a designation in the caption bar and set sensitivity.
2. Click “Add” button.
3. A square with the designation you’ve just defined will appear in viewer
window.
4. The size of the square can be adjusted by clicking and dragging its
lower right corner and the position can be adjusted by dragging the
square.
5. Click “Save” button once you are done defining the areas.
◎ This configures viewing of up to 4 different camera images simultaneously.
Click [Multi View] button to open the page shown in below figure.
The video from the XPEED-XNET product gets displayed on top left and the rest
Display video signals coming from the IP addresses defined in the Multi-Viewer Setup
page.
5756
Page 30

Camera Operation
Starting OSD Menu
• Function : Using the OSD menu, Preset, Pattern, Swing, Group and Alarm Input
function can be configured for each application.
• Enter Menu : Menu On Key.
• Exit Menu : Menu Off Key.
• Control Key : Press NEAR key to save values and Press FAR key to cancel values.
PRESET
• Function : Max. 127 positions can be stored as Preset position. The Preset number
can be assigned from 1 to 128, but 95 is reserved.
Camera characteristics (i.e. White Balance, Auto Exposure) can be set up
independently for each preset. Label should be blank and "Camera Adjust“
should be set to "GLOBAL" as default. All characteristics can be set up in
OSD menu.
• Set : Set Preset [1~128]
• Run : Go Preset [1~128]
• Delete : Del Preset [1~128]
58
59
Page 31

SWING
• Function : By using Swing function, you can make camera to move between 2 Preset
positions repeatedly. When swing function runs, camera moves from the
preset assigned as the 1st point to the preset assigned as the 2nd point in
CW(Clockwise) direction. Then camera moves from the preset assigned as
the 2nd point to the preset assigned as the 1st point in CCW(Counterclock
wise) direction.
1st Preset
on
i
t
c
e
r
i
d
W
C
①
C
②
2nd Preset
n
o
i
t
c
e
r
i
d
W
C
In case that the preset assigned as the 1st point is same as the preset
assigned as the 2nd point, camera turns on its axis by 360 ° in CW(Counter
wise) direction. Speed can be set up from 1°/sec to 180°/sec.
• Set : To set Swing, use OSD menu.
• Run : Run Swing [1~8]
• Delete : To delete Swing, use OSD menu.
PATTERN
• Function : Pattern Function is that a camera memorizes the path (mostly curve path)
by screen jog for assigned time and revives the path exactly as it
memorized. 4 Patterns are available and Maximum 1200 communication
commands can be stored in a pattern.
• Setting : Pattern can be created by one of following two methods.
Method 1) <Set Pattern> [Pattern NO.]
- Pattern editing screen is displayed as bellow.
- Movement by direction key and preset movement
can be memorized in a pattern.
- The rest memory size is displayed in progress bar.
- To save the recording, press NEAR or STORE key
and to cancel, press FAR key.
EDIT PATTERN 1
■■ ■■ ■■ ■■ ■■ ■■ ■■ ■■ ■■ ■
[NEAR:SAVE /FAR:DELETE]
0/0/x1/N
Method 2) OSD using OSD menu: See the section “How to use OSD menu”.
• Run : Run Pattern [1~4]
• Delete : To delete Pattern, use OSD menu.
GROUP
• Function : The group function allows running sequence of Presets, Pattern and/or
Swings. Max 8 group can be stored. Each group can have max 20 action
entities which can be preset, pattern or swing. Preset speed can be set up
and the repeat number of Pattern & Swing can be set up in Group setup.
Dwell time between actions can be set up also.
DWELL TIME
Preset 1 Pattern 1 Swing 1
Max. 20 Action
60
• Set : Use OSD menu to create a Group.
• Run : Run Group [1~8]
• Delete : To delete Group, use OSD menu.
61
Page 32

Other Functions
OSD Display of Main Screen
• PWR UP ACTION : This function enables to resume the last action executed before power down.
• AUTO FLIP : In case that tilt angle arrives at the top of tilt orbit (90°), zoom module camera keep
• PARKING ACTION : This function enables to locate the camera to specific position automatically if
• ALARM I/O : 4 Alarm Inputs and 1 Alarm output are used. If an external sensor is activated, camera
• PRIVACY ZONE : To protect privacy, Max. 4 Privacy Masks can be created on the arbitrary position
• CAM ADJUST : WB(White Balance) and AE(Auto Exposure) can be set up independently for each
• FOCUS MODE : This mode exchanges focus mode automatically between Manual Focus mode and
Most of actions such as Preset, Pattern, Swing and Group are available for this
function but Jog actions are not available to resume.
moving to opposite tilt direction (190°) to keep tracing targets. As soon as zoom module
camera passes through the top of tilt direction(90°), images should be reversed
automatically and
range is -5 ~ 95°.
operator doesn’t operate the Viewer for a while. The Park Time can be
defined as an interval from 1 minute to 4 hours.
can be set to move to corresponding preset position. It is noted that the latest alarm
input is effective if multiple sensors are activated.
to hide objects such as windows, shops or private house. With Spherical
Coordinates system, powerful Privacy Zone Mask function is possible.
preset. There are 2 modes, "Global" mode & "Local" mode. The Global mode means
that WB or AE can be set up totally and simultaneously for all presets in "ZOOM
CAMERA SETUP" menu. The Local mode means that WB or AE can be set up
independently or separately for each preset in each preset setup menu. Each Local
WB/AE value should activate correspondingly when camera arrives at each preset
location. During jog operation, Global WB/AE value should be applied. All Local
WB/AE value do not change although Global WB/AE value changes.
Auto Focus mode by operation. Manual Focus mode activates in preset operation
and Auto Focus mode activates during jog operation. With Manual mode at presets,
Focus data is memorized in each preset in advance and camera calls focus data in
correspondence with presets as soon as camera arrives at a preset. It should
shorten time to get focuses Focus mode changes to Auto Focus mode automatically
when jog operation starts.
F appears in screen. If this function is set to OFF, tilt movement
PRESET
I : 1 - - - O : -
Action TitlePreset Label
Alarm Information
P/T/Z Information
IRIS Information
Image Flip
Camera ID
LABEL12345
IRIS 25
F
CAM 1 15 /4/x1/ N
CAM 1
• P/T/Z Information : Current Pan/Tilt angle in degree, zoom magnification and a compass
direction.
• Alarm Information : This information shows current state of input and relay output.
If the input and output points are ON state it will show a number
corresponding to each point. When they are OFF state, ‘-‘ will be
displayed.
ex) Point 2 & 3 of inputs are 1 of output is ON, OSD will show as below
I:-23- O:1
• Camera ID : Current Camera ID(Address).
• Action Title : Followings are possible Action Titles and their meaning.
“SET PRESET xxx” When Preset xxx is stored.
“PRESET xxx” When camera reach to Preset xxx.
“PATTERN x” When Pattern x is in action.
“SWGx/PRESET xxx” When Swing x is in action.
“UNDEFINED” When undefined function is called to run.
• Preset Label : The Label stored for specific Preset.
• Image Flip : Shows that images are currently reversed by Auto Flip Function.
• IRIS Information : This information shows current iris value.
62
63
Page 33

General Rules of Key Operation for Menu
Compass Direction Setup
◎ The menu items surrounded with ( ) always has its sub menu.
◎ For all menu level, to go into sub menu, press NEAR key.
◎ To go to up-one-level menu, press FAR key.
◎ To move from items to item in the menu, use the UP/DOWN/LEFT/RGHT key.
◎ To change a value of an item, use the UP/DOWN key.
◎ Press NEAR key to save values and Press FAR key to cancel values.
MAIN MENU
SPEED DOME CAMERA
<SYSTEM INFORMATION >
☞
<DISPLAY SETUP >
<DOME CAMERA SETUP >
<SYSTEM INITIALIZE >
EXIT(MENU OFF)
• SYSTEM INFORMATION
- Displays system information and configuration.
• DISPLAY SETUP
- Enable/Disable of OSD display on Main Screen.
• DOME CAMERA SETUP
- Configure various functions of this camera.
• SYSTEM INITIALIZE
- Initializes system configuration and sets all data to
factory default configuration.
DISPLAY SETUP
DISPLAY SETUP
CAMERA ID
☞
PTZ INFORMATION
ACTION TITLE
PRESET LABEL
ALARM INPUT
<SET NORTH DIRECTION >
<PRIVACY ZONE >
BACK
EXIT(MENU OFF)
ON
AUTO
AUTO
AUTO
AUTO
◎ This menu defines Enable/Disable of OSD display
on Main Screen. If an item is set to be AUTO, the
item is displayed only when the value of it is
changed.
• CAMERA ID
• PTZ INFORMATION
• ACTION TITLE
• PRESET LABEL
• ALARM I/O
: [ON/OFF]
: [ON/OFF/AUTO]
: [ON/OFF/AUTO]
: [ON/OFF/AUTO]
: [ON/OFF/AUTO]
SET NORTH DIRECTION
MOVE TO TARGET POSITION
[NEAR :SAVE /FAR :CANCEL ]
Move camera and press NEAR button to save.
PRIVACY ZONE MASK SETUP
◎ Set North to assign compass direction as criteria.
PRIVACY ZONE
MASK NO
☞
DISPLAY
CLEAR MASK
<EDIT MASK >
BACK
EXIT(MENU OFF)
1
UNDEFINED
OFF
CANCEL
◎ Select area in image to mask.
• MASK NO. [1~4]
- Select Mask number. If the selected mask has already
data, camera moves as it was set. Otherwise,
“UNDEFINED” will be displayed under “Mask NO”.
• DISPLAY [ON/OFF]
- Sets if camera makes mask shows or not on images.
• CLEAR MASK [CANCEL/OK]
- Deletes data in the selected mask NO.
PRIVACY ZONE AREA SETUP
EDIT MASK 1
MOVE TO TARGET POSITION
[NEAR :SELECT /FAR :C ANCEL ]
◎ Move camera to area to mask. Then the menu to
adjust mask size will be displayed.
64
65
Page 34

PRIVACY ZONE SIZE ADJUSTMENT
AUTO EXPOSURE SETUP
EDIT MASK 1
◎ Adjust mask size. Use direction keys to adjust
mask size.
◀▶ (LEFT/RIGHT) : Adjusts mask width.
[◀▶:ADJUST MASK WIDT H ]
[▲▼ : ADJUST MASK HEIGHT ]
[NEAR :SAVE /FAR :CANCEL ]
▲▼ (UP/DOWN) : Adjusts mask height.
CAMERA SETUP
CAMERA SETUP
FOCUS MODE
☞
DIGITAL ZOOM
IMAGE FLIP
<WHITE BALANCE SETUP >
<AUTO EXPOSURE SETUP >
BACK
EXIT(MENU OFF)
SEMIAUTO
ON
OFF
• DIGITAL ZOOM [ON/OFF]
- Sets digital zoom function to ON/OFF. If this is set to OFF, optical zoom function runs
but zoom function stops at the end of optical zoom magnification.
• IMAGE FLIP [ON/OFF]
- If IMAGE FLIP is ON, Current image is reversed. If IMAGE FLIP is OFF, Reversed
image will recover to previous status.
◎ Setup the general functions of zoom camera module.
• FOCUS MODE [AUTO/MANUAL/SEMIAUTO]
- Sets camera focus mode.
SEMIAUTO Mode
This mode exchanges focus mode automatically between
Manual Focus mode and Auto Focus mode. Manual
Focus mode activates in preset operation and Auto Focus
mode activates when jog operation starts. With Manual
mode at presets, Focus data is memorized in each preset
in advance and camera calls focus data in
correspondence with presets as soon as camera arrives
at a preset.
WHITE BALANCE SETUP
AE SETUP ▬GLOBAL
BACKLIGHT
☞
DAY /NIGHT
BRIGHTNESS
IRIS
SHUTTER
AGC
SSNR
SENS▬UP
BACK
EXIT(MENU OFF)
OFF
<AUTO 2 >
25
AUTO
ESC
HIGH
MIDDLE
<AUTO >
• BACKLIGHT [ON/OFF]
- Sets Backlight Compensation
• DAY/NIGHT [AUTO1/AUTO2(0~255)/DAY/NIGHT]
- AUTO1 exchanges Day/Night mode faster than
AUTO2. You are able to adjust Day/Night sensitive
level if you have selected AUTO2 mode.
If Day&Night sensitive level has the higher value,
it execute that change Day&Night in the lower
luminance.
• BRIGHTNESS [0~100]
- Adjusts brightness of images. Iris, Shutter Speed and Gain are adjusted automatically in
correspondence with this value.
• IRIS [AUTO/MANUAL(0~100)]
- If Iris is set to Auto, Iris should have highest priority in adjusting AE and Shutter Speed
should be fixed. If Iris is set to Manual, Iris should be fixed and Iris has lower priority in
adjusting AE, in comparison with others.
• SHUTTER SPEED [ESC/A.Flicker/Manual(x128~1/120000sec]
- If Iris is set to Manual and Shutter Speed is set to ESC, Shutter Speed should have
highest priority. If Shutter Speed is set to A.Flicker, to remove Flicker, Shutter Speed
should be set to 1/100 sec. for NTSC and 1/120 for PAL. If Shutter Mode is set to
MANUAL, Shutter speed is able to adjust from x128 to 1/120000.
• AGC [OFF/NORMAL/HIGH]
- Enhances image brightness automatically in case that luminance level of image signal is
too low.
WB SETUP▬GLOBAL
WB MODE
☞
RED ADJUST
├
BLUE ADJUST
└
BACK
EXIT(MENU OFF)
AUTO
▬ ▬ ▬
▬ ▬ ▬
• WB MODE [AUTO/MANUAL]
- In Manual mode, Red and Blue level can be set
up manually.
• RED ADJUST [10~60]
• BLUE ADJUST [10~60]
66
• SSNR [OFF/LOW/MIDDLE/HIGH]
- Enhances images by deducting noises when gain level of images is too high.
• SENS-UP [AUTO(2~128)/OFF]
- Activates Slow Shutter function when luminance of image (signal) is too dark.
It is possible to set up the maximum number of frames piled up one on another by Slow
Shutter function.
67
Page 35

MOTION SETUP
PARKING ACTION SETUP
MOTION SETUP
MOTION LOCK
☞
PWR UP ACTION
FRZ IN PRESET
<JOG SETUP >
<PARKING ACTION SETUP >
<ALARM INPUT SETUP >
BACK
EXIT(MENU OFF)
OFF
ON
OFF
◎ Setup the general functions of Pan/Tilt motions.
• MOTION LOCK [ON/OFF]
- If Motion Lock is set to ON, it is impossible to set
up and delete Preset, Swing, Pattern and Group.
It is possible only to run those functions. To set
up and delete those functions, enter into OSD
menu.
• PWR UP ACTION [ON/OFF]
- Refer to “Other Functions" section.
• FRZ IN PRESET [ON/OFF]
- At start point of preset movement, camera starts freezing the image of start point.
Camera keeps displaying the image of start point during preset movement and does
not display the images which camera gets during preset movement. As soon as
camera stops at preset end point, camera starts displaying live images which it gets at
preset end point. This function availability should be different by models.
JOG SETUP
JOG SETUP
AUTO FLIP
☞
JOG MAX SPEED
JOG DIRECTION
BACK
EXIT(MENU OFF)
ON
120 /SEC
INVERSE
◎ Setup the Jog speed and Direction.
• AUTO FLIP [ON/OFF]
- Refer to “Other Functions" section.
• JOG MAX SPEED [1°/sec~360°/sec]
- Sets maximum jog speed. Jog speed is inversely
proportional to zoom magnification. As zoom
magnification goes up, pan/tilt speed goes down.
• JOG DIRECTION [INVERSE/NORMAL]
- If you set this to ‘Inverse’, the view in the screen
is moving same direction with jog tilting.
If ‘Normal’ is selected, the view in the screen is
moving reversely.
PARKING ACTION SETUP
PARK ENABLE
☞
WAIT TIME
PARK ACTION
BACK
EXIT(MENU OFF)
OFF
00 :10: 00
HOME
ALARM INPUT SETUP
ALARM INPUT SETUP
ALARM 1 TYPE
☞
ALARM 2 TYPE
ALARM 3 TYPE
ALARM 4 TYPE
ALARM 1 ACT
ALARM 2 ACT
ALARM 3 ACT
ALARM 4 ACT
BACK
EXIT(MENU OFF)
N.O PEN
N.O PEN
N.O PEN
N.O PEN
NOT USED
NOT USED
NOT USED
NOT USED
◎ If Park Enable is set to ON, camera runs assigned
function automatically if there is no PTZ command
during assigned "Wait Time".
• PARK ENABLE [ON/OFF]
• WAIT TIME [1minute~4hour]
- The time is displayed with "hh:mm:ss" format and
you can change this by 1 min unit.
• PARK ACTION [HOME/PRESET/PATTERN/SWING/GROUP]
HOME
Camera moves to home position if there is no
PTZ command during assigned "Wait Time".
◎ Match the Alarm sensor input to one of Preset
positions. If an external sensor is activated, camera
will move to corresponding preset position when
this item is predefined.
• ALARMx TYPE [NORMAL OPEN/NORMAL CLOSE]
- Sets sensor input type.
• ALARMx ACTION [NOT USED/PRESET 1~128]
- Assign counteraction Preset position to each
Alarm input.
68
69
Page 36

PRESET SETUP
EDIT PRESET LABEL
PRESET SETUP
PRESET NO .
☞
CLR PRESET
<EDIT SCENE >
<EDIT LABEL >
<RELAY OUT > -
CAM ADJUST GLOBAL
BACK
EXIT(MENU OFF)
1
UNDEFINED
CANCEL
• PRESET NO. [1~128]
- If a selected preset is already defined, camera
moves to pre-defined position and preset
characteristics such as Label and Relay Outputs
show on monitor. If a selected preset is not defined,
“UNDEFINED” shows on monitor.
• CLEAR PRESET [CANCEL/OK]
- Delete current Preset data
• EDIT PRESET SCENE
- Redefine current Preset scene position (i.e. PTZ).
• EDIT PRESET LABEL
- Edits Label to show on monitor when preset runs. MAX. 10 alphabets are allowed.
• RELAY OUT
- Sets the relay output
• CAM ADJUST [GLOBAL/LOCAL]
- WB(White Balance) and AE(Auto Exposure) can be set up independently for each
preset. There are 2 modes, "Global" mode & "Local" mode. The Global mode means
that WB or AE can be set up totally and simultaneously for all presets in "ZOOM
CAMERA SETUP“ menu. The Local mode means that WB or AE can be set up
independently or separately for each preset in each preset setup menu. Each Local
WB/AE value should activate correspondingly when camera arrives at each preset
location. During jog operation, Global WB/AE value should be applied. All Local WB/AE
value should not change although Global WB/AE value changes. If “Local’’
EDIT PRESET SCENE
EDIT LABEL ▬PRESET 1
[
■
1
2 3 4 5 6 7 8 9
ABC D EF GH I
KL M NOP QR S
UV W XY Z a b c
e f g h i j k l m
o pq r s t u v w
y z < >▬/ : .
]
0
J
T
d
n
x
OK
CANCEL
◎ Edits label to show on monitor when camera arrives
at presets. In Edit Label menu, a reverse
rectangular is cursor. As soon as finishing selecting
alphabet, cursor moves to the next digit.
(■ )
↑
Current Cursor Position
◎ Using the LEFT/RIGHT/UP/DOWN key, move to
an appropriate character from the Character set.
To choose that character, press the NEAR key.
• If you want to use blank, choose Space character (" ").
If you want to delete a character before, use backspace
character (" ←").
◎ If you complete the Label editing, move cursor to "OK" and
press NEAR key to save completed label. To abort current
change, move cursor to "Cancel" and press NEAR key.
RELAY OUTPUT SETUP
RELAY OUT ▬PRESET 1
RELAY OUT
☞
OFF
• RELAY OUT [ON/OFF]
- Sets relay output when changing preset position.
2 3 45 67 8 9
1
ABC DEFGH I
KLMNOPQR S
UVWXYZa b c
e f g h i j k l m
opq r s t uv w
y z < >▬/ : .
Space
0
J
T
d
n
x
Backspace
EDIT SCENE ▬PRESET 1
MOVE TO TARGET POSITION
[NEAR :SAVE /FAR :C ANCEL ]
◎ Using direction keys, move camera to desired
position.
◎ By pressing NEAR key, save current PTZ data.
◎ Press FAR key to cancel.
70
BACK
EXIT(MENU OFF)
71
Page 37

SWING SETUP
•
EDIT PATTERN
SWING SETUP
SWING NO .
☞
1ST POS .
2ND POS .
SWING SPEED
CLEAR SWING CANCEL
1
NOT USED
NOT USED
30 /SEC
• SWING NO. [1~8]
- Selects Swing number to edit. If a selected Swing
has not defined, "NOT USED" is displayed in 1st
Position and 2nd Position.
• 1st POS, 2nd POS [PRESET 1~128]
- Set up the 2 position for Swing function.
If a selected preset is not defined, "UNDEFINED“
BACK
EXIT(MENU OFF)
will be displayed as shown below.
◎ When swing function runs, camera moves from the preset assigned as the 1st point
to the preset assigned as the 2nd point in CW (Clockwise) direction. Then camera
moves from the preset assigned as the 2nd point to the preset assigned as the 1st
point in CCW (Counterclockwise) direction. In case that the preset assigned as the 1st
point is same as the preset assigned as the 2nd point, camera turns on its axis by
360° in CW direction and then it turns on its axis by 360° in CCW direction.
• SWING SPEED [1°/sec ~ 180°/sec]
- Sets Swing speed from 1°/sec to 180°/sec.
• CLEAR SWING [CANCEL/OK]
- Deletes current Swing data.
SWING SETUP
SWING NO .
1ST POS .
☞
2ND POS .
1
PRESET 5
NOT USED
UNDEFINED
PATTERN SETUP
PATTERN SETUP
PATTERN NO .
☞
CLR PATTERN
<EDIT PATTERN >
BACK
EXIT(MENU OFF)
1
UNDEFINED
CANCEL
• PATTERN NO. [1~4]
- Selects Pattern number to edit.
If a selected pattern number is not defined,
"UNDEFINED" will be displayed under selected
pattern number.
• CLEAR PATTERN [CANCEL/OK]
- Deletes data in current pattern.
• EDIT PATTERN
- Starts editing pattern.
EDIT PATTERN 1
EDIT PATTERN 1
■ ■ ■ ■ ■ ■ ■ ■ ■ ■ ■ ■ ■ ■ ■ ■ ■ ■ ■
NEAR
MOVE TO START POSITION
[NEAR :ST ART / FAR: CANCEL ]
[NEAR :SAVE /FAR : DELETE ]
0/0 /x1/ N
◎ Using direction keys, move to start position with appropriate zoom. To start pattern
recording, press NEAR key. To exit this menu, press FAR key.
◎ Move camera with the direction key or run preset function to memorize the path
(mostly curve path) in a selected pattern. The total memory size and the rest memory
size is displayed in the form of bar. Maximum 1200 communication commands can be
stored in a pattern.
◎ To save data and exit, press NEAR key. To cancel recording and delete record data,
press FAR key.
GROUP SETUP
GROUP SETUP
GROUP NO .
☞
CLEAR GROUP
<EDIT GROUP >
BACK
EXIT(MENU OFF)
• GROUP NO. [1~8]
- Selects Group number to edit.
If a selected Group number is not defined,
"UNDEFINED" will be displayed under selected
Group number.
• CLEAR GROUP [CANCEL/OK]
- Deletes data in current Group.
• EDIT GROUP
- Starts editing Group.
72
73
Page 38

EDIT GROUP
EDIT GROUP 1
NO ACTION ### DWELL OPT
1
NONE
2
NONE
3
NONE
4
NONE
5
NONE
SAVE
CANCEL
EDIT GROUP 1
NO ACTION ### DWELL OPT
☞
1
2
3
4
5
SAVE
CANCEL
NONE
NONE
NONE
NONE
NONE
[◀▶:MOVE CURSOR ]
[▲▼ :CHANGE VAL . ]
[NEAR :E DIT ]
• ACTION ### [NONE/PRESET/SWING/PATTERN]
• DWELL [0 sec~4minutes]
- Sets Dwell Time between functions.
• OPT
- Option. It should be preset speed when preset is set
in Action. It should be the number of repeat when
Pattern or Swing is selected in Action.
EDIT GROUP 1
NO ACTION ### DWELL OPT
1
NONE
☞
2
NONE
3
NONE
4
NONE
5
NONE
SAVE
CANCEL
[NEAR : EDIT ACT ]
[FAR :EDIT END ]
◎ Press NEAR key in “NO” list to start Group setup.
◎ Note that MAX. 20 Functions are allowed in a Group. Move cursor UP/DOWN and
press NEAR key to set up.
EDIT GROUP 1
NO ACTION ### DWELL OPT
☞
2
NONE
3
NONE
4
NONE
5
NONE
SAVE
CANCEL
1 00:03 360PRESET1
[NEAR :EDIT ACT ]
[FAR :EDIT END ]
NEAR
EDIT GROUP 1
NO ACTION ### DWELL OPT
1 00:03 360PRESET1
☞
2
NONE
3
NONE
4
NONE
5
NONE
SAVE
CANCEL
◎ Set up Action, Dwell time and Option. Note that selected item is displayed in reverse.
Move cursor LEFT/RIGHT to select items and move cursor UP/DOWN to change each
value.
◎ Set up items such as Action, ###, Dwell and OPT.
◎ After finishing setting up a Action, press NEAR key to one-upper-level menu.
Move cursor UP/DOWN to select Action number and repeat.
◎ After finishing setting up all Actions, press FAR key to exit. Then cursor should be
moved to “SAVE”. Press NEAR key to save data.
74
75
Page 39

SYSTEM INITIALIZE Initial Configuration Table
SYSTEM INITIALIZE
CLEAR ALL DATA
☞
CLR DISPLAY SET
├
CLR CAMERA SET
├
CLR MOTION SET
├
CLR EDIT DATA
└
REBOOT CAMERA
NO
NO
NO
NO
NO
NO
• CLR ALL DATA
- Deletes all configuration data such as display,
camera, motion setup and so on.
• CLR DISPLAY SET
- Initializes Display Configuration.
BACK
EXIT(MENU OFF)
• CLR CAMERA SET
- Initializes Camera Configuration.
• CLR MOTION SET
- Initializes Motion Configuration.
• CLR EDIT DATA
- Deletes Preset Data, Swing Data, Pattern Data and Group Data.
• REBOOT CAMERA
- Reboots Zoom Camera module.
Display Configuration Camera Configuration
Camera ID OFF Focus Mode SemiAuto
PTZ Information AUTO Digital Zoom ON
Action Title AUTO Image Flip OFF
Preset Label AUTO White Balance AUTO
Alarm In/Output AUTO Backlight OFF
North Direction Pan 0° Day/Night AUTO2
Privacy Zone Undefined Brightness 25
Iris AUTO
Shutter ESC
Motion Configuration
Motion Lock OFF SENS-UP AUTO (4 Frame)
Power Up Action ON
Freeze In Preset OFF
Auto Flip ON
Jog Max Speed 120°/sec Preset 1~128 Undefined
Jog Direction INVERSE Swing 1~8 Undefined
Park Action OFF Pattern 1~4 Undefined
AGC HIGH
SSNR MIDDLE
User Edit Data
UndefinedGroup 1~8OFFAlarm Action
76
77
Page 40

Specifications
◎ Camera Part ◎ Network Part
MODEL IPM3063N(P)
VIDEO SIGNAL
Camera
Pan/Tilt
General
CCD 1/4” Interline Transfer CCD
Max. Pixels 811(H)x508(V) 410K
Effective Pixels 768(H)x494(V) 380K
Horizontal Res. 500TV Line (Color), 570 TV Line(B/W)
S/N Ratio 50 dB (AGC Off)
Zoom X10 Optical Zoom, x10 Digital Zoom
Focal Length F1.8, f=3.8~38mm
Min. illumination 0.7 Lux (Color) / 0.02 Lux (B/W), 50 IRE
Day & Night Auto / Day / Night(ICR)
Focus Auto / Manual / SemiAuto
Iris Auto / Manual
Shutter Speed x128 ~ 1 / 120,000 sec
AGC Normal / High / Off
White Balance Auto / Manual(Red, Blue Gain Adjustable)
BLC Low / Middle / High / Off
Flickerless Selectable
SSNR Low / Middle / High / Off
Range
Pan/Tilt Speed
Preset 127 Preset (Label, Camera Image Setting)
Pattern 4 Pattern ,1200 Commands (about 5 minutes)/Pattern
Swing 8 Swing
Group 8 Group (20 action entities per Group)
Other Functions Auto-Flip, Auto Parking, Power Up Action Etc.
Privacy Zone 4 Zone
Alarm I/O 4 Input, 1 Output
OSD Menu / PTZ Information Etc.
Rated Power DC 12V/1A
Dimension
Weight Approx. 1kg
Operating Temp. 0°C ~ 40°C (32°F ~ 104°F)
NTSC PAL
Pan 360° (Endless)
Tilt 190° (Auto-Flip), 100° (Normal)
Preset 360°/sec
Manual 0.05° ~ 360°/sec(Proportional to Zoom)
Swing 1° ~ 180°/sec
∅ 130.2 x 142.1(H) mm
795(H)x596(V) 470K
752(H)x582(V) 440K
MODEL IPM3063N(P)
NTSCVIDEO SIGNAL
Output Resolution
MJPEG, MPEG4, H.264 codec selectable.Output Video Format
Bi-directional audio (ADPCM,G.726)Audio Format
Protocol
Security
Event
IPv4, HTTP, TCP, RTSP, RTP, RTCP, UDP, SMTP, FTP, ICMP, DHCP,
ㆍAccess level setup : Multiple user access levels with password protection.
ㆍNetwork Security : IP Filtering.
Motion detection (
ㆍ Upload : FTP Server, SMTP (E-mail server). (JPEG file)
ㆍ Storage : Internal memory, SD Card. (JPEG file)
UPnP, Bonjour, ARP, DNS, DynDNS
1. CNB DDNS, 2. DynDNS.org, 3. Reference code with SDKDDNS
Up to 3 motion detection area can be defined).Motion detection
PAL
704 x 576(D1), 352 x 288(CIF) 704 x 480(D1), 352 x 240(CIF)
Max 30 frame/secCompression transmission speed
10/100 Mbps(RJ-45 Type)Ethernet
10 UsersMax. User
78
79
Page 41

Specifications
◎ Product Bracket ◎ Ceiling Bracket
80
Unit(mm)
81
Page 42

설치 및 사용 매뉴얼 Ver 1.0
인테리어 네트워크 스피드돔 카메라 / IPM3063N(P)
Page 43

경 고
주의사항
주 의
전기적 충격이 있을 수
있으니 열지 마시오
주의 : 전기적 충격의 위험을 피하기 위하여 커버를 열거나 임의로 제품을 분해하지 마십시오.
사용자가 교체할 수 있는 서비스 부품은 들어있지 않습니다.
자격 있는 서비스 요원으로부터 서비스를 받으십시오.
이 표시는 사람에게 전기적 충격으로 인한 위험성이 충분히 있는 높은
전압이 제품 내부에서 나타나게 됨으로써 이러한 절연되지 않는 높은
전압으로부터의 위험성을 사용자에게 경고하는 표시입니다.
이 표시는 제품을 동작시키거나 정비(보수)를 함에 있어서 중요한 내용
임을 사용자에게 주지 시키는 표시 입니다.
경고 : 화재 또는 전기적 충격으로부터의 위험을 예방하기 위하여 본 제품을 비 또는
습기가 있는 환경에 노출시키지 마십시오.
안전에 대한 사항
◎ 사용하시기 전에 안전에 대한 사항 및 본 제품의 조작 방법을 잘 읽어 주십시오.
◎ 제품의 올바른 사용을 위해서 사용설명서는 잘 보관하십시오.
◎ 기기의 제조사로부터 추천되지 않은 부착물은 위험을 초래할 수 있으므로 사용하지
마십시오.
◎ 물이나 습기가 많은 환경에서는 본 제품을 사용하지 마십시오.
◎ 불안정한 상태로 설치하거나 불안정한 곳에 제품을 올려두지 마십시오. 제품을
떨어뜨리면 사람에게 중대한 상패를 입히거나 제품에 큰 손상을 초래합니다. 제품과
함께 판매되거나 제조사로부터 추천된 고정장치를 사용하십시오. 제품 부착은 제조사의
설치 방법에 따라 하여 주시고 반드시 제조사로부터 추천된 부품을 사용하여 주십시오.
◎ 본 제품은 정격 전원의 형식에 대해서만 동작됩니다.
사용시 주의사항
◎ 사용하시기 전에 결선과 전원연결이 올바른지 확인하십시오
◎ 사용하는 동안 어떠한 비정상적인 상태 또는 이상 동작이 관측될 경우 사용을 중지하고
즉시 공급자에게 문의하십시오.
◎ 제품을 분해하지 마시고 제품 내부의 부품을 만지지 않도록 주의하십시오.
◎ 제품의 손상을 피하기 위하여 카메라를 떨어뜨리거나 진동 및 충격을 가하지 마십시오.
◎ 커버를 청소할 때에는 커버에 이물질이 묻거나 흠집이 나지 않도록 주의하십시오.
◎ 허용되는 온도 범위를 초과하는 곳에 카메라를 설치하지 마십시오.
◎ 습기 또는 먼지가 많은 곳에서의 설치는 피해주십시오.
◎ 방사능이 있는 곳에서의 설치는 피해 주십시오. 부품에 고장을 일으킬 수 있습니다.
◎ 강한 자기장이나 전기 신호가 있는 곳에서의 설치는 피해 주십시오.
◎ 강한 진동이 가해지는 곳에서의 설치는 피해 주십시오.
◎ 카메라를 비 또는 물에 절대로 노출 시키지 마십시오.
◎ 네트워크 연결 시, RJ-45 케이블을 제품의 연결단자에 무리하게 연결하지 마십시오.
Page 44

제품 특징
제품 구성품
설치
--------------------------------------------------- 88
--------------------------------------------------- 90
--------------------------------------------------- 91
Web Viewer 설정
시스템 관리 ------------------------------------------------------------------------------------------ 100
스피드돔 제어 --------------------------------------------------------------------------------------- 102
103페이지 접근 권한 ------------------------------------------------------------------------------------
Web Viewer ------------------------------------------------------------------------------------------ 104
상태 창 ------------------------------------------------------------------------------------------------ 106
사용자 설정 ------------------------------------------------------------------------------------------- 107
날짜 및 시간 설정 ----------------------------------------------------------------------------------- 109
다중 영상 플레이어 설정 -------------------------------------------------------------------------- 111
PTZ Configuration ---------------------------------------------------------------------------------- 113
시스템(Maintain Server) 설정 -------------------------------------------------------------------- 115
117로그 보고서(Log Report) --------------------------------------------------------------------------
118오디오(Audio) 설정 ---------------------------------------------------------------------------------
119비디오(Video) 설정 ---------------------------------------------------------------------------------
121RTP/RTSP 설정 ------------------------------------------------------------------------------------122네트워크(TCP/IP) 설정 ----------------------------------------------------------------------------
124IP 필터(IP Filtering) 설정 -------------------------------------------------------------------------126HTTP 설정 -------------------------------------------------------------------------------------------127UPnP/DynDNS/Bonjour 설정 -------------------------------------------------------------------129CMS 설정 --------------------------------------------------------------------------------------------130Event Type 설정 ------------------------------------------------------------------------------------132SMTP 설정 -------------------------------------------------------------------------------------------134FTP 설정 ---------------------------------------------------------------------------------------------135PTZ 동작 및 설정 -----------------------------------------------------------------------------------137Motion Detection 영역 설정 ----------------------------------------------------------------------
다중 영상 플레이어 --------------------------------------------------------------------------------- 139
카메라 작동 방법
141OSD 메뉴 선택 -----------------------------------------------------------------------------------141프리셋 -----------------------------------------------------------------------------------------------
142스윙 --------------------------------------------------------------------------------------------------
142패턴 --------------------------------------------------------------------------------------------------
142그룹 --------------------------------------------------------------------------------------------------
144기타 주요 기능 ------------------------------------------------------------------------------------
145주 화면 OSD 구성 --------------------------------------------------------------------------------
메뉴 사용법 --------------------------------------------------------------------------------------- 146
메인 메뉴 ------------------------------------------------------------------------------------------ 146
주 화면 OSD 표시 설정 ------------------------------------------------------------------------ 146
방위 위치 설정 ----------------------------------------------------------------------------------- 147
PRIVACY ZONE MASK 설정 ---------------------------------------------------------------- 147
카메라 모듈 설정 --------------------------------------------------------------------------------- 148
모션 설정 ------------------------------------------------------------------------------------------ 150
프리셋 설정 --------------------------------------------------------------------------------------- 152
스윙 설정 ------------------------------------------------------------------------------------------- 154
패턴 설정 ------------------------------------------------------------------------------------------ 154
그룹 설정 ------------------------------------------------------------------------------------------ 155
시스템 초기화 ------------------------------------------------------------------------------------ 158
제품사양
---------------------------------------------- 160
Page 45

카메라 영상부 사양
◎ 1/4” Interline Transfer CCD
◎ x10 광학줌, x10 디지털 줌(최대 x100줌)
◎ Day & Night 기능
◎ Auto-Focus, Manual Focus 이외에 Semi-Auto Focus 기능이 제공되어 PTZ 카메라에
적합한 Focus 설정이 가능하며, OSD메뉴를 이용하여 영상부의 미세한 설정을 수행
할 수 있습니다.
네트워크부 사양
◎ D1, CIF 해상도 지원
◎ MJPEG, MPEG4, H.264 코덱 선택 가능.
◎ 최대 30 frame/sec 지원.
◎ Dual Stream 지원.
◎ 양방향 오디오 지원(ADPCM, G.726).
◎ 최대 10명의 사용자 접속 가능.
◎ IPv4, HTTP, TCP, RTSP, RTP, RTCP, UDP, SMTP, FTP, ICMP, DHCP, UPnP, Bonjour,
ARP, DNS, DynDNS 프로토콜 지원.
◎ Motion Detection 지원(3개 영역 설정 가능).
◎ 이벤트 발생시 이미지 저장 가능(JPEG 파일, 내부 메모리, SD Card).
프리셋, 패턴, 스윙, 그룹 및 Privacy Mask 기능
◎ 127개의 프리셋 위치를 지정할 수 있으며, 프리셋 마다 카메라 영상 설정을 독립적으로
지정할 수 있습니다. 이외에도 프리셋 위치에 따른 레이블, 디지털 출력을 설정 할 수
있습니다.
◎ 2개의 프리셋 위치를 반복적으로 이동하는 스윙 기능이 지원합니다.(8 스윙)
◎ 일정 시간 동안 조그 운전을 그대로 저장하여 다시 실행하는 패턴기능이 지원됩니다.
(4 패턴)
◎ 프리셋/패턴/스윙을 조합한 20개의 동작을 순차적으로 수행하는 그룹기능이 지원
됩니다.(8그룹)
◎ 원하는 위치에 영상을 Masking 처리하는 프라이버시 존 기능이 제공됩니다.
(4 Mask Zone)
OSD(On Screen Display) 메뉴 지원
◎ OSD 메뉴를 통해 제품의 다양한 기능을 사용할 수 있습니다.
◎ 카메라 ID, 팬/틸트 위치, 방위 정보, 알람 입/출력, 프리셋 정보 등이 화면상에 표시
됩니다.
알람 입/출력 기능
강력한 팬/틸트 기능
◎ 프리셋 운전시 최대 360°/초의 고속 운전이 가능합니다.
◎ 프리셋 운전시 팬과 틸트가 동시에 보간 운전되므로 빠르고 자연스러운 화면 확인이
가능합니다.
◎ 조그 운전시 0.05°/초의 저속 운전이 가능하여 원하는 위치로 보다 정밀하게 이동
할 수 있습니다. 또한, 줌 배율에 따라 조그 운전속도가 연동됨으로써 원하는 위치로
쉽게 이동할 수 있습니다.
88
◎ 4개의 센서 입력, 1개의 센서 출력을 사용할 수 있습니다.
◎ 외부의 전기적인 노이즈를 제거하기 위해 센서 입력은 포토 커플러 방식을, 출력부는
릴레이를 사용합니다.
◎ Normal Open 또는 Normal Close 방식의 센서를 모두 사용할 수 있습니다.
◎ 센서 입력은 DC 5~12V의 출력의 센서를 연결할 수 있습니다.
◎ 릴레이 출력은 AC 124V/0.5A 또는 DC 24V/1A 까지 연결할 수 있습니다.
◎ 외부 센서의 동작에 따라 원하는 프리셋 위치로 이동할 수 있습니다.
89
Page 46

기본 구성품
카메라 본체
케이블 커버 시공지본 매뉴얼
천장형 브래킷 제품형 브래킷
제품 설치 방법
① 천장형 브래킷을 4개의 스크류를 이용하여 천장에 설치합니다.
② 제품형 브래킷을 4개의 스크류를 이용하여 제품에 장착합니다
③ 제품형 브래킷을 장착한 스피드돔을 천장형 브래킷의 4개의 지시선에 일치하도록
본체를 끼우십시오. 본체를 시계방향으로 회전시켜 조립합니다.
Video Connect
설치 CD
DC Adaptor
90
고정용 나사
91
Page 47

제품 설치 방법
결선
④ 1개의 고정 스크류로 제품을 고정합니다.
⑤ 케이블 커버를 천장형 브래킷에 삽입한 후 2개의 고정 스크류로 고정합니다.
IrDA Sensor
Door Switch
Image Output Device (for installation)
◎ 전원
- 본 제품의 정격전원은 DC 12V/1A입니다.
사용하는 전원이 DC 12V 출력인지, 용량이 1A이상인지를 확인하신 후 사용하십시오.
정격 전원 입력 전압 허용 범위 소모 전류
DC 12V DC 11V ~ 18V 1A
◎ 영상출력
- 제공하는 케이블을 사용하여 결선하십시오. (제품 설치시 사용하십시오.)
◎ AUDIO IN/OUT
- 오디오 입/출력 장치를 결선하십시오.
Relay Output
Ethernet/LAN
POWER
92
◎ SD CARD
- 알람 입력 및 Motion Detection 발생시 이미지 저장 메모리 입니다.
- SD CARD는 제공하지 않습니다. (512K~4G Bytes 까지 사용가능)
93
Page 48

결선
◎ LAN 연결
- 1대 연결
LAN
Web Viewer / CMS
참고.
ㆍ 설치하려는 네트워크 카메라가 1대일 경우 사용자 PC에서 내부 IP를 등록해야
합니다.
내 네트워크 환경 -> 속성 -> 로컬 영역 연결 -> 속성에서 설정할 수 있습니다.
ㆍ 인터넷 프로토콜(TCP/IP) 속성을 누른 후, ‘고급’ 버튼을 눌러 고급 설정으로 들어갑니다.
XXX
ㆍ 192.168.123.XXX로 설정하며, 192.168.123.100은 카메라의 IP 주소이므로 사용자 PC
IP 주소로 사용할 수 없습니다.
94
95
Page 49

센서 입력결선
◎ LAN 연결
- N대 연결
ROUTER
LAN
LAN LAN
#1 #2
INTERNET
◎ UPGRADE
- 스피드돔의 펌웨어를 업그레이드 합니다. (Update Stick 이용)
- 이 기능은 현재 지원하지 않습니다.
Web Viewer / CMS
#n
내부회로
IN COM +
IN 1 -
IN 4 -
센서출력 1
센서출력 4
+5V ~ 12V
+ -
+
-
◎ 센서를 결선하기 전에 센서의 구동 전압과, 센서의 신호 출력 방식을 체크하십시오.
센서의 신호 출력방식은 크게 Open Collector 방식과 Voltage Output 방식이 있으며,
각각의 경우에 맞게 결선하여야 합니다.
신호선 기 능
COM+
IN1-, IN2-,
IN3- , IN4-
입력된 회로를 구동하는 전원입니다. 센서를 구동하는 전원의
(+)극성을 연결하십시오.
센서의 출력신호를 연결하십시오.
◎ 센서를 사용하기 위해서는 OSD 메뉴에서 센서 타입을 설정하십시오. 센서 타입은
크게 Normal Open과 Normal Close로 구분할 수 있습니다. 센서 입력 타입을 잘못
설정할 경우, 센서 입력에 대해 반대로 동작할 수 있습니다.
96
Normal Open
Normal Close
DescriptionType
센서가 동작할 때 전압이 출력되는 방식
센서가 동작하지 않을 때 전압이 출력되는 방식
97
Page 50

릴레이 출력 결선
내부회로
OUT 1
◎ 최대 연결할 수 있는 부하는 다음과 같습니다.
구동전원
최대용량
DC AC 110V
DC 24V, 1A AC 125V, 0.5A
AC or DC
부하
Web Viewer 설정
98
99
Page 51

시스템 관리
◎ 로그온
ㆍ관리자 모드에 접속하기 위해서는 2가지 방법이 있는데, 인터넷 브라우저를 이용
하거나 전용의 S/W인 “CMS”를 이용하는 방법이 있습니다.
(‘CMS’를 이용한 방법은 제외)
◎ IP Installer를 사용하는 방법
ㆍIP Installer를 실행하면 네트워크상에 연결된 IP 카메라의 정보가 나타냅니다.
◎ 인터넷 익스플로러(Internet Explorer)를 이용하는 방법
ㆍ인터넷 익스플로러에서 주소 창에 XPEED-XNET의 IP Address를 입력하고 Enter 키를
입력한다.
예) :
http://192.168.123.100
만일, HTTP 포트를 공장출하시의 설정 값(default value)을 사용하지 않는 경우는 포트
번호를 추가하여 아래와 같이 입력합니다.
XPEED-XNET 의 IP Address : Port No
예) : http://192,168.123.100:8080
◎ 사용자명 및 암호 입력
ㆍ로그온 항목에서 설명한 방법을 사용하여, 관리자 모드에 접속하려고 하면, 다음과
같이 사용자명(User name)과 암호(password)로서 인증을 요구하게 됩니다.
사용자의 사용자명과 암호를 입력한 후, “OK” 버튼을 누르면 사용자 모드의 기본설정
(Basic Setup) 페이지가 표시됩니다.
100
◎ 공장출하 상태에서 사용자명(User Name)과 암호(Password)는 각각 “root”, “admin”입니다.
보완을 위하여 관리자(Administrator)의 사용자명 및 암호는 제품 설치 시 공장출하의
기본값에서 관리자가 원하는 다른 값으로 바꾸는 것이 좋습니다.
관리자의 사용자명과 암호는 타인에게 노출이 되지 않고 잊어 버리지 않도록 철저히 관리
해주시기 바랍니다. 상세한 사항은 “사용자 설정”을 참조하여 주시기 바랍니다.
만약 관리자용 암호를 잊어버린 경우에, 카메라 내부 밑면의 “Factory Reset” 버튼을
눌러서 공장 초기화 상태로 만드는 것 이외의 복구 방법은 없습니다.
그러나, 이 경우에 기존의 모든 설정 값은 공장 출하 시의 값으로 초기화, 서버에 접속하기
위해서는 “IP Installer”를 사용하여 네트워크 모든 설정 및 IP 주소 부여 등의 작업이 다시
필요합니다. 상세한 사항은 “네트워크(TCP/IP) 설정”을 참조 하시기 바랍니다.
101
Page 52

스피드돔 제어
페이지 접근 권한
◎ 관리자 모드로 연결이 되면 아래와 같이 XPEED-XNET에 대한 기본 정보 페이지가
표시됩니다.
각 설정 페이지는 Setup 메뉴를 통해서 들어갈 수 있습니다. 로그인 사용자의 그룹
(Administrator, Operator, Viewer)에 따라 접근 가능한 페이지가 분류됩니다.
Function (page)
Event Type
권 한
ViewerOperatorAdministrator
OOOIndex
OOOMulti-Index
XOOPTZ
XOOMotion
OUsers
XOTCP / IP
XOIP Filtering
XOUPnP / DynDNS
OORTP
XX
XOODate&Time
XXOMulti-Viewer
XXOMaintain Server
XXOSystem / Log
XOOAudio
XOOVideo
X
X
XOOSMTP
XOOFTP
XXOHTTP
X
X
XXOCMS
XOO
XXOPTZ Configuration
O 접근 가능한 페이지
x 접근 불가능한 페이지
기본 정보 페이지는 Operator 그룹 이상이면 접근이 가능하며, Operator로 로그인하여
Administrator 권한의 페이지에 접근하려면 다시 인증정보를 입력해야 합니다. 각 페이지에
대한 권한은 다음 페이지의 표와 같습니다.
102
103
Page 53

Web Viewer (Index.html)
◎ Web Viewer는 XPEED-XNET 접속 시, 기본으로 연결되는 웹 페이지 입니다. 입력되는
영상이 표시되는 Viewer 영역과 설정/부가 기능을 나타내는 메뉴 영역으로 구성됩니다.
DESCRIPTIONITEM
Dual Stream
Service
-Capture
-Setting
-PTZ
-Motion
-Live View
-Multi View
-Stream Protocol
Main Stream
Sub Stream
현재 영상을 Capture하여 Pop_Up 창에 보여주는 버튼입니다
[저장폴더] c:\xNetCapture
설정 페이지를 여는 버튼입니다.
설정 페이지는 카메라의 기능들을 설정하는 Setup페이지들을 열 수
있습니다.
PTZ 페이지를 여는 버튼입니다.
PTZ 페이지는 XPEED-XNET의 PTZ관련 설정과 PTZ 동작을 시행할 수
있습니다.
Motion Detection 페이지를 여는 버튼입니다.
Motion Detection 페이지는 XPEED-XNET의 Motion Detection 영역을
추가 및 삭제 할 수 있습니다.
Index View 페이지를 여는 버튼입니다.
Index View 페이지는 XPEED-XNET의 영상을 보여주고, Stream Protocol
설정( TCP / UDP ), Dual Stream 사용시 Codec 설정을 할 수 있습니다.
Multi View 페이지를 여는 버튼입니다.
Multi View 페이지는 XPEED-XNET의 다중 영상 플레이어 설정 페이지
에서 설정된 다수(최대 4대)의 카메라의 영상을 볼 수 있습니다.
Edit box 선택 시, Stream Protocol을 선택할 수 있습니다.
(RTP over TCP/RTP over UDP)
Checkbox 선택 시, Main Stream 영상을 볼 수 있습니다.
(MPEG4/H.264/MJPEG)
Checkbox 선택 시, Sub Stream 영상을 보여줍니다.
비디오 설정 페이지에서 Enable Dual-Codec을 활성화해야, Sub Stream
영상을 볼 수 있습니다.(MJPEG)
104
105
Page 54

상태 창
사용자 설정
◎ 상태 창은 XPEED-XNET의 시스템 버전과 이더넷 주소를 표시합니다.
[Status]를 클릭하면 아래와 같은 화면이 표시 됩니다.
◎ 사용자 설정은 XPEED-XNET의 영상, 설정, 제어의 권한을 부여, 또는 박탈 할 수
있습니다.
[User]를 클릭하면 아래와 같은 화면이 표시됩니다.
106
107
Page 55

사용자 설정
날짜 및 시간(Date&Time) 설정
User List
User Settings
-Add
-Modify
-Remove
Enable
anonymous
viewer
login
-Save
-Reset
DESCRIPTIONITEM
현재 등록된 사용자를 보여주는 List box 입니다.
"root"는 기본 사용자입니다. "root“는 추가, 삭제가 가능하며, 암호변경만
가능합니다.
사용자 추가 버튼입니다.
User List Box에서 “[Add_User]” 탭을 선택하고, User name, Password,
User group의 내용을 정확히 기입하신 후에 Add 버튼을 누르면 사용자가
추가 됩니다.
변경된 내용은 User List Box에서 확인할 수 있습니다.
-최대 10명의 사용자를 추가할 수 있습니다.
- User Group의 기능.
ㆍAdministrator : XPEED-XNET에 대한 모든 제어 권리를 갖습니다.
ㆍOperator : Viewer, Audio&Video, Event Configuration의 제어 권리를
ㆍ Viewer : 영상만 볼 수 있습니다.
사용자 수정 버튼입니다.
User List box에서 수정할 사용자를 선택하고, 변경할 Password, User
Group의 내용을 정확히 기입하신 후에 Modify 버튼을 누르면 사용자 암호
및 그룹이 변경됩니다.
변경된 내용은 User List box에서 확인할 수 있습니다.
사용자 삭제 버튼입니다.
User List box에서 삭제할 사용자를 선택하고, Remove 버튼을 누르면
관리자가 삭제됩니다.
변경된 내용은 User List box에서 확인할 수 있습니다.
Anonymous Viewer 활성화, 비활성화를 설정합니다.
활성화 설정 시, Web Viewer에 접근할 경우, 인증 정보를 요구하지
않습니다.
설정한 옵션들을 저장하는 버튼입니다.
설정 변경 후,
폼을 기존에 설정된 값으로 되돌리는 버튼입니다.
Reset 버튼을 누르면 폼이 설정된 값으로 변경됩니다.
갖습니다.
Save 버튼을 누르면 설정한 옵션들이 적용, 저장됩니다.
◎ 날짜 및 시간 설정은 XPEED-XNET의 날짜와 시간을 설정 할 수 있습니다.
[Date & Time] 을 클릭하면 아래와 같은 화면이 표시됩니다.
108
109
Page 56

날짜 및 시간(Date&Time) 설정
Current Server
Time
현재 설정되어 있는 시스템의 시간을 표시합니다.-
다중 영상 플레이어(Multi-Viewer) 설정
◎ 다중 영상 플레이어 설정은 XPEED-XNET의 동일한 네트워크 망에 접속된 최대 3대의
DESCRIPTIONITEM
카메라를 설정합니다. Sub Camera의 영상은 Multi-View 페이지를 통해 볼 수 있습니다.
[Multi Viewer]를 클릭하면 아래 그림과 같은 화면이 표시됩니다.
New Server Time
Time Zone
Automatically
Adjust for
Daylight Saving
Time Changes
Time Mode
-Save
-Reset
Time Zone을 설정합니다.
<Default : GMT+09>
Summer Time 활성화, 비활성화를 설정합니다.
Server Date, Time을 설정합니다.
<Default : None>
[Synchronize with computer time]
Server Date, Time을 Client PC에 동기화합니다.
[Synchronize with NTP server]
- Server Date, Time을 NTP Server에 동기화합니다.
(NTP Server 설정은 Network 설정 페이지에서 가능)
[Set Manually]
-Server Date, Time을 수동으로 설정합니다.
[None]
- Server Date, Time을 변경하지 않습니다.
설정한 옵션들을 저장하는 버튼입니다.
설정 변경 후,
됩니다.
폼을 기존에 설정된 값으로 되돌리는 버튼입니다.
Reset 버튼을 누르면 폼이 설정된 값으로 변경됩니다.
Save 버튼을 누르면 설정한 옵션들이 적용, 저장
110
111
Page 57

다중 영상 플레이어(Multi-Viewer) 설정
PTZ Configuration 설정
1st Sub-Channel
Video Settings
2nd Sub-
Channel Video
Settings
3rd Sub-Channel
Video Settings
Enable 1st
Sub Channel
Video
Enable 2nd Sub
Channel Video
Enable 3rd
Sub Channel
Video
-Save
-Reset
DESCRIPTIONITEM
1st Sub Channel의 설정된 IP Address에 접속된 카메라의 Multi-View를
활성화 시킵니다. IP Address, User Name, Password 설정이 되어있지
않으면, 활성화가 되지 않습니다.
<Default : Disable>
1st Sub Channel의 IP 주소를 설정합니다.1st IP Address
1st Sub Channel의 사용자 이름을 설정합니다.1st User name
1st Sub Channel의 사용자 암호를 설정합니다.1st Password
1st Sub Channel의 RTSP 포트를 설정합니다.1st RTSP Port
1st Sub Channel의 HTTP 포토를 설정합니다.1st HTTP Port
2nd Sub Channel의 설정된 IP Address에 접속된 카메라의Multi-View를
활성화 시킵니다. IP Address, User Name, Password 설정이 되어있지
않으면, 활성화가 되지 않습니다.
<Default : Disable>
2nd Sub Channel의 IP 주소를 설정합니다.2nd IP Address
2nd Sub Channel의 사용자 이름을 설정합니다.2nd User name
2nd Sub Channel의 사용자 암호를 설정합니다2nd Password
2nd Sub Channel의 RTSP 포트를 설정합니다.2nd RTSP Port
2nd Sub Channel의 HTTP 포토를 설정합니다.2nd HTTP Port
3rd Sub Channel의 설정된 IP Address에 접속된 카메라의 Multi-View
를 활성화 시킵니다. IP Address, User Name, Password 설정이 되어
있지 않으면, 활성화가 되지 않습니다.
<Default : Disable>
3rd Sub Channel의 IP 주소를 설정합니다.3rd IP Address
3rd Sub Channel의 사용자 이름을 설정합니다.3rd User name
3rd Sub Channel의 사용자 암호를 설정합니다.3rd Password
3rd Sub Channel의 RTSP 포트를 설정합니다.3rd RTSP Port
3rd Sub Channel의 HTTP 포토를 설정합니다.3rd HTTP Port
설정한 옵션들을 저장하는 버튼입니다.
설정 변경 후, Save 버튼을 누르면 설정한 옵션들이 적용, 저장됩니다.
폼을 기존에 설정된 값으로 되돌리는 버튼입니다.
Reset 버튼을 누르면 폼이 설정된 값으로 변경됩니다.
◎ PTZ Configuration 설정은 XPEED-XNET의 PTZ 서버 정보를 설정합니다.
[PTZ Configuration]을 클릭하면 아래와 같은 화면이 표시됩니다.
112
113
Page 58

PTZ Configuration 설정
시스템(Maintain Server) 설정
Moving Speed
Setup
방향키
Tele/Wide
Near/Far
Iris-/Iris+
set
del
go
Tilt Speed
Set
DESCRIPTIONITEM
축을 중심으로 카메라 방향을 상하좌우로 이동합니다.
원점으로 이동합니다.
Tele 버튼을 누르면, 카메라 Zoom In 기능을 실행합니다.
Wide 버튼을 누르면, 카메라 Zoom Out 기능을 실행합니다.
Near 버튼을 누르면, 카메라 Focus In 기능을 실행합니다.
Far 버튼을 누르면, 카메라 Focus Out 기능을 실행합니다.
Iris- 버튼을 누르면, 카메라 조리개를 닫습니다
Iris+ 버튼을 누르면, 카메라 조리개를 엽니다.
Set 버튼을 누르면,
현재 Preset Edit 박스의 값으로 현재 위치를 저장합니다
del 버튼을 누르면,
현재 Preset Edit 박스의 현재 값이 삭제됩니다.
go 버튼을 누르면, 설정된 Preset 값으로 PTZ 이동합니다.
Pattern 저장을 시작합니다.
Pattern 저장을 종료합니다.
Pattern 기능을 실행합니다.
저장되어 있는 Swing 기능을 실행합니다.-
저장되어 있는 Group 기능을 실행합니다.-
Preset/Pattern/Swing/Group기능을 정지합니다.
Menu On : 카메라의 메뉴 OSD를 On 합니다.
Menu Off : 카메라의 메뉴 OSD를 Off 합니다.
: OSD 메뉴에서의 메뉴이동을 동작합니다.
Set(Near) : 메뉴의 기능 설정을 합니다.
Back(Far) : 메뉴의 기능 설정 취소 및 이전 메뉴로 이동합니다.
PTZ의 Pan Speed를 설정합니다.Pan Speed
PTZ의 Tilt Speed를 설정합니다.
Pan/Tilt의 Speed 설정값을 저장합니다.
Speed 설정값을 변경 후
Set 버튼을 누르면 설정값이 적용,저장됩니다.
◎ 시스템 설정은 XPEED-XNET의 시스템 관련 기능을 설정합니다. 시스템 재 시작, 공장
초기화의 시스템 설정기능과 시스템 업그레이드, 설정 저장, 이미지 저장의 부가
기능을 제공 합니다.
[Maintain Server]를 클릭하면 아래와 같은 화면이 표시됩니다.
115114
Page 59

시스템(Maintain Server) 설정
로그 보고서(Log Report) 설정
Maintain
Server
Image/Camera
Initialization
System
Upgrade
Restore
Default
Upgrade
BackupBackUp
RestoreRestore
DESCRIPTIONITEM
시스템을 재 시작 합니다. 약 45초 정도 소요됩니다.Restart
TCP/IP 관련 설정을 제외한, 모든 설정을 초기화합니다.
설정 적용 후, 시스템을 재 시작 합니다. 약 45초 정도 소요 됩니다.
모든 설정을 초기화합니다.
설정 적용 후, 시스템을 재 시작 합니다. 약 45초 정도 소요 됩니다.
저장된 Log Message를 모두 삭제합니다.Reset Log
내부 Flash Memory에 저장된 Alarm Image를 모두 삭제합니다.Reset Image
Speed Dome Mecha 시스템을 재 시작 합니다.Reboot Mecha
시스템을 Upgrade 합니다.
Client PC에서 Upgrade 파일 경로를 설정하고 Upgrade 버튼을
누르면 Upgrade가 진행됩니다.
설정 적용 후, 시스템을 재 시작 합니다. 약 1분 정도 소요됩니다.
(주의) Upgrade 진행도중 시스템의 전원케이블과 랜 케이블을 해체
하지 마십시오. 시스템 오류가 발생할 수 있습니다.
Upgrade 파일은 CNB 홈페이지에서 다운 받을 수 있습니다.
(http://www.cnbtec.com)
현재 설정을 Client PC에 파일로 저장합니다.
저장된 파일을 Restore 옵션을 사용하여 다수의 카메라에 설정 및
적용시킬 수 있습니다. 설정 적용 후, 시스템을 재 시작 합니다.
약 45초 정도 소요 됩니다.
Backup 파일을 이용하여 XPEED-XNET의 설정을 적용합니다.
Client PC에서 Backup 파일 경로를 설정하고 Restore 버튼을 누르면
Restore가 진행됩니다.
옵션 체크박스를 이용하여, Restore에서 제외할 설정을 선택할 수
있습니다.
- except TCP/IP parameters : TCP/IP 관련 설정을 제외합니다.
- except Users parameters : Users 관련 설정을 제외합니다.
- except IP Filter parameters : IP Filter 관련 설정을 제외합니다.
설정 적용 후, 시스템을 재 시작 합니다. 약 1분 정도 소요됩니다.
◎ 로그 보고서는 XPEED-XNET의 영상, 설정, 오류 관련 정보를 사용자에게 제공합니다.
[Log Report]를 클릭하면 아래 그림과 같은 화면이 표시됩니다.
DESCRIPTIONITEM
System
Settings
Log Report
System
Overview
Load List
Logs View
Logs Del
Save Logs
XPEED-XNET 옵션 페이지의 설정 상태를 보여줍니다.
XPEED-XNET에 저장된 Log Message 파일을 Load합니다.
Log Message 파일은 날짜와 인덱스로 구분됩니다.
Load List 버튼을 누르면 List box에 load 된 message 리스트가 표시됩니다.
Log List에서 File을 선택한 후 Logs View 버튼을 누르면 해당 Log File의
내용을 보여줍니다.
Log List에서 File을 선택한 후 Logs Del 버튼을 누르면 해당 Log File을 삭제
합니다.
Log List에서 File을 선택한 후 Save Logs 버튼을 누르면 해당 Log File을 PC
에 저장합니다.
117116
Page 60

오디오(Audio) 설정
비디오(Video) 설정
◎ 오디오 설정은 XPEED-XNET의 오디오 관련 기능을 설정합니다.
[Audio]를 클릭하면 아래 그림과 같은 화면이 표시됩니다.
DESCRIPTIONITEM
Audio
Enable
Audio
Input
Enable audio
Source
Encoding
오디오 활성화, 비활성화를 설정합니다.
<Default : Disable>
오디오 입력 Source를 설정합니다.<Default : Microphone>
Microphone과 Line을 선택할 수 있습니다.
Microphone은 사용자가 Microphone을 이용하여 육성을 XPEED-XNET에
전달하고 Client나 Audio 출력으로 외부에 Audio를 전송합니다.
Line은 사용자가 주변기기를 이용하여 Audio 정보를 XPEED-XNET에
전달하고 Client나 Audio 출력으로 외부에 Audio를 전송합니다.
오디오 입력 Encoding 방법을 설정합니다. G726과 PCM을 선택할 수 있
습니다.
<Default : G726>
설정한 옵션들을 저장하는 버튼입니다. 설정 변경 후,Save 버튼을 누르면
-Save
설정한 옵션들이 적용, 저장됩니다.
폼을 기존에 설정된 값으로 되돌리는 버튼입니다.
-Reset
Reset 버튼을 누르면 폼이 설정된 값으로 변경됩니다.
◎ 비디오 설정은 XPEED-XNET의 비디오 관련 기능을 설정합니다.
[Video]을 클릭하면 아래 그림과 같은 화면이 표시됩니다.
119118
Page 61

비디오(video) 설정
RTP/RTSP 설정
Main Stream
Frame Rate
Control
MJPEG
Appearance
Mpeg4&H.264
Appearance
Frame Rate
Control
MJPEG
Appearance
Resolution
Codec
Enable
Dual-Codec
Frame rate
Quality
Bit rate
ResolutionSub Stream
Frame rate
Quality
-Save
-Reset
DESCRIPTIONITEM
영상의 해상도를 설정합니다.
D1, CIF(320x240) <Default : D1>
영상 Codec을 설정합니다.
MJPEG, MPEG4, H.264 을 선택할 수 있습니다.
Sub Stream의 활성화, 비활성화를 설정합니다.<Default : Disable>
Sub Stream은 MJPEG의 최대 15frame의 영상을 출력합니다.
설정 시 Index 페이지에서 Main Stream과 Sub Stream을 선택할 수
있습니다.
Codec 설정을 MPEG4, H.264로 선택할 경우, Enable Dual-Codec
checkbox 가 활성화 됩니다.
영상의 Frame rate를 설정합니다.
1~30 Frame
MJPEG 영상의 Quality를 설정합니다.
10 ~ 100 사이의 quality를 선택할 수 있습니다.
MPEG4 및 H.264 영상의 Bit rate를 설정합니다.
128kbps ~ 3Mbps 사이의 bit rate을 선택할 수 있습니다.
서브 스트림 영상의 해상도를 설정합니다.
D1, CIF를 선택할 수 있습니다.
서브 스트림 영상의 ,Frame rate를 설정합니다.
1 ~ 15 사이의 Frame rate를 선택할 수 있습니다.
서브 스트림 영상의 Quality를 설정합니다.
10 ~ 100 사이의 Quality를 선택할 수 있습니다.
설정한 옵션들을 저장하는 버튼입니다.
설정 변경 후, Save 버튼을 누르면 설정한 옵션들이 적용, 저장됩니다
폼을 기존에 설정된 값으로 되돌리는 버튼입니다.
Reset 버튼을 누르면 폼이 설정된 값으로 변경됩니다.
◎ RTP/RTSP 설정은 XPEED-XNET의 DDNS 서버 정보를 설정합니다.
[RTP/RTSP]를 클릭하면 아래 그림과 같은 화면이 표시됩니다.
DESCRIPTIONITEM
Main Stream의 RTSP 포트를 설정합니다.
RTSP
Configuration
RTP
Configuration
RTSP Port
Multiple-RTSP
Port
RTP Start Port
RTP End Port
Maximum
number of
Connection
Main Stream의 RTSP 기본 포트는 554이며, 1 ~ 65535 사이의
값으로 변경이 가능합니다.
Sub Stream의 RTSP 포트를 설정합니다.
Sub Stream의 RTSP 기본 포트는 665이며, 1 ~ 65535 사이의 값으로
변경이 가능합니다.
RTP Start Port를 설정합니다. RTP Start Port의 기본 포트는 2000
며,1024 ~ 65534 사이의 값으로 변경이 가능합니다.
RTP End Port를 설정합니다.
RTP End Port의 기본 포트는 3000이며, 1124 ~ 65535 사이의
값으로 변경이 가능합니다.
Stream에 접근하는 최대 사용자를 설정합니다.
최소 1명에서 최대 10명까지의 사용자를 설정할 수 있습니다.
설정한 옵션들을 저장하는 버튼입니다. 설정 변경 후, Save 버튼을
-Save
누르면 설정한 옵션들이 적용, 저장됩니다.
폼을 기존에 설정된 값으로 되돌리는 버튼입니다.
-Reset
Reset 버튼을 누르면 폼이 설정된 값으로 변경됩니다.
121120
Page 62

네트워크(TCP/IP) 설정
◎ 네트워크 설정은 XPEED-XNET의 네트워크 관련 기능을 설정합니다.
[TCP/IP]를 클릭하면 아래 그림과 같은 화면이 표시됩니다.
IP Address
Configuration
DNS
Configuration
NTP
Configuration
Host name
Configuration
Enable DHCP
(default)
IP address
Subnet mask
Primary
DNS Server
Secondary DNS
Server
NTP address
User
the host name
-Save
-Reset
DESCRIPTIONITEM
DHCP 활성화 비활성화를 설정합니다.
네트워크 환경이 DHCP에 의한 자동 IP 할당인 경우, DHCP checkbox를
선택합니다. DHCP 설정 후, 적용된 IP Address는 IP Installer에서 확인할 수
있습니다.
(주의)만약, DHCP 서버가 활성화되어 있지 않다면, 2분간 응답 대기 후,
기존 IP address로 재 부팅 합니다.
IP 주소를 설정합니다. 현재 XPEED-XNET이 설치된 router 대역과 할당된 IP
주소를 확인하시고 변경하시기 바랍니다.
Subnet mask를 설정합니다.
기본 IP 주소와 마스크 주소를 연계하여 같은 서브 넷(subnet)내에 있는
경우에만 접속을 허용할 때 사용 합니다.
오직 하나의 PC에서만 접근을 허용하고자 할 때에는 255.255.255.255 설정
하여 주시기 바랍니다.
Default gateway를 설정합니다.Default gateway
첫 번째 DNS 주소를 설정합니다.
두 번째 DNS 주소를 설정합니다.
NTP (Network Time Protocol Server) 주소를 설정합니다.
NTP 서버는 Date&Time 페이지에서 NTP Server 동기화를 설정할 때 사용
합니다.
Host name을 설정합니다.
Ethernet 주소를 설정합니다.MAC ClonMAC Address
설정한 옵션들을 저장하는 버튼입니다.
설정 변경 후, Save 버튼을 누르면 설정한 옵션들이 적용, 저장됩니다.
폼을 기존에 설정된 값으로 되돌리는 버튼입니다.
Reset 버튼을 누르면 폼이 설정된 값으로 변경됩니다.
123122
Page 63

IP 필터(IP Filtering) 설정
◎ IP 필터 설정은 XPEED-XNET의 IP Filter 관련 기능을 설정합니다.
[IP Filtering]을 클릭하면 아래 그림과 같은 화면이 표시됩니다.
IP 필터(IP Filtering) 설정
DESCRIPTIONITEM
Filter IP
Addresses
IP Filter
Enable
-Add
-Remove
Enable
IP
Filtering
-Save
-Reset
현재 등록된 IP Filter 리스트를 표시합니다.-
IP Filter 주소 추가 버튼입니다.
IP Address의 내용을 정확히 기입하신 후에 Add 버튼을 누르면 IP Filter
Address가 추가됩니다.
변경된 내용은 IP Address List box에서 확인할 수 있습니다.
- 최대 20개의 IP 주소를 추가할 수 있습니다.
IP Filter 주소 삭제 버튼입니다.
IP Filter List box에서 삭제할 IP 주소를 선택하고, Remove 버튼을 누르면 IP
Filter 주소가 삭제됩니다.
변경된 내용은 IP Address List box에서 확인할 수 있습니다.
IP Filter 활성화, 비활성화를 설정합니다.
활성화 설정 시, IP Filter List box의 IP 주소는 XPEED-XNET에 접근이 차단
됩니다.
설정한 옵션들을 저장하는 버튼입니다.
설정 변경 후, Save 버튼을 누르면 설정한 옵션들이 적용, 저장됩니다.
폼을 기존에 설정된 값으로 되돌리는 버튼입니다.
Reset 버튼을 누르면 폼이 설정된 값으로 변경됩니다.
125124
Page 64

HTTP 설정
UPnP/DynDNS/Bonjour 설정
◎ HTTP 설정은 XPEED-XNET의 Webpage에 접속할 HTTP 포트를 설정합니다.
[HTTP]를 클릭하면 아래 그림과 같은 화면이 표시됩니다.
DESCRIPTIONITEM
Web 페이지에 접속할 HTTP Port 번호를 설정합니다.
HTTP
HTTP
port
기본 설정은 80이며, 변경 시, Explorer의 주소 창 맨 뒤에 포트 번호를
입력해주어야 Web 페이지에 접속할 수 있습니다.
(예:HTTP Port를 8080으로 변경 시, http://192.168.123.100:8080)
설정한 옵션들을 저장하는 버튼입니다.
설정 변경 후,Save 버튼을 누르면 설정한 옵션들이
-Save
적용, 저장됩니다.
폼을 기존에 설정된 값으로 되돌리는 버튼입니다.
-Reset
Reset 버튼을 누르면 폼이 설정된 값으로 변경됩니다.
◎ UPnP 설정은 XPEED-XNET의 IP Installer의 사용을 위한 프로토콜로서, UPnP의
활성화 및 Friendly Name을 설정합니다.
DynDNS 설정은 XPEED-XNET의 DDNS 서버 정보를 설정합니다.
[UPnP/DynDNS]를 클릭하면 아래와 같은 화면이 표시됩니다.
127126
Page 65

UPnP/DynDNS/Bonjour 설정
UPnP의 활성화, 비활성화를 설정합니다.
UpnP
Setting
DynDNS
Setting
Bonjour
Setting
Enable UPnP
Enable
DynDNS
Enable
Anonymous
Alias Host
Name
Enable Bonjour
UPnP 활성화 설정 시, IP Installer의 XPEED-XNET 자동 검색 기능을
사용할 수 있습니다.
UPnP Friendly Name을 설정합니다.Friendly Name
DynDNS의 활성화, 비활성화를 설정합니다.
DynDNS 활성화 설정 시, DDNS 서버에 XPEED-XNET을 등록하여,
도메인을 할당받을 수 있습니다.
DynDNS의 Anonymous 활성화, 비활성화를 설정합니다.
DynDNS Anonymous 활성화 시, Autoipset.com DDNS 서버에서
사용자 인증을 거치지 않고, DDNS 서비스를 사용합니다.
DynDNS 서버에 등록할 Host Name을 설정합니다.
DynDNS 서버에 등록할 사용자 이름을 설정합니다.User Name
DynDNS 서버에 등록할 사용자 비밀번호를 설정합니다.Password
Bonjour의 활성화, 비활성화를 설정합니다.
Bonjour 활성화 설정 시, IP Installer의 XPEED-XNET 자동 검색 기능을
사용할 수 있습니다.
Bonjour Server Name을 설정합니다.Server Name
설정한 옵션들을 저장하는 버튼입니다.
-Save
설정 변경 후, Save 버튼을 누르면 설정한 옵션들이 적용, 저장됩니다.
폼을 기존에 설정된 값으로 되돌리는 버튼입니다.
-Reset
Reset 버튼을 누르면 폼이 설정된 값으로 변경됩니다.
CMS 설정
◎ CMS 설정은 XPEED-XNET의 CMS 서버 정보를 설정합니다.
DESCRIPTIONITEM
[CMS]를 클릭하면 아래 그림과 같은 화면이 표시됩니다.
DESCRIPTIONITEM
CMS PortCMS
CMS와 통신하는 CMS Port 번호를 설정합니다.
기본 설정은 5000이며, 1 ~ 65535 사이의 값으로 변경이 가능합니다.
설정한 옵션들을 저장하는 버튼입니다.
-Save
설정 변경 후,Save 버튼을 누르면 설정한 옵션들이 적용, 저장됩니다.
폼을 기존에 설정된 값으로 되돌리는 버튼입니다.
-Reset
Reset 버튼을 누르면 폼이 설정된 값으로 변경됩니다.
129128
Page 66

Event Type 설정
◎ Event Type 설정은 XPEED-XNET의 Event를 설정합니다.
[Event Types]을 클릭하면 아래 그림과 같은 화면이 표시됩니다.
이벤트의 활성화, 비활성화를 설정합니다.<Default : Disable>Enable EventEvent Enable
Event Mode
Event Setting
Event Schedules
Event
Output
Select
Storage
Motion
Detection
Capture Frame
Pre-Alarm
Post-Alarm
Event Schedules
Event Schedules
Setting
Upload image
to FTP
Send Image to
Email
Save Image to
Internal
Memory
Save Image to
SD Memory
-Save
-Reset
센서 입력의 활성화, 비활성화를 설정합니다.Sensor
Motion Detection의 활성화, 비활성화를 설정합니다.
이벤트(Alarm)가 발생했을 때, 초당 저장할 영상의 개수를 결정합니다.
1~3개의 영상을 선택할 수 있습니다.
이벤트(Alarm) 발생한 시점에서, 이벤트(Alarm) 발생 전의 영상을
저장합니다. 최대 5초 전까지의 영상 저장이 가능하며, 저장되는 영상의
개수는 Capture Frame에 영향을 받습니다.
1~5초의 Pre-Alarm을 선택할 수 있습니다.
이벤트(Alarm)가 발생한 시점에서, 이벤트(Alarm) 발생 후의 영상을 저장
합니다. 최대 8초 후까지의 영상 저장이 가능하며, 저장되는 영상의 개수
는 Capture Frame의 영향을 받습니다.
1~8초의 Post-Alarm을 선택할 수 있습니다.
이벤트의 일정을 관리할 것인지의 여부를 결정합니다.
Always를 선택하고 이벤트(Alarm)을 활성화 시키면, 상시 설정된 이벤트
(Alarm)을 받도록 대기합니다.
During Time을 선택하고 이벤트(Alarm)을 활성화 시키면, 설정된 요일과
시간대에서만 이벤트(Alarm)을 받도록 대기합니다.
이벤트(Alarm) 일정을 관리합니다. 월요일에서 금요일까지 정해진 시간
사이에 이벤트(Alarm) 활성화가 가능합니다.
이벤트(Alarm) 발생 시, 영상을 FTP Server로 전송합니다. 영상을 전송
받을 Client PC에서는 FTP Server를 열어 놓아야 하며, FTP Setting
페이지에서 보낼 서버의 정보를 정확히 설정, 저장 해야 합니다.
이벤트(Alarm) 발생 시, 영상을 Mail로 전송합니다. Mail 전송의 경우,
이벤트(Alarm) 발생 시의 1개의 영상파일만 전송합니다.
SMTP 설정 페이지에서 Mail 주소를 정확히 설정, 저장 합니다.
이벤트(Alarm) 발생 시, 영상을 XPEED-XNET 내부 메모리에 저장합니다.
저장된 영상은 시스템 설정 페이지의 Save Image 버튼을 이용해 Client
PC로 저장 할 수 있습니다.
이벤트(Alarm) 발생 시, 영상을 XPEED-XNET의 외부 메모리(SD Card)에
저장합니다. SD Card 장착, 인식시에만 설정이 가능합니다.
설정한 옵션들을 저장하는 버튼입니다. 설정 변경 후, Save 버튼을 누르면
설정한 옵션들이 적용, 저장됩니다.
폼을 기존에 설정된 값으로 되돌리는 버튼입니다.
Reset 버튼을 누르면 폼이 설정된 값으로 변경됩니다.
• SD Card 제거 시 Event를 비 활성화 시키십시오.
DESCRIPTIONITEM
131130
Page 67

SMTP 설정
◎ SMTP 설정은 XPEED-XNET의 Event 발생 시 생성된 Alarm Image를 전송할 메일을
설정합니다.
[SMTP]를 클릭하면 아래 그림과 같은 화면이 표시됩니다.
SMTP
Settings
E-mail
Address
Setting
Enable
Internal SMTP
Server
Enable
SMTP
Authorization
SMTP Server
Name
Email
Address
-Save
-Reset
DESCRIPTIONITEM
내부 메일 서버의 활성화, 비활성화를 설정합니다.
checkbox 활성화 시, 내부 메일 서버를 이용하여 Alarm Image를 메일로
전송합니다.
내부 메일 서버 이용 시 메일 인증을 받을 수 없습니다.
Checkbox 비활성화 시, 외부 메일 서버를 이용하여 Alarm Image를
메일로 전송합니다.
외부 메일 서버 이용 시, 메일 인증 및 포트, 유저, 패스워드, 메일 주소,
등을 설정해야 합니다.
외부 메일 서버 이용 시, 메일 인증의 활성화, 비활성화를 설정합니다.
외부 메일 서버의 이름을 설정합니다.
외부 메일 서버의 포트번호를 설정합니다.SMTP Port
외부 메일 서버의 사용자 이름을 설정합니다.User name
외부 메일 서버의 사용자 비밀번호를 설정합니다.Password
외부 메일 서버의 사용자 메일 주소를 설정합니다.
설정한 옵션들을 저장하는 버튼입니다.
설정 변경 후, Save 버튼을 누르면 설정한 옵션들이 적용, 저장됩니다.
폼을 기존에 설정된 값으로 되돌리는 버튼입니다.
Reset 버튼을 누르면 폼이 설정된 값으로 변경됩니다.
133132
Page 68

FTP 설정
PTZ 동작 및 설정
◎ FTP 설정은 XPEED-XNET의 Event 발생 시 생성된 Alarm Image를 전송할 FTP를 설정
합니다. [FTP]을 클릭하면 아래 그림과 같은 화면이 표시됩니다.
DESCRIPTIONITEM
이벤트(Event) 발생시, Alarm Image를 전송할 FTP 서버의 주소를 설정
FTP
Server
Login
Information
FTP
Name
FTP
Port
User Name
Password
합니다.
설정된 IP주소의 Client PC에서 FTP 서버를 열어야 Alarm Image를
전송할 수 있습니다.
이벤트(Event) 발생시, Alarm Image를 전송할 FTP 서버의 포트를 설정
합니다.
이벤트(Event) 발생시, Alarm Image를 전송할 FTP 서버의 사용자
이름을 설정합니다.
이벤트(Event) 발생시, Alarm Image를 전송할 FTP 서버의 사용자
비밀번호를 설정합니다.
설정한 옵션들을 저장하는 버튼입니다.
-Save
설정 변경 후, Save 버튼을 누르면 설정한 옵션들이 적용, 저장됩니다.
폼을 기존에 설정된 값으로 되돌리는 버튼입니다.
-Reset
Reset 버튼을 누르면 폼이 설정된 값으로 변경됩니다.
◎ PTZ 동작 및 설정은 XPEED-XNET의 PTZ를 제어합니다.
[PTZ]를 클릭하면 아래 그림과 같은 화면이 표시됩니다.
135134
Page 69

PTZ 동작 및 설정
방향키
Tele/Wide
Near/Far
Iris-/Iris+
set
del
go
-
DESCRIPTIONITEM
축을 중심으로 카메라 방향을 상하좌우로 이동합니다.
원점으로 이동합니다.
Tele 버튼을 누르면, 카메라 Zoom In 기능을 실행합니다.
Wide 버튼을 누르면, 카메라 Zoom Out 기능을 실행합니다.
Near 버튼을 누르면, 카메라 Focus In 기능을 실행합니다.
Far 버튼을 누르면, 카메라 Focus Out 기능을 실행합니다.
Iris- 버튼을 누르면, 카메라 조리개를 닫습니다
Iris+ 버튼을 누르면, 카메라 조리개를 엽니다.
Set 버튼을 누르면,
현재 Preset Edit 박스의 값으로 현재 위치를 저장합니다
del 버튼을 누르면,
현재 Preset Edit 박스의 현재 값이 삭제됩니다.
go 버튼을 누르면, 설정된 Preset 값으로 PTZ 이동합니다.
Pattern 저장을 시작합니다.
Pattern 저장을 종료합니다.
Pattern 기능을 실행합니다.
저장되어 있는 Swing 기능을 실행합니다.-
저장되어 있는 Group 기능을 실행합니다.
Motion Detection 영역 설정
◎ Motion Detection 영역을 설정하여 세밀하게 수행하고자 하는 경우 사용되는 기능으로써
채널당 3개까지의 움직임 검출 영역을 설정합니다.
[Motion]을 클릭하면 아래와 같은 화면이 표시됩니다.
Preset/Pattern/Swing/Group기능을 정지합니다.
137136
Page 70

Motion Detection 영역 설정
다중 영상 플레이어
AREA
Show Selected
Area
Sensitivity
Defining
Motion
Detection
Area
DESCRIPTIONITEM
현재 등록된 Motion Detection 영역을 표시합니다.
List 선택 시 Viewer에서 선택된 영역을 표시합니다.
최대 3 개까지 독립된 움직임 검출 영역을 설정할 수 있습니다.
선택 영역만 보기 체크 시, 선택된 영역만 Viewer에 표시됩니다.
영역의 이름을 입력합니다.Caption
움직임 검출시의 감도를 설정합니다. “1”이 가장 둔감하며 “10”이 가장
민감한 경우를 나타냅니다. 같은 채널 내에서 각 영역은 동일한 감도가
적용됩니다. 사용자가 응용분야, 적용 환경에 맞게 적절한 값으로 설정을
해주셔야 합니다.
영역 설정 방법
1. 제목에 영역의 이름을 작성하고, 민감도를 설정합니다.
2. 추가" 버튼을 누릅니다.
3. 왼쪽의 Viewer에 설정한 제목이 쓰여있는 사각영역이 생성됩니다.
4. 사각영역의 오른쪽 아래의 빗금 영역을 드래그하여 사각영역의 크기를
조정하고, 그 외 영역을 드래그하여 위치를 조정합니다.
5. 사각영역의 크기와 위치 조정이 끝났으면 "저장" 버튼을 눌러 영역을
저장합니다.
◎ 다중 영상 플레이어 4개의 다른 XPEED-XNET 영상을 동시에 볼 수 있도록 설정할 수
있습니다.
[Multi View]을 클릭하면 아래와 같은 화면이 표시됩니다.
왼쪽 상단의 화면이 현재 설치된 XPEED-XNET의 영상이고, 나머지 3개의 화면이
다중 영상 플레이어 설정 페이지에서 설정된 영상을 보여줍니다.
139138
Page 71

카메라 작동 방법
OSD 메뉴 선택
• 기능 : 카메라의 OSD 메뉴 기능을 사용하여 영상을 설정하거나, Preset, Pattern,
Swing, Group등과 같은 PTZ동작들을 설정할 수 있습니다.
• Menu On : Menu On 키.
• Menu Off : Menu Off 키.
• 제어키 : 설정값을 저장할 경우 NEAR 키를, 취소할 경우 FAR 키를 이용하십시오.
프리셋
• 기능 : 최대 127개의 프리셋 위치를 지정할 수 있습니다. 프리셋 95번을 제외한
1~128번의 번호로 지정할 수 있습니다. 각각의 프리셋마다 카메라 영상 설정,
레이블을 별도로 설정 할 수 있습니다. 제어기를 이용하여 프리셋 위치를 직접
지정할 때는 레이블은 Blank로, 영상 설정은 Global 모드로 자동 설정되므로
각 설정값들을 변경하고자 할 경우 OSD 메뉴를 이용하십시오.
OSD 메뉴 내에서도 프리셋 위치를 지정할 수 있습니다.
• 설정 : Set Preset [1~128]
• 실행 : Go Preset [1~128]
• 삭제 : Del Preset [1~128]
140
141
Page 72

스윙
• 기능 : 스윙 동작은 2개의 프리셋 위치를 왕복 운전하는 기능입니다. 스윙 운전을 실행
하면 먼저 첫번째 프리셋에서 두번째 프리셋 위치로 CW(Clockwise)방향으로
운전하고, 이후에 반대로 두번째 프리셋 위치에서 첫번째 프리셋 위치로 CCW
(Counterclockwise)방향으로 운전합니다.
n
o
i
t
c
e
r
i
d
W
C
①
CC
②
1st Preset
만약 첫번째 프리셋과 두번째 프리셋을 같은 위치로 설정하면 360 회전을 반복
합니다. 운전속도는 1°/초 ~180°/초 범위에서 설정할 수 있습니다.
2nd Preset
n
o
i
t
c
e
r
i
d
W
• 설정 : 패턴 설정은 다음 두 가지 방법 모두 가능합니다.
방법 1) Set Pattern [패턴 번호]
- 다음과 같은 설정 화면이 표시됩니다.
- 조그 운전 및 프리셋 운전을 수행하면 패턴이
저장됩니다.
- 남은 저장 공간이 Bar 형태로 표시됩니다.
- 도중에 저장을 종료하려면 NEAR 키 또는 저장 키를,
취소하려면 FAR 키를 누르십시오.
방법 2) OSD 메뉴에서 동일하게 설정할 수 있습니다.
메뉴 기능을 참조하십시오.
• 실행 :
Run Pattern [1~4]
• 삭제 : OSD 메뉴를 이용하여 삭제하십시오.
EDIT PATTERN 1
■■ ■■ ■■ ■■ ■■ ■■ ■■ ■■ ■■ ■
[NEAR:SAVE /FAR:DELETE]
0/0/x1/N
• 설정 : OSD 메뉴를 이용하여 설정하십시오.
• 실행 :
Run Swing [1~8]
• 삭제 : OSD 메뉴를 이용하여 삭제하십시오.
패턴
• 기능 : 패턴 동작은 일정기간 동안 수행한 조그 운전 및 프리셋 운전 형태를 그대로
저장하여 다시 실행하는 기능 입니다. 최대 4개의 패턴을 기록할 수 있으며,
패턴당 최대 1200여 개의 통신 명령을 저장할 수 있습니다.
142
그룹
• 기능 : 그룹 기능은 프리셋, 패턴, 스윙 기능을 조합하여 반복적으로 실행하는 기능입니다.
최대 8개의 그룹을 지정할 수 있으며 각 그룹은 최대 20개의 Action(프리셋, 패턴 또는
스윙)을 설정할 수 있습니다. 그룹에서 설정한 프리셋은 운전 속도를 지정할 수
있으며 패턴 및 스윙은 반복횟수를 지정할 수 있습니다. 또한 각 Action을 수행한 후
운전을 정지하는 휴지시간을 설정할 수 있습니다.
휴지시간
Preset 1 Pattern 1 Swing 1
최대
20 Action
• 설정 : OSD 메뉴를 이용하여 설정하십시오.
• 실행 :
• 삭제 : OSD 메뉴를 이용하여 삭제하십시오.
Run Group [1~8]
143
Page 73

기타 주요 기능 주 화면 OSD 구성
• PWR UP ACTION : 카메라에 전원을 인가하면 전원이 꺼지기 이전에 수행하던 동작을
다시 수행하는 기능입니다. 프리셋, 패턴, 스윙, 그룹 동작만
재 수행되고 조그 운전 동작은 이 기능에서 제외됩니다.
• AUTO FLIP : Tilt 운전이 90°를 넘어서는 경우 자동으로 영상을 Flip하는 기능
입니다. 영상 Flip이 동작된 경우에는 화면에 F 문자가 표시됩니다.
이 기능이 OFF 되면, Tilt의 운전범위는 -5~95°로 변경됩니다.
• PARKING ACTION : 일정시간 동안 카메라를 운전하지 않을 경우 지정한 프리셋 위치로
자동으로 이동하는 기능 입니다. "Wait Time"은 1분 ~ 4시간의
값으로 설정할 수 있습니다.
• ALARM I/O : 4개의 알람 입력, 1개의 출력을 이용할 수 있습니다. 알람 입력이
동작하면 미리 지정된 프리셋 위치로 이동할 수 있습니다. 여러 개의
알람 입력이 동시에 동작하면 가장 마지막에 입력된 신호만
반응합니다.
• PRIVACY ZONE : 임의의 위치를 영상에서 Mask 처리하는 기능입니다. 최대 4개의
위치를 설정할 수 있습니다. 곡면 좌표를 이용하여 고성능의 Mask
기능을 활용할 수 있습니다.
• CAM ADJUST : 프리셋마다 WB(White Balance) 및 AE(Auto Exposure) 설정을
독립적으로 지정할 수 있도록 "Global" 모드와 "Local" 모드가 지원
됩니다.
"ZOOM CAMERA SET" 메뉴에서 지정한 WE/AE 설정값이 "Global“
모드의 설정값이며, 각 프로셋 설정메뉴에서 지정한 WB/AE 설정값이
"Local" 모드의 설정 값 입니다.
Local 모드에서 지정한 WB/AE 설정 값은 해당 프리셋 운전시 자동
으로 적용되며, 조그 운전등으로 프리셋 운전이 해제되면 자동으로
Global 설정으로 변경됩니다. 프리셋 설정에서 지정한 Local 모드의
설정값은 Global 모드의 설정값이 바뀌더라고 그대로 유지됩니다.
• FOCUS MODE : Manual Focus와 Auto Focus 모드를 자동 전환하는 모드입니다.
Preset 운전시에는 Manual Focus가 적용되고, 기타 조그 운전등에
서는 Auto Focus로 자동 전환됩니다. Preset 설정시에 결정된
Focus 값이 고정되므로, 프리셋 운전시에는 보다 빠른 Focus 성능을
가질 수 있으며, 조그 운전 전환시에는 보다 편리하게 사용할 수
있습니다.
IRIS Information
Image Flip
Camera ID
• P/T/Z Information : 현재의 Pan/Tilt/Zoom/방위 위치를 표시합니다.
• Alarm Information : 센서 입/출력 상태를 표시합니다. 해당 입/출력이 ON된 경우에는
해당 숫자가 표시되고 OFF인 경우에는 '-'가 표시 됩니다.
예제) 입력 2,3이 ON, 출력 1이 ON된 경우.
• Camera ID : 카메라의 ID를 표시합니다.
• Action Title : 다음은 Action Title에서 표시되는 정보입니다.
“SET PRESET xxx” 프리셋 위치를 설정하는 경우
“PRESET xxx” 프리셋 위치로 이동하는 경우
“PATTERN x” 패턴 운전을 실행한 경우
“SWGx/PRESET xxx” 스윙이 동작중인 경우, 스윙번호와 프리셋 번호 표시
“UNDEFINED” 설정되지 않은 운전을 선택한 경우
• Preset Label : 프리셋 운전시 프리셋에 설정된 Label을 표시합니다.
• Image Flip : Auto Flip 기능에 의해 영상이 Flip된 상태를 표시합니다.
• IRIS Information : 카메라의 IRIS 정보를 표시합니다.
LABEL12345
IRIS 25
F
CAM 1 15 /4/x1/ N
CAM 1
PRESET
I : 1 - - - O : -
I:-23- O:1
Action TitlePreset Label
Alarm Information
P/T/Z Information
144
145
Page 74

메뉴 사용법 방위 위치 설정
◎ ( )안에 표기된 메뉴에는 하위 메뉴가 있습니다.
◎ 하위 메뉴로의 이동은 NEAR 키를 누르십시오.
◎ 메뉴 항목에서 FAR 키를 누르면 이전 메뉴로 이동합니다.
◎ 메뉴 내에서 항목간에 커서를 이동하기 위해서는 UP/DOWN/LEFT/RIGHT 키를 이용
하십시오.
◎ 설정값을 변경하기 위해서는 UP/DOWN 키를 이용하십시오.
◎ 변경한 설정값을 저장하기 위해서는 NEAR 키를, 취소할 때는 FAR 키를 이용하십시오.
메인 메뉴
SPEED DOME CAMERA
<SYSTEM INFORMATION >
☞
<DISPLAY SETUP >
<DOME CAMERA SETUP >
<SYSTEM INITIALIZE >
EXIT(MENU OFF)
• SYSTEM INFORMATION
- 제품 관련 정보 및 설정 상태를 표시합니다.
• DISPLAY SETUP
- 주 화면 OSD 표시 여부를 각 항목별로 설정합니다.
• DOME CAMERA SETUP
- 제품의 여러 기능을 설정합니다.
• SYSTEM INITIALIZE
- 제품의 설정값을 출하 상태로 초기화 하거나 시스템
을 재 부팅합니다.
주 화면 OSD 표시 설정
DISPLAY SETUP
CAMERA ID
☞
PTZ INFORMATION
ACTION TITLE
PRESET LABEL
ALARM INPUT
<SET NORTH DIRECTION >
<PRIVACY ZONE >
BACK
EXIT(MENU OFF)
ON
AUTO
AUTO
AUTO
AUTO
◎ 주 화면의 표시여부를 각 항목별로 설정합니다.
- AUTO로 설정한 경우에는 각 정보가 변경될 때에
만 표시합니다.
• CAMERA ID
• PTZ INFORMATION
• ACTION TITLE
• PRESET LABEL
• ALARM I/O
: [ON/OFF]
: [ON/OFF/AUTO]
: [ON/OFF/AUTO]
: [ON/OFF/AUTO]
: [ON/OFF/AUTO]
SET NORTH DIRECTION
◎ 방위 표시를 위해 북쪽 방향을 지정합니다.
원하는 PAN 위치로 이동한 후 NEAR 키를 눌러
저장합니다.
MOVE TO TARGET POSITION
[NEAR :SAVE /FAR :CANCEL ]
PRIVACY ZONE MASK 설정
PRIVACY ZONE
MASK NO
☞
DISPLAY
CLEAR MASK
<EDIT MASK >
BACK
EXIT(MENU OFF)
1
UNDEFINED
OFF
CANCEL
◎ 원하는 영역을 영상에서 Mask 처리하도록 설정
합니다.
• MASK NO. [1~4]
- 지정하고자 하는 Mask 번호를 선택합니다. 이미 Mask가
지정되어 있는 경우에는 그 위치로 이동하게 되며, 비어
있는 경우에는 "UNDEFINED“가 표시됩니다.
• DISPLAY [ON/OFF]
- 선택한 번호의 Mask를 표시 유무를 설정합니다.
• CLEAR MASK [CANCEL/OK]
- 선택한 번호의 Mask를 삭제합니다.
PRIVACY ZONE 위치 설정
EDIT MASK 1
MOVE TO TARGET POSITION
[NEAR :SELECT / FAR: CANCEL ]
◎ Mask를 하고자 하는 위치로 이동합니다. 위치를
설정하면 Mask 크기를 조절하는 메뉴가 표시됩니다.
146
147
Page 75

PRIVACY ZONE 크기 조절 AUTO EXPOSURE 설정
EDIT MASK 1
[◀▶:ADJUST MASK WIDT H ]
[▲▼ : ADJUST MASK HEIGHT ]
[NEAR :SAVE /FAR :CANCEL ]
카메라 모듈 설정
CAMERA SETUP
FOCUS MODE
☞
DIGITAL ZOOM
IMAGE FLIP
<WHITE BALANCE SETUP >
<AUTO EXPOSURE SETUP >
BACK
EXIT(MENU OFF)
SEMIAUTO
ON
OFF
WHITE BALANCE 설정
WB SETUP▬GLOBAL
☞
WB MODE
RED ADJUST
├
BLUE ADJUST
└
AUTO
▬ ▬ ▬
▬ ▬ ▬
◎ Mask의 크기를 조절합니다.
상하, 좌우 방향키를 이용하여 크기를 조절합니다.
◀▶ (LEFT/RIGHT) : Mask의 폭을 조절합니다.
▲▼ (UP/DOWN) : Mask의 높이를 조절합니다.
◎ 카메라의 줌 모듈과 관련된 설정을 수행합니다.
• FOCUS MODE [AUTO/MANUAL/SEMIAUTO]
- 카메라의 Focus 모드를 설정합니다. SemiAuto 모드는
프리셋 운전시에만 Manual Focus로 동작하고, 기타
그 운전시에는 Auto Focus로 자동 전환되는 모드
입니다.
• DIGITAL ZOOM [ON/OFF]
- 디지털 줌 영역을 사용할지 선택합니다.
• IMAGE FLIP [ON/OFF]
- 현재 이미지를 상하좌우 반전시킵니다.
• WB MODE [AUTO/MANUAL]
- Manual 모드에서는 RED, BLUE 레벨을 직접 지정
할 수 있습니다.
• RED ADJUST [10~60]
• BLUE ADJUST [10~60]
AE SETUP ▬GLOBAL
BACKLIGHT
☞
DAY /NIGHT
BRIGHTNESS
IRIS
SHUTTER
AGC
SSNR
SENS▬UP
BACK
EXIT(MENU OFF)
OFF
<AUTO 2 >
25
AUTO
ESC
HIGH
MIDDLE
<AUTO >
• BACKLIGHT [ON/OFF]
- 역광 보정 기능을 설정합니다.
• DAY/NIGHT [AUTO1/AUTO2(0~255)/DAY/NIGHT]
- AUTO1은 AUTO2에 비해 상대적으로 빨리 Day/
Night 모드를 전환합니다. AUTO2모드를 선택했을
경우에는 Day/Night의 절환레벨을 변경할 수 있습니다.
절환 레벨값이 클수록 낮은 조도에서 D&N 절환이
이루어집니다.
• BRIGHTNESS [0~100]
- 화면의 밝기 기준을 설정합니다. 이에 따라 Iris, Shutter Speed, Gain등이 동작합니다.
• IRIS [AUTO/MANUAL(0~100)]
- Iris가 Auto인 경우 AE를 조절하는데 있어 Iris를 우선시하며, Shutter Speed는 고정
됩니다. Iris가 Manual인 경우 Iris값이 고정되며, 이 경우 AE 조절에 있어 다른 항목에
비해 우선 순위가 낮아집니다.
• SHUTTER SPEED [ESC/A.Flicker/Manual(x128~1/120000초]
- Iris가 Manual 모드이고 Shutter Speed가 ESC 모드인 경우 Shutter Speed를 우선시
합니다. Shutter Speed가 A.Flicker 모드인 경우 Flicker 현상을 없애기 위해서 Shutter
Speed를 NTSC에서는 1/100초로, PAL에서는 1/200초로 고정합니다.
• AGC [OFF/NORMAL/HIGH]
- 영상 신호의 휘도 레벨이 너무 어두울 경우 이미지를 자동으로 밝게 조절합니다.
• SSNR [OFF/LOW/MIDDLE/HIGH]
- 영상의 게인 레벨이 지나치게 높을 경우 이미지의 노이즈를 줄여 영상을 좀 더 선명하게
조절 합니다.
• SENS-UP [AUTO(2~128)/OFF]
- 영상신호의 휘도 레벨이 너무 어두울 경우 실행되는 Slow Shutter 기능의 중첩되는
프레임의 최대값을 설정할 수 있습니다.
BACK
EXIT(MENU OFF)
148
149
Page 76

모션 설정
PARKING ACTION 설정
MOTION SETUP
MOTION LOCK
☞
PWR UP ACTION
FRZ IN PRESET
<JOG SETUP >
<PARKING ACTION SETUP >
<ALARM INPUT SETUP >
BACK
EXIT(MENU OFF)
OFF
ON
OFF
◎ 모션과 관련된 일반 기능을 설정합니다.
• MOTION LOCK [ON/OFF]
- Motion Lock을 ON으로 설정하면, 일반 운전상황
에서 프리셋, 스윙, 패턴, 그룹과 같은 기능을 삭제
하거나 신규로 설정할 수 있으며 단지 실행만 할 수
있습니다. OSD 메뉴 내에서는 해당 되지 않습니다.
• PWR UP ACTION [ON/OFF]
- “기타 주요 기능”부분을 참조하십시오.
• FRZ IN PRESET [ON/OFF]
- 프리셋 운전시 이동 전에 영상을 정지시키고 이동 후 영상을 복구합니다.
조그 설정
JOG SETUP
AUTO FLIP
☞
JOG MAX SPEED
JOG DIRECTION
BACK
EXIT(MENU OFF)
ON
120 /SEC
INVERSE
◎ 조그 운전속도 및 운전방향을 설정하는 기능입니다.
• AUTO FLIP [ON/OFF]
- “기타 주요 기능” 부분 참조하십시오.
• JOG MAX SPEED [1°/초~360°/초]
- 조그 최대 운전 속도를 지정합니다. 조그 운전
속도는 줌 배율에 연동되므로 줌 배율이 커질 수록
속도가 줄어듭니다.
• JOG DIRECTION [INVERSE/NORMAL]
- Inverse로 설정한 경우 조그의 방향과 화면이동이
같아지고, Normal로 설정한 경우 조그의 방향과
화면 이동 방향이 반대로 됩니다.
PARKING ACTION SETUP
PARK ENABLE
☞
WAIT TIME
PARK ACTION
BACK
EXIT(MENU OFF)
알람 운전 설정
ALARM INPUT SETUP
ALARM 1 TYPE
☞
ALARM 2 TYPE
ALARM 3 TYPE
ALARM 4 TYPE
ALARM 1 ACT
ALARM 2 ACT
ALARM 3 ACT
ALARM 4 ACT
BACK
EXIT(MENU OFF)
OFF
00 :10: 00
HOME
N.O PEN
N.O PEN
N.O PEN
N.O PEN
NOT USED
NOT USED
NOT USED
NOT USED
◎ 설정된 "Wait Time"동안 카메라를 운전하지 않을
경우 지정한 운전을 자동으로 실행하는 기능입니다.
• PARK ENABLE [ON/OFF]
• WAIT TIME [1분~4시간]
- “시 : 분 : 초”로 표시되며, 분 단위로만 설정 가능
합니다.
• PARK ACTION [HOME/PRESET/PATTERN/SWING/GROUP]
- "HOME" 설정 시 초기 원점으로 이동하는 기능
입니다.
◎ 알람이 입력될 경우 이동할 프리셋을 설정합니다.
• ALARMx TYPE [NORMAL OPEN/NORMAL CLOSE]
- 해당 입력 센서의 동작 방식을 설정합니다.
• ALARMx ACTION [NOT USED/PRESET 1~128]
- 해당 입력의 사용여부 또는 프리셋 위치를 설정
합니다.
150
151
Page 77

프리셋 설정 프리셋 레이블 설정
.
PRESET SETUP
PRESET NO .
☞
CLR PRESET
<EDIT SCENE >
<EDIT LABEL >
<RELAY OUT > -
CAM ADJUST GLOBAL
BACK
EXIT(MENU OFF)
1
UNDEFINED
CANCEL
• PRESET NO. [1~128]
- 설정하고자 하는 프리셋 번호를 선택합니다. 이미
지정되어 있는 프리셋 번호를 선택하면 프리셋
이동을 실행하고 Label, CAM ADUJUST과 같은
프리셋 설정 값들을 표시합니다.
선택한 프리셋이 정의되어 있지 않은 경우에는
Preset 번호 아래에 "UNDEFINED"가 표시됩니다.
• CLEAR PRESET [CANCEL/OK]
- 현재의 프리셋의 모든 설정을 삭제합니다.
EDIT LABEL ▬PRESET 1
[
■
2 3 4 5 6 7 8 9
1
ABC D EF GH I
KL M NOP QR S
UV W XY Z a b c
e f g h i j k l m
o pq r s t u v w
y z < >▬/ : .
]
0
J
T
d
n
x
OK
CANCEL
◎ LABEL에서 반전되어 표시되는 부분이 현재 커서의
위치이며 글자를 선택하면 우측으로 위치가 이동합
니다.
(■ )
↑
현재 글자 위치
◎ LABEL하단의 Character Map부분에서 지정한 글자를
선택하십시오. LEFT/RIGHT/UP/DOWN 키를
이용하여 원하는 글자위치로 이동한 후 NEAR 키를
누르면 해당 글자가 선택됩니다.
• EDIT PRESET SCENE
- 하위 메뉴에서 프리셋 위치를 지정합니다.
• EDIT PRESET LABEL
- 프리셋 이동시 화면에 표시할 Label을 지정합니다. Label은 최대 10자까지 입력할 수
있습니다.
• RELAY OUT
- 릴레이 출력을 설정합니다.
• CAM ADJUST [GLOBAL/LOCAL]
- 프리셋마다 White Balance 설정 및 AE설정을 독립적으로 할 수 있습니다.
"Global"은 "ZOOM CAMERA SETUP" 메뉴에 설정된 값을 그대로 사용한다는 의미이며,
"Local"은 해당 프리셋에서만 적용되는 WB/AE 설정을 별도로 지정한다는 의미 입니다.
"Local"을 선택하면 WB/AE 설정을 위한 메뉴가 표시됩니다.
프리셋 위치 설정
EDIT SCENE ▬PRESET 1
MOVE TO TARGET POSITION
[NEAR : SAVE /FAR : CANCEL ]
◎ 방향키를 이용하여 원하는 위치로 카메라를 이동
합니다.
◎ NEAR 키를 눌러 프리셋 위치를 저장합니다.
◎ 프리셋 위치를 취소할 때는 FAR 키를 누르십시오.
• 빈칸으로 설정할때는 Space 문자(" ")를 ,현재 글자를 지우고
위치를 좌측으로 이동할때는 Backspace 문자("<-")를
선택하십시오.
◎ Label 설정이 완료되면 "OK" 위치로 커서를 이동한 후
NEAR 키를 눌러 저장하십시오. "CANCEL"을 선택하면 저장을
취소합니다.
릴레이 출력 설정
RELAY OUT ▬PRESET 1
RELAY OUT
☞
BACK
EXIT(MENU OFF)
OFF
• RELAY OUT [ON/OFF]
- Preset Position이 변할 때 relay 출력을 설정합니다.
2 3 45 67 8 9
1
ABC DEFGH I
KLMNOPQR S
UVWXYZa b c
e f g h i j k l m
opq r s t uv w
y z < >▬/ : .
Space
0
J
T
d
n
x
Backspace
152
153
Page 78

스윙 설정
패턴 편집
SWING SETUP
SWING NO .
☞
1ST POS .
2ND POS .
SWING SPEED
CLEAR SWING CANCEL
BACK
EXIT(MENU OFF)
1
NOT USED
NOT USED
30 /SEC
• SWING NO. [1~8]
- 설정할 스윙 번호를 선택합니다. 선택한 스윙번호가
설정되어 있지 않은 경우에는 1st Position과 2nd
Position이 "NOT USED"로 표시 됩니다.
• 1st POS, 2nd POS [PRESET 1~128]
- 스윙 운전의 두 위치를 설정합니다. 설정되어 있지
않은 프리셋 번호를 선택한 경우에 아래 그림과 같이
"UNDEFINED"가 표시 됩니다.
◎ 스윙 운전은 먼저 1st Position -> 2nd Position으로 시계방향(Clockwise)으로 이동한 후,
2nd Position -> 1st Position으로 반시계 방향(Counterclockwise)으로 이동합니다.
두 위치를 같은 프리셋 값으로 설정하거나, 한 개의 위치값 만 설정한 경우에는 팬 방향
으로 360° 회전 합니다.
• SWING SPEED [1°/초 ~ 180°/초]
- 스윙 운전시 이동 속도를 설정합니다.
• CLEAR SWING [CANCEL/OK]
- 현재의 Swing 설정값을 삭제합니다.
SWING SETUP
SWING NO .
1ST POS .
☞
2ND POS .
1
PRESET 5
NOT USED
UNDEFINED
패턴 설정
PATTERN SETUP
PATTERN NO .
☞
CLR PATTERN
<EDIT PATTERN >
BACK
EXIT(MENU OFF)
1
UNDEFINED
CANCEL
• PATTERN NO. [1~4]
- 설정할 패턴 번호를 선택합니다.
선택한 패턴이 정의되어 있지 않은 경우에 패턴
번호 아래에 “UNDEFINED”가 표시됩니다.
• CLEAR PATTERN [CANCEL/OK]
- 현재의 패턴 내용을 삭제합니다.
• EDIT PATTERN
- 패턴 편집을 시작합니다.
EDIT PATTERN 1
EDIT PATTERN 1
■ ■ ■ ■ ■ ■ ■ ■ ■ ■ ■ ■ ■ ■ ■ ■ ■ ■ ■
NEAR
MOVE TO START POSITION
[NEAR :ST ART / FAR: CANCEL ]
[NEAR : SAVE /FAR : DELETE ]
0/0 /x1/ N
◎ 패턴 편집을 원하는 초기 위치로 이동한 후 NEAR 키를 눌러 패턴 설정을 시작합니다.
FAR 키를 누르면 패턴 설정을 취소합니다.
◎ 방향키 및 프리셋 운전을 수행하면 패턴에 저장됩니다. 남은 공간이 Bar 형태로 표시
됩니다. 패턴 당 최대 1200여개의 명령을 저장할 수 있습니다.
◎ 저장 도중에 NEAR 키를 누르면 그 때까지의 데이터를 저장하고 종료합니다. FAR 키를
누르면 패턴 저장을 취소하고, 이전의 데이터도 삭제합니다.
그룹 설정
GROUP SETUP
GROUP NO .
☞
CLEAR GROUP
<EDIT GROUP >
BACK
EXIT(MENU OFF)
• GROUP NO. [1~8]
- 설정할 그룹 번호를 선택합니다.
선택한 그룹이 정의되어 있지 않을 경우에 그룹
번호 아래에 “UNDEFINED”가 표시됩니다.
• CLEAR GROUP [CANCEL/OK]
- 현재의 그룹 내용을 삭제합니다.
• EDIT GROUP
- 그룹 편집을 시작합니다.
154
155
Page 79

그룹 편집
EDIT GROUP 1
NO ACTION ### DWELL OPT
1
NONE
2
NONE
3
NONE
4
NONE
5
NONE
SAVE
CANCEL
EDIT GROUP 1
NO ACTION ### DWELL OPT
☞
1
2
3
4
5
SAVE
CANCEL
NONE
NONE
NONE
NONE
NONE
[◀▶:MOVE CURSOR ]
[▲▼ :CHANGE VAL . ]
[NEAR :EDIT ]
• ACTION ### [NONE/PRESET/SWING/PATTERN]
• DWELL [0초~4분]
- Action 종료 후 휴지시간을 설정합니다.
• OPT
- 옵션값이며 프리셋에서는 프리셋 이동속도를 의미하며
패턴/스윙에서는 반복횟수를 의미합니다.
EDIT GROUP 1
NO ACTION ### DWELL OPT
1
NONE
☞
2
NEAR
NONE
3
NONE
4
NONE
5
NONE
SAVE
CANCEL
[N EAR :EDIT ACT ]
[F AR : EDIT END ]
◎ "NO" 항목에서 NEAR 키를 누르면 그룹 설정을 시작합니다.
◎ 1개의 그룹에 20개의 Action을 설정할 수 있습니다. UP/DOWN 키를 이용해 원하는
Action 번호로 이동한 후 NEAR 키를 누르면 Action을 편집할 수 있습니다.
EDIT GROUP 1
NO ACTION ### DWELL OPT
☞
2
NONE
3
NONE
4
NONE
5
NONE
SAVE
CANCEL
1 00:03 360PRESET1
[NEAR :EDIT ACT ]
[FAR :EDIT END ]
NEAR
EDIT GROUP 1
NO ACTION ### DWELL OPT
1 00 :03 360PRESET1
☞
2
NONE
3
NONE
4
NONE
5
NONE
SAVE
CANCEL
◎ Action 종류와 휴지시간, Option값을 설정합니다. 선택된 항목은 반전 표시됩니다.
항목간의 커서 이동은 LEFT/RIGHT 키를 이용하고. 각 항목에서 설정값을 변경하고자
할 때는 UP/DOWN 키를 이용합니다.
◎ 각 항목을 이동하면서 설정값을 입력합니다.
◎ 원하는 하나의 Action에 대해 설정이 끝나고 NEAR 키를 누르면 이전단계로 돌아갑니다.
UP/DOWN 키를 이용해 다른 Action 번호로 이동한 후 설정하십시오.
◎ 모든 Action에 대해 설정이 완료된 후 FAR 키를 누르면 "SAVE"항목으로 커서가 이동
합니다. NEAR 키를 누르면 설정 내용이 저장됩니다.
156
157
Page 80

시스템 초기화 초기 설정값
SYSTEM INITIALIZE
CLEAR ALL DATA
☞
CLR DISPLAY SET
├
CLR CAMERA SET
├
CLR MOTION SET
├
CLR EDIT DATA
└
REBOOT CAMERA
BACK
EXIT(MENU OFF)
NO
NO
NO
NO
NO
NO
• CLEAR ALL DATA
- Display 설정값, 카메라 설정값, 모션 설정값, 사용자
편집 데이터 전체를 초기화 합니다.
• CLEAR DISPLAY SET
- Display 설정값을 초기화 합니다.
• CLEAR CAMERA SET
- 카메라 설정값을 초기화 합니다.
• CLEAR MOTION SET
- 모션 설정값을 초기화 합니다.
• CLEAR EDIT DATA
- 프리셋, 스윙, 패턴, 그룹 데이터를 삭제합니다.
• REBOOT CAMERA
- 줌 카메라부를 재부팅합니다.
Display 설정 카메라 설정
Camera ID OFF Focus Mode SemiAuto
PTZ Information AUTO Digital Zoom ON
Action Title AUTO Image Flip OFF
Preset Label AUTO White Balance AUTO
Alarm In/Output AUTO Backlight OFF
North Direction Pan 0° Day/Night AUTO2
Privacy Zone Undefined Brightness 25
Iris AUTO
Shutter ESC
모션 설정값
Motion Lock OFF SENS-UP AUTO (4 Frame)
Power Up Action ON
Freeze In Preset OFF
Auto Flip ON
Jog Max Speed 120°/sec Preset 1~128 Undefined
Jog Direction INVERSE Swing 1~8 Undefined
Park Action OFF Pattern 1~4 Undefined
Alarm Action OFF Group 1~8 Undefined
AGC HIGH
SSNR MIDDLE
사용자 설정 데이터
158
159
Page 81

제품 사양
◎ 카메라 부
비디오 신호방식 NTSC
카메라
팬/틸트
일반
모델 IPM3063N(P)
PAL
소자 1/4” Interline Transfer CCD
최대화소수 811(H)x508(V) 410K
유효화소수 768(H)x494(V) 380K
수평해상도 500TV 라인(Color), 570 TV 라인(B/W)
S/N 비 50 dB (AGC Off)
줌 비율 X10 Optical Zoom, x10 Digital Zoom
초점 거리 F1.8, f=3.8~38mm
최저 조도 0.7 Lux (Color) / 0.02 Lux (B/W), 50 IRE
Day & Night Auto / Day / Night(ICR)
Focus Auto / Manual / SemiAuto
Iris Auto / Manual
Shutter Speed x128 ~ 1 / 120,000 sec
AGC Normal / High / Off
White Balance Auto / Manual(Red, Blue Gain Adjustable)
BLC Low / Middle / High / Off
Flickerless Selectable
SSNR Low / Middle / High / Off
운전 각도
운전 속도
프리셋 설정 127 프리셋 (레이블 설정, 개별 영상 설정)
패턴 설정 4 패턴 (패턴당 1200 명령, 약 5분)
스윙 설정 8 스윙
그룹 설정 8 그룹(20동작/그룹)
기타 설정 Auto-Flip, Auto Parking, Power Up Action 등
Privacy Zone 4개
알람 입/출력 4 입력, 1 출력
OSD 메뉴/ 위치 표시 등
정격 전원 DC 12V/1A
외관 크기
무게 무게 약 1kg
동작 온도 0°C ~ 40°C (32°F ~ 104°F)
Pan 360° (Endless)
Tilt 190° (Auto-Flip), 100° (Normal)
Preset 360°/sec
Manual 0.05° ~ 360°/sec(줌 배율과 연동)
Swing 1° ~ 180°/sec
∅ 130.2 x 142.1(H) mm
795(H)x596(V) 470K
752(H)x582(V) 440K
◎ 네트워크 부
출력 해상도
프로토콜
보안
이벤트 처리
모델 IPM3063N(P)
NTSC비디오 신호방식
704 x 480(D1), 352 x 240(CIF)
MJPEG, MPEG4, H.264 선택 가능.출력 영상 형식
Max 30 frame/sec압축 전송 속도
양방향 오디오 (ADPCM,G.726)오디오 형식
IPv4, HTTP, TCP, RTSP, RTP, RTCP, UDP, SMTP, FTP, ICMP, DHCP,
ㆍAccess level setup : Multiple user access levels with password protection.
ㆍNetwork Security : IP Filtering.
ㆍ Upload : FTP Server, SMTP (E-mail server). (JPEG 파일)
ㆍ Storage : Internal memory, SD Card. (JPEG 파일)
UPnP, Bonjour, ARP, DNS, DynDNS
10/100 Mbps(RJ-45 Type)이더넷
1. CNB DDNS, 2. DynDNS.org, 3. Reference code with SDKDDNS
Motion detection (3개의 영역 설정 가능)움직임 검출
704 x 576(D1), 352 x 288(CIF)
10 명최대 사용자 수
PAL
160
161
Page 82

제품 사양
◎제품 브래킷 ◎ 천장 브래킷
162
단위(mm)
 Loading...