

Page 1
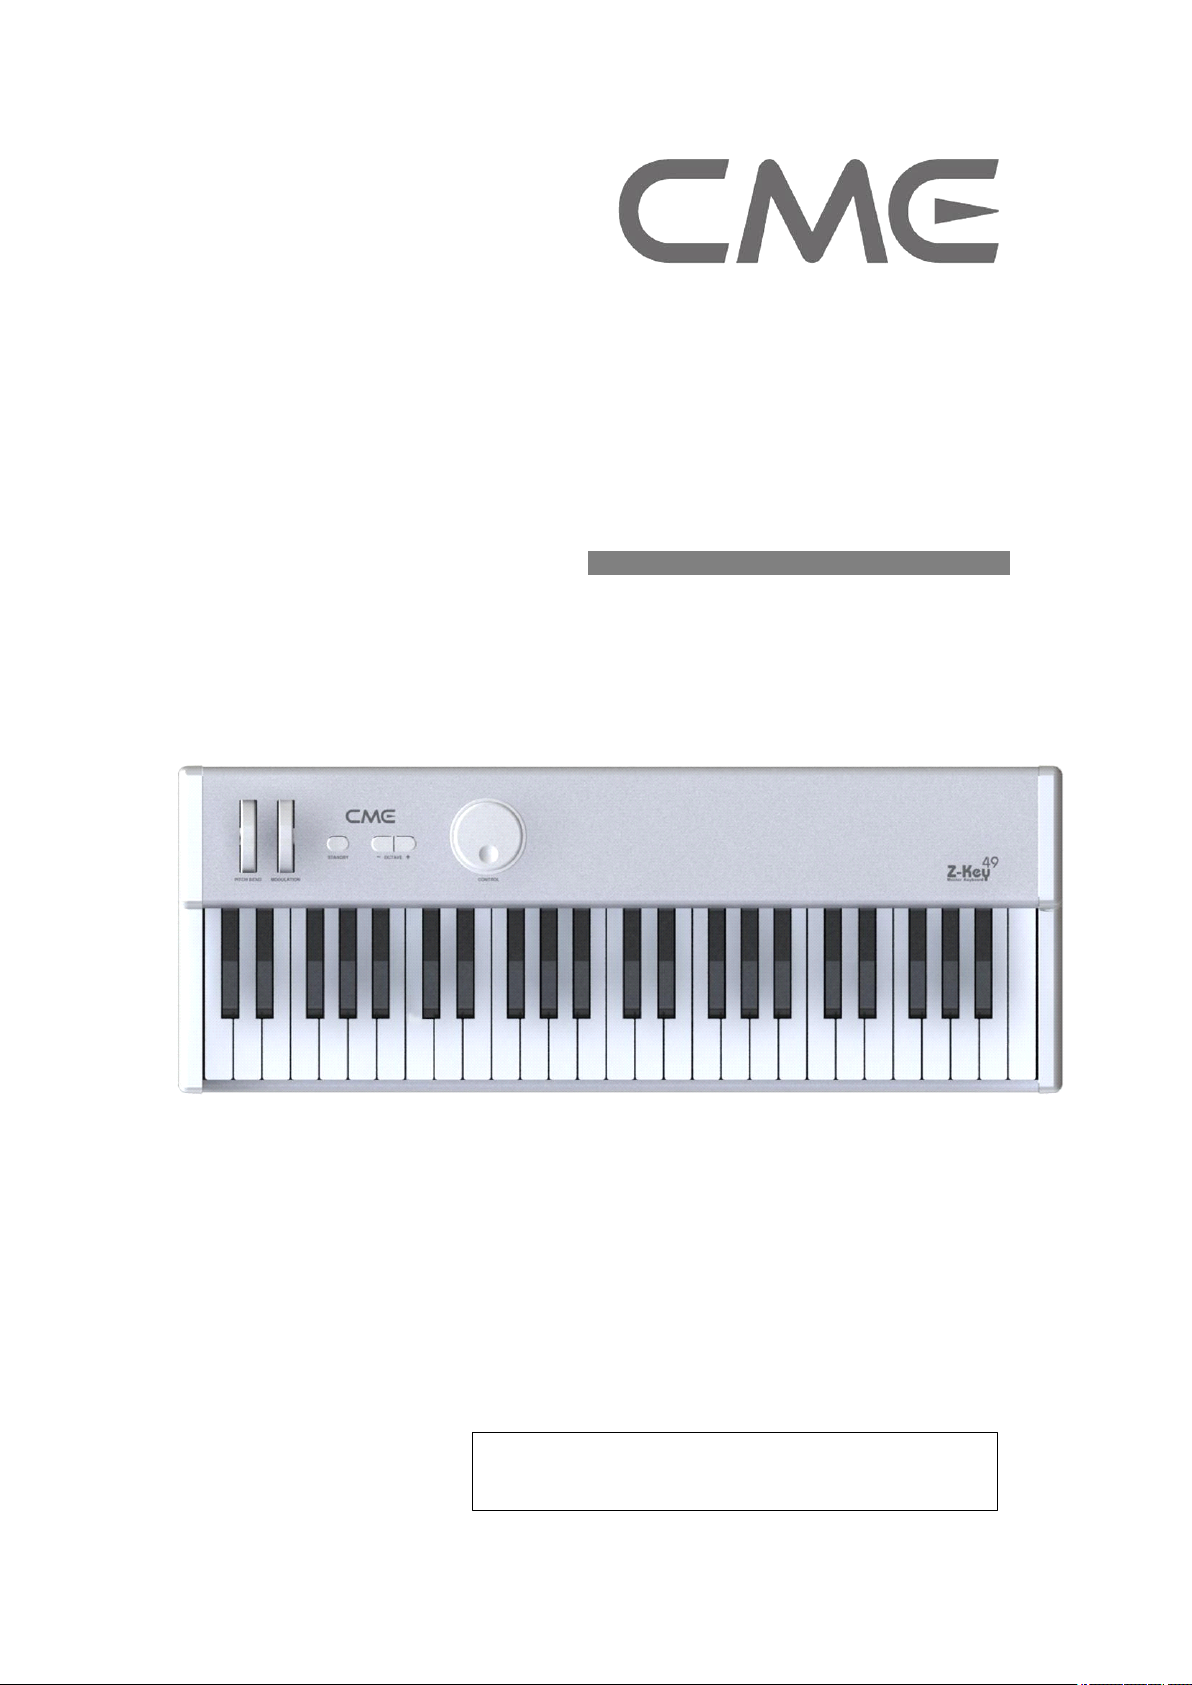
Professional Master MIDI Keyboard with
Built-in USB
User's Manual
—————————————————
Model: Z-Key 49/61/76/88
Please
Please
Please
Please read
read
"Precautions"
read
"Precautions"
read "Precautions"
"Precautions" on
on
page
on
page
on page
page 3
3
before
3
before
3 before
before use
use
use
use
(Ver
0 1 )
Please read this manual carefully before use.
Please keep this manual for reference.
Page 2
Thank
Thank
Thank
Thank you
you
for
you
for
you for
for choosing
choosing
choosing
choosing CME
CME
CME
CME Z-Key
Z-Key
Z-Key
Z-Key
Professional
Professional
Professional
Professional Master
Please
Please
Please
Please keep
Master
Master
Master MIDI
keep
keep
keep all
all
the
all
the
all the
the important
MIDI
MIDI
MIDI Keyboard
Keyboard
Keyboard
Keyboard with
important
important
important information
information
information
information here
with
Built-in
with
Built-in
with Built-in
Built-in USB
Attach your invoice or receipt here
~~~~~~~~~~~~~~~~~~~~~~~
For
reference
For
reference
For
For reference
reference
Purchase date Serial (on the back of the keyboard)
Dealer’s name and addr.
Dealer’s tel.
here
here
here
USB
USB
USB
Warning:
Warning:
Warning:
Warning:
Improper connection may cause damage to the device.
Copyright:
Copyright:
Copyright:
Copyright:
Copyright of the manual belongs to Central Music Co.. Anyone must
get written permission from Central Music Co. before copying any
part of the manual to any kind of media.
© Central Music Co. 2010
Package
Package
Package
Package contents
Please check all the items in the product package:
USB MIDI Master keyboard 1 pc
USB Cable 1 pc
�
�
User’s Manual 1 pc
�
�
contents
contents
contents
1
Page 3

PRECAUTIONS
PRECAUTIONS
PRECAUTIONS
PRECAUTIONS
IMPORTANT
IMPORTANT
IMPORTANT
IMPORTANT
Always follow the basic precautions listed below to avoid the possibility of serious injury or even
death from electrical shock, damage, fire or other hazards. These precautions include, but are not
limited to, the following:
1. Read and understand all the instructions.
2. Always follow the instructions on the instrument.
3. Before cleaning the instrument, always remove the electric plug from the outlet as well as the
USB cable. When cleaning, use a soft, dry cloth. Do not use gasoline, alcohol, acetone, turps
or any other organic solution; do not use liquid cleaner or spray cleaner, or too wet a cloth.
4. Do not use the instrument near water or moisture, such as bathtub, washbasin, or in the
washing area in the kitchen, or similar places.
5. Do not place the instrument in an unstable position where it might accidentally fall over.
6. Do not block sinks or holes of the instrument; those sinks or holes are used for air circulation
to prevent the instrument from overheating. Do not place the instrument near heat sink or any
places with poor air circulation.
7. Do not place anything on the power cord. Make sure the power cord is set on a safe place, so
nobody will step on it or trip over it.
8. Do not overload the outlet and AC cable to avoid fire or electrical shock.
9. Do not insert anything in the instrument, which may cause fire or electrical shock. Do not
splash any kind of liquid to the instrument.
10. Do not disassemble the instrument in case of accidental electrical shock.
11. Always take the instrument to a qualified service center in need of repair.
yourself in danger if you open or remove the cover, and improper assembly may cause
electrical shock in the future use.
12. Unplug all the connectors and take the instrument to qualified service center if anything in the
list below happens:
A. The power cord or connector get damaged or worn.
B. Any liquid gets into the instrument.
C. The instrument gets rain or water splashed on it.
The instrument does not work properly after following all the instructions regarding
troubleshooting.
D. The instrument falls down or gets broken.
E. The instrument functions poorly.
13. Do not use the instrument during lightning or thunder; otherwise the lightning may cause
long-distance electrical shock.
14. Do not use the instrument when there is gas leak nearby.
Keep
this
Keep
Keep
Keep this
manual
this
manual
this manual
manual in
in
safe
in
safe
in safe
safe place
place
place
place
You
will put
2
Page 4

CAUTION:
CAUTION:
CAUTION:
CAUTION:
Setting
Setting
Setting
Setting up
Do not connect the instrument during a thunderstorm.
When the power cord is connected to the AC outlet, do not touch the naked part of the cord or
Always follow the instructions carefully when setting up the instrument.
Avoid using any poor quality extending USB cable or over-long extending USB cable.
Do not use USB HUB to connect the product
Make sure the computer USB port has adequate power supply, otherwise the product will not
WARNING:
WARNING:
WARNING:
WARNING:
Do not expose the instrument to rain or moisture, avoid fire or electrical shock.
up
up
up
Do not set up the power cord or socket in a damp place, unless the power cord or socket is
specially designed for damp areas.
the connector.
work properly.
Other
Other
Other
Other Precautions:
Keep the instrument away from electrical interface source, such as fluorescent light and
Do not expose the instrument to sunlight.
Do not place heavy object on the instrument; do not place containers with liquid on the
Trade
Trade
Trade
Trade Marks
CME & Z-Key are the registered trade marks of Central Music Co. Other brands and names
belong to the respective owners.
Professional semi-weighted Keyboard with aftertouch across the entire range of Z-Key series
Precautions:
Precautions:
Precautions:
electrical motor.
Keep the instrument away from dust, heat and vibration.
instrument.
Do not touch connectors with a wet hand.
Central Music Co. is not responsible for any damage or data loss caused by improper
operation of the instrument.
All the pictures and display in the manual are for demonstration only; they may be different
from a real instrument.
Marks
Marks
Marks
Features
Features
Features
Features
keyboards.
Assignable data dial.
Choice of velocity curve and aftertouch curve.
USB plug and play, class-compliant with Windows XP / Vista / 7 or Mac OSX.
3
Page 5

Contents
Contents
Contents
Contents
1 General View ............................................................................................................................. 5
1.1 Front Panel ................................................................................................................ 5
1.2 Rear Panel ................................................................................................................. 6
2 Installation Guide ...................................................................................................................... 7
2.1 Power supply ............................................................................................................. 7
2.2 Power On Sequence ................................................................................................... 7
3 Connections ............................................................................................................................... 8
4 Turning On ................................................................................................................................ 9
4.1 Turning On Normally ................................................................................................ 9
4.2 Driver installation ...................................................................................................... 9
4.3 Turning On With Initi a lizing ..................................................................................... 9
5 Basic Functions ....................................................................................................................... 10
5.1 Octave Shift ............................................................................................................. 10
5.2 Pitch band And Modulation Whee s l ......................................................................... 10
5.3 Using Dial (c ontrol ) ................................................................................................. 10
5.4 Pedal ........................................................................................................................ 10
5.5 Aftertouch ................................................................................................................ 11
5.6 Standby .................................................................................................................... 11
6 System Settings ....................................................................................................................... 12
6.1 V elocity Curve Setting ............................................................................................. 12
6.2 Aftertouch Curve Setting ......................................................................................... 12
7 Appendix ................................................................................................................................. 13
7.1 V elocity Curve List .................................................................................................. 13
7.2 Aftertouch Curve List .............................................................................................. 13
7.3 GM V oice List ......................................................................................................... 14
8 Troubleshooting ....................................................................................................................... 15
9 Specifications .......................................................................................................................... 16
10 MIDI Implementation Chart .................................................................................................... 17
4
Page 6
1.1
Front
1.1
Front
1.1
1.1 Front
Front Panel
Panel
Panel
Panel
1
General
1
General
1
1 General
General View
View
View
View
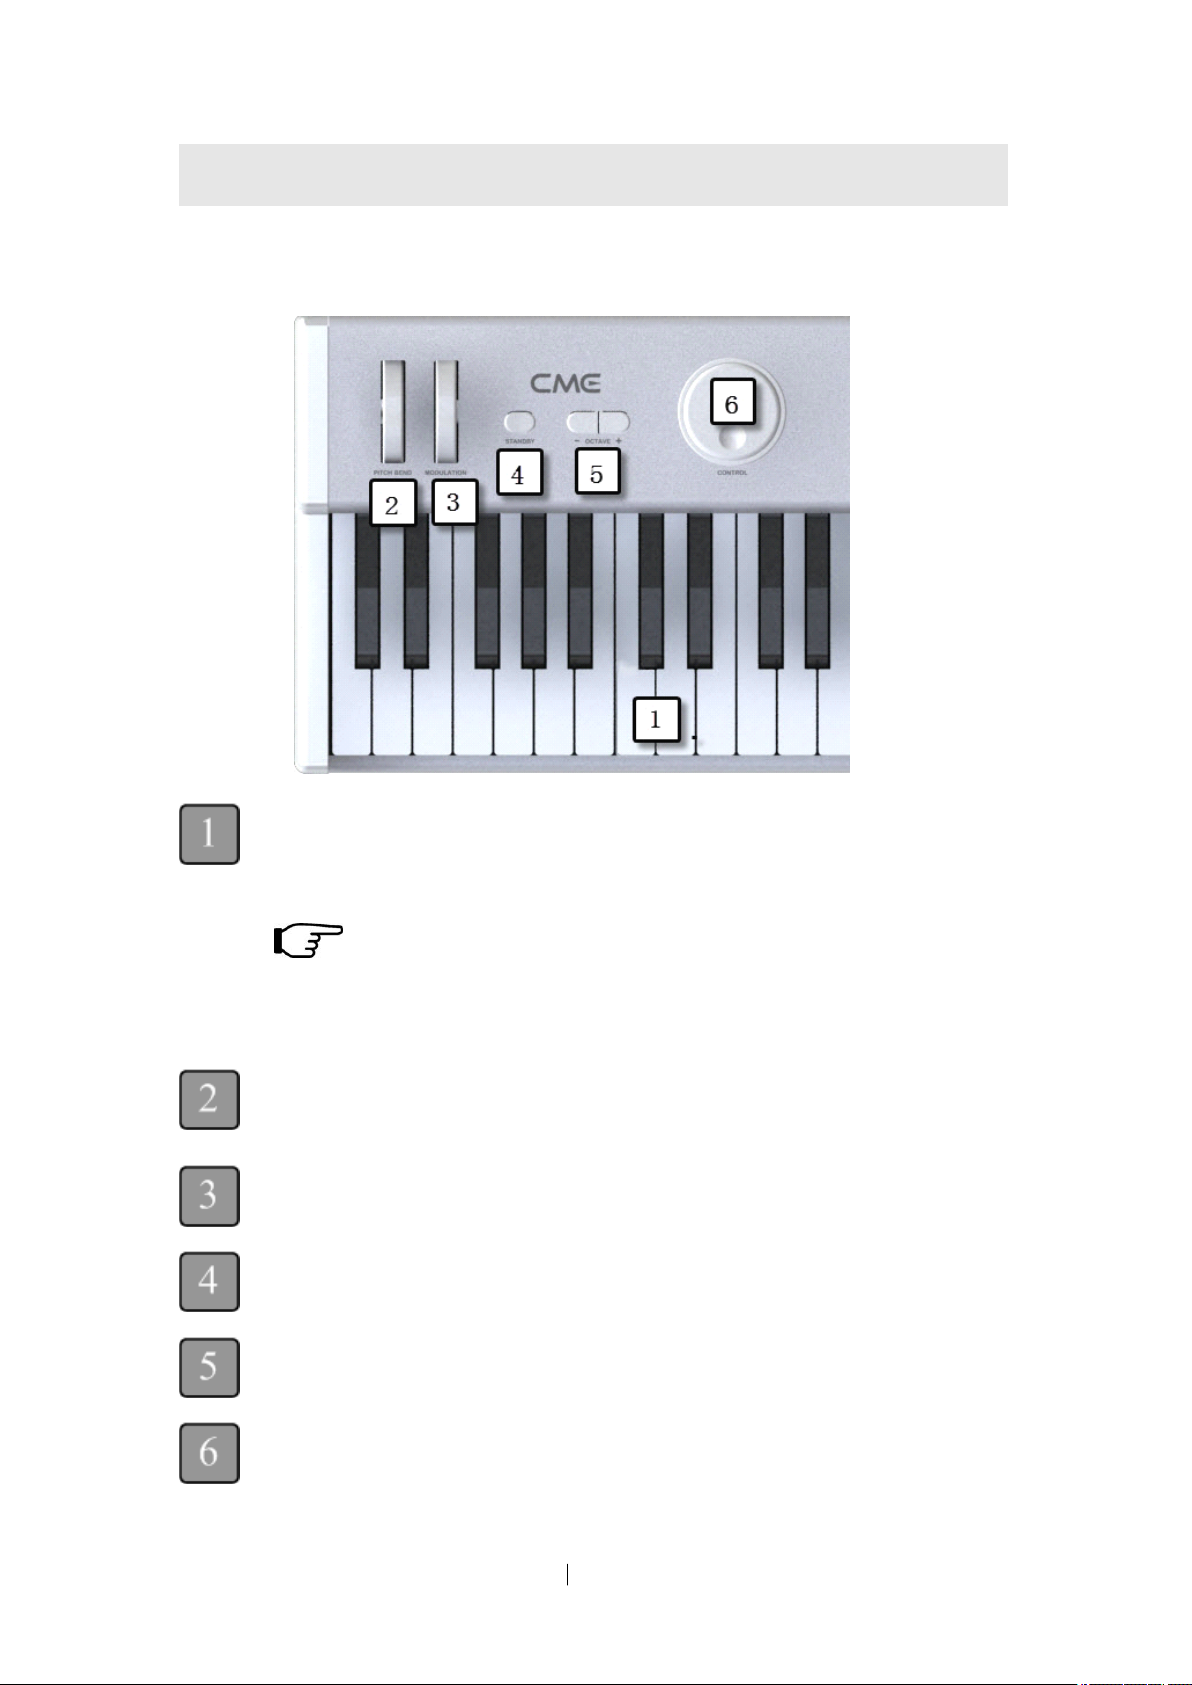
Keyboard
Keyboard
Keyboard
Keyboard
There are four models for the Z-Key series, comprising Z-Key 49 (49 keys), Z-Key 61 (61
keys), Z-Key 76 (76 keys) and Z-Key 88 (88 keys). All the keyboards in the Z-Key series are
equipped with velocity response and after-touch.
Velocity
Velocity
Velocity
Velocity response
initial
initial
initial
initial force
Aftertouch
Aftertouch
Aftertouch
Aftertouch means
to
to
to
to additional
Pitchbend
Pitchbend
Pitchbend
Pitchbend (spring
It changes the pitch up and down, and when released it will automatically return to the center
position.
Modulation
Modulation
Modulation
Modulation (not
It will make the sound more vibrant, and when released it will stay at that position.
Standby
Standby
Standby
Standby
This indicates the power status, switching between Standby and Active.
Octave
Octave
Octave
Octave /
These are used to change the keyboard pitch, one octave at a time.
(spring
(spring
(spring loaded)
(not
(not
(not spring
/
Transpose
/
Transpose
/ Transpose
Transpose
response
response
response means
force
used
force
force used
additional
additional
additional pressure
loaded)
loaded)
loaded)
spring
spring
spring loaded)
to
used
to
used to
to strike
means
means
means after
pressure
pressure
pressure applied
loaded)
loaded)
loaded)
means
means
means when
after
after
after you
strike
strike
strike the
you
you
you press
applied
applied
applied to
when
when
when you
the
the
the keys.
you
you
you play
keys.
keys.
keys.
press
press
press and
to
the
to
the
to the
the keys.
play
play
play the
and
and
and hold
keys.
keys.
keys.
the
keyboard,
the
keyboard,
the keyboard,
keyboard, it
hold
a
hold
hold a
key,
a
key,
a key,
key, it
it
it
it will
it
will
continue
it
will
continue
it will
will continue
continue to
will
respond
will
respond
will respond
respond to
to
to
to the
to
respond
to
respond
to respond
respond
the
the
the
Encoder
Encoder
Encoder
Encoder Data
It is a data change dial. In default status, it is a tone brightness control function.
Data
Dial
Data
Dial
Data Dial
Dial (control)
(control)
(control)
(control)
5
Page 7
1.2
Rear
1.2
Rear
1.2
1.2 Rear
Rear Panel
Panel
Panel
Panel
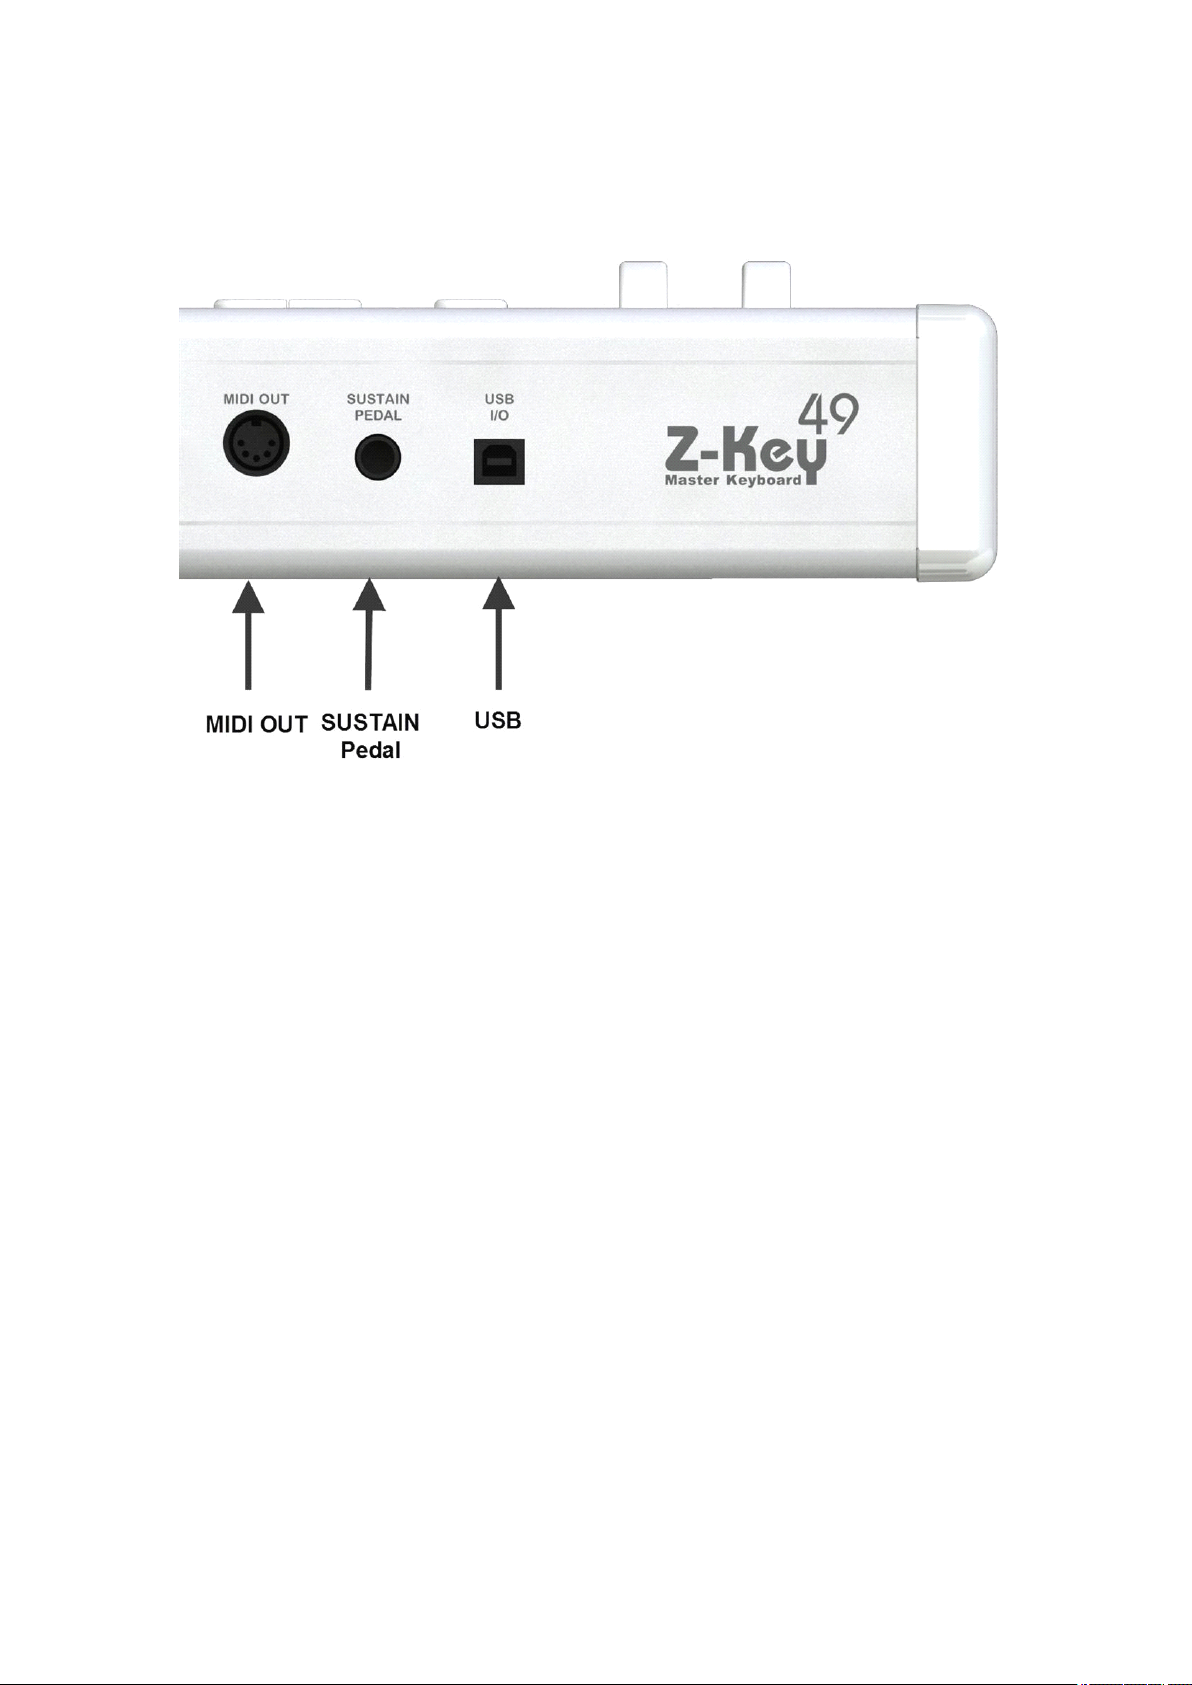
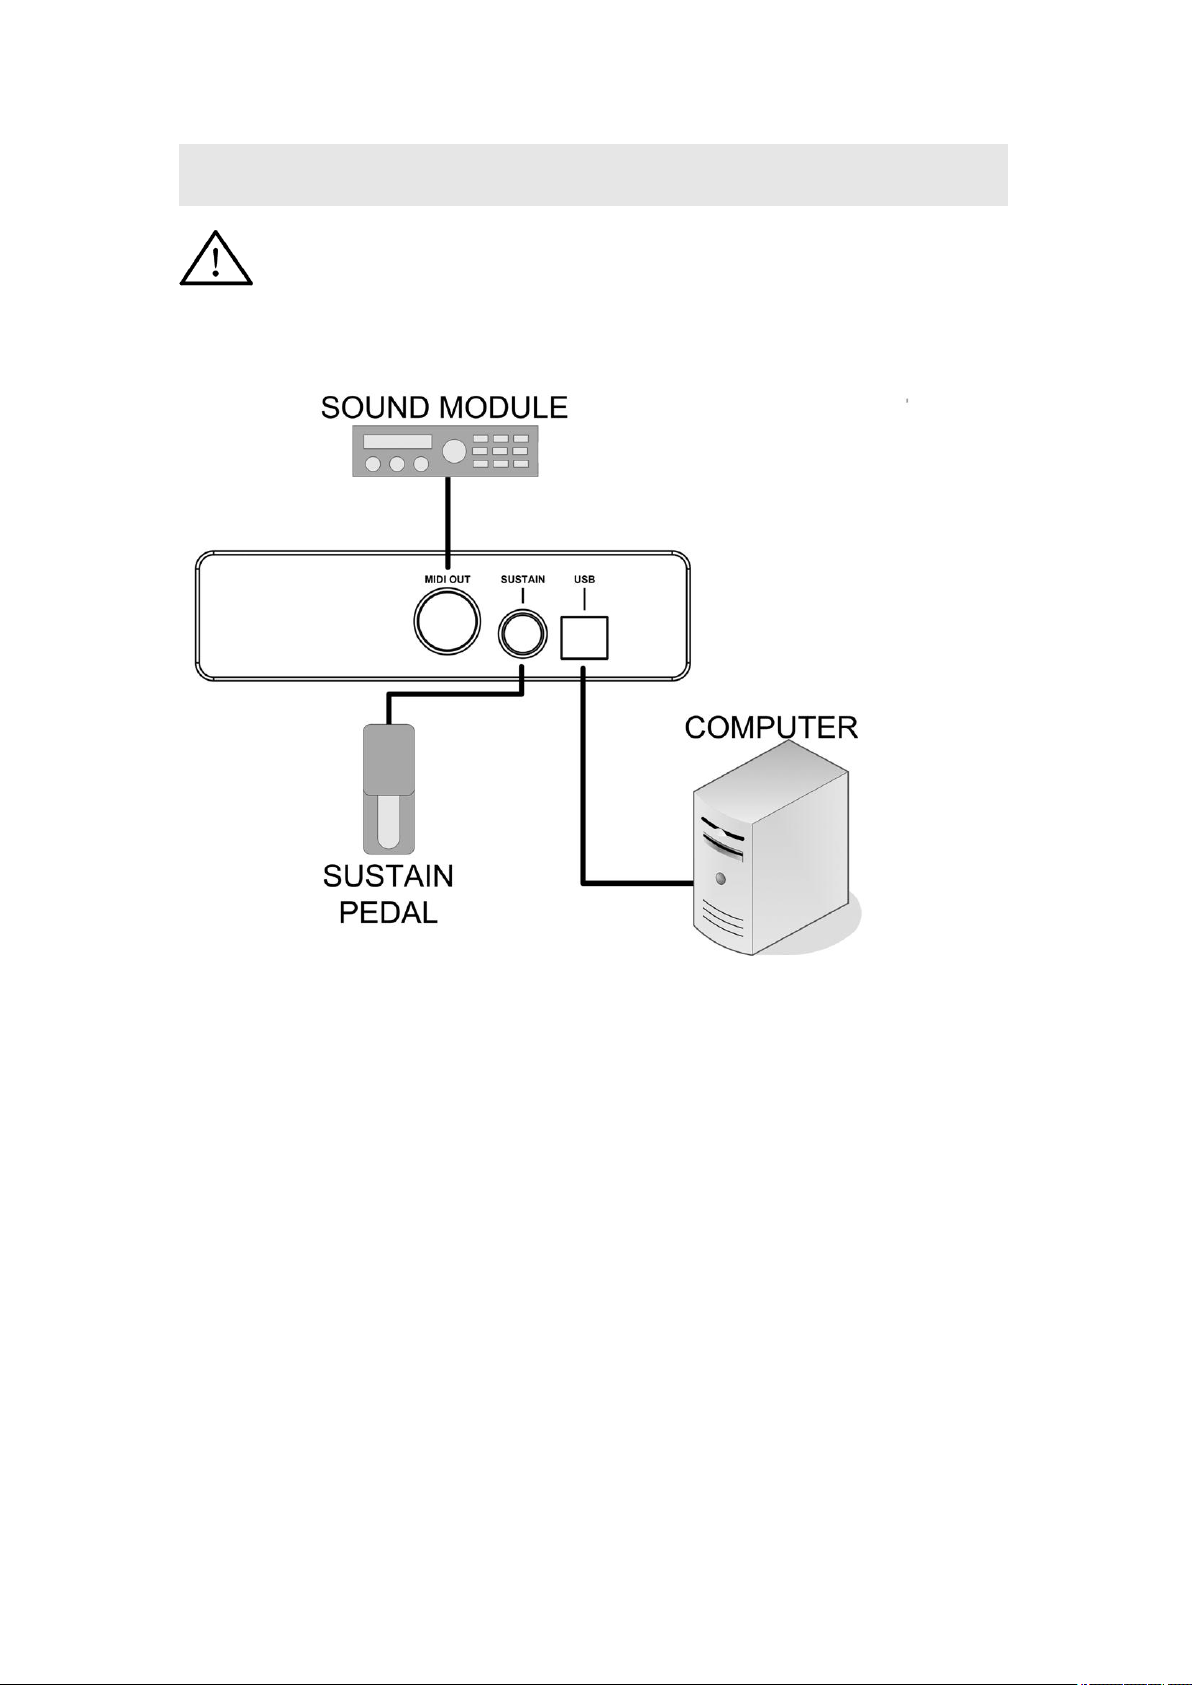
USB port: to make computer connection for MIDI data transfer and obtain power from the
USB bus.
MIDI OUT port: Standard Five Core MIDI socket.
Sustain Pedal Jack, Three core 1/4" TRS, can be used for sustain pedal.
6
Page 8

2
Installation
2
Installation
2
2 Installation
Installation Guide
2.1
Power
2.1
Power
2.1
2.1 Power
Power Supply
USB
Bus-powered:
USB
Bus-powered:
USB
USB Bus-powered:
Bus-powered:
Connect Z-Key to computer via USB.
2.2
Power
2.2
Power
2.2
2.2 Power
Power On
When connecting your Z-Key to a system, set all the volumes to minimum then follow the
correct sequence to turn all the devices on: 1) master MIDI device (which sends out MIDI data), 2)
slave MIDI device (which receives MIDI data), 3) audio devices (mixer, amplifier, speakers).
When you follow this order, all the signals (MIDI and audio) will perform correctly from start to
finish,. When you turn off the system, follow the reverse order (turn off the audio devices first,
then the MIDI devices).
Supply
Supply
Supply
On
Sequence
On
Sequence
On Sequence
Sequence
Guide
Guide
Guide
7
Page 9
3
Connections
3
Connections
3
3 Connections
Connections
Before you make these connections, ensure that the keyboard is powered off and turn
off all other devices to avoid possible damage.
Please refer to the diagram to make connections:
8
Page 10
4
Turning
4
Turning
4
4 Turning
Turning On
4.1
Turning
4.1
Turning
4.1
4.1 Turning
Turning On
Connect your Z-Keys to a computer via USB cable.
By default, this product operates on Windows XP/Vista/7 and Mac OSX .
4.2
Driver
4.2
Driver
4.2
4.2 Driver
Driver installation
After you have connected Z-Keys to your computer via USB, turn the Z-Keys on; the
computer will find it and install the drivers automatically.
You
When the driver installation is finished, this product will be recognized as the ” USB
Audio Device ” or ” CME Z-KEY ” .
The MIDI driver offers 1 USB IN and 1 USB OUT.
In some cases you may need to restart your computer during the driver installation.
Please follow the on-screen instructions.
4.3
Turning
4.3
Turning
4.3
4.3 Turning
Turning On
On
Normally
On
Normally
On Normally
Normally
installation
installation
installation
can plug and play this product on Windows XP / Vista / 7 and Mac OSX systems.
On
With
On
With
On With
With Initializing
Initializing
Initializing
Initializing
On
On
On
Turning Z-Keys on with initializing restores all factory settings
If you press and hold both 【 OCTA VE- 】 and 【 OCTA VE+ 】 buttons while turning on this
product, it will enter the initialization process. All button indicators will flash rapidly
until the process is complete.
The
initializing
The
initializing
The
The initializing
initializing operation
operation
operation
operation will
will
will
will clear
clear
clear
clear all
all
all
all the
the
user
the
user
the user
user settings,
settings,
settings,
settings, please
please
please
please be
be
careful
be
careful
be careful
careful !
!
!
!
9
Page 11
5
Basic
5
Basic
5
5 Basic
Basic Functions
5.1
Octave
5.1
Octave
5.1
5.1 Octave
Octave Shift
You
When the octave is shifted, the relevant button indicator will be lit
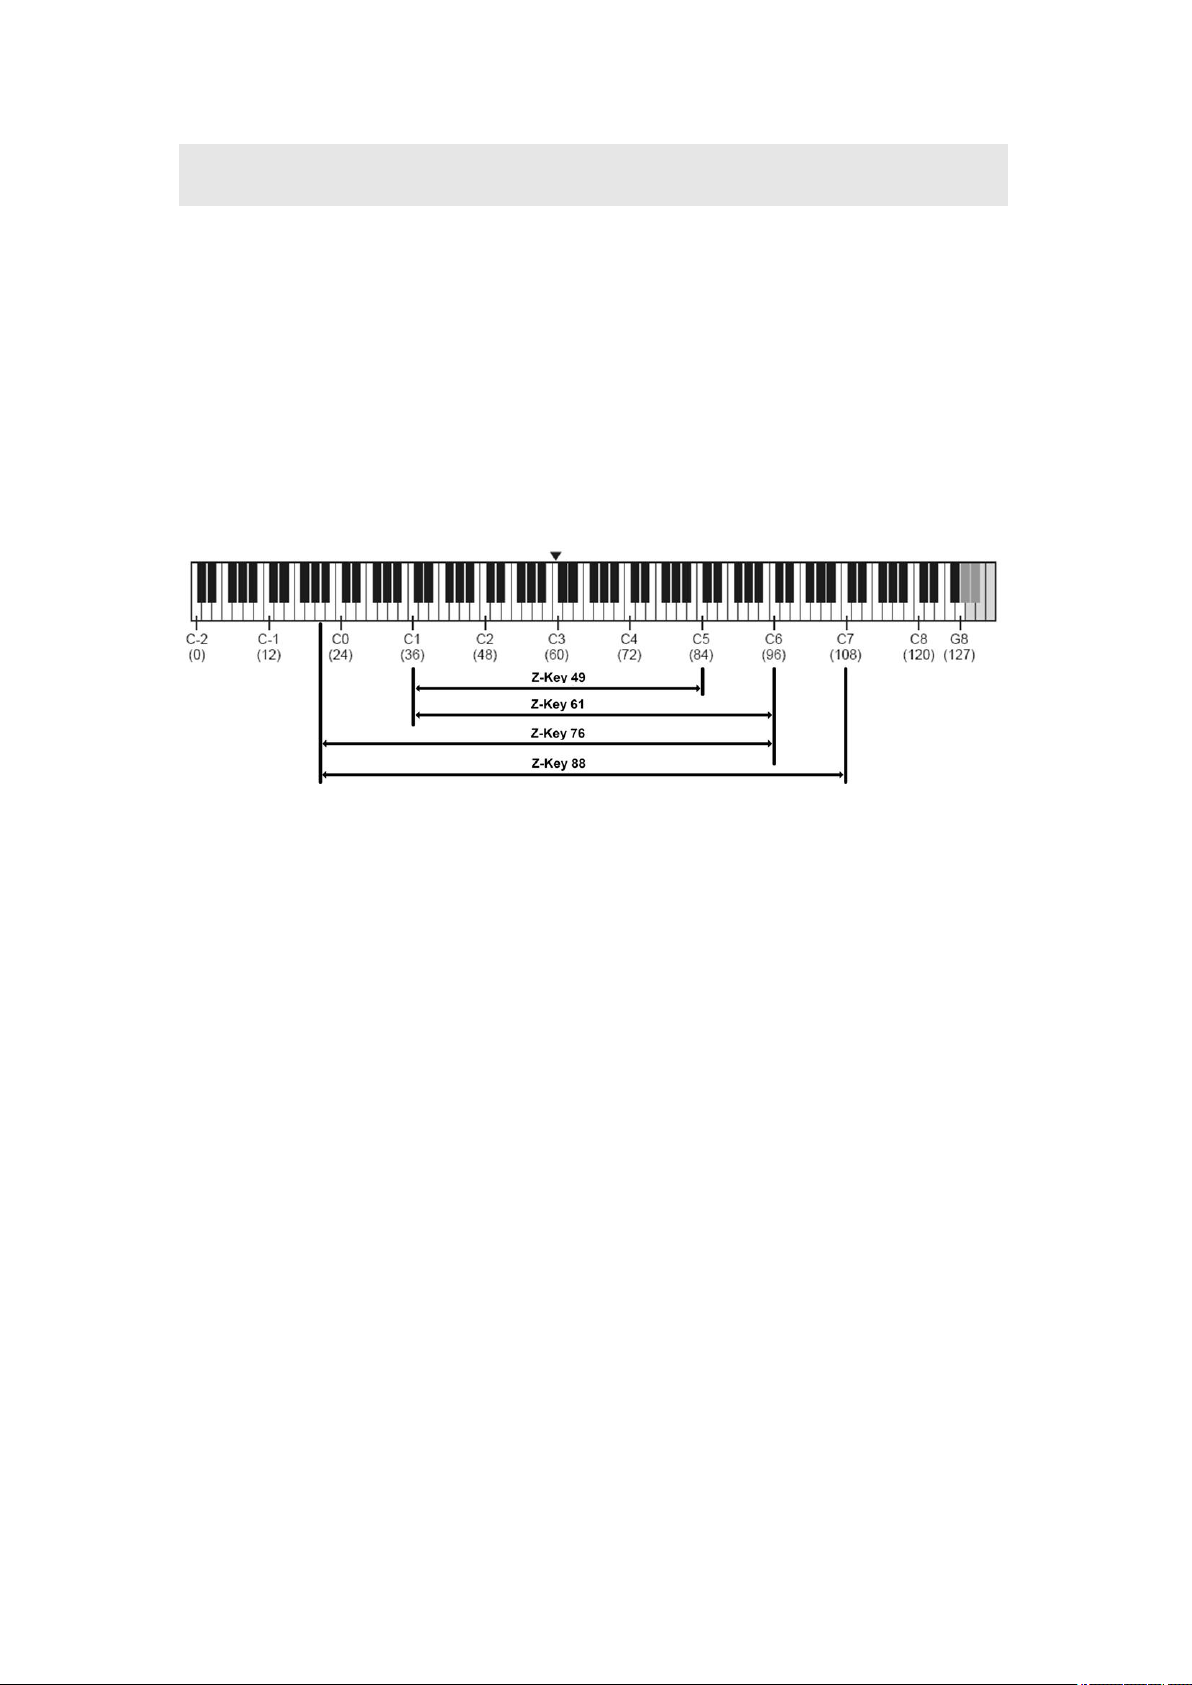
The octave shift range is -3 to +3. Press the two octave buttons at the same time to reset
the octave shift to 00, and the indicator light will be off.
The keyboard ranges of Z-Key series are shown below:
Shift
Shift
Shift
can shift the keyboard pitch in octaves by pressing 【 - OCTAVE + 】 button.
Functions
Functions
Functions
5.2
Pitchbend
5.2
Pitchbend
5.2
5.2 Pitchbend
Pitchbend and
● Use the pitch wheel to send the pitch bend data.
● Use the modulation wheel to send the modulation data CC#1.
5.3
Using
5.3
Using
5.3
5.3 Using
Using the
● Use the dial to send tone brightness changing data CC#74.
● Dial controller adjustment range: 0-127
5.4
Sustain
5.4
Sustain
5.4
5.4 Sustain
Sustain Pedal
Sustain is used to connect the damper pedal, sending damper pedal data CC#64 and
switch-type data 0 or 127.
Step on the pedal and turn on the power to reverse the pedal polarity.
5.5
Aftertouch
5.5
Aftertouch
5.5
5.5 Aftertouch
Aftertouch
After pressing a key, you can continue applying force to send channel aftertouch data.
You
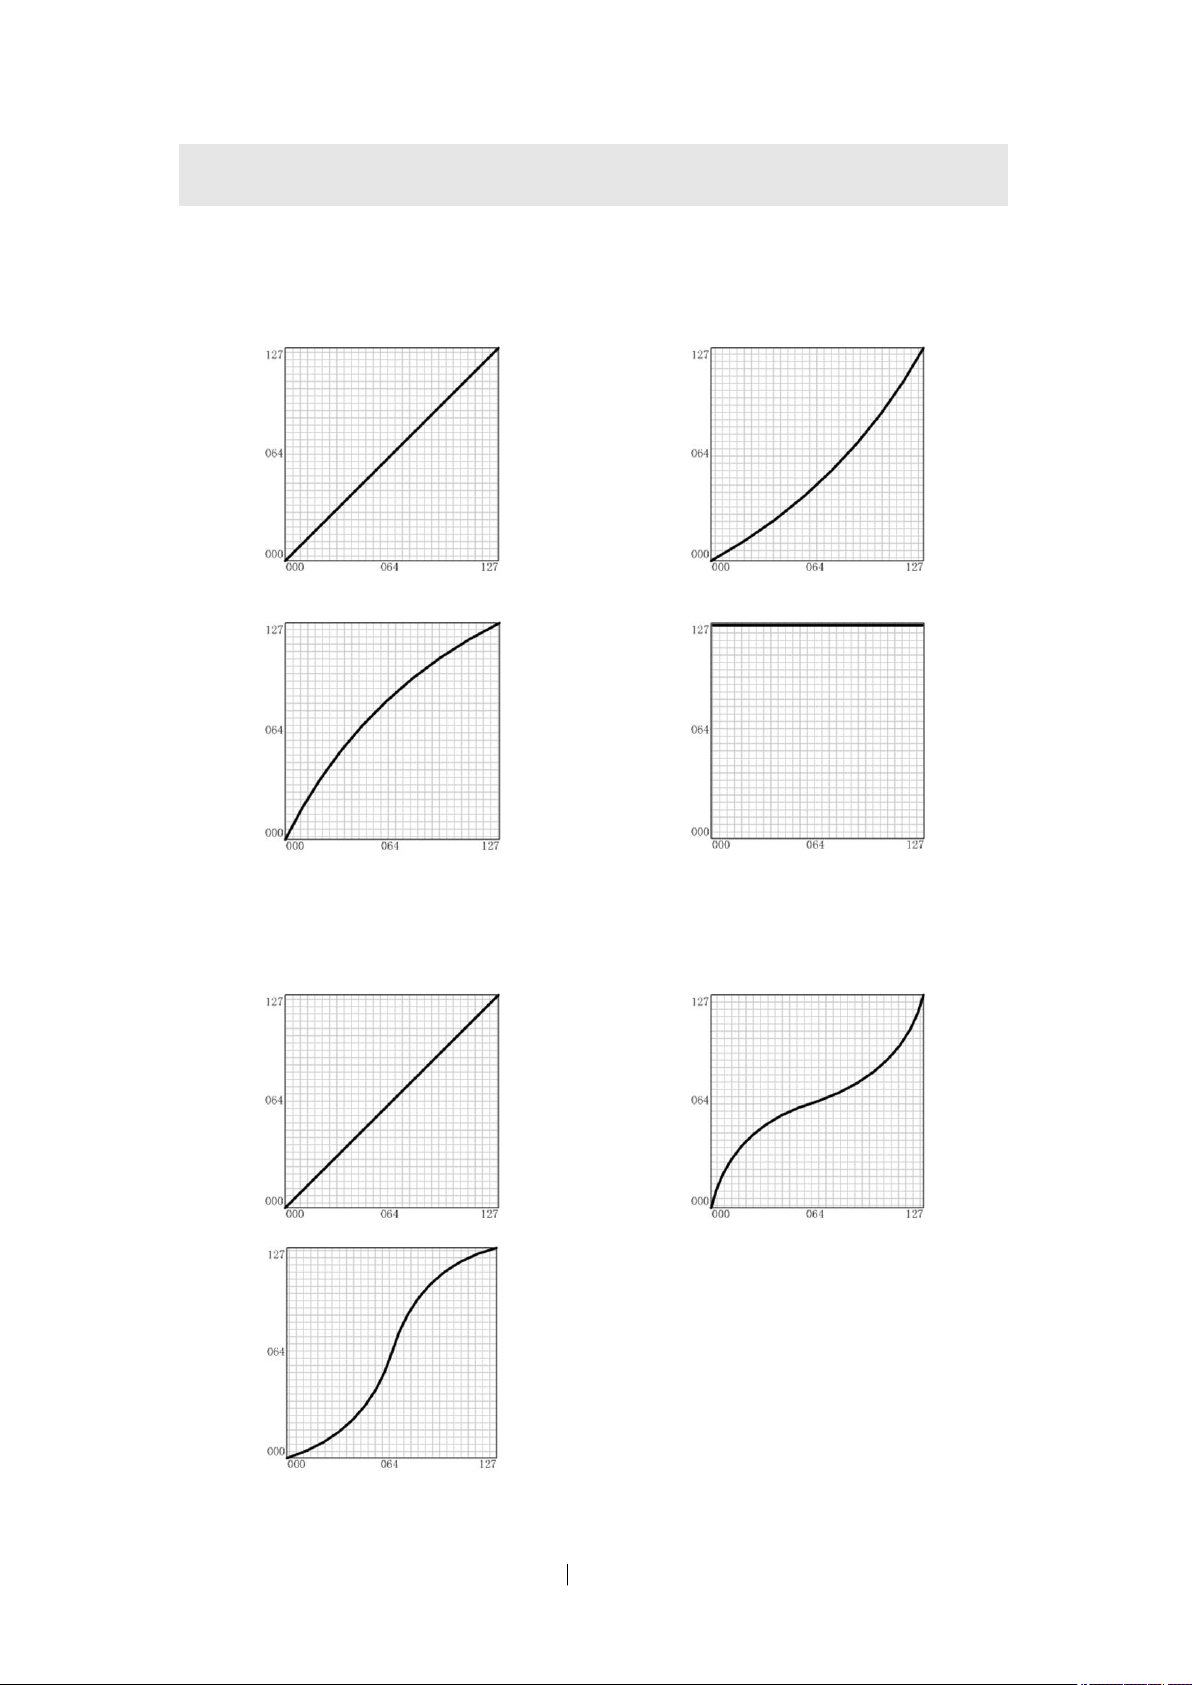
Please refer to the appendix 7.2 <After touch curve list>.
the
can adjust the data sending rate or turn off those MIDI data (8.2).
and
and
and Modulation
Dial
the
Dial
the Dial
Dial (control)
Pedal
Pedal
Pedal
Modulation
Modulation
Modulation Wheels
(control)
(control)
(control)
Wheels
Wheels
Wheels
10
Page 12

5.6
Standby
5.6
Standby
5.6
5.6 Standby
Standby
To enter Standby mode,press the Standby button for 2 seconds until the light turns red.
No data will be sent when the keyboard is in Standby mode.
�
�
�
� Press the Standby button again to restore the keyboard to its usual operational status. The
light turns from red to blue..
11
Page 13

6
System
6
System
6
6 System
System Settings
Settings
Settings
Settings
6.1
6.1
6.1
6.1 Velocity
This function lets musicians choose the velocity for different instruments to suit their genre
Velocity Curve 1: Press and hold C1(Z-Key 49/61) or A-1(Z-Key 76/88), turn on the
Velocity Curve2 : Press and hold D1(Z-Key 49/61) or B-1(Z-Key 76/88), turn on the
Velocity Curve4 : Press and hold F1(Z-Key 49/61) or D 0(Z-Key 76/88), turn on the
6.2
6.2
6.2
6.2 Aftertouch
Aftertouch Curve 1: Press and hold G4 (Z-Key 49) or G5 (Z-Key61/76) or G6 (Z-Key88),
Aftertouch Curve 2: Press and hold A4 (Z-Key 49) or A5 (Z-Key61/76) or A6 (Z-Key88),
Aftertouch Curve 3: Press and hold B4 (Z-Key 49) or B5 (Z-Key61/76) or B6 (Z-Key88),
Velocity
Velocity
Velocity Curve
of music.
response for the voice being played.
keyboard(
keyboard (
Velocity Curve3 : Press and hold E1(Z-Key 49/61) or C 0(Z-Key 76/88), turn on the
keyboard ( Hard );
keyboard (Fixed 127 ).
Aftertouch is defined as the effect when a series of data is sent while a key is being held
down.
turn on the keyboard (Normal);
turn on the keyboard (
turn on the keyboard ( Expand );
Aftertouch Curve 4: Press and hold C5 (Z-Key 49) or C6 (Z-Key61/76) or C7 (Z-Key88),
turn on the keyboard ( Close ).
Normal)
Soft
The [Octave +] button light flashes three times when the Velocity Curve is adjusted to
confirm that the setting has been successfully changed.
Aftertouch
Aftertouch
Aftertouch Curve
You
Curve
Curve
Curve Setting
You
can try different velocity curves to find your favorite and get the best touch
;
);
can change the sending rate by adjusting the Aftertouch Curve (8.2).
Setting
Setting
Setting
Curve
Curve
Curve Setting
Compress
Setting
Setting
Setting
);
If the [Octave -] button light flashes three times when the Aftertouch Curve has been
adjusted, , it confirms that the setting has been successfully changed.
12
Page 14
7.1
Velocity
7.1
Velocity
7.1
7.1 Velocity
Velocity Curve
Velocity Curve 1 (Normal) Velocity Curve 2 (Soft)
Curve
Curve
Curve List
List
List
List
7
Appendix
7
Appendix
7
7 Appendix
Appendix
7.2
After
7.2
After
7.2
7.2 After
After Touch
Velocity Curve 3 (Hard) Velocity Curve 4 (
Touch
Touch
Touch Curve
After Touch Curve 1 (Normal) After Touch Curve 2 (C
Curve
Curve
Curve List
List
List
List
Fixed at 127
ompress
)
)
After Touch Curve 3 (Expand) After Touch Curve 4 (
None
l
13
)
Off
Page 15

8
Troubleshooting
8
Troubleshooting
8
8 Troubleshooting
Troubleshooting
Common
Common
Common
Common problems
No sound when playing Z-Key:
Continuous long sound:
Incorrect voice:
problems
problems
problems with
After turning on the power switch, the Z-Key is not powered on:
Wrong pitch:
with
possible
with
possible
with possible
possible causes
1. Make sure the USB connection is made and the computer is on.
2. Make sure the power connector is firmly connected to the power outlet.
3. Faulty USB cable. Try another USB cable.
1. Check the volume settings of the tone generator and speaker system.
2. Check the MIDI connection and the audio cable
3. Check the attack time of the filter and envelop generator.
4. Make sure you have the right settings in your music software.
1. Check Sustain Pedal and polarity.
2. Check the release time of the envelop generator.
1. Tone generator not set properly . Initialize or Reset.
1. Check Octave function of the keyboard.
causes
causes
causes and
and
solutions
and
solutions
and solutions
solutions
2. MIDI pitch is tuned. Adjust fine turning or coarse tuning.
3. Pitch bend message not returned to default, please reset.
Some functions do not work:
1. Check the parts assigned correctly.
2. Make sure the tone generator or music software support those functions.
14
Page 16

9
Specifications
9
Specifications
9
9 Specifications
Specifications
Z-Key 49: 49-key keyboard (C1 - C5), (Initial Touch/After touch);
Z-Key 61: 61-key keyboard (C1 - C6), (Initial Touch/After touch);
Z-Key 76: 76-key keyboard (A-1 - C6), (Initial Touch/After touch);
Z-Key 88: 88-key keyboard (A-1 - C7), (Initial Touch/After touch).
Functions:
Basic: USB MIDI, Octave Shift, Pitch Band, Modulation Wheel, Pedal, MIDI Output,
Knob;
MIDI Data Sending: Control Change;
Assignable Parameters: Octave, Velocity Curve(Touch Sensitivity), Pitch Band Data,
Modulation Data, Luminance Information, After-touch Data, After-touch Velocity Curve
Data,.
Panel Control and Indicator:
Standby Button Indicator × 1;
Octave Button Indicator × 2;
Encoderr Dial × 1.
Input/Output Terminal:
USB port × 1;
Pedal × 1;
MIDI Out × 1.
Power Supply:
USB bus powered.
Dimension(W × D × H,)and Weight:
Z-Key 49: 719 × 266 × 83 mm, 5.9 Kg;
Z-Key 61: 882 × 266 × 83 mm, 7.2 Kg;
Z-Key 76: 1092 × 266 × 83 mm, 8.9 Kg;
Z-Key 88: 1255 × 266 × 83 mm, 10.1 Kg.
* Specifications and appearance are subject to change without notice.
15
Page 17
10
10
10
10 MIDI
CME Z-Key(MIDI KEYBOARD)
Module: Z-Key 49/61/76/88 MIDI
Fuction
Fuction
Fuction
Fuction Transmitted
Basic Channel Default 1 ×
Mode Default
Note
Number True Voice
Velocity Note ON
Aftertouch Key's
Pitch Band √ ×
Tremolo √ ×
Control Change 0~127 ×
System Command: Song
Position
Aux Messages: Active Sense × ×
√ :
Yes
Messages
Altered
Note OFF
Ch's
× : No
MIDI
MIDI
MIDI Implementation
Implementation
Implementation
Implementation Chart
MIDI
Implementation
MIDI
Implementation
MIDI Implementation
Implementation Chart
Transmitted
Transmitted
Transmitted Recognized
×
***********
0~127
***********
√ v=0~127
√ v=0~127
×
√
× ×
Chart
Chart
Chart Version: 1.0
×
×
×
×
×
×
Chart
Chart
Chart
Recognized
Recognized
Recognized
CME is continually improving its products, and every attempt is made to ensure the
information in the user’s manual is current and accurate. However, CME will not be
responsible for possible discrepancies between the manual and the real product.
16
Page 18

2010-09
Central
Central
Central
Central Music
Tel: +86-10-8580 1115
Fax: +86-10-8580 1114
Web: www.centrmus.com OR www.cme-pro.com
Music
Music
Music Co.
Co.
Co.
Co.
 Loading...