

Page 1
Intelligent Keyboard Controller
U-CTRL manual
—————————————————
models:VX 5/6/7/8
(v.1 .0 )
Page 2

INDEX:
Final Cut Pro 5 for Mac..................................................................................................................3
Soundtrack Pro for Mac................................................................................................................. 5
Logic Pro 7 / Logic Express 7.........................................................................................................7
ProTools ...........................................................................................................................................9
Nuendo 3.2 / Cubase SX 3.1 .........................................................................................................10
Sonar 6 ...........................................................................................................................................12
ACID Pro 6 / Vegas 7 ....................................................................................................................14
Audition 2 ......................................................................................................................................17
Live 5..............................................................................................................................................19
Reason 3 .........................................................................................................................................21
Tracktion 3.....................................................................................................................................23
Samplitude 8 / Sequoia .................................................................................................................24
SAWStudio.....................................................................................................................................26
APB Tools.......................................................................................................................................28
NOTICE:
¾ The purpose of this manual is to give you quick tutorial on how to use the U-CTRL function
of the CME VX keyboard in conjunction with commonly used software.
¾ The U-CTRL function uses hardware controllers to remotely control a variety of software
functions, for example, volume, pan, channel selection, sequence transport, on-off switches,
etc.
¾ Use only the adapter packaged with this instrument in order to ensure proper operation of the
motorized faders.
¾ The functions controllable by the VX U-CTRL depend on the specific software. Please
consult the supporting documentation for the software you are using.
¾ In U-CTRL mode, the U-CTRL function uses “VX USB AUDIO DEVICE [2]” to input and
output data; therefore do not assign the music channel to this port.
¾ Before using this manual, please update your VX firmware to v1.08 or higher.
You can check the version of your firmware by simultaneously pressing MASTER and
ASSIGN button while turning on the power.
To obtain the update program and the latest VX firmware file, please visit our websites.
http://www.centrmus.com and http://www.cme-pro.com ).
(
¾ If the software you are using is an earlier version, it may be different from or incompatible
with this manual. Therefore, be sure to upgrade you software to the latest version.
¾ The illustrations in this manual are for reference only, and may differ somewhat from the
actual software.
2
Page 3
Final Cut Pro 5 for Mac
z Connect the VX to the computer and turn on the power.
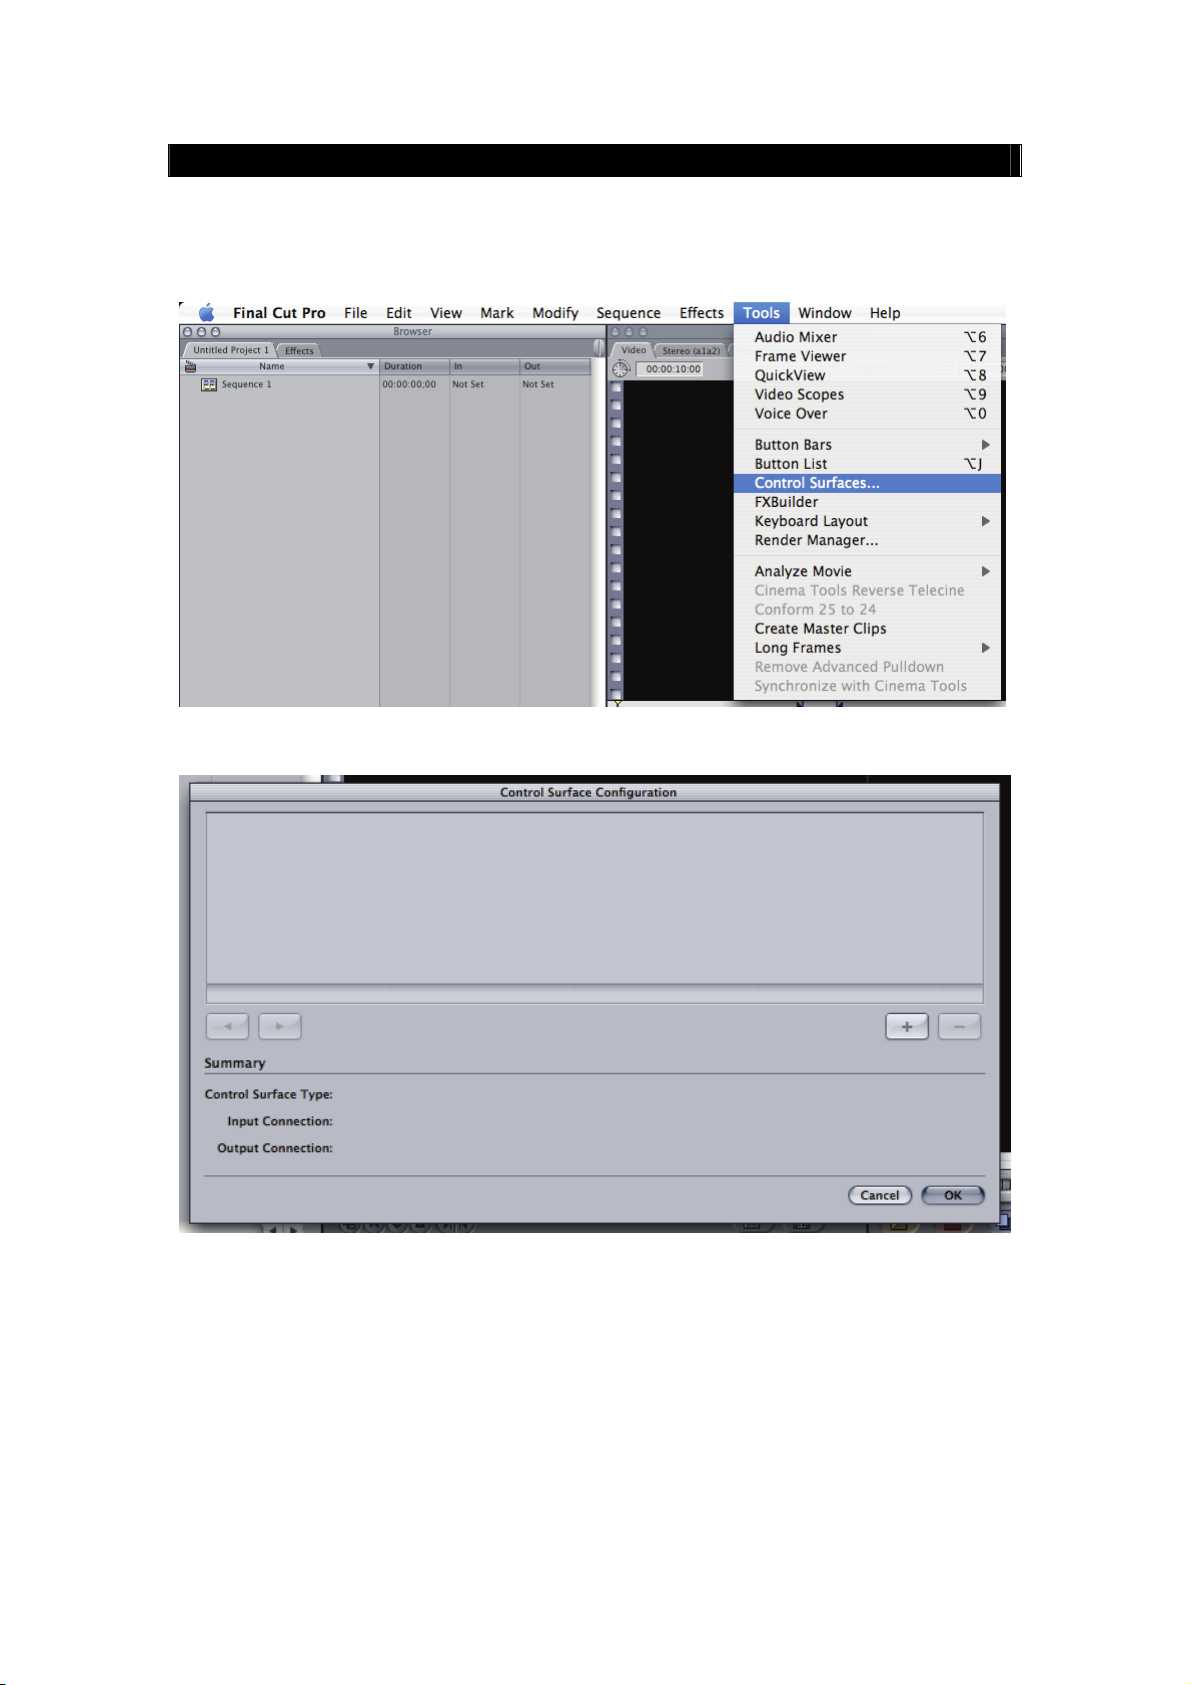
z Open Final Cut Pro 5.
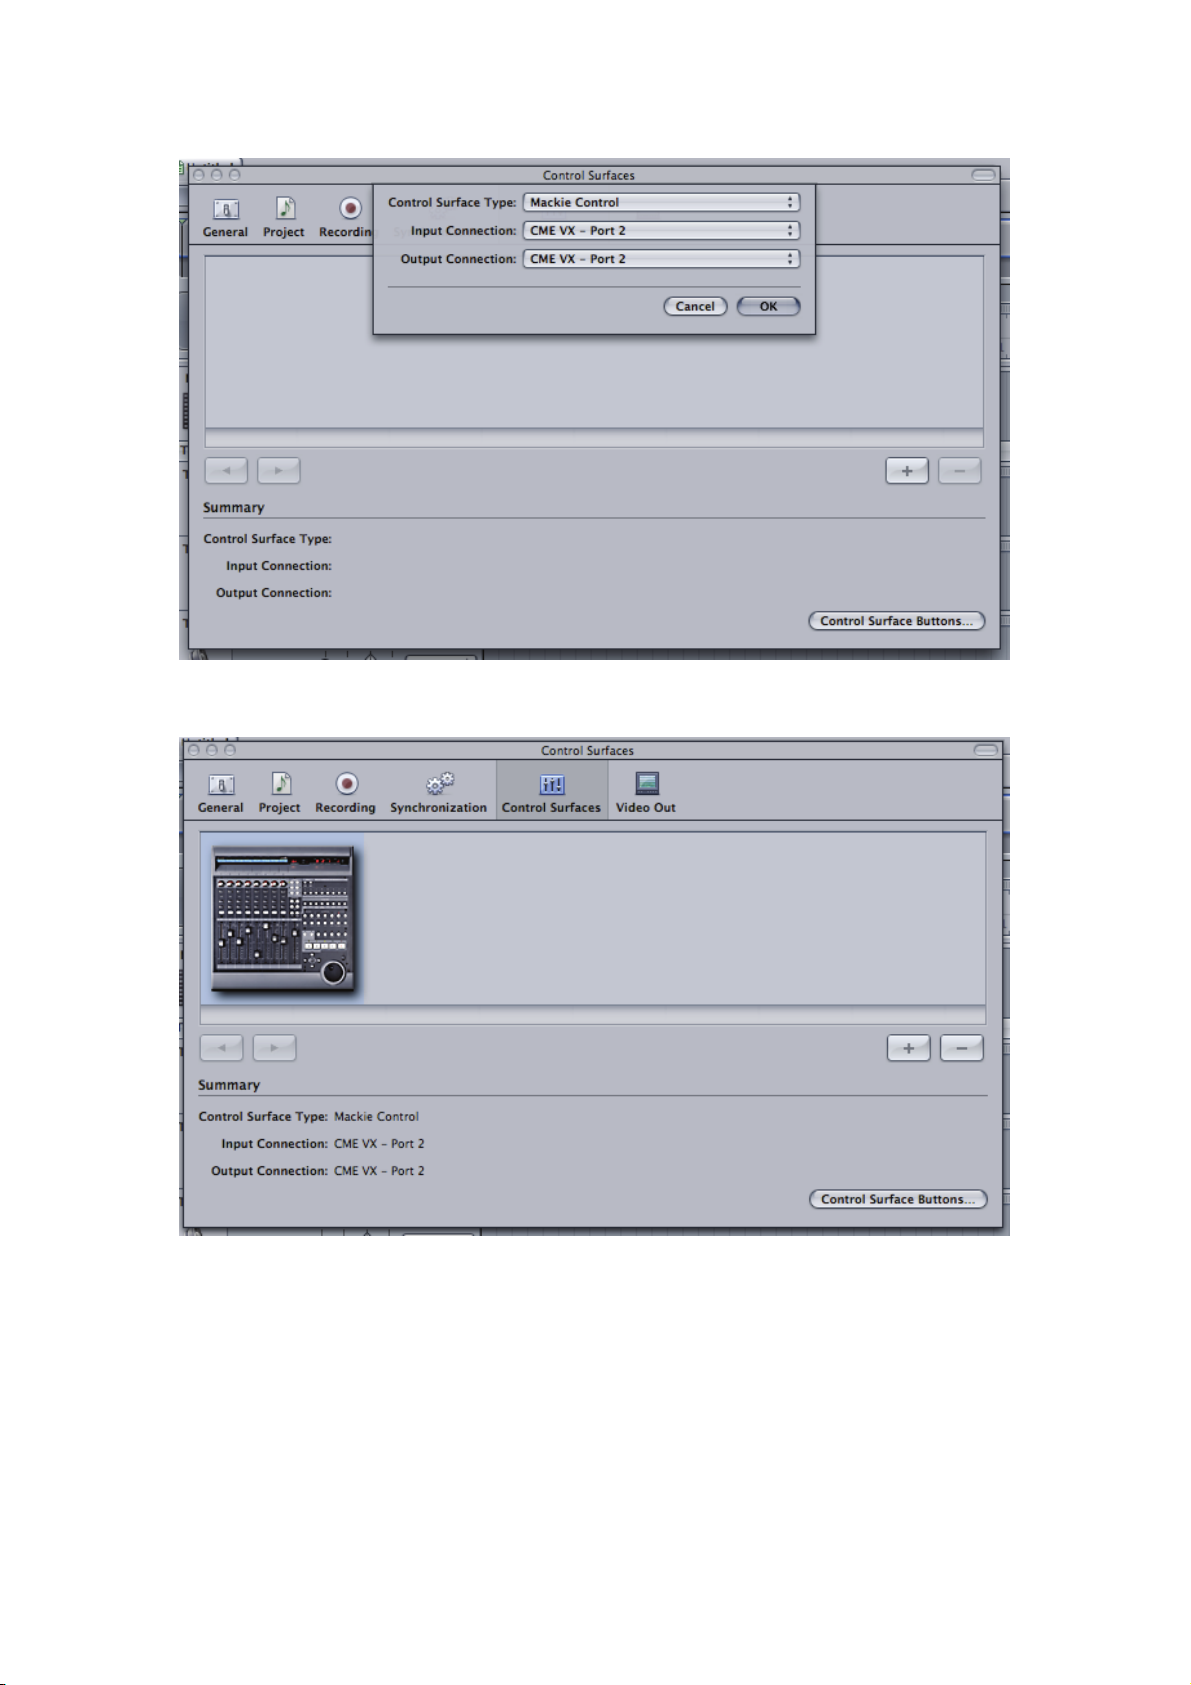
z Under the【Tools】menu click on【Control Surfaces】.
z Click on the [+] button on the pop-up window.
z For【Control Surface Type】, select “Mackie Control”, For【Input Connection】and【Output
Connection】, select “CME VX – Port 2”, and click on【OK】.
18
Page 4
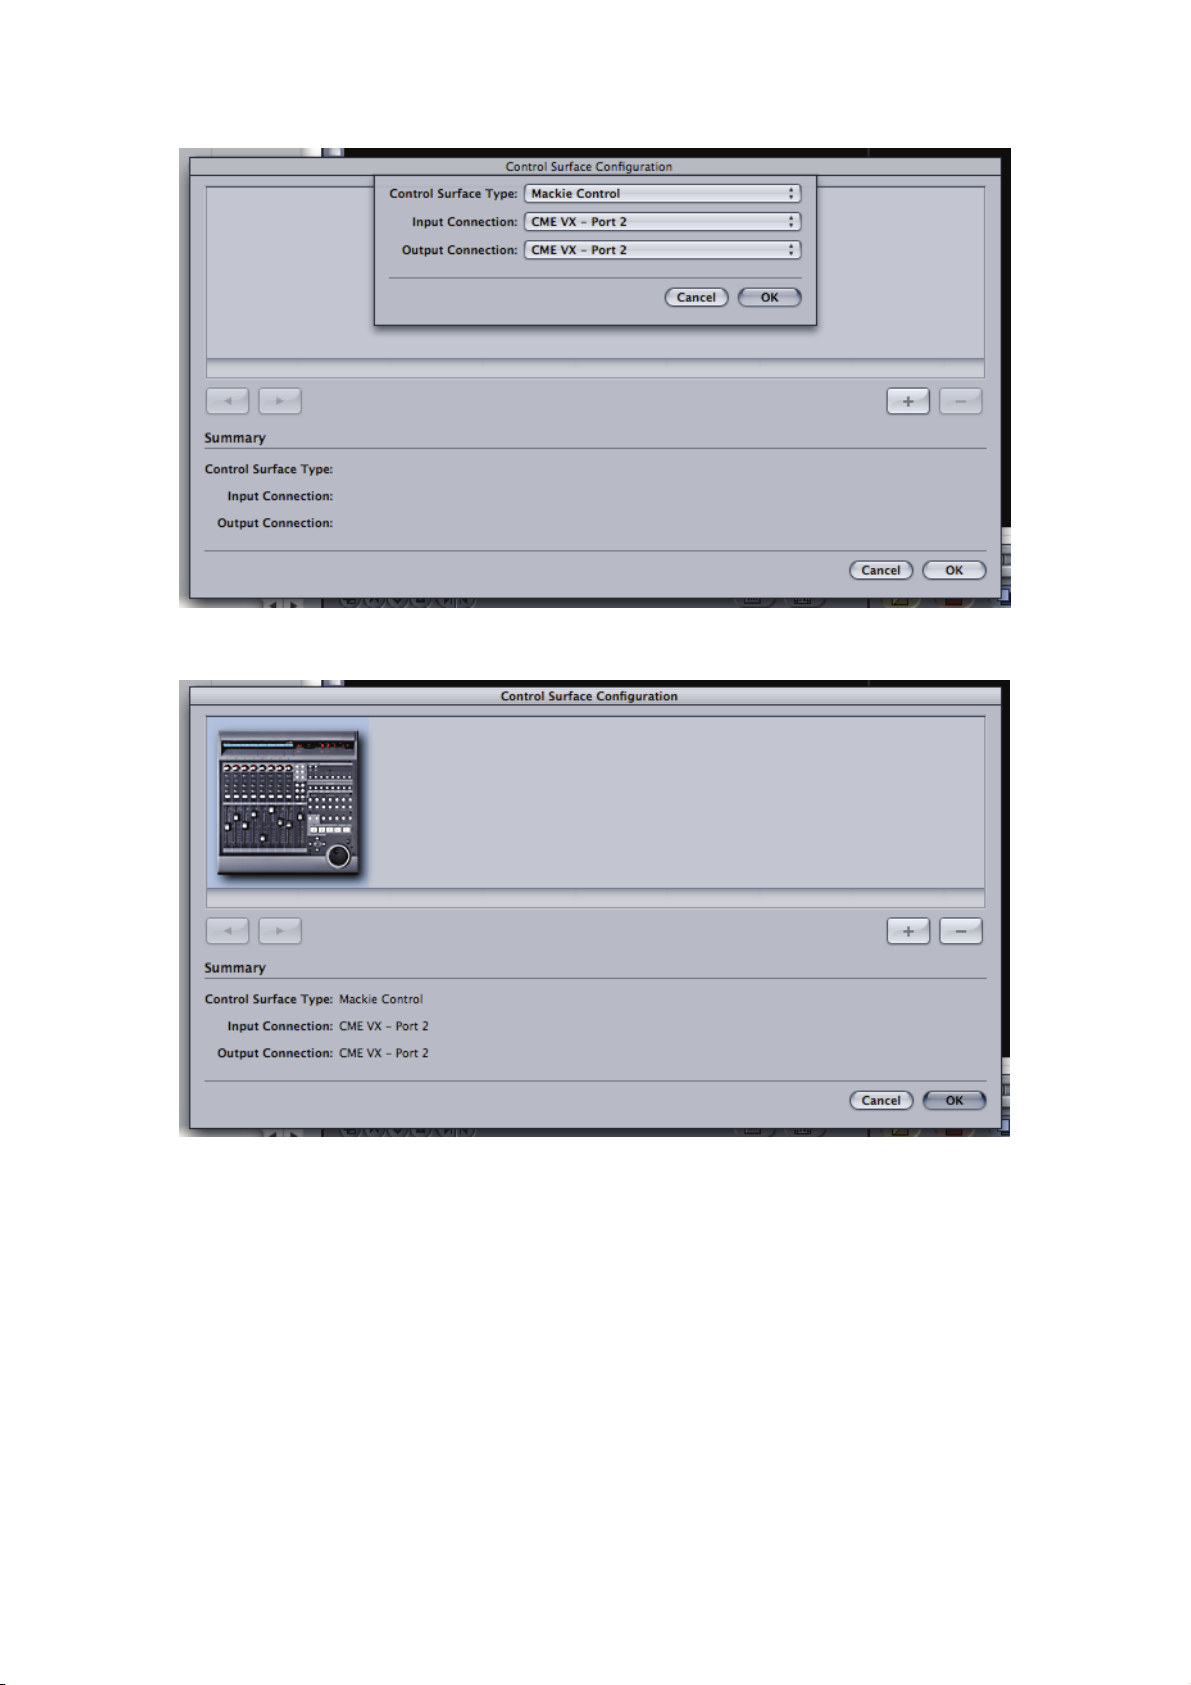
z Click on【OK】, close this window.
z Press the U-CTRL button on VX once to set U-CTRL to U-CTRL A.
z Finished.
19
Page 5
Soundtrack Pro for Mac
z Connect the VX to the computer and turn on the power.
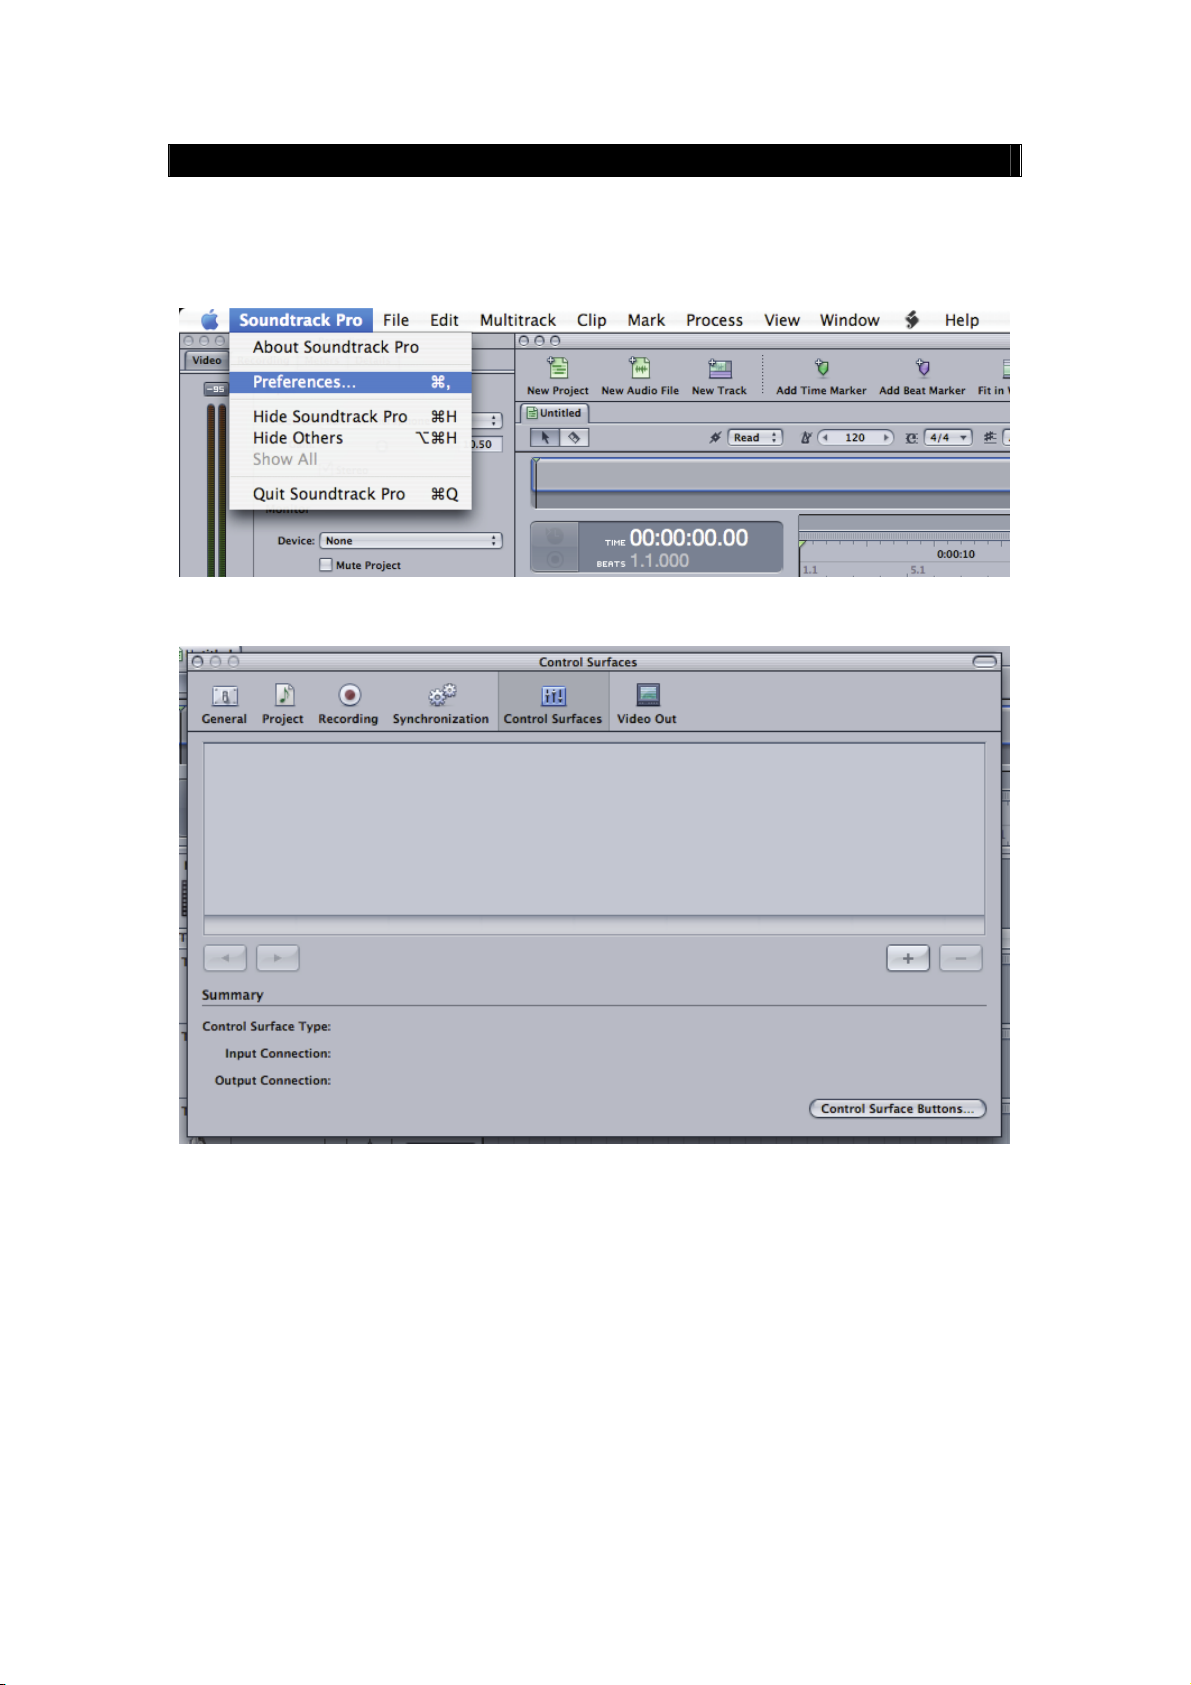
z Open Soundtrack Pro.
z Under the【Soundtrack Pro】menu, click【Preferences】.
z Click on the【Control Surfaces】icon,then click on【+】.
z For【Control Surface Type】select “Mackie Control”,For【Input Connection】and【Output
Connection】, select “CME VX – Port 2”,then click on【OK】.
20
Page 6
z Close this window.
z Press the U-CTRL button on the VX once to set U-CTRL to U-CTRL A.
z Finished.
21
Page 7
Logic Pro 7 / Logic Express 7
z Connect the VX to the computer and turn on the power.
z Open Logic.
z Press the U-CTRL button on VX three times to set U-CTRL to U-CTRL C.
z After a short wait, the Logic software automatically finds the VX and loads the
corresponding control interface.
z Finished.
If you wish to load the control interface manually, take the following steps:
z Connect the VX to the computer and turn on the power.
z Open Logic.
z Press the U-CTRL button on VX three times to set U-CTRL to U-CTRL C.
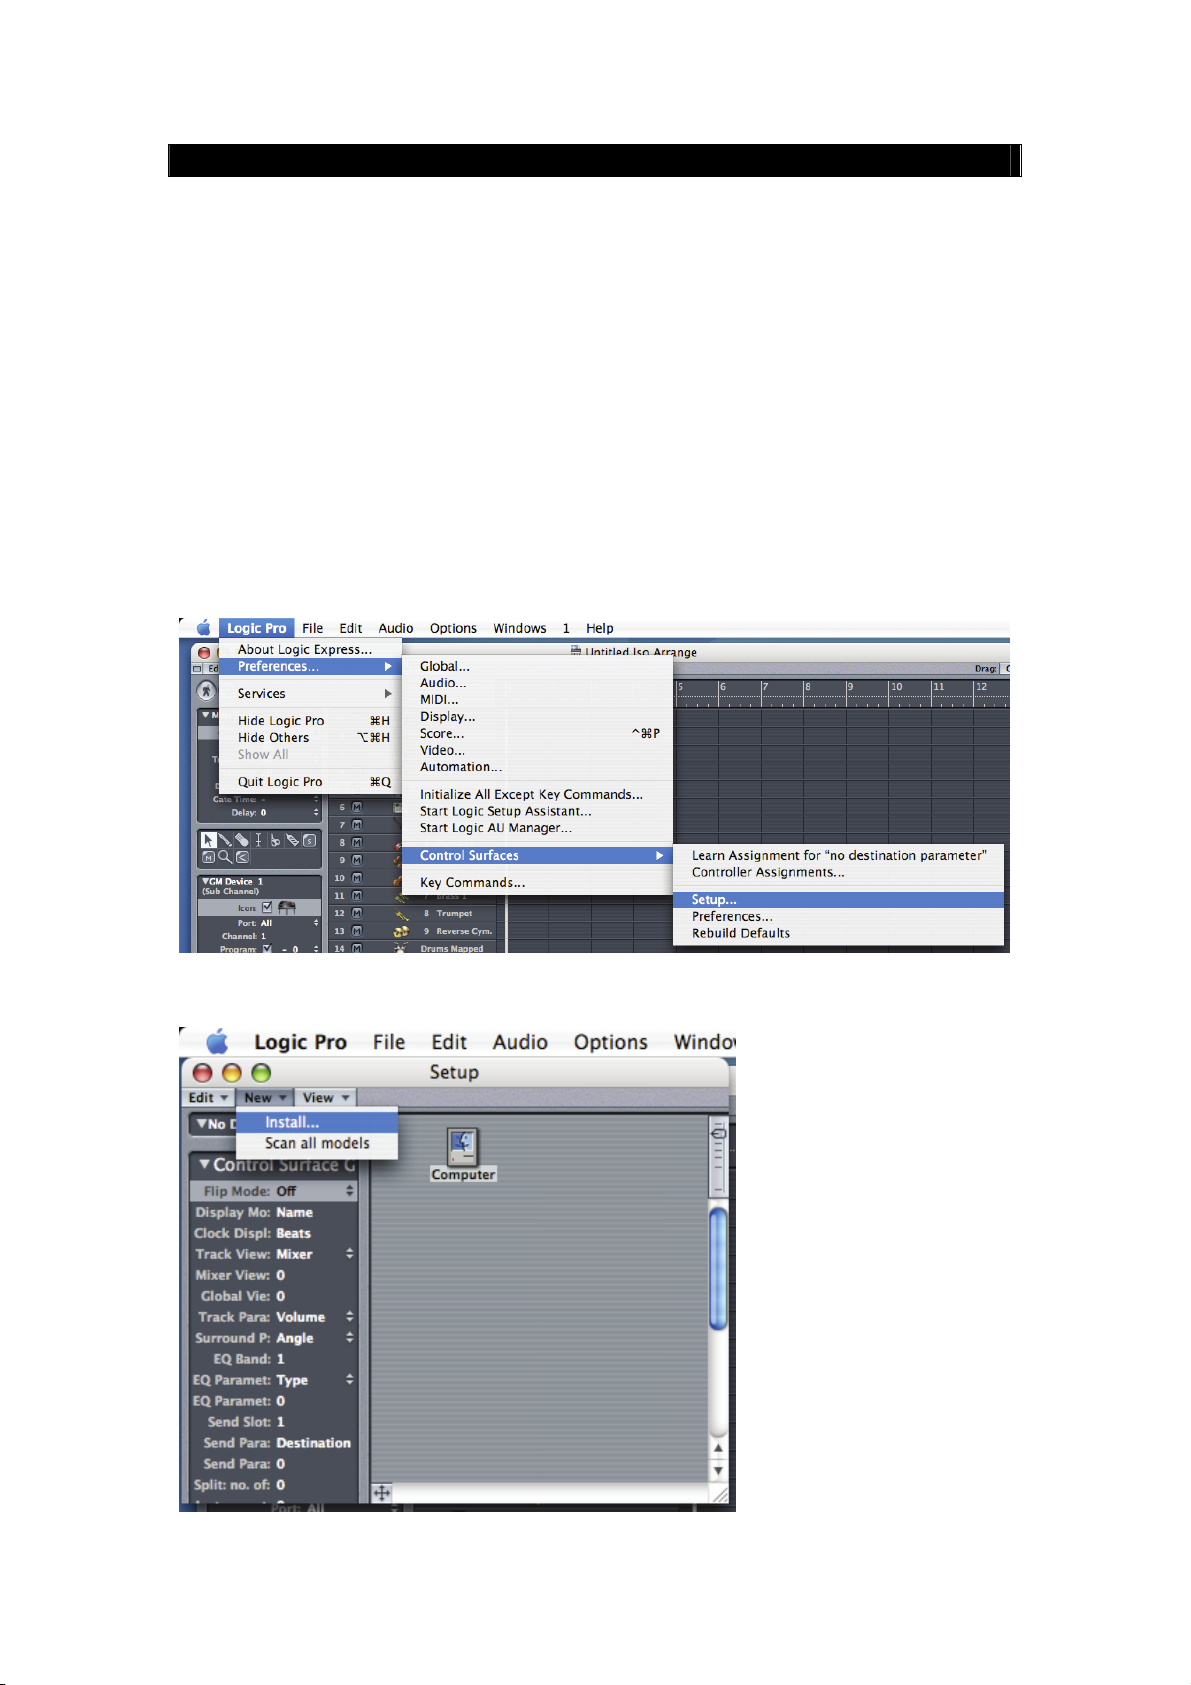
z Select these commands in the following order:【Logic】\【Preferences】\【Control Surfaces】
\【Setup】.
z Click on【New】\【Install…】.
22
Page 8
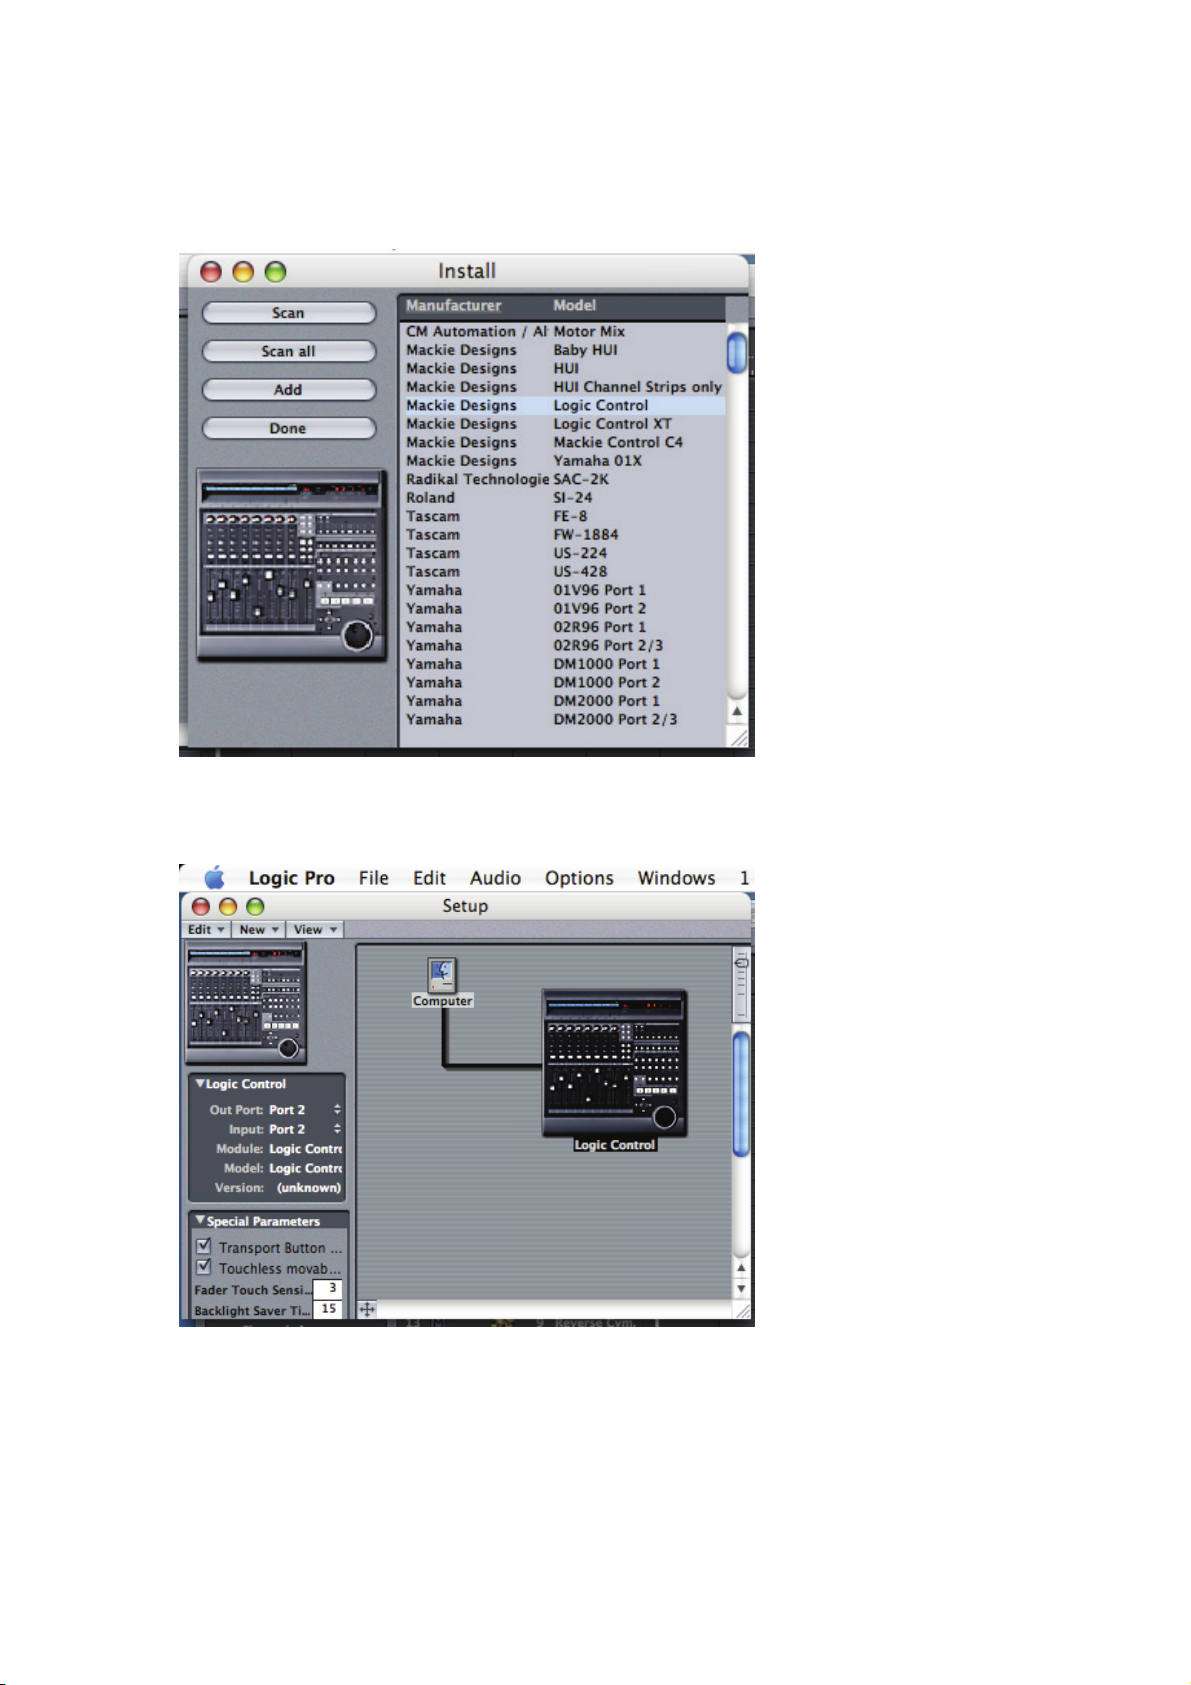
z Select【Mackie Designs Logic Control】on the right window,and click on【Add】on the left
window.
z In the window that pops up on the right, click on “Logic Control”, For【Out Port】和【 Input】
on the left, select “Port 2” of VX.
z Finished.
23
Page 9
ProTools
z Connect the VX to the computer and turn on the power.
z Open ProTools.
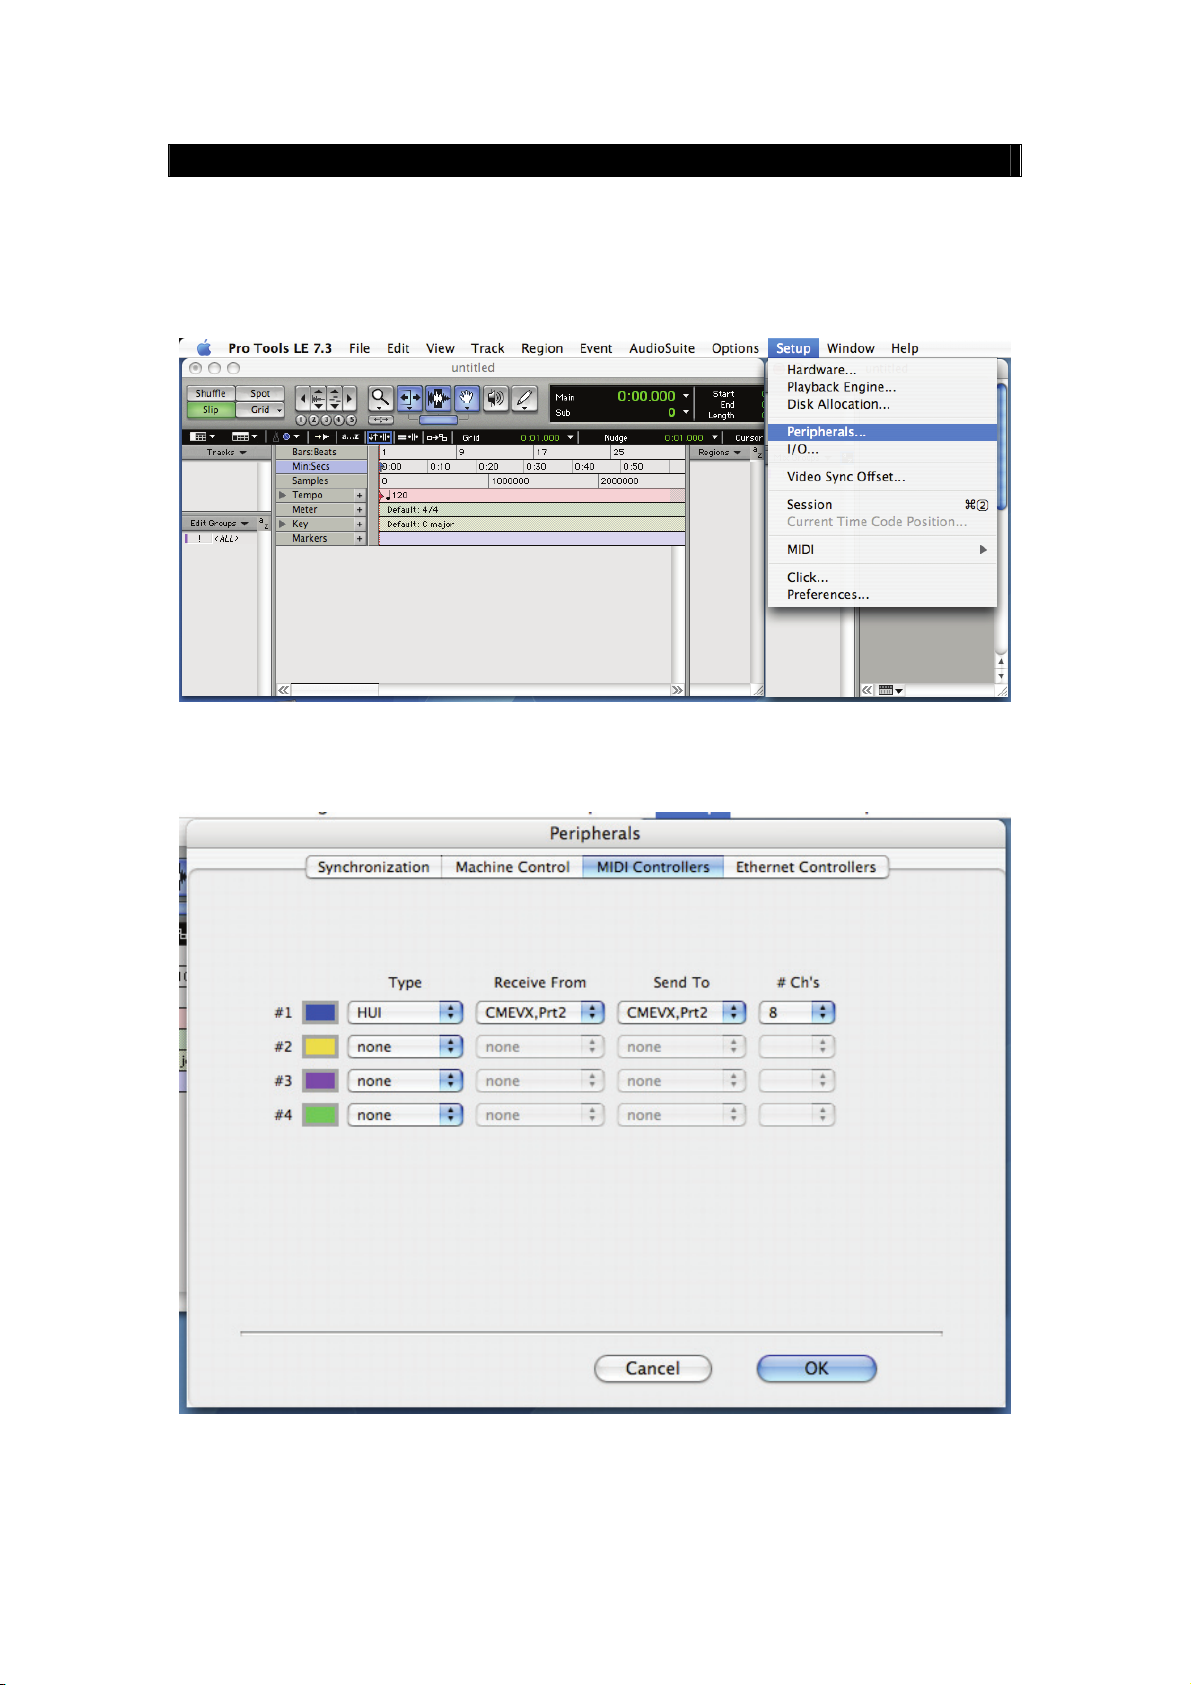
z Press the U-CTRL button on VX twice to set U-CTRL to U-CTRL B.
z Click on【Peripherals】under【Setup】menu.
z Click on【MIDI Controllers】on the pop-up window, For【Typ e】select “HUI”, For【Receive
Form】and【Send To】select “CME VX – Port 2”.
z Click on【OK】, close this window.
z Finished.
24
Page 10
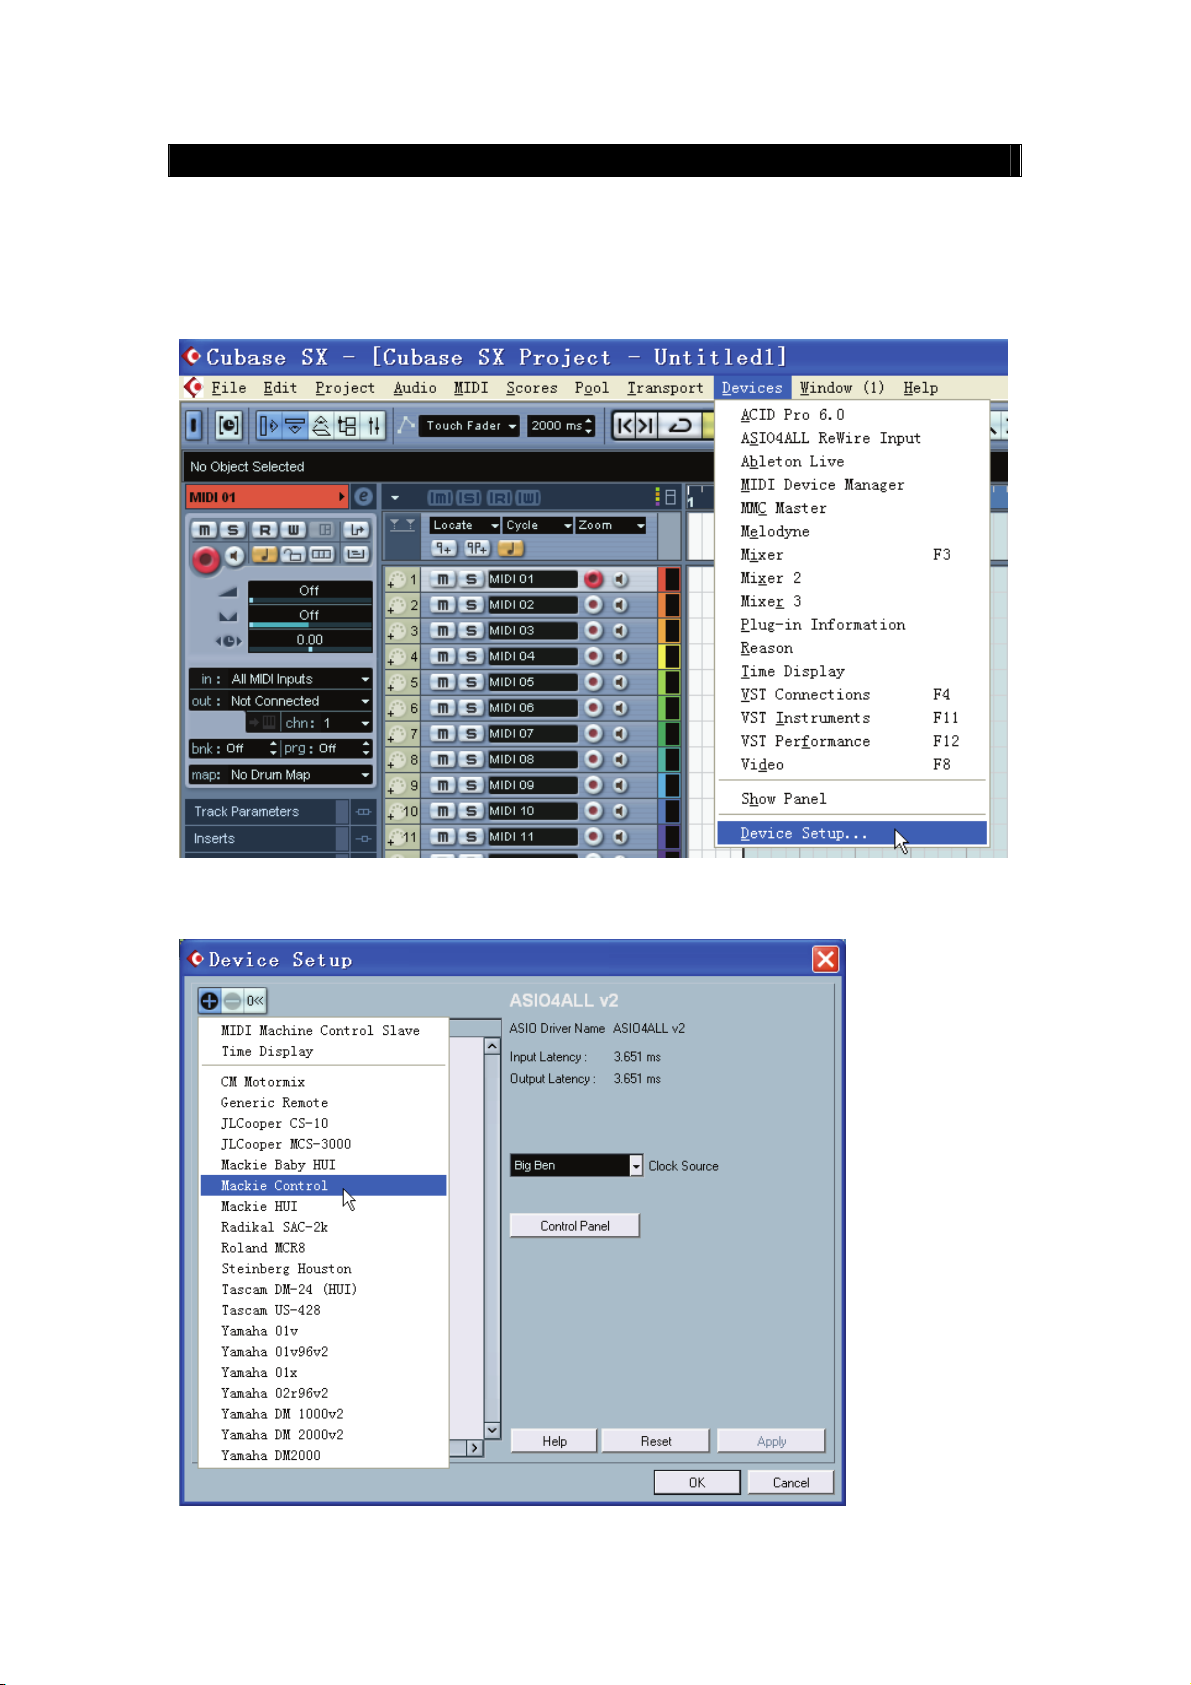
Nuendo 3.2 / Cubase SX 3.1
z Connect the VX to the computer and turn on the power.
z Press the U-CTRL button on VX once to set U-CTRL to U-CTRL A.
z Open Nuendo 3.2 / Cubase SX 3.1.
z Click【Device Setup…】under the【Devices】menu.
z On the【Device Setup】window,Click on【+】, then click on【Mackie Control】.
25
Page 11

z On the【Device Setup】window,
For【MIDI Input】, select “USB Audio Device [2]”
For【MIDI Output】, select “USB Audio Device [2]”
Unselect【Enable Auto Select】in the box below.
z Click on【OK】, close【Device Setup】window.
z Finished.
26
Page 12
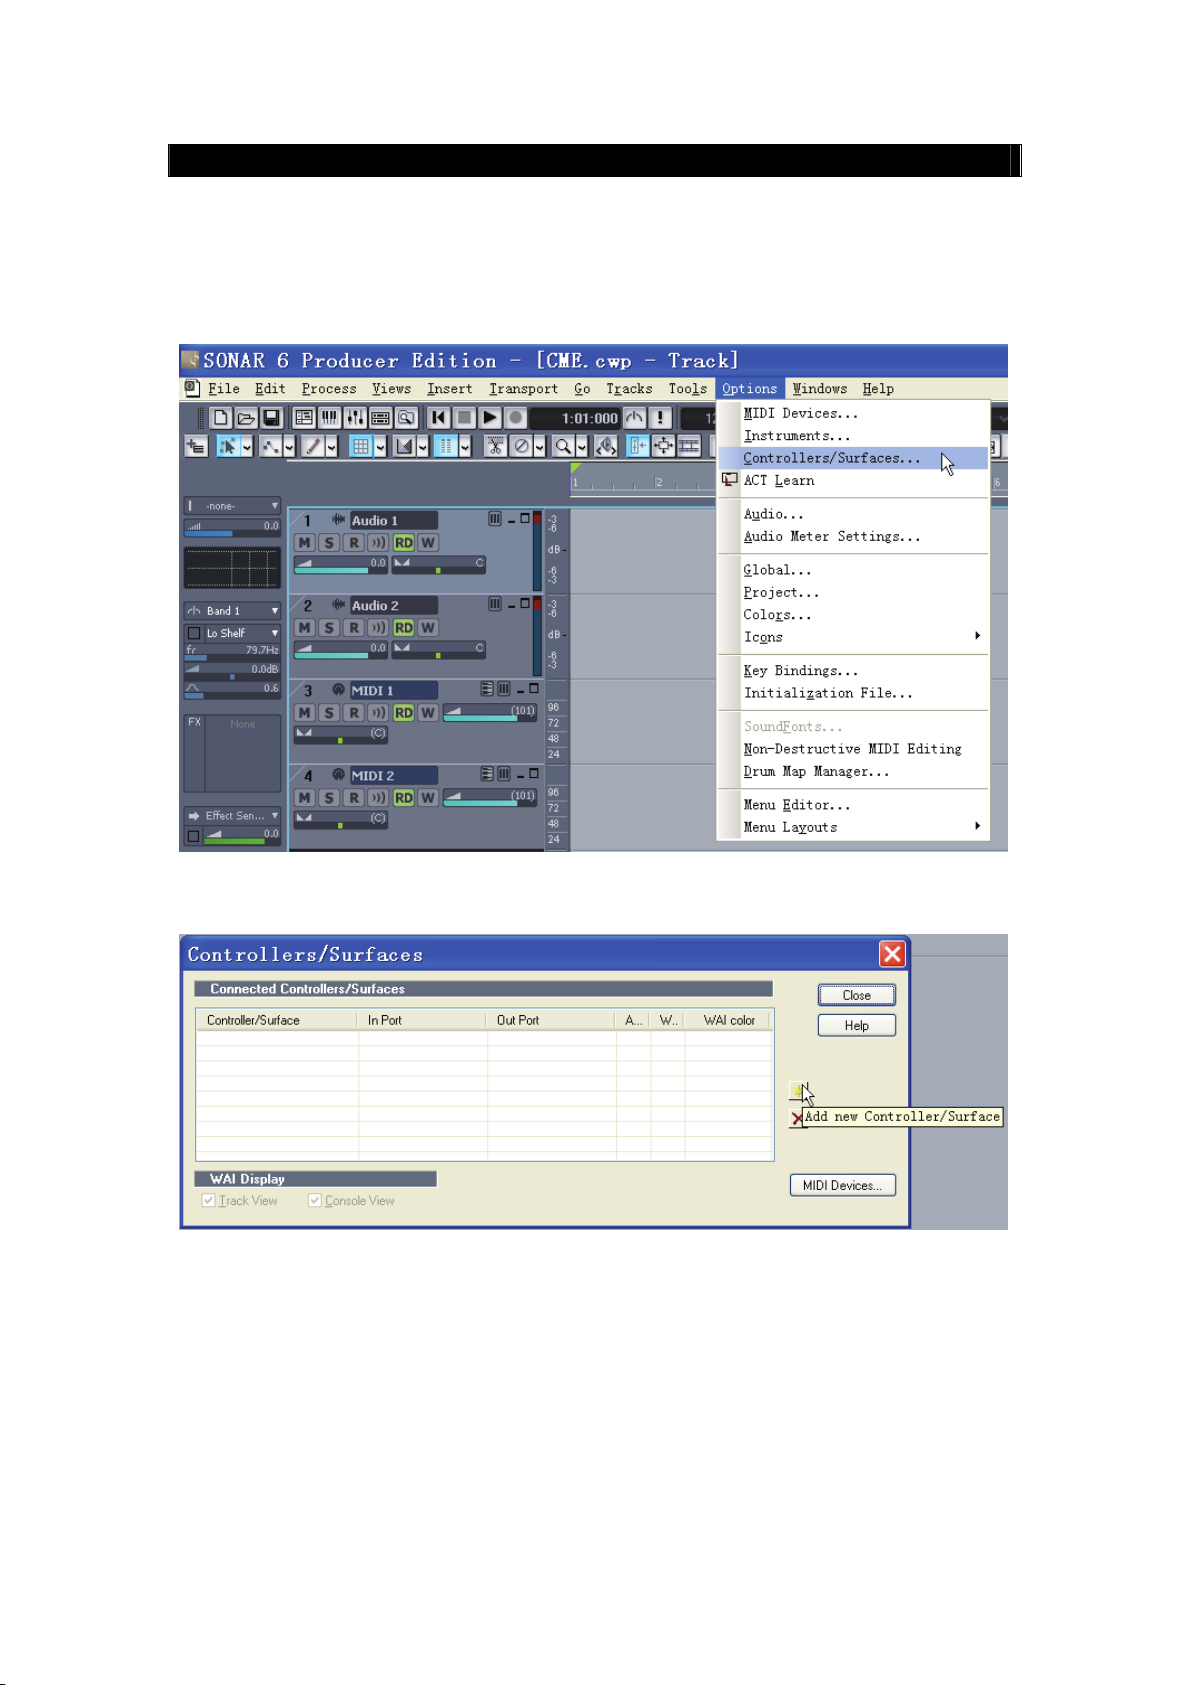
Sonar 6
z Connect the VX to the computer and turn on the power.
z Press the U-CTRL button on VX once to set U-CTRL to U-CTRL A.
z Open Sonar 6.
z Under the【Options】menu, click on【Controllers/Surfaces…】.
z On the【Controllers/Surfaces…】window, click on【Add new Controller/Surface】.
z On the【Controller/Surface Setup】window,
For【Controller/Surface】, select “Mackie Control”
For【Input Port】, select “USB Audio Device [2]”
For【Output Port】, select “USB Audio Device [2]”
z Click on【OK】, close【Controller/Surface Setup】window.
27
Page 13
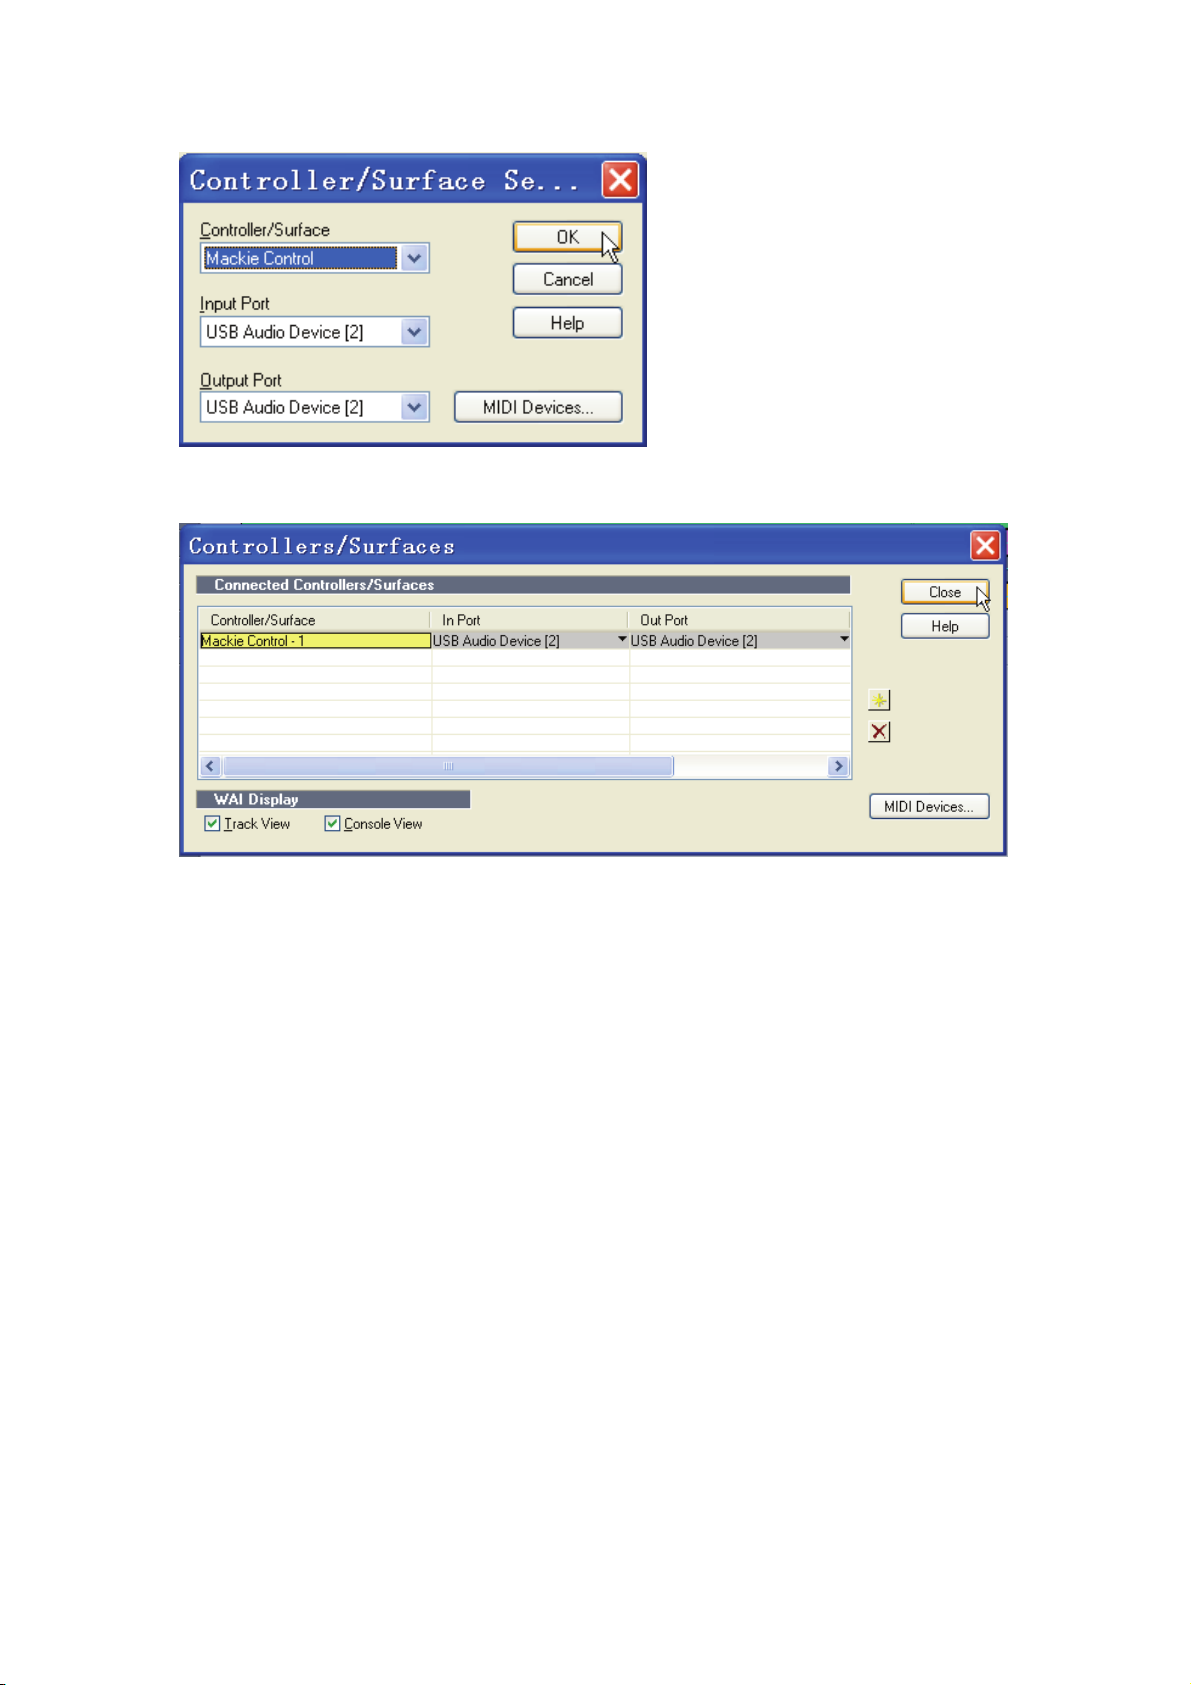
z Click on【Close】,Close【Controller/Surfaces】window.
z Finished.
28
Page 14

ACID Pro 6 / Vegas 7
z Connect the VX to the computer and turn on the power.
z Press the U-CTRL button on VX once to set U-CTRL to U-CTRL A.
z Open ACID Pro 6 / Vegas 7.
z Under the【Options】menu, click on【Preferences…】.
z On the【Preferences】window, click on the【External Control & Automation】tab.
z For【Available】, select “Mackie Control”.
z Click on【Add】.
29
Page 15

z Under【Active control devices】,
z Right click on【Mackie Control】, click on【Configure】.
z On the【Configure Mackie Control】window:
For【Device type】, select “Emulated Mackie Control Device”
For【MIDI Input】, select “USB Audio Device [2]”
For【MIDI Output】, select “USB Audio Device [2]”
z Click on【OK】, Close【Configure Mackie Control】window.
30
Page 16

z Click on【OK】, then close【Preferences】window.
z Under the【Options】menu, select the【External Control】box.
z Finished.
31
Page 17

Audition 2
z Connect the VX to the computer and turn on the power.
z Press the U-CTRL button on the VX once to set U-CTRL to U-CTRL A.
z Open Audition 2.
z Under the【Edit】menu, click on【Preferences…】.
z On the【Preferences】window, for【External Control Device】, select “Mackie Control”:
z Click on【Configure…】.
32
Page 18

z On the【Configure Mackie Control】window:
For【MIDI Input Device】, select “USB Audio Device [2]”
For【MIDI Output Device】, select “USB Audio Device [2]”
z Click on【OK】, Close【Configure Mackie Control】window.
z Click on【OK】, Close【Preferences】window.
z Finished.
33
Page 19

Live 5
z Connect the VX to the computer and turn on the power.
z Press the U-CTRL button on VX once to set U-CTRL to U-CTRL A.
z Open Live 5.
z Click on【Preferences…】under【Option】menu.
z On the【Preferences】window, select【MIDI/Sync】tabs.
For【Control Surface】, select “Mackie Control”
For【Input】, select “USB Audio Device [2]”
For【Output】, select “USB Audio Device [2]”
z Close【Preferences】window.
34
Page 20
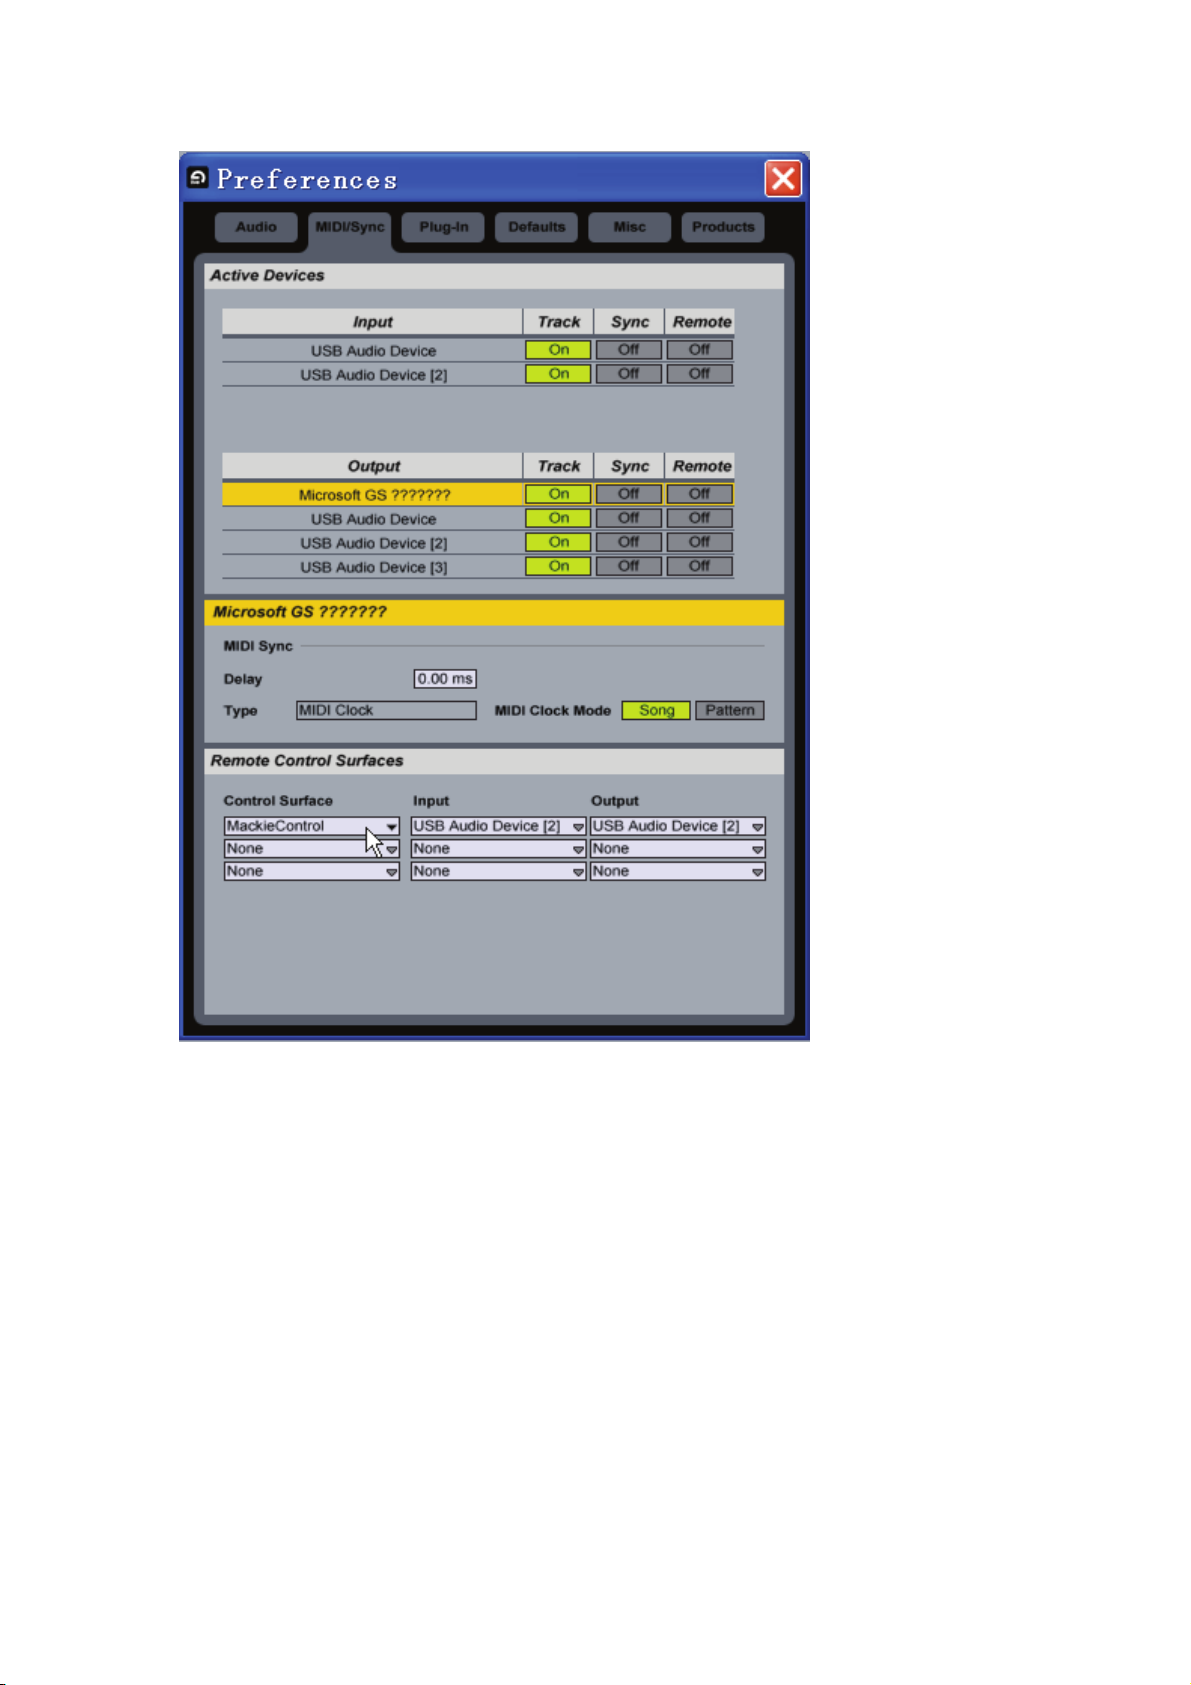
z Finished.
35
Page 21

Reason 3
z Connect the VX to the computer and turn on the power.
z Press the U-CTRL button on the VX once to set U-CTRL to U-CTRL A.
z Open Reason 3.
z Click on【Preferences…】under【Edit】menu.
z On the【Preferences】window. For【Page】, select “Control Surface and Keyboard”.
z Click on【Add】.
36
Page 22
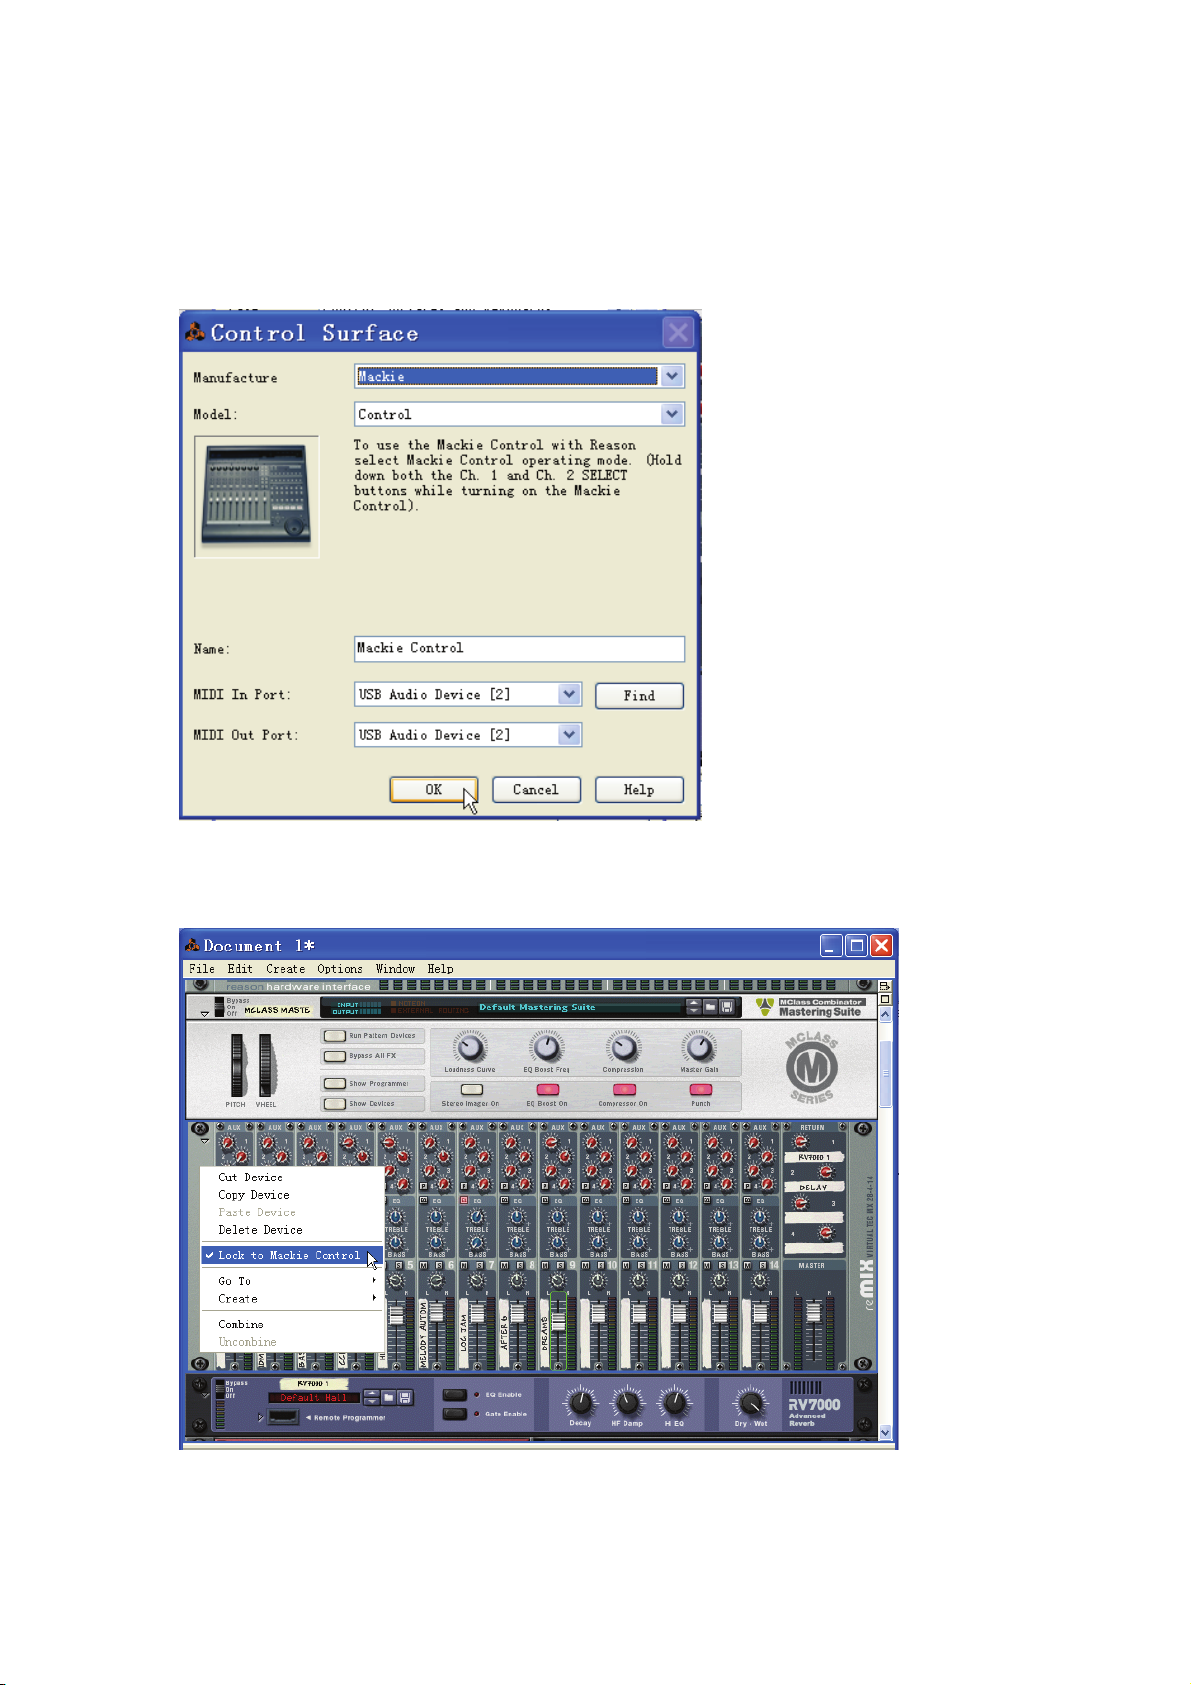
z On the【Control Surface】window, for【Manufacture】select “Mackie”.
For【MIDI In Port】, select “USB Audio Device [2]”
For【MIDI Out Port】, select “USB Audio Device [2]”
z Click on【OK】, Close【Control Surface】window.
z You may select which device you wish to be controlled by the VX by right-clicking on the
device and selecting【Lock to Mackie Control】.
z Finished.
37
Page 23

Tracktion 3
z Connect the VX to the computer and turn on the power.
z Press the U-CTRL button on VX once to set U-CTRL to U-CTRL A.
z Open Tracktion 3.
z Click on【Settings】menu.
z Click on【Control Surfaces】menu.
z Click on【Mackie Control Universal】under【Supported Control Surface】menu.
For【Input device】, select “USB Audio Device [2]”
For【Output device】, select “USB Audio Device [2]”
z Finished.
38
Page 24
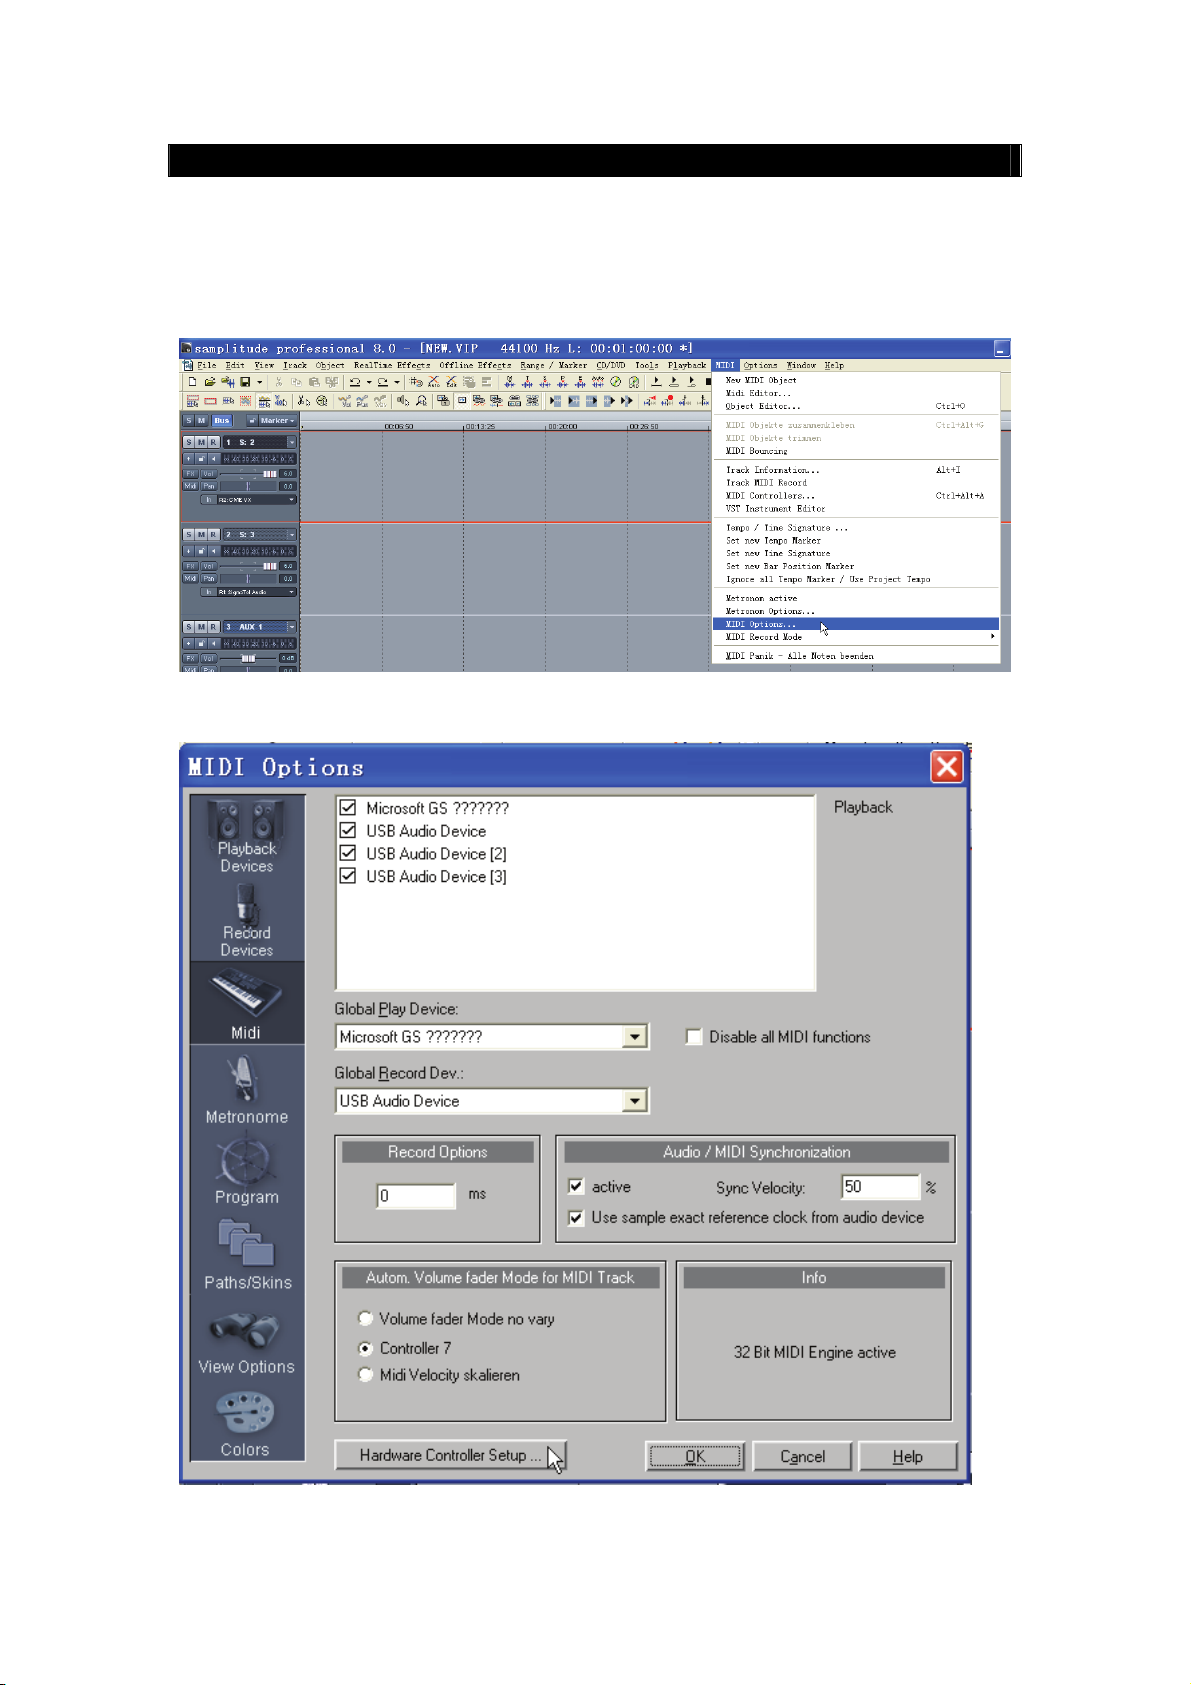
Samplitude 8 / Sequoia
z Connect the VX to the computer and turn on the power.
z Press the U-CTRL button on VX once to set U-CTRL to U-CTRL A.
z Open Samplitude 8 / Sequoia.
z Under the【MIDI】menu click on【MIDI Options…】.
z On the【MIDI Options】window, Click on【Hardware Controller Setup…】.
39
Page 25
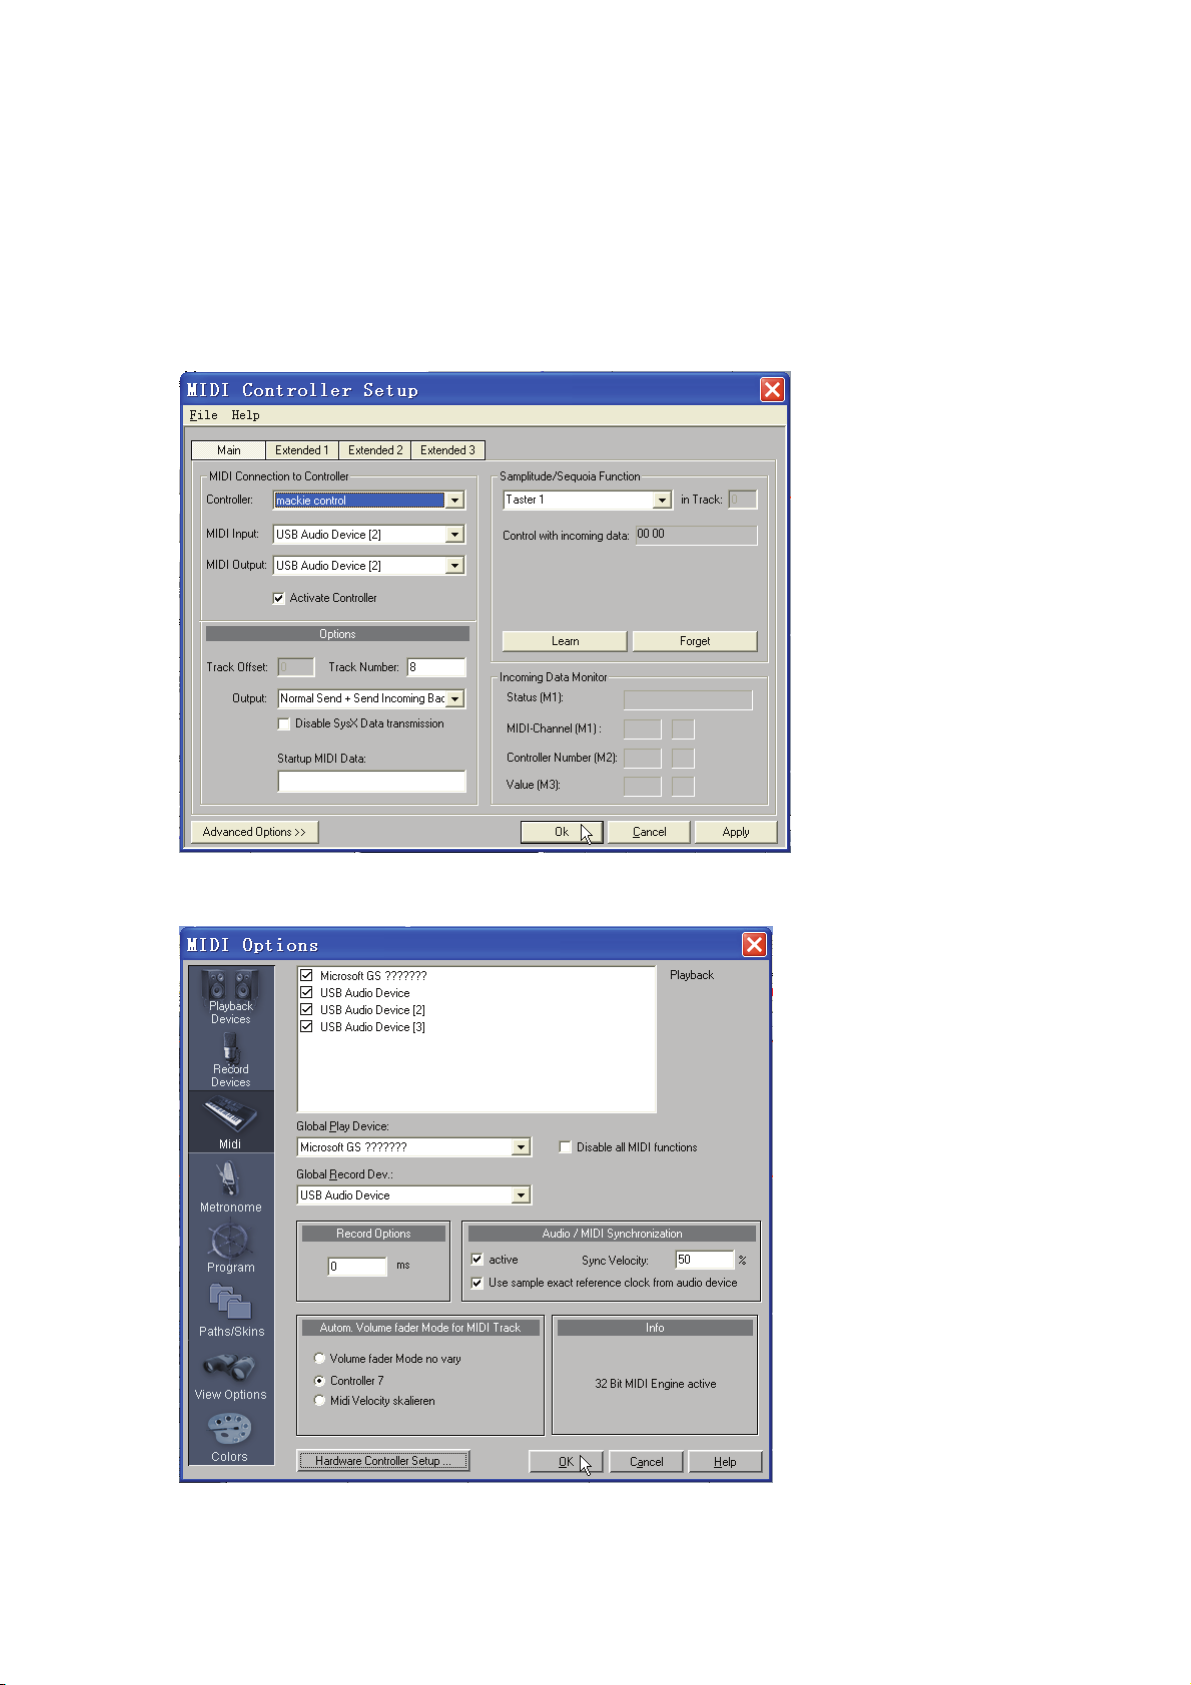
z On the【MIDI Controller Setup】window, note that under the【Main】tab, you must select
values for “MIDI Connection to Controller” as follows:
For【Controller】, select “Mackie control”
For【MIDI input】, select “USB Audio Device [2]”
For【MIDI output】, select “USB Audio Device [2]”
z Select【Activate Controller】.
z Click on【OK】, Close【MIDI Controller Setup】window.
z Click on【OK】, then close【MIDI Option】window.
z Finished.
40
Page 26

SAWStudio
z Connect the VX to the computer and turn on the power.
z Press the U-CTRL button on VX once to set U-CTRL to U-CTRL A.
z Open SAWStudio.
z Click【File】\【MIDI-Control Template File】\【Open】
z On the【Open MIDI-Control Template】window, Open “MidiCtrl_Mackie_Control.mct” file.
41
Page 27

z Click on【Midi Devices Setup】under【Options】menu.
z On the【Midi Device Setup】window:
For【Midi-Control Device in】, select “USB Audio Device [2]”
For【Midi-Control Device out】, select “USB Audio Device [2]”
z Click on【OK】, Close【Midi Device Setup】window.
z On the【Smpte/Midi】menu, select【Midi-Control In Active】and【Midi-Control Out Active】.
z Finished.
42
Page 28

APB Tools
z Connect the VX to the computer and turn on the power.
z Press the U-CTRL button on VX once to set U-CTRL to U-CTRL A.
z Open APB Tools.
z On the【Audio Hardware is online】window:
For【MIDI IN】, select “USB Audio Device [2]”
For【MIDI OUT】, select “USB Audio Device [2]”
z Finished.
● CME is continually improving its products, and every attempt is made to ensure the
information in the user’s manual is current and accurate. However, CME will not be
responsible for possible discrepancies between the manual and the real product.
43
Page 29

Central Music Co.
Tel: +86-10-8580 1115
Fax: +86-10-8580 1114
2007-09
Web: www.cme-pro.com
E-mail for support:: support@cme-pro.com
44
 Loading...