

Page 1
CMA-44/66
Quick Setup
Instructions
WARNIN G : Elec t r i c a l a n d p lu m b i n g
connections n e e d t o b e m a de b y a
licensed serv i c e p er s o n a nd c o m pl y
with all Fede r a l , St a t e a nd L o c al
Health, Elect r i c a l , P l u m b in g a n d
Safety codes.
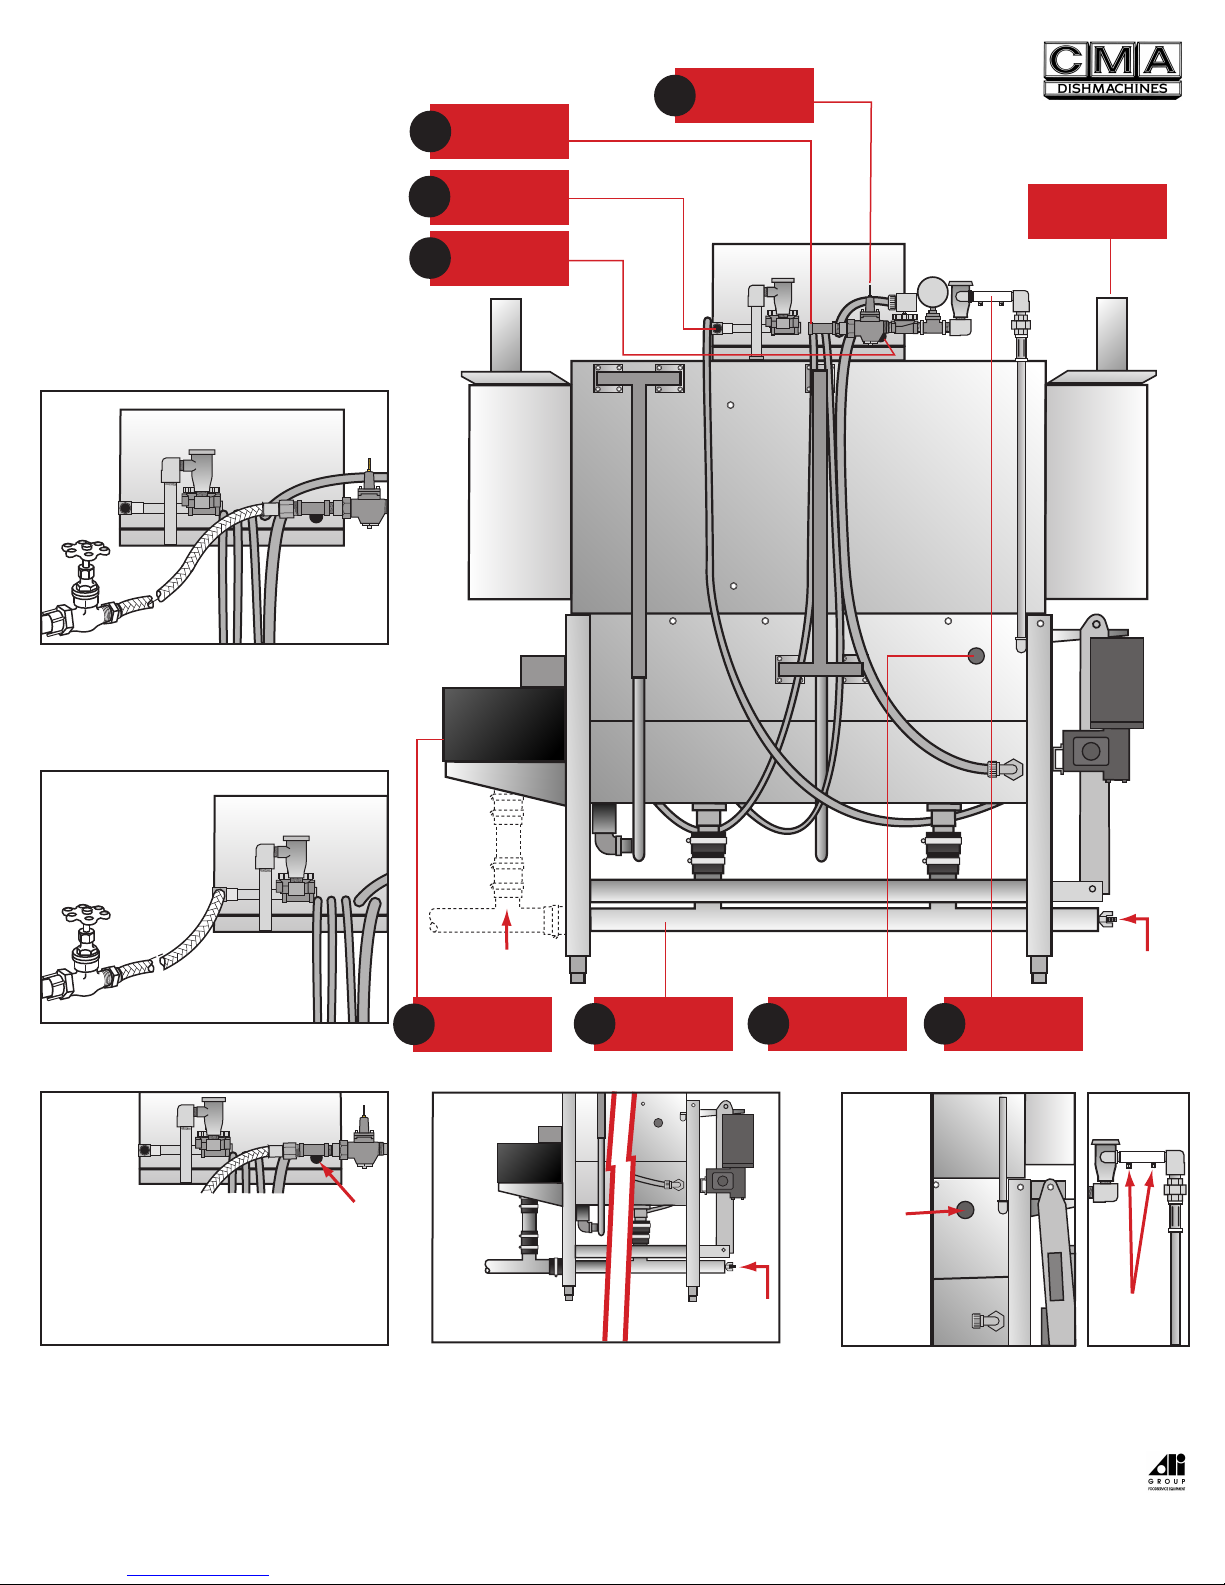
STEP
1
1/2" WATER
1
2
3
CONNECTION
REAR VIEW
INLET
3/4" WATER
INLET
ELECTRICAL
CMA-44
1
PRESSURE
REGULATOR
800-854-6417
OPTIONAL VENT
HOODS 4"X16"
Connect hot water supply line to rinse 1/2"water
i n l e t . A d j u s t p ressure re g u lator if n e c e ssary. Wat e r
te m p e rature sh ould b e 140°F wash and 14 0° F ri n se
fo r CMA- 44L. T he CMA-44 H should read 155° F wa sh,
180° F rinse.
STEP
2
Con n ect f ill w ater supp l y li n e (1 2 0° F/ 1 40° F ) to a
3 / 4 " w a t e r i n l e t t o f i l l t h e m a c h i n e .
STEP
3
VOLTS PHASE AMPS
208 1 61
240 1 65
208 3 38
240 3 42
HEATER 10kW
ELECTRICAL
HARD WIRE
CONNECTION
POINT
DRAIN PLUMBING
NOT SUPPLIED
4
SCRAP
TRAP DRAIN
STEP
4
4
DRAIN PIPE
2" HOLE
PLUG
DETERGENT
5
FITTING INLET
STEP
5
REMOVE
PLASTIC
PLUG AND
INSTALL
DETERGENT
FITTING
5
2" HOLE
PLUG
MIXING
CHAMBER
PLUGS
3 Phase: Connect the wire with the highest voltage
(stinger lead) to L2 on the contactor. L1, L2 and L3
mu st co mply with all l ocal and s tate elect rical code s
for sizing of wire and circuit breaker protection.
Additional information can be found in the Installation
and Operation manual supplied with machine.
C o nn ec t d r a in a t e i t h e r en d o f th e ho r i z o n ta l
d r ai n p i p e fr om w a s h t an k o r s c ra p tr a p d r a i n .
Remove plastic plug to install detergent fitting. Remove
plug from the mixing chamber to install sani/rinse injection
fitting (sanitizer detergent and rinse injection fittings provided
by dispenser manufacturer, CMA does not supply.)
1-2008
Page 2

CMA-44/66
Quick Setup
OP
ER
AT
I
N
G
I
N
S
T
R
UC
T
I
ON
S
POW
ER
OF
F-
ON
CMA-44 FRONT VIEW
800-854-6417
Instructions
WARNIN G : Elec t r i c a l a n d p lu m b i n g
connections n e e d t o b e m a de b y a
licensed serv i c e p er s o n a nd c o m pl y
with all Fede r a l , St a t e a nd L o c al
Health, Elect r i c a l , P l u m b in g a n d
Safety codes.
PRESSURE
GAUGE
DETERGENT
6
PROBE INLET
THERMOSTAT
8
MOTOR CAP
7
DRAIN VALVE
9
POWER
ON/OFF
TEMPERATURE
GAUGE
SCRAP TRAP
10
STEP
6
Remove the stainless steel plug to install the detergent
probe (provided by dispensermanufacturer, CMA does
not supply).
STEP
9
L
C
O
S
E
STEP
7
Remove motor cap to verify motor rotation. Shaft slot
should be rotating clock-wise when motor is running. If
shaft slot is turning counter clock wise, swap L-1 and L-2
on main contactor.
STEP
THERMOSTAT
ACCESS
8
Adjust th e r m ostat if n e c essary. Wa t e r temperatu r e
sh ould b e 140° F wash and 14 0° F ri nse fo r CMA44 L.
The CM A-44H sho uld read 155° F wash, 1 80°F rins e.
STEP
10
PO
W
E
R
OF
F
-
ON
C l o s e d r a i n v a l v e t o a l l o w m a c h i n e t o f i l l w i t h
water.
T u r n o n d i s h m a c h i n e b y p r e s s i n g t h e " P O W E R
ON/OFF"switch to the "ON"position. Dishmachine
will fill automatically and will also activate heater.
1-2008
 Loading...