

Page 1

CloverETL Server
Reference Manual
Page 2

CloverETL Server: Reference Manual
This Reference Manual refers to CloverETL Server 4.3.x release.
Copyright © 2016 Javlin, a.s. All rights reserved.
Javlin
www.cloveretl.com
www.javlininc.com
Feedback welcome:
If you have any comments or suggestions for this documentation, please send them by e-mail to
Consider How to speed up communication with CloverCARE support before contacting the support.
Page 3

Table of Contents
I. CloverETL Server ...................................................................................................................... 1
1. What is CloverETL Server? ................................................................................................ 2
II. Installation Instructions .............................................................................................................. 4
2. System Requirements for CloverETL Server .......................................................................... 5
3. Installing .......................................................................................................................... 8
Evaluation Server .......................................................................................................... 9
Installation of CloverETL Server ............................................................................. 9
Enterprise Server ......................................................................................................... 12
Apache Tomcat ................................................................................................... 12
Jetty .................................................................................................................. 16
IBM WebSphere ................................................................................................. 17
Glassfish / Sun Java System Application Server ........................................................ 20
JBoss Application Server ...................................................................................... 21
JBoss Enterprise Application Platform .................................................................... 23
Oracle WebLogic Server ...................................................................................... 27
Installation of CloverETL Server License ........................................................................ 29
Installation of CloverETL Server License using a Web Form ....................................... 29
Installation of CloverETL Server License using a license.file Property ........................... 32
Separate License WAR ........................................................................................ 32
IBM InfoSphere MDM Plugin Installation ....................................................................... 33
Installation into Server ......................................................................................... 33
Possible Issues during Installation .................................................................................. 34
4. Postinstallation Configuration ............................................................................................ 39
Memory Settings ......................................................................................................... 39
Maximum Number of Open Files ................................................................................... 40
5. Upgrading Server to Newer Version ................................................................................... 41
III. Configuration ........................................................................................................................ 43
6. Configuration Sources and Their Priorities ........................................................................... 44
Configuration Sources .................................................................................................. 44
Environment Variables ......................................................................................... 44
System Properties ................................................................................................ 44
Properties File on Default Location ........................................................................ 44
Properties File on Specified Location ...................................................................... 44
Modification of Context Parameters in web.xml ........................................................ 44
Context Parameters (Available on Apache Tomcat) ................................................... 45
Priorities of Configuration Sources ................................................................................. 45
7. Setup ............................................................................................................................. 46
Using Setup ............................................................................................................... 46
Setup Tabs ......................................................................................................... 48
8. Examples of DB Connection Configuration .......................................................................... 54
Embedded Apache Derby ............................................................................................. 55
MySQL ..................................................................................................................... 56
DB2 .......................................................................................................................... 57
DB2 on Linux/Windows ....................................................................................... 57
DB2 on AS/400 .................................................................................................. 58
Oracle ....................................................................................................................... 59
MS SQL .................................................................................................................... 60
Postgre SQL ............................................................................................................... 61
JNDI DB DataSource ................................................................................................... 62
Encrypted JNDI .......................................................................................................... 63
9. List of Properties ............................................................................................................. 69
10. Secure Configuration Properties ........................................................................................ 75
11. Logging ........................................................................................................................ 79
IV. Administration ....................................................................................................................... 81
12. Temp Space Management ................................................................................................ 82
iii
Page 4

CloverETL Server
Overview ................................................................................................................... 82
Management ............................................................................................................... 83
13. Secure Parameters .......................................................................................................... 88
14. Users and Groups .......................................................................................................... 91
LDAP Authentication ................................................................................................... 92
Users ......................................................................................................................... 95
Groups ...................................................................................................................... 98
15. Server Side Job Files - Sandboxes ................................................................................... 100
Referencing Files from the ETL Graph or Jobflow .......................................................... 102
Sandbox Content Security and Permissions .................................................................... 103
Sandbox Content ....................................................................................................... 104
Job Config Properties ................................................................................................. 108
WebDAV Access to Sandboxes ................................................................................... 111
WebDAV Clients .............................................................................................. 111
WebDAV Authentication/Authorization ................................................................. 111
16. CloverETL Server Monitoring ....................................................................................... 113
Standalone Server Detail ............................................................................................. 113
Cluster Overview ....................................................................................................... 118
Node Detail .............................................................................................................. 119
Server Logs .............................................................................................................. 120
17. Server Configuration Migration ....................................................................................... 121
Server Configuration Export ........................................................................................ 122
Server Configuration Import ........................................................................................ 123
18. Diagnostics ................................................................................................................. 127
V. Using Graphs ....................................................................................................................... 128
19. Graph/Jobflow Parameters ............................................................................................. 129
Parameters by Execution Type ..................................................................................... 130
Executed from Web GUI .................................................................................... 130
Executed by Launch Service Invocation ................................................................. 130
Executed by HTTP API Run Graph Operation Invocation ......................................... 130
Executed by RunGraph Component ...................................................................... 130
Executed by WS API Method executeGraph Invocation ............................................ 130
Executed by Task "graph execution" by Scheduler ................................................... 130
Executed from JMS Listener ............................................................................... 130
Executed by Task "Start a graph" by Graph/Jobflow Event Listener ............................ 130
Executed by Task "graph execution" by File Event Listener ....................................... 131
Adding Another Graph Parameters ............................................................................... 131
Additional "Graph Config Parameters" .................................................................. 131
Task "execute_graph" Parameters ......................................................................... 131
20. Manual Task Execution ................................................................................................. 132
21. Scheduling .................................................................................................................. 133
Timetable Setting ...................................................................................................... 134
Tasks ....................................................................................................................... 138
22. Viewing Job Runs - Executions History ........................................................................... 147
Filtering and ordering ................................................................................................. 147
23. Listeners ..................................................................................................................... 150
Graph Event Listeners ................................................................................................ 151
Graph Events .................................................................................................... 151
Listener ............................................................................................................ 152
Tasks ............................................................................................................... 152
Use Cases ........................................................................................................ 157
Jobflow Event Listeners .............................................................................................. 160
Jobflow Events .................................................................................................. 160
Listener ............................................................................................................ 161
Tasks ............................................................................................................... 161
JMS Messages Listeners ............................................................................................. 162
Universal Event Listeners ........................................................................................... 167
Evaluation Criteria ............................................................................................. 167
iv
Page 5

CloverETL Server
File event listeners ..................................................................................................... 169
Observed File ................................................................................................... 170
File Events ....................................................................................................... 170
Check Interval, Task and Use Cases ..................................................................... 171
24. API ............................................................................................................................ 172
Simple HTTP API ..................................................................................................... 172
JMX mBean ............................................................................................................. 182
JMX Configuration ............................................................................................ 182
Operations ........................................................................................................ 184
SOAP WebService API .............................................................................................. 185
SOAP WS Client ............................................................................................... 185
SOAP WS API Authentication/Authorization .......................................................... 185
Launch Services ........................................................................................................ 186
Launch Services Authentication ........................................................................... 191
Sending the Data to Launch Service ...................................................................... 191
Results of the Graph Execution ............................................................................ 191
CloverETL Server API Extensibility ............................................................................. 193
Groovy Code API .............................................................................................. 193
Embedded OSGi Framework ............................................................................... 194
25. Recommendations for Transformations Developers ............................................................. 196
26. Extensibility - CloverETL Engine Plugins ......................................................................... 197
27. Troubleshooting ........................................................................................................... 198
VI. Cluster ............................................................................................................................... 199
28. Clustering Features ....................................................................................................... 200
High Availability ....................................................................................................... 200
Scalability ................................................................................................................ 200
Transformation Requests ..................................................................................... 201
Parallel Data Processing ..................................................................................... 201
Graph Allocation Examples ......................................................................................... 207
Example of Distributed Execution ................................................................................ 208
Details of the Example Transformation Design ....................................................... 208
Scalability of the Example Transformation ............................................................. 211
29. Cluster Configuration .................................................................................................... 213
Mandatory Properties ................................................................................................. 214
Optional Properties .................................................................................................... 215
Example of 2 Node Cluster Configuration ...................................................................... 219
Basic 2-nodes Cluster Configuration ..................................................................... 219
2-nodes Cluster with Proxied Access to Database .................................................... 220
2-nodes cluster with load balancer ........................................................................ 221
Jobs Load Balancing Properties .................................................................................... 222
Running More Clusters ............................................................................................... 223
Cluster Reliability in Unreliable Network Environment .................................................... 224
NodeA Cannot Establish HTTP Connection to NodeB .............................................. 224
NodeA Cannot Establish TCP Connection (Port 7800 by Default) to NodeB .................. 224
NodeB is Killed or It Cannot Connect to the Database .............................................. 225
Long-Term Network Malfunction May Cause Jobs to Hang on ................................... 225
30. Recommendations for Cluster Deployment ........................................................................ 227
31. Multiple CloverServer Instances on the same Host ............................................................. 228
v
Page 6

Part I. CloverETL Server
Page 7

Chapter 1. What is CloverETL Server?
The CloverETL Server is an enterprise runtime, monitoring, and automation platform for the CloverETL data
integration suite. It provides the necessary tools to deploy, monitor, schedule, integrate, and automate data
integration processes in large scale and complex projects.
CloverETL Server's HTTP and SOAP Web Services APIs provide additional automation control for integrating
the CloverETL Server into existing application portfolios and processes.
The CloverETL Server is a Java application built to J2EE standards. We support a wide range of application
servers including Apache Tomcat, Jetty, IBM WebSphere, Sun Glassfish, JBoss AS, and Oracle WebLogic.
2
Page 8

Chapter 1. What is
CloverETL Server?
Table 1.1. CloverETL Server and CloverETL Engine comparison
CloverETL Server CloverEngine as executable tool
possibilities of executing
graphs
engine initialization during server startup init is called for each graph execution
thread and memory
optimalization
scheduling scheduling by timetable, onetime
statistics each graph execution has its own log file
monitoring If graph fails, event listener will
storage of graphs and
related files
security and authorization
support
integration capabilities CS provides APIs which can be called
development of graphs CS supports team cooperation above one
scalability CS implements horizontal scalability
jobflow CS implements various jobflow
by calling http (or JMX, etc.) APIs (See
details in Simple HTTP API (p. 172).)
threads recycling, graphs cache, etc. not implemented
trigger, logging included
and result status is stored; each event
triggered by the CS is logged
be notified. It may send an email,
execute a shell command or execute
another graph. See details in Graph
Event Listeners (p. 151). Additionally
server implements various APIs (HTTP
and JMX) which may be used for
monitoring of server/graphs status.
graphs are stored on server file system in
so called sandboxes
CS supports users/groups management,
so each sandbox may have its own
access privileges set. All interfaces
require authentication. See details in
Chapter 15, Server Side Job Files -
Sandboxes (p. 100).
using common protocols like HTTP. See
details in Simple HTTP API (p. 172).
project (sandbox). CloverETL Designer
is fully integrated with CloverETL
Server (CS).
of transformation requests as well as
data scalability. See details in Chapter
28, Clustering Features (p. 200) In
addition CloverEngine implements is
vertical scalability natively.
components. See details in the
CloverETL manual.
by executing external process or by
calling Java API
external tools (i.e. Cron) can be used
not implemented
JMX mBean can be used while graph is
running
passwords entered by user may be
encrypted
CloverEngine library can be used as
embedded library in client's Java code
or it may be executed as separated OS
process for each graph.
Clover Engine implements vertical
scalability
Clover Engine itself has limited support
of jobflow.
3
Page 9

Part II. Installation Instructions
Page 10

Chapter 2. System Requirements for CloverETL Server
Hardware Requirements
Table 2.1. Hardware requirements of CloverETL Server
Standard Edition Corporate Edition Cluster
RAM
(recommended 16 GB)
4 GB
(recommended 64 GB)
Processors up to 8 cores 16 cores 8 cores
Disk space (installation) 1 GB 1 GB 1 GB
Disk space (tempspace) > 25 GB
Disk space (data) > 50GB
Disk space (shared)
a
This may vary depending on total number of nodes and cores in license.
b
Minimum value, the disk space depends on data.
c
Disk space for shared sandboxes is required only for CloverETL Cluster.
c
b
b
- - > 50GB
8 GB
> 25 GB
> 50 GB
8 GB
(recommended 64 GB)
b
b
> 25 GB
> 50 GB
a
b
b
b
Software Requirements
Operating system
• Microsoft Windows Server 2003/2008/2012 32/64 bit
• GNU/Linux 32/64 bit
• Mac OS X
• Unix
• HP-UX
• AIX
• IBM System i (also known as AS/400)
Java Virtual Machine
• Oracle JDK 7/8 32/64 bit
• IBM SDK 7 (for IBM WebSphere only)
Application Server
• Apache Tomcat 6 or 7 or 8 (p. 12)
• Jetty 9.1 (p. 16)
• IBM WebSphere 8.5 (p. 17)
• Glassfish 3.1 (p. 20)
• JBoss 6 or 7 (p. 21)
• Oracle WebLogic 11g (10.3.6) or 12c (12.1.2 or 12.1.3) 32/64 bit (p. 27)
5
Page 11
Chapter 2. System Requirements
for CloverETL Server
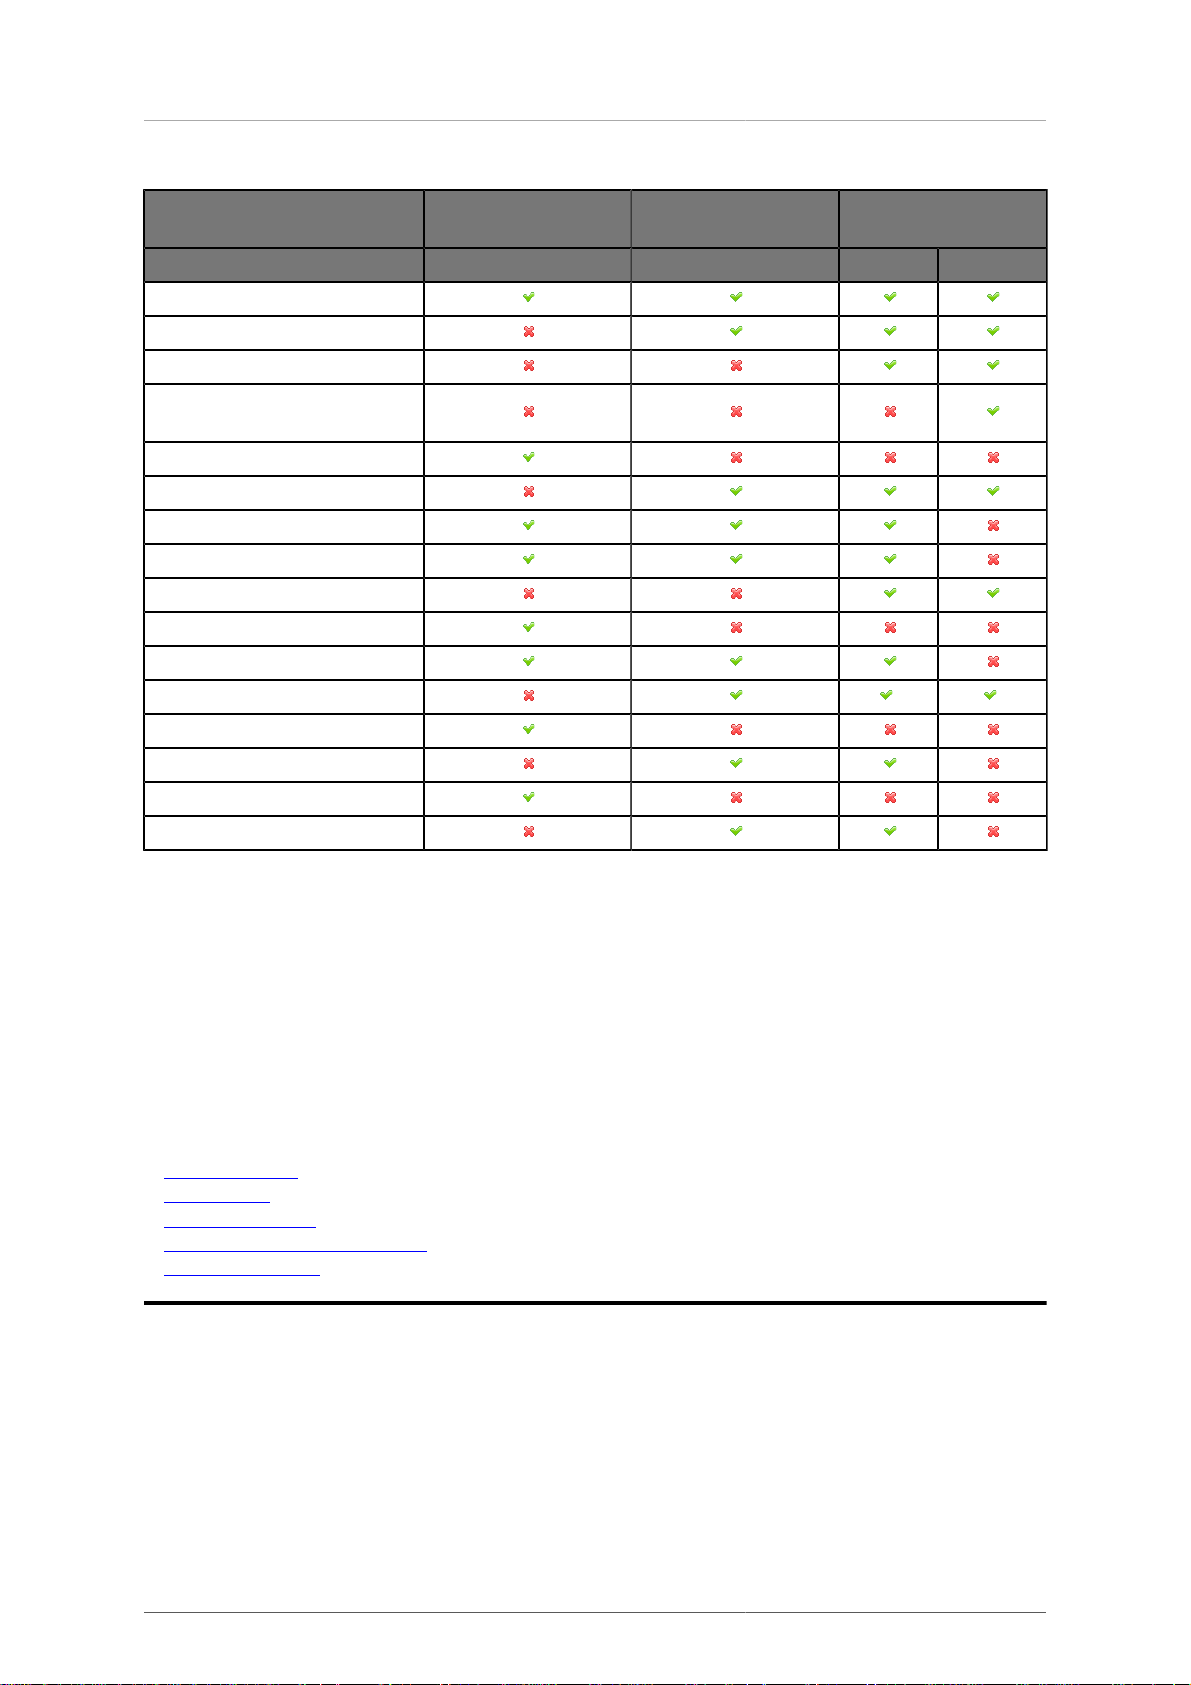
Table 2.2. CloverETL Server Compatibility Matrix
CloverETL 3.5 CloverETL 4.0 CloverETL
4.1, 4.2, and 4.3
Application Server Java 6 and 7 Java 7 Java 7 Java 8
Tomcat 6
Tomcat 7
Tomcat 8
Pivotal tc Server Standard (3.1.3,
Tomcat 7)
Jetty 6
Jetty 9
WebLogic 11g (10.3.6)
WebLogic 12c (12.1.2)
WebLogic 12c (12.1.3)
JBoss AS 5
JBoss AS 6
JBoss AS 7
1 2
Glassfish 2
Glassfish 3
WebSphere 7
WebSphere 8.5
1
EAP 6.2
2
EAP 6.4
We support Java 8 on particular supported application server only if the application server itself officially supports
Java 8.
Configuration Repository
We support the following database servers as a configuration repository. The officially supported versions, we
are testing against, are in parentheses.
• MySQL (5.6.12) (p. 56)
• DB2 (10.5.1) (p. 57)
• Oracle (11.2.0.2.0) (p. 59)
• SQL Server 2008 (10.0.1600.22) (p. 60)
• PostgreSQL (9.2.4) (p. 61)
Firewall
• HTTP(S) incoming: Communication between Designer and Server
• JMX incoming: Tracking and debugging information
• Other outgoing: (depending on actual usage)
• JDBC connection to databases (DBInputTable, DBOutputTable, DBExecute)
• MQ (JMSReader, JMSWriter, JMS Listener)
• HTTP(S) (Readers, WebserviceClient, HTTPConnector)
• SMTP (EmailSender)
6
Page 12

• IMAP/POP3 (EmailReader)
• FTP/SFTP/FTPS (readers, writers)
Chapter 2. System Requirements
for CloverETL Server
7
Page 13

Chapter 3. Installing
The following sections describe two different installation types.
The Evaluation Server (p. 9) section details the quickest and simplest installation – without configuration.
The section Enterprise Server (p. 12) includes details about further testing and production on your chosen
app-container and database.
To create a fully working instance of Enterprise CloverETL Server you should:
• install an application server
• create a database dedicated to CloverETL server
• set up limit on number of opened files and memory used
• install CloverETL Server into application server
• set up connection to database and mail server (optionally encrypting passwords in configuration files)
• install license
• set up a master password for secure parameters
• configure temp space
• configure sandboxes
8
Page 14

Chapter 3. Installing
Evaluation Server
The default installation of CloverETL Server does not need any extra database server. It uses the embedded
Apache Derby DB. What is more, it does not need any subsequent configuration. CloverETL Server configures
itself during the first startup. Database tables and some necessary records are automatically created on first startup
with an empty database. In the Sandboxes section of the web GUI, you can then check that sandboxes and a few
demo graphs are created there.
Note
Default login credentials for CloverETL Server Console:
Username: clover
Password: clover
If you need to evaluate CloverETL Server features which need any configuration changes, e.g. sending e-mails,
LDAP authentication, clustering, etc., or the CloverETL Server must be evaluated on another application container
then Tomcat, please proceed with the common installation: Enterprise Server (p. 12)
Installation of Apache Tomcat
See Application Server (p. 5) system requirements for currently supported version of Apache Tomcat.
If you have Apache Tomcat installed already, you can skip this section.
1. Download the ZIP with binary distribution from http://tomcat.apache.org/download-70.cgi (Tomcat 7) or http://
tomcat.apache.org/download-80.cgi (Tomcat 8).
Tomcat may be installed as a service on Windows OS as well, however there may be some issues with access
to file system, so it's not recommended aproach for evaluation. To install Apache Tomcat as Windows Service
see Apache Tomcat as a Windows Service (p. 13).
2. After you download the zip file, unpack it.
3. Run Tomcat by [tomcat_home]/bin/startup.sh (or [tomcat_home]/bin/startup.bat on
Windows OS).
4. Check whether Tomcat is running on URL: http://localhost:8080/. Apache Tomcat info page should appear.
5. Apache Tomcat is installed.
If you need detailed installation instructions, go to: http://tomcat.apache.org/tomcat-7.0-doc/setup.html (Tomcat
7) or to http://tomcat.apache.org/tomcat-8.0-doc/setup.html (Tomcat 8).
Installation of CloverETL Server
1. Check if you meet prerequisites:
• Oracle JDK or JRE v. 1.7.x or higher (check it with java -version). We recommend JDK 1.8.x.
• JAVA_HOME or JRE_HOME environment variable has to be set.
Unix-like systems:
Check it with echo $JAVA_HOME and echo $JAVA_HOME commands.
It can be set up in the file [tomcat]/bin/setenv.sh from step 2 by inserting line to the beginning
of the file, e.g.
9
Page 15
Chapter 3. Installing
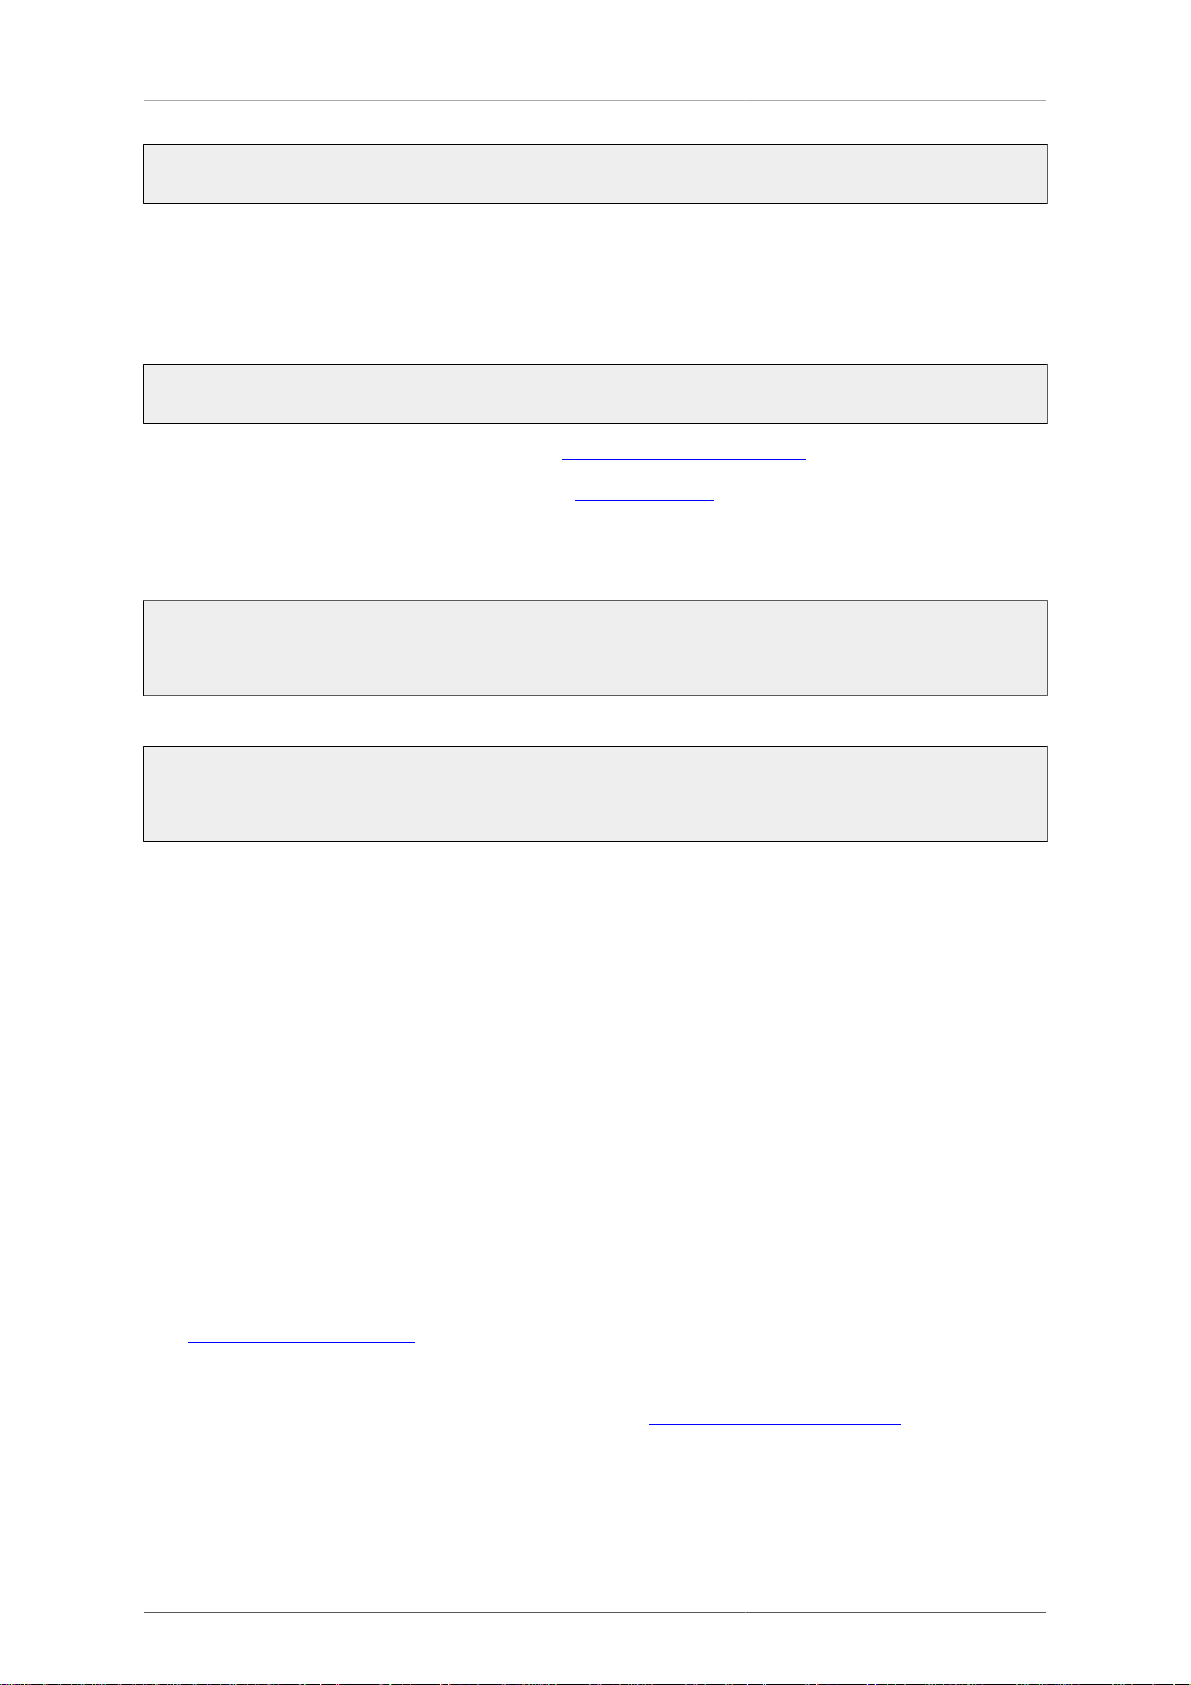
export JAVA_HOME=/opt/jdk1.8.0_60
Windows system:
Check it with echo %JAVA_HOME% and echo %JRE_HOME% commands.
It can be set up in the file [tomcat]/bin/setenv.bat from step 2 by inserting line to the beginning
of the file, e.g.
set JAVA_HOME=C:\Program Files\Java\jdk1.8.0_60
• Apache Tomcat 7.0.x or 8.0.x is installed. See Installation of Apache Tomcat (p. 9) for details.
2. Set memory limits and other switches. See section Memory Settings (p. 39) for details.
Create setenv file:
Unix-like systems: [tomcat]/bin/setenv.sh
export CATALINA_OPTS="$CATALINA_OPTS -XX:MaxMetaspaceSize=512m -Xms128m -Xmx2048m"
export CATALINA_OPTS="$CATALINA_OPTS -Dderby.system.home=$CATALINA_HOME/temp -server"
echo "Using CATALINA_OPTS: $CATALINA_OPTS"
Windows systems: [tomcat]/bin/setenv.bat
set CATALINA_OPTS=%CATALINA_OPTS% -XX:MaxMetaspaceSize=512m -Xms128m -Xmx1024m
set CATALINA_OPTS=%CATALINA_OPTS% -Dderby.system.home=%CATALINA_HOME%/temp -server
echo "Using CATALINA_OPTS: %CATALINA_OPTS%"
If you use Java 1.7, use -XX:MaxPermSize=512m instead of -XX:MaxMetaspaceSize=512m
3. Download the web archive file (clover.war) containing CloverETL Server for Apache Tomcat and
clover-license.war containing valid license.
4. Deploy both WAR files: clover.war and clover-license.war to [tomcat_home]/webapps
directory.
To avoid deployment problems, Tomcat should be down during the copying.
5. Run Tomcat by [tomcat_home]/bin/startup.sh (or [tomcat_home]/bin/startup.bat on
Windows OS).
6. Check whether CloverETL Server is running on URLs:
• Web-app root
http://[host]:[port]/[contextPath]
The default Tomcat port for the http connector is 8080 and the default contextPath for CloverETL Server
is "clover", thus the default URL is:
http://localhost:8080/clover/
• Web GUI
http://[host]:[port]/[contextPath]/gui http://localhost:8080/clover/gui
Use default administrator credentials to access the web GUI: username - "clover", password - "clover".
10
Page 16

Chapter 3. Installing
7. CloverETL Server is now installed and prepared for basic evaluation. There are couple of sandboxes with
various demo transformations installed.
11
Page 17

Chapter 3. Installing
Enterprise Server
This section describes installation of CloverETL Server on various app-containers in detail, also describes the
ways how to configure the server. If you need just quickly evaluate CloverETL Server features which don't need
any configuration, evaluation installation may be suitable: Evaluation Server (p. 9)
CloverETL Server for enterprise environment is shipped as a Web application archive (WAR file). Thus standard
methods for deploying a web application on you application server may be used. However each application server
has specific behavior and features. Detailed information about their installation and configuration can be found
in the chapters below.
List of Suitable Containers
• Apache Tomcat (p. 12)
• Jetty (p. 16)
• IBM WebSphere (p. 17)
• Glassfish / Sun Java System Application Server (p. 20)
• JBoss Application Server (p. 21)
• Oracle WebLogic Server (p. 27)
In case of problems during your installation see Possible Issues during Installation (p. 34).
Apache Tomcat
Installation of Apache Tomcat (p. 12)
Apache Tomcat as a Windows Service (p. 13)
Apache Tomcat on IBM AS/400 (iSeries) (p. 14)
Installation of CloverETL Server (p. 14)
Configuration of CloverETL Server on Apache Tomcat (p. 15)
Installation of Apache Tomcat
See Application Server (p. 5) in system requirements for currently supported version of Apache Tomcat.
If you have Apache Tomcat already installed, you can skip this section.
In case of installation as Windows Service skip this section and continue with Apache Tomcat as a Windows
Service (p. 13).
1. Download the binary distribution from http://tomcat.apache.org/download-60.cgi (Tomcat 6) or http://
tomcat.apache.org/download-70.cgi (Tomcat 7) or http://tomcat.apache.org/download-80.cgi (Tomcat 8).
2. After you download the zip file, unpack it.
3. Run Tomcat by [tomcat_home]/bin/startup.sh (or [tomcat_home]/bin/startup.bat on
Windows OS).
4. Check whether Tomcat is running on URL: http://localhost:8080/. Apache Tomcat info page should appear.
5. Apache Tomcat is installed.
If you need detailed installation instructions, go to: http://tomcat.apache.org/tomcat-6.0-doc/setup.html (Tomcat
6) or to http://tomcat.apache.org/tomcat-7.0-doc/setup.html (Tomcat 7) or to http://tomcat.apache.org/tomcat-8.0-
doc/setup.html (Tomcat 8).
Continue with: Installation of CloverETL Server (p. 14)
In case of installation on IBM AS/400 continue with Apache Tomcat on IBM AS/400 (iSeries) (p. 14).
12
Page 18
Chapter 3. Installing
Apache Tomcat as a Windows Service
1. Download the binary distribution from http://tomcat.apache.org/download-60.cgi (Tomcat 6) or http://
tomcat.apache.org/download-70.cgi (Tomcat 7) or http://tomcat.apache.org/download-80.cgi (Tomcat 8). Use
the file called Windows Service Installer.
2. Use the standard installation wizard to install Apache Tomcat.
Important
The instructions mentioned bellow assume that Tomcat (as a service) is already installed. If this is
not true, it is needed to do this first (using of Tomcat's Windows Service Installer is recommended).
Set up JAVA_HOME to point to the correct Java version: right click on This computer (or Computer on
some Windows versions) and choose Properties →Advanced System Settings →Advanced →Environment
variables. The restart of operating system is needed to apply changes.
In case that Tomcat is installed as a Windows service, CloverETL configuration is performed using configuration
of the respective service. The configuration can be performed either by graphical utility [tomcat_home]/bin/
Tomcat8w.exe or by command line utility [tomcat_home]/bin/Tomcat8.exe.
Graphical configuration utility
When using graphical configuration utility, select Java tab and set initial and maximum heap size in Initial
memory pool and Maximum memory pool fields. Other configuration parameters can be placed in Java Options
field, being separated by new line. Then click on Apply and restart the service.
The Java tab allows you to use alternative Java virtual machine by setup of path to jvm.dll file.
Command line tool
When using command line tool, navigate to [tomcat_home]/bin and stop the service (if running) using
(supposing that service is named "Tomcat8"):
.\Tomcat8.exe //SS//Tomcat8
Then configure service using command:
.\Tomcat8.exe //US//Tomcat8 --JvmMs=512 --JvmMx=1024
--JvmOptions=-Dclover.config.file=C:\path\to\clover-config.properties#-XX:MaxMetaspaceSize=256m
If you use Java 7, change -XX:MaxMetaspaceSize to -XX:MaxPermSize.
The parameter JvmMs is the initial and JvmMx is the maximum heap size in MB, JVM options are separated by
'#' or ';'. Finally start the service from Windows administration console or using:
.\Tomcat8.exe //TS//Tomcat8
When Apache Tomcat is run as a Windows service, it is not automatically available for tools like JConsole or
JVisualVM to attach and monitor Java process. However, those tools can still connect to the process via JMX. In
order to expose Tomcat's Java process via JMX add the following options to the service settings:
-Dcom.sun.management.jmxremote.port=3333
-Dcom.sun.management.jmxremote.ssl=false
-Dcom.sun.management.jmxremote.authenticate=false
Once the service is run with those options you can connect to port 3333 using JMX and monitor server.
13
Page 19
Chapter 3. Installing
Note
The same instructions can be used with Tomcat 6 and tomcat 7, just replace the number 8 with the
number 6 or 7.
More information about run of Java applications as Windows Service can be found at http://commons.apache.org/
proper/commons-daemon/procrun.html
Continue with: Installation of CloverETL Server (p. 14)
Apache Tomcat on IBM AS/400 (iSeries)
To run CloverETL Server on the iSeries platform, there are some additional settings:
1. Declare you are using Java 7.0 32-bit
2. Run Java with parameter -Djava.awt.headless=true
To configure this you can modify/create a file [tomcat_home]/bin/setenv.sh which contains:
JAVA_HOME=/QOpenSys/QIBM/ProdData/JavaVM/jdk70/32bit
JAVA_OPTS="$JAVA_OPTS -Djava.awt.headless=true"
Continue with: Installation of CloverETL Server (p. 14)
Installation of CloverETL Server
1. Download the web archive file (clover.war) containing CloverETL Server for Apache Tomcat.
2. Check if you meet prerequisites:
• Oracle JDK or JRE v. 1.7.x or higher. We recommend JDK 1.8.x.
• JAVA_HOME or JRE_HOME environment variable has to be set.
• Apache Tomcat 6.0.x or 7.0.x or 8.0.x is installed. CloverETL Server is developed and tested with the Apache
Tomcat 6.0.x, 7.0.x and 8.0.x containers (it may work unpredictably with other versions). See Installation
of Apache Tomcat (p. 12) for details.
• It is strongly recommended you change default limits for the heap and perm gen memory spaces.
See section Memory Settings (p. 39) for details.
You can set the minimum and maximum memory heap size by adjusting the "Xms" and "Xmx" JVM
parameters. You can set JVM parameters for Tomcat by setting the environment variable JAVA_OPTS in
the [TOMCAT_HOME]/bin/setenv.sh file (if it does not exist, you may create it).
Create setenv file:
Unix-like systems: [tomcat]/bin/setenv.sh
export CATALINA_OPTS="$CATALINA_OPTS -XX:MaxMetaspaceSize=512m -Xms128m -Xmx1024m"
export CATALINA_OPTS="$CATALINA_OPTS -Dderby.system.home=$CATALINA_HOME/temp -server"
echo "Using CATALINA_OPTS: $CATALINA_OPTS"
Windows systems: [tomcat]/bin/setenv.bat
14
Page 20

Chapter 3. Installing
set "CATALINA_OPTS=%CATALINA_OPTS% -XX:MaxMetaspaceSize=512m -Xms128m -Xmx1024m"
set "CATALINA_OPTS=%CATALINA_OPTS% -Dderby.system.home=%CATALINA_HOME%/temp -server"
echo "Using CATALINA_OPTS: %CATALINA_OPTS%"
If you use Java 7, change -XX:MaxMetaspaceSize to -XX:MaxPermSize.
As visible in the settings above, there is also switch -server. For performance reasons, it is recommended
to run the container in the "server" mode.
3. Copy clover.war (which is built for Tomcat) to [tomcat_home]/webapps directory.
Please note, that copying is not an atomic operation. If Tomcat is running, mind duration of the copying process!
Too long copying might cause failure during deployment as Tomcat tries to deploy an incomplete file. Instead,
manipulate the file when the Tomcat is not running.
4. War file should be detected and deployed automatically without restarting Tomcat.
5. Check whether CloverETL Server is running on URLs:
• Web-app root
http://[host]:[port]/[contextPath]
The default Tomcat port for the http connector is 8080 and the default contextPath for CloverETL Server
is "clover", thus the default URL is:
http://localhost:8080/clover/
• Web GUI
http://[host]:[port]/[contextPath]/gui
The default Tomcat port for the http connector is 8080 and the default contextPath for CloverETL Server
is "clover", thus the default URL is:
http://localhost:8080/clover/gui
Use default administrator credentials to access the web GUI: user name - "clover", password - "clover".
Continue with: Configuration of CloverETL Server on Apache Tomcat (p. 15)
Configuration of CloverETL Server on Apache Tomcat
Default installation (without any configuration) is only recommended for evaluation purposes. For production use,
both DB data source and SMTP server configurations are recommended.
The connection to database is configured in property file. On Apache Tomcat, it is $CATALINA_HOME/
webapps/clover/WEB-INF/config.properties file.
Properties File on Specified Location
Example of such a file:
jdbc.driverClassName=...
jdbc.url=...
jdbc.username=...
jdbc.password=...
jdbc.dialect=...
license.file=/path/to/license.dat
15
Page 21
Chapter 3. Installing
Properties file is loaded from location specified by a system property or by an environment variable
clover_config_file (clover.config.file).
On Apache Tomcat, you can set the system property in the [TOMCAT_HOME]/bin/setenv.sh file (if it does
not exist, you may create it). Just add: JAVA_OPTS="$JAVA_OPTS -Dclover_config_file=/path/
to/cloverServer.properties".
If you need an example of connection to any of supported databases, see Chapter 8, Examples of DB Connection
Configuration (p. 54).
Continue with: Installation of CloverETL Server License (p. 29)
Jetty
Installation of CloverETL Server (p. 16)
Configuration of CloverETL Server on Jetty (p. 16)
Installation of CloverETL Server
1. Download the web archive file (clover.war) containing the CloverETL Server application which is built
for Jetty.
2. Check if prerequisites are met:
• Oracle JDK or JRE (See Java Virtual Machine (p. 5) for required Java version.)
• See Application Server (p. 5) in system requirements for currently supported versions of Jetty.
All Jetty releases are available at http://download.eclipse.org/jetty/.
• Memory allocation settings
It involves JVM parameters: -Xms -Xmx (heap memory) and -XX:MaxMetaspaceSize (classloaders memory
limit). See section Memory Settings (p. 39) for details.
You can set the parameters by adding
JAVA_OPTIONS='$JAVA_OPTIONS -Xms128m -Xmx1024m -XX:MaxMetaspaceSize=256m'
to [jetty-home]/bin/jetty.sh
On Windows OS, edit [jetty-home]/start.ini and add those parameters on the end of the file, each
parameter on a new line.
If you use Java 7, change -XX:MaxMetaspaceSize to -XX:MaxPermSize.
3. Copy clover.war to [jetty-home]/webapps.
4. Run [jetty-home]/bin/jetty.sh start (or java -jar start.jar --exec on Windows
OS).
Finally, you can check if the server is running e.g. on http://localhost:8080/clover/.
Configuration of CloverETL Server on Jetty
Default installation (without any configuration) is only recommended for evaluation purposes. For production use,
both DB data source and SMTP server configurations are recommended.
16
Page 22
Chapter 3. Installing
There are more ways to set config properties, yet the most common one is a properties file in a specified location.
Properties file in Specified Location
Example of such a file:
jdbc.driverClassName=...
jdbc.url=...
jdbc.username=...
jdbc.password=...
jdbc.dialect=...
license.file=/path/to/license.dat
Note
JDBC Driver must be JDBC 4 compliant and stored in the [jetty-home]/lib/ext.
The common properties file is loaded from a location which is specified by the environment/system property
clover_config_file or clover.config.file. This is a recommended way of configuring Jetty.
On Unix-like OS, you can set system property in the [jetty-home]/bin/jetty.sh file. Add:
JAVA_OPTIONS="$JAVA_OPTIONS -Dclover_config_file=/path/to/cloverServer.properties"
On Windows OS add the property to [jetty-home]/start.ini, just after the memory settings.
Continue with: Installation of CloverETL Server License (p. 29)
IBM WebSphere
Installation of CloverETL Server (p. 17)
Configuration of CloverETL Server on IBM WebSphere (p. 19)
Installation of CloverETL Server
1. Get the web archive file (clover.war) with CloverETL Server application which is built for WebSphere.
2. Check if you meet prerequisites:
• IBM Java SDK (See Java Virtual Machine (p. 5) for required Java version.)
Important
In order to ensure reliable function of CloverETL Server always use the latest version of IBM Java
SDK. At least SDK 7.0 SR6 (package IBM WebSphere SDK Java Technology Edition V7.0.6.1) is
recommended. Using older SDKs may lead to deadlocks during execution of specific ETL graphs.
• See Application Server (p. 5) in system requirements for currently supported version of IBM WebSphere.
(see http://www.ibm.com/developerworks/downloads/ws/was/)
• Memory allocation settings
It involves JVM parameters: -Xms and -Xmx See section Memory Settings (p. 39) for details.
You can set heap size in IBM WebSphere's Integrated Solutions Console (by default accessible at:
http://[host]:9060/ibm/console/)
17
Page 23
Chapter 3. Installing
•
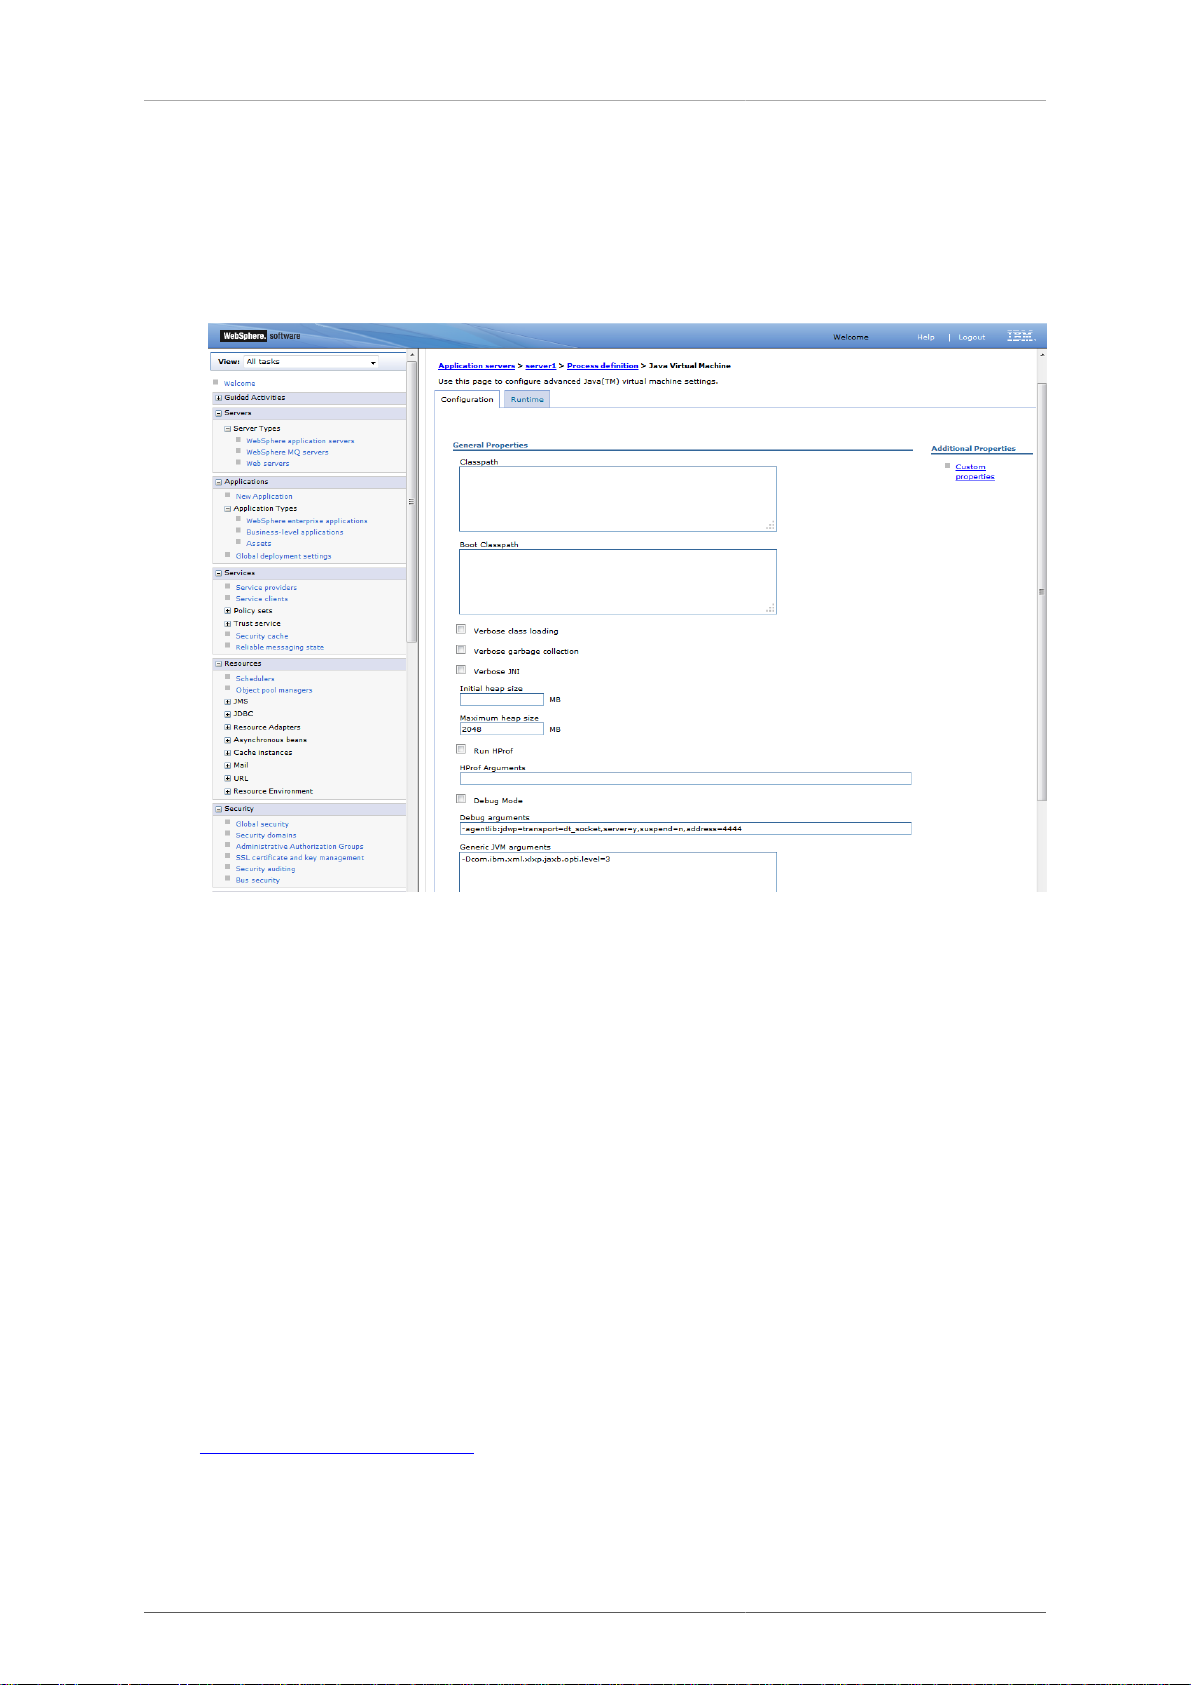
Go to Servers →Server Types →WebSphere application servers →[server1] (or another name of
your server) →Java and Process Management →Process definition →Java Virtual Machine
• There is the Maximum heap size field. Default value is only 256 MB, which is not enough for ETL
transformations.
Figure 3.1. Adjusting Maximum heap size limit
• On the same page, there is Generic JVM arguments. Add the perm space limit there, e.g. like this:
-XX:MaxPermSize=512M
Add the direct memory limit, e.g. like this:
-XX:MaxDirectMemorySize=512M
• Java runtime settings
Go to Servers →Application servers →[server1] (or another name of your server) →Java SDKs Here
select version 1.7 as the default SDK.
• Save the changes to configuration and restart the server so that they take effect.
3. Deploy WAR file
• Go to Integrated Solutions Console
( http://localhost:9060/ibm/console/)
•
Go to Applications →New Application →New Enterprise Application Here select a WAR archive of the
CloverETL server and deploy it to the application server, but do not start it.
4. Configure application class loading
18
Page 24
Chapter 3. Installing
Go to WebSphere Enterprise Applications →clover_war (or other name of the Clover application)
→Manage Modules →CloverETL Here under Class loader order select Classes loaded with local class
loader first (parent last).
5. Save the changes to the server configuration and start the clover_war application.
6. Check whether the server is running
Provided you set clover.war as the application running with "clover" context path. Notice the port number
has changed:
http://localhost:9080/clover
Note
Please note, that some CloverETL features using third party libraries don't work properly on IBM
WebSphere
• Hadoop is guaranteed to run only on Oracle Java 1.6+, but Hadoop developers do make an effort
to remove any Oracle/Sun-specific code. See Hadoop Java Versions on Hadoop Wiki.
• OSGi framework (if configured and initialized) causes malfunction of WebServiceClient and
EmailReader components. See Embedded OSGi Framework (p. 194) for details.
• AddressDoctor5 on IBM WebSphere, requires additional JVM parameter -Xmso2048k to
prevent AddressDoctor from crashing JVM. See documentation on AddressDoctor component.
Configuration of CloverETL Server on IBM WebSphere
Default installation (without any configuration) is only recommended for evaluation purposes. For production use,
configuring at least the DB data source and SMTP server is recommended.
There are more ways to set config properties. The most common one is a properties file in the specified location.
Properties File in Specified Location
Example of such a file:
jdbc.driverClassName=...
jdbc.url=...
jdbc.username=...
jdbc.password=...
jdbc.dialect=...
license.file=/path/to/license.dat
Set system property (or environment variable) clover_config_file pointing to the config properties file.
• go to Integrated Solutions Console
(http://localhost:9060/ibm/console/)
•
Go to Servers →WebSphere application servers →[server-name] →Java and Process Management
→Process Definition →Java Virtual Machine →Custom Properties
• Create system property named clover_config_file whose value is full path to config file named e.g.
cloverServer.properties on your file system.
• This change requires restarting IBM WebSphere.
19
Page 25
Chapter 3. Installing
Continue with: Installation of CloverETL Server License (p. 29)
Glassfish / Sun Java System Application Server
Installation of CloverETL Server (p. 20)
Configuration of CloverETL Server on Glassfish (p. 20)
Important
Glassfish 3.1.2 contains a bug causing Launch Services to work improperly (see https://java.net/jira/
browse/GLASSFISH-18444). Use a different version of Glassfish (version 3.1.2.2 is recommended).
Installation of CloverETL Server
1. Get CloverETL Server web archive file (clover.war) which is built for Glassfish 3.
2. Check if you meet prerequisites
• Oracle JDK or JRE (See Java Virtual Machine (p. 5) for required java version.)
• Glassfish (CloverETL Server is tested with version 3.1.2.2)
• Memory allocation settings
It involves JVM parameters: -Xms -Xmx and -XX:MaxPermSize See section Memory
Settings (p. 39) for details.
You can set the heap size and perm space in XML file [glassfish-home]/glassfish/domains/
domain1/config/domain.xml Add or change these sub-elements to <java-config>:
<jvm-options>-XX:MaxPermSize=384m</jvm-options>
<jvm-options>-XX:PermSize=256m</jvm-options>
<jvm-options>-Xms512m</jvm-options>
<jvm-options>-Xmx2g</jvm-options>
These changes require restarting Glassfish to take effect.
3. Deploy WAR file
• Open Glassfish Administration Console
It is accessible at http://localhost:4848/ by default.
•
Go to Applications →Web Applications and click Deploy ....
• Upload WAR file with CloverETL server application or select the file from filesystem if it is present on the
machine running Glassfish.
• Fill in attributes Application name and Context Root with "clover".
• Submit form.
Configuration of CloverETL Server on Glassfish
Default installation (without any configuration) is only recommended for evaluation purposes. For production use,
configuring at least the DB data source and SMTP server is recommended.
20
Page 26
Chapter 3. Installing
There are more ways to set config properties. The most common one is a properties file in the specified location.
Properties File in Specified Location
Example of such a file:
datasource.type=JDBC
jdbc.driverClassName=org.postgresql.Driver
jdbc.url=jdbc:postgresql://localhost:5432/cloverdb
jdbc.username=root
jdbc.password=
jdbc.dialect=org.hibernate.dialect.PostgreSQLDialect
license.file=/path/to/license.dat
Set system property clover.config.file pointing to the config properties file:
• Go to Glassfish Administration Console
By default accessible at http://localhost:4848/
•
Go to Configuration →System Properties
• Create system property named clover.config.file whose value is a full path to the file on your file
system named e.g. /home/clover/cloverServer.properties.
Copy the JDBC driver JAR file for a selected database (PostgreSQL) into [glassfish]/glassfish/
domains/[domain-name]/lib
These changes require restarting Glassfish to take effect.
Continue with: Installation of CloverETL Server License (p. 29)
JBoss Application Server
Installation of CloverETL Server (p. 21)
Configuration of CloverETL Server on JBoss AS (p. 22)
Installation of CloverETL Server
1. Get CloverETL Server web archive file ( clover.war ) that is built for JBoss AS.
2. Check if you meet prerequisites
• Oracle JDK or JRE (See Java Virtual Machine (p. 5) for required Java version.)
• JBoss AS 6.x http://www.jboss.org/jbossas/downloads
• Memory settings for JBoss Java process. See section Memory Settings (p. 39) for details.
You can set the memory limits in [jboss-home]/bin/run.conf ( run.conf.bat on Windows
OS)
JAVA_OPTS="$JAVA_OPTS -XX:MaxMetaspaceSize=512m -Xms128m -Xmx2048m"
If you use Java 7, change -XX:MaxMetaspaceSize to -XX:MaxPermSize.
On Windows, perform steps analogic to the ones above.
21
Page 27
Chapter 3. Installing
3. Create a separate JBoss server configuration
However it may be useful to use a specific JBoss server configuration, when it is necessary to run CloverETL:
• isolated from other JBoss applications
• with a different set of services
• with different libraries on the classpath than other applications
See the JBoss manual for details about the JBoss server configuration: JBoss Server Configurations Start
the Server With Alternate Configuration
4. Configure database connection
As CloverETL Server's embedded Derby database does not work under JBoss AS, a database connection has
to be always configured. We used MySQL accessed via JNDI-bound datasource in this example:
• Create datasource deployment file [jboss-home]/server/[serverConfiguration]/
deploy/mysql-ds.xml
<datasources>
<local-tx-datasource>
<jndi-name>CloverETLServerDS</jndi-name>
<connection-url>jdbc:mysql://localhost:3306/cloverServerDB</connection-url>
<driver-class>com.mysql.jdbc.Driver</driver-class>
<user-name>root</user-name>
<password>root</password>
</local-tx-datasource>
</datasources>
Note
Special characters in the XML file have to be typed in as XML entities. For instance, ampersand
"&" as "&" etc.
"CloverETLServerDS" is the name under which the datasource will be accessible. The thing to do here
is to set database connection parameters ( connection-url , driver-class , user-name and
password ) to the database. The database has to be empty before the first execution, the server creates
its tables on its own.
• Put the JDBC driver JAR file for your database to the application server classpath. In this example
we copied the file mysql-connector-java-5.1.5-bin.jar to [jboss-home]/server/
[serverConfiguration]/lib
5. Configure CloverETL Server according to the description in the next section (p. 22) .
6. Deploy the WAR file
Copy clover.war to [jboss-home]/server/[serverConfiguration]/deploy
7. Start JBoss AS via [jboss-home]/bin/run.sh (or run.bat on Windows OS) If you want to run JBoss
with a specific server configuration, it has to be specified as a parameter: [jboss-home]/bin/run.sh -
c [serverConfiguration] If the serverConfiguration isn't specified, the "default" is used.
Configuration of CloverETL Server on JBoss AS
Default installation (without any configuration) does not work under JBoss AS. In order to be able to use the
CloverETL Server, a working database connection is required.
22
Page 28
Chapter 3. Installing
There are more ways to set configuration properties. The most common one is a properties file in a specified
location.
Properties File in Specified Location
• Create cloverServer.properties in a suitable (i.e. readable by JBoss AS process) directory
datasource.type=JNDI
datasource.jndiName=java:/CloverETLServerDS
jdbc.dialect=org.hibernate.dialect.MySQLDialect
license.file=/home/clover/config/license.dat
datasource.type indicates the server will use JNDI-bound datasource created in steps above. The property
datasource.jndiName specifies where is the datasource to be found in JNDI. Set JDBC dialect according
to your database server ( Part III, “Configuration” (p. 43) ). You can set path to your license file, too.
• Set system property (or environment variable) clover.config.file .
It should contain the full path to the cloverServer.properties file created in the previous step.
The simplest way is setting Java parameter in [jboss-home]/bin/run.sh, e.g.:
export JAVA_OPTS="$JAVA_OPTS -Dclover.config.file=/home/clover/config/cloverServer.properties"
Do not override other settings in the JAVA_OPTS property - i.e. memory settings described above.
On Windows OS, edit [jboss-home]/bin/run.conf.bat and add this line to the section where options
are passed to the JVM:
set JAVA_OPTS=%JAVA_OPTS% -Dclover.config.file=C:/JBoss6/cloverServer.properties
• Restart the JBoss AS so that the changes take effect.
• Check the CloverETL Server application is running:
Server's console is accessible at http://localhost:8080/clover by default.
Continue with: Installation of CloverETL Server License (p. 29)
JBoss Enterprise Application Platform
Installation of CloverETL Server (p. 23)
Configuration of CloverETL Server on JBoss EAP (p. 25)
Installation of CloverETL Server
1. Get CloverETL Server web archive file ( clover.war ) which is built for JBoss EAP.
2. Check if you meet prerequisites
• Oracle JDK or JRE (See Java Virtual Machine (p. 5) for required Java version.)
• JBoss EAP 6.x (JBoss AS 7) - see http://www.jboss.org/jbossas/downloads
23
Page 29

Chapter 3. Installing
• Memory settings for JBoss Java process. See section Memory Settings (p. 39) for details.
You can set the memory limits in [jboss-home]/bin/standalone.conf ( [jboss-home]/
bin/standalone.conf.bar on Windows OS) for JBoss EAP in standalone mode:
JAVA_OPTS="$JAVA_OPTS -XX:MaxMetaspaceSize=512m -Xms128m -Xmx2048m"
If you use Java 7, change -XX:MaxMetaspaceSize to -XX:MaxPermSize.
On Windows, perform steps analogic to the ones above.
3. Configure database connection
By default CloverETL Server uses embedded Derby database, however such setup is not
recommended for production use. You can use database connection provided by JNDI-bound
datasource deployed by JBoss EAP. In order to define the datasource, edit the file [jboss-
home]/standalone/configuration/standalone.xml and into section <subsystem
xmlns="urn:jboss:domain:datasources:1.1"> under element <datasources> add
definition of the datasource. Here is an example of datasource connecting to MySQL database:
<datasource jndi-name="java:jboss/datasources/CloverETLServerDS"
pool-name="CloverETLServerDS-Pool" enabled="true">
<connection-url>jdbc:mysql://localhost:3307/cloverServerDB</connection-url>
<driver>com.mysql</driver>
<transaction-isolation>TRANSACTION_READ_COMMITTED</transaction-isolation>
<pool>
<min-pool-size>5</min-pool-size>
<max-pool-size>50</max-pool-size>
<prefill>true</prefill>
</pool>
<security>
<user-name>root</user-name>
<password>root</password>
</security>
<statement>
<prepared-statement-cache-size>32</prepared-statement-cache-size>
<share-prepared-statements>true</share-prepared-statements>
</statement>
</datasource>
<drivers>
<driver name="com.mysql" module="mysql.driver">
<driver-class>com.mysql.jdbc.Driver</driver-class>
</driver>
</drivers>
4. The datasource definition references a module ( mysql.driver ) with MySQL JDBC driver. Take following
steps to add the module:
5. Under JBoss EAP there are more options to setup CloverETL Server's database: along with JNDI-bound data
source it is possible to use embedded Derby database or other supported database specified in CloverETL
configuration file.
In order to be able to connect to the database, one needs to define global module so that the driver is available
for CloverETL web application - copying the driver to the lib/ext directory of the server will not work. Such
module is created and deployed in few steps (the example is for MySQL and module's name is mysql.driver
):
• Create directory [jboss-home]/modules/mysql/driver/main (note that the directory path
corresponds to module name mysql.driver )
24
Page 30

Chapter 3. Installing
• Copy the driver mysql-connector-java-5.1.5-bin.jar to that directory and create there file
module.xml with following content:
<?xml version="1.0" encoding="UTF-8"?>
<module xmlns="urn:jboss:module:1.1" name="mysql.driver">
<resources>
<resource-root path="mysql-connector-java-5.1.5-bin.jar" />
</resources>
<dependencies>
<module name="javax.api" />
</dependencies>
</module>
• Add the module to global server modules: in case of the standalone JBoss EAP server they are defined in
[jboss-home]/standalone/configuration/standalone.xml . The module is to be added
into EE domain subsystem section:
<subsystem xmlns="urn:jboss:domain:ee:1.1">
<global-modules>
<module name="mysql.driver" slot="main" />
</global-modules>
<spec-descriptor-property-replacement>false</spec-descriptor-property-replacement>
<jboss-descriptor-property-replacement>true</jboss-descriptor-property-replacement>
</subsystem>
6. Configure CloverETL Server according to a description in the next section (p. 25) .
7. Deploy WAR file
Copy the file clover.war to [jboss-home]/standalone/deployments
8. Run [jboss-home]/bin/standalone.sh (or standalone.bat on Windows OS) to start the JBoss
platform.
It may take a couple of minutes until all applications are started.
9. Check JBoss response and CloverETL Server response
• JBoss administration console is accessible at http://localhost:8080/ by default. Default username/password
is admin/admin
• CloverETL Server is accessible at http://localhost:8080/clover by default.
Configuration of CloverETL Server on JBoss EAP
Default installation (without any configuration) is only recommended for evaluation purposes. For production use,
configuring at least the database connection and SMTP server connection is recommended.
There are more ways to set config properties. The most common one is a properties file in a specified location.
Properties File in Specified Location
• Create cloverServer.properties in a directory the JBoss EAP has right to read:
25
Page 31
Chapter 3. Installing
datasource.type=JNDI
datasource.jndiName=java:jboss/datasources/CloverETLServerDS
jdbc.dialect=org.hibernate.dialect.MySQLDialect
license.file=/home/clover/config/license.dat
Do not forget to set correct JDBC dialect according to your database server ( Part III, “Configuration” (p. 43)
). You can set the path to the license file, too.
• Alternatively, you can set "JDBC" datasource.type and configure the database connection to be managed
directly by CloverETL Server (provided that you have deployed proper JDBC driver module to the server):
datasource.type=JDBC
jdbc.url=jdbc:mysql://localhost:3306/cloverServerDB
jdbc.dialect=org.hibernate.dialect.MySQLDialect
jdbc.driverClassName=com.mysql.jdbc.Driver
jdbc.username=root
jdbc.password=root
license.file=/home/clover/config/license.dat
• Set system property (or environment variable) clover.config.file .
It should contain the full path to the cloverServer.properties file created in the previous step.
The simplest way to set the system property is to edit the configuration file [jboss-home]/standalone/
configuration/standalone.xml , and to add the following snippet just under <extensions>
section:
<system-properties>
<property name="clover.config.file" value="C:/jboss-eap-6.2/cloverServer.properties" />
</system-properties>
• Restart the JBoss EAP so that the changes take effect.
• Check the CloverETL Server application is running:
Server's console is accessible at http://localhost:8080/clover by default.
Note
The JBoss EAP has, by default, enabled HTTP session replication. This requires session serialization
that is not supported by CloverETL Server, and produces lots of harmless errors in JBoss's console
like this:
10:56:38,248 ERROR [org.infinispan.transaction.TransactionCoordinator] (http-/127.0.0.1:8080-2)
ISPN000188: Error while processing a commit in a two-phase transaction:
java.lang.UnsupportedOperationException: Serialization of HTTP session objects is not supported
by CloverETL Server - disable the session passivation/replication for this web application.
at com.cloveretl.server.web.gui.e.writeExternal(Unknown Source) [cs.jar:]
at org.jboss.marshalling.river.RiverMarshaller.doWriteObject(RiverMarshaller.java:874)
To get rid of these errors, disable the session replication. Edit [jboss-home]/standalone/
configuration/standalone.xml and comment out whole <cache-container
name="web" aliases="standard-session-cache"> block under <subsystem
xmlns="urn:jboss:domain:infinispan:1.5"> section.
26
Page 32

Chapter 3. Installing
Continue with: Installation of CloverETL Server License (p. 29)
Oracle WebLogic Server
Installation of CloverETL Server (p. 27)
Configuration of CloverETL Server on WebLogic (p. 28)
Installation of CloverETL Server
1. Get CloverETL Server web archive file (clover.war) which is built for WebLogic.
2. Check if you meet prerequisites
• Oracle JDK or JRE (See Java Virtual Machine (p. 5) for required Java version.)
• WebLogic (CloverETL Server is tested with WebLogic Server 11g (10.3.6) and WebLogic Server 12c
(12.1.2), see http://www.oracle.com/technetwork/middleware/ias/downloads/wls-main-097127.html)
WebLogic has to be running and a domain has to be configured. You can check it by connecting to
Administration Console: http://hostname:7001/console/ (7001 is the default port for HTTP). Username and
password are specified during installation.
• Memory allocation settings
It involves JVM parameters: -Xms -Xmx and -XX:MaxMetaspaceSize
See section Memory Settings (p. 39) for details.
You can set it i.e. with
export JAVA_OPTIONS='$JAVA_OPTIONS -Xms512m -Xmx2048m -XX:MaxMetaspaceSize=512m' to the start script
If you use Java 7, change -XX:MaxMetaspaceSize to -XX:MaxPermSize.
This change requires restarting the domain.
3. Change HTTP Basic Authentication configuration
• When WebLogic finds "Authentication" header in an HTTP request, it tries to find a user in its own realm.
This behavior has to be disabled so CloverETL could authenticate users itself.
• Modify config file [domainHome]/config/config.xml. Add <enforce-valid-basic-
auth-credentials>false</enforce-valid-basic-auth-credentials> element into
<security-configuration> element (just before the end tag).
4. Deploy a WAR file (or an application directory)
• Get a clover.war suitable for your WebLogic version.
• Deploy the clover.war using the WebLogic Server Administration Console. See the Oracle Fusion
Middleware Administrator's Guide (http://docs.oracle.com/cd/E23943_01/core.1111/e10105/toc.htm) for
details.
5. Configure a license and other configuration properties. (See Configuration of CloverETL Server on
WebLogic (p. 28))
6. Check a CloverETL Server URL
• Web-app is started automatically after deployment, so you can check whether it is up and running.
27
Page 33
Chapter 3. Installing
CloverETL Server is accessible at http://host:7001/clover by default. The port 7001 is the default WebLogic
HTTP Connector port.
Configuration of CloverETL Server on WebLogic
Default installation (without any configuration) is only recommended for evaluation purposes. For production use,
at least the DB data source and SMTP server configuration is recommended.
There are more ways to set config properties. The most common one is a properties file in a specified location.
Properties File in Specified Location
Create cloverServer.properties in a suitable directory.
Config file should contain DB datasource config, SMTP connection config, etc.
Set clover_config_file system property (or environment variable) pointing to the config properties file.
• Set JAVA_OPTIONS variable in the WebLogic domain start script [domainHome]/startWebLogic.sh
JAVA_OPTIONS="${JAVA_OPTIONS} -Dclover_config_file=/path/to/clover-config.properties
• This change requires restarting WebLogic.
Important
When CloverETL Server is deployed on WebLogic and JNDI Datasource pointing to Oracle DB is
used, there must be an extra config property in the config file:
quartz.driverDelegateClass=org.quartz.impl.jdbcjobstore.oracle.weblogic.WebLogicOracleDelegate
Continue with: Installation of CloverETL Server License (p. 29)
28
Page 34

Chapter 3. Installing
Installation of CloverETL Server License
To be able to execute graphs, CloverETL Server requires a valid license. You can install CloverETL Server without
any license, but no graph will be executed.
There are three ways of installing the license working on all application servers.
• The simplest way is using 'Add license form' and save the license content to a database. See Installation of
CloverETL Server License using a Web Form (p. 29).
• The second way is configuring a license.file property to set the plain license file. See Installation of
CloverETL Server License using a license.file Property (p. 32).
• The last way is a separate web application clover-license.war. See Separate License WAR (p. 32).
Note
CloverETL license can be changed any time by replacing license.dat file. Afterwards, you
have to let CloverETL Server know the license has changed.
•
Go to server web GUI →Configuration →Setup →License
• Click Reload license.
• Alternatively, you can restart the CloverETL Server application.
Note
All three ways listed below can be used at the same time. The most recent valid license is used.
Installation of CloverETL Server License using a Web Form
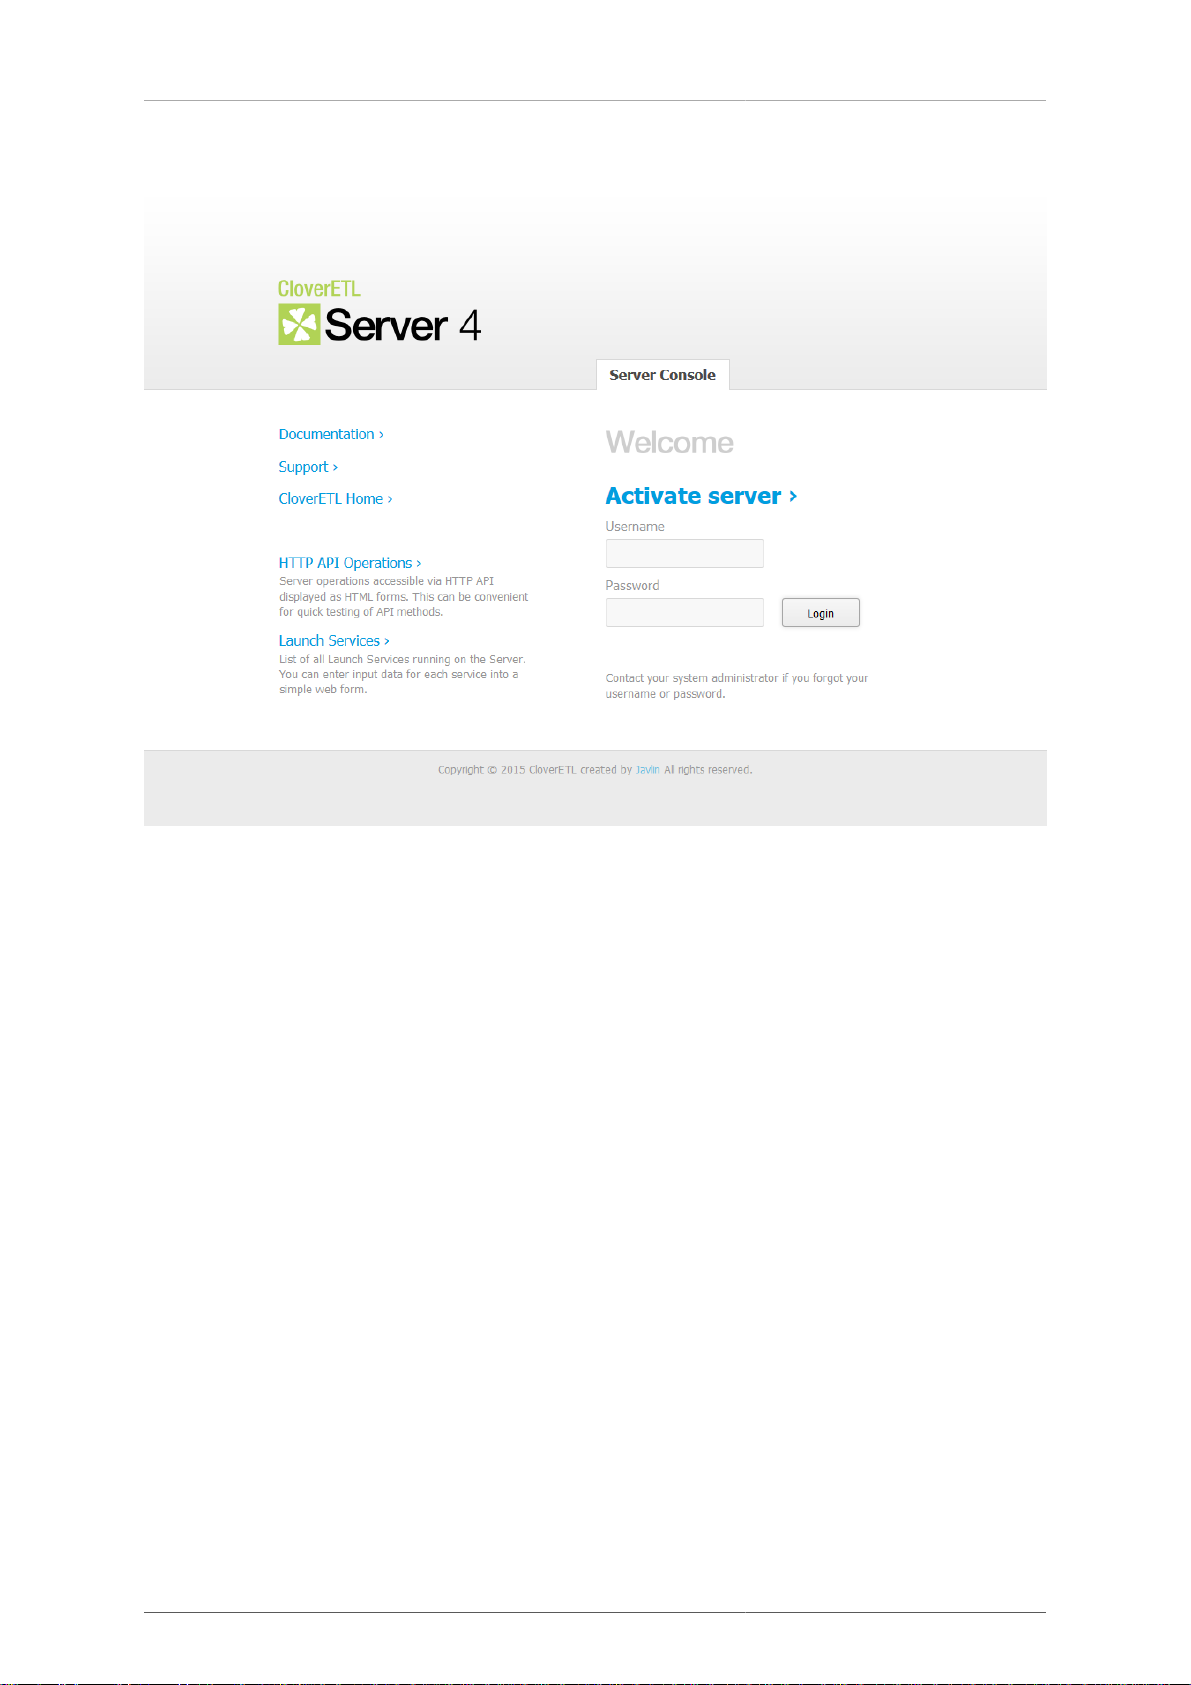
If the CloverETL Server has been started without assigning any license, you can use Add license form in the
server gui to install it. In this case the hyperlink No license available in system. Add new license is displayed on
the login page. It links to the form.
29
Page 35
Chapter 3. Installing
Figure 3.2. Login page of CloverETL Server without license
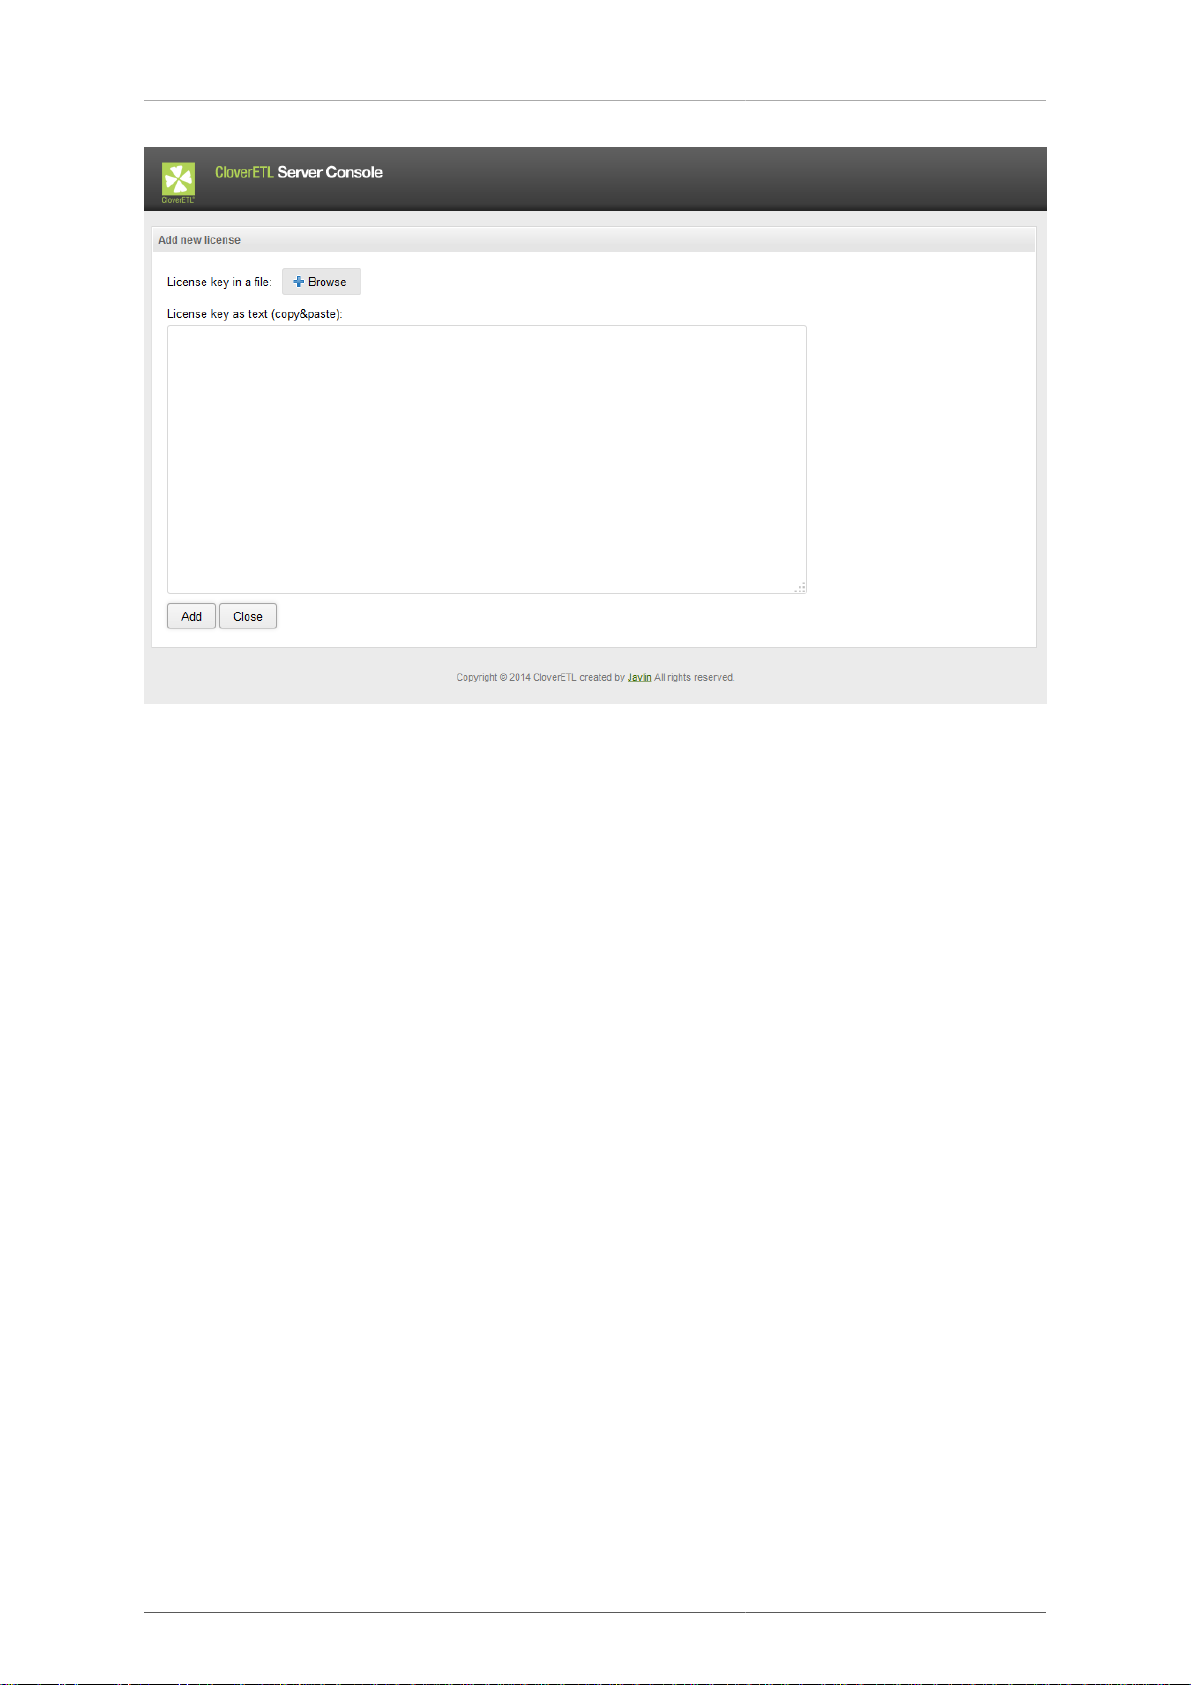
You can paste a license text into License key or use Browse button to search for license file in the filesystem.
After clicking Update button the license is validated and saved to the database table clover_licenses. If the license
is valid, a table with license's description appears. To proceed to CloverETL Serve console click Continue to
server console.
To skip adding a license you can use Close button.
30
Page 36
Chapter 3. Installing
Figure 3.3. Add new license form
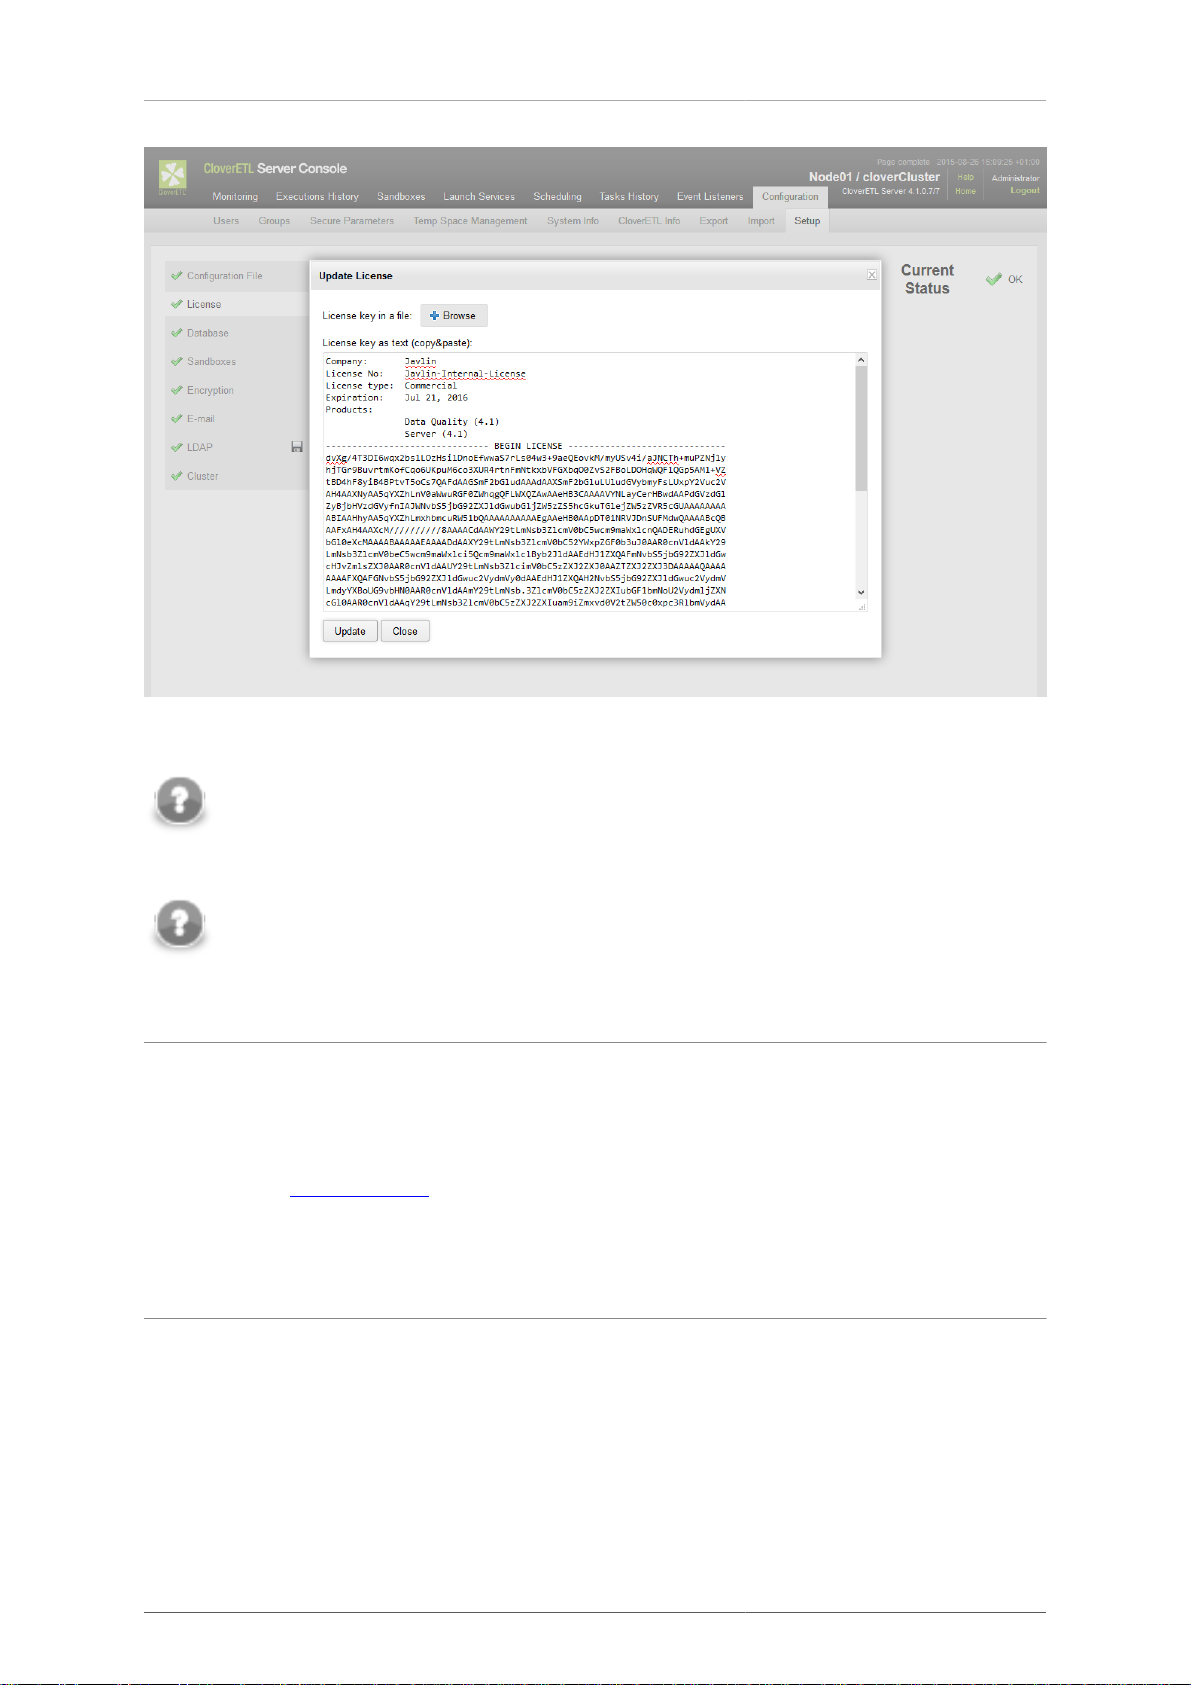
Update of CloverETL Server License in the Configuration Section
If the license has been already installed, you can still change it by using form in the server web gui.
•
Go to server web GUI →Configuration →CloverETL Info →License
• Click Update license.
You can paste a license text into a License key textarea or use the Browse button to search for a license file in
the filesystem. To skip adding a license you can use Close button.
After clicking the Update button the license is saved to the database table clover_licenses and reloaded.
31
Page 37
Chapter 3. Installing
Figure 3.4. Update license form
Note
The license in the database is common for all nodes in the cluster. Reloading of the license occurs
on each node in the cluster.
Note
If you assign more valid licenses, the most recent one is used.
Installation of CloverETL Server License using a license.file Property
1. Get the license.dat file.
2. Set the CloverETL Server license.file parameter to the path to license.dat. Set its value to full path
to the license.dat file.
See Chapter 9, List of Properties (p. 69) for list of properties.
3. Restart the application server.
Separate License WAR
Simple approach, but it may be used only for standalone server running on Apache Tomcat.
1. Download the clover-license.war web archive file.
2. Copy clover-license.war to the [tomcat_home]/webapps directory.
3. The war file should be detected and deployed automatically without restarting Tomcat.
4. Check whether the license web-app is running on:
32
Page 38

Chapter 3. Installing
http://[host]:[port]/clover-license/ (Note: clover-license contextPath is mandatory
and cannot by changed)
IBM InfoSphere MDM Plugin Installation
Downloading
IBM InfoSphere MDM Components for CloverETL Server are downloaded as a ZIP file containing the
extension. The ZIP file is available for download under your account on www.cloveretl.com in CloverETL Server
download area, under the Utilities section as ibm-mdm-connectors.${version}.zip file.
Requirements
Requirements of IBM InfoSphere MDM Components:
• supported OS are Microsoft Windows 32 bit, Microsoft Windows 64 bit, Linux 32 bit, Linux 64bit, and Mac
OS X Cocoa
• at least 512MB of RAM
• installed CloverETL Server
Installation into Server
The following steps are needed to install IBM InfoSphere MDM Components into CloverETL Server:
1. Install CloverETL Server, see its documentation for details.
2. Download the ZIP file with IBM InfoSphere MDM Components for Server and store it on the system where
CloverETL Server is installed. See Downloading (p. 33) for instructions for the download.
3. The ZIP file contains a CloverETL plugin. Your Server installation needs to be
configured to find and load the plugin from the ZIP file. This is done by setting the
engine.plugins.additional.src Server configuration property to the absolute path of the ZIP file,
e.g. engine.plugins.additional.src=c:/Server/ibm-mdm-connectors.4.3.0.zip (in
case the Server is configured via a property file).
Details for setting the configuration property depend on your Server installation specifics, application server
used etc. See CloverETL Server documentation for details. Typically the property would be set similarly to
how you set-up the properties for connection to the Server's database. Updating the configuration property
usually requires restart of the Server.
4. To verify that the plugin was loaded successfully, login to the Server's Reporting Console and look
in the Configuration > CloverETL Info > Plugins page. In the list of plugins you should see
cloveretl.engine.initiate.
Troubleshooting
If you get an Unknown component or Unknown connection error when running a graph with IBM
InfoSphere MDM components, it means that the IBM InfoSphere MDM Components plugin was not loaded by
the Server successfully. Please check the above steps to install the plugin, especially the path to the ZIP file.
33
Page 39

Chapter 3. Installing
Possible Issues during Installation
Since CloverETL Server is considered a universal JEE application running on various application servers,
databases and jvm implementations, problems may occur during the installation. These can be solved with a proper
configuration of the server environment. This section contains tips for the configuration.
Memory Issues on Derby (p. 34)
JAVA_HOME or JRE_HOME Environment Variables Are Not Defined (p. 34)
Apache Tomcat Context Parameters Do Not Have Any Effect (p. 35)
Tomcat Log File catalina.out Is Missing on Windows (p. 35)
Timeouts Waiting for JVM (p. 35)
clover.war as Default Context on WebSphere (Windows OS) (p. 36)
Tomcat 6.0 on Linux - Default DB (p. 36)
Derby.system.home Cannot be Accessed (p. 36)
Environment Variables and More than one CloverETL Server Instances Running on Single Machine (p. 37)
Special Characters and Slashes in Path (p. 37)
File System Permissions (p. 37)
JMS API and JMS Third-Party Libraries (p. 37)
Using an Unsupported JDBC Connector for MySQL (p. 37)
Memory Issues on Derby
If your server suddenly starts consuming too much resources (CPU, memory) despite having been working well
before, it might be because of running the internal Derby DB. Typically, causes are incorrect/incomplete shutdown
of Apache Tomcat and parallel (re)start of Apache Tomcat.
Solution: move to a standard (standalone) database.
How to fix this? Redeploy CloverETL Server:
1. Stop Apache Tomcat and verify there are no other instances running. If so, kill them.
2. Backup the config file, if you configured any.
3. Delete the webapps/clover directory.
4. Start Apache Tomcat server. It will automatically redeploy Clover Server.
5. Verify you can connect from Designer and from web.
6. Shutdown Apache Tomcat.
7. Restore the config file and point it to your regular database.
8. Start Apache Tomcat.
JAVA_HOME or JRE_HOME Environment Variables Are Not Defined
If you are getting this error message during an attempt to start your application server (mostly Tomcat), perform
the following actions.
Linux:
These two commands will help you set paths to the variables on the server.
• [root@server /] export JAVA_HOME=/usr/local/java
• [root@server /] export JRE_HOME=/usr/local/jdk
As a final step, restart the application server.
34
Page 40
Chapter 3. Installing
Windows OS:
Set JAVA_HOME to your JDK installation directory, e.g. C:\Program Files\java\jdk1.7.0. Optionally,
set also JRE_HOME to the JRE base directory, e.g. C:\Program Files\java\jre7.
Important
If you only have JRE installed, specify only JRE_HOME.
Apache Tomcat Context Parameters Do Not Have Any Effect
Tomcat may sometimes ignore some of context parameters. It may cause weird CloverETL Server behaviour,
since it looks like configured, but only partially. Some parameters are accepted, some are ignored. Usually
it works fine, however it may occur in some environments. Such behaviour is consistent, so after restart it's
the same. It's probably related to Tomcat issues: https://issues.apache.org/bugzilla/show_bug.cgi?id=47516 and
https://issues.apache.org/bugzilla/show_bug.cgi?id=50700 To avoid this, please use a properties file instead of
context parameters to configure CloverETL Server.
Tomcat Log File catalina.out Is Missing on Windows
Tomcat start batch files for Windows aren't configured to create catalina.out file which contains standard output
of the application. The catalina.out file may be vital when the Tomcat isn't started in console and any issue
occurs. Or even when Tomcat is executed in the console, it may be closed automatically just after the error message
appears in it.
Please follow these steps to enable catalina.out creation:
• Modify [tomcat_home]/bin/catalina.bat. Add parameter "/B" to lines where "_EXECJAVA" variable is set.
There should be two these lines. So they will look like this:
set _EXECJAVA=start /B [the rest of the line]
Parameter /B causes, that "start" command doesn't open new console window, but runs the command it's own
console window.
• Create new startup file. e.g. [tomcat_home]/bin/startupLog.bat, containing only one line:
catalina.bat start > ..\logs\catalina.out 2<&1
It executes Tomcat in the usual way, but standard output isn't put to the console, but to the catalina.out file.
Then use the new startup file instead of [tomcat_home]/bin/startup.bat.
Timeouts Waiting for JVM
If you get the Jetty application server successfully running but cannot start Clover Server, it might be because of
the wrapper waiting for JVM too long (it is considered a low-memory issue). Examine [JETTY_HOME]\logs
\jetty-service.log for a line like this:
Startup failed: Timed out waiting for signal from JVM.
If it is there, edit [JETTY_HOME]\bin\jetty-service.conf and add these lines:
wrapper.startup.timeout=60
wrapper.shutdown.timeout=60
35
Page 41
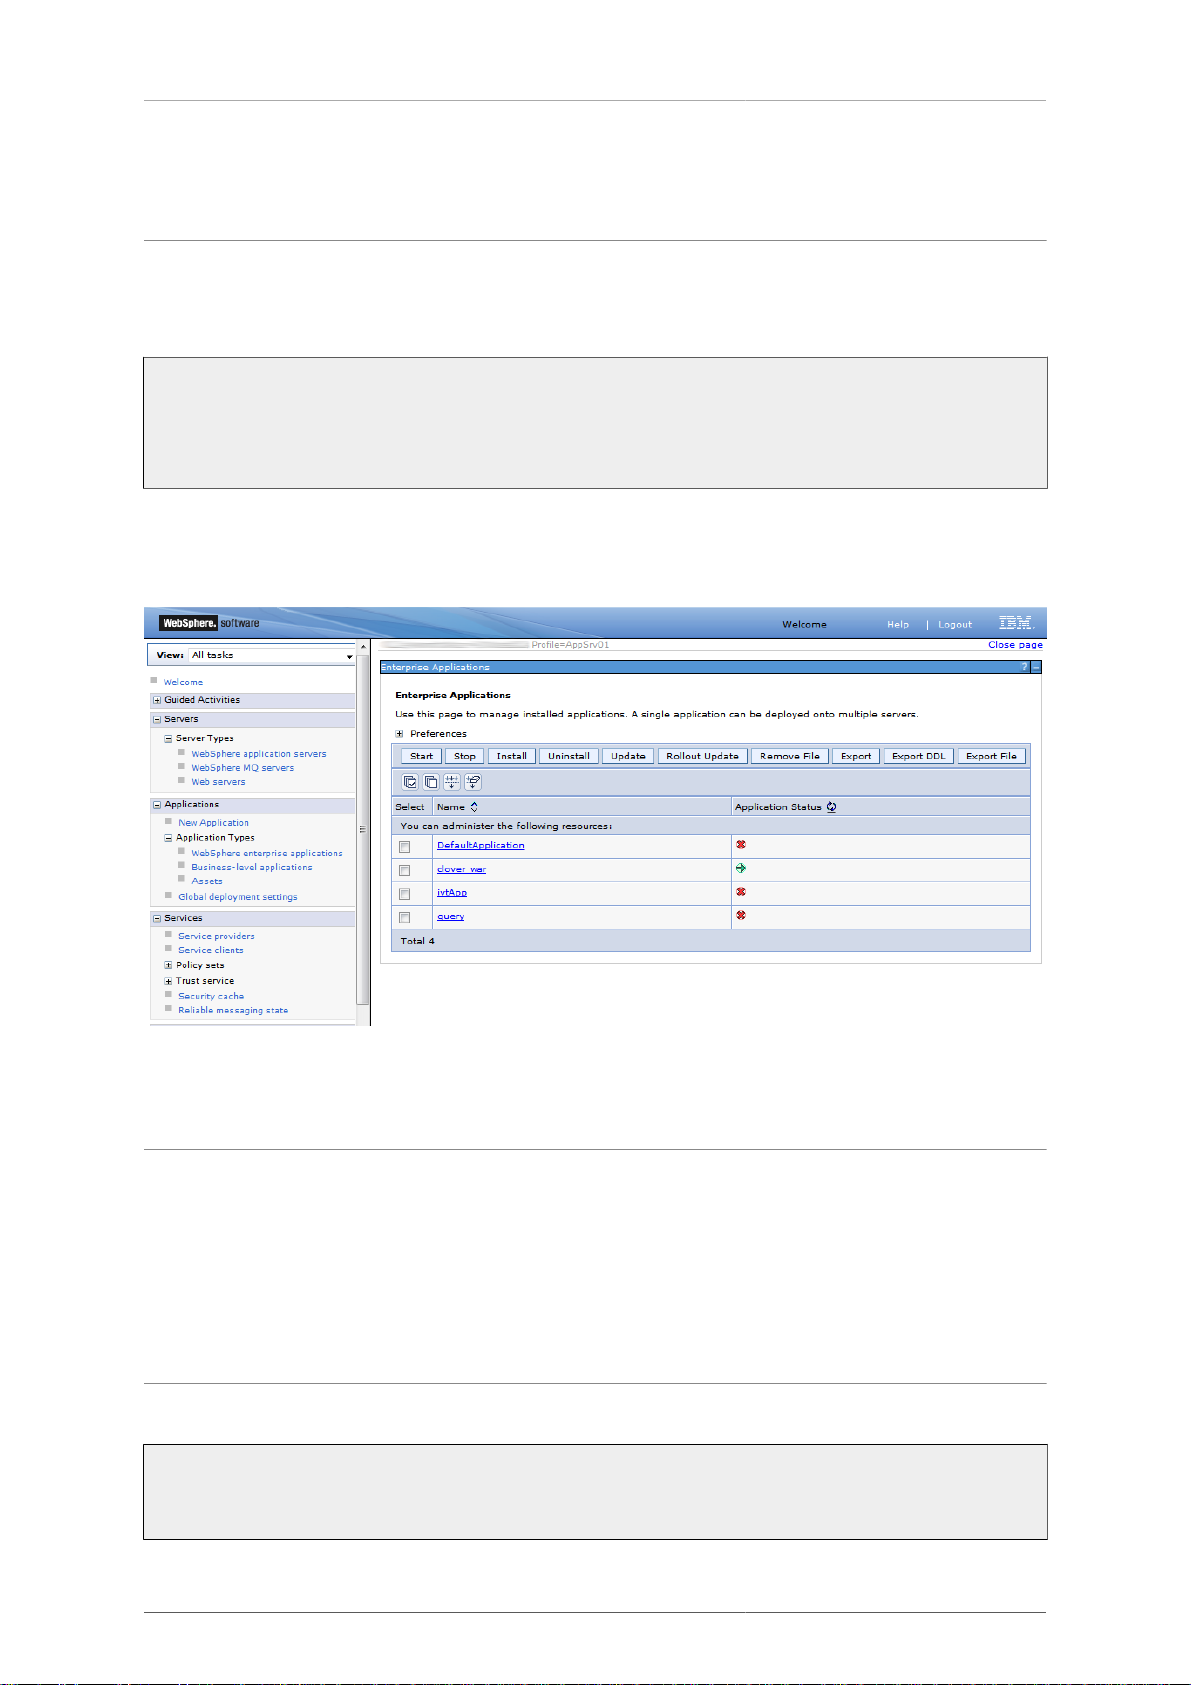
Chapter 3. Installing
If that does not help either, try setting 120 for both values. Default timeouts are 30 both.
clover.war as Default Context on WebSphere (Windows OS)
If you are deploying clover.war on the IBM WebSphere server without context path specified, be sure to check
whether it is the only application running in the context root. If you cannot start Clover Server on WebSphere,
check the log and look for a message like this:
com.ibm.ws.webcontainer.exception.WebAppNotLoadedException:
Failed to load webapp: Failed to load webapp: Context root /* is already bound.
Cannot start application CloverETL
If you can see it, then this is the case. Getting rid of the issue, the easiest way is to stop all other (sample)
applications and leave only clover.war running on the server. That should guarantee the server will be available
in the context root from now on (e.g. http://localhost:9080/).
Figure 3.5. Clover Server as the only running application on IBM WebSphere
Tomcat 6.0 on Linux - Default DB
When using the internal (default) database on Linux, your Clover Server might fail on first start for no obvious
reasons. Chances are that the /var/lib/tomcat6/databases directory was not created (because of access
rights in parent folders).
Solution: Create the directory yourself and try restarting the server. This simple fix was successfully tested with
Clover Server deployed as a WAR file via Tomcat web admin.
Derby.system.home Cannot be Accessed
If the server cannot start and the following message is in the log:
java.sql.SQLException: Failed to start database 'databases/cloverserver'
36
Page 42

Chapter 3. Installing
then see the next exception for details. After that check settings of the derby.system.home system property.
It may point to an unaccessible directory, or files may be locked by another process. We suggest you set a specific
directory as the system property.
Environment Variables and More than one CloverETL Server Instances
Running on Single Machine
If you are setting environment variables like clover_license_file or clover_config_file ,
remember you should not be running more than one CloverETL Server. Therefore if you ever needed to run more
instances at once, use other ways of setting parameters (see Part III, “Configuration” (p. 43) for description of
all possibilities) The reason is the environment variable is shared by all applications in use causing them to share
configurations and fail unexpectedly. Instead of environment variables you can use system properties (passed to
the application container process using parameter with -D prefix: -Dclover_config_file).
Special Characters and Slashes in Path
When working with servers, you ought to stick to folder naming rules more than ever. Do not use any special
characters in the server path, e.g. spaces, accents, diacritics are all not recommended. It's unfortunately common
naming strategy on Windows systems. It can produce issues which are hard to find. If you are experiencing weird
errors and cannot trace the source of them, why not install your application server in a safe destination like:
C:\JBoss6\
Similarly, use slashes but never backslashes in paths inside the *.properties files, e.g. when pointing to the
Clover Server license file. If you incorrectly use backlash, it will be considered an escape character and the server
may not work fine. This is an example of a correct path:
license.file=C:/CoverETL/Server/license.dat
File System Permissions
Application server must be executed by OS user which has proper read/write permissions on file system. Problem
may occur, if app-server is executed by root user for the first time, so log and other temp files are created by root
user. When the same app-server is executed by another user, it will fail because it cannot write to root's files.
JMS API and JMS Third-Party Libraries
Missing JMS libraries do not cause fail of server startup, but it is issue of deployment on an application server,
thus it still suits to this chapter.
clover.war itself does not contain jms.jar, thus it has to be on an application server's classpath. Most of the
application servers have jms.jar by default, but e.g. Tomcat does not. So if the JMS features are needed, the jms.jar
has to be added explicitly.
If "JMS Task" feature is used, there must be third-party libraries on a server's classpath as well. The same approach
is recommended for JMS Reader/Writer components, even if these components allow to specify external libraries.
It is due to common memory leak in these libraries which causes "OutOfMemoryError: PermGen space".
Using an Unsupported JDBC Connector for MySQL
CloverETL Server requires MySQL 5 up to version 5.5 included. Using an unsupported JDBC connector for
MySQL might cause exception, for example:
37
Page 43

Chapter 3. Installing
could not execute query
You have an error in your SQL syntax; check the manual that coresponds to your MySQL server version for the right syntax
to use near 'OPTION SQL_SELECT_LIMIT=DEFAULT' at line 1
38
Page 44

Chapter 4. Postinstallation Configuration
Memory Settings
Current implementation of Java Virtual Machine allows only global configuration of memory for the JVM system
process. Thus whole application server, together with WARs and EARs running on it, share one memory space.
Default JVM memory settings is too low for running application container with CloverETL Server. Some
application servers, like IBM WebSphere, increase JVM defaults themselves, however they still may be too low.
The best memory limits depend on many conditions, i.e. transformations which CloverETL should execute. Please
note, that maximum limit isn't amount of permanently allocated memory, but limit which can't be exceeded. If the
limit was exhausted, the OutOfMemoryError would be raised.
JVM Memory Areas
JVM memory consists of several areas: Heap memory, PermGen space (for loaded classes), so called direct
memory (used by graph edges), and stack memory (allocated for each thread). JVM memory is not just HEAP
memory. Thus it's not wise to set HEAP limit too high, since if it consumed whole RAM, JVM wouldn't be able
to allocate direct memory and stack for new threads.
Configuring Memory
You can set the minimum and maximum memory heap size by adjusting the "Xms" and "Xmx" JVM parameters.
There are more ways to change the settings depending on the used application container.
Recommended Heap Memory Configuration
If you have no idea about the memory required for the transformations, a maximum of 1-2 GB heap memory is
recommended. This limit may be increased during transformations development when OutOfMemoryError
occurs.
Heap limit is not limit of memory used by JVM. If you do not understand JVM in details, you should not assign
more than 50% of main memory to heap.
Memory Configuration in Different Java Versions
In Java 7 and earlier, memory space for loading classes (so called "PermGen space") is separated from heap
memory, and can be set by the JVM parameter "-XX:MaxPermSize". By default, it is just 64 MB which is not
enough for enterprise applications. Again, suitable memory limit depends on various criteria, but 512 MB should
be enough in most cases. If the PermGen space maximum is too low, OutOfMemoryError: PermGen space
may occur.
In Java 8, memory space for loading classes (so called "Metaspace") is separated from heap, and can be set by the
JVM parameter -XX:MaxMetaspaceSize. The default maximum Metaspace size is unlimited. You can change it
by parameter -XX:MaxMetaspaceSize.
Please see the specific container section for details how to make the settings.
Codecache Size
Some clover server installations can occasionally run into performance issue: JVM is running more than hundred
times slower. The issue can be caused by a full codecache (https://docs.oracle.com/javase/8/embedded/developapps-platforms/codecache.htm). Reserved code cache size is platform dependent and can be too small for clover
server. It is highly recommended to increase code cache size using following JVM argument:
-XX:ReservedCodeCacheSize=256m
39
Page 45

Chapter 4. Postinstallation
Configuration
Maximum Number of Open Files
When using resource-greedy components, such as FastSort, or when running a large number of graphs
concurrently, you may hit the system limit on simultaneously open files. This is usually indicated by the
java.io.IOException: Too many open files exception.
The default limit is fairly low in many Linux distributions (e.g. 4096 in Ubuntu). Such a limit can be easily
exceeded, considering that one FastSort component can open up to 1,000 files when sorting 10 million records.
Furthermore, some application containers recommend increasing the limit themselves (8192 for IBM WebSphere).
Therefore it is recommended to increase the limit for production systems. Reasonable limits vary from 10,000 to
about 100,000 depending on the expected load of CloverETL Server and the complexity of your graphs.
The current limit can be displayed in most UNIX-like systems using the ulimit -Hn command.
The exact way of increasing the limit is OS-specific and is beyond the scope of this manual.
40
Page 46

Chapter 5. Upgrading Server to Newer Version
General Notes on Upgrade
• Upgrade of CloverETL Server requires down time; plan a maintenance window
• Successful upgrade requires about 30 minutes; rollback requires 30 minutes
• Performing the below steps in development/testing environment first before moving onto production one
Upgrade Prerequisites
• Having new CloverETL Server web application archive (clover.war appropriate for the application server
used) & license files available
• Having release notes for particular CloverETL version available (and all version between current and intended
version to be upgraded to)
• Having the graphs and jobs updated and tested with regards to Known Issues & Compatibility for particular
CloverETL version.
• Having the CloverETL Server configuration properties file externalized from default location, see Chapter 6,
Configuration Sources and Their Priorities (p. 44)
• Standalone database schema where CloverETL Server stores configuration, see Chapter 8, Examples of DB
Connection Configuration (p. 54)
• Having a separate sandbox with test graph that can be run anytime to verify that CloverETL Server runs correctly
and allows for running jobs
Upgrade Instructions
1. Suspend all sandboxes, wait for running graphs to finish processing
2. Shutdown CloverETL Server application (or all servers, if they run in cluster mode)
3. Backup existing CloverETL database schema (if any changes to the database schema are necessary, the new
server will automatically make them when you start it for the first time)
4. Backup existing CloverETL web application archive (clover.war) & license files (on all nodes)
5. Backup existing CloverETL sandboxes (on all nodes)
6. Re-deploy the CloverETL Server web application. Instructions how to do that are application server dependent
- see Enterprise Server (p. 12) for installation details on all supported application servers. After you re-deploy,
your new server will be configured based on the previous version's configuration.
7. Replace old license files by the valid one (or you can later use web GUI form to upload new license). The
license file is shipped as a text containing a unique set of characters. If you:
• received the new license as a file (*.dat), then simply use it as new license file.
• have been sent the licence text e.g inside an e-mail, then copy the license contents (i.e. all text between
Company and END LICENSE) into a new file called clover-license.dat. Next, overwrite the old
license file with the new one or upload it in the web GUI.
See Installation of CloverETL Server License (p. 29) for details on license installation.
8. Start CloverETL Server application (on all nodes)
41
Page 47

Chapter 5. Upgrading
Server to Newer Version
9. Review that contents of all tabs in CloverETL Server Console, especially scheduling and event listeners looks
OK.
10.Update graphs to be compatible with the particular version of CloverETL Server (this should be prepared and
tested in advance)
11.Resume the test sandbox and run a test graph to verify functionality
12.Resume all sandboxes
Rollback Instructions
1. Shutdown CloverETL Server application
2. Restore CloverETL Server web application (clover.war) & license files (on all nodes)
3. Restore CloverETL Server database schema
4. Restore CloverETL sandboxes (on all nodes)
5. Start CloverETL Server application (on all nodes)
6. Resume the test sandbox and run a test graph to verify functionality
7. Resume all sandboxes
Important
Evaluation Version - a mere upgrade of your license is not sufficient. When moving from evaluation
to enterprise server, you should not use the default configuration and database. Instead, take some
time to configure Clover Server so that it best fits your production environment.
42
Page 48

Part III. Configuration
We recommend the default installation (without any configuration) only for evaluation purposes. For production
use, we recommend configuring a dedicated database and properly configuring the SMTP server for sending
notifications.
Page 49
Chapter 6. Configuration Sources and Their Priorities
Configuration Sources
There are several sources of configuration properties. If a property isn't set, application default is used.
Configuration properties can be encrypted (see details in Chapter 10, Secure Configuration Properties (p. 75)).
Warning: Do not combine sources specified below. Configuration becomes confusing and maintenance will be
much more difficult.
Environment Variables
Environment variables are variables configured by means of your operating system. E.g. $PATH is an environment
variable.
Set environment variable with prefix clover. , i.e. (clover.config.file)
Some operating systems may not use dot character, so also underlines (_) may be used instead of dots (.). So the
clover_config_file works as well.
System Properties
System properties are configured by means of JVM, e.g. with -D argument (-Dclover.config.file).
Set system property with clover. prefix, i.e. (clover.config.file)
Also underlines (_) may be used instead of dots (.) so the clover_config_file works as well.
Properties File on Default Location
Source is a common properties file (text file with key-value pairs):
[property-key]=[property-value]
By default, CloverETL tries to find the config file [workingDir]/cloverServer.properties.
Properties File on Specified Location
A file has the same file structure as in case above, but its location is specified with a clover_config_file
or clover.config.file environment variable or system property.
This is the recommended way of configuration if context parameters cannot be set in application server.
Modification of Context Parameters in web.xml
Unzip clover.war and modify the WEB-INF/web.xml file. Add the following piece of code into the file:
<context-param>
<param-name>[property-name]</param-name>
<param-value>[property-value]</param-value>
</context-param>
44
Page 50
Chapter 6. Configuration
Sources and Their Priorities
This way isn't recommended, but it may be useful when none of approaches above ways is possible.
Context Parameters (Available on Apache Tomcat)
Some application servers allow you to set context parameters without modification of a WAR file.
This way of configuration is possible, but is it not recommended, as Apache Tomcat may ignore some of context
parameters in some environments. Use of a properties file is almost as convenient and much more reliable way.
Example for Apache Tomcat
On Tomcat, it is possible to specify context parameters in a context configuration file. [tomcat_home]/conf/
Catalina/localhost/clover.xml which is created automatically just after deployment of a CloverETL
Server web application.
You can specify a property with adding this element:
<Parameter name="[propertyName]" value="[propertyValue]" override="false" />
Priorities of Configuration Sources
Configuration sources have these priorities:
1. context parameters (specified in an application server or directly in a web.xml file)
2. external config file; CS tries to find it in this order. Only one of them is loaded.
• path specified with a config.file context parameter
• path specified with a clover_config_file or clover.config.file system property.
• path specified with a clover_config_file or clover.config.file environment variable.
• default location ([workingDir]/cloverServer.properties)
3. system properties
4. environment variables
5. default values
45
Page 51
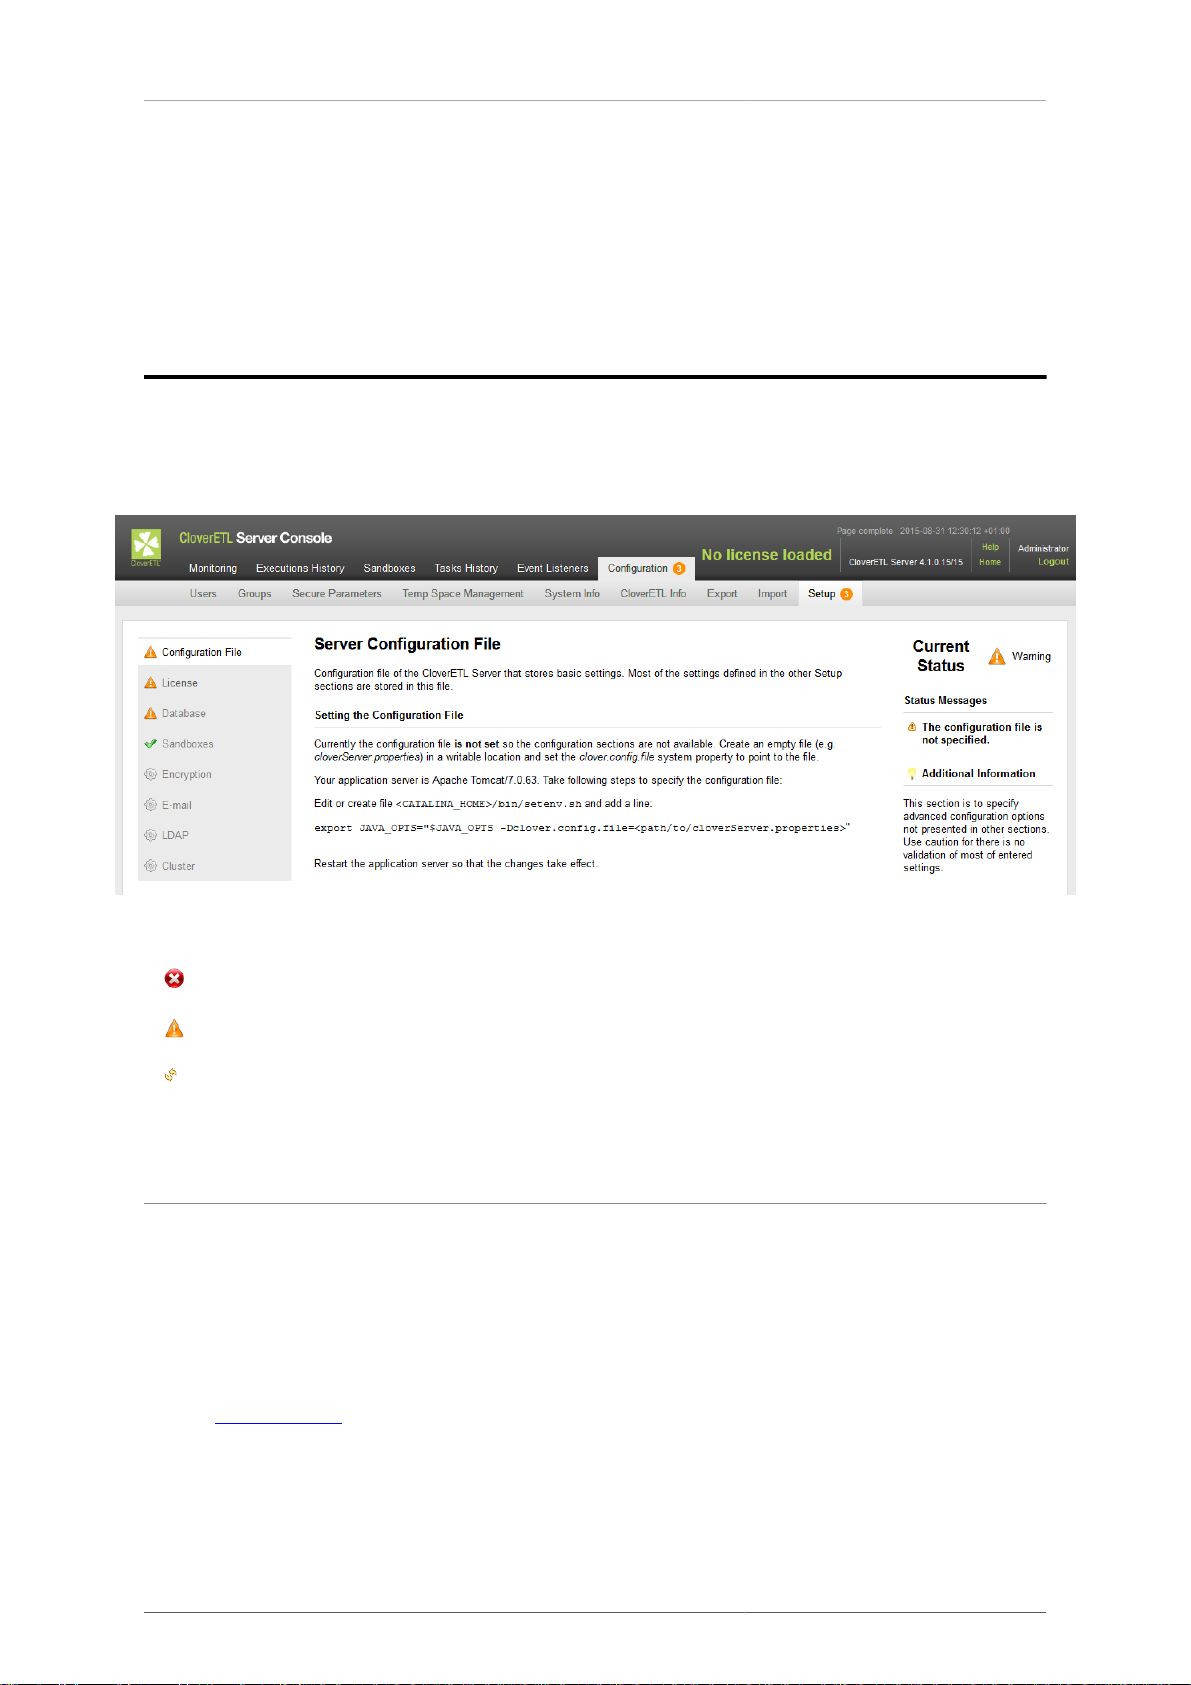
Chapter 7. Setup
CloverETL Server Setup helps you with configuration of CloverETL server. Instead of typing the whole
configuration file in a text editor, the Setup generates content of the configuration file according to your
instructions. It let you set up License and configure Database Connection, LDAP Connection, SMTP Server
Connection, Sandbox Paths, Encryption and Cluster Configuration.
The Setup is accessible from Server Console under Configuration →Setup.
Using Setup
If you start an unconfigured server, you can see decorators pointing to the Setup. The decorators mark problems
to be solved. The displayed number corresponds to the number of items.
The following states mean error as mentioned in the text above:
•
error
•
warning
• restart required
Setup will help you with solving the problems.
Path to the Configuration File
Firstly, you have to configure a path to a configuration file. Without this, the Setup does not know, to which file
the configuration should be saved. Each application server has different way to configure it.
Apache Tomcat
Edit bin/setenv.sh (or bin/setenv.bat) and add -Dclover.config.file=/absolute/path/
to/cloverServer.properties to CATALINA_OPTS.
See also Apache Tomcat (p. 12).
Jetty
Edit bin/jetty.sh and add -Dclover.config.file=/absolute/path/to/
cloverServer.properties to JAVA_OPTS.
46
Page 52
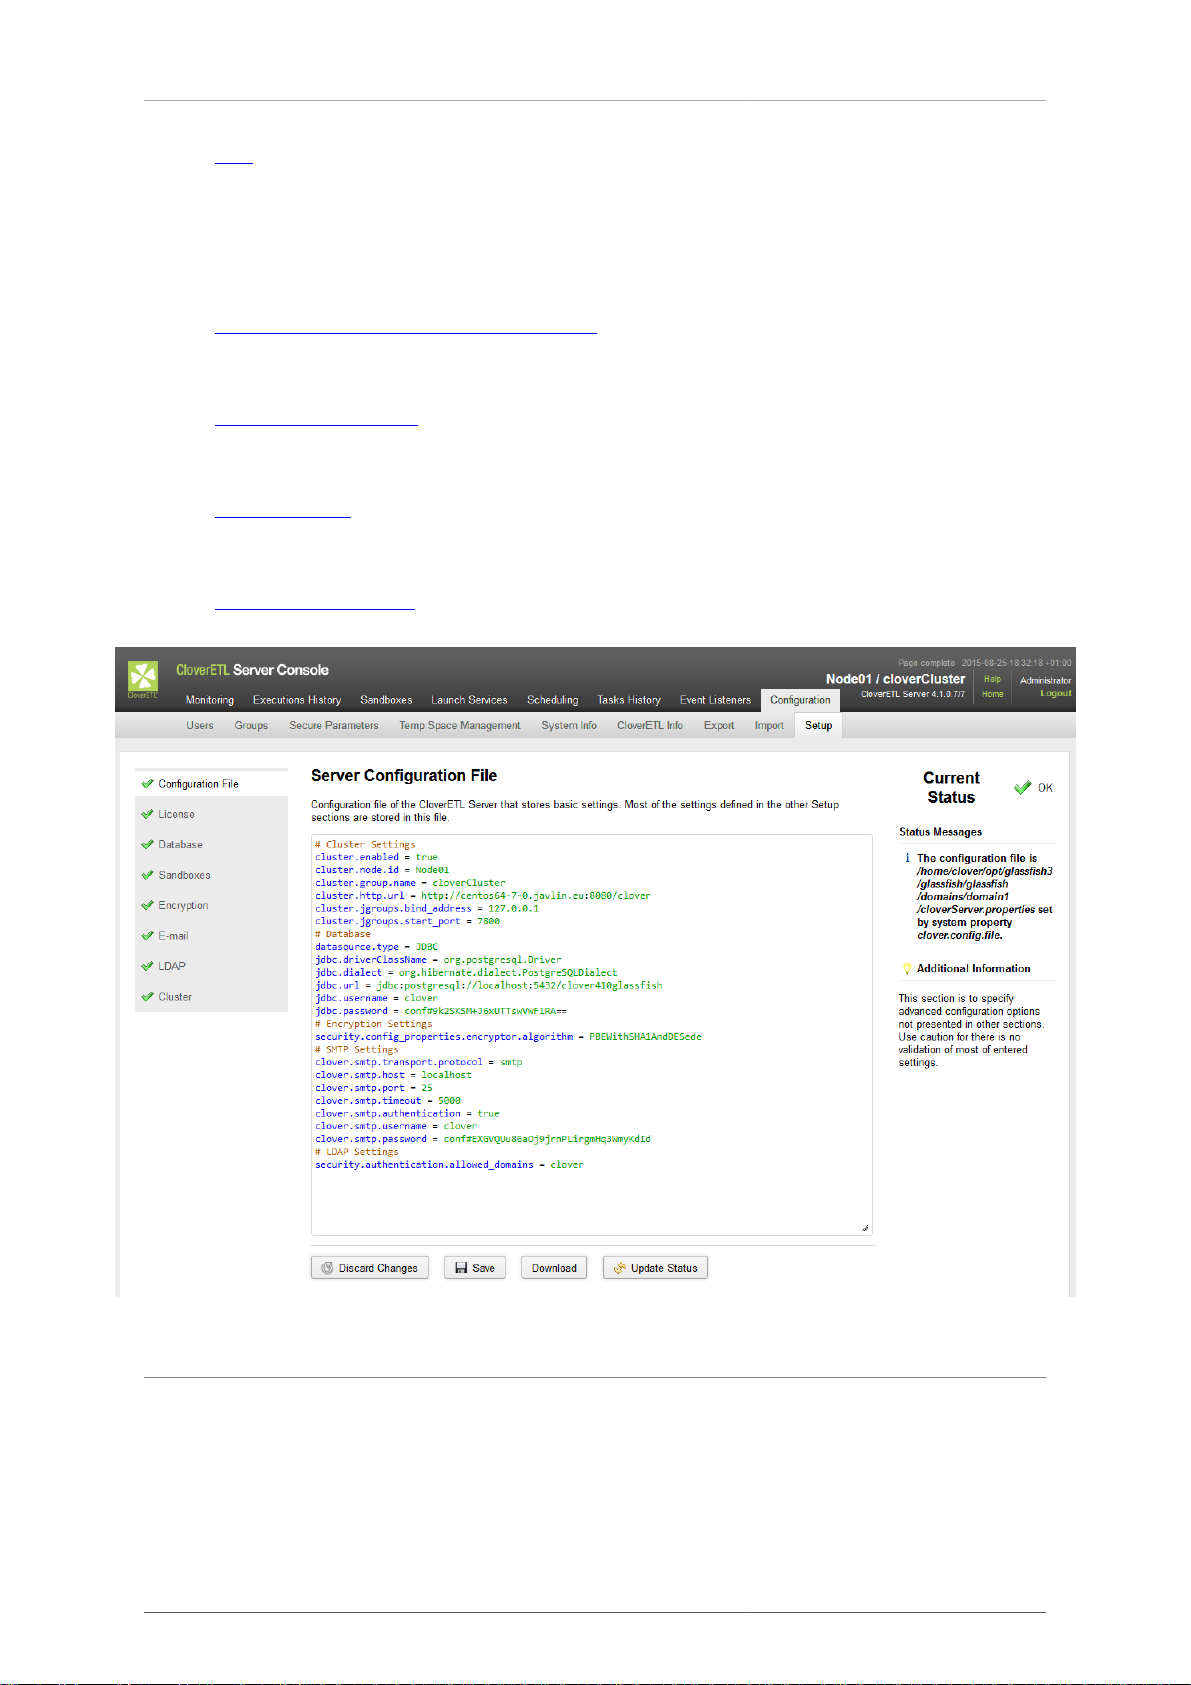
Chapter 7. Setup
See also Jetty (p. 16).
Glassfish
Add clover.config.file property in application server GUI (accessible on http://localhost:4848). The
property can be added under Configuration →System Properties.
See also Glassfish / Sun Java System Application Server (p. 20).
JBoss
See also JBoss Application Server (p. 21).
WebSphere
See also IBM WebSphere (p. 17).
WebLogic
See also Oracle WebLogic Server (p. 27).
Adding Libraries to Classpath
Secondly, you should configure connection to a database.
Place necessary libraries to a suitable directory. You usually need a jdbc driver for connection to a database or
a .jar file with an encryption provider.
Having added the libraries restart the application server and configure Clover Server using Setup.
47
Page 53
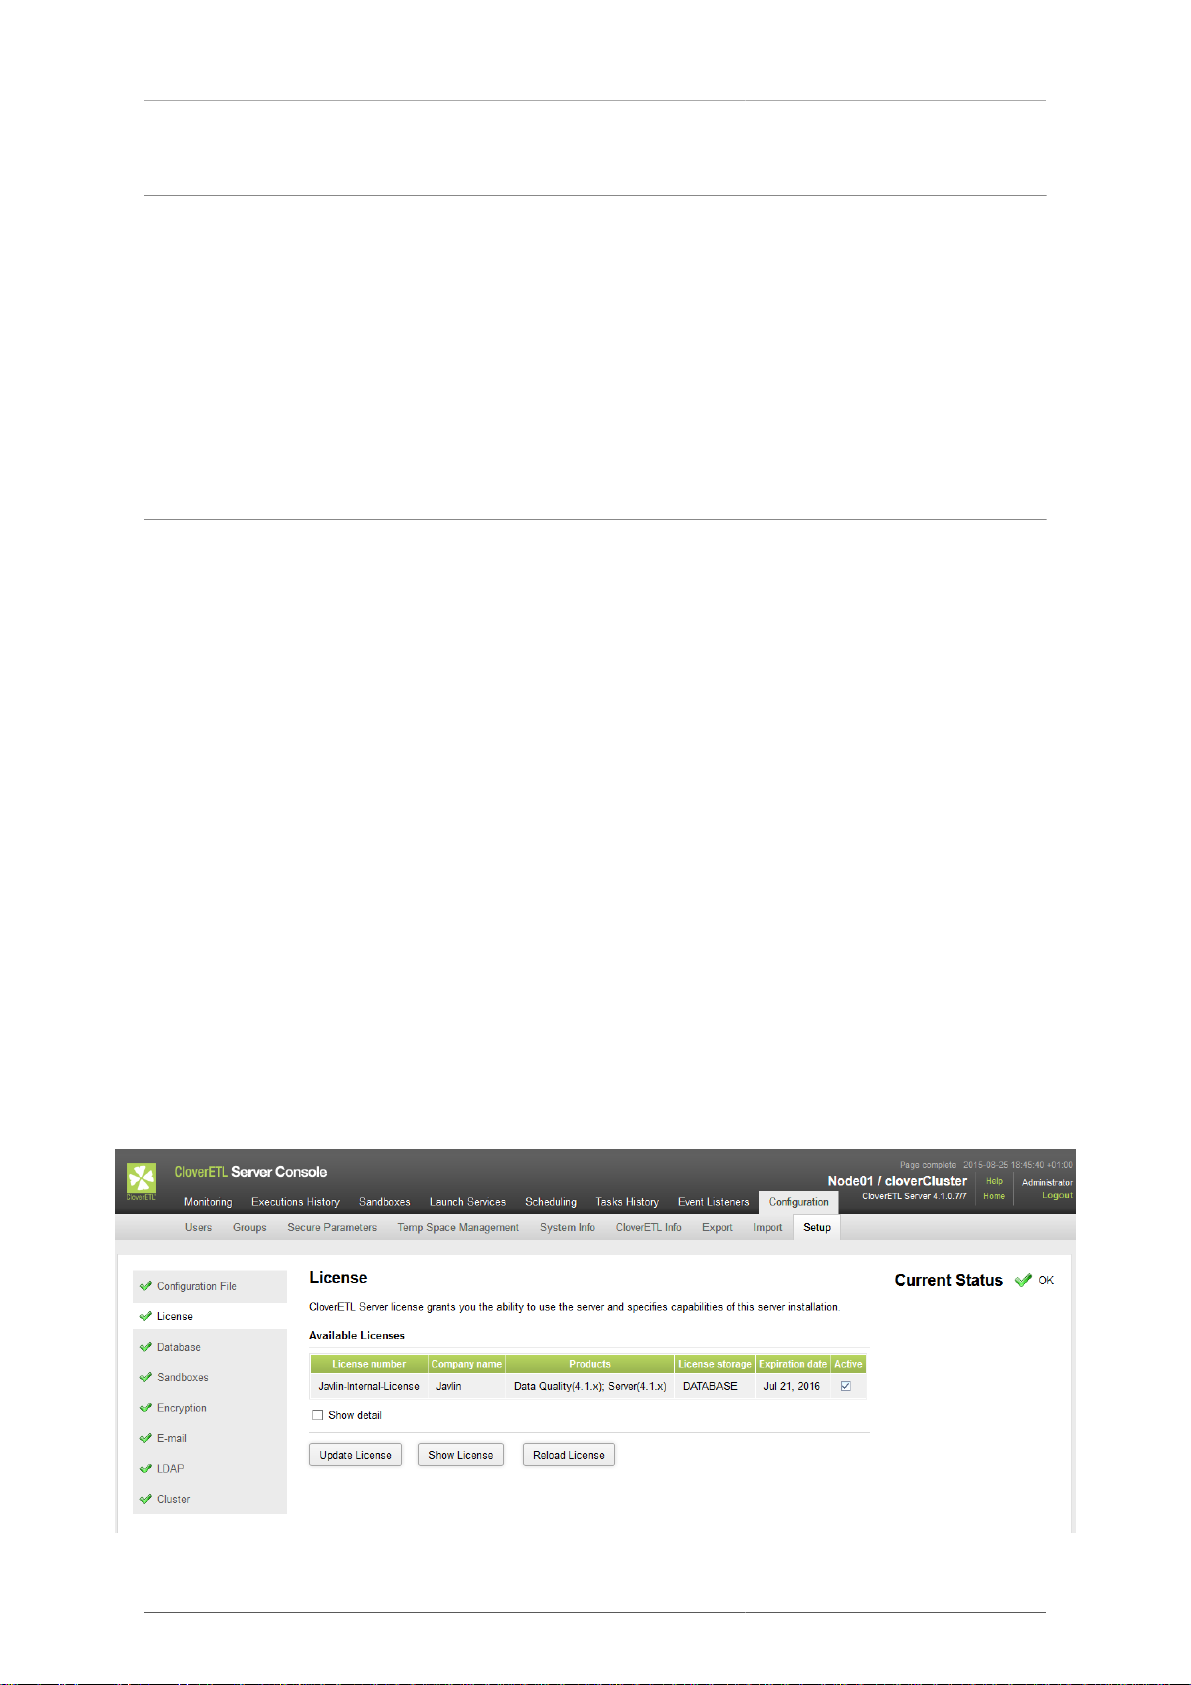
Chapter 7. Setup
Configuring Particular Items
Use Setup. Items configured in Setup are saved into a file defined with clover.config.file.
If you need encryption, configure the Encryption first.
Configure connection to database and then update license. Later, you can configure other setup items.
Some Setup items (Database and Cluster) require restart of an application server. The latter items (License,
Sandboxes, E-mail, LDAP) do not need restarting; the changes to them are applied immediately. If you change
something in a Configuration file tab, restart it or not depending on the updated part of the file.
As the last step, restart the server to use the new configuration.
Setup Tabs
Each setup page consists of a menu with setup tabs on the left, a main configuration part in the middle and a
configuration status and a text on the right side.
Menu tabs have icons surrounding the text: a tick marks a configured tab, a wheel marks an inactive tab, a floppy
disk marks a configuration that needs saving. Arrows signalize request on restart.
The main configuration part contains several buttons:
Discard Changes discards unsaved changes and returns to currently used values.
Save checks the configuration. If the configuration is valid, it is saved to the configuration file. If the configuration
is not valid, Save Anyway button appears. The Save Anyway button allows you to save the configuration
considered as invalid. E.g. Database connection is considered invalid if there is a required library missing. If you
see Save disabled, use Validate to validate the configuration first.
Validate validates the configuration on a current tab.
Configuration File
Configuration tab displays content of a configuration file. You do not have to edit the content of the file manually,
use the particular tab to configure the corresponding subsystem.
License
License tab let you specify license. The license is stored in database.
You should configure database before specifying license. Otherwise, you will have to specify the license twice.
48
Page 54
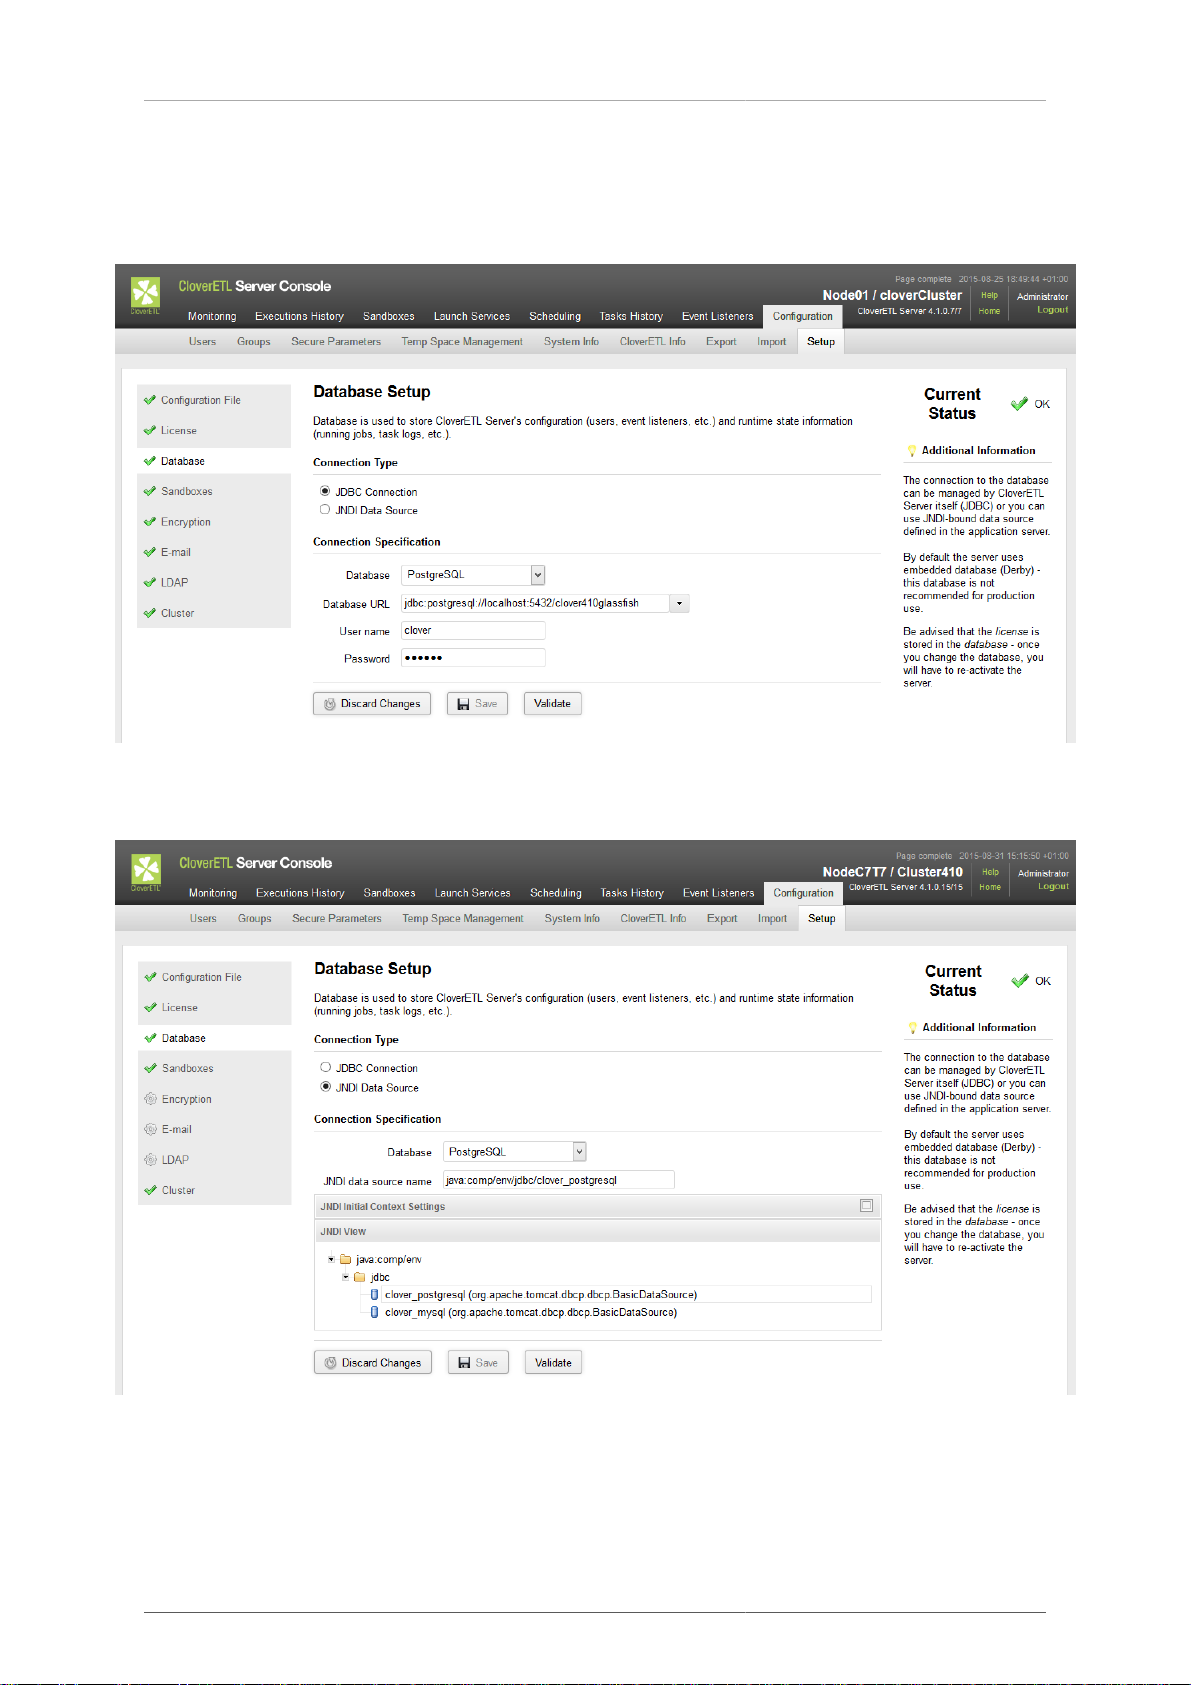
Chapter 7. Setup
Database
Database tab let you configure connection to database. You can connect via JDBC.
Or you can use JNDI to access the datasource on an application server level. Choose a suitable item of a JNDI tree.
Sandboxes
Sandboxes let you configure path to sandboxes: shared, local, partitioned.
49
Page 55
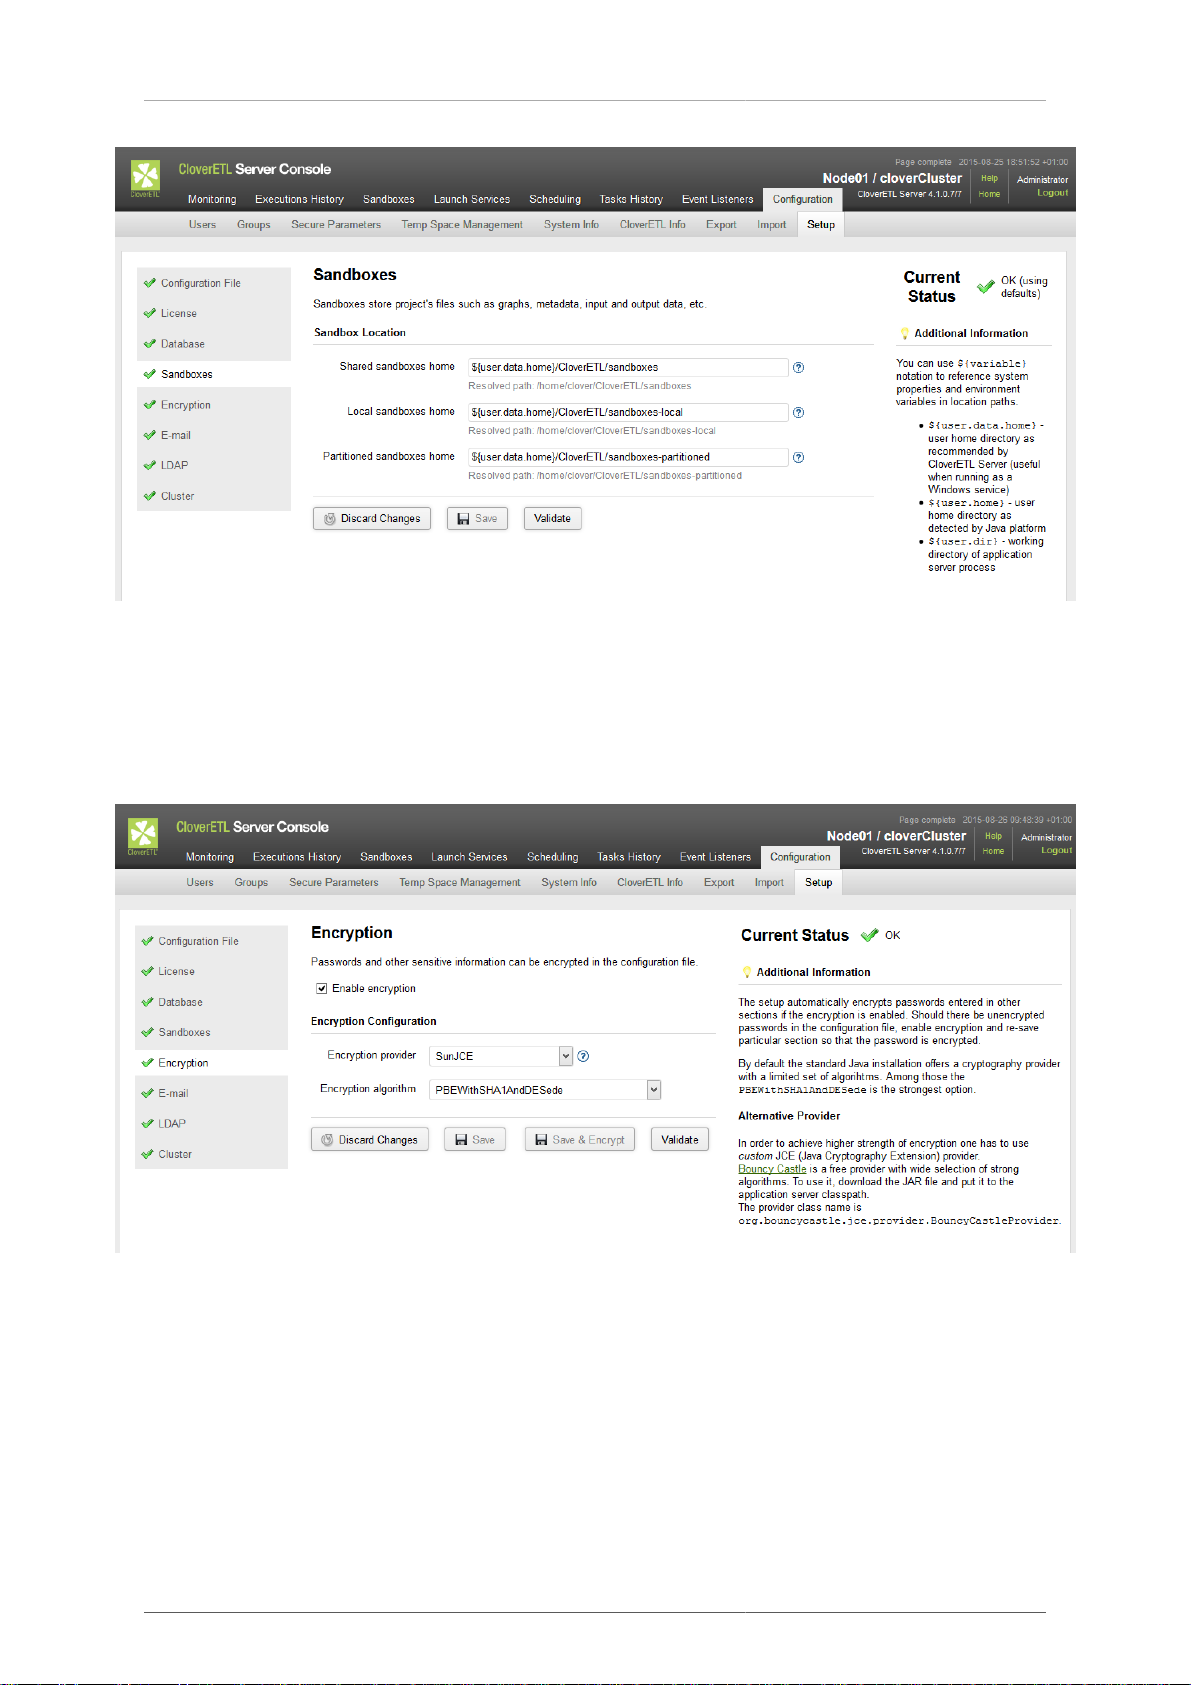
Encryption
Chapter 7. Setup
Encryption tab let you enable encryption of sensitive items of the configuration file. You can choose an encryption
provider and an encryption algorithm. An alternative encryption provider can be used; the libs have to be added
to classpath. (In the same way as database libraries.)
Save & Encrypt button saves the configuration and encrypts the passwords.
E-Mail
E-mail tab let you configure connection to SMTP server. The connection is necessary for reporting event on server
via e-mails.
E-mail configuration can be tested with sending an e-mail from the dialog.
50
Page 56
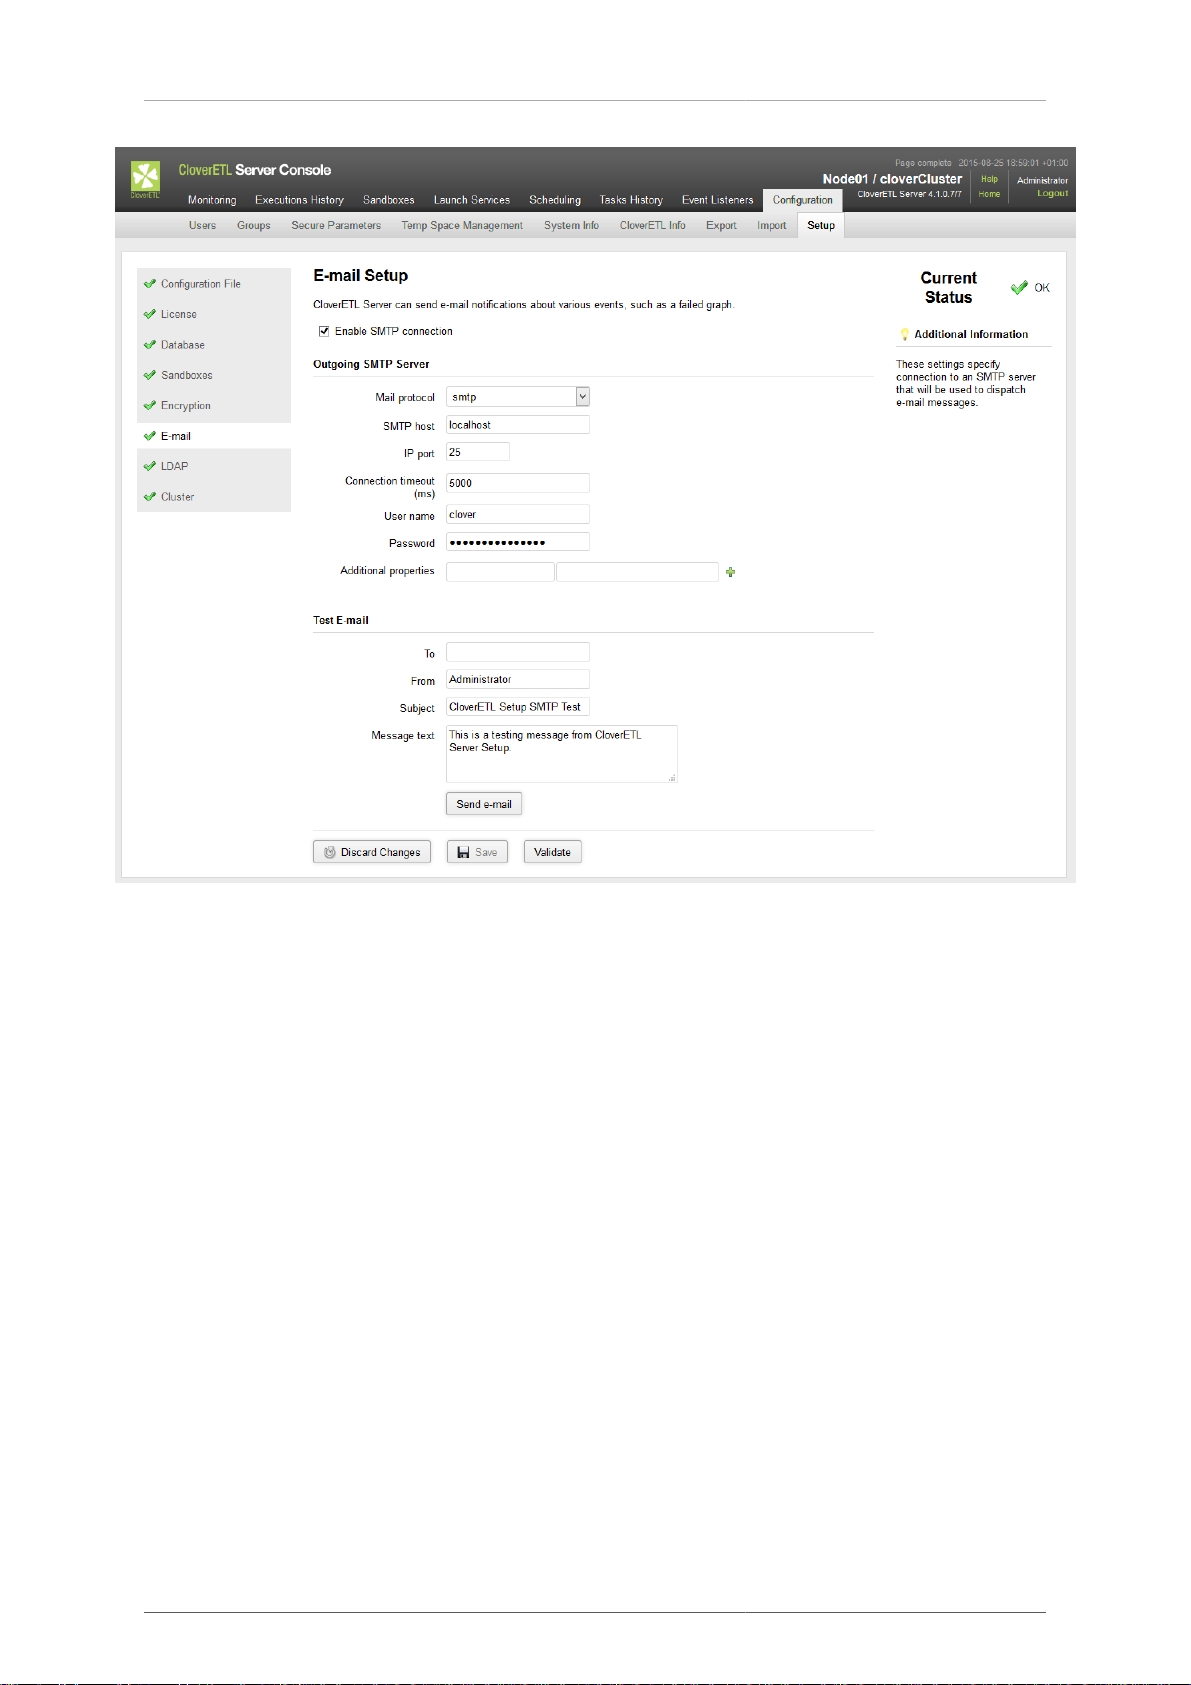
Chapter 7. Setup
LDAP
LDAP tab let you use an existing LDAP database for user authentication.
51
Page 57
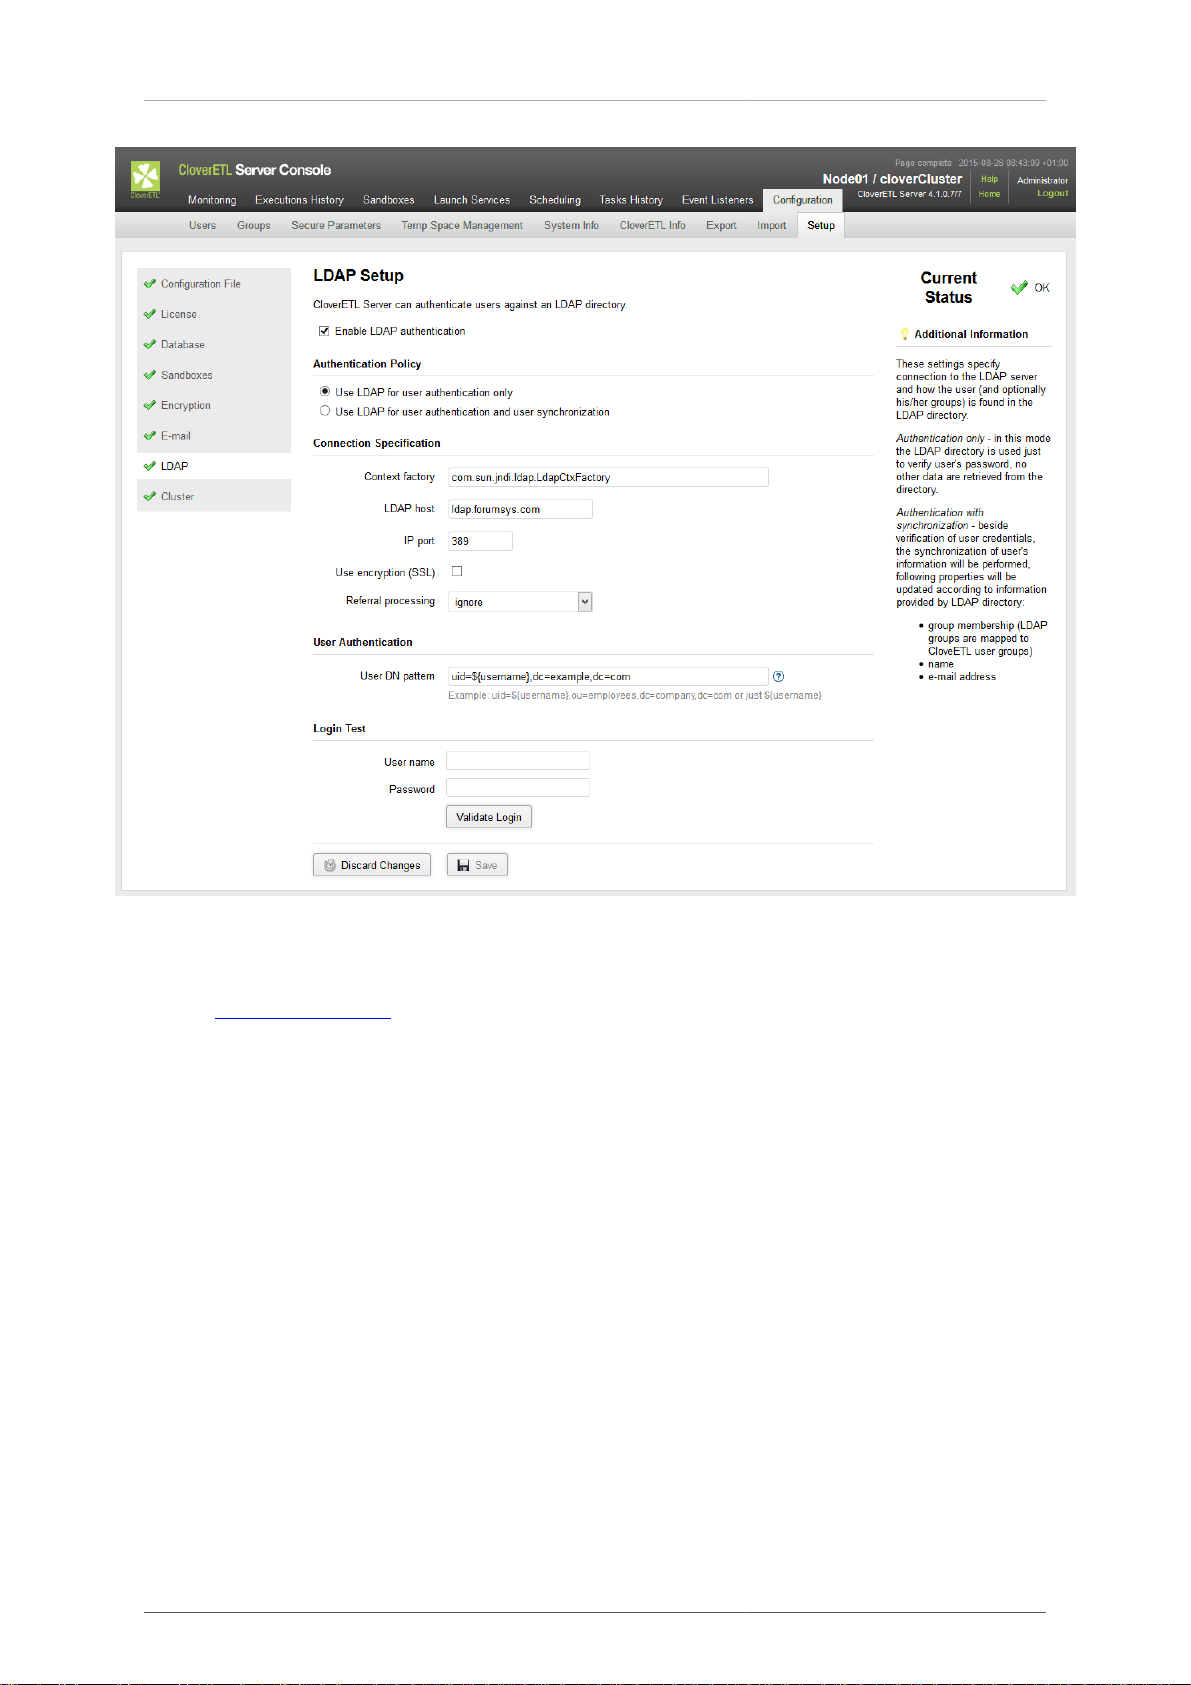
Chapter 7. Setup
Firstly, you should specify connection to the LDAP server. Secondly, define pattern for user DN. The login can
be validated using any user matching the pattern.
See also LDAP Authentication (p. 92).
Cluster
Cluster tab let you configure clustering features.
52
Page 58
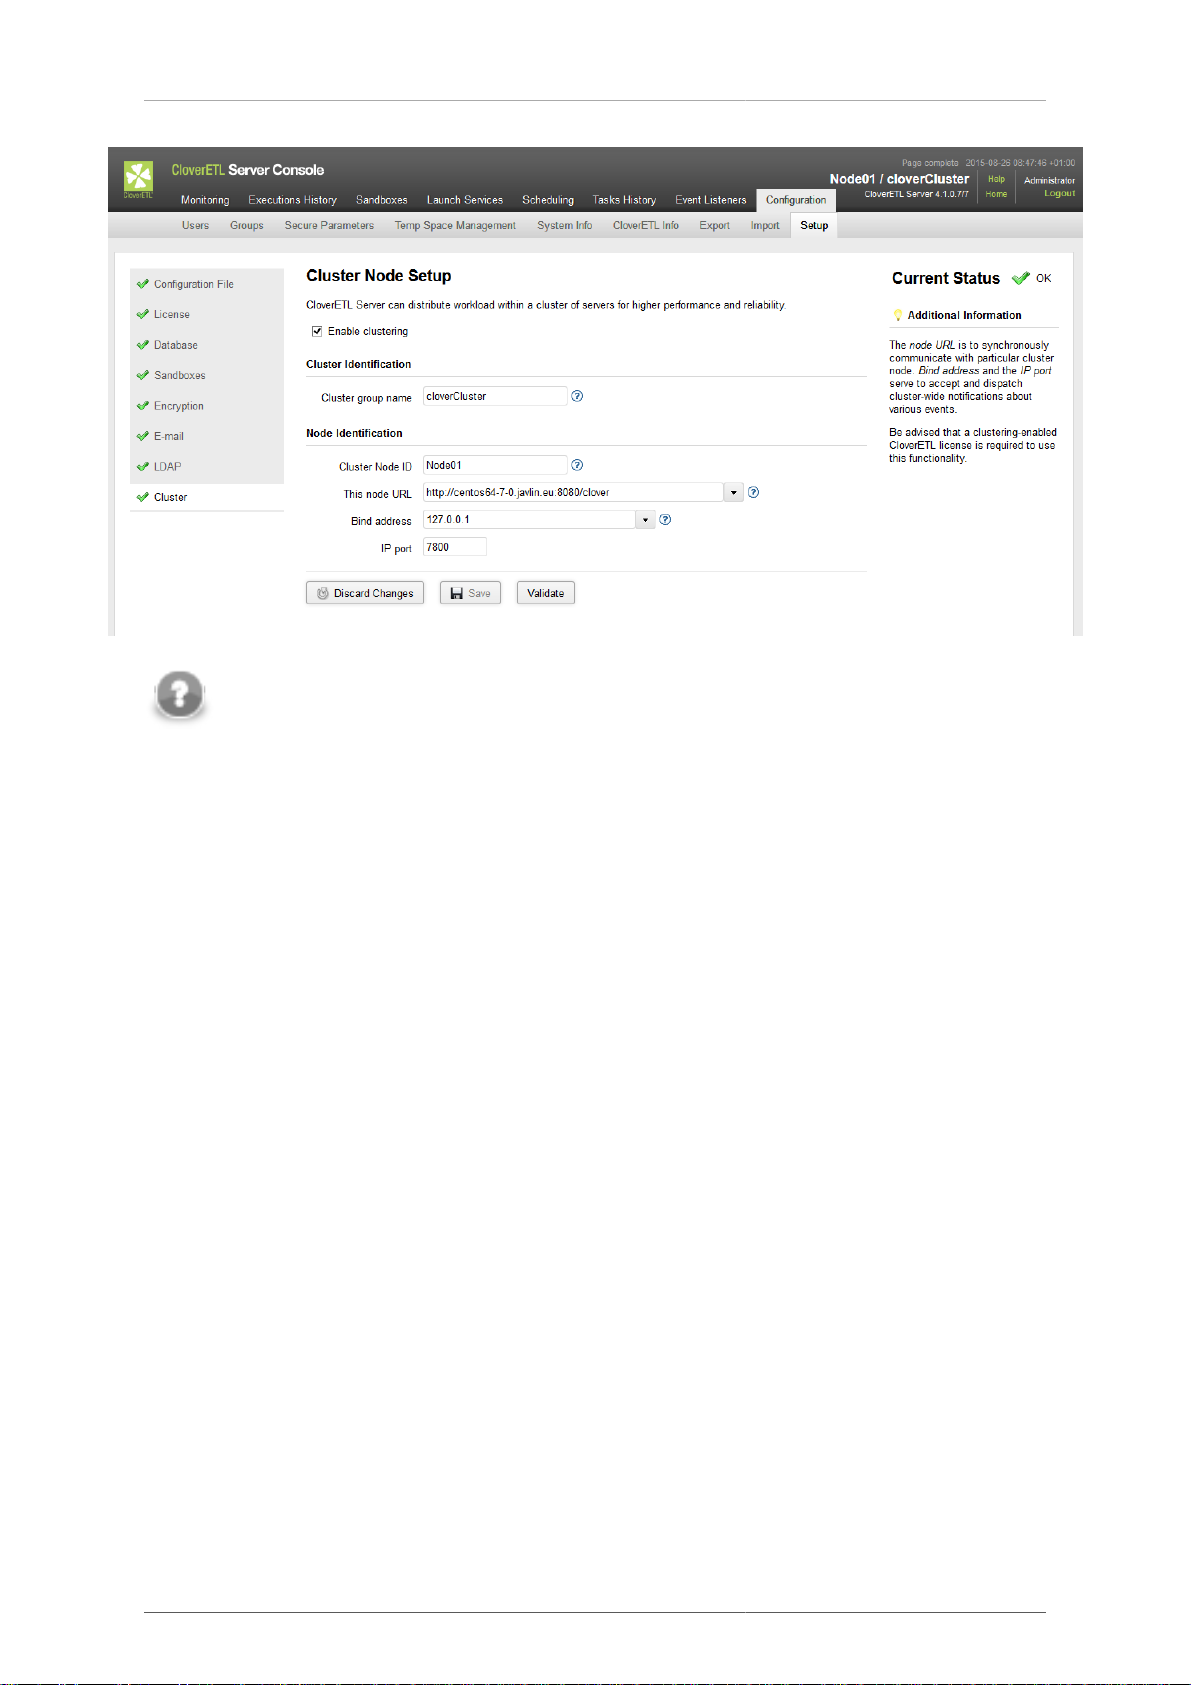
Chapter 7. Setup
Note
You can use the setup in a fresh installation of CloverETL Server, even if it had not been activated
yet: log in into Server Console and use Close button to access the menu.
53
Page 59

Chapter 8. Examples of DB Connection Configuration
In standalone deployment (non-clustered), configuration of DB connection is optional, since embedded Apache
Derby DB is used by default and it is sufficient for evaluation. However, configuration of external DB connection
is strongly recommended for production deployment. It is possible to specify common JDBC DB connection
attributes (URL, username, password) or JNDI location of DB DataSource.
In clustered deployment, at least one node in cluster must have DB connection configured. Other nodes may have
their own direct connection (to the same DB) or may use another node as proxy for persistent operations, however
scheduler is active only on nodes with direct connection. See Part VI, “Cluster” (p. 199) for details about this
feature, this section describes only direct DB connection configuration.
DB Configurations and their changes may be as follows:
• Embedded Apache Derby (p. 55)
• MySQL (p. 56)
• DB2 (p. 57)
• Oracle (p. 59)
• MS SQL (p. 60)
• Postgre SQL (p. 61)
• JNDI DB DataSource (p. 62)
See Configuration Repository (p. 6) for officially supported versions of particular databases.
54
Page 60
Chapter 8. Examples of DB
Connection Configuration
Embedded Apache Derby
Apache Derby embedded DB is used with default CloverETL Server installation. It uses working directory as a
storage directory for data persistence by default. This may be a problem on some systems. In case of any problems
with connecting to Derby DB, we recommend you configure connection to external DB or at least specify Derby
home directory:
Set derby.system.home system property to set path which is accessible for application server. You can
specify this system property with this JVM execution parameter:
-Dderby.system.home=[derby_DB_files_root]
If you use a properties file for configuration, specify these parameters: jdbc.driverClassName,
jdbc.url, jdbc.username, jdbc.password, jdbc.dialect. For example:
jdbc.driverClassName=org.apache.derby.jdbc.EmbeddedDriver
jdbc.url=jdbc:derby:databases/cloverDb;create=true
jdbc.username=
jdbc.password=
jdbc.dialect=com.cloveretl.server.dbschema.DerbyDialect
Take a closer look at the jdbc.url parameter. Part databases/cloverDb means a subdirectory for DB
data. This subdirectory will be created in the directory which is set as derby.system.home (or in the working
directory if derby.system.home is not set). Value databases/cloverDb is a default value, you may
change it.
Derby JDBC 4 compliant driver is bundled with CloverETL Server, thus there is no need to add it on the classpath.
55
Page 61
Chapter 8. Examples of DB
Connection Configuration
MySQL
CloverETL Server supports MySQL 5, up to version 5.5 included.
If you use a properties file for configuration, specify these parameters: jdbc.driverClassName,
jdbc.url, jdbc.username, jdbc.password, jdbc.dialect. For example:
jdbc.driverClassName=com.mysql.jdbc.Driver
jdbc.url=jdbc:mysql://127.0.0.1:3306/clover?useUnicode=true&characterEncoding=utf8
jdbc.username=root
jdbc.password=
jdbc.dialect=org.hibernate.dialect.MySQLDialect
Please don't forget to add a JDBC 4 compliant driver on the classpath. A JDBC Driver which doesn't meet JDBC
4 won't work properly.
Create DB with a proper charset, like this:
CREATE DATABASE IF NOT EXISTS clover DEFAULT CHARACTER SET 'utf8';
56
Page 62
Chapter 8. Examples of DB
Connection Configuration
DB2
DB2 on Linux/Windows
If you use a properties file for configuration, specify these parameters: jdbc.driverClassName,
jdbc.url, jdbc.username, jdbc.password, jdbc.dialect. For example:
jdbc.driverClassName=com.ibm.db2.jcc.DB2Driver
jdbc.url= jdbc:db2://localhost:50000/clover
jdbc.username=usr
jdbc.password=pwd
jdbc.dialect=org.hibernate.dialect.DB2Dialect
Please don't forget to add a JDBC 4 compliant driver on the classpath. A JDBC Driver which doesn't meet JDBC
4 won't work properly.
Possible problems
Wrong pagesize
Database clover has to be created with suitable PAGESIZE. DB2 has several possible values for this property:
4096, 8192, 16384 or 32768.
CloverETL Server should work on DB with PAGESIZE set to 16384 or 32768. If PAGESIZE value is not set
properly, there should be error message in the log file after failed CloverETL Server startup:
ERROR:
DB2 SQL Error: SQLCODE=-286, SQLSTATE=42727, SQLERRMC=16384;
ROOT, DRIVER=3.50.152
SQLERRMC contains suitable value for PAGESIZE.
You can create database with proper PAGESIZE like this:
CREATE DB clover PAGESIZE 32768;
The table is in the reorg pending state
After some ALTER TABLE commands, some tables may be in "reorg pending state". This behaviour is specific for
DB2. ALTER TABLE DDL commands are executed only during the first start of new CloverETL Server version.
Error message for this issue may look like this:
Operation not allowed for reason code "7" on table "DB2INST2.RUN_RECORD"..
SQLCODE=-668, SQLSTATE=57016
or like this
DB2 SQL Error: SQLCODE=-668, SQLSTATE=57016, SQLERRMC=7;DB2INST2.RUN_RECORD, DRIVER=3.50.152
In this case "RUN_RECORD" is table name which is in "reorg pending state" and "DB2INST2" is DB instance
name.
To solve this, go to DB2 console and execute command (for table run_record):
57
Page 63

Chapter 8. Examples of DB
Connection Configuration
reorg table run_record
DB2 console output should look like this:
db2 => connect to clover1
Database Connection Information
Database server = DB2/LINUX 9.7.0
SQL authorization ID = DB2INST2
Local database alias = CLOVER1
db2 => reorg table run_record
DB20000I The REORG command completed successfully.
db2 => disconnect clover1
DB20000I The SQL DISCONNECT command completed successfully.
"clover1" is DB name
DB2 does not allow ALTER TABLE which trims DB column length.
This problem depends on DB2 configuration and we've experienced this only on some AS400s so far. CloverETL
Server applies set of DP patches during the first installation after application upgrade. Some of these patches
may apply column modifications which trims length of the text columns. These changes never truncate any data,
however DB2 does not allow this since it "may" truncate some data. DB2 refuses these changes even in DB table
which is empty. Solution is, to disable the DB2 warning for data truncation, restart CloverETL Server which
applies patches, then enable DB2 warning again.
DB2 on AS/400
The connection on AS/400 might be slightly different.
If you use a properties file for configuration, specify these parameters: jdbc.driverClassName,
jdbc.url, jdbc.username, jdbc.password, jdbc.dialect. For example:
jdbc.driverClassName=com.ibm.as400.access.AS400JDBCDriver
jdbc.username=javlin
jdbc.password=clover
jdbc.url=jdbc:as400://host/cloversrv;libraries=cloversrv;date format=iso
jdbc.dialect=org.hibernate.dialect.DB2400Dialect
Use credentials of your OS user for jdbc.username and jdbc.password.
cloversrv in jdbc.url above is the name of the DB schema.
You can create schema in AS/400 console:
• execute command STRSQL (SQL console)
• execute CREATE COLLECTION cloversrv IN ASP 1
• cloversrv is the name of the DB schema and it may be at most 10 characters long
Proper JDBC driver must be in the application server classpath.
I use JDBC driver jt400ntv.jar, which I've found in /QIBM/ProdData/Java400 on the server.
Use jt400ntv.jar JDBC driver.
Please don't forget to add a JDBC 4 compliant driver on the classpath. A JDBC Driver which doesn't meet JDBC
4 won't work properly.
58
Page 64

Chapter 8. Examples of DB
Connection Configuration
Oracle
If you use a properties file for configuration, specify these parameters: jdbc.driverClassName,
jdbc.url, jdbc.username, jdbc.password, jdbc.dialect. For example:
jdbc.driverClassName=oracle.jdbc.OracleDriver
jdbc.url=jdbc:oracle:thin:@host:1521:db
jdbc.username=user
jdbc.password=pass
jdbc.dialect=org.hibernate.dialect.Oracle10gDialect
Please don't forget to add a JDBC 4 compliant driver on the classpath. A JDBC Driver which doesn't meet the
JDBC 4 specification won't work properly.
These are privileges which have to be granted to schema used by CloverETL Server:
CONNECT
CREATE SESSION
CREATE/ALTER/DROP TABLE
CREATE/ALTER/DROP SEQUENCE
QUOTA UNLIMITED ON <user_tablespace>;
QUOTA UNLIMITED ON <temp_tablespace>;
59
Page 65
Chapter 8. Examples of DB
Connection Configuration
MS SQL
MS SQL requires configuration of DB server.
• Allowing of TCP/IP connection:
• execute tool SQL Server Configuration Manager
• go to Client protocols
• switch on TCP/IP (default port is 1433)
• execute tool SQL Server Management Studio
• go to Databases and create DB clover
• go to Security/Logins and create user and assign this user as owner of DB clover
• go to Security and check SQL server and Windows authentication mode
If you use a properties file for configuration, specify these parameters: jdbc.driverClassName,
jdbc.url, jdbc.username, jdbc.password, jdbc.dialect. For example:
jdbc.driverClassName=com.microsoft.sqlserver.jdbc.SQLServerDriver
jdbc.url=jdbc:sqlserver://localhost:1433;databaseName=clover
jdbc.username=user
jdbc.password=pass
jdbc.dialect=org.hibernate.dialect.SQLServerDialect
Please don't forget to add a JDBC 4 compliant driver on the classpath. A JDBC Driver which doesn't meet the
JDBC 4 specification won't work properly.
60
Page 66

Chapter 8. Examples of DB
Connection Configuration
Postgre SQL
If you use a properties file for configuration, specify these parameters: jdbc.driverClassName,
jdbc.url, jdbc.username, jdbc.password, jdbc.dialect. For example:
jdbc.driverClassName=org.postgresql.Driver
jdbc.url=jdbc:postgresql://localhost/clover?charSet=UTF-8
jdbc.username=postgres
jdbc.password=
jdbc.dialect=org.hibernate.dialect.PostgreSQLDialect
Please don't forget to a add JDBC 4 compliant driver on the classpath. A JDBC Driver which doesn't meet the
JDBC 4 specification won't work properly.
The JDBC driver for PostgreSQL can be downloaded from: https://jdbc.postgresql.org/download.html. In Apache
Tomcat you would place libs into $CATALINA_HOME/libs directory.
61
Page 67
Chapter 8. Examples of DB
Connection Configuration
JNDI DB DataSource
CloverETL Server can connect to database using JNDI DataSource, which is configured in application server or
container. However there are some CloverETL parameters which must be set, otherwise the behaviour may be
unpredictable:
datasource.type=JNDI # type of datasource; must be set, because default value is JDBC
datasource.jndiName=# JNDI location of DB DataSource; default value is java:comp/env/jdbc/clover_server #
jdbc.dialect=# Set dialect according to DB which DataSource is connected to.
The same dialect as in sections above. #
The parameters above may be set in the same ways as other params (in properties file or Tomcat context file)
Example of DataSource configuration in Apache Tomcat. Add following context resource configuration may be
added to the [tomcat_home]/conf/server.xml file to the <Host> element.
<Context path="/clover" >
<Resource name="jdbc/clover_server" auth="Container"
type="javax.sql.DataSource" driverClassName="com.mysql.jdbc.Driver"
url="jdbc:mysql://127.0.0.1:3306/clover?useUnicode=true&characterEncoding=utf8"
username="root" password=""
maxActive="20" maxIdle="10" maxWait="-1"/>
</Context>
Do no put the code above into <GlobalNamingResources> element, since the resource would not be visible
by the CloverETL webapp.
Note
The resource configuration may be also added to context file [tomcat_home]/conf/
Catalina/localhost/clover.xml.
Note
Special characters you type in the context file have to be specified as XML entities. E.g. ampersand
"&" as "&" etc.
Important
The default jndi pool DBCP in Apache Tomcat does not handle connections in efficient way. With
DBCP jndi pool, low performance can be seen if DBOutputTable with returning statement is used.
Use tomcat-jdbc-pool instead. Just add
factory="org.apache.tomcat.jdbc.pool.DataSourceFactory" to the definition
of the jndi resource. See https://tomcat.apache.org/tomcat-7.0-doc/jdbc-pool.html
See Chapter 9, List of Properties (p. 69) for list of properties.
62
Page 68

Chapter 8. Examples of DB
Connection Configuration
Encrypted JNDI
You can store password for database connection encrypted. The configuration differs between particular
application servers.
Encrypted JNDI on Tomcat (p. 63)
Encrypted JNDI on Jetty 9 (9.2.6) (p. 64)
Encrypted JNDI on JBoss 6.0.0 (p. 64)
JBoss 7 (p. 66)
Encrypted JNDI on Glassfish 3 (3.1.2.2) (p. 67)
Encrypted JNDI on WebSphere 8.5.5.0 (p. 67)
Encrypted JNDI on WebLogic (p. 68)
Encrypted JNDI on Tomcat
You need secure-cfg-tool to encrypt the passwords. Use the version of secure-cfg-tool
corresponding to the version of CloverETL Server. Usage of the tool is described in Chapter 10, Secure
Configuration Properties (p. 75).
Use encrypt.sh or encrypt.bat for encryption of a password. Place the encrypted password
into a configuration file, and put cloveretl-secure-jndi-resource-{version}.jar and
jasypt-1.9.0.jar files on classpath of the application server. The .jar files can be found in tomcatsecure-jndi-resource directory packed in secure-cfg-tool.
The tomcat-secure-jndi-resource directory contains useful file README with further details on
encrypted JNDI.
Example of encrypted JNDI connection for Postgresql
Encrypt the password:
./encrypt.sh -a PBEWithSHA1AndDESede
The configuration is placed in ${CATALINA_HOME}/webapps/clover/META-INF/cotext.xml. Note
that the encryption algorithm PBEWithSHA1AndDESede is not default.
<Resource name="jdbc/clover_server"
auth="Container"
factory="com.cloveretl.secure.tomcatresource.SecureDataSourceFactory"
secureAlgorithm="PBEWithSHA1AndDESede"
type="javax.sql.DataSource"
driverClassName="org.postgresql.Driver"
url="jdbc:postgresql://127.0.0.1:5432/clover410m1?charSet=UTF-8"
username="conf#rPz5Foo7HPn4dFTRV5Ourg=="
password="conf#4KlNp8/FVDR+rTWX0dEqWA=="
maxActive="20"
maxIdle="10"
maxWait="-1"/>
If you use other JCE (e.g. Bouncy Castle), it has to be added to the classpath of an application server
(${CATALINA_HOME}/lib). The encrypt command requires the path to directory with JCE too.
./encrypt.sh -l ~/lib/ -c org.bouncycastle.jce.provider.BouncyCastleProvider
-a PBEWITHSHA256AND256BITAES-CBC-BC
<Resource name="jdbc/clover_server"
auth="Container"
factory="com.cloveretl.secure.tomcatresource.SecureDataSourceFactory"
secureProvider="org.bouncycastle.jce.provider.BouncyCastleProvider"
secureAlgorithm="PBEWITHSHA256AND256BITAES-CBC-BC"
63
Page 69

Chapter 8. Examples of DB
Connection Configuration
type="javax.sql.DataSource"
driverClassName="org.postgresql.Driver"
url="jdbc:postgresql://127.0.0.1:5432/clover410m1?charSet=UTF-8"
username="conf#Ws9IuHKo9h7hMjPllr31VxdI1A9LKIaYfGEUmLet9rA="
password="conf#Cj1v59Z5nCBHaktn6Ubgst4Iz69JLQ/q6/32Xwr/IEE="
maxActive="20" maxIdle="10"
maxWait="-1"/>
Encrypted JNDI on Jetty 9 (9.2.6)
http://eclipse.org/jetty/documentation/current/configuring-security-secure-passwords.html
Configuration of a JNDI jdbc connection pool is stored in the plain text file, $JETTY_HOME/etc/jetty.xml.
<New id="MysqlDB" class="org.eclipse.jetty.plus.jndi.Resource">
<Arg></Arg>
<Arg>jdbc/MysqlDS</Arg>
<Arg>
<New class="com.mysql.jdbc.jdbc2.optional.MysqlConnectionPoolDataSource">
<Set name="URL">jdbc:mysql://localhost:3306/clover_empty</Set>
<Set name="User">user</Set>
<Set name="Password">password</Set>
</New>
</Arg>
</New>
Obfuscating the Password
Password can be obfuscated using org.eclipse.jetty.util.security.Password class within lib/
jetty-util-{VERSION}.jar:
java -cp lib/jetty-util-9.2.6.v20141205.jar org.eclipse.jetty.util.security.Password password
Command returns obfuscated and hashed password. The obfuscated one will be used to replace the plain password
value.
Replacing the Password
Replace the plain text password with the Call element. Its only argument is a string starting with the OBF: prefix
returned by the command mentioned in the previous section.
<New id="MysqlDB" class="org.eclipse.jetty.plus.jndi.Resource">
<Arg></Arg>
<Arg>jdbc/MysqlDS</Arg>
<Arg>
<New class="com.mysql.jdbc.jdbc2.optional.MysqlConnectionPoolDataSource">
<Set name="URL">jdbc:mysql://localhost:3306/clover_empty</Set>
<Set name="User">user</Set>
<Set name="Password">
<Call class="org.eclipse.jetty.util.security.Password" name="deobfuscate">
<Arg>OBF:1v2j1uum1xtv1zej1zer1xtn1uvk1v1v</Arg>
</Call>
</Set>
</New>
</Arg>
</New>
Password in the JMS connection can be also obfuscated.
Encrypted JNDI on JBoss 6.0.0
Original datasource with an unencrypted password:
64
Page 70

Chapter 8. Examples of DB
Connection Configuration
<datasources>
<local-tx-datasource>
<jndi-name>MysqlDS</jndi-name>
<connection-url>jdbc:mysql://127.0.0.1:3306/clover</connection-url>
<driver-class>com.mysql.jdbc.Driver</driver-class>
<user-name>user</user-name>
<password>password</password>
</local-tx-datasource>
</datasources>
Encrypt the data source password
Linux
java -cp client/jboss-logging.jar:lib/jbosssx.jar org.jboss.resource.security.SecureIdentityLoginModule password
Windows
java -cp client\jboss-logging.jar;lib\jbosssx.jar org.jboss.resource.security.SecureIdentityLoginModule password
NOTE: in the JBoss documentation client/jboss-logging-spi.jar is used, but there is no such a file
in my JBossAS [6.0.0.Final "Neo"], but client/jboss-logging.jar can be used instead.
The command will return an encrypted password, e.g. 5dfc52b51bd35553df8592078de921bc.
Create a new application authentication policy in conf/login-config.xml within currently used server's
profile directory (e.g. server/default/conf/login-config.xml).
<application-policy name="EncryptDBPassword">
<authentication>
<login-module code="org.jboss.resource.security.SecureIdentityLoginModule" flag="required">
<module-option name="username">user</module-option>
<module-option name="password">5dfc52b51bd35553df8592078de921bc</module-option>
<module-option name="managedConnectionFactoryName">jboss.jca:name=MysqlDS,service=LocalTxCM</module-option>
</login-module>
</authentication>
</application-policy>
Replace authentication entries with a reference to the application authentication policy
<security-domain>EncryptDBPassword</security-domain>
The final datasource looks like this:
<datasources>
<local-tx-datasource>
<jndi-name>MysqlDS</jndi-name>
<connection-url>jdbc:mysql://127.0.0.1:3306/clover</connection-url>
<driver-class>com.mysql.jdbc.Driver</driver-class>
<security-domain>EncryptDBPassword</security-domain>
</local-tx-datasource>
</datasources>
The same mechanism can be probably used also for JMS.
<tx-connection-factory>
...
<security-domain-and-application>RealmWithEncryptedPassword</security-domain-and-application>
65
Page 71
Chapter 8. Examples of DB
Connection Configuration
...
</tx-connection-factory>
See http://docs.jboss.org/jbosssecurity/docs/6.0/security_guide/html/Encrypting_Data_Source_Passwords.html
JBoss 7
JBoss 7 - JBoss EAP 6.2.0.GA - AS 7.3.0.Final-redhat-14
Configuration steps are similar to configuring of JBoss 6.
All configuration takes place in the single configuration file, e.g. for standalone profile JBOSS_HOME/
standalone/configuration/standalone.xml.
Original datasource:
<datasources>
<datasource jndi-name="java:/MysqlDS" pool-name="MySQLPool">
<connection-url>jdbc:mysql://localhost:3306/clover</connection-url>
<driver>mysql</driver>
<pool>
<max-pool-size>30</max-pool-size>
</pool>
<security>
<user-name>user</user-name>
<password>password</password>
</security>
</datasource>
<drivers>
<driver name="mysql" module="com.cloveretl.jdbc">
<driver-class>com.mysql.jdbc.Driver</driver-class>
</driver>
</drivers>
<datasources>
In JBOSS_HOME directory run cli command:
java -cp modules/system/layers/base/org/picketbox/main/picketbox-4.0.19.SP2-redhat-1.jar:client/jboss-logging.jar org.picketbox.datasource.security.SecureIdentityLoginModule password
The command will return an encrypted password, e.g. 5dfc52b51bd35553df8592078de921bc.
Add a new security-domain to security-domains, the password value is a result of the command from the previous
step.
<security-domain name="EncryptDBPassword" cache-type="default">
<authentication>
<login-module code="org.picketbox.datasource.security.SecureIdentityLoginModule" flag="required">
<module-option name="username" value="user"/>
<module-option name="password" value="5dfc52b51bd35553df8592078de921bc"/>
<module-option name="managedConnectionFactoryName" value="jboss.jca:service=LocalTxCM,name=MysqlPool"/>
</login-module>
</authentication>
</security-domain>
Replace user and password with a reference to the security domain.
<datasources>
<datasource jndi-name="java:/MysqlDS" pool-name="MysqlPool" enabled="true" use-java-context="true">
<connection-url>jdbc:mysql://localhost:3306/clover</connection-url>
<driver>mysql</driver>
<pool>
<max-pool-size>30</max-pool-size>
66
Page 72
Chapter 8. Examples of DB
Connection Configuration
</pool>
<security>
<security-domain>EncryptDBPassword</security-domain>
</security>
</datasource>
<drivers>
<driver name="mysql" module="com.cloveretl.jdbc">
<driver-class>com.mysql.jdbc.Driver</driver-class>
</driver>
</drivers>
</datasources>
The same mechanism can be probably used also for JMS.
http://middlewaremagic.com/jboss/?p=1026
Encrypted JNDI on Glassfish 3 (3.1.2.2)
Configuration of jdbc connection pool is stored in the plain text file, $DOMAIN/config/domain.xml.
<jdbc-connection-pool driver-classname="com.mysql.jdbc.Driver" datasource-classname="" res-type="java.sql.Driver" description="" name="jdbc/MysqlDS">
<property name="URL" value="jdbc:mysql://localhost:3306/clover_empty"></property>
<property name="user" value="user"></property>
<property name="password" value="password"></property>
</jdbc-connection-pool>
Password is unencrypted, but can be replaced with so called password alias:
A password alias stores a password in encrypted form in the domain keystore, providing a clear-text alias name
to use instead of the password. In password files and the domain configuration file, use the form ${ALIAS=aliasname} to refer to the encrypted password.
Creating a Password Alias
There are two ways to create a password alias: using create-password-alias command in a command-line adminconsole utility, or in the web Server Administration Console in the Password Aliases section (Domain->Password
Aliases).
Replacing the Password with the Password Alias
Replace password (the attribute value) with a ${ALIAS=password_alias_name} string, where
password_alias_name is the name of the alias.
<jdbc-connection-pool driver-classname="com.mysql.jdbc.Driver" datasource-classname="" res-type="java.sql.Driver" description="" name="jdbc/MysqlDS">
<property name="URL" value="jdbc:mysql://localhost:3306/clover_empty"></property>
<property name="user" value="user"></property>
<property name="password" value="${ALIAS=password_alias_name}"></property>
</jdbc-connection-pool>
NOTE: Glassfish's Administration Server Console mentions a lower case keyword alias, but it doesn't work for
me. Changing to upper case ALIAS makes the connection pool work.
Password for a JMS connection can be replaced with an alias as well.
Encrypted JNDI on WebSphere 8.5.5.0
In WebSphere, user credentials aren't saved in plain text, but as J2C authentication data.
http://www-01.ibm.com/support/docview.wss?uid=nas8N1011315
67
Page 73

Chapter 8. Examples of DB
Connection Configuration
The same mechanism can be used also for JMS connection.
(Configuring an external JMS provider: https://www.ibm.com/developerworks/community/blogs/timdp/entry/
using_activemq_as_a_jms_provider_in_websphere_application_server_7149?lang=en )
Encrypted JNDI on WebLogic
Password in a JNDI datasource file is encrypted by default when created by admin's web console (Service/
Datasource).
Example of datasource file (located in DOMAIN/config/jdbc/ directory):
<?xml version='1.0' encoding='UTF-8'?>
<jdbc-data-source xmlns="http://xmlns.oracle.com/weblogic/jdbc-data-source" xmlns:sec="http://xmlns.oracle.com/weblogic/security" xmlns:wls="http://xmlns.oracle.com/weblogic/security/wls" xmlns:xsi="http://www.w3.org/2001/XMLSchema-instance" xsi:schemaLocation="http://xmlns.oracle.com/weblogic/jdbc-data-source http://xmlns.oracle.com/weblogic/jdbc-data-source/1.0/jdbc-data-source.xsd">
<name>MysqlDS</name>
<jdbc-driver-params>
<url>jdbc:mysql://127.0.0.1:3306/clover</url>
<driver-name>com.mysql.jdbc.Driver</driver-name>
<properties>
<property>
<name>user</name>
<value>user</value>
</property>
</properties>
<password-encrypted>{AES}zIiq6/JutK/wD4CcRPX1pOueIlKqc6uRVxAnZZcC3pI=</password-encrypted>
</jdbc-driver-params>
<jdbc-connection-pool-params>
<test-table-name>SQL SELECT 1</test-table-name>
</jdbc-connection-pool-params>
<jdbc-data-source-params>
<jndi-name>jdbc/MysqlDS</jndi-name>
<global-transactions-protocol>OnePhaseCommit</global-transactions-protocol>
</jdbc-data-source-params>
</jdbc-data-source>
The same mechanism is also used for encrypting password in the JMS connection.
(Configuring an external JMS provider: http://docs.oracle.com/cd/E12840_01/wls/docs103/ConsoleHelp/
taskhelp/jms_modules/foreign_servers/ConfigureForeignServers.html
68
Page 74

Chapter 9. List of Properties
Table 9.1. General configuration
key description default
config.file location of a CloverETL Server configuration file [working_dir]/
cloverServer.properties
license.file location of a CloverETL Server licence file (license.dat)
engine.config.file location of a CloverETL engine configuration
properties file
sandboxes.home This property is primarily intended to be used as a
placeholder in the sandbox root path specification. So
the sandbox path is specified with the placeholder
and it's resolved to the real path just before it's used.
Sandbox path may still be specified as an absolute path,
but placeholder has some significant advantages:
* sandbox definition may be exported/imported to
another environment with a different directory structure
* user creating sandboxed doesn't have to care about
physical location on the filesystem
properties file packed
with CloverETL
${user.data.home}/
CloverETL/
sandboxes
* each node in cluster environment may have a different
"sandboxes.home" value, so the directory structure
doesn't have to be identical
The default value uses content of a "user.data.home"
configuration property, which points to the home
directory of the user which runs the JVM process.
Directory depends on the OS. On unix-like systems it's
typically /home/[username]
private.properties List of server properties which are used only by
CloverETL Server code. So these properties are not
accessible outside of the ServerFacade. By default there
are all properties which may contain password in the
list. Basically it means, that their values are not visible
for web GUI users. Values are replaced by single star
"*". Changes in this list may cause unexpected behavior
of some server API.
engine.plugins.additional.src This property may contain an absolute path to some
"source" of additional CloverETL engine plugins.
These plugins are not a substitute for plugins packed
in WAR. "Source" may be a directory or a zip file.
Both, a directory and a zip, must contain a subdirectory
for each plugin. Changes in the directory or the ZIP
file apply only when the server is restarted. For details
see Chapter 26, Extensibility - CloverETL Engine
Plugins (p. 197).
datasource.type Set this explicitly to JNDI if you need CloverETL
Server to connect to a DB using JNDI datasource. In
such case, "datasource.jndiName" and "jdbc.dialect"
parameters must be set properly. Possible values: JNDI
| JDBC
jdbc.password,
executor.password,
security.ldap.password,
clover.smtp.password
empty
JDBC
69
Page 75

Chapter 9. List of Properties
key description default
datasource.jndiName JNDI location of a DB DataSource. It is applied only if
"datasource.type" is set to "JNDI".
jdbc.driverClassName class name for jdbc driver name
jdbc.url jdbc url used by CloverETL Server to store data
jdbc.username jdbc database user name
jdbc.password jdbc database user name
jdbc.dialect hibernate dialect to use in ORM
quartz.driverDelegateClass SQL dialect for quartz. Value is automatically derived
from "jdbc.dialect" property value.
sandboxes.access.check.boundaries.enabled
true | false If it is set to false, then path relative to
sandbox root may point out of the sandbox. No file/
folder outside of the sandbox is accessible by the
relative path otherwise.
security.session.validity Session validity in milliseconds. When the request
of logged-in user/client is detected, validity is
automatically prolonged.
security.session.exchange.limit Interval for exchange of invalid tokens in milliseconds. 360000
security.default_domain Domain which all new users are included in. Stored
in user's record in the database. Shouldn't be changed
unless the "clover" must be white-labelled.
security.basic_authentication.features_list
List of features which are accessible using HTTP
and which should be protected by Basic HTTP
Authentication. The list has form of semi-colon
separated items; Each feature is specified by its servlet
path.
security.basic_authentication.realm
java:comp/env/jdbc/
clover_server
true
14400000
clover
/request_processor;/
simpleHttpApi;/
launch;/launchIt;/
downloadStorage;/
downloadFile;/
uploadSandboxFile;/
downloadLog;/
webdav
CloverETL Server
Realm string for HTTP Basic Authentication.
security.digest_authentication.features_list
List of features which are accessible using HTTP
and which should be protected by HTTP Digest
Authentication. The list has form of semi-colon
separated items. Each feature is specified by its servlet
path.
Please keep in mind, that HTTP Digest Authentication
is feature added to the version 3.1. If you upgraded
your older CloverETL Server distribution, users created
before the upgrade cannot use the HTTP Digest
Authentication until they reset their passwords. So
when they reset their passwords (or the admin does it
for them), they can use Digest Authentication as well
as new users.
security.digest_authentication.storeA1.enabled false
70
Page 76

Chapter 9. List of Properties
key description default
Switch whether the A1 Digest for HTTP Digest
Authentication should be generated and stored or
not. Since there is no CloverETL Server API using
the HTTP Digest Authentication by default, it's
recommended to keep it disabled. This option is not
automatically enabled when any feature is specified
in the security.digest_authentication.features_list
property.
security.digest_authentication.realm
Realm string for HTTP Digest Authentication. If it
is changed, all users have to reset their passwords,
otherwise they won't be able to access to the server
features protected by HTTP digest Authentication.
security.digest_authentication.
nonce_validity
clover.event.
fileCheckMinInterval
clover.smtp.transport.protocol SMTP server protocol. Possible values are "smtp" or
clover.smtp.host SMTP server hostname or IP address
clover.smtp.port SMTP server port
clover.smtp.authentication true/false If it is false, username and password are
clover.smtp.username SMTP server username
clover.smtp.password SMTP server password
clover.smtp.additional.* Properties with a "clover.smtp.additional." prefix are
logging.project_name used in log messages where it is necessary to name the
logging.default_subdir name of a default subdirectory for all server logs; it
logging.logger.server_audit.enabled
launch.log.dir Location, where server should store launch requests
Interval of validity for HTTP Digest Authentication
specified in seconds. When the interval passes, server
requires new authentication from the client. Most of the
HTTP clients do it automatically.
Interval of file checkes (in milliseconds) See File event
listeners (p. 169) for details.
"smtps".
ignored
automatically added (without the prefix) to the
Properties instance passed to the Mailer. May be useful
for some protocol specific parameters. The prefix is
removed.
product name
is relative to the path specified by system property
"java.io.tmpdir". Don't specify as an absolute path, use
properties which are intended for absolute path.
Enables logging of operations called on ServerFacade
and JDBC proxy interfaces. The name of output file is
"server-audit.log". It is stored in the same directory as
other CloverETL Server log files by default. The default
logging level is DEBUG so it logs all operations which
may process any change.
logs. See Launch Services (p. 186) for details.
CloverETL Server
300
1000
smtp
CloverETL
cloverlogs
false
${java.io.tmpdir}/
[logging.
default_subdir]/
launch where
71
Page 77

Chapter 9. List of Properties
key description default
graph.logs_path Location, where server should store Graph run logs. See
Chapter 11, Logging (p. 79) for details.
temp.default_subdir Name of default subdirectory for server tmp files; it
is relative to the path specified by system property
"java.io.tmpdir".
graph.pass_event_params
_to_graph_in_old_style
threadManager.pool.corePoolSize
Since 3.0. It is switch for backwards compatibility of
passing parameters to the graph executed by a graph
event. In version prior to 3.0 all params has been
passed to executed graph. Since 3.0 just specified
parameters are passed. Please see Task - Execution of
Graph (p. 138) for details.
${java.io.tmpdir} is
system property
${java.io.tmpdir}/
[logging.
default_subdir]/
graph where
${java.io.tmpdir} is
system property
clovertmp
false
4
Number of threads which are always active (running or
idling). Related to a thread pool for processing server
events.
threadManager.pool.queueCapacity
Max size of the queue (FIFO) which contains tasks
waiting for an available thread. Related to a thread pool
for processing server events. For queueCapacity=0,
there are no waiting tasks, each task is immediately
executed in an available thread or in a new thread.
threadManager.pool.maxPoolSize
Max number of active threads. If no thread from a core
pool is available, the pool creates new threads up to
"maxPoolSize" threads. If there are more concurrent
tasks then maxPoolSize, thread manager refuses to
execute it.
threadManager.pool.allowCoreThreadTimeOut
Switch for idling threads timeout. If true, the
"corePoolSize" is ignored so all idling threads may be
time-outed
threadManager.pool.keepAliveSeconds
0
8192
false
20
timeout for idling threads in seconds
task.archivator.batch_size Max number of records deleted in one batch. It is used
for deleting of archived run records.
launch.http_header_prefix Prefix of HTTP headers added by launch services to the
HTTP response.
task.archivator.
archive_file_prefix
Prefix of archive files created by the archivator. cloverArchive_
72
50
X-cloveretl
Page 78

Chapter 9. List of Properties
key description default
license.context_names A comma-separated list of web-app contexts which may
contain license. Each of them has to start with a slash!
Works only on Apache Tomcat.
properties_resolver.resolve_server_props.server_props_list_additional
A list of properties from a subset of properties,
which values are resolved. The properties' values may
use system properties or environment variables as
placeholders. Values are resolved during the server
startup. If the system property is changed later, the
resolved CloverETL Server property value doesn't
change. Users may use this property, if some property
they need to resolve is missing in the property:
properties_resolver.resolve_server_props.server_props_list_default.
If the property to resolve is
already specified by the property
properties_resolver.resolve_server_props.server_props_list_default,
don't add it to this property.
properties_resolver.resolve_server_props.server_props_list_default
A list of properties from a subset of properties,
which values are resolved. The properties' values may
use system properties or environment variables as
placeholders. Values are resolved during the server
startup. If the system property is changed later, the
resolved CloverETL Server property value doesn't
change. Users are discouraged from modification
of the property, unles it's necessary. Instead users
may add more properties by modifying property:
properties_resolver.resolve_server_props.server_props_list_additional
properties_resolver.placeholders.server_props_list_default
A list of properties from a subset of properties, that
may be used as placeholders and shall be resolved
if used in paths. The properties can be used if
you define a path to the root of sandbox, or to
locations of local or partitioned sandboxes, or path to
a script, or path in archiver job. Users are strongly
discouraged from modification of the property. The
property name changed since CloverETL 4.2, however
also the obsolete name is still accepted to maintain
backwards compatibility.
webDav.method.propfind.maxDepth
/clover-license,/
clover_license
sandboxes.home,
sandboxes.home.local,
sandboxes.home.partitioned,
cluster.jgroups.bind_address,
cluster.jgroups.start_port,
cluster.jgroups.external_address,
cluster.jgroups.external_port,
cluster.jgroups.tcpping.initial_hosts,
cluster.group.name,
cluster.http.url
sandboxes.home,
sandboxes.home.local,
sandboxes.home.partitioned,
user.data.home
40
Maximum depth for webDAV method PROPFIND.
When the depth is not specified, the default is supposed
to be infinite (according to the rfc2518), however it's
necessary to set some limit, otherwise the webDav
client might overload the server filesystem.
Also if the depth value specified by webDAV client in
the request is higher than the pre-configured max depth,
only the pre-configured maximum is used.
73
Page 79

Chapter 9. List of Properties
Table 9.2. Defaults for job execution configuration - see Job Config Properties (p. 108) for details
key description default
executor.tracking_interval An interval in milliseconds for scanning of a current status of a
running graph. The shorter interval, the bigger log file.
executor.log_level Log level of graph runs. TRACE | DEBUG | INFO | WARN |
ERROR
executor.max_job_tree_depth Defines maximal depth of the job execution tree, e.g. for recursive
job it defines the maximal level of recursion (counting from root
job).
executor.max_running_concurrently Amount of graph instances which may exist (or run) concurrently.
0 means no limits
executor.max_graph_instance_age Interval in milliseconds. Specifies how long graph instance can be
idling before it is released from memory. 0 means no limits.
This property has been renamed since 2.8. Original name was
executor.maxGraphInstanceAge
executor.classpath Classpath for transformation/processor classes used in the graph.
Directory [sandbox_root]/trans/ does not have to be listed here,
since it is automatically added to graph run classpath.
executor.skip_check_config Disables check of graph configuration. Increases performance
of graph execution, however may be useful during graph
development.
executor.password This property is deprecated. Password for decoding of encoded
DB connection passwords.
executor.verbose_mode If true, more descriptive logs of graph runs are generated. true
executor.use_jmx If true, graph executor registers jmx mBean of running graph. true
executor.debug_mode If true, edges with enabled debug store data into files in debug
directory.
2000
INFO
32
0
0
true
false
See Chapter 28, Clustering Features (p. 200) for more properties.
74
Page 80

Chapter 10. Secure Configuration Properties
Some configuration properties can be confidential (e.g. password to database, mail client) and thus it's desirable
to encrypt them. For this purpose there is a command-line utility secure-cfg-tool.jar.
Basic Utility Usage (p. 75)
Advanced Usage - Custom Settings (p. 76)
Basic Utility Usage
1. Get a utility archive file (secure-cfg-tool.zip) and unzip it.
The utility is available in the download section of your CloverETL account - at the same location as the
download of CloverETL Server.
2. Execute the script given for your operating system, encrypt.bat for MS Windows, encrypt.sh for
Linux. You will be asked for inserting a value of a configuration property intended to be encrypted.
Example:
C:\secure-cfg-tool>encrypt.bat
**************************************************************
Secure config encryption (use --help or -h option to show help)
**************************************************************
****** Config settings ******
Provider: SunJCE
Algorithm: PBEWithMD5AndDES
*****************************
Enter text to encrypt: mypassword
Text to encrypt: "mypassword"
Encrypted text: conf#eCflGDlDtKSJjh9VyDlRh7IftAbI/vsH
C:\secure-cfg-tool>
If you want configure the way how are values encrypted, see Advanced Usage - Custom Settings (p. 76)
3. Encrypted string has conf#encrypted_property format. The encrypted string can be used as a value of
a configuration property in the properties file, clover.xml file or web.xml file (see details about
configuration sources in Chapter 6, Configuration Sources and Their Priorities (p. 44)).
Example (snippet of a configuration property file):
jdbc.driverClassName=com.mysql.jdbc.Driver
jdbc.url=jdbc:mysql://example.com:3306/clover?useUnicode=true&characterEncoding=utf8
jdbc.username=example
jdbc.password=conf#eCflGDlDtKSJjh9VyDlRh7IftAbI/vsH
jdbc.dialect=org.hibernate.dialect.MySQLDialect
Note
Alternatively, java -jar secure-cfg-tool.jar command can be used.
75
Page 81
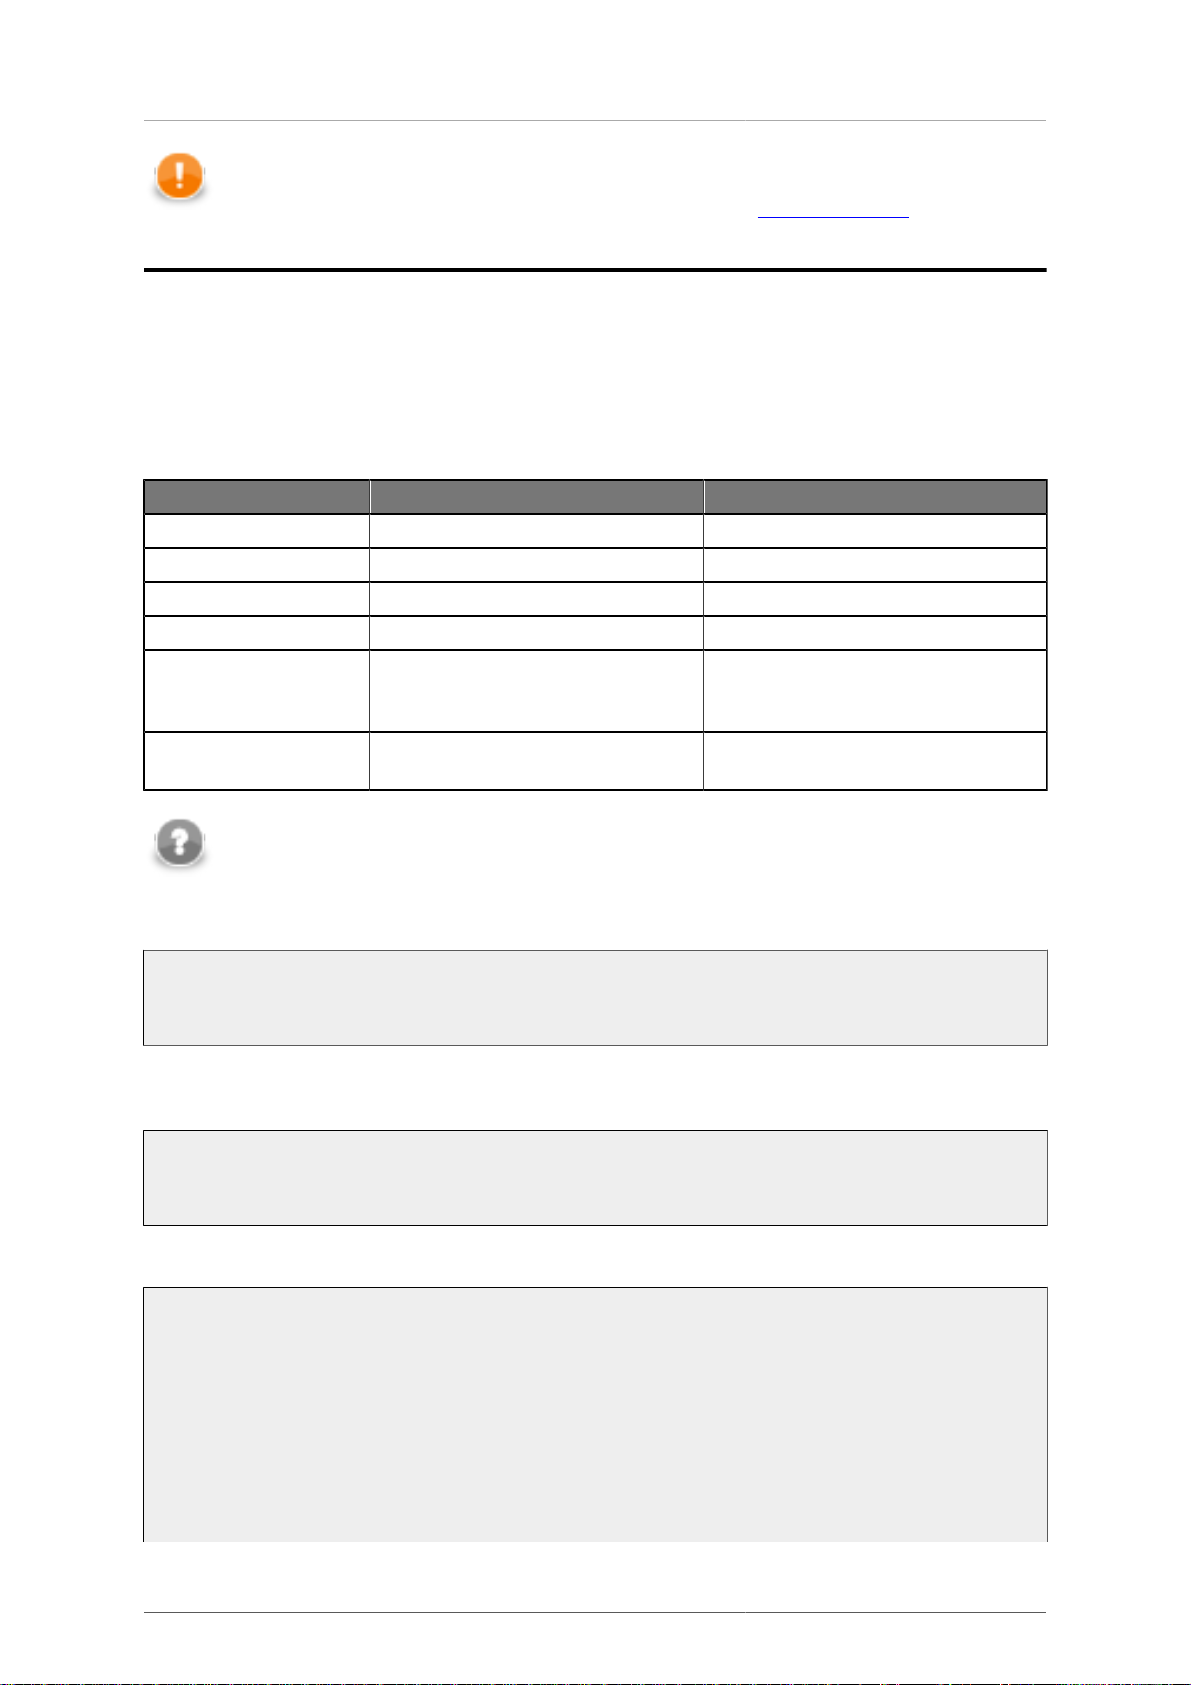
Chapter 10. Secure
Configuration Properties
Important
Values encrypted by a Secure parameter form (Chapter 13, Secure Parameters (p. 88)) cannot
be used as a value of a configuration property.
Advanced Usage - Custom Settings
The way how configuration values are encrypted described so far, uses default configuration settings (a default
provider and algorithm). But if there is a need to change these default settings with the custom ones, the secure-
cfg-tool.jar utility offers a set of parameters to achieve that.
Table 10.1. Parameters
Parameter Description Example
--algorithm, -a algorithm to encrypt --algorithm PBEWithMD5AndDES
--file, -f config file location -f C:\User\John\cloverServer.properties
--help, -h show help --help
--providerclass, -c custom provider class -c org.provider.ProviderClass
--providerlocation, -l path to jar/folder containing custom
provider class (it will be added to
classpath)
--providers, -p print available security providers and
their algorithms
--providerlocation C:\User\John\lib
\customprovider.jar, -l C:\User\John\lib\
--providers
Note
To demonstrate usage of an external provider the Bouncy Castle provider is used.
To find out a list of algorithms use -p or --providers
C:\secure-cfg-tool>encrypt.bat -p
If you want to find out a list of algorithms of an external provider, you must pass the provider's class name and
path to jar file(s)
C:\secure-cfg-tool>encrypt.bat -p -c org.bouncycastle.jce.provider.BouncyCastleProvider -l C:\User\John\bcprov-jdk15on-152.jar
Result might look like this
***** List of available providers and their algorithms *****
Provider: SunJCE
Provider class: com.sun.crypto.provider.SunJCE
Algorithms:
PBEWithMD5AndDES
PBEWithSHA1AndDESede
PBEWithSHA1AndRC2_40
Provider: BC
Provider class: org.bouncycastle.jce.provider.BouncyCastleProvider
Algorithms:
PBEWITHMD2ANDDES
PBEWITHMD5AND128BITAES-CBC-OPENSSL
76
Page 82
Chapter 10. Secure
Configuration Properties
PBEWITHMD5AND192BITAES-CBC-OPENSSL
PBEWITHMD5AND256BITAES-CBC-OPENSSL
Provider class is displayed on the row starting with Provider class, algorithms are strings with PBE prefix. Both
can be used to configure encryption.
Configuring the Encryption Process
Algorithm and provider can be passed to the utility in two ways.
•
Using command line arguments
To change the algorithm use argument -a. Provider remains the default one (SunJCE in case of Oracle Java).
C:\secure-cfg-tool>encrypt.bat -a PBEWithMD5AndDES
Using of an external provider is a little more complex. Provider's class name must be specified (argument
--providerclass or -c) and jar(s) must be added to the classpath (argument --providerlocation, -l). Provider
location must point to concrete jar file or directory containing jar(s) and can be used several times for several
paths.
C:\secure-cfg-tool>encrypt.bat -a PBEWITHSHA256AND256BITAES-CBC-BC -c org.bouncycastle.jce.provider.BouncyCastleProvider -l C:\User\John\bcprov-jdk15on-152.jar
•
Using configuration file
A configuration file is a common properties file (text file with key-value pairs):
[property-key]=[property-value]
It might look like this (example comes from secure.config.example.properties, distributed within
secure-cfg-tool.zip):
security.config_properties.encryptor.providerClassName=org.bouncycastle.jce.provider.BouncyCastleProvider
security.config_properties.encryptor.algorithm=PBEWITHSHA256AND256BITAES-CBC-BC
security.config_properties.encryptor.provider.location=C:\\User\\libs
To let utility know about the configuration file use -f argument
C:\secure-cfg-tool>encrypt.bat -f secure.config.example.properties
Note
More jar locations can be set in the security.config_properties.encryptor.providerLocation,
locations are delimited by semicolon.
Configuring an application server
CloverETL Server application needs to know how the values have been encrypted, therefore the properties must
be passed to the server (see details in Part III, “Configuration” (p. 43)). For example:
77
Page 83

Chapter 10. Secure
Configuration Properties
...
security.config_properties.encryptor.providerClassName=org.bouncycastle.jce.provider.BouncyCastleProvider
security.config_properties.encryptor.algorithm=PBEWITHSHA256AND256BITAES-CBC-BC
...
Important
If a third-party provider is used, its classes must be accessible for the application server. Property
security.config_properties.encryptor.providerLocation will be ignored.
78
Page 84
Chapter 11. Logging
Main Logs (p. 79)
Another Useful Logging Settings (p. 79)
Access Log in Apache Tomcat (p. 80)
Graph Run Logs (p. 80)
Server Audit Logs (p. 80)
Main Logs
The CloverETL Server uses the log4j library for logging. The WAR file contains the default log4j configuration.
The log4j configuration file log4j.xml is placed in WEB-INF/classes directory.
By default, log files are produced in the directory specified by system property "java.io.tmpdir" in the
cloverlogs subdirectory.
"java.io.tmpdir" usually contains common system temp dir i.e. /tmp. On Tomcat, it is usually $TOMCAT_HOME/
temp
The default logging configuration (log4j.xml bundled in the clover.war) may be changed to another log4j
configuration file using system property log4j.configuration. If you override the configuration, only the
properties from the new file are used.
The log4j.configuration should contain the URL of the a new log4j configuration file. It's not just file
system path, it must be URL, so it may look like this:
log4j.configuration=file:/home/clover/config/log4j.xml
It is better to copy the original file and modify the copy, than to create a new one.
Please note, that "log4j.configuration" is not a CloverETL Server config property, but system property, thus it must
be set on the JVM command line by -Dlog4j.configuration or in other way suitable for the application container.
Best possibility how to set a system property for each application container is described in the "Installation"
chapter.
Since such a configuration overrides the default configuration, it may have influence over Graph run logs. So your
own log config has to contain following fragment to preserve Graph run logs
<logger name="Tracking" additivity="false">
<level value="debug"/>
</logger>
Another Useful Logging Settings
These system properties allow for logging of HTTP requests/responses to stdout:
Client side:
com.sun.xml.ws.transport.http.client.HttpTransportPipe.dump=true (for more
information consult CloverETL Designer Users's Guide - chapter Integrating CloverETL Designer with
CloverETL Server)
Server side:
com.sun.xml.ws.transport.http.HttpAdapter.dump=true
79
Page 85

Chapter 11. Logging
Access Log in Apache Tomcat
If you need to log all requests processed by server, add the following code to $CATALINA_HOME/conf/
server.xml.
<Valve className="org.apache.catalina.valves.AccessLogValve" directory="logs"
prefix="localhost_access_log." suffix=".txt"
pattern="%h %l %u %t %D %r %s %b" />
The format defined above has following meaning
[IP address] [date-time] [processing duration in millis] [method] [URL] [protocol+version] [response code] [response size]
The log will look like the next line
172.17.30.243 - - [13/Nov/2014:12:53:03 +0000] 2 "POST /clover/sDispatcher/clusterNodeApi HTTP/1.1" 200 1435"
Graph Run Logs
Each graph or jobflow run has its own log file – for example, in the Server Console, section "Executions History".
By default, these log files are saved in the subdirectory cloverLogs/graph in the directory specified by
"java.io.tmpdir" system property.
It’s possible to specify a different location for these logs with the CloverETL "graph.logs_path" property. This
property does not influence main Server logs.
Server Audit Logs
Server Audit Log logs operations called on ServerFacade and JDBC proxy interfaces.
Audit logging can be enabled by setting (adding) the value of CloverETL property
logging.logger.server_audit.enabled to true. In server GUI, you can change the property value in
Configuration →Setup →Configuration File. Audit logging is disabled by default.
The name of output file is server-audit.log. The file is in the same directory as main server log files.
Default log level is DEBUG, so all operations which may do any change or another important operations (e.g.
login or openJdbcConnection) are logged. To enable logging of all operations, change log level to TRACE in the
log4j configuration.
Each logged operation is logged by two messages: entering method and exiting method (if the exception is raised,
it's logged instead of output parameters)
• Entering method (marked as "inputParams"). All method's parameters (except for passwords) are printed.
• Exiting method (marked as "outputParams"). Method's return value is printed.
• Exception in method (marked as "EXCEPTION"). Exception's stacktrace is printed.
Message also contains:
• username, if the user is known
• client IP address, if it's known
• cluster node ID
• Interface name and the operation name
Values of transient and lazy initialized (in entity classes) fields and fields with binary content are not printed.
80
Page 86

Part IV. Administration
Page 87
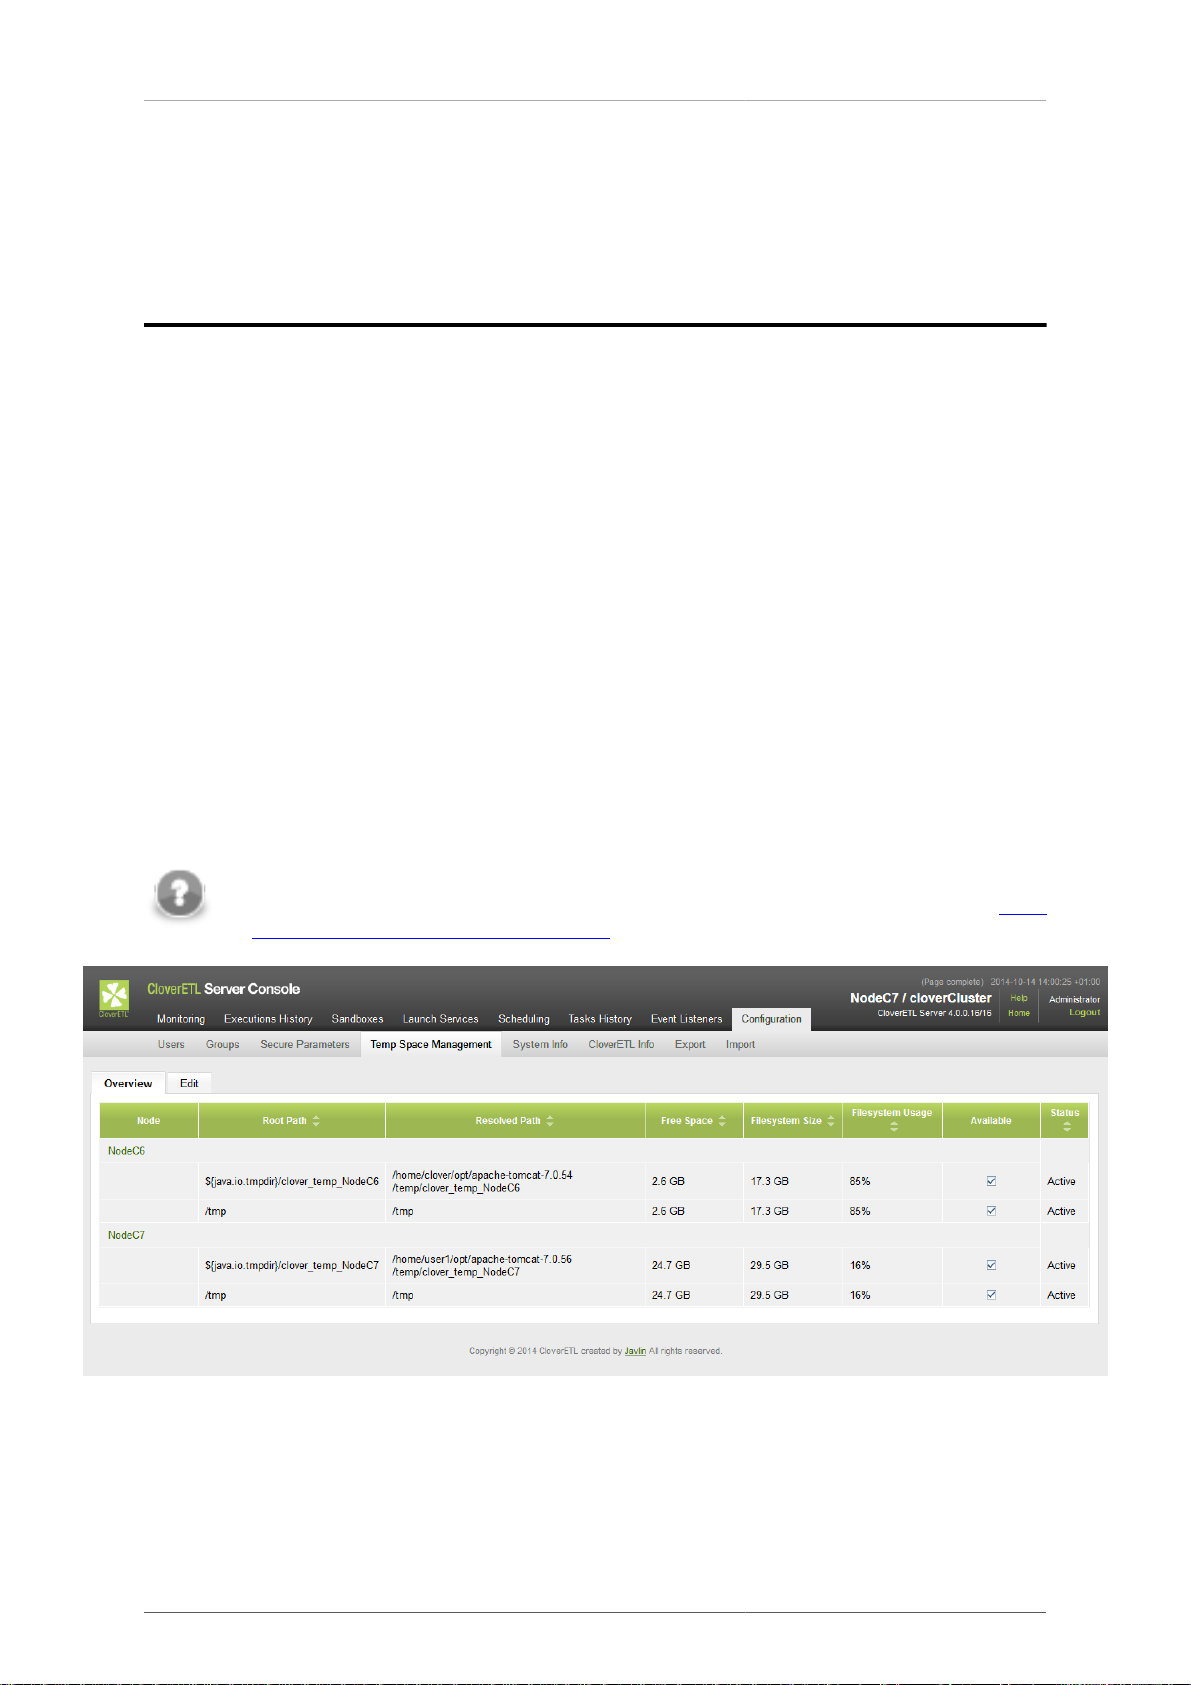
Chapter 12. Temp Space Management
Many of the components available in the CloverETL Server require temporary files or directories in order to work
correctly. Temp space is a physical location on the file system where these files or directories are created and
maintained. CloverETL Server allows you to configure and manage temp spaces - you can specify their locations,
see usage of the filesystem etc.
Overview
The overview of temp spaces defined in CloverETL Server is available under Configuration > Temp space
management > Overview
The overview panel displays list of temp spaces for each node in the cluster. These properties are displayed for
each temp space:
• Root Path - location of the temp space with unresolved placeholders (see note below for placeholders)
• Resolved Path - location of the temp space with resolved placeholders (see note below for placeholders)
• Free Space - remaining space for the temp space
• Filesystem Size - all available space for the temp space (actual size of the filesystem where the temp space
resides)
• Filesystem Usage - size of used space in percentage
• Available - the directory exists and is writable
• Status - current status of temp space, can be Active or Suspended
Note
It is possible to use system properties and environment variables as placeholders. See Using
environment variables and system properties (p. 84).
Figure 12.1. Configured temp spaces overview - one default temp space on each cluster node
82
Page 88
Chapter 12. Temp
Space Management
Management
Temp space management offers an interface to add, disable, enable and delete a temp space. It is accessible under
Configuration > Temp space management > Edit.
The screen is divided in two drop-down areas: Global Configuration and Per Node Configuration. The Global
configuration manages temp spaces of standalone server or in case of a server cluster temp spaces on all its nodes.
The Per Node Configuration allows to maintain temp spaces on each particular node.
Initialization (p. 83)
Adding Temp Space (p. 83)
Using environment variables and system properties (p. 84)
Disabling Temp Space (p. 85)
Enabling Temp Space (p. 86)
Removing Temp Space (p. 86)
Initialization
When CloverETL Server is starting the system checks temp space configuration: in case no temp space is
configured a new default temp space is created in the directory where java.io.tmpdir system property points.
The directory is named as follows:
• ${java.io.tmpdir}/clover_temp in case of a standalone server
• ${java.io.tmpdir}/clover_temp_<node_id> in case of server cluster
Adding Temp Space
In order to define new temp space enter its path into text field under last row in the table and click the Add link.
If the directory entered does not exist, it will be created.
Tip
The main point of adding additional temp spaces is to enable higher system throughput - therefore the
paths entered should point to directories residing on different physical devices to achieve maximal
I/O performance.
83
Page 89
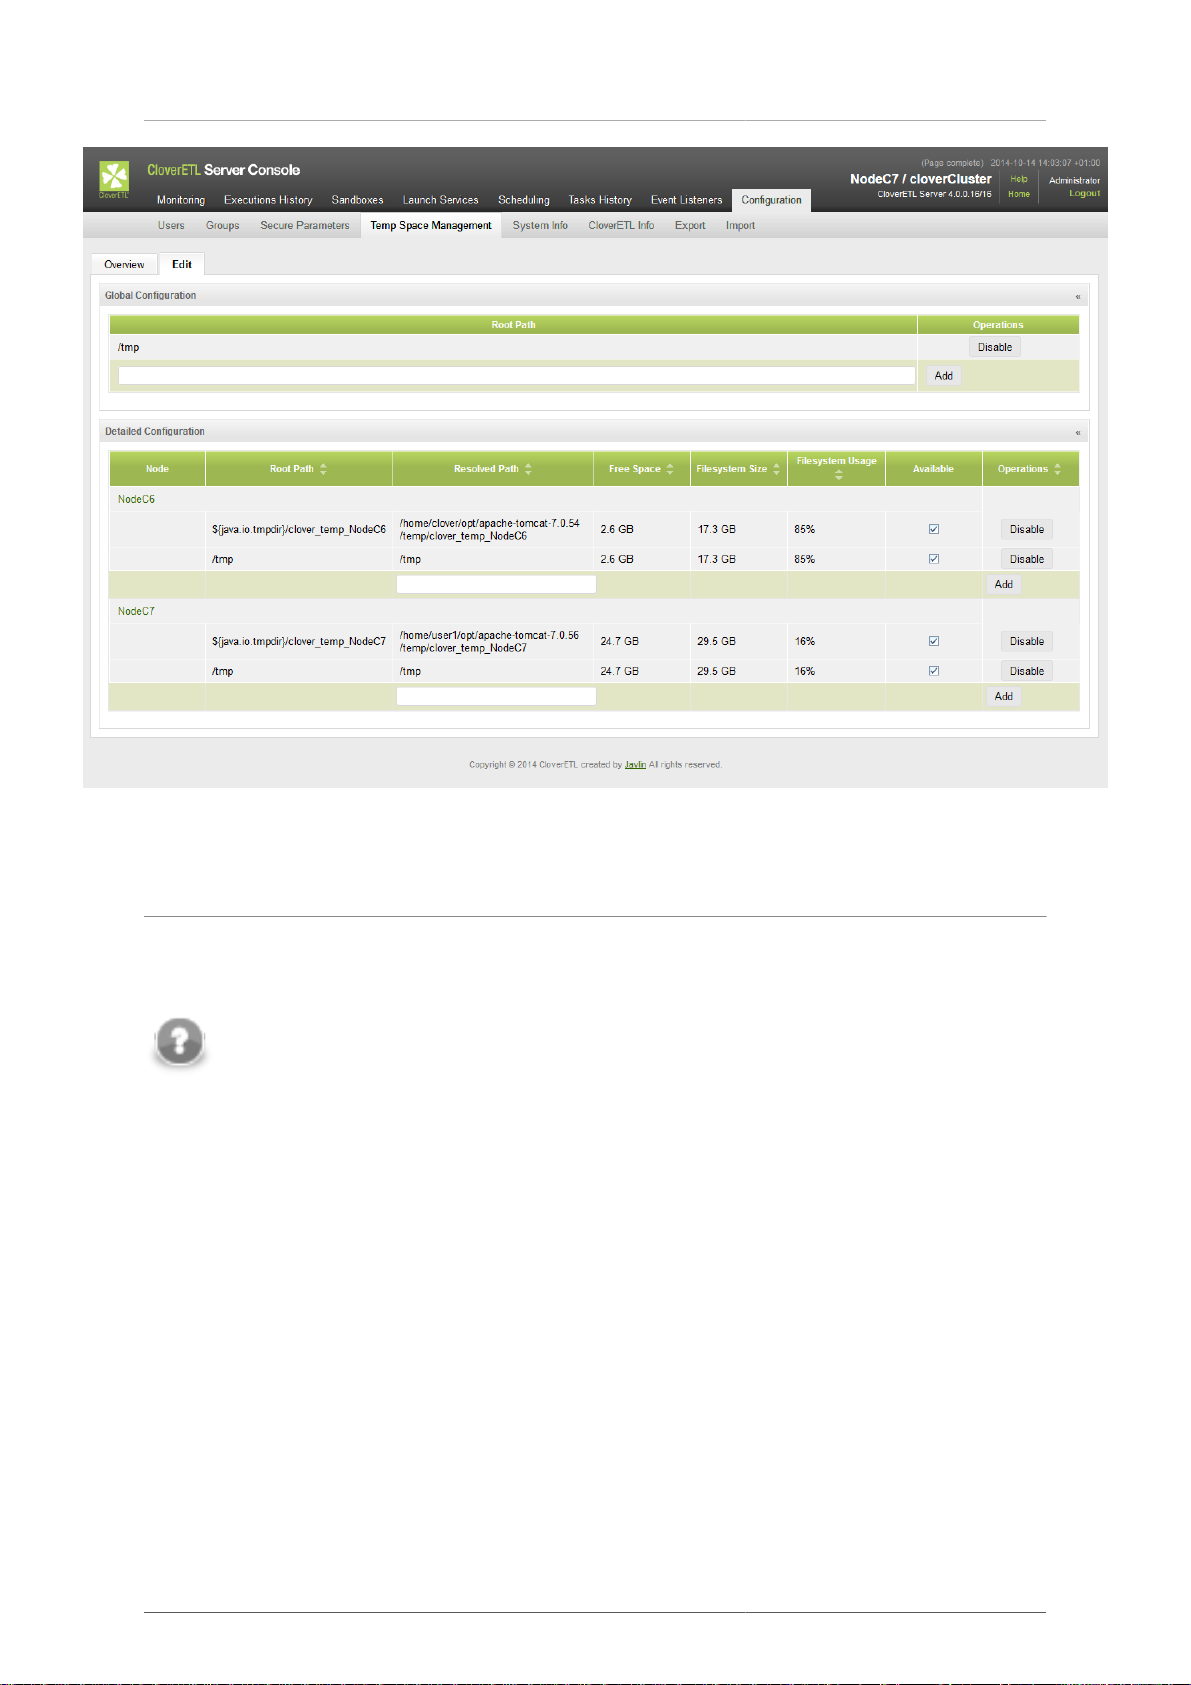
Chapter 12. Temp
Space Management
Figure 12.2. Newly added global temp space.
Using environment variables and system properties
Environment variables and system properties can be used in the temp space path as a placeholder; they can be
arbitrarily combined and resolved paths for each node may differ in accord with its configuration.
Note
The environment variables have higher priority than system properties of the same name. The path
with variables are resolved after system has added new temp space and when the server is starting.
In case the variable value has been changed it is necessary to restart the server so that the change
takes effect.
Examples:
• Given that an environment variable USERNAME has a value Filip. and is used as a placeholder in the path
C:\Users\${USERNAME}\tmp, the resolved path is C:\Users\Filip\tmp.
• Given that Java system property java.io.tmpdir has a value C:\Users\Filip\AppData\Local
\Temp and the property is used as a placeholder in the path ${java.io.tmpdir}\temp_folder, the
resolved path is C:\Users\Filip\AppData\Local\Temp\temp_folder.
• Node node01 has been started with -Dcustom.temporary.dir=C:\tmp_node01 parameter. Node
node02 has been started with -Dcustom.temporary.dir=C:\tmp_node02 parameter. The declared
path is ${custom.temporary.dir}. The resolved path is different for each node, C:\tmp_node01 for
node01 and C:\tmp_node02 for node02.
• When the declared path is ${java.io.tmpdir}\${USERNAME}\tmp_folder, the resolved path is C:
\tmp\Filip\tmp_folder.
84
Page 90
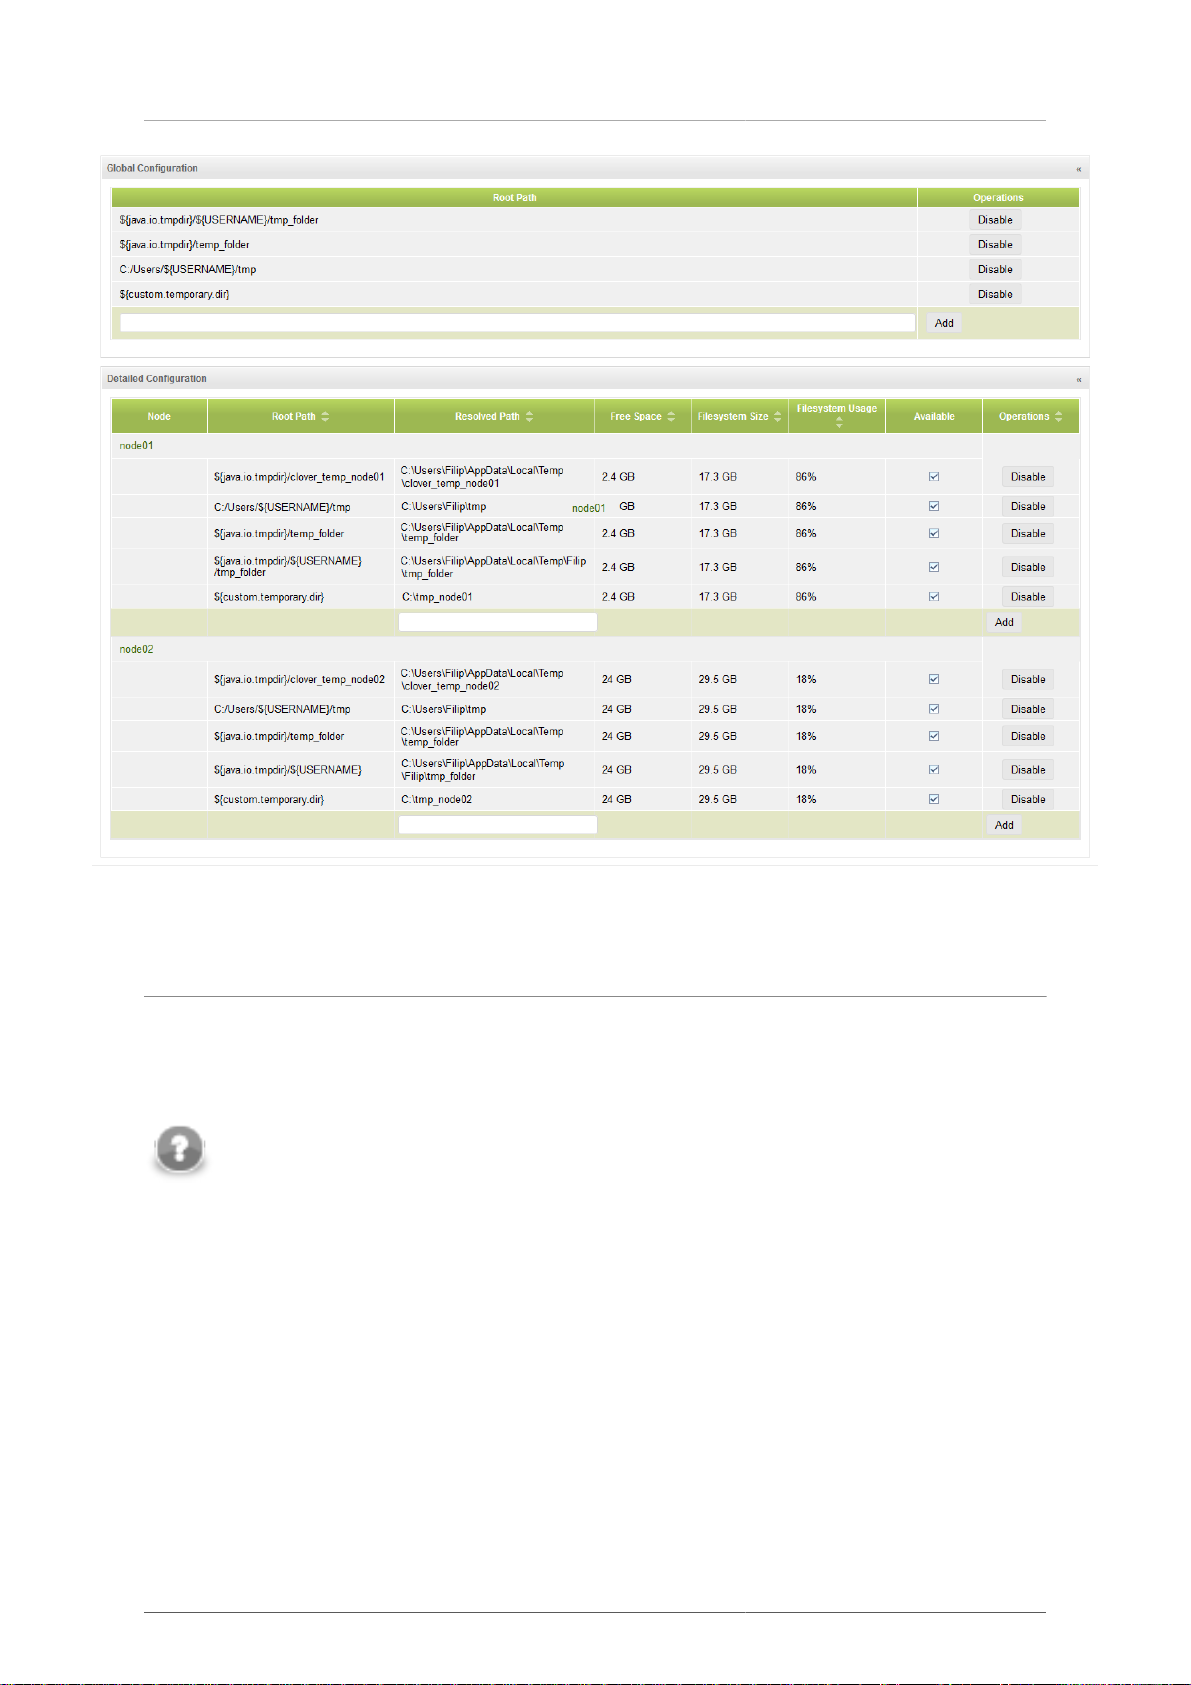
Chapter 12. Temp
Space Management
Figure 12.3. Temp spaces using environment variables and system properties
Disabling Temp Space
To disable a temp space click on "Disable" link in the panel. Once the temp space has been disabled, no new
temporary files will be created in it, but the files already created may be still used by running jobs. In case there
are files left from previous or current job executions a notification is displayed.
Note
The system ensures that at least one enabled temp space is available.
85
Page 91
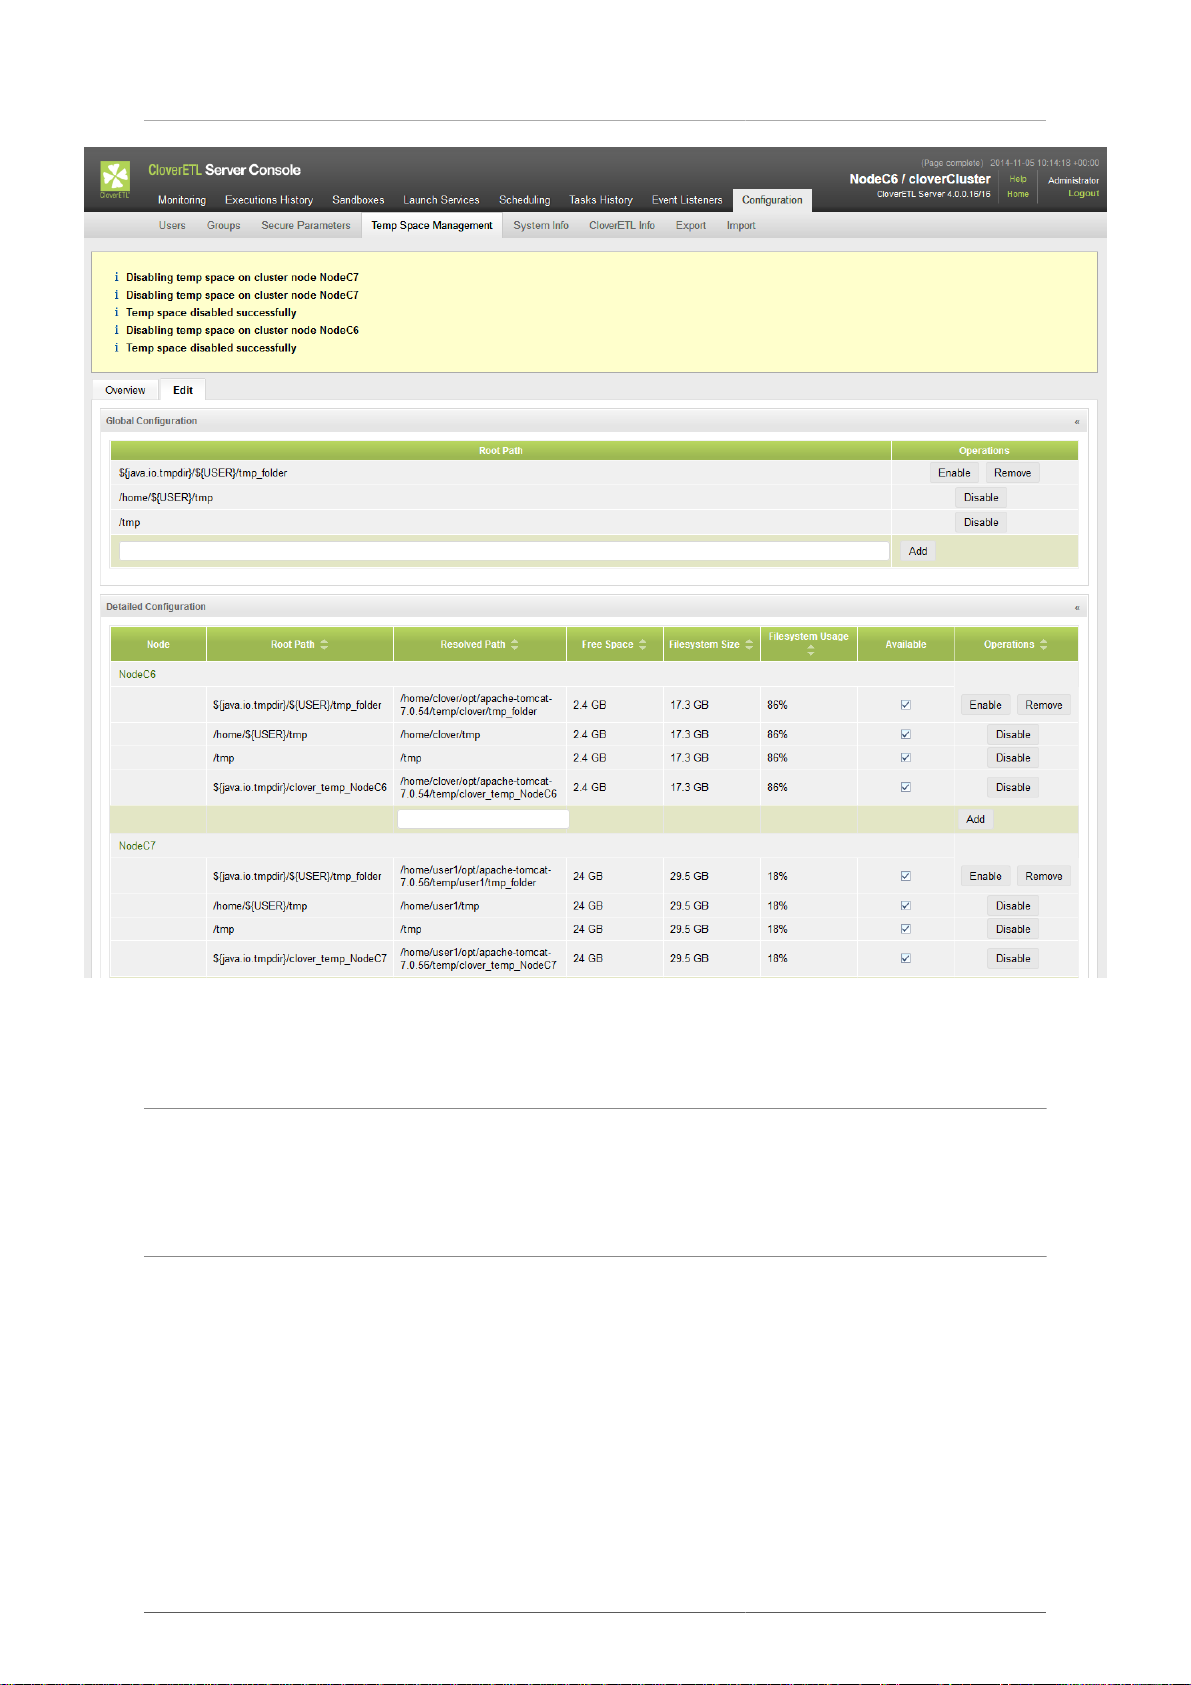
Chapter 12. Temp
Space Management
Figure 12.4. Disable operation reports action performed
Enabling Temp Space
To enable a temp space click on "Enable" link in the panel. Enabled temp space is active, i.e. available for
temporary files and directories creation.
Removing Temp Space
To remove a temp space click on "Remove" link in the panel. Only the disabled temp space may be removed. If
there are any running jobs using the temp space, the system will not allow its removal. In case there are some files
left in the temp space directory, it is possible to remove them in the notification panel. The available options are:
• Remove - remove temp space from a system, but keep its content
• Remove and delete - remove the temp space from a system and its content too
• Cancel - do not proceed with operation
86
Page 92
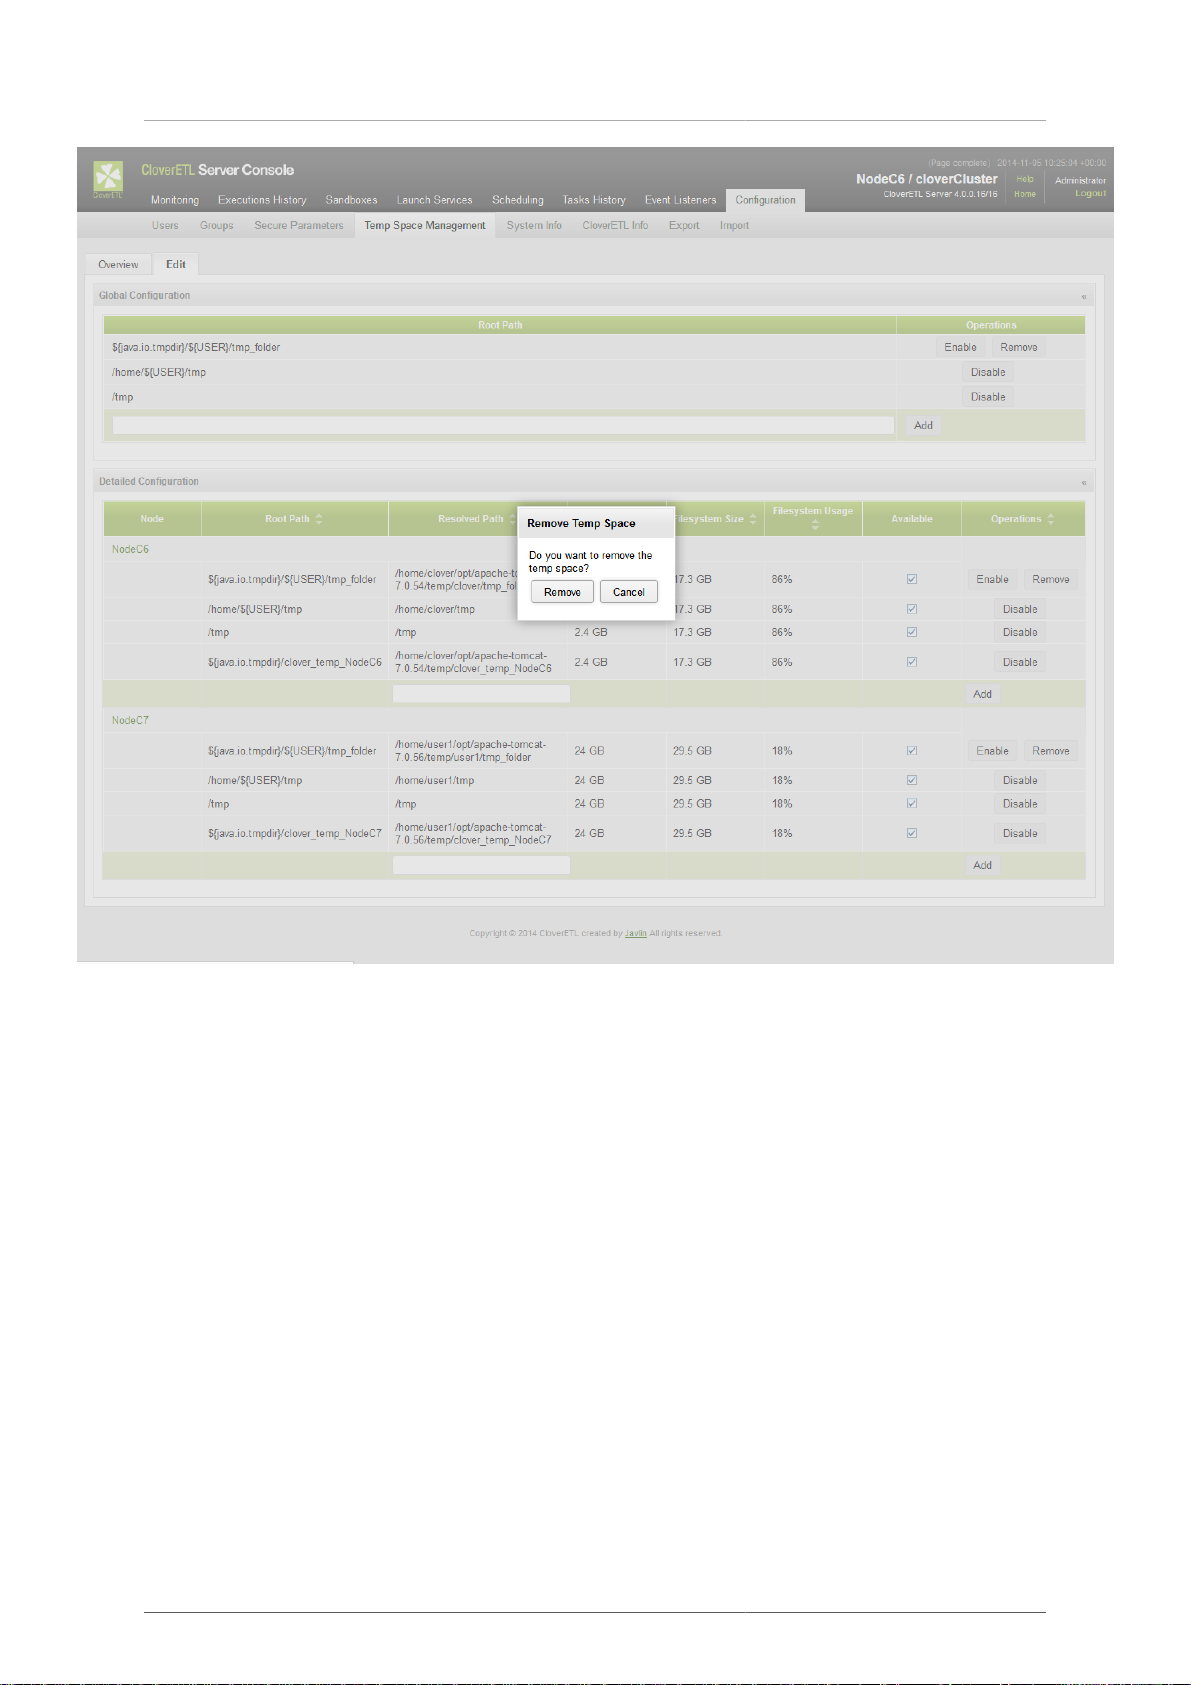
Chapter 12. Temp
Space Management
Figure 12.5. Remove operation asks for confirmation in case there are data present in the temp space
87
Page 93
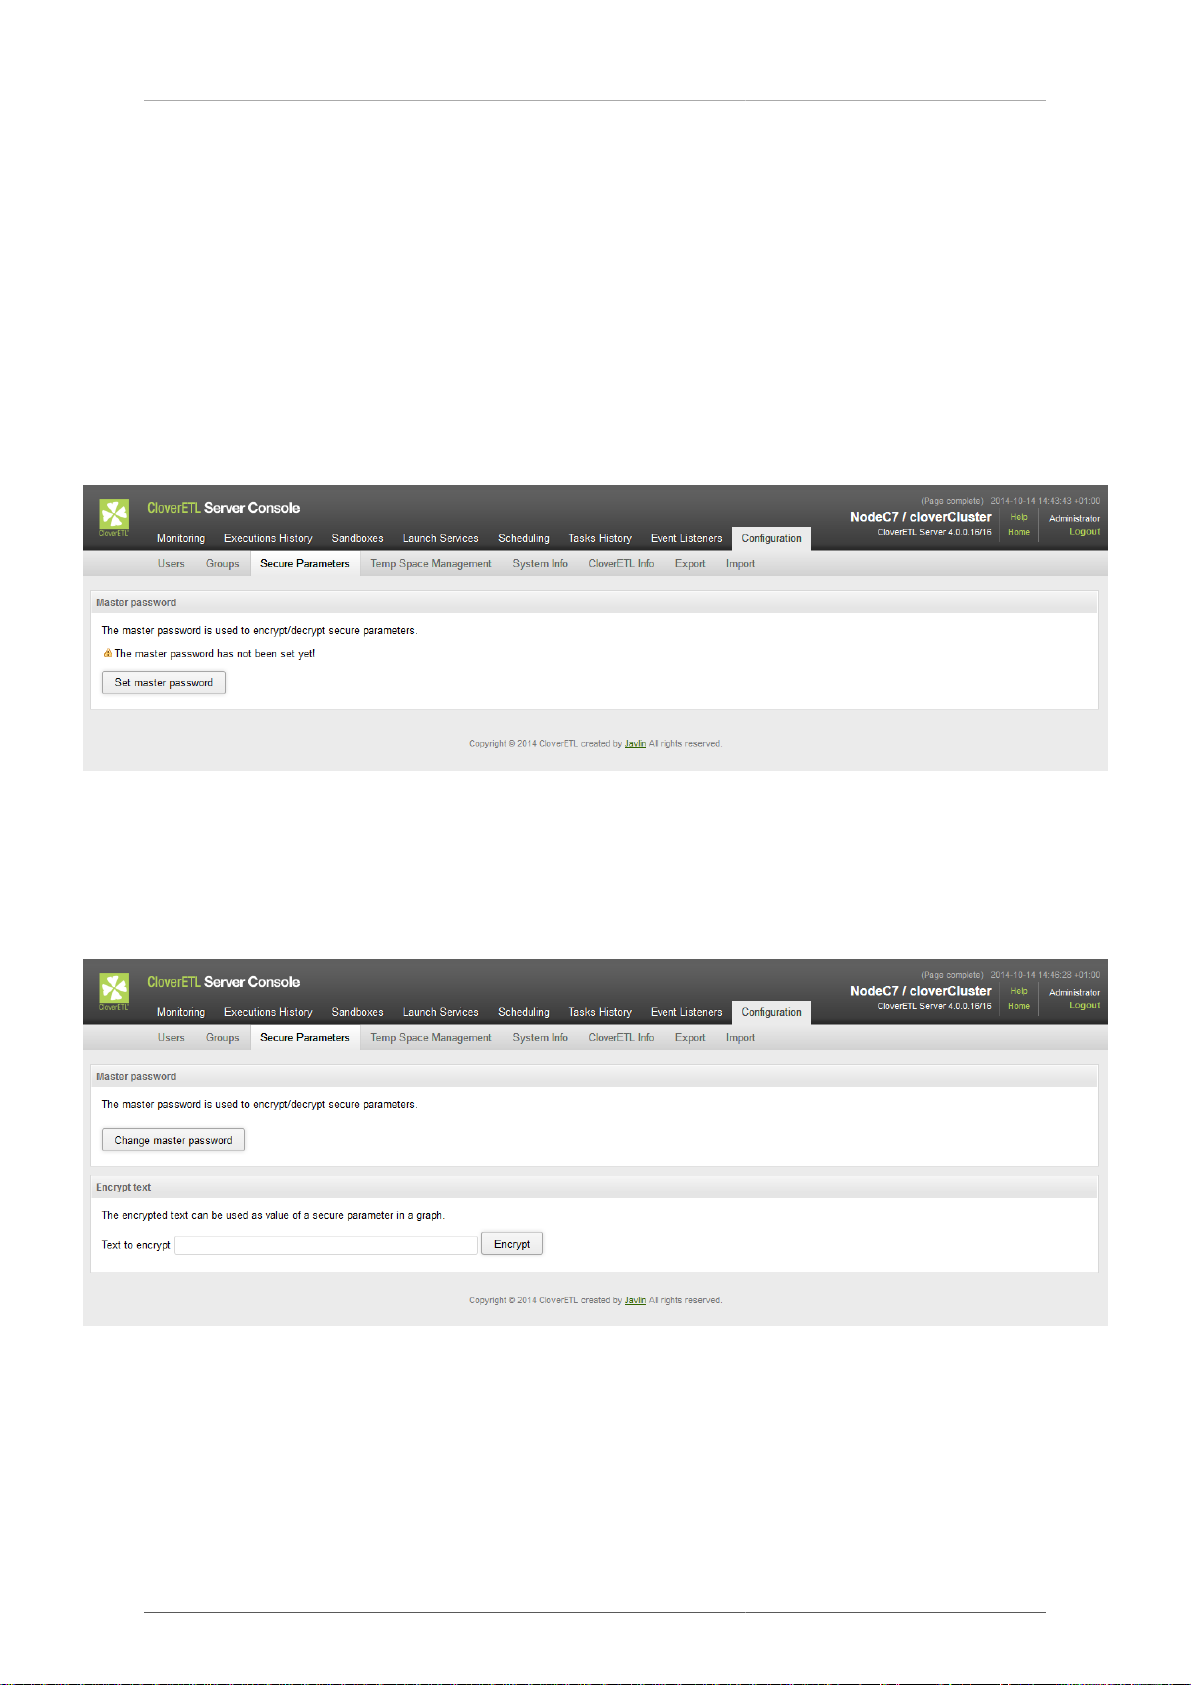
Chapter 13. Secure Parameters
Transformation graphs in CloverETL Server environment allow you to define secure graph parameters. Secure
graph parameters are regular graph parameters, either internal or external (in a *.prm file), but the values of the
graph parameters are not stored in plain text on the file system - encrypted values are persisted instead. This allows
you to use graph parameters to handle sensitive information, typically credentials such as passwords to databases.
Secure parameters are only available in CloverETL Server environment, including working with CloverETL
Server Projects in CloverETL Designer.
The encryption algorithm must be initialized with a master password. The master password has to be manually
set after server installation in Configuration > Secure Parameters > Master password. Secure parameters cannot
be used before the master password is set.
Figure 13.1. Master password initialization
After setting the master password secure parameters are fully available in Graph parameter editor in CloverETL
Designer. When setting value of a secure parameter, it will be automatically encrypted using the master password.
Secure parameters are automatically decrypted by server in graph runtime. A parameter value can also be encrypted
in the CloverETL Server Console in the Configuration > Secure Parameters page - use the Encrypt text section.
Figure 13.2. Graph parameters tab with initialized master password
If you change the master password, the secure parameters encrypted using the old master password cannot be
decrypted correctly anymore. In that case existing secure parameters need to be encrypted again with the new
master password. That can be accomplished simply by setting their value (non-encrypted) again in the Graph
parameter editor. Similar master password inconsistency issue can occur if you move a transformation graph
with some secure parameters to another server with a different master password. So it is highly recommended to
use the identical master password for all your CloverETL Server installations.
88
Page 94

Chapter 13. Secure Parameters
See documentation of secure parameters in CloverETL Designer manual for further details.
Secure parameters configuration
Encryption of secure parameters can be further customized via server configuration parameters.
Table 13.1. Secure parameters configuration parameters
Property name Default value Description
security.job_parameters.encryptor.algorithm
PBEWithMD5AndDES
security.job_parameters.encryptor.master_password_encryption.password
clover The password used to encrypt values persisted
security.job_parameters.encryptor.providerClassName
Empty string. The default
JVM provider is used (e.g.
for Oracle Java the SunJCE
provider is used)
The algorithm to be used for encryption. This
algorithm has to be supported by your JCE provider
(if you specify a custom one, or the default JVM
provider if you don't). The name of algorithm
should start with PBE prefix.
The list of available algorithms depends
on your JCE provider, e.g. for the
default SunJCE provider you can find them
on http://docs.oracle.com/javase/6/docs/technotes/
guides/security/
SunProviders.html#SunJCEProvider or for
the Bouncy Castle provider on http://
www.bouncycastle.org/specifications.html
(section Algorithms/PBE)).
in the database table secure_param_passwd (the
master password is persisted there).
The name of the security provider to
be asked for the encryption algorithm.
It must implement java.security.Provider
interface. For example set to
org.bouncycastle.jce.provider.BouncyCastleProvider
for the Bouncy Castle JCE provider, see below.
Installing Bouncy Castle JCE provider
Algorithms provided by JVM could be too weak to satisfy an adequate security. Therefore it is recommended to
install a third-party JCE provider. Following example demonstrates installation of one concrete provider, Bouncy
Castle JCE provider. Another provider would be installed similarly.
1. Download Bouncy Castle provider jar (e.g. bcprov-jdk15on-150.jar) from http://bouncycastle.org/
latest_releases.html
2. Add the jar to the classpath of your application container running CloverETL Server, e.g. to directory WEB-
INF/lib
3. Set value of the security.job_parameters.encryptor.providerClassName attribute to
org.bouncycastle.jce.provider.BouncyCastleProvider in file WEB-INF/config.properties.
4. Set value of the security.job_parameters.encryptor.algorithm attribute to the desired algorithm (e.g.
PBEWITHSHA256AND256BITAES-CBC-BC).
Example of configuration using Bouncy Castle:
89
Page 95

Chapter 13. Secure Parameters
security.job_parameters.encryptor.algorithm=PBEWITHSHA256AND256BITAES-CBC-BC
security.job_parameters.encryptor.providerClassName=org.bouncycastle.jce.provider.BouncyCastleProvider
90
Page 96

Chapter 14. Users and Groups
The CloverETL Server has a built-in security module that manages users and groups. User groups control access
permissions to sandboxes and operations the users can perform on the Server, including authenticated calls to
Server API functions. A single user can belong to multiple groups.
LDAP or Active Directory can be configured with the Server to authenticate users and optionally assign their
effective groups (and permissions) from a global directory.
You can manage users and user groups in Configuration/Users and Groups. Please note that you need a “List
users” (“List groups” respectively) permission for that.
91
Page 97

Chapter 14. Users and Groups
LDAP Authentication
Since 3.2 it's possible to configure CloverETL Server to use LDAP server for users authentication. So the
credentials of users registered in LDAP may be used for authentication to any CloverETL Server interface (API
or web console).
However authorization (access levels to sandboxes content and privileges for operations) is still handled by Clover
security module. Each user, event though logged-in using LDAP authentication, must have his own "user" record
(with related groups) in the CloverETL security module. So there must be the user with the same username and
domain set to "LDAP". Such record has to be created by a Server administrator before the the user can log in.
What does the CloverETL do to authenticate an LDAP user?
1. User specifies the LDAP credentials in a login form to the Server web console
2. CloverETL Server looks up a user record and checks whether has "LDAP" domain set
3. If the system is configured to use LDAP for authentication only, it attempts to connect to LDAP server using
user's credentials. If it succeeds, the user is logged in.
4. In case the system is configured for user group synchronization the procedure is as follows:
5. CloverETL Server connects to the LDAP server and checks whether the user exists (it uses specified search
to lookup in LDAP).
6. If the user exists in LDAP, CloverETL Server performs authentication.
7. If succeeded, CloverETL Server searches LDAP for user's groups.
8. Clover user is assigned to the Clover groups according to his current assignation to the LDAP groups.
9. User is logged-in.
Note
Switching domains:
• If a user was created as LDAP and then switched to clover domain, you have to set a password
for him in Change password tab.
• If a user was created as clover and then switched to LDAP domain, he has a password in clover
domain, but it is overridden by the LDAP password. After switching back to clover domain,
the original password is re-used. It can be reset in the Change password tab if needed (e.g.
forgotten).
Configuration
By default CloverETL Server allows only its own internal mechanism for authentication. To enable authentication
with LDAP, set the configuration property "security.authentication.allowed_domains" properly. It is a list of user
domains that are used for authentication.
Currently there are 2 authentication mechanism implemented: "LDAP" and "clover" ("clover" is an identifier of
CloverETL internal authentication and may be changed by security.default_domain property, but only for whitelabelling purposes). To enable LDAP authentication, set value to "LDAP" (only LDAP) or "clover,LDAP". Users
from both domain may login. It's recommended to allow both mechanisms together, until the LDAP is properly
configured. So the admin user can still login to web GUI although the LDAP connection isn't properly configured.
You can use Setup to configure LDAP authentication. See the section called “LDAP” (p. 51) in Chapter 7,
Setup (p. 46).
92
Page 98

Chapter 14. Users and Groups
Basic LDAP connection properties
# Implementation of context factory
security.ldap.ctx_factory=com.sun.jndi.ldap.LdapCtxFactory
# URL of LDAP server
security.ldap.url=ldap://hostname:port
# User DN pattern that will be used to create LDAP user DN from login name.
security.ldap.user_dn_pattern=uid=${username},dc=company,dc=com
Depending on the LDAP server configuration the property security.ldap.user_dn_pattern can be
pattern for user's actual distinguished name in the LDAP directory, or just the login name - in such case just set
the property to ${username}.
Configuration of user and group lookup
In order to be able to synchronize the Clover groups with those defined in LDAP directory, the
security.ldap.user_dn_pattern has to be left unspecified. There are additional properties required so
that the server is able to search the LDAP directory.
# User DN of a user that has sufficient privileges to search LDAP for users and groups
security.ldap.userDN=cn=Manager,dc=company,dc=com
# The password for user mentioned above.
security.ldap.password=
There are optional settings affecting how the LDAP directory is searched.
# Timeout for queries searching the directory.
security.ldap.timeout=5000
# Maximal number of records that the query can return.
security.ldap.records_limit=2000
# How LDAP referrals are processed, possible values are: 'follow', 'ignore' and 'throw'.
# The default depends on the context provider.
security.ldap.referral=
Specified values work for this specific LDAP tree:
• dc=company,dc=com
• ou=groups
• cn=admins
(objectClass=groupOfNames,member=(uid=smith,dc=company,dc=com),member=(uid=jones,dc=company,dc=com))
• cn=developers (objectClass=groupOfNames,member=(uid=smith,dc=company,dc=com))
• cn=consultants (objectClass=groupOfNames,member=(uid=jones,dc=company,dc=com))
• ou=people
• uid=smith (fn=John,sn=Smith,[email protected])
• uid=jones (fn=Bob,sn=Jones,[email protected])
Following properties are necessary for lookup for the LDAP user by his username. (step [4] in the login process
above)
# Base specifies the node of LDAP tree where the search starts
security.ldap.user_search.base=dc=company,dc=eu
# Filter expression for searching the user by his username.
# Note, that this search query must return just one record.
# Placeholder ${username} will be replaced by username specified by the logging user.
93
Page 99

Chapter 14. Users and Groups
security.ldap.user_search.filter=(uid=${username})
# Scope specifies type of search in "base". There are three possible values: SUBTREE | ONELEVEL | OBJECT
# http://download.oracle.com/javase/6/docs/api/javax/naming/directory/SearchControls.html
security.ldap.user_search.scope=SUBTREE
Following properties are names of attributes from the search defined above. They are used for getting basic info
about the LDAP user in case the user record has to be created/updated by Clover security module: (step [6] in
the login process above)
security.ldap.user_search.attribute.firstname=fn
security.ldap.user_search.attribute.lastname=sn
security.ldap.user_search.attribute.email=mail
# This property is related to the following step "searching for groups".
# Groups may be obtained from specified user's attribute, or found by filter (see next paragraph)
# Leave this property empty if the user doesn't have such attribute.
security.ldap.user_search.attribute.groups=memberOf
In the following step, clover tries to find groups which the user is assigned to. (step [4] in the login process above).
There are two ways how to get list of groups which the user is assigned to. The user-groups relation is specified
on the "user" side. The user record has some attribute with list of groups. It's "memberOf" attribute usually. Or
the relation is specified on the "group" side. The group record has an attribute with list of assigned users. It's
"member" attribute usually.
In case the relation is specified on users side, please specify property:
security.ldap.user_search.attribute.groups=memberOf
Leave it empty otherwise.
In case the relation is specified on the groups side, set properties for searching:
security.ldap.groups_search.base=dc=company,dc=com
# Placeholder ${userDN} will be replaced by user DN found by the search above
# If the filter is empty, searching will be skipped.
security.ldap.groups_search.filter=(&(objectClass=groupOfNames)(member=${userDN}))
security.ldap.groups_search.scope=SUBTREE
Otherwise, please leave property security.ldap.groups_search.filter empty, so the search will be skipped.
Clover user record will be assigned to the clover groups according to the LDAP groups found by the search (or
the attribute). (Groups synchronization is performed during each login)
# Value of the following attribute will be used for lookup for the Clover group by its code.
# So the user will be assigned to the Clover group with the same "code"
security.ldap.groups_search.attribute.group_code=cn
94
Page 100
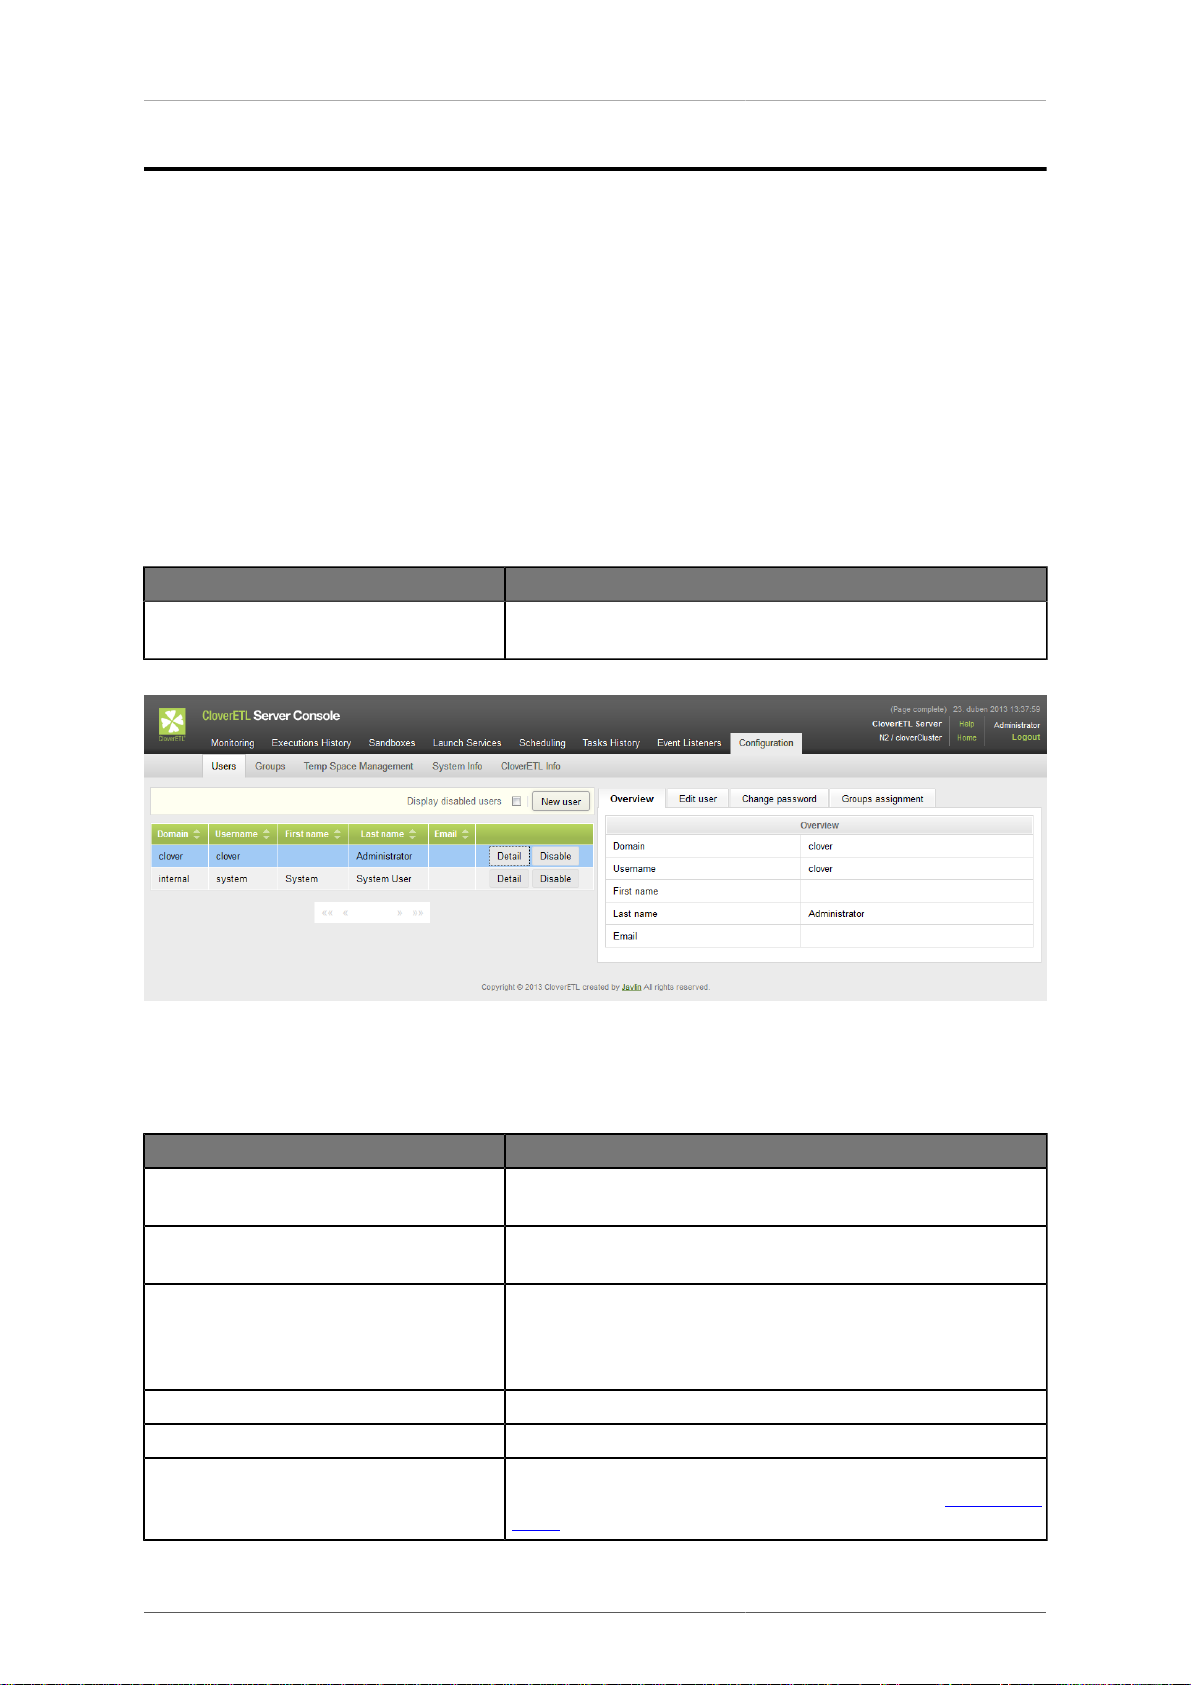
Chapter 14. Users and Groups
Users
This section is intended to users management. It offers features in dependence on user's permissions. i.e. User may
enter this section, but cannot modify anything. Or user may modify, but cannot create new users.
All possible features of users section:
• create new user
• modify basic data
• change password
• disable/enable user
• assign user to groups - Assignment to groups gives user proper permissions
Table 14.1. After default installation on an empty DB, admin user is created automatically
User name Description
clover Clover user has admin permissions, thus default password "clover"
should be changed after installation.
Figure 14.1. Web GUI - section "Users" under "Configuration"
Table 14.2. User attributes
Attribute Description
Domain Domain which is the origin of the user. There are only two possible
values currently: "clover" or "ldap".
Username Common user identifier. Must be unique, cannot contain spaces or
special characters, just letters and numbers.
Password Case sensitive password. If user looses his password, the new one
must be set. Password is stored in encrypted form for security
reasons, so it cannot be retrieved from database and must be
changed by the user who has proper permission for such operation.
First name
Last name
E-mail E-mail address which may be used by CloverETL administrator or
by CloverETL server for automatic notifications. See Task - Send
Email (p. 153) for details.
95
 Loading...