

Page 1
1
Android Tablet PC 7 ''
Instruction Manual
Référence : DV137
Date : 08/07/2013
Version : 1.2
Langue : Français / Anglais
Page 2

2
Instruction Manual
Thank you for buying our CLIPSONIC product.This is an User’s Guide, in order to make sure you can
use it conveniently,please read it before you use the product.
Contents
Contents ................................................................................................................................................2
1. Notes:.................................................................................................................................................3
2. Accessories: .......................................................................................................................................3
3. Hardware rules ..................................................................................................................................3
4. Main functions...................................................................................................................................4
5. Appearance and Buttons : .................................................................................................................5
6. MID Use and preparation ..................................................................................................................6
7.Startup and shutdown:.......................................................................................................................6
7.1. Startup:...................................................................................................................................6
7.2. Shutdown:..............................................................................................................................7
7.3. Sleep.......................................................................................................................................7
8. Main menu operation........................................................................................................................8
9. System settings:.................................................................................................................................8
9.1. wireless&networks:................................................................................................................9
9.2. Device...................................................................................................................................10
9.3. Personal................................................................................................................................13
9.4. System..................................................................................................................................15
10.Install, unload, run the application.................................................................................................16
10.1.Install APK software program from the TF card ..................................................................17
10.2.Install searched application from the"market"...................................................................18
10.3. Install from the "ApkInstaller"icon.....................................................................................19
10.4.Uninstall the application .....................................................................................................20
11. Widgets..........................................................................................................................................21
12.Main programs operation Introduction:.........................................................................................22
12.1 Browser: ..............................................................................................................................22
12. 2.Camera: ..............................................................................................................................22
12.3. E-mail: ................................................................................................................................23
12.4.Explorer:..............................................................................................................................26
12.5.Gallery:................................................................................................................................26
12.6.Gmail:..................................................................................................................................28
12.7.Music player:.......................................................................................................................29
12.8. Record ................................................................................................................................30
12.9. Market(Play Store) .............................................................................................................31
13. Wallpaper: .....................................................................................................................................34
13.1. Set the wallpaper from the setting icon.............................................................................34
13.2. Set the wallpaper from the "Gallery" icon.........................................................................35
13.3. Set the wallpaper from the mother interface....................................................................35
14. External device: .............................................................................................................................36
14.1. USB connection..................................................................................................................36
14.2. OTG use ..............................................................................................................................37
14.3. Keyboard and mouse..........................................................................................................37
15.Network connection methods:.......................................................................................................37
15.1.WIFI network.......................................................................................................................37
15.2.Ethernet network................................................................................................................38
15.3.External 3G network ...........................................................................................................38
16.Treatment for common problems: ..................................................................................................38
Page 3
3
Instruction Manual
1. Notes:
* This is a high-density electronic product; please do not dismantle it by yourself.
* Avoid strong beat and collision.
* Avoid using this product in the following environments: high and low temperature, humidity, dusty, with
strong magnetic and long-term exposure to the sun.
* Please wipe the product shell use twist dry wet cotton cloth gently; the use of other chemical cleaning is
prohibited. This product should keep away from water drop and water splash, so cups filled with liquids
should not be placed near the product.
* Use the headset long time, high volume may cause permanent damage to hearing.
* Do not use headphones when going across a road, driving a motorcycle or bicycle, in order to avoid
traffic accidents.
* Please use permitted battery, charger and accessories only, the use of any other type of product would
be a breach of warranty regulations, and may be dangerous.
* Please deal with waste machinery and accessories according to local environmental regulations.
* If you have any questions in the process of using of the product, please contact the local dealer or
contact customer service center of our company directly.
* For the smeared memory loss that is caused by product damage, repair or other causes of product
damage, repair, the company is not responsible for it, so please follow the user's guide and timely backup.
2. Accessories:
MID machine
5V 2A Charger
User manual
USB cable
OTG cable
3. Hardware rules
MID hardware parameters
Processor Rockchip2926 ARM Cortex A9 1.2Ghz
Memoiry RAM 512MB DDR3
Storage
Wireless IEEE 802.11 b/g/n network
Video output
4GB Nand Flash
Support External TF card maximum memory 32GB
AVI(H.264, DIVX, XVID, rm, rmvb, MKV, WMV, MOV, MP4(H.264, MPEG,
DIVX, XVID), MPEG, MPG, FLV. HD 2160P max
Photo JPG, JPEG, GIF, BMP, PNG
3.5mm earphone interface
High Q dimensional sound acoustics
Audio
Built-in microphone
Maximum output capacity of the earphone 40mW
MP3,WMA,MP2,OGG,AAC,M4A,MA4,FLAC,3GP,WAV
Page 4
4
Instruction Manual
Size 7" TFT LCD,Capacitive Touch Panel to support 5 points touch
Screen
O.S System Google Android 4.1.1 integrity system
Support APK format installation and application,vibration ......
Battery Built-in polymer lithium battery 2200Mah
Accessories
Resolution 800*480
Color Black
Adapter (DC5 V/2A)
User manual
USB cable
OTG cable
4. Main functions
●support OTG function, can transmit data and view the files through connecting U disk, mobile HDDetc.
●Multiple network access , support WIFI, enjoy the network life anywhere at any time.
●Support vibration function
●Support APK format installation and application, Mass of software can be downloaded through the
"application market" or you can download, install from the PC network.
●Support MP3、M4A、WMA、APE、FLAC、AAC、WAV、AMR、OGG audio formats etc. also support
part of LRC lyrics.
●Full hd video decoding support(1080P、720P、480P),video formats support::MKV、AVI、
RM/RMVB、WMV、3GP、MOV、MP4、ASF、MPG、DAT、VOB、FLV etc.
●support JPG、JPEG、BMP、PNG etc.
● Support Micro SD card (TF card ),Support 128MB-32GB.
Page 5
5
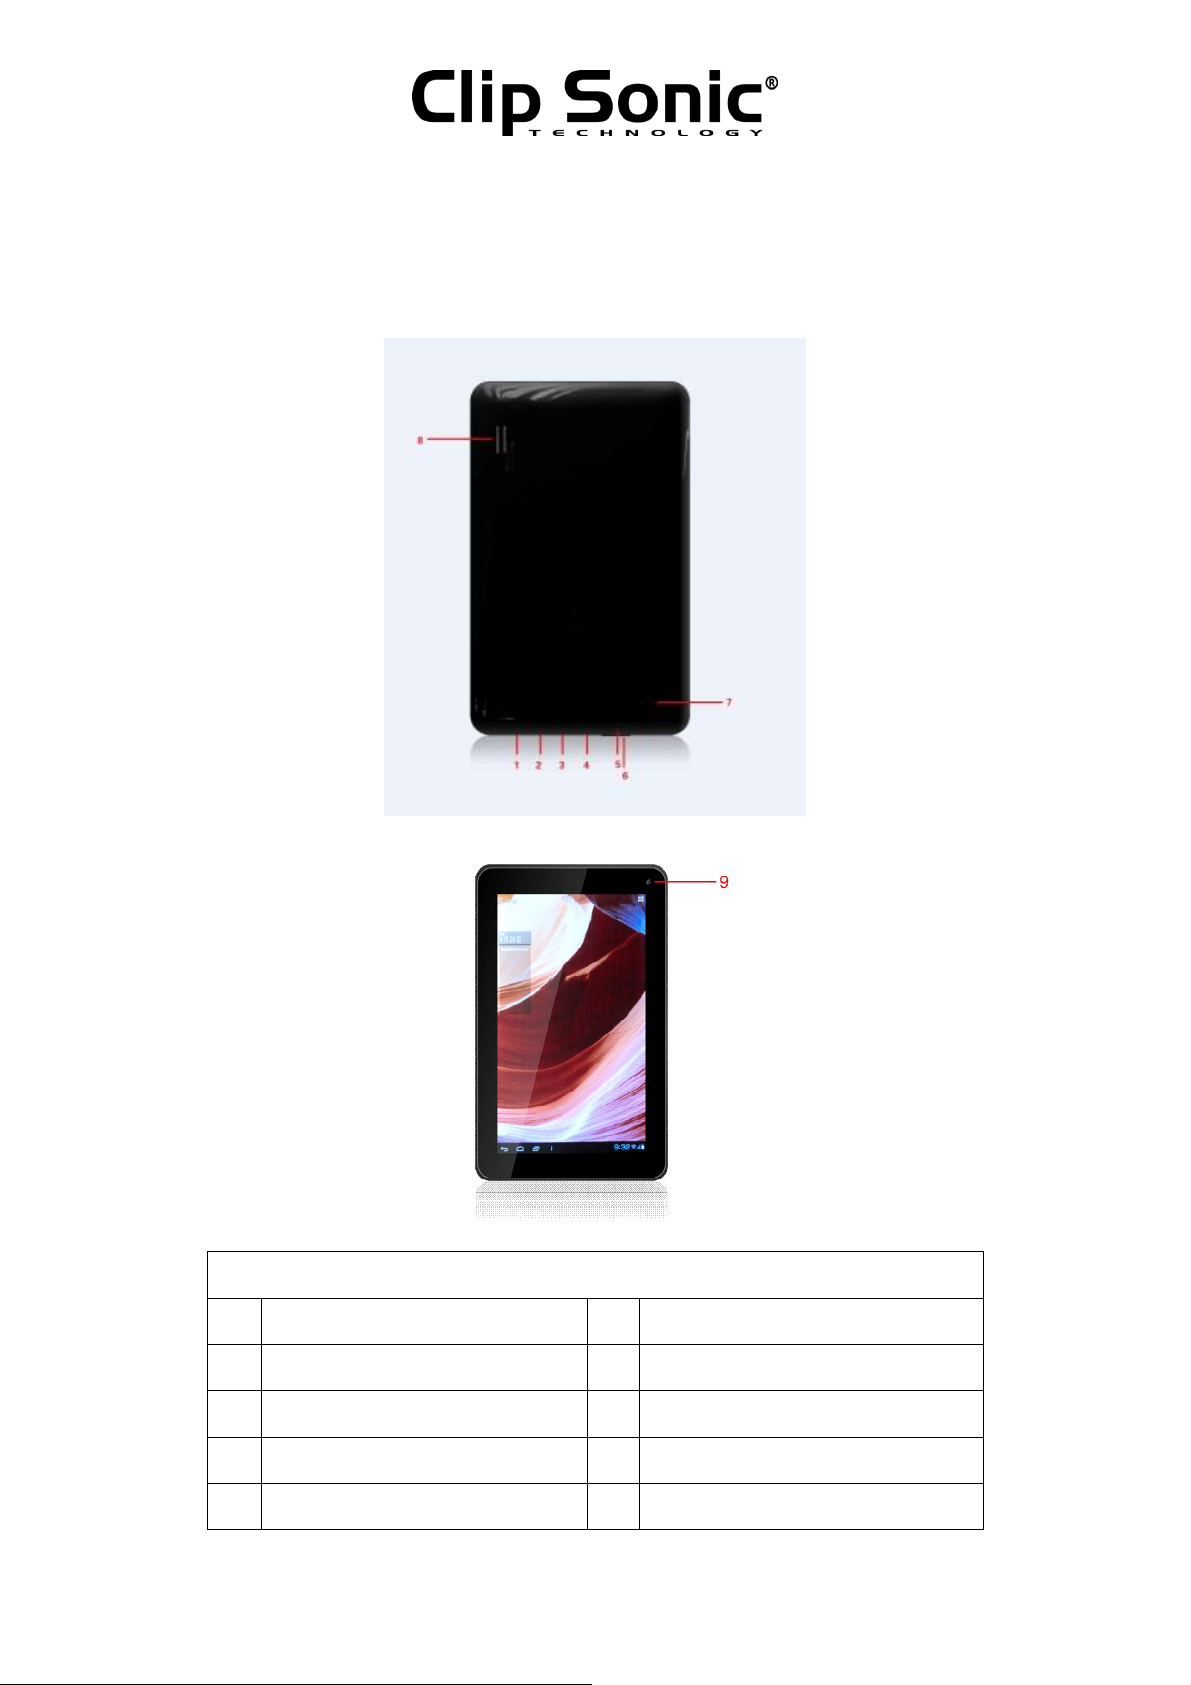
5. Appearance and Buttons :
Instruction Manual
Description of Button Functions
1 Power On/Off 2 Headset port
3 USB port 4 Power DC
5 TF Card port 6 Vol. Up/Down
7 Reset 8 Speaker
9 Camera
Page 6
6
Instruction Manual
Function definition:
1.“+”: Volume increase;
2. “-”:Volume decrease;
3. “ ”:Power Key, On shutdown state ,long press the power key and the system will enter the process of
Startup,on boot state,long press the power key and the system will come out for the turn off
information;on boot state,short press will lock the interface.
4. :This icon is used to return back to previous interface.
5. :At any interface, touch the icon will be back to the main interface.
6. : Touch this icon,it will show the recent applications you have used.
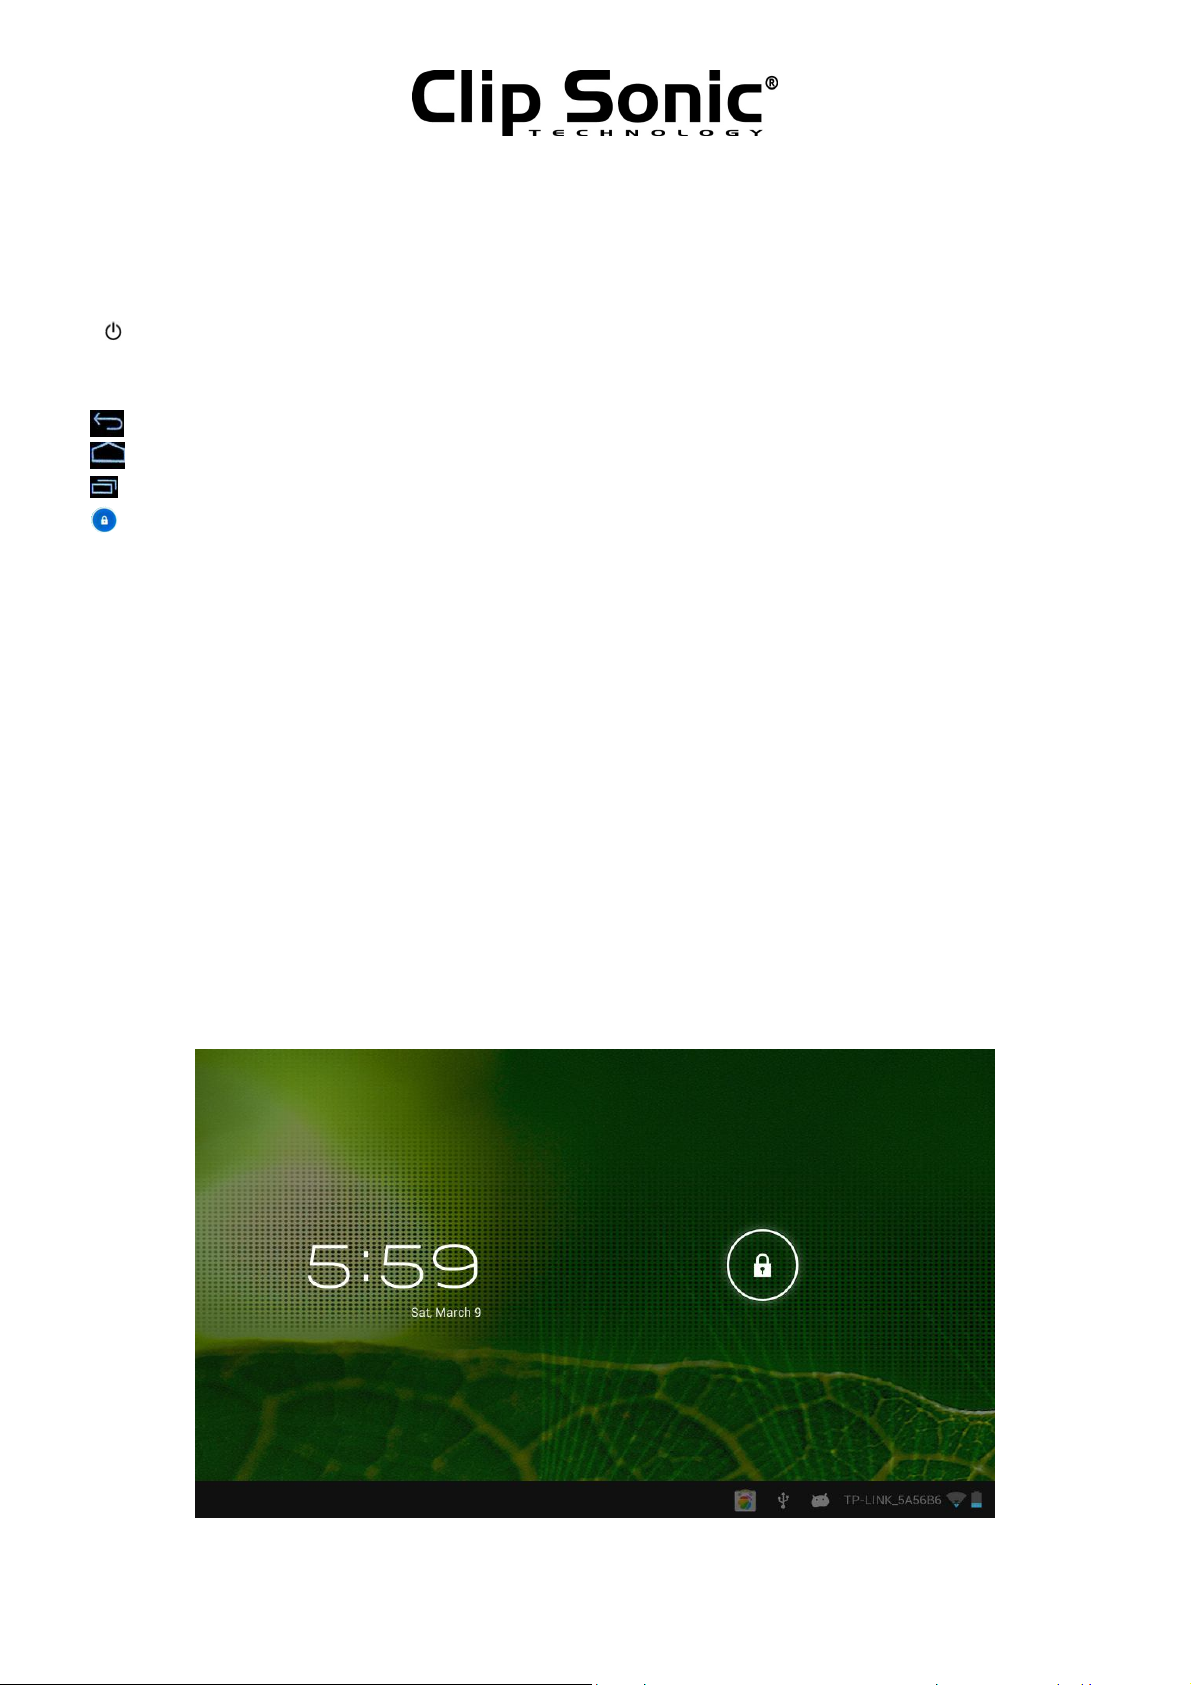
7. : Slide this icon to the right side on the interface to unlock this device,slide to left to the camera
interface.
6. MID Use and preparation
Battery charging
Before using MID firstly, please charge for battery.
1. Use the ac adapter to charge for MID.
2.In order to ensure that the battery is full, please charge for 4 hours or more.
7.Startup and shutdown:
7.1. Startup:
To long press the power key and the system will enter the process of Startup, as shown below:Startup Logo,
in the process of startup.
The system has been started and is entering the Android system.
Then the system enters the default home interface
Page 7
7
Instruction Manual
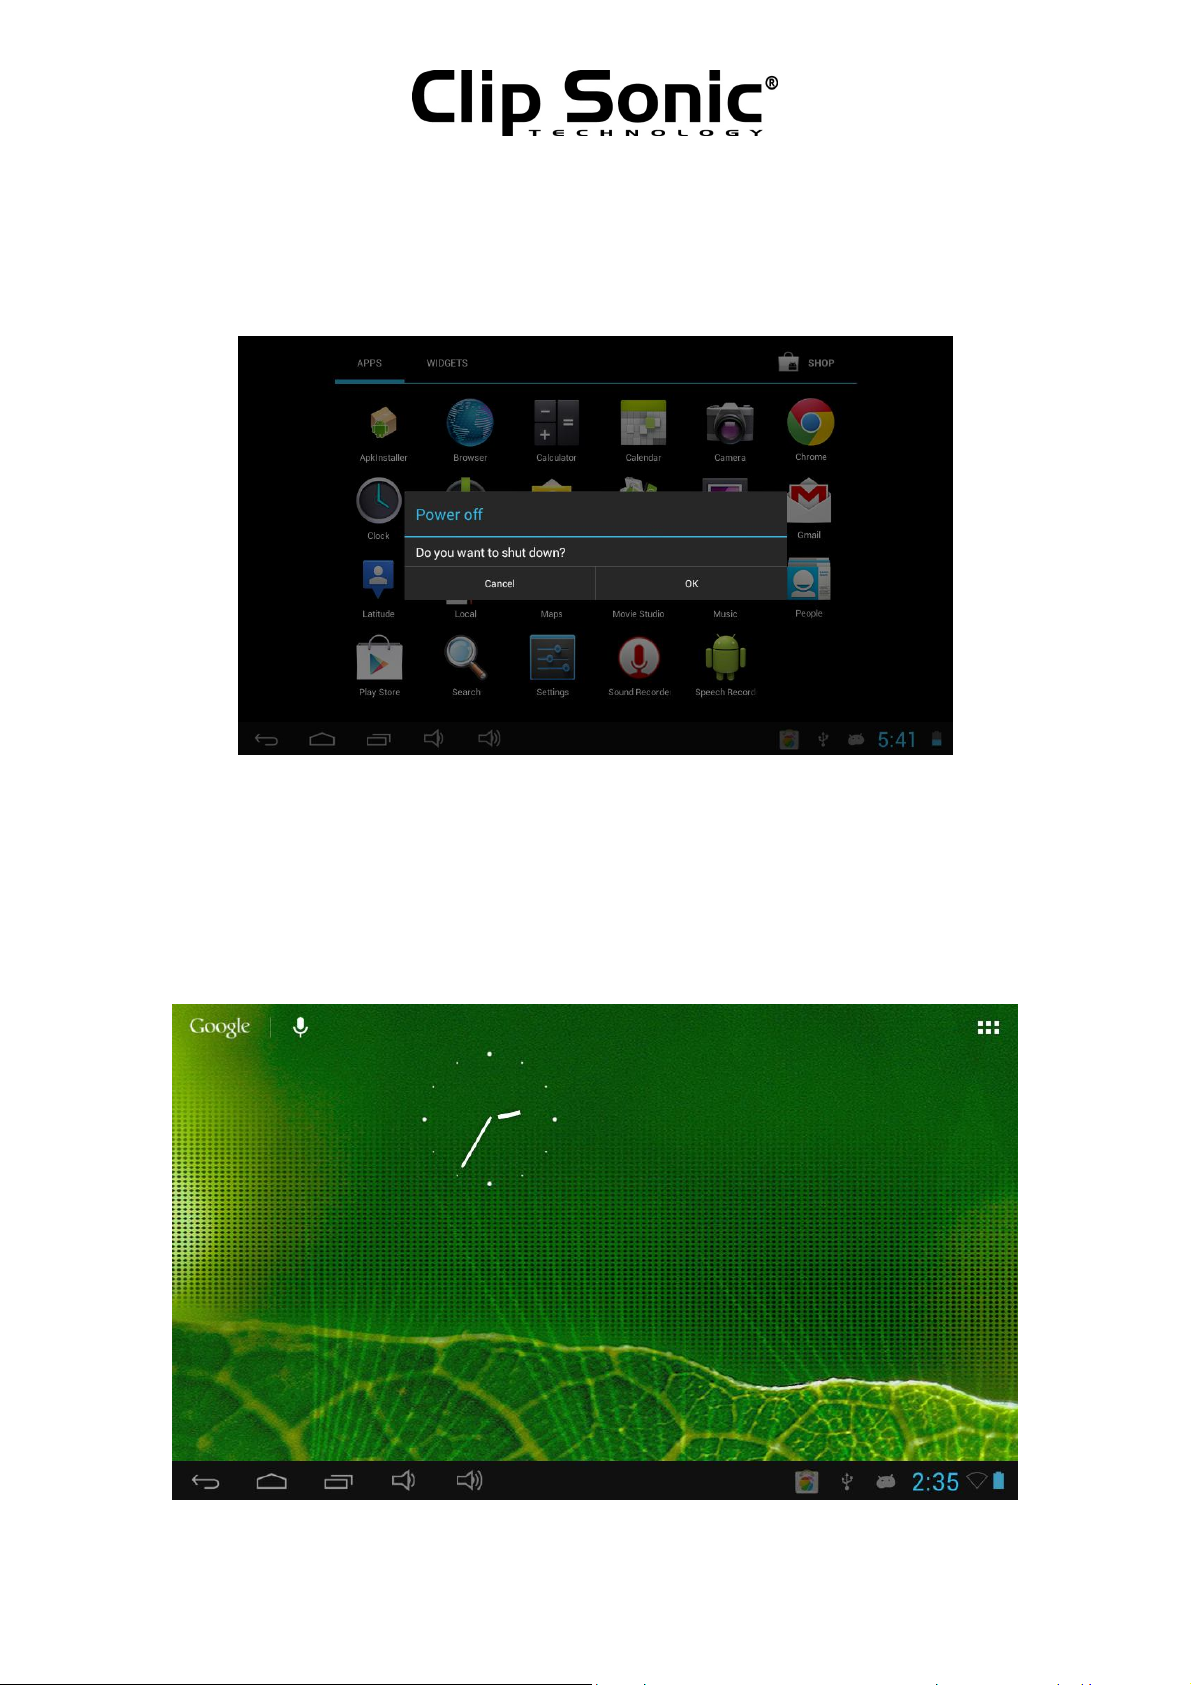
7.2. Shutdown:
To long press the power key then pop-up options will be on the desktop, choose the option of Power off ,
Click OK to shutdown.as shown below.
7.3. Sleep
In the normal state operation of the machine, short press the power button, enter a state of dormancy, at this time,
the screen will be closed. Another short press on the power button can be resume to normal mode. In order to
reduce power consumption,you can start this function when MID is not used.
After the normal startup of the system is completed, you can see the Android 4.0 desktop (below). The default
desktop is consisted by google search icon, status bar, menu label icon.
Page 8
8
Instruction Manual
The status bar is used to display the network status of current system, battery power, recent app.time and
other information.
Google search icon is used by typing keywords to do the Internet search. The main menu tag is in the leftup corner of the screen, click it and then can do the internet search.
The menu label icon is on the right-up corner,Touch the icon , can go into the main interface for all the
applications.
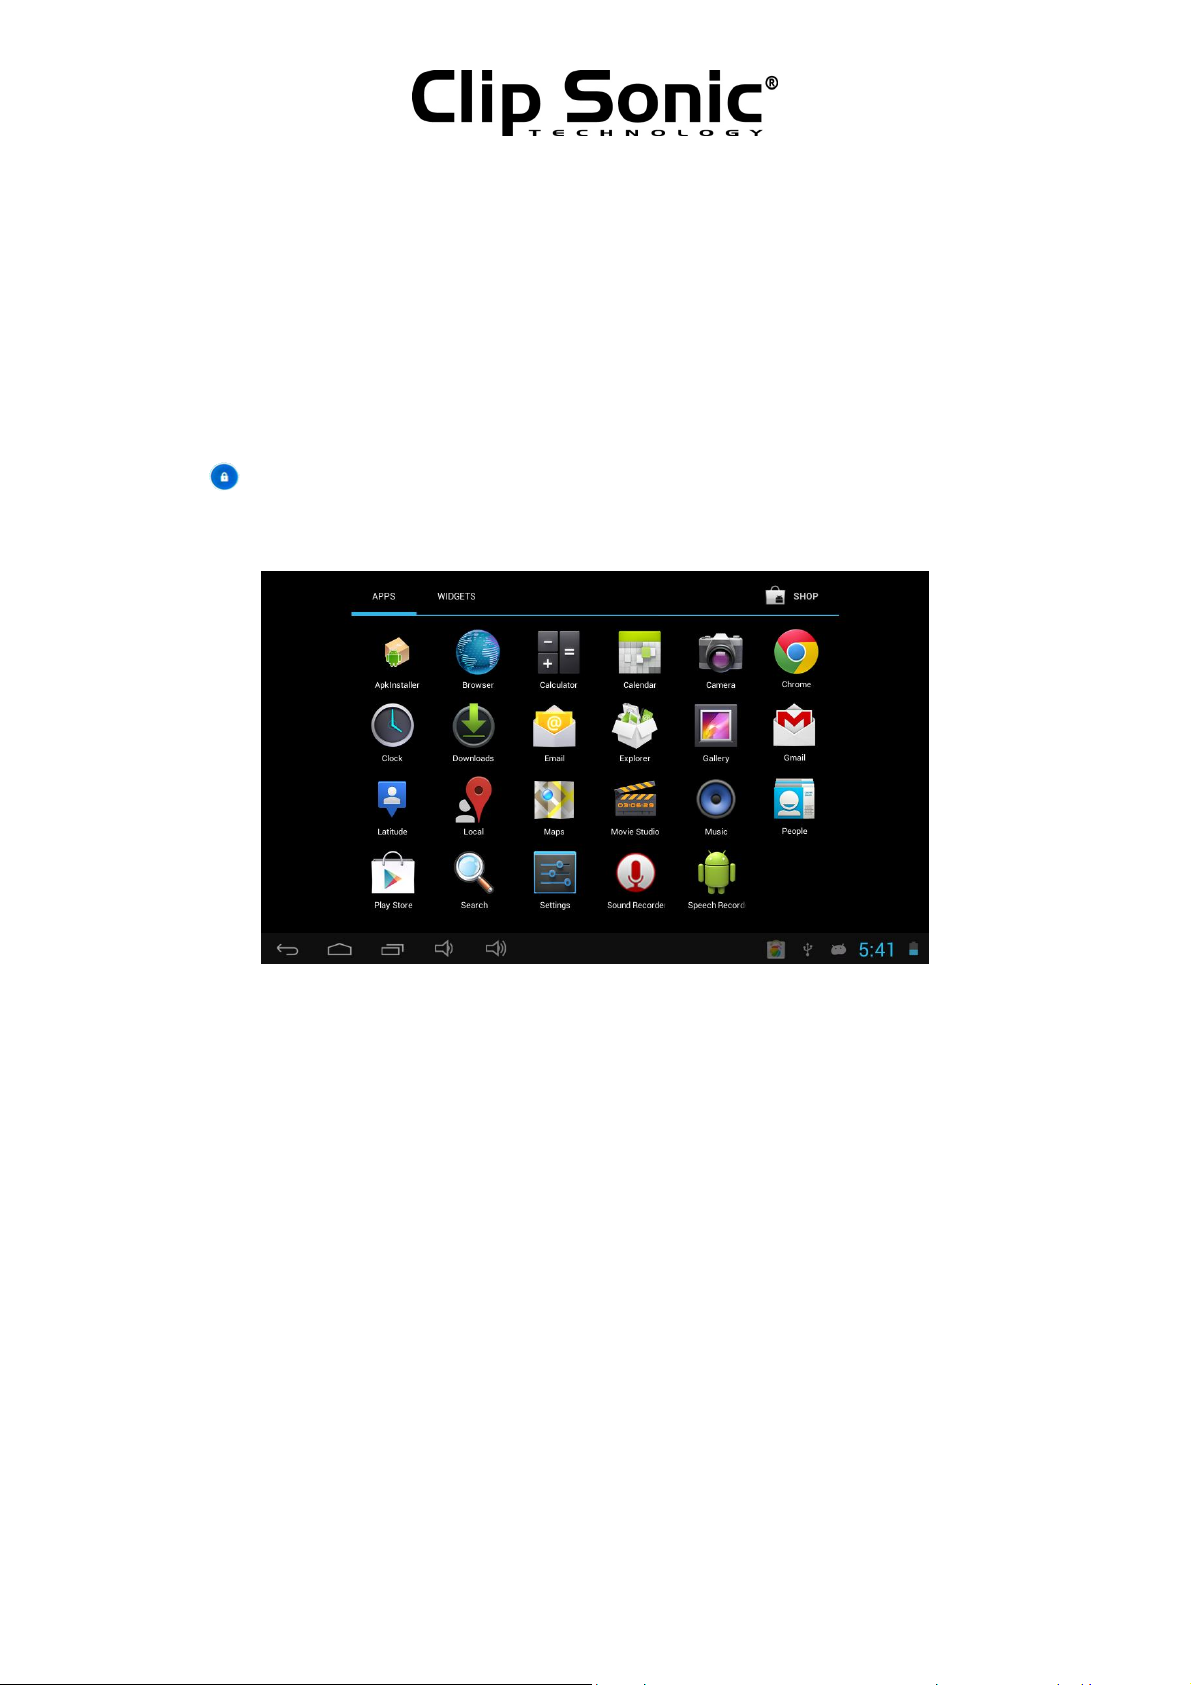
8. Main menu operation
First slide the icon to unlock the interface.then Press the main menu tag on the up-right corner,will
come to the menu interface,as shown below:
In the main menu, you can set the system, operate the existed application, install a new application, and
start touch calibration, play music and video, browse webpage, play game and other operations.
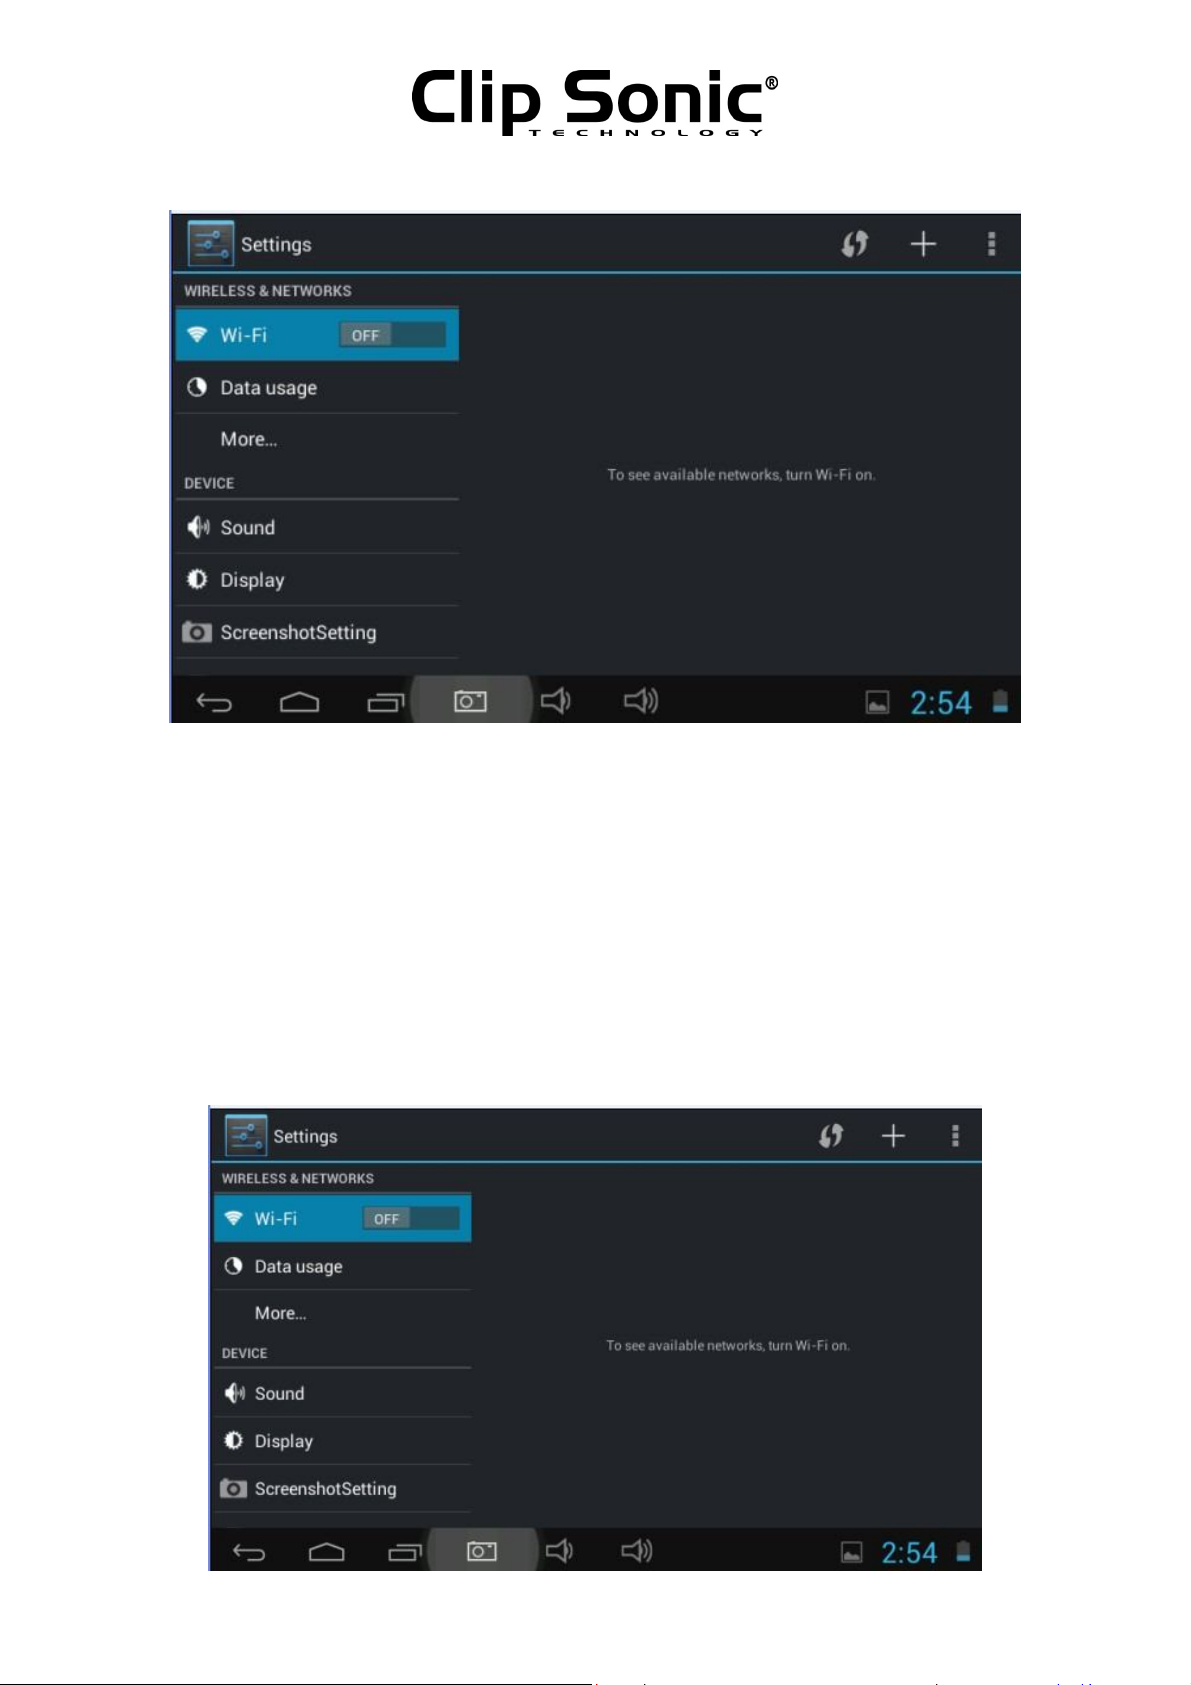
9. System settings:
Click on the main menu interface in the "Settings" icon, and then open the system settings interface, you
can slide up and down to choose the item you want to set, as shown below:
Page 9
9
Instruction Manual
Select the relevant items to do corresponding operation, for example:
* Wireless & network:
* Sound & display
* Date & time
* The equipment and so on
9.1. wireless&networks:
Click on the "Settings" icon in the main menu.Click on the "WIFI" column, WIFI function can be started at
once.You can choose the WIFI show on the interface,as shown below:
Page 10
Instruction Manual
10
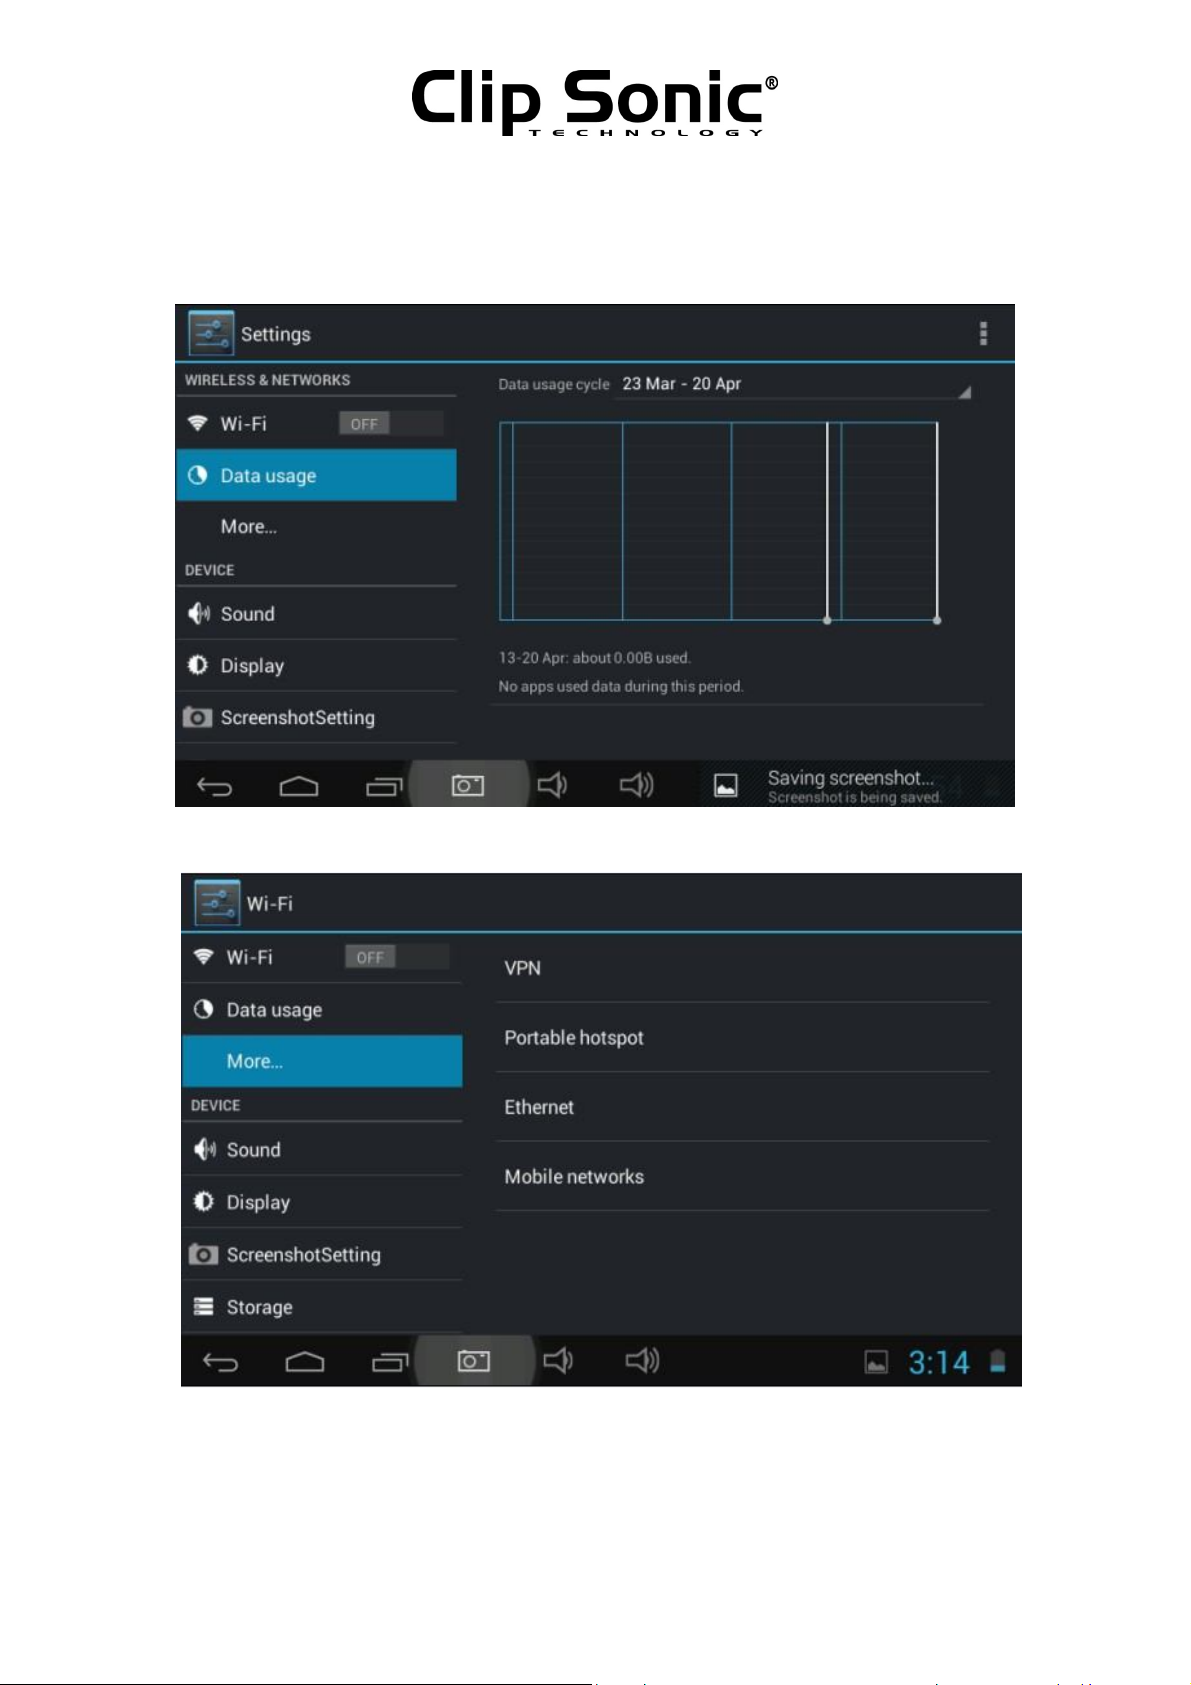
Click "Data usage" can know the information. as shown below:
Touch the "More" icon to see other settings, as shown below:
9.2. Device
Under this column , we can set up and see the Sound, Display,Storage, Battery, Apps.
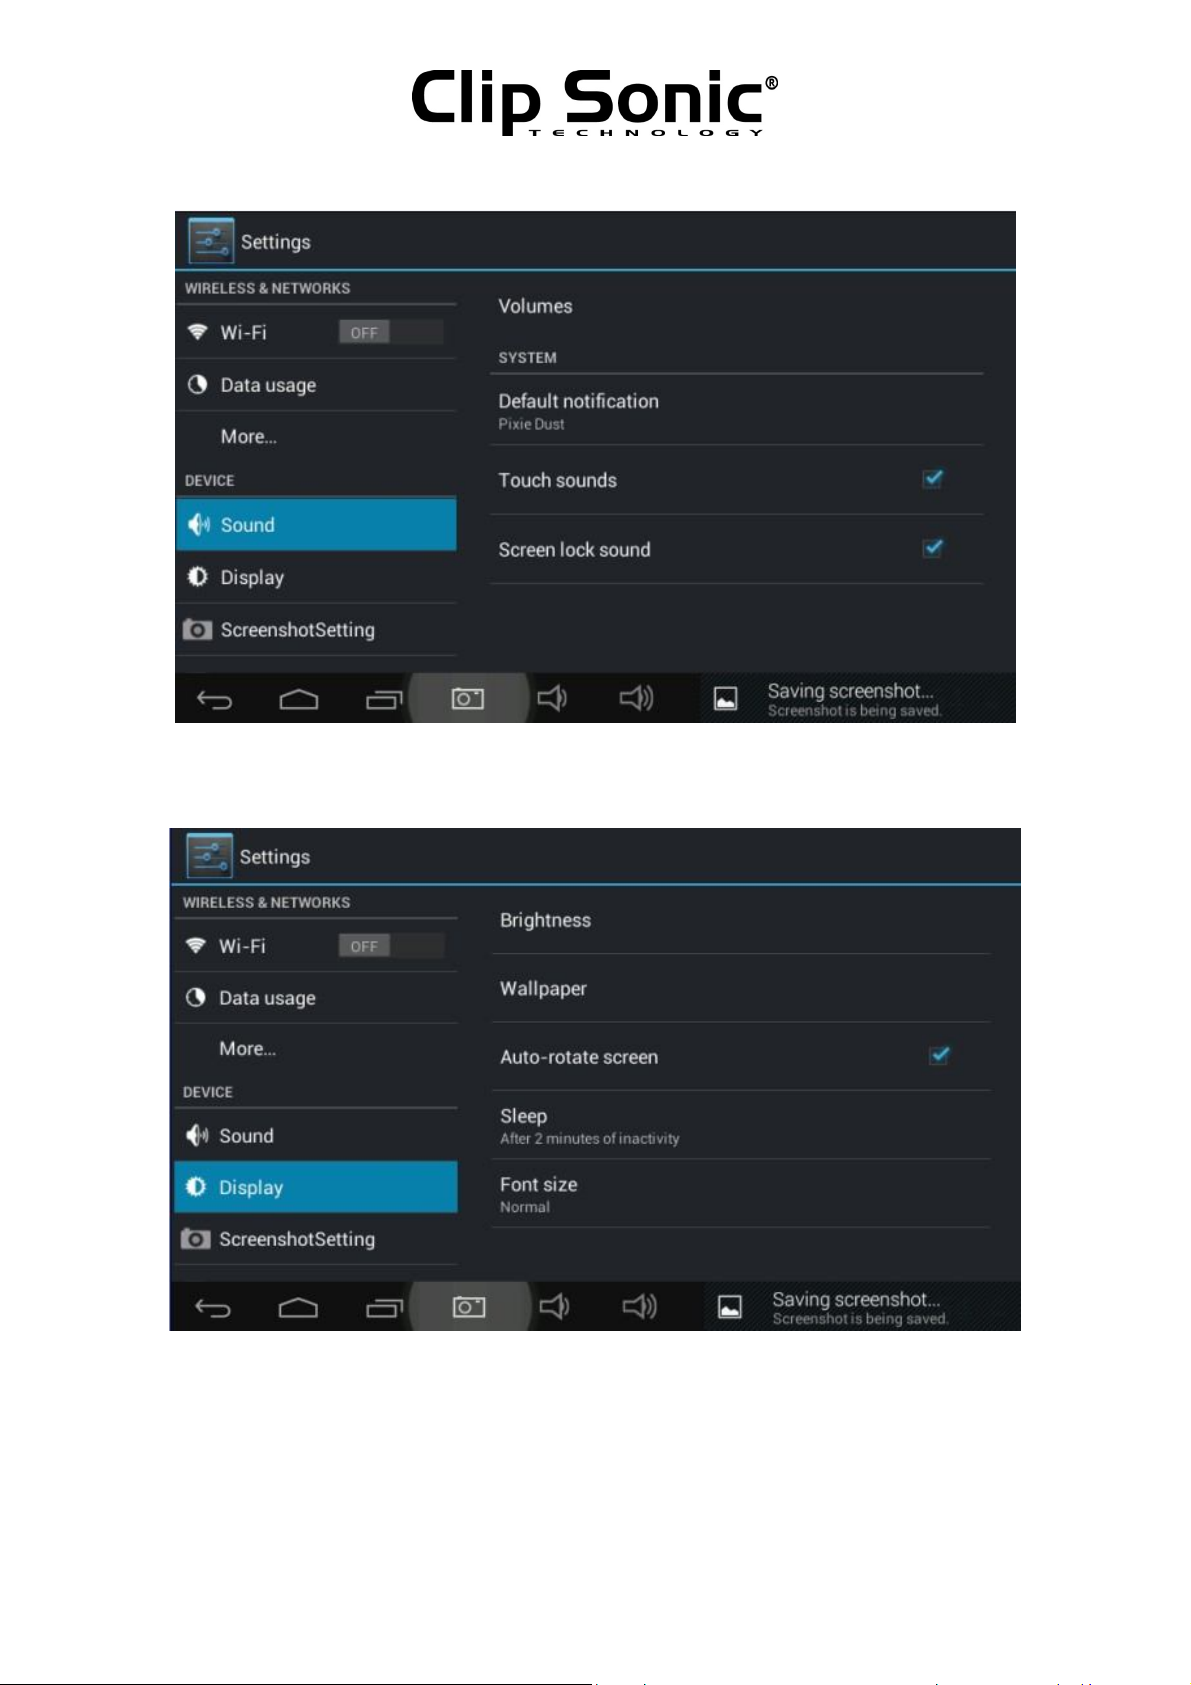
Click each item to set as you like. For example:
Click the "Sound" icon.and set the sound for the device.as shown below:
Page 11
11
Instruction Manual
Click the "Display" icon.and set the display for the device. Can set up the Brightness, Wallpaper etc. as
shown below:
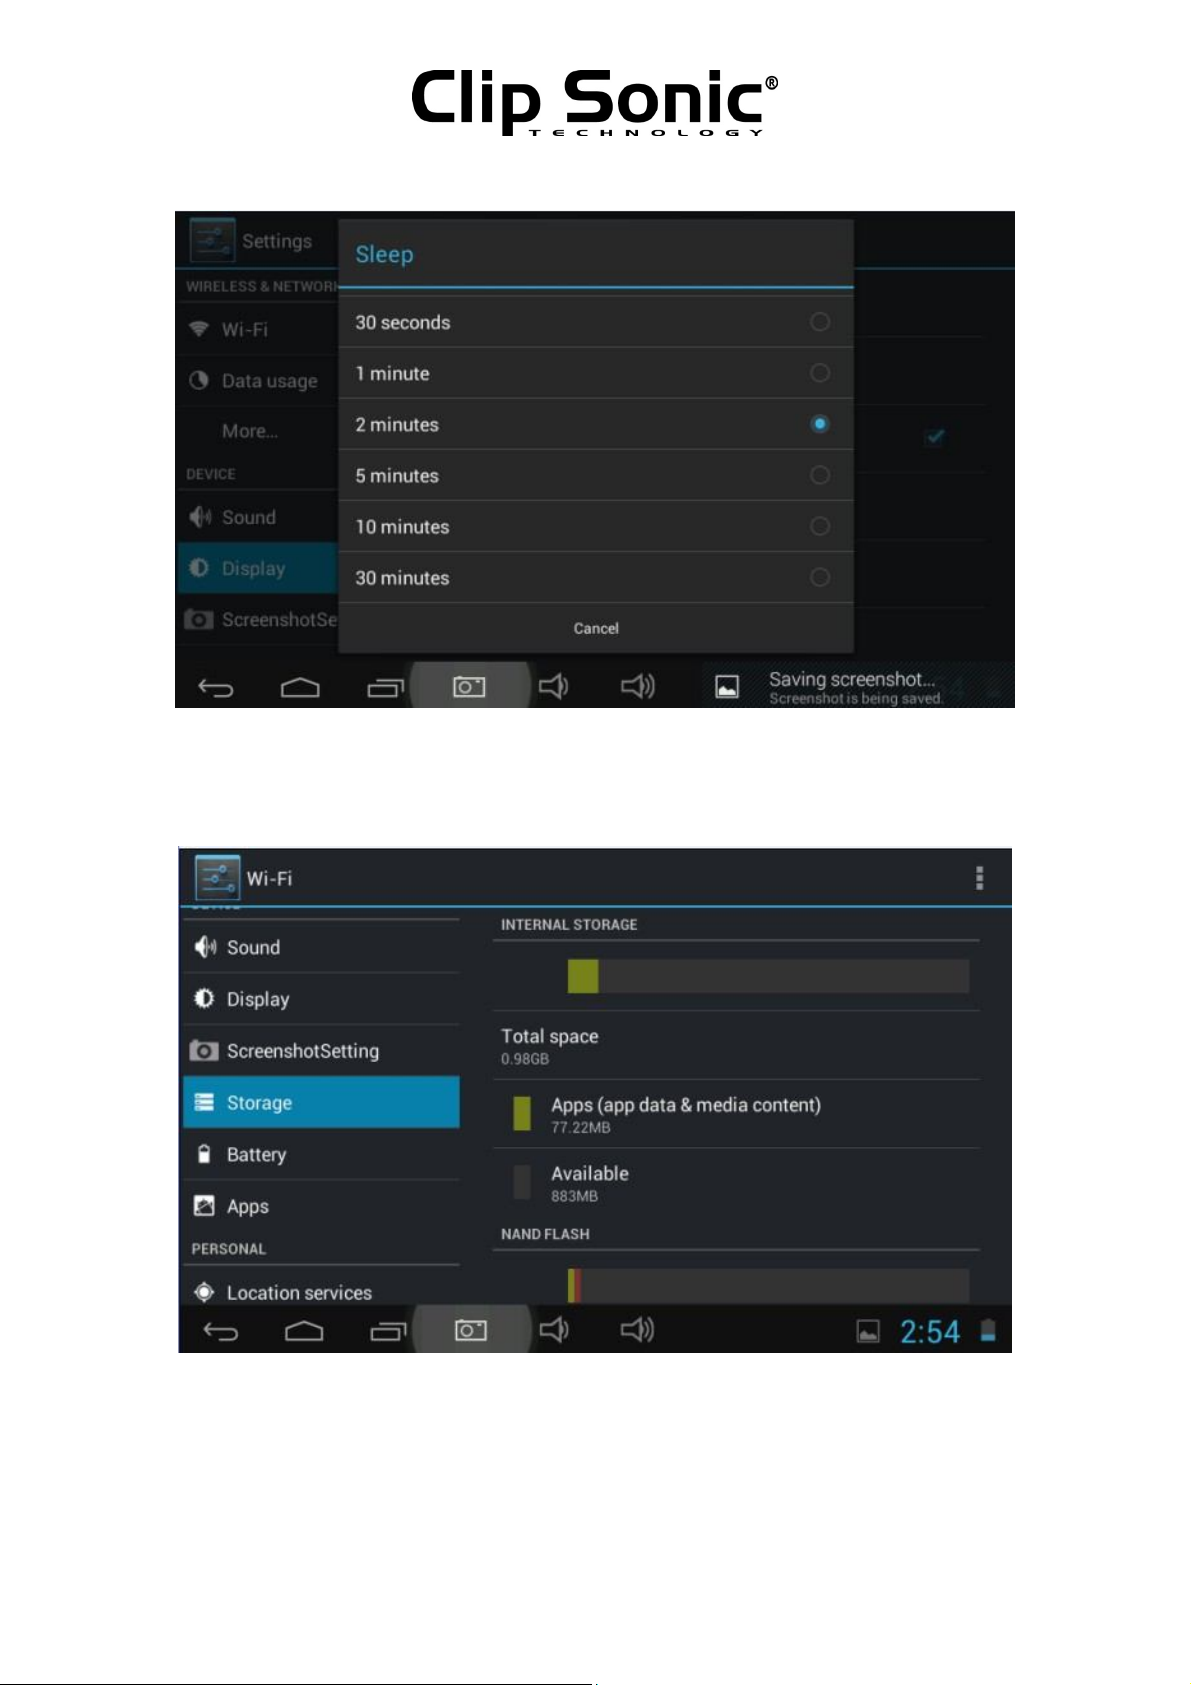
sleep: the delay before the screen standby automatic locking.
In the display of the interface to select "sleep", to choose the lock time, appeared the following interface:
Page 12
12
Instruction Manual
Note: during video broadcast, the screen automatically standby function is invalid.
Click the "Storage" icon.Can show the devices and external storage for the devices, as shown below:
Click the "Battery" icon.Can show battery use situation, as shown below:
Page 13

13
Instruction Manual
Click the "Apps" icon.Can show all the applications in devices,such ad downloaded, on mini SD card,
running, All, as shown below:
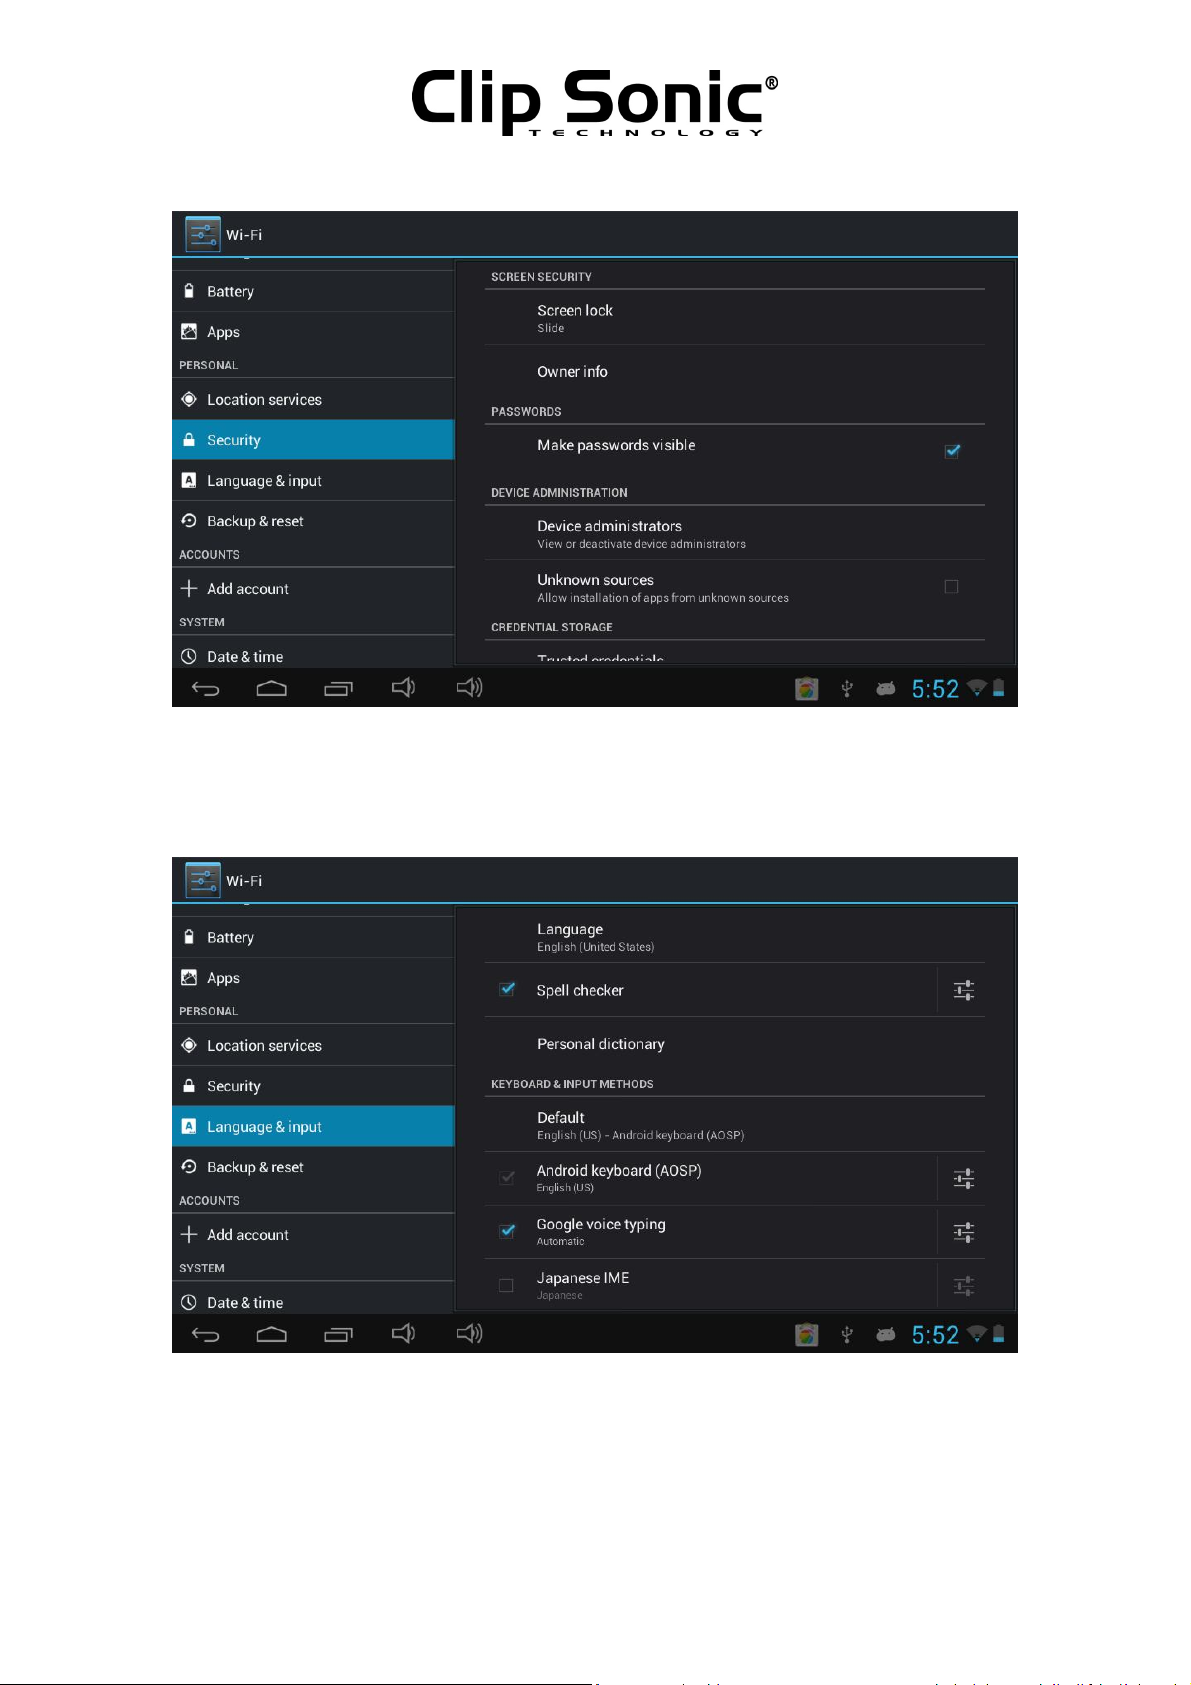
9.3. Personal
Under this column , we can set up and see the Location services, Security,Language&input, Backup&
reset.Click each item to set as you like. For example:
Click the "Security" icon.Can show the security situation, you can slide up and down to read all the
information ,as shown below:
Page 14
14
Instruction Manual
Click the "Language&input" icon.you can set up the language you want, and you can slide up and down to
read all the details.You can set up the input method under the "keyboard&input method "column.Can set
up the search method under the"Speech" column. ,as shown below:
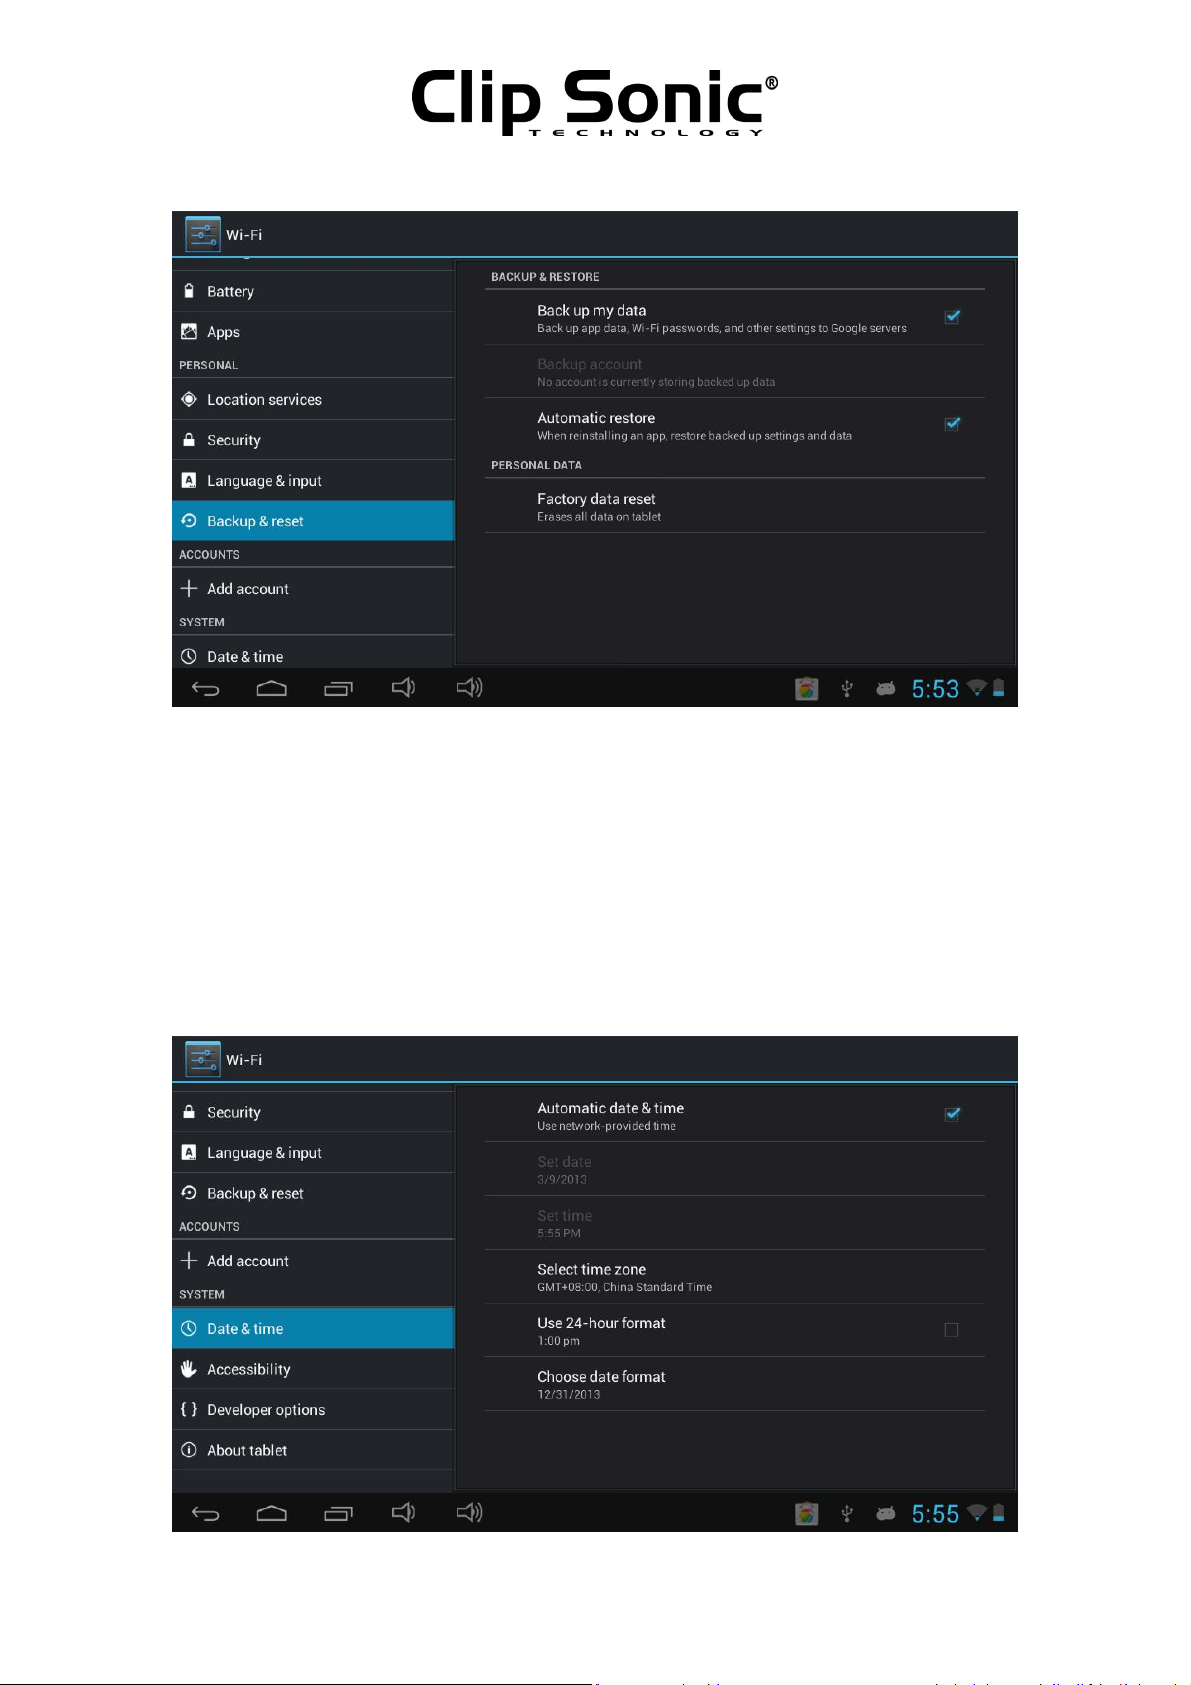
Click the "Backup&reset" icon. You can backup you data and also make factory data reset, ,as shown below:
Page 15
15
Instruction Manual
please note that after you make factory data reset, all the application you download and the dada will be
erased.
9.4. System
Under this column , we can see and set up the Date&time, Accessibility, Developer options,About
tablet .Click each item to set as you like. For example:
Click the "Date&time"icon. You can set the date and time you can choose the Automatic date&time etc,as
shown below:
Page 16
16
Instruction Manual
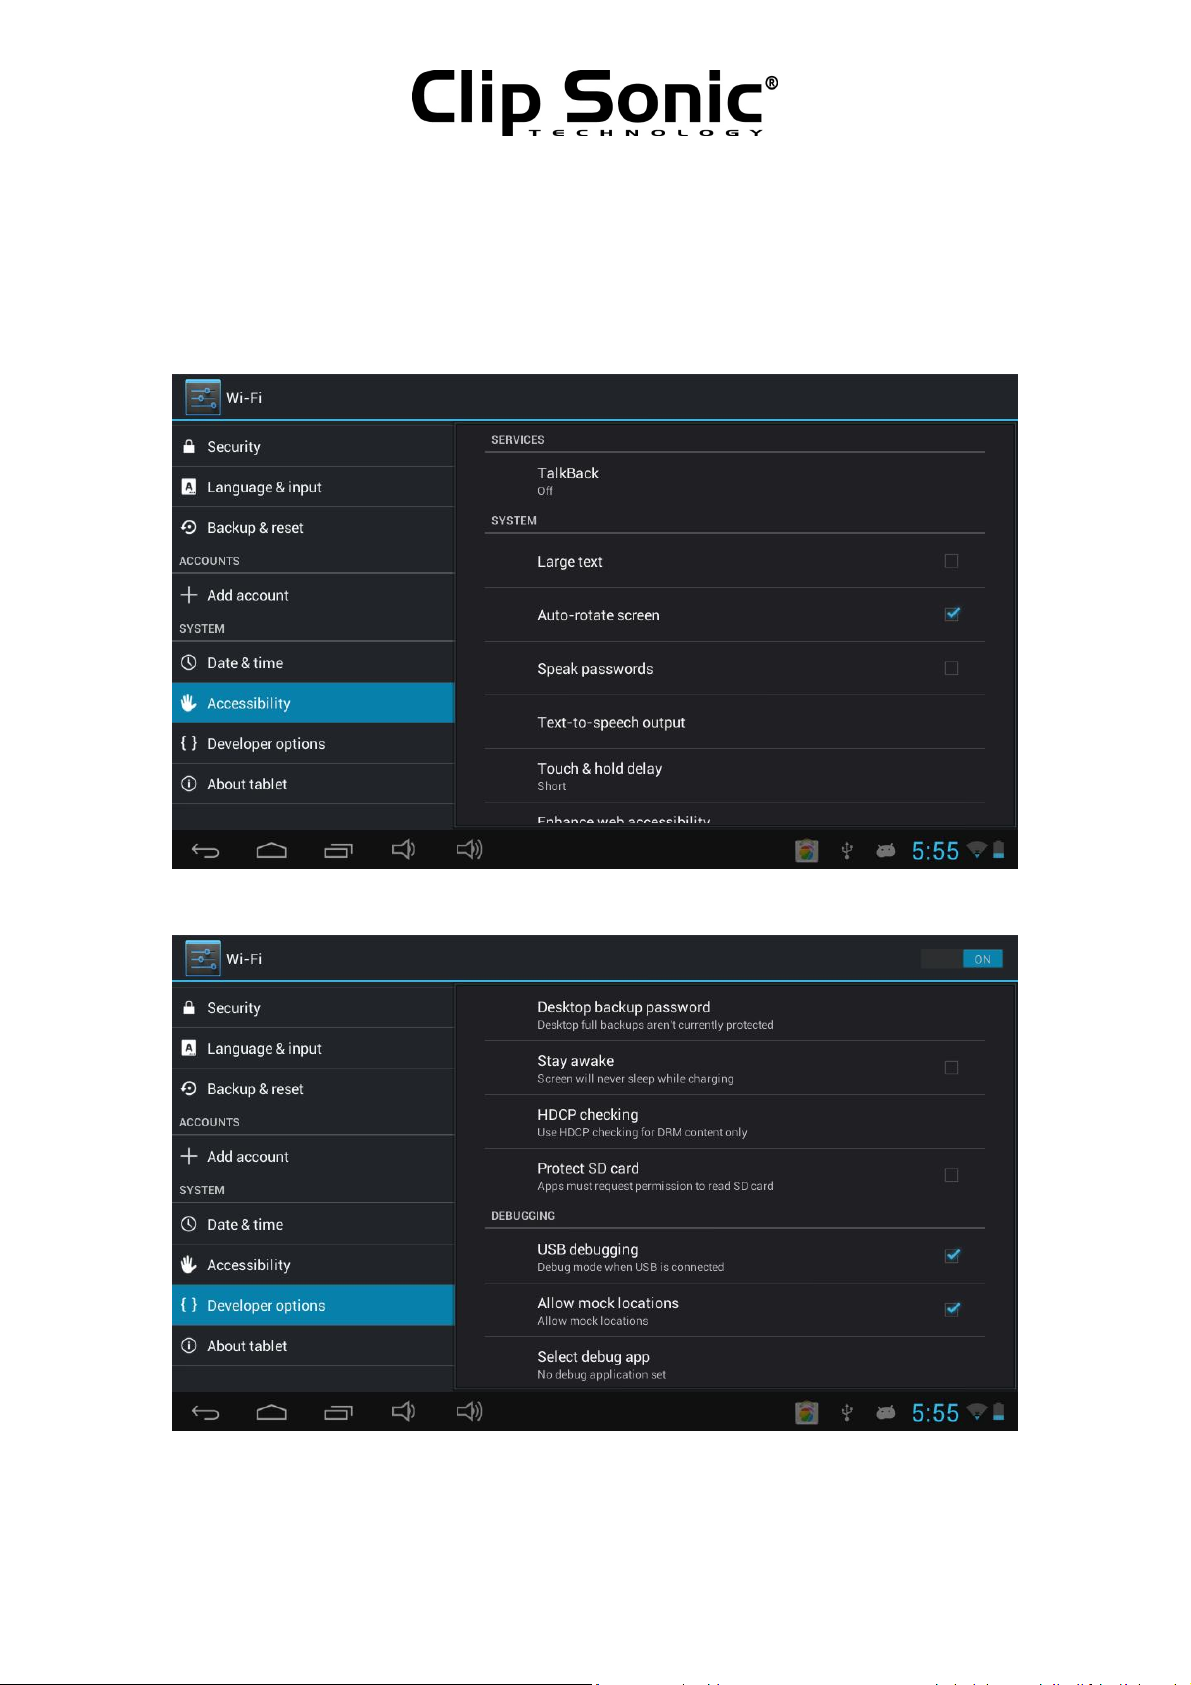
You can also choose to set the time as you like, after you done this,click "set". If the input number is
legitimate, then the operation is successful, and the system will use the new settings.
Click the "Accessibility" icon. You can set the as shown below:
Click the "Developer options" icon. You can set up the data under this column ,as shown below:
10.Install, unload, run the application
Android installation: there are a variety of ways to install applications, for example by USB setup, third
party programs support installation(TF card) ,install by the devices. The user also can do on-line installation
Page 17
17
Instruction Manual
through “Android market", or download and install by the computer, or through a built-in browser
download and install online
Here we introduced the way to install with the assist of the App. installer by TF card and the on-line
installation through “Android market"
First, please make sure the “Unknown sources” under the "security" in the "setting" icon is selected.
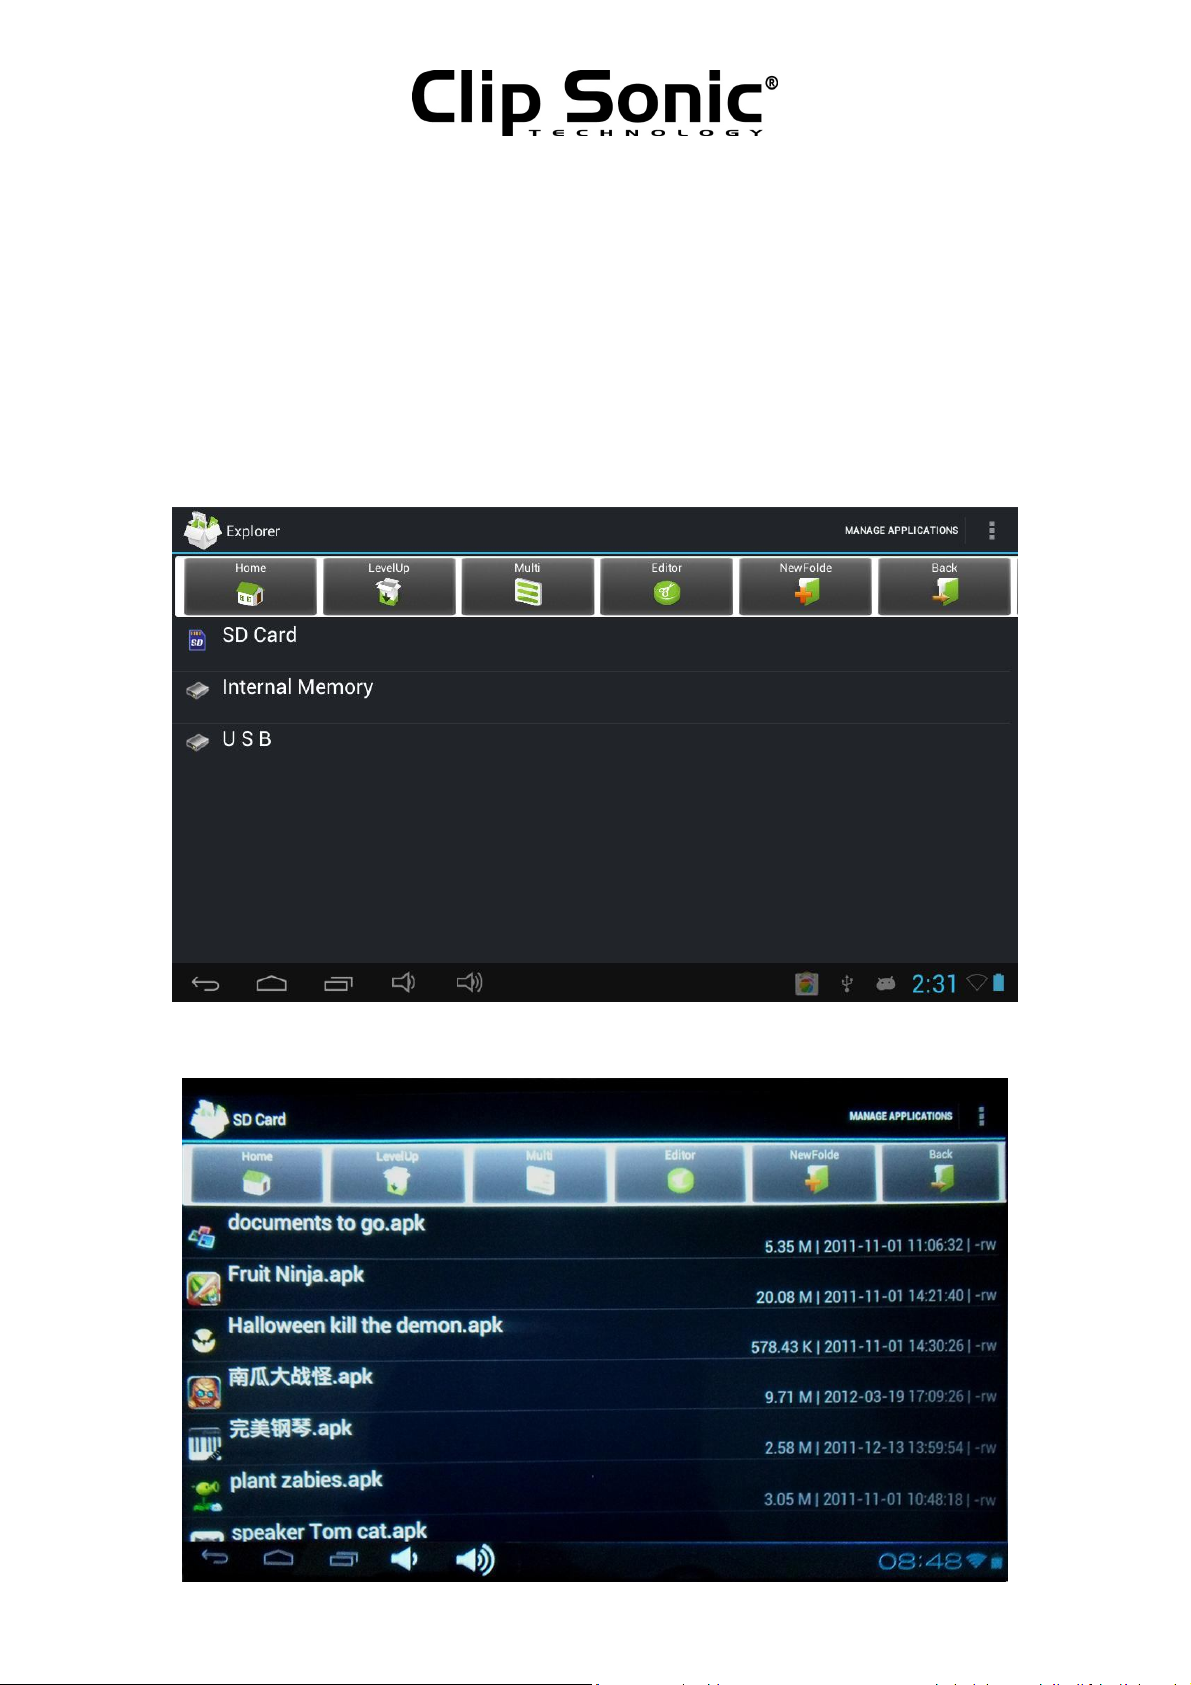
10.1.Install APK software program from the TF card
Put in the TF card which is already with the software you want to install. Select "Explorer" icon in main
menu.as shown below:
Choose the "SD card" to find the APK file you want to install, and you can install the software you
choose.as shown below:
Page 18
18
Instruction Manual
Note: The way to install from the USB(U disk) is the same as the installation from TF card(Micro SD).
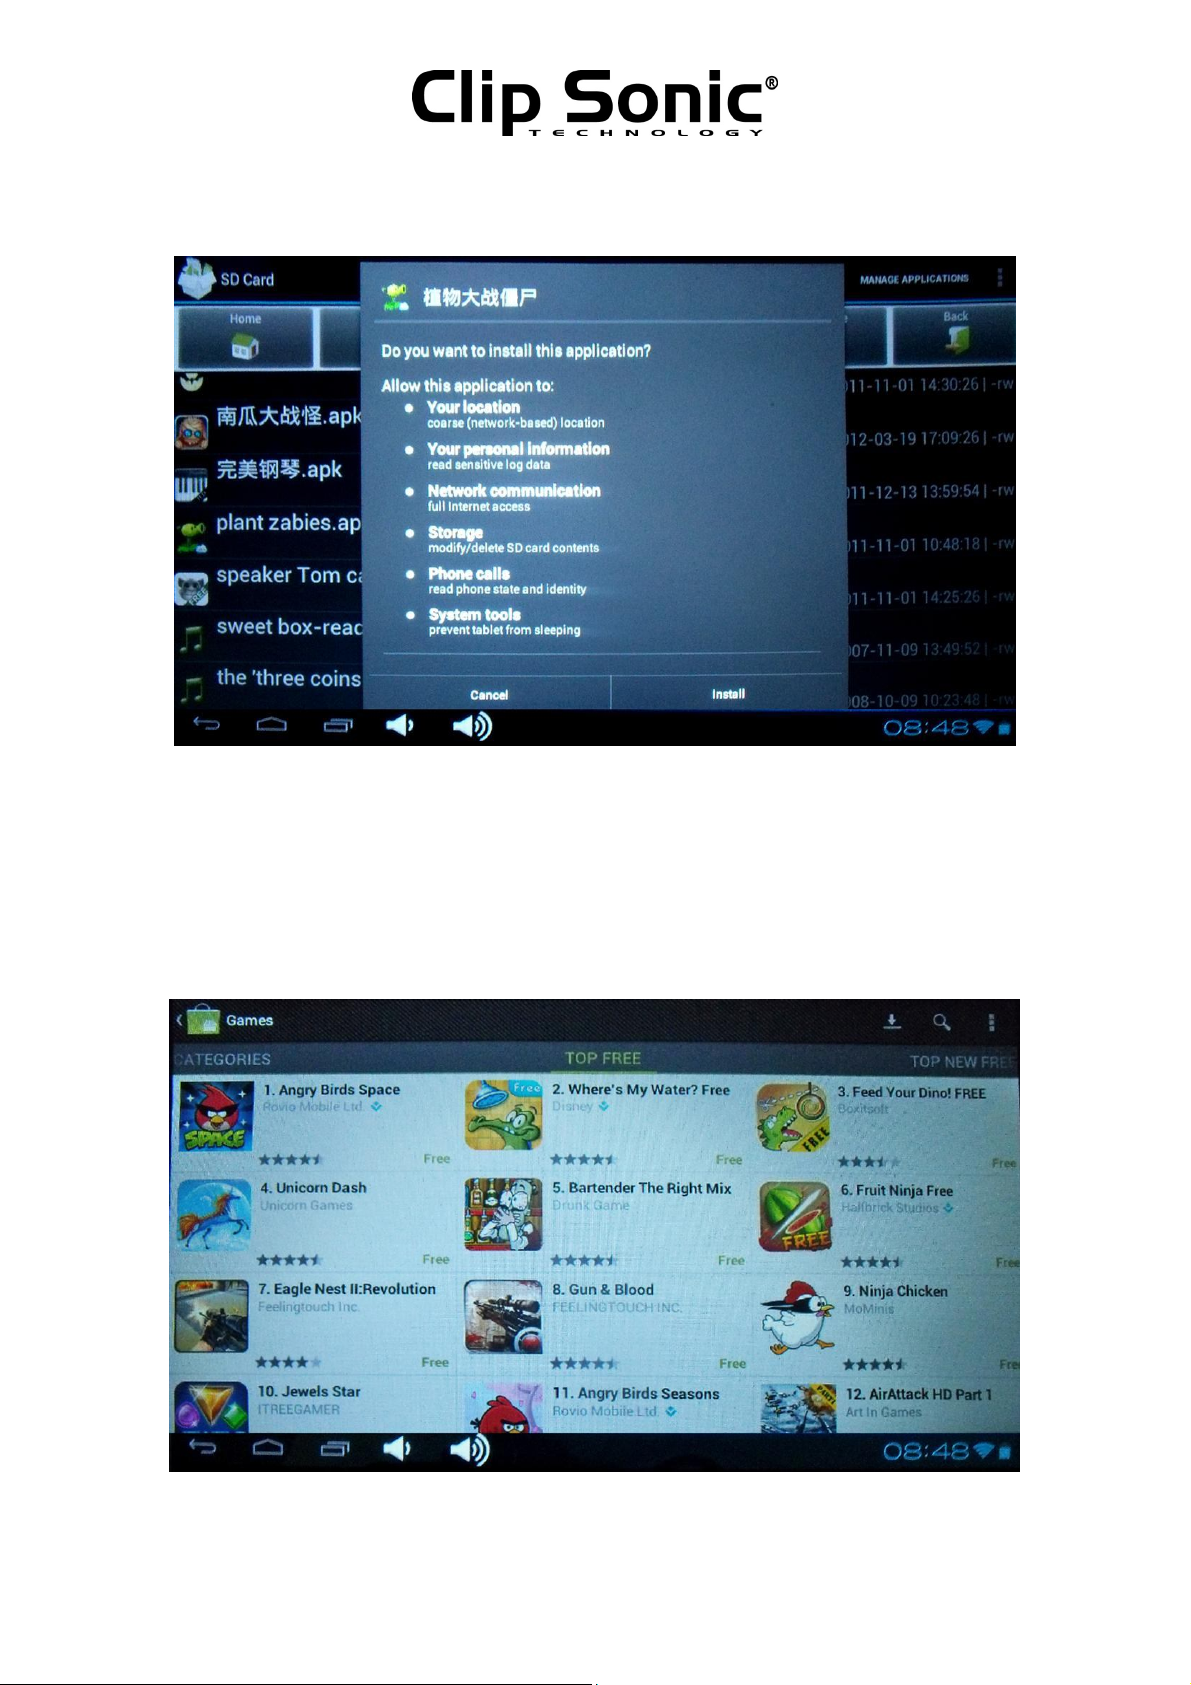
10.2.Install searched application from the"market"
First need go into the "market" ,For the first time you go into this program, you need to sign in with a gmail account. When sign ,please make sure the internet is available.
After you sign in the market, you can find many software there, as shown below:
Page 19

19
Instruction Manual
Choose the software you want to install. and it will be downloaded, as shown below:
After the software is downloaded, it will install automatically, after finished installing, you can find this icon
in the main menu.
Please note: After first time use the "Market" icon, it will change to another name shown" Play Store".
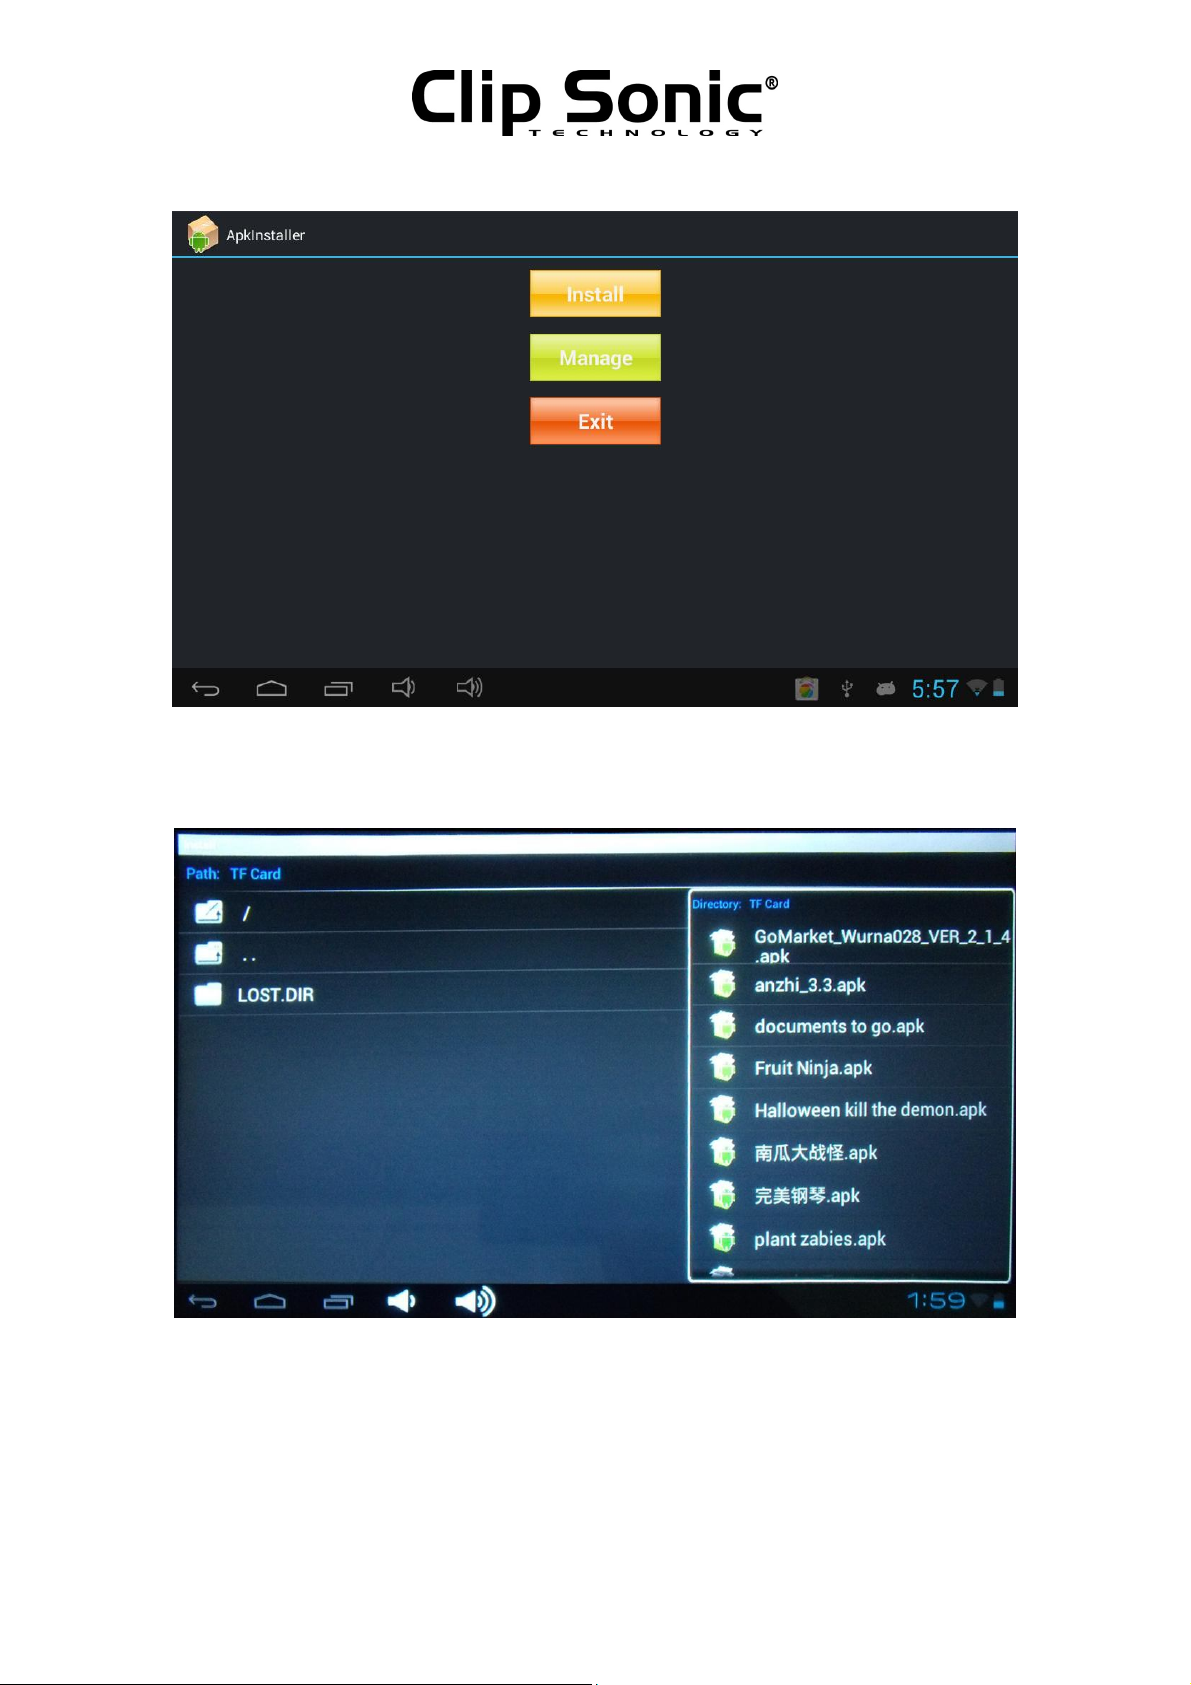
10.3. Install from the "ApkInstaller" icon
Find and open the " ApkInstaller" in the menu interface,as shown below:
Page 20
20
Instruction Manual
Click the "Install" from the interface. And choose the APK software from the internal memory or the TF
card to install, as shown below:
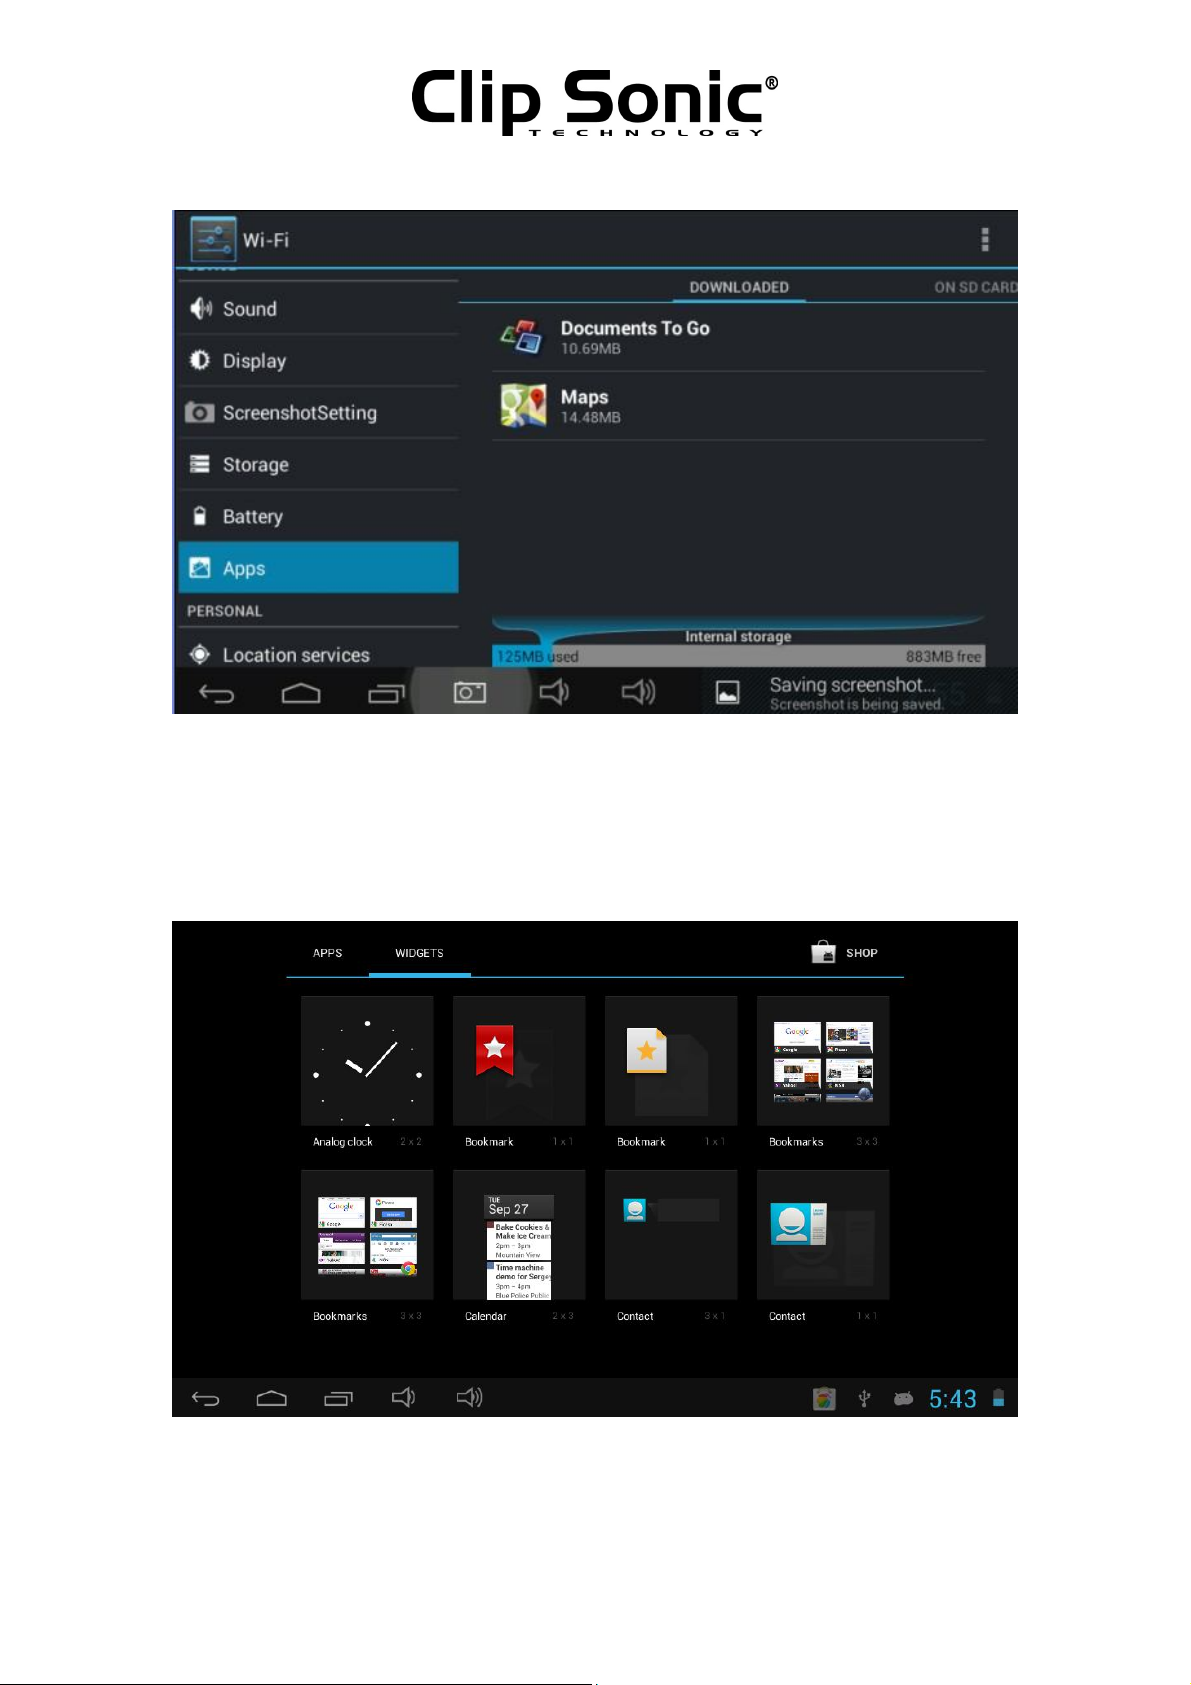
10.4.Uninstall the application
Uninstall the application: you can use the third party software management tools or use the built-in
Android application management software.
Select "Settings" / "Apps", select the corresponding installed applications to check the program
information, uninstall the program and other operations, as shown below:
Page 21
21
Instruction Manual
11. Widgets
The user can select "widget" in another page from the main menu, to see the applications in the widgets,
as shown below:
Long touch the item in the widget, you can copy it to the main interface. And also you can operate this
program to keep it in the main interface.
Page 22
22
Instruction Manual
Note: If you do not need the icon in the main interface, you can long touch the icon and delete it from the
main interface.
12.Main programs operation Introduction:
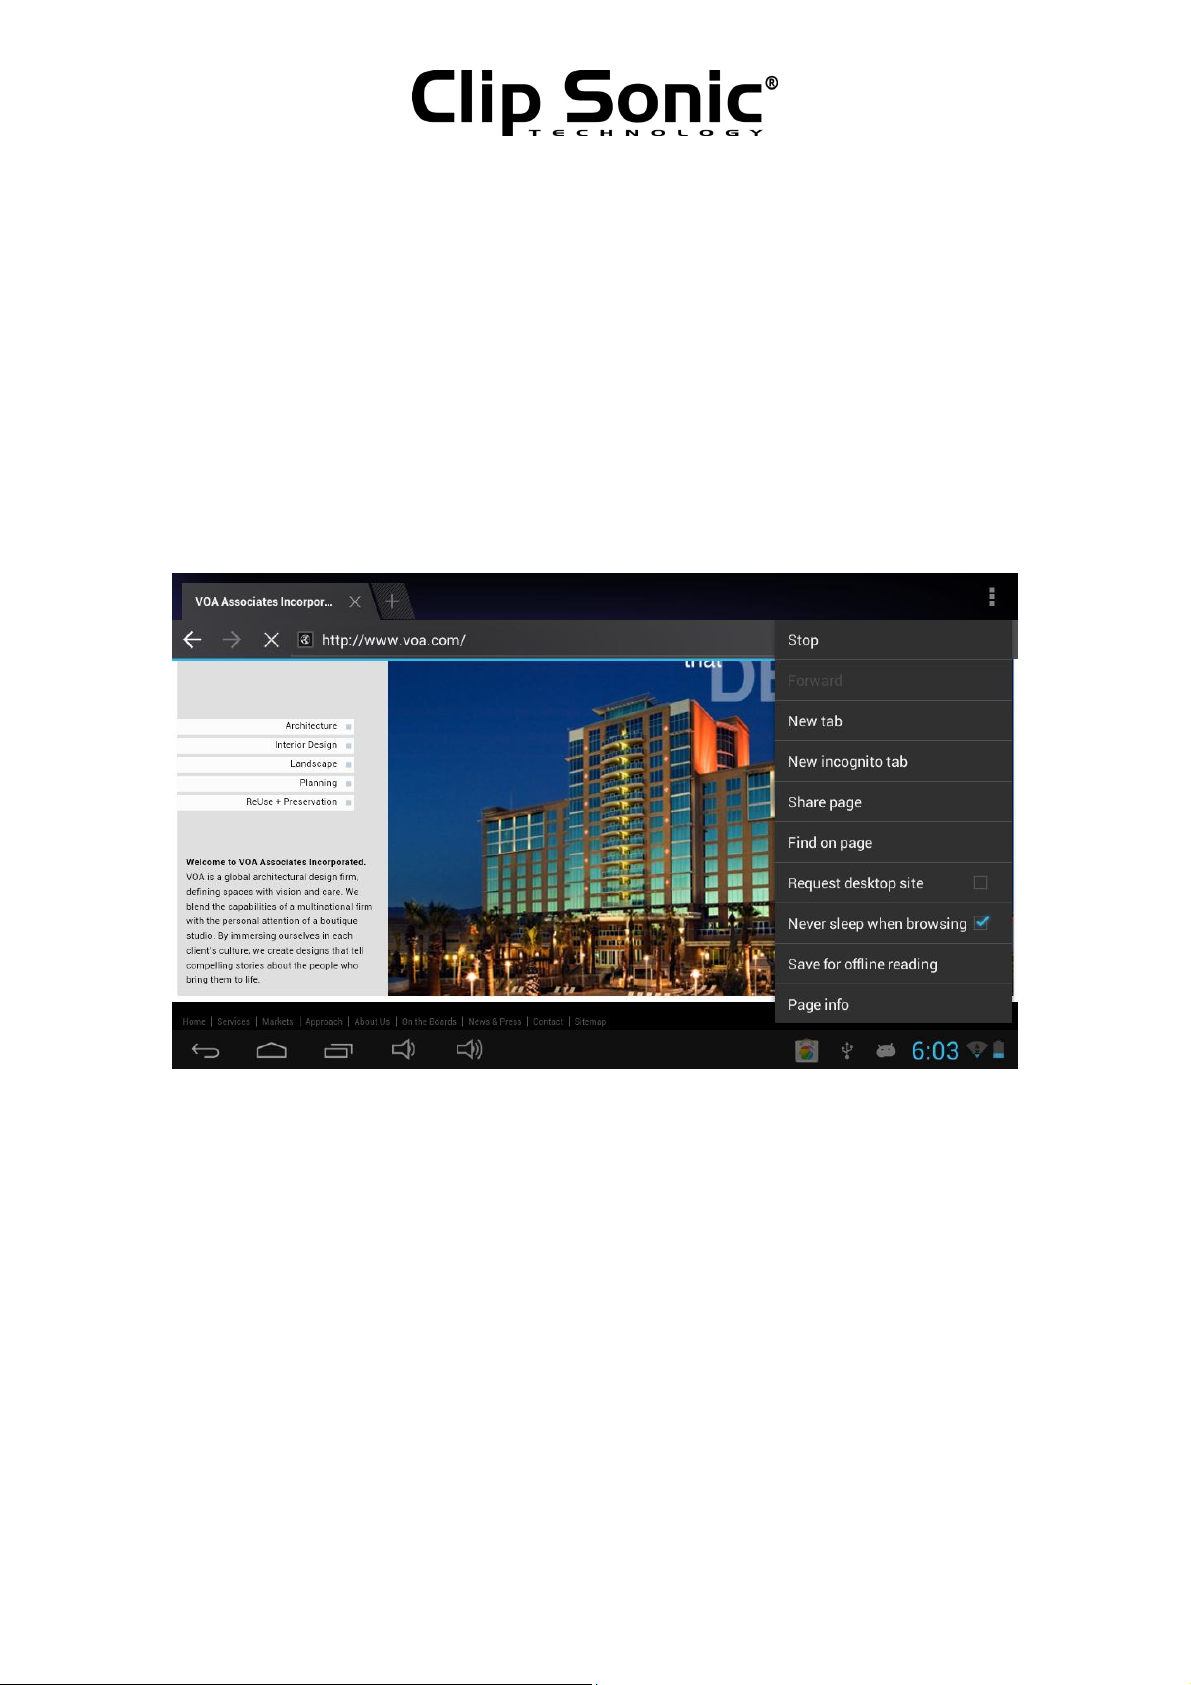
12.1 Browser:
Webpage browsing:
When the network is connected, open the " Browser" and enter the URL, you can browse webpage; or
through the main desktop search bar to input the website and open the webpage.
On the right-up corner ,there is a icon, touch the icon to make more setting for the webpage , as shown
below:
Online video:
Users can through the “Android market" or other ways to download online video player software, online
TV player software, online music software, and then install in the machine. To open the installed software,
you can watch online video or online TV, listen to online radio.
Users can also download other third party network application software, including the webpage browsing,
video player, website client, instant messaging and other software.
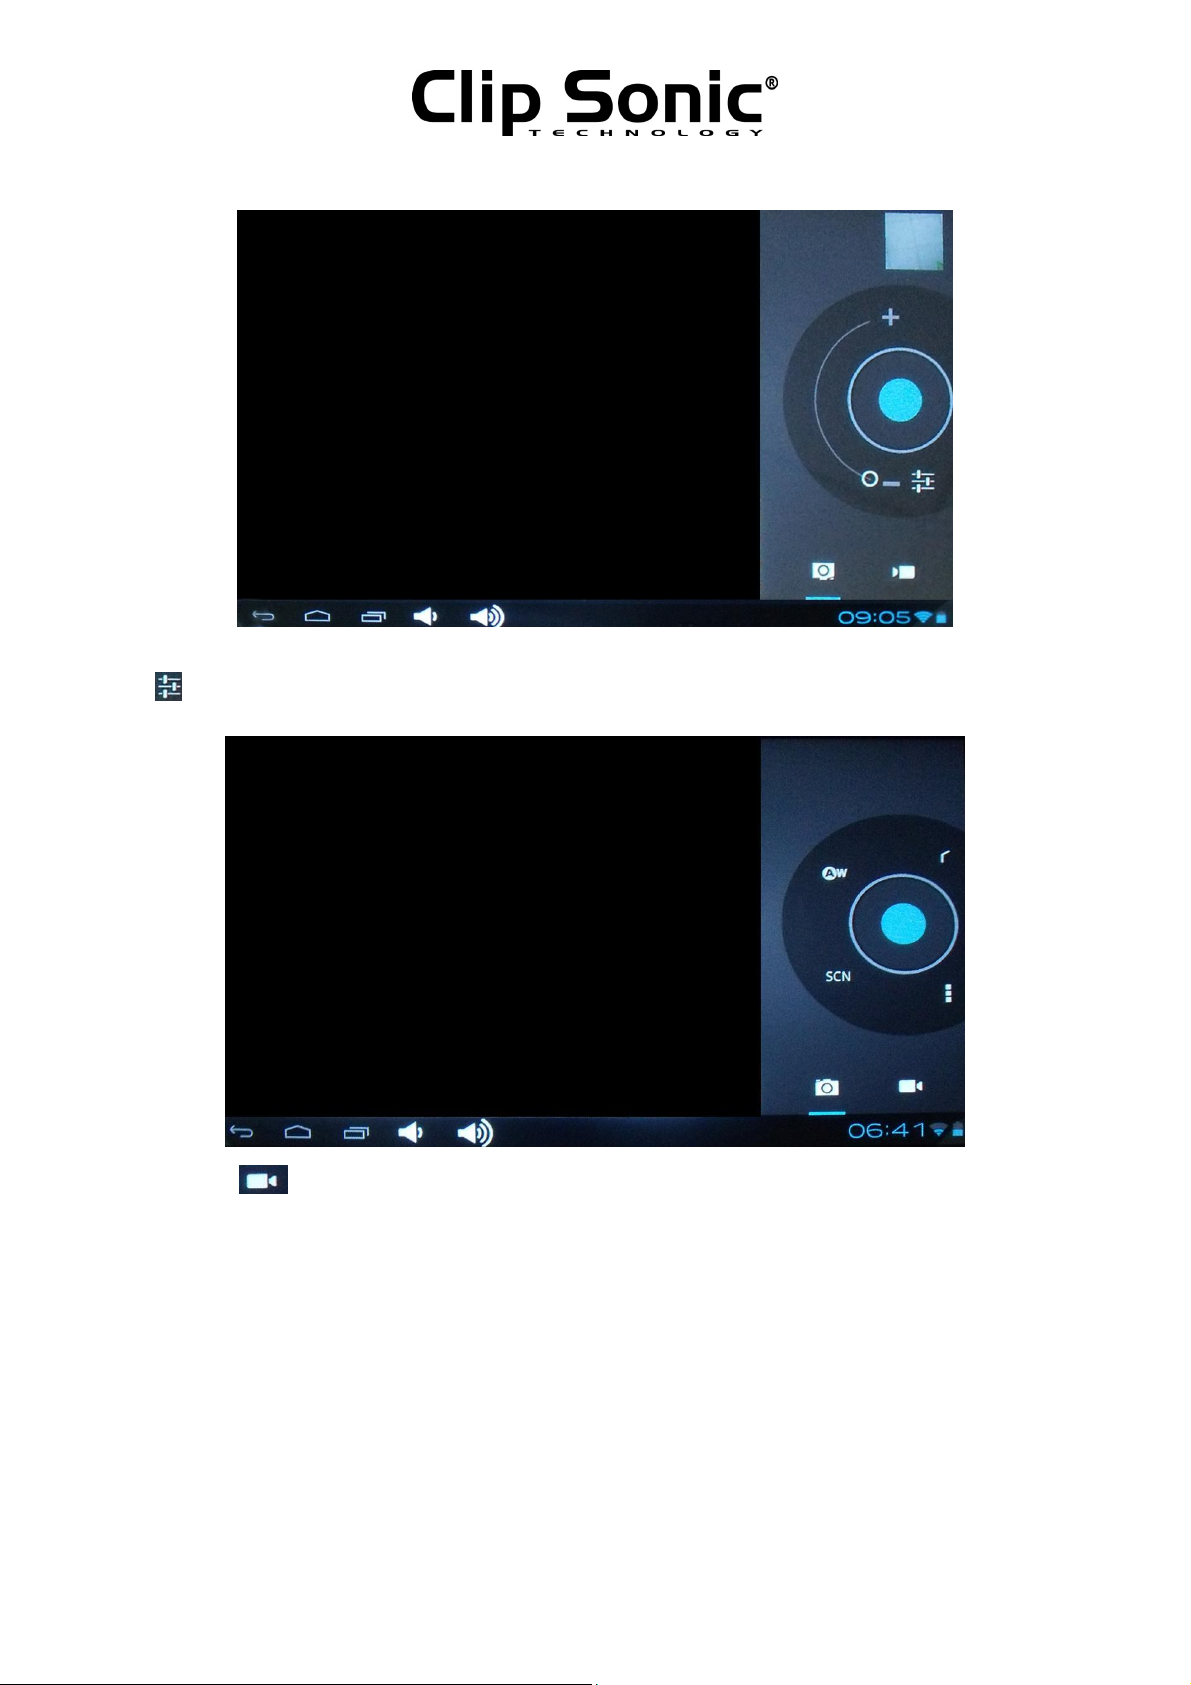
12. 2.Camera:
Click on the "Camera" icon in the main menu and enter the "camera" main interface, touch the dots in the
middle of the circle to take a photo, as shown below:
Page 23
23
Instruction Manual
Click the on the interface to chance to another interface for the setting, As shown below:
You can click the icon to change to videography.
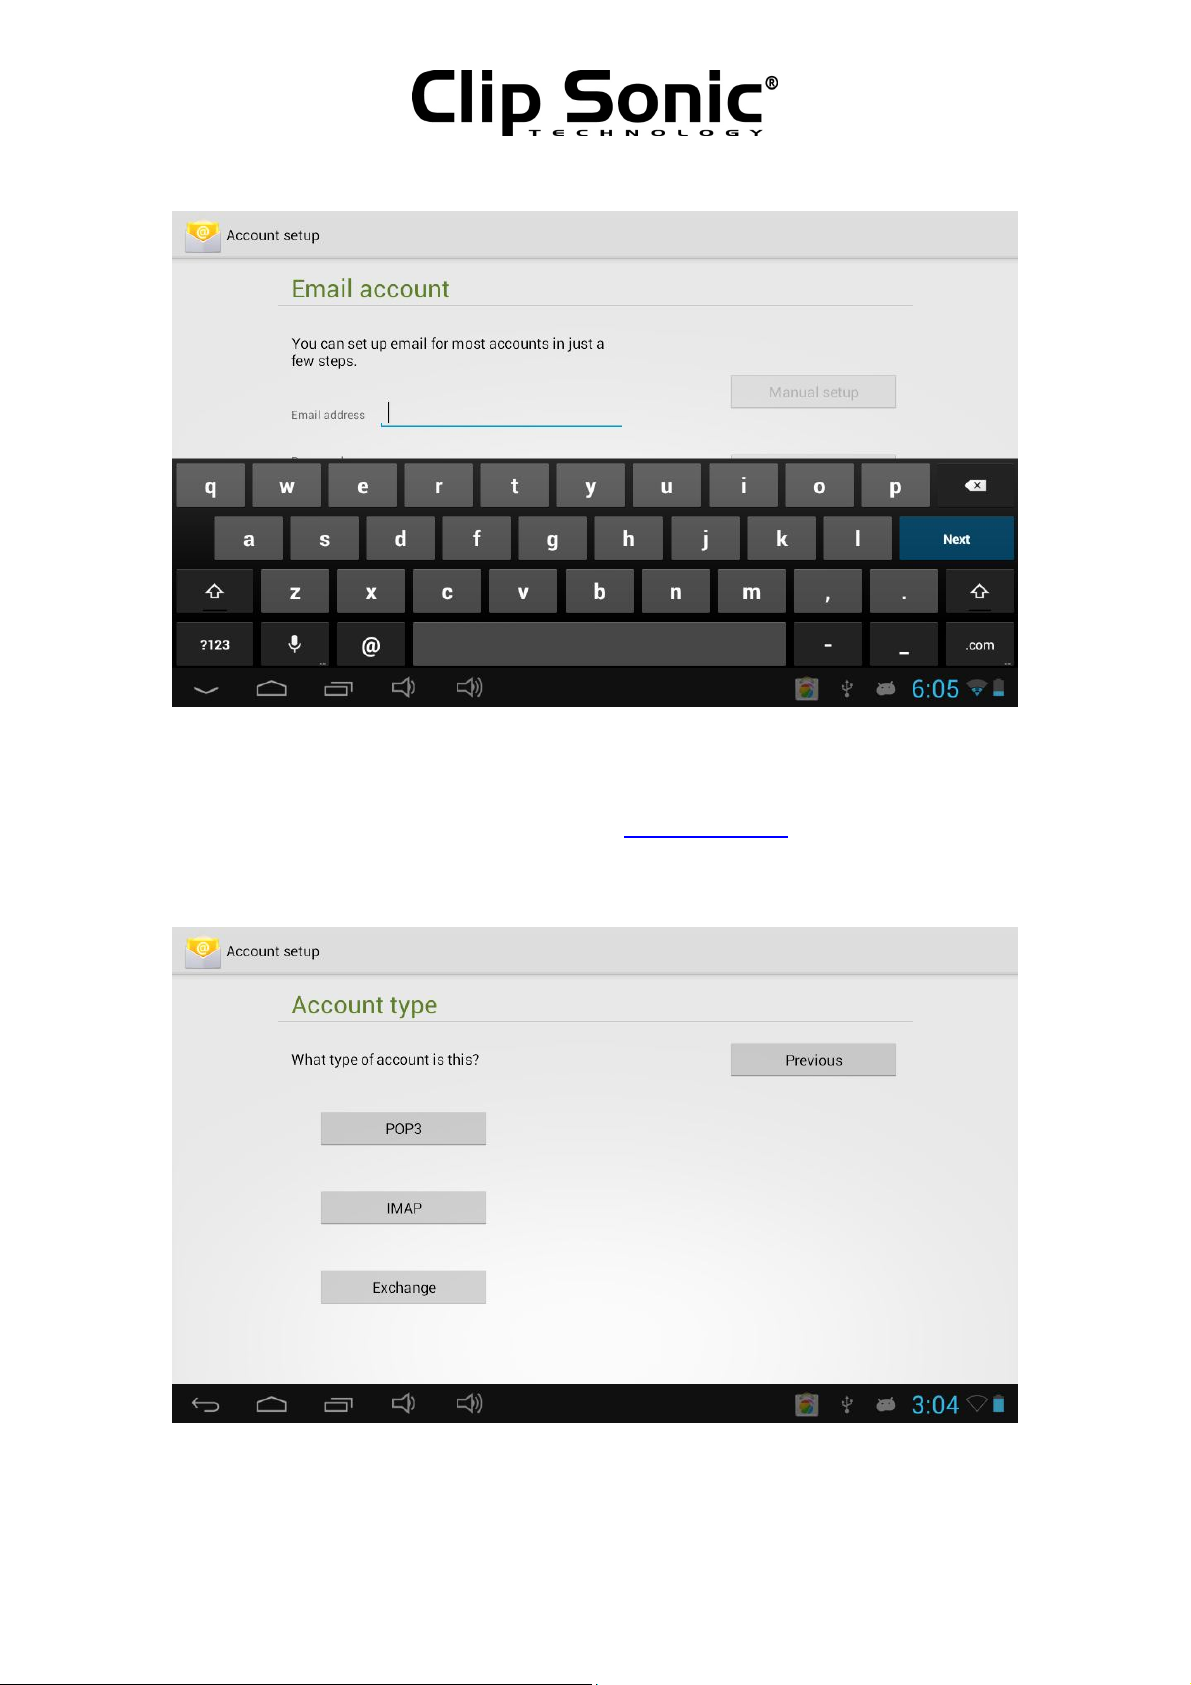
12.3. E-mail:
Click on the "e-mail" icon in the main menu to enter email client. E-mail applications accompany with
email settings guide, it can add the common Web email service providers (e.g. Gmail, Yahoo, Hotmail and
163 etc manufacturers) external POP3 or IMAP email account, As shown below:
Page 24
24
Instruction Manual
Note: before the mail will be sett guide, please ensure that you already link the network.
Here we take shellyidea@gmail.com as an example:
In the email address bar, enter your valid email address: idea@gmail.com
In the password field to enter your valid password: * * * * * * * *
Then you can choose the "Manual setup", account type selection interface will appear as shown below:
Here we are using the POP3 account type. And the receiving service settings will appear, interface as
shown below:
Page 25

25
Instruction Manual
Please according to each email provider’s information, set different parameter, such as:
The POP3 server: default is "126.com", and should be modified for "pop.126.com”
The port number is "110"
Then select the "next ", you will enter the "inspection acceptance server settings", if set up correctly, Select
the "next ", you will enter the account information custom interface:
In the column "name" to input the name you want to display in the outgoing message, and then click
"next" button, you can enter the mail interface. It will load the mail automatically; mail list will be as
follows:
Page 26

26
Instruction Manual
12.4. Explorer:
Click on the "Explorer" icon in the main menu, you can view all the files or information from the external
devices or the internal memory,as shown below:
Note: form this interface, you can edit the files as you like, for example: delete, move, paste rename cancel
etc.
12.5. Gallery:
Click on the "Gallery" in main menu, to enter the next interface, it will list all video files and image files. As
shown below:
Page 27

27
Instruction Manual
Select the video file and enter the video playing interface, Select "play", "stop",
"fast forward", "rewind", "progress" and other control keys to control the broadcast schedule, as shown
below.
Select the picture and enter the picture interface. on the right-up corner, click the icon to go into the set
for the picture. such as "slide show", "edit", as shown below:
Page 28

28
Instruction Manual
12.6.Gmail:
From this icon, you can sign in your gmail account to view the email, as shown below:
Page 29

Instruction Manual
29
: use to write and send an email.
: search the email or the address you want to use.
: refresh the email to check if there is new email arrive.
12.7.Music player:
Click on the "music" icon in the main menu, and then enter the music player interface. The default list
system in the user data area for all audio files as shown below:
You can through the synchronous USB to input audio file, or by inserting a SD card with audio file to input
audio files, you can also through the network to download the audio file.
Select the corresponding tag, and check the interface as "artists", "album", and “song" and so on to play
the song.as shown below
Page 30

30
Instruction Manual
12.8. Record
Click on the "Sound Recorder" icon in main menu and enter the recorder main interface as shown below:
Click the menu to start record, click the to done the record, as shown below;
Page 31

31
Instruction Manual
You can find the recorded files in the "Internal Memory" from the "Explorer" icon.
12.9. Market (Play Store)
Click on the “market" icon in the main menu and enter the main interface
as shown below:
Page 32

32
Instruction Manual
Please note: After first time use the "Market" icon, it will change to another name shown" Play Store".
Select “sign in” to sign in your gmail account.
If you have no Gmail account, you need to create a Gmail account, click "get a gmail account" to get the
account.
Input the email address and the password, click “sign in”, the following picture will appear:
Set the code of the account shown above, Following picture will appear after the setting is completed:
Page 33

33
Instruction Manual
Click on the "search" input the software you want to install, the following picture will appear:
Click to download and install software (pictured above), in the application of mine to find the software you
installed, as the following picture
Page 34

34
Instruction Manual
13. Wallpaper:
The system supports static wallpaper, and 3D wallpaper.
13.1. Set the wallpaper from the setting icon
In the "setting" interface, to find the "display" icon, under this icon you can choose wallpaper album, as
shown below:
Page 35

35
Instruction Manual
Choose the wallpaper, can go to the further interface, you can choose the picture you like to set as the
wallpaper.
13.2. Set the wallpaper from the "Gallery" icon
Go the Gallery interface to fine the picture you want to set as wallpaper.
Touch this picture's interface you choose, and it will come out some icons on the up-right corner, click upright icon" " to choose the "set picture as" album to set as wallpaper, it will shown interface as bellow:
Then it will appear one interface, then click Wallpaper , so you can click up-right word "CROP" , the picture
you have chosen will be setting as wallpaper after you click word "CROP'.
There are the following options:
Select "wallpaper": can customized using image as wallpaper.
Select the "live wallpaper": can use the systems supplied 3D wallpaper.
Please note: You can long touch the main interface, an then will come our the note for wallpaper setting.
13.3. Set the wallpaper from the mother interface
On the mother interface, long touch the screen it will come our the note, as shown below:
Page 36

36
Instruction Manual
14. External device:
14.1. USB connection
Using USB to connect the MID and PC, the default connection mode is a synchronous interface, when it
connect to the device, it will come out a note,
Touch "USB connected" and then go the interface .click the "Turn on USB storage":, and you can see the
corresponding letter in the PC terminal. As shown below.
Touch the "Turn on USB storage", can see below information.
Page 37

37
Instruction Manual
14.2. OTG use
Support FAT32 format mobile equipment: such as U disk, mobile hard disk.
The plug-and-play connection method:
Use the OTG wire to connect the MID USB OTG and the external equipment.
You can also go into the "Explorer" icon to fine the USB information.
14.3. Keyboard and mouse
Support plug and play USB mouse, keyboard device.
15.Network connection methods:
There are three ways to connect to the network: WIFI network, Ethernet network, External 3G network.
15.1.WIFI network
First need go to the "setting "interface to fine the WIFI album, touch the bar to turn on the wifi, it
will scan the wifi network around your place. Touch the wifi module to connect to wifi network, as shown
below:
Page 38

38
Instruction Manual
After the wifi network is connected successfully, it will have an icon under the lower-right corner.
15.2.Ethernet network.
First you need a converter to connect the reticle. And then you can connect to internet.
15.3.External 3G network
use OTG cable to connect external equipment. It will have a 3G signal under the lower- right corner.
16.Treatment for common problems:
1: What is an Android?
Answer: Android is an operating system name that Google announced on November 5, 2007 that based on
the open source operating system of Linux platform.
2: What is a APK?
Answer: APK is Android Package acronym, Android installation package.
3: How to get APK?
Answer: can download and install it by PC terminal online, you can also download and install it by “Android
market" online too.
4: What is the version of machine operating system?
Answer: This machine adopts Android4.0, 3D built-in hardware acceleration, can run on most Android
applications.
5: Can the machine be charged by USB?
Answer: Yes it is. Recommend the use of the accessories DC. 9V adapter to charge.
The picture is for reference only, product appearance, function, referring to the actual product, the
product rule and design are subject to change without notice.
Page 39

39
CLIP SONIC
Instruction Manual
Correct Disposal of this product
(Waste Electrical & Electronic Equipment)
(Applicable in the European Union and other European countries with separate collection systems)
This marking shown on the product or its literature, indicates that it should not be disposed with other household
wastes at the end of its working life.
To prevent possible harm to the environment or human health from uncontrolled waste disposal, please separate
this from other types of wastes and recycle it responsibly to promote the sustainable reuse of material resources.
Household users should contact either the retailer where they purchased this product or their local authority office,
for details of where and how they can take this item for environmentally safe recycling.
.
BP 61071
67452 Mundolsheim
Photo no contractual
Worried about the quality of his products the manufacturer reserves the right to make modifications without advance
notice
Page 40

38
CLIP SONIC
Soucieux de la qualité de ses produits le constructeur se réserve le droit d'effectuer des modifications sans préavis
Photo non contractuelle
67452 Mundolsheim
BP 61071
.
for details of where and how they can take this item for environmentally safe recycling.
Household users should contact either the retailer where they purchased this product or their local authority office,
this from other types of wastes and recycle it responsibly to promote the sustainable reuse of material resources.
To prevent possible harm to the environment or human health from uncontrolled waste disposal, please separate
wastes at the end of its working life.
This marking shown on the product or its literature, indicates that it should not be disposed with other household
(Applicable in the European Union and other European countries with separate collection systems)
(Waste Electrical & Electronic Equipment)
Correct Disposal of this product
préavis.
renvois à l'appareil actuel, le design et les spécifications du produit sont soumis à des modifications sans
Les images sont fournies à titre de référence uniquement, l'apparence de l'appareil, les fonctions, les
Réponse: Oui. Utilisation des accessoires DC recommandée. Adaptateur de charge 9V .
5: L'appareil peut-il être chargé par USB ?
applications Android.
Réponse: Cet appareil s'exécute sur Android 4.1, accélération matérielle intégrée 3D, et sur la plupart des
4: Quelle est la version du système d'exploitation de l'appareil ?
possibles par le "marché Android" en ligne.
Réponse: téléchargement et installation par le PC en ligne. Téléchargement et installation également
3: Comment obtenir l'APK ?
Notice d'utilisation
Page 41

37
Réponse: APK est l'acronyme pour Android Package, package d'installation Android.
2: Qu'est-ce que APK ?
sur le système d'exploitation en open source de la plateforme Linux.
Réponse: Android est un nom de système d'exploitation annoncé par Google le 5 novembre 2007 et basé
1: Qu'est-ce qu' Android ?
16. Traitement des problèmes courants :
inférieur droit.
Utilisez le câble OTG pour raccorder un équipement externe. L'écran affiche un signal 3G dans l'angle
15.3. Réseau externe 3G
Vous devez utiliser un convertisseur pour raccorder la tablette. Puis vous pouvez vous connecter à Internet.
15.2. Réseau Ethernet
Une fois le réseau wifi correctement connecté, l'icône apparaît dans l'angle inférieur droit.
comme montré ci-dessous:
le wifi, le système balaie et recherche le réseau wifi. Touchez le module wifi pour vous raccorder au réseau,
Accédez à l'interface "Settings" pour trouver la fonction WIFI, puis touchez, la barre pour activer
15.1.WIFI
votre tablette est équipé de cette fonction (en option) .
Il existe trois moyens de vous raccorder au réseau : réseau WIFI, réseau Ethernet, réseau externe3G si
15. Méthodes de connexion au réseau :
Prise en charge de la souris USB plug and play et du clavier.
14.3. Clavier et souris
Notice d'utilisation
Page 42

36
Vous pouvez aussi cliquer sur l'icône "Explorer" pour trouver les informations USB.
Utilisez le câble OTG pour raccorder l'OTG USB MID à l'équipement externe.
Mode de connextion "Plug-and-Play":
Prise en chargement des équipements mobiles au format FAT32, comme par exemple un disque dur.
14.2. Utilisation OTG
Touchez l'élément "Turn on USB storage" pour voir les informations suivantes.
Notice d'utilisation
Page 43

35
USB), vous voyez la lettre correspondante sur le PC, comme ci-dessous.
Touchez "USB connected" puis accédez à l’interface. Cliquez sur "Turn on USB storage" (Activer mémoire
connexion synchrone comme la suivante.
Utilisez la connexion USB pour connecter la tablette et le PC, le mode de connexion par défaut est une
14.1. Connexion USB
14. Périphérique externe :
Sur l'interface mère, touchez longuement l'écran pour faire apparaître ce qui suit :
13.3. Papier peint à partir du menu principale
peint.
Remarque: appuyez de manière prolongée l'interface principale pour faire apparaître l'interface papier
Sélectionnez "Live wallpaper" : utilisation des papiers peints en 3D fournis par le système.
Sélectionnez "Wallpaper": personnalisation en utilisant une image comme papier peint.
Les options suivantes sont disponibles :
deviendra le papier peint.
Cliquez sur le papier peint, puis en haut à droite sur le terme "CROP", l'image que vous avez choisie
Notice d'utilisation
Page 44

34
L'interface suivant apparaît comme ci-dessous:
à droite sur l'icône"up-right icon" " pour choisir l'album "set picture as" pour définir le papier peint.
Touchez l'interface de l'image et plusieurs icônes s'afficheront dans l'angle supérieur droit. Cliquez en haut
Allez dans l'interface Gallery pour trouver l'image que vous voulez installer comme papier peint.
13.2. Définition du papier peint à partir de l'icône "Gallery"
Choisissez le papier peint pour aller à l’interface suivante et le définir comme votre papier peint.
Notice d'utilisation
Page 45

33
dessous
Dans l'interface "Settings", cherchez l'icône"display", puis sélectioner "Papier peint" (Wallpaper) comme ci-
13.1. Papier peint à partir de l'icône Settings
Le système prend en charger les papiers peints statiques et les papiers peints en 3D.
13. Papiers peints :
suivante:
Cliquez pour télécharger et installer le logiciel (image ci-dessus) dans l’application comme sur l’image
Notice d'utilisation
Page 46

32
L'écran suivant apparaît :
Cliquez sur "search" (rechercher) pour trouver le logiciel que vous voulez installer.
Définissez le code du compte montré ci-dessus. L'écran suivant apparaît une fois la configuration terminée:
:
Notice d'utilisation
Page 47

31
Saisissez l'adresse email et le mot de passe, cliquez sur “Sign in”. L'écran suivant apparaît
compte Gmail).
Si vous n’avez pas de compte Gmail, vous devez en créer un puis cliquez sur “Get a gmail account (créer un
Sélectionnez "Sign in" pour vous connecter à votre compte gmail.
Remarque: après la première utilisation, utilisez l'icône "Market" qui portera un autre nom "Play Store".
dessous :
Cliquez sur l'icône “Market" dans le menu principal et accédez à l'interface principale, comme montré ci-
12.9. Adroid Market (Play Store)
Vous trouverez les fichiers enregistrés dans "Internal Memory" dans l'icône "Explorer" .
Notice d'utilisation
Page 48

30
montré ci-dessous :
Cliquez sur pour démarrer l'enregistrement, cliquez sur pour terminer l'enregistrement, comme
l'enregistreur comme montré ci-dessous :
Cliquez sur l'icône "Sound Recorder" dans le menu principal et accédez à l'interface principale de
12.8. Enregistrement
Notice d'utilisation
Page 49

29
etc. pour écouter le morceau, comme montré ci-dessous:
Sélectionnez l'étiquette correspondante, vérifiez l'interface et ses éléments "Artists", "Album" et "Songs"
et télécharger des fichiers audio afin de les écouter.
Vous pouvez utiliser une clé USB ou une carte SD pour écouter des fichiers audio ou naviguer sur le réseau
présente comme suit :
système de liste par défaut dans la zone des données de l'utilisateur pour tous les fichiers audio se
Cliquez sur l'icône "Music" dans le menu principal et accédez à l'interface du lecteur de musique. Le
12.7. Lecteur de musique :
: actualiser l'email pour vérifier si un nouveau courrier est arrivé.
: recherche l'email ou l'adresse que vous voulez utiliser.
: écrire et envoyer un email.
Notice d'utilisation
Page 50

28
Grâce à cette icône, vous pouvez vous connecter à votre compte, comme montré ci-dessous:
12.6.Gmail:
Notice d'utilisation
Page 51

27
"edit" (éditer), comme montré ci-dessous :
droit. Cliquez sur l'icône pour accéder à la configuration de l'image telle que "slide show" (diaporama),
Sélectionnez l'image puis entrez dans l'interface de l'image on the right-up corner, dans l'angle supérieur
commande pour contrôler le programme de diffusion, comme montré ci-dessous.
"fast forward" (avance rapide), "rewind" (rembobiner), "progress" (progression) ou d'autres boutons de
(stop),
Sélectionnez le fichier vidéo et entrez dans l'interface de lecture vidéo, sélectionnez "Play" (lire), "Stop"
Notice d'utilisation
Page 52

26
les fichiers vidéo et images. Comme montré ci-dessous :
Cliquez sur l'icône "Gallery" dans le menu principal pour accéder à l'interface suivante qui répertorie tous
12.5. Gallerie:
déplacer, coller, renommer, annuler etc.
Note: vous pouvez éditer les fichiers que vous voulez à partir de cette interface, par exemple: supprimer,
périphériques externes ou la mémoire interne, comme montré ci-dessous :
Cliquez sur l'icône "Explorer" dans le menu principal pour voir toutes les fichiers ou les informations sur les
12.4.Explorer:
automatique du mail, la liste de mail a l'apparence suivante :
suivante :e message sortant puis cliquez sur “Next” pour entrer dans l’interface mail. Chargement
Dans la colonne “Name”, saisissez le nom que vous voulez afficher dans l La liste de mail a l'apparence
Notice d'utilisation
Page 53

25
est correcte. Sélectionnez « Next » pour entrer dans l’interface personnalisée des informations de compte :
Sélectionnez "Next" pour accéder aux paramètres du serveur d’acceptation d’inspection » si l’installation
Numéro de port "110"
Serveur POP3: par défaut "126.com", et doit être remplacé par "pop.126.com”
En fonction des informations de chaque fournisseur d'email, déterminez les différents paramètres tels que:
Ici, nous utiliserons le type de compte POP3. Les paramètres de service entrant apparaissent comme suit :
Notice d'utilisation
Page 54

24
suit :
Vous pouvez choisir la configuration manuelle, l'interface de sélection du type de compte apparaît comme
Dans le champ mot de passe, saisissez votre mot de passe valide : * * * * * * * *
Dans la barre d'adresse email, saisissez votre email valide : idea@gmail.com
Nous utiliserons comme exemple l'email suivant shellyidea@gmail.com:
Note: avant d'utiliser le guide, assurez-vous que le réseau est actif.
Notice d'utilisation
Page 55

23
Yahoo, Hotmail et 163 etc ) un compte email POP3 ou IMAP externe, comme montré ci-dessous :
accompany with email settings guide, it can add the common Web email service providers (e.g. Gmail,
Cliquez sur l'icône "e-mail" dans le menu principal pour saisir l'email du client. E-mail applications
12.3. E-mail:
Vous pouvez cliquer sur l'icône pour passer en mode caméra
Cliquez sur sur l'interface pour passer à une autre interface, comme montré ci-dessous :
Notice d'utilisation
Page 56

22
appuyez sur le point centrale au miliei du cercle pour prendre une photo comme montré ci-dessous:
Cliquez sur l'icône "Camera" dans le menu principal et accédez à l'interface principale "camera"main,
12. 2.Caméra:
pages Web, le lecteur vidéo, le client du site Web, la messagerie instantanée et d'autres logiciels
Vous pouvez également télécharger un logiciel d'application en réseau tiers, y compris la navigation des
écouter une radio en ligne.
sur l'appareil. Une fois le logiciel installé, vous pouvez regarder une vidéo ou la télévision en ligne et
lecture vidéo en ligne, une logiciel de lecture TV en ligne, une logiciel de musique en ligne, puis l'installer
Vous pouvez vous rendre sur "Android market" ou choisir un autre moyen de télécharger un logiciel de
Vidéo en ligne :
montré ci-dessous :
L'angle supérieur droit comprend une icône que vous devez toucher pour paramétrer la page Web, comme
via la barre de recherche du bureau principal pour entrer sur le site et ouvrir la page Web.
Lorsque le réseau est connecté, ouvrez le Navigateur et saisissez l'URL pour naviguer sur une page Web; ou
Navigation page Web :
12.1 Navigateur:
12. Introduction au programme principal :
Notice d'utilisation
Page 57

21
principale pour la supprimer.
Remarque : Si vous n'avez plus besoin de l'icône, touchez l'icône de manière prolongée sur l'interface
Touchez de manière prolongée l'élément dans le widget pour le copier sur l'interface principale.
dans les widgets, comme montré ci-dessous :
Vous pouvez sélectionner "widget" sur une autre page du menu principal pour afficher les applications
11. Widgets
Notice d'utilisation
Page 58

20
dessous:
les informations du programme, désinstaller le programme et les autres opérations, comme montré ciSélectionnez "Settings" / "Apps", puis sélectionnez les applications installées correspondantes pour vérifier
gestion de l'application Android intégrés.
Désinstallation d'une application: vous pouvez utiliser les outils de gestion de logiciel tiers ou le logiciel de
10.4. Désinstallation d'une l'application
comme montré ci-dessous :
Cliquez sur "Install" sur l'interface et choisissez le logiciel APK dans la mémoire interne ou la carte TF,
Notice d'utilisation
Page 59

19
Cherchez et ouvrez l'icône "ApkInstaller" sur l'interface du menu, comme montré ci-dessous:
10.3. Installation depuis l'icône "ApkInstaller"
Remarque: Après la première utilisation, utilisez l'icône "Market" qui portera un autre nom "Play Store".
trouvez cette icône dans le menu principal.
Une fois le logiciel téléchargé, il sera automatiquement installé. Une fois l'installation terminée, vous
Choisissez le logiciel que vous voulez installer, choisissez le logiciel que vous voulez installer:
Notice d'utilisation
Page 60

18
Après avoir souscrit au marché, vous trouverez de nombreux logiciels, comme montré ci-dessous:
le compte créé, assurez-vous qu'Internet est disponible.
Vous devez d'abord vous rendre sur "marché". Pour cela vous devez souscrire à un compte g-mail. Une fois
10.2. . Installation de l'application depuis "Android market"
carte TF (Micro SD).
Note: Le mode d'installation par le disque U amovible (USB) est identique au mode d'installation depuis la
Notice d'utilisation
Page 61

17
:
Choisissez "SD card" pour chercher le fichier APK du logiciel à installer, comme montré ci-dessous
Insérez la carte TF qui contient le logiciel que vous voulez installer.
10.1. Installation du programme logiciel APK depuis la carte TF
Notice d'utilisation
Page 62

16
Vérifiez d'abord que "Unknown sources" sous l'onglet "Security" de l'icône "Setting" est sélectionné.
en ligne par le "Android Market"
Nous vous présentons ici l'installation au moyen d'un installateur d'Appli par la carte SDTF et l'installation
l’ordinateur, ou via un navigateur.
Vous pouvez aussi effectuer une installation en ligne via “Android Market" ou télécharger et installer via
par USB, des installations de support de programmes tiers (carte TF), par les périphériques de l'appareil.
Installation Android : plusieurs méthodes permettent d'installer les applications, par exemple installation
10. Installation, dé-installation et exécution d'une application
montré ci-dessous :
Cliquez sur l'icône "Developer options". Vous pouvez configurer les données dans cette colonne, comme
Notice d'utilisation
Page 63

15
Cliquez sur l'icône "Accessibility". Vous pouvez configurer l'accessibilité comme montré ci-dessous :
correct, le système utilisera les nouveaux paramètres.
Vous pouvez aussi choisir de régler l'heure manuellement, puis cliquez sur "set". Si le nombre saisi est
comme montré ci-dessous :
Cliquez sur l'icône "Date&time". Vous pouvez configurer la date et l'heure de manière automatique,
exemple:
Développeur, A propos de la tablette. Cliquez sur chaque élément pour le configurer à votre gré. Par
Dans cette colonne, vous pouvez configurer et afficher la Date et l'heure, l'Accessibilité, les options du
9.4. Système
effacées
notez qu'une fois que vous avez rétabli les paramètres usine par défaut, tous les applications et les données seront
Attention :
Notice d'utilisation
Page 64

14
par défaut, comme montré ci-dessous :
Cliquez sur l'icône "Backup&reset". Vous pouvez sauvegarder vos données et rétablir les paramètres usine
mode de recherche dans la colonne "Speech",comme montré ci-dessous:
pouvez configurer le mode de saisie dans la colonne "keyboard&input method". Vous pouvez configurer le
Cliquez sur l'icône "Language&Input" pour configurer la langue et faire défiler les informations. Vous
Notice d'utilisation
Page 65

13
montré ci-dessous :
Cliquez sur l'icône "Security" pour afficher le niveau de sécurité et faire défiler les informations, comme
exemple :
saisie, la sauvegarde et la réinitialisation. Cliquez sur chaque élément pour le configurer à votre gré. Par
Dans cette colonne, vous pouvez configurer et afficher les services de location, la sécurité, la langue et la
9.3. Personnel
cours, toutes, comme montré ci-dessous :
Cliquez sur l'icône "Apps" pour afficher toutes les applications, comme téléchargés, sur la mini carte SD, en
:
Notice d'utilisation
Page 66

12
ffusion d'une vidéo, la fonction veille est automatiquement indisponible.
Cliquez sur l'icône "Batterie" pour afficher le niveau de la batterie comme montré ci-dessous
:
Cliquez sur l'icône "Storage" pour afficher les dispositifs et le stockage externe, comme montré ci-dessous
Remarque: pendant la di
Notice d'utilisation
Page 67

11
Sur l'interface de l'écran "Sleep", choisissez la durée de verrouillage qui apparaît comme suit:
Mise en veille: la durée avant le verrouillage automatique de la veille d'écran.
Cliquez sur l'icône "Display" et réglez l'écran la tablette comme montré ci-dessous.
:
Notice d'utilisation
Page 68

10
Cliquez sur l'icône "Sound" et réglez le son comme montré ci-dessous
Cliquez sur chaque élément pour le configurer à votre gré. Par exemple :
Dans cette colonne, vous pouvez configurer et affiche le Son, l'Ecran, le Stockage, la Batterie, les Apps.
9.2. Configuration de l'appareil
Touchez l'icône "More" (Plus) pour voir les autres paramètres, comme montré ci-dessous :
dessous :
Cliquez sur "Data usage" (utilisation des données )pour connaître les informations, comme montré ci-
Notice d'utilisation
Page 69

9
montré sur l'interface, comme ci-dessous :
Cliquez sur l'icône "Settings" dans le menu principal puis sur la colonne "WIFI". Vous pouvez choisir WIFI
9.1. Sans fil & réseau:
* Autres fonctions
* Date & Heure
* Son & Ecran
* Sans fil & réseau:
Sélectionnez les éléments appropriés pour faire l'opération de votre choix, par exemple :
Notice d'utilisation
Page 70

8
vous voulez configurer, comme montré ci-dessous :
configuration du système, vous pouvez faire défiler vers le haut et vers le bas pour choisir l'élément que
Cliquez sur l'interface du menu principal de l'icône "Settings" (Configuration), puis ouvre l'interface de
9. Configuration du système:
sur le web, jouer à des jeux et autres applications.
nouvelle application et lancer la calibration tactile, écouter de la musique, regarder des vidéos, naviguer
Dans le menu principal, vous pouvez configurer le système, opérer l'application existante, installer une
droite pour accéder à l'interface du menu, comme montré ci-dessous :
Faites glisser l'icône pour déverrouiller l'interface. Appuyez sur l'étiquette " menu principal" en haut à
8. Menu principal
l'interface principale de toutes les applications.
L'icône d'étiquette menu se trouve dans l'angle supérieur droit de l'écran. Touchez l'icône pour aller sur
trouve dans l'angle supérieur gauche de l'écran, cliquez dessus puis faites votre recherche Internet.
Google search icon is used by typing keywords to do the Internet search. La balise du menu principal se
d'application et d'autres informations.
La barre d'état permet d'afficher l'état du réseau du système en cours, le niveau de la batterie, la durée
Notice d'utilisation
Page 71

7
compose d'une icône de recherche Google, d'une barre d'état et d'une icône d'étiquette menu.
Une fois le système sous tension, vous voyez le bureau Android 4.1 (ci-dessous). Le bureau par défaut se
quand vous n'utilisez pas l'appareil.
reprendre le mode normal. Pour réduire la consommation électrique, vous pouvez utiliser cette fonction
permet d'accéder à l'état de veille, l'écran sera fermé. Une autre courte pression sur la touche Power pour
Lorsque le système est en mode de fonctionnement normal, une courte pression sur la touche Power
7.3. Mise en veille
Choisissez l'option Mise à l'arrêt, puis cliquez sur OK comme montré ci-dessous.
Appui long sur la touche Power (marche/arrêt) puis les options contextuelles s'affichent sur le bureau.
7.2. Arrêt:
Notice d'utilisation
Page 72

6
Puis accès au menu de démarrage et écran d'accueil
Le système est lancé et accède au mode Android.
Logo de démarrage du processus de démarrage.
Appui long sur la touche marche/arrêt et le système passe en mode Démarrage, comme montré ci-dessous:
7.1. Démarrage:
7. Démarrage et mise à l'arrêt:
2. Pour recharger la batterie complètement, branchez-la pendant 4 heures minimum.
1. Utilisez l'adaptateur AC pour charger l'appareil.
Avant la première utilisation de la tablette, rechargez la batterie.
Chargement de la batterie
6. Utilisation et préparation de la tablette
vers la gauche de l’interface caméra.
7. : Faites glisser cette icône vers la droite de l’interface pour déverouiller ce périphérique, faites glisser
6. : Touchez cette icône pour afficher les applications récentes que vous avez utilisées.
5. : Dans n’importe quelle interface, touchez l’icône pour revenir à l’interface principale.
4. : Cette icône permet de revenir à l’interface précédente
entre en mode mise à l’arrêt, état marche, appui court pour verrouiller l’interface.
système entre en mode Démarrage, état marche, appui long sur le bouton marche/arrêt et le système
3. “ ” Bouton marche/arrêt, état de mise à l’arrêt actif, appui long sur le bouton marche/arrêt et le
2. “-”: baisse du volume
1.“+”: Hausse du volume
Définition de fonctions
Notice d'utilisation
Page 73

5
9 Caméra
7 Réinitialisation 8 Haut-parleur
5 Slot TF Card 6 Volume +/-
3 Port USB 4 Alimentation DC
1 Marche/Arrêt 2 Connexion casque
Description et fonction des touches
5. Description :
Notice d'utilisation
Page 74

4
Compatible carte Micro SD (TF card ),de 128MB à 32GB max..
Format: JPG、JPEG、BMP、PNG etc.
3GP、MOV、MP4、ASF、MPG、DAT、VOB、FLV etc
Décodage vidéo full HD(1080P、720P、480P), formats vidéo::MKV、AVI、RM /RMVB、WMV、
partie des paroles au format LRC.
Compatible aux formats audio MP3、M4A、WMA、APE、FLAC、AAC、WAV、AMR、OGG etc. et une
"marché des applications" ou du réseau PC.
Compatible avec l'installation et l'application du format APK, plusieurs logiciels à télécharger à partir du
Fonction vibreur
WIFI: accès multiples au réseau, profitez de la vie en réseau à tout moment et n'importe où..
mobile HDD etc.
La fonction OTG: transmission de données et affichage des fichiers via la connexion du disque amovible, du
4. Fonctions principales:
Câble OTG
Câble USB
Notice d'utilisation
Adaptateur (DC5 V/2A)
Accessoires
Batterie Batterie intégrée au lithium polymère 2200 mAh
Support Installation et application du format APK ,vibration ......
Couleur Noir
Résolution 800*480
Taile Ecran tactile TFT 5 points LCD 7"
MP3,WMA,MP2,OGG,AAC,M4A,MA4,FLAC,3GP,WAV
Capacité de sortie maximum des écouteurs 40mW
Microphone intégré
Son stéréo haute fidélité
Connecteur jack 3.5mm
MPEG, DIVX, XVID), MPEG, MPG, FLV. HD 2160P max
AVI(H.264, DIVX, XVID, rm, rmvb, MKV, WMV, MOV, MP4(H.264,
Prise en charge carte TF externe, maximum 32Go
4GB Nand Flash
O.S System Google Android 4.1.1 integrity system
Ecran
Audio
Photo JPG, JPEG, GIF, BMP, PNG
sortie vidéo
Wifi IEEE 802.11 b/g/n network
Stockage
Memoire RAM 512MB DDR3
Processeur Rockchip2926 ARM Cortex A9 1.2Ghz
Paramètres de la tablette PC DV137
3. Spécifications techniques
Notice d'utilisation
Page 75

3
Câble OTG
Câble USB
Notice d'utilisation
Chargeur 5V 2A
Tablette PC
2. Accessoires:
régulièrement.
ou toute autre cause, veillez donc à suivre les instructions d'utilisation et faire des sauvegardes
* La société ne peut être tenue responsable de la perte de mémoire causée par des dégâts, une réparation
vente de notre société.
* Si vous avez des questions sur la façon d'utiliser l'appareil, contactez votre revendeur ou le service aprèsd'environnement.
* Eliminer les déchets du produit ou des accessoires conformément à la réglementation locale en matière
produit constituerait une infraction à la garantie et pourrait être dangereuse.
* Utiliser uniquement une batterie, un chargeur et les accessoires autorisés, l'usage de tout autre type de
les accidents de la route.
* Ne pas utiliser les écouteurs en traversant une rue, en conduisant une moto ou sur un vélo pour éviter
* L’usage prolongé des écouteurs et un volume élevé peuvent causer des dommages auditifs permanents.
liquides, tels que des vases, ne doit être placé sur l'appareil.
interdit. Ce produit ne doit pas être exposé aux éclaboussures ou déversements et aucun objet rempli de
* Essuyez l’appareil avec un coton humide mais non mouillé ; l'usage d'autres produits chimiques est
champ magnétique fort et exposition prolongée au soleil.
* Evitez d'utiliser cet appareil dans les milieux suivants : température faible et forte, humidité, poussière,
* Evitez les coups et les collisions.
arbitraire.
* Ce produit est un appareil électronique de haute précision, veuillez ne pas le démonter de façon
1. Remarques:
Notice d'utilisation
Page 76

2
16.Traitement des problèmes courants:..............................................................................................38
15.3.Réseau externe 3G ..............................................................................................................38
15.2.Réseau Ethernet..................................................................................................................38
15.1.Réseau WIFI.........................................................................................................................37
15.Méthodes de connexion au réseau: ...............................................................................................37
14.3. Clavier et souris..................................................................................................................37
14.2. Utilisation OTG...................................................................................................................37
14.1. Connexion USB ...................................................................................................................37
14. Périphérique externe:....................................................................................................................36
13.3. Papier peint à partir de l’interface mère............................................................................35
13.2. Papier peint à partir de l’icône “Gallery" ...........................................................................34
13.1. Papier peint à partir de l’icône Settings .............................................................................34
13. Papiers peints: ...............................................................................................................................34
12.9. Marché (Play Store)............................................................................................................31
12.8. Enregistrement...................................................................................................................30
12.7.Lecteur de musique:............................................................................................................29
12.6.Gmail:..................................................................................................................................29
12.5.Gallerie:...............................................................................................................................27
12.4.Explorer:..............................................................................................................................26
12.3. E-mail: ................................................................................................................................24
12. 2.Caméra: ..............................................................................................................................23
12.1 Navigateur:..........................................................................................................................22
12.Introduction au programme principal: ...........................................................................................22
11. Widgets..........................................................................................................................................22
10.4.Désinstallation de l’application ...........................................................................................21
10.3. Installation depuis l’icône "ApkInstaller" ...........................................................................20
10.2.Installation de l’application depuis le "marché"..................................................................18
10.1.Installation du programme logiciel APK depuis la carte TF.................................................17
10.Installation, déploiement, exécution et application.......................................................................17
9.4. Système................................................................................................................................15
9.3. Personel................................................................................................................................14
9.2. Configuration de l'appareil...................................................................................................11
9.1. Sans fil&réseaux:....................................................................................................................9
9. Configuration du système:.................................................................................................................9
8. Menu principal...................................................................................................................................8
7.3. Veille.......................................................................................................................................7
7.2. Mise à l’arrêt: .........................................................................................................................7
7.1. Démarrage:.............................................................................................................................6
7.Démarrage et mise à l'arrêt:..............................................................................................................6
6. Utilisation MID et préparation...........................................................................................................6
5. Descrption: ........................................................................................................................................5
4. Fonctions principales.........................................................................................................................4
3. Spécifications du matériel .................................................................................................................4
2. Accessoires: .......................................................................................................................................3
1. Remarques:........................................................................................................................................3
Table des matières.................................................................................................................................1
Tables des matières
produit vous donnera entière satisfaction.
soin particulier au design, à l'ergonomie et à la simplicité d'usage de nos produits. Nous espérons que ce
Vous venez d’acquérir un produit de la marque DOMOCLIP et nous vous en remercions. Nous apportons un
Notice d'utilisation
Page 77

1
Tablette PC 7 '' Android
Langue : Français / Anglais
Version : 1.2
Date : 08/07/2013
Référence : DV137
Notice d'utilisation
 Loading...