

Page 1
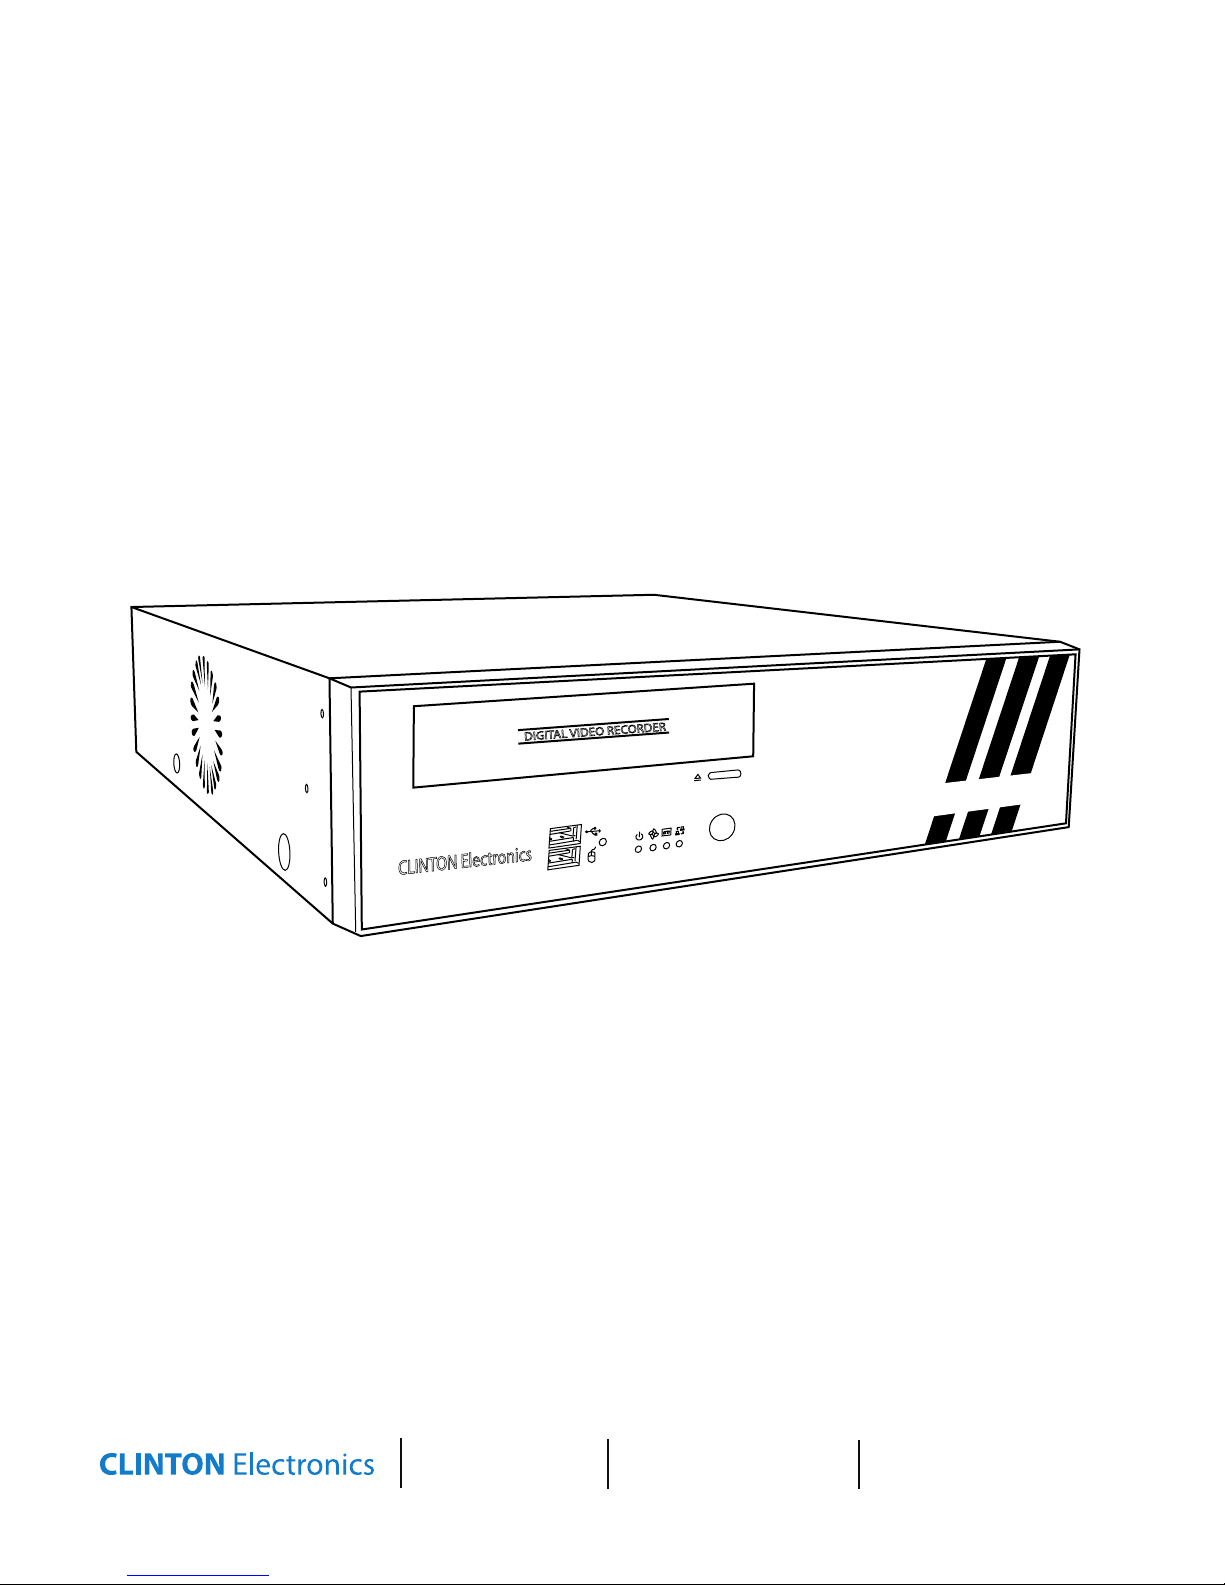
Digital Video Recorder
PRO SERIES DVR
DIGITAL VIDEO RECORDER
CLINTON Electronics
PRO SERIES
Quick Guide
CLINTON Electronics
6701 Clinton Road
Loves Park, IL 61111
1.800.447.3306 Sales
1.800.549.6393 Support
1.800.633.8712 Fax
www.clintonelectronics.com
Page 2

TABLE OF CONTENTS
Menus & Login 1
Selection Devices (Remote Control, Mouse) 1
Menu Icon Description 1
User Login 1
Setup Menu 2
General Setup 2
Date & Time 2
Motion 3-4
Recording Resolution 5
Recording Setup 6
Ethernet/Networking Setup 7-8
Search Menu 9
Calendar Search 9
Backup Menu 10
Backup 10
Page 3
MENUS & LOGIN
Remote Control / Mouse:
You can either use the supplied remote control or the two-button mouse with scroll wheel to
access and navigate OSD menus and controls. Use the supplied mouse for proper functionality.
Some selections use the left mouse button to increase, and the right mouse button to decrease.
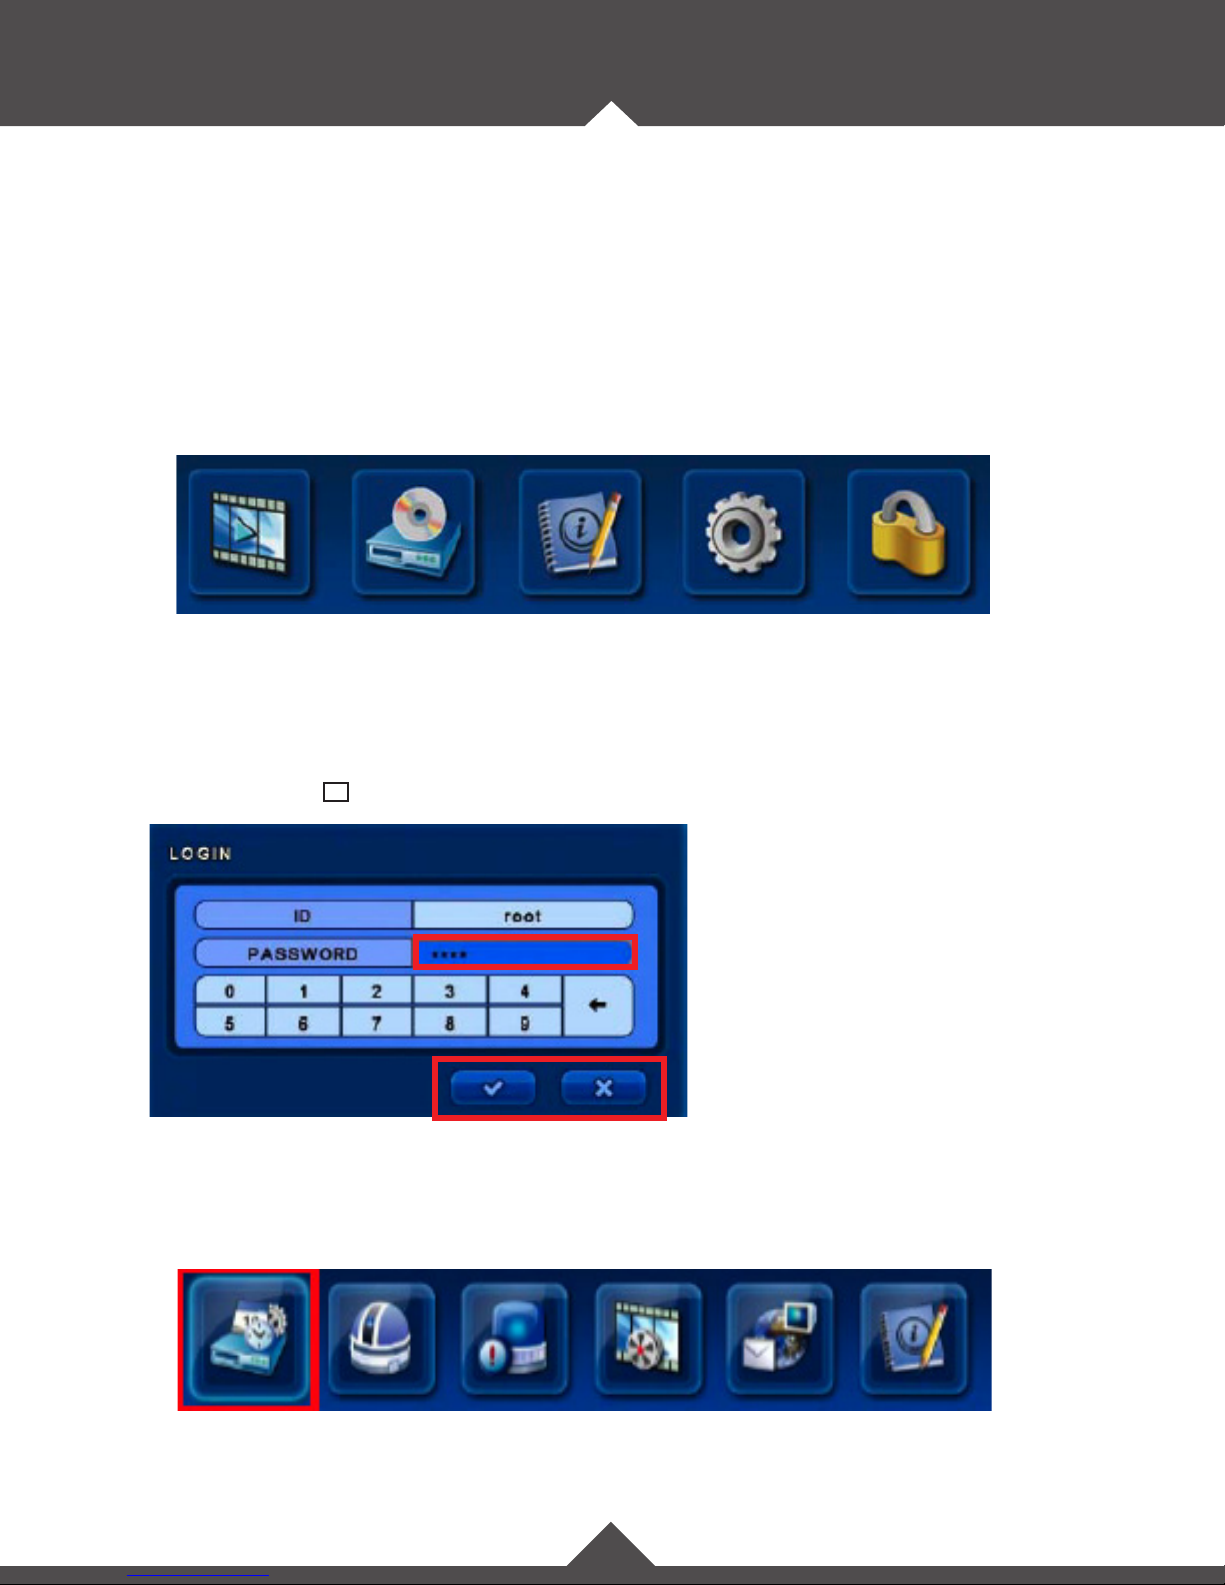
Top Menu
In live screen, move the mouse cursor over the top portion of the screen, or press the ▲ button on
the remote control to show the menu. Click on an icon to enter the menu. Login may be necessary.
Search Backup Status Setup Log-Out
Login Box
Before you can access any controls, you must rst login with your user ID and password.
The default ID is “root” and the default password is “1111”. Click the check-mark with your mouse
cursor or press the 8 enter button on the remote to proceed.
Default Password: 1111
The ✔ icon Accepts a setting.
The ✖ icon Cancels out of the selection.
Setup Menu
After successful login you will have access to the following features within the Setup menu selection.
General Camera Motion Schedule Ethernet Status
1
Page 4
SETUP
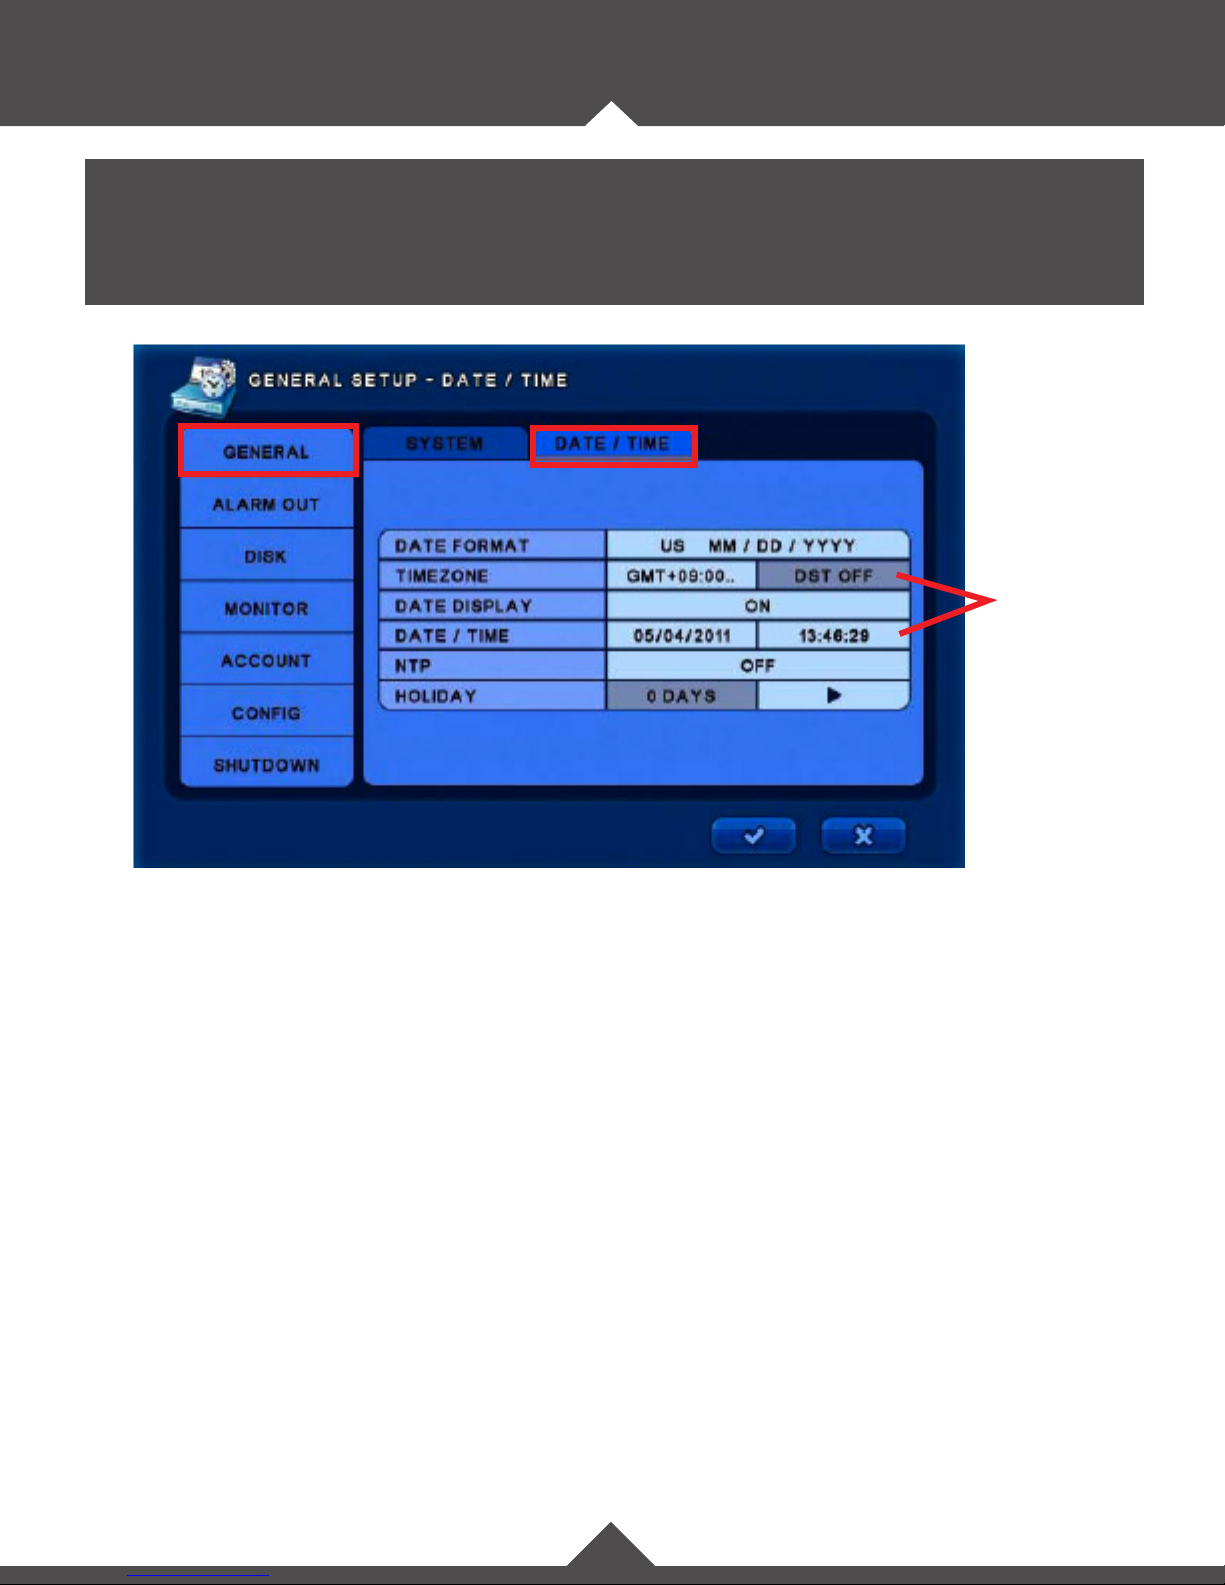
General Setup / General / Date & Time:
In this category you can congure the General, Alarm, Disk, Monitor, Account, Conguration, and Shutdown
settings.
Areas are noneditable if NTP
syncing is ON.
Date / Time:
• Date Format: Select the date format from the following: (YY/MM/DD) (MM/DD/YY) (DD/MM/YY)
• Time zone: Select the time zone and daylight savings time. DST will be automatically set to OFF if you
select a time zone which doesn’t use DST.
Note: This information will be automatically synced when connected to the internet. See NTP setting below.
• Date Display: Select ON for the date & time to be shown on the live view screen.
• Date / Time: Change the date and time. Note: This information will be automatically synced when
connected to the internet. See NTP setting below.
• NTP: Select the usage of the NTP (Network Time Protocol). With NTP the DVR is synchronized with NTP
server and will automatically obtain the correct time. The default server is [pool.ntp.org]. User can input
an alternate server if desired.
Auto Sync: Synchronize automatically every day. Note: Before you can select this option, you must
rst select “Sync Now”.
Sync Now: Synchronize immediately.
• Holiday: Add or Delete a holiday. You can choose holiday recording parameters in the “Schedule
Record” menu.
2
Page 5
SETUP
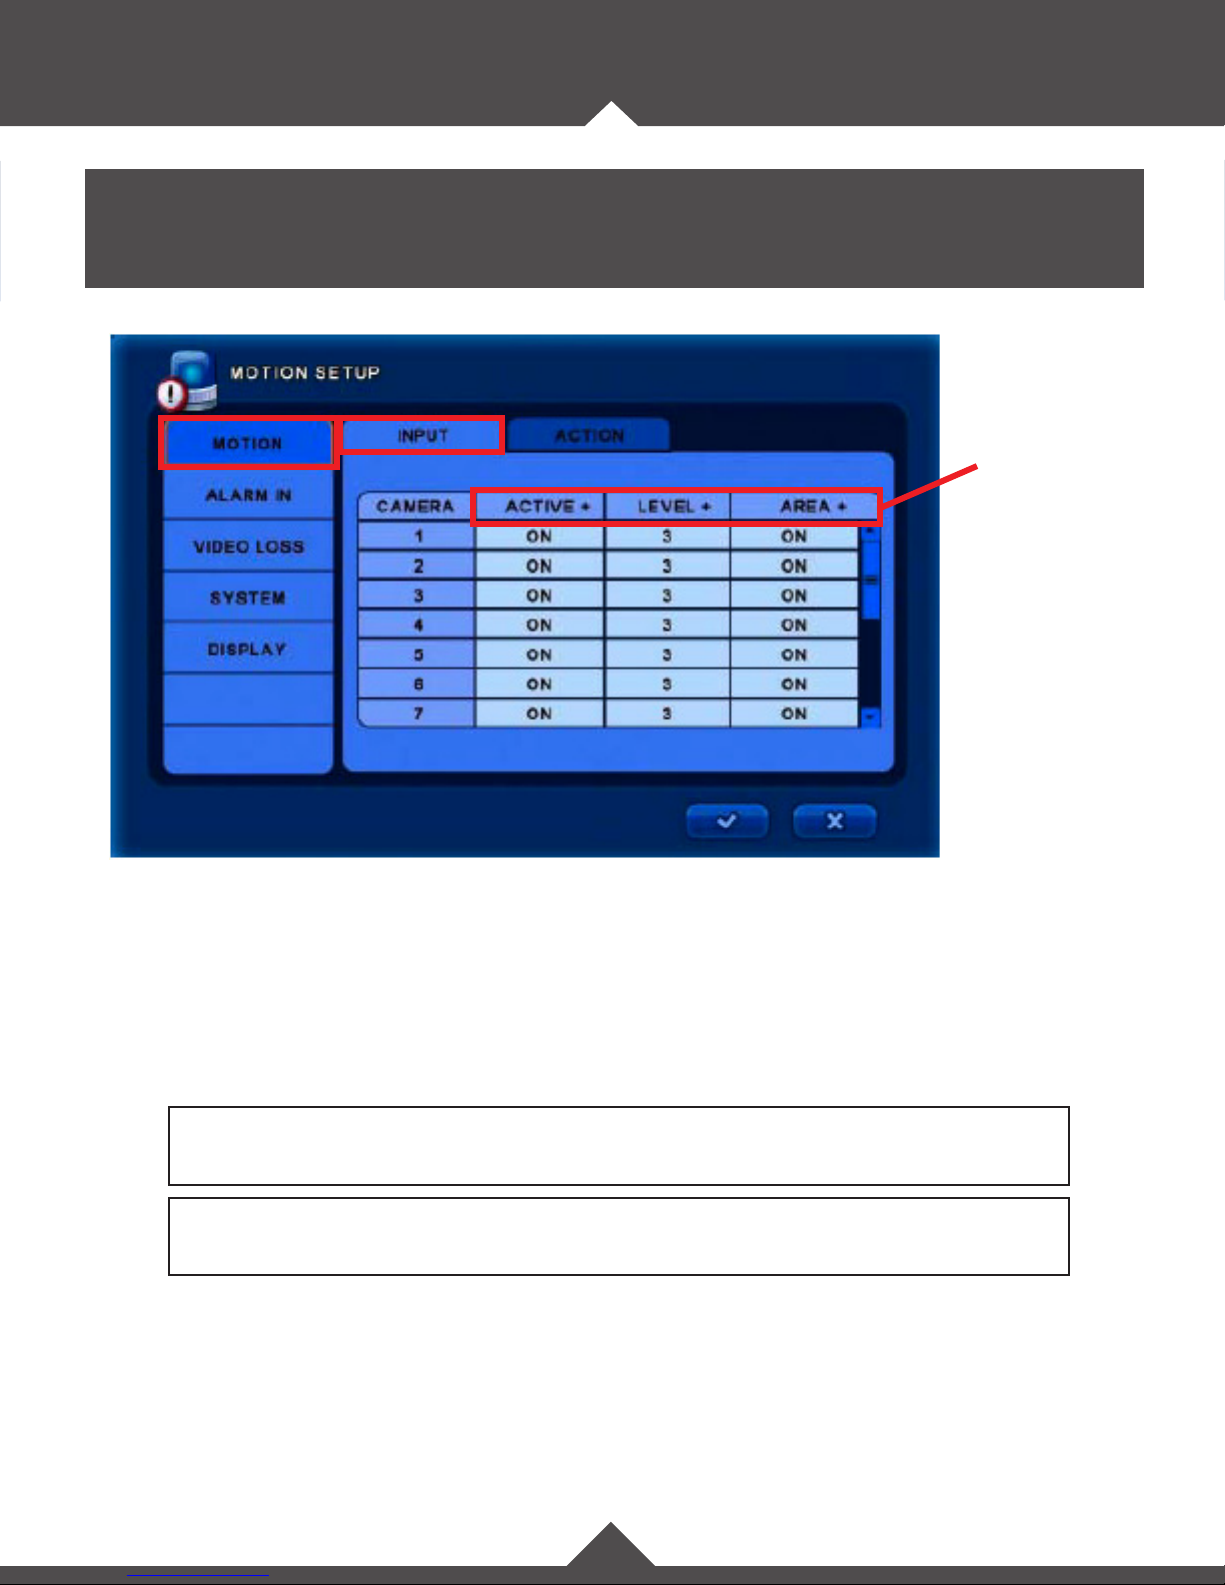
Motion Setup / Motion / Input:
In this category you can congure the Motion, Alarm-In, Video Loss, System and Display settings.
Top-Level Menu
Motion: Input
• Active: Select ON to activate the motion area.
• Level: Select the motion sensitivity level from low (1) to high (5).
• Area: Dene motion areas by selecting cells. When in the area selection screen, right click with the mouse,
or press the
MENU
button on the remote to bring up selection options.
Tip:
To apply settings to all cameras simultaneously, make changes in the top-level menu.
Note:
To enable motion recording, continuous recording should be turned OFF. See page 6 for details.
3
Page 6

SETUP
Motion Setup / Motion / Action:
Top-Level Menu
Motion: Action
• Record: Select ON to activate the motion area. You can enable a DVR channel to record when motion is
sensed by a another camera.
Example: Camera channels 1 and 2 will record when cameras 2-16 sense motion.
The default setting is to only record the channel in which motion has occurred.
Example: Camera channel 1 will only record when camera 1 senses motion.
Select the “Default” option when under the top level menu to restore the default to each camera.
• Alarm: Select ON to enable an externally attached alarm. You can also apply a delay before the alarm is
triggered, and select the duration of the alarm (from 0-99 seconds).
• Buzzer: Turn ON to enable an audible chime from the DVR when motion occurs.
• Preset: This number corresponds to the PTZ presets that can be dened in the “Camera Setup” menu.
• E-mail: Enabling this function will send an E-mail to the selected recipients when a motion event occurs.
4
Page 7

SETUP
Schedule Setup / Resolution / Resolution:
In this category you can congure the Resolution, Schedule, Record, Event, Audio, and Manual settings.
Schedule: Resolution
Factory settings will record continuously at High resolution (704x240) at 10 FPS.
• Resolution: Select the recording resolution for each channel.
STD(CIF) = 352x240 HIGH (Half D1) = 704x240 HIGHEST (D1) = 704x480
5
Page 8
SETUP
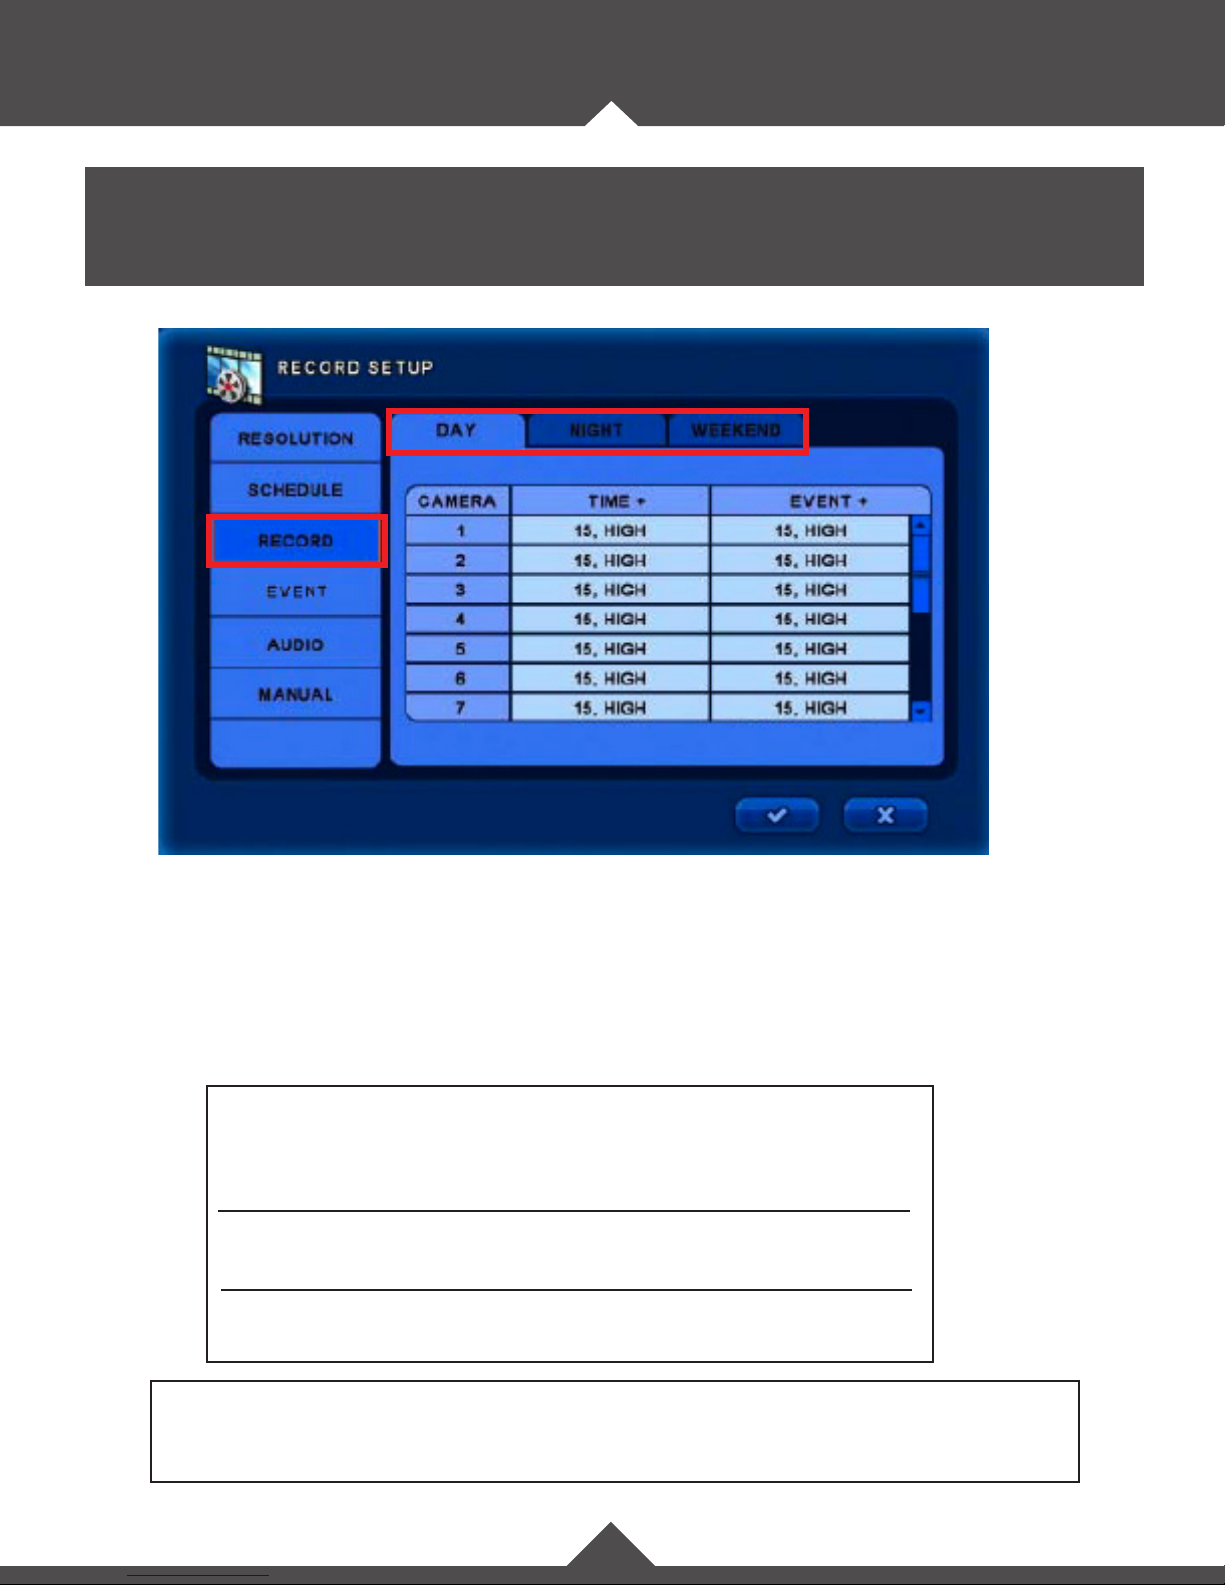
Record Setup / Record / Day, Night, Weekend:
In this category you can congure the Resolution, Record, Audio, Manual, and Filter settings.
Record
Recording Quality levels will aect the compression level. (Lower quality will result in less Hard Drive
space consumed.)
• Time: For time/continuous recording select the recording frame rate and resolution for each channel.
• Event: For event/motion recording- select the recording frame rate and resolution for each channel.
Notes:
If you wish to enable “EVENT” (motion) recording, you must set the
“TIME” (continuous) recording frame rate to “0” for all desired periods (day,
night, weekend).
If the setting for Schedule is switched from “Typical” to “Custom”, you will
see the Record top level menu items as “REC1 / REC2 / REC3”.
The default for Pre, and Post-recording times are set at 3-seconds. To apply
changes to these settings, select the “Event” tab.
Tip:
To change the FPS/quality of all cameras simultaneously in the selected period, make changes in
the top-level menu.
6
Page 9

SETUP
Ethernet Setup / Network / Ethernet:
In this category you can congure the Serial, DDNS, and E-mail settings.
Ethernet:
• Dynamic IP: Turn this setting ON to have the DVR automatically place your network settings into the
corresponding elds. Click the ✔ save icon to apply the settings.
Tip:
When your “Check Internet” test is successful, turn Dynamic IP back o and click the ✔
save icon again in order to avoid the DVR grabbing an invalid IP address in the future.
See Check Internet below for more information.
• Host Name: Input a desired host name.
For further info on these elds, see our support page at www.clintonelectronics.com.
• IP Address: Input an IP address for the DVR. (Dynamic IP must be o to edit this selection)
• Subnet Mask: Input the Subnet Mask here. (Dynamic IP must be o to edit this selection)
• Gateway: Input the Gateway Address here. (Dynamic IP must be o to edit this selection)
• DNS Server: Input the DNS Server Address here. (Dynamic IP must be o to edit this selection)
• Check Internet: Press “Start” next to Check Internet to check the internet status.
If Successful: “Internet access has succeeded”
If Unsuccessful: “Internet access has failed”
7
Page 10
SETUP
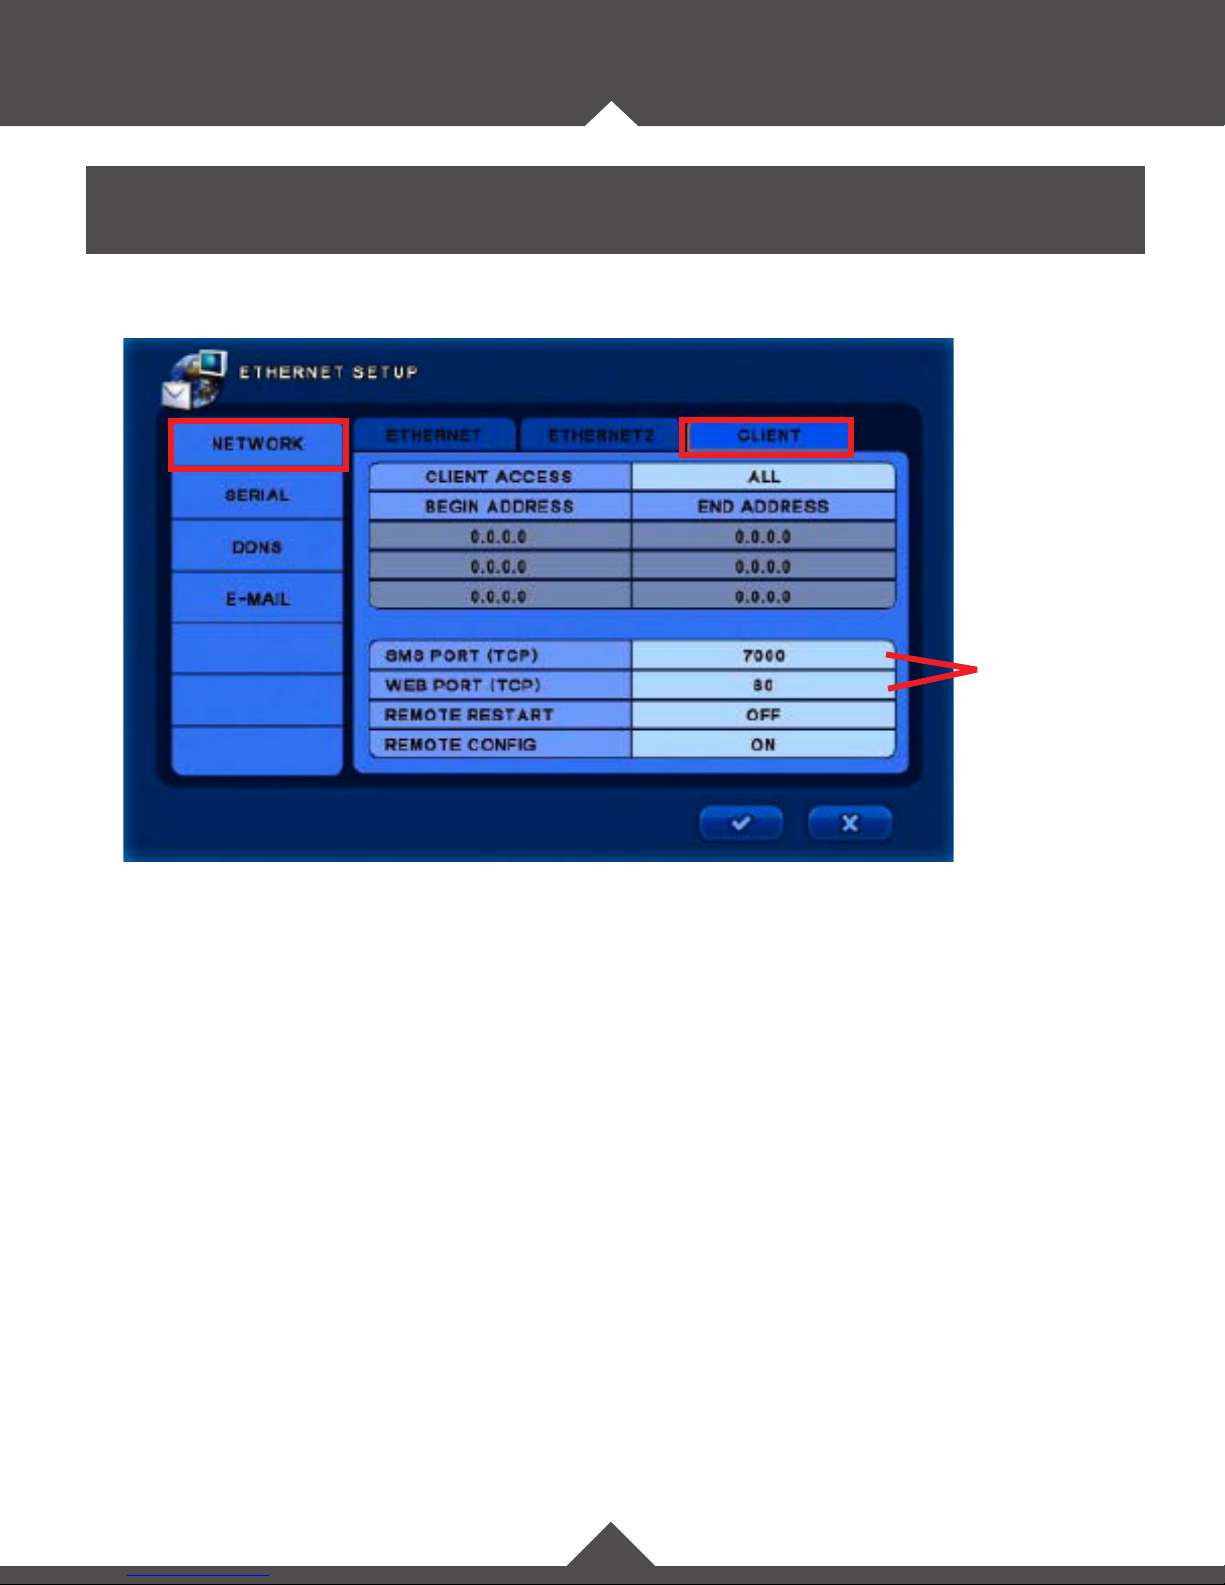
Ethernet Setup / Network / Client:
Default TCP
settings
Client:
• Client Access: Select a range of IP address for your client to be able to access, or select “ALL” to enable
searching of all IP addresses.
• Begin Address / End Address: Enter the desired beginning and ending address for client access when
range is selected above.
• SMS Port (TCP): Select the SMS port. (Default is 7000)
• Web Port (TCP): Select the Web port. (Default is 80)
• Remote Restart: Select ON to enable restarting of the DVR from a remote location via IP.
• Remote Cong: Select ON to enable conguration of the DVR from a remote location via IP.
8
Page 11
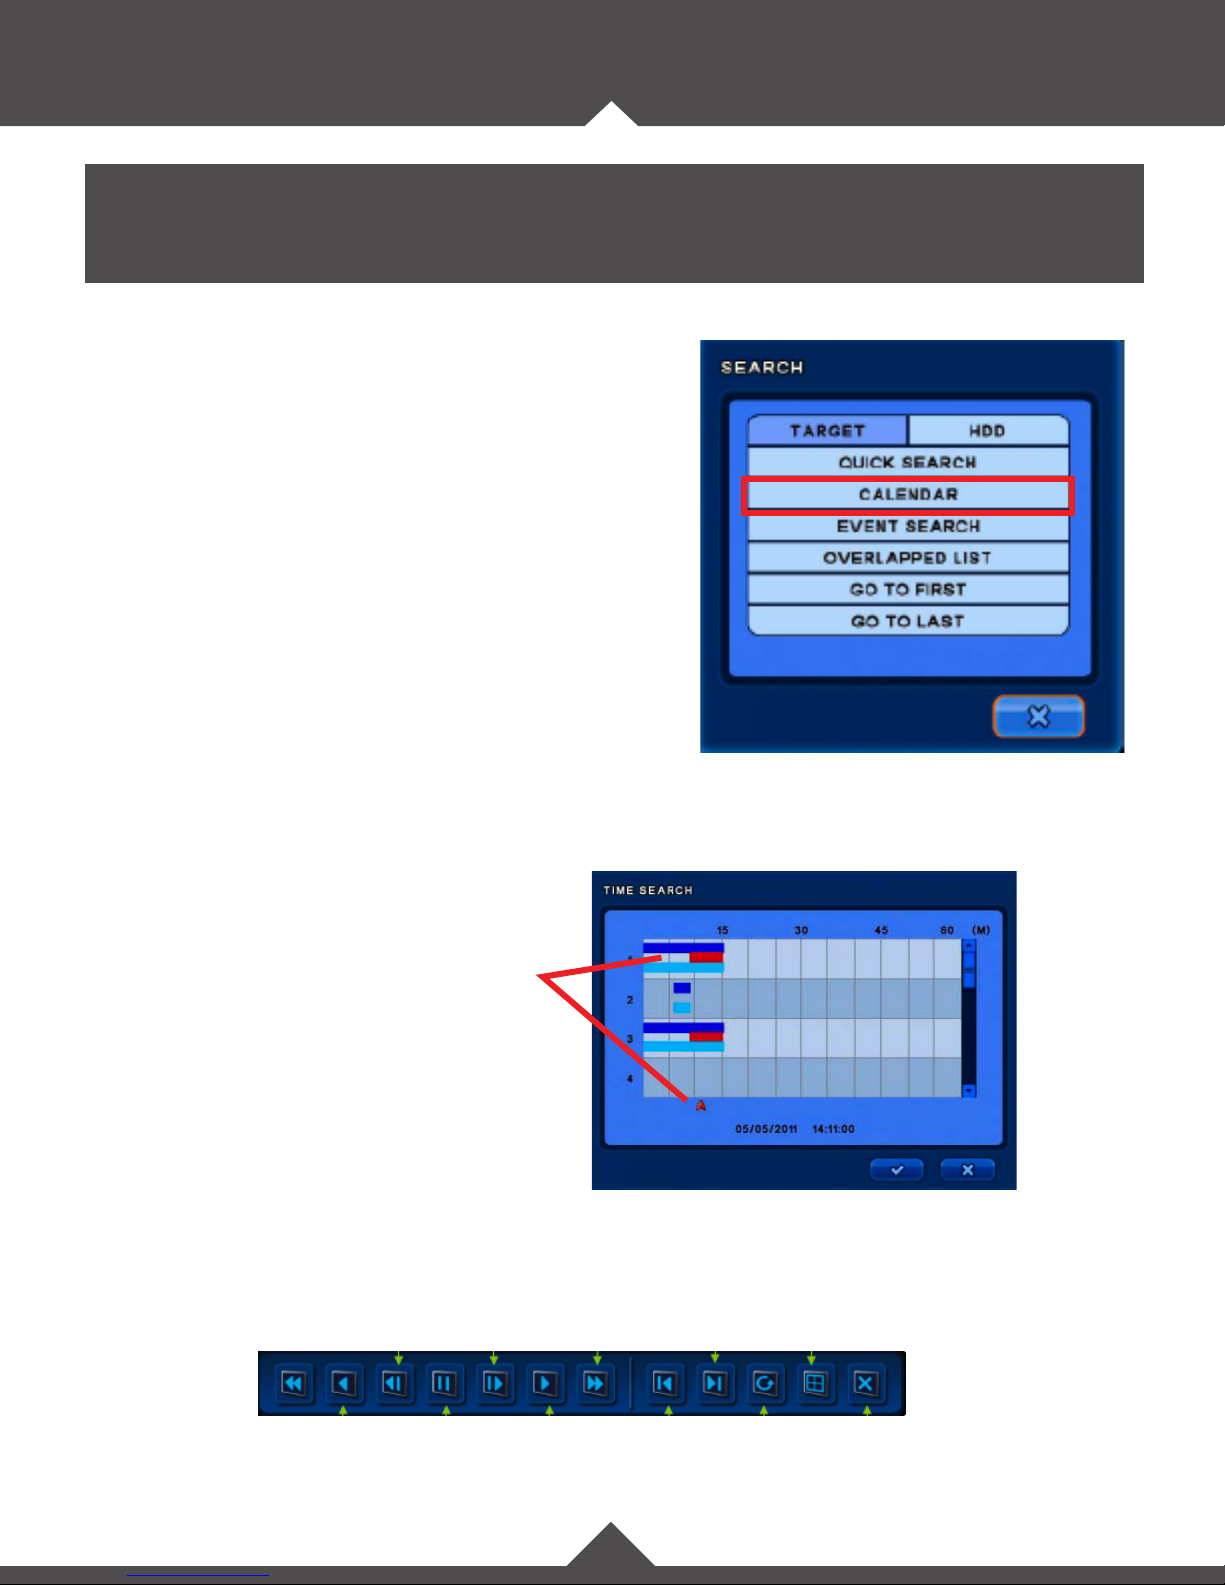
SEARCH
Calendar:
Within the search function you can search through recorded content by various methods.
For best results use calendar search function.
• Calendar: Narrow your search by selecting date and time.
1. Select a highlighted calendar day.
2. Select the hour you wish to begin viewing footage.
3. Select the minute you wish to begin viewing footage.
Color Indication:
An orange highlighted day indicates recorded content
Click in the content window, or move the
arrow indicator to select the desired time
frame. Click the ✔ icon to proceed.
Color Indications:
Blue: Continuous Recording
Teal: Audio Recording
Red: Event recording
Move the mouse cursor to the bottom of the screen to bring up the control panel. Control panel functions
can alternatively be selected by using the corresponding buttons on the remote control.
9
Page 12
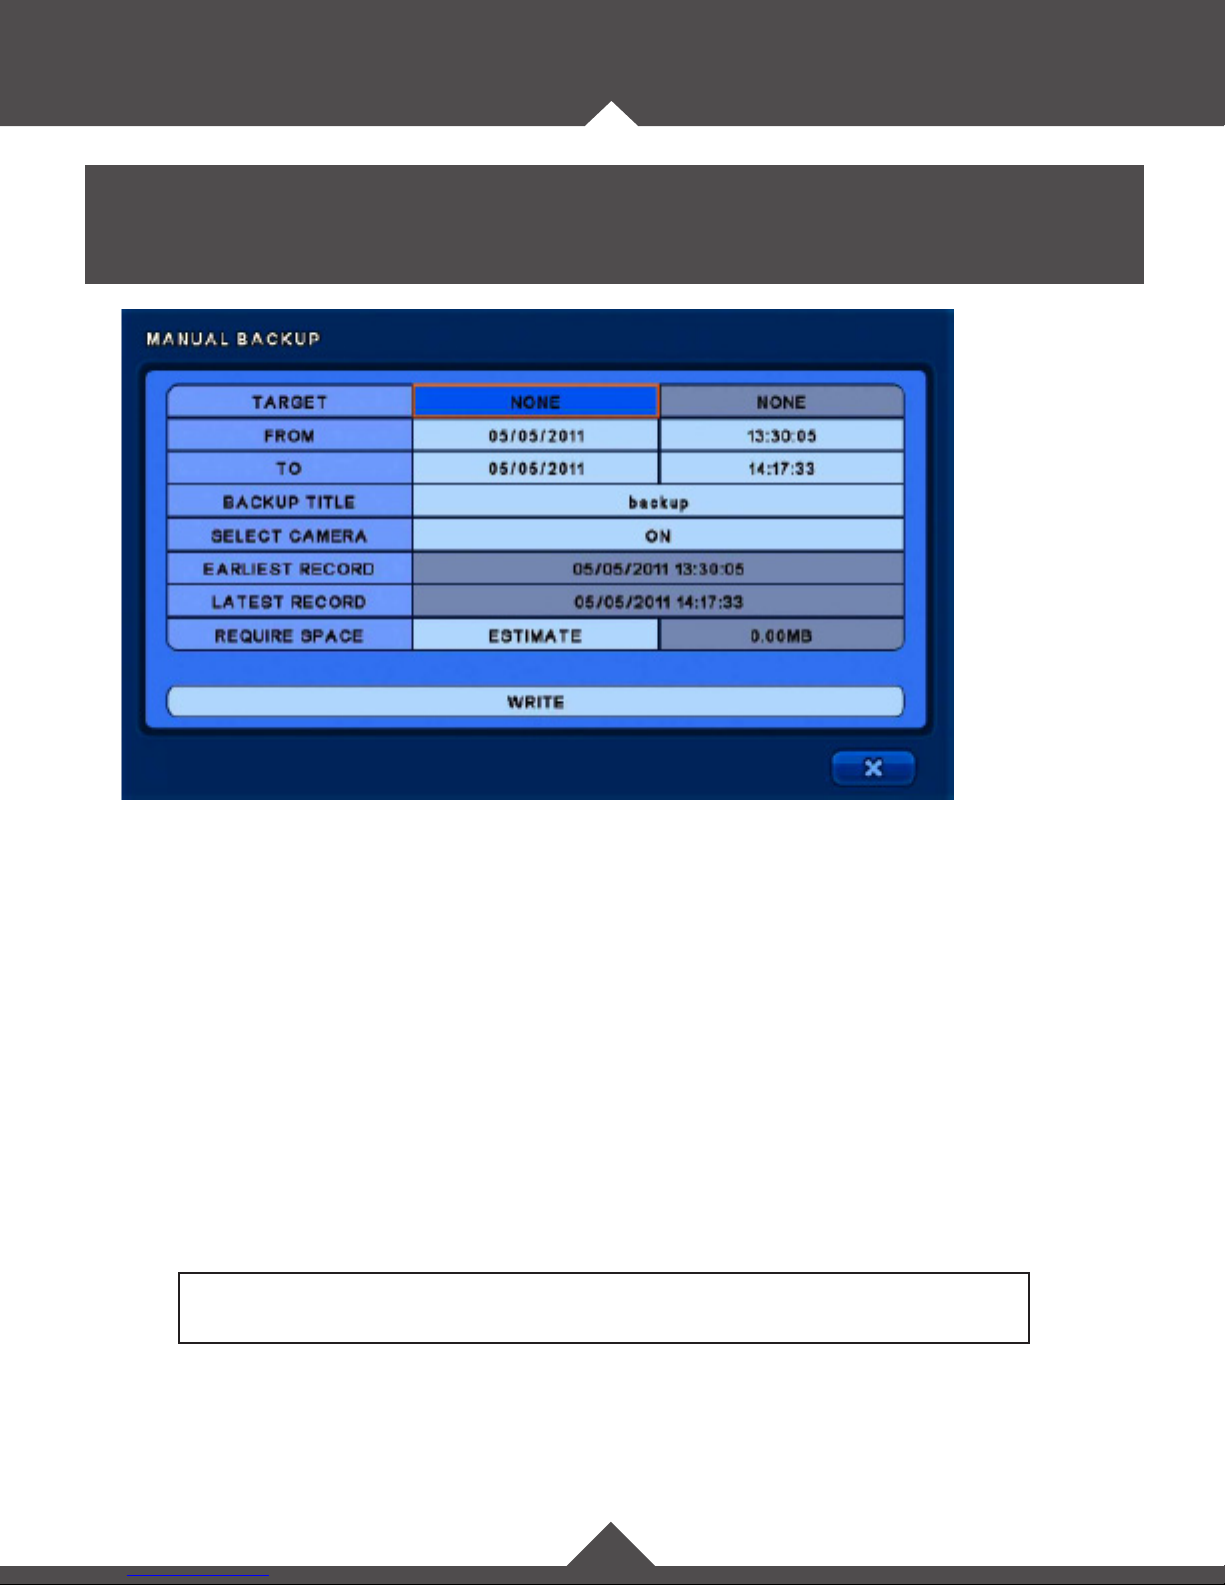
BACKUP
Backup:
In this category you can back-up recorded footage to an external device.
Backup:
• Targe t: Select the backup destination device. (USB / DVD)
• From: Select the start date and time.
• To: Select the end date and time.
• Backup Title: Input a title for your backup le.
• Select Camera: Select the desired camera(s) for backup.
• Earliest Record: Shows the earliest content that has been recorded.
• Latest Record: Shows the latest content that has been recorded.
• Require Space: Select “Estimate” to show the data capacity for the selected data.
Note:
Estimate must be selected before the backup selection will be written to the media.
• Write: Start the backup.
10
Page 13

CLINTON Electronics
6701 Clinton Road
Loves Park, IL 61111
1.800.447.3306 Sales
1.800.549.6393 Support
1.800.633.8712 Fax
www.clintonelectronics.com
v.01.04.12
 Loading...