


Sales: 1-800-447-3306 Support: 1-800-549-6393 www.clintonelectronics.com
Clinton Electronics Corp. 6701 Clinton Road. Loves Park, IL 61111
HD Series PVMs
Camera On Screen Display
User Manual
Make sure you read this manual before using the
camera. Store this manual safely so that you can use
it in the future. Please use this manual along with
the Installation Manual included with the camera.

1. Read these instructions.
2. Keep these instructions.
3. Heed all warnings.
4. Follow all instructions.
5. Do not use this apparatus near water.
6. Clean only with dry cloth.
7. Do not block any ventilation open-
ings. Install in accordance with the
manufacturer’s instructions.
8. Do not install near any heat sourc-
es such as radiators, heat registers,
stoves, or other apparatuses (including amplifiers) that produce heat.
9. Do not defeat the safety purpose of
the polarized or grounding-type plug.
A polarized plug has two blades with
one wider than the other. A grounding
type plug has two blades and a third
grounding prong. The wide blade or
the third prong are provided for your
safety. If the provided plug does not fit
into your outlet, consult an electrician
for replacement of the obsolete outlet.
10. Protect the power cord from being
walked on or pinched particularly at
plugs, convenience receptacles, and
the point where they exit from the apparatus.
11. Only use attachments/accessories
specified by the manufacturer.
12. Use only with the cart, stand, tri-
pod, bracket, or table specified by the
manufacturer, or sold with the apparatus. When a cart
is used, use caution
when moving the
cart/apparatus combination to avoid injury from tip-over.
13. Unplug this appa-
ratus during lightning storms or when
unused for long periods of time.
14. Refer all servicing to qualified ser-
vice personnel. Servicing is required
when the apparatus has been damaged in any way, such as power-supply cord or plug is damaged, liquid
has been spilled or objects have fallen into the apparatus, the apparatus
has been exposed to rain or moisture,
does not operate normally, or has been
dropped.
IMPORTANT SAFETY INSTRUCTIONS

INFORMATION: This equipment has been tested and found to comply with limits
for a Class A digital device, pursuant to part 15 of the FCC Rules. These limits are
designed to provide reasonable protection against harmful interference when the
equipment is operated in a commercial environment.
This equipment generates, uses, and can radiate radio frequency energy and, if not
installed and used in accordance with the instruction manual, may cause harmful
interference to radio communications.
Operation of this equipment in a residential area is likely to cause harmful
interference in which case the user will be required to correct the interference at his
own expense.
DISCLAIMER: Clinton Electronics reserves the right to change the contents of this
manual without prior notice.
WARNING: Changes or modifications not expressly approved by the manufacturer
could void the user’s authority to operate the equipment.
CAUTION: To prevent electric shock and risk of fire hazards:
u Do NOT use power sources other than that specified.
u Do NOT expose the inside of this appliance to rain or moisture.
This installation should be made by a qualified service person and
should conform to all local codes.
In USA and Canada, Use Class 2 Power Supply Only
The lightning flash with an arrowhead symbol, within an equilateral
triangle is intended to alert the user to the presence of uninsulated
dangerous voltage within the product’s enclosure that may be of sufficient magnitude to constitute a risk of electric shock to persons.
The exclamation point within an equilateral triangle is intended to
alert the user to the presence of important operating and maintenance
(servicing) instructions in the literature accompanying the appliance.

Contact an authorized technician to carry
out the inspection.
If the camera emits smoke or is unusually
hot for a long period, a fire may be caused.
The camera requires periodic
inspection.
Stop using your camera if you find it
malfunctioning.
If the camera is installed on an inappropriate
surface, it may fall and cause injury.
It could cause an electric shock.
Do not install the camera on a surface
that can not support it.
Do not hold plug with wet hands.
It may result in an electric shock or other
hazards.
It may result in a fire or other hazards.
Do not disassemble the camera. Do not use the camera close to a gas
or oil leak.
This is one of the most important parts of
the camera. Be careful not to leave fingerprints on the lens cover.
Only use the camera under conditions when
temperatures are between -20°F ~ 122°F. Be
especially careful to provide ventilation when
operating under high temperatures.
Do not touch the front lens of the
camera.
Do not install the camera in extreme
temperature conditions.
Severe lighting change or flicker can cause
the camera to work improperly.
It can damage the housing, compromising
weather resistance.
Do not install the camera under
unstable lighting conditions.
Do not drop the camera or subject it
to physical shocks.
If exposed to radioactivity the Image Sensor
will fail.
It can damage the Image Sensor.
Do not expose the camera to radioactivity.
Never keep the camera pointed
directly at strong light.

BACKLIGHT 09-10
IMAGE 14-15
LENS
07
WHITE BAL 12
ON SCREEN DISPLAY MENU 01-03
TABLE OF CONTENTS
OSD MENU SETTINGS 04
DAY & NIGHT 11
17-18MOTION
DIS (Digital Image Stabilization) 16
EXPOSURE 08
DNR (Digital Noise Reduction) 13
SYSTEM 19-20
EXIT 20
TROUBLESHOOTING 21
ZOOM FOCUS
05-06

Clinton Electronics Corp. HD Series PVMs User Manual
01
OSD
(
On Screen Display) MENU
Camera functions and settings can be adjusted or changed by activating the
OSD menu. When the OSD menu is activated, text will display on the monitor. The
user can then move the cursor to the desired function to change the setting.
LENS • MANUAL • DC
EXPOSURE
• BRIGHTNESS • SHUTTER • SENS-UP
• AGC
ZOOMFOCUS
• AF MODE • SCANNING • ONESHOT
• SYNC TDN • LENS RESET • REFOCUS
BACKLIGHT
• OFF
• WDR
• HLC • BLC
DAY AND NIGHT
• AUTO • B&W• COLOR
• EXTERN
WHITE BAL • AUTO • MANUAL • AWC-SET
DNR
• LOW
• AUTO • OFF
• MIDDLE • HIGH
IMAGE
• SHARPNESS • GAMMA• COLOR GAIN
• MIRROR • FLIP • E. ZOOM
• ACE • DEFOG • PRIVACY
DIS • ON • OFF
MOTION • ON • OFF
SYSTEM
• COMM • MODE SEL • FRAME RATE
• RESET
• SYSTEM • LANGUAGE • CAM TITLE
• RETURNEXIT
Clinton Electronics Corp. HD Series PVMs User Manual
02
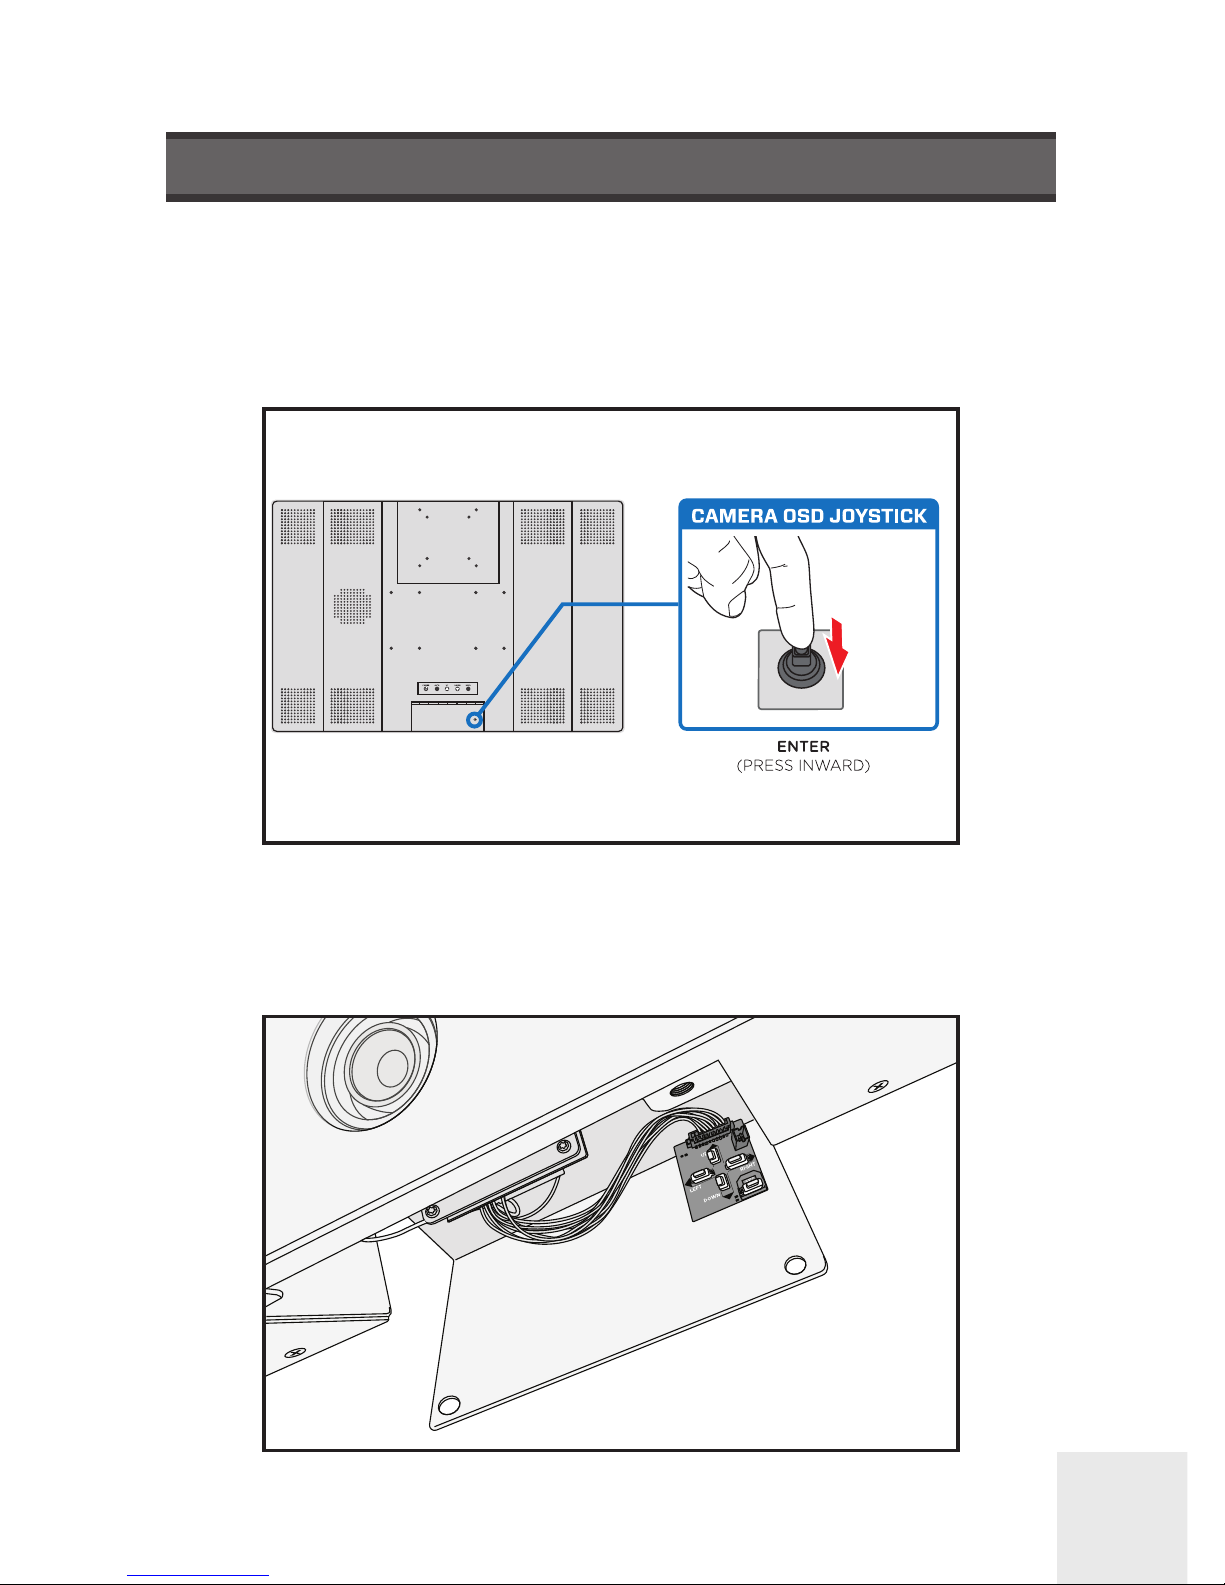
Settings can be adjusted using the built-in joystick (located on the back-side of the
PVM) or on older models can be adjusted with the button pad (located inside the
camera access door).
ACCESSING THE OSD
Button pad use:
Press the SET button to activate the OSD menu.
Joystick use:
Press the ‘IN’ on the joystick to activate the OSD menu.

Clinton Electronics Corp. HD Series PVMs User Manual
03
OSD MENU VARIATIONS
The OSD Menu varies slightly depending on the camera type. Certain menu option
shown in the manual may not be available or have fewer options on your camera.
MENU
ZOOMFOCUS
LENS
EXPOSURE
BACKLIGHT
DAY&NIGHT
WHITE BAL
DNR
IMAGE
DIS
MOTION
SYSTEM
EXIT
DC
WDR
AUTO
MIDDLE
OFF
ON
MENU
LENS
EXPOSURE
BACKLIGHT
DAY&NIGHT
WHITE BAL
DNR
IMAGE
DIS
MOTION
SYSTEM
EXIT
MANUAL
WDR
AUTO
MIDDLE
OFF
ON
10” PVMs with Fixed Lens:
21” ~ 43” with Autofocus Lens:
Additional ZOOMFOCUS menu.

Clinton Electronics Corp. HD Series PVMs User Manual
04
2. Scroll through menu items from the list available by using the UP or DOWN
buttons.
3. Use the LEFT or RIGHT buttons to change a setting.
4. When finished, select ‘EXIT’ and press IN on the joystick to save settings.
1. Press the IN on the joystick.
• Settings can only be changed when the OSD menu is displayed on the
monitor.
Select the
function using
the UP or DOWN
buttons.
When an arrow
is present, press
IN on the joystick
to enter the sub
menu.
Change the
setting using the
LEFT or RIGHT
buttons.
MENU
ZOOMFOCUS
LENS
EXPOSURE
BACKLIGHT
DAY&NIGHT
WHITE BAL
DNR
IMAGE
DIS
MOTION
SYSTEM
EXIT
DC
WDR
AUTO
MIDDLE
OFF
ON
Notes
• An item with the icon also has sub menus. To select a sub menu, select an
item with the icon and press IN on the joystick.
• An item with the “ - - - ” icon is unavailable due to function settings.
• All menu items have a ‘RETURN’ option. With this function you have the option
to ‘RET’ (RETURN), which takes you back to the previous menu screen.
OSD MENU SETTINGS

Clinton Electronics Corp. HD Series PVMs User Manual
05
ZOOM FOCUS
This function is only available on camera models with motorized Zoom & Focus. Use the
options in this menu function to turn On/O Auto Focus, reset focus and turn On/O
Day Night Sync.
From the main menu, scroll to ZOOMFOCUS and press the joystick ‘IN’ to access
the sub-menu.
► AF MODE
Choose either AUTO or MANUAL focus.
• AUTO: The lens will focus automatically after zooming in/out.
• MANUAL: Allows for manual lens focus using the joystick.
►
SCANNING
Choose either HALF or FULL scan for focusing during zoom adjustments.
• HALF: The lens scans only the current focal length, taking about 15 seconds.
• FULL: The lens scans the entire focal length, taking 30 seconds or longer.
CLINTON EXHD
ZOOMFOCUS
LENS
EXPOSURE
BACKLIGHT
DAY&NIGHT
WHITE BAL
DNR
0.
1.
2.
3.
4.
5.
6.
DC
OFF
EXTERN
AUTO
MIDDLE
ZOOMFOCUS
AF MODE
SCANNING
ONESHOT
SYNC TDN
LENSRESET
REFOCUS
RETURN
AUTO
HALF
ON
ON
ON
OFF
MENU
ZOOMFOCUS
LENS
EXPOSURE
BACKLIGHT
DAY&NIGHT
WHITE BAL
DNR
IMAGE
DC
WDR
AUTO
MIDDLE
• If Manual is the desired AF MODE; do not set SYNC TDN to ‘ON’– doing so will
refocus the camera at night, over-riding the manual focus selection.
Notes
Scanning Mode: Half Full
One Shot 5 seconds 15 seconds
Lens Reset 15 seconds 30 seconds

Clinton Electronics Corp. HD Series PVMs User Manual
06
ZOOM FOCUS
• If SYNC TDN is set to ‘ON’ regular inspection and cleaning of the camera surface is strongly recommended. If the surface is dirty from dust, moisture, spider
webs– the camera might not focus correctly.
• During refocusing of SYNC TDN, the camera will be out of focus for a few seconds.
• Upon initial installation/power ON of camera the camera will begin to focus on
the current scene. If there is an obstruction of the lens; installer or object blocking the lens – the camera might focus on those objects and could appear out of
focus. To refocus the camera either adjust the level of zoom (zoom in / zoom
out) or press and hold on ONESHOT.
Notes
Notes
► ONESHOT
Press and hold the joystick ‘IN’ to force the lens to quickly Auto Focus to the
current zoom level/focal length.
► SYNC TDN
Set to ON to automatically change the focus when the camera switches from
Day to Night mode. (re-focuses when switches back to Day mode from Night).
► LENSRESET
Press and hold the SETUP button to reset the lens– this will go through the
currently selected Scanning mode (Half or Full).
► REFOCUS
Turn ON and set the interval to when the lens should refocus. Not recommended
for most applications, only suggested to be used if/when the device is installed
next to something that might cause the lens to lose focus (such as a heavy door
slamming shut or machine that produces heavy/constant vibration). The time
that the refocusing will happen is based on the time that the device was initially
powered ON.

Clinton Electronics Corp. HD Series PVMs User Manual
07
MENU
LENS
EXPOSURE
BACKLIGHT
DAY&NIGHT
WHITE BAL
DNR
IMAGE
DIS
MOTION
SYSTEM
EXIT
MANUAL
WDR
AUTO
MIDDLE
OFF
ON
These settings are not user adjustable.
LENS

Clinton Electronics Corp. HD Series PVMs User Manual
08
EXPOSURE
• SENS-UP is disabled depending on SHUTTER settings & if WDR is turned ON..
• The higher the SENS-UP level, the brighter the screen, but the more likely it is
that an after-image will appear. Possible image blur is normal with increased
zoom while using SENS-UP.
Notes
MENU
DC
WDR
AUTO
MIDDLE
OFF
ON
This function allows for the control of the amount of light that enters the camera. Too
much light results in a washed out image.
Press IN on the joystick to access the sub-menu items listed below.
► BRIGHTNESS
Adjusts the video brightness (selectable from 0 -20).
► SHUTTER
Select either AUTO, MANUAL or FLICKER.
• AUTO: Automatic shutter speed/control.
• MANUAL: Control the shutter speed manually (1/60~1/60,000).
• FLICKER: Select this when you experience picture flicker, which can happen
when there is a clash with the frequency of the installed lighting.
► SENS-UP
During low light situations, the camera will automatically detect the light level and
maintain a clear picture if this mode is activated.
► AGC (Auto Gain Control)
The higher the gain level, the brighter the screen, but the higher the noise.

Clinton Electronics Corp. HD Series PVMs User Manual
09
BACKLIGHT
Select a desired mode using the LEFT or RIGHT buttons depending on the camera
purpose.
► HLC (High Light Compensation)
If the scene contains extremely bright light areas such as car headlights, the
light can mask out much of the on-screen detail. Use the HLC feature to remove
these bright lit areas to allow detail, such as a car license plate number, to
become more visible.
• LEVEL: The lower the level, the more of the HLC mask will be applied.
• COLOR: Black, White, Yellow, Cyan, Green, Magenta, Red, and Blue.
This function is useful for adjusting areas of interest that appear too bright or too dark
due to bright lighting conditions.
HLC ON HLC OFF
MENU

Clinton Electronics Corp. HD Series PVMs User Manual
10
BACKLIGHT : CONTINUED
► BLC (Back Light Compensation)
An area with a bright light source in the background can cause objects in the
foreground to appear as silhouettes. Use this setting to adjust the exposure of
the image to properly expose the object in the foreground.
• H-POS: Adjust LEFT or RIGHT to move the Horizontal Position.
• V-POS: Adjust LEFT or RIGHT to move the Vertical Position.
• H-SIZE: Adjust LEFT or RIGHT to increase or decrease the Horizontal Size.
• V-SIZE: Adjust LEFT or RIGHT to increase or decrease the Vertical Size.
► WDR (Wide Dynamic Range)
This function illuminates darker areas of an image while retaining the same light
level for brighter areas to even out the overall brightness of images with high
contrast between bright and dark areas.
• WEIGHT: Set to LOW, MIDDLE or HIGH.
BLC ON BLC OFF
WDR ON
WDR OFF
• When WDR is turned ‘ON’ certain OSD menu options are disabled.
Notes

Clinton Electronics Corp. HD Series PVMs User Manual
11
DAY & NIGHT
From the main menu, scroll to DAY&NIGHT and select a desired mode using the
Left or RIGHT buttons according to the picture display you want.
► AUTO ↵
The mode is switched to ‘COLOR’ in a normal environment, but switches to
‘B/W’ mode when ambient illumination is low.
• ANTI-SAT: Cameras equipped with IR LEDs may have an over-saturated night
time image. Adjust the level of ANTI-SAT to compensate for over-saturation.
• D>N THRES: Day to Night change level.
• N>D THRES: Night to Day change level.
• DELAY: Sets a delay time before the switch is made from day to night/night
to day. Useful if the camera is placed in an area that is subject to
shadows or intermittent light level changes.
► COLOR
The image is always displayed in color. Automatic switching does not occur.
► B/W
The image is always displayed in black and white. Automatic switching does not
occur.
This function displays images in color or B/W. In AUTO mode the camera will automatically transition to B/W to allow for clearer low-light images.
MENU

Clinton Electronics Corp. HD Series PVMs User Manual
12
This function allows the ability to adjust the color temperature, based on colors being
emitted from dierent light sources. Illumination is generally referred to as color tem-
perature, which is represented in a measurement of kelvin (K).
From the main menu, scroll to WHITE BAL and select one of the 4 following modes
using the Left or Right buttons.
► AUTO (1,800°K ~ 10,500°K)
Select this to automatically readjust the white balance each time a change in
the ambient color temperature is detected.
► AWC-SET
↵
Select this to find the optimal luminance level for the current environment,
point the camera towards a sheet of white paper, then press and hold the joystick
IN. Contine holding the joystick IN until the text stops flashing.
► MANUAL
Select this to fine-tune white balance manually. Color Temp (°Kelvin) and Red/
Blue gain values are adjustable.
NOTICE
• WHITE BALANCE may not work properly under the following conditions:
1. When the color temperature of the environment surrounding the subject is
out of the control range (ie. clear sky or sunset).
2. When the ambient illumination of the subject is dim.
3. If the camera is directed towards a fluorescent light or is installed in a place
where illumination changes dramatically, the WHITE BALANCE operation may
become unstable.
WHITE BALANCE
MENU

Clinton Electronics Corp. HD Series PVMs User Manual
13
This function reduces background image noise in a low light environment, improving
visibility.
DNR
(
DIGITAL NOISE REDUCTION
)
From the main menu, scroll to DNR and select one of the 4 following modes using
the Left or Right buttons.
►DNR
• AUTO
• LOW
• MIDDLE
• HIGH
MIDDLELOW HIGHOFF
• When adjusting the noise reduction level, remember that the higher the level
is set, the greater the reduction in noise level, as well as the brightness of the
image but trailing may occur with moving objects.
NOTICE
MENU

Clinton Electronics Corp. HD Series PVMs User Manual
14
IMAGE
This function includes features that allow you to make adjustments to fine-tune the
quality of the image displayed on the monitor.
MENU
From the main menu, scroll to IMAGE and enter the sub-menu to adjust one of the
9 following options.
► SHARPNESS
The outline of the image becomes cleaner and more distinctive as the SHARPNESS
level increases. If you increase the SHARPNESS level too high, the picture may
become distorted or noise may appear.
► COLOR GAIN
The higher the value, the more saturated the colors are. The lower the value, the
less color there is overall.
► GAMMA
Adjust how light and color are displayed.
► MIRROR
Mirror the camera image horizontally.
► FLIP
Flip the camera image vertically.
OFF MIRROR FLIP MIRROR & FLIP
(rotate 180°)

Clinton Electronics Corp. HD Series PVMs User Manual
15
IMAGE : CONTINUED
Notes
• Picture quality degrades when using the digital zoom functions.
• E. Zoom is disabled when Motion/Quick Zoom is turned ON.
• ACE & Defog are disabled when WDR is turned ON.
► E. ZOOM
Enable and adjust the level of digital zoom (1.0x~16.0x).
► ACE (Adaptive Color Enhancement)
Enhance the color contrast of the image.
► DEFOG:
Images in extraordinary environments such as fog, smoke, rain or smog have a
dynamic range lower than ordinary images. This function is a contrast
enhancement, which is used to overcome such shortcomings.
► PRIVACY
↵
Apply a mask to an area you want to hide. Useful in areas where a camera can
see into areas that are not relevant to security needs.
• BOX ↵ : Apply up to 16 different privacy boxes.
• POLYGON ↵ : For more complex masking areas use this feature.
DEFOG ON DEFOG OFF

Clinton Electronics Corp. HD Series PVMs User Manual
16
DIS
(
DIGITAL IMAGE STABILIZATION
)
This function reduces and stabilizes video caused from cameras installed on surfaces
subject to vibration or wind. When DIS is enabled, the image is zoomed in digitally
slightly, which results in sight resolution loss. DIS is less eective when the camera is
viewing a mostly solid color wall or in low lighting conditions.
►DIS (Digital Image Stabilization)
• RANGE: Adjust the level of stabilization compensation. The higher the level, the
more zoomed in the image will be.
• FILTER: Set the sensitivity to hold the DIS function in the worst case.
• AUTO C: Set the Auto Center mode.
Notes
• When DIS is turned on, the image is zoomed in digitally. Depending on the zoom
level (Range%) set, certain camera OSD overlays like Privacy and Motion boxes
will be zoomed in also– possibly off the screen.
MENU

Clinton Electronics Corp. HD Series PVMs User Manual
17
MOTION
Useful functions for crime prevention & detection. Motion must be set to ‘ON’ for motion
detection switching from Camera to SD Card content or vice-versa.
From the main menu, scroll to MOTION, move LEFT or RIGHT to select ON and
press the joystick IN to access the sub-menu.
► DET WINDOW
↵
Choose from 4 different detection windows to adjust their size and position as
needed.
► SENSITIVITY
The lower the value the more sensitive the camera will be to motion.
► ESTIMATE
If a moving object disappears, estimate where it will reappear.
► QUICK ZOOM ↵
Digital zoom to designated motion detection zones, the motion detection zones
are setup in the MOTION menu.
► MOTION OSD
Turn ‘ON’ to track moving objects with a colored outlined box.
► TEXT ALARM
When motion is detected text will be displayed on screen to alert you to the
type of motion; Unknown Motion / Motion Detected / Blocking Detected /
Shifting Detected.
► SIGNAL OUT
When a motion type is detected a signal is output from the camera. This must be
set to ON for the motion detection signal from the camera to trigger switching of
sources.
MOTION
DET WINDOW
SENSITIVITY
ESTIMATE
QUICK ZOOM
MOTION OSD
TEXT ALARM
SIGNAL OUT
RETURN
5
OFF
OFF
OFF
OFF
ON
MENU

Clinton Electronics Corp. HD Series PVMs User Manual
18
MOTION
From the main menu MOTION must be set to ON.
From the Motion sub-menu:
QUICK ZOOM ↵ - ON
MOTION OSD - ON
MOTION
DET WINDOW
SENSITIVITY
ESTIMATE
QUICK ZOOM
MOTION OSD
TEXT ALARM
SIGNAL OUT
RETURN
5
OFF
OFF
OFF
OFF
ON
MOTION
DET WINDOW
SENSITIVITY
ESTIMATE
QUICK ZOOM
MOTION OSD
TEXT ALARM
SIGNAL OUT
RETURN
5
OFF
ON
ON
OFF
ON
• MOTION must be set to ON for the switching from sources (SD Card Player to
Camera) when the IMAGE MODE is set to Motion.
• Changing the SIGNAL OUT to OFF (from the sub-menu) will disable automat-
ic motion detection switching.
• If Digital Image Stabilization is turned ON, Quick Zoom will be disabled.
• Enabling Quick Zoom will disable any E. ZOOM adjustments.
• The same image shown on the screen will be output to a connected DVR. Do
not turn on Motion Tracker & Quick Zoom if you do not want the recorded
video to have colored lines and zoom in & out.
NOTICE
To Enable Motion Tracker & Quick Zoom
MENU

Clinton Electronics Corp. HD Series PVMs User Manual
19
SYSTEM
From the main menu, scroll to SYSTEM and press IN on the joystick to access the
sub-menu.
► COMM. (Communication)
This function is disabled/not user adjustable.
► MODE_SEL
Select the HD video output of the camera; HD-SDI or EX-SDI. If set to EX-SDI the
camera must be connected to an EX-SDI DVR or Monitor to receive signal.
• HD-SDI / EX-SDI
► FRAME RATE
Set the frame rate and resolution output from the camera. Adjusting the frame
rate to any other setting besides 1080p/30fps can result in no camera image on
the screen of the PVM and/or no camera image recorded on a connect DVR.
► VIDEOSYS
Choose either NTSC or PAL depending on the region of the world the camera is
installed and display settings other connecting video components are set to. In
North America leave set to NTSC.
MENU
► LANGUAGE
Change the language of the OSD Menu.
• ENGLISH, CHINESE, CHINESE (S), JAPANESE or KOREAN

Clinton Electronics Corp. HD Series PVMs User Manual
20
EXIT
From the main menu, scroll to EXIT and press IN on the joystick to exit from the OSD
menu.
SYSTEM
• EX-SDI will not display on an HD-SDI system and vice-versa. Ensure that the
correct mode is selected.
• When the CAM TITLE menu is ‘OFF’, no title will be displayed on the monitor
even if you enter one.
Notes
► CAM TITLE
Use this feature if you want to quickly identify a given image by assigning a title
that will display on screen.
►
RESET
Press IN on the joystick and hold the SET button to reset the camera OSD settings
to the factory defaults. Release the SET button when “PUSHING” is displayed.
1) Select CAM TITLE, then use the LEFT/RIGHT button to set it to ‘ON’
and then press the SET button.
2) Use the 4 direction buttons to move to a desired letter and select
the letter by pressing the SET button. Repeat this to enter multiple
letters. You can enter up to 8 letters.
Camera Title
SETUP MENU
SCENE SELECT
PICT ADJUST
EZOOM
DIS
PRIVACY MASK
MOTION DET
SYS SETTINGS
EXIT
FULL AUTO
OFF
OFF
OFF
1 / 2
ENTER - RETURN
L , R - POSITION
U , D - CHAR SELECT
_ _ _ _ _ _ _ _
00000000
0000

Clinton Electronics Corp. HD Series PVMs User Manual
21
TROUBLESHOOTING
If you have trouble operating your camera, refer to the following table. If the
guidelines do not enable you to solve the problem, contact Clinton Electronics Technical
Support at 1-800-549-6393 or 815-633-1444.
Problem Solution
Nothing appears on the
screen.
• Check the power connection.
• Check the video signal connection (HD-SDI,
Composite).
• When the camera’s HD-SDI/EX-SDI BNC
output is directly connected to the DVR’s or
monitor’s BNC terminal: Make sure the DVR
or monitor supports that signal type/input.
• Check MODE_SEL; change to HD-SDI if
connected to HD-SDI system, or EX-SDI if
connected to EX-SDI system.
• HD-SDI output is converted into other
format such as HDMI, DVI or VGA by using a
video converter. Make sure the converter’s
HD-SDI input format supports the product’s
output video format
The video image is not
clear.
• Check if the lens is clean. Clean the lens with
a clean cloth.
• Check if the dome is clean. Clean the dome
with water and a clean, lint-free cloth.
• Check the focus of the camera.
• Adjust the contrast feature of the monitor.
• Make sure that the screen is not exposed
directly to a bright light. Move the camera
if necessary.
The screen is dark. • Adjust the contrast feature of the monitor.
• Adjust the BRIGHTNESS level of the EXPOSURE.
• If you have an intermediate device, set the
75Ω/Hi-z properly, and check the terminals.

Clinton Electronics Corp. HD Series PVMs User Manual
22
TROUBLESHOOTING
Problem Solution
There is a problem with
the camera operation. The
camera surface is too hot
and black stripes appear on
the screen.
• Check if an appropriate power source to the
camera complies with the manufacturer’s
standard requirement, or if the voltage
keeps changing.
The MOTION function is
not working.
• Check if the SENSITIVITY level is too low.
Colors are not quite right. • Check the WHITE BAL setting.
• Perform AWC
→SET.
The screen is flickering. • Check if the camera is facing directly into
sunlight or fluorescent light. Move the camera if necessary.
• Set Shutter to FLK. (Flicker)
• HD-SDI video may not appear to be normal if
distance exceeds the maximum transferable
distance.
• When a BNC cable adapter is used to combine two or more BNC cables for distributed
HD-SDI video transfer, make sure the impedance of the adapter is 75Ω. Otherwise, it may
cause shorter transfer distance or broken
video transfer.
COLOR (Day&Night) mode
is not working.
• Check the delay in the DAY&NIGHT ‘AUTO’
sub-menu.
The camera is not switching
to B/W mode at night.
• Check the DAY&NIGHT setting. If the camera
is equipped with IRs, leave set to EXTERN.
SENS-UP function is not
working.
• Check if Shutter settings are set to AUTO
or 1/30.

Clinton Electronics Corp. HD Series PVMs User Manual
23
HD-SDI INSTALL TIPS
SDI OUTPUT:
To change the digital video output of the camera (SDI Output): Enter the camera’s OSD menu– then access the SYSTEM menu, scroll to MODE SEL and move
left or right to change from HD-SDI to EX-SDI.
COMPATIBILITY:
While EX-SDI, HD-SDI and Analog share the same type of cable and connectors,
that is where the similarities end.
When making video connections, ensure the correct BNC connector is used.
• EX-SDI will not work on Analog only DVRs & Devices
• EX-SDI will not work on CVI, TVI, AHD DVRs & Devices
• EX-SDI will not work on HD-SDI only DVRs & Devices
DISTANCES:
The camera can transmit EX-SDI (1.0), which is capable of transmitting video up
to 800’ over RG59 coax cable.
Cable splices, improper BNC termination, damaged shielding, kinks and severe
bends in the cable will reduce the possible distance of the video transmission.
Distances will vary
depending on RG59
coax integrity.
SDI Output Distance*
EX-SDI 1.0 800 ft
HD-SDI 275 ft

Clinton Electronics Corp. HD Series PVMs User Manual
24
CONTACT

ver: 11.01.17
The material in this document is subject to change without notice.
While reasonable eorts have been made to assure the accuracy of this
document, Clinton Electronics and it’s employees assume no liability
resulting from errors or omissions in this document, or from the use
of the information contained herein. Clinton Electronics reserves the
right to make changes or revisions in the product design or the product
manual without reservation and without obligation to notify any person
of such revisions and changes.
Sales: 1-800-447-3306 Support: 1-800-549-6393 www.clintonelectronics.com
Clinton Electronics Corp. 6701 Clinton Road. Loves Park, IL 61111
 Loading...